Embed Size (px)
Citation preview

Montbrehain: Artillery Tactics, Techniques and Procedures
Adam Rankin
University of Western Australia
Seminar 11 Western Front: Breaching the Hindenburg Line
Firepower: Lessons from the Great War

https://www.awm.gov.au/collection/LIB100004232
Montbrehain: strategic context
Allied offensive: 26 September 1918 Fourth Army: 4 October
https://www.usma.edu/history/SiteAssets/SitePages/World%20War%20I/WWOne23.jpg
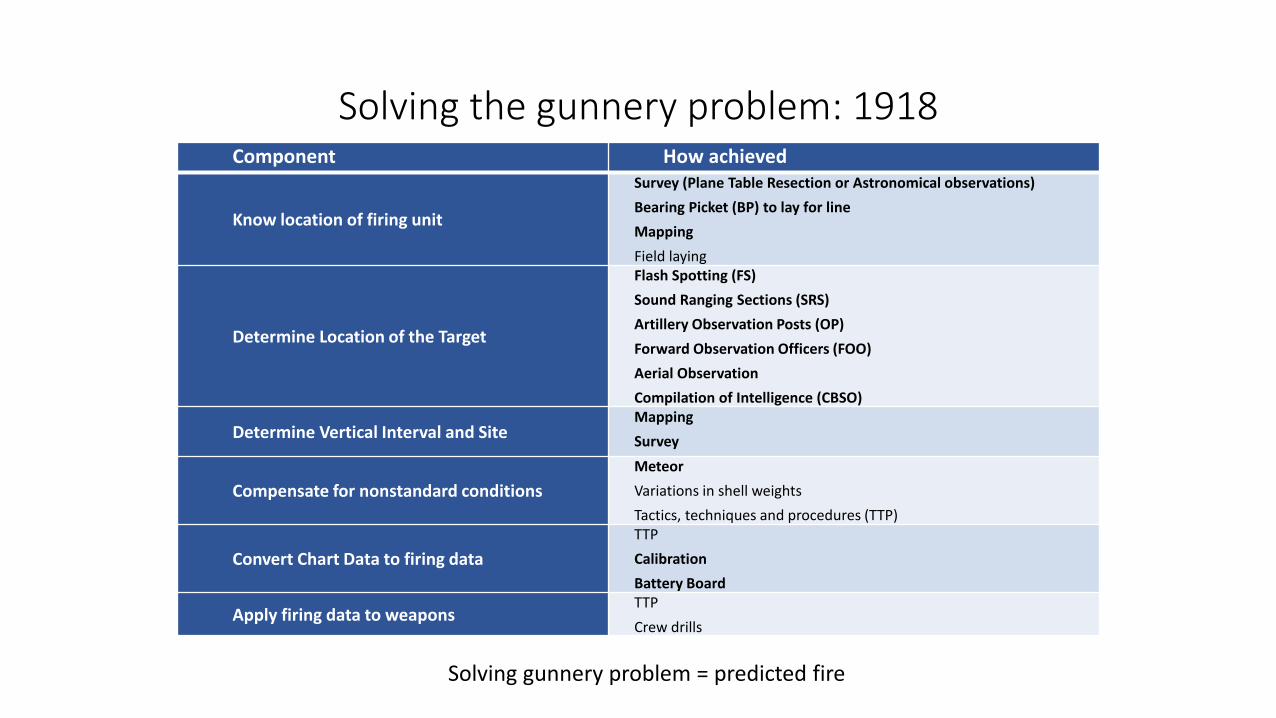
Solving the gunnery problem: 1918Component How achieved
Know location of firing unit
Survey (Plane Table Resection or Astronomical observations)
Bearing Picket (BP) to lay for line
Mapping
Field laying
Determine Location of the Target
Flash Spotting (FS)
Sound Ranging Sections (SRS)
Artillery Observation Posts (OP)
Forward Observation Officers (FOO)
Aerial Observation
Compilation of Intelligence (CBSO)
Determine Vertical Interval and SiteMapping
Survey
Compensate for nonstandard conditions
Meteor
Variations in shell weights
Tactics, techniques and procedures (TTP)
Convert Chart Data to firing data
TTP
Calibration
Battery Board
Apply firing data to weaponsTTP
Crew drills
Solving gunnery problem = predicted fire
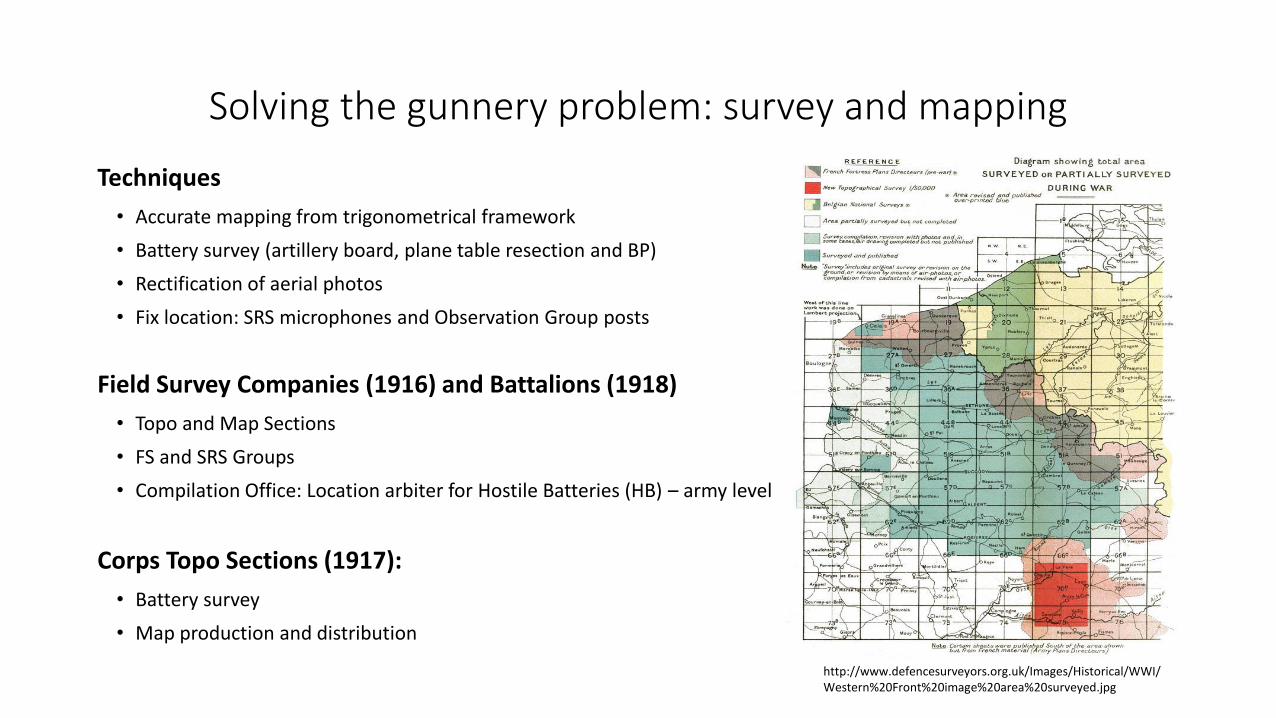
Techniques
• Accurate mapping from trigonometrical framework
• Battery survey (artillery board, plane table resection and BP)
• Rectification of aerial photos
• Fix location: SRS microphones and Observation Group posts
Field Survey Companies (1916) and Battalions (1918)
• Topo and Map Sections
• FS and SRS Groups
• Compilation Office: Location arbiter for Hostile Batteries (HB) – army level
Corps Topo Sections (1917):
• Battery survey
• Map production and distribution
Solving the gunnery problem: survey and mapping
http://www.defencesurveyors.org.uk/Images/Historical/WWI/Western%20Front%20image%20area%20surveyed.jpg

Solving the gunnery problem: sound ranging
Characteristics
• 1400-1800 yards between microphones
• 7000-9000 yard base
• Detection distance ≈ 12,000 yards
• 25 yard accuracy with multiple observations
Strengths
• Works in fog and rain
• Can determine calibre and target of HB
• Can be used for ranging
Limitations
• Slow emplacement time (36-48 hours 1918)
• Fails when wind blowing toward enemy guns
• Large reliance on cable (40 miles)

Solving the gunnery problem: observation groups
Characteristics
• 3-4 posts per corps frontage (overlapping)
• Group HQ has flash and sound buzzer to coordinate spotting
• Terrain and view dictated placement
Strengths
• Good accuracy
• Also use for ranging
• Relatively quick emplacement (5-8 hours 1918)
Limitations
• Posts out of touch with group HQ were ineffective
• Dummy flashes could fool observers
• High degree of training needed

Calibration
• Bull sound ranging apparatus
• Calibrates 6 guns at once; One division of field artillery per day
• Measured Muzzle Velocity (MV), jump and droop
• Part of field survey battalion
Meteor
• August 1918: 7x telegrams per day
• time of flight, air temperature, wind
• Barometer at Mean Sea Level (MSL)
• Sent from GHQ
Solving the gunnery problem: calibration and meteor
NAA A1194, 17.14/8761 A Treatise by Major Chapman, R. H. on the calibration of Guns and Howitzers

Solving the gunnery problem: Royal Air Force
Corps wing – 1 squadron per corps
• 3 Flights (6 aircraft each: A, B, C)
• A artillery, B counterattack, C infantry
• Photo reconnaissance (tactical and mapping)
• Facilitated destructive and neutralisation shoots
• Limited by weather and communications
Balloon wing – 1 Company per corps
• 4-5 per company. Artillery observation and ranging
Army wing – 6 squadrons per wing
• Fighting scouts and bombers. Air superiority
Zone call square
SS 131 Co-operation of Aircraft with artillery December 1916
Clock code
Wireless CallsNF = Guns firing GF = Fire for effect (fleeting opportunity)LL = All available guns open fire (favourable target)CIB = Central Information Bureau (clearinghouse for
reporting enemy aircraft and movement)

Solving the gunnery problem: artillery organisation
Field Artillery Brigade (FAB) Artillery Chain of Command
GOCRA: General Officer Commanding, Royal Artillery
BGHA: Brigadier General, Commanding Corps Heavy Artillery
CBSO: Counterbattery Staff Officer
CRA: Commander, Royal Artillery
AFA: Army Field Artillery or Australian Field Artillery
4-6 RGA/AFA

Solving the gunnery problem: artillery intelligence and counter battery
Image courtesy Nigel F Evans. British artillery in World War 2. nigelef.tripod.com/p_artyint-cb.htm
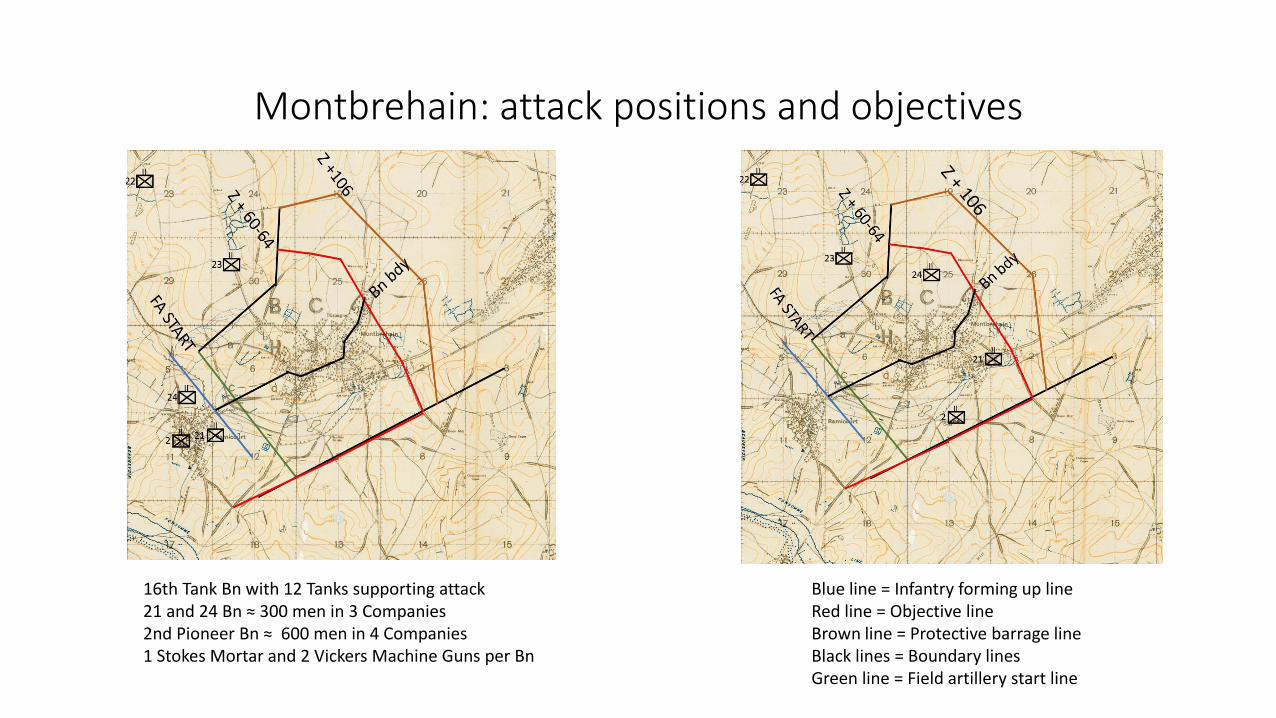
Montbrehain: attack positions and objectives
Blue line = Infantry forming up lineRed line = Objective lineBrown line = Protective barrage lineBlack lines = Boundary linesGreen line = Field artillery start line
16th Tank Bn with 12 Tanks supporting attack21 and 24 Bn ≈ 300 men in 3 Companies2nd Pioneer Bn ≈ 600 men in 4 Companies1 Stokes Mortar and 2 Vickers Machine Guns per Bn

Montbrehain: artillery organisation
Field artillery – CRA 2nd Division: Brigadier Phillips
• 144 18-pr and 48 4.5-in How (war establishment)
• 118 18-pr and 42 4.5-in How available
• Left Group: 4th, 5th FAB; 6th, 12th Army Bde AFA
• Right Group: 10th, 11th, 13th, 14th FAB
Heavy artillery - BGHA Australian Corps: Brigadier Fraser and CBSO Lt-Col Cummins
• 201 on establishment, 165 available, 108 in range
• Counterbattery Group: 93rd, 41st, 9th, 71st, 51st (60-pr)
• Bombardment Group: 68th, 18th, 51st (-60-pr)
• 73rd Army Brigade RGA: army control. Rear area harassing fire and counter battery
Brigade Type Guns in range
93rd Mixed 8x 60-pr; 12x 6-in How
41st Mobile 8x 60-pr; 8x 6-in How
9th Mobile 8x 60-pr; 8x 6-in How
71st 8-in How 16x 6-in How
51st Mixed 7x 60-pr; 11 6-in How
68th 8-in How 6x 6-in How
18th 9.2-in How 6x 6-in How
73rd Army Brigade 9x 6-in Gun; 1x 14-in Gun
Type Batteries Guns
Mobile 2x 60-pr, 2x 6-in How 24
Howitzer 3x 6-in How, 1x 8-in or 9.2-in How 20-22
Mixed2x 60-pr, 2x 6-in How, 1x 8-in How, 1x 9.2-in How
36
73rd Army Brigade
3x 6-in Gun, 1x 12-in How, 1x 14-in Railway Gun
15

Montbrehain: creeping barrage and bombardment
Liaison and FOO
• Each Group: liaison to Bns, 1 FOO
• Left Group: liaison 6th Bde
Ammunition
• 18-pr: 50% shrapnel, 50% HE. 1 rd. smoke (first 6 lifts); HE in village
• 4.5-in How: no restrictions. Fire within village only
GF and LL Calls
• 2 superimposed batteries per group
Rate of fire (rds per gun per minute)
From To 18-pr 4.5-in How
Zero Objective: Zero plus 64-84 2 1
Objective Zero Plus 90 1 ½
Zero Plus 90 Zero plus 120 ½ ½
Bombardment target: 6th and 12th Brigades

Montbrehain: heavy artillery bombardment and counter battery
Bombardment: 21 6-in How
• Fire until Z + 106
• Bdes engage fleeting targets when possible
• HE fires 75% 106 fuze, delay fuze for concrete structures and dugouts (village)
• Times show lift from the zone west of line
Counter battery: 31 60-pr, 44 6-in How
• 17 Hostile battery areas
• Engaged by section of 6-in How or 60-pr
• Fire until Z + 110 minutes
• Brigades detach sections to answer NF calls
Hostile battery areas under counter battery fire

Montbrehain: conduct of attack
Initial attack
• Objective reached right, tough fighting left
• Barrage reported ragged and short
• German counter barrage tracks infantry
German counterattack
• Pushes Bns 400 yards into village
• Artillery fire disperses troops Doon Mill and north village
Consolidation
• 21 Bn and 24 Bn edge of village, 2nd Pioneer defensive flank
• 18 and 27 Bn reinforced and provided carrying parties
Aftermath
• Casualties - 6th Brigade 400; FA 46; RGA 8
• 12 Officers, 594 OR taken prisoner

Montbrehain: field artillery supporting fire
ID TIME TYPE RDS
1 0807 NF 50 18-pr
2 0819 NF 50 18-pr
3 1100 NF 50 18-pr
4 1118 NF 50 18-pr
5 1130 FOO (MG Doon Mill) 100 18-pr; 200 4.5-in How
6 1210 GROUP (Prot. Barrage) 100-120 18-pr; 4.5 in How
7 1336 GF (HT) 20 18-pr
8 1402 GF (100 Infantry) 50 18-pr
9 1440 FOO (Infantry) 150 18-pr; 150 4.5-in How
A 1450 Bty OP (infantry) 150 18-pr; 100 4.5-in How
B 1500 Group UNK
C 1530 LL (4 Guns C.7.d.8.3) 200 18-pr
ID TIME TYPE RDS
D 0900 GROUP VIA FOO (Troops near Doon Mill) UNK
E UNK Infantry (continue protective fire) 1005-1130 UNK
F 1100 FOO (infantry movement) 100 4.5-in How
G UNK GROUP (harassing fire) UNK
H 1500 FOO (infantry movement) 100 4.5-in How
4TH AFA BRIGADE
11TH AFA BRIGADE
• Rounds detailed in War Diary. Not complete record of expenditure for brigade• 21,125 18-pr and 4959 4.5-in How fired total for Field Artillery

Solving the gunnery problem: Montbrehain
Know location of firing unit and Determine vertical interval and site
• Most batteries displaced 4 October
• Battery boards, BP and resection not available
• Mapping: current maps and photos available
• Batteries laid in by map, compass, aiming posts and director
• Vertical interval determined by map and director
Compensate for non-standard conditions
• Meteor: wind, temperature, barometer used
Determine location of target
• SRS not in action due to speed of advance
• Observation groups in action
• Aerial observation primary target location
• FOO and Artillery OP secondary method
Convert Chart Data to firing data
• Battery boards: not available
• Calibration: obtain MV, jump and droop

Solving the gunnery problem: conclusions
Survey and intelligence functions
• Optimised for static warfare
• Battery survey (BP, artillery board, resection)
• CBSO intel collection and compilation
• Mapping improvements from 1914
Mobility
• Improvement over 1917 but still limitations
Aerial Observation
• Crucial for target location, mapping and ranging
• Lack of wireless telephony (radio)
Infantry-Artillery Cooperation
• Liaison
• Lack of wireless telephony (radio)
Montbrehain from Doon Mill, photo by author