Embed Size (px)
Citation preview
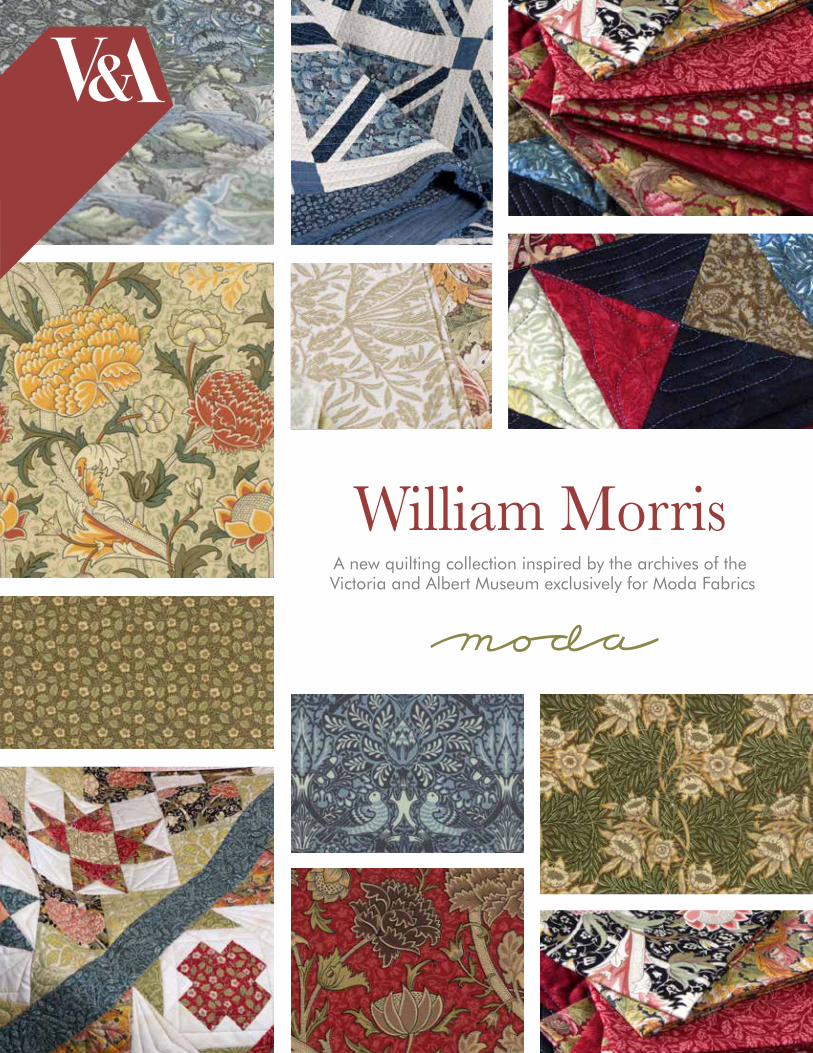
A new quilting collection inspired by the archives of the Victoria and Albert Museum exclusively for Moda Fabrics
Finished Quilt: 72"x80"
Finished Size: 72"x80"
Fabric 32
Cut 1 - 5½" x WOF strip. From the strip cut 3 –5½" x 5½" squares for quarter square triangles. From the remainder cut 2 –1½" x 18½" strips for medallion border, Border 1.Cut 1 - 1½" x WOF strip. From the strip cut 2 –1½" x 20½" strips for medallion border, Border 1.
Fabric 33
Cut 2 - 5½" x WOF strips. From the strips cut 12 –5½” x 5½” squares for quarter square triangles. Cut 8 - 2½" x WOF strips. Join the strips into 4 pairs for Border 2.
Fabric 34
Cut 22 – 5½" x WOF strips From the strips, cut a total of 153 –5½" x 5½" squares for quarter square triangles and the center medallion.Cut 1 - 4½"xWOF strip. From the strip, cut 4 - 4½" x 4½" squares for the center medallion.Cut 2 – 1⅞" x WOF strips From the strips, cut a total of 34 – 1⅞" x 1⅞" squares for the center medallion border.
Fabrics 1 – 8
From each of the 8 Fat QuartersCut 3 - 5½" x 21" strips. From each strip, cut 3 - 5½" x 5½" squares for quarter square triangles. Total number of 5½" squares: 72 (9 from each FQ)
Fabrics 9 – 29
From each of the 21 Fat Eighths Cut 1 - 5½" x 21" strip. From the strip, cut 3 - 5½" x 5½" squares for quarter square triangles. Total number of 5½" squares: 63 (3 from each F8)
Fabric 30
Cut 2 - 5½" x WOF strips. From the strips cut 9 –5½" x 5½" squares for quarter square trianglesCut 1 - 3¼" x WOF strip. From the strip cut 8 –3¼" x 3¼" squares for the pieced center medallion border. From the remainder cut 2 – 1⅞" x 1⅞" squares for the pieced center medallion border.Cut 8 - 2½" x WOF strips for binding.
Fabric 31
Cut 1 - 6⅛" x WOF strip. From the strip cut 1 –6⅛" x 6⅛" square for the center medallion. From the remainder cut 3 –5½" x 5½" squares for quarter square triangles.Cut 1 -5½" x WOF strip. From the strip cut 6 –5½" x 5½" squares for quarter square triangles.
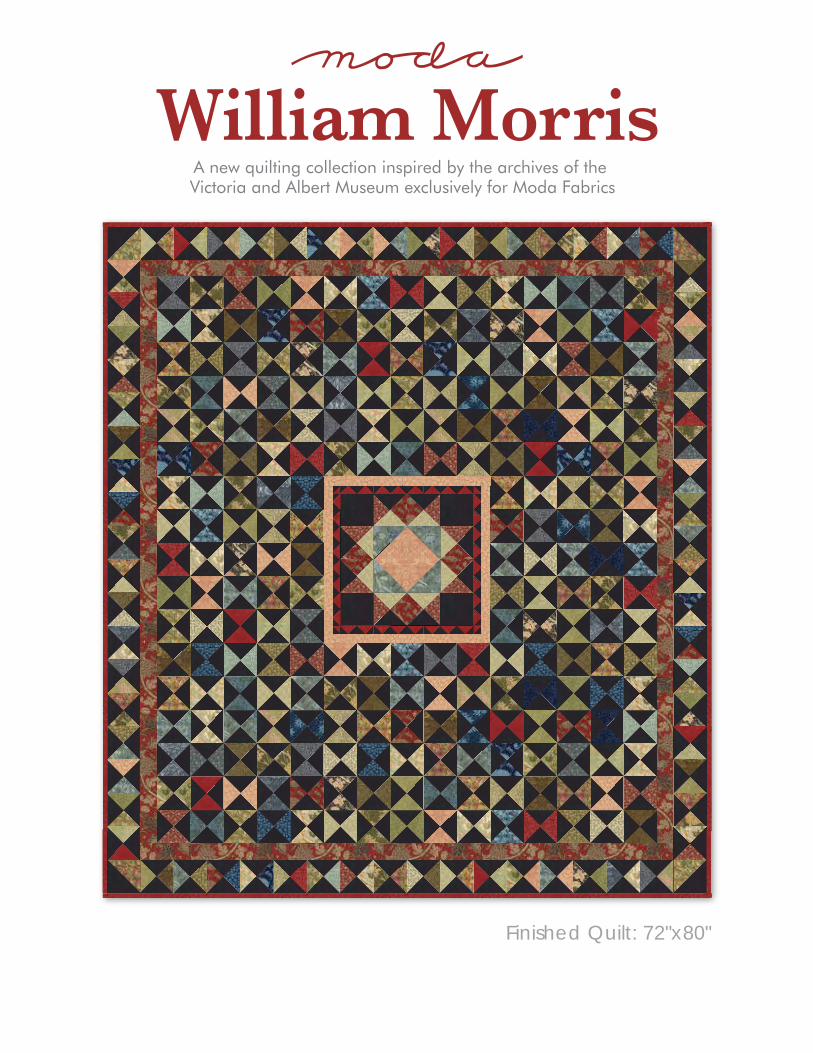
Quilter BasicsRead instructions before beginning a project.
All instructions include a ¼" seam allowance.Press as you go. Press seams in one direction.
22" measurement is approximate. WOF = Width of Fabric
1
CuttingNOTE: For ease of piecing, sort and label the various fabrics as they are cut. Sort by use, i.e. for borders, center medallion, hour glass blocks and size.
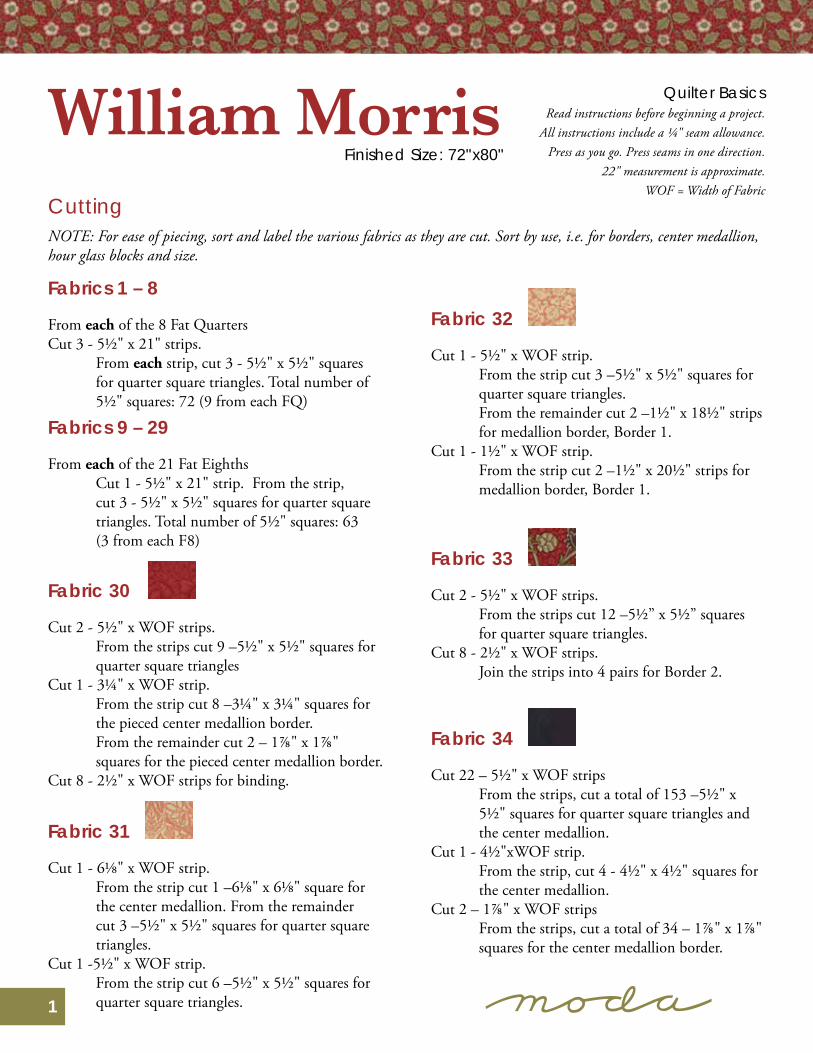
ConstructionFabrics for Center Medallion Fabric 3– 2-5½" squares. Cut once diagonally to yield 4 triangles; Fabric 7– 2-5½" squares. Cut twice diagonally to yield 8 triangles; Fabric 8– 2-5½" squares. Cut twice diagonally to yield 8 triangles; Fabric 31 – 1-6⅛" center square; Fabric 33 – 2-5½" squares. Cut twice diagonally to yield 8 triangles; Fabric 34– 4-4½" corner squares and 2-5½" squares. Cut twice diagonally to yield 8 triangles.
Piecing the Center Medallion
Step 1: Stitch the four Fabric 3 triangles to the sides of the Fabric 31 center square. Press seams toward arrows. Align the 4¼" marks on ruler with points of center square to square unit. Center square should measure 8½" x 8½" with seams.
Step 2: Using the triangles cut from Fabrics 7, 8, 33 and 34 – 5½" squares, piece two sets of four matching quarter-square triangle units. Press seams open. Square units to measure 4½" x 4½" with seams. See diagram.
Join two units as shown to make four side units - each unit should measure 4½" x 8½".
Step 3: Add two pieced units to the sides of the center square. Press seams open.
Step 4: Stitch the 4½" x 4½" black squares to opposite ends of the remaining two side units. Press seams open.
Step 1
Square center unit to measure 8½"x8½"
with seams.
F3
F31
Make 4 Make 4
Make 4
Step 2
Unit 1
Square units to measure 4½"x4½" with seams.
Pieced unit should measure 8½"x4½" with seams.
F34
F8
F7 F33Unit 2F34
F8
F33 F7
Step 3
Step 5
Step 4
Stitch the rows to the top and bottom of the Step 3 unit. The center block should measure 16½" x 16½".
2
Construction – cont.
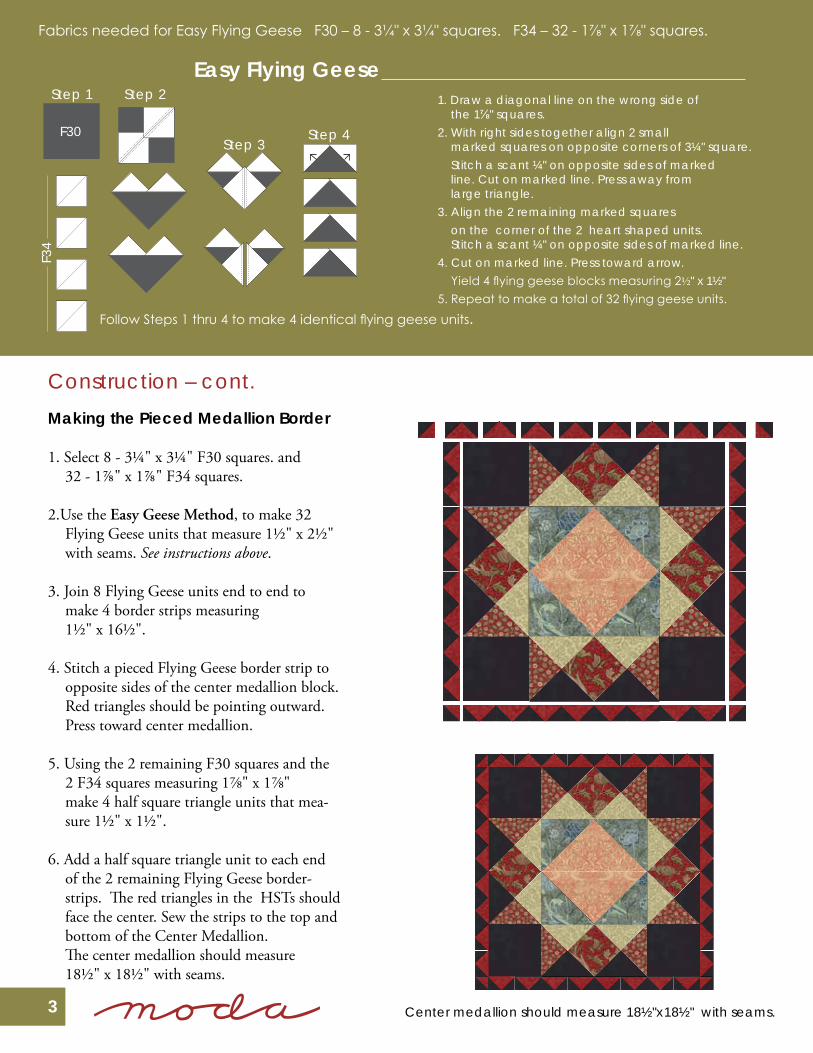
1. Draw a diagonal line on the wrong side of the 1⅞" squares.2. With right sides together align 2 small marked squares on opposite corners of 3¼" square. Stitch a scant ¼" on opposite sides of marked line. Cut on marked line. Press away from large triangle.3. Align the 2 remaining marked squares on the corner of the 2 heart shaped units. Stitch a scant ¼" on opposite sides of marked line.4. Cut on marked line. Press toward arrow. Yield 4 flying geese blocks measuring 2½" x 1½" 5. Repeat to make a total of 32 flying geese units.
Follow Steps 1 thru 4 to make 4 identical flying geese units.
Step 1 Step 2
Step 3Step 4
Easy Flying Geese
Fabrics needed for Easy Flying Geese F30 – 8 - 3¼" x 3¼" squares. F34 – 32 - 1⅞" x 1⅞" squares.
F30
F34
Making the Pieced Medallion Border
1. Select 8 - 3¼" x 3¼" F30 squares. and 32 - 1⅞" x 1⅞" F34 squares.
2.Use the Easy Geese Method, to make 32 Flying Geese units that measure 1½" x 2½" with seams. See instructions above.
3. Join 8 Flying Geese units end to end to make 4 border strips measuring
1½" x 16½". 4. Stitch a pieced Flying Geese border strip to
opposite sides of the center medallion block. Red triangles should be pointing outward. Press toward center medallion.
5. Using the 2 remaining F30 squares and the 2 F34 squares measuring 1⅞" x 1⅞" make 4 half square triangle units that mea-sure 1½" x 1½".
6. Add a half square triangle unit to each end of the 2 remaining Flying Geese border-strips. The red triangles in the HSTs should face the center. Sew the strips to the top and bottom of the Center Medallion. The center medallion should measure 18½" x 18½" with seams.
Center medallion should measure 18½"x18½" with seams.3
Construction – cont.
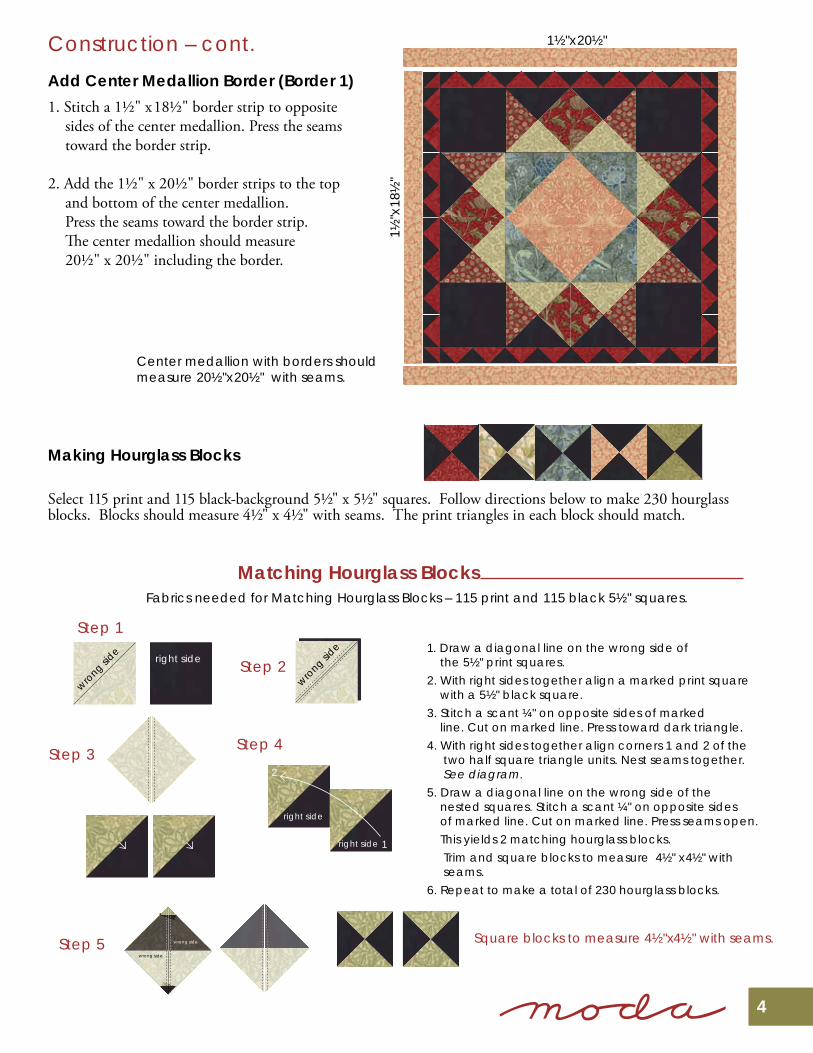
1. Stitch a 1½" x18½" border strip to opposite sides of the center medallion. Press the seams toward the border strip.
2. Add the 1½" x 20½" border strips to the top and bottom of the center medallion. Press the seams toward the border strip. The center medallion should measure 20½" x 20½" including the border.
Add Center Medallion Border (Border 1)
Center medallion with borders should measure 20½"x20½" with seams.
1½"x
18½
"
1½"x20½"
1. Draw a diagonal line on the wrong side of the 5½" print squares.2. With right sides together align a marked print square with a 5½" black square. 3. Stitch a scant ¼" on opposite sides of marked line. Cut on marked line. Press toward dark triangle.4. With right sides together align corners 1 and 2 of the two half square triangle units. Nest seams together. See diagram. 5. Draw a diagonal line on the wrong side of the nested squares. Stitch a scant ¼" on opposite sides of marked line. Cut on marked line. Press seams open. This yields 2 matching hourglass blocks. Trim and square blocks to measure 4½" x4½" with seams.6. Repeat to make a total of 230 hourglass blocks.
Matching Hourglass Blocks
Step 1
wrong sid
e right side Step 2wro
ng side
Step 3 Step 4
1
2
right side
right side
Step 5 wrong side
Making Hourglass Blocks
Select 115 print and 115 black-background 5½" x 5½" squares. Follow directions below to make 230 hourglass blocks. Blocks should measure 4½" x 4½" with seams. The print triangles in each block should match.
Fabrics needed for Matching Hourglass Blocks – 115 print and 115 black 5½" squares.
Square blocks to measure 4½"x4½" with seams.wrong side
4
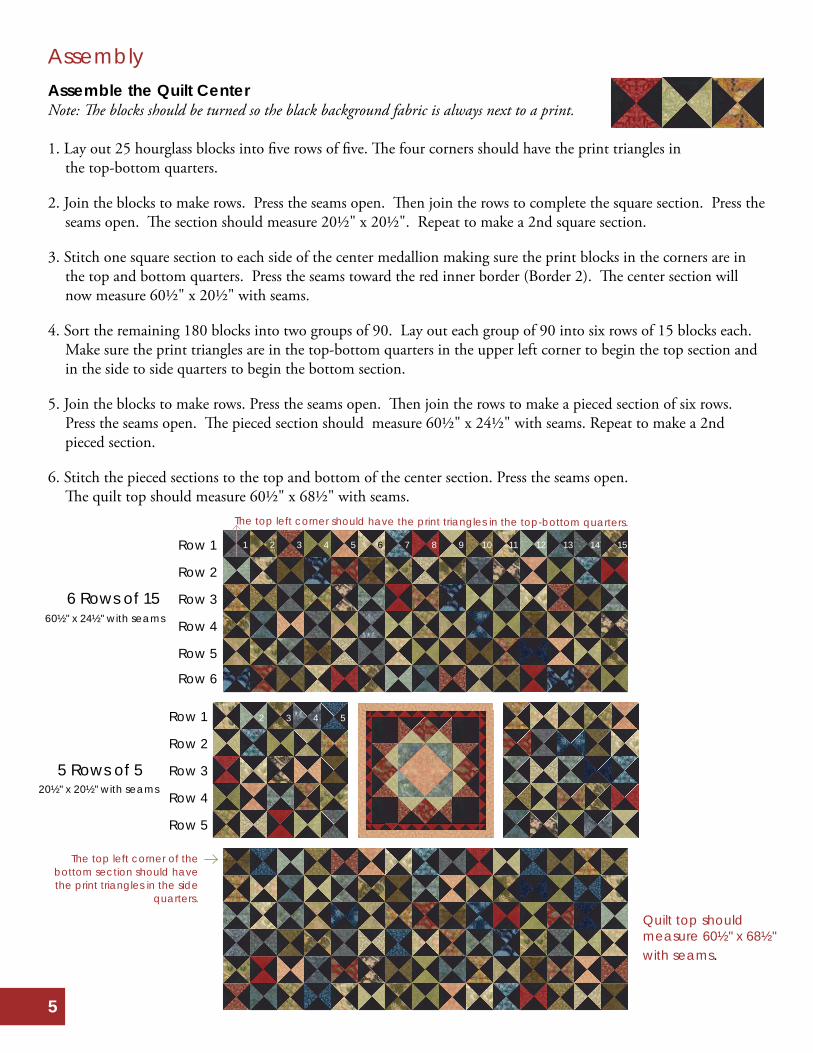
Assemble the Quilt CenterNote: The blocks should be turned so the black background fabric is always next to a print.
1. Lay out 25 hourglass blocks into five rows of five. The four corners should have the print triangles in the top-bottom quarters.
2. Join the blocks to make rows. Press the seams open. Then join the rows to complete the square section. Press the seams open. The section should measure 20½" x 20½". Repeat to make a 2nd square section.
3. Stitch one square section to each side of the center medallion making sure the print blocks in the corners are in the top and bottom quarters. Press the seams toward the red inner border (Border 2). The center section will now measure 60½" x 20½" with seams.
4. Sort the remaining 180 blocks into two groups of 90. Lay out each group of 90 into six rows of 15 blocks each. Make sure the print triangles are in the top-bottom quarters in the upper left corner to begin the top section and in the side to side quarters to begin the bottom section.
5. Join the blocks to make rows. Press the seams open. Then join the rows to make a pieced section of six rows. Press the seams open. The pieced section should measure 60½" x 24½" with seams. Repeat to make a 2nd pieced section.
6. Stitch the pieced sections to the top and bottom of the center section. Press the seams open. The quilt top should measure 60½" x 68½" with seams.
Assembly
Row 1
Row 1
Row 2
Row 2
Row 3
Row 3
Row 4
Row 4
Row 5
Row 5
Row 6
5 Rows of 5
6 Rows of 15
1 2 3 4 5 6 7 8 9 10 11 12 13 14 15
2 3 4 5
The top left corner should have the print triangles in the top-bottom quarters.
Quilt top should measure 60½" x 68½" with seams.
60½" x 24½" with seams
20½" x 20½" with seams
The top left corner of the bottom section should have the print triangles in the side
quarters.
5
Assembly-cont.
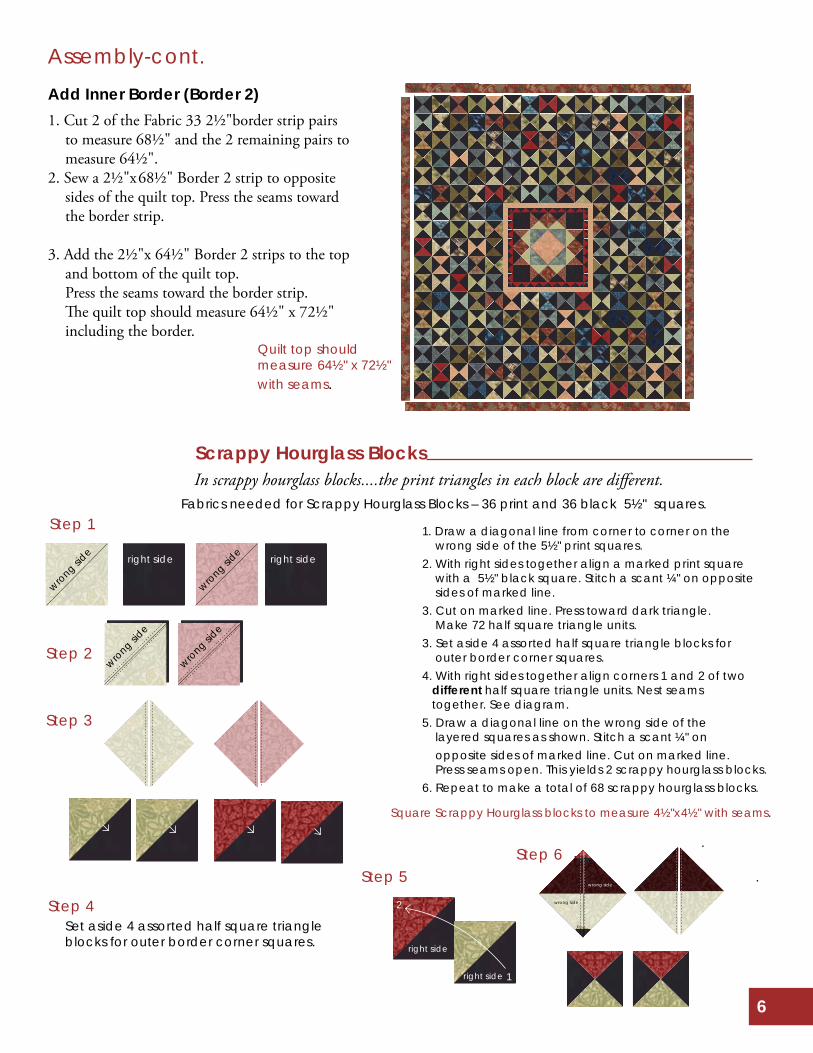
1. Cut 2 of the Fabric 33 2½"border strip pairs to measure 68½" and the 2 remaining pairs to measure 64½".
2. Sew a 2½"x68½" Border 2 strip to opposite sides of the quilt top. Press the seams toward the border strip.
3. Add the 2½"x 64½" Border 2 strips to the top and bottom of the quilt top. Press the seams toward the border strip. The quilt top should measure 64½" x 72½" including the border.
Add Inner Border (Border 2)
Quilt top should measure 64½" x 72½" with seams.
1. Draw a diagonal line from corner to corner on the wrong side of the 5½" print squares.2. With right sides together align a marked print square with a 5½" black square. Stitch a scant ¼" on opposite sides of marked line. 3. Cut on marked line. Press toward dark triangle. Make 72 half square triangle units.3. Set aside 4 assorted half square triangle blocks for outer border corner squares.4. With right sides together align corners 1 and 2 of two different half square triangle units. Nest seams together. See diagram. 5. Draw a diagonal line on the wrong side of the layered squares as shown. Stitch a scant ¼" on opposite sides of marked line. Cut on marked line. Press seams open. This yields 2 scrappy hourglass blocks.6. Repeat to make a total of 68 scrappy hourglass blocks.
Step 1
wrong sid
e
wrong sid
eright side right side
Step 2wro
ng side
wrong sid
e
Step 3
Step 4Set aside 4 assorted half square triangle blocks for outer border corner squares.
Step 6
wrong side
wrong side
Scrappy Hourglass Blocks
Fabrics needed for Scrappy Hourglass Blocks – 36 print and 36 black 5½" squares.
Square Scrappy Hourglass blocks to measure 4½"x4½" with seams.
Step 5
1
2
right side
right side
In scrappy hourglass blocks....the print triangles in each block are different.
6
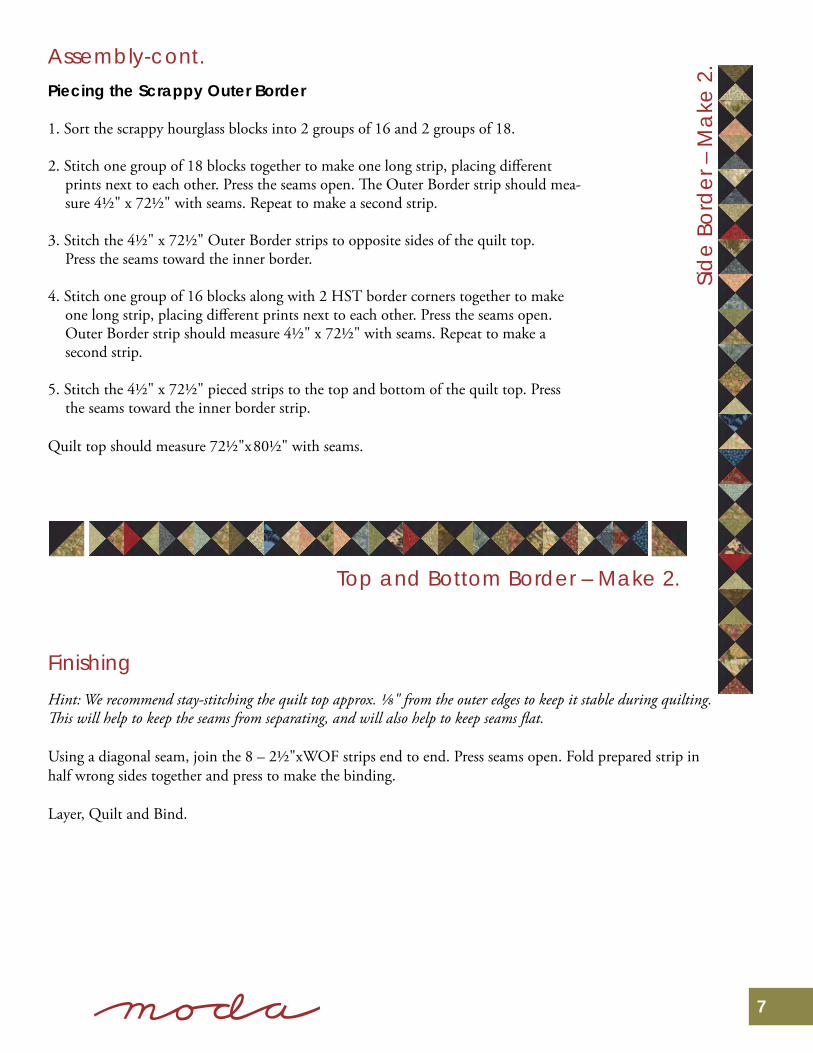
Piecing the Scrappy Outer Border
1. Sort the scrappy hourglass blocks into 2 groups of 16 and 2 groups of 18.
2. Stitch one group of 18 blocks together to make one long strip, placing different prints next to each other. Press the seams open. The Outer Border strip should mea-sure 4½" x 72½" with seams. Repeat to make a second strip.
3. Stitch the 4½" x 72½" Outer Border strips to opposite sides of the quilt top. Press the seams toward the inner border.
4. Stitch one group of 16 blocks along with 2 HST border corners together to make one long strip, placing different prints next to each other. Press the seams open. Outer Border strip should measure 4½" x 72½" with seams. Repeat to make a second strip.
5. Stitch the 4½" x 72½" pieced strips to the top and bottom of the quilt top. Press the seams toward the inner border strip.
. Quilt top should measure 72½"x80½" with seams.
FinishingHint: We recommend stay-stitching the quilt top approx. ⅛" from the outer edges to keep it stable during quilting. This will help to keep the seams from separating, and will also help to keep seams flat.
Using a diagonal seam, join the 8 – 2½"xWOF strips end to end. Press seams open. Fold prepared strip in half wrong sides together and press to make the binding.
Layer, Quilt and Bind.
Assembly-cont.
Sid
e Bo
rder
– M
ake
2.
Top and Bottom Border – Make 2.
38
7
Fabric 32 ¼ yd
7306
13
Fabric 33 1 yd
7300
17
Background
Fabric 34 3¾ yd
3015
0-16
5
Fabric 31 ⅜ yd
7301
-12
Fabric 9 F8
7300
11
Fabric 10 F8
7300
14
Fabric 11 F8
7300
21
Fabric 12 F8
7301
11
Fabric 1 FQ
7300
12
Fabric 2 FQ
7300
19
Fabric 3 FQ
7300
23
Fabric 4 FQ
7301
13
Fabric 5 FQ
7304
11
Fabric 6 FQ
7304
14
Fabric 8 FQ
7306
12
Fabric 7 FQ
7305
14
Fabric 17 F8
7303
17
Fabric 14 F8
7302
11
Fabric 15 F8
7302
16
Fabric 16 F8
7303
15
Fabric 13 F873
01 2
1
Fabric 25 F8
7307
18
Fabric 19 F8
7304
15
Fabric 20 F8
7304
17
Fabric 21 F8
7304
18
Fabric 22 F8
7305
11
Fabric 18 F873
04 1
3
Fabric 23 F873
05 1
3
Fabric 26 F8
730
7 20
Fabric 27 F8
730
7 24
Fabric 28 F8
7307
25
Fabric 29 F8
7307
26
Fabric 24 F8
7305
17
Blocks & Binding
Fabric 30 1 yd.,
7303
-19
PS7300 — SuggeSted Retail $10.00
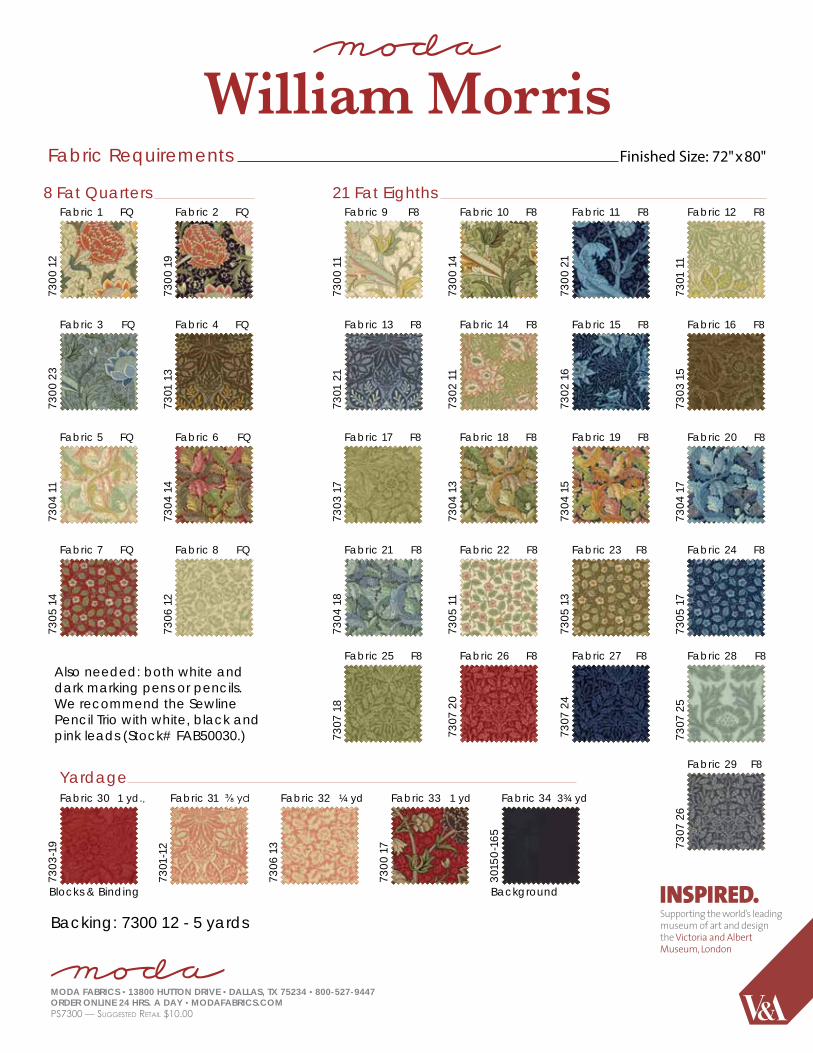
8 Fat Quarters 21 Fat Eighths
Yardage
MODA FABRICS • 13800 HUTTON DRIVE • DALLAS, TX 75234 • 800-527-9447ORDER ONLINE 24 HRS. A DAY • MODAFABRICS.COM
Backing: 7300 12 - 5 yards
Also needed: both white and dark marking pens or pencils. We recommend the Sewline Pencil Trio with white, black and pink leads (Stock# FAB50030.)
Fabric Requirements Finished Size: 72"x80"
William Morris35
36
38
35
36
37
A new quilting collection inspired by the archives of the Victoria and Albert Museum exclusively for Moda Fabrics