Embed Size (px)
Citation preview

Fingerprint Time Attendance Terminal Hardware Manual Rev: 1.01

Content
I. NOTICE FOR USING ......................................................................... ‐ 4 ‐
1.1 OPERATING ENVIRONMENT ............................................................. ‐ 4 ‐ 1.2 ABOUT THE SYSTEM ...................................................................... ‐ 4 ‐ 1.3 PRESSING METHOD ....................................................................... ‐ 5 ‐ 1.4 QUICK GUIDE ............................................................................... ‐ 6 ‐ 1.4.1 Turning on ................................................................................ ‐ 6 ‐ 1.4.2 Accessing management and setting menu .............................. ‐ 6 ‐ 1.4.3 Registering the administrator .................................................. ‐ 6 ‐ 1.4.4 Function Setup ......................................................................... ‐ 6 ‐ 1.4.5 Checking work attendance records .......................................... ‐ 6 ‐ 1.4.6 System information .................................................................. ‐ 7 ‐
II. FUNCTION ...................................................................................... ‐ 8 ‐
2.1 KEYPAD ...................................................................................... ‐ 8 ‐ 2.2 MENU ...................................................................................... ‐ 10 ‐ 2.2.1 Constitution of the menu ....................................................... ‐ 10 ‐ 2.3 COMMUNICATION ...................................................................... ‐ 14 ‐ 2.3.1 RS232 connection .................................................................. ‐ 14 ‐ 2.3.2 RS485 connection .................................................................. ‐ 15 ‐ 2.3.3 TCP/IP network connection .................................................... ‐ 16 ‐ 2.3.4 Connecting through USB‐Disk ................................................ ‐ 17 ‐
III. OPERATING INSTRUCTIONS ...................................................... ‐ 18 ‐
3.1 INSTALLING THE FINGERPRINT TIME ATTENDANCE TERMINAL ............... ‐ 18 ‐ 3.1.1 Installing the Fingerprint Time Attendance Terminal ............ ‐ 18 ‐ 3.2 ATTENDANCE BUTTON ................................................................. ‐ 18 ‐ 3.2.1 On duty attendance ............................................................... ‐ 18 ‐ 3.2.2 Off duty attendance ............................................................... ‐ 19 ‐ 3.2.3 Overtime on duty attendance ................................................ ‐ 19 ‐ 3.2.4 Overtime off duty attendance ............................................... ‐ 20 ‐ 3.2.5 Out attendance ...................................................................... ‐ 20 ‐ 3.2.6 Return attendance ................................................................. ‐ 20 ‐ 3.3 ENROLL .................................................................................... ‐ 21 ‐ 3.3.1 User ....................................................................................... ‐ 21 ‐ 3.3.2 User validation ....................................................................... ‐ 27 ‐ 3.3.3 Manager ................................................................................ ‐ 29 ‐ 3.3.4 Delete .................................................................................... ‐ 31 ‐ 3.3.5 Downloading to USB‐Disk ...................................................... ‐ 32 ‐

3.3.6 AllLog Delete .......................................................................... ‐ 32 ‐ 3.4 SETUP ...................................................................................... ‐ 33 ‐ 3.4.1 System ................................................................................... ‐ 33 ‐ 3.4.2 Communication ..................................................................... ‐ 40 ‐ 3.5 SYSTEM INFO ............................................................................. ‐ 43 ‐
IV. APPENDIX .................................................................................... ‐ 45 ‐
4.1 INTERFACES ............................................................................... ‐ 45 ‐ 4.1.1 RS232 interface and RJ45 interface ....................................... ‐ 45 ‐ 4.2 DESCRIPTION OF INTERFACE LINES .................................................. ‐ 46 ‐
V. TROUBLESHOOTING ..................................................................... ‐ 48 ‐

Fingerprint Time Attendance Terminal
- 4 -
Notice for using
I. Notice for using Thanks for purchasing our Fingerprint Time Attendance Terminal. Before using this product, please carefully read this manual, which helps you improve the efficiency of using this product.
1.1 Operating environment
Avoid installing the Fingerprint Time Attendance Terminal at places where irradiated by strong light directly. The strong light affects the collecting of fingerprints and cause that the fingerprint validation can’t pass normally.
The operating temperature of Fingerprint Time Attendance Terminal is 0℃–45℃. Avoid using outdoor for too long time. The normal working of the Fingerprint Time Attendance Terminal will be affected if it is used in outdoor for long time; if it is necessary to use outdoor, the sunshade and cooling equipment are recommended in summer and warm keeping facility is recommended in winter to protect the Fingerprint Time Attendance Terminal.
1.2 About the system
The Fingerprint Time Attendance System consists of two parts: Fingerprint Time Attendance Terminal and Attendance Management Software.
The terminal is mainly responsible for the registration of the employees’ fingerprints and daily check on work attendance; the software is mainly used to read the work attendance records(Log) of the terminal, process the statistics by following the attendance rules set by the administrator, and generate various kinds of statistics report forms.
Four communication modes are available between the terminal and PC installed the software: RS232, RS485, TCP/IP and USB-Disk, while RS232 is the standard communication mode of the terminal.

Fingerprint Time Attendance Terminal
- 5 -
Notice for using
1.3 Pressing method
After installing the terminal, the fingerprints (forefinger and middle finger are
recommended) will be registered first and then followed by the validating
operation.Correct pressing method: Press with your finger right on the fingerprint
gathering window, with the fingerprint’s centre aligning to the centre of the gathering
window as much as possible. Finger pressing method is shown as follows:
Tilting Too low
Too perpendicular Too deflective
Correct

Fingerprint Time Attendance Terminal
- 6 -
Notice for using
1.4 Quick guide
1.4.1 Turning on
After connecting the power cord, press the ⊙ key, the LCD displays the main interface and a long beep accompanies.
Note: The power supply for the Fingerprint Time Attendance Terminal must be DC 5V.
1.4.2 Accessing management and setting menu
Press the [MENU] key to access the Menu to manage the data and set the menu.
Note: After registering the administrator, it is necessary to pass the validation to enter the Menu.
1.4.3 Registering the administrator
In the Menu, select [Enroll] and press the [OK] button to access the menu; then, select [Manager] to register the fingerprints and password of the administrator.
The administrators include [Sup Manager] and [Gen Manager]. They have different management authorities, which will be explained in Chapter III.
1.4.4 Function Setup
In the Menu, select [Setup] and press the [OK] button to enter the setting menu. The [Setup] menu consists of [System] and [Log Setup]. [Communication] is also available for the Time Attendance Terminal integrated with TCP/IP communication function. In [System], you can configure the device. See Chapter III Section 3.4 for details.
1.4.5 Checking work attendance records
In the Menu, select [Glog View] and press the [OK] button to enter the menu. You can

Fingerprint Time Attendance Terminal
- 7 -
Notice for using
check the attendance time and number of times of the staff.
1.4.6 System information
In the Menu, select [System Info] and press the [OK] button to enter the submenu. You can check the data registered in the system.

Fingerprint Time Attendance Terminal
- 8 -
Function
II. Function
2.1 Keypad
The keypad deployment is shown in Fig. 2-1:
F1
F5
F2 F6
F3 F7
F4 F8
1 2 3 ESC
OK
4 5 6 MENU
7 8 9
* 0 #
The functions of keys are shown in Fig. 2-2:
Fig. 2-1

Fingerprint Time Attendance Terminal
- 9 -
Function
ESC To EXIT or CANCEL when operating
the menu
MENU To access the menu management
OK To confirm current Setup
Backspace key
Power switch
Scroll left while operating
Scroll right while operating
Scroll up while operating
Scroll down while operating
0…9 To input numbers when operating or
selecting menus
F1 On duty
F2 Off duty
F3 Overtime
F4 Off overtime
F5 OUT
F6 IN
F7, F8 Welcome
Fig. 2-2

Fingerprint Time Attendance Terminal
- 10 -
Function
2.2 Menu
You can use the function keys and number keys to select menu, input numbers and perform other operations.
2.2.1 Constitution of the menu
The Menu consists of Enroll, Setup, Glog View and System Info. Each menu contains second level and third level menus and you can select to perform corresponding operations.
Press the [MENU] button to display the structure of the Menu:
Enroll:
Register and delete the fingerprints, passwords and sensor card data of users or administrators, AllLog Delete and download to USB-Disk.
Setup
System, Log Setup and Communication of the Fingerprint Time Attendance Terminal.
Glog View
Check the attendance records of the staff.
System Info
Check the register, management and attendance information in the Fingerprint Time Attendance Terminal.
Menu ▼
Enroll

Fingerprint Time Attendance Terminal
- 11 -
Function
Structure of Enroll menu
Password
Card
Finger
SLog
All GLog
GLog
All SLog
Level 3 menu
Gen Manager
Sup Manager
Level 1 menu
Enroll
User
Manager
Delete
AllLog Delete
Download
Level 2 menu

Fingerprint Time Attendance Terminal
- 12 -
Function
Structure of Setup menu
Managers
Language
Time
Time Fmt
LCD Contrast
Voice Out
Log type
Lock Ctrl
Shut down Key
AutoShutdown
Setup System
Glog Wrn
Slog Wrn
Re-Verify
Log Setup
Level 1 menu
Level 2 menu
Level 3 menu

Fingerprint Time Attendance Terminal
- 13 -
Function
System Info menu
In the Menu, move the cursor to [System Info] and press the [OK] button to enter the secondary menu. Three menus and seven options are available (press the [OK] button to switch to corresponding item in every menu), as shown below:
If the TCP/IP functionisn’t integrated, thismenu isn’t available;however, the [DeviceID] and [Baud rate] willbe displayed in [System]menu.
Setup Communicatio
Subnet mask
Default Gateway
RS485
Ethernet
IP Address
Password
Port No
Baud rate
Device ID
Level 2 menu
Level 3 menu
Level 1 menu

Fingerprint Time Attendance Terminal
- 14 -
Function
For example, move the cursor to [User] and press the [OK] button to go to [Manager], and press the [OK] again to return to [User]. The other two menus have same operation.
2.3 Communication
2.3.1 RS232 connection
Setting RS232 communication parameters: Press the [MENU] button to enter -> [Setup] -> [System] (or [Communication]) -> [Device ID] -> [Baud rate] -> Press the [ESC] button -> press the [OK] button -> press the [ESC] button to exit. The initial System menu follows:
Manager User Press OK
First level menu
Finger Card System info
Password
Press OK Press OK
Press OK
G_Log S_Log
Second level menu Third level menus
Press OK

Fingerprint Time Attendance Terminal
- 15 -
Function
Tip:
If RS232 is selected, the baud rate in the COM port setting of the PC must be consistent with the baud rate of the Fingerprint Time Attendance Terminal.
Turn off the terminal;
Connect the terminal to PC with RS232 cable: connect one end of the cable to the 9-pin serial port of the PC and the other end to the RS232 port of the terminal;
Restart the terminal.
2.3.2 RS485 connection
If the terminal is integrated with TCP/IP function, you need to press the “▼” (scroll down) button in the Setup menu to select “Yes” for RS485 Communication and “No” for Ethernet, as follows:
Turn off the terminal;
Note: The default value is recommended if you use only one Fingerprint Time Attendance Terminal.If you use more than one terminal, you need to set different device numbers.
System ▼Managers 5 Device ID 1 Baud rate 38400
Communication ▼Default gateway RS485 Yes Ethernet No
Note: The device number, baud rate and serial port must be consistent with the Setup in management station. In addition, the RS485 data converter isn’t included in the standard configuration.

Fingerprint Time Attendance Terminal
- 16 -
Function
Connect the PIN7 and PIN8 of the bare end of the provided RJ45 cable to 485+ and 485- of the converter respectively (see Appendix 4.2 for the definition of wire connection);
Connect the RS485 converter to the serial port of the PC and the RJ45 cable to the RJ45 port of the terminal;
Restart the terminal.
2.3.3 TCP/IP network connection
In Communication, press the ▼ button (scroll down) to select “No” for RS485 Communication and “Yes” for Ethernet, as follows:
Set the IP address, subnet mask and default gateway according to Setup of LAN, as follows:
Connect the network cable of the LAN to the RJ45 interface of the terminal;
Start the terminal.
Communication ▼Default gateway RS485 NoEthernet Yes
Note: The IP address for TCP/IP must be exclusive. The password must be consistent with the management software of fingerprint attendance checking.
Communication ▼ IP address Subnet mask Default gateway
Fingerprint Time Attendance Terminal
- 17 -
Function
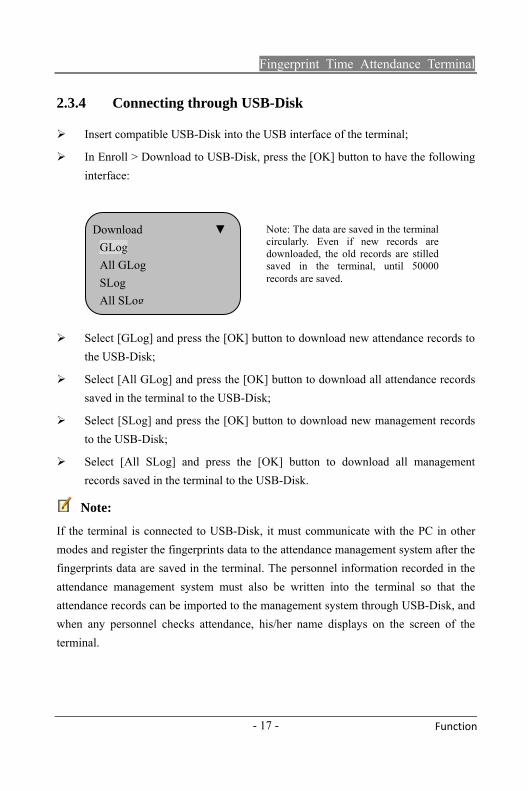
2.3.4 Connecting through USB-Disk
Insert compatible USB-Disk into the USB interface of the terminal;
In Enroll > Download to USB-Disk, press the [OK] button to have the following interface:
Select [GLog] and press the [OK] button to download new attendance records to the USB-Disk;
Select [All GLog] and press the [OK] button to download all attendance records saved in the terminal to the USB-Disk;
Select [SLog] and press the [OK] button to download new management records to the USB-Disk;
Select [All SLog] and press the [OK] button to download all management records saved in the terminal to the USB-Disk.
Note:
If the terminal is connected to USB-Disk, it must communicate with the PC in other modes and register the fingerprints data to the attendance management system after the fingerprints data are saved in the terminal. The personnel information recorded in the attendance management system must also be written into the terminal so that the attendance records can be imported to the management system through USB-Disk, and when any personnel checks attendance, his/her name displays on the screen of the terminal.
Note: The data are saved in the terminal circularly. Even if new records are downloaded, the old records are stilled saved in the terminal, until 50000 records are saved.
Download ▼GLog All GLog SLog All SLog

Fingerprint Time Attendance Terminal
- 18 -
Operating Instructions
III. Operating Instructions
3.1 Installing the Fingerprint Time Attendance Terminal
3.1.1 Installing the Fingerprint Time Attendance Terminal
Position: according to the screw hole position of fixing plate (provided), mark four positions for screws on the wall where the attendance terminal will be hung.
Drilling: use tool to drill four holes with same size and depth as provided screws at the marked positions.
Fixing plate: put the fixing plate at appropriate position in the drilling area and tighten the screws.
Fixing: hang the terminal on the fixing plate.
Turning on: connect one end of the power cord to the power inlet of the terminal and the other end to 220V power outlet, and then press the ⊙ button on the keypad to turn on the terminal.
3.2 Attendance button
3.2.1 On duty attendance
In standby state, press the [F1] button to access on duty attendance and record the time of on duty attendance, as follows:

Fingerprint Time Attendance Terminal
- 19 -
Operating Instructions
3.2.2 Off duty attendance
In standby state, press the [F2] button to access off duty attendance and record the time of off duty attendance, as follows:
3.2.3 Overtime on duty attendance
In standby state, press the [F3] button to access overtime on duty attendance and record the time of overtime on duty attendance, as follows:
Off duty
18:00 08/08/27 Wed
Overtime
18:30 08/08/27 Wed
On duty
08:00 08/08/27 Wed

Fingerprint Time Attendance Terminal
- 20 -
Operating Instructions
3.2.4 Overtime off duty attendance
In standby state, press the [F4] button to access overtime off duty attendance and record the time of overtime off duty attendance, as follows:
3.2.5 Out attendance
In standby state, press the [F5] button to access out attendance and record the out time, as follows:
3.2.6 Return attendance
In standby state, press the [F6] button to access return attendance and record the return time, as follows:
IN
16:00 08/08/27 Wed
Out
10:30 08/08/27 Wed
Off overtime
21:30 08/08/27 Wed

Fingerprint Time Attendance Terminal
- 21 -
Operating Instructions
3.3 Enroll
In normal working state, press the [MENU] button to access the Menu directly if no administrator is registered, as follows:
In this interface, press the Scroll right button to view the menus. If [Enroll] is selected, press the [OK] button to access level 2 menu, as follows:
[Enroll] consists of four level 2 menus, which are [User], [Manager], [Delete] and [AllLog Delete]; if USB-Disk function is integrated, the [Download] option is also available.
3.3.1 User
Two modes are available for the registration (validation) of the Fingerprint Time Attendance Terminal: fingerprint and password.
When users register, each person has only one exclusive “Enroll ID”, and the number
Enroll ▼
User
Menu ▼
Enroll

Fingerprint Time Attendance Terminal
- 22 -
Operating Instructions
must be corresponding to the user number (work number, student number, etc.) and Enroll ID in the attendance management software; each “Enroll ID” can register up to three fingerprints and one password.
Finger
The normal working interface of the Fingerprint Time Attendance Terminal is as follow:
Step of registering fingerprints: In the normal working state, press the [MENU] button to access [Menu] -> [Enroll] -> [User] -> [Finger] -> [New Enroll] -> Input Enroll ID -> Press same finger for three times -> Save -> Exit.
Refer to the following pictures for the details of the operation:
Press the [MENU] button to display the [Menu] as follow:
Select [Enroll] and press the [OK] button to display the following picture:
Menu ▼
Enroll
Welcome
16:09 08/03/27 Thu

Fingerprint Time Attendance Terminal
- 23 -
Operating Instructions
Select [User] and press the [OK] button to display the following picture:
Select [Finger] and press the [OK] button to display the following picture:
Press the [OK] button to access [New registration] as follow:
Press the number keys to enter Enroll ID and then press the [OK] button to display the
Enroll ▼
User
User ▼
Finger
Finger New Enroll?
No-ESC Yes-OK
New Enroll ID 00001
Esc-ESC Set/OK
Note: the range of register number is 1-65535
For the first registration, the register number is 00001 by default.

Fingerprint Time Attendance Terminal
- 24 -
Operating Instructions
following picture:
Press the fingerprint collector with a finger in correct method and move the finger away, and then follow the prompt to press the same finger for the second and third times; if the registration is successful, it displays the following picture:
Press the [OK] button to save and the following picture displays if the registration is successful:
To continue registering fingerprints, press the [OK] button:
Finger
New Enroll?
No-ESC Yes-OK
New Enroll 00001 - 0
Esc-ESC Save-OK
Note: 00001 - 0 The last figure 0 indicates the first fingerprint.
New Enroll Press finger #1
Finger
Continue?
No-ESC Yes-OK

Fingerprint Time Attendance Terminal
- 25 -
Operating Instructions
Press the [OK] button to register new fingerprint information and repeat the above steps. To backup another fingerprint for a registered user, press the ESC button to display the following picture:
Select Enroll ID, and press the [OK] button to confirm registering the backup fingerprint (you can backup two fingerprints with our Fingerprint Time Attendance Terminal).
Password register
Press the [MENU] button to access the Menu -> [Enroll] -> [User] and the following picture displays:
Select [Password] [OK] button to display the following picture:
Backup ID 00001
Esc-ESC Set-OK
User ▼
Password
Password
New Enroll? No-ESC Yes-OK

Fingerprint Time Attendance Terminal
- 26 -
Operating Instructions
Press the [OK] button to access New Register as follow:
Input the Enroll ID of certain personnel and press the [OK] button to display the following picture:
Input the password and press the [OK] button to display the following picture:
Repeat the password and press the [OK] button; if the tow passwords are same, the following picture displays:
New Register
PWD In ****
Confirm
New Enroll PWD In Esc-ESC Set-OK
New Enroll ID 00001
Esc-ESC Set-OK
Note: The password contains up to four digits.

Fingerprint Time Attendance Terminal
- 27 -
Operating Instructions
Press the [OK] button to save and the password is registered successfully.
Tip:
If the attendance terminal doesn’t have administrator, any person can edit the Setup of the terminal. If any administrator has been registered, the edit and Setup of the terminal must be approved by the administrator. The terminal can set [Sup Manager] and [Gen Manager]; the [Sup Manager] has the top management authority of the terminal and is able to set all functions of the terminal; the [Gen Manager] can only set three functions: [User]. [Delete] and [AllLog Delete].
When users input Enroll IDs to check registration, you can just input the nonzero and later figures. For example, if the Enroll ID is 00050, you can just input “50”.
After registration, you’d better validate your fingerprints to check the validity of the fingerprint registration. To check, press your fingerprint in normal working interface. If the recognition is successful, it indicates that the fingerprint is clear and the registration is in high quality. If the recognition is failed, it indicates that the fingerprint isn’t clear and you need to re-register or register with another finger.
3.3.2 User validation
The user validation generally refers to sign in/out (make sure that the fingerprint has been registered in the attendance terminal). Press in correct method to validate (see Chapter 1.3).
Fingerprint validation modes:
User 1: N fingerprint validation: press the fingerprint directly on the fingerprint collector and the terminal prompts “Thank you” if the validation is successful, as
New Enroll 00001-P
Esc-ESC Save-OK
Note: 1) 00001-P, P indicates that password is registered.
2) If the passwords are different, it asks you to re-input.

Fingerprint Time Attendance Terminal
- 28 -
Operating Instructions
follow:
User 1:1 fingerprint validation: input your Enroll ID with the keypad and then press the finger, and the terminal prompts “Thank you” if the validation is successful, as follow:
If the fingerprint validation fails, the terminal prompts “Please re-press your finger”, as follow:
Tip:
If the repeat confirmation time is set in the attendance terminal, if the user repeats pressing within the preset confirmation time, the terminal prompts “Already signed! Thank you!” and “Confirmed” displays on the interface. Only the first attendance record is saved in this case.
FP Verify
ID 00001 Verify OK!
1:1 FP Verify ID 00001 Verify OK!
FP Verify
Again Press

Fingerprint Time Attendance Terminal
- 29 -
Operating Instructions
Password validation modes:
The user inputs the Enroll ID with the keypad, presses the [OK] button and inputs the password to display the following picture:
If the password validation is successful, the attendance terminal displays “Confirm successfully” and prompts “Thank you!”
If the password validation fails, the terminal beeps and displays “Please re-input” as follow:
3.3.3 Manager
Sup Manager
Press the [MENU] button to access [Menu] -> [Enroll] -> [Manager], and press the [OK] button to access level 3 menu as follow:
PassVerify ID 00001
PWD In
FP Verify
ID 00001
Again Input!

Fingerprint Time Attendance Terminal
- 30 -
Operating Instructions
Select [Sup Manager] and press the [OK] button to access level 4 menu, and then you can select the validation mode of Sup Manager. The menu displays as follow:
See Chapter 3.3.1.1/3.3.1.2/3.3.1.3 for specific operating steps.
Gen Manager
Select the [Gen Manager] menu and press the [OK] button to access level 4 menu, and then you can select the validation mode of Gen Manager. The contents and operating method of the menu are same to Sup Manager; the [Gen Manager] only ahs three authorities: [Personnel register], [Delete] and [AllLog Delete].
Note:
If administrator has been registered, the identity validation of the administrator is needed to access the Menu, as follow:
Manager?
16:11 08/03/26 Wed
Manager▼
Password
Manager ▼
Sup Manager

Fingerprint Time Attendance Terminal
- 31 -
Operating Instructions
If the identity validation of the administrator fails (fingerprint is wrong, password is invalid or sensor card is incorrect), the terminal displays “Illegal operation!” and gives alert tone. You need to re-confirm the identity of the administrator; if the validation is successful, you can access the management menu interface.
Tip:
For administrators registered with fingerprints, press the [MENU] button and then press the finger that the fingerprint is registered on the fingerprint collecting window; the menu interface displays if the validation is successful;
For administrators registered with password, press the [MENU] button to input the registered number, press the [OK] button to enter the password, and then press the [OK] button; the menu interface displays if the validation is successful.
3.3.4 Delete
Select Delete menu and press the [OK] button to access level 3 menu. The following picture displays:
Input the Enroll ID to be deleted (e.g. 00001), and press the [OK] button to display the following interface:
Delete ID 00000
Delete ID 00001-0.
Note: the last figure of 00001-0 indicates the number of the fingerprint (0 indicates the first fi i )

Fingerprint Time Attendance Terminal
- 32 -
Operating Instructions
Press the [OK] button to confirm and the following interface displays:
Press the [OK] button to delete and the “Delete?” interface pops up after a beep; you can press the [ESC] button to cancel deleting.
3.3.5 Downloading to USB-Disk
To download with USB-Disk, insert the disk into the USB interface of the Fingerprint Time Attendance Terminal and select [Download] menu, and then press the [OK] button to access level 3 menu and select [GLog], as follow:
Press the [OK] button to download records and the downloaded records will be marked. If you want to download these records again, you need to select [All GLog]. If the download is successful, it displays “Download successfully”. It is similar to download management records.
3.3.6 AllLog Delete
Select the [AllLog Delete] menu and press the [OK] button to access level 3 menu as follow:
GLog Working?
Note: Write mark: mark the records that have been downloaded.
Delete Delete?
No-ESC Yes-YES

Fingerprint Time Attendance Terminal
- 33 -
Operating Instructions
Press the [OK] button to clear the access records and press the [ESC] button to cancel and exit.
3.4 Setup
In normal working state, press the [MENU] button to access and select the [Setup] menu, and then press the [OK] button to access level 2 menu, as follow:
The Setup menu consists of two submenus: System and Records; the [Communication] option is available if the terminal is integrated with TCP/IP function.
3.4.1 System
In System menu, press the [OK] button to display the following picture:
Setup ▼
System
AllLog Delete Delete? No-ESC Yes-YES

Fingerprint Time Attendance Terminal
- 34 -
Operating Instructions
The System menu consists of 9 level 3 menus: [Managers], [Language], [Time], [Time fmt], [LCD Contrast], [Voice Out], [Log type], [Shut down Key] and [AutoShutdown].
1) Total administrators
System ▼Language SC Time Time fmt Y/M/D
System ▼ Managers 5 Device ID 1 Baud rate 38400
System ▼ LCD Contrast 47 Voice Out No Log Type
System ▼ Lock Ctrl No Shutdown Key No AutoShutdown NO

Fingerprint Time Attendance Terminal
- 35 -
Operating Instructions
2) Language setting
Content Description
Simplified Chinese The characters are displayed in simplified Chinese
Traditional Chinese The characters are displayed in traditional Chinese
English The characters are displayed in English
Korean The characters are displayed in Korean
Default Simplified Chinese
3) Time Setup
Content Description
1-10 Set the total number of administrators of the Fingerprint Time Attendance Terminal
Default 5
Content Description
Time setting
Press the scroll left/right button to select desired item, and press the scroll up/down button or use the number keys to input the figures and set the time of the Fingerprint Time Attendance Terminal.
Default The time of the terminal is same as the time of the PC installed with the fingerprint attendance management software, therefore you can set the time with the software.

Fingerprint Time Attendance Terminal
- 36 -
Operating Instructions
4) Time format
Content Description
Year/Month/Day Display the time in the sequence of Year/Month/Day
Month/Day/Year Display the time in the sequence of Month/Day/Year
Default Year/Month/Day
5) LCD backlight adjustment
Select the [LCD Contrast] menu and press the [Scroll up]/[Scroll down] button to increase or reduce the contrast of LCD backlight. The range of the LCD backlight contrast is 0 to 63. Larger value indicates clearer characters and no character displays if “0” is selected. The default value is 47.
Tip:
If the contrast value is too low, the characters may be blurry. Please cautiously use the value between 0 and 20. If the value is too low, you can reset in the attendance management software.
6) Voice Out
Content Description
Yes Voice alert in case of validation
System ▼ LCD Contrast 47 Voice Out No Log Type

Fingerprint Time Attendance Terminal
- 37 -
Operating Instructions
No No voice alert. If the validation passes, it gives “Tick-tick-tick” tone. If the validation doesn’t pass, it gives only one “Tick” tone.
Default Yes
7) Switching time of attendance state
Content Description
On duty Set the switching time of attendance state, and it can switch to on duty state automatically
Off duty Set the switching time of attendance state, and it can switch to off duty state automatically
… Set the switching time of attendance states (F1-F6)
8) Power off
9) Schedule off
This menu is invalid if “No” is selected in the [Power off] menu; you can set the following items if it is activated:
Content Description
Content Description
Yes After confirmation, you can set the schedule off function
No After confirmation, the schedule off function is invalid
Default No

Fingerprint Time Attendance Terminal
- 38 -
Operating Instructions
1-255 If the schedule off time (unit: minute) has been set and there is no operation on the terminal, the device switches off automatically.
Default No
10) Records
Select the [Records] menu and press the [OK] button to access level-3 menu, as follow:
The [Records] menu consists of three level-3 menus: [Access records alarm], [Management records alarm] and [Confirming time of repeat].
11) Access records alarm
Content Description
No When the access records are full, the attendance terminal doesn’t alarm and overwrites the attendance records that have been read.
1-1500 The terminal alarms when the free capacity reaches the preset value. If the access records are full, the terminal overwrites the attendance records that have been read.
Default 1000
Log Setup ▼ Glog Wrn 1000 Slog Wrn 100 Re-Verify No

Fingerprint Time Attendance Terminal
- 39 -
Operating Instructions
Note:
Please download the attendance records in time when the terminal notifies that the access records memory is full in display and alert tone.
12) Management records alarm
Content Description
No When the management records are full, the attendance terminal doesn’t alarm and overwrites the old management records.
1-255
The terminal alarms according to the preset value (for example, if the value is set to 100, it starts to alarm from the 900th record). If the management records are full, the terminal overwrites the old management records.
Default 100
Note:
Please download the management records in time when the terminal notifies that the management records memory is full in display and alert tone.
13) Confirming time of repeat
Content Description
No The terminal doesn’t detect repeated attendance.
1-255 The terminal detects repeated attendance according to preset value (unit: minute).
Default No
Note:
If the user checks attendance repeatedly in preset time, the terminal will notify that the user has signed in and the attendance records won’t be saved repeatedly.

Fingerprint Time Attendance Terminal
- 40 -
Operating Instructions
3.4.2 Communication
In the [Communication] menu, press the [OK] button to access level-3 menu, as follow:
The [Communication] menu consists of nine level-3 menus: [Device ID], [Baud rate], [Port No], [Password], [IP address], [Subnet mask], [Default gateway], [RS485 communication] and [Ethernet].
1) Device No.
Content Description
1-255 Set the ID number of the Fingerprint Time Attendance Terminal
Default 1
Note:
Device No. is the unique identity of the terminal. If several terminals in same network have the same Device ID, they can’t work normally and will cause confusion when the
Communication ▼ Default gateway RS485 YesEthernet No
Communication ▼ Password No IP address Subnet mask
Communication ▼Device ID 1 Baud rate 38400 Port No 5005

Fingerprint Time Attendance Terminal
- 41 -
Operating Instructions
fingerprint attendance management software collects the attendance data. Therefore, please pay attention to the uniqueness of the Device ID if several terminals are in same network.
2) Baud rate
Content Description
9600 Set the baud rate to 9600bps
19200 Set the baud rate to 19200bps
38400 Set the baud rate to 38400bps
57600 Set the baud rate to 57600bps
115200 Set the baud rate to 115200bps
Default 38400
Note:
This value is valid only when RS232 or RS485 is selected and the value must be same as the port in the PC, otherwise, they can’t communicate.
3) Port number
Content Description
1-9999 Set the TCP/IP port of the Fingerprint Time Attendance Terminal
Default 5005
Note:
This port must be same to the port number of the software in the PC, otherwise, they can’t communicate.
4) Password

Fingerprint Time Attendance Terminal
- 42 -
Operating Instructions
Content Description
0-999999 Set the password of TCP/IP communication
Default No
5) IP address
Note:
The IP address in LAN must be exclusive.
6) Subnet mask
Content Description
255.255.255.0 Set the subnet mask of LAN for TCP/IP communication
Default 255.255.255.0
Note:
The subnet mask must be same to the subnet mask of the LAN.
7) Default gateway
Content Description
192.168.1.1 Set the default gateway of the LAN for TCP/IP communication
Default 192.168.1.1
Content Description
192.168.1.224 Set the IP address of the device for TCP/IP communication
Default 192.168.1.224
Fingerprint Time Attendance Terminal
- 43 -
Operating Instructions
Note:
The default gateway must be same to the default gateway of the LAN.
8) RS485 communication
Content Description
Yes Activate/deactivate RS485 communication
Default Yes
Note:
RS485 communication is used to activate/deactivate the RS485 communication function of the terminal. If the device is integrated with TCP/IP function, its default value is “OFF”; otherwise, it is “ON”.
9) Ethernet
Content Description
Yes Activate/deactivate TCP/IP communication
Default Yes
Note:
TCP/IP communication is used to activate/deactivate the TCP/IP communication function of the terminal. If the device is integrated with TCP/IP function, its default value is “ON”; otherwise, it is “OFF”.
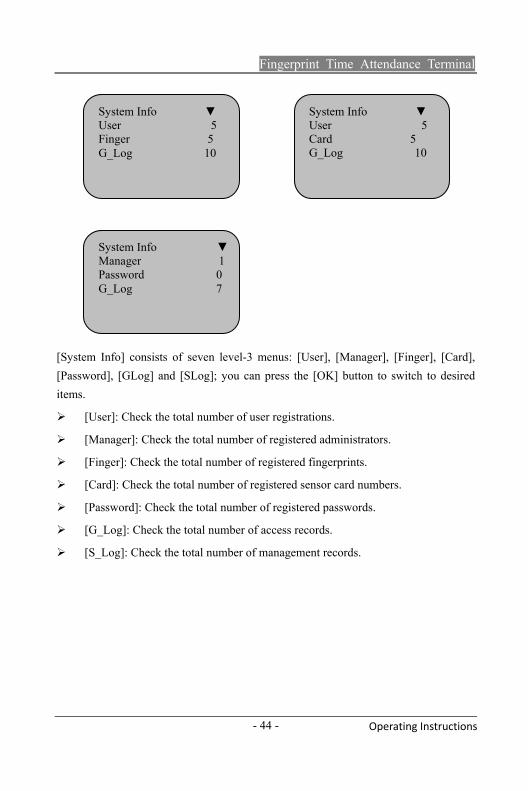
3.5 System Info
Select the [System Info] menu and press the [OK] button to access level-3 menu, as follow:
Fingerprint Time Attendance Terminal
- 44 -
Operating Instructions
[System Info] consists of seven level-3 menus: [User], [Manager], [Finger], [Card], [Password], [GLog] and [SLog]; you can press the [OK] button to switch to desired items.
[User]: Check the total number of user registrations.
[Manager]: Check the total number of registered administrators.
[Finger]: Check the total number of registered fingerprints.
[Card]: Check the total number of registered sensor card numbers.
[Password]: Check the total number of registered passwords.
[G_Log]: Check the total number of access records.
[S_Log]: Check the total number of management records.
System Info ▼ User 5 Finger 5 G_Log 10
System Info ▼Manager 1Password 0 G_Log 7
System Info ▼ User 5 Card 5 G_Log 10

Fingerprint Time Attendance Terminal
- 45 -
Appendix
IV. Appendix
4.1 Interfaces
The Fingerprint Time Attendance Terminal has three interfaces: 9-pin RS232 interface, RJ45 interface and 8-pin extension interface.
4.1.1 RS232 interface and RJ45 interface
RS232 interface provides RS232 communication and RJ45 interface provides RS485 and TCP/IP communication functions.
1) RS232 interface
RS232 interface has nine pins and their descriptions are shown in the table below:
PIN Description
1 Reserved
2 RS232 TX transmission
3 RS232 RX receiving
4 Reserved
5 Grounding
Fig. 2-3
RS232 interface
RJ45 interface

Fingerprint Time Attendance Terminal
- 46 -
Appendix
6 Reserved
7 Reserved
8 Reserved
9 Reserved
2) RJ45 interface
RJ45 interface provides RS485 communication and TCP/IP communication functions, and their descriptions are shown in the table below:
PIN Description
1 TCP_TX+
2 TCP_TX-
3 TCP_RX+
4 Reserved
5 Reserved
6 TCP_RX-
7 RS485A
8 RS485B
Note:
Do not connect the RJ45 network interface to telephone line.
4.2 Description of interface lines
The line sequence of the provided standard RJ45 interface line is shown in the picture below:

Fingerprint Time Attendance Terminal
- 47 -
Appendix
RJ45 interface pins and their colors are shown in the table below:
RJ45 pin Color of the Ethernet cable (8 lines)
1 Orange/white
2 Orange
3 Green/white
4 Blue
5 Blue/white
6 Green
7 Brown/white
8 Brown

Fingerprint Time Attendance Terminal
- 48 -
Troubleshooting
V. Troubleshooting 1. Q: Why the terminal can’t find available device when serial communication is
activated?
A: Operate in the following method:
1) Check whether the device No., baud rate, device type and communication
mode set in the management software accord with the Setup of the terminal;
2) Check whether the serial port of the PC is connected to the RS232 cable
properly; pull out and reinsert the cable;
3) Reduce the baud rate to 9600bps or change another PC;
4) If RS485 communication is selected, check whether the cable is connected
properly; see the hardware manual for the wiring method;
If the problem still exists, please refer to the Warranty Card and contact local
service center.
2. Q: Why the terminal can’t find available device when TCP/IP communication is
activated?
A: Follow the steps below:
1) Access the [Device Management] – [Connect to Device] – [Connecting
Options] menu in the management software and check whether the selected device
type in the software is correct;
2) The communication mode must be TCP/IP and the searching range is the
device number of the terminal; refer to the values set in the terminal for the IP address
and port number;
3) The [Password] of the terminal is 0 by default; you can change it into your
own private password;

Fingerprint Time Attendance Terminal
- 49 -
Troubleshooting
4) Because the terminal communicates in specified port number, please make
sure that the port isn’t disabled by the firewall or any other network device (port 80 is
available);
5) The terminal supports multiple network segments, but you need to pay
attention to the setting of subnet mask.
3. Q: How to cancel the administrator authority of the terminal?
A: If you forget the administrator password of the terminal, you can clear with the
management software. The specific steps are:
1) Connect the PC to the terminal with communication cable;
2) In the management software, select menu [Device Management] -> [Cancel
Pindege];
3) Press the [MENU] button on the terminal again and you can access the menu
of the terminal directly.
4. Q: Why the clock of the terminal is inaccurate after a period of time? How to
adjust?
A: The clock chip of the terminal is same to other electric appliance and the error
is unavoidable. It is regarded as normal if the clock error is within ±3 minutes in
one month. You can adjust in the menu of the terminal, or use the management
software, or synchronize to the PC time.
5. What to do if there is no reaction or the reaction is slow when personnel press
fingers to check attendance?
1) Maybe the finger is too dry or too wet; the fingerprint sensor works in optical
principle, and it will make the recognition too slow or even can’t recognize.
Please touch the wet towel with the finger, or wet the finger and wipe to 50% dry
to improve the sensitivity and recognition rate;

Fingerprint Time Attendance Terminal
- 50 -
Troubleshooting
2) The fingerprint of the employee is rubbed seriously; choose a finger with clear
fingerprint and register;
3) The employee doesn’t press in the proper way; keep the fingerprint surface
parallel to the sensor to keep sufficient contact area and improve the sensing
speed.
6. Why the terminal senses automatically and asks to repress the finger even when
no person checks attendance?
A: Reasons and solutions:
1) The terminal is irradiated by sunshine directly or the position where the
terminal is placed has strong light; please move the terminal to another position;
2) The fingerprint sensor is stained with dirt; please wipe with wet soft cloth;
3) Access the menu of the terminal to set the [Bri Adjust]. Please contact local
service center if the problem still exists.
7. Why the LCD of the terminal isn’t clear or only has backlight and no characters?
A: The terminal has the menu [LCD Contrast] and the value should be higher than
30 or 47. If this value is 0, the screen only has backlight but no characters. You
can also adjust this option in the management software if the terminal is
connected to the PC.
8. Why the data can’t be downloaded to flash memory even when the terminal is
integrated with flash memory function?
A: 1) Various flash memory brands are on market and their qualities are different.
Please select flash memory of famous brand (e.g. aigo, Netac, etc) and retry;
2) The flash memory must be formatted if it is used for the first time. To format,
the file system should be FAT32.
9. Q: I use the attendance software for the first time. What should I do?
A: Refer to the manual of the attendance management software.

Fingerprint Time Attendance Terminal
- 51 -
Troubleshooting
10. Q: How to operate the attendance management software?
A: Arrange the work order of the employees (if the order is fixed, set default order
during registering employees) and collect data, sign card and register for the
employees that don’t check attendance or have special conditions, check on
attendance and register overtime, leave, vocation, business trip and going out, and
then process the attendance data in the report search to search reports.
11. Q: What’s the operating procedure when new employee is enrolled?
A: When the terminal is turned on, press the [MENU] button to access the menu,
select [Enroll] → [OK] → [User] → select registration type, for example, select
[Finger] → [OK] → [New Enroll?] →, select “Yes” and press the [OK] button →
input the registration number → [OK] → follow the prompt and put the finger
close to the fingerprint sensor of the terminal to read the fingerprint information
→ save the new registration and press the [OK] button.