Embed Size (px)
Citation preview
Clinical Tips & TricksAnterior Restorations
FiltekTM
Supreme PlusUniversal Restorative
FiltekTM Supreme Plus
Page 2
Introduction
Page 3
Introduction
3MTM ESPETM FiltekTM Supreme Universal
Restorative was developed as an esthetic
restorative and within a year of its introduction
was one of the leading universal restoratives in
the world. With the creation of FiltekTM Supreme
Plus Universal Restorative, our goal is to help
dentists take direct composite layering to the
next level with improved shades and even better
cosmetic results.
Filtek Supreme Plus Universal Restorative is
esthetic enough for single or multi-layer anterior
restorations, yet strong enough for posterior use.
At 3M ESPE, our belief is that restorative
layering often yields the most natural-looking
result. Yet even when just one shade is used,
optimum results can be achieved using Filtek
Supreme Plus Universal Restorative. That’s why
we developed this booklet—to help familiarize
you with this breakthrough restorative material,
help you start layering when you’re ready, or help
boost your skill level if you’re a layering veteran.
Int
rodu
ctio
n
FiltekTM Supreme Plus
Page 4
About the clinical cases
To aid you as you learn and grow in your
practice, we approached some leading global
practitioners and asked them to share clinical
cases and short tips and tricks when layering with
FiltekTM Supreme Plus Universal Restorative.
For each clinician's case, some basic background
is provided along with tips and tricks. While
there is no one way to perform these techniques,
we know you’ll find value in examining these
restorations by dentists who have extensive
clinical experience with composite restorations.
Abo
ut th
e cl
inci
al c
ases
Page 5
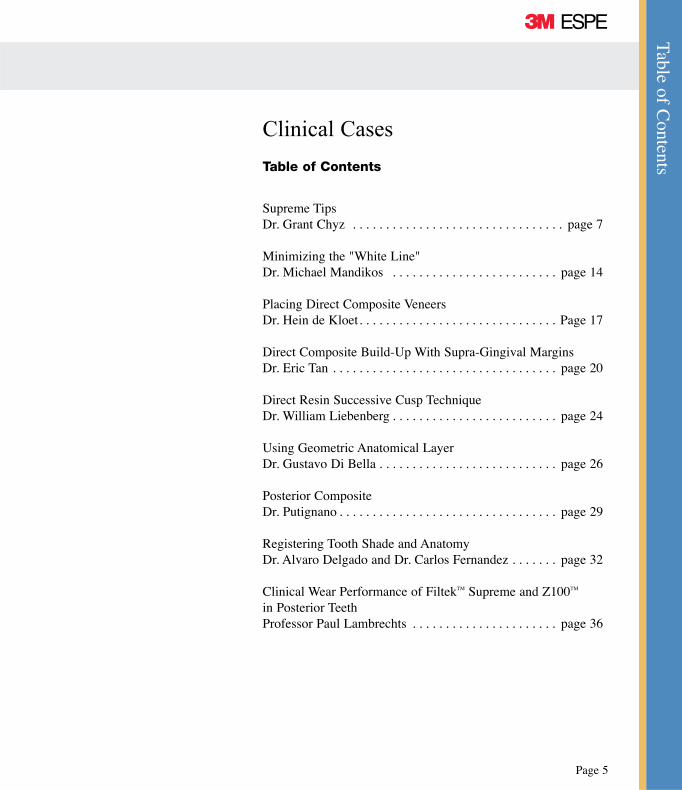
Table of Contents
Clinical Cases
Table of Contents
Supreme Tips Dr. Grant Chyz . . . . . . . . . . . . . . . . . . . . . . . . . . . . . . . . page 7
Minimizing the "White Line" Dr. Michael Mandikos . . . . . . . . . . . . . . . . . . . . . . . . . page 14
Placing Direct Composite Veneers Dr. Hein de Kloet. . . . . . . . . . . . . . . . . . . . . . . . . . . . . . Page 17
Direct Composite Build-Up With Supra-Gingival Margins Dr. Eric Tan . . . . . . . . . . . . . . . . . . . . . . . . . . . . . . . . . . page 20
Direct Resin Successive Cusp Technique Dr. William Liebenberg . . . . . . . . . . . . . . . . . . . . . . . . . page 24
Using Geometric Anatomical Layer Dr. Gustavo Di Bella . . . . . . . . . . . . . . . . . . . . . . . . . . . page 26
Posterior Composite Dr. Putignano . . . . . . . . . . . . . . . . . . . . . . . . . . . . . . . . . page 29
Registering Tooth Shade and Anatomy Dr. Alvaro Delgado and Dr. Carlos Fernandez . . . . . . . page 32
Clinical Wear Performance of FiltekTM Supreme and Z100TM in Posterior Teeth Professor Paul Lambrechts . . . . . . . . . . . . . . . . . . . . . . page 36

Int
rodu
ctio
n
FiltekTM Supreme Plus
Page 6
General T
ips & T
ricks
Page 7
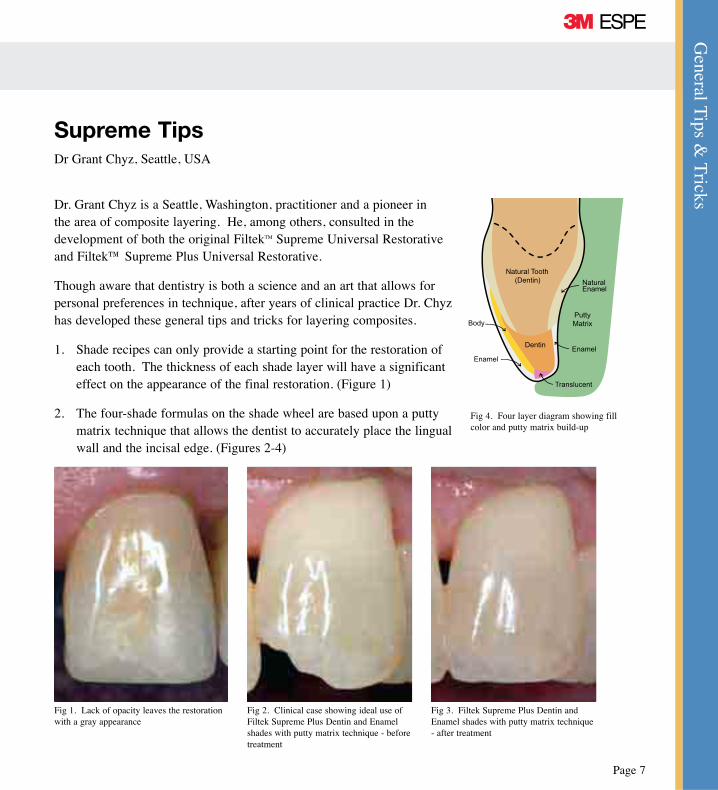
Dr. Grant Chyz is a Seattle, Washington, practitioner and a pioneer in the area of composite layering. He, among others, consulted in the development of both the original FiltekTM Supreme Universal Restorative and Filtek™ Supreme Plus Universal Restorative.
Though aware that dentistry is both a science and an art that allows for personal preferences in technique, after years of clinical practice Dr. Chyz has developed these general tips and tricks for layering composites.
1. Shade recipes can only provide a starting point for the restoration of each tooth. The thickness of each shade layer will have a significant effect on the appearance of the final restoration. (Figure 1)
2. The four-shade formulas on the shade wheel are based upon a putty matrix technique that allows the dentist to accurately place the lingual wall and the incisal edge. (Figures 2-4)
Fig 1. Lack of opacity leaves the restoration with a gray appearance
Enamel
Natural Enamel
Body
Dentin
Natural Tooth (Dentin)
Putty Matrix
Translucent
Enamel
Fig 4. Four layer diagram showing fill color and putty matrix build-up
Supreme TipsDr Grant Chyz, Seattle, USA
Fig 2. Clinical case showing ideal use of Filtek Supreme Plus Dentin and Enamel shades with putty matrix technique - before treatment
Fig 3. Filtek Supreme Plus Dentin and Enamel shades with putty matrix technique - after treatment
FiltekTM Supreme Plus
Page 8
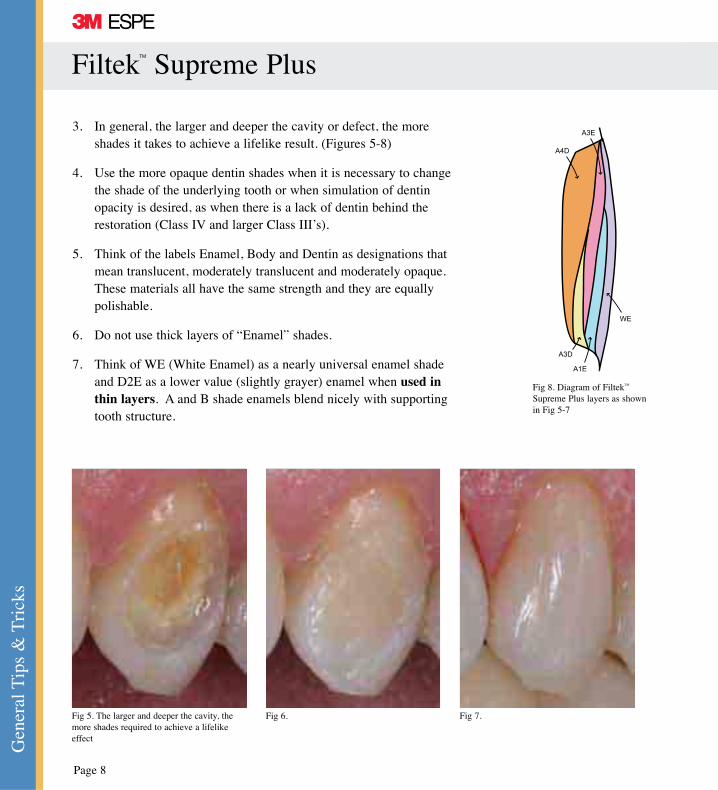
3. In general, the larger and deeper the cavity or defect, the more shades it takes to achieve a lifelike result. (Figures 5-8)
4. Use the more opaque dentin shades when it is necessary to change the shade of the underlying tooth or when simulation of dentin opacity is desired, as when there is a lack of dentin behind the restoration (Class IV and larger Class III’s).
5. Think of the labels Enamel, Body and Dentin as designations that mean translucent, moderately translucent and moderately opaque. These materials all have the same strength and they are equally polishable.
6. Do not use thick layers of “Enamel” shades.
7. Think of WE (White Enamel) as a nearly universal enamel shade and D2E as a lower value (slightly grayer) enamel when used in thin layers. A and B shade enamels blend nicely with supporting tooth structure.
A4D
A3D
A1E
A3E
WE
Fig 8. Diagram of FiltekTM Supreme Plus layers as shown in Fig 5-7
Fig 5. The larger and deeper the cavity, the more shades required to achieve a lifelike effect
Fig 6. Fig 7.
Gen
eral
Tip
s &
Tri
cks
General T
ips & T
ricks
Page 9
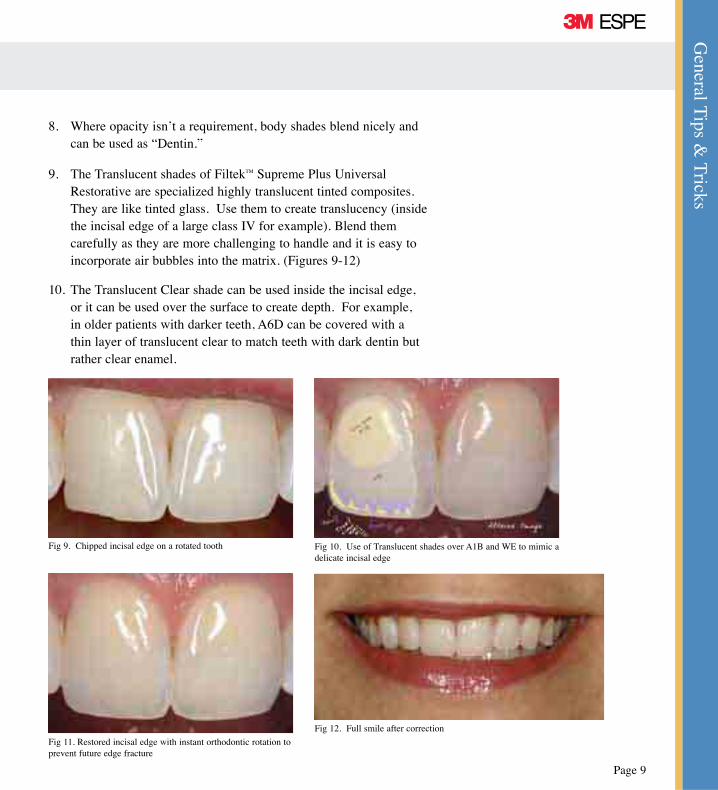
8. Where opacity isn’t a requirement, body shades blend nicely and can be used as “Dentin.”
9. The Translucent shades of FiltekTM Supreme Plus Universal Restorative are specialized highly translucent tinted composites. They are like tinted glass. Use them to create translucency (inside the incisal edge of a large class IV for example). Blend them carefully as they are more challenging to handle and it is easy to incorporate air bubbles into the matrix. (Figures 9-12)
10. The Translucent Clear shade can be used inside the incisal edge, or it can be used over the surface to create depth. For example, in older patients with darker teeth, A6D can be covered with a thin layer of translucent clear to match teeth with dark dentin but rather clear enamel.
Fig 9. Chipped incisal edge on a rotated tooth Fig 10. Use of Translucent shades over A1B and WE to mimic a delicate incisal edge
Fig 12. Full smile after correction
Fig 11. Restored incisal edge with instant orthodontic rotation to prevent future edge fracture
FiltekTM Supreme Plus
Gen
eral
Tip
s &
Tri
cks
Page 10
11. When using a Translucent shade on the surface, it is best to have a thin layer over the entire restoration, since the Translucent shades appear to polish to an even higher luster than microfills (or the other FiltekTM Supreme Plus shades). (Figures 9-12)
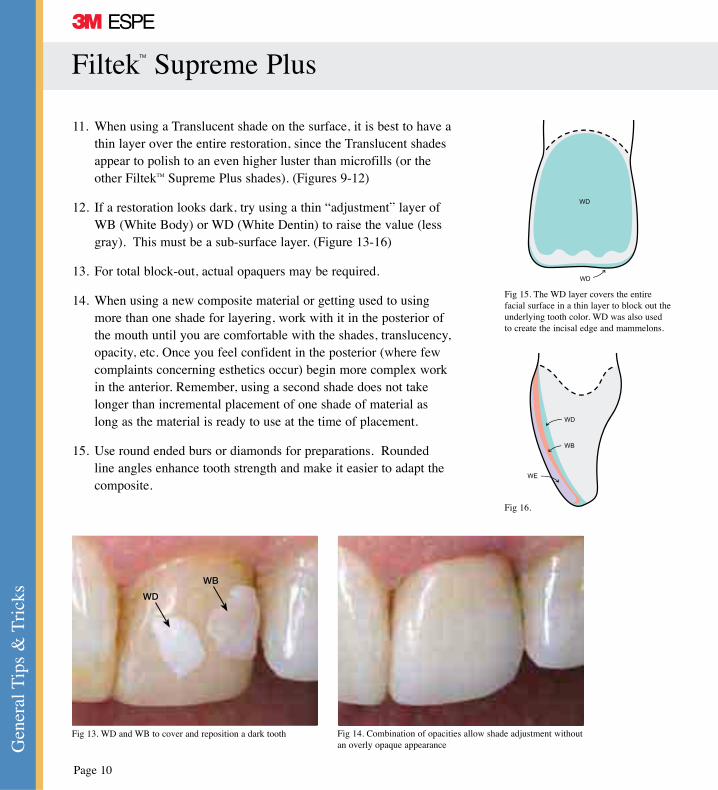
12. If a restoration looks dark, try using a thin “adjustment” layer of WB (White Body) or WD (White Dentin) to raise the value (less gray). This must be a sub-surface layer. (Figure 13-16)
13. For total block-out, actual opaquers may be required.
14. When using a new composite material or getting used to using more than one shade for layering, work with it in the posterior of the mouth until you are comfortable with the shades, translucency, opacity, etc. Once you feel confident in the posterior (where few complaints concerning esthetics occur) begin more complex work in the anterior. Remember, using a second shade does not take longer than incremental placement of one shade of material as long as the material is ready to use at the time of placement.
15. Use round ended burs or diamonds for preparations. Rounded line angles enhance tooth strength and make it easier to adapt the composite.
Fig 13. WD and WB to cover and reposition a dark tooth Fig 14. Combination of opacities allow shade adjustment without an overly opaque appearance
WD
WD
Fig 15. The WD layer covers the entire facial surface in a thin layer to block out the underlying tooth color. WD was also used to create the incisal edge and mammelons.
WE
WD
WB
Fig 16.
WD
WB

General T
ips & T
ricks
16. Learn to build to full contour rather than overfilling (the opposite of what we learned to do with amalgam). Managing the thickness of each layer is one of the keys to success when using multiple shades and opacities of composite (see #1).
17. Remember to choose the shade(s) at the beginning of treatment and before placement of the rubber dam. The goal is to avoid desiccation of the teeth. Desiccated teeth appear lighter than a tooth that is fully hydrated. Trying small samples of material on the tooth can help sort out the shade puzzle in difficult cases. (See Figure 13)
18. Keep the teeth wet, right up to the time of etching. Keeping the teeth wet optimizes bonding to dentin and minimizes post-operative sensitivity while helping to preserve the true color of the teeth. Even though you choose your shades at the beginning of treatment, it is helpful to work with teeth that have not experienced a significant color shift, so that you get immediate visual feedback.
19. Magnification is nearly essential for layering techniques that call for three or more shades. Those who use magnification do not need to hear this and those who do not, don’t think they need it. Would you play tennis with a traditional head size, or golf? Magnification makes the intricate job that we do seem less intricate.
20. Take pride in your improvement and show it off. Your staff and your patients will love it!
Page 11

FiltekTM Supreme Plus
Notes
Gen
eral
Tip
s &
Tri
cks
Page 12

Tips &
Tricks in C
linical Cases
Page 13
FiltekTM Supreme Plus
Tip
s &
Tri
cks
in C
linic
al C
ases
Page 14
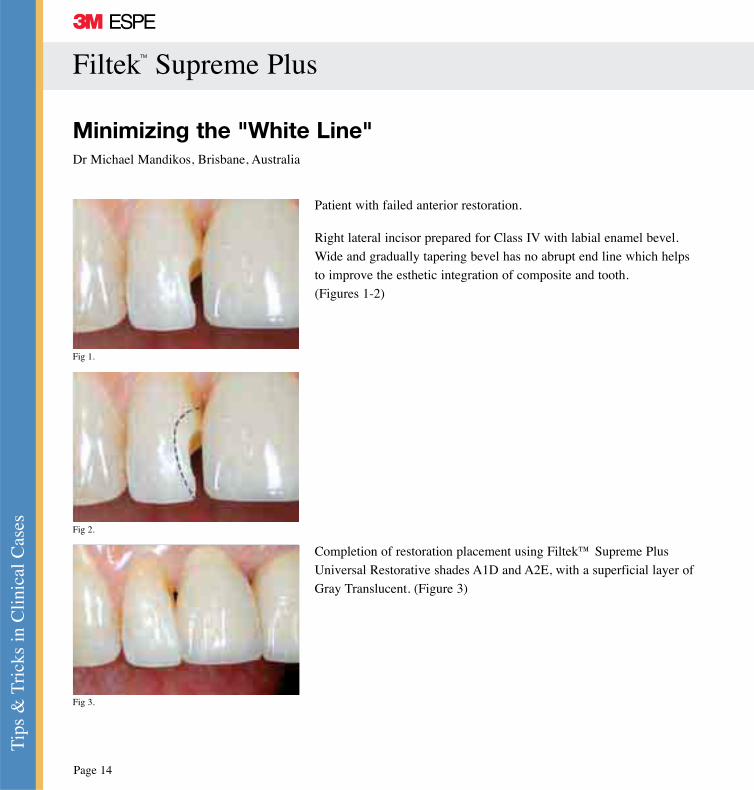
Patient with failed anterior restoration.
Right lateral incisor prepared for Class IV with labial enamel bevel.
Wide and gradually tapering bevel has no abrupt end line which helps
to improve the esthetic integration of composite and tooth.
(Figures 1-2)
Completion of restoration placement using Filtek™ Supreme Plus
Universal Restorative shades A1D and A2E, with a superficial layer of
Gray Translucent. (Figure 3)
Minimizing the "White Line"Dr Michael Mandikos, Brisbane, Australia
Fig 1.
Fig 3.
Fig 2.
Tips &
Tricks in C
linical Cases
Page 15
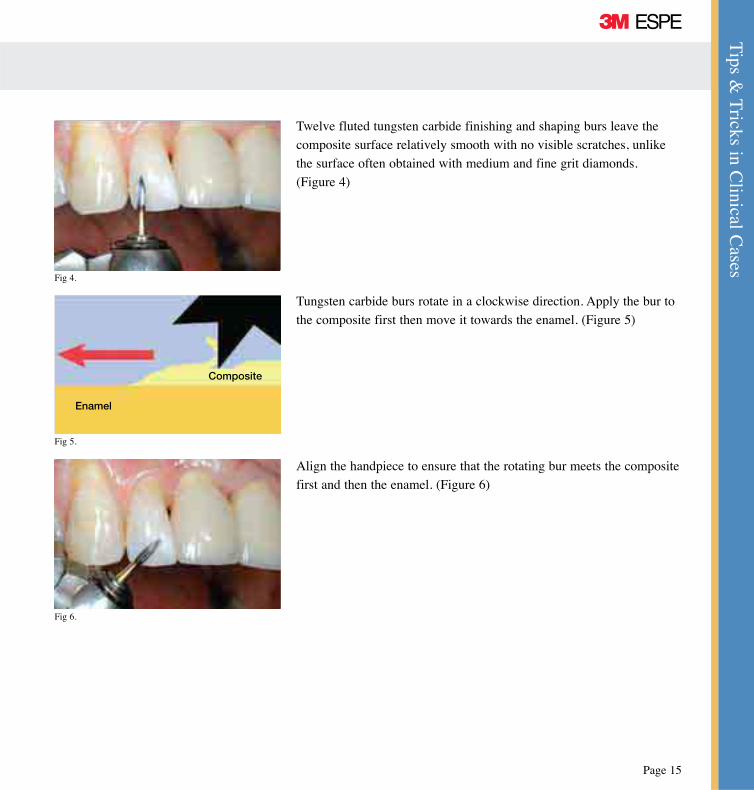
Tungsten carbide burs rotate in a clockwise direction. Apply the bur to
the composite first then move it towards the enamel. (Figure 5)
Align the handpiece to ensure that the rotating bur meets the composite
first and then the enamel. (Figure 6)
Fig 6.
Fig 5.
Enamel
Composite
Fig 4.
Twelve fluted tungsten carbide finishing and shaping burs leave the
composite surface relatively smooth with no visible scratches, unlike
the surface often obtained with medium and fine grit diamonds.
(Figure 4)
FiltekTM Supreme Plus
Tip
s &
Tri
cks
in C
linic
al C
ases
Page 16
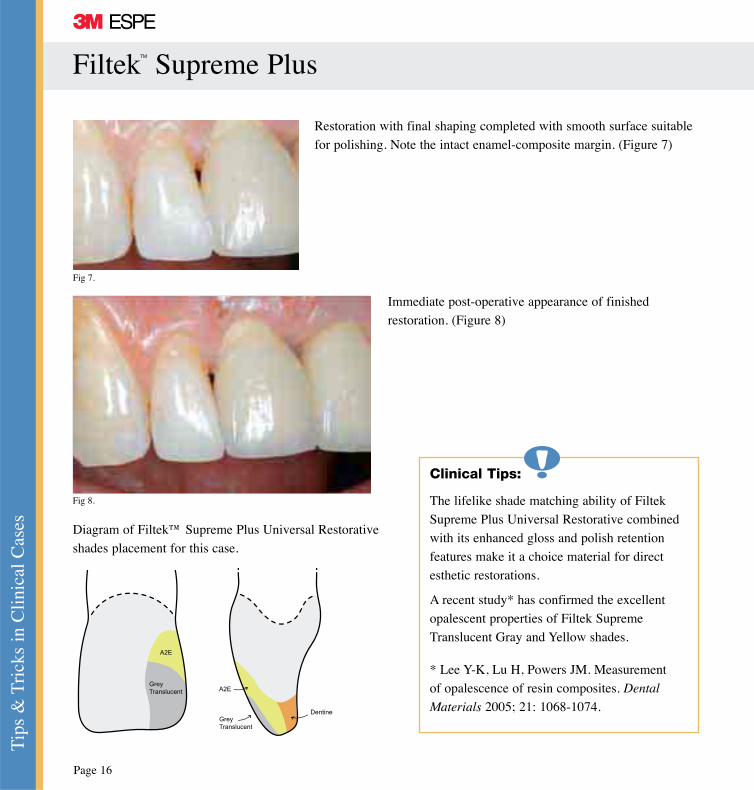
Restoration with final shaping completed with smooth surface suitable
for polishing. Note the intact enamel-composite margin. (Figure 7)
Fig 7.
Fig 8.
Immediate post-operative appearance of finished
restoration. (Figure 8)
GreyTranslucent
A2E
Clinical Tips:
The lifelike shade matching ability of Filtek
Supreme Plus Universal Restorative combined
with its enhanced gloss and polish retention
features make it a choice material for direct
esthetic restorations.
A recent study* has confirmed the excellent
opalescent properties of Filtek Supreme
Translucent Gray and Yellow shades.
* Lee Y-K, Lu H, Powers JM. Measurement
of opalescence of resin composites. Dental
Materials 2005; 21: 1068-1074.DentineGreyTranslucent
A2E
Diagram of Filtek™ Supreme Plus Universal Restorative
shades placement for this case.
Tips &
Tricks in C
linical Cases
Page 17
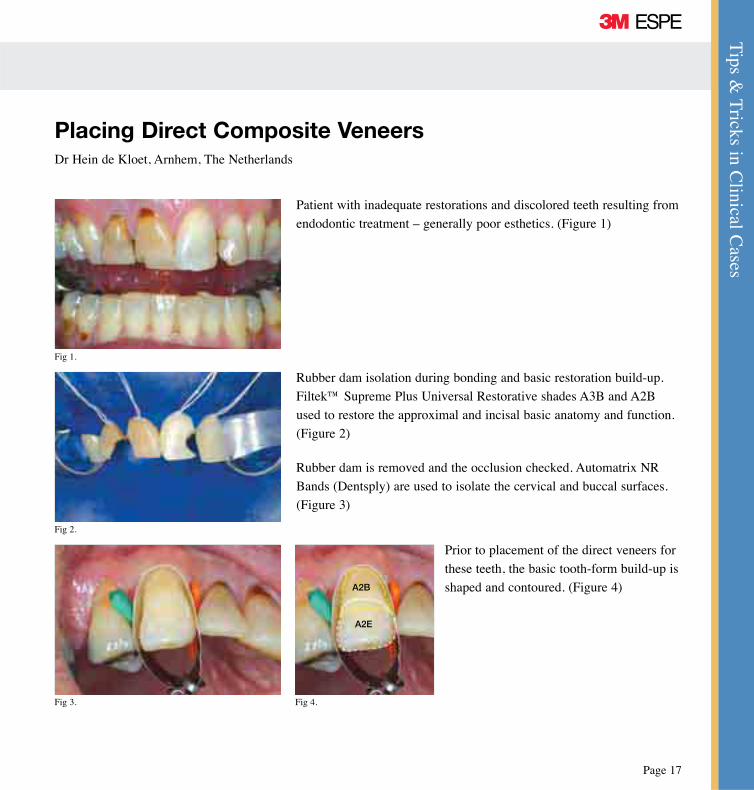
Patient with inadequate restorations and discolored teeth resulting from
endodontic treatment – generally poor esthetics. (Figure 1)
Fig 1.
Placing Direct Composite VeneersDr Hein de Kloet, Arnhem, The Netherlands
Fig 2.
Fig 3.
Rubber dam isolation during bonding and basic restoration build-up.
Filtek™ Supreme Plus Universal Restorative shades A3B and A2B
used to restore the approximal and incisal basic anatomy and function.
(Figure 2)
Rubber dam is removed and the occlusion checked. Automatrix NR
Bands (Dentsply) are used to isolate the cervical and buccal surfaces.
(Figure 3)
Prior to placement of the direct veneers for
these teeth, the basic tooth-form build-up is
shaped and contoured. (Figure 4)
Fig 4.
A2B
A2E
FiltekTM Supreme Plus
Tip
s &
Tri
cks
in C
linic
al C
ases
Page 18
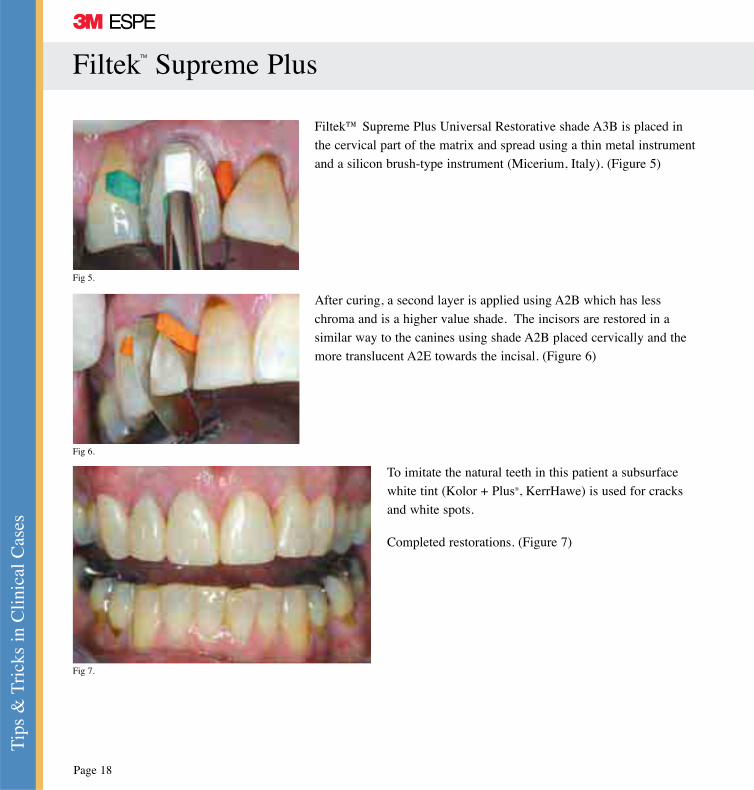
Filtek™ Supreme Plus Universal Restorative shade A3B is placed in
the cervical part of the matrix and spread using a thin metal instrument
and a silicon brush-type instrument (Micerium, Italy). (Figure 5)
Fig 5.
Fig 6.
After curing, a second layer is applied using A2B which has less
chroma and is a higher value shade. The incisors are restored in a
similar way to the canines using shade A2B placed cervically and the
more translucent A2E towards the incisal. (Figure 6)
To imitate the natural teeth in this patient a subsurface
white tint (Kolor + Plus®, KerrHawe) is used for cracks
and white spots.
Completed restorations. (Figure 7)
Fig 7.
Tips &
Tricks in C
linical Cases
Page 19
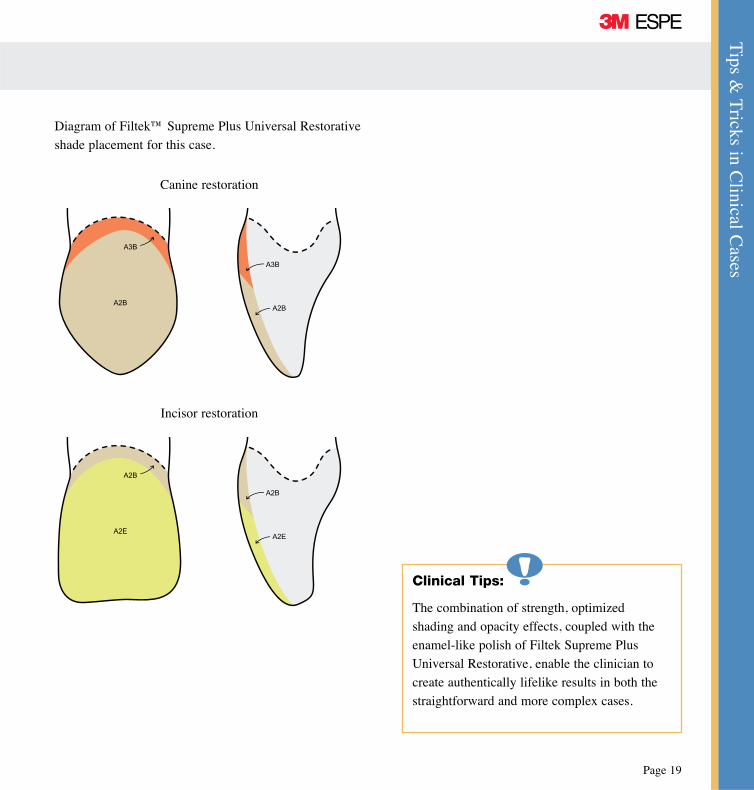
A3B
A2B
Canine restoration
A3B
A2B
A2B
A2E
A2B
A2E
Diagram of Filtek™ Supreme Plus Universal Restorative
shade placement for this case.
Clinical Tips:
The combination of strength, optimized
shading and opacity effects, coupled with the
enamel-like polish of Filtek Supreme Plus
Universal Restorative, enable the clinician to
create authentically lifelike results in both the
straightforward and more complex cases.
Incisor restoration
FiltekTM Supreme Plus
Tip
s &
Tri
cks
in C
linic
al C
ases
Page 20
Direct Composite Build-Up With Supra-Gingival MarginsDr. Eric Tan, Melbourne, Australia
Fig 3.
Patient with severe tooth wear. (Figure 1)
Modern composite resins have optical properties that allow very
conservative preparation in situations where the margin can be
feathered out supragingivally.
Fig 1.
Fig 2.
Proposed restorative margins. (Figure 2)
The final tooth profiles are waxed up on an articulated model with
exaggerated separation in the interproximal embrasures, and ensuring
that the wax is not excessively thick in any area. (Figure 3)
Fig 4.
A clear silicone registration key is taken of the wax up and trimmed to a
stop distal to the last tooth being restored. (Figure 4)
Tips &
Tricks in C
linical Cases
Page 21
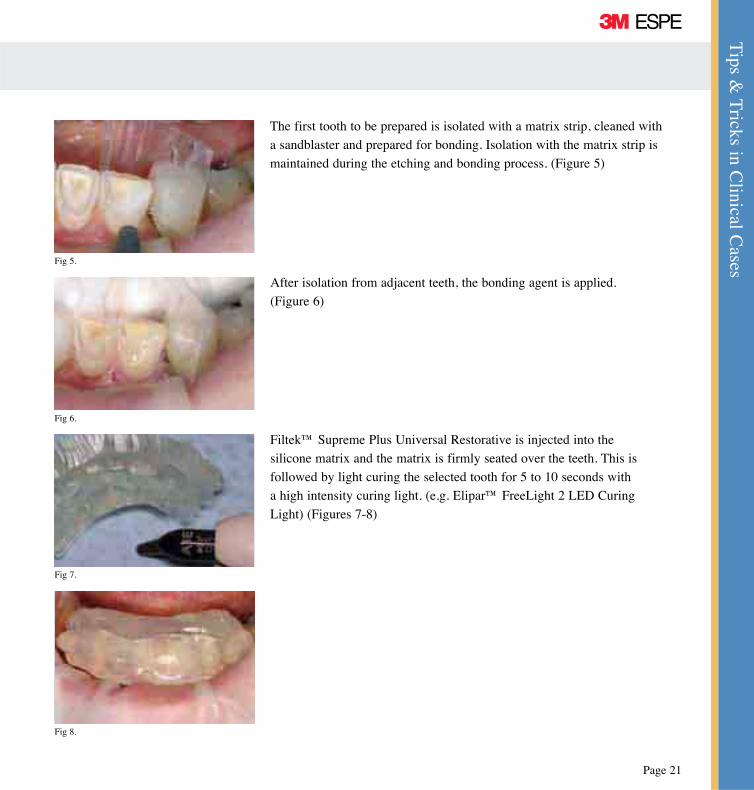
The first tooth to be prepared is isolated with a matrix strip, cleaned with
a sandblaster and prepared for bonding. Isolation with the matrix strip is
maintained during the etching and bonding process. (Figure 5)
Fig 5.
Fig 6.
After isolation from adjacent teeth, the bonding agent is applied.
(Figure 6)
Filtek™ Supreme Plus Universal Restorative is injected into the
silicone matrix and the matrix is firmly seated over the teeth. This is
followed by light curing the selected tooth for 5 to 10 seconds with
a high intensity curing light. (e.g. Elipar™ FreeLight 2 LED Curing
Light) (Figures 7-8)
Fig 7.
Fig 8.
FiltekTM Supreme Plus
Tip
s &
Tri
cks
in C
linic
al C
ases
Page 22
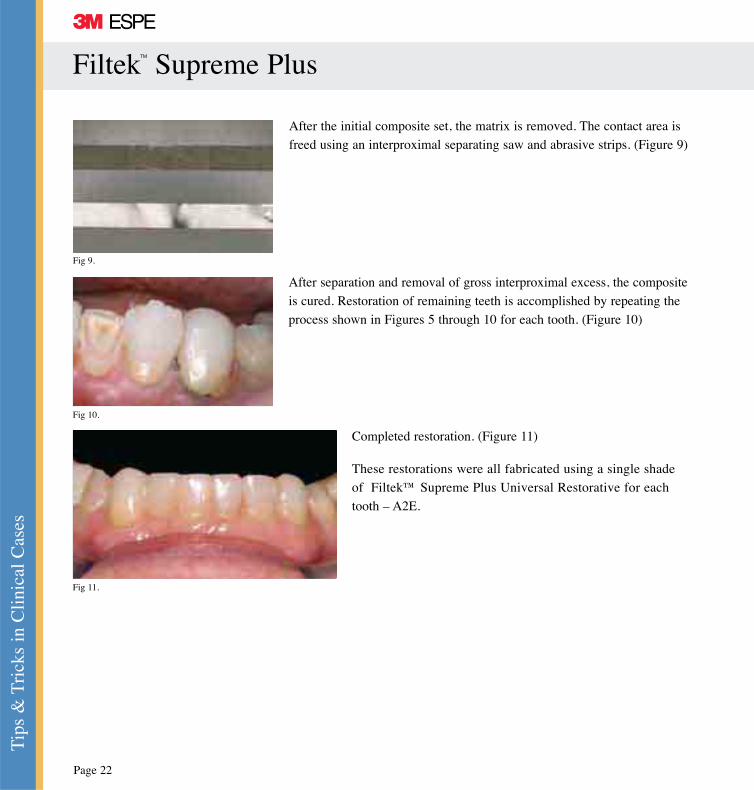
Fig 9.
After the initial composite set, the matrix is removed. The contact area is
freed using an interproximal separating saw and abrasive strips. (Figure 9)
Fig 11.
Fig 10.
After separation and removal of gross interproximal excess, the composite
is cured. Restoration of remaining teeth is accomplished by repeating the
process shown in Figures 5 through 10 for each tooth. (Figure 10)
Completed restoration. (Figure 11)
These restorations were all fabricated using a single shade
of Filtek™ Supreme Plus Universal Restorative for each
tooth – A2E.
Tips &
Tricks in C
linical Cases
Page 23
Clinical Tips:
It is helpful to apply a thin film of Vaseline to the
interproximal surface of any previously finished
adjacent restorations before the matrix strip is
pulled through and removed. This prevents the
new increment from bonding to the neighboring
restoration when it is seated on the tooth in the
silicone matrix, and allows easy separation.
The thickness of the diagnostic wax-up must not
exceed 1-2mm to ensure adequate depth of cure of
the composite.
There will invariably be a thin flash of excess
composite beyond the desired finishing line – this
can be polished back to a feather edge finish.
FiltekTM Supreme Plus
Tip
s &
Tri
cks
in C
linic
al C
ases
Page 24
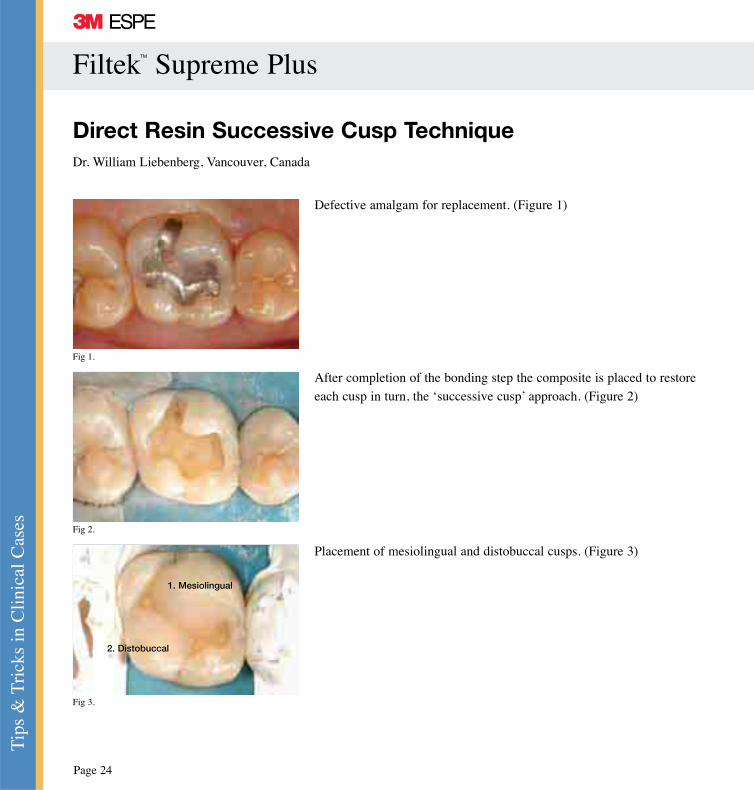
Direct Resin Successive Cusp TechniqueDr. William Liebenberg, Vancouver, Canada
Defective amalgam for replacement. (Figure 1)
Fig 1.
Fig 2.
Fig 3.
After completion of the bonding step the composite is placed to restore
each cusp in turn, the ‘successive cusp’ approach. (Figure 2)
Placement of mesiolingual and distobuccal cusps. (Figure 3)
1. Mesiolingual
2. Distobuccal
Tips &
Tricks in C
linical Cases
Page 25
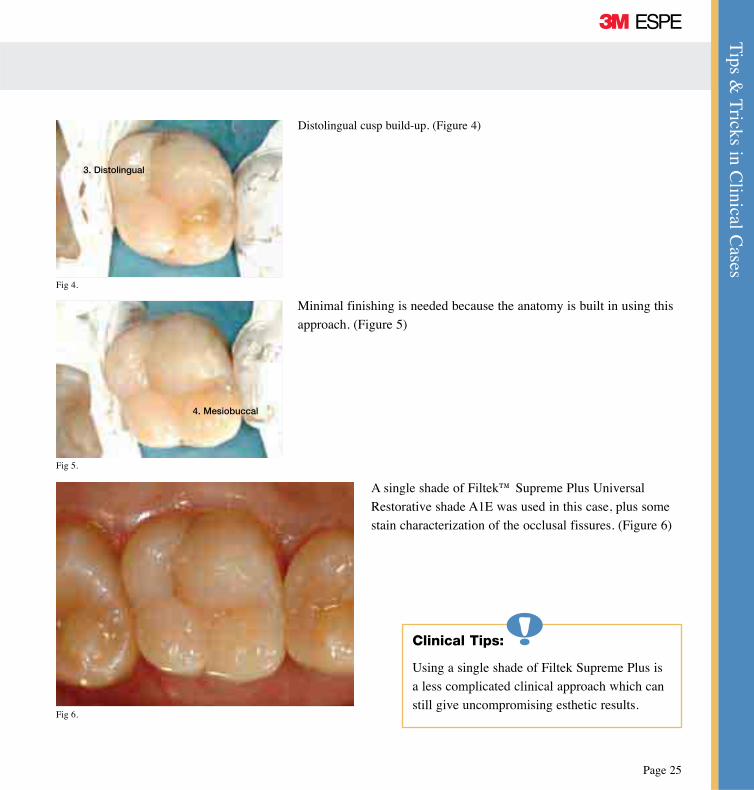
Distolingual cusp build-up. (Figure 4)
Fig 4.
Fig 6.
A single shade of Filtek™ Supreme Plus Universal
Restorative shade A1E was used in this case, plus some
stain characterization of the occlusal fissures. (Figure 6)
Minimal finishing is needed because the anatomy is built in using this
approach. (Figure 5)
Fig 5.
3. Distolingual
4. Mesiobuccal
Clinical Tips:
Using a single shade of Filtek Supreme Plus is
a less complicated clinical approach which can
still give uncompromising esthetic results.
FiltekTM Supreme Plus
Tip
s &
Tri
cks
in C
linic
al C
ases
Page 26
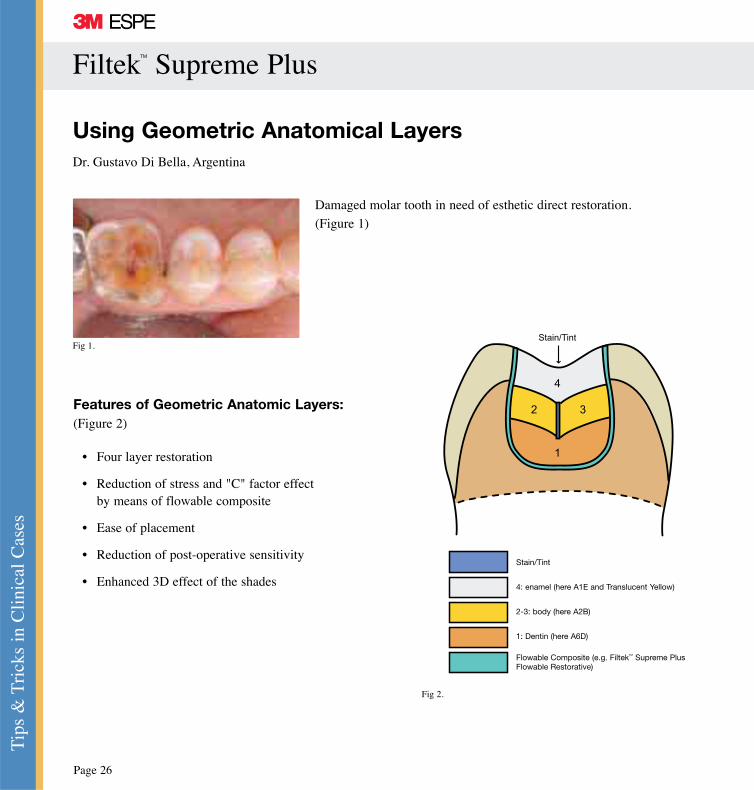
Damaged molar tooth in need of esthetic direct restoration.
(Figure 1)
• Four layer restoration
• Reduction of stress and "C" factor effect by means of flowable composite
• Ease of placement
• Reduction of post-operative sensitivity
• Enhanced 3D effect of the shades
Features of Geometric Anatomic Layers: (Figure 2)
Using Geometric Anatomical LayersDr. Gustavo Di Bella, Argentina
Fig 1.
Fig 2.
Stain/Tint
1
2 3
4
Stain/Tint
4: enamel (here A1E and Translucent Yellow)
2-3: body (here A2B)
1: Dentin (here A6D)
Flowable Composite (e.g. FiltekTM Supreme Plus Flowable Restorative)
Tips &
Tricks in C
linical Cases
Page 27
Fig 5.
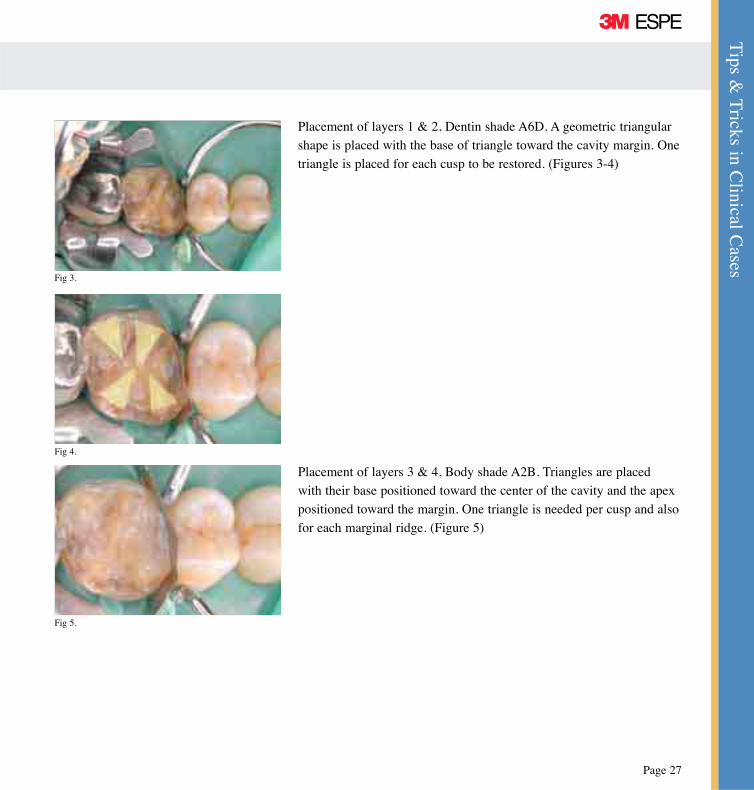
Placement of layers 1 & 2, Dentin shade A6D. A geometric triangular
shape is placed with the base of triangle toward the cavity margin. One
triangle is placed for each cusp to be restored. (Figures 3-4)
Fig 3.
Fig 4.
Placement of layers 3 & 4, Body shade A2B. Triangles are placed
with their base positioned toward the center of the cavity and the apex
positioned toward the margin. One triangle is needed per cusp and also
for each marginal ridge. (Figure 5)
FiltekTM Supreme Plus
Tip
s &
Tri
cks
in C
linic
al C
ases
Page 28
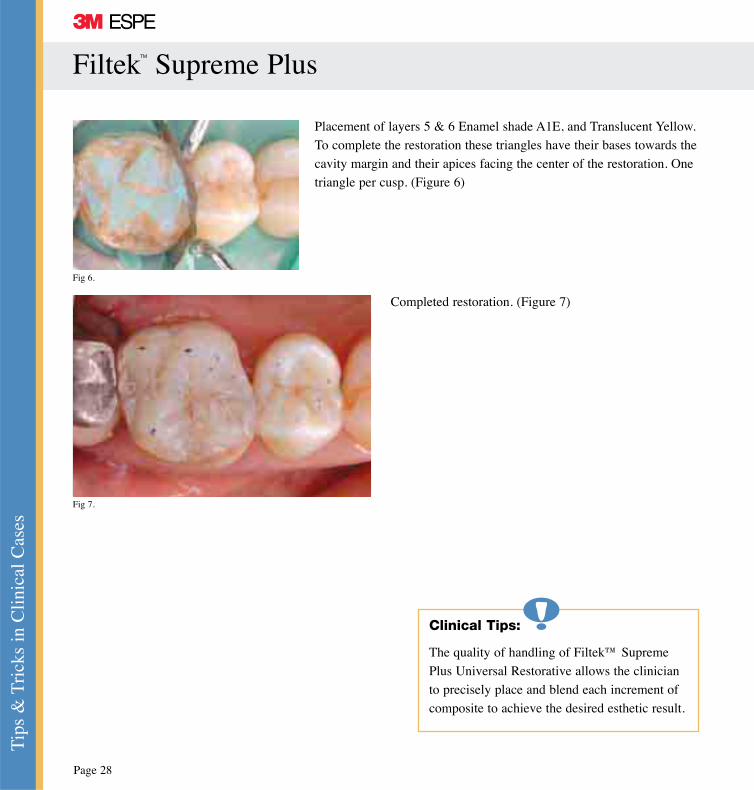
Fig 7.
Placement of layers 5 & 6 Enamel shade A1E, and Translucent Yellow.
To complete the restoration these triangles have their bases towards the
cavity margin and their apices facing the center of the restoration. One
triangle per cusp. (Figure 6)
Fig 6.
Completed restoration. (Figure 7)
Clinical Tips:
The quality of handling of Filtek™ Supreme
Plus Universal Restorative allows the clinician
to precisely place and blend each increment of
composite to achieve the desired esthetic result.
Tips &
Tricks in C
linical Cases
Page 29
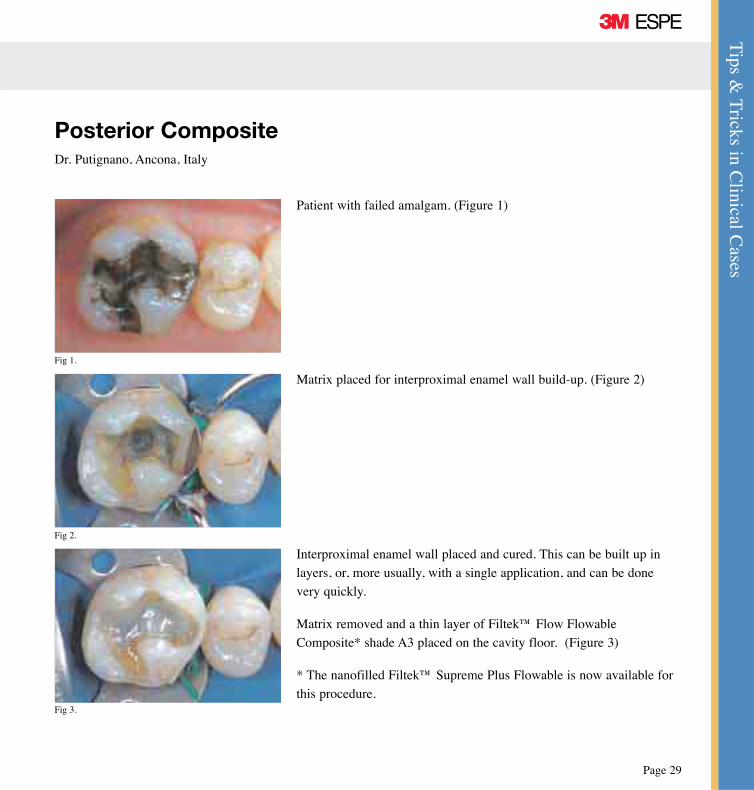
Posterior CompositeDr. Putignano, Ancona, Italy
Patient with failed amalgam. (Figure 1)
Fig 1.
Interproximal enamel wall placed and cured. This can be built up in
layers, or, more usually, with a single application, and can be done
very quickly.
Matrix removed and a thin layer of Filtek™ Flow Flowable
Composite* shade A3 placed on the cavity floor. (Figure 3)
* The nanofilled Filtek™ Supreme Plus Flowable is now available for
this procedure.
Matrix placed for interproximal enamel wall build-up. (Figure 2)
Fig 2.
Fig 3.
FiltekTM Supreme Plus
Tip
s &
Tri
cks
in C
linic
al C
ases
Page 30
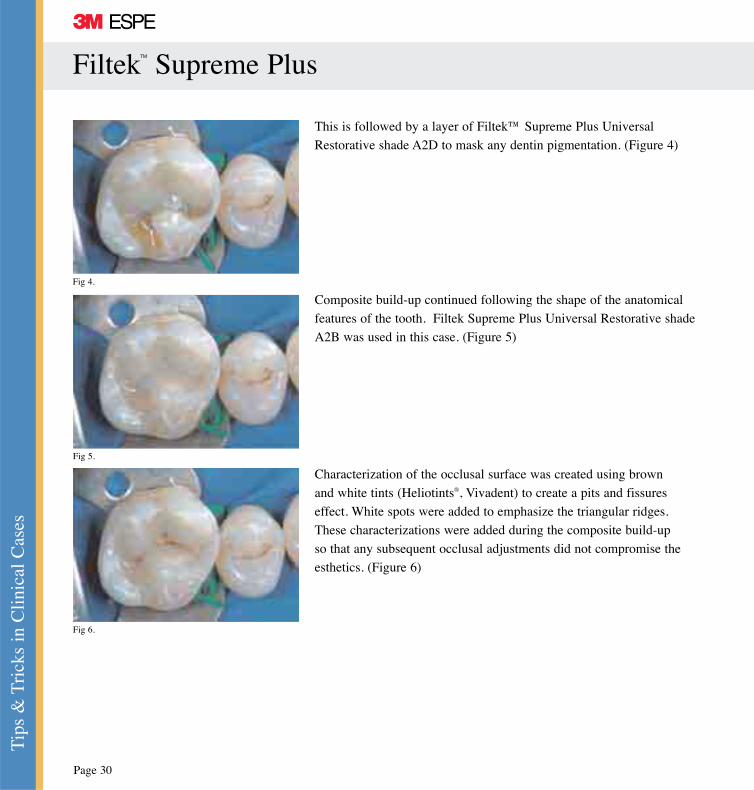
This is followed by a layer of Filtek™ Supreme Plus Universal
Restorative shade A2D to mask any dentin pigmentation. (Figure 4)
Fig 4.
Composite build-up continued following the shape of the anatomical
features of the tooth. Filtek Supreme Plus Universal Restorative shade
A2B was used in this case. (Figure 5)
Fig 5.
Fig 6.
Characterization of the occlusal surface was created using brown
and white tints (Heliotints®, Vivadent) to create a pits and fissures
effect. White spots were added to emphasize the triangular ridges.
These characterizations were added during the composite build-up
so that any subsequent occlusal adjustments did not compromise the
esthetics. (Figure 6)
Tips &
Tricks in C
linical Cases
Page 31
Fig 7.
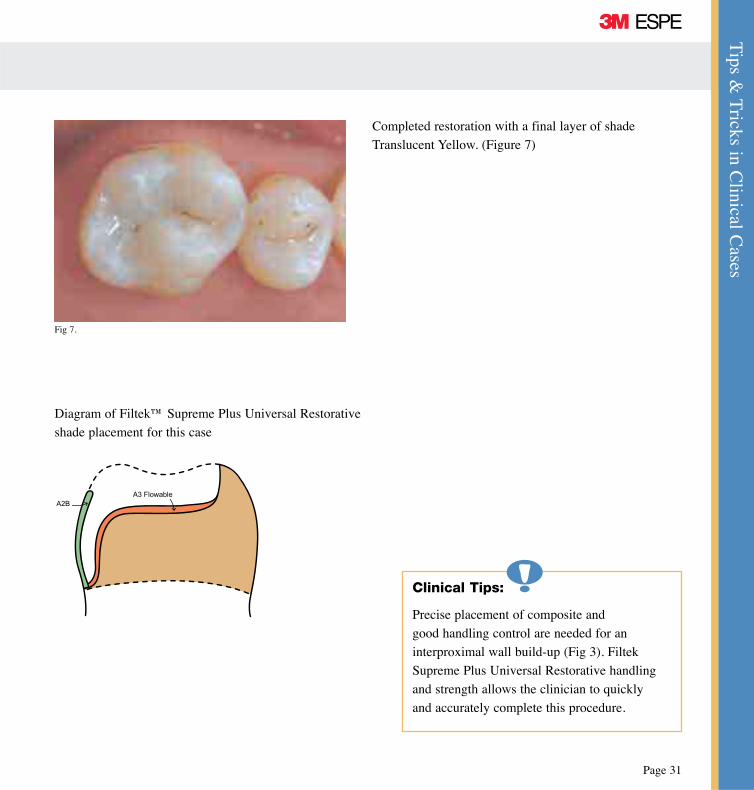
Completed restoration with a final layer of shade
Translucent Yellow. (Figure 7)
A2BA3 Flowable
Diagram of Filtek™ Supreme Plus Universal Restorative
shade placement for this case
Clinical Tips:
Precise placement of composite and
good handling control are needed for an
interproximal wall build-up (Fig 3). Filtek
Supreme Plus Universal Restorative handling
and strength allows the clinician to quickly
and accurately complete this procedure.
FiltekTM Supreme Plus
Tip
s &
Tri
cks
in C
linic
al C
ases
Page 32
Registering Tooth Shade and AnatomyDr. Alvaro Delgado and Dr. Carlos Fernandez, Madrid, Spain
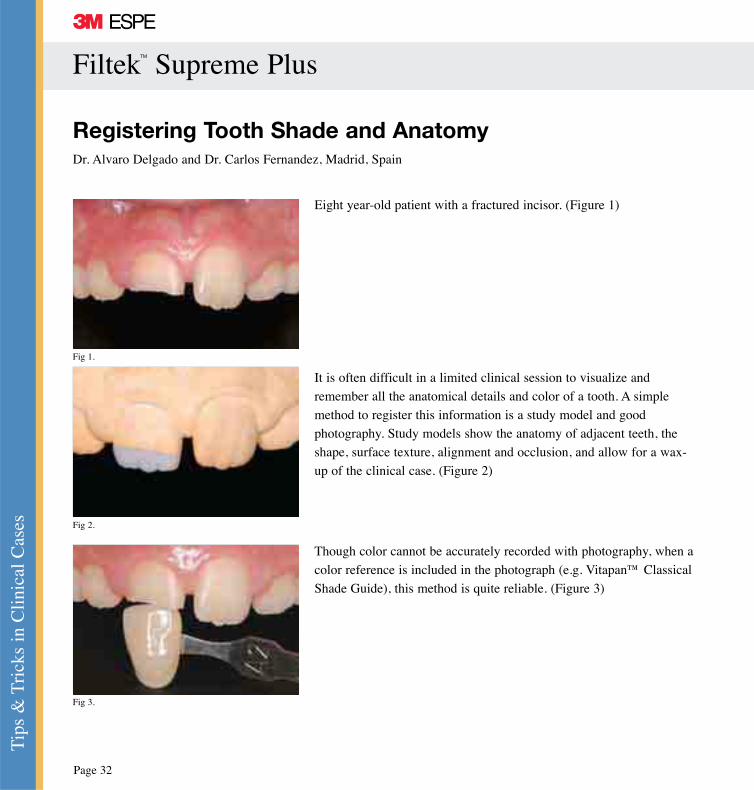
Eight year-old patient with a fractured incisor. (Figure 1)
Fig 1.
Fig 2.
Fig 3.
It is often difficult in a limited clinical session to visualize and
remember all the anatomical details and color of a tooth. A simple
method to register this information is a study model and good
photography. Study models show the anatomy of adjacent teeth, the
shape, surface texture, alignment and occlusion, and allow for a wax-
up of the clinical case. (Figure 2)
Though color cannot be accurately recorded with photography, when a
color reference is included in the photograph (e.g. Vitapan™ Classical
Shade Guide), this method is quite reliable. (Figure 3)
Tips &
Tricks in C
linical Cases
Page 33
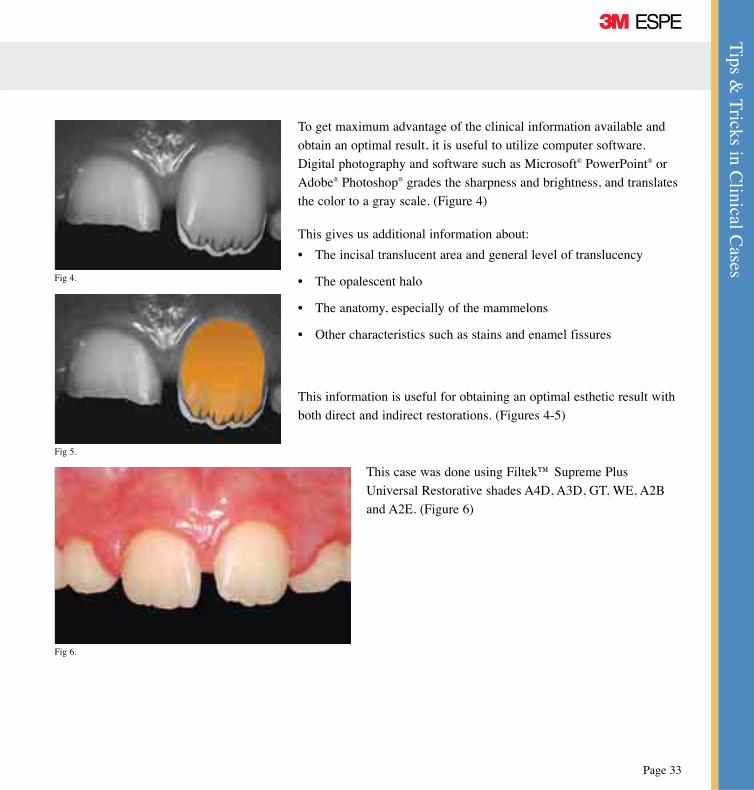
To get maximum advantage of the clinical information available and
obtain an optimal result, it is useful to utilize computer software.
Digital photography and software such as Microsoft® PowerPoint® or
Adobe® Photoshop® grades the sharpness and brightness, and translates
the color to a gray scale. (Figure 4)
Fig 4.
Fig 5.
This gives us additional information about:
• The incisal translucent area and general level of translucency
• The opalescent halo
• The anatomy, especially of the mammelons
• Other characteristics such as stains and enamel fissures
Fig 6.
This information is useful for obtaining an optimal esthetic result with
both direct and indirect restorations. (Figures 4-5)
This case was done using Filtek™ Supreme Plus
Universal Restorative shades A4D, A3D, GT, WE, A2B
and A2E. (Figure 6)

FiltekTM Supreme Plus
Tip
s &
Tri
cks
in C
linic
al C
ases
Page 34
WE
A2B
A2E
GT
WE
A3D
A2B
A2E
A2D
Diagram of Filtek™ Supreme Plus Universal
Restorative shade placement for this case.
Clinical Tips:
Filtek Supreme Plus Universal Restorative has
application for restoration of both primary and
permanent teeth in children; shade WE (White
Enamel) is an excellent match with the bright
white color of primary teeth.

Clinical Study
Page 35
FiltekTM Supreme Plus
Clin
ical
Stu
dy
Page 36
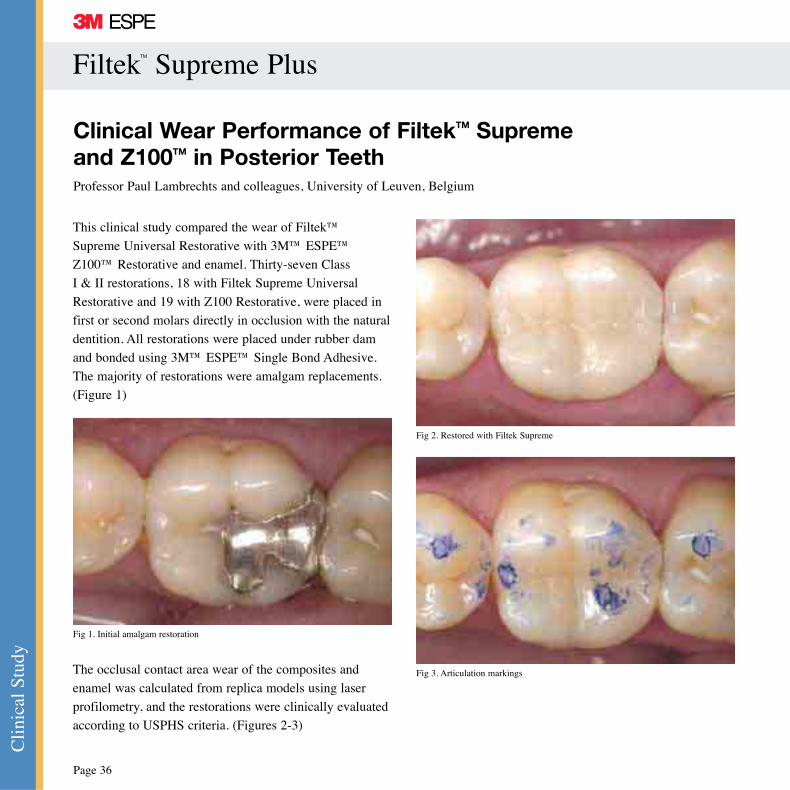
This clinical study compared the wear of Filtek™
Supreme Universal Restorative with 3M™ ESPE™
Z100™ Restorative and enamel. Thirty-seven Class
I & II restorations, 18 with Filtek Supreme Universal
Restorative and 19 with Z100 Restorative, were placed in
first or second molars directly in occlusion with the natural
dentition. All restorations were placed under rubber dam
and bonded using 3M™ ESPE™ Single Bond Adhesive.
The majority of restorations were amalgam replacements.
(Figure 1)
The occlusal contact area wear of the composites and
enamel was calculated from replica models using laser
profilometry, and the restorations were clinically evaluated
according to USPHS criteria. (Figures 2-3)
Fig 1. Initial amalgam restoration
Fig 2. Restored with Filtek Supreme
Clinical Wear Performance of FiltekTM Supreme and Z100TM in Posterior TeethProfessor Paul Lambrechts and colleagues, University of Leuven, Belgium
Fig 3. Articulation markings
Clinical Study
Page 37
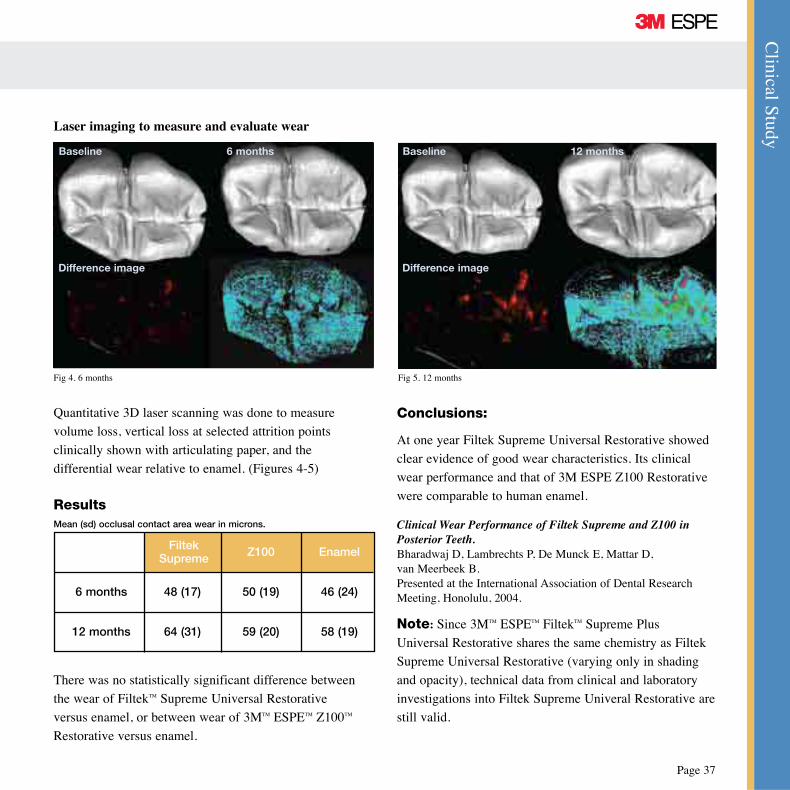
Quantitative 3D laser scanning was done to measure
volume loss, vertical loss at selected attrition points
clinically shown with articulating paper, and the
differential wear relative to enamel. (Figures 4-5)
ResultsMean (sd) occlusal contact area wear in microns.
There was no statistically significant difference between
the wear of FiltekTM Supreme Universal Restorative
versus enamel, or between wear of 3MTM ESPETM Z100TM
Restorative versus enamel.
Conclusions:
At one year Filtek Supreme Universal Restorative showed
clear evidence of good wear characteristics. Its clinical
wear performance and that of 3M ESPE Z100 Restorative
were comparable to human enamel.
Clinical Wear Performance of Filtek Supreme and Z100 in Posterior Teeth. Bharadwaj D, Lambrechts P, De Munck E, Mattar D, van Meerbeek B.Presented at the International Association of Dental Research Meeting, Honolulu, 2004.
Note: Since 3MTM ESPETM FiltekTM Supreme Plus
Universal Restorative shares the same chemistry as Filtek
Supreme Universal Restorative (varying only in shading
and opacity), technical data from clinical and laboratory
investigations into Filtek Supreme Univeral Restorative are
still valid.
Fig 4. 6 months
Baseline
Difference image
6 months Baseline
Difference image
12 months
Fig 5. 12 months
Laser imaging to measure and evaluate wear
Z100 Enamel
6 months 48 (17) 50 (19) 46 (24)
12 months 64 (31) 59 (20) 58 (19)
Filtek
Supreme

Page 38
FiltekTM Supreme Plus
For additional scientific results, see the 3M publication:
FiltekTM Supreme Plus Universal Restorative; A collection of
scientific results.
Page 39
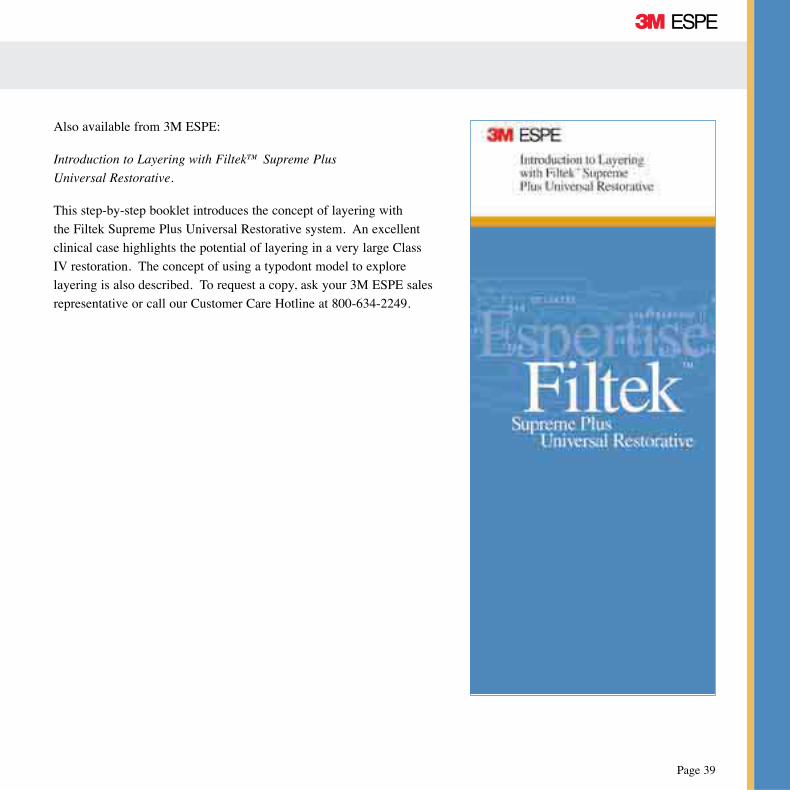
Also available from 3M ESPE:
Introduction to Layering with Filtek™ Supreme Plus
Universal Restorative.
This step-by-step booklet introduces the concept of layering with
the Filtek Supreme Plus Universal Restorative system. An excellent
clinical case highlights the potential of layering in a very large Class
IV restoration. The concept of using a typodont model to explore
layering is also described. To request a copy, ask your 3M ESPE sales
representative or call our Customer Care Hotline at 800-634-2249.
3M ESPE Dental Products3M CenterBuilding 0275-U2-SE-33St. Paul, MN 55144-1000USA
3M CanadaPost Office Box 5757London, Ontario N6A 4T1Canada1-800-265-1840 ext. 6229
The charts in this brochure were reproduced by 3M ESPE from the data listed in the cited sources.
3M, ESPE, Filtek, Z100, Elipar and Adper are trademarks of 3M or 3M ESPE AG.
Vitapan is a trademark of VITA Zahnfabrik, H. Rauter Gmbh & Co. KG.Heliotints is a registered trademark of Ivoclar Vivadent. Vaseline is a registered trademark of Chesebrough-Ponds Inc. Automatrix is a trademark of Dentsply. Kolor +Plus is a registered trademark of KerrHawe. Microsoft and PowerPoint are registered trademarks of Microsoft Corp. Adobe Photoshop is a registered trademark of Adobe Systems Inc.
© 3M 2006. All rights reserved.70-2009-3790-5
Minimum 10%Post-Consumer Fiber
Printed in U.S.A.