Embed Size (px)
Citation preview
SINGER® PROFESSIONAL 5™ Overlock Workbook

Congratulations on the purchase of your new SINGER® PROFESSIONAL 5™ Overlock Machine! The SINGER PROFESSIONAL 5 (14T968DC) Overlock Machine is a time saving innovation that provides professional seams, seam finishes, and creative stitch capabilities. Sew one-of-kind projects with the special effects of decorative stitching, such as Flatlocking, Chainstitching and Rolled Hemming. The overlock works side by side with your conventional sewing machine and adds new creative possiblities to your sewing projects.
This workbook has been created as a tool for learning the various stitch types, which you can then apply to your projects. The workbook is divided into individual chapters, and each chapter focuses on a particular stitch type. Each chapter has comprehensive machine set-up and threading directions, photos and definitions on how and where the stitch can be used, and suggestions for successful stitch formation. It is a good starting point to fully understanding your SINGER PROFESSIONAL 5 Overlock Machine.
We are certain that your creativity will be inspired and that you will have many hours of sewing enjoyment with this easy-to-use, feature-packed machine! Enjoy! The Singer Sewing Company SINGER® and PROFESSIONAL 5™ are exclusive trademarks of The Singer Company Ltd. or its affiliates. ©2008 The Singer Company Limited or its affiliates.
Chapter 1 Double Chain Stitch Chapter 2 Two-Thread Wrapped Edge Overlock (narrow and wide) Chapter 3 Two-Thread Overedge (narrow and wide) Chapter 4 Three-Thread Overlock (narrow, wide, and wide with decorative threads) Chapter 5 Three-Thread Flatlock (narrow and wide) Chapter 6 Three-Thread Ultra-Stretch Mock Safety Stitch Chapter 7 Four-Thread Ultra-Stretch Mock Safety Stitch Chapter 8 Four-Thread Safety Stitch Chapter 9 Five-Thread Safety Stitch Wide Chapter 10 Five-Thread Safety Stitch Narrow Chapter 11 Cover Hem (Cover Stitch) Narrow Chapter 12 Cover Hem (Cover Stitch) Wide Chapter 13 Triple Cover Hem Stitch Chapter 14 Three-Thread Rolled Hem Chapter 15 Additional Presser Feet
Table of Contents
Chapter 1:
Double Chain Stitch
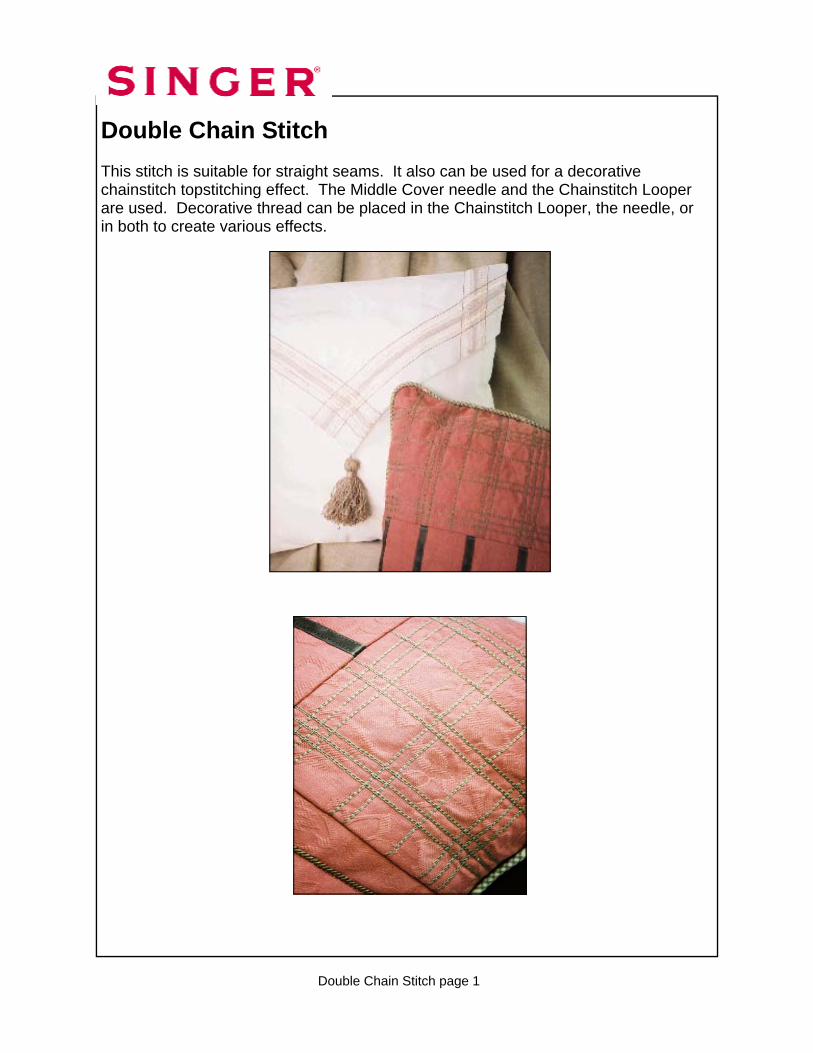
Double Chain Stitch This stitch is suitable for straight seams. It also can be used for a decorative chainstitch topstitching effect. The Middle Cover needle and the Chainstitch Looper are used. Decorative thread can be placed in the Chainstitch Looper, the needle, or in both to create various effects.
Double Chain Stitch page 1
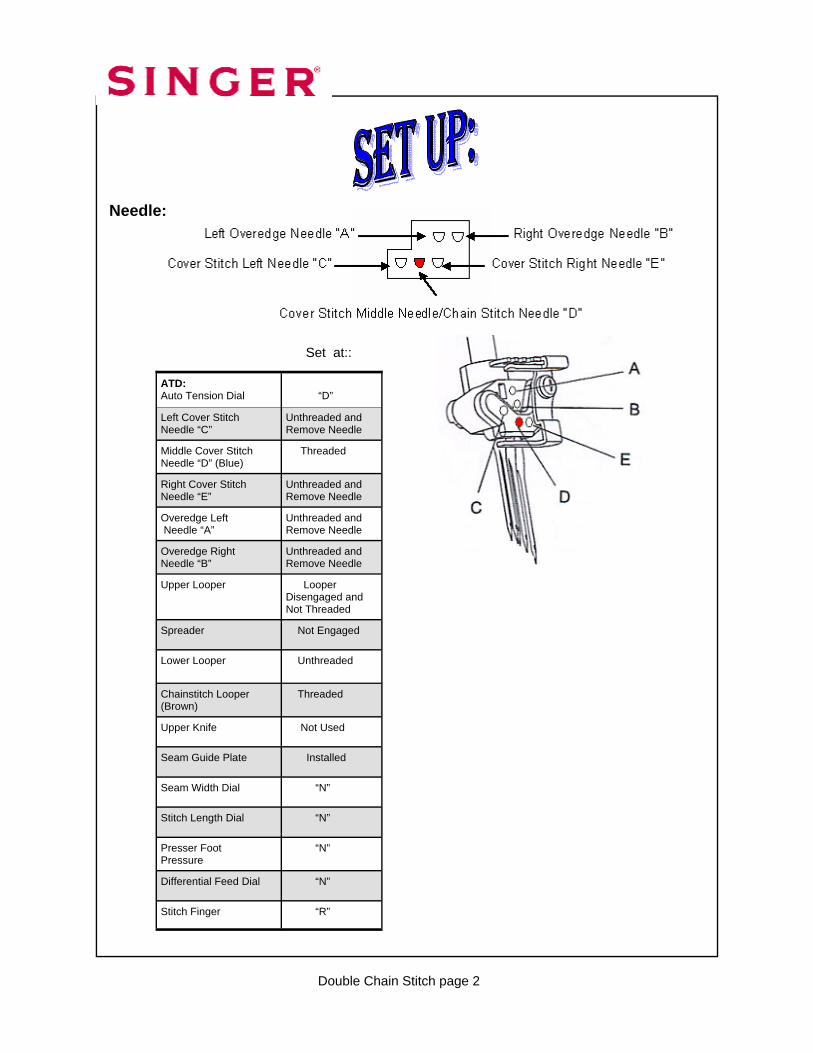
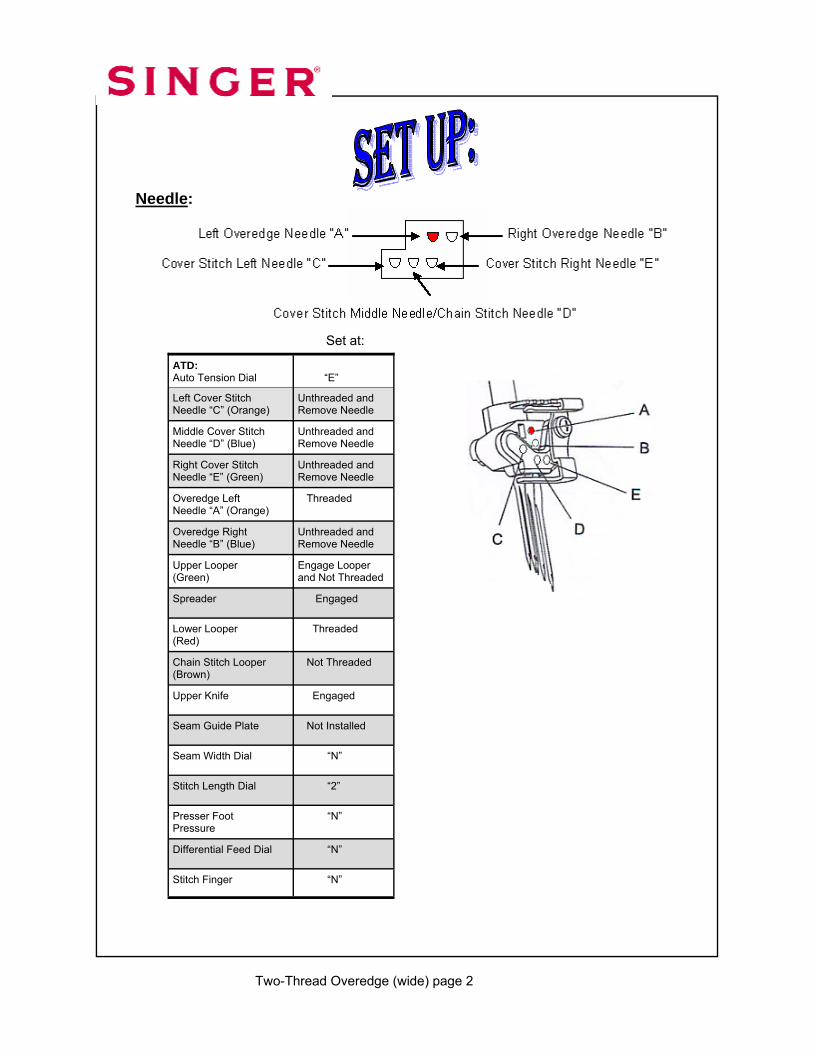
ATD: Auto Tension Dial
“D”
Left Cover Stitch Needle “C”
Unthreaded and Remove Needle
Middle Cover Stitch Needle “D” (Blue)
Threaded
Right Cover Stitch Needle “E”
Unthreaded and Remove Needle
Overedge Left Needle “A”
Unthreaded and Remove Needle
Overedge Right Needle “B”
Unthreaded and Remove Needle
Upper Looper
Looper Disengaged and Not Threaded
Lower Looper
Unthreaded
Chainstitch Looper (Brown)
Threaded
Upper Knife Not Used
Seam Guide Plate Installed
Seam Width Dial “N”
Stitch Length Dial “N”
Presser Foot Pressure
“N”
Differential Feed Dial “N”
Stitch Finger “R”
Spreader Not Engaged
Set at::
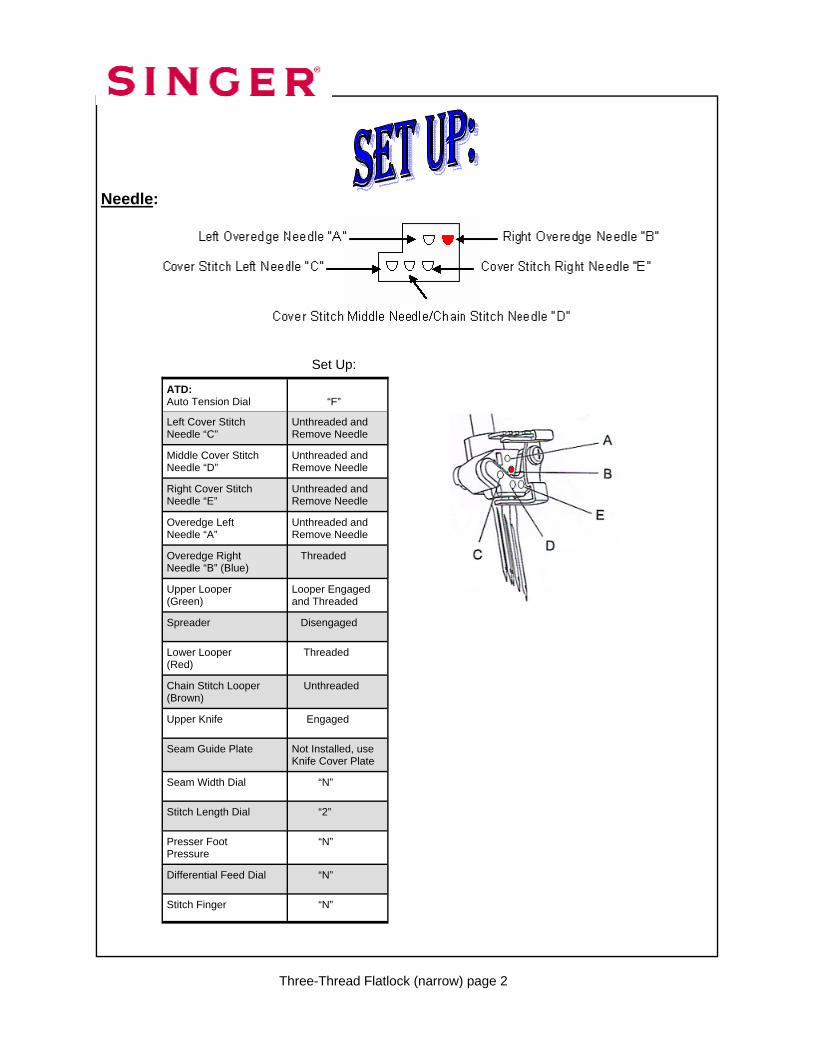
Needle:
Double Chain Stitch page 2
Double Chain Stitch
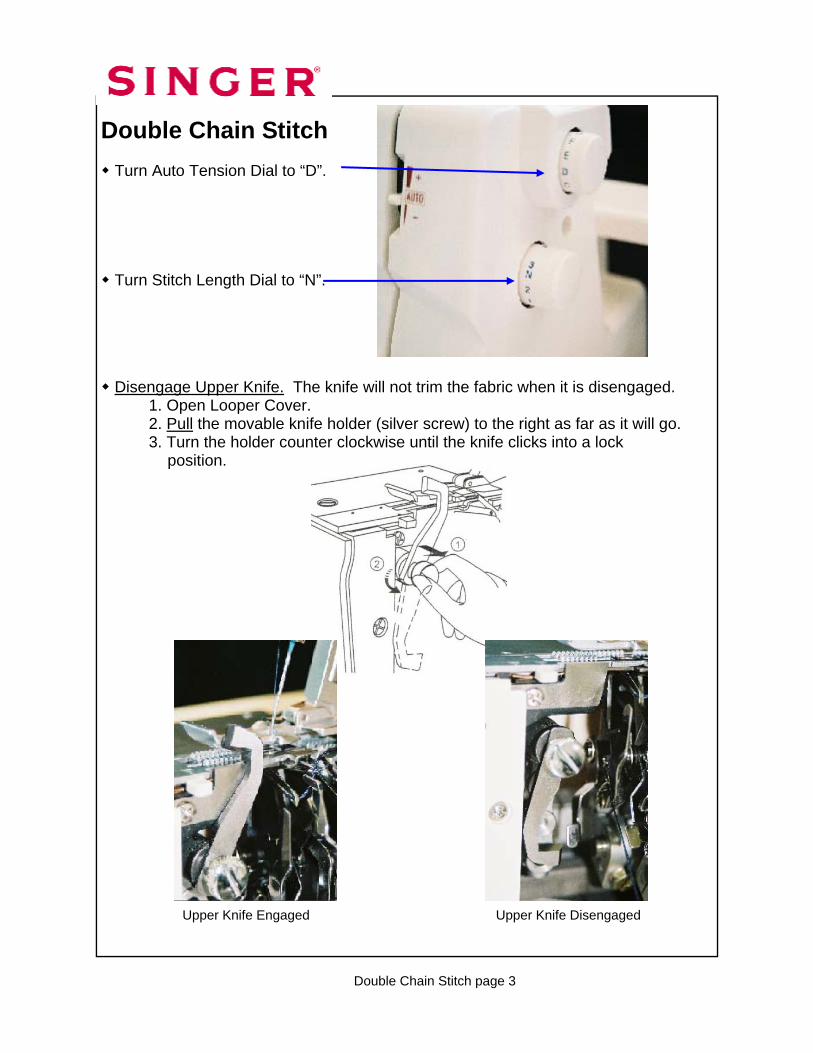
Turn Auto Tension Dial to “D”.
Turn Stitch Length Dial to “N”.
Disengage Upper Knife. The knife will not trim the fabric when it is disengaged. 1. Open Looper Cover. 2. Pull the movable knife holder (silver screw) to the right as far as it will go. 3. Turn the holder counter clockwise until the knife clicks into a lock position.
Upper Knife Engaged Upper Knife Disengaged
Double Chain Stitch page 3
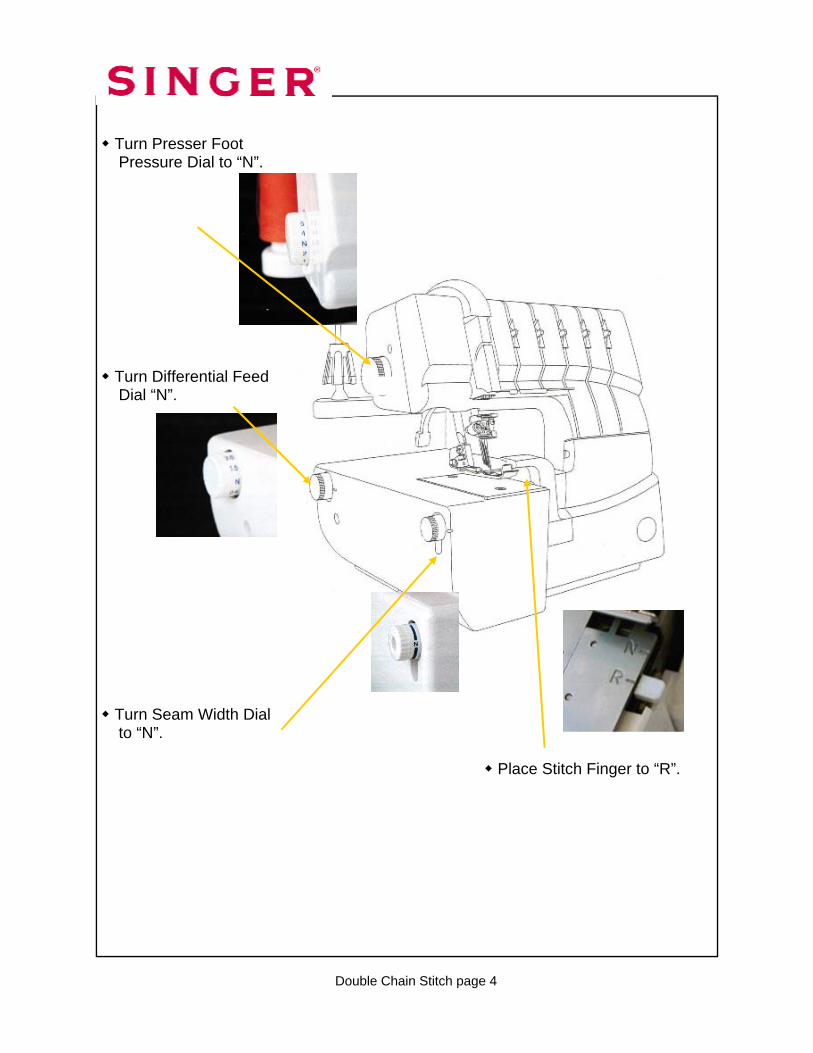
Turn Presser Foot Pressure Dial to “N”.
Turn Differential Feed Dial “N”.
Turn Seam Width Dial to “N”. Place Stitch Finger to “R”.
Double Chain Stitch page 4
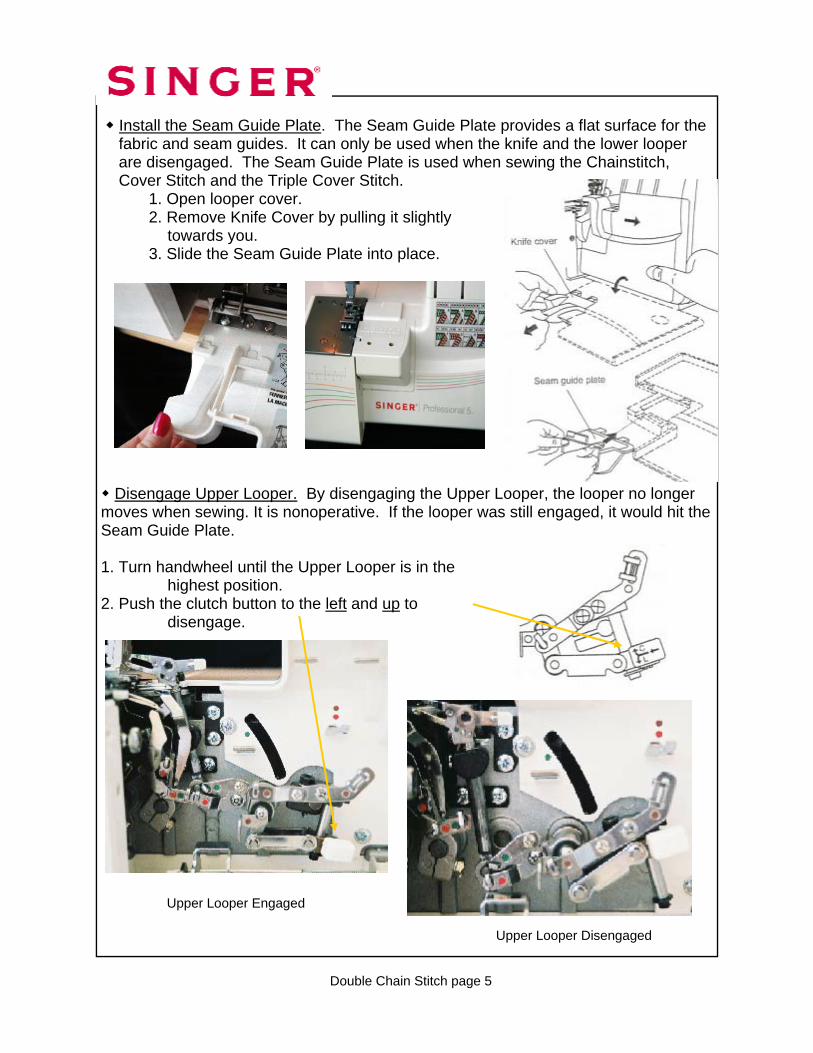
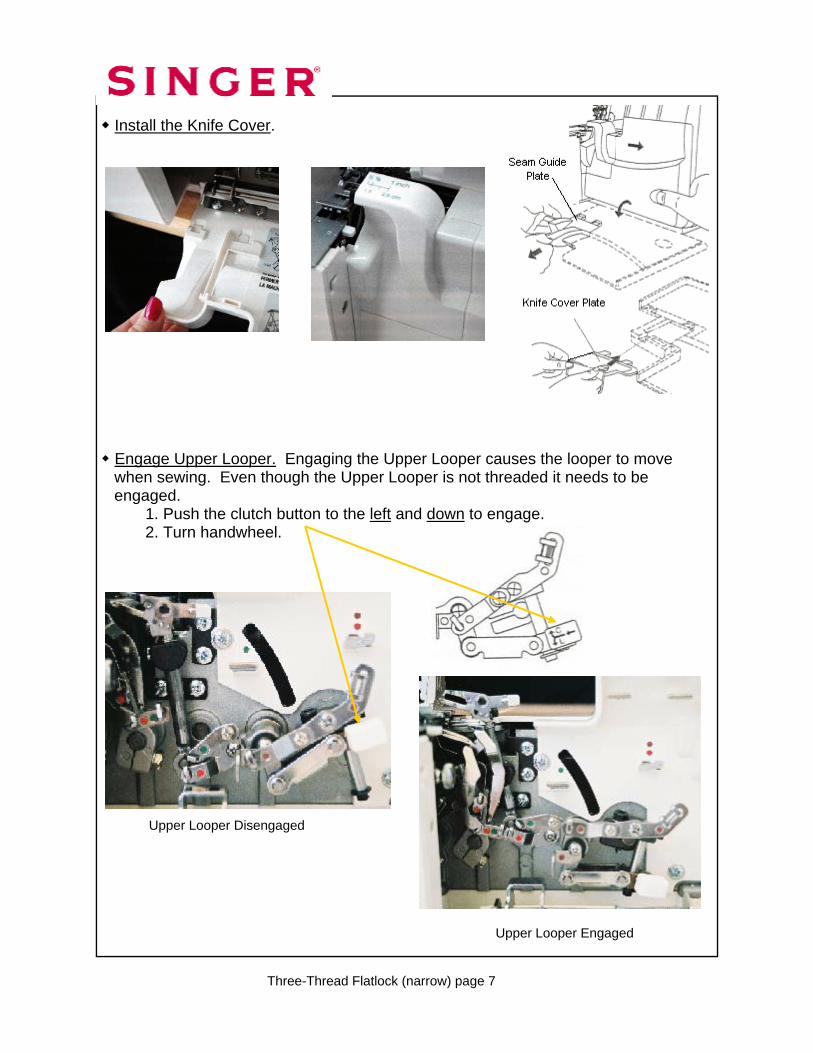
Install the Seam Guide Plate. The Seam Guide Plate provides a flat surface for the fabric and seam guides. It can only be used when the knife and the lower looper are disengaged. The Seam Guide Plate is used when sewing the Chainstitch, Cover Stitch and the Triple Cover Stitch. 1. Open looper cover. 2. Remove Knife Cover by pulling it slightly towards you. 3. Slide the Seam Guide Plate into place.
Disengage Upper Looper. By disengaging the Upper Looper, the looper no longer moves when sewing. It is nonoperative. If the looper was still engaged, it would hit the Seam Guide Plate. 1. Turn handwheel until the Upper Looper is in the highest position. 2. Push the clutch button to the left and up to disengage.
Upper Looper Disengaged
Double Chain Stitch page 5
Upper Looper Engaged
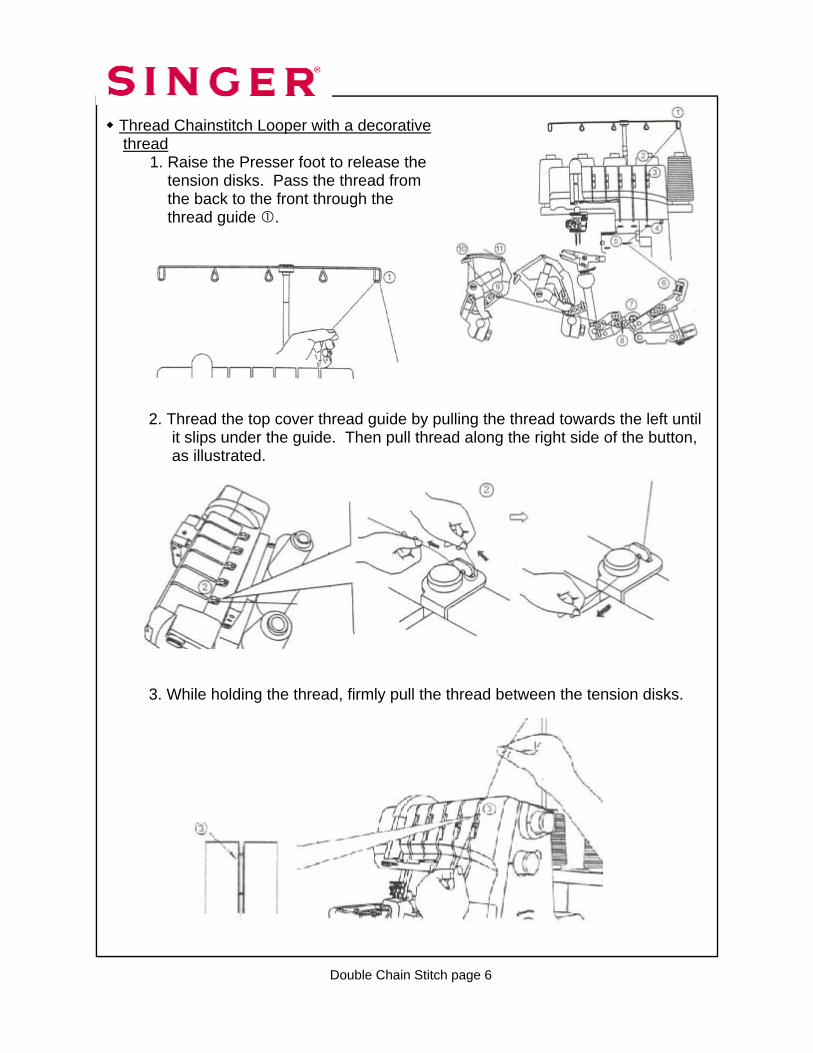
Thread Chainstitch Looper with a decorative thread 1. Raise the Presser foot to release the tension disks. Pass the thread from the back to the front through the thread guide .
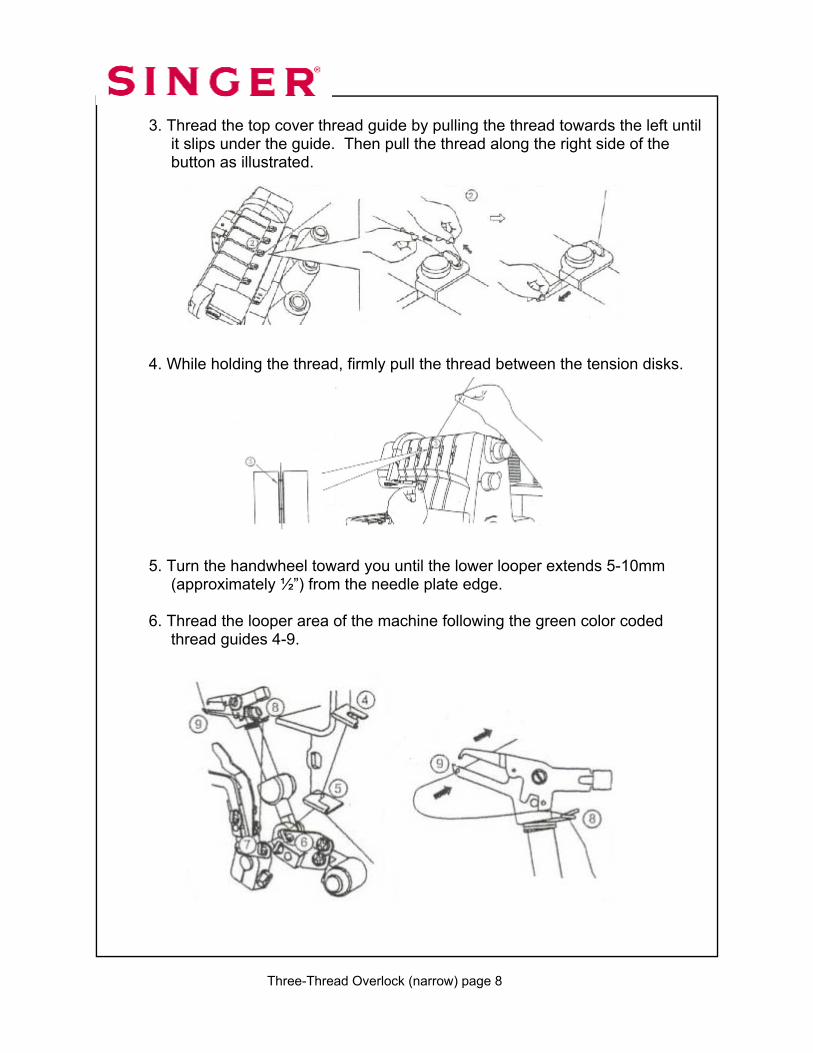
2. Thread the top cover thread guide by pulling the thread towards the left until it slips under the guide. Then pull thread along the right side of the button, as illustrated. 3. While holding the thread, firmly pull the thread between the tension disks.
Double Chain Stitch page 6
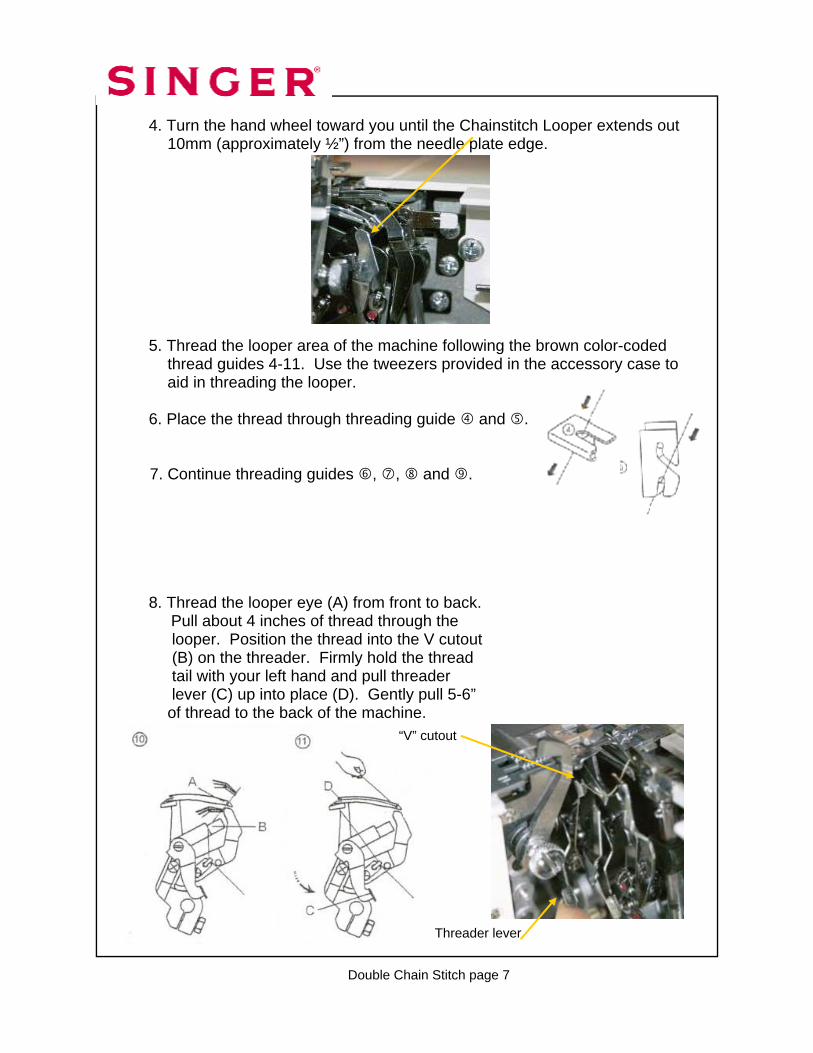
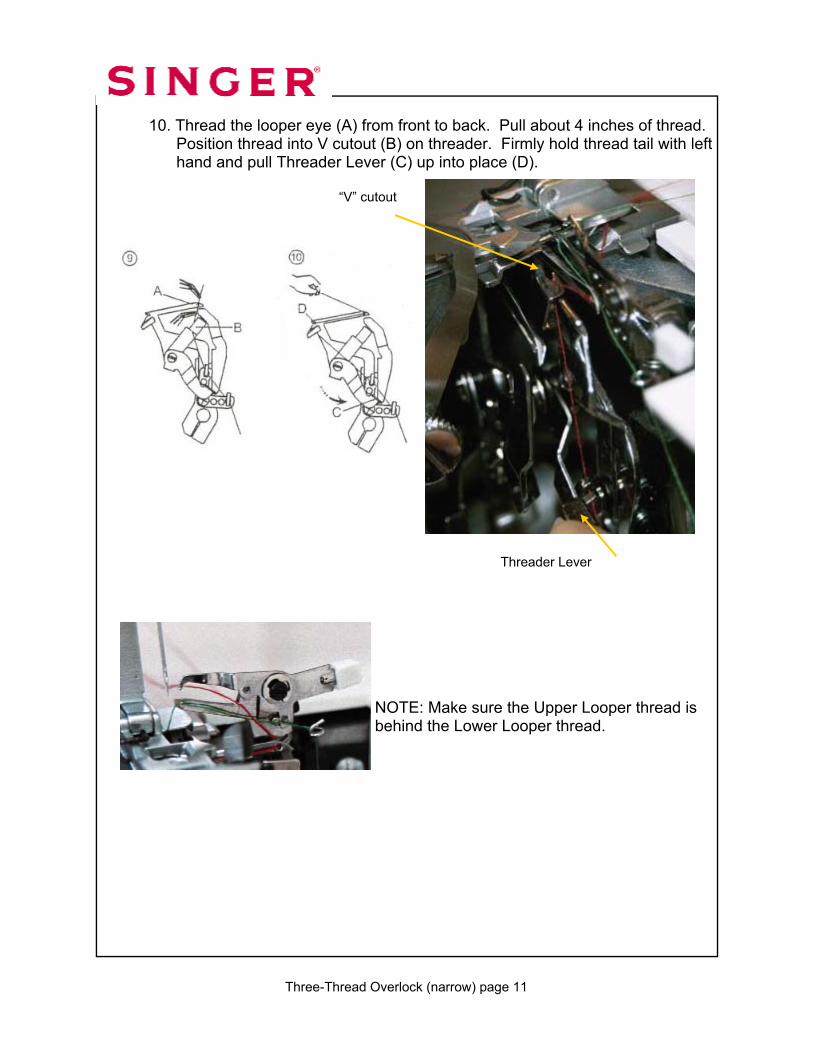
4. Turn the hand wheel toward you until the Chainstitch Looper extends out 10mm (approximately ½”) from the needle plate edge. 5. Thread the looper area of the machine following the brown color-coded thread guides 4-11. Use the tweezers provided in the accessory case to aid in threading the looper. 6. Place the thread through threading guide and . 7. Continue threading guides , , and . 8. Thread the looper eye (A) from front to back. Pull about 4 inches of thread through the looper. Position the thread into the V cutout (B) on the threader. Firmly hold the thread tail with your left hand and pull threader lever (C) up into place (D). Gently pull 5-6” of thread to the back of the machine.
Double Chain Stitch page 7
“V” cutout
Threader lever
Thread Middle Cover Stitch Needle with
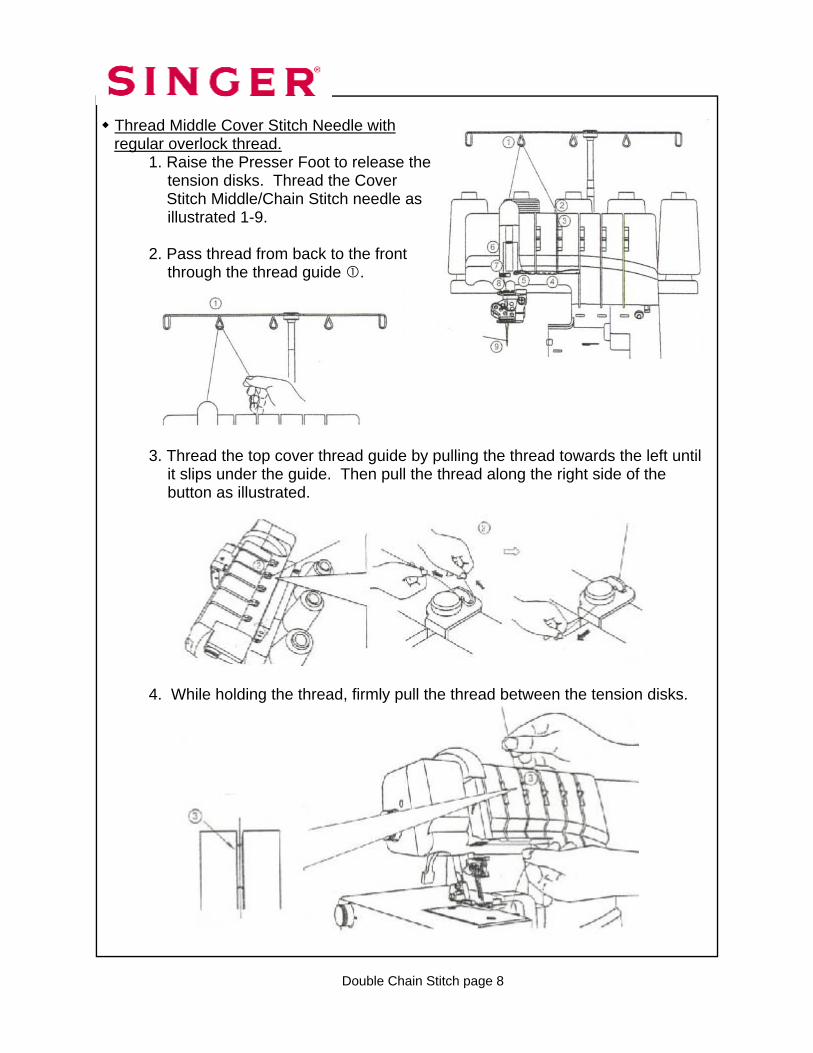
regular overlock thread. 1. Raise the Presser Foot to release the tension disks. Thread the Cover Stitch Middle/Chain Stitch needle as illustrated 1-9. 2. Pass thread from back to the front through the thread guide .
3. Thread the top cover thread guide by pulling the thread towards the left until it slips under the guide. Then pull the thread along the right side of the button as illustrated. 4. While holding the thread, firmly pull the thread between the tension disks.
Double Chain Stitch page 8
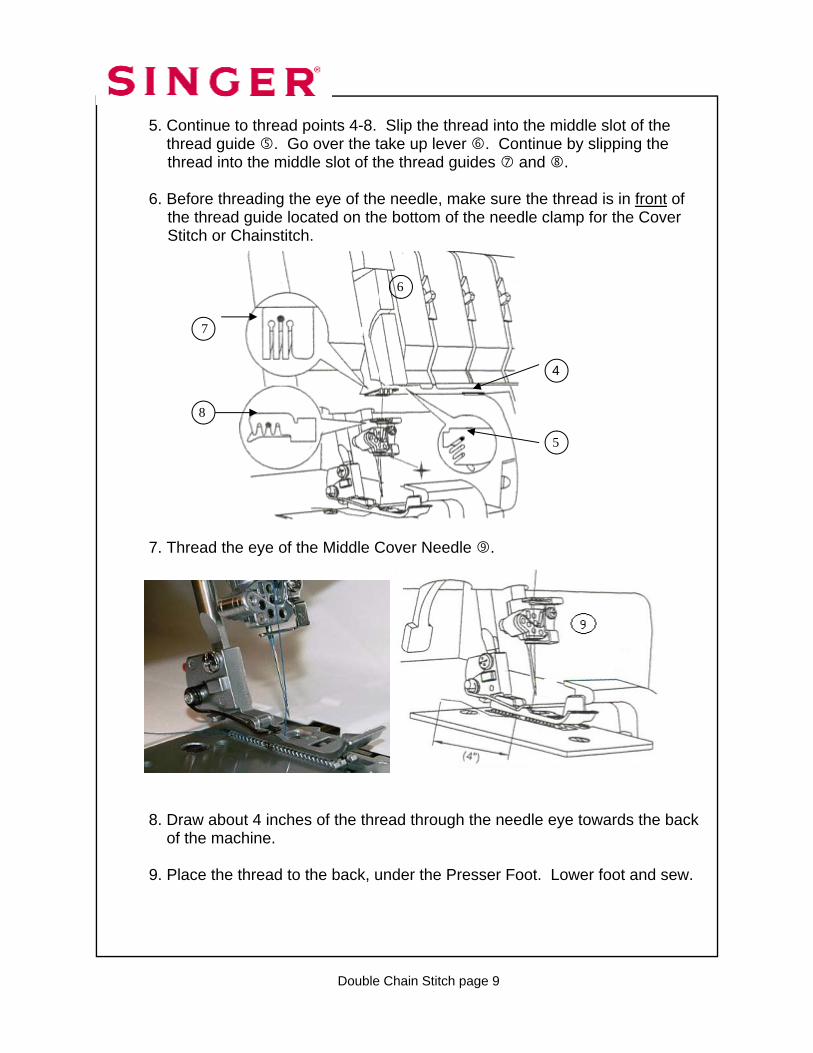
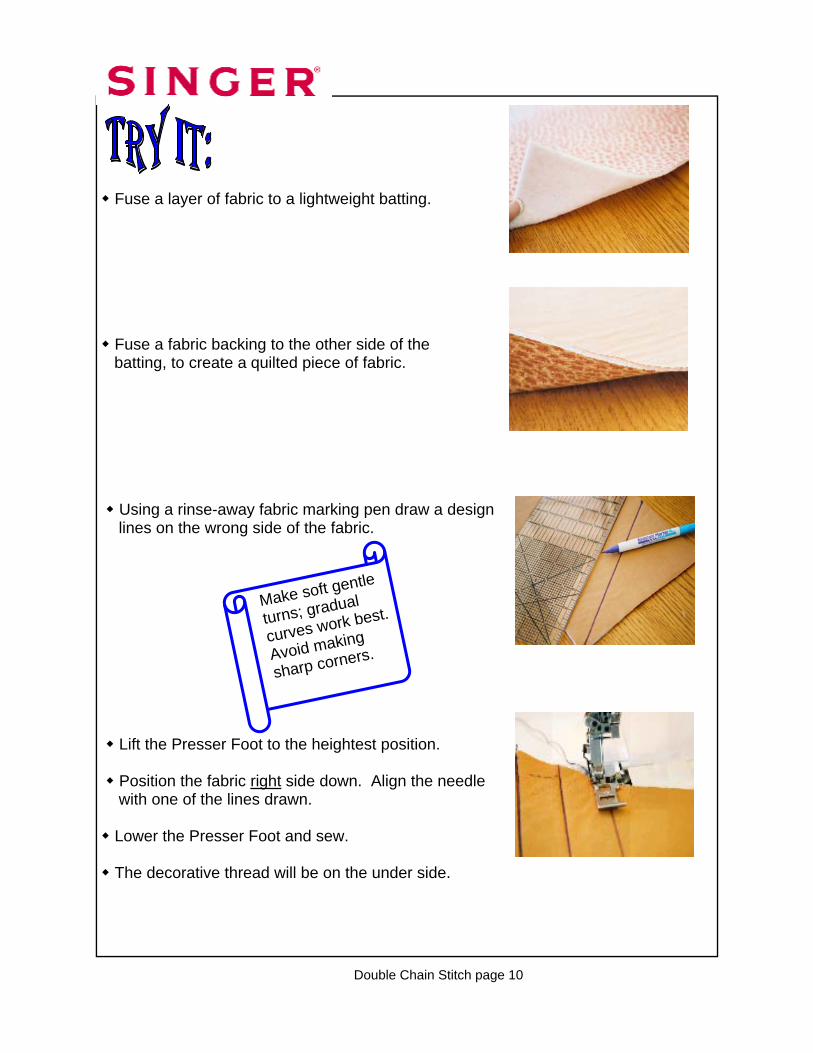
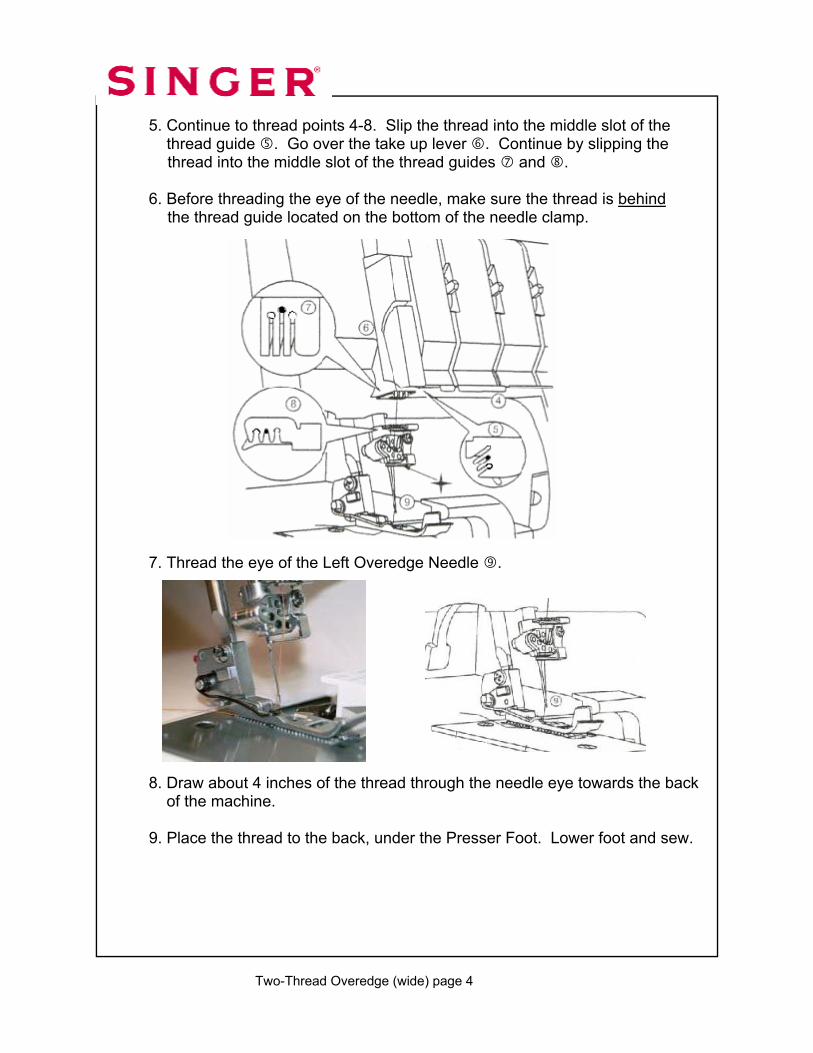
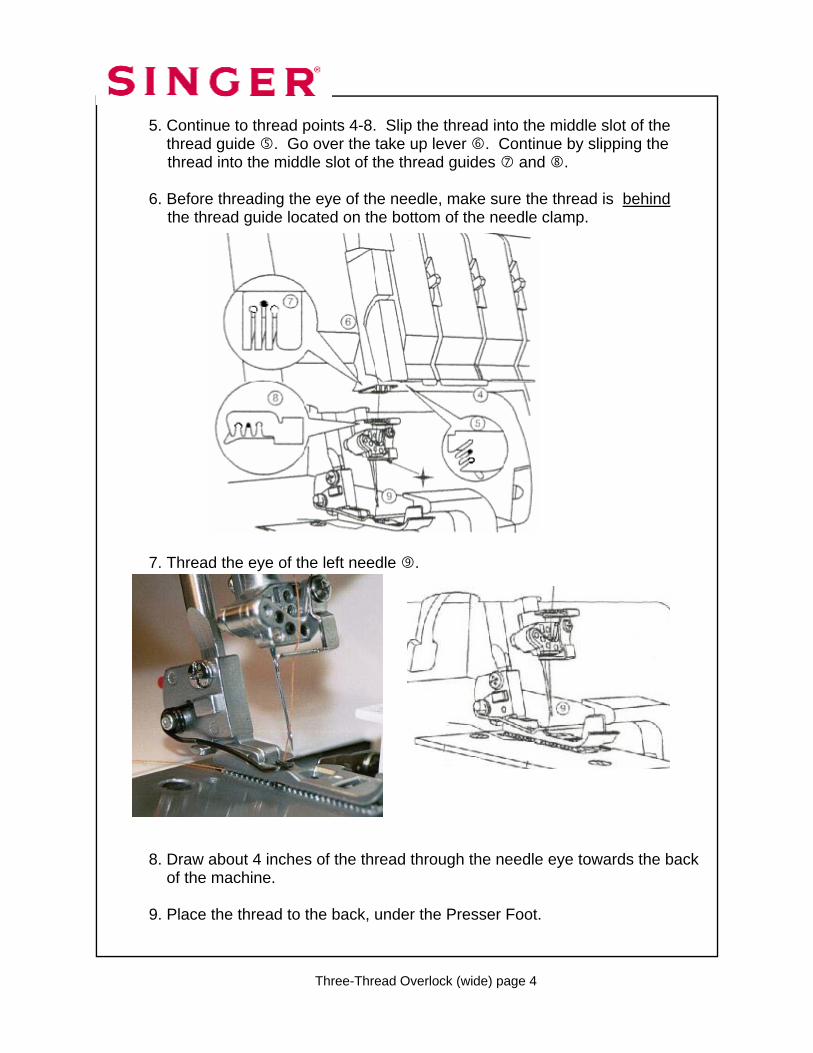
5. Continue to thread points 4-8. Slip the thread into the middle slot of the thread guide . Go over the take up lever . Continue by slipping the thread into the middle slot of the thread guides and . 6. Before threading the eye of the needle, make sure the thread is in front of the thread guide located on the bottom of the needle clamp for the Cover Stitch or Chainstitch. 7. Thread the eye of the Middle Cover Needle .
8. Draw about 4 inches of the thread through the needle eye towards the back of the machine. 9. Place the thread to the back, under the Presser Foot. Lower foot and sew.
4
5
7
8
Double Chain Stitch page 9
6
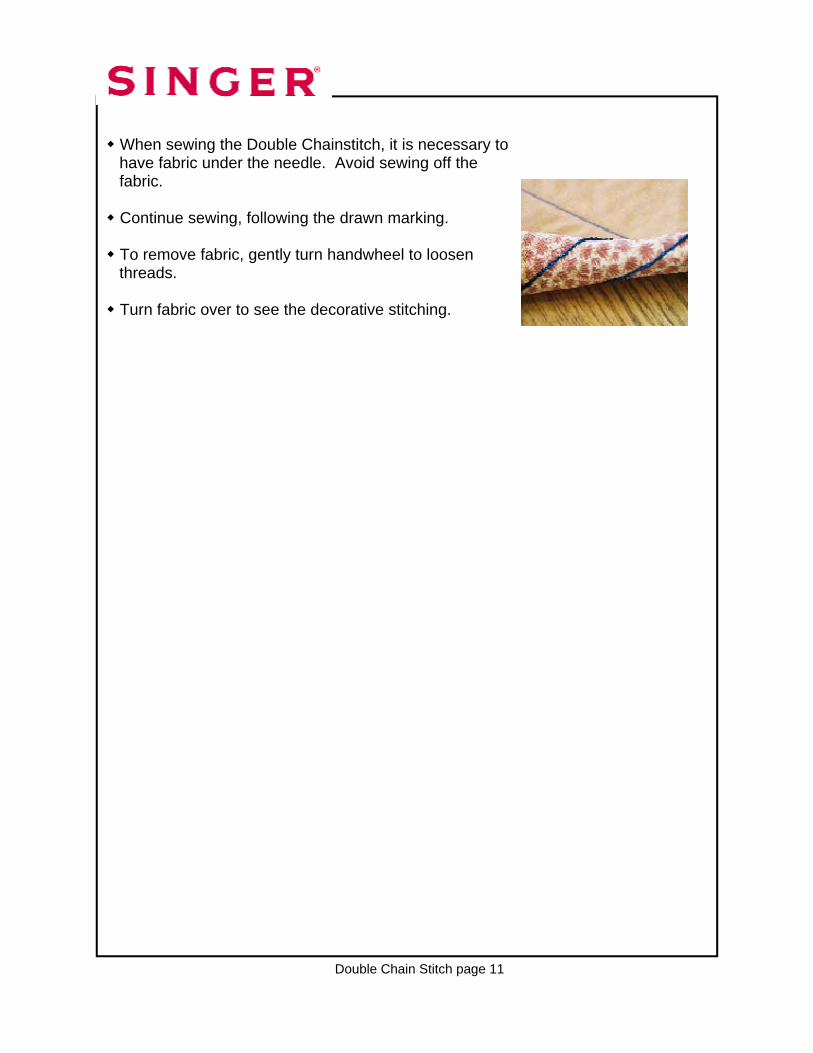
Fuse a layer of fabric to a lightweight batting.
Fuse a fabric backing to the other side of the batting, to create a quilted piece of fabric. Using a rinse-away fabric marking pen draw a design lines on the wrong side of the fabric. Lift the Presser Foot to the heightest position. Position the fabric right side down. Align the needle with one of the lines drawn.
Lower the Presser Foot and sew.
The decorative thread will be on the under side.
Make soft gentle
turns; gradual
curves work best.
Avoid making
sharp corners.
Double Chain Stitch page 10
When sewing the Double Chainstitch, it is necessary to have fabric under the needle. Avoid sewing off the fabric. Continue sewing, following the drawn marking. To remove fabric, gently turn handwheel to loosen threads. Turn fabric over to see the decorative stitching.
Double Chain Stitch page 11
Chapter 2: Two-Thread Wrapped Edge Overlock (narrow and wide)
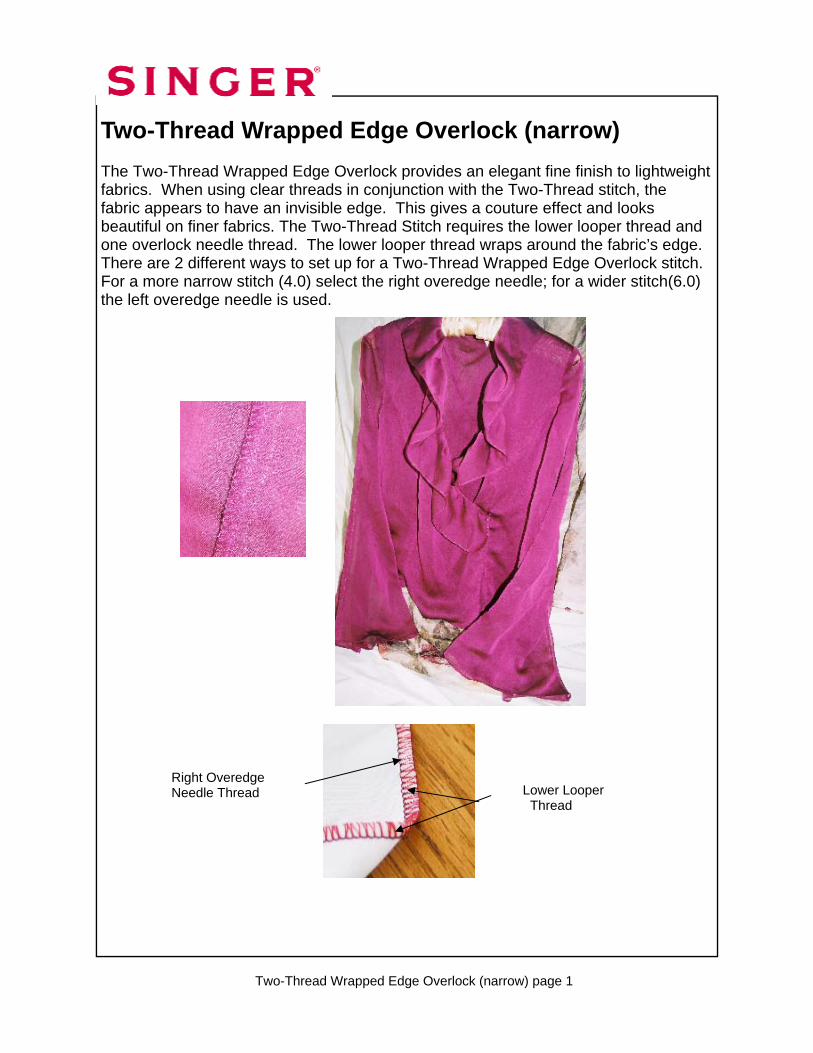
Two-Thread Wrapped Edge Overlock (narrow) The Two-Thread Wrapped Edge Overlock provides an elegant fine finish to lightweight fabrics. When using clear threads in conjunction with the Two-Thread stitch, the fabric appears to have an invisible edge. This gives a couture effect and looks beautiful on finer fabrics. The Two-Thread Stitch requires the lower looper thread and one overlock needle thread. The lower looper thread wraps around the fabric’s edge. There are 2 different ways to set up for a Two-Thread Wrapped Edge Overlock stitch. For a more narrow stitch (4.0) select the right overedge needle; for a wider stitch(6.0) the left overedge needle is used.
Right Overedge Needle Thread
Lower Looper Thread
Two-Thread Wrapped Edge Overlock (narrow) page 1
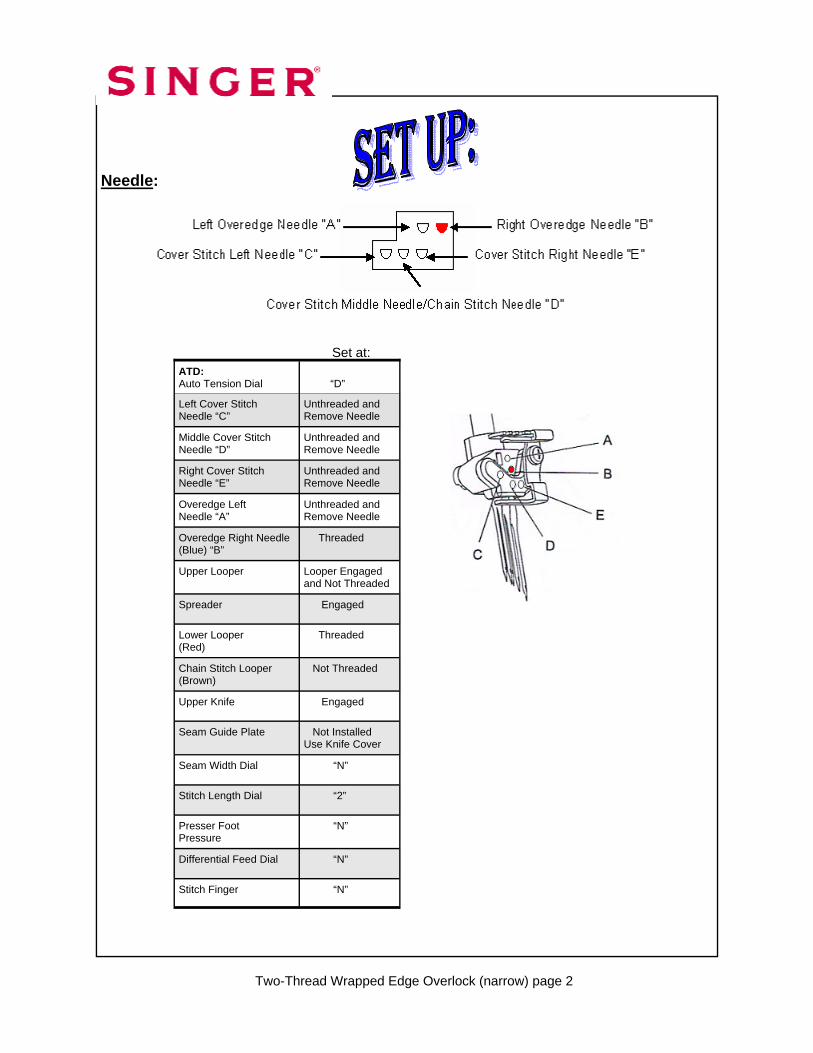
Needle:
ATD: Auto Tension Dial
“D”
Left Cover Stitch Needle “C”
Unthreaded and Remove Needle
Middle Cover Stitch Needle “D”
Unthreaded and Remove Needle
Right Cover Stitch Needle “E”
Unthreaded and Remove Needle
Overedge Left Needle “A”
Unthreaded and Remove Needle
Overedge Right Needle (Blue) “B”
Threaded
Upper Looper
Looper Engaged and Not Threaded
Lower Looper (Red)
Threaded
Chain Stitch Looper (Brown)
Not Threaded
Upper Knife Engaged
Seam Guide Plate Not Installed Use Knife Cover
Seam Width Dial “N”
Stitch Length Dial “2”
Presser Foot Pressure
“N”
Differential Feed Dial “N”
Stitch Finger “N”
Spreader Engaged
Set at:
Two-Thread Wrapped Edge Overlock (narrow) page 2
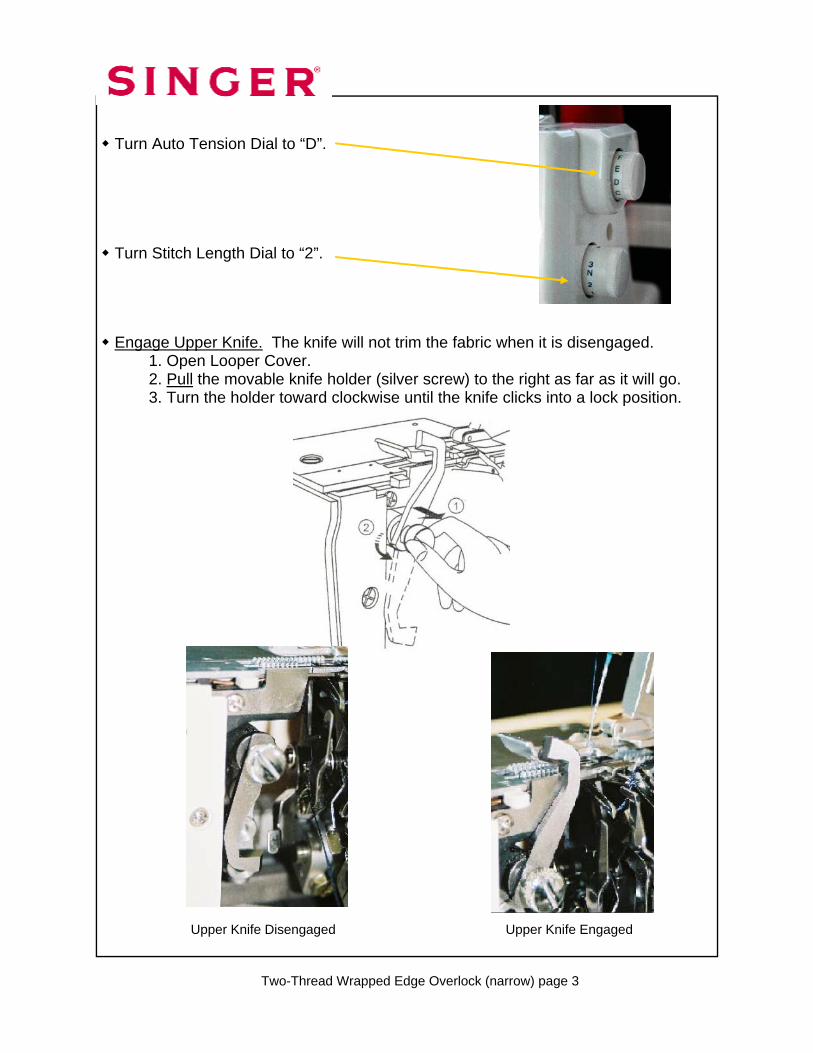
Turn Auto Tension Dial to “D”.
Turn Stitch Length Dial to “2”.
Engage Upper Knife. The knife will not trim the fabric when it is disengaged. 1. Open Looper Cover. 2. Pull the movable knife holder (silver screw) to the right as far as it will go. 3. Turn the holder toward clockwise until the knife clicks into a lock position.
Upper Knife Engaged Upper Knife Disengaged
Two-Thread Wrapped Edge Overlock (narrow) page 3

Turn Presser Foot Pressure Dial to “N”.
Turn Differential Feed Dial to “N”.
Turn Seam Width Dial to “N”. Set Stitch Finger to “N”.
Two-Thread Wrapped Edge Overlock (narrow) page 4

Install the Knife Cover.
Engage Upper Looper. Engaging the Upper Looper causes the looper to move when sewing. Even though the Upper Looper is not threaded, it needs to be engaged. 1. Push the clutch button to the left and down to engage. 2. Turn handwheel.
Upper Looper Disengaged
Upper Looper Engaged
Two-Thread Wrapped Edge Overlock (narrow) page 5
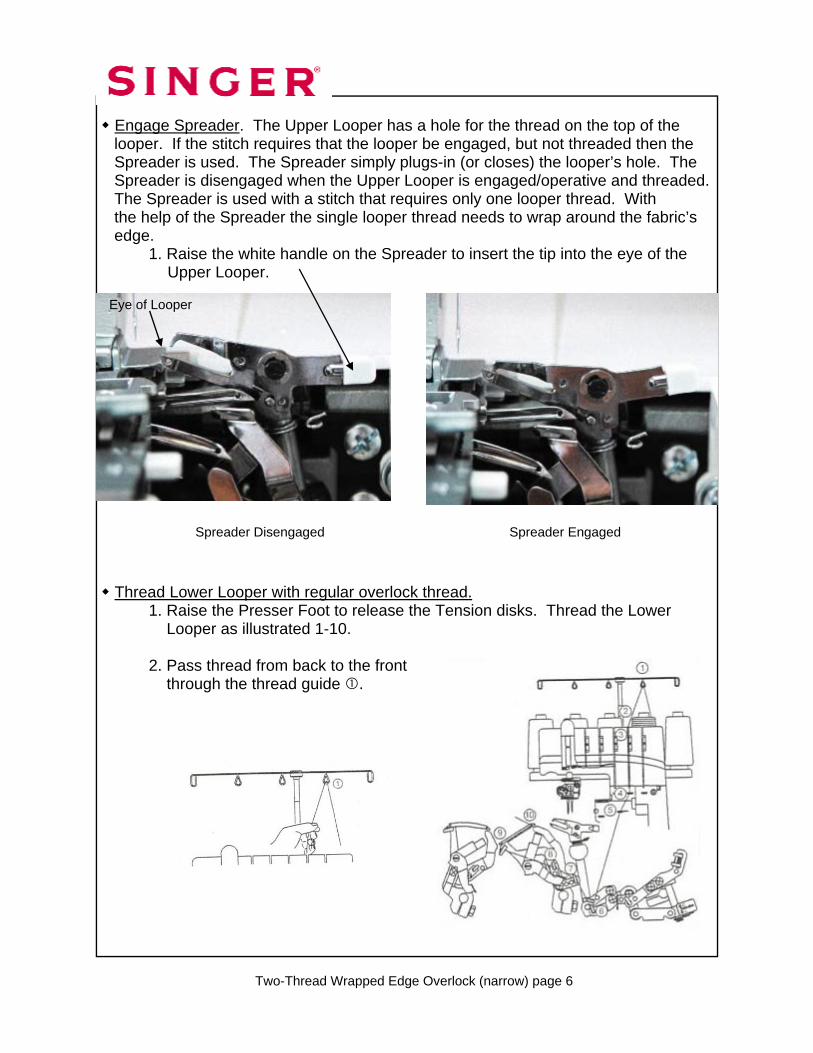
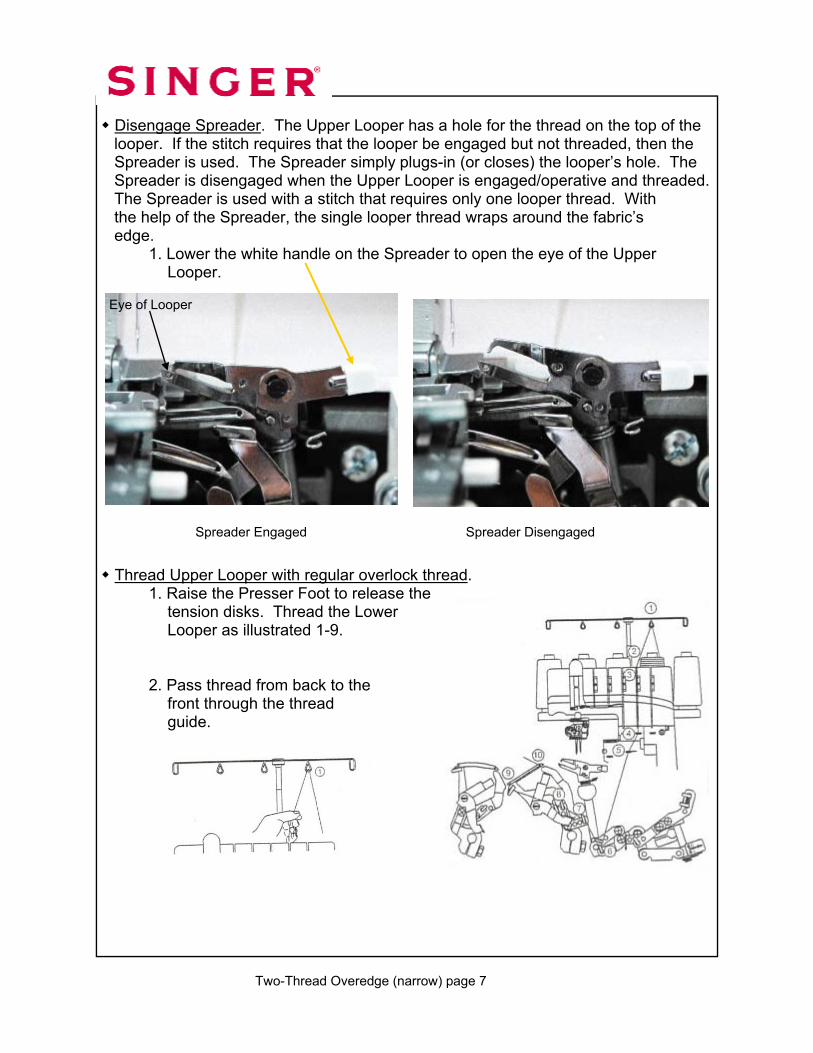
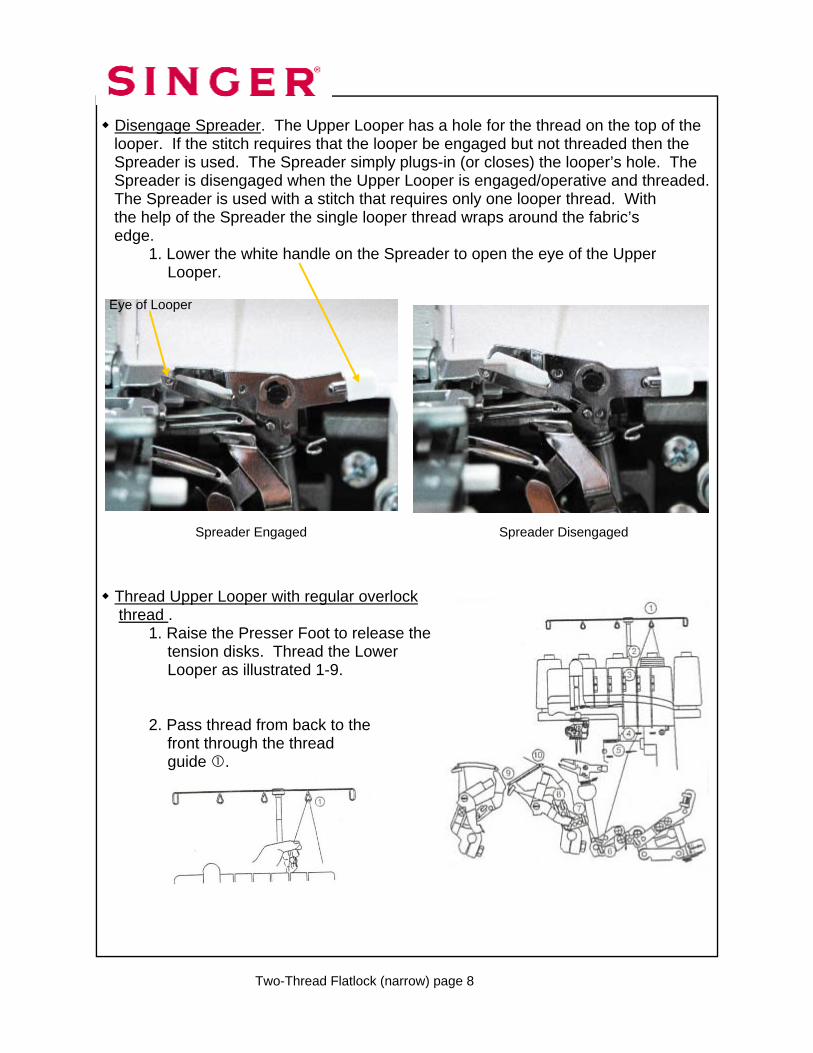
Engage Spreader. The Upper Looper has a hole for the thread on the top of the
looper. If the stitch requires that the looper be engaged, but not threaded then the Spreader is used. The Spreader simply plugs-in (or closes) the looper’s hole. The Spreader is disengaged when the Upper Looper is engaged/operative and threaded. The Spreader is used with a stitch that requires only one looper thread. With the help of the Spreader the single looper thread needs to wrap around the fabric’s edge. 1. Raise the white handle on the Spreader to insert the tip into the eye of the Upper Looper.
Thread Lower Looper with regular overlock thread. 1. Raise the Presser Foot to release the Tension disks. Thread the Lower Looper as illustrated 1-10. 2. Pass thread from back to the front through the thread guide .
Spreader Disengaged Spreader Engaged
Two-Thread Wrapped Edge Overlock (narrow) page 6
Eye of Looper

3. Thread the top cover thread guide by pulling the thread towards the left until it slips under the guide. Then pull the thread along the right side of the button as illustrated. 4. While holding the thread firmly, pull the thread between the tension disks. 5. Turn the handwheel toward you until the lower looper extends 5-10mm (approximately ½ inch) from the needle plate edge. 6. Thread the looper area of the machine following the red color coded thread guides 4-10. 7. Place the thread slighty from left and to the right of threading guide . 8. Place the thread slightly from the front and to the back of threading guide . 9. Place the thread through , ,and .
Two-Thread Wrapped Edge Overlock (narrow) page 7

10. Thread the looper eye (A) from front to back. Pull about 4 inches of thread. Position thread into V cutout (B) on threader. Firmly hold thread tail with left hand and pull Threader lever (C) up into place (D).
Thread Right Overedge needle with regular thread. 1. Raise the Presser Foot to release the tension discs. Thread the right needle as illustrated 1-9. 2. Pass thread from back to the front through the thread guide .
Two-Thread Wrapped Edge Overlock (narrow) page 8
Threader Lever
“V” cutout
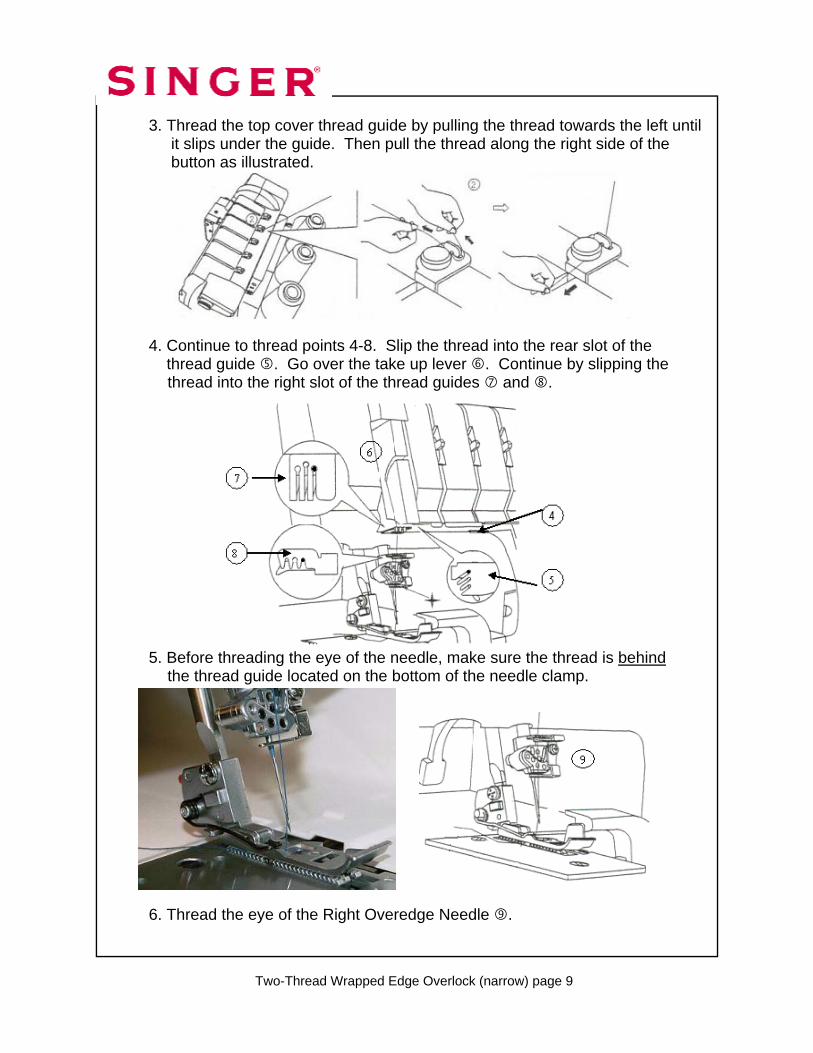
3. Thread the top cover thread guide by pulling the thread towards the left until it slips under the guide. Then pull the thread along the right side of the button as illustrated. 4. Continue to thread points 4-8. Slip the thread into the rear slot of the thread guide . Go over the take up lever . Continue by slipping the thread into the right slot of the thread guides and . 5. Before threading the eye of the needle, make sure the thread is behind the thread guide located on the bottom of the needle clamp.
6. Thread the eye of the Right Overedge Needle .
6
Two-Thread Wrapped Edge Overlock (narrow) page 9

Align two pieces of lightweight fabric, right sides
together so that the knife just slightly trims the fabric edge. Sew. Press seam to one side.
Two-Thread Wrapped Edge Overlock (narrow) page 10
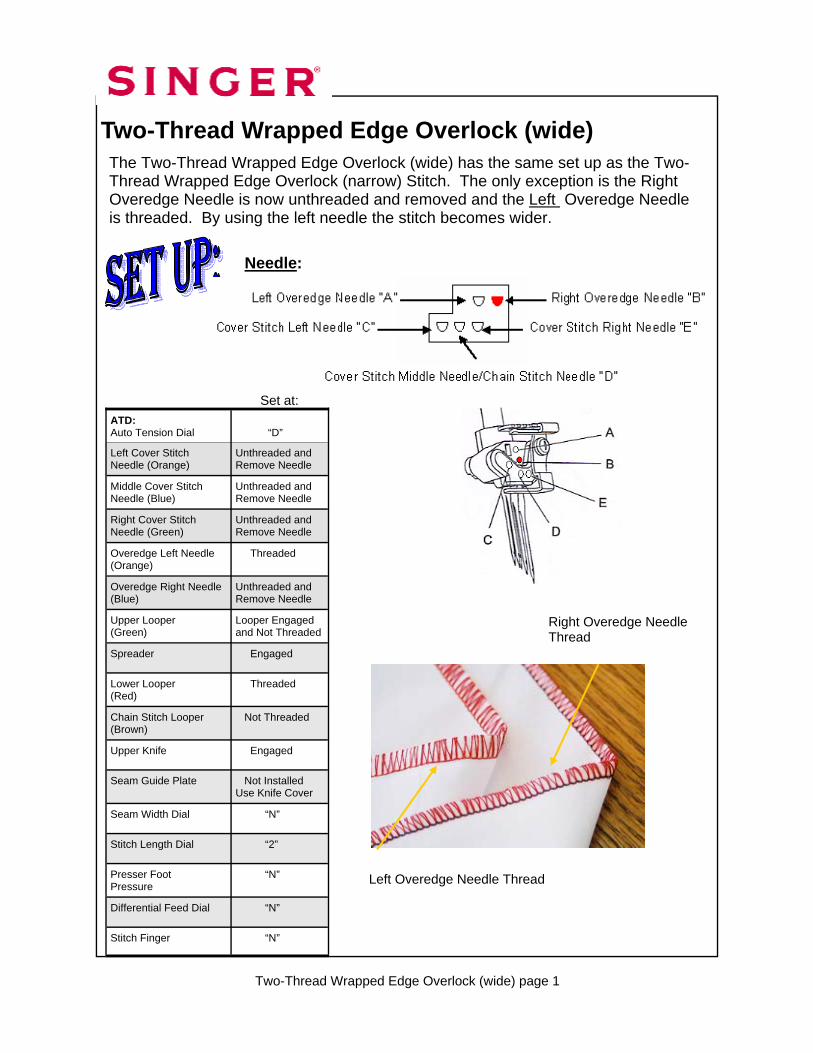
Two-Thread Wrapped Edge Overlock (wide)
Needle:
ATD: Auto Tension Dial
“D”
Left Cover Stitch Needle (Orange)
Unthreaded and Remove Needle
Middle Cover Stitch Needle (Blue)
Unthreaded and Remove Needle
Right Cover Stitch Needle (Green)
Unthreaded and Remove Needle
Overedge Left Needle (Orange)
Threaded
Overedge Right Needle (Blue)
Unthreaded and Remove Needle
Upper Looper (Green)
Looper Engaged and Not Threaded
Lower Looper (Red)
Threaded
Chain Stitch Looper (Brown)
Not Threaded
Upper Knife Engaged
Seam Guide Plate Not Installed Use Knife Cover
Seam Width Dial “N”
Stitch Length Dial “2”
Presser Foot Pressure
“N”
Differential Feed Dial “N”
Stitch Finger “N”
Spreader Engaged
The Two-Thread Wrapped Edge Overlock (wide) has the same set up as the Two-Thread Wrapped Edge Overlock (narrow) Stitch. The only exception is the Right Overedge Needle is now unthreaded and removed and the Left Overedge Needle is threaded. By using the left needle the stitch becomes wider.
Left Overedge Needle Thread
Right Overedge Needle Thread
Two-Thread Wrapped Edge Overlock (wide) page 1
Set at:
Thread Left Overedge needle with regular thread.
1. Raise the Presser Foot to release the tension disks. Thread the left needle as indicated 1-9. 2. Pass thread from back to the front through the thread guide . 3. Thread the top cover thread guide by pulling the thread towards the left until it slips under the guide. Then pull the thread along the right side of the button as illustrated. 4. While holding the thread firmly, pull the thread between the tension disks.
Two-Thread Wrapped Edge Overlock (wide) page 2
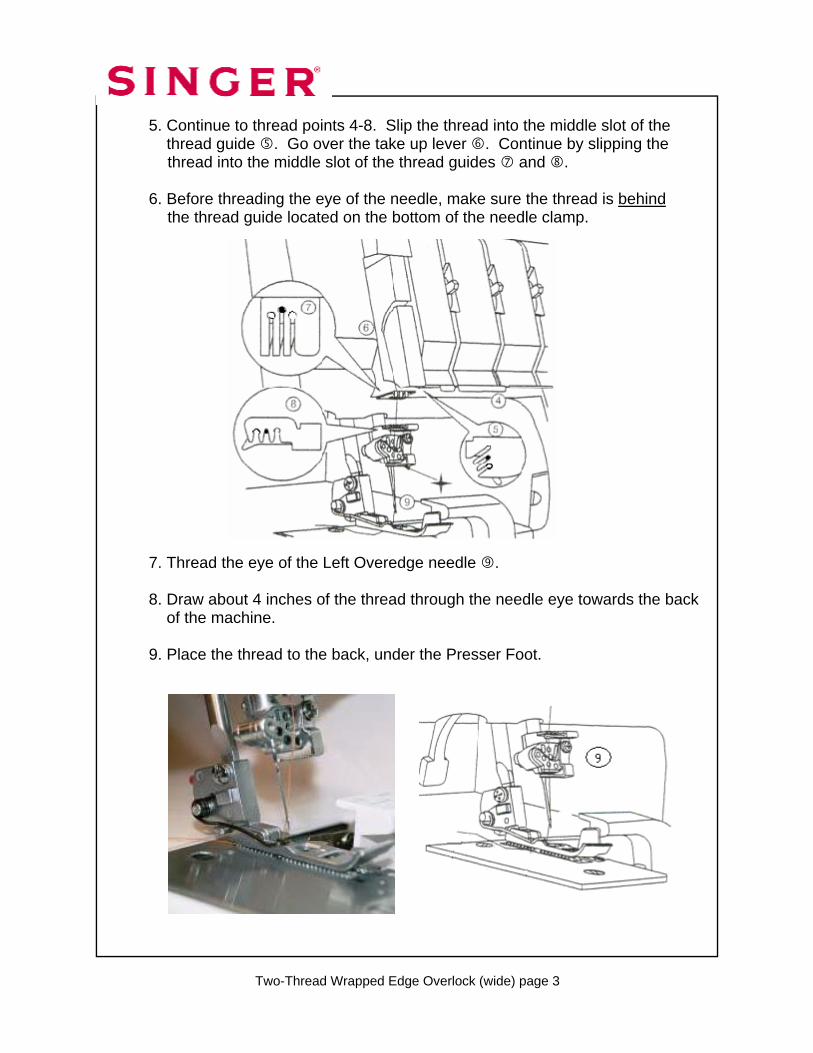
5. Continue to thread points 4-8. Slip the thread into the middle slot of the thread guide . Go over the take up lever . Continue by slipping the thread into the middle slot of the thread guides and . 6. Before threading the eye of the needle, make sure the thread is behind the thread guide located on the bottom of the needle clamp. 7. Thread the eye of the Left Overedge needle . 8. Draw about 4 inches of the thread through the needle eye towards the back of the machine. 9. Place the thread to the back, under the Presser Foot.
Two-Thread Wrapped Edge Overlock (wide) page 3
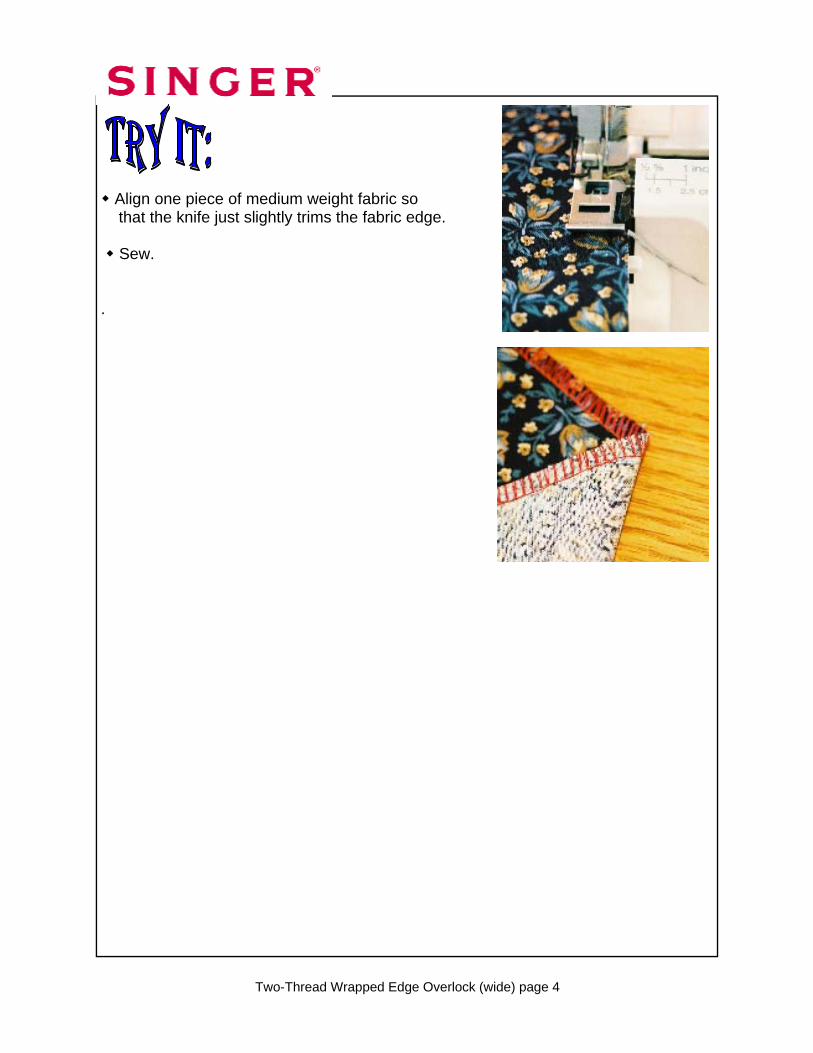
Align one piece of medium weight fabric so
that the knife just slightly trims the fabric edge. Sew. .
Two-Thread Wrapped Edge Overlock (wide) page 4
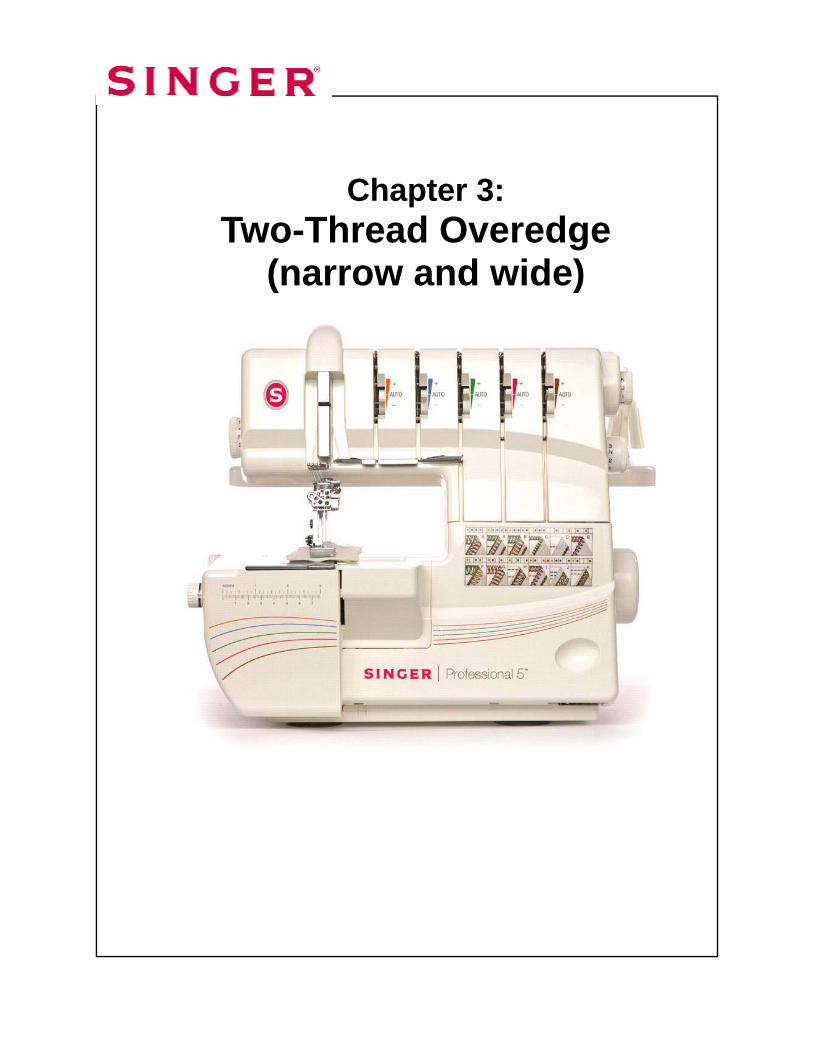
Chapter 3:
Two-Thread Overedge (narrow and wide)
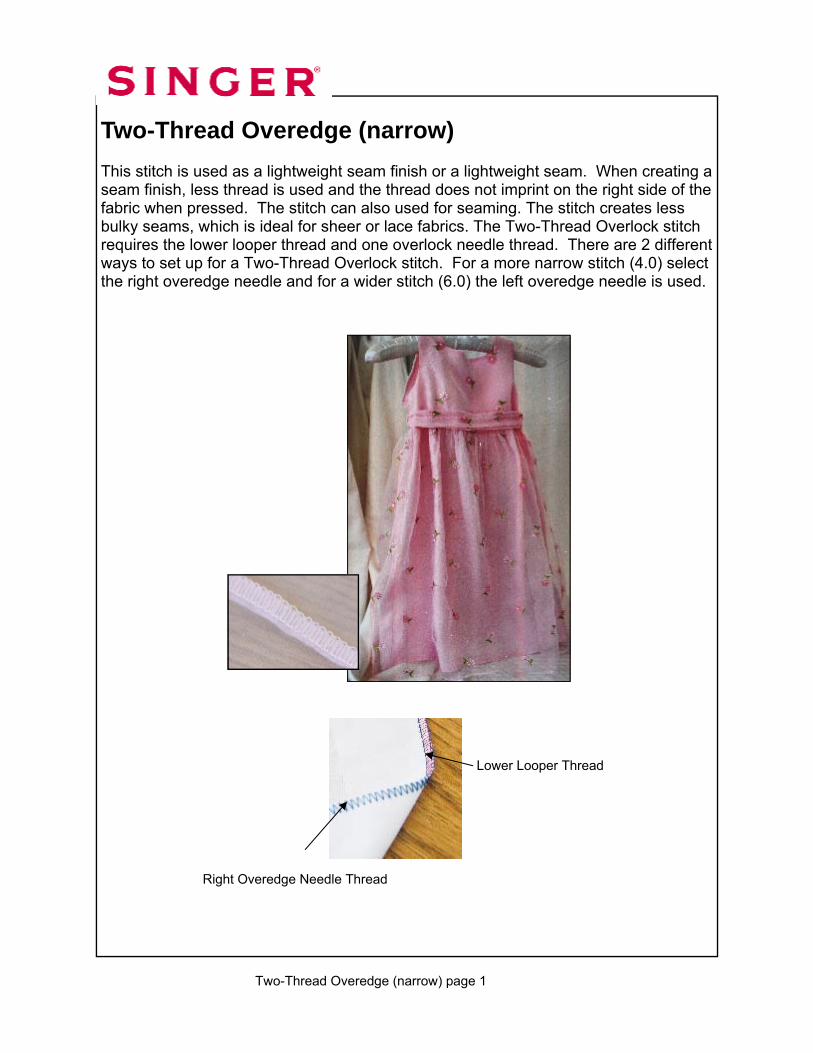
Two-Thread Overedge (narrow) This stitch is used as a lightweight seam finish or a lightweight seam. When creating a seam finish, less thread is used and the thread does not imprint on the right side of the fabric when pressed. The stitch can also used for seaming. The stitch creates less bulky seams, which is ideal for sheer or lace fabrics. The Two-Thread Overlock stitch requires the lower looper thread and one overlock needle thread. There are 2 different ways to set up for a Two-Thread Overlock stitch. For a more narrow stitch (4.0) select the right overedge needle and for a wider stitch (6.0) the left overedge needle is used.
Right Overedge Needle Thread
Lower Looper Thread
Two-Thread Overedge (narrow) page 1
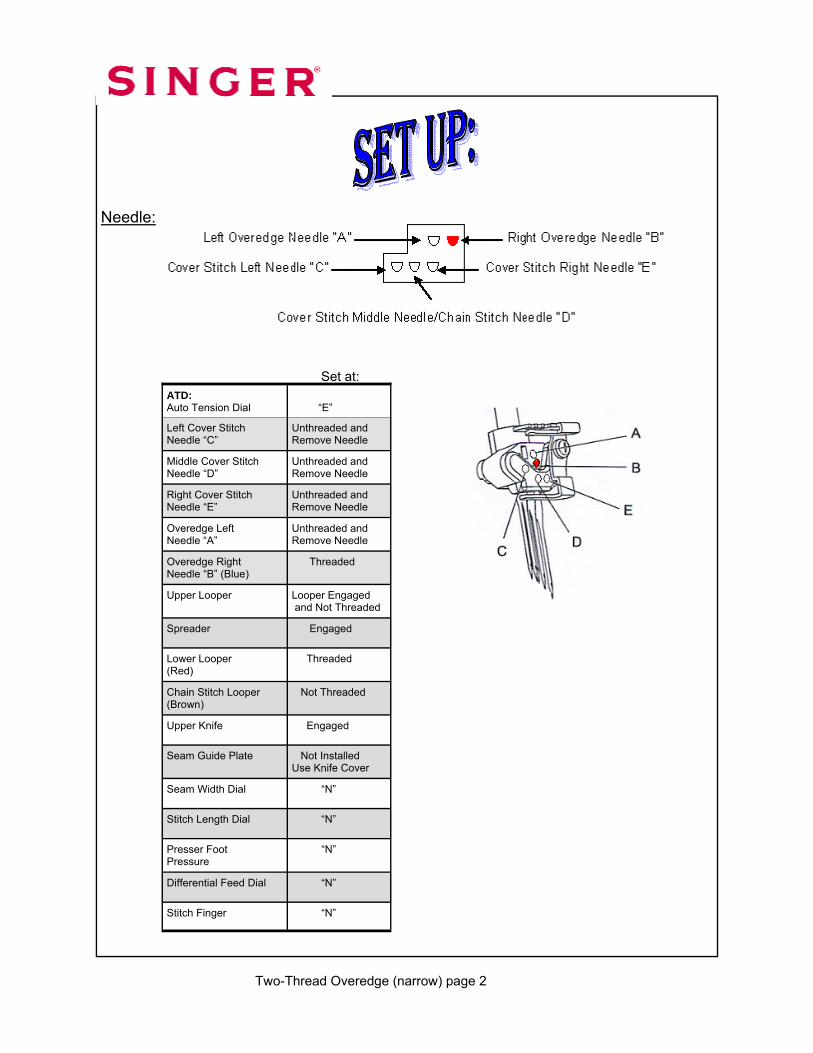
Needle:
ATD: Auto Tension Dial
“E”
Left Cover Stitch Needle “C”
Unthreaded and Remove Needle
Middle Cover Stitch Needle “D”
Unthreaded and Remove Needle
Right Cover Stitch Needle “E”
Unthreaded and Remove Needle
Overedge Left Needle “A”
Unthreaded and Remove Needle
Overedge Right Needle “B” (Blue)
Threaded
Upper Looper
Looper Engaged and Not Threaded
Lower Looper (Red)
Threaded
Chain Stitch Looper (Brown)
Not Threaded
Upper Knife Engaged
Seam Guide Plate Not Installed Use Knife Cover
Seam Width Dial “N”
Stitch Length Dial “N”
Presser Foot Pressure
“N”
Differential Feed Dial “N”
Stitch Finger “N”
Spreader Engaged
Two-Thread Overedge (narrow) page 2
Set at:
Two-Thread Overedge (narrow) page 3
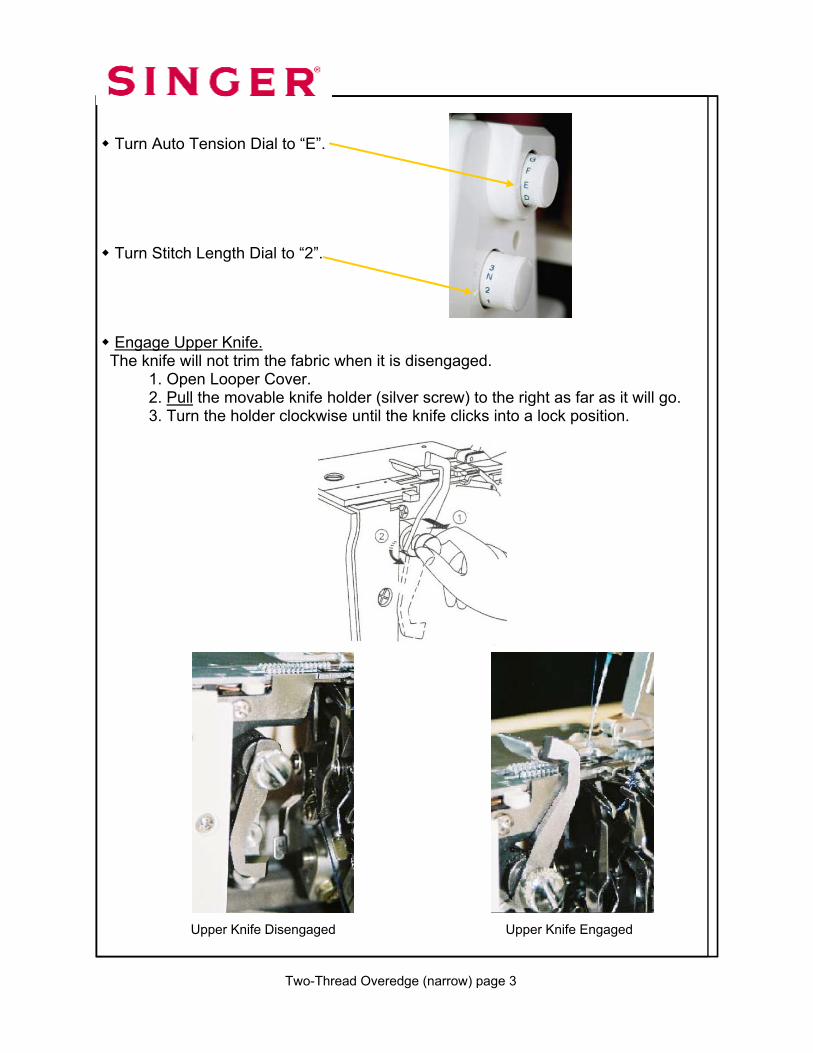
Turn Auto Tension Dial to “E”.
Turn Stitch Length Dial to “2”.
Engage Upper Knife. The knife will not trim the fabric when it is disengaged. 1. Open Looper Cover. 2. Pull the movable knife holder (silver screw) to the right as far as it will go. 3. Turn the holder clockwise until the knife clicks into a lock position.
Upper Knife Engaged Upper Knife Disengaged
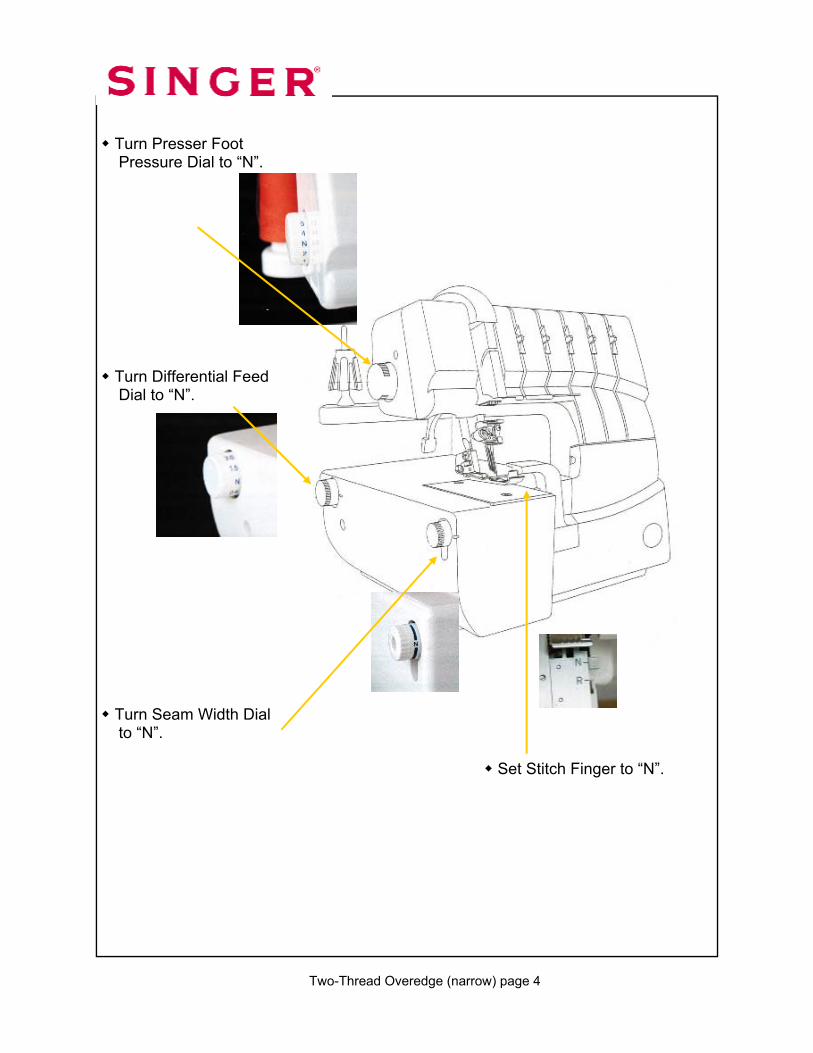
Turn Presser Foot Pressure Dial to “N”.
Turn Differential Feed Dial to “N”.
Turn Seam Width Dial to “N”. Set Stitch Finger to “N”.
Two-Thread Overedge (narrow) page 4

Install the Knife Cover.
Engage Upper Looper. Engaging the Upper Looper causes the looper to move when sewing. Even though the Upper Looper is not threaded, it needs to be engaged. 1. Push the clutch button to the left and down to engage. 2. Turn handwheel.
Upper Looper Disengaged
Upper Looper Engaged
Two-Thread Overedge (narrow) page 5
Two-Thread Overedge (narrow) page 6
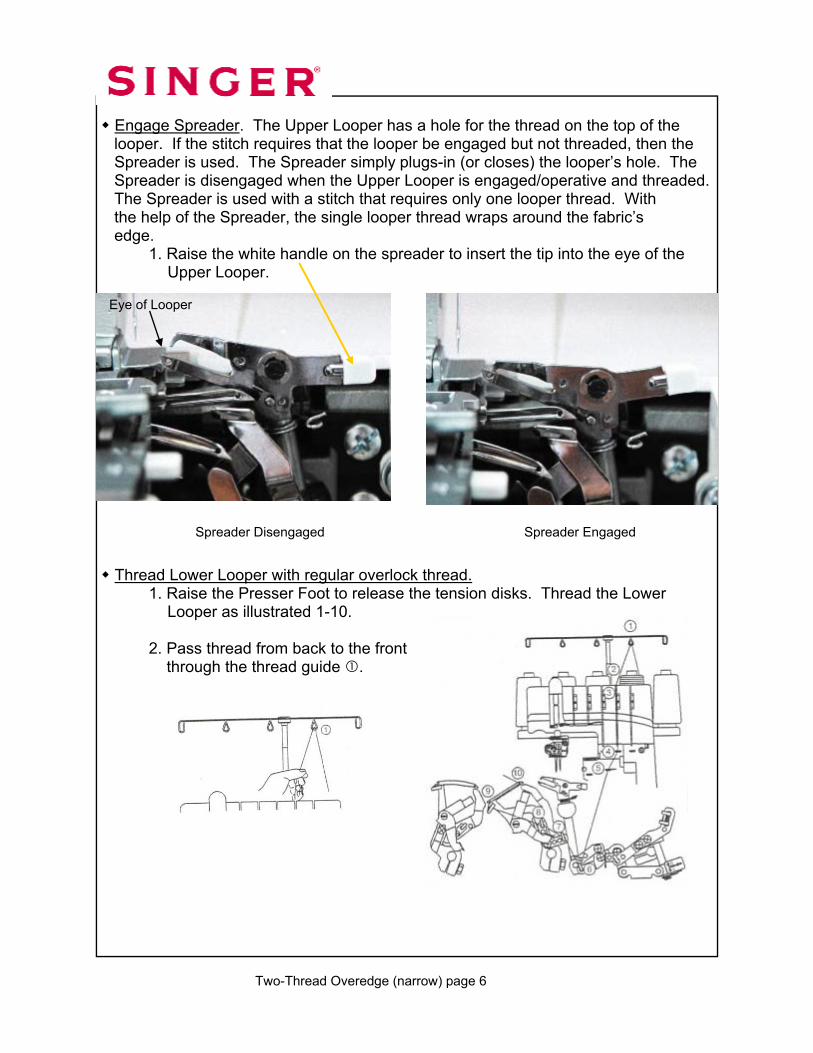
Engage Spreader. The Upper Looper has a hole for the thread on the top of the
looper. If the stitch requires that the looper be engaged but not threaded, then the Spreader is used. The Spreader simply plugs-in (or closes) the looper’s hole. The Spreader is disengaged when the Upper Looper is engaged/operative and threaded. The Spreader is used with a stitch that requires only one looper thread. With the help of the Spreader, the single looper thread wraps around the fabric’s edge. 1. Raise the white handle on the spreader to insert the tip into the eye of the Upper Looper.
Thread Lower Looper with regular overlock thread. 1. Raise the Presser Foot to release the tension disks. Thread the Lower Looper as illustrated 1-10. 2. Pass thread from back to the front through the thread guide .
Spreader Disengaged Spreader Engaged
Eye of Looper
Two-Thread Overedge (narrow) page 7
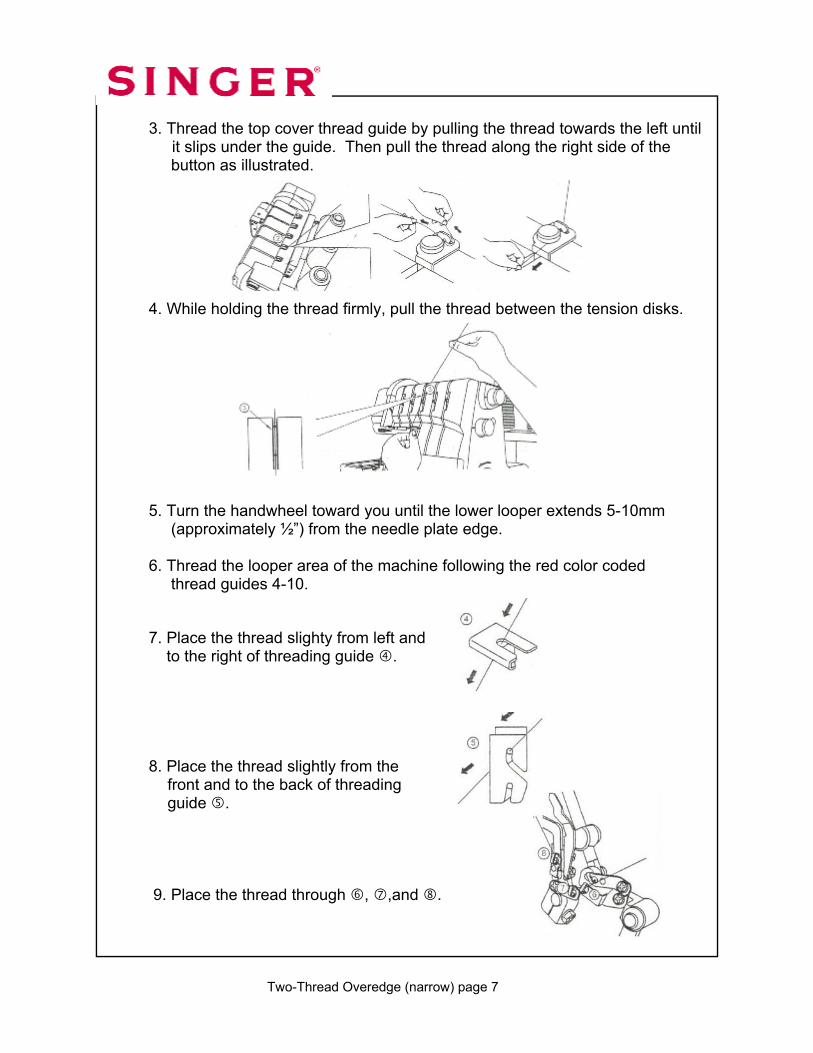
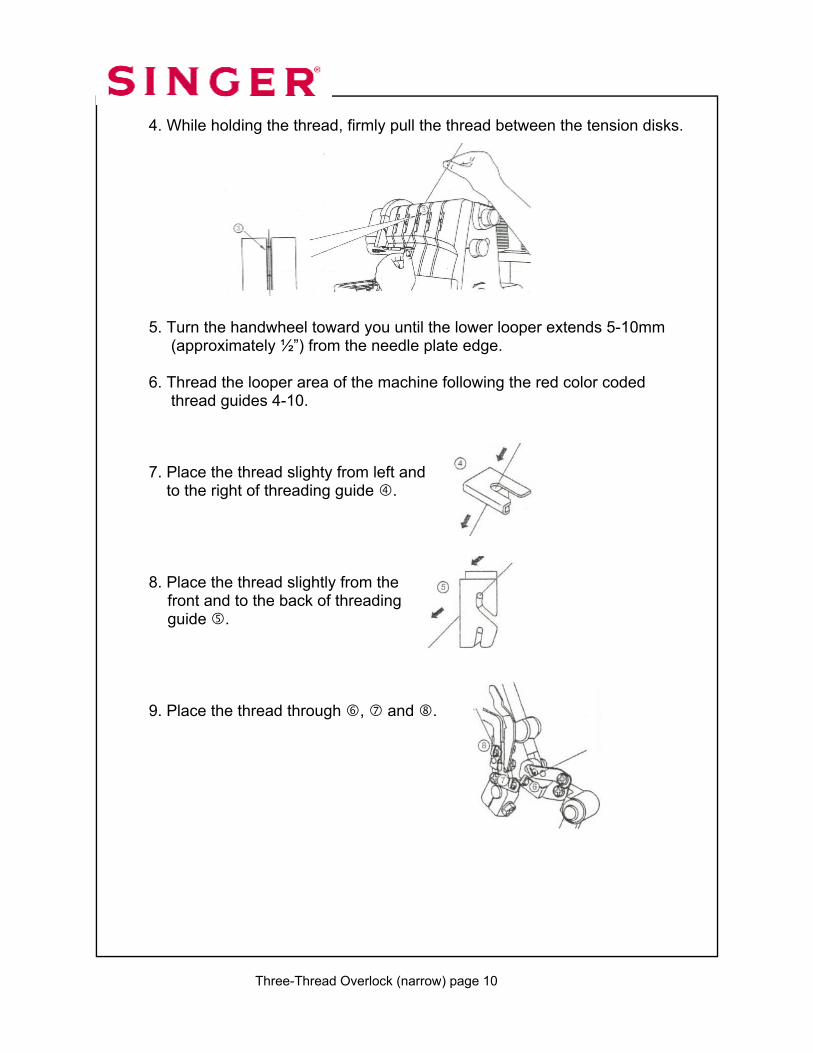
3. Thread the top cover thread guide by pulling the thread towards the left until it slips under the guide. Then pull the thread along the right side of the button as illustrated. 4. While holding the thread firmly, pull the thread between the tension disks. 5. Turn the handwheel toward you until the lower looper extends 5-10mm (approximately ½”) from the needle plate edge. 6. Thread the looper area of the machine following the red color coded thread guides 4-10. 7. Place the thread slighty from left and to the right of threading guide . 8. Place the thread slightly from the front and to the back of threading guide . 9. Place the thread through , ,and .
Two-Thread Overedge (narrow) page 8
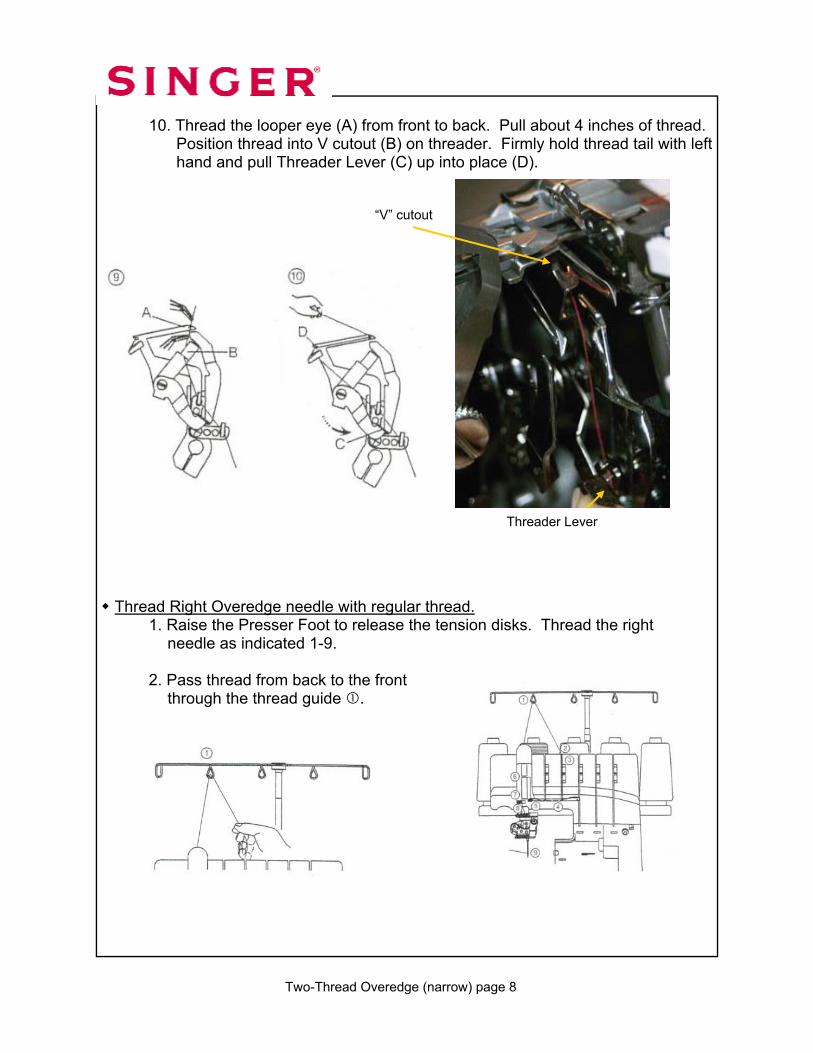
10. Thread the looper eye (A) from front to back. Pull about 4 inches of thread. Position thread into V cutout (B) on threader. Firmly hold thread tail with left hand and pull Threader Lever (C) up into place (D).
Thread Right Overedge needle with regular thread. 1. Raise the Presser Foot to release the tension disks. Thread the right needle as indicated 1-9. 2. Pass thread from back to the front through the thread guide .
Threader Lever
“V” cutout
Two-Thread Overedge (narrow) page 9
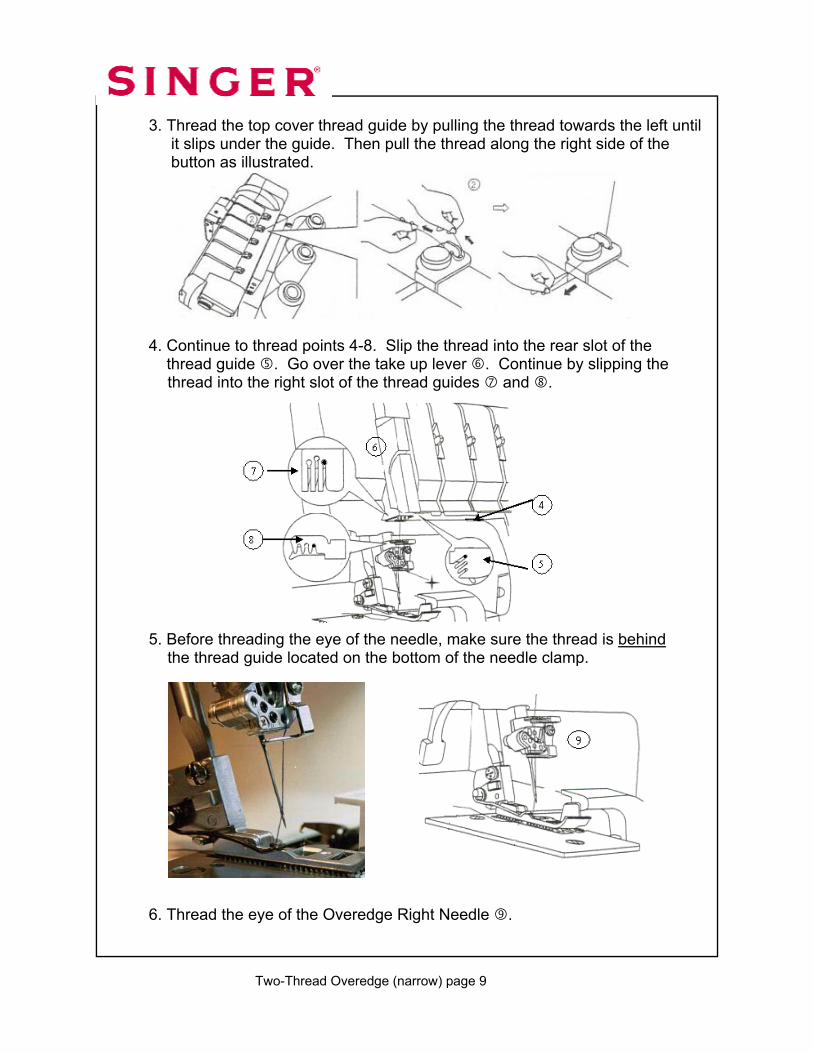
3. Thread the top cover thread guide by pulling the thread towards the left until it slips under the guide. Then pull the thread along the right side of the button as illustrated. 4. Continue to thread points 4-8. Slip the thread into the rear slot of the thread guide . Go over the take up lever . Continue by slipping the thread into the right slot of the thread guides and . 5. Before threading the eye of the needle, make sure the thread is behind the thread guide located on the bottom of the needle clamp. 6. Thread the eye of the Overedge Right Needle .
6
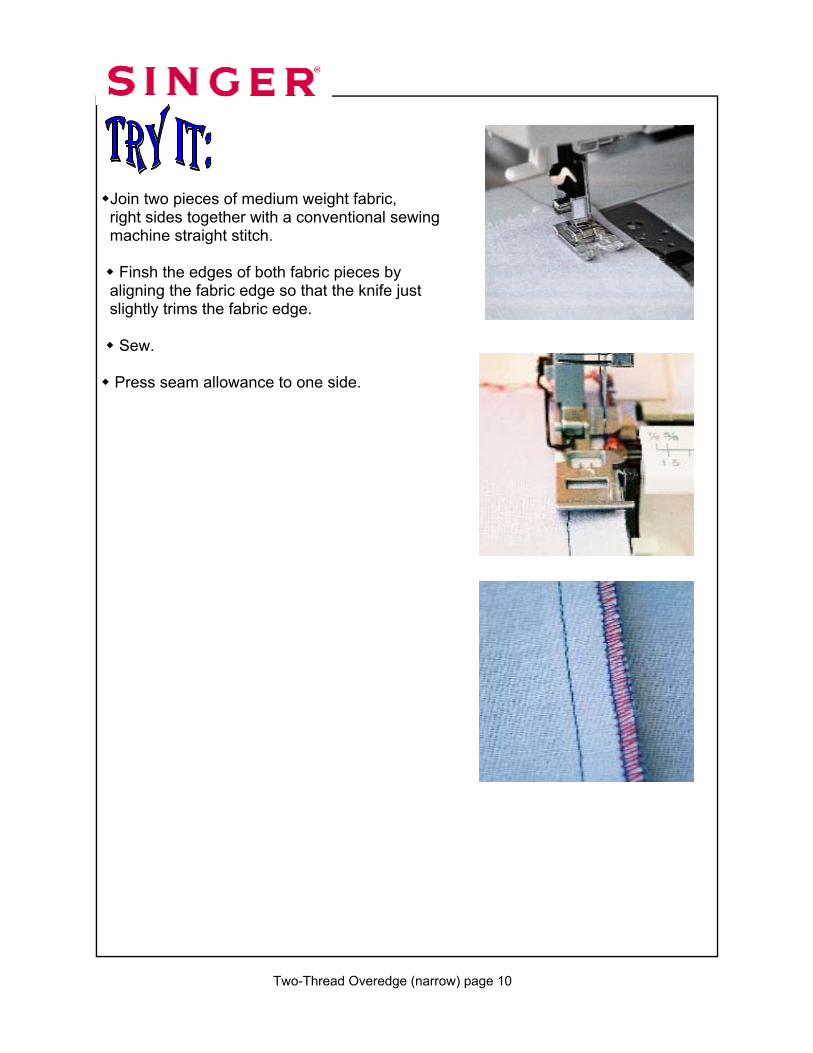
Join two pieces of medium weight fabric,
right sides together with a conventional sewing machine straight stitch. Finsh the edges of both fabric pieces by aligning the fabric edge so that the knife just slightly trims the fabric edge. Sew.
Press seam allowance to one side.
Two-Thread Overedge (narrow) page 10
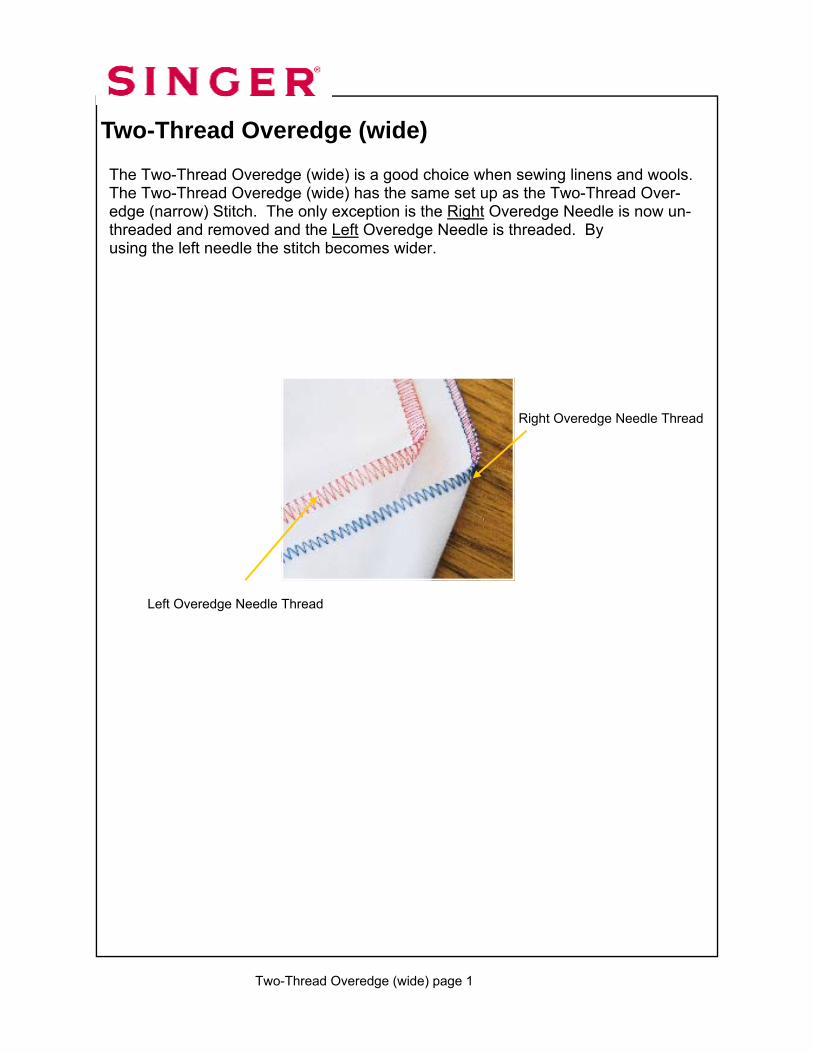
Two-Thread Overedge (wide)
The Two-Thread Overedge (wide) is a good choice when sewing linens and wools. The Two-Thread Overedge (wide) has the same set up as the Two-Thread Over-edge (narrow) Stitch. The only exception is the Right Overedge Needle is now un-threaded and removed and the Left Overedge Needle is threaded. By using the left needle the stitch becomes wider.
Two-Thread Overedge (wide) page 1
Right Overedge Needle Thread
Left Overedge Needle Thread
ATD: Auto Tension Dial
“E”
Left Cover Stitch Needle “C” (Orange)
Unthreaded and Remove Needle
Middle Cover Stitch Needle “D” (Blue)
Unthreaded and Remove Needle
Right Cover Stitch Needle “E” (Green)
Unthreaded and Remove Needle
Overedge Left Needle “A” (Orange)
Threaded
Overedge Right Needle “B” (Blue)
Unthreaded and Remove Needle
Upper Looper (Green)
Engage Looper and Not Threaded
Lower Looper (Red)
Threaded
Chain Stitch Looper (Brown)
Not Threaded
Upper Knife Engaged
Seam Guide Plate Not Installed
Seam Width Dial “N”
Stitch Length Dial “2”
Presser Foot Pressure
“N”
Differential Feed Dial “N”
Stitch Finger “N”
Spreader Engaged
Set at:
Needle:
Two-Thread Overedge (wide) page 2

Thread Left Overedge needle with regular thread.
1. Raise the Presser Foot to release the tension disks. Thread the left needle as illustrated 1-9. 2. Pass thread from back to the front through the thread guide . 3. Thread the top cover thread guide by pulling the thread towards the left until it slips under the guide. Then pull the thread along the right side of the button as illustrated. 4. While holding the thread firmly, pull the thread between the tension disks.
Two-Thread Overedge (wide) page 3
5. Continue to thread points 4-8. Slip the thread into the middle slot of the thread guide . Go over the take up lever . Continue by slipping the thread into the middle slot of the thread guides and . 6. Before threading the eye of the needle, make sure the thread is behind the thread guide located on the bottom of the needle clamp. 7. Thread the eye of the Left Overedge Needle . 8. Draw about 4 inches of the thread through the needle eye towards the back of the machine. 9. Place the thread to the back, under the Presser Foot. Lower foot and sew.
Two-Thread Overedge (wide) page 4
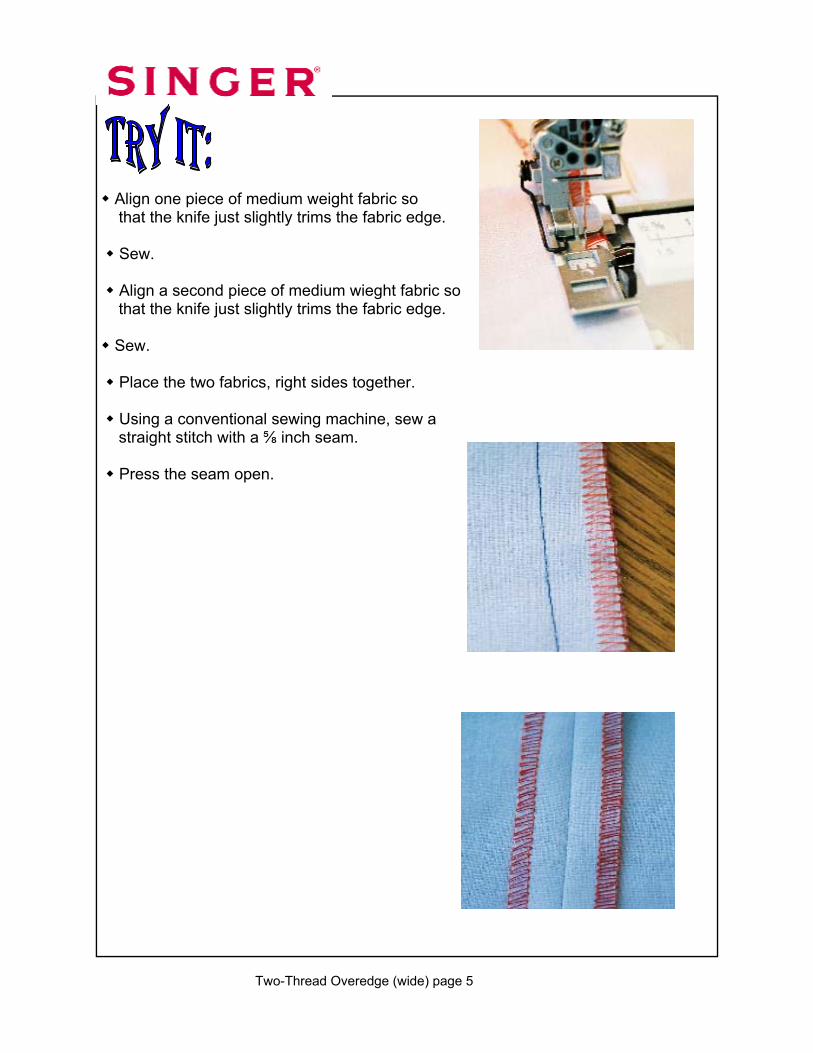
Align one piece of medium weight fabric so
that the knife just slightly trims the fabric edge. Sew. Align a second piece of medium wieght fabric so that the knife just slightly trims the fabric edge.
Sew. Place the two fabrics, right sides together. Using a conventional sewing machine, sew a straight stitch with a ⅝ inch seam. Press the seam open.
Two-Thread Overedge (wide) page 5

Chapter 4:
Three-Thread Overlock (narrow, wide, and wide with decorative threads)
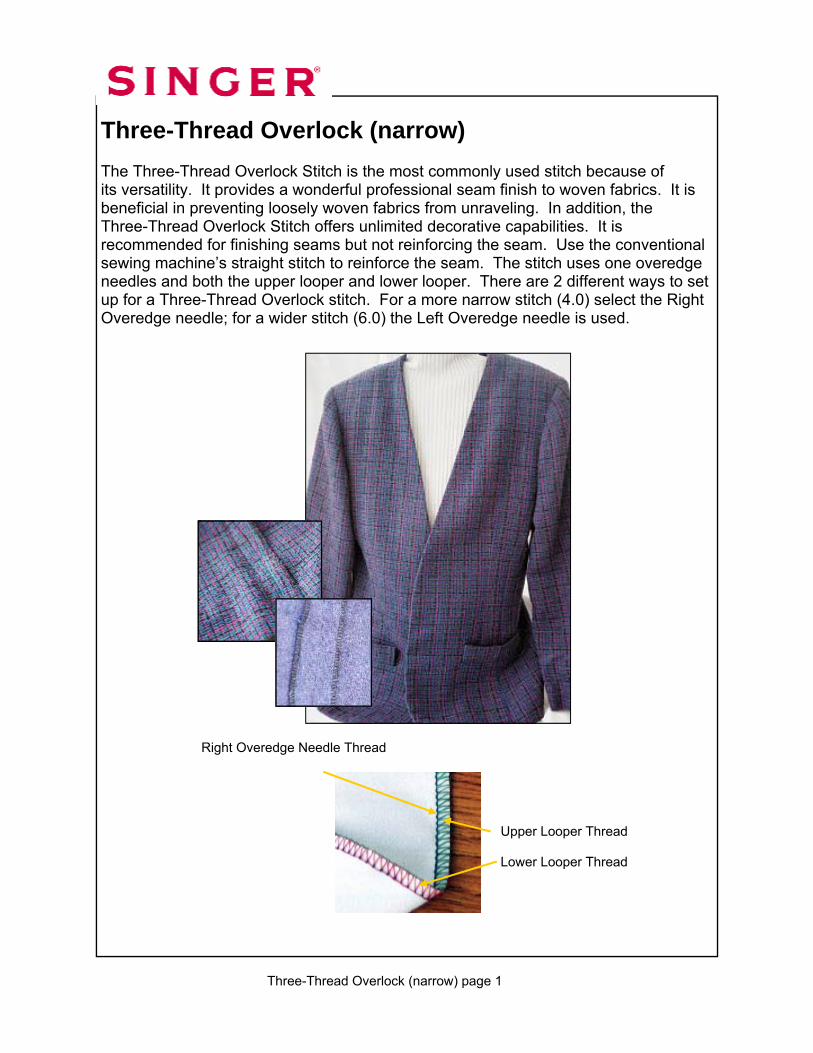
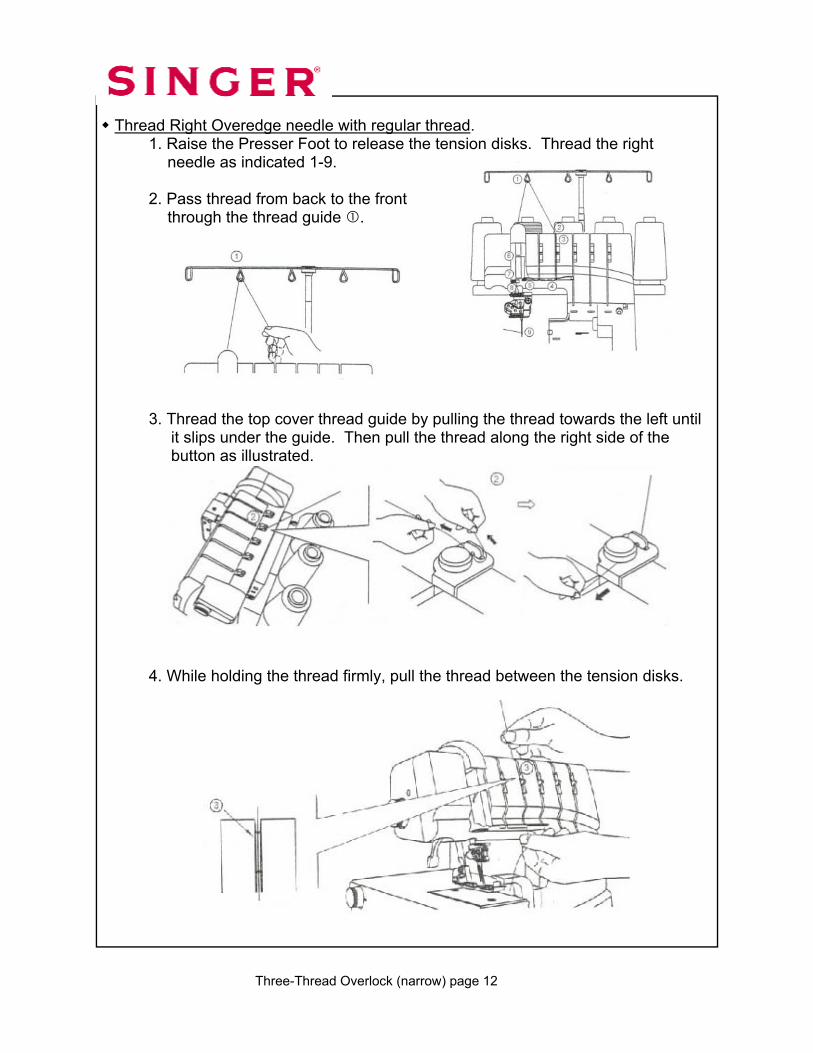
Three-Thread Overlock (narrow) The Three-Thread Overlock Stitch is the most commonly used stitch because of its versatility. It provides a wonderful professional seam finish to woven fabrics. It is beneficial in preventing loosely woven fabrics from unraveling. In addition, the Three-Thread Overlock Stitch offers unlimited decorative capabilities. It is recommended for finishing seams but not reinforcing the seam. Use the conventional sewing machine’s straight stitch to reinforce the seam. The stitch uses one overedge needles and both the upper looper and lower looper. There are 2 different ways to set up for a Three-Thread Overlock stitch. For a more narrow stitch (4.0) select the Right Overedge needle; for a wider stitch (6.0) the Left Overedge needle is used.
Upper Looper Thread Lower Looper Thread
Right Overedge Needle Thread
Three-Thread Overlock (narrow) page 1
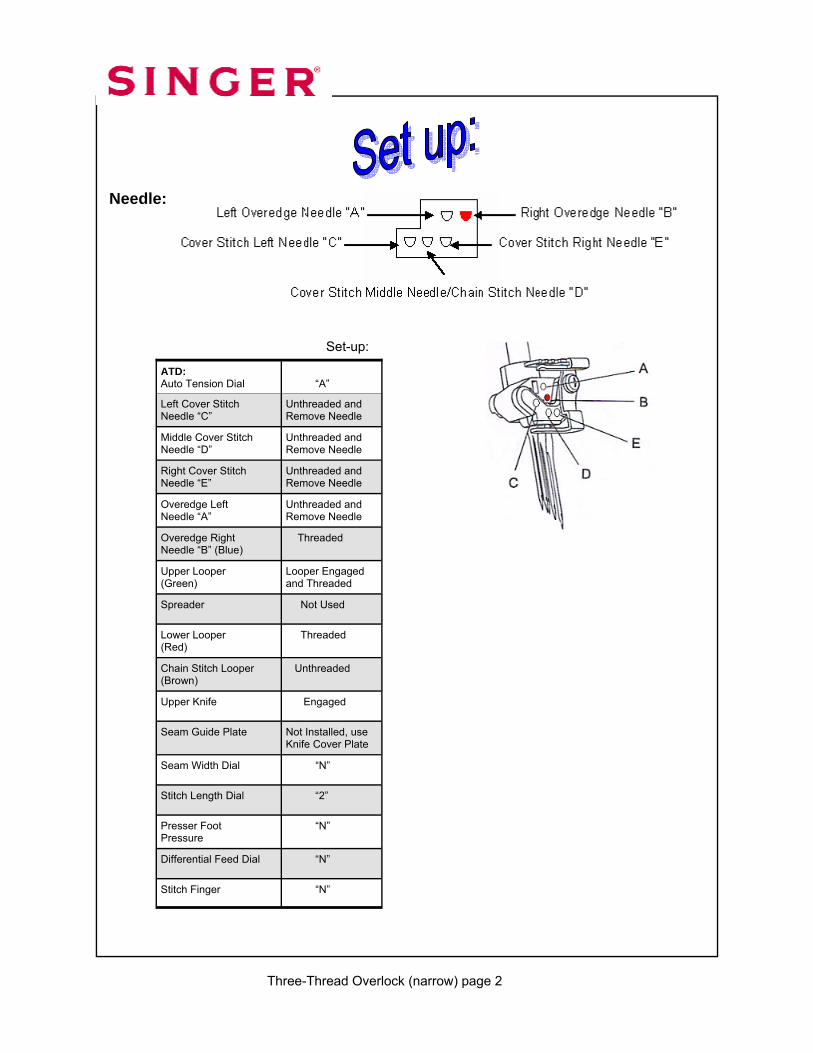
ATD: Auto Tension Dial
“A”
Left Cover Stitch Needle “C”
Unthreaded and Remove Needle
Middle Cover Stitch Needle “D”
Unthreaded and Remove Needle
Right Cover Stitch Needle “E”
Unthreaded and Remove Needle
Overedge Left Needle “A”
Unthreaded and Remove Needle
Overedge Right Needle “B” (Blue)
Threaded
Upper Looper (Green)
Looper Engaged and Threaded
Lower Looper (Red)
Threaded
Chain Stitch Looper (Brown)
Unthreaded
Upper Knife Engaged
Seam Guide Plate Not Installed, use Knife Cover Plate
Seam Width Dial “N”
Stitch Length Dial “2”
Presser Foot Pressure
“N”
Differential Feed Dial “N”
Stitch Finger “N”
Spreader Not Used
Set-up:
Needle:
Three-Thread Overlock (narrow) page 2
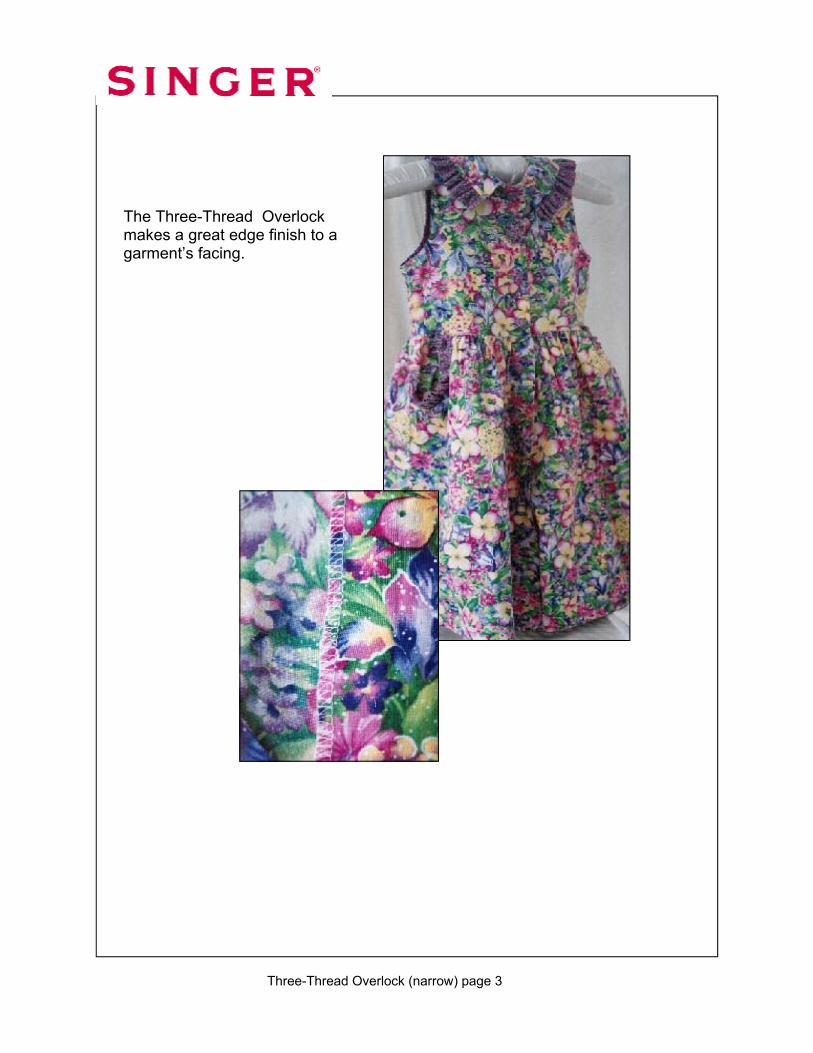
The Three-Thread Overlock makes a great edge finish to a garment’s facing.
Three-Thread Overlock (narrow) page 3
Three-Thread Overlock (narrow) page 4
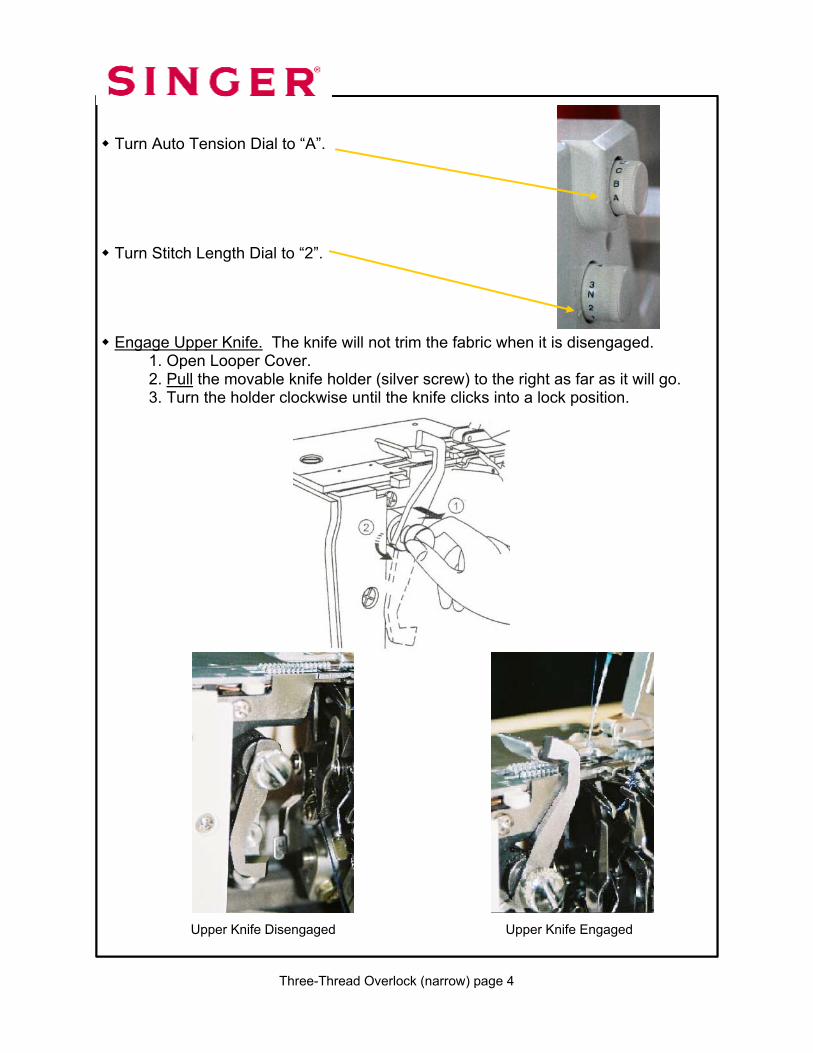
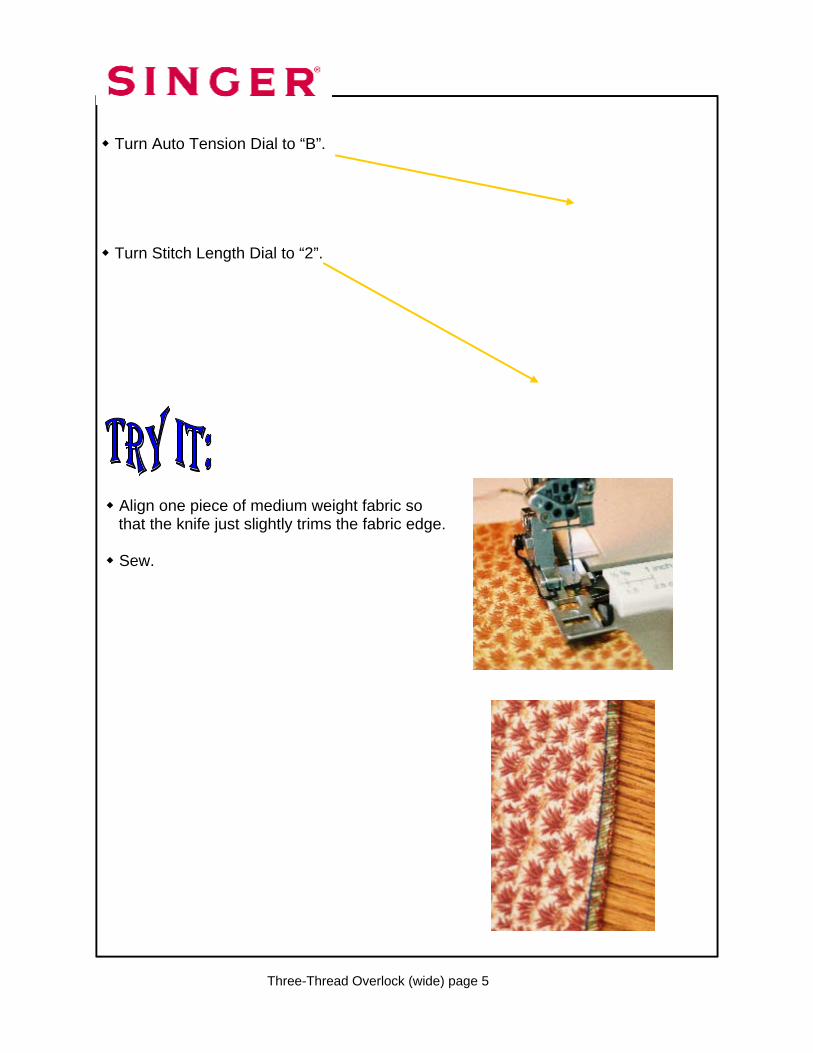
Turn Auto Tension Dial to “A”.
Turn Stitch Length Dial to “2”.
Engage Upper Knife. The knife will not trim the fabric when it is disengaged. 1. Open Looper Cover. 2. Pull the movable knife holder (silver screw) to the right as far as it will go. 3. Turn the holder clockwise until the knife clicks into a lock position.
Upper Knife Engaged Upper Knife Disengaged
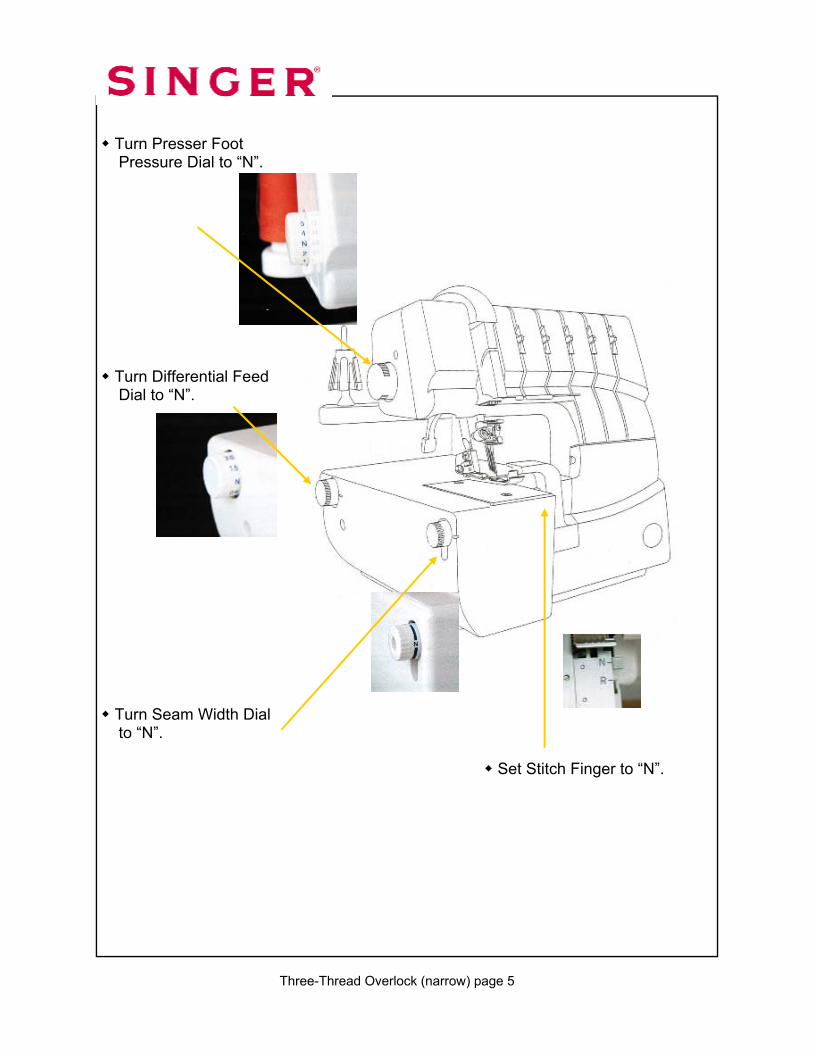
Turn Presser Foot Pressure Dial to “N”.
Turn Differential Feed Dial to “N”.
Turn Seam Width Dial to “N”. Set Stitch Finger to “N”.
Three-Thread Overlock (narrow) page 5

Install the Knife Cover.
Engage Upper Looper. Engaging the Upper Looper causes the looper move when sewing. Even though the Upper Looper is not threaded it needs to be engaged. 1. Push the clutch button to the left and down to engage. 2. Turn handwheel.
Upper Looper Disengaged
Upper Looper Engaged
Three-Thread Overlock (narrow) page 6
Two-Thread Overedge (narrow) page 7
Disengage Spreader. The Upper Looper has a hole for the thread on the top of the
looper. If the stitch requires that the looper be engaged but not threaded, then the Spreader is used. The Spreader simply plugs-in (or closes) the looper’s hole. The Spreader is disengaged when the Upper Looper is engaged/operative and threaded. The Spreader is used with a stitch that requires only one looper thread. With the help of the Spreader, the single looper thread wraps around the fabric’s edge. 1. Lower the white handle on the Spreader to open the eye of the Upper Looper.
Thread Upper Looper with regular overlock thread. 1. Raise the Presser Foot to release the tension disks. Thread the Lower Looper as illustrated 1-9. 2. Pass thread from back to the front through the thread guide.
Spreader Engaged Spreader Disengaged
Eye of Looper
3. Thread the top cover thread guide by pulling the thread towards the left until it slips under the guide. Then pull the thread along the right side of the button as illustrated. 4. While holding the thread, firmly pull the thread between the tension disks. 5. Turn the handwheel toward you until the lower looper extends 5-10mm (approximately ½”) from the needle plate edge. 6. Thread the looper area of the machine following the green color coded thread guides 4-9.
Three-Thread Overlock (narrow) page 8

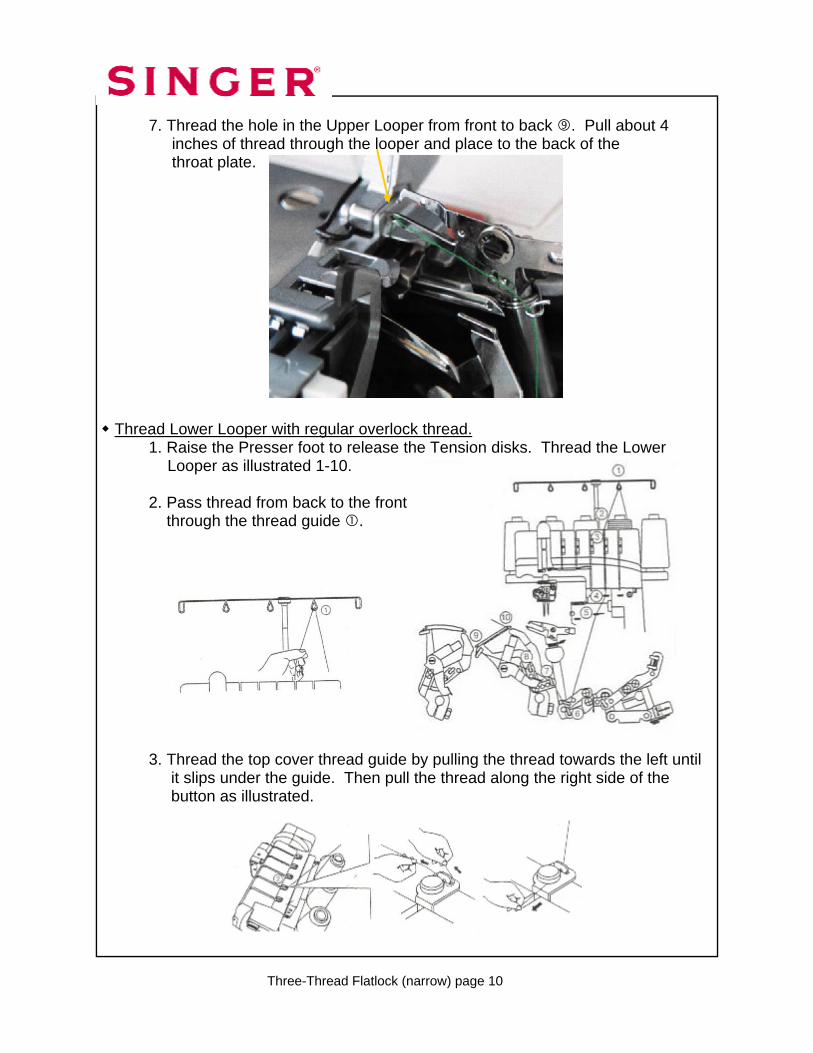
7. Thread the hole in the Upper Looper from front to back . Pull about 4 inches of thread through the looper and place to the back of the throat plate.
Thread Lower Looper with regular overlock thread. 1. Raise the Presser Foot to release the tension disks. Thread the Lower Looper as indicated 1-10. 2. Pass thread from back to the front through the thread guide . 3. Thread the top cover thread guide by pulling the thread towards the left until it slips under the guide. Then pull the thread along the right side of the button as illustrated.
Three-Thread Overlock (narrow) page 9
4. While holding the thread, firmly pull the thread between the tension disks. 5. Turn the handwheel toward you until the lower looper extends 5-10mm (approximately ½”) from the needle plate edge. 6. Thread the looper area of the machine following the red color coded thread guides 4-10. 7. Place the thread slighty from left and to the right of threading guide . 8. Place the thread slightly from the front and to the back of threading guide . 9. Place the thread through , and .
Three-Thread Overlock (narrow) page 10
Three-Thread Overlock (narrow) page 11
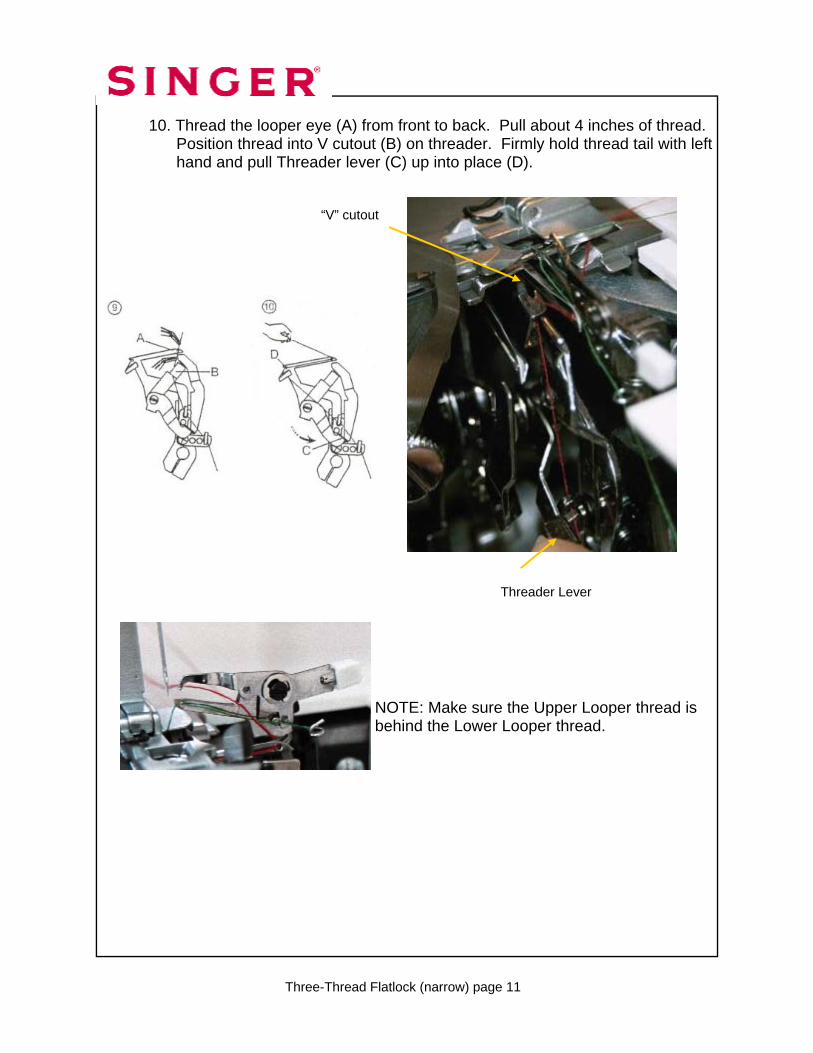
10. Thread the looper eye (A) from front to back. Pull about 4 inches of thread. Position thread into V cutout (B) on threader. Firmly hold thread tail with left hand and pull Threader Lever (C) up into place (D).
NOTE: Make sure the Upper Looper thread is behind the Lower Looper thread.
Threader Lever
“V” cutout
Thread Right Overedge needle with regular thread.
1. Raise the Presser Foot to release the tension disks. Thread the right needle as indicated 1-9. 2. Pass thread from back to the front through the thread guide . 3. Thread the top cover thread guide by pulling the thread towards the left until it slips under the guide. Then pull the thread along the right side of the button as illustrated. 4. While holding the thread firmly, pull the thread between the tension disks.
Three-Thread Overlock (narrow) page 12
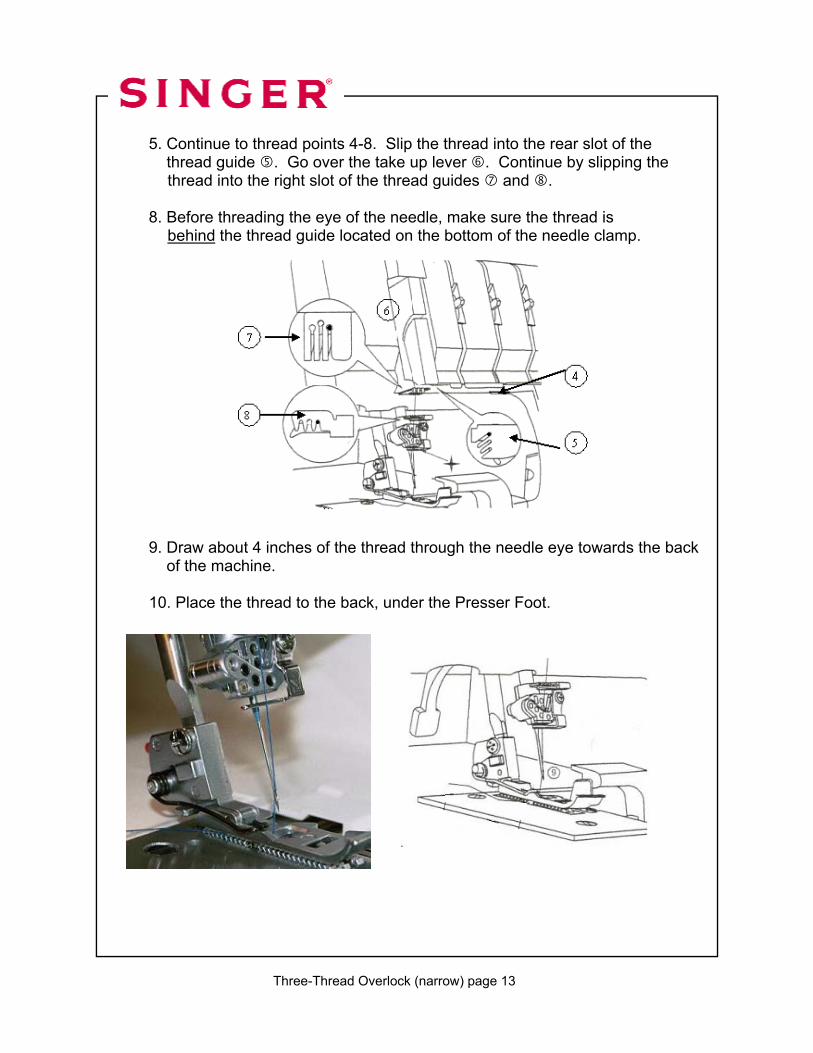
5. Continue to thread points 4-8. Slip the thread into the rear slot of the thread guide . Go over the take up lever . Continue by slipping the thread into the right slot of the thread guides and . 8. Before threading the eye of the needle, make sure the thread is behind the thread guide located on the bottom of the needle clamp. 9. Draw about 4 inches of the thread through the needle eye towards the back of the machine. 10. Place the thread to the back, under the Presser Foot.
Three-Thread Overlock (narrow) page 13
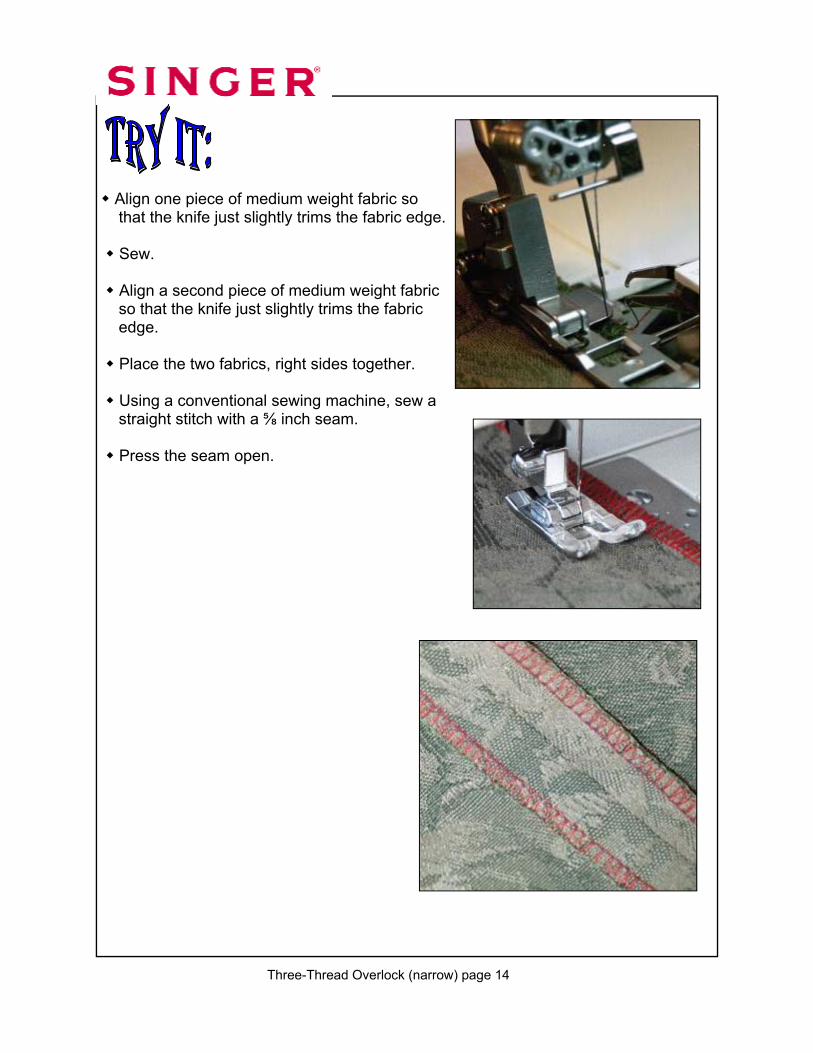
Align one piece of medium weight fabric so
that the knife just slightly trims the fabric edge. Sew. Align a second piece of medium weight fabric so that the knife just slightly trims the fabric edge. Place the two fabrics, right sides together. Using a conventional sewing machine, sew a straight stitch with a ⅝ inch seam. Press the seam open.
Three-Thread Overlock (narrow) page 14
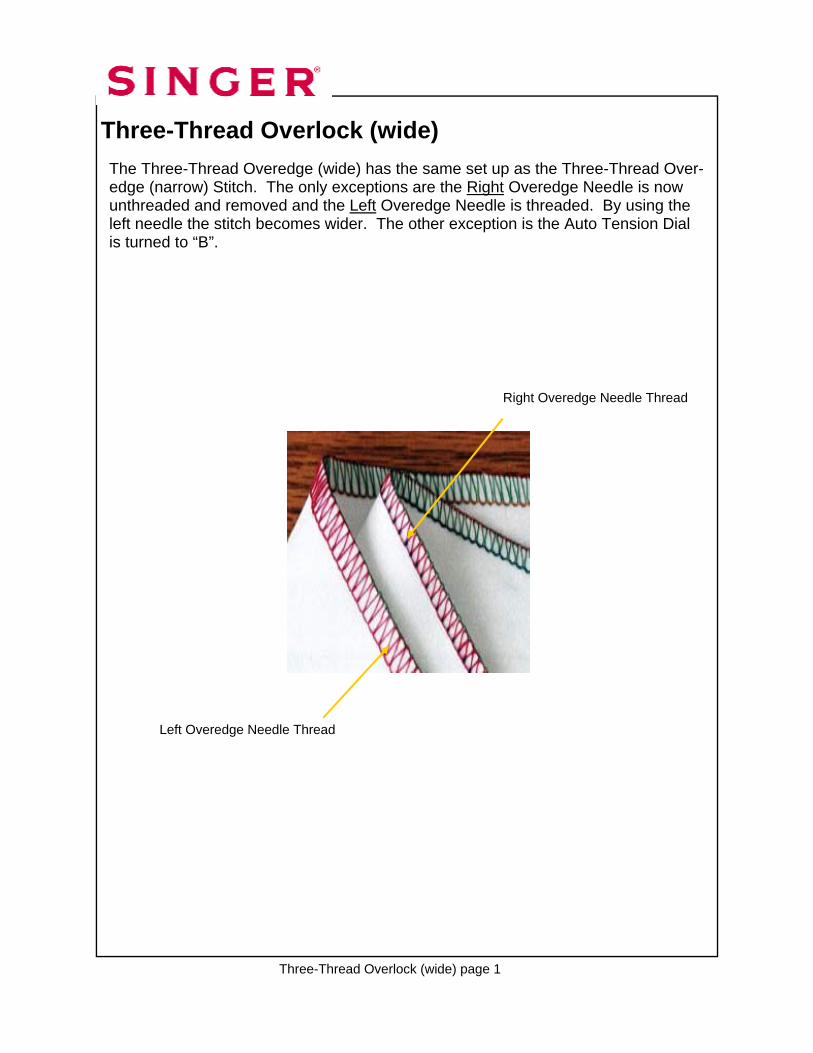
Three-Thread Overlock (wide)
The Three-Thread Overedge (wide) has the same set up as the Three-Thread Over-edge (narrow) Stitch. The only exceptions are the Right Overedge Needle is now unthreaded and removed and the Left Overedge Needle is threaded. By using the left needle the stitch becomes wider. The other exception is the Auto Tension Dial is turned to “B”.
Three-Thread Overlock (wide) page 1
Right Overedge Needle Thread
Left Overedge Needle Thread

ATD: Auto Tension Dial
“B”
Left Cover Stitch Needle “C”
Unthreaded and Remove Needle
Middle Cover Stitch Needle “D”
Unthreaded and Remove Needle
Right Cover Stitch Needle “E”
Unthreaded and Remove Needle
Overedge Left Needle “A” (Orange)
Threaded
Overedge Right Needle “B”
Unthreaded and Remove Needle
Upper Looper (Green)
Looper Engaged and Threaded
Lower Looper (Red)
Threaded
Chain Stitch Looper (Brown)
Unthreaded
Upper Knife Engaged
Seam Guide Plate Not Installed, use Knife Plate Cover
Seam Width Dial “N”
Stitch Length Dial “2”
Presser Foot Pressure
“N”
Differential Feed Dial “N”
Stitch Finger “N”
Spreader Disengaged
Set-up:
Needle:
Three-Thread Overlock (wide) page 2

Thread Left Overedge needle with regular thread.
1. Raise the Presser Foot to release the tension disks. Thread the left needle as illustrated 1-9. 2. Pass thread from back to the front through the thread guide. 3. Thread the top cover thread guide by pulling the thread towards the left until it slips under the guide. Then pull the thread along the right side of the button as illustrated. 4. While holding the thread firmly, pull the thread between the tension disks.
Three-Thread Overlock (wide) page 3
5. Continue to thread points 4-8. Slip the thread into the middle slot of the thread guide . Go over the take up lever . Continue by slipping the thread into the middle slot of the thread guides and . 6. Before threading the eye of the needle, make sure the thread is behind the thread guide located on the bottom of the needle clamp. 7. Thread the eye of the left needle .
8. Draw about 4 inches of the thread through the needle eye towards the back of the machine. 9. Place the thread to the back, under the Presser Foot.
Three-Thread Overlock (wide) page 4
Turn Auto Tension Dial to “B”.
Turn Stitch Length Dial to “2”.
Align one piece of medium weight fabric so that the knife just slightly trims the fabric edge. Sew.
Three-Thread Overlock (wide) page 5
Three-Thread Overedge (wide with decorative thread)
Three-Thread Overlock (wide-decorative) page 1
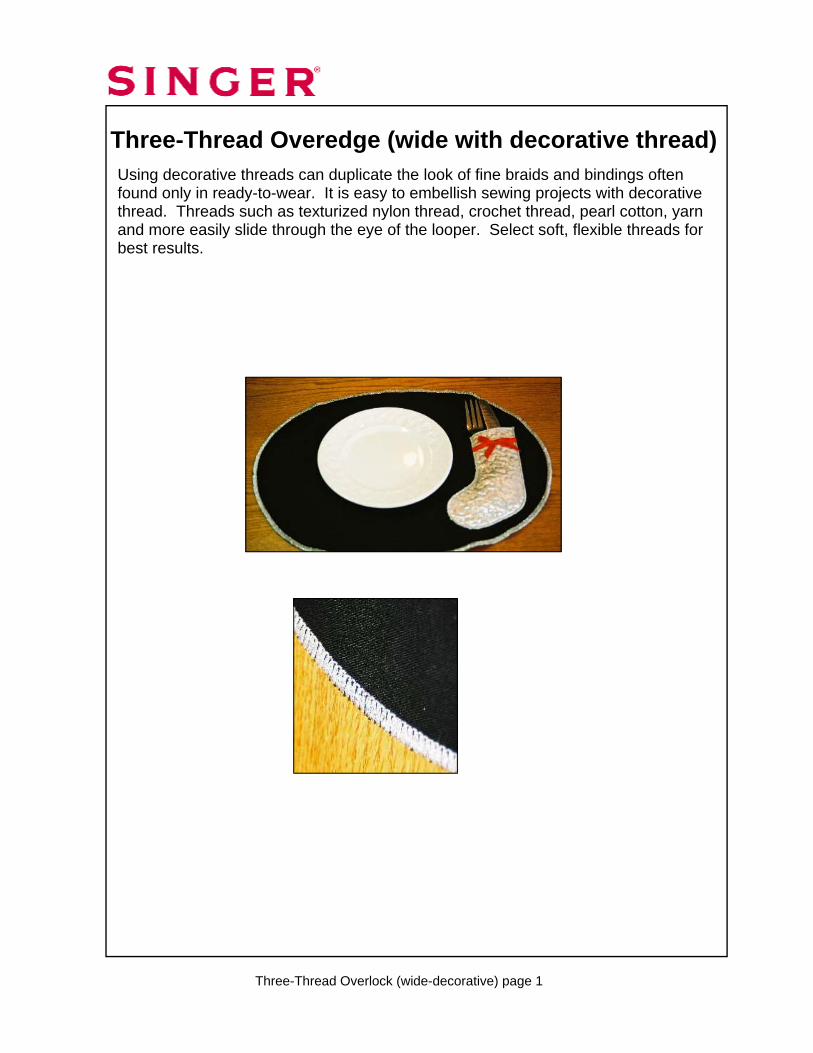
Using decorative threads can duplicate the look of fine braids and bindings often found only in ready-to-wear. It is easy to embellish sewing projects with decorative thread. Threads such as texturized nylon thread, crochet thread, pearl cotton, yarn and more easily slide through the eye of the looper. Select soft, flexible threads for best results.
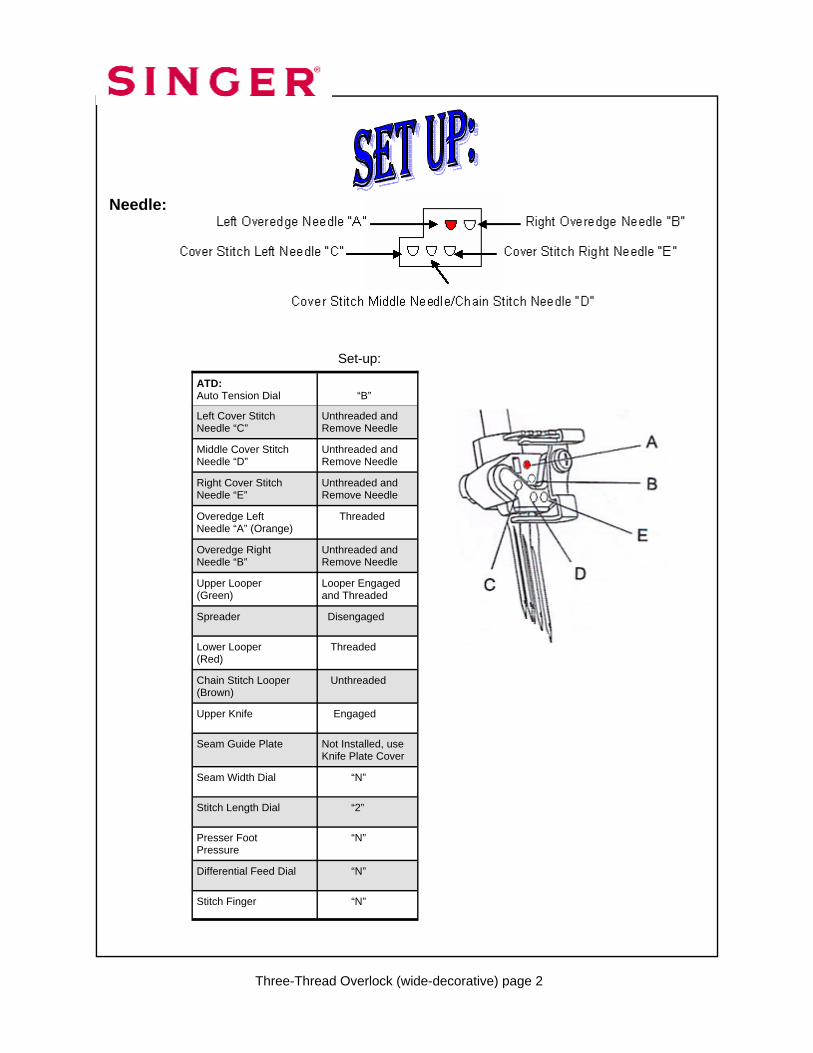
ATD: Auto Tension Dial
“B”
Left Cover Stitch Needle “C”
Unthreaded and Remove Needle
Middle Cover Stitch Needle “D”
Unthreaded and Remove Needle
Right Cover Stitch Needle “E”
Unthreaded and Remove Needle
Overedge Left Needle “A” (Orange)
Threaded
Overedge Right Needle “B”
Unthreaded and Remove Needle
Upper Looper (Green)
Looper Engaged and Threaded
Lower Looper (Red)
Threaded
Chain Stitch Looper (Brown)
Unthreaded
Upper Knife Engaged
Seam Guide Plate Not Installed, use Knife Plate Cover
Seam Width Dial “N”
Stitch Length Dial “2”
Presser Foot Pressure
“N”
Differential Feed Dial “N”
Stitch Finger “N”
Spreader Disengaged
Set-up:
Needle:
Three-Thread Overlock (wide-decorative) page 2
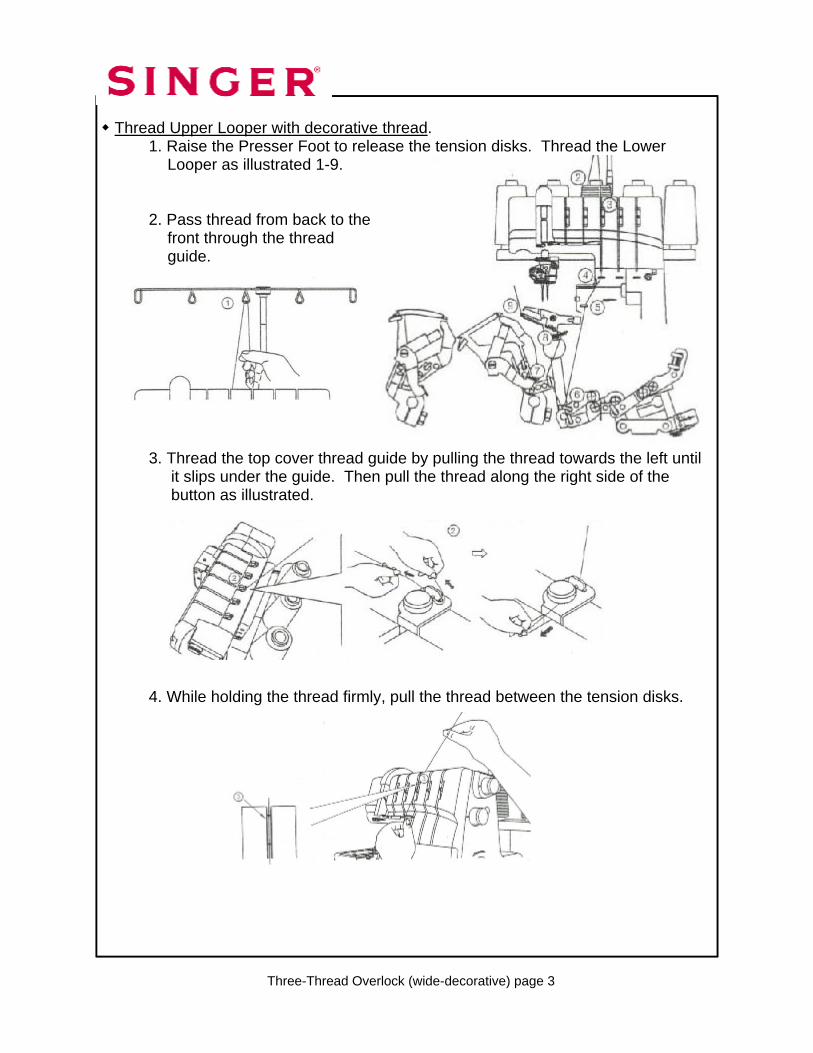
Thread Upper Looper with decorative thread.
1. Raise the Presser Foot to release the tension disks. Thread the Lower Looper as illustrated 1-9. 2. Pass thread from back to the front through the thread guide. 3. Thread the top cover thread guide by pulling the thread towards the left until it slips under the guide. Then pull the thread along the right side of the button as illustrated. 4. While holding the thread firmly, pull the thread between the tension disks.
Three-Thread Overlock (wide-decorative) page 3
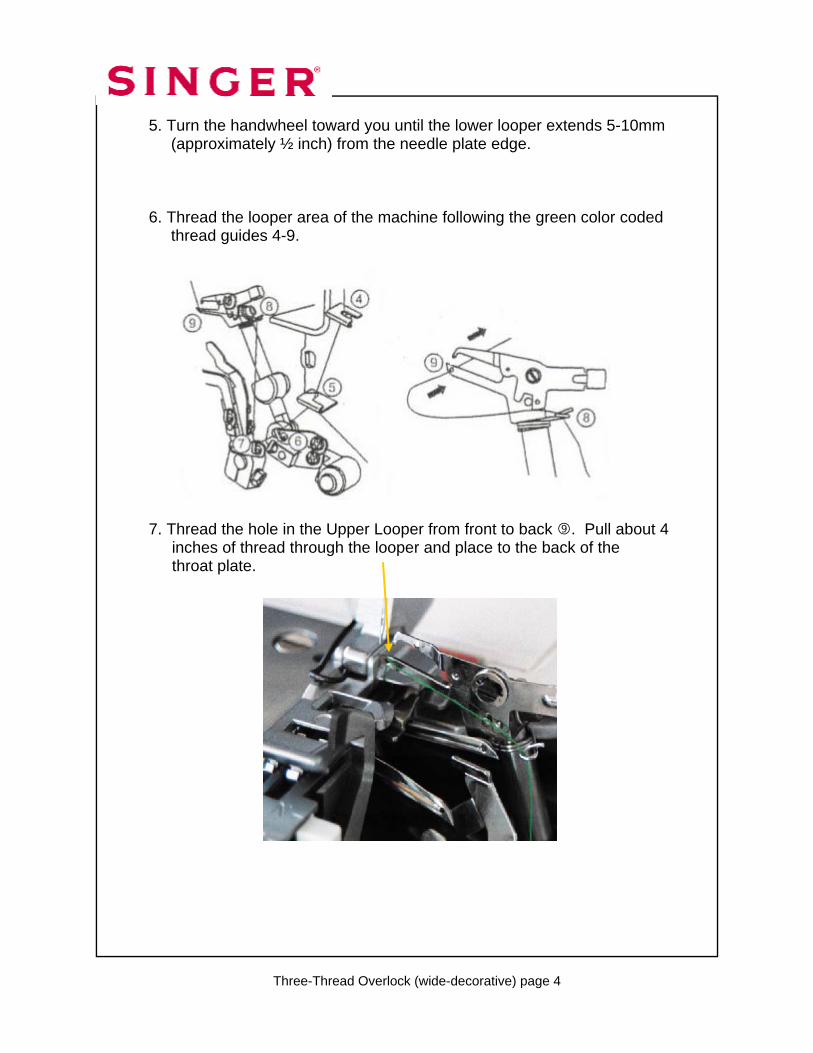
5. Turn the handwheel toward you until the lower looper extends 5-10mm (approximately ½ inch) from the needle plate edge. 6. Thread the looper area of the machine following the green color coded thread guides 4-9. 7. Thread the hole in the Upper Looper from front to back . Pull about 4 inches of thread through the looper and place to the back of the throat plate.
Three-Thread Overlock (wide-decorative) page 4

Thread Lower Looper with decorative overlock thread.
1. Raise the Presser Foot to release the tension disks. Thread the Lower Looper as illustrated 1-10. 2. Pass thread from back to the front through the thread guide . 3. Thread the top cover thread guide by pulling the thread towards the left until it slips under the guide. Then pull the thread along the right side of the button as illustrated. 4. While holding the thread, firmly pull the thread between the tension disks. 5. Turn the handwheel toward you until the lower looper extends 5-10mm (approximately ½ inch) from the needle plate edge.
Three-Thread Overlock (wide-decorative) page 5
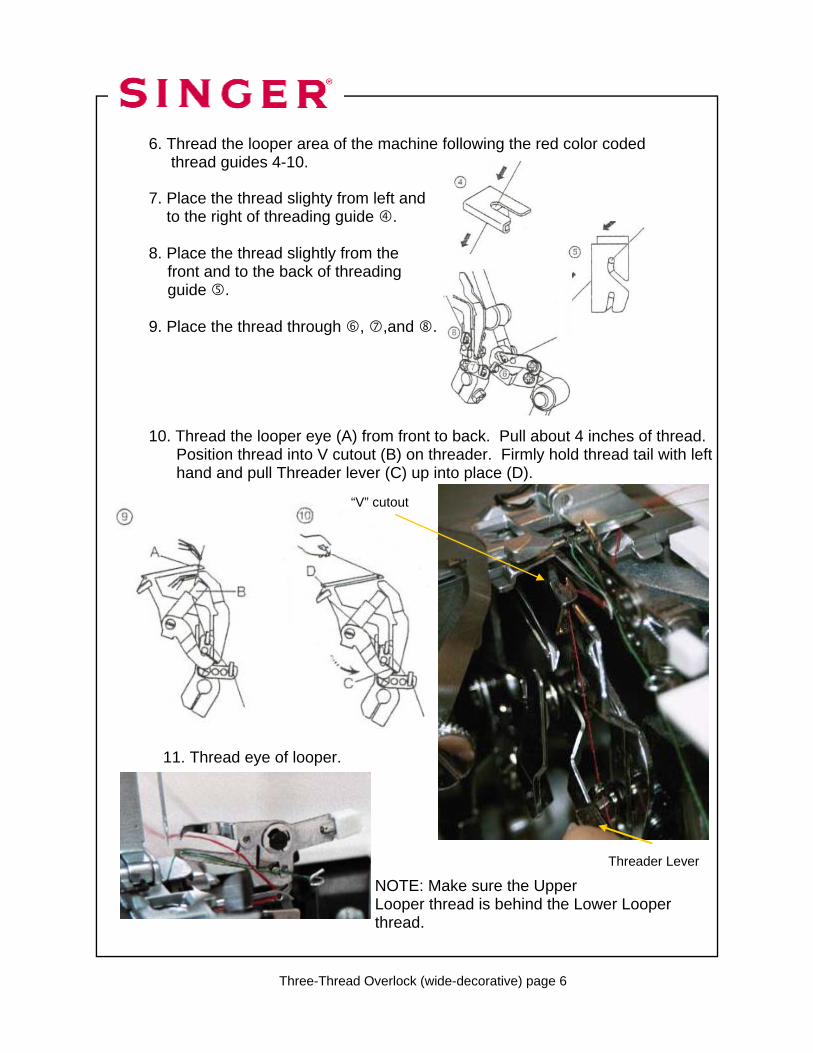
6. Thread the looper area of the machine following the red color coded thread guides 4-10. 7. Place the thread slighty from left and to the right of threading guide . 8. Place the thread slightly from the front and to the back of threading guide . 9. Place the thread through , ,and . 10. Thread the looper eye (A) from front to back. Pull about 4 inches of thread. Position thread into V cutout (B) on threader. Firmly hold thread tail with left hand and pull Threader lever (C) up into place (D).
11. Thread eye of looper.
NOTE: Make sure the Upper Looper thread is behind the Lower Looper thread.
Three-Thread Overlock (wide-decorative) page 6
“V” cutout
Threader Lever
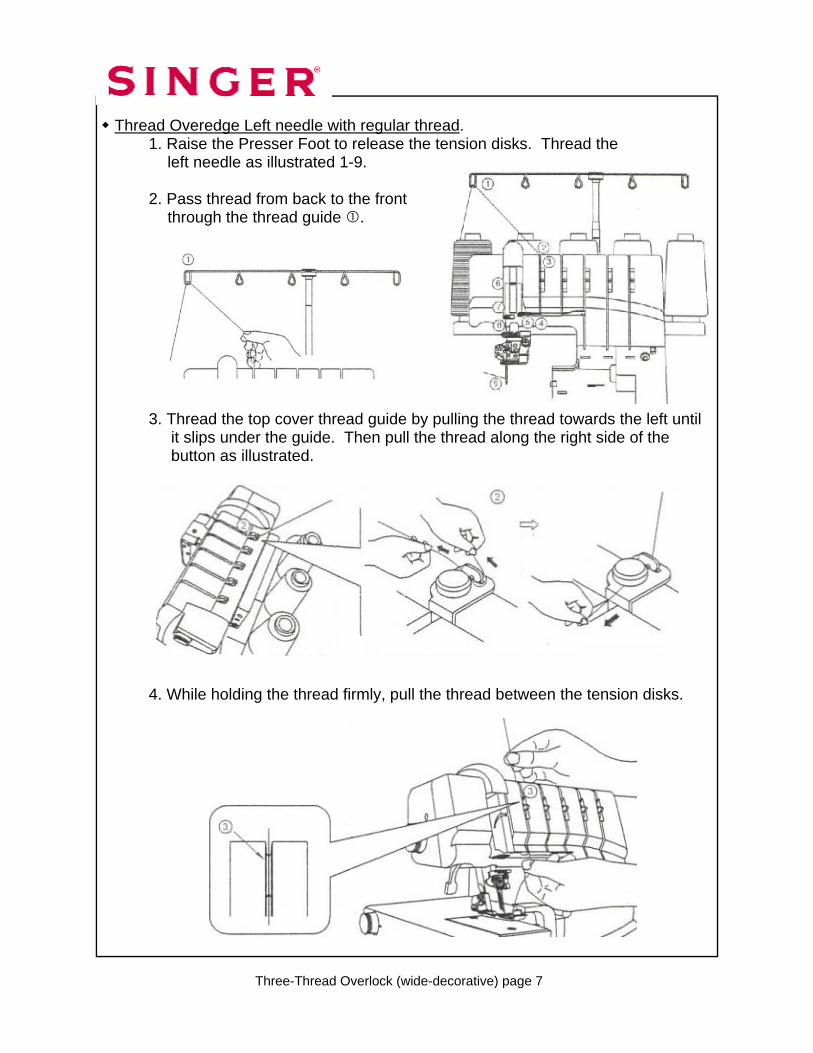
Thread Overedge Left needle with regular thread.
1. Raise the Presser Foot to release the tension disks. Thread the left needle as illustrated 1-9. 2. Pass thread from back to the front through the thread guide . 3. Thread the top cover thread guide by pulling the thread towards the left until it slips under the guide. Then pull the thread along the right side of the button as illustrated. 4. While holding the thread firmly, pull the thread between the tension disks.
Three-Thread Overlock (wide-decorative) page 7

Three-Thread Overlock (wide-decorative) page 8
5. Continue to thread points 4-8. Slip the thread into the middle slot of the thread guide . Go over the take up lever . Continue by slipping the thread into the middle slot of the thread guides and . 6. Before threading the eye of the needle, make sure the thread is behind the thread guide located on the bottom of the needle clamp. 7. Thread the eye of the Left Overedge Needle . 8. Draw about 4 inches of the thread through the needle eye towards the back of the machine. 9. Place the thread to the back, under the Presser Foot. Lower foot and sew.
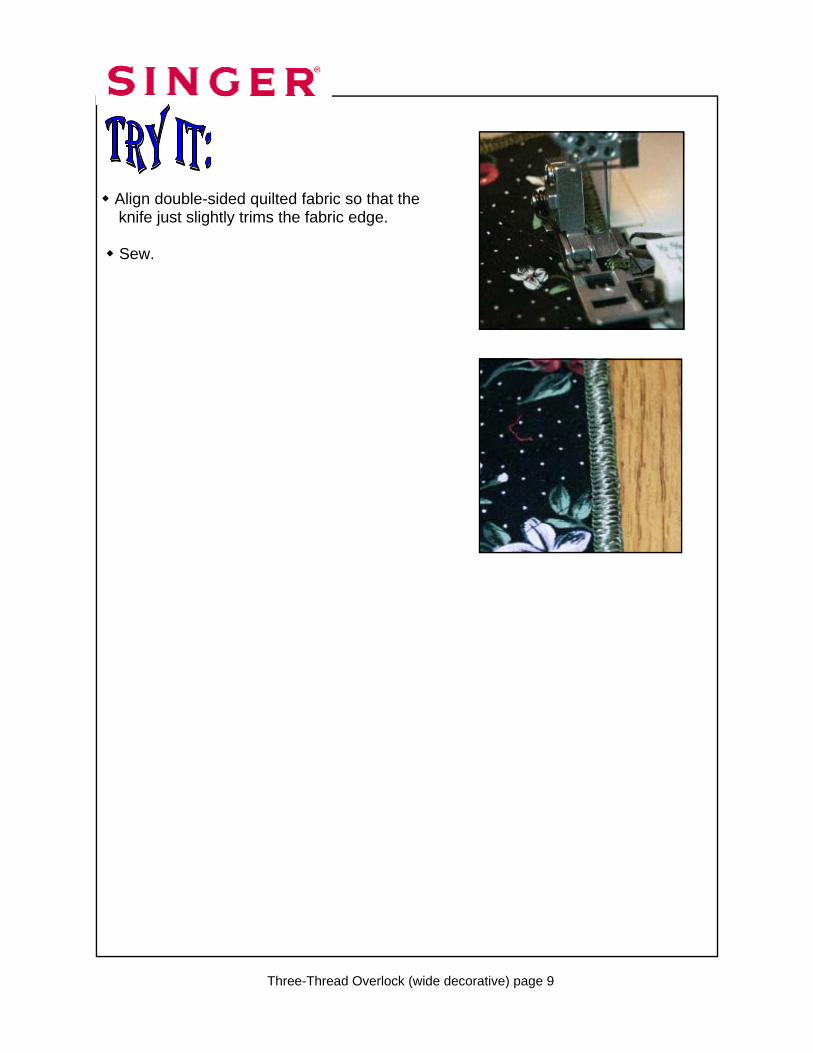
Align double-sided quilted fabric so that the
knife just slightly trims the fabric edge. Sew.
Three-Thread Overlock (wide decorative) page 9
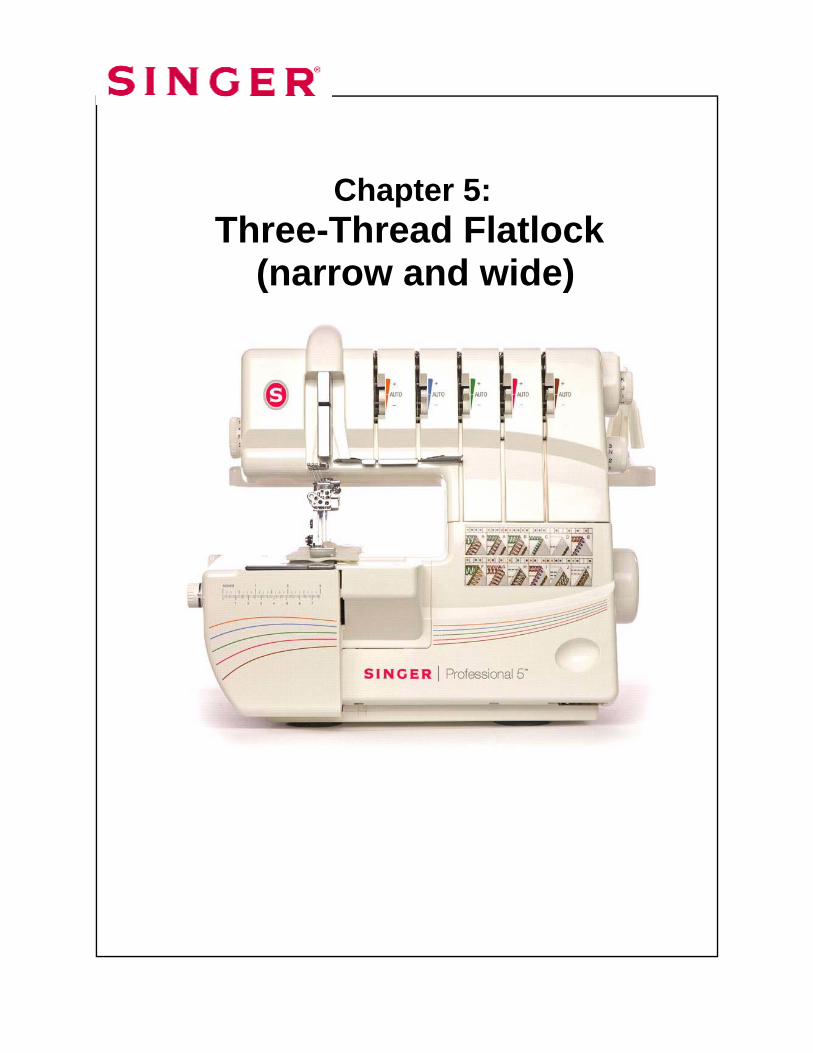
Chapter 5:
Three-Thread Flatlock (narrow and wide)
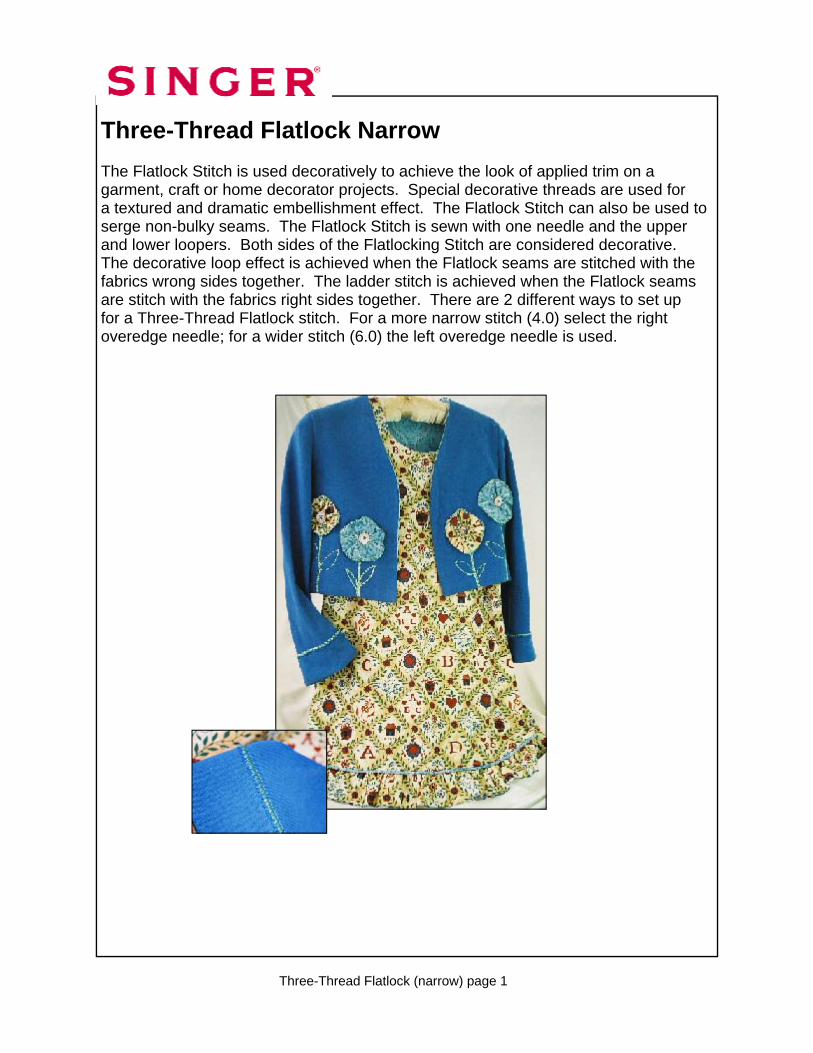
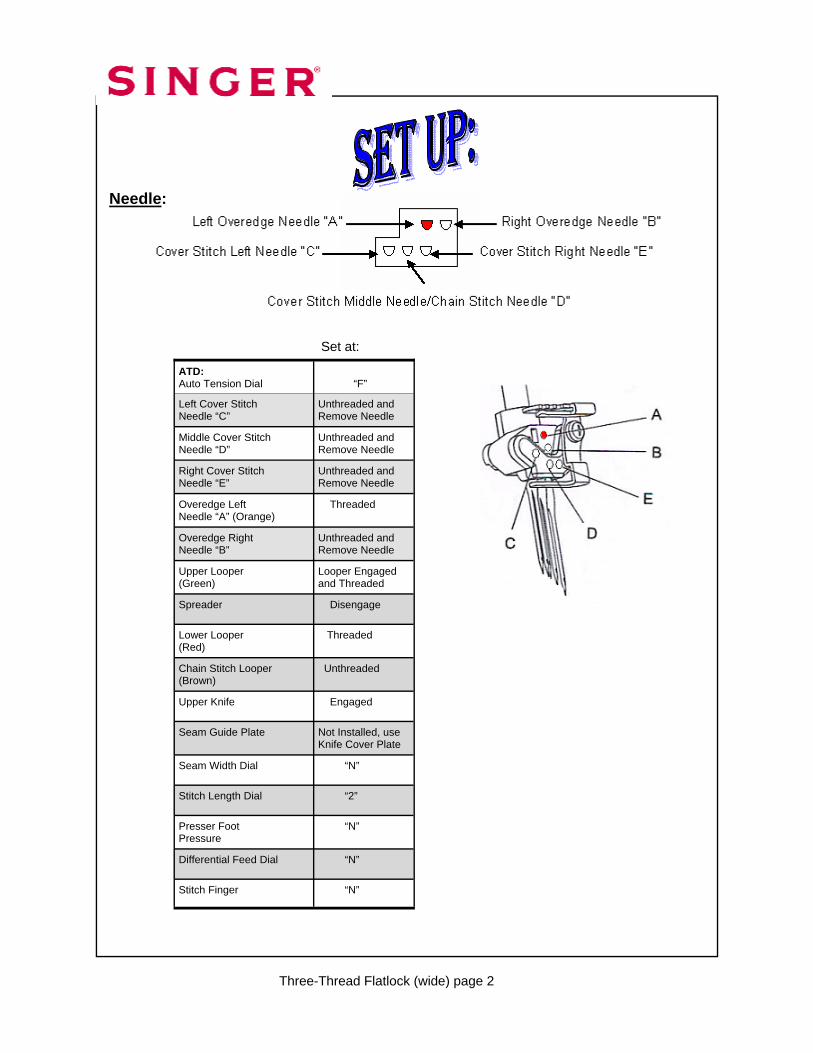
Three-Thread Flatlock Narrow The Flatlock Stitch is used decoratively to achieve the look of applied trim on a garment, craft or home decorator projects. Special decorative threads are used for a textured and dramatic embellishment effect. The Flatlock Stitch can also be used to serge non-bulky seams. The Flatlock Stitch is sewn with one needle and the upper and lower loopers. Both sides of the Flatlocking Stitch are considered decorative. The decorative loop effect is achieved when the Flatlock seams are stitched with the fabrics wrong sides together. The ladder stitch is achieved when the Flatlock seams are stitch with the fabrics right sides together. There are 2 different ways to set up for a Three-Thread Flatlock stitch. For a more narrow stitch (4.0) select the right overedge needle; for a wider stitch (6.0) the left overedge needle is used.
Three-Thread Flatlock (narrow) page 1
Needle:
ATD: Auto Tension Dial
“F”
Left Cover Stitch Needle “C”
Unthreaded and Remove Needle
Middle Cover Stitch Needle “D”
Unthreaded and Remove Needle
Right Cover Stitch Needle “E”
Unthreaded and Remove Needle
Overedge Left Needle “A”
Unthreaded and Remove Needle
Overedge Right Needle “B” (Blue)
Threaded
Upper Looper (Green)
Looper Engaged and Threaded
Lower Looper (Red)
Threaded
Chain Stitch Looper (Brown)
Unthreaded
Upper Knife Engaged
Seam Guide Plate Not Installed, use Knife Cover Plate
Seam Width Dial “N”
Stitch Length Dial “2”
Presser Foot Pressure
“N”
Differential Feed Dial “N”
Stitch Finger “N”
Spreader Disengaged
Set Up:
Three-Thread Flatlock (narrow) page 2
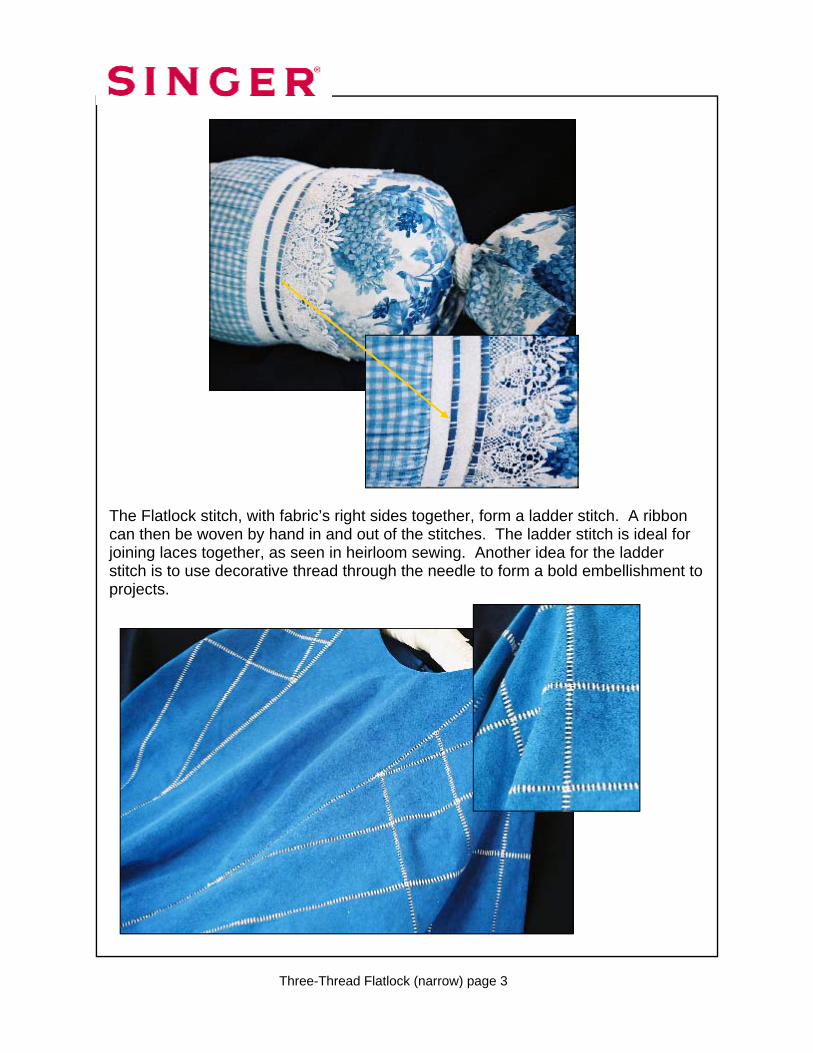
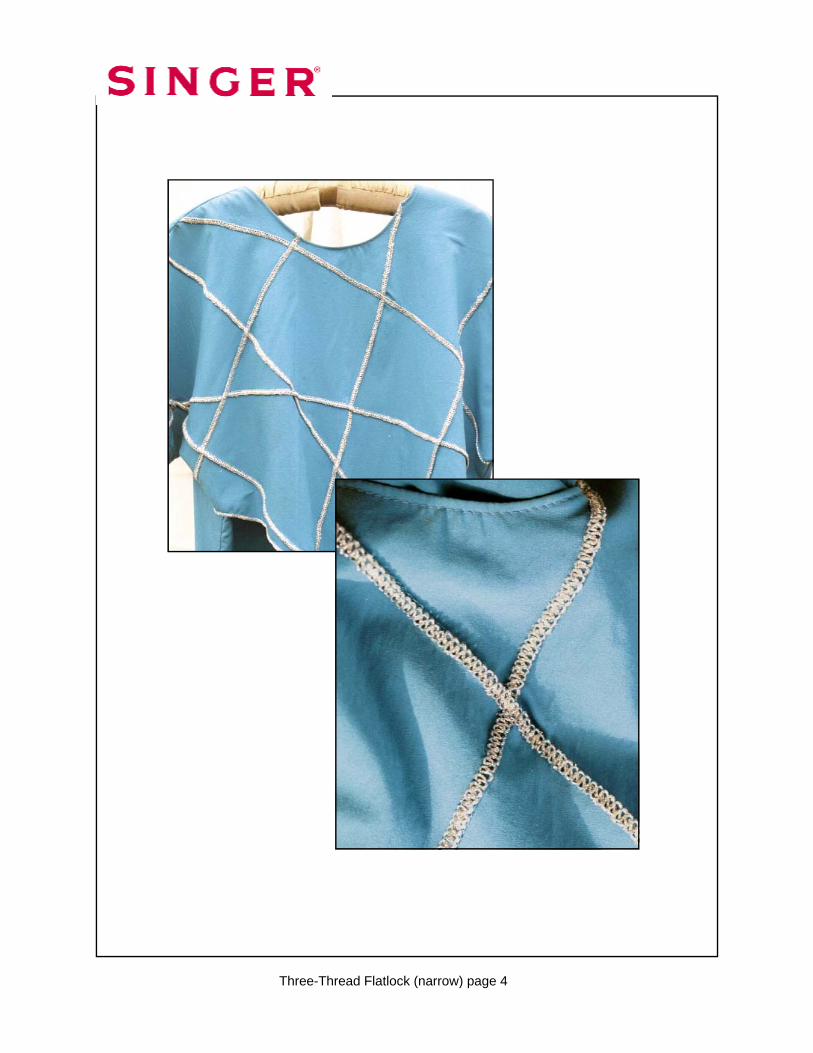
The Flatlock stitch, with fabric’s right sides together, form a ladder stitch. A ribbon can then be woven by hand in and out of the stitches. The ladder stitch is ideal for joining laces together, as seen in heirloom sewing. Another idea for the ladder stitch is to use decorative thread through the needle to form a bold embellishment to projects.
Three-Thread Flatlock (narrow) page 3
Three-Thread Flatlock (narrow) page 4
Three-Thread Flatlock (narrow) page 5
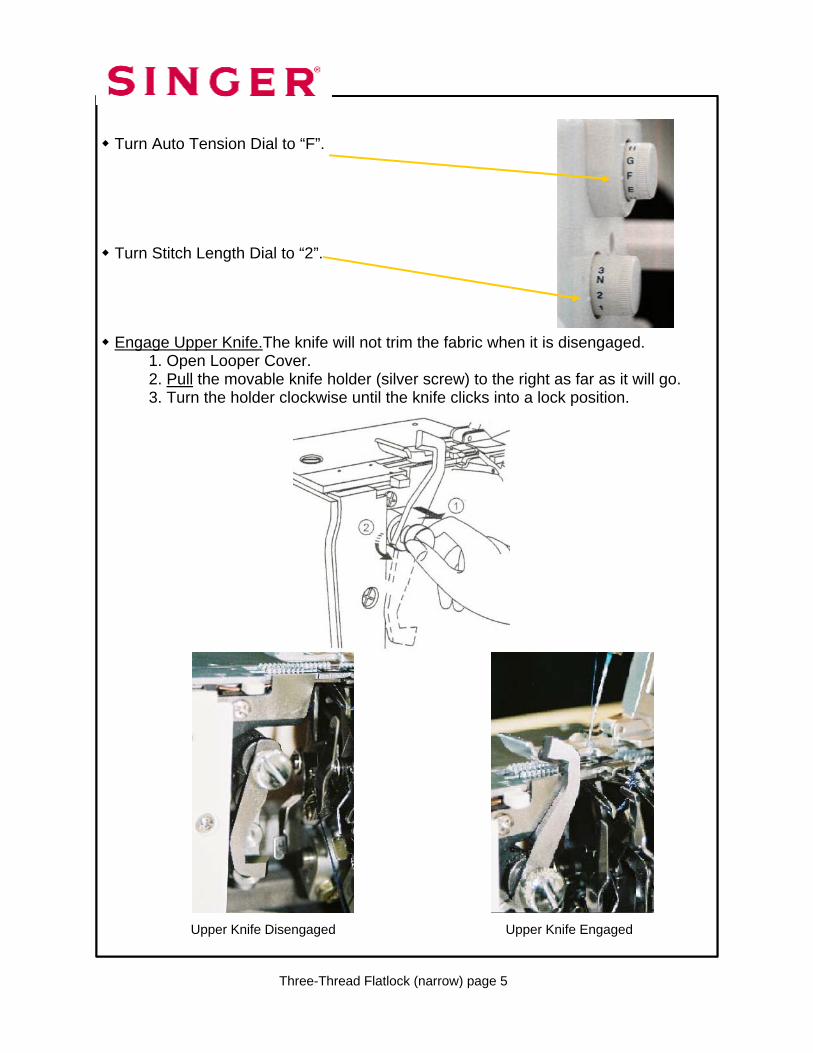
Turn Auto Tension Dial to “F”.
Turn Stitch Length Dial to “2”.
Engage Upper Knife.The knife will not trim the fabric when it is disengaged. 1. Open Looper Cover. 2. Pull the movable knife holder (silver screw) to the right as far as it will go. 3. Turn the holder clockwise until the knife clicks into a lock position.
Upper Knife Engaged Upper Knife Disengaged
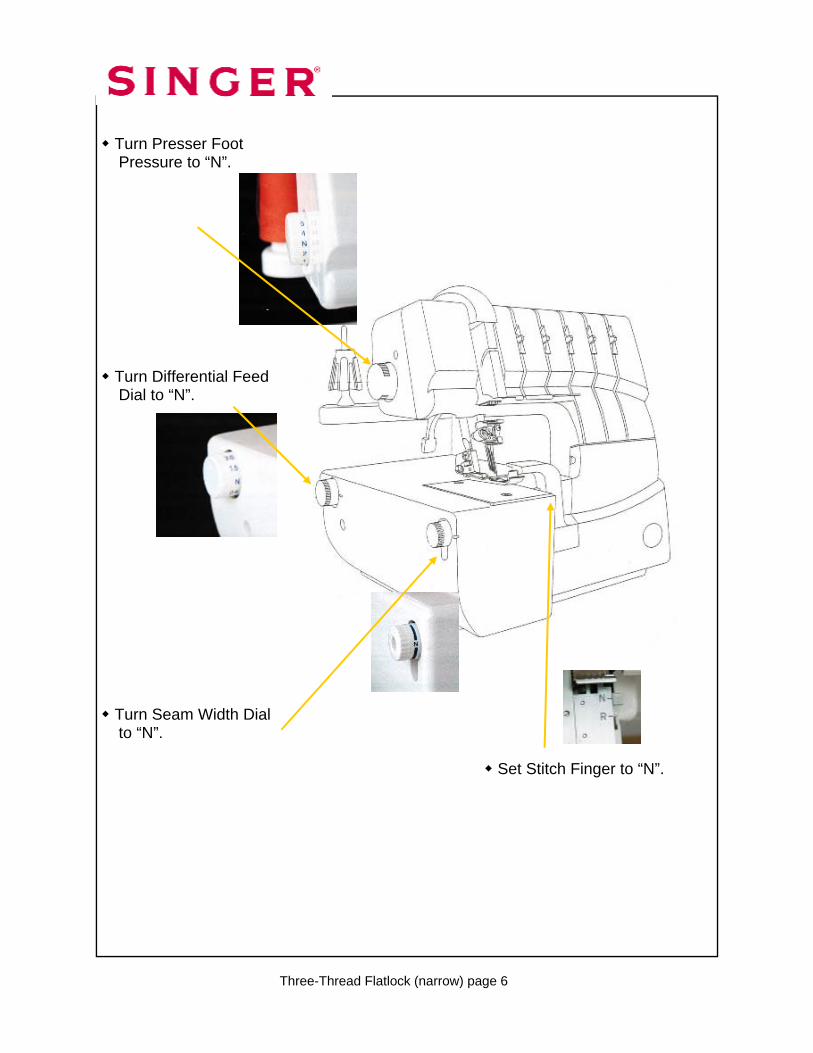
Turn Presser Foot Pressure to “N”.
Turn Differential Feed Dial to “N”.
Turn Seam Width Dial to “N”. Set Stitch Finger to “N”.
Three-Thread Flatlock (narrow) page 6
Install the Knife Cover.
Engage Upper Looper. Engaging the Upper Looper causes the looper to move when sewing. Even though the Upper Looper is not threaded it needs to be engaged. 1. Push the clutch button to the left and down to engage. 2. Turn handwheel.
Upper Looper Disengaged
Upper Looper Engaged
Three-Thread Flatlock (narrow) page 7
Two-Thread Flatlock (narrow) page 8
Disengage Spreader. The Upper Looper has a hole for the thread on the top of the
looper. If the stitch requires that the looper be engaged but not threaded then the Spreader is used. The Spreader simply plugs-in (or closes) the looper’s hole. The Spreader is disengaged when the Upper Looper is engaged/operative and threaded. The Spreader is used with a stitch that requires only one looper thread. With the help of the Spreader the single looper thread wraps around the fabric’s edge. 1. Lower the white handle on the Spreader to open the eye of the Upper Looper.
Thread Upper Looper with regular overlock thread . 1. Raise the Presser Foot to release the tension disks. Thread the Lower Looper as illustrated 1-9. 2. Pass thread from back to the front through the thread guide .
Spreader Engaged Spreader Disengaged
Eye of Looper

3. Thread the top cover thread guide by pulling the thread towards the left until it slips under the guide. Then pull the thread along the right side of the button as illustrated. 4. While holding the thread firmly, pull the thread between the tension disks. 5. Turn the handwheel toward you until the lower looper extends 5-10mm (approximately ½ inch) from the needle plate edge. 6. Thread the looper area of the machine following the green color coded thread guides 4-9.
Three-Thread Flatlock (narrow) page 9
7. Thread the hole in the Upper Looper from front to back . Pull about 4 inches of thread through the looper and place to the back of the throat plate.
Thread Lower Looper with regular overlock thread. 1. Raise the Presser foot to release the Tension disks. Thread the Lower Looper as illustrated 1-10. 2. Pass thread from back to the front through the thread guide . 3. Thread the top cover thread guide by pulling the thread towards the left until it slips under the guide. Then pull the thread along the right side of the button as illustrated.
Three-Thread Flatlock (narrow) page 10
Three-Thread Flatlock (narrow) page 11
10. Thread the looper eye (A) from front to back. Pull about 4 inches of thread. Position thread into V cutout (B) on threader. Firmly hold thread tail with left hand and pull Threader lever (C) up into place (D).
NOTE: Make sure the Upper Looper thread is behind the Lower Looper thread.
Threader Lever
“V” cutout
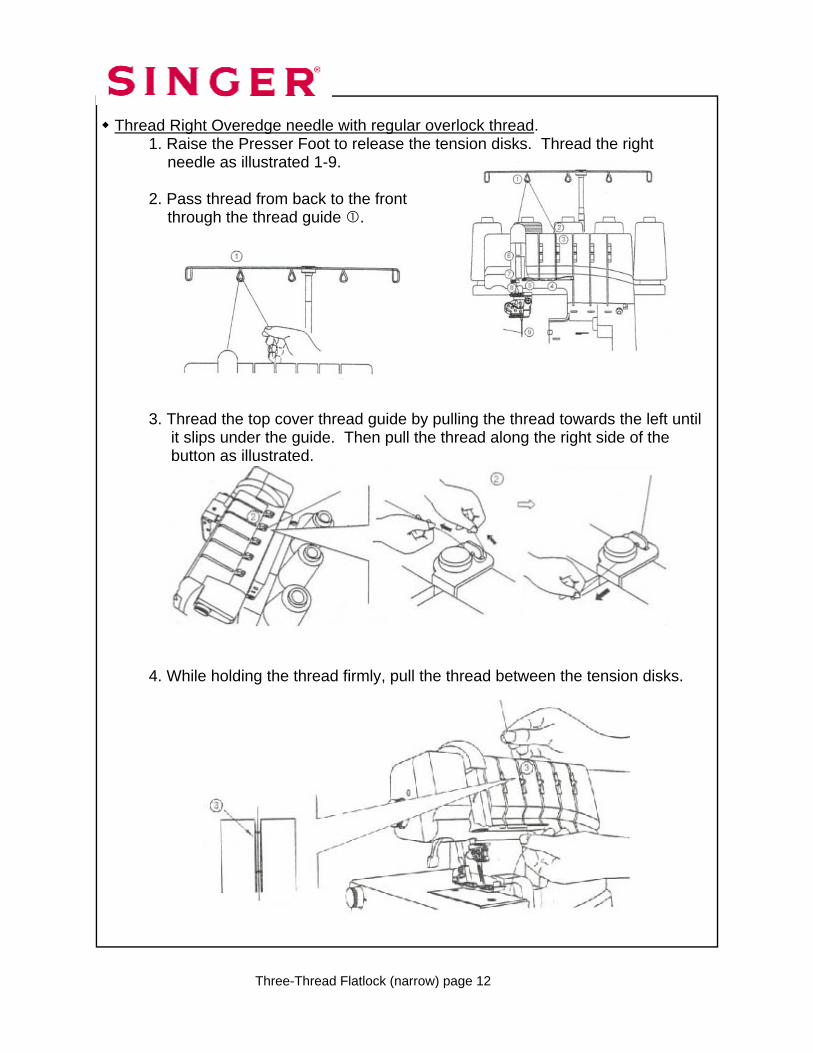
Thread Right Overedge needle with regular overlock thread.
1. Raise the Presser Foot to release the tension disks. Thread the right needle as illustrated 1-9. 2. Pass thread from back to the front through the thread guide . 3. Thread the top cover thread guide by pulling the thread towards the left until it slips under the guide. Then pull the thread along the right side of the button as illustrated. 4. While holding the thread firmly, pull the thread between the tension disks.
Three-Thread Flatlock (narrow) page 12
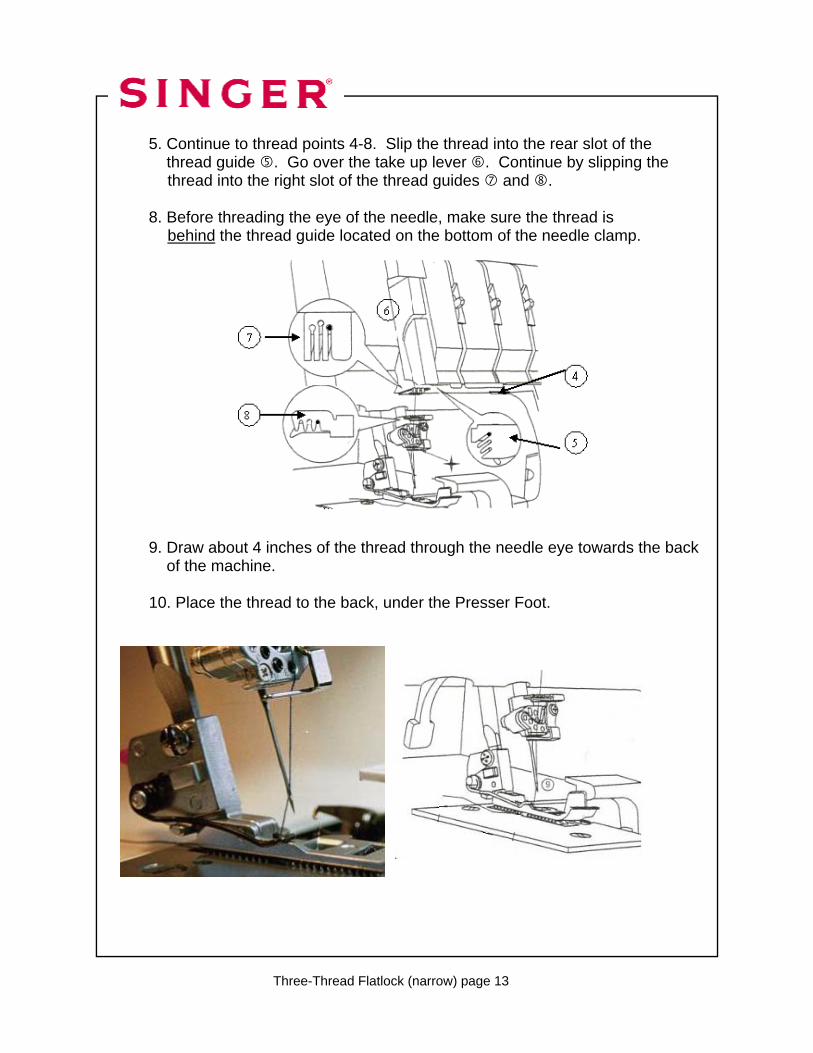
5. Continue to thread points 4-8. Slip the thread into the rear slot of the thread guide . Go over the take up lever . Continue by slipping the thread into the right slot of the thread guides and . 8. Before threading the eye of the needle, make sure the thread is behind the thread guide located on the bottom of the needle clamp. 9. Draw about 4 inches of the thread through the needle eye towards the back of the machine. 10. Place the thread to the back, under the Presser Foot.
Three-Thread Flatlock (narrow) page 13
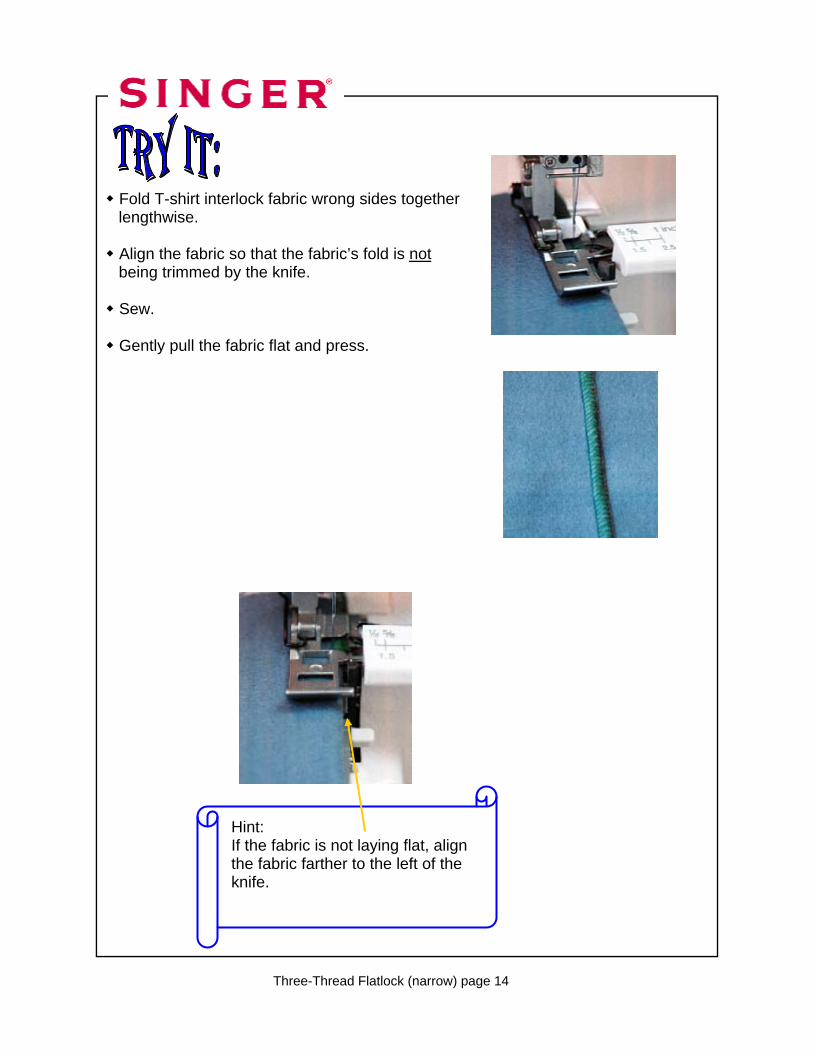
Fold T-shirt interlock fabric wrong sides together lengthwise. Align the fabric so that the fabric’s fold is not being trimmed by the knife. Sew. Gently pull the fabric flat and press.
Hint: If the fabric is not laying flat, align the fabric farther to the left of the knife.
Three-Thread Flatlock (narrow) page 14
Three-Thread Flatlock (wide)
Three-Thread Flatlock (wide) page 1
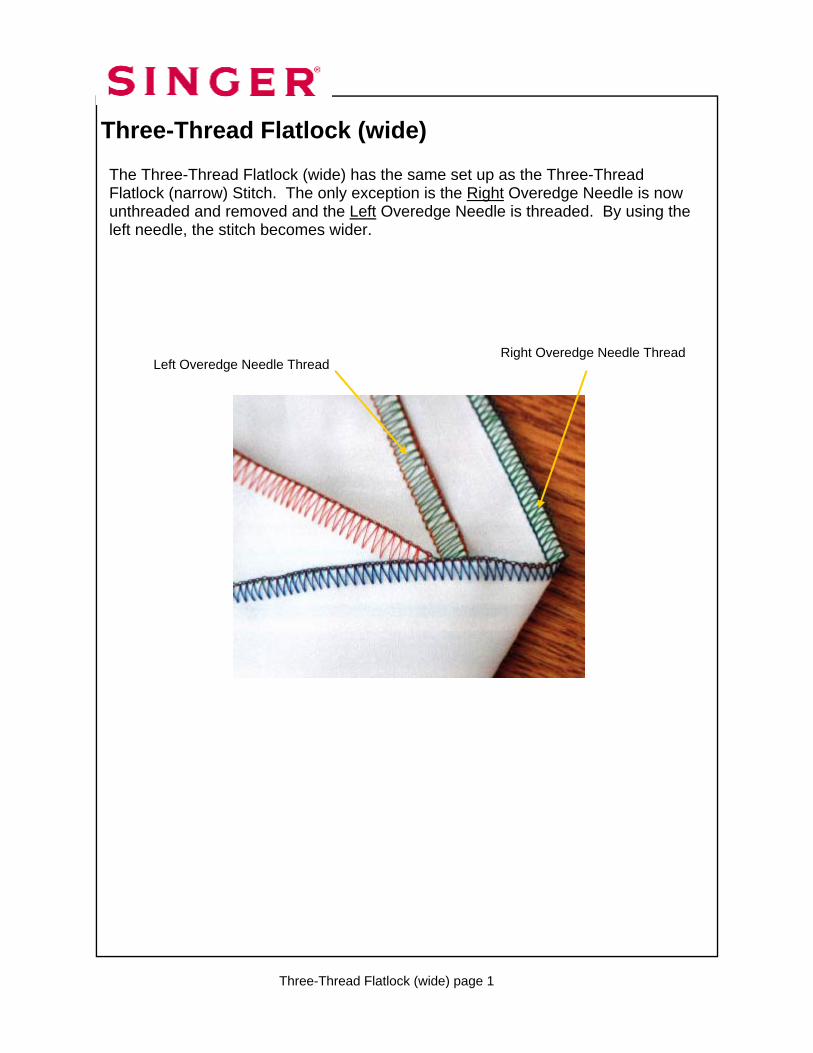
The Three-Thread Flatlock (wide) has the same set up as the Three-Thread Flatlock (narrow) Stitch. The only exception is the Right Overedge Needle is now unthreaded and removed and the Left Overedge Needle is threaded. By using the left needle, the stitch becomes wider.
Right Overedge Needle Thread Left Overedge Needle Thread
ATD: Auto Tension Dial
“F”
Left Cover Stitch Needle “C”
Unthreaded and Remove Needle
Middle Cover Stitch Needle “D”
Unthreaded and Remove Needle
Right Cover Stitch Needle “E”
Unthreaded and Remove Needle
Overedge Left Needle “A” (Orange)
Threaded
Overedge Right Needle “B”
Unthreaded and Remove Needle
Upper Looper (Green)
Looper Engaged and Threaded
Lower Looper (Red)
Threaded
Chain Stitch Looper (Brown)
Unthreaded
Upper Knife Engaged
Seam Guide Plate Not Installed, use Knife Cover Plate
Seam Width Dial “N”
Stitch Length Dial “2”
Presser Foot Pressure
“N”
Differential Feed Dial “N”
Stitch Finger “N”
Spreader Disengage
Set at:
Needle:
Three-Thread Flatlock (wide) page 2
Three-Thread Flatlock (wide) page 3
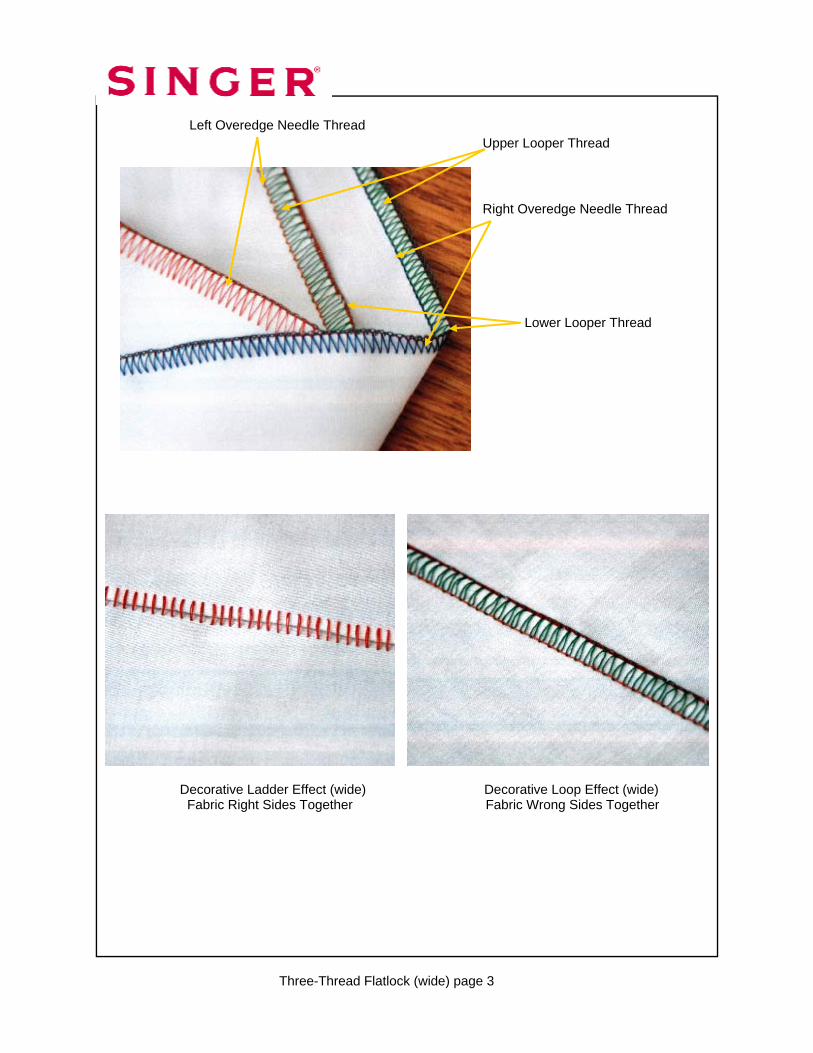
Decorative Ladder Effect (wide) Decorative Loop Effect (wide) Fabric Right Sides Together Fabric Wrong Sides Together
Right Overedge Needle Thread
Left Overedge Needle Thread
Lower Looper Thread
Upper Looper Thread
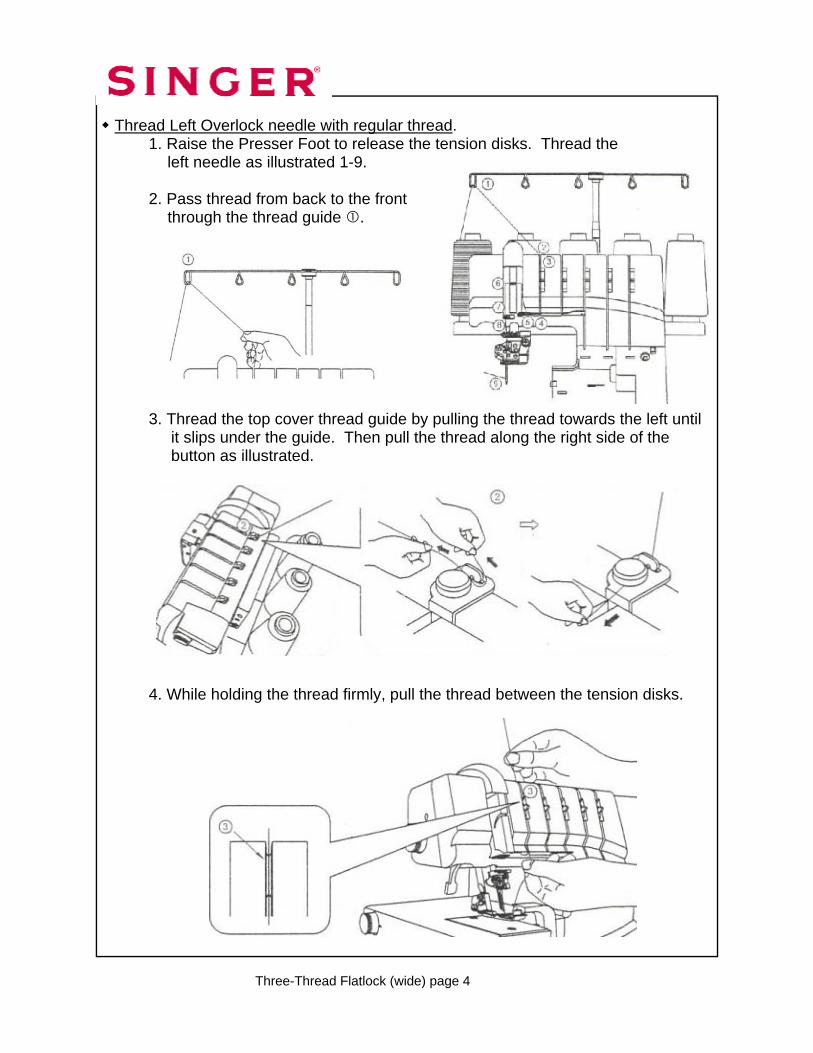
Thread Left Overlock needle with regular thread.
1. Raise the Presser Foot to release the tension disks. Thread the left needle as illustrated 1-9. 2. Pass thread from back to the front through the thread guide . 3. Thread the top cover thread guide by pulling the thread towards the left until it slips under the guide. Then pull the thread along the right side of the button as illustrated. 4. While holding the thread firmly, pull the thread between the tension disks.
Three-Thread Flatlock (wide) page 4
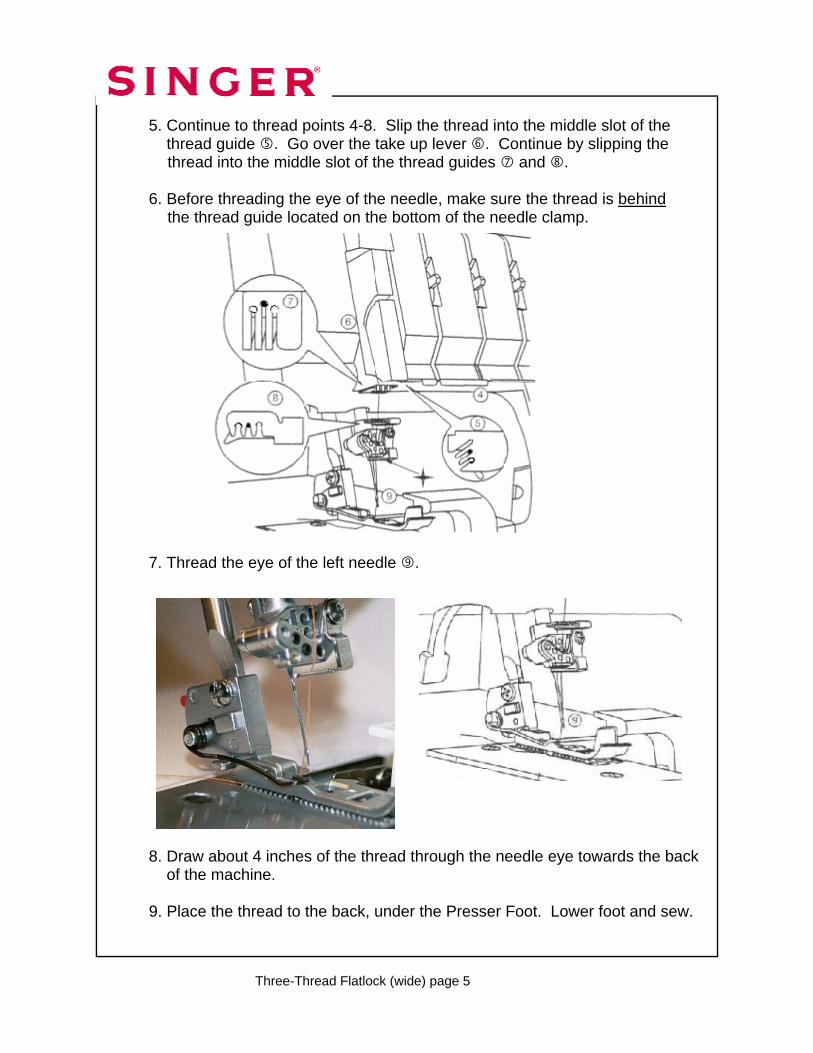
5. Continue to thread points 4-8. Slip the thread into the middle slot of the thread guide . Go over the take up lever . Continue by slipping the thread into the middle slot of the thread guides and . 6. Before threading the eye of the needle, make sure the thread is behind the thread guide located on the bottom of the needle clamp. 7. Thread the eye of the left needle . 8. Draw about 4 inches of the thread through the needle eye towards the back of the machine. 9. Place the thread to the back, under the Presser Foot. Lower foot and sew.
Three-Thread Flatlock (wide) page 5
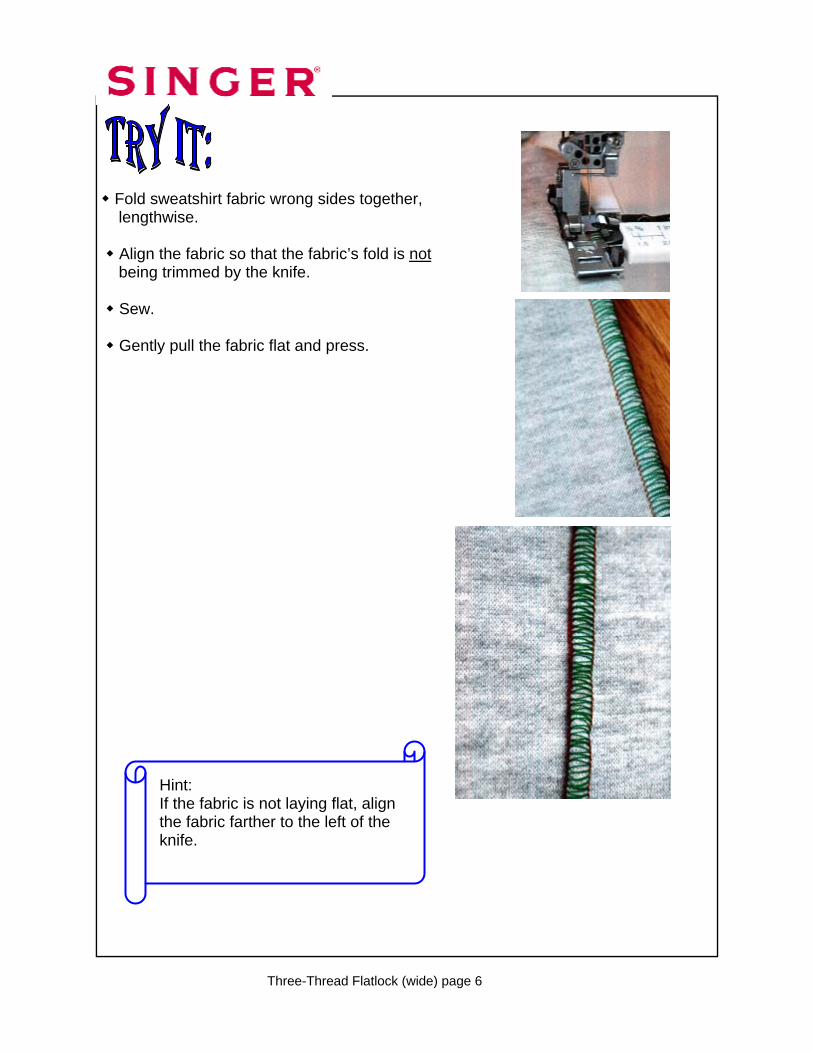
Fold sweatshirt fabric wrong sides together,
lengthwise. Align the fabric so that the fabric’s fold is not being trimmed by the knife. Sew. Gently pull the fabric flat and press.
Hint: If the fabric is not laying flat, align the fabric farther to the left of the knife.
Three-Thread Flatlock (wide) page 6
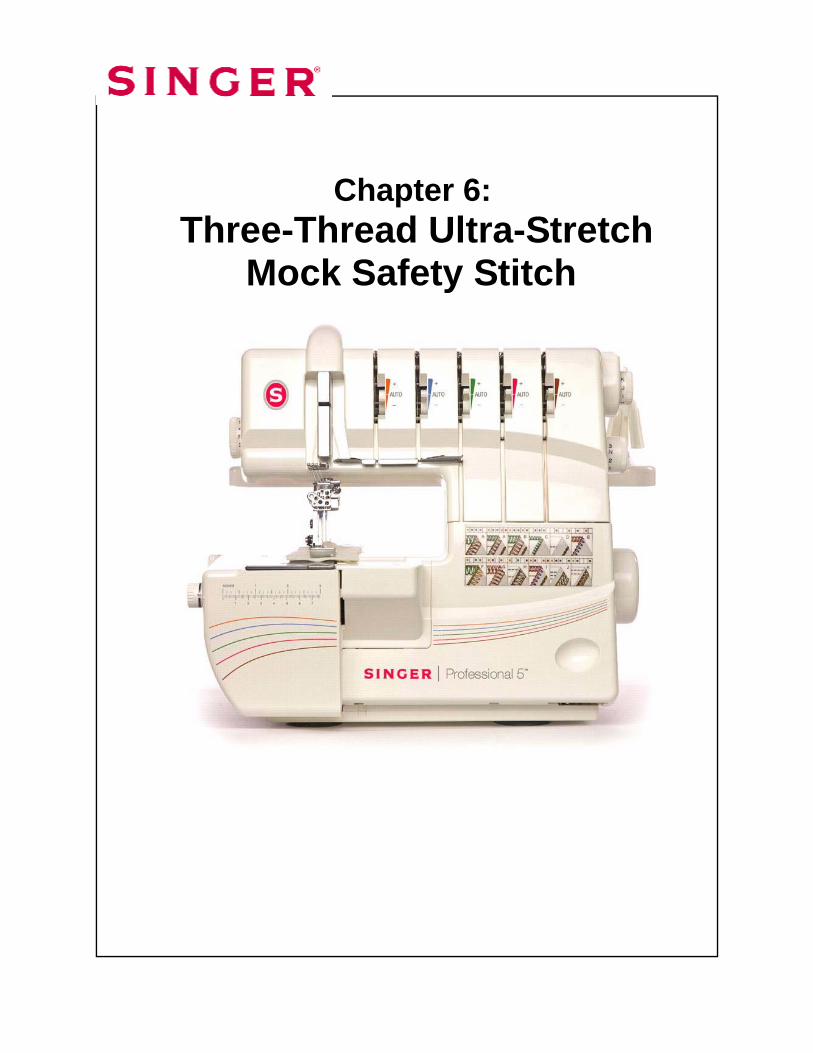
Chapter 6:
Three-Thread Ultra-Stretch Mock Safety Stitch
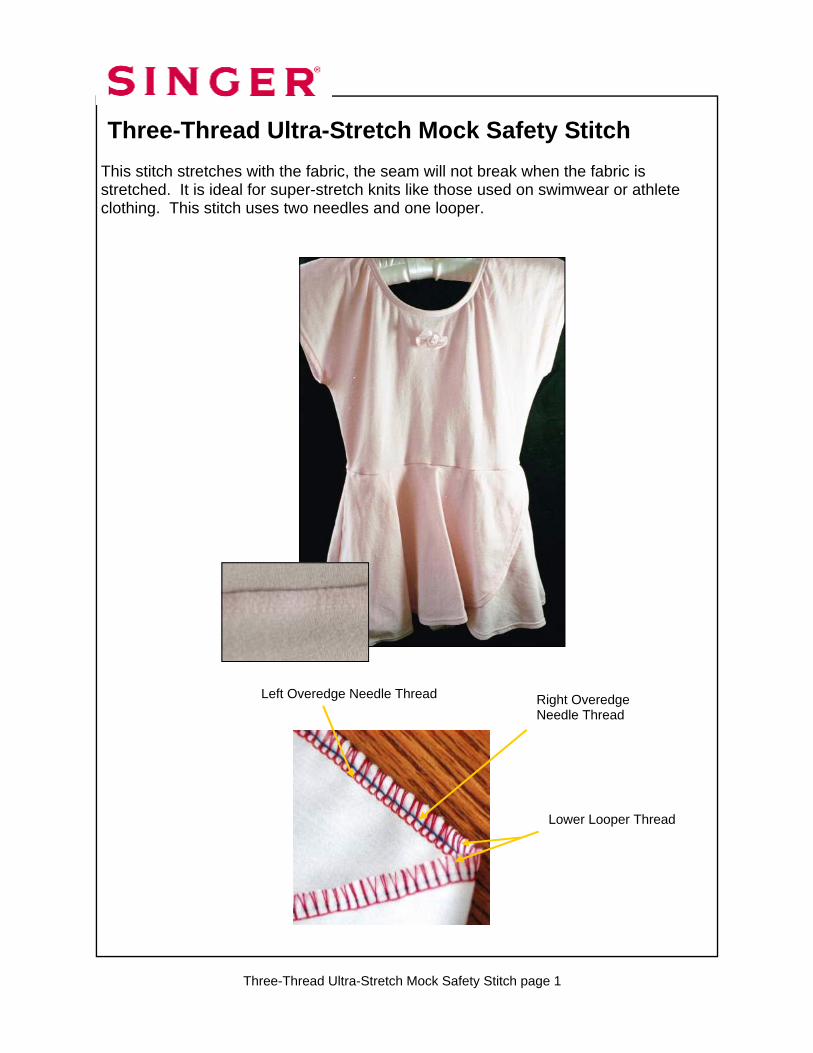
Three-Thread Ultra-Stretch Mock Safety Stitch This stitch stretches with the fabric, the seam will not break when the fabric is stretched. It is ideal for super-stretch knits like those used on swimwear or athlete clothing. This stitch uses two needles and one looper.
Left Overedge Needle Thread
Lower Looper Thread
Right Overedge Needle Thread
Three-Thread Ultra-Stretch Mock Safety Stitch page 1
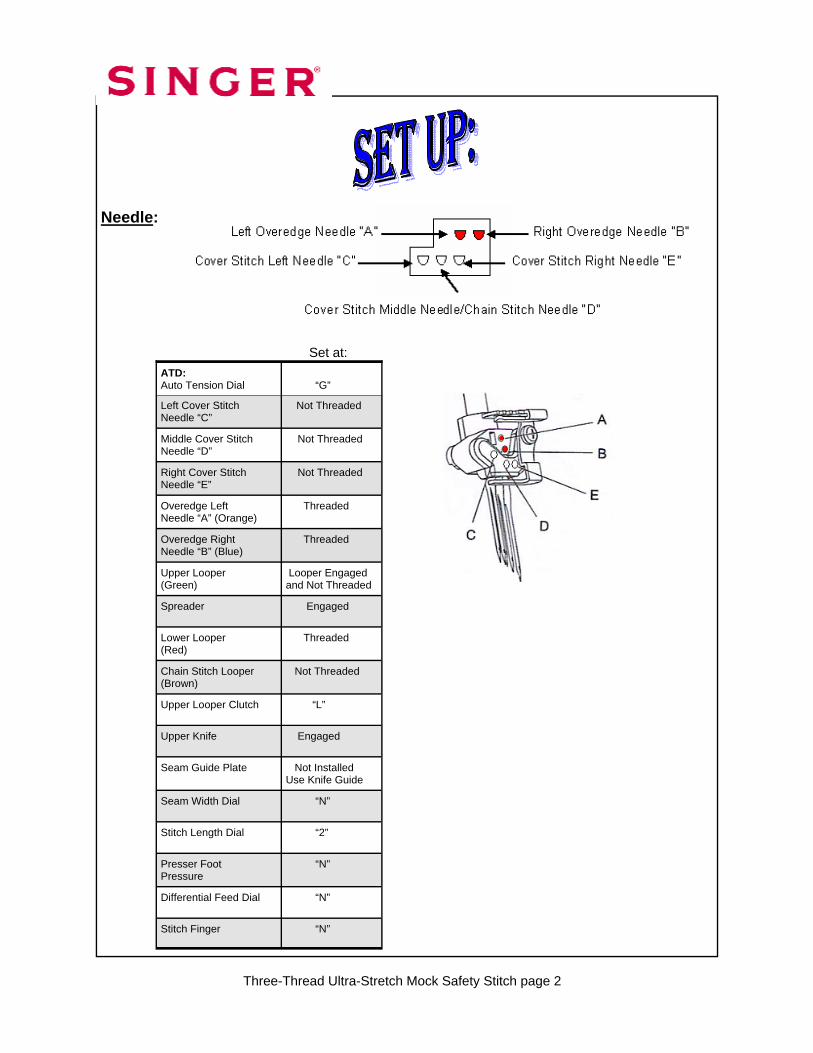
Needle:
ATD: Auto Tension Dial
“G”
Left Cover Stitch Needle “C”
Not Threaded
Middle Cover Stitch Needle “D”
Not Threaded
Right Cover Stitch Needle “E”
Not Threaded
Overedge Left Needle “A” (Orange)
Threaded
Overedge Right Needle “B” (Blue)
Threaded
Upper Looper (Green)
Looper Engaged and Not Threaded
Lower Looper (Red)
Threaded
Chain Stitch Looper (Brown)
Not Threaded
Upper Looper Clutch “L”
Upper Knife Engaged
Seam Guide Plate Not Installed Use Knife Guide
Seam Width Dial “N”
Stitch Length Dial “2”
Presser Foot Pressure
“N”
Differential Feed Dial “N”
Stitch Finger “N”
Spreader Engaged
Set at:
Three-Thread Ultra-Stretch Mock Safety Stitch page 2
Three-Thread Ultra-Stretch Mock Safety Stitch page 3
Turn Auto Tension Dial to “G”.
Turn Stitch Length Dial to “2”.
Engage Upper Knife. The knife will not trim the fabric when it is disengaged. 1. Open Looper Cover. 2. Pull the movable knife holder (silver screw) to the right as far as it will go. 3. Turn the holder clockwise until the knife clicks into a lock position.
Upper Knife Engaged Upper Knife Disengaged
Turn Presser Foot Pressure Dial to “N”.
Turn Differential Feed Dial to “N”.
Turn Seam Width Dial to “N”. Set Stitch Finger to “N”.
Three-Thread Ultra-Stretch Mock Safety Stitch page 4
Install the Knife Cover.
Engage Upper Looper. Engaging the Upper Looper causes the looper to move when sewing. Even though the Upper Looper is not threaded it needs to be engaged. 1. Push the clutch button to the left and down to engage. 2. Turn handwheel.
Upper Looper Disengaged
Upper Looper Engaged
Three-Thread Ultra-Stretch Mock Safety Stitch page 5
Three-Thread Ultra-Stretch Mock Safety Stitch page 6
Engage Spreader. The Upper Looper has a hole for the thread on the top of the
looper. If the stitch requires that the looper be engaged, but not threaded then the Spreader is used. The Spreader simply plugs-in (or closes) the looper’s hole. The Spreader is disengaged when the Upper Looper is engaged/operative and threaded. The Spreader is used with a stitch that requires only one looper thread. With the help of the Spreader the single looper thread wraps around the fabric’s edge. 1. Raise the white handle on the Spreader to insert the tip into the eye of the Upper Looper.
Thread Lower Looper with regular overlock thread. 1. Raise the Presser Foot to release the Tension disks. Thread the Lower Looper as illustrated 1-10. 2. Pass thread from back to the front through the thread guide.
Spreader Disengaged Spreader Engaged
Eye of Looper
Three-Thread Ultra-Stretch Mock Safety Stitch page 7
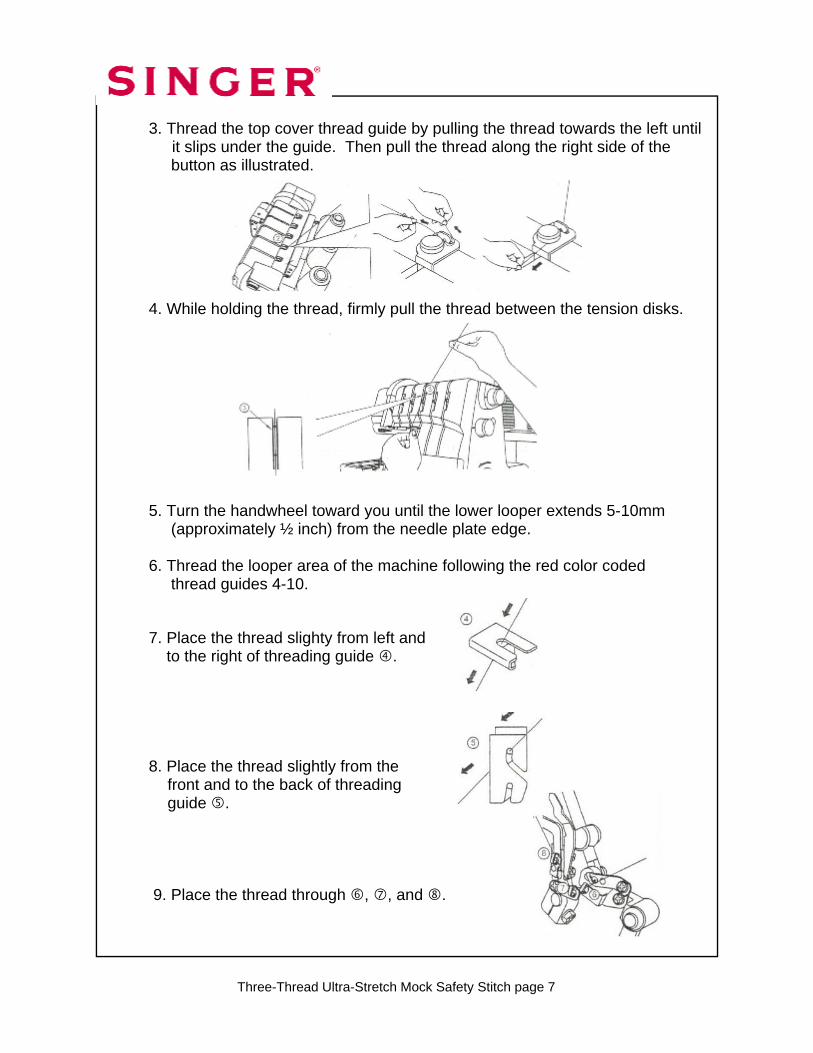
3. Thread the top cover thread guide by pulling the thread towards the left until it slips under the guide. Then pull the thread along the right side of the button as illustrated. 4. While holding the thread, firmly pull the thread between the tension disks. 5. Turn the handwheel toward you until the lower looper extends 5-10mm (approximately ½ inch) from the needle plate edge. 6. Thread the looper area of the machine following the red color coded thread guides 4-10. 7. Place the thread slighty from left and to the right of threading guide . 8. Place the thread slightly from the front and to the back of threading guide . 9. Place the thread through , , and .

Three-Thread Ultra-Stretch Mock Safety Stitch page 8
10. Thread the looper eye (A) from front to back. Pull about 4 inches of thread. Position thread into V cutout (B) on threader. Firmly hold thread tail with left hand and pull Threader lever (C) up into place (D).
Thread Right Overedge needle with regular overlock thread. 1. Raise the Presser Foot to release the tension disks. Thread the right needle as illustrated 1-9. 2. Pass thread from back to the front through the thread guide .
Threader Lever
“V” cutout
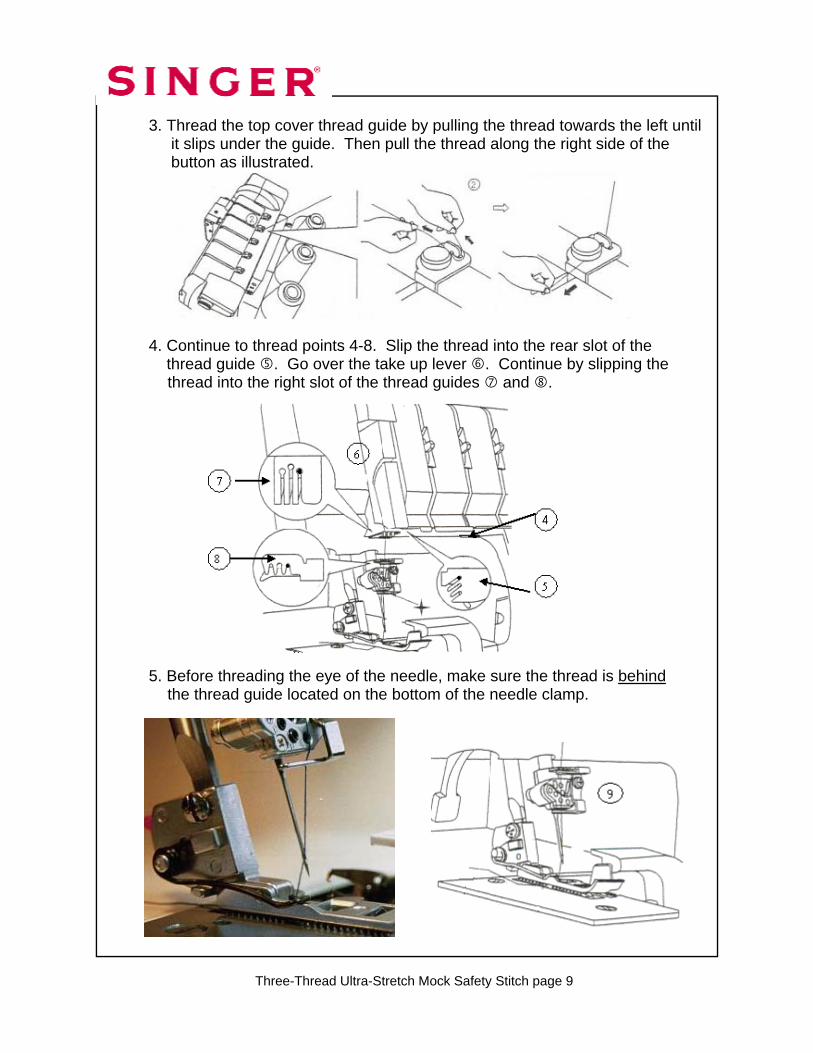
Three-Thread Ultra-Stretch Mock Safety Stitch page 9
3. Thread the top cover thread guide by pulling the thread towards the left until it slips under the guide. Then pull the thread along the right side of the button as illustrated. 4. Continue to thread points 4-8. Slip the thread into the rear slot of the thread guide . Go over the take up lever . Continue by slipping the thread into the right slot of the thread guides and . 5. Before threading the eye of the needle, make sure the thread is behind the thread guide located on the bottom of the needle clamp.
6

Thread Left Overedge needle with regular thread.
1. Raise the Presser foot to release the tension disks. Thread the left needle as indicated 1-9. 2. Pass thread from back to the front through the thread guide . 3. Thread the top cover thread guide by pulling the thread towards the left until it slips under the guide. Then pull the thread along the right side of the button as illustrated. 4. While holding the thread firmly, pull the thread between the tension disks.
Three-Thread Ultra-Stretch Mock Safety Stitch page 10
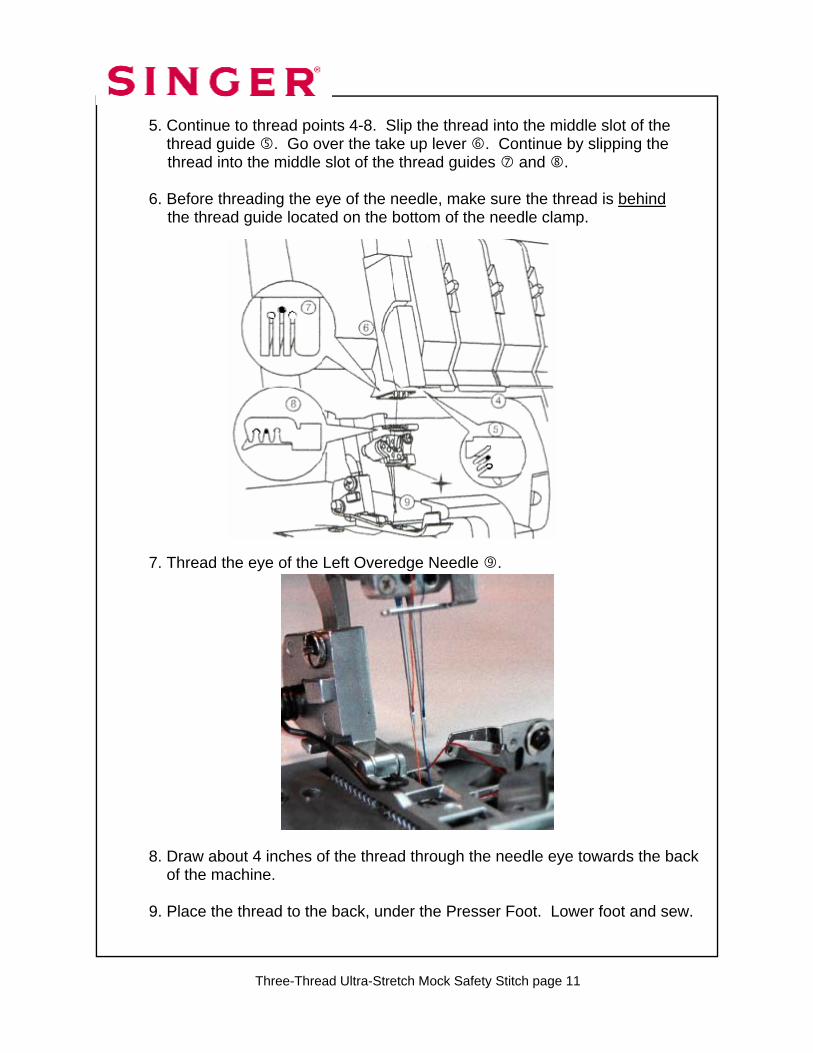
5. Continue to thread points 4-8. Slip the thread into the middle slot of the thread guide . Go over the take up lever . Continue by slipping the thread into the middle slot of the thread guides and . 6. Before threading the eye of the needle, make sure the thread is behind the thread guide located on the bottom of the needle clamp. 7. Thread the eye of the Left Overedge Needle . 8. Draw about 4 inches of the thread through the needle eye towards the back of the machine. 9. Place the thread to the back, under the Presser Foot. Lower foot and sew.
Three-Thread Ultra-Stretch Mock Safety Stitch page 11
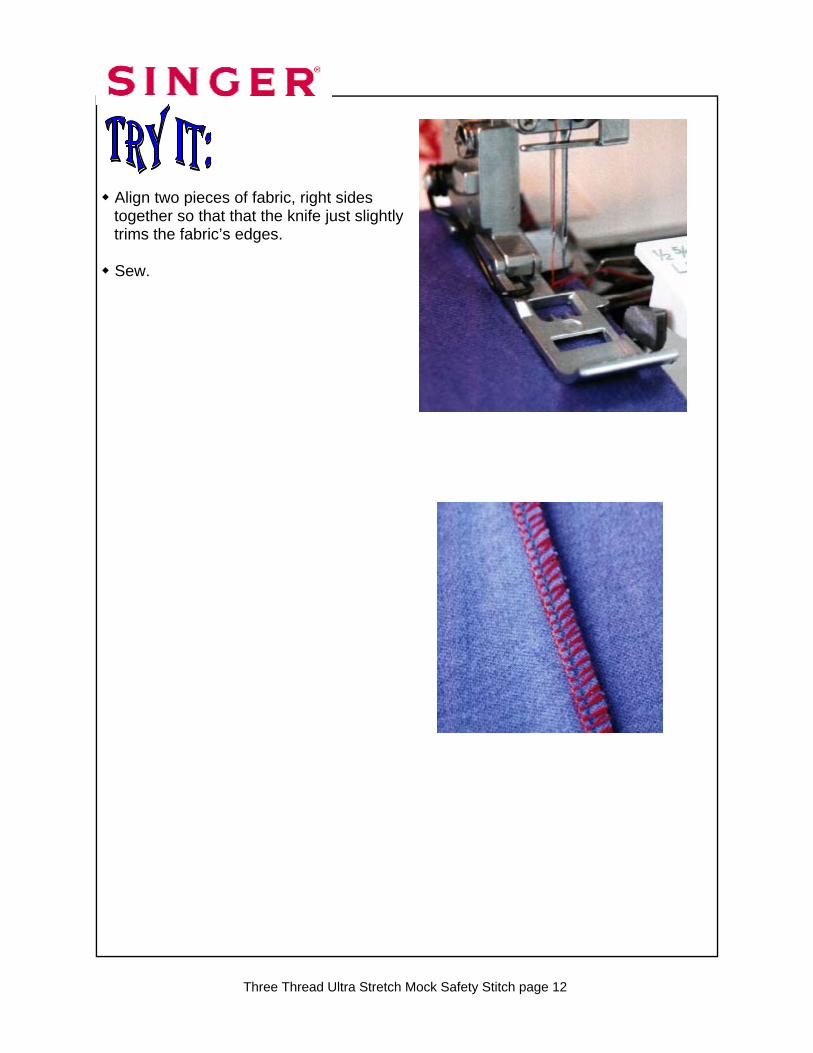
Align two pieces of fabric, right sides
together so that that the knife just slightly trims the fabric’s edges.
Sew.
Three Thread Ultra Stretch Mock Safety Stitch page 12