Embed Size (px)
Citation preview

Right On Replicas, LLC ©2013 All rights reserved. *All registered trademarks are the property of their respective brands.
RoR Step-by-Step Review 20130323* 1977 GMC Pickup with Snow Plow 1/24 Scale Revell 85-7222 Review
I don’t know where you live, but here in Michigan, USA even in the month of March, it still looks like this; grey skies, snow everywhere, and the ever-present Chevy plow truck in every parking lot, drive, and going from one to another. From October through March every year they bring out these old workhorses for snow removal so we can open up the driveways and get things moving again For the Modeler: This skill level 2 Revell #85-7222 kit is 1:24 scale and consists of 103 highly detailed plastic pieces molded in white, clear and chrome plated pieces. This kit also features separate frame pieces, soft black tires, chrome-plated parts and decals with stock and custom graphics. After a long hiatus, we finally have a classic GM pickup back on the shelves! Back in the spring of 2012 I had heard rumors of Revell’s upcoming re-release of their ’77 short box pickup, which was exciting enough, but finding out that an all new snow plow would come with it, was icing on the cake. GM made millions of GMC pickups from 1973-1980. Unfortunately, most of the kits that replicated them were stepside models, with just a couple of “smooth side” versions. Until now, finding those kits would cost you a pretty penny, If you could find one. With the re-release of Revell’s kit, the void is filled for the off road, short box truck lovers in the modeling world. Covered in this Review: If you want to perfect your build, basic construction; paint and adhesive selections and applications; modified assembly sequence for easier construction; instruction errors identified; modifying attachment points for assembly; mold sinks located; using markers and craft paints for detailing; detailing the under carriage with metalizer paints; weatherizing with pastel powders; finishing tires for realism; engine detailing; stripping chrome form plated parts for realism; adding strength to the exhaust manifolds; snow assembly and detailing; part orientation for assembly; driving light detailing; plow finishing suggestions; detailing the grill; bed accessory and mirror modifications; and using Alclad Chrome Lacquer for finishing are all fully examined in this 16 page, full-color Step-by-Step review.

Right On Replicas, LLC ©2013 All rights reserved. *All registered trademarks are the property of their respective brands.
Fig 000a) The box art and kit layout. THE BODY
To start this build off I started with painting the body, since I could let it dry for a time while I built the rest of the truck. The instruction sheet shows assembling the body after paint throughout the build. Assembling it first will help avoid problems later. Starting with the cab, attach the rear bulkhead (part 2), and the front bumper extension. The instruction sheet calls that part 162; actually it’s part 161 (body 1).
Next open up the holes for the rollbar in the bed (body 2), and then attach the bedsides and tailgate.

Right On Replicas, LLC ©2013 All rights reserved. *All registered trademarks are the property of their respective brands.
I was a little surprised to see the indentation on both of the bedsides (body 3) due to the support molded in on the backside. Not a big deal, a little filler will take care of it now that you know it’s there. It’s difficult to see before paint. After everything is glued and dry, remove any mold lines and sand down with some steel wool and then wash the body with warm water. After all was dry I sprayed the body with Testors Orange with my airbrush, then set it aside to dry for a week. INTERIOR
The interior is as basic as you can get, with a part count of only six, there isn’t a whole lot there. The interior shell is made up of the molded in bench seat, dash, steering wheel, steering column, 4 wheel drive shifter, and C.B. There is no detail on the door panels (int. 1), so if you want a super detailed model, you will have to do a lot of scratch building.
Right On Replicas, LLC ©2013 All rights reserved. *All registered trademarks are the property of their respective brands.
After painting the shell and dash Krylon Saddle Tan, the dash can be detailed with a Testors semi gloss black paint marker and some brown acrylic craft paint (int. 2).
Attach the C.B. to the underside of the dash, and glue the shifter to the floor, and that is all there is (int. 3)

Right On Replicas, LLC ©2013 All rights reserved. *All registered trademarks are the property of their respective brands.
CHASSIS
The chassis is a pretty good representation of the real thing, with all the swaybars, axle trusses, driveshafts, and cross members. The disappointing thing is the open topped differentials, and the leaf springs lack some detail, and the exhaust is molded in, but other than that the chassis looks pretty nice when all put together (chassis 1).
Assemble the chassis as instructed in step 3, and give it all a shot of Testors flat black. After it dried, I brush painted the exhaust with Testors Burnt Metal Metalizer (chassis 2).

Right On Replicas, LLC ©2013 All rights reserved. *All registered trademarks are the property of their respective brands.
I didn’t paint the shocks, since they are a pain to paint; I left them white plastic and attached them per instructions (chassis 3).
After all was dry, I used some brown pastel powder to dry brush the chassis to give it a “used” look (chassis 4).

Right On Replicas, LLC ©2013 All rights reserved. *All registered trademarks are the property of their respective brands.
I sanded down the treads on the tires to give them a worn look, and attached the wheels and wheel backs. Something to note with the tires is the lip on the inside; it is off center to accommodate the difference in thickness between the wheel back and rim (chassis 5). The chassis is a pretty basic assembly, but with all the detail included in the kit, it looks really good once it’s painted up and sitting on the wheels
ENGINE The Chevy 350 small block is the engine with a 3 speed manual transmission is represented in this kit. It’s the typical Revell “blob block”; two halves of the engine and tranny, with molded in oil pan, starter, fuel pump, and oil filter (eng. 1).
Once the halves are glued together you will have a nice line through the oil pan that will need smoothed out. I attached the heads, valve covers, and water pump, (eng. 2) and then painted it all Testor’s flat black.

Right On Replicas, LLC ©2013 All rights reserved. *All registered trademarks are the property of their respective brands.
Once the assembly had dried, I painted the transmission Testors Steel. And highlighted the engine block with Testors semi gloss black (eng. 3)
The intake came in the kit chrome, which was a little too shiny for my taste, so I soaked it in Royal Purple (household bleach will work too) to de-chrome it. Then I assembled it and painted it Testors Aluminum (eng. 4).

Right On Replicas, LLC ©2013 All rights reserved. *All registered trademarks are the property of their respective brands.
After gluing the intake on I attached the pulley assembly and fan. The exhaust manifolds where painted Testors burnt metal Metalizer, but before I attached them I drilled out a hole in the middle of each manifold, (eng. 5) then glued a small piece of brass rod into them (eng. 6)
This makes for a better attachment point to the engine block (eng. 7).
Once all was dry the engine was glued to the transfer case and then dropped into the chassis. (chassis 6)
Right On Replicas, LLC ©2013 All rights reserved. *All registered trademarks are the property of their respective brands.
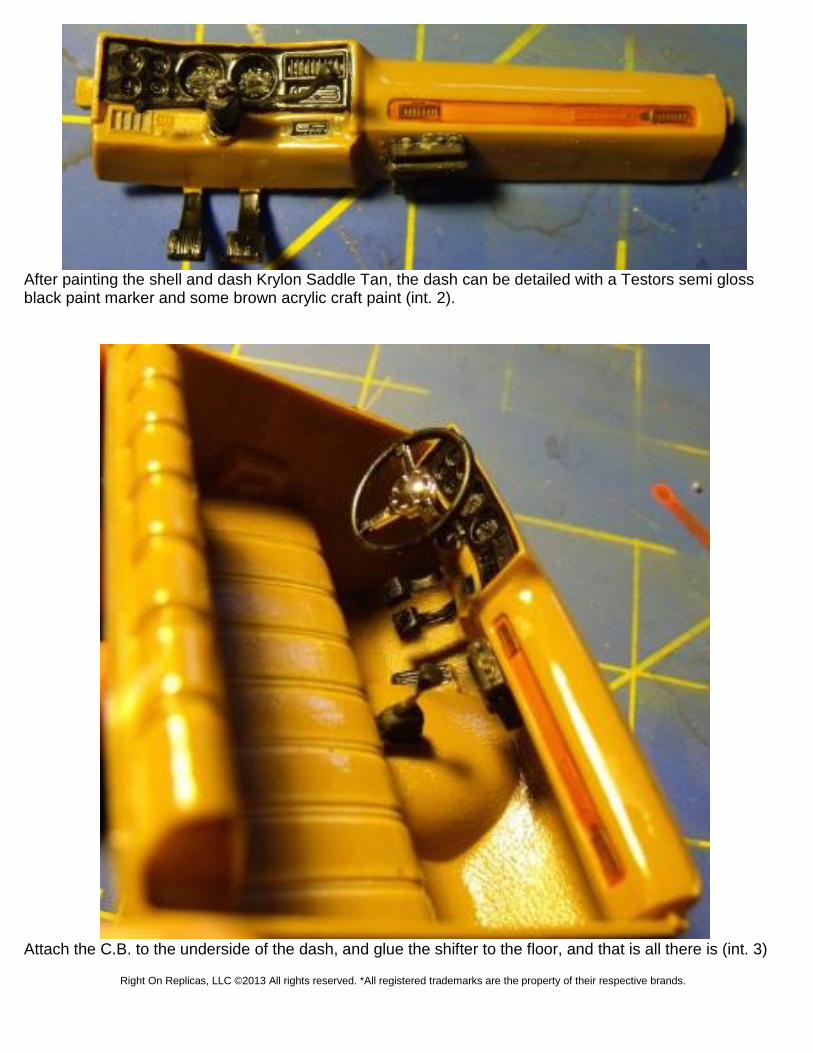
THE PLOW This is the exciting part of this kit. Revell tooled up a whole new snowplow just for this kit. The amazing thing is that it doesn’t alter the existing truck hardly at all, just a bumper attachment extension (plow). The plow is made up of the main plow, the chassis, three springs, a pump housing, bumper mount, lights and lift arm. There is a chassis mount also, that should have been assembled with the chassis.
Paint the main Plow unit, I painted mine with Fusion spray paint for plastics, I’ve had pretty good results with it (plow 1).
Setting it aside to dry I focused on the main plow chassis. I painted that Testors flat black, and then detailed the hydraulic rams with aluminum paint (plow 2).

Right On Replicas, LLC ©2013 All rights reserved. *All registered trademarks are the property of their respective brands.
Attach the chassis to the main plow and then attach the springs, which were painted Testors gunmetal gray Metalizer. Put the pump together and attach to the bumper mount, making sure it lines up with the lift arm (plow 4), attach the light pods and paint it all flat black.
Once the bumper mount assembly is dry attach it to the bumper. The main plow attaches to the truck chassis with two tabs that slide into the slots on the truck (plow 5) You could drill this mounting system to accept small pins.
Right On Replicas, LLC ©2013 All rights reserved. *All registered trademarks are the property of their respective brands.
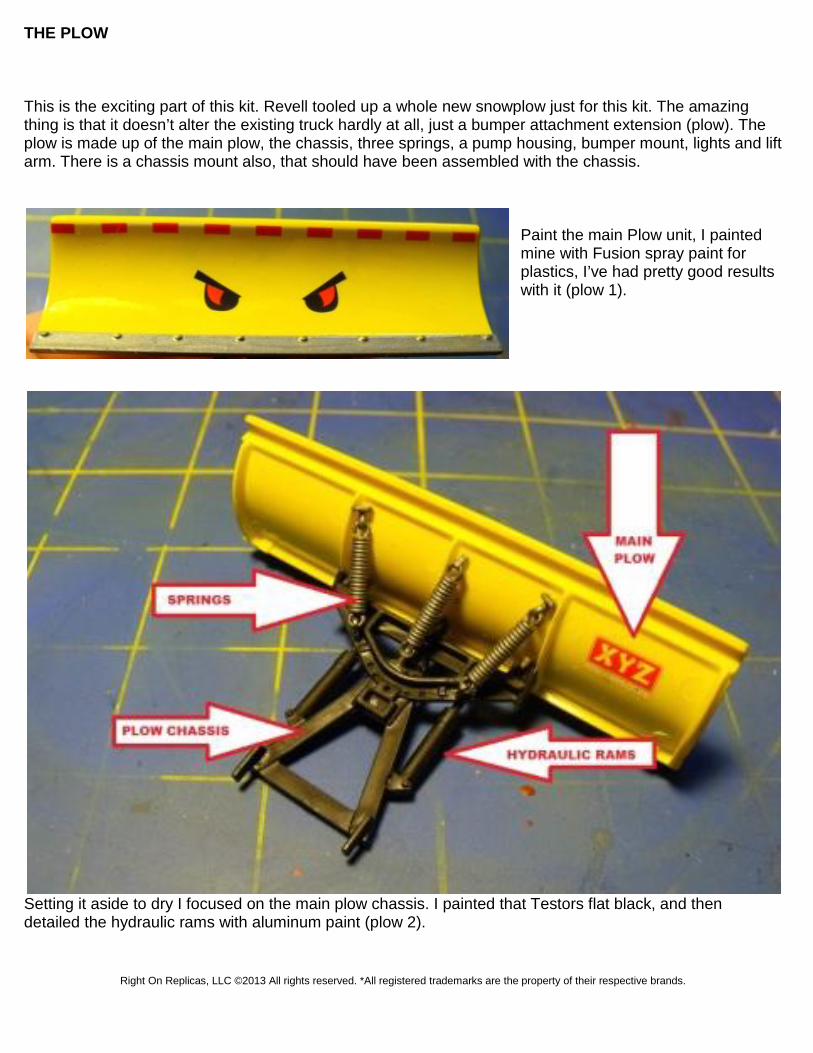
The lights are the disappointing part; they are just clear plastic with no detail. I tried painting behind the lenses silver, but the glue attacked the paint once I assembled them. So I used white acrylic paint to paint the outside of the lenses with Testors turn signal amber for the directional lights. Once dry, detail the pump motor, and add the clear lenses for the lights (plow 3).
The plow looks great, except, it needs a hook that the lift chain would hook onto on the plow chassis, AND a lift chain (plow 6) Both of which could be added easily with craft store parts.

Right On Replicas, LLC ©2013 All rights reserved. *All registered trademarks are the property of their respective brands.
FINAL ASSEMBLY
Now with the chassis done, engine mounted, plow assembly done, and body painted, it’s time to put it all together. The cab needs some detail painting done, so grab your favorite Testors semi gloss paint pen and line out the front and back windows with it (final 1). I used Testors aluminum paint on the vent windows. I used craft paint to detail the engine bay and batteries. Attach the glass, front and back, and apply decals to the sides of the truck.
The grill was stripped of chrome and repainted using Alcad Lacquer, before I repainted it I opened up the back of the grill with a Dremel Tool, it gives it a little more detail (final 2 &3)
Right On Replicas, LLC ©2013 All rights reserved. *All registered trademarks are the property of their respective brands.
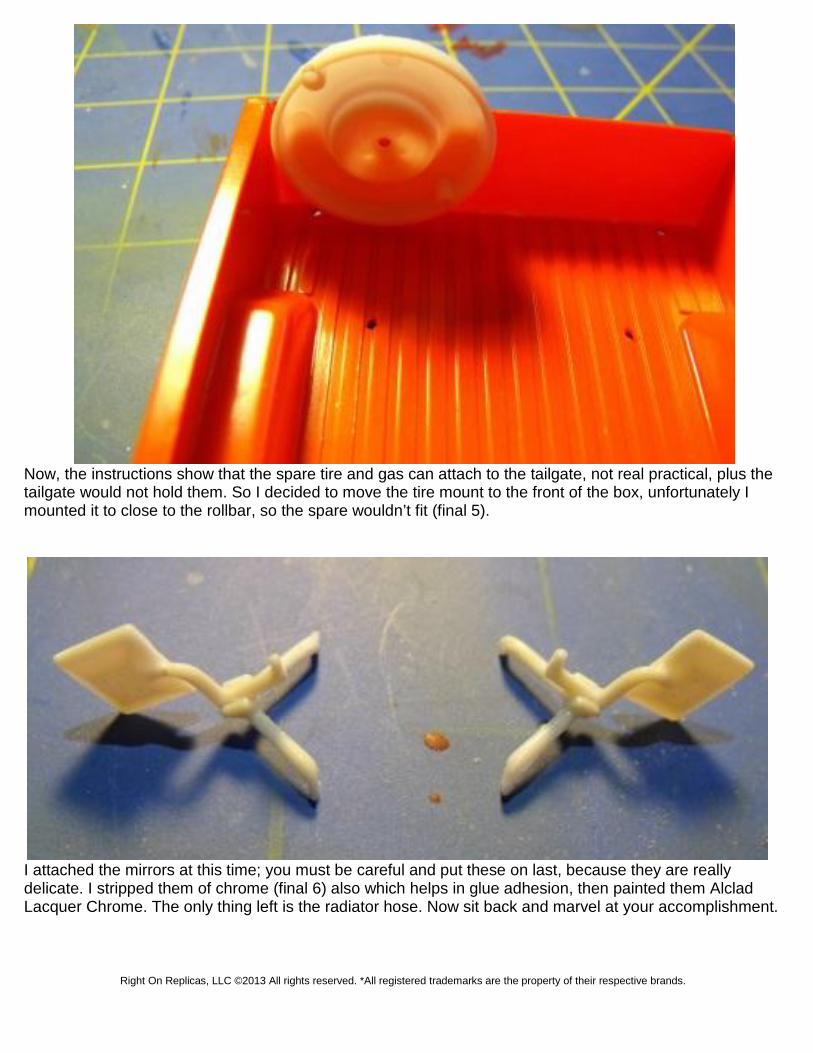
Now, the instructions show that the spare tire and gas can attach to the tailgate, not real practical, plus the tailgate would not hold them. So I decided to move the tire mount to the front of the box, unfortunately I mounted it to close to the rollbar, so the spare wouldn’t fit (final 5).
I attached the mirrors at this time; you must be careful and put these on last, because they are really delicate. I stripped them of chrome (final 6) also which helps in glue adhesion, then painted them Alclad Lacquer Chrome. The only thing left is the radiator hose. Now sit back and marvel at your accomplishment.

Right On Replicas, LLC ©2013 All rights reserved. *All registered trademarks are the property of their respective brands.
The bed of the truck receives the taillights, which were painted red from behind, and outlined in black, also the rollbar with lights and antennae were installed at this time (final 4). So I used it for the gas can and put the spare on the bed floor. Attach the bed to the chassis at this time. I slid the completed interior into the cab, which is a REALLY tight fit, so be careful. Once in the cab glue it in place and attach the cab to the chassis
A view of the under carriage looks pretty clean.

Right On Replicas, LLC ©2013 All rights reserved. *All registered trademarks are the property of their respective brands.
999) All-in-all, this is a decent kit, not a lot of detail compared to new, modern kits, but good. The subject matter is great; we’ve wanted a reissue of this kit for a long time. The truck lends itself to a ton of building options and scratch building. The plow could be used on other models, as well as some diorama scenes, but it needs some more details to really make it pop.