Embed Size (px)
Citation preview
1
FieldMate Handheld Communicator Data Converter for FieldMate
User’s MANUAL
Introduction
The FieldMate Handheld Communicator Data Converter for FieldMate (“Data Converter”) is a
data-interfacing software which allows device configuration files saved by the FieldMate Handheld
Communicator to be used in FieldMate.
The functions of the Data Converter are as follows:
Converts device configuration files created by the Handheld Communicator into DTM data that
can be used in type-B HART Built-in DTM.
Saves converted DTM data in the device maintenance information (DTM data) of FieldMate
Advance.
Saves converted DTM data to a DTM data file in a PC.
The supporting FieldMate revisions and languages are shown below.
FieldMate revision R2.05.00 or later
FieldMate edition Advance and Basic
Language Japanese and English
2
Contents
Introduction ..................................................................................................................... 1
1. Data Converter Window .................................................................................................. 3
1.1. List of Menus ............................................................................................................ 4
1.1.1. Selecting the Language ...................................................................................... 4
1.2. Window for Selecting Device Configuration Files ..................................................... 5
1.2.1. List of Device Configuration Files ...................................................................... 6
2. Converting Device Configuration Files ........................................................................... 9
2.1. Saving Data in Device Maintenance Information (possible only in FieldMate
Advance) .......................................................................................................................... 9
2.2 Saving Data to File (possible in both FieldMate Basic and Advance) ....................... 10
2.3. List of Device Configuration Files ........................................................................... 11
2.4. List of Dialogs .......................................................................................................... 12
2.4.1. Confirmation Dialog for Creating New Device Maintenance Information ......... 12
2.4.2. Dialog for Selecting Target Device Maintenance Information ........................... 12
2.4.3. Confirmation Dialog for Overwriting Data ........................................................ 13
2.4.4. Dialog for Displaying Details ............................................................................ 14
2.4.5. Dialog for Required DD File List ....................................................................... 15
3. How to Install DD Files into FieldMate ......................................................................... 16
3.1. Using “Set device files for this device …” ................................................................ 16
Appendix ............................................................................................................................ 19
Appendix A: Target Device Configuration Files ............................................................. 19
3
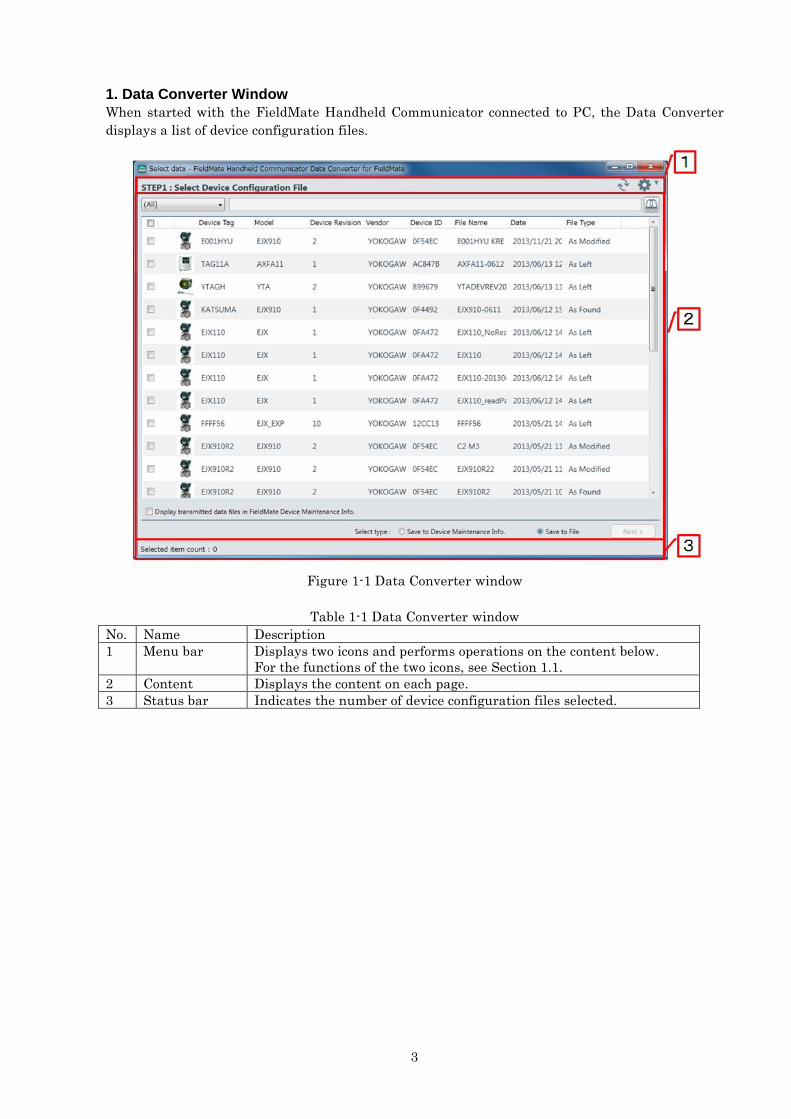
1. Data Converter Window
When started with the FieldMate Handheld Communicator connected to PC, the Data Converter
displays a list of device configuration files.
Figure 1-1 Data Converter window
Table 1-1 Data Converter window
No. Name Description
1 Menu bar Displays two icons and performs operations on the content below.
For the functions of the two icons, see Section 1.1.
2 Content Displays the content on each page.
3 Status bar Indicates the number of device configuration files selected.

4
1.1. List of Menus
The menu bar displays two icons.
The table below describes the icons and respective functions.
Table 1-2 List of menu icons
No. Icon Function
1
• Communicates with the Handheld Communicator to update the list of
device configuration files.
• This function is enabled in the window for selecting device
configuration files, while it is not enabled in the window for confirming
device configuration files.
Enabled:
Not enabled:
2
The following functions are available:
• Selects a language
• Displays the version of Data Converter
• Help: Displays this Manual
This function is enabled in both windows described above.
1.1.1. Selecting the Language
Switches the language to be displayed between Japanese and English.
Click the icon and choose Japanese or English from the language item.
Figure 1-2 Selecting a language
5
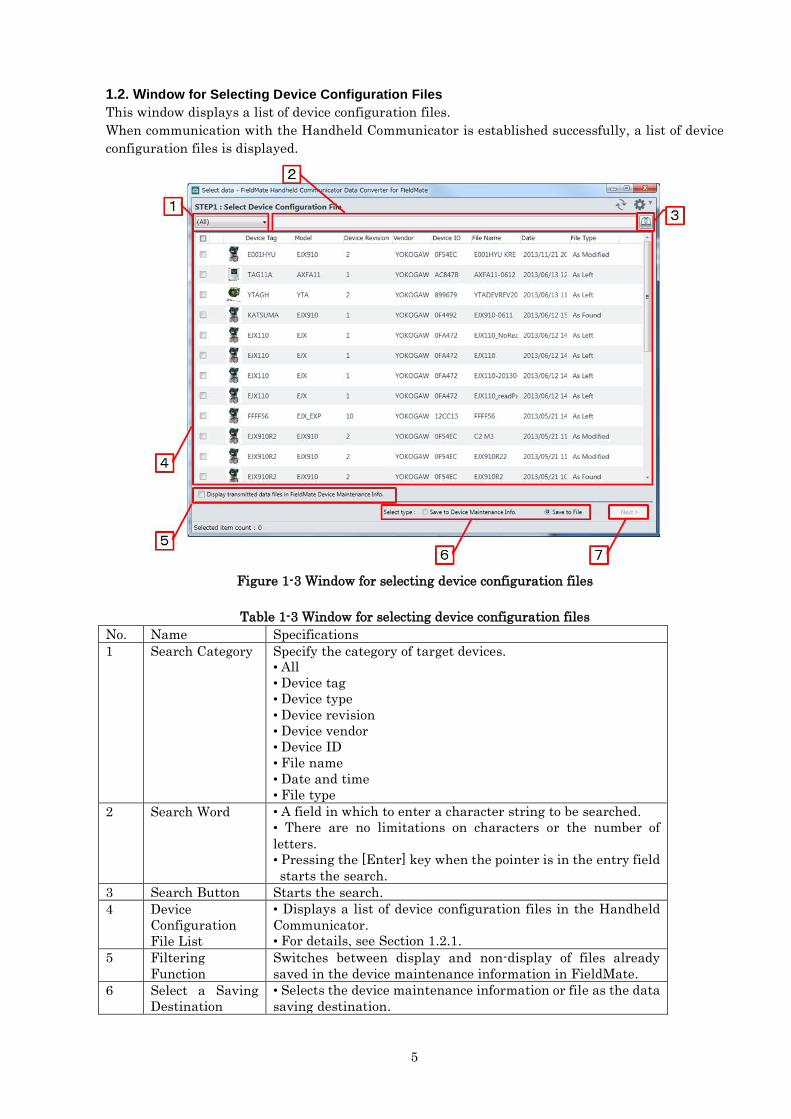
1.2. Window for Selecting Device Configuration Files
This window displays a list of device configuration files.
When communication with the Handheld Communicator is established successfully, a list of device
configuration files is displayed.
Figure 1-3 Window for selecting device configuration files
Table 1-3 Window for selecting device configuration files
No. Name Specifications
1 Search Category Specify the category of target devices.
• All
• Device tag
• Device type
• Device revision
• Device vendor
• Device ID
• File name
• Date and time
• File type
2 Search Word • A field in which to enter a character string to be searched.
• There are no limitations on characters or the number of
letters.
• Pressing the [Enter] key when the pointer is in the entry field
starts the search.
3 Search Button Starts the search.
4 Device
Configuration
File List
• Displays a list of device configuration files in the Handheld
Communicator.
• For details, see Section 1.2.1.
5 Filtering
Function
Switches between display and non-display of files already
saved in the device maintenance information in FieldMate.
6 Select a Saving
Destination
• Selects the device maintenance information or file as the data
saving destination.
6
• Data can be saved in the device maintenance information
only for FieldMate Advance.
• Data can be saved in a file for both FieldMate Basic and
Advance.
7 To Confirmation
Window
Moves to the window for confirming device configuration files.
1.2.1. List of Device Configuration Files
Figure 1-4 List of device configuration files
Table 1-4 Items in the list of device configuration files
Order Item Description
1
• Check this box for the data to be converted.
• This box cannot be checked for files already saved in the
device maintenance information of FieldMate.
2
This mark appears for files already saved in the device
maintenance information of FieldMate.
3 Device Icon • Displays device icons.
• For any device other than Yokogawa devices, the HART
protocol icon is displayed.
4 Device Tag • Displays device tags.
• The display items depend on the setting in the FieldMate
Setup Tool.
5 Device Type Displays device types.
6 Device Rev. Displays device revisions in decimal notation.
7 Device Vendor Displays device vendor names.
8 Device ID Displays device IDs in hexadecimal notation.
9 File Name • Displays the device configuration file names.
• Displays the file name which was used to save the device
configuration file in the Handheld Communicator.
10 Date and Time Displays the date and time when the file was saved in the
Handheld Communicator.
11 File Type Displays the file type which was used to save the file in the
Handheld Communicator.
7
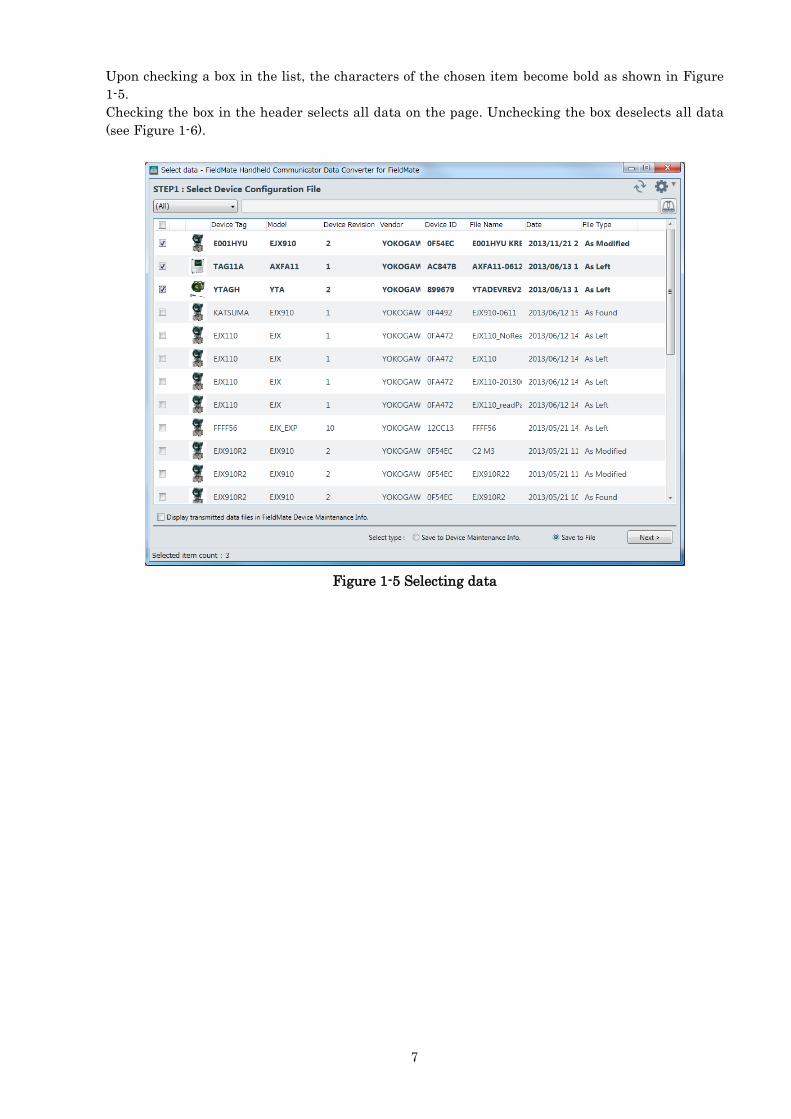
Upon checking a box in the list, the characters of the chosen item become bold as shown in Figure
1-5.
Checking the box in the header selects all data on the page. Unchecking the box deselects all data
(see Figure 1-6).
Figure 1-5 Selecting data
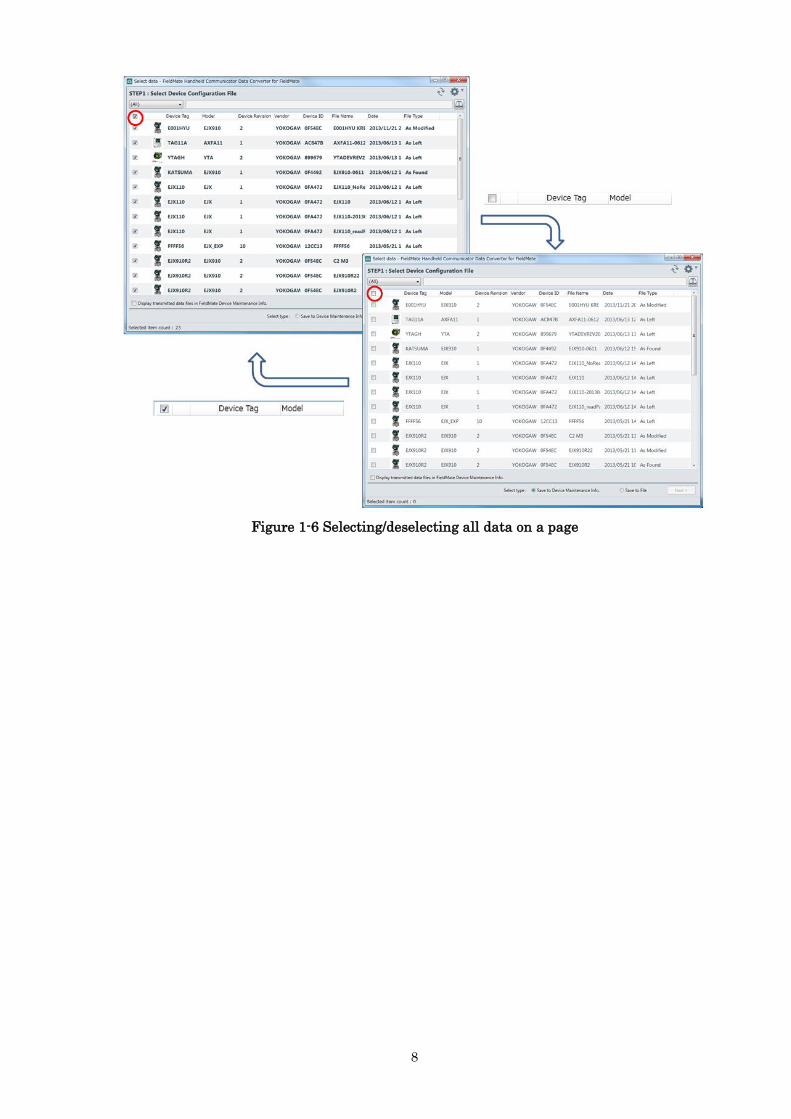
8
Figure 1-6 Selecting/deselecting all data on a page
9
2. Converting Device Configuration Files
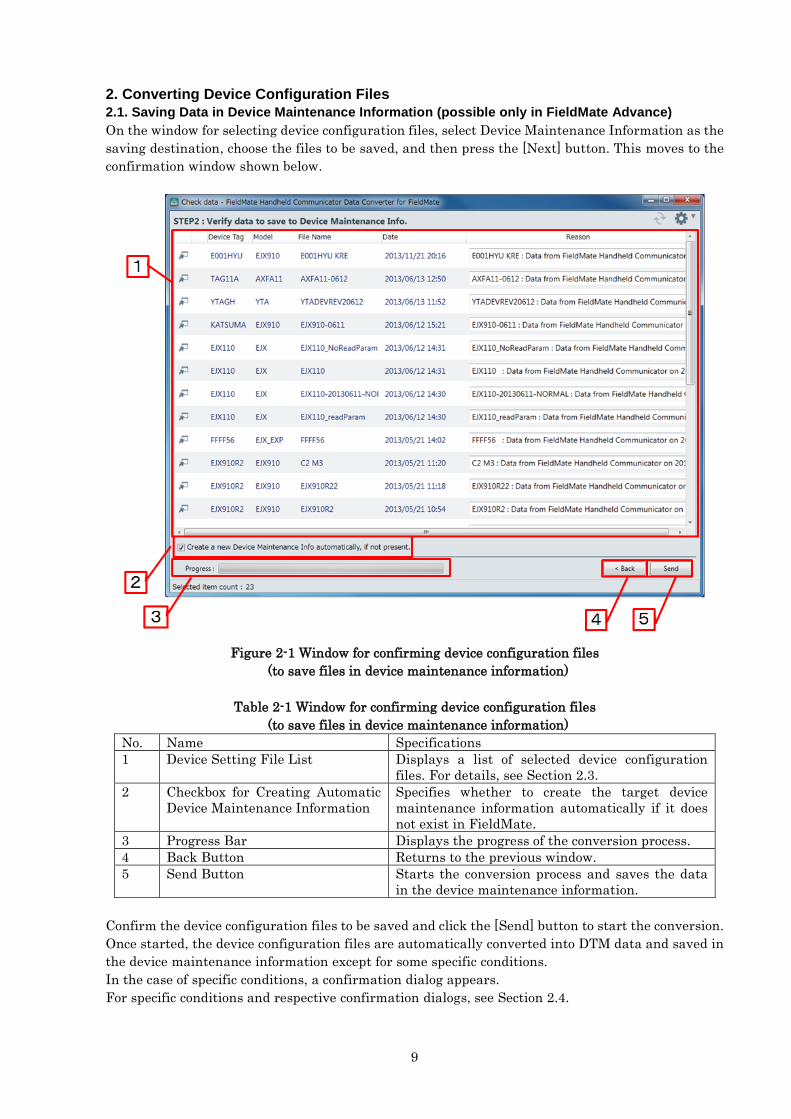
2.1. Saving Data in Device Maintenance Information (possible only in FieldMate Advance)
On the window for selecting device configuration files, select Device Maintenance Information as the
saving destination, choose the files to be saved, and then press the [Next] button. This moves to the
confirmation window shown below.
Figure 2-1 Window for confirming device configuration files
(to save files in device maintenance information)
Table 2-1 Window for confirming device configuration files
(to save files in device maintenance information)
No. Name Specifications
1 Device Setting File List Displays a list of selected device configuration
files. For details, see Section 2.3.
2 Checkbox for Creating Automatic
Device Maintenance Information
Specifies whether to create the target device
maintenance information automatically if it does
not exist in FieldMate.
3 Progress Bar Displays the progress of the conversion process.
4 Back Button Returns to the previous window.
5 Send Button Starts the conversion process and saves the data
in the device maintenance information.
Confirm the device configuration files to be saved and click the [Send] button to start the conversion.
Once started, the device configuration files are automatically converted into DTM data and saved in
the device maintenance information except for some specific conditions.
In the case of specific conditions, a confirmation dialog appears.
For specific conditions and respective confirmation dialogs, see Section 2.4.
10
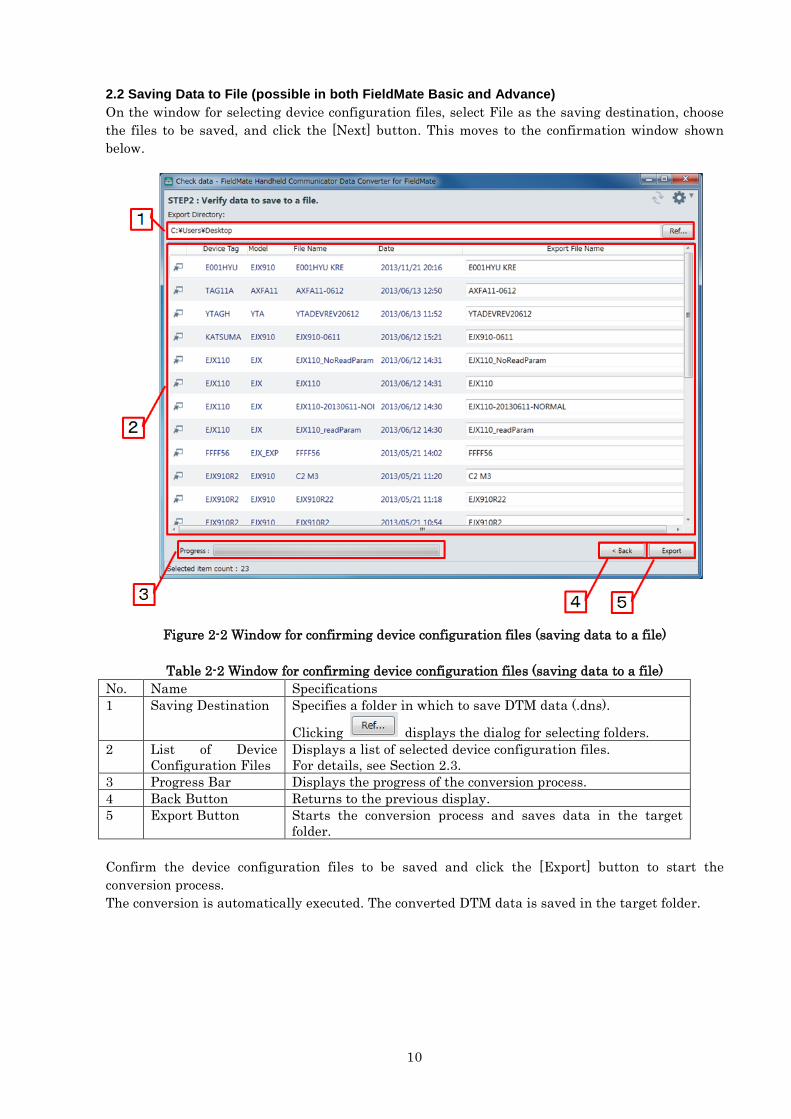
2.2 Saving Data to File (possible in both FieldMate Basic and Advance)
On the window for selecting device configuration files, select File as the saving destination, choose
the files to be saved, and click the [Next] button. This moves to the confirmation window shown
below.
Figure 2-2 Window for confirming device configuration files (saving data to a file)
Table 2-2 Window for confirming device configuration files (saving data to a file)
No. Name Specifications
1 Saving Destination Specifies a folder in which to save DTM data (.dns).
Clicking displays the dialog for selecting folders.
2 List of Device
Configuration Files
Displays a list of selected device configuration files.
For details, see Section 2.3.
3 Progress Bar Displays the progress of the conversion process.
4 Back Button Returns to the previous display.
5 Export Button Starts the conversion process and saves data in the target
folder.
Confirm the device configuration files to be saved and click the [Export] button to start the
conversion process.
The conversion is automatically executed. The converted DTM data is saved in the target folder.
11
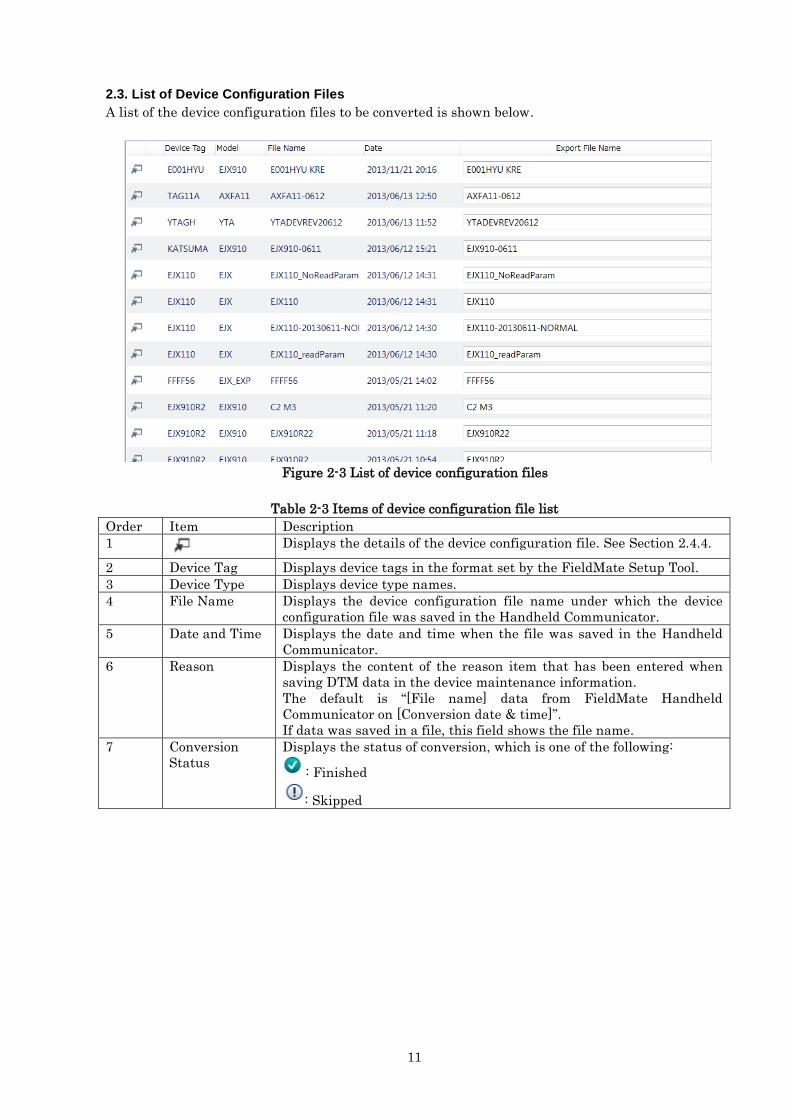
2.3. List of Device Configuration Files
A list of the device configuration files to be converted is shown below.
Figure 2-3 List of device configuration files
Table 2-3 Items of device configuration file list
Order Item Description
1
Displays the details of the device configuration file. See Section 2.4.4.
2 Device Tag Displays device tags in the format set by the FieldMate Setup Tool.
3 Device Type Displays device type names.
4 File Name Displays the device configuration file name under which the device
configuration file was saved in the Handheld Communicator.
5 Date and Time Displays the date and time when the file was saved in the Handheld
Communicator.
6 Reason Displays the content of the reason item that has been entered when
saving DTM data in the device maintenance information.
The default is “[File name] data from FieldMate Handheld
Communicator on [Conversion date & time]”.
If data was saved in a file, this field shows the file name.
7 Conversion
Status
Displays the status of conversion, which is one of the following:
: Finished
: Skipped
12
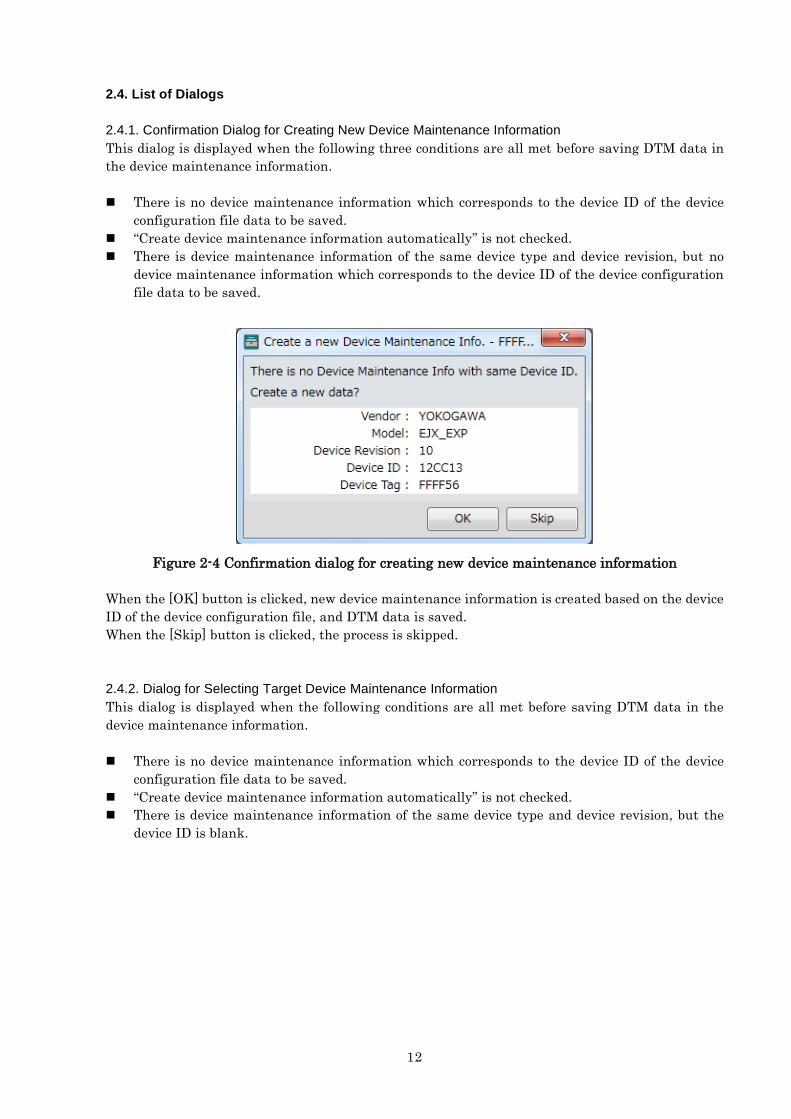
2.4. List of Dialogs
2.4.1. Confirmation Dialog for Creating New Device Maintenance Information
This dialog is displayed when the following three conditions are all met before saving DTM data in
the device maintenance information.
There is no device maintenance information which corresponds to the device ID of the device
configuration file data to be saved.
“Create device maintenance information automatically” is not checked.
There is device maintenance information of the same device type and device revision, but no
device maintenance information which corresponds to the device ID of the device configuration
file data to be saved.
Figure 2-4 Confirmation dialog for creating new device maintenance information
When the [OK] button is clicked, new device maintenance information is created based on the device
ID of the device configuration file, and DTM data is saved.
When the [Skip] button is clicked, the process is skipped.
2.4.2. Dialog for Selecting Target Device Maintenance Information
This dialog is displayed when the following conditions are all met before saving DTM data in the
device maintenance information.
There is no device maintenance information which corresponds to the device ID of the device
configuration file data to be saved.
“Create device maintenance information automatically” is not checked.
There is device maintenance information of the same device type and device revision, but the
device ID is blank.

13
Figure 2-5 Confirmation dialog for selection
1. If “Create new device maintenance information” is selected
When [OK] is clicked, new device maintenance information is created based on the device ID of
the device configuration file, and DTM data is saved.
2. If “Use the existing device maintenance information” is selected
Device maintenance information with a blank device ID is displayed in the list.
When device maintenance information is selected in the list and [OK] is clicked, the device ID of
the device configuration file is used as the device ID of the selected device maintenance
information, and DTM data is saved.
When the [Skip] button is clicked, transfer of the device configuration file is skipped.
2.4.3. Confirmation Dialog for Overwriting Data
This dialog is displayed when the following conditions are met before saving DTM data in the device
maintenance information.
There are five pieces of DTM data of the device maintenance information to be saved.
Figure 2-6 Confirmation dialog for overwriting DTM data
When data to be overwritten is selected and [OK] is clicked, the DTM data is overwritten and saved.
When the [Skip] button is clicked, the process is skipped.
①
②
14
If “Skip the process if the same device ID is found during the subsequent processes” is checked, data
of the same device ID is automatically skipped in the subsequent processes.
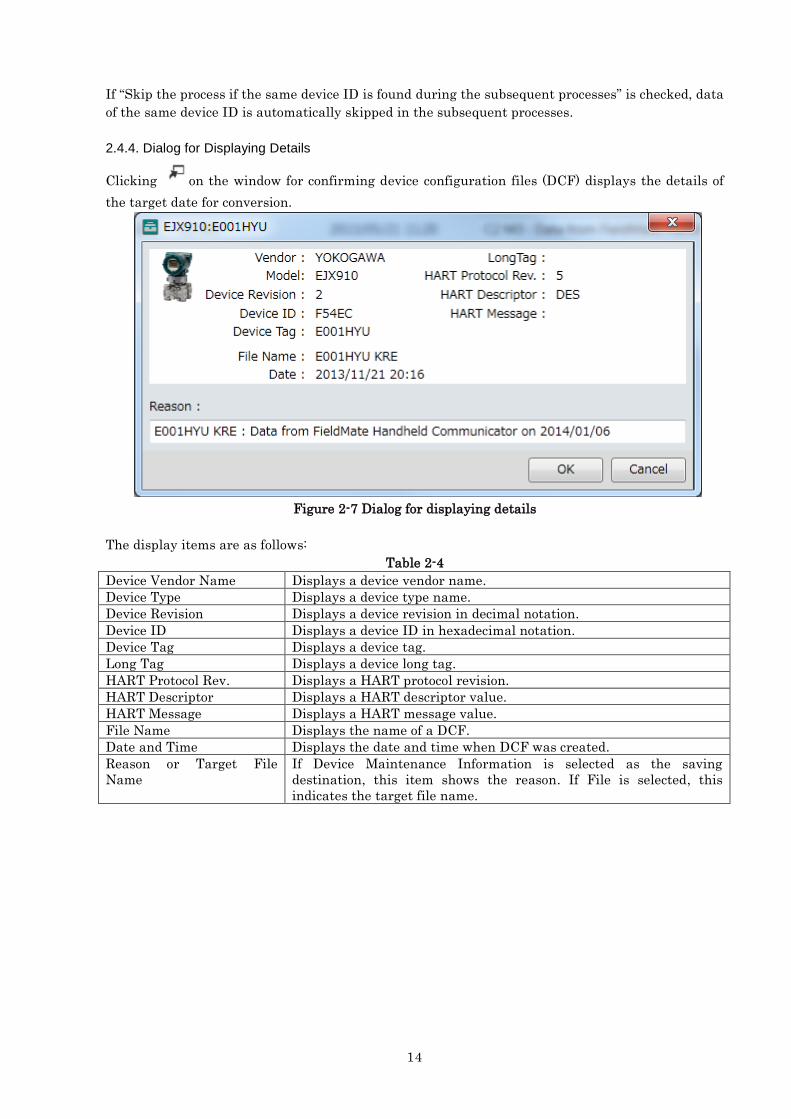
2.4.4. Dialog for Displaying Details
Clicking on the window for confirming device configuration files (DCF) displays the details of
the target date for conversion.
Figure 2-7 Dialog for displaying details
The display items are as follows:
Table 2-4
Device Vendor Name Displays a device vendor name.
Device Type Displays a device type name.
Device Revision Displays a device revision in decimal notation.
Device ID Displays a device ID in hexadecimal notation.
Device Tag Displays a device tag.
Long Tag Displays a device long tag.
HART Protocol Rev. Displays a HART protocol revision.
HART Descriptor Displays a HART descriptor value.
HART Message Displays a HART message value.
File Name Displays the name of a DCF.
Date and Time Displays the date and time when DCF was created.
Reason or Target File
Name
If Device Maintenance Information is selected as the saving
destination, this item shows the reason. If File is selected, this
indicates the target file name.
15
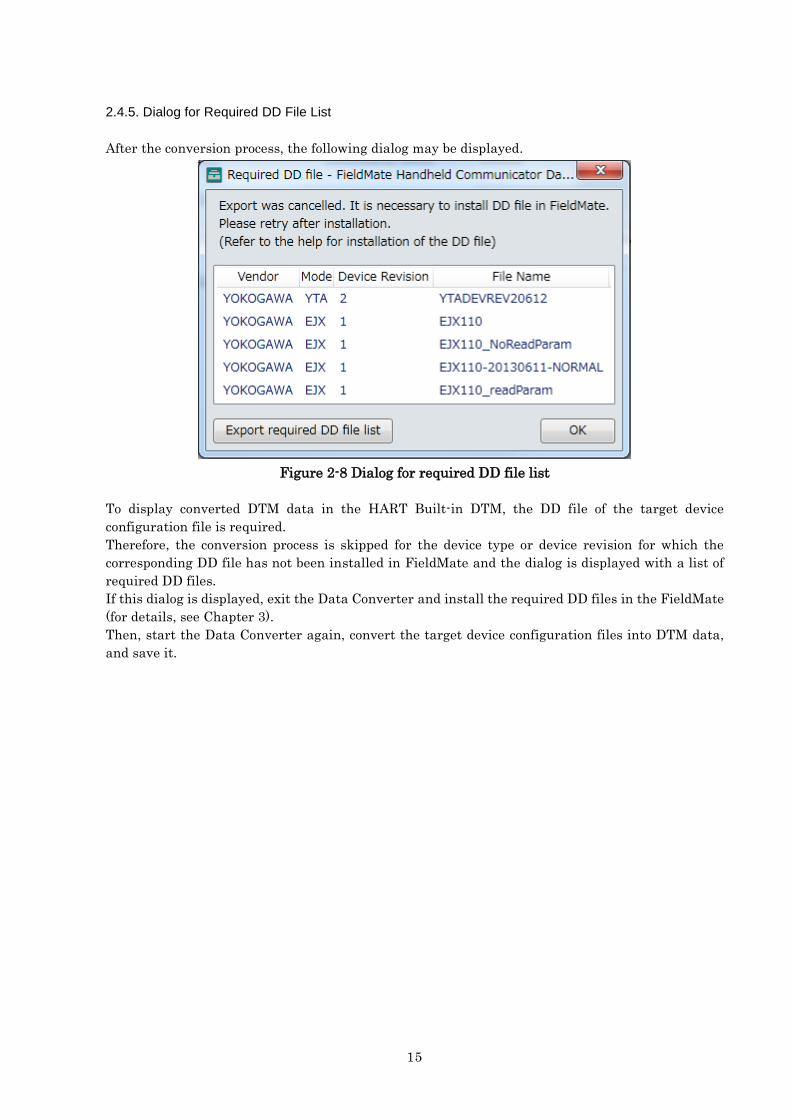
2.4.5. Dialog for Required DD File List
After the conversion process, the following dialog may be displayed.
Figure 2-8 Dialog for required DD file list
To display converted DTM data in the HART Built-in DTM, the DD file of the target device
configuration file is required.
Therefore, the conversion process is skipped for the device type or device revision for which the
corresponding DD file has not been installed in FieldMate and the dialog is displayed with a list of
required DD files.
If this dialog is displayed, exit the Data Converter and install the required DD files in the FieldMate
(for details, see Chapter 3).
Then, start the Data Converter again, convert the target device configuration files into DTM data,
and save it.
16
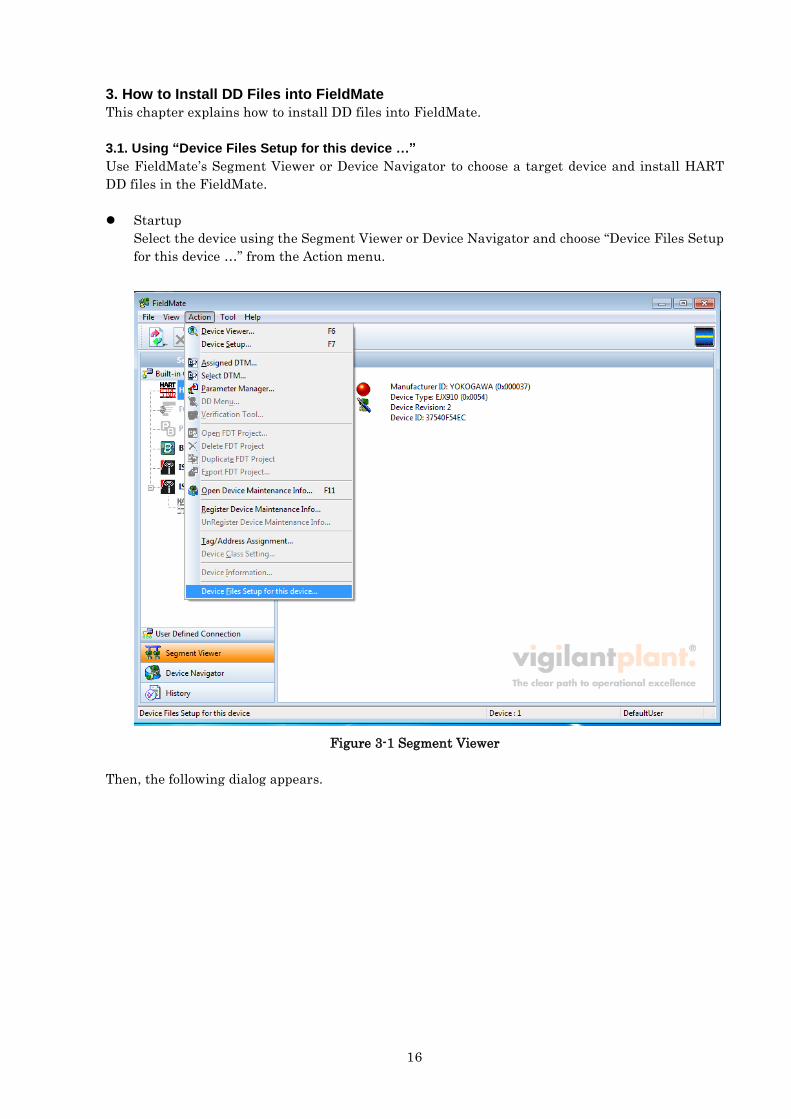
3. How to Install DD Files into FieldMate
This chapter explains how to install DD files into FieldMate.
3.1. Using “Device Files Setup for this device …”
Use FieldMate’s Segment Viewer or Device Navigator to choose a target device and install HART
DD files in the FieldMate.
Startup
Select the device using the Segment Viewer or Device Navigator and choose “Device Files Setup
for this device …” from the Action menu.
Figure 3-1 Segment Viewer
Then, the following dialog appears.
17
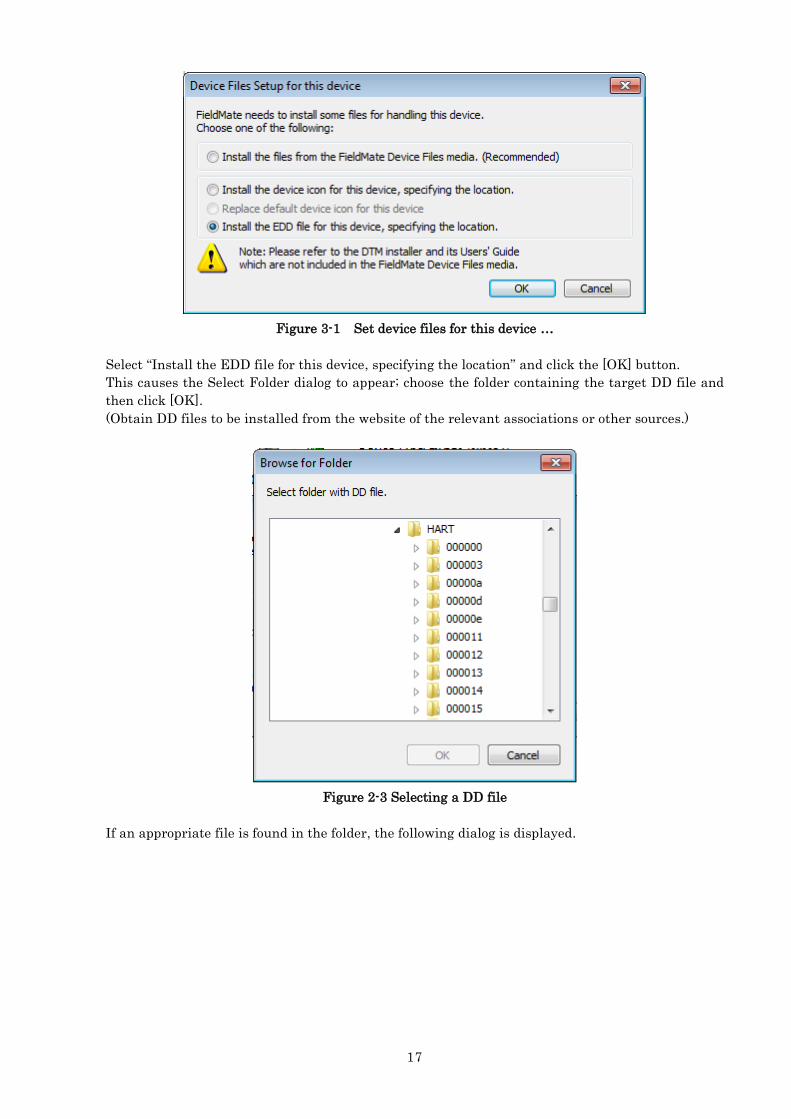
Figure 3-1 Set device files for this device …
Select “Install the EDD file for this device, specifying the location” and click the [OK] button.
This causes the Select Folder dialog to appear; choose the folder containing the target DD file and
then click [OK].
(Obtain DD files to be installed from the website of the relevant associations or other sources.)
Figure 2-3 Selecting a DD file
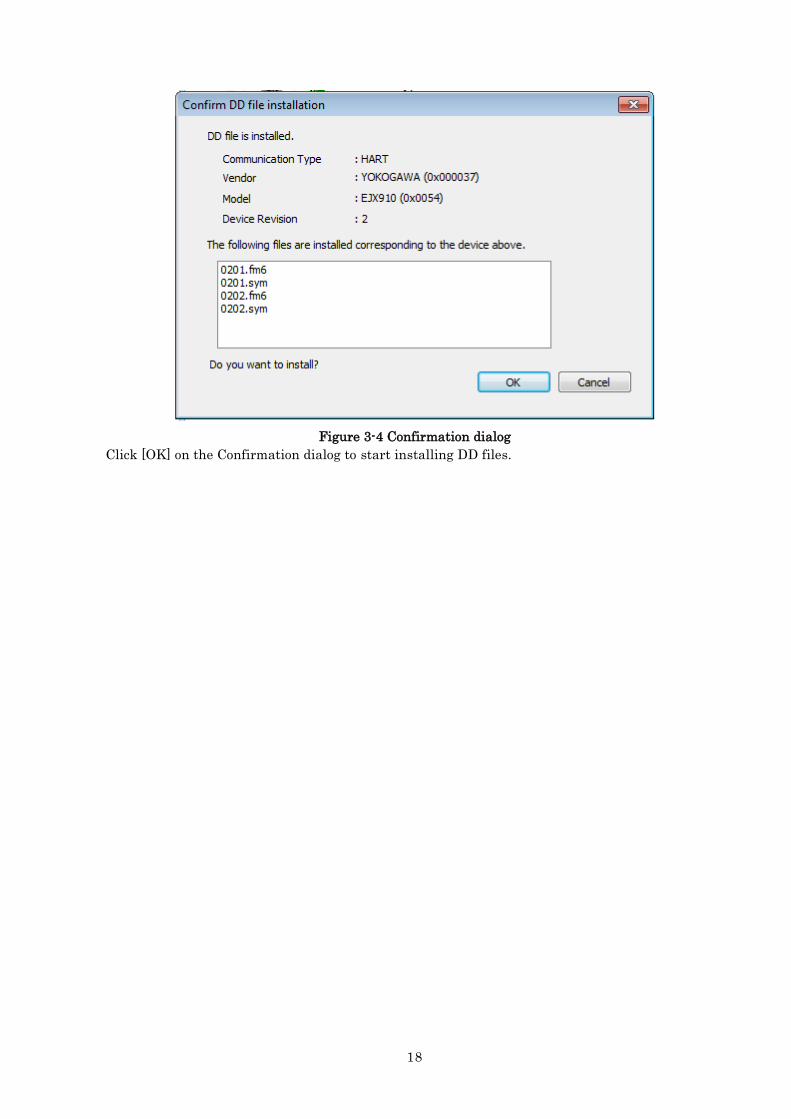
If an appropriate file is found in the folder, the following dialog is displayed.
18
Figure 3-4 Confirmation dialog
Click [OK] on the Confirmation dialog to start installing DD files.
19
Appendix
Appendix A: Target Device Configuration Files
The Data Converter deals with device configuration files that meet the following condition.
• Device configuration created with the language setting of English or Japanese in the Handheld
Communicator
*Other device configuration files are not displayed on the Select File window.