Embed Size (px)
DESCRIPTION
first aid in a disaster situation
Citation preview


Field Medic’s First Aid | How To Treat Injury & Illness In A Disaster Situation
© Copyright Swann Media LLC | www.expertprepper.com | Page 2
Copyright, Legal Notice and Disclaimer:
This publication is protected under the US Copyright Act of 1976 and all other
applicable international, federal, state and local laws, and all rights are reserved,
including resale rights: you are not allowed to give or sell this Guide to anyone else. If
you received this publication from anyone other than ExpertPrepper.com, Skip Tanner
or Swann Media LLC, you’ve received a pirated copy. Please contact us via e-mail at
support [at] swannmedia.com and notify us of the situation.
Please note that much of this publication is based on personal experience and
anecdotal evidence. Although the author and publisher have made every reasonable
attempt to achieve complete accuracy of the content in this Guide, they assume no
responsibility for errors or omissions. Also, you should use this information as you see
fit, and at your own risk. Your particular situation may not be exactly suited to the
examples illustrated here; in fact, it’s likely that they won’t be the same, and you should
adjust your use of the information and recommendations accordingly.
Any trademarks, service marks, product names or named features are assumed to be
the property of their respective owners, and are used only for reference. There is no
implied endorsement if we use one of these terms.
Finally, use your head. Nothing in this Guide is intended to replace common sense,
legal, medical or other professional advice, and is meant to inform the reader.
Copyright © 2013 and on Swann Media LLC. All rights reserved worldwide.
Field Medic’s First Aid | How To Treat Injury & Illness In A Disaster Situation
© Copyright Swann Media LLC | www.expertprepper.com | Page 3
Table Of Contents
FIRST AID AND TRAUMA KITS ...................................................................................... 5
FIRST AID KITS ............................................................................................................ 6
TRAUMA KITS .............................................................................................................. 7
MEDICINE ........................................................................................................................ 8
PERSONAL HYGEINE ................................................................................................... 12
PROTECTIVE CLOTHING ............................................................................................. 14
VITAMINS ....................................................................................................................... 16
FIRST AID ...................................................................................................................... 17
ASSESSING THE SITUATION ................................................................................... 17
Minor First Aid Situations ............................................................................................ 18
BURNS & SCALDS ................................................................................................. 18
CUTS & SCRAPES ................................................................................................. 19
SPLINTERS ............................................................................................................ 19
STINGS ................................................................................................................... 20
EMERGENCY / TRAUMA SITUATIONS .................................................................... 21
BLEEDING .............................................................................................................. 21
BREATHING PROBLEMS ...................................................................................... 21
BROKEN BONE (FRACTURE) ............................................................................... 23
CHEMICAL BURNS ................................................................................................ 24
CHOKING, AIRWAY OBSTRUCTION .................................................................... 24
PENETRATING OBJECTS ..................................................................................... 25
POISONING ............................................................................................................ 26
SEVERED BODY PARTS (AVULSION) ................................................................. 27
SHOCK .................................................................................................................... 27
SPRAINS ................................................................................................................. 28
TRANSPORTING AN INJURED PERSON ............................................................. 28
UNCONSCIOUSNESS ............................................................................................ 29
WOUNDS (SEVERE) .............................................................................................. 29
WEATHER-RELATED SITUATIONS .......................................................................... 30
Field Medic’s First Aid | How To Treat Injury & Illness In A Disaster Situation
© Copyright Swann Media LLC | www.expertprepper.com | Page 4
COLD EXPOSURE ................................................................................................. 30
FROSTBITE ............................................................................................................ 30
HEAT EXHAUSTION .............................................................................................. 31
SUNBURN ............................................................................................................... 31
SUNSTROKE / HEAT STROKE .............................................................................. 32

Field Medic’s First Aid | How To Treat Injury & Illness In A Disaster Situation
© Copyright Swann Media LLC | www.expertprepper.com | Page 5
Important note - this ebook is in no way implying or recommending that medical attention should only be administered at home, or avoided altogether in favor or self or home treatment. Any illness, wound, or unusual symptoms beyond that of simple, commonly known factors should be treated seriously, and professional medical attention should be sought out to whatever extent available. If you are not a trained medical professional, do not make assumptions or decisions as one.
While technically speaking, “safety” is what being prepared is all about. Keeping
ourselves and our families safe from starvation, sickness, extreme weather, thieves,
and other potential enemies is our ultimate goal. This section will focus on the smaller
aspect of safety, medicinal and elemental safety.
FIRST AID AND TRAUMA KITS Touched upon briefly in an earlier
section of this guide, a replenished
selection of medical supplies can stave
off the need to seek outside sources of
medical help for smaller injuries and
sicknesses. Especially valuable if
services are scarce or unavailable
completely, being able to treat your
own wounds or illnesses can be
paramount to preventing a small illness
from becoming a deadly, widespread
pandemic.

Field Medic’s First Aid | How To Treat Injury & Illness In A Disaster Situation
© Copyright Swann Media LLC | www.expertprepper.com | Page 6
FIRST AID KITS A serious first aid kit. Not the Walmart special, but a large kit in a transportable bag or
case that contains items any nurse, doctor, paramedic, or medical professional could
use professionally. There should be items contained that you are clueless of what they
are, or how to use them properly. Learn what these items are and how to use them.
A really good first aid kit will contain at least the following:
Airway
- 1 Disposable Airway Kit
- 1 Bag Valve Mask Resuscitator
Burn
- 1 Sterile Burn Sheet
Bandages
- 16 Adhesive bandages (1" x 3")
- 2 Abdominal Pads (5" x 9")
- 1 Trauma Dressing (12" x 30")
- 20 Sterile Dressings (4" x 4")
- 4 Eye Pads
- 1 Petroleum Gauze (3" x 9")
- 2 Kerlix (4-1/2")
- 10 Sterile Dressings (3" x 3")
- 2 Blood Stoppers
- 2 Gauze Rolls (4" NS)
- 2 Gauze Rolls (3" NS)
- 1 1/2" Waterproof Tape
- 1 1" Waterproof Tape
- 1 Elastic Bandage (4")
- 1 Elastic Bandage (3")
- 2 Triangular Bandages
Instrument Pack
- 1 Shears
- 1 Kelly forceps
- 1 Bandage scissors
- 1 Splinter forceps
- 1 Penlight
Equipment & Supplies - 1 First Aid Booklet
- 10 Alcohol Prep Pads
- 10 Antibiotic Ointment (.5 g)
- 2 Small Cold Packs
- 1 Eye Wash
- 10 PVP Iodine
- 1 Space Blanket
- 10 Antimicrobial Wipes
- 10 Pair Nitrile Gloves
- 1 D Cylinder Oxygen Tank (shipped
empty)
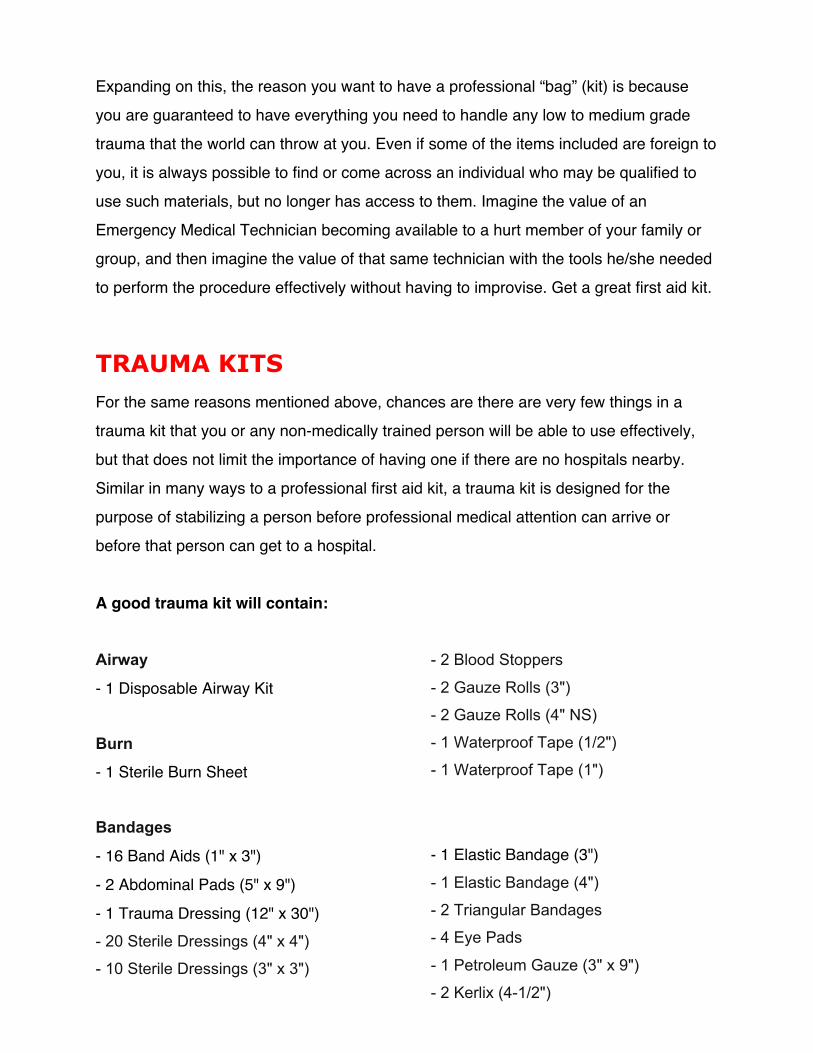
Expanding on this, the reason you want to have a professional “bag” (kit) is because
you are guaranteed to have everything you need to handle any low to medium grade
trauma that the world can throw at you. Even if some of the items included are foreign to
you, it is always possible to find or come across an individual who may be qualified to
use such materials, but no longer has access to them. Imagine the value of an
Emergency Medical Technician becoming available to a hurt member of your family or
group, and then imagine the value of that same technician with the tools he/she needed
to perform the procedure effectively without having to improvise. Get a great first aid kit.
TRAUMA KITS For the same reasons mentioned above, chances are there are very few things in a
trauma kit that you or any non-medically trained person will be able to use effectively,
but that does not limit the importance of having one if there are no hospitals nearby.
Similar in many ways to a professional first aid kit, a trauma kit is designed for the
purpose of stabilizing a person before professional medical attention can arrive or
before that person can get to a hospital.
A good trauma kit will contain: Airway
- 1 Disposable Airway Kit
Burn
- 1 Sterile Burn Sheet
Bandages
- 16 Band Aids (1" x 3")
- 2 Abdominal Pads (5" x 9")
- 1 Trauma Dressing (12" x 30") - 20 Sterile Dressings (4" x 4")
- 10 Sterile Dressings (3" x 3")
- 2 Blood Stoppers
- 2 Gauze Rolls (3")
- 2 Gauze Rolls (4" NS)
- 1 Waterproof Tape (1/2")
- 1 Waterproof Tape (1")
- 1 Elastic Bandage (3") - 1 Elastic Bandage (4")
- 2 Triangular Bandages
- 4 Eye Pads
- 1 Petroleum Gauze (3" x 9")
- 2 Kerlix (4-1/2")

Field Medic’s First Aid | How To Treat Injury & Illness In A Disaster Situation
© Copyright Swann Media LLC | www.expertprepper.com | Page 8
Equipment & Supplies
- 1 Eye Wash
- 10 PVP Iodine
- 10 Antibiotic Ointment (.5 gram)
- 10 Alcohol Prep Pads
- 10 Pair Nitrile Gloves
- 1 First Aid Booklet
- 1 Space Blanket
- 10 Antimicrobial Wipes
- 1 Dyna Flo Brass Regulator
- 1 D Oxygen Cylinder
Now THOSE are true medical kits.
MEDICINE All the medical equipment in the world won’t solve all your medical emergency problems
(“Hey lady, where’d ya want this CT machine?”) unless bolstered by commonly
necessary medications. While no means a comprehensive list of all possible RX needs,
some usual ones are:
1. Antibiotics -
A. Penicillin: Penicillins are the cheapest, safest, and
most effective antibacterial treatments available
(although some have allergic reaction to them).
Penicillin G and V remain the drugs of choice for
treating many bacterial infections. (Penicillin V is not
destroyed by stomach acid, so it is a better drug for
oral prescriptions.) Methicillin was the first penicillin to
have activity against staphylococcus that was
resistant to penicillin G.
Ampicillin and Amoxicillin have a wider application
than earlier penicillins, being effective against Escherichia coli (urinary tract
infections), Haemophilus influenzae (ear infections and meningitis) and
Salmonella typhi (responsible for typhoid fever).

Field Medic’s First Aid | How To Treat Injury & Illness In A Disaster Situation
© Copyright Swann Media LLC | www.expertprepper.com | Page 9
Carbenicillin was the first penicillin synthesized to possess useful activity against
Pseudomonas aeruginosa (surface bacteria causing hospital infections).
B. Cephalosporin:The injectable forms of this drug are generally broad-spectrum,
bactericidal agents that are restricted to hospital use for the treatment of serious
infections.
C. Tetracycline: Tetracyclines are broad-spectrum antibiotics that have been used
to treat a wide range of infections. They can be taken orally, and prevent
regrowth of bacteria. They are used in the treatment of gonorrhea, and in urinary
tract infections (Escherichia coli). They can cause teeth stains in children, so they
are not usually prescribed for patients less than 12 years of age.
D. Macrolides: Notably Erythromycin, a very safe and effective antibiotic used for
respiratory tract infections caused by streptococci or mycoplama. It is also used
for patients allergic to penicillin. It can penetrate human cells and is used to treat
"Legionnaires' disease", a serious type of pneumonia.
Cipofloxacine, Cephradine, Amoxiciline and Augmentine are more common.
Believe it or not, many common antibiotics that are prescribed to humans today are
also used to keep fish healthy in aquariums. Yes, we’re serious. Most of the
antibiotic medicines used to treat bacteria in aquariums contain just one ingredient -
the active antibiotic, and in most cases this is exactly the same antibiotic used for
human consumption-nothing more or less. Strangely enough, these aquarium
antibiotics come in the same dosages which are used in human prescriptions.
Having checked several sources, some of which were created by medical doctors,
see below for a list of aquarium branded medicines that contain commonly
prescribed human antibiotics:
•Amoxicillin - FISH-MOX, FISH-MOX FORTE

Field Medic’s First Aid | How To Treat Injury & Illness In A Disaster Situation
© Copyright Swann Media LLC | www.expertprepper.com | Page 10
•Keflex - FISH-FLEX, FISH-FLEX FORTE •Metronidazole - FISH-ZOLE •Penicillin - FISH-PEN, FISH-PEN FORTE
Remember that all of the antibiotics above do require a prescription from a doctor,
and usually a doctor will only prescribe a single course of treatment in order to treat
your illness. However, they can all be purchased in large quantities from pet stores
without a prescription. This means you can stockpile these common antibiotics,
something which would have been normally impossible.
The bottom line here is that you should head to the doctor over the pet store when
we are in need of medical treatment, but do keep it in mind that if things go horribly
wrong in the future, we will have to improvise many aspects of our lives--especially
medical care (as outlined above).
2. Pain Killers - Aspirin, Advil, Tylenol, Children’s Tylenol, Motrin, and a host of other
products designed for the control of pain. Be frugal in the taking of these drugs and
in dispensing them. As with any pain meds, it is far too easy to become reliant on
taking them for every little bump and bruise, and even the most marginal of
headaches. Stop. Save them for when they are truly needed, because you have no
idea as to how long they might remain commonly available. These types of drugs do
expire, so take care to replenish them regularly, and discard the expired bottles.
3. RX medications - Your prescription medications can be a long term problem. It will
not be easy to hoard very specific treatment prescriptions like blood pressure
medication, diabetes, or any number of pharmaceuticals that you or your loved ones
need on a daily basis. An option to account for this is to look into a cross comparison
with medication that might be available from Canada or overseas. Not the greatest
option, and it can be risky when trying to discern differences between what is
available and what was prescribed, but it’s better than nothing.

Field Medic’s First Aid | How To Treat Injury & Illness In A Disaster Situation
© Copyright Swann Media LLC | www.expertprepper.com | Page 11
4. Cold And Flu Medications - Again, watch out for those expiration dates, but at the
same time, there are so many varieties and are so commonly available (for adults to
buy) that there should be no problem hoarding these meds for your sniffles and
sneezes.
5. Baby Needs - Think a truckload of diapers and a room full of formula is enough to
keep your baby clean and fed? You may have to think again. Cloth diapers might be
the long term solution, provided you have a source of water that can be used for
cleaning that won’t be contaminated by large amounts of fecal matter. It may not be
a lot per diaper, but it does add up day by day. Luckily, most Moms have natural,
built in formula that is just right for baby, or in some cases, multiple babies to help
out Moms who are not so fortunate. If artificial formula must be used, then obtain the
powdered, self mix kind to take advantage of the long term storability of this product.
Luckily, babies do grow up, so the long term problem does have an end.
6. Children's Medications - As with the adult variety, these medications are
commonly available and can be collected in larger quantities, with the expiration
date dictating how long.

Field Medic’s First Aid | How To Treat Injury & Illness In A Disaster Situation
© Copyright Swann Media LLC | www.expertprepper.com | Page 12
PERSONAL HYGEINE Working with the assumption that we are not looking to start a barbarian horde,
personal hygiene will not only help to keep a semblance of societal dignity, but at the
same time, provide better health and wellbeing for all involved or nearby. Hand washing
alone can help prevent some of the deadliest diseases known to man including e-coli,
and influenza. Some things to have at the ready, then:
• Toothbrush, Toothpaste and Floss - Oh, brushing your teeth is the last thing you’ll
be worried about when the feces hits the oscillating fan, is it? Shall we remember
that excessive plaque buildup on our teeth has been linked to heart disease? Not to
mention, how easy do you think it will be to find a dentist while you’re packed out at
your escape location? Pulling a rotten tooth with pliers=not fun. Brush and floss your
damn teeth.
• Soap, Shampoo and Lotion – Let’s hit these in reverse order.
• Lotion is essential, especially in winter, to help avoid dry, cracked skin from
extreme biting cold. Apply to your pet’s foot pads for the same reason. Split skin
leads to bleeding. Bleeding leaves you open to infection.
• Shampoo will not only clean your hair, but your scalp. You are just as prone to
infection through your head as anywhere else on your body. You will also have a
better chance of avoiding, killing, and preventing ticks, fleas, and other burrowing-
type insects from making a home by tunneling through your head and drinking your
blood. Gives me chills just thinking about it. Yuck.
• Soap - Goes without saying, right? Can’t wash your hands with just running water.
Soap is the original anti-bacterial. Do you know how to make your own? You will
want to learn. There are two usual ways of “making” soap.

Field Medic’s First Aid | How To Treat Injury & Illness In A Disaster Situation
© Copyright Swann Media LLC | www.expertprepper.com | Page 13
Melt and Pour - the easiest way to make soap is to hoard all the little bits and
pieces that remain when a bar of soap is almost used up. Rarer these days,
thanks to the prevalence of liquid soaps and dispensers, bars of soap are easier
to keep in storage, last forever (if kept dry) and can be reused. Warming lots of
pieces of soap bars in a double-boiler will slowly melt the soap to the point of
becoming liquid. At this point, you can gently stir the soap with a plastic spoon to
thoroughly combine them and even add your own fragrances if you would like to
(again, survival does not have to be uncivilized). Gently pour the liquid soap into
clean soap bar molds, or whatever molds you happen to have around. Large
candy molds work very well and you can even make your own forms out of wood,
rubbed down on the inside with a little castor oil to help with sticking. Cool 10-12
hours.
Cold Process soap - While this method will give you a true soap, it can be very
dangerous to work with one of the most important ingredients - Lye. Lye is a
caustic substance and burns can occur if handled improperly. The basic
ingredients of cold process soap are combinations of light and heavy oils like
palm, coconut, olive and castor. Animal fats completely rendered from any
foreign material, blood and flesh can also be substituted. The oils are melted
together, and a solution of lye and water is created and cooled (extremely
carefully), mixed into the fats, gently stirred, poured into molds, and allowed to
cool. Once de-molded, the soap is allowed to cure for several weeks before it is
usable. There are many great books and video sources to learn how to make
soap. It is not hard, but as mentioned, can be dangerous when working with lye if
not careful.
• Hand Sanitizer - When washing our hands is not possible, hand sanitizers
(essentially gelled alcohol) are our best friends. Beware of using them in the winter,
as they are excruciatingly drying to your hands, even if they say “moisturizing”, they
will still make a desert of your hands. They will kill the germs on your hands though.

Field Medic’s First Aid | How To Treat Injury & Illness In A Disaster Situation
© Copyright Swann Media LLC | www.expertprepper.com | Page 14
• Deodorant - Who needs stinky pits? Maybe a little low on the survival scale, but if
you are planning on hunting, then you had better have as much unscented
deodorant and anti-perspirant as possible keeping you dry and neutral-scented while
up in that tree stand in that blind. If your wife wrinkles her nose at how you smell, an
animal will smell you for miles off.
• Feminine Hygiene Items - Obvious.
PROTECTIVE CLOTHING “Better to be too warm than too cold” is the motto for survival. But while it’s easy for
wool, Gore-Tex and similar natural and synthetic fabrics to keep us toasty when
exposed to the elements, too often do we forget that heat can be just as troublesome as
the cold. Trudging through the foothills of New Mexico during high summer can pose
more short-term dangers that even sub-zero temperatures can when comparing the
times of exposure. Sunstroke, sunburn, extreme dehydration, and the after-effects of
each can ruin your day, not to mention challenge your survival skills. Clothing that
protects against the sun should also be light colored for reflection - white and tan works
best.
• Shirts (first base layer) - There’s only one term you need to remember when looking
for hot-weather clothing - “sweat wicks”. And it’s not only cotton anymore, special
channels formed into polyester and other materials allow most sweat to be quickly
absorbed and drawn away from the skin. Airflow across the skin is increased, allowing
the remaining sweat to evaporate quickly, thereby cooling your skin. This is equally
useful in cold weather as a base layer, which I’m sure you would agree if you ever
started sweating under your coat while shoveling your driveway, then went for a stroll
and froze solid as your sweat-saturated shirt under your coat welcomed all the cold air
possible to drop your core temperature to absolute zero (or so it felt, clenching your
jaw to stop your teeth from chattering). Hot or cold, sweat=bad.

Field Medic’s First Aid | How To Treat Injury & Illness In A Disaster Situation
© Copyright Swann Media LLC | www.expertprepper.com | Page 15
• Shell layer - A light jacket with a hood and lots of vents. What? We’re looking to keep
cool, right? Yes, but when the sun sets in your arid climate and bone-chilling
temperatures set in, your jacket will be your best friend. And what’s with all the
zippers, you ask? During the day, while your shirt is busy wicking your sweat away, all
the zippers in the jacket (especially under your arms) allow all that moisture to
evaporate away instead of collecting on the inner layers, further cooling your body
system. At night, when the sun sets, zip up all the zippers and retain your body heat.
Unnecessary in humid, tropical conditions due to the fact that the moisture in the air
holds onto the heat, which is why it can still be 90 degrees at night in Florida during
the summer. Use the hood day and night-day to keep the sun off your head and at
night for further heat retention.
• Shorts - Cool and comfortable is what we want here, and your shorts should have the
following criteria: sweat wicking (if possible) like your shirt, quick dry nylon, slightly
stretchable so there is no restriction in movement and no chafing on your inner thighs,
legs that fall just above the knee and deep pockets for carrying survival gear, food or
water. At night, a thermal blanket for your legs does the trick, and can be folded up to
the size of a large wallet and stuffed into the pocket during the day.
• Insulation - Loose fitting hoody. A pullover (no front zipper where heat can escape)
with a kangaroo front pocket and no draw strings that can get snagged on anything
will fit perfectly into your post-sunset or pre-dawn ensemble to be worn in between
your base layer and shell layer. The key will be weight. Too heavy and lugging it
around all day becomes a chore and it takes up a lot of room. Too light and it will be
not as effective in keeping you warm, but you are still better off having it too light than
too heavy, provided you have a decent shirt and shell layer to pick up the slack.
• Hat - One of the most essential items to have for heat or cold survival. And we’re not
talking about a ski cap here. Something with a wide brim to keep the sun off your
head, face and neck. Ventilated to release moisture as well as quick-drying if possible.
Your car can literally make the difference between heat stroke and a casual comment;
Field Medic’s First Aid | How To Treat Injury & Illness In A Disaster Situation
© Copyright Swann Media LLC | www.expertprepper.com | Page 16
“Hot enough for ya?” And at night-nothing on your body loses heat like your head
does. Keep your hat on.
VITAMINS While taking multi-vitamins as part of a regular healthy diet is as important as your
doctor always says it is(as you completely ignore him), it is also important to remember
vitamins as part of a survival situation. Your bucket of 100-year food rations may be
enough to keep you alive and your belly somewhat full, but your overall health is not
based upon what survival packs can offer you. On the same note, regular hunting and
fishing for lean protein must also be offset by regular vitamin consumption. What to do
when your vitamins run out? Create your own by drinking them. Now I will warn you, this
drink tastes terrible, but it will do the trick.
Pull from your garden (of edible vegetables-no poison ivy milkshakes, please) one
handful each of a dark leafy green (spinach, kale, parsley, mustard, field lettuce),
something yellow or orange (carrot, parsnip, pumpkin, squash), something white or red
(potato, turnip, tomato) and a non-leafy green (string bean, broccoli, lima bean, snap
pea), and finally any fruit that you might have.
You see where this is going, right?
If you have access to a juicer (and electricity) then do this all through the juicer. If not,
but you have electricity, a blender or food processor will work but you’ll need to add
some liquid like a fruit juice, or water, or broth. If no electricity, then chop it all up as fine
as possible, and then get out the old mortar and pestle. Grind it all up to a paste and
then add a liquid. Mix well and then drink as fast as possible. It's a long way to go to get
vitamins, but it does the job. Drink this twice a week at least (more is better). Hold your
nose if necessary so you don’t taste it.

Field Medic’s First Aid | How To Treat Injury & Illness In A Disaster Situation
© Copyright Swann Media LLC | www.expertprepper.com | Page 17
FIRST AID Serious accidents and injuries in survival situation are rare. However, minor injuries of
one kind or another are encountered in many day-to-day activities. In some cases the
injured need to be evacuated to medical care, but most injuries can be managed
adequately in the field.
REMINDER: The information here is intended as a guide or a reminder for basic first aid. It is highly recommended that you and your family take a first aid course as part of your survival preparations.
ASSESSING THE SITUATION What to Treat First
1. Don’t panic. You will be able to assess
the situation more effectively.
Remember, psychological support is
also important.
2. Remember the ABCs of Life Support:
Airways open – Open and maintain
victim’s airway.
Breathing restored – If victim is not
breathing, begin rescue breathing
techniques immediately.
Circulation maintained – If no pulse is present, get assistance from a person
certified in cardiopulmonary resuscitation (CPR) techniques.
Field Medic’s First Aid | How To Treat Injury & Illness In A Disaster Situation
© Copyright Swann Media LLC | www.expertprepper.com | Page 18
REMEMBER, to be able to perform CPR effectively, it is essential to be properly
trained.
3. Check for bleeding. Apply direct pressure and elevate injured limb.
4. Look for signs of shock and broken bones (fractures).
5. Check for emergency medical identification on the victim.
6. Get professional medical help quickly. Know emergency numbers, such as 0 or
911. Telephone appropriate authorities (rescue squad, ambulance, police, poison
control center or fire department) and describe the problem. Be sure to give your
name, location and the number of persons involved.
7. Loosen any clothing that may restrict victim’s breathing or interfere with
circulation.
8. Never give an unconscious person anything by mouth.
9. DO NOT move injured persons unless situation is life-threatening. Keep victim
still, quiet and warm (except heat exhaustion and sunstroke). Victims with broken
bones (fractures) should not be moved until a splint has been properly applied.
Minor First Aid Situations
BURNS & SCALDS
CAUTION: DO NOT clean burns or break blisters. DO NOT remove any clothing that
sticks to burn. DO NOT apply grease, ointment or medication to a severe burn. DO NOT
use cotton or material with loose fibers to cover burns.
TREATMENT

Field Medic’s First Aid | How To Treat Injury & Illness In A Disaster Situation
© Copyright Swann Media LLC | www.expertprepper.com | Page 19
First degree burns – redness or discoloration of skin surface; mild swelling and pain.
1. Apply cool, wet cloths or immerse in water. DO NOT use ice.
2. Blot gently; apply a dry, sterile pad if necessary.
3. Usually medical treatment is not necessary; however, if severe exist, call for
professional medical help. Be alert for signs of shock.
Second degree burns – deep burn with red or mottled appearance; blisters;
considerable pain and swelling; skin surface appears wet. See treatment for first degree
burns. If arms and legs are affected, elevate above heart level. Burns may be deep and
potentially serious, requiring medical treatment depending on extent and location. Be
alert for signs of shock and infection.
Third degree burns – deep tissue destruction with a white or charred appearance; no
pain. Call for professional medical help immediately. Be alert for signs of shock.
CUTS & SCRAPES BEFORE INITIATING ANY FIRST AID TO CONTROL BLEEDING, BE SURE TO
WEAR HEALTH CARE GLOVES TO AVOID CONTACT OF THE VICTIM’S BLOOD
WITH YOUR SKIN.
1. CLEAN... wound and surrounding area gently with mild soap and rinse. Blot dry with
sterile pad or clean dressing.
2. TREAT... to protect against contamination.
3. PROTECT... and cover to absorb fluids and prevent further contamination. (Handle
only the edges of sterile pads or dressings.) Secure with first aid tape to help keep out
dirt and germs.
SPLINTERS Slender Pieces of Wood, Bone, Glass or Metal Objects that Lodge In or Under Skin
Field Medic’s First Aid | How To Treat Injury & Illness In A Disaster Situation
© Copyright Swann Media LLC | www.expertprepper.com | Page 20
SYMPTOMS: May Include: Pain, redness, swelling
TREATMENT
1. First wash your hands thoroughly, then gently wash affected area with mild soap and
water.
2. Sterilize needle or tweezers by boiling for 10 minutes; wipe with a sterile pad before
use.
3. Loosen skin around splinter with needle; use tweezers to remove splinter. If splinter
breaks or is deeply lodged, consult professional medical help.
4. Cover with adhesive bandage or sterile pad, if necessary.
STINGS CAUTION: In highly sensitive persons, do not wait for symptoms to appear. Get
professional medical help immediately. If breathing difficulties occur, start rescue
breathing techniques; if pulse is absent, begin CPR.
SIGNS: Signs of allergic reaction may include: Nausea; severe swelling; breathing
difficulties; bluish face, lips and fingernails; shock or unconsciousness.
TREATMENT 1. For mild or moderate symptoms, wash with soap and cold water. Remove stinger or
venom sac with tweezers or by gently scraping with fingernail (DO NOT squeeze).
2. For multiple stings, soak affected area in cool bath. Add one tablespoon of baking
soda per quart of water.

Field Medic’s First Aid | How To Treat Injury & Illness In A Disaster Situation
© Copyright Swann Media LLC | www.expertprepper.com | Page 21
EMERGENCY / TRAUMA SITUATIONS
BLEEDING
BEFORE INITIATING ANY FIRST AID TO CONTROL BLEEDING, BE SURE TO
WEAR HEALTH CARE GLOVES TO AVOID CONTACT OF THE VICTIM’S BLOOD
WITH YOUR SKIN.
TREATMENT 1. Act quickly. Have victim lie down. Elevate injured limb higher than heart unless you
suspect a broken bone.
2. Control bleeding by applying direct pressure on the wound with a sterile pad or clean
cloth.
3. If bleeding is controlled by direct pressure, bandage firmly to protect wound. Check
pulse to be sure bandage is not too tight.
4. If bleeding is not controlled by use of direct pressure, apply a tourniquet only as a last
resort.
5. Call for professional medical help immediately.
6. If you are bleeding and have no one to help you, call for professional medical help.
Lie down, so your body weight applies pressure to the bleeding site.
BREATHING PROBLEMS ESTABLISH NON-RESPONSIVENESS AND ACTIVATE EMERGENCY MEDICAL
SERVICES (EMS) OR CALL FOR HELP.
Field Medic’s First Aid | How To Treat Injury & Illness In A Disaster Situation
© Copyright Swann Media LLC | www.expertprepper.com | Page 22
SYMPTOMS: May include: Shortness of breath, dizziness, chest pain, rapid pulse,
bluish-purple skin color, dilated pupils, unconsciousness.
TREATMENT For victim who has stopped breathing:
1. Lay victim flat on back. Tilt the head back with one hand to open airway, while placing
two fingers of the other hand under the chin.
2. Clear airway, using your fingers in a hooked fashion to remove any solid or liquid
obstructions.
3. Look, listen, and feel for respiratory movement for 5 seconds. If breathing is absent,
pinch victim’s nostrils closed, take a deep breath, completely cover victim’s mouth, and
give two slow, full breaths.
4. Check for carotid pulse in neck and for signs of breathing.
5. If pulse is present:
For adults – continue rescue breathing at a rate of one strong every five seconds.
Re-check for pulse and breathing every twelve breaths.
For infants and small children – breathe shallow breaths at a rate of one every
three seconds or 20 per minute.
6. If pulse is not present, begin Cardiopulmonary Resuscitation (CPR).
For adults... Exert enough pressure to depress the breastplate 1 1/2 to 2 inches.
Continue compressions at a rate of "one and two and..." Every fifteen
compressions should be followed with a pause by two rescue breaths.
For children... Use the heel of only one hand to depress the breastplate 1 to 1 ½
inches. Continue compressions at a rate of 100 per minute "one, two, three..."
Every five compressions should be followed without a pause by one rescue
breath.
For infants... Use only fingertips. Apply moderate pressure to depress breastplate
1/2 to 3/4 inches. Continue compressions at a rate of at least 100 per minute.
Every five compressions (3 seconds) should be followed without a pause by one
rescue breath.

Field Medic’s First Aid | How To Treat Injury & Illness In A Disaster Situation
© Copyright Swann Media LLC | www.expertprepper.com | Page 23
BROKEN BONE (FRACTURE) Break or Crack in a Bone
SYMPTOMS: The victim hearing or feeling the bone break; area tender to touch with
pain in one spot; swelling noted around suspected fracture; limb in an unnatural
position; painful movement; abnormal motion; loss of function; grating sensation;
discoloration of affected area.
TREATMENT 1. Keep victim warm and still, treat for shock if necessary. DO NOT move victim until a
splint has been applied unless there is danger of a life-threatening emergency.
2. If bone is suspected to be broken but does not pierce the skin (closed fracture), splint
the limb before the victim is moved, immobilizing the joint above and below the
suspected fracture site.
3. If broken bone pierces the skin (open or compound fracture), apply pressure to
appropriate pressure point to control bleeding. DO NOT try to straighten limb, return it to
a natural position, or replace bone fragments. DO NOT touch or clean the wound.
Secure a sterile pad or clean cloth firmly in place over the wound and tie with strong
bandages or cloth strips.
4. If victim must be moved, apply a splint to prevent further damage. Use anything that
will keep the broken bones from moving, including broomsticks, boards or rolled

Field Medic’s First Aid | How To Treat Injury & Illness In A Disaster Situation
© Copyright Swann Media LLC | www.expertprepper.com | Page 24
magazines. Pad splints with cotton, clothes or clean cloths tied firmly (but not tightly) in
place. If victim complains of numbness, loosen splint.
5. Get professional medical help immediately.
CHEMICAL BURNS
TREATMENT
1. Remove contaminated clothing.
2. Flush burned area with cool water for at least 5 minutes.
3. Treat as you would any major or minor burn.
4. If eye has been burned:
A. Immediately flood face, inside of eyelid and eye with cool running water for at
least 15 minutes. Turn head so water does not drain into uninjured eye. Lift
eyelid away from eye so the inside of lid can also be washed.
B. If eye has been burned by a dry chemical, lift any loose particles off the eye
with the corner of a sterile pad or clean cloth.
C. Cover both eyes with dry sterile pads, clean cloths, or eye pads; bandage in
place.
5. Consult professional medical help.
CHOKING, AIRWAY OBSTRUCTION Partial Obstruction with Good Air Exchange
SYMPTOMS: May include: Forceful cough with wheezing sounds between coughs.
TREATMENT
Encourage victim to cough as long as good air exchange continues. DO NOT interfere
with attempts to expel object.

Field Medic’s First Aid | How To Treat Injury & Illness In A Disaster Situation
© Copyright Swann Media LLC | www.expertprepper.com | Page 25
Partial or Complete Airway Obstruction in Conscious Victim with Poor Air Exchange
SYMPTOMS: May include: Weak cough; high-pitched crowing noises during inhalation;
inability to breathe, cough or speak; gesture of clutching neck between thumb and index
finger; exaggerated breathing efforts; dusky or bluish skin color.
TREATMENT For Adult Victim
If victim is standing or sitting:
1. Stand slightly behind victim.
2. Place your arms around victim’s waist; place your fist, thumb side in, against victim’s
abdomen, slightly above the navel and below the rib margins.
3. Grasp fist with your other hand and exert a quick upward thrust. Repeat (five times in
a rapid succession) if necessary (Heimlich Maneuver or manual thrust.)
Complete Airway Obstruction in Unconscious Victim
1. Activate EMS system first. Follow breathing problems section
PENETRATING OBJECTS Such as Sticks or Pieces of Metal Protruding from Body
SYMPTOMS May include: Profuse bleeding; swelling and redness of injured tissue.
CAUTION DO NOT remove penetrating object.
TREATMENT 1. Get professional medical help immediately.
2A. If victim is fixed to object (impaled), cut it off at a safe distance from skin. Immobilize
object with thick dressings made from sterile pads or clean cloths secured in place with
first aid tape, a belt or a bandage.

Field Medic’s First Aid | How To Treat Injury & Illness In A Disaster Situation
© Copyright Swann Media LLC | www.expertprepper.com | Page 26
B. If object is protruding from victim, DO NOT move it. Immobilize object with thick
dressings made from sterile pads or clean cloths secured in place with first aid tape, a
belt or a bandage. Do not apply bandage so tightly that breathing is restricted.
3. If object penetrates chest and victim complains of discomfort or pressure, quickly
loosen bandage on one side and reseal. Watch carefully for recurrence. Repeat
procedure if necessary.
4. If breathing problems develop, begin rescue breathing techniques immediately.
5. Treat for shock.
POISONING CALL 911, YOUR LOCAL FIRST AID SQUAD, OR POISON CONTROL CENTER
IMMEDIATELY, BEFORE ADMINISTERING FIRST AID.
TREATMENT 1. DO NOT give any other first aid if victim is unconscious or is having convulsions.
Begin rescue breathing techniques or CPR if necessary. If victim is convulsing, protect
from further injury; loosen tight clothing if possible.
2. If professional medical help cannot be reached immediately:
A. DO NOT induce vomiting if poison is unknown, a corrosive substance (i.e.,
acid, cleaning fluid, lye, drain cleaner), or a petroleum product (i.e., gasoline,
turpentine, paint thinner, lighter fluid). DO NOT use activated charcoal.
B. Induce vomiting if poison is known and is not a corrosive substance or
petroleum product. To induce vomiting: Give adult one ounce of syrup of ipecac
(1/2 ounce for child) followed by four or five glasses of water. If victim has
vomited, follow with one ounce of powdered, activated charcoal in water, if
available.
3. Take poison container (or vomitus if poison is unknown) with victim to the hospital.

Field Medic’s First Aid | How To Treat Injury & Illness In A Disaster Situation
© Copyright Swann Media LLC | www.expertprepper.com | Page 27
SEVERED BODY PARTS (AVULSION) Tissue is Partially or Completely Cut or Torn from Body
CAUTION: Wrap the detached part of the body in something clean, and send it to the
hospital with the victim so that it may be reattached if possible. Ice may be used to keep
the detached part cool; however, prevent it from direct contact with ice and/or from
freezing.
TREATMENT 1. Stop the bleeding immediately.
2. Treat for shock if necessary. If breathing problems are present, begin rescue
breathing techniques.
3. If wound is not deep or is not bleeding severely, gently cleanse with mild soap and
warm water. Cover with a sterile dressing or clean cloth and bandage.
4. Get professional medical help immediately.
SHOCK Disturbance in the Circulation of the Blood That Can Upset All Body Functions
CAUTION: Shock is a dangerous condition and can be fatal. Expect some degree of
shock in any emergency.
DO NOT give anything by mouth.
SYMPTOMS
May include: Unusual weakness or faintness; cold, pale, clammy skin; rapid, weak
pulse; shallow, irregular breathing; chills; nausea; unconsciousness.
TREATMENT
1. Treat known cause of shock as quickly as possible (i.e., breathing difficulties,
bleeding, severe pain).

Field Medic’s First Aid | How To Treat Injury & Illness In A Disaster Situation
© Copyright Swann Media LLC | www.expertprepper.com | Page 28
2. Maintain an open airway. If victim vomits, gently turn head to side.
3. Keep victim warm and lying flat. (In cases of head or chest injuries, with no chance of
broken neck or back, elevate head and shoulders 10 inches higher than feet if possible.)
4. Get professional medical help immediately.
5. DO NOT give anything by mouth.
SPRAINS Injury to Soft Tissue Surrounding Joint Due to Wrenching or Laceration of Ligaments,
Muscles, Tendons or Blood Vessels
SYMPTOMS May include: Painful movement, swelling, discoloration and tenderness
around injured joint.
CAUTION: Victim may have a broken bone (fracture) and should be examined by a
medical professional.
TREATMENT 1. If ankle or knee is affected, do not allow victim to walk. Loosen or remove shoe;
elevate leg.
2. Protect skin with thin towel or cloth. Then apply cold, wet compresses or cold packs
to affected area.
Never pack joint in ice or immerse in icy water.
3. Consult professional medical assistance for further treatment if necessary.
TRANSPORTING AN INJURED PERSON If injury involves neck or back, DO NOT move victim unless absolutely necessary. Call
for professional medical help.
If victim must be pulled to safety, move body lengthwise, not sideways. If possible,
slide a coat or blanket under the victim:

Field Medic’s First Aid | How To Treat Injury & Illness In A Disaster Situation
© Copyright Swann Media LLC | www.expertprepper.com | Page 29
A. Carefully turn victim toward you and slip a half-rolled blanket under back.
B. Turn victim on side over blanket, unroll, and return victim onto back.
C. Drag victim head first, keeping back as straight as possible.
If victim must be lifted: Support each part of the body. Position a person at victim’s
head to provide additional stability. Use a board, shutter, table top or other firm surface
to keep body as level as possible.
UNCONSCIOUSNESS Victim Is Not Mentally Aware; Does Not Respond to Sensory Stimuli, Such as Sound or
Light
TREATMENT 1. Call for professional medical help.
2. DO NOT move victim or give anything by mouth.
3. Keep victim warm; loosen any tight clothing.
4. Maintain an open airway. If breathing difficulties develop, begin rescue breathing
techniques immediately.
5. Check for emergency medical identification tag to help determine cause of
unconsciousness.
WOUNDS (SEVERE) Breaks in Skin or Mucus Membrane (Open) or Injuries to Underlying Tissue Breaks in
Skin (Closed)
CAUTION: Some wounds, such as small cuts or minor scrapes, require only simple first
aid measures; others, however, require immediate first aid followed by professional
medical treatment.

Field Medic’s First Aid | How To Treat Injury & Illness In A Disaster Situation
© Copyright Swann Media LLC | www.expertprepper.com | Page 30
Before treating any serious incision, abrasion or laceration with extensive bleeding, act
quickly to control bleeding. Get professional medical help immediately.
Any wound can become contaminated and infected.
WEATHER-RELATED SITUATIONS
COLD EXPOSURE TREATMENT 1. Move victim into warm room as soon as possible.
2. Be alert for breathing difficulties; start rescue breathing techniques if necessary.
3. Remove wet or frozen clothing. Immediately rewarm victim by wrapping in blankets or
placing in tub of warm, not hot, water. Dry victim thoroughly after bath.
4. Give victim hot liquids to drink, only if conscious (not alcohol).
5. Follow treatment for frostbite.
6. Consult professional medical help if indicated.
FROSTBITE
CAUTION: DO NOT break blisters, rub affected area, or apply heat lamps or hot water
bottles.
DO NOT attempt rapid thawing if refreezing is a possibility.
TREATMENT 1. Warm affected areas as quickly as possible by covering with clothing and blankets or
immersing frozen part in warm, not hot, water. If frostbitten area has been thawed and
refrozen, then warm at room temperature.
2. Discontinue warming techniques as soon as affected area becomes flushed. Expect
swelling and pain after thawing. Victim may require an analgesic.

Field Medic’s First Aid | How To Treat Injury & Illness In A Disaster Situation
© Copyright Swann Media LLC | www.expertprepper.com | Page 31
3. Gently exercise affected area after it has been rewarmed.
4. DO NOT apply dressings or clothing unless transportation is required for medical
help. If fingers or toes are affected, separate with sterile pads or clean cloths.
5. Elevate frostbitten areas, but not higher than heart.
6. Get professional medical help.
HEAT EXHAUSTION (Heat Prostration)
SYMPTOMS May include: Fatigue; irritability; headache; faintness; weak, rapid pulse;
shallow breathing; cold, clammy skin; profuse perspiration.
TREATMENT 1. Instruct victim to lie down in a cool, shaded area or an air-conditioned room. Elevate
feet.
2. Massage legs toward heart.
3. Only if victim is conscious, give cool water or electrolyte solution every 15 minutes
until victim recovers.
4. Use caution when letting victim first sit up, even after feeling recovered.
SUNBURN
TREATMENT 1. Treat for first or second degree burns.
2. Treat for shock if necessary.
3. Cool victim as rapidly as possible by applying cool, damp cloths or immersing in cool,
not cold, water.
4. Give victim fluids to drink.
5. Get professional medical help immediately for severe cases.

Field Medic’s First Aid | How To Treat Injury & Illness In A Disaster Situation
© Copyright Swann Media LLC | www.expertprepper.com | Page 32
SUNSTROKE / HEAT STROKE
SYMPTOMS May include: Extremely high body temperature (106°F or higher); hot, red,
dry skin; absence of sweating; rapid pulse; convulsions; unconsciousness.
CAUTION: Sunstroke is a life-threatening emergency.
TREATMENT 1. Get professional medical help immediately.
2. Lower body temperature quickly by placing victim in partially filled tub of cool, not
cold, water (avoid over-cooling). Briskly sponge victim’s body until temperature is
reduced; then towel dry. If tub is not available, wrap victim in cold, wet sheets in well-
ventilated room or use fans and air conditioners until body temperature is reduced.
3. DO NOT give stimulating beverages, such as coffee, tea, or soda.


![Medics Gone Wild [PIQUE]](https://img.pdfslide.us/doc/110x75/577ce05c1a28ab9e78b327e2/medics-gone-wild-pique.jpg)