Embed Size (px)
Citation preview

Fernbedienungs-KitRemote control kit
Capristo Automotive GmbH - Kalmecke 5 - D 59846 Sundern Germany
Capristo Automotive GmbH - Kalmecke 5 - D 59846 Sundern Germany
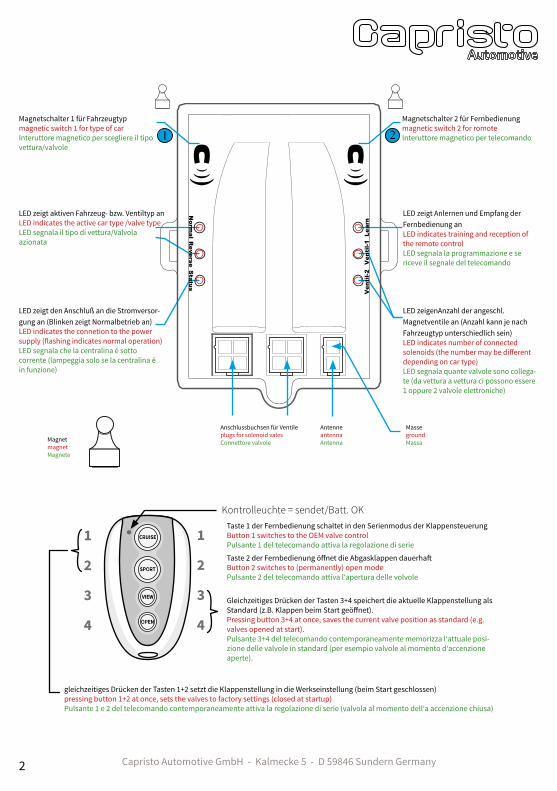
Magnetschalter 1 für Fahrzeugtypmagnetic switch 1 for type of carInteruttore magnetico per scegliere il tipo vettura/valvole
LED zeigt aktiven Fahrzeug- bzw. Ventiltyp anLED indicates the active car type /valve type LED segnala il tipo di vettura/Valvola azionata
LED zeigt den Anschluß an die Stromversor-gung an (Blinken zeigt Normalbetrieb an)LED indicates the connetion to the power supply (flashing indicates normal operation)LED segnala che la centralina é sotto corrente (lampeggia solo se la centralina é in funzione)
LED zeigenAnzahl der angeschl. Magnetventile an (Anzahl kann je nach Fahrzeugtyp unterschiedlich sein)LED indicates number of connected solenoids (the number may be different depending on car type)LED segnala quante valvole sono collega-te (da vettura a vettura ci possono essere 1 oppure 2 valvole elettroniche)
LED zeigt Anlernen und Empfang der Fernbedienung anLED indicates training and reception of the remote controlLED segnala la programmazione e se riceve il segnale del telecomando
Magnetschalter 2 für Fernbedienungmagnetic switch 2 for romoteInteruttore magnetico per telecomando
Anschlussbuchsen für Ventile plugs for solenoid valesConnettore valvole
Taste 1 der Fernbedienung schaltet in den Serienmodus der KlappensteuerungButton 1 switches to the OEM valve controlPulsante 1 del telecomando attiva la regolazione di serie
Taste 2 der Fernbedienung öffnet die Abgasklappen dauerhaftButton 2 switches to (permanently) open modePulsante 2 del telecomando attiva l‘apertura delle volvole
gleichzeitiges Drücken der Tasten 1+2 setzt die Klappenstellung in die Werkseinstellung (beim Start geschlossen)pressing button 1+2 at once, sets the valves to factory settings (closed at startup)Pulsante 1 e 2 del telecomando contemporaneamente attiva la regolazione di serie (valvola al momento dell‘a accenzione chiusa)
Gleichzeitiges Drücken der Tasten 3+4 speichert die aktuelle Klappenstellung als Standard (z.B. Klappen beim Start geöffnet).Pressing button 3+4 at once, saves the current valve position as standard (e.g. valves opened at start).Pulsante 3+4 del telecomando contemporaneamente memorizza l‘attuale posi-zione delle valvole in standard (per esempio valvole al momento d‘accenzione aperte).
AntenneantennaAntenna
MassegroundMassaMagnet
magnetMagnete
2
1 2
Kontrolleuchte = sendet/Batt. OK
1
2
3
4
1
2
3
4
1 2
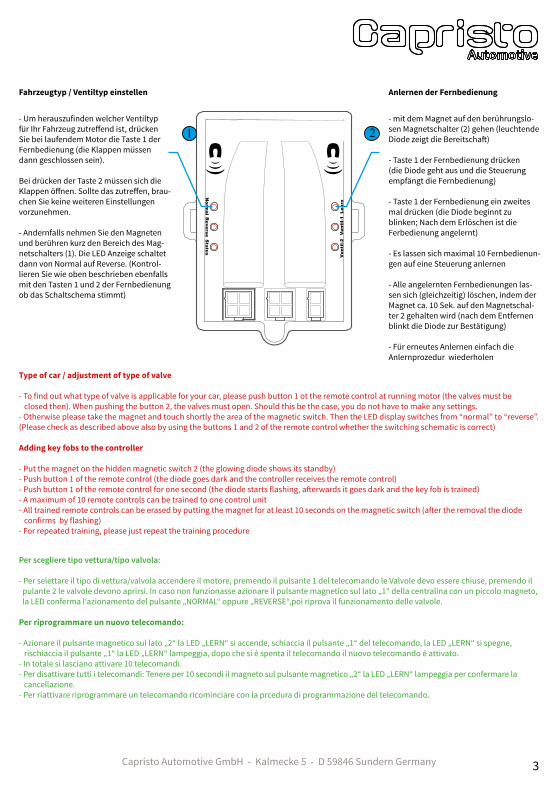
Anlernen der Fernbedienung
- mit dem Magnet auf den berührungslo-sen Magnetschalter (2) gehen (leuchtende Diode zeigt die Bereitschaft)
- Taste 1 der Fernbedienung drücken (die Diode geht aus und die Steuerung empfängt die Fernbedienung)
- Taste 1 der Fernbedienung ein zweites mal drücken (die Diode beginnt zu blinken; Nach dem Erlöschen ist die Ferbedienung angelernt)
- Es lassen sich maximal 10 Fernbedienun-gen auf eine Steuerung anlernen
- Alle angelernten Fernbedienungen las-sen sich (gleichzeitig) löschen, indem der Magnet ca. 10 Sek. auf den Magnetschal-ter 2 gehalten wird (nach dem Entfernen blinkt die Diode zur Bestätigung)
- Für erneutes Anlernen einfach die Anlernprozedur wiederholen
Fahrzeugtyp / Ventiltyp einstellen
- Um herauszufinden welcher Ventiltyp für Ihr Fahrzeug zutreffend ist, drücken Sie bei laufendem Motor die Taste 1 der Fernbedienung (die Klappen müssen dann geschlossen sein).
Bei drücken der Taste 2 müssen sich die Klappen öffnen. Sollte das zutreffen, brau-chen Sie keine weiteren Einstellungen vorzunehmen.
- Andernfalls nehmen Sie den Magneten und berühren kurz den Bereich des Mag-netschalters (1). Die LED Anzeige schaltet dann von Normal auf Reverse. (Kontrol-lieren Sie wie oben beschrieben ebenfalls mit den Tasten 1 und 2 der Fernbedienung ob das Schaltschema stimmt)
Type of car / adjustment of type of valve
- To find out what type of valve is applicable for your car, please push button 1 ot the remote control at running motor (the valves must be closed then). When pushing the button 2, the valves must open. Should this be the case, you do not have to make any settings.- Otherwise please take the magnet and touch shortly the area of the magnetic switch. Then the LED display switches from “normal” to “reverse”. (Please check as described above also by using the buttons 1 and 2 of the remote control whether the switching schematic is correct)
Adding key fobs to the controller
- Put the magnet on the hidden magnetic switch 2 (the glowing diode shows its standby)- Push button 1 of the remote control (the diode goes dark and the controller receives the remote control)- Push button 1 of the remote control for one second (the diode starts flashing, afterwards it goes dark and the key fob is trained)- A maximum of 10 remote controls can be trained to one control unit- All trained remote controls can be erased by putting the magnet for at least 10 seconds on the magnetic switch (after the removal the diode confirms by flashing)- For repeated training, please just repeat the training procedure
Per scegliere tipo vettura/tipo valvola:
- Per selettare il tipo di vettura/valvola accendere il motore, premendo il pulsante 1 del telecomando le Valvole devo essere chiuse, premendo il pulante 2 le valvole devono aprirsi. In caso non funzionasse azionare il pulsante magnetico sul lato „1“ della centralina con un piccolo magneto, la LED conferma l‘azionamento del pulsante „NORMAL“ oppure „REVERSE“,poi riprova il funzionamento delle valvole.
Per riprogrammare un nuovo telecomando:
- Azionare il pulsante magnetico sul lato „2“ la LED „LERN“ si accende, schiaccia il pulsante „1“ del telecomando, la LED „LERN“ si spegne, rischiaccia il pulsante „1“ la LED „LERN“ lampeggia, dopo che si é spenta il telecomando il nuovo telecomando é attivato.- In totale si lasciano attivare 10 telecomandi.- Per disattivare tutti i telecomandi: Tenere per 10 secondi il magneto sul pulsante magnetico „2“ la LED „LERN“ lampeggia per confermare la cancellazione.- Per riattivare riprogrammare un telecomando ricominciare con la prcedura di programmazione del telecomando.
Capristo Automotive GmbH - Kalmecke 5 - D 59846 Sundern Germany 3

Capristo Automotive GmbH - Kalmecke 5 - D 59846 Sundern Germany
Anschluss an das Unterdrucksystem vom Fahrzeugconnection to the vacuum system of the engineConnssione vacuum del motore
Originalanschluss des elektromagnetischen Ventilsoriginal connection to the solenoid valveConnessione della valvola originale
Anschlußschema im originalen Zustand mit einem elektromagnetischen Umschaltventiloriginal connection schematic with one solenoid valveSchema di connessione originale
Diesen Anschluß nicht benutzendon‘t use this pinquesto connetore lasciare libero
Magnetventilsolenoid valvevalvole elettroniche
Unterdruckschläuche zu den Abgasklappenvacuum hoses to the exhaust valves connessione sottovuoto alle valvole dello scarico
Abgasklappenexhaust valves valvole dello scarico
4
Capristo Automotive GmbH - Kalmecke 5 - D 59846 Sundern Germany
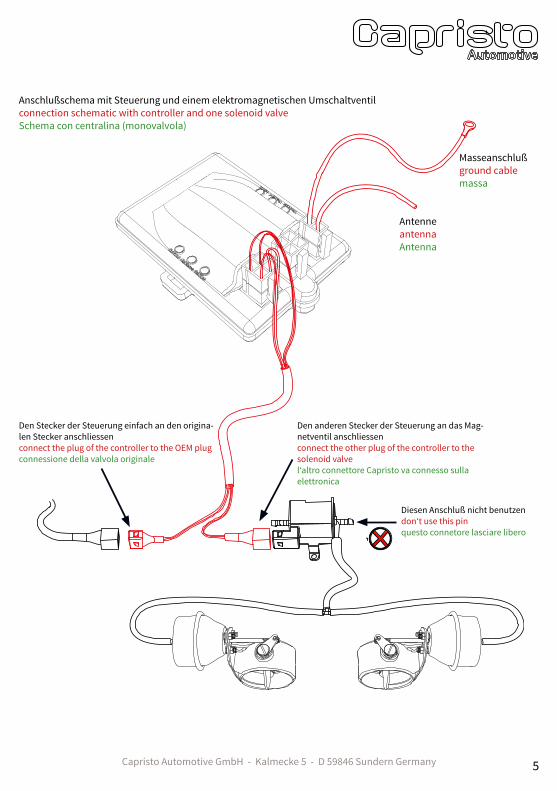
Anschlußschema mit Steuerung und einem elektromagnetischen Umschaltventilconnection schematic with controller and one solenoid valveSchema con centralina (monovalvola)
Masseanschlußground cablemassa
AntenneantennaAntenna
Den Stecker der Steuerung einfach an den origina-len Stecker anschliessenconnect the plug of the controller to the OEM plugconnessione della valvola originale
Diesen Anschluß nicht benutzendon‘t use this pinquesto connetore lasciare libero
Den anderen Stecker der Steuerung an das Mag-netventil anschliessenconnect the other plug of the controller to the solenoid valvel‘altro connettore Capristo va connesso sulla elettronica
5
Unterdruckschläuche zu den Abgasklappenvacuum hoses to the exhaust valves connessione sottovuoto alle valvole dello scarico
Abgasklappenexhaust valves valvole dello scarico
elektromagnetische Ventilesoleonid valvesvalvole elettroniche
diese Anschlüsse nicht benutzendon‘t use these pinsquesto connetore lasciare libero
Capristo Automotive GmbH - Kalmecke 5 - D 59846 Sundern Germany
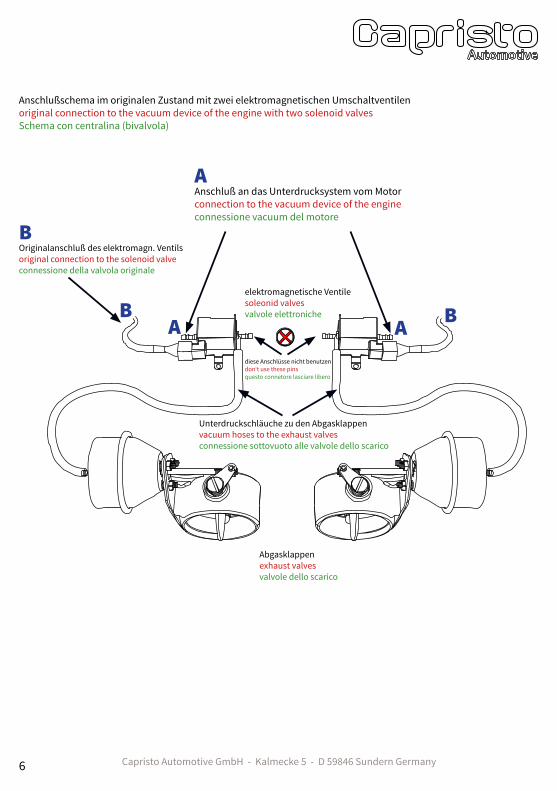
Anschluß an das Unterdrucksystem vom Motorconnection to the vacuum device of the engineconnessione vacuum del motore
Originalanschluß des elektromagn. Ventilsoriginal connection to the solenoid valveconnessione della valvola originale
Anschlußschema im originalen Zustand mit zwei elektromagnetischen Umschaltventilenoriginal connection to the vacuum device of the engine with two solenoid valvesSchema con centralina (bivalvola)
A
A AB B
B
6
Capristo Automotive GmbH - Kalmecke 5 - D 59846 Sundern Germany
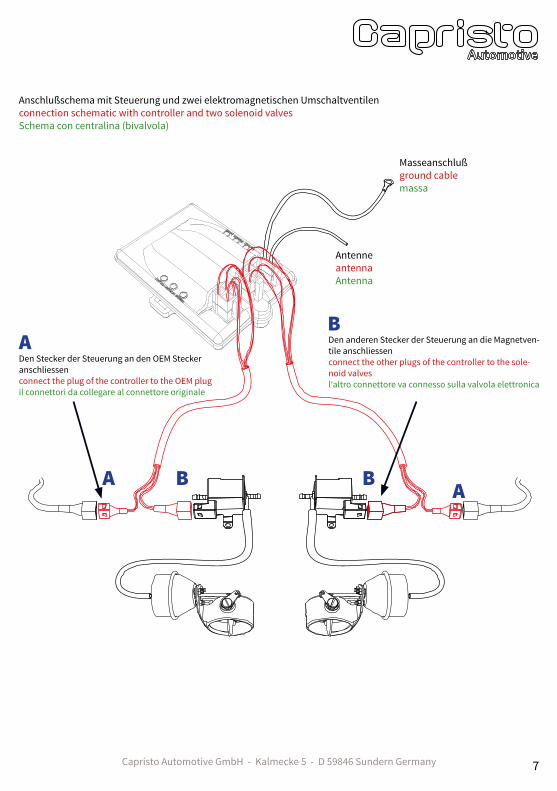
Anschlußschema mit Steuerung und zwei elektromagnetischen Umschaltventilenconnection schematic with controller and two solenoid valvesSchema con centralina (bivalvola)
Masseanschlußground cablemassa
AntenneantennaAntenna
Den Stecker der Steuerung an den OEM Stecker anschliessenconnect the plug of the controller to the OEM plugil connettori da collegare al connettore originale
Den anderen Stecker der Steuerung an die Magnetven-tile anschliessenconnect the other plugs of the controller to the sole- noid valvesl‘altro connettore va connesso sulla valvola elettronica
AB
BBA A
7
Capristo Automotive GmbHKalmecke 5
D 59846 Sundern Made in Germany