Embed Size (px)
Citation preview

UNCLASSIFIED//FOR OFFICIAL USE ONLY
Federal Bureau of Investigation (FBI)
Criminal Justice Information Services (CJIS) Division’s
New National Instant Criminal Background Check System (New NICS)
NNICS-41 User Manual
Appendix 2: NICS E-Check User Manual
Version 2.3
September 29, 2017
CJIS Document Number: NICS-DOC-01670-2.3
Contract Number: DJF-17-1200-G-0002447 ALL INFORMATION CONTAINED HEREIN IS UNCLASSIFIED
Distribution of the required data is limited to authorized United States Government Agencies only. All
other requests for this document shall be referred to FBI, Attention: Information Technology Contracts
Unit, 1000 Custer Hollow Road, Clarksburg, West Virginia 26306
Produced for: Prepared by:
Federal Bureau of Investigation Accenture Federal Services
CJIS Division
1000 Custer Hollow Road
4601 N. Fairfax Drive
Suite 1100
Clarksburg, WV 26306 Arlington, VA 22203

UNCLASSIFIED//FOR OFFICIAL USE ONLY
Version 2.3; September 29, 2017 UNCLASSIFIED//FOR OFFICIAL USE ONLY NICS-DOC-01670-2.3
ii
Table of Contents
1. Overview ......................................................................................................................... 1 2. Register for a NICS E-Check Account......................................................................... 1
2.1 Create an Account ............................................................................................................ 1
3. Navigation Basics and Settings ..................................................................................... 5 3.1 Login ................................................................................................................................ 5
3.2 E-Check Terms and Conditions ....................................................................................... 6
3.3 Access Number (FFL RDS Key) ..................................................................................... 7
3.4 Portal Overview ............................................................................................................... 7
3.5 Processes .......................................................................................................................... 8
3.6 Common Links................................................................................................................. 8
3.7 Tabs .................................................................................................................................. 9
3.8 Commonly Used Icons ..................................................................................................... 9
4. Submit a Search Request via E-Check....................................................................... 10 4.1 Submit a Search Request – E.C. .................................................................................... 10
4.2 Submit Multiple Search Requests .................................................................................. 22
5. Check an NTN Status .................................................................................................. 23 5. 1 Check an NTN Status......................................................................................................... 23
5.2 Retrieve a Delayed Status .............................................................................................. 24
5.3 Retrieve a New Proceed Status ...................................................................................... 25
5.4 Retrieve a Denied Status Before Brady Transfer Date .................................................. 25
5.5 Retrieve a Denied Status After Brady Transfer Date............................................... 26
6. NTN History Query ..................................................................................................... 27 6.1 Query an NTN................................................................................................................ 27
7. FFL User – Create ....................................................................................................... 32 8. User Accounts – Maintain ........................................................................................... 36
List of Table/Figures
Table 1: Commonly Used Icons .................................................................................................... 9
Table 2: Application Page ............................................................................................................ 14
Table 3: Keyboard Shortcuts for the Submit a Search Request Page ........................................... 22
Table 4: NTN Status Descriptions ............................................................................................... 23
Table 5: NTN History Query Search Criteria .............................................................................. 28

UNCLASSIFIED//FOR OFFICIAL USE ONLY
Version 2.3; September 29, 2017 UNCLASSIFIED//FOR OFFICIAL USE ONLY NICS-DOC-01670-2.3
iii
Figure 2-1: E-Check Terms and Conditions .................................................................................. 2
Figure 2-2: E-Check Registration Page ......................................................................................... 3
Figure 2-3: E-Check Terms and Conditions .................................................................................. 4
Figure 2-4: Sample of Completed Enrollment Form ..................................................................... 4
Figure 3-1: FBI NICS E-Check ..................................................................................................... 5
Figure 3-2: LEEP Portal Login ...................................................................................................... 6
Figure 3-3: FFL RDS Key Row ..................................................................................................... 7
Figure 3-4: FFL Information .......................................................................................................... 7
Figure 3-5: NICS Portal Page ........................................................................................................ 8
Figure 3-6: Processes Section ........................................................................................................ 8
Figure 3-7: Common Links ............................................................................................................ 9
Figure 3-8: Home Tab .................................................................................................................... 9
Figure 4-1: Submit a Background Check via E-Check ................................................................ 11
Figure 4-2: Application Page ........................................................................................................ 12
Figure 4-3: Place of Birth Predictive Text Field ........................................................................... 12
Figure 4-4: Birth Date Field .......................................................................................................... 13
Figure 4-5: Transaction Purpose Field .......................................................................................... 13
Figure 4-6: Other Actions Dropdown Menu ................................................................................. 14
Figure 4-7: Verify Search Information Page ................................................................................ 18
Figure 4-8: Verify Search Information Page ................................................................................ 19
Figure 4-9: Transaction Information Section ............................................................................... 19
Figure 4-10: Immediate Search Response Page – New Status .................................................... 20
Figure 5-1: Check NTN Status .................................................................................................... 24
Figure 5-2: Check Status .............................................................................................................. 24
Figure 5-3: Retrieve Status from ‘New’ Status............................................................................ 25
Figure 5-4: Retrieve Delayed Status ............................................................................................ 25
Figure 5-5: Retrieve Delayed Status ............................................................................................ 25
Figure 5-6: Retrieve Status from ‘New’ Status............................................................................ 25
Figure 5-7: Proceed Status ............................................................................................................ 25
Figure 5-8: Retrieve Status from ‘New’ Link .............................................................................. 26
Figure 5-9: Denied Status Before Brady Transfer Date............................................................... 26
Figure 5-10: Retrieve Status from ‘New’ Status........................................................................... 26
Figure 5-11: Display Transaction Status Window for Denied Transaction After Brady Transfer
Date ............................................................................................................................................... 26
Figure 5-12:Firearm Transfer Question ........................................................................................ 27
Figure 5-13: Denied Transaction Status ....................................................................................... 27
Figure 6-1: NTN History Query .................................................................................................. 27
Figure 6-2: NTN History Query Search Critieria ........................................................................ 28
Figure 6-3: NTN History Query Search....................................................................................... 30
Figure 6-4: NTN History Query Search Results .......................................................................... 30

UNCLASSIFIED//FOR OFFICIAL USE ONLY
Version 2.3; September 29, 2017 UNCLASSIFIED//FOR OFFICIAL USE ONLY NICS-DOC-01670-2.3
iv
Figure 6-5: Double arrow icons used to display request details ................................................... 31
Figure 6-6: Export ........................................................................................................................ 31
Figure 6-7: Format ....................................................................................................................... 31
Figure 6-8: Open .......................................................................................................................... 32
Figure 6-9: Excel Document ........................................................................................................ 32
Figure 7-1: FFL User – Create ..................................................................................................... 33
Figure 7-2: Account Information ................................................................................................. 33
Figure 7-3: Access Numbers ........................................................................................................ 34
Figure 7-4: Add User Access FFL ............................................................................................... 34
Figure 7-5: FFL Inquiry Results .................................................................................................. 35
Figure 7-6: Access Numbers ........................................................................................................ 35
Figure 7-7: User Maintenance Success Message .......................................................................... 36
Figure 8-1: User Accounts – Maintain Process Link ................................................................... 36
Figure 8-2: User Maintenance – Inquiry ...................................................................................... 37
Figure 8-3: Inquiry Results .......................................................................................................... 37
Figure 8-4: User Account Page .................................................................................................... 38
Figure 8-5: Account Information ................................................................................................. 38
Figure 8-6: Access Numbers Tab ................................................................................................ 39
Figure 8-7: Change Password Tab ............................................................................................... 39

UNCLASSIFIED//FOR OFFICIAL USE ONLY
Version 2.3; September 29, 2017 UNCLASSIFIED//FOR OFFICIAL USE ONLY NICS-DOC-01670-2.3
1
1. Overview
This NICS E-Check User Manual has been created to assist you with all functions of the
new and improved FBI NICS E-Check. A screen shot has been created for each step of the
various functions covered within the user manual. An associated numbered step will be
featured above each screen shot to provide direction for the user.
When reviewing the user manual, keep in mind that there are multiple user roles with
varying user permissions; therefore, the screen shots may vary.
2. Register for a NICS E-Check Account
2.1 Create an Account
Register for FBI NICS E-Check at the E-Check Website. Registration should only be
completed once per FFL account. An owner or manager can create accounts for the
remaining NICS E-Check users once the FFL account has been created.
Information you will need to set up your account includes:
Username—If you are the person registering your FFL to use the FBI NICS E-
Check, you will receive your username via e-mail. If your FFL is already registered
to use the FBI NICS E-Check, then your FFL has at least one administrative user
(Primary User or Organization Lead). The administrative users create accounts for
the remaining employees who will be using the FBI NICS E-Check. When creating
your account, the administrative user will receive your username and provide it to
you.
Password—If you are the person registering your FFL to use the FBI NICS E-
Check, you will receive instructions via e-mail on how to obtain your temporary
password. If your FFL is already registered to use the FBI NICS E-Check, then
your FFL has at least one administrative user. When creating your account, the
administrative user will receive your temporary password and provide it to you.
Upon receipt of your temporary password, you will need to change the password to
something you will use each time you log on.
UNCLASSIFIED//FOR OFFICIAL USE ONLY
Version 2.3; September 29, 2017 UNCLASSIFIED//FOR OFFICIAL USE ONLY NICS-DOC-01670-2.3
2
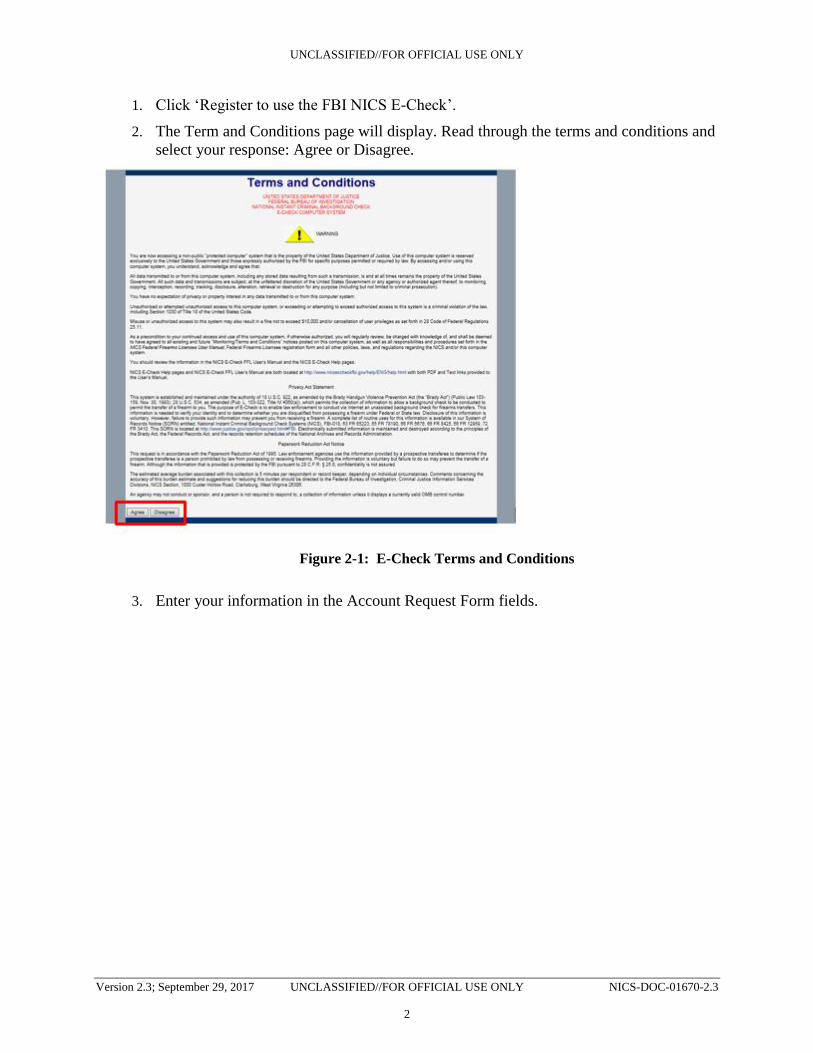
1. Click ‘Register to use the FBI NICS E-Check’.
2. The Term and Conditions page will display. Read through the terms and conditions and
select your response: Agree or Disagree.
Figure 2-1: E-Check Terms and Conditions
3. Enter your information in the Account Request Form fields.

UNCLASSIFIED//FOR OFFICIAL USE ONLY
Version 2.3; September 29, 2017 UNCLASSIFIED//FOR OFFICIAL USE ONLY NICS-DOC-01670-2.3
3
Figure 2-2: E-Check Registration Page
4. Click the ‘Registration’ button.
Reminder: The registration process only needs to be done once by the owner/manager
of the FFL. The manager/owner will create and modify the accounts for the employees.
5. The E-Check Account Request Confirmation page will display. Click Populated
Enrollment Form. Note: The request is not complete until you fax or e-mail the
enrollment form.

UNCLASSIFIED//FOR OFFICIAL USE ONLY
Version 2.3; September 29, 2017 UNCLASSIFIED//FOR OFFICIAL USE ONLY NICS-DOC-01670-2.3
4
Figure 2-3: E-Check Terms and Conditions
6. Review the Completed Enrollment Form (sample below).
Figure 2-4: Sample of Completed Enrollment Form
7. Print and complete the form.

UNCLASSIFIED//FOR OFFICIAL USE ONLY
Version 2.3; September 29, 2017 UNCLASSIFIED//FOR OFFICIAL USE ONLY NICS-DOC-01670-2.3
5
8. Sign and date the form. Also, have a witness sign and date the form. The witness can
be anybody you wish.
9. Fax the form to: 1-888-550-6427 OR e-mail it to [email protected]
10. Once the account has been created, an e-mail will be sent to the e-mail address
provided. The e-mail will include your username and instructions on how to obtain
your temporary password.
3. Navigation Basics and Settings
3.1 Login
To initiate a new E-Check session,
1. On the Welcome Page, Click on the “Log on to the FBI NICS E-Check” link.
Figure 3-1: FBI NICS E-Check
2. At the LEEP Page, enter your username.
3. Below the username field is an option for Password or Token. The Password
button should be selected.
4. Click the Sign In button.

UNCLASSIFIED//FOR OFFICIAL USE ONLY
Version 2.3; September 29, 2017 UNCLASSIFIED//FOR OFFICIAL USE ONLY NICS-DOC-01670-2.3
6
Figure 3-2: LEEP Portal Login
3.2 E-Check Terms and Conditions
The E-Check Terms and Conditions page will display once the NICS application is open.
1. Select ‘Agree’ to move forward into E-Check.

UNCLASSIFIED//FOR OFFICIAL USE ONLY
Version 2.3; September 29, 2017 UNCLASSIFIED//FOR OFFICIAL USE ONLY NICS-DOC-01670-2.3
7
Figure 3-3: E-Check Terms and Conditions
3.3 Access Number (FFL RDS Key)
Note: These steps only apply to users with more than one FFL associated with their
username.
Once you have selected the ‘Agree’ button on the E-Check Terms and Conditions page,
you will be prompted to select an Access Number (RDS Key).
The RDS Key is an abbreviated version of the FFL ID. It is the first 3 and last 5 characters
of the FFL number.
1. Double-click the row to view the FFL Information.
Figure 3-3: FFL RDS Key Row
2. Select your Access Number or RDS Key by clicking the Select button.
Figure 3-4: FFL Information
3.4 Portal Overview
After selecting the RDS Key, the portal page will display. This is the page where you will
initiate all work in the NICS. It provides access to the processes, notifications, and common
links assigned to your user role. NICS has role-based access control, which is an approach
to limit system access to authorized users only. Therefore, your portal is tailored to the
rights granted to you based on your user role and will not display items you do not have

UNCLASSIFIED//FOR OFFICIAL USE ONLY
Version 2.3; September 29, 2017 UNCLASSIFIED//FOR OFFICIAL USE ONLY NICS-DOC-01670-2.3
8
permission to access. At the top of the portal page, users can see when their password is
scheduled to expire as well as the last login date.
Figure 3-5: NICS Portal Page
3.5 Processes
The Processes section is located on the left side of the portal page. It lists the actions a user
can initiate within the application. As noted above, the processes listed on a user’s portal
are driven by the user’s role settings. Each process is described in further detail in this user
manual.
Figure 3-6: Processes Section
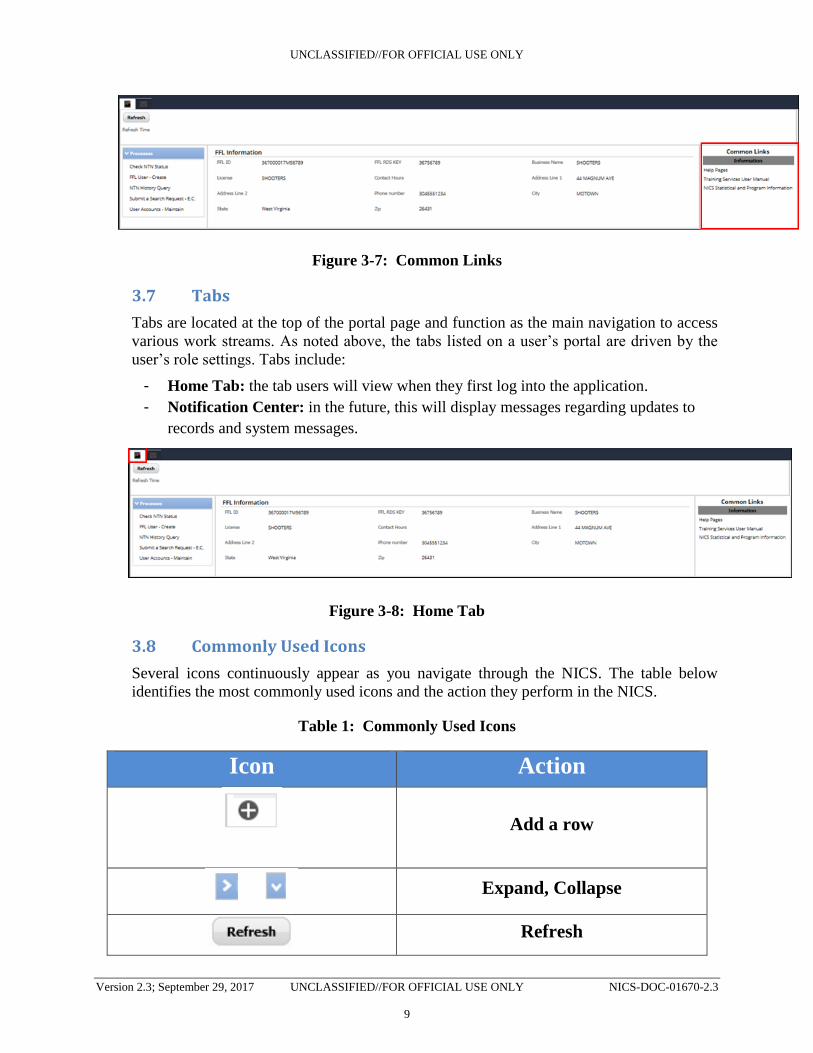
3.6 Common Links
The Common Links section features the most frequently used links when working in NICS.
The following links are included in this section:
- Help Pages: includes a description of and instructions for using the NICS.
- Training Services User Manual: a link to the document you are currently reading,
intended to give assistance to users of the NICS E-Check application.
- NICS Statistical and Program Information: links to the FBI.gov NICS public
statistics.
UNCLASSIFIED//FOR OFFICIAL USE ONLY
Version 2.3; September 29, 2017 UNCLASSIFIED//FOR OFFICIAL USE ONLY NICS-DOC-01670-2.3
9
Figure 3-7: Common Links
3.7 Tabs
Tabs are located at the top of the portal page and function as the main navigation to access
various work streams. As noted above, the tabs listed on a user’s portal are driven by the
user’s role settings. Tabs include:
- Home Tab: the tab users will view when they first log into the application.
- Notification Center: in the future, this will display messages regarding updates to
records and system messages.
Figure 3-8: Home Tab
3.8 Commonly Used Icons
Several icons continuously appear as you navigate through the NICS. The table below
identifies the most commonly used icons and the action they perform in the NICS.
Table 1: Commonly Used Icons
Icon Action
Add a row
Expand, Collapse
Refresh

UNCLASSIFIED//FOR OFFICIAL USE ONLY
Version 2.3; September 29, 2017 UNCLASSIFIED//FOR OFFICIAL USE ONLY NICS-DOC-01670-2.3
10
Icon Action
Delete a Row
Select a Date
Exit
Submit
Search
Required Field
Add a Comment
Sort Ascending (within an inquiry)
Sort Descending (within an inquiry)
Error Icon
(Hover over with mouse to see error message)
4. Submit a Search Request via E-Check
The background check is the core functionality to the NICS. Before transferring the
firearm, submit the Background Check via the NICS E-Check to ensure the customer is
eligible to receive the firearm.
4.1 Submit a Search Request – E.C.
A background check can be submitted via E-Check by navigating to the Submit a Search
Request – E.C. process. The section below documents the steps necessary to submit a
background check search via E-Check.
1. Select ‘Submit a Search Request – E.C.’ from the Processes section.

UNCLASSIFIED//FOR OFFICIAL USE ONLY
Version 2.3; September 29, 2017 UNCLASSIFIED//FOR OFFICIAL USE ONLY NICS-DOC-01670-2.3
11
Figure 4-1: Submit a Background Check via E-Check
2. A blank Application page will display. Enter the Application information as depicted in
the figures below. The purpose of this page is to supply the subject information listed
on the ATF Form 4473 in order to conduct a background check. Required fields will be
marked with a gold asterisk. Not all fields are required; however, it is recommended
that you complete as many fields as possible. Each field will have data validation
controls that prevent you from going to the next field without supplying information for
the current field.

UNCLASSIFIED//FOR OFFICIAL USE ONLY
Version 2.3; September 29, 2017 UNCLASSIFIED//FOR OFFICIAL USE ONLY NICS-DOC-01670-2.3
12
Figure 4-2: Application Page
Predictive typing fields allow you to quickly enter a state/country code and then
select a corresponding state/country.
Figure 4-3: Place of Birth Predictive Text Field
Birth Dates can be entered in the standard MM/dd/YYYY format; however, you
must use slashes when entering the date to avoid system errors. Otherwise, enter the
date in yyyyMMdd format without slashes and the system will automatically
reformat your entry.

UNCLASSIFIED//FOR OFFICIAL USE ONLY
Version 2.3; September 29, 2017 UNCLASSIFIED//FOR OFFICIAL USE ONLY NICS-DOC-01670-2.3
13
Figure 4-4: Birth Date Field
To select a transaction purpose, type a purpose ID into the autocomplete bar, then
hit the Enter key to select the purpose ID. You can also select the checkbox(es)
manually.
Figure 4-5: Transaction Purpose Field
To quickly delete and reset all fields in an E-Check form, select the “Clear All”
option from the Other Actions dropdown menu.

UNCLASSIFIED//FOR OFFICIAL USE ONLY
Version 2.3; September 29, 2017 UNCLASSIFIED//FOR OFFICIAL USE ONLY NICS-DOC-01670-2.3
14
Figure 4-6: Other Actions Dropdown Menu
The table below defines each field and criteria for each field within the Application page, as well
as denotes if the field is required.
Table 2: Application Page
Field Name Field Type Required
Field (Y/N)? Description
Clear All Button No Permits the user to reset the application page to a blank screen from the Other Actions dropdown menu.
Last Name Text Yes
The last name of the subject.
If hyphenated, do not leave space on either side of the hyphen.
First Name Text Yes The first name of the subject.
If hyphenated, do not leave space on either side of the hyphen.
Middle Name Text No
The middle name of the subject.
If hyphenated, do not leave space on either side of the hyphen.
If no middle name the system accepts the following formats:
NMN, nmn, “NMN”, “nmn”, (NMN) or (nmn)
Cadence (Ex: Jr., Sr. and III)
Dropdown No
The cadence of the subject. Permitted values include:
JR
SR
II
III
IV
V
VI
VII
VIII
IX
X

UNCLASSIFIED//FOR OFFICIAL USE ONLY
Version 2.3; September 29, 2017 UNCLASSIFIED//FOR OFFICIAL USE ONLY NICS-DOC-01670-2.3
15
Field Name Field Type Required
Field (Y/N)? Description
Place of Birth Text Code Yes This is a predictive typing field. The subject’s place of birth. U.S. states are listed first, followed by non-U.S. provinces, states and countries.
Height Text No
The height associated with the subject. Must be 3 alphanumeric characters. Field includes example Height value for reference. Permitted values include:
First position must be feet.
Positions 2 and 3 must be inches with fractions of an inch rounded off to the nearest inch.
If nothing is entered in the HGT field, it will be left blank.
The values allowed are 400-711 or 000 for missing or unknown.
Weight Alphanumeric No The weight associated with the subject. Must be written as alphanumeric characters. Field includes example Weight value for reference.
Sex Dropdown Yes
The gender of the subject. Permitted values include:
Female
Male
Birth Date Dropdown or Text
Yes
The subject’s date of birth, composed of the individual day, month, and year. Must be 8 alphanumeric characters. The DOB may only be provided as MM/DD/YYYY and partials are not accepted.
Social Security No. (xxxxxxxxx)
Text No
The Social Security Number of a subject. Note: The Social Security Number will not be validated when entered in the SSN field on the NTN Inquiry window. Must be 9 numeric characters. Permitted values include:
Cannot be all zeroes
Cannot be all nines
Must be all numeric
Must not be < 001010001
Must not have 8 or 9 in the first character
Must not have 00 in the fourth and fifth positions
UPIN Text No
A unique number assigned to every individual whose record(s) is entered into the VAF. Must be 8 alphanumeric characters. Permitted values include: Uppercase or lowercase “V” followed by 5 to 7 numbers and/or uppercase or lowercase consonants. Vowels will not be accepted in this field.
Ethnicity Radio Button Yes
The ethnicity of a subject. Permitted values include:
Hispanic or Latino
Not Hispanic or Latino

UNCLASSIFIED//FOR OFFICIAL USE ONLY
Version 2.3; September 29, 2017 UNCLASSIFIED//FOR OFFICIAL USE ONLY NICS-DOC-01670-2.3
16
Field Name Field Type Required
Field (Y/N)? Description
Race Checkbox No
The race and/or ethnicity of a subject. Permitted values include:
Asian
Black or African American
American Indian or Alaskan Native
Native Hawaiian or Other Pacific Islander
White
State of Residence Text Code Yes
Code representing the state, U.S. province, or U.S. territory in which a subject currently resides. Permitted values include: Applicable values for U.S. locations from Code Table POB SOR CODES (U.S. States)
Code/Description Code/Description AK Alaska AL Alabama AM American Samoa AR Arkansas AZ Arizona BK Baker Island CA California CG Caroline Islands CO Colorado CT Connecticut CZ Canal Zone DC Dist of Columbia DE Delaware FL Florida FS Federated States of
Micronesia GA Georgia GM Guam HI Hawaii HO Howland Islands IA Iowa ID Idaho IL Illinois IN Indiana JI Johnston Atoll JR Jarvis Island KI Kingman Reef KS Kansas KY Kentucky LA Louisiana MA Massachusetts MD Maryland ME Maine MH Marshall Islands MI Michigan MK Northern Marianas
MN Minnesota MO Missouri MS Mississippi MT Montana MW Midway Islands NB Nebraska NC North Carolina ND North Dakota NH New Hampshire NJ New Jersey NM New Mexico NV Nevada NY New York OH Ohio OK Oklahoma OR Oregon PA Pennsylvania PD Palau PL Palmyra Atoll PR Puerto Rico RI Rhode Island SC South Carolina SD South Dakota TN Tennessee TX Texas UT Utah VA Virginia VI US Virgin Islands VL Navassa Island VT Vermont WA Washington State WI Wisconsin WK Wake Island WV West Virginia WY Wyoming
Citizenship Status Dropdown Yes
This is a predictive typing field. The status of the subject’s citizenship. Permitted values include:
Citizen
UNCLASSIFIED//FOR OFFICIAL USE ONLY
Version 2.3; September 29, 2017 UNCLASSIFIED//FOR OFFICIAL USE ONLY NICS-DOC-01670-2.3
17
Field Name Field Type Required
Field (Y/N)? Description
Non-U.S. Citizen
Non-U.S. Citizen (IAQ)
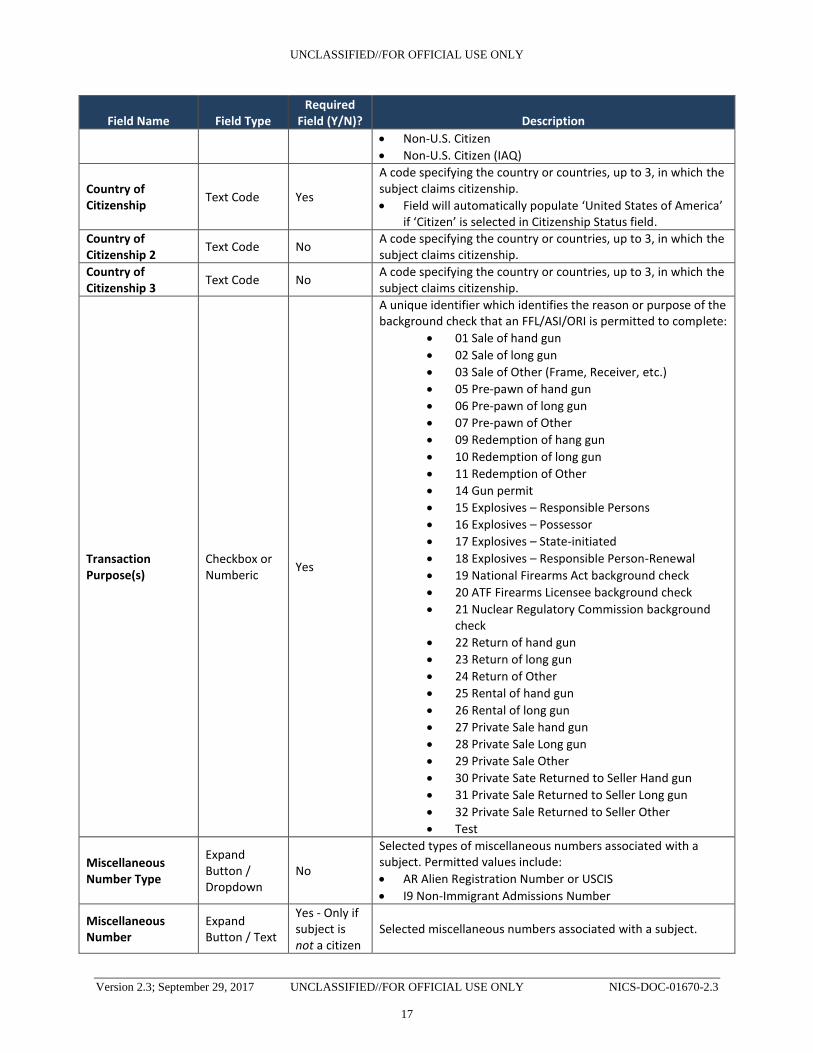
Country of Citizenship
Text Code Yes
A code specifying the country or countries, up to 3, in which the subject claims citizenship.
Field will automatically populate ‘United States of America’ if ‘Citizen’ is selected in Citizenship Status field.
Country of Citizenship 2
Text Code No A code specifying the country or countries, up to 3, in which the subject claims citizenship.
Country of Citizenship 3
Text Code No A code specifying the country or countries, up to 3, in which the subject claims citizenship.
Transaction Purpose(s)
Checkbox or Numberic
Yes
A unique identifier which identifies the reason or purpose of the background check that an FFL/ASI/ORI is permitted to complete:
01 Sale of hand gun
02 Sale of long gun
03 Sale of Other (Frame, Receiver, etc.)
05 Pre-pawn of hand gun
06 Pre-pawn of long gun
07 Pre-pawn of Other
09 Redemption of hang gun
10 Redemption of long gun
11 Redemption of Other
14 Gun permit
15 Explosives – Responsible Persons
16 Explosives – Possessor
17 Explosives – State-initiated
18 Explosives – Responsible Person-Renewal
19 National Firearms Act background check
20 ATF Firearms Licensee background check
21 Nuclear Regulatory Commission background check
22 Return of hand gun
23 Return of long gun
24 Return of Other
25 Rental of hand gun
26 Rental of long gun
27 Private Sale hand gun
28 Private Sale Long gun
29 Private Sale Other
30 Private Sate Returned to Seller Hand gun
31 Private Sale Returned to Seller Long gun
32 Private Sale Returned to Seller Other
Test
Miscellaneous Number Type
Expand Button / Dropdown
No
Selected types of miscellaneous numbers associated with a subject. Permitted values include:
AR Alien Registration Number or USCIS
I9 Non-Immigrant Admissions Number
Miscellaneous Number
Expand Button / Text
Yes - Only if subject is not a citizen
Selected miscellaneous numbers associated with a subject.

UNCLASSIFIED//FOR OFFICIAL USE ONLY
Version 2.3; September 29, 2017 UNCLASSIFIED//FOR OFFICIAL USE ONLY NICS-DOC-01670-2.3
18
Field Name Field Type Required
Field (Y/N)? Description
Non-Immigration with Visa Exceptions
Dropdown No
<insert definition> Permitted values include:
No
Not Answered
Yes
Contact Information: Contact Name
Text No The contact information provided by user when a NICS transaction is submitted to facilitate callbacks.
Contact Information: Callback Hours
Text No The contact information provided by user when a NICS transaction is submitted to facilitate callbacks.
Contact Information: Phone
Text No The contact information provided by user when a NICS transaction is submitted to facilitate callbacks.
Miscellaneous Information
Text No Free text box.
3. Click the Submit button.
4. You will be taken to the Verify Search Information page. This page depicts the
information entered on the ATF 4473 form in read-only.
Figure 4-7: Verify Search Information Page
5. Scroll down and click the Submit button at the bottom of the screen to submit the
application to the NICS, or click the Previous button to edit the form if information is
listed incorrectly.
UNCLASSIFIED//FOR OFFICIAL USE ONLY
Version 2.3; September 29, 2017 UNCLASSIFIED//FOR OFFICIAL USE ONLY NICS-DOC-01670-2.3
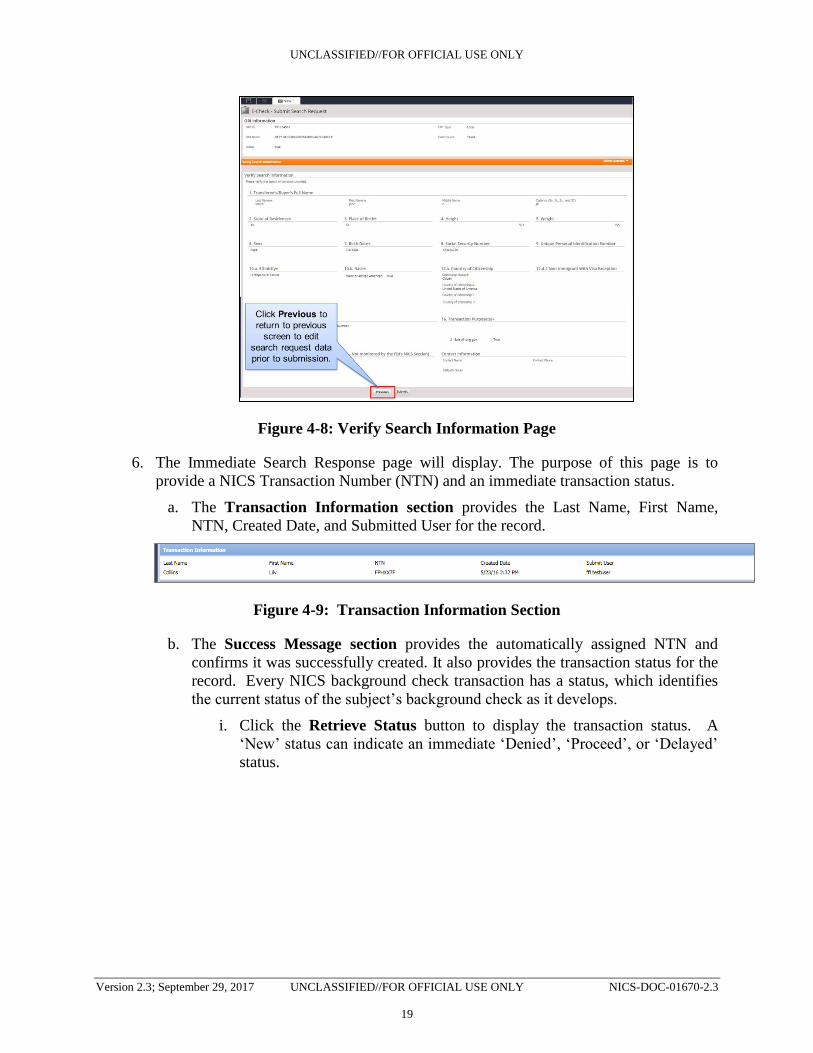
19
Figure 4-8: Verify Search Information Page
6. The Immediate Search Response page will display. The purpose of this page is to
provide a NICS Transaction Number (NTN) and an immediate transaction status.
a. The Transaction Information section provides the Last Name, First Name,
NTN, Created Date, and Submitted User for the record.
Figure 4-9: Transaction Information Section
b. The Success Message section provides the automatically assigned NTN and
confirms it was successfully created. It also provides the transaction status for the
record. Every NICS background check transaction has a status, which identifies
the current status of the subject’s background check as it develops.
i. Click the Retrieve Status button to display the transaction status. A
‘New’ status can indicate an immediate ‘Denied’, ‘Proceed’, or ‘Delayed’
status.

UNCLASSIFIED//FOR OFFICIAL USE ONLY
Version 2.3; September 29, 2017 UNCLASSIFIED//FOR OFFICIAL USE ONLY NICS-DOC-01670-2.3
20
Figure 4-10: Immediate Search Response Page – New Status
ii. If the transaction status is immediately denied or proceeded the respective
status ‘Denied’ or ‘Proceed’ will appear after clicking Retrieve Status.

UNCLASSIFIED//FOR OFFICIAL USE ONLY
Version 2.3; September 29, 2017 UNCLASSIFIED//FOR OFFICIAL USE ONLY NICS-DOC-01670-2.3
21
Figure 4-10: Immediate Search Response Page – Denied & Proceed
Status
iii. If the transaction has been ‘Delayed’, you will see an MDI Message pop-
up. Click Submit to exit out of the window and view the status on the
immediate search response page.
Figure 4-11: Display MDI Message for Delayed Transactions
Figure 4-12: Immediate Search Response Page – Delayed Status
iv. A status of ‘Researching’ will display if the NICS received your request
for the NTN and must conduct further research on the transaction.
Note: Click the Refresh button periodically until ‘Researching’ has
changed to either ‘Delay’ or a final status.

UNCLASSIFIED//FOR OFFICIAL USE ONLY
Version 2.3; September 29, 2017 UNCLASSIFIED//FOR OFFICIAL USE ONLY NICS-DOC-01670-2.3
22
Figure 4-13: Immediate Search Response Page – Researching Status
7. Click the Submit button to return to the Home tab.
Key Combination Result
Alt + S Selects the “Submit” button regardless of location
on the page.
Tab Navigates from field to field without the need of a
mouse
Spacebar Opens dropdown menu
Selects radio button
Selects/Unselects checkboxes
Note: Click the enter button to finalize
selection
Table 3: Keyboard Shortcuts for the Submit a Search Request Page
4.2 Submit Multiple Search Requests
Additional searches can be performed by selecting the ‘Submit Another Search Request’
link on the Search Request Details page.
1. Select the Submit Another Search Request link.

UNCLASSIFIED//FOR OFFICIAL USE ONLY
Version 2.3; September 29, 2017 UNCLASSIFIED//FOR OFFICIAL USE ONLY NICS-DOC-01670-2.3
23
Figure 4-14: E-Check – Submit a Search Request
2. A new Search Request page will display. Repeat the previous steps to submit another
background check.
5. Check an NTN Status
The status of an NTN can be checked by selecting the ‘Check NTN Status’ link in the
Processes section. The table below defines the different status types and depicts how they
will appear in the NICS.
Table 4: NTN Status Descriptions
Status Description
A new status can be retrieved by clicking the 'Retrieve Status' button.
This NTN has passed the Brady Transfer Date.
This NTN is in a Delayed status and the NICS is conducting further
research on the transaction.
This NTN is being sent to the NICS to conduct further research.
This NTN was cancelled.
This NTN has received a final status of Denied.
This NTN has received a final status of Proceed.
5.1 Check an NTN Status
The section below documents the steps necessary to check an NTN status via E-Check.
UNCLASSIFIED//FOR OFFICIAL USE ONLY
Version 2.3; September 29, 2017 UNCLASSIFIED//FOR OFFICIAL USE ONLY NICS-DOC-01670-2.3
24
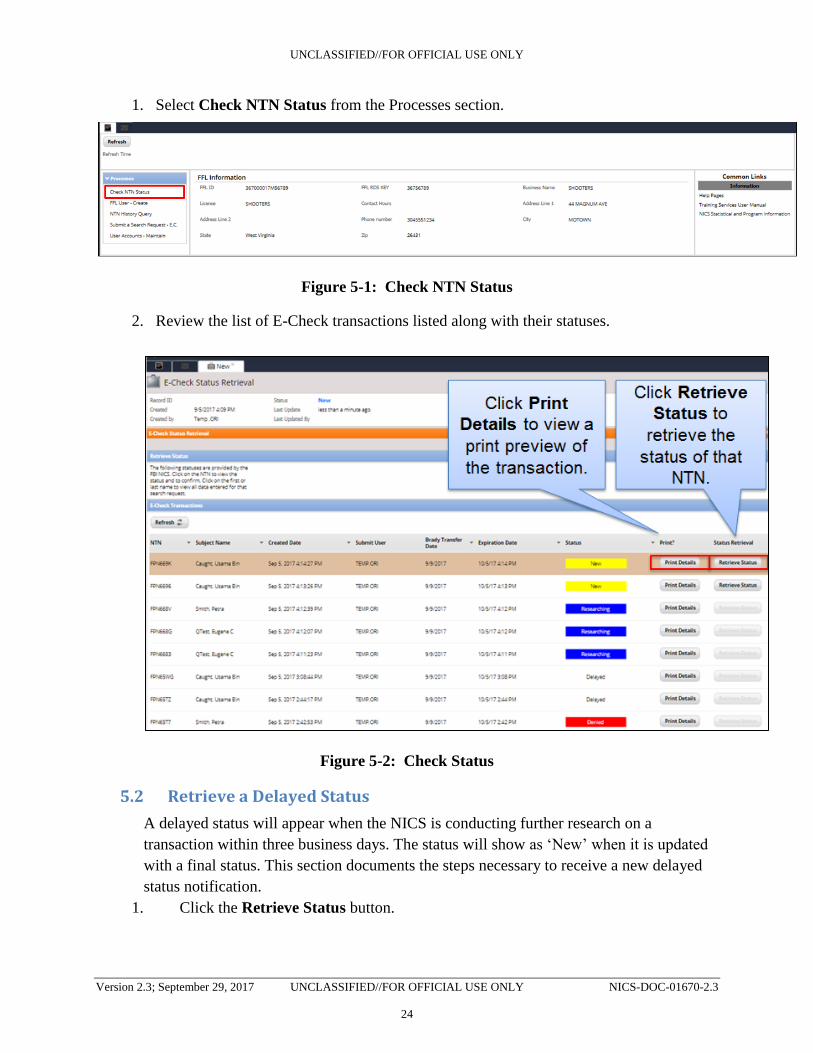
1. Select Check NTN Status from the Processes section.
Figure 5-1: Check NTN Status
2. Review the list of E-Check transactions listed along with their statuses.
Figure 5-2: Check Status
5.2 Retrieve a Delayed Status
A delayed status will appear when the NICS is conducting further research on a
transaction within three business days. The status will show as ‘New’ when it is updated
with a final status. This section documents the steps necessary to receive a new delayed
status notification.
1. Click the Retrieve Status button.

UNCLASSIFIED//FOR OFFICIAL USE ONLY
Version 2.3; September 29, 2017 UNCLASSIFIED//FOR OFFICIAL USE ONLY NICS-DOC-01670-2.3
25
Figure 5-3: Retrieve Status from ‘New’ Status
2. Click the Submit button on the DisplayMDI screen.
Figure 5-4: Retrieve Delayed Status
3. The status will change to display ‘Delayed’ on the Check NTN Status page.
Figure 5-5: Retrieve Delayed Status
5.3 Retrieve a New Proceed Status
The section below documents the steps necessary to receive a ‘Proceed’ status
notification.
1. Click the Retrieve Status button.
Figure 5-6: Retrieve Status from ‘New’ Status
2. The status of ‘Proceed’ will display on the Check NTN Status page.
Figure 5-7: Proceed Status
5.4 Retrieve a Denied Status Before Brady Transfer Date
The section below documents the steps necessary to retrieve a ‘Denied’ status before the
Brady Transfer Date.
1. Click the Retrieve Status button.

UNCLASSIFIED//FOR OFFICIAL USE ONLY
Version 2.3; September 29, 2017 UNCLASSIFIED//FOR OFFICIAL USE ONLY NICS-DOC-01670-2.3
26
Figure 5-8: Retrieve Status from ‘New’ Link
2. The status of ‘Denied’ will display on the Check NTN Status page if retrieved before
the Brady Transfer Date.
Figure 5-9: Denied Status Before Brady Transfer Date
5.5 Retrieve a Denied Status After Brady Transfer Date
The section below documents the steps necessary to retrieve a ‘Denied’ transaction after
the Brady Transfer Date has passed.
1. Click the Retrieve Status button.
Figure 5-10: Retrieve Status from ‘New’ Status
2. The ‘Display Transaction Status’ window will appear because the Brady Transfer Date
has passed. Click Submit after having reviewed the final response.
Figure 5-11: Display Transaction Status Window for Denied Transaction After
Brady Transfer Date
3. Answer the Firearm Transfer Question by selecting an option from the dropdown
menu.

UNCLASSIFIED//FOR OFFICIAL USE ONLY
Version 2.3; September 29, 2017 UNCLASSIFIED//FOR OFFICIAL USE ONLY NICS-DOC-01670-2.3
27
Figure 5-12:Firearm Transfer Question
4. Click Submit.
5. The status of ‘Denied’ will now display on the Check NTN Status page.
Figure 5-13: Denied Transaction Status
6. NTN History Query
6.1 Query an NTN
Inquiries allow users to retrieve information based on a specific set of criteria. Multiple
search criteria can be applied when querying an NTN. As an org lead, you will have the
ability to search across all associated RDS keys for an NTN within the NTN History
Inquiry. Org leads are seen as Primary Users for every FFL associated with the Org. The
section below documents the steps necessary to query an NTN.
1. Click the NTN History Query from the Processes section.
Figure 6-1: NTN History Query
2. Use one (or more) of the pre-populated Field dropdowns to select the criteria.
3. Enter the information to be searched in the Value field. Note: The more fields you use,
the more specific the results will be.

UNCLASSIFIED//FOR OFFICIAL USE ONLY
Version 2.3; September 29, 2017 UNCLASSIFIED//FOR OFFICIAL USE ONLY NICS-DOC-01670-2.3
28
Figure 6-2: NTN History Query Search Critieria
The table below defines each field and criteria for each field within the Inquiry Criteria
page, as well as denotes if the field is required.
Table 5: NTN History Query Search Criteria
Field Name Field Type Required
Field (Y/N)? Secondary Inquiry Criteria
Enabled (Y/N)? Description
ASI Text No No The alternate search identifier number
FFL RDS Key Text No No The number associated with the FFL RDS Key (First 3 and last 5 numbers of the FFL Number)
NTN Text No No The number associated with the transaction
Firearm Transfer Dropdown No No The response given by the user when setting or retrieving the status of a denied transaction to the question “Was the firearm transferred?” Permitted values include:
No, the firearm did not transfer and I am acknowledging receipt of the Deny status
Unknown; at this time, I do not know if the firearm transferred and I am acknowledging receipt of the Deny status
Yes, the firearm transferred and I am acknowledging receipt of the Deny status
Create Date Text No No The date the NTN was created
Current Status Date
Text No No The date the NTN status was changed or assigned

UNCLASSIFIED//FOR OFFICIAL USE ONLY
Version 2.3; September 29, 2017 UNCLASSIFIED//FOR OFFICIAL USE ONLY NICS-DOC-01670-2.3
29
Field Name Field Type Required
Field (Y/N)? Secondary Inquiry Criteria
Enabled (Y/N)? Description
Status Retrieved Date
Text No No The date the NTN status was retrieved
NTN Status Dropdown No Yes The status assigned to a transaction Applicable to State and FBI searches:
I = Initial Search (System-applied only) Applicable to State Searches:
M = Submitted to State Applicable to FBI Searches:
D = Denied
P = Proceed
C = Cancelled
Y = Redo Cancel (System-applied only)
L = Delayed
V = Open
A = Under Appeal
Citizen Dropdown No Yes The citizenship of the subject. Permitted values include:
Citizen
Non-U.S. Citizen
State of Purchase Dropdown No Yes The state of purchase of the subject.
State of Residence
Dropdown No Yes The state of residence of the subject.
Place of Birth Dropdown No Yes The place of birth of the subject.
Retrieved Indicator
Dropdown No Yes Indicates whether the NTN status was retrieved. Permitted values:
Yes
No
Region ID Dropdown No Yes Indicates the region to which the NTN is assigned
Expiration Date Start
Text No Yes The expiration date of the NTN
ORI_ID Text No Yes The number associated with the ORI ID
Misc Indicators Dropdown No Yes Miscellanous indicators for the NTN
4. Click the Search button to display the query results.

UNCLASSIFIED//FOR OFFICIAL USE ONLY
Version 2.3; September 29, 2017 UNCLASSIFIED//FOR OFFICIAL USE ONLY NICS-DOC-01670-2.3
30
Figure 6-3: NTN History Query Search
5. The search results will display in a list below the Inquiry Criteria. The first 100 search
results will display on the first page.
6. Double-click the results to open the record.
Figure 6-4: NTN History Query Search Results
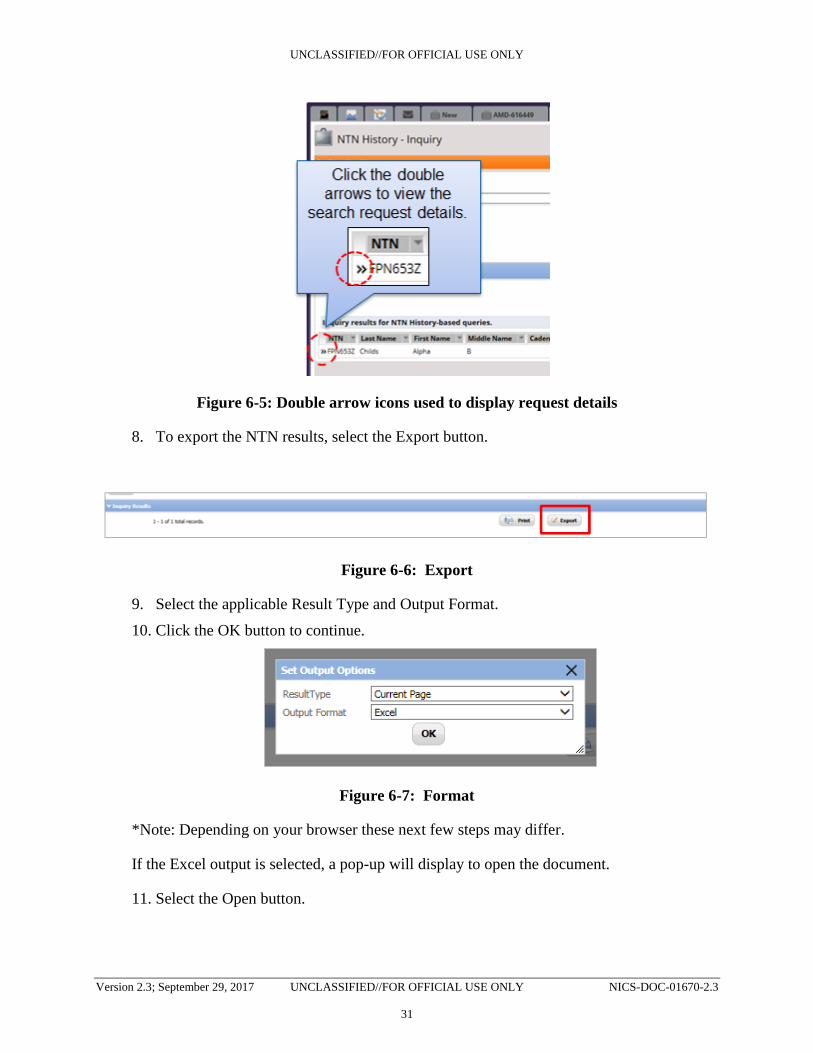
7. Click the double arrows to the left of an NTN to view its request details.
UNCLASSIFIED//FOR OFFICIAL USE ONLY
Version 2.3; September 29, 2017 UNCLASSIFIED//FOR OFFICIAL USE ONLY NICS-DOC-01670-2.3
31
Figure 6-5: Double arrow icons used to display request details
8. To export the NTN results, select the Export button.
Figure 6-6: Export
9. Select the applicable Result Type and Output Format.
10. Click the OK button to continue.
Figure 6-7: Format
*Note: Depending on your browser these next few steps may differ.
If the Excel output is selected, a pop-up will display to open the document.
11. Select the Open button.

UNCLASSIFIED//FOR OFFICIAL USE ONLY
Version 2.3; September 29, 2017 UNCLASSIFIED//FOR OFFICIAL USE ONLY NICS-DOC-01670-2.3
32
Figure 6-8: Open
12. The Excel document will display. Print or save the document if applicable.
Figure 6-9: Excel Document
7. FFL User – Create
To create an FFL user, select the FFL User – Create process link on the Home tab.
1. Select the FFL User – Create process link.

UNCLASSIFIED//FOR OFFICIAL USE ONLY
Version 2.3; September 29, 2017 UNCLASSIFIED//FOR OFFICIAL USE ONLY NICS-DOC-01670-2.3
33
Figure 7-1: FFL User – Create
2. Enter the User Information data in the required fields on the User Account page.
Figure 7-2: Account Information
If your Organization only has one associated RDS key, disregard steps 3-7. The system
will automatically set the RDS Key and Employee Type of the new user.
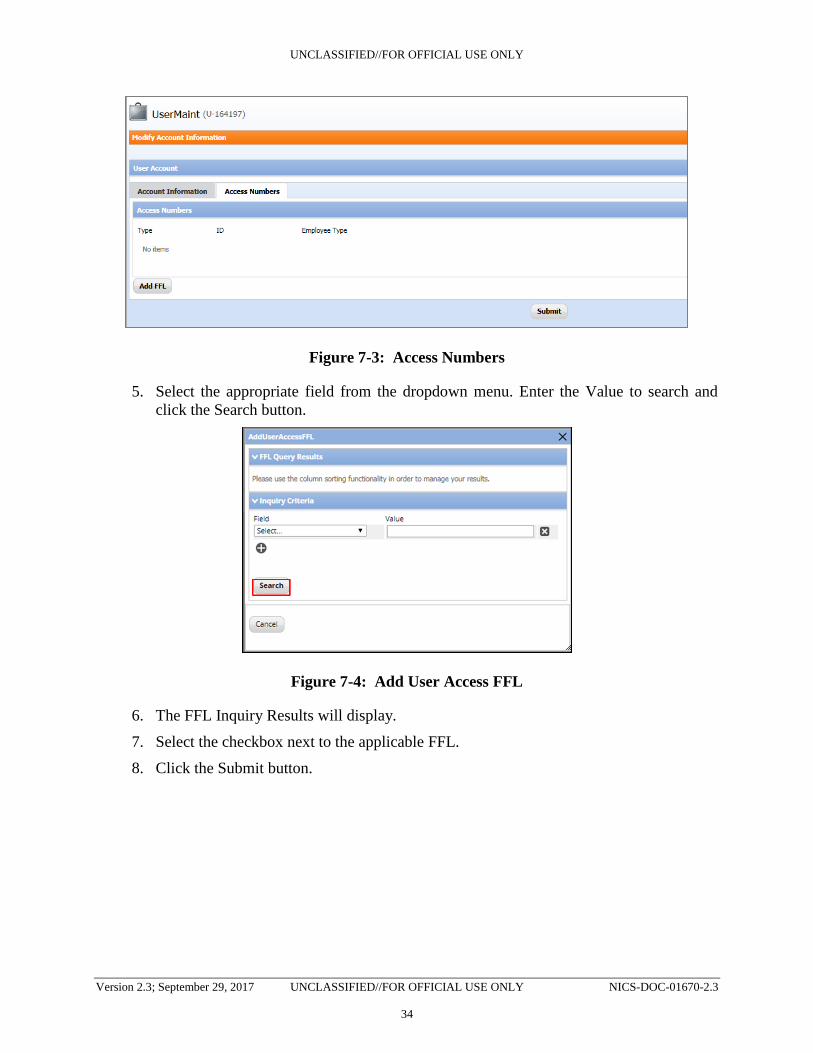
3. Select the Access Numbers tab.
4. Click the Add FFL button.
UNCLASSIFIED//FOR OFFICIAL USE ONLY
Version 2.3; September 29, 2017 UNCLASSIFIED//FOR OFFICIAL USE ONLY NICS-DOC-01670-2.3
34
Figure 7-3: Access Numbers
5. Select the appropriate field from the dropdown menu. Enter the Value to search and
click the Search button.
Figure 7-4: Add User Access FFL
6. The FFL Inquiry Results will display.
7. Select the checkbox next to the applicable FFL.
8. Click the Submit button.

UNCLASSIFIED//FOR OFFICIAL USE ONLY
Version 2.3; September 29, 2017 UNCLASSIFIED//FOR OFFICIAL USE ONLY NICS-DOC-01670-2.3
35
Figure 7-5: FFL Inquiry Results
9. The FFL RDS Key will display on the Access Number tab.
10. Click the Submit button.
Figure 7-6: Access Numbers
11. A success message will display.
12. Click the Reopen button to modify the FFL User account.

UNCLASSIFIED//FOR OFFICIAL USE ONLY
Version 2.3; September 29, 2017 UNCLASSIFIED//FOR OFFICIAL USE ONLY NICS-DOC-01670-2.3
36
Figure 7-7: User Maintenance Success Message
8. User Accounts – Maintain
1. To modify an FFL user account, select the User Accounts – Maintan process link from
the Home tab.
Figure 8-1: User Accounts – Maintain Process Link
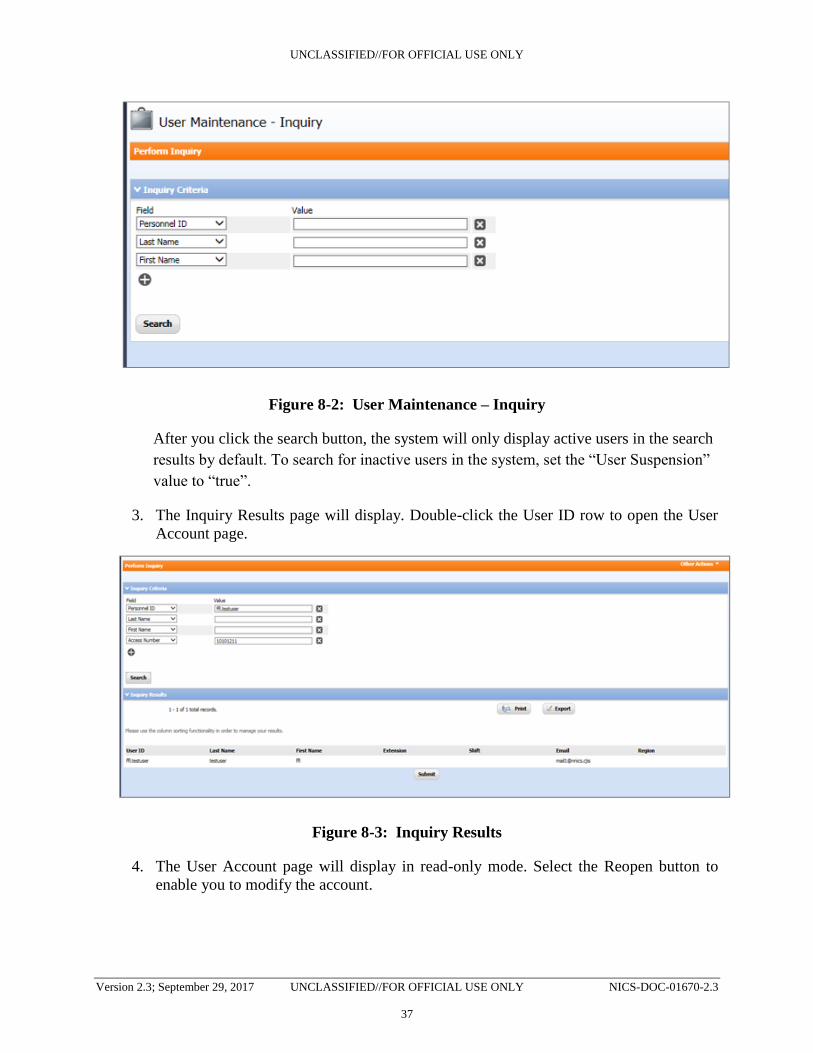
2. Select the Inquiry Criteria criteria and enter the appropriate value.
Note: You may do a search based on only one field or multiple fields in order to better
narrow the results.
UNCLASSIFIED//FOR OFFICIAL USE ONLY
Version 2.3; September 29, 2017 UNCLASSIFIED//FOR OFFICIAL USE ONLY NICS-DOC-01670-2.3
37
Figure 8-2: User Maintenance – Inquiry
After you click the search button, the system will only display active users in the search
results by default. To search for inactive users in the system, set the “User Suspension”
value to “true”.
3. The Inquiry Results page will display. Double-click the User ID row to open the User
Account page.
Figure 8-3: Inquiry Results
4. The User Account page will display in read-only mode. Select the Reopen button to
enable you to modify the account.

UNCLASSIFIED//FOR OFFICIAL USE ONLY
Version 2.3; September 29, 2017 UNCLASSIFIED//FOR OFFICIAL USE ONLY NICS-DOC-01670-2.3
38
Figure 8-4: User Account Page
5. Modify the Account Information as needed.
Figure 8-5: Account Information
6. Modify the Access Numbers tab as needed. If you only have one FFL then it is the
only one that will appear.

UNCLASSIFIED//FOR OFFICIAL USE ONLY
Version 2.3; September 29, 2017 UNCLASSIFIED//FOR OFFICIAL USE ONLY NICS-DOC-01670-2.3
39
Figure 8-6: Access Numbers Tab
7. The Change Password tab is used to edit your password. Enter the old password and
create and confirm a new password.
8. Click the Change Password button.
9. Click the Submit button to save all changes to the user account.
Figure 8-7: Change Password Tab