Embed Size (px)
Citation preview

1
To prevent possible SERIOUS INJURY or DEATH from electrocution:• Be sure power is NOT connected BEFORE installing door control.• Connect ONLY to 12 VOLT low voltage wires.To prevent possible SERIOUS INJURY or DEATH from a closing garage door:• Install door control within sight of garage door, out of reach of children at a minimum
height of 5 feet (1.5 m), and away from ALL moving parts of door.• NEVER permit children to operate or play with door control push buttons or remote control
transmitters.• Activate door ONLY when it can be seen clearly, is properly adjusted, and there are no
obstructions to door travel.• ALWAYS keep garage door in sight until completely closed. NEVER permit anyone to cross
path of closing garage door.
MULTI-FUNCTION CONTROL PANEL (SECURITY✚ 2.0TM) MODEL 882LM
Feature Overview
Multi-Function Control Panel
Safety Reversing Sensors
Yellow LEARN Button
NOTICE: To comply with FCC and or Industry Canada rules (IC), adjustment or modifi cations of this receiver and/or transmitter are prohibited, except for changing the code setting or replacing the battery. THERE ARE NO OTHER USER SERVICEABLE PARTS.Tested to Comply with FCC Standards for Home or offi ce use. Operation is subject to the following two conditions: (1) this device may not cause harmful interference, and (2) this device must accept any interference received, including interference that may cause undesired operation.
This Class B digital apparatus complies with Canadian ICES-003. Cet appareil numérique de la classe B est conforme à la norme NMB-003 du Canada.
For use with Security✚ 2.0TM Garage Door Openers. All Security✚ 2.0TM Garage Door Openers have a yellow Learn button and a yellow antenna wire. The features are adjustable and may be turned off or on as desired. Refer to the Feature Settings section.
LIGHT BUTTONPress the LIGHT button to turn the garage door opener lights on or off. When the lights are turned on they will stay on until the LIGHT button is pressed again, or until the garage door opener is activated. Once the garage door opener is activated the lights will turn off after the specified period of time (the factory setting is 4-1/2 minutes). The LIGHT button will not control the lights when the door is in motion.
LOCKThe LOCK feature is designed to prevent activation of the garage door opener from remote controls while still allowing activation from the door control and keyless entry. This feature is useful for added peace of mind when the home is empty (i.e. vacation).
MAINTENANCE ALERT SYSTEM (MAS)This feature assists the homeowner in ensuring the garage door opener system stays in good working condition. When the garage door opener needs to be serviced (approximately 4500 garage door opener cycles) the command (yellow) and service (red) LEDs will begin to alternately flash back and forth. The MAS feature can be activated at time of installation. Contact your installing dealer for service. The factory setting for the MAS feature is off.

2
RED
WHI
TE
WHI
TE
GREY
WH
WHI
TEE
InstallationInstall the door control within sight of the garage door at a minimum height of 5 feet (1.5 m) where small children cannot reach, and away from the moving parts of the door. For gang box installations it is not necessary to drill holes or install the drywall anchors. Use the existing holes in the gang box.NOTE: Pre-wiring means that your garage already has wires installed for the door control. If this a new installation, or if you are not replacing an existing door control, it may be necessary to run new wire from the garage door opener to this door control.
WIRE THE DOOR CONTROL
1
2
3
1
2
3
7/16" (11 mm)
Disconnect electrical and battery power (if applicable) to the garage door opener.
Strip 7/16" (11 mm) of insulation from one end of the wire and separate the wires.
Connect one wire to each of the screws on the back of the door control. The wires can be connected to either screw.
PRE-WIRED INSTALLATIONS: Choose any two wires to connect, but make note of which wires are used.
WIRE TO GARAGE DOOR OPENER
Run the white and red/white wire from the door control to the garage door opener. Attach the wire to the wall and ceiling with staples (not provided). Strip 7/16" (11 mm) of insulation from the end of the wire near the garage door opener.
Connect the wire to the red and white terminals on the garage door opener. The wires can be connected to either terminal.
Reconnect electrical and battery power (if applicable) to the garage door opener. The command LED behind the push bar on the door control will blink if installed correctly. To synchronize the garage door opener and the door control, press the push bar up to 3 times, until the garage door opener activates.
PRE-WIRED INSTALLATIONS: Connect the same wires to the garage door opener that were previously connected to the door control.
To insert or release wire, push in tab with screwdriver tip.
GANG BOXDRYWALL
6ABx1-1/4" Drywall Anchors 6-32x1"
HARDWARE
1
2
3
4
5
6
MOUNT THE DOOR CONTROL
Mark the location of the bottom mounting hole and drill a 5/32" (4 mm) hole.
Install the bottom screw, allowing 1/8" (3 mm) to protrude from the wall.
Position the bottom hole of the door control over the screw and slide down into place.
Lift the push bar up and mark the top hole.
Remove the door control from the wall and drill a 5/32" (4 mm) hole for the top screw.
Position the bottom hole of the door control over the screw and slide down into place. Attach the top screw.
- Wall -
1
2
35
6
4
7/16" (11 mm)

3
TO ADD, REPROGRAM, OR CHANGE A REMOTE CONTROL/KEYLESS ENTRY PINNOTE: The following steps are for standard accessories. If programming is unsuccessful, refer to your accessory or garage door opener manual for programming information.
Program
OperationPUSH BARPress the push bar to open or close the door.
GARAGE DOOR OPENER LIGHTSPress the LIGHT button to turn the garage door opener lights on or off. When the lights are turned on they will stay on until the LIGHT button is pressed again, or until the garage door opener is activated. Once the garage door opener is activated the lights will turn off after the specified period of time (the factory setting is 4-1/2 minutes). The LIGHT button will not control the lights when the door is in motion.Light FeatureThe lights will turn on when someone enters through the open garage door and the safety reversing sensor infrared beam is broken. If using the garage door opener light as a work light, turn the light on using the light button on the wall control or the light will turn off after a set amount of time.
LIGHT Button
Push Bar
Press and release the LEARN button on the door control to enter Programming Mode.
Press and release the LEARN button again, the LED will flash once.
Press the button on the remote control that you wish to operate your garage door.
Enter a 4-digit personal identification number (PIN) of your choice on the keyless entry keypad. Then press the ENTER button.
The garage door opener lights will flash (or two clicks will be heard) when the code has been programmed. Repeat the steps above for programming additional remote controls or keyless entry devices.
PIN
? ? ? ?1 2ABC 3DEF
4GHI 5JKL 6MNO
7PRS 8TUV 9WXY
0 QZ* #
ENTER
0 QZ* #
ENTER
OR1 2 3a 3b
Service LED
LEARN Button
LOCK Button
Command LED

4
FOR SERVICE DIAL OUR TOLL FREE NUMBER:1-800-528-9131
www.liftmaster.com
Feature SettingsLOCK
Activate:NOTE: Your remote controls will NOT work when LOCK mode is active however your keyless entry will still allow access to your garage. Press and hold the LOCK button for 2 seconds. The command LED will flash as long as the lock feature is activated and your handheld remote control will not operate your door at this time.
Deactivate:Press and hold the LOCK button again for 2 seconds. The command LED will stop flashing and normal operation will resume.
LIGHT
To change the amount of time the garage door opener lights will stay on (default time is 4-1/2 Minutes):Press and hold the LOCK button until the garage door opener lights flash.* The garage door opener lights will then indicate the current light duration by flashing up to 4 times (see table below).
NUMBER OF TIMES GARAGE DOOR OPENER LIGHTS FLASH
TIME THE GARAGE DOOR OPENER LIGHT STAYS ON
1 1 ½ Minutes2 2 ½ Minutes3 3 ½ Minutes4 4 ½ Minutes
MAINTENANCE ALERT SYSTEM (MAS)
Activate/Deactivate: NOTE: Factory setting is off.Press and hold the LEARN button. Then press the LIGHT button. The service LED will flash the status; Activated is 2 flashes and deactivated is 3 flashes.
WarrantyONE YEAR LIMITED WARRANTYThe Chamberlain Group, Inc. warrants to the first consumer purchaser of this product that it is free from defect in materials and/or workmanship for a period of 1 year from the date of purchase.
To change the light duration time repeat the steps above until the lights flashes indicate your desired time frame.Light FeatureNOTE: Factory setting is on.This feature will turn on the garage door opener lights when the safety reversing sensors beam has been broken.Deactivate:Start with the garage door opener lights off. Press and hold the LIGHT button to turn on the light, continue to hold until the light turns off.*Activate:Start with the garage door opener lights on. Press and hold the LIGHT button to turn off the light, continue to hold until the light turns on.*
* Approximately 10 seconds
LOCK Button
Command LED
LOCK Button
LIGHT Button
Command LED
LEARN Button
LIGHT Button
Service LED

1
PANNEAU DE COMMANDE MULTIFONCTION (SECURITY✚ 2.0TM) MODÈLE 882LM
Aperçu des fonctions
Pour utilisation avec les ouvre-portes de garage Security✚ 2.0TM. Tous les ouvre-portes de garage Security✚ 2.0TM ont un bouton d’apprentissage (« Learn ») jaune et un antenne jaune. Les fonctions sont réglables et peuvent être activées ou désactivées comme vous le souhaitez. Se reporter à la section Réglages.
BOUTON ÉCLAIRAGE (LIGHT)Appuyez sur la bouton éclairage (LIGHT) pour allumer ou éteindre l'éclairage de l'ouvre-porte de garage. Les lumières restent allumées jusqu'à ce qu'on appuie de nouveau sur la bouton « LIGHT » ou jusqu'à ce que l'ouvre-porte est activé. Lorsque l'ouvre-porte a été activé, les lumières s'éteignent après une période de temps préréglée (réglage en usine : 4-1/2 minutes). La bouton « LIGHT » ne contrôle pas l'éclairage lorsque la porte est en mouvement.
VERROUILLAGE (LOCK)La fonction de verrouillage est conçue pour empêcher l'activation de l'ouvre-porte de garage à partir destélécommandes tout en permettant l'activation à partir de la commande de porte et de télédéverrouillage. Cette fonction est utile pour avoir l'esprit en paix lorsque la maison est vide (p. ex., pendant les vacances).
SYSTÈME D'ALERTE D'ENTRETIEN (MAINTENANCE ALERT SYSTEM - MAS)Cette fonction permet au propriétaire de s’assurer que l’ouvre-porte de garage restera en bon état de fonctionnement. Lorsque l’ouvre-porte de garage doit faire l’objet d’un entretien (après environ 4 500 cycles d’ouverture-fermeture), les DEL de commande (jaune) et d’entretien (rouge) commenceront à clignoter en alternance. La fonction d’alerte d’entretien est réglée en usine à la position de désactivation, elle peut être activée au moment de l’installation. Contactez le concessionnaire chargé de l’installation.
Pour prévenir d’éventuelles BLESSURES GRAVES ou LA MORT par suite d’électrocution :• S’assurer que le courant est coupé AVANT de poser la commande de porte.• Raccorder UNIQUEMENT à des fi ls basse tension 12 VOLTS.Pour prévenir d’éventuelles BLESSURES GRAVES ou LA MORT par suite d’une porte de garage qui se ferme :• Poser la commande de porte en vue de la porte de garage, hors de la portée des enfants à une hauteur
minimum de 5 pieds (1,5 m), et à l’écart de TOUTES les pièces mobiles de la porte.• Ne JAMAIS laisser des enfants faire fonctionner les boutons-poussoirs de la commande de porte ou les
émetteurs de la télécommande, ni jouer avec ceux-ci.• Actionner la porte UNIQUEMENT lorsqu’on la voit clairement, qu’elle est bien réglée et que rien n’en
gêne la course.• TOUJOURS garder la porte de garage en vue jusqu’à ce qu’elle soit complètement fermée. Ne JAMAIS
laisser personne croiser le chemin d’une porte de garage qui se ferme.
ATTENTION
ATTENTION
AVERTISSEMENT AVERTISSEMENT
AVERTISSEMENTAVERTISSEMENT
AVERTISSEMENT
AVERTISSEMENT
AVERTISSEMENT
AVERTISSEMENT
Détecteurs inverseurs de sécurité
Bouton jaune « LEARN »
Panneau de commande multifonction
AVIS : Les règles de la FCC ou d’Industrie Canada (IC), ou les deux, interdisent tout ajustement ou toute modification de ce récepteur et/ou de cet émetteur, sauf pour modifier le code ou pour remplacer la pile. IL N’EXISTE AUCUNE AUTRE PIÈCE SUSCEPTIBLE D’ÊTRE ENTRETENUE PAR L’UTILISATEUR.Vérifié pour conformité avec les normes de la FCC POUR UTILISATION À LA MAISON OU AU BUREAU. L’utilisation est sujette aux deux conditions ci-après : (1) ce dispositif ne peut causer des interférences nuisibles, et (2) ce dispositif doit accepter toute interférence reçue, y compris une interférence pouvant causer un fonctionnement non désiré.
Cet appareil numérique de la classe B est conforme à la norme NMB-003 du Canada.

2
InstallationPosez la commande de la porte en vue de l'ouvre-porte de garage, à un minimum de 1,5 m (5 pieds) du sol, où les enfants ne pourront l'atteindre et aussi hors d'atteinte de toutes les pièces mobiles de la porte. En cas d'installation d'un boîtier de raccordement, il n'est pas nécessaire de forer des trous ou d'installer des chevilles pour mur sec. Utilisez les trous du boîtier de raccordement.REMARQUE : Le terme précâblage indique que votre garage est équipé de fils électriques pour la commande de porte. S'il s'agit d'une nouvelle installation ou que vous n'allez pas remplacer une ancienne commande de porte, il sera peut-être nécessaire de brancher un nouveau fil de l'ouvre-porte de garage à cette commande de porte.
1
2
3
1
2
3
4
5
6
1
2
3
11 mm (7/16 de po)
11 mm (7/16 de po)
Déconnectez l’alimentation électrique et les piles (le cas échéant) connectées à l’ouvre-porte de garage.
Dénudez une extrémité du câble sur 11 mm (7/16 po) et séparez les fils.
RACCORDEMENT DE FIL À L'OUVRE-PORTE DE GARAGE
Rebranchez l'alimentation de la prise électrique et de la batterie (le cas échéant) à l'ouvre-porte de garage. La DEL de commande derrière la barre-poussoir de la commande de porte clignotera si elle est correctement installée. Pour synchroniser l'ouvre-porte de garage et la commande de porte, poussez la barre de poussée jusqu'à trois fois vers le haut jusqu'à l'actionnement de l'ouvre-porte de garage.
6AB x 1-1/4 po Chevilles pour murs secs 6-32 x 1 po
1
2
3
4
5
6
- Mur -
CÂBLAGE DE LA COMMANDE DE PORTE MONTAGE DE LA COMMANDE DE PORTE
MUR SECMATÉRIEL
DE RACCORDEMENT BOÎTIER
Branchez un fil à chacune des deux vis situées au dos de la commande de porte. Les fils peuvent être raccordés à l'une ou l'autre vis.
INSTALLATIONS PRÉCÂBLÉES : Sélectionnez deux fils pour le raccordement, mais notez quels fils vous utilisez.
Marquez l'emplacement du trou de montage inférieur et forez un trou de 4 mm (5/32 po).
Installez la vis du bas en la laissant saillir du mur de 3 mm (1/8 po).
Placez le trou inférieur de la commande de porte sur la vis et glissez la commande vers le bas.
Soulevez la barre de poussée et marquez le trou supérieur.
Enlevez la commande de porte du mur et forez un trou de 4 mm (5/32 po) pour la vis du haut.
Placez le trou inférieur de la commande de porte sur la vis et glissez la commande vers le bas. Serrez la vis du haut.
Acheminer les fils blanc et rouge/blanc de la commande de porte vers l'ouvre-porte de garage. Fixer le fil au mur et au plafond avec des agrafes. Dénudez 11 mm (7/16 po) de l'extrémité du câble près de l'ouvre-porte de garage.
Raccordez les fils aux bornes rouge et blanc de l'ouvre-porte de garage. Les fils peuvent être raccordés à n'importe quelle borne.
INSTALLATIONS PRÉCÂBLÉES : Raccordez les fils qui étaient précédemment raccordés à la commande de porte à l'ouvre-porte de garage.
Poussez sur la patte avec le bout du tournevis pour insérer ou libérer le fil.
ROUG
EBL
ANC
BLAN
CGR
IS
BLA
BLANAN
RR
3
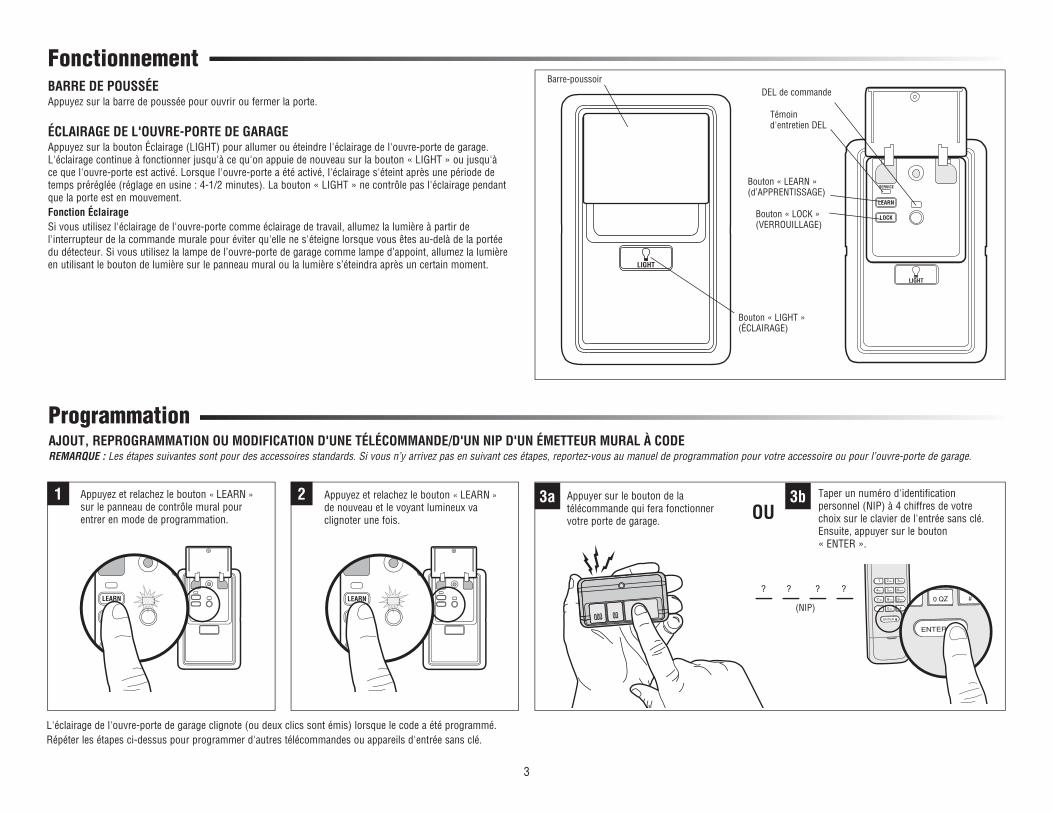
BARRE DE POUSSÉEAppuyez sur la barre de poussée pour ouvrir ou fermer la porte.
ÉCLAIRAGE DE L'OUVRE-PORTE DE GARAGEAppuyez sur la bouton Éclairage (LIGHT) pour allumer ou éteindre l'éclairage de l'ouvre-porte de garage. L'éclairage continue à fonctionner jusqu'à ce qu'on appuie de nouveau sur la bouton « LIGHT » ou jusqu'à ce que l'ouvre-porte est activé. Lorsque l'ouvre-porte a été activé, l'éclairage s'éteint après une période de temps préréglée (réglage en usine : 4-1/2 minutes). La bouton « LIGHT » ne contrôle pas l'éclairage pendant que la porte est en mouvement.Fonction ÉclairageSi vous utilisez l'éclairage de l'ouvre-porte comme éclairage de travail, allumez la lumière à partir de l'interrupteur de la commande murale pour éviter qu'elle ne s'éteigne lorsque vous êtes au-delà de la portée du détecteur. Si vous utilisez la lampe de l’ouvre-porte de garage comme lampe d’appoint, allumez la lumière en utilisant le bouton de lumière sur le panneau mural ou la lumière s’éteindra après un certain moment.
Fonctionnement
OU3a 3bAppuyer sur le bouton de la
télécommande qui fera fonctionner votre porte de garage.
Taper un numéro d'identification personnel (NIP) à 4 chiffres de votre choix sur le clavier de l'entrée sans clé. Ensuite, appuyer sur le bouton « ENTER ».
Bouton « LIGHT » (ÉCLAIRAGE)
Barre-poussoir
AJOUT, REPROGRAMMATION OU MODIFICATION D'UNE TÉLÉCOMMANDE/D'UN NIP D'UN ÉMETTEUR MURAL À CODEREMARQUE : Les étapes suivantes sont pour des accessoires standards. Si vous n’y arrivez pas en suivant ces étapes, reportez-vous au manuel de programmation pour votre accessoire ou pour l’ouvre-porte de garage.
Programmation
Appuyez et relachez le bouton « LEARN » sur le panneau de contrôle mural pour entrer en mode de programmation.
Appuyez et relachez le bouton « LEARN » de nouveau et le voyant lumineux va clignoter une fois.
L'éclairage de l'ouvre-porte de garage clignote (ou deux clics sont émis) lorsque le code a été programmé. Répéter les étapes ci-dessus pour programmer d'autres télécommandes ou appareils d'entrée sans clé.
1 2
(NIP)
? ? ? ?1 2ABC 3DEF
4GHI 5JKL 6MNO
7PRS 8TUV 9WXY
0 QZ* #
ENTER
0 QZ* #
ENTER
Témoin d'entretien DEL
Bouton « LEARN » (d’APPRENTISSAGE)
Bouton « LOCK »(VERROUILLAGE)
DEL de commande

© 2012, The Chamberlain Group, Inc. All Rights Reserved114A4007 Tous droits réservés
VERROUILLAGE (LOCK)
Activer : REMARQUE : Vos télécommandes ne fonctionnent PAS lorsque le mode de verrouillage (LOCK) est actif; toutefois, la fonction d’entrée sans clé vous permet quand même d’accéder à votre garage.Appuyer sur le bouton « LOCK » et le tenir enfoncé pendant 2 secondes. Le DEL de commande clignote tant que la fonction de verrouillage est activée et, pendant ce temps, vous ne pourrez pas commander la porte avec votre télécommande portative.
Désactiver : Appuyer à nouveau sur le bouton « LOCK » et le tenir enfoncé pendant 2 secondes. La DEL de commande cesse de clignoter et le fonctionnement normal reprend.
Bouton « LOCK »(VERROUILLAGE)
ÉCLAIRAGE (LIGHT)Pour modifier la période de temps pendant laquelle l'éclairage de l'ouvre-porte de garage restera allumé (la durée par défaut est de 4 1/2 minutes) : Appuyer sur le bouton « LOCK » et le maintenir enfoncé jusqu'à ce que l'éclairage de l'ouvre-porte de garage clignote.* Les lampes électriques de l’ouvre-porte de garage indiqueront alors la durée de l’eclairage en clignotant jusqu'à 4 fois (reportez-vous à la table ci-dessous).
Pour changer l'heure la durée de l'éclairage, répéter les étapes ci-dessus jusqu'à ce que les lumières clignotent, ce qui indique le délai de votre choix.
FONCTION D'ÉCLAIRAGE REMARQUE : Le réglage d'usine est activé.Cette fonction allume les lampes de l’ouvre-porte de garage quand le faisceau entre les inverseurs de sécurité est interrompu.Désactiver : Commencez en maintenant l'éclairage de l'ouvre-porte de garage éteint. Appuyez et gardez le bouton « LIGHT » (éclairage) enfoncé pour allumer, continuez à le maintenir enfoncé jusqu'à ce que la lumière s'éteigne.*Activer : Commencez en maintenant l'éclairage de l'ouvre-porte de garage allumé. Appuyez et gardez le bouton « LIGHT » (éclairage) enfoncé pour éteindre la lumière, continuez à le maintenir enfoncé jusqu'à ce qu'elle s'allume.*
NOMBRE DE CLIGNOTEMENTS DE L'ÉCLAIRAGE DE L'OUVRE-PORTE DE
GARAGETEMPS D'ACTIVATION DE L'ÉCLAIRAGE
DE L'OUVRE-PORTE DE GARAGE
1 1 ½ Minutes2 2 ½ Minutes3 3 ½ Minutes4 4 ½ Minutes
Bouton « LOCK »(VERROUILLAGE)
Bouton « LIGHT » (ÉCLAIRAGE)
DEL de commande
* Environ 10 secondes
COMPOSEZ LE NUMÉRO SANS FRAIS SUIVANT POUR LE SERVICE CLIENTÈLE :1-800-528-9131
www.liftmaster.com
GARANTIE LIMITÉE D'UN ANLa société Chamberlain Group, Inc. garantit à l’acheteur initial que le produit est exempt de tout défaut de matériaux ou de fabrication pendant une période d’un an à compter de la date d’achat.
Garantie
SYSTÈME D'ALERTE D'ENTRETIEN (MAINTENANCE ALERT SYSTEM - MAS)
Activer/Désactiver :REMARQUE : Le réglage d'usine est désactivé.Appuyez sur le bouton « LEARN » (apprentissage) et le maintenir enfoncé. Appuyer ensuite sur le bouton « LIGHT » (éclairage). Le témoin DEL de l'entretien fera clignoter l'état; 2 éclairs pour l'état actif et 3 éclairs pour l'état inactif.
Bouton « LEARN » (d’APPRENTISSAGE)
Témoin d'entretien DEL
Bouton « LIGHT » (ÉCLAIRAGE)
Réglages
DEL de commande