Embed Size (px)
Citation preview

Document #5007905/23/97 Rev:
12 Clintonville RoadNorthford, CT 06472203-484-7161FAX: 203-484-7118
FCPS-24F/FCPS-24FEField Charger/Power Supply
Installation, Operation and Application Manual
P/N 50079:D ECN 97-145
D
WARNING: This equipment generates, uses, and can radiate radio frequencyenergy and if not installed and used in accordance with the instruction manual, maycause interference to radio communications. It has been tested and found to complywith the limits for class A computing device pursuant to Subpart B of Part 15 of FCCRules, which is designed to provide reasonable protection against such interferencewhen operated in a commercial environment. Operation of this equipment in aresidential area is likely to cause interference, in which case the user will be requiredto correct the interference at his own expense.
Installation Precautions - Adherence to the following will aid in problem-free installation with long-term reliability:
WARNING - Several different sources of power can be connected to the fire alarmcontrol panel. Disconnect all sources of power before servicing. Control unit andassociated equipment may be damaged by removing and/or inserting cards,modules, or interconnecting cables while the unit is energized. Do not attempt toinstall, service, or operate this unit until this manual is read and understood.
CAUTION - System Reacceptance Test after Software Changes: To ensureproper system operation, this product must be tested in accordance with NFPA 72-1993 Chapter 7 after any programming operation or change in site-specific software.Reacceptance testing is required after any change, addition or deletion of systemcomponents, or after any modification, repair or adjustment to system hardware orwiring.
All components, circuits, system operations, or software functions known to beaffected by a change must be 100% tested. In addition, to ensure that otheroperations are not inadvertently affected, at least 10% of initiating devices that arenot directly affected by the change, up to a maximum of 50 devices, must also betested and proper system operation verified.
This system meets NFPA requirements for operation at 0-49O C/32-120O Fand at a relative humidity of 85% RH (non-condensing) at 30O C/86O F.However, the useful life of the system's standby batteries and the electroniccomponents may be adversely affected by extreme temperature ranges andhumidity. Therefore, it is recommended that this system and its peripherals beinstalled in an environment with a nominal room temperature of 15-27O C/60-80O
F.
Verify that wire sizes are adequate for all initiating and indicating device loops.Most devices cannot tolerate more than a 10% I.R. drop from the specified devicevoltage.
Like all solid state electronic devices, this system may operate erratically or canbe damaged when subjected to lightning induced transients. Although no system iscompletely immune from lightning transients and interferences, proper grounding willreduce susceptibility. Overhead or outside aerial wiring is not recommended, due toan increased susceptibility to nearby lightning strikes. Consult with the TechnicalServices Department if any problems are anticipated or encountered.
Disconnect AC power and batteries prior to removing or inserting circuit boards.Failure to do so can damage circuits.
Remove all electronic assemblies prior to any drilling, filing, reaming, or punchingof the enclosure. When possible, make all cable entries from the sides or rear.Before making modifications, verify that they will not interfere with battery,transformer, and printed circuit board location.
Do not tighten screw terminals more than 9 in-lbs. Over tightening may damagethreads, resulting in reduced terminal contact pressure and difficulty with screwterminal removal.
This system contains static-sensitive components. Always ground yourself with aproper wrist strap before handling any circuits so that static charges are removedfrom the body. Use static suppressive packaging to protect electronic assembliesremoved from the unit.
Follow the instructions in the installation, operating, and programming manuals.These instructions must be followed to avoid damage to the control panel andassociated equipment. FACP operation and reliability depend upon properinstallation.
Fire Alarm System Limitations While installing a fire alarm system may make lower insurancerates possible, it is not a substitute for fire insurance!
An automatic fire alarm system - typically made up of smoke detectors, heatdetectors, manual pull stations, audible warning devices, and a fire alarm controlwith remote notification capability can provide early warning of a developing fire.Such a system, however, does not assure protection against property damage orloss of life resulting from a fire.
Any fire alarm system may fail for a variety of reasons:
Smoke detectors may not sense fire where smoke cannot reach the detectors suchas in chimneys, in walls, or roofs, or on the other side of closed doors. Smokedetectors also may not sense a fire on another level or floor of a building. A secondfloor detector, for example, may not sense a first floor or basement fire. Further-more, all types of smoke detectors - both ionization and photoelectric types, havesensing limitations. No type of smoke detector can sense every kind of fire causedby carelessness and safety hazards like smoking in bed, violent explosions,escaping gas, improper storage of flammable materials, overloaded electricalcircuits, children playing with matches, or arson.
IMPORTANT! Smoke detectors must be installed in the same room as thecontrol panel and in rooms used by the system for the connection of alarmtransmission wiring, communications, signaling, and/or power. If detectors arenot so located, a developing fire may damage the alarm system, crippling itsability to report a fire.
Audible warning devices such as bells may not alert people if these devices arelocated on the other side of closed or partly open doors or are located on anotherfloor of a building.
A fire alarm system will not operate without any electrical power. If AC power fails,the system will operate from standby batteries only for a specified time.
Rate-of-Rise heat detectors may be subject to reduced sensitivity over time. Forthis reason, the rate-of-rise feature of each detector should be tested at least onceper year by a qualified fire protection specialist.
Equipment used in the system may not be technically compatible with the control.It is essential to use only equipment listed for service with your control panel.
Telephone lines needed to transmit alarm signals from a premise to a centralmonitoring station may be out of service or temporarily disabled.
The most common cause of fire alarm malfunctions, however, is inadequatemaintenance. All devices and system wiring should be tested and maintained byprofessional fire alarm installers following written procedures supplied with eachdevice. System inspection and testing should be scheduled monthly or as requiredby National and/or local fire codes. Adequate written records of all inspections shouldbe kept.
FCC WarningCanadian RequirementsThis digital apparatus does not exceed the Class A limits for radiation noiseemissions from digital apparatus set out in the Radio Interference Regulations of theCanadian Department of Communications.
Le present appareil numerique n'emet pas de bruits radioelectriques depassant leslimites applicables aux appareils numeriques de la classe A prescrites dans leReglement sur le brouillage radioelectrique edicte par le ministere des Communica-tions du Canada.
Technical Publishing Document PRECAULG.P65 12/31/96
Document # 50079 Rev. D 05/23/97 Page 3
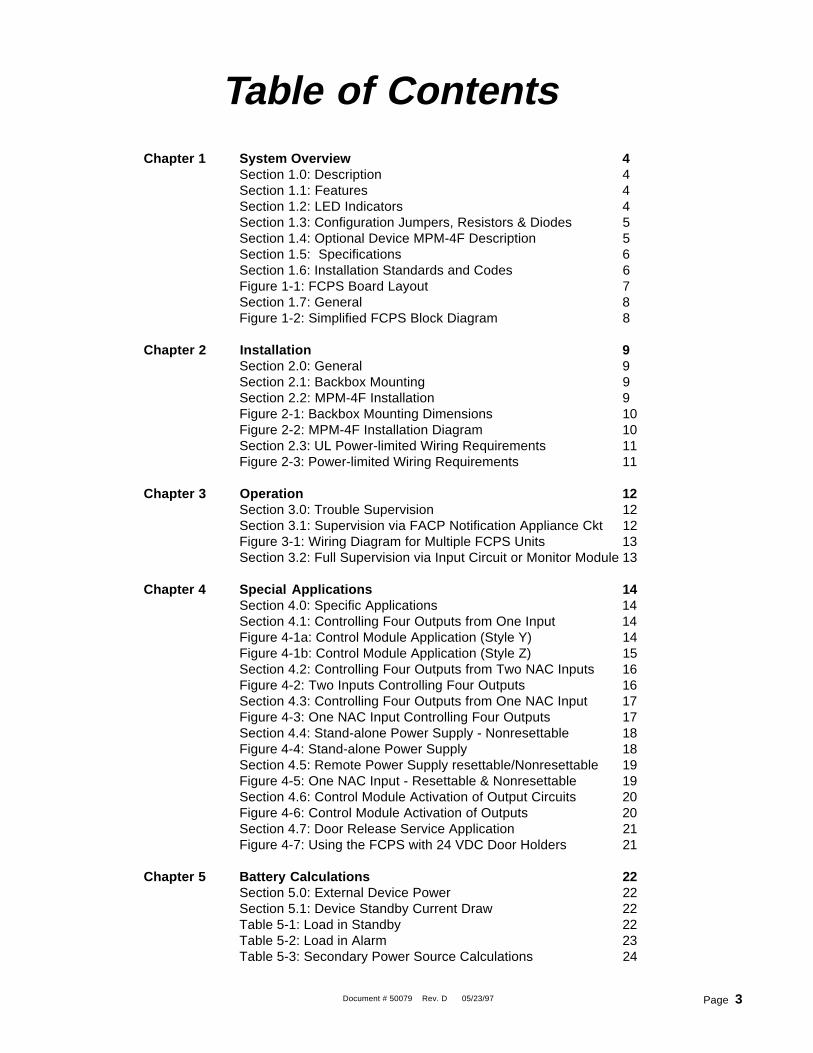
Table of ContentsChapter 1 System Overview 4
Section 1.0: Description 4Section 1.1: Features 4Section 1.2: LED Indicators 4Section 1.3: Configuration Jumpers, Resistors & Diodes 5Section 1.4: Optional Device MPM-4F Description 5Section 1.5: Specifications 6Section 1.6: Installation Standards and Codes 6Figure 1-1: FCPS Board Layout 7Section 1.7: General 8Figure 1-2: Simplified FCPS Block Diagram 8
Chapter 2 Installation 9Section 2.0: General 9Section 2.1: Backbox Mounting 9Section 2.2: MPM-4F Installation 9Figure 2-1: Backbox Mounting Dimensions 10Figure 2-2: MPM-4F Installation Diagram 10Section 2.3: UL Power-limited Wiring Requirements 11Figure 2-3: Power-limited Wiring Requirements 11
Chapter 3 Operation 12Section 3.0: Trouble Supervision 12Section 3.1: Supervision via FACP Notification Appliance Ckt 12Figure 3-1: Wiring Diagram for Multiple FCPS Units 13Section 3.2: Full Supervision via Input Circuit or Monitor Module 13
Chapter 4 Special Applications 14Section 4.0: Specific Applications 14Section 4.1: Controlling Four Outputs from One Input 14Figure 4-1a: Control Module Application (Style Y) 14Figure 4-1b: Control Module Application (Style Z) 15Section 4.2: Controlling Four Outputs from Two NAC Inputs 16Figure 4-2: Two Inputs Controlling Four Outputs 16Section 4.3: Controlling Four Outputs from One NAC Input 17Figure 4-3: One NAC Input Controlling Four Outputs 17Section 4.4: Stand-alone Power Supply - Nonresettable 18Figure 4-4: Stand-alone Power Supply 18Section 4.5: Remote Power Supply resettable/Nonresettable 19Figure 4-5: One NAC Input - Resettable & Nonresettable 19Section 4.6: Control Module Activation of Output Circuits 20Figure 4-6: Control Module Activation of Outputs 20Section 4.7: Door Release Service Application 21Figure 4-7: Using the FCPS with 24 VDC Door Holders 21
Chapter 5 Battery Calculations 22Section 5.0: External Device Power 22Section 5.1: Device Standby Current Draw 22Table 5-1: Load in Standby 22Table 5-2: Load in Alarm 23Table 5-3: Secondary Power Source Calculations 24
Document # 50079 Rev. D 05/23/97Page 4
CHAPTER ONE
System Overview
1.0 DescriptionThe FCPS-24F is a compact, cost-effective, remote power supply and battery charger.This remote power supply consists of a filtered 24 VDC output that may be configuredto drive four Notification Appliance Circuits (two Style Y or Style Z, and two Style Y only).Alternately, the four Notification Appliance Circuits may be configured as resettable ornonresettable power outputs. The FCPS-24FE offers the same features as the FCPS-24F but allows connection to 220/240 VAC input.
1.1 Features
• Self contained in lockable cabinet.• 24 VDC remote power supply.• Outputs are completely power-limited.• Two optically-isolated input/control circuits.• Two Style Y/Style Z Notification Appliance Circuits.• Two additional circuits that are configurable as Style Y Notification Appli-
ance Circuits.• Alternately, all four or a combination of the circuits may be configured as
24 VDC power outputs.• Output power circuits may be configured as resettable or nonresettable.• 3.0 amps maximum current available for any one output circuit.• 4.0 amps total of continuous current available.• 6.0 amps maximum short term (one hour maximum) current can be
provided.• Fully filtered power output.• Integral supervised battery charger.• Up to 7.0 AH batteries in remote power supply cabinet.• Fully supervised power supply, battery, and Notification Appliance Circuits.• Selectable Earth Fault detection.• Delay of AC loss reporting (8 or 16 hours).• Fixed terminal blocks for field wiring that are capable of accepting up to 12
AWG wire.• Normally closed trouble contact.• MPM-4F optional charger Voltmeter/Ammeter.
1.2 LED Indicators• AC power on (green).• AC Fail/Earth Fault (yellow).• Battery/charger trouble (yellow).• Circuits field wiring faults (yellow). Circuits 1 through 4 are supervised for
shorts and opens during the inactive state.
Note: Unless otherwise specified, the term 'FCPS' shall be used in this manual, whereappropriate, to refer to both the FCPS-24F and FCPS-24FE power supplies.
Document # 50079 Rev. D 05/23/97 Page 5
1.3 Configuration Jumpers, Resistors & Diodes
• Battery Charging Circuit (JP1) - To disable local battery charger, cut jumperJP1 (an external charger listed for fire protective signaling is required).
• Optional MPM-4F Voltmeter/Ammeter - To enable charger current mea-surement with MPM-4F, cut JP1 and plug-in MPM-4F connector to the P3header.
• Earth Fault Detection (R27)- To disable local earth fault detection, cutresistor R27. Note that Earth Fault detection is required in Canada.
• Trouble Supervision (R63, D31, JP2) - These components are used toconfigure local trouble reporting through the remote power supply troublecontact. Refer to the Trouble Supervision section for a complete descrip-tion.
• Delay AC Loss Reporting (R76 and R134) - When a Digital Alarm Commu-nicator Transmitter (DACT) is installed in the FACP, the reporting of an ACloss condition to a central station must be delayed. With 24-hour batterystandby, cut R134 to delay AC loss reporting for 8 hours. With 60-hourbattery standby, cut R76 and R134 to delay the report by 16 hours.
• Disable Resettable Power Function for Output Circuit #2 or #4 (R175 andR176).Cut R175 to make Output #2 nonresettable power.Cut R176 to make Output #4 nonresettable power.
1.4 Optional Device MPM-4F Description
The MPM-4F is used for:• Monitoring battery/charger voltage (Voltmeter)• Monitoring charger current (Ammeter)
The MPM-4F is most commonly required in military installations. It consists oftwo analog edge meters (a voltmeter and an ammeter) which connects to theP3 Header.
The voltmeter measures battery and charger voltage. It is electrically con-nected across battery terminals TB2.1 and TB2.2. When the battery isdisconnected, the voltmeter measures charger voltage only. Periodically(approximately 2 seconds every 40 seconds) the FCPS performs a battery testby disabling the charger. During this period, charger current that is measuredby the ammeter, drops to zero. The voltmeter now only measures the batteryvoltage. Battery voltage ranges from 20.4 (low battery) to 27.6 (fully charged).
The ammeter is electrically connected across JP1 and measures currentdelivered from the charger to the battery, except for the period during the batterytest. Charger current is normally limited to 250mA. In order to enable theammeter, JP1 must be cut.
1.5 Specifications
Primary (AC) Power• FCPS-24F: 120 VAC 50/60 Hz, 2.0 A maximum.• FCPS-24FE: 220/240 VAC 50/60 Hz, 1.0 A maximum.
Document # 50079 Rev. D 05/23/97Page 6
• Wire size: minimum #14 AWG with 600V insulation
Control Input Circuit• Trigger Input Voltage - 9 to 32 VDC• Input Current Draw in Alarm Polarity
16 - 32V 2.0mA per input9 - 16V 1.0mA per input
Trouble Contact Rating• 5 amps at 24VDC
Output Circuits (19.1 - 26.4 VDC, filtered)• 3.0 amps maximum for any one circuit• 4.0 amps maximum total continuous current for all outputs• 6.0 amps maximum total short term (one hour maximum) current for all
outputs
Auxiliary Power Output• Specific Application Power - 45 mA Short Circuit.
Secondary Power (Battery) Charging Circuit• Supports lead acid batteries only.• Float Charge Voltage: 27.6V• Maximum Charge Current: 250 mA• Maximum Battery Capacity: 7.0 AH
1.6 Installation Standards and CodesThe FCPS complies with the following standards:
NFPA 72-1993 National Fire Alarm Code
Underwriters Laboratories:• UL 864 Standard for Control Units for Fire Alarm Systems• UL 1481 Power Supplies for Fire Alarm Systems
In addition, the installer should be familiar with the following stan-dards:• NEC Article 300 Wiring Methods• NEC Article 760 Fire Protective Signaling Systems• Applicable Local and State Building Codes• Requirements of the Local Authority Having Jurisdiction
Other documents supporting Fire•Lite Alarms products referenced in thismanual are listed below.• Device Compatibility Document 15384• The MS-9200 Instruction Manual, Document 15668• The Sensiscan 2000 Installation Manual, Document 15017
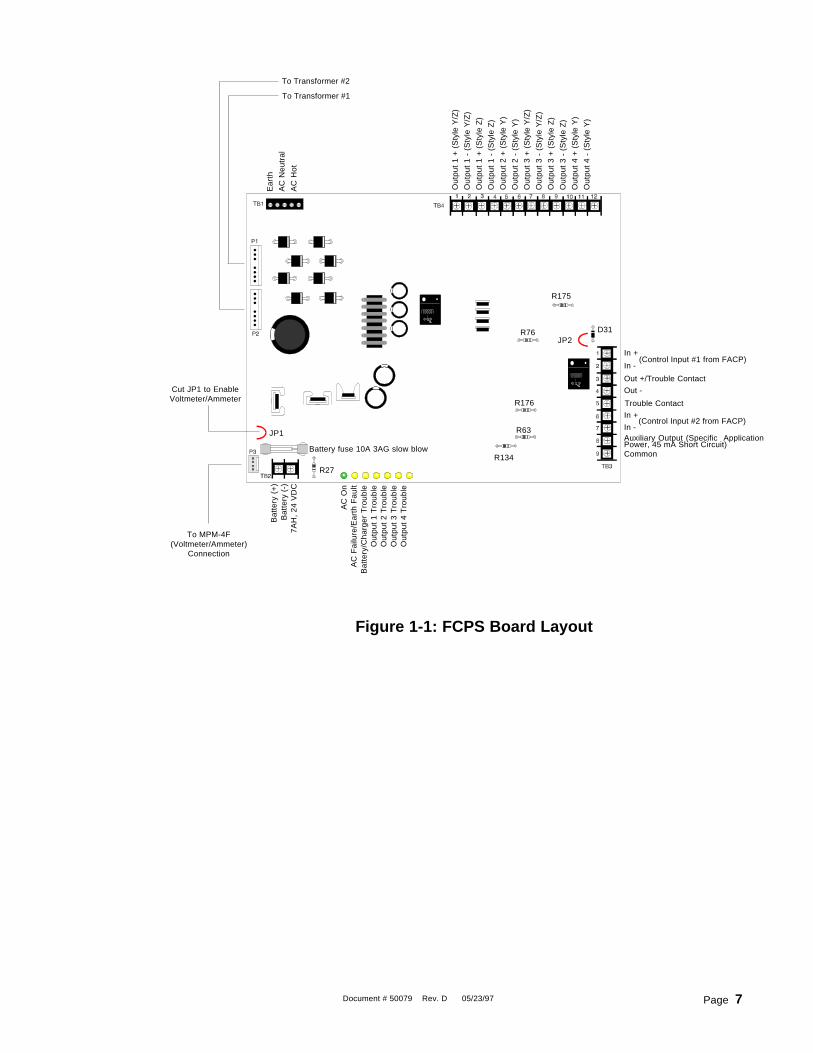
Document # 50079 Rev. D 05/23/97 Page 7
Figure 1-1: FCPS Board Layout
Out
put
1 +
(S
tyle
Y/Z
)
Out
put
1 -
(Sty
le Y
/Z)
Out
put
1 +
(S
tyle
Z)
Out
put
1 -
(Sty
le Z
)
Out
put
2 +
(S
tyle
Y)
Out
put
2 -
(Sty
le Y
)
Out
put
3 +
(S
tyle
Y/Z
)
Out
put
3 -
(Sty
le Y
/Z)
Out
put
3 +
(S
tyle
Z)
Out
put
3 -
(Sty
le Z
)
Out
put
4 +
(S
tyle
Y)
Out
put
4 -
(Sty
le Y
)
Bat
tery
(+
)B
atte
ry (
-)7A
H,
24 V
DC
AC
On
AC
Fai
lure
/Ear
th F
ault
Bat
tery
/Cha
rger
Tro
uble
Out
put
1 T
roub
leO
utpu
t 2
Tro
uble
Out
put
3 T
roub
leO
utpu
t 4
Tro
uble
JP1
R27
Battery fuse 10A 3AG slow blow
Ear
th
AC
Neu
tral
AC
Hot
To Transformer #1
To Transformer #2
D31
R175
JP2R76
R176
R63
R134
In +
In -
Out +/Trouble Contact
Out -
Trouble Contact
In +
In -
(Control Input #1 from FACP)
(Control Input #2 from FACP)
Auxiliary Output (Specific ApplicationPower, 45 mA Short Circuit)Common
To MPM-4F(Voltmeter/Ammeter)
Connection
Cut JP1 to EnableVoltmeter/Ammeter
Document # 50079 Rev. D 05/23/97Page 8
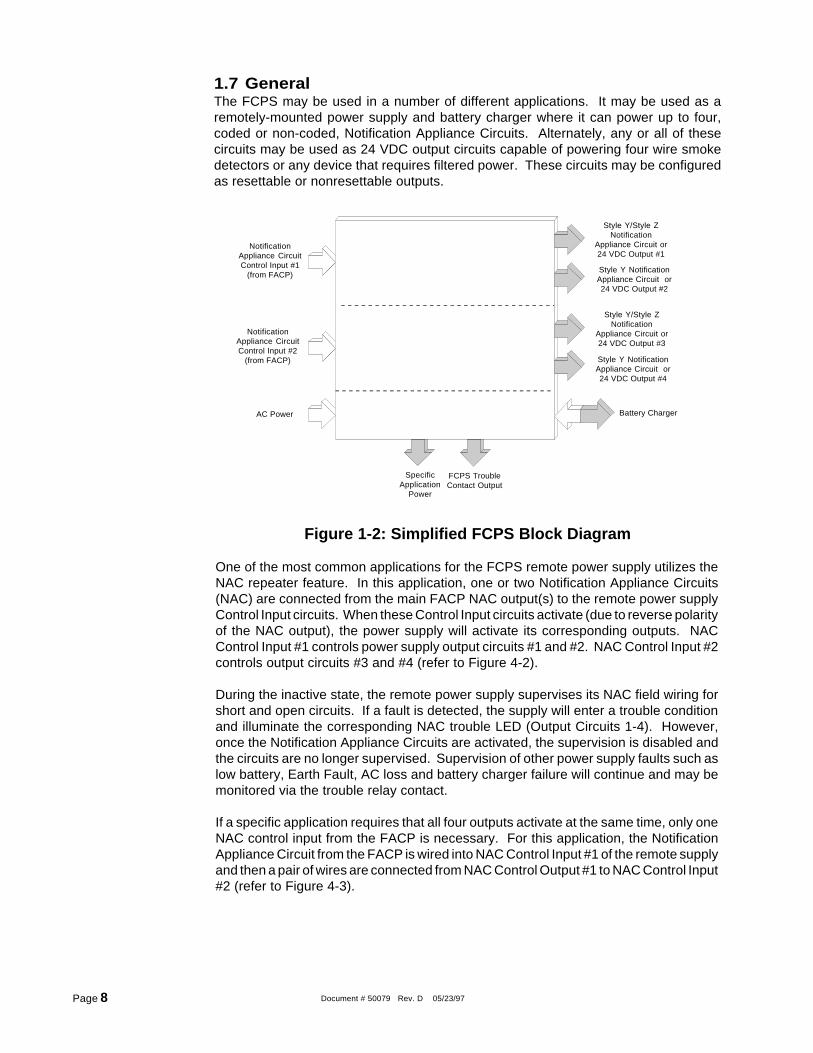
1.7 GeneralThe FCPS may be used in a number of different applications. It may be used as aremotely-mounted power supply and battery charger where it can power up to four,coded or non-coded, Notification Appliance Circuits. Alternately, any or all of thesecircuits may be used as 24 VDC output circuits capable of powering four wire smokedetectors or any device that requires filtered power. These circuits may be configuredas resettable or nonresettable outputs.
NotificationAppliance CircuitControl Input #1
(from FACP)
NotificationAppliance CircuitControl Input #2
(from FACP)
FCPS TroubleContact Output
SpecificApplication
Power
Style Y/Style ZNotification
Appliance Circuit or24 VDC Output #1
Style Y NotificationAppliance Circuit or24 VDC Output #2
Style Y/Style ZNotification
Appliance Circuit or24 VDC Output #3
Style Y NotificationAppliance Circuit or24 VDC Output #4
Battery Charger
Figure 1-2: Simplified FCPS Block Diagram
One of the most common applications for the FCPS remote power supply utilizes theNAC repeater feature. In this application, one or two Notification Appliance Circuits(NAC) are connected from the main FACP NAC output(s) to the remote power supplyControl Input circuits. When these Control Input circuits activate (due to reverse polarityof the NAC output), the power supply will activate its corresponding outputs. NACControl Input #1 controls power supply output circuits #1 and #2. NAC Control Input #2controls output circuits #3 and #4 (refer to Figure 4-2).
During the inactive state, the remote power supply supervises its NAC field wiring forshort and open circuits. If a fault is detected, the supply will enter a trouble conditionand illuminate the corresponding NAC trouble LED (Output Circuits 1-4). However,once the Notification Appliance Circuits are activated, the supervision is disabled andthe circuits are no longer supervised. Supervision of other power supply faults such aslow battery, Earth Fault, AC loss and battery charger failure will continue and may bemonitored via the trouble relay contact.
If a specific application requires that all four outputs activate at the same time, only oneNAC control input from the FACP is necessary. For this application, the NotificationAppliance Circuit from the FACP is wired into NAC Control Input #1 of the remote supplyand then a pair of wires are connected from NAC Control Output #1 to NAC Control Input#2 (refer to Figure 4-3).
AC Power
Document # 50079 Rev. D 05/23/97 Page 9
CHAPTER TWO:
Installation
2.0 GeneralCarefully unpack the system and check for shipping damage. Select a location for thecabinet that is in a clean, dry, vibration-free area where extreme temperatures are notencountered. The area should be readily accessible with sufficient room to easily installand maintain the panel. Locate the top of the cabinet approximately five feet above thefloor with the hinge mounting on the left.
Determine the number of conductors required for the devices to be installed anddetermine the appropriate knockouts. All wiring must be in accordance with the Nationaland/or Local codes for fire alarm systems.
2.1 Backbox Mounting
1) Remove the main PC board assembly by unscrewing the four screws in thecorners of the board. Two permanent standoffs support the board in thecenter.
Set the board aside in a safe, clean place. Avoid static discharge whichmay damage the board.
2) Mark and predrill holes for the top two keyhole mounting bolts.
3) Install two upper fasteners in the wall with the screw heads protrudingapproximately 1/4".
4) Using the upper keyholes, mount the backbox over the two screws.
5) Mark the lower two holes, remove backbox and drill mounting holes.
6) Mount backbox, install remaining fasteners and tighten.
7) When the location is dry and free of construction dust, reinstall the main PCboard (refer to Figure 2.1).
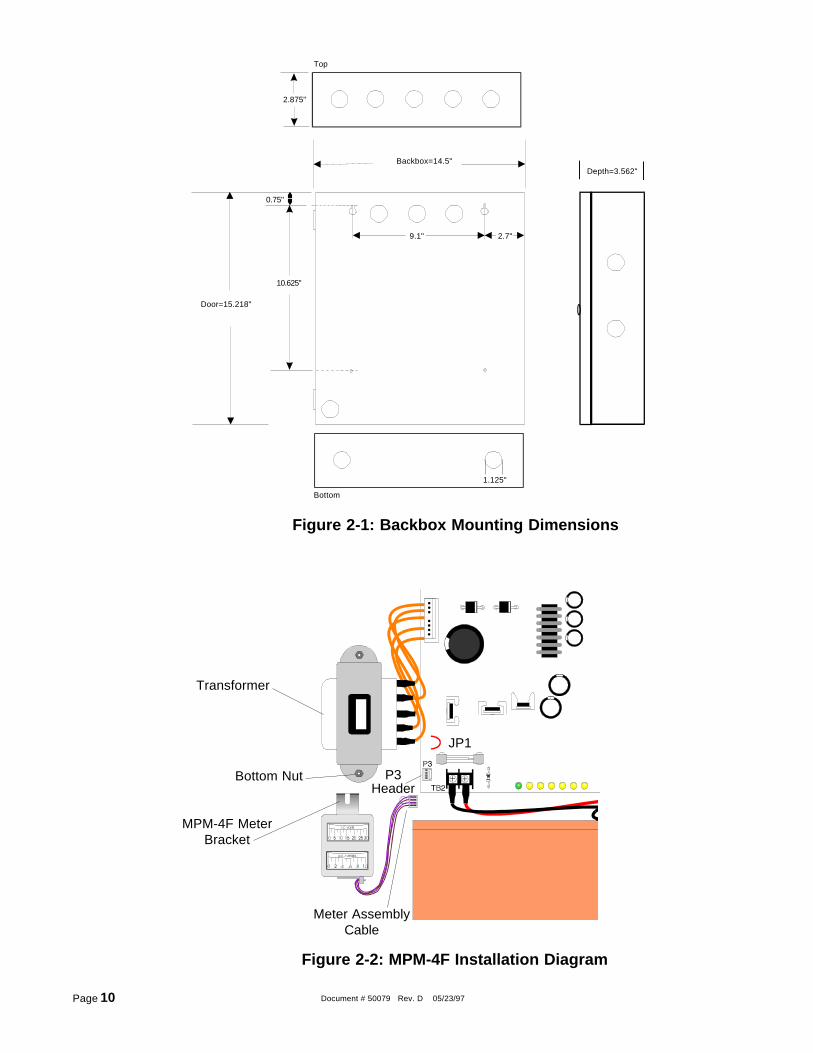
2.2 MPM-4F Installation
1) Cut Jumper JP1.
2) With a nut driver, loosen bottom nut of the lower transformer.
3) Slide in MPM-4F meter bracket between transformer and nut.
4) Fasten the nut.
5) Connect the meter assembly cable to P3 header (refer to Figure 2.2).
Document # 50079 Rev. D 05/23/97Page 10
Figure 2-1: Backbox Mounting Dimensions
Bottom
1.125"
Backbox=14.5"
Door=15.218"
Top
Depth=3.562"
0.75"
10.625"
2.875"
2.7"9.1"
Figure 2-2: MPM-4F Installation Diagram
MPM-4F MeterBracket
Transformer
Bottom Nut
JP1
Meter AssemblyCable
P3Header
Document # 50079 Rev. D 05/23/97 Page 11
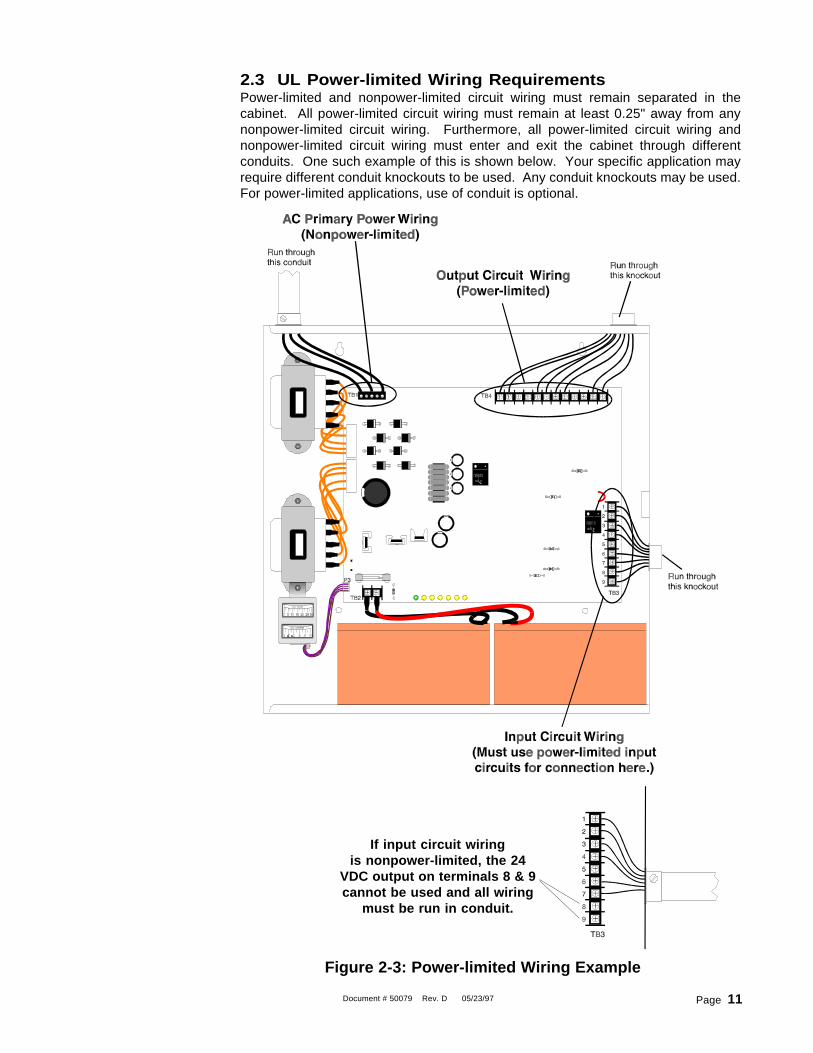
2.3 UL Power-limited Wiring RequirementsPower-limited and nonpower-limited circuit wiring must remain separated in thecabinet. All power-limited circuit wiring must remain at least 0.25" away from anynonpower-limited circuit wiring. Furthermore, all power-limited circuit wiring andnonpower-limited circuit wiring must enter and exit the cabinet through differentconduits. One such example of this is shown below. Your specific application mayrequire different conduit knockouts to be used. Any conduit knockouts may be used.For power-limited applications, use of conduit is optional.
Figure 2-3: Power-limited Wiring Example
If input circuit wiringis nonpower-limited, the 24
VDC output on terminals 8 & 9cannot be used and all wiring
must be run in conduit.
Document # 50079 Rev. D 05/23/97Page 12
CHAPTER THREE:
Operation
3.0 Trouble SupervisionWhen a trouble occurs on the FCPS, it must also appear on the main Fire Alarm ControlPanel. The remote power supply has two ways of sending this trouble signal to theFACP. However, only one of the trouble reporting methods may be used.
3.1 Supervision via FACP Notification Appliance CircuitSupervision of FACP to FCPS WiringThe FACP supervises the connection between itself and the FCPS via an End-of-LineResistor (ELR). The ELR must be installed at the FCPS end of the circuit. If no additionaldevices are connected to these terminals, the ELR must be connected directly acrossterminals 3 and 4. An open or short on this circuit will be detected at the FACP as anNAC trouble (refer to Figure 4-2).
Supervision of FCPS FaultsThe FACP will detect these power supply faults as an open circuit condition on its NAC.Any of the following conditions will cause an internal trouble contact on the FCPS to openprovided the FACP NAC is not in alarm:
a) A field wiring fault on any output of the power supply during the inactive state.b) An AC fail condition at the power supply (may be delayed depending on R134).c) A battery fail condition at the power supply.d) Battery charger fail.e) Earth Fault condition.
Any power supply trouble will break the connection between the FACP and the ELRprovided the FACP's NAC is not in alarm. The FACP's ELR must be placed after thelast NAC appliance connected to FCPS terminals 3 & 4 or, if no appliances areconnected to these terminals, the ELR must be connected directly across terminals 3& 4 (refer to Figure 4-2 and 4-3).
Note: Circuit Control Input #2 cannot be used to supervise the power supply but an ELRis still required for FACP wiring supervision.
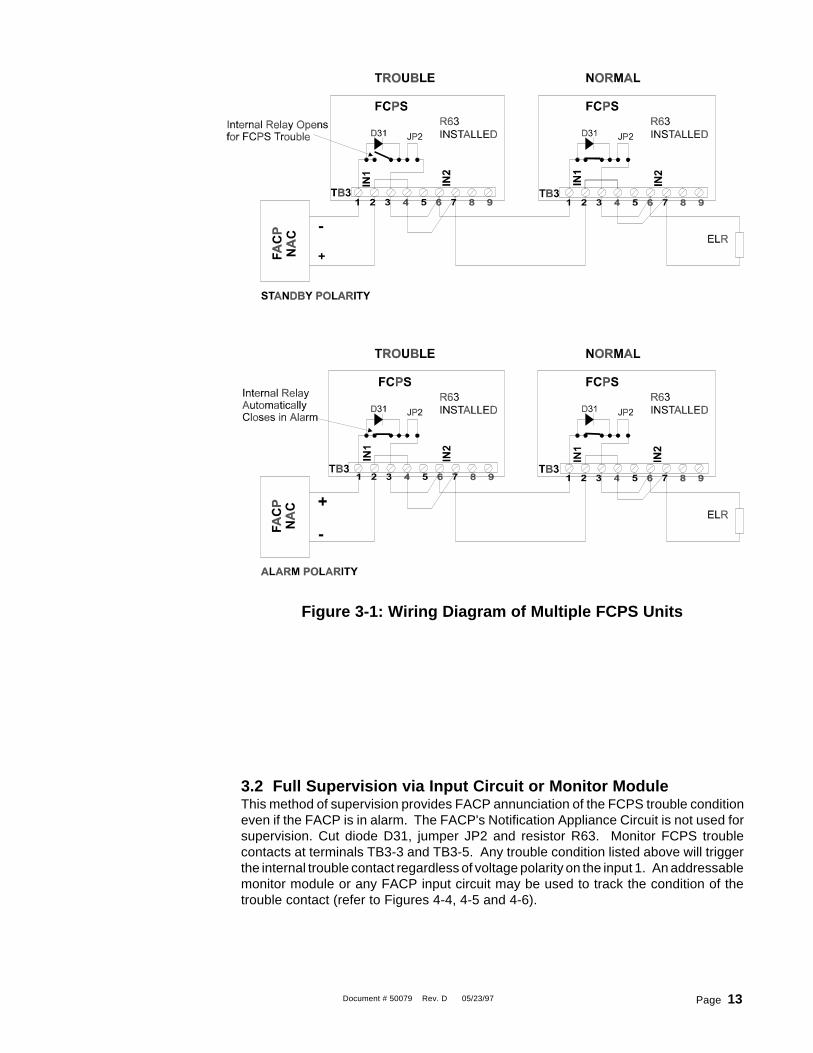
Multiple FCPS-24 Controlled by a Single NACIn a standby condition with no troubles, the FACP NAC output produces a negativevoltage which forces current to flow through the ELR. If any FCPS is in a trouble state,that FCPS will open connection between input terminal TB3.1 and TB3.3. This will causea break in the NAC, which will then be reported by the FACP as a NAC open trouble.
The alarm polarity sent by the FACP will always force restoration of connection betweenTB3.1 and TB3.3 on all FCPS units, unless this function was disabled by cutting resistorR63 or by the removal of JP2 and D31 (refer to Figure 3-1).
Document # 50079 Rev. D 05/23/97 Page 13
3.2 Full Supervision via Input Circuit or Monitor ModuleThis method of supervision provides FACP annunciation of the FCPS trouble conditioneven if the FACP is in alarm. The FACP's Notification Appliance Circuit is not used forsupervision. Cut diode D31, jumper JP2 and resistor R63. Monitor FCPS troublecontacts at terminals TB3-3 and TB3-5. Any trouble condition listed above will triggerthe internal trouble contact regardless of voltage polarity on the input 1. An addressablemonitor module or any FACP input circuit may be used to track the condition of thetrouble contact (refer to Figures 4-4, 4-5 and 4-6).
Figure 3-1: Wiring Diagram of Multiple FCPS Units
Document # 50079 Rev. D 05/23/97Page 14
CHAPTER FOUR:
Special Applications4.0 Specific Applications
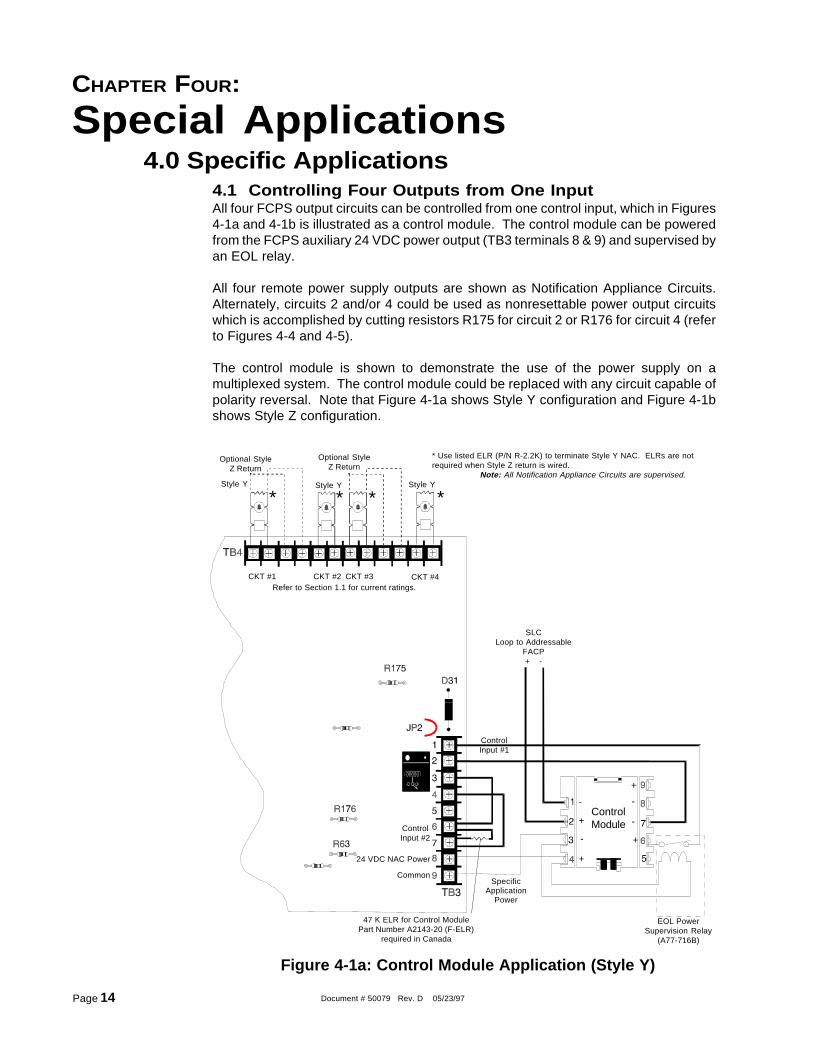
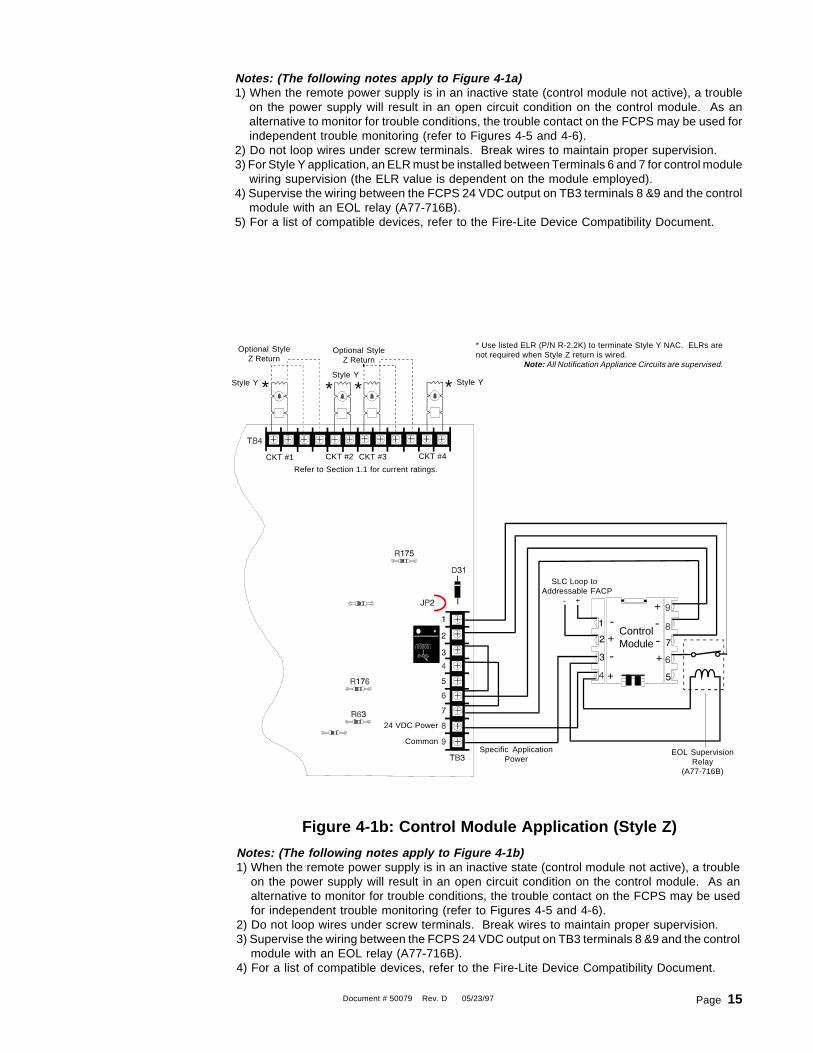
Figure 4-1a: Control Module Application (Style Y)
4.1 Controlling Four Outputs from One InputAll four FCPS output circuits can be controlled from one control input, which in Figures4-1a and 4-1b is illustrated as a control module. The control module can be poweredfrom the FCPS auxiliary 24 VDC power output (TB3 terminals 8 & 9) and supervised byan EOL relay.
All four remote power supply outputs are shown as Notification Appliance Circuits.Alternately, circuits 2 and/or 4 could be used as nonresettable power output circuitswhich is accomplished by cutting resistors R175 for circuit 2 or R176 for circuit 4 (referto Figures 4-4 and 4-5).
The control module is shown to demonstrate the use of the power supply on amultiplexed system. The control module could be replaced with any circuit capable ofpolarity reversal. Note that Figure 4-1a shows Style Y configuration and Figure 4-1bshows Style Z configuration.
Optional StyleZ Return
Optional StyleZ Return
SLCLoop to Addressable
FACP+ -
47 K ELR for Control ModulePart Number A2143-20 (F-ELR)
required in Canada
ControlModule
CKT #1 CKT #2 CKT #3 CKT #4Refer to Section 1.1 for current ratings.
*Style Y
* Use listed ELR (P/N R-2.2K) to terminate Style Y NAC. ELRs are notrequired when Style Z return is wired.
Note: All Notification Appliance Circuits are supervised.Style Y
24 VDC NAC Power
Common
ControlInput #2
* **Style Y
ControlInput #1
EOL PowerSupervision Relay
(A77-716B)
SpecificApplication
Power
Document # 50079 Rev. D 05/23/97 Page 15
Notes: (The following notes apply to Figure 4-1a)1) When the remote power supply is in an inactive state (control module not active), a trouble
on the power supply will result in an open circuit condition on the control module. As analternative to monitor for trouble conditions, the trouble contact on the FCPS may be used forindependent trouble monitoring (refer to Figures 4-5 and 4-6).
2) Do not loop wires under screw terminals. Break wires to maintain proper supervision.3) For Style Y application, an ELR must be installed between Terminals 6 and 7 for control module
wiring supervision (the ELR value is dependent on the module employed).4) Supervise the wiring between the FCPS 24 VDC output on TB3 terminals 8 &9 and the control
module with an EOL relay (A77-716B).5) For a list of compatible devices, refer to the Fire-Lite Device Compatibility Document.
* Use listed ELR (P/N R-2.2K) to terminate Style Y NAC. ELRs arenot required when Style Z return is wired.
Note: All Notification Appliance Circuits are supervised.
Optional StyleZ Return
Optional StyleZ Return
Figure 4-1b: Control Module Application (Style Z)
Notes: (The following notes apply to Figure 4-1b)1) When the remote power supply is in an inactive state (control module not active), a trouble
on the power supply will result in an open circuit condition on the control module. As analternative to monitor for trouble conditions, the trouble contact on the FCPS may be usedfor independent trouble monitoring (refer to Figures 4-5 and 4-6).
2) Do not loop wires under screw terminals. Break wires to maintain proper supervision.3) Supervise the wiring between the FCPS 24 VDC output on TB3 terminals 8 &9 and the control
module with an EOL relay (A77-716B).4) For a list of compatible devices, refer to the Fire-Lite Device Compatibility Document.
Style Y * *Style Y
* Style Y*
CKT #1 CKT #2 CKT #3 CKT #4
Refer to Section 1.1 for current ratings.
SLC Loop toAddressable FACP - +
ControlModule
EOL SupervisionRelay
(A77-716B)
24 VDC Power
CommonSpecific Application
Power
Document # 50079 Rev. D 05/23/97Page 16
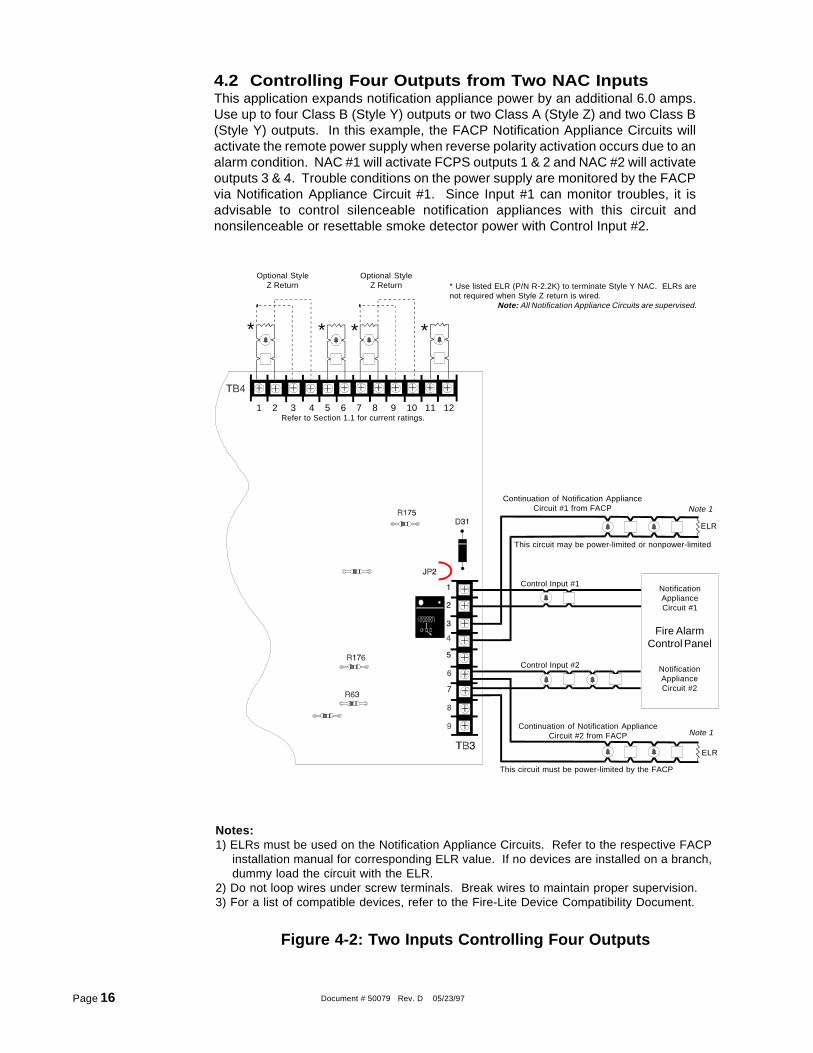
4.2 Controlling Four Outputs from Two NAC InputsThis application expands notification appliance power by an additional 6.0 amps.Use up to four Class B (Style Y) outputs or two Class A (Style Z) and two Class B(Style Y) outputs. In this example, the FACP Notification Appliance Circuits willactivate the remote power supply when reverse polarity activation occurs due to analarm condition. NAC #1 will activate FCPS outputs 1 & 2 and NAC #2 will activateoutputs 3 & 4. Trouble conditions on the power supply are monitored by the FACPvia Notification Appliance Circuit #1. Since Input #1 can monitor troubles, it isadvisable to control silenceable notification appliances with this circuit andnonsilenceable or resettable smoke detector power with Control Input #2.
Figure 4-2: Two Inputs Controlling Four Outputs
Optional StyleZ Return
Optional StyleZ Return
* ** *
This circuit may be power-limited or nonpower-limited
Continuation of Notification ApplianceCircuit #1 from FACP
This circuit must be power-limited by the FACP
Control Input #1
Control Input #2
Continuation of Notification ApplianceCircuit #2 from FACP
Fire AlarmControl Panel
NotificationApplianceCircuit #1
NotificationApplianceCircuit #2
Notes:1) ELRs must be used on the Notification Appliance Circuits. Refer to the respective FACP
installation manual for corresponding ELR value. If no devices are installed on a branch,dummy load the circuit with the ELR.
2) Do not loop wires under screw terminals. Break wires to maintain proper supervision.3) For a list of compatible devices, refer to the Fire-Lite Device Compatibility Document.
* Use listed ELR (P/N R-2.2K) to terminate Style Y NAC. ELRs arenot required when Style Z return is wired.
Note: All Notification Appliance Circuits are supervised.
ELR
ELR
Note 1
Note 1
Refer to Section 1.1 for current ratings. 1 2 3 4 5 6 7 8 9 10 11 12
Document # 50079 Rev. D 05/23/97 Page 17
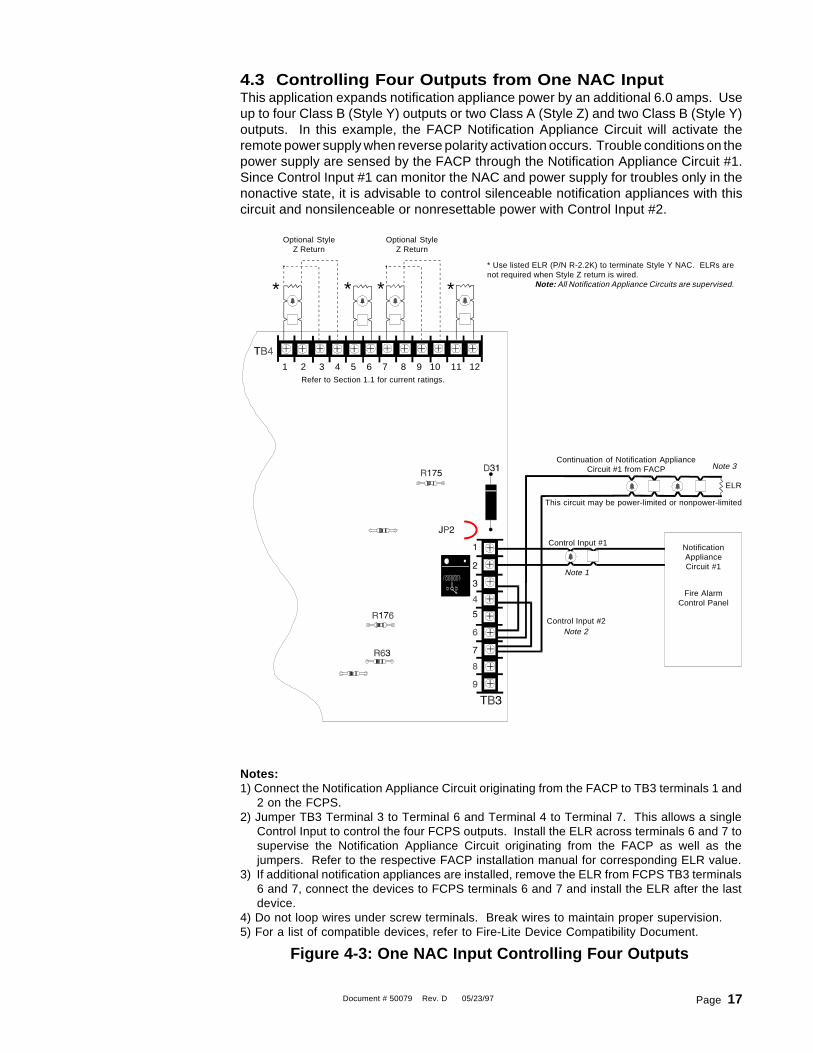
4.3 Controlling Four Outputs from One NAC InputThis application expands notification appliance power by an additional 6.0 amps. Useup to four Class B (Style Y) outputs or two Class A (Style Z) and two Class B (Style Y)outputs. In this example, the FACP Notification Appliance Circuit will activate theremote power supply when reverse polarity activation occurs. Trouble conditions on thepower supply are sensed by the FACP through the Notification Appliance Circuit #1.Since Control Input #1 can monitor the NAC and power supply for troubles only in thenonactive state, it is advisable to control silenceable notification appliances with thiscircuit and nonsilenceable or nonresettable power with Control Input #2.
Optional StyleZ Return
Optional StyleZ Return
* * * *
Fire AlarmControl Panel
NotificationApplianceCircuit #1
Continuation of Notification ApplianceCircuit #1 from FACP
Notes:1) Connect the Notification Appliance Circuit originating from the FACP to TB3 terminals 1 and
2 on the FCPS.2) Jumper TB3 Terminal 3 to Terminal 6 and Terminal 4 to Terminal 7. This allows a single
Control Input to control the four FCPS outputs. Install the ELR across terminals 6 and 7 tosupervise the Notification Appliance Circuit originating from the FACP as well as thejumpers. Refer to the respective FACP installation manual for corresponding ELR value.
3) If additional notification appliances are installed, remove the ELR from FCPS TB3 terminals6 and 7, connect the devices to FCPS terminals 6 and 7 and install the ELR after the lastdevice.
4) Do not loop wires under screw terminals. Break wires to maintain proper supervision.5) For a list of compatible devices, refer to Fire-Lite Device Compatibility Document.
* Use listed ELR (P/N R-2.2K) to terminate Style Y NAC. ELRs arenot required when Style Z return is wired.
Note: All Notification Appliance Circuits are supervised.
ELR
This circuit may be power-limited or nonpower-limited
Control Input #1
Control Input #2Note 2
Note 1
Note 3
Figure 4-3: One NAC Input Controlling Four Outputs
Refer to Section 1.1 for current ratings.
1 2 3 4 5 6 7 8 9 10 11 12
Document # 50079 Rev. D 05/23/97Page 18
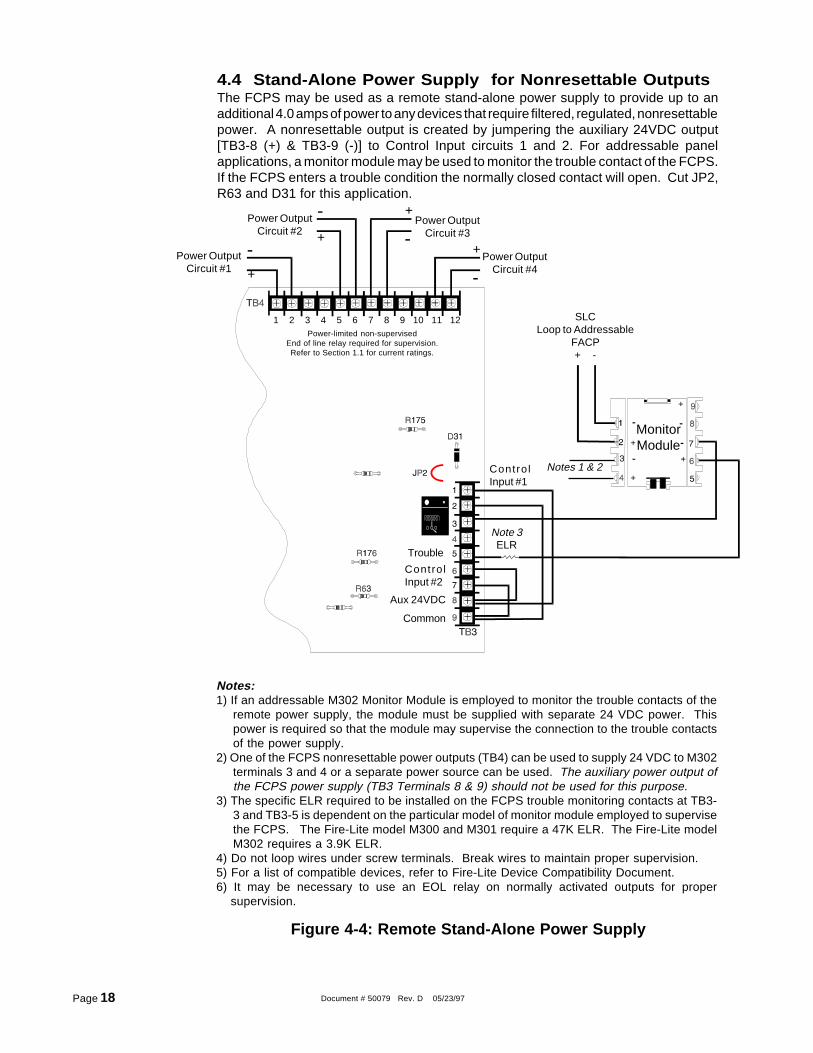
4.4 Stand-Alone Power Supply for Nonresettable OutputsThe FCPS may be used as a remote stand-alone power supply to provide up to anadditional 4.0 amps of power to any devices that require filtered, regulated, nonresettablepower. A nonresettable output is created by jumpering the auxiliary 24VDC output[TB3-8 (+) & TB3-9 (-)] to Control Input circuits 1 and 2. For addressable panelapplications, a monitor module may be used to monitor the trouble contact of the FCPS.If the FCPS enters a trouble condition the normally closed contact will open. Cut JP2,R63 and D31 for this application.
Notes:1) If an addressable M302 Monitor Module is employed to monitor the trouble contacts of the
remote power supply, the module must be supplied with separate 24 VDC power. Thispower is required so that the module may supervise the connection to the trouble contactsof the power supply.
2) One of the FCPS nonresettable power outputs (TB4) can be used to supply 24 VDC to M302terminals 3 and 4 or a separate power source can be used. The auxiliary power output ofthe FCPS power supply (TB3 Terminals 8 & 9) should not be used for this purpose.
3) The specific ELR required to be installed on the FCPS trouble monitoring contacts at TB3-3 and TB3-5 is dependent on the particular model of monitor module employed to supervisethe FCPS. The Fire-Lite model M300 and M301 require a 47K ELR. The Fire-Lite modelM302 requires a 3.9K ELR.
4) Do not loop wires under screw terminals. Break wires to maintain proper supervision.5) For a list of compatible devices, refer to Fire-Lite Device Compatibility Document.6) It may be necessary to use an EOL relay on normally activated outputs for proper
supervision.
Power OutputCircuit #4
SLCLoop to Addressable
FACP+ -
ELR
MonitorModule
Power OutputCircuit #3
Aux 24VDC
Common
Contro lInput #2
Contro lInput #1
Trouble
Note 3
Power OutputCircuit #2
Power OutputCircuit #1 +
+
+-
-+
-
-
Figure 4-4: Remote Stand-Alone Power Supply
Notes 1 & 2
Power-limited non-supervisedEnd of line relay required for supervision.Refer to Section 1.1 for current ratings.
1 2 3 4 5 6 7 8 9 10 11 12
Document # 50079 Rev. D 05/23/97 Page 19
4.5 Remote Power Supply - Resettable and NonresettableThe FCPS may be used as a remote stand-alone power supply to provide up to anadditional 4.0 amps of power to any devices that require filtered, regulated, resettableor nonresettable power. A monitor module may be used to monitor the trouble contactof the FCPS. If the FCPS enters a trouble condition the normally closed contact willopen. A resettable output is created by tying the resettable output from the FACP to oneor both of the power supply inputs. A nonresettable output is created by cutting an onboard resistor (R175 for Output 2, R176 for Output 4). For addressable panelapplications, use a monitor module to sense the trouble status of the remote powersupply via the trouble relay contact. Cut JP2, R63 and D31 for this application.
Fire AlarmControl Panel
Resettable24VDC Output
Control Input #1
SLC
ControlInput #2
Trouble
ELR
Note 2
+ -
ResettablePower Output
Circuit #1-
+
ResettablePower Output
Circuit #3-
Notes:1) Outputs 2 and 4 are also resettable 24 VDC power in this example. To make Output 2
nonresettable power, cut R175. To make Output 4 nonresettable, cut R176.2) The specific ELR required to be installed on the FCPS trouble monitoring contacts at TB3-
3 and TB3-5 is dependent on the particular model of monitor module employed to supervisethe FCPS. Fire-Lite models M300 and M301 require a 47K ELR. Fire-Lite model M302requires a 3.9K ELR.
3) Do not loop wires under screw terminals. Break wires to maintain proper supervision.4) If an addressable M302 Monitor Module is employed to monitor the trouble contacts of the
remote power supply, the module must be supplied with separate 24 VDC power. This poweris required so that the module may supervise the connection to the trouble contacts of thepower supply.
5) One of the FCPS nonresettable power outputs (TB4) can be used to supply 24 VDC to M302terminals 3 and 4 or a separate power source can be used. The auxiliary power output ofthe FCPS power supply (TB3 Terminals 8 & 9) should not be used for this purpose.
6) For a list of compatible devices, refer to Fire-Lite Device Compatibility Document.7) It may be necessary to use an EOL relay on outputs that are normally activated for proper
supervision.
Figure 4-5: One NAC Input - Resettable & Nonresettable Outputs
Note 1
+ -Power Output
Circuit #4
+
Power OutputCircuit #2 Resettable outputs deliver a negative polarity
voltage of up to -5 VDC during reset. In the unlikelycase that this negative voltage causes a problemresetting certain models of 4-wire smoke detectors,use TB-4 terminals 3 (+) and 2 (-) for Output #1 andterminals 9 (+) and 8 (-) for Output #3.
MonitorModule
Notes 4 & 5
Refer to Section 1.1 for current ratings.
1 2 3 4 5 6 7 8 9 10 11 12
Document # 50079 Rev. D 05/23/97Page 20
4.6 Control Module Activation of Output CircuitsThis application illustrates the use of addressable control modules instead of NotificationAppliance Circuits on an FACP to activate the FCPS remote power supply. Typically,this allows for mounting of the power supply at greater distances from the FACP andexpanding the system architecture in various applications.
An addressable control module is used to activate the power supply and an addressablemonitor module is used to sense power supply trouble conditions. The Fire•Lite MS-9200 has the capability of locating control and monitor modules up to 10,000 feet away.Cut JP2, R63 and D31 for this application.
Figure 4-6: Control Module Activation of Outputs
* * **
Optional StyleZ Return
Optional StyleZ Return
Note 6
SLC Loop + -
ControlModule
EOL SupervisionRelay (A77-716B)Note 1
Note 2 & 3
MonitorModule
SLC Loop + -
* Use listed ELR (P/N R-2.2K) to terminate Style Y NAC. ELRs arenot required when Style Z return is wired.
Note: All Notification Appliance Circuits are supervised.
Notes:1) To control all four power supply outputs with one control module, connect output to TB3
Terminals 1 and 2 on the FCPS and jumper Terminal 1 to Terminal 6 and Terminal 2 toTerminal 7.
2) An ELR must be installed between Terminals 6 and 7 for control module wiring supervision(the ELR value is dependent on the module employed).
3) The specific ELR required to be installed on the FCPS trouble monitoring contacts at TB3-3and TB3-5 is dependent on the particular model of monitor module employed to supervise theFCPS. Fire-Lite models M300 and M301 require a 47K ELR. Fire-Lite model M302 requiresa 3.9K ELR.
4) If an addressable M302 Monitor Module is employed to monitor the trouble contacts of theremote power supply, the module must be supplied with separate 24 VDC power. This poweris required so that the module may supervise the connection to the trouble contacts of thepower supply.
5) One of the FCPS nonresettable power outputs (TB4) can be used to supply 24 VDC to M302terminals 3 and 4 or a separate power source can be used. The auxiliary power output of theFCPS power supply (TB3 Terminals 8 & 9) should not be used for this purpose.
6) Use EOL relay (A77-716B) to supervise 24 VDC power from the FCPS, TB3 terminals 8 & 9.7) Do not loop wires under screw terminals. Break wires to maintain proper supervision.8) For a list of compatible devices, refer to Fire-Lite Device Compatibility Document.
Notes 4 & 5
Refer to Section 1.1 for current ratings. 1 2 3 4 5 6 7 8 9 10 11 12
Document # 50079 Rev. D 05/23/97 Page 21
4.7 Door Release ServiceThis application illustrates the use of the FCPS to power 24 VDC door holders. A signalmust be supplied from the FACP to activate the FCPS's outputs. This signal shouldconsist of a 24 VDC source run through a set of normally closed alarm contacts. Duringa normal (nonalarm) condition, 24 VDC should be applied to the FCPS. This will resultin the outputs of the FCPS being activated which will in turn energize the door holders.When the FACP enters an alarm condition, the relay contact will open and remove the24 VDC signal from the FCPS, causing the doors to close.
Control Input #1
+ 24 VDC nonresettable
Relay Common
Relay Normally Closed
Power Supply Common
Fire AlarmControl Panel
Control input #2
Notes:1) During a normal condition (nonalarm), +24 VDC should be applied to TB3-1 and TB3-2.2) The normally closed alarm relay may consist of an actual relay in the Fire Alarm Control Panel
or a control module. If a control module is being used, it may be mounted remotely or atthe control panel.
3) A monitor module may be used to monitor the trouble contacts of the FCPS.4) Nonresettable power must be used from the FACP.5) A maximum of 4.0 amps may be drawn continuously for holding doors.6) For a list of compatible devices, refer to the Fire-Lite Device Compatibility Document.7) Loss of AC power may cause doors to close due to a momentary power drop while switching
over to batteries.
Note 4
Typical 24 VDC Door Holder circuits.Use polarized devices only.
Figure 4-7: Using the FCPS with 24 VDC Door Holders
Refer to Section 1.1 for current ratings.
1 2 3 4 5 6 7 8 9 10 11 12
Document # 50079 Rev. D 05/23/97Page 22
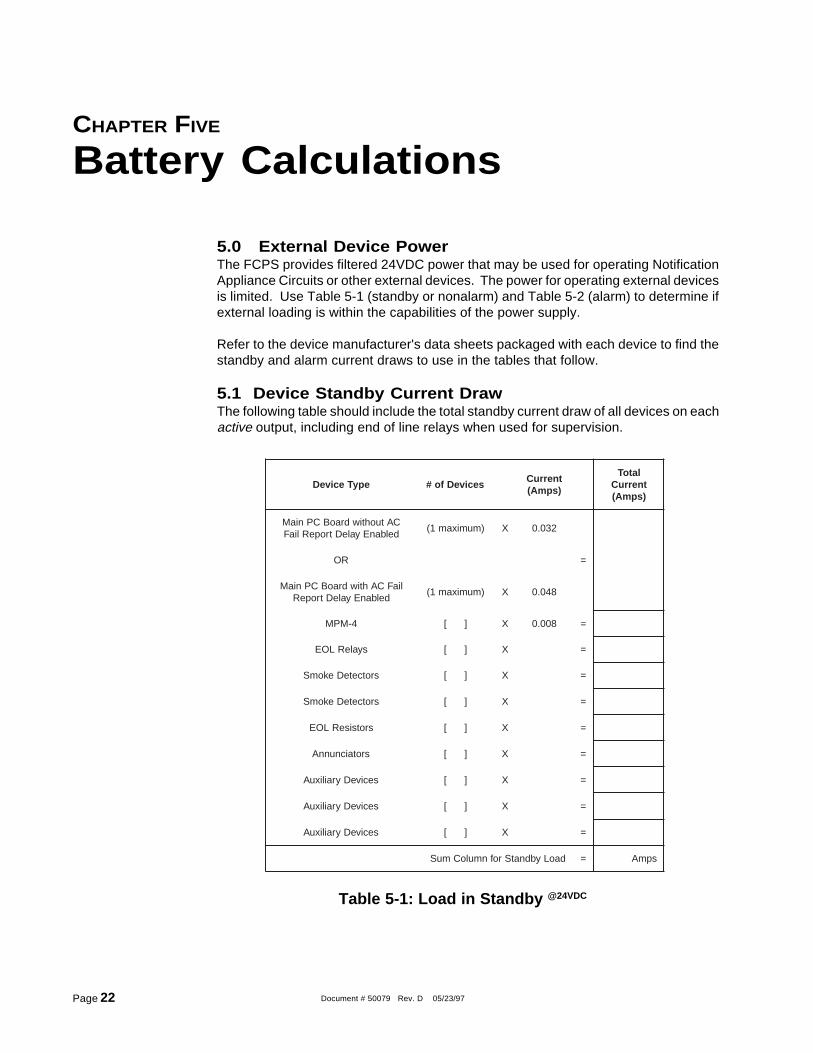
CHAPTER FIVE
Battery Calculations
5.0 External Device PowerThe FCPS provides filtered 24VDC power that may be used for operating NotificationAppliance Circuits or other external devices. The power for operating external devicesis limited. Use Table 5-1 (standby or nonalarm) and Table 5-2 (alarm) to determine ifexternal loading is within the capabilities of the power supply.
Refer to the device manufacturer's data sheets packaged with each device to find thestandby and alarm current draws to use in the tables that follow.
5.1 Device Standby Current DrawThe following table should include the total standby current draw of all devices on eachactive output, including end of line relays when used for supervision.
Table 5-1: Load in Standby @24VDC
epyTeciveD seciveDfo#tnerruC)spmA(
latoTtnerruC)spmA(
CAtuohtiwdraoBCPniaMdelbanEyaleDtropeRliaF
)mumixam1( X 230.0
RO =
liaFCAhtiwdraoBCPniaMdelbanEyaleDtropeR
)mumixam1( X 840.0
4-MPM ][ X 800.0 =
syaleRLOE ][ X =
srotceteDekomS ][ X =
srotceteDekomS ][ X =
srotsiseRLOE ][ X =
srotaicnunnA ][ X =
seciveDyrailixuA ][ X =
seciveDyrailixuA ][ X =
seciveDyrailixuA ][ X =
daoLybdnatSrofnmuloCmuS = spmA
Document # 50079 Rev. D 05/23/97 Page 23
Current Calculations
1. When Using the 6.0 amps Maximum Current Available:Five minutes under full load (6.0 amps current draw) requires 3.0 AH of a 7.0 AHcapacity battery. The remaining 4.0 AH capacity must support the FCPS during itsrequired standby time. Because of this, the standby current draw cannot exceed thefigures listed below:
1) For 24 hour standby time, the standby current draw cannot exceed 0.166 amps at 24VDC (24 hours x 0.166A) = 3.984 AH
2) For 60 hour standby time, the standby current draw cannot exceed 0.066 amps at 24VDC (60 hours x 0.066A) = 3.96 AH
3) Standby Current CalculationSubtract total standby load calculated above from 0.166 amps for 24 hours standby or0.066 amps for 60 hours standby. This figure should not be less than zero. If the amountis less than zero, the required standby time will not be achieved.
2. When Using Less than 6.0 amps Maximum Current:Use the following tables to determine the proper battery size.
3. When Battery Amp-Hour Requirements are for Greater than 7.0 AH:Cut FCPS jumper JP1 to disable onboard battery charger and use an external batterycharger.
Table 5-2: Load in Alarm @24VDC
epyTeciveD seciveDfo#tnerruC)spmA(
tnerruClatoT)spmA(
CAtuohtiwdraoBCPniaMdelbanEyaleDtropeRliaF
)mumixam1( X 230.0
RO =
liaFCAhtiwdraoBCPniaMdelbanEyaleDtropeR
)mumixam1( X 840.0
4-MPM ][ X 800.0 =
syaleRLOE ][ X =
srotceteDekomS ][ X =
srotceteDekomS ][ X =
srotsiseRLOE ][ X =
srotaicnunnA ][ X =
seciveDyrailixuA ][ X =
seciveDyrailixuA ][ X =
seciveDyrailixuA ][ X =
secnailppAnoitacifitoN ][ X =
secnailppAnoitacifitoN ][ X =
secnailppAnoitacifitoN ][ X =
daoLmralArofnmuloCmuS = spmA
Document # 50079 Rev. D 05/23/97Page 24
Secondary Power Source CalculationsUse the Total Standby and Alarm Load Currents calculated in Tables 5-1 and 5-2 forthe following battery calculation.
Standby LoadCurrent (Amps)
[ ]X
Required Standby Time in Hours(24 or 60 Hours)
[ ]= _________
Alarm LoadCurrent (Amps)
[ ]X
Required Alarm Time in Hours (i.e.5 min. = 0.084 hours)
[ ]= _________
Add Standby and Alarm Load for Required Ampere Hours = _________
Multiply by the Derating Factor of 1.2 = _________
Total Ampere Hours (AH) Required = _________
Notes:1) Battery size is limited to 7.0 AH using the internal FCPS battery charger.2) For battery sizes greater than 7.0 AH, cut FCPS jumper JP1 to disable the internal battery
charger and use an external battery charger.
Table 5-3: Secondary Power Source Calculations

Document # 50079 Rev. D 05/23/97 Page 25
NOTES

Document # 50079 Rev. D 05/23/97Page 26
NOTES

Document # 50079 Rev. D 05/23/97 Page 27
NOTES

Fire-Lite ® warrants its products to be free from defects in materials and workmanshipfor eighteen (18) months from the date of manufacture, under normal use and service.Products are date stamped at time of manufacture. The sole and exclusive obligationof Fire-Lite ® is to repair or replace, at its option, free of charge for parts and labor,any part which is defective in materials or workmanship under normal use and service.For products not under Fire-Lite ® manufacturing date-stamp control, the warranty iseighteen (18) months from date of original purchase by Fire-Lite ®'s distributor unlessthe installation instructions or catalog sets forth a shorter period, in which case theshorter period shall apply. This warranty is void if the product is altered, repaired orserviced by anyone other than Fire-Lite ® or its authorized distributors or if there is afailure to maintain the products and systems in which they operate in a proper andworkable manner. In case of defect, secure a Return Material Authorization formfrom our customer service department. Return product, transportation prepaid, toFire-Lite ®, 12 Clintonville Road, Northford, Connecticut 06472-1653.
This writing constitutes the only warranty made by Fire-Lite ® with respect to itsproducts. Fire-Lite ® does not represent that its products will prevent any loss by fireor otherwise, or that its products will in all cases provide the protection for which theyare installed or intended. Buyer acknowledges that Fire-Lite ® is not an insurer andassumes no risk for loss or damages or the cost of any inconvenience, transportation,damage, misuse, abuse, accident or similar incident.
Fire-Lite ® GIVES NO WARRANTY, EXPRESSED OR IMPLIED, OFMERCHANTABILITY, FITNESS FOR ANY PARTICULAR PURPOSE, OROTHERWISE WHICH EXTEND BEYOND THE DESCRIPTION ON THE FACEHEREOF. UNDER NO CIRCUMSTANCES SHALL Fire-Lite ® BE LIABLE FOR ANYLOSS OF OR DAMAGE TO PROPERTY, DIRECT, INCIDENTAL ORCONSEQUENTIAL, ARISING OUT OF THE USE OF, OR INABILITY TO USEFire-Lite ® PRODUCTS. FURTHERMORE, Fire-Lite ® SHALL NOT BE LIABLE FORANY PERSONAL INJURY OR DEATH WHICH MAY ARISE IN THE COURSE OF,OR AS A RESULT OF, PERSONAL, COMMERCIAL OR INDUSTRIAL USE OF ITSPRODUCTS.
This warranty replaces all previous warranties and is the only warranty made by Fire-Lite ®. No increase or alteration, written or verbal, of the obligation of this warranty isauthorized.
"Fire-Lite" is a registered trademark.
Limited Warranty
12 Clintonville Road, Northford, CT 06472Phone: (203) 484-7161FAX: (203) 484-7118
Technical Publishing Document WARFBG-C.PM6 04/02/96