Embed Size (px)
Citation preview

Remember to keep this Operating Manual in a place easily accessible to persons using the unit.Please read this Operating Manual before use.
supply
6 speeds
4 speeds
(Narrow, Medium, Wide)
5 Healthcare programs / 3 Well-Being programs (with Automatic Massage Point Detection System)
Legs/Seat (High, Medium, Low)
Back・Seat (High, Low) / Armrest (1 setting)
Adjustable range: Approx. 4 inches
Power recline to any position between approx. 120 and 170 degrees
Upright 29''W×47''L×45''H, Reclined 29''W×68''L×29''H
Remote control, Remote control stand
7 West 56th Street
Technical assistance: 10:00 -17:00 (Eastern Standard Time) / Closed: Saturday, Sunday, and Public Holidays
Inada Chair i.2 2AModel number
Power frequency
Width between rollers
Back stroke range
Preset
Air massage
Footrest adjustment range
dimensions
M-6210601
Preset Programs)
angle
Toll-freeUS Headquarters: , 10019FAMILY
Sp
ecif
icat
ion
s
Features……………………………………………………………………
Safety Precautions ………………………………………………………
Parts Descriptions…………………………………………………………
Before Use…………………………………………………………………
Massage Types And Features……………………………………………
Preset Programs /Massage Types …………………………………
Preset Programs /Operation…………………………………………
Manual Selection Modes /Liquid Crystal Display・Explanation Of Movements…
Manual Selection Modes /Operation ………………………………………
Cleaning And Storage……………………………………………………
Troubleshooting Guide……………………………………………………
Service………………………………………………………………………
Specifications………………………………………………………
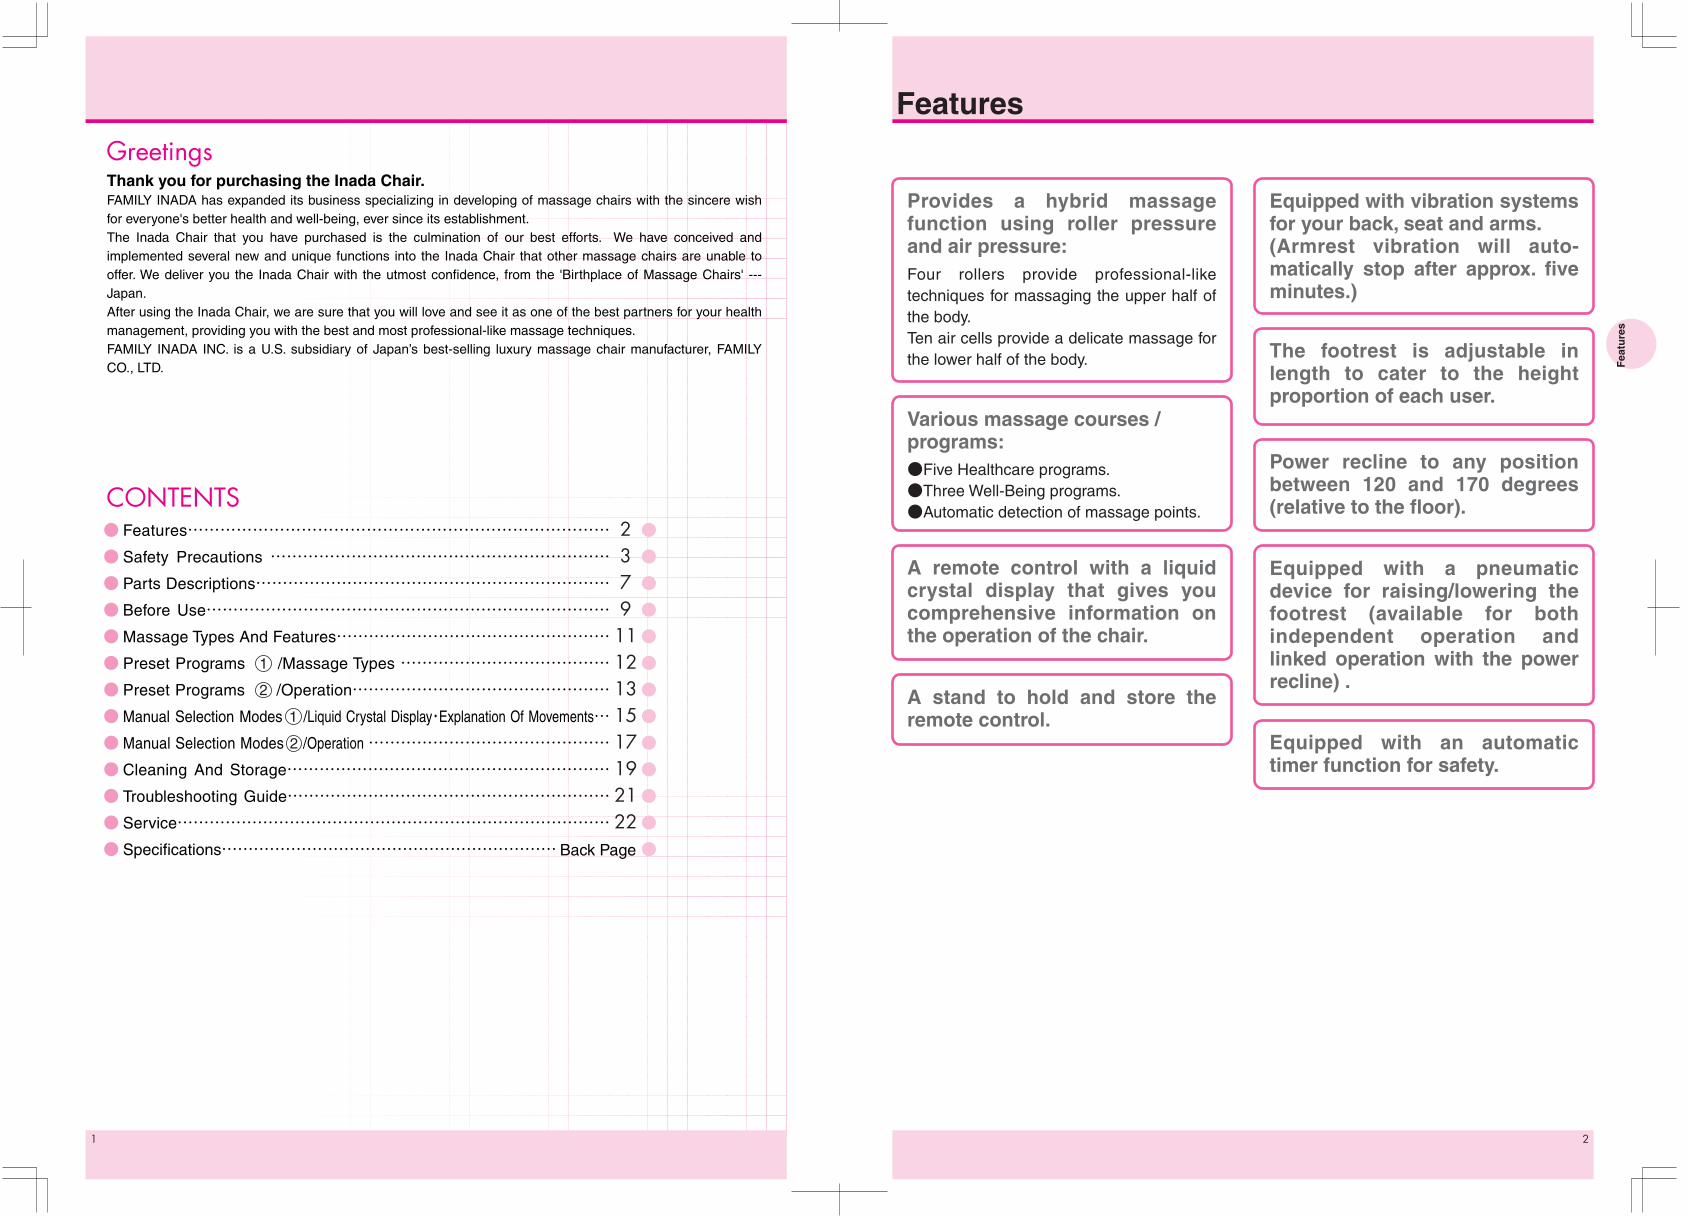
Thank you for purchasing the Inada Chair.FAMILY INADA has expanded its business specializing in developing of massage chairs with the sincere wish for everyone's better health and well-being, ever since its establishment.The Inada Chair that you have purchased is the culmination of our best efforts. We have conceived and implemented several new and unique functions into the Inada Chair that other massage chairs are unable to offer. We deliver you the Inada Chair with the utmost confidence, from the 'Birthplace of Massage Chairs' --- Japan.After using the Inada Chair, we are sure that you will love and see it as one of the best partners for your health management, providing you with the best and most professional-like massage techniques.FAMILY INADA INC. is a U.S. subsidiary of Japan’s best-selling luxury massage chair manufacturer, FAMILY CO., LTD.
Provides a hybrid massage function using roller pressure and air pressure:Four rollers provide professional-like techniques for massaging the upper half of the body.Ten air cells provide a delicate massage for the lower half of the body.
A remote control with a liquid crystal display that gives you comprehensive information on the operation of the chair.
A stand to hold and store the remote control.
The footrest is adjustable in length to cater to the height proportion of each user.
Power recline to any position between 120 and 170 degrees (relative to the floor).
Equipped with a pneumatic device for raising/lowering the footrest (available for both independent operation and linked operation with the power recline) .
Equipped with an automatic timer function for safety.
Equipped with vibration systems for your back, seat and arms.(Armrest vibration will auto-matically stop after approx. five minutes.)
Various massage courses /programs:●Five Healthcare programs.●Three Well-Being programs.●Automatic detection of massage points.
1
2
1
2
Features
Fea
ture
s
Back Page
43
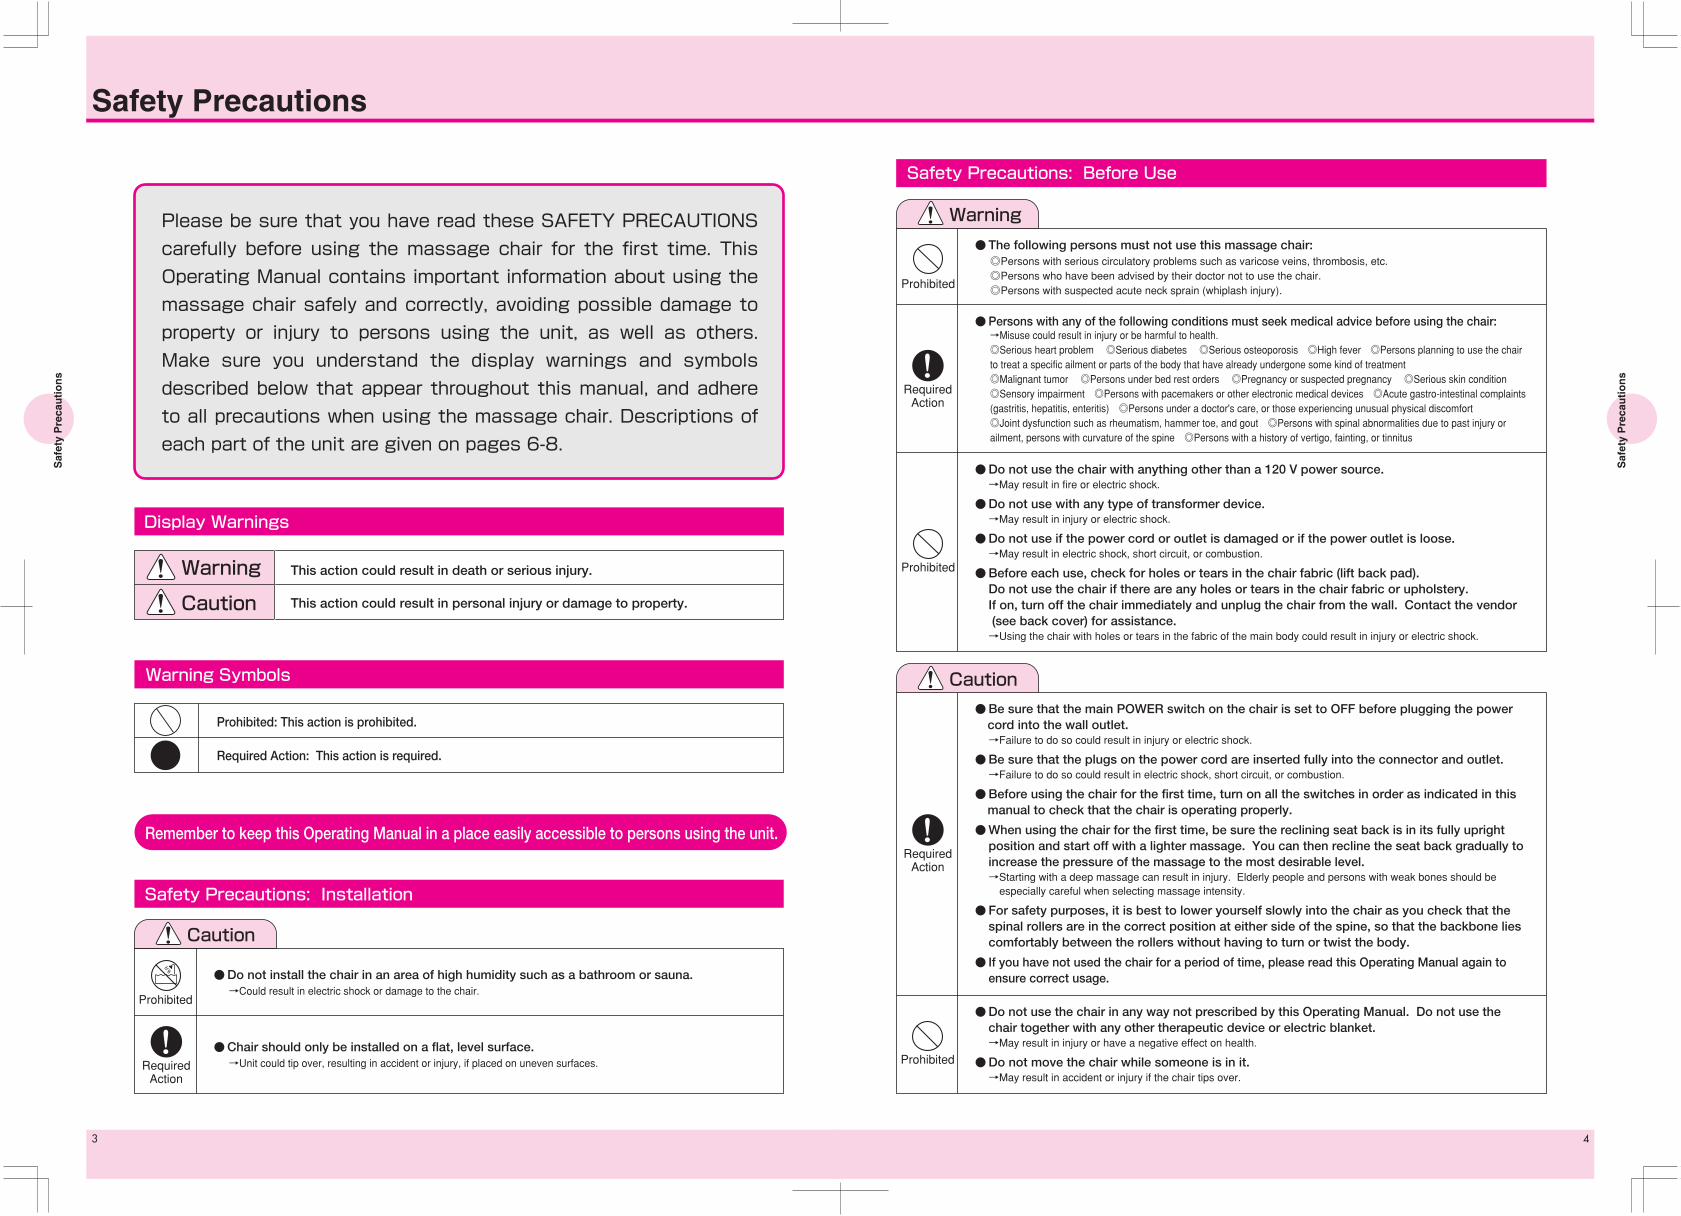
Please be sure that you have read these SAFETY PRECAUTIONS
carefully before using the massage chair for the first time. This
Operating Manual contains important information about using the
massage chair safely and correctly, avoiding possible damage to
property or injury to persons using the unit, as well as others.
Make sure you understand the display warnings and symbols
described below that appear throughout this manual, and adhere
to all precautions when using the massage chair. Descriptions of
each part of the unit are given on pages 6-8.
Display Warnings
Warning Symbols
Safety Precautions: Installation
This action could result in death or serious injury.
Prohibited: This action is prohibited.
Required Action: This action is required.
This action could result in personal injury or damage to property.
Warning
Caution
Caution
Remember to keep this Operating Manual in a place easily accessible to persons using the unit.
●Do not install the chair in an area of high humidity such as a bathroom or sauna.→Could result in electric shock or damage to the chair.
●Chair should only be installed on a flat, level surface.→Unit could tip over, resulting in accident or injury, if placed on uneven surfaces.
Safety Precautions: Before Use
●The following persons must not use this massage chair:◎Persons with serious circulatory problems such as varicose veins, thrombosis, etc. ◎Persons who have been advised by their doctor not to use the chair. ◎Persons with suspected acute neck sprain (whiplash injury).
●Persons with any of the following conditions must seek medical advice before using the chair:→Misuse could result in injury or be harmful to health. ◎Serious heart problem ◎Serious diabetes ◎Serious osteoporosis ◎High fever ◎Persons planning to use the chair to treat a specific ailment or parts of the body that have already undergone some kind of treatment ◎Malignant tumor ◎Persons under bed rest orders ◎Pregnancy or suspected pregnancy ◎Serious skin condition ◎Sensory impairment ◎Persons with pacemakers or other electronic medical devices ◎Acute gastro-intestinal complaints (gastritis, hepatitis, enteritis) ◎Persons under a doctor's care, or those experiencing unusual physical discomfort ◎Joint dysfunction such as rheumatism, hammer toe, and gout ◎Persons with spinal abnormalities due to past injury or ailment, persons with curvature of the spine ◎Persons with a history of vertigo, fainting, or tinnitus
●Do not use the chair with anything other than a 120 V power source. →May result in fire or electric shock.
●Do not use with any type of transformer device. →May result in injury or electric shock.
●Do not use if the power cord or outlet is damaged or if the power outlet is loose. →May result in electric shock, short circuit, or combustion.
●Before each use, check for holes or tears in the chair fabric (lift back pad). Do not use the chair if there are any holes or tears in the chair fabric or upholstery. If on, turn off the chair immediately and unplug the chair from the wall. Contact the vendor (see back cover) for assistance. →Using the chair with holes or tears in the fabric of the main body could result in injury or electric shock.
●Be sure that the main POWER switch on the chair is set to OFF before plugging the power cord into the wall outlet. →Failure to do so could result in injury or electric shock.
●Be sure that the plugs on the power cord are inserted fully into the connector and outlet. →Failure to do so could result in electric shock, short circuit, or combustion.
●Before using the chair for the first time, turn on all the switches in order as indicated in this manual to check that the chair is operating properly.
●When using the chair for the first time, be sure the reclining seat back is in its fully upright position and start off with a lighter massage. You can then recline the seat back gradually to increase the pressure of the massage to the most desirable level. →Starting with a deep massage can result in injury. Elderly people and persons with weak bones should be especially careful when selecting massage intensity.
●For safety purposes, it is best to lower yourself slowly into the chair as you check that the spinal rollers are in the correct position at either side of the spine, so that the backbone lies comfortably between the rollers without having to turn or twist the body.
● If you have not used the chair for a period of time, please read this Operating Manual again to ensure correct usage.
●Do not use the chair in any way not prescribed by this Operating Manual. Do not use the chair together with any other therapeutic device or electric blanket. →May result in injury or have a negative effect on health.
●Do not move the chair while someone is in it. →May result in accident or injury if the chair tips over.
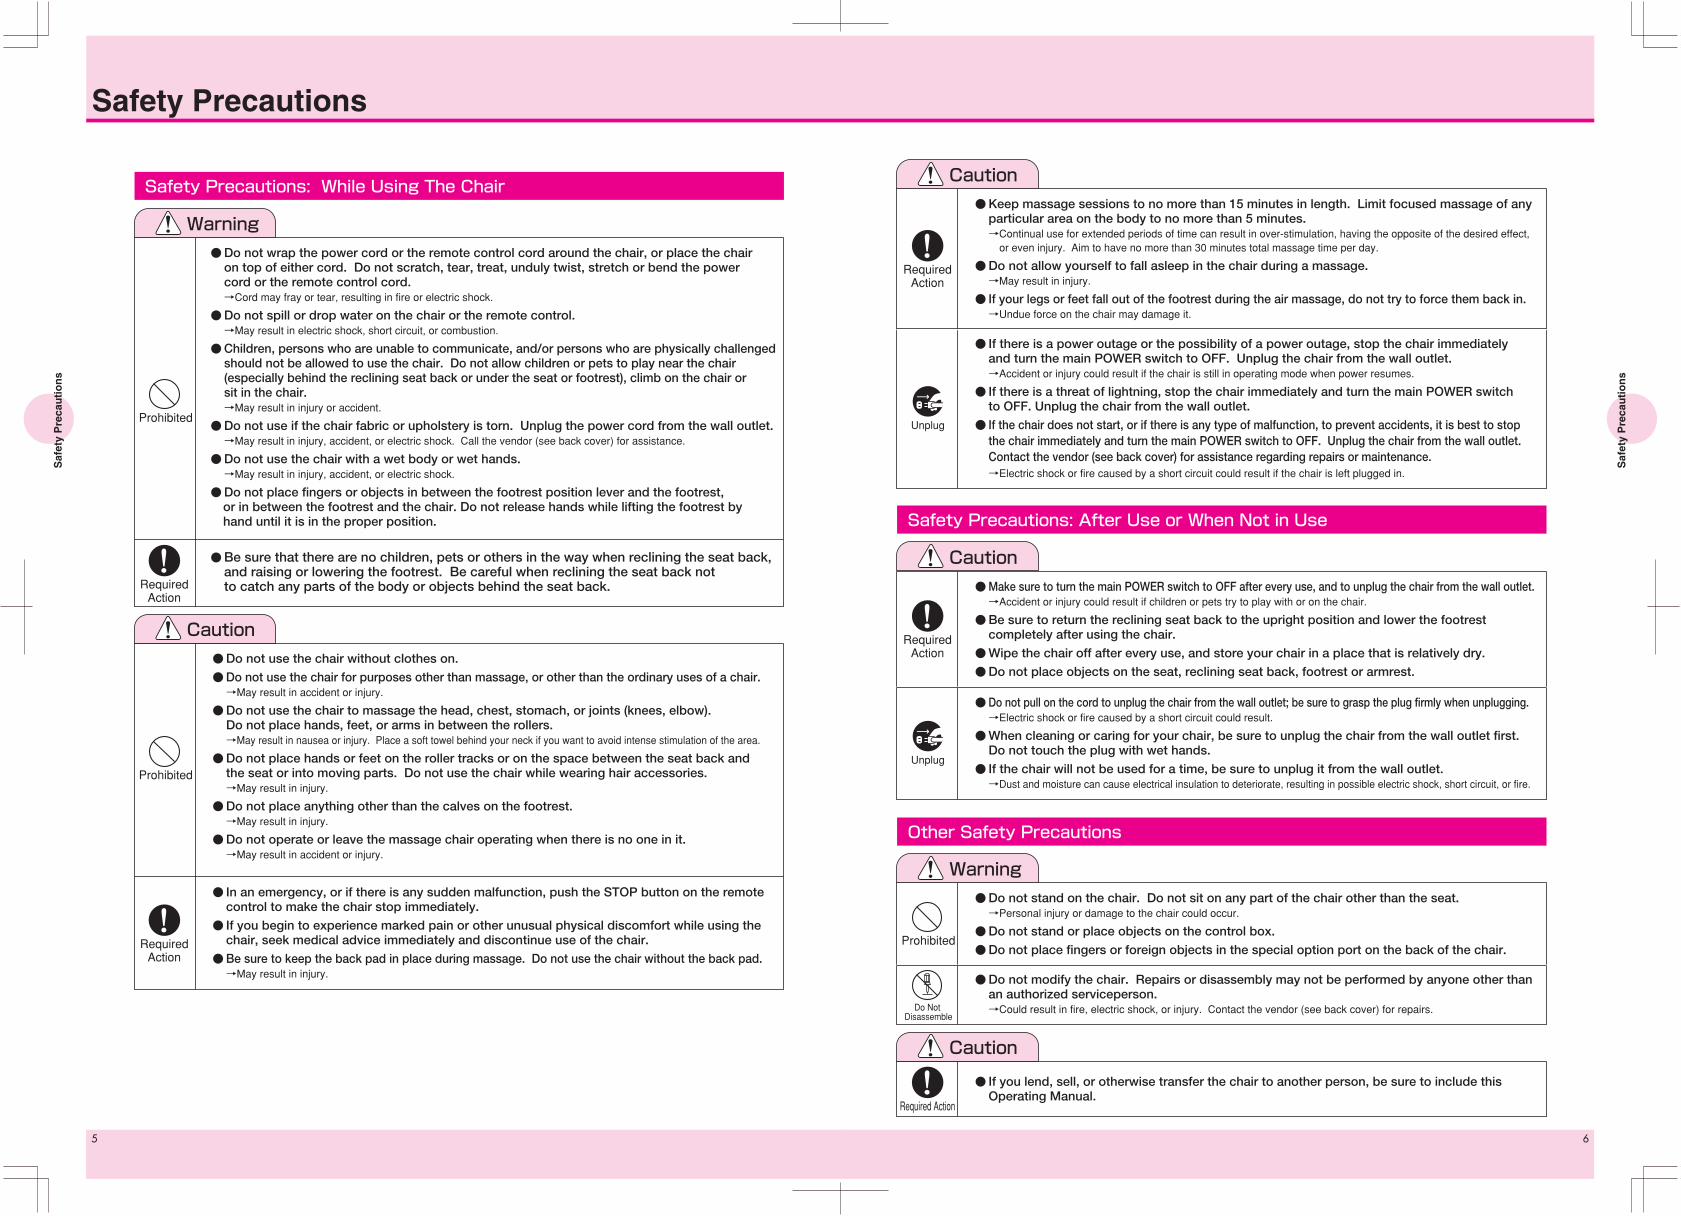
Warning
Caution
Prohibited
Required Action
Required Action
Required Action
Prohibited
Prohibited
Prohibited
Saf
ety
Pre
cau
tio
ns
Saf
ety
Pre
cau
tio
ns
Safety Precautions
65
Warning
●Do not wrap the power cord or the remote control cord around the chair, or place the chair on top of either cord. Do not scratch, tear, treat, unduly twist, stretch or bend the power cord or the remote control cord. →Cord may fray or tear, resulting in fire or electric shock.
●Do not spill or drop water on the chair or the remote control. →May result in electric shock, short circuit, or combustion.
●Children, persons who are unable to communicate, and/or persons who are physically challenged should not be allowed to use the chair. Do not allow children or pets to play near the chair (especially behind the reclining seat back or under the seat or footrest), climb on the chair or sit in the chair. →May result in injury or accident.
●Do not use if the chair fabric or upholstery is torn. Unplug the power cord from the wall outlet. →May result in injury, accident, or electric shock. Call the vendor (see back cover) for assistance.
●Do not use the chair with a wet body or wet hands. →May result in injury, accident, or electric shock.
●Do not place fingers or objects in between the footrest position lever and the footrest, or in between the footrest and the chair. Do not release hands while lifting the footrest by hand until it is in the proper position.
●Be sure that there are no children, pets or others in the way when reclining the seat back, and raising or lowering the footrest. Be careful when reclining the seat back not to catch any parts of the body or objects behind the seat back.
Caution
Caution
Caution
Caution
Warning
Safety Precautions: While Using The Chair
●Do not use the chair without clothes on.
●Do not use the chair for purposes other than massage, or other than the ordinary uses of a chair. →May result in accident or injury.
●Do not use the chair to massage the head, chest, stomach, or joints (knees, elbow). Do not place hands, feet, or arms in between the rollers. →May result in nausea or injury. Place a soft towel behind your neck if you want to avoid intense stimulation of the area.
●Do not place hands or feet on the roller tracks or on the space between the seat back and the seat or into moving parts. Do not use the chair while wearing hair accessories. →May result in injury.
●Do not place anything other than the calves on the footrest. →May result in injury.
●Do not operate or leave the massage chair operating when there is no one in it. →May result in accident or injury.
● In an emergency, or if there is any sudden malfunction, push the STOP button on the remote control to make the chair stop immediately.
● If you begin to experience marked pain or other unusual physical discomfort while using the chair, seek medical advice immediately and discontinue use of the chair.
●Be sure to keep the back pad in place during massage. Do not use the chair without the back pad. →May result in injury.
●Keep massage sessions to no more than 15 minutes in length. Limit focused massage of any particular area on the body to no more than 5 minutes. →Continual use for extended periods of time can result in over-stimulation, having the opposite of the desired effect, or even injury. Aim to have no more than 30 minutes total massage time per day.
●Do not allow yourself to fall asleep in the chair during a massage. →May result in injury.
● If your legs or feet fall out of the footrest during the air massage, do not try to force them back in. →Undue force on the chair may damage it.
● If there is a power outage or the possibility of a power outage, stop the chair immediately and turn the main POWER switch to OFF. Unplug the chair from the wall outlet. →Accident or injury could result if the chair is still in operating mode when power resumes.
● If there is a threat of lightning, stop the chair immediately and turn the main POWER switch to OFF. Unplug the chair from the wall outlet.
● If the chair does not start, or if there is any type of malfunction, to prevent accidents, it is best to stop the chair immediately and turn the main POWER switch to OFF. Unplug the chair from the wall outlet. Contact the vendor (see back cover) for assistance regarding repairs or maintenance. →Electric shock or fire caused by a short circuit could result if the chair is left plugged in.
Safety Precautions: After Use or When Not in Use
●Make sure to turn the main POWER switch to OFF after every use, and to unplug the chair from the wall outlet. →Accident or injury could result if children or pets try to play with or on the chair.
●Be sure to return the reclining seat back to the upright position and lower the footrest completely after using the chair.
●Wipe the chair off after every use, and store your chair in a place that is relatively dry.
●Do not place objects on the seat, reclining seat back, footrest or armrest.
●Do not stand on the chair. Do not sit on any part of the chair other than the seat. →Personal injury or damage to the chair could occur.
●Do not stand or place objects on the control box.
●Do not place fingers or foreign objects in the special option port on the back of the chair.
●Do not modify the chair. Repairs or disassembly may not be performed by anyone other than an authorized serviceperson. →Could result in fire, electric shock, or injury. Contact the vendor (see back cover) for repairs.
● If you lend, sell, or otherwise transfer the chair to another person, be sure to include this Operating Manual.
●Do not pull on the cord to unplug the chair from the wall outlet; be sure to grasp the plug firmly when unplugging. →Electric shock or fire caused by a short circuit could result.
●When cleaning or caring for your chair, be sure to unplug the chair from the wall outlet first. Do not touch the plug with wet hands.
● If the chair will not be used for a time, be sure to unplug it from the wall outlet. →Dust and moisture can cause electrical insulation to deteriorate, resulting in possible electric shock, short circuit, or fire.
Other Safety Precautions
Do Not Disassemble
Unplug
Unplug
Required Action
Required Action
Prohibited
Prohibited
Prohibited
Required Action
Required Action
Required Action
Saf
ety
Pre
cau
tio
ns
Saf
ety
Pre
cau
tio
ns
Safety Precautions
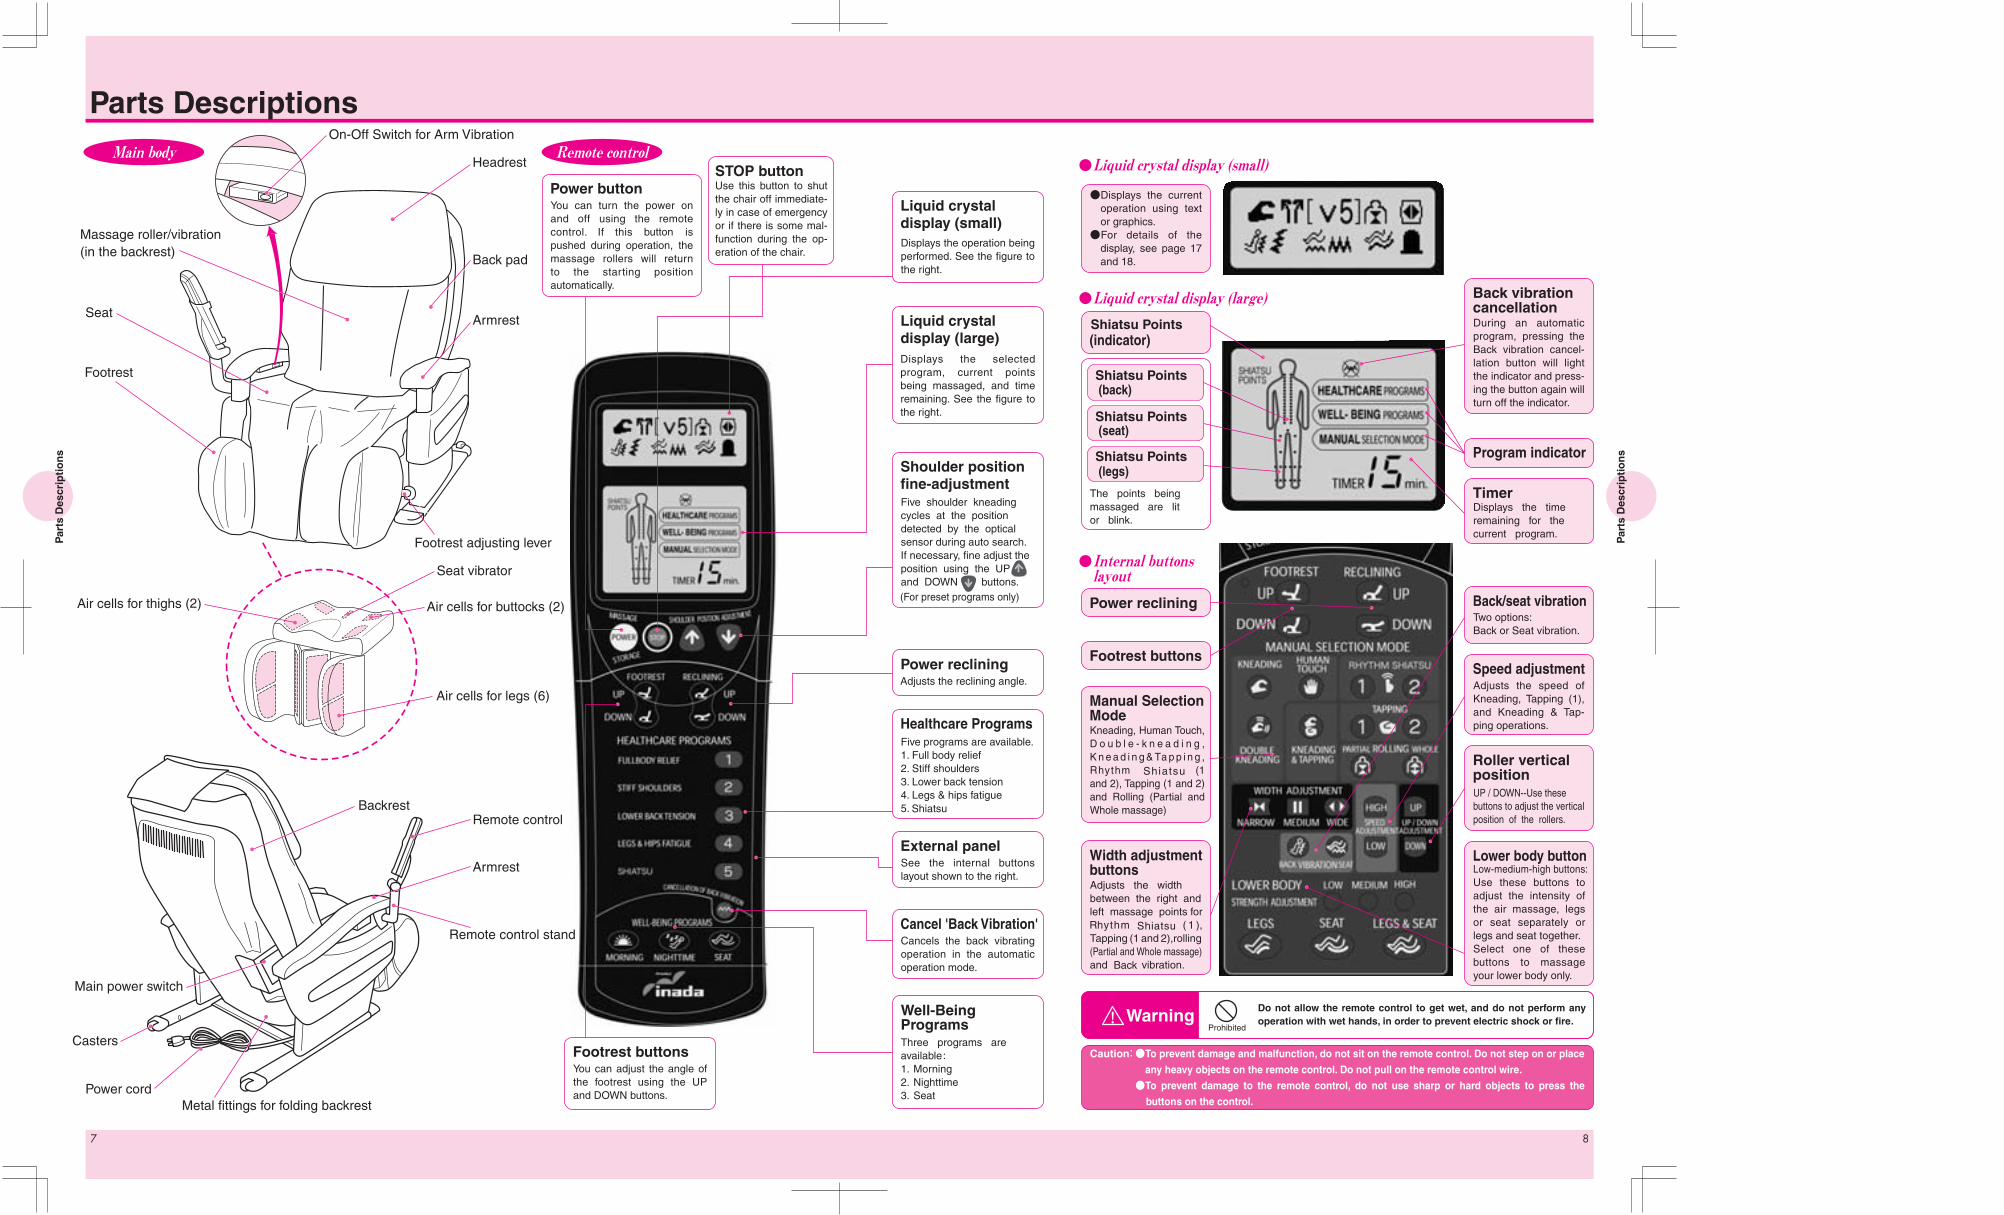
On-Off Switch for Arm Vibration
Air cells for buttocks (2)
Shiatsu
Shiatsu
Shiatsu
Shiatsu Points
Shiatsu Points
Shiatsu Points
Shiatsu Points
Casters
Main power switch
:
RT
Back
2
Displays the selected program, current points being massaged, and time remaining. See the figure to the right.
During an automatic program, pressing the Back vibration cancel-lation button will light the indicator and press-ing the button again will turn off the indicator.
Adjusts the speed of Kneading, Tapping (1), and Kneading & Tap-ping operations.
Adjusts the reclining angle.
Well-BeingPrograms
To prevent damage and malfunction, do not sit on the remote control. Do not step on or place
any heavy objects on the remote control. Do not pull on the remote control wire.
STOP buttonUse this button to shut the chair off immediate-ly in case of emergency or if there is some mal-function during the op-eration of the chair.
button
Power button
(For preset programs only)
UP / DOWN--Use these

30cm以上以上
Do not expose the chair to sudden changes in temperature. If the room where the chair is to be used is cold, turn the heat up slowly. If the chair is to be moved from a cold place into a heated room, wait one hour before using the chair.→Condensation can occur in the moving parts of the
chair, which may compromise performance.
How to adjust the footrest
How to adjust angle of the footrest
How to sit in the chair
Armrest (right) side
Screw
Footrestadjustment lever
Remote control stand
20 inches
12 inches
as this
*
*
Before each use, check for holes or tears in the chair fabric (lift back pad). Do not use the chair if there are any holes or tears in the chair fabric or upholstery.
Disconnect the plug and consult the vendor immediately.→Using the chair with holes or
tears in the chair fabric could result in injury or electric shock.
Make sure that your fingers or any other objects are not caught between the footrest and footrest adjustment lever to avoid injury and/or accident.
The auto timer function will automatically stop the chair. However, you should be familiar with how to manually turn off the power after use to prevent an accidental start of the chair.
Place the chair at least 3 feet away from a TV, radio, or other AV equipment. It may cause noise in the equipment.
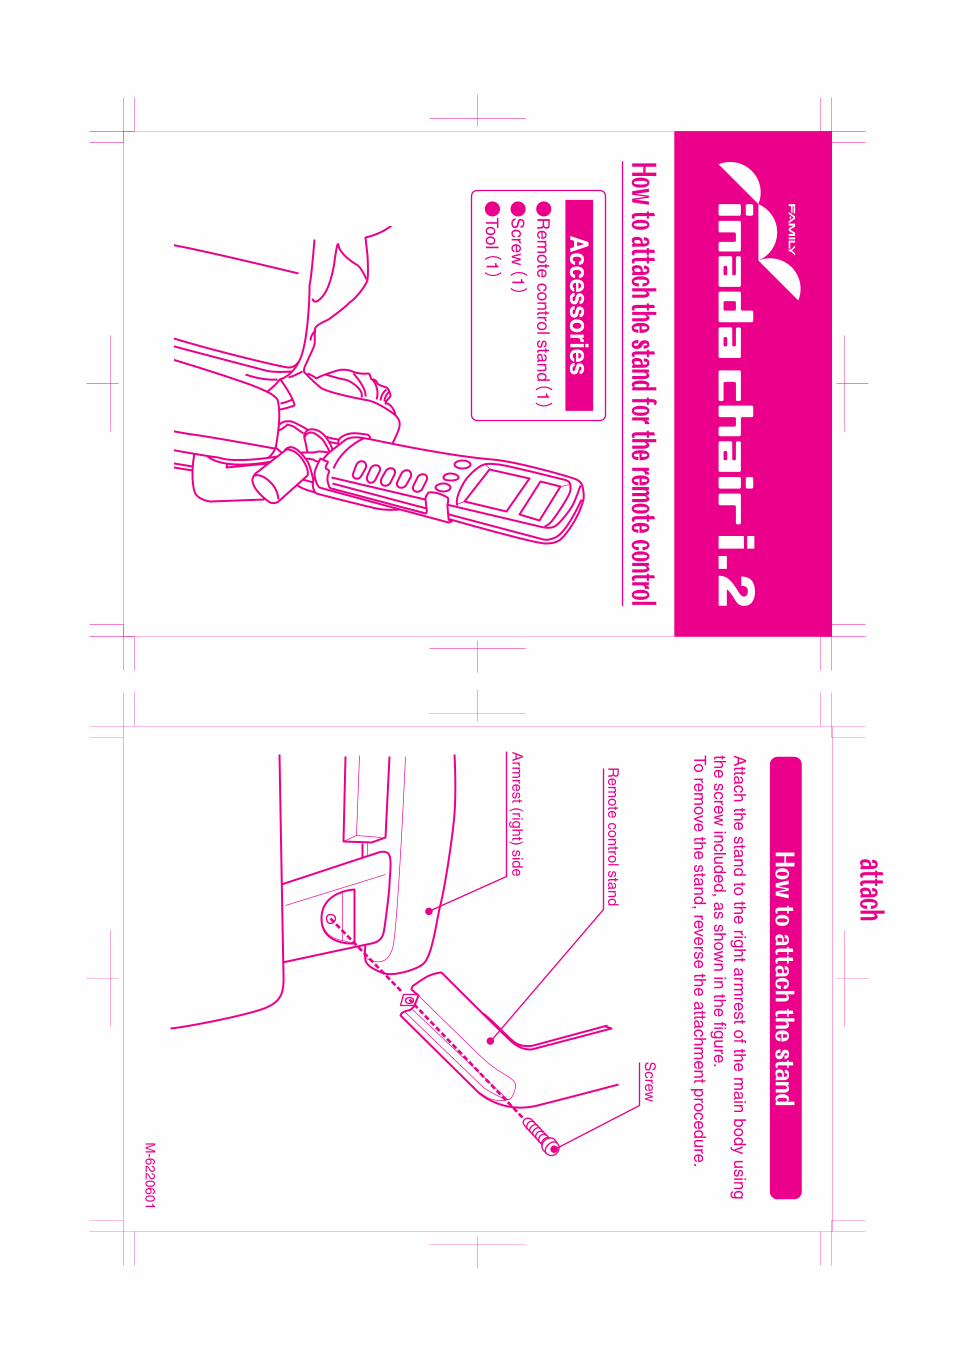
Attach the stand to the right armrest of main body using the screw included, as shown in the figure.
Press and hold the reclining button labeled "DOWN" until the desired angle is obtained.
Press and hold the reclining button labeled "UP" until the desired angle is obtained.
adjust the footrest so that your calves are resting
comfortably on it.
Turn off the main power switch and be sure to disconnect
the plug from the socket.
How to attach the stand for the remote control
Make sure the footrest is down. When the chair power is off, the rollers are normally drawn back into the left and right sides
of the upper part of the backrest (storage position). For safety reasons, first check the position of the rollers. If they are in
any position other than the storage position, turn the main POWER switch on before sitting down to allow the rollers to
return to the storage position. Then sit down slowly with your back centered in the backrest.
UP/DOWN2.The main power switch is on the right side of the
backrest. Turn the power on and the display on the
remote control will light up.
main
MASSAGE
POWER
SHOULDER POSITION ADJUSTMENT
HEALTHCARE PROGRAMS
WELL-BEING PROGRAMS
CANCELLATION OF BACK VIBRATION
STIFF SHOULDERS
SHIATSU
MORNING NIGHTTIME SEAT
LOWER BACK TENSION
FULLBODY RELIEF
LEGS & HIPS FATIGUE
HEALTHCARE PROGRAMS
TIMER min.
HEALTHCARE PROGRAMS
TIMER min.
HEALTHCARE PROGRAMS
HEALTHCARE PROGRAMS
Pre
set
Pro
gra
ms
/O
per
atio
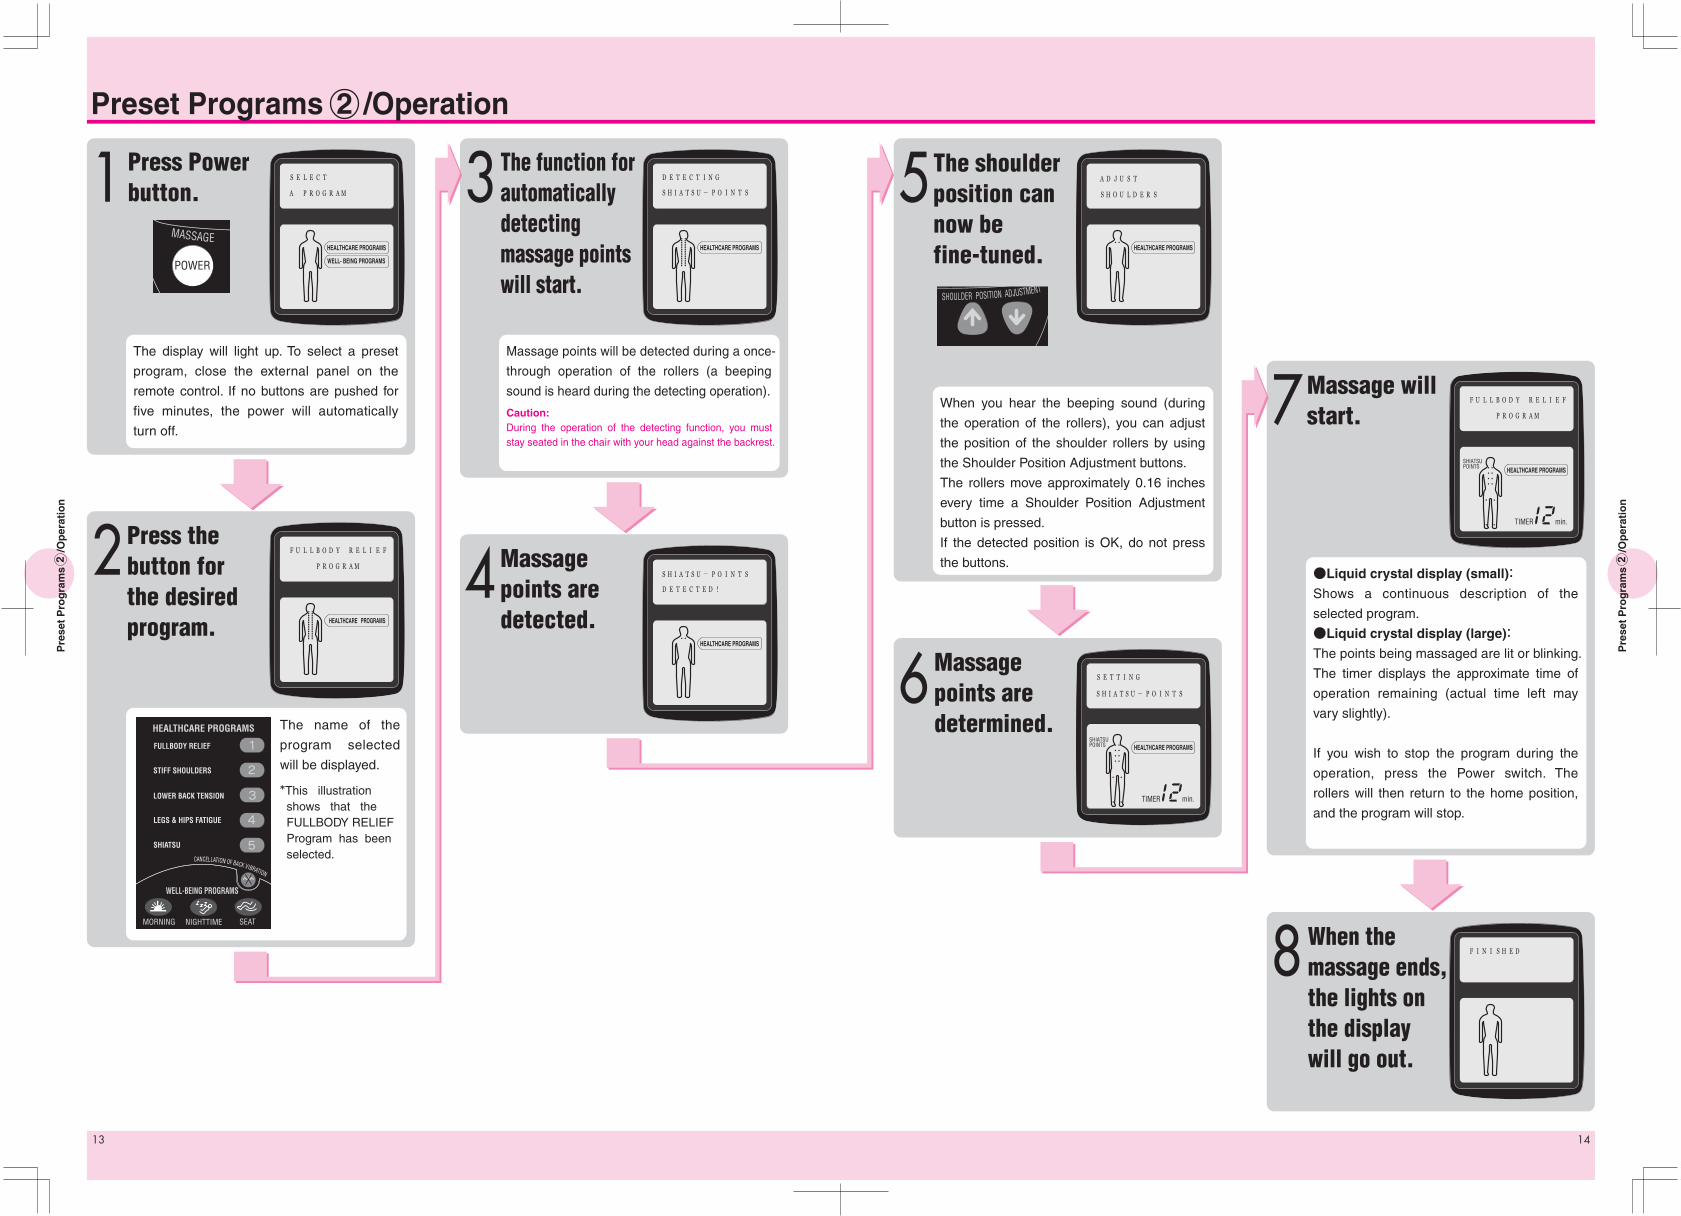
n2
Preset Programs /Operation
Massage points will be detected during a once-
through operation of the rollers (a beeping
sound is heard during the detecting operation).
Caution:During the operation of the detecting function, you must stay seated in the chair with your head against the backrest.
The name of the
program selected
will be displayed.
*This illustration shows that the FULLBODY RELIEF Program has been selected.
HEALTHCARE PROGRAMS
●Liquid crystal display (small): Shows a continuous description of the
selected program.
●Liquid crystal display (large):The points being massaged are lit or blinking.
The timer displays the approximate time of
operation remaining (actual time left may
vary slightly).
If you wish to stop the program during the
operation, press the Power switch. The
rollers will then return to the home position,
and the program will stop.
The display will light up. To select a preset
program, close the external panel on the
remote control. If no buttons are pushed for
five minutes, the power will automatically
turn off.
HEALTHCARE PROGRAMS
WELL- BEING PROGRAMS
When you hear the beeping sound (during
the operation of the rollers), you can adjust
the position of the shoulder rollers by using
the Shoulder Position Adjustment buttons.
The rollers move approximately 0.16 inches
every time a Shoulder Position Adjustment
button is pressed.
If the detected position is OK, do not press
the buttons.
HEALTHCARE PROGRAMS
2
Press the button for the desired program.
Press Power button.
The function for automatically detecting massage points will start.
Massage points are detected.
The shoulderposition cannow befine-tuned.
Massage points are determined.
Massage will start.
When the massage ends, the lights on the display will go out.
Pre
set
Pro
gra
ms
/O
per
atio
n2
SHIATSUPOINTS
SHIATSUPOINTS
Movements
Figure shows the remote control with the external panel opened.
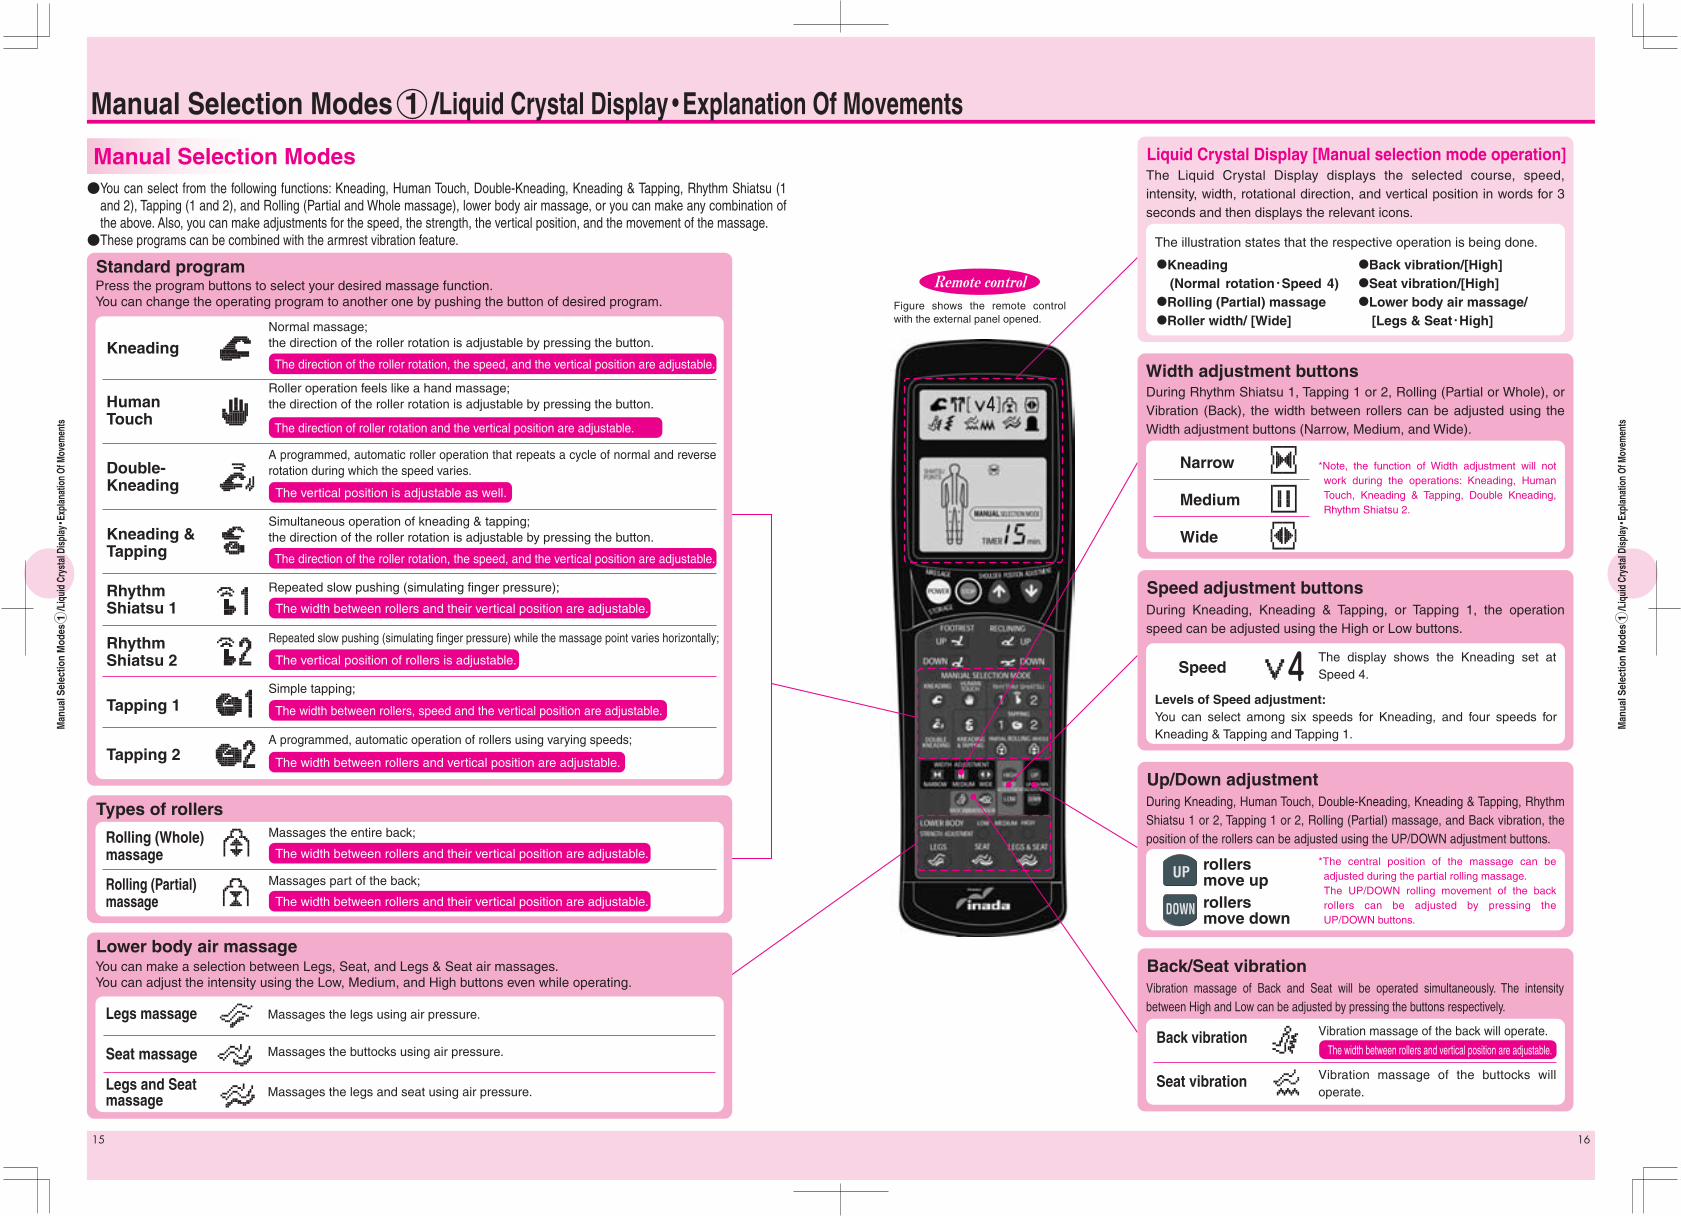
●You can select from the following functions: Kneading, Human Touch, Double-Kneading, Kneading & Tapping, Rhythm Shiatsu (1 and 2), Tapping (1 and 2), and Rolling (Partial and Whole massage), lower body air massage, or you can make any combination of the above. Also, you can make adjustments for the speed, the strength, the vertical position, and the movement of the massage.●These programs can be combined with the armrest vibration feature.
Manual Selection Modes
Standard program
Types of rollers
Press the program buttons to select your desired massage function.You can change the operating program to another one by pushing the button of desired program.
During Rhythm Shiatsu 1, Tapping 1 or 2, Rolling (Partial or Whole), or Vibration (Back), the width between rollers can be adjusted using the Width adjustment buttons (Narrow, Medium, and Wide).
During Kneading, Kneading & Tapping, or Tapping 1, the operation speed can be adjusted using the High or Low buttons.
Width adjustment buttons
The Liquid Crystal Display displays the selected course, speed, intensity, width, rotational direction, and vertical position in words for 3 seconds and then displays the relevant icons.
Liquid Crystal Display [Manual selection mode operation]
Man
ual S
elec
tion
Mod
es
/Li
quid
Cry
stal
Dis
play・E
xpla
natio
n Of
Mov
emen
ts1
Kneading
Rhythm Shiatsu 2
Rhythm Shiatsu 1
Kneading & Tapping
Double-Kneading
Human Touch
Tapping 1
Tapping 2
Normal massage; the direction of the roller rotation is adjustable by pressing the button.
Roller operation feels like a hand massage;the direction of the roller rotation is adjustable by pressing the button.
Simultaneous operation of kneading & tapping; the direction of the roller rotation is adjustable by pressing the button.
Repeated slow pushing (simulating finger pressure);
Repeated slow pushing (simulating finger pressure) while the massage point varies horizontally;
Simple tapping;
A programmed, automatic operation of rollers using varying speeds;
Massages the entire back;
Massages part of the back;
Remote control
Speed adjustment buttons
The vertical position is adjustable as well.
The vertical position of rollers is adjustable.
The width between rollers and their vertical position are adjustable.
The width between rollers and vertical position are adjustable.
The width between rollers and vertical position are adjustable.
The width between rollers and their vertical position are adjustable.
The width between rollers and their vertical position are adjustable.
The direction of the roller rotation, the speed, and the vertical position are adjustable.
The direction of the roller rotation, the speed, and the vertical position are adjustable.
The direction of roller rotation and the vertical position are adjustable.
Speed
Back vibration
Seat vibration
The display shows the Kneading set at Speed 4.
*Note, the function of Width adjustment will not work during the operations: Kneading, Human Touch, Kneading & Tapping, Double Kneading, Rhythm Shiatsu 2.
*The central position of the massage can be adjusted during the partial rolling massage.The UP/DOWN rolling movement of the back rollers can be adjusted by pressing the UP/DOWN buttons.
Vibration massage of the back will operate.
Vibration massage of the buttocks will operate.
Levels of Speed adjustment:You can select among six speeds for Kneading, and four speeds for Kneading & Tapping and Tapping 1.
The illustration states that the respective operation is being done.
During Kneading, Human Touch, Double-Kneading, Kneading & Tapping, Rhythm Shiatsu 1 or 2, Tapping 1 or 2, Rolling (Partial) massage, and Back vibration, the position of the rollers can be adjusted using the UP/DOWN adjustment buttons.
Up/Down adjustment
rollers move uprollers move down
UP
DOWN
Vibration massage of Back and Seat will be operated simultaneously. The intensity between High and Low can be adjusted by pressing the buttons respectively.
Back/Seat vibration
Legs massage
Seat massage
Massages the legs using air pressure.
Massages the buttocks using air pressure.
You can make a selection between Legs, Seat, and Legs & Seat air massages.You can adjust the intensity using the Low, Medium, and High buttons even while operating.
Lower body air massage
Legs and Seatmassage
Rolling (Whole) massage
Rolling (Partial) massage
Massages the legs and seat using air pressure.
Narrow
Medium
Wide
1
A programmed, automatic roller operation that repeats a cycle of normal and reverse rotation during which the speed varies.
●Kneading (Normal rotation・Speed 4)●Rolling (Partial) massage●Roller width/ [Wide]
●Back vibration/[High]●Seat vibration/[High]●Lower body air massage/ [Legs & Seat・High]
Manual Selection Modes /Liquid Crystal Display・Explanation Of Movements
Man
ual S
elec
tion
Mod
es
/Li
quid
Cry
stal
Dis
play・E
xpla
natio
n Of
Mov
emen
ts1
The width between rollers, speed and the vertical position are adjustable.
4
MASSAGE
POWER
TIMER min.
MANUAL SELECTION MODE
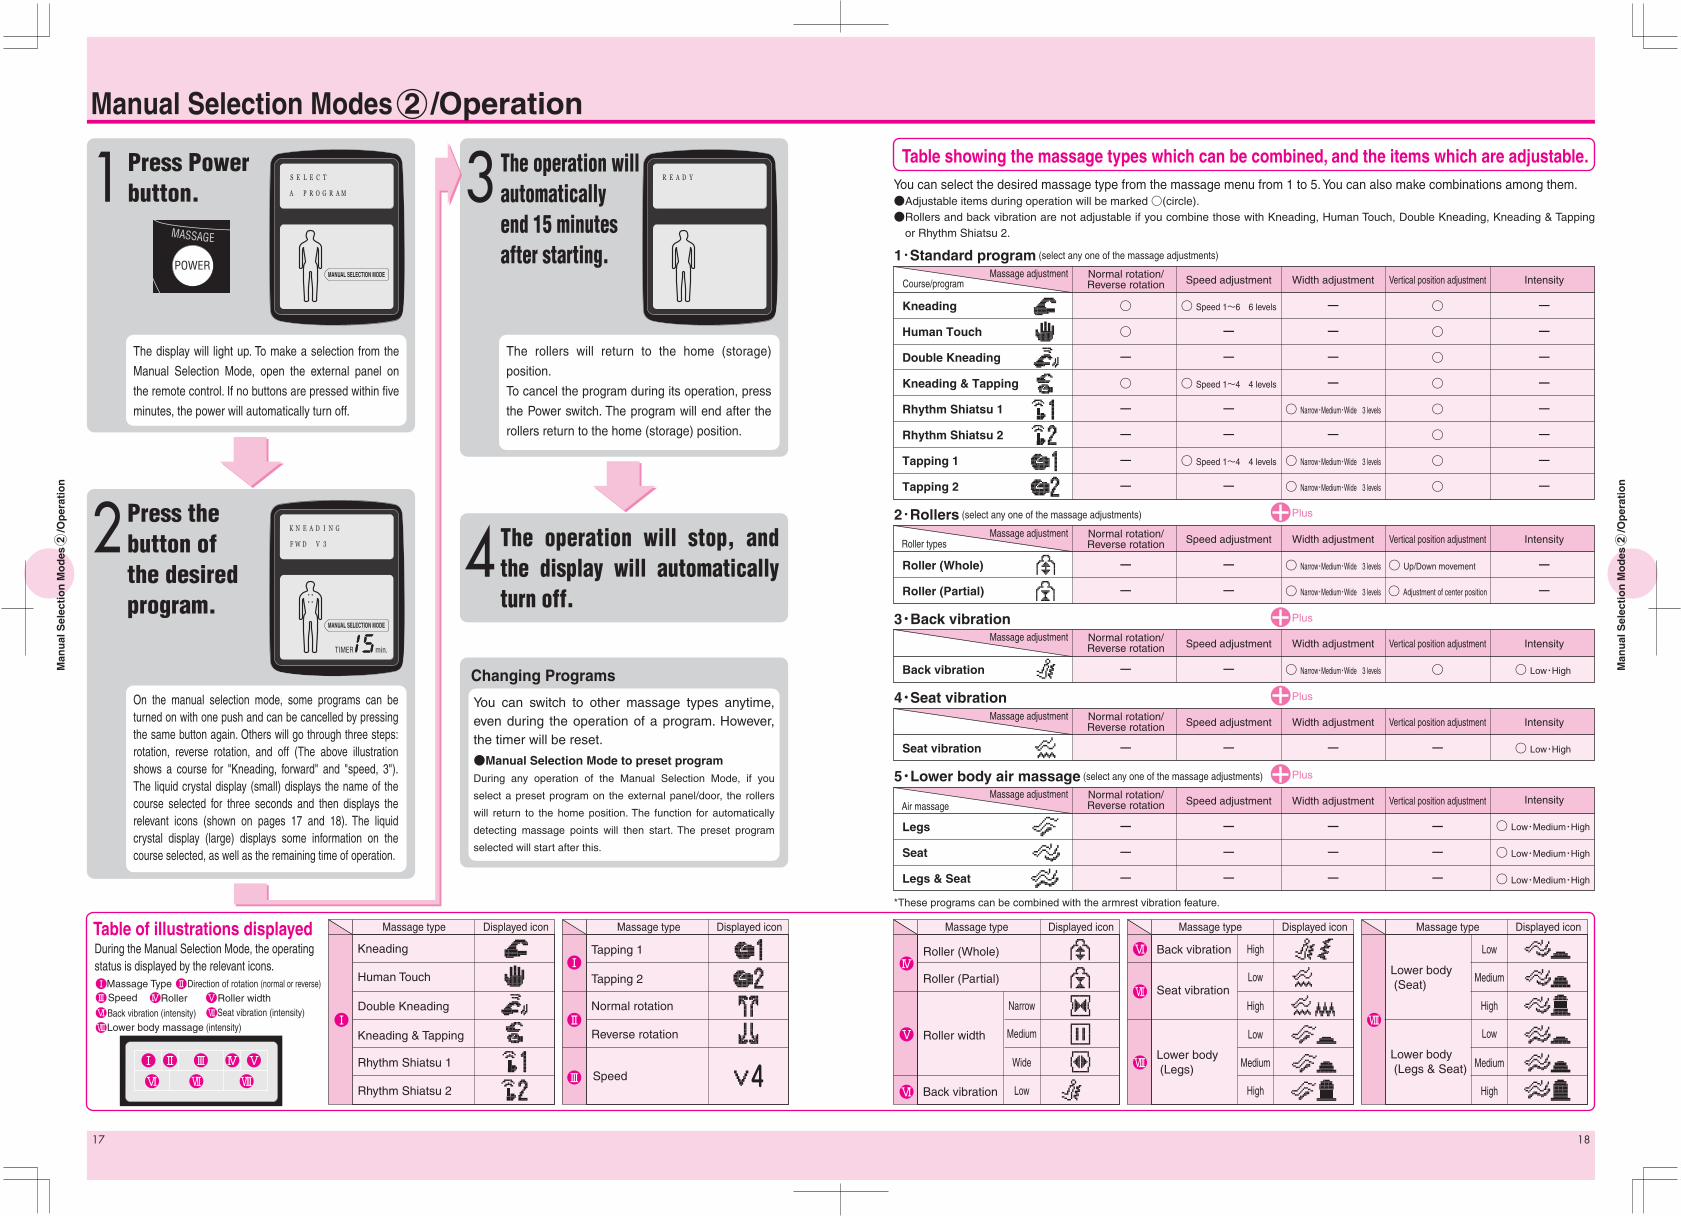
On the manual selection mode, some programs can be turned on with one push and can be cancelled by pressing the same button again. Others will go through three steps: rotation, reverse rotation, and off (The above illustration shows a course for "Kneading, forward" and "speed, 3"). The liquid crystal display (small) displays the name of the course selected for three seconds and then displays the relevant icons (shown on pages 17 and 18). The liquid crystal display (large) displays some information on the course selected, as well as the remaining time of operation.
The display will light up. To make a selection from the
Manual Selection Mode, open the external panel on
the remote control. If no buttons are pressed within five
minutes, the power will automatically turn off.
MANUAL SELECTION MODE
The operation will stop, and the display will automatically turn off.
The rollers will return to the home (storage)
position.
To cancel the program during its operation, press
the Power switch. The program will end after the
rollers return to the home (storage) position.
Man
ual
Sel
ecti
on
Mo
des
/
Op
erat
ion
2
Table showing the massage types which can be combined, and the items which are adjustable.
Table of illustrations displayed
You can select the desired massage type from the massage menu from 1 to 5. You can also make combinations among them.●Adjustable items during operation will be marked ○(circle).●Rollers and back vibration are not adjustable if you combine those with Kneading, Human Touch, Double Kneading, Kneading & Tapping
or Rhythm Shiatsu 2.
1・Standard program (select any one of the massage adjustments)
Kneading
Human Touch
Double Kneading
Kneading & Tapping
Rhythm Shiatsu 1
Rhythm Shiatsu 2
Tapping 1
Tapping 2
Massage adjustment
○
○
ー
○
ー
ー
ー
ー
Speed adjustment
○ Speed 1~6 6 levels
ー
ー
○ Speed 1~4 4 levels
ー
ー
○ Speed 1~4 4 levels
ー
Width adjustment
ー
ー
ー
ー
○ Narrow・Medium・Wide 3 levels
ー
○ Narrow・Medium・Wide 3 levels
○ Narrow・Medium・Wide 3 levels
Vertical position adjustment
○
○
○
○
○
○
○
○
Intensity
ー
ー
ー
ー
ー
ー
ー
ー
5・Lower body air massage (select any one of the massage adjustments)
Legs
Seat
Legs & Seat
ー
ー
ー
Speed adjustment
ー
ー
ー
Width adjustment
ー
ー
ー
Vertical position adjustment
ー
ー
ー
Intensity
○ Low・Medium・High
○ Low・Medium・High
○ Low・Medium・High
2・Rollers (select any one of the massage adjustments)
Roller (Whole)
Roller (Partial)
Roller types
Air massage
ー
ー
Speed adjustment
ー
ー
Width adjustment
○ Narrow・Medium・Wide 3 levels
○ Narrow・Medium・Wide 3 levels
Vertical position adjustment
○ Up/Down movement
○ Adjustment of center position
Intensity
ー
ー
3・Back vibration
Back vibration
ー
Speed adjustment
ー
Width adjustment
○ Narrow・Medium・Wide 3 levels
Vertical position adjustment
○
Intensity
○ Low・High
4・Seat vibration
Seat vibration
ー
Speed adjustment
ー
Width adjustment
ー
Vertical position adjustment
ー
Intensity
○ Low・High
Plus
Plus
Plus
Plus
Massage type Displayed icon
Rhythm Shiatsu 1
Kneading & Tapping
Double Kneading
Human Touch
Massage type Displayed icon
Normal rotation
Reverse rotation
Tapping 2
Tapping 1
Massage type Displayed icon
Roller (Partial)
Back vibration
Roller (Whole)
Narrow
Wide
Medium
Changing Programs
You can switch to other massage types anytime, even during the operation of a program. However, the timer will be reset.
●Manual Selection Mode to preset programDuring any operation of the Manual Selection Mode, if you
select a preset program on the external panel/door, the rollers
will return to the home position. The function for automatically
detecting massage points will then start. The preset program
selected will start after this.
Course/program
Roller width
Massage type Displayed icon Massage type Displayed icon
Lower body (Legs)
High
High
Low
Low
Seat vibration
Lower body (Legs & Seat)
High
Medium
Low
High
Lower body (Seat)
During the Manual Selection Mode, the operating status is displayed by the relevant icons.
Massage Type Direction of rotation (normal or reverse)Speed Roller Roller width
Back vibration (intensity) Seat vibration (intensity)
Lower body massage (intensity)
Back vibration
LowRhythm Shiatsu 2
Low
Medium
Medium
High
Kneading
Speed
Manual Selection Modes /Operation2
Man
ual
Sel
ecti
on
Mo
des
/
Op
erat
ion
2
Press Power button.
Press the button of the desired program.
The operation will automatically end 15 minutes after starting.
Normal rotation/Reverse rotation
Massage adjustment Normal rotation/Reverse rotation
Massage adjustment Normal rotation/Reverse rotation
Massage adjustment Normal rotation/Reverse rotation
Massage adjustment Normal rotation/Reverse rotation
*These programs can be combined with the armrest vibration feature.
Backpad
Headrest
Back pad
Headrest
ZipperZipper (Rear)
Velcro
Velcro (Rear)
BackrestBackrestcover
Velcro
Seat cover (Rear)
Arm cover
Footrest cover
ZipperFootrest
Zipper
VelcroFootrest cover
Seat cover
Velcro
Footrest bottom cover
Arm blow
Velcro
Seat
Seat cover
Velcro (Rear)
Arm cover
Cle
anin
g A
nd
Sto
rag
e
Cle
anin
g A
nd
Sto
rag
e
●Store the chair in a dry area after cleaning.●To shield from dust, please make sure to
cover the chair.
How to remove the seat cover
Storage
How to remove covers
Caution
Do not keep the chair in a dusty or high-temperature (104°F/40°C) area.Do not keep the chair near a stove or in direct sunlight as it may cause discoloration and/or degeneration of the external parts.
WarningDo not connect or disconnect the power plug with wet hands. You may be exposed to the danger of electric shock and injury.
Before any cleaning is carried out, make sure that the power is turned off and the plug is disconnected from the socket.
Cleaning
●Plastic parts, pipes, and fabric should be cleaned by wiping with a mild detergent and damp cloth. Wipe with a dry cloth next to dry the surface of the chair.
Never use alcohol, solvents, or abrasive agents. Using these chemicals may cause scratches, discoloration, and/or cracks.
Main parts
●Remove stains by wiping with a mild detergent and a damp cloth. Wipe with a dry cloth next to dry the surface of the chair.
Caution
Caution
Long contact with vinyl, plastic material, or wallpaper may cause discoloration.
Back pad Headrest Covers
1. Undo the velcro that fixes the seat cover to the footrest bottom cover.2. Undo the 6 velcro strips that fix the seat cover to the seat and remove the seat cover. *To re-attach the seat cover, reverse the above procedure (Note that you should securely put the bag-shaped part of the seat cover on the footrest cover).
How to remove the backrest cover
1. Undo the velcro that fixes the backrest cover to the headrest and remove the headrest.2. Undo the zipper that connects the back pad and the backrest and remove the back pad.3. Undo the 13 velcro strips that fix the backrest cover to the backrest and remove the backrest cover.*To re-attach the backrest cover, reverse the above procedure.
How to remove the arm cover
1. Undo the velcro that fixes the arm cover.2. Remove the arm cover from the arm blow.*To re-attach the arm cover, reverse the above procedure.
How to remove the footrest cover
1. Undo the zipper that fixes the footrest cover on the
footrest and remove the footrest cover.
*To re-attach the footrest cover, reverse the above
procedure. (Note that you should securely put the
bag-shaped part of the footrest cover on the air
cushion.)
Cleaning And Storage
●Remove stains by using a dry cloth.
Caution Never use a wet cloth. Moisture can damage the controls.
Remote control
Pulling the plug

Ser
vice
Tro
ub
lesh
oo
tin
g G
uid
e
During use, the air massage stops when the footrest is moved up or down.The air massage will stop when the footrest is moved up or down to ensure safety. The air massage will start operating again when the footrest stops moving.
The chair will not operate. Is it broken?
●Only qualified service technicians should repair the massage chair.
Automatic massage points detected unsuccessfully.
The external panel on the remote control came off.If you try to open the external panel too far, the panel may come off in order to prevent it from being damaged. Please re-attach it to the remote control.
The recliner moved in the opposite direction from what was chosen.You may be pushing both of the reclining buttons together at the same time. Please release the button(s) and try again.
How do I move the chair when cleaning the room or changing rooms?
The chair stops during use.
Press the main power switch on the side of the backrest and turn it on again after about 5 seconds.1)If the chair recovers, continue use.2)If the chair does not restart, stop
use, disconnect the power plug, and contact the vendor.
The rollers have moved to the upper position.
The rollers stop halfway.
The rollers may have been strained due to excessive force. Slow down the speed or try to lightly lift your body.
This is the result of alternate tap-ping and is nor-mal.
How can I increase the level of stimulation?Recline the backrest further, sit back deeply in the seat, and try to lean back into the chair.
How can I decrease the level of stimulation?Raise the backrest position. If it is still too strong, apply a towel to the area being massaged.
This is because the height of the person using the chair may be different from the standard height used for calculating the operation time. This time discrepancy is not a malfunction.
The message "Reset main power switch" is shown on the liquid crystal display.The main power switch is located on the side of the backrest and turn it on again after about 5 seconds.1)If the chair recovers, continue use.2)If the same message is displayed
again, stop using the chair, disconnect the power plug, and contact the vendor.
There is noise during operation, should use be continued?The following sounds do not indicate any trouble or malfunction. They may occur during normal operation.●Rattling during kneading or tapping.●A sound (creak) due to rubbing
between the rollers and fabric in the kneading operation.
●Whirring sound from the air pump.●Whirring sound from the vibration
function.●When the backrest has been fully
reclined, the pump for operating the footrest is working (a whirring sound is heard).
●Whirring sound when reclining.
Troubleshooting Guide Service
WarningDo not move the chair while someone is in it.→ Accident or injury could result if the chair tips over.
Prohibited
Please try the following operations: 1)Is the power plug securely
connected to a wall outlet?2)Is the main power switch (on the
side of the backrest) turned on completely?
When the massage finishes operating as programmed by the auto timer, the rollers move to the upper position automatically to prevent interfering with the body. To continue the massage, press the power button on the remote control again.
Keep your body at the deepest position in the chair and keep your head on the headrest.The Automatic Massage Points Detection System will not function if the Manual Selection Mode is in operation. You can adjust the width and vertical positions of the rollers using the buttons while the rollers are operating.
There are casters on the chair. Turn off the main power switch with the backrest in the raised position, disconnect the power plug from the socket, lift the front part of the chair as shown in the figure and move it using the casters.
In the preset program, the actual operation time differs from that shown on the display of the remote control.
Please refer to the following Q&As for checking your chair before calling for service. If this does not solve the problem, stop using the chair immediately and disconnect the power plug. Then consult the vendor.
The right and left rollers are not positioned horizontally.
Maximum approx.0.6 inches
Maximum approx.0.6 inches
The chair is under warranty for three
years from the date of purchase. A
warranty card is provided with each
chair. Keep this card in a safe place
since it is required for repair during the
warranty period.
Regular inspections are essential for maintaining the Inada Chair performance.
●The chair does not start with the main power switch on.
●The power cable has been cracked or scratched.
●The power cable or plug becomes abnormally hot.
●The chair produces a burnt smell, abnormal sound or vibration.
●The auto timer function does not work in some cases.
●The fabric is torn where it comes into contact with the rollers or air
cells.
●Other failures.
◆After about five years of use, a professional inspection should be performed even if there are no symptoms or problems.
For inspection fees, contact the vendor.
Possible symptoms
Service
Safety inspections for Inada Chair
1.WarrantyBefore requesting service, be sure to read the Troubleshooting section on Page
21 in this manual. If this does not resolve your problem, call the vendor for
assistance. The following information should be given to the vendor when
requesting service.
1. Your name, address, and phone number
2. Product name and model number (see the back page of this manual)
3. Serial No. (see the Serial No. label on the back cover of the chair)
4. Date of purchase
5. Trouble status
6. Proof of purchase
●If the warranty is valid:
Show the vendor the warranty card.
A service charge may apply, subject to the nature of the trouble and/or repair
according to the terms of the warranty. See the warranty for full details.
●If the warranty has expired:
Consult the vendor.
If the product can be repaired, the vendor will give you an estimate of the cost
to repair the product.
●Replacement parts stock:
We will stock service-intended functional parts (except fabric) of this product
for at least six years after terminating the production of this model. Functional
parts refer to those necessary for maintaining the intended performance of the
product.
●For more information on service:
Contact the vendor.
2.When requesting service
■If you see any of the symptoms or problems
shown on the left, stop using the chair,
disconnect the power plug, and consult the
vendor to repair the product.
M-6220601
Attach the stand to the right arm
rest of the main body using
the screw included, as show
n in the figure.To rem
ove the stand, reverse the attachment procedure.
Arm
rest (right) side
Screw
Rem
ote control stand