Embed Size (px)
Citation preview
Faculty Core Facility Version 1.1
LKS Faculty of Medicine
BD FACS LSRFortessa Operation Manual
1
FACS LSRFortessa Standard Operation Protocol
Basic Operation
Check sheath tank and waste tank
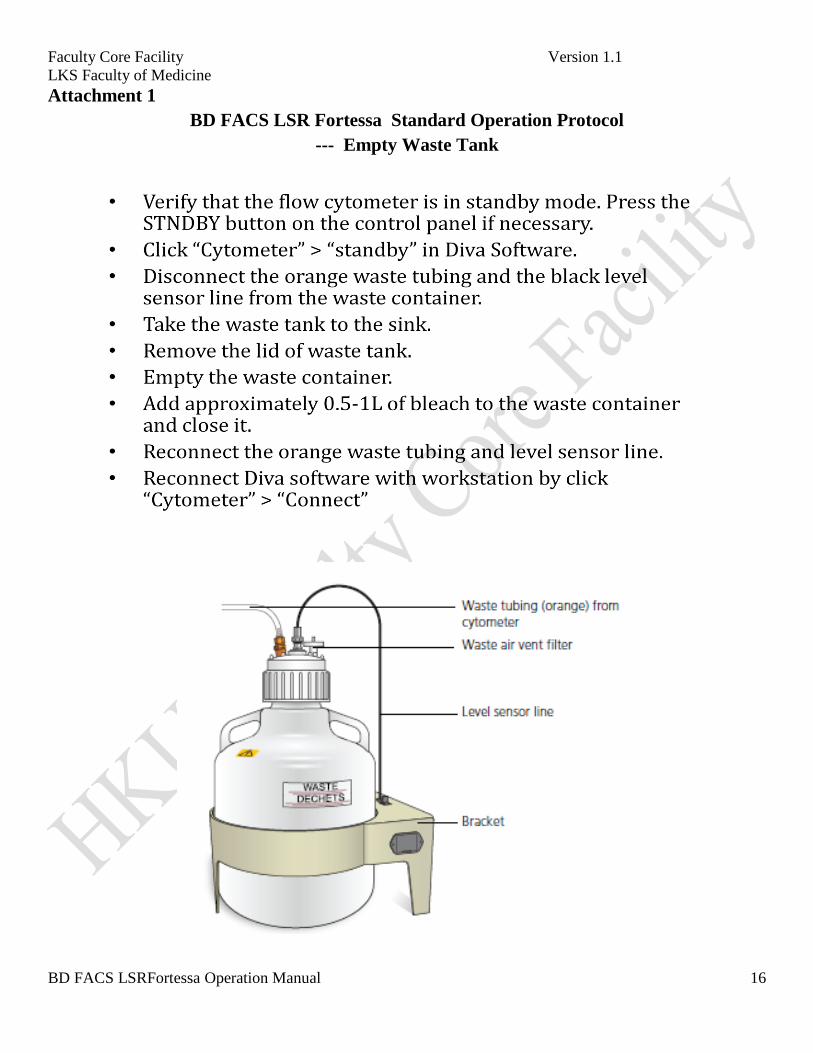
Please empty waste tank if liquid reaches to the red line (Please refer to attachment 1 on page
16: SOP for empty waste tank. ).
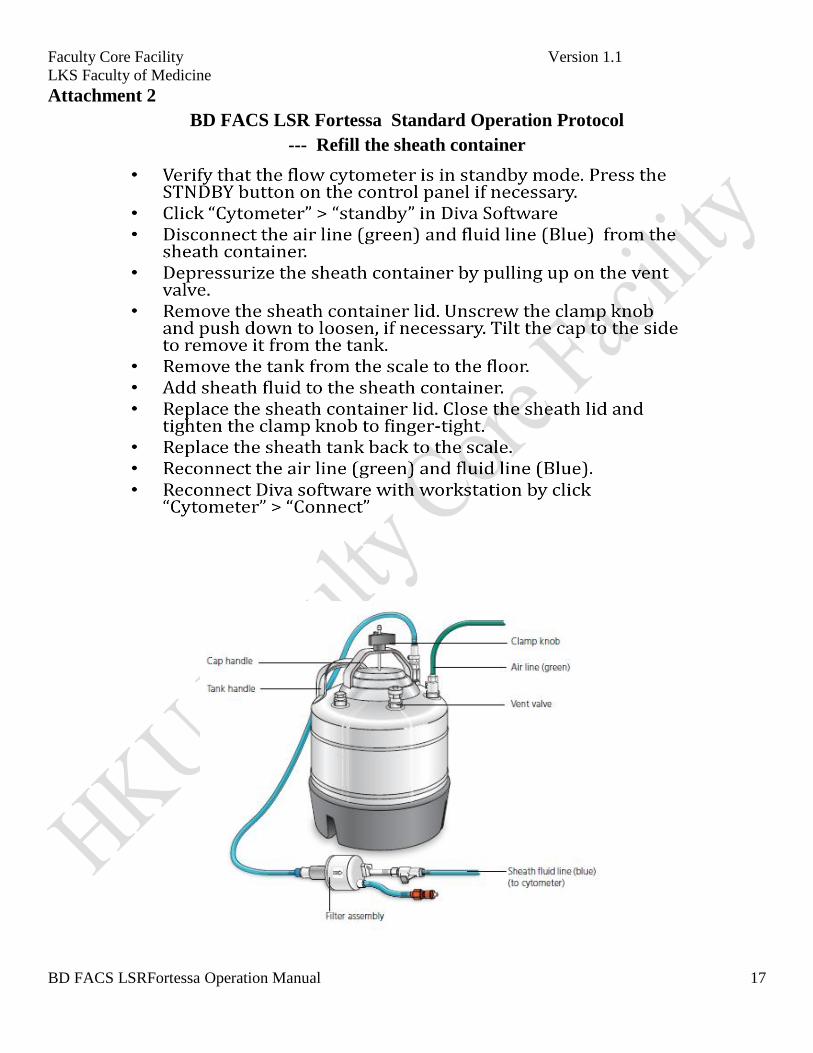
Please refill sheath tank if its weight is less than 7KG (Please refer to attachment 2 on page
17: SOP for refill sheath tank).
Launching the BD FACSDiva Software
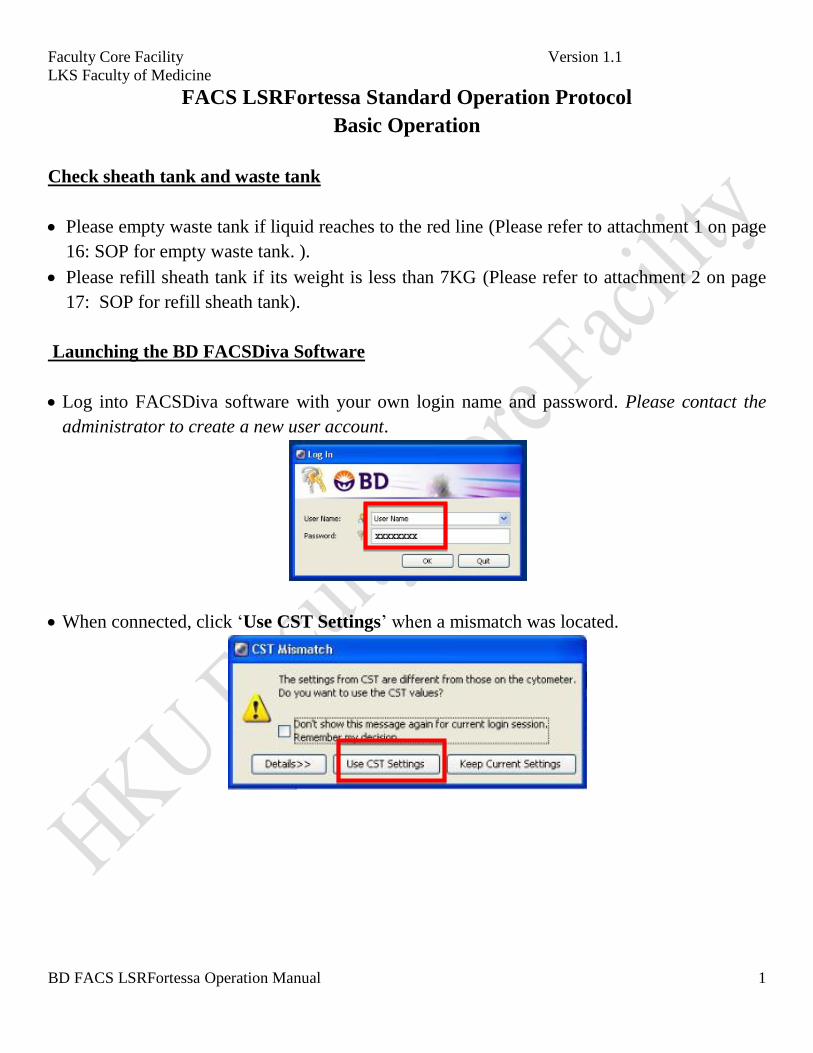
Log into FACSDiva software with your own login name and password. Please contact the
administrator to create a new user account.
When connected, click ‘Use CST Settings’ when a mismatch was located.
Faculty Core Facility Version 1.1
LKS Faculty of Medicine
BD FACS LSRFortessa Operation Manual
2
Creating and working with experiment in BD FACSDiva Software
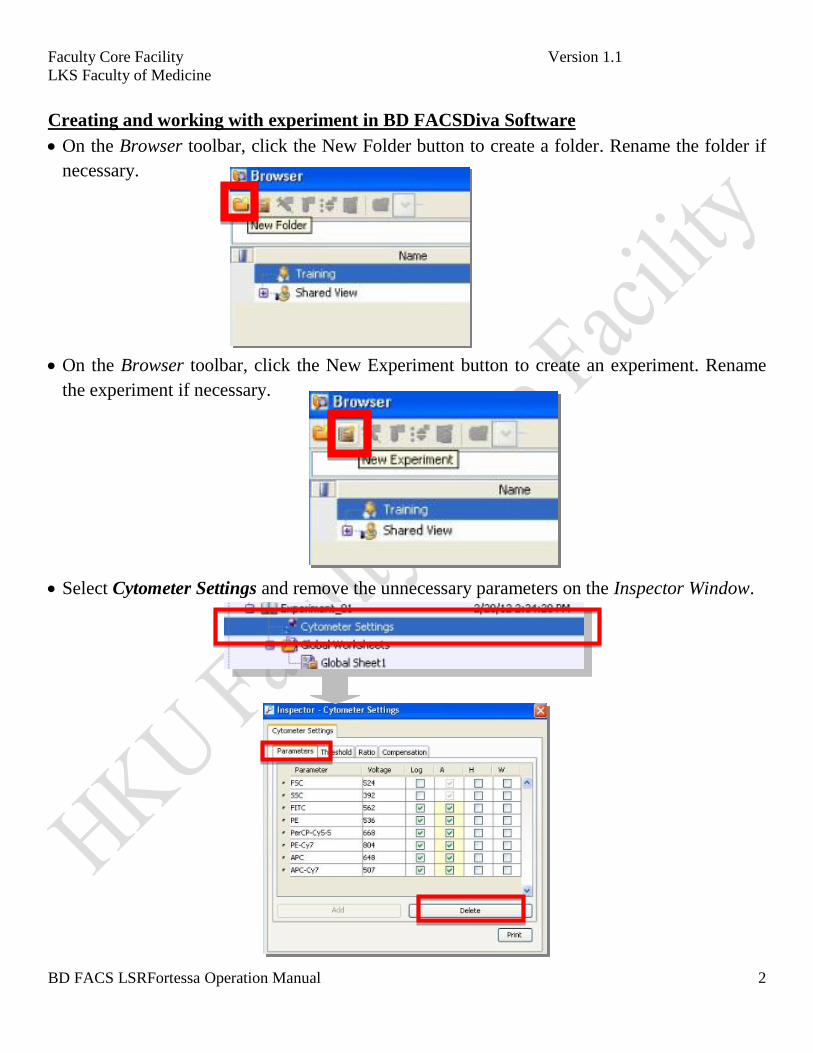
On the Browser toolbar, click the New Folder button to create a folder. Rename the folder if
necessary.
On the Browser toolbar, click the New Experiment button to create an experiment. Rename
the experiment if necessary.
Select Cytometer Settings and remove the unnecessary parameters on the Inspector Window.
Faculty Core Facility Version 1.1
LKS Faculty of Medicine
BD FACS LSRFortessa Operation Manual
3
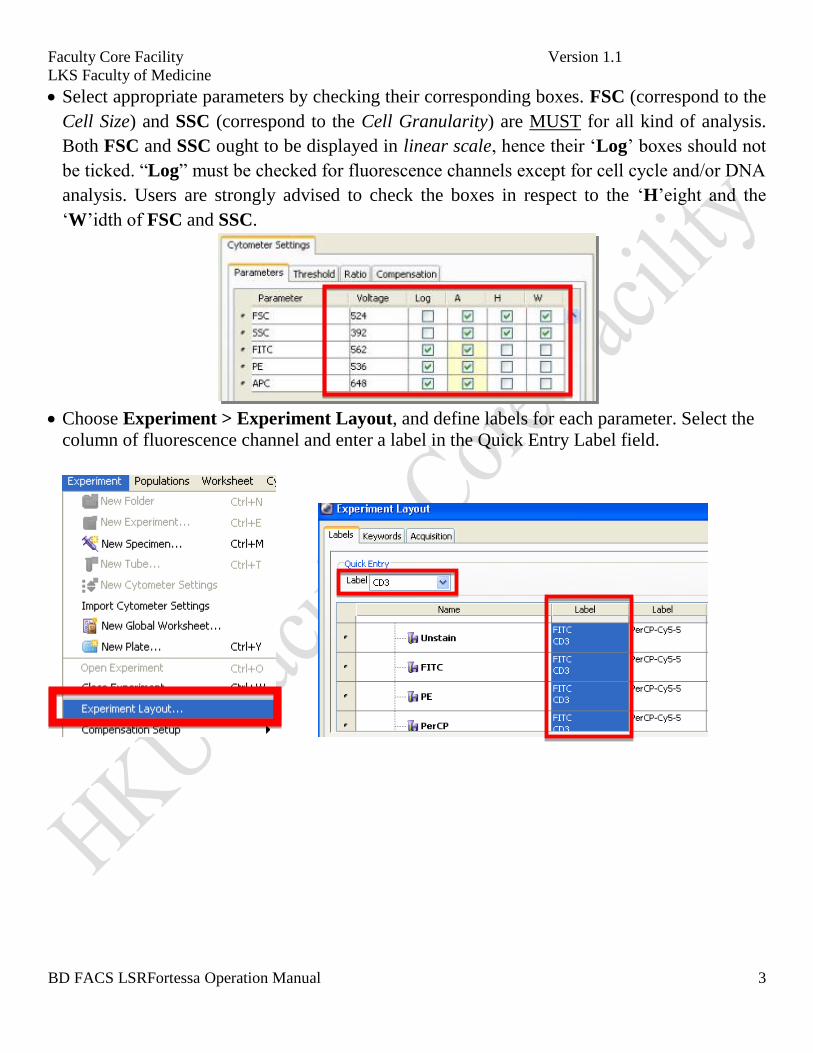
Select appropriate parameters by checking their corresponding boxes. FSC (correspond to the
Cell Size) and SSC (correspond to the Cell Granularity) are MUST for all kind of analysis.
Both FSC and SSC ought to be displayed in linear scale, hence their ‘Log’ boxes should not
be ticked. “Log” must be checked for fluorescence channels except for cell cycle and/or DNA
analysis. Users are strongly advised to check the boxes in respect to the ‘H’eight and the
‘W’idth of FSC and SSC.
Choose Experiment > Experiment Layout, and define labels for each parameter. Select the
column of fluorescence channel and enter a label in the Quick Entry Label field.
Faculty Core Facility Version 1.1
LKS Faculty of Medicine
BD FACS LSRFortessa Operation Manual
4
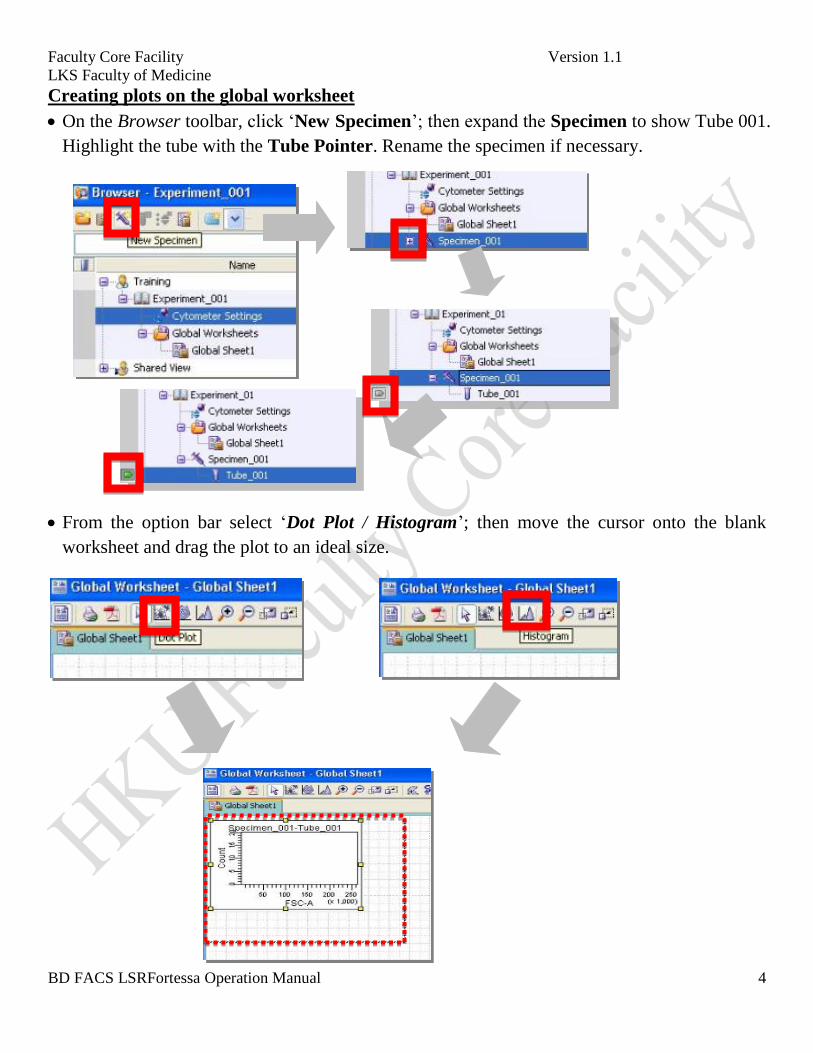
Creating plots on the global worksheet
On the Browser toolbar, click ‘New Specimen’; then expand the Specimen to show Tube 001.
Highlight the tube with the Tube Pointer. Rename the specimen if necessary.
From the option bar select ‘Dot Plot / Histogram’; then move the cursor onto the blank
worksheet and drag the plot to an ideal size.
Faculty Core Facility Version 1.1
LKS Faculty of Medicine
BD FACS LSRFortessa Operation Manual
5
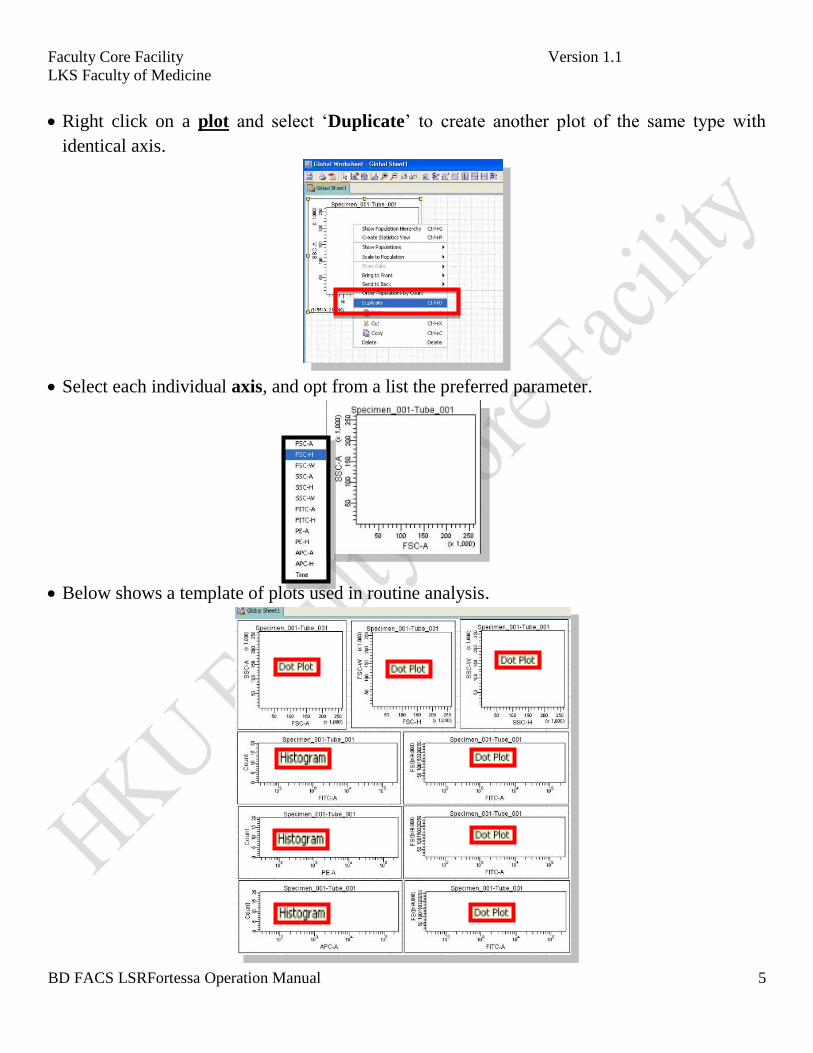
Right click on a plot and select ‘Duplicate’ to create another plot of the same type with
identical axis.
Select each individual axis, and opt from a list the preferred parameter.
Below shows a template of plots used in routine analysis.
Faculty Core Facility Version 1.1
LKS Faculty of Medicine
BD FACS LSRFortessa Operation Manual
6
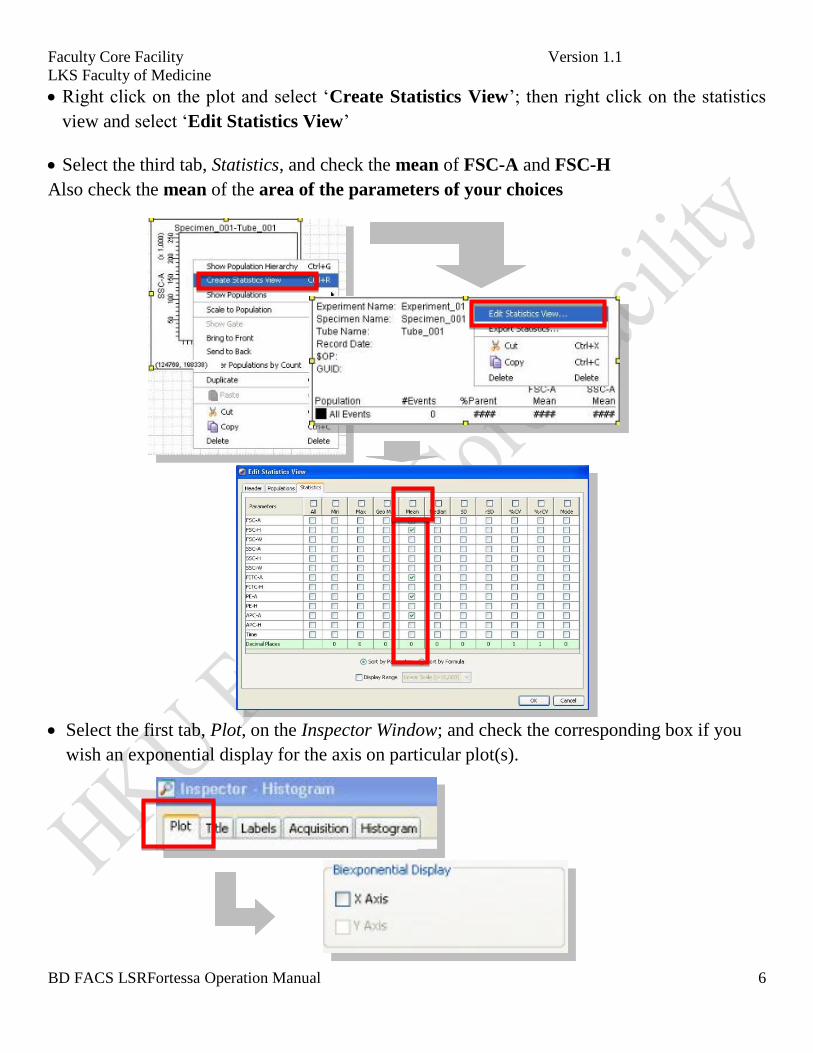
Right click on the plot and select ‘Create Statistics View’; then right click on the statistics
view and select ‘Edit Statistics View’
Select the third tab, Statistics, and check the mean of FSC-A and FSC-H
Also check the mean of the area of the parameters of your choices
Select the first tab, Plot, on the Inspector Window; and check the corresponding box if you
wish an exponential display for the axis on particular plot(s).
Faculty Core Facility Version 1.1
LKS Faculty of Medicine
BD FACS LSRFortessa Operation Manual
7
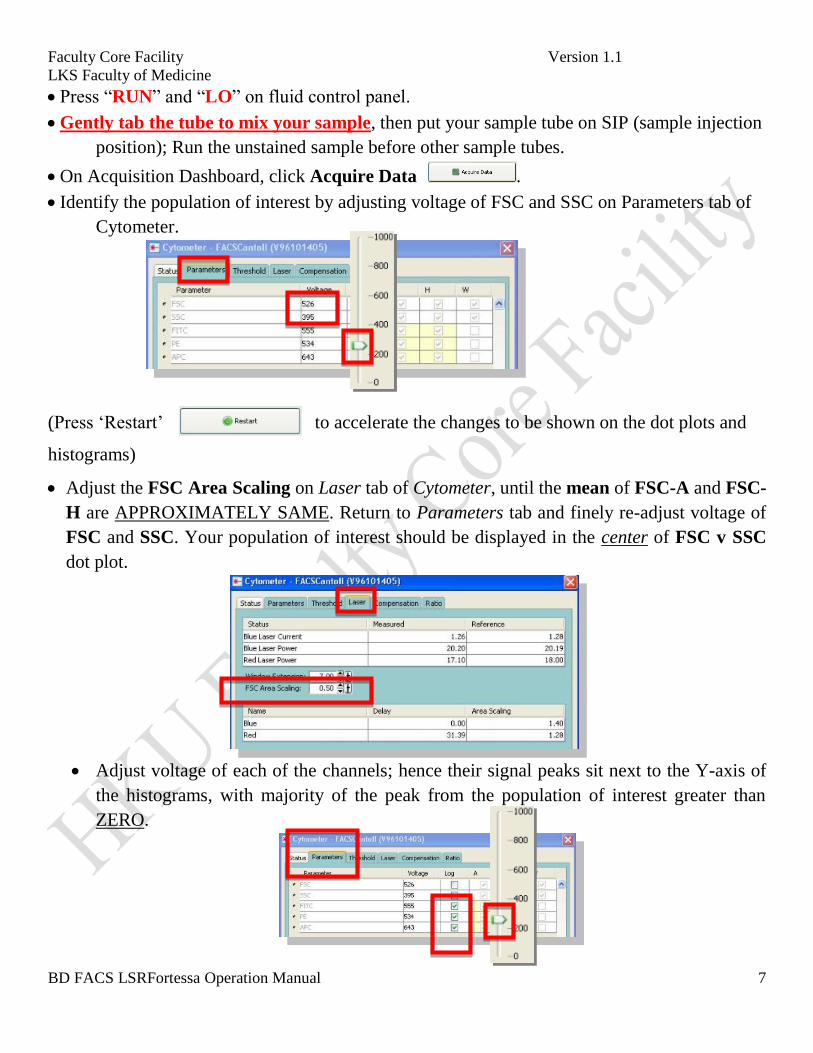
Press “RUN” and “LO” on fluid control panel.
Gently tab the tube to mix your sample, then put your sample tube on SIP (sample injection
position); Run the unstained sample before other sample tubes.
On Acquisition Dashboard, click Acquire Data .
Identify the population of interest by adjusting voltage of FSC and SSC on Parameters tab of
Cytometer.
(Press ‘Restart’ to accelerate the changes to be shown on the dot plots and
histograms)
Adjust the FSC Area Scaling on Laser tab of Cytometer, until the mean of FSC-A and FSC-
H are APPROXIMATELY SAME. Return to Parameters tab and finely re-adjust voltage of
FSC and SSC. Your population of interest should be displayed in the center of FSC v SSC
dot plot.
Adjust voltage of each of the channels; hence their signal peaks sit next to the Y-axis of
the histograms, with majority of the peak from the population of interest greater than
ZERO.
Faculty Core Facility Version 1.1
LKS Faculty of Medicine
BD FACS LSRFortessa Operation Manual
8
Click Stop Acquiring on Acquisition Dashboard and replace your sample with DI H2O.
Repeat above steps with the positive control sample tubes. Adjust the voltage of
corresponding channels if their signal peaks are outside the limit of the histograms.
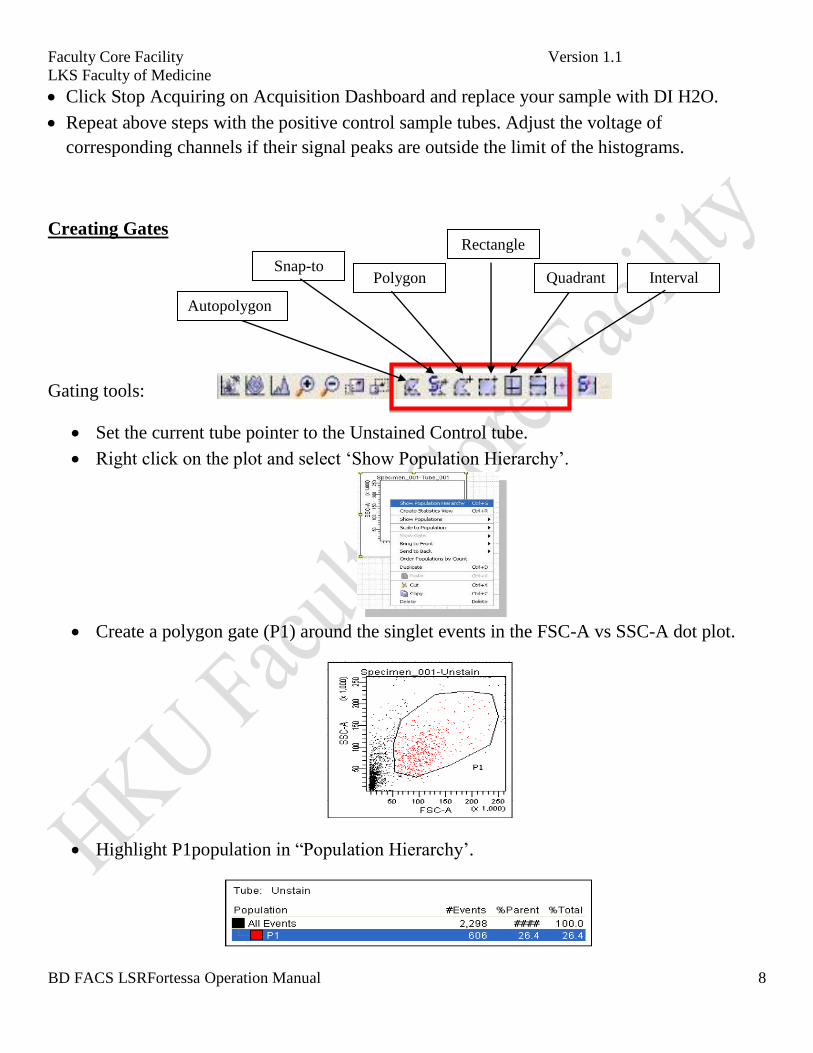
Creating Gates
Gating tools:
Set the current tube pointer to the Unstained Control tube.
Right click on the plot and select ‘Show Population Hierarchy’.
Create a polygon gate (P1) around the singlet events in the FSC-A vs SSC-A dot plot.
Highlight P1population in “Population Hierarchy’.
Autopolygon
Polygon Quadrant Interval Snap-to
Rectangle
Faculty Core Facility Version 1.1
LKS Faculty of Medicine
BD FACS LSRFortessa Operation Manual
9
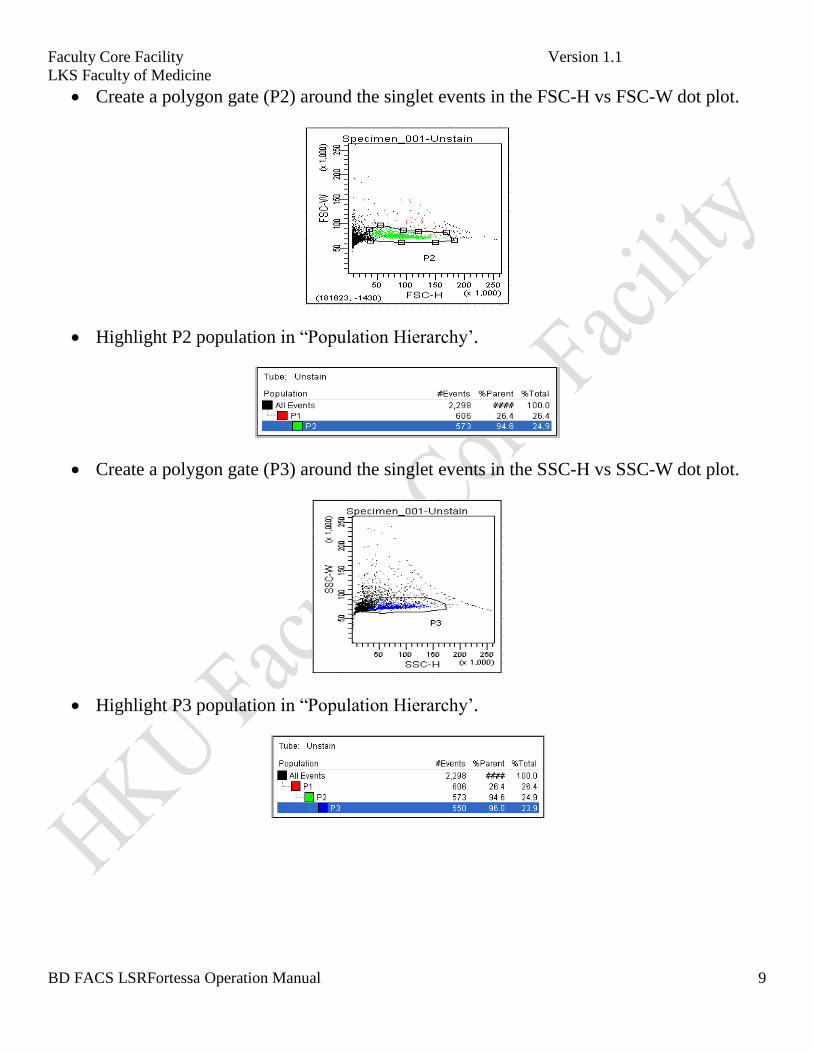
Create a polygon gate (P2) around the singlet events in the FSC-H vs FSC-W dot plot.
Highlight P2 population in “Population Hierarchy’.
Create a polygon gate (P3) around the singlet events in the SSC-H vs SSC-W dot plot.
Highlight P3 population in “Population Hierarchy’.
Faculty Core Facility Version 1.1
LKS Faculty of Medicine
BD FACS LSRFortessa Operation Manual
10
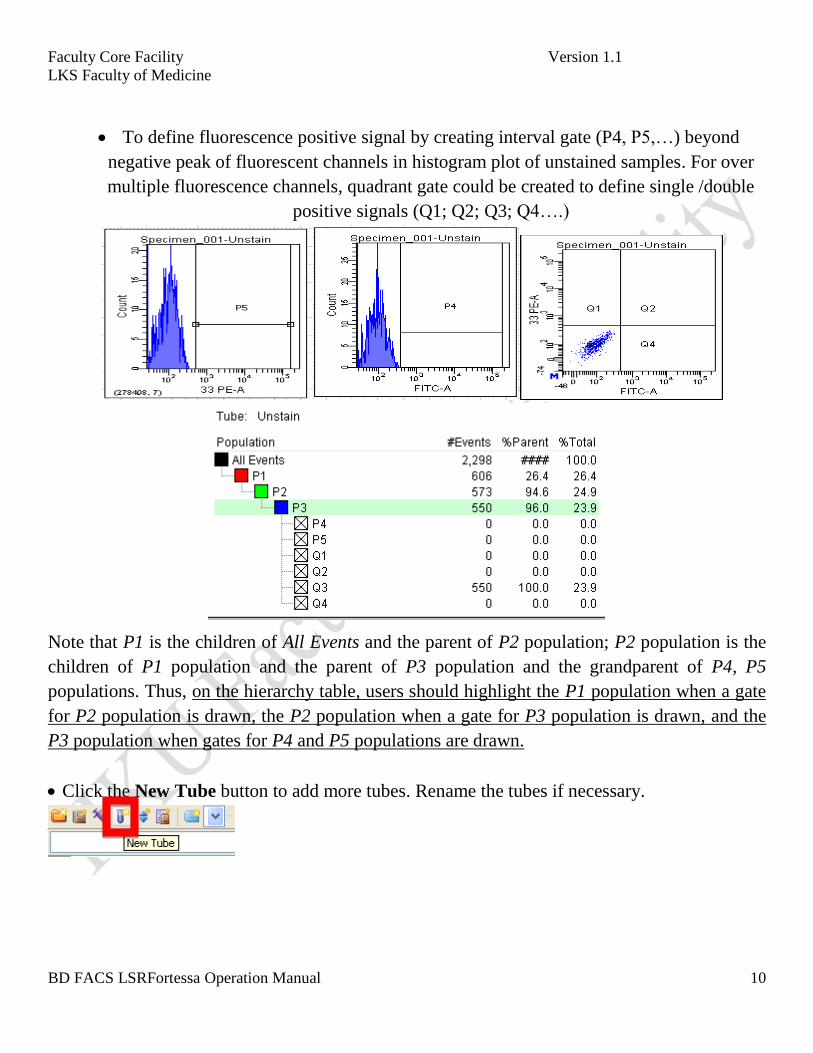
To define fluorescence positive signal by creating interval gate (P4, P5,…) beyond
negative peak of fluorescent channels in histogram plot of unstained samples. For over
multiple fluorescence channels, quadrant gate could be created to define single /double
positive signals (Q1; Q2; Q3; Q4….)
Note that P1 is the children of All Events and the parent of P2 population; P2 population is the
children of P1 population and the parent of P3 population and the grandparent of P4, P5
populations. Thus, on the hierarchy table, users should highlight the P1 population when a gate
for P2 population is drawn, the P2 population when a gate for P3 population is drawn, and the
P3 population when gates for P4 and P5 populations are drawn.
Click the New Tube button to add more tubes. Rename the tubes if necessary.
Faculty Core Facility Version 1.1
LKS Faculty of Medicine
BD FACS LSRFortessa Operation Manual
11
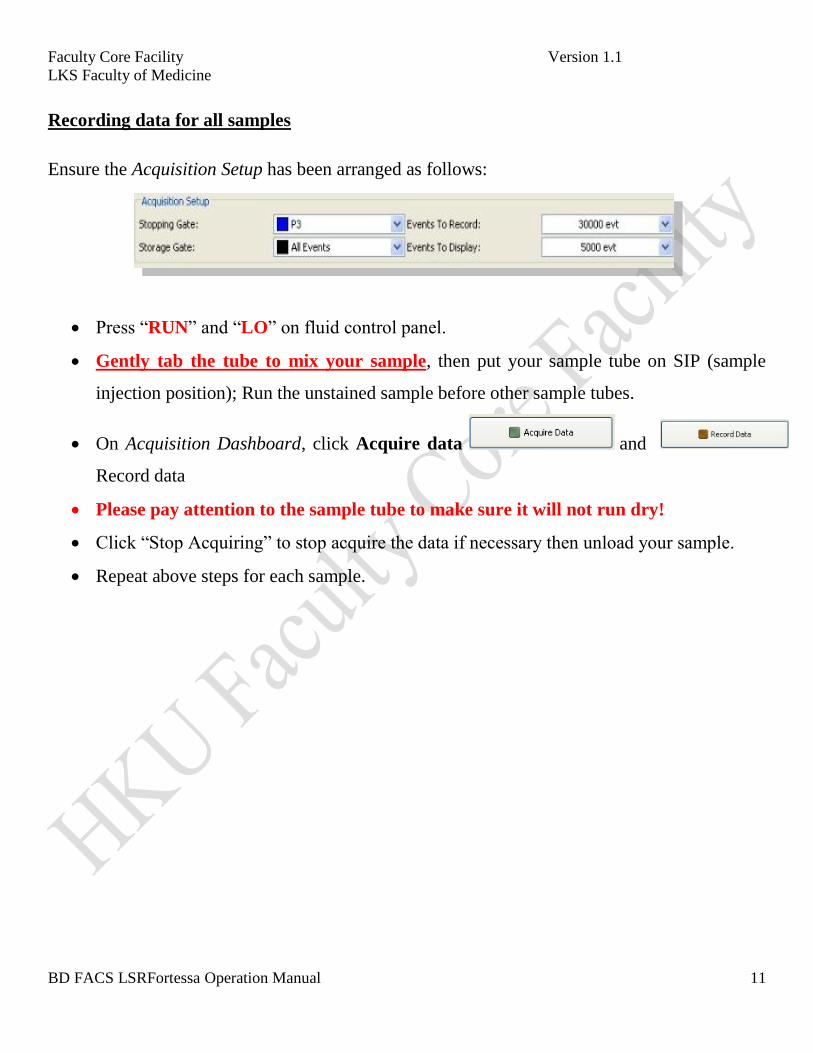
Recording data for all samples
Ensure the Acquisition Setup has been arranged as follows:
Press “RUN” and “LO” on fluid control panel.
Gently tab the tube to mix your sample, then put your sample tube on SIP (sample
injection position); Run the unstained sample before other sample tubes.
On Acquisition Dashboard, click Acquire data and
Record data
Please pay attention to the sample tube to make sure it will not run dry!
Click “Stop Acquiring” to stop acquire the data if necessary then unload your sample.
Repeat above steps for each sample.
Faculty Core Facility Version 1.1
LKS Faculty of Medicine
BD FACS LSRFortessa Operation Manual
12
Cleaning the System
To do cleaning step by step (HI, 3, 1, 5, 2, DI):
Cleaning procedure between each user is required.
• Press RUN and HI on the cytometer fluid control panel.
• Prepare 3 mL of cleaning solution (FACS Clean, FACS Rinse, DI H2O)
• Install a tube of FACS Clean solution on the SIP with the support arm to the side
(vacuum on) and let it run for 1 minute.
• Move the tube support arm under the tube (vacuum off) and allow the cleaning solution
to run for 5 minutes with the sample flow rate set to HI.
• Repeat steps 2 and 3 with BD™ FACSRinse solution.
• Repeat steps 2 and 3 with DI water.
• Remove the DI water tube from the SIP.
• Move the tube support arm to the side.
• Press the PRIME button on the fluidics control panel.
• When the STNDBY button lights (amber), press the PRIME button again.
• Place a tube containing 1 mL of DI water on the SIP.
• Press the STNDBY button on the fluidics control panel.
Faculty Core Facility Version 1.1
LKS Faculty of Medicine
BD FACS LSRFortessa Operation Manual
13
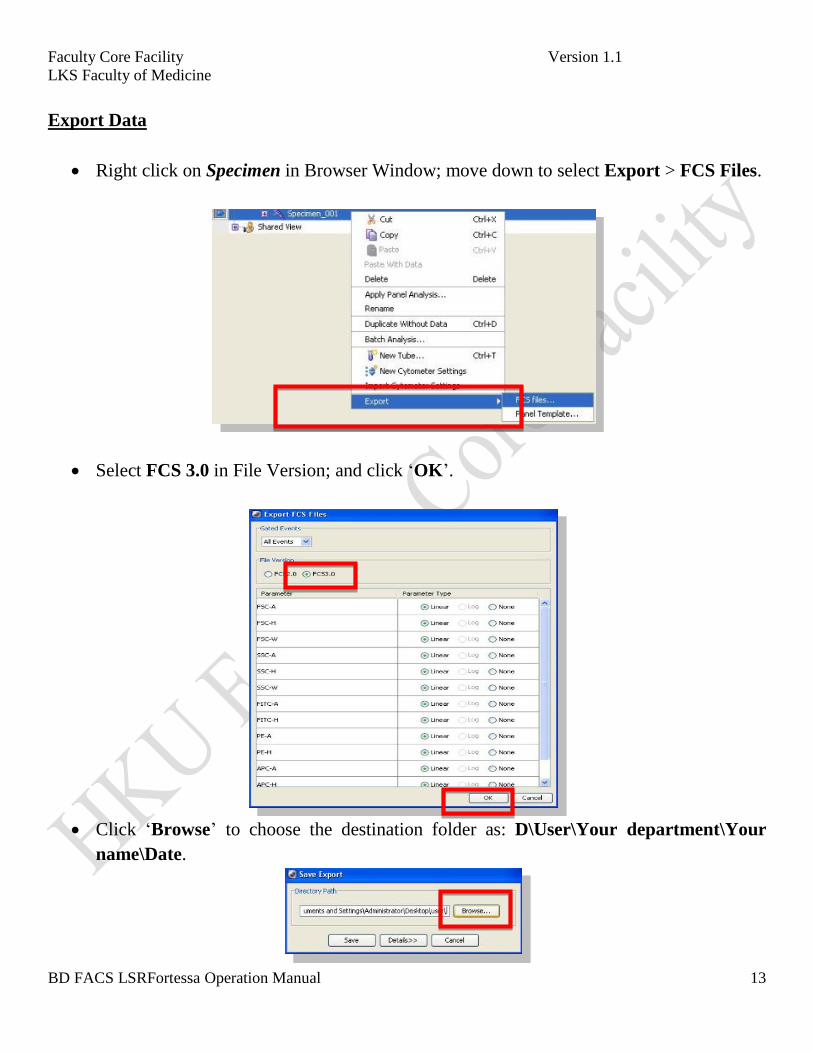
Export Data
Right click on Specimen in Browser Window; move down to select Export > FCS Files.
Select FCS 3.0 in File Version; and click ‘OK’.
Click ‘Browse’ to choose the destination folder as: D\User\Your department\Your
name\Date.
Faculty Core Facility Version 1.1
LKS Faculty of Medicine
BD FACS LSRFortessa Operation Manual
14
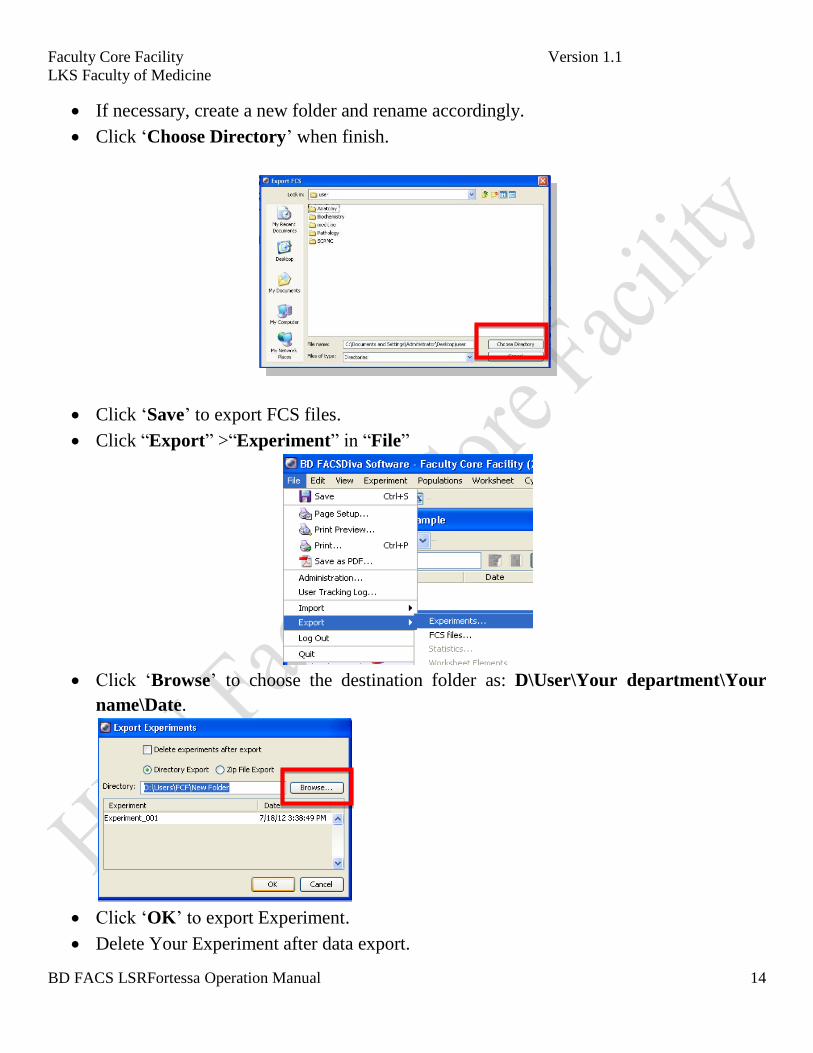
If necessary, create a new folder and rename accordingly.
Click ‘Choose Directory’ when finish.
Click ‘Save’ to export FCS files.
Click “Export” >“Experiment” in “File”
Click ‘Browse’ to choose the destination folder as: D\User\Your department\Your
name\Date.
Click ‘OK’ to export Experiment.
Delete Your Experiment after data export.
Faculty Core Facility Version 1.1
LKS Faculty of Medicine
BD FACS LSRFortessa Operation Manual
15
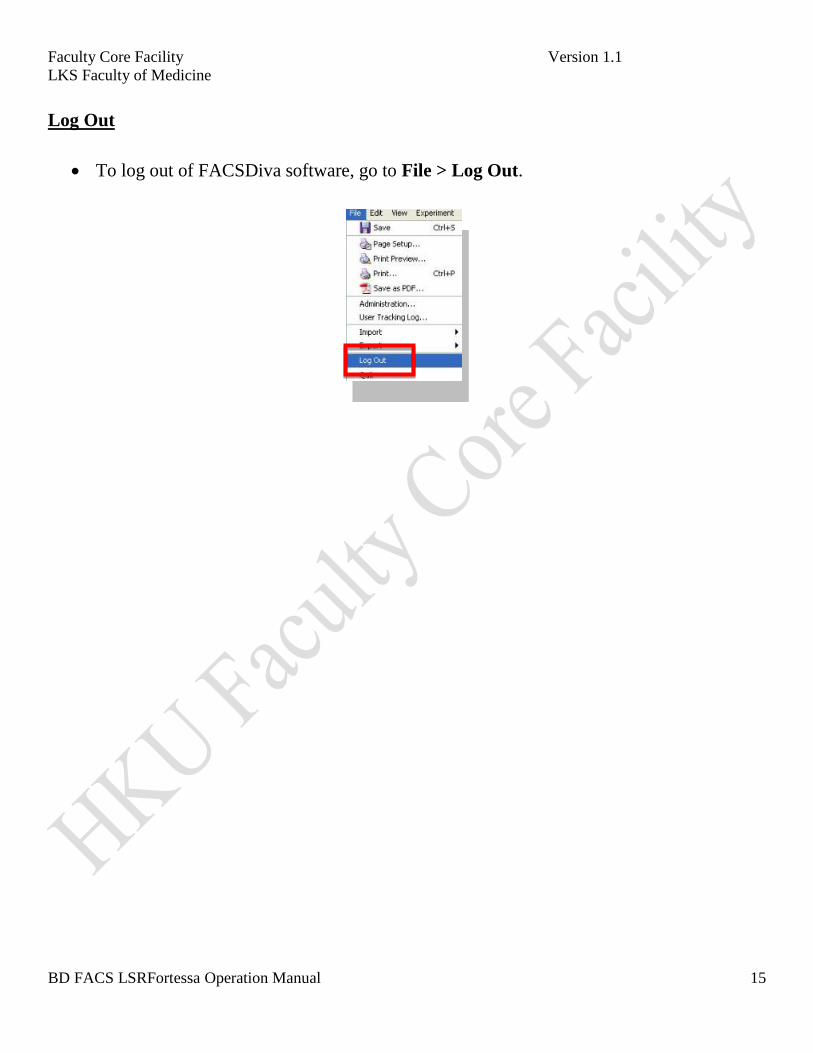
Log Out
To log out of FACSDiva software, go to File > Log Out.
Faculty Core Facility Version 1.1
LKS Faculty of Medicine
BD FACS LSRFortessa Operation Manual
16
Attachment 1
BD FACS LSR Fortessa Standard Operation Protocol
--- Empty Waste Tank
Faculty Core Facility Version 1.1
LKS Faculty of Medicine
BD FACS LSRFortessa Operation Manual
17
Attachment 2
BD FACS LSR Fortessa Standard Operation Protocol
--- Refill the sheath container