Embed Size (px)
Citation preview
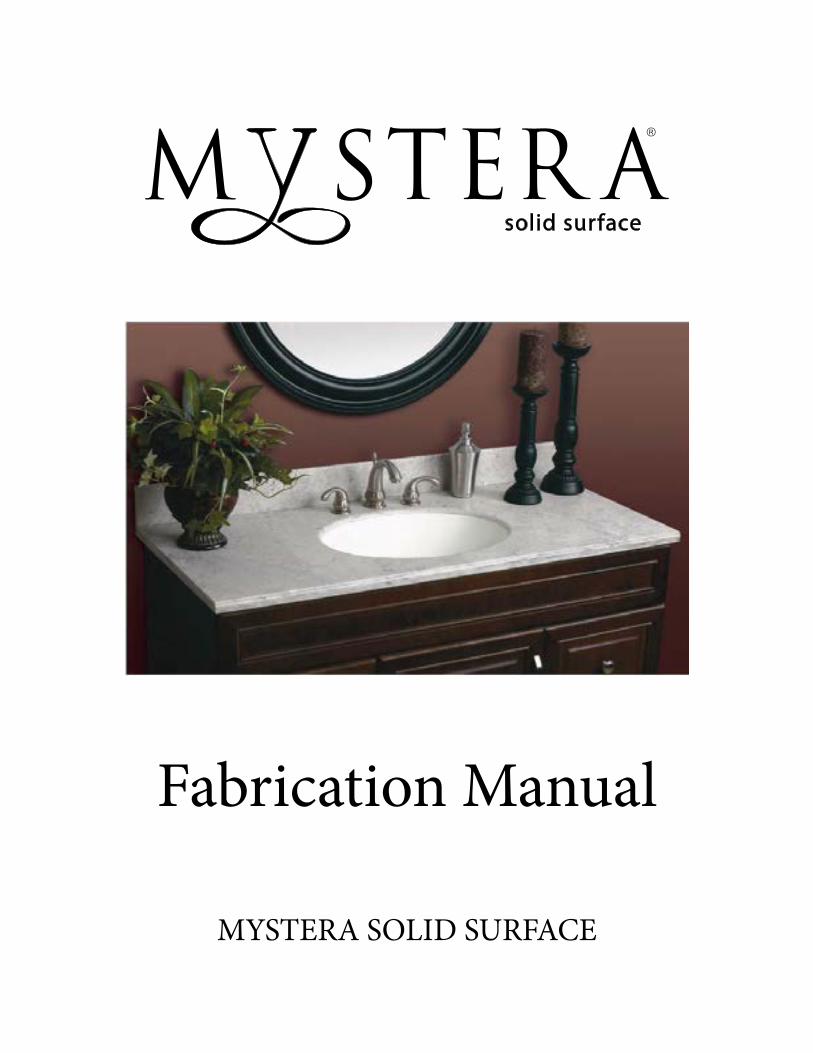
Fabrication Manual
MYSTERA SOLID SURFACE
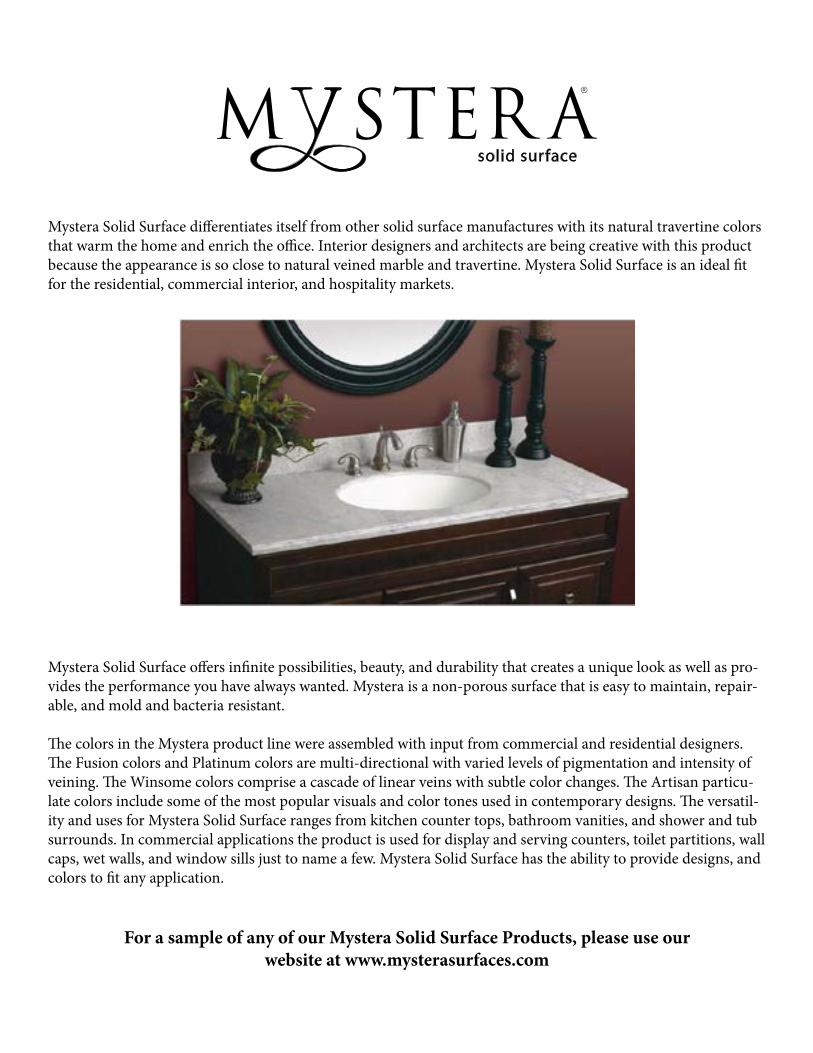
Mystera Solid Surface differentiates itself from other solid surface manufactures with its natural travertine colors that warm the home and enrich the office. Interior designers and architects are being creative with this product because the appearance is so close to natural veined marble and travertine. Mystera Solid Surface is an ideal fit for the residential, commercial interior, and hospitality markets.
Mystera Solid Surface offers infinite possibilities, beauty, and durability that creates a unique look as well as pro-vides the performance you have always wanted. Mystera is a non-porous surface that is easy to maintain, repair-able, and mold and bacteria resistant.
The colors in the Mystera product line were assembled with input from commercial and residential designers. The Fusion colors and Platinum colors are multi-directional with varied levels of pigmentation and intensity of veining. The Winsome colors comprise a cascade of linear veins with subtle color changes. The Artisan particu-late colors include some of the most popular visuals and color tones used in contemporary designs. The versatil-ity and uses for Mystera Solid Surface ranges from kitchen counter tops, bathroom vanities, and shower and tub surrounds. In commercial applications the product is used for display and serving counters, toilet partitions, wall caps, wet walls, and window sills just to name a few. Mystera Solid Surface has the ability to provide designs, and colors to fit any application.
For a sample of any of our Mystera Solid Surface Products, please use our website at www.mysterasurfaces.com
3
Table of ContentsIntroduction
Summary of Testing for ISFA Performance Properties 5Color Properties 5Health & Safety Information for Sheet and Shaped Products 6
FabricationStorage 11Handling 11Transportation 12Color Matching 12Layout 13
The L-Template 13Seam Blocks 13Backsplashes 14Inside Corner Blocks 14Expansion& Contraction 14Tooling 15
Routers 15Cut Outs & Curved Cuts 15Radial Arm & Miter Box 15Table Saws 15Circular Saws with Straightedges 15
Machining Seams 16Mirror Cutting 17Wavy Bit System 17
Preparing & Using the Adhesive Cartridge & Gun 17Clamping Seams 18Mitered Deck Seams 19Drop Edges 20V-Groove/ Miter Fold and Butt Jointed Techniques 21Machining Drop Edges 22Sanding & Polishing 23
Abrasive Grade Comparison 24General Steps in the Sanding Process 25Comparison of P-Grade vs. Micron used to achieve different finishes 26
Finishing Mystera Solid Surface Material 27Matte Finish 27Satin Finish 27Semi-Gloss Finish 27Gloss Finish 27Helpful Tips 27
Continued on Page 4
4
InstallationClearances 28Substrates 28Lattice Method 28Runner Method 29Adhering Solid Surface to Substrates 29Securing Top to Cabinets 30Using Flexible Adhesives 30Cook top Cut Outs 30Cook top and Backsplash Clearance 31
Heat Reflective Tape 31Making Field Seams 32Commercial Hotwell Food Service Countertops 32Overhangs 33General Fabrication Principals 34Sink & Bowl Installation 35
Positioning and Preparation 35Bonding 35Shaping the Edge 36Alternative Mounting Hardware 36
Vertical Installation 37Surface Preparation 37Scribing and Cut-outs for Wall Panels 37Adhering Wall Panels to Subsurface 37Seaming Wall Panels 37Soft Seams 37Hard Seams 37
Special ApplicationsThermoforming 38
Safety Practices 38Thermoforming Parameters 38
Repairs 38
Support MaterialsRoutine Care & Maintenance 39Mystera Solid Surface Sheets 10-Year Limited Warranty for U.S. 40Disclaimer 42
5
INTRODUCTION
Summary of Testing for ISFA Performance Properties
The International Surface Fabricators Association has established standards for solid surfacing materials. The standard provides definitions and performance expectations for sold surface materials. Here is extracted from the ISFA Standard, ISFA 2-01 (2013) Classification and Standards for Solid Surfacing Material, the definition of “Standard Type” solid surface materials:
“1.3.1 Standard Type Standard Type solid surface sheets are designed for horizontal, vertical, wet, and dry appli-cations. Standard Type solid surface sheets do not require a full substrate to perform in horizontal applications. Standard Type solid surface sheets typically exhibit optimal performance and engineering characteristics.”
Mystera Solid Surface complies with all requirements for Standard Type solid surface products according to ISFA 2-10 (3013), Classification and Standards for Solid Surfacing Material.
Color Properties
Mystera Solid Surface products are a hard, non-porous material that is mold, stain and fire resistant. Veined colors will have a veining pattern that is unique. No two sheets will have exactly the same pattern. Slight shading, tone and pattern differences may occur from sheet to sheet as they would in the natural state. Samples are used to give the customer a good representation of the background color, veining color and general veining pattern, but no sample can exactly represent the conditions that will exist in a full sheet of material. Color selection from a sample chip must be verified by the fabricator and the end-user on the actual sheets to be used for a job. Sheet stock color must be approved before fabrication begins. Mystera Solid Surface will not warranty any claims regarding color or pattern once the material has been cut. Customers must be made aware of the maintenance requirements for dark and/or polished materials at the “Point of Sale”. An option is to establish a maintenance contract with the customer, where the fabricator will restore the look of the material for an agreed upon time line (i.e.: yearly, semi-annually, etc.)
Because of the unique pattern of the vein from sheet to sheet, seams will not match the vein, just as in fabricated natural stone seams. Mystera Solid Surface WILL NOT BE RESPONSIBLE IF A CUSTOMER DOES NOT UN-DERSTAND THE LOOKS OF A SEAM IN A RANDOM PATTERN MATERIAL.
Mystera particulate solid surface colors are monolithic with colors and designs that offer little variation from sheet to sheet.
All solid surface products will scratch if not protected. Darker colors will require more maintenance to maintain their look than lighter colors. Mystera Solid Surfaces will retain their original look with a small degree of main-tenance. Customers should be made aware of the care and maintenance section of the fabrication manual so that they can maintain the desired look with minimal effort.

6
Health & Safety Information for Sheet and Shaped Products
MATERIAL SAFETY DATA SHEET (MSDS)
SECTION I – CHEMICAL PRODUCT AND COMPANY INFORMATION
Product Name: Mystera Acrylic Solid Surface Sheets
Manufacturer: GSP Surfaces
9810 E. 42nd Street, Suite 220 Tulsa, OK 74146
SECTION II – COMPOSITION AND INFORMATION ON INGREDIANTS
COMPONENTS CAS# Acrylic Polymer 9011-14-7 Aluminum Hydroxide 21645-51-2
SECTION III – HEALTH HAZARD INFORMATION
EYES: Dust or small particles from cutting and sanding may irritate the eyes.
SKIN: Any sharp edge may cut the skin.
RESPIRATORY TRACT: Dust generated during fabrication or exposure to fumes from
overheating or combustion may cause irritation.
INGESTION: Not applicable
FIRST AID:
EYES: Rinse thoroughly with plenty of water, also under eyelids.
SKIN: Typical first aid for cuts.
INHALATION: Move to fresh air.
INGESTION: No hazards which require first aid measures
7
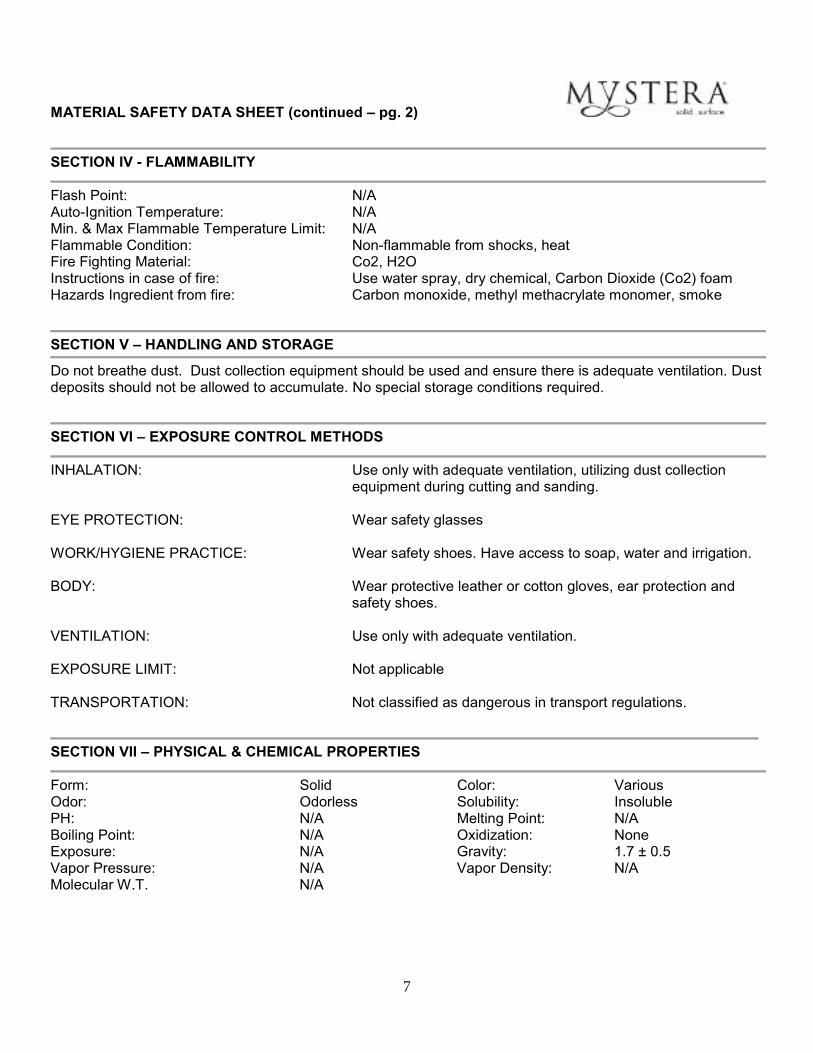
MATERIAL SAFETY DATA SHEET (continued – pg. 2)
SECTION IV - FLAMMABILITY
Flash Point: N/A Auto-Ignition Temperature: N/A Min. & Max Flammable Temperature Limit: N/A Flammable Condition: Non-flammable from shocks, heat Fire Fighting Material: Co2, H2O Instructions in case of fire: Use water spray, dry chemical, Carbon Dioxide (Co2) foam Hazards Ingredient from fire: Carbon monoxide, methyl methacrylate monomer, smoke
SECTION V – HANDLING AND STORAGE
Do not breathe dust. Dust collection equipment should be used and ensure there is adequate ventilation. Dust deposits should not be allowed to accumulate. No special storage conditions required.
SECTION VI – EXPOSURE CONTROL METHODS
INHALATION: Use only with adequate ventilation, utilizing dust collection
equipment during cutting and sanding.
EYE PROTECTION: Wear safety glasses
WORK/HYGIENE PRACTICE: Wear safety shoes. Have access to soap, water and irrigation. BODY: Wear protective leather or cotton gloves, ear protection and
safety shoes.
VENTILATION: Use only with adequate ventilation.
EXPOSURE LIMIT: Not applicable TRANSPORTATION: Not classified as dangerous in transport regulations.
SECTION VII – PHYSICAL & CHEMICAL PROPERTIES
Form: Solid Color: Various Odor: Odorless Solubility: Insoluble PH: N/A Melting Point: N/A Boiling Point: N/A Oxidization: None Exposure: N/A Gravity: 1.7 ± 0.5 Vapor Pressure: N/A Vapor Density: N/A Molecular W.T. N/A
8
MATERIAL SAFETY DATA SHEET (continued – pg. 3)
SECTION VIII – STABILITY & REACTIVITY DATA
Stability: Stable under normal conditions Instable Conditions: Extreme heat, Spark and fire Hazards Reaction: None Hazardous Decomposition Product: Carbon monoxide, methyl methacrylate monomer
SECTION IX – TOXICOLOGICAL INFORMATION
Toxicity to Humans: NON TOXIC
SECTION X – ECOLOGICAL INFORMATION
Ecological Affect: This product has no known eco-toxicological effects
SECTION XI – DISPOSAL and TRANSPORT
Waste Disposal: Can be landfilled or incinerated, when in compliance with local
regulations.
Transport Information: Not classified as dangerous in the meaning of transport regulations.
SECTION XII – OTHER INFORMATION
Edition Reference: OSHA
SECTION X– DISCLAIMER
The information and statements in the MSDS sheets were obtained from sources which we believe are reliable.
However, the information is provided without any representation or warranty, expressed or implied, regarding its accuracy or completeness. User should undertake sufficient verification and testing to determine the suitability of a particular purpose of any information or products referred to herein.
9
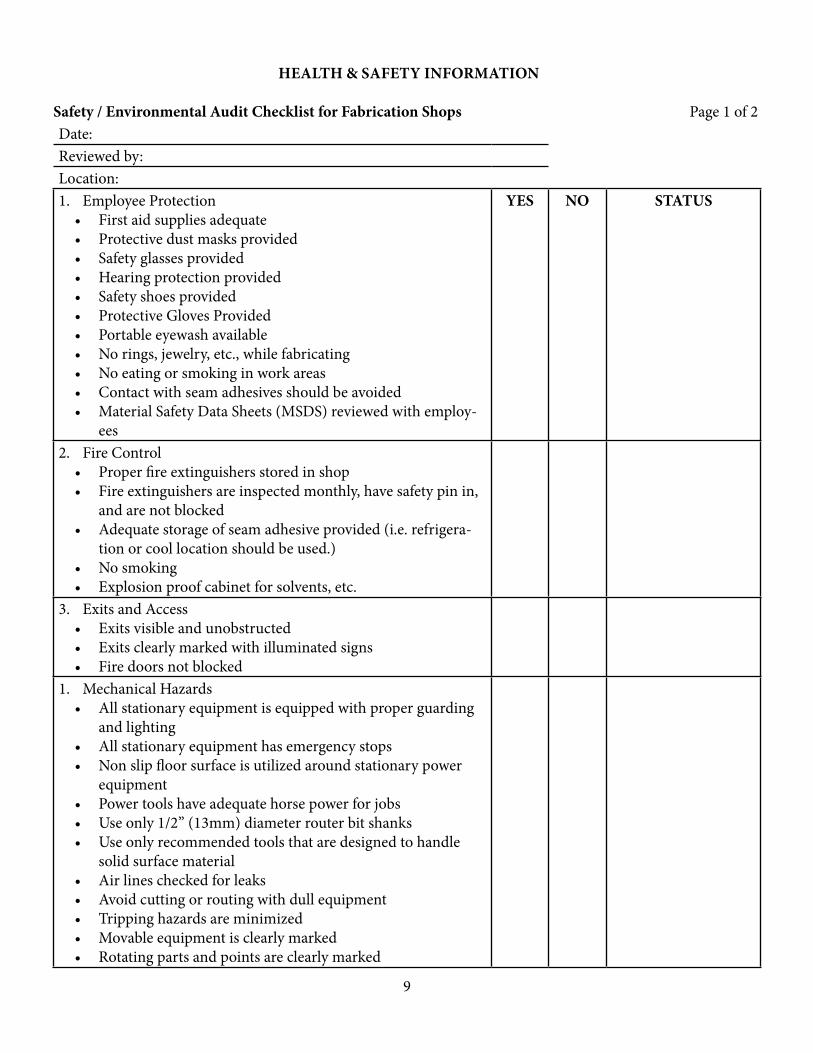
HEALTH & SAFETY INFORMATION
Safety / Environmental Audit Checklist for Fabrication Shops Page 1 of 2Date:Reviewed by:Location:1. Employee Protection
• First aid supplies adequate• Protective dust masks provided• Safety glasses provided• Hearing protection provided• Safety shoes provided• Protective Gloves Provided• Portable eyewash available• No rings, jewelry, etc., while fabricating• No eating or smoking in work areas• Contact with seam adhesives should be avoided• Material Safety Data Sheets (MSDS) reviewed with employ-
ees
YES NO STATUS
2. Fire Control• Proper fire extinguishers stored in shop• Fire extinguishers are inspected monthly, have safety pin in,
and are not blocked• Adequate storage of seam adhesive provided (i.e. refrigera-
tion or cool location should be used.)• No smoking• Explosion proof cabinet for solvents, etc.
3. Exits and Access• Exits visible and unobstructed• Exits clearly marked with illuminated signs• Fire doors not blocked
1. Mechanical Hazards• All stationary equipment is equipped with proper guarding
and lighting• All stationary equipment has emergency stops• Non slip floor surface is utilized around stationary power
equipment• Power tools have adequate horse power for jobs• Use only 1/2” (13mm) diameter router bit shanks• Use only recommended tools that are designed to handle
solid surface material• Air lines checked for leaks• Avoid cutting or routing with dull equipment• Tripping hazards are minimized• Movable equipment is clearly marked• Rotating parts and points are clearly marked
10
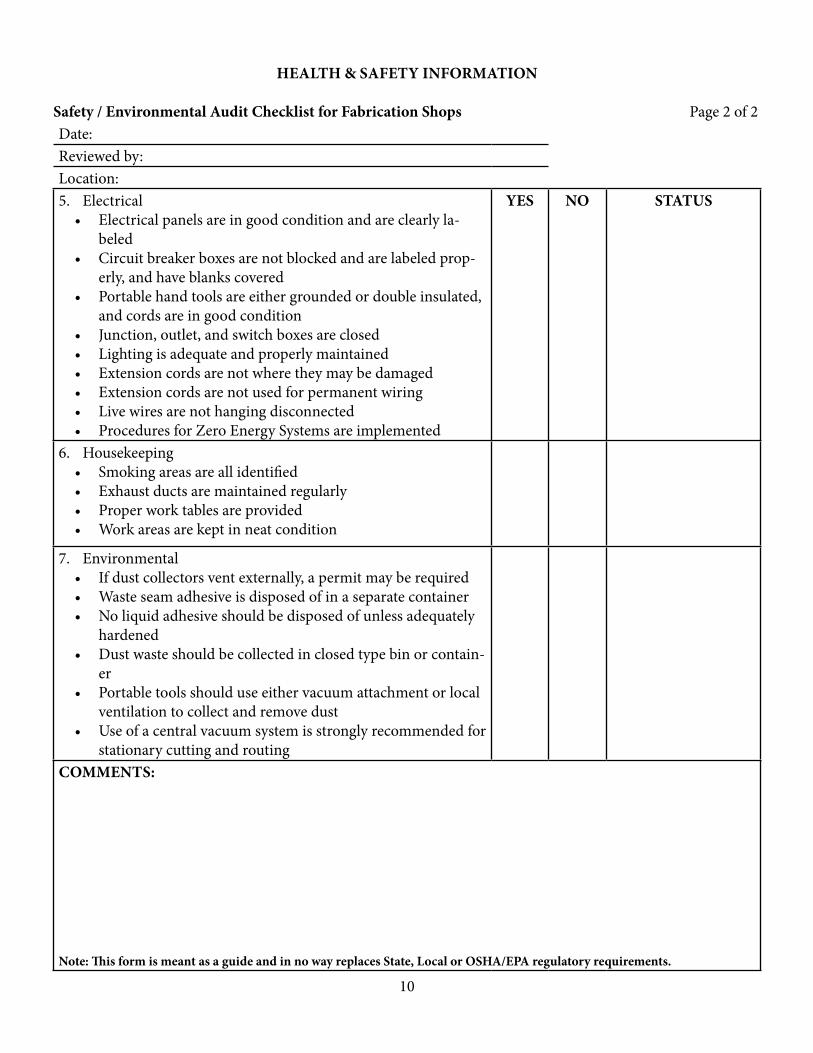
HEALTH & SAFETY INFORMATION
Safety / Environmental Audit Checklist for Fabrication Shops Page 2 of 2Date:Reviewed by:Location:5. Electrical
• Electrical panels are in good condition and are clearly la-beled
• Circuit breaker boxes are not blocked and are labeled prop-erly, and have blanks covered
• Portable hand tools are either grounded or double insulated, and cords are in good condition
• Junction, outlet, and switch boxes are closed• Lighting is adequate and properly maintained• Extension cords are not where they may be damaged• Extension cords are not used for permanent wiring• Live wires are not hanging disconnected• Procedures for Zero Energy Systems are implemented
YES NO STATUS
6. Housekeeping• Smoking areas are all identified• Exhaust ducts are maintained regularly• Proper work tables are provided• Work areas are kept in neat condition
7. Environmental• If dust collectors vent externally, a permit may be required• Waste seam adhesive is disposed of in a separate container• No liquid adhesive should be disposed of unless adequately
hardened• Dust waste should be collected in closed type bin or contain-
er• Portable tools should use either vacuum attachment or local
ventilation to collect and remove dust• Use of a central vacuum system is strongly recommended for
stationary cutting and routingCOMMENTS:
Note: This form is meant as a guide and in no way replaces State, Local or OSHA/EPA regulatory requirements.
11
FABRICATION
When you lay out your job, consider where you need to place the seams. Make as many seams as possible in the shop and not in the field. All seams must be reinforced directly under the seamed area to provide maximum strength. Avoid placing seams in the following locations:
1. Inside corners (Minimum 2” or 50mm).2. In cutouts or within 3” (75mm) of cutouts.3. Over dishwashers or other heat producing appliances.4. When using dark colors, avoid placing seams in direct sunlight.5. If a seam is required over a dishwasher, a reinforced seam is mandatory in addition to a full under-
layment of plywood or MDF, which should cover the entire dishwasher opening and be supported by the sides of the cabinets on both sides of the dishwasher opening.
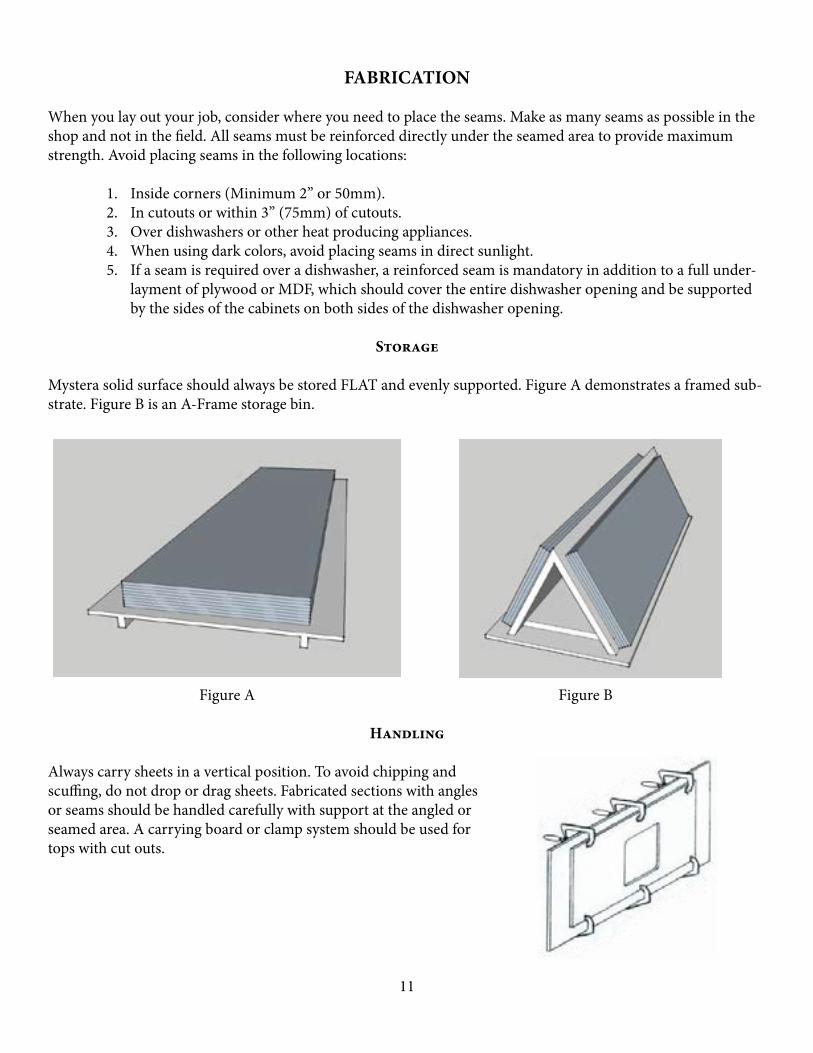
Storage
Mystera solid surface should always be stored FLAT and evenly supported. Figure A demonstrates a framed sub-strate. Figure B is an A-Frame storage bin.
Figure A Figure B
Handling
Always carry sheets in a vertical position. To avoid chipping and scuffing, do not drop or drag sheets. Fabricated sections with angles or seams should be handled carefully with support at the angled or seamed area. A carrying board or clamp system should be used for tops with cut outs.
12
Transportation
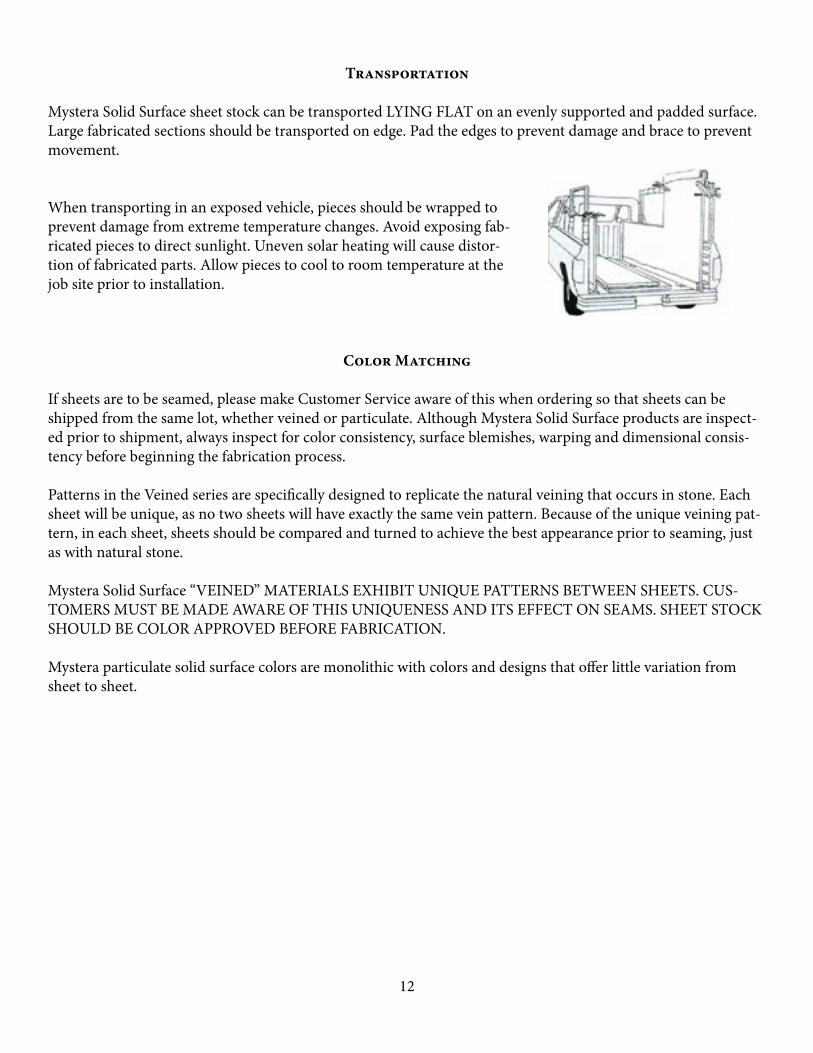
Mystera Solid Surface sheet stock can be transported LYING FLAT on an evenly supported and padded surface. Large fabricated sections should be transported on edge. Pad the edges to prevent damage and brace to prevent movement.
When transporting in an exposed vehicle, pieces should be wrapped to prevent damage from extreme temperature changes. Avoid exposing fab-ricated pieces to direct sunlight. Uneven solar heating will cause distor-tion of fabricated parts. Allow pieces to cool to room temperature at the job site prior to installation.
Color Matching
If sheets are to be seamed, please make Customer Service aware of this when ordering so that sheets can be shipped from the same lot, whether veined or particulate. Although Mystera Solid Surface products are inspect-ed prior to shipment, always inspect for color consistency, surface blemishes, warping and dimensional consis-tency before beginning the fabrication process.
Patterns in the Veined series are specifically designed to replicate the natural veining that occurs in stone. Each sheet will be unique, as no two sheets will have exactly the same vein pattern. Because of the unique veining pat-tern, in each sheet, sheets should be compared and turned to achieve the best appearance prior to seaming, just as with natural stone.
Mystera Solid Surface “VEINED” MATERIALS EXHIBIT UNIQUE PATTERNS BETWEEN SHEETS. CUS-TOMERS MUST BE MADE AWARE OF THIS UNIQUENESS AND ITS EFFECT ON SEAMS. SHEET STOCK SHOULD BE COLOR APPROVED BEFORE FABRICATION.
Mystera particulate solid surface colors are monolithic with colors and designs that offer little variation from sheet to sheet.
13
Layout
The L-Template:
The L-Template is a convenient way to fabricate the L or U shaped counter top.
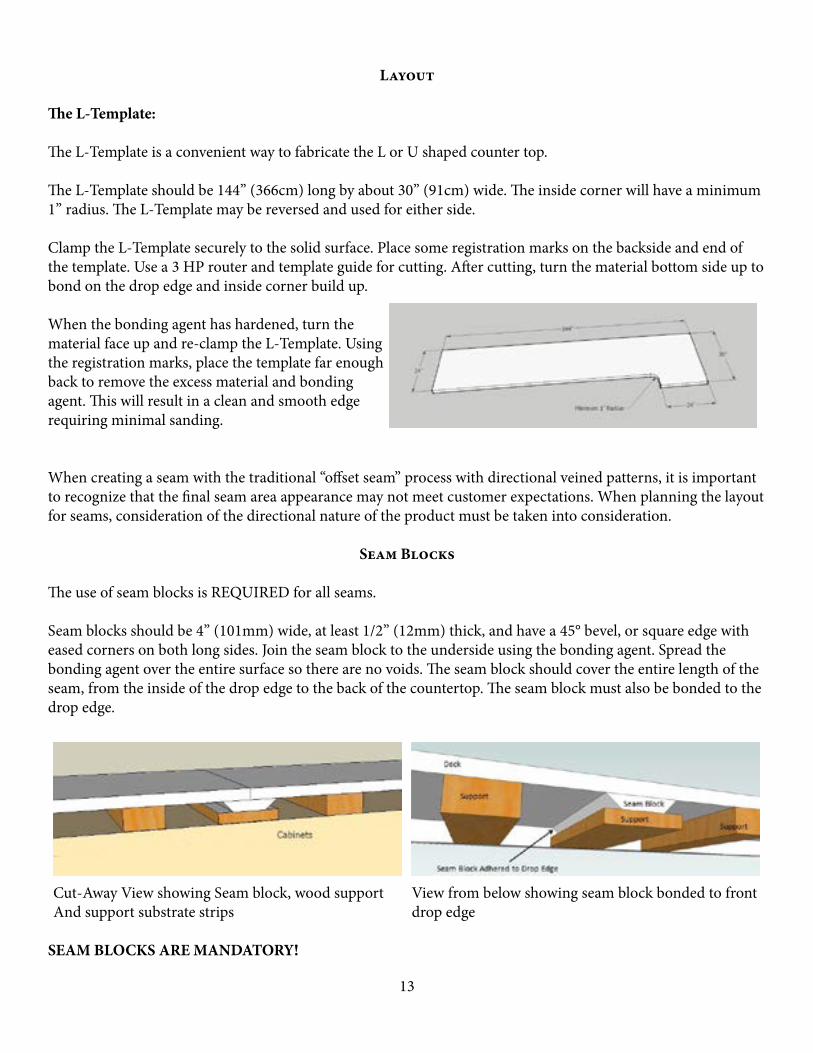
The L-Template should be 144” (366cm) long by about 30” (91cm) wide. The inside corner will have a minimum 1” radius. The L-Template may be reversed and used for either side.
Clamp the L-Template securely to the solid surface. Place some registration marks on the backside and end of the template. Use a 3 HP router and template guide for cutting. After cutting, turn the material bottom side up to bond on the drop edge and inside corner build up.
When the bonding agent has hardened, turn the material face up and re-clamp the L-Template. Using the registration marks, place the template far enough back to remove the excess material and bonding agent. This will result in a clean and smooth edge requiring minimal sanding.
When creating a seam with the traditional “offset seam” process with directional veined patterns, it is important to recognize that the final seam area appearance may not meet customer expectations. When planning the layout for seams, consideration of the directional nature of the product must be taken into consideration.
Seam Blocks
The use of seam blocks is REQUIRED for all seams.
Seam blocks should be 4” (101mm) wide, at least 1/2” (12mm) thick, and have a 45° bevel, or square edge with eased corners on both long sides. Join the seam block to the underside using the bonding agent. Spread the bonding agent over the entire surface so there are no voids. The seam block should cover the entire length of the seam, from the inside of the drop edge to the back of the countertop. The seam block must also be bonded to the drop edge.
Cut-Away View showing Seam block, wood support And support substrate strips
View from below showing seam block bonded to front drop edge
SEAM BLOCKS ARE MANDATORY!
14
Backsplashes
Silicone, not grout, must be used where tile meets the Mystera product. Backsplashes should comply with the same clearance requirements as countertops.
Inside Corner Blocks
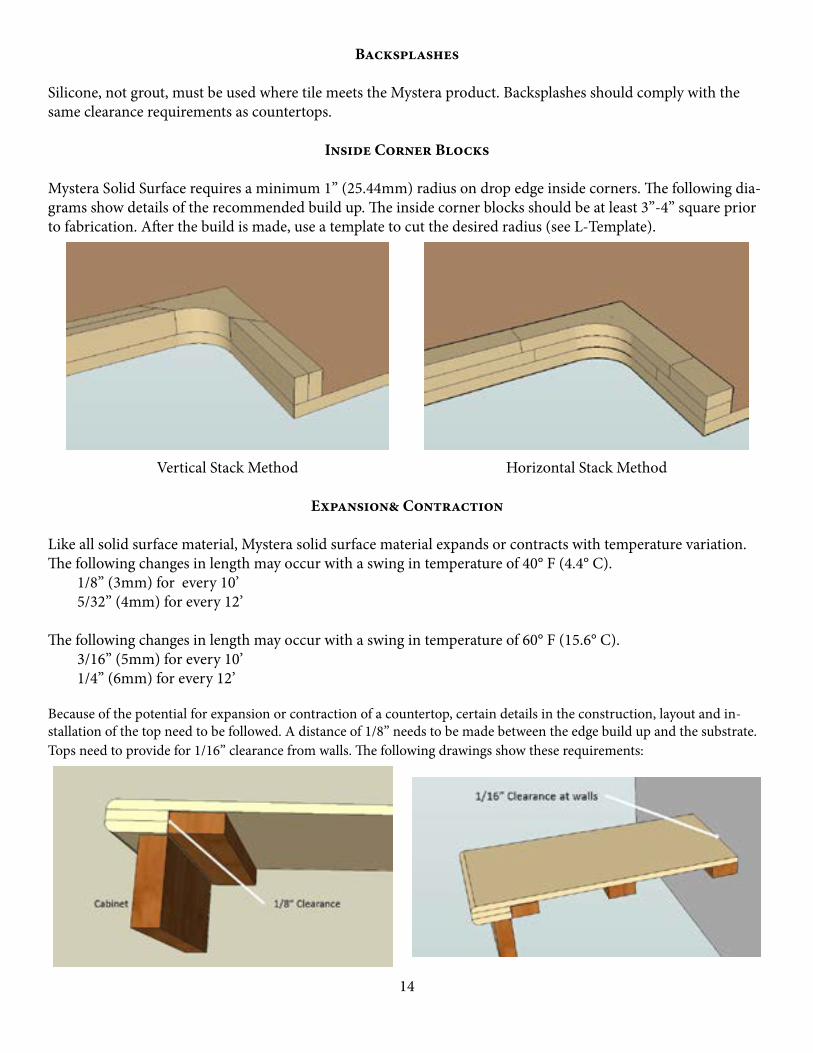
Mystera Solid Surface requires a minimum 1” (25.44mm) radius on drop edge inside corners. The following dia-grams show details of the recommended build up. The inside corner blocks should be at least 3”-4” square prior to fabrication. After the build is made, use a template to cut the desired radius (see L-Template).
Vertical Stack Method Horizontal Stack Method
Expansion& Contraction
Like all solid surface material, Mystera solid surface material expands or contracts with temperature variation. The following changes in length may occur with a swing in temperature of 40° F (4.4° C).
1/8” (3mm) for every 10’ 5/32” (4mm) for every 12’
The following changes in length may occur with a swing in temperature of 60° F (15.6° C).3/16” (5mm) for every 10’ 1/4” (6mm) for every 12’
Because of the potential for expansion or contraction of a countertop, certain details in the construction, layout and in-stallation of the top need to be followed. A distance of 1/8” needs to be made between the edge build up and the substrate. Tops need to provide for 1/16” clearance from walls. The following drawings show these requirements:
15
Tooling
Mystera solid surface material can be easily machined with ordinary woodworking tools, such as routers, saws, planers, lathes, drills and sanders. All blades and bits should be carbide tipped.
Routers:
For general purpose routing, a 1 1/2 to 2 HP router may be used. For heavier cutting of thick edges and cut outs a 3 1/4 HP router is recommended. A 1/2” (12mm) shank carbide bit is needed to minimize chatter for all routing with the exception of small details like a 1/4” (6.3mm) round over or a pin stripe inlay. In some circumstances a 3/8” single flute carbide bit can be used for utility cutting with a router. The reduced width saves material and energy on the cut and for most cases produces a fine quality cut. With a good router & straightedge system, the 3/8” bit can produce a seam-quality cut. Most manufacturers still recommend a double-fluted ½” bit for produc-ing seams. This is a safe recommendation in order to help emphasize the need for a high quality cut for a seam.Mystera solid surface material should be properly supported during all phases of fabrication.
Cut Outs & Curved Cuts:
A template and a router are mandatory for all cutouts. The use of a saber saw, hole saws, reciprocating saws and similar equipment will leave a rough edge where stress cracks can occur. Use a template for all inside and outside corner radiuses.
Two square feet of original color matched material must be left on the job site in case of the need for future repairs. This material should be placed under a bottom drawer or mounted to the inside of the sink cabinet. Hot surface trivets do not meet this requirement.
Radial Arm & Miter Box:
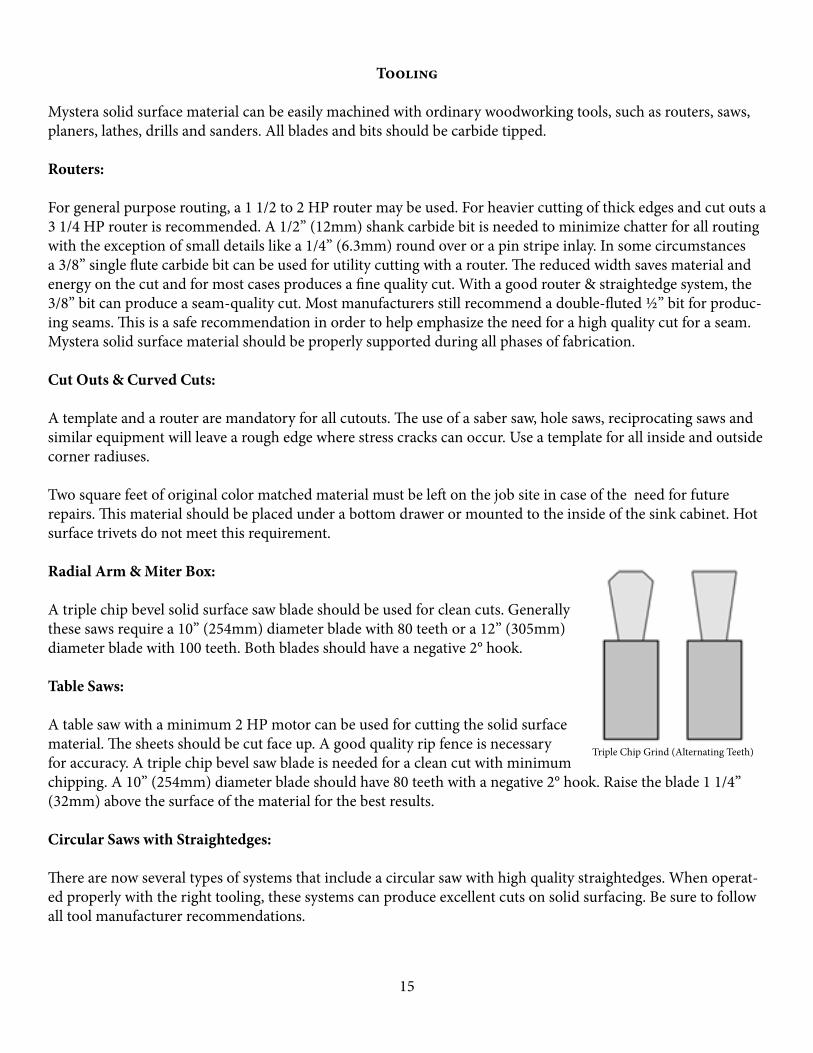
A triple chip bevel solid surface saw blade should be used for clean cuts. Generally these saws require a 10” (254mm) diameter blade with 80 teeth or a 12” (305mm) diameter blade with 100 teeth. Both blades should have a negative 2° hook.
Table Saws:
A table saw with a minimum 2 HP motor can be used for cutting the solid surface material. The sheets should be cut face up. A good quality rip fence is necessary for accuracy. A triple chip bevel saw blade is needed for a clean cut with minimum chipping. A 10” (254mm) diameter blade should have 80 teeth with a negative 2° hook. Raise the blade 1 1/4” (32mm) above the surface of the material for the best results.
Circular Saws with Straightedges:
There are now several types of systems that include a circular saw with high quality straightedges. When operat-ed properly with the right tooling, these systems can produce excellent cuts on solid surfacing. Be sure to follow all tool manufacturer recommendations.
Triple Chip Grind (Alternating Teeth)
16
Machining Seams
With the variety of bits, blades, routers and saws available, it is essential to understand the required characteris-tics of a well-machined cut. Essentially the requirements are:
• Straight – Each face of adjoining pieces to be seamed must be perfectly straight and meet together with no gaps.
• Square – Each cut must be square to the face of the sheet. Back-beveled cuts are unacceptable.• No Chatter – Bits or blades used to make seam cuts must be very sharp and be appropriate for
cutting solid surface materials. Equipment must be in excellent working order, with no “wobble” or run out. Equipment must also be powerful enough to easily cut through the material being machined.
• Clean – All surfaces to be seamed must be totally free of any foreign substances before being bonded.
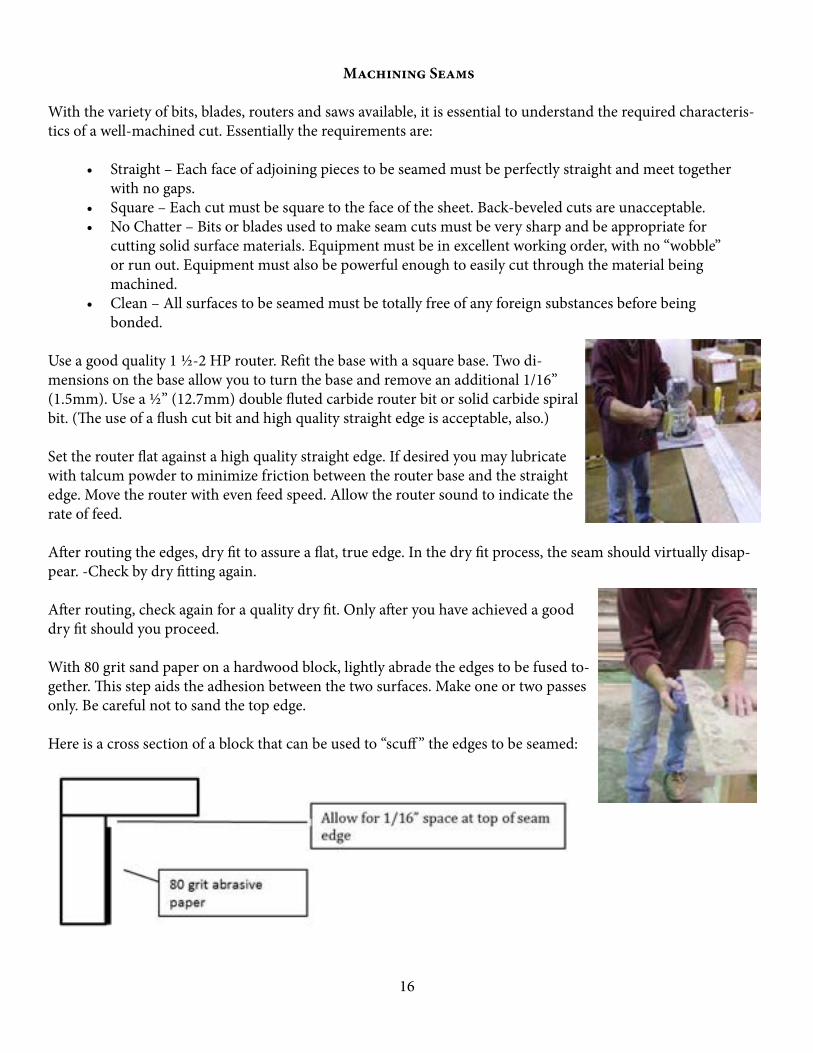
Use a good quality 1 ½-2 HP router. Refit the base with a square base. Two di-mensions on the base allow you to turn the base and remove an additional 1/16” (1.5mm). Use a ½” (12.7mm) double fluted carbide router bit or solid carbide spiral bit. (The use of a flush cut bit and high quality straight edge is acceptable, also.)
Set the router flat against a high quality straight edge. If desired you may lubricate with talcum powder to minimize friction between the router base and the straight edge. Move the router with even feed speed. Allow the router sound to indicate the rate of feed.
After routing the edges, dry fit to assure a flat, true edge. In the dry fit process, the seam should virtually disap-pear. -Check by dry fitting again.
After routing, check again for a quality dry fit. Only after you have achieved a good dry fit should you proceed.
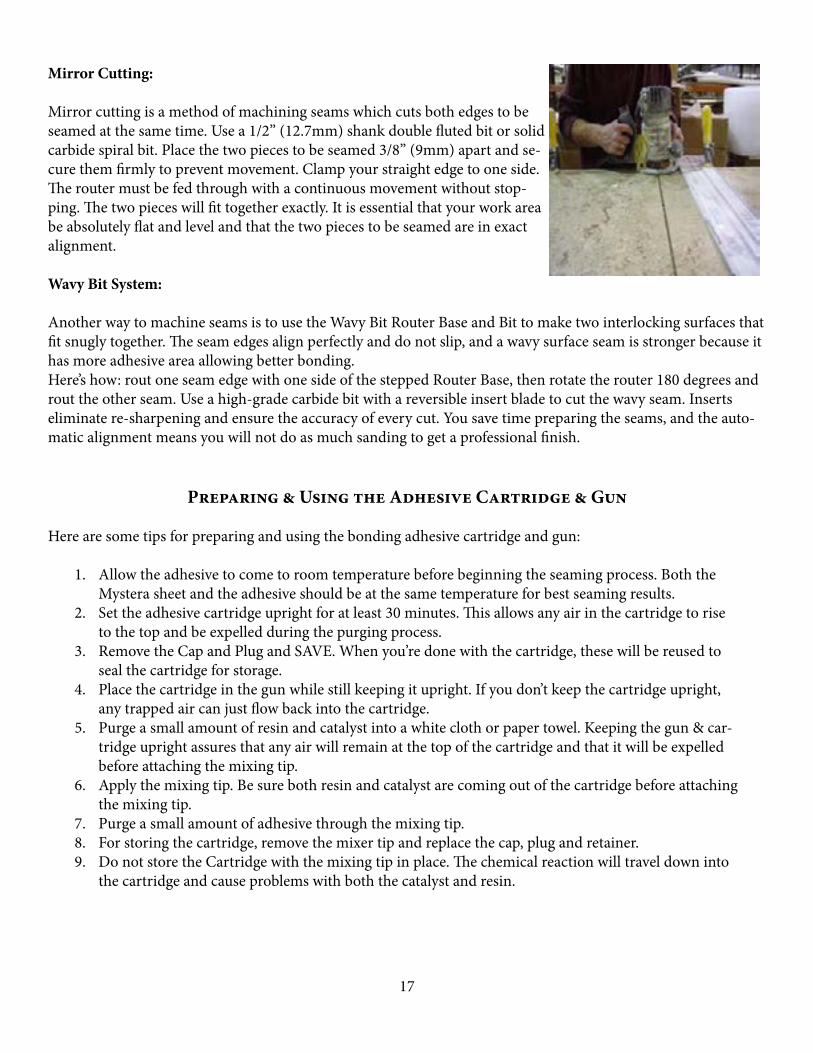
With 80 grit sand paper on a hardwood block, lightly abrade the edges to be fused to-gether. This step aids the adhesion between the two surfaces. Make one or two passes only. Be careful not to sand the top edge.
Here is a cross section of a block that can be used to “scuff ” the edges to be seamed:
17
Mirror Cutting:
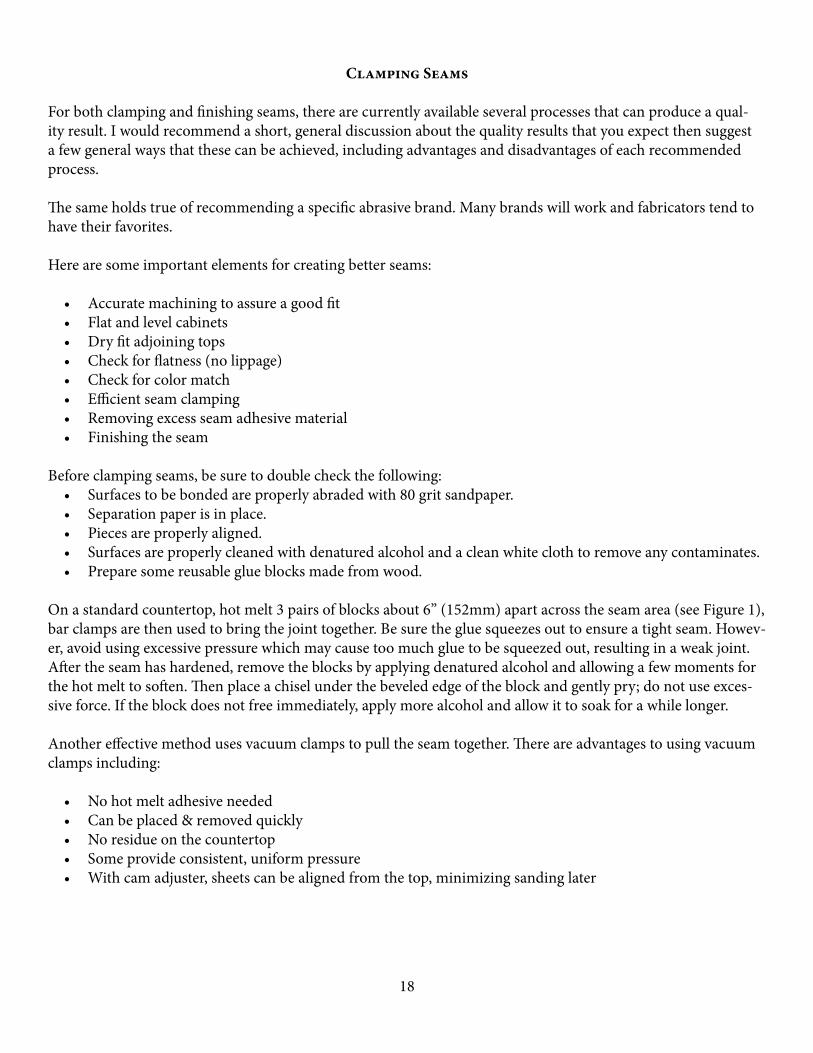
Mirror cutting is a method of machining seams which cuts both edges to be seamed at the same time. Use a 1/2” (12.7mm) shank double fluted bit or solid carbide spiral bit. Place the two pieces to be seamed 3/8” (9mm) apart and se-cure them firmly to prevent movement. Clamp your straight edge to one side. The router must be fed through with a continuous movement without stop-ping. The two pieces will fit together exactly. It is essential that your work area be absolutely flat and level and that the two pieces to be seamed are in exact alignment.
Wavy Bit System:
Another way to machine seams is to use the Wavy Bit Router Base and Bit to make two interlocking surfaces that fit snugly together. The seam edges align perfectly and do not slip, and a wavy surface seam is stronger because it has more adhesive area allowing better bonding.Here’s how: rout one seam edge with one side of the stepped Router Base, then rotate the router 180 degrees and rout the other seam. Use a high-grade carbide bit with a reversible insert blade to cut the wavy seam. Inserts eliminate re-sharpening and ensure the accuracy of every cut. You save time preparing the seams, and the auto-matic alignment means you will not do as much sanding to get a professional finish.
Preparing & Using the Adhesive Cartridge & Gun
Here are some tips for preparing and using the bonding adhesive cartridge and gun:
1. Allow the adhesive to come to room temperature before beginning the seaming process. Both the Mystera sheet and the adhesive should be at the same temperature for best seaming results.
2. Set the adhesive cartridge upright for at least 30 minutes. This allows any air in the cartridge to rise to the top and be expelled during the purging process.
3. Remove the Cap and Plug and SAVE. When you’re done with the cartridge, these will be reused to seal the cartridge for storage.
4. Place the cartridge in the gun while still keeping it upright. If you don’t keep the cartridge upright, any trapped air can just flow back into the cartridge.
5. Purge a small amount of resin and catalyst into a white cloth or paper towel. Keeping the gun & car-tridge upright assures that any air will remain at the top of the cartridge and that it will be expelled before attaching the mixing tip.
6. Apply the mixing tip. Be sure both resin and catalyst are coming out of the cartridge before attaching the mixing tip.
7. Purge a small amount of adhesive through the mixing tip.8. For storing the cartridge, remove the mixer tip and replace the cap, plug and retainer.9. Do not store the Cartridge with the mixing tip in place. The chemical reaction will travel down into
the cartridge and cause problems with both the catalyst and resin.
18
Clamping Seams
For both clamping and finishing seams, there are currently available several processes that can produce a qual-ity result. I would recommend a short, general discussion about the quality results that you expect then suggest a few general ways that these can be achieved, including advantages and disadvantages of each recommended process.
The same holds true of recommending a specific abrasive brand. Many brands will work and fabricators tend to have their favorites.
Here are some important elements for creating better seams:
• Accurate machining to assure a good fit• Flat and level cabinets• Dry fit adjoining tops• Check for flatness (no lippage)• Check for color match• Efficient seam clamping• Removing excess seam adhesive material• Finishing the seam
Before clamping seams, be sure to double check the following:• Surfaces to be bonded are properly abraded with 80 grit sandpaper.• Separation paper is in place.• Pieces are properly aligned.• Surfaces are properly cleaned with denatured alcohol and a clean white cloth to remove any contaminates.• Prepare some reusable glue blocks made from wood.
On a standard countertop, hot melt 3 pairs of blocks about 6” (152mm) apart across the seam area (see Figure 1), bar clamps are then used to bring the joint together. Be sure the glue squeezes out to ensure a tight seam. Howev-er, avoid using excessive pressure which may cause too much glue to be squeezed out, resulting in a weak joint.After the seam has hardened, remove the blocks by applying denatured alcohol and allowing a few moments for the hot melt to soften. Then place a chisel under the beveled edge of the block and gently pry; do not use exces-sive force. If the block does not free immediately, apply more alcohol and allow it to soak for a while longer.
Another effective method uses vacuum clamps to pull the seam together. There are advantages to using vacuum clamps including:
• No hot melt adhesive needed• Can be placed & removed quickly• No residue on the countertop• Some provide consistent, uniform pressure• With cam adjuster, sheets can be aligned from the top, minimizing sanding later
19
Mitered Deck Seams
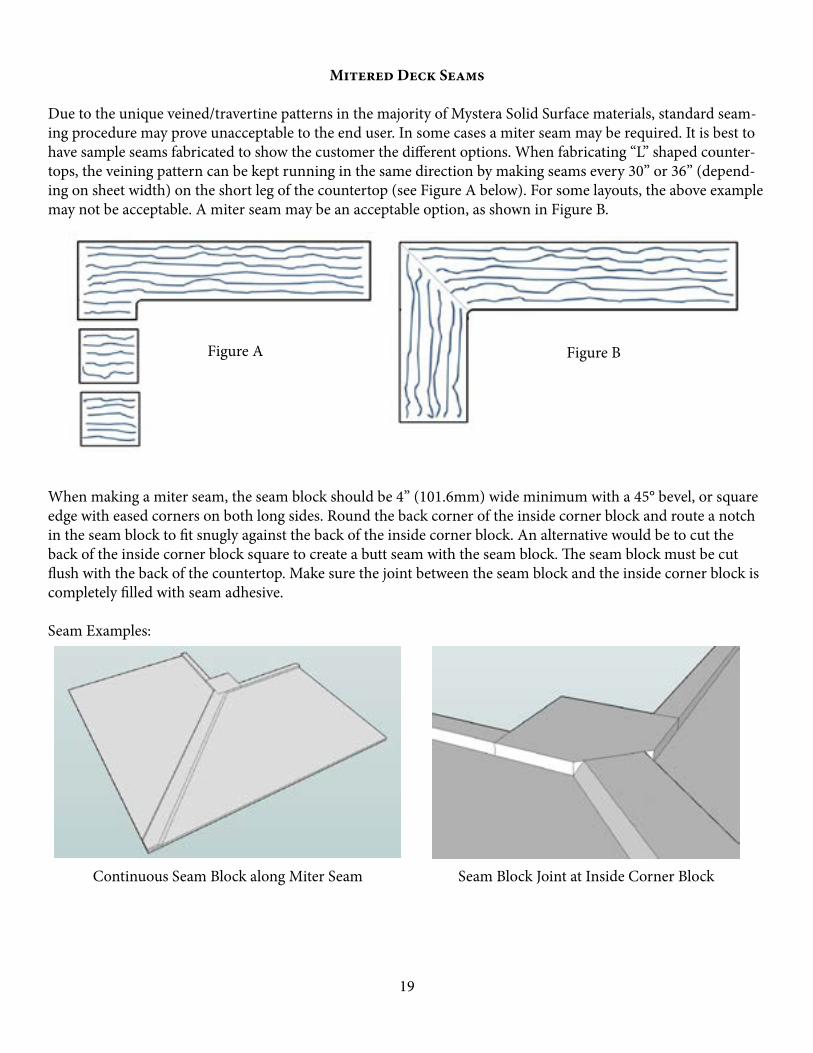
Due to the unique veined/travertine patterns in the majority of Mystera Solid Surface materials, standard seam-ing procedure may prove unacceptable to the end user. In some cases a miter seam may be required. It is best to have sample seams fabricated to show the customer the different options. When fabricating “L” shaped counter-tops, the veining pattern can be kept running in the same direction by making seams every 30” or 36” (depend-ing on sheet width) on the short leg of the countertop (see Figure A below). For some layouts, the above example may not be acceptable. A miter seam may be an acceptable option, as shown in Figure B.
When making a miter seam, the seam block should be 4” (101.6mm) wide minimum with a 45° bevel, or square edge with eased corners on both long sides. Round the back corner of the inside corner block and route a notch in the seam block to fit snugly against the back of the inside corner block. An alternative would be to cut the back of the inside corner block square to create a butt seam with the seam block. The seam block must be cut flush with the back of the countertop. Make sure the joint between the seam block and the inside corner block is completely filled with seam adhesive.
Seam Examples:
Continuous Seam Block along Miter Seam Seam Block Joint at Inside Corner Block
Figure A Figure B
20
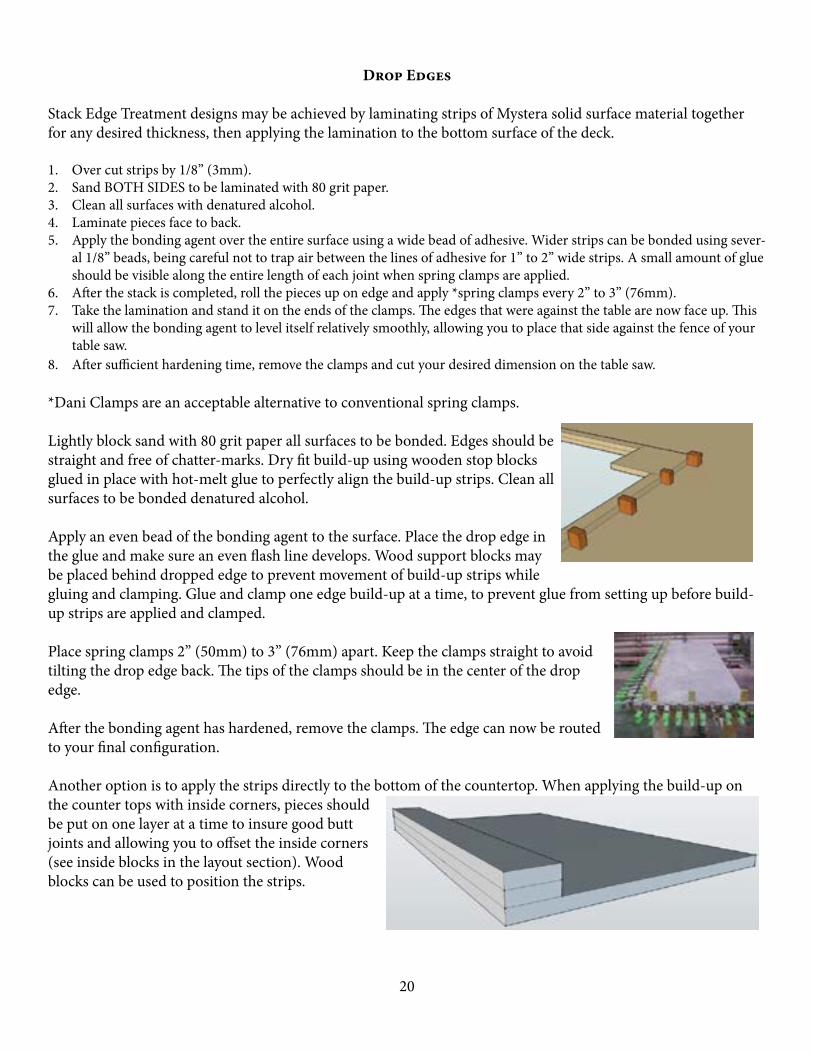
Drop Edges
Stack Edge Treatment designs may be achieved by laminating strips of Mystera solid surface material together for any desired thickness, then applying the lamination to the bottom surface of the deck.
1. Over cut strips by 1/8” (3mm).2. Sand BOTH SIDES to be laminated with 80 grit paper.3. Clean all surfaces with denatured alcohol.4. Laminate pieces face to back.5. Apply the bonding agent over the entire surface using a wide bead of adhesive. Wider strips can be bonded using sever-
al 1/8” beads, being careful not to trap air between the lines of adhesive for 1” to 2” wide strips. A small amount of glue should be visible along the entire length of each joint when spring clamps are applied.
6. After the stack is completed, roll the pieces up on edge and apply *spring clamps every 2” to 3” (76mm).7. Take the lamination and stand it on the ends of the clamps. The edges that were against the table are now face up. This
will allow the bonding agent to level itself relatively smoothly, allowing you to place that side against the fence of your table saw.
8. After sufficient hardening time, remove the clamps and cut your desired dimension on the table saw.
*Dani Clamps are an acceptable alternative to conventional spring clamps.
Lightly block sand with 80 grit paper all surfaces to be bonded. Edges should be straight and free of chatter-marks. Dry fit build-up using wooden stop blocks glued in place with hot-melt glue to perfectly align the build-up strips. Clean all surfaces to be bonded denatured alcohol.
Apply an even bead of the bonding agent to the surface. Place the drop edge in the glue and make sure an even flash line develops. Wood support blocks may be placed behind dropped edge to prevent movement of build-up strips while gluing and clamping. Glue and clamp one edge build-up at a time, to prevent glue from setting up before build-up strips are applied and clamped.
Place spring clamps 2” (50mm) to 3” (76mm) apart. Keep the clamps straight to avoid tilting the drop edge back. The tips of the clamps should be in the center of the drop edge.
After the bonding agent has hardened, remove the clamps. The edge can now be routed to your final configuration.
Another option is to apply the strips directly to the bottom of the countertop. When applying the build-up on the counter tops with inside corners, pieces should be put on one layer at a time to insure good butt joints and allowing you to offset the inside corners (see inside blocks in the layout section). Wood blocks can be used to position the strips.

21
V-Groove/ Miter Fold and Butt Jointed Techniques
Mystera Solid Surface recognizes the growing number of fabrication techniques within the solid surface industry.For those using the V-Groove/Miter Fold, or Butt Jointed methods, we would like to advise you of certain re-quirements. The section drawings below demonstrate reinforcing methods for 1 ½” drop edges and drop edges greater than 1 1/2”.
22
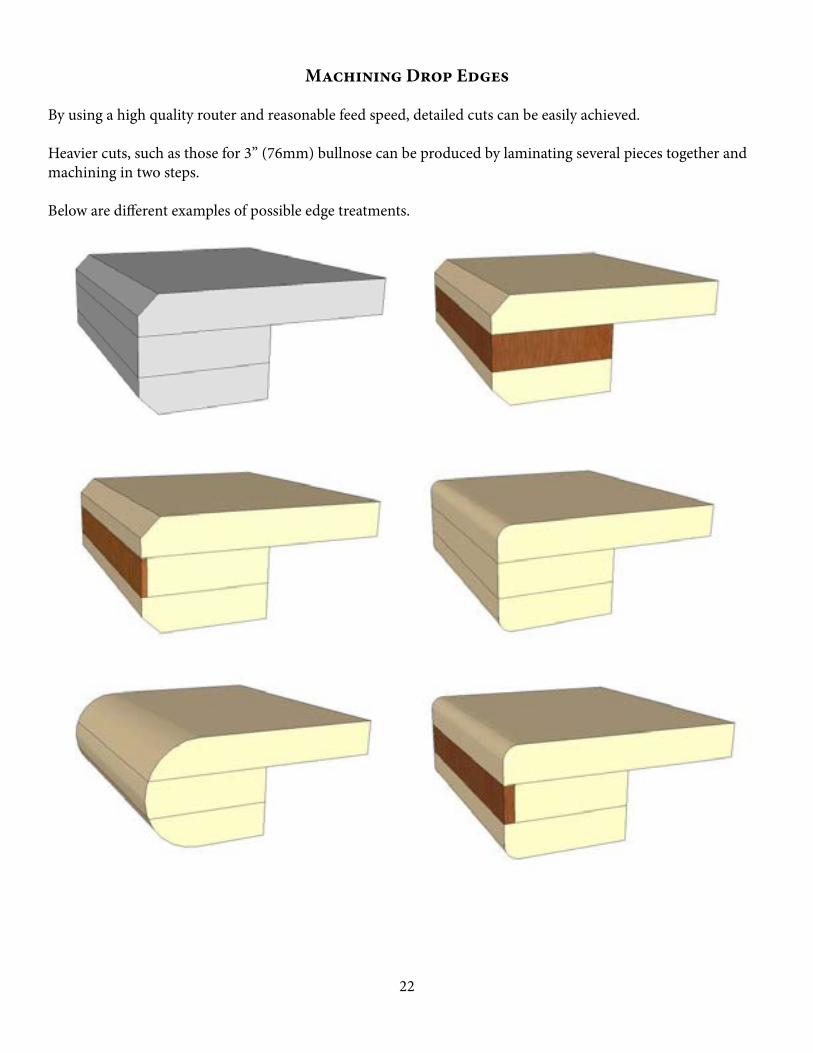
Machining Drop Edges
By using a high quality router and reasonable feed speed, detailed cuts can be easily achieved.
Heavier cuts, such as those for 3” (76mm) bullnose can be produced by laminating several pieces together and machining in two steps.
Below are different examples of possible edge treatments.
23
Sanding & Polishing
There are numerous procedures that have been successfully used to achieve consistent, high-quality finishes for solid surface products. It is the responsibility of the fabricator to select the equipment, abrasive materials and process that will achieve the desired effect with Mystera products. In this section, there are some suggested tech-niques that can be used in the finishing process.
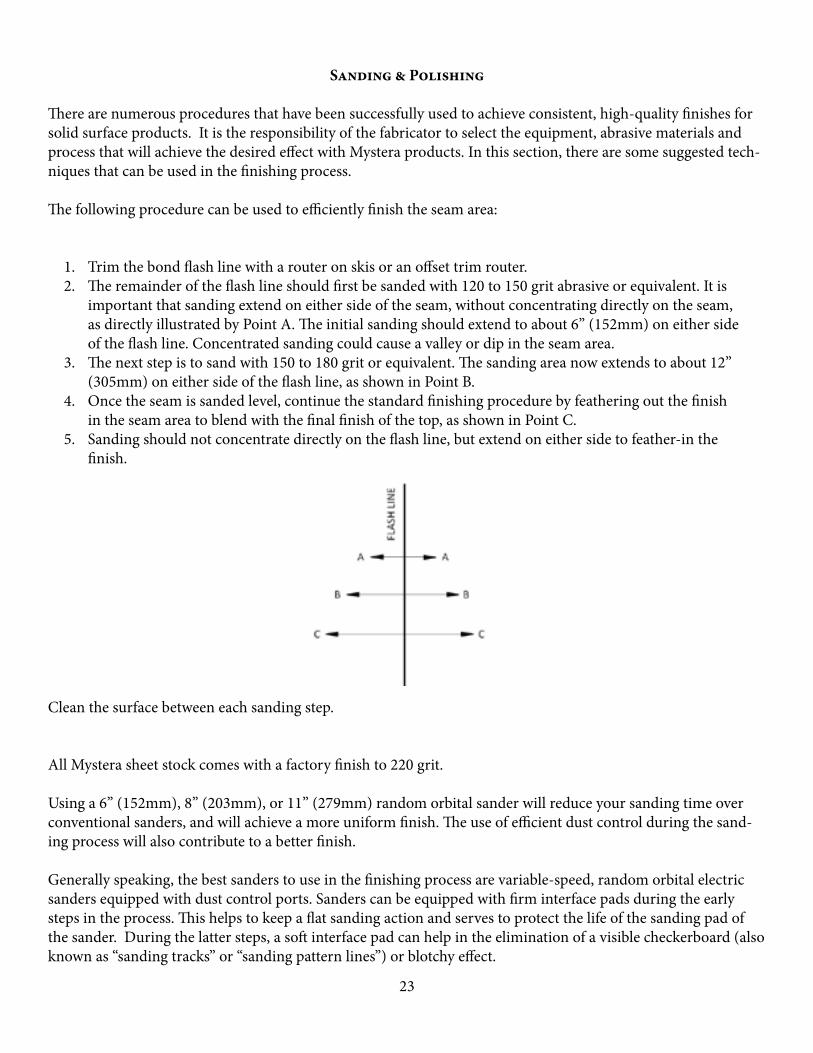
The following procedure can be used to efficiently finish the seam area:
1. Trim the bond flash line with a router on skis or an offset trim router.2. The remainder of the flash line should first be sanded with 120 to 150 grit abrasive or equivalent. It is
important that sanding extend on either side of the seam, without concentrating directly on the seam, as directly illustrated by Point A. The initial sanding should extend to about 6” (152mm) on either side of the flash line. Concentrated sanding could cause a valley or dip in the seam area.
3. The next step is to sand with 150 to 180 grit or equivalent. The sanding area now extends to about 12” (305mm) on either side of the flash line, as shown in Point B.
4. Once the seam is sanded level, continue the standard finishing procedure by feathering out the finish in the seam area to blend with the final finish of the top, as shown in Point C.
5. Sanding should not concentrate directly on the flash line, but extend on either side to feather-in the finish.
Clean the surface between each sanding step.
All Mystera sheet stock comes with a factory finish to 220 grit.
Using a 6” (152mm), 8” (203mm), or 11” (279mm) random orbital sander will reduce your sanding time over conventional sanders, and will achieve a more uniform finish. The use of efficient dust control during the sand-ing process will also contribute to a better finish.
Generally speaking, the best sanders to use in the finishing process are variable-speed, random orbital electric sanders equipped with dust control ports. Sanders can be equipped with firm interface pads during the early steps in the process. This helps to keep a flat sanding action and serves to protect the life of the sanding pad of the sander. During the latter steps, a soft interface pad can help in the elimination of a visible checkerboard (also known as “sanding tracks” or “sanding pattern lines”) or blotchy effect.
24
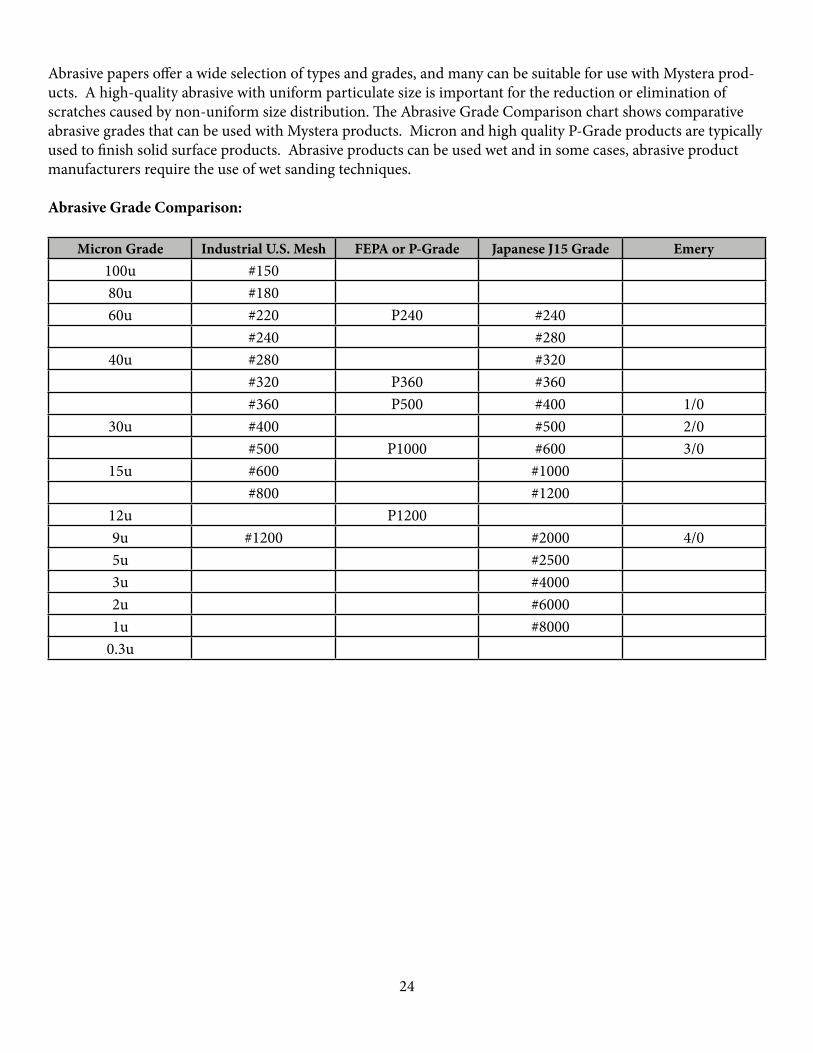
Abrasive papers offer a wide selection of types and grades, and many can be suitable for use with Mystera prod-ucts. A high-quality abrasive with uniform particulate size is important for the reduction or elimination of scratches caused by non-uniform size distribution. The Abrasive Grade Comparison chart shows comparative abrasive grades that can be used with Mystera products. Micron and high quality P-Grade products are typically used to finish solid surface products. Abrasive products can be used wet and in some cases, abrasive product manufacturers require the use of wet sanding techniques. Abrasive Grade Comparison:
Micron Grade Industrial U.S. Mesh FEPA or P-Grade Japanese J15 Grade Emery100u #15080u #18060u #220 P240 #240
#240 #28040u #280 #320
#320 P360 #360#360 P500 #400 1/0
30u #400 #500 2/0#500 P1000 #600 3/0
15u #600 #1000#800 #1200
12u P12009u #1200 #2000 4/05u #25003u #40002u #60001u #8000
0.3u
25
General Steps in the Sanding Process:
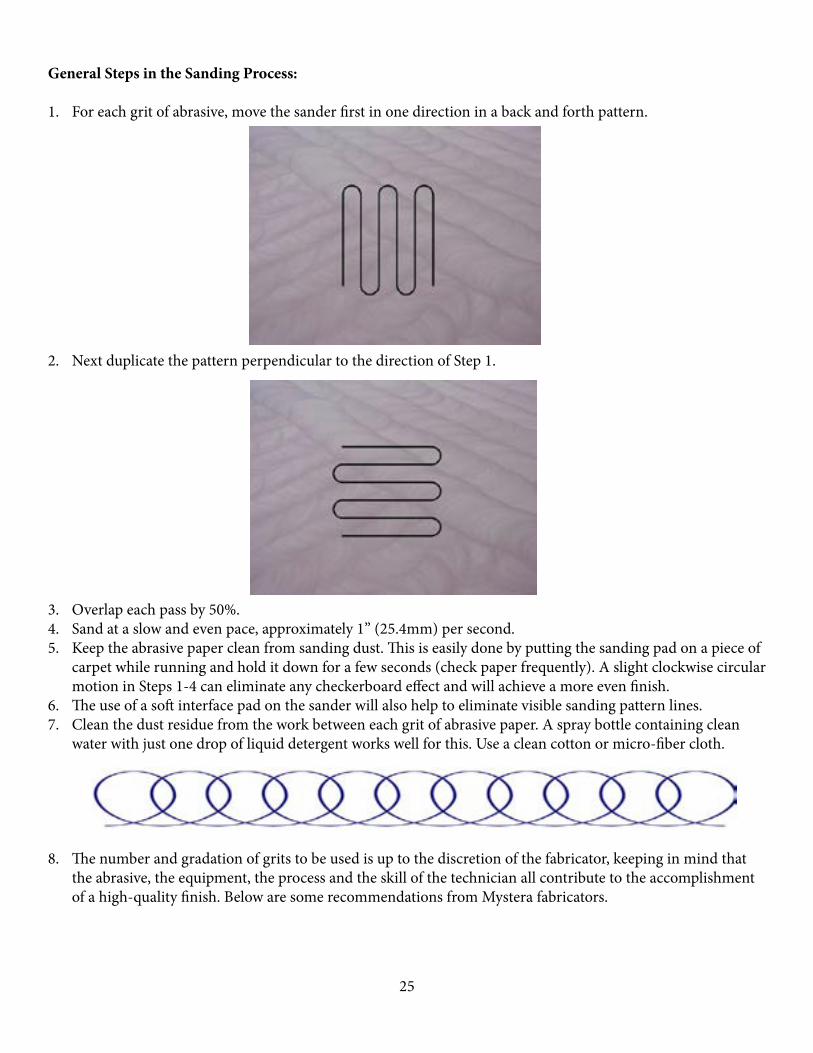
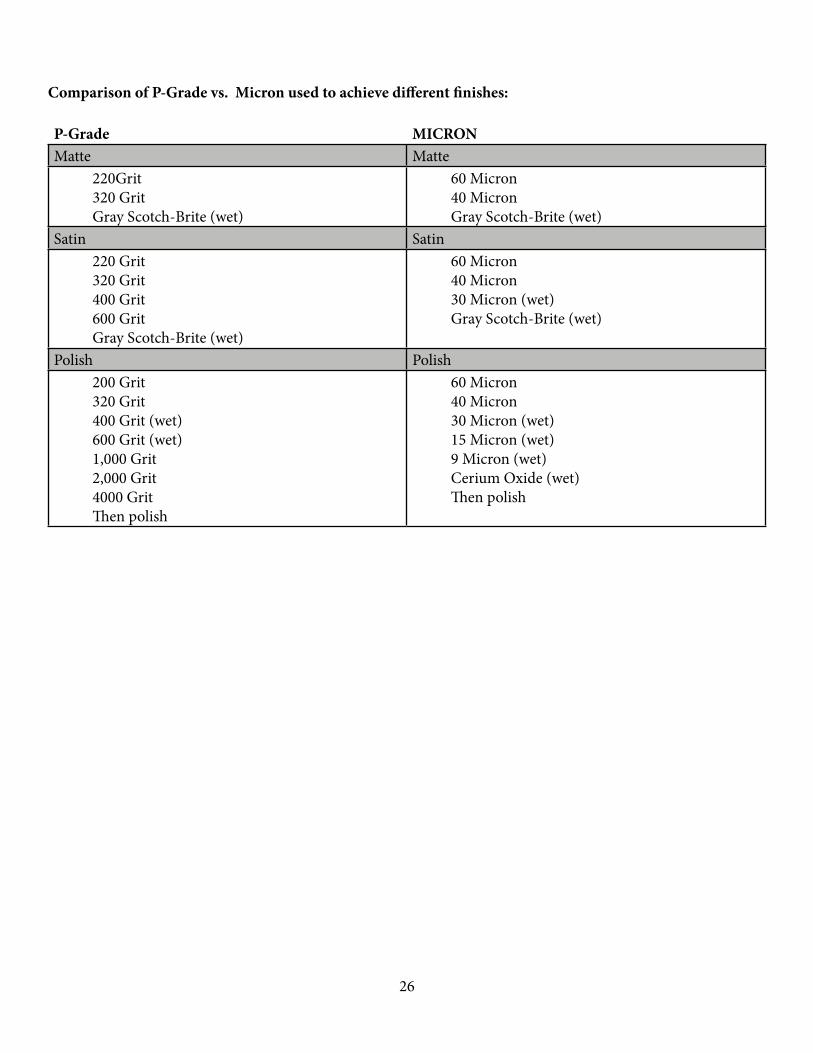
1. For each grit of abrasive, move the sander first in one direction in a back and forth pattern.
2. Next duplicate the pattern perpendicular to the direction of Step 1.
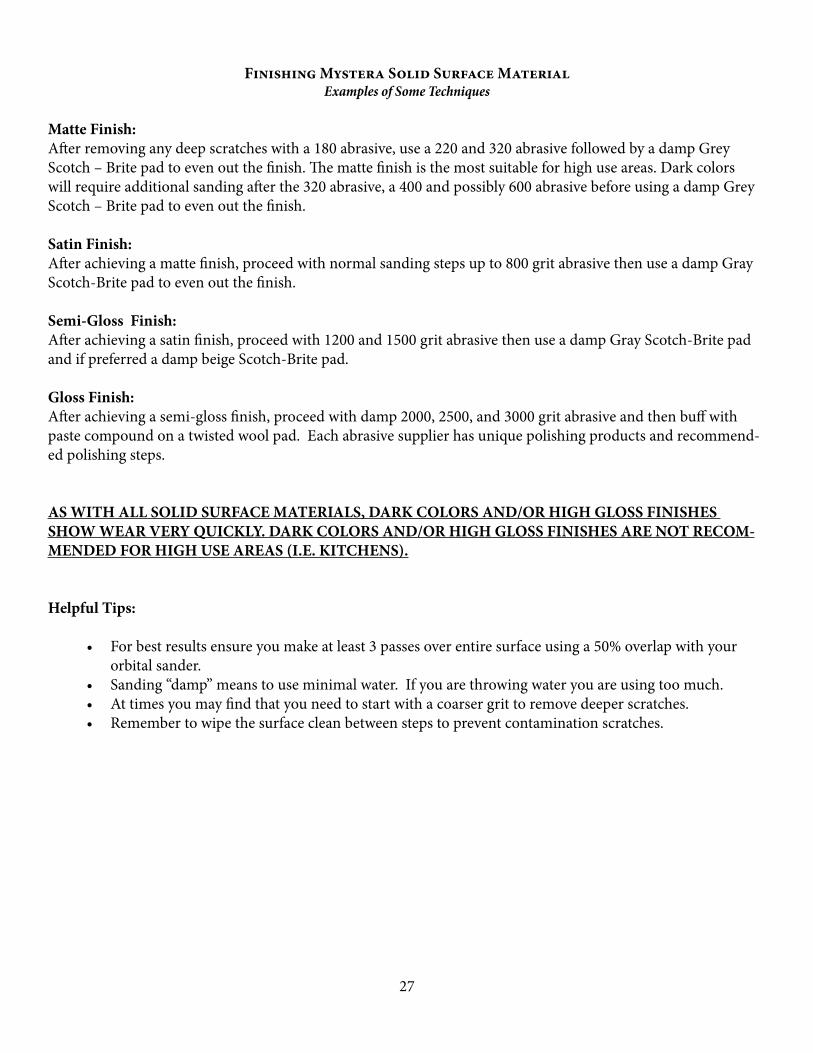
3. Overlap each pass by 50%.4. Sand at a slow and even pace, approximately 1” (25.4mm) per second.5. Keep the abrasive paper clean from sanding dust. This is easily done by putting the sanding pad on a piece of
carpet while running and hold it down for a few seconds (check paper frequently). A slight clockwise circular motion in Steps 1-4 can eliminate any checkerboard effect and will achieve a more even finish.
6. The use of a soft interface pad on the sander will also help to eliminate visible sanding pattern lines.7. Clean the dust residue from the work between each grit of abrasive paper. A spray bottle containing clean
water with just one drop of liquid detergent works well for this. Use a clean cotton or micro-fiber cloth.
8. The number and gradation of grits to be used is up to the discretion of the fabricator, keeping in mind that the abrasive, the equipment, the process and the skill of the technician all contribute to the accomplishment of a high-quality finish. Below are some recommendations from Mystera fabricators.
26
Comparison of P-Grade vs. Micron used to achieve different finishes:
P-Grade MICRONMatte Matte
220Grit320 GritGray Scotch-Brite (wet)
60 Micron40 MicronGray Scotch-Brite (wet)
Satin Satin220 Grit320 Grit400 Grit600 GritGray Scotch-Brite (wet)
60 Micron40 Micron30 Micron (wet)Gray Scotch-Brite (wet)
Polish Polish200 Grit320 Grit400 Grit (wet)600 Grit (wet)1,000 Grit2,000 Grit4000 GritThen polish
60 Micron40 Micron30 Micron (wet)15 Micron (wet)9 Micron (wet)Cerium Oxide (wet)Then polish
27
Finishing Mystera Solid Surface Material Examples of Some Techniques
Matte Finish:After removing any deep scratches with a 180 abrasive, use a 220 and 320 abrasive followed by a damp Grey Scotch – Brite pad to even out the finish. The matte finish is the most suitable for high use areas. Dark colors will require additional sanding after the 320 abrasive, a 400 and possibly 600 abrasive before using a damp Grey Scotch – Brite pad to even out the finish.
Satin Finish:After achieving a matte finish, proceed with normal sanding steps up to 800 grit abrasive then use a damp Gray Scotch-Brite pad to even out the finish.
Semi-Gloss Finish:After achieving a satin finish, proceed with 1200 and 1500 grit abrasive then use a damp Gray Scotch-Brite pad and if preferred a damp beige Scotch-Brite pad.
Gloss Finish:After achieving a semi-gloss finish, proceed with damp 2000, 2500, and 3000 grit abrasive and then buff with paste compound on a twisted wool pad. Each abrasive supplier has unique polishing products and recommend-ed polishing steps.
AS WITH ALL SOLID SURFACE MATERIALS, DARK COLORS AND/OR HIGH GLOSS FINISHES SHOW WEAR VERY QUICKLY. DARK COLORS AND/OR HIGH GLOSS FINISHES ARE NOT RECOM-MENDED FOR HIGH USE AREAS (I.E. KITCHENS).
Helpful Tips:
• For best results ensure you make at least 3 passes over entire surface using a 50% overlap with your orbital sander.
• Sanding “damp” means to use minimal water. If you are throwing water you are using too much. • At times you may find that you need to start with a coarser grit to remove deeper scratches.• Remember to wipe the surface clean between steps to prevent contamination scratches.
28
INSTALLATION
It is very important that the personnel installing Mystera solid surface be properly trained and follow the recom-mended procedures. Improper installation may lead to problems in the future.
Failure to follow the recommended procedures will void the warranty. The warranty registration must be filled out and mailed to GSP Surfaces by the end user.
Clearances
Be sure to leave 1/8” (3mm) between the edge of the substrate and the back of the buildup. Leave a minimum 1/16” (1.5mm) between the counter top and the back wall. For wall to wall installations, allow clearance on each end for the expansion (see Expansion and Contraction in the layout section for more details). Allow as much clearance as possible (minimum 1/4”) at cook tops and drop-in sinks.
Substrates
Choose the substrate appropriate for different applications. Typical substrate materials are:
• Moisture Resistant MDF• Solid Wood • Tubular Steel•
A solid substrate cannot be used in kitchen and bathroom installations.
The following methods demonstrate alternatives to solid substrates.
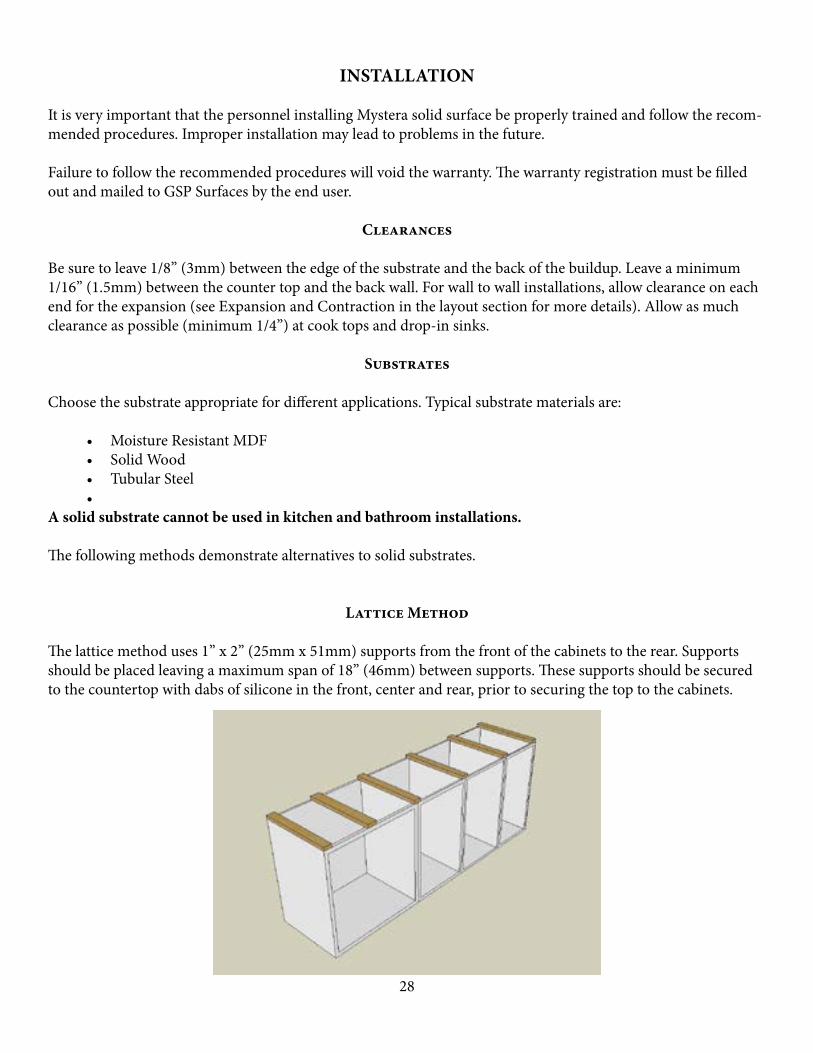
Lattice Method
The lattice method uses 1” x 2” (25mm x 51mm) supports from the front of the cabinets to the rear. Supports should be placed leaving a maximum span of 18” (46mm) between supports. These supports should be secured to the countertop with dabs of silicone in the front, center and rear, prior to securing the top to the cabinets.
29
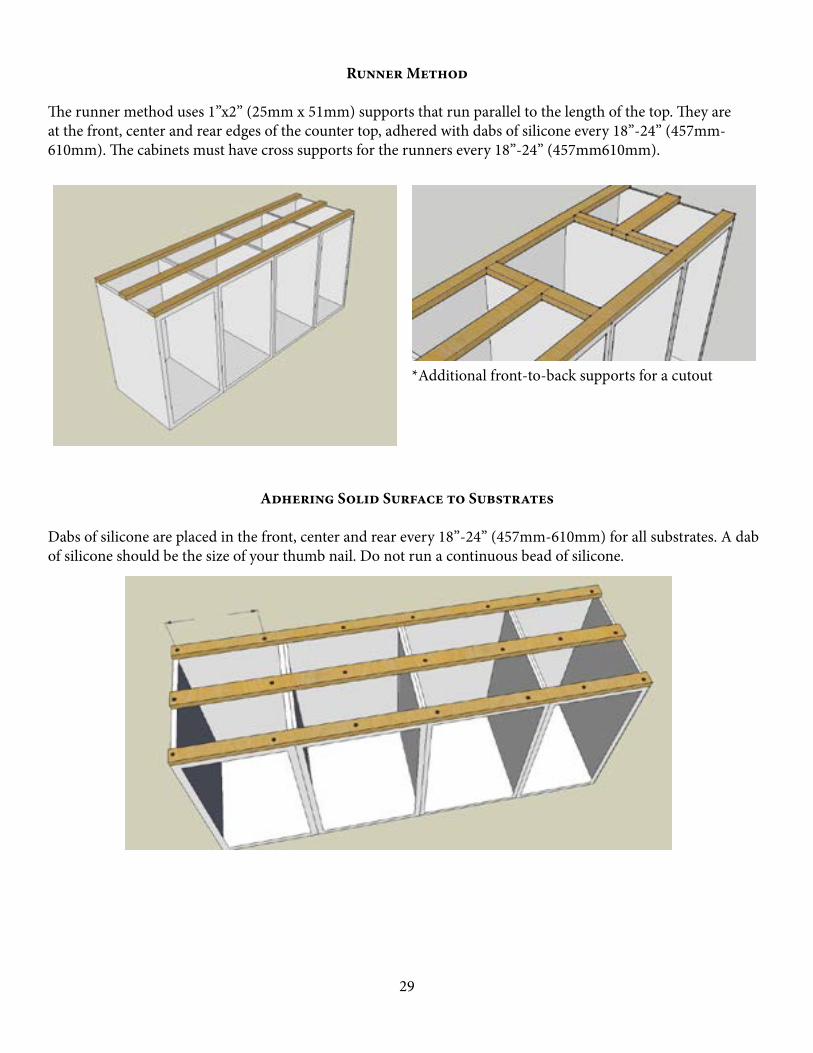
Runner Method
The runner method uses 1”x2” (25mm x 51mm) supports that run parallel to the length of the top. They are at the front, center and rear edges of the counter top, adhered with dabs of silicone every 18”-24” (457mm-610mm). The cabinets must have cross supports for the runners every 18”-24” (457mm610mm).
*Additional front-to-back supports for a cutout
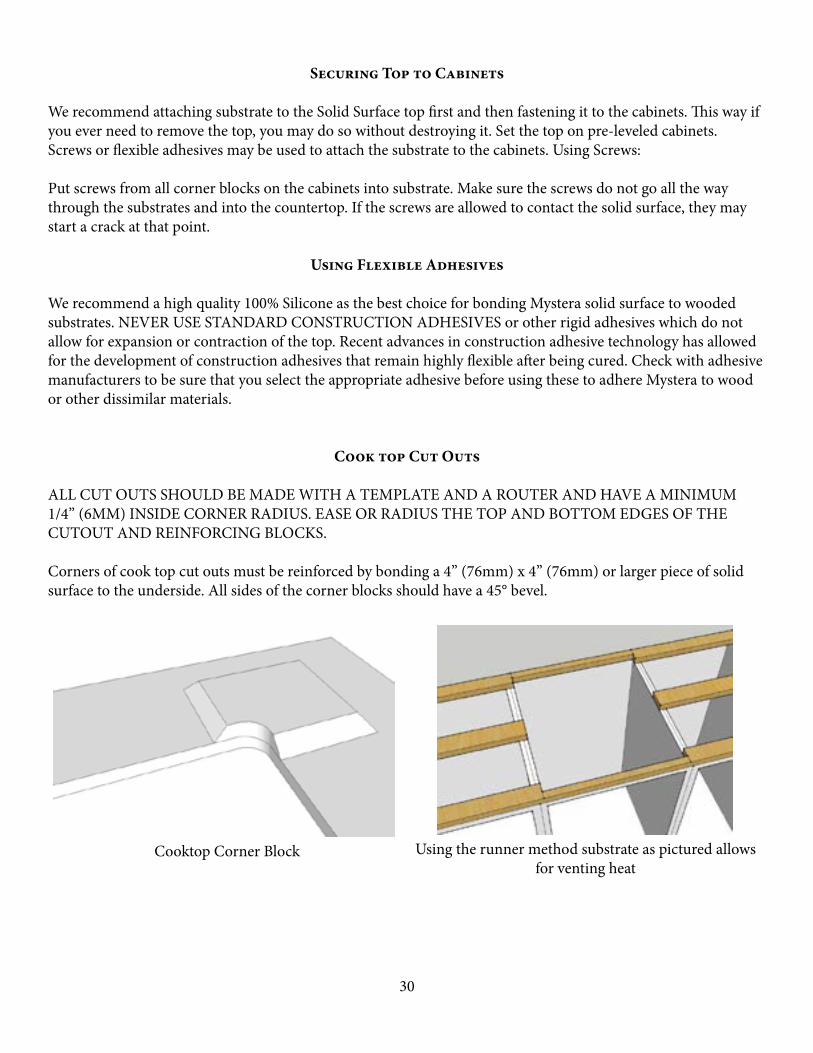
Adhering Solid Surface to Substrates
Dabs of silicone are placed in the front, center and rear every 18”-24” (457mm-610mm) for all substrates. A dab of silicone should be the size of your thumb nail. Do not run a continuous bead of silicone.
30
Securing Top to Cabinets
We recommend attaching substrate to the Solid Surface top first and then fastening it to the cabinets. This way if you ever need to remove the top, you may do so without destroying it. Set the top on pre-leveled cabinets.Screws or flexible adhesives may be used to attach the substrate to the cabinets. Using Screws:
Put screws from all corner blocks on the cabinets into substrate. Make sure the screws do not go all the way through the substrates and into the countertop. If the screws are allowed to contact the solid surface, they may start a crack at that point.
Using Flexible Adhesives
We recommend a high quality 100% Silicone as the best choice for bonding Mystera solid surface to wooded substrates. NEVER USE STANDARD CONSTRUCTION ADHESIVES or other rigid adhesives which do not allow for expansion or contraction of the top. Recent advances in construction adhesive technology has allowed for the development of construction adhesives that remain highly flexible after being cured. Check with adhesive manufacturers to be sure that you select the appropriate adhesive before using these to adhere Mystera to wood or other dissimilar materials.
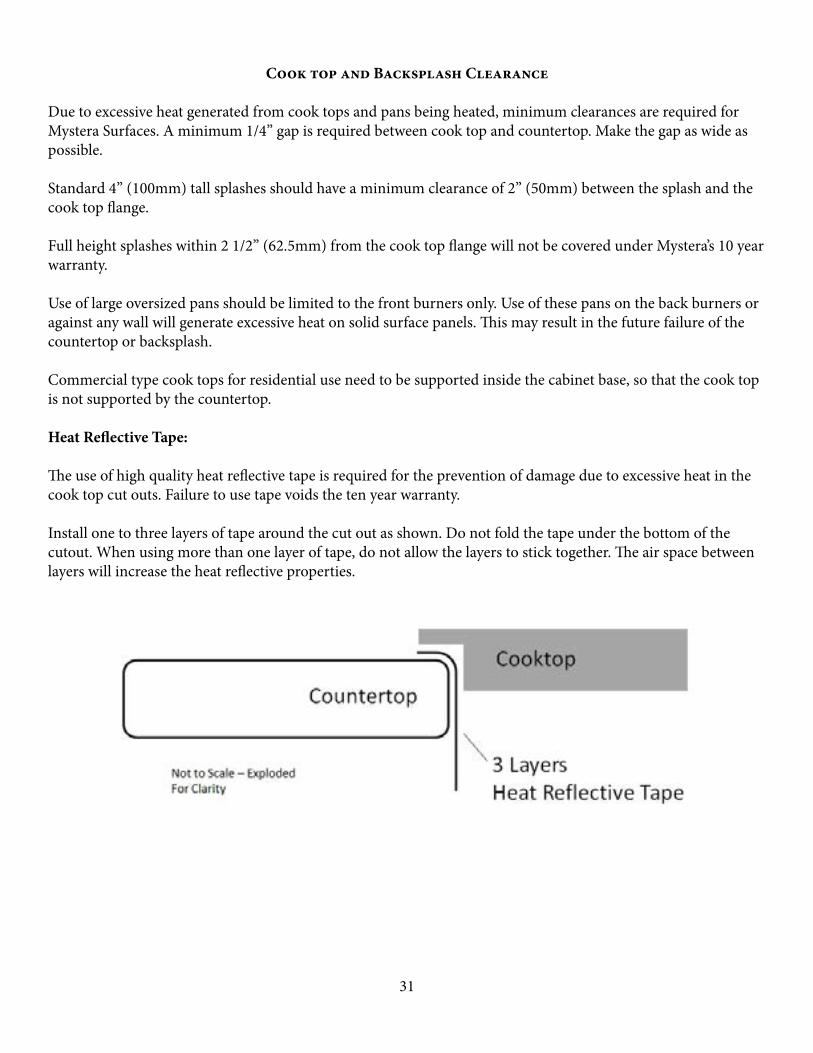
Cook top Cut Outs
ALL CUT OUTS SHOULD BE MADE WITH A TEMPLATE AND A ROUTER AND HAVE A MINIMUM 1/4” (6MM) INSIDE CORNER RADIUS. EASE OR RADIUS THE TOP AND BOTTOM EDGES OF THE CUTOUT AND REINFORCING BLOCKS.
Corners of cook top cut outs must be reinforced by bonding a 4” (76mm) x 4” (76mm) or larger piece of solid surface to the underside. All sides of the corner blocks should have a 45° bevel.
Cooktop Corner Block Using the runner method substrate as pictured allows for venting heat
31
Cook top and Backsplash Clearance
Due to excessive heat generated from cook tops and pans being heated, minimum clearances are required for Mystera Surfaces. A minimum 1/4” gap is required between cook top and countertop. Make the gap as wide as possible.
Standard 4” (100mm) tall splashes should have a minimum clearance of 2” (50mm) between the splash and the cook top flange.
Full height splashes within 2 1/2” (62.5mm) from the cook top flange will not be covered under Mystera’s 10 year warranty.
Use of large oversized pans should be limited to the front burners only. Use of these pans on the back burners or against any wall will generate excessive heat on solid surface panels. This may result in the future failure of the countertop or backsplash.
Commercial type cook tops for residential use need to be supported inside the cabinet base, so that the cook top is not supported by the countertop. Heat Reflective Tape:
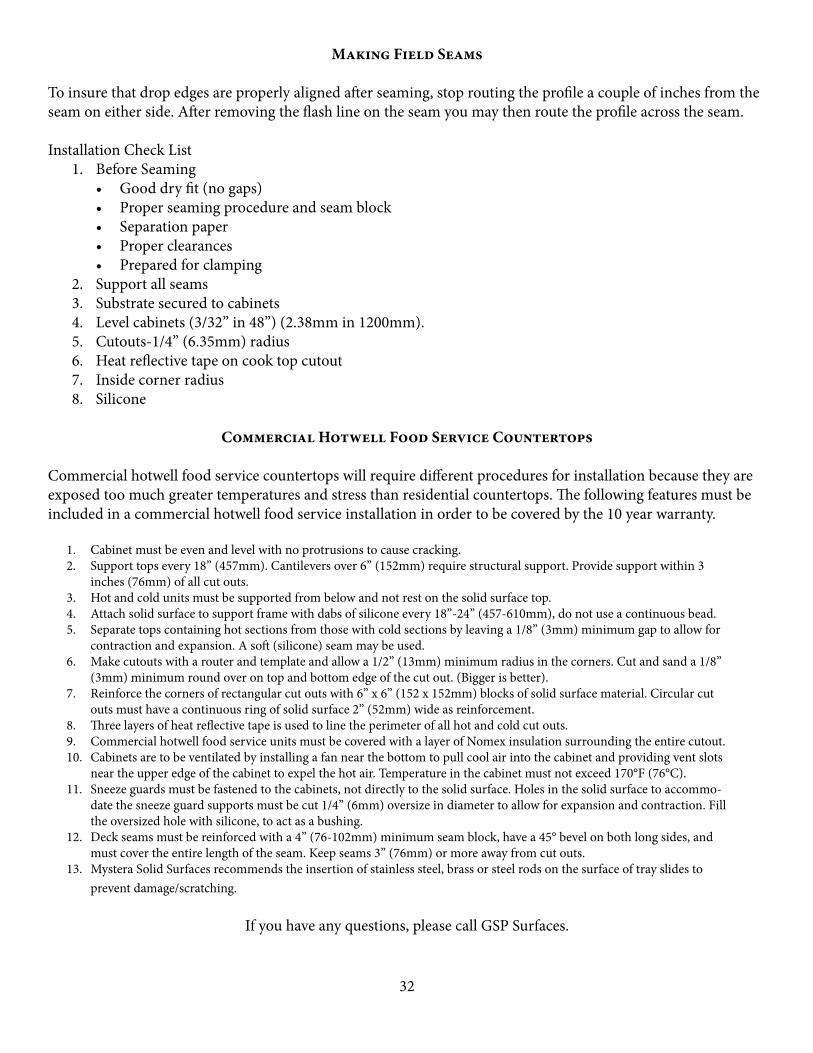
The use of high quality heat reflective tape is required for the prevention of damage due to excessive heat in the cook top cut outs. Failure to use tape voids the ten year warranty.
Install one to three layers of tape around the cut out as shown. Do not fold the tape under the bottom of the cutout. When using more than one layer of tape, do not allow the layers to stick together. The air space between layers will increase the heat reflective properties.
32
Making Field Seams
To insure that drop edges are properly aligned after seaming, stop routing the profile a couple of inches from the seam on either side. After removing the flash line on the seam you may then route the profile across the seam.
Installation Check List1. Before Seaming
• Good dry fit (no gaps)• Proper seaming procedure and seam block• Separation paper• Proper clearances• Prepared for clamping
2. Support all seams3. Substrate secured to cabinets4. Level cabinets (3/32” in 48”) (2.38mm in 1200mm).5. Cutouts-1/4” (6.35mm) radius6. Heat reflective tape on cook top cutout7. Inside corner radius8. Silicone
Commercial Hotwell Food Service Countertops
Commercial hotwell food service countertops will require different procedures for installation because they are exposed too much greater temperatures and stress than residential countertops. The following features must be included in a commercial hotwell food service installation in order to be covered by the 10 year warranty.
1. Cabinet must be even and level with no protrusions to cause cracking.2. Support tops every 18” (457mm). Cantilevers over 6” (152mm) require structural support. Provide support within 3
inches (76mm) of all cut outs.3. Hot and cold units must be supported from below and not rest on the solid surface top.4. Attach solid surface to support frame with dabs of silicone every 18”-24” (457-610mm), do not use a continuous bead.5. Separate tops containing hot sections from those with cold sections by leaving a 1/8” (3mm) minimum gap to allow for
contraction and expansion. A soft (silicone) seam may be used.6. Make cutouts with a router and template and allow a 1/2” (13mm) minimum radius in the corners. Cut and sand a 1/8”
(3mm) minimum round over on top and bottom edge of the cut out. (Bigger is better).7. Reinforce the corners of rectangular cut outs with 6” x 6” (152 x 152mm) blocks of solid surface material. Circular cut
outs must have a continuous ring of solid surface 2” (52mm) wide as reinforcement.8. Three layers of heat reflective tape is used to line the perimeter of all hot and cold cut outs.9. Commercial hotwell food service units must be covered with a layer of Nomex insulation surrounding the entire cutout.10. Cabinets are to be ventilated by installing a fan near the bottom to pull cool air into the cabinet and providing vent slots
near the upper edge of the cabinet to expel the hot air. Temperature in the cabinet must not exceed 170°F (76°C).11. Sneeze guards must be fastened to the cabinets, not directly to the solid surface. Holes in the solid surface to accommo-
date the sneeze guard supports must be cut 1/4” (6mm) oversize in diameter to allow for expansion and contraction. Fill the oversized hole with silicone, to act as a bushing.
12. Deck seams must be reinforced with a 4” (76-102mm) minimum seam block, have a 45° bevel on both long sides, and must cover the entire length of the seam. Keep seams 3” (76mm) or more away from cut outs.
13. Mystera Solid Surfaces recommends the insertion of stainless steel, brass or steel rods on the surface of tray slides to prevent damage/scratching.
If you have any questions, please call GSP Surfaces.
33
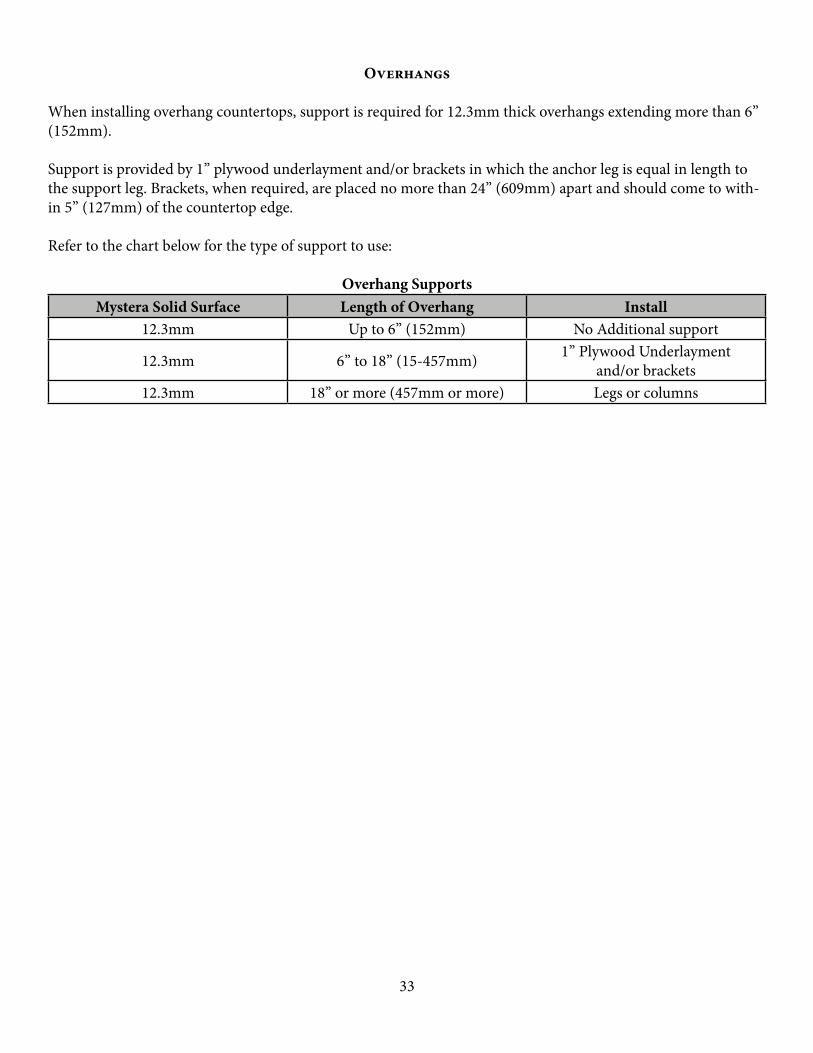
Overhangs
When installing overhang countertops, support is required for 12.3mm thick overhangs extending more than 6” (152mm).
Support is provided by 1” plywood underlayment and/or brackets in which the anchor leg is equal in length to the support leg. Brackets, when required, are placed no more than 24” (609mm) apart and should come to with-in 5” (127mm) of the countertop edge.
Refer to the chart below for the type of support to use:
Overhang SupportsMystera Solid Surface Length of Overhang Install
12.3mm Up to 6” (152mm) No Additional support
12.3mm 6” to 18” (15-457mm) 1” Plywood Underlayment and/or brackets
12.3mm 18” or more (457mm or more) Legs or columns
34
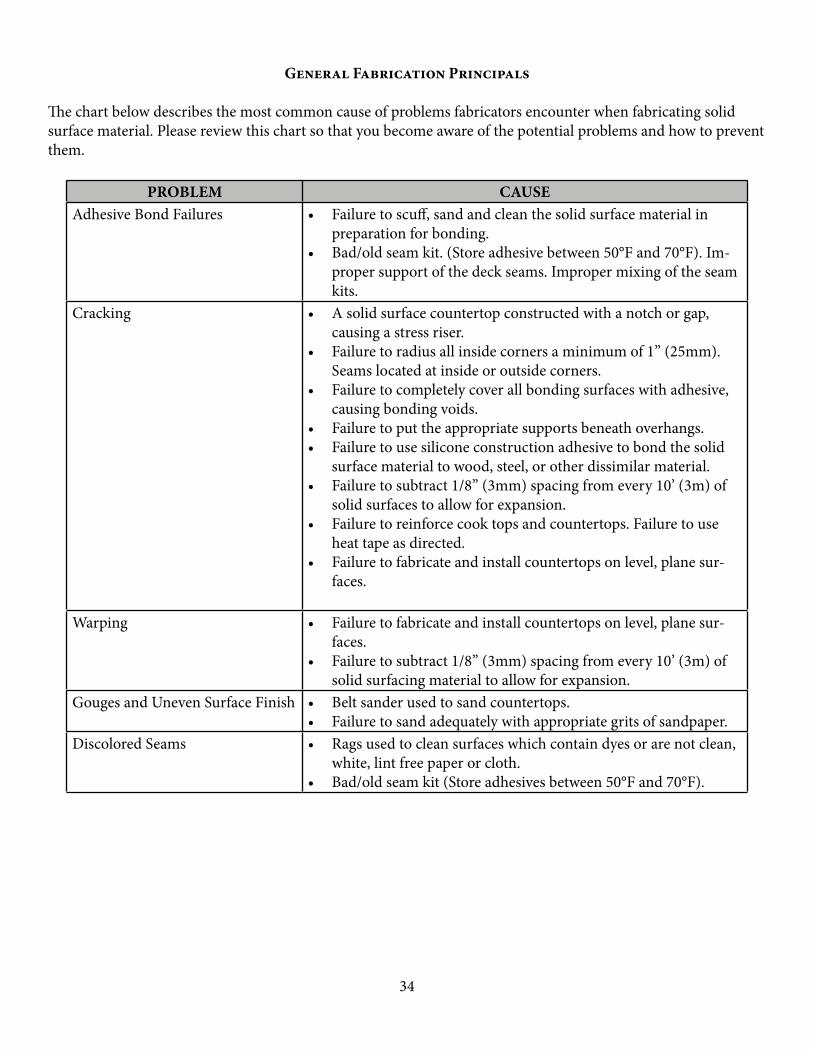
General Fabrication Principals
The chart below describes the most common cause of problems fabricators encounter when fabricating solid surface material. Please review this chart so that you become aware of the potential problems and how to prevent them.
PROBLEM CAUSEAdhesive Bond Failures • Failure to scuff, sand and clean the solid surface material in
preparation for bonding.• Bad/old seam kit. (Store adhesive between 50°F and 70°F). Im-
proper support of the deck seams. Improper mixing of the seam kits.
Cracking • A solid surface countertop constructed with a notch or gap, causing a stress riser.
• Failure to radius all inside corners a minimum of 1” (25mm). Seams located at inside or outside corners.
• Failure to completely cover all bonding surfaces with adhesive, causing bonding voids.
• Failure to put the appropriate supports beneath overhangs.• Failure to use silicone construction adhesive to bond the solid
surface material to wood, steel, or other dissimilar material.• Failure to subtract 1/8” (3mm) spacing from every 10’ (3m) of
solid surfaces to allow for expansion.• Failure to reinforce cook tops and countertops. Failure to use
heat tape as directed.• Failure to fabricate and install countertops on level, plane sur-
faces.
Warping • Failure to fabricate and install countertops on level, plane sur-faces.
• Failure to subtract 1/8” (3mm) spacing from every 10’ (3m) of solid surfacing material to allow for expansion.
Gouges and Uneven Surface Finish • Belt sander used to sand countertops.• Failure to sand adequately with appropriate grits of sandpaper.
Discolored Seams • Rags used to clean surfaces which contain dyes or are not clean, white, lint free paper or cloth.
• Bad/old seam kit (Store adhesives between 50°F and 70°F).
35
Sink & Bowl InstallationGeneral Sink Mounting Instructions
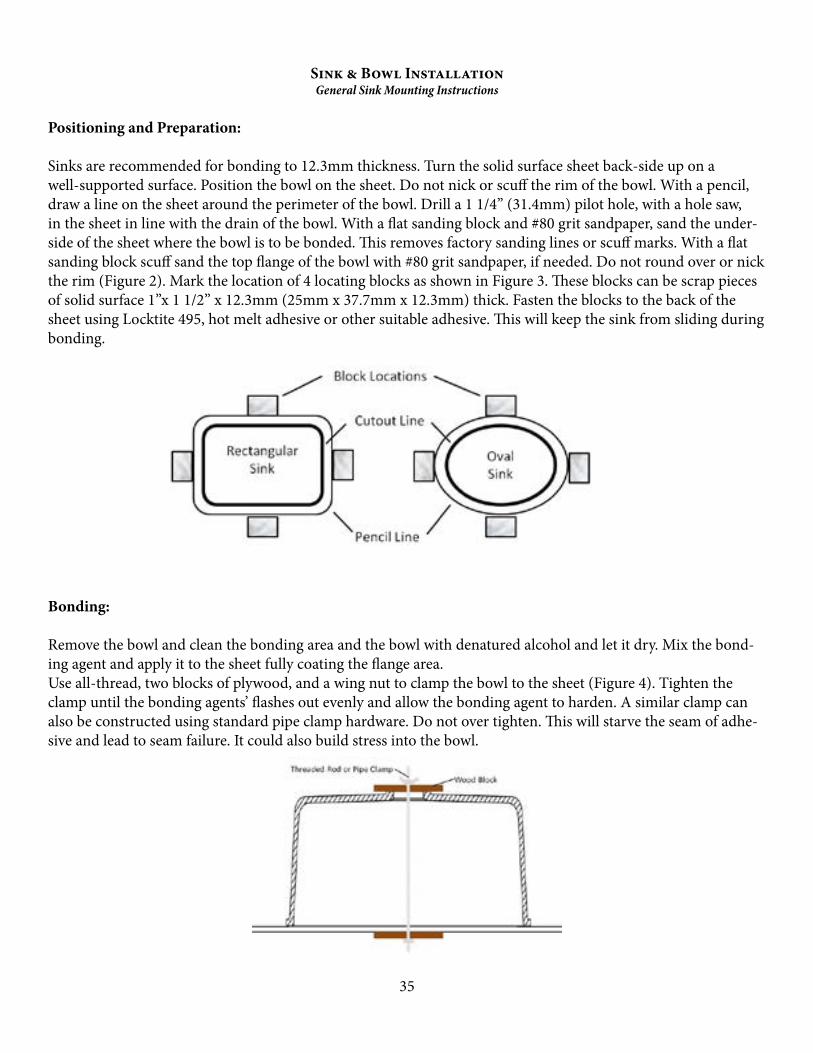
Positioning and Preparation:
Sinks are recommended for bonding to 12.3mm thickness. Turn the solid surface sheet back-side up on a well-supported surface. Position the bowl on the sheet. Do not nick or scuff the rim of the bowl. With a pencil, draw a line on the sheet around the perimeter of the bowl. Drill a 1 1/4” (31.4mm) pilot hole, with a hole saw, in the sheet in line with the drain of the bowl. With a flat sanding block and #80 grit sandpaper, sand the under-side of the sheet where the bowl is to be bonded. This removes factory sanding lines or scuff marks. With a flat sanding block scuff sand the top flange of the bowl with #80 grit sandpaper, if needed. Do not round over or nick the rim (Figure 2). Mark the location of 4 locating blocks as shown in Figure 3. These blocks can be scrap pieces of solid surface 1”x 1 1/2” x 12.3mm (25mm x 37.7mm x 12.3mm) thick. Fasten the blocks to the back of the sheet using Locktite 495, hot melt adhesive or other suitable adhesive. This will keep the sink from sliding during bonding.
Bonding:
Remove the bowl and clean the bonding area and the bowl with denatured alcohol and let it dry. Mix the bond-ing agent and apply it to the sheet fully coating the flange area.Use all-thread, two blocks of plywood, and a wing nut to clamp the bowl to the sheet (Figure 4). Tighten the clamp until the bonding agents’ flashes out evenly and allow the bonding agent to harden. A similar clamp can also be constructed using standard pipe clamp hardware. Do not over tighten. This will starve the seam of adhe-sive and lead to seam failure. It could also build stress into the bowl.
36
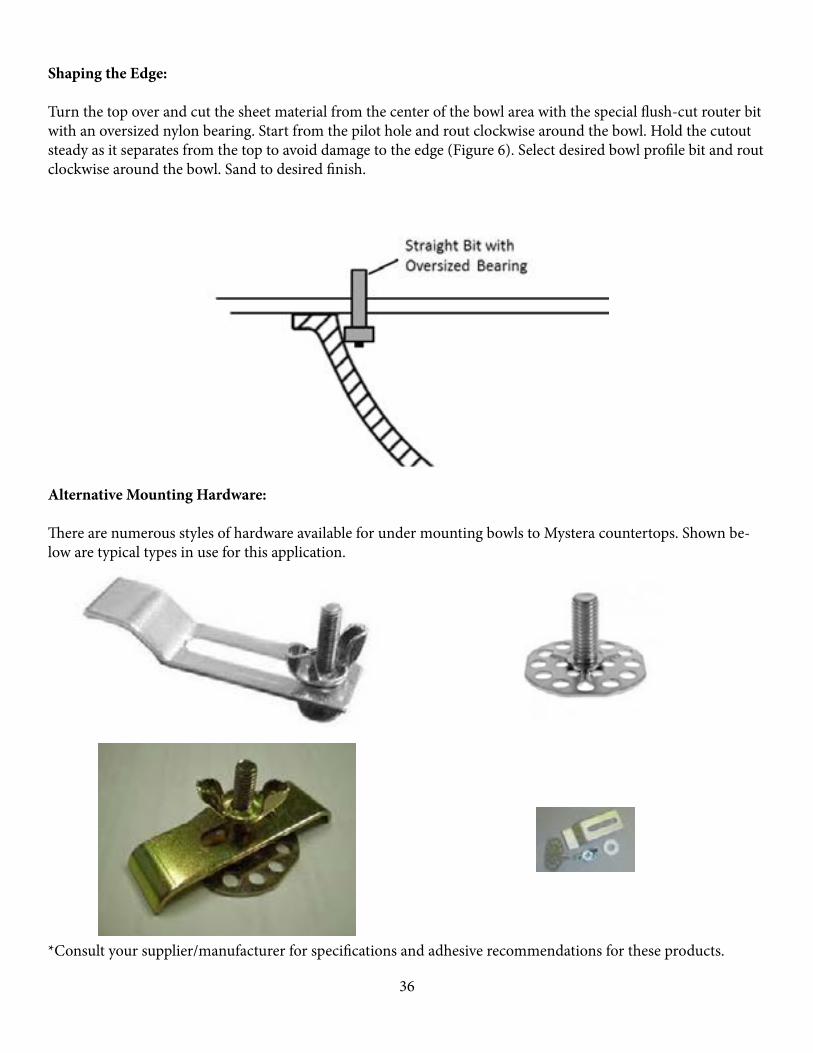
Shaping the Edge:
Turn the top over and cut the sheet material from the center of the bowl area with the special flush-cut router bit with an oversized nylon bearing. Start from the pilot hole and rout clockwise around the bowl. Hold the cutout steady as it separates from the top to avoid damage to the edge (Figure 6). Select desired bowl profile bit and rout clockwise around the bowl. Sand to desired finish.
Alternative Mounting Hardware:
There are numerous styles of hardware available for under mounting bowls to Mystera countertops. Shown be-low are typical types in use for this application.
*Consult your supplier/manufacturer for specifications and adhesive recommendations for these products.
37
Vertical Installation
Surface Preparation:
Before beginning any vertical installation check to ensure the subsurface is dry and structurally sound (so that no moisture can seep through to the Mystera Surfaces wall panel). An acceptable subsurface includes moisture resistant drywall, tile backer board, Durock, or Hardie Backer. Never install wall panel directly on masonry, concrete, cinder block, or any wall that may become damp. If necessary, stud out the wall with 2x4’s and install an acceptable subsurface. Remove any dust, loose debris or any other obstruction that may prevent sufficient adhesion of the wall panel to the subsurface.
Scribing and Cut-outs for Wall Panels:
Scribing is required when walls are not square or plumb (as is most often the case). Test fit the wall panels to determine if scribing is necessary. Mark scribe lines on the wall panel as necessary. Use a sander or router to cut the material back to the scribe line. Sand the cut edges so that they are free of chips and scratches. Gaps should be no larger than 1/4” and no smaller than 1/8” (to allow for contraction and expansion of the material). All hole cut-outs should be made with a router or a power drill equipped with a hole saw bit.
Adhering Wall Panels to Subsurface:
Remove all dust, debris, etc. from the subsurface and back side of the wall panel. Apply a continuous bead of silicone 1” to 2” around the top and edge perimeters (2” to 4” from bottom) of the backside of the wall panel.Apply dabs (about the size of a quarter) of silicone 6” to 8” apart over the remaining area of the wall panel. Position the wall panel on the subsurface and press firmly to evenly spread the silicone. Hot melt glue may be used to hold the wall panel in place until the silicone cures. Repeat this procedure for the remaining wall panels and caulk all seam/joints with color-matched silicone. Accessories (i.e.: soap/shampoo holder) may be installed at this time using silicone and hot melt glue. Remove excess silicone with denatured alcohol.
Seaming Wall Panels:
The recommended seaming procedures for wall panel installation are the caulked (soft) seam and the joint adhesive (hard) seam.
Soft Seams:
Test fit and scribe sheets that are to be seamed. Route a 45-degree bevel on the edges that are to be seamed together. Apply silicone to one wall panel and install. Apply a continuous silicone bead along the seam and install the next wall panel. Apply more silicone to the seam area if necessary. Remove excess silicone with denature alcohol. The use of batten strips is recommended when fabricating soft seams. Hard Seams:
Test fit and scribe sheets that are to be seamed together. Horizontally seam the wall panels using standard seaming pro-cedures. Always remove excess adhesive and smooth the backside of the wall panel to avoid any potential stress when the panel is adhered to the subsurface. Apply reinforcement strip to the backside of the seam. It will be necessary to remove a portion of the subsurface to allow the wall panel to be installed flush with the subsurface. Alternatively, apply a continuous 1” to 2” wide silicone bead the full length of the seam to the subsurface. This method is acceptable in lieu of a reinforce-ment strip. Adhere seamed wall according to directions.
Mystera Solid Surfaces “veined” materials exhibit unique patterns between sheets. Customers must be made aware of this uniqueness and its’ effect on seams.
38
SPECIAL APPLICATIONS
Thermoforming
Safety Practices:
Mystera strongly recommends that thermoforming procedures should only be performed by individuals trained in the proper techniques, equipment and procedures applicable to the thermoforming process. As a minimum, all individuals must use personal protective equipment including eye protection, high temperature gloves, safety shoes and clothing appropriate for hot temperature operations.
Thermoforming Parameters:
Due to the wide variety of equipment used in the process of thermoforming, Mystera recommends starting with a baseline temperature of 300° F - 310° F and a heat-up time of 30-50 minutes for a full sheet. Test a sample piece and adjust the heat and time for the desired effect.
Repairs
Mystera Solid Surfaces recommends using a repair system developed by Andreas Custom Design called Tem-plates by Andreas (800-935-5406). This system was developed to be utilized with directional material and will provide satisfactory results unlike other repair techniques.
39
SUPPORT MATERIALS
Routine Care & Maintenance
Mystera® is a hard, non-porous, mold, stain, and fire resistant product, making this surface material a cost- ef-fective investment. The colors of these surfaces go all the way through each piece. General care is as simple as wiping the surface with a damp cloth. If a stain should develop, wipe it away with soap and water. Or if you prefer, wipe it clean with a non-abrasive household cleaner such as Windex or Formula 409. If the stain does not respond to soap and water or a household cleaner, for a matte finish, buff with a wet white scotch-bright pad, us-ing a circular motion. The same technique can be used in the case of a cigarette burn, minor cuts, and scratches. Fabricators utilize various methods to achieve satin and high gloss finishes. If you have a satin or gloss finish, or are not sure which finish you have, please contact your dealer or fabricator for repair assistance.
Avoid exposure of the material to harsh chemicals such as stove and drain cleaners, paint removers, etc. If con-tact with these chemicals should occur, immediately flush the surface with water, using appropriate safety mea-sures to avoid injury. Hot pans and heat-producing appliances (such as electric skillets, crock- pots, etc.), when set directly on the countertop, can possibly mar the product’s beauty. Always use a heat shield or a trivet with legs. In addition, since heat-producing appliances can also damage your countertop seams, it is essential to check with your fabricator to identify all-seam locations, in order to avoid them.
Although Mystera® is repaired easily; certain steps should be taken to protect the surface. Be sure to use a cutting board instead of cutting directly on the surface. While minor cuts and scratches can be repaired, care should be taken to prevent them in order to keep the surface looking new. Should you require assistance with an unusual problem, please contact your dealer, fabricator, or GSP Surfaces.
CARE RECOMMENDATIONS
• Use felt protectors on the bottom of hard objects and avoid sliding them across the surface of your countertop, especially with satin and high gloss finishes and/or dark colors.
• Always use a heat shield or trivet with legs• Always use a cutting board.• Avoid harsh chemicals such as a stove or drain cleaner, paint remover, etc.• Consult your dealer, fabricator, or GSP Surfaces with any care or maintenance issues you are unsure
about.
40
Mystera Solid Surface Sheets 10-Year Limited Warranty for U.S.
GSP Surfaces, (Manufacturer) provides a ten (10) year limited liability warranty (Warranty) to the original owner in the United States of Mystera Acrylic Solid Surface (Mystera). Mystera shall be free from manufacturing defects in the material under normal use and service for ten (10) years from the date of installation to the original pur-chaser (Owner). This Warranty applies to Mystera product only for interior, residential and commercial applica-tions in the U.S., and is void unless the product has been paid for in full and registered with Manufacturer within 60 days of installation.
The fabricator and/or the installer is responsible for inspecting the Mystera product before cutting and fabricat-ing and installing. It is also the Owner’s responsibility to inspect the finished product before permanent instal-lation. The Warranty shall apply only where the Mystera product is properly fabricated and installed for interior residential or commercial use. If the Mystera product is replaced under the Warranty, the 10 year warranty peri-od will continue from the original date of installation and not from the date of repair or replacement.
When choosing a color, please note that samples are a general indication of a particular color’s design pattern, aesthetics, and color hue. There may be variation between the display sample(s) and the final product, therefore the sample(s) is not guaranteed to be an exact replica of the final installation. Cutting and fabrication of Mystera is acceptance of the color and veining patterns, as color and veining patterns are not covered under this Warran-ty.
Exclusions:
This Warranty for Mystera products does not cover the following:
• Product subjected to damage or mishandling, abnormal use, misuse, direct or sustained heat or cold or sudden or rapid tempera-ture change or thermal shock, physical or chemical abuse or exposure, pressure or loading applied from any object including, but not limited to, a person, structural movement or other object not typical to the application.
• Product installed in moving vehicles including, but not limited to, boats, or other watercraft, aircraft, trailers or recreational vehi-cles. (Qualified OEM companies manufacturing recreational vehicles and boats and aircraft interiors may request Manufacturer to warranty the Mystera products outside of this Warranty, but must have a written warranty from Manufacturer for it to be valid.)
• Installation of product for steam showers, steam rooms or saunas.• Poor quality installation or damage caused by the installer or fabricator. (It is the sole responsibility of the Owner to resolve fabri-
cation defects directly with the installer or fabricator.)• Product issues caused by failure to comply with Mystera guidelines for usage, care & maintenance.• Installed Mystera product that is removed from the original installation.• Tear out, demolition, disposal, and electrical, tile, wall surfaces, and plumbing modifications necessary to repair Mystera products.• Minor conditions such as stains, water spots or seam appearance.• Appearance of edge and re-fabrication or polishing of surface.• Damage due to exposure to extreme heat. (In countertop applications a trivet must be used for any hot pots, pans, crock pots, and
other heat generating items. A heat resistant pad is highly recommended.)• Damage or injury caused in whole or in part by acts of God, job site conditions, installation, engineering or architectural design,
structural movement, acts of vandalism or accidents.• Use of Mystera products in applications which do not comply with local, state and national laws, building codes and regulations.• Warranty claim submitted more than thirty (30) days after the Owner learns of the facts upon which the warranty claim is based,
in which case, such warranty claim shall be deemed waived.• Products which are sold under brand names other than the Mystera brand name are not covered by this Warranty.
41
Right to Inspect and Determine Validity of Claim
When a claim is submitted under the Warranty, Manufacturer or its authorized agents must be permitted access with suffi-cient time and opportunity to inspect the Mystera product at the installation site and determine an appropriate response to the claim.All decisions regarding the existence of manufacturing defects relating to this Warranty shall be made by Manufacturer and shall be final and binding upon the parties.
General Terms and Conditions of the Warranty
This is a limited liability warranty. The Owner’s exclusive remedy against Manufacturer shall be, at the sole discretion of Manufacturer, to 1) replace the defective product, or 2) replace and cover cost of installation of the replacement material, or 3) refund the purchase price. If Manufacturer elects to replace the original Mystera product purchased by Owner and the original Mystera product is no longer available,Manufacturer will offer replacement with a similar product of equal or greater value.
FURTHER, TO THE EXTENT PERMITTED BY LOCAL LAW, THIS WARRANTY IS EXCLUSIVE AND IN LIEU OF ANY OTHER WARRANTY, EXPRESS OR IMPLIED, INCLUDING ANY WARRANTY OF MERCHANTABILITY, FITNESS FOR PARTICULAR PURPOSE, OR OTHER WARRANTY OF QUALITY, WHETHER EXPRESS OR IMPLIED AND ALL OTHER LIABILITIES OR OBLIGATIONS ON THE PART OF MANUFACTURER. ANY IMPLIED WAR-RANTIES WHICH ARE NOT EXCLUDED HEREBY, DUE TO OPERATION OF LAW, ARE LIMITED IN DURATION TO THE DURATION OF THE EXPRESS WARRANTY PROVIDED HEREIN FOR THE PRODUCT WARRANTED. IN NO CASE WILL MANUFACTURER BE LIABLE EITHER IN TORT, CONTRACT OR OTHERWISE, FOR DIRECT, INDIRECT, SPECIAL, INCIDENTAL, PUNITIVE, CONSEQUENTIAL, OR OTHER SIMILAR DAMAGES, INCLUD-ING BUT NOT LIMITED TO DAMAGE FOR LOSS OF BUSINESS PROFITS, BUSINESS INTERRUPTIONS, OR ANY OTHER LOSS REGARDLESS OF THE CAUSE OF SUCH DAMAGE WHETHER OR NOT CAUSED BY OR RESULT-ING FROM THE NEGLIGENCE OF MANUFACTURER, EVEN IF MANUFACTURER HAS BEEN ADVISED OF THE POSSIBILITY OF SUCH DAMAGES.
No other warranties express or implied, are made, including merchantability or fitness for a particular purpose. This is the only Warranty made by Manufacturer for Mystera. No representative, dealer, employee, fabricator, installer or any other person is authorized to make, modify or change this Warranty or make any other warranty, representation or promise on behalf of Manufacturer regarding this product.No changes to the Warranty can be made unless made in writing and signed by an officer of Manufacturer. This Warranty is not transferable and applies only to the original owner of the Mystera product.
Choice of Law:This Limited Warranty shall be interpreted exclusively under the laws of the State of Oklahoma.
Claims Information Mailed to Manufacturer: - Owner name, address and telephone number - Date damage appeared - Description of the claimed failure of the material and events at the time of the failure - Pictures of the damaged area
To obtain service under this Warranty, or for more information, please contact Manufacturer: GSP Surfaces9810 E. 42nd Street, Suite 220Tulsa, OK 74146Tel: 918-895-6300Fax: [email protected]
42
Disclaimer
The information contained herein is believed to be reliable but is not a warranty or representation for which we assume legal responsibility. It is the user’s responsibility to undertake sufficient confirmation and testing to de-termine the appropriateness for their own particular purpose of any information or products referred to herein. Therefore, no warranty for any particular purpose is made or implied.All information relating to applications, code and standards compliance is provided for your convenient refer-ence without any representation as to accuracy or suitability. GSP Surfaces disclaims any responsibility. It is the user’s responsibility to assess the suitability of any information or products for his specific application.