Embed Size (px)
Citation preview
©Aristech Surfaces LLC • January 2016 • Avonite® Technical Services +1 (800) 428-6648 • FAX +1 (505) 864-7790 • www.aristechsurfaces.com
This fabrication guide has been prepared to assist the
fabricator and installer in the proper methods for seaming,
polishing, patching and handling our 100% acrylic and Studio
Collection® of specialty blend solid surface products.
Avonite® brand building and surfacing materials are
warranted to be free from defects at time of manufacture.
Any materials found defective will be replaced promptly.
Information or references to application, code compliance or
specific standards are provided for convenience only. The
accuracy or suitability of any recommendations in this guide
must be verified by the user, Aristech Surfaces LLC disclaims
any legal responsibility.
Questions pertaining to any procedure detailed
herein should be addressed to the
Avonite® Technical Services Department.
+1 (800) 428-6648
+1 (505) 864-3800
Fax +1 (505) 864-7790
Name : __________________________________________________
Address : ________________________________________________
Date of Seminar: __________________________________________
Instructor : _______________________________________________
Fabrication Guide
©Aristech Surfaces LLC • January 2016 • Avonite® Technical Services +1 (800) 428-6648 • FAX +1 (505) 864-7790 • www.aristechsurfaces.com
WHO WE ARE
Since 1983, the Avonite® brand has been a pioneer in solid surfacing. We have been known for our unbridled passion and
spirited innovations. We have been with many of you from the beginning. For more than 30 years, we’ve celebrated the rela-
tionship between extraordinary product, design and craftsmanship. We are inspired by and committed to designers and fabri-
cators with a passion for bringing forth original ideas and taking them beyond the ordinary.
HOW TO USE THIS GUIDE
We at Aristech Surfaces LLC hope you will find the following Fabrication Manual to be a useful tool. It was created to help you
discover unlimited design possibilities, which will lead to wonderful solutions for you and your clients. Although many
applications are covered in this guide, there will be new applications that may not be covered in detail. Our fabrication guide
is designed to provide you with the fundamental knowledge of fabrication. These fundamentals can be adapted for new
applications.
If you have specific questions or requests, our friendly and expert technical staff is eager to help. Feel free to call your regional
representative or contact us at +1 (800) 428-6648.
Important updates such as Technical Bulletins published after the printing date of this manual are also available for download.
Certified fabricators should periodically check for updates and add them to this guide. For additional copies of this guide or quick
references for your clients, please visit www.aristechsurfaces.com, where the complete guide and individual sections are
available for download.

©Aristech Surfaces LLC • January 2016 • Avonite® Technical Services +1 (800) 428-6648 • FAX +1 (505) 864-7790 • www.aristechsurfaces.com
Table of Contents
SECTION 1: INTRODUCTION
Product Introduction 1.1
Health and Safety 1.2 - 1.3
Storage and Handling 1.4
Color Matching 1.5
Layout 1.6 - 1.9
SECTION 2: FABRICATION
Tooling 2.1 - 2.2
Machining Seams 2.3 - 2.4
Joining 2.5 - 2.6
Clamping Seams 2.7 - 2.8
Edge Build Ups 2.9
Clamping Edges 2.10
Machining Edges 2.11
Sanding and Polishing 2.12 - 2.16
Finishing Guidelines 2.16—2.17
Symphony 2.18
SECTION 3: INSTALLATION
Installation 3.1 - 3.4
Shower Base System Installation 3.5
Wet Wall Panel System Installation 3.6 - 3.10
Sinks, Bases, and Bowls 3.11 - 3.14
SECTION 4: PATCHING AND INLAY
Patching 4.1
Color Inlay 4.2
Catalyst Ratio Chart 4.3
SECTION 5: SPECIAL APPLICATIONS
Wall Panels and Signage 5.1
Thermoforming 5.2
Repairs 5.3 - 5.4
Partitions and Wainscoting 5.5
SECTION 6: SUPPORT MATERIALS
Fabrication Support 6.1 - 6.2
Sanding & Polishing Accessories 6.3 - 6.4
Care and Maintenance (Spanish) 6.5 - 6.6
Warranty 6.7 - 6.8
APPENDIX
Avonite® Surfaces Colors A.1
Joining Color Charts A.2 - A.3

©Aristech Surfaces LLC • January 2016 • Avonite® Technical Services +1 (800) 428-6648 • FAX +1 (505) 864-7790 • www.aristechsurfaces.com
Avonite® Product Introduction
For over 30 years the debate of polyester versus acrylic solid surface has rumbled through fabrication shops. Aristech Surfaces LLC is in the
unique position of offering both types of products. These product types share many common characteristics but some Avonite® products are
so unique that they deserve special recognition for their applications and fabrication techniques.
To Fill or Not to Fill
The majority of solid surface products are composed of polymer resins and a mineral filler called alumina trihydrate (ATH). The resins are
typically polyester, acrylic, or a blend of the two. Polyester resin is a thermoset polymer while acrylic is a thermoplastic resin. To produce a
solid surface product with acrylic resin, you must add ATH filler. Only with the filler can you create an acrylic product that can be cut, shaped
and sanded. Without the filler the acrylic resin is too soft . Solid surface products made with polyester resins do not require the ATH filler to
be machined. Producers, therefore, have a choice of how much ATH filler to use.
ATH filler is a fine white powder that clouds the matrix. Products with high levels of ATH are opaque whereas products using small amounts
can maintain their clarity and depth. This is where the Studio Collection® stands alone. We are the only major producer of solid surface that
has chosen to create some products with minimum amounts of fillers to achieve depth and clarity found in no other solid surface product.
PRODUCT SUMMARY
Our 100% acrylic solid surface products bring innovation to today’s most popular colors. Our production facility allow us to produce acrylic
solid surface up to 60” wide. This wide width can save you time and money by eliminating seams and reducing labor costs. These savings can
be even more dramatic using our Right-Size sheet capabilities. Visit www.aristechsurfaces.com for details.
1/2” Standard Sheet Size is 30” x 144” x 12mm (76.2cm x 365.7cm x 12mm)
1/4” Standard Sheet Sizes are:
36” x 96” x 6mm (914mm x 2,438mm x 6mm)
48” x 96” x 6mm (1214mm x 2,438mm x 6mm)
60” x 96” x 6mm (1,518mm x 2,438mm x 6mm)
These products are made in the USA at our Florence, KY facility.
Our Studio Collection® features a wide variety of products that are unparalleled in their beauty and composition. From dynamic colors and natural textures, to our series of recycled content products and rich collections inspired by glass, concrete, and metallics, no other manufacturer offers you more choices.
Standard Sheet Size is 36” x 120” x 12mm (91.5cm x 304.8 cm x 12mm) Custom colors are available.
These products are made in the USA at our Belen, NM facility.
Shaped Products Fully integrated sinks provide a seamless bond between the counter and sink leaving no space for bacteria to gather. This non-porous combination remains the wise choice for healthcare facilities and more.
Wet Wall Panel System The Avonite® Wet Wall Panel system includes our seamless wide wall panels with optional pans and accessories. The standard wall panels are available in 30”, 36”, 48” and 60” widths and a full 96” high. These standard dimensions are stocked in eight popular colors and are available in all Avonite® 100% acrylic solid surface products.
PRODUCT IDENTIFICATION: F= 100% Acrylic / K= Studio Collection®
The second digit represents the Fire Rating : 1= Class 1 /A 3= Class III/ C
1.1

©Aristech Surfaces LLC • January 2016 • Avonite® Technical Services +1 (800) 428-6648 • FAX +1 (505) 864-7790 • www.aristechsurfaces.com
FOR SHEET AND SHAPED PRODUCTS
FIRST AID PROCEDURES:
Avonite® solid surfacing material is non-toxic; however,
during fabrication such as sawing, routing, and sanding, dust
consisting of cured resin and filler is generated. This dust is
classified as “Nuisance Dust”.
INHALATION: a) “Nuisance Dust”— Overexposure to dust
may cause irritation of the respiratory tract. Should this
happen, remove the affected individual to fresh air. If
symptoms persist, consult a physician. b) Styrene —
Although no vapor build-up is expected, excessive inhala-
tion of vapors can cause nasal and respiratory irritation,
dizziness, weakness, fatigue, nausea, headache, and even
asphyxiation. Remove the affected individual to fresh air. If
symptoms persist, consult a physician.
SKIN OR EYE: a) “Nuisance Dust”— May cause irritation.
Wash skin and flush eyes with water for at least 15 minutes.
Contact physician if irritation persists. b) Styrene — Vapor
concentration is expected to be too low to cause irritation,
but odor is recognizable. Excessive exposure can cause
severe eye irritation and moderate skin irritation. Wash skin
and flush eyes with water for at least 15 minutes.
EXPOSURE CONTROL METHODS: Provide sufficient ventila-
tion and dust pick-up at saw, sander, drill, or router to keep
dust level below 10mg/m3 TWA (Time Weighted Average)
for total dust, or provide and make mandatory the wearing
of NIOSH approved fitted dust respirators. Wear protective
leather or cotton gloves, safety glasses, and safety shoes
when installing or fabricating Avonite® solid surfacing
material.
DISPOSAL PROCEDURES: Dust from fabrication operations is
non-hazardous. Collect in impervious bags. Dispose of dust
and scrap in accordance with local, state, and federal
regulations. FOR MORE COMPLETE INFORMATION,
REQUEST THE MATERIAL SAFETY DATA SHEET.
INLAY RESIN
CAUTION:
• FLAMMABLE COMPONENTS; AVOID HEAT, SPARKS AND
OPEN FLAME.
• WEAR SAFETY GLASSES AND PROTECTIVE GLOVES.
• FOR PROFESSIONAL USE ONLY.
• USE ONLY AS RECOMMENDED.
The Inlay Resin is a polyester resin used with MEK peroxide.
These components and vapors may cause irritation of the
skin, eyes, nose, and throat. AVOID CONTACT WITH EYES,
SKIN AND CLOTHING. USE ONLY WITH ADEQUATE
VENTILATION; AVOID BREATHING VAPORS. WASH HANDS
AFTER USE.
EMERGENCY AND FIRST AID PROCEDURES: In case the resin
or catalyst contacts your skin, wash with soap and water, for
at least 15 minutes. For eyes, immediately flush with water
for at least 15 minutes. Contact physician if irritation
persists. In case of ingestion, immediately consult a physician
or your local poison control center, identifying the catalyst as
methyl ethyl ketone peroxide solution in dimethyl phthalate
containing a small amount of hydrogen peroxide, and the
resin as an unsaturated polyester in styrene monomer.
SPECIAL HEALTH EFFECTS: Excessive inhalation of resin
monomer may aggravate pre-existing medical conditions
such as, but not limited to, chronic respiratory problems,
skin disease, and central nervous disorders. There is a low
health risk from inhalation of the filler dust. Avoid inhalation
or eye contact.
DISPOSAL PROCEDURES: Un-reacted resin and hardener are
classified as hazardous waste. All components should be
disposed by mixing so that they react and become fully
cured and solid. At this point, they can then be disposed in
accordance with local, state, and federal regulations, as non-
hazardous solid waste.
FOR MORE COMPLETE INFORMATION,
REQUEST THE MATERIAL SAFETY DATA SHEET,
or visit www.aristechsurfaces.com.
Health and Safety Information 1.2

©Aristech Surfaces LLC • January 2016 • Avonite® Technical Services +1 (800) 428-6648 • FAX +1 (505) 864-7790 • www.aristechsurfaces.com
Health and Safety Information 1.3
AVONITE® SOLID SURFACE ADHESIVE
• FLAMMABLE COMPONENTS: Avonite® Solid Surface
Adhesive Component A contains acrylic resin and
Component B contains benzoyl peroxide. The liquid
and vapors may cause irritation to skin, eyes, nose and
throat and may cause an allergic skin reaction.
• AVOID HEAT, SPARKS, AND OPEN FLAME
• USE ONLY AS DIRECTED
• WEAR SAFETY EYE PROTECTION
• AVOID CONTACT WITH EYES, SKIN, AND CLOTHING
• HAVE ADEQUATE VENTILATION
AVOID BREATHING VAPORS
WASH HANDS AFTER USE
EMERGENCY AND FIRST AID PROCEDURES:
If the Avonite® Solid Surface Adhesive resin or hardener
contacts your skin, wash with soap and water for 15
minutes. For eyes, immediately wash thoroughly with
plenty of water for 15 minutes and consult a physician. In
case of accidental ingestion, immediately consult a
physician or your local poison control center, identifying
the hardener as benzoyl peroxide in plasticizer and the
resin as acrylic resin in methylmethacrylate monomer.
SPECIAL HEALTH EFFECTS:
Excessive inhalation of resin monomer may aggravate
pre-existing medical conditions such as, but not limited to,
chronic respiratory problems, skin disease, and central
nervous disorders and may cause nausea and loss of
consciousness.
DISPOSAL PROCEDURES:
Acrylic resin and hardener when disposed in liquid state
are hazardous waste but when mixed and polymerized
are non-hazardous solid waste. Dispose of used or unused
Avonite® Solid Surface Adhesive by mixing
components, allowing the mixture to solidify, and then
disposing in accordance with applicable local, state and
federal regulations. The information and statements herein
are believed to be reliable but are not to be construed as a
warranty or representation for which we assume legal
responsibility.
FOR MORE INFORMATION
REQUEST THE MATERIAL SAFETY DATA SHEET,
or visit www.aristechsurfaces.com.
©Aristech Surfaces LLC • January 2016 • Avonite® Technical Services +1 (800) 428-6648 • FAX +1 (505) 864-7790 • www.aristechsurfaces.com
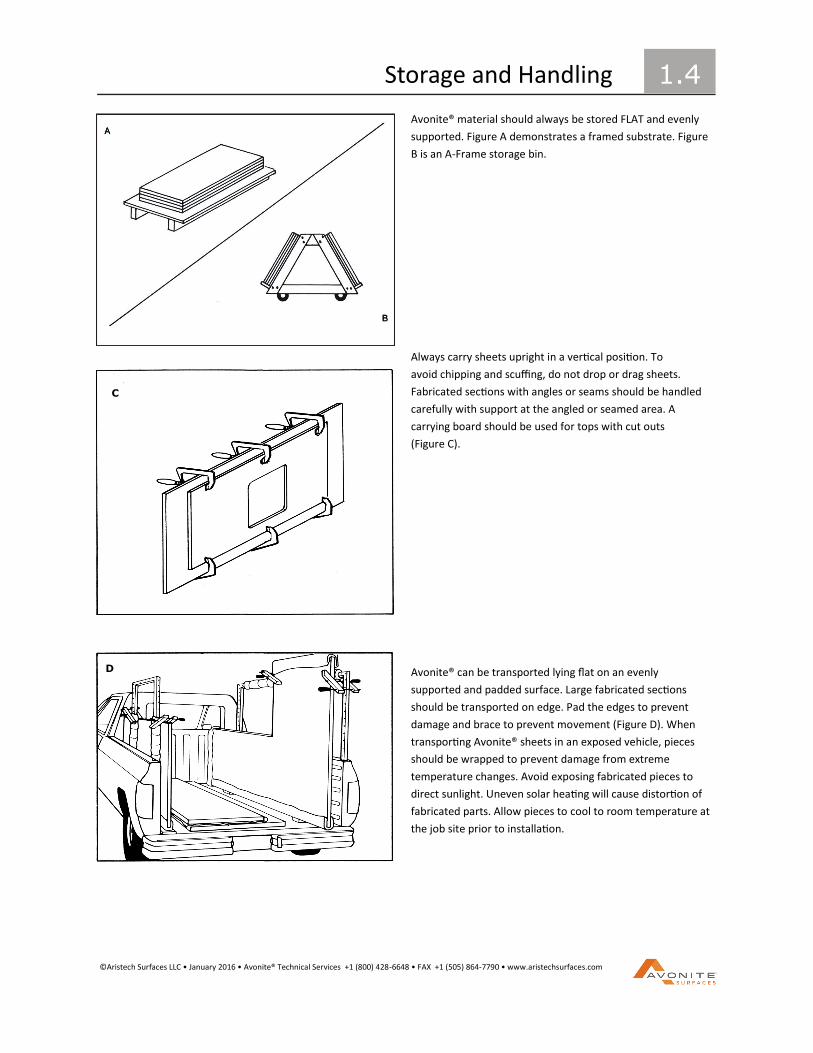
1.4 Storage and Handling
Avonite® material should always be stored FLAT and evenly
supported. Figure A demonstrates a framed substrate. Figure
B is an A-Frame storage bin.
Always carry sheets upright in a vertical position. To
avoid chipping and scuffing, do not drop or drag sheets.
Fabricated sections with angles or seams should be handled
carefully with support at the angled or seamed area. A
carrying board should be used for tops with cut outs
(Figure C).
Avonite® can be transported lying flat on an evenly
supported and padded surface. Large fabricated sections
should be transported on edge. Pad the edges to prevent
damage and brace to prevent movement (Figure D). When
transporting Avonite® sheets in an exposed vehicle, pieces
should be wrapped to prevent damage from extreme
temperature changes. Avoid exposing fabricated pieces to
direct sunlight. Uneven solar heating will cause distortion of
fabricated parts. Allow pieces to cool to room temperature at
the job site prior to installation.
C
D

©Aristech Surfaces LLC • January 2016 • Avonite® Technical Services +1 (800) 428-6648 • FAX +1 (505) 864-7790 • www.aristechsurfaces.com
Color Matching 1.5
Every Avonite® sheet has a sticker which displays an
identification number. When ordering multiple sheets to be
seamed, be sure that sheets come from the same batch.
Please notify the distributor of this fact when ordering.
Advise that you need sheets with consecutive numbers.
Although Avonite® sheets have been inspected prior to
shipment, always remove the peel coat and inspect for color
consistency, surface blemishes, warping, and dimensional
consistency.
Remove the protective peel coat and arrange the sheets in
the manner in which they will be installed. Sand 12"-
16" (305mm - 407mm) of the surface to verify color match.
After sanding, wet the material with alcohol or water.
For Studio Collection® sheets, be aware that the pattern at
the edge and end of the sheet may be different from the
center of the sheet. This may not be noticeable when looking
at a single sheet. Always plan to trim 1"-2" (25mm- 51mm)
off an edge to be joined to another piece. Aristech Surfaces
LLC does not honor any claims that have migration due to not
trimming the sides or ends of the sheet when joining them
together.

©Aristech Surfaces LLC • January 2016 • Avonite® Technical Services +1 (800) 428-6648 • FAX +1 (505) 864-7790 • www.aristechsurfaces.com
THE L - TEMPLATE
The L-Template is a convenient way to fabricate the L or U
shaped counter top. The L-Template should be 10' (305cm)
long by about 30"(76cm) wide. The inside corner will have a
minimum 1"(25.4mm) radius. The L-Template may be
reversed and used for either side. Clamp the L-Template
securely to the Avonite® material. Place some registration
marks on the backside and end of the template. Use a 3 HP
router and template guide for cutting. After cutting, turn the
material bottom side up to bond on the drop edge and inside
corner build up. When the Avonite® Solid Surface Adhesive
has hardened, turn the material face up and re-clamp the L-
Template. Using the registration marks, place the template far
enough back to remove the excess material and Avonite®
Solid Surface Adhesive. This will result in a clean and smooth
edge requiring minimal sanding.
LOCATING SEAMS
When you lay out your job, consider where you need to
place the seams. Make as many seams as possible in the
shop and not in the field. All seams must be supported.
Avoid placing seams in the following locations:
1. Inside corners minimum 2" (50mm)
2. In cut outs
3. Over dishwashers or other heat producing appliances
4. When using dark colors, avoid placing seams in direct
sunlight
Layout 1.6
SEAM BLOCKS
The use of seam blocks is recommended for all seams.
Seam blocks should be 4" (101mm) wide and at least
1/2" (12mm) thick. Join the seam block to the underside
using Avonite® Solid Surface Adhesive. Spread the adhesive
over the entire surface so there are no voids. The seam
block should cover the entire length of the seam.
Seam blocks are highly recommended. Seams are not
covered under warranty. The seam block provides you with
the strongest seam possible.
Studio Collection® Glass and Petals Series products require
different seam block methods. See section 1.8.

©Aristech Surfaces LLC • January 2016 • Avonite® Technical Services +1 (800) 428-6648 • FAX +1 (505) 864-7790 • www.aristechsurfaces.com
1.7 Layout
INSIDE BLOCKS
Avonite® material requires a minimum 1"(25.4mm) radius
on drop edge inside corners. This diagram shows the
recommended build-up. After the build-up is made, use a
template to cut the desired radius (see L-Template).
TILE BACKSPLASHES
The transition from tile to Avonite® should be silicone
sealed and not grouted.
TRANSLUCENT COLORS
Glass and Petals Series products are translucent and may
require a seal coat of water based interior/exterior primer
on the back of the sheet to reduce shadowing effects. For
more information call the Avonite® Technical Services
Department +1 (800) 428-6648.
EXPANSION AND CONTRACTION
Like all solid surface materials, Avonite® material expands
or contracts with temperature variation. The following
changes in length may occur with a swing in temperature of
55° F (31 ° C).
Class I (Filled)—1/8" (3mm) for every 10' (304.8cm)
Class III (Unfilled)—3/16" (5mm) for every 10’ (304.8cm)
Always leave appropriate clearances for expansion and
contraction.

©Aristech Surfaces LLC • January 2016 • Avonite® Technical Services +1 (800) 428-6648 • FAX +1 (505) 864-7790 • www.aristechsurfaces.com
Layout 1.8
NEW SEAM BLOCK METHOD
Previously the use of seam blocks on the translucent Petals
and Glass Series was not recommended. The seam block
location was apparent and back painting the sheets
prevented good bond strength for the seam blocks. This
challenge has been resolved by using adhesion primer for
the back side painting. This high adhesion primer was devel-
oped for hard to paint surfaces such as PVC, glass, and tile.
Recommended:
INSL-X Stix Waterborne Bonding Primer or
Sherwin-Williams DTM Bonding Primer
For the best results, continue preparing seams with the
Wavy Bit. Once the seam is complete, turn the sheet over for
the remaining fabrication. Clean the excess glue where the
4” seam block will be applied. Paint the back side with the
adhesion primer. Two coats are recommended. Allow to dry
completely.
The seam block must run the full length of the seam. Apply a
generous amount of adhesive to the seam block and to the
edge that meets the back of the buildup edge. Uniform
weight should be placed on the seam block to assure even
pressure as the adhesive is drying.
BACKLIT APPLICATIONS
For backlit applications, you may use 1/2” (12.7mm) acrylic
to support larger spans. Using the 1/2” (12.7mm) acrylic
sheet as a solid substrate is recommended. Frosted or white
acrylic may be used to diffuse the light source. When adher-
ing the Avonite® Glass or Petals product to the acrylic, we
recommend small pieces of 3M VHB double sided tape. If
clear acrylic is used, it should be sanded with 100 Micron to
frost the surfaces. This will help hide the adhesive tape.
Always test a small piece to judge appearance.
Backlit Applications that require deck seams or have
unsupported spans will require special consideration. Please
call Avonite® Technical Service +1 (800) 428-6648 as you
have questions.
SEAMING THE NEW PETALS
The new Petals products should be fabricated the same way
as the original Glass Series. Because of the very large petal
shapes, these products will have more conspicuous seams.
The Petal products are hand crafted creating an organic
patterns that have different petal flake concentrations
across the sheet. This too will effect the appearance of
seams in a completed top.
DESIGNING AND FABRICATING WITH AVONITE® GLASS, PETALS AND METALLICS SERIES
The unique translucent quality of Avonite® Glass, Petals and some Metallics products allows you to exercise a great deal of crea-
tivity. For this reason, it is expected that there will be many new applications that will produce unanticipated effects. By all
means experiment, be creative, and consult with us as you have questions. However, always make sure that the end result will
meet your expectations. We recommend that you create a sample mock-up to share with your customers. Due to their translu-
cency, Silver Pearl, Charcoal Pearl, and Celestial Pearl should be fabricated in the same manner as the Glass and Petal colors.
The Nature of the Glass and Petals Series Product
Keep in mind that dabs of silicone, supports, and under-mount sink flanges will show through these products like any typical
glass. When the products are laminated together for a thicker appearance, such as a drop edge or seam block, they will appear
darker due to reduced light transmission. These special effects can be worked into the design for a unique aesthetic effect or
application. Thermoforming Glass and Petals Series products is not recommended due to potential color shifts.
When these products are chosen for more typical applications, where less transparency is desired, the backsides of the finished
tops must be undercoated to hide any supports. For best results, we recommend undercoating with a white latex paint. This
brightens the top closer to the sample chip but magnifies the contrast to the darker edge. This effect should be demonstrated to
the end user. Avoid paints with non-stick additives. Painting should be done after fabrication to avoid painting areas where solid
surface adhesive will be applied.
Frosted Glass offers unique opportunities for painting the back different colors to achieve custom hues that transmit through
the sheet.
The translucent nature of these products allow light to travel through the sheet and sometimes show an interruption such as a
seam. Lighting conditions can sometimes mask or amplify this effect. In almost all conditions the 1/2” (12.7mm) thick edge of

©Aristech Surfaces LLC • January 2016 • Avonite® Technical Services +1 (800) 428-6648 • FAX +1 (505) 864-7790 • www.aristechsurfaces.com
Layout 1.9
Designing and Fabricating with Metallics
The appearance and seaming qualities of our Studio Collection® metallic colors is different than conventional solid surfaces. These products have a light reflective quality that provides an optical effect or “direction” that shows lighter or darker depending on the angle from which they are viewed. This unique reflective quality allows patterns to be created where sheets are joined together. All seams will show this inherent reflective quality and will be visible unlike standard solid surface. The color will appear to change when viewed from different angles. These effects can be incorporated into your designs.
These directional patterns are not detectable in single sheet applications where no seam is required. Seams made from the same sheet will also be noticeable. Because of these conditions there will be no claims allowed for color matching of these products.
Designers and fabricators must consider these characteristics when using these three products. Contact Avonite® Technical Service for any questions +1 (800) 428-6648.
Silver Comet K3-8585

©Aristech Surfaces LLC • January 2016 • Avonite® Technical Services +1 (800) 428-6648 • FAX +1 (505) 864-7790 • www.aristechsurfaces.com
Tooling 2.1
Avonite® material can be easily machined with ordinary
woodworking tools, such as routers, saws, planers, lathes,
drills, and sanders. All blades and bits should be carbide
tipped.
ROUTERS
For general purpose routing, a 1-1/2 to 2 HP router maybe
used. For heavier cutting of thick edges and cut outs, a 3 HP
router is recommended. A 1/2" (12.7mm) shank carbide bit
is needed to minimize chatter for all routing with the excep-
tion of small details like a 1/4" (6.3mm) round over or a pin
stripe inlay. Avonite® Surfaces material should be properly
supported during all phases of fabrication.
CUT OUTS AND CURVED CUTS
A template and a router is mandatory for all cuts. The use
of a saber saw will leave a rough edge where stress cracks
can occur.
Use a template for all inside and outside corner radiuses.
Helpful Tip
Two square feet of color matched material should be left
on the job site for future repairs. Material should be
placed under a bottom drawer or mounted to the inside of
the sink cabinet. Mark the material to identify it is for
potential repairs.

©Aristech Surfaces LLC • January 2016 • Avonite® Technical Services +1 (800) 428-6648 • FAX +1 (505) 864-7790 • www.aristechsurfaces.com
Tooling 2.2
TABLE SAWS
A table saw with a minimum 2 HP motor can be used to cut
Avonite® materials. The sheets should be cut face up. A
good quality rip fence is necessary for accuracy. A triple
chip bevel saw blade is needed for a clean cut with
minimum chipping. A 10" (254mm) diameter blade should
have 40 teeth with a 20° positive hook. Raise the blade
1-1/4" (32mm) above the surface of the material for the
best results.
RADIAL ARM AND MITER BOX
A triple chip bevel saw blade should be used for clean cuts.
These saws require a 10" (254mm) diameter blade with 60
teeth and a 5° positive hook.
TOOLING SUPPLIERS:
Forrest Manufacturing 1-800-733-7111
Monument Toolworks (Parallign) (508) 644-2400
JCM Industries, Inc. 1-800-669-5519
The Pinske Edge 1-800-T-PINSKE
Festool Power Tools 1-888-337-8600
Velepec (Router Bits) 1-800-365-6636
©Aristech Surfaces LLC • January 2016 • Avonite® Technical Services +1 (800) 428-6648 • FAX +1 (505) 864-7790 • www.aristechsurfaces.com
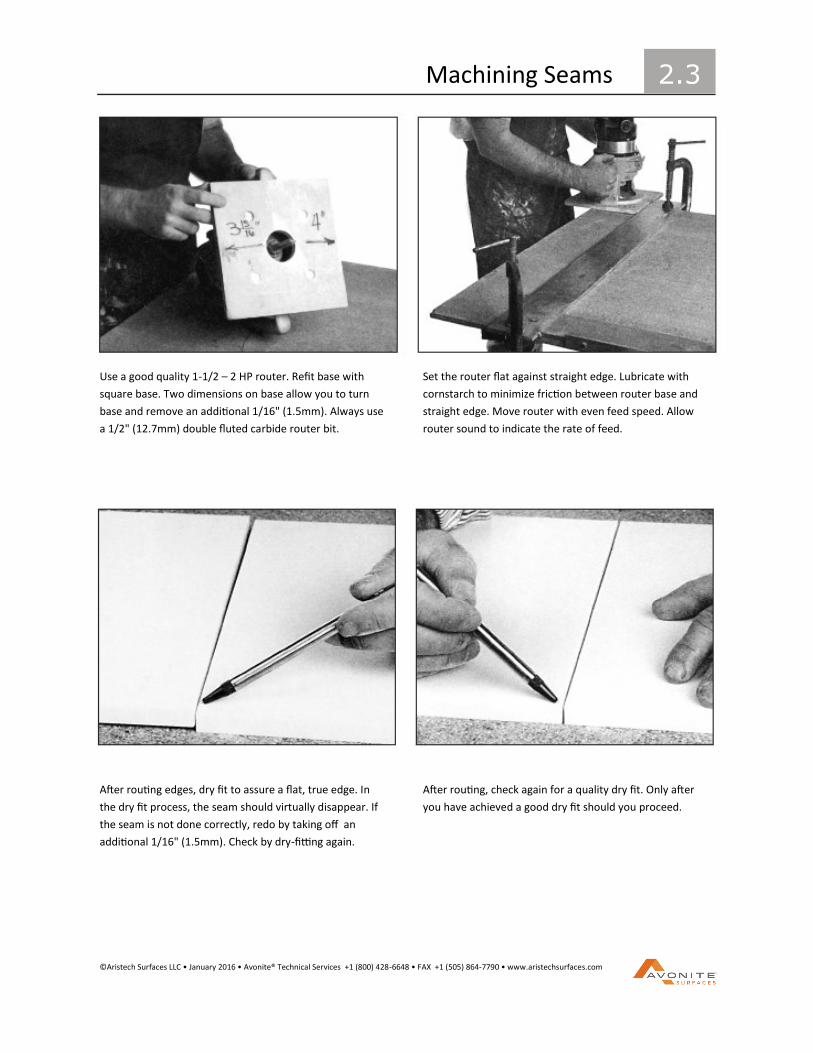
Machining Seams 2.3
Use a good quality 1-1/2 – 2 HP router. Refit base with
square base. Two dimensions on base allow you to turn
base and remove an additional 1/16" (1.5mm). Always use
a 1/2" (12.7mm) double fluted carbide router bit.
Set the router flat against straight edge. Lubricate with
cornstarch to minimize friction between router base and
straight edge. Move router with even feed speed. Allow
router sound to indicate the rate of feed.
After routing edges, dry fit to assure a flat, true edge. In
the dry fit process, the seam should virtually disappear. If
the seam is not done correctly, redo by taking off an
additional 1/16" (1.5mm). Check by dry-fitting again.
After routing, check again for a quality dry fit. Only after
you have achieved a good dry fit should you proceed.
©Aristech Surfaces LLC • January 2016 • Avonite® Technical Services +1 (800) 428-6648 • FAX +1 (505) 864-7790 • www.aristechsurfaces.com
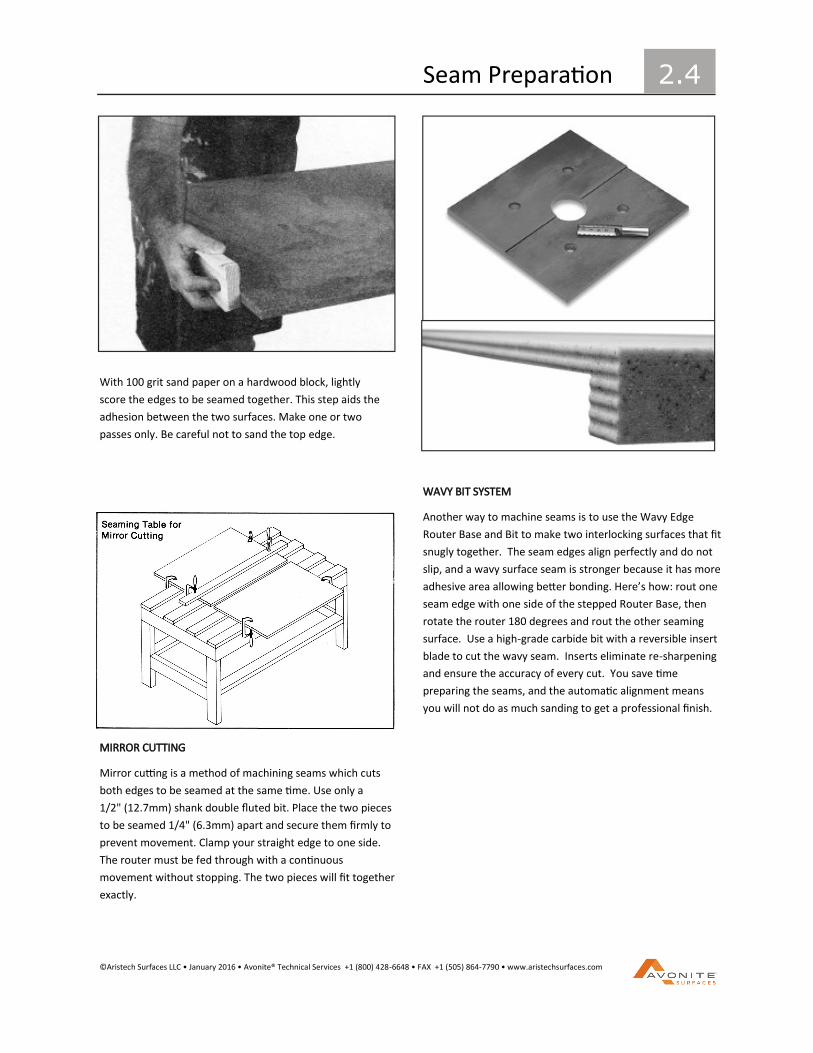
Seam Preparation 2.4
With 100 grit sand paper on a hardwood block, lightly
score the edges to be seamed together. This step aids the
adhesion between the two surfaces. Make one or two
passes only. Be careful not to sand the top edge.
MIRROR CUTTING
Mirror cutting is a method of machining seams which cuts
both edges to be seamed at the same time. Use only a
1/2" (12.7mm) shank double fluted bit. Place the two pieces
to be seamed 1/4" (6.3mm) apart and secure them firmly to
prevent movement. Clamp your straight edge to one side.
The router must be fed through with a continuous
movement without stopping. The two pieces will fit together
exactly.
WAVY BIT SYSTEM
Another way to machine seams is to use the Wavy Edge
Router Base and Bit to make two interlocking surfaces that fit
snugly together. The seam edges align perfectly and do not
slip, and a wavy surface seam is stronger because it has more
adhesive area allowing better bonding. Here’s how: rout one
seam edge with one side of the stepped Router Base, then
rotate the router 180 degrees and rout the other seaming
surface. Use a high-grade carbide bit with a reversible insert
blade to cut the wavy seam. Inserts eliminate re-sharpening
and ensure the accuracy of every cut. You save time
preparing the seams, and the automatic alignment means
you will not do as much sanding to get a professional finish.

©Aristech Surfaces LLC • January 2016 • Avonite® Technical Services +1 (800) 428-6648 • FAX +1 (505) 864-7790 • www.aristechsurfaces.com
Joining 2.5
AVONITE® Ultra-Bond Adhesive
Our adhesive is a pre-measured and pre-tinted two part
adhesive. Ultra Bond hardens in approximately 40 minutes
and is available in 250 ml. cartridges. Ultra Bond is available
in several colors and clear for excellent color matches. It is
specially formulated to offer superior bond strength for all
Avonite® products.
CARTRIDGES
Each cartridge contains 250 ml (10 oz.) of adhesive and will
adhere 35 to 45 feet (12.1M) of 1/2" (12.7mm) seam. The
adhesive flows through a static mixer tube and is ready for
use. Two mixer tubes are included with each cartridge. To
assure positive flow of activator, dispense a small quantity
of adhesive before installing mixer tube.
REFER TO MACHINING SEAMS SECTION BEFORE
APPLYING ADHESIVE
ADHESIVE STORAGE
It is recommended that Ultra Bond be stored in a
refrigerator for extended life. Ultra Bond should be
acclimated to at least 60°F or 15°C before being used. Store
cartridges in an upright position as shown in photo. Storage
at temperatures above 75°F or 24°C may affect the shelf
life, and could adversely affect proper curing of the adhe-
sive. All cartridges are dated with an expiration date. Do
not use expired adhesive.
FINAL PREP
After the dry fit is complete and you are ready to join the
seam, clean edges thoroughly with isopropyl alcohol. Place
separation paper under seam area. Have seam blocks in
place.
FABRICATION TIP
From time to time the bead of adhesive dispensed with the Avonite® Solid Surface Adhesive cartridge will not contain the
prescribed amount of hardener. This may arise for a variety of reasons, but the end result is that small sections of the seam
may not set up as rapidly as others. There are techniques that will reduce the variation in setup time. Once the bead of
adhesive has been dispensed, a popsicle stick applicator may be used to spread the adhesive over the bonding surface. This
serves to more uniformly blend the adhesive with the hardener and prevents variation in the hardening time of the adhesive.
Another helpful technique used frequently is to dispense two thin beads as opposed to one thick bead. This method overlaps
any possible gap in the hardener and prevents uneven hardening.
Scoring the top of the surface strengthens the bond of the excess
adhesive. This helps prevent the critical top layer of the seam from
pulling out when machined.

©Aristech Surfaces LLC • January 2016 • Avonite® Technical Services +1 (800) 428-6648 • FAX +1 (505) 864-7790 • www.aristechsurfaces.com
Joining 2.6
DISPENSING OPTIONS
Ultra Bond cartridges are designed to fit only in a
10 to 1 ratio system. Our systems are available in
both manual and pneumatic styles.
Unique Properties
• The activator is opaque and viscous, much like
a paste.
• The resin is similar to the viscosity of honey.
• The “clear” Avonite® Solid Surface Adhesive is
“foggy” in appearance rather than “water
clear.”
For a complete list of current adhesive colors,
please see Tables A.2 and A.3 in this manual, or
visit www.aristechsurfaces.com.
FABRICATION TIP
When a small amount is needed there is no reason to waste
a mixing tube. Simply remove the end plug and squeeze the
adhesive into a paper cup and stir for one minute.
Manual Pneumatic

©Aristech Surfaces LLC • January 2016 • Avonite® Technical Services +1 (800) 428-6648 • FAX +1 (505) 864-7790 • www.aristechsurfaces.com
Clamping Seams 2.7
CLAMPING METHODS
Before clamping seams, be sure to double check
the following:
1. Surfaces to be bonded are properly scuffed with 100
grit sandpaper.
2. Separation paper is in place.
3. Pieces are properly aligned and level.
4. Edges are clean.
Prepare some reusable glue blocks made from scrap pieces
of Avonite® material. They should be 1"(25.4mm) thick by 1
-1/2" (38mm) w x 2" (51mm). Bevel the edges and drill
1/4" (6.3mm) holes as shown in Figure 1 so the
isopropyl alcohol will penetrate and release the hot melt
bond when it is time to remove them.
On a standard countertop, hot melt 3 pairs of blocks about
6"(152mm) apart across the seam area (see Figure A). Bar
clamps are then used to bring the joint together. Be sure
the glue squeezes out to ensure a tight seam. However,
avoid using excessive pressure which may cause too much
glue to be squeezed out resulting in a weak joint.
After the seam has hardened, remove the blocks by
applying isopropyl alcohol and allowing a few moments for
the hot melt to soften. Also apply alcohol in the
1/4" (6.3mm) holes to allow for penetration of alcohol in
the center of the block. Then place a chisel under the
beveled edge of the block and gently pry; do not use exces-
sive force. If the block does not free immediately, apply
more alcohol and allow to soak for a while longer.
Other effective clamping methods use the Pinske Power
Grips with brackets and turnbuckle, as shown in Figure B,
or the Parallign Clamps shown in Figure C (Available
through Monument Toolworks ).
Other innovative devices designed by independent
suppliers may save time or simplify difficult tasks. If there
is any question regarding the use of such devices, please
contact Avonite® Technical Services at +1 (800) 428-6648.

©Aristech Surfaces LLC • January 2016 • Avonite® Technical Services +1 (800) 428-6648 • FAX +1 (505) 864-7790 • www.aristechsurfaces.com
Finishing Seams 2.8
REMOVING THE FLASH LINE
Do not attempt to sand away the flash line with a belt
sander. Instead, attach two skis to the base of a router. Use
a flat bottom cutting bit and lower the cutter to just over
the surface of the sheet. Cutting the flash line off this way
eliminates sanding time.
SANDING SEAMS
The following procedure will efficiently finish seam areas.
For illustration, please refer to Figure C.
1. Trim the Avonite® Solid Surface Adhesive flash line
with router on skis or offset trim router.
2. The remainder of the flash line should first be sanded
with 100 micron paper. It is important that sanding
extend on either side of the seam, without
concentrating directly on the seam, as illustrated by
Point A. The 100 micron sanding should extend to
about 6" (152mm) on either side of the flash line.
Concentrated sanding could cause a valley, or dip, in
the seam area.
3. The next step is to sand with 80 micron paper. The
sanding area now extends to about 12" (305mm) on
either side of the flash line, as shown in Point B.
4. Once the seam is sanded level, continue the standard
finishing procedure by feathering out the finish in the
seam area to blend with the final finish of the top, as
shown in Point C.
Sanding should not concentrate directly on the flash line, but
extend on either side to feather-in the finish.
©Aristech Surfaces LLC • January 2016 • Avonite® Technical Services +1 (800) 428-6648 • FAX +1 (505) 864-7790 • www.aristechsurfaces.com
Edge Build Ups 2.9
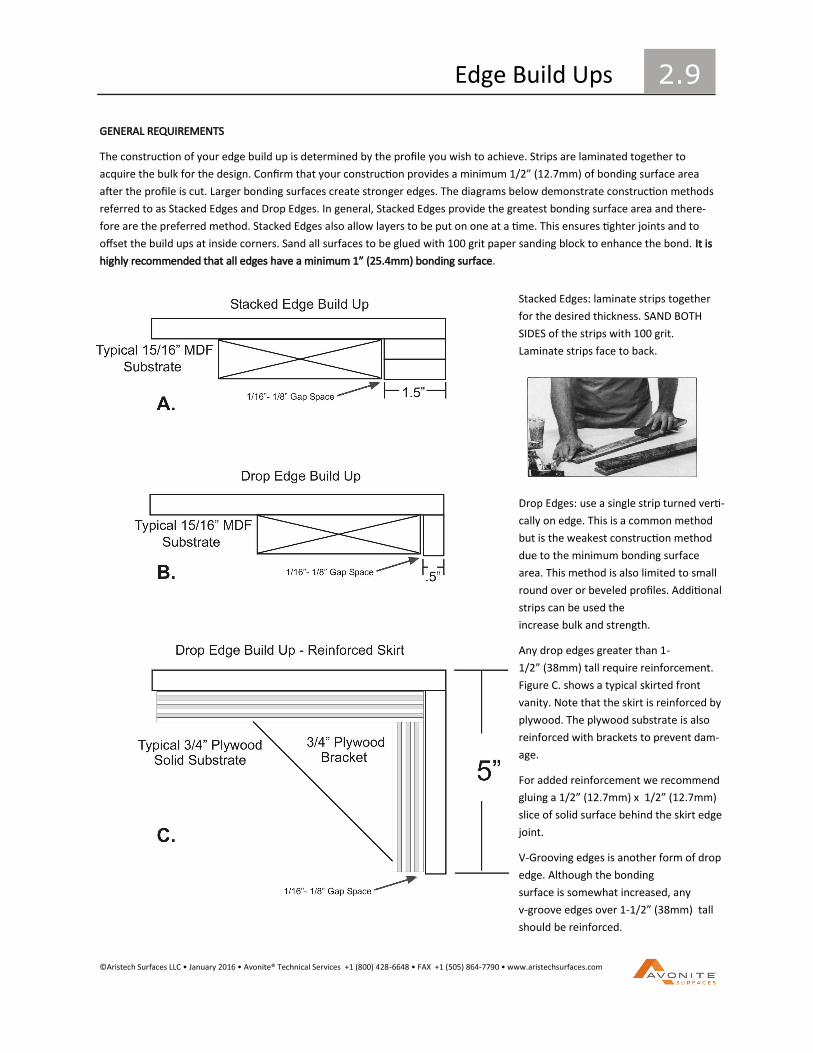
Stacked Edges: laminate strips together
for the desired thickness. SAND BOTH
SIDES of the strips with 100 grit.
Laminate strips face to back.
Drop Edges: use a single strip turned verti-
cally on edge. This is a common method
but is the weakest construction method
due to the minimum bonding surface
area. This method is also limited to small
round over or beveled profiles. Additional
strips can be used the
increase bulk and strength.
Any drop edges greater than 1-
1/2” (38mm) tall require reinforcement.
Figure C. shows a typical skirted front
vanity. Note that the skirt is reinforced by
plywood. The plywood substrate is also
reinforced with brackets to prevent dam-
age.
For added reinforcement we recommend
gluing a 1/2” (12.7mm) x 1/2” (12.7mm)
slice of solid surface behind the skirt edge
joint.
V-Grooving edges is another form of drop
edge. Although the bonding
surface is somewhat increased, any
v-groove edges over 1-1/2” (38mm) tall
should be reinforced.
GENERAL REQUIREMENTS
The construction of your edge build up is determined by the profile you wish to achieve. Strips are laminated together to
acquire the bulk for the design. Confirm that your construction provides a minimum 1/2” (12.7mm) of bonding surface area
after the profile is cut. Larger bonding surfaces create stronger edges. The diagrams below demonstrate construction methods
referred to as Stacked Edges and Drop Edges. In general, Stacked Edges provide the greatest bonding surface area and there-
fore are the preferred method. Stacked Edges also allow layers to be put on one at a time. This ensures tighter joints and to
offset the build ups at inside corners. Sand all surfaces to be glued with 100 grit paper sanding block to enhance the bond. It is
highly recommended that all edges have a minimum 1” (25.4mm) bonding surface.

©Aristech Surfaces LLC • January 2016 • Avonite® Technical Services +1 (800) 428-6648 • FAX +1 (505) 864-7790 • www.aristechsurfaces.com
Clamping Edges 2.10
LAMINATING BUILD-UP DIRECTLY ON COUNTERTOPS
Edges should be straight and free of chatter-marks. Clean bottom of sheet and fascias with isopropyl alcohol. Light block sanding may be needed where edge is to be applied.
Dry fit and mark where they go with arrows.
Hot melt some guide blocks along the backside of the edge.
Glue and clamp one edge build up at a time to prevent glue from setting up before build up strips are applied.
Apply two small beads of adhesive to the surface.
Place the drop edge in the glue and make sure an even flash line develops.
Hold the drop edge back 1/8" (3mm) to avoid any chip out on seamed edge.
Place spring clamps 2" (51mm) to 3" (76mm) apart.
Keep clamps straight to avoid tilting the drop edge back. The tips of the clamps should be in the center of the drop edge.
After the Ultra Bond G has hardened, clamps may be removed. The edge can now be routed to your final configuration.

©Aristech Surfaces LLC • January 2016 • Avonite® Technical Services +1 (800) 428-6648 • FAX +1 (505) 864-7790 • www.aristechsurfaces.com
Machining Edges 2.11
LISTEN TO YOUR TOOLS
By using a high quality router and reasonable feed speed,
detailed cuts can be easily achieved. Keep the router steady
and make a smooth pass without stressing the motor as
this can cause chatter and more labor time. Heavier cuts,
such as those for a 3" (76mm) bull nose can be produced by
laminating several pieces together and machining in two
steps.
For Best Results...
Use a 1/2” (12.7mm) shank profile cutter.
Sharp cutters require less sanding.
COMMON CONSTRUCTION METHODS FOR POPULAR EDGE PROFILES
©Aristech Surfaces LLC • January 2016 • Avonite® Technical Services +1 (800) 428-6648 • FAX +1 (505) 864-7790 • www.aristechsurfaces.com
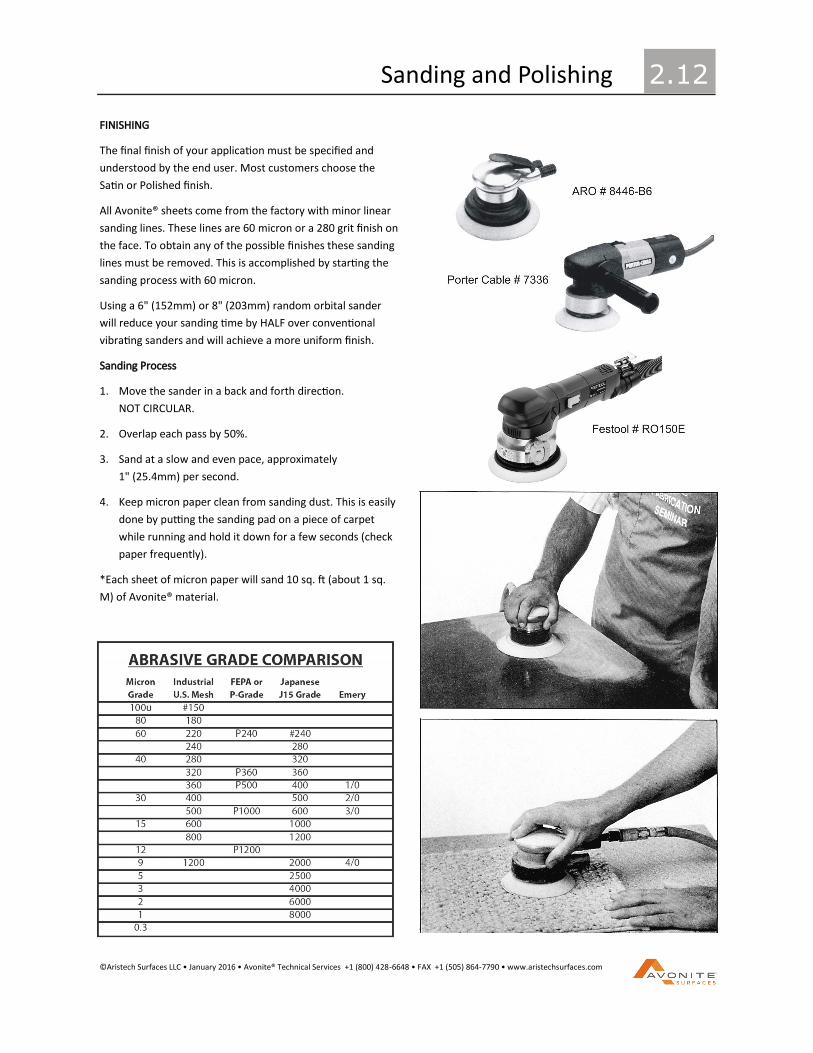
Sanding and Polishing 2.12
FINISHING
The final finish of your application must be specified and
understood by the end user. Most customers choose the
Satin or Polished finish.
All Avonite® sheets come from the factory with minor linear
sanding lines. These lines are 60 micron or a 280 grit finish on
the face. To obtain any of the possible finishes these sanding
lines must be removed. This is accomplished by starting the
sanding process with 60 micron.
Using a 6" (152mm) or 8" (203mm) random orbital sander
will reduce your sanding time by HALF over conventional
vibrating sanders and will achieve a more uniform finish.
Sanding Process
1. Move the sander in a back and forth direction.
NOT CIRCULAR.
2. Overlap each pass by 50%.
3. Sand at a slow and even pace, approximately
1" (25.4mm) per second.
4. Keep micron paper clean from sanding dust. This is easily
done by putting the sanding pad on a piece of carpet
while running and hold it down for a few seconds (check
paper frequently).
*Each sheet of micron paper will sand 10 sq. ft (about 1 sq.
M) of Avonite® material.

©Aristech Surfaces LLC • January 2016 • Avonite® Technical Services +1 (800) 428-6648 • FAX +1 (505) 864-7790 • www.aristechsurfaces.com
Sanding and Polishing 2.13
Matte Finish
After removing the linear sanding lines with 60 micron
paper, place a Scotch-Brite® pad, (#7447 Red) under the
sanding pad to even out the finish. The matte finish is easily
maintained and is usually the most suitable for lighter
colors. Make sure the customer understands the required
maintenance for the finish they have chosen. Most solid
surface samples are Satin finished and likely will be what the
customer is expecting.
Satin Finish
Sand with 60 micron paper, repeat sanding process with 30
micron paper. Place Scotch-Brite® pad (#7448 light gray)
under sanding pad. Sand with Scotch-Brite®#7448 and
soapy water. Homeowners may maintain this finish using a
white Scotch-Brite® and Soft-Scrub.®
Polished Finish
After sanding with 60 micron paper, repeat the sanding
process with 30 micron paper. Use a 3M Super Buff adapter
to prevent the arbor of the polisher from damaging the
surface. Dark colors with a high gloss finish show wear very
quickly. A dark color is not recommended for heavy use
areas.
Coppermine K3-8490 and Goldmine K3-8495 are dark
colors that may require polishing for full impact. The
brilliance of the shine comes from the fact that these
products use real nonferrous metal in the ingot. The
nonferrous metal will:
1. Have no effect on your tooling.
2. Cause some oxidation during polishing, as exemplified
by blackening of the polishing pads. This is normal for
polishing metals.
Finishing Guidelines
You should become familiar with the different colors and
options you present to your clients. Most customers are
expecting the gloss level they have on the sample they are
choosing from. Download and print our Finishing Guidelines
document. Go over these guidelines with your customers to
help manage expectations.
The buffer should be variable speed between 1000-3000 RPM.
Best results are achieved at lower speeds.
©Aristech Surfaces LLC • January 2016 • Avonite® Technical Services +1 (800) 428-6648 • FAX +1 (505) 864-7790 • www.aristechsurfaces.com
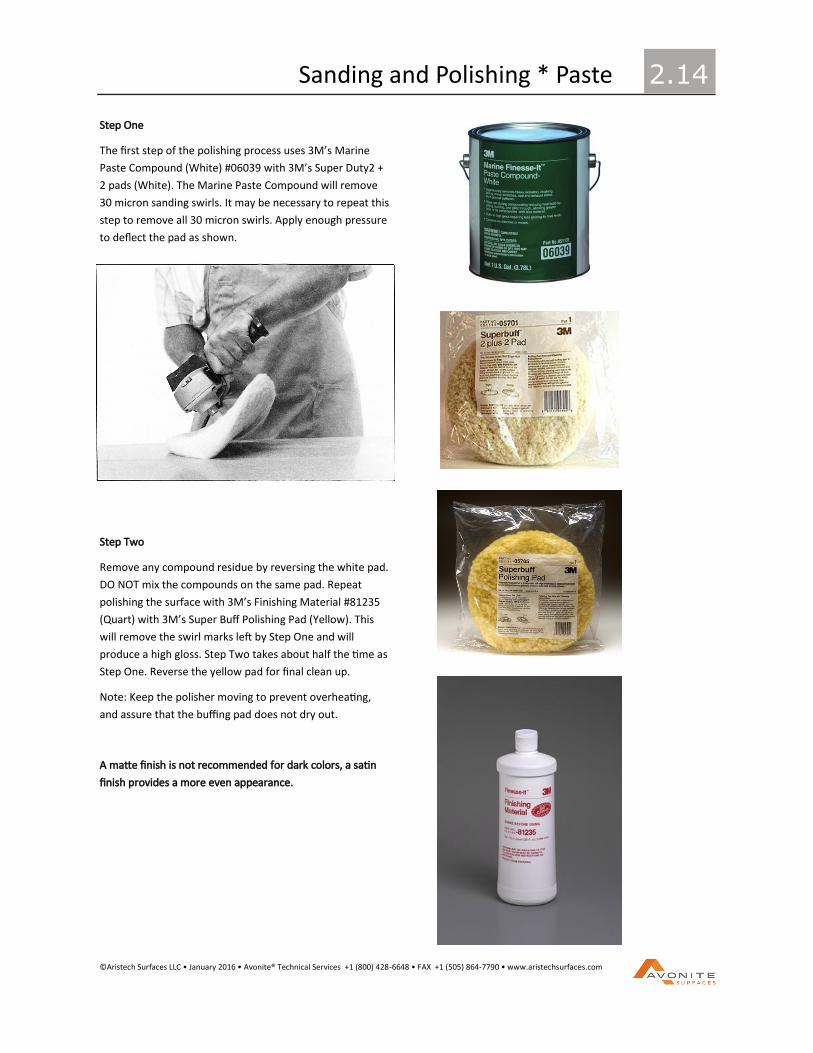
Sanding and Polishing * Paste 2.14
Step One
The first step of the polishing process uses 3M’s Marine
Paste Compound (White) #06039 with 3M’s Super Duty2 +
2 pads (White). The Marine Paste Compound will remove
30 micron sanding swirls. It may be necessary to repeat this
step to remove all 30 micron swirls. Apply enough pressure
to deflect the pad as shown.
Step Two
Remove any compound residue by reversing the white pad.
DO NOT mix the compounds on the same pad. Repeat
polishing the surface with 3M’s Finishing Material #81235
(Quart) with 3M’s Super Buff Polishing Pad (Yellow). This
will remove the swirl marks left by Step One and will
produce a high gloss. Step Two takes about half the time as
Step One. Reverse the yellow pad for final clean up.
Note: Keep the polisher moving to prevent overheating,
and assure that the buffing pad does not dry out.
A matte finish is not recommended for dark colors, a satin
finish provides a more even appearance.

©Aristech Surfaces LLC • January 2016 • Avonite® Technical Services +1 (800) 428-6648 • FAX +1 (505) 864-7790 • www.aristechsurfaces.com
Sanding and Polishing * Dry Cut 2.15
POLISHING WITH THE AVONITE® DRY-CUT SYSTEM
Another effective polishing method involves the use of the Avonite® Dry-Cut
Finishing System abrasive bars. This is a three step system that quickly and easily
removes sanding scratches. Since the compound is a solid it can be cleaner to use
than 3M Marine Paste. Apply sparingly to the buffing wheel and it stays there to
efficiently create a high luster finish.
Step 1: (Brown Bar)
The first step in polishing with the Avonite® Dry-Cut Finishing System is to use the
brown bar (SM4036-A) with a 3M Super Duty 2+2 pad (white). Start with the
Avonite® material sanded to a 30-micron finish. The brown bar must be applied
directly to the buffing pad. With the buffing pad turned up and buffer running, press
the bar firmly against the pad allowing it to buildup on the pad. Begin buffing the
material, and be sure to apply enough pressure to deflect the pad as shown on page
2.14. Add material to the buffing pad if you feel you need more to ensure you do not
build up excessive heat by using a dry pad. Repeat Step 1 as necessary to remove all
of the 30-micron swirls.
Step 2: (Purple Stick)
This step will remove any marks left by the more aggressive cutting brown bar.
Reverse the white pad and apply the purple stick compound (SM4036-B) to the pad.
The purple stick must be applied directly to the buffing pad. With the buffing pad
turned up and buffer running, press the stick firmly against the pad allowing it to
build up on the pad. Add material to the buffing pad as you feel is needed to ensure
you do not build up excessive heat by using a dry pad. Repeat Step 2 as necessary
until you have removed the buffing swirls resulting from Step 1. To achieve a high
gloss finish, complete Step 3.
Step 3:
This is the final step in achieving a high gloss finish. Remove any residue from the
previous steps by buffing lightly with a clean 3M Super Duty 2+2 pad (white). Use at
the lowest power setting, gliding across the material until all the material from Step 2
is removed. Repeat polishing the surface with 3M’s Finesse-it Finishing Material
(#81235) with 3M’s Super Buff Polishing Pad (yellow) at the lowest power setting.
This step will remove any swirl marks that may have resulted from Step 2 and
produce a high gloss finish. Reverse the yellow pad for final clean up.
WET VS. DRY
We have found this polishing method to give equivalent results to the Finesse-It
system, however the Finesse-It system is a little more forgiving and it is easier to
control surface temperature. The Avonite® Dry-Cut Finishing System will give you a
good polish if you are experienced and you will save some cleanup time.
©Aristech Surfaces LLC • January 2016 • Avonite® Technical Services +1 (800) 428-6648 • FAX +1 (505) 864-7790 • www.aristechsurfaces.com
Finishing Guidelines 2.16
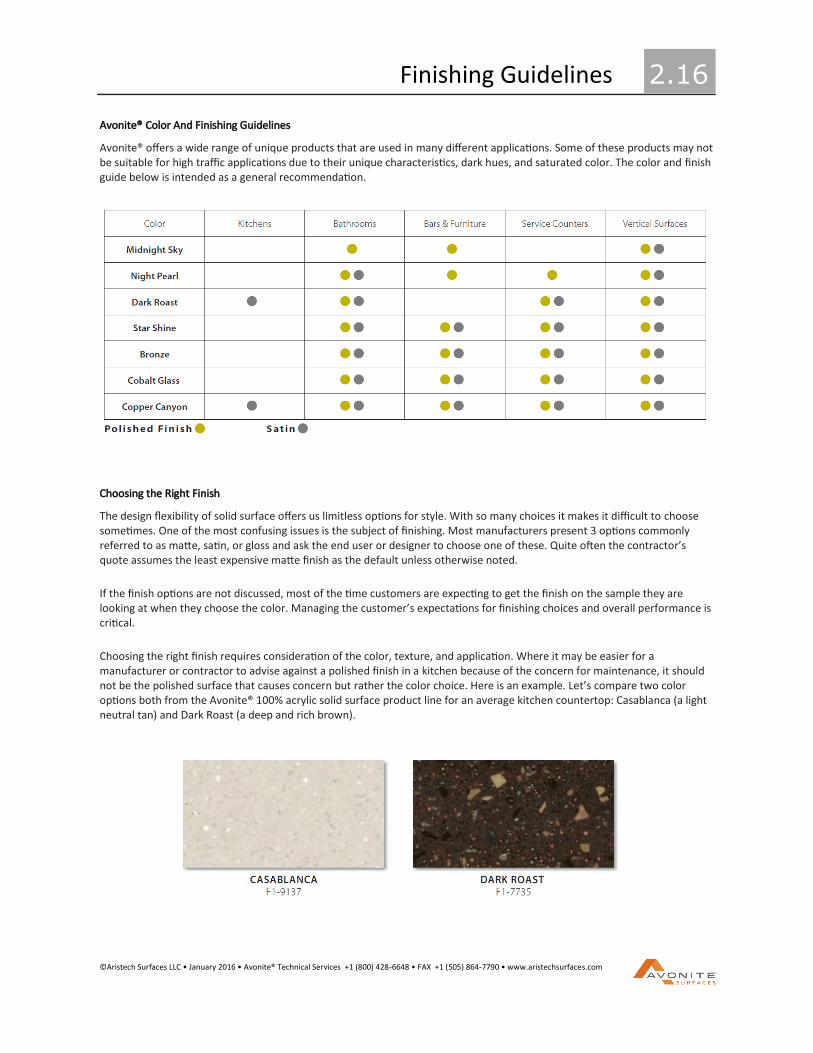
Avonite® Color And Finishing Guidelines
Avonite® offers a wide range of unique products that are used in many different applications. Some of these products may not be suitable for high traffic applications due to their unique characteristics, dark hues, and saturated color. The color and finish guide below is intended as a general recommendation.
Choosing the Right Finish
The design flexibility of solid surface offers us limitless options for style. With so many choices it makes it difficult to choose sometimes. One of the most confusing issues is the subject of finishing. Most manufacturers present 3 options commonly referred to as matte, satin, or gloss and ask the end user or designer to choose one of these. Quite often the contractor’s quote assumes the least expensive matte finish as the default unless otherwise noted.
If the finish options are not discussed, most of the time customers are expecting to get the finish on the sample they are looking at when they choose the color. Managing the customer’s expectations for finishing choices and overall performance is critical.
Choosing the right finish requires consideration of the color, texture, and application. Where it may be easier for a manufacturer or contractor to advise against a polished finish in a kitchen because of the concern for maintenance, it should not be the polished surface that causes concern but rather the color choice. Here is an example. Let’s compare two color options both from the Avonite® 100% acrylic solid surface product line for an average kitchen countertop: Casablanca (a light neutral tan) and Dark Roast (a deep and rich brown).
©Aristech Surfaces LLC • January 2016 • Avonite® Technical Services +1 (800) 428-6648 • FAX +1 (505) 864-7790 • www.aristechsurfaces.com
Finishing Guidelines 2.17
The light and neutral Casablanca will not easily show signs of everyday wear but the Dark Roast may show early signs of wear simply because of its color. This scenario would be true regardless of the finish chosen. A polished Casablanca countertop can go years without showing any wear.
Finishing Dark Colors
This is a good time to discuss what finishes are appropriate for dark and rich colors like Dark Roast. There are some of these colors in everyone’s sample box. When it comes to extra dark colors like these, the “matte” finish is a very poor choice. Rough matte finishes on dark colors leave surfaces looking chalky and they easily smudge with fingerprints. All dark colors should have a minimum “satin” finish. Manufacturers put a minimum satin finish on the samples in their sample boxes because all of the colors look much better and cleaner.
Maintenance
Now let’s consider the question of long term maintenance for different colors and finishes. Regardless of which finish was originally chosen, similar finishing steps must be applied to restore the surface to its original finish. There are two steps for a matte, three for a satin, and four steps for a high gloss. Because of the specialty equipment used to achieve a high gloss, end users wanting a polished finish must be prepared to acquire this equipment and technique or contract their installer to refinish their surfaces periodically every 4 or 5 years depending on the application. In most cases, countertops that are used and cleaned everyday develop their own level of “patina”. Matte surfaces become more reflective with use. It is generally agreed that the satin finish offers end users the best look with the minimum required maintenance. However maintaining a polished surface is only one more step than a satin finish. Overall hardness and scratch resistance of all solid surfaces are relatively the same. Anything that is harder than the surface has the potential to scratch. Items such as ceramic jars or stoneware for example should have felt protectors on the bottom to prevent scratching.
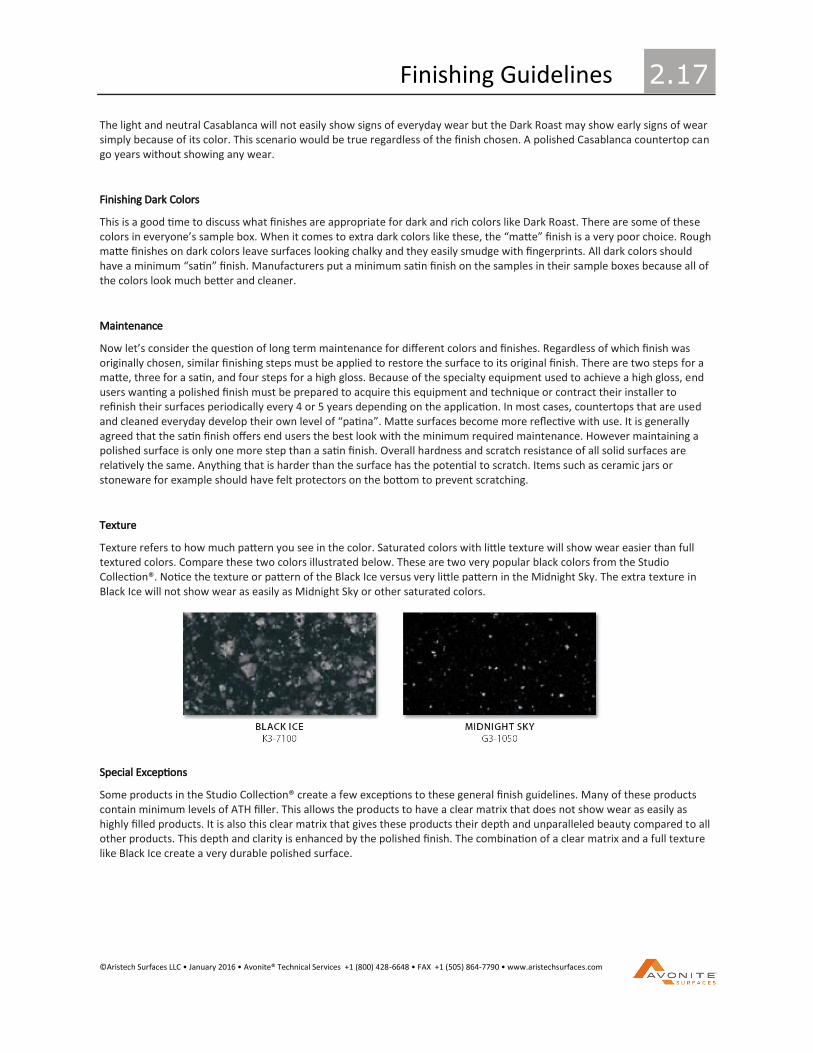
Texture
Texture refers to how much pattern you see in the color. Saturated colors with little texture will show wear easier than full textured colors. Compare these two colors illustrated below. These are two very popular black colors from the Studio Collection®. Notice the texture or pattern of the Black Ice versus very little pattern in the Midnight Sky. The extra texture in Black Ice will not show wear as easily as Midnight Sky or other saturated colors.
Special Exceptions
Some products in the Studio Collection® create a few exceptions to these general finish guidelines. Many of these products contain minimum levels of ATH filler. This allows the products to have a clear matrix that does not show wear as easily as highly filled products. It is also this clear matrix that gives these products their depth and unparalleled beauty compared to all other products. This depth and clarity is enhanced by the polished finish. The combination of a clear matrix and a full texture like Black Ice create a very durable polished surface.
©Aristech Surfaces LLC • January 2016 • Avonite® Technical Services +1 (800) 428-6648 • FAX +1 (505) 864-7790 • www.aristechsurfaces.com
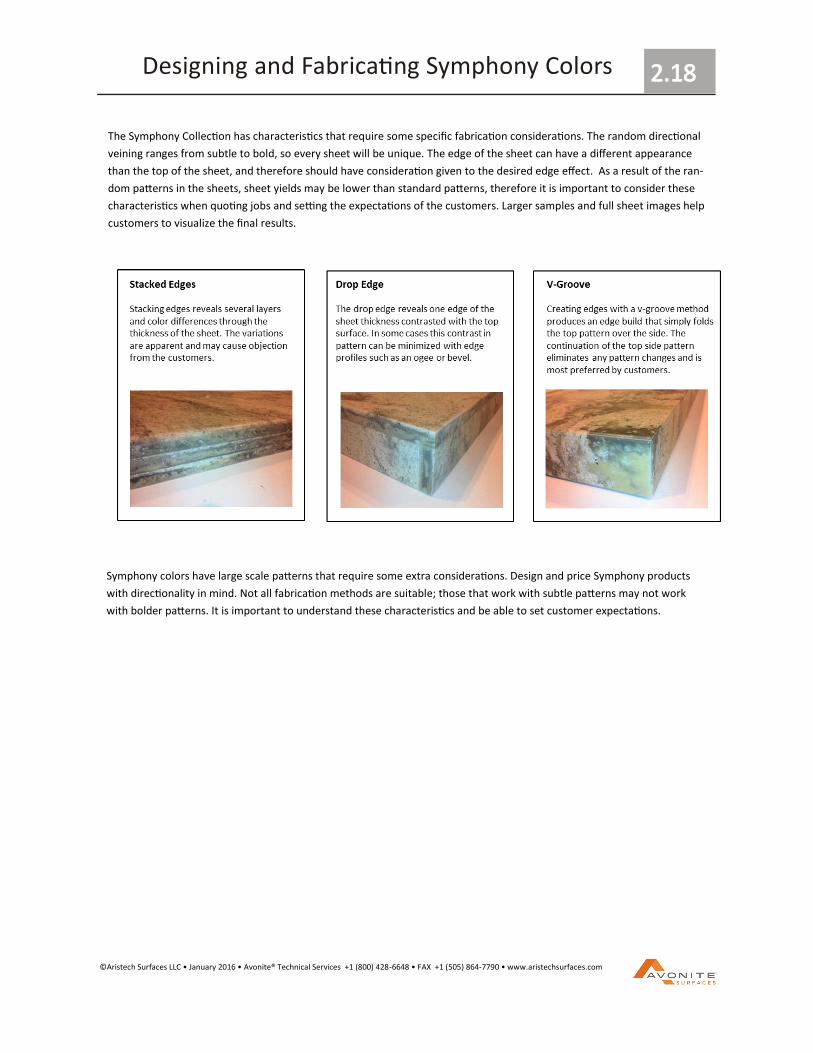
The Symphony Collection has characteristics that require some specific fabrication considerations. The random directional
veining ranges from subtle to bold, so every sheet will be unique. The edge of the sheet can have a different appearance
than the top of the sheet, and therefore should have consideration given to the desired edge effect. As a result of the ran-
dom patterns in the sheets, sheet yields may be lower than standard patterns, therefore it is important to consider these
characteristics when quoting jobs and setting the expectations of the customers. Larger samples and full sheet images help
customers to visualize the final results.
Designing and Fabricating Symphony Colors 2.18
Symphony colors have large scale patterns that require some extra considerations. Design and price Symphony products
with directionality in mind. Not all fabrication methods are suitable; those that work with subtle patterns may not work
with bolder patterns. It is important to understand these characteristics and be able to set customer expectations.
©Aristech Surfaces LLC • January 2016 • Avonite® Technical Services +1 (800) 428-6648 • FAX +1 (505) 864-7790 • www.aristechsurfaces.com
Installation 3.1
It is very important that the personnel installing the
Avonite® material be properly trained and follow the
recommended procedures. Improper installation may lead
to problems in the future. Failure to follow the
recommended procedures will void the warranty.
Substrates
Choosing the appropriate substrate for different
applications should be considered. A solid substrate cannot
be used when heat sources are present, as in kitchen
applications. The following methods demonstrate alterna-
tives to solid substrates.
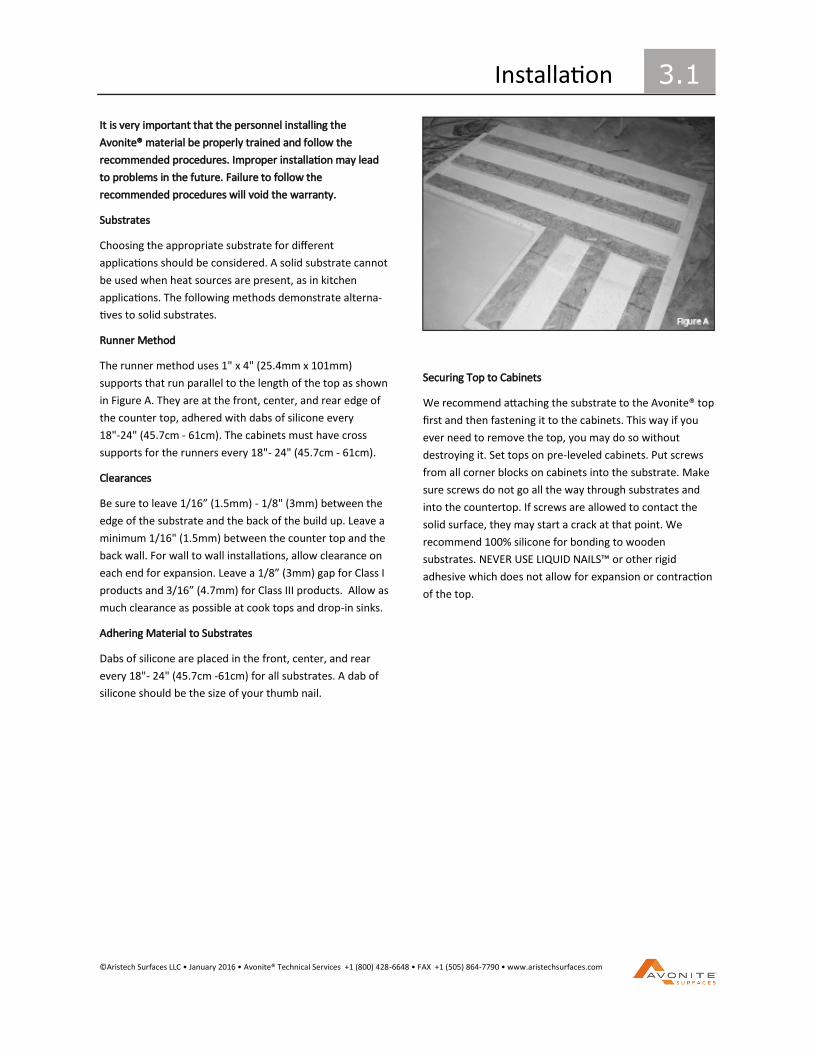
Runner Method
The runner method uses 1" x 4" (25.4mm x 101mm)
supports that run parallel to the length of the top as shown
in Figure A. They are at the front, center, and rear edge of
the counter top, adhered with dabs of silicone every
18"-24" (45.7cm - 61cm). The cabinets must have cross
supports for the runners every 18"- 24" (45.7cm - 61cm).
Clearances
Be sure to leave 1/16” (1.5mm) - 1/8" (3mm) between the
edge of the substrate and the back of the build up. Leave a
minimum 1/16" (1.5mm) between the counter top and the
back wall. For wall to wall installations, allow clearance on
each end for expansion. Leave a 1/8” (3mm) gap for Class I
products and 3/16” (4.7mm) for Class III products. Allow as
much clearance as possible at cook tops and drop-in sinks.
Adhering Material to Substrates
Dabs of silicone are placed in the front, center, and rear
every 18"- 24" (45.7cm -61cm) for all substrates. A dab of
silicone should be the size of your thumb nail.
Securing Top to Cabinets
We recommend attaching the substrate to the Avonite® top
first and then fastening it to the cabinets. This way if you
ever need to remove the top, you may do so without
destroying it. Set tops on pre-leveled cabinets. Put screws
from all corner blocks on cabinets into the substrate. Make
sure screws do not go all the way through substrates and
into the countertop. If screws are allowed to contact the
solid surface, they may start a crack at that point. We
recommend 100% silicone for bonding to wooden
substrates. NEVER USE LIQUID NAILS™ or other rigid
adhesive which does not allow for expansion or contraction
of the top.

©Aristech Surfaces LLC • January 2016 • Avonite® Technical Services +1 (800) 428-6648 • FAX +1 (505) 864-7790 • www.aristechsurfaces.com
Installation 3.2
ALL CUT OUTS SHOULD BE MADE WITH A TEMPLATE AND A
ROUTER AND HAVE A MINIMUM 1/4" (6mm) INSIDE
CORNER RADIUS.
Corners of cook top cut outs must be reinforced by bonding
a 3" (76mm) x 3" (76mm) or larger piece of Avonite®
material to the underside.
Using the runner method substrate as pictured allows for
venting of heat.
COOKTOP AND BACKSPLASH CLEARANCE
Due to excessive heat generated from cook tops and pans
being heated, minimum clearances are required by
Avonite® material.
Standard 4" (102mm) tall splashes should have a minimum
clearance of 2" (51mm) between the splash and the cook
top flange.
Note to homeowner:
Full height splashes within 2-1/2" (63.5mm) from the cook
top flange will not be covered under Avonite® 10-Year
Warranty. Extensive use of large oversized pans that
overhang the counter should be avoided.
Commercial type cook tops for residential use need to be
supported inside cabinet base, so that cook top is not
supported by countertop alone.
THERMO-FLOW TAPE
The use of Avonite® Thermo-Flow tape is REQUIRED for
prevention of damage in cook top cut outs and slide-in
ranges due to excessive heat. The use of any other tape
voids the Avonite® 10-Year Warranty. Thermo-Flow is a
2-1/2" (63.5mm) wide heat conductive aluminum tape with
a glass backing that adds insulating properties. Install one
layer of Thermo-Flow around the cut out as shown in
Figure A.
Commercial Food Service Hot Well Limitations
Aristech Surfaces LLC does not warrant the use of Class III
products for use in commercial hot well unit applications.
This restriction will continue in effect until appropriate
design criteria have been developed. We will keep you
advised of any future developments in this area. Guidelines
for installation of commercial hot wells are given on
page 3.4.

©Aristech Surfaces LLC • January 2016 • Avonite® Technical Services +1 (800) 428-6648 • FAX +1 (505) 864-7790 • www.aristechsurfaces.com
Installation 3.3
Making Field Seams
To insure that drop edges are properly aligned after seam-
ing, stop routing the profile a couple of inches from the
seam on either side. After removing the flash line of the
seam you may then route the profile across the seam.
INSTALLATION CHECK LIST
1. Before Seaming
a. Good dry fit (no gaps)
b. Seam block in place
c. Separation paper
d. Proper clearances
e. Clean with isopropyl alcohol
f. Prepared for clamping
2. Support all seams
3. Substrate secured to cabinets
4. Level cabinets 3/32" in 48"(2.38mm in 120cm)
5. Cutouts—1/4" (6.3mm) radius
6. Thermo-Flow tape on cook top cutout
7. Inside corner radius
8. Silicone
OVERHANGS
When installing overhanging countertops, support is re-
quired for 1/2" (12.7mm) thick overhangs extending more
than 6" (152mm). Support is provided by plywood under-
layment and brackets which are equilateral right triangles
(anchor leg is equal in length to the support leg). Brackets,
when required, are placed no more than 24" (60.9cm) apart
and should come to within 5" (127mm) of the countertop
edge. Refer to the dimensions below for the type of sup-
port to use.
OVERHANG SUPPORTS
Up to 6” (15.2cm) require no additional support.
6” - 12” (15.2cm—30cm) require 3/4” (19mm) plywood
substrate or brackets
12” - 18” (30cm—45.7cm) require brackets or metal frame
Overhangs more than 18” (45.7cm) should be engineered
to no more than 1/8” (3mm) deflection.

©Aristech Surfaces LLC • January 2016 • Avonite® Technical Services +1 (800) 428-6648 • FAX +1 (505) 864-7790 • www.aristechsurfaces.com
COMMERCIAL FOOD SERVICE AREAS
The following features must be included in a commercial food service installation in order to be covered by Avonite® 10-Year Limited Warranty. Color must be selected from among Avonite® Class I fire rated products.
1. Cabinet must be even and level with no protrusions to cause cracking.
2. Support tops every 18” (45.7cm). Cantilevers over 6” (15.2cm) require structural support. Provide support within 3” (7.6cm) of all cut outs.
3. Hot and cold units must be supported from below and not rest on the Avonite® top.
4. Attach Avonite® to support frame with dabs of silicone every 18”- 24” (45.7-61cm) ; do not use a continuous bead.
5. Separate tops containing hot sections from those with cold sections. A soft (silicone) seam may be used.
6. Make cut outs with router and template and allow a 1/2” (12.7mm) radius in the corners. Cut and sand a 1/8” (3mm) round over on top and bottom edge of cut out.
7. Reinforce corners of rectangular cut outs with 6” x 6” (15.2 x 15.2cm) blocks of Avonite®. Circular cut outs must have a continuous ring of Avonite® 2” (5cm) wide as reinforcement.
8. Use a layer of Thermo-Flow tape to line the perimeter of all hot and cold cut outs.
9. Hot well units must be covered with a layer of Flex- Sulation blended PVC foam sheeting. The foam may be attached to the hot well with 3M® double sided aircraft tape, or duct tape. McMaster Carr Supply 562-692-5911 Part # 9349K1 10. Cabinets are to be ventilated by installing a fan near the bottom to pull cool air into the cabinet and by providing vent slots near the upper edge of the cabinet to expel the hot air. Temperatures in the cabinet must not exceed 170°F (78°C). 11. Sneeze guards must be fastened to the cabinets or the floor, not directly to the Avonite® sheet. Holes in the Avonite® sheet to accommodate the sneeze guard supports must be cut 1/4” (6mm) oversize in diameter to allow for expansion and contraction. 12. Deck seams must be reinforced with a 4” (10cm) seam block. Keep seams 3” (7.6cm) or more away from cutouts.
Installation 3.4

©Aristech Surfaces LLC • January 2016 • Avonite® Technical Services +1 (800) 428-6648 • FAX +1 (505) 864-7790 • www.aristechsurfaces.com
3.5
Base Installation
Please read the instructions carefully prior to installing the base. These are the basic instructions for the installation of a
shower base in a step-by-step sequence that will work in most types of installations. If you have an installation that is not
covered here, please call Avonite® Technical Services for additional information +1 (800) 428-6648.
Warning—Please inspect the shower base for breakage and report any damage to your Avonite® representative. Allow the
shower base to acclimate to room temperature before installing.
Preparing the Installation Site
• Open shower base and inspect the product for any damage.
• Clean and scrape the floor of the shower base alcove. This space must be free of any debris in order to get a proper
adhesion with the thin-set mortar.
• Measure the size of the alcove to insure that the base and panels fit properly.
• Trial fit the base in the alcove and make sure that the drain location lines up properly with the shower base.
In a three wall application, the base should slide in easily with approximately 1/16” - 1/8” (1.5mm—3mm) spacing between
the studs and the base. Placing a level on the base, check that the base sits level on the floor. Lean the base back or remove
from the alcove.
Installing the Base
• Install the cast brass shower drain into the shower base. Follow the installation instructions that came with the drain.
Plumber’s putty or silicone are acceptable to use with the drain.
• Mix and apply thin-set mortar to the floor, using the notched trowel. Spread the mixture to achieve a depth necessary to fill
the voids in the floor and enable the base to sit level. A 50 lb. (22.6kg) bag of thin-set should provide at least 45-50 sq. ft.
(13.7—15.2 M2) of coverage. All supporting points should have contact with the thin-set mortar.
• After applying the thin-set, the base into place. Make sure the base is resting level on the thin-set.
• Clean the area at the threshold of any excess thin-set. Allow the thin-set and shower pan to cure for 24 hours before
working in the pan area. Be sure to protect the base floor after installation, using card board sheeting or a like material,
until the complete project is finished.
• Before proceeding to install the wall system, flood test the shower base for proper drainage.
Tools and Supplies Needed for Installation
• Level • Silicone/Plumber’s Putty • Thin-Set Mortar & Water
• Shims • Wrench • 1/4” - 1/2” (6mm—12.7mm) Grooved Trowel
• Cast Brass Shower Drain • 5-gallon Empty Bucket • Tool for Mixing Thin-Set Mortar
Shower Base System Installation

©Aristech Surfaces LLC • January 2016 • Avonite® Technical Services +1 (800) 428-6648 • FAX +1 (505) 864-7790 • www.aristechsurfaces.com
Wet Wall Panel System Installation 3.6
Wet Wall Panels and Accessories
Please read the instructions carefully prior to installing the wall system. This document will give you basic instructions for the
installation of wet wall panels in a step-by-step sequence that will work in most types of installations. If you have an
installation that is not covered, please call Avonite® Technical Services with any questions +1 (800) 428-6648.
Warning—Please inspect all items and report any damage. Store panels in a flat area to avoid warping until the time of
installation. Allow panels to acclimate to room temperature before installing.
Recommended Tools and Supplies for Installation
• Circular Saw with Carbide Tip Blade (24-40 tooth) • Level
• Random Orbital Sander • Square
• Belt Sander w/80 Grit Belt • Jig Saw with Wood Finish Blade
• 150-320 Grit Sandpaper & Scotch Brite Pad • Compass or Scribe Tool
• Installation Kit or Hot Melt Gun & Glue Sticks • Denatured Alcohol
• Drill, Hole Saw, 1/2” (12.7mm) Diameter Bit (Sharp) • Clean Shop Rags
• Caulk Gun & Silicone • 1” x 4” x 8” (25mm x 10cm x 203mm) Wood for Bracing (4 pcs.)
• Paintable Latex Caulk
Preparing the Site
• Prepare the area with moisture resistant dry wall or tile backer board. Never install directly on any masonry wall or
construction that is, or may become, damp.
• When installing over ceramic tile, check for loose tiles. If you find any, correct the problem. Make sure that the area
to be covered is uniform in support. If not, build up the areas without tile. Remove the bottom row of tile and cut a
ventilation gap in the substrate.
• On every installation, make sure that there is a 1/2”-1” (12.7mm—25.4mm) (Detail A) clearance between the top
of the shower base or tub deck and the bottom of the moisture resistant substrate. This will allow for ventilation and
keep water leaks from wicking up the substrate. (Figure 1)
Preparation for Accessories
Recessed Accessories
Make sure the accessories will fit near, but not in, a stud and closer to the center of the sheet. Make sure no electrical
wiring or plumbing is present before cutting out for the accessories. Make the cutout in the substrate to receive the
accessory.
Surface Mounted Accessories
If a surface mounted accessory, such as a grab bar, is going to be installed, make sure 2” x 6” (50.8mm x 152.4mm)
wood blocking is installed behind the substrate where the surface mounted accessory will be located. This will insure
that there is solid backing for any screws that need to be used in the installation. (For blocking requirements see the

©Aristech Surfaces LLC • January 2016 • Avonite® Technical Services +1 (800) 428-6648 • FAX +1 (505) 864-7790 • www.aristechsurfaces.com
3.7
Measuring for Installation
1. Determine your desired wall panel height. Allow for a
1/16” (1.5mm) gap between the solid surface panel and
shower/tub base pan for a better silicone seal (Detail B).
2. Solid surface panels should be installed in the following
order: Back wall, Side wall without plumbing, and then the
plumbing wall.
3. You may need to draw level and plumb lines on the wall to
determine whether your shower bases or walls are out of
square. Using the reference line and measuring from the
lowest point on base or widest point on the wall, determine
how your panels will need to be cut. Transfer this data to the
panels. (Figure 1)
4. Check your measurements and cut the panels with a
circular saw or jig saw. You may make final adjustments to
your cuts with a belt sander.
Measuring and Making Cutouts
1. All inside corners of cutouts should have a minimum
1⁄4” (6mm) radius. Do not cut sharp inside corners.
2. Locate the location of the plumbing holes. Transfer the data
to the panels. Cut the holes a minimum 1⁄4” (6mm) larger
than the pipe diameters. The cover plates for the plumbing
fixtures may allow for more variance. Consult the plumbing
fixture installation instructions for templates and recom-
mended hole cut out sizes. Check your measurements and
using a jig saw or standard bimetal hole saw, cut out the
plumbing holes.
3. Once the panels are cut to size, locate the caddie cutouts,
marking the cut out locations. Cut the caddies out after the
panels have been installed.
Wet Wall Panel System Installation
©Aristech Surfaces LLC • January 2016 • Avonite® Technical Services +1 (800) 428-6648 • FAX +1 (505) 864-7790 • www.aristechsurfaces.com
3.8
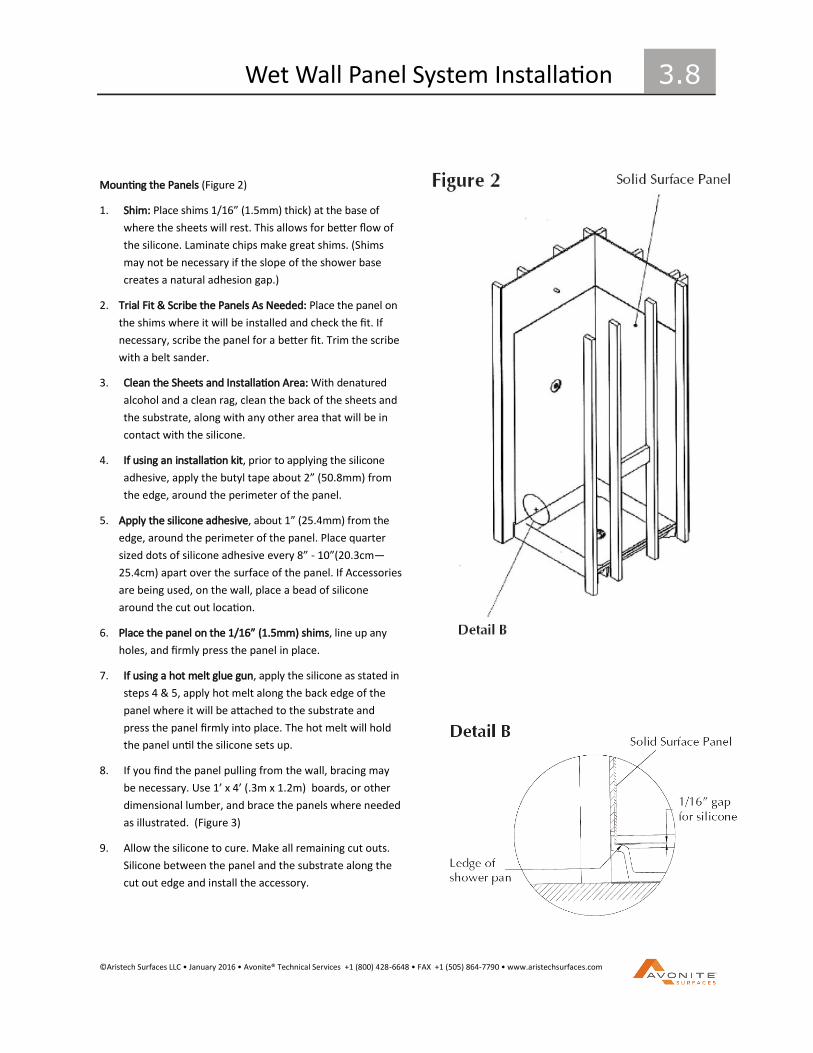
Mounting the Panels (Figure 2)
1. Shim: Place shims 1/16” (1.5mm) thick) at the base of
where the sheets will rest. This allows for better flow of
the silicone. Laminate chips make great shims. (Shims
may not be necessary if the slope of the shower base
creates a natural adhesion gap.)
2. Trial Fit & Scribe the Panels As Needed: Place the panel on
the shims where it will be installed and check the fit. If
necessary, scribe the panel for a better fit. Trim the scribe
with a belt sander.
3. Clean the Sheets and Installation Area: With denatured
alcohol and a clean rag, clean the back of the sheets and
the substrate, along with any other area that will be in
contact with the silicone.
4. If using an installation kit, prior to applying the silicone
adhesive, apply the butyl tape about 2” (50.8mm) from
the edge, around the perimeter of the panel.
5. Apply the silicone adhesive, about 1” (25.4mm) from the
edge, around the perimeter of the panel. Place quarter
sized dots of silicone adhesive every 8” - 10”(20.3cm—
25.4cm) apart over the surface of the panel. If Accessories
are being used, on the wall, place a bead of silicone
around the cut out location.
6. Place the panel on the 1/16” (1.5mm) shims, line up any
holes, and firmly press the panel in place.
7. If using a hot melt glue gun, apply the silicone as stated in
steps 4 & 5, apply hot melt along the back edge of the
panel where it will be attached to the substrate and
press the panel firmly into place. The hot melt will hold
the panel until the silicone sets up.
8. If you find the panel pulling from the wall, bracing may
be necessary. Use 1’ x 4’ (.3m x 1.2m) boards, or other
dimensional lumber, and brace the panels where needed
as illustrated. (Figure 3)
9. Allow the silicone to cure. Make all remaining cut outs.
Silicone between the panel and the substrate along the
cut out edge and install the accessory.
Wet Wall Panel System Installation
©Aristech Surfaces LLC • January 2016 • Avonite® Technical Services +1 (800) 428-6648 • FAX +1 (505) 864-7790 • www.aristechsurfaces.com
3.9
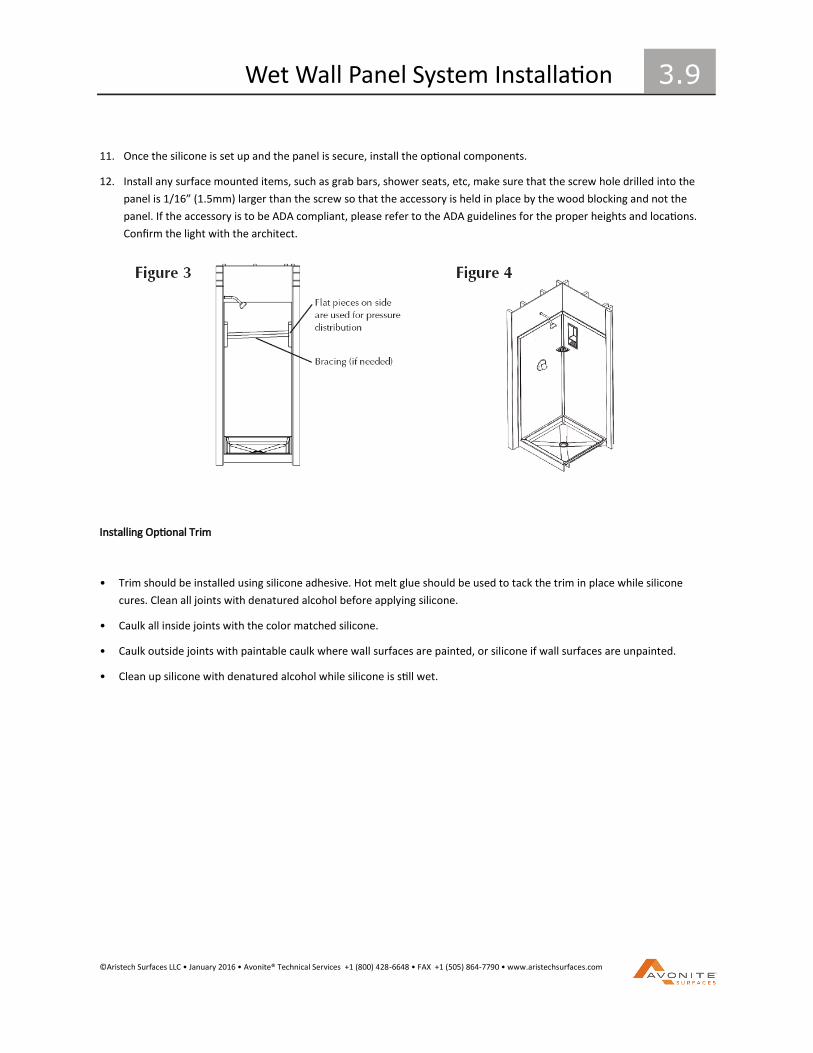
11. Once the silicone is set up and the panel is secure, install the optional components.
12. Install any surface mounted items, such as grab bars, shower seats, etc, make sure that the screw hole drilled into the
panel is 1/16” (1.5mm) larger than the screw so that the accessory is held in place by the wood blocking and not the
panel. If the accessory is to be ADA compliant, please refer to the ADA guidelines for the proper heights and locations.
Confirm the light with the architect.
Installing Optional Trim
• Trim should be installed using silicone adhesive. Hot melt glue should be used to tack the trim in place while silicone
cures. Clean all joints with denatured alcohol before applying silicone.
• Caulk all inside joints with the color matched silicone.
• Caulk outside joints with paintable caulk where wall surfaces are painted, or silicone if wall surfaces are unpainted.
• Clean up silicone with denatured alcohol while silicone is still wet.
Wet Wall Panel System Installation
©Aristech Surfaces LLC • January 2016 • Avonite® Technical Services +1 (800) 428-6648 • FAX +1 (505) 864-7790 • www.aristechsurfaces.com
3.10
Surface Mounted Shelf Accessory
These instructions apply to the shelf accessories that are designed to rest flush against the corner of two wall panels and not
recessed within a wall panel.
1. For ease of installation, clean the mounting area of the panels with denatured alcohol.
2. Use the level and mark on each panel where the shelf unit should be placed. Hot melt or tape two indexing blocks (small
pieces of wood or solid surface) where the shelf unit will be mounted, using the marks from above. These blocks will
ensure that the mounting is level and will hold the unit in place until the silicone adhesive dries.
3. Apply silicone to the sides of the accessory that will be in contact with the wall panels. Leave several spots between the
silicone on the accessory to apply hot glue or tape.
4. Apply small amounts of hot melt or tape to the accessory in several places and immediately press the accessory into the
wall panels, making sure that it is straight and flush against the wall panels and index blocks.
5. Hold the accessory in place for 30 seconds or until the hot melt has cured. The holt melt should hold the accessory in
place until the silicone cures. Remove any excess silicone around the shelf accessory before it dries.
5. Once the accessory is securely in place, the index blocks can be removed if desired. Apply silicone to all edges of the
accessory that contact the wall panels. Let silicone cure for 24 hours in the dry environment before resting objects on the
shelf accessory.
Note: Never try to screw into the wall panel.
Recessed Shelf Accessory
These instructions apply to the shelf accessories that are designed to be recessed within a wall panel.
1. Make sure no electrical wiring or plumbing is present before cutting out the location for the accessory.
2. Measure, level, and mark the panel for the location of the accessory. Place the accessory against the wall panel and trace
the outline of the back of the accessory unit against the wall panel.
3. Use the drill and hole saw to drill a hole inside the outline for the accessory item, to be used as starting point for the jig
saw to cut the opening. Use a jig saw with a fine to medium tooth blade to cut the opening for the accessory.
4. Dry fit the accessory to ensure a proper fit. The shelf accessory should fit tightly within the opening. If the accessory does
not fit, repeat Step 4 until the proper fit is achieved.
5. Clean the mounting area of the panels and shelf accessory with denatured alcohol.
6. Apply silicone to the sides of the accessory that will be in contact with the shower panels.
7. Press the accessory into the opening, making sure that it is flush against the wall panel. Clean any excess silicone from the
wall panel or shelf accessory before the silicone dries.
8. Once the accessory is securely in place, apply silicone to all edges of the accessory that contact the wall panel. Let silicone
cure for 24 hours in dry environment before resting objects on the shelf accessory.
Wet Wall Panel System Installation

©Aristech Surfaces LLC • January 2016 • Avonite® Technical Services +1 (800) 428-6648 • FAX +1 (505) 864-7790 • www.aristechsurfaces.com
Sinks, Bases & Bowls 3.11

©Aristech Surfaces LLC • January 2016 • Avonite® Technical Services +1 (800) 428-6648 • FAX +1 (505) 864-7790 • www.aristechsurfaces.com
Sinks, Bases, & Bowls 3.12
GENERAL SINK FUSED MOUNTING INSTRUCTIONS
Positioning and Preparation
Sinks are recommended for bonding to 1/2" (12 mm)Avonite® sheet thickness. Turn the sheet back-side up on a well supported surface. Position the bowl on the sheet (Figure 1). Do not nick or scuff the rim of the bowl. With a nail or screwdriver, etc., scratch a line on the sheet around the perimeter of the bowl. Drill a 1-1/4" (31.4mm) pilot hole, with a hole saw, in the sheet in line with the drain of the bowl (Figure 1). With a flat sanding block and #80 grit sandpaper, sand the underside of the sheet where the bowl is to be bonded. This removes factory sanding lines or scuff marks. With a flat sanding block, scuff sand with #80 grit sandpaper the top flange of the bowl. Do not round over or nick the rim (Figure 2). Mark the location of 4 locating blocks as shown in Figure 3. These blocks can be scrap pieces of material 1" x 1-1/2" x 1/2" (25mm x 38mm x 12.7mm) thick. Fasten the blocks to the back of the sheet using Locktite 495, or equivalent. This will keep the sink from sliding during bonding.
Bonding
Remove the bowl and clean the bonding area and the bowl with isopropyl alcohol and let it dry. Apply the Ultra-Bond G to the sheet fully coating the flange area. Always use adhe-sive to match the bowl or sink. Use all-thread, two blocks of plywood and a wing nut to clamp the bowl to the sheet as in Figure 4. Tighten the clamp until the adhesive flashes out evenly and allow the adhesive to harden. Schock Sink colors available are White, Crème, and Ivory. Use the following Ultra-Bond G colors: White = Polar Crème = Crystal Ivory = Crystal
Mounting Brackets
Mounting brackets may be used to under mount sinks other than Avonite® sinks. Drill a 1/4" (6mm) diameter hole by 1/2" (12.7mm) deep, 3/4" (19mm) from the sink into the locating blocks as shown in Figure 5. Remove any dust and tap in the brass anchors slotted end first. Set with Locktite. Mount hardware by first threading the wing nut well up on the screw near the head. With washer and slotted clip in place, tighten screw securely to lock the brass anchor (Figure 5). Bond the bowl to the sheet using silicone if it is a non-solid surface bowl. Swing clips on to the bowl lip and evenly tighten the wing nuts until the bracket begins to deflect. Recheck to be sure the bowl is in the proper position. Allow the compound to harden. After adhesive cures, do not remove under mount brackets.

©Aristech Surfaces LLC • January 2016 • Avonite® Technical Services +1 (800) 428-6648 • FAX +1 (505) 864-7790 • www.aristechsurfaces.com
Sinks, Bases, & Bowls 3.13
Shaping The Edge
Turn the top over and use the specially designed bowl
router bits to shape either a flush or bull nose bowl edge
trim. Cut the sheet material from the center of the bowl
area with the special straight router bit with an over sized
nylon bearing. Start from the pilot hole and rout clockwise
around the bowl. Hold the cutout steady as it separates
from the top to avoid damage to the edge (Figure 6). A bull
nose trim on the edge (Figure 8 and 10) of the sheet
creates a shadow which can help hide seams. The cutter
slightly shaves the bowl edge and removes all the seam
compound. A round over bit on the edge (Figure 7 and 9) of
the sheet will produce a smooth edge. The cutter slightly
shaves the bowl edge and removes all the adhesive.
Different sheet thickness and cutter heights can produce
various edge profiles.
NOTE: The bowl bits shown have a 2 1/2" (64mm) cutting
diameter. Router base adjustments may be needed.
For additional information contact Avonite® Technical
Services +1 (800) 428-6648.
NOTE: WHEN POURING BOILING WATER INTO THE SINK OR
USING AN INSTANT HOT WATER DISPENSER, COLD WATER
SHOULD BE RUNNING INTO THE SINK SIMULTANEOUSLY.
THIS WILL ELIMINATE ANY POTENTIAL THERMAL SHOCK
CRACK. THE USE OF A GARBAGE DISPOSAL LARGER THAN
3/4 HP IS NOT COVERED UNDER AVONITE® WARRANTY .
Kitchen Sink Rounding Over Bit—Velepec 30-155
CRST10-8-8VTR 1/2” (12.7mm) Radius for 1/2” (12.7mm)
thick top
The bowl bit in Figure 10 is from Velepec
# SUBN-8-12 4VT
Velepec . 1-800-365-6636
Vanity Sink Rounding Over Bit—Velepec 30-140
CRST20-8-8VT 1/2” (12.7mm) Radius for
1/2” (12.7mm) thick top

©Aristech Surfaces LLC • January 2016 • Avonite® Technical Services +1 (800) 428-6648 • FAX +1 (505) 864-7790 • www.aristechsurfaces.com
Sinks, Bases & Bowls 3.14
Color Matching Sheet to Bowl
Aristech Surfaces LLC makes every effort to achieve a visual
color match between Avonite® 100% acrylic solid surface
sheet products and bowls. However, we do not guarantee a
color match between sheet and bowl of the same name.
When you are given an order to supply a fused under
mount sink in which the sink and the deck are the same
color, there is a distinct possibility that there will be a visual
color mismatch between the edge of the deck and the wall
of the sink. The likely color mismatch problem is complicat-
ed by the fact that you cannot tell how closely the sink and
sheet match until the two are joined and the edge of the
deck is routed flush with the sink. We do have a method of
mounting a bowl in the same color which will mask the
color mismatch (See illustration on right). Using bit shown,
sanding the seam area between the bowl and the sheet and
putting the seam on the bottom side of the bull nose should
hide most color match problems. If you have any questions
regarding this procedure, please contact the Avonite® Tech-
nical Service Department at +1 (800) 428-6648.
NOTE: ARISTECH SURFACES LLC DOES NOT WARRANTY
COLOR MATCH BETWEEN SAME COLOR AVONITE® 100%
ACRYLIC SOLID SURFACE SHEET AND BOWL.
BULL NOSE BIT
TO CUT AVONITE® UNDERMOUNT LAVATORY BOWLS &
KITCHEN SINKS with VEL-VET TOUCH™ Bearing Guide
Assembly 1/2" (12.7mm) Shank Diameter - 2 Flutes

©Aristech Surfaces LLC • January 2016 • Avonite® Technical Services +1 (800) 428-6648 • FAX +1 (505) 864-7790 • www.aristechsurfaces.com
Patching 4.1
PATCH KITS ARE ONLY AVAILABLE FOR
STUDIO COLLECTION® COLORS.
PRODUCTS NEEDED FOR PATCHING:
a. Patching Resin
b. Catalyst (sold separately)
c. Stirring Stick
d. Particulate Can
e. Two Shading Vials
Minimal damage — lightly rough out area to 3/16" (5mm)
depth. You may need to rout out the area to hold patching
material. Be sure to serrate edges of routed area to help
blend in the patch. Clean area with isopropyl alcohol. Allow
to dry completely. Mix particulate with patching resin in
one large container. Stir mixtures thoroughly together.
Compare color by placing a puddle of water next to the
area to be patched. Add darker shading to darken, light
particulate to lighten. The amount of catalyst to be added
should be measured by the amount of resin used not the
total volume of both containers. (see page 4.3) Area has
been masked off to contain patch material. Patch material
is difficult to bring to the same gloss as the sheet in a
polished finish. A 100 watt light bulb to post heat the patch
will help. Larger areas should be repaired with an insert of
matching Avonite® material.
Patch kits are not to be used to repair a bad or broken seam,
see page 5.4-5.5, REPAIRING SEAMS
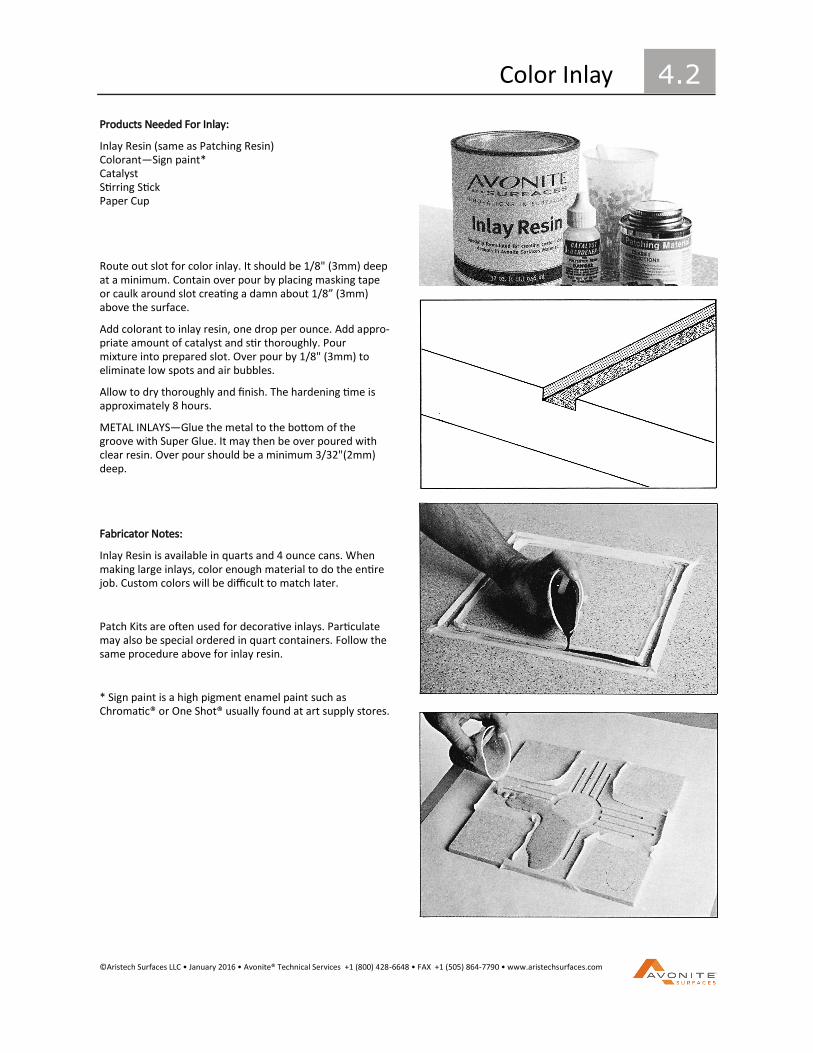
©Aristech Surfaces LLC • January 2016 • Avonite® Technical Services +1 (800) 428-6648 • FAX +1 (505) 864-7790 • www.aristechsurfaces.com
Color Inlay 4.2
Products Needed For Inlay:
Inlay Resin (same as Patching Resin) Colorant—Sign paint* Catalyst Stirring Stick Paper Cup
Route out slot for color inlay. It should be 1/8" (3mm) deep at a minimum. Contain over pour by placing masking tape or caulk around slot creating a damn about 1/8” (3mm) above the surface.
Add colorant to inlay resin, one drop per ounce. Add appro-priate amount of catalyst and stir thoroughly. Pour mixture into prepared slot. Over pour by 1/8" (3mm) to eliminate low spots and air bubbles.
Allow to dry thoroughly and finish. The hardening time is approximately 8 hours.
METAL INLAYS—Glue the metal to the bottom of the groove with Super Glue. It may then be over poured with clear resin. Over pour should be a minimum 3/32"(2mm) deep.
Fabricator Notes:
Inlay Resin is available in quarts and 4 ounce cans. When making large inlays, color enough material to do the entire job. Custom colors will be difficult to match later.
Patch Kits are often used for decorative inlays. Particulate may also be special ordered in quart containers. Follow the same procedure above for inlay resin.
* Sign paint is a high pigment enamel paint such as Chromatic® or One Shot® usually found at art supply stores.

©Aristech Surfaces LLC • January 2016 • Avonite® Technical Services +1 (800) 428-6648 • FAX +1 (505) 864-7790 • www.aristechsurfaces.com
Catalyst Ratio Chart 4.3
RATIO OF CATALYST DEPENDS ON TEMPERATURE
Ratio of Catalyst: Drops per one ounce of
Patching/lnlay Resin.
EXAMPLE: Ten drops per one ounce of Patching/lnlay
Resin.
Ambient temperature at 75° F (23.8° C).
Therefore: At an ambient temperature of 75° F (23.8° C)
4 ounces (113.4gm) of Patching/lnlay Resin would take
40 drops of catalyst.
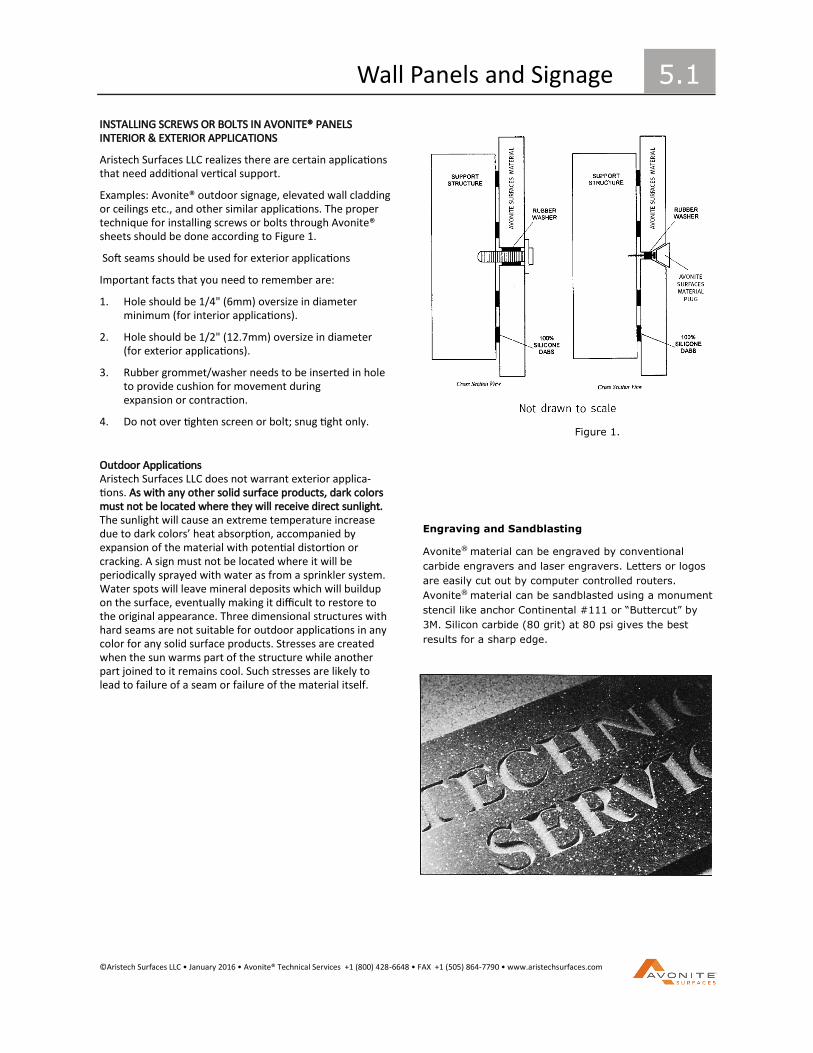
©Aristech Surfaces LLC • January 2016 • Avonite® Technical Services +1 (800) 428-6648 • FAX +1 (505) 864-7790 • www.aristechsurfaces.com
Wall Panels and Signage 5.1
INSTALLING SCREWS OR BOLTS IN AVONITE® PANELS INTERIOR & EXTERIOR APPLICATIONS
Aristech Surfaces LLC realizes there are certain applications that need additional vertical support.
Examples: Avonite® outdoor signage, elevated wall cladding or ceilings etc., and other similar applications. The proper technique for installing screws or bolts through Avonite® sheets should be done according to Figure 1.
Soft seams should be used for exterior applications
Important facts that you need to remember are:
1. Hole should be 1/4" (6mm) oversize in diameter minimum (for interior applications).
2. Hole should be 1/2" (12.7mm) oversize in diameter (for exterior applications).
3. Rubber grommet/washer needs to be inserted in hole to provide cushion for movement during expansion or contraction.
4. Do not over tighten screen or bolt; snug tight only.
Outdoor Applications Aristech Surfaces LLC does not warrant exterior applica-tions. As with any other solid surface products, dark colors must not be located where they will receive direct sunlight. The sunlight will cause an extreme temperature increase due to dark colors’ heat absorption, accompanied by expansion of the material with potential distortion or cracking. A sign must not be located where it will be periodically sprayed with water as from a sprinkler system. Water spots will leave mineral deposits which will buildup on the surface, eventually making it difficult to restore to the original appearance. Three dimensional structures with hard seams are not suitable for outdoor applications in any color for any solid surface products. Stresses are created when the sun warms part of the structure while another part joined to it remains cool. Such stresses are likely to lead to failure of a seam or failure of the material itself.
Engraving and Sandblasting
Avonite® material can be engraved by conventional
carbide engravers and laser engravers. Letters or logos
are easily cut out by computer controlled routers.
Avonite® material can be sandblasted using a monument
stencil like anchor Continental #111 or “Buttercut” by
3M. Silicon carbide (80 grit) at 80 psi gives the best
results for a sharp edge.
Figure 1.

©Aristech Surfaces LLC • January 2016 • Avonite® Technical Services +1 (800) 428-6648 • FAX +1 (505) 864-7790 • www.aristechsurfaces.com
Thermoforming 5.2
These Thermoforming Parameters are basic guidelines for fabricators to thermoform Avonite® material. The parame-ters listed below are recommendations, which are a direct result of actual forming of Avonite® material. This testing was conducted by the Avonite® Technical Service Department, but values are approximate. We suggest re-testing for varying conditions.
Material Preparation
When preparing material to be formed, it is recommended that material be cut to size. Then, remove all chips or gouges on the edge of the material. Any chip or gouge left on an edge may cause the material to tear during forming.
Thermoforming Temperature
Temperatures given here are approximate and represent a starting point to establish the conditions you need for your project. If material is too cool or too hot it may crack or tear while bending.
Studio Collection®
When heating material for forming, it is important to uni-formly heat the entire thickness of the sheet. Spot heating or surface heating is not adequate to form the sheet stock. To achieve this, it is recommended that an oven designed for solid surface be used. Be aware that heating in an oven may darken the color of light colored Avonite® material. Avonite® Glass and Petals Series products are very difficult to bend and are not recommended for thermoforming.
Oven Options
Below are thermoforming guidelines for conventional and platen style ovens. Every oven is unique and calibrations may be necessary. Be sure the oven used is large enough for the entire piece to be formed.
MOLD DESIGN
When forming we recommend that male and female molds be made. The molds need to be designed so they can ac-commodate clamps to hold them together while material is cooling.
COOL DOWN
Allow material to cool for a minimum of two hours to prevent the material from springing back. If material is not allowed to cool adequately, it may spring back as much as 10% which will make any further fabrication of the applica-tion difficult.
FABRICATION: FINISHING/SEAMING
Finishing formed sheet stock is no different from standard finishing. However, it is important that any seaming/joining be done after forming. The heat to which the material is subjected will weaken the seamed areas of the pieces, which may result in seam failures.
Conventional Oven Platen Oven
Product Group Temperature Time/Minutes Minimum Radius " Temperature Time/ Minutes Minimum Radius "
Avonite® 100% Acrylic 370 F / 187 C 20-25 6" 302 F/ 150 C 15 6"
Avonite® 100% Acrylic 370 F / 187 C 10 to 15 3" 302 F/ 150 C 8 3"
Studio Collection® C III 254 F /120 C 20-25 8" 212 F / 100 C 10 to 12 8"
Studio Collection® C I 270 F / 132 C 20-25 14" 225 F / 110 C 10 to 12 14"
Special Notice *
Avonite® 100% Acrylic Recycled 13.5%
370 F / 187 C 20-25 14" 302 F/ 150 C 10 to 12 14"
* Sharkskin F1-7556, Tango F1-7552, Hazelnut F1-7557, Canary F1-7554, Icecap F1-7555, Jungle F1-7553, Ginger F1-7551
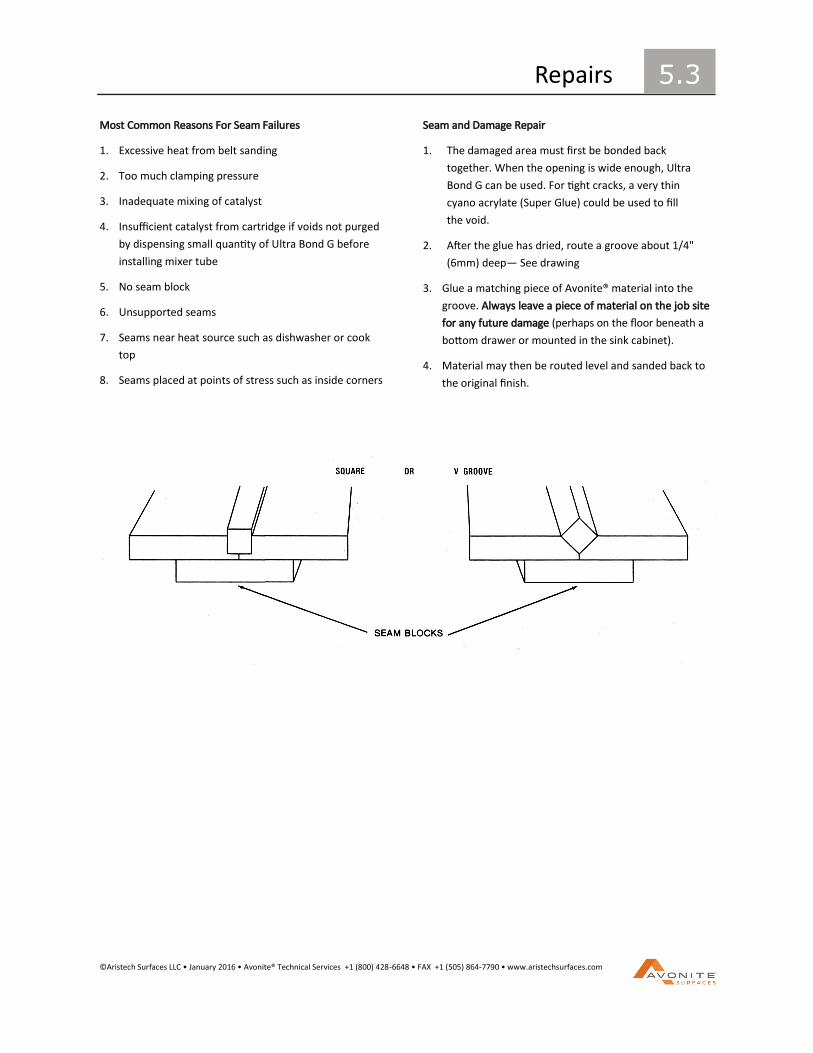
©Aristech Surfaces LLC • January 2016 • Avonite® Technical Services +1 (800) 428-6648 • FAX +1 (505) 864-7790 • www.aristechsurfaces.com
Repairs 5.3
Most Common Reasons For Seam Failures
1. Excessive heat from belt sanding
2. Too much clamping pressure
3. Inadequate mixing of catalyst
4. Insufficient catalyst from cartridge if voids not purged
by dispensing small quantity of Ultra Bond G before
installing mixer tube
5. No seam block
6. Unsupported seams
7. Seams near heat source such as dishwasher or cook
top
8. Seams placed at points of stress such as inside corners
Seam and Damage Repair
1. The damaged area must first be bonded back
together. When the opening is wide enough, Ultra
Bond G can be used. For tight cracks, a very thin
cyano acrylate (Super Glue) could be used to fill
the void.
2. After the glue has dried, route a groove about 1/4"
(6mm) deep— See drawing
3. Glue a matching piece of Avonite® material into the
groove. Always leave a piece of material on the job site
for any future damage (perhaps on the floor beneath a
bottom drawer or mounted in the sink cabinet).
4. Material may then be routed level and sanded back to
the original finish.

©Aristech Surfaces LLC • January 2016 • Avonite® Technical Services +1 (800) 428-6648 • FAX +1 (505) 864-7790 • www.aristechsurfaces.com
Repairs 5.4
Pie Shape Repairs
The pie shape repair has proven to be one of the best methods of repairing cracks and damaged areas. The principal is to create a template large enough to encompass the damaged area. Clamp on the template and rout out the area to be replaced.
Cut a matching wedge piece to fit using the same template and router. Check the dry fit and adjust until there are no gaps. Glue the repair piece (s) in place with a reinforcing block underneath whenever possible.
The methods and techniques have improved over the years and today there are several companies that offer repair templates and router bits that make repairs very quick and accurate.
Circle Template Repairs
The circle template repair is recommended for damages from heat producing appliances or hot pots that occur in the center of the counter.
Templates By Andreas offers a selection solid surface repair templates and tools. www.andreascustomdesign.com
Below is the 10 Degree Repair Kit available at
www.specialtytools.com

©Aristech Surfaces LLC • January 2016 • Avonite® Technical Services +1 (800) 428-6648 • FAX +1 (505) 864-7790 • www.aristechsurfaces.com
Partitions and Wainscoting 5.5
General
When choosing solid surface for partitions, allowances for expansion and contraction must be considered. Avoid rigid fasteners that will not move. Rubber or nylon sleeves should be used for bolts going through the partition.
Toilet Partitions
Choose only Avonite® 100% acrylic solid surface 12mm (1/2”) or Studio Collection® Class I 1/2” (12.7mm) thickness to be used.
It is recommended that all hardware should have rubber or nylon grommets between the hardware and Avonite® surface.
1” (25mm) thick pilasters are recommended for support post running floor to ceiling.
For added strength, construct a 1” x 4” (25mm x 10cm) build-up with a 1/2” (12.7mm) channel for top and bottom rails.
Place no seams in stall doors.
Wall panels should be secured to back to walls with a full length “U” channel.
Partition hardware available at:
Bommer Industries 803-457-3301
Decolam 418-527-2544
Jacknob 888-231-9333
AVONITE® WAINSCOTING SYSTEM
This system utilizes our wide sheet Avonite® 100% acrylic solid surface 6mm (1/4”) product with 12mm (1/2”) base and trim. The Avonite® Wainscoting system provides stylish and durable wall protection. The panels can be Right-Sized to fit the application design.
The panels are adhered directly to dry wall. The wall surfaces and backsides of sheets need to be clean and free of dust. Panels and trim can be adhered with silicone. Allow 3mm (1/8”) gap between panels and fill with color matched silicone for an inconspicuous soft seam.
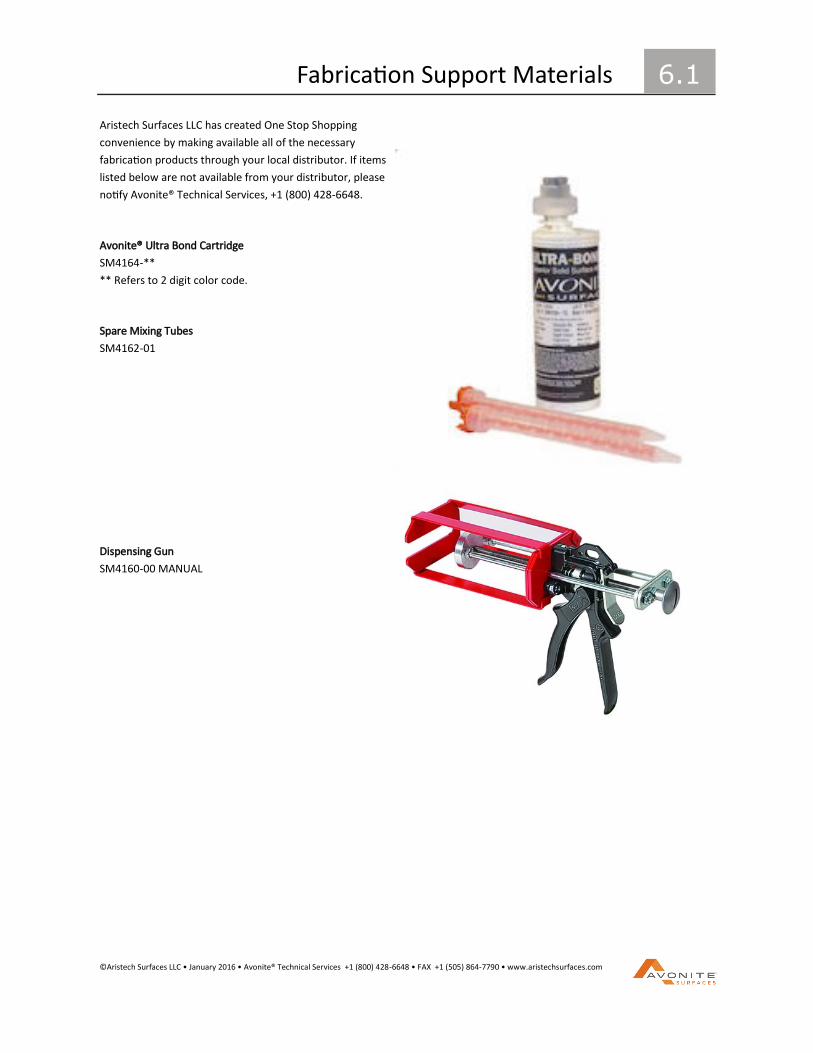
©Aristech Surfaces LLC • January 2016 • Avonite® Technical Services +1 (800) 428-6648 • FAX +1 (505) 864-7790 • www.aristechsurfaces.com
Fabrication Support Materials 6.1
Aristech Surfaces LLC has created One Stop Shopping
convenience by making available all of the necessary
fabrication products through your local distributor. If items
listed below are not available from your distributor, please
notify Avonite® Technical Services, +1 (800) 428-6648.
Avonite® Ultra Bond Cartridge
SM4164-**
** Refers to 2 digit color code.
Spare Mixing Tubes
SM4162-01
Dispensing Gun
SM4160-00 MANUAL

©Aristech Surfaces LLC • January 2016 • Avonite® Technical Services +1 (800) 428-6648 • FAX +1 (505) 864-7790 • www.aristechsurfaces.com
Fabrication Support Materials 6.2
Inlay Resin—Quart
SM4130-00
Specially formulated inlay resin for creating custom detail
designs in Avonite® material. Can be used with Avonite®
Inlay Filler for an “intarsia” look.
Patch Kits
SM4021-**
Color coordinated Patch Kits each include (1) 4 oz.
(113.4gm) can of filler, toners, and (1) 4 oz. (113.4gm) can
of patching resin. Patch Kits are available in all current
Studio Collection® colors. The catalyst hardener must be
ordered separately (SM4001-10).
This is MEKP-9 catalyst and is usually available locally.
Spring Clamps—2" or 3" (50.8 - 76.2mm)
SM4063-00
SM4063-01
Needed for equal and consistent pressure to avoid open
joints. Standard equipment for every fabricator.
Avonite® Thermo-Flow Tape
SM4065-00
Insulates from excessive heat in cook top cut outs. One roll
of tape contains 18 yards (16.45m).

©Aristech Surfaces LLC • January 2016 • Avonite® Technical Services +1 (800) 428-6648 • FAX +1 (505) 864-7790 • www.aristechsurfaces.com
6.3
Finesse-It Finishing Material
SM4058-00
Second step in polishing system (1 liter).
Superbuff Adapter
SM4044-00
Buffing pad adapter for grinder/polisher.
Avonite® Dry-Cut Finishing System
SM4036-A Brown bar
SM4036-B Purple stick
Polishing system
Step 1: Brown bar. SM4036-A
Step 2: Purple stick. SM4036-B
Sanding and Polishing Accessories

©Aristech Surfaces LLC • January 2016 • Avonite® Technical Services +1 (800) 428-6648 • FAX +1 (505) 864-7790 • www.aristechsurfaces.com
Sanding and Polishing Accessories 6.4
Superbuff 2 + 2 Pad (White)
SM4045-
Polishing Pad used with Marine Paste compound and
Avonite® Dry-Cut Finishing System Compound.
Superbuff Polishing Pad (Yellow)
SM4046-00 Polishing Pad used with Finishing Material

©Aristech Surfaces LLC • January 2016 • Avonite® Technical Services +1 (800) 428-6648 • FAX +1 (505) 864-7790 • www.aristechsurfaces.com
Care & Maintenance
The final finish of Avonite® material should be specified in one of the following finishes: Matte, Satin or High Gloss. Each
customer must receive Avonite® Care & Maintenance information to ensure they understand the proper care and
maintenance for the Avonite® installation and to register for the 10-Year Limited Warranty, or the new Installed Warranty as
appropriate. The Avonite® Care & Maintenance information, as well as all warranty information is available online at
www.aristechsurfaces.com
CARE AND MAINTENANCE GUIDELINES
Avonite® Sink Care
Use the Matte Finish cleaning and scratch removal procedures above. To keep sink color bright, clean occasionally with liquid
bleach and water. Fill the sink 1/4 full with water, add 1 to 2 cups of bleach, wipe the sides of the sink and let stand for 15
minutes. Then drain the sink and rinse.
Do’s and Don’ts Quick Reference
Always use a hot pad or trivet under hot pots or heat pro-ducing appliances.
Always use a cutting board.
Never stand on your counters.
Avoid harsh chemicals such as drain cleaners and paint re-movers.
For high gloss counters, do place felt protectors on the bottom of pottery or other hard objects.
Do avoid sliding hard objects across these glossy surfaces.
Always run cold water when pouring boiling water into Avonite® sinks.
6.5
MATTE FINISH
Cleaning:
Soap and water will clean most stains.
For more stubborn stains use a green
Scotch-Brite® pad and an abrasive
cleanser.
Scratches:
To remove scratches, start sanding with
240 grit paper and then clean with and
abrasive cleanser and a green Scotch-
Brite® pad.
Remember to periodically go over the
entire matte surface with a dry, green
Scotch Brite® pad to return the original
finish.
SATIN FINISH
Cleaning:
Soap and water will clean most stains.
For Stubborn Stains use a white Scotch-
Brite® pad and non-abrasive cleanser
such as Soft Scrub™.
Scratches:
To remove scratches, start sanding with
400 grit paper followed by 600 grit pa-
per. Then clean the area with Soft
Scrub™ and a white Scotch-Brite® pad.
HIGH GLOSS
Cleaning:
Soap and water will clean most stains.
Use a polishing compound like 3M
Perfect-It and a soft cloth to remove
more stubborn stains.
Scratches:
To remove scratches from a high gloss
finish, start sanding with 400 grit
paper. The surface must then be
machine polished back to it’s original
finish. If you do not own or have
access to this equipment, you should
contact you local Avonite® fabricator
for assistance.

©Aristech Surfaces LLC • January 2016 • Avonite® Technical Services +1 (800) 428-6648 • FAX +1 (505) 864-7790 • www.aristechsurfaces.com
Care & Maintenance (Español)
MATE
Del Final:
El jabón y el agua limpiarán lamayoría de
las manchas. Paramanchas más obstina-
das utilice unapista escocesa verde del
Brite y unadespedregadora abrasiva.
Rasguños:
Para quitar rasguños, comience ae-
narenar con el papel de 240 arenasy
después limpie con unadespedregadora
abrasiva y una pistaescocesa verde del
Brite.
Recuerde pasar periódicamentesobre la
superficie mate entera conuna pista
escocesa verde seca del Brite volver el
final original.
LIMPIEZA DEL FINAL DEL
SATÉN
El jabón y el agua limpiarán lamayoría de
las manchas. Para lasmanchas obstina-
das utilice una pistaescocesa blanca del
Brite y unadespedregadora que no sena-
brasiva, tal como suavidad friega.
Rasguños:
A quitar rasguños, comienceenarenando
con 400 de papel de laarena seguida por
el papel de 600arenas. Entonces limpie
el área consuavidad friegan y una pis-
taescocesa blanca del Brite. Ustedpuede
elegir rociar una capaligera del protege
todos para realzarel lustre.
ALTA LIMPIEZA DEL
LUSTRE
El jabón y el agua quitarán lamayoría de
las manchas. Utilice uncompuesto que
pule como los 3m Perfect-It y un paño
suave paraquitar manchas más obstina-
das.
Rasguños:
Para quitar rasguños de acabe delustre
alto, comience el enarenar conel papel
de 400 arenas. Entonces lasuperficie
debe entonces sermáquina pulida de
nuevo a su finaloriginal.Aconseje al cli-
ente que contacteal fabricante de
Avonite Surfaces si no poseen ni
tienenacceso a este equipo.
FREGADERO DE AVONITE SURFACES:
Utilice la limpieza mate del final y rasguñe los procedimientos de retiro arriba.Para mantener color del fregadero brillante,
limpie de vez en cuando con el blanqueo líquido y riegue. Llene elfregadero 1/4 por completo de agua, agregue 1 a 2 tazas de
blanqueo, limpie las caras del fregadero y deje elsoporte por 15 minutos. Después drene el fregadero y aclárelo.
LAS QUIAS DE CONSULTA DE QUE HACER Y NO HACER
Utilice una pista o un trivet caliente bajo loscrisoles calientes o caliente siempre producer aplicaciones.
Siempre utilice una tabla.
Nunca se pare sobre en sus contadores.
Evite los productos químicos ásperos tales comoproductos de limpieza de discos deldren y removedores de pin ura.
6.6

©Aristech Surfaces LLC • January 2016 • Avonite® Technical Services +1 (800) 428-6648 • FAX +1 (505) 864-7790 • www.aristechsurfaces.com
Limited Warranty – Commercial and Residential Applications
Aristech Surfaces LLC (“ARISTECH”) warrants to the original purchaser of any of its manufactured solid surface products that ARISTECH will, at its option, repair or replace the product if such product fails due to an ARISTECH manufacturing defect which is discovered during the first ten (10) years after the initial purchase, subject to the limitations set forth in this Limited Warranty. This Limited Warranty applies only to Avonite Surfaces products that have been fabricated and installed by an authorized ARISTECH fabricator or installer in accordance with the installation instructions provided by ARISTECH; which have been used as recommended; and which have failed due to a manufacturing defect and not from damage caused by physical abuse, structural movement, excessive heat, or breakage not due to a Company defect in the manufacture of the material. This Limited Warranty does not cover damage caused by failure of any adhesive, caulk or other accessory, or failure of any caulked or filled joint or seam. This Limited Warranty covers the product for normal interior use in the United States, Mexico and Canada and does not cover the product moved from its original place of installation. Labor charges incurred during any installations are not included under this Limited Warranty. This Limited Warranty does not apply to ARISTECH’S ADVANC3 solid surface product, which is covered by a separate one-year limited warranty. This Limited Warranty applies to Avonite Surfaces products that are purchased after January 1, 2015, and maintained as described by Avonite Surfaces care and maintenance guide. (The care and maintenance guide may be found on the Avonite Surfaces website at www.avonitesurfaces.com.) You may obtain coverage by providing proof of the date of initial purchase. For service under this Limited Warranty, you must notify ARISTECH in writing, providing your name and address, a descrip-tion of the product involved, the nature of the defect or failure, and proof of purchase and date of purchase. Repair or re-placement shall not include any labor charges. This Limited Warranty is non-transferable and non-assignable. The address to which Warranty problems should be reported is: Aristech Surfaces LLC 7350 Empire Drive Florence, KY 41042
ARISTECH will ship (freight collect) to you products repaired or replaced under this Limited Warranty. THIS LIMITED WARRANTY IS IN LIEU OF ALL OTHER WARRANTIES, AND ARISTECH EXPRESSLY DISCLAIMS ALL OTHER WAR-RANTIES, EXPRESS OR IMPLIED, INCLUDING WITHOUT LIMITATION ANY IMPLIED WARRANTY OF MERCHANTABILITY OR FIT-NESS FOR A PARTICULAR PURPOSE. THIS LIMITED WARRANTY SETS FORTH THE INITIAL PURCHASER’S SOLE REMEDY IN CON-NECTION WITH THE SALE OR USE OF PRODUCTS COVERED BY THIS LIMITED WARRANTY AND IN NO EVENT SHALL ARISTECH BE OTHERWISE LIABLE FOR ANY LOSS, DAMAGE OR INJURY OF ANY NATURE ARISING OUT OF THE SALE OR USE OF THE PRODUCTS DELIVERED HEREUNDER, WHETHER FOR NEGLIGENCE, BREACH OF CONTRACT OR UNDER ANY OTHER LEGAL OR EQUITABLE THEORY. ARISTECH SHALL NOT BE LIABLE FOR ANY INDIRECT, SPECIAL OR CONSEQUENTIAL DAMAGES ARISING OUT OF THE SALE OR USE OF SUCH PRODUCTS, INCLUDING BUT NOT LIMITED TO LOST PROFITS, REVENUES, ANTICIPATED SALES, BUSINESS OPPORTUNITIES OR FOR INTERRUPTION OF BUSINESS. THIS WARRANTY IS NON-TRANSFERABLE. *Some states do not allow the exclusion or limitation of incidental or consequential damages, so the above limitation or exclusion may not apply to you. This warranty gives you specific legal rights, and you may also have other rights which may vary from state to state. Note: This Avonite Surfaces Limited Warranty does not include items identified as ‘wear items’ that can be purchased through Avonite Surfaces. If you require replacement of a ‘wear item’, please contact ARISTECH.
©2015 All Rights Reserved - Aristech Surfaces LLC – 7350 Empire Drive – Florence, KY 41042 – USA – www.aristechsurfaces.com
Effective 01/15
6.7

©Aristech Surfaces LLC • January 2016 • Avonite® Technical Services +1 (800) 428-6648 • FAX +1 (505) 864-7790 • www.aristechsurfaces.com
Warranty Claims Processing 6.8
FILING CLAIMS
To resolve warranty claims, we ask that our Distributor Representatives prepare a Warranty Claim Report. You can help us
expedite the processing of warranty claims and achieve improved customer satisfaction by assisting in the following areas:
1. Warranty Claim Report Form - Please fill form out completely so that the information needed to make decisions is
readily available for us. This information helps us tremendously in the processing of the claim.
2. Quality Inspection Checklist -We ask your assistance in completing this form in detail, as this helps us to identify how the
defect occurred. Your help in this area in the past has led to the advanced fabrication procedures that now exist in the
solid surface industry, further improving our industry’s reputation.
3. Job Layout -Include a detailed diagram of the job, complete with all measurements, including distances to seams and
seam locations. This helps us to accurately estimate the cost of fabrication and material, thereby reducing errors and
allowing us to validate a repair/replacement quote.
4. Photos -Take three to four photographs (cell phone photos are acceptable) of the defective area and a photograph of
the overall kitchen.
5. Quotation -Submit a written quotation on the repair or replacement of the job. Repair is encouraged over replacement.
However, if repair is not possible, a quote of the job replacement is needed.
Warranty claims that are submitted with complete information will be resolved within two weeks of receipt of the claim.
Without this information, the processing of a claim will be delayed. We ask for your continued cooperation and thank you
for your assistance.
AVONITE® TECHNICAL SERVICE DEPARTMENT +1 (800) 428-6648
©Aristech Surfaces LLC • January 2016 • Avonite® Technical Services +1 (800) 428-6648 • FAX +1 (505) 864-7790 • www.aristechsurfaces.com
IMPORTANT NOTICE
The information and statements herein are believed to be reliable but are not to be construed as a warranty or represen-tation for which we assume legal responsibility. User should undertake sufficient verification and testing to determine the suitability for their own particular purpose of any information or products referred to herein. NO WARRANTY OF FITNESS FOR A PARTICULAR PURPOSE IS MADE. Nothing herein is to be taken as permission, inducement or recommendation to practice any patented invention without a license. Any information or suggestion concerning applications, specifications or compliance with codes and standards is provided solely for your convenient reference and without any representation as to accuracy or suitability. Aristech Surfaces LLC disclaims any responsibility. The user must verify and test the suitability of any information or products for his specific application.
Aristech Surfaces LLC
7350 Empire Drive
Florence, KY 41042
All Rights Reserved.
© Aristech Surfaces LLC
+1 800-354-9858
www.aristechsurfaces.com