Embed Size (px)
Citation preview

8/13/2019 f5d7330 Manual
http://slidepdf.com/reader/full/f5d7330-manual 1/31
Belkin Tech SupportUS: 877.736.5771
310.898.1100 ext. 2263
Europe: 00 800 223 55 460Australia: 1800 666 040
Belkin Corporation501 West Walnut Street
Compton • CA • 90220 • USATel: 310.898.1100Fax: 310.898.1111
Belkin Components, Ltd.Express Business Park • Shipton Way
Rushden • NN10 6GL • United KingdomTel: +44 (0) 1933 35 2000
Fax: +44 (0) 1933 31 2000
Belkin Components B.V.Starparc Building • Boeing Avenue 333
1119 PH Schiphol-Rijk • The NetherlandsTel: +31 (0) 20 654 7300Fax: +31 (0) 20 654 7349
Belkin, Ltd.7 Bowen Crescent • West Gosford
NSW 2250 • AustraliaTel: +61 (0) 2 4372 8600Fax: +61 (0) 2 4372 8603
P74397© 2003 Belkin Corporation. All rights reserved. All trade names are registered trademarks of respective manufacturerslisted. Mac and AppleTalk are trademarks of Apple Computer, Inc., registered in the U.S. and other countries. 54g and
the 54g logo are trademarks of Broadcom Corporation in the United States and other countries.
belkin.com
8/13/2019 f5d7330 Manual
http://slidepdf.com/reader/full/f5d7330-manual 2/31
802.11g WirelessEthernet BridgeConnect your gaming console orEthernet-equipped PC to a wireless network
User ManualF5D7330
8/13/2019 f5d7330 Manual
http://slidepdf.com/reader/full/f5d7330-manual 3/31
TABLE OF CONTENTS
Introduction . . . . . . . . . . . . . . . . . . . . . . . . . . . . . . . . . . . . . . . . . . . .1
System Requirements . . . . . . . . . . . . . . . . . . . . . . . . . . . . . . . . . . . .1Package Contents . . . . . . . . . . . . . . . . . . . . . . . . . . . . . . . . . . . . . .1
Overview . . . . . . . . . . . . . . . . . . . . . . . . . . . . . . . . . . . . . . . . . . . . . . .2
Features . . . . . . . . . . . . . . . . . . . . . . . . . . . . . . . . . . . . . . . . . . . .2
Applications and Advantages . . . . . . . . . . . . . . . . . . . . . . . . . . . . . . .2
Product Specifications . . . . . . . . . . . . . . . . . . . . . . . . . . . . . . . . . . .3
Knowing your Wireless Ethernet Bridge . . . . . . . . . . . . . . . . . . . . . . . .4Connecting the Hardware . . . . . . . . . . . . . . . . . . . . . . . . . . . . . . . . . . .5
Connecting the Bridge Using the Setup Wizard . . . . . . . . . . . . . . . . . . . .6
Setting Up your Computer to Use Web-Based Setup Interface . . . . . . . . .13
Connecting the Bridge Using Web-Based Setup Interface . . . . . . . . . . . . .14
Status . . . . . . . . . . . . . . . . . . . . . . . . . . . . . . . . . . . . . . . . . . . . .14
Bridge Settings . . . . . . . . . . . . . . . . . . . . . . . . . . . . . . . . . . . . . . .16Site Survey . . . . . . . . . . . . . . . . . . . . . . . . . . . . . . . . . . . . . . . . . .19
Restart the Wireless Bridge . . . . . . . . . . . . . . . . . . . . . . . . . . . . . . .19
Restore Factory Default . . . . . . . . . . . . . . . . . . . . . . . . . . . . . . . . .20
Save Current Settings . . . . . . . . . . . . . . . . . . . . . . . . . . . . . . . . . . .20
Restore Previous Settings . . . . . . . . . . . . . . . . . . . . . . . . . . . . . . . .20
Firmware Update . . . . . . . . . . . . . . . . . . . . . . . . . . . . . . . . . . . . . .21Password . . . . . . . . . . . . . . . . . . . . . . . . . . . . . . . . . . . . . . . . . . .22
Troubleshooting . . . . . . . . . . . . . . . . . . . . . . . . . . . . . . . . . . . . . . . . .23
Information . . . . . . . . . . . . . . . . . . . . . . . . . . . . . . . . . . . . . . . . . . . .26
8/13/2019 f5d7330 Manual
http://slidepdf.com/reader/full/f5d7330-manual 4/31
1
INTRODUCTION
Thank you for purchasing the Belkin 802.11g Wireless Ethernet Bridge (theBridge). Now you can take advantage of this great new technology and gain thefreedom you need around the home or office without using cables. The 802.11gWireless Ethernet Bridge works like a conventional network card, but without thewires. The easy installation and setup will have you networking wirelessly inminutes. Please be sure to read through this manual completely to be sure thatyou are getting the most out of your Wireless Ethernet Bridge.
System Requirements
• Computing device, such as a computer (PC and Mac®), or any device with
an available Ethernet port• (Installation Wizard) Windows® 98SE, Me, 2000, XP
Package Contents
• Belkin 802.11g Wireless Ethernet Bridge
• Ethernet cable
• Installation Software CD
• User Manual
• Quick Installation Guide
• Registration Card
8/13/2019 f5d7330 Manual
http://slidepdf.com/reader/full/f5d7330-manual 5/31
OVERVIEW
2
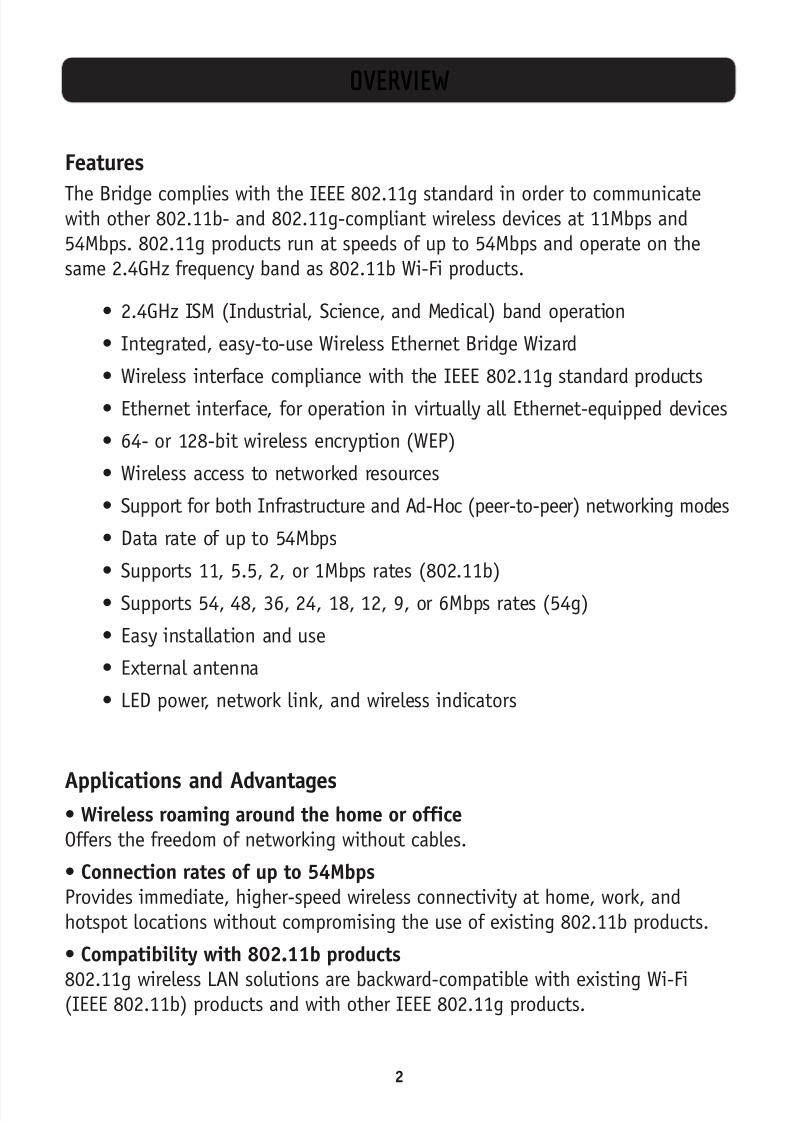
Features
The Bridge complies with the IEEE 802.11g standard in order to communicatewith other 802.11b- and 802.11g-compliant wireless devices at 11Mbps and54Mbps. 802.11g products run at speeds of up to 54Mbps and operate on thesame 2.4GHz frequency band as 802.11b Wi-Fi products.
• 2.4GHz ISM (Industrial, Science, and Medical) band operation
• Integrated, easy-to-use Wireless Ethernet Bridge Wizard
• Wireless interface compliance with the IEEE 802.11g standard products
• Ethernet interface, for operation in virtually all Ethernet-equipped devices
• 64- or 128-bit wireless encryption (WEP)
• Wireless access to networked resources
• Support for both Infrastructure and Ad-Hoc (peer-to-peer) networking modes
• Data rate of up to 54Mbps
• Supports 11, 5.5, 2, or 1Mbps rates (802.11b)
• Supports 54, 48, 36, 24, 18, 12, 9, or 6Mbps rates (54g)
• Easy installation and use
• External antenna
• LED power, network link, and wireless indicators
Applications and Advantages• Wireless roaming around the home or officeOffers the freedom of networking without cables.
• Connection rates of up to 54MbpsProvides immediate, higher-speed wireless connectivity at home, work, andhotspot locations without compromising the use of existing 802.11b products.
• Compatibility with 802.11b products
802.11g wireless LAN solutions are backward-compatible with existing Wi-Fi(IEEE 802.11b) products and with other IEEE 802.11g products.

8/13/2019 f5d7330 Manual
http://slidepdf.com/reader/full/f5d7330-manual 6/31
OVERVIEW
3
• Difficult-to-wire environments
Enables networking in buildings with solid or finished walls, or open areas wherewiring is difficult to install.
• Frequently changing environmentsAdapts easily in offices or environments that frequently rearrange orchange locations.
• Temporary LANs for special projects or peak timeSets up temporary networks such as at trade shows, exhibitions, and constructionsites, which need networks on a short-term basis; also companies that needadditional workstations for a peak activity period.
• SOHO (Small Office/Home Office) networking needsProvides the easy and quick, small network installation SOHO users need.
Product Specifications
Standards
IEEE 802.3/IEEE 802.3U10/100Base-T Ethernet
Wireless:
Radio Technology Direct Sequence Spread Spectrum (DSSS)Data Rate 802.11b: 11, 5.5, 2, 1Mbps
802.11g: 54, 48, 36, 24, 18, 12, 9, 6Mbps
Modulation 802.11b: CCK, DQPSK, DBPSK802.11g: OFDMOperating Frequency 2.412-2.497GHz ISM bandOperating Channels 802.11b: 11 for North America, 14 for Japan, 13 for Europe
802.11g: 11 for North America, 13 for Japan, 13 for EuropeSecurity 64-/128-bit WEP
Protocol Supported: TCP/IPManagement: Software & Browser-basedPorts: 1 10/100Base-T RJ45 port
1 power jack1 reset button
8/13/2019 f5d7330 Manual
http://slidepdf.com/reader/full/f5d7330-manual 7/31
OVERVIEW
4
a
b
c
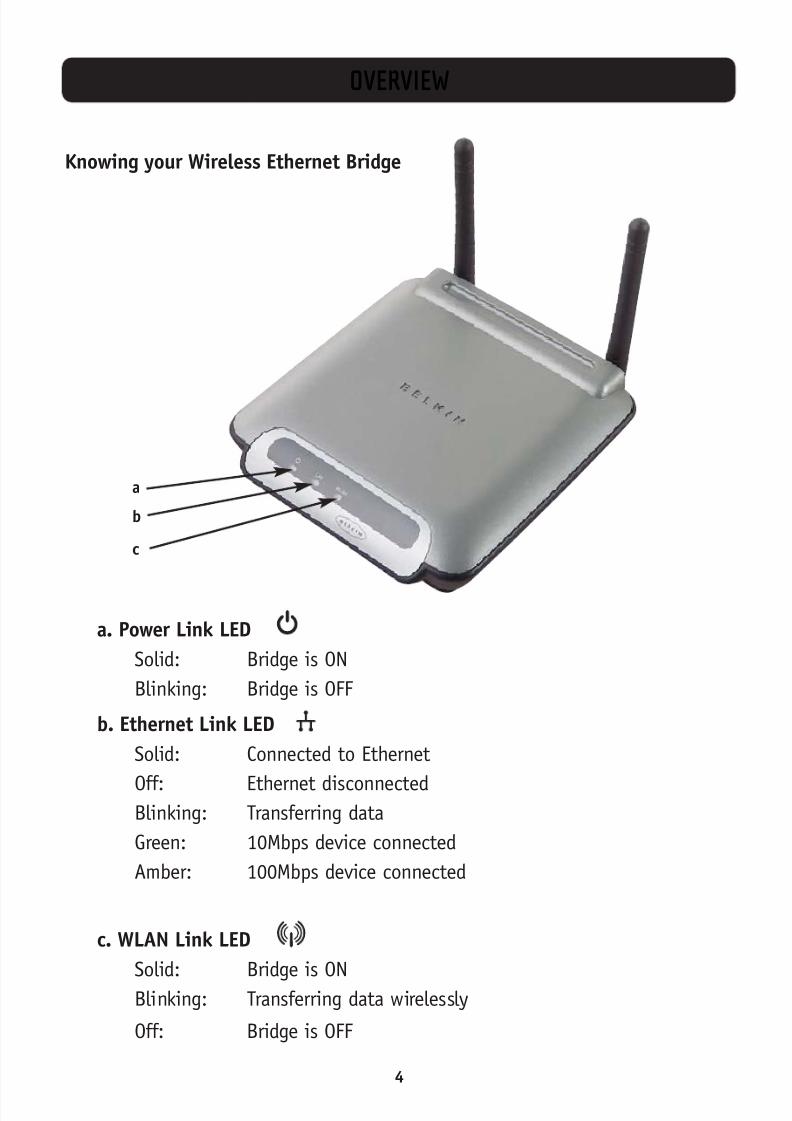
a. Power Link LED
Solid: Bridge is ON
Blinking: Bridge is OFF
b. Ethernet Link LED
Solid: Connected to Ethernet
Off: Ethernet disconnectedBlinking: Transferring data
Green: 10Mbps device connected
Amber: 100Mbps device connected
c. WLAN Link LED
Solid: Bridge is ON
Blinking: Transferring data wirelessly
Off: Bridge is OFF
Knowing your Wireless Ethernet Bridge

8/13/2019 f5d7330 Manual
http://slidepdf.com/reader/full/f5d7330-manual 8/31
CONNECTING THE HARDWARE
1. Connect the included Ethernet network cable into the LAN port on the back of the 802.11g Wireless Ethernet Bridge and plug the other end of the cable tothe back of your computer or any other Ethernet-enabled device.
2. Turn on your Bridge by connecting the power supply cable to your Bridge.Then plug the other end into a power outlet.
3. In most instances, the Bridge will work out-of-the-box. In cases where youneed to set up the Bridge for special settings, you need to run the setupwizard from a PC or configure it using a web-based setup. Non-Windows users,
please refer to the “Setting Up your Computer to Use Web-Based Setup”section in this manual for advanced setup.
5
8/13/2019 f5d7330 Manual
http://slidepdf.com/reader/full/f5d7330-manual 9/31
CONNECTING THE BRIDGE USING THE SETUP WIZARD
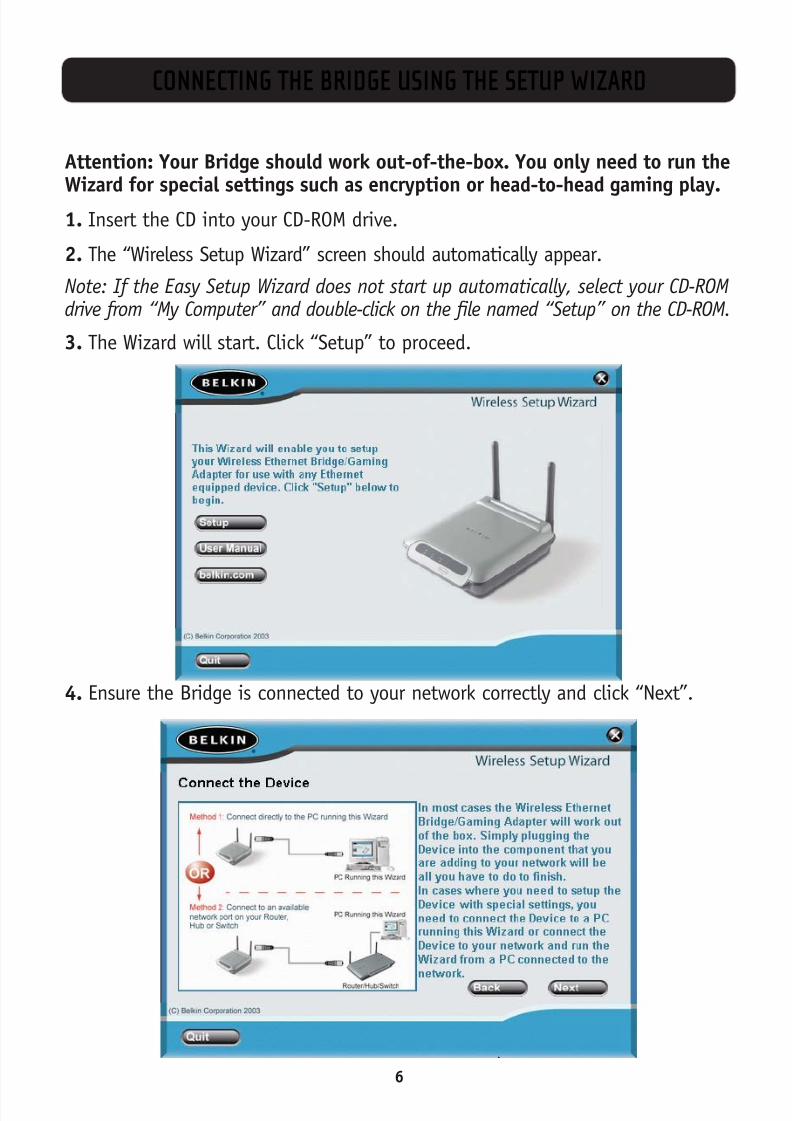
Attention: Your Bridge should work out-of-the-box. You only need to run the
Wizard for special settings such as encryption or head-to-head gaming play.1. Insert the CD into your CD-ROM drive.
2. The “Wireless Setup Wizard” screen should automatically appear.
Note: If the Easy Setup Wizard does not start up automatically, select your CD-ROMdrive from “My Computer” and double-click on the file named “Setup” on the CD-ROM.
3. The Wizard will start. Click “Setup” to proceed.
4. Ensure the Bridge is connected to your network correctly and click “Next”.
6
8/13/2019 f5d7330 Manual
http://slidepdf.com/reader/full/f5d7330-manual 10/31
CONNECTING THE BRIDGE USING THE SETUP WIZARD
7
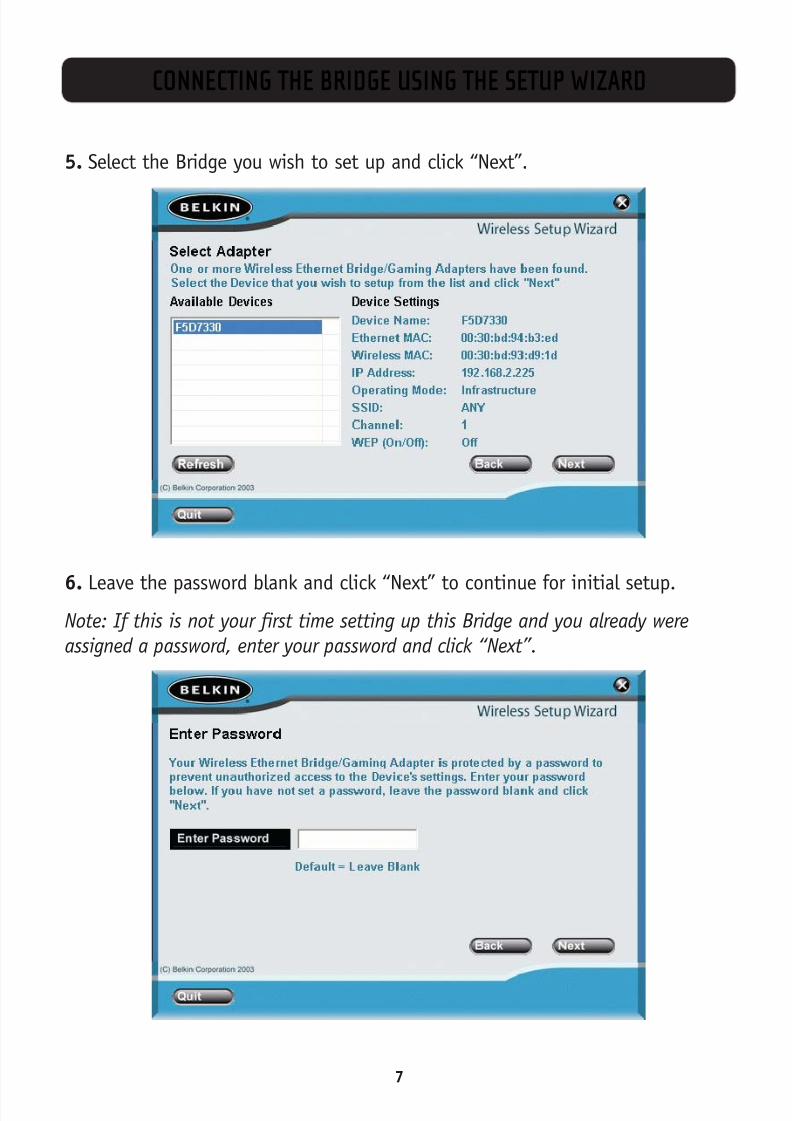
5. Select the Bridge you wish to set up and click “Next”.
6. Leave the password blank and click “Next” to continue for initial setup.Note: If this is not your first time setting up this Bridge and you already were
assigned a password, enter your password and click “Next”.
8/13/2019 f5d7330 Manual
http://slidepdf.com/reader/full/f5d7330-manual 11/31
CONNECTING THE BRIDGE USING THE SETUP WIZARD
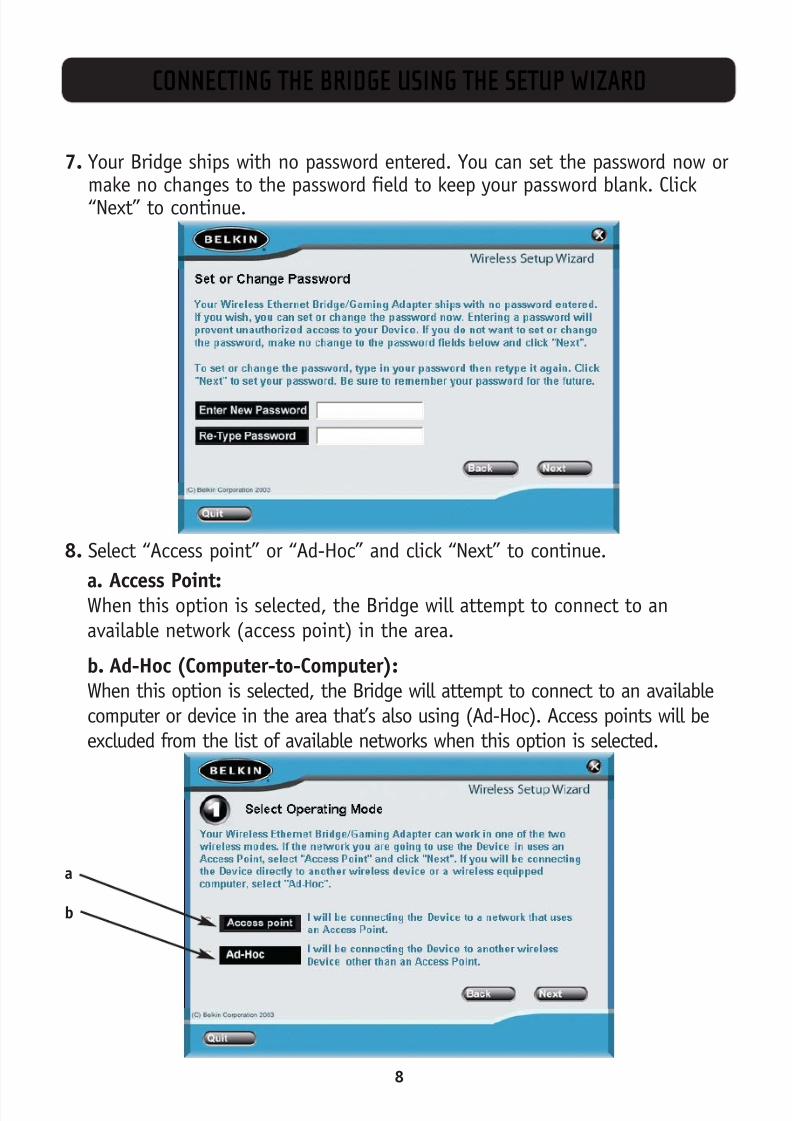
7. Your Bridge ships with no password entered. You can set the password now ormake no changes to the password field to keep your password blank. Click“Next” to continue.
8. Select “Access point” or “Ad-Hoc” and click “Next” to continue.
a. Access Point:When this option is selected, the Bridge will attempt to connect to anavailable network (access point) in the area.
b. Ad-Hoc (Computer-to-Computer):When this option is selected, the Bridge will attempt to connect to an availablecomputer or device in the area that’s also using (Ad-Hoc). Access points will beexcluded from the list of available networks when this option is selected.
a
b
8
8/13/2019 f5d7330 Manual
http://slidepdf.com/reader/full/f5d7330-manual 12/31
CONNECTING THE BRIDGE USING THE SETUP WIZARD
9
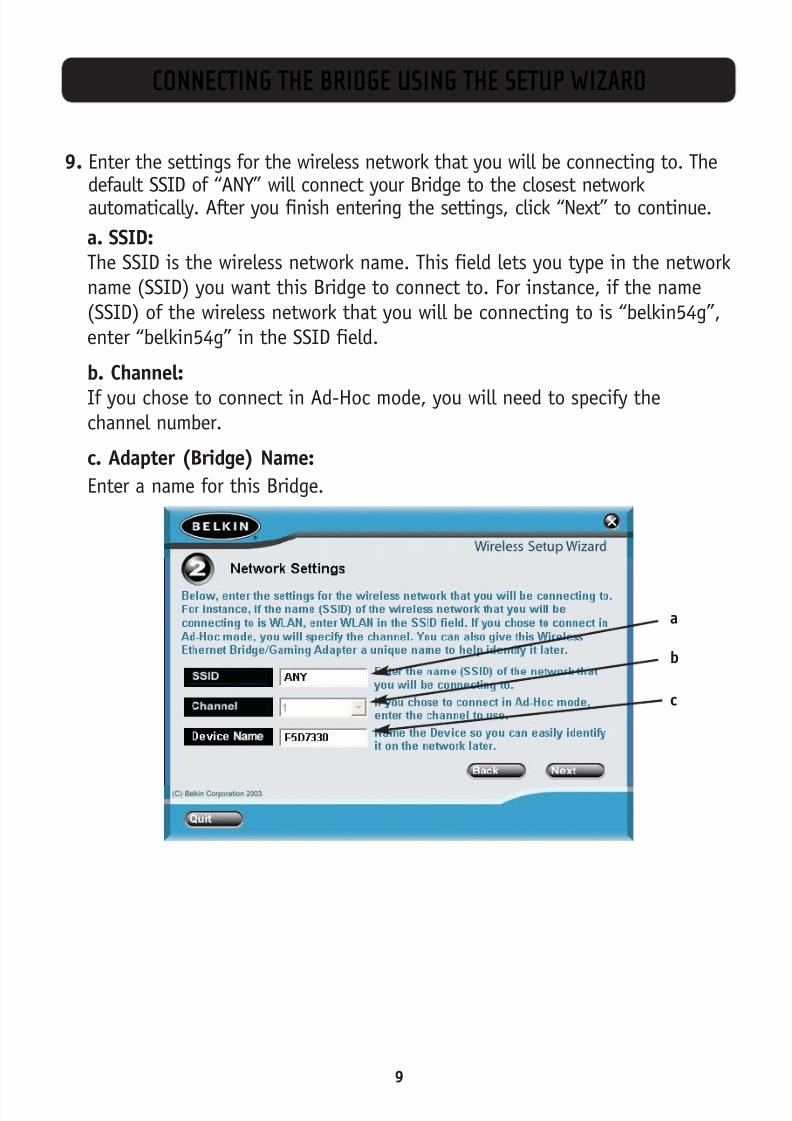
9. Enter the settings for the wireless network that you will be connecting to. Thedefault SSID of “ANY” will connect your Bridge to the closest networkautomatically. After you finish entering the settings, click “Next” to continue.
a. SSID:The SSID is the wireless network name. This field lets you type in the networkname (SSID) you want this Bridge to connect to. For instance, if the name(SSID) of the wireless network that you will be connecting to is “belkin54g”,enter “belkin54g” in the SSID field.
b. Channel:
If you chose to connect in Ad-Hoc mode, you will need to specify thechannel number.
c. Adapter (Bridge) Name:
Enter a name for this Bridge.
a
b
c
8/13/2019 f5d7330 Manual
http://slidepdf.com/reader/full/f5d7330-manual 13/31
CONNECTING THE BRIDGE USING THE SETUP WIZARD
10
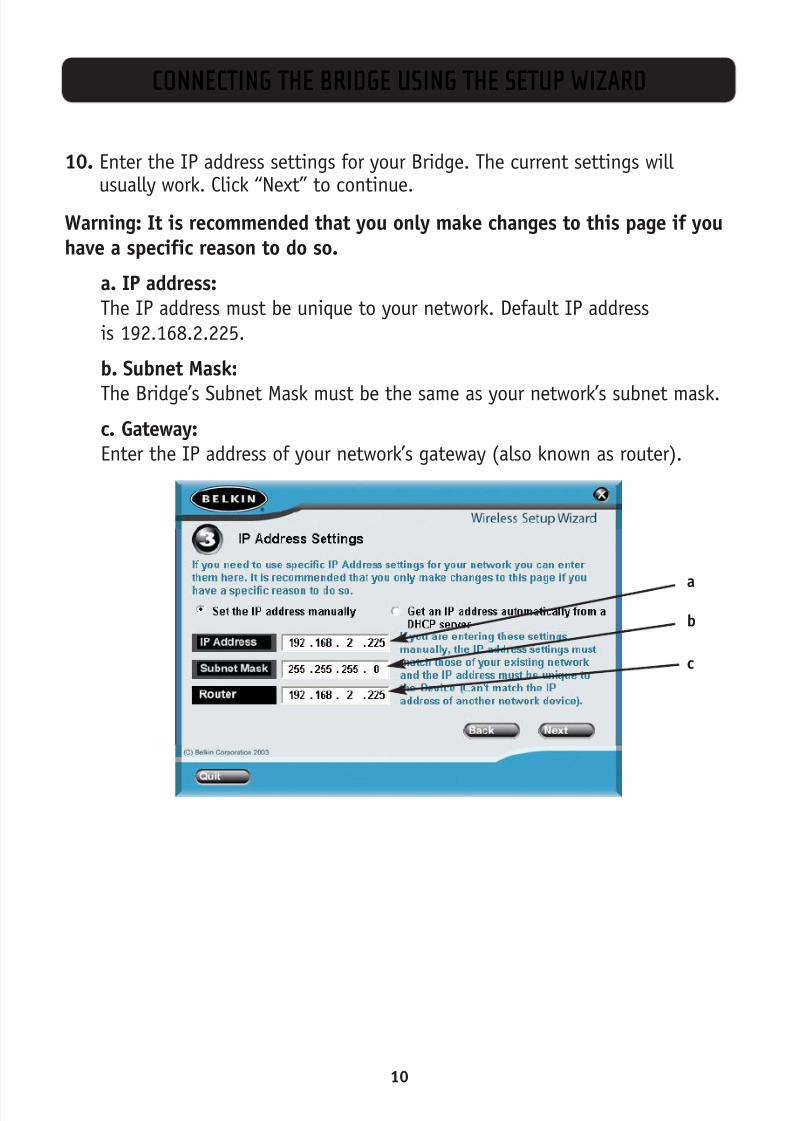
10. Enter the IP address settings for your Bridge. The current settings will usually work. Click “Next” to continue.
Warning: It is recommended that you only make changes to this page if youhave a specific reason to do so.
a. IP address:The IP address must be unique to your network. Default IP addressis 192.168.2.225.
b. Subnet Mask:
The Bridge’s Subnet Mask must be the same as your network’s subnet mask.
c. Gateway:Enter the IP address of your network’s gateway (also known as router).
a
b
c
8/13/2019 f5d7330 Manual
http://slidepdf.com/reader/full/f5d7330-manual 14/31
CONNECTING THE BRIDGE USING THE SETUP WIZARD
11
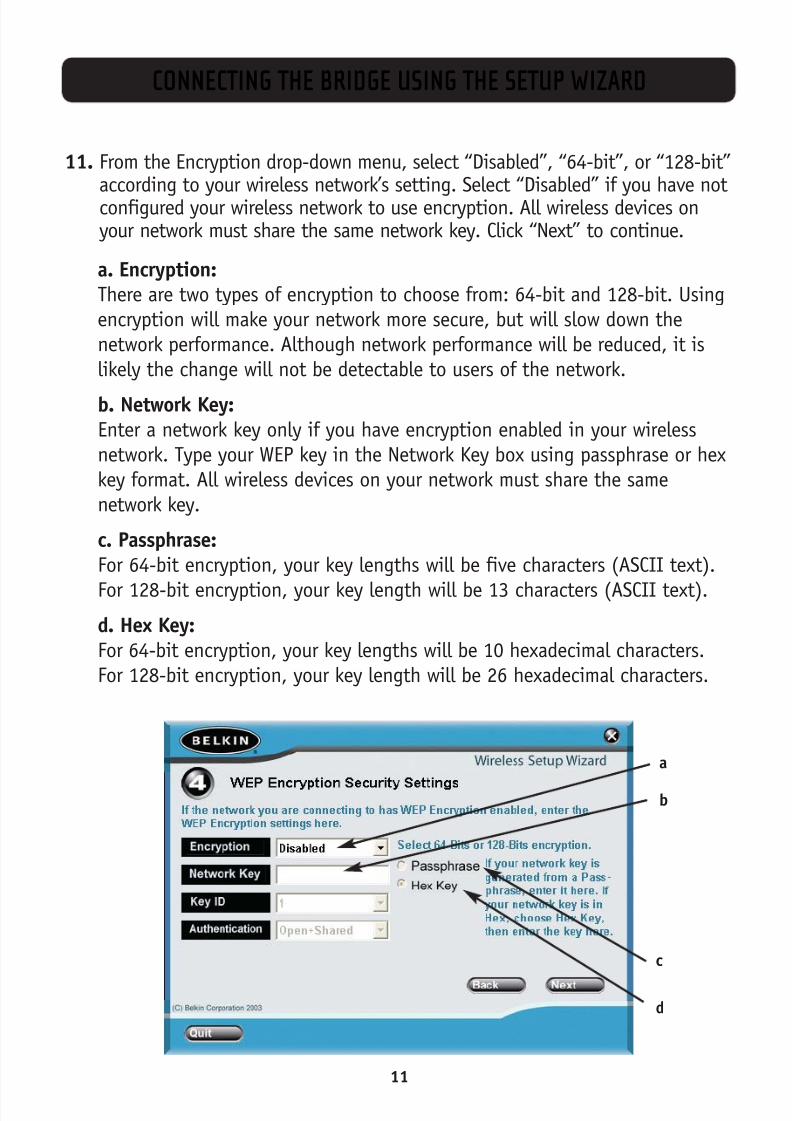
11. From the Encryption drop-down menu, select “Disabled”, “64-bit”, or “128-bit”according to your wireless network’s setting. Select “Disabled” if you have notconfigured your wireless network to use encryption. All wireless devices onyour network must share the same network key. Click “Next” to continue.
a. Encryption:There are two types of encryption to choose from: 64-bit and 128-bit. Usingencryption will make your network more secure, but will slow down thenetwork performance. Although network performance will be reduced, it islikely the change will not be detectable to users of the network.
b. Network Key:Enter a network key only if you have encryption enabled in your wirelessnetwork. Type your WEP key in the Network Key box using passphrase or hexkey format. All wireless devices on your network must share the samenetwork key.
c. Passphrase:For 64-bit encryption, your key lengths will be five characters (ASCII text).
For 128-bit encryption, your key length will be 13 characters (ASCII text).
d. Hex Key:For 64-bit encryption, your key lengths will be 10 hexadecimal characters.For 128-bit encryption, your key length will be 26 hexadecimal characters.
a
b
c
d
8/13/2019 f5d7330 Manual
http://slidepdf.com/reader/full/f5d7330-manual 15/31
CONNECTING THE BRIDGE USING THE SETUP WIZARD
12
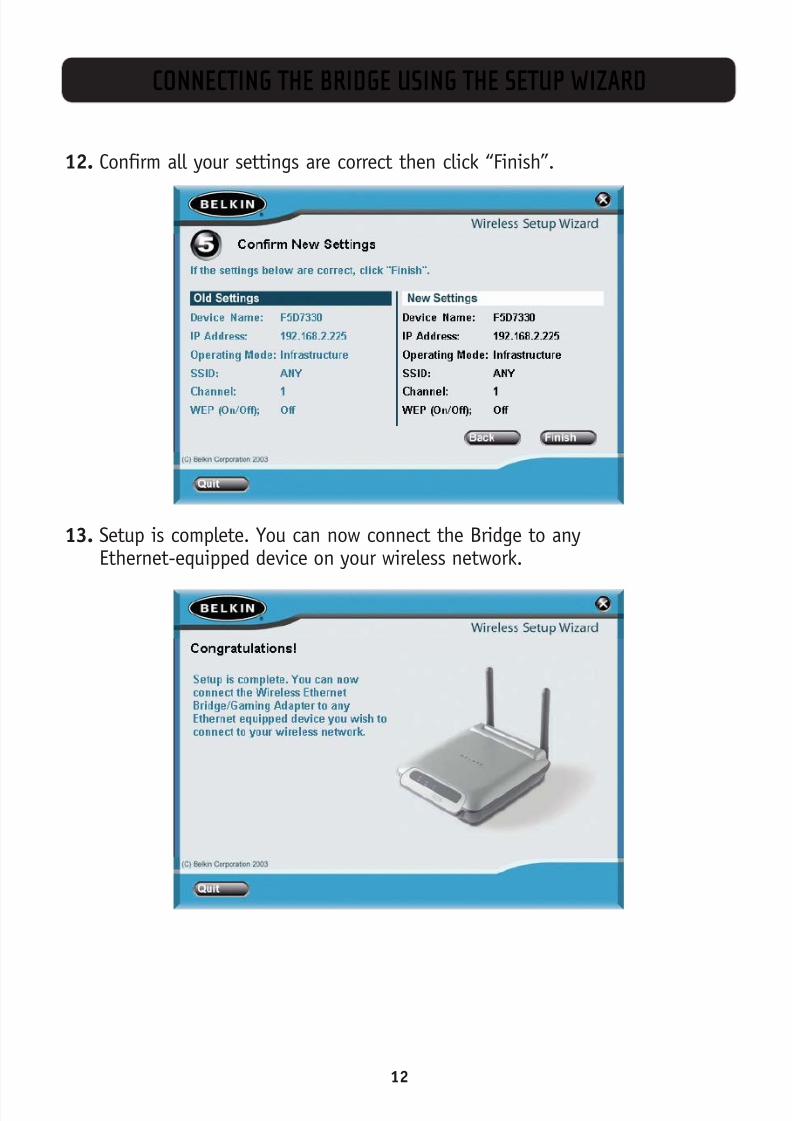
12. Confirm all your settings are correct then click “Finish”.
13. Setup is complete. You can now connect the Bridge to anyEthernet-equipped device on your wireless network.
8/13/2019 f5d7330 Manual
http://slidepdf.com/reader/full/f5d7330-manual 16/31
SETTING UP YOUR COMPUTER TO USE THE WEB-BASED INTERFACE
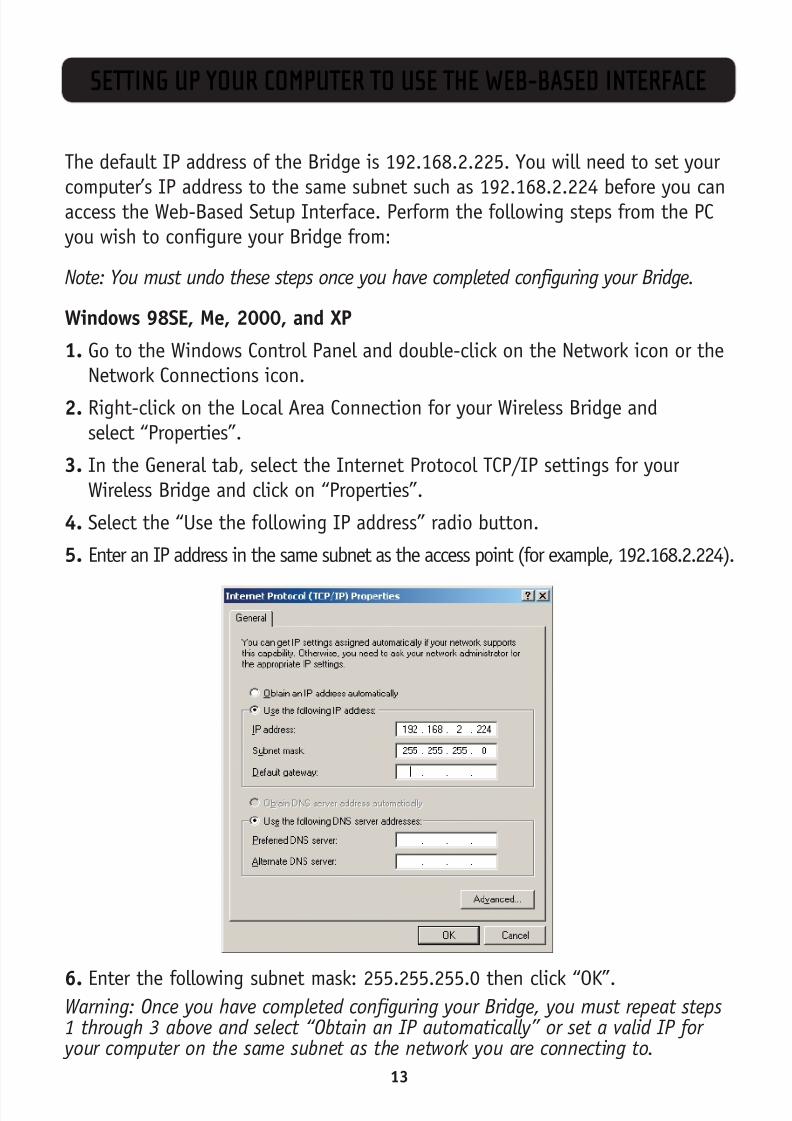
The default IP address of the Bridge is 192.168.2.225. You will need to set your
computer’s IP address to the same subnet such as 192.168.2.224 before you canaccess the Web-Based Setup Interface. Perform the following steps from the PCyou wish to configure your Bridge from:
Note: You must undo these steps once you have completed configuring your Bridge.
Windows 98SE, Me, 2000, and XP
1. Go to the Windows Control Panel and double-click on the Network icon or theNetwork Connections icon.
2. Right-click on the Local Area Connection for your Wireless Bridge andselect “Properties”.
3. In the General tab, select the Internet Protocol TCP/IP settings for yourWireless Bridge and click on “Properties”.
4. Select the “Use the following IP address” radio button.
5. Enter an IP address in the same subnet as the access point (for example, 192.168.2.224).
6. Enter the following subnet mask: 255.255.255.0 then click “OK”.Warning: Once you have completed configuring your Bridge, you must repeat steps1 through 3 above and select “Obtain an IP automatically” or set a valid IP for your computer on the same subnet as the network you are connecting to.
13
8/13/2019 f5d7330 Manual
http://slidepdf.com/reader/full/f5d7330-manual 17/31
CONNECTING THE BRIDGE USING THE WEB-BASED INTERFACE
14
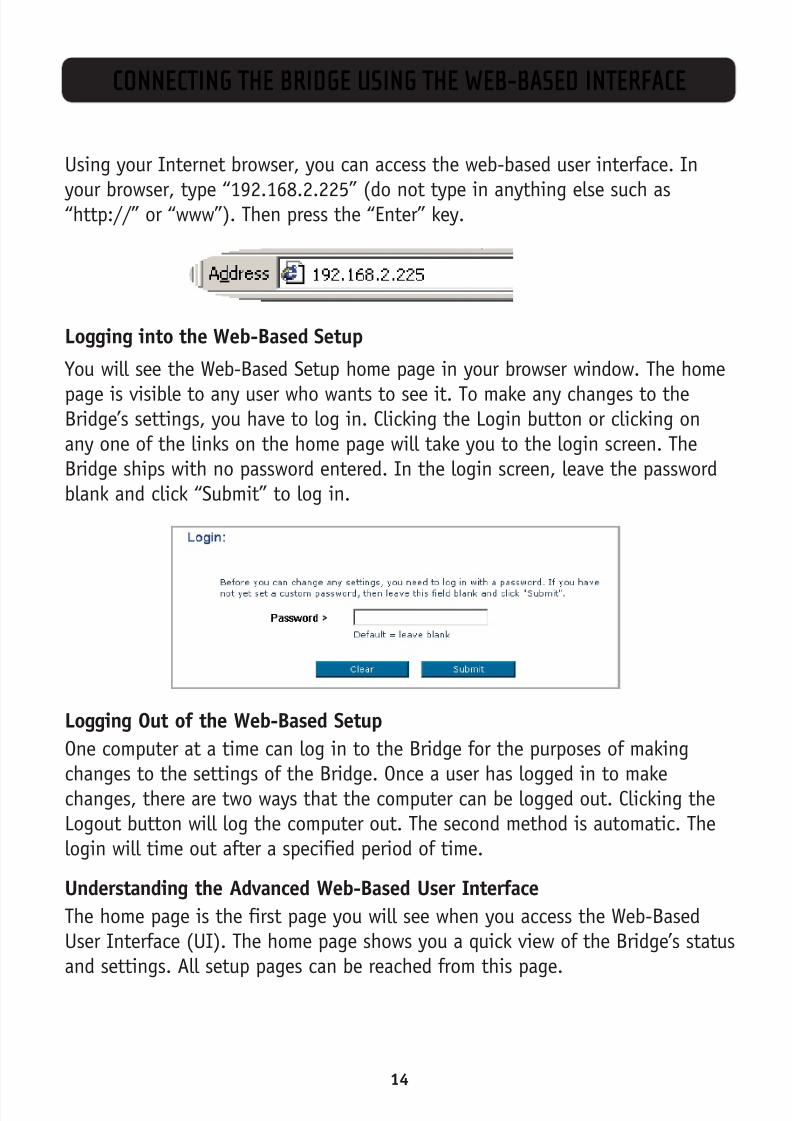
Using your Internet browser, you can access the web-based user interface. In
your browser, type “192.168.2.225” (do not type in anything else such as“http://” or “www”). Then press the “Enter” key.
Logging into the Web-Based Setup
You will see the Web-Based Setup home page in your browser window. The home
page is visible to any user who wants to see it. To make any changes to theBridge’s settings, you have to log in. Clicking the Login button or clicking onany one of the links on the home page will take you to the login screen. TheBridge ships with no password entered. In the login screen, leave the passwordblank and click “Submit” to log in.
Logging Out of the Web-Based Setup
One computer at a time can log in to the Bridge for the purposes of makingchanges to the settings of the Bridge. Once a user has logged in to makechanges, there are two ways that the computer can be logged out. Clicking theLogout button will log the computer out. The second method is automatic. Thelogin will time out after a specified period of time.
Understanding the Advanced Web-Based User Interface
The home page is the first page you will see when you access the Web-BasedUser Interface (UI). The home page shows you a quick view of the Bridge’s statusand settings. All setup pages can be reached from this page.
8/13/2019 f5d7330 Manual
http://slidepdf.com/reader/full/f5d7330-manual 18/31
CONNECTING THE BRIDGE USING THE WEB-BASED INTERFACE
15
Status
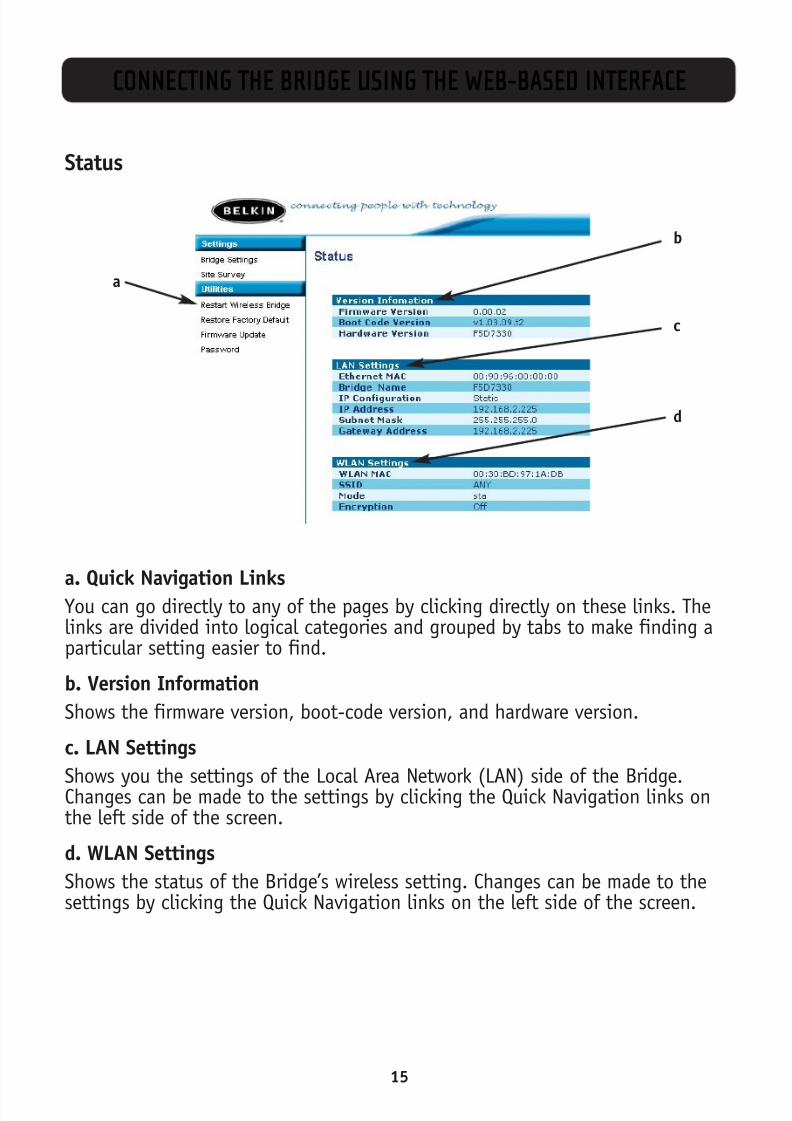
a. Quick Navigation LinksYou can go directly to any of the pages by clicking directly on these links. Thelinks are divided into logical categories and grouped by tabs to make finding aparticular setting easier to find.
b. Version Information
Shows the firmware version, boot-code version, and hardware version.
c. LAN Settings
Shows you the settings of the Local Area Network (LAN) side of the Bridge.Changes can be made to the settings by clicking the Quick Navigation links onthe left side of the screen.
d. WLAN Settings
Shows the status of the Bridge’s wireless setting. Changes can be made to thesettings by clicking the Quick Navigation links on the left side of the screen.
b
c
d
a
8/13/2019 f5d7330 Manual
http://slidepdf.com/reader/full/f5d7330-manual 19/31
CONNECTING THE BRIDGE USING THE WEB-BASED INTERFACE
16
b c
d
a
e
f
g
h
i
j
k
l
Bridge Settings
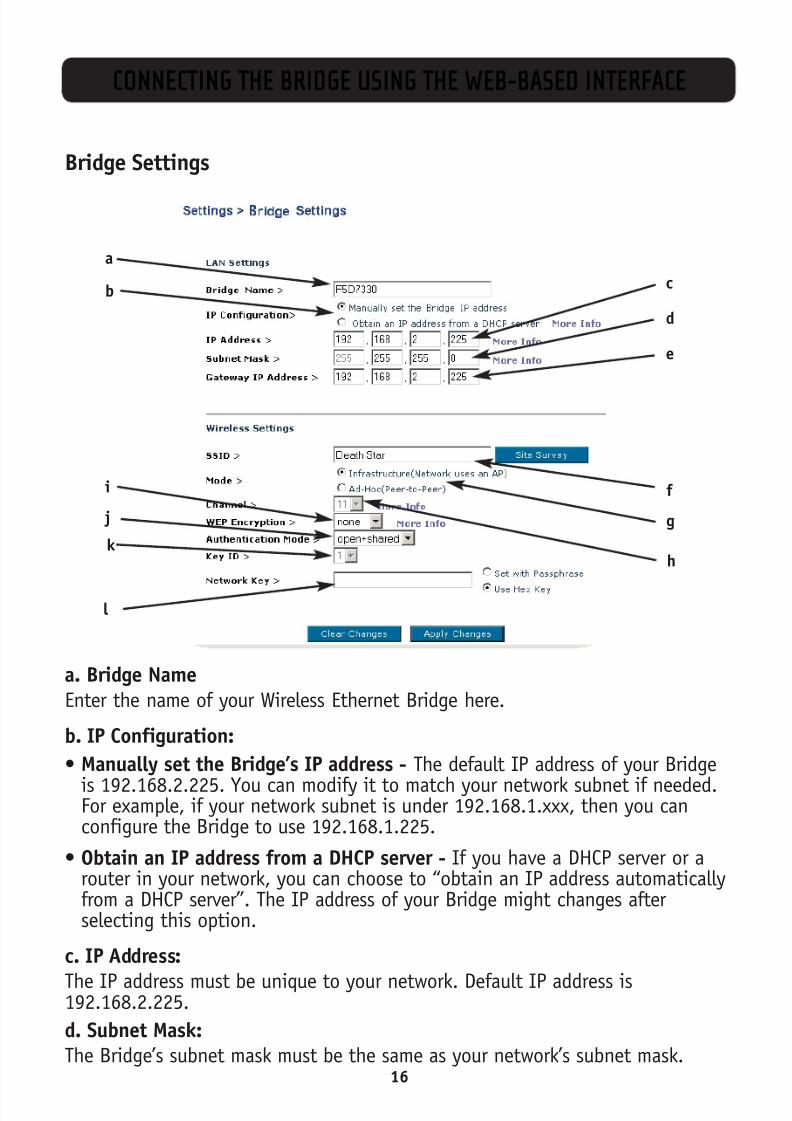
a. Bridge NameEnter the name of your Wireless Ethernet Bridge here.
b. IP Configuration:
• Manually set the Bridge’s IP address - The default IP address of your Bridge
is 192.168.2.225. You can modify it to match your network subnet if needed.For example, if your network subnet is under 192.168.1.xxx, then you canconfigure the Bridge to use 192.168.1.225.
• Obtain an IP address from a DHCP server - If you have a DHCP server or arouter in your network, you can choose to “obtain an IP address automaticallyfrom a DHCP server”. The IP address of your Bridge might changes afterselecting this option.
c. IP Address:
The IP address must be unique to your network. Default IP address is192.168.2.225.
d. Subnet Mask:The Bridge’s subnet mask must be the same as your network’s subnet mask.
8/13/2019 f5d7330 Manual
http://slidepdf.com/reader/full/f5d7330-manual 20/31
CONNECTING THE BRIDGE USING THE WEB-BASED INTERFACE
17
e. Gateway IP Adress:
Enter the IP address of your network’s gateway (also known as router).f. SSID:The SSID is the wireless network name. This field lets you type in the networkname (SSID) you want this Bridge to connect to. For instance, if the name(SSID) of the wireless network that you will be connecting to is “belkin54g”,enter “belkin54g” in the SSID field. The default SSID of “ANY” will connect yourBridge to the closest network automatically. You can also click the Site Surveybutton to see available networks around you.
g. Mode• Infrastructure - When this option is selected, the Bridge will attempt to
connect to an available network (access point) in the area.
• Ad-Hoc (Computer-to-Computer) - When this option is selected, the Bridgewill attempt to connect to an available computer or device in the area that’salso using (Ad-Hoc). Access points will be excluded from the list of availablenetworks when this option is selected.
h. Channel:
If you chose to connect in Ad-Hoc mode, you will need to specify the channel number. All computers in the network need to use the same channel.
i. WEP Encryption:From the Encryption drop-down menu, select “none”, “64-bit”, or “128-bit”according to your wireless network’s setting. Select “none” if you have notconfigured your wireless network to use encryption. All wireless devices on yournetwork must share the same network key. There are two types of encryption tochoose from: 64-bit and 128-bit. Using encryption will make your network more
secure, but will slow down the network performance. Although networkperformance will be reduced, it is likely the change will not be detectable tousers of the network.
j. Authentication Mode:This setting allows the Bridge to authenticate communication with the wirelessdevices in your network. With “Shared only” mode, all wireless devices must havethe same WEP keys so that all wireless devices can authenticate each other andstart transmitting data.
The default “Open + Shared” setting will automatically detect whether a wirelessdevice is set to “Open” or “Shared Key” and transmit data using the appropriateauthentication type. You will need to select “Shared only” mode if your wirelessnetwork is also set to “Shared only” mode.
8/13/2019 f5d7330 Manual
http://slidepdf.com/reader/full/f5d7330-manual 21/31
CONNECTING THE BRIDGE USING THE WEB-BASED INTERFACE
18
k. Key ID:
Select the network key (1-4) that will be used to authenticate.l. Network Key:
Enter a network key only if you have encryption enabled in your wirelessnetwork. Type your WEP key in the Network Key box using passphrase or hex keyformat. All wireless devices on your network must share the same network key.
• Passphrase - For 64-bit encryption, your key lengths will be five characters(ASCII text). For 128-bit encryption, your key length will be 13characters (ASCII text).
• Hex Key - For 64-bit encryption, your key lengths will be 10 hexadecimal characters. For 128-bit encryption, your key length will be 26hexadecimal characters.

8/13/2019 f5d7330 Manual
http://slidepdf.com/reader/full/f5d7330-manual 22/31
CONNECTING THE BRIDGE USING THE WEB-BASED INTERFACE
Site Survey
a. SSID:The SSID is the wireless network name.
b. Refresh:Clicking the Refresh button will give you the most up-to-date data.
c. Join:
You can connect to a specific wireless network by selecting the check box andclick “Apply Changes”.
Restart the Wireless BridgeYou can restart your Wireless Bridge without losing any of your configurationsettings by clicking “Restart Wireless Bridge”.
19
b
a
c
8/13/2019 f5d7330 Manual
http://slidepdf.com/reader/full/f5d7330-manual 23/31
CONNECTING THE BRIDGE USING THE WEB-BASED INTERFACE
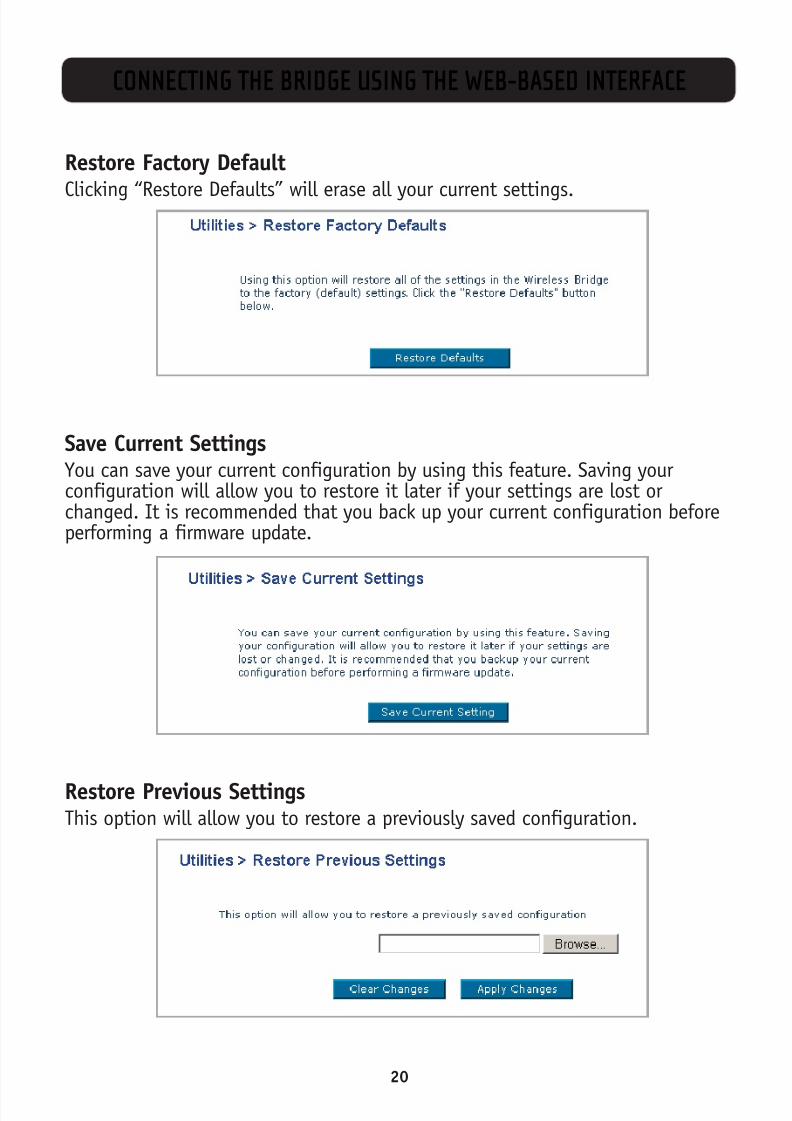
Restore Factory Default
Clicking “Restore Defaults” will erase all your current settings.
Save Current SettingsYou can save your current configuration by using this feature. Saving yourconfiguration will allow you to restore it later if your settings are lost orchanged. It is recommended that you back up your current configuration beforeperforming a firmware update.
Restore Previous SettingsThis option will allow you to restore a previously saved configuration.
20
8/13/2019 f5d7330 Manual
http://slidepdf.com/reader/full/f5d7330-manual 24/31
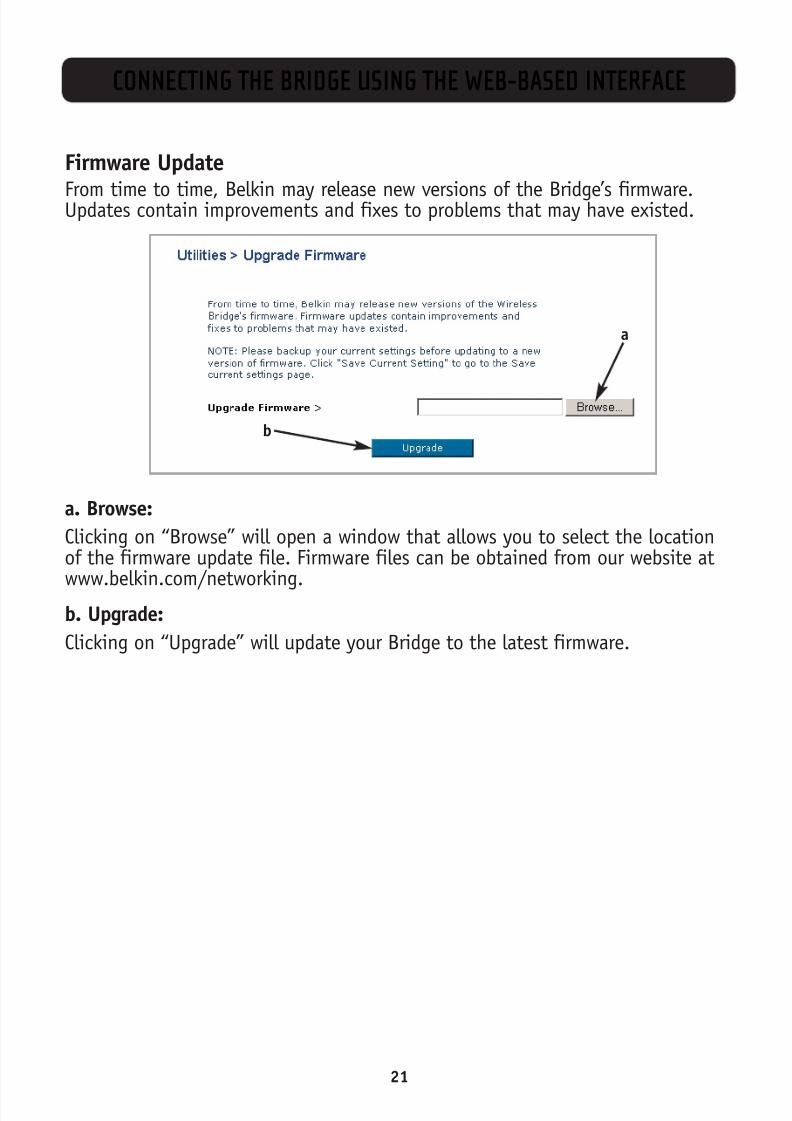
Firmware Update
From time to time, Belkin may release new versions of the Bridge’s firmware.Updates contain improvements and fixes to problems that may have existed.
a. Browse:
Clicking on “Browse” will open a window that allows you to select the locationof the firmware update file. Firmware files can be obtained from our website at
www.belkin.com/networking.b. Upgrade:
Clicking on “Upgrade” will update your Bridge to the latest firmware.
21
CONNECTING THE BRIDGE USING THE WEB-BASED INTERFACE
b
a
8/13/2019 f5d7330 Manual
http://slidepdf.com/reader/full/f5d7330-manual 25/31
CONNECTING THE BRIDGE USING THE WEB-BASED INTERFACE
22
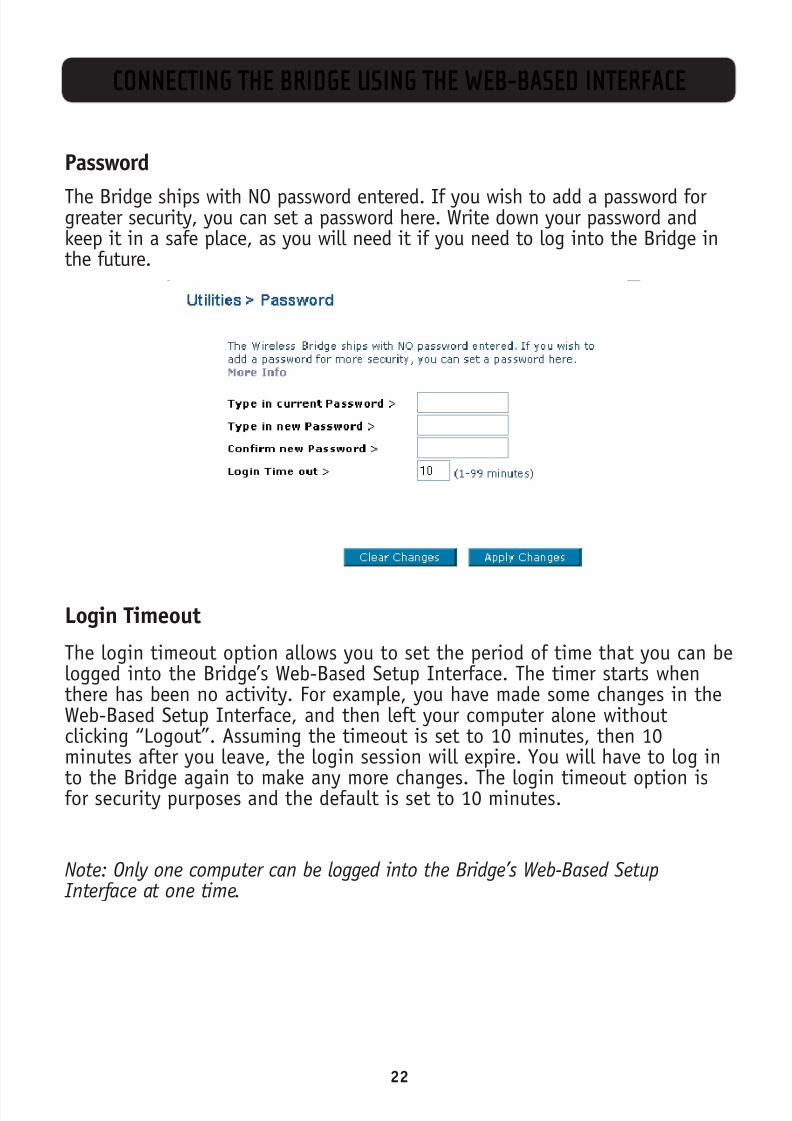
Password
The Bridge ships with NO password entered. If you wish to add a password forgreater security, you can set a password here. Write down your password andkeep it in a safe place, as you will need it if you need to log into the Bridge inthe future.
Login Timeout
The login timeout option allows you to set the period of time that you can belogged into the Bridge’s Web-Based Setup Interface. The timer starts whenthere has been no activity. For example, you have made some changes in theWeb-Based Setup Interface, and then left your computer alone withoutclicking “Logout”. Assuming the timeout is set to 10 minutes, then 10minutes after you leave, the login session will expire. You will have to log in
to the Bridge again to make any more changes. The login timeout option isfor security purposes and the default is set to 10 minutes.
Note: Only one computer can be logged into the Bridge’s Web-Based Setup Interface at one time.
8/13/2019 f5d7330 Manual
http://slidepdf.com/reader/full/f5d7330-manual 26/31
23
TROUBLESHOOTING
Cannot connect to the network.
If your Bridge appears to be functioning properly but you cannot connect to thenetwork, the problem may be that there is a mismatch between the “Networkname (SSID)” and “Wireless network key (WEP)” settings in your wireless networkproperties and the name and WEP key of the network you are trying to connectto. The network name and WEP key are case-sensitive. Verify that the spellingand case of these parameters are correct and that the settings are exactly thesame on all computers on the network.
The computers do not appear in the “My Computer” window or in the “MyNetwork Places” window.
Windows 2000Verify that “File and Printer Sharing” is enabled on all the computers onyour network. From the desktop, click the Start button, go to “Settings”,and click “Control Panel”. In Control Panel, double-click the “Network andDial-up Connections” icon. In the “Network and Dial-up Connections” window,
double-click the “Local Area Connection” icon. In the “Local Area ConnectionStatus” box, click “Properties”. In the “Local Area Connection Properties” box,verify that the “File and Printer Sharing for Microsoft Networks” check box isselected. If the check box is cleared, select it.
If the check box is not present, click “Install”. In the “Select Network ComponentType” box, select “Service” and click “Add”. In the “Select Network Service” box,select “File and Printer Sharing for Microsoft Networks” and click “OK”. Close the
“Local Area Connection Properties” box. Close the “Local Area Connection Status”box. Close the “Network and Dial-up Connections” window.
Windows XP EnvironmentVerify that “File and Printer Sharing” is enabled on all the computers on yournetwork. From the desktop, click the “Start” button and click “Control Panel”(if you are looking at Category View, click “Switch to Classic View”). In Control Panel, double-click the “Network Connections” icon. In the “LAN or High-Speed
Internet” area, right-click “Wireless Network Connection” and click “Properties”.In the “Wireless Network Connection Properties” box, if the “General” tab is noton top, click the “General” tab.
8/13/2019 f5d7330 Manual
http://slidepdf.com/reader/full/f5d7330-manual 27/31
24
TROUBLESHOOTING
In the “This connection uses the following items” list, verify that the “File and
Printer Sharing for Microsoft Networks” check box is selected. If the check box iscleared, select it. If this item is not present, click “Install”. In the “SelectNetwork Component Type” box, select “Service” and click “Add”. In the “SelectNetwork Service” box, select “File and Printer Sharing for Microsoft Networks”and click “OK”. Close the “Wireless Network Connection Properties” box. Close the“Network Connections” window.
Data transfer is sometimes very slow.
Microwave ovens and some cordless phones operate at the same radio frequencyas the wireless network cards. When the microwave oven or cordless phone is inuse, it interferes with the wireless network.
Therefore, keep computers with the Bridge at least 20 feet away from yourmicrowave oven and any cordless telephone that operates at a frequencyof 2.4GHz.
Data transfer is always very slow.Some homes and most offices are steel-framed structures. The steel in suchbuildings may interfere with your network’s radio signals, thus causing aslowdown in the data transmission rate. Try moving your computers to differentlocations in the building to see if performance improves.
Computers are not communicating with the network.If your network has an access point, check all cables and make sure the power
LED on the front of the access point is on.
In Windows 2000, I get the following error message: “Medium cabledisconnected”. Also, there is a red X on my network icon in the system tray.This indicates that your computer is not properly configured to connect to thenetwork. Verify that all of the wireless network properties settings are correct.Also, make sure that your computer is receiving a good signal from the
access point.

8/13/2019 f5d7330 Manual
http://slidepdf.com/reader/full/f5d7330-manual 28/31
TROUBLESHOOTING
25
Technical Support
You can find technical support information at www.belkin.com/networking orwww.belkin.com through the tech support area. If you want to contact technical support by phone, please call 877-736-5771.
8/13/2019 f5d7330 Manual
http://slidepdf.com/reader/full/f5d7330-manual 29/31
26
INFORMATION
Caution: Exposure to Radio Frequency Radiation.The radiated output power of this device is far below the FCC radio frequency exposure limits.
Nevertheless, the device shall be used in such manner that the potential for human contactnormal operation is minimized. When connecting an external antenna to the device, the antennashall be placed in such a manner to minimize the potential for human contact during normal
operation. In order to avoid the possibility of exceeding the FCC radio frequency exposure limits,
human proximity to the antenna shall not be less than 20cm (8 inches) during normal operation.
Federal Communications Commission NoticeThis equipment has been tested and found to comply with the limits for a Class B digital device,
pursuant to Part 15 of the FCC Rules. These limits are designed to provide reasonable protectionagainst harmful interference in a residential installation.
This equipment generates, uses, and can radiate radio frequency energy. If not installed and usedin accordance with the instructions, it may cause harmful interference to radio or television
reception, which can be determined by turning the equipment off and on, the user is encouragedto try and correct the interference by one or more of the following measures:
• Reorient or relocate the receiving antenna.
• Increase the distance between the equipment and the receiver.
• Connect the equipment to an outlet on a circuit different from that to which the receiver
is connected.
• Consult the dealer or an experienced radio/TV technician for help.
Modifications
The FCC requires the user to be notified that any changes or modifications to this device that
are not expressly approved by Belkin Corporation may void the users authority to operatethe equipment.
FCC Statement
DECLARATION OF CONFORMITY WITH FCC RULES FORELECTROMAGNETIC COMPATIBILITY
We, Belkin Corporation, of 501 West Walnut Street, Compton, CA 90220, declare under our soleresponsibility that the product,
F5D7330
to which this declaration relates,complies with Part 15 of the FCC Rules. Operation is subject to the following two conditions: (1) thisdevice may not cause harmful interference, and (2) this device must accept any interference received,including interference that may cause undesired operation.

8/13/2019 f5d7330 Manual
http://slidepdf.com/reader/full/f5d7330-manual 30/31
27
INFORMATION
Canada-Industry Canada (IC)
The wireless radio of this device complies with RSS 139 & RSS 210 Industry Canada. This Class Bdigital complies with Canadian ICES-003.
Cet appareil numérique de la classe B conforme á la norme NMB-003 du Canada.
Europe-European Union Notice
Radio products with the CE 0682 or CE alert marking complywith the R&TTE Directive (1995/5/EC) issued by the Commission of theEuropean Community.
Compliance with this directive implies conformity to the following European Norms (in bracketsare the equivalent international standards).
• EN 60950 (IEC60950) – Product Safety
• EN 300 328 Technical requirement for radio equipment
• ETS 300 826 General EMC requirements for radio equipment.
To determine the type of transmitter, check the identification label on your Belkin product.
Products with the CE marking comply with the EMC Directive (89/336/EEC) and the Low VoltageDirective (72/23/EEC) issued by the Commission of the European Community. Compliance with
these directives implies conformity to the following European Norms (in brackets are theequivalent international standards).
• EN 55022 (CISPR 22) – Electromagnetic Interference
• EN 55024 (IEC61000-4-2,3,4,5,6,8,11)- Electromagnetic Immunity
• EN 61000-3-2 (IEC610000-3-2) - Power Line Harmonics
• EN 61000-3-3 (IEC610000) – Power Line Flicker
• EN 60950 (IEC60950) – Product Safety
Products that contain the radio transmitter are labeled with CE 0682 or CE alert marking and may
also carry the CE logo.

8/13/2019 f5d7330 Manual
http://slidepdf.com/reader/full/f5d7330-manual 31/31
INFORMATION
Belkin Corporation Limited Lifetime Product Warranty
Belkin Corporation warrants this product against defects in materials and workmanship for itslifetime. If a defect is discovered, Belkin will, at its option, repair or replace the product atno charge provided it is returned during the warranty period, with transportation charges prepaid,to the authorized Belkin dealer from whom you purchased the product. Proof of purchase maybe required.
This warranty does not apply if the product has been damaged by accident, abuse, misuse, ormisapplication; if the product has been modified without the written permission of Belkin; or if any Belkin serial number has been removed or defaced.
THE WARRANTY AND REMEDIES SET FORTH ABOVE ARE EXCLUSIVE IN LIEU OF ALL OTHERS,WHETHER ORAL OR WRITTEN, EXPRESSED OR IMPLIED. BELKIN SPECIFICALLY DISCLAIMS ANY ANDALL IMPLIED WARRANTIES, INCLUDING, WITHOUT LIMITATION, WARRANTIES OF MERCHANTABILITYAND FITNESS FOR A PARTICULAR PURPOSE.
No Belkin dealer, agent, or employee is authorized to make any modification, extension, oraddition to this warranty.
BELKIN IS NOT RESPONSIBLE FOR SPECIAL, INCIDENTAL, OR CONSEQUENTIAL DAMAGES RESULTINGFROM ANY BREACH OF WARRANTY, OR UNDER ANY OTHER LEGAL THEORY, INCLUDING BUT NOTLIMITED TO, LOST PROFITS, DOWNTIME, GOODWILL, DAMAGE TO OR REPROGRAMMING ORREPRODUCING ANY PROGRAM OR DATA STORED IN, OR USED WITH, BELKIN PRODUCTS.
Some states do not allow the exclusion or limitation of incidental or consequential damages or
exclusions of implied warranties, so the above limitations of exclusions may not apply to you.This warranty gives you specific legal rights, and you may also have other rights that vary fromstate to state.