Embed Size (px)
Citation preview
f2D /3a
INSTRUCTION MANUAL
FOR
SEWING MACHINE
WHITE’
j
I
EL3-1©
WHITE SEWING MACHINE COMPANY
Record in space provided below the Serial No. andModel No. of this appliance.
The Serial No. is located on Bed Plate.The Model No. is located on Rating Plate.
Serial No.
____________________
Model No.
_________________
Retain these numbers for future reference.
Threading upper thread & Twin needle threadg.
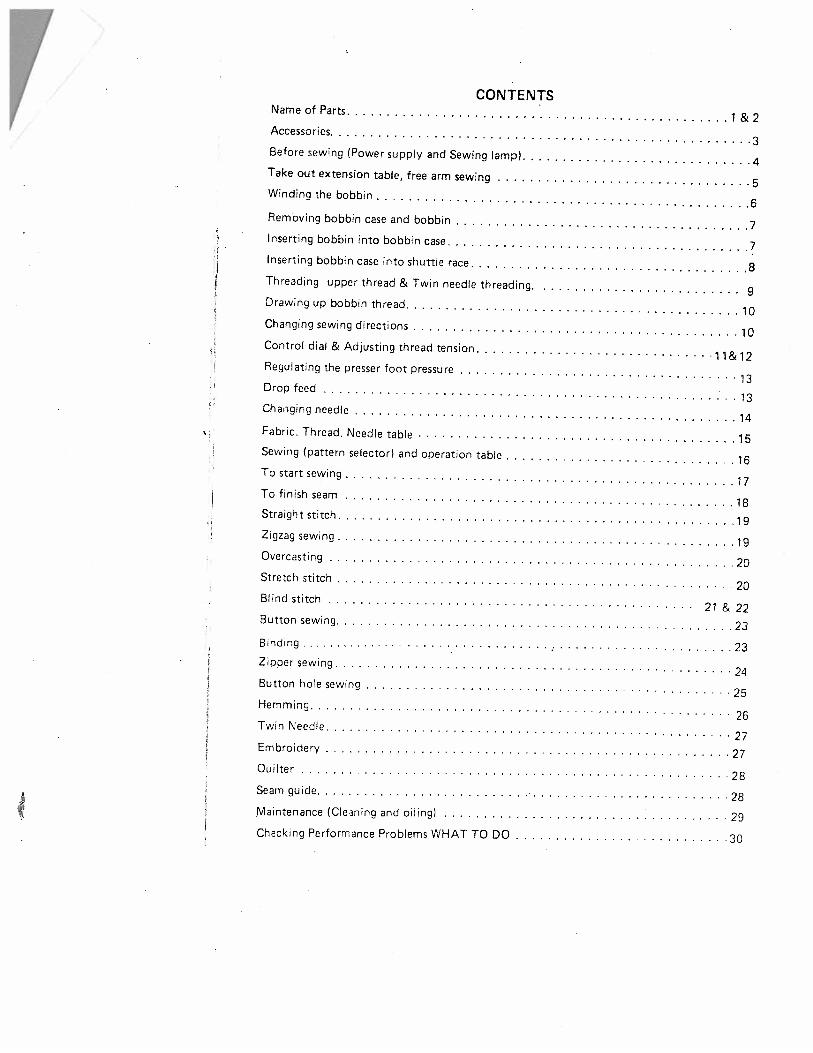
CONTENTSName of Parts
1 & 2Accessories
3Before sewing (Power supply and Sewing lamp) 4Take out extension table, free arm sewing 5Winding the bobbin
6Removing bobbin case and bobbin 7Inserting bobbin into bobbin case 7Inserting bobbin case into shuttle race 8
9
10
10
11&12
13
13
14
15
16
17
18
19
19
20
20
21&22
23
23
24
25
26
27
27
28
28
29
Drawing up bobbin thread
Changing sewing directions
Control dial & Adjusting thread tension
Regulating the presser foot pressure
Drop feed
Changing needle
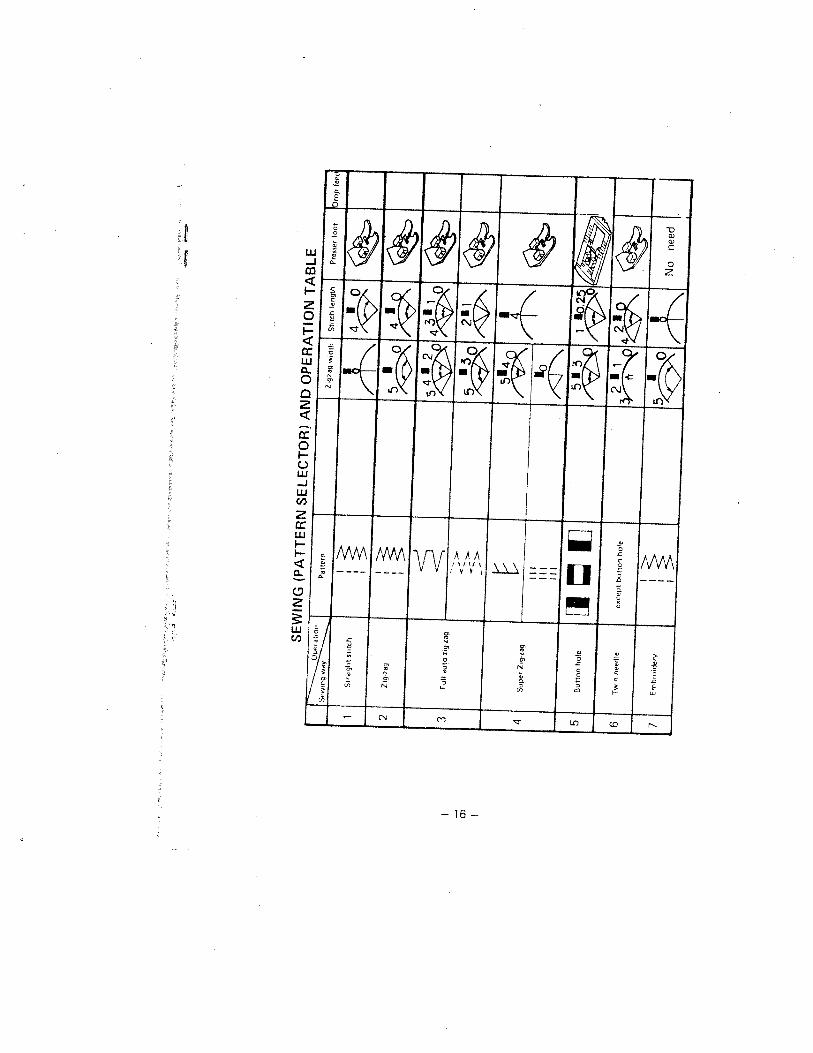
Fabric. Thread. Needle tableSewing (pattern selector) and operation table
To start sewing
To finish seam
Straight stitch
Zigzag sewing
Overcasting
Stretch stitch
Blind stitch
Button sewing
Binding
Zipper sewing
Button hole sewing
Hemming
Twin Needle
Embroidery
Quilter
Seam guide
Maintenance (Cle.ning and oiling)
Checking Performance Problems WHAT TO DO 30
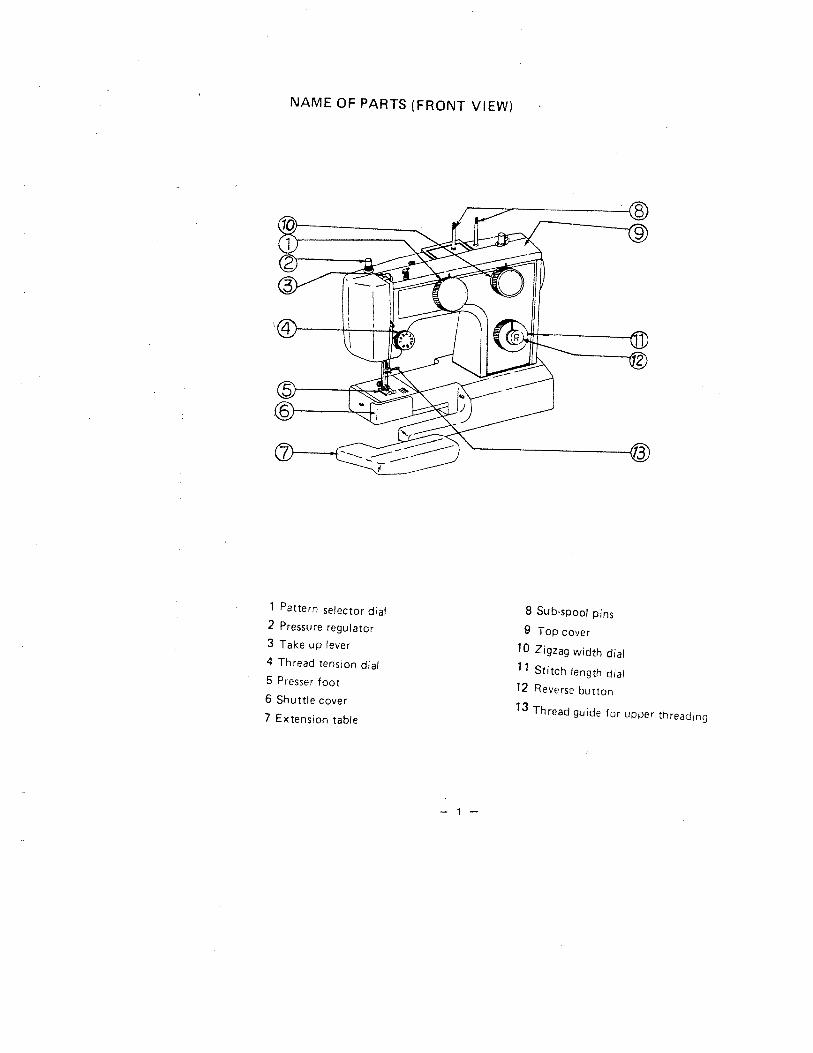
NAME OF PARTS (FRONT VIEW)
1 Pattern selector dial2 Pressure regulator3 Take up lever
4 Thread tension dial5 Presser foot
6 Shuttle cover
7 Extension table
8 Sub-spool pins9 Top cover
10 Zigzag width dial1 1 Stitch length dial12 Reverse button
13 Thread guide for upper threading
—1—
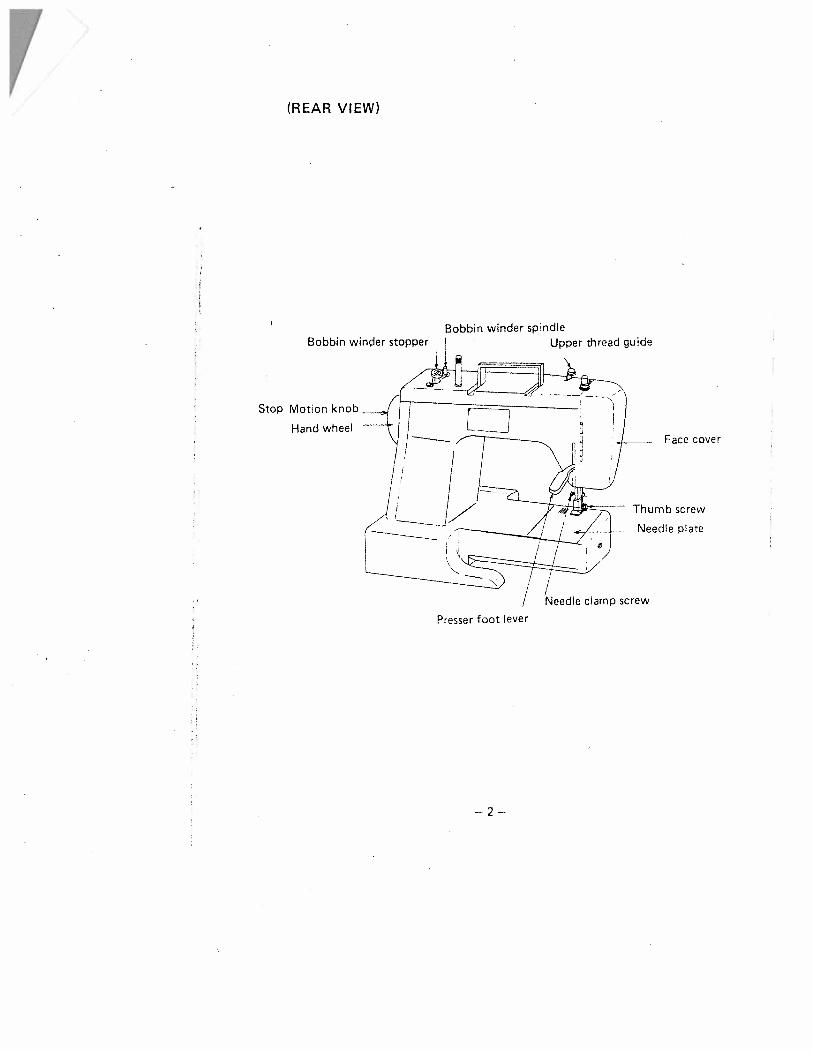
(REAR VIEW)
Stop Motion knob
Hand wheel
Bobbin winder spindle
Face cover
Thumb screw
Needle plate
Bobbin winder stopper Upper thread guide
Presser foot lever
—2—
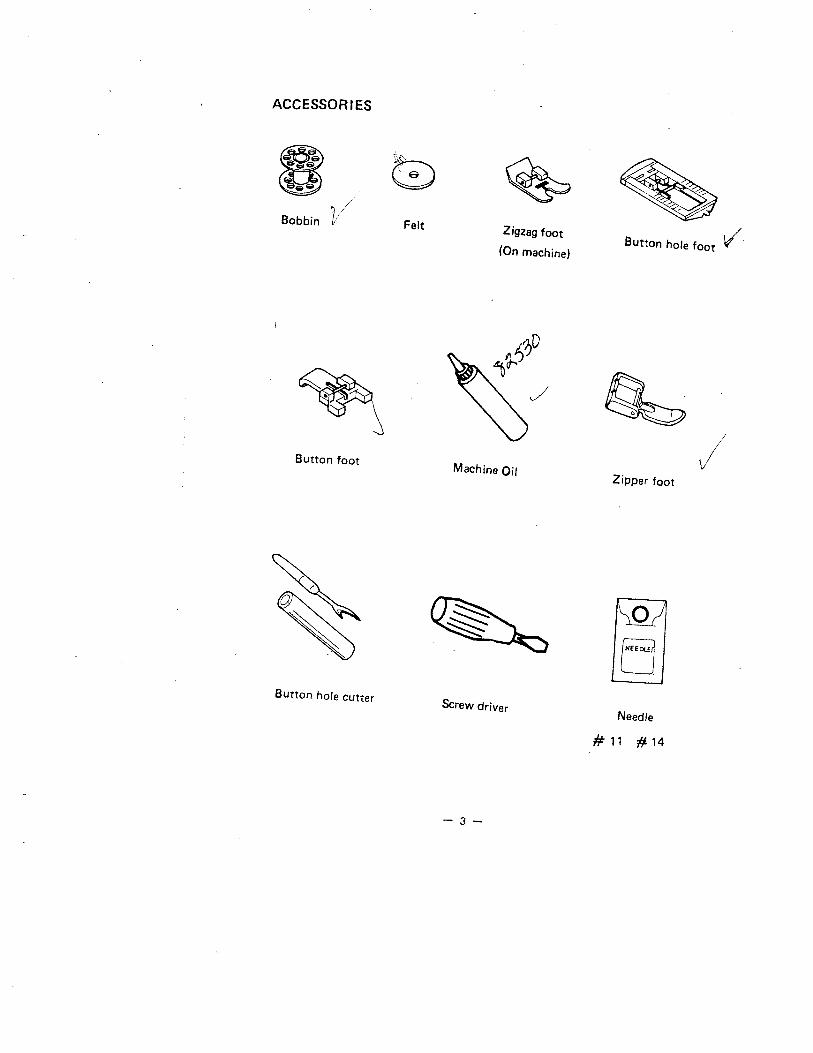
ACCESSOR I ES
Bobbin/
Felt Zigzag foot
(On machine)Button hole foot
Button foot
0
Needle
#11 #14
/Zipper foot
Machine Oil
Screw driverButton hole cutter
—3—
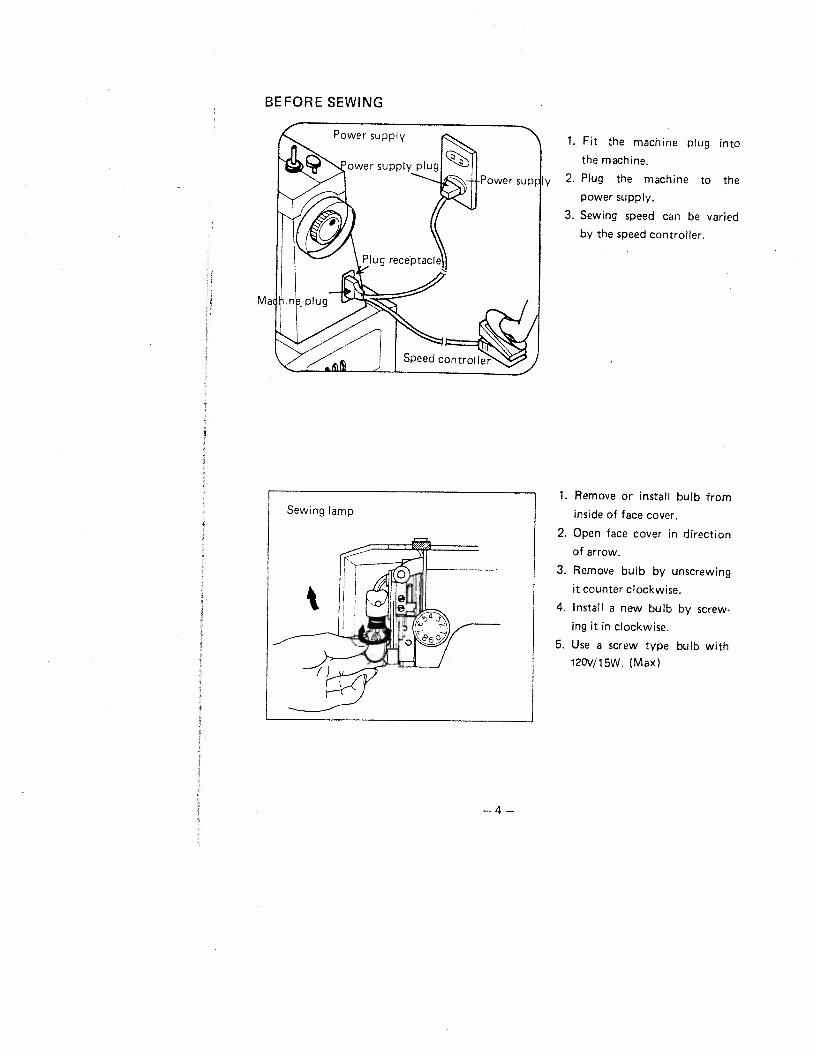
BEFORE SEWING
1. Fit the machine plug intothe machine.
2. Plug the machine to thepower supply.
3. Sewing speed can be variedby the speed controller.
1. Remove or install bulb frominside of face cover.
2. Open face cover in directionof arrow.
3. Remove bulb by unscrewing
it counter clockwise.
4. Install a new bulb by screwing it in clockwise.
5. Use a screw type bulb with120V/15W. (Max)
Sewing lamp
4
—4—
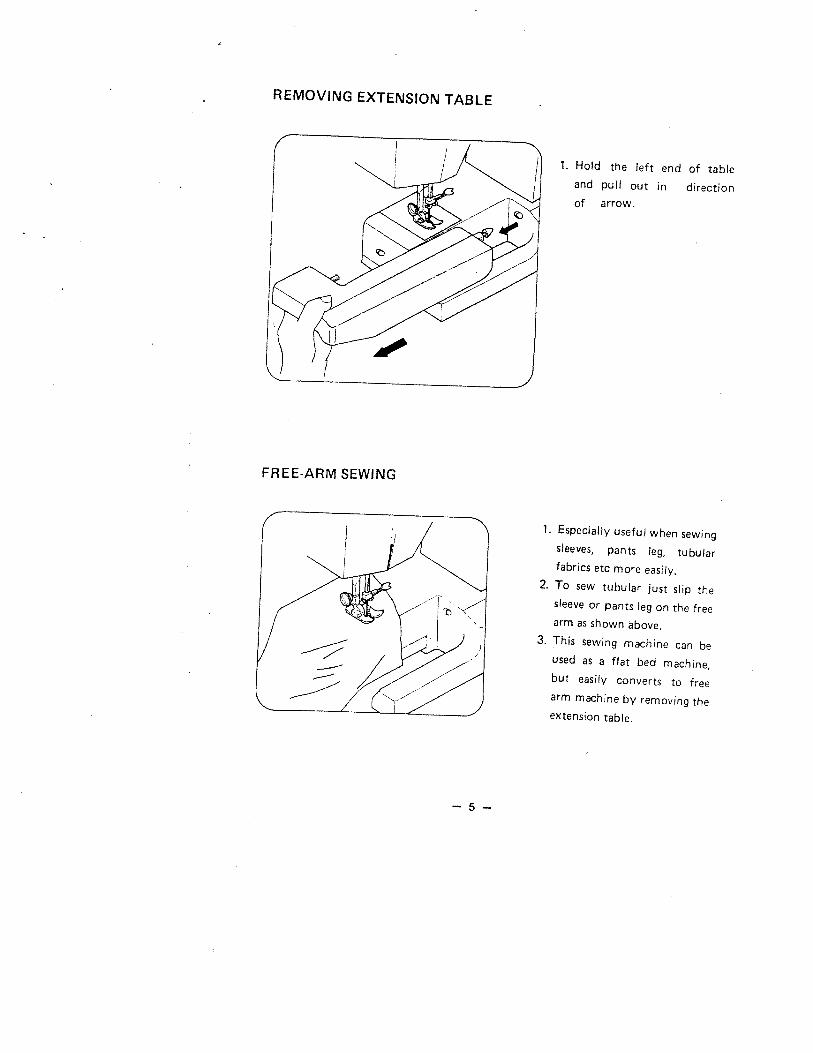
REMOVING EXTENSION TABLE
FREE-ARM SEWING
1. Hold the left end of tableand pull out in directionof arrow.
1. Especially useful when sewingsleeves, pants leg, tubularfabrics etc more easily.
2. To sew tubular just slip thesleeve or pants leg on the freearm as shown above.
3. This sewing machine can beused as a flat bed machine,but easily converts to freearm machine by removing theextension table.
—5—
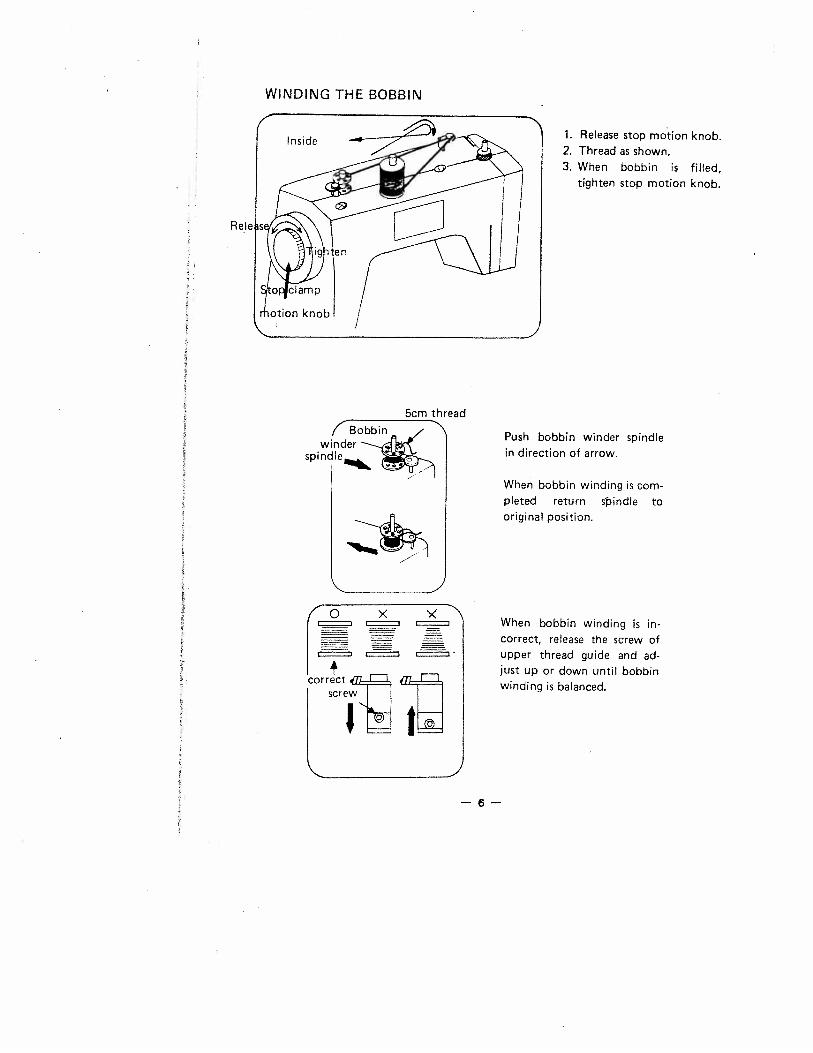
WINDING THE BOBBIN
1. Release stop motion knob.2. Thread as shown.3. When bobbin is filled,
tighten stop motion knob.
Push bobbin winder spindlein direction of arrow.
When bobbin winding is completed return spindle tooriginal position.
When bobbin winding is incorrect, release the screw ofupper thread guide and adjust up or down until bobbinwinding is balanced.
Rel
—6—
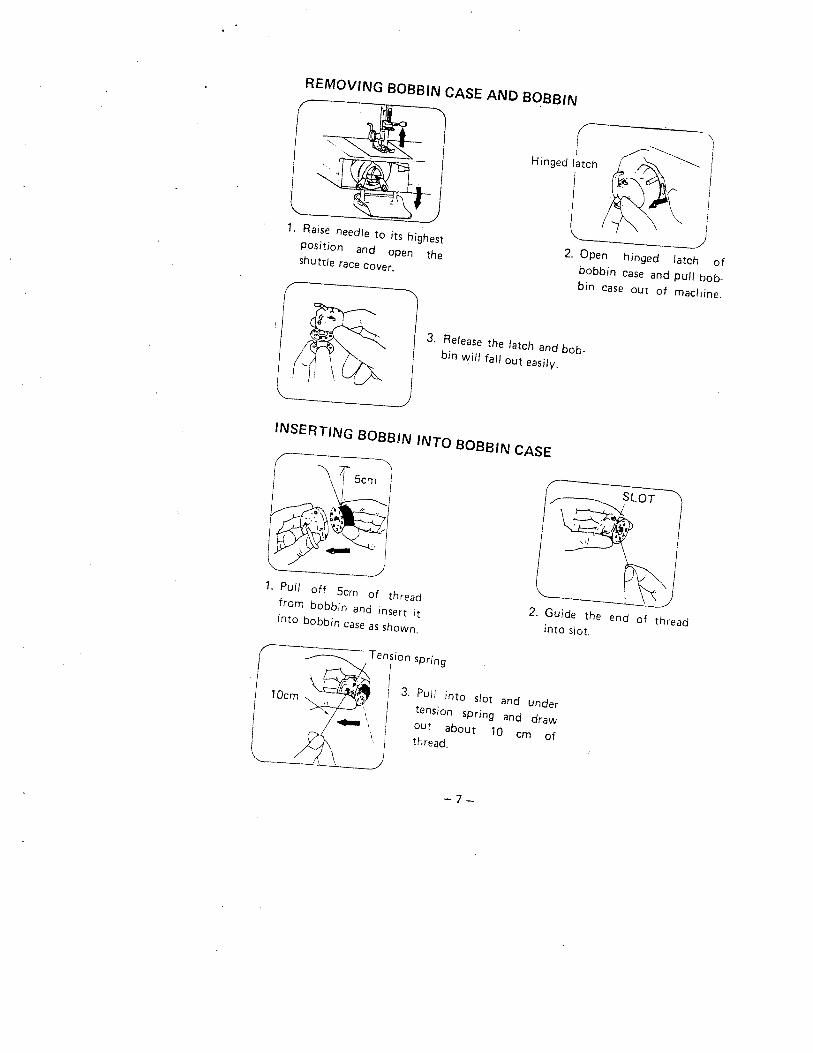
REMOVING BOBBIN CASE AND BOBBIN
1 Raise needle to its highestposition and open theshuttle race cover.
Hinged latch /
J2. Open hinged latch of
bobbin case and pull bobbin case out of machine.
3. Release the latch and bobbin will fall out easily.
INSERTING BOBBIN INTO BOBBIN CASE
3. Pull into slot and undertension spring and drawout about 10 cm ofthread.
cm
1. Pull off 5cm of threadfrom bobbin and insert itinto bobbin case as shown.
Tension spring
2. Guide the end of threadinto slot.
—7—
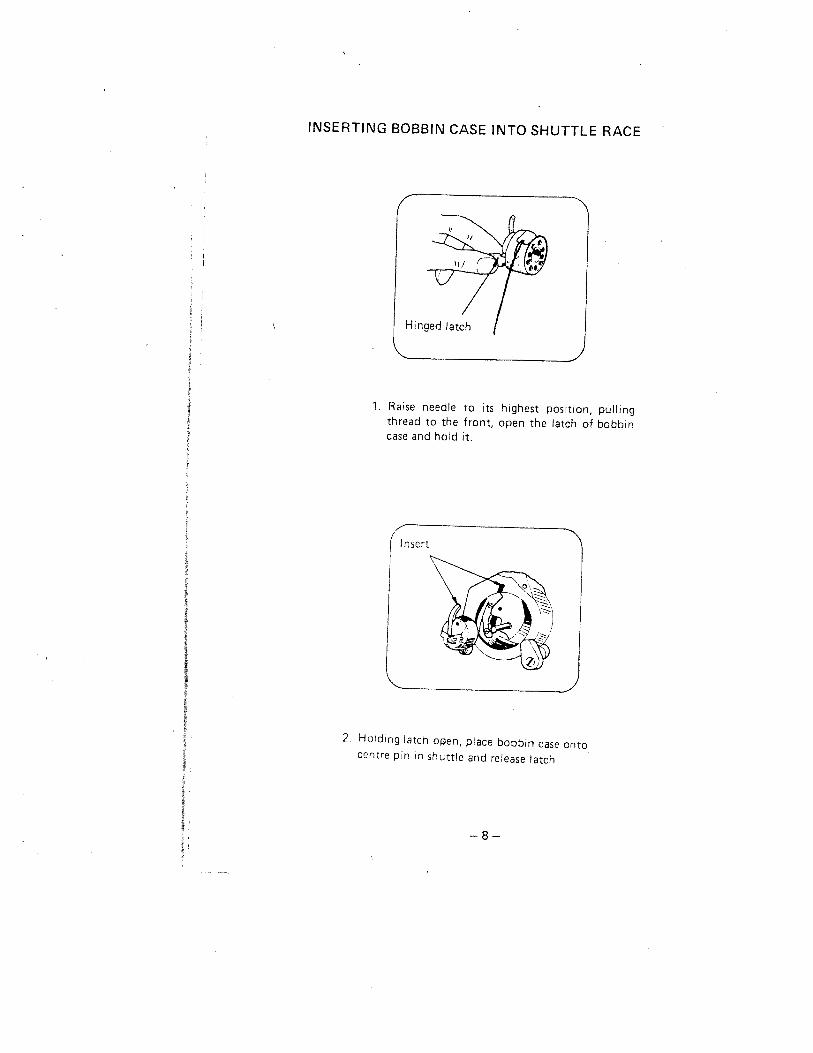
INSERTING BOBBIN CASE INTO SHUTTLE RACE
1 Raise needle to its highest position, pullingthread to the front, open the latch of bobbincase and hold it.
2, Holding latch open, place bobbin case ontocentre pin in shuttle and release latch
(lnsert
)
—8—
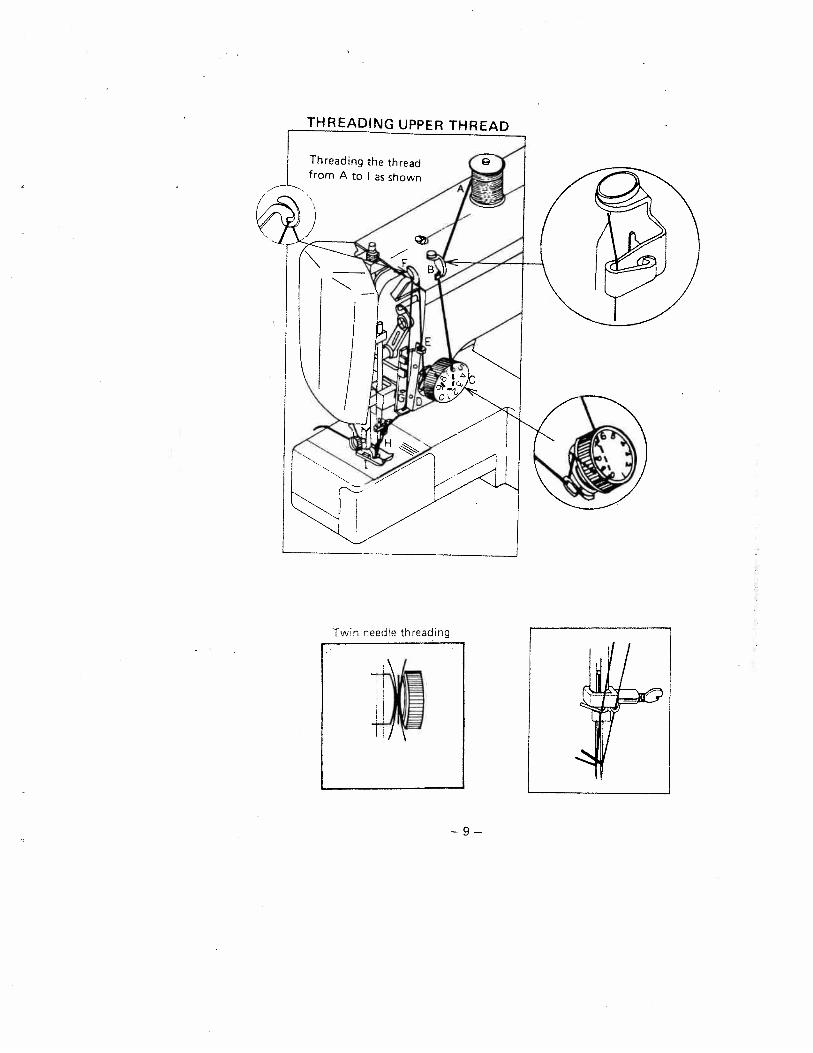
Twin needle threading
—9—
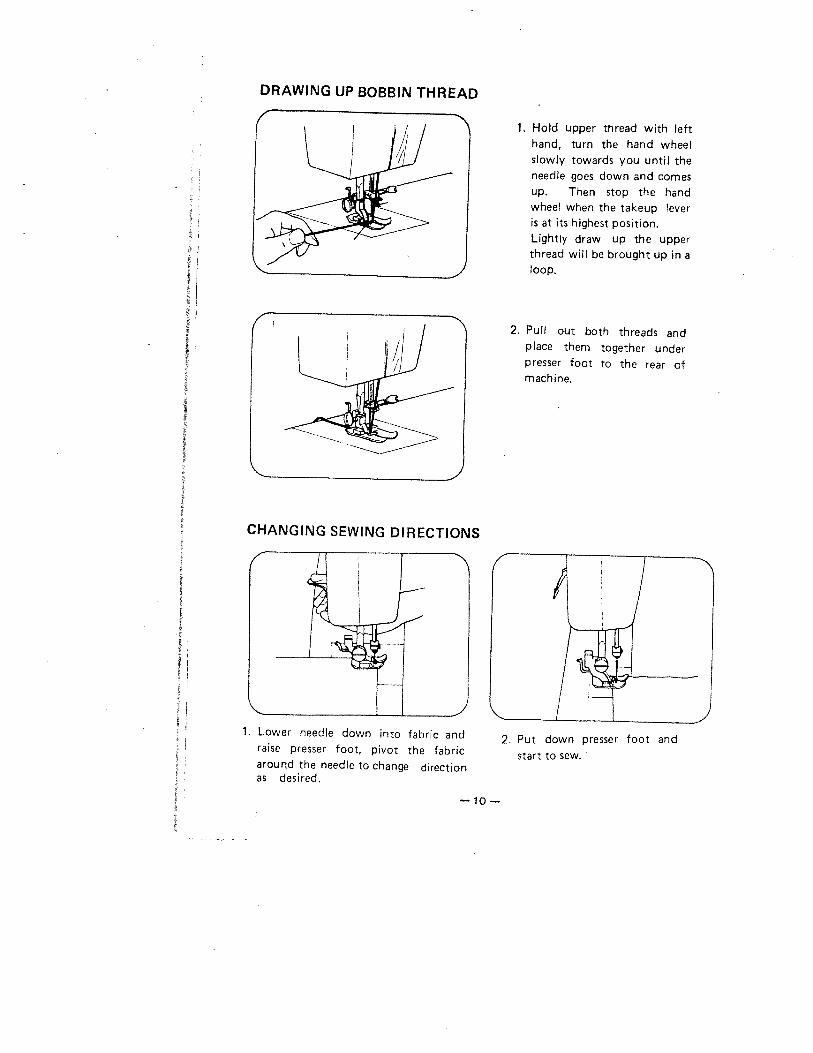
CHANGING SEWING DIRECTIONS
1. Hold upper thread with lefthand, turn the hand wheelslowly towards you until theneedle goes down and comesup. Then stop the handwheel when the takeup leveris at its highest position.Lightly draw up the upperthread will be brought up in aloop.
2. Pull out both threads andplace them together underpresser foot to the rear ofmachine.
1. Lower needle down into fabric andraise presser foot, pivot the fabricaround the needle to change directionas desired.
DRAWING UP BOBBIN THREAD
/
2. Put down presser foot and
start to sew.
—10—
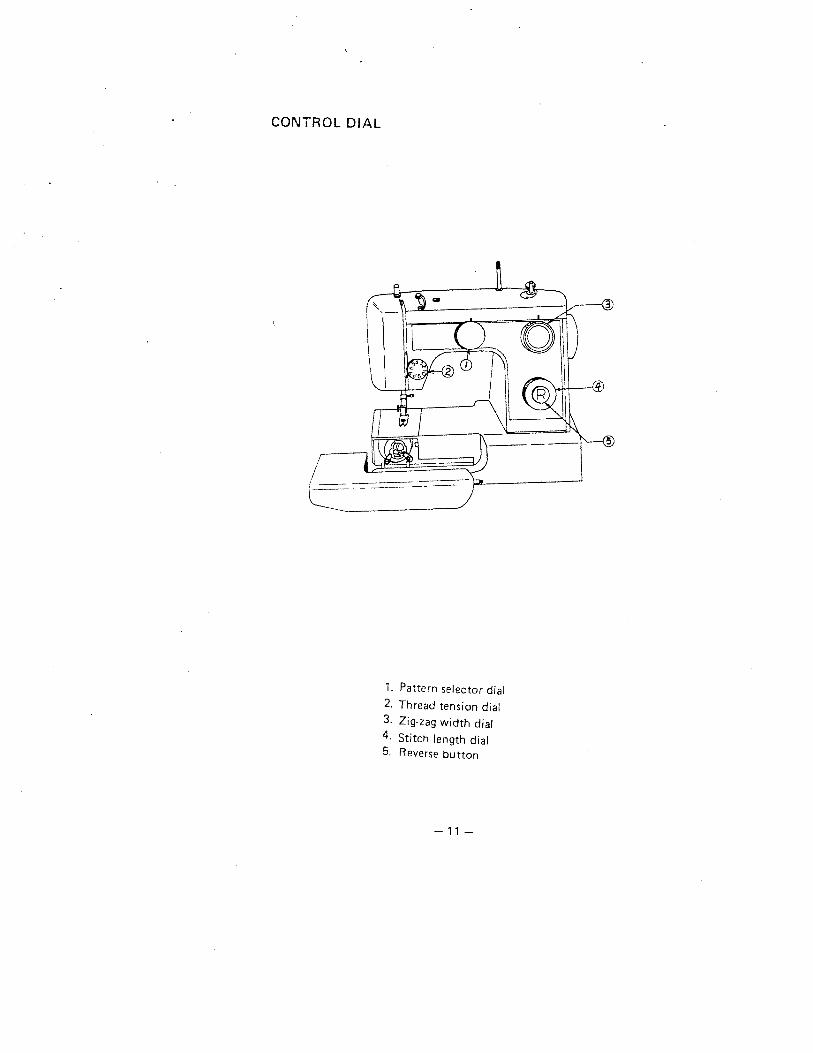
CONTROL DIAL
1. Pattern selector dial2. Thread tension dial3. Zig-zag width dial4 Stitch length dial5. Reverse button
—11—
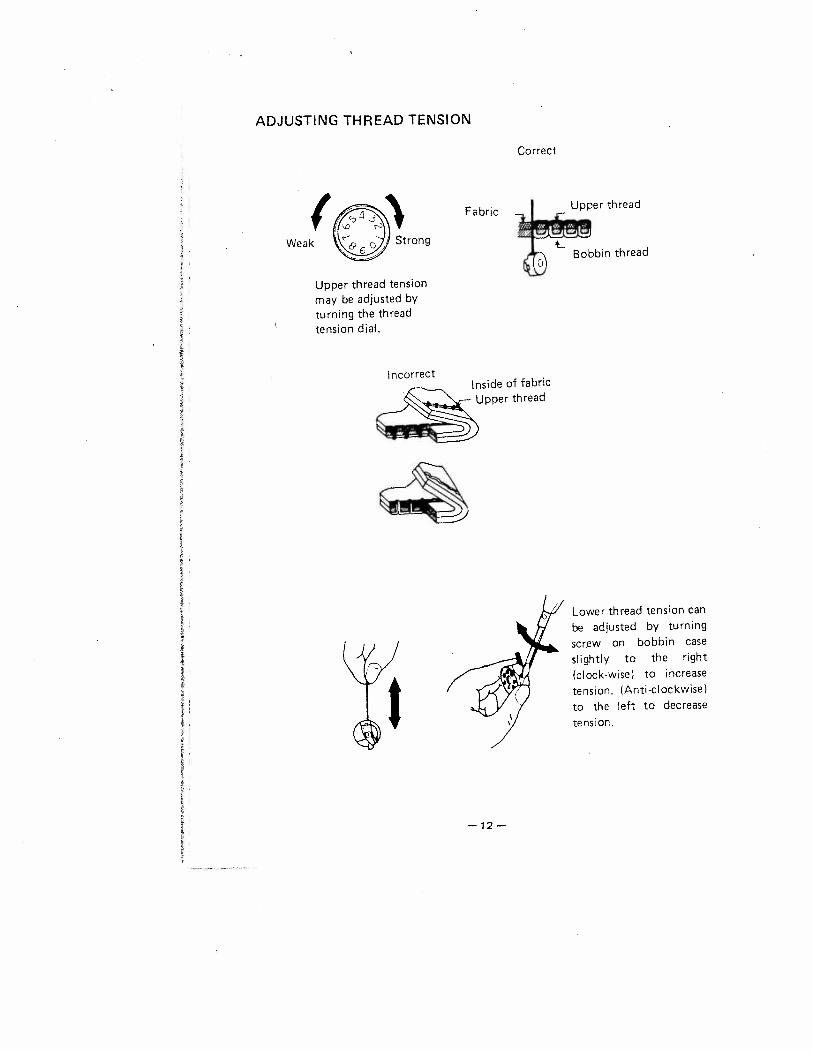
ADJUSTING THREAD TENSION
Correct
,( Fabric Upper thread
Weak StrongBobbin thread
Upper thread tensionmay be adjusted byturning the threadtension dial.
Incorrect
rthread
Lower thread tension can
be adjusted by turning
screw on bobbin case
slightly to the right
—12—
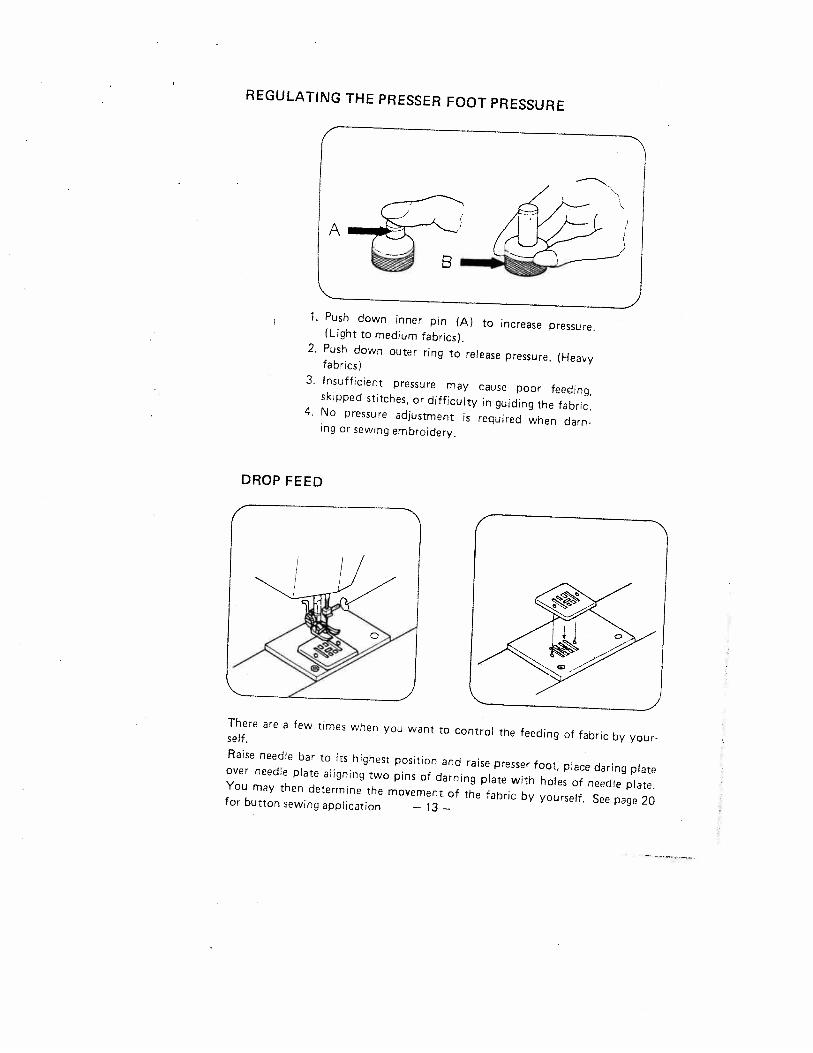
REGULA11NG THE PRESSER FOOT PRESSURE
1. Push down inner pin (A) to increase pressure.(Light to medium fabrics).2. Push down outer ring to release pressure, (Heavyfabrics)3. Insufficient pressure may cause poor feeding,skipped stitches, or difficulty in guiding the fabric.4. No pressure adjustment is required when darning or sewing embroidery.
DROP FEED
There are a few times when you want to control the feeding of fabric by yourself.Raise needle bar to its highest position and raise presser foot, place daring plateover needle plate aligning two pins of darning plate with holes of needle plate.You may then determine the movement of the fabric by yourself. See page 20for button sewing application — 13 —
A
1
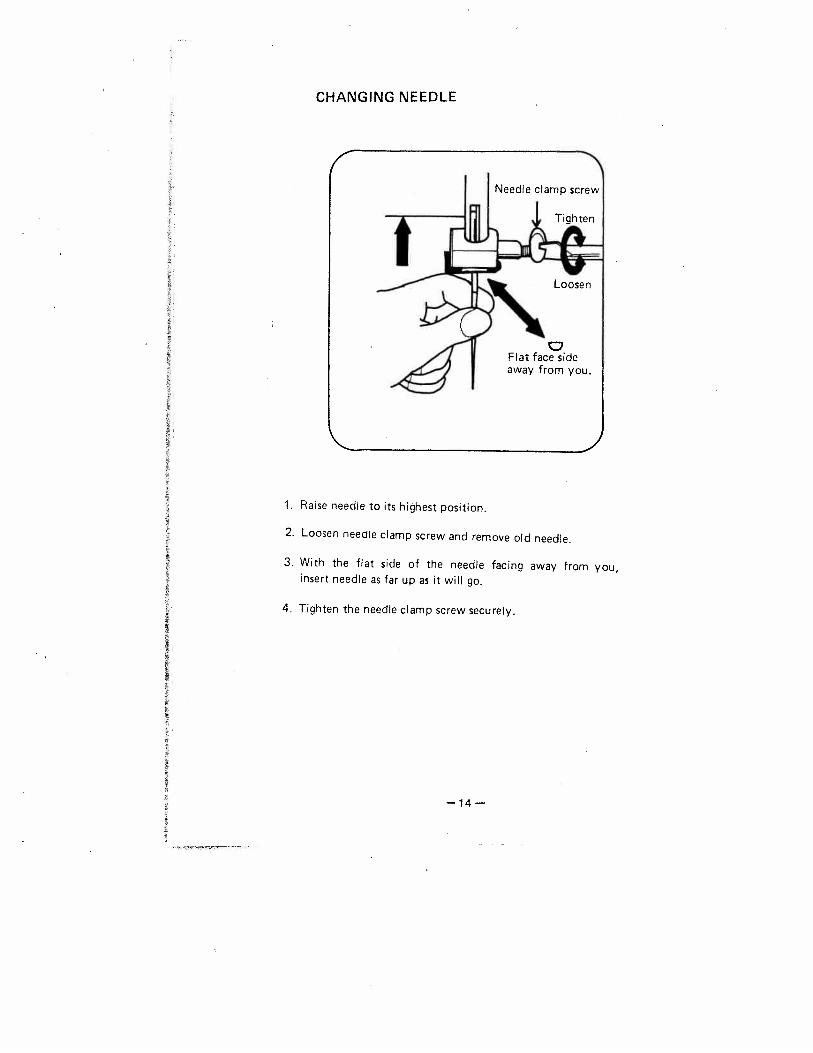
CHANGING NEEDLE
1. Raise needle to its highest position.
2. Loosen neecile clamp screw and remove old needle.
3. With the flat side of the needle facing away from you,insert needle as far up as it will go.
4. Tighten the needle clamp screw securely.
—14—
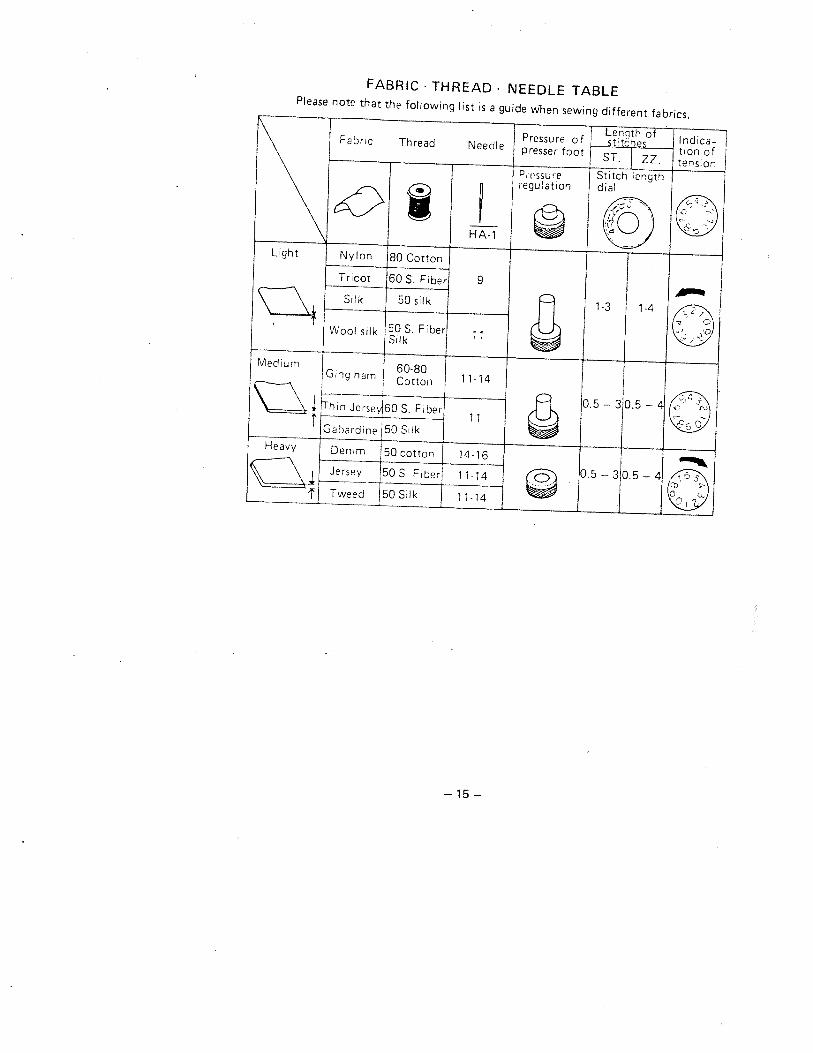
FABRIC THREAD• NEEDLE TABLEPlease note that the following list is a guide when sewing different fabrics.
F Lenqth of\ Pressure of stthes lndica\ Fabric Thread Needle presser foot ST. zz.\ Pressure Stitch lengthregulation dial\4
Light Nylon 80 Cotton
Tricot 60 S. Fiber 9
! Woolsilk 50S Fiber
1-3 1-4
MediumGing ham
60-80Cotton 1 1-14
thin Jcrsey60 S. Fiber
abardine 50 SL1k11
0.5 — 30.5 —
0
Denim !S0conon 14-16Jersey 150S. Fiber 11-14 0.5—30.5
Tweed j5OSilk 11-14
4
— 15—
LU-J
I2C
LU0C02
CF-.C-)LU-JLUC,,
2
LUI-I—
0
C2
LUC/)
I
— 16—
TO START SEWING
Important Hints.1. Raise the take-up lever to its highest position when starting and stopping
sewing.2. Hold both threads about 10 ems to the rear of machine for the first two to
three stitches.3. Sufficient fabric should be placed under needle before lowering presser foot.4. Depress foot/Speed control and start to sew.5. Test the machine stitches on a scrap of fabric you plan to use, adjusting the
machine for the length of stitch and tension suitable to your fabric.
Attenttion.
1. When turning the hand wheei manually, always turn it toward you.2. Guide the cloth gently with your hand.3. To prevent breaking needle always stop with the needle out of the fabric.
—17—

TO FINISH SEAM
1 Sew to the edge of seam.2. Push the reverse button and sew in reverse
for about 3—4 cms.3. Raise need’e to its highest position.4. Lift presser foot and pufl out the fabric to
rear of machine.
5. Cut threads as shown on the thread cutter.
— is —
STRAIGHT STITCH
1. This type of stitching is the one used most frequently.2. The zig-zag presser foot can be used for both straight and zig-zag sewing.3. For sewing light fabric, use smaller stitch size and left needle position.(Refer to page 15 for dal setting).
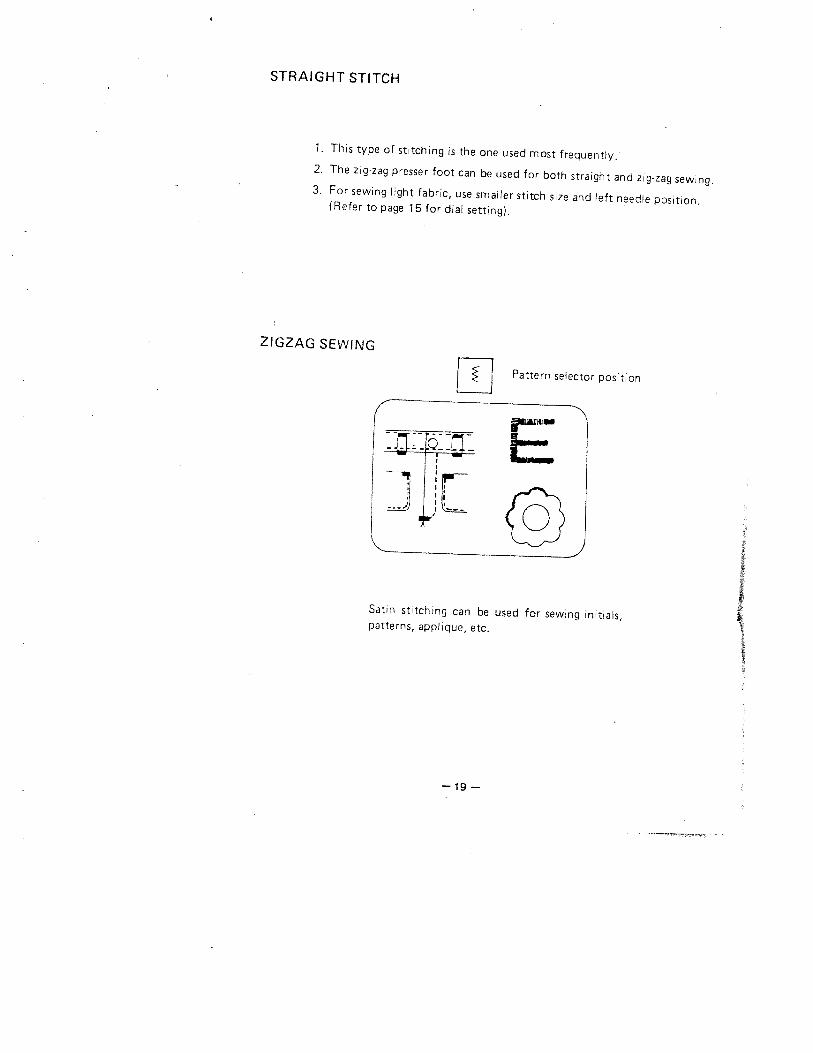
ZIGZAG SEWING
____
Pattern selector position
t-e.
Satin stitching can be used for sewing initials,patterns, applique, etc.
—19—
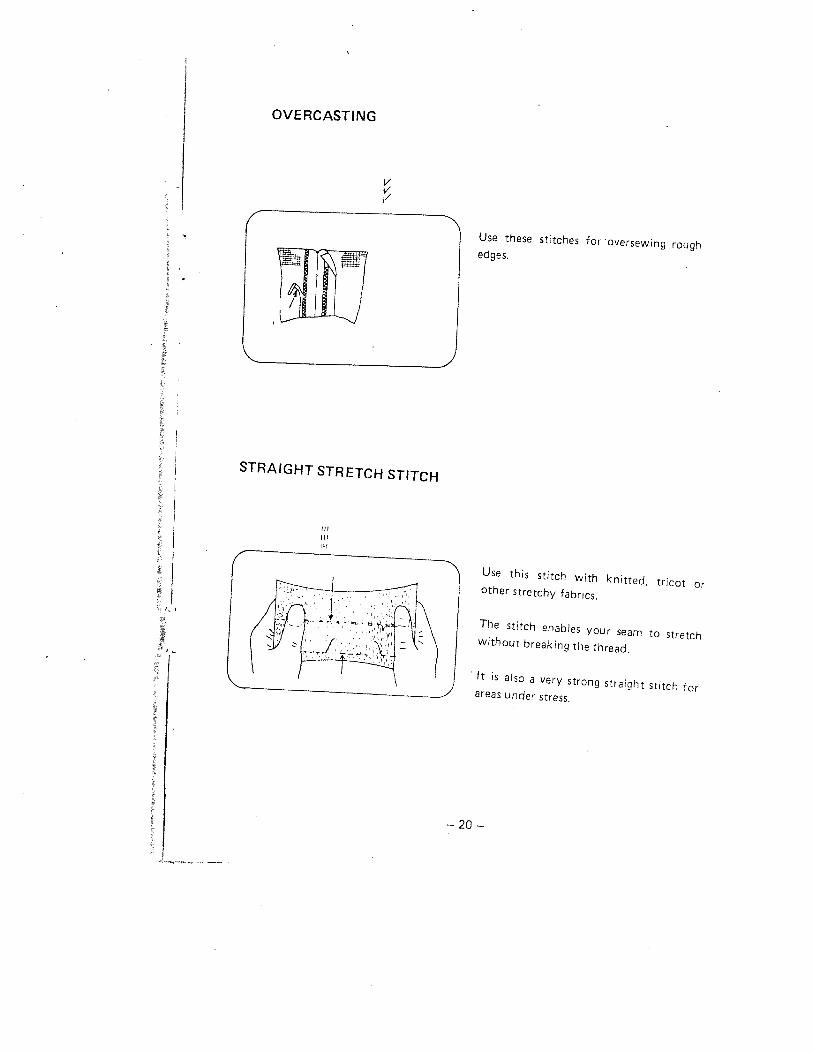
OVERCASTING
I
V
Use these stitches for oversewing roughedges.
STRAIGHT STRETCH STITCH
Use this stitch with knitted, tricot orother stretchy fabrics.
The stitch enables your seam to stretchwithout breaking the thread.
is also a very strong straight stitch forareas under stress.
— 20 —
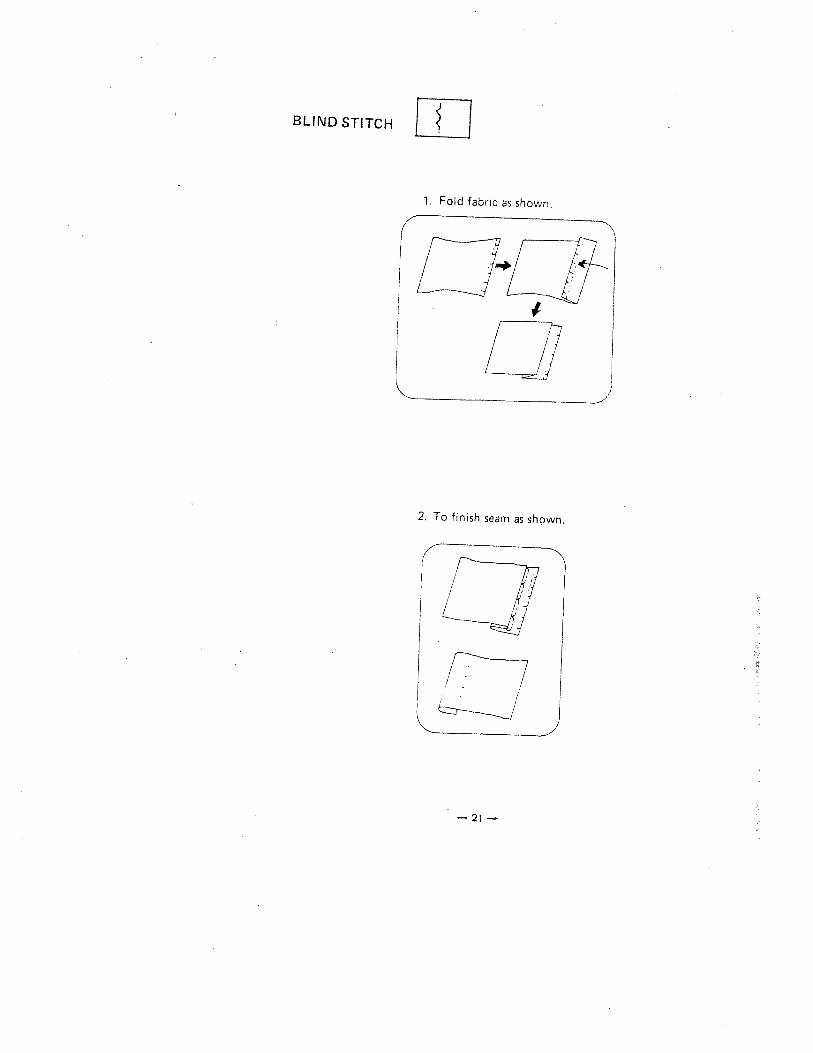
BLIND STITCH
1. Fold fabric as shown.
2. To frnjsh seam as shown.
— 21 —
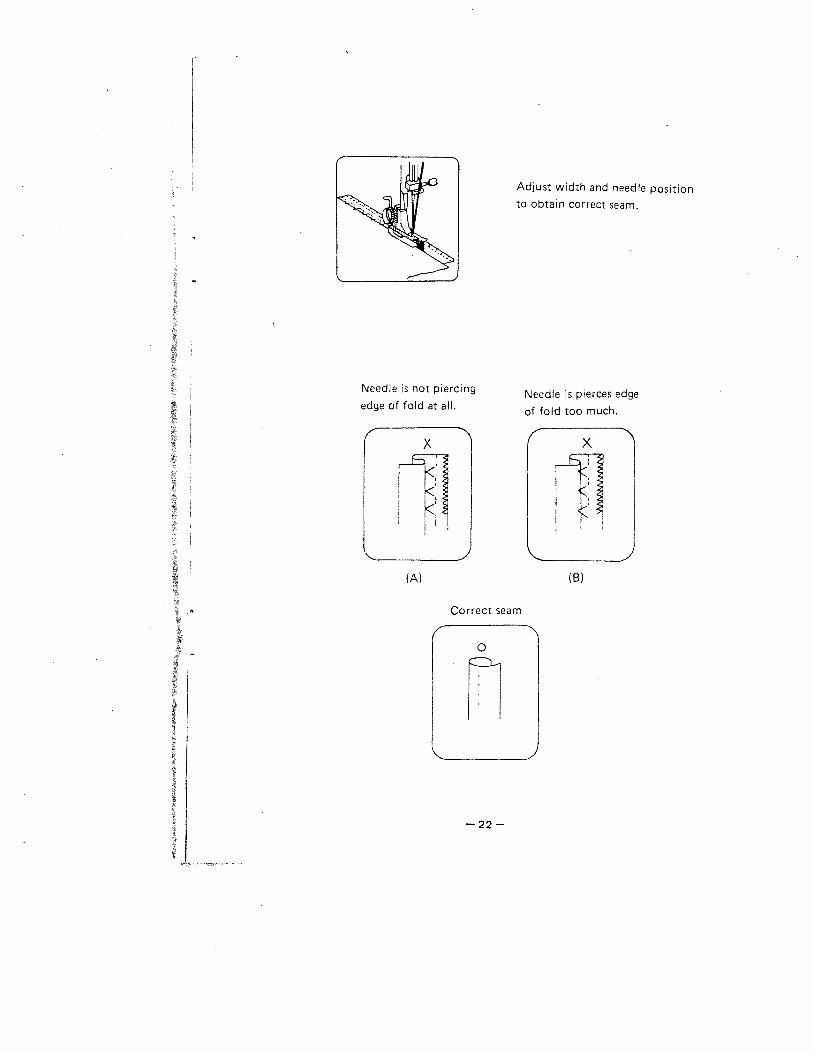
Adjust width and needle positionto obtain correct seam
Needle s not piercing Needle is pierces edgeedge of fold at all of fold too much
x x
_E1
(A) (8)
Correct seam
H—22—
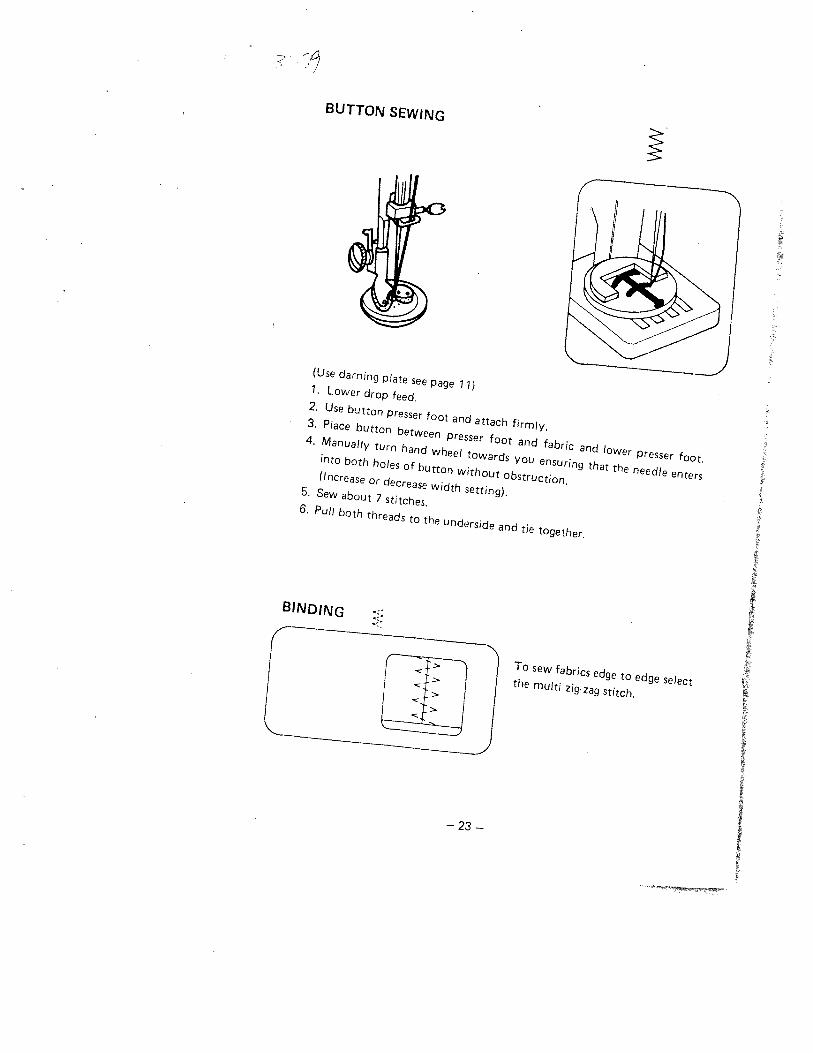
BUTTON SEWING
(Use darning plate see page 11)1. Lower drop feed.2. Use button presser foot and attach firmly.3. Place button between presser foot and fabric and lower presser foot.
4. Manually turn hand wheel towards you ensuring that the needle enters
into both holes of button without obstruction.(Increase or decrease width setting),5. Sew about 7 stitches.6. Pull both threads to the underside and tie together.
BINDING
To sew fabrics edge to edge selectthe multi zig’zag stitch.
— 23—
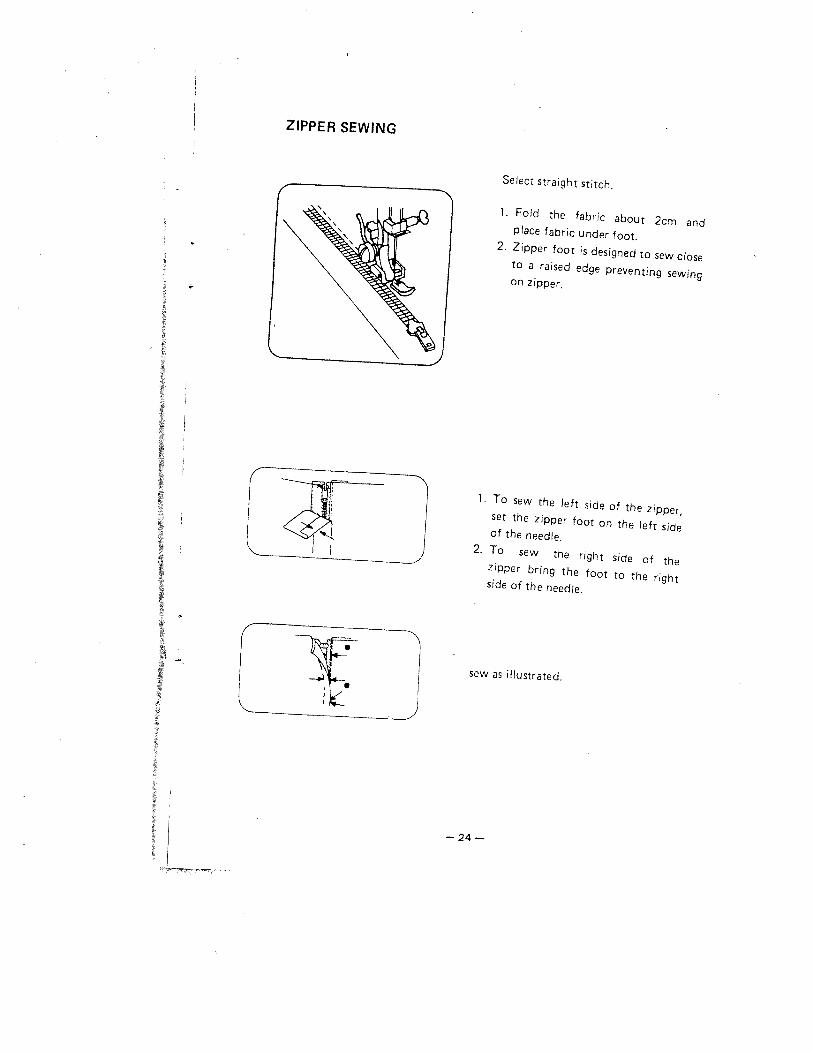
Select straight stitch.
1. Fold the fabric about 2cm andplace fabric under foot.
2. Zipper foot is designed to sew closeto a raised edge preventing sewingon zipper.
1. To sew the left side of the zipper,set the zipper foot on the left sideof the needle.2. To sew the right side of thezipper bring the foot to the rightside of the needle.
—24—
ZIPPER SEWING
jsew as illustrated.
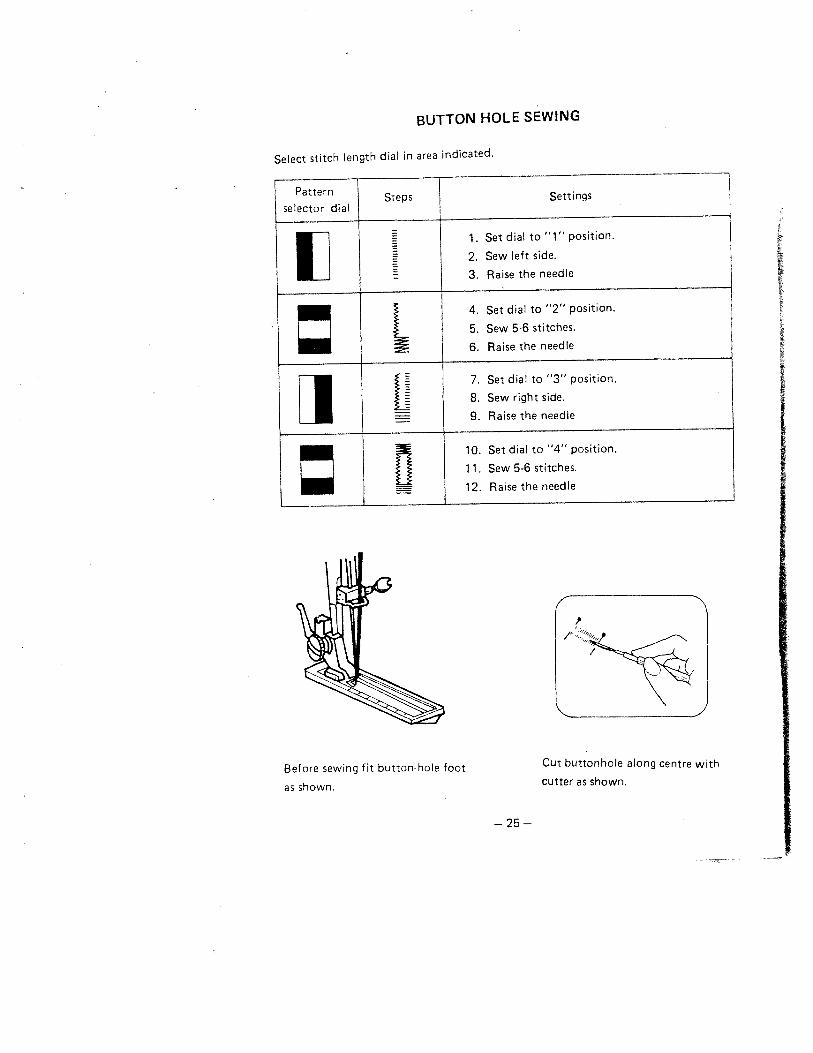
BUTTON HOLE SEWING
Select stitch length dial in area indicated.
as shown.
Settings
1. Set dial to ‘.1” position.
2. Sew left side.
3. Raise the needle
4. Set dial to “2” position.
5. Sew 56 stitches.
6. Raise the needle
7. Set dial to “3” position.
8. Sew right side.
9. Raise the needle
10. Set dial to “4” position.
1 1. Sew 5-6 stitches.
12. Raise the needle
Before sewing fit button-hole foot Cut buttonhole along centre with
cutter as shown.
— 25 —
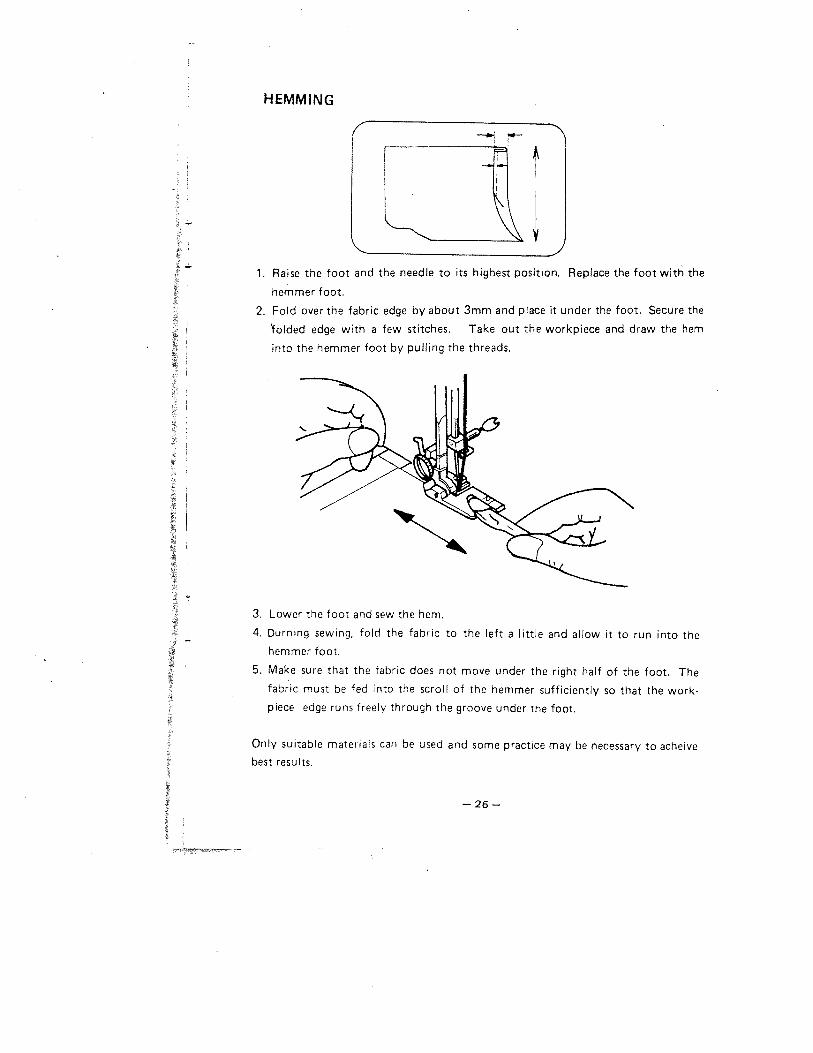
HEMMJNG
1. Raise the foot and the needle to its highest position. Replace the foot with the
hemmer foot.
2. Fold over the fabric edge by about 3mm and place it under the foot. Secure the
folded edge with a few stitches. Take out the workpiece and draw the hem
into the hemmer foot by pulling the threads.
3. Lower the foot and sew the hem.
4. Durning sewing, fold the fabric to the left a little and allow it to run into thehemmer foot.
5, Make sure that the fabric does not move under the right half of the foot. The
fabric must be fed into the scroll of the hemmer sufficiently so that the work-
piece edge runs freely through the groove under the foot.
Only suitable mazeriajs can be used and some practice may be.necessary to acheive
best results.
— 26 —
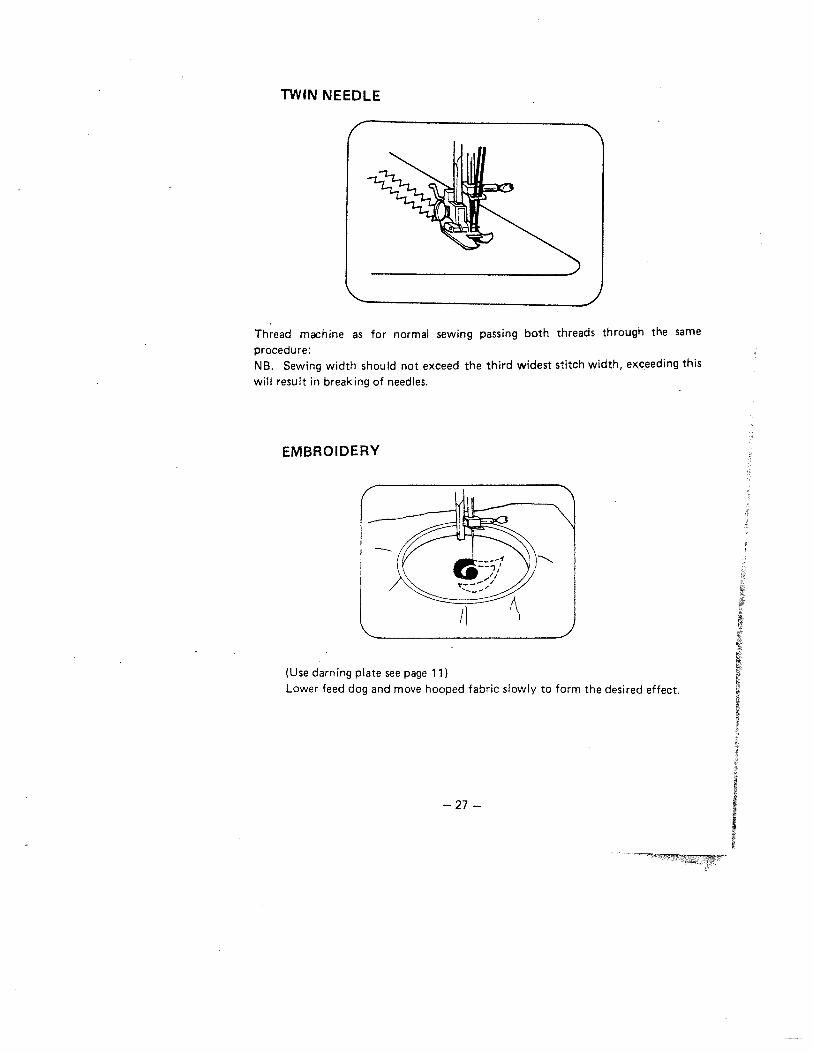
TWIN NEEDLE
Thread machine as for normal sewing passing both threads through the same
procedure:NB. Sewing width should not exceed the third widest stitch width, exceeding this
will result in breaking of needles.
EMBROIDERY
(Use darning plate see page 11)Lower feed dog and move hooped fabric slowly to form the desired effect.
— 27 —
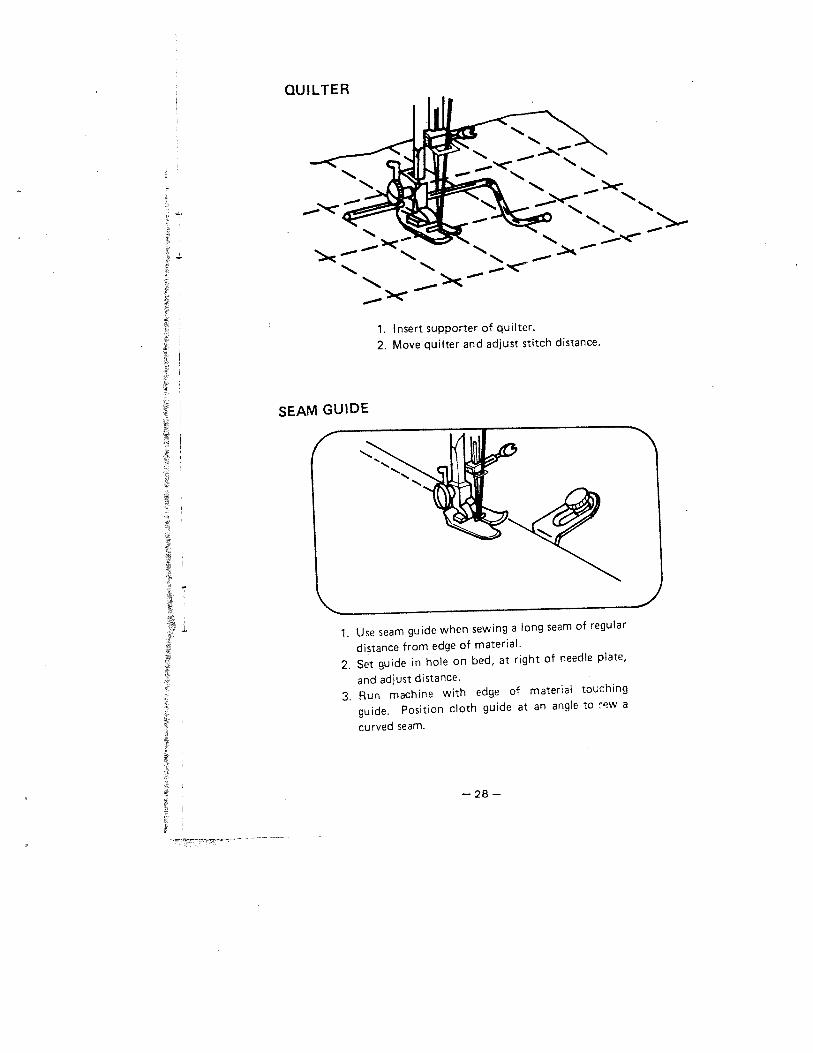
1. Insert supporter of quilter.
2. Move quilter and adjust stitch distance.
1. Use seam guide when sewing a long seam of regular
distance from edge of material.
2. Set guide in hole on bed, at right of needle plate,
and adjust distance.
3. Run machine with edge of material touching
guide. Position cloth guide at an angle to rw a
curved seam.
QUILTER
%%
SEAM GUIDE
I— 28 —
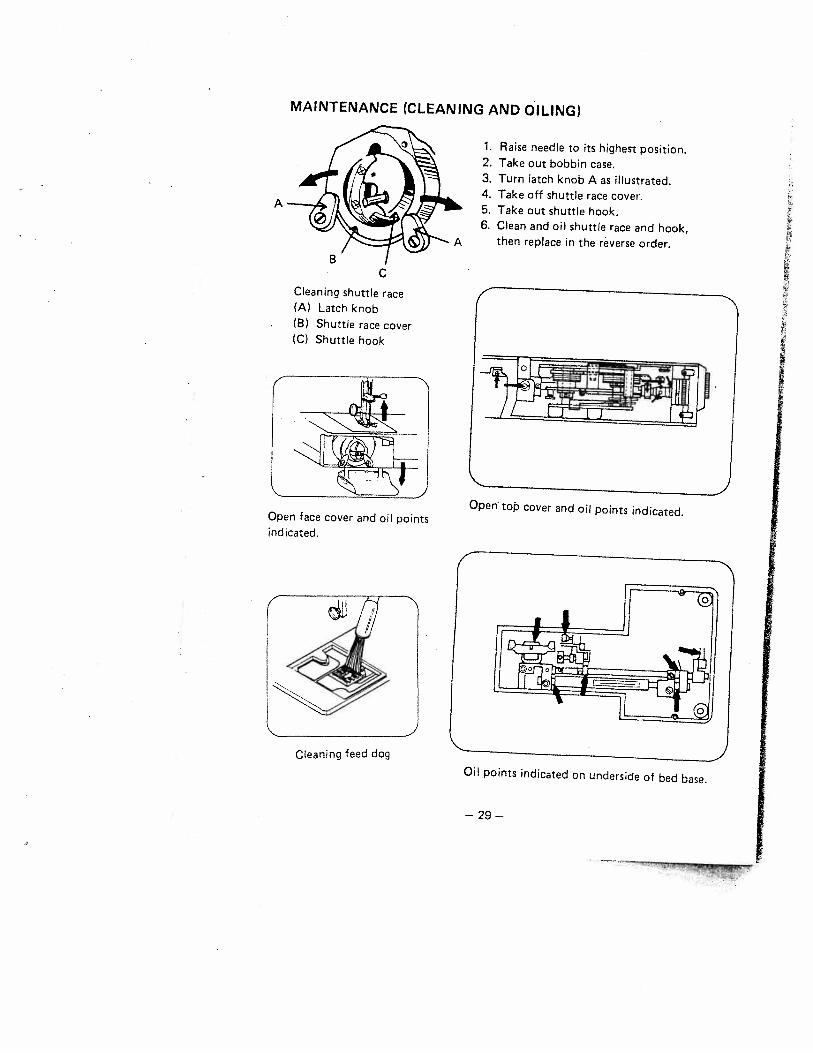
MAINTENANCE (CLEANING AND OILING)
Cleaning shuttle race(A) Latch knob(B) Shuttle race cover(C) Shuttle hook
1. Raise needle to its highest position.2. Take out bobbin case.3. Turn latch knob A as illustrated.4. Take off shuttle race cover.5. Take out shuttle hook.6. Clean and oil shuttle race and hook,
then replace in the reverse order.
A
C
I
r
IE1flOpen face cover and oil pointsindicated.
JOpen top cover and oil points indicated.
I
Cleaning feed dog
Oil points indicated on underside of bed base.
— 29 —

I-
C,-,
C
CH
EC
KIN
GP
ER
FO
RM
AN
CE
PR
OB
LE
MS
WH
AT
TO
DO
PRO
BL
EM
PRO
BA
BL
EC
AU
SEC
OR
RE
CT
ION
—F
eed
dog
dow
n.—
Rai
sefe
eddo
g.
Fab
ric
flO
t—
Mac
hine
not
mov
ing.
—M
ovin
gst
op
moti
on.
mov
ing
—S
titc
hle
ngth
dial
in0
posi
tion.
—M
ovin
gdi
alto
1-4.
—L
ight
pres
sure
onpr
esse
rfo
ot.
—in
crea
sepr
essu
reon
pres
ser
foot.
—In
corr
ect
sett
ing
ofne
edle
.—
Res
etnee
dle
.
.—
Nee
dle
bent
.—
Rep
lace
new
need
le.
Bre
akin
gN
eedl
e—
Pull
inj
fabr
ic.
—D
onot
pull
fabr
ic.
—In
corr
ect
usin
gne
edle
,th
read
and
fabr
ic.
—C
orr
ect
usin
gne
edle
,th
read
,an
dfa
bric
.
—In
corr
ect
posi
tion
ofzi
gzag
wid
thdi
al.
—M
ovin
gto
corr
ect
posi
tion.
—Im
pro
per
thre
adin
g.—
Ret
hre
adm
achi
ne.
Bre
akin
gU
pper
—T
ight
uppe
rth
read
tensi
on.
—L
oose
nupper
thre
adte
nsio
n.
Thr
ead
—N
eedl
ebe
nt.
—R
epla
cene
wne
edle
.
—N
icks
orbu
rrs
onsh
utt
le.
—R
epla
cesh
utt
le,
orpo
lish
off
burr
s
com
ple
tely
.
—T
ight
bobbin
thre
adte
nsi
on.
—L
oose
nbobbin
thre
adte
nsio
n.
Bre
adki
nB
obbi
n—
Inco
rrec
tst
ting
ofne
edle
.—
Res
etne
edle
.
Thr
ead
—Im
prop
erth
read
ing.
—R
ethre
adm
achi
ne.
—D
ust
and
thre
adin
shutt
le.
—C
lean
shutt
le.
Mac
hine
Jam
min
g—
No
oil.
—N
eed
oil.
Kno
ckin
gN
oise
—D
ust
and
thre
adin
shutt
le.
—C
lean
shutt
le.
—T
ensi
onto
oti
ght.
--
Res
et.
Puck
erin
g—
Sew
ing
foot
pres
sure
too
stro
ng.
—R
egula
ting
sew
ing
foot
pre
ssure
.
—In
corr
ect
usin
gfa
bric
,ne
edle
,an
dth
read
.—
Corr
ect
usin
gfa
bric
,ne
edle
and
thre
ad.