Embed Size (px)
Citation preview

Wren Hall Specification of Works Specification 10-MC
Phase 2
December 2017
Specification 10-MC is for main building work in Phase 2 of the alteration to Wren Hall at Wroxall, Warwickshire.
Brief construction history of Wren Hall
The building was originally a school hall with the master’s house attached at the east end. The polychromatic brick section was built in the 1840s in Victorian Gothick style. The Victorian building had a blue brick Arts & Craft style west wing added in the first decade of the 20th Century. This work also removed the original heating stoves and replaced them with a solid fuel heater in a sunken boiler room providing heat to cast iron radiators in the Halls and West Wing, A range of outbuilding also existed in the space north of the original hall that was likely to have been the original toilets and outbuildings. These were removed in the late 1960s when the village school was modernized by WCC to include the construction of indoor toilets in the west wing, a new kitchen and offices under a felted flat roof. The original floors in the old Hall was replaced with a suspended concrete slab construction and the Hall windows were replaced with metal framed units. .A large opening with sliding folding doors was formed in the main Hall north wall to provide access to the Kitchen servery.
When the school became redundant the building was sold to the local Community which has run the building since then. This 1960s construction is still in existence and in 2016 obtained planning permission and listed building consent to be altered in accordance with the scheme shown in drawings: Wroxall 17-02. The .Phase 1 alterations (Rooms 4,5,6,7 & corridor) involve internal changes to the west wing and Phase 2 is the demolition of the 1968 flat roof area (shown on drawing 17-10) for the construction of a new large hall and new entrance block.
Phase 1 of this scheme involves removing the existing toilets in the west wing and constructing new facilities which includes a new kitchen enclosure. A new west entrance door will be constructed as part of this phase. The Phase 1work is described in specifications 1 to 7 and will be complete before Phase 2 is started. See drawing Wroxall 17-31 to identify the phases..
The original School Master’s House passed into different ownership in 2017 and is now a separate dwelling but has a flying freehold over a section of the east corridor.

See Specification 10-E for details of the electrical Work
See Specification 10-H for details of the Heating & Ventilation Work
Table of Contents
C Existing site/buildings/servicesDemolitionDamp proof course renewal/ insertionCavity wall tie renewal/ insertionFungus/ beetle eradication
D Groundwork
Excavating and fillingE In situ concrete
In situ concreteFormwork for in situ concreteReinforcement for in situ concrete
F MasonryBrick/ block wallingNatural stone Accessories/ sundry items for brick/ block/ stone
G Structural/Carcassing metal/timberStructural steel framingIsolated structural metal membersCarpentry/ timber framing/ first fixing
H Cladding/CoveringPlain roof tilingLead sheet coverings/ flashingsStainless steel strip/ sheet coverings/ flashings
J Waterproofing
K Linings/Sheathing/Dry partitioningPlasterboard dry linings/ partitions/ ceilingsWood strip/ board fine flooring/ linings
L Windows/Doors/StairsWindows/ rooflights/ screens/ louvresDoors/ shutters/ hatchesStairs/ ladders/ walkways/ handrails/ balustradesGeneral glazing

M Surface finishesCement based levelling/wearing screedsResin flooringPlastered/ rendered/ roughcast coatingsStone/ concrete/ quarry/ ceramic tilingWood block/ composition block/ mosaic parquet flooringDecorative papers/fabricsPainting/clear finishing
N Furniture/EquipmentGeneral fixtures/ furnishings/ equipmentSanitary appliances/ fittings
P Building fabric sundriesSundry insulation/ proofing work/ fire stopsFoamed/ fibre/ bead cavity wall insulationUnframed isolated trims/skirtings/sundry itemsDoor/ window ironmongeryTrenches/ pipeways/ pits for buried engineering servicesHoles/ chases/ covers/ supports for services
Q Paving/Planting/Fencing/Site furnitureSite/street furniture/equipment
R Disposal systemsRainwater pipework/ guttersFoul drainage above groundDrainage below ground
S Piped supply systemsSee separate Heating & Ventilation Specification 10-H
T Mechanical heating systemsSee separate Heating & Ventilation Specification 10-H
V Electrical supply/power/lighting systemsSee separate Electrical Specification 10-E
U Ventilation/Air systemsSee separate Heating & Ventilation Specification 10-H
Z Building fabric reference specificationPurpose made joineryPurpose made metalworkPreservative/ fire retardant treatmentFixings/ adhesivesMortarsSealants

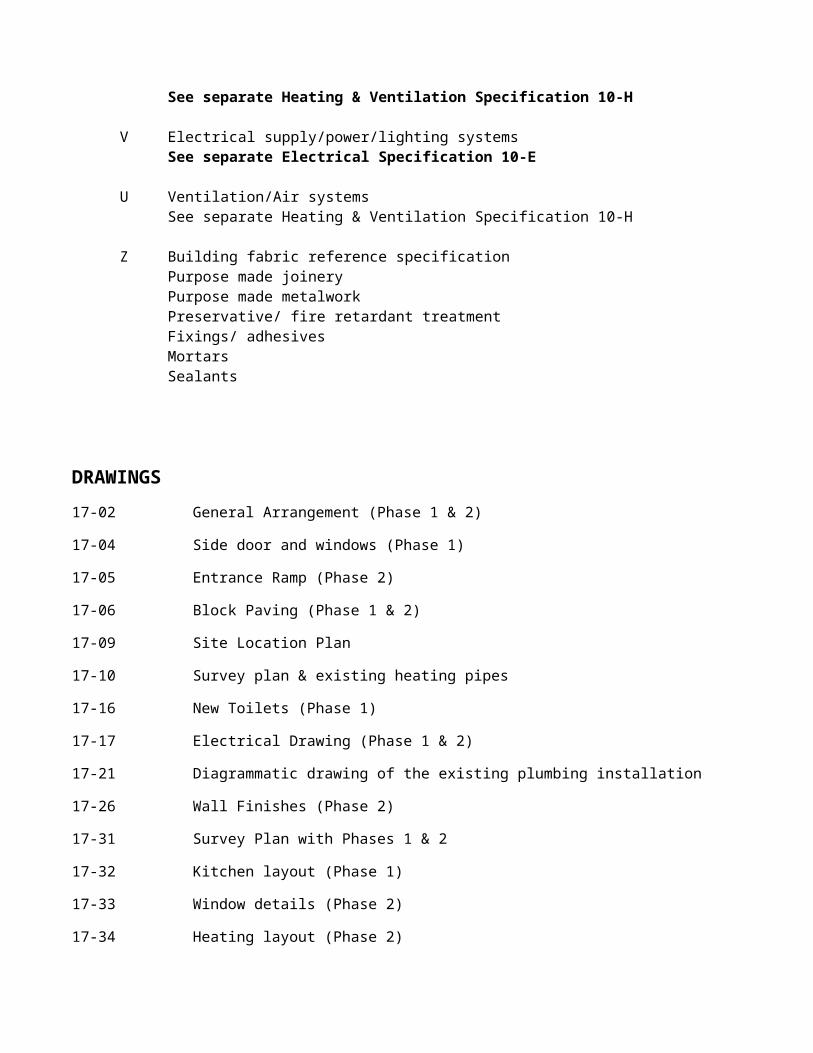
DRAWINGS 17-02 General Arrangement (Phase 1 & 2)
17-04 Side door and windows (Phase 1)
17-05 Entrance Ramp (Phase 2)
17-06 Block Paving (Phase 1 & 2)
17-09 Site Location Plan
17-10 Survey plan & existing heating pipes
17-16 New Toilets (Phase 1)
17-17 Electrical Drawing (Phase 1 & 2)
17-21 Diagrammatic drawing of the existing plumbing installation
17-26 Wall Finishes (Phase 2)
17-31 Survey Plan with Phases 1 & 2
17-32 Kitchen layout (Phase 1)
17-33 Window details (Phase 2)
17-34 Heating layout (Phase 2)
17-37 Ventilation Ducts (Phase 2)
17-38 Roof finishes (Phase 2)
17-39 Roof Structure (Phase 2)
17-40 Door details (Phase 2)
17-42 Floor Finishes (Phase 2)
These drawings are available on the Wren hall website: [email protected]
A. Existing site/buildings/services
A/1. The building has the following mains services:Electricity,
Water, -Severn Trent.Gas,
Waste disposal, - Warwick District CouncilSewage, an onsite sewage treatment facility
A/2. See drawing Wroxall 17-10 & 17-34 for indication of known services. Note; these have been taken from old drawings and have not been surveyed.
A/3. Older service pipes are likely to exist due to the age of the building and the number of alterations over the last 150 years.
A/4. The Contractor is required to co-ordinate the provision of a new control panel to the electrical supply in the lobby at the west end of the building. Install ducts for the existing main incoming cable where it will be under the new Entrance Block floor. Details of the new electrical system for the building are shown in section V.
A/5. The Contractor is required to include and co-ordinate the extension of the existing water main for provision of a water supply to the east end of the building in a duct and to provide a cabinet for the water meter where indicated on drawings..
A/6. The Contractor is required to co-ordinate the provision of an extended gas supply pipe to the new Meter in a new wall cabinet and provide a gas supply to the boiler in the Kitchen; Room 4.
A/7 The Electrical work is being arranged as a sub-contract that will be a nominated sub-contractor to the Main Contractor. The tenders for the main building work are invited to submit a price for the Electrical Installation with their building tender if they wish.
B HeatingB/1. The current heating is supplied by a gas fired boiler in the eastern Boiler Room. This is a low pressure hot water system heating radiators calorifiers and hot water cylinders for washing. The pipework uses a pressurise system. The pipe distribution is a complicated layout reflecting the hundred year old installation and the changes. The primary flow is through a pump assisted three inch diameter cast iron pipes rising to high level in the Halls, (Rooms 1 & 2), this heats cast iron radiators in the West Wing (Rooms 4, 5 & 6 & 7) and the Halls using a single pipe flow and return. A plumbing schematic of the system is shown on drawing 17-21. B/2. The single pipe supply drops to ground level in the north east corner of the West Wing and runs at low level around the external walls serving the radiators under the windows.

B/3. The 1962 extension introduced a copper pipe sub-system to heat the Kitchen and new rooms. Sections of the copper pipe circuit are buried in the floor slab and the exact line of the runs is not known. This buried copper pipe system will be abandoned by the work in phase 2 . B/4. A new heating system is required for the altered building using a new gas heater in the replacement kitchen (Room 4) with a new gas supply and a concentric input air / exhaust gases flue to the roof.The new Boiler will be connected to the west wing old halls and new rooms serving new steel panel radiators which will replace the existing cast iron radiators. All radiators are to be fitted with thermostatic valves.
B/5. Hot water for the kitchen and toilet washbasins will be supplied by a new mains pressure hot water cylinder mounted at high level in the kitchen.
B/6 The new heating system is being arranged as a sub-contract that will be a nominated sub-contractor to the Main Contractor. The tenders for the main building work are invited to submit a price for the Heating Installation with their building tender if they wish.

C Demolition
C/1 SURVEY• Scope: Before starting work, carry out a survey and submit a report and method
statement covering the following:- Condition and demolition methods and sequences for the structures.- Removal methods of any hazardous materials.- Protection to adjoining house which will be adversely affected by the Works.- Identification, location, disconnection and removal of services.- Arrangements for protection of personnel and the public.- Arrangements for control of site materials and compound.- See drawing Wroxall 17-10 for a drawing of the building as existing in 2017.
C/2 EXTENT OF DEMOLITION• General: Subject to retention requirements specified elsewhere, demolish structures down to Slab Level for internal partition walls and down to foundations for north east external wall. See drawing Wroxall 17-31 Phase 2 Demolitions..Generally the 1960s building will be removed and the remaining structures is to be preserved. Note this building is Listed Grade 2.
C/3 FEATURES TO BE RETAINED• General: keep in place and protect the following: all walls identified to be retained as part of final
scheme. Specific care to be taken for: the Party Wall to the adjoining house; room above east corridor belonging to adjoining house; all elements of the 1840s and 1900s Listed building, excluding the services.
C/4 LOCATION OF SERVICES• Services affected by the Works: Locate and mark positions.• Mains services: Arrange with the appropriate authorities for locating and marking
positions. Arrange for the services providers to move or alter incoming services as shown on drawings.Protect services to adjoining house inside area of new works
C/5 DISCONNECTION OF SERVICES ARRANGED BY CONTRACTOR• Responsibility: Before starting demolition arrange with the appropriate authorities for
disconnection of services and removal of fittings and equipment.Water Services. Existing incoming main supply pipeGas supply to boiler and appliances: Meter to be moved to west of building.Electrical supply to Wren Hall. Minimise the time that Wren Hall is without power.
C/6 DISCONNECTION OF SERVICES ARRANGED BY EMPLOYER• Responsibility: The Employer will arrange disconnection of services and removal of fittings and
equipment prior to demolition: Security Alarm system.• Before starting demolition ensure that disconnections have been carried out.
C/7 DISCONNECTION OF DRAINS• General: Locate and disconnect all disused drain connections. Permanently seal within
the site. Drains from the Disabled WC, Utility Room, Kitchen, Boiler Room, Kitchen Yard.

C/8 DRAINS IN USE• General: Protect drains and fittings still in use and keep free of debris at all times.• Damage: Make good any damage arising from demolition work. Leave clean and in
working order at completion. Drawing 17-34 shows the known drains on site but others are likely to exist. Note the House drain connects into the Wren Hall system.
C/9 BYPASS CONNECTIONS• General: Provide as necessary to maintain continuity of services to occupied areas of the
same and adjoining properties: Adjoining House. New Toilets and New Kitchen in Phase 1.• Notice: Give adequate notice to occupiers if shutdown is necessary.
C/10 SERVICES WHICH ARE TO REMAIN • Damage: Give notice and notify the service authority or owner of any damage arising from the execution
of the Works. Protect services to adjoining house.• Repairs: To the satisfaction of the CA and service authority or owner.
C/11 WORKMANSHIP• Standard: Demolish structures in accordance with best practice.• Operatives: Appropriately skilled and experienced for the type of work and holding or be
training to obtain relevant Certificates of Competence.• Site staff responsible for supervision and control of work: Experienced in the assessment
of risks involved and methods of demolition to be used. Keep adjoining owner informed of the times of noisy or dusty operations.
C/12 SITE HAZARDS• Fire or explosion caused by gas or vapour: Prevent.• Dust: Reduce by periodically spraying with water.• Site operatives and general public: Protect from vibration, dangerous fumes and dust
arising during the course of the Works.
C/`13ADJOINING DOMESTIC PROPERTY• Temporary support and protection: Provide at each stage.• Damage: Prevent. Promptly repair. Leave no unnecessary or unstable projections.• Support to foundations: Do not disturb.• Defects: Report any defects exposed or becoming apparent.
Minimise inconvenience to adjoining property.
C/14 STRUCTURES TO BE RETAINED• Parts which are to be kept in place: Protect. In particular, safeguard wall to existing Halls and West
Wing of building.• Extent of work: Cut away and strip out the minimum necessary.• Debris: Prevent from overloading any part of the structure which is not to be demolished.
C/15 PARTLY DEMOLISHED STRUCTURES• General: Leave partly in a stable condition, with adequate temporary support at each
stage to prevent risk of uncontrolled collapse.• Debris: Prevent from overloading scaffolding platforms.• Unauthorised persons: Prevent access. Keep safe outside working hours.
Note the north wall of the Hall (room 1) was altered in the 1960s by insertion of a large opening into

the Kitchen which may have weakened the structure.
C/16 DANGEROUS OPENINGS• General: Illuminate and protect as necessary.
C/17 ASBESTOS BASED MATERIALSNone have been identified but on discovery: Give note immediately of any suspected asbestos based materials discovered. Avoid disturbing such materials and submit details of methods for safe removal.
C/18 UNFORESEEN HAZARDS• Unrecorded voids, tanks, chemicals, etc discovered during demolition: Give notice.• Method for safe removal: Agree with Client’s representative.
C/19 SITE CONDITION AT COMPLETION• Debris: Clear away and leave the site tidy on completion.
C/20 CONTRACTOR'S PROPERTY• Components and materials arising from the demolition work: Property of the Contractor
except where otherwise provided. Remove from site as work proceeds.
C/21 EMPLOYER'S PROPERTY• Components and materials to remain the property of the Employer: Description: All materials outside
the defined demolition area. The Disabled toilet and fittings carefully remove for reuse/ Stone Notice block built into wall
• Protection: Until removed by the Employer, reused in the Works or end of the Contract.
C/22 RECYCLED MATERIALS• Materials arising from demolition work: May be recycled or reused elsewhere in the
project, subject to compliance with the appropriate specification. Save existing external bricks where able to be used for making good and repairs
C Damp proof course renewal/ insertion
C/23 SURVEY OF EXISTING WALLS• Survey generally:- Purpose: To identify the presence and extent of any rising damp - Remedial work: Nature and extent of work required to ensure an effective dpc.- Other information: Any considered relevant.
Note the walls to the old Hall (room 1) are solid masonry construction.
C/24 BEFORE DPC INSTALLATION• Internal finishes: Remove only sufficient to expose the proposed line of any new dpc.• Fungal or beetle attack to timber sections: Report any occurrences.

C Fungus/ beetle eradication
C/25 SURVEY AND REPORT• Survey generally: Survey all portions of the roofs affected by new works.
- Purpose: To ascertain nature and extent of any fungal and/or beetle attack. To ascertain sources and extent of any dampness.Report to Clients representative the findings
• Survey report content:- Factors affecting execution of the work: Identify any site conditions and restrictions including the presence of bats.- Eradication treatments and procedures: Submit proposals and quantities.- Associated work: Nature and extent of repair and/ or replacement work required to
building fabric.- Other information: Any considered relevant.
C/26 FUNGAL ATTACK• Extent of cutting out/ removal of building fabric: Submit proposals.• Dry rot:- Fruiting bodies: Spray with fungicide. Remove carefully and clean down surfaces.- Infected materials: Remove immediately and dispose of safely.• Wet rot: Cut out rotten timber.
C/27 BEETLE INFESTATION• Extent of cutting out/ removal of building fabric: Submit proposals.• Infected timber: Cut, scrape and trim back to sound timber. Remove debris immediately
and dispose of safely.
C/28 TIMBER PRESERVATIVES/ MASONRY FUNGICIDES GENERALLY• Products: Registered by the Health and Safety Executive (HSE) and listed in HSE
publication 'Pesticides'.• Application: In accordance with statutory conditions of approval given on product labels.
C/29 GUARANTEE• Type: Insurance backed. Administered by an independent insurance protection company.- Guarantee period (minimum): 20 years from Practical Completion.• Documentation: Provide certificates/ guarantees at Practical Completion.
D Groundwork
D/1 Excavating and filling Work relates to new foundations for the new Hall and filling the old Kitchen Yard. See drawing 17-10 runs
D/2 OBSTRUCTIONS• Recorded foundations, beds, drains, etc: Break out and seal off drain ends. Remove
contaminated earth.• Unrecorded foundations, beds, basements, filling, tanks, service pipes, drains, etc: Give
notice.
D/3 EXCESS EXCAVATIONS• Excavation taken wider or deeper than required: Backfill with weak mix 1:15 concrete .

D/4 SURPLUS EXCAVATED MATERIAL• Material not specified to be spread and levelled: Remove from site, including all
sub-grade clay material.
D/5 HAZARDOUS, AGGRESSIVE OR UNSTABLE MATERIALS• Generally: Do not import or use fill materials which would, either in themselves or in
combination with other material or ground water, give rise to a health hazard, damage to building structures or instability in the filling.
D/6 WATERGeneral: Keep excavations free from water until foundations and below ground constructions are completed.
D/7 PLACING FILL GENERALLY• Excavations and areas to be filled: Free from loose soil, rubbish and standing water.• Freezing conditions: Do not use frozen materials or materials containing ice. Do not place
fill on frozen surfaces.• Fill against structures, membranes or buried services: Place and compact in a sequence
and manner which will ensure stability and avoid damage.
D/8 BACKFILLING AROUND FOUNDATIONS• Under oversite concrete and pavings: Hardcore as specification clause D/10.
D/9 FROST SUSCEPTIBILITY• General: Except as allowed below, fill must be non frost-susceptible
D/10 HARDCORE• Fill: Granular material, free from harmful matter and excessive dust or clay, well graded,
all pieces less than 75 mm in any direction, and in any one layer only one of the following:- Crushed hard rock or quarry waste.- Crushed concrete, brick or tile, free from plaster.- Gravel or hoggin.• Filling: Spread and level both backfilling and general filling in layers not exceeding 150
mm. Thoroughly compact each layer.
D/11 BLINDING TO HARDCORE• Surfaces to receive sheet overlays or concrete: Blind with:
- Concrete where shown on drawings; or- Sand, fine gravel, or other approved fine material applied to provide a closed smooth surface.
• Permissible deviation on surface level: +0 -25 mm.
E In situ concrete
E/1 SPECIFICATION• Concrete generally: To BS EN 206-1 and BS 8500-2.
E/2 SUBSTITUTION OF STANDARDIZED PRESCRIBED FOR DESIGNATED CONCRETE• General: Conform to BS 8500-2 clause 8.• Substitution: In accordance with BS 8500-1 table A.7.
- Proposals: Submit for each substitution, stating reasons.• Mixing: If standardized prescribed concretes are made on site conform to BS 8000-2.1

subsections 2, 3 and 4.
E/3 PROPERTIES OF FRESH CONCRETE• Adjustments to suit construction process: Determine with concrete producer. Maintain
conformity to the specification.
E/4 PREMATURE WATER LOSS• Requirement: Prevent water loss from concrete laid on absorbent substrates.
- Underlay: Polyethylene sheet 250 micrometres thick.- Installation: Lap edges 150 mm.
E/5 PLACING AND COMPACTING• Surfaces to receive concrete: Clean, with no debris, tying wire clippings, fastenings or free water.
• Timing: Place as soon as practicable after mixing and while sufficiently plastic for full compaction.
• Temperature limitations for concrete: 30°C (maximum) and 5°C (minimum). Do not place against frozen or frost covered surfaces.
• Compaction: Fully compact to full depth to remove entrapped air especially around reinforcement, cast-in accessories, into corners of formwork and at joints. Continue until air bubbles cease to appear on the top surface.- Methods of compaction: To suit consistence class and use of concrete.
E/6 CURING AND PROTECTING• Evaporation from surfaces of concrete: Prevent throughout curing period.
- Surfaces covered by formwork: Retain formwork in position and, where necessary to satisfy curing period, cover surfaces immediately after striking.- Top surfaces: Cover immediately after placing and compacting. Replace cover immediately after any finishing operations.
• Curing periods: - Surfaces which in the finished building will be exposed to the elements, and wearing surfaces of floors and pavements: 10 days (minimum).- Other structural concrete surfaces: 5 days (minimum).
• Protection: Protect concrete from shock, indentation and physical damage.
E Formwork for in situ concrete
E/7 For details of concrete mix and strength see Structural Engineers Specification.
E/8 FORMWORK• General: Accurately and robustly constructed to produce finished concrete to the required
dimensions. • Formed surfaces: Free from twist and bow with intersections, lines and angles square,
plumb and true.• Joints between forms and completed work: Prevent loss of grout and formation of steps.• Holes and chases: Form with inserts or box out as required.
E/9. Construct new foundations for columns next to old Halls‘ north wall (Rooms 1 &2). Take care not to damage the existing walls, foundations or their bearing capacity. See dwg. 17-39.
E/10. Construct new foundations to walls forming the new Hall (Room 3 north wall). Construct new f

oundations for an additional block wall against the party wall with house, avoid damage to existing party wall.
E/11. Construct new foundations to the new entrance (Rooms 8, 9 & 10) including the ramp access.E Reinforcement for in situ concrete
E/12 For details of concrete reinforcement see Structural Engineers drawings.
Masonry
F Brick/ block walling
F/1 FACING BRICKWORK Blue Class A engineering bricks for new walls as shown on drawings 17-02 and 17-03 Red engineering bricks for details as shown on drawings over windows, doors and at eaves.Manufacturer: Ketley solid Blue Engineering BrickManufacturer: Ketley solid Red Engineering brickSize: 73 x 215 x 102mm wide
• Mortar: As section Z.• Bond: Flemish bond with snapped headers.
• Joints: size and appearance: 8mm thick recessed 6mm, coloured mortar to match existing West Wing
F/2 RECLAIMED FACING BRICKWORK use to repair existing walls in West Wing• Reclaimed bricks: save blue bricks from demolished chimney and walls.- Condition: Sound, free from mortar and deleterious matter.- Supplier/ source: on site.
Mortar: As section Z21.- Mix: Coloured lime: cement: Sand; Tarmac Y172• Bond: for Facing work.• Joints: recessed 6mm .
F/3 STONEWORK • Type: two engraved school blocks. One built in & one on site• Block type: Notices cut into dressed stone blocks.
- Finish/ colour: natural stone.• Special shapes: Fix into new wall where shown on elevation drawings.• Mortar: As section Z.
• Joints: Struck joints around stone blocks.
F/4 SPECIAL FACING BRICKWORK Use single cant header facing bricks for window reveals, window sills and arches.Use cant header bricks at eaves corbel courses in blue & red engineering bricks as shown on drawings 17-02 and 17-33.Manufacturer: Ketley Brick CoType: Single Cant AN5
F/5 CONCRETE COMMON BLOCKWORK • Blocks: To BS 6073-1.
- Manufacturer: Tarmac.

Product reference: Toplite. - Type: aerated concrete blocks .- Average compressive strength (minimum): 7.3 n/mm².- Work sizes: 440 x 215 x 140mm .
• Mortar: As section Z.- Mix: Cement : Sand : plasticiser .
• Bond : half lap stretcher. Solid dense concrete blocks to be used to provide bearings and where specified by the Structural
Engineer
F/6 ENGINEERING BRICKWORK for work below ground level • Engineering bricks: To BS 3921:
- Class: B..Mortar: As section Z.- Mix; Cement : Sand +plasticiser.
• Bond: half lap stretcher.• Joints: Flush.
F/7 BOND• Bond where not specified: Flemish with snapped headers above ground, Stretcher below.• Mortar joints: Fill all vertical joints. Lay bricks, solid and cellular blocks on a full bed.• Quoins and advance work: Rack back.• Locations for equal levelling of cavity wall leaves:
- Every course containing vertical twist type ties or other rigid ties.- Every third tie course for double triangle/ butterfly ties.- Courses in which lintels are to be bedded.
• Lift height (maximum): 1.2 m above any other part of work at any time.• Daily lift height (maximum): 1.5 m for any one leaf.
F/8 FACEWORK• Commencement of facework: Not less than 150 mm below finished level of adjoining
ground or external works level. • Brick/ block selection: Do not use units with damaged faces or arises.• Cut masonry units: Where cut faces or edges are exposed cut with table masonry saw.
• Coursing: Evenly spaced using gauge rods. To produce satisfactory junctions and joints with built-in elements and components.
F/9 ALTERATIONS/ EXTENSIONS• Coursing: Line up with existing work.
• Block bonding new walls to existing: Unless agreed otherwise use stainless steel tie bars with expansion joint between old walls and new.
Brick to brick: 4 courses high. Block to block: Every other course.- Bar joints: Fully filled with mortar on old wall side , sheathed with plastic tube on new wall..• New and existing facework in the same plane: Bond to achieve continuity of bond and coursing.
Support of existing work: Fully consolidate joint above inserted new concrete lintel or masonry with semidry mortar to support existing structure for West Wing Kitchen and corridor, Rooms 2 & 3 openings
F/10 FIRE STOPPING• Avoidance of fire and smoke penetration: Fit tightly between cavity barriers and masonry. Leave no

gaps.
F/11 CRACKED BRICKS IN EXISTING FACEWORK• Replacement: Prior to repointing adjacent cracked joints, cut out and replace with
matching sound bricks to approval.• Jointing mortar: As section Z. - Mix: coloured mortar to match existing.
F/12 CRACKED JOINTS IN EXISTING FACEWORK WHICH IS NOT TO BE REPOINTED• Crack width determining need for joint remedial work (minimum): 5 mm.• Preparation: Cut out joints to form a rectangular recess of 15-20 mm depth. Clean and
dampen joints sufficiently to control suction.• Joint profile: To match existing.• Repointing mortar: As section Z21.- Mix: coloured mortar to match existing.
F/13 REPOINTING• Preparation: Cut out joints to form a rectangular recess of 15-20 mm depth. Clean and
dampen joints sufficiently to control suction.• Joint profile 5mm recessed .• Mortar: As section Z.
- Mix: coloured mortar to match existing.
F Accessories/ sundry items for brick/ block walling
F/14 CAVITIES• Concrete fill to base of cavity:- Concrete mix to BS 5328: Designated mix GEN1 or Standard mix ST2 with high
workability.- Extent: Maintain 75 mm between top of fill and external ground level and a minimum of 225 mm between top of fill and ground level DPC.
• Cleanliness: Keep cavity faces, ties and DPCs free from mortar and debris. Cavity to new north wall to be 75mm wide to allow partial fill insulation.
Seal top of cavity with slate layer capping as drawing 17-33F/16 PERPEND JOINT PLASTICS WEEP HOLES
• Manufacturer: Timloc.- Product reference: Concealed wall weeps – TW1.
• Locations: Through outer leaf, immediately above base of cavity at cavity trays, stepped DPCs and external openings. 75 mm above top of cavity fill at base of cavity.
• Provision: At not greater than 1000 mm centres and not less than two over openings.
F/17 PARTIAL FILL CAVITY INSULATION• Insulation: polyisocyanurate rigid foam insulation panel. - Manufacturer: Celotex or equal. Product reference: CG5000.- Face size: 1200 x 450mm.- Thickness: 60mm• Placement: Secure against face of inner leaf.- Residual cavity: Clear and unobstructed.

• Joints between boards, at closures and penetrations: No gaps and free from mortar and debris.• Other requirements: fix cavity trays to insulation.• Placement: Built in with no gaps at joints.
F/18 WALL TIES FOR Cavity Wall• Standard: To BS 1243:- Type: Sabrefix or equal.• Material/ finish: Stainless steel. • Sizes: 225mm.
F/19 WALL TIE RETAINING CLIPS - Type Cavity insulation retaining clips.
• Manufacturer: Sabrefix or equal.• Material/ finish: Plastic.• Sizes 89mm diameter clip .
F/20 FIXING TIES IN MASONRY CAVITY WALLS WITH PARTIAL FILL CAVITY INSULATION• Embedment in mortar beds (minimum): 50 mm.• Placement: Sloping downwards towards outer leaf without bending. Drip centred in the
cavity and pointing downwards. • Spacing: Evenly spaced in non staggered horizontal and vertical rows:- Horizontal centres: 600 mm.- Vertical centres: 225 mm.• Spacing centres of top (eaves) row of ties:450mm .• Provision of additional ties: Within 225 mm of reveals of unbonded openings.
F/22 JOINT REINFORCEMENT FOR NORTH WALL & ENTRANCE HALL• Manufacturer: Bricktor.- Product reference: Reinforcing mesh.• Material: Stainless steel.• Width: 40-50 mm less in width than wall or leaf.
• Placement: Lay on an even bed of mortar in a continuous strip with 225 mm laps at joints and full laps at angles. Keep back 20 mm from face of external work, 12 mm back from face of internal work and finish joint to normal thickness.Lay every 5th brick bedding course in new cavity walls & alternate courses in block walls.
F/23 DAMP PROOF COURSE - POLYETHYLENE• Standard: To BS 6515.• Manufacturer: Visqueen.- Product reference: Zedex co-polymer thermoplastic .
F/24 SITE FORMED FLEXIBLE SHEET CAVITY TRAYS over all external lintels, built in wall service cabinets and Stone blocks F/3
• Manufacturer: Visqueen .- Product reference: Zedex.
F/25 INSTALLATION OF HORIZONTAL DPCs• Placement: In continuous lengths on full even bed of fresh mortar, with 100 mm laps at
joints and full laps at angles.

• Width: At least full width of masonry leaf. Edges of DPC not covered with mortar or projecting into cavity.
• Overlying construction: Immediately cover with full even bed of mortar to receive next masonry course.
• Overall finished joint thickness: As close to normal as practicable.• Ground level DPCs joint with damp proof membrane: Continuous and effectively sealed.• Low level DPCs in external walls: Install not less than 150 mm above adjoining finished
ground level.• Sill DPCs form and placement: In one piece and turned up at the back when the sill is in
contact with inner leaf.• DPCs crossing cavity: Provide support to prevent sagging.• Joint with damp proof membrane: Overlap DPC/ cavity tray not less than 150 mm.
F/26 INSTALLATION OF VERTICAL DPCS• Form: In one piece wherever possible.- Joints: Upper part overlapping lower not less than 100 mm.• Dpcs to jambs of openings: Fully lap behind cavity tray/ lintel at head and over horizontal
dpc at sill. Project not less than 25 mm into cavity and maintain full contact with frames.• Fixing of jamb dpcs to back of built in timber frames: Secure using galvanized clout nails or staples.
F/27 MOVEMENT JOINTS WITH SEALANT AT ALL NEW TO EXISTING WALL JOINTS.• Joint preparation and sealant application: As section Z22.• Filler: Polyethylene foam strip.- Placement: Build in as work proceeds ensuring no projections into cavities and to
correct depth to receive sealant system.• Sealant: Polysulphide.- Colour: black.
F/28 PREFABRICATED STEEL LINTELS• Standard: To BS 5977-2.• Manufacturer: IG Lintels .- Product reference: Hi Therm HT/HD100.• Material/ finish: Galv. steel.
• Placement: Bed on mortar used for adjacent work with bearing of not less than 150 mm. Note: a purpose made steel lintel is requires for the large window in the Entrance Hall see dwgs 17-38 & 17-39.
F/29 REINFORCEMENT• Carbon steel reinforcement: As appropriate to BS 4449, BS 4482 and BS 4483.- Cutting and bending: To BS 8666.• Fixing: Accurate and secure.- Method: Wire tying, approved steel clips or tack welding if permitted.- Concrete cover: Maintain free of tying wire or clips.- Cover spacers on visible faces: Not permitted.
F/30 SUPPORT OF EXISTING WORK OVER NEW LINTELS • Joint above lintels: Fully fill and compact with semi dry mortar.

G Structural/Carcassing metal/timberG Structural steel framing
G/1 DESIGN• Design standard: Install structural steelwork for new roof structure as shown on Structural Engineer’s
drawings and calculations. A general arrangement is shown on dwg 17-39. Details of the steelwork will be sent out to Tenderers by the Client when received for fabricators.
G/2 COLUMN BASESLevels: Adjust using steel shims or folding wedges no larger than necessary, positioned symmetrically around perimeter of base plate. Do not use a single central pack.Accuracy of erection: Check, and correct errors before filling and bedding beneath bases and carrying out other adjacent work.Do not load the north wall Room 3 until the complete masonry is set and 7 days old.
G/3 MORTAR FILLING/ BEDDING OF COLUMN BASES• Bolt pockets: Completely filled with neat cement slurry.• Spaces beneath base plates: Completely filled with 1:1 cement:sand mortar, just fluid
enough to pour, tamped well as filling proceeds. Provide temporary shuttering as necessary.
• Cement: Portland cement BS EN 197-1 - CEM I 42.5 or 52.5.• Sand: To BS 882, Grading limit M or equivalent to BS EN 12620.
G Isolated structural metal members
G/4 INSTALLATION• Accuracy: Members positioned true to line and level using, if necessary, steel packs of
sufficient area to allow full transfer of loads to bearing surfaces.• Fixing: Use washers under bolt heads and nuts.
- Tapered washers: Provide under bolt heads and nuts bearing on sloping surfaces. Match taper to slope angle and align correctly.
G Carpentry/ timber framing/ first fixing
G/5 GRADED SOFTWOOD FOR new roof to Hall• Grading standard: To BS 4978 or BS EN 519 or other national equivalent and so marked.
- Timber of a target thickness less than 100 mm and not specified for wet exposure: Graded at an average moisture content not exceeding 20% with no reading being in excess of 24% and clearly marked as 'DRY' or 'KD' (kiln dried).- Timber graded undried (green) and specified for installation at higher moisture contents: Clearly marked as 'WET' or 'GRN'.
G/6 UNGRADED SOFTWOOD FOR GENERAL CARCASSING • Quality of timber: Free from decay, insect attack (except pinhole borers) and with no knots wider than half the width of the section.• Surface finish: sawn.• Treatment: brush applied preservative.
G/6 WROT TIMBER FOR exposed framing. • Species: Hemlock.

• Standard: To BS 1186-3.- Class: A
• Treatment: sanded for painting• Fixing: concealed.
G/7 SELECTION AND USE OF TIMBER• Timber members damaged, crushed or split beyond the limits permitted by their grading:
Do not use.• Notches and holes: Position in relation to knots or other defects such that the strength of
members will not be reduced.• Scarf joints, finger joints and splice plates: Do not use.
G/8 PROCESSING TREATED TIMBER• Cutting and machining: As much as possible before treatment.• Extensively processed timber: Retreat timber sawn lengthways, thicknessed, planed,
ploughed, etc.• Surfaces exposed by minor cutting and drilling: Treat with two flood coats of a solution
recommended by main treatment solution manufacturer.
G/9 MOISTURE CONTENT • Moisture content of timber and wood based products at time of installation: Not more than:
- Covered in generally unheated spaces: 24%.- Covered in generally heated spaces: 20%.- Internal in continuously heated spaces: 20%.
G/10 ADDITIONAL SUPPORTS • Provision: Where not shown on drawings, position and fix additional studs, noggins or
battens for appliances, fixtures, edges of sheets, etc.• Material properties: Timber to be of adequate size and have the same treatment as
adjacent timber supports.
G/11 JOISTS GENERALLY• Centres: Equal, and not exceeding designed spacing.• Bowed joists: Installed with positive camber.• End joists: Positioned about 50 mm from masonry walls.
G/12 TRIMMING OPENINGS• Trimmers and trimming joists: Not less than 25 mm wider than general joists.• Lap joints: Extended over and nailed to at least two truss members.
G/13 EAVES SOFFIT VENTILATORS• Manufacturer: Timloc .
- Product reference: Soffit vents .- Type: 70mm circular - Colour: to suit soffit.
• Airway: The equivalent of a continuous opening of not less than 2 mm for full length of eaves. Fit in new eaves and existing eaves in west wing.

G/14 FASCIAS/ BARGES/ SOFFITS- Material: 18mm WBP plywood .- Finish: sanded for painted.- Accessories/ Other requirements: vents.
• Support timber: 44 x 44mm.- Provide additional support at joints.
• Fixings: recessed galvanized screw .• Installer: contractor
H60 Plain roof tiling
H/1 ROOF TILING red brown Clay to match existing• Base: Tanalised laths• Pitch:35 degrees
Underlay: breather felt - Horizontal lap (minimum): 100 mm.
• Battens: As clause 30. - Size:32mm x 25 mm.- Fixing: As clause 32, using galv nails..
• Tiles Antique Brown Plain Clay Tiles- Manufacturer: Hinton, Perry & Davenhill Ltd. - Product reference Dreadnought Brown Antique smoothfaced tile - Pattern: Single Camber Roof Tile - Colour: - Brown Antique. - Size: 265 x 165 mm.- Headlap (minimum): 65 mm.- Fixing: As clauses 35 and 37: Fixing of local areas: nail alternate tiles Fixing of general areas; nail alternate rows
H/2 REMOVE EXISTING TILING at West Wing junction with new roof see dwg 17-38• General: Carefully remove tiles, battens, underlay, etc. with minimum disturbance of
adjacent retained tiling. • Undamaged tiles: Set aside for reuse. See dwg 17-02
H/3 UNDERLAY• Laying: Maintain consistent tautness.• Vertical laps (minimum): 100 mm wide, coinciding with supports. • Fixing: Galvanized steel, copper or aluminium 20 x 3.35 mm extra large head nails. • Eaves: Where exposed, underlay must be BS 747, type 5U, or equivalent UV durable
type.• Penetrations: Use proprietary underlay seals or cut underlay neatly.
H/4 BATTENS/COUNTERBATTENS• Timber: Sawn softwood.
- Standard: BS 5534-1.- Moisture content at time of covering (maximum): 22%.
• Preservative treatment: CCA or OS as section Z and BWPDA Commodity Specification Counter battens are required on the new roof south face see dwg 17-38
H/5 BATTEN FIXING

• Batten length (minimum): 1800 mm.• Joints in length: Butt centrally on supports. Joints must not occur more than once in any
group of four battens on one support.• Additional battens: Provide where unsupported laps in underlay occur between battens.
H/6 TILE FIXING• General: Fix tiling and accessories to make the whole sound and weather tight at the
earliest opportunity.• Exposed fittings and accessories: To match tile colour and finish.• Setting out: To true lines and regular appearance. Lay tiles to a half lap bond with joints
slightly open. Align tails.• Cut tiles: Cut only where necessary, to give straight, clean edges.• Ends of courses: Use tile and a half tiles to maintain bond and to ensure that cut tiles are
as large as possible.• Top and bottom courses: Use eaves/tops tiles to maintain gauge.• Perimeter tiles: Twice nail end tile in every course. Twice nail or clip two courses of tiles at eaves
and top edges.• Fixings: As recommended by tile manufacturer.
H/7 LOCAL AND GENERAL FIXING AREAS• Definitions:
- Local areas: Bands of tiling around all edges or obstructions of each plane of the roof. Calculate extent of each band in accordance with BS 5534-1, section 3.- General areas: Remaining areas of roof tiling.
H/8 MORTAR BEDDING/POINTING• Mortar: As section Z21, 1:3 cement:sand, with plasticizing admixtures permitted.
- Bond strength: To BS 5534-1.• Weather: Do not use in wet or frosty conditions or when imminent.• Appearance: Finish neatly and remove residue.
H/9 FIRE SEPARATING WALLS• Separating wall: Completely fill space between top of wall and underside of tiles with
mineral wool quilt to provide fire stopping.• Boxed eaves: Completely seal air paths in plane of separating wall with wire reinforced
mineral wool, 50 mm thick, to provide fire stopping.H/10 EAVES
• Ventilation components: - ManufacturerTimloc - Product reference:TV1
• Underlay support: plywood- Continuous to prevent water retaining troughs.
• Gutter: Dress underlay or underlay support tray to form drip into gutter.• Undercourse and first course tiles: Fix with tails projecting 50 mm over gutter or to centreof gutter.
H/11 BEDDED VERGES WITH BEDDED UNDERCLOAK (Entrance Hall gable)• Underlay: Carry 50 mm onto outer leaf of gable wall and bed on mortar.• Undercloak: Matching plain tiles, sloping towards verge and projecting 38 - 50 mm beyond face of
wall. - Bedding: On mortar identical to that used in gable walling.
• Tiling battens: Carry over undercloak and finish 100 mm from verge edge.• Verge tiles: Bed flush with undercloak on 75 mm wide bed of mortar as clause H/10.
: Tiles: Dreadnought Tile and a half for alternate courses

H/12 BEDDED VERGES WITH NAILED UNDERCLOAK (north wall to new hall)• Underlay: Carry over full width of verge.• Undercloak: Fibre cement sheet, nail fixed, sloping towards verge and projecting 38 - 50
mm beyond face of wall. • Tiling battens: Carry over undercloak and finish 100 mm from verge edge.• Verge tiles: Bed flush with undercloak on 75 mm wide bed of mortar as clause H/10.
H/13 MORTAR BEDDED HIPS (New Hall east end)• Underlay: Lay courses over hip. Overlap (minimum) 150 mm.• Roof tiles: Cut and fix closely at hip.• Hip irons: Galvanized steel to BS 5534-1, clause 2.16.1. Fix to hip rafter or hip batten with
galvanized steel screws.• Hip tiles: Dreadnaught
- Manufacturer: Hinton, Perry & Davenhill Ltd- Product reference: Clay Arris Hip tile- Bedding: Continuous to edges, solid to joints, in mortar as clause 40. - Fixing: Where rigid masonry walls support or abut hip, secure hip tiles within 900 mm of
such walls with nails/wire ties or screws. - Bottom hip tiles: Shape neatly to align with corner of eaves and fill ends with mortar and slips of tile
finished flush.
H/15 METAL VALLEYS, Stainless steel sheet for internal valleys• Underlay: Cut over tilting fillets to lap onto metal valley. Do not lay under metal.• Roof tiles: Cut adjacent tiles to fit neatly.
- Bedding: On mortar as clause 40 on fibre cement undercloaks laid loose each side of valleys.
• Valley width between tiles: 175-mm.
H/16 CURVED PLAIN TILE VALLEYS for exposed valleys to Entrance Hall roof• Underlay: Lay strips not less than 600 mm wide centred on valleys. Overlap with general
roof underlay.• Curved valley tiles:
- Product reference: Dreadnaught Valley Tiles • Roof tiles: Cut adjacent tiles to fit neatly.
H/17 SIDE ABUTMENTS, Junction of internal gutter and old hall or house walls• Underlay: Turn up not less than 100 mm at abutments.• Abutment tiles: Cut as necessary. Fix close to abutments.• Soakers: Interleave and turn down over head of abutment tiles.
H/18 MORTAR BEDDED RIDGES• Underlay: Lay courses over ridge. Overlap (minimum) 150 mm.• Ridge tiles:- Manufacturer: Hinton, Perry & Davenhill Ltd - Product reference Clay Dreadnaught Arris Hip tiles- Bedding: Continuous to edges, solid to joints, in mortar as clause H/10. - Fixing: Where rigid masonry walls support or abut ridge, secure ridge tiles within 900 mm
of such walls with nails/wire ties or screws.

- Gable end ridge tiles: Fill ends with mortar and slips of tiles finished flush.• Ridge terminals: Marley Eternit
H/19 VENTILATOR TILES• Ventilator tiles: - Manufacturer: Marley Eternit - Product reference: Danelaw plain tile vent. - Positions: Main roof ROOM 3 south side of ridge, Entrance Hall west side of ridge.
H/20 METAL VALLEYS• Underlay: Cut over tilting fillets to lap onto metal valley. - Valley width between slates: 175 mm.
H/22 ROOF TILING WITH COUNTERBATTENS Joining West Wing Roof• Substrate: T&G Tanalised softwood where required for repairs• Pitch: Existing 34 degrees..• Underlay: breather felt
- Horizontal lap (minimum): 600mm.• Counterbattens: As clause H/21. • Battens: As clause H/21. • Tiles: reuse existing tiles to make good West Wing roof.
H/23 REMOVING EXISTING TILING• General: Carefully remove tiles, battens, underlay, etc. with minimum disturbance of
adjacent retained tiling. • Undamaged tiles: Set aside for reuse.
H/24 UNDERLAY• Laying: Maintain consistent tautness.• Vertical laps (minimum): 100 mm wide, coinciding with supports. • Fixing: Stainless steel, copper or aluminium felt nails.• Eaves: Where exposed, underlay must be BS 747, type 5U, or equivalent UV durable
type. • Penetrations: Use proprietary underlay seals or cut underlay neatly.
H/25 BATTENS/ COUNTERBATTENS• Timber: Sawn softwood.
- Standard: BS 5534-1. - Moisture content at time of covering (maximum): 22%.
• Preservative treatment: CCA or OS as section Z12 and BWPDA Commodity Specification
H/26 BATTEN FIXING• Batten length (minimum): 1200 mm.• Joints in length: Butt centrally on supports. Joints must not occur more than once in any
group of four battens on one support.• Additional battens: Provide where unsupported laps in underlay occur between battens.
H/27 TILE FIXING• General: Fix tiling and accessories to make the whole sound and weathertight at the

earliest opportunity.• Setting out: To true lines and regular appearance. Align tails.• Ends of courses: Use special tiles to maintain bond and to ensure that cut tiles are as
large as possible.• Perimeter tiles: Fix tiles in eaves and top courses, and at verges, abutments and each
side of valleys and hips.• Fixings: As recommended by tile manufacturer.
H/28 LOCAL AND GENERAL FIXING AREAS• Definitions:
- Local areas: Bands of tiling around all edges or obstructions of each plane of the roof. Calculate extent of each band in accordance with BS 5534-1, section 3.- General areas: Remaining areas of roof tiling.
H/29 MORTAR BEDDING/ POINTING• Mortar: As section Z21, 1:3 cement:sand, with plasticizing admixtures permitted.
- Bond strength: To BS 5534-1.• Weather: Do not use in wet or frosty conditions or when imminent.• Appearance: Finish neatly and remove residue.
H/30 MORTAR BEDDED DENTIL COURSES• Dentil tile slips: Place in mortar edge bedding of hip and ridge tiles, one to each roof tile
pan, projecting a consistent dimension.
H/31 FIRE SEPARATING WALLS• Separating walls: Completely fill space between top of wall and underside of tiles with
mineral wool quilt to provide fire stopping.• Boxed eaves: Completely seal air paths in plane of separating wall with wire reinforced
mineral wool, 50 mm thick, to provide fire stopping.
H/32 EAVES• Ventilation components:
- Manufacturer: Timloc HV1- - Continuous to prevent water retaining troughs.• Gutter: Dress underlay or underlay support tray to form drip into gutter.• Eaves filler units for profiled tiles: Fix to close underside of first course tiles.• First course tiles: Fix with tails projecting 50 mm over gutter or to centre of gutter.
H/33 BEDDED VERGES WITH BEDDED UNDERCLOAK• Underlay: Carry 50 mm onto outer leaf of gable wall and bed on mortar.• Undercloak: Fibre cement sheet, sloping towards verge and projecting 38 - 50 mm beyond face of
wall. - Bedding: On mortar identical to that used in gable walling.
• Tiling battens: Carry over undercloak and finish 100 mm from verge edge.• Verge clips: Fix to every tiling batten.• Verge tiles: Bed flush with undercloak on 75 mm wide bed of mortar as clause
H/34 BEDDED VERGES WITH NAILED UNDERCLOAK• Underlay: Carry over full width of verge.• Undercloak: Fibre cement sheet, nail fixed, sloping towards verge and projecting 38 - 50 mm
beyond face of wall.• Tiling battens: Carry over undercloak and finish 100 mm from verge edge.

• Verge clips: Fix to every tiling batten.• Verge tiles: Bed flush with undercloak on 75 mm wide bed of mortar as clause
H/35 MITRED HIPS• Underlay: Lay courses over hip. Overlap (minimum) 150 mm.• Mitred tiles: Cut double and tile and a half tiles and fix to a neat mitre through
. • Hip tiles:- Manufacturer: Redland.- Product reference Clay Rosemary Arris Hip- Bedding: Continuous to edges, solid to joints, in mortar as clause 40. - Fixing: Where rigid masonry walls support or abut hip, secure hip tiles within 900 mm of such walls
with nails/wire ties or screws. - Bottom hip tiles: Shape neatly to align with corner of eaves and fill ends with mortar and slips of tile
finished flush.
H/36 METAL VALLEYS• Underlay: Cut over tilting fillets to lap onto metal valley. Do not lay under metal.• Roof tiles: Cut adjacent tiles to fit neatly. - Bedding: On mortar as clause 40 on fibre cement undercloaks laid loose each side of valleys. - Valley width between tiles: 175mm.
H/37 MORTAR BEDDED RIDGES• Underlay: Lay courses over ridge. Overlap (minimum) 150 mm.• Ridge tiles: Dreadnaught
- Manufacturer: Hinton, Perry & Davenhill Ltd.- Product reference: Arris Hip tile.- Bedding: Continuous to edges, solid to joints, in mortar as clause 40. - Fixing: Where rigid masonry walls support or abut ridge, secure ridge tiles within 900 mm of such
walls with nails/ wire ties or screws.- Gable end ridge tiles: Fill ends with mortar and slips of tiles finished flush.
• Ridge terminals: concentric Gas Flue & flashing outlet to suit heater.
H Lead sheet coverings/ flashings
H/38 GUTTER LININGS• Underlay: Waterproof building paper to BS 1521, class A.• Lead:
- Thickness: Code 6.• Cross joints: lead welded
- Spacing: 1800mm .• Outlets: one lead welded sleeve into sealed rainwater overflow pipe .• Other requirements: Upstand to roof and walls a minimum of 250mm.
H/39 VALLEY LININGS• Underlay: Waterproof building paper to BS 1521, class A.• Annealed stainless steel sheet
- Thickness: 1.25 mm (• Laying: Over and beyond tilting fillets. In lengths not more than 1500 mm.
- Cross joints: Lapped not less than 150 mm.• Fixing: Welt edges. Nail top edge of each sheet. Dress bottom edge neatly into gutter.

H/40 WEATHERING TO HOUSE PARTY WALL • Underlay: Waterproof building paper to BS 1521, class A.• Annealed stainless steel sheet
- Thickness: 1.25 mm• Joints: Top chased into bedding joint and pointed• Fixing: wedges
H/41 STEP AND COVER FLASHINGS at removed chimney • Lead:
- Thickness: 1.75 to 2.00 mm (code 4).• Dimensions:
- Lengths: Not more than 1500 mm.- End to end joints: Laps not less than 100 mm.- Upstand: Not less than 85 mm.- Cover to roof: Not less than 150 mm.
• Fixing: Lead wedges at every course
H/42 MATERIALS AND WORKMANSHIP GENERALLY• Lead production method:- Rolled, to BS EN 12588.- Machine cast: Agrément certified.• Identification: Colour marked for thickness/ code, weight and type.• Workmanship standard: To BS 6915 and latest editions of ‘The Lead Sheet Manual’
published by the Lead Sheet Association.• Fabrication and fixing: To provide a secure, free draining and weathertight installation.• Marking out: Do not use scribers or other sharp instruments to mark out lead without
approval.• Solder: Use only where specified.• Finished leadwork: Fully supported, adequately fixed to resist wind uplift but also able to
accommodate thermal movement without distortion or stress.• Patination oil: Apply smear coating to all visible lead, evenly in one direction and in dry
conditions.
H/43 LEADWELDING• In situ lead welding: Not permitted.
H/44 TIMBER FOR USE WITH LEADWORK• Quality: Planed, free from wane, pitch pockets, decay and insect attack (ambrosia beetle
excepted).• Moisture content: Not more than 22% at time of covering. Give notice if greater than 16%.• Preservative treatment: CCA as section Z12 and BWPDA Commodity Specification C8.
H/45 UNDERLAY• Handling: Prevent tears and punctures.• Laying: Butt or overlap jointed onto a dry substrate.- Fixing edges: With copper or stainless steel staples or clout nails.- Do not lay over roof edges.- Turn up at abutments.• Wood core rolls: Fixed over underlay.• Protection: Keep dry and cover with lead at the earliest opportunity.
H/46 FIXING LEAD SHEET• Top edge: Secured with two rows of fixings, 25 and 50 mm from edge.• Fixings:- Nails to timber substrates: Copper clout nails to BS1202-2 , or stainless steel (austenitic)
clout nails to BS 1202-1. Shank type: Annular ringed, helical threaded or serated. Length: Not less than 20 mm or equal to substrate thickness.- Screws to concrete or masonry substrates: Brass or stainless steel to BS 1210. Diameter: Not less than 3.35 mm. Length: Not less than 19 mm. Washers and plastics plugs: Compatible with screws.
H/47 CLIPS• Material:- Lead clips: Cut from sheets of the same thickness/ code as sheet being secured.- Copper clips: Cut from 0.7 mm thick sheet to BS EN 1172, temper R220 (soft) or R240
(half hard) depending on position, dipped in solder if exposed to view.- Stainless steel: Cut from 0.38 mm sheet to BS EN 10088, grade 1.4301(304), terne
coated if exposed to view.• Dimensions:- Width: 50 mm where not continuous.- Length: To suit detail.• Fixing clips: Secure each to substrate with two fixings not more than 50 mm from edge of
lead sheet.• Fixing lead sheet: Welt clips around edges and turn over 25 mm.
H/48 WEDGE FIXING INTO JOINTS/ CHASES• Joint/ chase: Rake out to a depth of not less than 25 mm.• Lead: Dress into joint/ chase.- Fixing: Lead wedges at not more than 450 mm centres, at every change of direction and
with at least two for each piece of lead.• Sealant: As section Z22:.
H/49 WEDGE FIXING INTO DAMP PROOF COURSE JOINTS• Joint: Rake/ cut out under damp proof course to a depth of not less than 25 mm.• Lead: Dress into joint.- Fixing: Lead wedges at not more than 450 mm centres, at every change of direction and
with at least two for each piece of lead.• Sealant: As section Z
J41 Bitumen sheet roof coverings for Valley roof under Solar panels see dwg 17-38
J/12 COLD ROOF COVERING• Substrate: 18mm WBP plywood on SW rafters.- Preparation: Icopal bitumen primer, 6kg per m2.• Waterproof covering:- Manufacturer: Anderson Ltd.- First layer: Torchsafe TA

- Attachment: thermofusible film.- Top layer: Anderson Tecnatorch FireSmart torch-on capsheet.• Surface protection: Crawl boards during ridge tile installation.• Accessories: Tanalised timber Counter battens. Aluminium edge angle to tiles.
J/15 ROOFING GENERALLY• Surfaces to be covered: Secure, clean, dry, free from frost, contaminants, voids and
protrusions.• Unfinished areas of roof: Keep dry.• Work in severe or continuously wet weather: Suspend or provide effective temporary
cover over working area.• Completed coverings: Firmly attached, free draining and completely waterproof.
J/20 RENEWING EXISTING COVERINGS• Areas to be renewed: West Wing junction with new roof over Room 3.• Existing roof: Do not damage, cut access hatch900mm wide X 1500mm high into new roof space. • Timing: Remove coverings, and temporary waterproof west wing on the same day.
J/30 TIMBER FOR TRIMS, ETC• Quality: Planed, free from wane, pitch pockets, decay and insect attack (except ambrosia
beetle damage).• Moisture content at time of covering (maximum): 22%.• Preservative treatment: Tanalith or equal.• Fixing: Sherardized steel screws at not more than 600 mm centres.
J/35 JOINTS IN RIGID BOARD SUBSTRATES• Cover strips: Bitumen sheet to BS 747 type 5U, 150 mm wide. Lay centrally over substrate joints and adhere with bonding compound along edges only.
J/50 LAYING BITUMEN SHEETS GENERALLY• Bonding: Full bond with no air pockets.- Pour and roll bonding: Use hot compound. Remove excess compound at laps of top layers.- Torch-on bonding: Leave a continuous bead of compound at laps of top layers. • Laps:- Direction: Install sheets so that water drains over and not into laps.- Sealing: Not less than 50 mm at sides and 75 mm at ends.- Offset of side laps: Stagger by one half sheet width in two layer coverings, one third
sheet width in three layer coverings.• Successive layers: Apply without delay. Do not trap moisture.• Details: Form with adequate overlapping, staggering of laps and full bonding so that they
are waterproof.
J/70 SKIRTINGS/ UPSTANDS• Angle fillets: TIMBER.• Venting first layer: Stop at angle fillet. Fully bond in bitumen for 300 mm around
perimeters. Overlap onto upstand with strips of BS 747, type 3B felt fully bonded with 75 mm lap onto first layer, except where subsequent two layers are of high performance polyester based felt.
• Other layers: Carry in staggered formation up upstand, with each layer fully bonded. Where practicable carry top layer over top of upstand.

• Upstands:- At ends of rolls: Carry bitumen sheet up without using separate strip. - Elsewhere: Use matching strips of bitumen sheet, maintaining laps.
K9 Plasterboard dry linings/ partitions/ ceilings
K9/1 LINING ON TIMBER FRAMED CEILINGS• Background: Softwood rafters.• Linings: 12.5mm plasterboard taper edge foil backed.• Fixings: galv clout nails.
- Centres: 150mm.• Finishing: As clause M/50.• Accessories: tape for jointing and jointing plaster compound..
K9/2 DRY LINING GENERALLY• General: Use fixing, jointing and finishing materials, components and installation methods recommended by board manufacturer.• Plasterboards: To BS 1230-1 with exposed surface and edge profiles suitable to receive
the specified finish.• Cutting plasterboards: Neatly and accurately without damaging core or tearing paper
facing. Minimize cut edges.• Finishing: Neatly to give flush, smooth, flat surfaces free from bowing and abrupt changes of level.
K9/3 ADDITIONAL SUPPORTS• Framing: Accurately position and securely fix to fully support:
- Partition heads running parallel with, but offset from main structural supports.- Fixtures, fittings and services.- Board edges and lining perimeters.
K9/4 MINERAL WOOL INSULATION in roof voids over new and existing ceilings• Fitting: Accurately and firmly with closely butted joints and no gaps. Fasten where
necessary to prevent slumping. Use 450mm thick insulation in roof voids• Services: Do not cover electrical cables that are not sized accordingly. Do not lay over luminaires.
K9/5 SEAMLESS JOINTING• Filling and taping: Fill joints, gaps and internal angles with jointing compound and cover
with continuous lengths of tape, fully bedded.• Finishing: Apply jointing compound feathered out to give a flush, smooth, seamless
surface.• Nail/ screw depressions and minor indents: Fill to give a flush surface.
K10 Timber board flooring/ sarking/ linings/ casings
K/6 BATTENED TIMBER BOARD FLOATING FLOOR• Substrate concrete; existing re-levelled.• Resilient layer: PVC• Loose laid battens wrought timber 35 x44mm• Thermal insulation between battens40mm Celotex foam slabs• Vapour check: Polythene sheet. Note the old floors do not appear to have DPMs.

- Installation: Fix neatly with taped joints to provide a fully sealed barrier.• Boards: Tongued and grooved hard wood flooring grade.
- Finished face width: 125 mm.- Finished thickness: 10 mm.- Moisture content: Notwithstanding BS 1297, clause 6.1, moisture content at time of fixing to be 15 %
• Fixing: As clause secret nailing- Nail length: Nails must not be so long that they penetrate underside of battens.
K10/7 MOISTURE CONTENT OF NEW CONCRETE/ SCREED SUBSTRATE FOR FLOATING FLOORS• Test for moisture content:
- Standard: To BS 8201, Appendix A.- Acceptability: Do not lay flooring until all readings show 75% relative humidity or less.
K10/8 BATTENS FOR FLOATING FLOORS• Quality of timber: Free from decay, insect attack (except ambrosia beetle damage) and
with no knots wider than half the width of the section.• Surface finish: Wrought.• Treatment: Preservative impregnation.
- Standard: To NBS section Z12 and British Wood Preserving and Damp-proofing Association Commodity Specification .- Type/ desired service life: 15 years.
• Moisture content: Not more than 16% at time of fixing boards.
K10/9 FIXING BOARDS• Protection during and after installation: Keep boards dry, clean and undamaged.• Boards to be used internally: Do not install until building is weathertight.• Moisture content of timber supports: Not more than 18% at time of fixing boards.
• Fixing: Fix boards securely to each support to give flat, true surface free from undulations, lipping, splits and protruding fasteners.
• Timber movement: Position boards and fixings to prevent cupping. springing, excessive opening of joints and other defects.
• Heading joints: Tightly butted, central over supports and at least two boards widths apart on any one support.
• Edges: Plane off proud edges.K10/10TREATED TIMBER• Surfaces exposed by minor cutting and/ or drilling: Treat with two flood coats of a solution
recommended for the purpose by main treatment solution manufacturer.
K11 Wood strip/ board fine flooring
K11/11FIXTURES• Fixtures around which flooring is to be fitted: Installed before starting work specified in this section.
K11/12VAPOUR CONTROL LAYER INSTALLATION• Location: Immediately below battens.• Installation: Joints overlapped minimum 150 mm and sealed with vapour resistant tape.
Membrane turned up at perimeter of flooring and upstands and sealed to top face of

flooring. Excess material trimmed off neatly.
K11/13EXPANSION PROVISION• Expansion gaps:
- Edges of flooring parallel to lie of boards: 18mm .- Ends of flooring: 12mm.
• Spacer blocks and debris: Removed before fixing skirtings.
L Windows/Doors L10 Windows/ / screens/ louvers
L10/10 WOOD WINDOWS• Manufacturer: Purpose made.
reference: Dwg 17-33 &17-40.• Wood species: Class 1 softwood for.general sections; cills harwood Sapele or equivalent• Finish as delivered: primed.• Glazing details: Double glazed units.• Ironmongery/ Accessories: as ironmongery schedule.• Fixing: screwed side fixing into brick jambs.
- Fastener spacing: When not predrilled or specified otherwise, position fasteners not more than 150 mm from ends of each jamb, adjacent to each hanging point of opening lights, and at maximum 450 mm centres.
L10/60 PRIMING/ SEALING• Timber surfaces inaccessible after installation: Prime or seal as specified before fixing
components.
L10/70 FIRE RESISTING FRAMES• Gap between back of frame and reveal: Completely fill with fiberglass rope.
L10/75 SEALANT JOINTS• Sealant:
- Manufacturer: Adshead Ratcliffe & Co Ltd;. Product reference Arbot two part polysulphide- Colour: to suit finishes.- Application: As section Z22 to prepared joints. Finish triangular fillets to a flat or slightly convex profile.
L10/80 IRONMONGERY • Fixing: Assemble and fix carefully and accurately using fasteners with matching finish
supplied by ironmongery manufacturer. Do not damage ironmongery and adjacent surfaces.
• Checking/ adjusting/ lubricating: Carry out at Practical Completion and ensure correct functioning.
L20 Doors/ shutters/ hatches See Dwg. 17-40

L20/20 FIRE RESISTING WOOD FLUSH DOORS• Manufacturer: Premdor Ltd.
- Product reference: White Oak Veneer 18G Clear Glazed Internal Fire Door• Facings: Oak Veneer• Lippings: Solid Oak.• Preservative treatment: Pressure impregnated.• Finish as delivered: Varnished• Glazing details: Fire resisting glass 2 panels in each door.• Other requirements: Protective covering to each door
L20/30 FLUSH WOOD DOORS• Materials generally: To BS EN 942.
- Wood species: hardwood veneer.• Panels:ply face solid core.
- Joinery workmanship: As section Z10.- Accuracy: To BS 4787-1.
• Preservative treatment: Pressure impregnated .• Moisture content on delivery: 14% .• Finish as delivered: primed ready for paint.• Other requirements: Protective covering to each door.
L20/31a EXISTING WOOD DOORRemove existing single door from Room 1 to corridor and hang in new door frame as door D13 in Room 12. See dwg 17-40
L20 /35 SOLID WOOD DOOR FRAMES • Manufacturer: Premdor for fire doors.
- Product reference: to suit doors .• Wood species: hardwood faced plywood.• Preservative treatment Pressure impregnated.• Finish as delivered: primed ready to paint .• Perimeter seals: recessed draught strip• Fixing: pin and glue .
- Spacing of fixings (frames not predrilled): 150 mm from ends of each jamb, adjacent to each hanging point and at 600 mm maximum centres.
L20/40 FIRE RESISTING DOOR FRAMES • Materials generally: To BS EN 942.
- Wood species: Softwood• Assembly: glued and pinned
- Adhesive: WBP .- Joinery workmanship: As section Z12.
• Preservative treatment: Pressure impregnated .• Moisture content on delivery: 14% .• Finish as delivered: Primed ready for painting .• Perimeter seals: recessed intumescent strips.• Fixing: pinned and glued to recess .
- Spacing of fixings (frames not predrilled): 150 mm from ends of each jamb, adjacent to each hanging point and at 600 mm maximum centres.
L20/75 FIRE RESISTING FRAMES• Gaps between frames and supporting construction: Filled as necessary in accordance

with door/ doorset manufacturer's instructions.
L20/80 SEALANT JOINTS• Sealant: fire resisting around door frames
- Manufacturer Adshead Ratcliffe & Co Ltd. Product reference Arbo .
- Colour: to suit finishes .- Application: As section Z22 to prepared joints. Triangular fillets finished to a flat or slightly convex profile.
L20/85 FIXING IRONMONGERY GENERALLY• Fasteners: Supplied by ironmongery manufacturer.
- Finish/ Corrosion resistance: To match ironmongery.• Holes for components: No larger than required for satisfactory fit/ operation.• Adjacent surfaces: Undamaged.• Moving parts: Adjusted, lubricated and functioning correctly at completion.
L30 Stairs/ ladders/ walkways/ handrails/ balustrades
L30/65 PURPOSE MADE HANDRAILS to entrance ramps. See drawing 17-05• Component material, grade and finish as delivered:
- Handrails: Wrought hardwood, Iroko or equivalent.- Brackets :galvanized steel.
• Workmanship: welded and fettled smooth before hot dip galvanizing treatment- Joinery: As section Z10. See drawing 17-05- Metalwork: As section Z11.
• Other requirements: acid etch metal surface before priming and painting• Fixing: Concrete foundations . sections bolted together with SS bolts.
L/40 General glazing
L40/10 WORKMANSHIP GENERALLY• Glazing:
- Generally: To BS 6262.- Integrity: Wind and watertight under all conditions. Make full allowance for deflections and other movements.
• Glass:- Standards: Generally to BS 952 and to the relevant parts of: BS EN 572 for basic soda lime silicate glass.
BS EN 1096 for coated glass. BS EN 12150 for thermally toughened soda lime silicate glass.
BS EN ISO 12543 for laminated glass.- Quality: Free from scratches, bubbles and other defects.- Dimensional tolerances: Panes/ sheets to be accurately sized.
• Material compatibility: Glass/ plastics, surround materials, sealers primers and paints/ clear finishes to be compatible. Comply with glazing/ sealant manufacturers' recommendations.
L40/57 BEAD FIXED INSULATING GLASS UNITS to all external windows• Pane material: .- Inner pane: laminated safety glass.

- Outer pane: annealed glass.- Spacer: plastic/metal seal.- Perimeter taping: Do not use.• Surround/ bead: timber bead to suit windows.- Preparation: Outside.- Bead location: external.- Bead fixing: bed in mastic and screw fix with stainless steel screws .• Glazing system:
- Inner sealant: Arbo glass sealer .- Outer sealant: Arbo glass sealer. • Glazing installation:
- Insulating unit: Located centrally in surround using setting and location blocks and distance pieces.- Inner sealant: Applied to full height of rebate.- Outer sealant: Applied to fill edge clearance void and space between unit and beads up to sight line.- Finished thickness of back and front bedding after inserting glazing (minimum): 3 mm.- Beads: Bedded on outer sealant and fixed securely.- Excess sealant: Trimmed to a smooth chamfer.
L40/65 FIRE RESISTANT TAPE/ STRIP GLAZING in DOORs See Dwg 17-40.• Fire resistance rating: as door rating. • Pane material: FR Glass. • Surround/ bead: timber. - Bead fixing: by door manufacturer. • Glazing system single glazed FR .
• Installation: By a firm currently registered under a UKAS certified accreditation scheme for the installation of fire resistant glazing, in accordance with glazing manufacturer's recommendations.
M Surface finishes
M10 Cement based levelling/wearing screeds
M/2 BONDED CEMENT SAND LEVELLING SCREEDS to new rooms R8, R9, R10 • Base: existing concrete slab cleaned and scrabbled.• Screed type: Bonded as clause 30.• Nominal thickness: 40mm.
- Thickness (minimum): 25 mm.- Thickness (maximum): 45 mm.
• Mix:

- Aggregates: Standards as clause 45.- Proportions (cement:sand): 1:3-4.5.- Admixture: As clause 47.
• Finish:- To receive: floor finish.
M/4 CEMENT¦SAND LEVELLING SCREEDS To Area over existing Yard & Boiler Rm.• Base: new concrete slab. See dwg 17-10• Screed type cement sand • Nominal thickness: 65mm
- Thickness (minimum): 50mm• Mix:
- Aggregates: Standards as clause 45.- Proportions (cement:sand): 1:3-4.5.- Admixture: As clause 47.
• Finish:- Method: power float- To receive: leveling screed as remaining area of Room 3.
M/45 AGGREGATE STANDARDS• Cement: Portland to BS EN 197-1, class 42.5 or Portland blast furnace to BS 146, c 42.5.• Sand: To BS EN 12620.
- Grading limit: To BS 8204-1, table 1.• Coarse aggregate: To BS EN 12620.
M/47 ADMIXTURE STANDARD• Type: Water reducing to BS EN 934-2.• Calcium chloride: Do not use in admixtures.
M/50 MIXING • Water content: Minimum necessary to achieve full compaction.• Mixing: Mix materials thoroughly to uniform consistency in a suitable forced action
mechanical mixer.
M/52 COMPACTION • General: Compact thoroughly over entire area.• Screeds over 50 mm thick: Lay in two layers of equal thickness. Roughen surface of
compacted lower layer then immediately lay upper layer.
M/55 JOINTS IN LEVELLING SCREEDS• Laying screeds: Lay continuously using 'wet screeds' between strips or bays. Minimize
defined joints.
M/70 SMOOTH FLOATED FINISH • Finish: Even texture with no ridges or steps.
M/75 TROWELLED FINISH TO LEVELLING SCREEDS• Floating: To an even texture with no ridges or steps.
• Trowelling: To a uniform smooth surface, free from trowel marks and other blemishes, and suitable to receive specified flooring material.

M/80 TROWELLED FINISH TO WEARING SCREEDS• Floating: To an even texture with no ridges or steps.• Trowelling: Successively trowel at intervals, applying sufficient pressure to close surface
and give a uniform, smooth finish free from trowel marks and other blemishes.
M/90 CURING • Curing period: As soon as screed has set sufficiently, closely cover with polyethylene
sheeting for minimum of 7 days.• Drying after curing: Allow screeds to dry gradually.
M/25 EXISTING SUBSTRATES• Preparation: Remove coverings/ coatings and residues, surface imperfections and
ingrained contaminants.
M/30 WORKMANSHIP• Fillers and incorporated aggregates: Thoroughly mix to ensure wetting but without
excessive air entrainment.• Curing: Allow appropriate periods between coats, before surface treatments and before
trafficking/ use.
M/52 MIXING TROWELLED SCREEDS• Mixing:
- Mechanical mixer: Suitable forced action. Do not use a free fall drum mixer.• Materials: Mix thoroughly to uniform consistence.• Water content: Minimum necessary to achieve crystallisation of synthetic anhydrite and full
compaction.
M/56 LAYING TROWELLED SCREEDS• Trowelled screeds: Lay continuously using 'wet screeds' between strips or bays. Compact
thoroughly.• Defined joints: Minimize.
M/60 TROWELLED FINISH TO SCREEDS• Surface on completion: Uniform and smooth but not polished, suitable to receive specified flooring
material.
M/70 CURING TROWELLED SCREEDS• Curing period: As soon as screed has set sufficiently, closely cover with polyethylene
sheeting and maintain in position for a minimum period of 48 hours.• Drying after curing: Allow screeds to dry gradually.
M20 Plastered/ rendered/ roughcast coatings
M/30 LIGHTWEIGHT GYPSUM PLASTER • Background/ Backing: brick and concrete block. .
- Preparation: seal face with PVA sealer.• Plaster manufacturer: British Gypsum Ltd.• Undercoats: To BS 1191-2.
- Product reference: Thistle Plasters. .- Thickness (excluding dubbing out): 12mm.
• Final coat: Finish plaster to BS 1191-1, class B.- Product reference: Thistle finishing Plaster.
- Thickness: 2 mm.- Finish: Smooth.
M/50 GYPSUM PLASTER SKIM ON PLASTERBOARD • Background: 12mm foil backed plasterboard with mesh tape & filled joints• Plasterboard manufacturer British Gypsum ,.
- Product reference: Gyproc.• Plaster: Board finish plaster to BS 1191-1, class B.
- Manufacturer: British Gypsum. Product reference: Thistle Finishing Plaster.- Thickness: 3mm.- Finish: Smooth.
M40 Stone/ concrete/ quarry/ ceramic tiling See drawings 17-05
M/5 TILING to Entrance Hall , and side rooms R9 & R10• Tiles: Ceramic tiling.
- Manufacturer/ Supplier: Dorset Wolliscroft. Product reference: None- slip range- Colour: Quartz- Size: 300 x 300mm.
• Background/ Base: Screed .- Preparation: seal screed.
• Bedding: solid fill.- Adhesive Waterproof synthetic.
• Joint width: 8mm .• Grout: Waterproof synthetic .• Movement joints 8mm wide coloured PVC strip.
- Location: at doorways and as drawings.• Accessories: expansion foam plastic strip at perimeters
M/15 NEW BACKGROUNDS/BASES• Background drying times (minimum):- Cement:sand screeds: 3 weeks.
M/20 EXISTING BACKGROUNDS/BASES GENERALLY• Efflorescence, laitance, dirt, loose and defective material: Remove and make good
defective areas with materials compatible with background/base and bedding.• Deposits of oil, grease and other materials incompatible with the bedding: Remove.• Tile, paint and other nonporous surfaces: Clean.• Wet backgrounds: Dry before tiling.• Paint with unsatisfactory adhesion: Remove so as not to impair bedding adhesion.
M/30 FIXING GENERALLY• Colour/shade: Avoid unintended variations within tiles for use in each area/room.
- Variegated tiles: Mix thoroughly.• Adhesive: Compatible with background/base.• Cut tiles: Neat and accurate.• Fixing: Provide adhesion over entire background/base and tile backs.• Final appearance: Before bedding material sets, make adjustments necessary to give
true, regular appearance to tiles and joints.• Deviation of surface: Variations in gap under a 2 m straightedge (with feet) placed
anywhere on the surface to be not more than 3 mm.• Surplus bedding material: Clean from joints and face of tiles.
M/35 SETTING OUT• Joints: True to line, continuous and without steps.
- Joints on walls: Horizontal, vertical and aligned round corners.- Joints in floors: Parallel to main axis of space or specified features.
• Cut tiles: Minimise number, maximise size and locate unobtrusively.• Joints in adjoining floors and walls: Align.• Joints in adjoining floors and skirtings: Align.
M/40 TILE SKIRTINGS See drawing 17-42. Rooms R8, R4, West Wing Corridors, R11• Bedding: Solid to wall on Entrance R8, Kitchen R4, Corridors and Utility Room 11.
M/55 SOLID ADHESIVE BEDDING TO WALLS• Application: Apply floated coat of adhesive to dry background. Comb surface.• Tiling: Apply thin even coat of adhesive to backs of dry tiles. Press tiles firmly onto float
coat.• Finished adhesive thickness: Within range recommended by manufacturer.
M/60 SOLID ADHESIVE BEDDING TO FLOORS• Application: Apply floated coat of adhesive to dry base. Comb surface.• Tiling: Apply coat of adhesive to backs of tiles filling depressions or keys. Press tiles into
position.• Finished adhesive thickness: Within range recommended by manufacturer.
M/70 GROUTING• Sequence: Grout when bed/adhesive has set sufficient to prevent disturbance of tiles.• Joints: 6 mm deep (or depth of tile if less). Free from dust and debris.• Grouting: Fill joints completely, tool to profile, clean off surface. Leave free from
blemishes.• Polishing: When grout is hard, polish tiling with dry cloth.
M/75 SEALANT MOVEMENT JOINTS Tiled wall Areas R 9 & 10• Joints: Extend through tiles and bedding to base/ background. Centre over joints in base/ background.- Width: 8mm.• Sealant: Polysulphide mastic. - Colour: to suit - Preparation and application: As section Z22.
M60 Painting/clear finishing See dwg 17-26
M/10 EMULSION PAINT Dulux Kitchen+ Matt • Manufacturer: AkzoNobel Paint.- Product reference: Jasmine White. • Surfaces: Plaster. - Preparation: Rub plaster to remove surface polish and Prime surface. • Initial coats: - Type:Watered Dulux emulsion.• Finishing coats: - Type: under coat and top coat .- Number of coats: 2.

M/12 GLOSS PAINT Dulux Paint • Manufacturer:AkzoNobel.
- Product reference: Dulux Paint Mixing Satinwood; Rock Salt colour.• Surfaces: Timber window & door frames.
- Preparation: As M/30.• Initial coats:- Type: Dulux Quick Dry Primer.- Number of coats: one.• Finishing coats:- Type Dulux Paint Mixing Satinwood.- Number of coats two .
M/18 SPECIAL COATING Phase 2, Kitchen walls• Manufacturer: Resincoat Ltd. Kinsley, WF9 5JB
- Product reference: Resincoat 2 part Antibacterial Wall Paint.• Surfaces: plastered walls; old and new plaster finish.
- Preparation: rub smooth, fill all defects as M/30• Initial coats:
- Type Resincoat Primer .- Number of coats: one
• Finishing coats: - Type: 2 part, white resin coating.- Number of coats: one 60 micron dry film finish onto white undercoat..
M/32 PREVIOUSLY COATED SURFACES GENERALLY• Preparation standard: To BS 6150, Section 6.• Removing coatings: Do not damage substrate and adjacent surfaces or adversely affect
subsequent coatings.• Loose, flaking or otherwise defective areas: Carefully remove to a firm edge.• Alkali affected coatings: Completely remove.• Discovery: Give notice of:
- Coatings suspected of containing lead.- Substrates suspected of containing asbestos.- Significant rot, corrosion or other degradation of substrates.
• Retained coatings: - Thoroughly clean.- Gloss coated surfaces: Abrade to provide a key.
• Partly removed coatings: Apply additional preparatory coats.• Completely stripped surfaces: Prepare as for uncoated surfaces.M/35 FIXTURES AND FITTINGS• Before commencing work: Remove the following:
Ironmongery to doors and windows. • On completion of coating work: Refix.
M/37 TIMBER PREPARATION• General: Abrade to a smooth, even finish with lightly rounded arrises.• Degraded or weathered surface timber: Abrade to remove.• Degraded substrate timber: Repair with sound timber of same species.• Heads of fasteners: Countersink sufficient to hold stoppers/fillers.• Resinous areas and knots: Apply two coats of knotting.• Defective primer: Abrade back to bare timber.

M/39 STEEL PREPARATION• Corrosion and loose scale: Abrade back to bare metal.• Residual rust: Treat with a proprietary removal solution.• Bare metal: Apply primer as soon as possible.
M/41 MASONRY/RENDERING PREPARATION• Loose and flaking material: Remove.
M/43 PLASTER PREPARATION• Nibs, trowel marks and plaster splashes: Scrape off.• Over trowelled ‘polished’ areas: Abrade lightly.
M/45 PREVIOUSLY PAINTED WINDOW FRAMES• Paint encroaching beyond glass sight line: Remove.• Loose and defective putty: Remove.• Putty cavities and junctions between previously painted surfaces and glass: Clean
thoroughly.• Finishing: - Patch prime, reputty and allow to set.- Seal and coat as soon as sufficiently hard.
M/50 EXTERNAL POINTING TO EXISTING FRAMES• Defective sealant pointing: Remove.• Joint depth: Approximately half joint width; adjust with backing strip if necessary.• Preparation and application: As section Z22.• Sealant:
- Manufacturer: Adshead Ratcliff Ltd . Product reference: Arbo
M/52 POINTING TO INTERNAL MOVEMENT JOINTS• General: Apply to junctions of walls and ceilings with architraves, skirtings and other trims.
• Preparation and application: As section Z22.• Sealant: Water based acrylic.
- Manufacturer: Adshead Ratcliff Ltd Product reference: Arbo Coloured Polysulphide floor mastic
M/55 EXISTING GUTTERS• Dirt and debris: Clean from inside of gutters.• Defective joints: Clean and seal with suitable jointing material.
M/61 COATING GENERALLY• Application standard: To BS 6150, Section 5.• Conditions: Maintain suitable temperature, humidity and air quality.• Surfaces: Clean and dry at time of application.• Thinning and intermixing: Not permitted unless recommended by manufacturer.• Priming coats: Apply as soon as possible on same day as preparation is completed.• Finish:
- Even, smooth and of uniform colour. - Free from brush marks, sags, runs and other defects. - Cut in neatly.
M/65 CONCEALED JOINERY SURFACES• General: After priming, apply additional coatings to surfaces that will be concealed when
fixed in place.- Additional coatings: bituminous paint- Components: window frame against brick openings.
M/66 CONCEALED METAL SURFACES • General: Apply additional coatings to surfaces that will be concealed when fixed in place.- Additional coatings: 2 coats of bituminous paint. - Components: purpose made lintels that are ungalvanized. Aluminium Solar panel supports
M/70 EXTERNAL DOORS• Bottom edges: Prime and coat before hanging.
M/75 BEAD GLAZING TO COATED TIMBER (all windows in Phase 2)• Before glazing: Apply first two coats to rebates and beads.
M/80 PUTTY GLAZING• Setting: Allow putty to set for seven days.• Sealing: - Within a further 14 days, seal with an oil based primer. - Fully protect putty with coating system as soon as it is sufficiently hard. - Extend finishing coats on to glass up to sight line.
R Disposal systemsR10 Rainwater pipework/ gutters
R10/20 PLASTICS PIPEWORK• Pipes, fittings and accessories: PVC-U, Bret Martin Pipes, bends and junctions: MUPVC Solvent Weld
Waste Pipe to BS 4514 Kitemark certified.- Manufacturer: Brett martin. Product reference: Solvent Weld Waste Is Manufactured to BS5255 • Sizes: 50mm, 40mm & 32mm.- Colour:.White• Accessories: brackets, joints & junctions.• Fixing: SS screws to wall.
R10/25 PLASTICS GUTTERS• Gutters, fittings and accessories: PVC-U, Bret Martin Prostyle Cast Iron Style Rainwater
System.- Profile: Ogee .- Colour: Classic Black .• Accessories; Unions, end stops, outlets and corner angles.• Fixing: brackets to eaves construction.
R10/23 RAINWATER PIPE & OUTLET at south end of valley gutter next to window W1• Manufacturer: Bret Martin.- Product reference: 105mm diameter iron effect pipe.• Type of outlet: hopper head BRH54..• Outlet: Type and direction to suit pipework, with adaptors and connections recommended
for the purpose by outlet manufacturer.• Accessories: lead dressing into hopper. Gully at RWP / SWD junction.

• Fixing: bracket fixed to wall
R10/50 INSTALLATION GENERALLY• Discharge of rainwater: Complete, and without leakage or noise nuisance.• Components: Obtain from same manufacturer for each type of pipework/ guttering.• Allowance for thermal and building movement: Provide and maintain clearance as fixing
and jointing proceeds.• Fixings/ Fasteners: As section Z20.
R10/60 GUTTERS• Setting out: To true line and even gradient to prevent ponding or backfall. Position high
points of gutters as close as practical to the roof and low points not more than 50 mm below the roof.
• Joints: Overlap in direction of fall and seal as specified to make watertight.• Roofing underlay: Dressed into gutter.
R10/70 PIPEWORK• Fixing: Securely at specified centres plumb and/ or true to line with additional supports as
necessary to support pipe collars, particularly at changes in direction.• Cut ends of pipes/ gutters: Clean and square with burrs and swarf removed.
R10/80 INTERNAL PIPEWORK TEST• Preparation: Temporarily seal open ends of pipework with plugs. Fill traps.• Testing: Connect a 'U' tube water gauge and pump air into pipework until gauge registers
38 mm.• Required performance:- Allow a period for temperature stabilization, after which the pressure of 38 mm is to be
maintained without loss for not less than 3 minutes.- Traps must maintain minimum 25 mm water seal.
R10/81 INTERNAL PIPEWORK TEST• Standard: To BS EN 12056-2, NG.3.1.• Required performance: As BS EN 12056-2, NG.3.1.2.
R11 Foul drainage above ground
R11/10PVC-U SOIL/ VENT PIPEWORK AND WC BRANCHES• Pipes, fittings and accessories:
- Standard: To BS EN 1329-1 or BS 4514, Kitemark certified.- Additional requirements: Use to connect valley gutter outlet to RWP on south side of Hall 2.• Manufacturer Bret Martin Ltd.- Product reference: 110mm diam. • Colour: gray. • Accessories: insulation in casing on west wall of Hall 2. • Jointing: solvent. • Fixing: brackets screwed to internal wall.
R11/20 PLASTICS BRANCH PIPEWORK • Pipes, fittings and accessories:

- Material/ Standard: PVC to BS EN 1329:2000, Kitemark certified.- Additional requirements: sealed gully for gutter.• Manufacturer: Bret Martin Ltd.- Product reference: 110mm solvent welded. • Colour: black. • Jointing: double socket coupling solvent welded. • Fixing: Bret Martin double clip. Pipe to be cased and insulated.
R11/45 AIR ADMITTANCE VALVE• Standard: To prEN 12380 and/ or Agrément certified. McAlpine VP100N• Position: Vertical.• Locations: Disabled WC, Room 9.
R11/50 INSTALLATION GENERALLY• Standard:- BS EN 12056-1, clauses 3 - 6.- BS EN 12056-2, clauses 3 - 6, National Annex NA - NG, System III.- BS EN 12056-5, clauses 4 - 6, 8, 9 and 11.• Drainage from appliances: Quick, quiet and complete, without blockage, crossflow,
backfall, leakage, odours, noise nuisance or risk to health. • Components: From same manufacturer for each type of pipework.• Access: Provide access fittings in convenient locations to permit cleaning and testing of
pipework.• Thermal and building movement: Provide and maintain clearance as fixing and jointing
proceeds.• Fixings: To allow the pipe to slide.- Finish: Plated, sherardized, galvanized or other nonferrous.- Compatibility: Suitable for the purpose, material being fixed and background.
R11/60 PIPEWORK• Fixing: Securely at specified centres plumb and/ or true to line. Fix every length of
discharge stack pipe at or close below socket collar or coupling.- Additional supports: Provide as necessary at junctions and changes in direction. • Cut ends of pipes: Clean and square with burrs and swarf removed.
R11/70 PIPEWORK TEST• Preparation: Temporarily seal open ends of pipework with plugs.• Testing: Connect a ‘U’ tube water gauge and pump air into pipework until gauge registers
38 mm.• Required performance: Allow a period for temperature stabilisation, after which the
pressure of 38 mm is to be maintained without loss for not less than three minutes.
R12 Drainage below ground
R12/2 EXISTING DRAINS• Setting out: Before starting work, check levels and positions of existing drains, inspection
chambers and manholes against drawings. Report discrepancies.
R12/4 IN SITU CONCRETE FOR USE IN DRAINAGE BELOW GROUND• Standard: To BS 5328-1, -2, -3 and -4, or to BS 8500-1 and -2 and BS EN 206-1.
• Mix: 1 : 15.• Equivalent or better mix: Submit proposals.• Different mixes may be used for different parts of the drainage work.
R12/11 CLAY PIPELINES • Pipes, bends and junctions: Vitrified clay to BS EN 295-1, with flexible joints, Kitemark
certified; to be used for repair work to existing drains.
R12/14 PLASTICS PIPELINES• Pipes, bends and junctions: Pipe to BS 4514 Kitemark certified.- Manufacturer: Brett martin. Product reference: Solvent Weld Waste Is Manufactured to BS5255 • Sizes: 110mm.• Type of subsoil: clay and fill.
R12/19 EXCAVATING PIPE TRENCHES• Trench from bottom up to 300 mm above crown of pipe: With vertical sides and of a width
as small as practicable but not less than external diameter of pipe plus 300 mm.• Type of subsoil: Where the type of subsoil at the level of the crown of the pipe differs from
that stated for the type of pipeline, obtain instructions before proceeding.• Timing: Excavate to formation immediately before laying beds or pipes.• Mud, rock projections, boulders and hard spots: Remove. Replace with bedding material,
well consolidated.• Local soft spots: Harden by tamping in bedding material.
R12/21 BEDDING/ JOINTING GENERALLY• Laying pipes: To true line and regular gradient on even bed for full length of barrel with
sockets (if any) facing up the gradient.• Jointing: Using recommended lubricants, and leaving recommended gaps at ends of
spigots to allow for movement.• Differential settlement: Comply with local authority requirements for arrangement, flexible
jointing, bedding and surround of pipes at junctions with manholes, foundation walls and other points where differential settlement may occur.
R12/23 CLASS D NATURAL BED• Trench bottom: Hand trim to accurate levels, levelling up any overdig with compacted
spoil. • Pipes: Cut holes for couplings/ sockets and lay pipes resting uniformly on their barrels,
adjusting to line and gradient. Do not use hard packings under pipes.• Backfilling: After initial testing, backfill to 150 mm above crown of pipe with a protective
cushion of selected fill, free from vegetable matter, rubbish and frozen soil and material retained on a 40 mm sieve. Thoroughly hand compact in 100 mm layers.
R12/25 CLASS F GRANULAR BED• Granular material: 10 mm single sized aggregate to BS 882.• Bedding: Granular material, compacted to a thickness of 150 mm (minimum). Scoop
out locally at couplings/ sockets and lay pipes digging slightly into bed and resting uniformly on their barrels. Adjust to line and gradient.
• Backfilling: After initial testing, backfill to 150 mm above crown of pipe with a protective cushion of selected fill, free from vegetable matter, rubbish and frozen soil and material

retained on a 40 mm sieve. Thoroughly hand compact in 100 mm layers.
R12/27 CLASS P FULL DEPTH GRANULAR SUPPORT• Granular material: 10 mm single sized aggregate to BS 882.• Bedding: Granular material, compacted to a thickness of 100 mm (minimum). Scoop out
locally at couplings/ sockets and lay pipes digging slightly into bed and resting uniformly on their barrels. Adjust to line and gradient.
• Granular support: After initial testing, lay and compact by hand more granular material uniformly to 100 mm above crown of pipe.
R12/31 CLASS W GRANULAR SURROUND• Timing: Excavate trench after hardcore has been laid and compacted.• Granular material: 10 mm single sized aggregate to BS 882.• Granular bedding: Compacted to a thickness of 100 mm (minimum). Scoop out locally at
couplings/ sockets and lay pipes digging slightly into bed and resting uniformly on their barrels. Adjust to line and gradient.
• Granular surround: After initial testing, lay and compact by hand more granular material to 100 mm above crown of pipe.
• Backfilling: Hardcore or granular material compacted in layers not exceeding 300 mm thick up to slab formation.
R12/35 CLASS X GRANULAR SURROUND FOR GROUND WATER• Granular material: 10 mm single sized aggregate to BS 882.• Bedding: Granular material, 75 mm deep, at least 100 mm wider than pipe.• Pipes: Adjusted to line and gradient.• Granular surround: Compacted to 150 mm above crown of pipe.
R12/37 CLASS Y CONCRETE SURROUND FOR SHALLOW PIPES UNDER BUILDINGS• Locations: Where crown of pipe is less than 300 mm below underside of slab. • Timing: Excavate trench after hardcore has been laid and compacted.• Concrete blinding: 25 mm thick, over full width of trench.• Temporary pipe support: Folding wedges of compressible board, pipe inverts 100 mm
(minimum) above blinding.• Concrete pipe surround: Same mix as slab and cast integrally with slab. Extend length to
within 150 mm of nearest flexible joint.
R12/39 CLASS Z CONCRETE SURROUND• Concrete blinding: 25 mm thick, over full width of trench.• Temporary pipe support: Folding wedges of compressible board, pipe inverts 100 mm
(minimum) above blinding.• Vertical construction joints: At face of flexible pipe joints using 18 mm thick compressible
board precut to profile of pipe. Fill any gap between spigot and socket with resilient material to prevent entry of concrete.
• Concrete surround: After testing, place and compact concrete for full width of trench to encase pipe to 150 mm above crown or as shown on drawings.
R12/41 TRENCHES LESS THAN 1 M FROM FOUNDATIONS• Class Z concrete surround: Provide in locations where bottom of trench is lower than
bottom of foundation.- Top of concrete to be not lower than bottom of foundation.
R12/44 BENDS AT BASE OF SOIL STACKS

• Unless specified otherwise, use a 90° nominal rest bend with a minimum radius of 200 mm to centreline of the pipe.
• Height of invert of horizontal drain at base of stack below centreline of lowest branch pipe (minimum): 450 mm.
• Stabilizing bends: Bed in concrete without impairing flexibility of couplings.
R12/47 DIRECT CONNECTION OF GROUND FLOOR WCS TO DRAINS• Drop from crown of WC trap to invert of drain (maximum): 750mm. • Horizontal distance from the drop to a ventilated drain (maximum): 6 m.
R12/50 ROOF GULLY in Valley gutterMarley Alutec Gully Outlet DR470Size: 238 X 175mm 105 outlet
R12/58 INSTALLATION OF FITTINGS• Appearance: Square with and tightly jointed to adjacent construction as appropriate. • Bedding and surround of fittings, traps, etc: Concrete, 150 mm thick. • Permissible deviation in level of gullies: +0 to -10mm.
R12/64 PLASTICS INSPECTION CHAMBER • Manufacturer: Polypipe Civils Ltd . - Product reference: Rigidrain Chamber 1050mm diameter.• Bedding: Concrete.• Surround: Granular 150mm thick.• Backfilling: screened soil consolidated • Concrete collar: Precast.• Access covers and seating: Rigidrain circular galv. steel cover and frame.
R12/69 CONVENTIONAL CHANNELS, BRANCHES AND BENCHING• Main channel: Bedded solid in 1:3 cement:sand mortar, branches connected to main
channel at half channel level, so that discharge flows smoothly in direction of main flow.• Benching: Concrete rising vertically from main channel to a height not lower than soffit of
outlet pipe, then sloping upwards at 10% to walls, and with dense smooth uniform finish.
R12/71 PREFORMED PLASTICS CHANNELS, BRANCHES AND BENCHING • Manufacturer: Polypipe Civils Ltd. - Product reference: Rigidrain preformed plastic chamber base set in concrete sub-base. • Sizes and integral branches: To suit each manhole.• Bedding: 1:3 cement:sand mortar. • Benching: preformed
R12/79 CAST IRON ACCESS COVERS AND SEATING• Covers: Grey iron or ductile iron to BS EN 124.• Manufacturer: Clerk Drain• Types: 10 ton Galv. Steel 600 X 450mm with Galv steel frame.• Seating: Engineering bricks to BS 3921, Class B, laid in 1:3 cement:sand mortar.• Bedding and haunching to frame: Solid, in 1:3 cement:sand mortar, square with joints in
surrounding finishes. Cut back top of haunching to 30 mm below top of cover.

12/81CONNECTION TO SEWERS• Connection of new pipework to existing sewers: To the requirements of the current Building Regulations
R12/84 TESTING/ INSPECTION GENERALLY• Obstructions and debris: Remove. Check that all sections of installation are clear before
testing.• Water, assistance and apparatus: Provide as required.
R12/87 WATER/ AIR TESTING OF DRAINS• Initial testing: To ensure that pipelines are sound and properly installed, air test short
lengths to BS 8301, clause 25.6.3 immediately after completion of bedding/ surround.• Final testing: For final checking and statutory authority approval, water test to BS 8301,
clause 25.6.2 all lengths of pipeline from terminals and connections to manholes/ chambers and between manholes/ chambers.
R12/88 WATER/ AIR TESTING OF DRAINS• Air testing preparation and method: To BS 8301, clauses 25.6.3.1 and 25.6.3.2.• Initial testing: To ensure that pipelines are sound and properly installed, air test short
lengths to BS EN 1610, clauses 13.1 and 13.2 immediately after completion of bedding/ surround.
• Final testing: For final checking and statutory authority approval, water test to BS EN 1610, clause 13.1 and 13.3 all lengths of pipeline from terminals and connections to manholes/ chambers and between manholes/ chambers.
R12/89 WATER TESTING OF MANHOLES/INSPECTION CHAMBERS• Timing: Before backfilling. • Standard:- Exfiltration: To BS EN 1610, clause 13.3.- Infiltration: No identifiable flow of water penetrating the chamber.
R12/91 BACKFILLING TO PIPELINES GENERALLY• Backfill from top of specified surround or protective cushion: Material excavated from
trench, compacted in 300 mm layers. Do not use heavy compactors before there is 600 mm of material over pipes.
R12/94 BACKFILLING UNDER ROADS AND PAVINGS• Backfill from top of specified surround or protective cushion up to formation level: Well
graded gravel or hardcore passing a 75 mm sieve, well compacted in 150 mm layers.
R12/97 CLEANING• General: Flush out the whole installation and remove all silt and debris immediately before
handing over.
S12 Hot and cold water Piped supply systems
S/5 COLD WATER SUPPLY• Position of incoming mains water supply: See dwg 17-10, water supply enters in boiler house.• Type: PVC.• Pipelines: Extend to new kitchen as shown on dwg 17-34.• Pipe insulation: 25mm thick foam plastic; Climaflex or equal.
S/10 INSTANTANEOUS HOT WATER SUPPLY• Position of water heater: in disabled toilet Room 9 & Utility room Room 10.• Instantaneous water heater: Heatrae Sadia Multipoint 7kW Instantaneous Water Heater.• Manufacturer: Heatrae Sadia .- Product reference: Heatrae Multipoint Instantaneous. Ref: 7.0kW 95 050 424• Type: electric, size 210 x 160 104mm.• Outlets: 15mm copper pipe.• Control: water flow 1 bar min. to 7 bar max. & 10 bar relief valve.
• Accessories The tee piece and expansion relief valve discharge port 22mm plumbed via an air break (tundish) to a safe, visible place
PERFORMANCE
S/20 DESIGN AND DETAILING• Design: Complete the design and detailing of the hot and cold water supply.• Standard: To BS 6700.• Drawings: Submit drawings showing equipment positions and pipeline routes.
S/22 WATER PIPELINE SIZES• Sizing: Calculate sizes to meet simultaneous demand for the building to BS 6700
Appendix D.• Performance: - Water velocity (maximum): 1.3 m/s for hot water and 2.0 m/s for cold water.
S/25 GAS SUPPLY• Incoming gas supply: into boiler room see dwg 17-10 & 17-34. Extend supply pipe to new
boiler position in new Kitchen, Room 4.
PRODUCTS
S/35 COPPER PIPELINES FOR GENERAL USE (only copper or stainless steel pipes to be used inside the building with compression or capillary joints)• Standard: To BS EN 1057, Kitemark certified.• Jointing generally: To BS EN 1254-1, Kitemark certified. Use integral lead free solder ring
capillary fittings.• Supports: Compatible with pipe material.
S/40 POLYETHYLENE PIPELINES FOR USE BELOW GROUND• Standard: To BS 6572, Kitemark certified.• Jointing: As recommended by pipe manufacturer.• Colour: Blue.
S/42 GAS PIPELINES• Standard: To BS 6891.• Materials: Copper to BS EN 1057.• Fittings: Copper compression and capillary to BS 864-2.
S/44 WARNING/ OVERFLOW PIPES TO CISTERNS• Material: PVC-U to BS 5255.• Jointing: Solvent welded.• Minimum OD: Greater than inlet pipe OD and at least 22 mm.

S/45 INSULATION TO PIPELINES• Material: Preformed flexible closed cell or mineral fibre split tube.• Thermal conductivity (maximum): 0.04 W/m K.• Thickness:- Hot water pipelines: Equal to the OD of the pipe up to a maximum of 40 mm.- Internal cold water pipelines: 25 mm.- Roof space cold water pipelines: 32 mm.- External cold water pipelines: 38 mm.• Fire performance: Class 1 spread of flame when tested to BS 476-7.
T32 Low temperature hot water heatingFor the heating section see Specification 10-H
Ventilation/Air conditioning systemsU10 General ventilation
U/14 WINDOW TRICKLE VENTILATORS• Manufacturer: Titon.- Product reference: Trimvent SM .• Type: aluminium slot ventilator for windows fixed at head of d/glazing panel.• Size: 12mm slot• Free area: 5000 mm².• Colour: white• Finish: matt.
U/21 VENTILATION FAN UNITS• Manufacturer: - Product reference: • Standard: To BS EN 60335-2-80, BEAB approved.• Performance: heat recovery system .• Mounting: in ceiling void over the West Wing• Controls: control unit mounted in the Kitchen Room 4.• Accessories: Duct system and outlet grills.
U/52 EXTRACT FAN UNITS• Manufacturer: Xpelair .- Product reference: DX100HTA .• Functions: in disabled Toilet & Utility rooms R9 & R10 connected to Light circuit.
U/30 RIGID DUCTWORK AND FITTINGS• Manufacturer: I-sells or equal.- Product reference: Galvanized Spiral Ducting -.• Type: Gauge ~0.8mm .• Size: 160 to 300mm.• Accessories: Tees, junctions, galvanized safe male sleeve coupling
U/32 FLEXIBLE DUCTWORK AND FITTINGS• Manufacturer: I-sells.- Product reference: Flexible aluminium hose 5 layer laminate of aluminium/polyester.• Type: Conforms to UK BS476 parts 6, 7 and 20 (54923, 54068, 53442) .

• Diameter: 152 to 305 mm.• Accessories: quick release worm drive clips - steel
U/36 SUPPLY/ EXTRACT AIR TERMINALS• Manufacturer: CVE Shop.- Product reference: aluminium . louvre faced diffusers• Type: rectangular 4 Way Blow Ceiling Diffuser.• Size: 295 x 295mm.• Colour: white.• Finish: paint.
U/38 EXTERNAL GRILLES• Manufacturer: CVE Shop.- Product reference: – CVWL38.• Type Aluminium Weather Louvre.• Size: 280 x 280 mm.• Colour: aluminium painted
U/60 DUCTWORK GENERALLY• Joints: Seal. Provide a robust airtight installation.• Support: Do not distort or reduce cross-sectional area. Do not strain joints.• Flexible ductwork:- Installation: Fully extend without overstretching.- Support: Form smooth curvature without kinking, sagging or slumping.• Falls: Fall away from fans, dampers and other accessories.
U/64 COMPLETION• Operation: Examine ductwork for leakage. Test the operation of all fans, equipment, controls and sensors, and submit report.• Operating and maintenance instructions: Submit operating and maintenance instructions for all equipment and controls.• Tools: Supply tools for operation and maintenance, and keys for valves and vents.
Z Building fabric reference specificationZ10 Purpose made joinery
Z10/10 FABRICATION• Standard: To BS 1186-2.• Sections: Accurate in profile and length, and free from twist and bowing. Formed out of
solid unless shown otherwise.- Machined surfaces: Smooth and free from tearing, wooliness, chip bruising and other
machining defects.• Joints: Tight and close fitting.• Assembled components: Rigid. Free from distortion.• Screws: Provide pilot holes. Heads of countersunk screws sunk at least 2 mm below
surfaces visible in completed work.
Z10/20 CROSS SECTION DIMENSIONS OF TIMBER• General: Dimensions on drawings are finished sizes.

• Maximum permitted deviations from finished sizes:- Softwood sections: To BS EN 1313-1.- Hardwood sections: To BS EN 1313-2.
Z10/30 PRESERVATIVE TREATED WOOD• Cutting and machining: Completed as far as possible before treatment.• Extensively processed timber: Retreat timber sawn lengthways, thicknessed, planed,
ploughed, etc.• Surfaces exposed by minor cutting and/ or drilling: Treat with two flood coats of a solution
recommended by main treatment solution manufacturer.
Z10/40 MOISTURE CONTENT• Wood and wood based products: Maintained within range specified for the component
during manufacture and storage.
Z10/50 FINISHING• Joinery surfaces: Smooth, even and suitable to receive finishes.- Arrises: Eased unless shown otherwise on drawings.• End grain in external components: Sealed with primer or sealer as section M60 and
allowed to dry before assembly.
Z11 Purpose made metalworkZ11/10 FABRICATION GENERALLY
• Grades of metals, section dimensions and properties: To the appropriate British Standard and suitable for the purpose.
• Fasteners: Unless specified otherwise, of same metal as component, with matching coating or finish.
• Contact between dissimilar metals in components that are to be fixed where moisture may be present or occur: Avoid.
• Finished components: Rigid and free from distortion, cracks, burrs and sharp arrises. - Moving parts: Free moving without binding.
Z11/20 COLD FORMED WORK• Profiles: Accurate, with straight arrises.
Z11/30 WELDING/ BRAZING GENERALLY• Surfaces to be joined: Thoroughly cleaned.• Tack welds: Use only for temporary attachment.• Joints: Made with parent and filler metal fully bonded throughout with no inclusions, holes,
porosity or cracks.• Surfaces of materials that will be self-finished and visible in completed work: Protect from
weld spatter.• Traces of flux residue, slag and weld spatter: Removed.
Z11/40 WELDING OF STEEL• Preferred method: Metal arc welding to BS EN 1011-1 and -2.- Alternative methods: Submit proposals.
Z11/50 FINISHING WELDED/ BRAZED JOINTS VISIBLE IN COMPLETED WORK
• Butt joints: Smooth, and flush with adjacent surfaces.• Fillet joints: Neatly executed and ground smooth where specified.
Z11/60 PREPARATION FOR APPLICATION OF COATINGS• General: Fabrication complete, and fixing holes drilled before applying coatings.• Paint, grease, flux, rust, burrs and sharp arrises: Removed.
Z11/70 GALVANIZING• Standard: To BS EN ISO 1461.• Vent and drain holes: Provide in approved locations and seal to approval after galvanizing.
Z11/80 ANODIZING• Standards:- Internal applications: To BS EN 12373-1.- External applications: To BS 3987 or BS EN 12373-1.• Certificate of compliance: Submit.
Z12 Preservative/ fire retardant treatment
Z12/10 TREATMENT APPLICATION• Timing: After cutting and machining timber, and before assembling components.• Processor: Licensed by manufacturer of specified treatment solution.• Certification: For each batch of timber provide a certificate of assurance that treatment has been carried out as specified.
Z12/20 COMMODITY SPECIFICATIONS• Standard: Current edition of the British Wood Preserving and Damp-proofing Association (BWPDA) Manual.
Z12/25 PRESERVTAIVE TREATMENT SOLUTION STRENGTHS/ TREATMENT CYCLES• General: Select to achieve specified service life and to suit timber treatability.
Z12/30 COPPER - CHROMIUM - ARSENIC (CCA) PRESERVATIVE TREATMENT• Solution: Based on oxides of copper, chromium and arsenic.- Manufacturer: Tanalith . Product reference: Tanalith preservative .- Application: High pressure impregnation.• Moisture content of timber at time of treatment: Not more than 28%. After treatment, allow
timber to dry for at least 14 days before using.
Z12/40 ORGANIC SOLVENT PRESERVATIVE TREATMENT- Manufacturer: Celcure . Product reference: Celcure A. - Application: Double vacuum + low pressure impregnation.
• Moisture content of timber at time of treatment: As specified for the timber/ component at time of fixing. After treatment, timber to be surface dry before use.
Z21 Mortars

Z21/10 MIX PROPORTIONS• Specification: Proportions and special requirements are specified elsewhere in relevant
mortar mix items.
Z21/20 SAND FOR CEMENT GAUGED MORTARS• Standard: To BS 1200.- Grades: Where the proportion of sand is specified as a range (e.g. 1:1:5 - 6) use: Lower proportion with type G sands. Higher proportion with type S sands.• Sand for facework mortar: Obtain from one source. Mix different loads if necessary to maintain consistent colour and texture.
Z21/25 SAND FOR LIMESAND MORTARS• Type: Sharp, well graded.- Quality, sampling and testing: To BS 1200.- Grading/ Source: As specified elsewhere in relevant mortar mix items.
Z21/30 READY-MIXED LIMESAND FOR CEMENT GAUGED MORTARS• Standard: To BS 4721.• Pigments for coloured mortars: To BS EN 12878.
Z21/40 CEMENTS FOR MORTARS • Cement:- Standard: To BS EN 197-1.- Types: Portland cement, CEM I. Portland slag cement, CEM II/ B-S. Portland fly ash cement, CEM II/ B-V.- Strength class: 42.5 or 52.5.• Sulfate resisting cement: - Standard: To BS 4027.- Strength class: 42.5 or 52.5.• Masonry cement: - Standard: To BS 5224.- Class: MC 12.5 (with air entraining agent).• Certification for all cements: BSI Kitemark scheme.
Z21/60 MAKING MORTARS GENERALLY • Batching: By volume. Use clean and accurate gauge boxes or buckets.- Mix proportions: Based on dry sand. Allow for bulking of damp sand.• Mixing: Mix materials thoroughly to uniform consistency, free from lumps. - Mortars containing air entraining admixtures: Mix mechanically. Do not overmix. • Contamination: Prevent intermixing with other materials. Keep plant and banker boards
clean.
Z21/70 MAKING HYDRAULIC LIMESAND MORTARS • Mixing hydrated hydraulic lime:sand: Follow the lime manufacturer's recommendations for
each stage of the mix. - Water quantity: Only sufficient to produce a workable mix.

Z22 Sealants
Z22/20 SUITABILITY OF JOINTS• Presealing checks:- Joint dimensions: Within limits specified for the sealant.- Substrate quality: Surfaces regular, undamaged and stable.• Joints not fit to receive sealant: Submit proposals for rectification.
Z22/30 PREPARING JOINTS• Surfaces to which sealant must adhere: Remove temporary coatings, tapes, loosely
adhering material, dust, oil, grease, surface water and contaminants that may affect bond.• Vulnerable surfaces adjacent to joints: Mask to prevent staining or smearing with primer or
sealant.• Primer, backing strip, bond breaker: Types recommended by sealant manufacturer.
- Backing strip and/or bond breaker installation: Insert into joint to correct depth, without stretching or twisting, leaving no gaps.
• Protection: Keep joints clean and protect from damage until sealant is applied.
Z22/40 APPLYING SEALANTS• Substrate: Dry (unless recommended otherwise) and unaffected by frost, ice or snow.• Environmental conditions: Mix and apply primers and sealants within temperature and
humidity ranges recommended by manufacturers. Do not dry or raise temperature of joints by heating.• Sealant application: Fill joints completely and neatly, ensuring firm adhesion to substrates.• Sealant profiles:
- Butt and lap joints: Slightly concave.- Fillet joints: Flat or slightly convex.
• Protection: Protect finished joints from contamination or damage until sealant has cured.
Electrical SpecificationThe Electrical work is being arranged as a sub-contract that will be a nominated sub-contractor to the Main Contractor. The tenders for the main building work are invited to submit a price for the Electrical Installation with their building tender if they wish.See the separate Electrical Specification 10-H and drawings 17-10, 17-21 & 17- 17 for details of the work.
Heating & Ventilating SpecificationThe Heating and Ventilation work is being arranged as a sub-contract that will be a nominated sub-contractor to the Main Contractor. The tenders for the main building work are invited to submit a price for the Heating and Ventilation Installation with their building tender if they wish.See the separate Heating and Ventilation Specification 10-E and drawing 17- 10 , 17-21, 17-34 & 17-37 for details of the work.
END