Embed Size (px)
DESCRIPTION
Ultrasonic Massage, Galvanic, High Frequency, Vacuum & Spray Machine
Citation preview
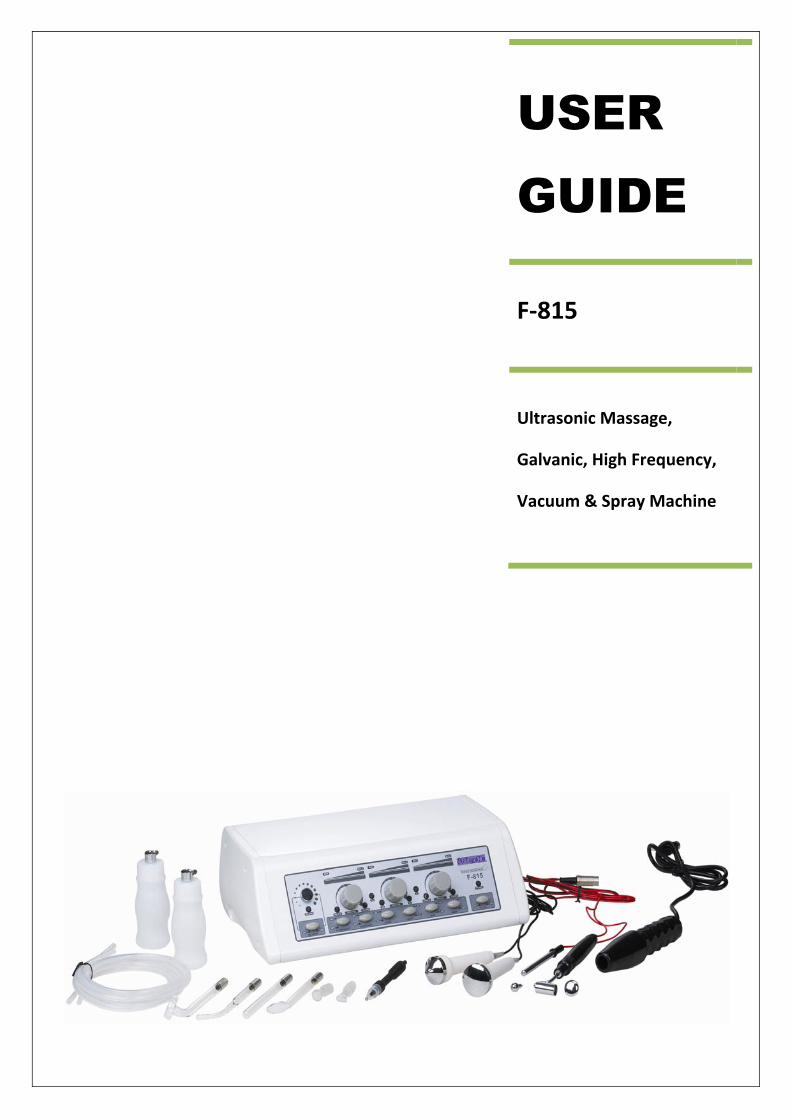
USER GUIDE
F‐815
Ultrasonic Massage,
Galvanic, High Frequency,
Vacuum & Spray Machine
PREFACE Congratulations and thank you for purchasing the F-815 ultrasound massage, galvanic, high frequency, vacuum and spray machine. Your choice of machine is a reliable, safe and easy to use piece of professional salon equipment. The F-815 is designed for multi-purpose treatment use, only by trained beauty or medical professionals. Although the machine is designed for various (types of) treatment use, it must never be used for any purpose other than its intended design limitations, or by any person unqualified to do so, as per your local or national legislation requirements. It is important that you read and retain this user guide for future reference. Should you need to contact us regarding your purchase of this product at a future date, please make a note (in the space below) of the following information upon arrival, as this information will expedite any communication you may have with us. SALON NAME _________________________________________________________________
FULL NAME OF PURCHASER _________________________________________________ MODEL OF EQUIPMENT _______________F-815_________________________________ DATE OF PURCHASE ___________________________________________________________ INVOICE NUMBER ______________________________________________________________
Contact details Tel 0(044) 1322 290101 Fax 0(044) 1322 290011
Email [email protected]
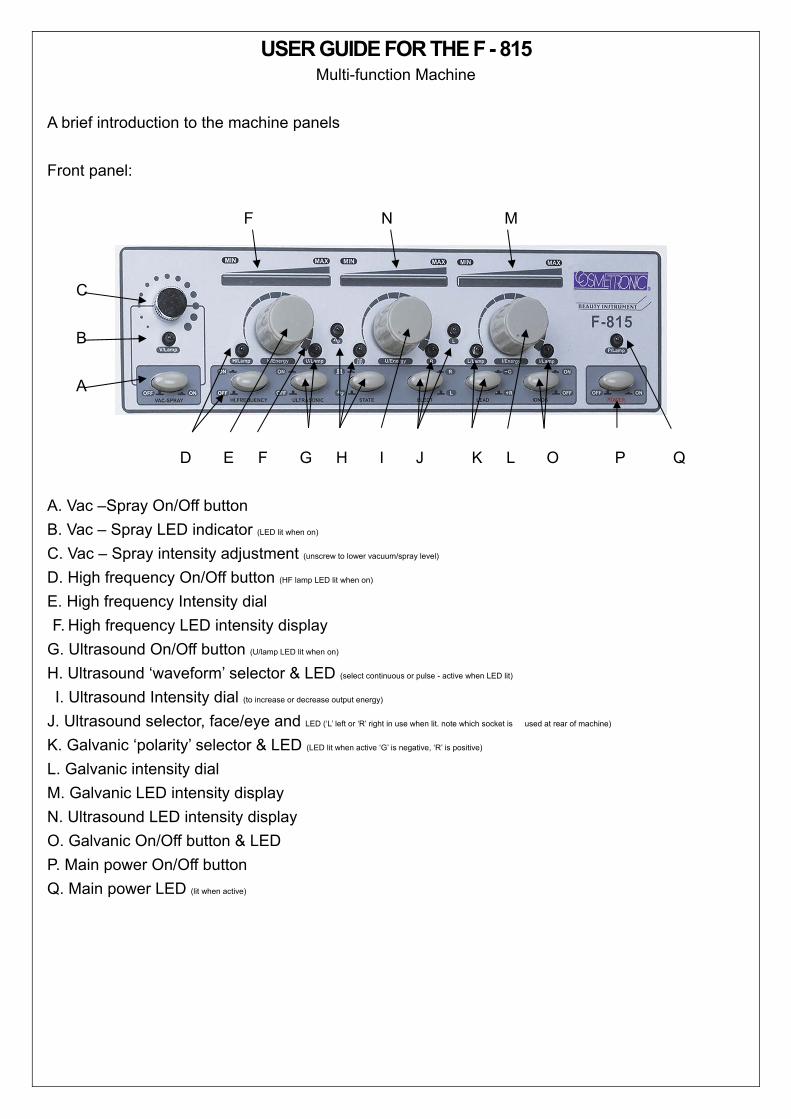
USER GUIDE FOR THE F - 815 Multi-function Machine
A brief introduction to the machine panels
Front panel:
F N M C B A D E F G H I J K L O P Q
A. Vac –Spray On/Off button B. Vac – Spray LED indicator (LED lit when on)
C. Vac – Spray intensity adjustment (unscrew to lower vacuum/spray level) D. High frequency On/Off button (HF lamp LED lit when on)
E. High frequency Intensity dial F. High frequency LED intensity display G. Ultrasound On/Off button (U/lamp LED lit when on)
H. Ultrasound ‘waveform’ selector & LED (select continuous or pulse - active when LED lit)
I. Ultrasound Intensity dial (to increase or decrease output energy) J. Ultrasound selector, face/eye and LED (‘L’ left or ‘R’ right in use when lit. note which socket is used at rear of machine)
K. Galvanic ‘polarity’ selector & LED (LED lit when active ‘G’ is negative, ‘R’ is positive) L. Galvanic intensity dial M. Galvanic LED intensity display N. Ultrasound LED intensity display O. Galvanic On/Off button & LED P. Main power On/Off button Q. Main power LED (lit when active)
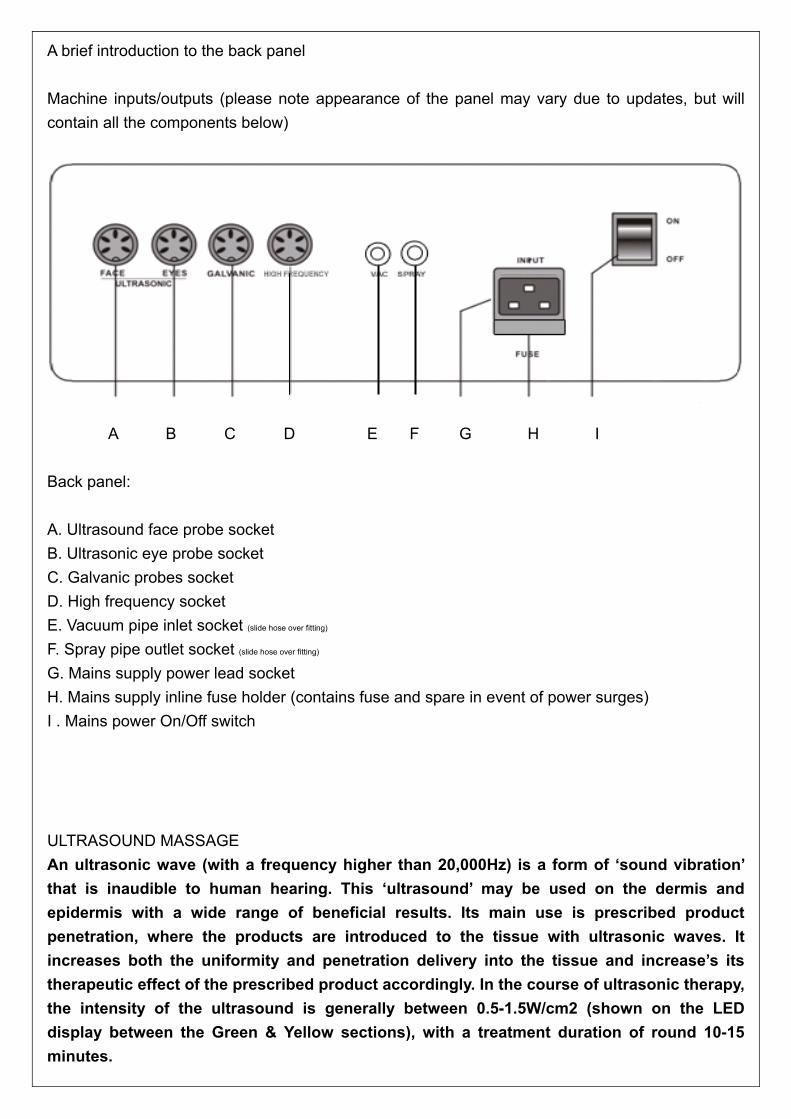
A brief introduction to the back panel Machine inputs/outputs (please note appearance of the panel may vary due to updates, but will contain all the components below)
A B C D E F G H I
Back panel:
A. Ultrasound face probe socket B. Ultrasonic eye probe socket C. Galvanic probes socket D. High frequency socket E. Vacuum pipe inlet socket (slide hose over fitting) F. Spray pipe outlet socket (slide hose over fitting) G. Mains supply power lead socket H. Mains supply inline fuse holder (contains fuse and spare in event of power surges) I . Mains power On/Off switch
ULTRASOUND MASSAGE
An ultrasonic wave (with a frequency higher than 20,000Hz) is a form of ‘sound vibration’ that is inaudible to human hearing. This ‘ultrasound’ may be used on the dermis and epidermis with a wide range of beneficial results. Its main use is prescribed product penetration, where the products are introduced to the tissue with ultrasonic waves. It increases both the uniformity and penetration delivery into the tissue and increase’s its therapeutic effect of the prescribed product accordingly. In the course of ultrasonic therapy, the intensity of the ultrasound is generally between 0.5-1.5W/cm2 (shown on the LED display between the Green & Yellow sections), with a treatment duration of round 10-15 minutes.
1) MAn micmovwhialsoUltr 2) WTheIt prbloohelpsweand 3) CTheAnacheCati.e. synthusthe cellabsprocprob4. B• Cr• Br• Re
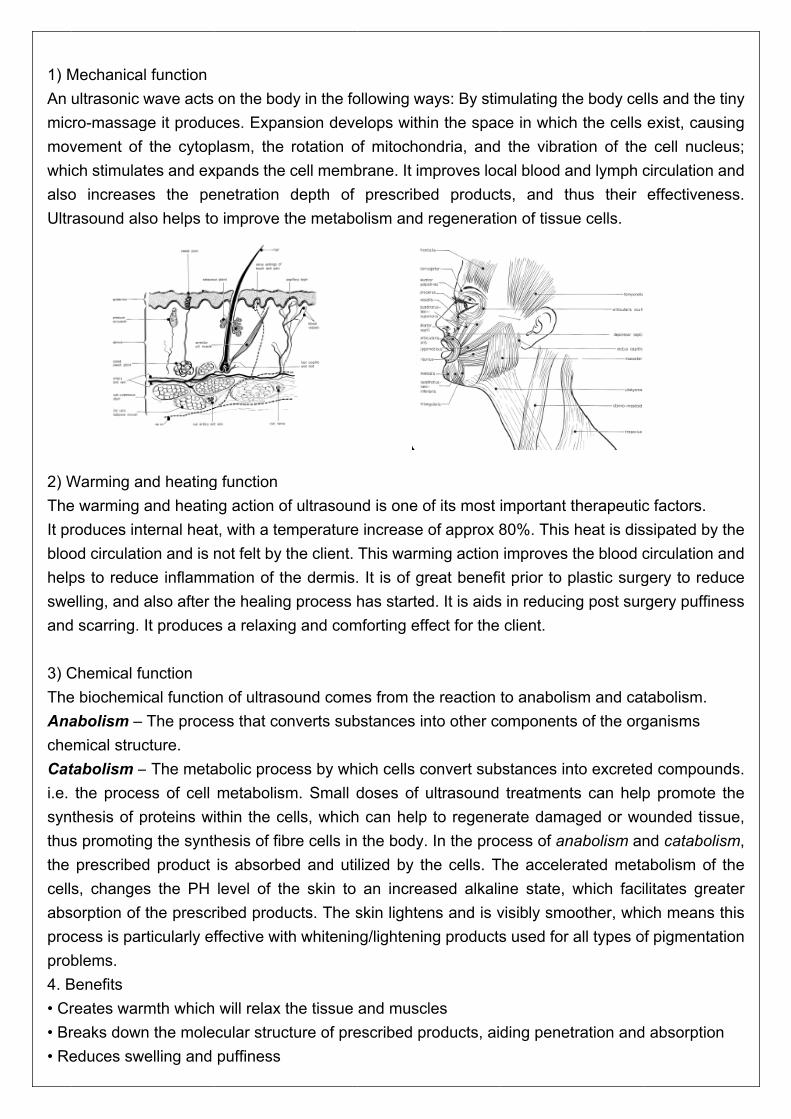
Mechanicaultrasonic
cro-massagvement of ch stimulato increaserasound als
Warming ae warming roduces inod circulatips to reducelling, and d scarring.
Chemical fue biochemiabolism – emical structabolism –the procethesis of ps promotinprescribed
s, changesorption of cess is parblems.
Benefits reates warreaks downeduces sw
l function wave acts
ge it produthe cytop
tes and exes the peso helps to
nd heatingand heatinternal heation and is nce inflammalso after tIt produce
unction cal functioThe proce
cture. – The metaess of cell proteins wig the syntd product s the PH the prescrrticularly ef
rmth whichn the mole
welling and
on the bodces. Expa
plasm, the xpands the enetration o improve t
g function ng action ot, with a tenot felt by
mation of ththe healings a relaxin
n of ultrasoess that co
abolic procmetabolisithin the cehesis of fibis absorbelevel of th
ribed produffective wit
will relax tcular strucpuffiness
dy in the fonsion deverotation ocell membdepth of
the metabo
of ultrasounmperaturethe client. he dermis.g process hng and com
ound comeonverts sub
cess by whm. Small dells, whichbre cells ined and utihe skin to ucts. The sth whitenin
the tissue cture of pre
ollowing waelops withiof mitochonbrane. It im
prescribeolism and r
nd is one oe increase oThis warm. It is of grhas started
mforting eff
es from thebstances in
ich cells codoses of u
h can help the body. lized by than increa
skin lightenng/lightenin
and musclescribed pr
ays: By stimin the spacndria, and
mproves loced productregeneratio
of its most of approx 8
ming action reat benefid. It is aidsfect for the
e reaction nto other co
onvert subultrasound to regeneIn the pro
he cells. Tased alkalins and is vng products
les roducts, aid
mulating thce in which the vibracal blood ats, and thon of tissu
important t80%. This improves t prior to p
s in reducinclient.
to anabolisomponents
bstances intreatment
erate damacess of an
The accelene state, visibly smos used for
ding penet
he body ceh the cells tion of the
and lymph chus their e cells.
therapeuticheat is disthe blood c
plastic surgng post sur
sm and cas of the org
nto excretets can helpaged or wonabolism anrated metawhich faci
oother, whiall types o
tration and
lls and theexist, cau
e cell nuclecirculation effectiven
c factors. ssipated bycirculationgery to redrgery puffin
tabolism.ganisms
d compoup promoteounded tissnd catabolabolism ofilitates greich means
of pigmenta
d absorptio
tiny sing eus; and ess.
y the and
duce ness
nds. e the sue, lism, f the eater
this ation
n
• Helps to smooth and soften fine lines and wrinkles • Exfoliates the top layer of the skin • Improves blood circulation • Increases cellular regeneration • Has a healing and regenerative effect on wounds and inflamed tissue • Increases the moisture retention of the skin • Softens the thrombus “any blood clots within a vessel that partially or totally obstructs circulation”. • Improves acneic skin and reduces pore size • Gives the skin a healthy glow 5. Caution (during use)
• Never use on dry skin. A conductive product medium must always be applied • Do not use on the stomach area of pregnant women • Do not use on people with pacemakers (any electrical or rhythmic heart regulating device) • Do not use on people with known heart conditions • Always use ultrasonic electrodes with sufficient media (moisturiser or serum on the skin) • Ultrasonic treatment is suitable for all skin types – the massage time and machine settings are varied for each of the different skin types. • For sensitive skins – reduce the treatment time to ‘3-5min’ and ensure the power setting is at its
lowest level to start with. 6. Combining ultrasound treatments Ultrasonic exfoliation lends itself perfectly as an after treatment for micro-dermabrasion, glycolic and other peels. It removes dead cells and any leftover crystals, better than most cleansing techniques. You can help to speed up the healing and rejuvenation process of your client’s skin, by inducing water soluble products into the client’s skin with ultrasound after you have completed the cleansing process. Treatment (product penetration) .The treatment of using both ultrasound & cosmetic products consists of, (a) the intensity of the ultrasonic wave, (b) the period of treatment and (c) treatment course length. Points for attention during the course of the treatment are: That the intensity for facial massage should be controlled between 0.5-1.25W/cm2
. . The time taken for treatment for the entire face is generally between 5 and 15 minutes per treatment. However, prolonging each treatment will not multiply or improve its effectiveness. . The course length may be decided according to different skin conditions: acne 3-5 courses, chronic issues, such as pigmentation or hyper-pigmentation, scars, acne rosacea, darkened eye-rim, eye bags, wrinkles etc, once every 2-3 days. One course usually consists of 10 sessions. Preventative treatment: 1 or 2 times every week. If the patient’s condition worsens during the specific treatment course, reduce the frequency of treatment (extend intervals between treatments) or reduce the intensity and extend the course of treatment. The interval between the each treatment should be 1-2 weeks. If the treatment required is over 3-4 courses, then the interval between treatments may be prolonged after the second treatment session.
.The ultrasonic massage instrument has two kinds of wave state. The first is a ‘successive’ (continuous) wave , and the second is a ‘pulse’ (intermittent) wave. The first is a continuous ultrasound wave - whose intensity has a remarkably beneficial effect on the skin. The second, is an intermittent (short) pulsing of ultrasound waves which lasts for a tiny fraction of a second. The important characteristic’s of these ‘pulse’ waves is that, the heat generated is markedly reduced, so that the ‘mechanical action’ of the ultrasound wave can be brought into full effect without any client discomfort. The choice of wave state is as follows: generally, the pulse (intermittent wave form) state is used for the inflamed tissue areas (redness etc.) or for use on dilated capillaries, while the continuous (constant wave form) state is suitable for all other treatment types.
.Method Ultrasonic treatment utilises direct (touching) radiation. During the treatment, the ultrasonic head must be pressed against the surface of the skin. Please note a suitable conductive agent (prescribed product) should always be used between the ultrasound head and the skin. Never use on dry skin only. The ultrasound head (generator) should be gently and slowly moved over the treatment area in circular or linear (back and forth) movements, dependant on the size of area being treated. Before treatment, cleanse/tone the treatment area with the prescribed skin type products. Remove any product residue prior to steaming the face for 10 minutes. Cleanse the treatment area again to remove any dirt or debris on the face (milia/porous secretions etc) to prevent the ultrasound waves from pushing it back into the skin. Gently tone, over every part of the face (treatment area) with the correct toner or astringent. After wiping off the toner/astringent, the skin will be thoroughly cleansed for optimum protection. After analysis of the face, carefully apply the correctly prescribed product. Apply a sufficient amount of prescribed product to cover the entire treatment area. Plug in the machine to the mains and power up the unit. Push the “POWER” button and select the “ULTRASONIC” function; then adjust the intensity of the ‘output’ according to “U/Energy” LED display, generally in the green and the yellow section. Output may vary with skin quality, age, and tolerance of the patient. Select the desired wave state, successive (continuous) wave ( ), or pulse wave ( ) according to the chosen treatment, by switching the “STATE” button. Hold the ultrasonic probe firmly and begin to massage the treatment area that the prescribed product has been applied to. Treatment time will vary dependant on the size of the treatment area in question. A standard, a (whole) facial area should take 10-15 min’s of repetitive massage. Wash and sterilise the ultrasonic head after each treatment or use. .Notes for ultrasound treatment Always cleanse before treatment. Always ensure adequate product is applied for 15 mins of treatment. The heat output of the ultrasound generator corresponds directly to the power output selected. Generally, lower output is used in facials and higher output for body treatments. Always confirm client comfort to ensure that the output (temperature) is not ‘too high’.
If the treatment area is small or sensitive, use the ‘eye’ probe and ensure the energy output should be limited between 0.5-0.75W/cm (the green LED’s on the “ENERGY” display). The treatment time may be reduced to 8-10minutes. A treatment course is generally around 10 sessions in total, with a minimum rest period of 1 day between sessions. If other facial treatments are being conducted to the same area, a minimum rest period of 7 days should be observed between treatments. If the ultrasound generator of choice does not appear to have an output, please check that the correct probe & output socket for the chosen treatment has been selected. The ultrasound probes should be cleaned with clean water (not hot) using a clean soft cloth and then chemically sterilised using the appropriate sterilisation fluid. Dry the probe carefully after sterilising and store safely in its holder on the trolley in between uses. NOTE: - do not immerse the probe in any fluid! Always sterilize the probes again prior to use with a ‘steri-wipe’ type product of your choice. .CAUTION (during use) Do not leave any of the ultrasound probes turned on whilst unattended, otherwise ‘over heating’ will occur and this may result in damage to the probe or reduction of its working lifespan. Do not attempt to separate the stainless steel generator from its rubber holder (handle), any attempt to do so, may cause irreparable damage to the generator. Do not attempt to open any attachment or machine. The machine and attachments have no user changeable parts. All items should be returned to your purchasing agent or authorised repair centre GALVANIC . Contra-indications • Pacemaker (any electrical or rhythmic heart regulating device) • Pregnancy • Thrombosis/Phlebitis • Skin diseases • Operations (within last 6 months) • Silicone implants • Hypersensitive or vascular skins .Iono theory The galvanic current is a ‘constant’ direct current (D.C.) rectified to a safe low – voltage level. This direct current flows in one direction only and has adjustable polarity. When current is flowing, one electrode will always be negatively charged and the other positively. Chemical changes are produced when this current is passed through certain solutions containing acids and salts. Chemical effects are also produced when a galvanic current is passed through the tissue and fluids of the body. The Galvanic machine: The galvanic machine has two important functions during a facial treatment. Its main function is to introduce water soluble products into the skin, and this process is called ionophoresis. When using a galvanic current, there are two poles with a selective negative (-) or positive (+) polarity output to choose from.

Positive pole (ANODE) and Negative pole (CATHODE) • Produces acid reaction • Produces alkaline reaction • Soothes nerves • Stimulates nerves • Decreases blood supply • Increases blood supply • Hardens tissue • Softens tissue The positive pole may be used: • To close the follicles/pores after the facial treatment • To decrease redness, as in mild acne. • To prevent inflammation after comedone and blemish treatment • To force acid pH solutions, such as astringent, into the skin. The negative pole may be used for the following conditions: • To stimulate the circulation of blood to dry skin. • To force desincrustation lotion (alkaline pH solution) into the skin. Do not use the galvanic current over areas containingbroken capillaries. Desincrustation: describes a process that softens and liquefies grease deposits, which are accumulations of sebum in the follicles. This sebum is usually filled with dead cells, makeup and grease. In order to perform a desincrustation treatment, an alkaline solution is used to penetrate the follicle and dissolve the debris. It is important to remove all traces of massage cream or cleansers from the skin before starting the desincrustation treatment, as any residual products may mix with the desincrustation lotion and then emulsify the products, and may then force it back into the follicles. Ionisation: is the forcing of a solution or cream into the skin. The ions of electricity from the positive pole will pass through a moisturising cream or lotion that has been applied to the client’s face and assure deeper penetration of the product into the skin. In order for the ionisation to work properly, the cream or lotion applied to the face must be water soluble (o/w), such as moisturiser or ‘vanishing’ type cream. Heavy creams that do not dissolve in water (w/o) and leave an oily film on the skin will not penetrated due to their larger molecular structure. .Method . Connect the required galvanic probes (roller or ball) to the output lead which is inserted in the
galvanic output socket on the rear of the machine. Ensure this is done prior to switching on or powering up the machine. The client then holds the metal pole (where present), and the therapist holds the handle of the roller.
. Changing polarity of the probes is done by adjusting leading in (+R) and leading out (-G) button. The treatment area must be cleansed and dried before penetrating any products into the tissue.
Turn the electrode button to (+R). Now the probes are positive, whilst the indifferent pole is negative. You can then introduce the chosen product to the treatment area. You may then cover the probe (or face) with a piece of cotton or sponge that has your product on it, or you may use directly, with the probe onto the skins surface which is generously covered with the desired product. Whilst carrying out desincrustation, you should change the electrode polarity button to (-G), now the probe is negative while the indifferent pole is positive. Cover the probe with a piece of cotton or sponge that has been soaked in the alkaline solution (chosen astringent) before doing this treatment. This is done to balance the skin PH and aid in the breakdown and removal of debris & grease/oil from the skin.
NB: ‘+ & R’ refers to positive and ‘R’ red LED, whilst ‘- & G’ refers to negative and ‘G’ Green LED. Power on “IONOS”, select the operational polarity for the treatment (+ or -), then turn the “I/Energy” level to the minimum. Touch the treatment area with the probes, then slowly adjust the “I/Energy” level to appropriate intensity (usually to the point just before the client feels a mild tingling sensation). Smoothly slide the chosen probes over the treatment area. When using a cotton or linen with the probes (or as a shroud) it should be noted that, the more moisture on the cotton or linen pads/mask, the more effective the treatment will be.
HIGH FREQUENCY .Theory The high frequency (H.F.) electrotherapy instrument generates a ‘high speed’ vibrating current, which converts to heat energy and kills bacteria creating a sterilising effect on the surface of the skin. The current is so fast - it will not cause muscle shrinkage, despite giving physical stimulation. Functions
Accelerate blood circulation. Stimulate glandular activity. Helping the skins excretion and absorption. Promote increased metabolism. Kill dermal bacteria Generate heat ‘energy’ within the dermal tissue. Help the penetration of active substances (prescribed product) deeper into tissue.
.Method 1) First choose the desired glass electrode and insert the metal cap end into the receiving slot (mouthpiece) of HF handset, then push firmly inwards until the electrode is securely connected. Glass electrode ‘areas of use’ a. Mushroom shaped electrode ---- for large areas of skin: face, forehead, neck, etc. b. Spade shaped electrode ---- for medium areas of skin: chin, etc. c. Ball shaped electrode ---- for small areas of skin: nose, etc. d. Straight electrode pipe ---- for indirect treatment.
2) Hold only the handle of the H.F. handset (try not to touch glass electrode with your hands or any metal objects) next, power on the “Hi-Frequency” unit and ensure the ‘energy’ dial is set to the minimum output setting. Then touch the treatment area with the glass electrode. You may then, slowly adjust the output using the energy dial (clockwise direction) and increase the output until a mild current (tingling sensation) is felt by the client. If the face is covered with product or treatment gauze, move the glass electrode pipe in an upward direction from client’s neck, slowly sliding up to the chin, then the cheek, nose and forehead - over lapping to ensure complete coverage. Note that the electrodes may be changed as the treatment area changes. When changing the electrodes mid-treatment, you should return the output level to minimum before swapping the electrodes, and then slowly adjust the energy level returning to the intensity required. The warmth generated in the tissue will give a comfortable and calming effect, whilst actively killing any bacterial presence on the epidermis. This is particularly effective for oily or acne skin to reduce secretion and increase tissue regeneration. At the end of the treatment, slowly reduce the ‘energy’ level to the minimum output and then switch off the ‘power’ button, before removing the electrode from the clients face. Indirect usage Firstly, select and insert the ‘straight’ glass electrode into the H.F. handset. Give the handset to the client ensuring they hold the ‘glass electrode’ and not the handset. Then, power on the “Hi-Frequency” function and then gradually increase “power’ level to the desired intensity. Then carry out the facial massage or treatment using the prescribed product as required. During the whole treatment process, ensure you do not touch or come into contact with the glass electrode being held by the client. When you have completed the treatment process, it is vital that the HF intensity level is returned to its minimum setting and that, the ‘power output’ is switched off before removing the glass electrode from the client. Indirect usage will accelerate tissue regeneration and comfort the skin simultaneously. VACUUM & SPRAY Vacuum - Using the desired glass vacuum attachment to aid with the extraction of black-head (comedone), white-head (milia), and acne or blockages of the pores, everyday dirt and grease including stubborn make-up. To improve the circulatory system and metabolism of the skin Spray - Use the spray bottle to spray toner, or astringent lotion to diminish any visible areas of inflammation or redness. The spray function also helps to calm and comfort and the skin, and close pores after treatment. .Method Turn on the ‘Power’ button 1) Vacuum: First turn on the vac-spray ‘Power’ button. Then select the ‘Vacuum’ intensity to meet your requirements by opening or closing the intensity valve. Connect the vacuum air pipe to the corresponding vacuum socket on the rear of the machine, and then connect the other end of the pipe to the (chosen) small glass vontuse. 4 x small glass vontuse attachments are included giving you the option to perform all types of facial vacuuming. You may also improve vacuum control by
using your forefinger over the vacuum release hole on each vontuse. It is advisable (for cleaning &
machine longevity) to insert some absorbent cotton wool into the glass vacuum attachments to act as a ‘disposable filter’ stopping any dirt or debris from being vacuumed into the pipe, which will prevent debris entering the vacuum pump and causing damage to the machine. The glass vacuum vontuse must not be held in one position too long, to prevent hematoma occurring on the face. Vacuum pressure is not instantaneous and may take a few seconds to build up when the pump is first switched on. It is advisable to use a small piece of cotton wool over the vacuum hole (on the hand
piece) and between your finger, to give increased control over the vacuum pressure release. 2) Spray: First turn on “VAC-SPRAY”, connect one end of the spray air pipe to the corresponding spray output nozzle on the machine, then connect the other end to the small spray bottle inlet nozzle. Two spray bottles are supplied so that they may contain different liquids for use in treatments. To operate the spray bottle, simply cover the ‘top’ vacuum nozzle with your index finger which will allow the release of the desired liquid from the spray canister. To stop the flow of spray, simply remove your finger from the nozzle and the vacuum seal will be broken. Always spray in a downward direction from the forehead during use. Care should be taken to prevent liquid entering the nasal cavities, and clients should be asked to close their eyes and mouth during this treatment. Maintain an adequate distance from the face whilst spraying so the effect is felt as a gentle mist landing on the skin. .Notes Normal use should not last longer than 5 minutes per session; prolonged use may cause your machine pump to overheat. If the pump stops working due to ‘over-heating’ switch off the machine and allow a 10 minute ‘cool-down’ period before trying using again. Always switch the unit off immediately after use and never leave running whilst unattended. .CAUTION Always ensure the spray pipe is on the correct nozzle at the machine, to prevent ‘accidental’ vacuuming of any spray solution into the pump, as this will damage your machine pump and invalidate your manufacturer’s warranty. Do not work the vac/spray pump for extended periods without ‘cool-down’ time between treatments, to prevent over heating of the pump and damage to the machine, any damage caused by overheating of the pump, is not covered by the manufacturer’s warranty. Technical information
Name Ultrasound/Galvanic/High Frequency/Vacuum & Spray machine
Item no. F- 815 Rated working Voltage AC 220V AC 240V
Rated working Frequency 50Hz 60Hz
Rated working power (max) 120W
N.W. 6kg
Certification
GENERAL NOTES It should be noted, that your F-815 series machine is CE approved and is only for use by competent and qualified professionals - as per your required regional or country legislation currently in effect. It is recommended that you should annually have your unit checked (PAT tested or equivalent) by a competent technician to ensure continued safe working practices. We recommend that you regularly (minimum of once weekly) inspect all trailing leads and power cables to ensure no accidental damage has occurred during use. By being proactive it this matter, you will help to continue the safe use and longevity of your multi-function unit and its accessories. It is recommend that when not in use, your machine has all cables and attachments securely stowed were possible, to prevent tripping hazards. You should try to ensure the unit is stored in a suitable location to prevent accidental damage by other items of salon furniture and equipment. Your F-815 is covered by its standard manufacturing warranty against component or material defects. Should you encounter any user issues, unplug the machine from the mains power supply and immediately contact your sales agent/supplier for further advice. Do not use or allow your machine to be used, if you or any other user is unsure of its operations or features, to prevent any accidental damage or injury. Never under any circumstances try to open or inspect the machines internal components or its accessories. In the event an inspection becomes necessary, you should contact your supplier or a suitably competent technician to do so. There are no user serviceable parts within your F-815 series machine. Any repairs or alterations to your F-815 series machine by unauthorized persons will invalidate your manufacturer’s warranty and will render you liable in full for the cost of any repairs or parts replacement, whether covered by the original warranty period or not. Any machines returned, and not bearing the original manufacturer’s serial numbers will invalidate their warranty. Where the manufactures warranty has been invalidated for any reason, any repair costs incurred will be chargeable in full. This will include making ‘whole’ any returned items missing their originally supplied attachments, which will then be charged at the prevailing retail rates.
Warranty Procedure 1 - The warranty on all Cosmetronic equipment is 12 months from the date of invoice and covers the products against defects in materials and workmanship or
component defect (Unless superseded by an extended warranty agreement). This warranty is non transferable and applies to the original purchaser only.
2 - No product repairs or component replacement will take place unless all/any amounts owed to Cosmetronic for the said goods have been paid for in full, prior
to any repairs.
3 - All extended warranty policies must be paid in full prior to dispatch of goods and will extend the above cover (No 1) by a further 2 or 4 years, to a maximum
of 5 years including the first free year (certain products only).
4 - Before returning any product to Cosmetronic UK Ltd for repair or replacement you must first: -
- Endeavour to establish cause of product fault (e.g.. check fuses etc.).
- Notify Cosmetronic of any fault development within 24 hrs of its occurrence.
- Contact a member of our technical service dept (95% of faults can be rectified over the telephone).
- Obtain an RMA (return material authorisation) from a member of Cosmetronic.
- Package the goods to include all parts or accessories received with that item.
- Any item received incomplete for repair will be made complete and all relevant parts/accessories charges will be added to the repair cost.
- Pack the goods to be returned in sufficient packaging as to prevent any damage occurring in transit, as Cosmetronic will not be held liable for damage to
products due to insufficient packaging.
5 - All goods returned to Cosmetronic without the correct RMA authorisation will be refused.
6 - No goods will automatically be replaced, when the faulty item can be repaired within a reasonable time span (except items deemed unserviceable on arrival).
Goods will be replaced at the discretion of Cosmetronic when it is deemed that all/any goods are beyond economic repair. Items of loan equipment may be
given at the discretion of the management and subject to delivery/collection charges, together with a refundable deposit.
7 - Cosmetronic will not be held liable for any momentary lack of stock, or technical resource, or any other circumstance beyond its control that may delay any
component replacement or repair. Cosmetronic will not be held liable for any special, incidental, consequential damages resulting from a breach of warranty, or
under any other legal theory, including but not limited to loss of profit or good will, downtime, damage to or any products, treatments used in conjunction with its
products. Purchase implies your acceptance of Cosmetronic terms & conditions.
8 - When our service department cannot determine any fault or malfunction with the goods returned, you may be liable for any administration and testing costs.
8a- When goods returned are not in a merchantable (dirty or unhygienic) condition, they will be made to merchantable quality again, and cleaning costs will be
charged where necessary.
9 - All goods returned will be at the owner’s risk. Cosmetronic will not be held liable for any damage or loss to goods whilst in transit.
10 - Carriage costs are at the owner’s expense for all collection & return freight costs. All goods will be carried via Cosmetronic nominated couriers unless
specified and their terms & conditions of carriage will apply and be accepted by you on application of your collection/delivery request . Any goods in transit
insurance required must be requested prior to collection/dispatch.
11 - No repaired goods will be released until any costs relevant to that repair (unless under warranty) have been settled in full, this will include all
carriage/freight costs.
12 - Call out/on-site repairs will be carried out as soon as is physically possible and charged at a cost of £ POA. The charge is based on the original delivery
address of the product when purchased. This charge is payable in full, prior to any on site attendance. This charge will not include travel expenses (fuel,
parking, toll charges etc.) but, will include labour and the parts replacement of electrical or motorised mechanical components, to include electrical motors, foot
control boxes, and system control boxes but does not include optional extras such as Vibro or Thermo heat functions. The call out repair charge will not cover
items deemed as natural “wear & tear” such as upholstery etc. The call out charge will not cover damage by accident, misuse, or misapplication, or if the
product has been modified without permission. Any serial numbers removed or displaced will also result in warranty invalidation. Proof of purchase will be
required before any repairs carried out.
13 - Warranty call out/ on-site repairs, will be charged (POA), but will be refunded once any warranty claim is validated, less any travel cost or toll/parking levies.
Call for travel costs prior to any warranty call out inspection.