Embed Size (px)
Citation preview

IOS EYE4 APP User Manual
Eye4 App can be downloaded from Google Play (Android) and App Store (IOS). Besides, it can
be downloaded from http://www.eye4.so/download/
The below user manual is based on Eye4 App version 2.4
Start-up: There are three ways to go into login UI. For oversea customers: Ordinary account
login. For domestic customers: the first two ways.
Login: 1. Register User. 2. Use your email address as your Eye4 user account and input password.

Add Camera. There are three ways to add IP Camera into Eye4.
1. QRCode. Scan QR code at the bottom of IP Camera sticker
2. Search Camera. Eye4 will automatically search IP Camera in the same LAN.
3. Manually. Add IP Camera in Eye4 by typing into UID and Password at the bottom of IP
Camera sticker.
Multi-Screen (Four Sections) and Main UI Introduction
Click” ”, you will have four sections screen. Multi-screen can be vertical or horizontal.
shows IP Camera is on line. Click , you will have a real-time live video surveillance
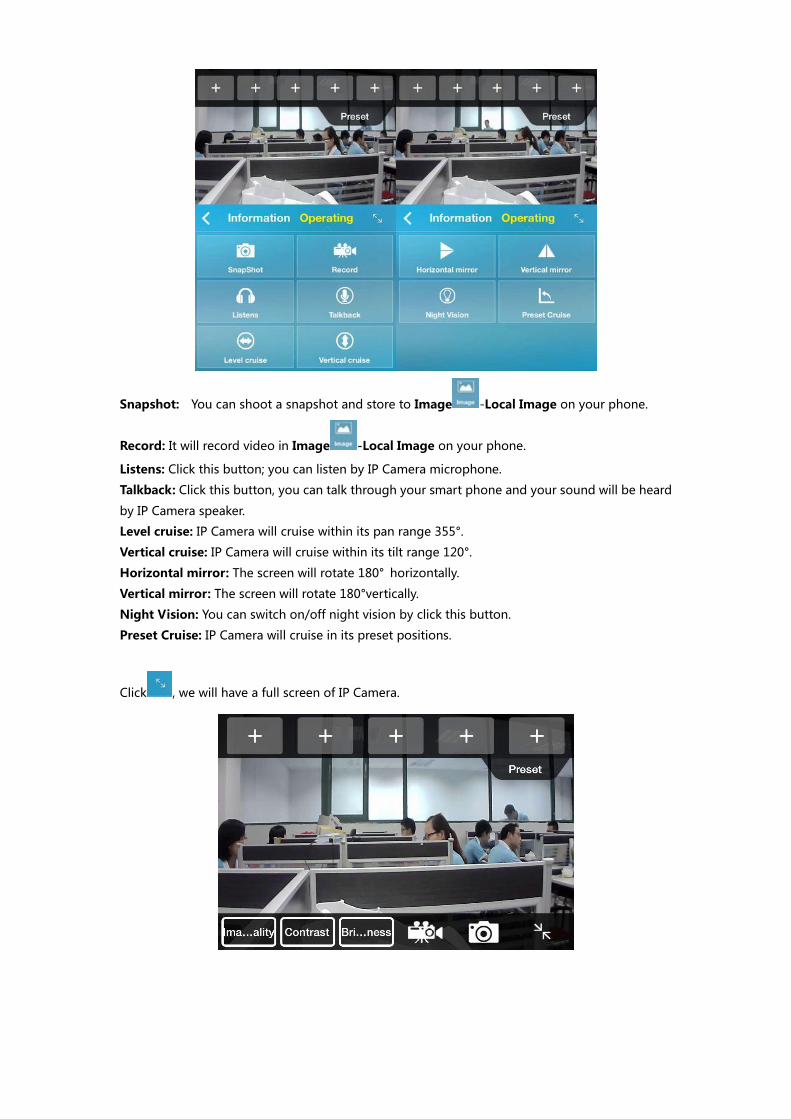
Snapshot: You can shoot a snapshot and store to Image -Local Image on your phone.
Record: It will record video in Image -Local Image on your phone.
Listens: Click this button; you can listen by IP Camera microphone.
Talkback: Click this button, you can talk through your smart phone and your sound will be heard
by IP Camera speaker.
Level cruise: IP Camera will cruise within its pan range 355°.
Vertical cruise: IP Camera will cruise within its tilt range 120°.
Horizontal mirror: The screen will rotate 180° horizontally.
Vertical mirror: The screen will rotate 180°vertically.
Night Vision: You can switch on/off night vision by click this button.
Preset Cruise: IP Camera will cruise in its preset positions.
Click , we will have a full screen of IP Camera.
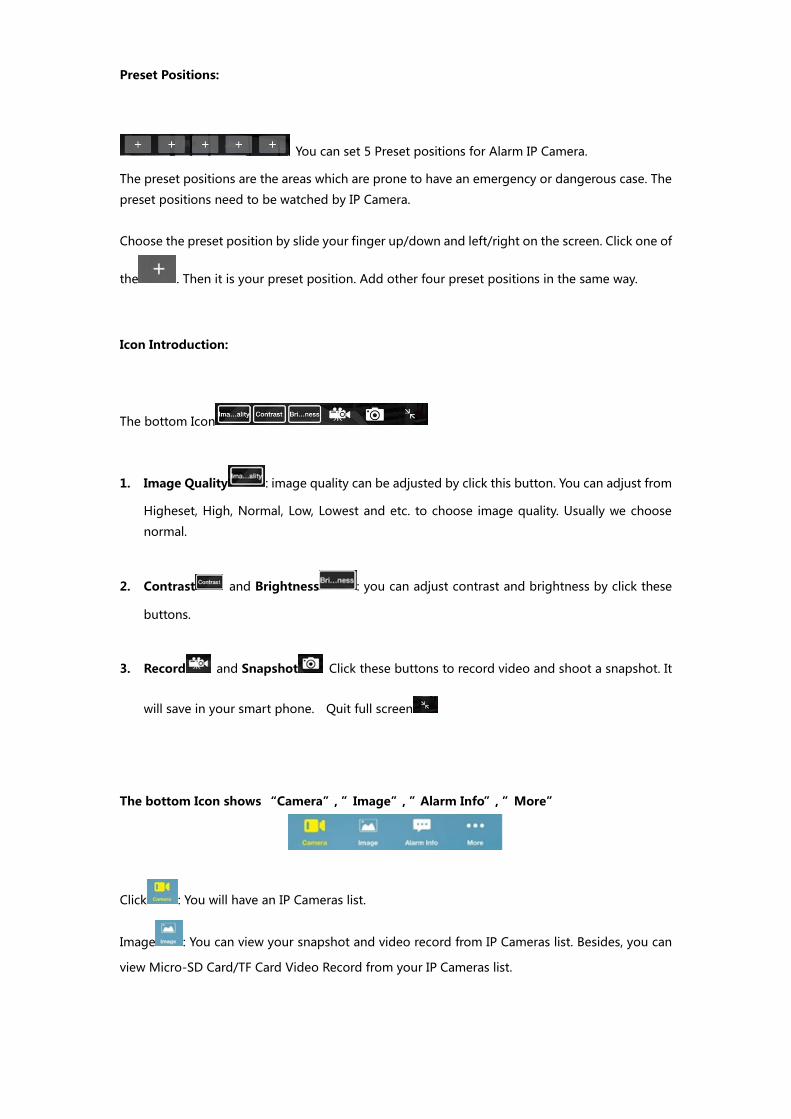
Preset Positions:
You can set 5 Preset positions for Alarm IP Camera.
The preset positions are the areas which are prone to have an emergency or dangerous case. The
preset positions need to be watched by IP Camera.
Choose the preset position by slide your finger up/down and left/right on the screen. Click one of
the . Then it is your preset position. Add other four preset positions in the same way.
Icon Introduction:
The bottom Icon
1. Image Quality : image quality can be adjusted by click this button. You can adjust from
Higheset, High, Normal, Low, Lowest and etc. to choose image quality. Usually we choose
normal.
2. Contrast and Brightness : you can adjust contrast and brightness by click these
buttons.
3. Record and Snapshot Click these buttons to record video and shoot a snapshot. It
will save in your smart phone. Quit full screen
The bottom Icon shows “Camera”, ”Image”, ”Alarm Info”, ”More”
Click : You will have an IP Cameras list.
Image : You can view your snapshot and video record from IP Cameras list. Besides, you can
view Micro-SD Card/TF Card Video Record from your IP Cameras list.

Alarm Info : You can view alarm log from your IP Cameras list. Alarm log will automatically
overlap the first alarm log when it reaches to 100 logs.
More : Click this button; you will go to this screen.
Account: you can change your login password here.
Flow Statistics: It shows your data flow used by 3G/Wifi.
Thumbnail display: IP Camera showed a list in main UI by switch on. IP Cameras showed big
image in main UI by switch off.
Startup Password: to set gesture pass code
About: Check for updates and Eye4 Version
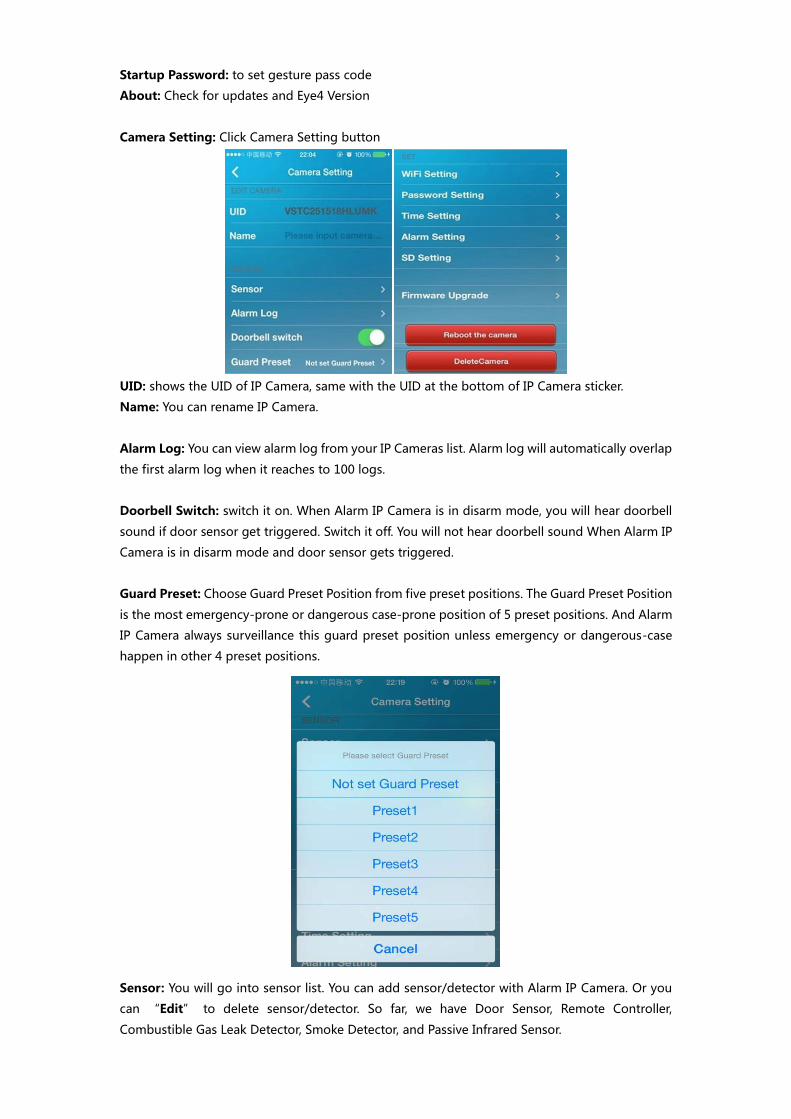
Camera Setting: Click Camera Setting button
UID: shows the UID of IP Camera, same with the UID at the bottom of IP Camera sticker.
Name: You can rename IP Camera.
Alarm Log: You can view alarm log from your IP Cameras list. Alarm log will automatically overlap
the first alarm log when it reaches to 100 logs.
Doorbell Switch: switch it on. When Alarm IP Camera is in disarm mode, you will hear doorbell
sound if door sensor get triggered. Switch it off. You will not hear doorbell sound When Alarm IP
Camera is in disarm mode and door sensor gets triggered.
Guard Preset: Choose Guard Preset Position from five preset positions. The Guard Preset Position
is the most emergency-prone or dangerous case-prone position of 5 preset positions. And Alarm
IP Camera always surveillance this guard preset position unless emergency or dangerous-case
happen in other 4 preset positions.
Sensor: You will go into sensor list. You can add sensor/detector with Alarm IP Camera. Or you
can “Edit” to delete sensor/detector. So far, we have Door Sensor, Remote Controller,
Combustible Gas Leak Detector, Smoke Detector, and Passive Infrared Sensor.

Add New Sensor: You need do sensor/detector encoding. Every different sensor/detector
encoding has an animation to show you how to do encoding. See here picture below.
If sensor/detector encoding is successful, it shows like, for example:
Sensor Edit: You can edit sensor name and bind preset position with sensor/detector.

Location Tracking Function (alarm IP camera in arm mode):
First of all, set 5 preset positions. See Preset Positions. Second, go to Camera Setting to set
Guard Preset; choose one of preset position as Guard Preset. Then go to Camera Setting→
Sensor→Edit, bind sensor with preset position. If any bound detectors get triggered, alarm IP
camera will automatically rotate from Guard Preset to triggered detector’s preset position to
record video. Recording time is 30 seconds by default. After the recording, it will rotate to Guard
Preset.
Take door sensor and smoke detector for example, first of all, set preset position 1, preset
position 2. Second, go to Camera Setting to set preset 1 as Guard Preset. Third, go to Camera
Setting→Sensor→Edit, bind preset 1 with door sensor, and bind preset 2 with smoke detector.
So if smoke detector gets triggered, alarm IP camera will automatically rotate to preset 1 position
to record video.
Wifi Setting: Go to Camera Setting→Click , choose wifi network
Password Setting: Go to Camera Setting→click , change your login password
Time Setting: Go to Camera Setting→click ,you can change Time Zone or Sync with
server, Sync with local time
Alarm Setting: Go to Camera Setting→click

Here Alarm Setting is for normal IP Camera with I/O interface. The default setting for Motion
detect armed is off.
SD Setting: Go to Camera Setting→click
Click Record Schedule, you can Add Record Schedule. You can change Start Time and End
Time.
Firmware Upgrade: Go to Camera Setting→click
Reboot the Camera and Delete Camera: Go to Camera Setting→click or
, you can reboot or delete camera from Eye4.
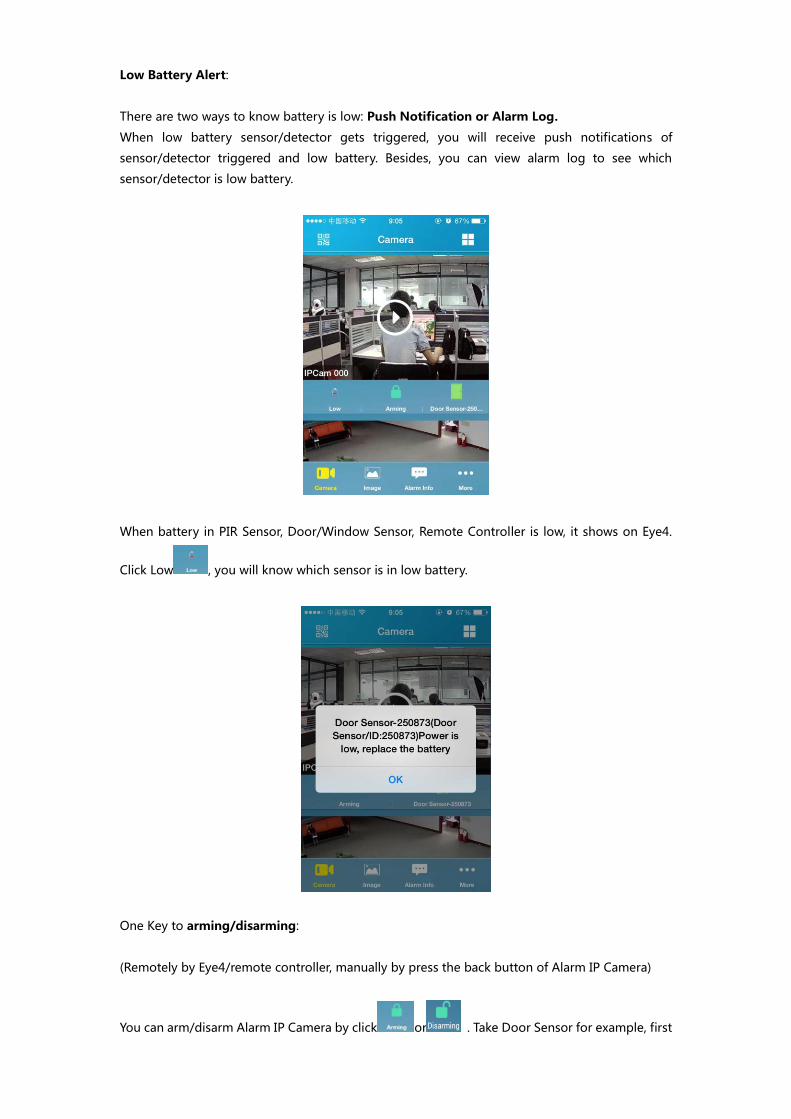
Low Battery Alert:
There are two ways to know battery is low: Push Notification or Alarm Log.
When low battery sensor/detector gets triggered, you will receive push notifications of
sensor/detector triggered and low battery. Besides, you can view alarm log to see which
sensor/detector is low battery.
When battery in PIR Sensor, Door/Window Sensor, Remote Controller is low, it shows on Eye4.
Click Low , you will know which sensor is in low battery.
One Key to arming/disarming:
(Remotely by Eye4/remote controller, manually by press the back button of Alarm IP Camera)
You can arm/disarm Alarm IP Camera by click or . Take Door Sensor for example, first

arming Alarm IP Camera, when door sensor gets triggered, you will hear alarm sound and receive
alarm push notification which shows what sensor or detector gets triggered. Besides, alarm icon
will show on Eye4. You can click this icon to cancel alarm sound and view alarm log. And
shows door sensor gets triggered.
Notification Setting on IOS device: turn on all switches for Eye4. See below.
If you don’t need push notification, just switch off Badge App Icon. If you don’t want to hear
alarm sound, just switch off Sounds. But at least you need switch on one of them to receive alarm
alert.