Embed Size (px)
Citation preview

Eye of NewtCreated by Erin St Blaine
Last updated on 2018-08-25 01:54:45 AM UTC

233466789
1012121214141516
19
Guide Contents
Guide ContentsIntroductionPartsOther Stuff NeededSoftware
Code DownloadCustomizing the GraphicsEye OrientationTroubleshooting
Wiring DiagramAssembly
Prep your ChargerPrep your SwitchPrep your Photo Cell SensorPrep your Teensy & DisplaySolder Power Wires & ChargerAttach Display Wires & Photo Cell
Make the Case
© Adafruit Industries https://learn.adafruit.com/eye-of-newt Page 2 of 23

IntroductionEye of newt, and toe of frog,Wool of bat, and tongue of dog,Adder's fork, and blind-worm's sting,Lizard's leg, and howlet's wing,--For a charm of powerful trouble,Like a hell-broth boil and bubble.
This guide is based on the Uncanny Eyes project by Phil Burgess (https://adafru.it/j6B), with a Halloween-y twist. We'llbuild an electronic eye as compact and small as possible. Put it in a wide-mouthed jar and add it to your potion shelf,or attach a leather thong to wear it like a pendant around your neck.
This is a fairly advanced project that requires fiddly soldering in a small space and uses delicate parts. There's a goodbit of software setup needed also. You can add custom images and tweak the code if you'd like, or just copy andpaste our code as-is. It's not an easy project, but the end result is so incredibly cool that it's worth a bit of hard work!
Parts
1 x Teensy 3.2Teensy 3.1 or 3.2 Microcontroller
ADD TO CART
1 x OLED DisplayOLED Breakout Board 16 Bit Display
ADD TO CART
© Adafruit Industries https://learn.adafruit.com/eye-of-newt Page 3 of 23

1 x Photo CellPhoto cell CdS Photoreistor
ADD TO CART
1 x Battery ChargerLiPoly Backpack Battery Charger
ADD TO CART
1 x Battery500 mAh LiPoly Battery
ADD TO CART
1 x 10k Resistor10k Resistor
ADD TO CART
1 x On/Off SwitchSPDT Slide Switch
ADD TO CART
Other Stuff Needed
Hookup wire in 2 types / multiple colors:
Solid core wire Silicone stranded wire
Soldering iron & accessoriesHot glue gunReptile print or halloween fabricWide mouth jar or necklace cord1.5" acrylic half-sphere (https://adafru.it/Bt7) (less expensive at your local Tap Plastics)Needle & thread
© Adafruit Industries https://learn.adafruit.com/eye-of-newt Page 4 of 23

© Adafruit Industries https://learn.adafruit.com/eye-of-newt Page 5 of 23

SoftwareBefore you start soldering, get all your software running and uploaded to your Teensy microcontroller. Getting thecode loaded up first will make it easier to troubleshoot any soldering or build issues later on.
Software setup is fully covered in the Uncanny Eyes project here (https://adafru.it/zOC). Make sure you have installedeverything listed below before moving on.
Arduino IDETeensyduino Installer Libraries (installed via the Arduino IDE and NOT the Teensyduino installer):
Adafruit_GFXAdafruit_SSD1351Adafruit_ST7735
Python PIL Library (only if you want to add your own custom images)
Once all that is installed, download and open the sketch.
Select 72 MHz as your CPU speed…it’s actually smoother than 96 KHz for this particular code.
Code Download
The code will download as a .zip file. Inside you'll find a folder called "convert" that contains several different imagefolders and a python script, and another folder called "uncannyEyes" that contains the Arduino sketch. Start byuploading the code as-is, for testing purposes. Make sure it works before making changes.
© Adafruit Industries https://learn.adafruit.com/eye-of-newt Page 6 of 23

https://adafru.it/BU1
https://adafru.it/BU1
Look at the config.h file. Right at the top you'll find several different eye options. Uncomment the #include "newtEye.h"
line to turn on the newt eye option, and comment out the #include "defaultEye.h" line. There can be only one!
This code defaults to rendering to two eyes. Since we only have one eye, we can turn off the second one to make thecode run faster. Just a few lines down, look for the eyeInfo[] array and comment out the last item within:
Customizing the Graphics
I wanted to make an eyeball that looked as much like a real newt's eye as possible. I did an imagesearch (https://adafru.it/Bta) and found one I liked.
I used photoshop to "unroll" the eyeball so the software
can draw it correctly. After some cropping, zooming,
and judicious use of the "Liquify" tool, here's what I
ended up with.
// Enable ONE of these #includes -- HUGE graphics tables for various eyes://#include "graphics/defaultEye.h" // Standard human-ish hazel eye -OR-//#include "graphics/dragonEye.h" // Slit pupil fiery dragon/demon eye -OR-//#include "graphics/noScleraEye.h" // Large iris, no sclera -OR-//#include "graphics/goatEye.h" // Horizontal pupil goat/Krampus eye -OR-#include "graphics/newtEye.h" // Eye of newt
eyeInfo_t eyeInfo[] = {#ifdef ADAFRUIT_HALLOWING { 39, -1, 2 }, // SINGLE EYE display-select and wink pins, rotate 180#else { 9, 0, 0 }, // LEFT EYE display-select and wink pins, no rotation//{ 10, 2, 0 }, // RIGHT EYE display-select and wink pins, no rotation#endif};
© Adafruit Industries https://learn.adafruit.com/eye-of-newt Page 7 of 23

The sclera (the white part of the eye) on a human looks
really different from a reptilian eye. I wanted a more
newt-like look, so I inverted the colors in Photoshop,
then added a black circle to the center to keep the pupil
dark.
It took me several tries to get it right, but I'm really
happy with the end result. These images are included
with the code download, and the process is explained
thoroughly over at the Uncanny Eyes
guide (https://adafru.it/zOC). Go nuts and create your
own unique look.
Eye Orientation
There's one more change we can make in the code to change the orientation of the image. If your build comes outsideways or upside-down, and you want to rotate the eye to compensate, look for this line in the code, in the eyeInfo[]array:
To rotate the eye 90 degrees clockwise, change the last “0” to a “1.” To rotate 180 degrees, use “2,” and for 90
{ 9, 0, 0 }, // LEFT EYE display-select and wink pins, no rotation
© Adafruit Industries https://learn.adafruit.com/eye-of-newt Page 8 of 23

degrees counterclockwise use “3.”
I personally like this eye rotated 180 degrees to upside-down from the original image. I think It makes the eye look likeit's up to something crafty, which is really what I'm looking for in my Eye of Newt.
Troubleshooting
If you're having trouble, head over to the Uncanny Eyes guide (https://adafru.it/zOC) and take a look at some of thetroubleshooting ideas.
© Adafruit Industries https://learn.adafruit.com/eye-of-newt Page 9 of 23

Wiring Diagram
There are a lot of connections that need to be made. Using a combination of solid core wire and stranded wire is theeasiest way to get everything packed into as small a footprint as possible.
Color coding is your friend here! Keep your power wires all red and ground wires all black, and use a variety of colorsfor the other connections so you don't get confused. Write down the colors you used and the corresponding pins theyconnect with so you have a quick reference you can use while soldering.
© Adafruit Industries https://learn.adafruit.com/eye-of-newt Page 10 of 23

Teensy 3.1 OLED Backpack Charger
Vin + BAT
G G G
USB 5V
7 DC
8 Reset
9 OC
11 SI
13 CL
16 Resistor + Photo Cell
3.3V Resistor
G Photo Cell
© Adafruit Industries https://learn.adafruit.com/eye-of-newt Page 11 of 23

Assembly
Prep your Charger
1. Bridge the charge pad on the back with a blob of
solder, to make your battery charge faster
2. Cut the trace between the switch pads on the front
to enable your on/off switch.
Prep your Switch
© Adafruit Industries https://learn.adafruit.com/eye-of-newt Page 12 of 23

Trim the switch legs to about half their length. Solder a
4" wire to the middle leg and to one of the side legs,
and cut off the other side leg. Secure the connections
with heat shrink.
© Adafruit Industries https://learn.adafruit.com/eye-of-newt Page 13 of 23

Solder the two switch wires into the switch pads on the
charger.
Prep your Photo Cell Sensor
Trim your photo cell's legs to about 1/3 of their length.
Solder a stranded black wire to one leg, and two
stranded colored wires to the other leg. (The legs are
interchangeable so it doesn't matter which is which.)
Cover each connection with heat shrink, then cover the
whole photo cell with larger heat shrink, leaving the top
visible and uncovered.
Prep your Teensy & Display
© Adafruit Industries https://learn.adafruit.com/eye-of-newt Page 14 of 23

Cut the trace between the USB charging pads on the
back of the Teensy.
Place a large piece of thick tape (gaffer's tape or duct
tape works great) over the back of the OLED display,
carefully covering all the exposed components but
leaving the solder hole labels visible.
Solder Power Wires & Charger
Using silicone stranded wire, solder two red wires into
VIN and two black wires into G on your Teensy.
We're using silicone stranded wire here because the
solid core wires won't fit two-to-a-hole.
© Adafruit Industries https://learn.adafruit.com/eye-of-newt Page 15 of 23
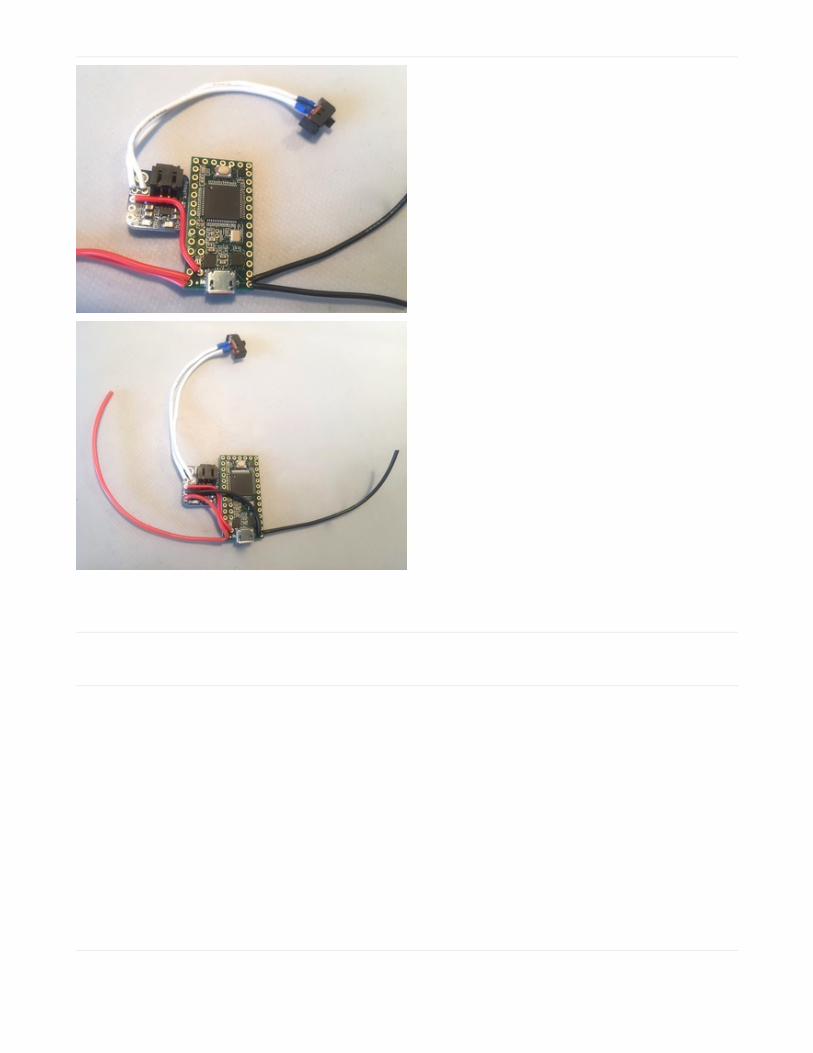
Set the charger next to the Teensy and solder a solid
core wire from Teensy's USB pin to the charger's 5V pin.
Solder one of the stranded red wires to BAT and one of
the stranded black wires to G.
Attach Display Wires & Photo Cell
Solder various colors of solid core wires to Teensy's pin
7, 8, 9, 11, and 13. We'll trim these to length later, for
now just be sure they're at least a couple inches long.
© Adafruit Industries https://learn.adafruit.com/eye-of-newt Page 16 of 23

Trim one leg of your resistor down and solder it into the
3.3V pin on the Teensy. Solder the other leg to one of
the wires coming from your Photo cell sensor. Cover
the whole resistor with heat shrink.
Solder the other colored wire from the Photo cell into Teensy's pin 16, and the black wire into the GND pin next to theTeensy's reset button.
Place the Teensy and charger in line with the back of
the OLED display as shown. Carefully trim and solder all
the remaining wires to the OLED display.
Plug your battery in and slide it between the OLED
display and the rest of the components. Wind the wire
around and bend the solid core wires until you have a
tidy package. Secure everything in place with a few
judicious blobs of hot glue.
© Adafruit Industries https://learn.adafruit.com/eye-of-newt Page 17 of 23

Flip your switch on and watch your eye dance around!
Cover the photo cell to watch the pupil dilate. (Photo
cell not shown in this image)
© Adafruit Industries https://learn.adafruit.com/eye-of-newt Page 18 of 23

Make the Case
Cut a small piece of fabric about 8"x8". Place your
cabochon in the middle and trace around it on the
wrong side of the fabric. Cut a hole for the cabochon
that's a little smaller than your mark so the cabochon
won't fall through.
Fold your fabric in half around your electronic eye and
mark where it meets itself. Sew the raw edges together
with the right sides facing inwards.
© Adafruit Industries https://learn.adafruit.com/eye-of-newt Page 19 of 23

Flatten the fabric so the hole is on top and the seam is
at the center back. Stitch a curved edge about 1 inch
below the hole. Make sure the electronics fit nicely
inside.
Place your cabochon into the hole, face down (so you're
looking at the flat side). Run a bead of glue all around
the edges to hold it securely in place.
© Adafruit Industries https://learn.adafruit.com/eye-of-newt Page 20 of 23

Turn your case right side out and gently slide the
electronics inside with the switch and photo cell coming
out the open top. With a utility knife, make a small slit
above the USB port. Make another hole for the photo
cell sensor to poke through.
© Adafruit Industries https://learn.adafruit.com/eye-of-newt Page 21 of 23

Sew up the top of the case with a needle and thread,
leaving the on/off switch accessible. I finished by
coloring my on/off switch with a paint pen so it blends in
better with my case.
Finish up by attaching a necklace cord, or leave it as-is and keep it safe inside a potion jar.
Remember that the OLED screen is really delicate, so do NOT try and squeeze it into a jar that's a tight fit -- you canbreak the screen if you squeeze it too hard.
Charge it up by plugging in a USB cable -- the indicator light on the charger will turn green when it's fully charged.
© Adafruit Industries https://learn.adafruit.com/eye-of-newt Page 22 of 23

© Adafruit Industries Last Updated: 2018-08-25 01:54:44 AM UTC Page 23 of 23