Embed Size (px)
Citation preview

Bleacher Reacher MegaT-Shirt Launcher
TSHIRTGUN.com
TSHIRTGUN.com
Operation Manual
Great to have in situations where you can’t get to a quick tank fill and need to shoot tons of shirts quickly.
Deluxe Two Valve CO2 Cylinder Fill Station
O Rings are used to seal your CO2 bottle into your launcher, occasionally they become damaged, worn and will need replacing.
This allows you to connect your launcher directly to a bulk CO2 tank, providing a direct and continuous air source without the use of a CO2 tank. The quick disconnect comes with a 2-piece adapter that screws directly into your launcher where the CO2 tank usually goes and a braided hose with air fitting to adapt directly to a bulk tank.
This optional accessory allows you fill your own CO2 tanks by weighing them accurately.
Extra Regular CO2 Tank - $40.00
Deluxe Co2 Fill Station - $85.00
O-Rings(pack of 10) - $5.00 per pack
Quick-Disconnect Hose - $229.00
Digital Scale - $35.00
!Limited Lifetime Warranty
Warranty Claim/Return Policy
Cleaning and Lubrication
TO FILL YOUR OWN TANKS
War Machine Inc. warranties to initial retail purchaser that the product is free from defects in materials and workmanship, subject to the limitations of the warranty. Disposable parts (o-rings, seals etc) are not warranted. The use of non sanctioned accessories or upgrades is not covered and will void your warranty. This warranty does not cover aesthetic damages (scratches, dents and nicks) misuse, or improper disassembly and re-assembly, or attempts made to drill holes, remove metal or modify this product from its original state, which could cause pressure safety factors or degrade the performance. This warranty does not cover failures due to wear and tear, exposure to the elements or extreme conditions. This war-ranty is limited to the repair or replacement of defective parts with the customer to pay shipping costs. This limited lifetime warranty is effective to the original customer with proof of purchase and proper warranty registration. The warranty is non-transferable. Repair or replacement of defective material is at the discretion of WAR MACHINE INC.
For any warranty return/claim needed, please contact our RMA claims department at 1-864-349-1500. An RMA number must be issued prior to any warranty return. Please be sure to mail your war-ranty registration card found in your shipping package for proper registration of your War Machine Product. All returns should be pre-paid by shipper and shipped to:
War Machine Warranty Depot 3429 Rutherford Road Ext STE BTaylors, SC 29687
The anodized parts of your launcher should be cleaned off with a damp cloth. DO NOT run the launcher under water to clean, as this will damage the internal components. Only O-ring safe oils and lubricants should be used. The Launcher regulators require silicon grease and must be kept clean – recommended every 50-100 shots. Always use War Machine replacement parts.
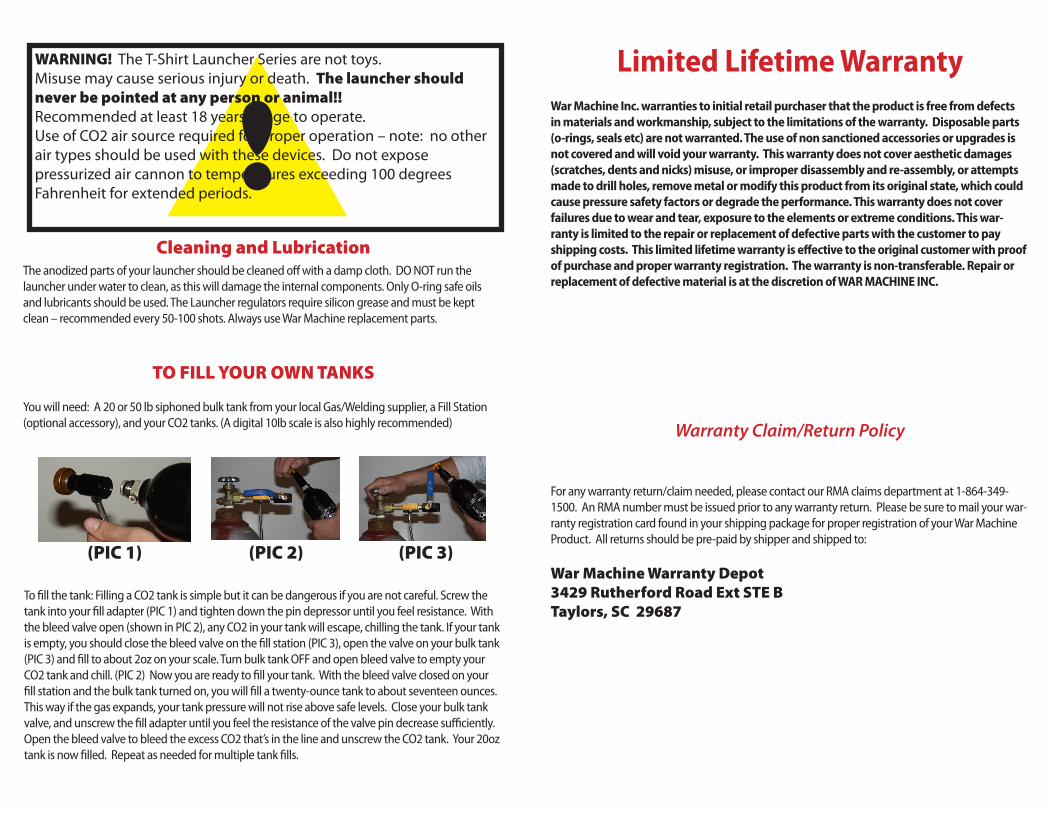
You will need: A 20 or 50 lb siphoned bulk tank from your local Gas/Welding supplier, a Fill Station (optional accessory), and your CO2 tanks. (A digital 10lb scale is also highly recommended)
To fill the tank: Filling a CO2 tank is simple but it can be dangerous if you are not careful. Screw the tank into your fill adapter (PIC 1) and tighten down the pin depressor until you feel resistance. With the bleed valve open (shown in PIC 2), any CO2 in your tank will escape, chilling the tank. If your tank is empty, you should close the bleed valve on the fill station (PIC 3), open the valve on your bulk tank (PIC 3) and fill to about 2oz on your scale. Turn bulk tank OFF and open bleed valve to empty your CO2 tank and chill. (PIC 2) Now you are ready to fill your tank. With the bleed valve closed on your fill station and the bulk tank turned on, you will fill a twenty-ounce tank to about seventeen ounces. This way if the gas expands, your tank pressure will not rise above safe levels. Close your bulk tank valve, and unscrew the fill adapter until you feel the resistance of the valve pin decrease sufficiently. Open the bleed valve to bleed the excess CO2 that’s in the line and unscrew the CO2 tank. Your 20oz tank is now filled. Repeat as needed for multiple tank fills.
WARNING! The T-Shirt Launcher Series are not toys. Misuse may cause serious injury or death. The launcher should never be pointed at any person or animal!! Recommended at least 18 years of age to operate. Use of CO2 air source required for proper operation – note: no other air types should be used with these devices. Do not expose pressurized air cannon to temperatures exceeding 100 degrees Fahrenheit for extended periods.
(PIC 1) (PIC 2) (PIC 3)

FOLDING TIPS FOR T-SHIRTS
1. Fold T-Shirt in half
3. Fold in half again 4. Starting from the neck, begin a tight roll. As the roll is done, a slight pull on the opposite end will insure the tightness of the roll.
5. Test to make sure the shirt fits into the barrel of the launcher easily – if it does, the roll should be secured with rubber bands, balloons, tape, etc. to make sure it maintains a tight roll.Note: The tighter the shirt fits into the barrel, the farther it will travel. Likewise, distance is affected by how loose the roll is in the barrel. A tightly rolled shirt will go farther in distance than a loosely rolled shirt.
2. Fold Sleeves in
BLEA
CH
ER
REA
CH
ER
MEGA
No
me
nc
latu
re D
iag
ram
BARR
EL
POW
ER C
ELL
MAN
IFO
LD
REM
OTE
HOSE
REGU
LATO
R
SAFE
TY
FIRI
NGSO
LENO
ID
OVE
RPRE
SSUR
IZE
SAFE
TYVA
LVE
PRES
SURE
GAU
GE
ON/
OFF
KNO
B
UFA
(UNI
VERS
AL F
ILL
ADAP
TER)
TRIG
GER

CHARGING AND FIRING THE CANNON
DEGASSING THE CANNON (after use)
STEP 1This is your standard pin valve CO2 tank. It is shipped EMPTY because of federal law. The first step is to fill your tank. You can either fill it yourself using the method described earlier in this manual ortake it to a local paintball shop or sporting goods store and have them fill it for you.
Make sure that the on/off knob on the top of the UFA is in the closed position. (All the way counter clockwise) Then screw the CO2 tank into the open end.
Turn the on/off know clockwise slowly to engage the pin valve on the tank until you hear the cannon begin to pressurize. Use caution not to screw the knob all the way in as you can damage the pin valve on the tank by doing so.
Depress and hold down the safety button.
Turn the on/off knob on the UFA to the off position (counter-clockwise). Point the cannon in a safe direction, depress and hold the safety button, and pull the trigger to fire and de-gas the cannon. You may now unscrew the CO2 tank from the UFA.
Check reg for pressure (90psi max) If thegauge exceeds max pressure, there is a safety relief valve that will vent over pressure.
Place your pre rolled t-shirt down into the barrel.
Point in a safe direction and pull the trigger to fire.
STEP 2
STEP 3
STEP 6
STEP 4
STEP 5
STEP 7

![[XLS]dep.ky.govdep.ky.gov/formslibrary/Documents/TankSpreadsheetv6a.xls · Web viewHints Glossary Tank#10 Tank#9 Tank#8 Tank#7 Tank#6 Tank#5 Tank#4 Tank#3 Tank#2 Tank#1 Summary Instructions](https://img.pdfslide.us/doc/110x75/5ab43ede7f8b9a1a048ba1de/xlsdepky-viewhints-glossary-tank10-tank9-tank8-tank7-tank6-tank5-tank4.jpg)