Embed Size (px)
Citation preview

Extending and Customizing the IBM Security Identity Manager
Parag Gokhale [email protected]
May 12, 2016
Abstract: The IBM Security Identity Manager (ISIM) virtual appliance significantly reduces the complexity in installing and configuring the ISIM environment, including the operating system, middleware, and the ISIM application itself. However, with this simplification, comes some change in the way ISIM administrators and consultants can customize and extend the ISIM environment compared to previous software stack installations of ISIM. This document describes supported approaches for developing and maintaining ISIM extensions or customization.
Audience: The intended audience for this document includes customers, IBM business partners, IBM technical sales, and IBM Services consultants who want to understand how to develop and maintain ISIM extensions and customization.
• Table of Contents1Introduction................................................................................................................................42JavaScript extensions...............................................................................................................4
2.1Develop and deploy Extension..........................................................................................42.2Register extension.............................................................................................................42.3Test and Verify...................................................................................................................5
3Workflow application extensions...............................................................................................53.1Develop workflow extension..............................................................................................63.2Create workflow extension.................................................................................................6
3.2.1Define Activity.............................................................................................................63.2.2Add pre-defined Activity..............................................................................................7
4Password extensions................................................................................................................84.1Register RegularExpressionRule......................................................................................8
5Policy join directives................................................................................................................106User Interface..........................................................................................................................11
6.1Identity Service Center.....................................................................................................116.2Self service user interface................................................................................................116.3Administration interface...................................................................................................12
7Subforms.................................................................................................................................128Single Sign-on.........................................................................................................................13
8.1WebSEAL based authentication and SSO......................................................................138.2LTPA keys based trust.....................................................................................................14
9Application clients...................................................................................................................1510Identity feeds.........................................................................................................................1611Custom adapters...................................................................................................................1612Conclusion.............................................................................................................................1613Appendixes............................................................................................................................16
13.1Appendix A. Download Sample code............................................................................1613.2Appendix B. Download libraries.....................................................................................1713.3Appendix C. External libraries.......................................................................................1813.4Appendix D. Add or change property value...................................................................1813.5Appendix E. Modifying files outside the virtual appliance.............................................19
14Resources.............................................................................................................................21
• Table of FiguresFigure 1: Register JS Extension.................................................................................................5Figure 2: Provide information to create activity that generates XML..........................................6Figure 3: Create activity by using the existing XML....................................................................7Figure 4: Save Configuration......................................................................................................8Figure 5: Register RegularExpression rule.................................................................................9Figure 6: Password Extension..................................................................................................10Figure 7: ISC Customizable files...............................................................................................11Figure 8: Administrative console customization........................................................................12Figure 9: Subforms....................................................................................................................12Figure 10: WebSEAL SSO Configuration.................................................................................14
2 / 21
Figure 11: Export LTPA Keys....................................................................................................14Figure 12: Download examples................................................................................................16Figure 13: Download Libraries..................................................................................................17Figure 14: External libraries......................................................................................................18Figure 15: Add, change Property..............................................................................................19Figure 16: Download files..........................................................................................................20Figure 17: Upload files..............................................................................................................20
3 / 21
1 Introduction IBM Security Identity Manager (ISIM) Virtual Appliance version 7.x provides options to modify the default settings of various parts of the product and its supported middleware. The reasons for changing these settings typically include: need to enable enterprise branding, modifying default behavior to match existing business processes, integrating with other enterprise applications, and providing enterprise user interface consistency across all functions. This document describes best practices for implementing the most commonly used customization and extensions for ISIM version 7.x and also describes limits in these areas.
2 JavaScript extensionsJavaScript is used in ISIM to specify identity policies, provisioning policy parameters, service selectionpolicies, placement rules for identity feeds, and orphan account adoption.In addition, JavaScript is used in workflows to specify transition conditions, loop conditions, JavaScriptactivities, activity postscripts, and workflow notification. Various scripting extensions are provided by ISIM to expose useful data and services to each of these scripts. In addition to these extensions, system administrators can configure ISIM to load custom JavaScript extensions.
ISIM supports IBM JSEngine, a Java™ Script interpreter conforming the third edition (December 1999) of the ECMA-262 specification. Refer to the IBM Knowledge Center for information about all the available extensions that you can use.
To register new custom extensions, follow these steps:
2.1 Develop and deploy Extension
Extensions are written in Java and compiled into Java archive (JAR) files. Best practices to develop extensions are described on IBM Knowledge Center and demonstration code is available for download from the virtual appliance.
Refer to Appendix A. Download Sample code to download extensions.zip file. SampleGlobalExtension.java and SampleObjectExtension.java are available under path '/extensions/7.0/examples/javascript/src/examples/itim50/javascript/' in the zip archive.
Refer to Appendix B. Download libraries to download any system JARs such as itim_common.jar or itim_server_api.jar required for developing your custom extension.Develop and compile JavaScript extension class(es) and generate a Java archive (JAR) file – For example, myJSExtension.jar. The JAR file must be imported into the virtual appliance along with any other non-system, external JARs it depends on. Refer to Appendix C. External libraries to upload myJSExtension.jar.
2.2 Register extension
All new JavaScript extensions are to be registered in scriptframework.properties. Navigate to Configure– Update Property and select scriptframework.properties under 'Identity server property files' area.
4 / 21
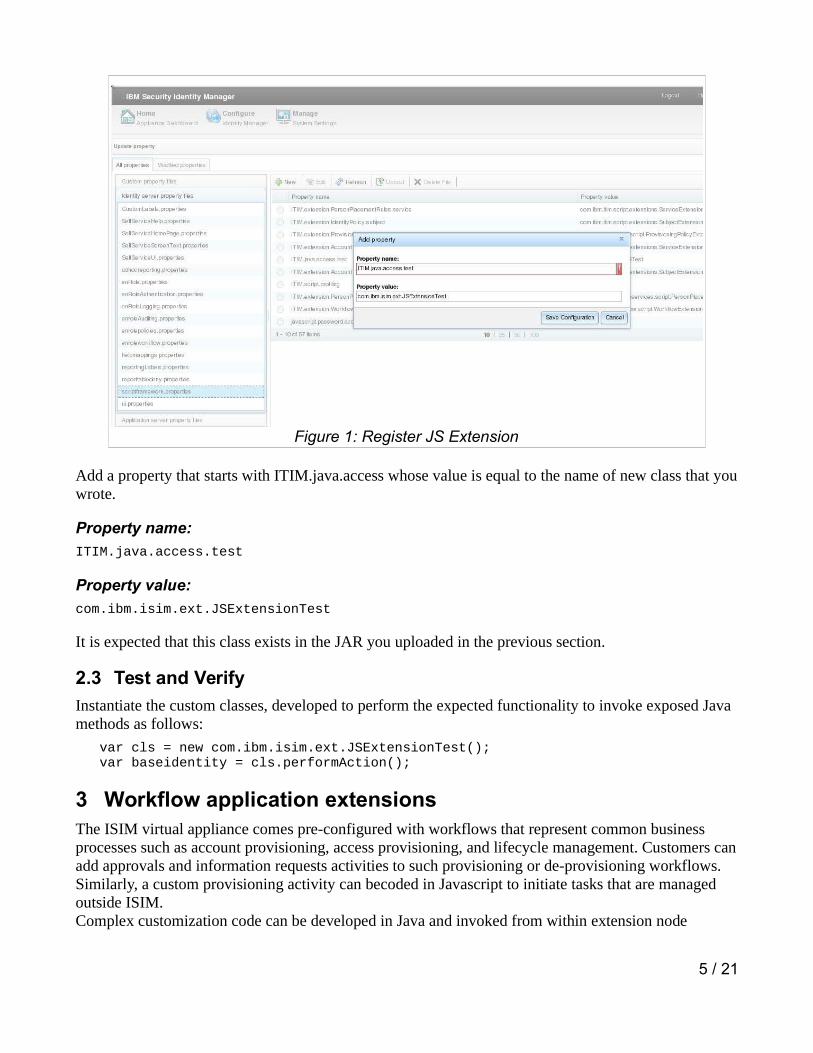
Add a property that starts with ITIM.java.access whose value is equal to the name of new class that youwrote.
Property name:
ITIM.java.access.test
Property value:
com.ibm.isim.ext.JSExtensionTest
It is expected that this class exists in the JAR you uploaded in the previous section.
2.3 Test and Verify
Instantiate the custom classes, developed to perform the expected functionality to invoke exposed Java methods as follows:
var cls = new com.ibm.isim.ext.JSExtensionTest(); var baseidentity = cls.performAction();
3 Workflow application extensionsThe ISIM virtual appliance comes pre-configured with workflows that represent common business processes such as account provisioning, access provisioning, and lifecycle management. Customers canadd approvals and information requests activities to such provisioning or de-provisioning workflows. Similarly, a custom provisioning activity can becoded in Javascript to initiate tasks that are managed outside ISIM. Complex customization code can be developed in Java and invoked from within extension node
5 / 21
Figure 1: Register JS Extension
JavaScript. This highly flexible architecture allows implementing various complex business processes.
3.1 Develop workflow extension
Refer to AsynchronousApplicationExtension.java and SynchronousApplicationExtension.java examples under /extensions/7.0/examples/workflow/ in extensions.zip (Appendix A. Download Samplecode).
Refer to Appendix B. Download libraries to download any system JARs such as itim_common.jar or itim_server_api.jar required for developing your custom extension. Develop and compile JavaScript extension classes and generate a Java archive (JAR) file – For example, myWFExtension.jar. Import this JAR file into the virtual appliance along with any other non-system, external JARs it depends on. Refer to Appendix C. External libraries to upload myWFExtension.jar.
3.2 Create workflow extension
You can create an activity in the following two ways. The first option is that you can provide the required information and create the activity that automatically generates the necessary XML snippet. Another option is that you develop the XML snippet and save it to create the activity.
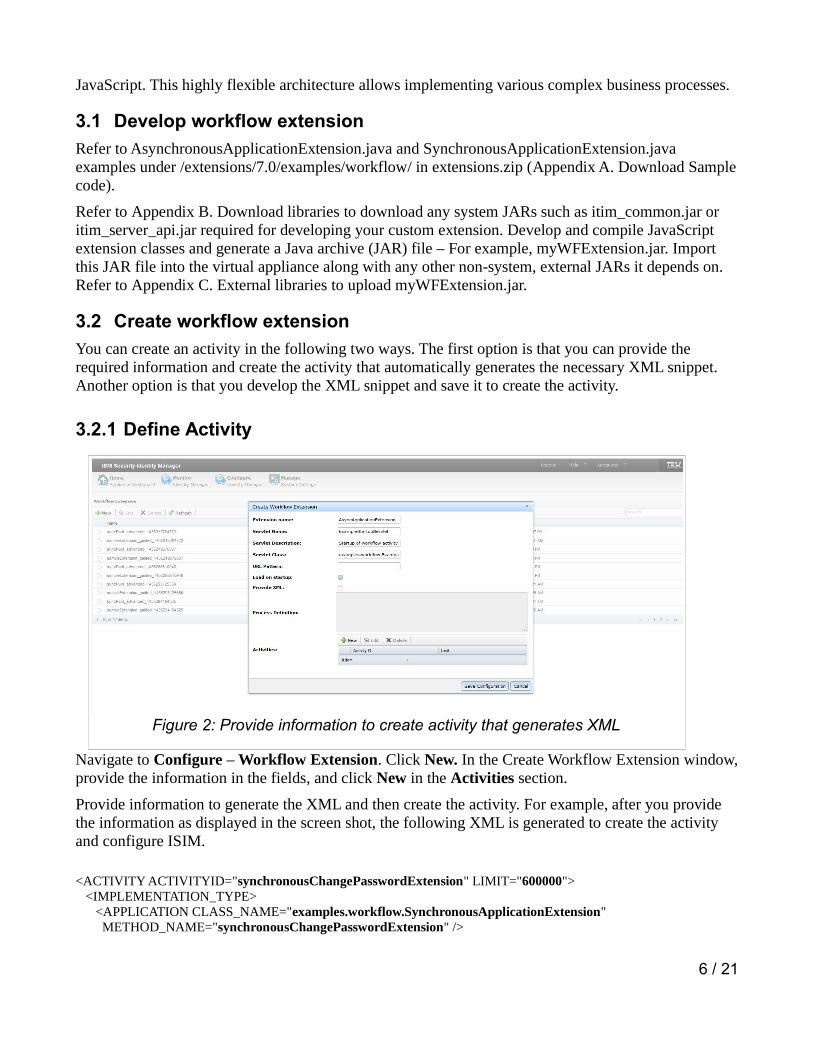
3.2.1 Define Activity
Navigate to Configure – Workflow Extension. Click New. In the Create Workflow Extension window,provide the information in the fields, and click New in the Activities section.
Provide information to generate the XML and then create the activity. For example, after you provide the information as displayed in the screen shot, the following XML is generated to create the activity and configure ISIM.
<ACTIVITY ACTIVITYID="synchronousChangePasswordExtension" LIMIT="600000"> <IMPLEMENTATION_TYPE> <APPLICATION CLASS_NAME="examples.workflow.SynchronousApplicationExtension" METHOD_NAME="synchronousChangePasswordExtension" />
6 / 21
Figure 2: Provide information to create activity that generates XML
</IMPLEMENTATION_TYPE></ACTIVITY>
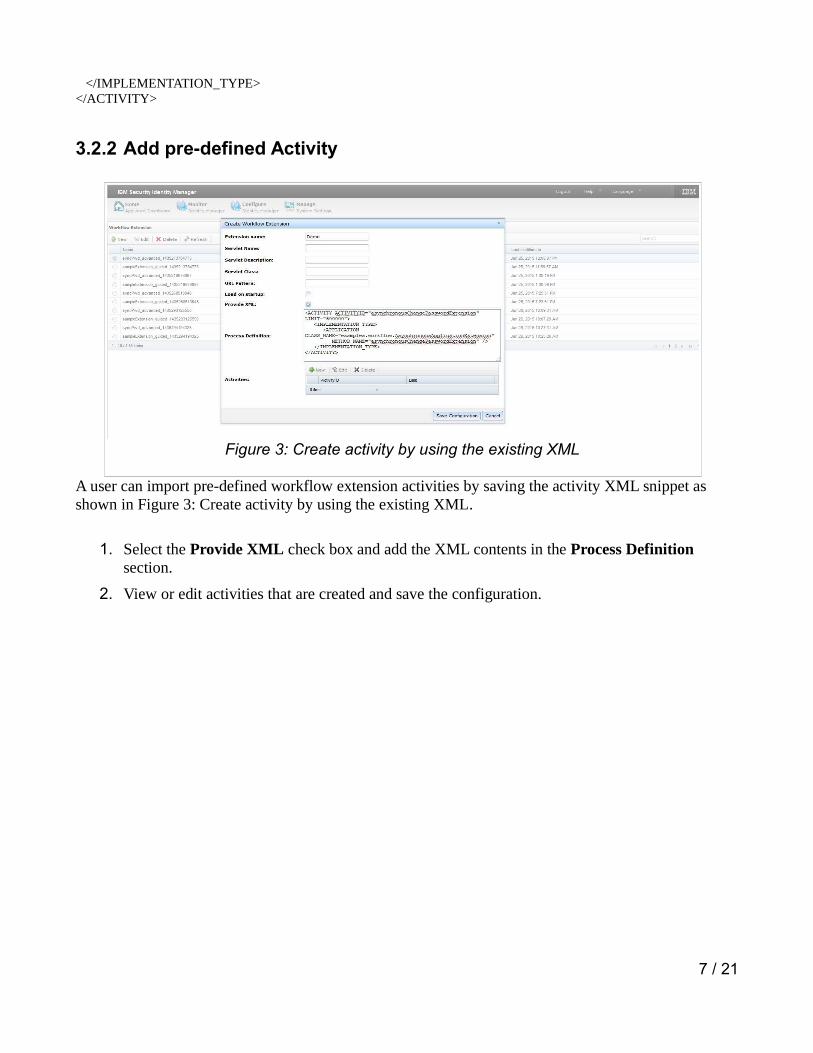
3.2.2 Add pre-defined Activity
A user can import pre-defined workflow extension activities by saving the activity XML snippet as shown in Figure 3: Create activity by using the existing XML.
1. Select the Provide XML check box and add the XML contents in the Process Definition section.
2. View or edit activities that are created and save the configuration.
7 / 21
Figure 3: Create activity by using the existing XML
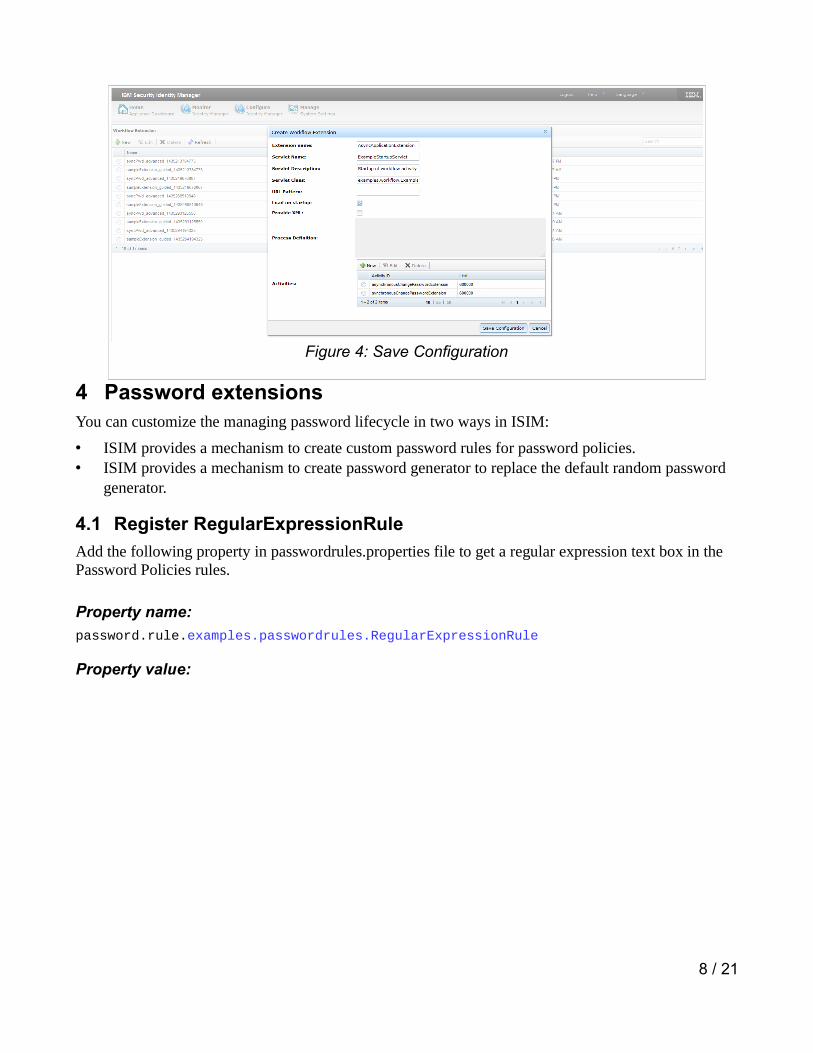
4 Password extensionsYou can customize the managing password lifecycle in two ways in ISIM:
• ISIM provides a mechanism to create custom password rules for password policies.• ISIM provides a mechanism to create password generator to replace the default random password
generator.
4.1 Register RegularExpressionRule
Add the following property in passwordrules.properties file to get a regular expression text box in the Password Policies rules.
Property name:
password.rule.examples.passwordrules.RegularExpressionRule
Property value:
8 / 21
Figure 4: Save Configuration
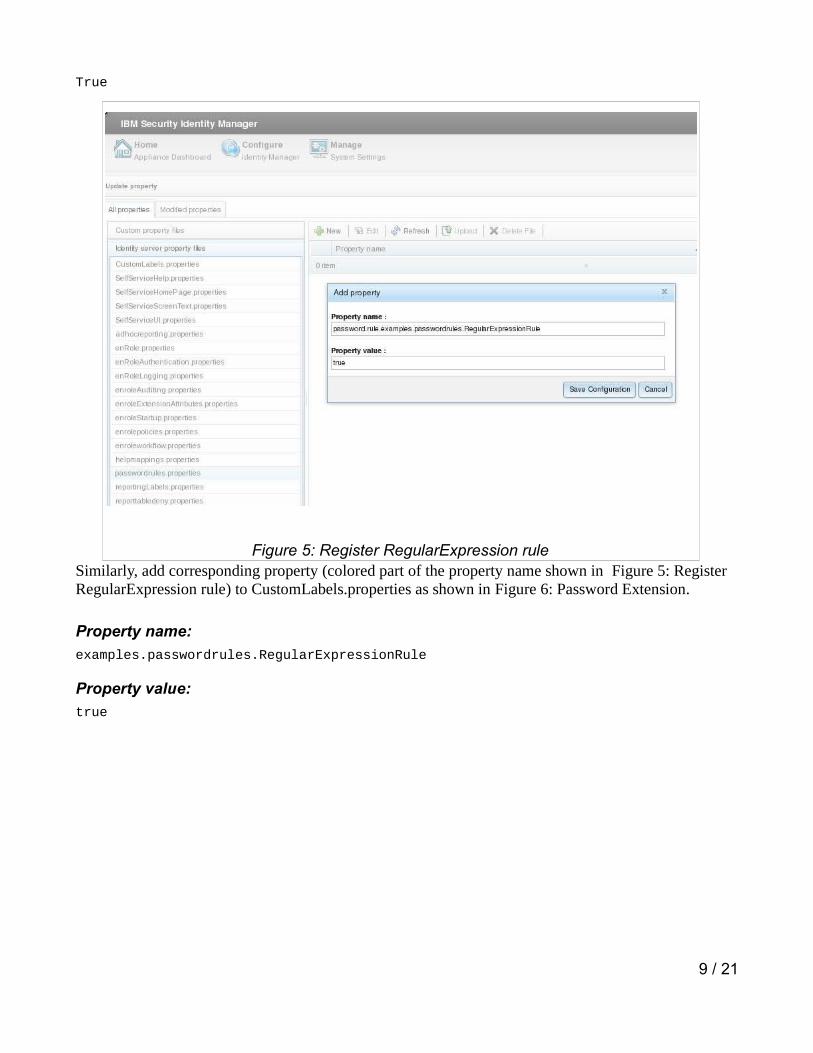
True
Similarly, add corresponding property (colored part of the property name shown in Figure 5: Register RegularExpression rule) to CustomLabels.properties as shown in Figure 6: Password Extension.
Property name:
examples.passwordrules.RegularExpressionRule
Property value:
true
9 / 21
Figure 5: Register RegularExpression rule
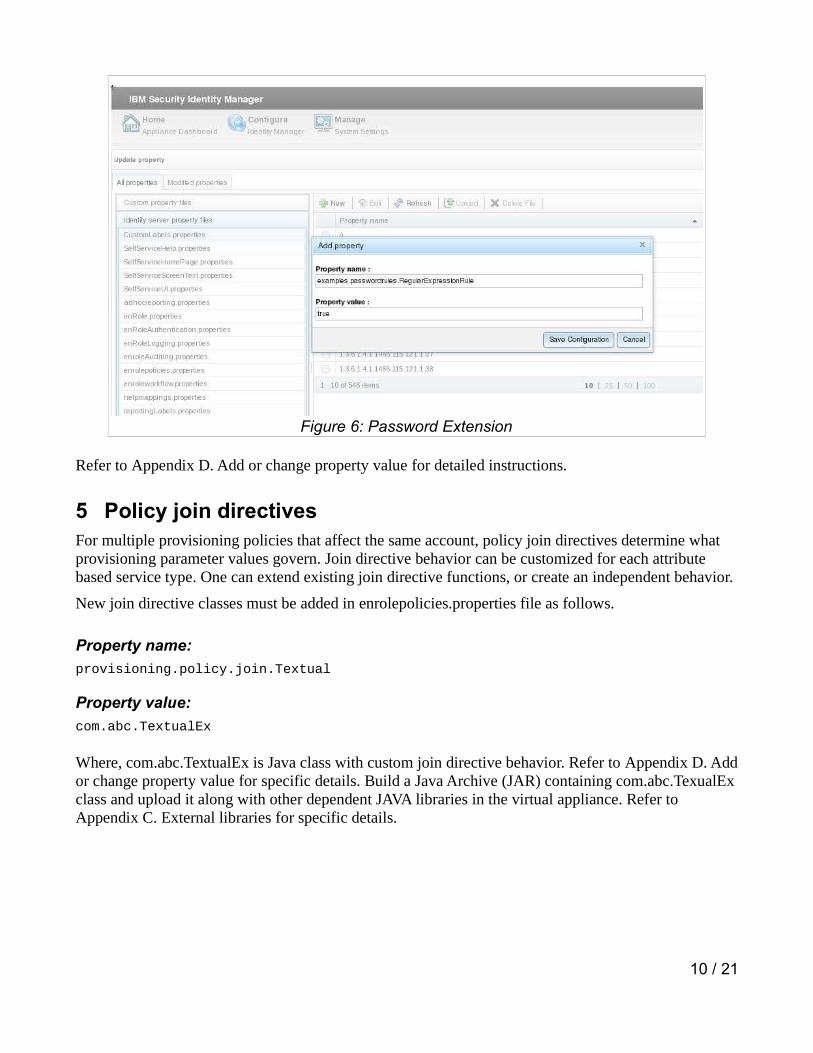
Refer to Appendix D. Add or change property value for detailed instructions.
5 Policy join directivesFor multiple provisioning policies that affect the same account, policy join directives determine what provisioning parameter values govern. Join directive behavior can be customized for each attribute based service type. One can extend existing join directive functions, or create an independent behavior.
New join directive classes must be added in enrolepolicies.properties file as follows.
Property name:
provisioning.policy.join.Textual
Property value:
com.abc.TextualEx
Where, com.abc.TextualEx is Java class with custom join directive behavior. Refer to Appendix D. Addor change property value for specific details. Build a Java Archive (JAR) containing com.abc.TexualExclass and upload it along with other dependent JAVA libraries in the virtual appliance. Refer toAppendix C. External libraries for specific details.
10 / 21
Figure 6: Password Extension
6 User InterfaceISIM provides separate interfaces for users and administrators. A newly designed Identity Service Center (ISC) UI is replacing the legacy Self-Service User Interface. Customization that are listed in theISIM Configuration Guide are supported.
6.1 Identity Service Center
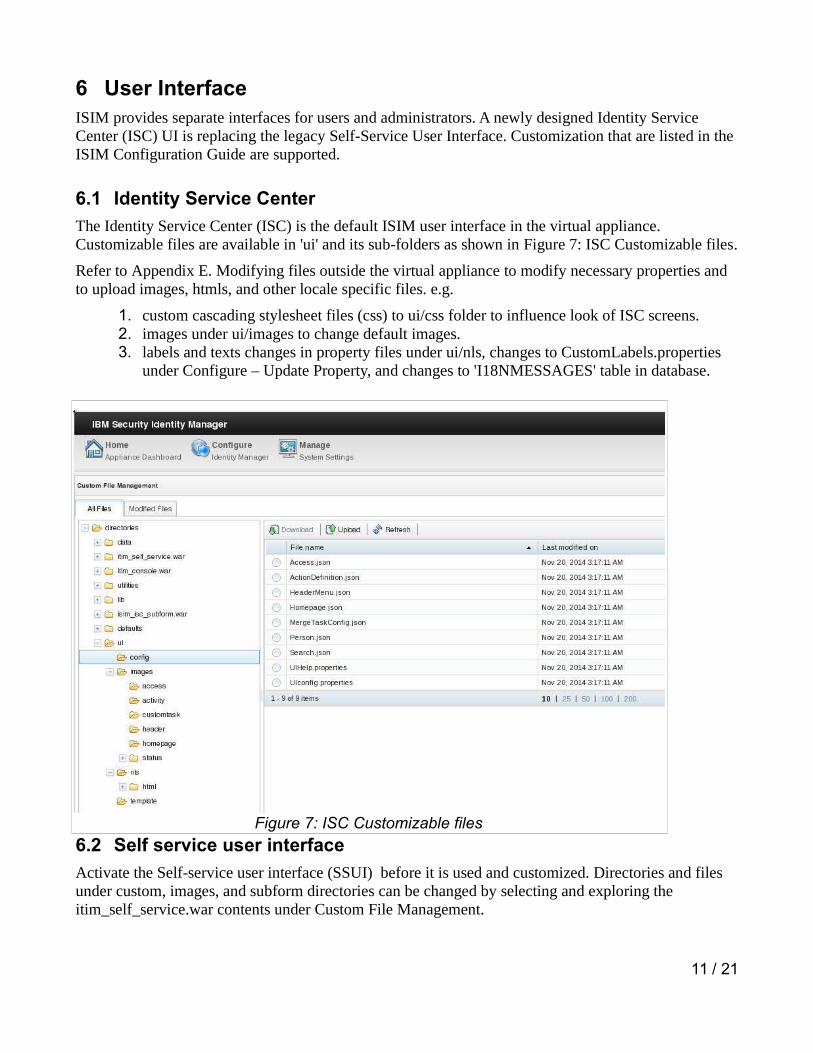
The Identity Service Center (ISC) is the default ISIM user interface in the virtual appliance. Customizable files are available in 'ui' and its sub-folders as shown in Figure 7: ISC Customizable files.
Refer to Appendix E. Modifying files outside the virtual appliance to modify necessary properties and to upload images, htmls, and other locale specific files. e.g.
1. custom cascading stylesheet files (css) to ui/css folder to influence look of ISC screens.2. images under ui/images to change default images.3. labels and texts changes in property files under ui/nls, changes to CustomLabels.properties
under Configure – Update Property, and changes to 'I18NMESSAGES' table in database.
6.2 Self service user interface
Activate the Self-service user interface (SSUI) before it is used and customized. Directories and files under custom, images, and subform directories can be changed by selecting and exploring the itim_self_service.war contents under Custom File Management.
11 / 21
Figure 7: ISC Customizable files
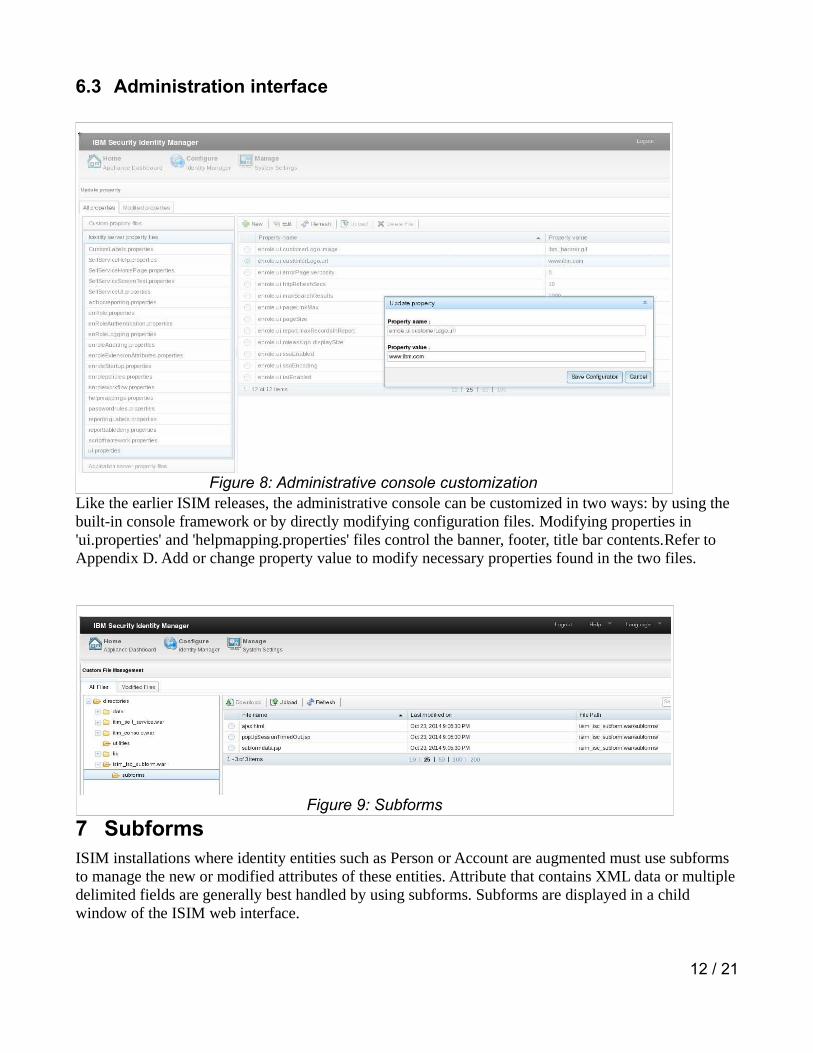
6.3 Administration interface
Like the earlier ISIM releases, the administrative console can be customized in two ways: by using the built-in console framework or by directly modifying configuration files. Modifying properties in 'ui.properties' and 'helpmapping.properties' files control the banner, footer, title bar contents.Refer toAppendix D. Add or change property value to modify necessary properties found in the two files.
7 SubformsISIM installations where identity entities such as Person or Account are augmented must use subforms to manage the new or modified attributes of these entities. Attribute that contains XML data or multipledelimited fields are generally best handled by using subforms. Subforms are displayed in a child window of the ISIM web interface.
12 / 21
Figure 9: Subforms
Figure 8: Administrative console customization
The ISIM virtual appliance supports deploying only JSPs and HTML files. These files must be placed in the subforms directory.
Navigate to Configure – Custom File Management. Select subforms folder under isim_isc_subform.war in the All Files tab. This is the location where proprietary JSPs and HTMLs should be uploaded. Similarly, to add subforms in the administrative console, select subforms folder under itim_console_war.
8 Single Sign-onSingle sign-on services provide a seamless experience for a user who accesses multiple enterprise applications in the enterprise without logging in to those applications individually. Single sign-on is enabled automatically between ISIM's self-service user interface (SSUI), Identity Service Center (ISC),and administrative console.
Two mechanisms are discussed below for ISIM to define trust between other web applications in customer's environment.
8.1 WebSEAL based authentication and SSO
You can enable SSO for ISIM self-service console applications and IBM Security Access Manager (ISAM) with WebSEAL.
1. You must install ISAM Service type by importing the ISAM service profile JAR into ISIM.2. Ensure that the user ID of the individuals match between ISIM and ISAM. Appropriate
privileges are provided to a user and the user is added to groups to enforce access authorization within ISIM.
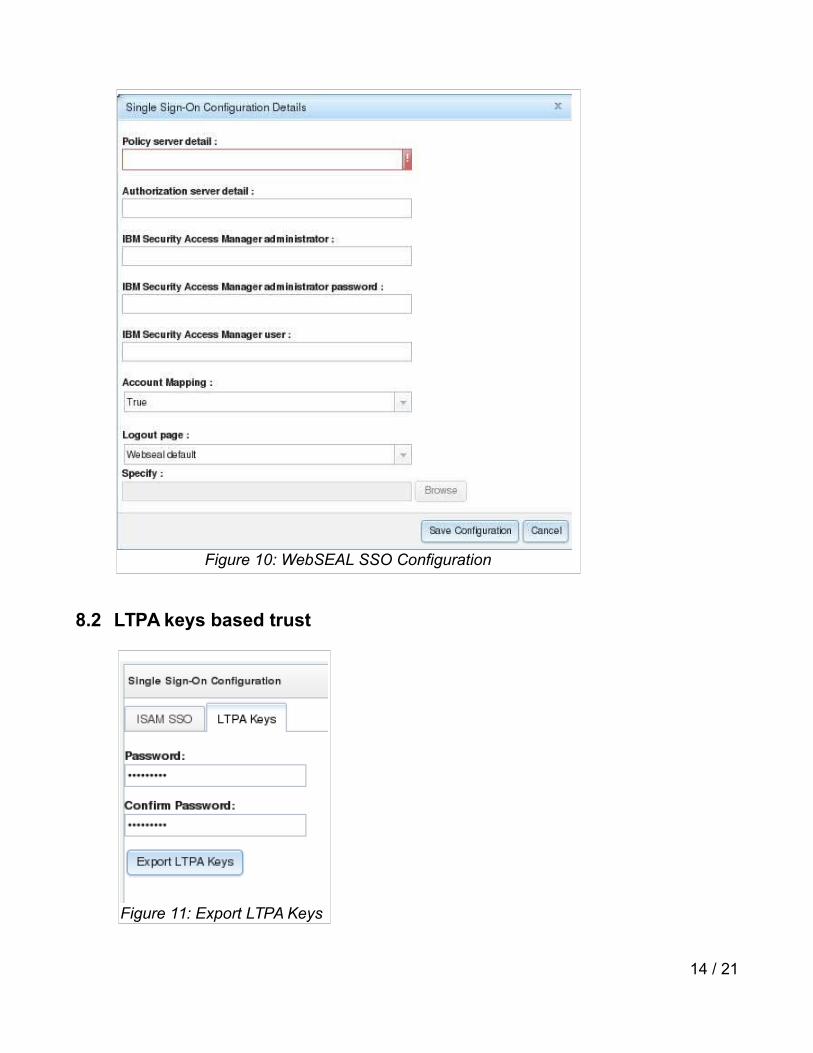
3. Create Junction between WebSEAL and the external WebSphere server.4. Configure SSO details in the ISIM virtual appliance as shown in Figure 10: WebSEAL SSO
Configuration.5. Provide ACL permissions to the junctions for ISIM self-service console applications.
13 / 21
8.2 LTPA keys based trust
14 / 21
Figure 10: WebSEAL SSO Configuration
Figure 11: Export LTPA Keys
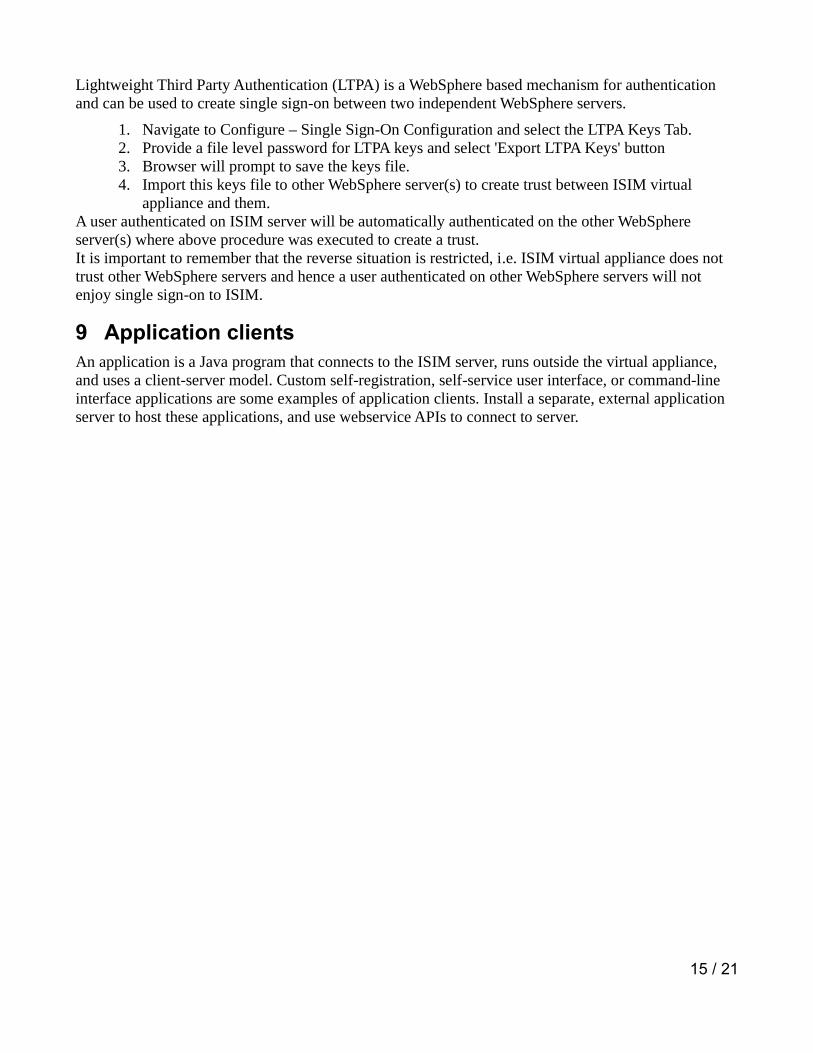
Lightweight Third Party Authentication (LTPA) is a WebSphere based mechanism for authentication and can be used to create single sign-on between two independent WebSphere servers.
1. Navigate to Configure – Single Sign-On Configuration and select the LTPA Keys Tab.2. Provide a file level password for LTPA keys and select 'Export LTPA Keys' button 3. Browser will prompt to save the keys file.4. Import this keys file to other WebSphere server(s) to create trust between ISIM virtual
appliance and them.A user authenticated on ISIM server will be automatically authenticated on the other WebSphere server(s) where above procedure was executed to create a trust.It is important to remember that the reverse situation is restricted, i.e. ISIM virtual appliance does not trust other WebSphere servers and hence a user authenticated on other WebSphere servers will not enjoy single sign-on to ISIM.
9 Application clientsAn application is a Java program that connects to the ISIM server, runs outside the virtual appliance, and uses a client-server model. Custom self-registration, self-service user interface, or command-line interface applications are some examples of application clients. Install a separate, external application server to host these applications, and use webservice APIs to connect to server.
15 / 21
10 Identity feedsIBM Security Directory Integrator (SDI)server that runs inside ISIM virtual appliance provides a fixed set of SDI feed adapters. Specifically, following service types are supplied:
• Comma-separated value (CSV) identity feed• DSML identity feed• AD OrganizationalPerson identity feed (Active Directory)• INetOrgPerson (LDAP) identity feed
Host any custom feed file adapter or connector on a separate SDI server.
11 Custom adaptersCustom adapters are used to manage accounts on platforms for which no predefined adapter is available. Host these custom connectors or adapters on a separate instance of SDI server.
12 Conclusion Most common customizations, which are expected in ISIM, continue to be available for customers in the virtual appliance. Any expectations to deploy binaries directly in a specific folder on WebSphere is severely restricted. Use logging mechanism in any custom code developed since the virtual appliance exposes only the log files for any such debugging.
13 Appendixes
13.1Appendix A. Download Sample code
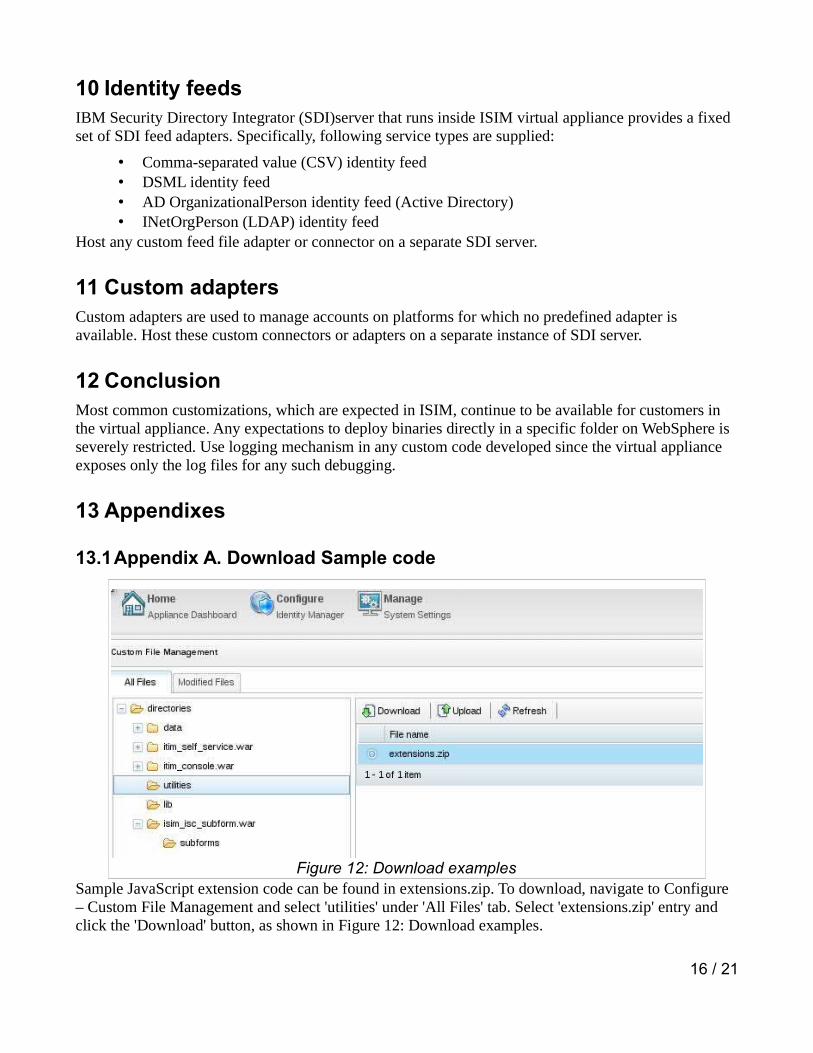
Sample JavaScript extension code can be found in extensions.zip. To download, navigate to Configure – Custom File Management and select 'utilities' under 'All Files' tab. Select 'extensions.zip' entry and click the 'Download' button, as shown in Figure 12: Download examples.
16 / 21
Figure 12: Download examples
In addition to sample code, the extensions.zip also contains all necessary ISIM and third party library files under lib folder.
13.2Appendix B. Download libraries
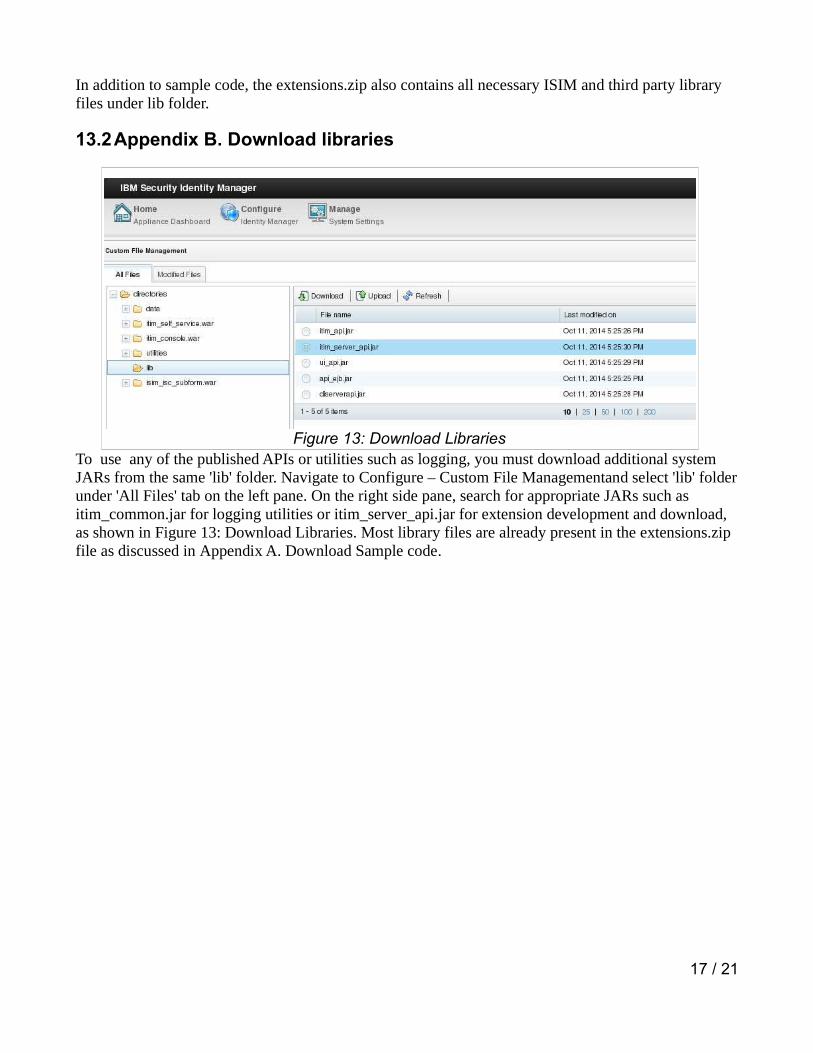
To use any of the published APIs or utilities such as logging, you must download additional system JARs from the same 'lib' folder. Navigate to Configure – Custom File Managementand select 'lib' folderunder 'All Files' tab on the left pane. On the right side pane, search for appropriate JARs such as itim_common.jar for logging utilities or itim_server_api.jar for extension development and download, as shown in Figure 13: Download Libraries. Most library files are already present in the extensions.zip file as discussed in Appendix A. Download Sample code.
17 / 21
Figure 13: Download Libraries
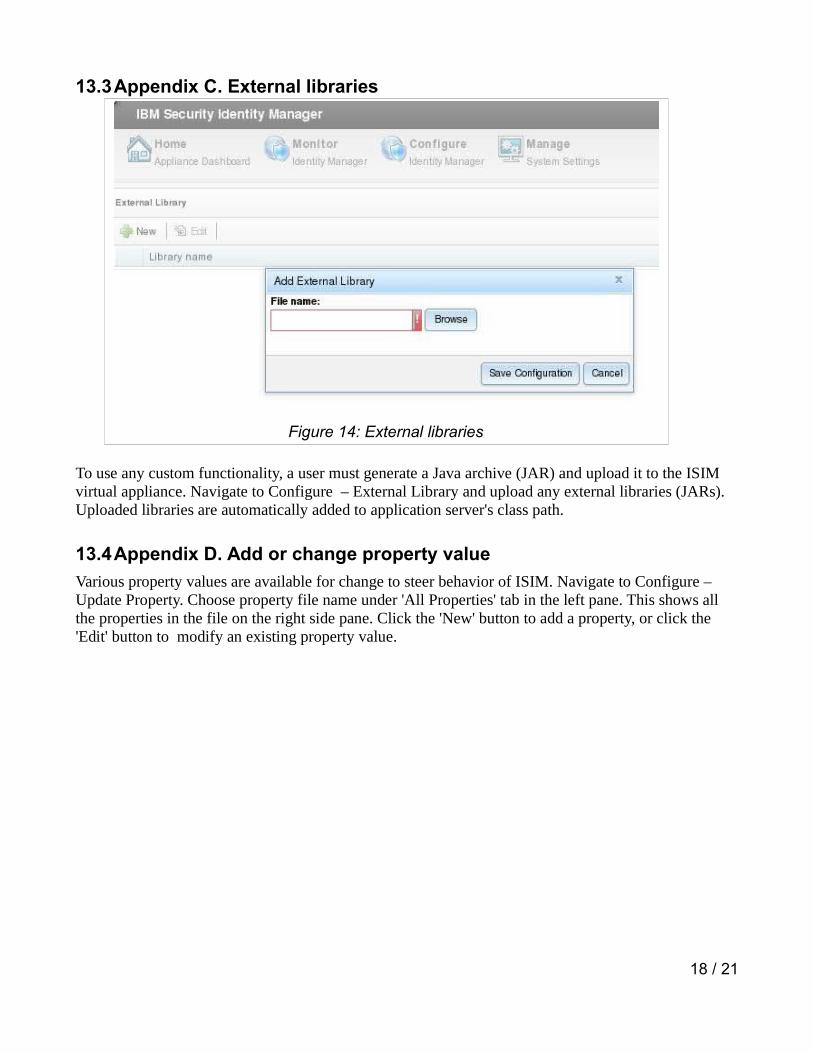
13.3Appendix C. External libraries
To use any custom functionality, a user must generate a Java archive (JAR) and upload it to the ISIM virtual appliance. Navigate to Configure – External Library and upload any external libraries (JARs). Uploaded libraries are automatically added to application server's class path.
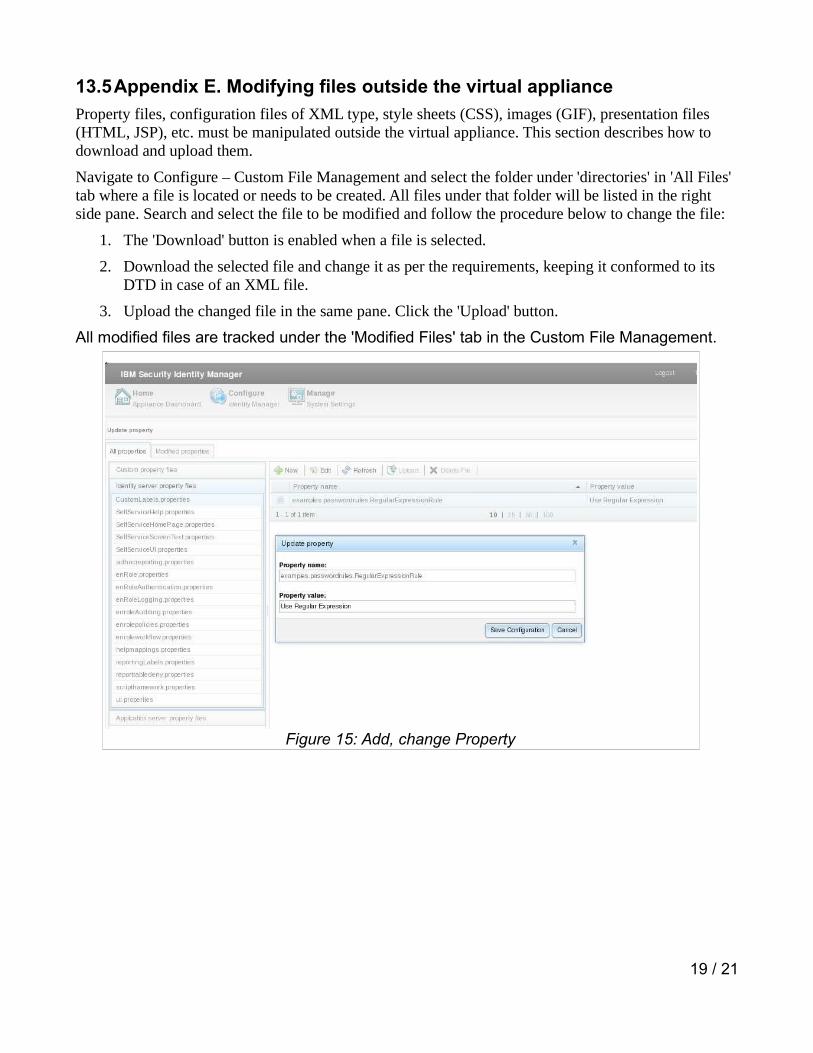
13.4Appendix D. Add or change property value
Various property values are available for change to steer behavior of ISIM. Navigate to Configure – Update Property. Choose property file name under 'All Properties' tab in the left pane. This shows all the properties in the file on the right side pane. Click the 'New' button to add a property, or click the 'Edit' button to modify an existing property value.
18 / 21
Figure 14: External libraries
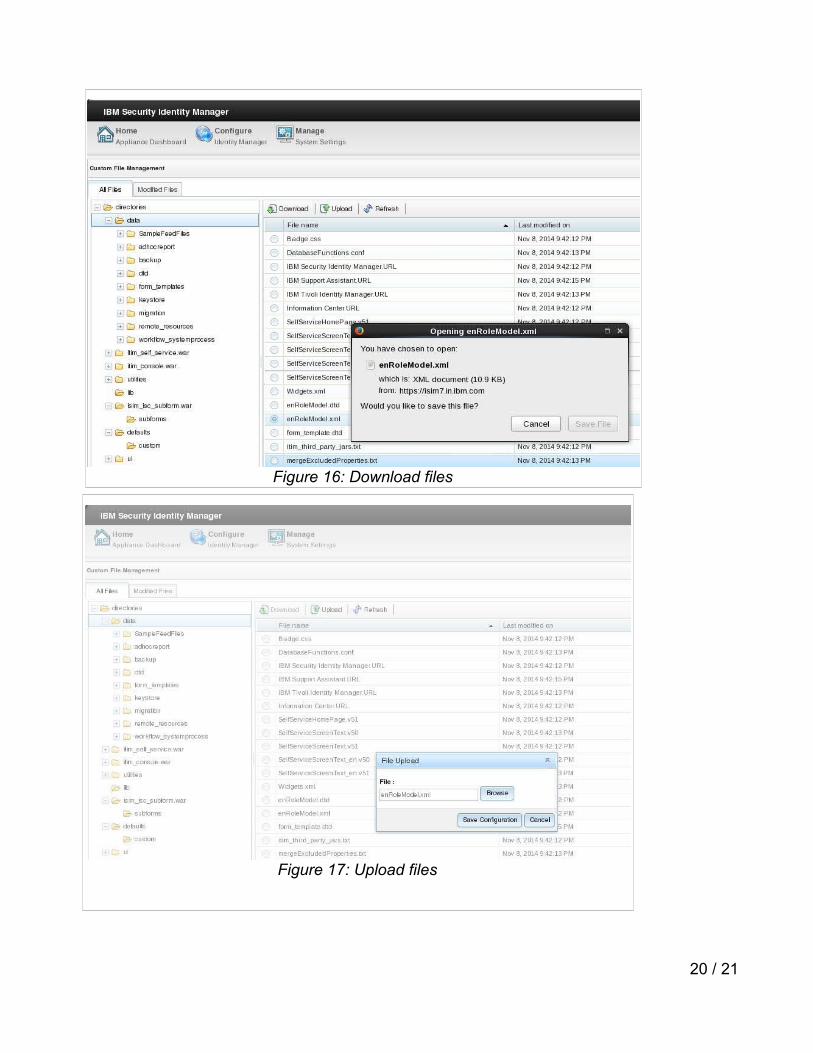
13.5Appendix E. Modifying files outside the virtual appliance
Property files, configuration files of XML type, style sheets (CSS), images (GIF), presentation files (HTML, JSP), etc. must be manipulated outside the virtual appliance. This section describes how to download and upload them.
Navigate to Configure – Custom File Management and select the folder under 'directories' in 'All Files' tab where a file is located or needs to be created. All files under that folder will be listed in the right side pane. Search and select the file to be modified and follow the procedure below to change the file:
1. The 'Download' button is enabled when a file is selected.
2. Download the selected file and change it as per the requirements, keeping it conformed to its DTD in case of an XML file.
3. Upload the changed file in the same pane. Click the 'Upload' button.
All modified files are tracked under the 'Modified Files' tab in the Custom File Management.
19 / 21
Figure 15: Add, change Property
20 / 21
Figure 16: Download files
Figure 17: Upload files

14 Resources ISIM Configuration Guide
21 / 21