Embed Size (px)
Citation preview
14464GC11
Production 1.1
November 2000
M0-13462
R11i Extend Oracle Applications: Forms
Electronic Presentation
Authors
Martin Taylor
Mildred Wang
Sara Woodhull
Technical Contributors and Reviewers
Phil Cannon
Anne Carlson
Steve Carter
Lisa Nordhagen
Mary Thomas
Peter Wallack
Publisher
Copyright © Oracle Corporation, 2000. All rights reserved.
This documentation contains proprietary information of Oracle Corporation. It isprovided under a license agreement containing restrictions on use and disclosureand is also protected by copyright law. Reverse engineering of the software isprohibited. If this documentation is delivered to a U.S. Government Agency of theDepartment of Defense, then it is delivered with Restricted Rights and thefollowing legend is applicable:
Restricted Rights Legend
Use, duplication or disclosure by the Government is subject to restrictions forcommercial computer software and shall be deemed to be Restricted Rightssoftware under Federal law, as set forth in subparagraph (c)(1)(ii) of DFARS252.227-7013, Rights in Technical Data and Computer Software (October 1988).
This material or any portion of it may not be copied in any form or by any meanswithout the express prior written permission of the Education Products group ofOracle Corporation. Any other copying is a violation of copyright law and mayresult in civil and/or criminal penalties.
If this documentation is delivered to a U.S. Government Agency not within theDepartment of Defense, then it is delivered with ìRestricted Rights,î as defined inFAR 52.227-14, Rights in Data-General, including Alternate III (June 1987).
The information in this document is subject to change without notice. If you findany problems in the documentation, please report them in writing to WorldwideEducation Services, Oracle Corporation, 500Oracle Parkway, Box SB-6,Redwood Shores, CA 94065. Oracle Corporation does not warrant that thisdocument is error-free.
Oracle and all references to Oracle Products are trademarks or registeredtrademarks of Oracle Corporation.
All other products or company names are used for identification purposes only,and may be trademarks of their respective owners.
Extend Oracle Applications: Forms - Table of Contents iii
Table of Contents
Preface
Objectives ..................................................................................................................................................I-3Before You Begin This Course ...............................................................................................................I-4Prerequisites .............................................................................................................................................I-5How This Course is Organized ..............................................................................................................I-6Other Sources of Information .................................................................................................................I-7
1 Internet Computing Architecture
Objectives ..........................................................................................................................................1-3Architecture Objectives with Internet Computing .....................................................................1-4The Internet Computing Architecture ..........................................................................................1-5The Oracle8i Database Server ........................................................................................................1-7Choosing Your Development Platform(s) ...................................................................................1-8Choosing Your Database Server Platform ...................................................................................1-9Choosing Your Forms Server Platform ......................................................................................1-10Choosing Your Developer Desktop Platform ............................................................................1-12Or Develop on a Single Machine .................................................................................................1-15The Form Development Process ..................................................................................................1-16Building Your Form ......................................................................................................................1-17Generating Your Form ..................................................................................................................1-19Running Your Form for Testing ..................................................................................................1-20Running Your Form on the Web .................................................................................................1-21Deployment ....................................................................................................................................1-22
iv Extend Oracle Applications: Forms - Table of Contents
2 Application Architecture
Objectives ..........................................................................................................................................2-3Overview of Application Development .......................................................................................2-4
Overview of Form Development Steps .................................................................................2-5Building an Application ..........................................................................................................2-6Definitions .................................................................................................................................2-7Getting Started on Your Application .....................................................................................2-8Register Your Application .....................................................................................................2-10Application Directory Structure ...........................................................................................2-12Define Your Application Basepath ......................................................................................2-17Overview of Oracle Applications Schemas ........................................................................2-19Users, Responsibilities, and Data .........................................................................................2-21Register Your Oracle User (Schema) ....................................................................................2-22Add Your Application to a Data Group ..............................................................................2-25Create a Responsibility ..........................................................................................................2-27Create an Application User ...................................................................................................2-28Register Your Tables ..............................................................................................................2-29
3 Overview of the User Interface Standards
Objectives ..........................................................................................................................................3-3Goals of the User Interface .............................................................................................................3-4Designing an Application’s Interface ............................................................................................3-5Field-Level Validation Model ........................................................................................................3-6Elements of the Interface ................................................................................................................3-7Hybrid Formats ..............................................................................................................................3-10Window and Block Relationships ...............................................................................................3-12Master and Detail Block Coordination .......................................................................................3-13Presentation Models ......................................................................................................................3-15Dynamic Layouts ...........................................................................................................................3-18Retrieving Records ........................................................................................................................3-19Indicating Attributes .....................................................................................................................3-23Navigation and Function Invocation ..........................................................................................3-24Exercise ............................................................................................................................................3-26
Extend Oracle Applications: Forms - Table of Contents v
4 Overview of Coding Standards
Objectives ..........................................................................................................................................4-3Benefits of Following Coding Standards .....................................................................................4-4Goals of the Coding Standards ......................................................................................................4-5Runtime Environment ....................................................................................................................4-6Property Classes: Definition ..........................................................................................................4-7Libraries Provide Useful Routines ................................................................................................4-8Ensure Your Form Works on the Web .........................................................................................4-9Build Forms Based on Views .......................................................................................................4-10
5 The Template Form
Objectives ..........................................................................................................................................5-3Copy TEMPLATE to Start New Forms ........................................................................................5-4TEMPLATE Inherits Object Groups from APPSTAND .............................................................5-7Property Classes ..............................................................................................................................5-8Colors and Visual Attributes .........................................................................................................5-9Toolbar and Pulldown Menu .......................................................................................................5-10TEMPLATE Inherits the Calendar ..............................................................................................5-11Special Triggers in TEMPLATE ...................................................................................................5-13
6 Menus and Function Security
Objectives ..........................................................................................................................................6-3Understand Function Security: Overview ...................................................................................6-4Function Security: Definitions .......................................................................................................6-5Relationship of Function Security to Responsibilities ................................................................6-7Setting Up Function Security .........................................................................................................6-8Naming Standards in Function Security ....................................................................................6-11Building Your Form into Your Application ...............................................................................6-14Register a Form ..............................................................................................................................6-15Register Form Functions and Subfunctions ...............................................................................6-16Create a Menu of Functions .........................................................................................................6-18Create/Tailor a Responsibility ....................................................................................................6-20Modify the User Definition ..........................................................................................................6-21
vi Extend Oracle Applications: Forms - Table of Contents
7 Container Objects
Objectives ..........................................................................................................................................7-3Modules .............................................................................................................................................7-4Windows ...........................................................................................................................................7-6Non-Modal Windows .....................................................................................................................7-8Modal Windows ...............................................................................................................................7-9Canvases ..........................................................................................................................................7-10Blocks ...............................................................................................................................................7-15Regions ............................................................................................................................................7-22Navigation ......................................................................................................................................7-27
8 Widgets
Objectives ..........................................................................................................................................8-3General Properties ...........................................................................................................................8-4Text Items ..........................................................................................................................................8-5Display Items ....................................................................................................................................8-7Check Boxes ......................................................................................................................................8-9Buttons .............................................................................................................................................8-10Option Groups ...............................................................................................................................8-13Poplists ............................................................................................................................................8-15LOVs ................................................................................................................................................8-17Descriptive Flexfields ....................................................................................................................8-20Key Flexfields .................................................................................................................................8-21
9 Layout
Objectives ..........................................................................................................................................9-3The Layout Process Chronologically ............................................................................................9-4General Layout Settings ..................................................................................................................9-5Arranging Items and Translation ..................................................................................................9-6Cosmetics and Property Classes ....................................................................................................9-8Accessibility in Oracle Forms Applications .................................................................................9-9Properties of Block Titles ..............................................................................................................9-14Regions ............................................................................................................................................9-16Properties of Region Titles ...........................................................................................................9-19
Extend Oracle Applications: Forms - Table of Contents vii
Arranging Items .............................................................................................................................9-21Setting the Prompt Properties of Widget Objects .....................................................................9-23Single-Record Items ......................................................................................................................9-25Multi-Row Item Prompts ..............................................................................................................9-27Check Boxes ....................................................................................................................................9-35Buttons ............................................................................................................................................9-37Option Groups ...............................................................................................................................9-38Descriptive Flexfields ....................................................................................................................9-39Properties of Dynamic Prompts and Titles ................................................................................9-40Conventions ....................................................................................................................................9-41
10 Coding with PL/SQL
Objectives ........................................................................................................................................10-3Overview of Coding with PL/SQL .............................................................................................10-4Use Handlers to Organize Code ..................................................................................................10-5Item Handlers Validate Items ......................................................................................................10-6Event Handlers Control Events ...................................................................................................10-8Table Handlers Manipulate Tables .............................................................................................10-9Database Tier or Application Tier? ...........................................................................................10-10Follow Coding Standards ...........................................................................................................10-11Replacements for Oracle Forms Built-Ins ................................................................................10-13Coding Triggers ...........................................................................................................................10-14Review: Triggers in TEMPLATE ...............................................................................................10-16Record history (WHO): Track Data Changes ..........................................................................10-18Debugging Your Forms ..............................................................................................................10-20Using Examine to Debug Your Forms ......................................................................................10-21
11 Coding Window and Region Behavior
Objectives ........................................................................................................................................11-3Master and Detail Windows ........................................................................................................11-4Controlling Your Windows ..........................................................................................................11-6Tabbed Regions: Three Degrees of Coding Difficulty .............................................................11-9Many Types of Tabbed Regions ................................................................................................11-10Characteristics of Tabbed Regions ............................................................................................11-15Creating Tab Canvases ...............................................................................................................11-17
viii Extend Oracle Applications: Forms - Table of Contents
Tab Related Code .........................................................................................................................11-18Example of Building a Tabbed Region (Fixed Field Case) ....................................................11-20
12 Coding Item Behavior
Objectives ........................................................................................................................................12-3Formatting Currency Fields .........................................................................................................12-4Calendar - Let’s Make a Date .......................................................................................................12-5Flexible Dates .................................................................................................................................12-7Overview of Numbers .................................................................................................................12-11Coding Dependencies Between Items ......................................................................................12-14Dynamic Item Properties ............................................................................................................12-24Item-level and Item-instance-level Properties .........................................................................12-26Getting Item Properties ...............................................................................................................12-27Using User Profiles in Your Form .............................................................................................12-28“FND: Override Directory” Profile Option for Developers ..................................................12-31
13 Message Dictionary
Objectives ........................................................................................................................................13-3Message Dictionary Overview .....................................................................................................13-4Define Messages for Your Application .......................................................................................13-5Message Content Standards .........................................................................................................13-7Generate Message Files .................................................................................................................13-9Displaying Messages Is a Two-Phase Process .........................................................................13-10Set Up Messages in the Form .....................................................................................................13-11Display Your Message in the Form ...........................................................................................13-15Call Messages from the Server ...................................................................................................13-21Other Useful Message Routines ................................................................................................13-23
14 Flexfields
Objectives ........................................................................................................................................14-3Benefits of Flexfields ......................................................................................................................14-4Look at a Flexfield ..........................................................................................................................14-5When to Use A Flexfield ...............................................................................................................14-9Your End User’s Perspective ......................................................................................................14-10
Extend Oracle Applications: Forms - Table of Contents ix
Intelligent Keys ............................................................................................................................14-11Key Flexfields in Oracle Applications ......................................................................................14-13Create Key flexfield Combinations ...........................................................................................14-14Key Flexfield Combinations Table ............................................................................................14-15Use Three Types of Key Flexfield Forms .................................................................................14-17Use Qualifiers to Identify Key Segments .................................................................................14-21Use Segment Qualifiers to Identify Values ..............................................................................14-25Create New Combinations Dynamically .................................................................................14-27Descriptive Flexfields Table Structure ......................................................................................14-29Overview of Developing a Flexfield .........................................................................................14-30
Stage 1: Designing the Table Structure ..............................................................................14-31Stage 2: Creating the Fields .................................................................................................14-35Stage 3: Calling Flexfield Routines ....................................................................................14-37Stage 4: Registration .............................................................................................................14-44Stage 5: Definition ................................................................................................................14-51
Flexfield View Generation ..........................................................................................................14-60
15 Query Find
Objectives ........................................................................................................................................15-3Overview of Query Find ...............................................................................................................15-4Create a Row-LOV .........................................................................................................................15-7Create a Find Window ..................................................................................................................15-8
16 Menus and Advanced Function Security
Objectives ........................................................................................................................................16-3Understand Function Security: Review .....................................................................................16-4Review: Subfunction Naming Standards ...................................................................................16-5Register Form Functions and Subfunctions ...............................................................................16-6Create a Menu of Functions .........................................................................................................16-7Advanced Function Security ........................................................................................................16-8Code the Form to Test a Subfunction .........................................................................................16-9Open Forms from Form Logic ...................................................................................................16-10Add Choices to the Special Menus ...........................................................................................16-12Example: Using the Special Menu with FND_FUNCTION.TEST ........................................16-16Right Mouse Button Menus (Popup Menus) ...........................................................................16-17
x Extend Oracle Applications: Forms - Table of Contents
Coding Custom Right Mouse Button Menu Entries ...............................................................16-18
17 Attachments
Objectives ........................................................................................................................................17-3Overview of the Attachments Feature ........................................................................................17-4Definitions .......................................................................................................................................17-5Plan the Attachments Feature for Your Application ................................................................17-7Define the Attachments Feature ...................................................................................................17-9Set Up Entities ..............................................................................................................................17-10Set Up Document Categories .....................................................................................................17-11Set Up Attachment Functions ....................................................................................................17-12Add and View Attachments from Your Form .........................................................................17-16
A - Order Entry Workshop
Your Order Entry Workshop Project ...........................................................................................A-3Order Form Specifications .............................................................................................................A-4Order Form Inquiry Features ........................................................................................................A-8Tables and Predefined Data: Salespeople .................................................................................A-10Tables and Predefined Data: Customers ...................................................................................A-14Tables and Predefined Data: Products ......................................................................................A-17Tables and Predefined Data: Orders ..........................................................................................A-21Tables and Predefined Data: Order Lines .................................................................................A-29Register Flexfield Tables ..............................................................................................................A-34
B - Practices
Login Information B-3Lab 1: Architecture .................................................................................................................. B-4Lab 2: Menus and Function Security .................................................................................... B-5Lab 3: Container Objects ......................................................................................................... B-7Lab 4: Widgets ........................................................................................................................ B-12Lab 5: Layout .......................................................................................................................... B-18Lab 6: Enhance Items: Create LOVs .................................................................................... B-20Lab 7: Coding with PL/SQL ................................................................................................ B-22Lab 8: Controlling Windows ................................................................................................ B-26
Extend Oracle Applications: Forms - Table of Contents xi
Lab 9: Tabbed Regions .......................................................................................................... B-28Lab 10: Currency Fields ........................................................................................................ B-31Lab 11: Runtime Behavior .................................................................................................... B-32Lab 12: Conditionally Dependent Items ............................................................................ B-33Lab 13: Message Dictionary ................................................................................................. B-34Lab 14: Flexfields ................................................................................................................... B-35Lab 15: Query Find ................................................................................................................ B-36Lab 16: Advanced Function Security .................................................................................. B-37Lab 17: Setting Up Attachments .......................................................................................... B-39Lab 18: Testing and Reviewing Your Form ....................................................................... B-41
C - Practices and Solutions
Login Information .......................................................................................................................... C-3Lab 1: Architecture .................................................................................................................. C-4Lab 2: Menus and Function Security .................................................................................... C-5Lab 3: Container Objects ......................................................................................................... C-8Lab 4: Widgets ....................................................................................................................... C-15Lab 5: Layout .......................................................................................................................... C-21Lab 6: Enhance Items: Create LOVs ....................................................................................C-24Lab 7: Coding with PL/SQL ................................................................................................ C-28Lab 8: Controlling Windows ................................................................................................ C-35Lab 9: Tabbed Regions .......................................................................................................... C-40Lab 10: Currency Fields ........................................................................................................ C-48Lab 11: Runtime Behavior .................................................................................................... C-51Lab 12: Conditionally Dependent Items ............................................................................ C-53Lab 13: Message Dictionary ................................................................................................. C-57Lab 14: Flexfields ................................................................................................................... C-59Lab 15: Query Find ................................................................................................................C-63Lab 16: Advanced Function Security .................................................................................. C-65Lab 17: Setting Up Attachments ..........................................................................................C-68Lab 18: Testing and Reviewing Your Form ....................................................................... C-70

xii Extend Oracle Applications: Forms - Table of Contents

................................
Preface

.....................................................................................................................................................I-2 R11i Extend Oracle Applications: Forms - Preface
.....................................................................................................................................................Preface
.....................................................................................................................................................R11i Extend Oracle Applications: Forms - Preface I-3
.....................................................................................................................................................Objectives
ObjectivesAt the end of this course, you should be able to:
• Describe the philosophy behind the Oracle Applications standards.
• Describe the environments the standards are designed for.
• Build a form conforming to the Oracle Applications User Interface and Coding Standards.
• Define application menus and related features.
.....................................................................................................................................................I-4 R11i Extend Oracle Applications: Forms - Preface
.....................................................................................................................................................Preface
Before You Begin This CourseBefore you begin this course, you should have working experience with :
• Oracle Forms Developer 6i
• Oracle8i Enterprise Edition Release 8.1.6
• PL/SQL 8
• Graphical User Interfaces (GUI) such as Microsoft Windows
• Applications Architecture Release 11i (11.5.0 or greater)
• Planning and Defining Oracle Applications Flexfields
• Oracle Applications System Administration
.....................................................................................................................................................R11i Extend Oracle Applications: Forms - Preface I-5
.....................................................................................................................................................Prerequisites
PrerequisitesThe required prerequisites for this course are:
• Oracle Forms Developer 6i: Build Internet Applications I or Oracle Developer 1.6 (Forms 4.5) I
• Introduction to Oracle SQL and PL/SQL (ILT)
• PL/SQL Fundamentals (ILT)
• Develop PL/SQL Program Units (41024, ILT)
The suggested prerequisites for this course are:
• Oracle Forms Developer 6i: Build Internet Applications II or Oracle Developer 1.6 (Forms 4.5) II
• Defining Flexfields (ILT, either Release 11 or 11i)
• Oracle Applications System Administration (ILT, either Release 11 or 11i)
This course assumes you are using the following development environment:
• Oracle Forms Developer version 6i (6.0.8 or greater)
• Oracle Application Object Library Release 11i (11.5.0 or greater)
• Oracle8i Enterprise Edition Release 8.1.6
.....................................................................................................................................................I-6 R11i Extend Oracle Applications: Forms - Preface
.....................................................................................................................................................Preface
How This Course is Organized“Extend Oracle Applications: Forms” is an instructor-led course featuring lecture and hands-on exercises. Online demonstrations and written practice sessions reinforce the concepts and skills introduced.
.....................................................................................................................................................R11i Extend Oracle Applications: Forms - Preface I-7
.....................................................................................................................................................Other Sources of Information
Other Sources of InformationThis course is primarily based on information from the following Release 11i Oracle Applications manuals, and you can find further information in these manuals:
• Oracle Applications Developer’s Guide
• Oracle Applications User Interface Standards for Forms-Based Products
The following manuals provide additional information that you may find helpful for doing custom development:
• Oracle Applications System Administrator’s Guide
• Oracle Applications Concepts
• Installing Oracle Applications
• Upgrading Oracle Applications
• Oracle Applications User’s Guide
These manuals are available in the Oracle Applications Documentation Library CD in Adobe Acrobat format and/or as online help. You may also purchase printed, English versions of the documentation online via the Oracle Store at http://oraclestore.oracle.com.
.....................................................................................................................................................I-8 R11i Extend Oracle Applications: Forms - Preface
.....................................................................................................................................................Preface

.................................
Internet ComputingArchitecture
.....................................................................................................................................................1-2 R11i Extend Oracle Applications: Forms - Internet Computing Architecture
.....................................................................................................................................................Lesson 1: Internet Computing Architecture
.....................................................................................................................................................R11i Extend Oracle Applications: Forms - Internet Computing Architecture 1-3
.....................................................................................................................................................Objectives
ObjectivesAt the end of this lesson, you should be able to:
• Explain the Internet Computing architecture
.....................................................................................................................................................1-4 R11i Extend Oracle Applications: Forms - Internet Computing Architecture
.....................................................................................................................................................Lesson 1: Internet Computing Architecture
Architecture Objectives with Internet ComputingThe right architecture maximizes customers’ return on their application investment by making the best use of available administration, desktop, server, and network resources.
Oracle Applications Goals
• Provide a highly capable, highly-responsive, fully graphical user interface
• Reduce cost and complexity of installing and maintaining client software on each desktop
• Minimize network traffic between client and server computers, allowing transactions to execute in a few seconds in local area networks (LANs) and fast wide area networks (WANs)
• Exploit the full processing power of high-end, scalable servers, including clustered and massively-parallel servers
Make Optimal Use of Available Resources
• Make the best use of server computers, while making the best use of a desktop client
– Processing cycle cost is not the issue, since servers are built with the same commodity components as PCs
• Avoid overloading the network that connects desktop client and server computers
– Network performance has the most influence on users’ perceptions of application performance
• Make the best use of scarce administration resources
– Administrative labor cost influences long-term cost of ownership
.....................................................................................................................................................R11i Extend Oracle Applications: Forms - Internet Computing Architecture 1-5
.....................................................................................................................................................The Internet Computing Architecture
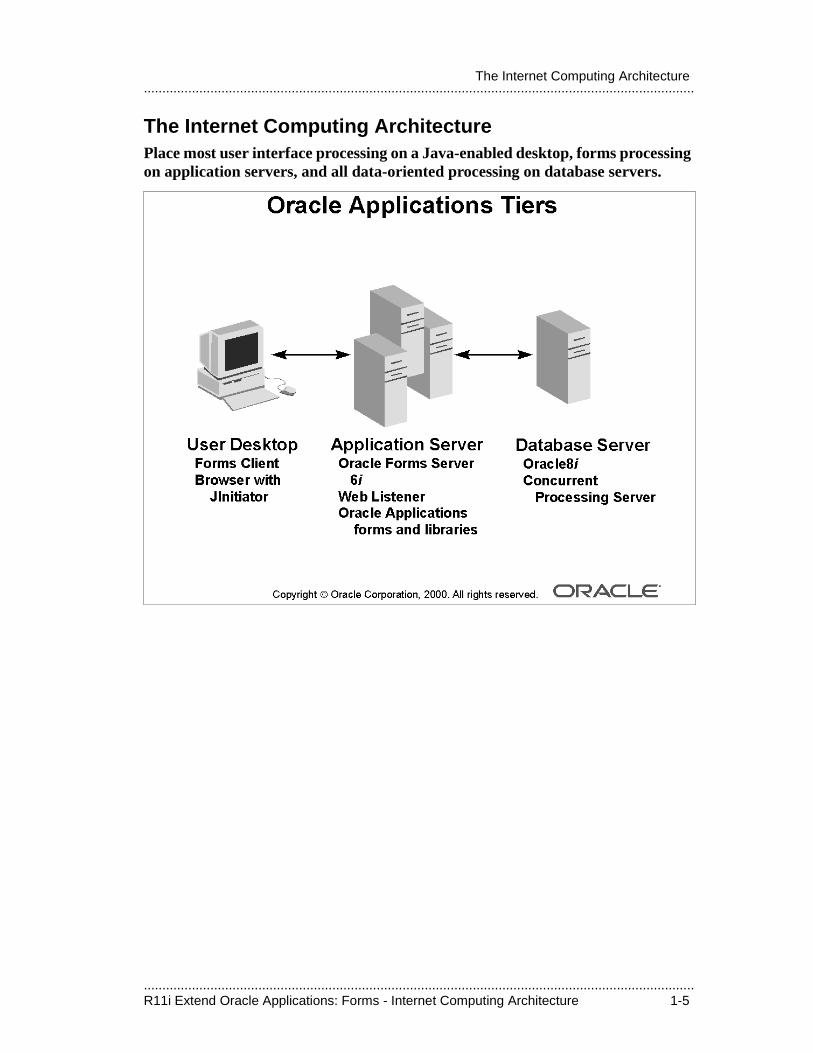
The Internet Computing ArchitecturePlace most user interface processing on a Java-enabled desktop, forms processing on application servers, and all data-oriented processing on database servers.
.....................................................................................................................................................1-6 R11i Extend Oracle Applications: Forms - Internet Computing Architecture
.....................................................................................................................................................Lesson 1: Internet Computing Architecture
Maximize the use of client and server resources while minimizing administration effort and network use.
Desktop Client
• Full graphical user interface, with user interface display handled by a standard Java-enabled browser running JInitiator
– Oracle JInitiator is Oracle’s version of JavaSoft’s Java Plug-In. Oracle JInitiator provides the ability to specify the use of a specific Java Virtual Machine (JVM) on Web clients instead of relying on a browser’s default JVM
• Closely integrated windows present an entire business flow
• Deploy on any PC, network computer, or other desktop on which Java is available
Middle Tier (Forms Server)
• User interface logic happens on the forms server
• Key reference data cached locally (on the middle tier)
• Few network calls to database server needed
Database Server
• Remote Procedure Calls (RPCs) communicate with the database server when necessary
– Single RPC to stored procedures can initiate multiple database actions (SQL statements)
• Server handles data-oriented applications processing (for example, calculating tax on a sales order)
• Stored procedures are in the database, so communications between stored procedures and the database occur in memory, not across the network
.....................................................................................................................................................R11i Extend Oracle Applications: Forms - Internet Computing Architecture 1-7
.....................................................................................................................................................The Oracle8i Database Server
The Oracle8i Database ServerBenefits of the Oracle8i Database Server:
Oracle Applications are Fully Scalable on all Oracle Servers
• Use state-of-the-art Oracle Parallel Server technology
• Parallelism at other layers of the architecture includes query processing, batch processing, transaction processing, and application module processing
Use Multiple Nodes to Achieve Higher Performance
• Multiple database instances and their embedded applications servers are distributed across multiple nodes of a cluster or a massively parallel (MPP) system
• Having multiple nodes also provides better reliability
Single Database
• Using only the Oracle 8i database allows for optimization and use of all features rather than using the lowest common denominator
Stored Procedures for Applications Server Logic
• Storing logic directly in the database allows access to data at RAM speeds rather than network speed
Modularity
• Share stored procedures with multiple forms or reports processes
.....................................................................................................................................................1-8 R11i Extend Oracle Applications: Forms - Internet Computing Architecture
.....................................................................................................................................................Lesson 1: Internet Computing Architecture
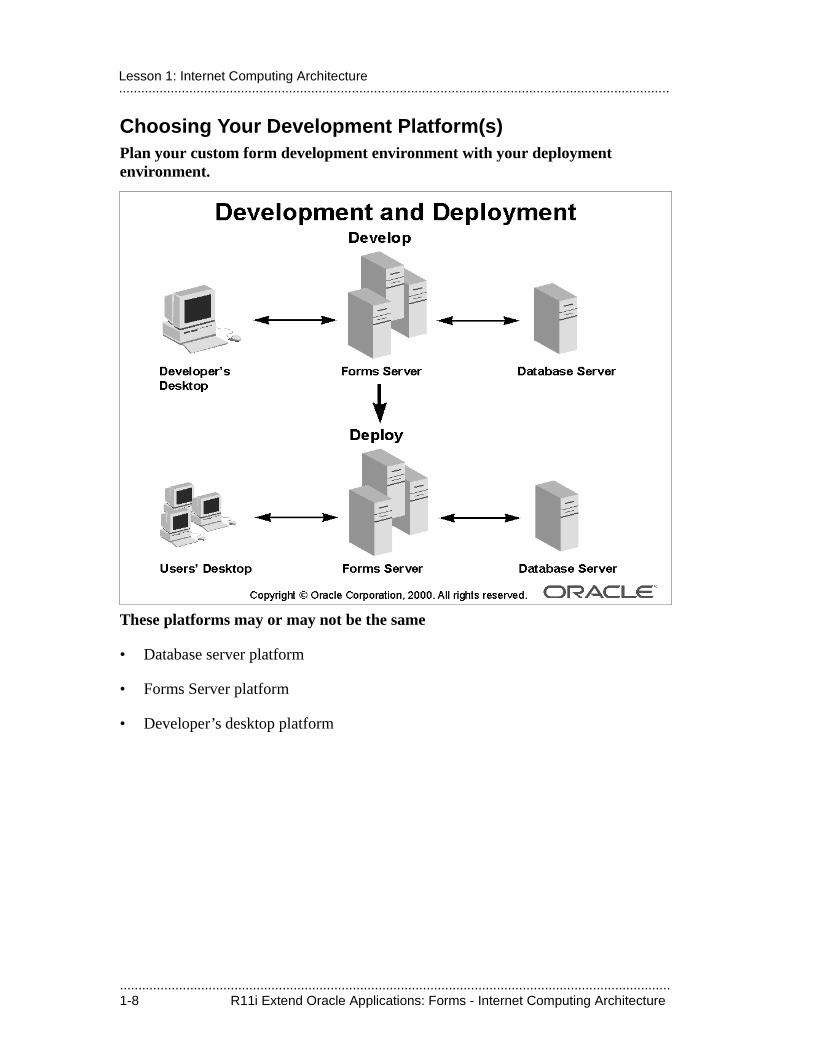
Choosing Your Development Platform(s)Plan your custom form development environment with your deployment environment.
These platforms may or may not be the same
• Database server platform
• Forms Server platform
• Developer’s desktop platform
.....................................................................................................................................................R11i Extend Oracle Applications: Forms - Internet Computing Architecture 1-9
.....................................................................................................................................................Choosing Your Database Server Platform
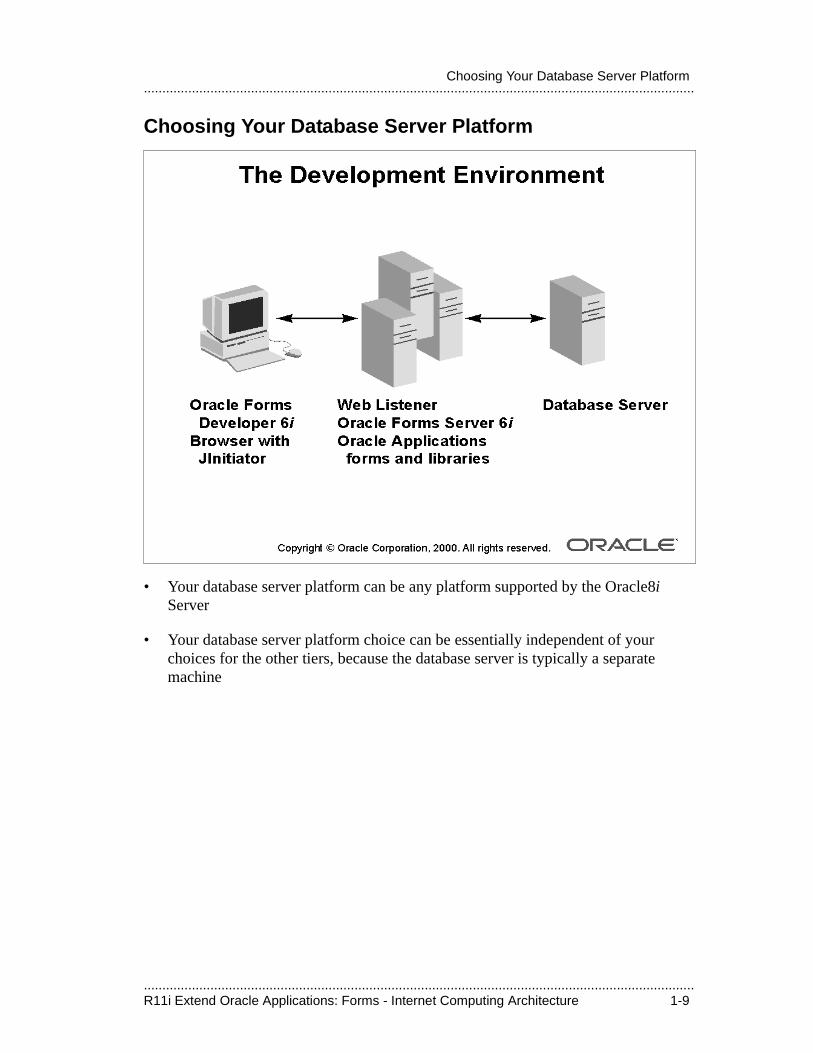
Choosing Your Database Server Platform
• Your database server platform can be any platform supported by the Oracle8i Server
• Your database server platform choice can be essentially independent of your choices for the other tiers, because the database server is typically a separate machine
.....................................................................................................................................................1-10 R11i Extend Oracle Applications: Forms - Internet Computing Architecture
.....................................................................................................................................................Lesson 1: Internet Computing Architecture
Choosing Your Forms Server PlatformYour choice of the deployment platform for the Forms Server affects your development environment choices.
Choose Unix or Windows NT
• You can have your deployment Forms Server either on a Microsoft Windows NT server or on a Unix server.
Match Development and Deployment Platforms
• Oracle recommends that you have your development Forms Server on the same platform as the deployment Forms Server
– Development and deployment should be on different machines
• Maintain exactly the same set of software patches on both environments to allow smooth testing and migration of your custom application
– Oracle Applications software includes user exit code whose executable files are platform specific and cannot simply be moved from one platform to another
.....................................................................................................................................................R11i Extend Oracle Applications: Forms - Internet Computing Architecture 1-11
.....................................................................................................................................................Choosing Your Forms Server Platform
If Development and Deployment Forms Server Platforms Do Not Match
• If the two environments are on different platforms, you will have to keep the patch levels synchronized and obtain any patches for both platforms
• You can maintain a third environment, with exactly the same platform and patch level as your deployment environment, for testing your customizations before deployment
Consider a Source-Control System
• Having the Forms Server on a centrally-administered server machine facilitates using a source control system
• A source control system is helpful in managing shared development where you have many developers
• Make your source-control system choice, if any, when you choose your Forms Server
.....................................................................................................................................................1-12 R11i Extend Oracle Applications: Forms - Internet Computing Architecture
.....................................................................................................................................................Lesson 1: Internet Computing Architecture
Choosing Your Developer Desktop PlatformOnce you have chosen your Forms Server platform for development, you have several other choices for other parts of the development environment.
If Your Forms Server Platform Is NT 4.0
• If your Forms Server platform is Microsoft Windows NT 4.0, having Windows 98 or NT 4.0 as your developer desktop environment is the natural choice.
• Typically you would set up your PC network to map the developer desktop drives to the same application directory structures used by the Forms Server machine.
• To lower the administration complexity of having Oracle Forms Developer installed on all of your PCs, you can use Windows Terminal Server or a similar product to manage a shared installation of Oracle Forms Developer.
.....................................................................................................................................................R11i Extend Oracle Applications: Forms - Internet Computing Architecture 1-13
.....................................................................................................................................................Choosing Your Developer Desktop Platform
If Your Forms Server Platform Is UNIX
• If your Forms Server platform is UNIX, you currently have these choices for the developer desktop platform:
– PCs with Microsoft Windows 98 or NT 4.0 running Oracle Forms Developer (Windows version) and the browser with JInitiator
– PCs with Microsoft Windows 98 or NT 4.0 running the browser with JInitiator and running UNIX emulation software that provides a UNIX version of Oracle Forms Developer
– PCs with Microsoft Windows 98 or NT 4.0 running the browser, and UNIX workstations running a UNIX version of Oracle Forms Developer
• To test your forms with the browser with JInitiator, you need at least one PC for your development environment
.....................................................................................................................................................1-14 R11i Extend Oracle Applications: Forms - Internet Computing Architecture
.....................................................................................................................................................Lesson 1: Internet Computing Architecture
Share Oracle Forms Developer Installations
• To lower the administration complexity of having Oracle Forms Developer installed on all of your PCs, you can use Windows Terminal Server or similar software to manage a shared installation of Oracle Forms Developer.
• If you are using Oracle Forms Developer on UNIX you typically use a shared installation
Keep Your Options Open
• You can use a mix of desktop platforms in the development environment. For example, some developers can develop forms using Microsoft Windows 98 but generate their forms using UNIX, while other developers can build and generate their forms on a UNIX desktop such as Sun Solaris.
• The key point is that code generation occurs on the forms server platform.
.....................................................................................................................................................R11i Extend Oracle Applications: Forms - Internet Computing Architecture 1-15
.....................................................................................................................................................Or Develop on a Single Machine
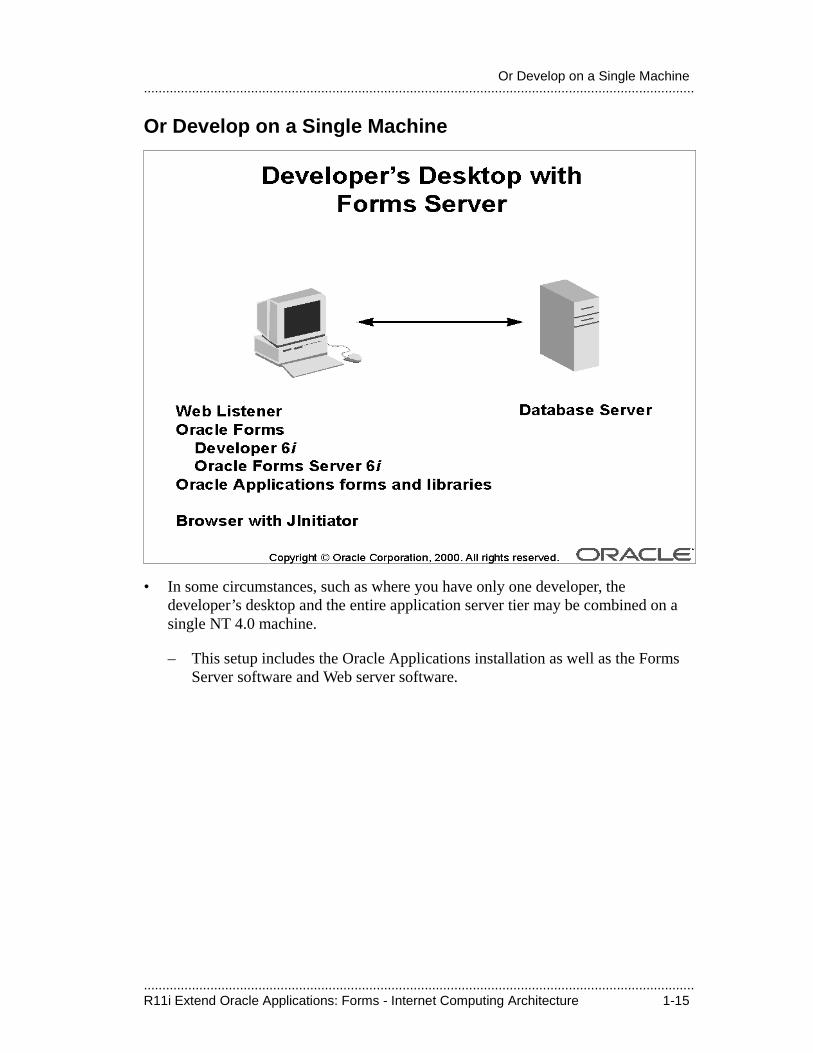
Or Develop on a Single Machine
• In some circumstances, such as where you have only one developer, the developer’s desktop and the entire application server tier may be combined on a single NT 4.0 machine.
– This setup includes the Oracle Applications installation as well as the Forms Server software and Web server software.
.....................................................................................................................................................1-16 R11i Extend Oracle Applications: Forms - Internet Computing Architecture
.....................................................................................................................................................Lesson 1: Internet Computing Architecture
The Form Development ProcessAt its simplest, the form development process with Oracle Developer breaks down to three main steps that take place on different parts of your Internet Computing setup.
Three Steps
• Build
• Generate
• Run/Test
.....................................................................................................................................................R11i Extend Oracle Applications: Forms - Internet Computing Architecture 1-17
.....................................................................................................................................................Building Your Form
Building Your FormYou build your form on the developer’s desktop using the Oracle Forms Developer.
Access to Libraries and Referenced Forms
• The developer’s desktop machine must have access to any attached libraries (.pll files) and referenced forms necessary for opening the custom form in Oracle Forms Developer.
• These files are usually a small subset of an Oracle Applications installation, and they could be local copies on the desktop machine or shared files on a common file server such as the Forms Server.
– For Release 11i, you need at least the following libraries, and any others attached to the form you are opening: APPCORE.pll, FNDSQF.pll, APPDAYPK.pll, CUSTOM.pll, VERT.pll, GLOBE.pll, JA.pll, JE.pll, JL.pll, GHR.pll, PSAC.pll, PQH_GEN.pll, OPM.pll
– Many Oracle Applications forms also use APPFLDR.pll.
– You also need (at least) APPSTAND.fmb
• If your developer’s desktop and form server machines are not connected by a fast network, you may get significantly better performance by having local copies of the libraries and referenced forms.
.....................................................................................................................................................1-18 R11i Extend Oracle Applications: Forms - Internet Computing Architecture
.....................................................................................................................................................Lesson 1: Internet Computing Architecture
Other Access
• The FORMS60_PATH variable must be set on the desktop machine to find the libraries and referenced forms during development.
– On NT, FORMS60_PATH may need to be set by editing the Windows NT registry
• Developer needs access to database for creating blocks and compiling logic
Referenced Objects and the ORACLE_APPLICATIONS Variable
• In Oracle Forms Developer 6i, referenced objects can be modified
– Do not modify any objects referenced from APPSTAND.fmb
– For example, many blocks, triggers, canvases, and so on are referenced from APPSTAND.fmb
• Before starting form development, create and set the environment variable ORACLE_APPLICATIONS to TRUE before starting Oracle Forms Developer. This variable setting displays the “R” flags that indicate an object is referenced from another form.
– On NT, the ORACLE_APPLICATIONS variable may need to be created by editing the Windows NT Registry (in the same location as the FORMS60_PATH setting)
.....................................................................................................................................................R11i Extend Oracle Applications: Forms - Internet Computing Architecture 1-19
.....................................................................................................................................................Generating Your Form
Generating Your FormYou generate your form on the Forms Server.
Moving the File
• The form file (.fmb) must be moved or copied to the middle tier machine for generation of the .fmx file
– Typically the developer’s desktop machine has drives mapped to the forms and libraries directories on the Forms Server such that when the developer saves a form or library file, the file is saved directly to the Forms Server using third-party NFS software, for example
– Otherwise, the developer uses third-party FTP software to transfer the file the the Forms Server for generation
Generating the File
• The developer then generates the form directly on the Forms Server using the Forms Compiler (such as from the command line)
• For example:
f60gen module=DEMXXEOR userid=APPS/APPS@TESTDB
• Oracle Applications forms and libraries reside in an Oracle Applications installation on the Forms Server
• Set the FORMS60_PATH variable on the Forms Server to find the libraries (.pll files) under AU_TOP/resource and referenced forms under AU_TOP/forms/<language> during generation
.....................................................................................................................................................1-20 R11i Extend Oracle Applications: Forms - Internet Computing Architecture
.....................................................................................................................................................Lesson 1: Internet Computing Architecture
Running Your Form for TestingAfter generation, the developer runs the form for testing using the browser with JInitiator on the desktop machine
• It is desirable to test the form in the same type of environment that user will use
• You cannot run your form from within the Oracle Forms Developer
.....................................................................................................................................................R11i Extend Oracle Applications: Forms - Internet Computing Architecture 1-21
.....................................................................................................................................................Running Your Form on the Web
Running Your Form on the WebYou must run your form on the Web for testing during development.
Testing from Oracle Applications
• Once you have registered your form and added it to a menu and responsibility (to be covered later), you use the URL that points to the Signon window
• Navigate to your form through Oracle Applications
• To test newly-generated changes, close your form and navigate to it again (without exiting Oracle Applications)
.....................................................................................................................................................1-22 R11i Extend Oracle Applications: Forms - Internet Computing Architecture
.....................................................................................................................................................Lesson 1: Internet Computing Architecture
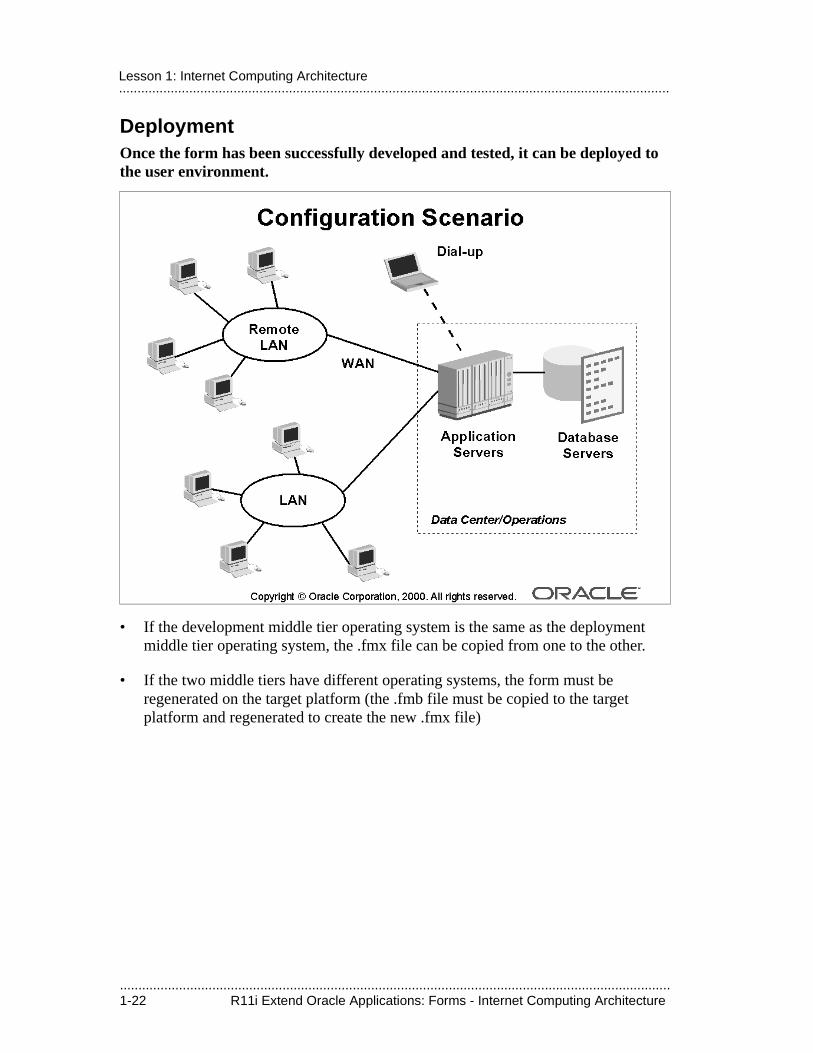
DeploymentOnce the form has been successfully developed and tested, it can be deployed to the user environment.
• If the development middle tier operating system is the same as the deployment middle tier operating system, the .fmx file can be copied from one to the other.
• If the two middle tiers have different operating systems, the form must be regenerated on the target platform (the .fmb file must be copied to the target platform and regenerated to create the new .fmx file)
.................................
Application Architecture

.....................................................................................................................................................2-2 R11i Extend Oracle Applications: Forms - Application Architecture
.....................................................................................................................................................Lesson 2: Application Architecture
.....................................................................................................................................................R11i Extend Oracle Applications: Forms - Application Architecture 2-3
.....................................................................................................................................................Objectives
ObjectivesAt the end of this lesson, you should be able to:
• Understand the basic Oracle Applications development process
• Understand the form development process within the Oracle Applications development process
• Describe the application directory structures
• Place custom files in the correct location
• Register a custom application

.....................................................................................................................................................2-4 R11i Extend Oracle Applications: Forms - Application Architecture
.....................................................................................................................................................Lesson 2: Application Architecture
Overview of Application DevelopmentThis is the general process of creating an application that integrates with Oracle Applications.
1 Register your custom application.
2 Register your custom Oracle schema.
3 Include your custom application and Oracle schema in data groups.
4 Create your application tables and views.
5 Integrate your tables and views with the Oracle Applications APPS schema.
6 Register your tables if necessary.
7 Build your application forms.
8 Build your application functions and menus.
9 Build your application responsibilities.
10 Assign responsibilities to users.
11 Build concurrent programs and reports.
12 Customize Oracle Applications using CUSTOM library if necessary.
Concurrent programs and customizing Oracle Applications using CUSTOM library are covered in two separate classes for Release 11i.
.....................................................................................................................................................R11i Extend Oracle Applications: Forms - Application Architecture 2-5
.....................................................................................................................................................Overview of Form Development Steps
Overview of Form Development StepsThis is the general process of building a form that integrates with Oracle Applications.
1 Copy the form TEMPLATE and rename it.
2 Create your form objects and layout in adherence with the Oracle Applications User Interface Standards for Forms-Based Products.
3 Code your form logic using Oracle Applications Developer’s Guide.
4 Register your form.
5 Create a form function for your form and register any subfunctions.
6 Add your form function to a menu, or create a custom menu.
7 Assign your menu to a responsibility and assign your responsibility to a user.
8 Test your form from within Oracle Applications (especially if it uses features such as user profiles or function security).

.....................................................................................................................................................2-6 R11i Extend Oracle Applications: Forms - Application Architecture
.....................................................................................................................................................Lesson 2: Application Architecture
Building an ApplicationThere is more to building an application than just building forms. This is how some of the components fit together.
.....................................................................................................................................................R11i Extend Oracle Applications: Forms - Application Architecture 2-7
.....................................................................................................................................................Definitions
Definitions
ApplicationAn application is a functional grouping of forms, programs and code, such as Oracle General Ledger or Oracle Inventory. Custom applications group together site specific components such as custom menus, forms, or concurrent programs.
Application Short NameAbbreviated form of your application that Oracle Applications uses to identify your application.
Oracle SchemaDatabase username used by Oracle Applications to access the database. Also known as Oracle ID (includes password) or Oracle user.
Application BasepathAn environment variable that denotes the directory path to your application-level subdirectories.
Environment VariableAn operating system variable that describes an aspect of the environment in which your application runs. For example, you can define an environment variable to specify a directory path.
• $APPL_TOP: An environment variable that denotes the installation directory for Oracle Application Object Library and your other Oracle applications. $APPL_TOP is usually one virtual directory level above each of the product directories (usually two virtual directory levels above counting the version number).

.....................................................................................................................................................2-8 R11i Extend Oracle Applications: Forms - Application Architecture
.....................................................................................................................................................Lesson 2: Application Architecture
Getting Started on Your ApplicationComplete the following tasks when creating a new application.
Set Up Your Directory Structure
• Create required directories and subdirectories
• Create separate directory structures as needed on the forms server and the concurrent processing server
• Define environment variables so the applications recognize your directories
Register Your Application
• Define your application’s user-friendly name and short name
• Using the environment variable, provide the base directory path for your application
Register Your ORACLE Schema
• Provide your application with a database password
• Integrate your schema with Oracle Applications APPS schema
• Register your tables with Oracle Applications
Add Your Application to a Data Group
• Copy an existing data group to customize
• Provide database access for forms and programs
• Add your application to the new data group
.....................................................................................................................................................R11i Extend Oracle Applications: Forms - Application Architecture 2-9
.....................................................................................................................................................Getting Started on Your Application
Set Up Concurrent Managers
• Define concurrent managers to run your immediate programs
.....................................................................................................................................................2-10 R11i Extend Oracle Applications: Forms - Application Architecture
.....................................................................................................................................................Lesson 2: Application Architecture
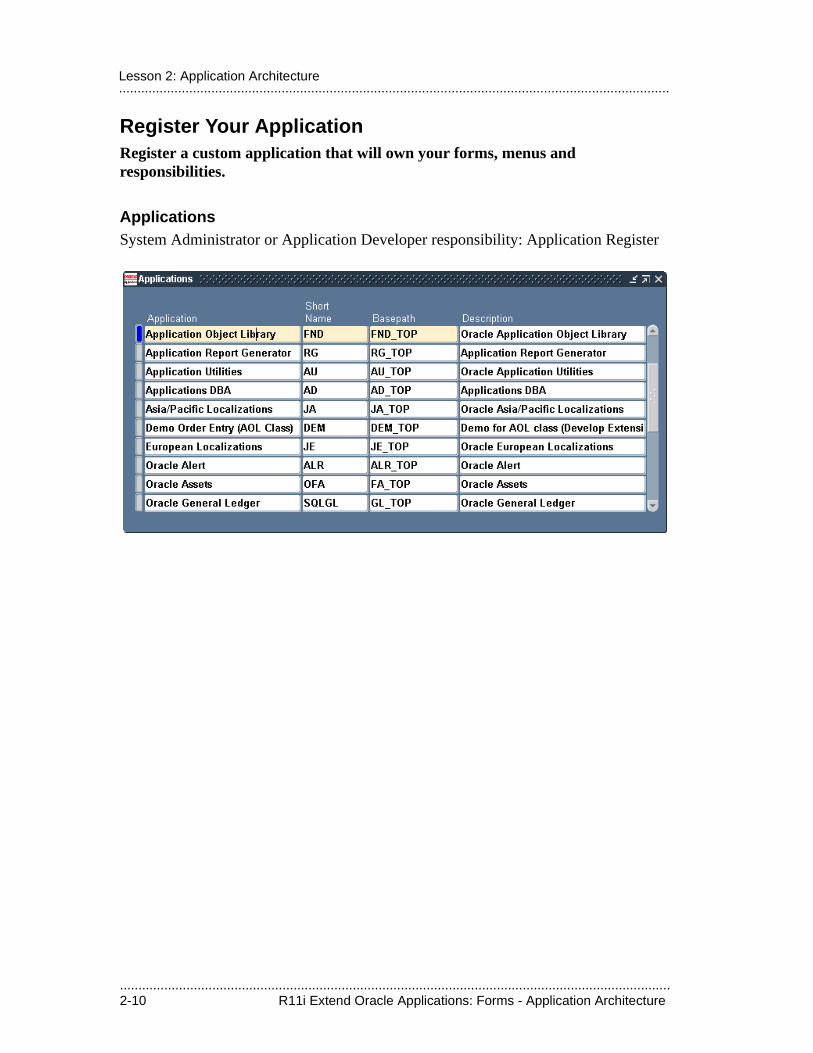
Register Your ApplicationRegister a custom application that will own your forms, menus and responsibilities.
ApplicationsSystem Administrator or Application Developer responsibility: Application Register
.....................................................................................................................................................R11i Extend Oracle Applications: Forms - Application Architecture 2-11
.....................................................................................................................................................Register Your Application
Application Name
• This user-friendly name appears in lists seen by application users
Short Name
• Oracle Applications use the application short name when identifying forms, menus, concurrent programs and other application components
• The short name is stored in hidden fields; users see the full application name
• Your short name should not include spaces
• Short names of custom applications should be four characters or longer, and begin with the letters XX, to avoid conflicting with future Oracle Applications products
Basepath
• Enter the name of an environment variable which translates into the top directory of your application’s directory tree (on the applications server)
• Oracle Applications searches specific directories beneath the basepath for your application’s executable files and scripts when performing actions that reside in external files
.....................................................................................................................................................2-12 R11i Extend Oracle Applications: Forms - Application Architecture
.....................................................................................................................................................Lesson 2: Application Architecture
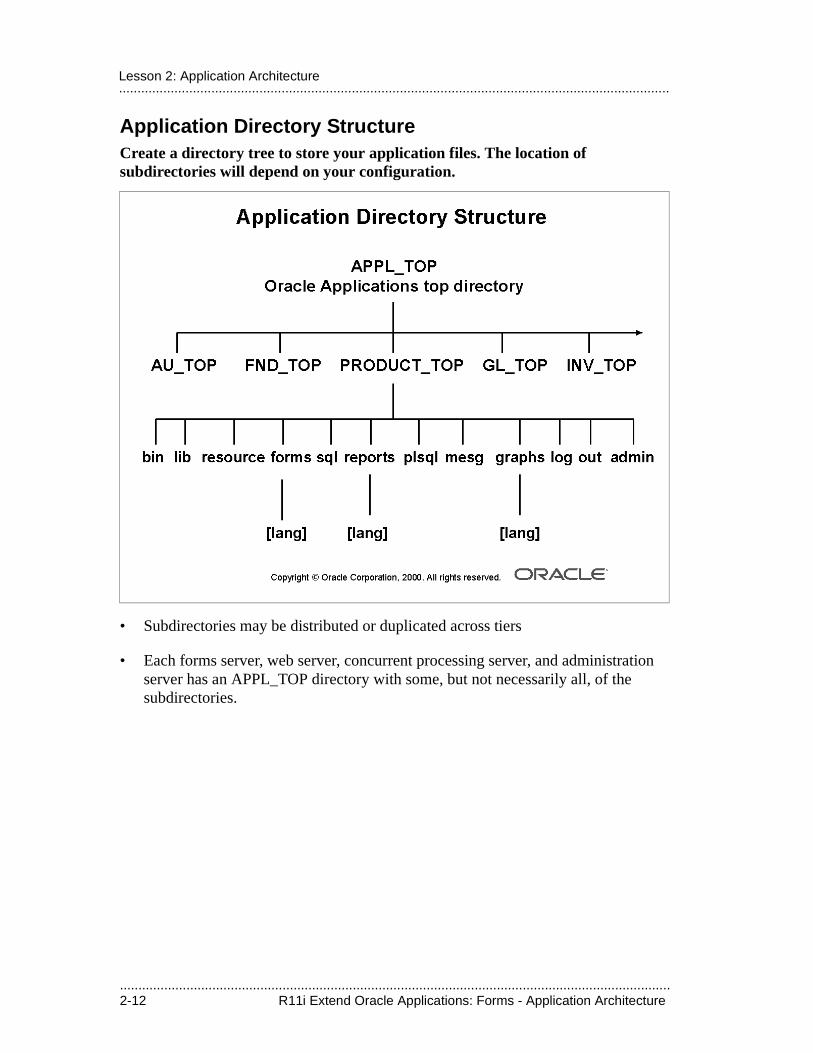
Application Directory StructureCreate a directory tree to store your application files. The location of subdirectories will depend on your configuration.
• Subdirectories may be distributed or duplicated across tiers
• Each forms server, web server, concurrent processing server, and administration server has an APPL_TOP directory with some, but not necessarily all, of the subdirectories.
.....................................................................................................................................................R11i Extend Oracle Applications: Forms - Application Architecture 2-13
.....................................................................................................................................................Application Directory Structure
TOP Directories
• APPL_TOP, FND_TOP, and so on are environment variables that point to the application basepath (use of environment variables depends on your operating system)
• The actual directory for each application will vary according to your installation
bin
• Contains executable code of your concurrent programs written in a programming language such as C, Pro*C, Fortran, or an operating system script
lib
• Contains compiled object code of your concurrent programs
resource
• Contains PL/SQL libraries used with Oracle Forms, which must be copied to AU_TOP for forms generation
forms/[LANGUAGE]
• The FORMS directory contains .fmx files (and .fmb files) under language subdirectories
sql
• Contains concurrent programs written in SQL*Plus and PL/SQL scripts
reports
• Contains concurrent programs written with Oracle Reports
• May contain language subdirectories
.....................................................................................................................................................2-14 R11i Extend Oracle Applications: Forms - Application Architecture
.....................................................................................................................................................Lesson 2: Application Architecture
plsql
• Contains PL/SQL libraries used with Oracle Reports
mesg
• Holds your application message files for Message Dictionary
• Messages files are generated by the Generate Messages program and reside in a file designated by language names (such as US.msb)
graph/[LANGUAGE]
• Contains Oracle Graphics files under language subdirectories
log
• Contains log files from concurrent programs
• Your configuration may use one log directory shared across applications
out
• Contains output files from concurrent programs
• Your configuration may use one out directory shared across applications
admin
• Contains any installation or upgrade scripts you may have
• In Oracle Applications products, used for AutoInstall and AutoPatch
.....................................................................................................................................................R11i Extend Oracle Applications: Forms - Application Architecture 2-15
.....................................................................................................................................................Application Directory Structure
Some Products Always Installed
• Every installation must include Oracle Application Object Library and Oracle Applications DBA (AD)
Language Subdirectories Contain Appropriate Files
• Files that require translation are stored in subdirectories
• These subdirectories use the Oracle NLS language name—US for United States English, D for German, and so on

.....................................................................................................................................................2-16 R11i Extend Oracle Applications: Forms - Application Architecture
.....................................................................................................................................................Lesson 2: Application Architecture
Your custom application may require files in the AU_TOP directory.
AU_TOP Directory Holds Shared Files
• The Application Utilities directory contains a resource directory with PL/SQL libraries
– If you have libraries for your custom application, put them in the AU_TOP/resource directory
• The forms/language subdirectories hold forms referenced by other forms at generation time (such as APPSTAND.fmb)
– If you have referenced forms for your custom application, put them in the appropriate AU_TOP/forms/[language] directory
• The DOCS directory contains help files
– If you have help files for your custom application, put them in the appropriate AU_TOP/docs/[language] directory (or wherever you have installed the Oracle Applications help)
• Forms libraries are put in the product top and copied to the directory AU_TOP/resources for code generation.
.....................................................................................................................................................R11i Extend Oracle Applications: Forms - Application Architecture 2-17
.....................................................................................................................................................Define Your Application Basepath
Define Your Application BasepathVariables must be set on any server machine that holds Oracle Applications files.
Environment File Sets the Variables
• An environment file that sets up Oracle Applications environment variables should be run when you log on to your computer
• This main environment file is usually named <DBNAME>.env, where DBNAME is the name of your database, and is located under APPL_TOP
– for example, APPSTEST.env
• The location of APPL_TOP may vary for different installations
• FND_TOP, GL_TOP and other applications variables appear in <DBNAME>.env or the NT Registry
Define Environment Variables for Custom Applications
• adovars.env contains more environment variables
• adovars.env is located under APPL_TOP/admin
• Add PRODUCT_TOP (application basepath) variables for custom applications to adovars.env (Unix) or adovars.cmd (NT)
Add Your Application to the Environment File
• You may need to restart the forms server or other servers to recognize the new environment variables, or
• See your installation manual for details
Technical Note<DBNAME>.env is equivalent to APPLSYS.env file in earlier versions of Oracle Applications
.....................................................................................................................................................2-18 R11i Extend Oracle Applications: Forms - Application Architecture
.....................................................................................................................................................Lesson 2: Application Architecture
Customers used to put their PRODUCT_TOP variables into the applsys.env file, which still works. However, we are now recommending that customers put their custom variables into adovars.env because they already must edit adovars.env for their installation and <DBNAME>.env is overwritten by patches and other maintenance activities (using adadmin)
If your form is not being found, try restarting the forms server or other servers

.....................................................................................................................................................R11i Extend Oracle Applications: Forms - Application Architecture 2-19
.....................................................................................................................................................Overview of Oracle Applications Schemas
Overview of Oracle Applications SchemasArrangement of database tables, views, grants, and other database objects varies with your Oracle Applications release and the implementation at your site.
Oracle Applications Products Use APPS Schema
• For a custom application to be tightly integrated with Oracle Applications:
– Tables, indices, and sequences go in a custom Oracle schema
– Code objects such as packages, views, procedures, functions, and triggers go in the APPS schema
– APPS schema must have grants and synonyms to tables, indices, and sequences in the custom Oracle schema
Copyright Oracle Corporation, 1999. All rights reserved.
Overview of Oracle Applications Schemas
APPLSYS
AOL tablesAOL indexesAOL sequencesALR tablesALR indexesALR sequencesAD tablesAD indexesAD sequencesetc.
GL
GL tablesGL indexesGL sequences
INV
INV tablesINV indexesINV sequences
CUSTOM
tablesindexessequences
APPS
AOL code objects GL packages INV packages packagesALR code objects GL views INV views viewsAD code objects GL procedures INV procedures procedures
GL functions INV functions functionsGL triggers INV triggers triggers
Various grants and synonyms
.....................................................................................................................................................2-20 R11i Extend Oracle Applications: Forms - Application Architecture
.....................................................................................................................................................Lesson 2: Application Architecture
Your Setup May Vary
• Your setup will vary depending on:
– Which release of Oracle Applications you use
– Whether your site uses multiple sets of books or multiple organizations
– Which products you use
– Various other factors
• If your application does not need to be tightly integrated with Oracle Applications, you would have a different arrangement of database objects
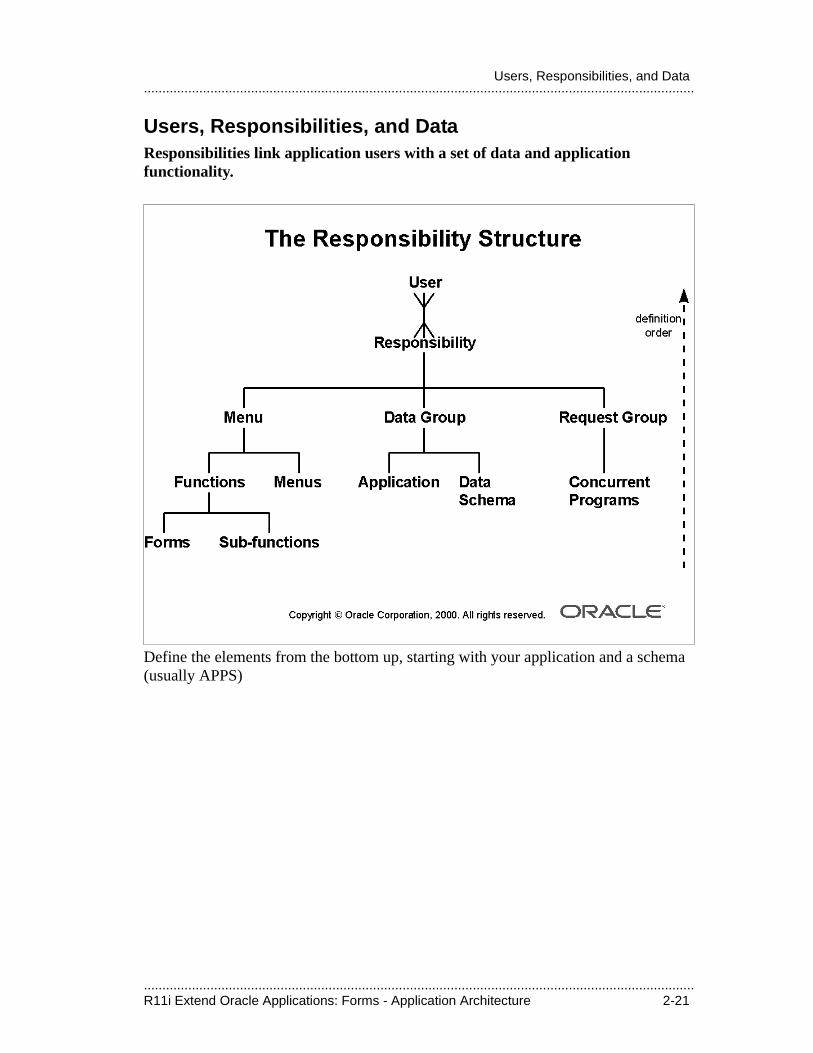
.....................................................................................................................................................R11i Extend Oracle Applications: Forms - Application Architecture 2-21
.....................................................................................................................................................Users, Responsibilities, and Data
Users, Responsibilities, and DataResponsibilities link application users with a set of data and application functionality.
Define the elements from the bottom up, starting with your application and a schema (usually APPS)
.....................................................................................................................................................2-22 R11i Extend Oracle Applications: Forms - Application Architecture
.....................................................................................................................................................Lesson 2: Application Architecture
Register Your Oracle User (Schema)
Create an Oracle Schema for Your Application
• Database administrator grants connect and resource privileges to new Oracle schema
• Register the Oracle schema with Oracle Applications
Integrate Your Schema with Oracle Applications Schemas
• Grant access to your tables and other objects to the APPS schema
• Create synonyms in the APPS schema
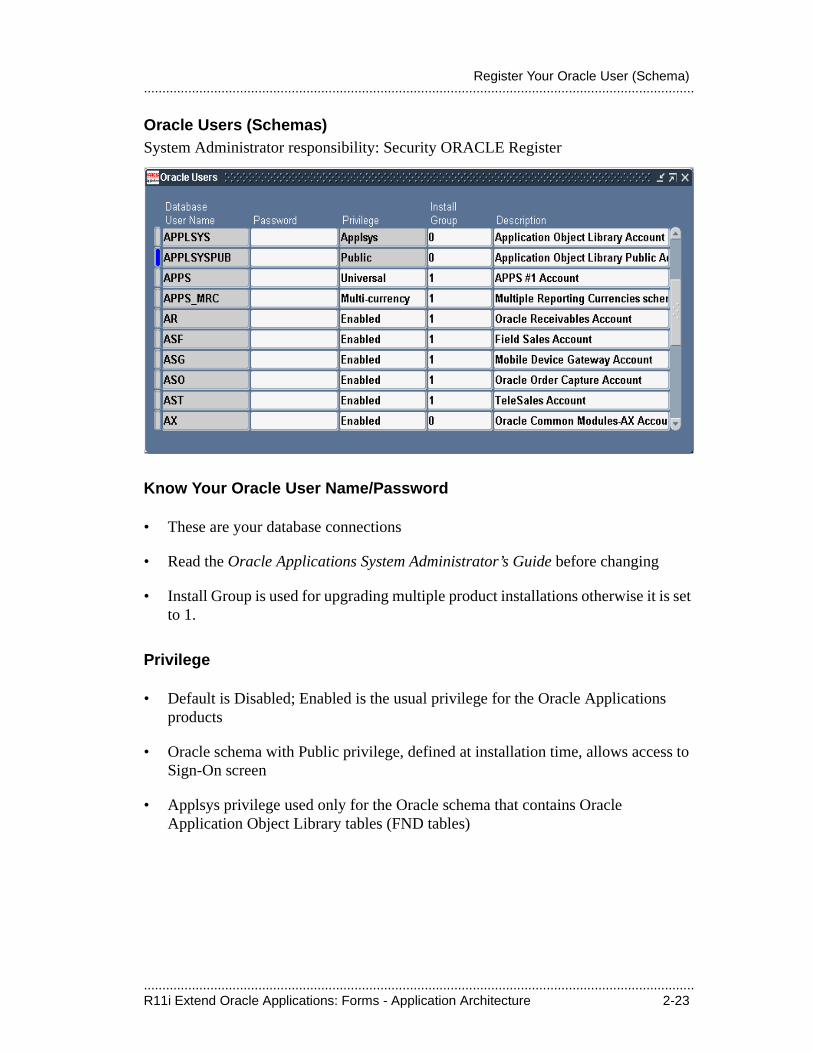
.....................................................................................................................................................R11i Extend Oracle Applications: Forms - Application Architecture 2-23
.....................................................................................................................................................Register Your Oracle User (Schema)
Oracle Users (Schemas)System Administrator responsibility: Security ORACLE Register
Know Your Oracle User Name/Password
• These are your database connections
• Read the Oracle Applications System Administrator’s Guide before changing
• Install Group is used for upgrading multiple product installations otherwise it is set to 1.
Privilege
• Default is Disabled; Enabled is the usual privilege for the Oracle Applications products
• Oracle schema with Public privilege, defined at installation time, allows access to Sign-On screen
• Applsys privilege used only for the Oracle schema that contains Oracle Application Object Library tables (FND tables)
.....................................................................................................................................................2-24 R11i Extend Oracle Applications: Forms - Application Architecture
.....................................................................................................................................................Lesson 2: Application Architecture
– Schema usually called APPLSYS
– Set up during installation
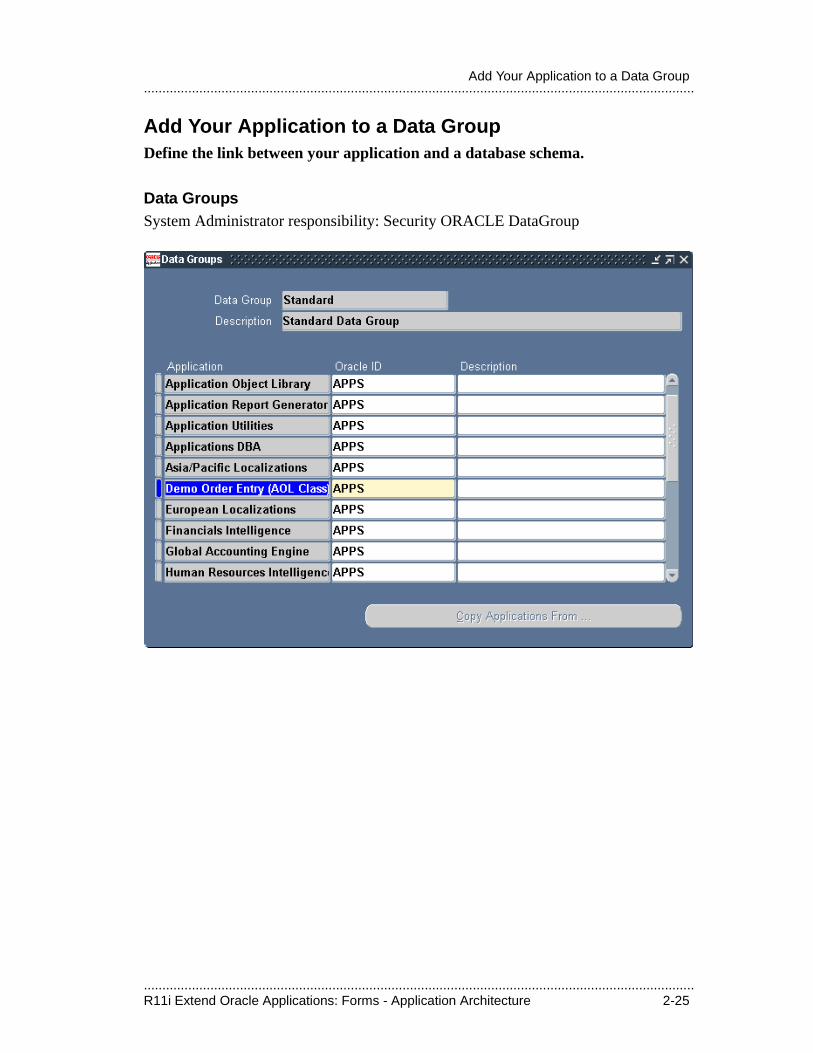
.....................................................................................................................................................R11i Extend Oracle Applications: Forms - Application Architecture 2-25
.....................................................................................................................................................Add Your Application to a Data Group
Add Your Application to a Data GroupDefine the link between your application and a database schema.
Data GroupsSystem Administrator responsibility: Security ORACLE DataGroup
.....................................................................................................................................................2-26 R11i Extend Oracle Applications: Forms - Application Architecture
.....................................................................................................................................................Lesson 2: Application Architecture
Define Your Data Group
• Available data groups depend on your installation
• Typically make a copy of the Standard data group and add custom applications to the copy
– Avoid changing data groups installed by Oracle Applications as this may affect future upgrades
• Read the Oracle Applications System Administrator’s Guide before changing
Specify Oracle IDs
• Oracle Applications connects to the schema you specify here for your application when users use a responsibility that points to your data group and application
• Specify which Oracle user (schema) contains your application tables
– Specify the APPS schema (or equivalent for your installation) if your custom application is tightly integrated with Oracle Applications (most cases)
– Specify your custom schema if your custom application is not tightly integrated with Oracle Applications or if the schema is a read-only schema
.....................................................................................................................................................R11i Extend Oracle Applications: Forms - Application Architecture 2-27
.....................................................................................................................................................Create a Responsibility
Create a ResponsibilityResponsibilities form the link between users and data.
ResponsibilitiesSystem Administrator responsibility: Security Responsibility Define
• The responsibility points to a specific database schema (typically APPS) by pointing to a particular application in a data group

.....................................................................................................................................................2-28 R11i Extend Oracle Applications: Forms - Application Architecture
.....................................................................................................................................................Lesson 2: Application Architecture
Create an Application UserAssign your responsibility to the user.
UsersSystem Administrator responsibility: Security User Define
• For most development purposes, it is sufficient to define just a user name and password and assign responsibilities
• You must enter the password twice
.....................................................................................................................................................R11i Extend Oracle Applications: Forms - Application Architecture 2-29
.....................................................................................................................................................Register Your Tables
Register Your TablesUse the table registration API to register tables you use with flexfields or Oracle Alert.
Oracle Applications Uses this Information When You:
• Register your new flexfields
• Create alerts with Oracle Alert
See Your Developer’s Guide
• See the Oracle Applications Developer’s Guide for more information
.....................................................................................................................................................2-30 R11i Extend Oracle Applications: Forms - Application Architecture
.....................................................................................................................................................Lesson 2: Application Architecture
.................................
Overview of the UserInterface Standards
.....................................................................................................................................................3-2 R11i Extend Oracle Applications: Forms - Overview of the User Interface Standards
.....................................................................................................................................................Lesson 3: Overview of the User Interface Standards
.....................................................................................................................................................R11i Extend Oracle Applications: Forms - Overview of the User Interface Standards 3-3
.....................................................................................................................................................Objectives
ObjectivesAt the end of this lesson, you should be able to:
• Understand the goals and constraints set by the Oracle Applications user interface.
• Analyze user requirements and expectations.
• Understand the basic elements of the Oracle Applications user interface.
• Select the most appropriate presentation model for your data.
• Understand the different models to retrieve data.

.....................................................................................................................................................3-4 R11i Extend Oracle Applications: Forms - Overview of the User Interface Standards
.....................................................................................................................................................Lesson 3: Overview of the User Interface Standards
Goals of the User InterfaceFollowing the user interface standards provides the following benefits:
Productivity
• Make users more productive than their previous system
• Employ simple and easy-to-grasp presentation of information
Ease of Learning
• Be intuitive and easy to learn
• Offer consistency, familiarity, and predictability—extremely important to users!
• Combine obvious methods for novice users with quick, powerful methods for experts
Positive User Experience
• Be inviting to use
• Allow exploration without fear of irreversible consequences
• Provide timely and meaningful feedback
.....................................................................................................................................................R11i Extend Oracle Applications: Forms - Overview of the User Interface Standards 3-5
.....................................................................................................................................................Designing an Application’s Interface
Designing an Application’s Interface
Find actual users
• Design based on feedback from people who will be using the product
• Have actual users try out the interface
Think before you leap
• Keep in mind some basic but important criteria, such as:
– What is the frequency of use and volume of data for a screen?
– What are current common mistakes that are made? Code for them.
– Will the screen be used for heads-down, high-speed data entry?
– What level of training will your users have?
– What other tools might your users be familiar with? If your users are familiar with typical products that run under Microsoft Windows, for example, they will expect interface elements that they have seen before to behave in a familiar and predictable way.
• Determine all the platforms and languages your application needs to support
.....................................................................................................................................................3-6 R11i Extend Oracle Applications: Forms - Overview of the User Interface Standards
.....................................................................................................................................................Lesson 3: Overview of the User Interface Standards
Field-Level Validation ModelAll Applications screens validate input on a per-field basis.
Users Get Instant Feedback
• Brief but meaningful messages notify when validation rules are violated
• In some forms, validation performed at record level, with specific messages indicating when validation errors occur
Fields Change As the Situation Changes
• Some fields require values in other fields before validation is possible. These fields are disabled until the other fields are populated and validated
• If the value in the ‘master’ field changes, the ‘dependent’ field immediately reacts
• Data entry in detail blocks is impossible unless the master is validated
• Defaults appear upon navigating to a new record
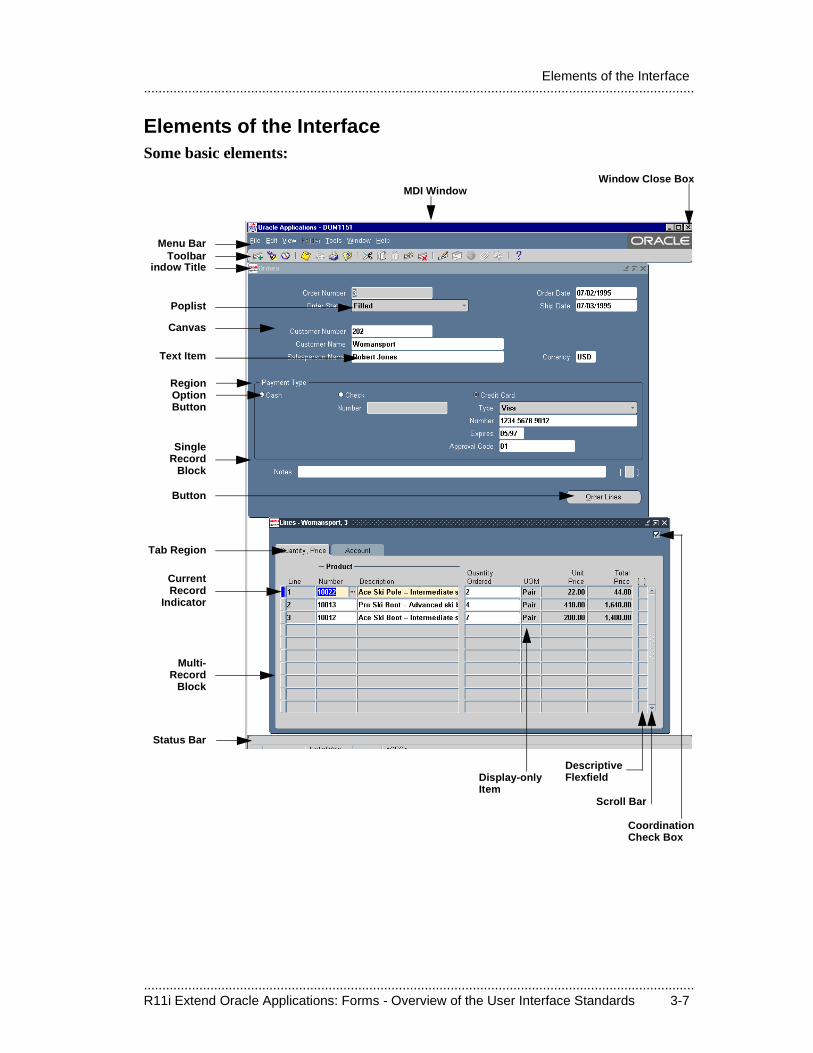
.....................................................................................................................................................R11i Extend Oracle Applications: Forms - Overview of the User Interface Standards 3-7
.....................................................................................................................................................Elements of the Interface
Elements of the InterfaceSome basic elements:
Menu BarToolbar
indow Title
Canvas
Text Item
Region
Tab Region
Current
Multi-Record
Block
Status Bar
Window Close Box
Single
Button
CoordinationCheck Box
DescriptiveFlexfieldDisplay-only
Item
RecordIndicator
Poplist
OptionButton
Scroll Bar
RecordBlock
MDI Window
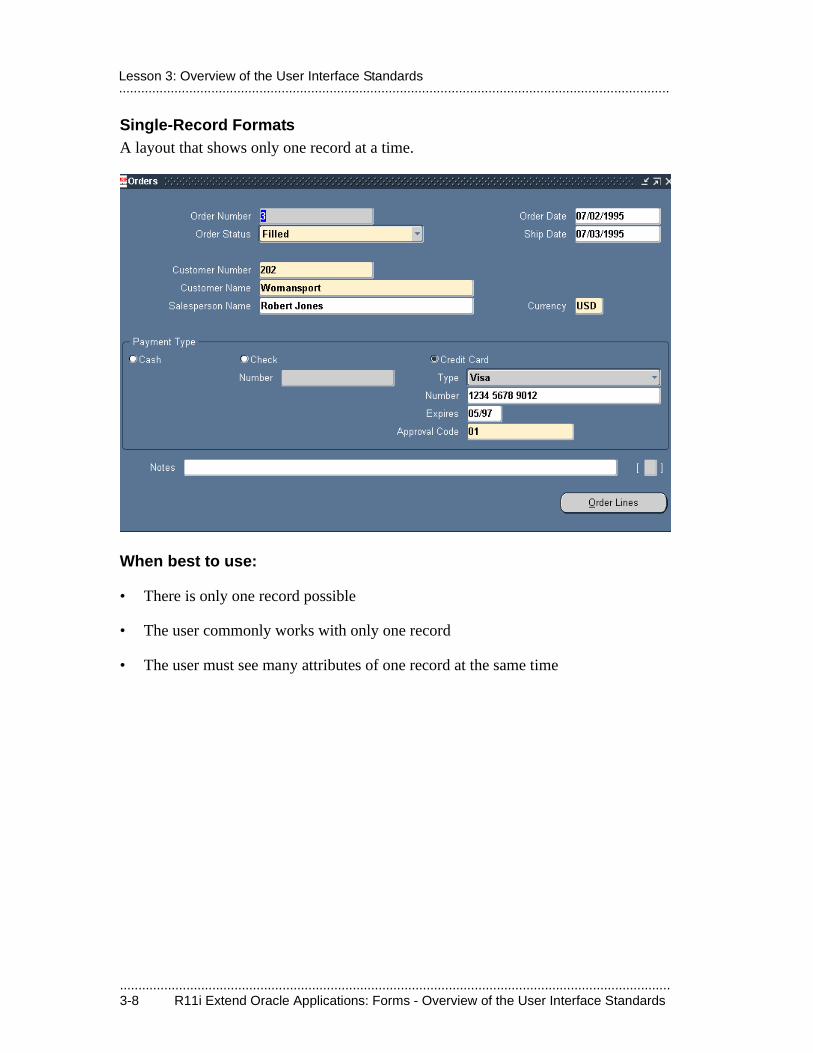
.....................................................................................................................................................3-8 R11i Extend Oracle Applications: Forms - Overview of the User Interface Standards
.....................................................................................................................................................Lesson 3: Overview of the User Interface Standards
Single-Record FormatsA layout that shows only one record at a time.
When best to use:
• There is only one record possible
• The user commonly works with only one record
• The user must see many attributes of one record at the same time
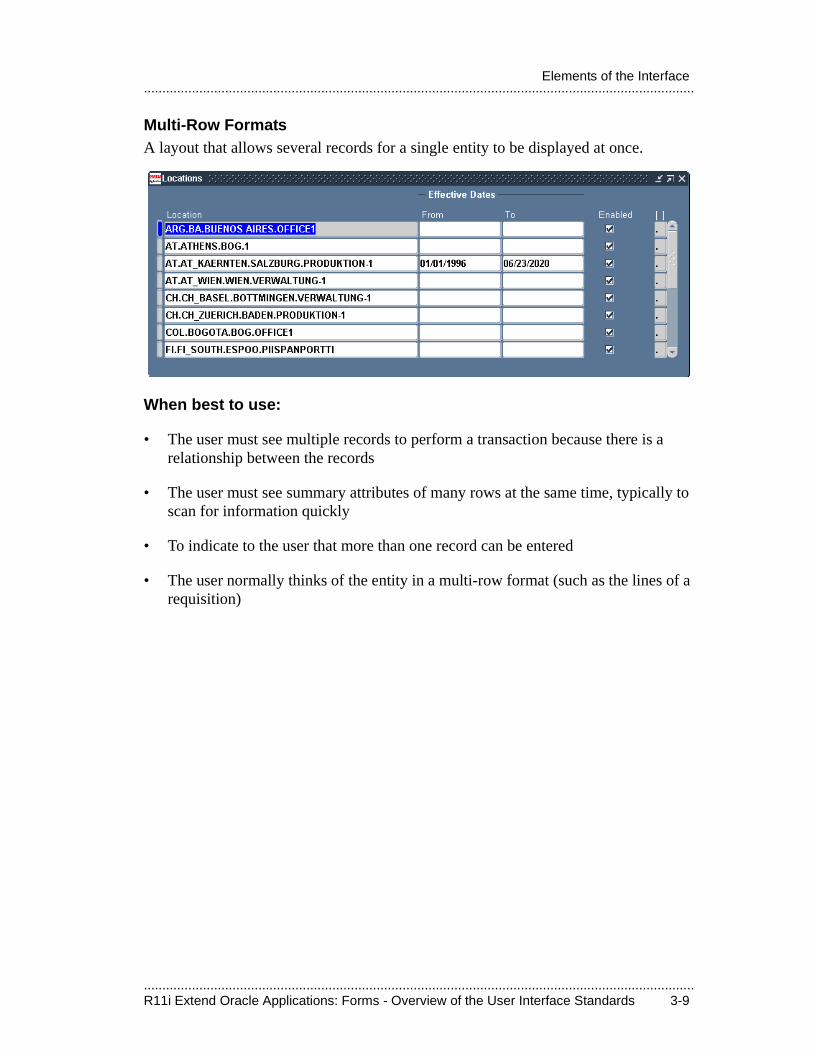
.....................................................................................................................................................R11i Extend Oracle Applications: Forms - Overview of the User Interface Standards 3-9
.....................................................................................................................................................Elements of the Interface
Multi-Row FormatsA layout that allows several records for a single entity to be displayed at once.
When best to use:
• The user must see multiple records to perform a transaction because there is a relationship between the records
• The user must see summary attributes of many rows at the same time, typically to scan for information quickly
• To indicate to the user that more than one record can be entered
• The user normally thinks of the entity in a multi-row format (such as the lines of a requisition)
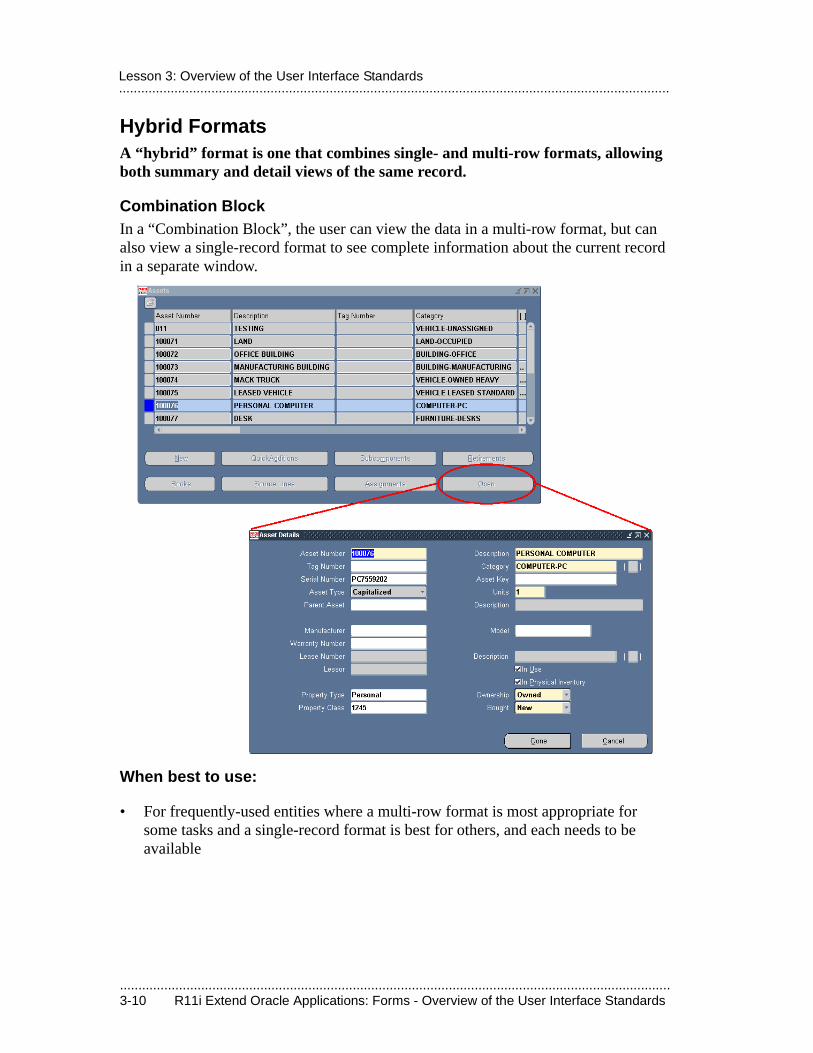
.....................................................................................................................................................3-10 R11i Extend Oracle Applications: Forms - Overview of the User Interface Standards
.....................................................................................................................................................Lesson 3: Overview of the User Interface Standards
Hybrid FormatsA “hybrid” format is one that combines single- and multi-row formats, allowing both summary and detail views of the same record.
Combination BlockIn a “Combination Block”, the user can view the data in a multi-row format, but can also view a single-record format to see complete information about the current record in a separate window.
When best to use:
• For frequently-used entities where a multi-row format is most appropriate for some tasks and a single-record format is best for others, and each needs to be available
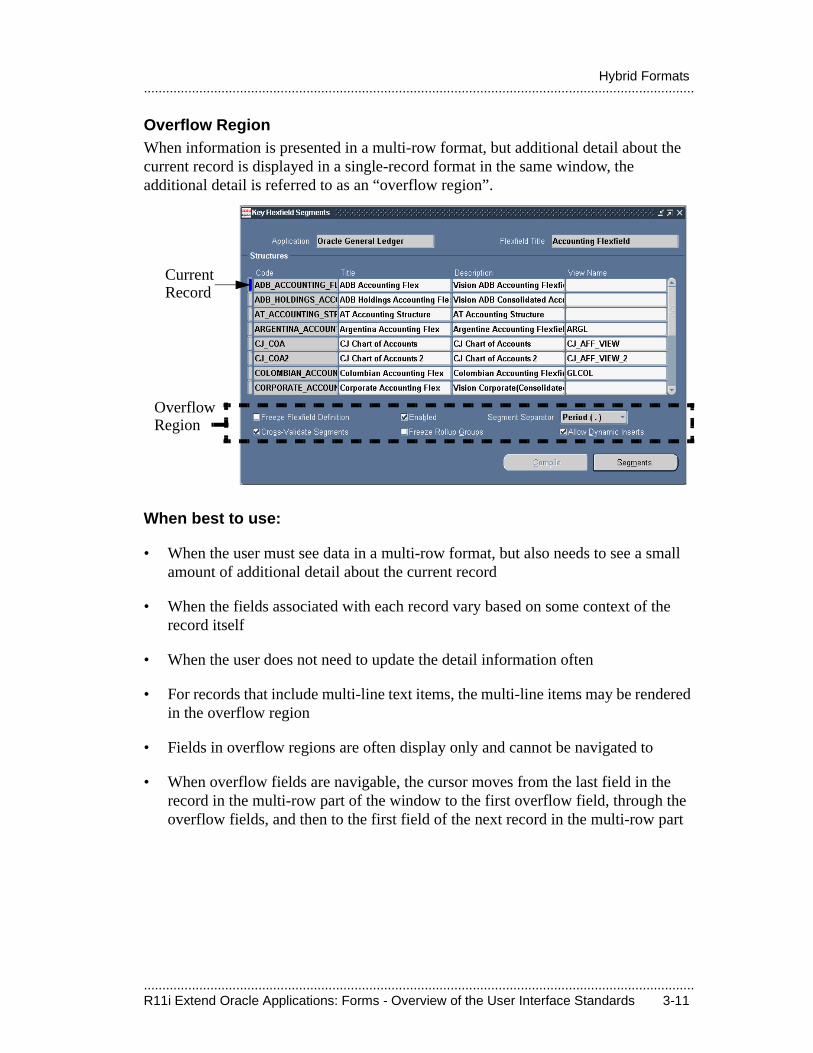
.....................................................................................................................................................R11i Extend Oracle Applications: Forms - Overview of the User Interface Standards 3-11
.....................................................................................................................................................Hybrid Formats
Overflow RegionWhen information is presented in a multi-row format, but additional detail about the current record is displayed in a single-record format in the same window, the additional detail is referred to as an “overflow region”.
When best to use:
• When the user must see data in a multi-row format, but also needs to see a small amount of additional detail about the current record
• When the fields associated with each record vary based on some context of the record itself
• When the user does not need to update the detail information often
• For records that include multi-line text items, the multi-line items may be rendered in the overflow region
• Fields in overflow regions are often display only and cannot be navigated to
• When overflow fields are navigable, the cursor moves from the last field in the record in the multi-row part of the window to the first overflow field, through the overflow fields, and then to the first field of the next record in the multi-row part
CurrentRecord
OverflowRegion
.....................................................................................................................................................3-12 R11i Extend Oracle Applications: Forms - Overview of the User Interface Standards
.....................................................................................................................................................Lesson 3: Overview of the User Interface Standards
Window and Block RelationshipsEach window should contain a logical entity, which often requires more than one block to be displayed in a window.
• If possible, all blocks for a logical entity should be shown in one window
• When space is tight, tabbed regions may be used
• A single block may be displayed across more than one window when:
– There are additional fields about the current record that a user may want to see, but only on request
– When the user doesn’t necessarily perceive some fields as part of the same block
Examples
• A header and its lines should be shown in a single window because they are perceived as a logical entity from a user’s point of view, even though they may be in separate blocks
• The Credit Card Information region of a Sales Order is part of the Header block, but is not necessarily perceived as additional attributes of the header
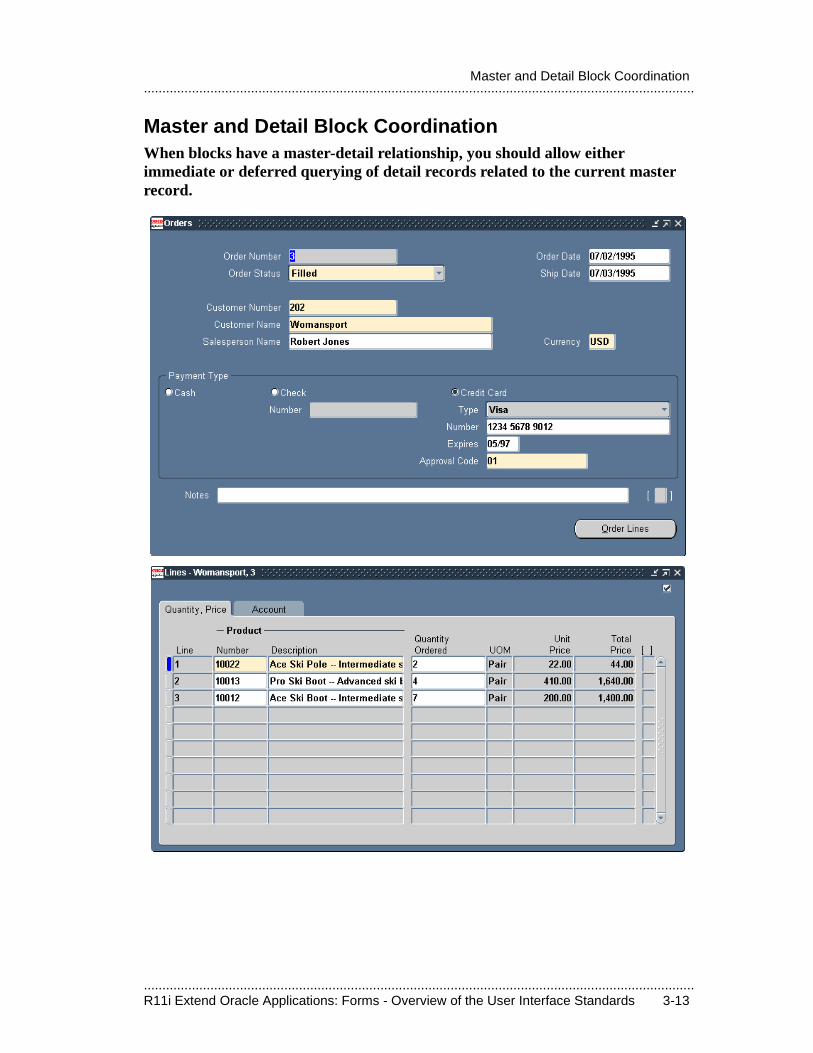
.....................................................................................................................................................R11i Extend Oracle Applications: Forms - Overview of the User Interface Standards 3-13
.....................................................................................................................................................Master and Detail Block Coordination
Master and Detail Block CoordinationWhen blocks have a master-detail relationship, you should allow either immediate or deferred querying of detail records related to the current master record.
.....................................................................................................................................................3-14 R11i Extend Oracle Applications: Forms - Overview of the User Interface Standards
.....................................................................................................................................................Lesson 3: Overview of the User Interface Standards
Behavior of Detail Block
• If the master and detail blocks are in the same window, querying of detail records is usually immediate as user moves to different master records
• If the master and detail blocks are in separate windows, provide a coordination check box to let user choose whether querying is deferred or immediate
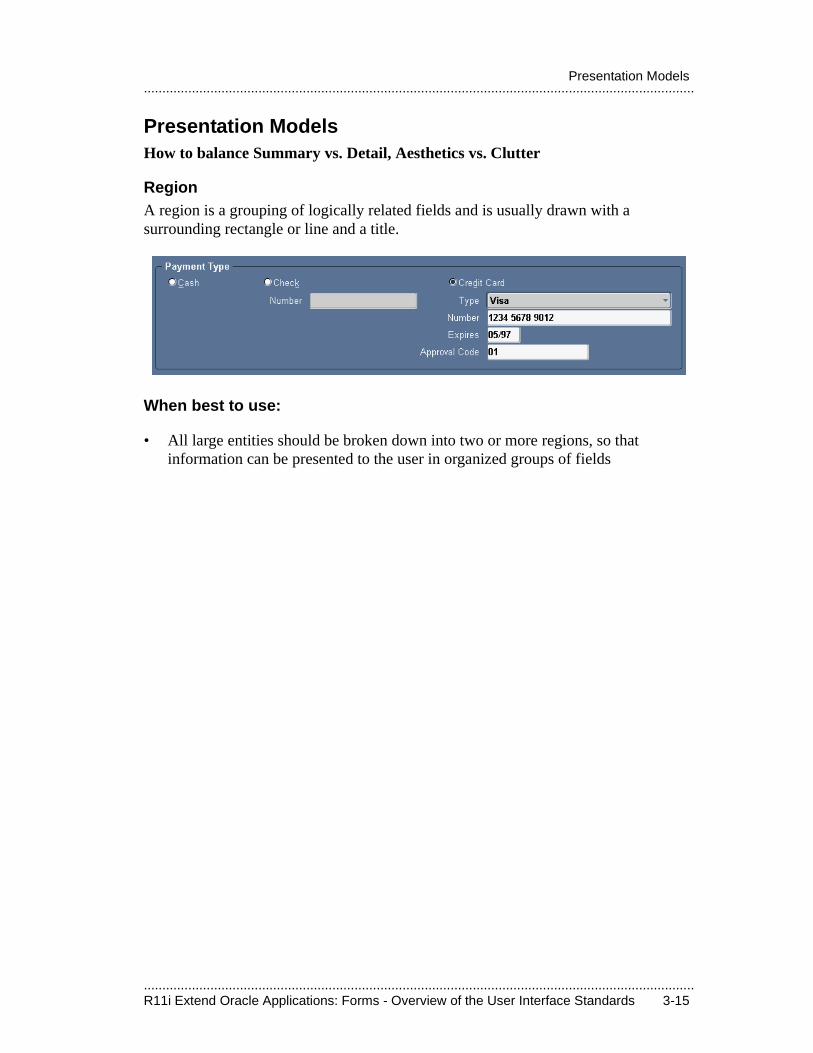
.....................................................................................................................................................R11i Extend Oracle Applications: Forms - Overview of the User Interface Standards 3-15
.....................................................................................................................................................Presentation Models
Presentation ModelsHow to balance Summary vs. Detail, Aesthetics vs. Clutter
RegionA region is a grouping of logically related fields and is usually drawn with a surrounding rectangle or line and a title.
When best to use:
• All large entities should be broken down into two or more regions, so that information can be presented to the user in organized groups of fields
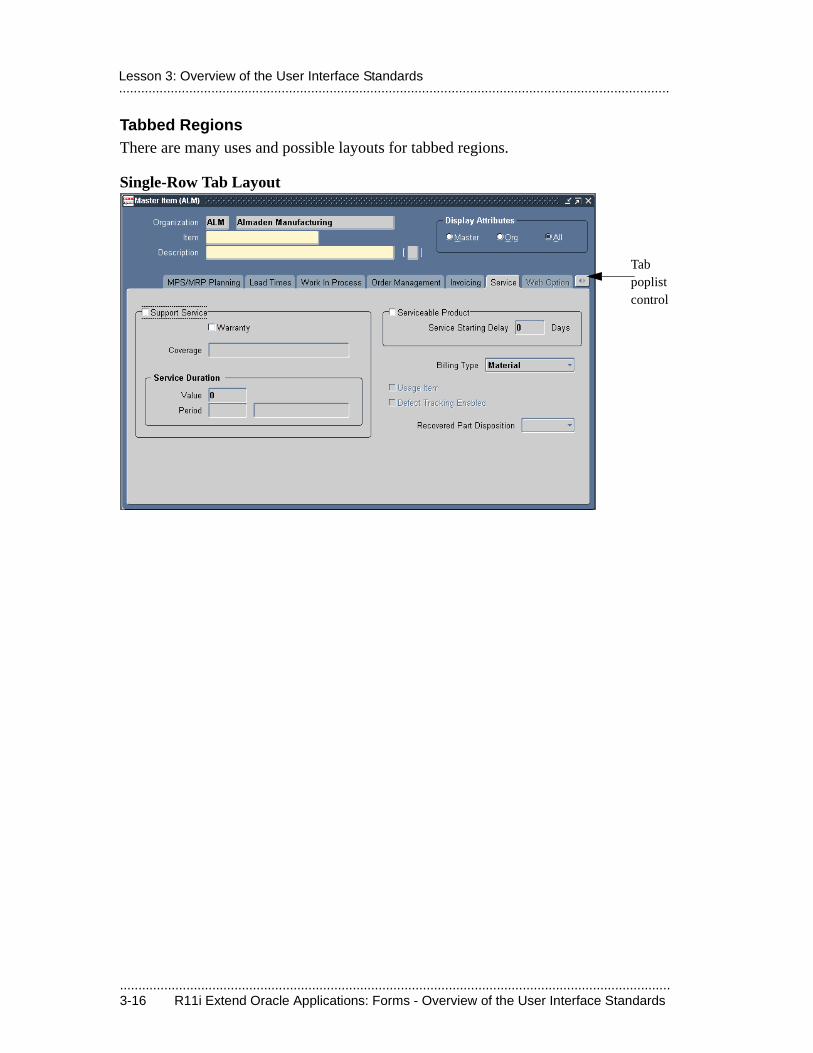
.....................................................................................................................................................3-16 R11i Extend Oracle Applications: Forms - Overview of the User Interface Standards
.....................................................................................................................................................Lesson 3: Overview of the User Interface Standards
Tabbed RegionsThere are many uses and possible layouts for tabbed regions.
Single-Row Tab Layout
Tab poplist control
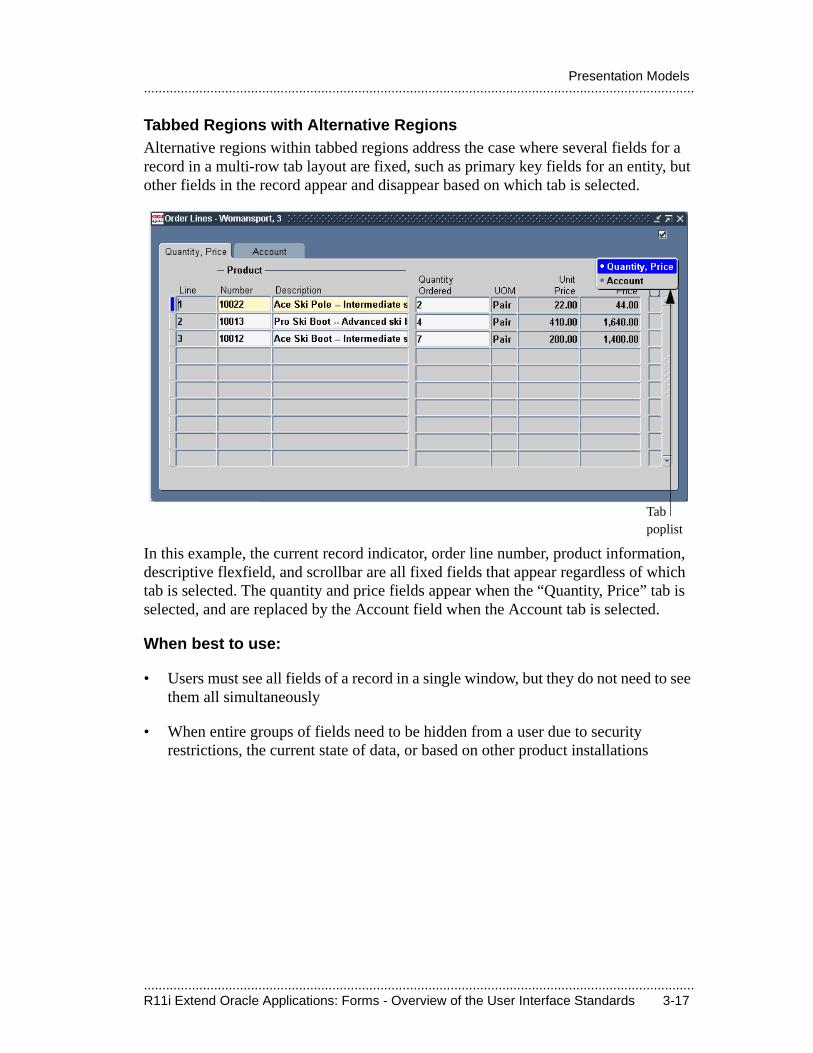
.....................................................................................................................................................R11i Extend Oracle Applications: Forms - Overview of the User Interface Standards 3-17
.....................................................................................................................................................Presentation Models
Tabbed Regions with Alternative RegionsAlternative regions within tabbed regions address the case where several fields for a record in a multi-row tab layout are fixed, such as primary key fields for an entity, but other fields in the record appear and disappear based on which tab is selected.
In this example, the current record indicator, order line number, product information, descriptive flexfield, and scrollbar are all fixed fields that appear regardless of which tab is selected. The quantity and price fields appear when the “Quantity, Price” tab is selected, and are replaced by the Account field when the Account tab is selected.
When best to use:
• Users must see all fields of a record in a single window, but they do not need to see them all simultaneously
• When entire groups of fields need to be hidden from a user due to security restrictions, the current state of data, or based on other product installations
Tab poplist
.....................................................................................................................................................3-18 R11i Extend Oracle Applications: Forms - Overview of the User Interface Standards
.....................................................................................................................................................Lesson 3: Overview of the User Interface Standards
Dynamic LayoutsIf necessary, modify the layout of a form dynamically at form startup.
Use of Dynamic Layouts
• Dynamically modify screen layout to show, hide, or rearrange certain fields or even blocks
• Base layout changes on the value of a particular profile option, product installation, setup parameter, and so on
When best to use:
• When an attribute appears in multiple forms, and a single point of control is necessary to establish its behavior
• When, based on the setup of a product, optimal layouts can be dynamically inferred
• Invoke dynamic layout logic at form startup
• Avoid changing the layout during a user session, as it will be confusing (unless the user initiates the change as in tabbed regions)
Examples
• If a customer is not using Encumbrance accounting, they should be able to declare that once, and all related fields on all screens should respond appropriately
• If a customer uses serial number control, the Serial Number field should be presented more prominently
• A single form that has features for use only in particular countries may show those features based on profile options
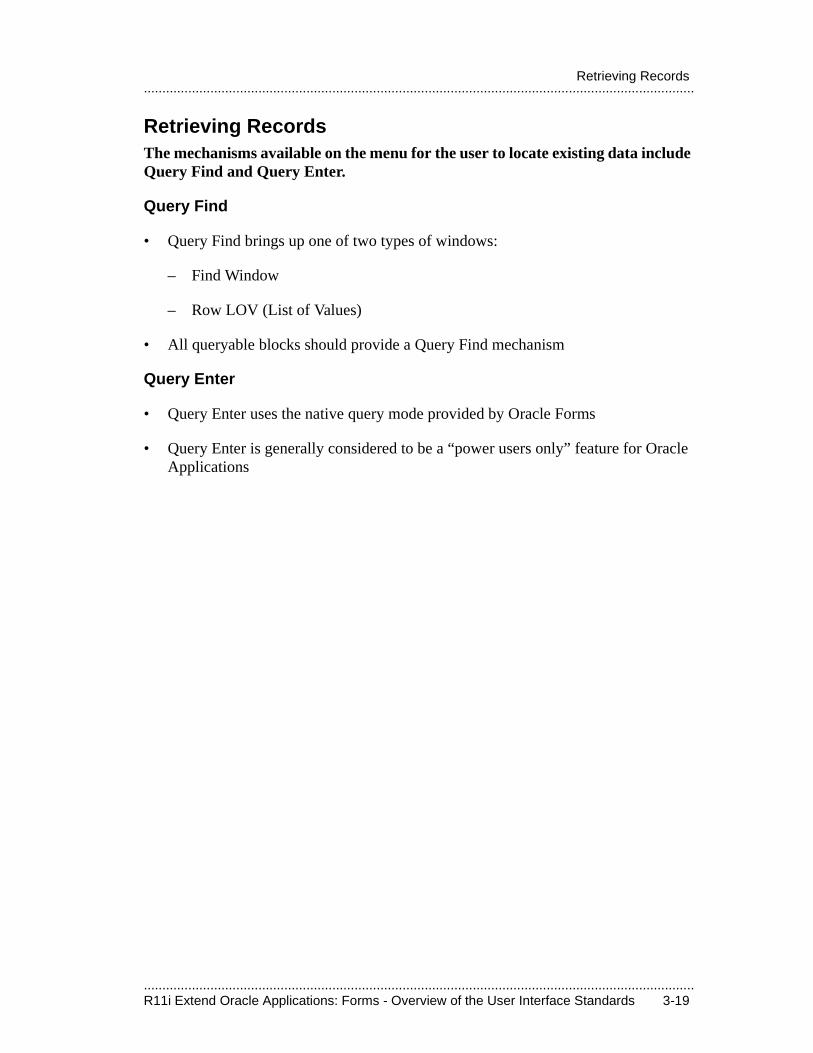
.....................................................................................................................................................R11i Extend Oracle Applications: Forms - Overview of the User Interface Standards 3-19
.....................................................................................................................................................Retrieving Records
Retrieving RecordsThe mechanisms available on the menu for the user to locate existing data include Query Find and Query Enter.
Query Find
• Query Find brings up one of two types of windows:
– Find Window
– Row LOV (List of Values)
• All queryable blocks should provide a Query Find mechanism
Query Enter
• Query Enter uses the native query mode provided by Oracle Forms
• Query Enter is generally considered to be a “power users only” feature for Oracle Applications
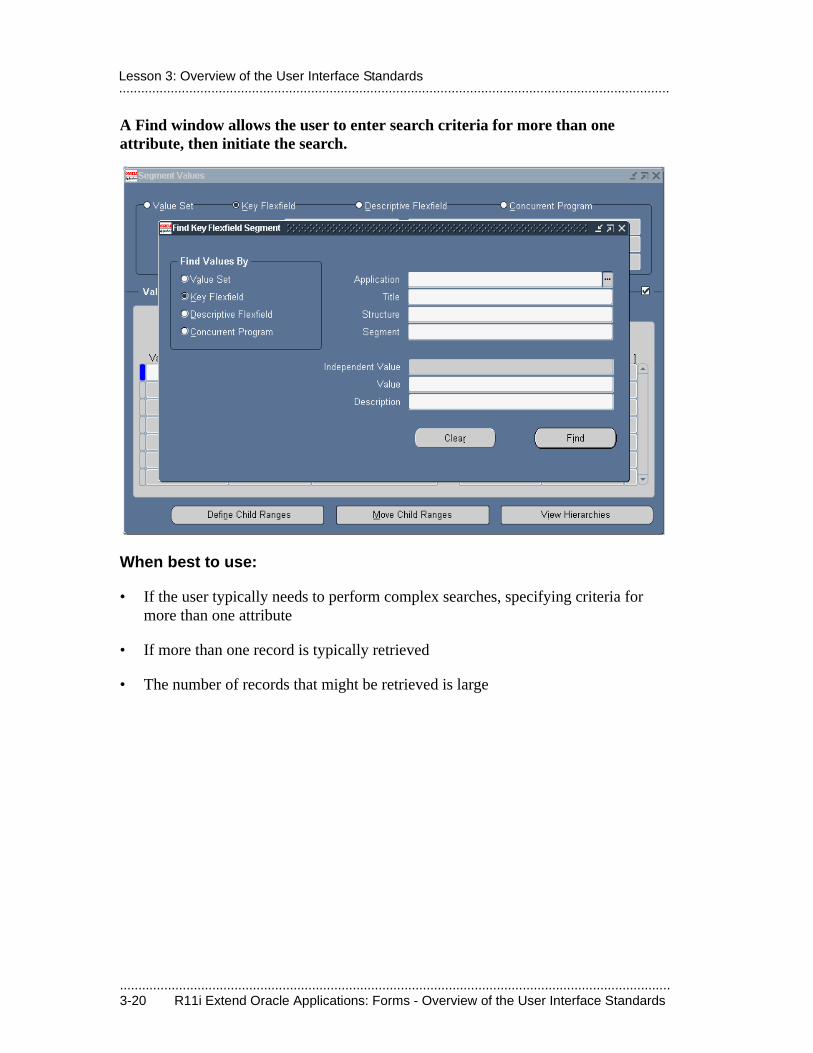
.....................................................................................................................................................3-20 R11i Extend Oracle Applications: Forms - Overview of the User Interface Standards
.....................................................................................................................................................Lesson 3: Overview of the User Interface Standards
A Find window allows the user to enter search criteria for more than one attribute, then initiate the search.
When best to use:
• If the user typically needs to perform complex searches, specifying criteria for more than one attribute
• If more than one record is typically retrieved
• The number of records that might be retrieved is large
.....................................................................................................................................................R11i Extend Oracle Applications: Forms - Overview of the User Interface Standards 3-21
.....................................................................................................................................................Retrieving Records
A Row LOV is a List of Values (LOV) that shows all possible records the user can query.
When best to use:
• In most detail blocks, which by default will autoquery all records that pertain to the current master record
• If the user typically needs to search for only one record
• The desired record can be selected based on a primary key value
• The number of records that might be shown in the LOV is small
.....................................................................................................................................................3-22 R11i Extend Oracle Applications: Forms - Overview of the User Interface Standards
.....................................................................................................................................................Lesson 3: Overview of the User Interface Standards
Query Enter is available in most forms. Query Enter criteria are exclusive of criteria entered via Query Find.
Query Enter Is a Native Oracle Forms Feature
• Free
• Powerful
Less Preferable than Query Find for Several Reasons
• Modes (such as Query Enter mode) are restrictive
• Cannot see query criteria after query has been run without reentering query mode
• If in a single-record format, users only initially see first record when multiple records are retrieved
• Query criteria involving ranges are not as easily specified
• Query Find runs a more efficient query
• Can be complicated to use
.....................................................................................................................................................R11i Extend Oracle Applications: Forms - Overview of the User Interface Standards 3-23
.....................................................................................................................................................Indicating Attributes
Indicating AttributesUse the following characteristics to visually indicate a particular type of field, record or block:
• Text items that are always display-only (in which the user can never type) are rendered as grey
• Text items that are currently not applicable, such as a field that can only be validated when a “master” field has a value, are rendered as grey
• Text items in the current record that are required are rendered with a yellow background
• Text items in the current record that are queryable are rendered with a pale blue background in enter-query mode
• List items (either enabled or disabled) are grey, unless they are required, in which case they are yellow for the current record
• All other fields always have a white background
• Fields that respond to the List of Values function show the List lamp in the console
• Entries on the menu and toolbar are disabled if the function is not available for the current field, record, or block (unless such logic causes serious performance or coding problems)

.....................................................................................................................................................3-24 R11i Extend Oracle Applications: Forms - Overview of the User Interface Standards
.....................................................................................................................................................Lesson 3: Overview of the User Interface Standards
Navigation and Function InvocationElements used to facilitate movement among the screens and blocks of a product, as well as to invoke product-specific functions:
The Navigator
• The Navigator is the means for opening forms associated with a responsibility
.....................................................................................................................................................R11i Extend Oracle Applications: Forms - Overview of the User Interface Standards 3-25
.....................................................................................................................................................Navigation and Function Invocation
[Tab] Key
• [Tab] moves the cursor to the next item
Buttons
• Buttons are used to invoke product-specific functions, and to facilitate navigation through the various windows of a form
Next/Previous Block
• Next/Previous Block is the mechanism for moving forward and backward through the hierarchy of a complex object
Drilldown
• Clicking on the drilldown indicator (a two-character wide record indicator) or field displays the next level of detail
Special Menus and Toolbar
• Up to 45 form-specific functions may be placed under the Tools, Reports, and Actions menu items (15 under each) , and any of these entries may also be added to the Toolbar
Lists
• Lists are sometimes used as control elements of blocks
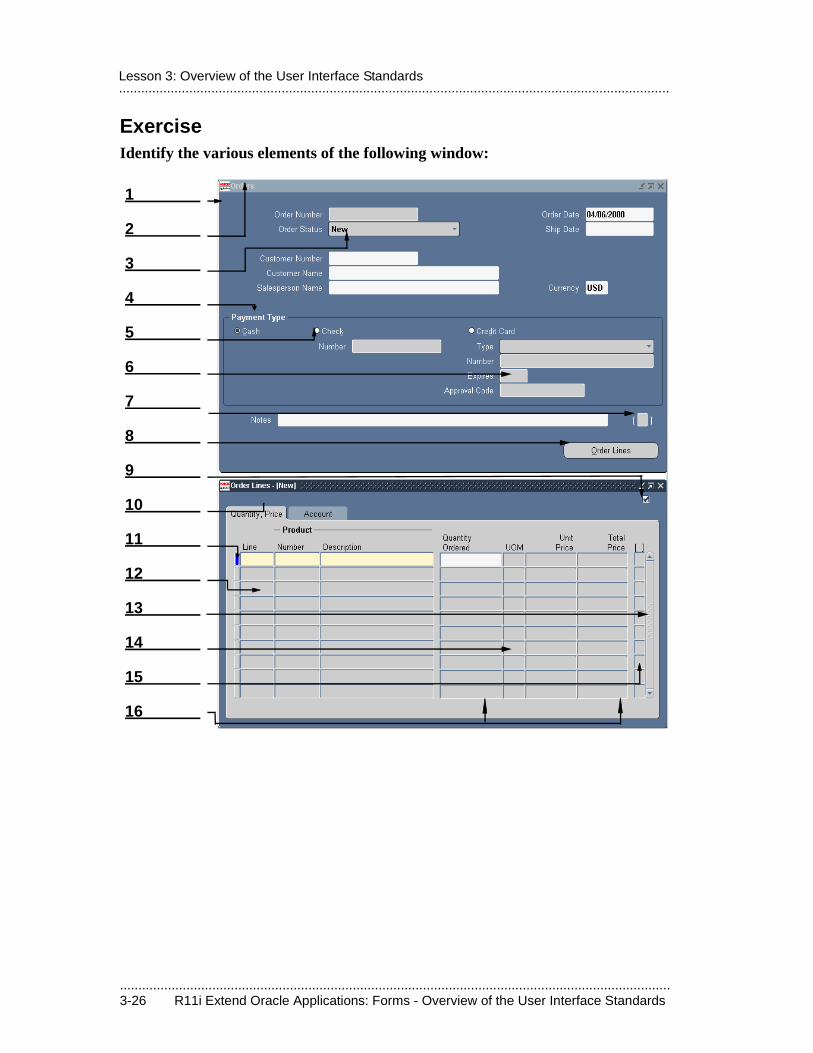
.....................................................................................................................................................3-26 R11i Extend Oracle Applications: Forms - Overview of the User Interface Standards
.....................................................................................................................................................Lesson 3: Overview of the User Interface Standards
ExerciseIdentify the various elements of the following window:
1
2
3
4
5
6
7
8
9
10
11
12
13
14
15
16

.................................
Overview of CodingStandards

.....................................................................................................................................................4-2 Extend Oracle Applications: Forms - Overview of Coding Standards
.....................................................................................................................................................Lesson 4: Overview of Coding Standards
.....................................................................................................................................................Extend Oracle Applications: Forms - Overview of Coding Standards 4-3
.....................................................................................................................................................Objectives
ObjectivesAt the end of this lesson, you should be able to:
• Understand the goals and constraints set by the Oracle Applications coding standards.
• Use shared components and objects when defining your form.
• Base forms on views rather than tables.
• Understand what it means to build a form that adheres to Oracle Applications coding standards.
.....................................................................................................................................................4-4 Extend Oracle Applications: Forms - Overview of Coding Standards
.....................................................................................................................................................Lesson 4: Overview of Coding Standards
Benefits of Following Coding StandardsIf you develop applications to integrate with Oracle Applications, follow the Oracle Application Coding Standards:
• To be compatible with the forms produced by Oracle Applications by using specific coding conventions
• To use the libraries and templates with Oracle Applications to speed development and ensure consistency
• To make future support and maintenance easier
.....................................................................................................................................................Extend Oracle Applications: Forms - Overview of Coding Standards 4-5
.....................................................................................................................................................Goals of the Coding Standards
Goals of the Coding Standards
Code Must Be Maintainable
• Write code in discrete packaged procedures known as handlers
• Follow specific naming conventions for objects, packages and procedures
Code Things Once and Share Them
• TEMPLATE form is your starting point for building a form
• FNDSQF library contains many Application Object Library utilities
• APPCORE library contains utilities to control the menu, toolbar and standard behaviors of objects
• APPDAYPK library gives you the calendar
• Property classes let you define an object’s attributes once for many forms
• Use Oracle Applications property classes and define custom ones
• Use database views and stored procedures
.....................................................................................................................................................4-6 Extend Oracle Applications: Forms - Overview of Coding Standards
.....................................................................................................................................................Lesson 4: Overview of Coding Standards
Runtime EnvironmentThe Oracle Applications coding and user interface standard is designed to meet many requirements:
Requirements
• Run on Web browsers
• Run on screen resolutions of 800x600 or higher with any color depth (color, grayscale, or black and white)
• Allow translation into any language
Single file, please
• A single source-code file for a form must be able to satisfy all the above requirements
Operating System
• Optimized for Web browsers and browsers with JInitiator
.....................................................................................................................................................Extend Oracle Applications: Forms - Overview of Coding Standards 4-7
.....................................................................................................................................................Property Classes: Definition
Property Classes: DefinitionProperty classes define a type of object that is used across many forms.
Ensure Standardization
• For example, all textual buttons in Oracle Applications achieve the same look and behavior by using the BUTTON property class
Simplify Coding
• Property classes provide the correct attributes for each Graphical User Interface (GUI)
• For example, instead of coding the same properties into each button, apply the BUTTON property class to get them automatically
Custom Property Classes
• To create a uniform item used in several forms, define a property class and include it in a custom object group
– Place your custom object group in a custom form in the appropriate AU_TOP/forms/[language] directory so you can reference its objects
• Apply that property class to the objects to ensure conformance
.....................................................................................................................................................4-8 Extend Oracle Applications: Forms - Overview of Coding Standards
.....................................................................................................................................................Lesson 4: Overview of Coding Standards
Libraries Provide Useful RoutinesThe Application Object Library libraries contain packages and procedures for Application Object Library features and to leverage form development. Do not modify these libraries.
FNDSQF Supports Many Application Object Library Features
• Most AOL extensions such as Message Dictionary, multicurrency, Record History (WHO) information tracking
• Includes packages and procedures for flexfields, concurrent processing, profiles, and Message Dictionary
APPCORE Supports Form and User Interface Features
• Packages and procedures that support the menu, toolbar and other standard behaviors contained here
• Use APPCORE routines to enable fields dynamically, maintain dependencies between items, and control specific window behaviors
Other Libraries
• Other libraries support features specific to a particular country (localizations and globalizations) and product-specific features
– GLOBE
– VERT
– JE, JL, JA
– CUSTOM
– ... and more
.....................................................................................................................................................Extend Oracle Applications: Forms - Overview of Coding Standards 4-9
.....................................................................................................................................................Ensure Your Form Works on the Web
Ensure Your Form Works on the WebFollowing Oracle Applications standards carefully will help ensure a smooth deployment to the Web.
Avoid Using the Following Features in Your Custom Forms:
• ActiveX, VBX, OCX, OLE, DDE (Microsoft Windows-specific features that would not be available for a browser running on a Macintosh, for example, and cannot be displayed to users from within the browser) or any feature that is specific to a particular browser.
• Timers (all timers will be treated as timers that fire immediately, so avoid coding logic that relies on a timer having a specific duration).
• WHEN-MOUSE-MOVE, WHEN-MOUSE-ENTER/LEAVE and WHEN-WINDOW-ACTIVATED/DEACTIVATED triggers.
• Open File dialog box
• Combo boxes
• Text_IO and HOST built-in routines
.....................................................................................................................................................4-10 Extend Oracle Applications: Forms - Overview of Coding Standards
.....................................................................................................................................................Lesson 4: Overview of Coding Standards
Build Forms Based on ViewsDenormalize foreign key information by building views.
Views Improve Performance
• Minimize network traffic because all foreign keys are denormalized on the server
• POST-QUERY logic to populate non-database fields unnecessary
• PRE-QUERY logic to implement query-by-example on non-database fields unnecessary
Views Promote Modularity
• Views are available in the database, so all client or server code can access them
• Corrections or enhancements can be made in one location
• Views are easily and centrally patched
View Enable Advanced Features
• Multiple organizations
• Data in multiple languages
Necessary Coding For Views
• Call code in your ON-INSERT, ON-UPDATE, ON-DELETE, and ON-LOCK triggers to access the base table instead of the view
• Create ROWID as the first column in your view, and alias it to ROW_ID
• Use the ROWID of the main entity table in your view

.....................................................................................................................................................Extend Oracle Applications: Forms - Overview of Coding Standards 4-11
.....................................................................................................................................................Build Forms Based on Views
Views include foreign key columns.
Base Table (DEM_ORDER_LINES)Name Type-------------------------------------------------------------------------------ORDER_ID NUMBER(15)ORDER_LINE_NUM NUMBER(15)LAST_UPDATE_DATE DATELAST_UPDATED_BY NUMBER(15)CREATION_DATE DATECREATED_BY NUMBER(15)LAST_UPDATE_LOGIN NUMBER(15)PRODUCT_ID NUMBER(15)GL_ACCOUNT_CC_ID NUMBER(15)ORDERED_QUANTITY NUMBER(15)ATTRIBUTE_CATEGORY VARCHAR2(30)ATTRIBUTE1 [-15] VARCHAR2(150)
View (DEM_ORDER_LINES_V)Name Type-------------------------------------------------------------------------------ROW_ID ROWIDORDER_ID NUMBER(15)ORDER_LINE_NUM NUMBER(15)LAST_UPDATE_DATE DATELAST_UPDATED_BY NUMBER(15)CREATION_DATE DATECREATED_BY NUMBER(15)LAST_UPDATE_LOGIN NUMBER(15)PRODUCT_ID NUMBER(15)PRODUCT_DESCRIPTION VARCHAR2(255)SUGGESTED_PRICE NUMBER(25)GL_ACCOUNT_CC_ID NUMBER(15)ORDERED_QUANTITY NUMBER(15)UNIT_OF_MEASURE VARCHAR2(25)ATTRIBUTE_CATEGORY VARCHAR2(30)ATTRIBUTE1 [-15] VARCHAR2(150)
.....................................................................................................................................................4-12 Extend Oracle Applications: Forms - Overview of Coding Standards
.....................................................................................................................................................Lesson 4: Overview of Coding Standards
.................................
The Template Form
.....................................................................................................................................................5-2 R11i Extend Oracle Applications: Forms - The Template Form
.....................................................................................................................................................Lesson 5: The Template Form
.....................................................................................................................................................R11i Extend Oracle Applications: Forms - The Template Form 5-3
.....................................................................................................................................................Objectives
ObjectivesAt the end of this lesson, you should be able to:
• Know what features are provided as part of the Oracle Applications TEMPLATE form.
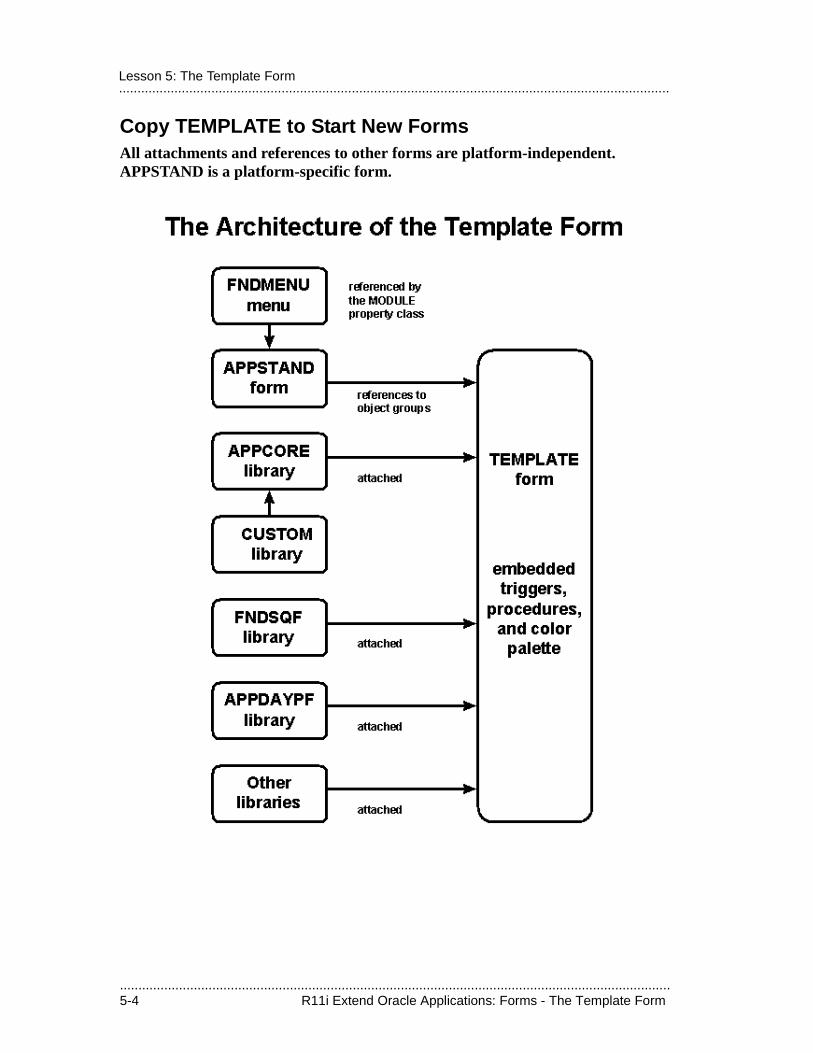
.....................................................................................................................................................5-4 R11i Extend Oracle Applications: Forms - The Template Form
.....................................................................................................................................................Lesson 5: The Template Form
Copy TEMPLATE to Start New FormsAll attachments and references to other forms are platform-independent. APPSTAND is a platform-specific form.
.....................................................................................................................................................R11i Extend Oracle Applications: Forms - The Template Form 5-5
.....................................................................................................................................................Copy TEMPLATE to Start New Forms
The TEMPLATE form includes many referenced blocks, canvases, LOVs, parameters, windows and other objects. Objects such as program units and triggers are built directly into TEMPLATE.
Check It Out
• The contents of the TEMPLATE form changes from release to release as new features are added to TEMPLATE and APPSTAND
• Objects in APPSTAND appear as referenced objects
• TEMPLATE also contains sample blocks and a sample window
.....................................................................................................................................................5-6 R11i Extend Oracle Applications: Forms - The Template Form
.....................................................................................................................................................Lesson 5: The Template Form
Starting your form with TEMPLATE is the only way to ensure you get the following:
• Applications property classes and visual attributes
• Toolbar
• Menu
• Calendar
• Required form-level triggers
• Required procedures
• Applications color palette
• Required parameters
• Required LOVs and record groups
• And so much more!
.....................................................................................................................................................R11i Extend Oracle Applications: Forms - The Template Form 5-7
.....................................................................................................................................................TEMPLATE Inherits Object Groups from APPSTAND
TEMPLATE Inherits Object Groups from APPSTANDAPPSTAND is a platform-specific form. TEMPLATE contains referenced object groups from APPSTAND.
TEMPLATE Provides the ToolbarThe TEMPLATE form inherits the STANDARD_TOOLBAR object group, which contains Toolbar items.
TEMPLATE Provides Property ClassesThe STANDARD_PC_AND_VA object group provides Visual Attributes and Property Classes for commonly-used items.
.....................................................................................................................................................5-8 R11i Extend Oracle Applications: Forms - The Template Form
.....................................................................................................................................................Lesson 5: The Template Form
Property Classes
Assign the appropriate property class to objects to enforce uniform appearance and behavior.
Apply Property Classes
• Almost every object has an associated property class
• Apply the appropriate property class when creating the object to inherit the standard properties
Do Not Override Property Class Attributes
• You should not override inherited property class attributes unless there is a compelling need
• In most cases, modifications cause confusion for the user by giving an object an anomalous look or behavior
• Properties you override will not reflect any future changes to the property classes supplied by Oracle Applications
• The coding standards specifically indicate attributes that may be altered
.....................................................................................................................................................R11i Extend Oracle Applications: Forms - The Template Form 5-9
.....................................................................................................................................................Colors and Visual Attributes
Colors and Visual AttributesAll forms use the same color palette, which contains the colors necessary for all platforms.
Automatic Colors
• Most colors are applied automatically at runtime and may not appear correct in the Oracle Forms Developer layout editor.
• Colors may change automatically depending on the circumstances.
• We strongly recommend against changing our colors, which have been designed to look good on all supported platforms.
Visual Attributes
• Visual attributes are combinations of typefaces and colors that can be applied to Oracle Forms objects and enforce the standard colors and fonts.
• Applying the property class to an object gives it the correct visual attribute
.....................................................................................................................................................5-10 R11i Extend Oracle Applications: Forms - The Template Form
.....................................................................................................................................................Lesson 5: The Template Form
Toolbar and Pulldown MenuCustomize the toolbar and the menu for your form.
Add Entries to the Special Menus or Icons to the Toolbar
• Add up to 45 entries the special menus (Tools, Reports, and Actions, with up to 15 entries each) to support calls to other functions, forms, or concurrent programs
• Any of these entries may also be added to the Toolbar
• Use APP_SPECIAL package to code special menu entries
Customize Other Entries:
• Define form specific Save and Proceed behavior
• Enable the Summary/Detail button
• Invoke Find windows and Row-LOVs from the View Find menu entry
• Zoom button becomes enabled if a custom Zoom is defined for that form and block
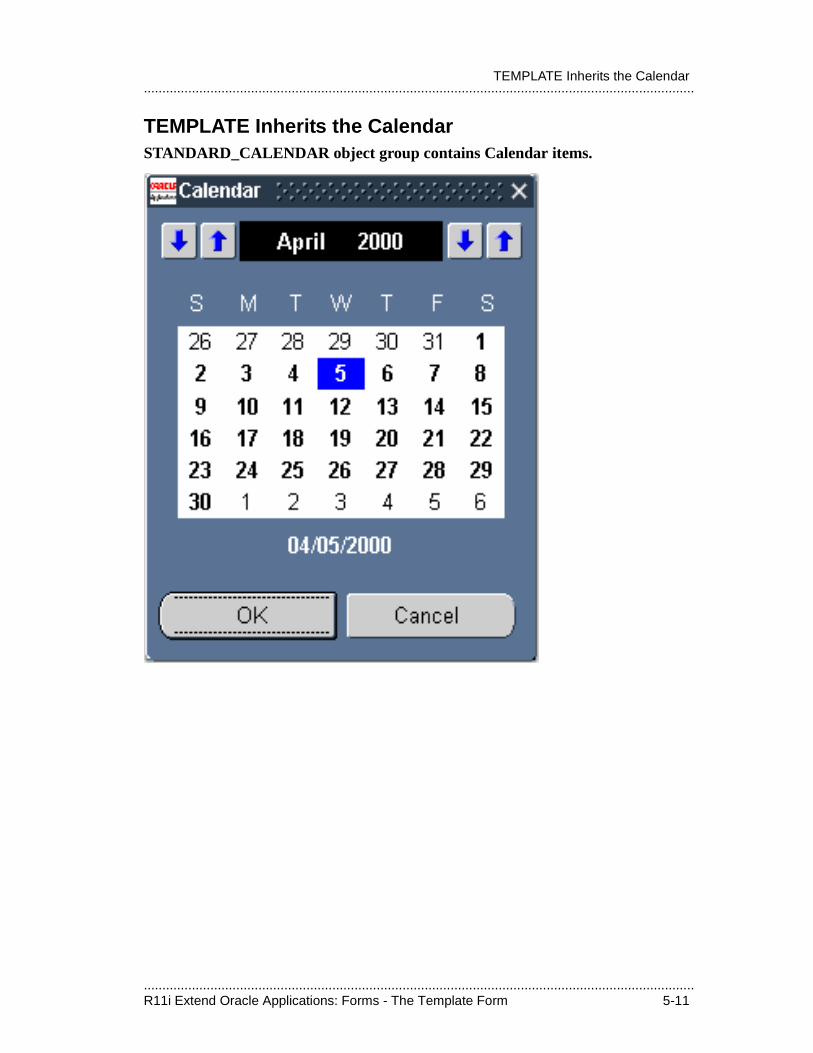
.....................................................................................................................................................R11i Extend Oracle Applications: Forms - The Template Form 5-11
.....................................................................................................................................................TEMPLATE Inherits the Calendar
TEMPLATE Inherits the CalendarSTANDARD_CALENDAR object group contains Calendar items.
.....................................................................................................................................................5-12 R11i Extend Oracle Applications: Forms - The Template Form
.....................................................................................................................................................Lesson 5: The Template Form
Customize the calendar to match your required behavior.
Call the Calendar from Every Date field
• Enable the List lamp from date and datetime fields. Date fields use the ‘ENABLE_LIST_LAMP’ LOV from the TEMPLATE form
• Invoking List of Values or Edit opens the Calendar window
Control Valid Dates Within the Calendar
• You can select which dates are valid (available for selection) when you open the Calendar window
• For example, you can disable all the dates listed in a table

.....................................................................................................................................................R11i Extend Oracle Applications: Forms - The Template Form 5-13
.....................................................................................................................................................Special Triggers in TEMPLATE
Special Triggers in TEMPLATEThe TEMPLATE form includes several form-level triggers.
Form-level Triggers You Must Modify
• PRE-FORM
Form-level Triggers You Can Modify
• KEY-CLRFRM
• POST-FORM
• QUERY_FIND
• ACCEPT
Triggers You Can Add at the Block or Item Level
• WHEN-NEW-RECORD-INSTANCE
• WHEN-NEW-BLOCK-INSTANCE
• WHEN-NEW-ITEM-INSTANCE
• KEY-DUPREC
• KEY-MENU
• KEY-LISTVAL
• QUERY_FIND
• ACCEPT
• ON-ERROR
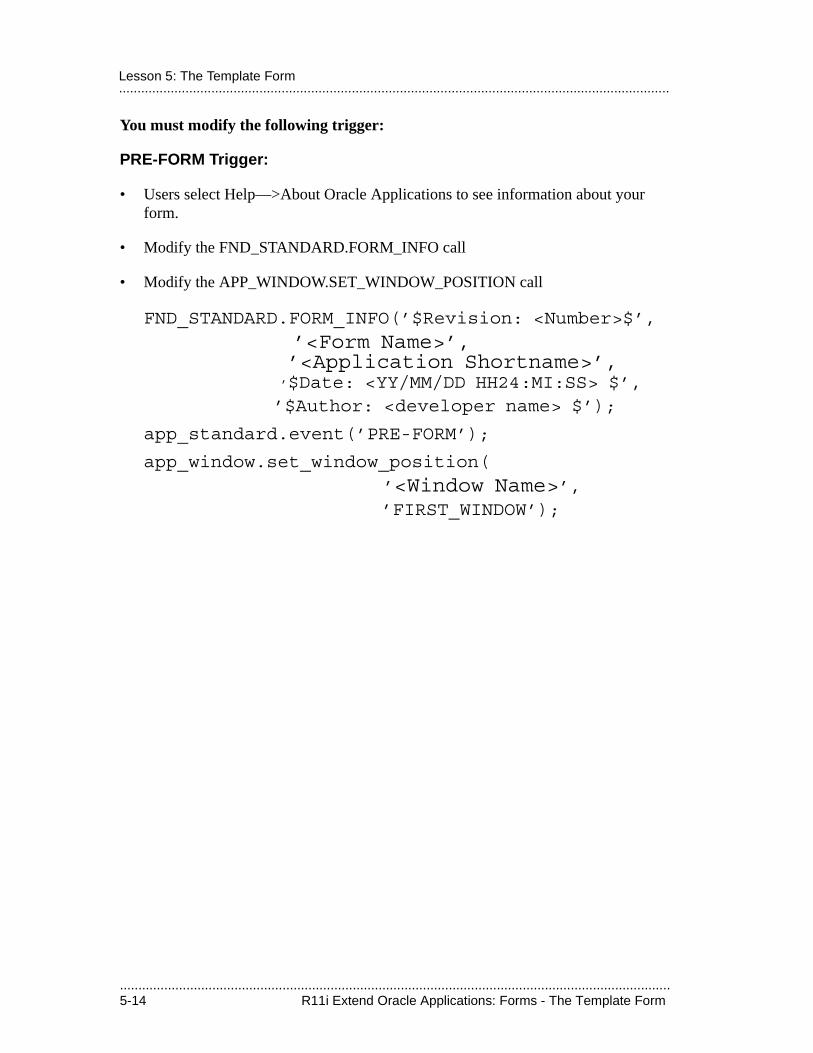
.....................................................................................................................................................5-14 R11i Extend Oracle Applications: Forms - The Template Form
.....................................................................................................................................................Lesson 5: The Template Form
You must modify the following trigger:
PRE-FORM Trigger:
• Users select Help—>About Oracle Applications to see information about your form.
• Modify the FND_STANDARD.FORM_INFO call
• Modify the APP_WINDOW.SET_WINDOW_POSITION call
FND_STANDARD.FORM_INFO(’$Revision: <Number>$’,
’<Form Name>’, ’<Application Shortname>’,
’$Date: <YY/MM/DD HH24:MI:SS> $’, ’$Author: <developer name> $’);
app_standard.event(’PRE-FORM’);
app_window.set_window_position(
’<Window Name>’,’FIRST_WINDOW’);
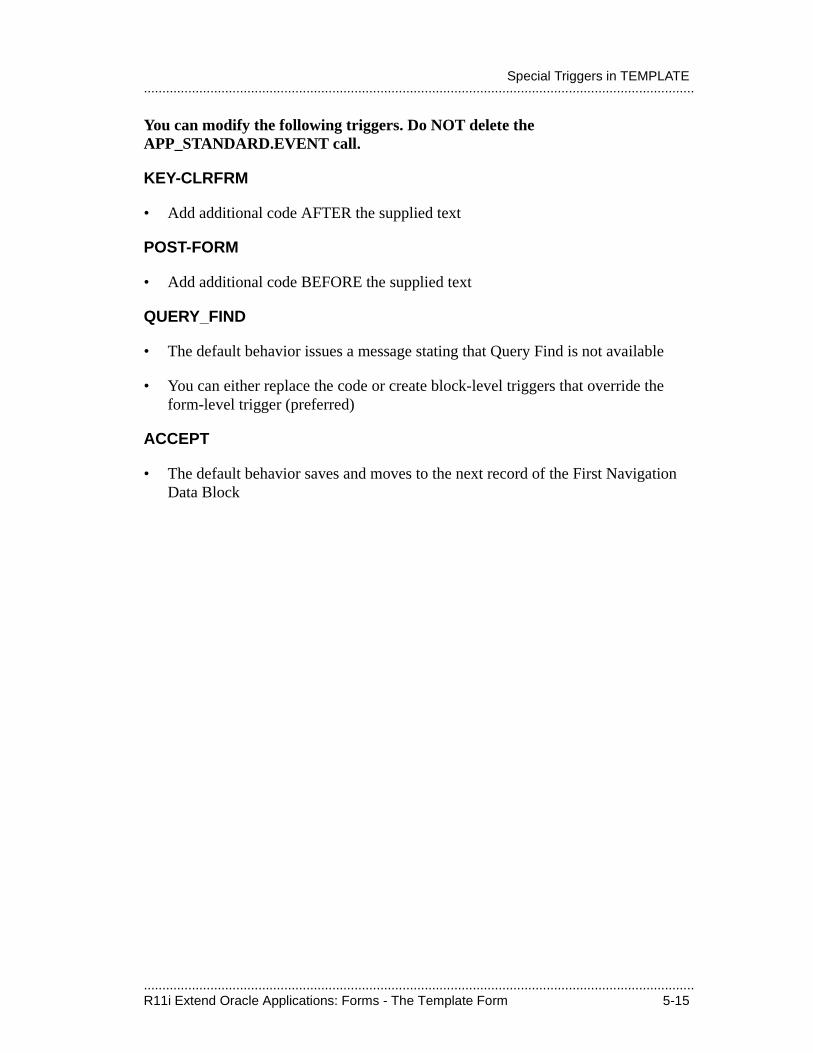
.....................................................................................................................................................R11i Extend Oracle Applications: Forms - The Template Form 5-15
.....................................................................................................................................................Special Triggers in TEMPLATE
You can modify the following triggers. Do NOT delete the APP_STANDARD.EVENT call.
KEY-CLRFRM
• Add additional code AFTER the supplied text
POST-FORM
• Add additional code BEFORE the supplied text
QUERY_FIND
• The default behavior issues a message stating that Query Find is not available
• You can either replace the code or create block-level triggers that override the form-level trigger (preferred)
ACCEPT
• The default behavior saves and moves to the next record of the First Navigation Data Block
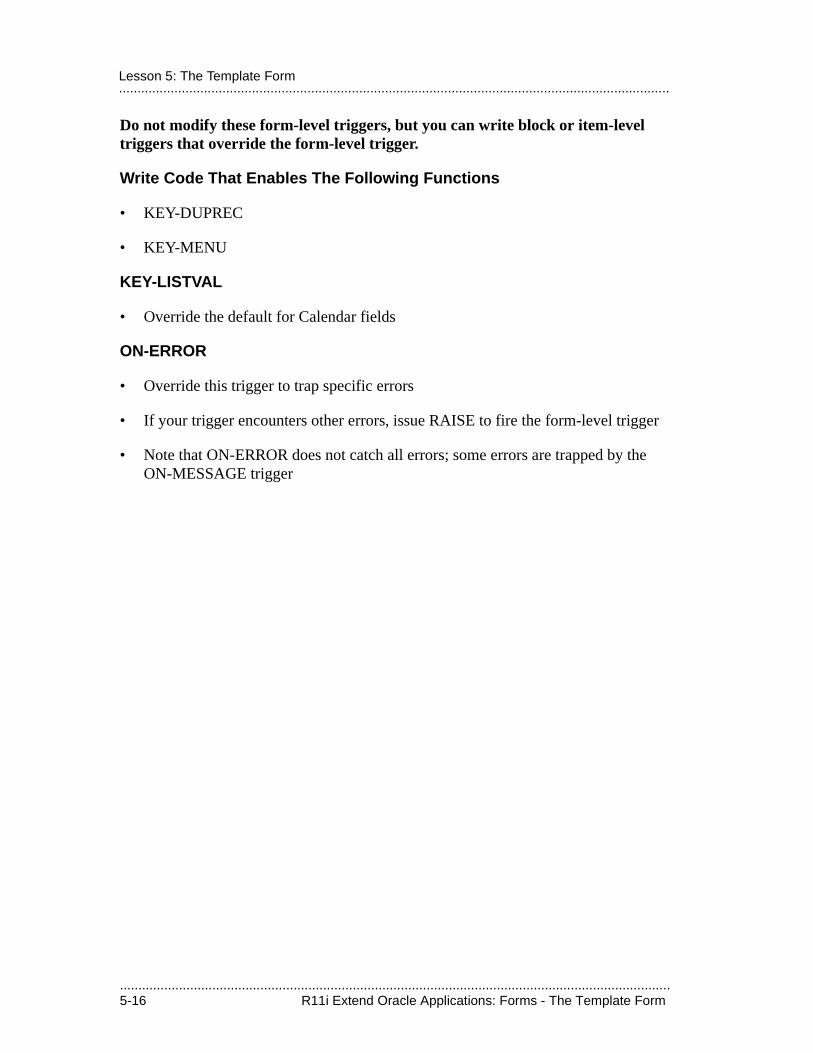
.....................................................................................................................................................5-16 R11i Extend Oracle Applications: Forms - The Template Form
.....................................................................................................................................................Lesson 5: The Template Form
Do not modify these form-level triggers, but you can write block or item-level triggers that override the form-level trigger.
Write Code That Enables The Following Functions
• KEY-DUPREC
• KEY-MENU
KEY-LISTVAL
• Override the default for Calendar fields
ON-ERROR
• Override this trigger to trap specific errors
• If your trigger encounters other errors, issue RAISE to fire the form-level trigger
• Note that ON-ERROR does not catch all errors; some errors are trapped by the ON-MESSAGE trigger
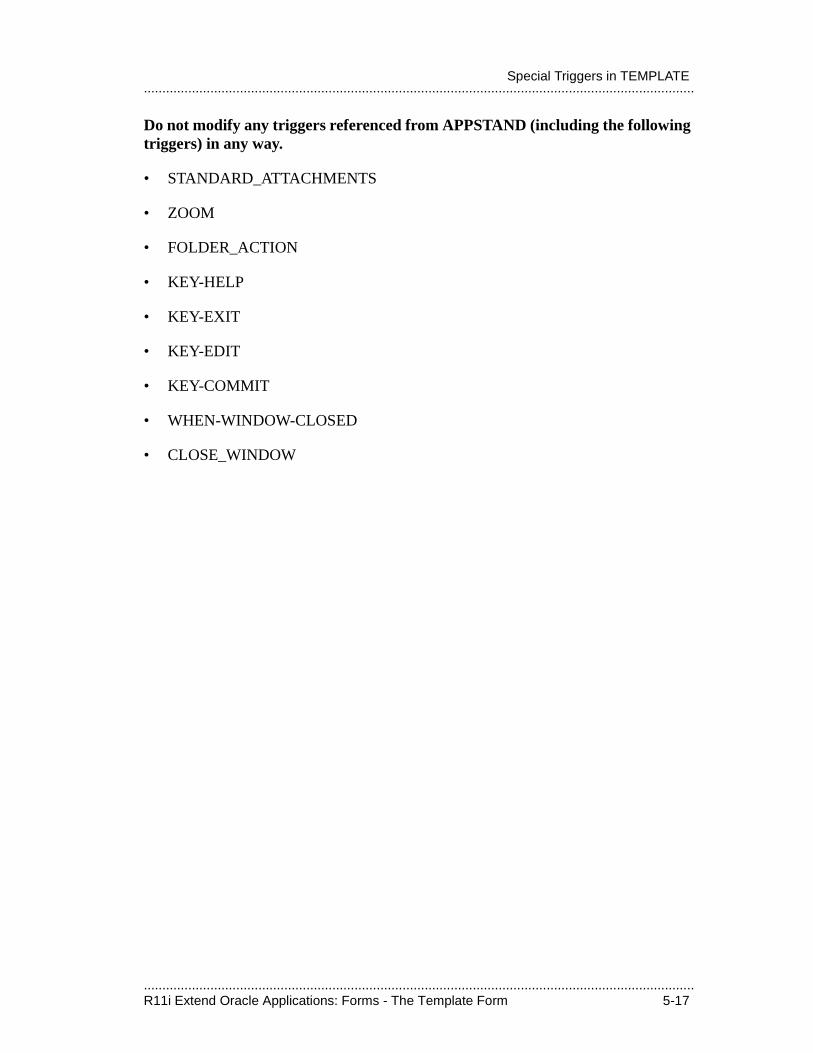
.....................................................................................................................................................R11i Extend Oracle Applications: Forms - The Template Form 5-17
.....................................................................................................................................................Special Triggers in TEMPLATE
Do not modify any triggers referenced from APPSTAND (including the following triggers) in any way.
• STANDARD_ATTACHMENTS
• ZOOM
• FOLDER_ACTION
• KEY-HELP
• KEY-EXIT
• KEY-EDIT
• KEY-COMMIT
• WHEN-WINDOW-CLOSED
• CLOSE_WINDOW

.....................................................................................................................................................5-18 R11i Extend Oracle Applications: Forms - The Template Form
.....................................................................................................................................................Lesson 5: The Template Form
.................................
Menus and FunctionSecurity

.....................................................................................................................................................6-2 R11i Extend Oracle Applications: Forms - Menus and Function Security
.....................................................................................................................................................Lesson 6: Menus and Function Security
.....................................................................................................................................................R11i Extend Oracle Applications: Forms - Menus and Function Security 6-3
.....................................................................................................................................................Objectives
ObjectivesAt the end of this lesson, you should be able to:
• Understand the purpose of menus and function security.
• Understand how basic function security works.
• Implement basic function security.
• Conform to function security standards.
.....................................................................................................................................................6-4 R11i Extend Oracle Applications: Forms - Menus and Function Security
.....................................................................................................................................................Lesson 6: Menus and Function Security
Understand Function Security: OverviewFunction security lets you restrict application functionality to authorized users.
Basic Function Security
• Group the forms and functionality of an application into logical menu structures
• Assign a menu to one or more responsibilities
• Assign one or more responsibilities to one or more users
• Forms or submenus on a menu can be secured on a responsibility basis (that is, excluded from a particular responsibility)
Advanced Function Security
• Oracle Applications GUI-based architecture aggregates several related business functions into a single form
• Not all users should have access to every business function in a form
• Oracle Applications provides the ability to identify pieces of application logic as functions
• Functions or submenus on a menu can be secured on a responsibility basis (that is, excluded from a particular responsibility)
.....................................................................................................................................................R11i Extend Oracle Applications: Forms - Menus and Function Security 6-5
.....................................................................................................................................................Function Security: Definitions
Function Security: DefinitionsFunction Security extends the definitions of these existing terms.
Menu
• A menu is a hierarchical arrangement of functions and menus of functions
Menu Entry
• A menu entry is a menu component that identifies a function or a menu of functions
Responsibility
• When application users sign on, they select a responsibility that determines, among other things, the functions they may access
• Available functions are determined by the menu assigned to the current responsibility
Form
• An Oracle Forms .fmx file
• Forms are located in their application basepath/forms/US (or appropriate language) directory
.....................................................................................................................................................6-6 R11i Extend Oracle Applications: Forms - Menus and Function Security
.....................................................................................................................................................Lesson 6: Menus and Function Security
Function Security introduces the following new terms:
Function
• A function is a part of an application’s functionality, registered under a unique name, that can be assigned to or excluded from a responsibility
• There are two types of functions: form functions (forms), and non-form functions (subfunctions)
Form Function
• A form (form function) invokes an Oracle Forms form
• A form has the unique property that users may navigate to it from the Navigate window
Subfunction
• A subfunction (non-form function) is a securable subset of a form’s functionality
• A developer can write logic to test the availability of a subfunction in the current responsibility, then take some action based on whether the subfunction is available
• A subfunction is frequently associated with a button or an entry on the Special menu. When such a subfunction is enabled, the corresponding button or menu entry is enabled
• A subfunction may correspond to a form procedure not associated with a graphical element, and its availability may not be obvious to the end user
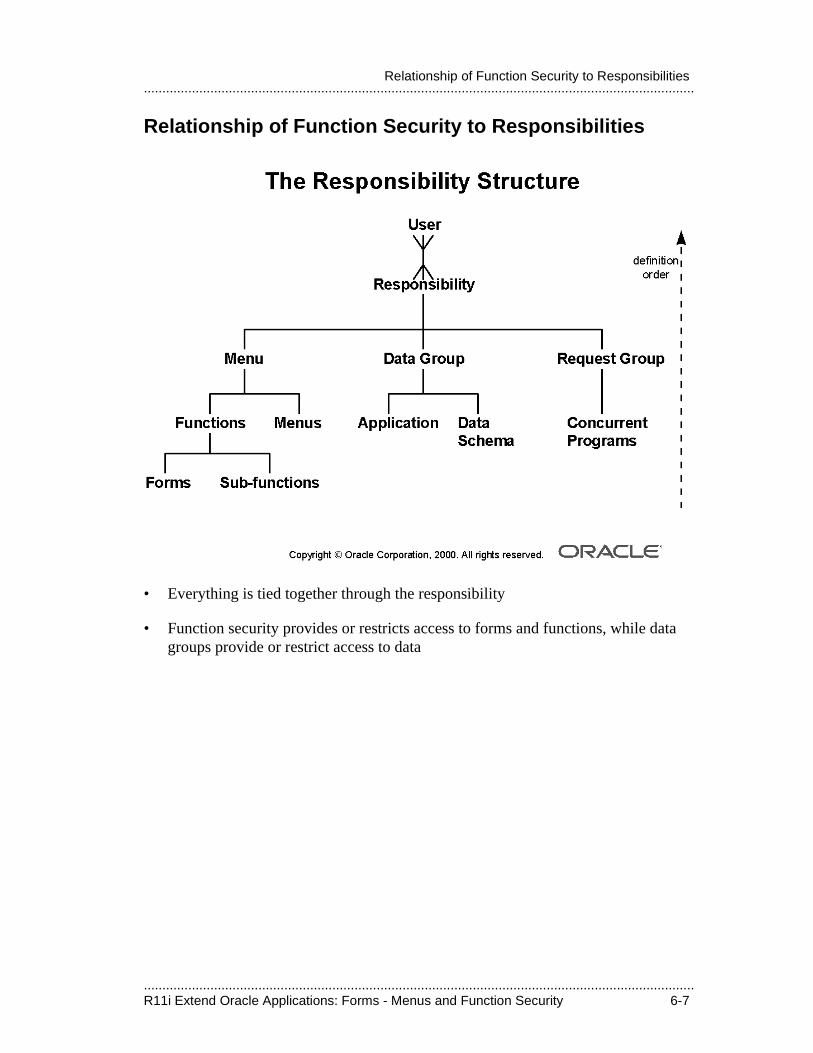
.....................................................................................................................................................R11i Extend Oracle Applications: Forms - Menus and Function Security 6-7
.....................................................................................................................................................Relationship of Function Security to Responsibilities
Relationship of Function Security to Responsibilities
• Everything is tied together through the responsibility
• Function security provides or restricts access to forms and functions, while data groups provide or restrict access to data
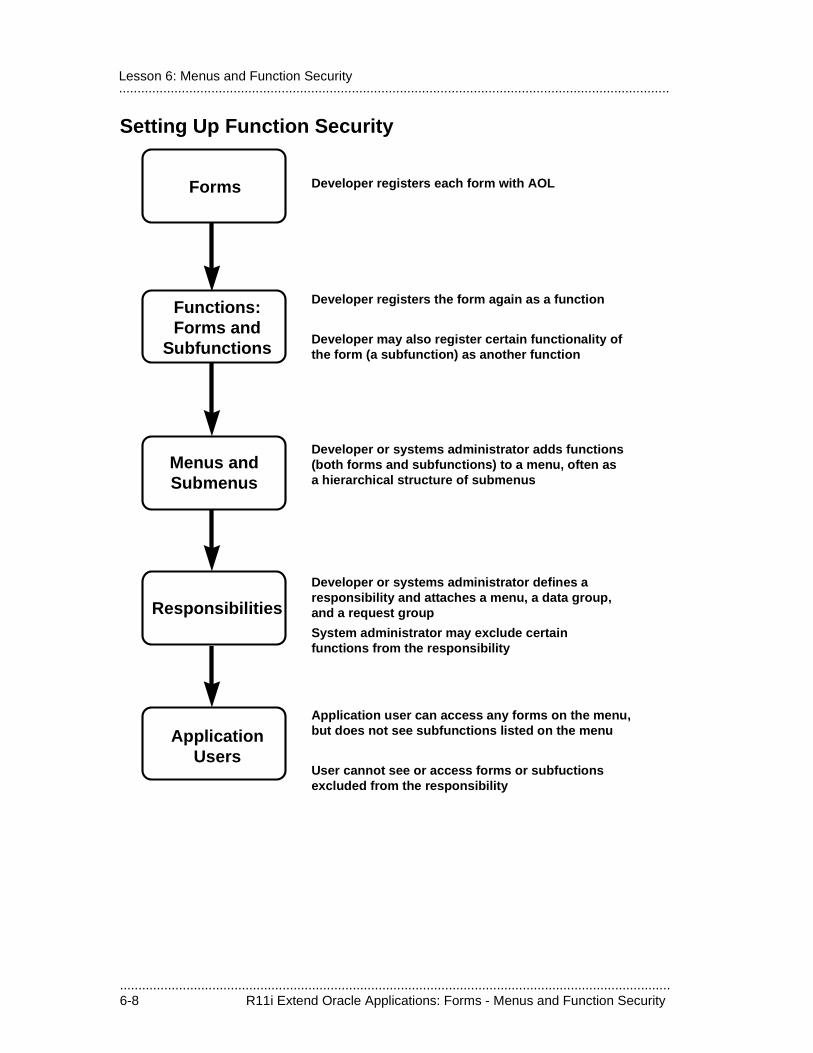
.....................................................................................................................................................6-8 R11i Extend Oracle Applications: Forms - Menus and Function Security
.....................................................................................................................................................Lesson 6: Menus and Function Security
Setting Up Function Security
Developer registers each form with AOL
Developer registers the form again as a function
Developer may also register certain functionality ofthe form (a subfunction) as another function
Forms
Functions:Forms and
Subfunctions
Menus andSubmenus
Responsibilities
ApplicationUsers
Developer or systems administrator adds functions(both forms and subfunctions) to a menu, often asa hierarchical structure of submenus
Developer or systems administrator defines aresponsibility and attaches a menu, a data group,and a request group
System administrator may exclude certainfunctions from the responsibility
Application user can access any forms on the menu,but does not see subfunctions listed on the menu
User cannot see or access forms or subfuctionsexcluded from the responsibility
.....................................................................................................................................................R11i Extend Oracle Applications: Forms - Menus and Function Security 6-9
.....................................................................................................................................................Setting Up Function Security
Developers Create Functions and Menus of Functions
• Developers can require parts of their form code to test the availability of a particular function, then take some action based on whether the function is available.
• Developers register each function they create.
• For form functions, developers can register parameters that pass values to a function. For example, a form may support data entry only when a function parameter is passed to it.
• Developers define a menu including all the functions available in an application (that is, all the forms and their securable subfunctions).
• For some applications, developers may define additional menus that contain different subsets of application functionality.
System Administrators Exclude Functions from Menus
• Each Oracle Applications product is delivered with one or more predefined menus.
• System Administrators can assign a predefined menu to a responsibility.
• To tailor a responsibility, a System Administrator can exclude functions or menus of functions using exclusion rules.
• When a menu is excluded, all of the functions and menus of functions that it selects are excluded.
• When a function is excluded, all occurrences of that function throughout the responsibility’s menu are excluded.
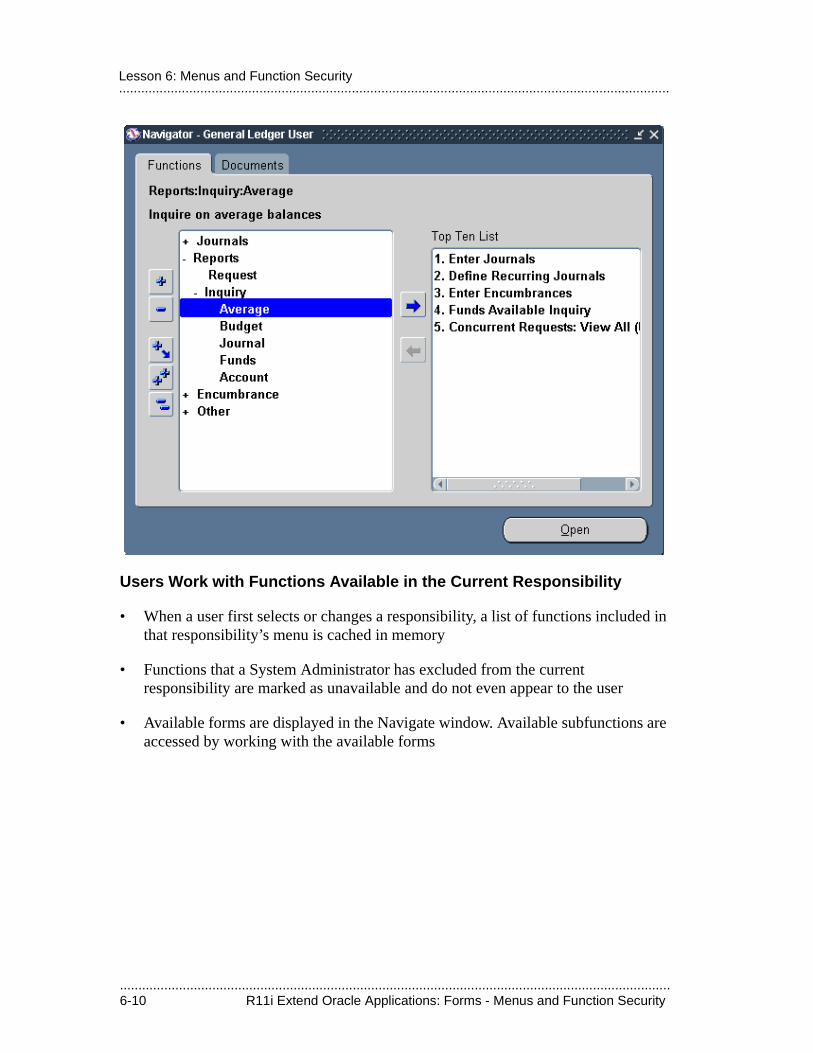
.....................................................................................................................................................6-10 R11i Extend Oracle Applications: Forms - Menus and Function Security
.....................................................................................................................................................Lesson 6: Menus and Function Security
Users Work with Functions Available in the Current Responsibility
• When a user first selects or changes a responsibility, a list of functions included in that responsibility’s menu is cached in memory
• Functions that a System Administrator has excluded from the current responsibility are marked as unavailable and do not even appear to the user
• Available forms are displayed in the Navigate window. Available subfunctions are accessed by working with the available forms
.....................................................................................................................................................R11i Extend Oracle Applications: Forms - Menus and Function Security 6-11
.....................................................................................................................................................Naming Standards in Function Security
Naming Standards in Function Security
Menus are Object-Based
• Try to base menus around an object, as opposed to the type of action taken on an object
– For example, Purchase Orders, not Entering
• Provide as many levels of categorical groupings as necessary until eventually getting to a menu entry for a single object
• In general, all top-level menus have a report entry (for Standard Request Submission)
• A menu of subfunctions always uses the name of the form entry with “_MENU” appended
.....................................................................................................................................................6-12 R11i Extend Oracle Applications: Forms - Menus and Function Security
.....................................................................................................................................................Lesson 6: Menus and Function Security
Form Function Naming Standards
• Create form function names by combining the application short name with the internal form name, for example: “PO_POXPOMPO”
• User function name (which is defined using the Form Functions form, and which is the selection value in the LOV on the Menus form) is simply the form name, for example: “Purchase Orders”
• Never begin a user function name with a number, as it will conflict with the Top Ten list in the Navigator
• When the same form is used for multiple functions, differing only in the parameters passed to it, make the user function name the logical name for the function
.....................................................................................................................................................R11i Extend Oracle Applications: Forms - Menus and Function Security 6-13
.....................................................................................................................................................Naming Standards in Function Security
Subfunction Naming Standards
• All restrictable subfunctions for each form are predefined by the developer, and are named <form>_<subfunction>
– For example, PO_POXPOMPO_DELETE
– For example, AR_FNDRSRUN_LISTING_RPTS
• The user function name should be <form name>: <subfunction>
– For example, Purchase Orders: Delete
– For example, Run Reports: Listing
• This naming standard enables the System Administrator to find all the available functions to include or exclude from a responsibility by using Autoreduction in the LOV in the Responsibilities form
• Where there are many restrictable subfunctions for a particular form, and those subfunctions group well into categories (Approvals, for example), group the subfunctions according to their category

.....................................................................................................................................................6-14 R11i Extend Oracle Applications: Forms - Menus and Function Security
.....................................................................................................................................................Lesson 6: Menus and Function Security
Building Your Form into Your ApplicationThese are the forms you use to add your form to the application so that it can be accessed by the user:
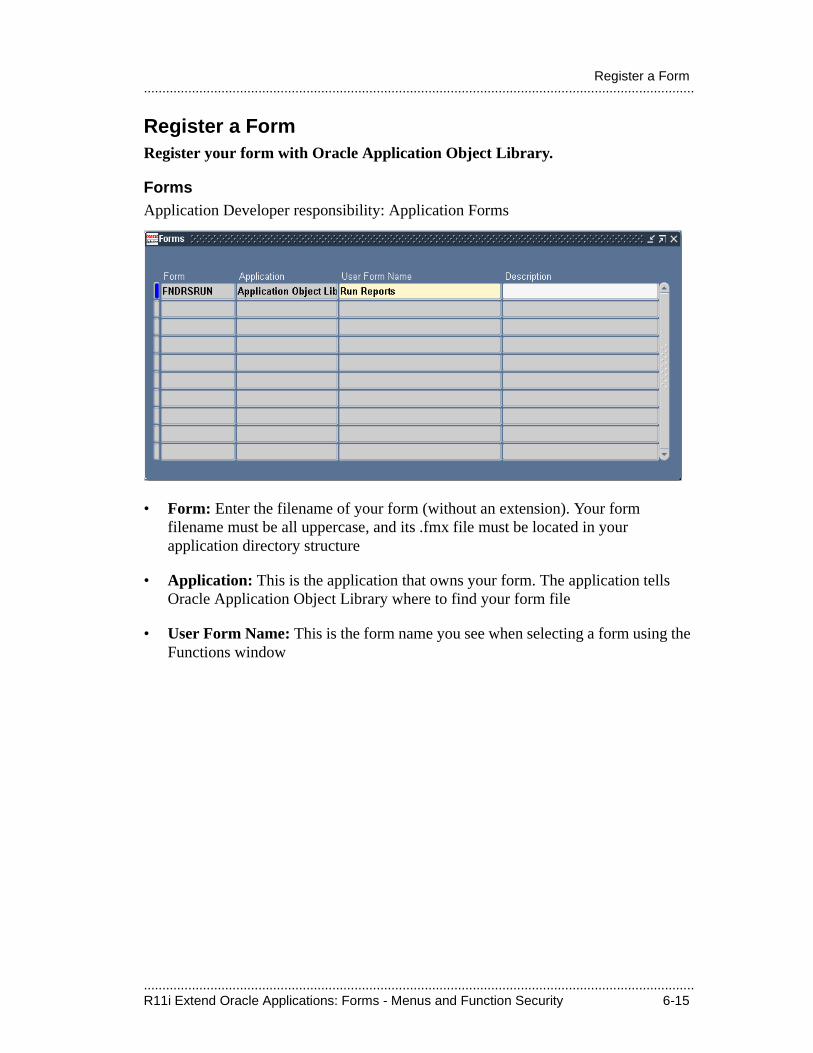
.....................................................................................................................................................R11i Extend Oracle Applications: Forms - Menus and Function Security 6-15
.....................................................................................................................................................Register a Form
Register a FormRegister your form with Oracle Application Object Library.
FormsApplication Developer responsibility: Application Forms
• Form: Enter the filename of your form (without an extension). Your form filename must be all uppercase, and its .fmx file must be located in your application directory structure
• Application: This is the application that owns your form. The application tells Oracle Application Object Library where to find your form file
• User Form Name: This is the form name you see when selecting a form using the Functions window
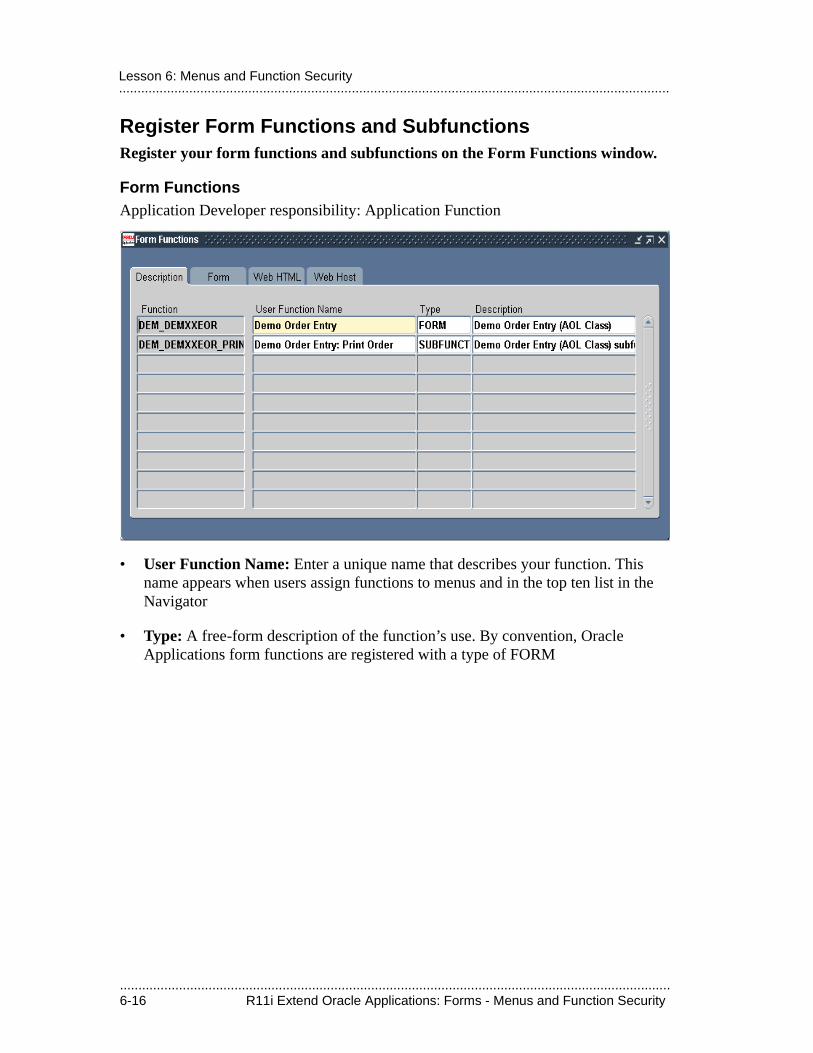
.....................................................................................................................................................6-16 R11i Extend Oracle Applications: Forms - Menus and Function Security
.....................................................................................................................................................Lesson 6: Menus and Function Security
Register Form Functions and SubfunctionsRegister your form functions and subfunctions on the Form Functions window.
Form FunctionsApplication Developer responsibility: Application Function
• User Function Name: Enter a unique name that describes your function. This name appears when users assign functions to menus and in the top ten list in the Navigator
• Type: A free-form description of the function’s use. By convention, Oracle Applications form functions are registered with a type of FORM
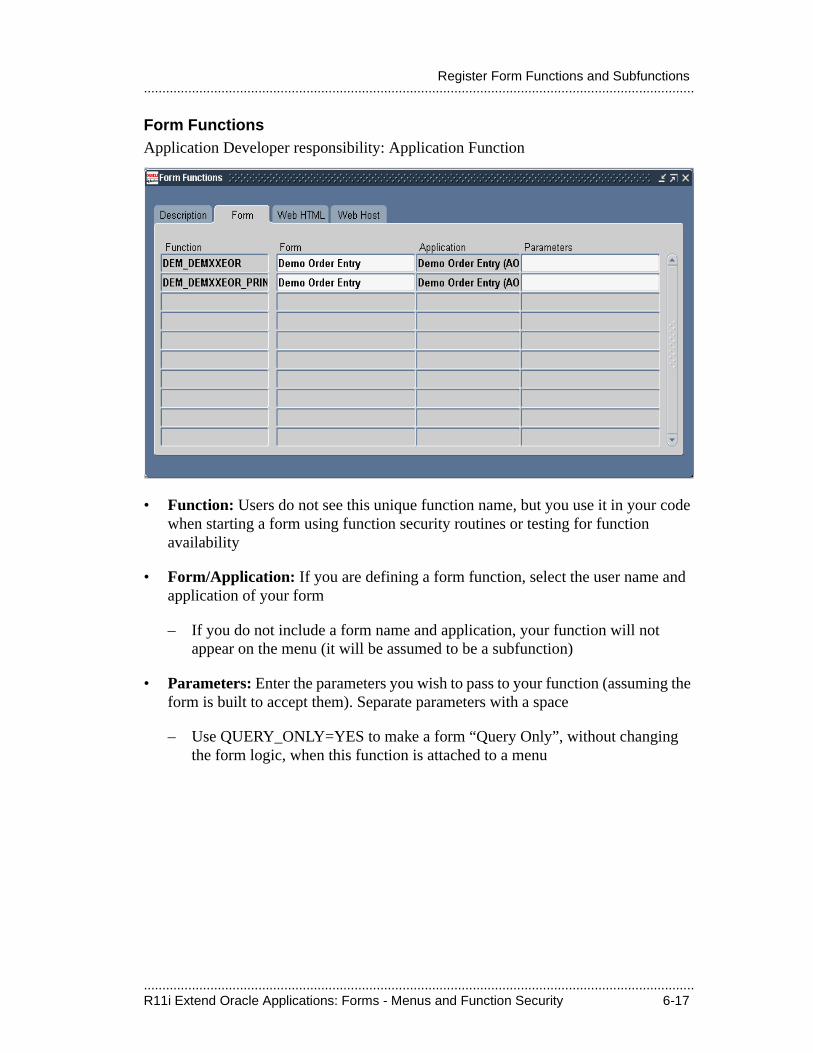
.....................................................................................................................................................R11i Extend Oracle Applications: Forms - Menus and Function Security 6-17
.....................................................................................................................................................Register Form Functions and Subfunctions
Form FunctionsApplication Developer responsibility: Application Function
• Function: Users do not see this unique function name, but you use it in your code when starting a form using function security routines or testing for function availability
• Form/Application: If you are defining a form function, select the user name and application of your form
– If you do not include a form name and application, your function will not appear on the menu (it will be assumed to be a subfunction)
• Parameters: Enter the parameters you wish to pass to your function (assuming the form is built to accept them). Separate parameters with a space
– Use QUERY_ONLY=YES to make a form “Query Only”, without changing the form logic, when this function is attached to a menu

.....................................................................................................................................................6-18 R11i Extend Oracle Applications: Forms - Menus and Function Security
.....................................................................................................................................................Lesson 6: Menus and Function Security
Create a Menu of FunctionsAdd your functions to a menu. The functions in a menu determine the access privileges of a user.
MenusSystem Administrator or Application Developer responsibility: Application Menu
• Include any forms the user should have access to, including forms that are opened programmatically from another form (such as by pressing a button)
– Leave the prompt blank for form functions that should not appear in the Navigator menu listing even though they are on the menu
.....................................................................................................................................................R11i Extend Oracle Applications: Forms - Menus and Function Security 6-19
.....................................................................................................................................................Create a Menu of Functions
Field Help:
• Menu: Choose a name that describes the purpose of the menu
• User Menu Name: You use a menu name when a responsibility calls a main menu or when one menu calls another
• Sequence: Enter a sequence number to specify where a menu entry appears relative to other menu entries in a menu
• Navigator Prompt: Enter a user-friendly, intuitive prompt your menu displays for this menu entry. You see this menu prompt in the Navigate window
– Leave the prompt blank for subfunctions or form functions that should not appear in the Navigator menu listing even though they are on the menu
• Submenu: Call another menu, which allows your user to select menu entries from that menu
• Function: Call a function you wish to include in the menu. A form function (form) with a prompt appears in the Navigate window and allows access to that form. Other non-form functions (subfunctions) allow access to a particular subset of form functionality from this menu
– Functions and submenus are not mutually exclusive—you can have both a submenu and a function as a single menu entry, though the function is invisible to the user in the Navigator and could be a separate menu entry
• Description: Enter a description of the menu choice. This description appears in the Description field under the menu path in the Navigator
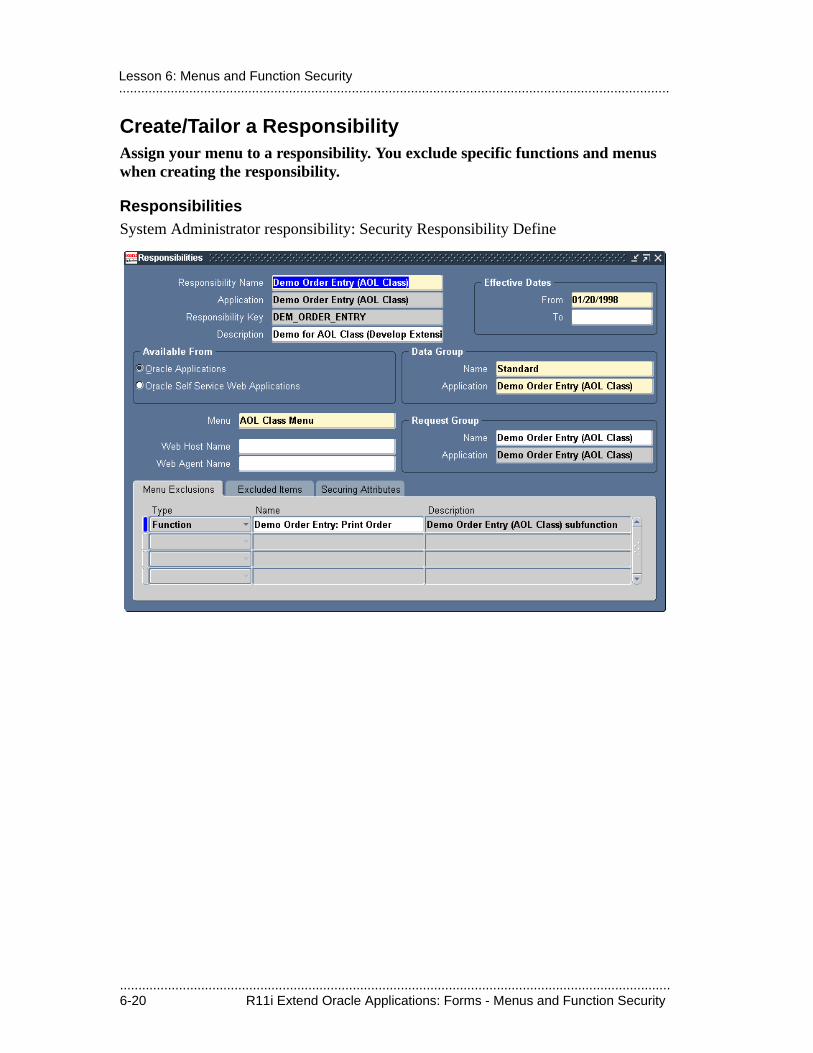
.....................................................................................................................................................6-20 R11i Extend Oracle Applications: Forms - Menus and Function Security
.....................................................................................................................................................Lesson 6: Menus and Function Security
Create/Tailor a ResponsibilityAssign your menu to a responsibility. You exclude specific functions and menus when creating the responsibility.
ResponsibilitiesSystem Administrator responsibility: Security Responsibility Define
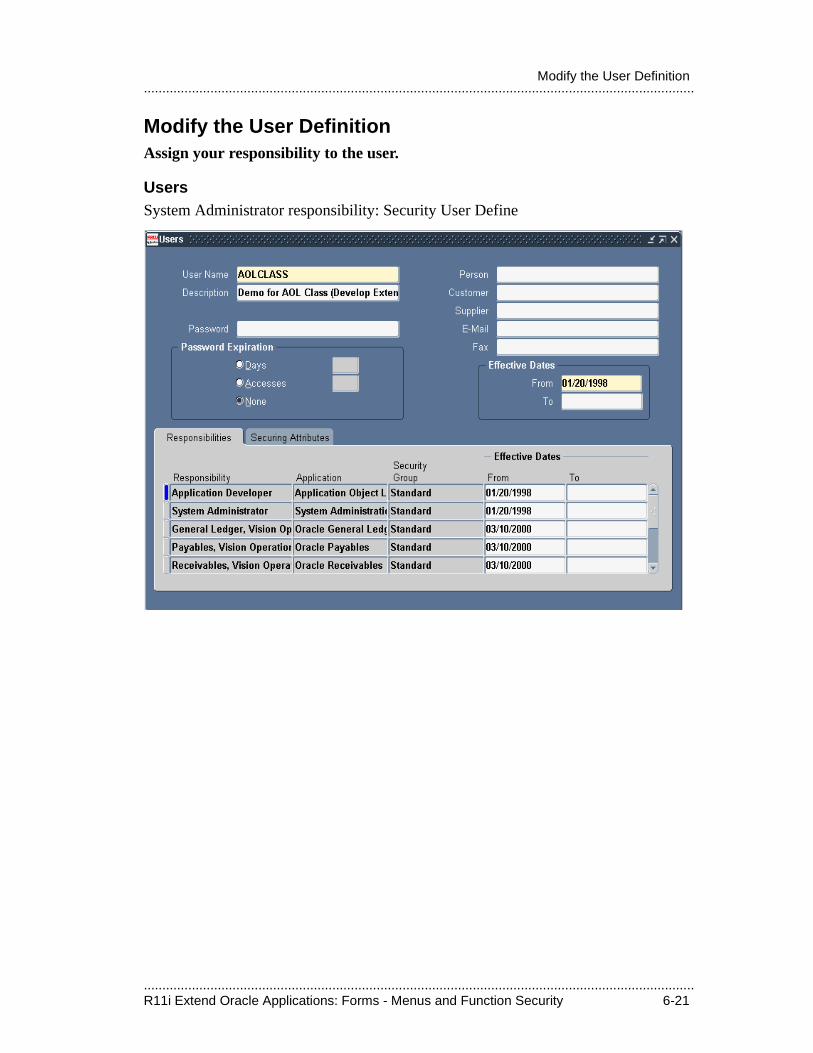
.....................................................................................................................................................R11i Extend Oracle Applications: Forms - Menus and Function Security 6-21
.....................................................................................................................................................Modify the User Definition
Modify the User DefinitionAssign your responsibility to the user.
UsersSystem Administrator responsibility: Security User Define
.....................................................................................................................................................6-22 R11i Extend Oracle Applications: Forms - Menus and Function Security
.....................................................................................................................................................Lesson 6: Menus and Function Security
.................................
Container Objects
.....................................................................................................................................................7-2 R11i Extend Oracle Applications: Forms - Container Objects
.....................................................................................................................................................Lesson 7: Container Objects
.....................................................................................................................................................R11i Extend Oracle Applications: Forms - Container Objects 7-3
.....................................................................................................................................................Objectives
ObjectivesAt the end of this lesson, you should be able to:
• Understand the standard rules and cosmetics for each container.
• Describe standard behaviors of each container.
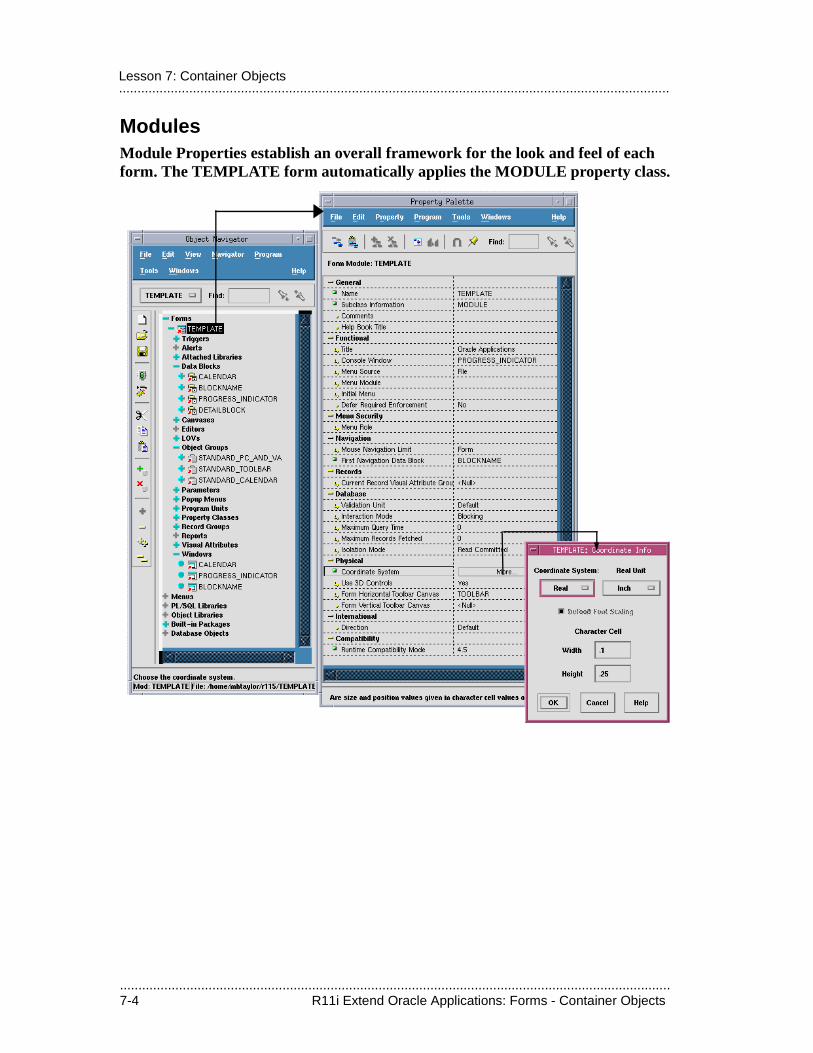
.....................................................................................................................................................7-4 R11i Extend Oracle Applications: Forms - Container Objects
.....................................................................................................................................................Lesson 7: Container Objects
ModulesModule Properties establish an overall framework for the look and feel of each form. The TEMPLATE form automatically applies the MODULE property class.
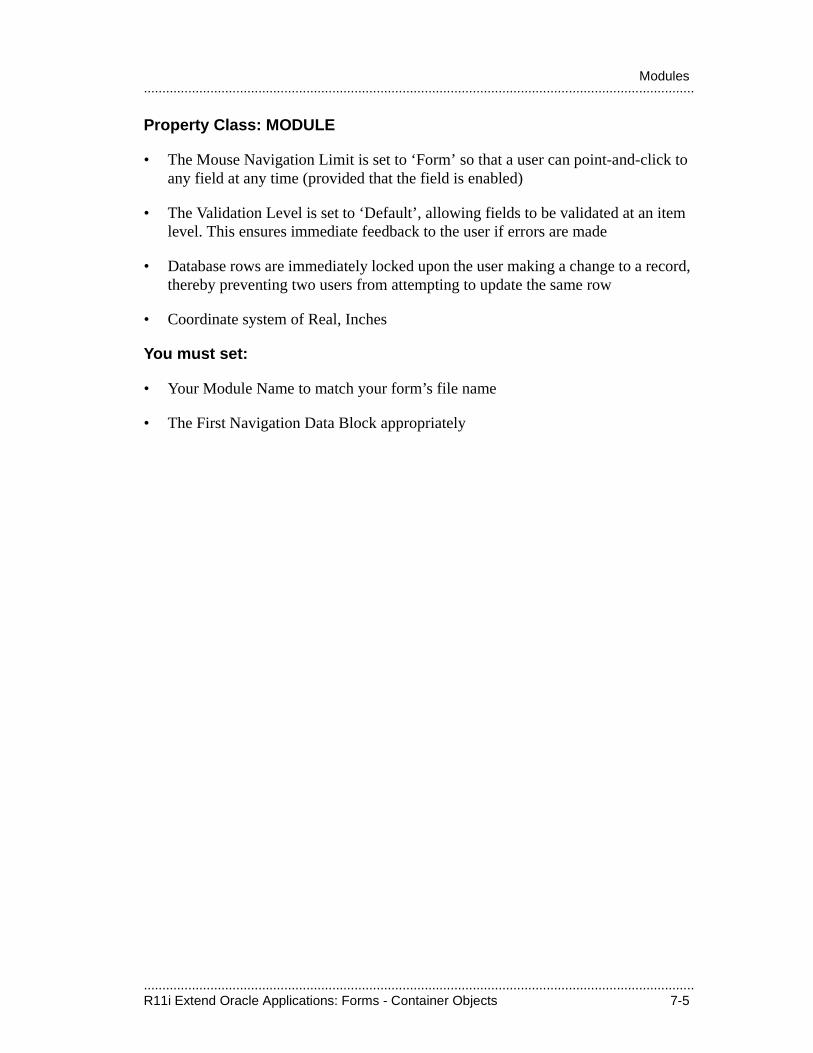
.....................................................................................................................................................R11i Extend Oracle Applications: Forms - Container Objects 7-5
.....................................................................................................................................................Modules
Property Class: MODULE
• The Mouse Navigation Limit is set to ‘Form’ so that a user can point-and-click to any field at any time (provided that the field is enabled)
• The Validation Level is set to ‘Default’, allowing fields to be validated at an item level. This ensures immediate feedback to the user if errors are made
• Database rows are immediately locked upon the user making a change to a record, thereby preventing two users from attempting to update the same row
• Coordinate system of Real, Inches
You must set:
• Your Module Name to match your form’s file name
• The First Navigation Data Block appropriately
.....................................................................................................................................................7-6 R11i Extend Oracle Applications: Forms - Container Objects
.....................................................................................................................................................Lesson 7: Container Objects
Windows Windows are frames in which information is presented. Except for the simplest of forms, most forms have several windows associated with them.
Attributes Set By the Property Class
• Windows inherit the proper look and feel of the GUI on which they are running, including:
– characteristics of the frame
– color settings
– title bar fonts
– window manager buttons
• No bevels around the edge of the window
• Icons
Space, The Final Frontier
• The top and bottom lines of the window should remain blank, except for buttons and coordination check boxes (and certain exceptional cases)
• Leave the left and right edge character cell columns of a window blank, except for region lines and block boundary lines
Toolbars
• No windows use toolbars. The exceptions to this rule are the ROOT_WINDOW which controls the Applications toolbar, and certain complex flexfield windows
.....................................................................................................................................................R11i Extend Oracle Applications: Forms - Container Objects 7-7
.....................................................................................................................................................Windows
Types of windows include:
Non-modal windows
• Non-modal windows are used to display most application entities
• Apply the WINDOW property class to all non-modal windows
• Users can resize non-modal windows (with the native GUI mechanism)
• Users may navigate out of this window
Modal Windows
• Modal windows force the user to work within a single window, then either accept or cancel the changes they have made
• Users cannot close modal windows with the native GUI mechanism; your code must explicitly close the window
• Users cannot resize modal windows (even with the native GUI mechanism)
• Apply the WINDOW_DIALOG property class to all modal windows
ROOT_WINDOW
• Do not use this special Oracle Forms window, as it interferes with the Toolbar functioning
.....................................................................................................................................................7-8 R11i Extend Oracle Applications: Forms - Container Objects
.....................................................................................................................................................Lesson 7: Container Objects
Non-Modal WindowsA non-modal window allows the user to interact with any other window, as well as the toolbar and the menu. Apply the WINDOW property class to inherit the correct attributes.
Titles
• Each window in a form must be titled uniquely so that iconified names and entries in the Windows menu are significant
• Follow the naming standards in the Oracle Applications User Interface Standards for Forms-based Products
• You can create dynamic titles containing context information for your windows
– General format for detail windows is: Object(org) - context
Scroll Bars
• No scroll bars are attached to the window (although scroll bars may appear inside the window, attached to canvasses, blocks, or items)
Window Size
• You must adjust the window size for each window of your form
• The maximum window size is 7.8" (width) x 5.0" (height)
• The minimum size of a window is 2" x 2"
• A window may be drawn any size between the maximum and minimum. Make windows only as large as is necessary
Technical NoteApplications Division: do not differentiate titles by padding with spaces, making one singular and another plural, or changing word order. Japanese does not have singular/plural, and many languages have varying word orders
.....................................................................................................................................................R11i Extend Oracle Applications: Forms - Container Objects 7-9
.....................................................................................................................................................Modal Windows
Modal WindowsApply the WINDOW_DIALOG property class to all modal windows. Only use them when a user must enter information to complete an action.
Titles
• Relate the title to the label of the widget that opens the window
Window Size
• Make all modal windows smaller than non-modal windows
• Do not allow resizing of modal windows
Positioning Windows
• Modal windows are centered when opened
• Use APP_WINDOW.SET_WINDOW_POSITION
Window Opening and Closing
• Most modal windows open from a button or action on the form
• You must explicitly write code to close the window, as the native GUI window close mechanism is disabled (APP_CUSTOM.CLOSE_WINDOW will not be called automatically)
.....................................................................................................................................................7-10 R11i Extend Oracle Applications: Forms - Container Objects
.....................................................................................................................................................Lesson 7: Container Objects
Canvases Canvases are the surfaces on which all interface items are placed.
Content Canvases
• Each window contains one content canvas, which fully occupies the window
• Use the CANVAS property class with all content canvases
• Content canvasses have the following display characteristics:
– All content canvasses are marked to Display immediately
– Content canvases do not raise on entry
– Size a content canvas the same as the window it is shown in
– Enter the name of the window the canvas is shown in
Tab Canvases
• Use the TAB_CANVAS property class with all tab canvases
.....................................................................................................................................................R11i Extend Oracle Applications: Forms - Container Objects 7-11
.....................................................................................................................................................Canvases
Stacked CanvasesOne or more stacked canvases may be rendered in front of the content canvas of a particular window. If needed, a stacked canvas may fully occupy a window.
• Use the CANVAS_STACKED property class with stacked canvases
• Size stacked canvases to contain all the items. The View should ideally match the canvas size to avoid scrolling
• Set the sequence for multiple stacked canvases in a single window
• Stacked canvases should adhere to these display characteristics:
– Only the one stacked canvas that is to be shown when its window is first opened should be set to Displayed
– Stacked canvases always raise on entry
– Stacked canvases should be explicitly hidden when not visible to conserve resources
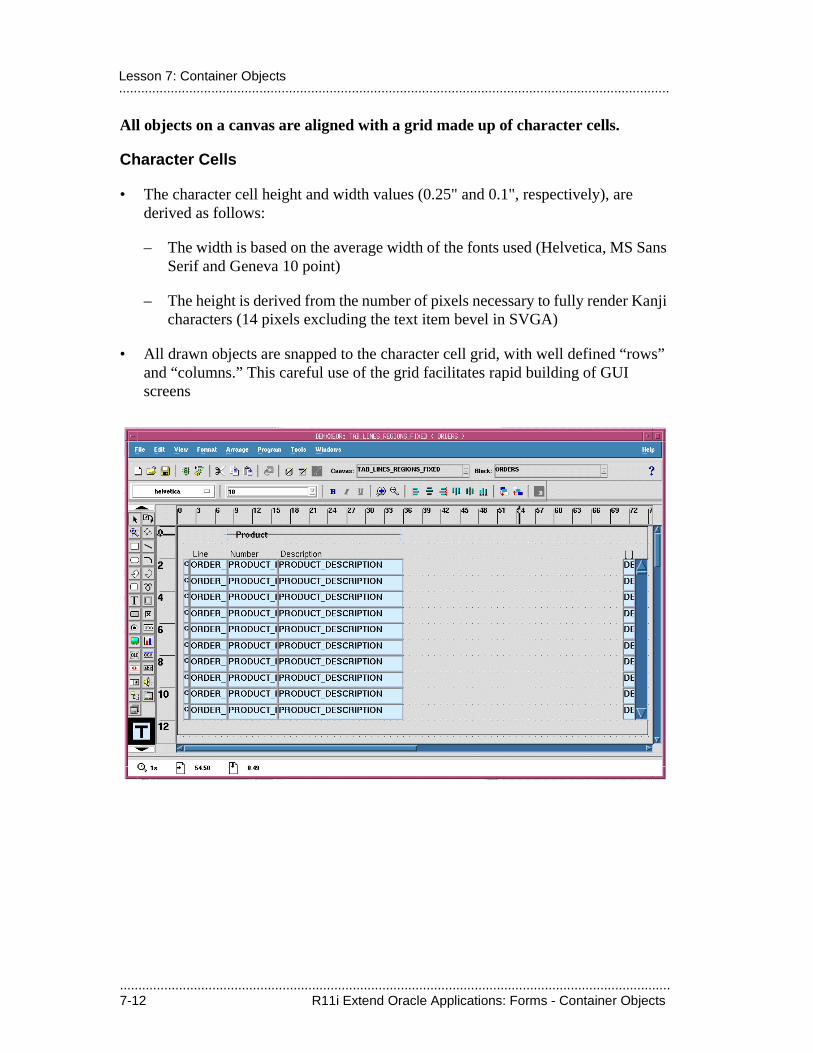
.....................................................................................................................................................7-12 R11i Extend Oracle Applications: Forms - Container Objects
.....................................................................................................................................................Lesson 7: Container Objects
All objects on a canvas are aligned with a grid made up of character cells.
Character Cells
• The character cell height and width values (0.25" and 0.1", respectively), are derived as follows:
– The width is based on the average width of the fonts used (Helvetica, MS Sans Serif and Geneva 10 point)
– The height is derived from the number of pixels necessary to fully render Kanji characters (14 pixels excluding the text item bevel in SVGA)
• All drawn objects are snapped to the character cell grid, with well defined “rows” and “columns.” This careful use of the grid facilitates rapid building of GUI screens
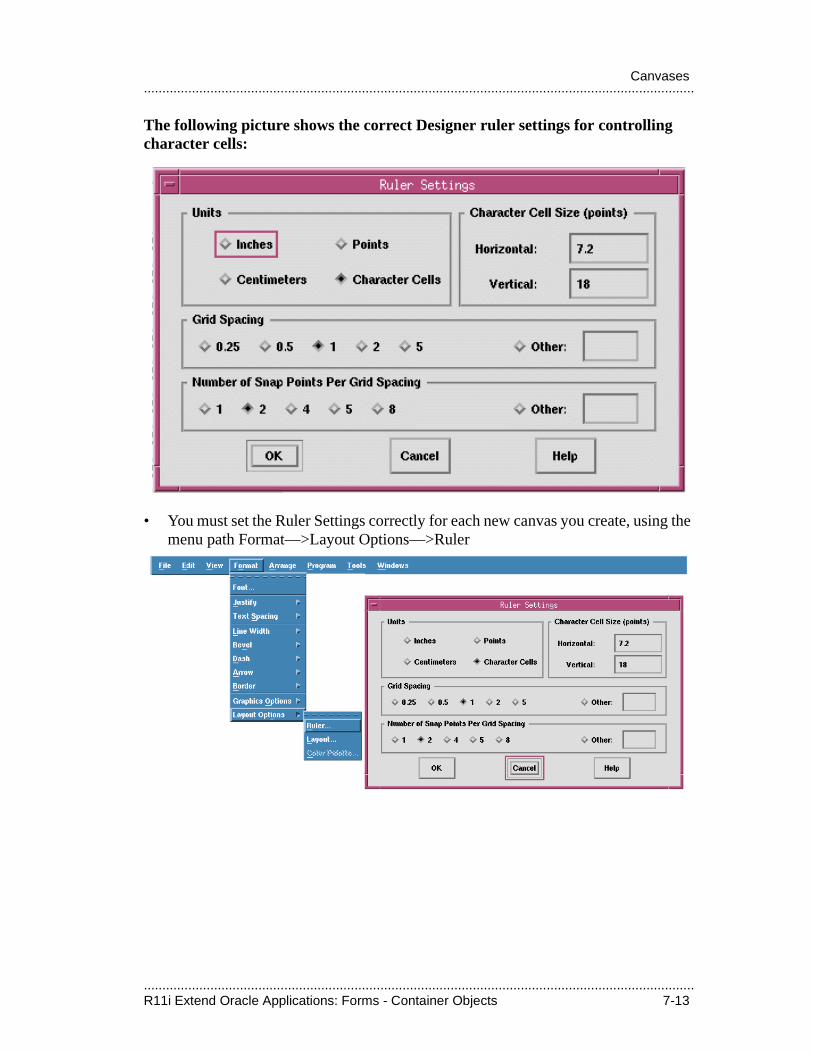
.....................................................................................................................................................R11i Extend Oracle Applications: Forms - Container Objects 7-13
.....................................................................................................................................................Canvases
The following picture shows the correct Designer ruler settings for controlling character cells:
• You must set the Ruler Settings correctly for each new canvas you create, using the menu path Format—>Layout Options—>Ruler
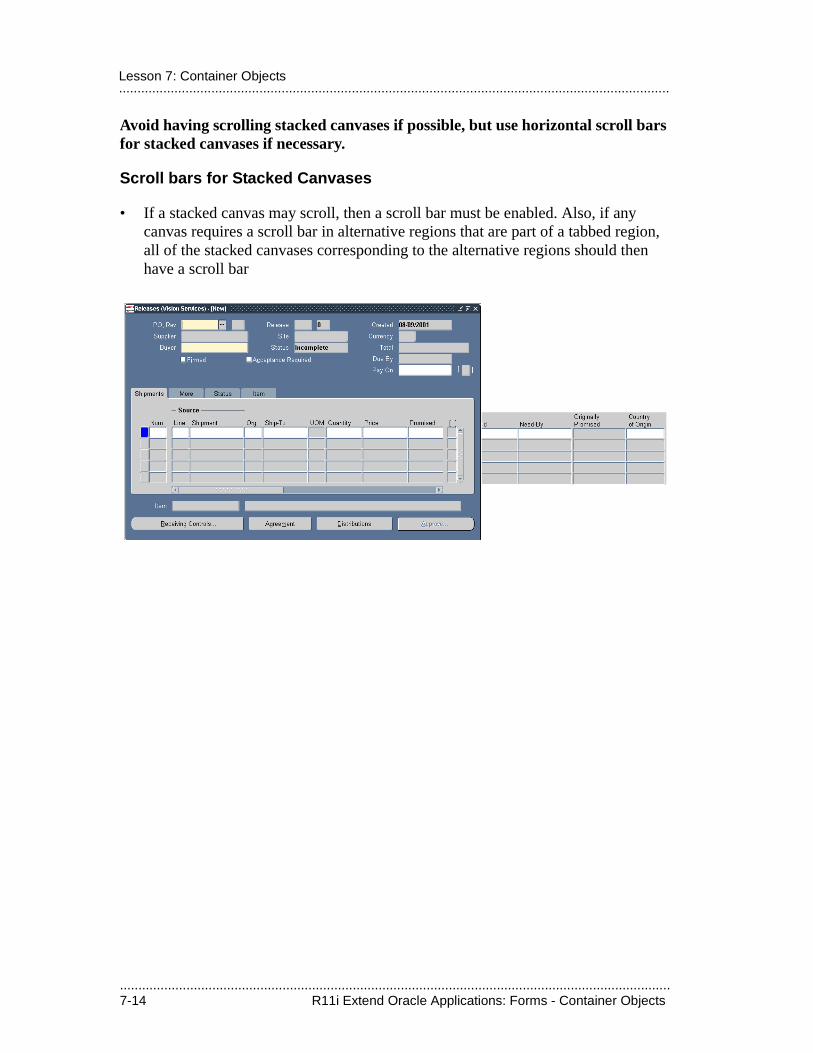
.....................................................................................................................................................7-14 R11i Extend Oracle Applications: Forms - Container Objects
.....................................................................................................................................................Lesson 7: Container Objects
Avoid having scrolling stacked canvases if possible, but use horizontal scroll bars for stacked canvases if necessary.
Scroll bars for Stacked Canvases
• If a stacked canvas may scroll, then a scroll bar must be enabled. Also, if any canvas requires a scroll bar in alternative regions that are part of a tabbed region, all of the stacked canvases corresponding to the alternative regions should then have a scroll bar
.....................................................................................................................................................R11i Extend Oracle Applications: Forms - Container Objects 7-15
.....................................................................................................................................................Blocks
BlocksAdjust your block properties to fit the situation and the form. Different types of blocks require different characteristics. Some basic cosmetic properties are common to all blocks:
Property Classes
• Use the BLOCK property class for most blocks
• Use the BLOCK_DIALOG property class for blocks in dialog (modal) windows

.....................................................................................................................................................7-16 R11i Extend Oracle Applications: Forms - Container Objects
.....................................................................................................................................................Lesson 7: Container Objects
Use context blocks when the title does not fully display the context for a window.
Context Block Characteristics
• Each non-modal window must be designed so that a user can maintain context merely by viewing that single window
• Mirror fields on the context block to the master field
• Follow standards when choosing which fields to place in a context block
ContextFields
.....................................................................................................................................................R11i Extend Oracle Applications: Forms - Container Objects 7-17
.....................................................................................................................................................Blocks
Use dialog blocks with modal windows. Users must interact with the dialog block before proceeding.
Dialog Block Characteristics
• Use the BLOCK_DIALOG property class for dialog blocks
• The menu and toolbar are not accessible from a dialog block
• Code buttons into a dialog block that exit the block and close the modal window
• You typically disable most KEY-triggers within a dialog block so that users cannot access the functions that do not currently apply
• Adjust navigation to keep the user within the dialog block
Helpful Coding TipWhen defining a dialog block, code the logic for the OK and Cancel buttons before testing it. Otherwise opening your modal window is a dead end—with the KEY- triggers and the menu disabled, there are no ways to exit the form.
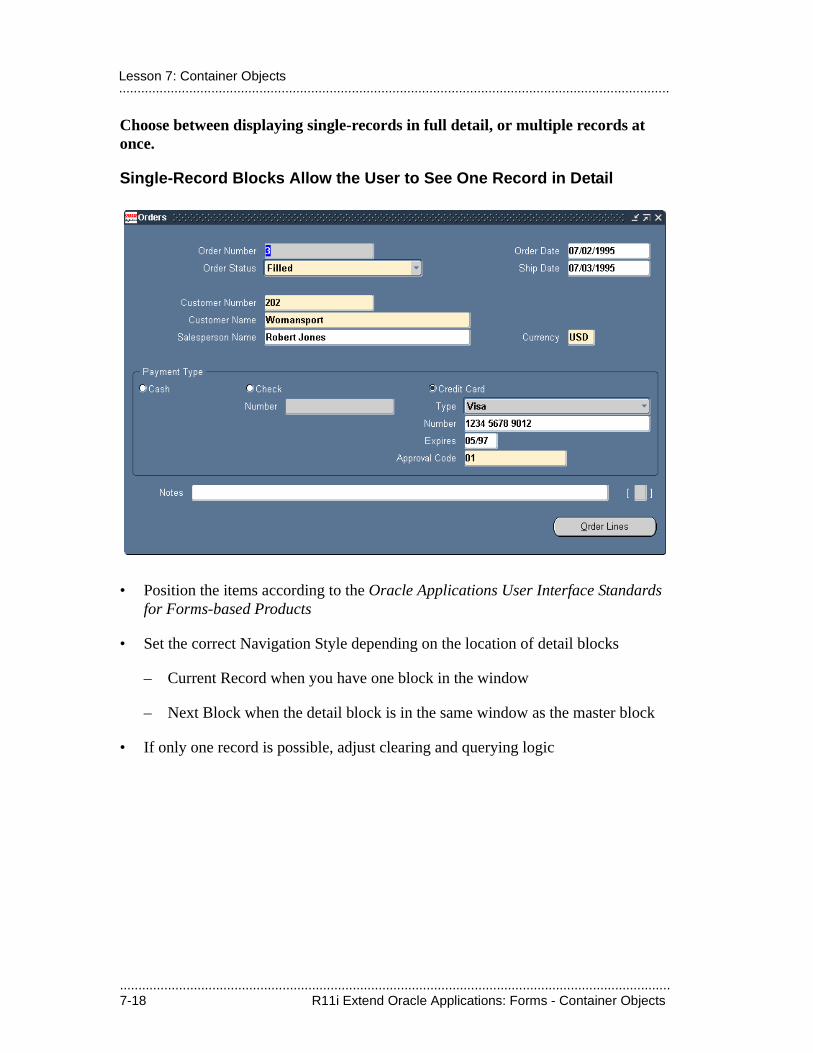
.....................................................................................................................................................7-18 R11i Extend Oracle Applications: Forms - Container Objects
.....................................................................................................................................................Lesson 7: Container Objects
Choose between displaying single-records in full detail, or multiple records at once.
Single-Record Blocks Allow the User to See One Record in Detail
• Position the items according to the Oracle Applications User Interface Standards for Forms-based Products
• Set the correct Navigation Style depending on the location of detail blocks
– Current Record when you have one block in the window
– Next Block when the detail block is in the same window as the master block
• If only one record is possible, adjust clearing and querying logic
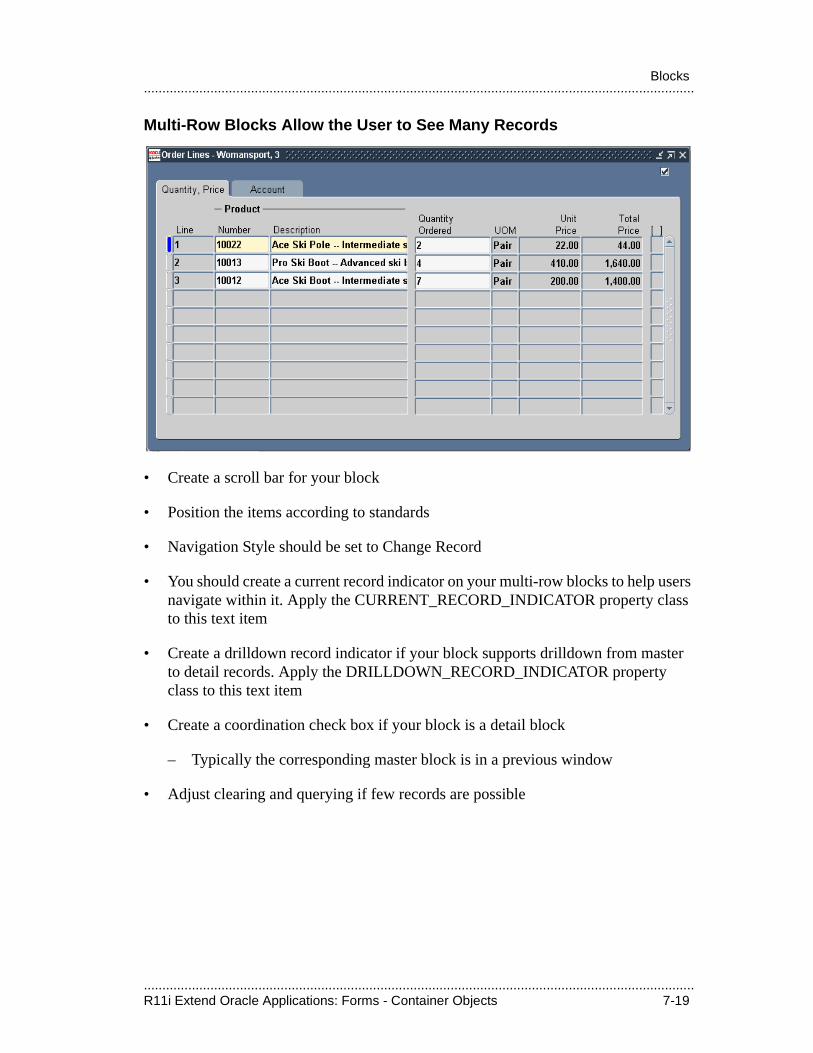
.....................................................................................................................................................R11i Extend Oracle Applications: Forms - Container Objects 7-19
.....................................................................................................................................................Blocks
Multi-Row Blocks Allow the User to See Many Records
• Create a scroll bar for your block
• Position the items according to standards
• Navigation Style should be set to Change Record
• You should create a current record indicator on your multi-row blocks to help users navigate within it. Apply the CURRENT_RECORD_INDICATOR property class to this text item
• Create a drilldown record indicator if your block supports drilldown from master to detail records. Apply the DRILLDOWN_RECORD_INDICATOR property class to this text item
• Create a coordination check box if your block is a detail block
– Typically the corresponding master block is in a previous window
• Adjust clearing and querying if few records are possible
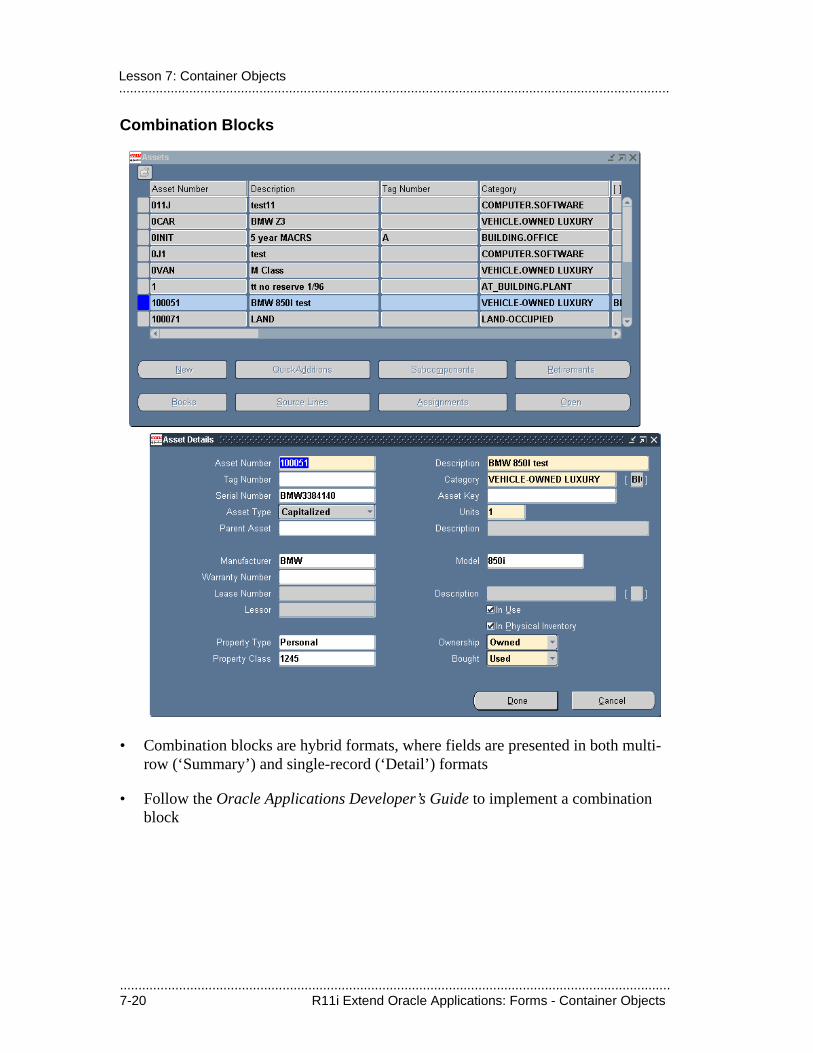
.....................................................................................................................................................7-20 R11i Extend Oracle Applications: Forms - Container Objects
.....................................................................................................................................................Lesson 7: Container Objects
Combination Blocks
• Combination blocks are hybrid formats, where fields are presented in both multi-row (‘Summary’) and single-record (‘Detail’) formats
• Follow the Oracle Applications Developer’s Guide to implement a combination block
.....................................................................................................................................................R11i Extend Oracle Applications: Forms - Container Objects 7-21
.....................................................................................................................................................Blocks
Master-detail relationships between blocks are common.
Titles
• Repeat the name of the master block in the detail block title if possible
Coordination Between Blocks
• Prevent masterless operations
• Create a coordination check box when the master and detail blocks are in separate windows. Follow the instructions in the Oracle Applications Developer’s Guide
• Follow the standards in the Oracle Applications User Interface Standards for coordination rules for blocks within the same window
– Only have a coordination check box if immediate coordination would be very costly
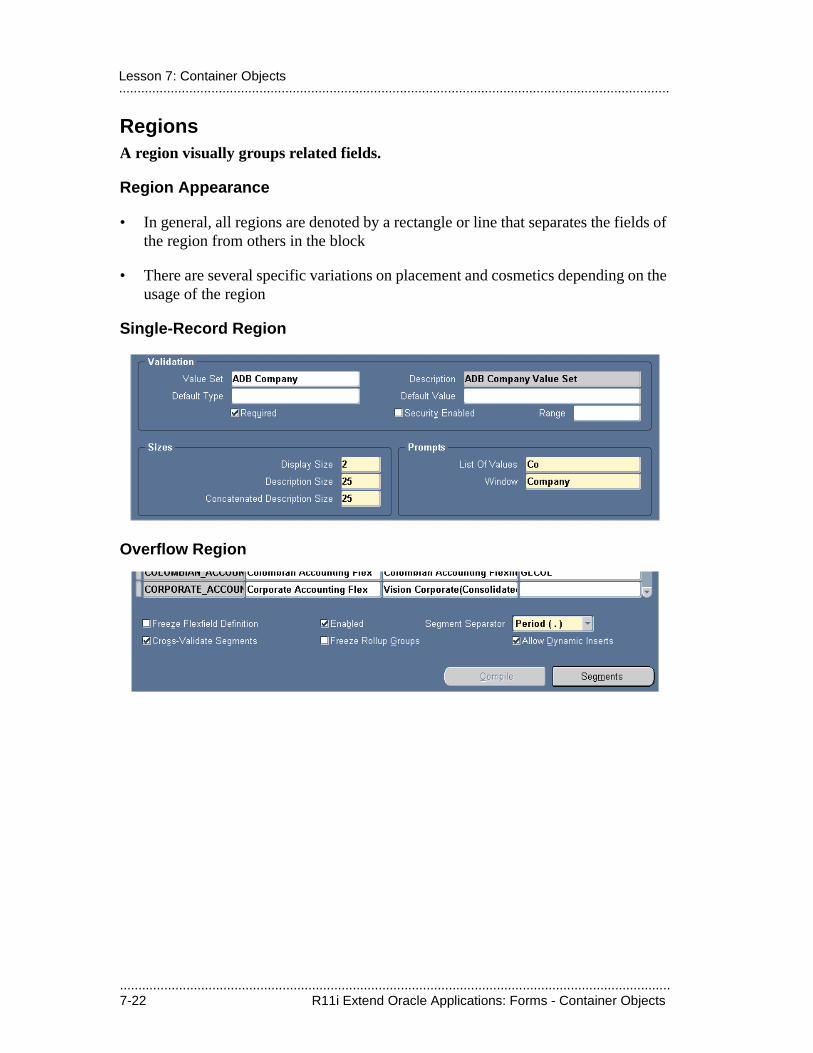
.....................................................................................................................................................7-22 R11i Extend Oracle Applications: Forms - Container Objects
.....................................................................................................................................................Lesson 7: Container Objects
RegionsA region visually groups related fields.
Region Appearance
• In general, all regions are denoted by a rectangle or line that separates the fields of the region from others in the block
• There are several specific variations on placement and cosmetics depending on the usage of the region
Single-Record Region
Overflow Region

.....................................................................................................................................................R11i Extend Oracle Applications: Forms - Container Objects 7-23
.....................................................................................................................................................Regions
Multi-Row Region
When to Use Regions that Scroll
• Only a few fields will not fit within the space of the region, and they are used less frequently than the visible fields
• Any other division of the fields into regions is illogical or clumsy

.....................................................................................................................................................7-24 R11i Extend Oracle Applications: Forms - Container Objects
.....................................................................................................................................................Lesson 7: Container Objects
Tabbed RegionsTabbed regions can be used many different ways.
Multirow Tab Layout
• Multirow tabbed regions include a scrollbar on the right side of the tab page and either a current record indicator or a drilldown indicator on the left side
• Any coordination check boxes must be positioned completely outside the boundaries of the tab canvas
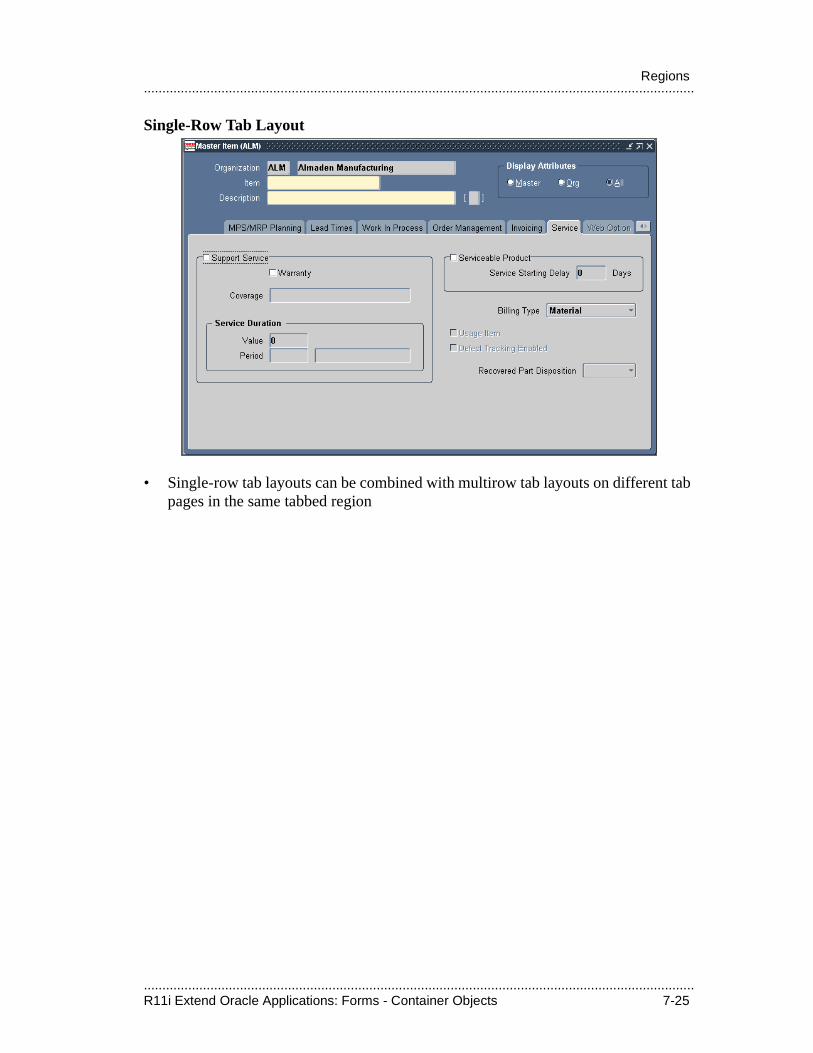
.....................................................................................................................................................R11i Extend Oracle Applications: Forms - Container Objects 7-25
.....................................................................................................................................................Regions
Single-Row Tab Layout
• Single-row tab layouts can be combined with multirow tab layouts on different tab pages in the same tabbed region
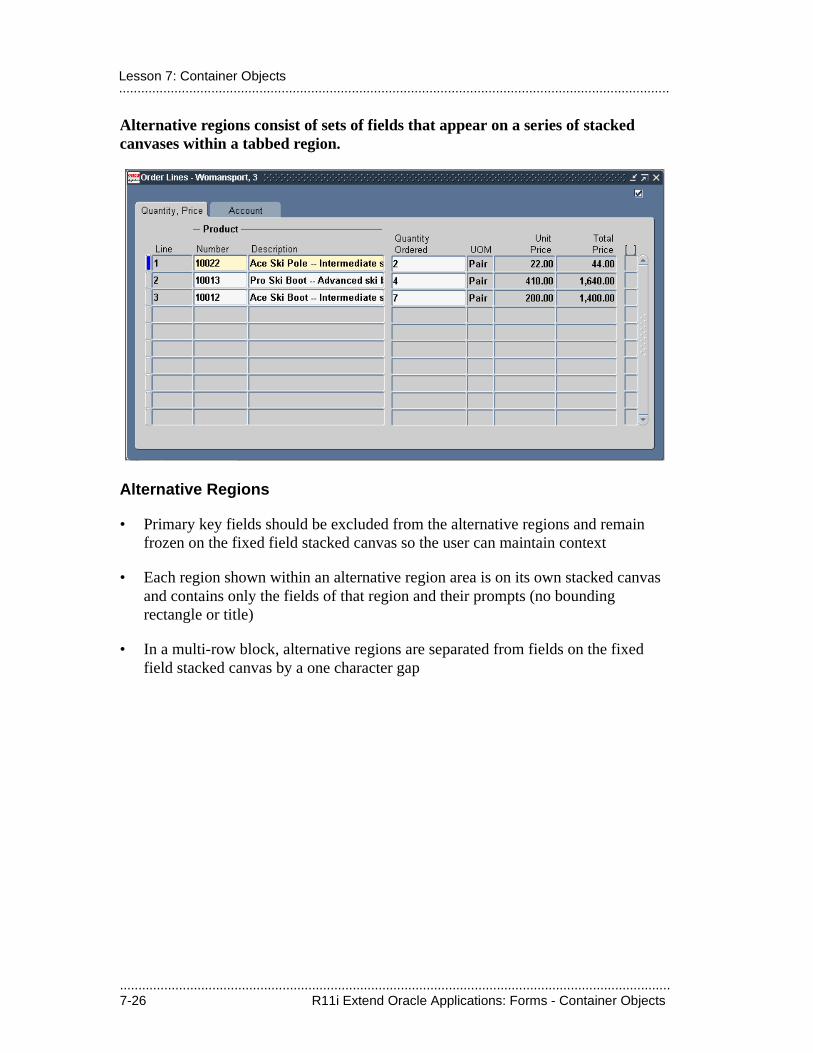
.....................................................................................................................................................7-26 R11i Extend Oracle Applications: Forms - Container Objects
.....................................................................................................................................................Lesson 7: Container Objects
Alternative regions consist of sets of fields that appear on a series of stacked canvases within a tabbed region.
Alternative Regions
• Primary key fields should be excluded from the alternative regions and remain frozen on the fixed field stacked canvas so the user can maintain context
• Each region shown within an alternative region area is on its own stacked canvas and contains only the fields of that region and their prompts (no bounding rectangle or title)
• In a multi-row block, alternative regions are separated from fields on the fixed field stacked canvas by a one character gap
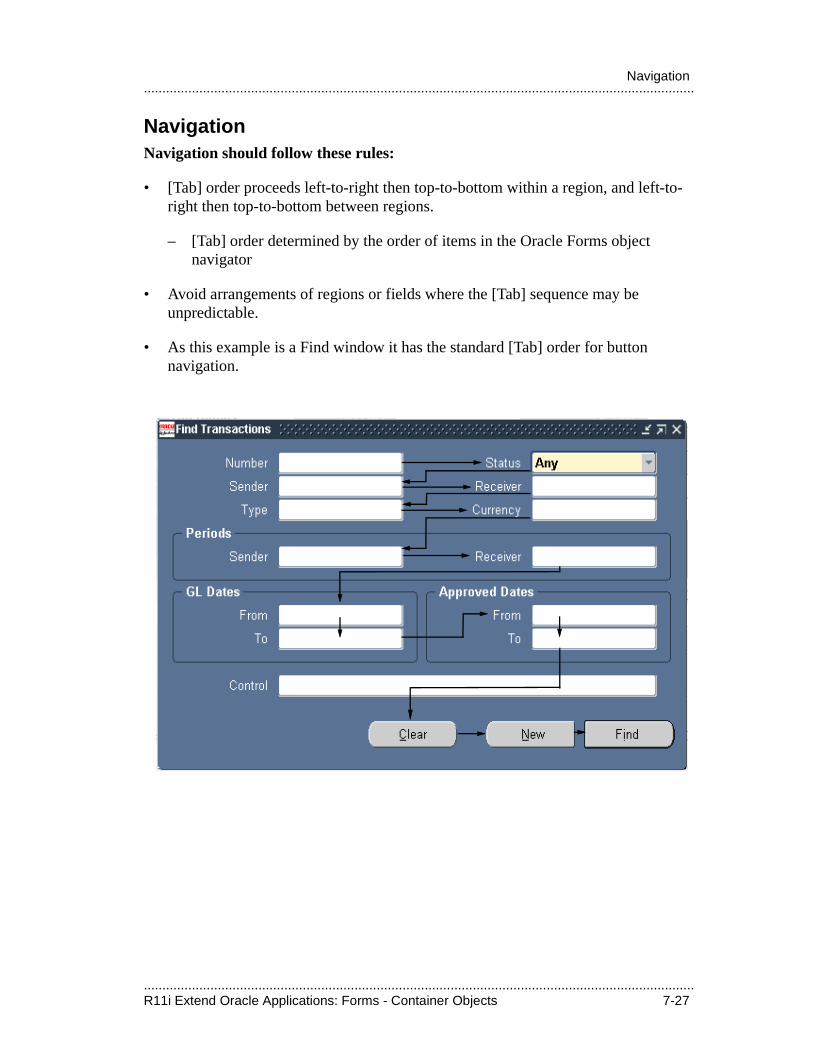
.....................................................................................................................................................R11i Extend Oracle Applications: Forms - Container Objects 7-27
.....................................................................................................................................................Navigation
NavigationNavigation should follow these rules:
• [Tab] order proceeds left-to-right then top-to-bottom within a region, and left-to-right then top-to-bottom between regions.
– [Tab] order determined by the order of items in the Oracle Forms object navigator
• Avoid arrangements of regions or fields where the [Tab] sequence may be unpredictable.
• As this example is a Find window it has the standard [Tab] order for button navigation.

.....................................................................................................................................................7-28 R11i Extend Oracle Applications: Forms - Container Objects
.....................................................................................................................................................Lesson 7: Container Objects

.................................
Widgets

.....................................................................................................................................................8-2 R11i Extend Oracle Applications: Forms - Widgets
.....................................................................................................................................................Lesson 8: Widgets
.....................................................................................................................................................R11i Extend Oracle Applications: Forms - Widgets 8-3
.....................................................................................................................................................Objectives
ObjectivesAt the end of this lesson, you should be able to:
• Create widgets such as text items, display items, poplists, option groups, etc.
• Understand the standard rules and cosmetics for each widget.
• Recognize and implement standard behaviors for each of the following widgets:
– Text Items
– Display Items
– Buttons
– Check Boxes
– Option Groups
– Poplists
– LOVs
– Flexfields
.....................................................................................................................................................8-4 R11i Extend Oracle Applications: Forms - Widgets
.....................................................................................................................................................Lesson 8: Widgets
General PropertiesConsistency and keyboard use
• Each object should be rendered consistently with the same widget type, width, prompt, etc., everywhere the user will encounter it (with certain exceptions)
• In forms that are designed for heads-down data entry, avoid any widget that cannot be operated from the keyboard and without looking at the screen
• Items are always sequenced left-to-right, top-to-bottom, within a region, block, or window
.....................................................................................................................................................R11i Extend Oracle Applications: Forms - Widgets 8-5
.....................................................................................................................................................Text Items
Text Items
Usage
• When any text is valid
• When data is validated from a list that may contain more than 15 entries
• When a field displays textual data that the user cannot alter, but the field must support querying or scrolling
Rules
• Text items should allow mixed-case entry, unless there is a business need to enforce either upper or lower case
• If a text item has an LOV associated with it, set “Validate from List” to Yes. This allows a user to type a partial value into the field, and it will autoreduce against the list of valid values
• Make sure the maximum length of the item matches the size of the related database column, if any
Property Classes
• Most text items use the TEXT_ITEM property class
• Apply the TEXT_ITEM_DISPLAY_ONLY property class to non-alterable fields
• Apply the TEXT_ITEM_MULTILINE property class to all multiline text items
• Apply the TEXT_ITEM_DATE for most date fields
• Apply the CREATION_OR_LAST_UPDATE_DATE property class to WHO date fields
• Apply the TEXT_ITEM_PERCENT_FIXED property class to all percent items requiring 2 digits after the decimal
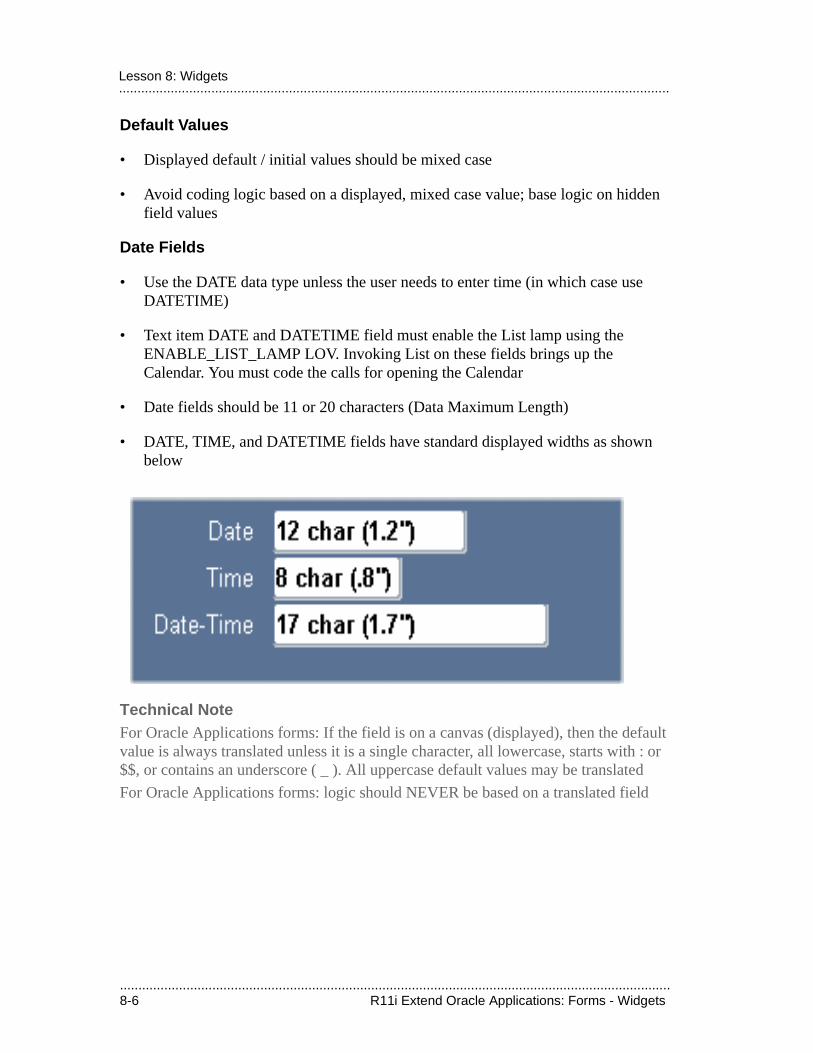
.....................................................................................................................................................8-6 R11i Extend Oracle Applications: Forms - Widgets
.....................................................................................................................................................Lesson 8: Widgets
Default Values
• Displayed default / initial values should be mixed case
• Avoid coding logic based on a displayed, mixed case value; base logic on hidden field values
Date Fields
• Use the DATE data type unless the user needs to enter time (in which case use DATETIME)
• Text item DATE and DATETIME field must enable the List lamp using the ENABLE_LIST_LAMP LOV. Invoking List on these fields brings up the Calendar. You must code the calls for opening the Calendar
• Date fields should be 11 or 20 characters (Data Maximum Length)
• DATE, TIME, and DATETIME fields have standard displayed widths as shown below
Technical NoteFor Oracle Applications forms: If the field is on a canvas (displayed), then the default value is always translated unless it is a single character, all lowercase, starts with : or $$, or contains an underscore ( _ ). All uppercase default values may be translated
For Oracle Applications forms: logic should NEVER be based on a translated field
.....................................................................................................................................................R11i Extend Oracle Applications: Forms - Widgets 8-7
.....................................................................................................................................................Display Items
Display ItemsDisplay items never allow the user to interact with them in any way, including scrolling or querying.
Use Display Items For:
• Context fields
• Fields that are sized such that scrolling would be unnecessary (such as total fields)
• Fields that display reference information, but some other mechanism exists for the user to see the entire contents of the field (such as overflow fields)
• Dynamic boilerplate (mostly for backwards compatibility)
Property Classes
• Use the DISPLAY_ITEM property class for Display Items
• For dynamic titles, use the DYNAMIC_TITLE property class
• Use the DYNAMIC_PROMPT property class for dynamic prompts
Display Item Characteristics
• Display items used as boilerplate must be wide enough to display all of the contents
• Make sure the maximum length of the item matches the size of the related database column, if any
Default Values
• Displayed default values should be mixed case
• Avoid coding logic based on a displayed, mixed case value; base logic on hidden field values
.....................................................................................................................................................8-8 R11i Extend Oracle Applications: Forms - Widgets
.....................................................................................................................................................Lesson 8: Widgets
Technical NoteFor Oracle Applications forms: If the field is on a canvas (displayed), then the default value is always translated unless it is a single character, all lowercase, starts with : or $$, or contains an underscore ( _ ). All uppercase default values may be translated.
For Oracle Applications forms: logic should NEVER be based on a translated field.
In Oracle Forms Developer 6i, dynamic boilerplate can now be accomplished by programmatically changing the Prompt property of a field, rather than by having a separate display item to contain the dynamic prompt of another field.
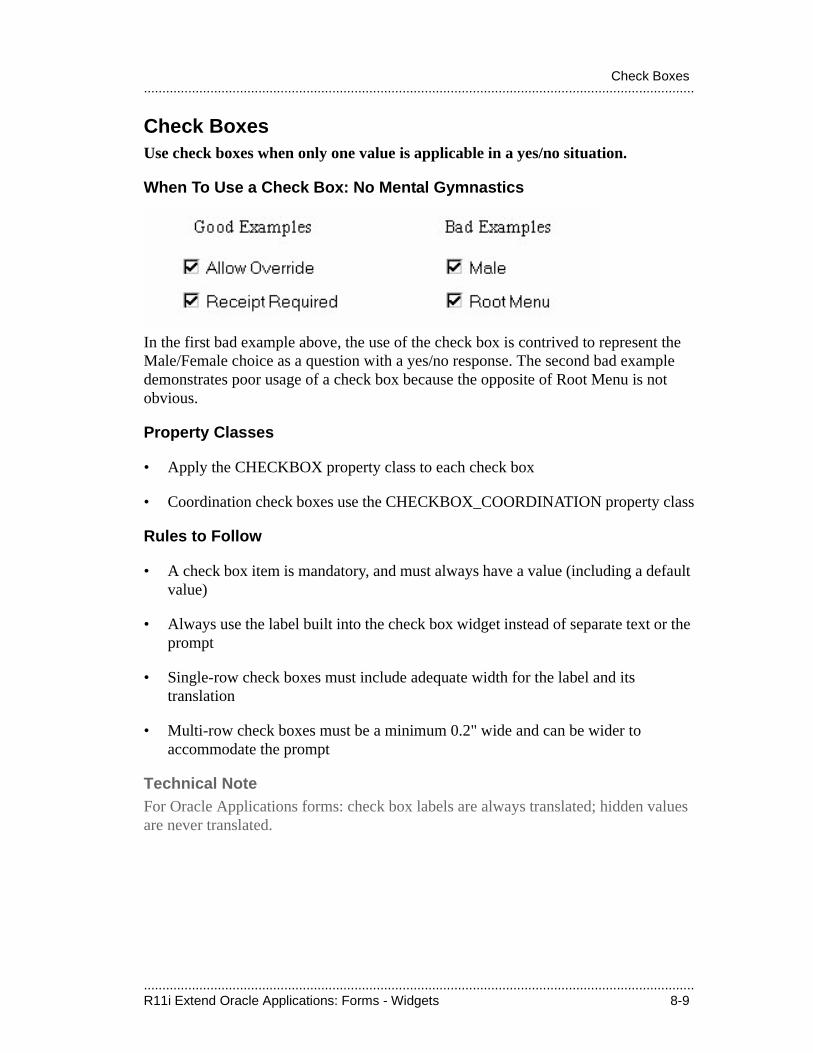
.....................................................................................................................................................R11i Extend Oracle Applications: Forms - Widgets 8-9
.....................................................................................................................................................Check Boxes
Check BoxesUse check boxes when only one value is applicable in a yes/no situation.
When To Use a Check Box: No Mental Gymnastics
In the first bad example above, the use of the check box is contrived to represent the Male/Female choice as a question with a yes/no response. The second bad example demonstrates poor usage of a check box because the opposite of Root Menu is not obvious.
Property Classes
• Apply the CHECKBOX property class to each check box
• Coordination check boxes use the CHECKBOX_COORDINATION property class
Rules to Follow
• A check box item is mandatory, and must always have a value (including a default value)
• Always use the label built into the check box widget instead of separate text or the prompt
• Single-row check boxes must include adequate width for the label and its translation
• Multi-row check boxes must be a minimum 0.2" wide and can be wider to accommodate the prompt
Technical NoteFor Oracle Applications forms: check box labels are always translated; hidden values are never translated.
.....................................................................................................................................................8-10 R11i Extend Oracle Applications: Forms - Widgets
.....................................................................................................................................................Lesson 8: Widgets
ButtonsUse buttons to initiate an action, such as a product-specific function, or block-to-block navigation. Buttons can be either textual or iconic.
Property Classes
• Use the BUTTON property class for textual buttons
• Use the BUTTON_ICONIC property class for iconic buttons
Standards to Follow
• Set the Mouse Navigate property to No
• For buttons in a multi-row block, set Keyboard Navigable to No; for buttons in a single-record block set it to Yes
• Avoid iconic buttons in the body of your forms (iconic buttons are generally used only by the toolbar)
• Buttons belong to the block in which they appear to sit (not in a separate control block)
• WHEN-BUTTON-PRESSED triggers should have the “Fire in Enter-Query mode” property of the trigger set to False
Functional Considerations
• Provide one default button per window, where that function is the most likely for the user to perform.
• The leftmost button in the window should be set to be the default button, unless it is a Help button (which must be leftmost in the window)
.....................................................................................................................................................R11i Extend Oracle Applications: Forms - Widgets 8-11
.....................................................................................................................................................Buttons
Allow keyboard access to certain control elements
Always provide access keys for:
• All textual buttons except OK and Cancel. Ok and Cancel should not have access keys unless the buttons are non-navigable
• Option buttons or check boxes that set a “mode” (the way you work with a form)
Rules
• Specify access keys using an ampersand ( & ) in the button label, not as a separate property. The access key is displayed as an underline in the button’s label.
• Use the first letter of the label if possible. Another letter may be used if it offers a stronger link
• Access keys should be unique within a window, and should not conflict with the keys used by the top level of the menu (F, E, V, L, T, W, and H)
• Use the first letters as access keys for these common terms:
– Clear
– Cancel
– New
– Open
– Done
• Use “i” as the access key for a Find button
.....................................................................................................................................................8-12 R11i Extend Oracle Applications: Forms - Widgets
.....................................................................................................................................................Lesson 8: Widgets
Automatic Access Key Assignments
• Oracle Applications will automatically determine unique access keys within a window. The letter you supply will be used unless it is already employed, in which case another letter will be selected at runtime.
– The pulldown menu access keys do not change
– If you do not specify an initial access key, no access key will be assigned
– The assignment algorithm first tries to assign an unused key that is part of the label, then proceeds through unused letters
– If the selected access key is not part of the label, it appears in parentheses after the label
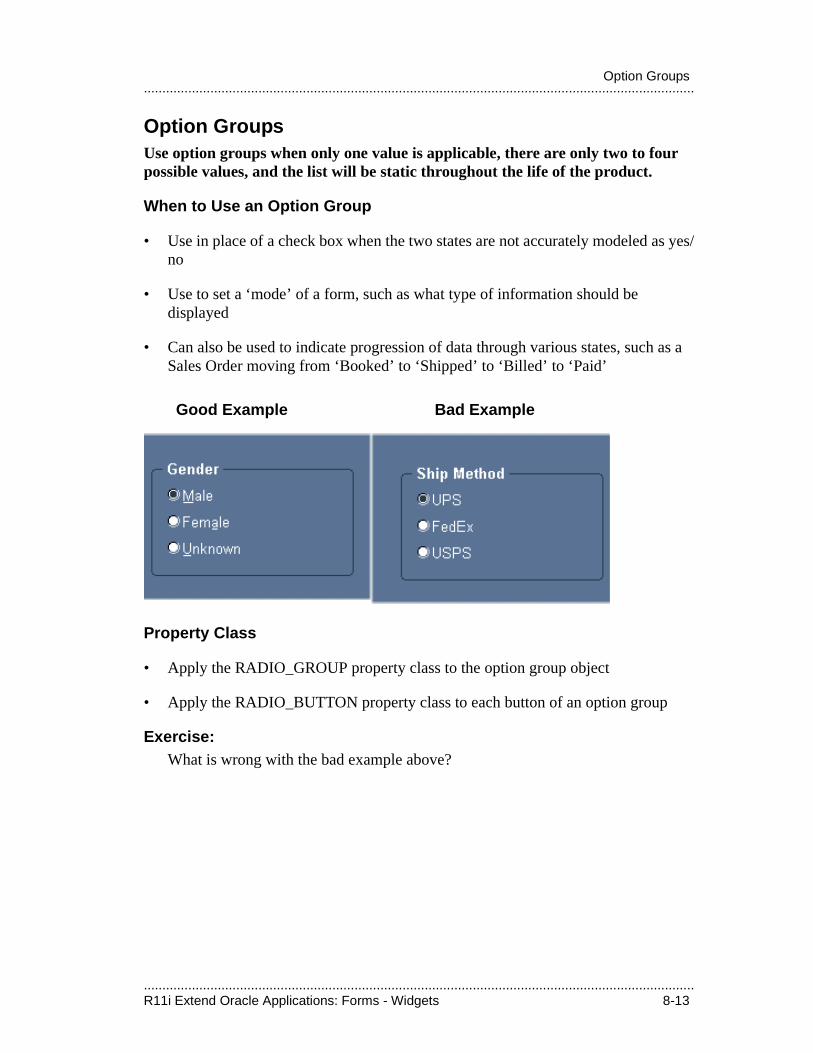
.....................................................................................................................................................R11i Extend Oracle Applications: Forms - Widgets 8-13
.....................................................................................................................................................Option Groups
Option GroupsUse option groups when only one value is applicable, there are only two to four possible values, and the list will be static throughout the life of the product.
When to Use an Option Group
• Use in place of a check box when the two states are not accurately modeled as yes/no
• Use to set a ‘mode’ of a form, such as what type of information should be displayed
• Can also be used to indicate progression of data through various states, such as a Sales Order moving from ‘Booked’ to ‘Shipped’ to ‘Billed’ to ‘Paid’
Property Class
• Apply the RADIO_GROUP property class to the option group object
• Apply the RADIO_BUTTON property class to each button of an option group
Exercise:What is wrong with the bad example above?
Good Example Bad Example
.....................................................................................................................................................8-14 R11i Extend Oracle Applications: Forms - Widgets
.....................................................................................................................................................Lesson 8: Widgets
Rules to Follow
• Avoid using option groups for items in multi-row blocks
• Always provide a default value
• Always use the label built into the radio button widget instead of separate boilerplate text
• Minimum width of each radio button widget (including label) is 1.3" or [0.1"(number of characters + 30%) + 0.3"]
• Ideally make the widget wider if space allows
Cosmetics
• Draw the buttons of an option group in their own region, where the name of the item is the region name, and the individual buttons are labelled elements within the region
• Option buttons may be laid out vertically or horizontally, but a vertical orientation is preferable
Technical NoteFor Oracle Applications forms: option group labels are always translated; hidden values are never translated
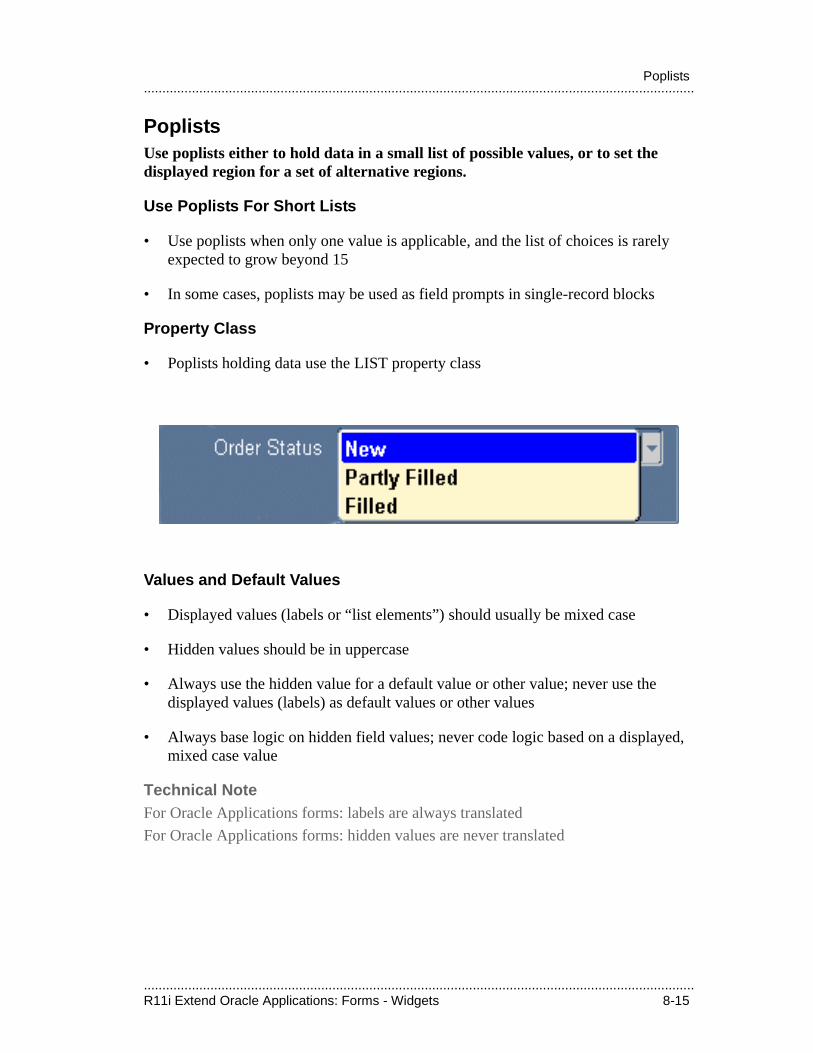
.....................................................................................................................................................R11i Extend Oracle Applications: Forms - Widgets 8-15
.....................................................................................................................................................Poplists
PoplistsUse poplists either to hold data in a small list of possible values, or to set the displayed region for a set of alternative regions.
Use Poplists For Short Lists
• Use poplists when only one value is applicable, and the list of choices is rarely expected to grow beyond 15
• In some cases, poplists may be used as field prompts in single-record blocks
Property Class
• Poplists holding data use the LIST property class
Values and Default Values
• Displayed values (labels or “list elements”) should usually be mixed case
• Hidden values should be in uppercase
• Always use the hidden value for a default value or other value; never use the displayed values (labels) as default values or other values
• Always base logic on hidden field values; never code logic based on a displayed, mixed case value
Technical NoteFor Oracle Applications forms: labels are always translated
For Oracle Applications forms: hidden values are never translated

.....................................................................................................................................................8-16 R11i Extend Oracle Applications: Forms - Widgets
.....................................................................................................................................................Lesson 8: Widgets
Rules for all Poplists
• To adhere to translation requirements, the minimum width of a poplist is 1.5" or [0.1"(number of characters + 30%) + 0.5"]. An exception to this is a ‘yes/no’ poplist which should be 1" wide. The maximum width of a list element is 30 characters (maximum width in English is 23 characters)
• You may populate a list dynamically at runtime. This list should not exceed 15 elements
• In multi-row blocks, the list cannot change on a per-record basis
• Avoid using poplists as the first item in multi-row blocks
• Poplists cannot be used for data that might become disabled or inactive, except in Find windows
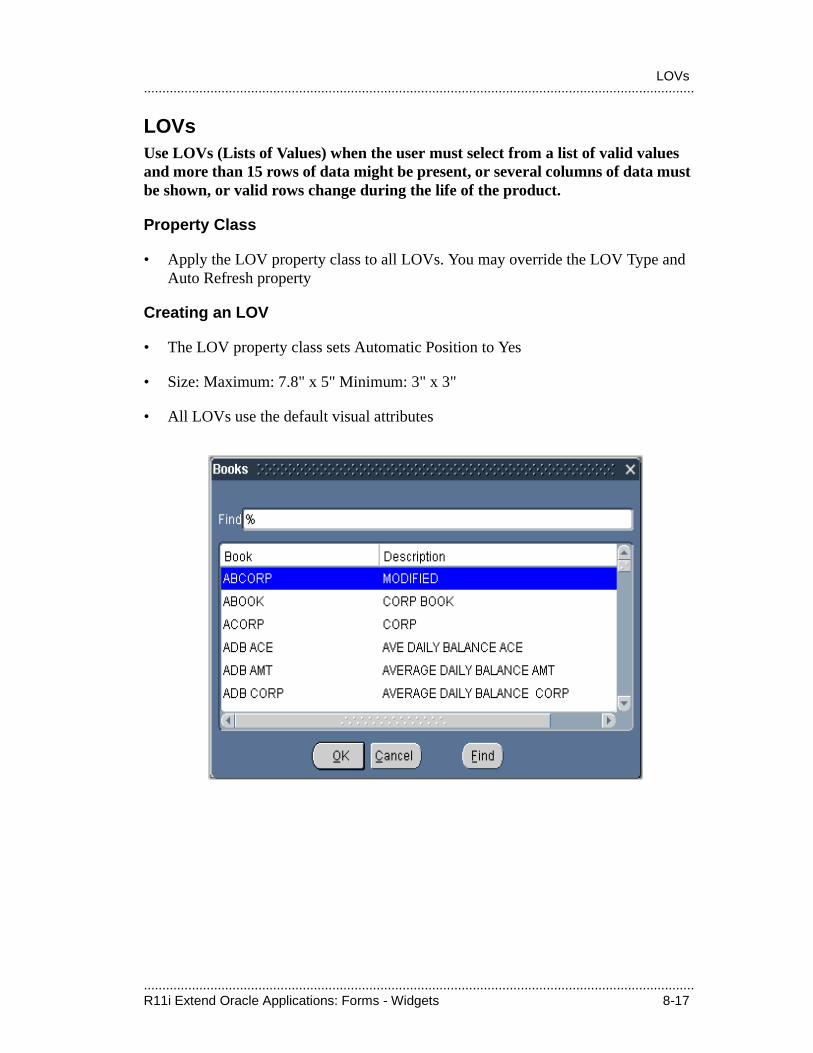
.....................................................................................................................................................R11i Extend Oracle Applications: Forms - Widgets 8-17
.....................................................................................................................................................LOVs
LOVsUse LOVs (Lists of Values) when the user must select from a list of valid values and more than 15 rows of data might be present, or several columns of data must be shown, or valid rows change during the life of the product.
Property Class
• Apply the LOV property class to all LOVs. You may override the LOV Type and Auto Refresh property
Creating an LOV
• The LOV property class sets Automatic Position to Yes
• Size: Maximum: 7.8" x 5" Minimum: 3" x 3"
• All LOVs use the default visual attributes
.....................................................................................................................................................8-18 R11i Extend Oracle Applications: Forms - Widgets
.....................................................................................................................................................Lesson 8: Widgets
Behaviors
• LOV lamp is enabled when LOV is available
• LOV widget appears with the field when the user’s focus is in the field
• LOVs do not display automatically upon navigating to a field
• LOVs automatically select a row when the list of valid choices is reduced to one
• After selecting from a LOV, the cursor automatically moves to the next field
• If a LOV may show more than 100 records, then the user must be prompted to reduce the list of valid values first. If you use Long List, leave Auto Refresh set to TRUE
Titles and Prompts
• The LOV title is the name of the object in the LOV, and is plural. For a “Row LOV”, where the user chooses a particular record, the title is ‘Find’ plus the name of the entity (with the name of the entity in singular)
• The title of the first column is related to, or matches identically, the prompt of the item that invoked it
• The width of a column in a LOV should, in general, be the same as the displayed length of the field on the form, and should also allow for 30% expansion of the column title
• Be sure to set the column title for each column as appropriate (usually not the default column title) and remove underscores ( _ )
Technical NoteApplications Division: underscores in column titles mean that the column title will not be translated—this is to be considered a bug
.....................................................................................................................................................R11i Extend Oracle Applications: Forms - Widgets 8-19
.....................................................................................................................................................LOVs
Coding an LOV
• Base most LOVs on views to promote reuse and simplify maintenance
• Use AutoRefresh to cache data, but be careful!
• The LOV should only show valid rows, so most validation should be done in the LOV. There are exceptions to this rule, so consult your developer’s guide
• When providing a LOV in enter-query mode, it should select all the primary key values from the foreign key table, restricted only by those records which could never be valid for the current field
• To show “check box-like” values in LOV columns, use * for Yes (checked) and a blank for No (unchecked). You can use a DECODE statement for this
• Use ORDER BY for your record group, using the column the user will be looking for. This column should be displayed first
Technical NoteApplications Division: We typically do not provide LOVs for enter-query mode, as that is considered a “power-users-only” feature. Better to spend the effort providing better Find windows (with LOVs on the fields).
.....................................................................................................................................................8-20 R11i Extend Oracle Applications: Forms - Widgets
.....................................................................................................................................................Lesson 8: Widgets
Descriptive FlexfieldsAll blocks with a base table (or view) should provide a descriptive flexfield to allow customization.
Rules to Follow
• Code a descriptive flexfield as a text item, displaying two characters (width of 0.2")
• Use the TEXT_ITEM_DESC_FLEX property class
• Place the descriptive flexfield last in each block, on the content canvas
• When an alternative region exists, the descriptive flexfield is located after the regions (not as an item within an alternative region)
Behaviors
• The descriptive flexfield item should be navigable, but should not allow input
• It adheres to all text item standards
• The descriptive flexfield shows a glimpse of the concatenated values
.....................................................................................................................................................R11i Extend Oracle Applications: Forms - Widgets 8-21
.....................................................................................................................................................Key Flexfields
Key FlexfieldsUsed for all attributes that are modeled as a multi-segment key, such as Item Number or Account.
Cosmetics
• Do not code any special visual indicator or activation button for key flexfields. The field should look like any other text item
Behaviors
• All key flexfields use the direct-entry method
• Invoking Edit or List of Values in a flexfield expands the field to allow entry of values in individual segments
Technical NoteOther miscellaneous translation requirements for Oracle Applications forms:
• High and low values are never translated (and should only be numbers—never dates or alphabetic characters)
• Parameters and “cells” of static record groups are always translated if they are mixed case, and never translated if they are all uppercase or all lowercase
• Boilerplate is always translated

.....................................................................................................................................................8-22 R11i Extend Oracle Applications: Forms - Widgets
.....................................................................................................................................................Lesson 8: Widgets

.................................
Layout

.....................................................................................................................................................9-2 R11i Extend Oracle Applications: Forms- Layout
.....................................................................................................................................................Lesson 9: Layout
.....................................................................................................................................................R11i Extend Oracle Applications: Forms - Layout 9-3
.....................................................................................................................................................Objectives
ObjectivesAt the end of this lesson, you should be able to:
• Arrange and align the objects that make up your window according to application standards.
• Create single- and multi-row block prompts.
• Follow rules that allow for translation to foreign languages.
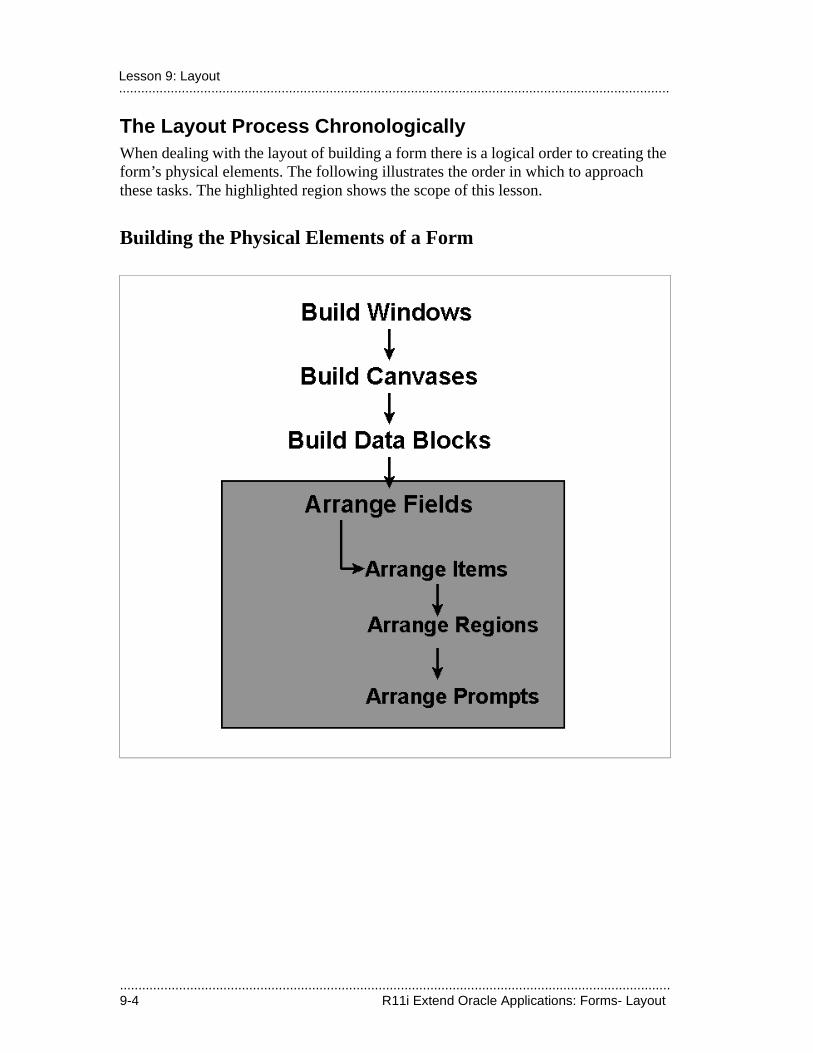
.....................................................................................................................................................9-4 R11i Extend Oracle Applications: Forms- Layout
.....................................................................................................................................................Lesson 9: Layout
The Layout Process ChronologicallyWhen dealing with the layout of building a form there is a logical order to creating the form’s physical elements. The following illustrates the order in which to approach these tasks. The highlighted region shows the scope of this lesson.
Building the Physical Elements of a Form
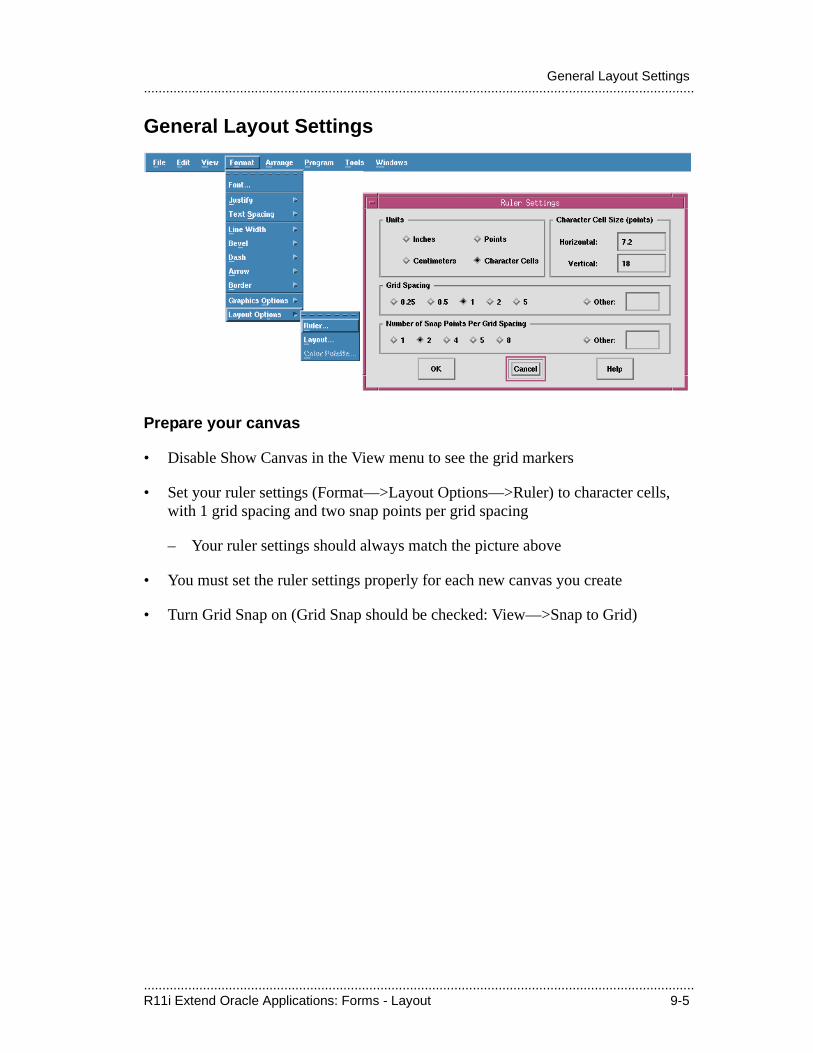
.....................................................................................................................................................R11i Extend Oracle Applications: Forms - Layout 9-5
.....................................................................................................................................................General Layout Settings
General Layout Settings
Prepare your canvas
• Disable Show Canvas in the View menu to see the grid markers
• Set your ruler settings (Format—>Layout Options—>Ruler) to character cells, with 1 grid spacing and two snap points per grid spacing
– Your ruler settings should always match the picture above
• You must set the ruler settings properly for each new canvas you create
• Turn Grid Snap on (Grid Snap should be checked: View—>Snap to Grid)
.....................................................................................................................................................9-6 R11i Extend Oracle Applications: Forms- Layout
.....................................................................................................................................................Lesson 9: Layout
Arranging Items and TranslationOracle Applications run in many different languages, so all prompts, titles, messages and data (other than data entered while using the application) must be translatable. Assuming English is the base language for development, translating applications requires sufficient space to expand from English, which is a relatively compact language, to the user’s native language.
Create all items, text, and prompts to allow for future translation. Depending on the widget and its placement, this space must be available either to the left, right or both sides. If text will be translated, allow a minimum of 30% extra space or at least 1 inch.
• Applies to prompts, buttons, check box labels, poplists, option groups, region titles, and display-only fields
– For prompts, arrange your layout so there is white space where prompts can expand later
– For buttons, option buttons, single-record block check boxes, and poplists, allow the expansion space as part of the widget (label) size (minimum of 30%)
• Buttons, single-record block check boxes, and poplists also need extra space for the cosmetics of the widget
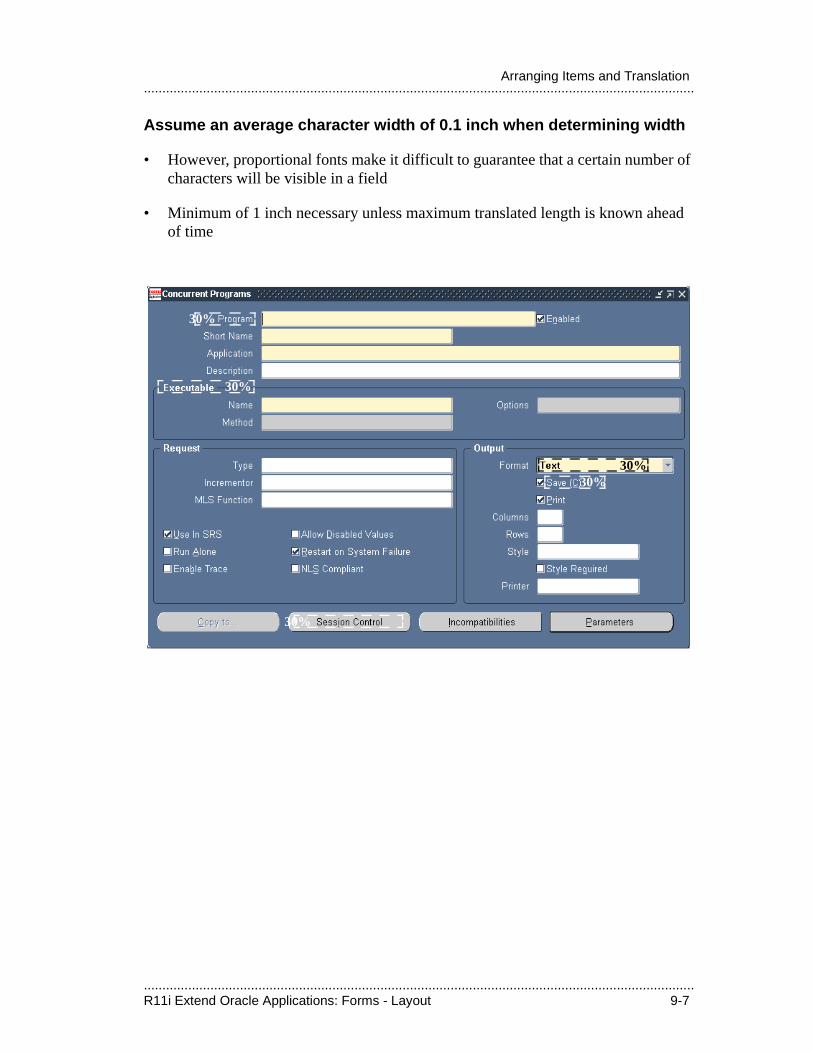
.....................................................................................................................................................R11i Extend Oracle Applications: Forms - Layout 9-7
.....................................................................................................................................................Arranging Items and Translation
Assume an average character width of 0.1 inch when determining width
• However, proportional fonts make it difficult to guarantee that a certain number of characters will be visible in a field
• Minimum of 1 inch necessary unless maximum translated length is known ahead of time
30%
30%
30%
30%
30%
30%30%
30%
30%

.....................................................................................................................................................9-8 R11i Extend Oracle Applications: Forms- Layout
.....................................................................................................................................................Lesson 9: Layout
Cosmetics and Property Classes
• For most Oracle Applications objects, the property classes include settings for most cosmetic properties of the object. These settings include prompt font, font sizes, and colors for most objects.
• When you do your layout, you need to set additional properties that are not covered by the property classes, such as prompt (content), justification and prompt alignment relative to the item.
• Do not override any attribute set by a property class unless the Oracle Applications Developer’s Guide explicitly states that such a change is acceptable, or there is a compelling reason to do so. Overriding an inherited attribute is rarely required.
.....................................................................................................................................................R11i Extend Oracle Applications: Forms - Layout 9-9
.....................................................................................................................................................Accessibility in Oracle Forms Applications
Accessibility in Oracle Forms Applications
• The Americans with Disabilities Act (ADA) requires reasonable accommodation of employees with disabilities.
• In August 2000, the U.S. government requires ADA compliance features in software it purchases.
All Oracle Forms Developer code must allow the following capabilities:
• A screen reader must have access to a “prompt” for each item
• All necessary functionality must be accessible from the keyboard
There are a few exceptional cases that may not need to have accessibility compliance.
Oracle Forms currently provides sufficient attributes to meet the accessibility requirements:
• Every widget can specify information that will be communicated to a screen reader with the Hint Text, Prompt, Label or Tooltip Text attribute.
• Every widget is operable from the keyboard. This is needed independent of accessibility requirements; the Oracle Forms Developer based products are targeted to the professional user, and heads-down operation is a fundamental requirement.
.....................................................................................................................................................9-10 R11i Extend Oracle Applications: Forms- Layout
.....................................................................................................................................................Lesson 9: Layout
Oracle Forms identifies prompts in the following order of precedence:
1 Hint Text
2 Prompt
3 Label
4 Tooltip Text
Starting with Hint Text, the first attribute that is not null (after stripping any leading and trailing spaces) is interpreted as the prompt and sent to the screen reader. Not every one of these attributes is available on each widget, in which case the invalid attribute is simply skipped. Note that the property Display Hint Automatically must be set to No if you are relying on Hint Text; otherwise, any Hint Text you add will appear on the message line when any user operates the product.
.....................................................................................................................................................R11i Extend Oracle Applications: Forms - Layout 9-11
.....................................................................................................................................................Accessibility in Oracle Forms Applications
Access Keys (Mnemonics)Provide an access key (underlined mnemonic access character) to provide keyboard access to controls.
• Provide access keys for the following objects:
– Textual buttons (except “OK” if it is the default, and “Cancel” if Window Close performs the Cancel action).
– All non-navigable option buttons and check boxes (except coordination check boxes) must have an access key. All navigable option buttons and check boxes should have an access key.
– All check box and option buttons in multi-row blocks (except coordination check boxes) must be navigable.
• Access keys are specified by prefixing a letter in the label with the “&” character, for example, “L&abel”
• Access keys must be unique within a window. They must not conflict with keys used in the pull-down menu (F, E, V, L, T, W and H) even if those menus are not active.
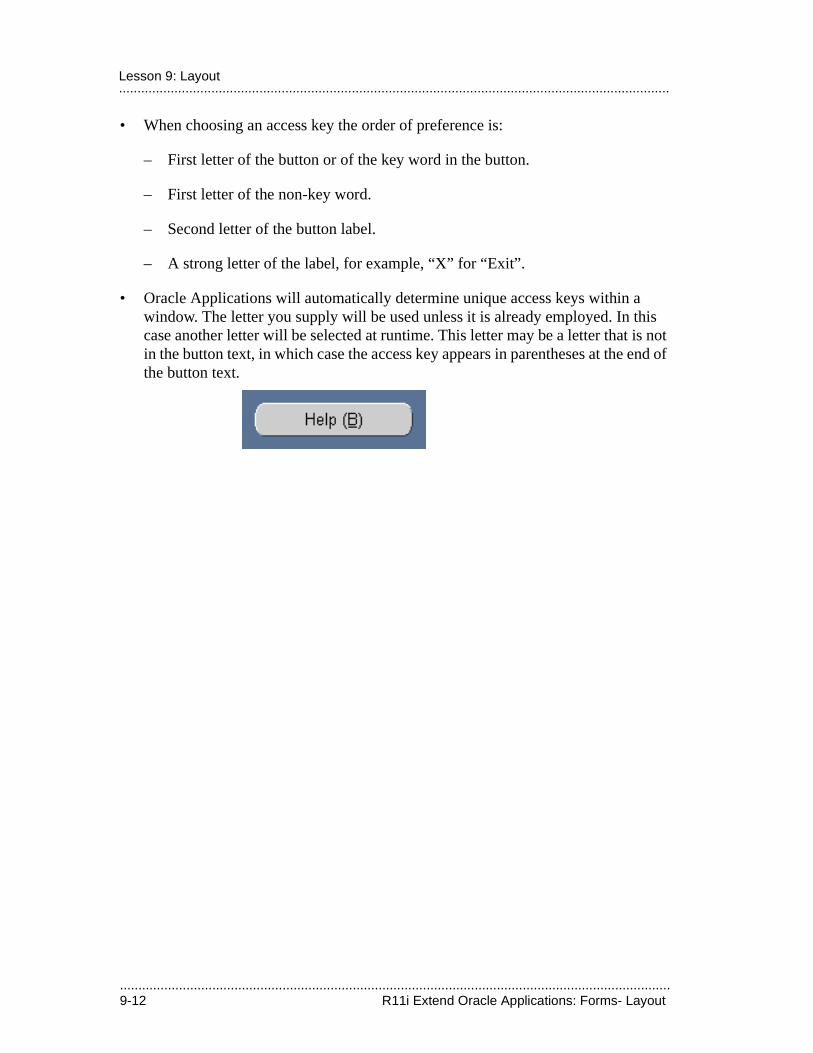
.....................................................................................................................................................9-12 R11i Extend Oracle Applications: Forms- Layout
.....................................................................................................................................................Lesson 9: Layout
• When choosing an access key the order of preference is:
– First letter of the button or of the key word in the button.
– First letter of the non-key word.
– Second letter of the button label.
– A strong letter of the label, for example, “X” for “Exit”.
• Oracle Applications will automatically determine unique access keys within a window. The letter you supply will be used unless it is already employed. In this case another letter will be selected at runtime. This letter may be a letter that is not in the button text, in which case the access key appears in parentheses at the end of the button text.
.....................................................................................................................................................R11i Extend Oracle Applications: Forms - Layout 9-13
.....................................................................................................................................................Accessibility in Oracle Forms Applications
Block Titles
• Block titles are rendered automatically as the title attribute of a “frame” object. The frame is either a line or a rectangle delimiting the physical real estate of the block.
• Visual attributes of titles are inherited from property classes. Assign the frame the property class FRAME_HORZ_LINE or FRAME_RECT as appropriate
• If your title is not a frame title, but it is a display item, check box or radio group, appropriate settings must be applied.
• Titles are generally singular for single-record blocks and plural for multi-row blocks
• The title must reflect the name of the object displayed in the block
• Block titles are optional unless:
– The object in the block is not obvious and is not the same as the window title
– The block must be distinguished from another in the same window
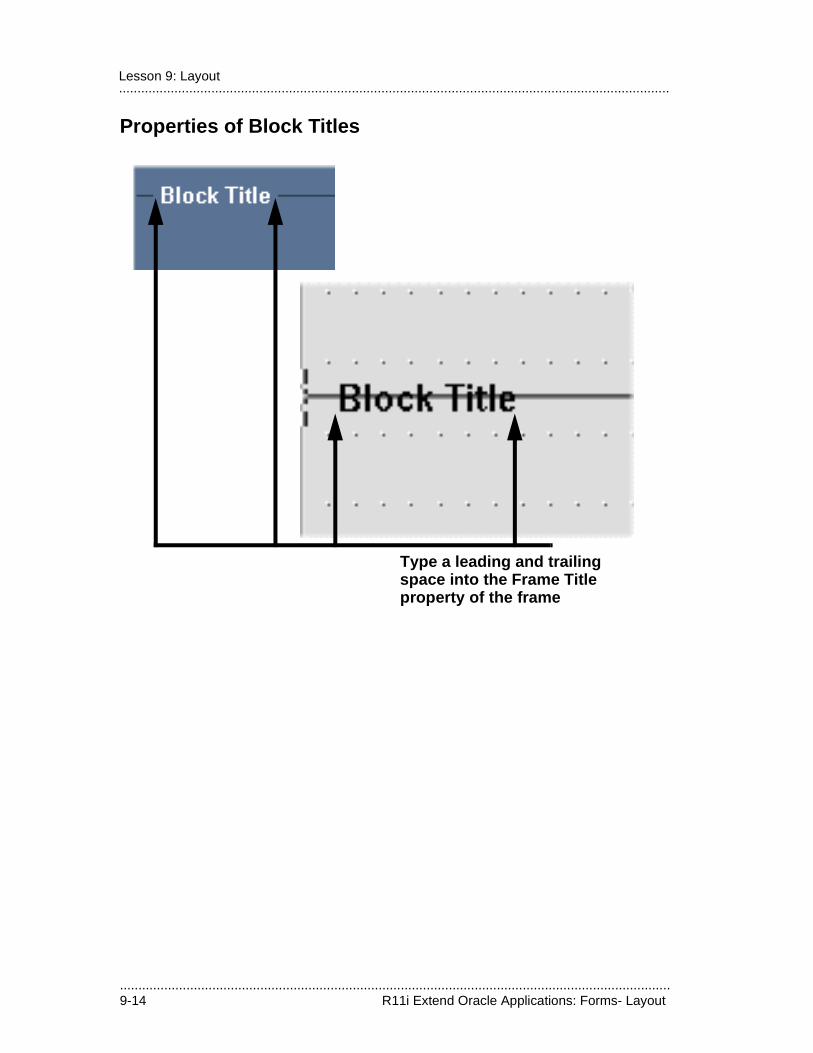
.....................................................................................................................................................9-14 R11i Extend Oracle Applications: Forms- Layout
.....................................................................................................................................................Lesson 9: Layout
Properties of Block Titles
Type a leading and trailingspace into the Frame Titleproperty of the frame
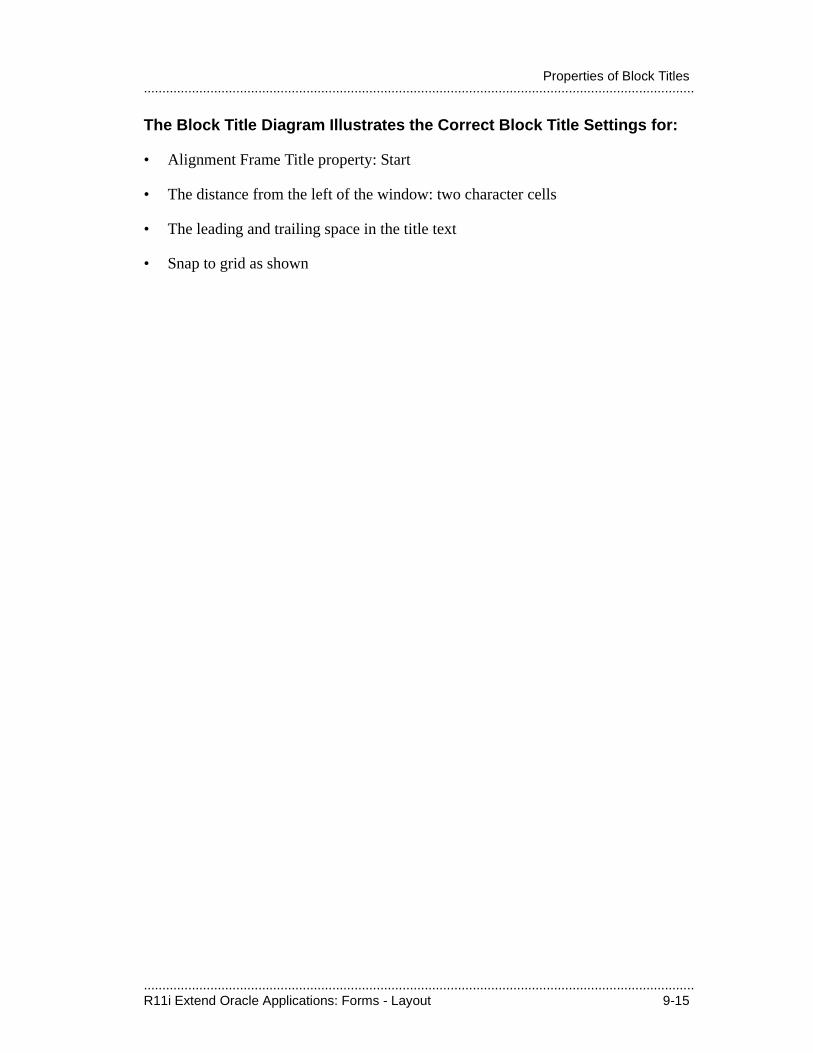
.....................................................................................................................................................R11i Extend Oracle Applications: Forms - Layout 9-15
.....................................................................................................................................................Properties of Block Titles
The Block Title Diagram Illustrates the Correct Block Title Settings for:
• Alignment Frame Title property: Start
• The distance from the left of the window: two character cells
• The leading and trailing space in the title text
• Snap to grid as shown

.....................................................................................................................................................9-16 R11i Extend Oracle Applications: Forms- Layout
.....................................................................................................................................................Lesson 9: Layout
Regions
Single-Record Region Cosmetics
• Regions are distinguished by a frame drawn around a collection of related items
• Multiple regions may be drawn side-by-side, or top-to-bottom, but ideally should form rectangles when viewed together
Overflow Region Cosmetics
• Overflow regions may be drawn without a surrounding frame if it is clear that the fields pertain to the current record of the multi-row block. No title is necessary
• Overflow regions for a block are usually drawn below the items of the multi-row block
• It is strongly recommended that you leave a blank row between a multi-row block and the overflow region
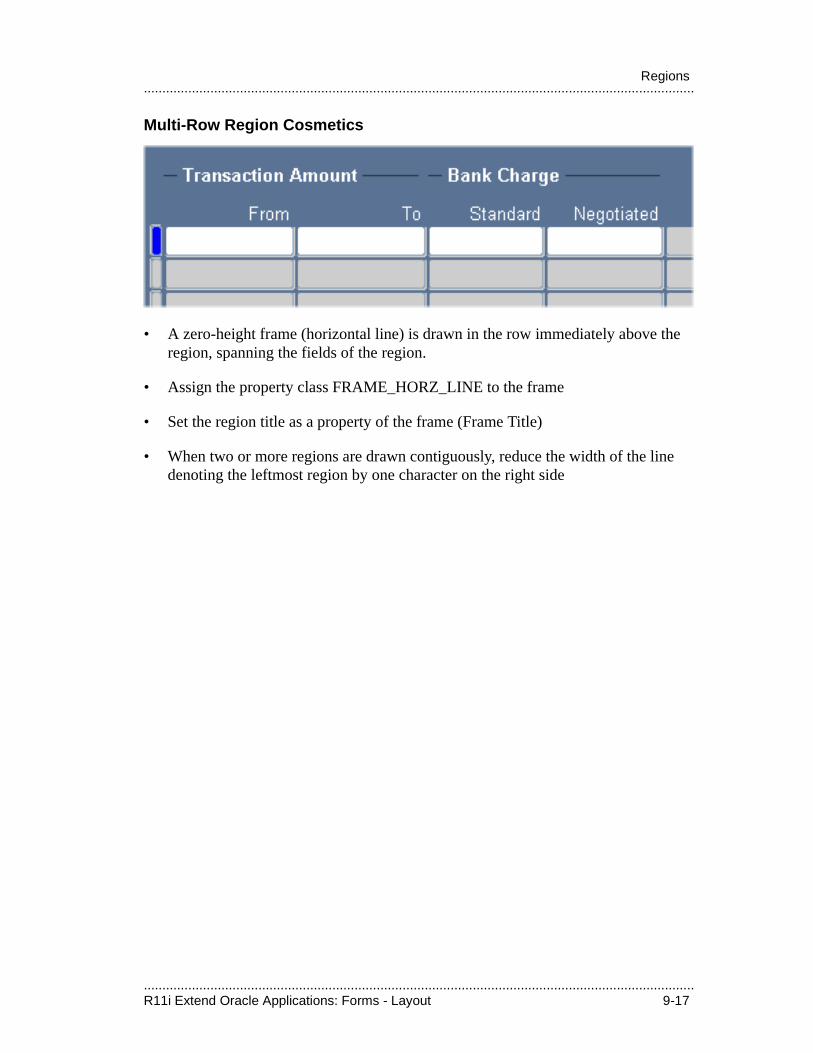
.....................................................................................................................................................R11i Extend Oracle Applications: Forms - Layout 9-17
.....................................................................................................................................................Regions
Multi-Row Region Cosmetics
• A zero-height frame (horizontal line) is drawn in the row immediately above the region, spanning the fields of the region.
• Assign the property class FRAME_HORZ_LINE to the frame
• Set the region title as a property of the frame (Frame Title)
• When two or more regions are drawn contiguously, reduce the width of the line denoting the leftmost region by one character on the right side
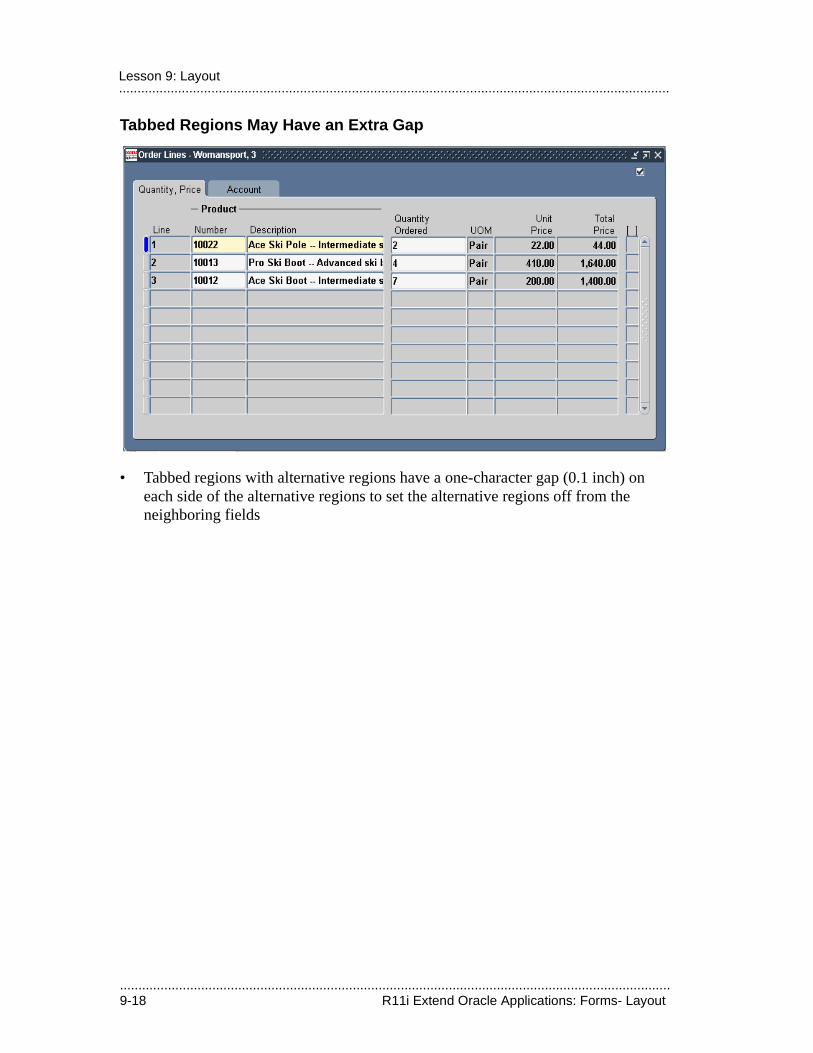
.....................................................................................................................................................9-18 R11i Extend Oracle Applications: Forms- Layout
.....................................................................................................................................................Lesson 9: Layout
Tabbed Regions May Have an Extra Gap
• Tabbed regions with alternative regions have a one-character gap (0.1 inch) on each side of the alternative regions to set the alternative regions off from the neighboring fields
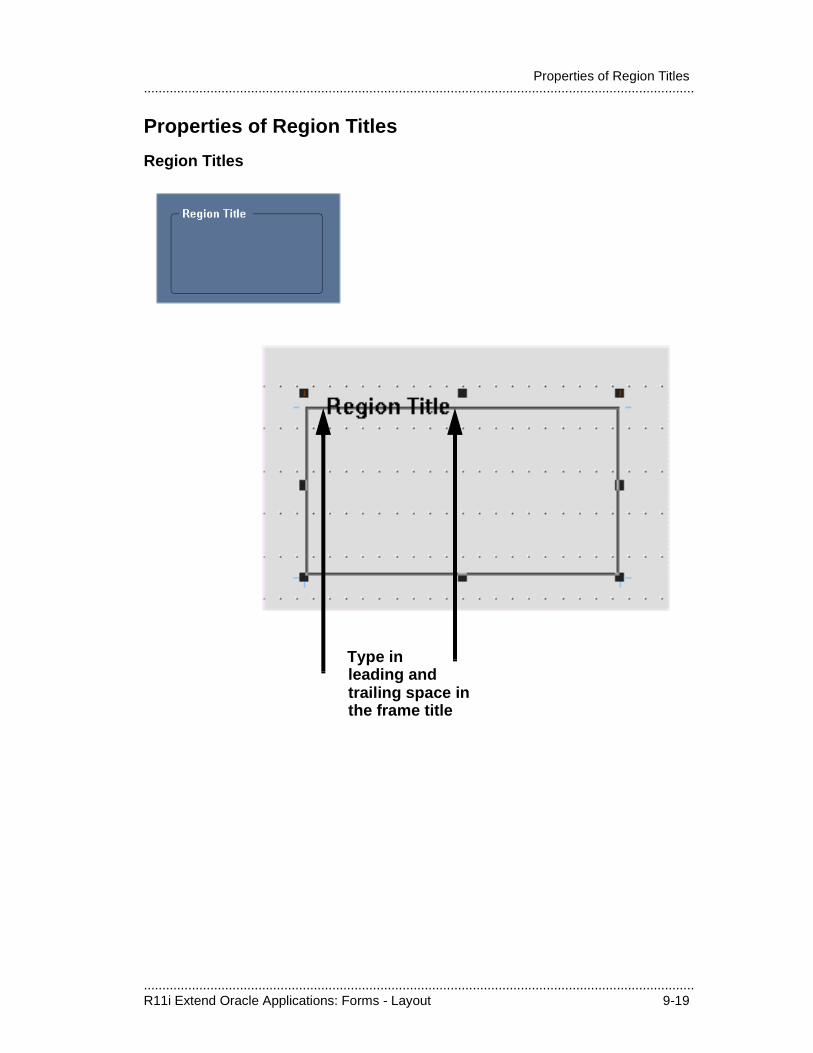
.....................................................................................................................................................R11i Extend Oracle Applications: Forms - Layout 9-19
.....................................................................................................................................................Properties of Region Titles
Properties of Region Titles
Region Titles
Type in
trailing space inleading and
the frame title
.....................................................................................................................................................9-20 R11i Extend Oracle Applications: Forms- Layout
.....................................................................................................................................................Lesson 9: Layout
The Region Titles Diagram Illustrates the Correct Region Title Settings for:
• Alignment Frame Title property: Start
• The distance from the left of the window: two character cells
• The leading and trailing space in the text of the frame title property.
• Snap to grid as shown.
• Use the property class FRAME_RECT
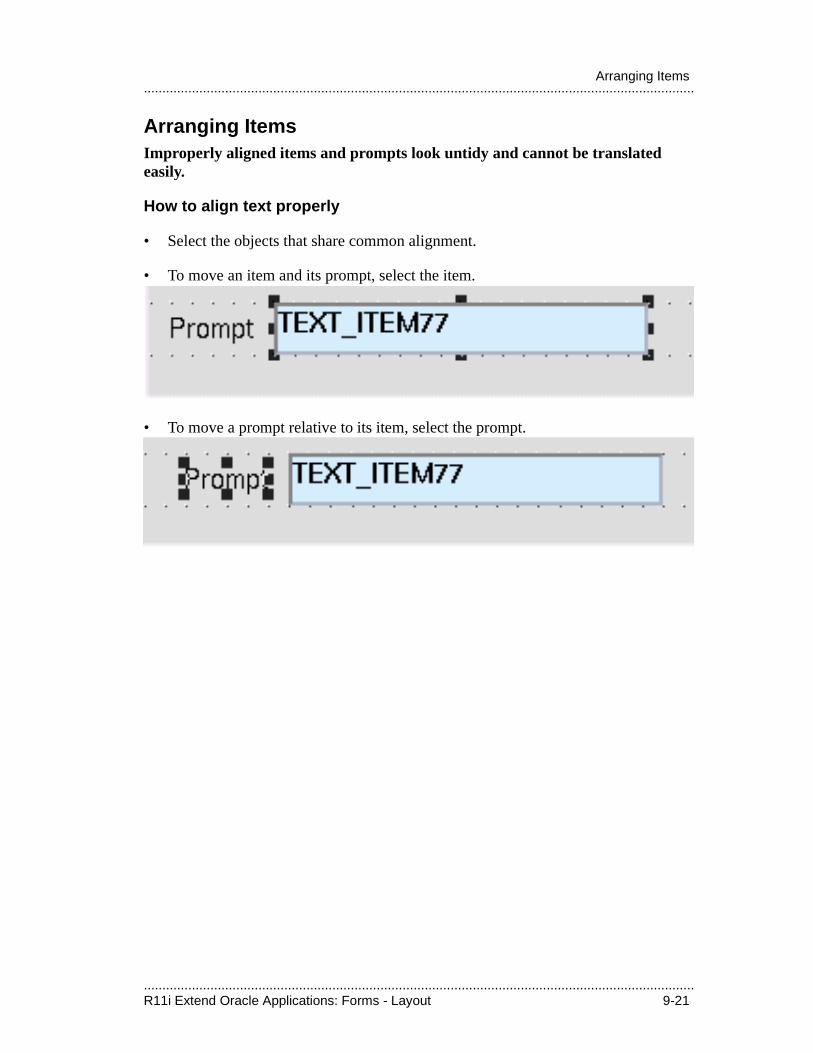
.....................................................................................................................................................R11i Extend Oracle Applications: Forms - Layout 9-21
.....................................................................................................................................................Arranging Items
Arranging ItemsImproperly aligned items and prompts look untidy and cannot be translated easily.
How to align text properly
• Select the objects that share common alignment.
• To move an item and its prompt, select the item.
• To move a prompt relative to its item, select the prompt.
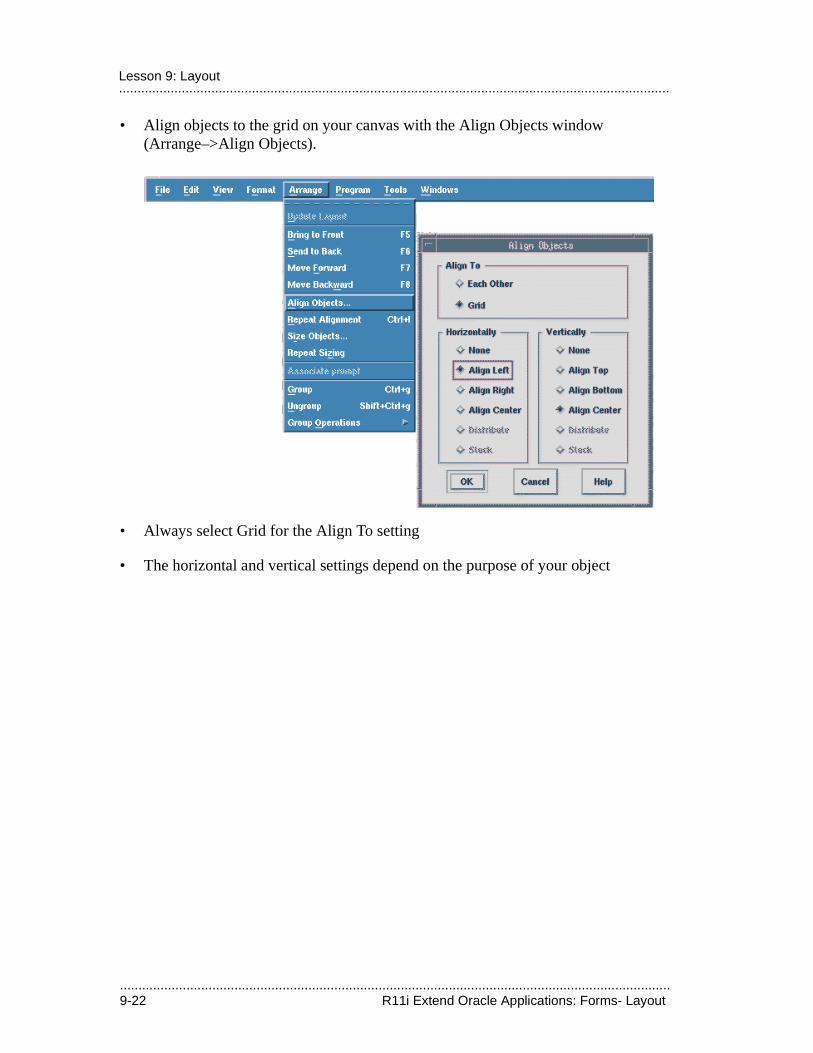
.....................................................................................................................................................9-22 R11i Extend Oracle Applications: Forms- Layout
.....................................................................................................................................................Lesson 9: Layout
• Align objects to the grid on your canvas with the Align Objects window (Arrange–>Align Objects).
• Always select Grid for the Align To setting
• The horizontal and vertical settings depend on the purpose of your object
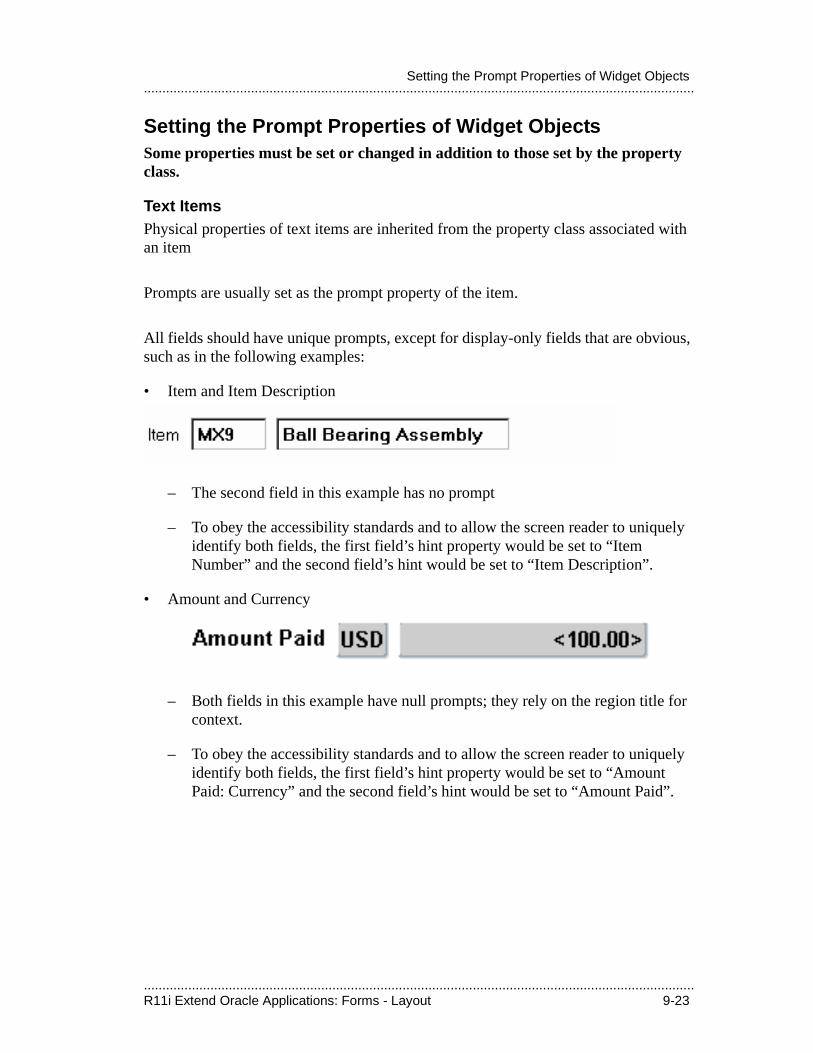
.....................................................................................................................................................R11i Extend Oracle Applications: Forms - Layout 9-23
.....................................................................................................................................................Setting the Prompt Properties of Widget Objects
Setting the Prompt Properties of Widget ObjectsSome properties must be set or changed in addition to those set by the property class.
Text ItemsPhysical properties of text items are inherited from the property class associated with an item
Prompts are usually set as the prompt property of the item.
All fields should have unique prompts, except for display-only fields that are obvious, such as in the following examples:
• Item and Item Description
– The second field in this example has no prompt
– To obey the accessibility standards and to allow the screen reader to uniquely identify both fields, the first field’s hint property would be set to “Item Number” and the second field’s hint would be set to “Item Description”.
• Amount and Currency
– Both fields in this example have null prompts; they rely on the region title for context.
– To obey the accessibility standards and to allow the screen reader to uniquely identify both fields, the first field’s hint property would be set to “Amount Paid: Currency” and the second field’s hint would be set to “Amount Paid”.
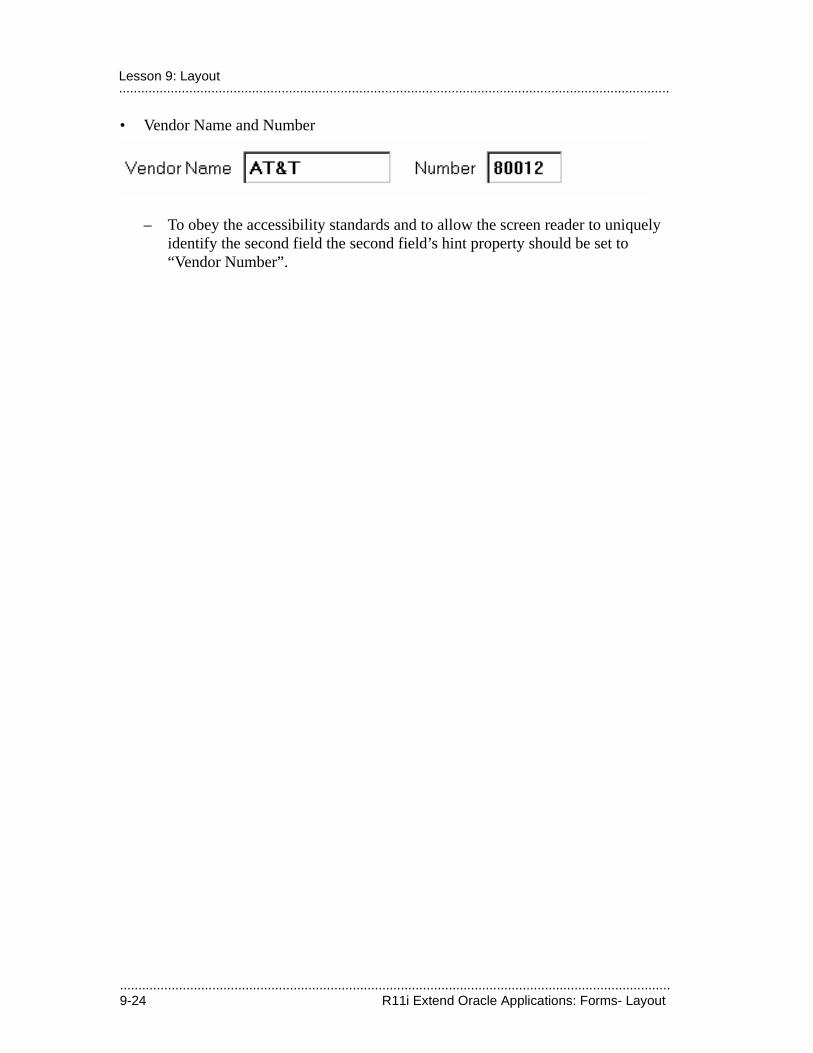
.....................................................................................................................................................9-24 R11i Extend Oracle Applications: Forms- Layout
.....................................................................................................................................................Lesson 9: Layout
• Vendor Name and Number
– To obey the accessibility standards and to allow the screen reader to uniquely identify the second field the second field’s hint property should be set to “Vendor Number”.
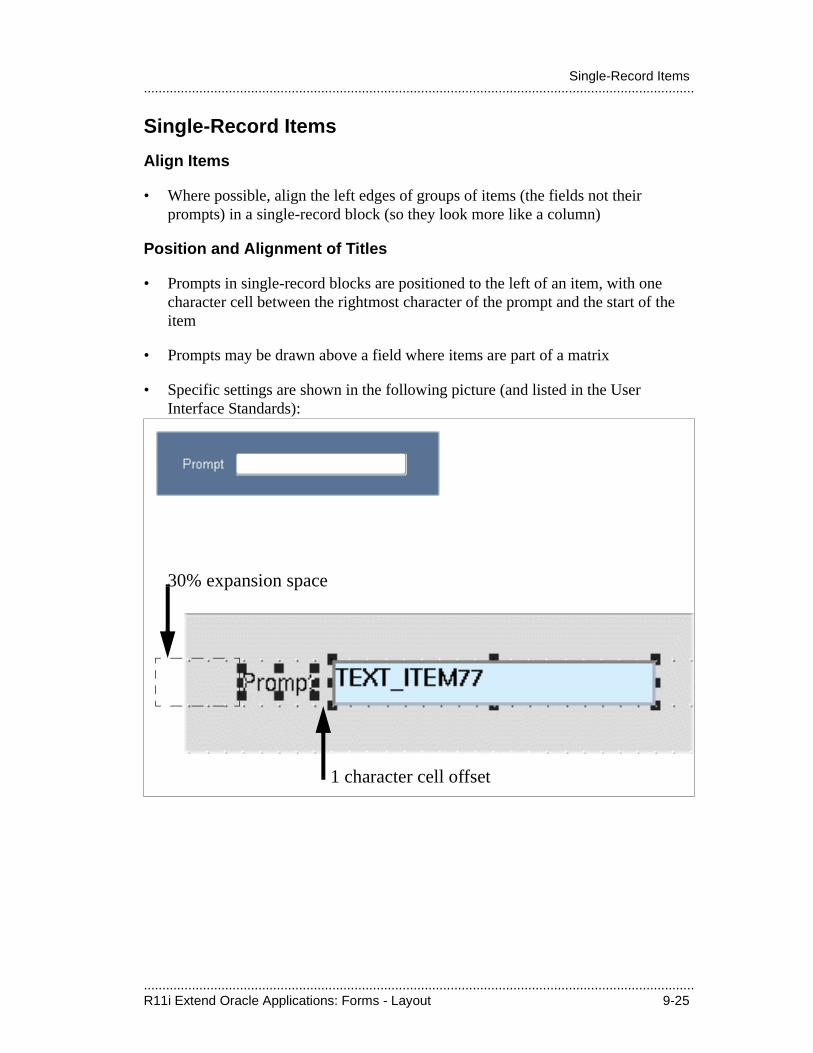
.....................................................................................................................................................R11i Extend Oracle Applications: Forms - Layout 9-25
.....................................................................................................................................................Single-Record Items
Single-Record Items
Align Items
• Where possible, align the left edges of groups of items (the fields not their prompts) in a single-record block (so they look more like a column)
Position and Alignment of Titles
• Prompts in single-record blocks are positioned to the left of an item, with one character cell between the rightmost character of the prompt and the start of the item
• Prompts may be drawn above a field where items are part of a matrix
• Specific settings are shown in the following picture (and listed in the User Interface Standards):
30% expansion space
1 character cell offset

.....................................................................................................................................................9-26 R11i Extend Oracle Applications: Forms- Layout
.....................................................................................................................................................Lesson 9: Layout
Specific settings are enumerated below:
Prompt Display Style: First Record
Justification: End
Attachment Edge: Start
Alignment: Center
Attachment Offset: 0.1 inch
Alignment Offset: 0.0 inch

.....................................................................................................................................................R11i Extend Oracle Applications: Forms - Layout 9-27
.....................................................................................................................................................Multi-Row Item Prompts
Multi-Row Item Prompts
Position and Alignment of Prompts
• Prompts in multi-row blocks are positioned above the first record of each item and are aligned similarly to the data in their corresponding text fields (except for the case of connecting lines)
• Prompts for multi-row blocks have the following vertical placement settings that should override the settings applied by the item’s property class:
– Display Style: First Record
– Attachment Edge: Top
– Attachment Offset: 0.0 inches
Top AlignmentEdge
0.0 inch AttachmentOffset
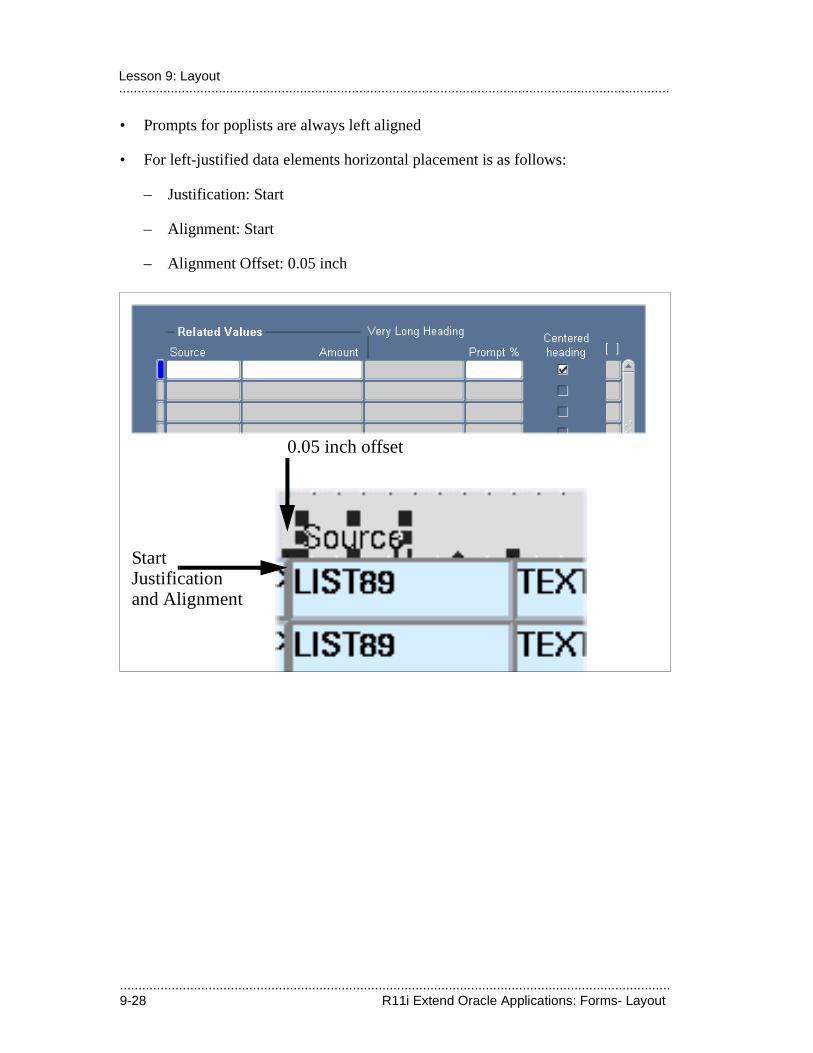
.....................................................................................................................................................9-28 R11i Extend Oracle Applications: Forms- Layout
.....................................................................................................................................................Lesson 9: Layout
• Prompts for poplists are always left aligned
• For left-justified data elements horizontal placement is as follows:
– Justification: Start
– Alignment: Start
– Alignment Offset: 0.05 inch
0.05 inch offset
StartJustificationand Alignment
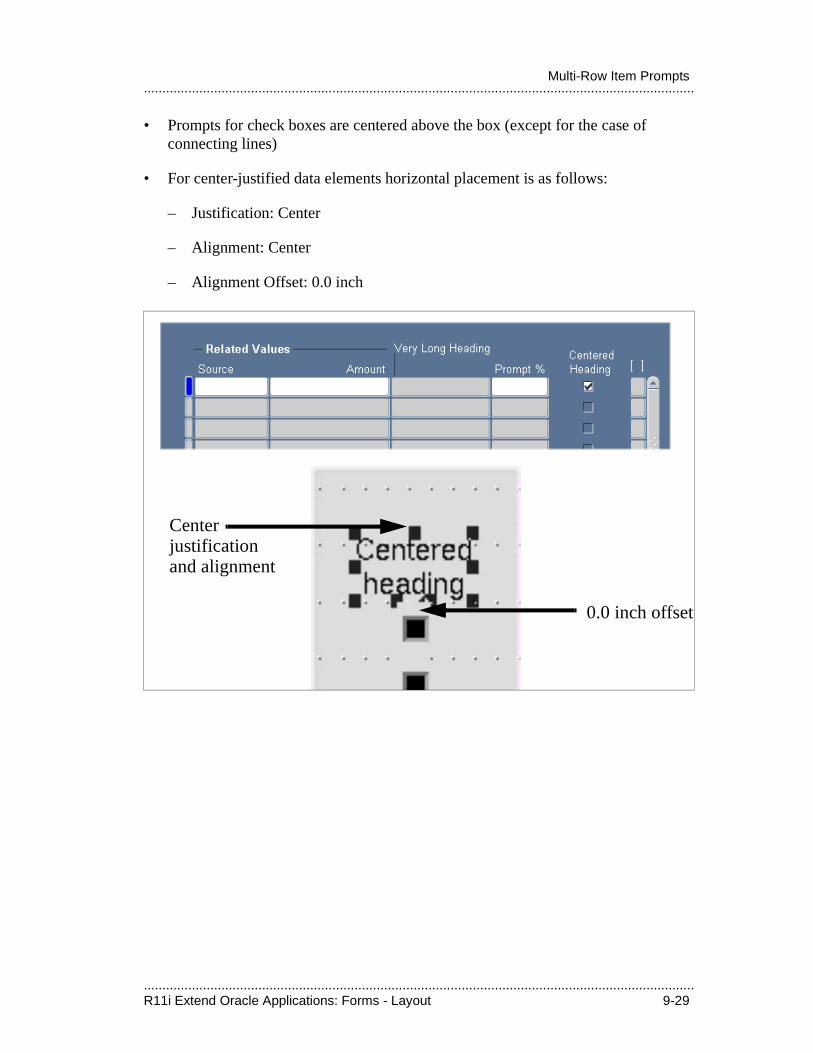
.....................................................................................................................................................R11i Extend Oracle Applications: Forms - Layout 9-29
.....................................................................................................................................................Multi-Row Item Prompts
• Prompts for check boxes are centered above the box (except for the case of connecting lines)
• For center-justified data elements horizontal placement is as follows:
– Justification: Center
– Alignment: Center
– Alignment Offset: 0.0 inch
0.0 inch offset
Centerjustificationand alignment
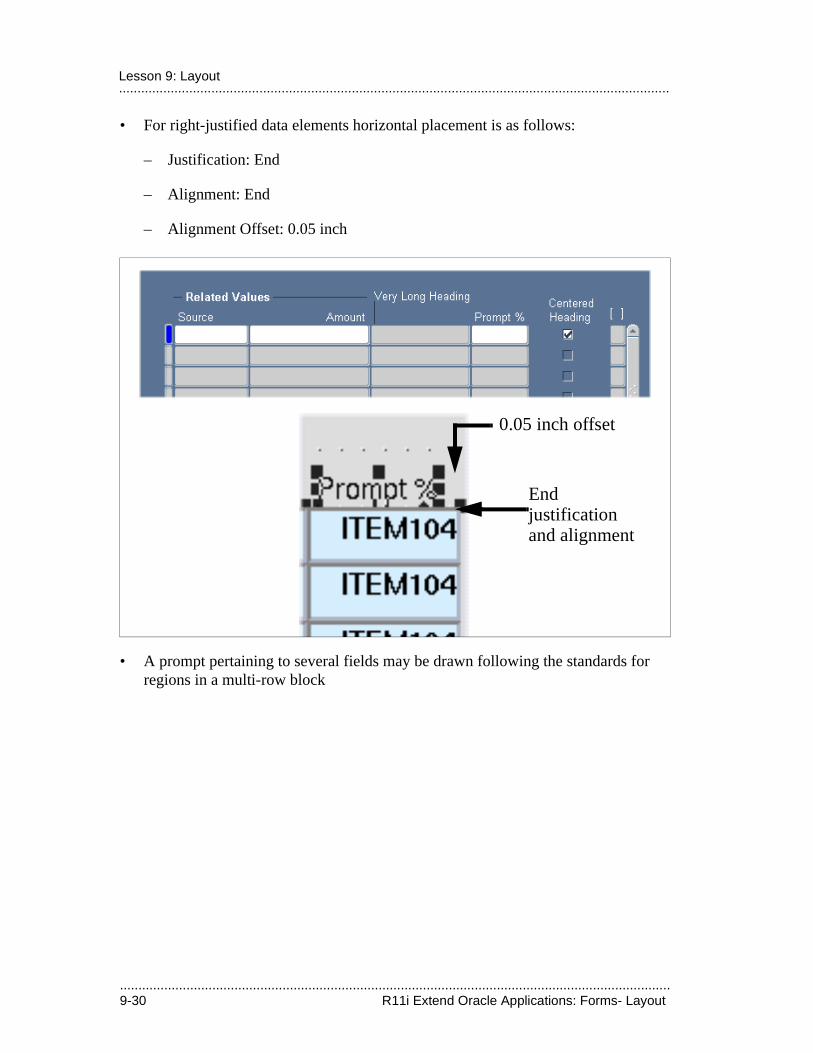
.....................................................................................................................................................9-30 R11i Extend Oracle Applications: Forms- Layout
.....................................................................................................................................................Lesson 9: Layout
• For right-justified data elements horizontal placement is as follows:
– Justification: End
– Alignment: End
– Alignment Offset: 0.05 inch
• A prompt pertaining to several fields may be drawn following the standards for regions in a multi-row block
0.05 inch offset
Endjustificationand alignment

.....................................................................................................................................................R11i Extend Oracle Applications: Forms - Layout 9-31
.....................................................................................................................................................Multi-Row Item Prompts
Handling long promptsHandling long prompts can be done in different ways:
• Split the prompt onto multiple lines
• Leave a gap between fields to accommodate the prompt
• Raise the prompt and use a connecting line (frame with zero width). Use the property class FRAME_VERT_LINE for this frame item.
• Let the prompt overlap the adjacent field
0.0 inch
Startjustificationand alignment
horizontaloffset
1 charactercell verticaloffset
FRAME_VERT_LINE
(0.25 inch)
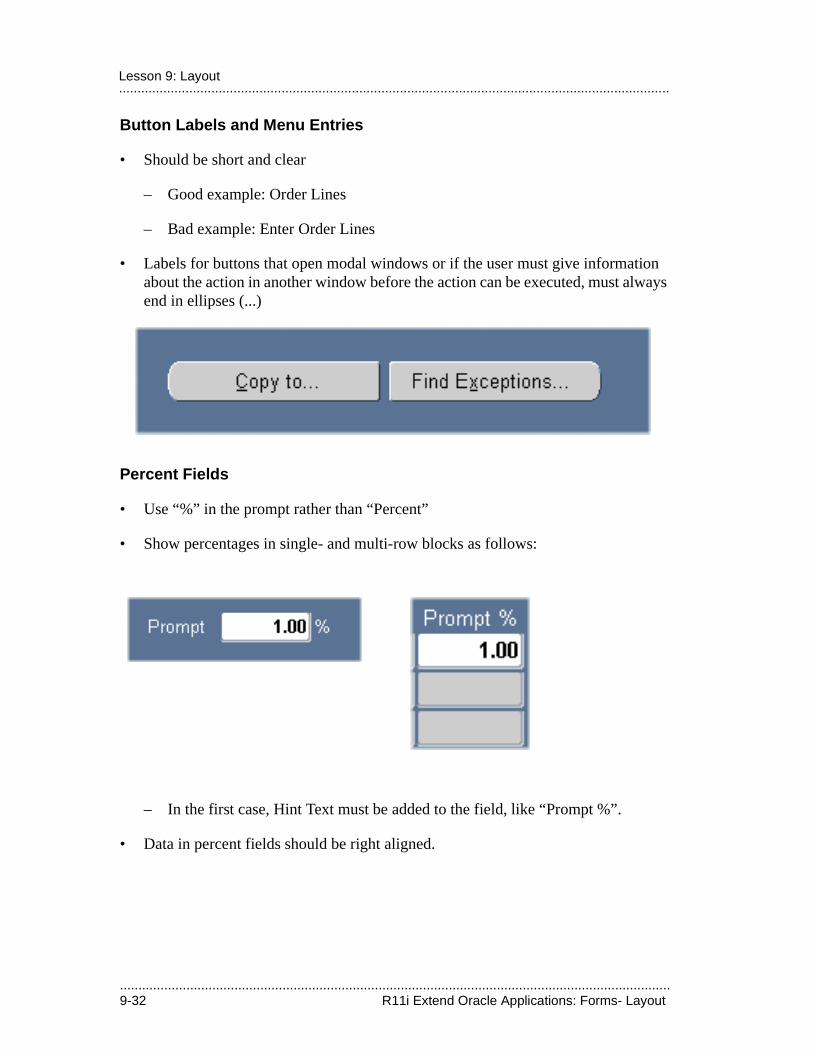
.....................................................................................................................................................9-32 R11i Extend Oracle Applications: Forms- Layout
.....................................................................................................................................................Lesson 9: Layout
Button Labels and Menu Entries
• Should be short and clear
– Good example: Order Lines
– Bad example: Enter Order Lines
• Labels for buttons that open modal windows or if the user must give information about the action in another window before the action can be executed, must always end in ellipses (...)
Percent Fields
• Use “%” in the prompt rather than “Percent”
• Show percentages in single- and multi-row blocks as follows:
– In the first case, Hint Text must be added to the field, like “Prompt %”.
• Data in percent fields should be right aligned.

.....................................................................................................................................................R11i Extend Oracle Applications: Forms - Layout 9-33
.....................................................................................................................................................Multi-Row Item Prompts
• If appropriate, specify range limits of 0 to 100 for percent fields.
• Fixed vs. Floating decimal
– For a fixed decimal use the property class TEXT_ITEM_PERCENT_FIXED
– For a floating decimal use the property class NUMERIC
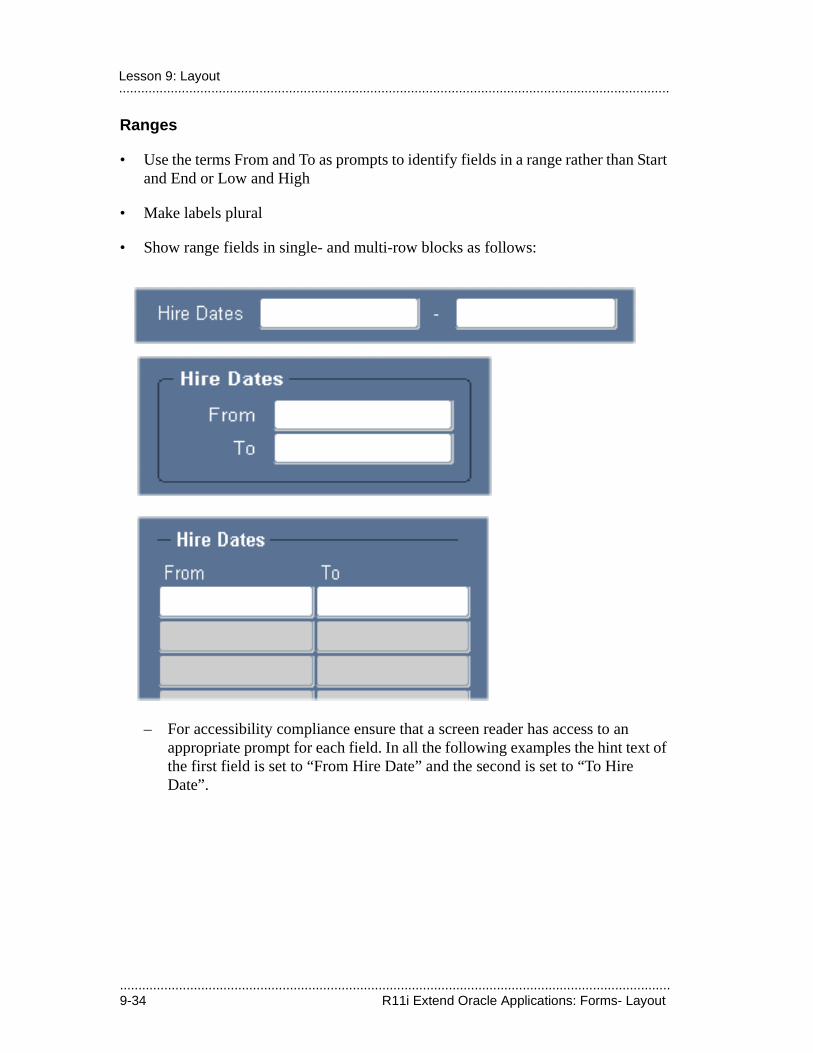
.....................................................................................................................................................9-34 R11i Extend Oracle Applications: Forms- Layout
.....................................................................................................................................................Lesson 9: Layout
Ranges
• Use the terms From and To as prompts to identify fields in a range rather than Start and End or Low and High
• Make labels plural
• Show range fields in single- and multi-row blocks as follows:
– For accessibility compliance ensure that a screen reader has access to an appropriate prompt for each field. In all the following examples the hint text of the first field is set to “From Hire Date” and the second is set to “To Hire Date”.
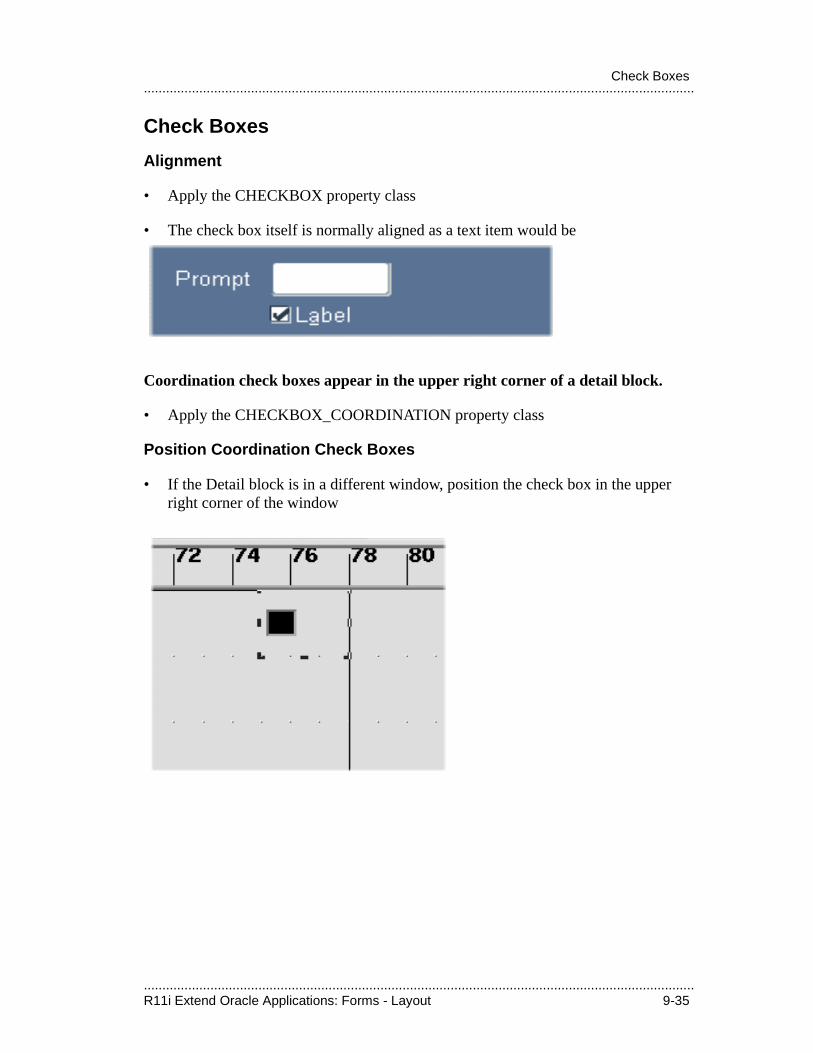
.....................................................................................................................................................R11i Extend Oracle Applications: Forms - Layout 9-35
.....................................................................................................................................................Check Boxes
Check Boxes
Alignment
• Apply the CHECKBOX property class
• The check box itself is normally aligned as a text item would be
Coordination check boxes appear in the upper right corner of a detail block.
• Apply the CHECKBOX_COORDINATION property class
Position Coordination Check Boxes
• If the Detail block is in a different window, position the check box in the upper right corner of the window
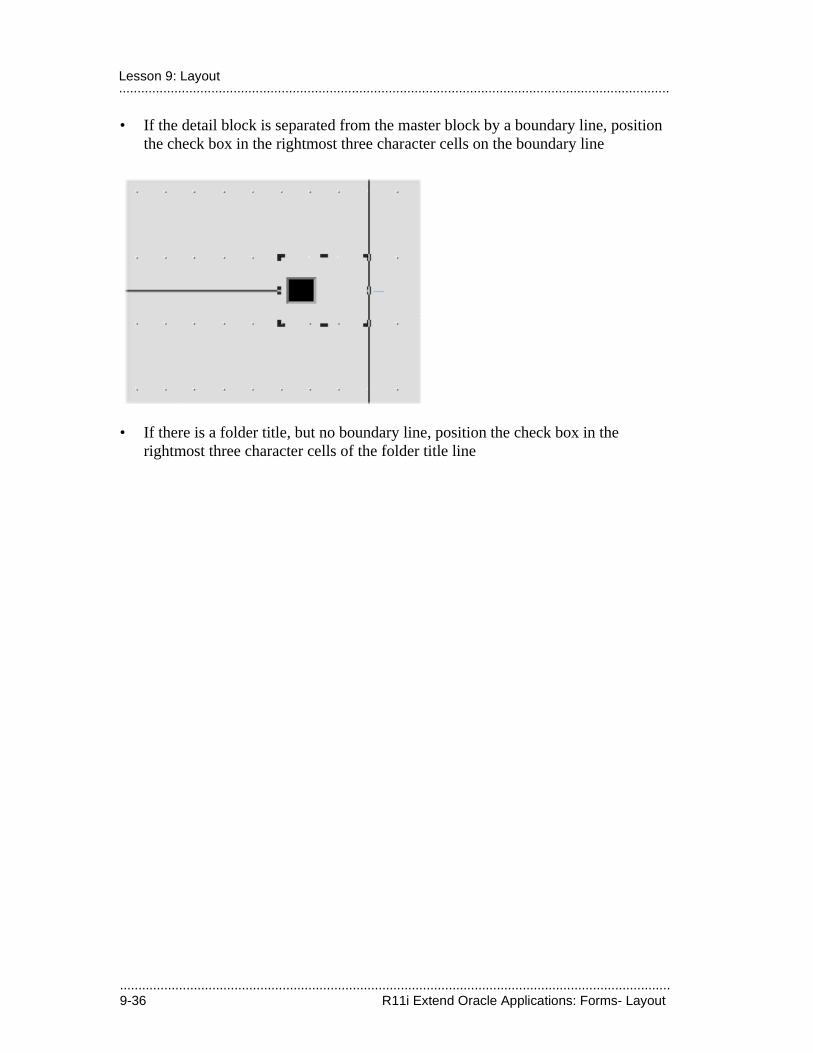
.....................................................................................................................................................9-36 R11i Extend Oracle Applications: Forms- Layout
.....................................................................................................................................................Lesson 9: Layout
• If the detail block is separated from the master block by a boundary line, position the check box in the rightmost three character cells on the boundary line
• If there is a folder title, but no boundary line, position the check box in the rightmost three character cells of the folder title line
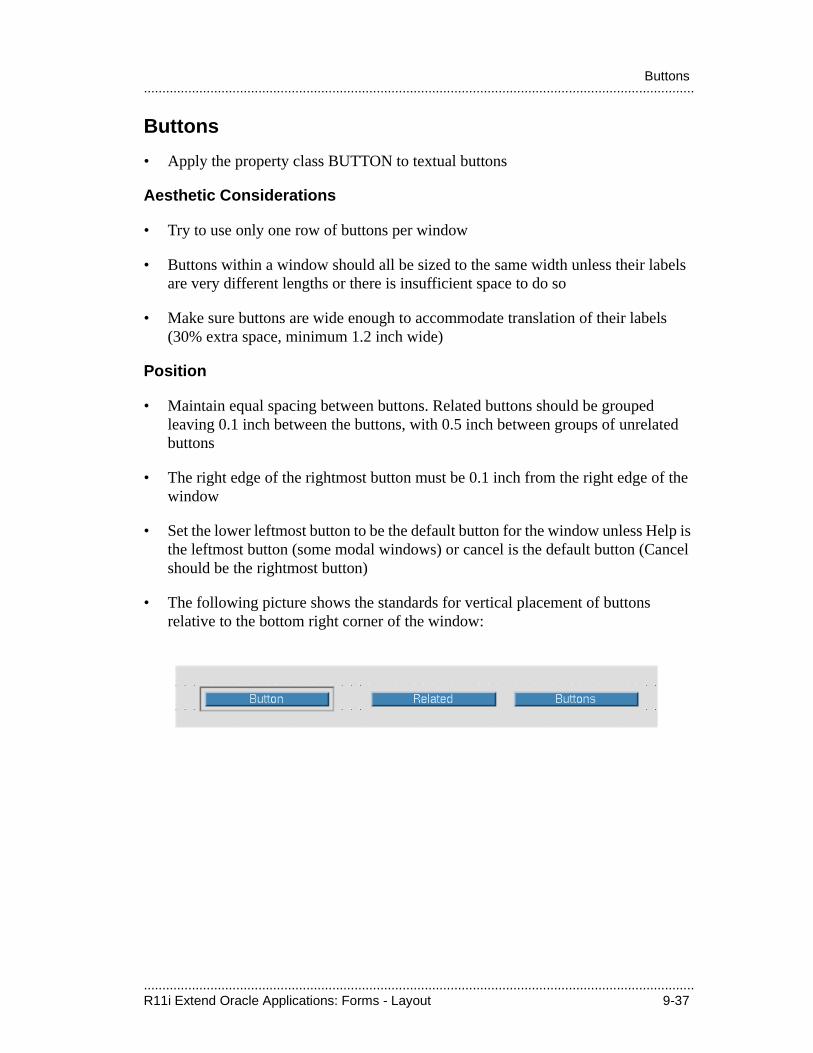
.....................................................................................................................................................R11i Extend Oracle Applications: Forms - Layout 9-37
.....................................................................................................................................................Buttons
Buttons
• Apply the property class BUTTON to textual buttons
Aesthetic Considerations
• Try to use only one row of buttons per window
• Buttons within a window should all be sized to the same width unless their labels are very different lengths or there is insufficient space to do so
• Make sure buttons are wide enough to accommodate translation of their labels (30% extra space, minimum 1.2 inch wide)
Position
• Maintain equal spacing between buttons. Related buttons should be grouped leaving 0.1 inch between the buttons, with 0.5 inch between groups of unrelated buttons
• The right edge of the rightmost button must be 0.1 inch from the right edge of the window
• Set the lower leftmost button to be the default button for the window unless Help is the leftmost button (some modal windows) or cancel is the default button (Cancel should be the rightmost button)
• The following picture shows the standards for vertical placement of buttons relative to the bottom right corner of the window:
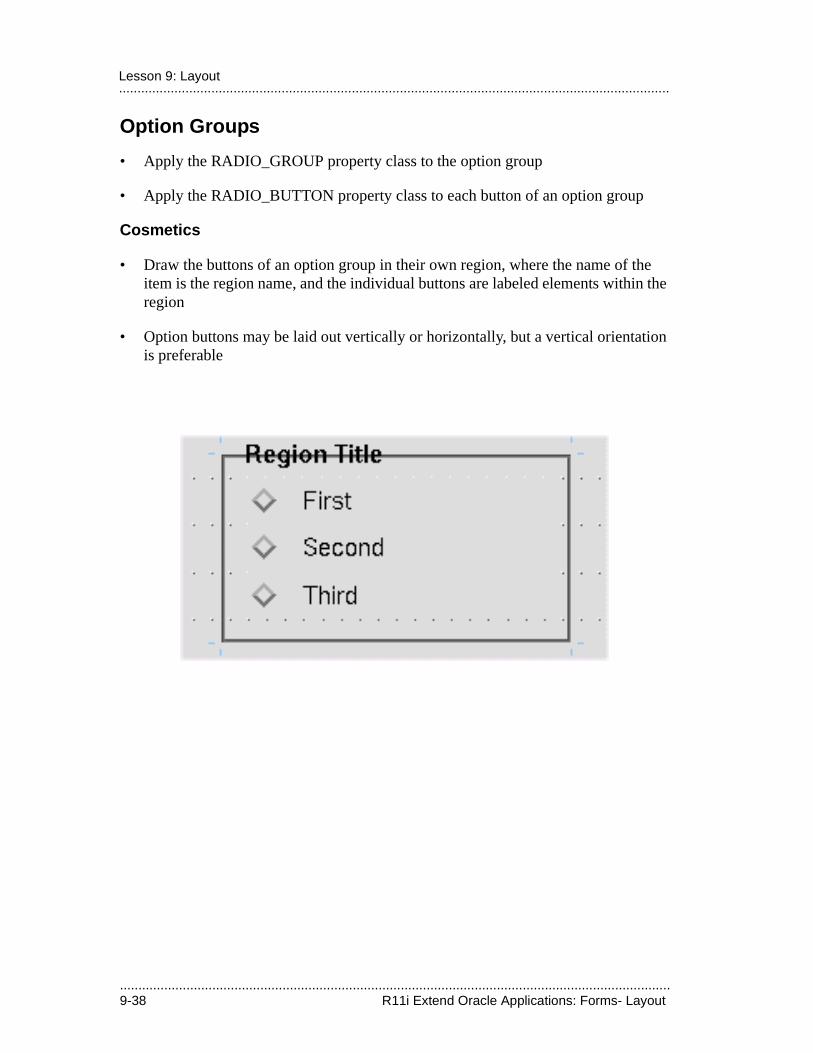
.....................................................................................................................................................9-38 R11i Extend Oracle Applications: Forms- Layout
.....................................................................................................................................................Lesson 9: Layout
Option Groups
• Apply the RADIO_GROUP property class to the option group
• Apply the RADIO_BUTTON property class to each button of an option group
Cosmetics
• Draw the buttons of an option group in their own region, where the name of the item is the region name, and the individual buttons are labeled elements within the region
• Option buttons may be laid out vertically or horizontally, but a vertical orientation is preferable
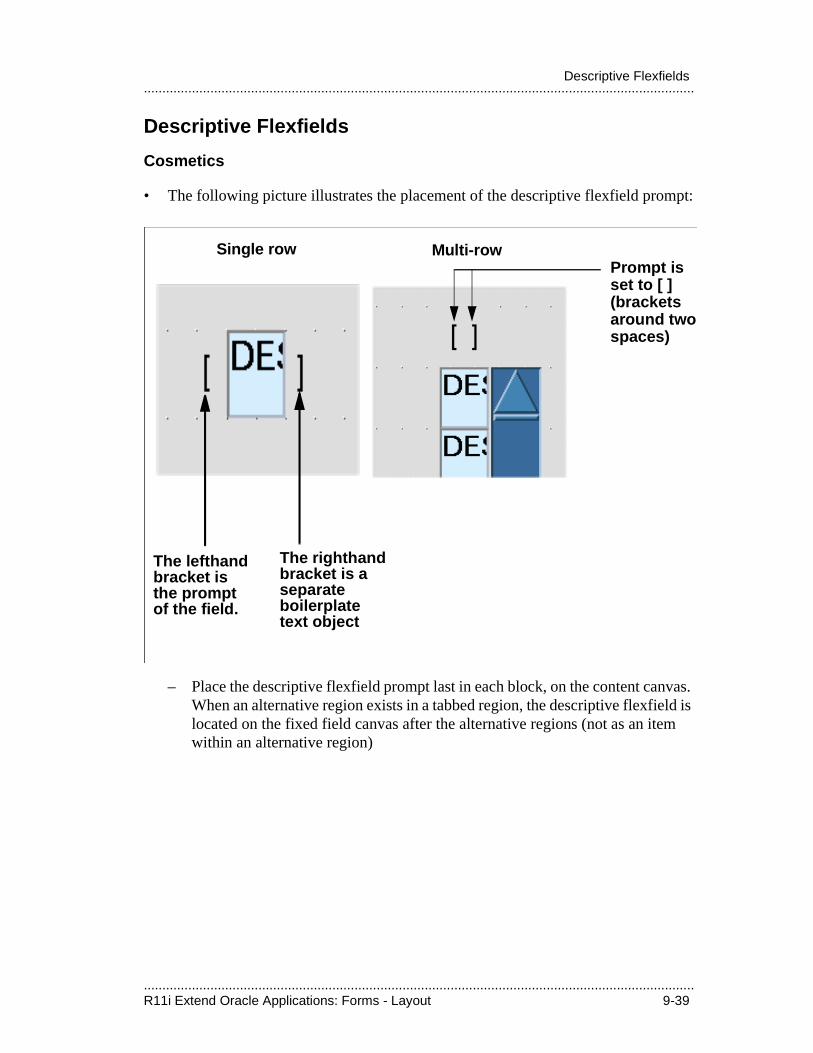
.....................................................................................................................................................R11i Extend Oracle Applications: Forms - Layout 9-39
.....................................................................................................................................................Descriptive Flexfields
Descriptive Flexfields
Cosmetics
• The following picture illustrates the placement of the descriptive flexfield prompt:
– Place the descriptive flexfield prompt last in each block, on the content canvas. When an alternative region exists in a tabbed region, the descriptive flexfield is located on the fixed field canvas after the alternative regions (not as an item within an alternative region)
The lefthand bracket is the prompt of the field.
Prompt is set to [ ] (brackets around two spaces)
Single row Multi-row
The righthand bracket is a separate boilerplate text object
.....................................................................................................................................................9-40 R11i Extend Oracle Applications: Forms- Layout
.....................................................................................................................................................Lesson 9: Layout
Properties of Dynamic Prompts and Titles
Dynamic Prompts and Titles
• Item prompts and frame titles can be dynamically manipulated. Only in very rare circumstances should dynamic prompts or title be required.
• Always use specific prompts, rather than using short but vague prompts such as Name, Number, or Type
.....................................................................................................................................................R11i Extend Oracle Applications: Forms - Layout 9-41
.....................................................................................................................................................Conventions
Conventions
A Few Oracle Applications Standard Abbreviations:
• Qty - Quantity
• Seq - Sequence
• Num - Number
• Min - Minimum
• Max - Maximum
• UOM - Unit of Measure
Allow 4 character cells for each of these abbreviations. See your Oracle Applications User Interface Standards for Forms-Based Products manual for many more standard abbreviations.

.....................................................................................................................................................9-42 R11i Extend Oracle Applications: Forms- Layout
.....................................................................................................................................................Lesson 9: Layout
.................................
Coding with PL/SQL

.....................................................................................................................................................10-2 R11i Extend Oracle Applications: Forms - Coding with PL/SQL
.....................................................................................................................................................Lesson 10: Coding with PL/SQL
.....................................................................................................................................................R11i Extend Oracle Applications: Forms - Coding with PL/SQL 10-3
.....................................................................................................................................................Objectives
ObjectivesAt the end of this lesson, you should be able to:
• Identify where code belongs—database server or forms server.
• Create PL/SQL code in accordance with standards.
• Avoid certain Oracle Forms built-ins.
• Explain why code resides in handlers.
• Create Item, Table, and Event handlers.
• Debug your forms using Examine and other methods.
.....................................................................................................................................................10-4 R11i Extend Oracle Applications: Forms - Coding with PL/SQL
.....................................................................................................................................................Lesson 10: Coding with PL/SQL
Overview of Coding with PL/SQL
Database Server and Forms Server Code
• Recognize what must reside on one or the other
• Learn to select best place for performance if code could go on either
Following Coding Standards
• Use uniform formatting
• Handle exceptions gracefully, and raise errors in meaningful ways
• Follow general naming standards
Use Handlers to Write Code
• Use item, event and table handlers
• Avoid coding logic into triggers; it is hard to maintain or debug
.....................................................................................................................................................R11i Extend Oracle Applications: Forms - Coding with PL/SQL 10-5
.....................................................................................................................................................Use Handlers to Organize Code
Use Handlers to Organize CodeHandlers provide clear standards for writing forms.
What Are Handlers?
• Centralized pieces of code that deal with a specific event, item or table
• Packaged procedures called from triggers
Why Use Handlers?
• Easy to work with self-contained code
• All the code that affects an entity appears in one place for easy development and maintenance
Types of Handlers
• Item handlers—for each item in a block
• Event handlers—for complex events
• Table handlers—for base tables
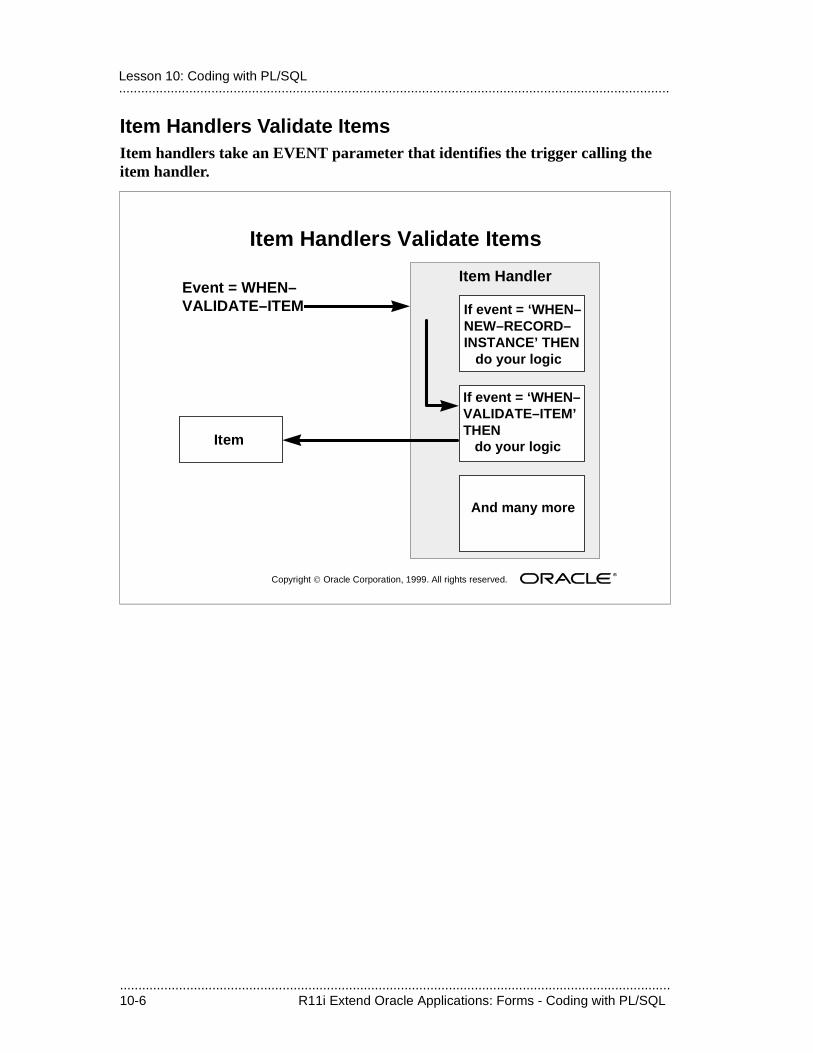
.....................................................................................................................................................10-6 R11i Extend Oracle Applications: Forms - Coding with PL/SQL
.....................................................................................................................................................Lesson 10: Coding with PL/SQL
Item Handlers Validate ItemsItem handlers take an EVENT parameter that identifies the trigger calling the item handler.
Copyright Oracle Corporation, 1999. All rights reserved.
Item Handlers Validate Items
If event = ‘WHEN–NEW–RECORD–INSTANCE’ THEN do your logic
Item HandlerEvent = WHEN–VALIDATE–ITEM
If event = ‘WHEN–VALIDATE–ITEM’ THEN do your logic
And many more
Item
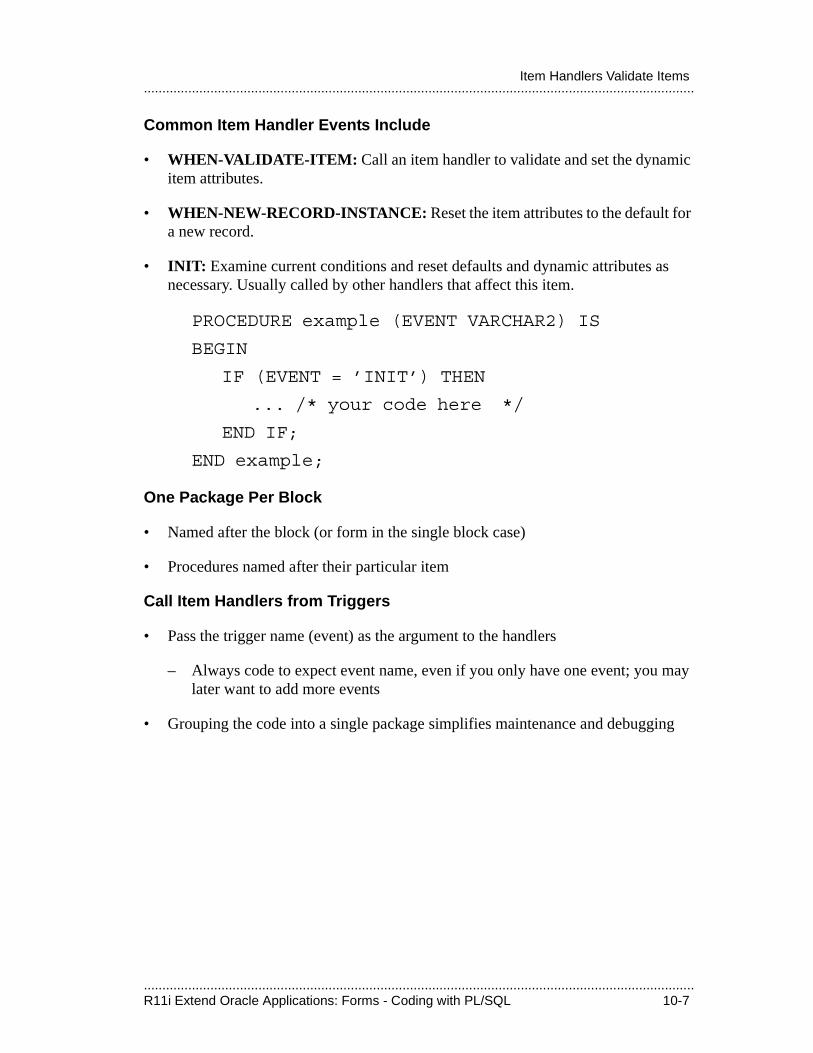
.....................................................................................................................................................R11i Extend Oracle Applications: Forms - Coding with PL/SQL 10-7
.....................................................................................................................................................Item Handlers Validate Items
Common Item Handler Events Include
• WHEN-VALIDATE-ITEM: Call an item handler to validate and set the dynamic item attributes.
• WHEN-NEW-RECORD-INSTANCE: Reset the item attributes to the default for a new record.
• INIT: Examine current conditions and reset defaults and dynamic attributes as necessary. Usually called by other handlers that affect this item.
PROCEDURE example (EVENT VARCHAR2) IS
BEGIN
IF (EVENT = ’INIT’) THEN
... /* your code here */
END IF;
END example;
One Package Per Block
• Named after the block (or form in the single block case)
• Procedures named after their particular item
Call Item Handlers from Triggers
• Pass the trigger name (event) as the argument to the handlers
– Always code to expect event name, even if you only have one event; you may later want to add more events
• Grouping the code into a single package simplifies maintenance and debugging
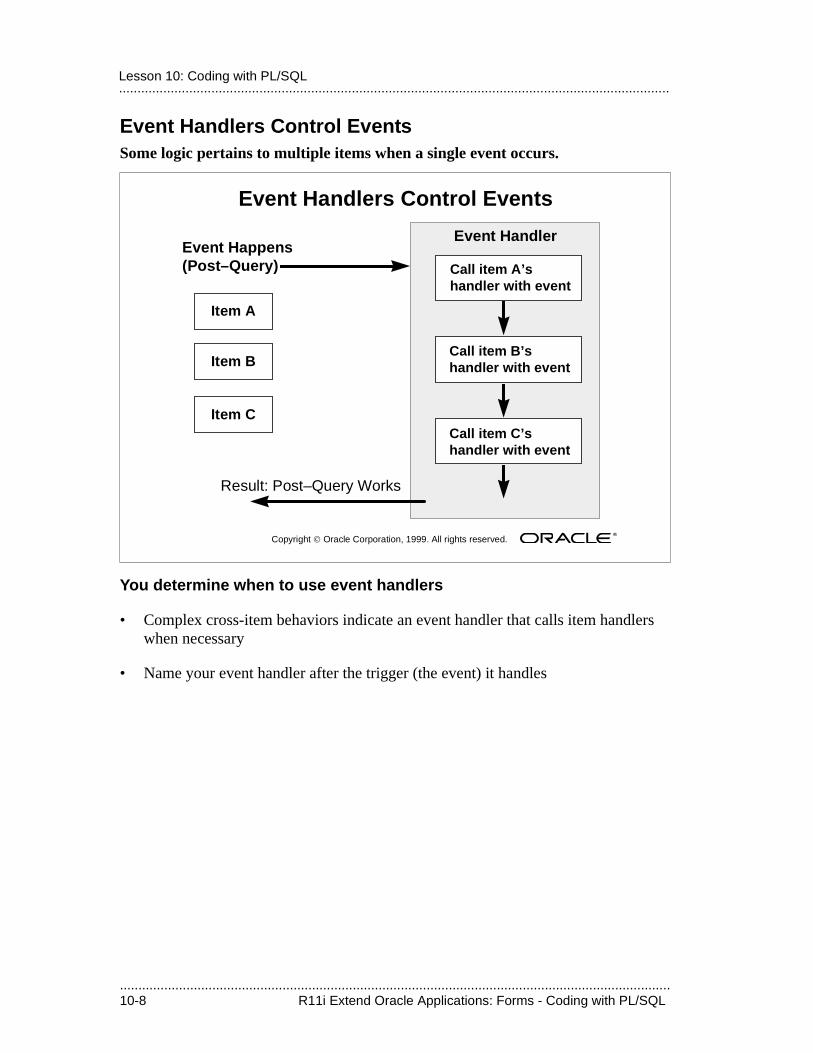
.....................................................................................................................................................10-8 R11i Extend Oracle Applications: Forms - Coding with PL/SQL
.....................................................................................................................................................Lesson 10: Coding with PL/SQL
Event Handlers Control EventsSome logic pertains to multiple items when a single event occurs.
You determine when to use event handlers
• Complex cross-item behaviors indicate an event handler that calls item handlers when necessary
• Name your event handler after the trigger (the event) it handles
Copyright Oracle Corporation, 1999. All rights reserved.
Event Handlers Control Events
Call item A’shandler with event
Event HandlerEvent Happens(Post–Query)
Call item B’shandler with event
Item A
Call item C’shandler with event
Result: Post–Query Works
Item B
Item C

.....................................................................................................................................................R11i Extend Oracle Applications: Forms - Coding with PL/SQL 10-9
.....................................................................................................................................................Table Handlers Manipulate Tables
Table Handlers Manipulate TablesTable handlers support insert, update, delete and locks for your block-level views.
Copyright Oracle Corporation, 1998. All rights reserved.
Table Handlers Manipulate TablesFORM
Block Based on View
Table Handler
Insert/Update/Delete/Lock
QueryVIEW
Foreign Key TableBase Table
.....................................................................................................................................................10-10 R11i Extend Oracle Applications: Forms - Coding with PL/SQL
.....................................................................................................................................................Lesson 10: Coding with PL/SQL
Database Tier or Application Tier?Place code on the database tier or application tier to optimize performance.
Code that Must Reside on the Application Tier
• Procedures that call Oracle Forms built-ins
• Procedures that reference fields directly
Code that Must Reside on the Database Tier
• Procedures called from the database
• Procedures used for multiple forms and programs
• Large procedures (greater than 64K)
You Make the Call:
• Complex SQL (three or more statements) usually belongs on the database server
• Procedures should reside wherever they are needed; sometimes they should be on both the application tier and the database tier
• Keep your options open: you can avoid referencing fields directly (see above) by accepting field values or names as parameters to your PL/SQL procedures
Technical NoteOracle Applications products: typically most code is put into libraries instead of directly into the form program units, though this varies by product team.
• Pros: if code resides in libraries, then patching can be done to the library, and the form does not need to be retranslated after a patch. Also, code can easily be shared across forms.
• Cons: creating, using, and maintaining libraries involves special coding practices and extra work.
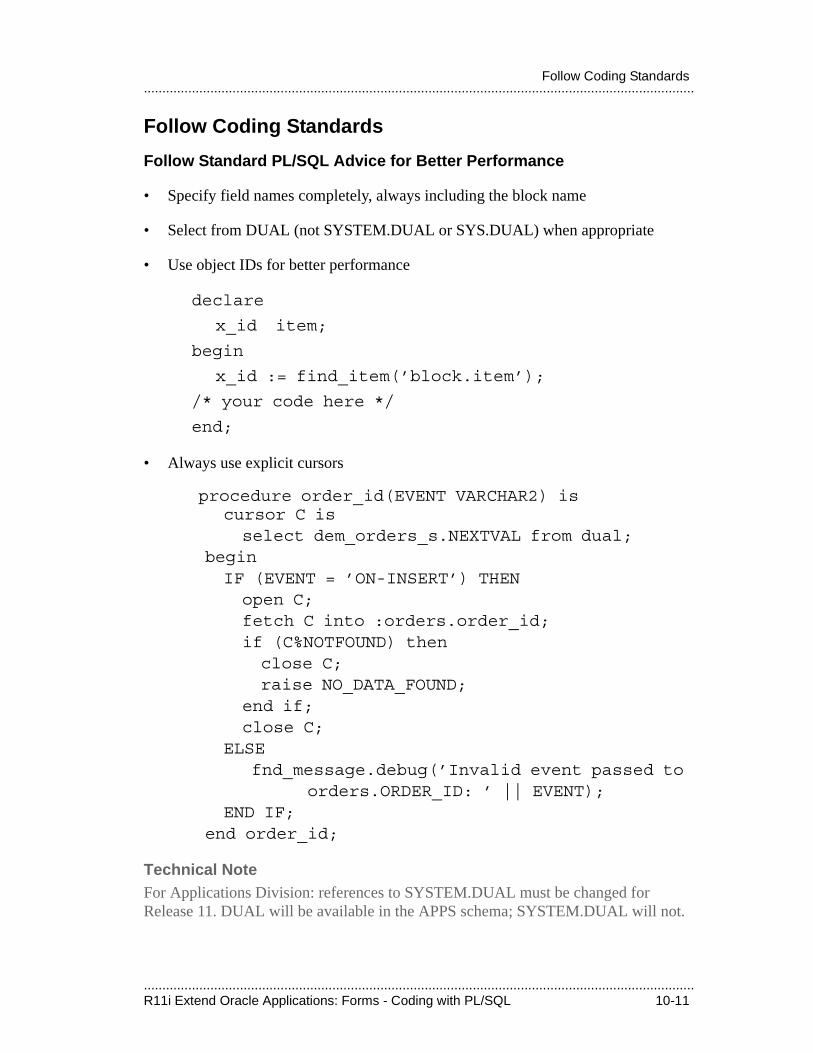
.....................................................................................................................................................R11i Extend Oracle Applications: Forms - Coding with PL/SQL 10-11
.....................................................................................................................................................Follow Coding Standards
Follow Coding Standards
Follow Standard PL/SQL Advice for Better Performance
• Specify field names completely, always including the block name
• Select from DUAL (not SYSTEM.DUAL or SYS.DUAL) when appropriate
• Use object IDs for better performance
declare
x_id item;
begin
x_id := find_item(’block.item’);
/* your code here */
end;
• Always use explicit cursors
procedure order_id(EVENT VARCHAR2) is cursor C is select dem_orders_s.NEXTVAL from dual; begin IF (EVENT = ’ON-INSERT’) THEN open C; fetch C into :orders.order_id; if (C%NOTFOUND) then close C; raise NO_DATA_FOUND; end if; close C; ELSE fnd_message.debug(’Invalid event passed to orders.ORDER_ID: ’ || EVENT); END IF; end order_id;
Technical NoteFor Applications Division: references to SYSTEM.DUAL must be changed for Release 11. DUAL will be available in the APPS schema; SYSTEM.DUAL will not.
.....................................................................................................................................................10-12 R11i Extend Oracle Applications: Forms - Coding with PL/SQL
.....................................................................................................................................................Lesson 10: Coding with PL/SQL
Package Sizes
• Limit packages to 64K on the forms server
• Keep the number of procedures in a package under 25
Handle Exceptions Politely
• Use FND_MESSAGE routines to display any messages
• Use RAISE FORM_TRIGGER_FAILURE to stop processing on the application tier
• Use APP_EXCEPTION.RAISE_EXCEPTION to stop processing on the database server
• Process “expected” exceptions on the server yourself
• Be wary when testing FORM_SUCCESS, FORM_FAILURE or FORM_FATAL - your built-in may not be the last one fired
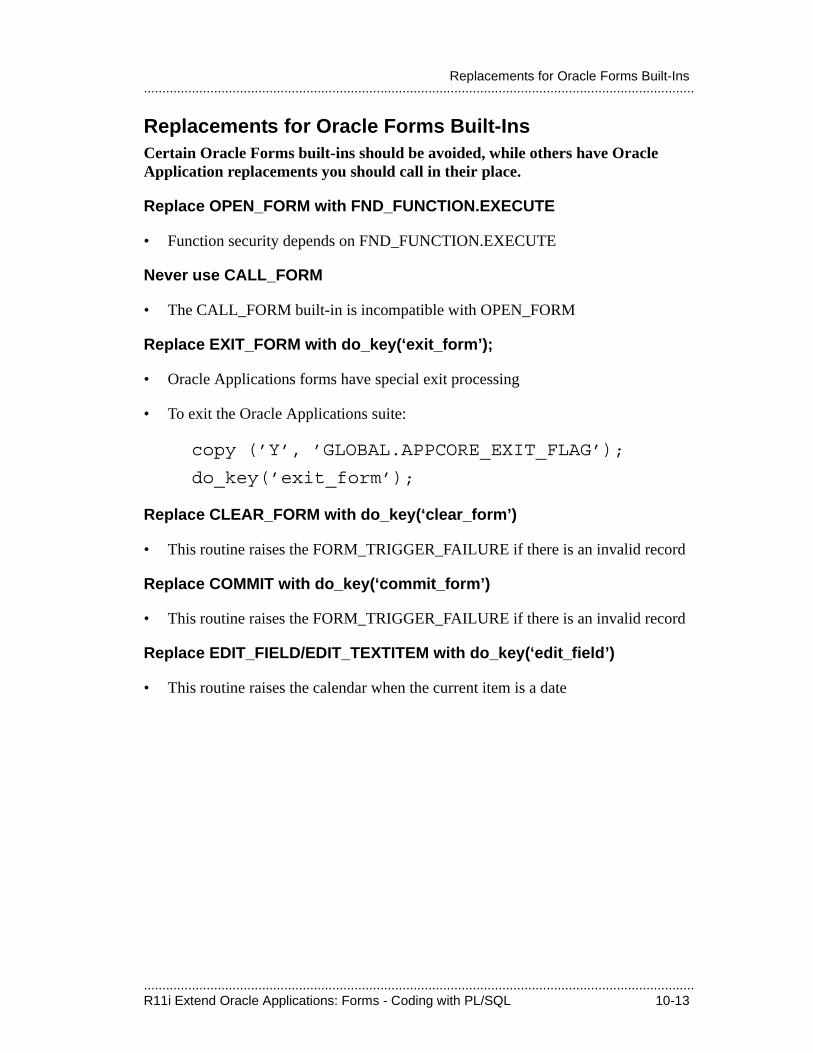
.....................................................................................................................................................R11i Extend Oracle Applications: Forms - Coding with PL/SQL 10-13
.....................................................................................................................................................Replacements for Oracle Forms Built-Ins
Replacements for Oracle Forms Built-InsCertain Oracle Forms built-ins should be avoided, while others have Oracle Application replacements you should call in their place.
Replace OPEN_FORM with FND_FUNCTION.EXECUTE
• Function security depends on FND_FUNCTION.EXECUTE
Never use CALL_FORM
• The CALL_FORM built-in is incompatible with OPEN_FORM
Replace EXIT_FORM with do_key(‘exit_form’);
• Oracle Applications forms have special exit processing
• To exit the Oracle Applications suite:
copy (’Y’, ’GLOBAL.APPCORE_EXIT_FLAG’);
do_key(’exit_form’);
Replace CLEAR_FORM with do_key(‘clear_form’)
• This routine raises the FORM_TRIGGER_FAILURE if there is an invalid record
Replace COMMIT with do_key(‘commit_form’)
• This routine raises the FORM_TRIGGER_FAILURE if there is an invalid record
Replace EDIT_FIELD/EDIT_TEXTITEM with do_key(‘edit_field’)
• This routine raises the calendar when the current item is a date
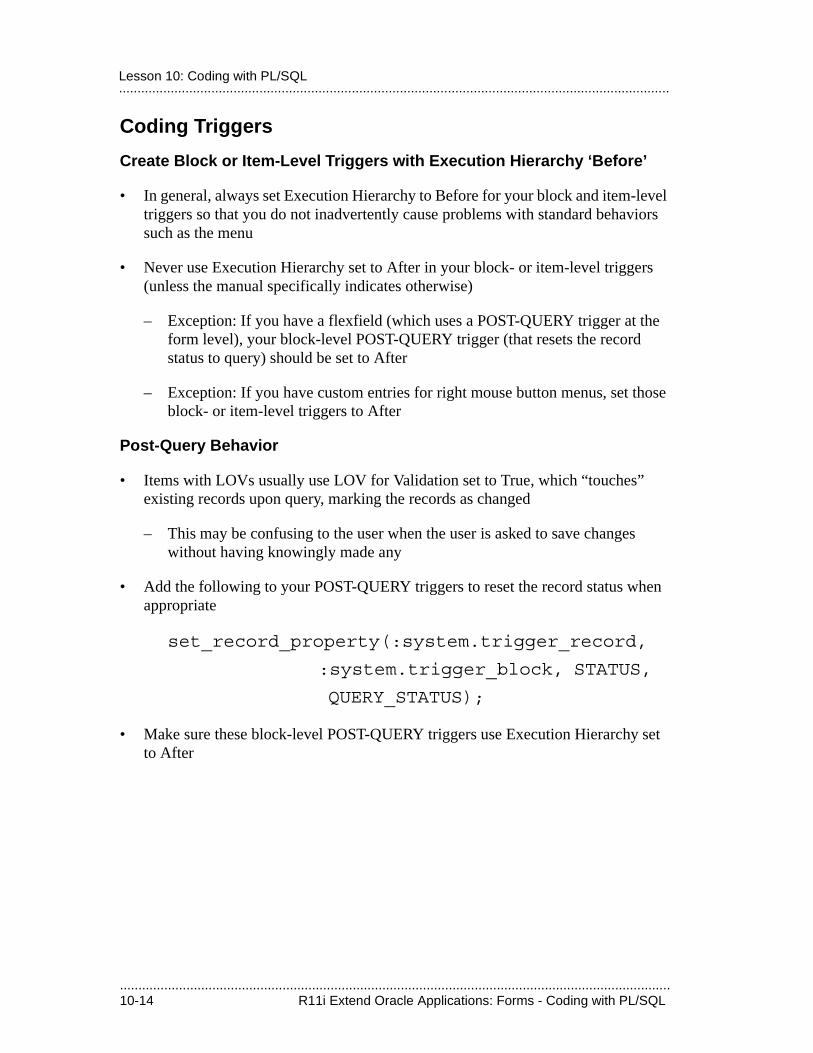
.....................................................................................................................................................10-14 R11i Extend Oracle Applications: Forms - Coding with PL/SQL
.....................................................................................................................................................Lesson 10: Coding with PL/SQL
Coding Triggers
Create Block or Item-Level Triggers with Execution Hierarchy ‘Before’
• In general, always set Execution Hierarchy to Before for your block and item-level triggers so that you do not inadvertently cause problems with standard behaviors such as the menu
• Never use Execution Hierarchy set to After in your block- or item-level triggers (unless the manual specifically indicates otherwise)
– Exception: If you have a flexfield (which uses a POST-QUERY trigger at the form level), your block-level POST-QUERY trigger (that resets the record status to query) should be set to After
– Exception: If you have custom entries for right mouse button menus, set those block- or item-level triggers to After
Post-Query Behavior
• Items with LOVs usually use LOV for Validation set to True, which “touches” existing records upon query, marking the records as changed
– This may be confusing to the user when the user is asked to save changes without having knowingly made any
• Add the following to your POST-QUERY triggers to reset the record status when appropriate
set_record_property(:system.trigger_record,
:system.trigger_block, STATUS,
QUERY_STATUS);
• Make sure these block-level POST-QUERY triggers use Execution Hierarchy set to After
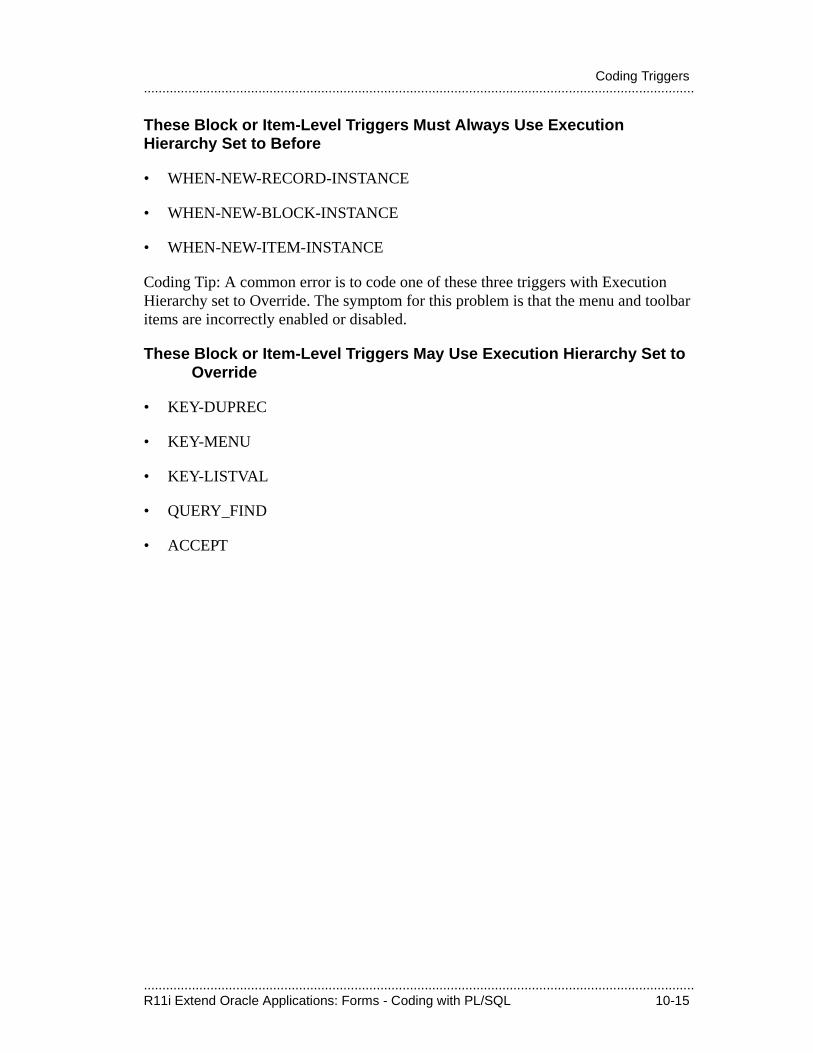
.....................................................................................................................................................R11i Extend Oracle Applications: Forms - Coding with PL/SQL 10-15
.....................................................................................................................................................Coding Triggers
These Block or Item-Level Triggers Must Always Use Execution Hierarchy Set to Before
• WHEN-NEW-RECORD-INSTANCE
• WHEN-NEW-BLOCK-INSTANCE
• WHEN-NEW-ITEM-INSTANCE
Coding Tip: A common error is to code one of these three triggers with Execution Hierarchy set to Override. The symptom for this problem is that the menu and toolbar items are incorrectly enabled or disabled.
These Block or Item-Level Triggers May Use Execution Hierarchy Set to Override
• KEY-DUPREC
• KEY-MENU
• KEY-LISTVAL
• QUERY_FIND
• ACCEPT
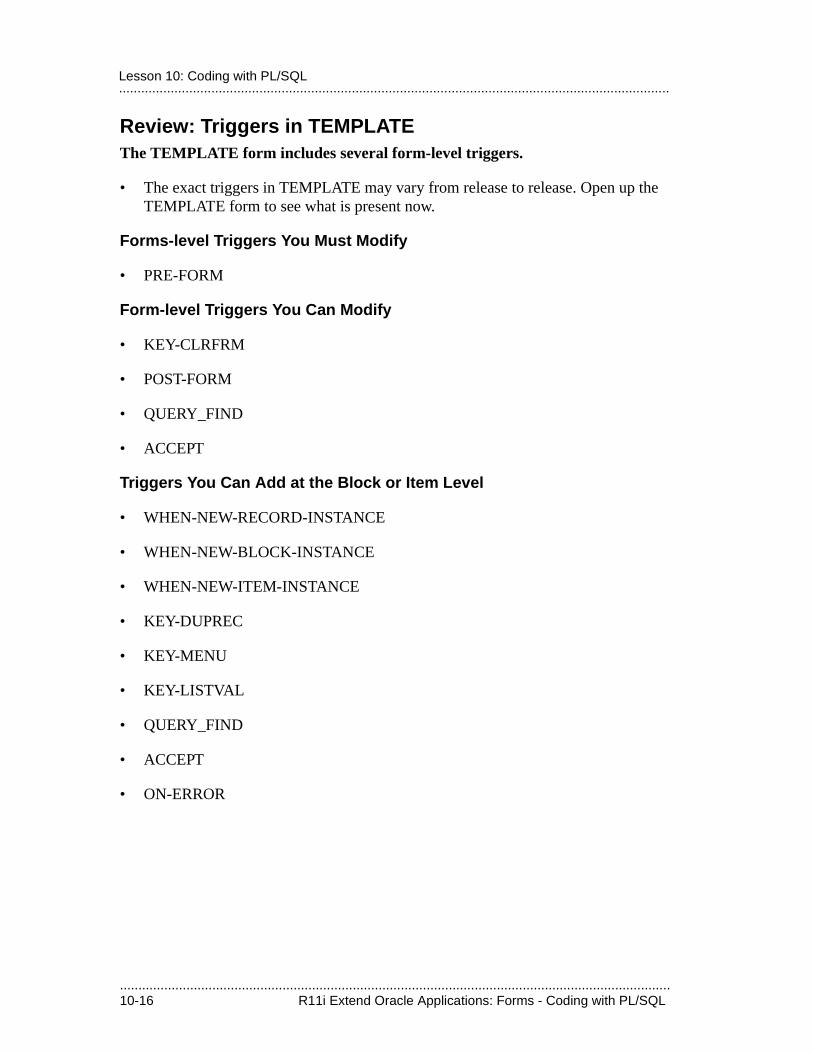
.....................................................................................................................................................10-16 R11i Extend Oracle Applications: Forms - Coding with PL/SQL
.....................................................................................................................................................Lesson 10: Coding with PL/SQL
Review: Triggers in TEMPLATEThe TEMPLATE form includes several form-level triggers.
• The exact triggers in TEMPLATE may vary from release to release. Open up the TEMPLATE form to see what is present now.
Forms-level Triggers You Must Modify
• PRE-FORM
Form-level Triggers You Can Modify
• KEY-CLRFRM
• POST-FORM
• QUERY_FIND
• ACCEPT
Triggers You Can Add at the Block or Item Level
• WHEN-NEW-RECORD-INSTANCE
• WHEN-NEW-BLOCK-INSTANCE
• WHEN-NEW-ITEM-INSTANCE
• KEY-DUPREC
• KEY-MENU
• KEY-LISTVAL
• QUERY_FIND
• ACCEPT
• ON-ERROR
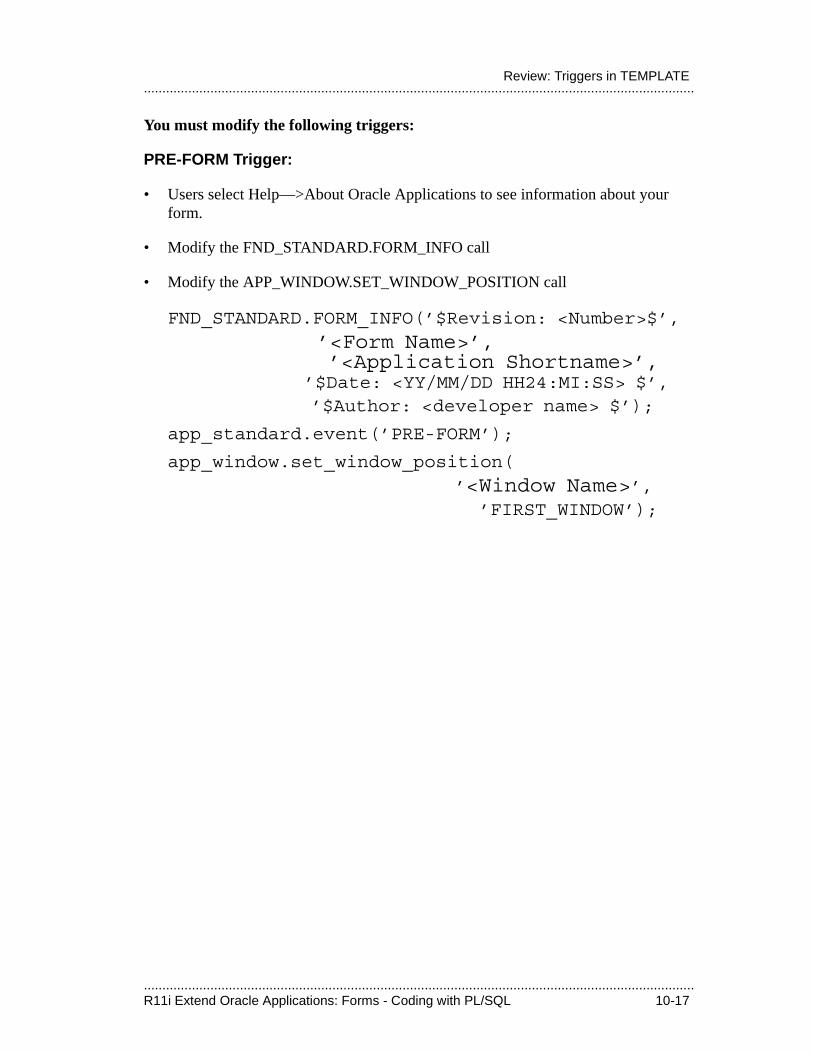
.....................................................................................................................................................R11i Extend Oracle Applications: Forms - Coding with PL/SQL 10-17
.....................................................................................................................................................Review: Triggers in TEMPLATE
You must modify the following triggers:
PRE-FORM Trigger:
• Users select Help—>About Oracle Applications to see information about your form.
• Modify the FND_STANDARD.FORM_INFO call
• Modify the APP_WINDOW.SET_WINDOW_POSITION call
FND_STANDARD.FORM_INFO(’$Revision: <Number>$’,
’<Form Name>’, ’<Application Shortname>’, ’$Date: <YY/MM/DD HH24:MI:SS> $’,
’$Author: <developer name> $’);
app_standard.event(’PRE-FORM’);
app_window.set_window_position(
’<Window Name>’, ’FIRST_WINDOW’);
.....................................................................................................................................................10-18 R11i Extend Oracle Applications: Forms - Coding with PL/SQL
.....................................................................................................................................................Lesson 10: Coding with PL/SQL
Record history (WHO): Track Data ChangesThe Record History (WHO) feature reports who created or updated rows in your tables. Add WHO columns to your tables.
Who Needs Record History (WHO)
• Oracle Applications upgrade technology relies on Record History information to detect and preserve customization
• Sites usually want to know who changed or created rows in their tables
• Record History identifies changes made by forms and by concurrent programs
When Not to Use Record History
• Do not use WHO columns to qualify rows for processing
• Your form logic should never depend on WHO columns containing correct information
• Do not resolve WHO columns to HR_EMPLOYEES
Use Event Handlers to Code Record History in Your Forms
• Place the logic for setting WHO information in PRE_INSERT and/or PRE_UPDATE event handlers
• Call FND_STANDARD.SET_WHO in your event handlers
• Call your event handlers during inserts or updates in the PRE-INSERT and PRE-UPDATE triggers
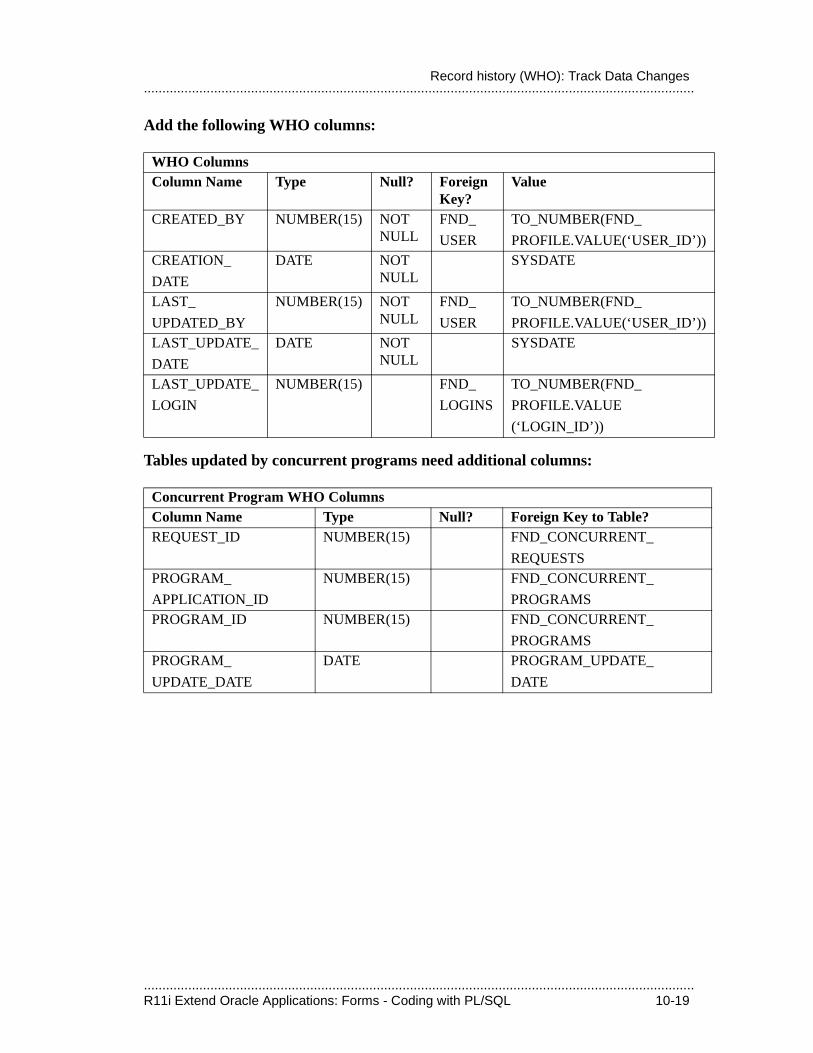
.....................................................................................................................................................R11i Extend Oracle Applications: Forms - Coding with PL/SQL 10-19
.....................................................................................................................................................Record history (WHO): Track Data Changes
Add the following WHO columns:
Tables updated by concurrent programs need additional columns:
WHO ColumnsColumn Name Type Null? Foreign
Key?Value
CREATED_BY NUMBER(15) NOT NULL
FND_
USER
TO_NUMBER(FND_
PROFILE.VALUE(‘USER_ID’))CREATION_
DATE
DATE NOT NULL
SYSDATE
LAST_
UPDATED_BY
NUMBER(15) NOT NULL
FND_
USER
TO_NUMBER(FND_
PROFILE.VALUE(‘USER_ID’))LAST_UPDATE_
DATE
DATE NOT NULL
SYSDATE
LAST_UPDATE_
LOGIN
NUMBER(15) FND_
LOGINS
TO_NUMBER(FND_
PROFILE.VALUE
(‘LOGIN_ID’))
Concurrent Program WHO ColumnsColumn Name Type Null? Foreign Key to Table?REQUEST_ID NUMBER(15) FND_CONCURRENT_
REQUESTSPROGRAM_
APPLICATION_ID
NUMBER(15) FND_CONCURRENT_
PROGRAMSPROGRAM_ID NUMBER(15) FND_CONCURRENT_
PROGRAMSPROGRAM_
UPDATE_DATE
DATE PROGRAM_UPDATE_
DATE
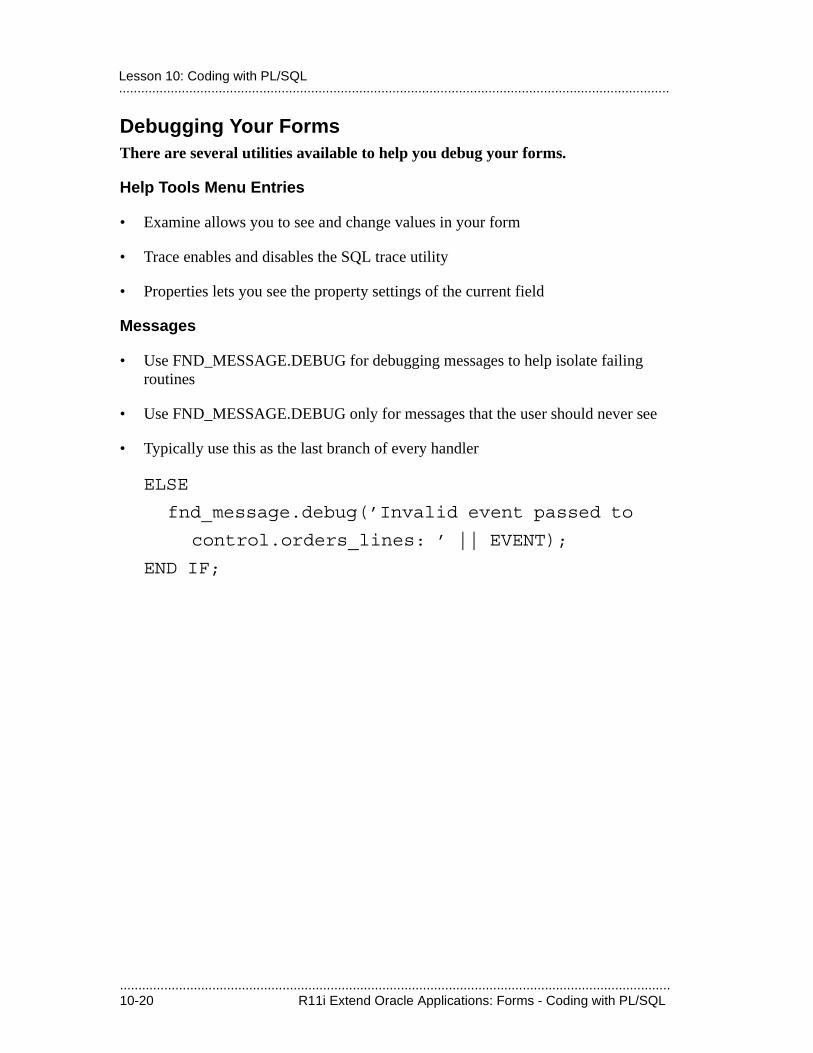
.....................................................................................................................................................10-20 R11i Extend Oracle Applications: Forms - Coding with PL/SQL
.....................................................................................................................................................Lesson 10: Coding with PL/SQL
Debugging Your FormsThere are several utilities available to help you debug your forms.
Help Tools Menu Entries
• Examine allows you to see and change values in your form
• Trace enables and disables the SQL trace utility
• Properties lets you see the property settings of the current field
Messages
• Use FND_MESSAGE.DEBUG for debugging messages to help isolate failing routines
• Use FND_MESSAGE.DEBUG only for messages that the user should never see
• Typically use this as the last branch of every handler
ELSE
fnd_message.debug(’Invalid event passed to
control.orders_lines: ’ || EVENT);
END IF;
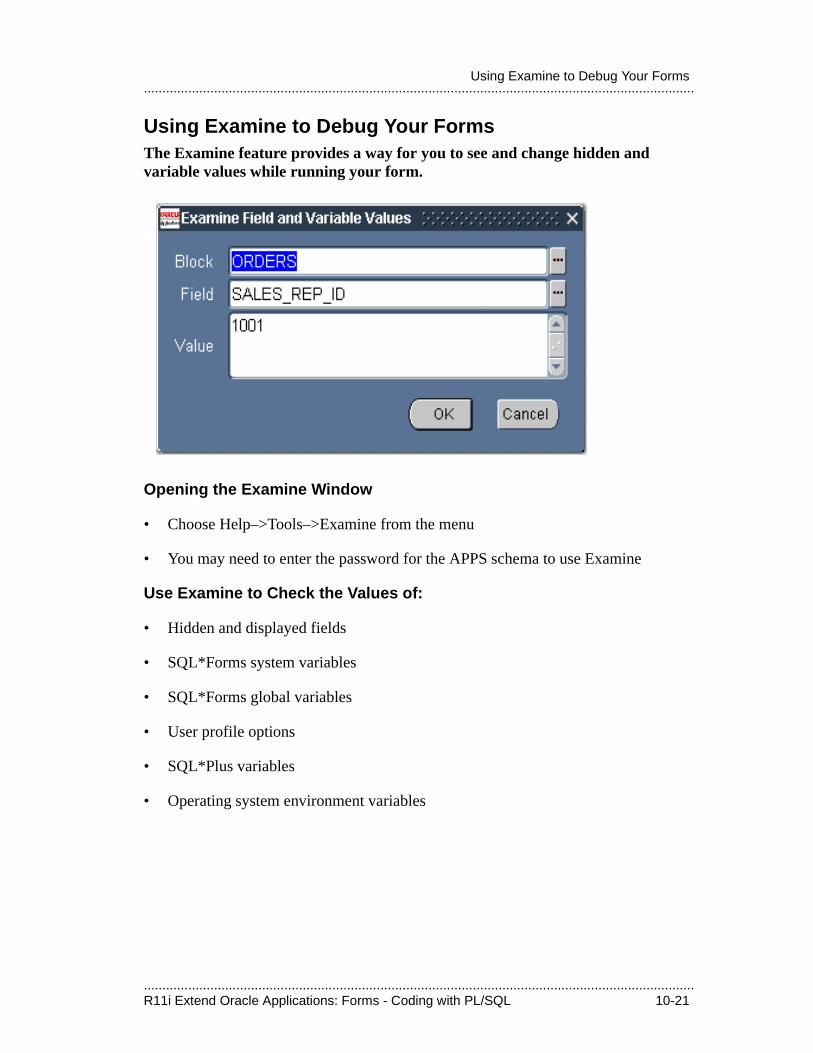
.....................................................................................................................................................R11i Extend Oracle Applications: Forms - Coding with PL/SQL 10-21
.....................................................................................................................................................Using Examine to Debug Your Forms
Using Examine to Debug Your FormsThe Examine feature provides a way for you to see and change hidden and variable values while running your form.
Opening the Examine Window
• Choose Help–>Tools–>Examine from the menu
• You may need to enter the password for the APPS schema to use Examine
Use Examine to Check the Values of:
• Hidden and displayed fields
• SQL*Forms system variables
• SQL*Forms global variables
• User profile options
• SQL*Plus variables
• Operating system environment variables
.....................................................................................................................................................10-22 R11i Extend Oracle Applications: Forms - Coding with PL/SQL
.....................................................................................................................................................Lesson 10: Coding with PL/SQL
Using Examine
• Examine defaults Block and Field to the names of your current block and field and fills in Value with the value in the current field
• Use the Block field to choose among blocks, profile options, parameters, and other types of variables
• Use the Field field to choose among fields, particular profile options, particular parameters, and other variables
• The Value field then displays the value of the field or variable you chose
• You can change the value in the Value field
• When you press OK, the changed value takes effect in your form
Security for Examine
• Your system administrator can set the profile option Utilities:Diagnostics at the Site, Application, Responsibility, or User levels
• If your system administrator sets Utilities:Diagnostics to Yes, then users can automatically use Examine
• If your system administrator sets Utilities:Diagnostics to No, then users must enter the password for the APPS schema to use Examine
.................................
Coding Window andRegion Behavior
.....................................................................................................................................................11-2 R11i Extend Oracle Applications: Forms - Coding Window and Region Behavior
.....................................................................................................................................................Lesson 11: Coding Window and Region Behavior
.....................................................................................................................................................R11i Extend Oracle Applications: Forms - Coding Window and Region Behavior 11-3
.....................................................................................................................................................Objectives
ObjectivesAt the end of this lesson, you should be able to:
• Control window opening and closing.
• Handle master-detail relations across windows.
• Code a tabbed region.
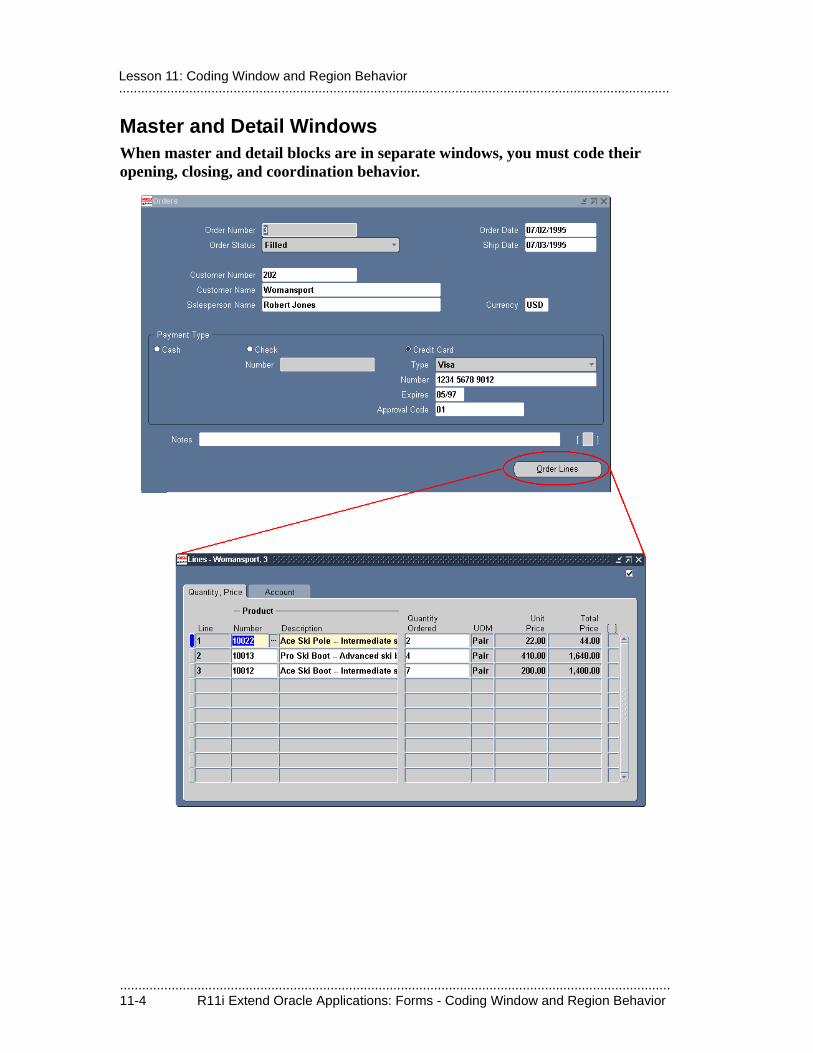
.....................................................................................................................................................11-4 R11i Extend Oracle Applications: Forms - Coding Window and Region Behavior
.....................................................................................................................................................Lesson 11: Coding Window and Region Behavior
Master and Detail WindowsWhen master and detail blocks are in separate windows, you must code their opening, closing, and coordination behavior.
.....................................................................................................................................................R11i Extend Oracle Applications: Forms - Coding Window and Region Behavior 11-5
.....................................................................................................................................................Master and Detail Windows
Reviewing information from the Containers chapter:
How Your Windows Should Behave
• The user closes a window using the close box or menu entry. Do not code “Close” or “Dismiss” buttons in non-modal windows.
• The first window of each form opens immediately below the toolbar; detail or child windows open in relation to the parent window that invoked them (CASCADE, RIGHT, BELOW, OVERLAP or CENTER).
• Context-dependent titles remain in context.
• Windows cannot be closed in query mode.
• Closing a window does not force a commit in the code without prompting the user.
• Closing a parent window asks whether to save if there are changes pending. Child windows do not require this as the data is just hidden and can be saved later. The user will be prompted to save the child data when the parent window is closed.
• The cursor leaves closing windows and moves to a previous block.
• Closing a master window closes all detail windows and associated find windows.
• Closing the first window of a form exits the form.
Master-Detail Coordination
• If the coordination check box is checked then the detail block autoqueries whenever the record in the master block changes.
• If the coordination check box is not checked then the detail block clears when the record in the master block changes. The detail block requeries only when user’s cursor enters the detail block.
• Usually, detail blocks are initially set to coordinate immediately.
• Relations are altered at window open and close events.
.....................................................................................................................................................11-6 R11i Extend Oracle Applications: Forms - Coding Window and Region Behavior
.....................................................................................................................................................Lesson 11: Coding Window and Region Behavior
Controlling Your WindowsModify the APP_CUSTOM package in your form, and call it from your triggers and handlers. Use the APPCORE package APP_WINDOW to get standard behaviors.
1. Modify Open Window Logic
• Modify the PRE-FORM trigger to call form’s First Window.
• Modify APP_CUSTOM.OPEN_WINDOW to reference window names.
• For each window:
– Set any necessary coordination using APP_WINDOW.SET_COORDINATION
– Set the correct window position using APP_WINDOW.SET_WINDOW_POSITION
– Navigate to the window and (optionally) force the window to the front.
2. Modify Close Window Logic
• Modify APP_CUSTOM.CLOSE_WINDOW to reference window names.
• For each window, use APP_WINDOW.SET_COORDINATION to defer coordination.
• Use APP_WINDOW.CLOSE_FIRST_WINDOW to close the form when the first window closes.
• Do not remove the default clauses that:
– Prevent windows from closing in query mode.
– Move the cursor from a closing window to the previous block.
– Hide the specified window with HIDE_WINDOW.
.....................................................................................................................................................R11i Extend Oracle Applications: Forms - Coding Window and Region Behavior 11-7
.....................................................................................................................................................Controlling Your Windows
Set your context-dependent detail window title, and create your navigation button and coordination check box.
3. Set Context-Dependent Window Title
• Detail windows provide context information, either in the title or in a context block.
• Title context information usually references the current organization.
• Use APP_WINDOW.SET_TITLE to set context-dependent information.
– Organization ID is a number; other parameters are often characters.
• Invoke title calls in PRE-RECORD and validation triggers from your context field(s).
– Usually, create a handler for your code to call from triggers.
4. Create New Items
• Create a button in the master window (and block) to navigate to the detail window (and block).
• Create a coordination check box in the detail window as part of the CONTROL block.
.....................................................................................................................................................11-8 R11i Extend Oracle Applications: Forms - Coding Window and Region Behavior
.....................................................................................................................................................Lesson 11: Coding Window and Region Behavior
Code handlers for your navigation button and coordination check box.
5. Code Your Check Box Behavior
• Give it the CHECKBOX_COORDINATION property class.
– Your check box inherits the checked value of ‘IMMEDIATE’ and the unchecked value of ‘DEFERRED’.
• Code for the check box goes in a procedure named after the item, in the package named after the block (such as CONTROL.CHECKBOX_NAME).
• Procedure for the check box should call APP_WINDOW.SET_COORDINATION whenever the check box value changes.
• Call your procedure from the WHEN-CHECKBOX-CHANGED trigger.
6. Code Your Button Behavior
• Give it the BUTTON property class.
• Code for the button goes in a procedure named after the item, in the package named after the block (such as MASTER_BLOCK.BUTTON_NAME).
• The procedure for the button should call APP_CUSTOM.OPEN_WINDOW.
• Call your procedure from the WHEN-BUTTON-PRESSED and KEY-NXTBLK triggers.
.....................................................................................................................................................R11i Extend Oracle Applications: Forms - Coding Window and Region Behavior 11-9
.....................................................................................................................................................Tabbed Regions: Three Degrees of Coding Difficulty
Tabbed Regions: Three Degrees of Coding Difficulty
Case 1 - Simple: no scrolling or fixed fields
• Typical single-row tab pages.
• Place items directly onto the tab pages.
• Align items with items outside of tabs as appropriate.
Case 2 - Medium: canvas scrolling but no fixed fields
• Some single-row tab pages and different blocks on each tab page.
• requires stacked canvases in front of tab pages for each tab page.
Case 3 - Complex: canvas scrolling and fixed fields
• Includes and multi-row blocks spread across multiple tab pages.
• Requires stacked canvases in front of tab pages for fixed fields and alternative region fields.
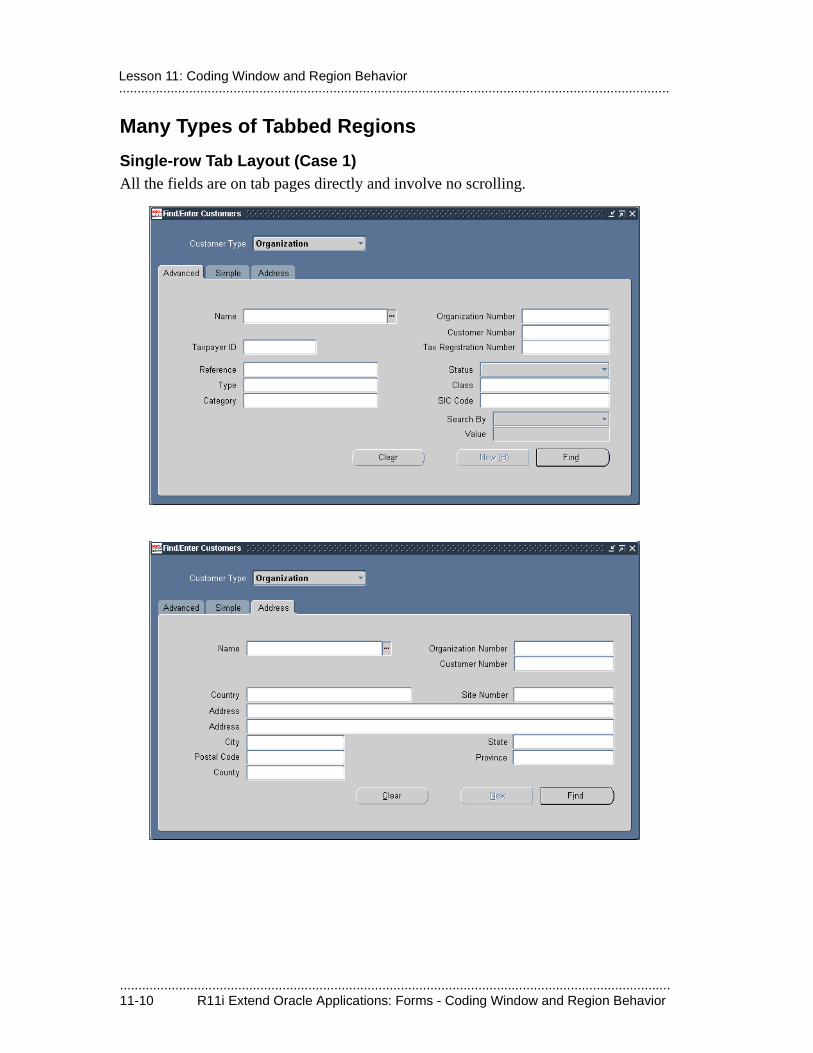
.....................................................................................................................................................11-10 R11i Extend Oracle Applications: Forms - Coding Window and Region Behavior
.....................................................................................................................................................Lesson 11: Coding Window and Region Behavior
Many Types of Tabbed Regions
Single-row Tab Layout (Case 1)All the fields are on tab pages directly and involve no scrolling.
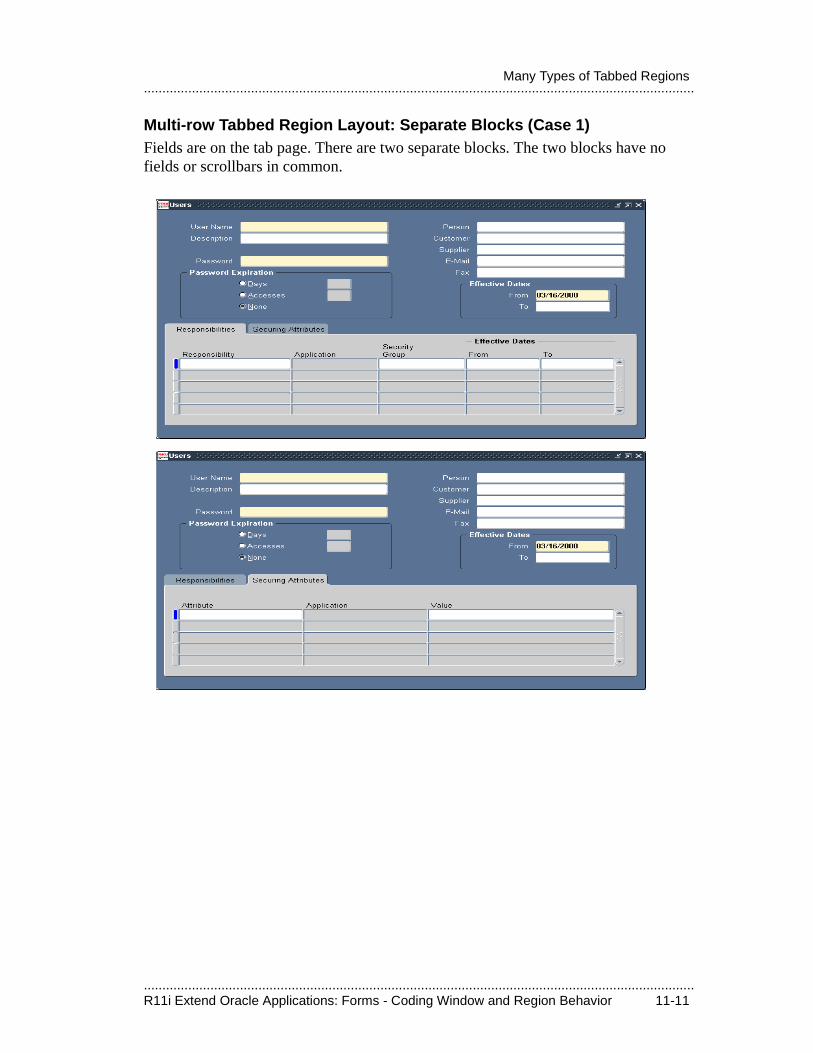
.....................................................................................................................................................R11i Extend Oracle Applications: Forms - Coding Window and Region Behavior 11-11
.....................................................................................................................................................Many Types of Tabbed Regions
Multi-row Tabbed Region Layout: Separate Blocks (Case 1)Fields are on the tab page. There are two separate blocks. The two blocks have no fields or scrollbars in common.
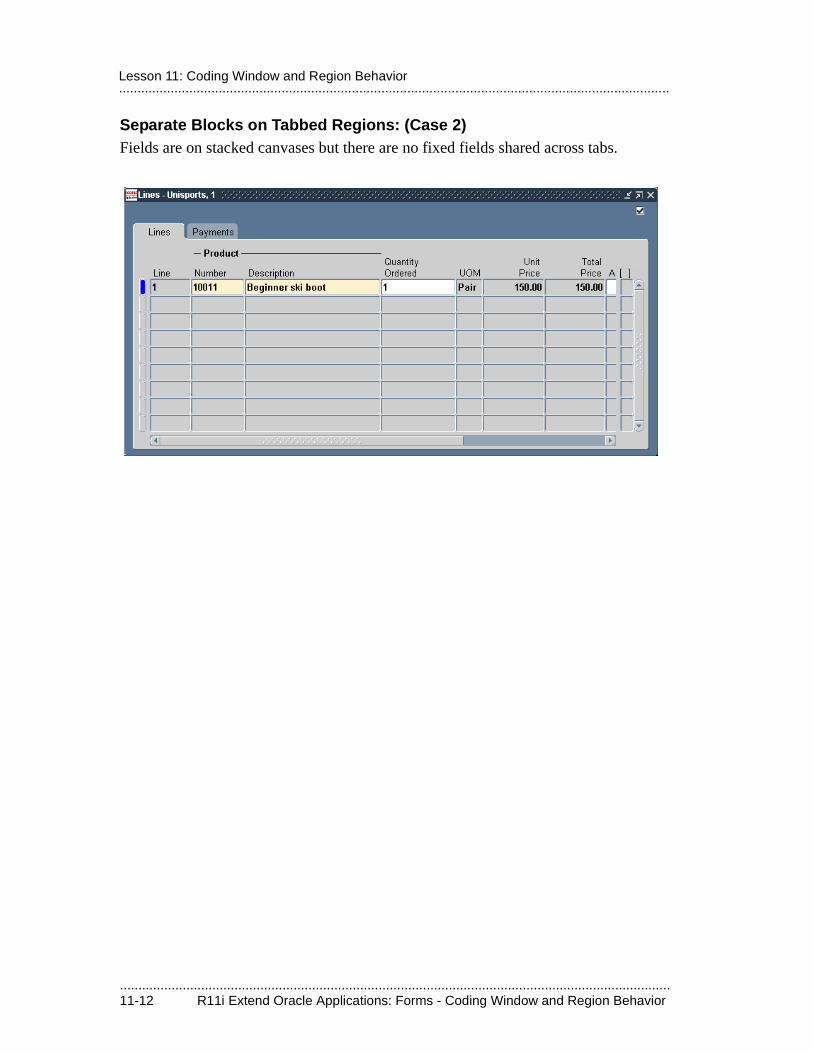
.....................................................................................................................................................11-12 R11i Extend Oracle Applications: Forms - Coding Window and Region Behavior
.....................................................................................................................................................Lesson 11: Coding Window and Region Behavior
Separate Blocks on Tabbed Regions: (Case 2)Fields are on stacked canvases but there are no fixed fields shared across tabs.
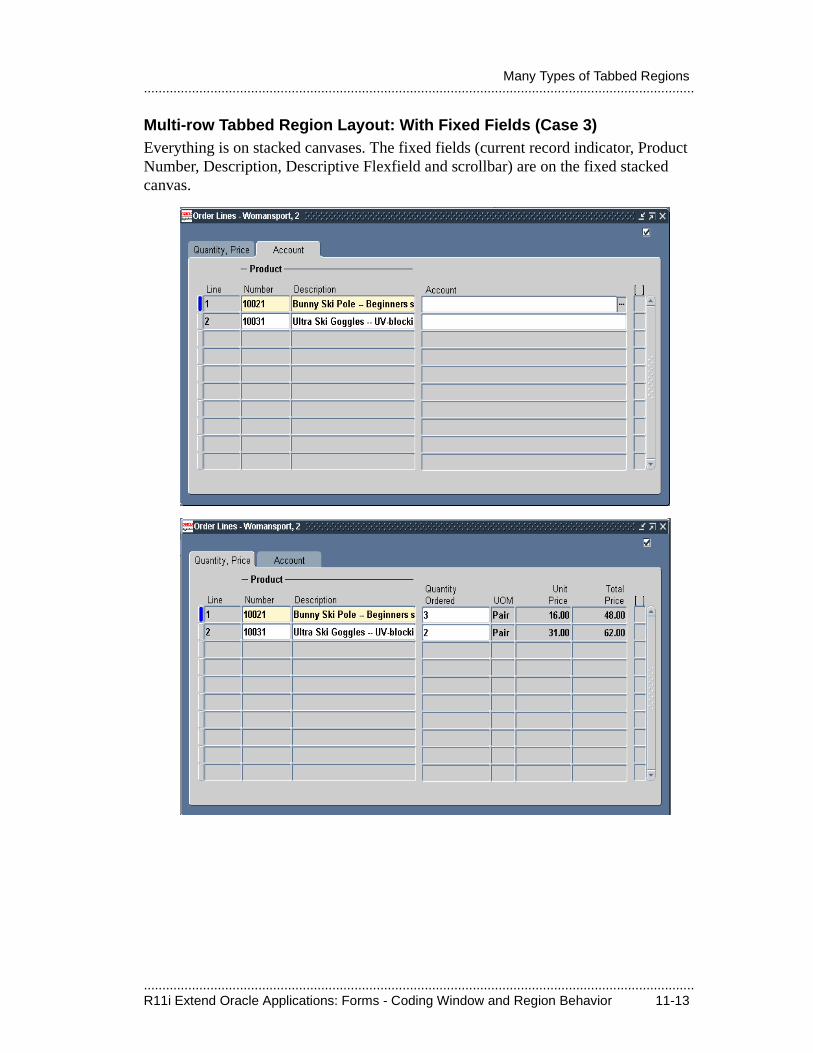
.....................................................................................................................................................R11i Extend Oracle Applications: Forms - Coding Window and Region Behavior 11-13
.....................................................................................................................................................Many Types of Tabbed Regions
Multi-row Tabbed Region Layout: With Fixed Fields (Case 3)Everything is on stacked canvases. The fixed fields (current record indicator, Product Number, Description, Descriptive Flexfield and scrollbar) are on the fixed stacked canvas.
.....................................................................................................................................................11-14 R11i Extend Oracle Applications: Forms - Coding Window and Region Behavior
.....................................................................................................................................................Lesson 11: Coding Window and Region Behavior
Fixed Fields
• Primary key fields should remain stationary when alternative regions are displayed as these provide the context for each record.
• Stationary fields are implemented as fields on a special stacked canvas known as a fixed field stacked canvas.
.....................................................................................................................................................R11i Extend Oracle Applications: Forms - Coding Window and Region Behavior 11-15
.....................................................................................................................................................Characteristics of Tabbed Regions
Characteristics of Tabbed Regions
Behavior
• Primary key fields should be excluded from the tab alternative regions and remain frozen on the content canvas so the user can see the record context. In the complex tabbed region case (canvas scrolling and fixed fields) this behavior is accomplished by placing the context fields onto a fixed field stacked canvas.
• Selecting a tab causes the region associated with that tab to be displayed and the tab itself to change to indicate that it is now the top most region. If the cursor is in the tab block and is not in any of the fixed fields then it will move focus to the first available item in the displayed tab region.
• A tab control list can be activated from the keyboard.
• As the user tabs through a block, navigation cycles between all fields of the block, across tabs as appropriate.
• Tabs can be enabled and disabled dynamically due to installation, security, data or other conditions.
– Hide a tab at start-up if it will not apply for the duration of the form session.
– It is not ideal but is acceptable to have only one tab remaining visible.
– Dynamically disable and enable a tab if its state is determined by data within each record.
• Tabs must remain operable in query by example mode.
– The field that a go_item goes to in query by example mode must be queryable.
.....................................................................................................................................................11-16 R11i Extend Oracle Applications: Forms - Coding Window and Region Behavior
.....................................................................................................................................................Lesson 11: Coding Window and Region Behavior
Appearance
• One overriding standard: make it pretty!
• Each region shown within a tab controlled region area is on its own stacked canvas and contains only the fields of that tab region and their prompts (no bounding rectangle or title).
• Gaps around the tab control region should ideally be 0.1 inches horizontally and 0.125 or 0.25 inches vertically.
• In single row blocks only items related to each region should be displayed within the tabbed region.
• In a multi-row block all fields should be within the tabbed region.
• In a multi-row block a gap of 0.1 inches should separate the last fixed context field and fields unique to each tab page. Also, between the tab page fields and any object to their right, for example descriptive flexfields and scroll bars.
• Controls, such as buttons, that are specific to a particular tab page should be placed on that page only. Controls that pertain to all tab regions should be placed outside the tab region.
• If any one of the tabbed regions requires horizontal scrolling, then all regions should have scroll bars. The scroll bar is visibly disabled for the regions where there is nothing to scroll to by forms.
• The label of each tabbed region should be descriptive and concise. Oracle Forms sizes tabs based on the label.
• If the block has a coordination check box it is placed above the tab region and aligned to its right edge. It cannot overlay the tab canvas.
• If the tabbed region is the second block in a window the block frame is not required.
• Avoid nested tabbed regions.
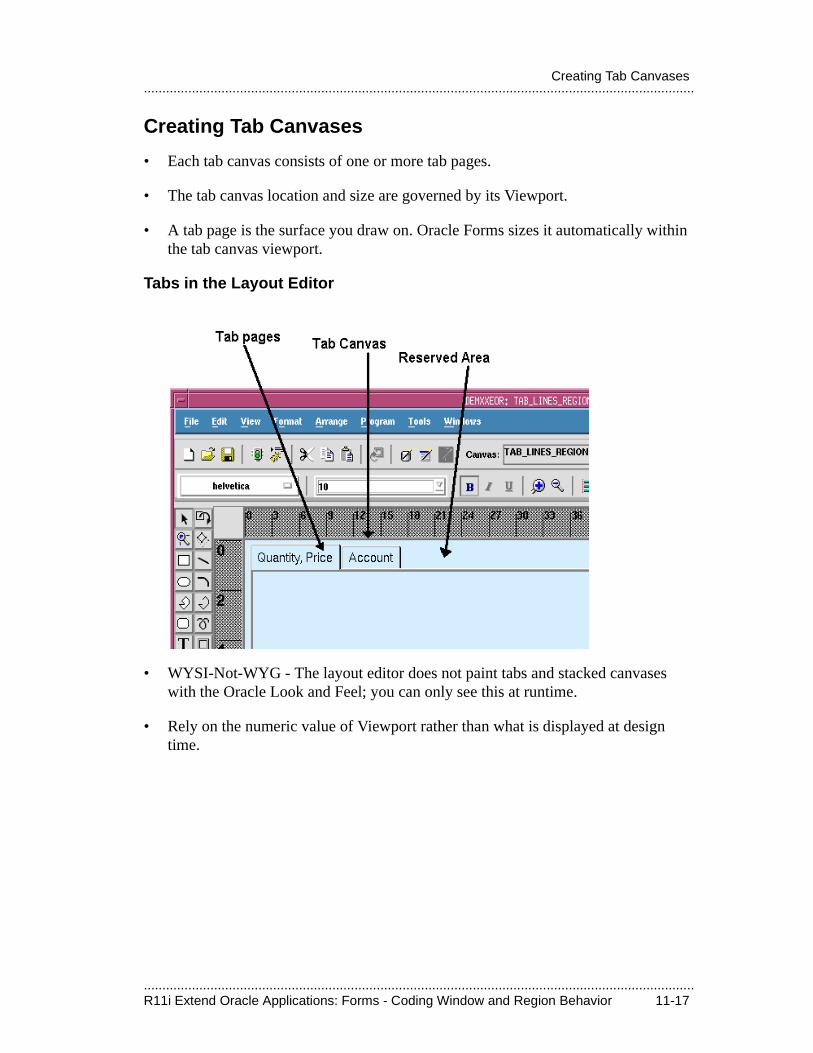
.....................................................................................................................................................R11i Extend Oracle Applications: Forms - Coding Window and Region Behavior 11-17
.....................................................................................................................................................Creating Tab Canvases
Creating Tab Canvases
• Each tab canvas consists of one or more tab pages.
• The tab canvas location and size are governed by its Viewport.
• A tab page is the surface you draw on. Oracle Forms sizes it automatically within the tab canvas viewport.
Tabs in the Layout Editor
• WYSI-Not-WYG - The layout editor does not paint tabs and stacked canvases with the Oracle Look and Feel; you can only see this at runtime.
• Rely on the numeric value of Viewport rather than what is displayed at design time.
.....................................................................................................................................................11-18 R11i Extend Oracle Applications: Forms - Coding Window and Region Behavior
.....................................................................................................................................................Lesson 11: Coding Window and Region Behavior
Tab Related Code
Tab-related Built-ins
• Set/Get_tab_page_property (canvas.tabpage...) uses these properties
– ENABLED
– LABEL
– VISIBLE
• Set/Get_canvas_property (canvas...)
– TOPMOST_TAB_PAGE
• Set/Get_view_property (canvas...) lets you treat tab canvases like stacked canvases:
– VIEW_X/Y_POS
– HEIGHT
– WIDTH
Tab-related Trigger
• WHEN-TAB-PAGE-CHANGED
– fires only when user clicks on a tab
– cannot be fired programmatically
– can only exist at the form level
.....................................................................................................................................................R11i Extend Oracle Applications: Forms - Coding Window and Region Behavior 11-19
.....................................................................................................................................................Tab Related Code
Tab-related Variables
• :SYSTEM.TAB_NEW_PAGE
– name of the tab page the user clicked on
• :SYSTEM.EVENT_CANVAS
– name of canvas that owns the newly-selected tab page
• :SYSTEM.TAB_PREVIOUS_PAGE
– name of the tab page that was topmost before the user clicked on the new one
Dynamically Changing Tabs
• Dynamically hide tabs only at form startup.
– set_tab_page_property(...VISIBLE)
• Dynamically enabling/disabling tabs.
– set_tab_page_property(...ENABLED...)
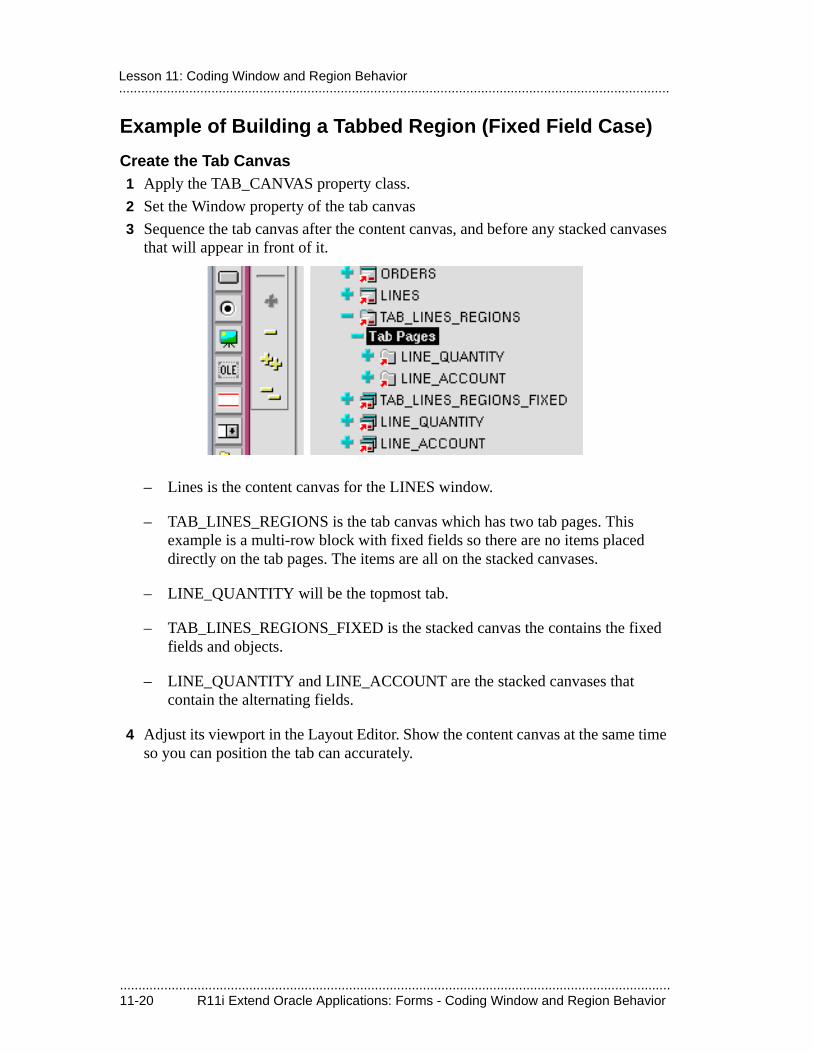
.....................................................................................................................................................11-20 R11i Extend Oracle Applications: Forms - Coding Window and Region Behavior
.....................................................................................................................................................Lesson 11: Coding Window and Region Behavior
Example of Building a Tabbed Region (Fixed Field Case)
Create the Tab Canvas1 Apply the TAB_CANVAS property class.
2 Set the Window property of the tab canvas
3 Sequence the tab canvas after the content canvas, and before any stacked canvases that will appear in front of it.
– Lines is the content canvas for the LINES window.
– TAB_LINES_REGIONS is the tab canvas which has two tab pages. This example is a multi-row block with fixed fields so there are no items placed directly on the tab pages. The items are all on the stacked canvases.
– LINE_QUANTITY will be the topmost tab.
– TAB_LINES_REGIONS_FIXED is the stacked canvas the contains the fixed fields and objects.
– LINE_QUANTITY and LINE_ACCOUNT are the stacked canvases that contain the alternating fields.
4 Adjust its viewport in the Layout Editor. Show the content canvas at the same time so you can position the tab can accurately.

.....................................................................................................................................................R11i Extend Oracle Applications: Forms - Coding Window and Region Behavior 11-21
.....................................................................................................................................................Example of Building a Tabbed Region (Fixed Field Case)
Create the Tab Pages5 Apply the property class TAB_PAGE to each tab page.
6 Set the tab page labels.
7 Sequence tab pages in Object Navigator to match item tab sequence.
Create the Fixed Field Canvas8 Name it (tab_canvas)_FIXED.
9 Sequence it after the tab canvas but before any stacked canvases.
10 Apply the property class CANVAS_STACKED_FIXED_FIELD.
11 Set its viewport just inside the tab canvas viewport.
Move Appropriate Items onto Fixed Field Canvas12 Select the items and change their canvas property in the property palette.
13 Select the graphics and drag them to the new canvas in the Object Navigator.
14 Adjust the positions of items and/or graphics since Y positions are probably wrong.
15 Position the block scroll bar on the right edge of the canvas.
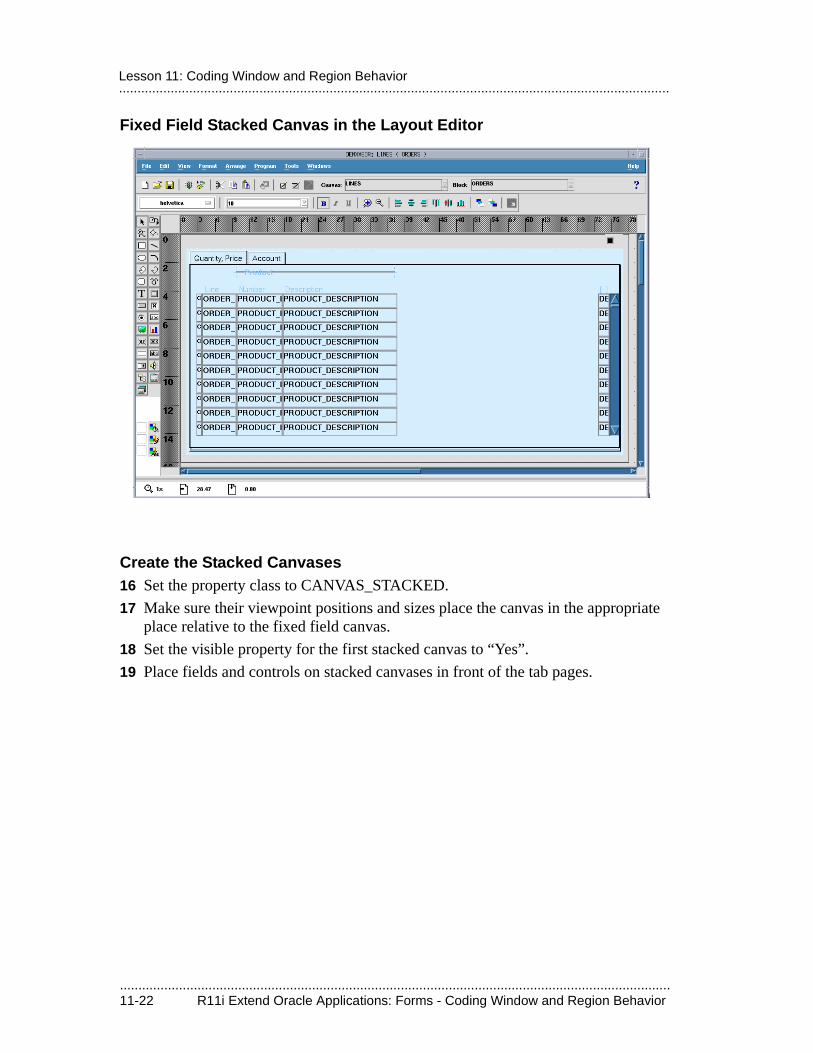
.....................................................................................................................................................11-22 R11i Extend Oracle Applications: Forms - Coding Window and Region Behavior
.....................................................................................................................................................Lesson 11: Coding Window and Region Behavior
Fixed Field Stacked Canvas in the Layout Editor
Create the Stacked Canvases16 Set the property class to CANVAS_STACKED.
17 Make sure their viewpoint positions and sizes place the canvas in the appropriate place relative to the fixed field canvas.
18 Set the visible property for the first stacked canvas to “Yes”.
19 Place fields and controls on stacked canvases in front of the tab pages.
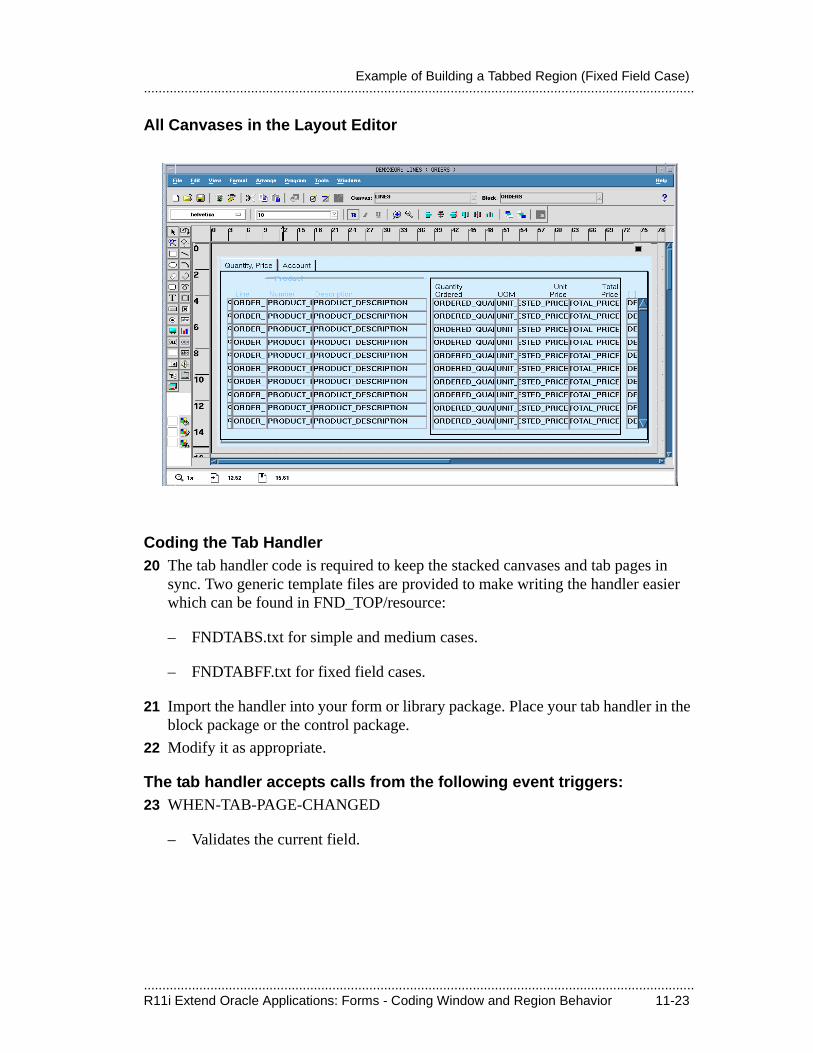
.....................................................................................................................................................R11i Extend Oracle Applications: Forms - Coding Window and Region Behavior 11-23
.....................................................................................................................................................Example of Building a Tabbed Region (Fixed Field Case)
All Canvases in the Layout Editor
Coding the Tab Handler20 The tab handler code is required to keep the stacked canvases and tab pages in
sync. Two generic template files are provided to make writing the handler easier which can be found in FND_TOP/resource:
– FNDTABS.txt for simple and medium cases.
– FNDTABFF.txt for fixed field cases.
21 Import the handler into your form or library package. Place your tab handler in the block package or the control package.
22 Modify it as appropriate.
The tab handler accepts calls from the following event triggers:23 WHEN-TAB-PAGE-CHANGED
– Validates the current field.
.....................................................................................................................................................11-24 R11i Extend Oracle Applications: Forms - Coding Window and Region Behavior
.....................................................................................................................................................Lesson 11: Coding Window and Region Behavior
– Moves the cursor to the appropriate field.
– Explicitly displays a stacked canvas if necessary.
– Validation check is not required if inquiry only.
– Operation in query mode: go_item calls must move to queryable fields.
– Dynamic tabs: case of a “master” field whose value controls enabling and disabling of tabs must account for the user clicking onto (displayed) tab that should now be disabled. The UI should act as if the tab really was disabled.
– Caution: the code assumes it was called as a result of the user pressing the tab. Tab-related SYSTEM variables only are valid in this mode. If you want to programmatically fire this code you need to pass a different event and adjust the logic.
24 WHEN-NEW-ITEM-INSTANCE
– Handles behavior for the user tabbing through all the fields of the block.
– Accounts for when Oracle Forms Developer moves the cursor automatically (for example, when a required field is null).
– Not needed at all for the simple case.
– No extra code required to specifically handle the fixed field canvas.
– Handles the Topmost Tab Page. Keeps the topmost tab page in sync with the current stacked canvas and current item
– The default “topmost” tab page is the leftmost tab as it appears in the Layout Editor.
– Change the topmost tab using set_canvas_property(...TOPMOST_TAB_PAGE...)
25 Others as appropriate such as KEY-CLRFRM.
.....................................................................................................................................................R11i Extend Oracle Applications: Forms - Coding Window and Region Behavior 11-25
.....................................................................................................................................................Example of Building a Tabbed Region (Fixed Field Case)
Calling the Tab Handler26 WHEN-NEW-ITEM-INSTANCE
27 WHEN-TAB-PAGE-CHANGED
28 Others as appropriate such as KEY-CLRFRM.
Form-level WHEN-TAB-PAGE-CHANGED trigger29 If you only have one set of tabs, call the handler and pass the event:
– my_package.tab_entity_regions(‘WHEN-TAB-PAGE-CHANGED’);
30 If you have multiple sets of tabs (multiple tabbed regions), branch on the current canvas name and call the appropriate tab handler.

.....................................................................................................................................................11-26 R11i Extend Oracle Applications: Forms - Coding Window and Region Behavior
.....................................................................................................................................................Lesson 11: Coding Window and Region Behavior

.................................
Coding Item Behavior

.....................................................................................................................................................12-2 R11i Extend Oracle Applications: Forms - Coding Item Behavior
.....................................................................................................................................................Lesson 12: Coding Item Behavior
.....................................................................................................................................................R11i Extend Oracle Applications: Forms - Coding Item Behavior 12-3
.....................................................................................................................................................Objectives
ObjectivesAt the end of this lesson, you should be able to:
• Format currency fields.
• Open the calendar on your date fields.
• Identify and implement relations between items.
• Know how to manipulate item properties.
.....................................................................................................................................................12-4 R11i Extend Oracle Applications: Forms - Coding Item Behavior
.....................................................................................................................................................Lesson 12: Coding Item Behavior
Formatting Currency FieldsYou can use special Oracle Applications routines to dynamically format your currency fields.
Determine Your Currency
• Your application uses some mechanism to determine which currency code to use, such as USD for United States Dollars, DEM for Deutsche Marks, and so on
• Currencies are listed in the table FND_CURRENCIES
Get the Related Format Mask
FND_CURRENCY.GET_FORMAT_MASK(
:ORDERS.CURRENCY_CODE,
GET_ITEM_PROPERTY(’LINES.PRICE’,
MAX_LENGTH));
Set Your Item Properties Accordingly
• Embed the previous code in the APP_ITEM_PROPERTY.SET_PROPERTY call
APP_ITEM_PROPERTY.SET_PROPERTY(’LINES.PRICE’, FORMAT_MASK,
FND_CURRENCY.GET_FORMAT_MASK(
:ORDERS.CURRENCY_CODE,
GET_ITEM_PROPERTY(’LINES.PRICE’,
MAX_LENGTH)));
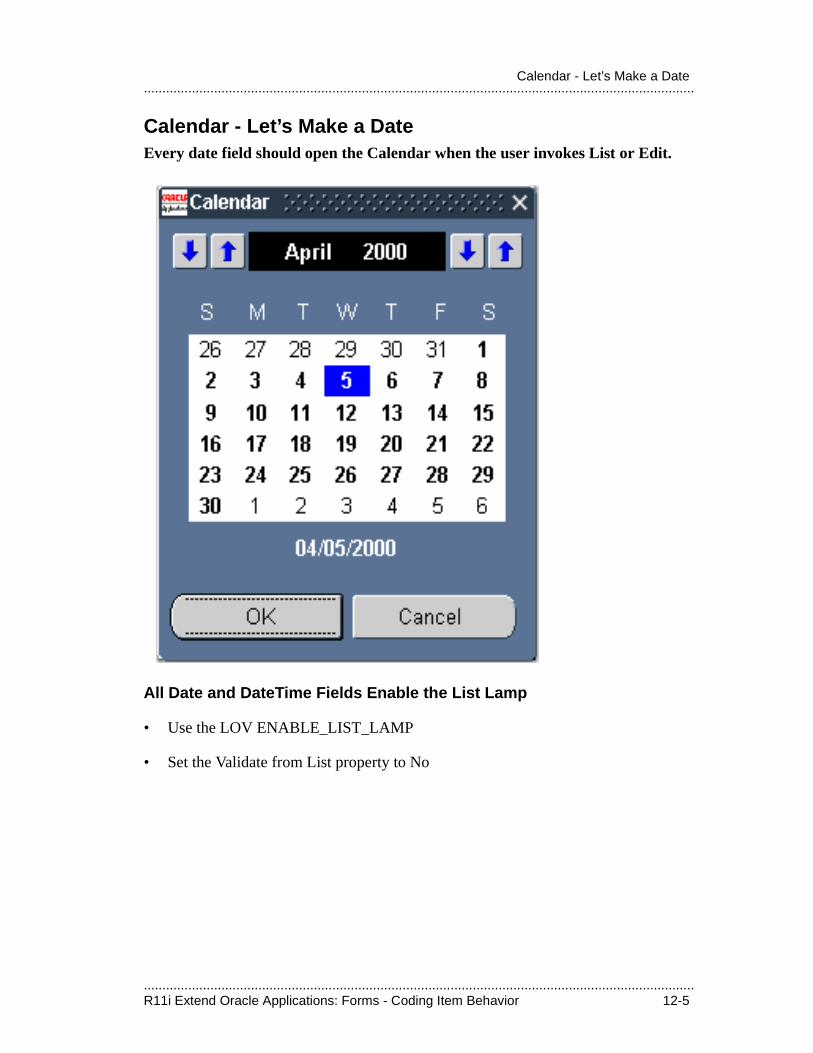
.....................................................................................................................................................R11i Extend Oracle Applications: Forms - Coding Item Behavior 12-5
.....................................................................................................................................................Calendar - Let’s Make a Date
Calendar - Let’s Make a DateEvery date field should open the Calendar when the user invokes List or Edit.
All Date and DateTime Fields Enable the List Lamp
• Use the LOV ENABLE_LIST_LAMP
• Set the Validate from List property to No
.....................................................................................................................................................12-6 R11i Extend Oracle Applications: Forms - Coding Item Behavior
.....................................................................................................................................................Lesson 12: Coding Item Behavior
Required Call: CALENDAR.SHOW
• Call CALENDAR.SHOW from every date field’s KEY-LISTVAL trigger
calendar.show;
• That is always the last call, and often the only one
Getting Fancy?
• Disable specific date ranges
calendar.setup(’Not between Order and Ship Date’,
:ord.order_date, :ord.ship_date);
calendar.show;
• Open the calendar to a specific date
calendar.show(:gl_period.first_date_of_period);
• Disable dates based on a table (for example, holidays)
Specify Dates to Disable
• All dates are enabled unless you specifically disable them
.....................................................................................................................................................R11i Extend Oracle Applications: Forms - Coding Item Behavior 12-7
.....................................................................................................................................................Flexible Dates
Flexible Dates
Overview of Dates Goals
• All dates are Year 2000 compliant
• Dates work in a multilingual environment
• Users can see and enter dates in forms using the format they prefer:
– 1/20/99
– 20.1.1999
– Any valid SQL date mask
Date Display in Forms
• The date data type automatically supports Year 2000.
• Where dates are displayed in forms as a date data type, Oracle Forms Developer uses new environment variables to allow viewing and entry in any valid format.
• Automatic date display conversion occurs only in Oracle Forms Developer forms.
Technical NoteNo tools other than Oracle Forms Developer and the Oracle Applications APP_DATE and FND_DATE routines are aware of the new environment variables for dates. Dates in reports and log files are not affected by the new environment variables.
.....................................................................................................................................................12-8 R11i Extend Oracle Applications: Forms - Coding Item Behavior
.....................................................................................................................................................Lesson 12: Coding Item Behavior
Dates in Character StringsDates stored as character strings or converted to or from character strings may cause a problem.
• You must examine cases where you display dates to the user as strings.
• Character dates (dates stored as character strings) that can be shared across database sessions must be converted to canonical format.
Dates Trouble Spots in PL/SQL
• PL/SQL uses the NLS_DATE_FORMAT mask.
• to_char(my_date) will not necessarily produce what the user sees in a Oracle Forms Developer date field.
• NAME_IN(‘block.date_field’) still returns in format DD-MON-YYYY; this can cause translation problems.
• COPY() to a date field expects DD-MON-RRRR format if using the Oracle Applications environment.
Technical NoteBe aware of data type conversions that use an implicit format mask (such as DD-MON-YYYY or the current setting of NLS_DATE_FORMAT). You may not get the results you expect.

.....................................................................................................................................................R11i Extend Oracle Applications: Forms - Coding Item Behavior 12-9
.....................................................................................................................................................Flexible Dates
Use APPCORE Routines in PL/SQL CodeThe APP_DATE routines help you get it right. FND_DATE is the server-side equivalent of APP_DATE. FND_DATE routines can be used in SQL statements.
The magic APPCORE routines perform:
• Ensure that NLS_DATE_FORMAT is DD-MON-RR
• Test that the MON component of all months is at most three bytes
• Test that USER_DATE_FORMAT has only one mask entry
• Force Oracle Forms Developer built-in routines to expect years in RR format
• Ensure that Gregorian calendar is used
APP_DATE Conversion Routines
• app_date.date_to_field Use instead of COPY built-in
• app_date.field_to_dateUse instead of NAME_IN built-in
• app_date.date_to_displaydate
– Converts dates to display format
– Same as date_to_chardate
• app_date.date_to_displayDT
– Similar to date_to_displaydate
– Same as date_to_charDT
• app_date.date_to_canonicalConverts a date to a string in canonical datetime format
• app_date.canonical_to_dateConverts a canonical date(time) string to an Oracle date
.....................................................................................................................................................12-10 R11i Extend Oracle Applications: Forms - Coding Item Behavior
.....................................................................................................................................................Lesson 12: Coding Item Behavior
APP_DATE Validation Routines
• app_date.validate_chardateUsed to validate a date entered in the character field passed to it (does not return the date)
• app_date.validate_charDTUsed to validate a datetime entered in the character field passed to it (does not return the date)
• app_date.displaydate_to_date
– Takes a character in display format and returns a date
– Same as chardate_to_date
• app_date.displayDT_to_date
– Takes a character in display format and returns a datetime
– Same as charDT_to_date
Dates and the Calendar
• The Calendar handles dates correctly with virtually no code change to your forms.
• Only change: When invoked from a non-date field, the Calendar now writes back value in output_mask format, rather than DD-MON-YYYY.
• Examine your CALENDAR_WROTE_ DATE triggers, if any.
.....................................................................................................................................................R11i Extend Oracle Applications: Forms - Coding Item Behavior 12-11
.....................................................................................................................................................Overview of Numbers
Overview of NumbersUsers can see and enter numbers in forms using the format they prefer.
• 1,000.2
• 1.000,2
Numbers BeforeIn the past, PL/SQL 1 and Oracle Forms 4.5 ran expecting English-style numbers internally: 1000.2
Numbers NowNow everything “floats” with the language and territory settings:
• to_char(my_number) will produce a string in the native format
• to_number(my_char) expects the string to be in native format
• name_in(“block.number_field”) produces a string in native format
Technical NoteThe native format is determined by the language, territory, and NLS_NUMERIC_CHARACTERS settings. Settings are set at Forms-server- instance level, not at the user level.

.....................................................................................................................................................12-12 R11i Extend Oracle Applications: Forms - Coding Item Behavior
.....................................................................................................................................................Lesson 12: Coding Item Behavior
Supporting Flexible Numbers
• Affects all code: Forms, Reports, C code, and server-side PL/SQL
• What to look for and correct:
– Real numbers stored or passed as characters
– Code where US format (2,999.25) is assumed
Numbers as Strings
• Avoid processing numbers as strings if at all possible.
• Numbers stored as strings or passed across database sessions as strings should all use the canonical format.
Technical NoteThe canonical format mask is “FM999999999999999999999.99999999999999999999”. This should never be changed.
.....................................................................................................................................................R11i Extend Oracle Applications: Forms - Coding Item Behavior 12-13
.....................................................................................................................................................Overview of Numbers
APP_NUMBER Package in APPCORE
• Use APP_NUMBER routines in APPCORE as much as possible to convert to and from the canonical format.
• FND_NUMBER: Server-side equivalent of APP_NUMBERFND_NUMBER routines can be used in SQL statements.
Number Conversion Routines in APPCORE
• number_to_canonical converts numbers to canonical format
• canonical_to_number converts canonical format to number
Testing Code with Numbers
• Use non-integer numbers and mixed radix characters as much as possible during testing.
• Test with unusual decimal and group separators, like “DG”.Numbers look like “1G000D2”
Technical NoteFor testing with unusual radix characters, you would set the NLS_NUMERIC_CHARACTERS variable to “DG” (before starting your Forms server instance, for example).
.....................................................................................................................................................12-14 R11i Extend Oracle Applications: Forms - Coding Item Behavior
.....................................................................................................................................................Lesson 12: Coding Item Behavior
Coding Dependencies Between ItemsSeveral APIs provide standard ways of controlling dependencies between items.
Create Item Handlers for the Master and Dependent Items
• Package name is usually the block name
• Procedures are named after the items
• Your item handlers should usually expect calls from PRE-RECORD, WHEN-VALIDATE-ITEM (or WHEN-CHECKBOX-CHANGED, WHEN-RADIO-CHANGED, or WHEN-LIST-CHANGED) triggers and the ‘INIT’ event

.....................................................................................................................................................R11i Extend Oracle Applications: Forms - Coding Item Behavior 12-15
.....................................................................................................................................................Coding Dependencies Between Items
One master and one dependent item is the simplest case.
Master Empty = Dependent Disabled
Master Valid = Dependent Enabled
Enforced Behaviors
• Clear dependent item when master item changes
• Disable dependent item when master item is NULL
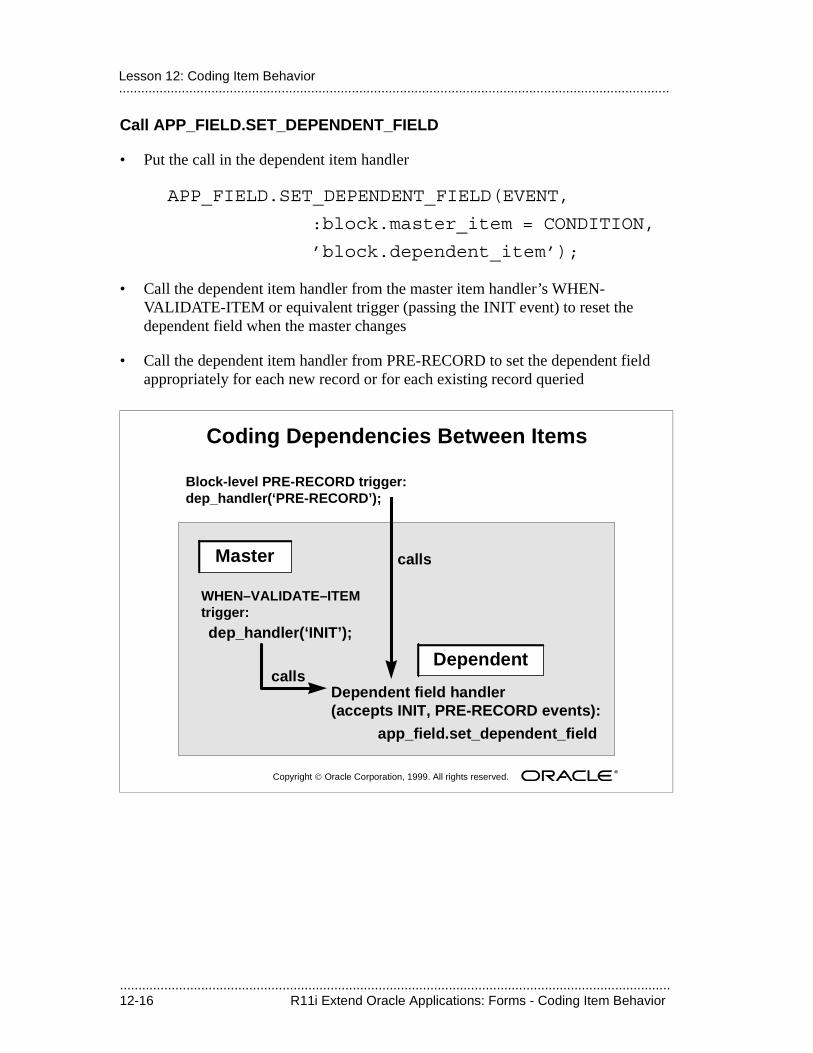
.....................................................................................................................................................12-16 R11i Extend Oracle Applications: Forms - Coding Item Behavior
.....................................................................................................................................................Lesson 12: Coding Item Behavior
Call APP_FIELD.SET_DEPENDENT_FIELD
• Put the call in the dependent item handler
APP_FIELD.SET_DEPENDENT_FIELD(EVENT,
:block.master_item = CONDITION,
’block.dependent_item’);
• Call the dependent item handler from the master item handler’s WHEN-VALIDATE-ITEM or equivalent trigger (passing the INIT event) to reset the dependent field when the master changes
• Call the dependent item handler from PRE-RECORD to set the dependent field appropriately for each new record or for each existing record queried
Copyright Oracle Corporation, 1999. All rights reserved.
Coding Dependencies Between Items
Dependent
dep_handler(‘INIT’);
Block-level PRE-RECORD trigger:dep_handler(‘PRE-RECORD’);
Master
WHEN–VALIDATE–ITEMtrigger:
Dependent field handler(accepts INIT, PRE-RECORD events):
app_field.set_dependent_field
calls
calls
.....................................................................................................................................................R11i Extend Oracle Applications: Forms - Coding Item Behavior 12-17
.....................................................................................................................................................Coding Dependencies Between Items
A conditionally-dependent item changes validation when the value in the master item changes. Specify the condition rather than the master item name.
Enforced Behaviors
• Clear Dependent item when master item changes
• Disable dependent item when master item is NULL
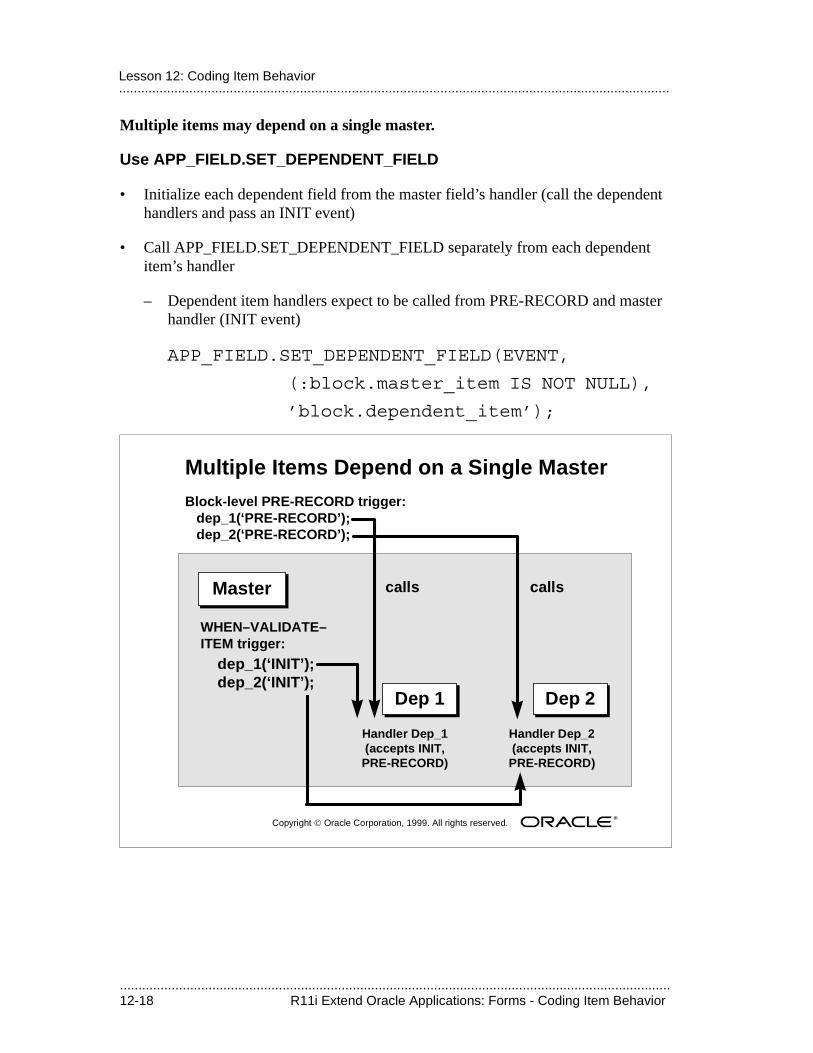
.....................................................................................................................................................12-18 R11i Extend Oracle Applications: Forms - Coding Item Behavior
.....................................................................................................................................................Lesson 12: Coding Item Behavior
Multiple items may depend on a single master.
Use APP_FIELD.SET_DEPENDENT_FIELD
• Initialize each dependent field from the master field’s handler (call the dependent handlers and pass an INIT event)
• Call APP_FIELD.SET_DEPENDENT_FIELD separately from each dependent item’s handler
– Dependent item handlers expect to be called from PRE-RECORD and master handler (INIT event)
APP_FIELD.SET_DEPENDENT_FIELD(EVENT,
(:block.master_item IS NOT NULL),
’block.dependent_item’);
Copyright Oracle Corporation, 1999. All rights reserved.
Multiple Items Depend on a Single Master
Dep 1Dep 1
dep_1(‘INIT’);dep_2(‘INIT’);
Block-level PRE-RECORD trigger: dep_1(‘PRE-RECORD’); dep_2(‘PRE-RECORD’);
MasterMaster
WHEN–VALIDATE–ITEM trigger:
Handler Dep_1(accepts INIT,PRE-RECORD)
calls
Dep 2Dep 2
Handler Dep_2(accepts INIT,PRE-RECORD)
calls
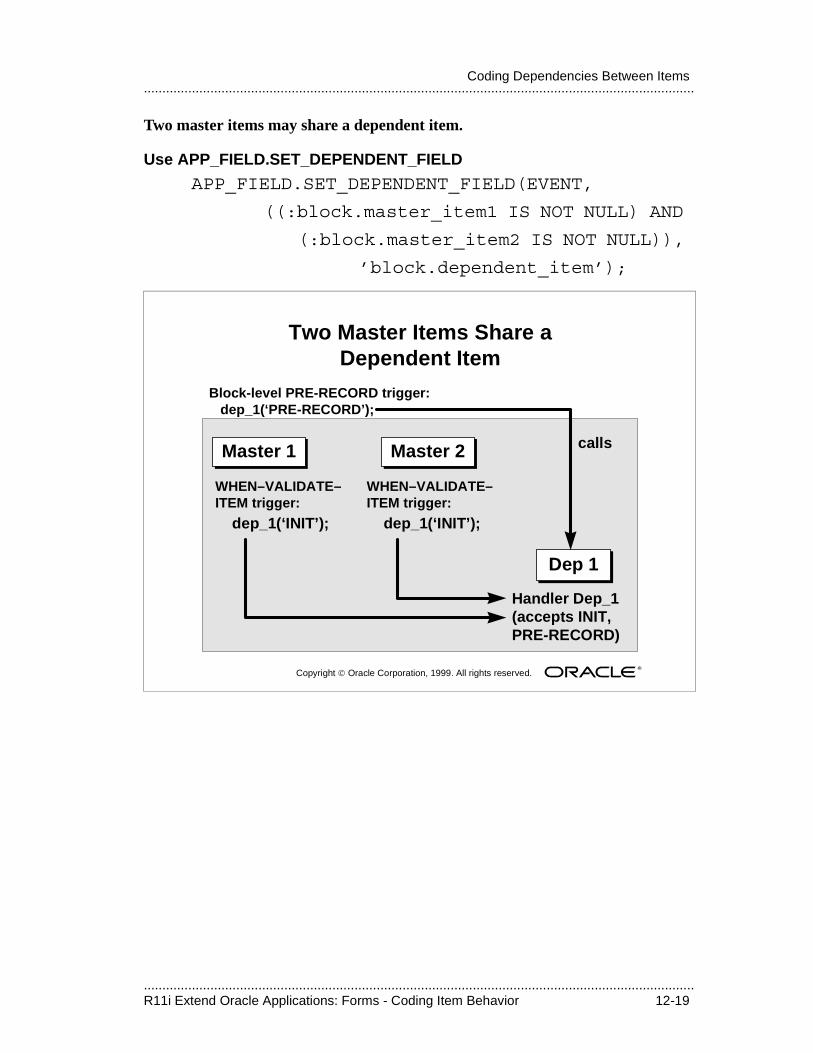
.....................................................................................................................................................R11i Extend Oracle Applications: Forms - Coding Item Behavior 12-19
.....................................................................................................................................................Coding Dependencies Between Items
Two master items may share a dependent item.
Use APP_FIELD.SET_DEPENDENT_FIELD
APP_FIELD.SET_DEPENDENT_FIELD(EVENT,
((:block.master_item1 IS NOT NULL) AND
(:block.master_item2 IS NOT NULL)),
’block.dependent_item’);
Copyright Oracle Corporation, 1999. All rights reserved.
Two Master Items Share aDependent Item
dep_1(‘INIT’);
Block-level PRE-RECORD trigger: dep_1(‘PRE-RECORD’);
Master 1Master 1
WHEN–VALIDATE–ITEM trigger:
callsMaster 2Master 2
Dep 1Dep 1
Handler Dep_1(accepts INIT, PRE-RECORD)
dep_1(‘INIT’);
WHEN–VALIDATE–ITEM trigger:
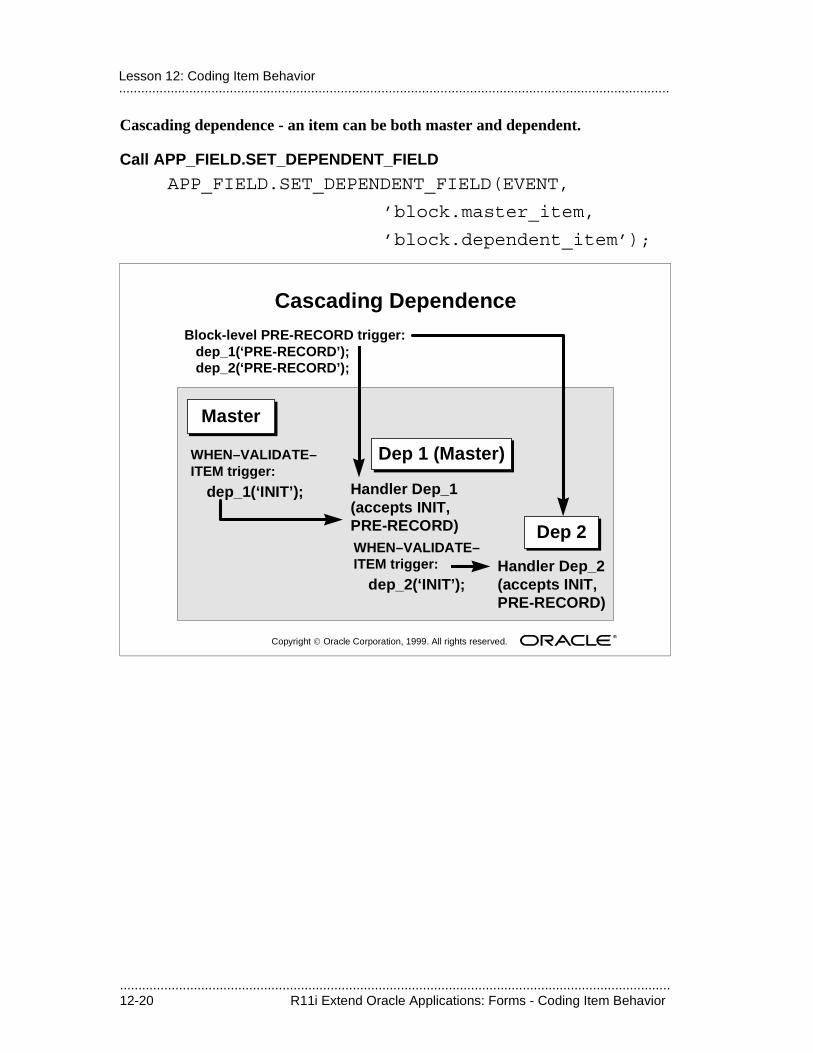
.....................................................................................................................................................12-20 R11i Extend Oracle Applications: Forms - Coding Item Behavior
.....................................................................................................................................................Lesson 12: Coding Item Behavior
Cascading dependence - an item can be both master and dependent.
Call APP_FIELD.SET_DEPENDENT_FIELD
APP_FIELD.SET_DEPENDENT_FIELD(EVENT,
’block.master_item,
’block.dependent_item’);
Copyright Oracle Corporation, 1999. All rights reserved.
Cascading Dependence
Dep 1 (Master)
dep_1(‘INIT’);
Block-level PRE-RECORD trigger: dep_1(‘PRE-RECORD’); dep_2(‘PRE-RECORD’);
MasterMaster
WHEN–VALIDATE–ITEM trigger:
Handler Dep_1(accepts INIT, PRE-RECORD) Dep 2Dep 2
Handler Dep_2(accepts INIT,PRE-RECORD)
dep_2(‘INIT’);
WHEN–VALIDATE–ITEM trigger:
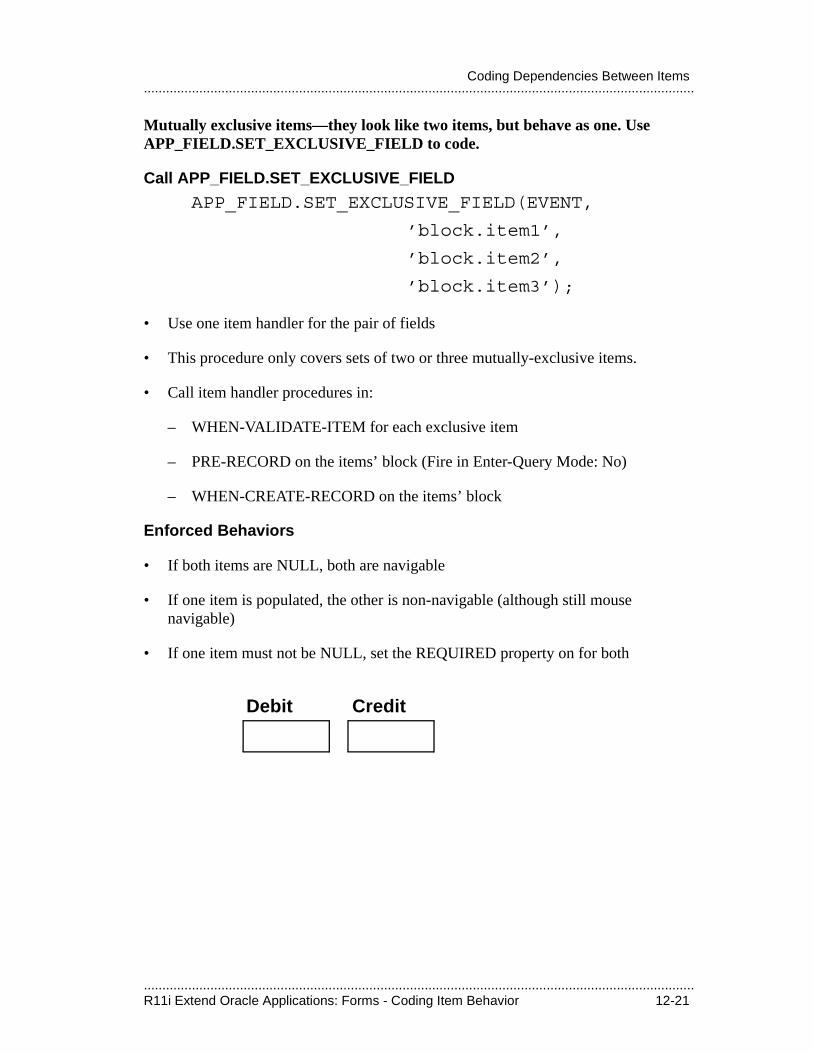
.....................................................................................................................................................R11i Extend Oracle Applications: Forms - Coding Item Behavior 12-21
.....................................................................................................................................................Coding Dependencies Between Items
Mutually exclusive items—they look like two items, but behave as one. Use APP_FIELD.SET_EXCLUSIVE_FIELD to code.
Call APP_FIELD.SET_EXCLUSIVE_FIELD
APP_FIELD.SET_EXCLUSIVE_FIELD(EVENT,
’block.item1’,
’block.item2’,
’block.item3’);
• Use one item handler for the pair of fields
• This procedure only covers sets of two or three mutually-exclusive items.
• Call item handler procedures in:
– WHEN-VALIDATE-ITEM for each exclusive item
– PRE-RECORD on the items’ block (Fire in Enter-Query Mode: No)
– WHEN-CREATE-RECORD on the items’ block
Enforced Behaviors
• If both items are NULL, both are navigable
• If one item is populated, the other is non-navigable (although still mouse navigable)
• If one item must not be NULL, set the REQUIRED property on for both
Debit Credit

.....................................................................................................................................................12-22 R11i Extend Oracle Applications: Forms - Coding Item Behavior
.....................................................................................................................................................Lesson 12: Coding Item Behavior
Mutually Inclusive Items—one for all and all for one! Use APP_FIELD.SET_INCLUSIVE_FIELD to code a set of items where, if any of the items is not null, all items are required.
Call APP_FIELD.SET_INCLUSIVE_FIELD
APP_FIELD.SET_INCLUSIVE_FIELD(EVENT,
’block.item1’,
’block.item2’);
Enforced Behaviors
• If any item is NOT NULL, all are REQUIRED
• Five is our limit—more than that and you are on your own
• Call item handler procedures in:
– WHEN-VALIDATE-ITEM for each inclusive item
– PRE-RECORD on the items’ block (Fire in Enter-Query Mode: No)
Mutually Inclusive Items with Dependent Items
• Left as an exercise for the reader (Hint—see your manual!)
.....................................................................................................................................................R11i Extend Oracle Applications: Forms - Coding Item Behavior 12-23
.....................................................................................................................................................Coding Dependencies Between Items
Conditionally Mandatory items—use APP_FIELD.SET_REQUIRED_FIELD to require certain items only if a certain condition is met.
Call APP_FIELD.SET_REQUIRED_FIELD
APP_FIELD.SET_REQUIRED_FIELD(EVENT,
(CONDITION),
’block.item’);
Enforced Behaviors
• If a condition is met, the item is mandatory
• If the condition is FALSE, the item is optional (but not cleared)
.....................................................................................................................................................12-24 R11i Extend Oracle Applications: Forms - Coding Item Behavior
.....................................................................................................................................................Lesson 12: Coding Item Behavior
Dynamic Item PropertiesUse APP_ITEM_PROPERTY.SET_PROPERTY instead of SET_ITEM_PROPERTY (the Oracle Forms built-in) to set most item properties.
APP_ITEM_PROPERTY.SET_PROPERTY modifies the following properties:
• DISPLAYED
• ENABLED
• ENTERABLE
• ALTERABLE (item instance level)
• ALTERABLE_PLUS (item level)
• REQUIRED
Use APP_ITEM_PROPERTY.SET_PROPERTY Consistently
• Use APP_ITEM_PROPERTY.SET_PROPERTY consistently. Avoid using SET_ITEM_PROPERTY (the Oracle Forms built-in).
• A single call to APP_ITEM_PROPERTY.SET_PROPERTY may have the effect of several calls to SET_ITEM_PROPERTY
• Use APP_ITEM_PROPERTY.SET_PROPERTY for setting native Oracle Forms Developer properties, as well as Oracle Applications-modified properties
• If Oracle Applications property behavior changes in the future, your forms automatically reflect the latest behavior, even for properties that do not currently have special behavior
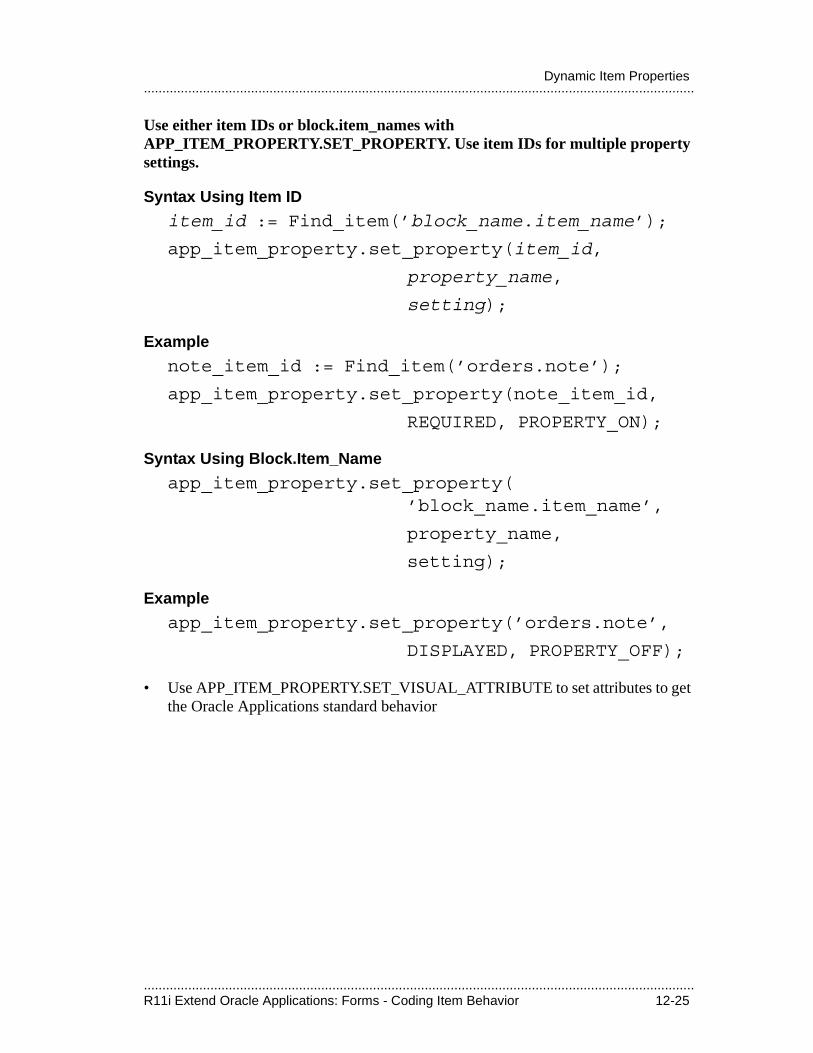
.....................................................................................................................................................R11i Extend Oracle Applications: Forms - Coding Item Behavior 12-25
.....................................................................................................................................................Dynamic Item Properties
Use either item IDs or block.item_names with APP_ITEM_PROPERTY.SET_PROPERTY. Use item IDs for multiple property settings.
Syntax Using Item ID
item_id := Find_item(’block_name.item_name’);
app_item_property.set_property(item_id,
property_name,
setting);
Example
note_item_id := Find_item(’orders.note’);
app_item_property.set_property(note_item_id,
REQUIRED, PROPERTY_ON);
Syntax Using Block.Item_Name
app_item_property.set_property(’block_name.item_name’,
property_name,
setting);
Example
app_item_property.set_property(’orders.note’,
DISPLAYED, PROPERTY_OFF);
• Use APP_ITEM_PROPERTY.SET_VISUAL_ATTRIBUTE to set attributes to get the Oracle Applications standard behavior
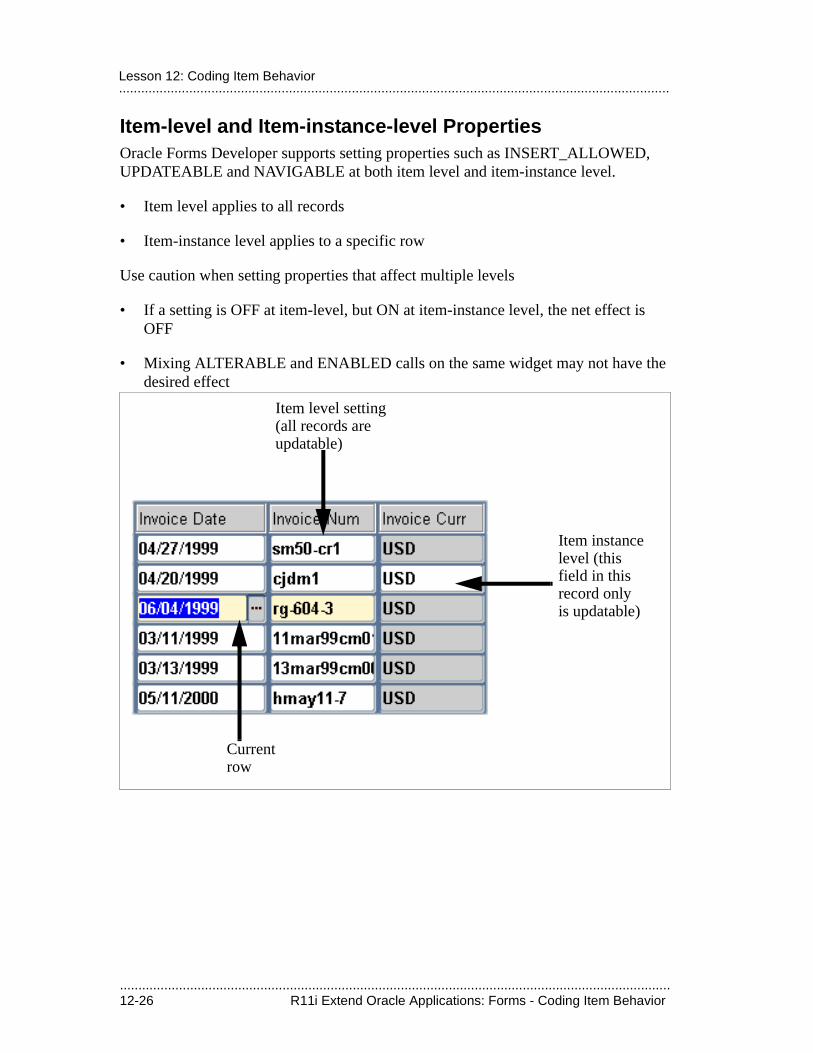
.....................................................................................................................................................12-26 R11i Extend Oracle Applications: Forms - Coding Item Behavior
.....................................................................................................................................................Lesson 12: Coding Item Behavior
Item-level and Item-instance-level PropertiesOracle Forms Developer supports setting properties such as INSERT_ALLOWED, UPDATEABLE and NAVIGABLE at both item level and item-instance level.
• Item level applies to all records
• Item-instance level applies to a specific row
Use caution when setting properties that affect multiple levels
• If a setting is OFF at item-level, but ON at item-instance level, the net effect is OFF
• Mixing ALTERABLE and ENABLED calls on the same widget may not have the desired effect
Currentrow
Item level setting(all records areupdatable)
Item instancelevel (thisfield in thisrecord onlyis updatable)
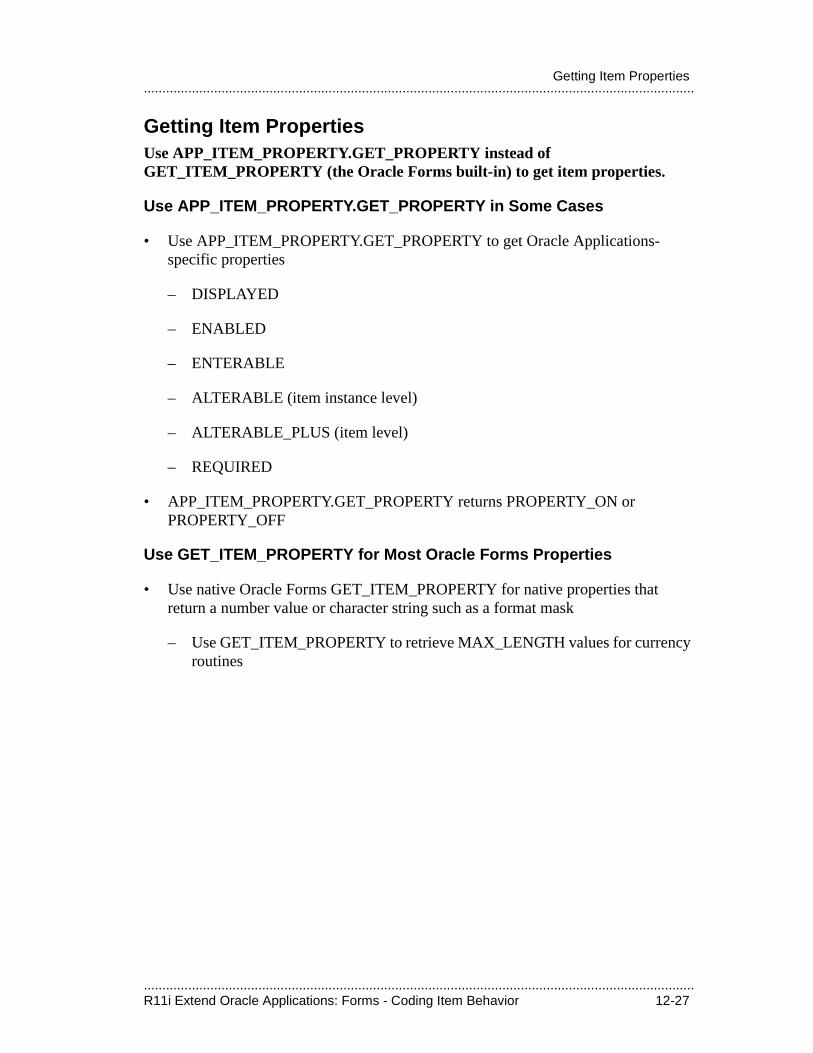
.....................................................................................................................................................R11i Extend Oracle Applications: Forms - Coding Item Behavior 12-27
.....................................................................................................................................................Getting Item Properties
Getting Item PropertiesUse APP_ITEM_PROPERTY.GET_PROPERTY instead of GET_ITEM_PROPERTY (the Oracle Forms built-in) to get item properties.
Use APP_ITEM_PROPERTY.GET_PROPERTY in Some Cases
• Use APP_ITEM_PROPERTY.GET_PROPERTY to get Oracle Applications-specific properties
– DISPLAYED
– ENABLED
– ENTERABLE
– ALTERABLE (item instance level)
– ALTERABLE_PLUS (item level)
– REQUIRED
• APP_ITEM_PROPERTY.GET_PROPERTY returns PROPERTY_ON or PROPERTY_OFF
Use GET_ITEM_PROPERTY for Most Oracle Forms Properties
• Use native Oracle Forms GET_ITEM_PROPERTY for native properties that return a number value or character string such as a format mask
– Use GET_ITEM_PROPERTY to retrieve MAX_LENGTH values for currency routines
.....................................................................................................................................................12-28 R11i Extend Oracle Applications: Forms - Coding Item Behavior
.....................................................................................................................................................Lesson 12: Coding Item Behavior
Using User Profiles in Your FormUser profiles let you code logic based on a user’s Site, Application, Responsibility, or User-level information.
Overview of User Profiles
• A user profile is a set of changeable options that affects how your application looks and behaves
• You as a developer can define user profile options whenever you want the application to react in different ways for different users, depending on specific user attributes
Four Different Levels for Maximum Flexibility
• Site: values pertain to all users at an installation site
• Application: values affect all users of any responsibility associated with the application
• Responsibility: values affect all users currently signed on under the responsibility
• User: values affect an individual applications user
• Site-level setting overridden by application, then responsibility, with user-level having the highest priority
Profile Option Values Derived at Runtime
• Oracle Application Object Library establishes values when the user logs on or changes responsibility
• If a user changes a user-changeable profile option value, the new value takes effect immediately
• If a system administrator changes a user’s profile option value, the change takes effect when the user logs on again or changes responsibility
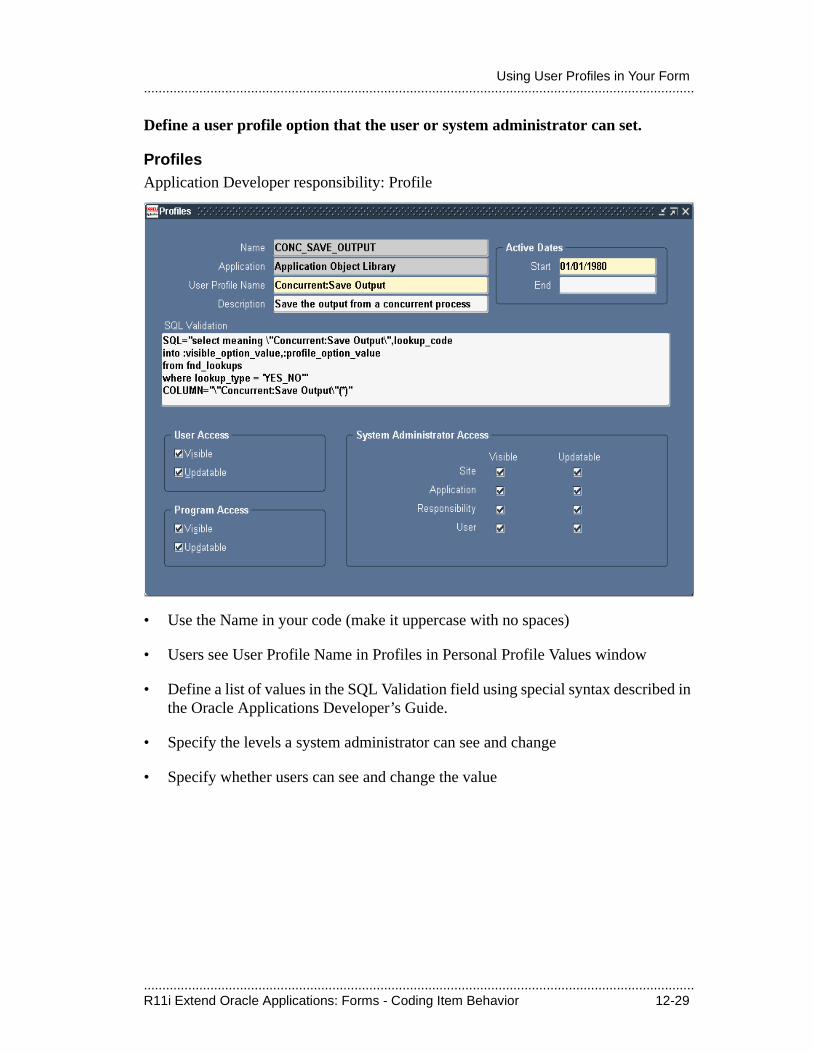
.....................................................................................................................................................R11i Extend Oracle Applications: Forms - Coding Item Behavior 12-29
.....................................................................................................................................................Using User Profiles in Your Form
Define a user profile option that the user or system administrator can set.
ProfilesApplication Developer responsibility: Profile
• Use the Name in your code (make it uppercase with no spaces)
• Users see User Profile Name in Profiles in Personal Profile Values window
• Define a list of values in the SQL Validation field using special syntax described in the Oracle Applications Developer’s Guide.
• Specify the levels a system administrator can see and change
• Specify whether users can see and change the value
.....................................................................................................................................................12-30 R11i Extend Oracle Applications: Forms - Coding Item Behavior
.....................................................................................................................................................Lesson 12: Coding Item Behavior
Call user profiles routines at form startup to determine profiles settings.
Retrieve Profile Values
procedure FND_PROFILE.GET (
name IN varchar2,
value OUT varchar2);
• Example:
FND_PROFILE.GET (’GL_DEFAULT_JE_CATEGORY’,
category_value);
function FND_PROFILE.VALUE (
name IN varchar2) return varchar2;
• VALUE works exactly like GET, except it returns the value of the specified profile option as a function result.
Retrieve Values Set by System
• Many option values are set by the system; you can read these from your code
– RESP_ID
– RESP_APPL_ID
– USER_ID
– and many others
ReferenceFor Additional Information See:
User Profiles
Oracle Applications Developer’s Guide
.....................................................................................................................................................R11i Extend Oracle Applications: Forms - Coding Item Behavior 12-31
.....................................................................................................................................................“FND: Override Directory” Profile Option for Developers
“FND: Override Directory” Profile Option for DevelopersThe “FND: Override Directory” profile option provides a way for developers to test forms in their own directories.
FND: Override Directory
• This feature works for Forms files only.
• Set this profile option to a directory path on the Forms Server (middle) tier where you have form .fmx files you want to test
• Oracle Applications first looks in your directory for .fmx files, then in the usual application directories
– If you have already opened a form before setting the option, you must restart your Oracle Applications session to see files from the new location
• Typically set this profile option at the user level to avoid affecting other users
.....................................................................................................................................................12-32 R11i Extend Oracle Applications: Forms - Coding Item Behavior
.....................................................................................................................................................Lesson 12: Coding Item Behavior

.................................
Message Dictionary

.....................................................................................................................................................13-2 R11i Extend Oracle Applications: Forms - Message Dictionary
.....................................................................................................................................................Lesson 13: Message Dictionary

.....................................................................................................................................................R11i Extend Oracle Applications: Forms - Message Dictionary 13-3
.....................................................................................................................................................Objectives
ObjectivesAt the end of this lesson, you should be able to:
• Understand the purpose of Message Dictionary.
• Understand how Message Dictionary works.
• Implement Message Dictionary in your forms.
• Follow Message Dictionary standards.
.....................................................................................................................................................13-4 R11i Extend Oracle Applications: Forms - Message Dictionary
.....................................................................................................................................................Lesson 13: Message Dictionary
Message Dictionary OverviewMessage Dictionary lets you catalog messages without hardcoding them into your form.
Define Messages Using the Messages Form
• Define standard messages you can use in all your applications
• Define flexible messages that include context-sensitive variable text
• Change or translate your message text without regenerating or compiling your application code
• Messages window appears on Application Developer menu
• Generate message files using Generate Messages concurrent program
Use FND_MESSAGE Routines to Call Messages
• Specify the name and application of a message
• Pop open a modal window with your message
• Display your message on the status line
• Write messages to a concurrent program’s log or output file
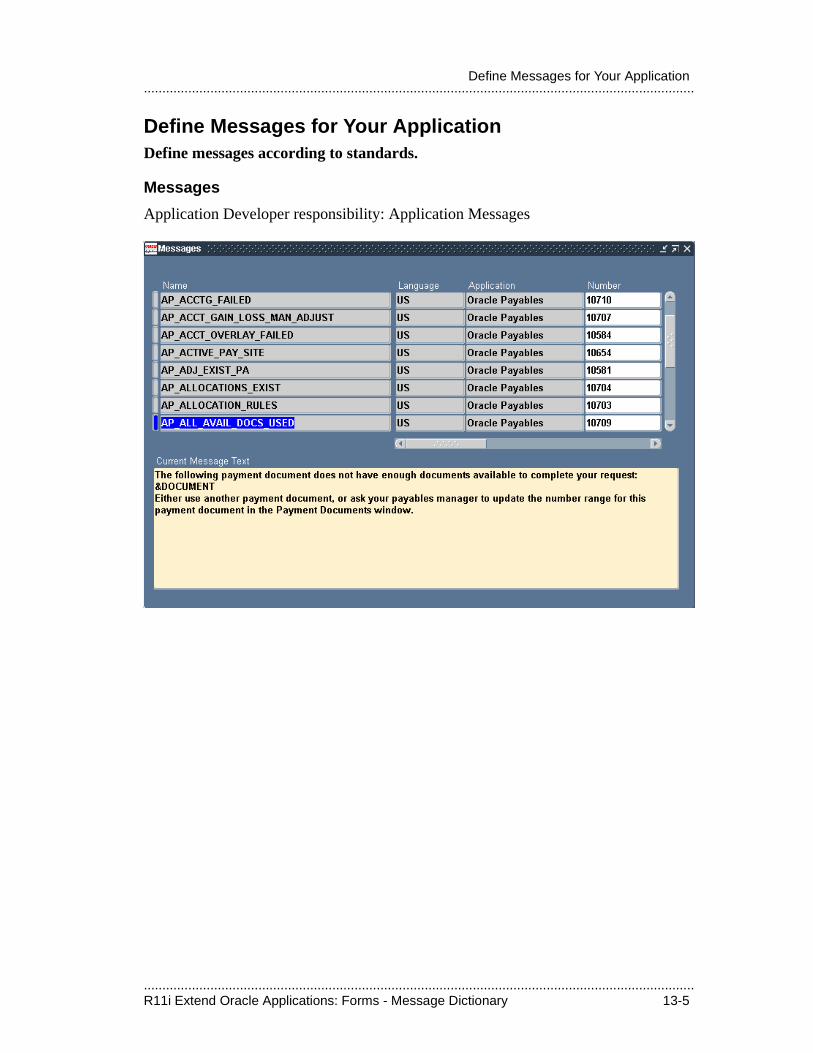
.....................................................................................................................................................R11i Extend Oracle Applications: Forms - Message Dictionary 13-5
.....................................................................................................................................................Define Messages for Your Application
Define Messages for Your ApplicationDefine messages according to standards.
Messages
Application Developer responsibility: Application Messages
.....................................................................................................................................................13-6 R11i Extend Oracle Applications: Forms - Message Dictionary
.....................................................................................................................................................Lesson 13: Message Dictionary
Follow message definition standards.
Message Naming
• We recommend that you use uppercase names with underbars rather than spaces. See your manual for naming conventions
Message Numbering
• Use a number for errors and warnings, but not hints, notes or questions
• Message Dictionary displays message numbers with the APP- prefix
• A null (blank) message number is equivalent to a zero and does not display (the prefix does not display either)
Other Information
• Language: Oracle Applications displays the correct language based on the user’s current language
• Application: Each message is associated with an application
• Description: You should enter information in this field that would help explain the context of this message to translators
• Current Message Text: Enter a message that describes the problem and its resolution. You can include variable tokens preceded by an ampersand (&) to indicate the location of substitute text
Technical NoteOracle Applications message names use uppercase only. Separate words with underbars rather than spaces
Applications Division: the Description field is a requirement, especially for “non-message” messages such as menu entries
.....................................................................................................................................................R11i Extend Oracle Applications: Forms - Message Dictionary 13-7
.....................................................................................................................................................Message Content Standards
Message Content StandardsFollowing content standards makes your application more pleasant to use and easier to translate.
A Few General Guidelines
• Tell users everything they need to correct the problem, but no more
• Make messages short and avoid repetition of information
• Use vocabulary consistent with Oracle Forms boilerplate. Refer to a field by its correct name. If a field is labeled “Sales Representative”, do not use the message “Please enter a different salesperson”
• Talk to the user directly (use “you” rather than “the user”)
• Use active voice when possible
• Say “please” wherever possible, especially when a message contains instructions
• Avoid including the routine name in the message unnecessarily
• See your Oracle Applications User Interface Standards manual for more suggestions
Technical NoteUnclear messages that result in support calls increase costs: each support call costs Oracle, on average, $600 (much more if the call must be escalated to development).
Messages should never exceed 1260 characters in English
Message translation costs Oracle 25 cents a word (0.25 USD), per language. For Release 11, we translate to 28 languages. Ten unnecessary words cost $70 to translate.
Routine names are usually ugly and tend to alarm users
Applications Division: words in all uppercase are not translated. Do not use uppercase for emphasis. Mention exceptions in the message description
Applications Division: Avoid table and column names in messages, but if you have them, make them uppercase so they will not be translated (and mention them in the message description)
Applications Division: Avoid underscores in messages. Words containing underscores will generally not be translated
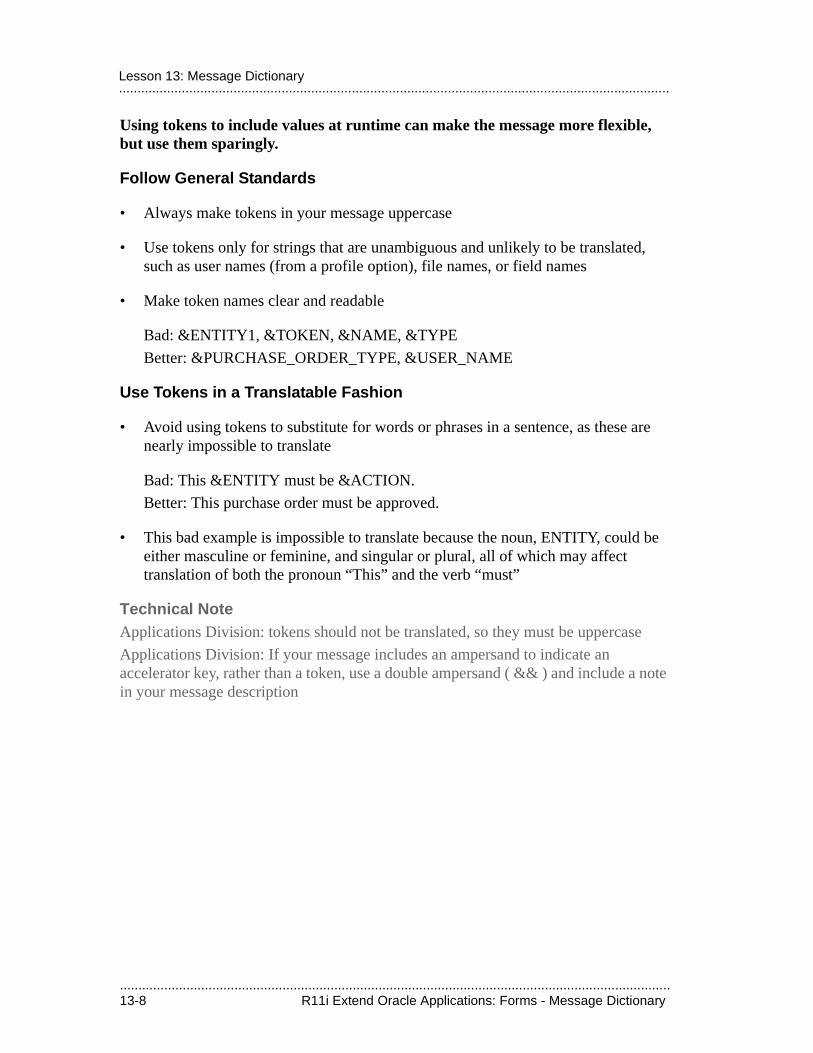
.....................................................................................................................................................13-8 R11i Extend Oracle Applications: Forms - Message Dictionary
.....................................................................................................................................................Lesson 13: Message Dictionary
Using tokens to include values at runtime can make the message more flexible, but use them sparingly.
Follow General Standards
• Always make tokens in your message uppercase
• Use tokens only for strings that are unambiguous and unlikely to be translated, such as user names (from a profile option), file names, or field names
• Make token names clear and readable
Bad: &ENTITY1, &TOKEN, &NAME, &TYPE
Better: &PURCHASE_ORDER_TYPE, &USER_NAME
Use Tokens in a Translatable Fashion
• Avoid using tokens to substitute for words or phrases in a sentence, as these are nearly impossible to translate
Bad: This &ENTITY must be &ACTION.
Better: This purchase order must be approved.
• This bad example is impossible to translate because the noun, ENTITY, could be either masculine or feminine, and singular or plural, all of which may affect translation of both the pronoun “This” and the verb “must”
Technical NoteApplications Division: tokens should not be translated, so they must be uppercase
Applications Division: If your message includes an ampersand to indicate an accelerator key, rather than a token, use a double ampersand ( && ) and include a note in your message description
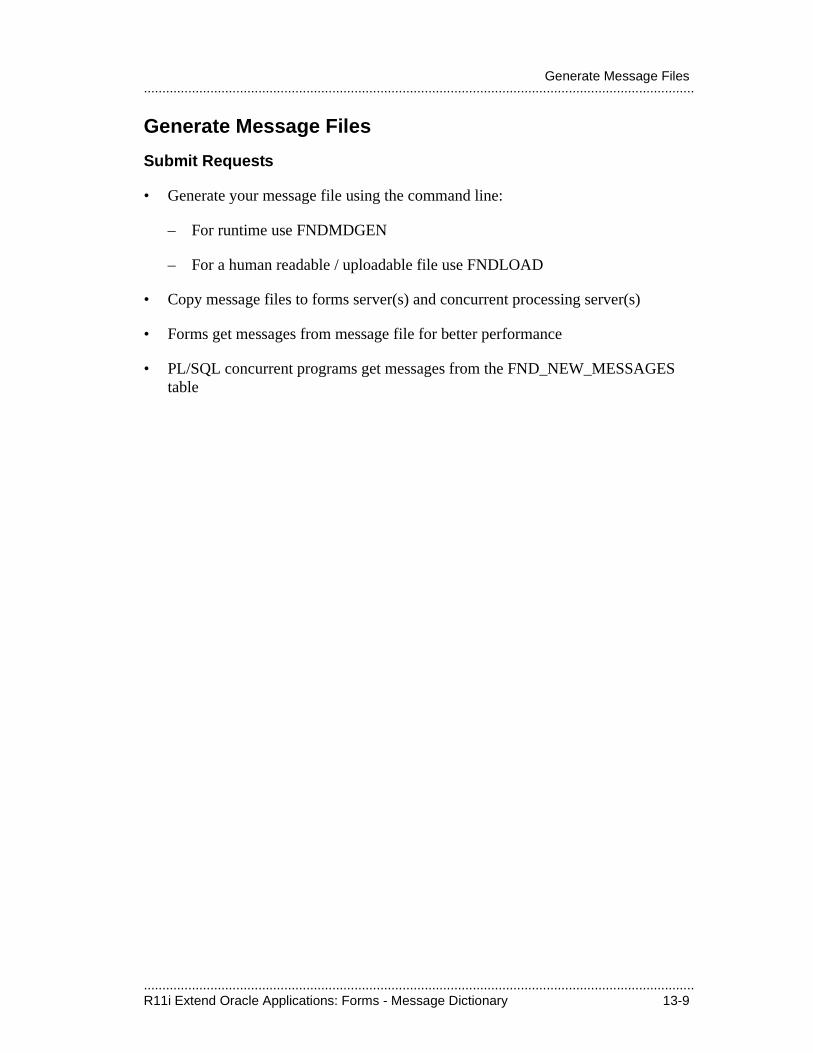
.....................................................................................................................................................R11i Extend Oracle Applications: Forms - Message Dictionary 13-9
.....................................................................................................................................................Generate Message Files
Generate Message Files
Submit Requests
• Generate your message file using the command line:
– For runtime use FNDMDGEN
– For a human readable / uploadable file use FNDLOAD
• Copy message files to forms server(s) and concurrent processing server(s)
• Forms get messages from message file for better performance
• PL/SQL concurrent programs get messages from the FND_NEW_MESSAGES table
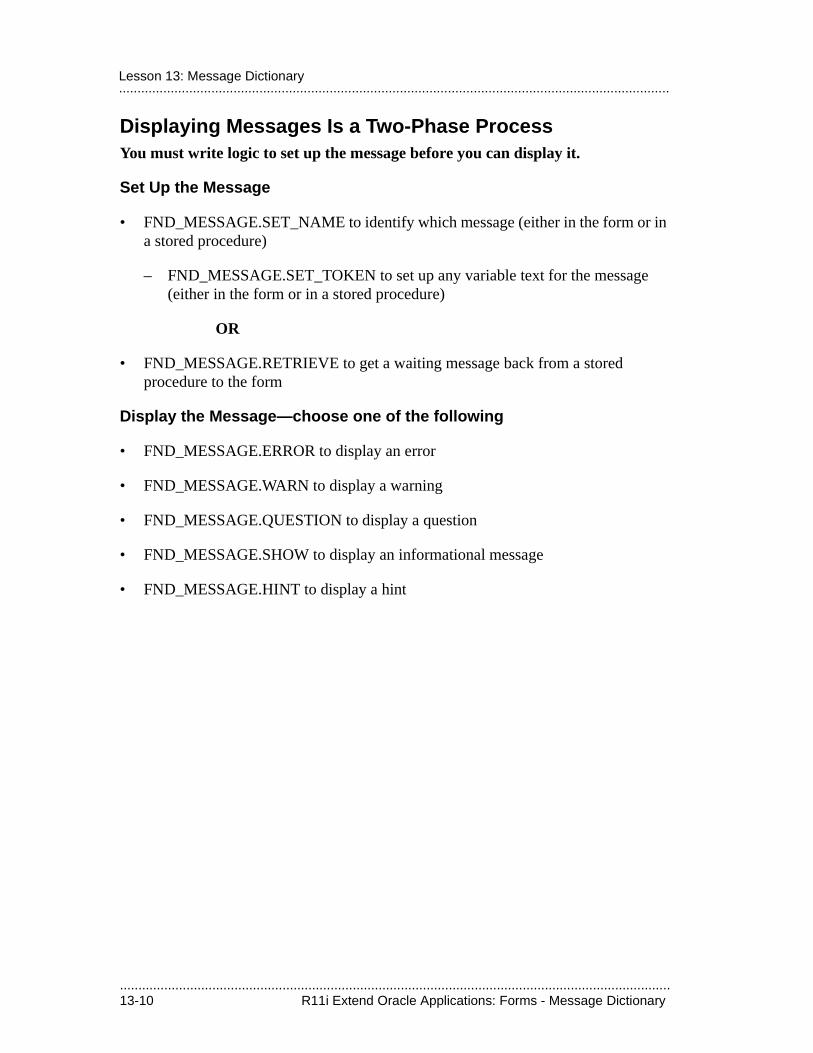
.....................................................................................................................................................13-10 R11i Extend Oracle Applications: Forms - Message Dictionary
.....................................................................................................................................................Lesson 13: Message Dictionary
Displaying Messages Is a Two-Phase ProcessYou must write logic to set up the message before you can display it.
Set Up the Message
• FND_MESSAGE.SET_NAME to identify which message (either in the form or in a stored procedure)
– FND_MESSAGE.SET_TOKEN to set up any variable text for the message (either in the form or in a stored procedure)
OR
• FND_MESSAGE.RETRIEVE to get a waiting message back from a stored procedure to the form
Display the Message—choose one of the following
• FND_MESSAGE.ERROR to display an error
• FND_MESSAGE.WARN to display a warning
• FND_MESSAGE.QUESTION to display a question
• FND_MESSAGE.SHOW to display an informational message
• FND_MESSAGE.HINT to display a hint
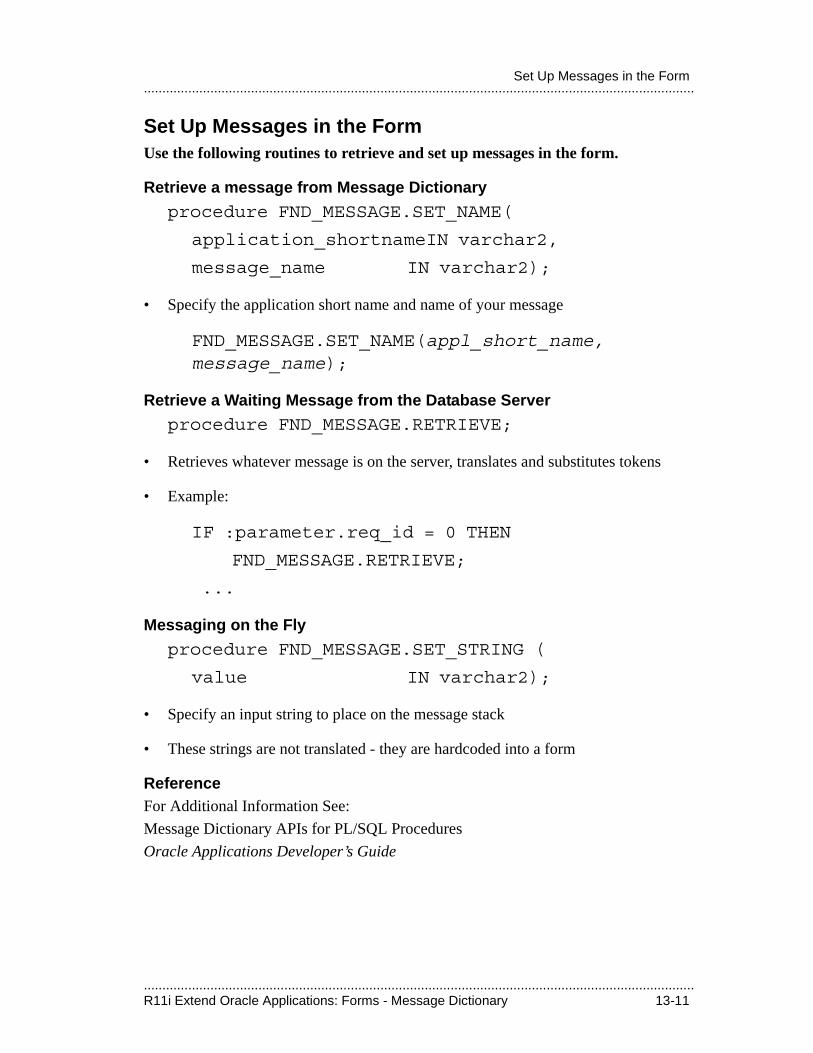
.....................................................................................................................................................R11i Extend Oracle Applications: Forms - Message Dictionary 13-11
.....................................................................................................................................................Set Up Messages in the Form
Set Up Messages in the FormUse the following routines to retrieve and set up messages in the form.
Retrieve a message from Message Dictionary
procedure FND_MESSAGE.SET_NAME(
application_shortnameIN varchar2,
message_name IN varchar2);
• Specify the application short name and name of your message
FND_MESSAGE.SET_NAME(appl_short_name, message_name);
Retrieve a Waiting Message from the Database Server
procedure FND_MESSAGE.RETRIEVE;
• Retrieves whatever message is on the server, translates and substitutes tokens
• Example:
IF :parameter.req_id = 0 THEN
FND_MESSAGE.RETRIEVE;
...
Messaging on the Fly
procedure FND_MESSAGE.SET_STRING (
value IN varchar2);
• Specify an input string to place on the message stack
• These strings are not translated - they are hardcoded into a form
ReferenceFor Additional Information See:
Message Dictionary APIs for PL/SQL Procedures
Oracle Applications Developer’s Guide
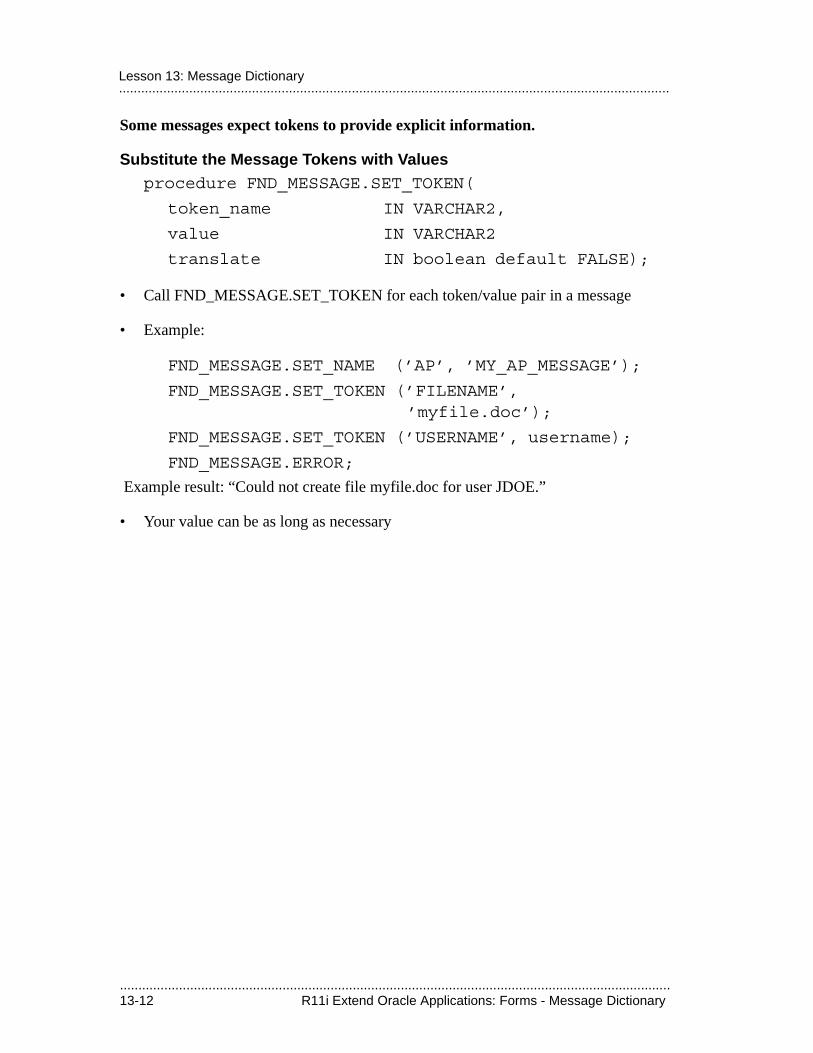
.....................................................................................................................................................13-12 R11i Extend Oracle Applications: Forms - Message Dictionary
.....................................................................................................................................................Lesson 13: Message Dictionary
Some messages expect tokens to provide explicit information.
Substitute the Message Tokens with Valuesprocedure FND_MESSAGE.SET_TOKEN(
token_name IN VARCHAR2,
value IN VARCHAR2
translate IN boolean default FALSE);
• Call FND_MESSAGE.SET_TOKEN for each token/value pair in a message
• Example:
FND_MESSAGE.SET_NAME (’AP’, ’MY_AP_MESSAGE’);
FND_MESSAGE.SET_TOKEN (’FILENAME’,’myfile.doc’);
FND_MESSAGE.SET_TOKEN (’USERNAME’, username);
FND_MESSAGE.ERROR;
Example result: “Could not create file myfile.doc for user JDOE.”
• Your value can be as long as necessary
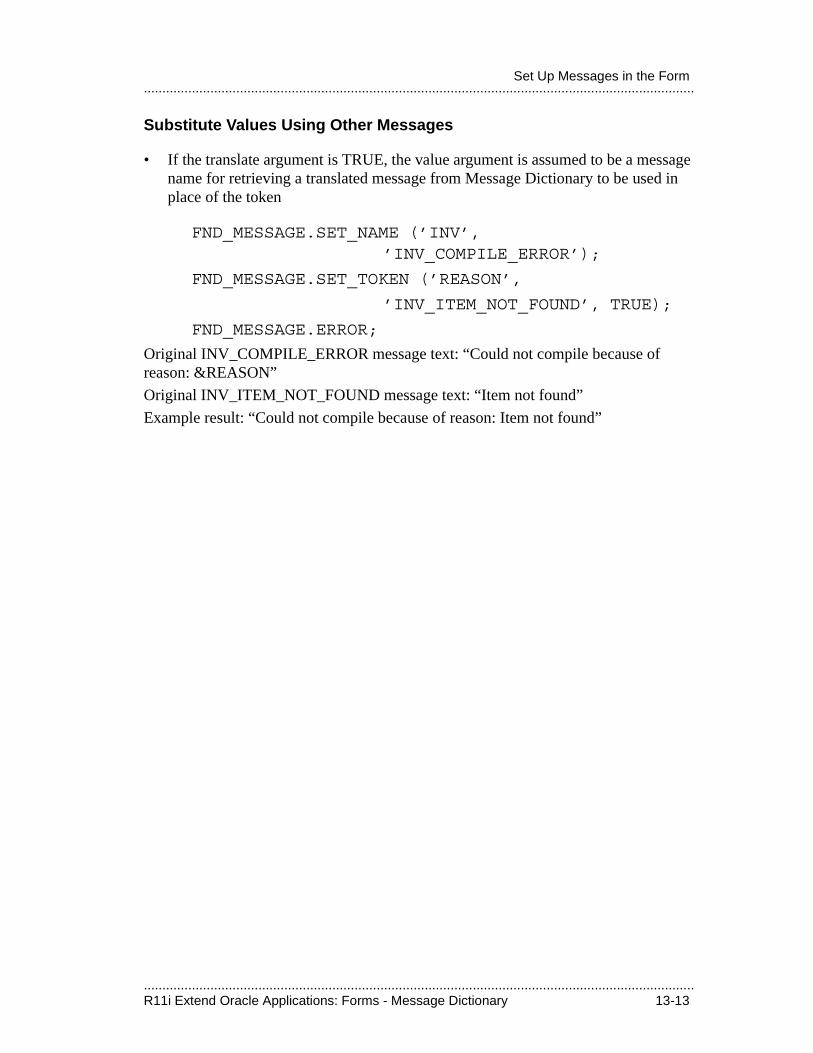
.....................................................................................................................................................R11i Extend Oracle Applications: Forms - Message Dictionary 13-13
.....................................................................................................................................................Set Up Messages in the Form
Substitute Values Using Other Messages
• If the translate argument is TRUE, the value argument is assumed to be a message name for retrieving a translated message from Message Dictionary to be used in place of the token
FND_MESSAGE.SET_NAME (’INV’,’INV_COMPILE_ERROR’);
FND_MESSAGE.SET_TOKEN (’REASON’,
’INV_ITEM_NOT_FOUND’, TRUE);
FND_MESSAGE.ERROR;
Original INV_COMPILE_ERROR message text: “Could not compile because of reason: &REASON”
Original INV_ITEM_NOT_FOUND message text: “Item not found”
Example result: “Could not compile because of reason: Item not found”
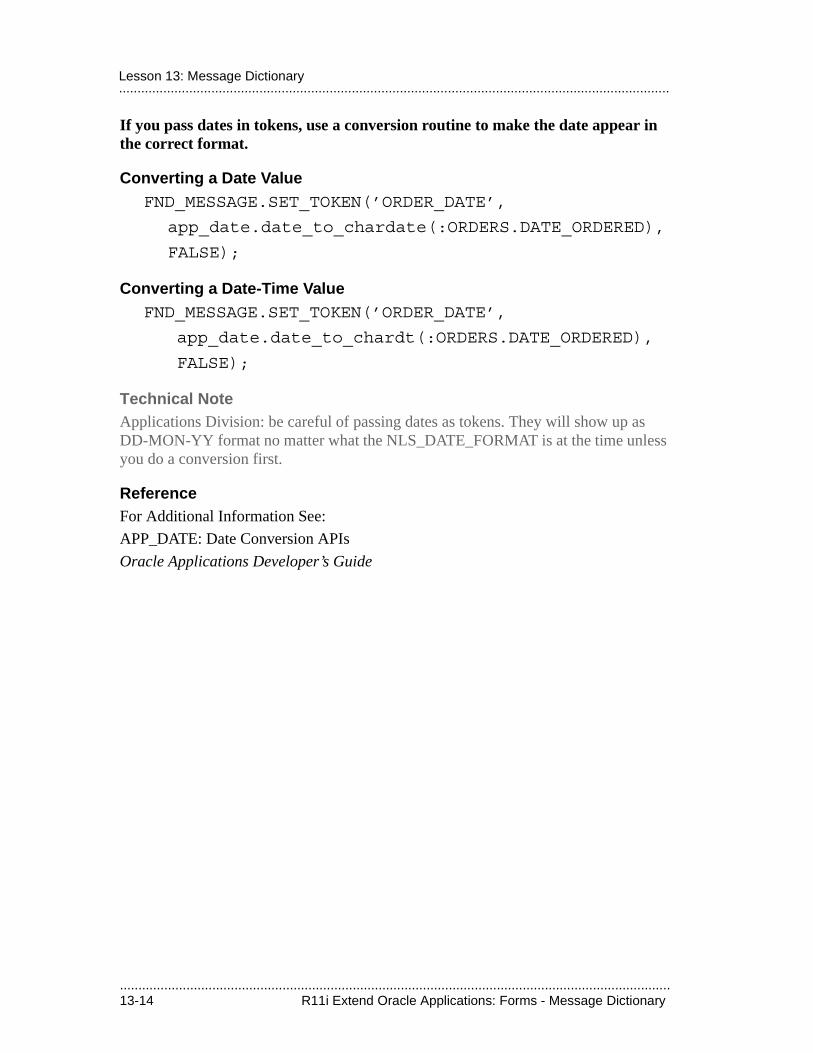
.....................................................................................................................................................13-14 R11i Extend Oracle Applications: Forms - Message Dictionary
.....................................................................................................................................................Lesson 13: Message Dictionary
If you pass dates in tokens, use a conversion routine to make the date appear in the correct format.
Converting a Date ValueFND_MESSAGE.SET_TOKEN(’ORDER_DATE’,
app_date.date_to_chardate(:ORDERS.DATE_ORDERED),
FALSE);
Converting a Date-Time ValueFND_MESSAGE.SET_TOKEN(’ORDER_DATE’,
app_date.date_to_chardt(:ORDERS.DATE_ORDERED),
FALSE);
Technical NoteApplications Division: be careful of passing dates as tokens. They will show up as DD-MON-YY format no matter what the NLS_DATE_FORMAT is at the time unless you do a conversion first.
ReferenceFor Additional Information See:
APP_DATE: Date Conversion APIs
Oracle Applications Developer’s Guide
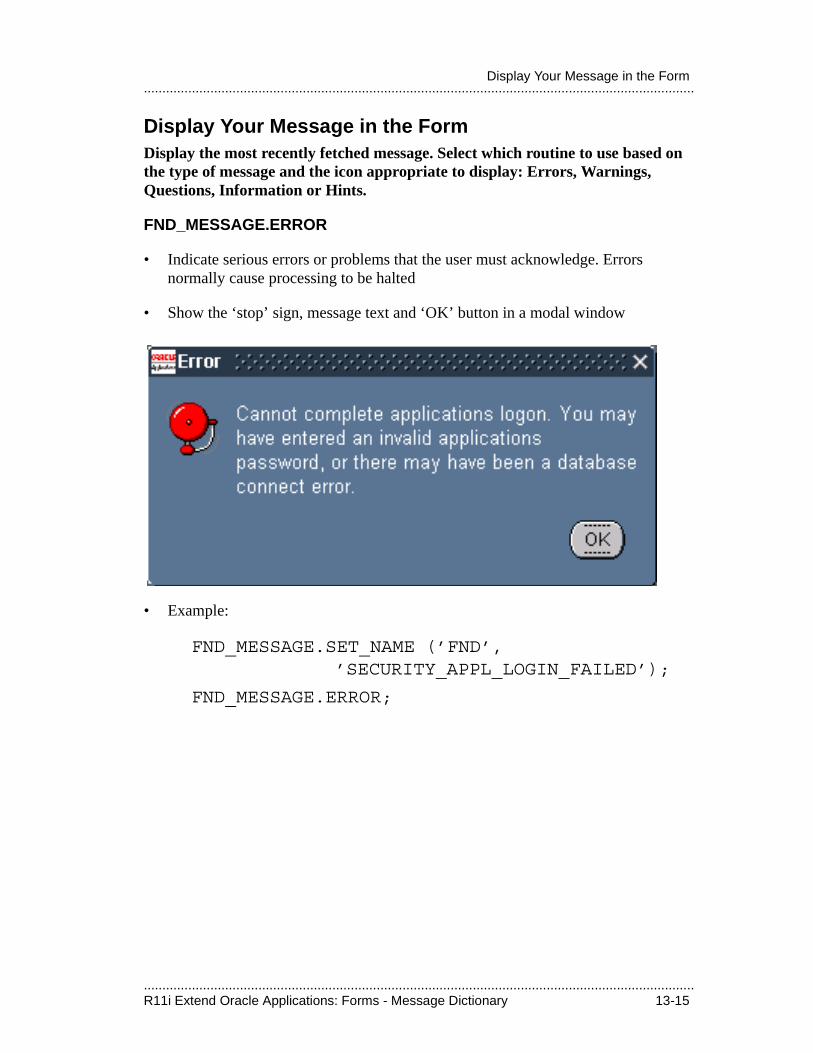
.....................................................................................................................................................R11i Extend Oracle Applications: Forms - Message Dictionary 13-15
.....................................................................................................................................................Display Your Message in the Form
Display Your Message in the FormDisplay the most recently fetched message. Select which routine to use based on the type of message and the icon appropriate to display: Errors, Warnings, Questions, Information or Hints.
FND_MESSAGE.ERROR
• Indicate serious errors or problems that the user must acknowledge. Errors normally cause processing to be halted
• Show the ‘stop’ sign, message text and ‘OK’ button in a modal window
• Example:
FND_MESSAGE.SET_NAME (’FND’, ’SECURITY_APPL_LOGIN_FAILED’);
FND_MESSAGE.ERROR;
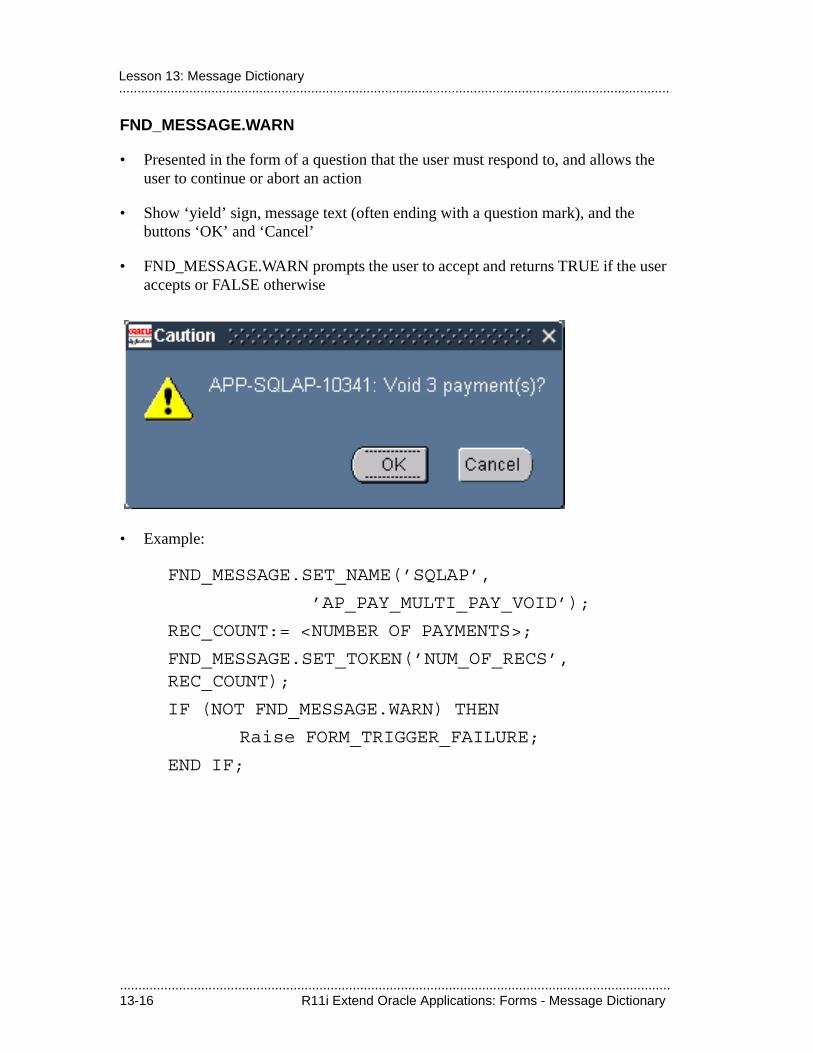
.....................................................................................................................................................13-16 R11i Extend Oracle Applications: Forms - Message Dictionary
.....................................................................................................................................................Lesson 13: Message Dictionary
FND_MESSAGE.WARN
• Presented in the form of a question that the user must respond to, and allows the user to continue or abort an action
• Show ‘yield’ sign, message text (often ending with a question mark), and the buttons ‘OK’ and ‘Cancel’
• FND_MESSAGE.WARN prompts the user to accept and returns TRUE if the user accepts or FALSE otherwise
• Example:
FND_MESSAGE.SET_NAME(’SQLAP’,
’AP_PAY_MULTI_PAY_VOID’);
REC_COUNT:= <NUMBER OF PAYMENTS>;
FND_MESSAGE.SET_TOKEN(’NUM_OF_RECS’, REC_COUNT);
IF (NOT FND_MESSAGE.WARN) THEN
Raise FORM_TRIGGER_FAILURE;
END IF;
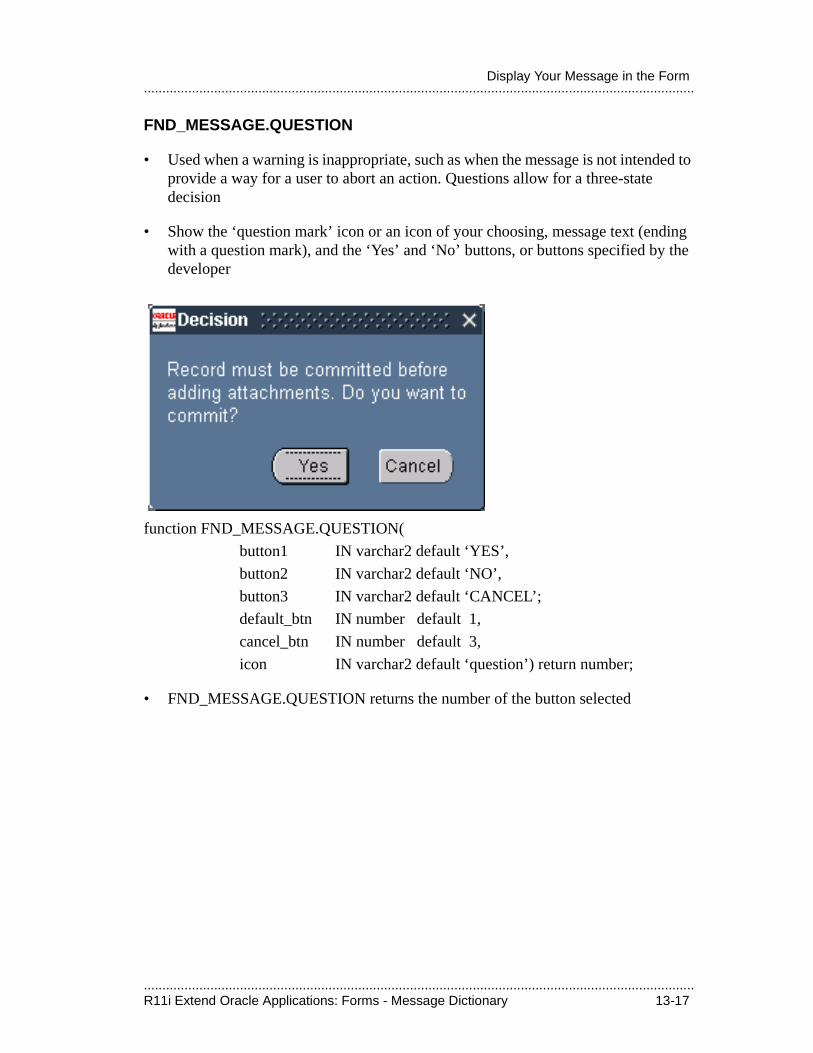
.....................................................................................................................................................R11i Extend Oracle Applications: Forms - Message Dictionary 13-17
.....................................................................................................................................................Display Your Message in the Form
FND_MESSAGE.QUESTION
• Used when a warning is inappropriate, such as when the message is not intended to provide a way for a user to abort an action. Questions allow for a three-state decision
• Show the ‘question mark’ icon or an icon of your choosing, message text (ending with a question mark), and the ‘Yes’ and ‘No’ buttons, or buttons specified by the developer
function FND_MESSAGE.QUESTION(
button1 IN varchar2 default ‘YES’,
button2 IN varchar2 default ‘NO’,
button3 IN varchar2 default ‘CANCEL’;
default_btn IN number default 1,
cancel_btn IN number default 3,
icon IN varchar2 default ‘question’) return number;
• FND_MESSAGE.QUESTION returns the number of the button selected
.....................................................................................................................................................13-18 R11i Extend Oracle Applications: Forms - Message Dictionary
.....................................................................................................................................................Lesson 13: Message Dictionary
• Specifying one button displays that button as the first (rightmost) button and defaults the second button to ‘Cancel’
• Example:
FND_MESSAGE.SET_NAME(’FND’,’ATCHMT-COMMIT BEFORE INVOKING’);
IF FND_MESSAGE.QUESTION (’YES’,’CANCEL’,NULL,1,2,NULL) = 2 THEN
RAISE FORM_TRIGGER_FAILURE;
END IF;
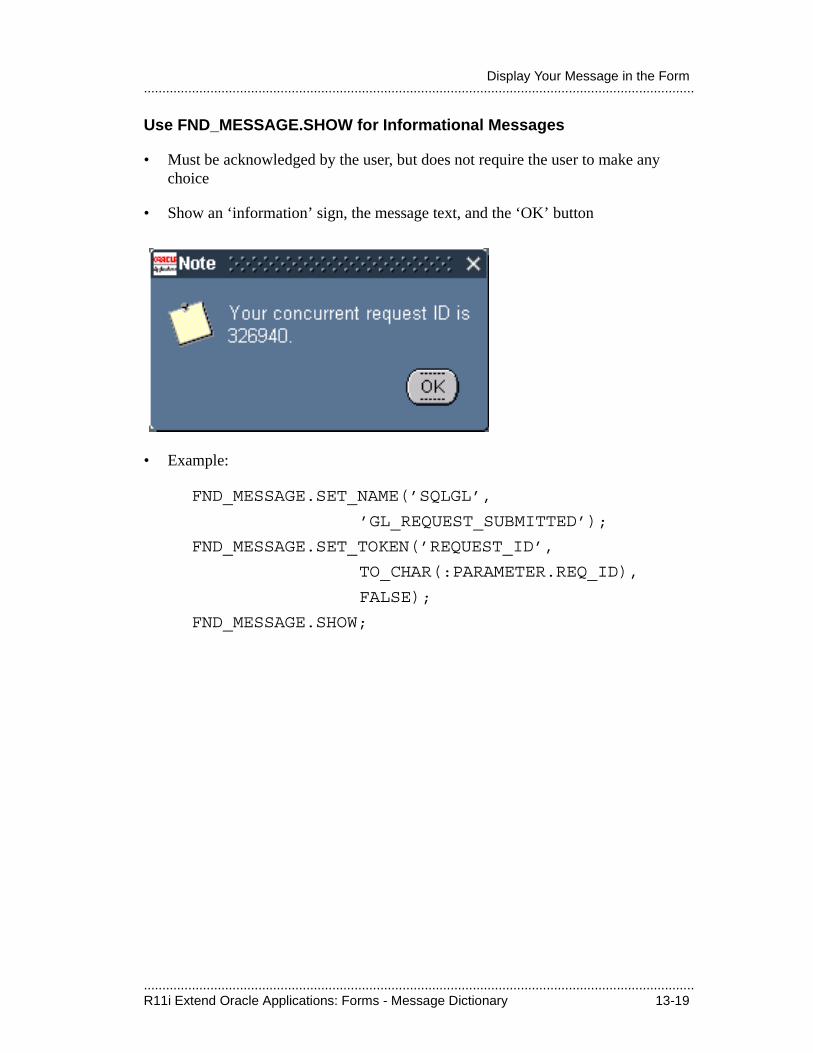
.....................................................................................................................................................R11i Extend Oracle Applications: Forms - Message Dictionary 13-19
.....................................................................................................................................................Display Your Message in the Form
Use FND_MESSAGE.SHOW for Informational Messages
• Must be acknowledged by the user, but does not require the user to make any choice
• Show an ‘information’ sign, the message text, and the ‘OK’ button
• Example:
FND_MESSAGE.SET_NAME(’SQLGL’,
’GL_REQUEST_SUBMITTED’);
FND_MESSAGE.SET_TOKEN(’REQUEST_ID’,
TO_CHAR(:PARAMETER.REQ_ID),
FALSE);
FND_MESSAGE.SHOW;
.....................................................................................................................................................13-20 R11i Extend Oracle Applications: Forms - Message Dictionary
.....................................................................................................................................................Lesson 13: Message Dictionary
FND_MESSAGE.HINT
• FND_MESSAGE.HINT displays a message on the forms status line
• Use for messages that have little consequence, or are ‘progress indicator’ messages that do not require acknowledgment
Examples: ‘Working...’ and ‘At first record.’
.....................................................................................................................................................R11i Extend Oracle Applications: Forms - Message Dictionary 13-21
.....................................................................................................................................................Call Messages from the Server
Call Messages from the ServerSet messages on the server from server side procedures or programs. You can retrieve them for use on the client if necessary.
Buffer a Message to Retrieve on the Client
• Call FND_MESSAGE.SET_NAME on the server to set a message name in the global area
• Call FND_MESSAGE.SET_TOKEN on the server to add a token/value pair to the global area without actually doing the substitution
• You can only buffer one message on the server

.....................................................................................................................................................13-22 R11i Extend Oracle Applications: Forms - Message Dictionary
.....................................................................................................................................................Lesson 13: Message Dictionary
There are three methods for displaying messages set on the database server.
Set the message and call APP_EXCEPTION.RAISE_EXCEPTION
• Use SET_NAME and SET_TOKEN to set the message on the database server
• The APPCORE routine APP_EXCEPTION.RAISE_EXCEPTION raises the application error PL/SQL exception
• When the server procedure exits, control resumes on the client in the standard forms ON-ERROR trigger
• The ON-ERROR trigger retrieves the message and displays it
Set the message and ask the form to RETRIEVE it
• Use SET_NAME and SET_TOKEN to set the message on the database server
• Return a result code to indicate that a message is waiting
• The form calls FND_MESSAGE.RETRIEVE to pull the message to the form
• The form logic displays the message using one of the display routines
Get the message into a buffer on the server
• Use SET_NAME and SET_TOKEN to set the message
• Use FND_MESSAGE.GET to get the message into a buffer
.....................................................................................................................................................R11i Extend Oracle Applications: Forms - Message Dictionary 13-23
.....................................................................................................................................................Other Useful Message Routines
Other Useful Message RoutinesUse FND_MESSAGE.DEBUG for messages that are not displayed to the user.
FND_MESSAGE.DEBUG
• Use FND_MESSAGE.DEBUG for debugging messages to help isolate failing routines
• Use FND_MESSAGE.DEBUG only for messages that the user should never see
• Typically use this as the last branch of every handler
ELSE
fnd_message.debug(’Invalid event passed to
control.orders_lines: ’ || EVENT);
END IF;
Technical NoteApplications Division: these messages may be hardcoded in English
.....................................................................................................................................................13-24 R11i Extend Oracle Applications: Forms - Message Dictionary
.....................................................................................................................................................Lesson 13: Message Dictionary
Use FND_MESSAGE.GET to retrieve translated text from Message Dictionary.
FND_MESSAGE.GET
• Use FND_MESSAGE.GET to retrieve pieces of text (defined in Message Dictionary and translated with other messages) for use as titles, Special menu entries and other purposes
fnd_message.set_name(appl_short_name, message_name);
fnd_message.get(window_title);
set_window_property(’WINDOW_NAME’, TITLE,
window_title);
• This example retrieves a message into a buffer, then sets the window title using the contents of the buffer
• FND_MESSAGE.GET can retrieve up to 1800 characters
• For short pieces of text, declare variables with at least length 255 to avoid truncation errors
Technical NoteApplications Division: whenever possible, place text to be translated (dynamic button labels and field prompts, etc.) in the form itself as default values, parameters, static record groups, etc., instead of using Message Dictionary.
Text stored in Message Dictionary does not have the context information to help translators, but if the text is within the form itself, the translator has much more information on which to base a better translation.

.................................
Flexfields
.....................................................................................................................................................14-2 R11i Extend Oracle Applications: Forms - Flexfields
.....................................................................................................................................................Lesson 14: Flexfields
.....................................................................................................................................................R11i Extend Oracle Applications: Forms - Flexfields 14-3
.....................................................................................................................................................Objectives
ObjectivesAt the end of this lesson, you should be able to:
• Use flexfield terms correctly.
• Recognize key and descriptive flexfields in Oracle Applications.
• Add a key flexfield to your form.
• Add a descriptive flexfield to your form.
.....................................................................................................................................................14-4 R11i Extend Oracle Applications: Forms - Flexfields
.....................................................................................................................................................Lesson 14: Flexfields
Benefits of FlexfieldsFlexibility is your goal.
• Every application contains flexible data structures (for example, accounting codes and product codes) amenable to flexfield-type structures
• Every application can benefit from easy customization without programming, available through flexfields
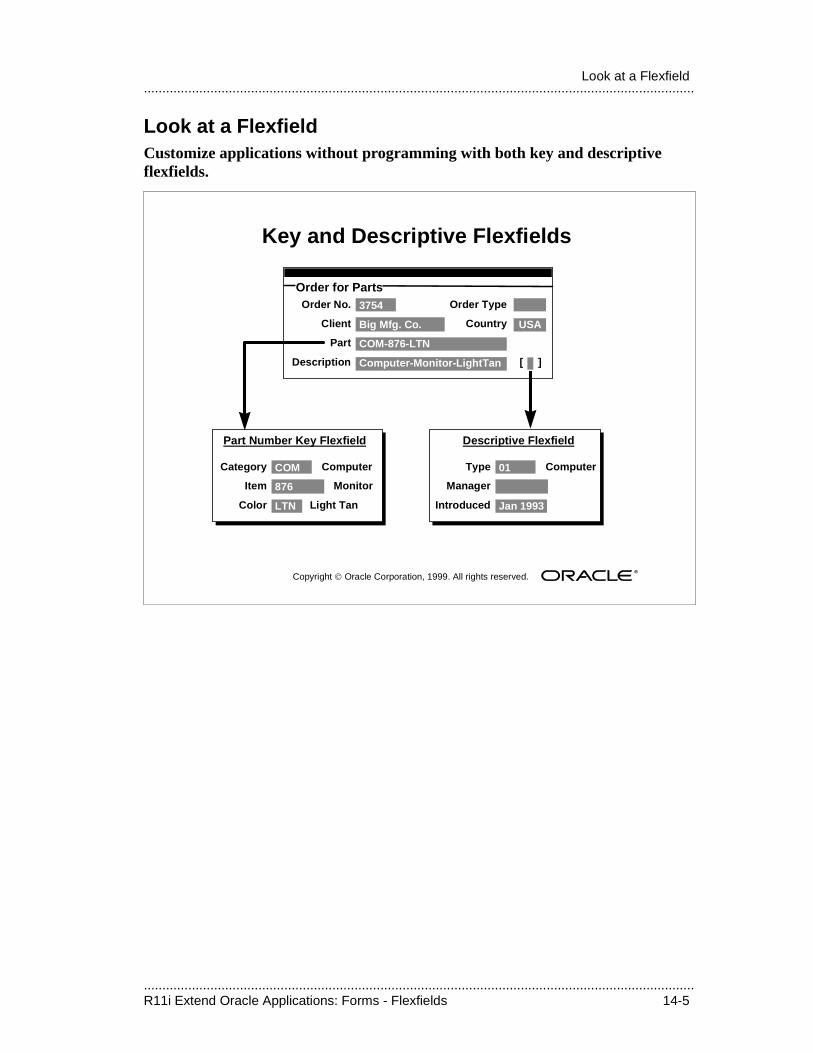
.....................................................................................................................................................R11i Extend Oracle Applications: Forms - Flexfields 14-5
.....................................................................................................................................................Look at a Flexfield
Look at a FlexfieldCustomize applications without programming with both key and descriptive flexfields.
Copyright Oracle Corporation, 1999. All rights reserved.
Key and Descriptive Flexfields
Order No.
Client
Part
Description
Order Type
Country
[ ]
Order for Parts3754
Big Mfg. Co.
COM-876-LTN
Computer-Monitor-LightTan
USA
Category
Item
Color
Part Number Key Flexfield
COM
876
LTN
Computer
Monitor
Light Tan
Type
Manager
Introduced
Descriptive Flexfield
Computer01
Jan 1993
.....................................................................................................................................................14-6 R11i Extend Oracle Applications: Forms - Flexfields
.....................................................................................................................................................Lesson 14: Flexfields
A Field Made Up of Sub-fields
• Flexfields appear in a pop-up window on a form
• Flexfields are implemented as a set of database columns, with one column for each segment
• The brackets [ ] indicate the presence of a descriptive flexfield
• When the cursor reaches the brackets, the descriptive flexfield pops open. If the descriptive flexfield is not enabled, the cursor skips over the flexfield
A Flexfield Segment Is a Single Sub-field of a Flexfield
• Each segment represents a single column of a table
• Flexfield segments are usually validated against a set of valid values, called a value set
Key Flexfields Identify an Entity
• Key flexfields serve as an intelligent primary key, where each segment contains meaningful information
• Key flexfields are integral parts of a form. They appear as normal fields (concatenated values fields) until the flexfield window pops up. Often the segment descriptions also appear on the form in a concatenated descriptions field
Descriptive Flexfields Add Extra Information
• Descriptive flexfields provide extra fields for information concerning this form. Use a descriptive flexfield to describe an application entity (for example, a vendor) and to record business-specific information
• Different segments may appear depending on other information in the form (called context)
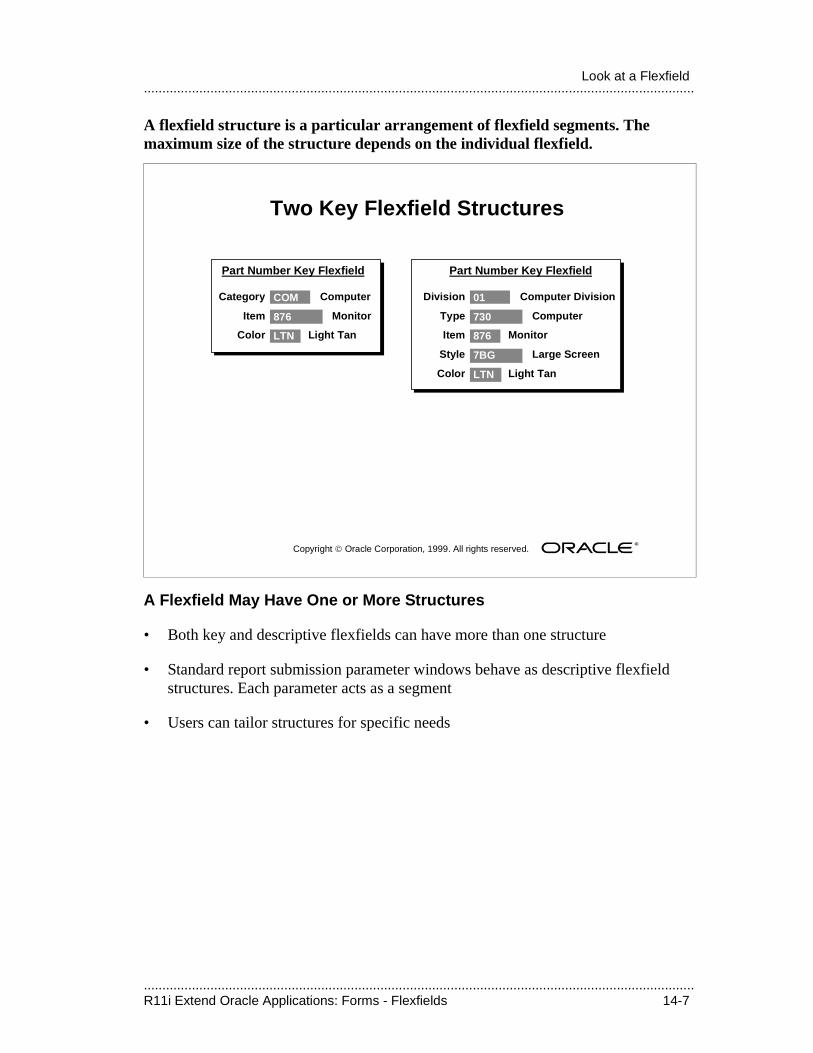
.....................................................................................................................................................R11i Extend Oracle Applications: Forms - Flexfields 14-7
.....................................................................................................................................................Look at a Flexfield
A flexfield structure is a particular arrangement of flexfield segments. The maximum size of the structure depends on the individual flexfield.
A Flexfield May Have One or More Structures
• Both key and descriptive flexfields can have more than one structure
• Standard report submission parameter windows behave as descriptive flexfield structures. Each parameter acts as a segment
• Users can tailor structures for specific needs
Copyright Oracle Corporation, 1999. All rights reserved.
Two Key Flexfield Structures
Category
Item
Color
Part Number Key Flexfield
COM
876
LTN
Computer
Monitor
Light Tan
Computer Division
Computer
Monitor
Large Screen
Light Tan
Division
Type
Item
Style
Color
Part Number Key Flexfield
01
730
876
7BG
LTN
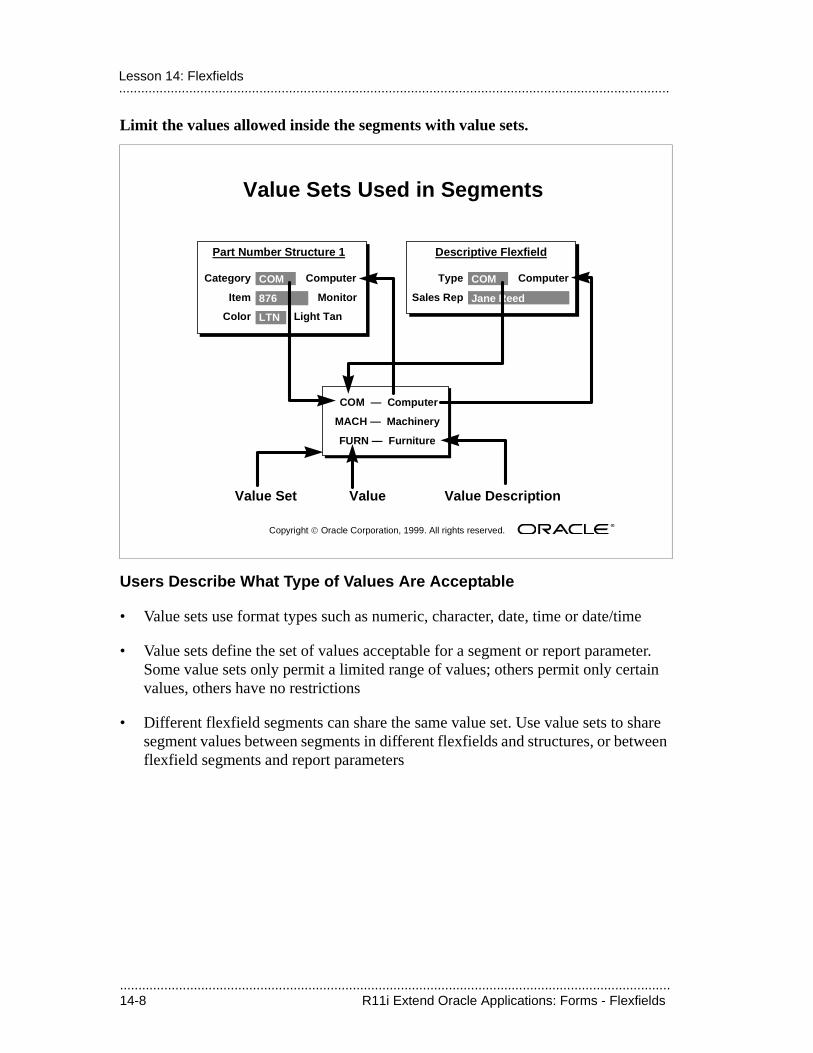
.....................................................................................................................................................14-8 R11i Extend Oracle Applications: Forms - Flexfields
.....................................................................................................................................................Lesson 14: Flexfields
Limit the values allowed inside the segments with value sets.
Users Describe What Type of Values Are Acceptable
• Value sets use format types such as numeric, character, date, time or date/time
• Value sets define the set of values acceptable for a segment or report parameter. Some value sets only permit a limited range of values; others permit only certain values, others have no restrictions
• Different flexfield segments can share the same value set. Use value sets to share segment values between segments in different flexfields and structures, or between flexfield segments and report parameters
Copyright Oracle Corporation, 1999. All rights reserved.
Type
Sales Rep
Descriptive Flexfield
ComputerCOM
Jane Reed
Value Sets Used in Segments
Category
Item
Color
Part Number Structure 1
COM
876
LTN
Computer
Monitor
Light Tan
COM — Computer
MACH — Machinery
FURN — Furniture
Value Set Value Value Description
.....................................................................................................................................................R11i Extend Oracle Applications: Forms - Flexfields 14-9
.....................................................................................................................................................When to Use A Flexfield
When to Use A FlexfieldUse a flexfield in your application where you need flexible data structures.
Descriptive Flexfields
• Use where you want to let your users create new data entry fields without programming
• Use when you want to provide user-customizable “expansion space” in your forms
• Use where you want forms to have context-sensitive field arrangements that you cannot determine in advance
• Use a blank descriptive flexfield in every data entry window in your application, corresponding to having a descriptive flexfield for each application entity
Key Flexfields
• Used to uniquely identify an application entity with an intelligent key, where the key can be multipart and each part can have meaning
• Use key flexfields that Oracle Applications provides to integrate your applications seamlessly with Oracle Applications
.....................................................................................................................................................14-10 R11i Extend Oracle Applications: Forms - Flexfields
.....................................................................................................................................................Lesson 14: Flexfields
Your End User’s Perspective
Customize the Flexfield Appearance
• Flexfield title
• Number and order of segments
• Prompts
• Value sets, values, and value descriptions
Use Flexfield Functionality for Validation
• Individual segment validation
• Cross-segment validation for key flexfields
Customize to the Situation
• Flexfields allow the application to adjust to fit specific business needs
• Use multiple structures to match different needs in different situations
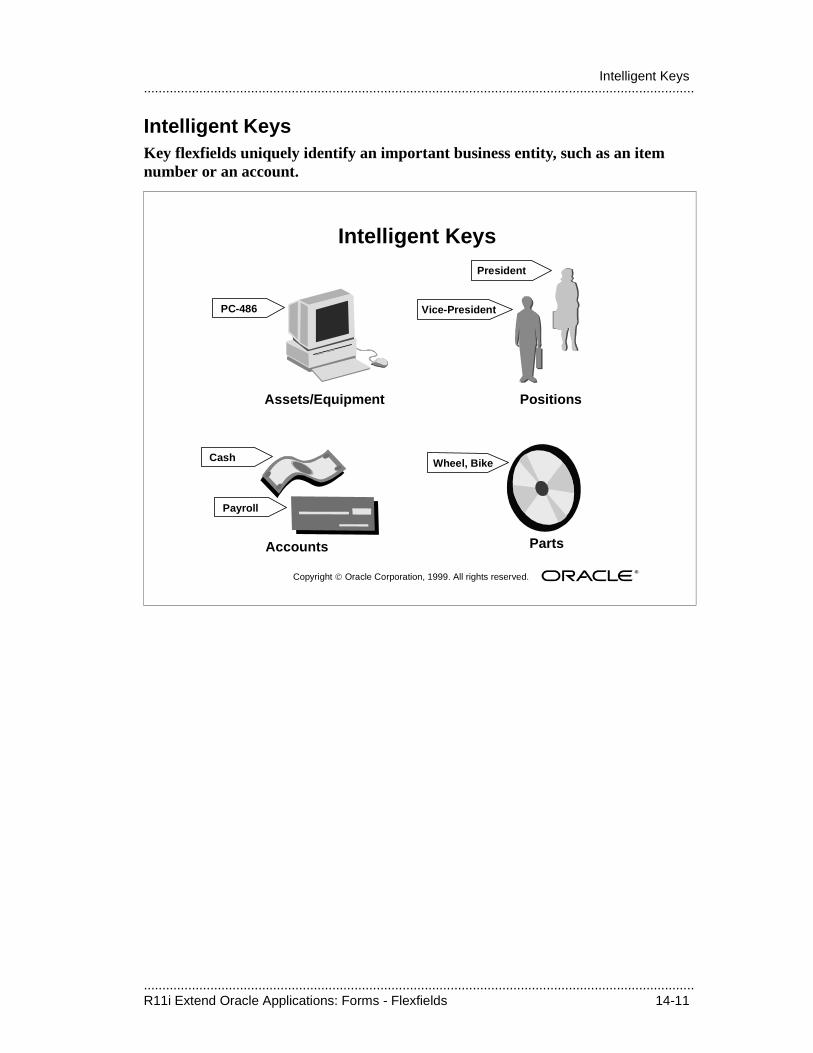
.....................................................................................................................................................R11i Extend Oracle Applications: Forms - Flexfields 14-11
.....................................................................................................................................................Intelligent Keys
Intelligent KeysKey flexfields uniquely identify an important business entity, such as an item number or an account.
Copyright Oracle Corporation, 1999. All rights reserved.
Intelligent Keys
Assets/Equipment Positions
PartsAccounts
Wheel, Bike
Vice-President
President
PC-486
Cash
Payroll
.....................................................................................................................................................14-12 R11i Extend Oracle Applications: Forms - Flexfields
.....................................................................................................................................................Lesson 14: Flexfields
Identify Objects with Intelligent Keys
• Intelligent keys are often multi-part codes (primary keys) where one or more individual parts contain meaningful information
• Each intelligent key can uniquely identify an application entity
Use Key Flexfields as Intelligent Keys
• Use many types of business codes with Oracle Applications
• Customize the intelligent key to suit a specific need without requiring programming skills
Specify Valid Values And Cross-validation Rules
• Each segment has a value set that regulates which values are valid
• The flexfield as a whole must pass validation rules to determine if the segments make sense together
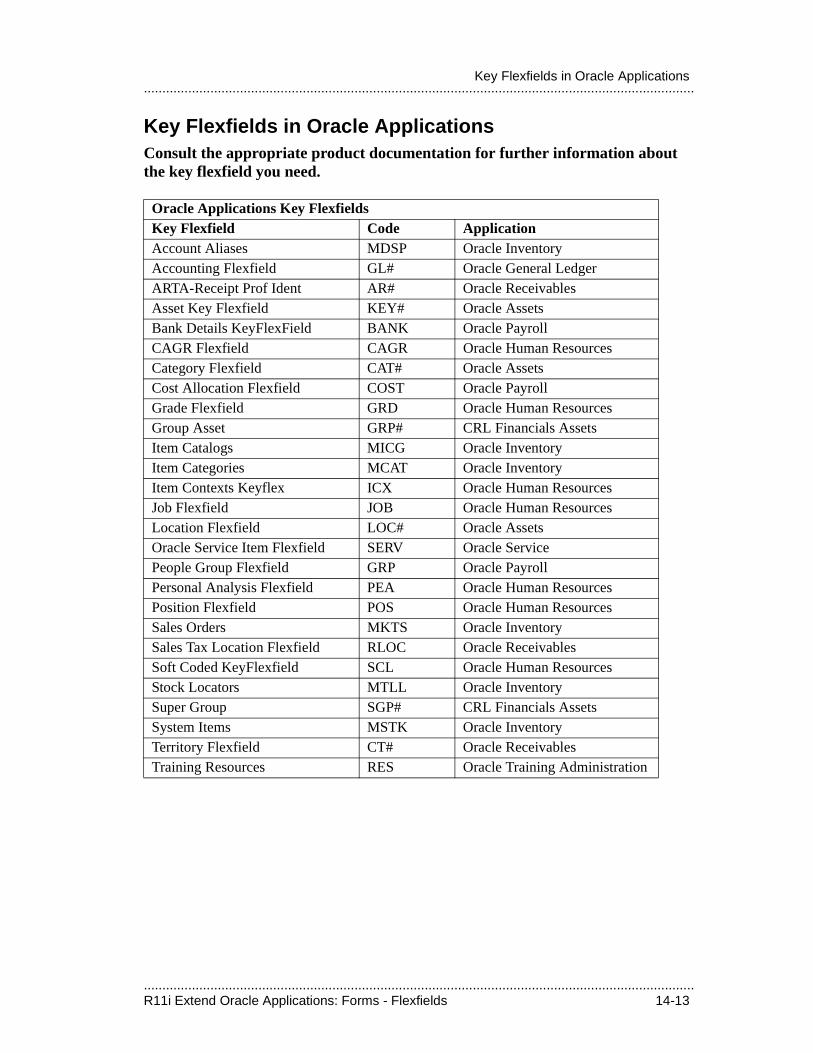
.....................................................................................................................................................R11i Extend Oracle Applications: Forms - Flexfields 14-13
.....................................................................................................................................................Key Flexfields in Oracle Applications
Key Flexfields in Oracle ApplicationsConsult the appropriate product documentation for further information about the key flexfield you need.
Oracle Applications Key FlexfieldsKey Flexfield Code ApplicationAccount Aliases MDSP Oracle InventoryAccounting Flexfield GL# Oracle General LedgerARTA-Receipt Prof Ident AR# Oracle ReceivablesAsset Key Flexfield KEY# Oracle AssetsBank Details KeyFlexField BANK Oracle PayrollCAGR Flexfield CAGR Oracle Human ResourcesCategory Flexfield CAT# Oracle AssetsCost Allocation Flexfield COST Oracle PayrollGrade Flexfield GRD Oracle Human ResourcesGroup Asset GRP# CRL Financials AssetsItem Catalogs MICG Oracle InventoryItem Categories MCAT Oracle InventoryItem Contexts Keyflex ICX Oracle Human ResourcesJob Flexfield JOB Oracle Human ResourcesLocation Flexfield LOC# Oracle AssetsOracle Service Item Flexfield SERV Oracle ServicePeople Group Flexfield GRP Oracle PayrollPersonal Analysis Flexfield PEA Oracle Human ResourcesPosition Flexfield POS Oracle Human ResourcesSales Orders MKTS Oracle InventorySales Tax Location Flexfield RLOC Oracle ReceivablesSoft Coded KeyFlexfield SCL Oracle Human ResourcesStock Locators MTLL Oracle InventorySuper Group SGP# CRL Financials AssetsSystem Items MSTK Oracle InventoryTerritory Flexfield CT# Oracle ReceivablesTraining Resources RES Oracle Training Administration
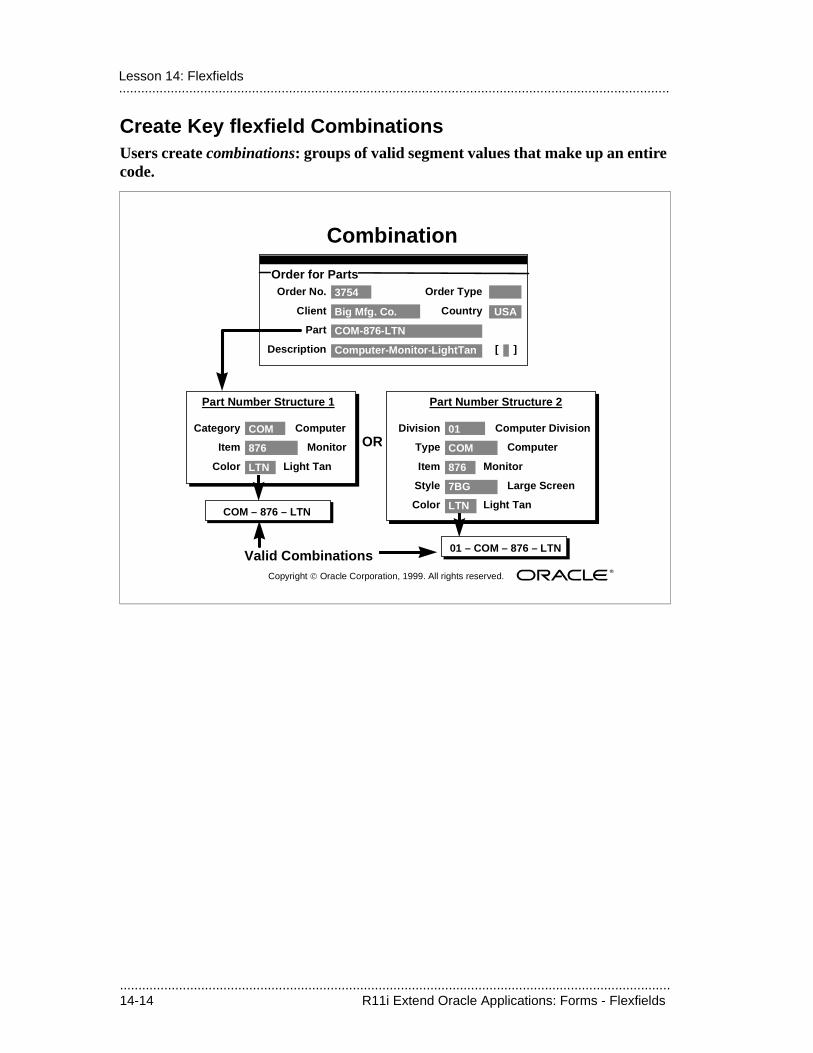
.....................................................................................................................................................14-14 R11i Extend Oracle Applications: Forms - Flexfields
.....................................................................................................................................................Lesson 14: Flexfields
Create Key flexfield CombinationsUsers create combinations: groups of valid segment values that make up an entire code.
Copyright Oracle Corporation, 1999. All rights reserved.
Combination
Order No.
Client
Part
Description
Order Type
Country
[ ]
Order for Parts3754
Big Mfg. Co.
COM-876-LTN
Computer-Monitor-LightTan
USA
Category
Item
Color
Part Number Structure 1
COM
876
LTN
Computer
Monitor
Light Tan
Computer Division
Computer
Monitor
Large Screen
Light Tan
Division
Type
Item
Style
Color
Part Number Structure 2
01
COM
876
7BG
LTN
OR
Valid Combinations
COM – 876 – LTN
01 – COM – 876 – LTN
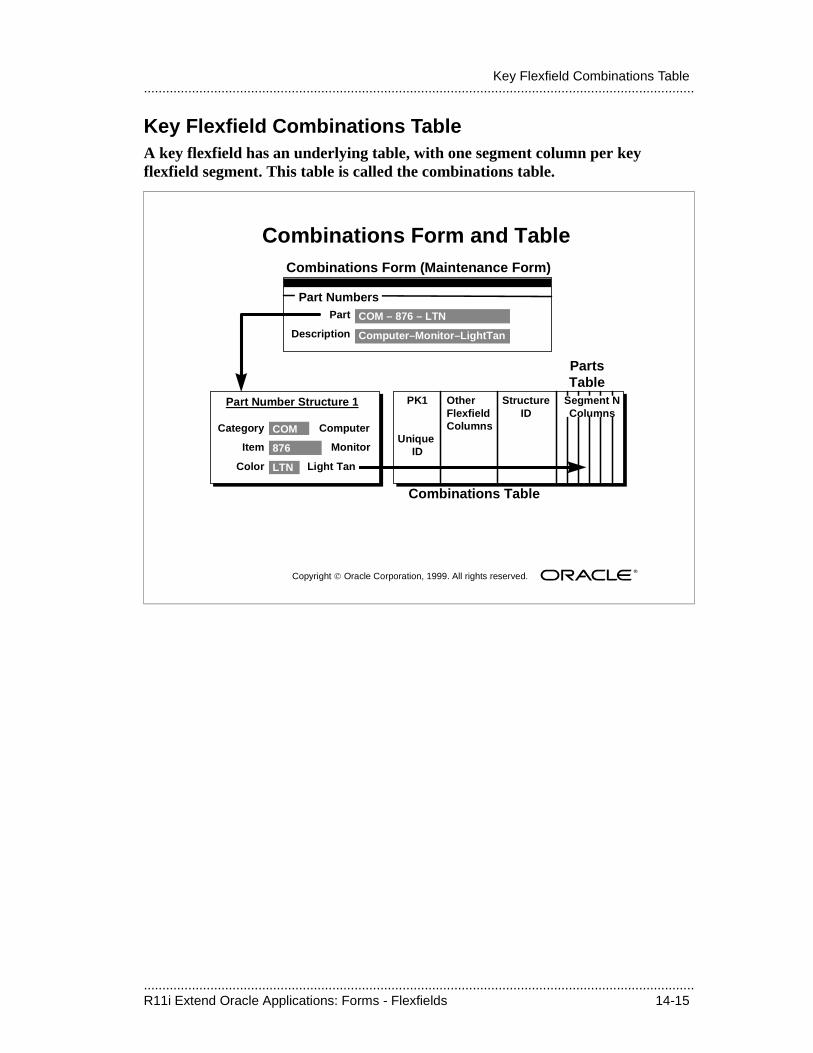
.....................................................................................................................................................R11i Extend Oracle Applications: Forms - Flexfields 14-15
.....................................................................................................................................................Key Flexfield Combinations Table
Key Flexfield Combinations TableA key flexfield has an underlying table, with one segment column per key flexfield segment. This table is called the combinations table.
Copyright Oracle Corporation, 1999. All rights reserved.
Combinations Form and Table
Category
Item
Color
Part Number Structure 1
COM
876
LTN
Computer
Monitor
Light Tan
Part
Description
Part Numbers
Combinations Form (Maintenance Form)
COM – 876 – LTN
Computer–Monitor–LightTan
PK1
Unique ID
PartsTable
Combinations Table
OtherFlexfieldColumns
StructureID
Segment NColumns
.....................................................................................................................................................14-16 R11i Extend Oracle Applications: Forms - Flexfields
.....................................................................................................................................................Lesson 14: Flexfields
Developers Build In Segment Columns
• A single structure can use only as many segments as the table has segment columns
• Choose the columns for each segment when defining the flexfield
Valid Combinations Stored Here
• Each valid combination of segment values corresponds to a value in the unique ID column. The unique ID column is a primary key for the combinations table
• The combinations table may also contain a column to identify the flexfield structure to use with the combination
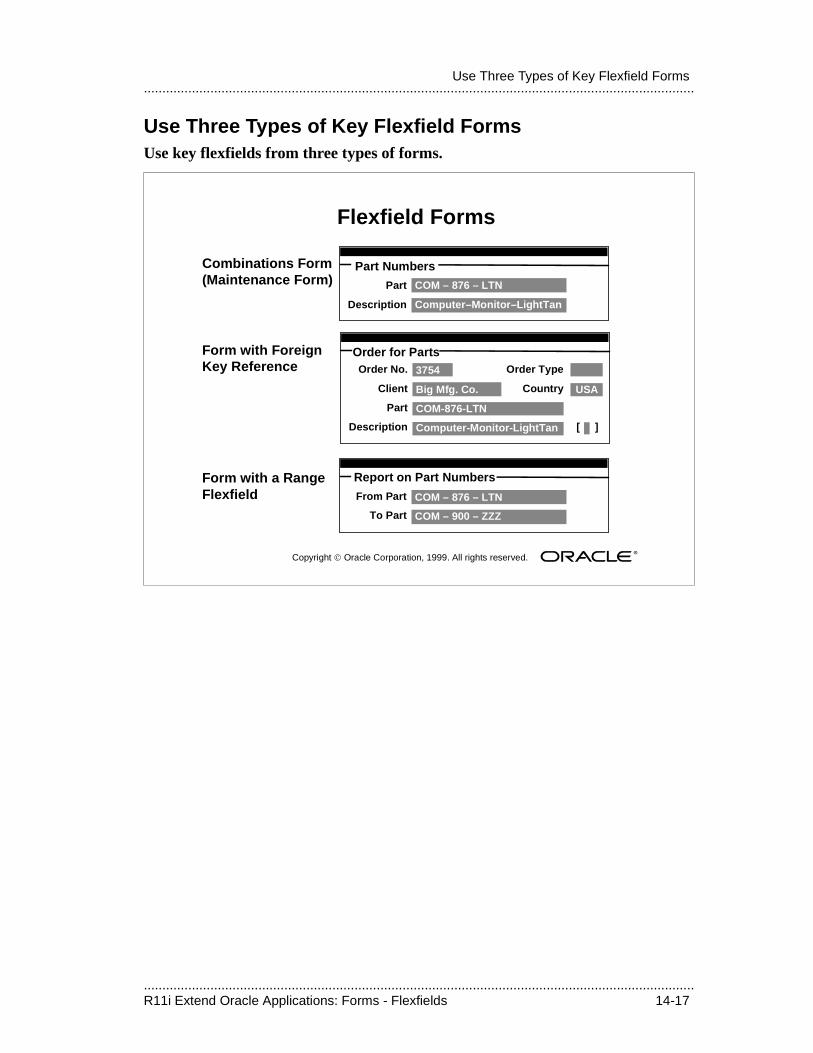
.....................................................................................................................................................R11i Extend Oracle Applications: Forms - Flexfields 14-17
.....................................................................................................................................................Use Three Types of Key Flexfield Forms
Use Three Types of Key Flexfield FormsUse key flexfields from three types of forms.
Copyright Oracle Corporation, 1999. All rights reserved.
Flexfield Forms
Combinations Form(Maintenance Form)
Part Numbers
COM – 876 – LTN
Computer–Monitor–LightTan
Order No.
Client
Part
Description
Order Type
Country
[ ]
Order for Parts3754
Big Mfg. Co.
COM-876-LTN
Computer-Monitor-LightTan
USA
Report on Part Numbers
COM – 876 – LTN
COM – 900 – ZZZ
Part
Description
From Part
To Part
Form with ForeignKey Reference
Form with a RangeFlexfield
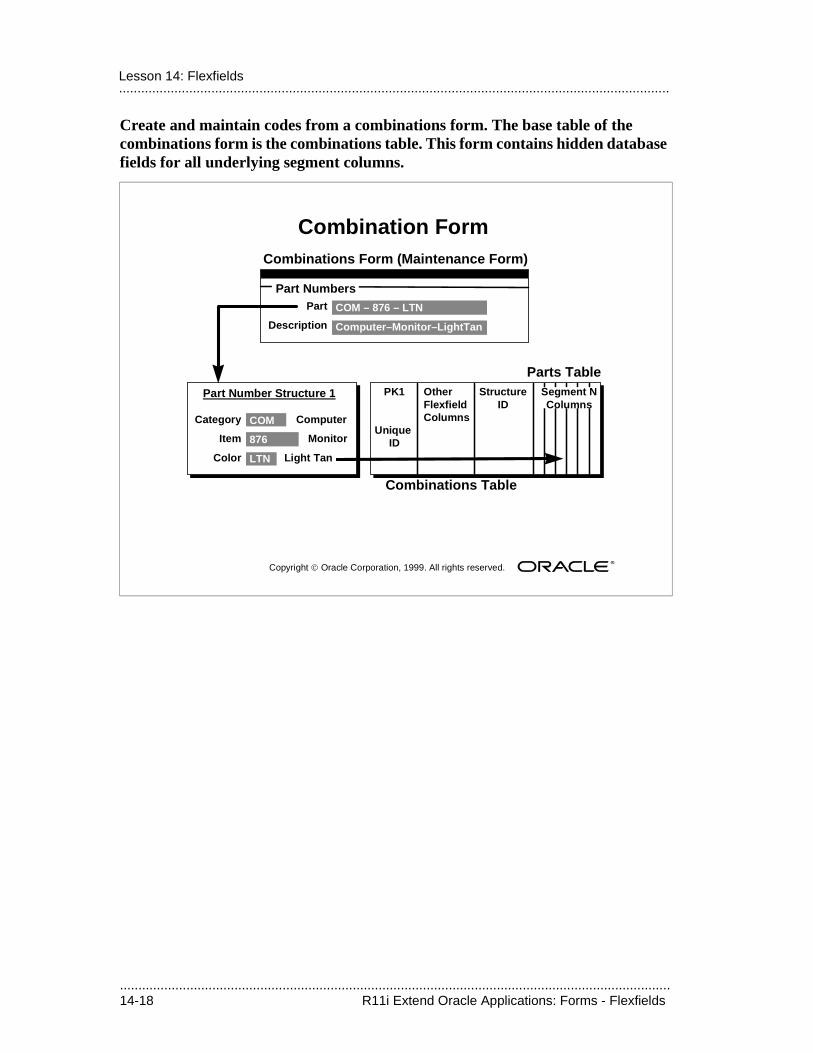
.....................................................................................................................................................14-18 R11i Extend Oracle Applications: Forms - Flexfields
.....................................................................................................................................................Lesson 14: Flexfields
Create and maintain codes from a combinations form. The base table of the combinations form is the combinations table. This form contains hidden database fields for all underlying segment columns.
Copyright Oracle Corporation, 1999. All rights reserved.
Combination Form
Category
Item
Color
Part Number Structure 1
COM
876
LTN
Computer
Monitor
Light Tan
Part
Description
Part Numbers
Combinations Form (Maintenance Form)
COM – 876 – LTN
Computer–Monitor–LightTan
PK1
Unique ID
Parts Table
Combinations Table
OtherFlexfieldColumns
StructureID
Segment NColumns
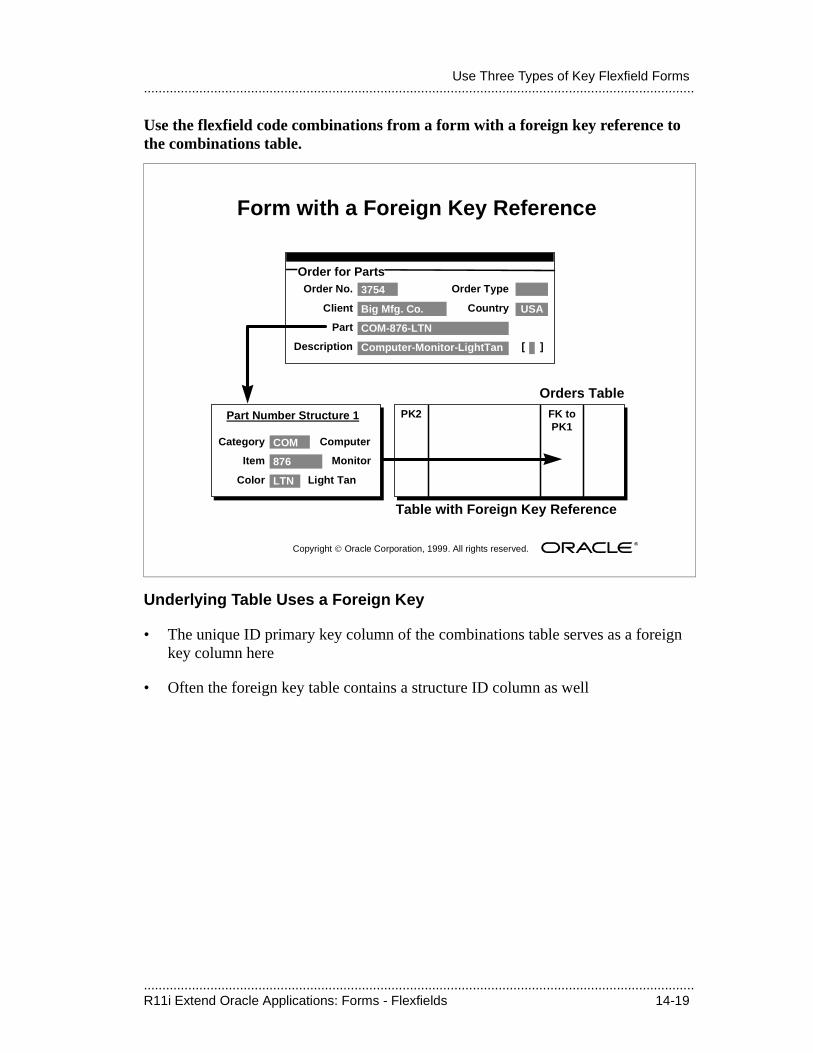
.....................................................................................................................................................R11i Extend Oracle Applications: Forms - Flexfields 14-19
.....................................................................................................................................................Use Three Types of Key Flexfield Forms
Use the flexfield code combinations from a form with a foreign key reference to the combinations table.
Underlying Table Uses a Foreign Key
• The unique ID primary key column of the combinations table serves as a foreign key column here
• Often the foreign key table contains a structure ID column as well
Copyright Oracle Corporation, 1999. All rights reserved.
Form with a Foreign Key Reference
Order No.
Client
Part
Description
Order Type
Country
[ ]
Order for Parts3754
Big Mfg. Co.
COM-876-LTN
Computer-Monitor-LightTan
USA
Category
Item
Color
Part Number Structure 1
COM
876
LTN
Computer
Monitor
Light Tan
PK2
Orders Table
Table with Foreign Key Reference
FK toPK1
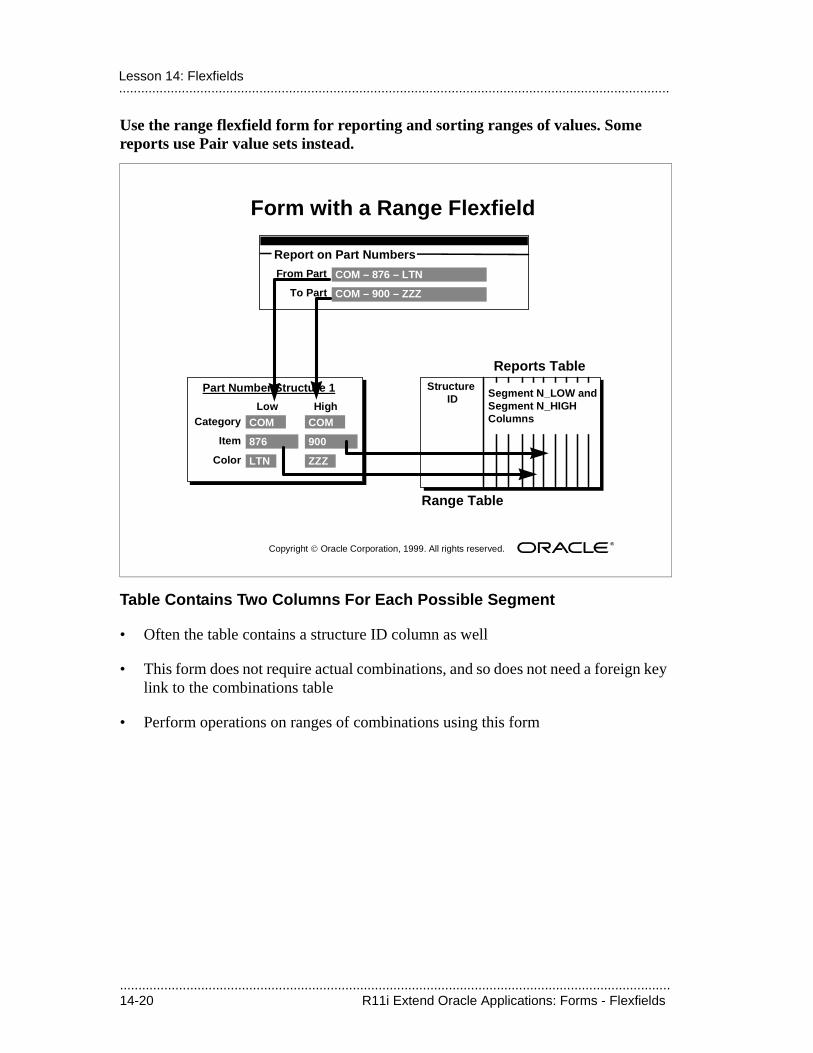
.....................................................................................................................................................14-20 R11i Extend Oracle Applications: Forms - Flexfields
.....................................................................................................................................................Lesson 14: Flexfields
Use the range flexfield form for reporting and sorting ranges of values. Some reports use Pair value sets instead.
Table Contains Two Columns For Each Possible Segment
• Often the table contains a structure ID column as well
• This form does not require actual combinations, and so does not need a foreign key link to the combinations table
• Perform operations on ranges of combinations using this form
Copyright Oracle Corporation, 1999. All rights reserved.
Form with a Range Flexfield
Report on Part Numbers
COM – 876 – LTN
COM – 900 – ZZZ
From Part
To Part
Category
Item
Color
Part Number Structure 1
COM
876
LTN
Reports Table
Range Table
Structure ID Segment N_LOW and
Segment N_HIGHColumns
Low High
COM
900
ZZZ
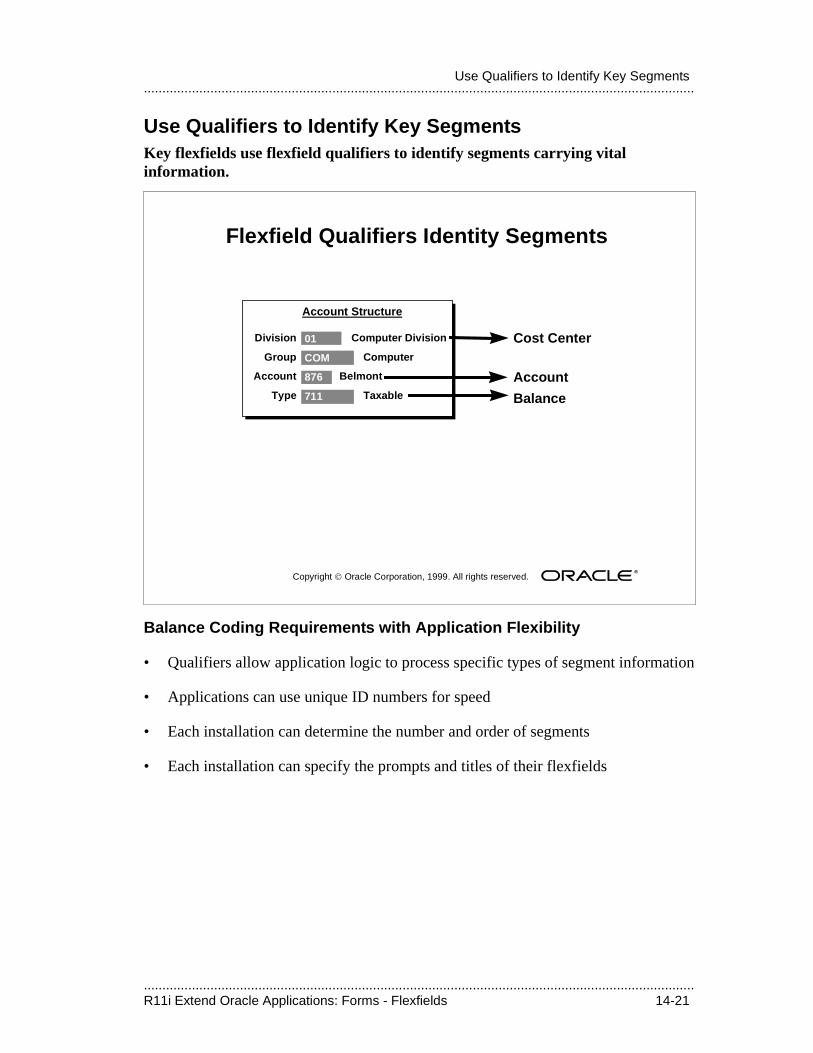
.....................................................................................................................................................R11i Extend Oracle Applications: Forms - Flexfields 14-21
.....................................................................................................................................................Use Qualifiers to Identify Key Segments
Use Qualifiers to Identify Key SegmentsKey flexfields use flexfield qualifiers to identify segments carrying vital information.
Balance Coding Requirements with Application Flexibility
• Qualifiers allow application logic to process specific types of segment information
• Applications can use unique ID numbers for speed
• Each installation can determine the number and order of segments
• Each installation can specify the prompts and titles of their flexfields
Copyright Oracle Corporation, 1999. All rights reserved.
Flexfield Qualifiers Identity Segments
Computer Division
Computer
Belmont
Taxable
Division
Group
Account
Type
Account Structure
01
COM
876
711
Cost Center
Account
Balance
.....................................................................................................................................................14-22 R11i Extend Oracle Applications: Forms - Flexfields
.....................................................................................................................................................Lesson 14: Flexfields
Identify which key segments have specific properties or importance within an application with flexfield and segment qualifiers.
Include Elements Required by the Application
• For example, Oracle General Ledger requires a segment in the Accounting Flexfield that can be used for balancing operations
• Other applications, such as Human Resources, want to display certain segments on some forms but not others
• Maintain current practices while still using all the functionality of the application. Segments identified with qualifiers are not associated with a particular placement in the flexfield
Use Two Types of Qualifiers
• Flexfield qualifier, which designates a particular segment within a flexfield
• Segment qualifier, which designates a type of value within a segment
.....................................................................................................................................................R11i Extend Oracle Applications: Forms - Flexfields 14-23
.....................................................................................................................................................Use Qualifiers to Identify Key Segments
Identify segments within a flexfield with flexfield qualifiers.
The Flexfield Asks Each Segment a Yes/No Question
• Flexfield qualifiers may be unique, global, and required
• Unique: “Is this the segment that this flexfield can only have one of?”
• Required: “Is this the segment this flexfield must have to do its work?”
• Global: “Is this a segment?” Global qualifiers exist as “carriers” for segment qualifiers.
Assign Flexfield Qualifiers To Segments
• Do not assign global qualifiers since they apply automatically to every segment in the flexfield
• Users assign flexfield qualifiers while defining segments
.....................................................................................................................................................14-24 R11i Extend Oracle Applications: Forms - Flexfields
.....................................................................................................................................................Lesson 14: Flexfields
Identify Segments For Calculating and Reporting Operations
• Oracle General Ledger and Oracle Assets use flexfield qualifiers with the Accounting Flexfield
• Oracle Assets uses flexfield qualifiers with the Location Flexfield and the Asset Category Flexfield
• Oracle Revenue Accounting uses flexfield qualifiers with the Sales Territory Flexfield
• Oracle Human Resources uses flexfield qualifiers with the Soft Coded Key Flexfield to identify segments that should not display on certain forms
• Oracle Payroll uses flexfield qualifiers with the Cost Allocation Flexfield to identify segments that should not display on certain forms
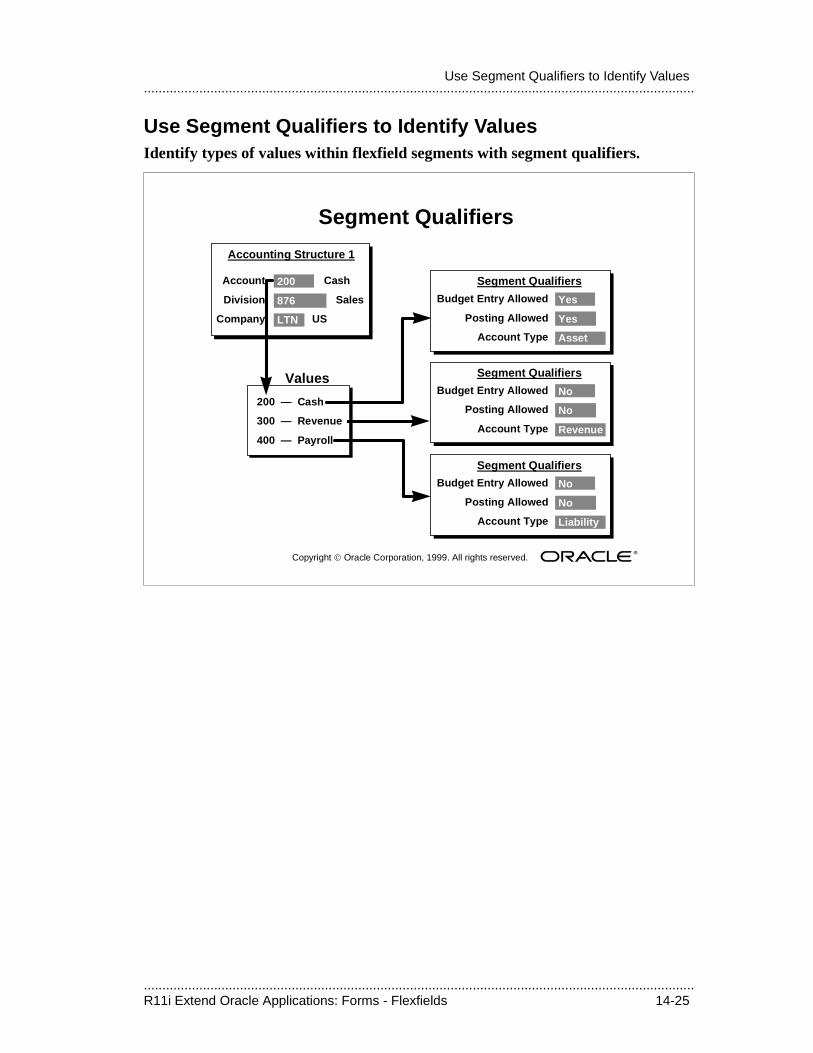
.....................................................................................................................................................R11i Extend Oracle Applications: Forms - Flexfields 14-25
.....................................................................................................................................................Use Segment Qualifiers to Identify Values
Use Segment Qualifiers to Identify ValuesIdentify types of values within flexfield segments with segment qualifiers.
Copyright Oracle Corporation, 1999. All rights reserved.
Segment Qualifiers
Cash
Sales
US
Account
Division
Company
Accounting Structure 1
200
876
LTN
Budget Entry Allowed
Posting Allowed
Account Type
Segment Qualifiers
Yes
Yes
Asset
Budget Entry Allowed
Posting Allowed
Account Type
Segment Qualifiers
No
No
Revenue
Budget Entry Allowed
Posting Allowed
Account Type
Segment Qualifiers
No
No
Liability
200 — Cash
300 — Revenue
400 — Payroll
Values
.....................................................................................................................................................14-26 R11i Extend Oracle Applications: Forms - Flexfields
.....................................................................................................................................................Lesson 14: Flexfields
Describe The Values In a Segment
• A segment qualifier is like the segment asking each value a question “What type of value are you?”
• For example, assign an account type of “Expense” to the Account segment value 3003
Use Segment Qualifiers with the Accounting Flexfield
• Detail Budgeting Allowed
• Detail Posting Allowed
• Account Type: Asset, Expense, Liability, Ownership/Stockholder’s Equity, or Revenue

.....................................................................................................................................................R11i Extend Oracle Applications: Forms - Flexfields 14-27
.....................................................................................................................................................Create New Combinations Dynamically
Create New Combinations DynamicallyAllow the definition of new flexfield combinations from forms with a foreign key reference.
Copyright Oracle Corporation, 1999. All rights reserved.
Dynamic Inserts Allowed
Order No.
Client
Part
Description
Order Type
Country
[ ]
Order for Parts3754
Big Mfg. Co.
COM-876-LTN
Computer-Monitor-LightTan
USA
Form with Foreign Key Reference
Category
Item
Color
Part Number Structure 1
COM
876
LTN
Computer
Monitor
Light Tan
Parts Table
Combinations Table
PK1
Unique ID
OtherFlexfieldColumns
StructureID
Segment NColumns
Orders Table
Table with ForeignKey Reference
PK2 FK toPK1
New Combination (New Record)Created from a Form with aForeign Key Reference
.....................................................................................................................................................14-28 R11i Extend Oracle Applications: Forms - Flexfields
.....................................................................................................................................................Lesson 14: Flexfields
Dynamic Inserts Allowed
• Set and change this property while defining the flexfield structure on the Define Key Flexfield Segments form
• Sometimes this property is not technically feasible
– If the combinations table includes mandatory columns that cannot be filled by the flexfield
– Who columns, CCID columns, and enabled/activation date information can be filled by the flexfield
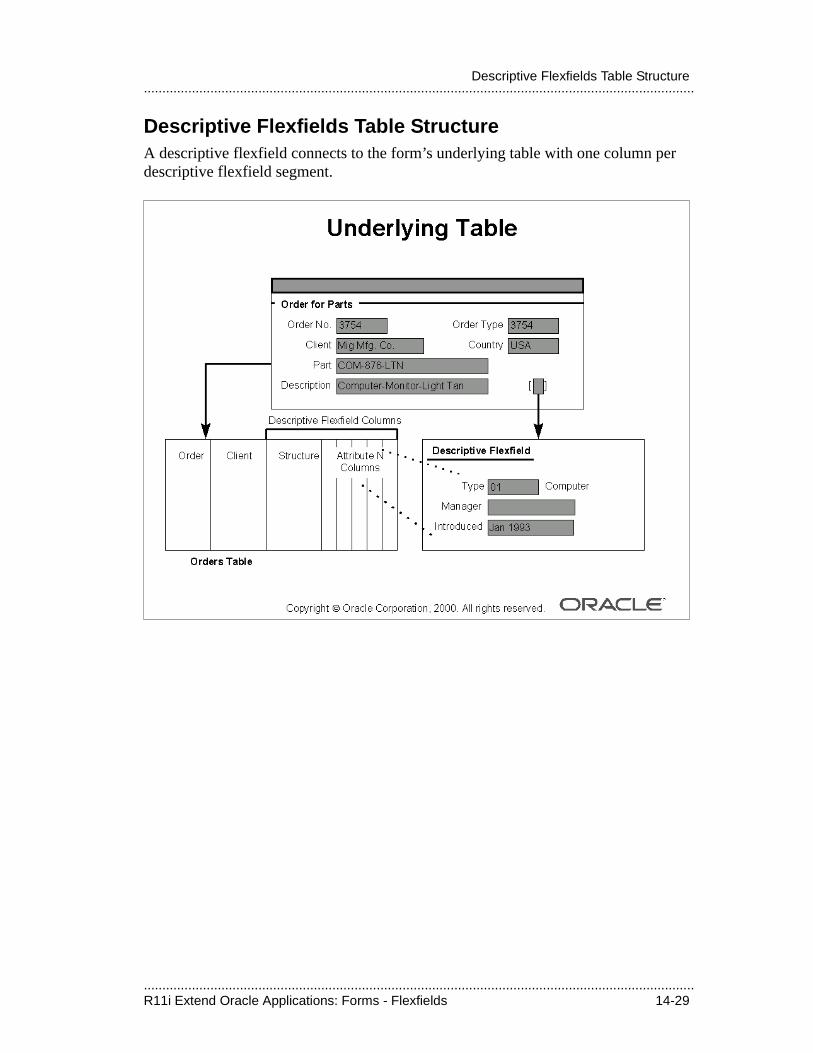
.....................................................................................................................................................R11i Extend Oracle Applications: Forms - Flexfields 14-29
.....................................................................................................................................................Descriptive Flexfields Table Structure
Descriptive Flexfields Table StructureA descriptive flexfield connects to the form’s underlying table with one column per descriptive flexfield segment.
.....................................................................................................................................................14-30 R11i Extend Oracle Applications: Forms - Flexfields
.....................................................................................................................................................Lesson 14: Flexfields
Overview of Developing a FlexfieldFlexfields are built in five stages:
1. Design the Table Structure
• You design a flexfield into the application database table structure
• The flexfield, especially a key flexfield, becomes an integral part of the application
• Use SQL*Plus to create your tables
2. Create the Fields
• You paint necessary fields onto the form. These include both visible and hidden fields
• You use the Oracle Forms Designer tool
3. Call Appropriate Routines
• Use Oracle Forms Designer to call Oracle Application Object Library routines from the form
• Insert necessary trigger text and handlers
4. Registration
• The developer registers the flexfield initially using an Oracle Application Object Library form
5. Definition
• The user defines the registered flexfield using Oracle Application Object Library setup forms
– All Oracle Applications that use flexfields include the Oracle Application Object Library forms needed to define flexfields
– Flexfield forms also appear on the System Administrator menu
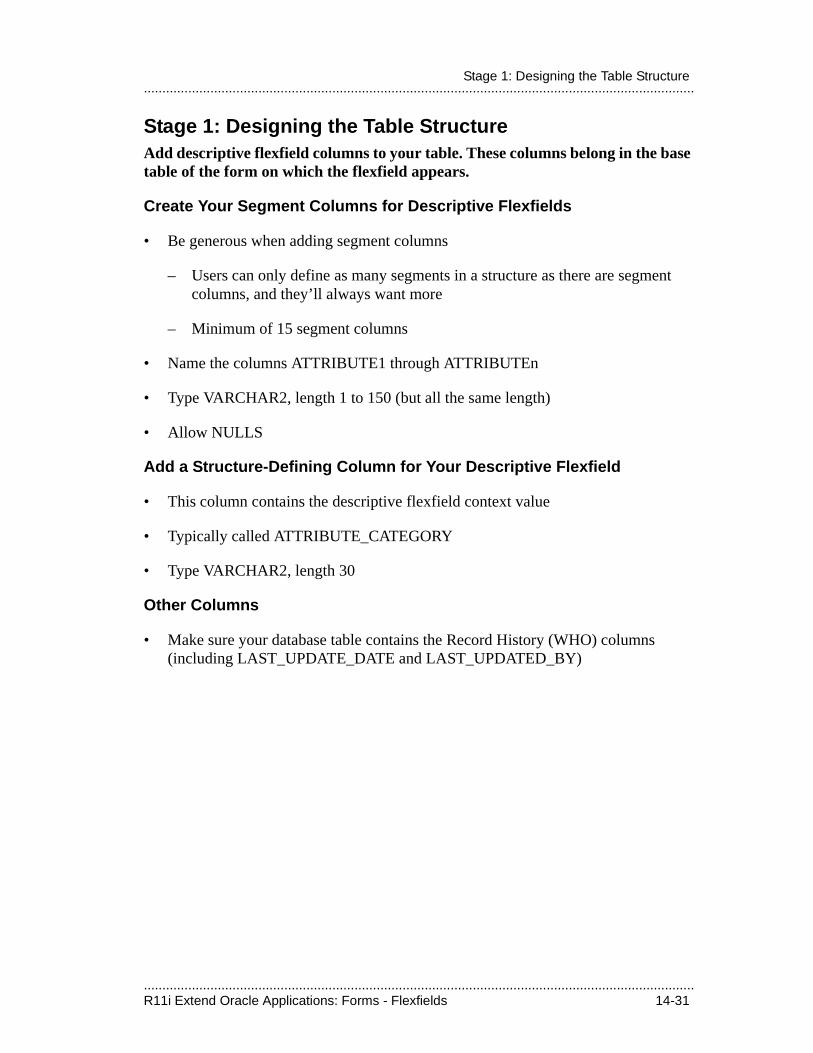
.....................................................................................................................................................R11i Extend Oracle Applications: Forms - Flexfields 14-31
.....................................................................................................................................................Stage 1: Designing the Table Structure
Stage 1: Designing the Table StructureAdd descriptive flexfield columns to your table. These columns belong in the base table of the form on which the flexfield appears.
Create Your Segment Columns for Descriptive Flexfields
• Be generous when adding segment columns
– Users can only define as many segments in a structure as there are segment columns, and they’ll always want more
– Minimum of 15 segment columns
• Name the columns ATTRIBUTE1 through ATTRIBUTEn
• Type VARCHAR2, length 1 to 150 (but all the same length)
• Allow NULLS
Add a Structure-Defining Column for Your Descriptive Flexfield
• This column contains the descriptive flexfield context value
• Typically called ATTRIBUTE_CATEGORY
• Type VARCHAR2, length 30
Other Columns
• Make sure your database table contains the Record History (WHO) columns (including LAST_UPDATE_DATE and LAST_UPDATED_BY)
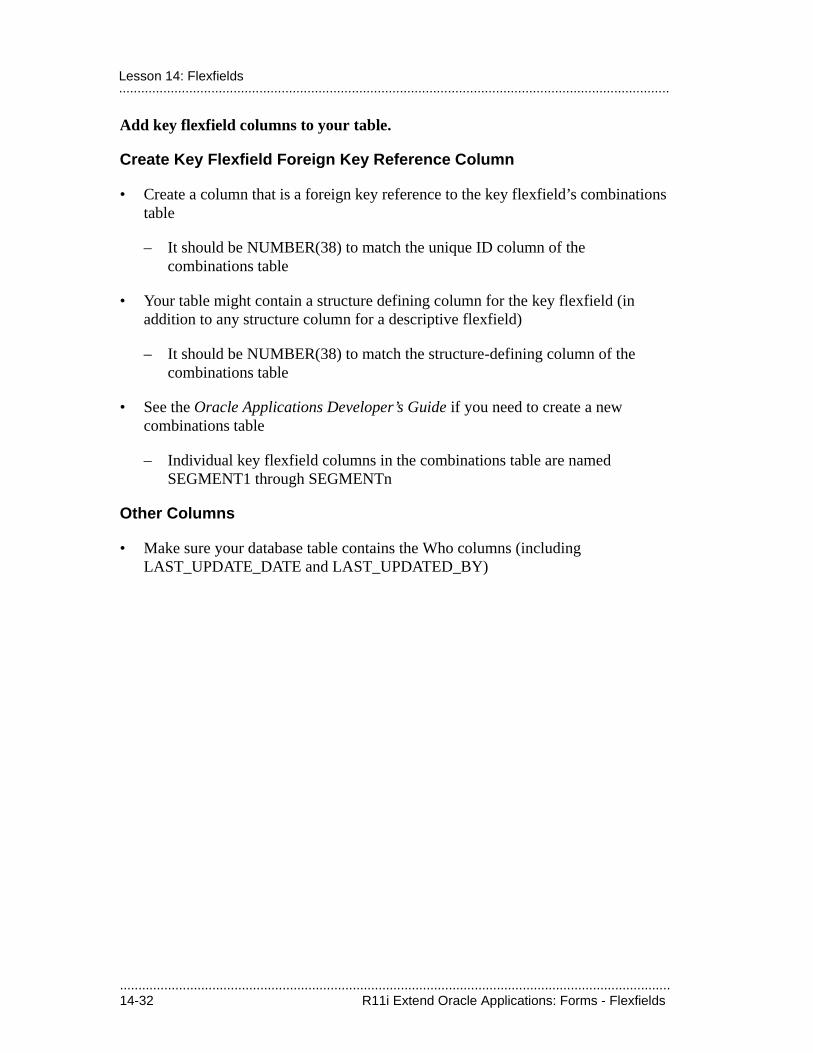
.....................................................................................................................................................14-32 R11i Extend Oracle Applications: Forms - Flexfields
.....................................................................................................................................................Lesson 14: Flexfields
Add key flexfield columns to your table.
Create Key Flexfield Foreign Key Reference Column
• Create a column that is a foreign key reference to the key flexfield’s combinations table
– It should be NUMBER(38) to match the unique ID column of the combinations table
• Your table might contain a structure defining column for the key flexfield (in addition to any structure column for a descriptive flexfield)
– It should be NUMBER(38) to match the structure-defining column of the combinations table
• See the Oracle Applications Developer’s Guide if you need to create a new combinations table
– Individual key flexfield columns in the combinations table are named SEGMENT1 through SEGMENTn
Other Columns
• Make sure your database table contains the Who columns (including LAST_UPDATE_DATE and LAST_UPDATED_BY)
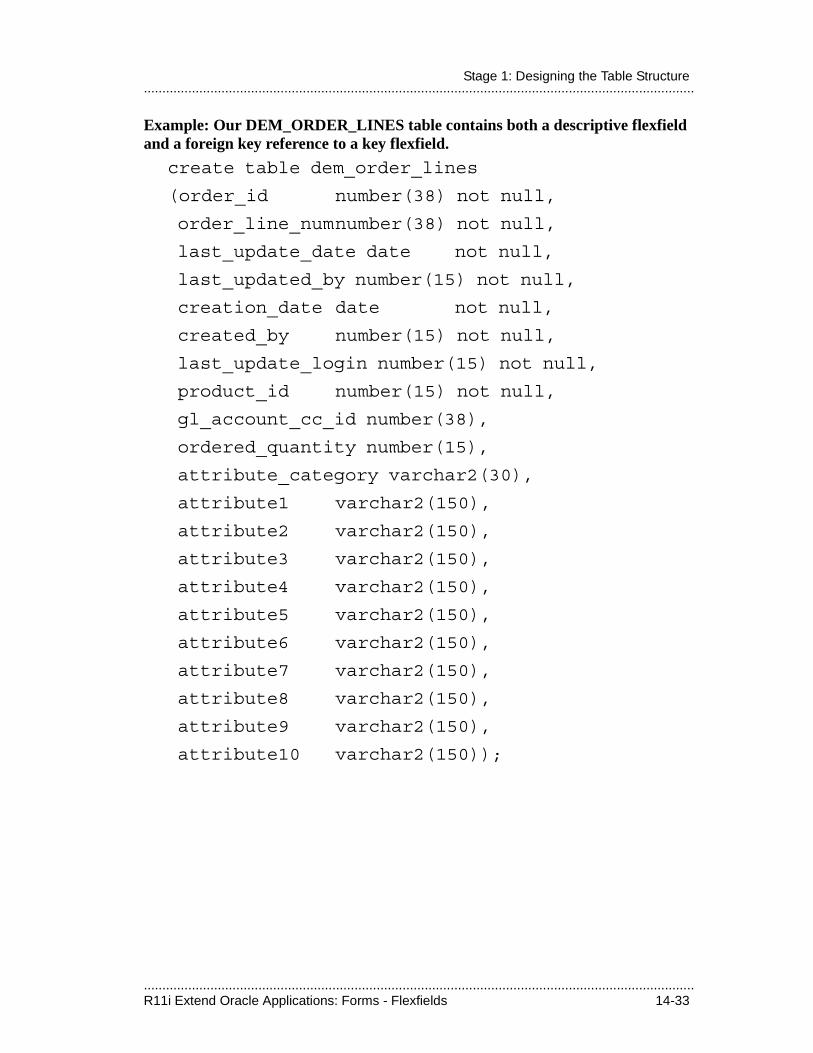
.....................................................................................................................................................R11i Extend Oracle Applications: Forms - Flexfields 14-33
.....................................................................................................................................................Stage 1: Designing the Table Structure
Example: Our DEM_ORDER_LINES table contains both a descriptive flexfield and a foreign key reference to a key flexfield.
create table dem_order_lines
(order_id number(38) not null,
order_line_numnumber(38) not null,
last_update_date date not null,
last_updated_by number(15) not null,
creation_date date not null,
created_by number(15) not null,
last_update_login number(15) not null,
product_id number(15) not null,
gl_account_cc_id number(38),
ordered_quantity number(15),
attribute_category varchar2(30),
attribute1 varchar2(150),
attribute2 varchar2(150),
attribute3 varchar2(150),
attribute4 varchar2(150),
attribute5 varchar2(150),
attribute6 varchar2(150),
attribute7 varchar2(150),
attribute8 varchar2(150),
attribute9 varchar2(150),
attribute10 varchar2(150));

.....................................................................................................................................................14-34 R11i Extend Oracle Applications: Forms - Flexfields
.....................................................................................................................................................Lesson 14: Flexfields
Example: Our DEM_ORDER_LINES table contains a descriptive flexfield and a foreign key reference to a key flexfield.
Descriptive Flexfield
• Descriptive flexfield segment columns are ATTRIBUTE1 through ATTRIBUTE10
• Structure defining column is ATTRIBUTE_CATEGORY
Key Flexfield
• Column GL_ACCOUNT_CC_ID is a foreign key reference to the GL_CODE_COMBINATIONS table, which is the combinations table for the Accounting Flexfield
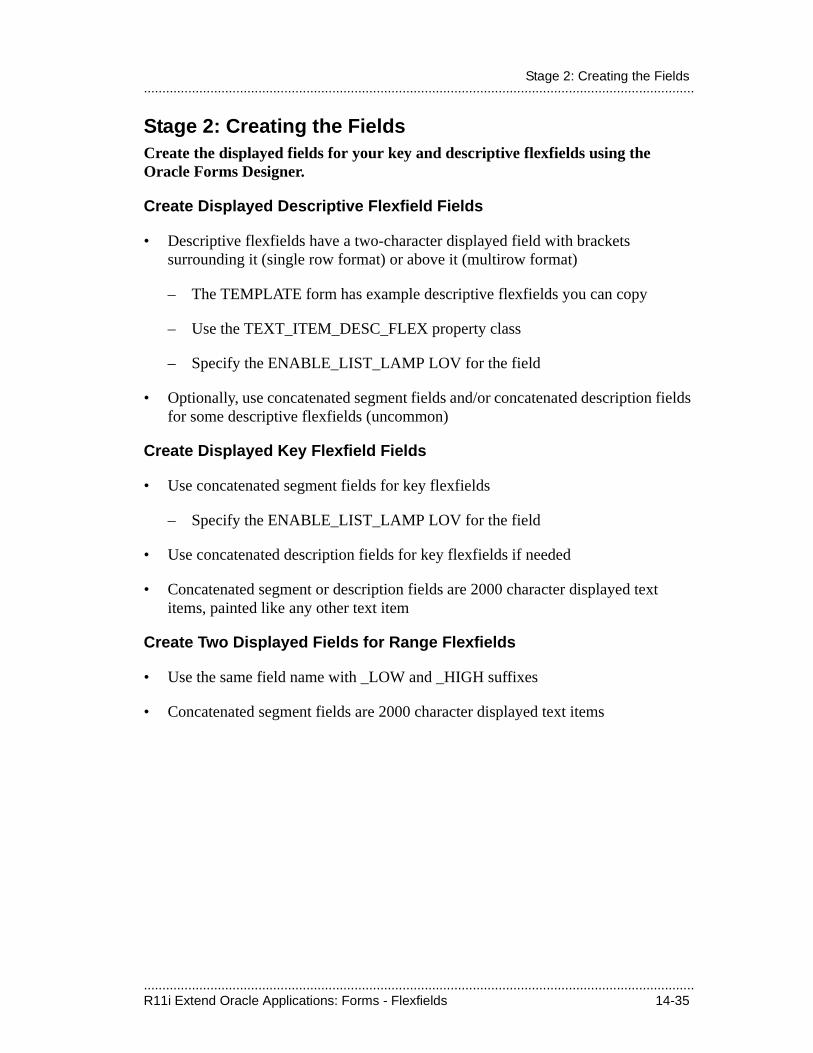
.....................................................................................................................................................R11i Extend Oracle Applications: Forms - Flexfields 14-35
.....................................................................................................................................................Stage 2: Creating the Fields
Stage 2: Creating the FieldsCreate the displayed fields for your key and descriptive flexfields using the Oracle Forms Designer.
Create Displayed Descriptive Flexfield Fields
• Descriptive flexfields have a two-character displayed field with brackets surrounding it (single row format) or above it (multirow format)
– The TEMPLATE form has example descriptive flexfields you can copy
– Use the TEXT_ITEM_DESC_FLEX property class
– Specify the ENABLE_LIST_LAMP LOV for the field
• Optionally, use concatenated segment fields and/or concatenated description fields for some descriptive flexfields (uncommon)
Create Displayed Key Flexfield Fields
• Use concatenated segment fields for key flexfields
– Specify the ENABLE_LIST_LAMP LOV for the field
• Use concatenated description fields for key flexfields if needed
• Concatenated segment or description fields are 2000 character displayed text items, painted like any other text item
Create Two Displayed Fields for Range Flexfields
• Use the same field name with _LOW and _HIGH suffixes
• Concatenated segment fields are 2000 character displayed text items
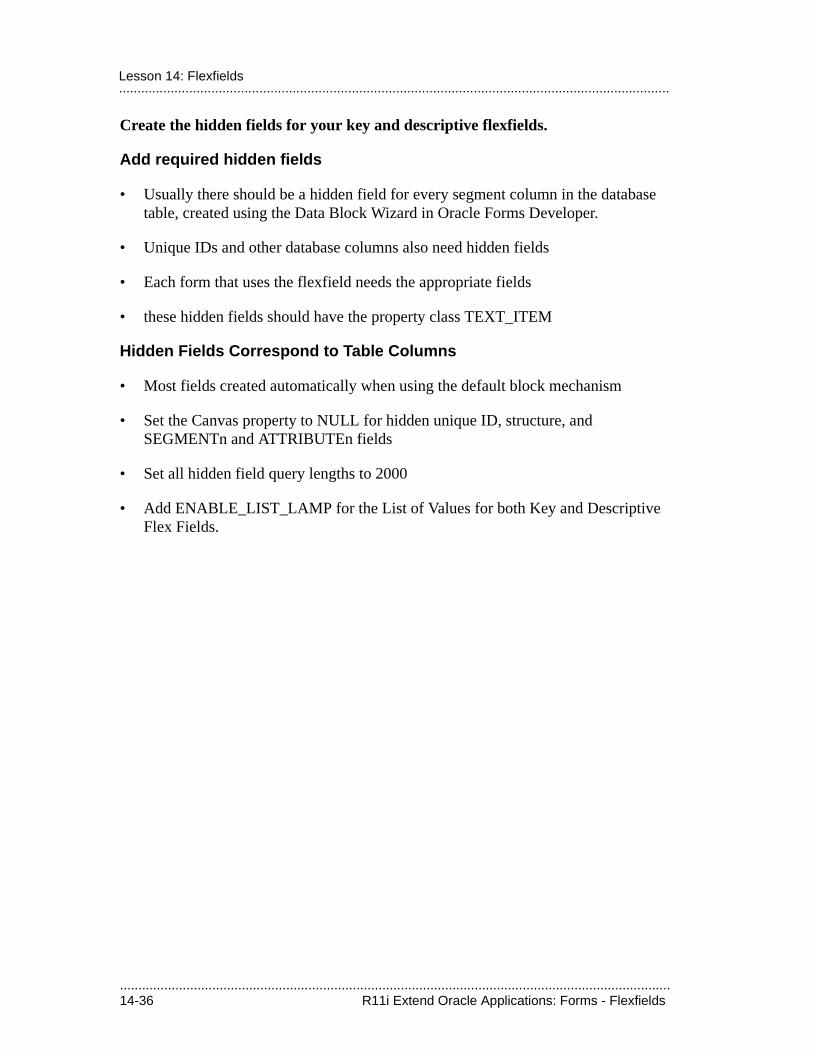
.....................................................................................................................................................14-36 R11i Extend Oracle Applications: Forms - Flexfields
.....................................................................................................................................................Lesson 14: Flexfields
Create the hidden fields for your key and descriptive flexfields.
Add required hidden fields
• Usually there should be a hidden field for every segment column in the database table, created using the Data Block Wizard in Oracle Forms Developer.
• Unique IDs and other database columns also need hidden fields
• Each form that uses the flexfield needs the appropriate fields
• these hidden fields should have the property class TEXT_ITEM
Hidden Fields Correspond to Table Columns
• Most fields created automatically when using the default block mechanism
• Set the Canvas property to NULL for hidden unique ID, structure, and SEGMENTn and ATTRIBUTEn fields
• Set all hidden field query lengths to 2000
• Add ENABLE_LIST_LAMP for the List of Values for both Key and Descriptive Flex Fields.
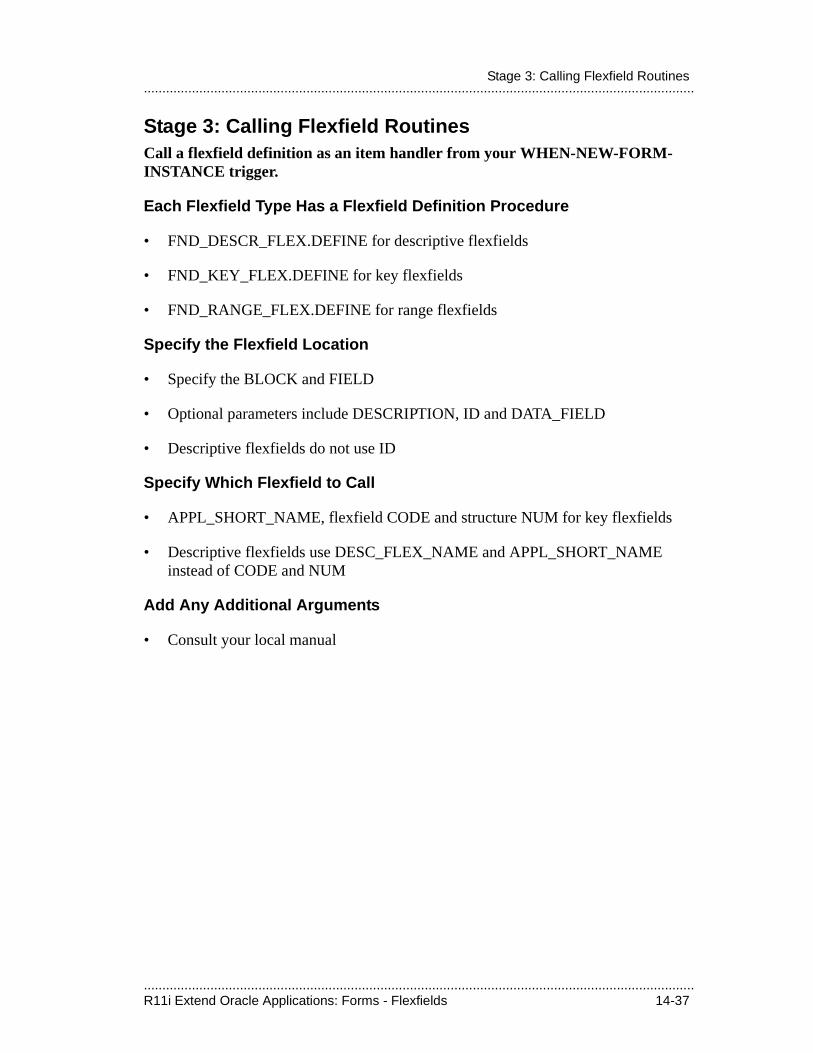
.....................................................................................................................................................R11i Extend Oracle Applications: Forms - Flexfields 14-37
.....................................................................................................................................................Stage 3: Calling Flexfield Routines
Stage 3: Calling Flexfield RoutinesCall a flexfield definition as an item handler from your WHEN-NEW-FORM-INSTANCE trigger.
Each Flexfield Type Has a Flexfield Definition Procedure
• FND_DESCR_FLEX.DEFINE for descriptive flexfields
• FND_KEY_FLEX.DEFINE for key flexfields
• FND_RANGE_FLEX.DEFINE for range flexfields
Specify the Flexfield Location
• Specify the BLOCK and FIELD
• Optional parameters include DESCRIPTION, ID and DATA_FIELD
• Descriptive flexfields do not use ID
Specify Which Flexfield to Call
• APPL_SHORT_NAME, flexfield CODE and structure NUM for key flexfields
• Descriptive flexfields use DESC_FLEX_NAME and APPL_SHORT_NAME instead of CODE and NUM
Add Any Additional Arguments
• Consult your local manual
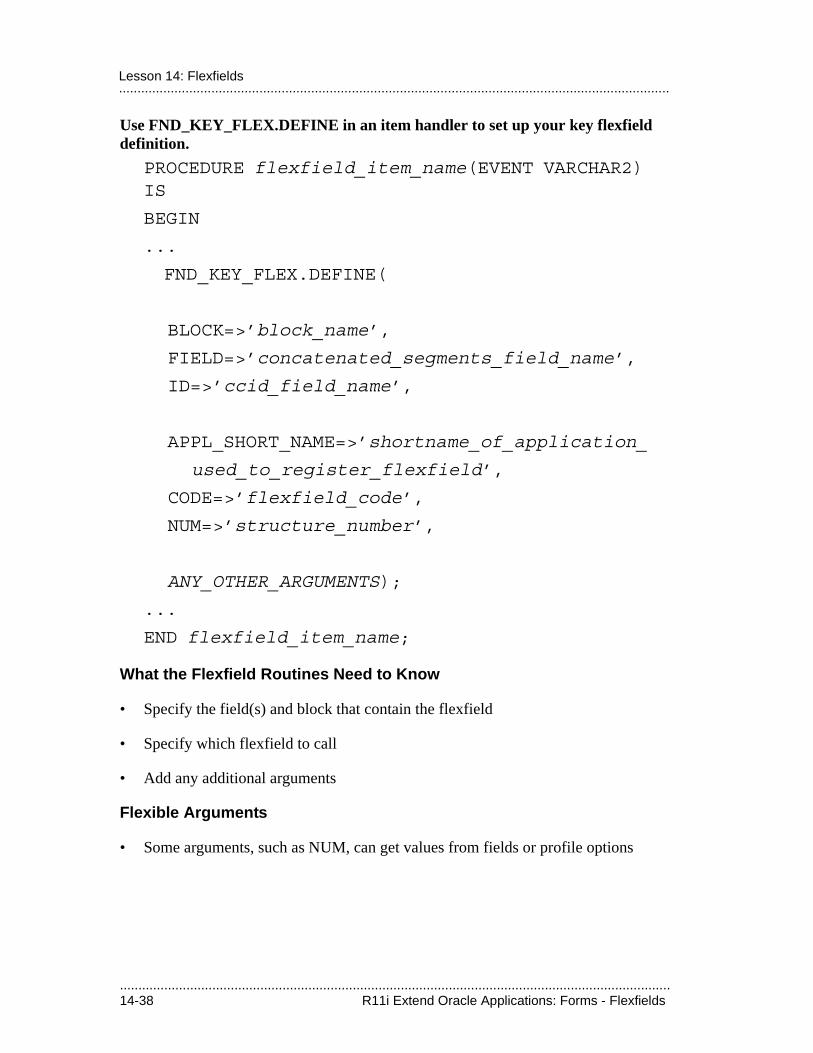
.....................................................................................................................................................14-38 R11i Extend Oracle Applications: Forms - Flexfields
.....................................................................................................................................................Lesson 14: Flexfields
Use FND_KEY_FLEX.DEFINE in an item handler to set up your key flexfield definition.
PROCEDURE flexfield_item_name(EVENT VARCHAR2) IS
BEGIN
...
FND_KEY_FLEX.DEFINE(
BLOCK=>’block_name’,
FIELD=>’concatenated_segments_field_name’,
ID=>’ccid_field_name’,
APPL_SHORT_NAME=>’shortname_of_application_
used_to_register_flexfield’,
CODE=>’flexfield_code’,
NUM=>’structure_number’,
ANY_OTHER_ARGUMENTS);
...
END flexfield_item_name;
What the Flexfield Routines Need to Know
• Specify the field(s) and block that contain the flexfield
• Specify which flexfield to call
• Add any additional arguments
Flexible Arguments
• Some arguments, such as NUM, can get values from fields or profile options
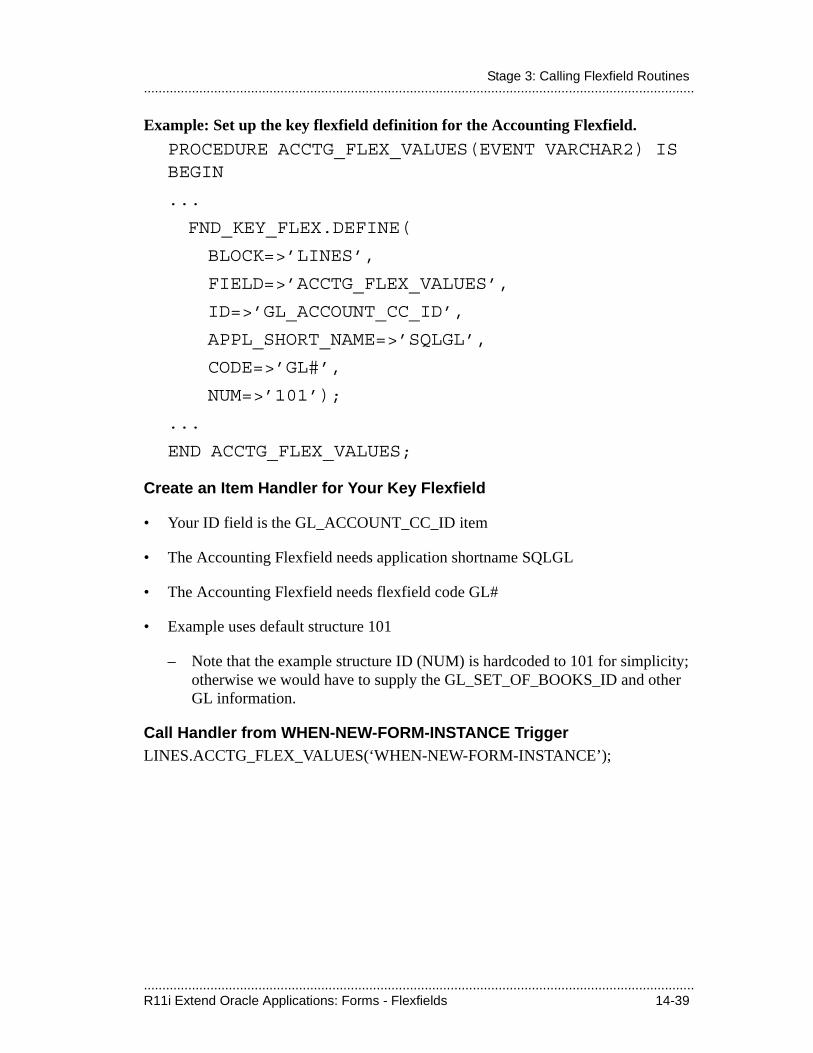
.....................................................................................................................................................R11i Extend Oracle Applications: Forms - Flexfields 14-39
.....................................................................................................................................................Stage 3: Calling Flexfield Routines
Example: Set up the key flexfield definition for the Accounting Flexfield.
PROCEDURE ACCTG_FLEX_VALUES(EVENT VARCHAR2) ISBEGIN
...
FND_KEY_FLEX.DEFINE(
BLOCK=>’LINES’,
FIELD=>’ACCTG_FLEX_VALUES’,
ID=>’GL_ACCOUNT_CC_ID’,
APPL_SHORT_NAME=>’SQLGL’,
CODE=>’GL#’,
NUM=>’101’);
...
END ACCTG_FLEX_VALUES;
Create an Item Handler for Your Key Flexfield
• Your ID field is the GL_ACCOUNT_CC_ID item
• The Accounting Flexfield needs application shortname SQLGL
• The Accounting Flexfield needs flexfield code GL#
• Example uses default structure 101
– Note that the example structure ID (NUM) is hardcoded to 101 for simplicity; otherwise we would have to supply the GL_SET_OF_BOOKS_ID and other GL information.
Call Handler from WHEN-NEW-FORM-INSTANCE TriggerLINES.ACCTG_FLEX_VALUES(‘WHEN-NEW-FORM-INSTANCE’);
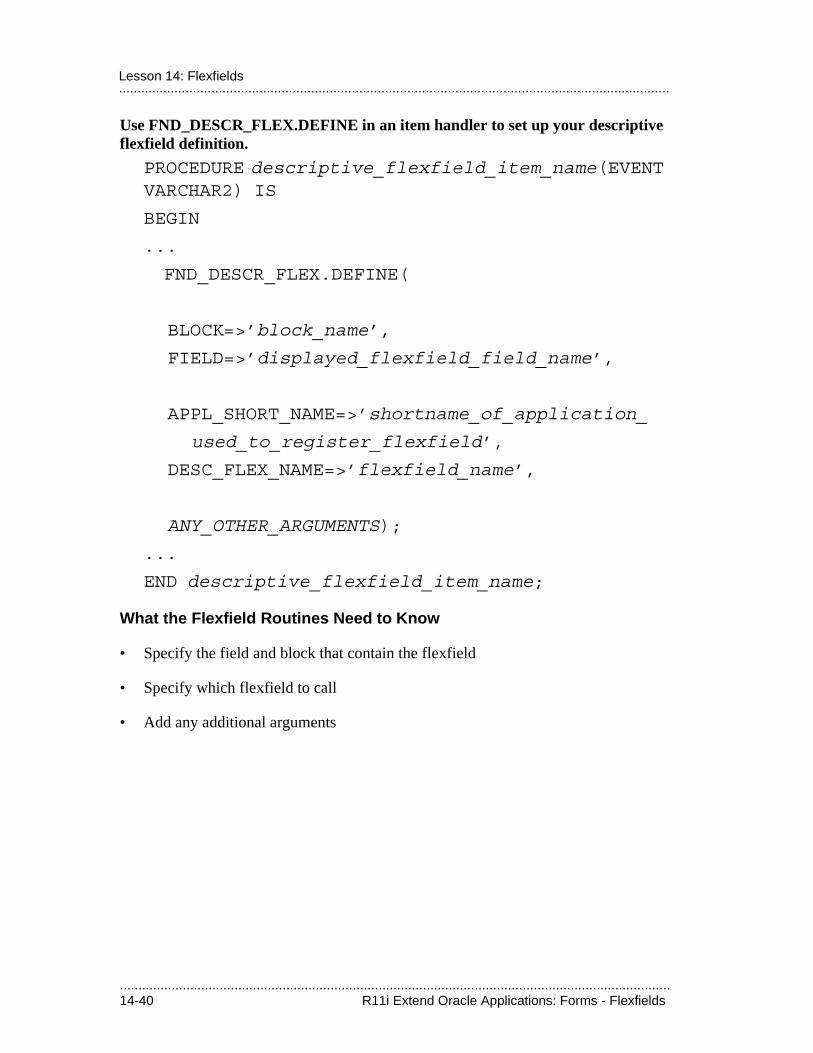
.....................................................................................................................................................14-40 R11i Extend Oracle Applications: Forms - Flexfields
.....................................................................................................................................................Lesson 14: Flexfields
Use FND_DESCR_FLEX.DEFINE in an item handler to set up your descriptive flexfield definition.
PROCEDURE descriptive_flexfield_item_name(EVENT VARCHAR2) IS
BEGIN
...
FND_DESCR_FLEX.DEFINE(
BLOCK=>’block_name’,
FIELD=>’displayed_flexfield_field_name’,
APPL_SHORT_NAME=>’shortname_of_application_
used_to_register_flexfield’,
DESC_FLEX_NAME=>’flexfield_name’,
ANY_OTHER_ARGUMENTS);
...
END descriptive_flexfield_item_name;
What the Flexfield Routines Need to Know
• Specify the field and block that contain the flexfield
• Specify which flexfield to call
• Add any additional arguments
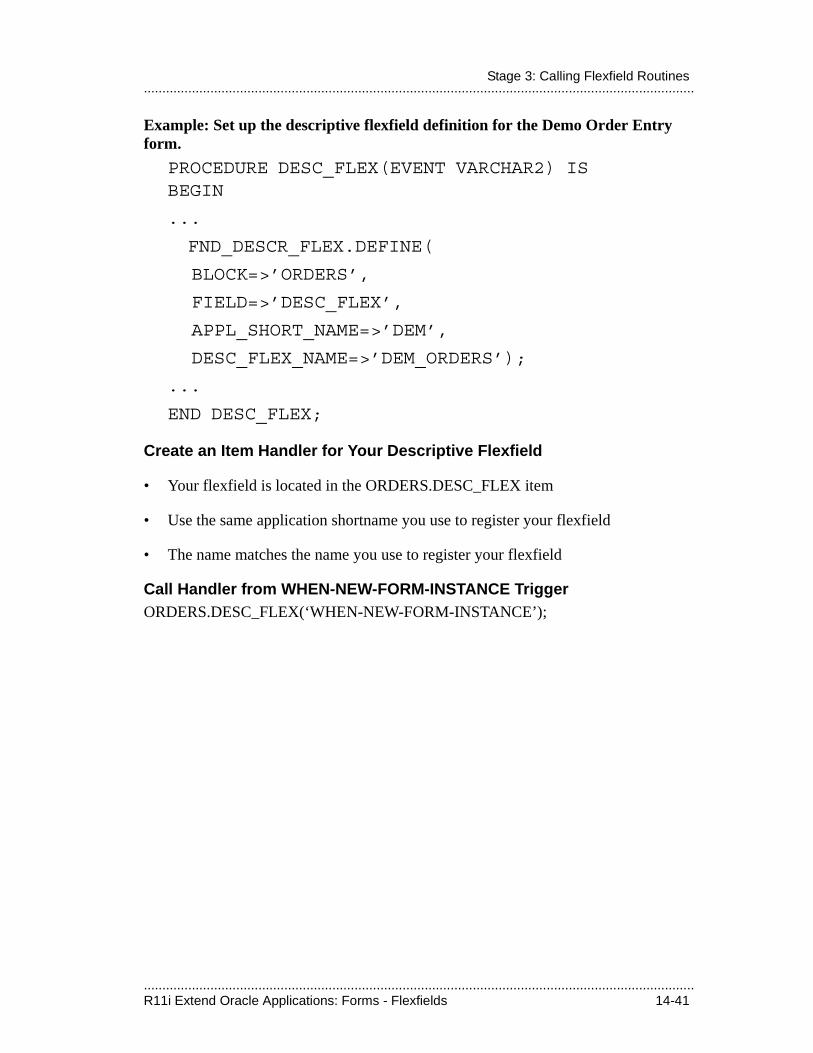
.....................................................................................................................................................R11i Extend Oracle Applications: Forms - Flexfields 14-41
.....................................................................................................................................................Stage 3: Calling Flexfield Routines
Example: Set up the descriptive flexfield definition for the Demo Order Entry form.
PROCEDURE DESC_FLEX(EVENT VARCHAR2) ISBEGIN
...
FND_DESCR_FLEX.DEFINE(
BLOCK=>’ORDERS’,
FIELD=>’DESC_FLEX’,
APPL_SHORT_NAME=>’DEM’,
DESC_FLEX_NAME=>’DEM_ORDERS’);
...
END DESC_FLEX;
Create an Item Handler for Your Descriptive Flexfield
• Your flexfield is located in the ORDERS.DESC_FLEX item
• Use the same application shortname you use to register your flexfield
• The name matches the name you use to register your flexfield
Call Handler from WHEN-NEW-FORM-INSTANCE TriggerORDERS.DESC_FLEX(‘WHEN-NEW-FORM-INSTANCE’);

.....................................................................................................................................................14-42 R11i Extend Oracle Applications: Forms - Flexfields
.....................................................................................................................................................Lesson 14: Flexfields
Invoke your flexfield definition from several form-level triggers.
Code FND_FLEX.EVENT into Form-level Triggers
• Special case: if you have a block or item-level POST-QUERY trigger that resets the record status to query, use Execution Hierarchy ‘After’ for the block or item-level POST-QUERY trigger
– This ensures that the record status will be correct after the form-level trigger fires
• If you override any of these triggers from a block or item-level trigger, you must code these into your block or item-level trigger as well
• You need one set of these triggers per form (at form level) regardless of the number of flexfields in the form.
Trigger ProcedurePRE-QUERY FND_FLEX.EVENT(‘PRE-QUERY’);POST-QUERY FND_FLEX.EVENT(‘POST-QUERY’);PRE-INSERT FND_FLEX.EVENT(‘PRE-INSERT’);PRE-UPDATE FND_FLEX.EVENT(‘PRE-UPDATE’);WHEN-VALIDATE-RECORD
FND_FLEX.EVENT(‘WHEN-VALIDATE-RECORD’);
WHEN-NEW-ITEM-INSTANCE
FND_FLEX.EVENT(‘WHEN-NEW-ITEM-INSTANCE’);
WHEN-VALIDATE-ITEM FND_FLEX.EVENT(‘WHEN-VALIDATE-ITEM’);
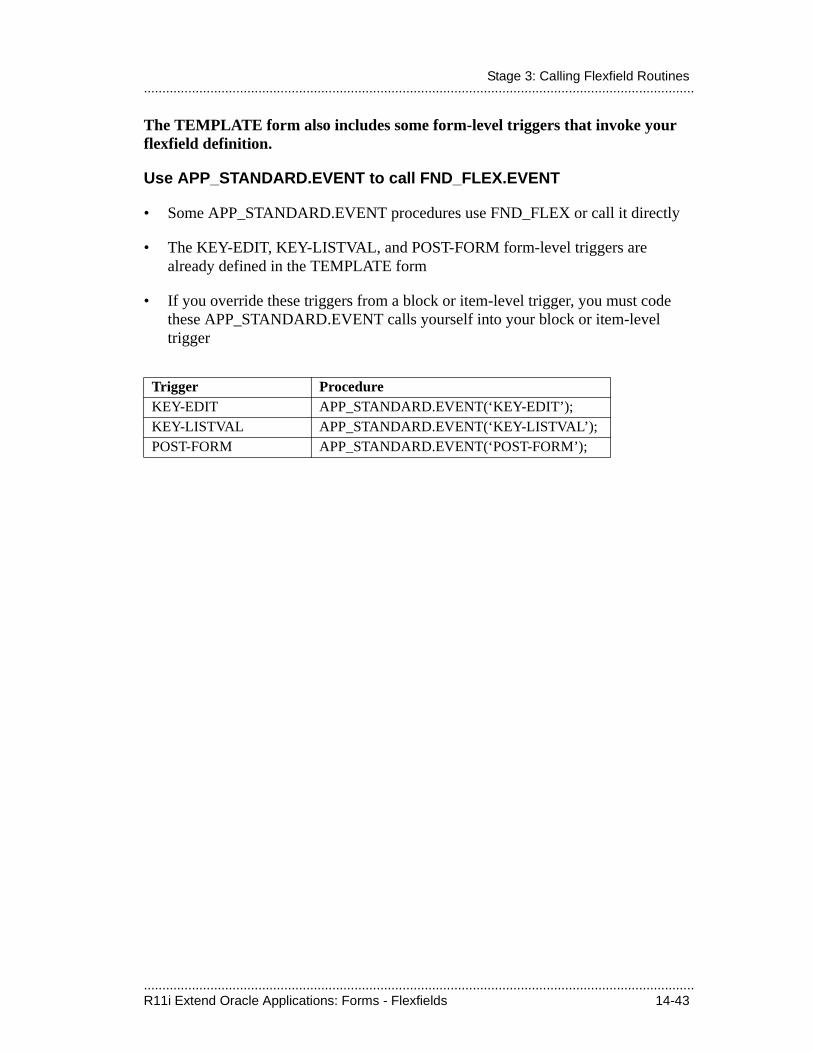
.....................................................................................................................................................R11i Extend Oracle Applications: Forms - Flexfields 14-43
.....................................................................................................................................................Stage 3: Calling Flexfield Routines
The TEMPLATE form also includes some form-level triggers that invoke your flexfield definition.
Use APP_STANDARD.EVENT to call FND_FLEX.EVENT
• Some APP_STANDARD.EVENT procedures use FND_FLEX or call it directly
• The KEY-EDIT, KEY-LISTVAL, and POST-FORM form-level triggers are already defined in the TEMPLATE form
• If you override these triggers from a block or item-level trigger, you must code these APP_STANDARD.EVENT calls yourself into your block or item-level trigger
Trigger ProcedureKEY-EDIT APP_STANDARD.EVENT(‘KEY-EDIT’);KEY-LISTVAL APP_STANDARD.EVENT(‘KEY-LISTVAL’);POST-FORM APP_STANDARD.EVENT(‘POST-FORM’);
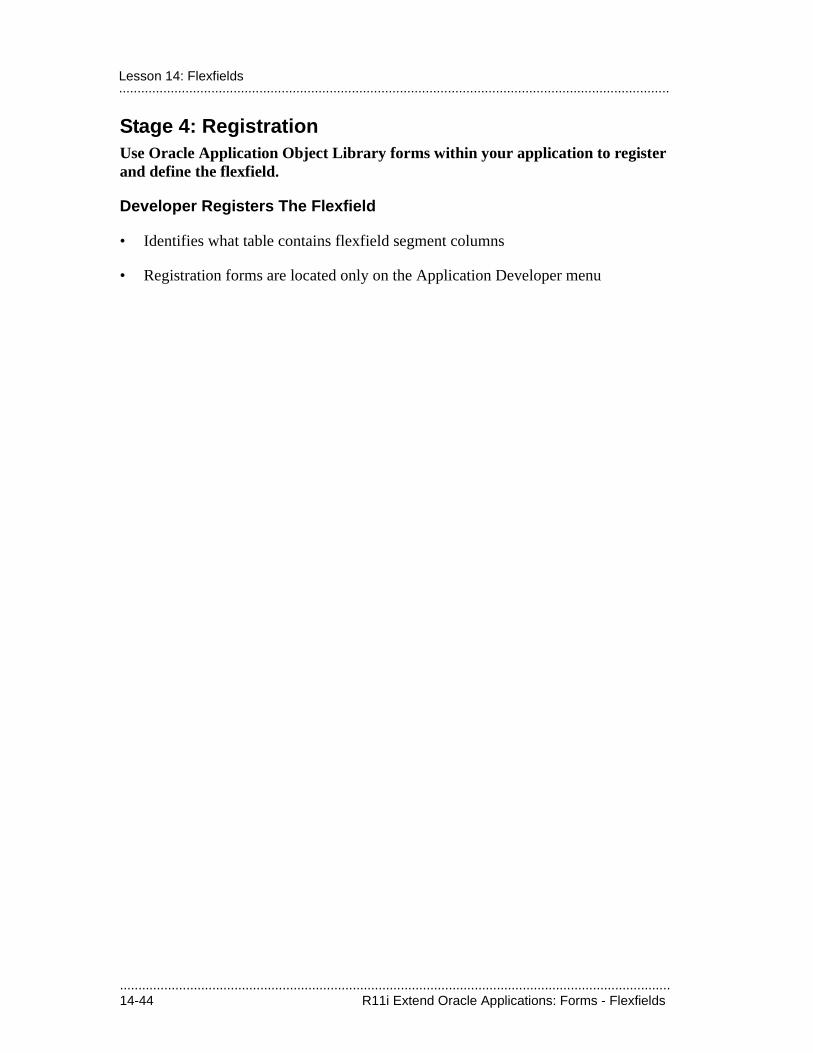
.....................................................................................................................................................14-44 R11i Extend Oracle Applications: Forms - Flexfields
.....................................................................................................................................................Lesson 14: Flexfields
Stage 4: RegistrationUse Oracle Application Object Library forms within your application to register and define the flexfield.
Developer Registers The Flexfield
• Identifies what table contains flexfield segment columns
• Registration forms are located only on the Application Developer menu
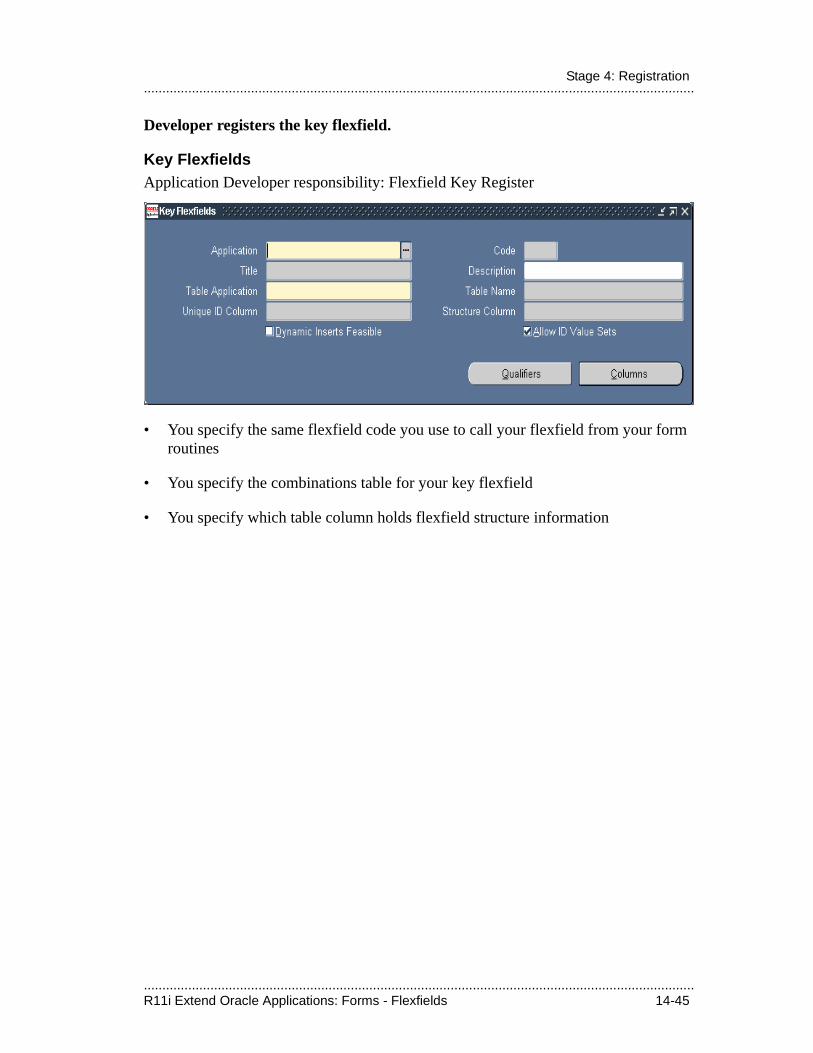
.....................................................................................................................................................R11i Extend Oracle Applications: Forms - Flexfields 14-45
.....................................................................................................................................................Stage 4: Registration
Developer registers the key flexfield.
Key FlexfieldsApplication Developer responsibility: Flexfield Key Register
• You specify the same flexfield code you use to call your flexfield from your form routines
• You specify the combinations table for your key flexfield
• You specify which table column holds flexfield structure information
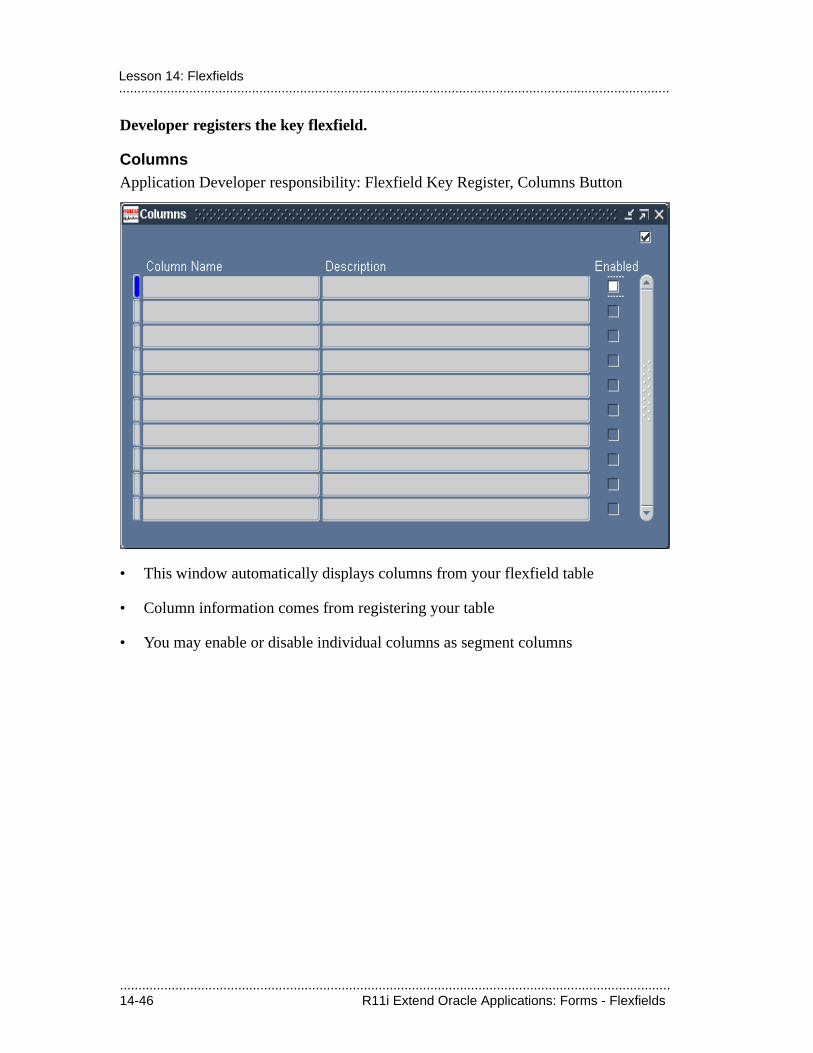
.....................................................................................................................................................14-46 R11i Extend Oracle Applications: Forms - Flexfields
.....................................................................................................................................................Lesson 14: Flexfields
Developer registers the key flexfield.
ColumnsApplication Developer responsibility: Flexfield Key Register, Columns Button
• This window automatically displays columns from your flexfield table
• Column information comes from registering your table
• You may enable or disable individual columns as segment columns

.....................................................................................................................................................R11i Extend Oracle Applications: Forms - Flexfields 14-47
.....................................................................................................................................................Stage 4: Registration
Developer registers the key flexfield.
Flexfield QualifiersApplication Developer responsibility: Flexfield Key Register, Qualifiers Button
• Qualifiers serve as identification tags for segments and values
• Most key flexfields do not use qualifiers

.....................................................................................................................................................14-48 R11i Extend Oracle Applications: Forms - Flexfields
.....................................................................................................................................................Lesson 14: Flexfields
Developer registers the descriptive flexfield.
Descriptive FlexfieldsApplication Developer responsibility: Flexfield Descriptive Register
• You specify the same flexfield name you use to call your flexfield from your form routines
• You specify the table that holds columns for your descriptive flexfield
• You specify which table column holds flexfield structure information
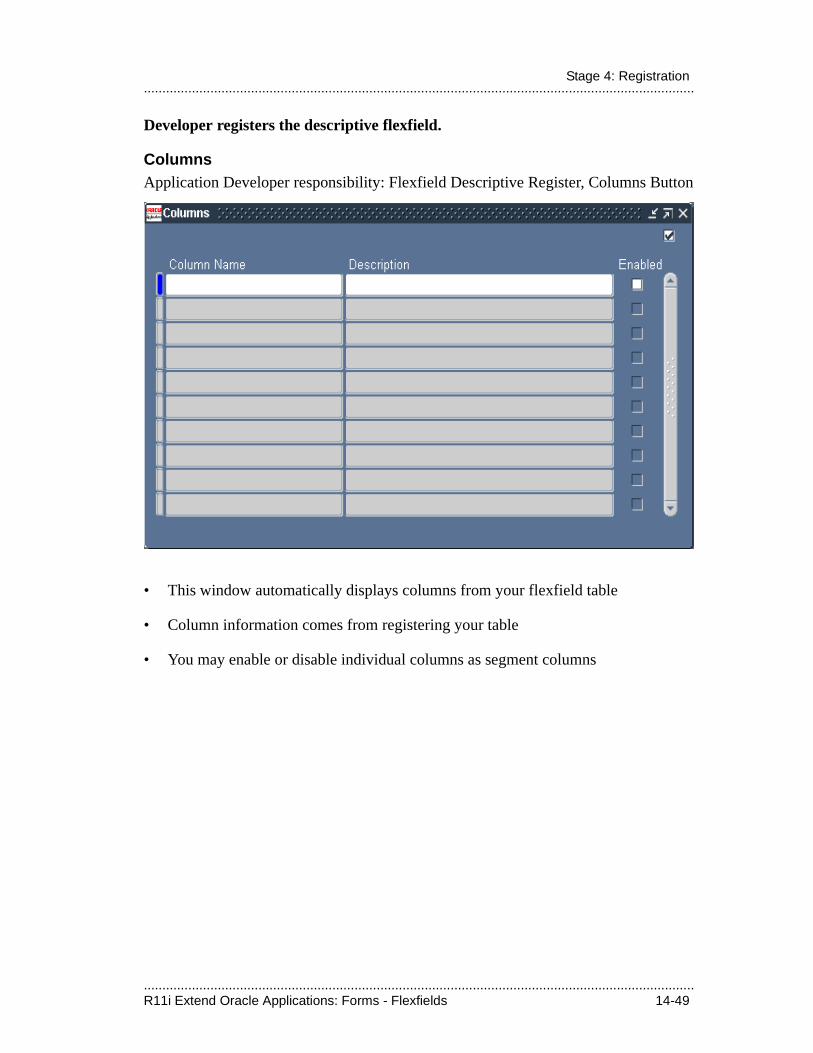
.....................................................................................................................................................R11i Extend Oracle Applications: Forms - Flexfields 14-49
.....................................................................................................................................................Stage 4: Registration
Developer registers the descriptive flexfield.
ColumnsApplication Developer responsibility: Flexfield Descriptive Register, Columns Button
• This window automatically displays columns from your flexfield table
• Column information comes from registering your table
• You may enable or disable individual columns as segment columns
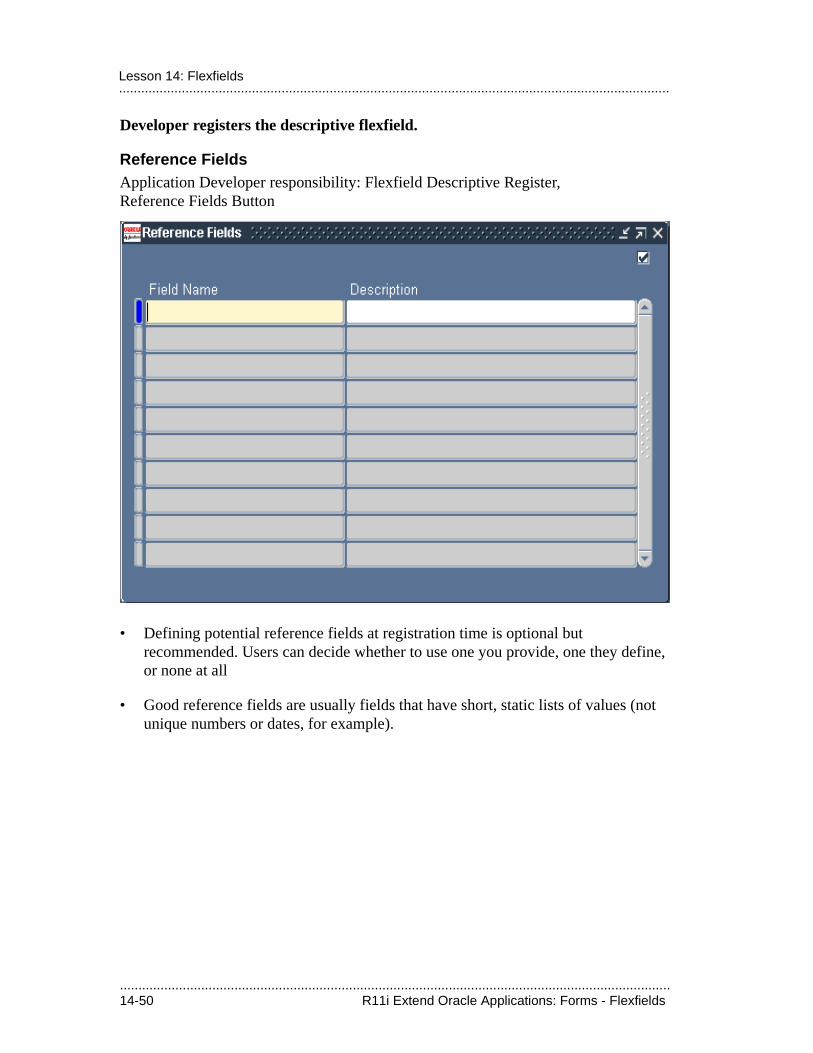
.....................................................................................................................................................14-50 R11i Extend Oracle Applications: Forms - Flexfields
.....................................................................................................................................................Lesson 14: Flexfields
Developer registers the descriptive flexfield.
Reference FieldsApplication Developer responsibility: Flexfield Descriptive Register, Reference Fields Button
• Defining potential reference fields at registration time is optional but recommended. Users can decide whether to use one you provide, one they define, or none at all
• Good reference fields are usually fields that have short, static lists of values (not unique numbers or dates, for example).
.....................................................................................................................................................R11i Extend Oracle Applications: Forms - Flexfields 14-51
.....................................................................................................................................................Stage 5: Definition
Stage 5: Definition
Users Define And Customize the Flexfield
• They define the appearance of the flexfield, the number of segments, value sets used by the segments, values accepted by the value sets, and much more
• They use the flexfield forms located in the Setup menus of most default responsibilities
ReferenceFor Additional Information See:
Defining Flexfields class
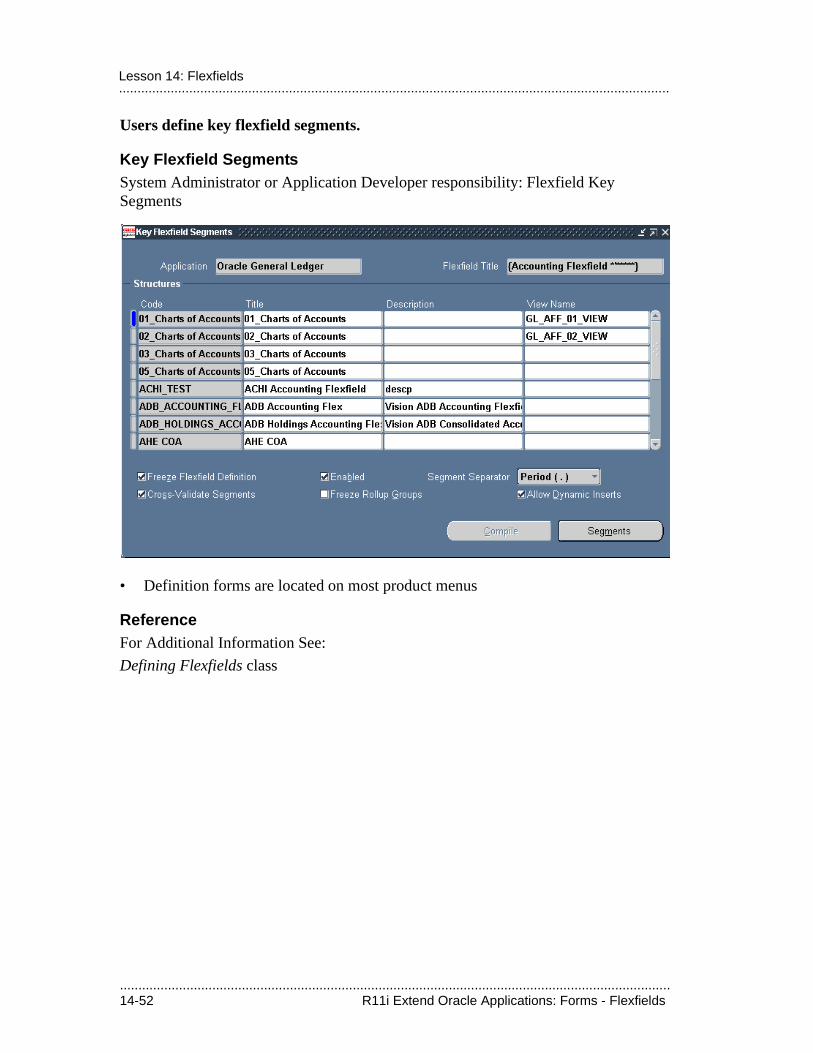
.....................................................................................................................................................14-52 R11i Extend Oracle Applications: Forms - Flexfields
.....................................................................................................................................................Lesson 14: Flexfields
Users define key flexfield segments.
Key Flexfield SegmentsSystem Administrator or Application Developer responsibility: Flexfield Key Segments
• Definition forms are located on most product menus
ReferenceFor Additional Information See:
Defining Flexfields class
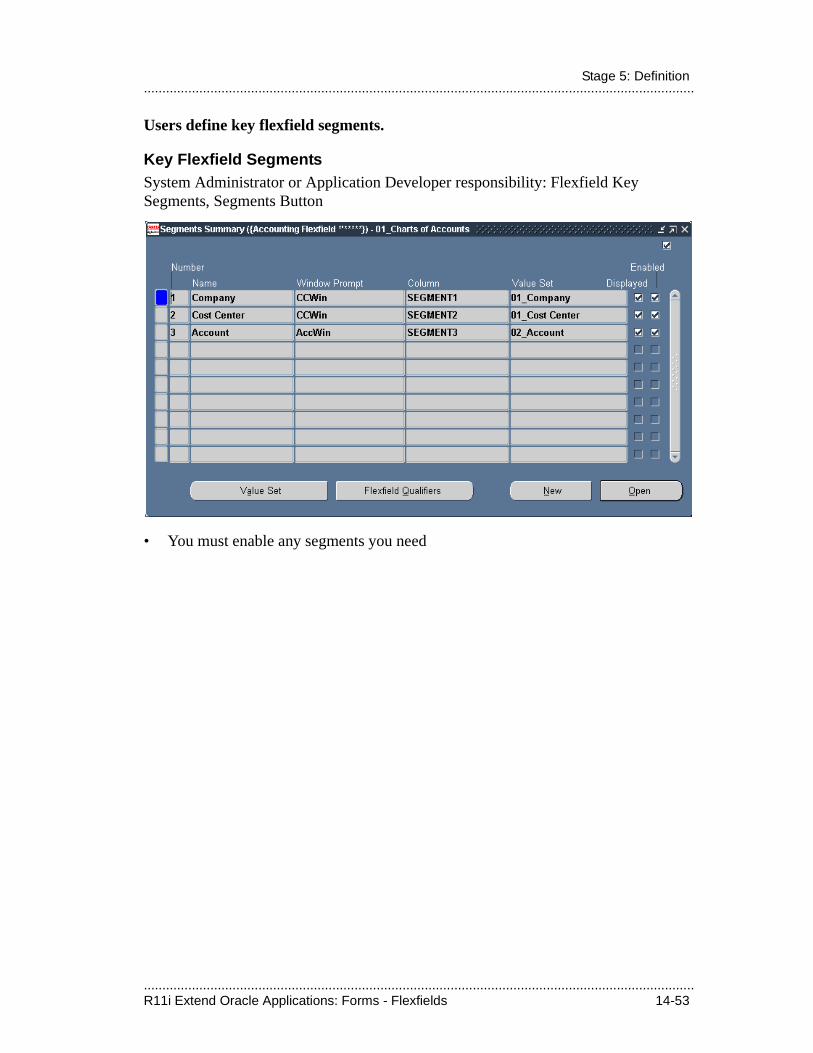
.....................................................................................................................................................R11i Extend Oracle Applications: Forms - Flexfields 14-53
.....................................................................................................................................................Stage 5: Definition
Users define key flexfield segments.
Key Flexfield SegmentsSystem Administrator or Application Developer responsibility: Flexfield Key Segments, Segments Button
• You must enable any segments you need
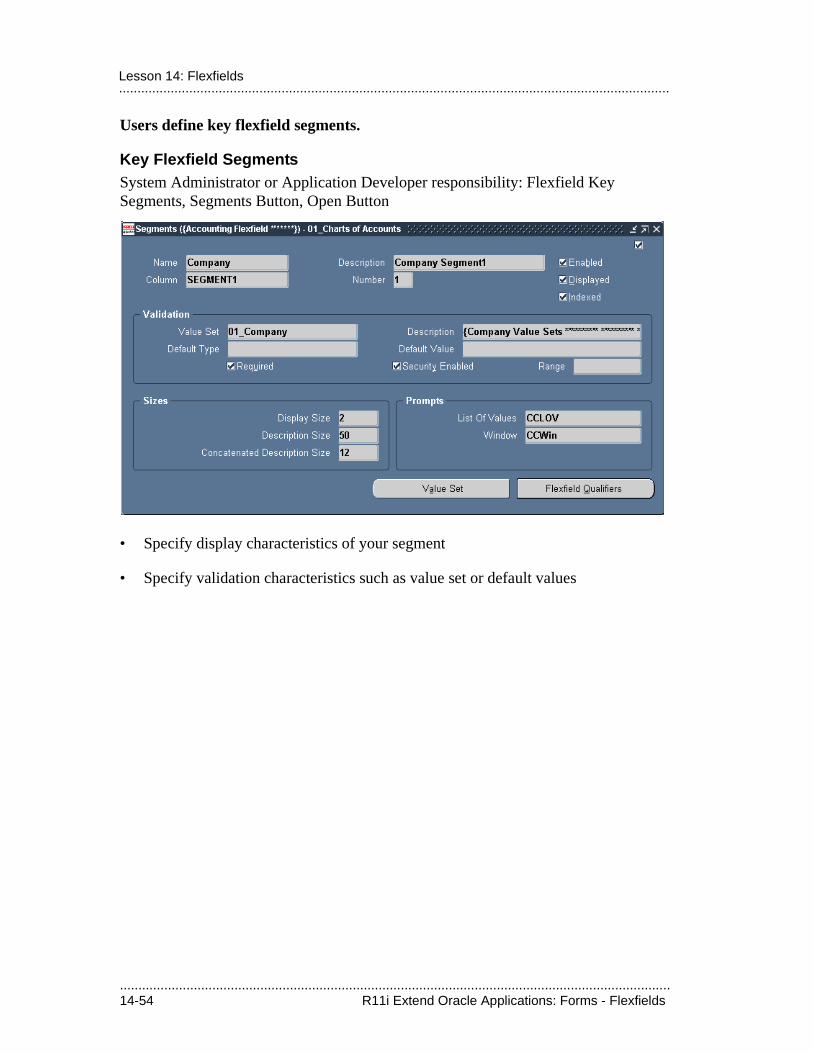
.....................................................................................................................................................14-54 R11i Extend Oracle Applications: Forms - Flexfields
.....................................................................................................................................................Lesson 14: Flexfields
Users define key flexfield segments.
Key Flexfield SegmentsSystem Administrator or Application Developer responsibility: Flexfield Key Segments, Segments Button, Open Button
• Specify display characteristics of your segment
• Specify validation characteristics such as value set or default values

.....................................................................................................................................................R11i Extend Oracle Applications: Forms - Flexfields 14-55
.....................................................................................................................................................Stage 5: Definition
Users define descriptive flexfield segments.
Descriptive Flexfield SegmentsSystem Administrator or Application Developer responsibility: Flexfield Descriptive Segments
• Specify context field values for your descriptive flexfield
• These values also serve as structure names
• The context code is not translatable; the context name and description are translatable
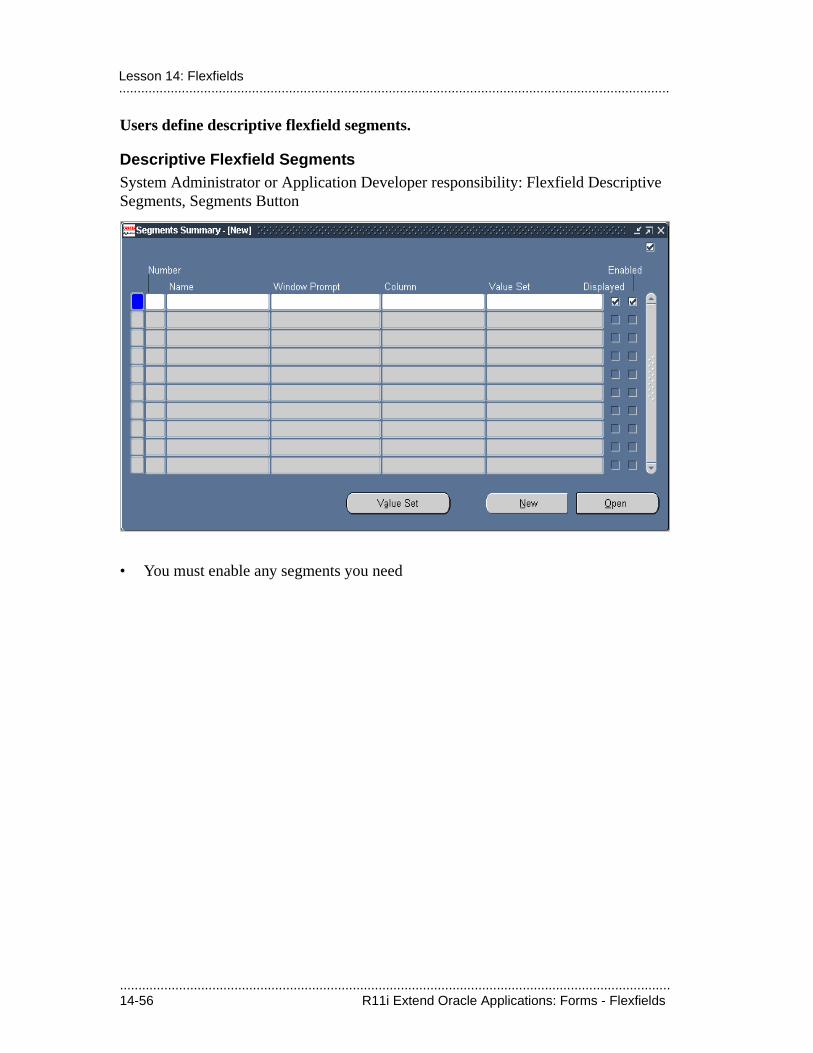
.....................................................................................................................................................14-56 R11i Extend Oracle Applications: Forms - Flexfields
.....................................................................................................................................................Lesson 14: Flexfields
Users define descriptive flexfield segments.
Descriptive Flexfield SegmentsSystem Administrator or Application Developer responsibility: Flexfield Descriptive Segments, Segments Button
• You must enable any segments you need
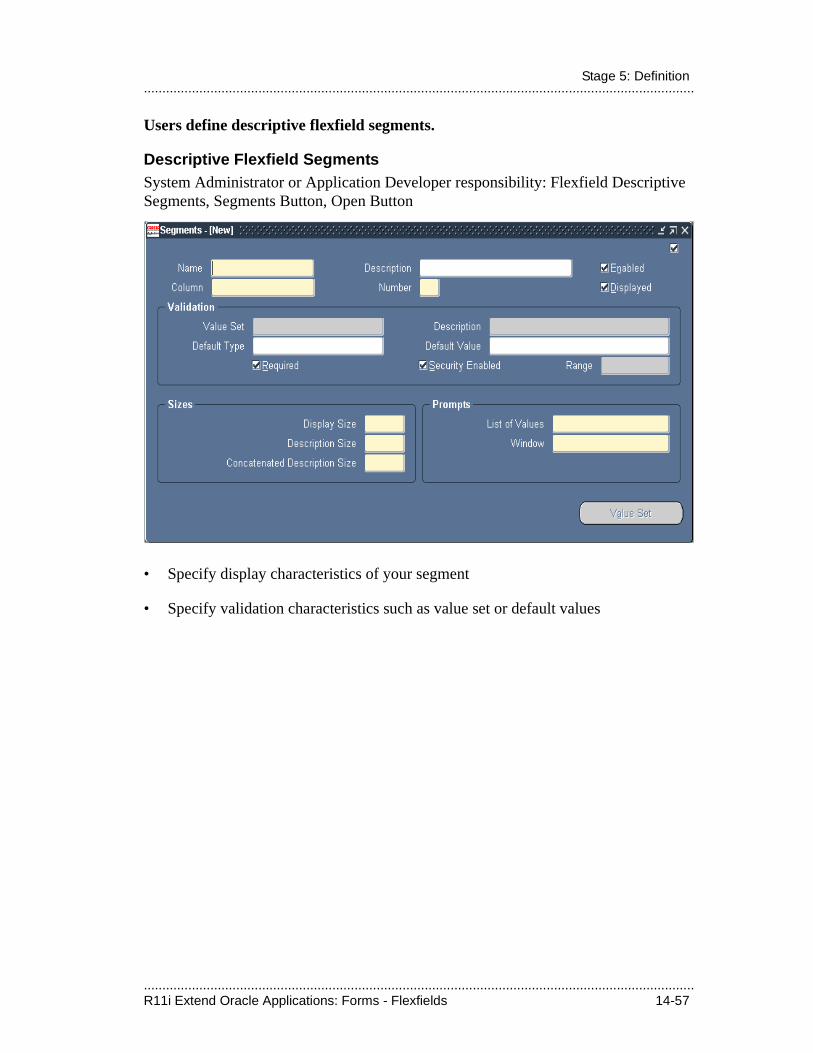
.....................................................................................................................................................R11i Extend Oracle Applications: Forms - Flexfields 14-57
.....................................................................................................................................................Stage 5: Definition
Users define descriptive flexfield segments.
Descriptive Flexfield SegmentsSystem Administrator or Application Developer responsibility: Flexfield Descriptive Segments, Segments Button, Open Button
• Specify display characteristics of your segment
• Specify validation characteristics such as value set or default values
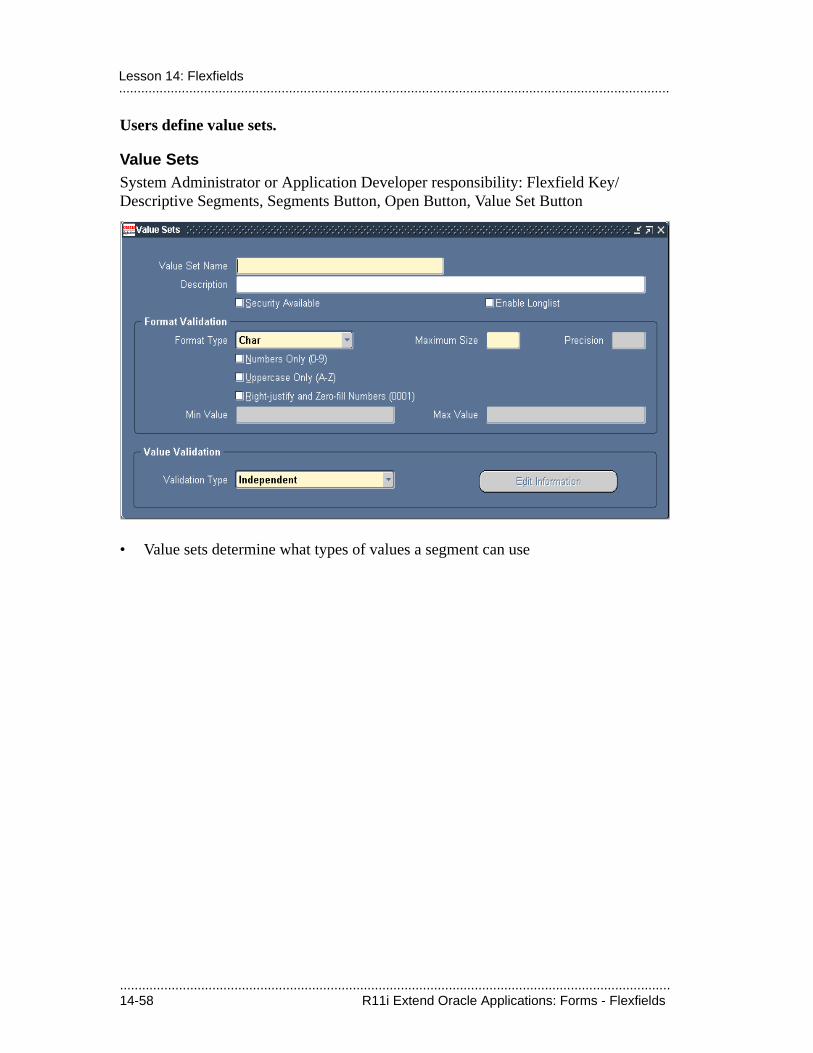
.....................................................................................................................................................14-58 R11i Extend Oracle Applications: Forms - Flexfields
.....................................................................................................................................................Lesson 14: Flexfields
Users define value sets.
Value SetsSystem Administrator or Application Developer responsibility: Flexfield Key/Descriptive Segments, Segments Button, Open Button, Value Set Button
• Value sets determine what types of values a segment can use
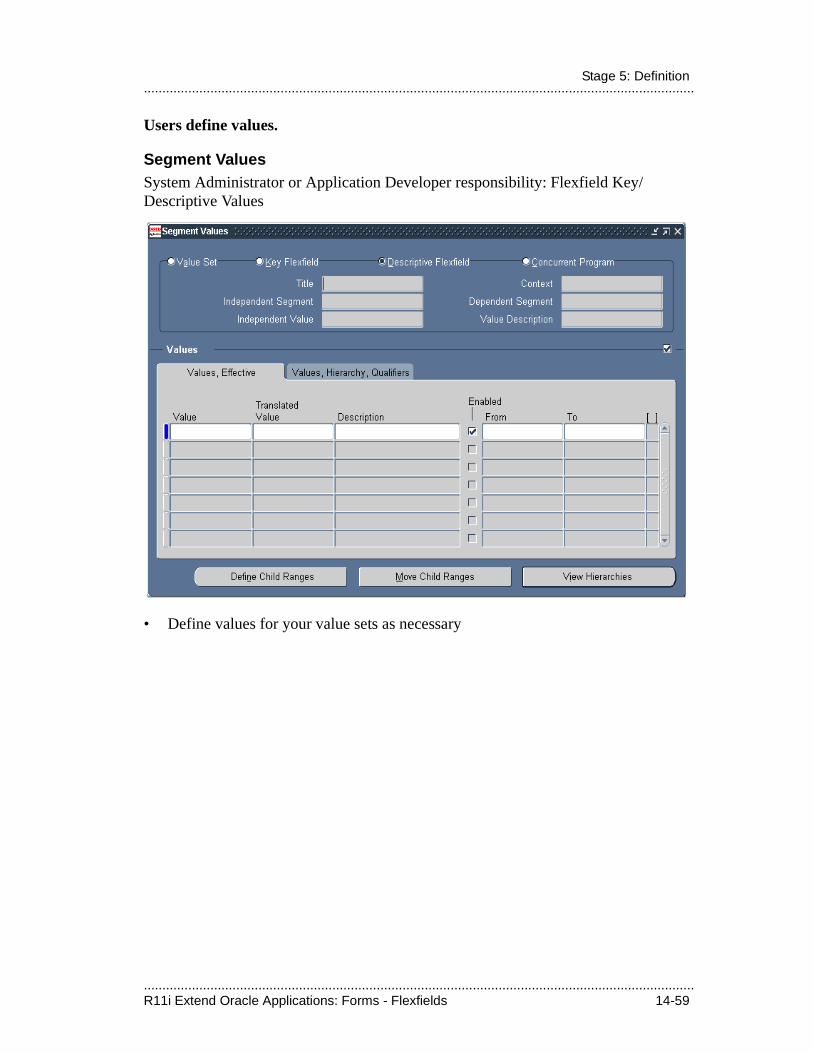
.....................................................................................................................................................R11i Extend Oracle Applications: Forms - Flexfields 14-59
.....................................................................................................................................................Stage 5: Definition
Users define values.
Segment ValuesSystem Administrator or Application Developer responsibility: Flexfield Key/Descriptive Values
• Define values for your value sets as necessary
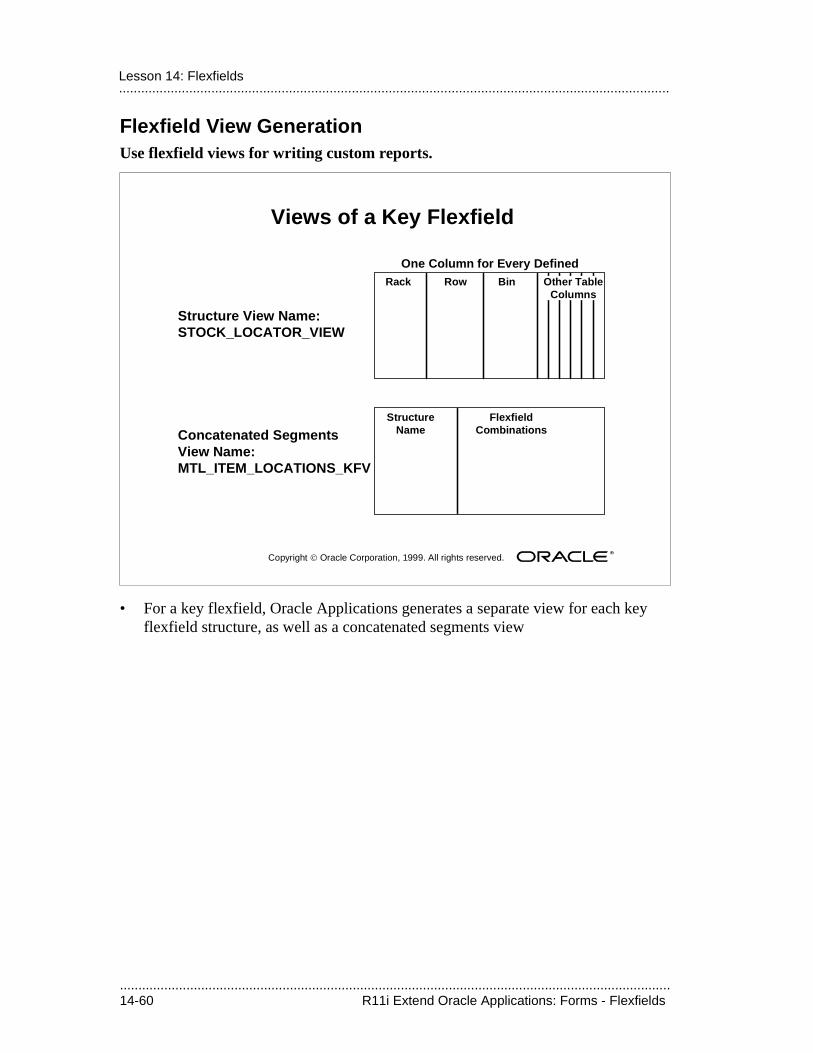
.....................................................................................................................................................14-60 R11i Extend Oracle Applications: Forms - Flexfields
.....................................................................................................................................................Lesson 14: Flexfields
Flexfield View GenerationUse flexfield views for writing custom reports.
• For a key flexfield, Oracle Applications generates a separate view for each key flexfield structure, as well as a concatenated segments view
Copyright Oracle Corporation, 1999. All rights reserved.
Views of a Key Flexfield
One Column for Every DefinedSegment
Structure View Name:STOCK_LOCATOR_VIEW
Rack Row Bin Other TableColumns
StructureName
FlexfieldCombinationsConcatenated Segments
View Name:MTL_ITEM_LOCATIONS_KFV
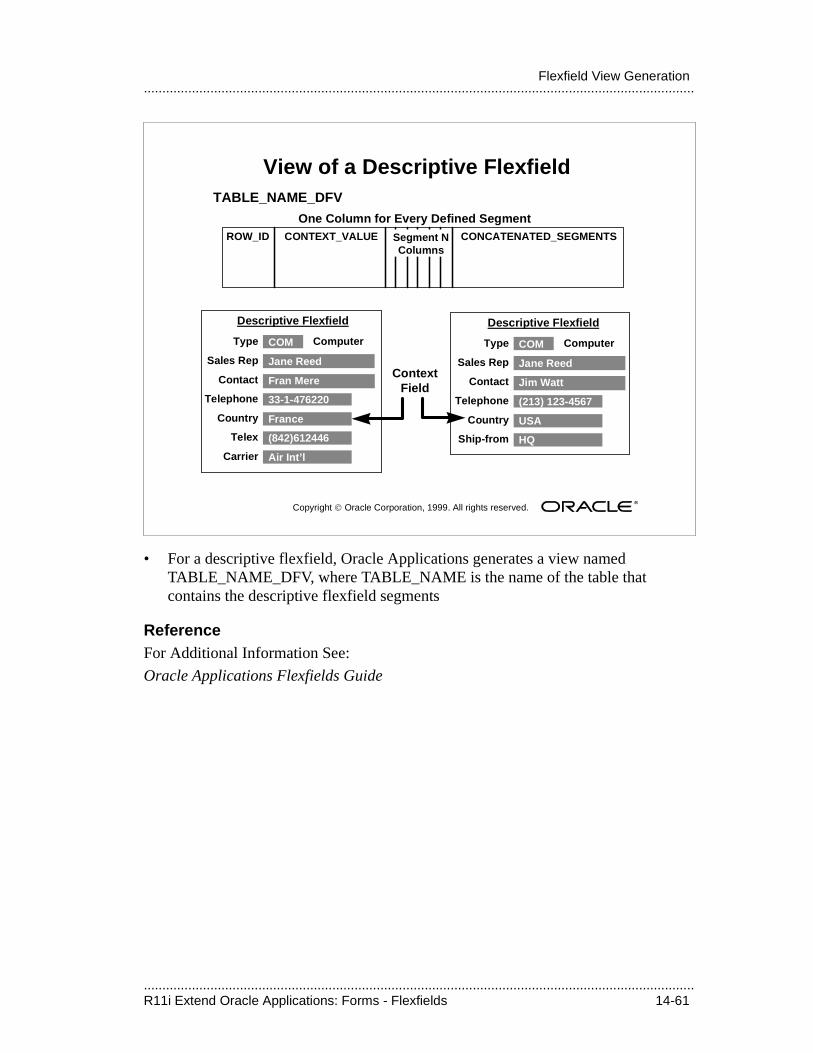
.....................................................................................................................................................R11i Extend Oracle Applications: Forms - Flexfields 14-61
.....................................................................................................................................................Flexfield View Generation
• For a descriptive flexfield, Oracle Applications generates a view named TABLE_NAME_DFV, where TABLE_NAME is the name of the table that contains the descriptive flexfield segments
ReferenceFor Additional Information See:
Oracle Applications Flexfields Guide
Copyright Oracle Corporation, 1999. All rights reserved.
View of a Descriptive Flexfield
One Column for Every Defined SegmentROW_ID CONTEXT_VALUE Segment N
ColumnsCONCATENATED_SEGMENTS
TABLE_NAME_DFV
Computer
Type
Sales Rep
Contact
Telephone
Country
Telex
Carrier
Descriptive Flexfield
COM
Jane Reed
Fran Mere
33-1-476220
France
(842)612446
Air Int’l
ContextField
Computer
Type
Sales Rep
Contact
Telephone
Country
Ship-from
Descriptive Flexfield
COM
Jane Reed
Jim Watt
(213) 123-4567
USA
HQ
.....................................................................................................................................................14-62 R11i Extend Oracle Applications: Forms - Flexfields
.....................................................................................................................................................Lesson 14: Flexfields
Users request view generation by defining flexfield segments and saving changes to the flexfield definition.
The Structure View Contains Rows for Each Segment
• Define the view name when defining the structure
• Select the column needed by the segment names
• Submit a request to build the view by saving a frozen structure
The Flexfield View Contains Structure Names and Combinations
• The view name depends on the code combination table name plus _KFV
• The rows selected depend on the structure specified
• The request to build the view submits after navigating out of the form
.................................
Query Find
.....................................................................................................................................................15-2 R11i Extend Oracle Applications: Forms - Query Find
.....................................................................................................................................................Lesson 15: Query Find
.....................................................................................................................................................R11i Extend Oracle Applications: Forms - Query Find 15-3
.....................................................................................................................................................Objectives
ObjectivesAt the end of this lesson, you should be able to:
• Create a Row-LOV.
• Create a Find window.
.....................................................................................................................................................15-4 R11i Extend Oracle Applications: Forms - Query Find
.....................................................................................................................................................Lesson 15: Query Find
Overview of Query Find Find Windows and Row-LOVs provide querying without using enter query mode.
Use Find Windows
• If the user needs to do complex searches
• If the user needs to retrieve multiple records
• If many records exist
• For combination blocks
Use Row-LOVs
• If the user only needs to retrieve one record
• If the user selects a record by the primary key
• If the total number of records is small
• For detail blocks that would normally autoquery
Use One Per Block
• All queryable blocks should support one of the Query Find implementations
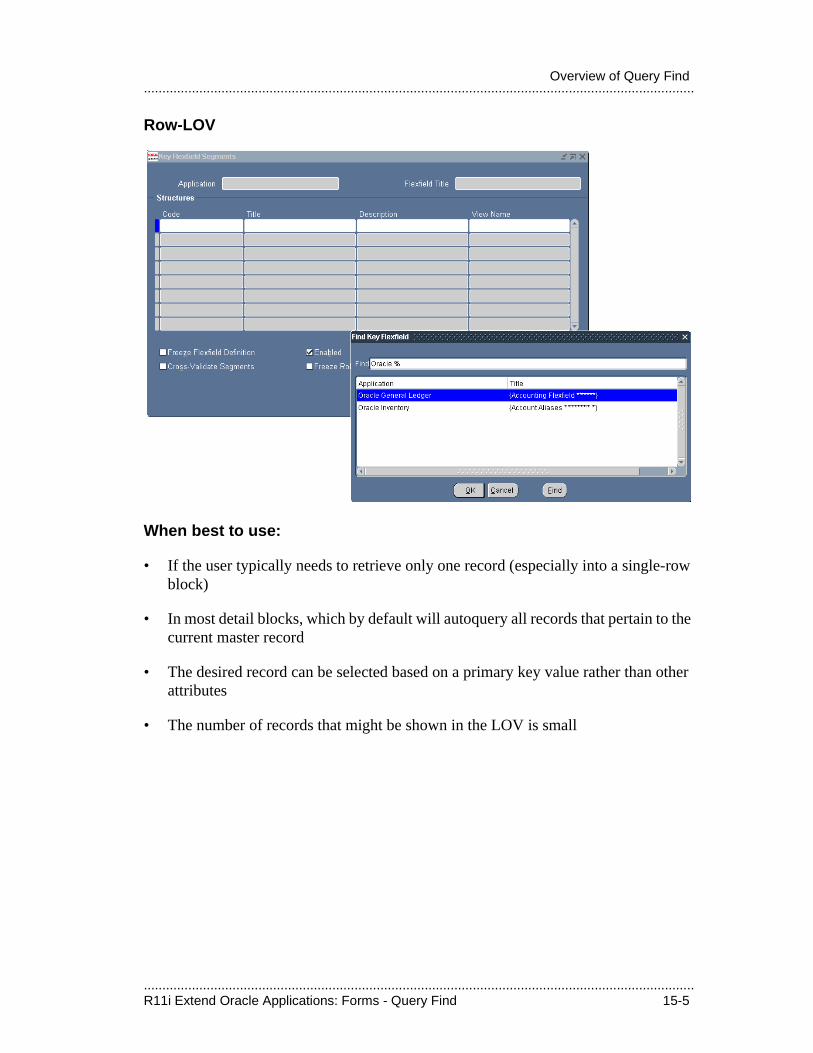
.....................................................................................................................................................R11i Extend Oracle Applications: Forms - Query Find 15-5
.....................................................................................................................................................Overview of Query Find
Row-LOV
When best to use:
• If the user typically needs to retrieve only one record (especially into a single-row block)
• In most detail blocks, which by default will autoquery all records that pertain to the current master record
• The desired record can be selected based on a primary key value rather than other attributes
• The number of records that might be shown in the LOV is small
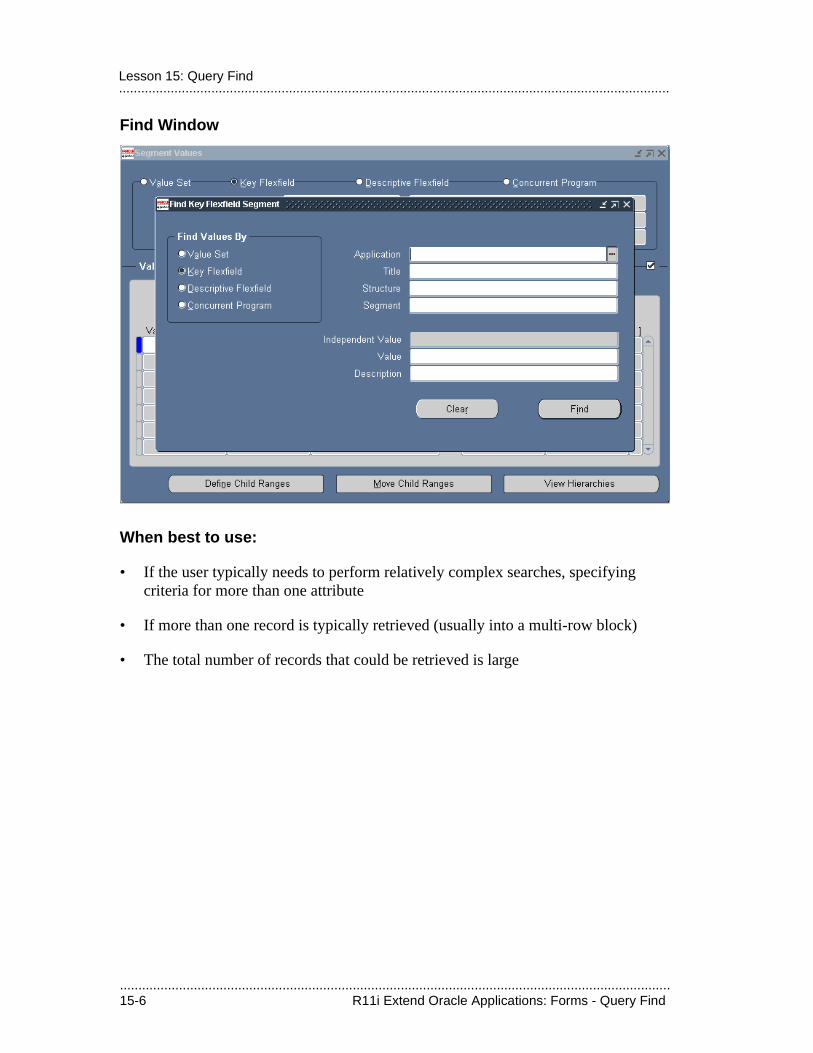
.....................................................................................................................................................15-6 R11i Extend Oracle Applications: Forms - Query Find
.....................................................................................................................................................Lesson 15: Query Find
Find Window
When best to use:
• If the user typically needs to perform relatively complex searches, specifying criteria for more than one attribute
• If more than one record is typically retrieved (usually into a multi-row block)
• The total number of records that could be retrieved is large
.....................................................................................................................................................R11i Extend Oracle Applications: Forms - Query Find 15-7
.....................................................................................................................................................Create a Row-LOV
Create a Row-LOVRow-LOVs show all possible records a user can query and allow the user to query one row.
Row-LOVs are... LOVs (surprise!)
• Follow standards for LOVs when creating and naming them
Steps for Creating a Row-LOV
• Create a parameter for each column of the primary key
• Create an LOV that includes all the columns users need to identify the row
• Return the primary key value(s) into your parameter(s)
• Create a block-level PRE-QUERY (Before style) according to the coding standards:
IF :parameter.G_query_find = ’TRUE’ THEN<Primary Key> := <Your Parameter>;:parameter.G_query_find := ’FALSE’;
END IF;
• Create a block-level QUERY_FIND trigger (Override style)
APP_FIND.QUERY_FIND(‘<Your LOV Name>’);
ReferenceFor Additional Information See:
Query Find Windows
APP_FIND: Query-Find Utilities
Oracle Applications Developer’s Guide
.....................................................................................................................................................15-8 R11i Extend Oracle Applications: Forms - Query Find
.....................................................................................................................................................Lesson 15: Query Find
Create a Find WindowFind Windows provide an easy way for users to search for data.
Find Window Layout
• Use single-record format
• Include all fields a user might use for search criteria
• Title the window “Find <objects>”
• Open centered on the results window, and close the window when the results window closes
Find Window Buttons
• Clear–clears the window
• New–moves the cursor to a new record in the results block
• Find–does the query (this is the default button)
How Find Windows Work
• Next Block does a Find, Previous Block moves to the results window without doing the Find
• Do not keep the criteria in the Find window in sync with the data in the results block
• Validate fields, but do not use much cross-field validation
• If a Find locates no records, the cursor stays in the Find window
.....................................................................................................................................................R11i Extend Oracle Applications: Forms - Query Find 15-9
.....................................................................................................................................................Create a Find Window
Copy your Find Window and its canvas and block.
1. Copy QUERY_FIND Object Group from APPSTAND
• Copy this object group instead of referencing it
• Delete the object group after you copy it
• Do not reference anything in this object group
• Apply the appropriate property classes to the objects created when you copy the object group
2. Rename the Block, Canvas, and Window
• Rename the Block, Canvas and Window according to naming standards
• Naming standards:
<YOUR BLOCK>_QF,
<YOUR CANVAS>_QF_CANVAS,
<YOUR WINDOW>_QF_WINDOW
3. Change the Find Window Title
• Find Windows have the title “Find <Objects>”

.....................................................................................................................................................15-10 R11i Extend Oracle Applications: Forms - Query Find
.....................................................................................................................................................Lesson 15: Query Find
Edit the triggers for your Find Window.
4. Edit the NEW Button’s WHEN-BUTTON-PRESSED Trigger
• Your NEW button trigger should pass the results block name in the APP_FIND.NEW procedure
• When users select the NEW button, they navigate to the results block and begin a new record
• Some Find Windows open automatically upon navigation to a form; this trigger allows users to immediately start a new record
5. Edit the FIND Button’s WHEN-BUTTON-PRESSED Trigger
• Your FIND button trigger should pass the results block name in the APP_FIND.FIND procedure
• Place any further validation of items in the Find Window before the call to APP_FIND.FIND
• When users select the FIND button, they navigate to the results block where the correct query is executed
6. Edit the KEY-NXTBLK Trigger
• KEY-NXTBLK trigger on the Find block should invoke the FIND button logic
• Go–>Next Block should have the same functionality as the FIND button
7. Correct Navigation
• Previous Navigation Data Block should be the results block
• Users can exit the Find Window without executing a query
• Do not navigate to the Find Window by selecting previous or next block from the results block
.....................................................................................................................................................R11i Extend Oracle Applications: Forms - Query Find 15-11
.....................................................................................................................................................Create a Find Window
Paint your canvas.
8. Develop the Canvas
• Create the items you need
• Copying from the results block can simplify this, but remember to:
– Make sure all items in the Find window are non-database items
– Remove most triggers associated with your items
– Keep or replace logic for the Calendar on date fields
– Check that Find window items have the correct canvas name property
– Apply the appropriate property classes to objects you copy
• Check boxes and option groups should be poplists in the Find Window block to allow NULLs
• No items should require values, and all default values are NULL
• Usually the only logic associated with items is an LOV, which may allow values no longer valid in the results block
– Do not share LOVs with the results window, since any return items in the LOVs associated with the results window will return values to that window, not your Find window
– Do not share record groups with the results window if you want to allow values no longer valid in the results block
• Include hidden ID fields to drive your queries
9. Fit the Find Window to Your Form
• Resize the window, position the fields, follow the standards
• Find Windows open centered on the results window (APP_FIND.QUERY_FIND handles this for you in most cases)
.....................................................................................................................................................15-12 R11i Extend Oracle Applications: Forms - Query Find
.....................................................................................................................................................Lesson 15: Query Find
Check whether to use the Find Window in your results block’s PRE-QUERY trigger. Code efficient queries based on your Find Window.
10. Create a Block-Level PRE-QUERY Trigger
• PRE-QUERY trigger in results block (Execution hierarchy of Before) checks for Query Find
• If Query Find is true, copy the data from the Find Window to the results block before executing the query
• Use APP_FIND.QUERY_RANGE to handle range logic
• Check for NULL values before copying back to your radio groups or list items or check boxes
• For non-character fields use := to copy values
11. Create a Block-Level QUERY_FIND Trigger
• Block-level QUERY_FIND trigger (Execution hierarchy of Override) for results block opens Find Window
• This trigger centers the Find Window on the results block
.................................
Menus and AdvancedFunction Security

.....................................................................................................................................................16-2 R11i Extend Oracle Applications: Forms - Menus and Advanced Function Security
.....................................................................................................................................................Lesson 16: Menus and Advanced Function Security
.....................................................................................................................................................R11i Extend Oracle Applications: Forms - Menus and Advanced Function Security 16-3
.....................................................................................................................................................Objectives
ObjectivesAt the end of this lesson, you should be able to:
• Understand the purpose of advanced function security.
• Understand how advanced function security works.
• Implement advanced function security.
• Conform to function security standards.
.....................................................................................................................................................16-4 R11i Extend Oracle Applications: Forms - Menus and Advanced Function Security
.....................................................................................................................................................Lesson 16: Menus and Advanced Function Security
Understand Function Security: ReviewFunction security lets you restrict application functionality to authorized users.
Basic Function Security
• Group the forms and functionality of an application into logical menu structures
• Assign a menu to one or more responsibilities
• Assign one or more responsibilities to one or more users
Advanced Function Security
• Oracle Applications GUI-based architecture aggregates several related business functions into a single form
• Not all users should have access to every business function in a form
• Oracle Applications provides the ability to identify pieces of application logic as functions
• Functions can be secured on a responsibility basis (that is, included or excluded from a responsibility)
.....................................................................................................................................................R11i Extend Oracle Applications: Forms - Menus and Advanced Function Security 16-5
.....................................................................................................................................................Review: Subfunction Naming Standards
Review: Subfunction Naming StandardsAny restrictable subfunctions for each form are predefined by the developer.
• Subfunctions are named <form>_<subfunction>
– For example, PO_POXPOMPO_DELETE
– For example, AR_FNDRSRUN_LISTING_RPTS
• The user function name should be <form name>: <subfunction>
– For example, Purchase Orders: Delete
– For example, Run Reports: Listing
• This naming standard enables the System Administrator to find all the available functions to include or exclude from a responsibility by using Auto-reduction in the LOV in the Responsibilities form
• Where there are many restrictable subfunctions for a particular form, and those subfunctions group well into categories (Approvals, for example), group the subfunctions according to their category
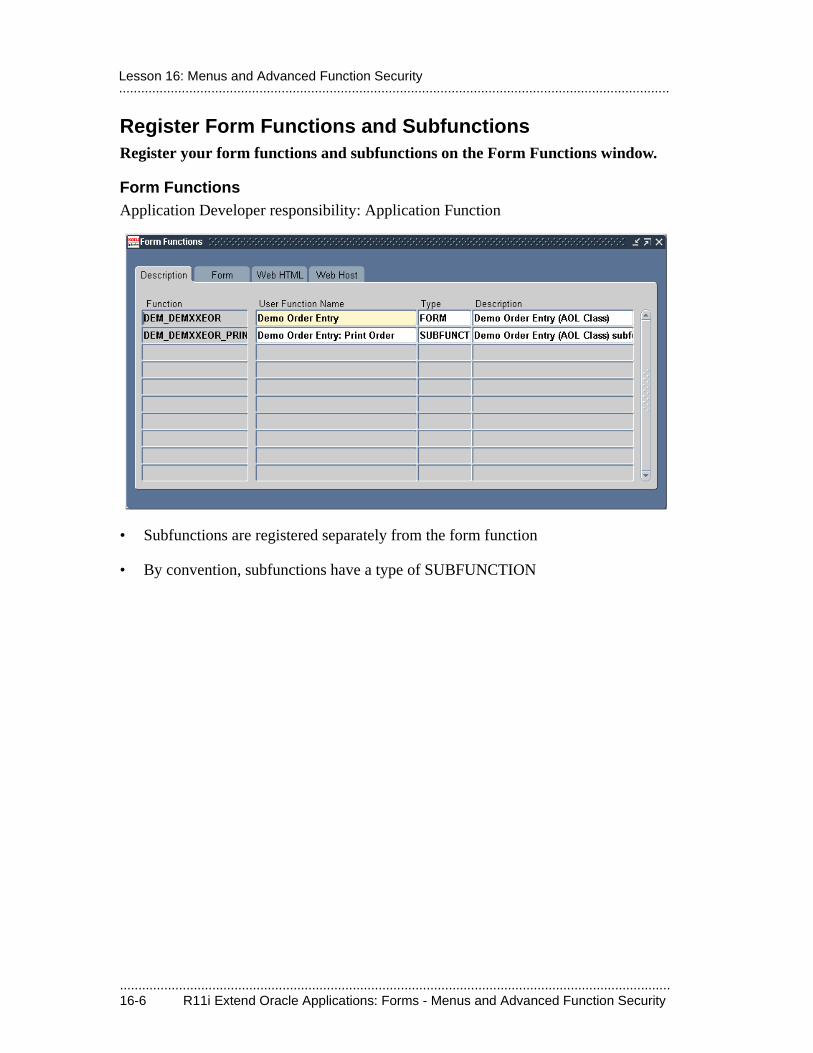
.....................................................................................................................................................16-6 R11i Extend Oracle Applications: Forms - Menus and Advanced Function Security
.....................................................................................................................................................Lesson 16: Menus and Advanced Function Security
Register Form Functions and SubfunctionsRegister your form functions and subfunctions on the Form Functions window.
Form FunctionsApplication Developer responsibility: Application Function
• Subfunctions are registered separately from the form function
• By convention, subfunctions have a type of SUBFUNCTION
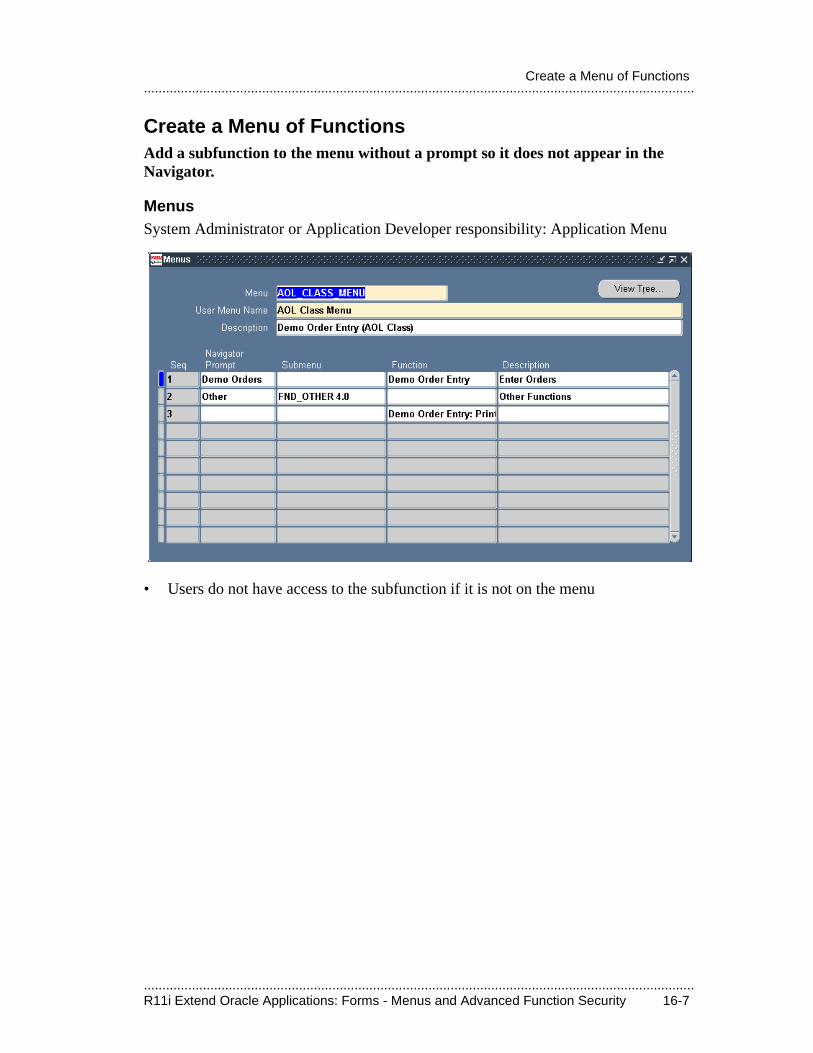
.....................................................................................................................................................R11i Extend Oracle Applications: Forms - Menus and Advanced Function Security 16-7
.....................................................................................................................................................Create a Menu of Functions
Create a Menu of FunctionsAdd a subfunction to the menu without a prompt so it does not appear in the Navigator.
MenusSystem Administrator or Application Developer responsibility: Application Menu
• Users do not have access to the subfunction if it is not on the menu
.....................................................................................................................................................16-8 R11i Extend Oracle Applications: Forms - Menus and Advanced Function Security
.....................................................................................................................................................Lesson 16: Menus and Advanced Function Security
Advanced Function SecurityUse advanced function security features to control access to form features.
Restrict Access to Subsections of Form Functionality
• Use FND_FUNCTION.TEST to check for availability of a function for the current responsibility
• Use to enable or disable parts of forms such as buttons, windows, fields, alternative regions, and so on
Open Forms Programmatically
• Use FND_FUNCTION.EXECUTE or APP_NAVIGATE.EXECUTE to open forms from buttons and other logic
• Using FND_FUNCTION.EXECUTE or APP_NAVIGATE.EXECUTE instead of OPEN_FORM ensures that only authorized users can open a form
Add Choices to the Special Menus and Toolbar
• Use APP_SPECIAL routines to add choices to the special menus (Tools, Reports, Actions) for an individual form
• Add up to 45 form-specific buttons to the toolbar (use restraint)
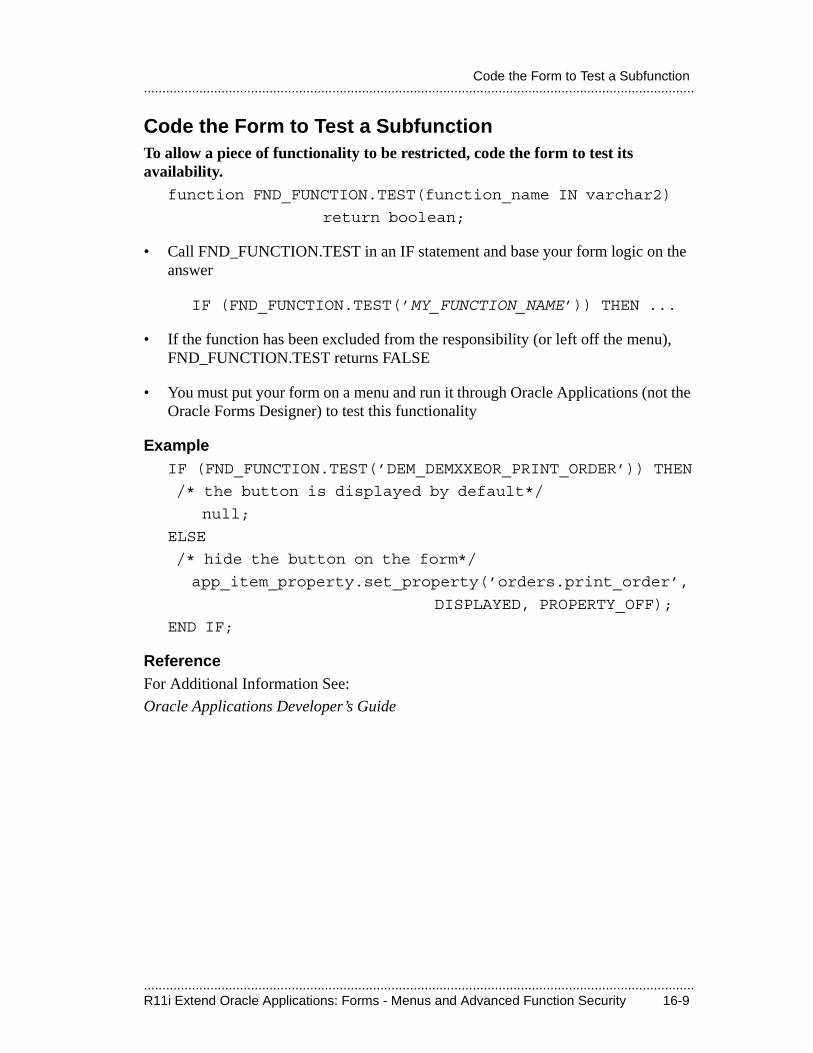
.....................................................................................................................................................R11i Extend Oracle Applications: Forms - Menus and Advanced Function Security 16-9
.....................................................................................................................................................Code the Form to Test a Subfunction
Code the Form to Test a SubfunctionTo allow a piece of functionality to be restricted, code the form to test its availability.
function FND_FUNCTION.TEST(function_name IN varchar2)
return boolean;
• Call FND_FUNCTION.TEST in an IF statement and base your form logic on the answer
IF (FND_FUNCTION.TEST(’MY_FUNCTION_NAME’)) THEN ...
• If the function has been excluded from the responsibility (or left off the menu), FND_FUNCTION.TEST returns FALSE
• You must put your form on a menu and run it through Oracle Applications (not the Oracle Forms Designer) to test this functionality
ExampleIF (FND_FUNCTION.TEST(’DEM_DEMXXEOR_PRINT_ORDER’)) THEN
/* the button is displayed by default*/
null;
ELSE
/* hide the button on the form*/
app_item_property.set_property(’orders.print_order’,
DISPLAYED, PROPERTY_OFF);
END IF;
ReferenceFor Additional Information See:
Oracle Applications Developer’s Guide
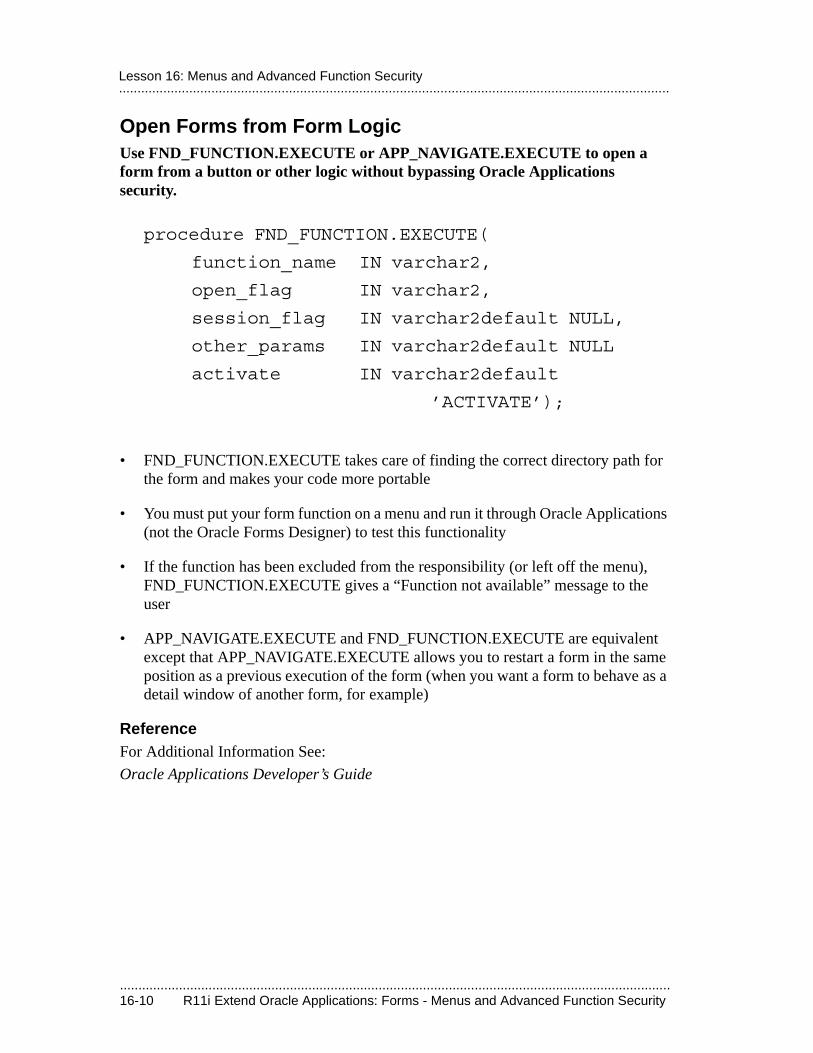
.....................................................................................................................................................16-10 R11i Extend Oracle Applications: Forms - Menus and Advanced Function Security
.....................................................................................................................................................Lesson 16: Menus and Advanced Function Security
Open Forms from Form LogicUse FND_FUNCTION.EXECUTE or APP_NAVIGATE.EXECUTE to open a form from a button or other logic without bypassing Oracle Applications security.
procedure FND_FUNCTION.EXECUTE(
function_name IN varchar2,
open_flag IN varchar2,
session_flag IN varchar2default NULL,
other_params IN varchar2default NULL
activate IN varchar2default
’ACTIVATE’);
• FND_FUNCTION.EXECUTE takes care of finding the correct directory path for the form and makes your code more portable
• You must put your form function on a menu and run it through Oracle Applications (not the Oracle Forms Designer) to test this functionality
• If the function has been excluded from the responsibility (or left off the menu), FND_FUNCTION.EXECUTE gives a “Function not available” message to the user
• APP_NAVIGATE.EXECUTE and FND_FUNCTION.EXECUTE are equivalent except that APP_NAVIGATE.EXECUTE allows you to restart a form in the same position as a previous execution of the form (when you want a form to behave as a detail window of another form, for example)
ReferenceFor Additional Information See:
Oracle Applications Developer’s Guide
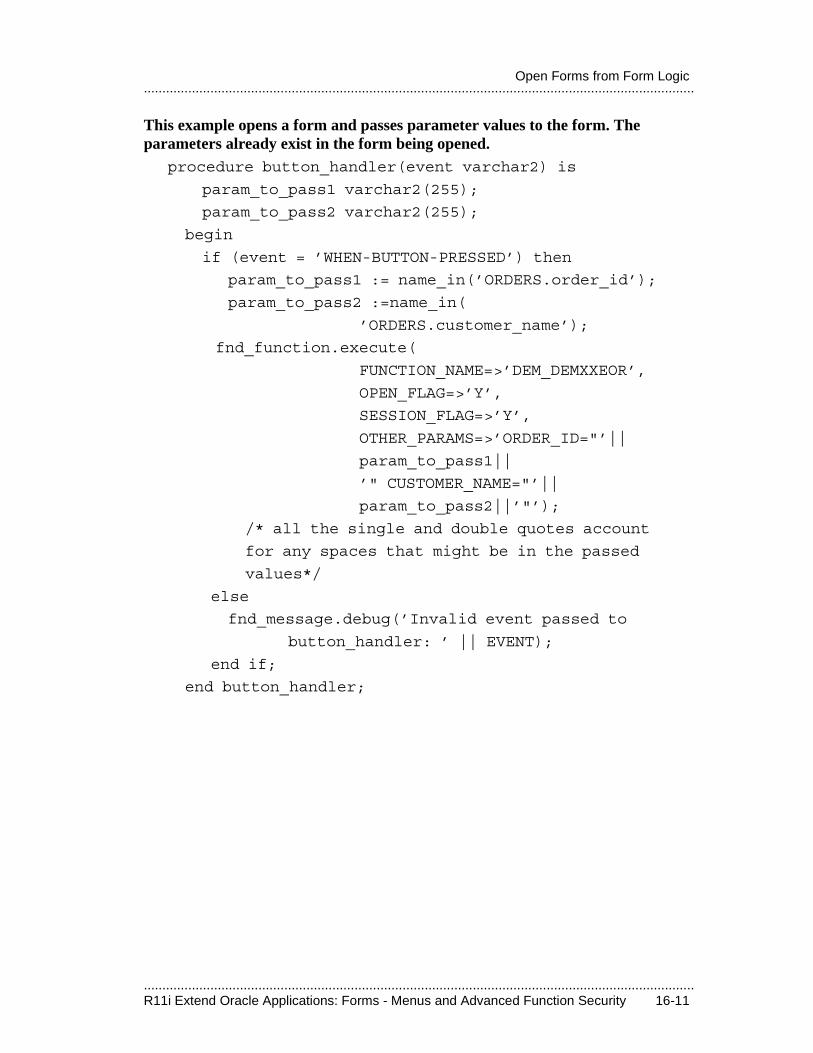
.....................................................................................................................................................R11i Extend Oracle Applications: Forms - Menus and Advanced Function Security 16-11
.....................................................................................................................................................Open Forms from Form Logic
This example opens a form and passes parameter values to the form. The parameters already exist in the form being opened.
procedure button_handler(event varchar2) is
param_to_pass1 varchar2(255);
param_to_pass2 varchar2(255);
begin
if (event = ’WHEN-BUTTON-PRESSED’) then
param_to_pass1 := name_in(’ORDERS.order_id’);
param_to_pass2 :=name_in(
’ORDERS.customer_name’);
fnd_function.execute(
FUNCTION_NAME=>’DEM_DEMXXEOR’,
OPEN_FLAG=>’Y’,
SESSION_FLAG=>’Y’,
OTHER_PARAMS=>’ORDER_ID="’||
param_to_pass1||
’" CUSTOMER_NAME="’||
param_to_pass2||’"’);
/* all the single and double quotes account
for any spaces that might be in the passed
values*/
else
fnd_message.debug(’Invalid event passed to
button_handler: ’ || EVENT);
end if;
end button_handler;
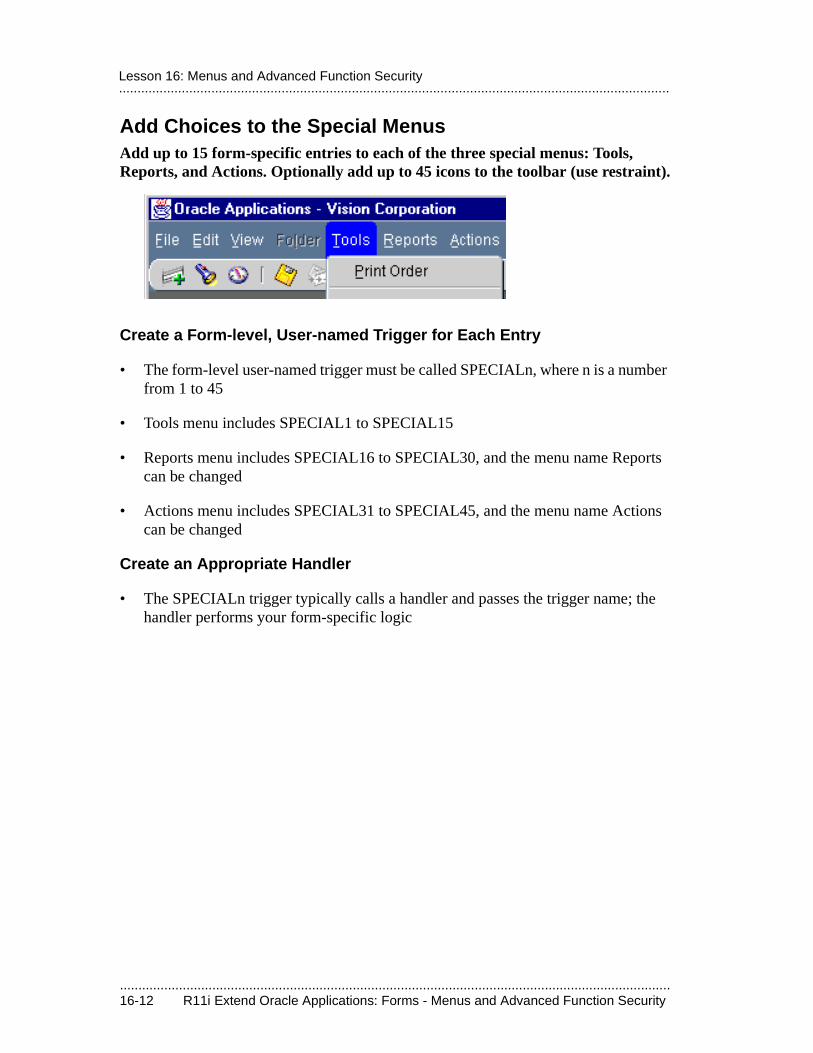
.....................................................................................................................................................16-12 R11i Extend Oracle Applications: Forms - Menus and Advanced Function Security
.....................................................................................................................................................Lesson 16: Menus and Advanced Function Security
Add Choices to the Special MenusAdd up to 15 form-specific entries to each of the three special menus: Tools, Reports, and Actions. Optionally add up to 45 icons to the toolbar (use restraint).
Create a Form-level, User-named Trigger for Each Entry
• The form-level user-named trigger must be called SPECIALn, where n is a number from 1 to 45
• Tools menu includes SPECIAL1 to SPECIAL15
• Reports menu includes SPECIAL16 to SPECIAL30, and the menu name Reports can be changed
• Actions menu includes SPECIAL31 to SPECIAL45, and the menu name Actions can be changed
Create an Appropriate Handler
• The SPECIALn trigger typically calls a handler and passes the trigger name; the handler performs your form-specific logic
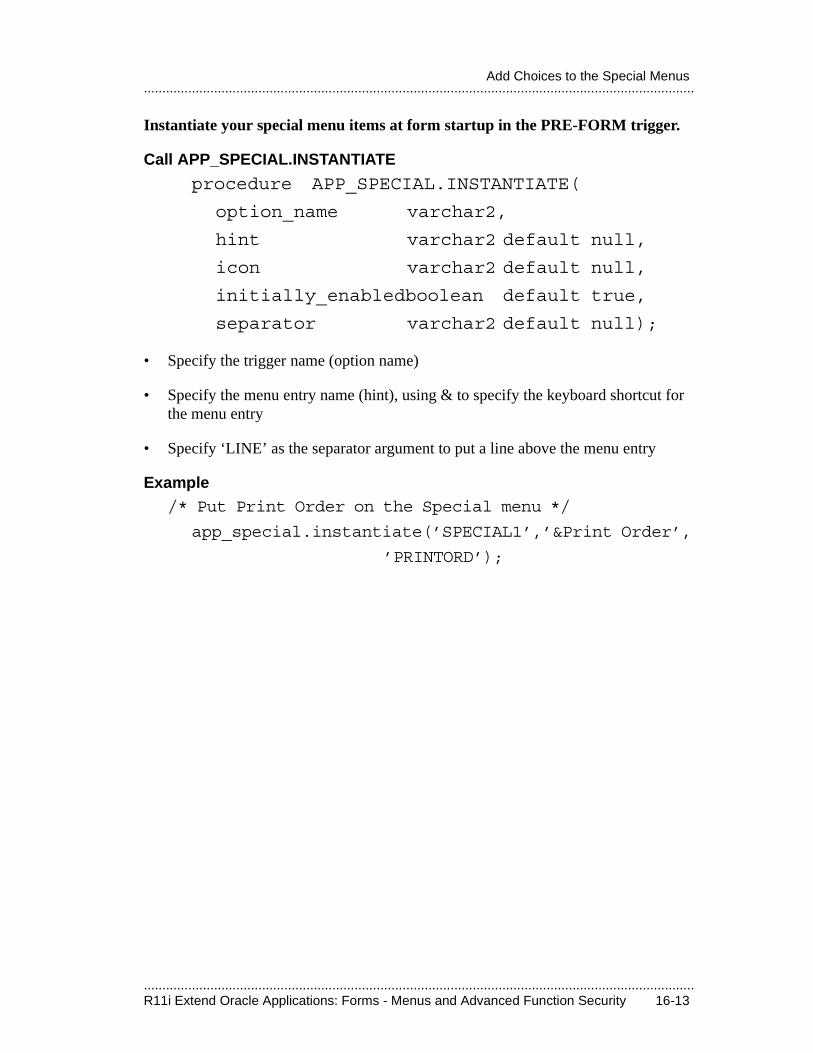
.....................................................................................................................................................R11i Extend Oracle Applications: Forms - Menus and Advanced Function Security 16-13
.....................................................................................................................................................Add Choices to the Special Menus
Instantiate your special menu items at form startup in the PRE-FORM trigger.
Call APP_SPECIAL.INSTANTIATE
procedure APP_SPECIAL.INSTANTIATE(
option_name varchar2,
hint varchar2 default null,
icon varchar2 default null,
initially_enabledboolean default true,
separator varchar2 default null);
• Specify the trigger name (option name)
• Specify the menu entry name (hint), using & to specify the keyboard shortcut for the menu entry
• Specify ‘LINE’ as the separator argument to put a line above the menu entry
Example/* Put Print Order on the Special menu */
app_special.instantiate(’SPECIAL1’,’&Print Order’,
’PRINTORD’);
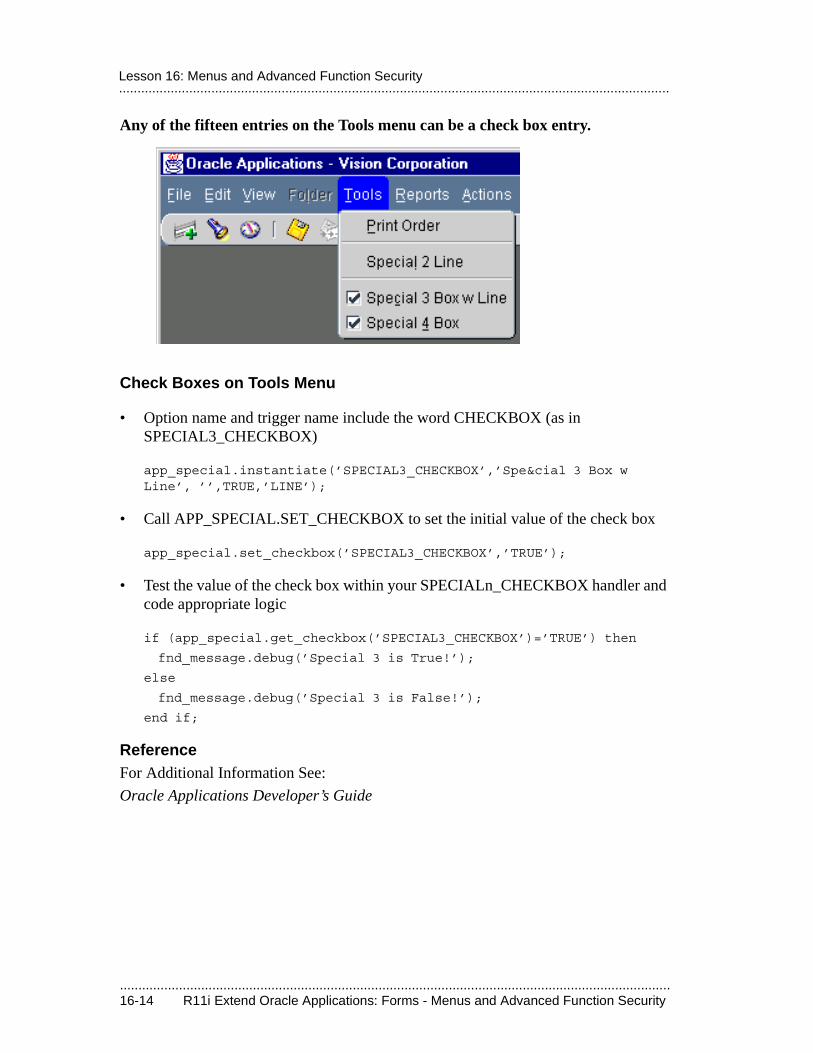
.....................................................................................................................................................16-14 R11i Extend Oracle Applications: Forms - Menus and Advanced Function Security
.....................................................................................................................................................Lesson 16: Menus and Advanced Function Security
Any of the fifteen entries on the Tools menu can be a check box entry.
Check Boxes on Tools Menu
• Option name and trigger name include the word CHECKBOX (as in SPECIAL3_CHECKBOX)
app_special.instantiate(’SPECIAL3_CHECKBOX’,’Spe&cial 3 Box w Line’, ’’,TRUE,’LINE’);
• Call APP_SPECIAL.SET_CHECKBOX to set the initial value of the check box
app_special.set_checkbox(’SPECIAL3_CHECKBOX’,’TRUE’);
• Test the value of the check box within your SPECIALn_CHECKBOX handler and code appropriate logic
if (app_special.get_checkbox(’SPECIAL3_CHECKBOX’)=’TRUE’) then
fnd_message.debug(’Special 3 is True!’);
else
fnd_message.debug(’Special 3 is False!’);
end if;
ReferenceFor Additional Information See:
Oracle Applications Developer’s Guide
.....................................................................................................................................................R11i Extend Oracle Applications: Forms - Menus and Advanced Function Security 16-15
.....................................................................................................................................................Add Choices to the Special Menus
Optionally enable and disable Special menu entries on a block-by-block basis after you instantiate the entries in PRE-FORM.
Call APP_SPECIAL.ENABLE
procedure APP_SPECIAL.ENABLE(
option_name varchar2,
state);
• Disable your SPECIAL menu item in a form-level PRE-BLOCK trigger
app_special.enable(’SPECIAL1’,PROPERTY_OFF);
• Enable your SPECIAL menu item in a block-level PRE-BLOCK trigger for the block where you want the menu entry
app_special.enable(’SPECIAL1’,PROPERTY_ON);
Disable the Entire Special Menu
• Disable the entire Special menu (for example, when entering query mode) by passing ‘SPECIAL’ as the option name
app_special.enable(’SPECIAL’,PROPERTY_OFF);
More Menu Control Options
• APP_SPECIAL.ENABLE also lets you enable and disable certain other entries on the Oracle Applications menu
ReferenceFor Additional Information See:
Oracle Applications Developer’s Guide
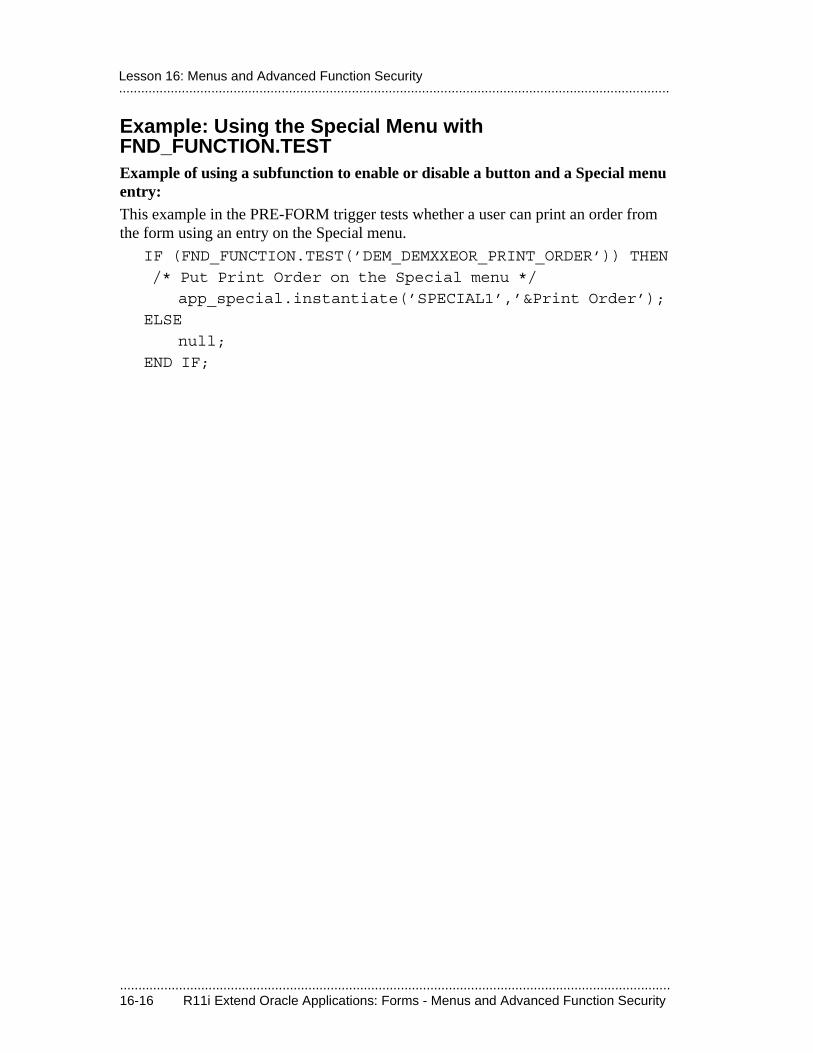
.....................................................................................................................................................16-16 R11i Extend Oracle Applications: Forms - Menus and Advanced Function Security
.....................................................................................................................................................Lesson 16: Menus and Advanced Function Security
Example: Using the Special Menu with FND_FUNCTION.TESTExample of using a subfunction to enable or disable a button and a Special menu entry:This example in the PRE-FORM trigger tests whether a user can print an order from the form using an entry on the Special menu.
IF (FND_FUNCTION.TEST(’DEM_DEMXXEOR_PRINT_ORDER’)) THEN
/* Put Print Order on the Special menu */
app_special.instantiate(’SPECIAL1’,’&Print Order’);
ELSE
null;
END IF;
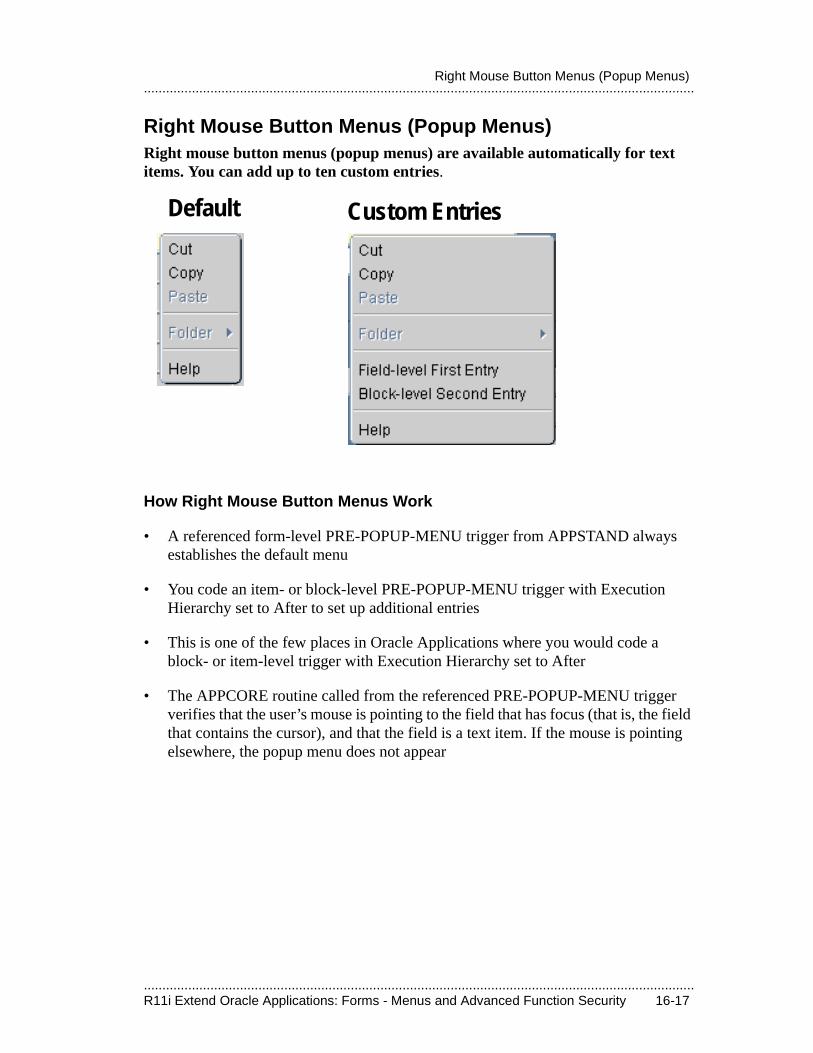
.....................................................................................................................................................R11i Extend Oracle Applications: Forms - Menus and Advanced Function Security 16-17
.....................................................................................................................................................Right Mouse Button Menus (Popup Menus)
Right Mouse Button Menus (Popup Menus)Right mouse button menus (popup menus) are available automatically for text items. You can add up to ten custom entries.
How Right Mouse Button Menus Work
• A referenced form-level PRE-POPUP-MENU trigger from APPSTAND always establishes the default menu
• You code an item- or block-level PRE-POPUP-MENU trigger with Execution Hierarchy set to After to set up additional entries
• This is one of the few places in Oracle Applications where you would code a block- or item-level trigger with Execution Hierarchy set to After
• The APPCORE routine called from the referenced PRE-POPUP-MENU trigger verifies that the user’s mouse is pointing to the field that has focus (that is, the field that contains the cursor), and that the field is a text item. If the mouse is pointing elsewhere, the popup menu does not appear
Default Custom Entries
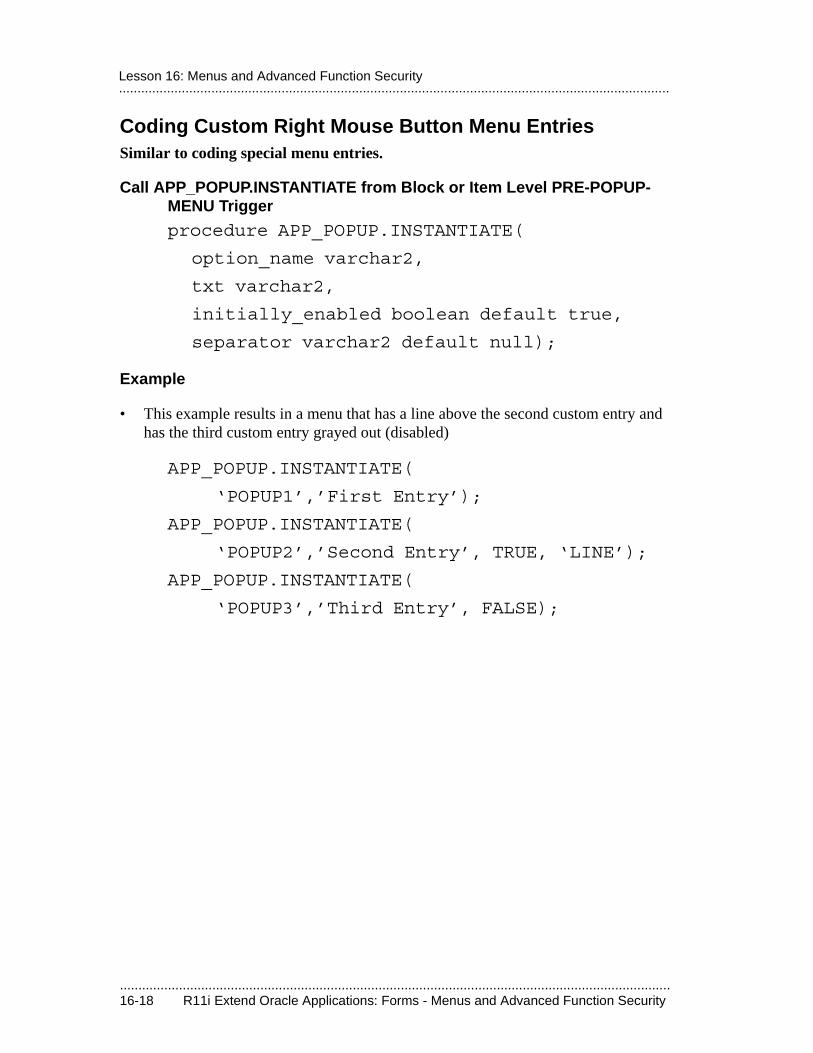
.....................................................................................................................................................16-18 R11i Extend Oracle Applications: Forms - Menus and Advanced Function Security
.....................................................................................................................................................Lesson 16: Menus and Advanced Function Security
Coding Custom Right Mouse Button Menu EntriesSimilar to coding special menu entries.
Call APP_POPUP.INSTANTIATE from Block or Item Level PRE-POPUP-MENU Trigger
procedure APP_POPUP.INSTANTIATE(
option_name varchar2,
txt varchar2,
initially_enabled boolean default true,
separator varchar2 default null);
Example
• This example results in a menu that has a line above the second custom entry and has the third custom entry grayed out (disabled)
APP_POPUP.INSTANTIATE(
‘POPUP1’,’First Entry’);
APP_POPUP.INSTANTIATE(
‘POPUP2’,’Second Entry’, TRUE, ‘LINE’);
APP_POPUP.INSTANTIATE(
‘POPUP3’,’Third Entry’, FALSE);
.....................................................................................................................................................R11i Extend Oracle Applications: Forms - Menus and Advanced Function Security 16-19
.....................................................................................................................................................Coding Custom Right Mouse Button Menu Entries
Create a User-named Trigger for Each Entry
• Call your trigger POPUP1 through POPUP10
• When a user chooses your menu entry, your POPUPn trigger is executed
• Put your trigger at the appropriate level for your logic (typically block or item level)
• Call an appropriate handler to execute the logic you want
• If your logic should not execute when the field is disabled, you must test for that in your code

.....................................................................................................................................................16-20 R11i Extend Oracle Applications: Forms - Menus and Advanced Function Security
.....................................................................................................................................................Lesson 16: Menus and Advanced Function Security
.................................
Attachments
.....................................................................................................................................................17-2 R11i Extend Oracle Applications: Forms - Attachments
.....................................................................................................................................................Lesson 17: Attachments
30 minutes Demo
.....................................................................................................................................................R11i Extend Oracle Applications: Forms - Attachments 17-3
.....................................................................................................................................................Objectives
ObjectivesAt the end of this lesson, you should be able to:
• Understand the structure of the attachments feature.
• Set up the attachments feature for your forms.
.....................................................................................................................................................17-4 R11i Extend Oracle Applications: Forms - Attachments
.....................................................................................................................................................Lesson 17: Attachments
Overview of the Attachments Feature
Attachments Feature
• Enables users to link unstructured data, such as images, word processing documents, spreadsheets, or text to application data. For example, users can link images to items or video to operations as operation instructions.
• Attachment information can flow through your entire application. For example, if you enable attachments for a part number, where users would attach images of the part, you can then enable attachments for all your other forms that refer to your part number. Users would then be able to see the image of the part wherever that part number occurs.
• You can provide security to limit which attachments users can see from particular forms by assigning document categories to your form functions. Users then assign individual attachments to particular categories.
• You can add the attachments feature to your application forms and functions without modifying form code, so long as your forms are built using Oracle Applications standards.
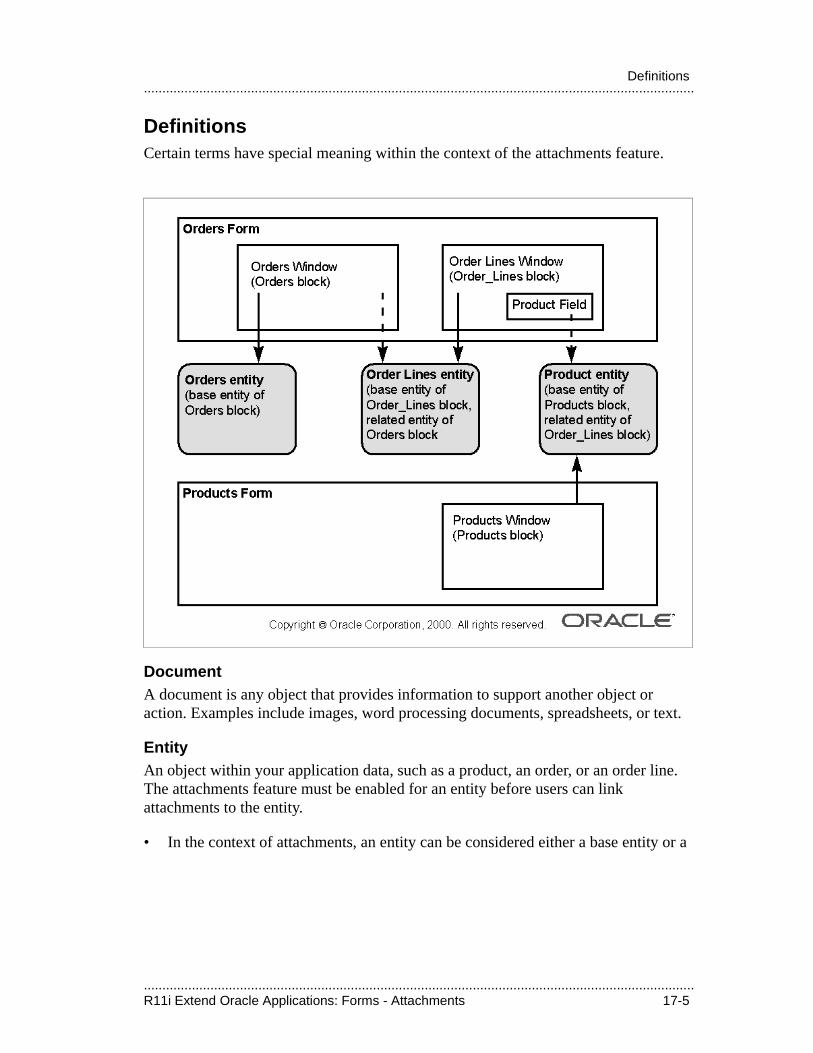
.....................................................................................................................................................R11i Extend Oracle Applications: Forms - Attachments 17-5
.....................................................................................................................................................Definitions
DefinitionsCertain terms have special meaning within the context of the attachments feature.
DocumentA document is any object that provides information to support another object or action. Examples include images, word processing documents, spreadsheets, or text.
EntityAn object within your application data, such as a product, an order, or an order line. The attachments feature must be enabled for an entity before users can link attachments to the entity.
• In the context of attachments, an entity can be considered either a base entity or a
.....................................................................................................................................................17-6 R11i Extend Oracle Applications: Forms - Attachments
.....................................................................................................................................................Lesson 17: Attachments
related entity.
• A base entity is the main entity of the block.
• A related entity is an entity that is usually related to the block by a foreign–key relationship.
AttachmentA document associated with an entity is called an attachment.
Attachment FunctionA form or form function in your application cannot use attachments until the attachments feature is set up for that form or function; that is, it must be defined as an ”attachment function” in the Attachment Functions window.
Document CategoryA document category is a label that users apply to individual attachments and documents. Document categories provide security by restricting the documents that can be viewed or added via a specific form or form function. When you set up the attachments feature, you assign document categories to particular forms or form functions.
• When a user defines a document, the user assigns a category to the document.
• The attachments form can query only those documents that are assigned to a category to which the calling form or form function is associated.
• A ”Miscellaneous” category is seeded to provide easy visibility of a document across forms.
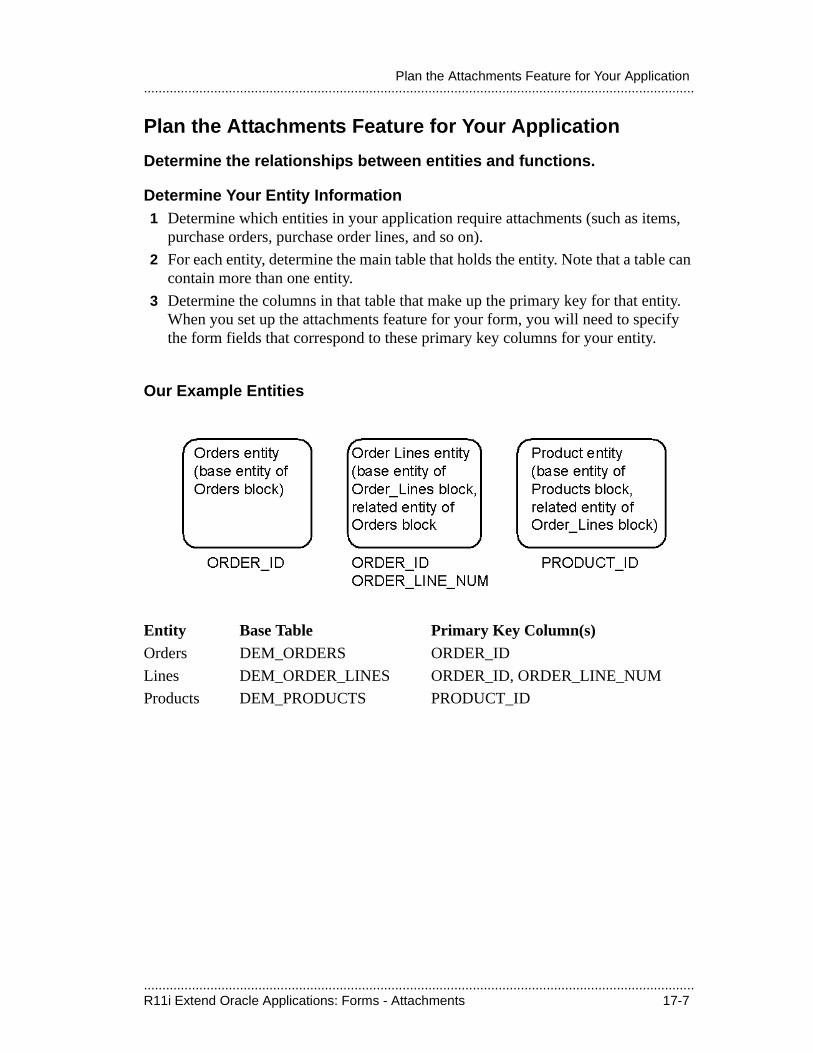
.....................................................................................................................................................R11i Extend Oracle Applications: Forms - Attachments 17-7
.....................................................................................................................................................Plan the Attachments Feature for Your Application
Plan the Attachments Feature for Your Application
Determine the relationships between entities and functions.
Determine Your Entity Information1 Determine which entities in your application require attachments (such as items,
purchase orders, purchase order lines, and so on).
2 For each entity, determine the main table that holds the entity. Note that a table can contain more than one entity.
3 Determine the columns in that table that make up the primary key for that entity. When you set up the attachments feature for your form, you will need to specify the form fields that correspond to these primary key columns for your entity.
Our Example Entities
Entity Base Table Primary Key Column(s)Orders DEM_ORDERS ORDER_ID
Lines DEM_ORDER_LINES ORDER_ID, ORDER_LINE_NUM
Products DEM_PRODUCTS PRODUCT_ID
.....................................................................................................................................................17-8 R11i Extend Oracle Applications: Forms - Attachments
.....................................................................................................................................................Lesson 17: Attachments
Determine Your Function Information1 Determine which forms or form functions should show attachments for those
entities.
2 For each form that requires attachments, determine whether you want to enable attachments for a specific form function or for all occurrences of the form.
3 For the entire form or function, identify what attachment categories you want to use.
4 For each form (function), determine the block/entity correspondence. That is, determine which entities should have attachments and in which block(s) those entities should have attachments.
5 For each block/entity combination, determine whether the entity is a base entity or a related entity. A block can have only one base entity. Users can query and see attachments for more than one entity in a given form block; however, users may only insert or update attachments for the base entity of the block.
Our Example FunctionForm Function: DEM_DEMXXEOR
User Function Name: Demo Order Entry
Document Category: Miscellaneous
Block: Orders
1 Entity: Orders (base entity, insert/update/delete)
Block: Lines
1 Entity: Lines (base entity, insert/update/delete)
2 Entity: Products (related entity, view only)
3 Entity: Orders (related entity, view only)
.....................................................................................................................................................R11i Extend Oracle Applications: Forms - Attachments 17-9
.....................................................................................................................................................Define the Attachments Feature
Define the Attachments FeatureOnce you have planned your feature thoroughly, you can set it up.
Use Oracle Applications forms to set up your attachment functions1 Define your document entities using the Document Entities window
2 Define your document categories using the Document Categories window
3 Define your attachment functions using the Attachment Functions windows
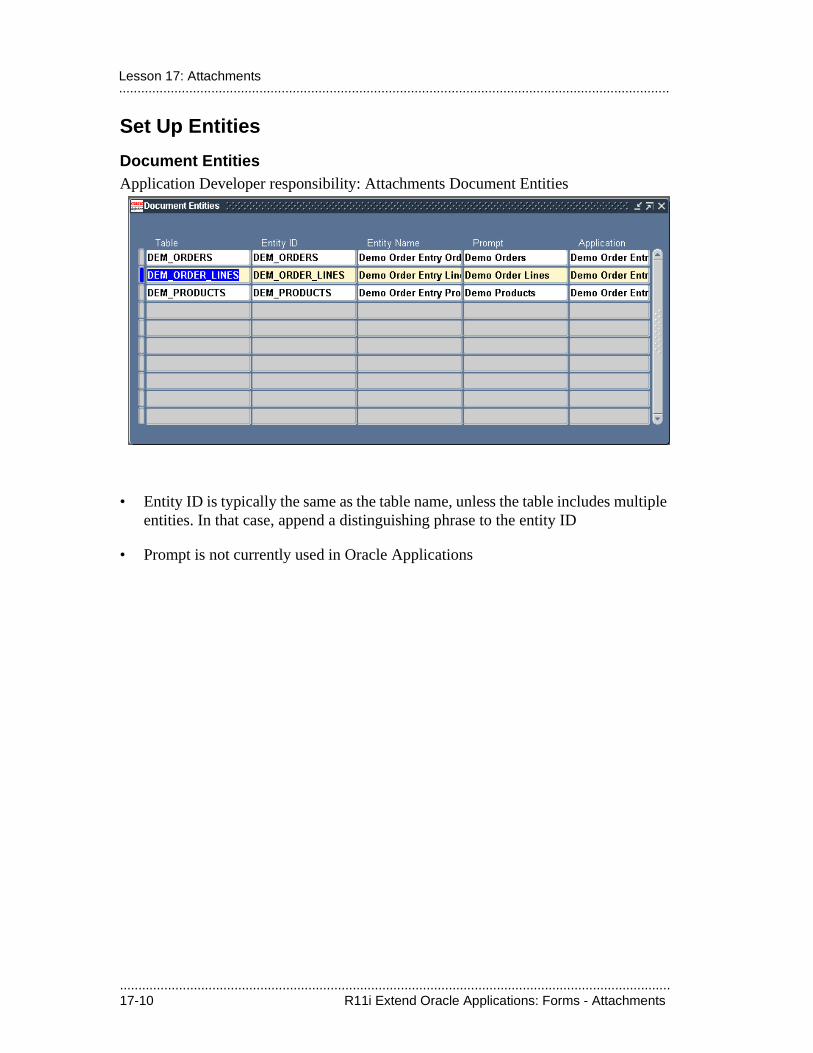
.....................................................................................................................................................17-10 R11i Extend Oracle Applications: Forms - Attachments
.....................................................................................................................................................Lesson 17: Attachments
Set Up Entities
Document EntitiesApplication Developer responsibility: Attachments Document Entities
• Entity ID is typically the same as the table name, unless the table includes multiple entities. In that case, append a distinguishing phrase to the entity ID
• Prompt is not currently used in Oracle Applications
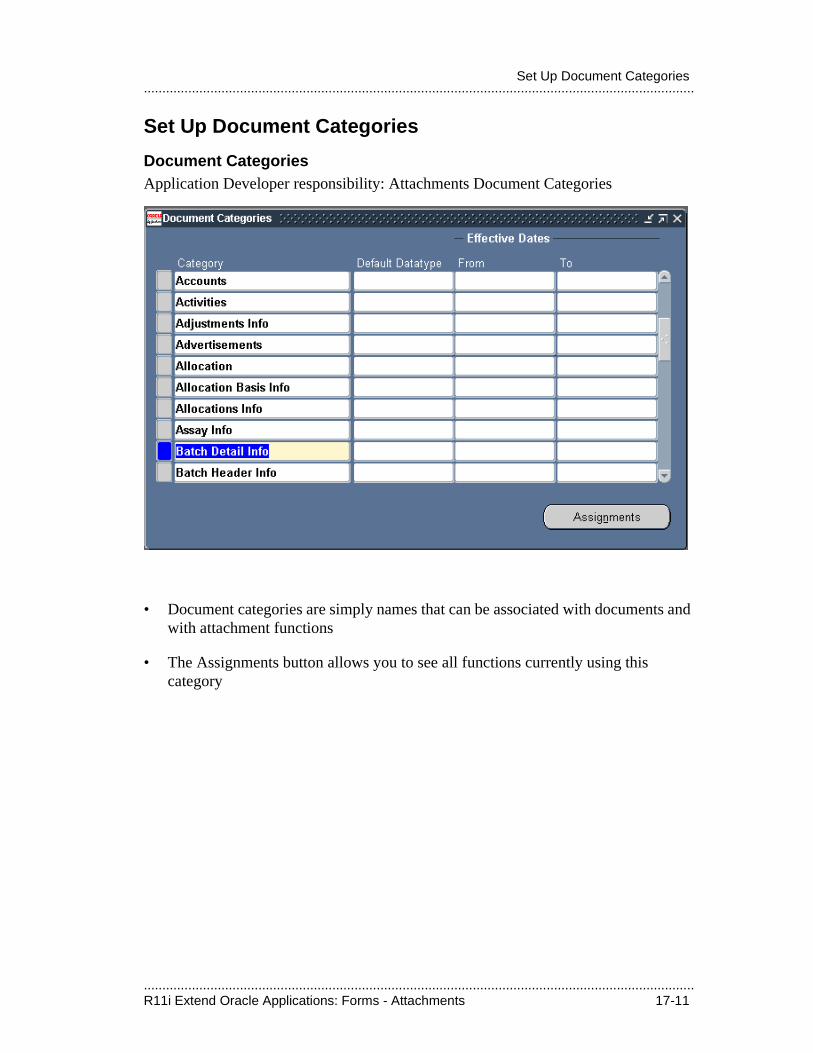
.....................................................................................................................................................R11i Extend Oracle Applications: Forms - Attachments 17-11
.....................................................................................................................................................Set Up Document Categories
Set Up Document Categories
Document CategoriesApplication Developer responsibility: Attachments Document Categories
• Document categories are simply names that can be associated with documents and with attachment functions
• The Assignments button allows you to see all functions currently using this category
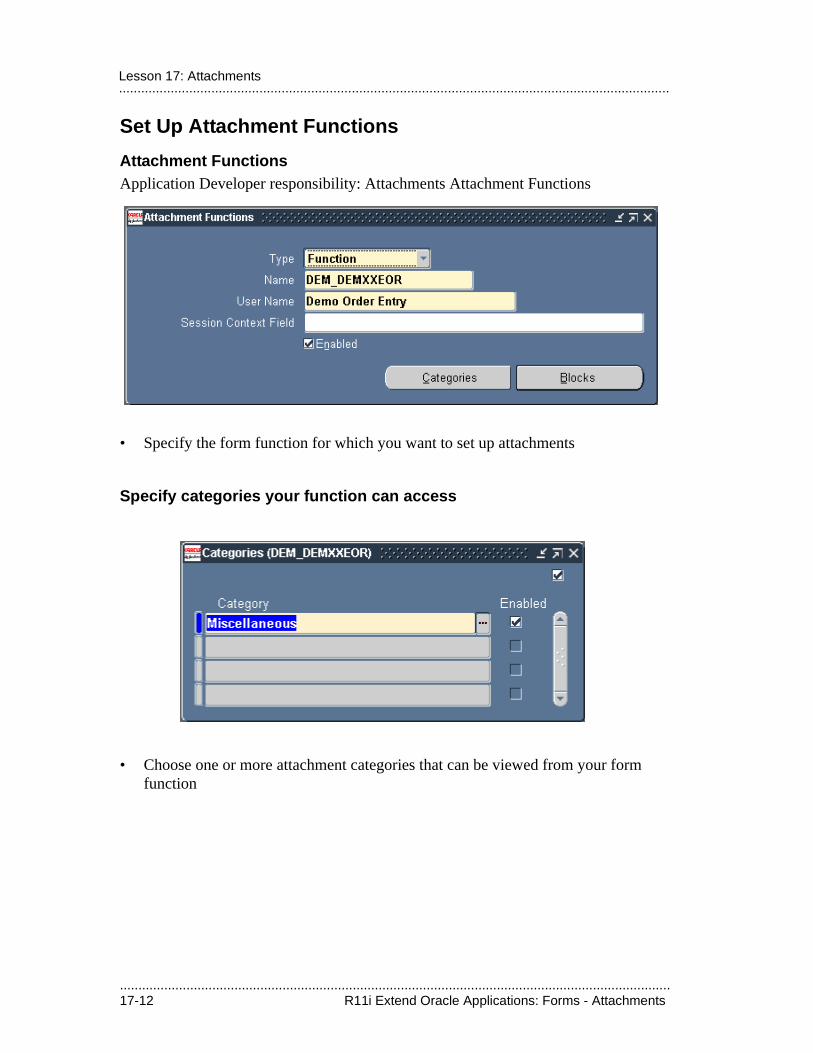
.....................................................................................................................................................17-12 R11i Extend Oracle Applications: Forms - Attachments
.....................................................................................................................................................Lesson 17: Attachments
Set Up Attachment Functions
Attachment FunctionsApplication Developer responsibility: Attachments Attachment Functions
• Specify the form function for which you want to set up attachments
Specify categories your function can access
• Choose one or more attachment categories that can be viewed from your form function
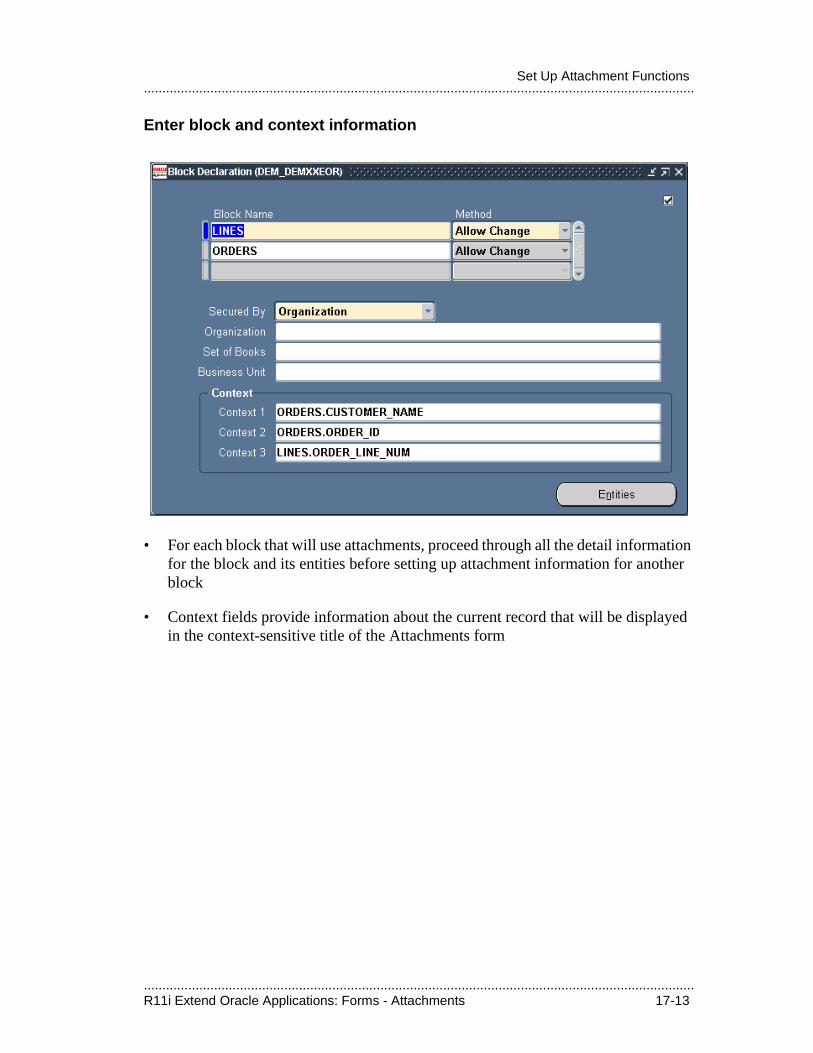
.....................................................................................................................................................R11i Extend Oracle Applications: Forms - Attachments 17-13
.....................................................................................................................................................Set Up Attachment Functions
Enter block and context information
• For each block that will use attachments, proceed through all the detail information for the block and its entities before setting up attachment information for another block
• Context fields provide information about the current record that will be displayed in the context-sensitive title of the Attachments form
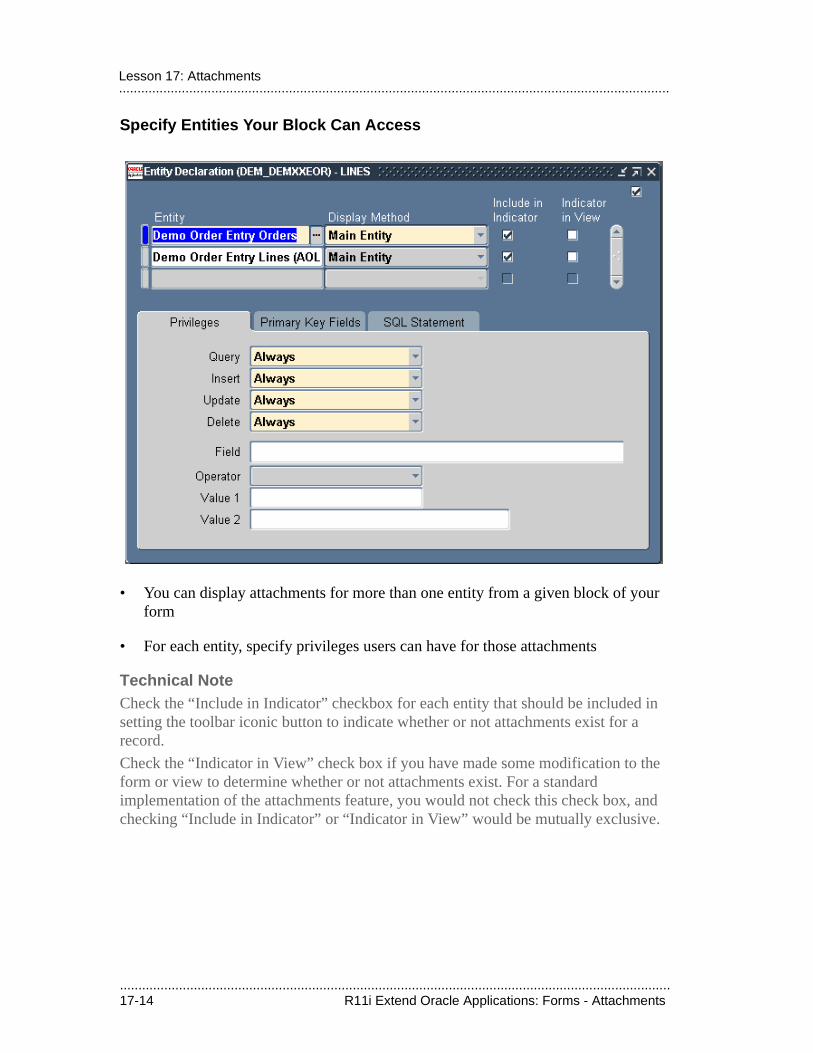
.....................................................................................................................................................17-14 R11i Extend Oracle Applications: Forms - Attachments
.....................................................................................................................................................Lesson 17: Attachments
Specify Entities Your Block Can Access
• You can display attachments for more than one entity from a given block of your form
• For each entity, specify privileges users can have for those attachments
Technical NoteCheck the “Include in Indicator” checkbox for each entity that should be included in setting the toolbar iconic button to indicate whether or not attachments exist for a record.
Check the “Indicator in View” check box if you have made some modification to the form or view to determine whether or not attachments exist. For a standard implementation of the attachments feature, you would not check this check box, and checking “Include in Indicator” or “Indicator in View” would be mutually exclusive.
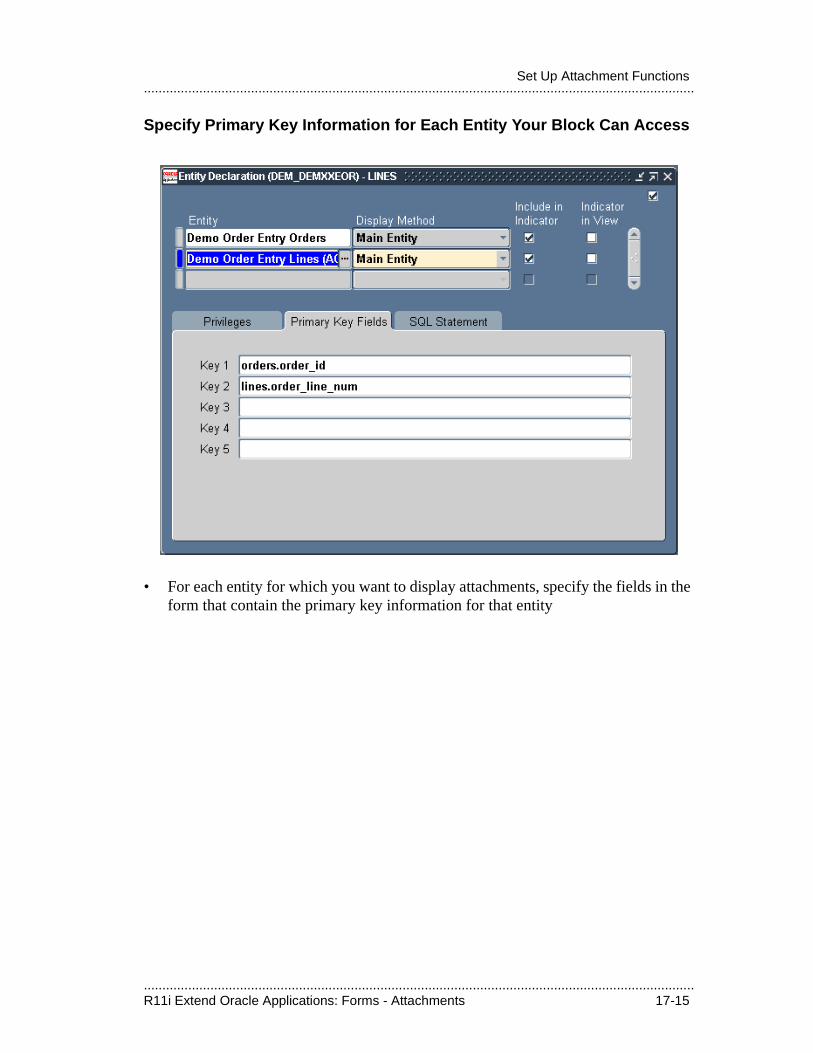
.....................................................................................................................................................R11i Extend Oracle Applications: Forms - Attachments 17-15
.....................................................................................................................................................Set Up Attachment Functions
Specify Primary Key Information for Each Entity Your Block Can Access
• For each entity for which you want to display attachments, specify the fields in the form that contain the primary key information for that entity
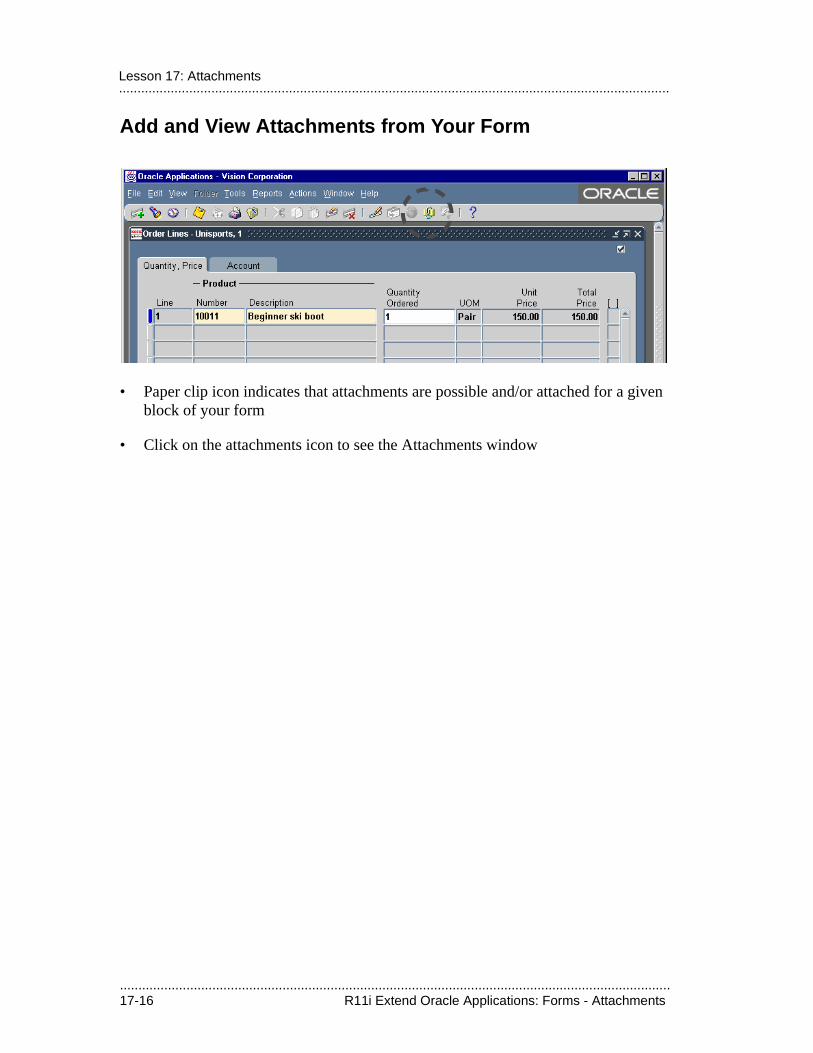
.....................................................................................................................................................17-16 R11i Extend Oracle Applications: Forms - Attachments
.....................................................................................................................................................Lesson 17: Attachments
Add and View Attachments from Your Form
• Paper clip icon indicates that attachments are possible and/or attached for a given block of your form
• Click on the attachments icon to see the Attachments window
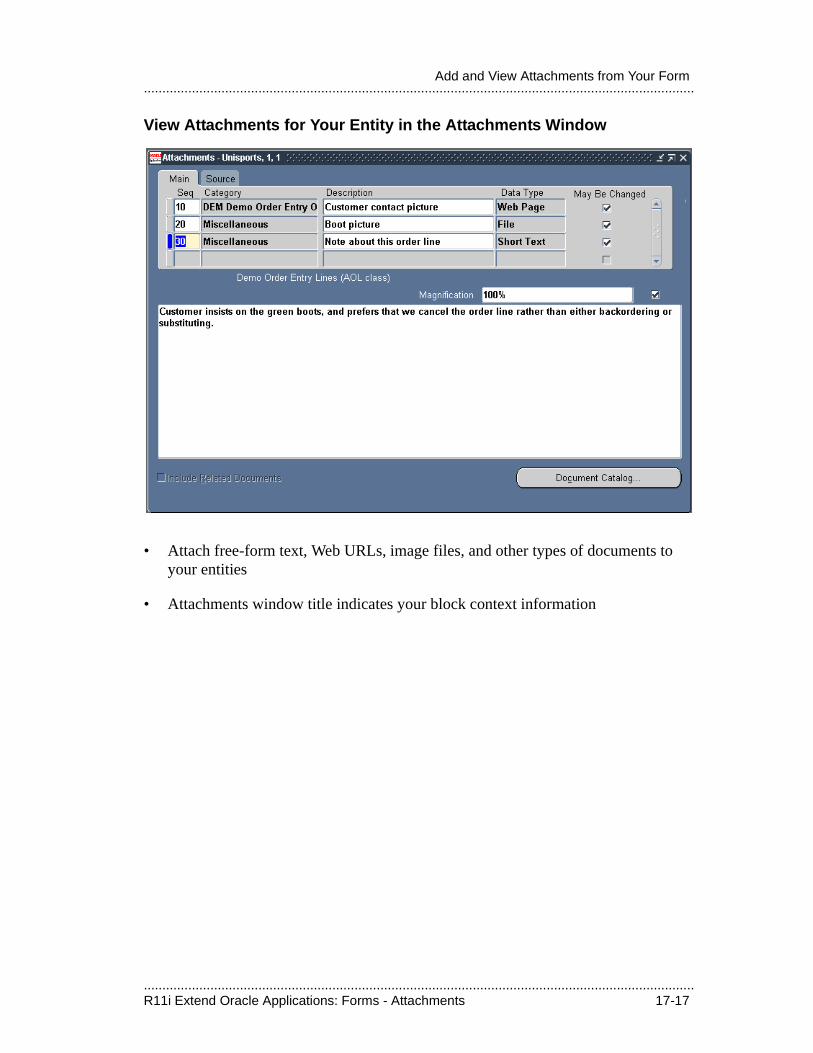
.....................................................................................................................................................R11i Extend Oracle Applications: Forms - Attachments 17-17
.....................................................................................................................................................Add and View Attachments from Your Form
View Attachments for Your Entity in the Attachments Window
• Attach free-form text, Web URLs, image files, and other types of documents to your entities
• Attachments window title indicates your block context information

.....................................................................................................................................................17-18 R11i Extend Oracle Applications: Forms - Attachments
.....................................................................................................................................................Lesson 17: Attachments
................................
Order Entry Workshop
.....................................................................................................................................................A-2 R11i Extend Oracle Applications: Forms - Order Entry Workshop
.....................................................................................................................................................Appendix A: Order Entry Workshop
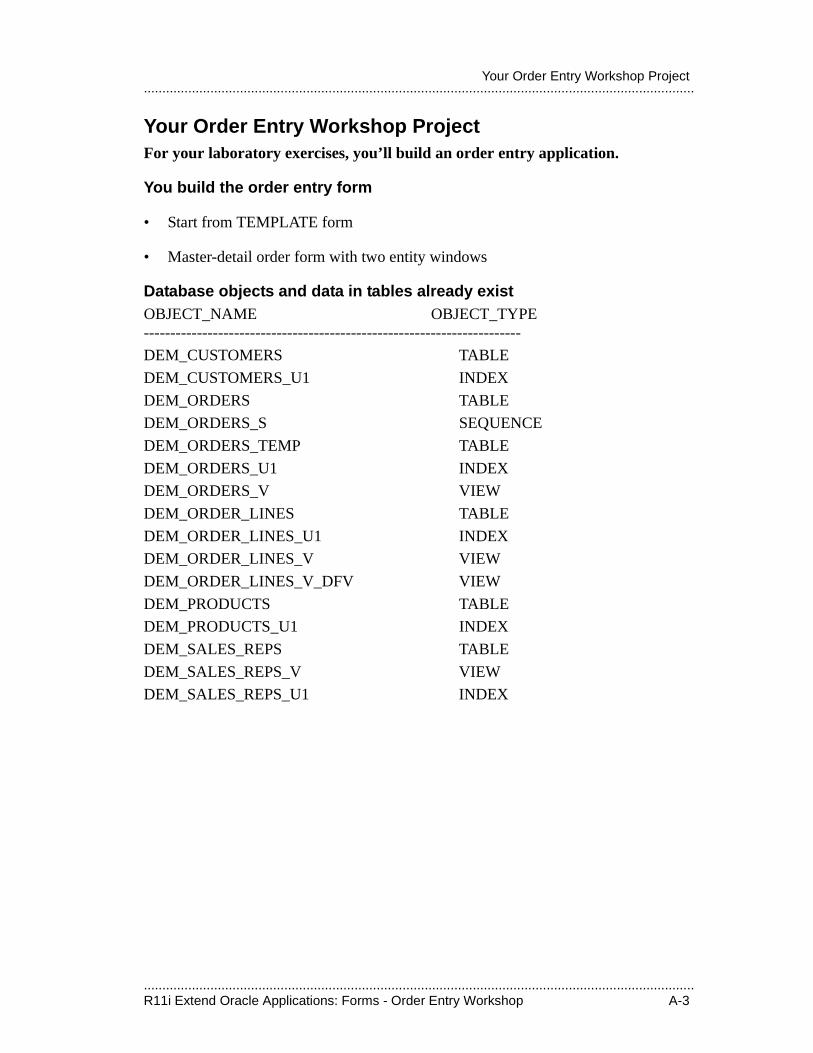
.....................................................................................................................................................R11i Extend Oracle Applications: Forms - Order Entry Workshop A-3
.....................................................................................................................................................Your Order Entry Workshop Project
Your Order Entry Workshop ProjectFor your laboratory exercises, you’ll build an order entry application.
You build the order entry form
• Start from TEMPLATE form
• Master-detail order form with two entity windows
Database objects and data in tables already existOBJECT_NAME OBJECT_TYPE-----------------------------------------------------------------------
DEM_CUSTOMERS TABLE
DEM_CUSTOMERS_U1 INDEX
DEM_ORDERS TABLE
DEM_ORDERS_S SEQUENCE
DEM_ORDERS_TEMP TABLE
DEM_ORDERS_U1 INDEX
DEM_ORDERS_V VIEW
DEM_ORDER_LINES TABLE
DEM_ORDER_LINES_U1 INDEX
DEM_ORDER_LINES_V VIEW
DEM_ORDER_LINES_V_DFV VIEW
DEM_PRODUCTS TABLE
DEM_PRODUCTS_U1 INDEX
DEM_SALES_REPS TABLE
DEM_SALES_REPS_V VIEW
DEM_SALES_REPS_U1 INDEX
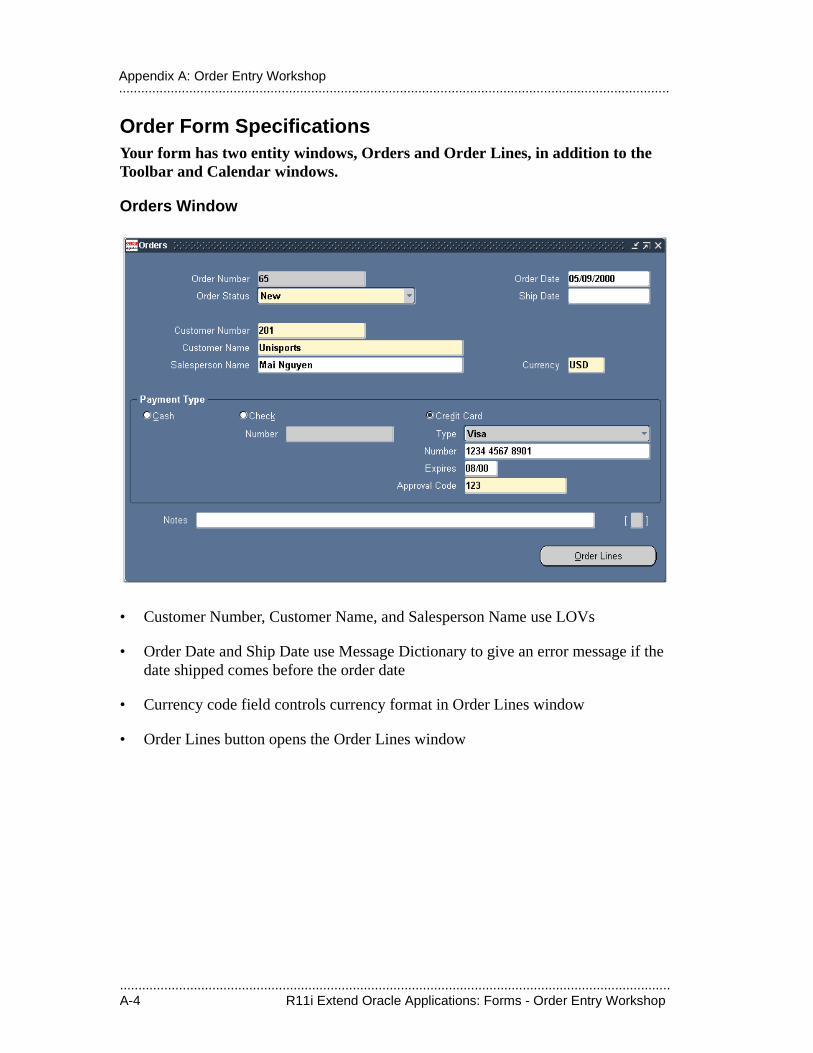
.....................................................................................................................................................A-4 R11i Extend Oracle Applications: Forms - Order Entry Workshop
.....................................................................................................................................................Appendix A: Order Entry Workshop
Order Form SpecificationsYour form has two entity windows, Orders and Order Lines, in addition to the Toolbar and Calendar windows.
Orders Window
• Customer Number, Customer Name, and Salesperson Name use LOVs
• Order Date and Ship Date use Message Dictionary to give an error message if the date shipped comes before the order date
• Currency code field controls currency format in Order Lines window
• Order Lines button opens the Order Lines window
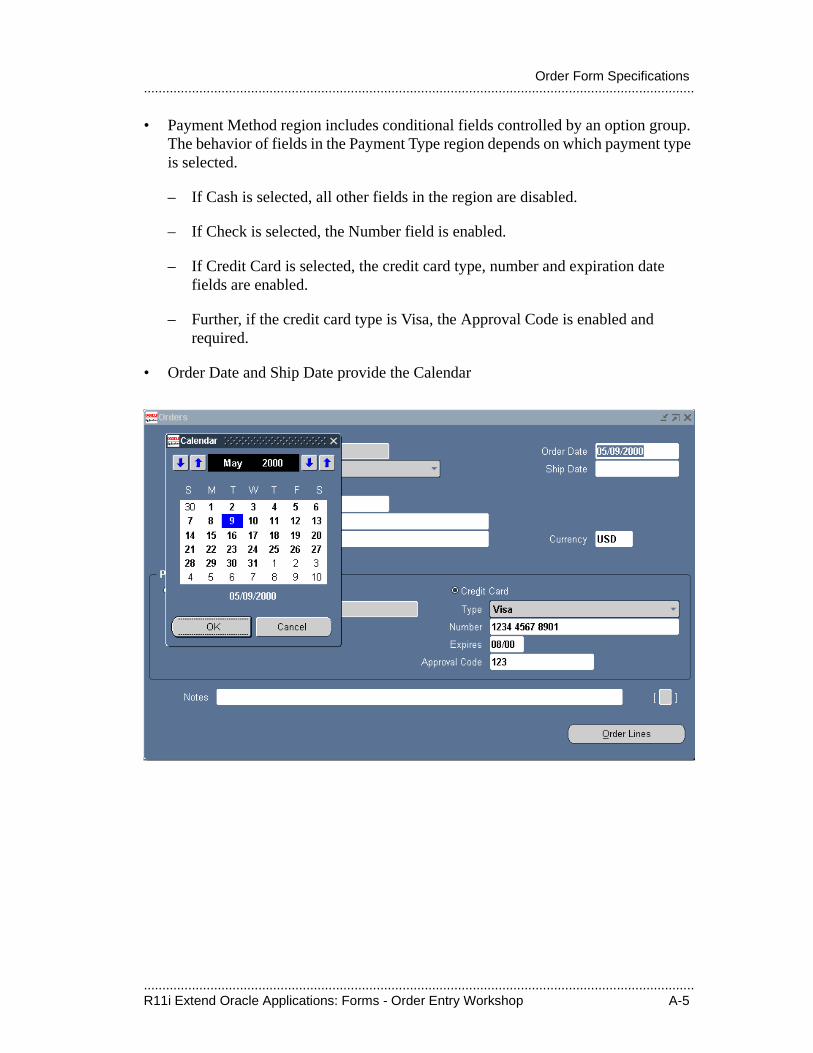
.....................................................................................................................................................R11i Extend Oracle Applications: Forms - Order Entry Workshop A-5
.....................................................................................................................................................Order Form Specifications
• Payment Method region includes conditional fields controlled by an option group. The behavior of fields in the Payment Type region depends on which payment type is selected.
– If Cash is selected, all other fields in the region are disabled.
– If Check is selected, the Number field is enabled.
– If Credit Card is selected, the credit card type, number and expiration date fields are enabled.
– Further, if the credit card type is Visa, the Approval Code is enabled and required.
• Order Date and Ship Date provide the Calendar

.....................................................................................................................................................A-6 R11i Extend Oracle Applications: Forms - Order Entry Workshop
.....................................................................................................................................................Appendix A: Order Entry Workshop
Order Lines Window
• Window title is context-dependent on the order, and dynamically displays the order number and customer name
• A coordination check box provides master-detail coordination control
• Product description and number have related LOVs
• Provide a descriptive flexfield
• Automatically calculate Total Price
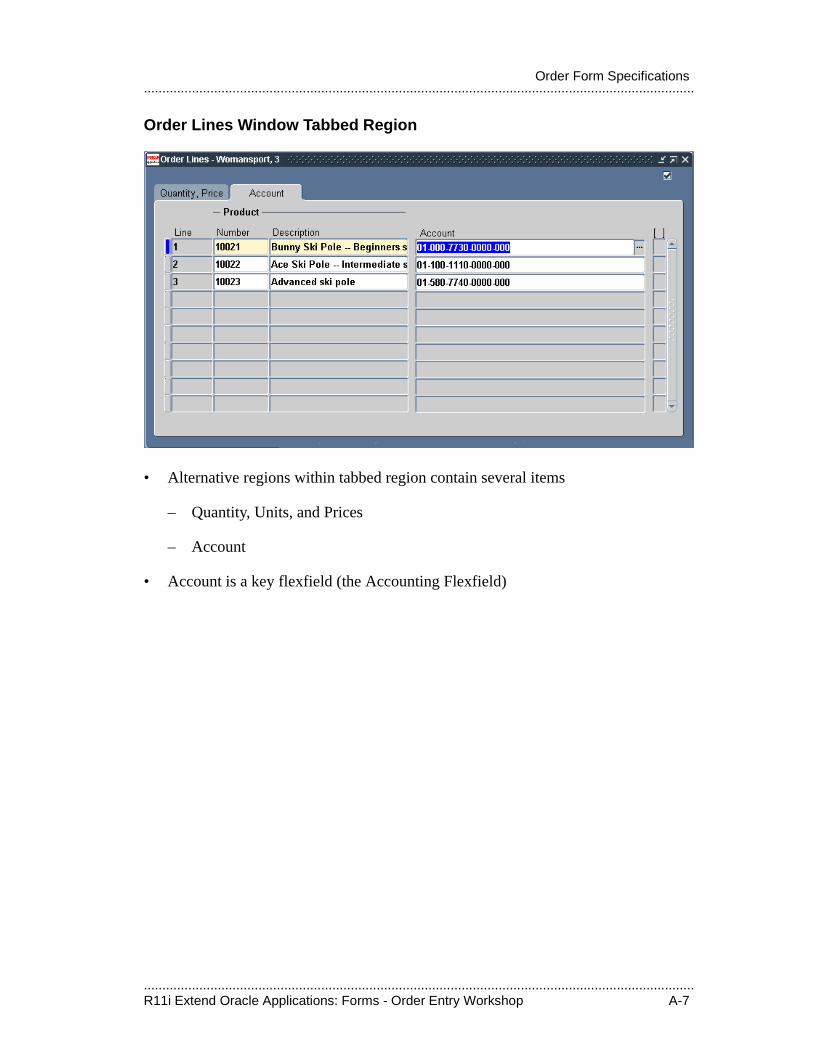
.....................................................................................................................................................R11i Extend Oracle Applications: Forms - Order Entry Workshop A-7
.....................................................................................................................................................Order Form Specifications
Order Lines Window Tabbed Region
• Alternative regions within tabbed region contain several items
– Quantity, Units, and Prices
– Account
• Account is a key flexfield (the Accounting Flexfield)
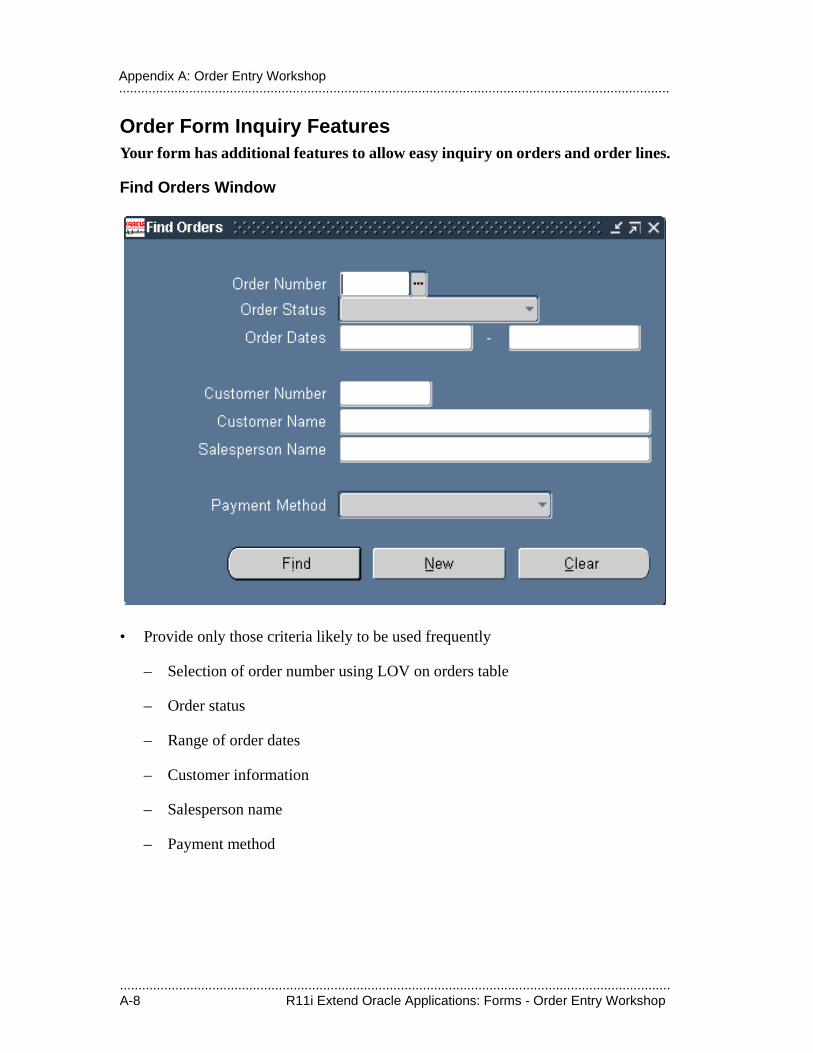
.....................................................................................................................................................A-8 R11i Extend Oracle Applications: Forms - Order Entry Workshop
.....................................................................................................................................................Appendix A: Order Entry Workshop
Order Form Inquiry FeaturesYour form has additional features to allow easy inquiry on orders and order lines.
Find Orders Window
• Provide only those criteria likely to be used frequently
– Selection of order number using LOV on orders table
– Order status
– Range of order dates
– Customer information
– Salesperson name
– Payment method

.....................................................................................................................................................R11i Extend Oracle Applications: Forms - Order Entry Workshop A-9
.....................................................................................................................................................Order Form Inquiry Features
Row LOV
• Let user select one particular order line
• Provide all relevant information in the row LOV
– Order number
– Product number and description
– Quantity ordered
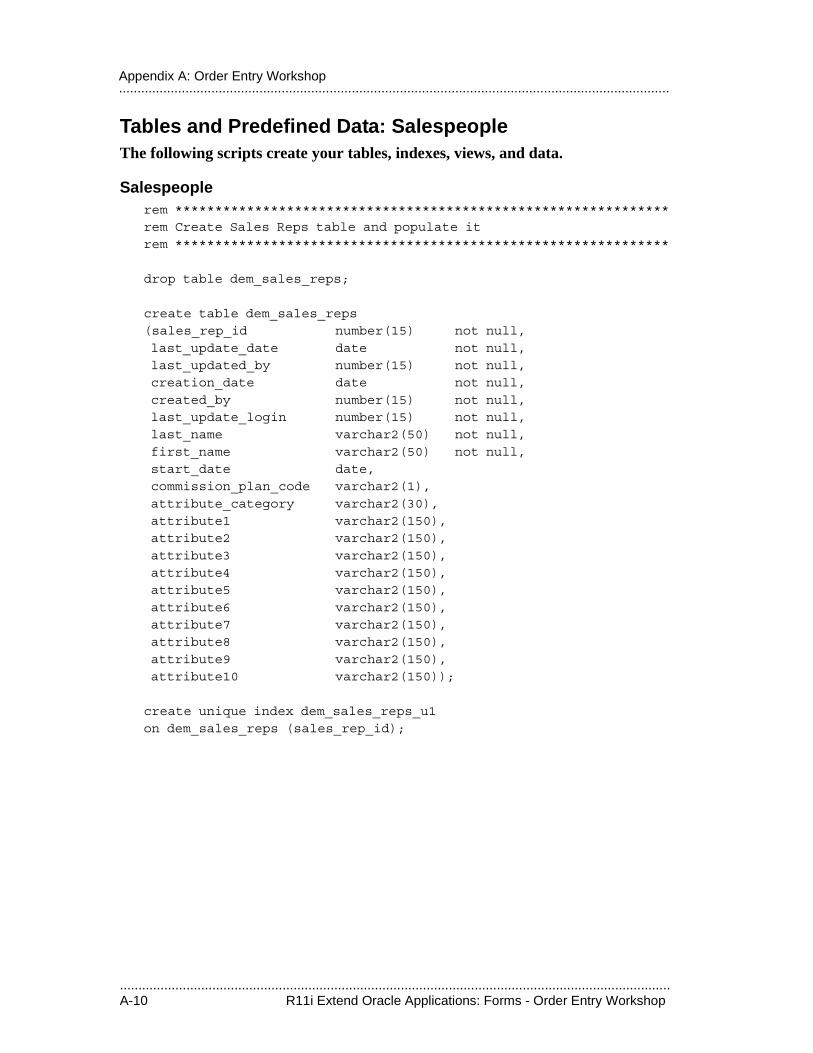
.....................................................................................................................................................A-10 R11i Extend Oracle Applications: Forms - Order Entry Workshop
.....................................................................................................................................................Appendix A: Order Entry Workshop
Tables and Predefined Data: SalespeopleThe following scripts create your tables, indexes, views, and data.
Salespeoplerem **************************************************************rem Create Sales Reps table and populate itrem **************************************************************
drop table dem_sales_reps;
create table dem_sales_reps(sales_rep_id number(15) not null, last_update_date date not null, last_updated_by number(15) not null, creation_date date not null, created_by number(15) not null, last_update_login number(15) not null, last_name varchar2(50) not null, first_name varchar2(50) not null, start_date date, commission_plan_code varchar2(1), attribute_category varchar2(30), attribute1 varchar2(150), attribute2 varchar2(150), attribute3 varchar2(150), attribute4 varchar2(150), attribute5 varchar2(150), attribute6 varchar2(150), attribute7 varchar2(150), attribute8 varchar2(150), attribute9 varchar2(150), attribute10 varchar2(150));
create unique index dem_sales_reps_u1on dem_sales_reps (sales_rep_id);

.....................................................................................................................................................R11i Extend Oracle Applications: Forms - Order Entry Workshop A-11
.....................................................................................................................................................Tables and Predefined Data: Salespeople
insert into dem_sales_reps
(sales_rep_id, last_update_date, last_updated_by, creation_date,
created_by, last_update_login, last_name, first_name,
start_date, commission_plan_code)
values
(1001, ’23-JUN-95’, 1, ’23-JUN-95’, 1, 1,
’Magee’, ’Colin’, ’14-MAY-90’, ’A’);
insert into dem_sales_reps
(sales_rep_id, last_update_date, last_updated_by, creation_date,
created_by, last_update_login, last_name, first_name,
start_date, commission_plan_code)
values
(1002, ’23-JUN-95’, 1, ’23-JUN-95’, 1, 1,
’Giljum’, ’Henry’, ’18-JAN-92’, ’A’);
insert into dem_sales_reps
(sales_rep_id, last_update_date, last_updated_by, creation_date,
created_by, last_update_login, last_name, first_name,
start_date, commission_plan_code)
values
(1003, ’23-JUN-95’, 1, ’23-JUN-95’, 1, 1,
’Sedeghi’, ’Yasmin’, ’18-FEB-91’, ’A’);
insert into dem_sales_reps
(sales_rep_id, last_update_date, last_updated_by, creation_date,
created_by, last_update_login, last_name, first_name,
start_date, commission_plan_code)
values
(1004, ’23-JUN-95’, 1, ’23-JUN-95’, 1, 1,
’Nguyen’, ’Mai’, ’22-JAN-92’, ’A’);
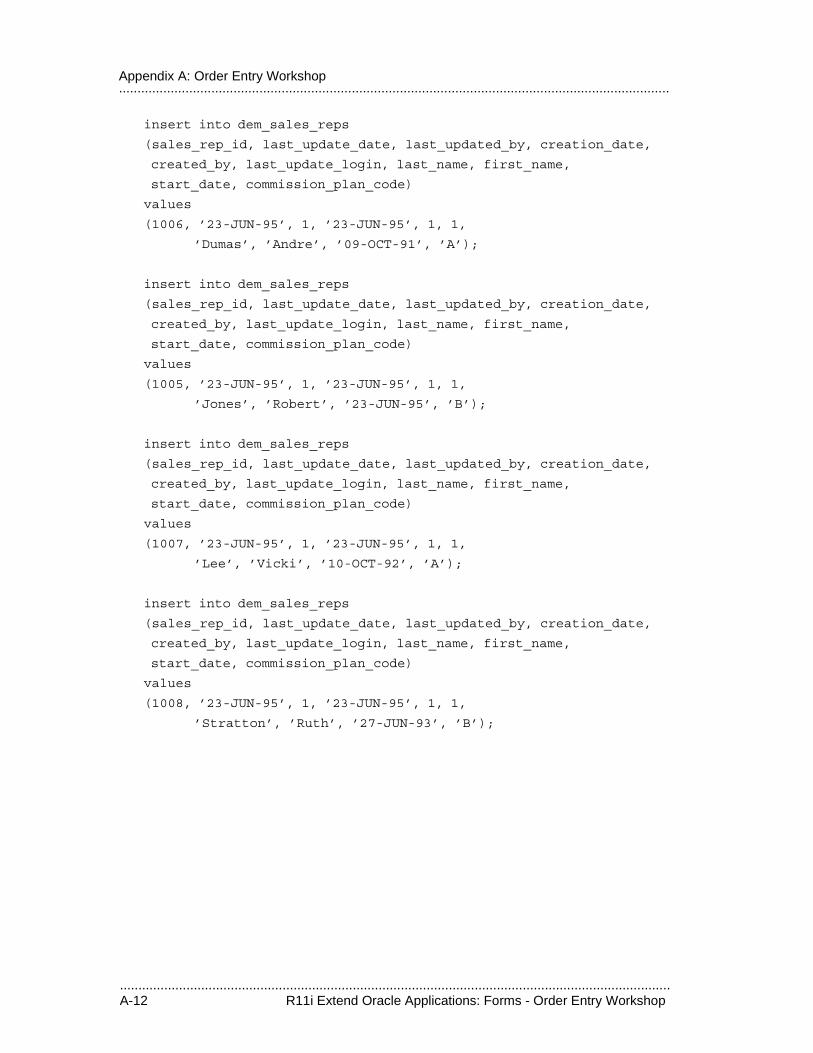
.....................................................................................................................................................A-12 R11i Extend Oracle Applications: Forms - Order Entry Workshop
.....................................................................................................................................................Appendix A: Order Entry Workshop
insert into dem_sales_reps
(sales_rep_id, last_update_date, last_updated_by, creation_date,
created_by, last_update_login, last_name, first_name,
start_date, commission_plan_code)
values
(1006, ’23-JUN-95’, 1, ’23-JUN-95’, 1, 1,
’Dumas’, ’Andre’, ’09-OCT-91’, ’A’);
insert into dem_sales_reps
(sales_rep_id, last_update_date, last_updated_by, creation_date,
created_by, last_update_login, last_name, first_name,
start_date, commission_plan_code)
values
(1005, ’23-JUN-95’, 1, ’23-JUN-95’, 1, 1,
’Jones’, ’Robert’, ’23-JUN-95’, ’B’);
insert into dem_sales_reps
(sales_rep_id, last_update_date, last_updated_by, creation_date,
created_by, last_update_login, last_name, first_name,
start_date, commission_plan_code)
values
(1007, ’23-JUN-95’, 1, ’23-JUN-95’, 1, 1,
’Lee’, ’Vicki’, ’10-OCT-92’, ’A’);
insert into dem_sales_reps
(sales_rep_id, last_update_date, last_updated_by, creation_date,
created_by, last_update_login, last_name, first_name,
start_date, commission_plan_code)
values
(1008, ’23-JUN-95’, 1, ’23-JUN-95’, 1, 1,
’Stratton’, ’Ruth’, ’27-JUN-93’, ’B’);
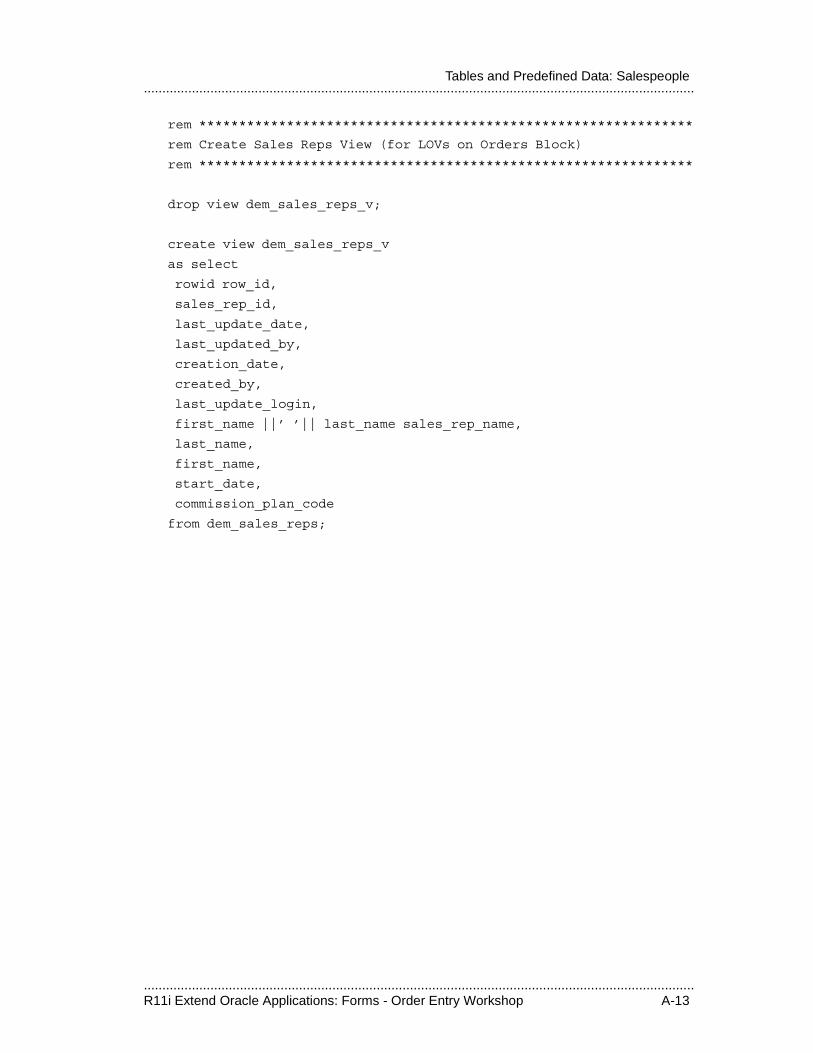
.....................................................................................................................................................R11i Extend Oracle Applications: Forms - Order Entry Workshop A-13
.....................................................................................................................................................Tables and Predefined Data: Salespeople
rem **************************************************************
rem Create Sales Reps View (for LOVs on Orders Block)
rem **************************************************************
drop view dem_sales_reps_v;
create view dem_sales_reps_v
as select
rowid row_id,
sales_rep_id,
last_update_date,
last_updated_by,
creation_date,
created_by,
last_update_login,
first_name ||’ ’|| last_name sales_rep_name,
last_name,
first_name,
start_date,
commission_plan_code
from dem_sales_reps;
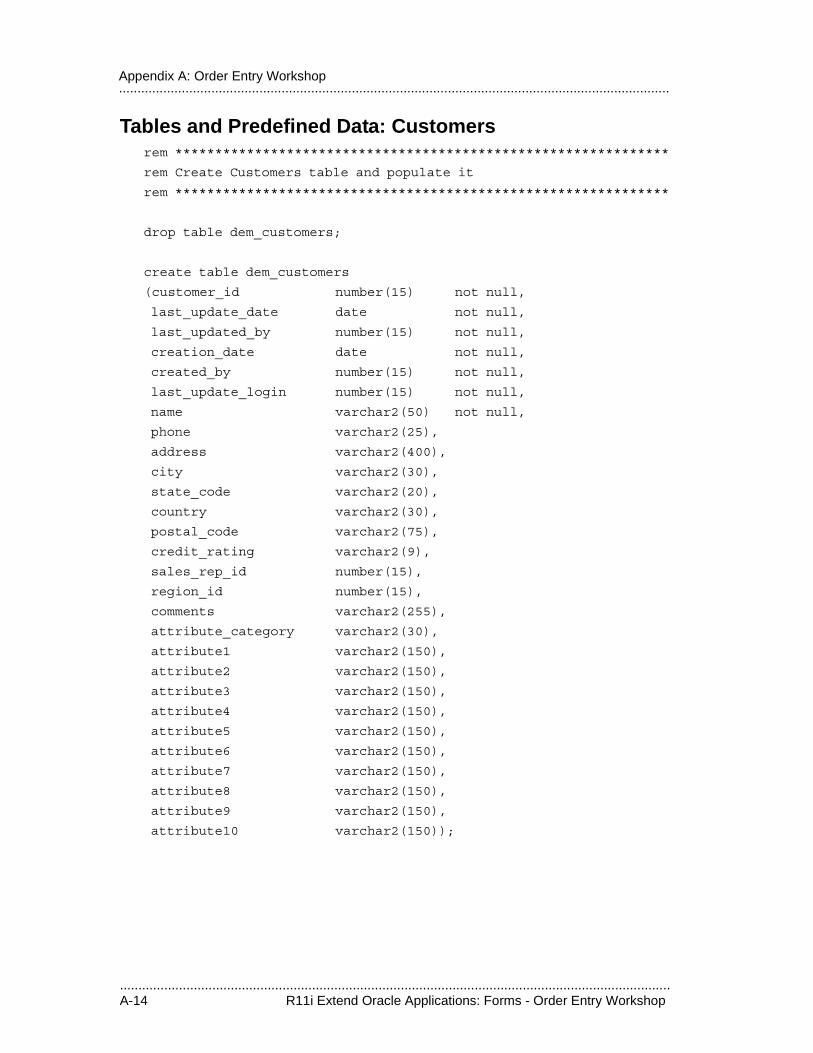
.....................................................................................................................................................A-14 R11i Extend Oracle Applications: Forms - Order Entry Workshop
.....................................................................................................................................................Appendix A: Order Entry Workshop
Tables and Predefined Data: Customersrem **************************************************************
rem Create Customers table and populate it
rem **************************************************************
drop table dem_customers;
create table dem_customers
(customer_id number(15) not null,
last_update_date date not null,
last_updated_by number(15) not null,
creation_date date not null,
created_by number(15) not null,
last_update_login number(15) not null,
name varchar2(50) not null,
phone varchar2(25),
address varchar2(400),
city varchar2(30),
state_code varchar2(20),
country varchar2(30),
postal_code varchar2(75),
credit_rating varchar2(9),
sales_rep_id number(15),
region_id number(15),
comments varchar2(255),
attribute_category varchar2(30),
attribute1 varchar2(150),
attribute2 varchar2(150),
attribute3 varchar2(150),
attribute4 varchar2(150),
attribute5 varchar2(150),
attribute6 varchar2(150),
attribute7 varchar2(150),
attribute8 varchar2(150),
attribute9 varchar2(150),
attribute10 varchar2(150));
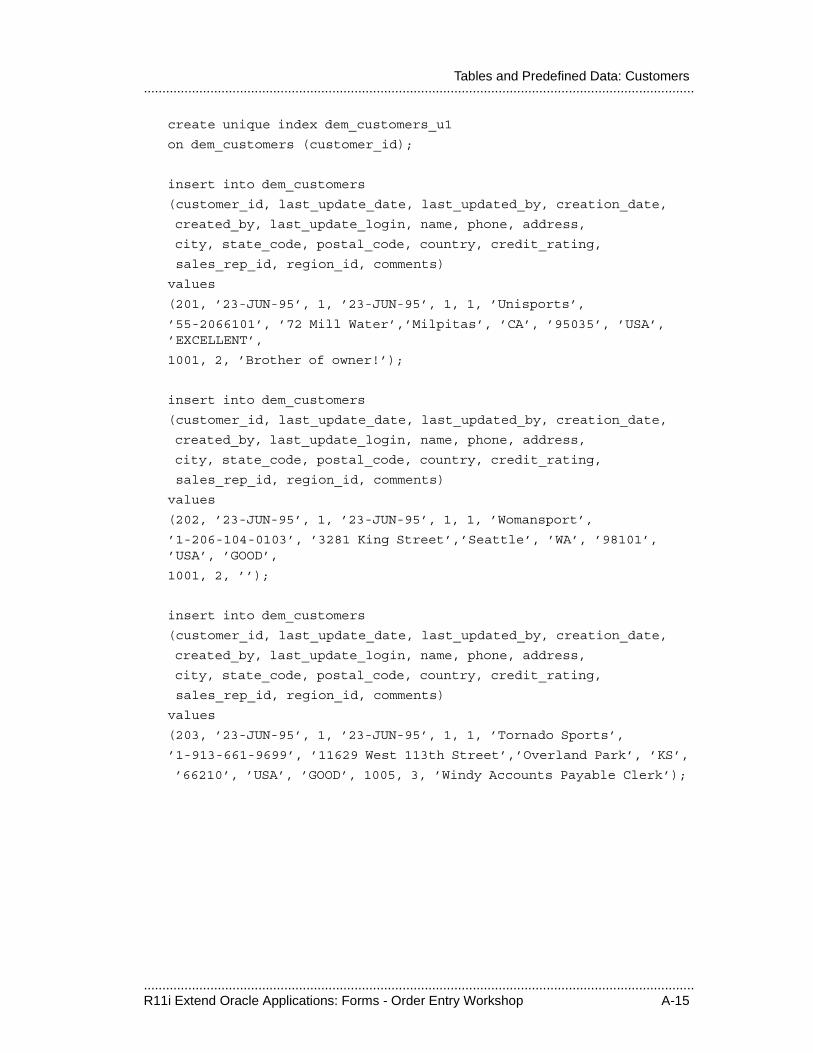
.....................................................................................................................................................R11i Extend Oracle Applications: Forms - Order Entry Workshop A-15
.....................................................................................................................................................Tables and Predefined Data: Customers
create unique index dem_customers_u1
on dem_customers (customer_id);
insert into dem_customers
(customer_id, last_update_date, last_updated_by, creation_date,
created_by, last_update_login, name, phone, address,
city, state_code, postal_code, country, credit_rating,
sales_rep_id, region_id, comments)
values
(201, ’23-JUN-95’, 1, ’23-JUN-95’, 1, 1, ’Unisports’,
’55-2066101’, ’72 Mill Water’,’Milpitas’, ’CA’, ’95035’, ’USA’, ’EXCELLENT’,
1001, 2, ’Brother of owner!’);
insert into dem_customers
(customer_id, last_update_date, last_updated_by, creation_date,
created_by, last_update_login, name, phone, address,
city, state_code, postal_code, country, credit_rating,
sales_rep_id, region_id, comments)
values
(202, ’23-JUN-95’, 1, ’23-JUN-95’, 1, 1, ’Womansport’,
’1-206-104-0103’, ’3281 King Street’,’Seattle’, ’WA’, ’98101’, ’USA’, ’GOOD’,
1001, 2, ’’);
insert into dem_customers
(customer_id, last_update_date, last_updated_by, creation_date,
created_by, last_update_login, name, phone, address,
city, state_code, postal_code, country, credit_rating,
sales_rep_id, region_id, comments)
values
(203, ’23-JUN-95’, 1, ’23-JUN-95’, 1, 1, ’Tornado Sports’,
’1-913-661-9699’, ’11629 West 113th Street’,’Overland Park’, ’KS’,
’66210’, ’USA’, ’GOOD’, 1005, 3, ’Windy Accounts Payable Clerk’);
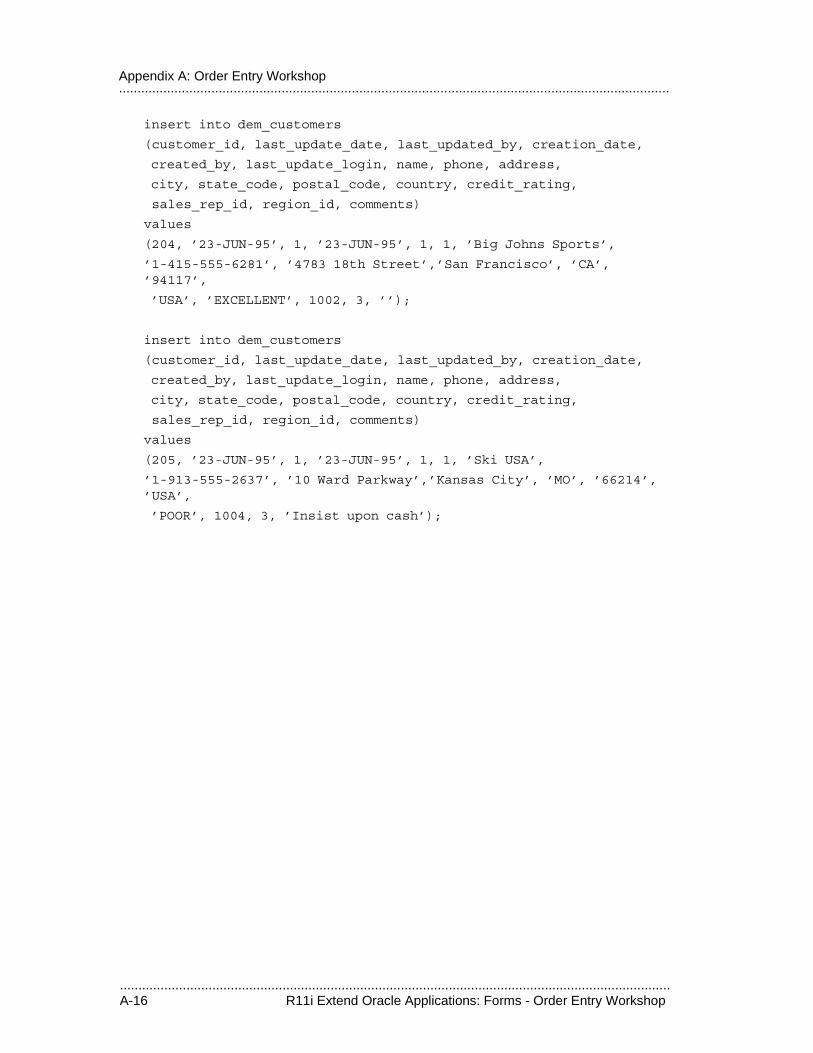
.....................................................................................................................................................A-16 R11i Extend Oracle Applications: Forms - Order Entry Workshop
.....................................................................................................................................................Appendix A: Order Entry Workshop
insert into dem_customers
(customer_id, last_update_date, last_updated_by, creation_date,
created_by, last_update_login, name, phone, address,
city, state_code, postal_code, country, credit_rating,
sales_rep_id, region_id, comments)
values
(204, ’23-JUN-95’, 1, ’23-JUN-95’, 1, 1, ’Big Johns Sports’,
’1-415-555-6281’, ’4783 18th Street’,’San Francisco’, ’CA’, ’94117’,
’USA’, ’EXCELLENT’, 1002, 3, ’’);
insert into dem_customers
(customer_id, last_update_date, last_updated_by, creation_date,
created_by, last_update_login, name, phone, address,
city, state_code, postal_code, country, credit_rating,
sales_rep_id, region_id, comments)
values
(205, ’23-JUN-95’, 1, ’23-JUN-95’, 1, 1, ’Ski USA’,
’1-913-555-2637’, ’10 Ward Parkway’,’Kansas City’, ’MO’, ’66214’, ’USA’,
’POOR’, 1004, 3, ’Insist upon cash’);
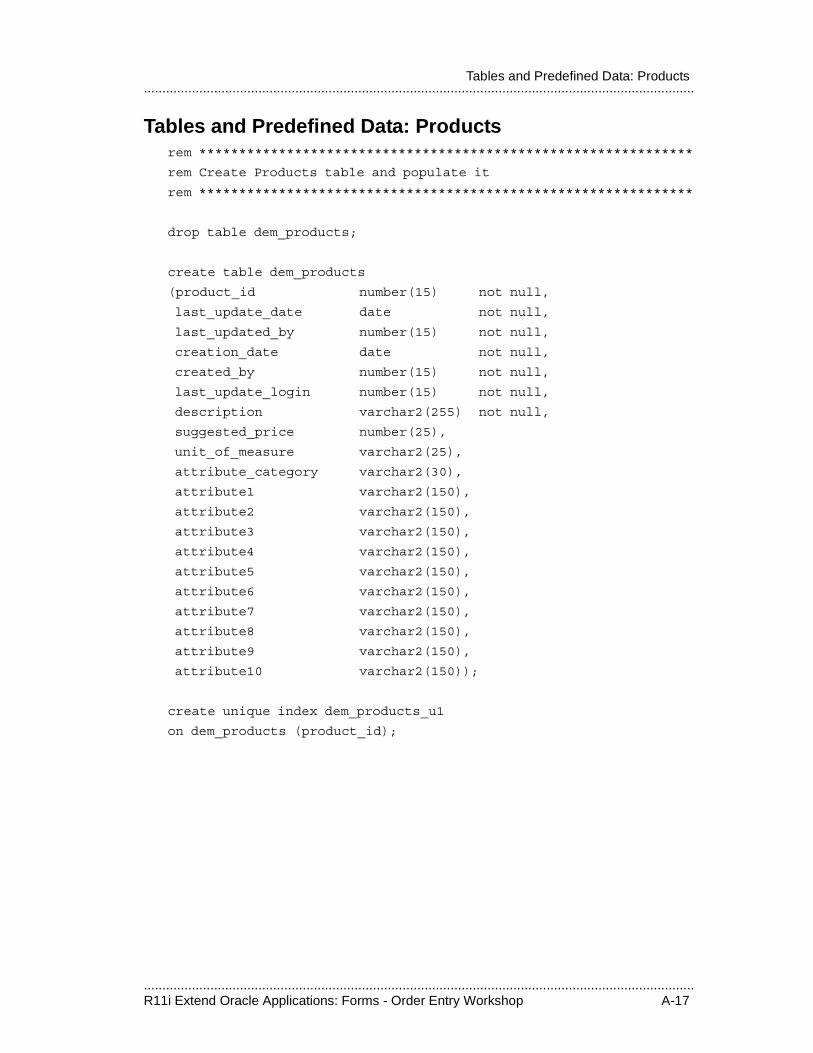
.....................................................................................................................................................R11i Extend Oracle Applications: Forms - Order Entry Workshop A-17
.....................................................................................................................................................Tables and Predefined Data: Products
Tables and Predefined Data: Productsrem **************************************************************
rem Create Products table and populate it
rem **************************************************************
drop table dem_products;
create table dem_products
(product_id number(15) not null,
last_update_date date not null,
last_updated_by number(15) not null,
creation_date date not null,
created_by number(15) not null,
last_update_login number(15) not null,
description varchar2(255) not null,
suggested_price number(25),
unit_of_measure varchar2(25),
attribute_category varchar2(30),
attribute1 varchar2(150),
attribute2 varchar2(150),
attribute3 varchar2(150),
attribute4 varchar2(150),
attribute5 varchar2(150),
attribute6 varchar2(150),
attribute7 varchar2(150),
attribute8 varchar2(150),
attribute9 varchar2(150),
attribute10 varchar2(150));
create unique index dem_products_u1
on dem_products (product_id);
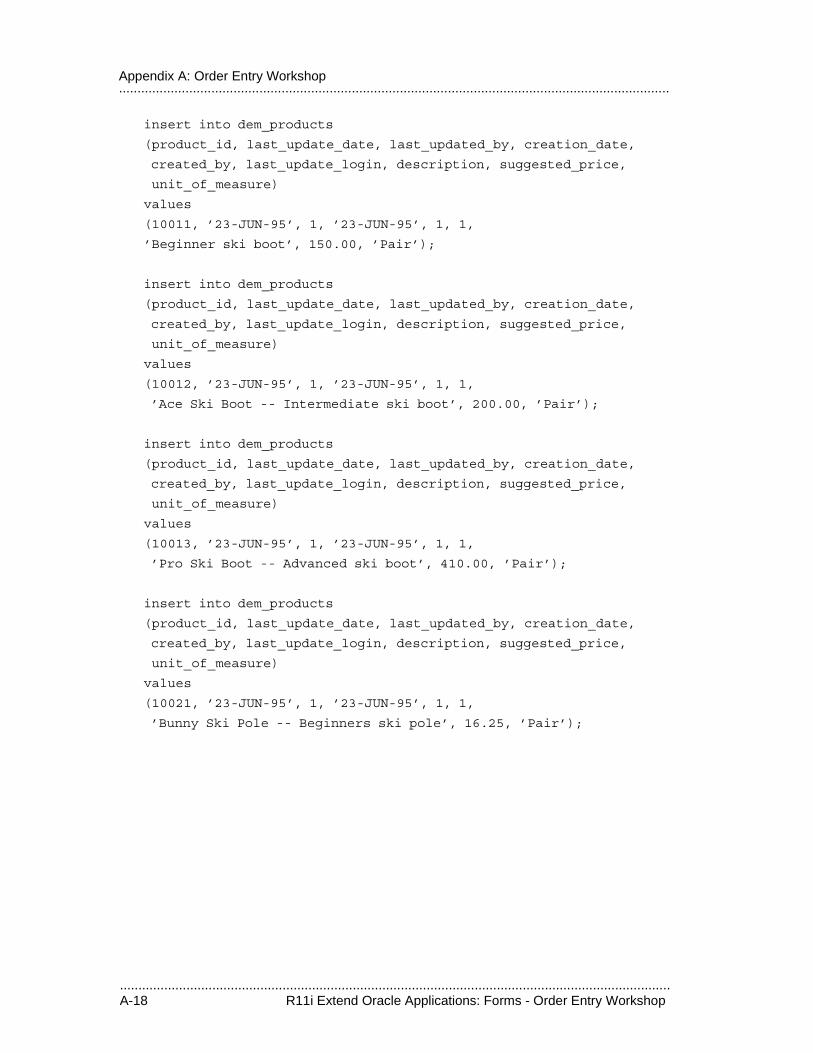
.....................................................................................................................................................A-18 R11i Extend Oracle Applications: Forms - Order Entry Workshop
.....................................................................................................................................................Appendix A: Order Entry Workshop
insert into dem_products
(product_id, last_update_date, last_updated_by, creation_date,
created_by, last_update_login, description, suggested_price,
unit_of_measure)
values
(10011, ’23-JUN-95’, 1, ’23-JUN-95’, 1, 1,
’Beginner ski boot’, 150.00, ’Pair’);
insert into dem_products
(product_id, last_update_date, last_updated_by, creation_date,
created_by, last_update_login, description, suggested_price,
unit_of_measure)
values
(10012, ’23-JUN-95’, 1, ’23-JUN-95’, 1, 1,
’Ace Ski Boot -- Intermediate ski boot’, 200.00, ’Pair’);
insert into dem_products
(product_id, last_update_date, last_updated_by, creation_date,
created_by, last_update_login, description, suggested_price,
unit_of_measure)
values
(10013, ’23-JUN-95’, 1, ’23-JUN-95’, 1, 1,
’Pro Ski Boot -- Advanced ski boot’, 410.00, ’Pair’);
insert into dem_products
(product_id, last_update_date, last_updated_by, creation_date,
created_by, last_update_login, description, suggested_price,
unit_of_measure)
values
(10021, ’23-JUN-95’, 1, ’23-JUN-95’, 1, 1,
’Bunny Ski Pole -- Beginners ski pole’, 16.25, ’Pair’);
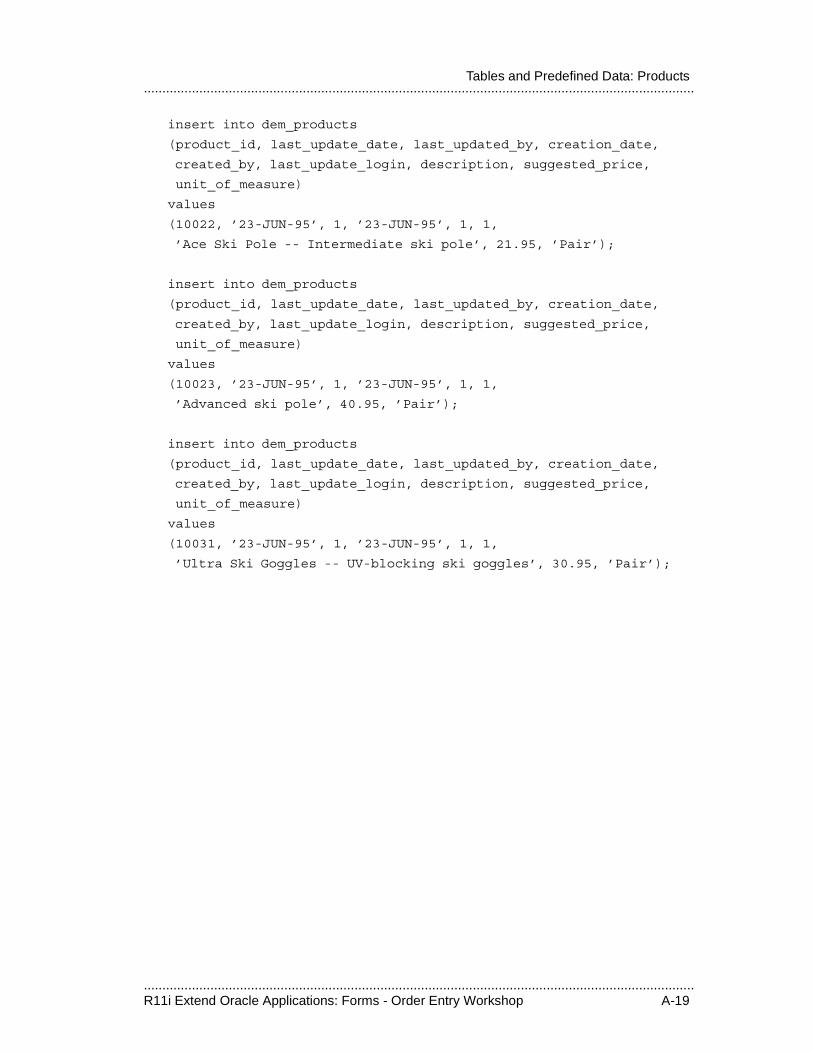
.....................................................................................................................................................R11i Extend Oracle Applications: Forms - Order Entry Workshop A-19
.....................................................................................................................................................Tables and Predefined Data: Products
insert into dem_products
(product_id, last_update_date, last_updated_by, creation_date,
created_by, last_update_login, description, suggested_price,
unit_of_measure)
values
(10022, ’23-JUN-95’, 1, ’23-JUN-95’, 1, 1,
’Ace Ski Pole -- Intermediate ski pole’, 21.95, ’Pair’);
insert into dem_products
(product_id, last_update_date, last_updated_by, creation_date,
created_by, last_update_login, description, suggested_price,
unit_of_measure)
values
(10023, ’23-JUN-95’, 1, ’23-JUN-95’, 1, 1,
’Advanced ski pole’, 40.95, ’Pair’);
insert into dem_products
(product_id, last_update_date, last_updated_by, creation_date,
created_by, last_update_login, description, suggested_price,
unit_of_measure)
values
(10031, ’23-JUN-95’, 1, ’23-JUN-95’, 1, 1,
’Ultra Ski Goggles -- UV-blocking ski goggles’, 30.95, ’Pair’);
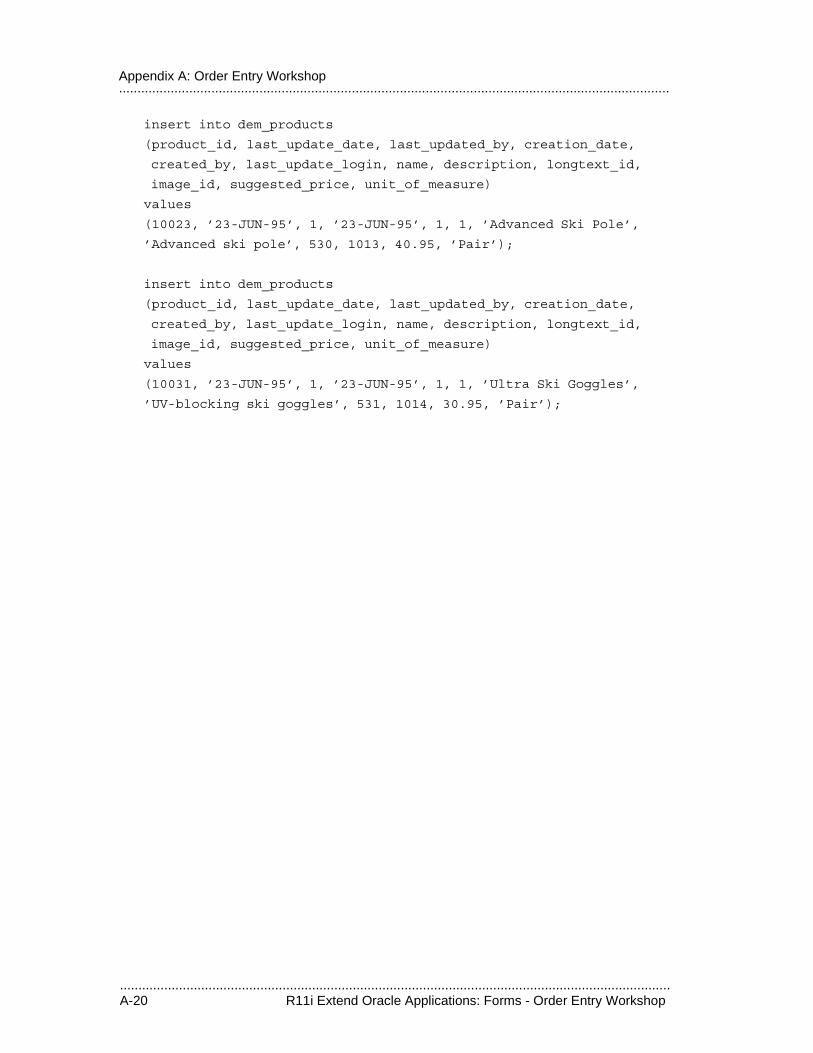
.....................................................................................................................................................A-20 R11i Extend Oracle Applications: Forms - Order Entry Workshop
.....................................................................................................................................................Appendix A: Order Entry Workshop
insert into dem_products
(product_id, last_update_date, last_updated_by, creation_date,
created_by, last_update_login, name, description, longtext_id,
image_id, suggested_price, unit_of_measure)
values
(10023, ’23-JUN-95’, 1, ’23-JUN-95’, 1, 1, ’Advanced Ski Pole’,
’Advanced ski pole’, 530, 1013, 40.95, ’Pair’);
insert into dem_products
(product_id, last_update_date, last_updated_by, creation_date,
created_by, last_update_login, name, description, longtext_id,
image_id, suggested_price, unit_of_measure)
values
(10031, ’23-JUN-95’, 1, ’23-JUN-95’, 1, 1, ’Ultra Ski Goggles’,
’UV-blocking ski goggles’, 531, 1014, 30.95, ’Pair’);
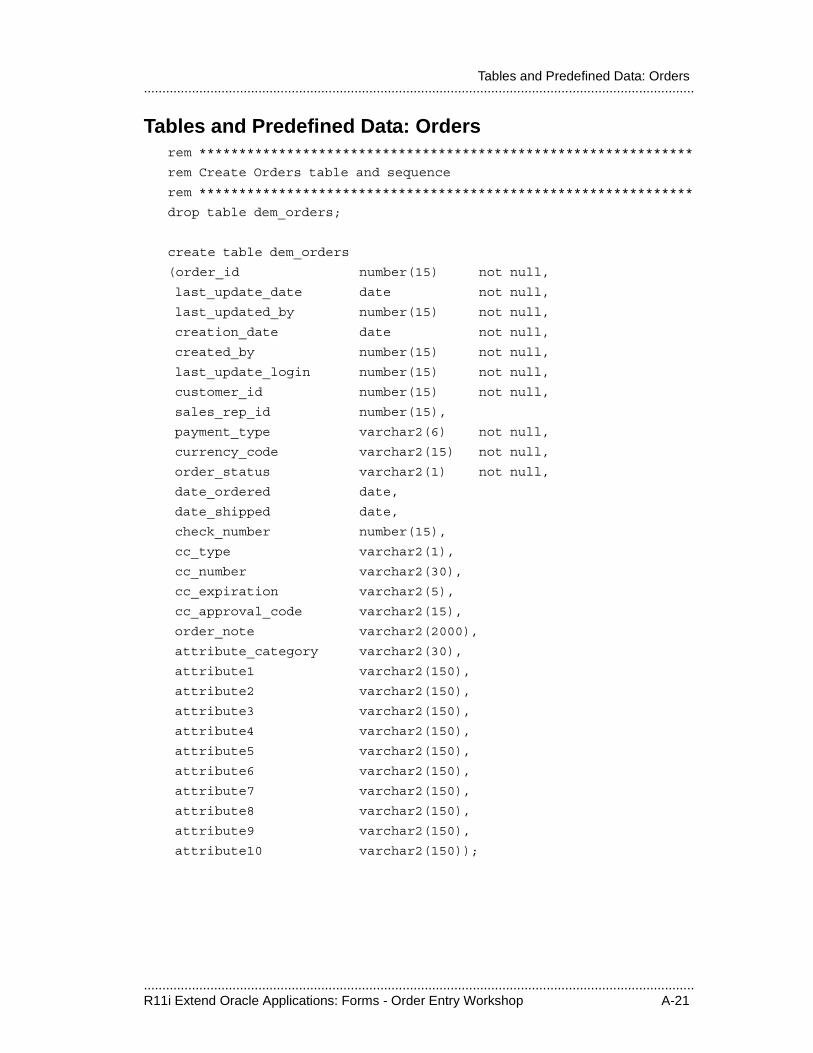
.....................................................................................................................................................R11i Extend Oracle Applications: Forms - Order Entry Workshop A-21
.....................................................................................................................................................Tables and Predefined Data: Orders
Tables and Predefined Data: Ordersrem **************************************************************
rem Create Orders table and sequence
rem **************************************************************
drop table dem_orders;
create table dem_orders
(order_id number(15) not null,
last_update_date date not null,
last_updated_by number(15) not null,
creation_date date not null,
created_by number(15) not null,
last_update_login number(15) not null,
customer_id number(15) not null,
sales_rep_id number(15),
payment_type varchar2(6) not null,
currency_code varchar2(15) not null,
order_status varchar2(1) not null,
date_ordered date,
date_shipped date,
check_number number(15),
cc_type varchar2(1),
cc_number varchar2(30),
cc_expiration varchar2(5),
cc_approval_code varchar2(15),
order_note varchar2(2000),
attribute_category varchar2(30),
attribute1 varchar2(150),
attribute2 varchar2(150),
attribute3 varchar2(150),
attribute4 varchar2(150),
attribute5 varchar2(150),
attribute6 varchar2(150),
attribute7 varchar2(150),
attribute8 varchar2(150),
attribute9 varchar2(150),
attribute10 varchar2(150));
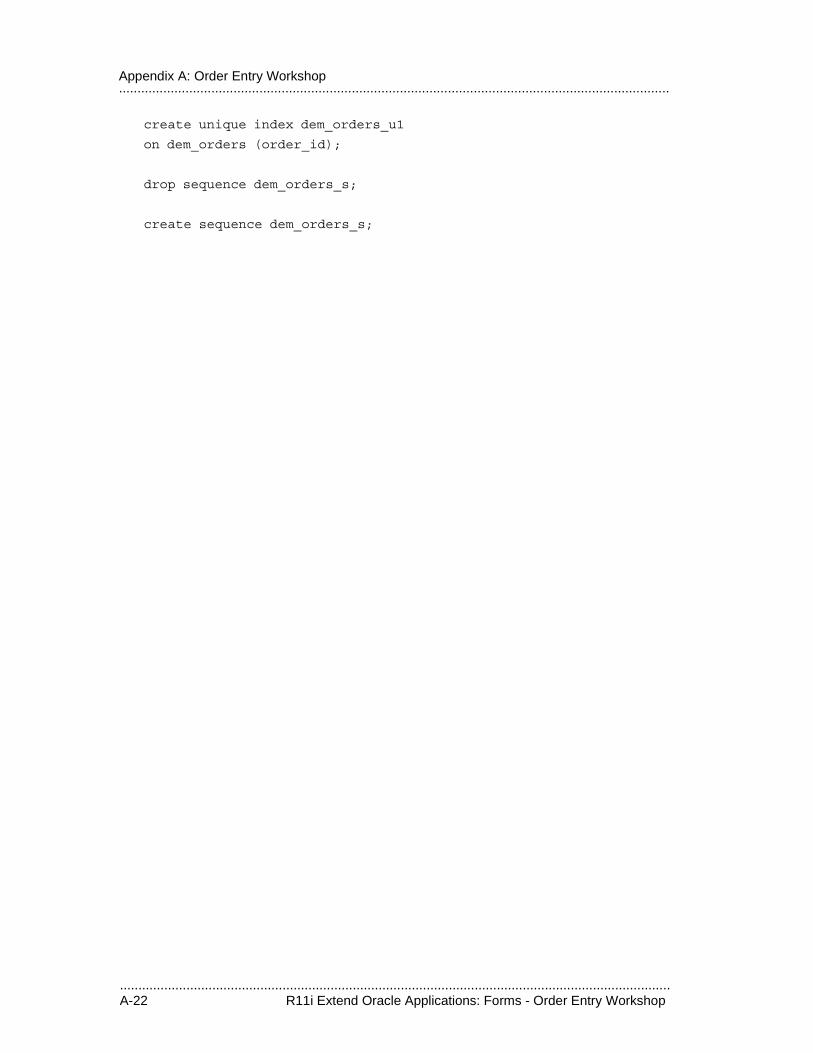
.....................................................................................................................................................A-22 R11i Extend Oracle Applications: Forms - Order Entry Workshop
.....................................................................................................................................................Appendix A: Order Entry Workshop
create unique index dem_orders_u1
on dem_orders (order_id);
drop sequence dem_orders_s;
create sequence dem_orders_s;
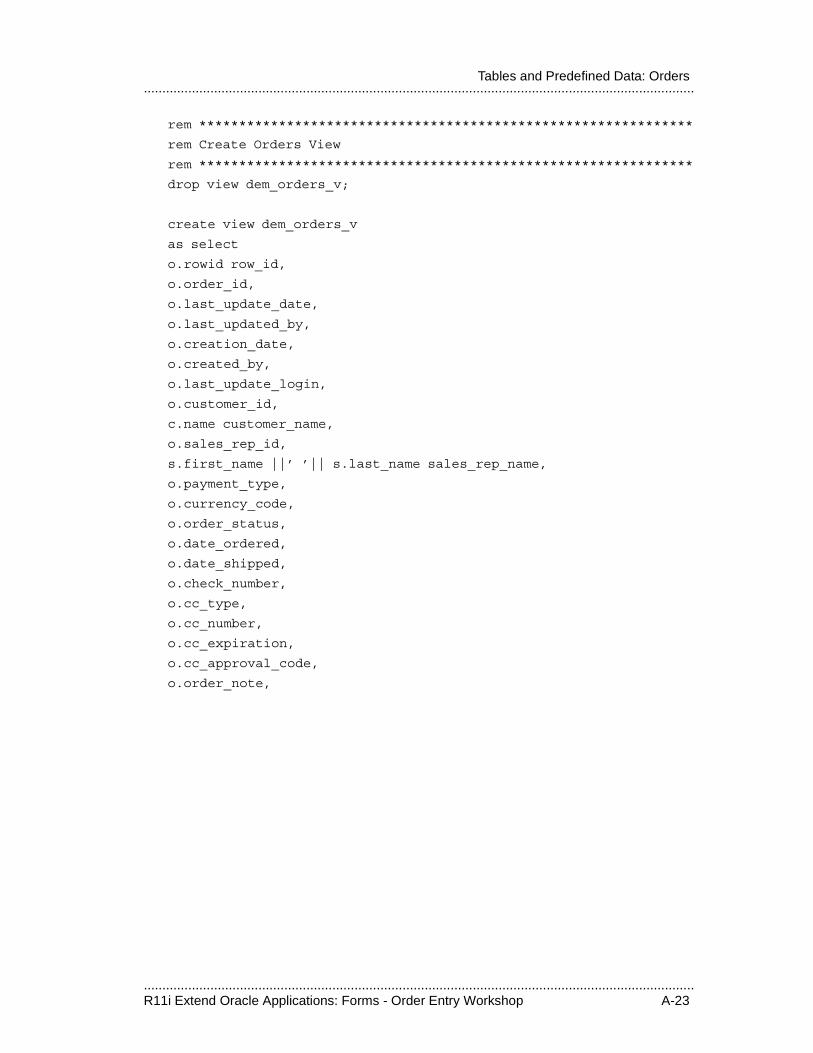
.....................................................................................................................................................R11i Extend Oracle Applications: Forms - Order Entry Workshop A-23
.....................................................................................................................................................Tables and Predefined Data: Orders
rem **************************************************************
rem Create Orders View
rem **************************************************************
drop view dem_orders_v;
create view dem_orders_v
as select
o.rowid row_id,
o.order_id,
o.last_update_date,
o.last_updated_by,
o.creation_date,
o.created_by,
o.last_update_login,
o.customer_id,
c.name customer_name,
o.sales_rep_id,
s.first_name ||’ ’|| s.last_name sales_rep_name,
o.payment_type,
o.currency_code,
o.order_status,
o.date_ordered,
o.date_shipped,
o.check_number,
o.cc_type,
o.cc_number,
o.cc_expiration,
o.cc_approval_code,
o.order_note,
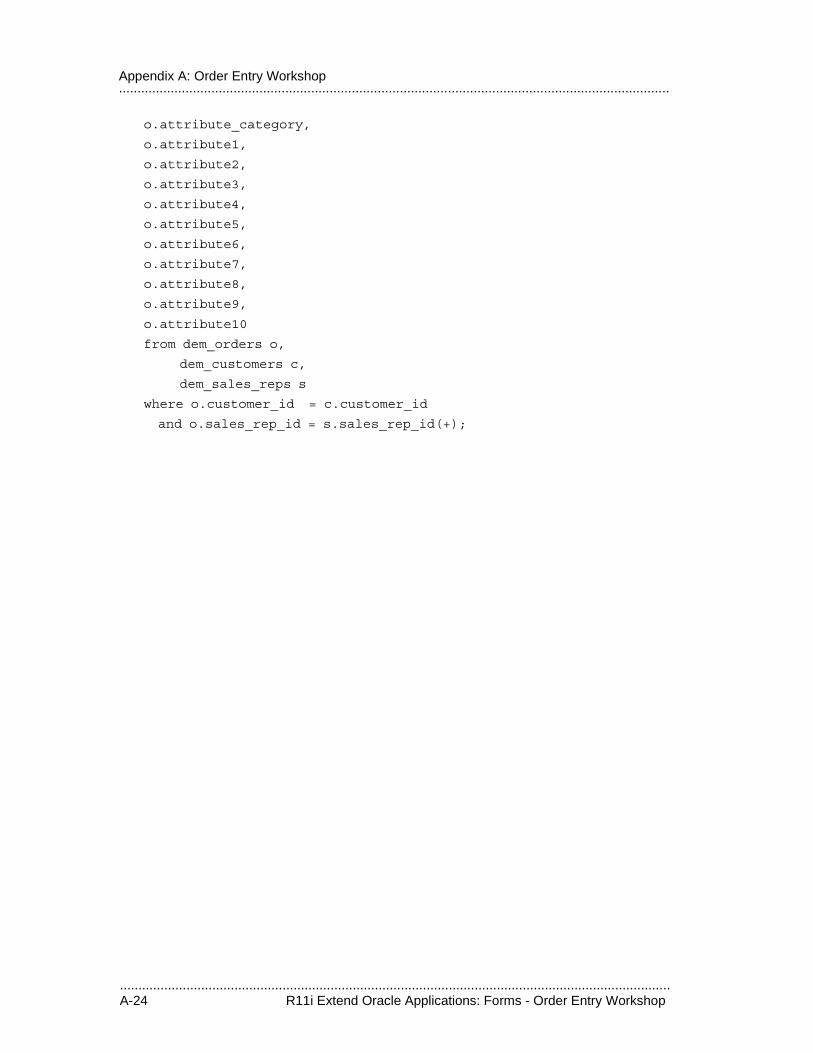
.....................................................................................................................................................A-24 R11i Extend Oracle Applications: Forms - Order Entry Workshop
.....................................................................................................................................................Appendix A: Order Entry Workshop
o.attribute_category,
o.attribute1,
o.attribute2,
o.attribute3,
o.attribute4,
o.attribute5,
o.attribute6,
o.attribute7,
o.attribute8,
o.attribute9,
o.attribute10
from dem_orders o,
dem_customers c,
dem_sales_reps s
where o.customer_id = c.customer_id
and o.sales_rep_id = s.sales_rep_id(+);
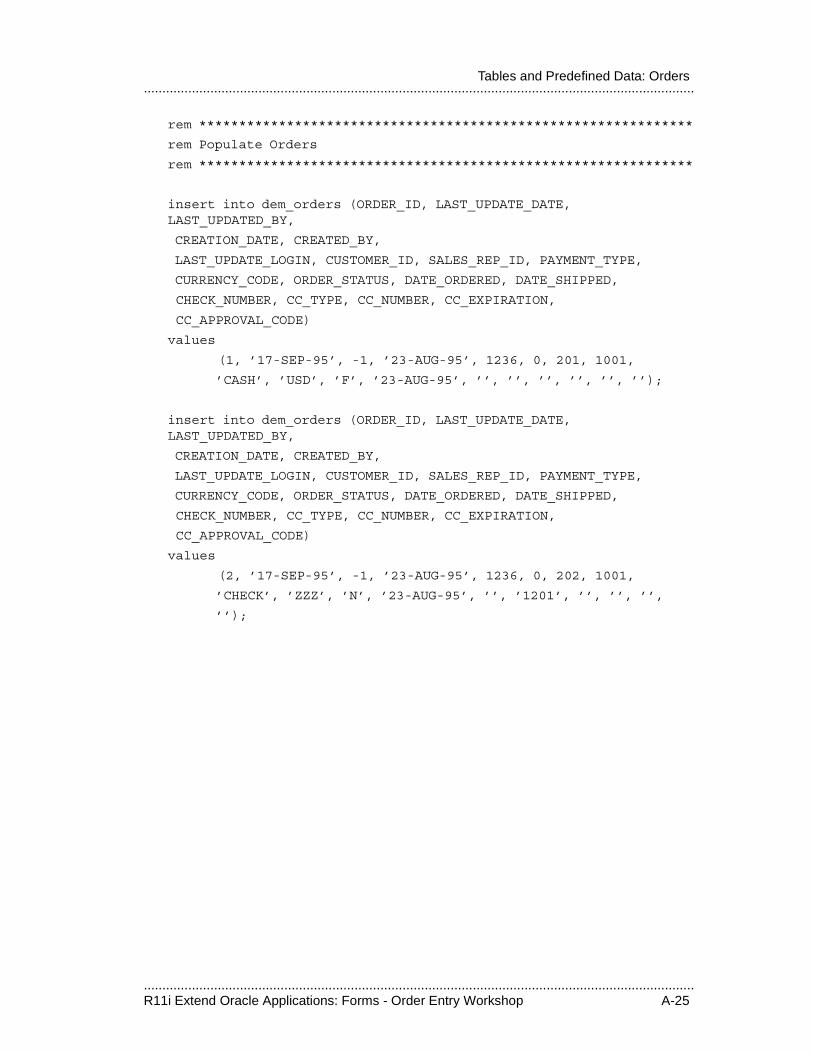
.....................................................................................................................................................R11i Extend Oracle Applications: Forms - Order Entry Workshop A-25
.....................................................................................................................................................Tables and Predefined Data: Orders
rem **************************************************************
rem Populate Orders
rem **************************************************************
insert into dem_orders (ORDER_ID, LAST_UPDATE_DATE, LAST_UPDATED_BY,
CREATION_DATE, CREATED_BY,
LAST_UPDATE_LOGIN, CUSTOMER_ID, SALES_REP_ID, PAYMENT_TYPE,
CURRENCY_CODE, ORDER_STATUS, DATE_ORDERED, DATE_SHIPPED,
CHECK_NUMBER, CC_TYPE, CC_NUMBER, CC_EXPIRATION,
CC_APPROVAL_CODE)
values
(1, ’17-SEP-95’, -1, ’23-AUG-95’, 1236, 0, 201, 1001,
’CASH’, ’USD’, ’F’, ’23-AUG-95’, ’’, ’’, ’’, ’’, ’’, ’’);
insert into dem_orders (ORDER_ID, LAST_UPDATE_DATE, LAST_UPDATED_BY,
CREATION_DATE, CREATED_BY,
LAST_UPDATE_LOGIN, CUSTOMER_ID, SALES_REP_ID, PAYMENT_TYPE,
CURRENCY_CODE, ORDER_STATUS, DATE_ORDERED, DATE_SHIPPED,
CHECK_NUMBER, CC_TYPE, CC_NUMBER, CC_EXPIRATION,
CC_APPROVAL_CODE)
values
(2, ’17-SEP-95’, -1, ’23-AUG-95’, 1236, 0, 202, 1001,
’CHECK’, ’ZZZ’, ’N’, ’23-AUG-95’, ’’, ’1201’, ’’, ’’, ’’,
’’);
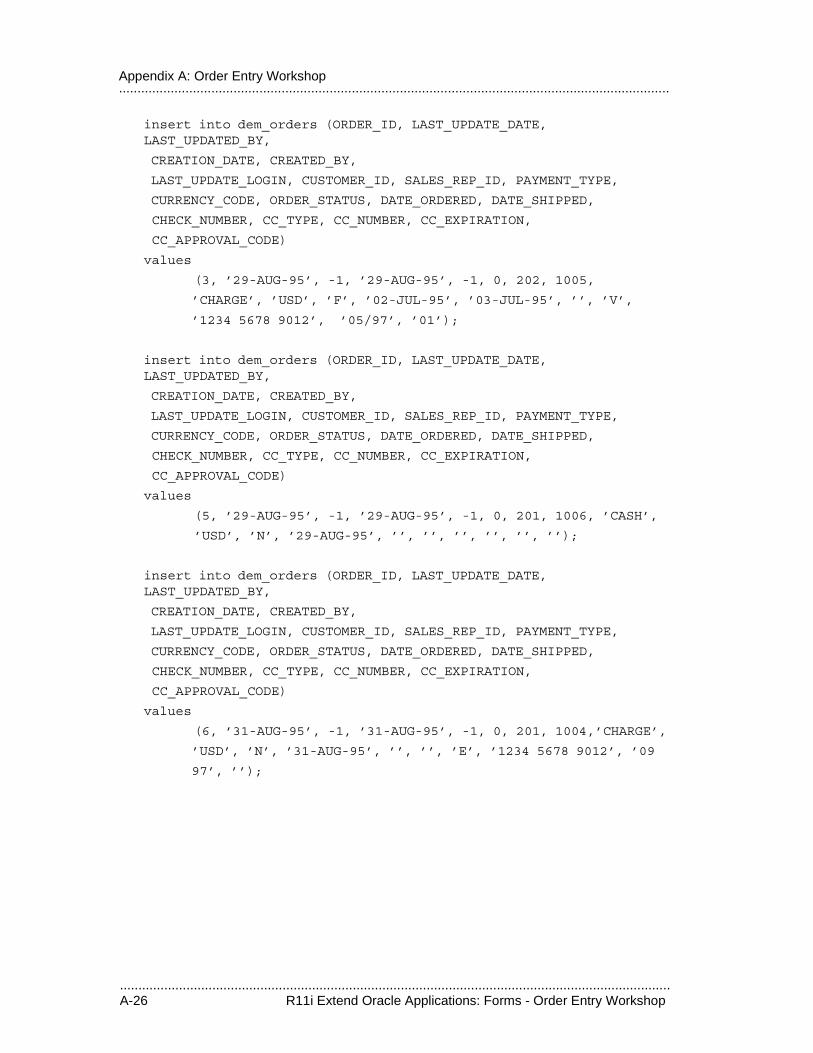
.....................................................................................................................................................A-26 R11i Extend Oracle Applications: Forms - Order Entry Workshop
.....................................................................................................................................................Appendix A: Order Entry Workshop
insert into dem_orders (ORDER_ID, LAST_UPDATE_DATE, LAST_UPDATED_BY,
CREATION_DATE, CREATED_BY,
LAST_UPDATE_LOGIN, CUSTOMER_ID, SALES_REP_ID, PAYMENT_TYPE,
CURRENCY_CODE, ORDER_STATUS, DATE_ORDERED, DATE_SHIPPED,
CHECK_NUMBER, CC_TYPE, CC_NUMBER, CC_EXPIRATION,
CC_APPROVAL_CODE)
values
(3, ’29-AUG-95’, -1, ’29-AUG-95’, -1, 0, 202, 1005,
’CHARGE’, ’USD’, ’F’, ’02-JUL-95’, ’03-JUL-95’, ’’, ’V’,
’1234 5678 9012’, ’05/97’, ’01’);
insert into dem_orders (ORDER_ID, LAST_UPDATE_DATE, LAST_UPDATED_BY,
CREATION_DATE, CREATED_BY,
LAST_UPDATE_LOGIN, CUSTOMER_ID, SALES_REP_ID, PAYMENT_TYPE,
CURRENCY_CODE, ORDER_STATUS, DATE_ORDERED, DATE_SHIPPED,
CHECK_NUMBER, CC_TYPE, CC_NUMBER, CC_EXPIRATION,
CC_APPROVAL_CODE)
values
(5, ’29-AUG-95’, -1, ’29-AUG-95’, -1, 0, 201, 1006, ’CASH’,
’USD’, ’N’, ’29-AUG-95’, ’’, ’’, ’’, ’’, ’’, ’’);
insert into dem_orders (ORDER_ID, LAST_UPDATE_DATE, LAST_UPDATED_BY,
CREATION_DATE, CREATED_BY,
LAST_UPDATE_LOGIN, CUSTOMER_ID, SALES_REP_ID, PAYMENT_TYPE,
CURRENCY_CODE, ORDER_STATUS, DATE_ORDERED, DATE_SHIPPED,
CHECK_NUMBER, CC_TYPE, CC_NUMBER, CC_EXPIRATION,
CC_APPROVAL_CODE)
values
(6, ’31-AUG-95’, -1, ’31-AUG-95’, -1, 0, 201, 1004,’CHARGE’,
’USD’, ’N’, ’31-AUG-95’, ’’, ’’, ’E’, ’1234 5678 9012’, ’09
97’, ’’);
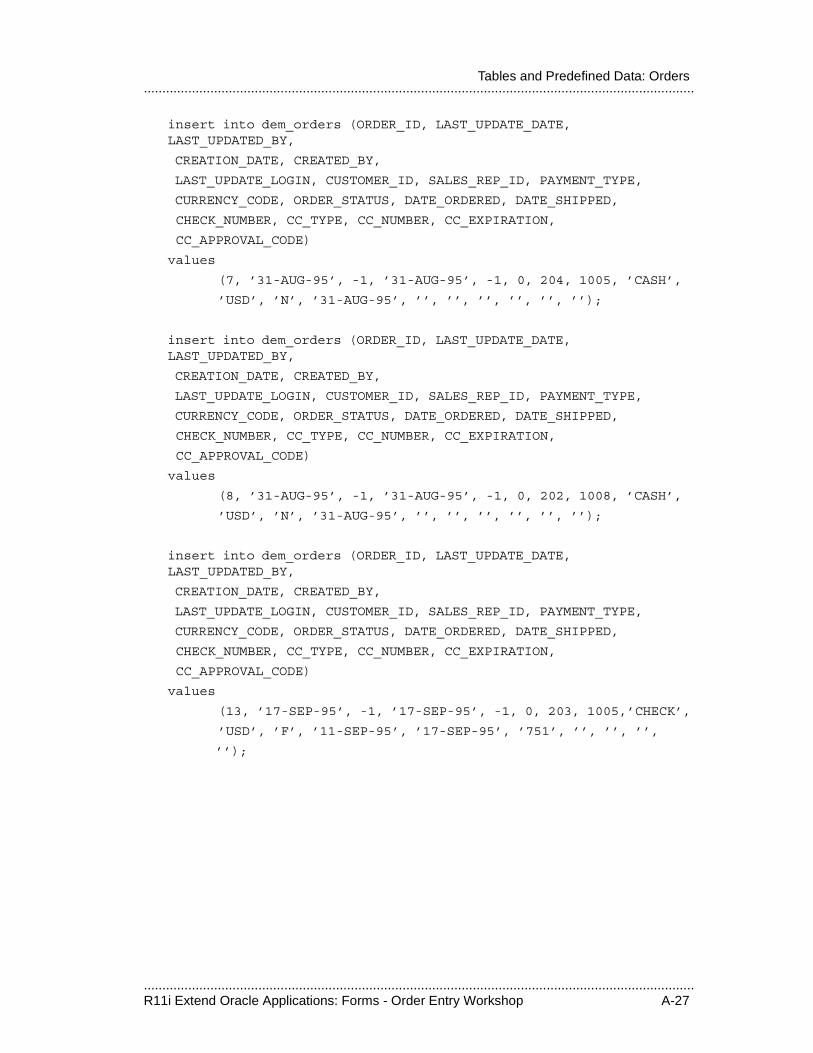
.....................................................................................................................................................R11i Extend Oracle Applications: Forms - Order Entry Workshop A-27
.....................................................................................................................................................Tables and Predefined Data: Orders
insert into dem_orders (ORDER_ID, LAST_UPDATE_DATE, LAST_UPDATED_BY,
CREATION_DATE, CREATED_BY,
LAST_UPDATE_LOGIN, CUSTOMER_ID, SALES_REP_ID, PAYMENT_TYPE,
CURRENCY_CODE, ORDER_STATUS, DATE_ORDERED, DATE_SHIPPED,
CHECK_NUMBER, CC_TYPE, CC_NUMBER, CC_EXPIRATION,
CC_APPROVAL_CODE)
values
(7, ’31-AUG-95’, -1, ’31-AUG-95’, -1, 0, 204, 1005, ’CASH’,
’USD’, ’N’, ’31-AUG-95’, ’’, ’’, ’’, ’’, ’’, ’’);
insert into dem_orders (ORDER_ID, LAST_UPDATE_DATE, LAST_UPDATED_BY,
CREATION_DATE, CREATED_BY,
LAST_UPDATE_LOGIN, CUSTOMER_ID, SALES_REP_ID, PAYMENT_TYPE,
CURRENCY_CODE, ORDER_STATUS, DATE_ORDERED, DATE_SHIPPED,
CHECK_NUMBER, CC_TYPE, CC_NUMBER, CC_EXPIRATION,
CC_APPROVAL_CODE)
values
(8, ’31-AUG-95’, -1, ’31-AUG-95’, -1, 0, 202, 1008, ’CASH’,
’USD’, ’N’, ’31-AUG-95’, ’’, ’’, ’’, ’’, ’’, ’’);
insert into dem_orders (ORDER_ID, LAST_UPDATE_DATE, LAST_UPDATED_BY,
CREATION_DATE, CREATED_BY,
LAST_UPDATE_LOGIN, CUSTOMER_ID, SALES_REP_ID, PAYMENT_TYPE,
CURRENCY_CODE, ORDER_STATUS, DATE_ORDERED, DATE_SHIPPED,
CHECK_NUMBER, CC_TYPE, CC_NUMBER, CC_EXPIRATION,
CC_APPROVAL_CODE)
values
(13, ’17-SEP-95’, -1, ’17-SEP-95’, -1, 0, 203, 1005,’CHECK’,
’USD’, ’F’, ’11-SEP-95’, ’17-SEP-95’, ’751’, ’’, ’’, ’’,
’’);
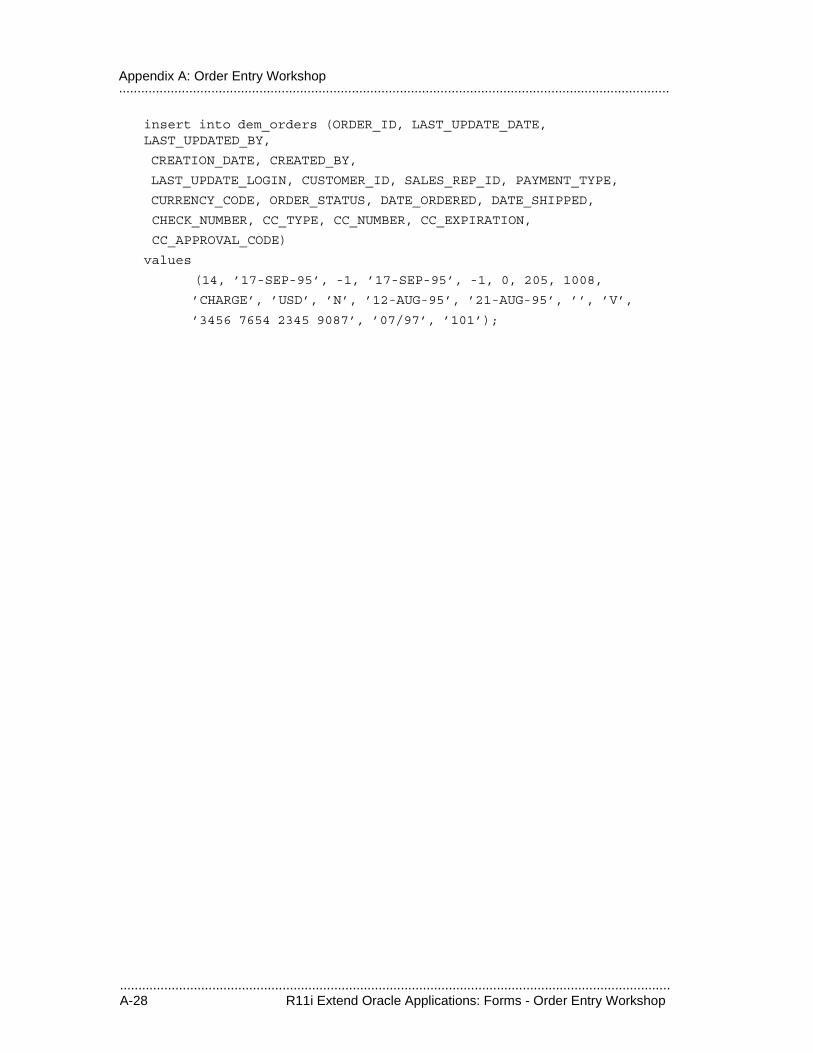
.....................................................................................................................................................A-28 R11i Extend Oracle Applications: Forms - Order Entry Workshop
.....................................................................................................................................................Appendix A: Order Entry Workshop
insert into dem_orders (ORDER_ID, LAST_UPDATE_DATE, LAST_UPDATED_BY,
CREATION_DATE, CREATED_BY,
LAST_UPDATE_LOGIN, CUSTOMER_ID, SALES_REP_ID, PAYMENT_TYPE,
CURRENCY_CODE, ORDER_STATUS, DATE_ORDERED, DATE_SHIPPED,
CHECK_NUMBER, CC_TYPE, CC_NUMBER, CC_EXPIRATION,
CC_APPROVAL_CODE)
values
(14, ’17-SEP-95’, -1, ’17-SEP-95’, -1, 0, 205, 1008,
’CHARGE’, ’USD’, ’N’, ’12-AUG-95’, ’21-AUG-95’, ’’, ’V’,
’3456 7654 2345 9087’, ’07/97’, ’101’);
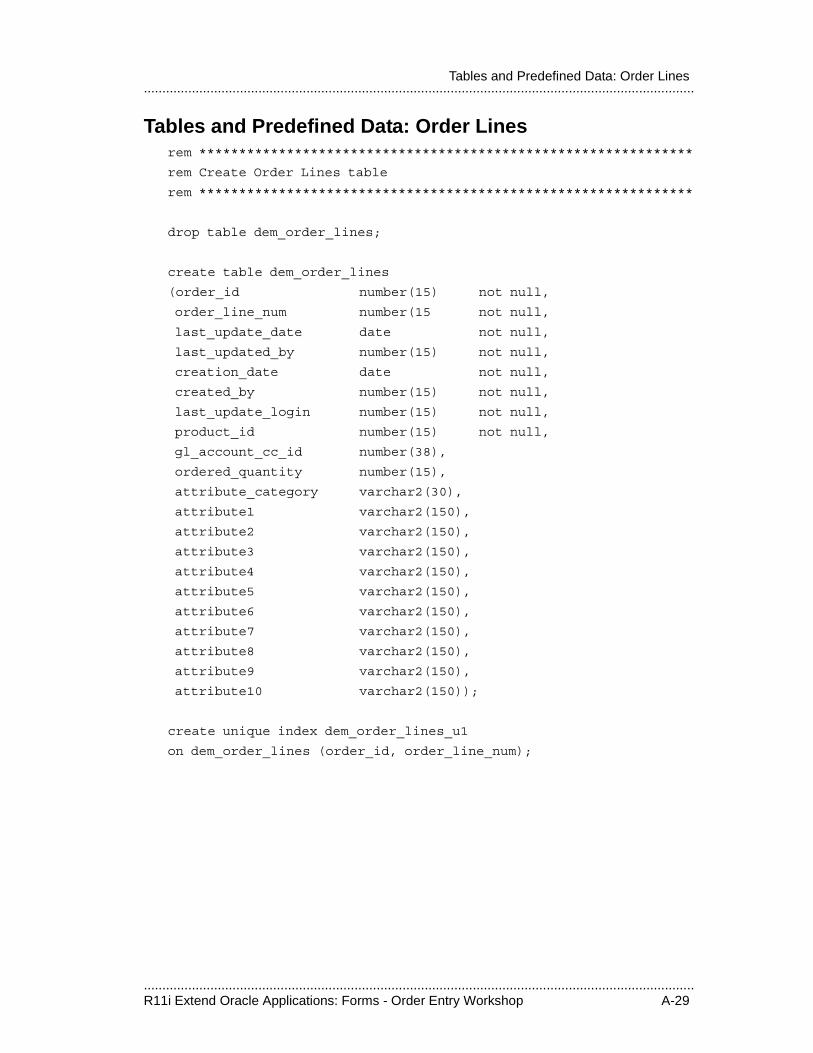
.....................................................................................................................................................R11i Extend Oracle Applications: Forms - Order Entry Workshop A-29
.....................................................................................................................................................Tables and Predefined Data: Order Lines
Tables and Predefined Data: Order Linesrem **************************************************************
rem Create Order Lines table
rem **************************************************************
drop table dem_order_lines;
create table dem_order_lines
(order_id number(15) not null,
order_line_num number(15 not null,
last_update_date date not null,
last_updated_by number(15) not null,
creation_date date not null,
created_by number(15) not null,
last_update_login number(15) not null,
product_id number(15) not null,
gl_account_cc_id number(38),
ordered_quantity number(15),
attribute_category varchar2(30),
attribute1 varchar2(150),
attribute2 varchar2(150),
attribute3 varchar2(150),
attribute4 varchar2(150),
attribute5 varchar2(150),
attribute6 varchar2(150),
attribute7 varchar2(150),
attribute8 varchar2(150),
attribute9 varchar2(150),
attribute10 varchar2(150));
create unique index dem_order_lines_u1
on dem_order_lines (order_id, order_line_num);
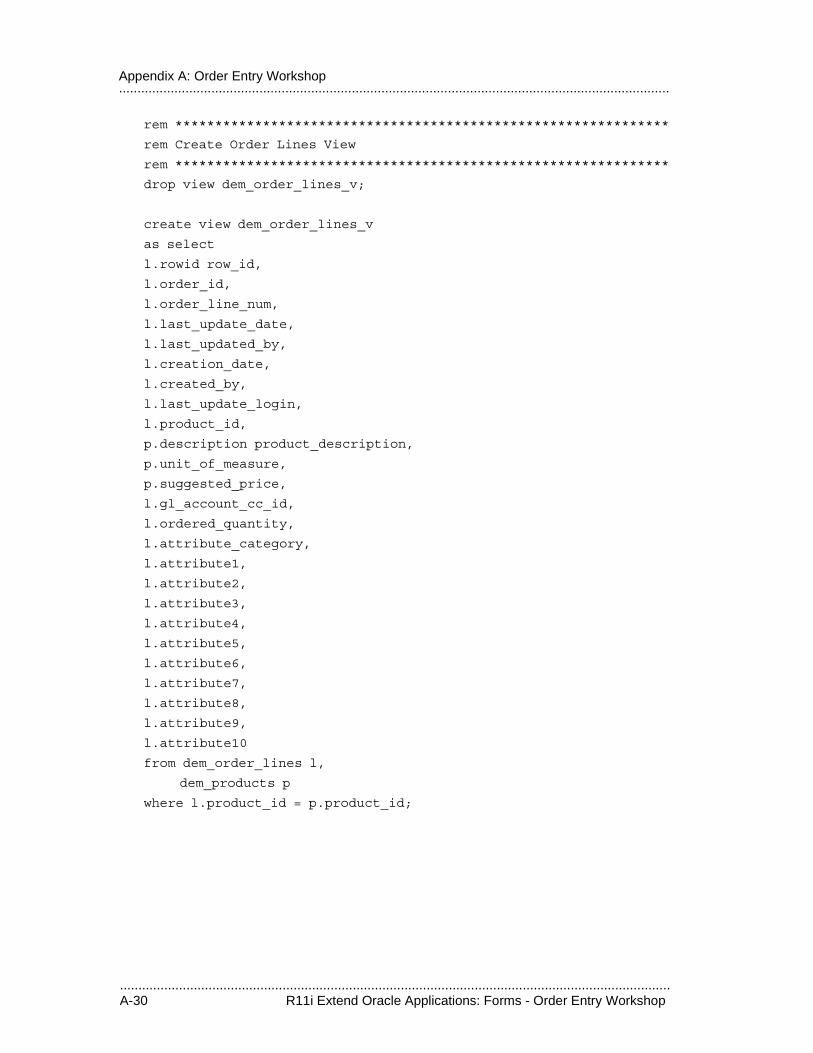
.....................................................................................................................................................A-30 R11i Extend Oracle Applications: Forms - Order Entry Workshop
.....................................................................................................................................................Appendix A: Order Entry Workshop
rem **************************************************************
rem Create Order Lines View
rem **************************************************************
drop view dem_order_lines_v;
create view dem_order_lines_v
as select
l.rowid row_id,
l.order_id,
l.order_line_num,
l.last_update_date,
l.last_updated_by,
l.creation_date,
l.created_by,
l.last_update_login,
l.product_id,
p.description product_description,
p.unit_of_measure,
p.suggested_price,
l.gl_account_cc_id,
l.ordered_quantity,
l.attribute_category,
l.attribute1,
l.attribute2,
l.attribute3,
l.attribute4,
l.attribute5,
l.attribute6,
l.attribute7,
l.attribute8,
l.attribute9,
l.attribute10
from dem_order_lines l,
dem_products p
where l.product_id = p.product_id;
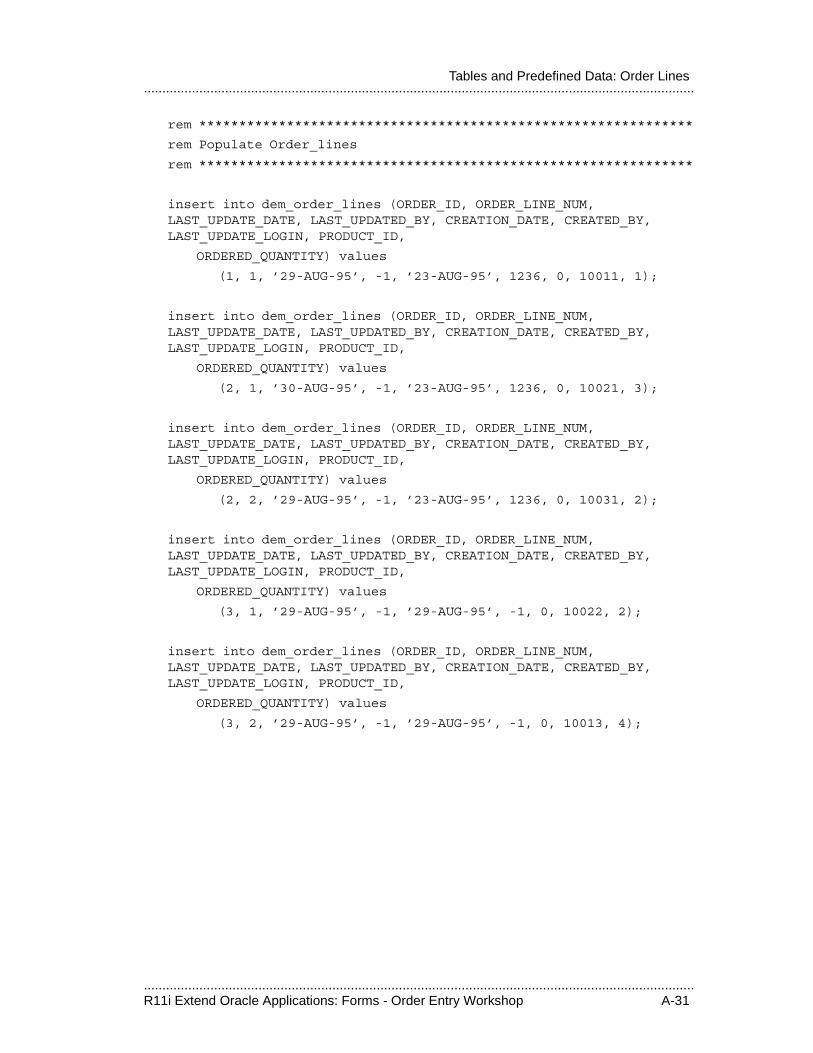
.....................................................................................................................................................R11i Extend Oracle Applications: Forms - Order Entry Workshop A-31
.....................................................................................................................................................Tables and Predefined Data: Order Lines
rem **************************************************************
rem Populate Order_lines
rem **************************************************************
insert into dem_order_lines (ORDER_ID, ORDER_LINE_NUM, LAST_UPDATE_DATE, LAST_UPDATED_BY, CREATION_DATE, CREATED_BY, LAST_UPDATE_LOGIN, PRODUCT_ID,
ORDERED_QUANTITY) values
(1, 1, ’29-AUG-95’, -1, ’23-AUG-95’, 1236, 0, 10011, 1);
insert into dem_order_lines (ORDER_ID, ORDER_LINE_NUM, LAST_UPDATE_DATE, LAST_UPDATED_BY, CREATION_DATE, CREATED_BY, LAST_UPDATE_LOGIN, PRODUCT_ID,
ORDERED_QUANTITY) values
(2, 1, ’30-AUG-95’, -1, ’23-AUG-95’, 1236, 0, 10021, 3);
insert into dem_order_lines (ORDER_ID, ORDER_LINE_NUM, LAST_UPDATE_DATE, LAST_UPDATED_BY, CREATION_DATE, CREATED_BY, LAST_UPDATE_LOGIN, PRODUCT_ID,
ORDERED_QUANTITY) values
(2, 2, ’29-AUG-95’, -1, ’23-AUG-95’, 1236, 0, 10031, 2);
insert into dem_order_lines (ORDER_ID, ORDER_LINE_NUM, LAST_UPDATE_DATE, LAST_UPDATED_BY, CREATION_DATE, CREATED_BY, LAST_UPDATE_LOGIN, PRODUCT_ID,
ORDERED_QUANTITY) values
(3, 1, ’29-AUG-95’, -1, ’29-AUG-95’, -1, 0, 10022, 2);
insert into dem_order_lines (ORDER_ID, ORDER_LINE_NUM, LAST_UPDATE_DATE, LAST_UPDATED_BY, CREATION_DATE, CREATED_BY, LAST_UPDATE_LOGIN, PRODUCT_ID,
ORDERED_QUANTITY) values
(3, 2, ’29-AUG-95’, -1, ’29-AUG-95’, -1, 0, 10013, 4);
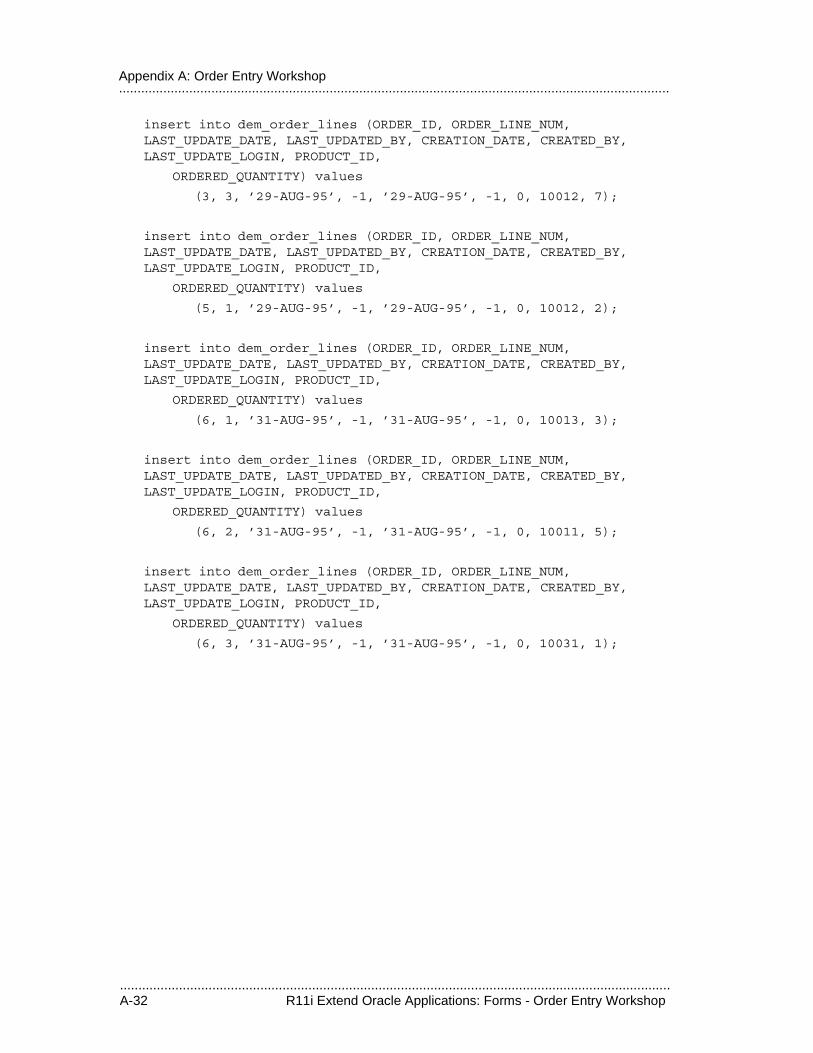
.....................................................................................................................................................A-32 R11i Extend Oracle Applications: Forms - Order Entry Workshop
.....................................................................................................................................................Appendix A: Order Entry Workshop
insert into dem_order_lines (ORDER_ID, ORDER_LINE_NUM, LAST_UPDATE_DATE, LAST_UPDATED_BY, CREATION_DATE, CREATED_BY, LAST_UPDATE_LOGIN, PRODUCT_ID,
ORDERED_QUANTITY) values
(3, 3, ’29-AUG-95’, -1, ’29-AUG-95’, -1, 0, 10012, 7);
insert into dem_order_lines (ORDER_ID, ORDER_LINE_NUM, LAST_UPDATE_DATE, LAST_UPDATED_BY, CREATION_DATE, CREATED_BY, LAST_UPDATE_LOGIN, PRODUCT_ID,
ORDERED_QUANTITY) values
(5, 1, ’29-AUG-95’, -1, ’29-AUG-95’, -1, 0, 10012, 2);
insert into dem_order_lines (ORDER_ID, ORDER_LINE_NUM, LAST_UPDATE_DATE, LAST_UPDATED_BY, CREATION_DATE, CREATED_BY, LAST_UPDATE_LOGIN, PRODUCT_ID,
ORDERED_QUANTITY) values
(6, 1, ’31-AUG-95’, -1, ’31-AUG-95’, -1, 0, 10013, 3);
insert into dem_order_lines (ORDER_ID, ORDER_LINE_NUM, LAST_UPDATE_DATE, LAST_UPDATED_BY, CREATION_DATE, CREATED_BY, LAST_UPDATE_LOGIN, PRODUCT_ID,
ORDERED_QUANTITY) values
(6, 2, ’31-AUG-95’, -1, ’31-AUG-95’, -1, 0, 10011, 5);
insert into dem_order_lines (ORDER_ID, ORDER_LINE_NUM, LAST_UPDATE_DATE, LAST_UPDATED_BY, CREATION_DATE, CREATED_BY, LAST_UPDATE_LOGIN, PRODUCT_ID,
ORDERED_QUANTITY) values
(6, 3, ’31-AUG-95’, -1, ’31-AUG-95’, -1, 0, 10031, 1);
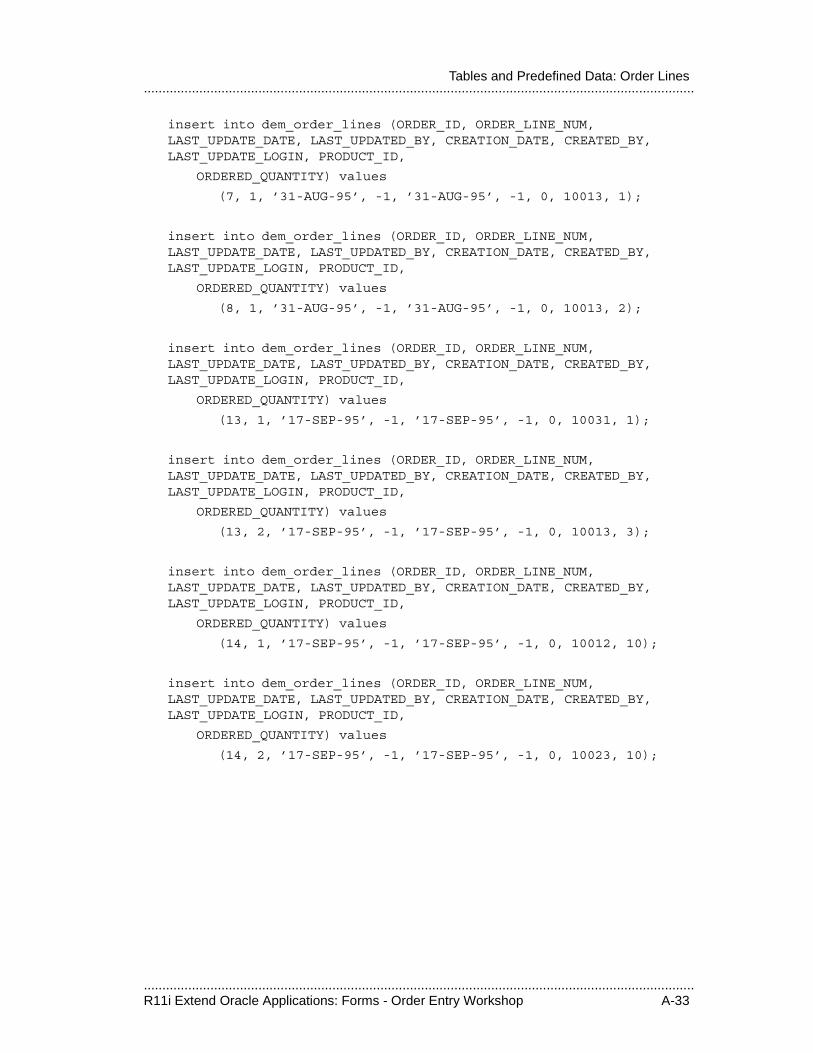
.....................................................................................................................................................R11i Extend Oracle Applications: Forms - Order Entry Workshop A-33
.....................................................................................................................................................Tables and Predefined Data: Order Lines
insert into dem_order_lines (ORDER_ID, ORDER_LINE_NUM, LAST_UPDATE_DATE, LAST_UPDATED_BY, CREATION_DATE, CREATED_BY, LAST_UPDATE_LOGIN, PRODUCT_ID,
ORDERED_QUANTITY) values
(7, 1, ’31-AUG-95’, -1, ’31-AUG-95’, -1, 0, 10013, 1);
insert into dem_order_lines (ORDER_ID, ORDER_LINE_NUM, LAST_UPDATE_DATE, LAST_UPDATED_BY, CREATION_DATE, CREATED_BY, LAST_UPDATE_LOGIN, PRODUCT_ID,
ORDERED_QUANTITY) values
(8, 1, ’31-AUG-95’, -1, ’31-AUG-95’, -1, 0, 10013, 2);
insert into dem_order_lines (ORDER_ID, ORDER_LINE_NUM, LAST_UPDATE_DATE, LAST_UPDATED_BY, CREATION_DATE, CREATED_BY, LAST_UPDATE_LOGIN, PRODUCT_ID,
ORDERED_QUANTITY) values
(13, 1, ’17-SEP-95’, -1, ’17-SEP-95’, -1, 0, 10031, 1);
insert into dem_order_lines (ORDER_ID, ORDER_LINE_NUM, LAST_UPDATE_DATE, LAST_UPDATED_BY, CREATION_DATE, CREATED_BY, LAST_UPDATE_LOGIN, PRODUCT_ID,
ORDERED_QUANTITY) values
(13, 2, ’17-SEP-95’, -1, ’17-SEP-95’, -1, 0, 10013, 3);
insert into dem_order_lines (ORDER_ID, ORDER_LINE_NUM, LAST_UPDATE_DATE, LAST_UPDATED_BY, CREATION_DATE, CREATED_BY, LAST_UPDATE_LOGIN, PRODUCT_ID,
ORDERED_QUANTITY) values
(14, 1, ’17-SEP-95’, -1, ’17-SEP-95’, -1, 0, 10012, 10);
insert into dem_order_lines (ORDER_ID, ORDER_LINE_NUM, LAST_UPDATE_DATE, LAST_UPDATED_BY, CREATION_DATE, CREATED_BY, LAST_UPDATE_LOGIN, PRODUCT_ID,
ORDERED_QUANTITY) values
(14, 2, ’17-SEP-95’, -1, ’17-SEP-95’, -1, 0, 10023, 10);
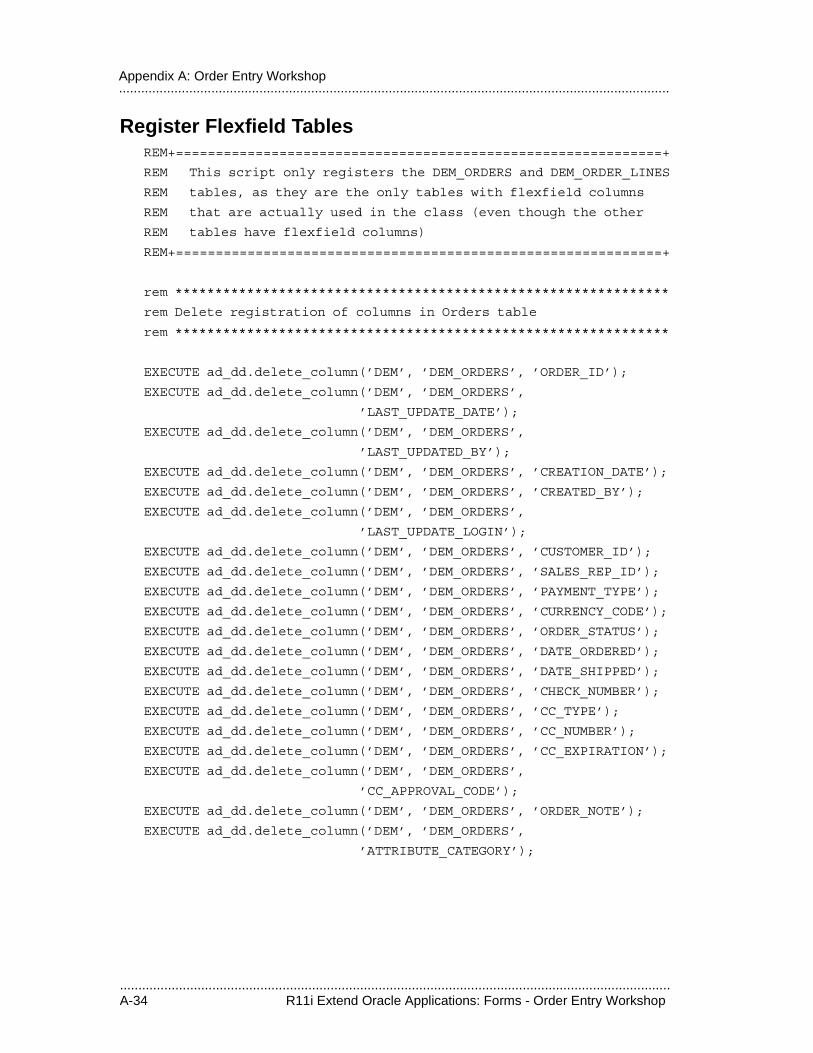
.....................................................................................................................................................A-34 R11i Extend Oracle Applications: Forms - Order Entry Workshop
.....................................................................................................................................................Appendix A: Order Entry Workshop
Register Flexfield TablesREM+=============================================================+
REM This script only registers the DEM_ORDERS and DEM_ORDER_LINES
REM tables, as they are the only tables with flexfield columns
REM that are actually used in the class (even though the other
REM tables have flexfield columns)
REM+=============================================================+
rem **************************************************************
rem Delete registration of columns in Orders table
rem **************************************************************
EXECUTE ad_dd.delete_column(’DEM’, ’DEM_ORDERS’, ’ORDER_ID’);
EXECUTE ad_dd.delete_column(’DEM’, ’DEM_ORDERS’,
’LAST_UPDATE_DATE’);
EXECUTE ad_dd.delete_column(’DEM’, ’DEM_ORDERS’,
’LAST_UPDATED_BY’);
EXECUTE ad_dd.delete_column(’DEM’, ’DEM_ORDERS’, ’CREATION_DATE’);
EXECUTE ad_dd.delete_column(’DEM’, ’DEM_ORDERS’, ’CREATED_BY’);
EXECUTE ad_dd.delete_column(’DEM’, ’DEM_ORDERS’,
’LAST_UPDATE_LOGIN’);
EXECUTE ad_dd.delete_column(’DEM’, ’DEM_ORDERS’, ’CUSTOMER_ID’);
EXECUTE ad_dd.delete_column(’DEM’, ’DEM_ORDERS’, ’SALES_REP_ID’);
EXECUTE ad_dd.delete_column(’DEM’, ’DEM_ORDERS’, ’PAYMENT_TYPE’);
EXECUTE ad_dd.delete_column(’DEM’, ’DEM_ORDERS’, ’CURRENCY_CODE’);
EXECUTE ad_dd.delete_column(’DEM’, ’DEM_ORDERS’, ’ORDER_STATUS’);
EXECUTE ad_dd.delete_column(’DEM’, ’DEM_ORDERS’, ’DATE_ORDERED’);
EXECUTE ad_dd.delete_column(’DEM’, ’DEM_ORDERS’, ’DATE_SHIPPED’);
EXECUTE ad_dd.delete_column(’DEM’, ’DEM_ORDERS’, ’CHECK_NUMBER’);
EXECUTE ad_dd.delete_column(’DEM’, ’DEM_ORDERS’, ’CC_TYPE’);
EXECUTE ad_dd.delete_column(’DEM’, ’DEM_ORDERS’, ’CC_NUMBER’);
EXECUTE ad_dd.delete_column(’DEM’, ’DEM_ORDERS’, ’CC_EXPIRATION’);
EXECUTE ad_dd.delete_column(’DEM’, ’DEM_ORDERS’,
’CC_APPROVAL_CODE’);
EXECUTE ad_dd.delete_column(’DEM’, ’DEM_ORDERS’, ’ORDER_NOTE’);
EXECUTE ad_dd.delete_column(’DEM’, ’DEM_ORDERS’,
’ATTRIBUTE_CATEGORY’);
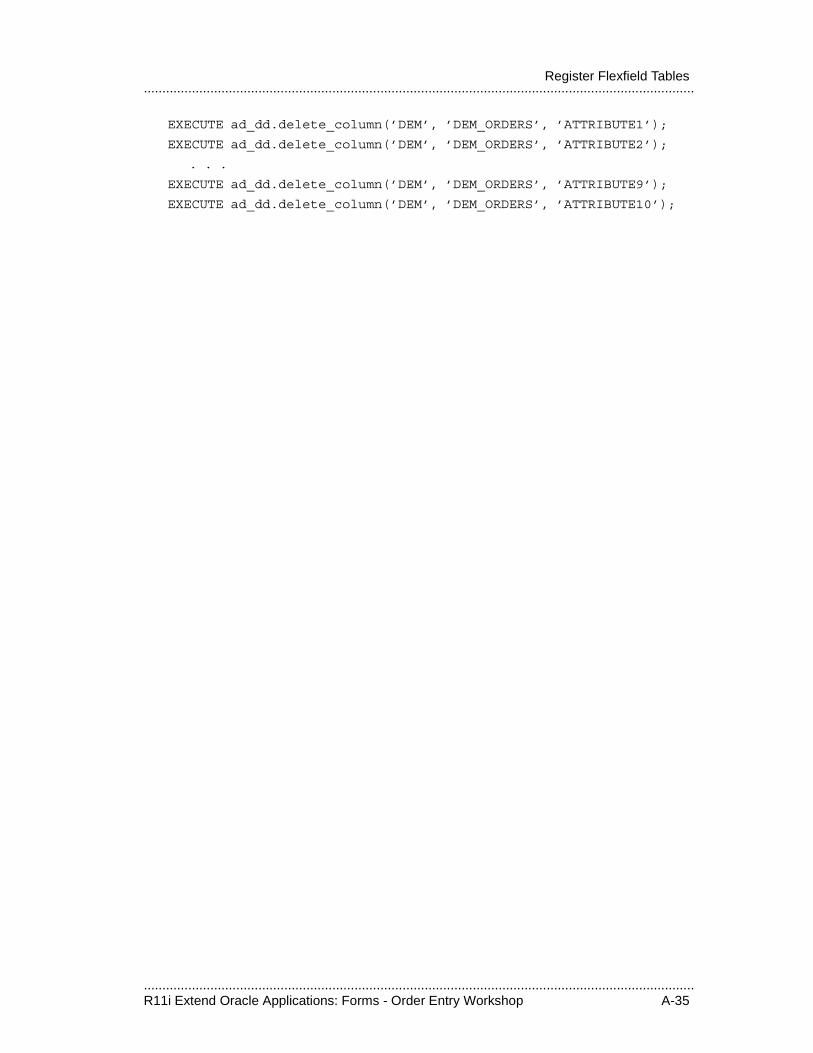
.....................................................................................................................................................R11i Extend Oracle Applications: Forms - Order Entry Workshop A-35
.....................................................................................................................................................Register Flexfield Tables
EXECUTE ad_dd.delete_column(’DEM’, ’DEM_ORDERS’, ’ATTRIBUTE1’);
EXECUTE ad_dd.delete_column(’DEM’, ’DEM_ORDERS’, ’ATTRIBUTE2’);
. . .
EXECUTE ad_dd.delete_column(’DEM’, ’DEM_ORDERS’, ’ATTRIBUTE9’);
EXECUTE ad_dd.delete_column(’DEM’, ’DEM_ORDERS’, ’ATTRIBUTE10’);
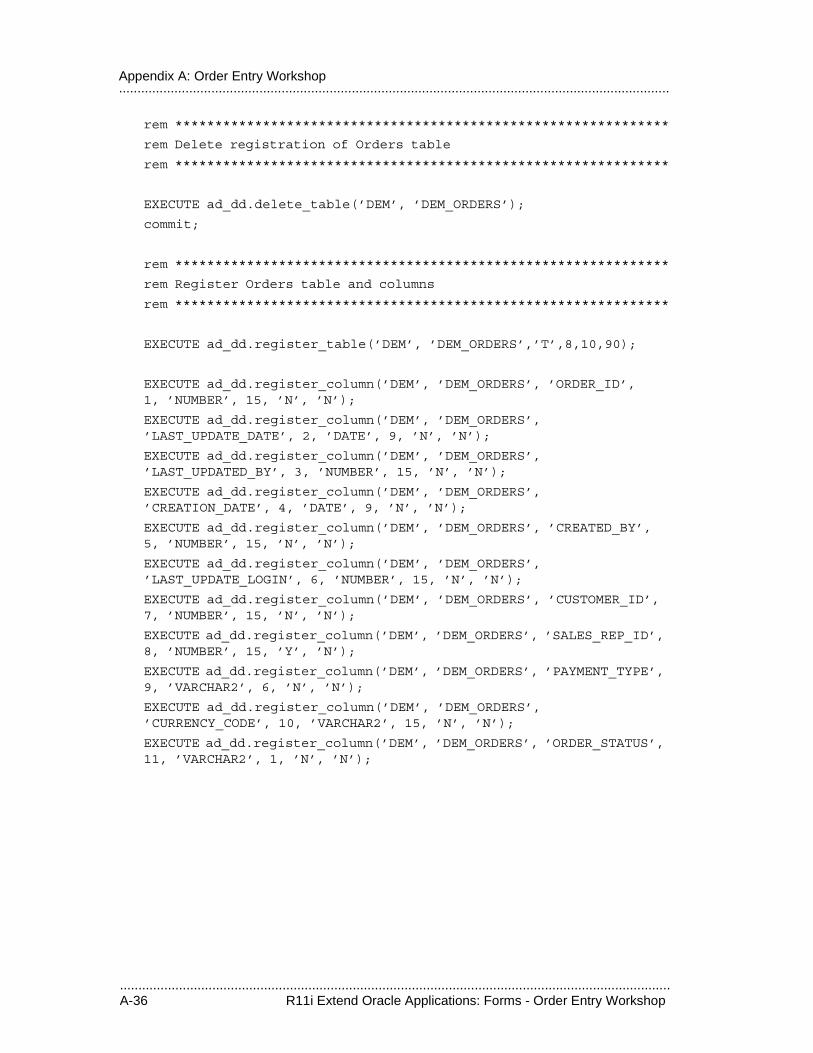
.....................................................................................................................................................A-36 R11i Extend Oracle Applications: Forms - Order Entry Workshop
.....................................................................................................................................................Appendix A: Order Entry Workshop
rem **************************************************************
rem Delete registration of Orders table
rem **************************************************************
EXECUTE ad_dd.delete_table(’DEM’, ’DEM_ORDERS’);
commit;
rem **************************************************************
rem Register Orders table and columns
rem **************************************************************
EXECUTE ad_dd.register_table(’DEM’, ’DEM_ORDERS’,’T’,8,10,90);
EXECUTE ad_dd.register_column(’DEM’, ’DEM_ORDERS’, ’ORDER_ID’, 1, ’NUMBER’, 15, ’N’, ’N’);
EXECUTE ad_dd.register_column(’DEM’, ’DEM_ORDERS’, ’LAST_UPDATE_DATE’, 2, ’DATE’, 9, ’N’, ’N’);
EXECUTE ad_dd.register_column(’DEM’, ’DEM_ORDERS’, ’LAST_UPDATED_BY’, 3, ’NUMBER’, 15, ’N’, ’N’);
EXECUTE ad_dd.register_column(’DEM’, ’DEM_ORDERS’, ’CREATION_DATE’, 4, ’DATE’, 9, ’N’, ’N’);
EXECUTE ad_dd.register_column(’DEM’, ’DEM_ORDERS’, ’CREATED_BY’, 5, ’NUMBER’, 15, ’N’, ’N’);
EXECUTE ad_dd.register_column(’DEM’, ’DEM_ORDERS’, ’LAST_UPDATE_LOGIN’, 6, ’NUMBER’, 15, ’N’, ’N’);
EXECUTE ad_dd.register_column(’DEM’, ’DEM_ORDERS’, ’CUSTOMER_ID’, 7, ’NUMBER’, 15, ’N’, ’N’);
EXECUTE ad_dd.register_column(’DEM’, ’DEM_ORDERS’, ’SALES_REP_ID’, 8, ’NUMBER’, 15, ’Y’, ’N’);
EXECUTE ad_dd.register_column(’DEM’, ’DEM_ORDERS’, ’PAYMENT_TYPE’, 9, ’VARCHAR2’, 6, ’N’, ’N’);
EXECUTE ad_dd.register_column(’DEM’, ’DEM_ORDERS’, ’CURRENCY_CODE’, 10, ’VARCHAR2’, 15, ’N’, ’N’);
EXECUTE ad_dd.register_column(’DEM’, ’DEM_ORDERS’, ’ORDER_STATUS’, 11, ’VARCHAR2’, 1, ’N’, ’N’);
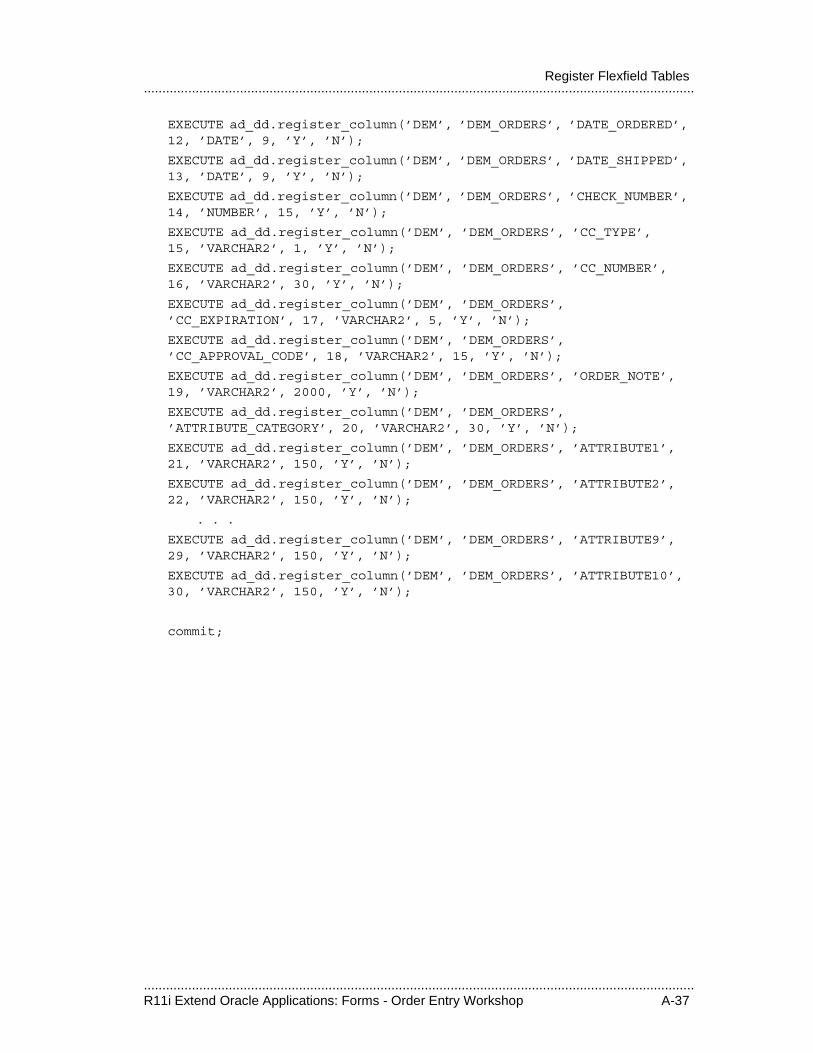
.....................................................................................................................................................R11i Extend Oracle Applications: Forms - Order Entry Workshop A-37
.....................................................................................................................................................Register Flexfield Tables
EXECUTE ad_dd.register_column(’DEM’, ’DEM_ORDERS’, ’DATE_ORDERED’, 12, ’DATE’, 9, ’Y’, ’N’);
EXECUTE ad_dd.register_column(’DEM’, ’DEM_ORDERS’, ’DATE_SHIPPED’, 13, ’DATE’, 9, ’Y’, ’N’);
EXECUTE ad_dd.register_column(’DEM’, ’DEM_ORDERS’, ’CHECK_NUMBER’, 14, ’NUMBER’, 15, ’Y’, ’N’);
EXECUTE ad_dd.register_column(’DEM’, ’DEM_ORDERS’, ’CC_TYPE’, 15, ’VARCHAR2’, 1, ’Y’, ’N’);
EXECUTE ad_dd.register_column(’DEM’, ’DEM_ORDERS’, ’CC_NUMBER’, 16, ’VARCHAR2’, 30, ’Y’, ’N’);
EXECUTE ad_dd.register_column(’DEM’, ’DEM_ORDERS’, ’CC_EXPIRATION’, 17, ’VARCHAR2’, 5, ’Y’, ’N’);
EXECUTE ad_dd.register_column(’DEM’, ’DEM_ORDERS’, ’CC_APPROVAL_CODE’, 18, ’VARCHAR2’, 15, ’Y’, ’N’);
EXECUTE ad_dd.register_column(’DEM’, ’DEM_ORDERS’, ’ORDER_NOTE’, 19, ’VARCHAR2’, 2000, ’Y’, ’N’);
EXECUTE ad_dd.register_column(’DEM’, ’DEM_ORDERS’, ’ATTRIBUTE_CATEGORY’, 20, ’VARCHAR2’, 30, ’Y’, ’N’);
EXECUTE ad_dd.register_column(’DEM’, ’DEM_ORDERS’, ’ATTRIBUTE1’, 21, ’VARCHAR2’, 150, ’Y’, ’N’);
EXECUTE ad_dd.register_column(’DEM’, ’DEM_ORDERS’, ’ATTRIBUTE2’, 22, ’VARCHAR2’, 150, ’Y’, ’N’);
. . .
EXECUTE ad_dd.register_column(’DEM’, ’DEM_ORDERS’, ’ATTRIBUTE9’, 29, ’VARCHAR2’, 150, ’Y’, ’N’);
EXECUTE ad_dd.register_column(’DEM’, ’DEM_ORDERS’, ’ATTRIBUTE10’, 30, ’VARCHAR2’, 150, ’Y’, ’N’);
commit;

.....................................................................................................................................................A-38 R11i Extend Oracle Applications: Forms - Order Entry Workshop
.....................................................................................................................................................Appendix A: Order Entry Workshop
rem **************************************************************
rem Delete registration of columns in Order Lines table
rem **************************************************************
EXECUTE ad_dd.delete_column(’DEM’, ’DEM_ORDER_LINES’, ’ORDER_ID’);
EXECUTE ad_dd.delete_column(’DEM’, ’DEM_ORDER_LINES’, ’ORDER_LINE_NUM’);
EXECUTE ad_dd.delete_column(’DEM’, ’DEM_ORDER_LINES’, ’LAST_UPDATE_DATE’);
EXECUTE ad_dd.delete_column(’DEM’, ’DEM_ORDER_LINES’, ’LAST_UPDATED_BY’);
EXECUTE ad_dd.delete_column(’DEM’, ’DEM_ORDER_LINES’, ’CREATION_DATE’);
EXECUTE ad_dd.delete_column(’DEM’, ’DEM_ORDER_LINES’, ’CREATED_BY’);
EXECUTE ad_dd.delete_column(’DEM’, ’DEM_ORDER_LINES’, ’LAST_UPDATE_LOGIN’);
EXECUTE ad_dd.delete_column(’DEM’, ’DEM_ORDER_LINES’, ’PRODUCT_ID’);
EXECUTE ad_dd.delete_column(’DEM’, ’DEM_ORDER_LINES’, ’GL_ACCOUNT_CC_ID’);
EXECUTE ad_dd.delete_column(’DEM’, ’DEM_ORDER_LINES’, ’ORDERED_QUANTITY’);
EXECUTE ad_dd.delete_column(’DEM’, ’DEM_ORDER_LINES’, ’ATTRIBUTE_CATEGORY’);
EXECUTE ad_dd.delete_column(’DEM’, ’DEM_ORDER_LINES’, ’ATTRIBUTE1’);
EXECUTE ad_dd.delete_column(’DEM’, ’DEM_ORDER_LINES’, ’ATTRIBUTE2’);
. . .
EXECUTE ad_dd.delete_column(’DEM’, ’DEM_ORDER_LINES’, ’ATTRIBUTE9’);
EXECUTE ad_dd.delete_column(’DEM’, ’DEM_ORDER_LINES’, ’ATTRIBUTE10’);
rem **************************************************************
rem Delete registration of Order Lines table
rem **************************************************************
EXECUTE ad_dd.delete_table(’DEM’, ’DEM_ORDER_LINES’);
commit;
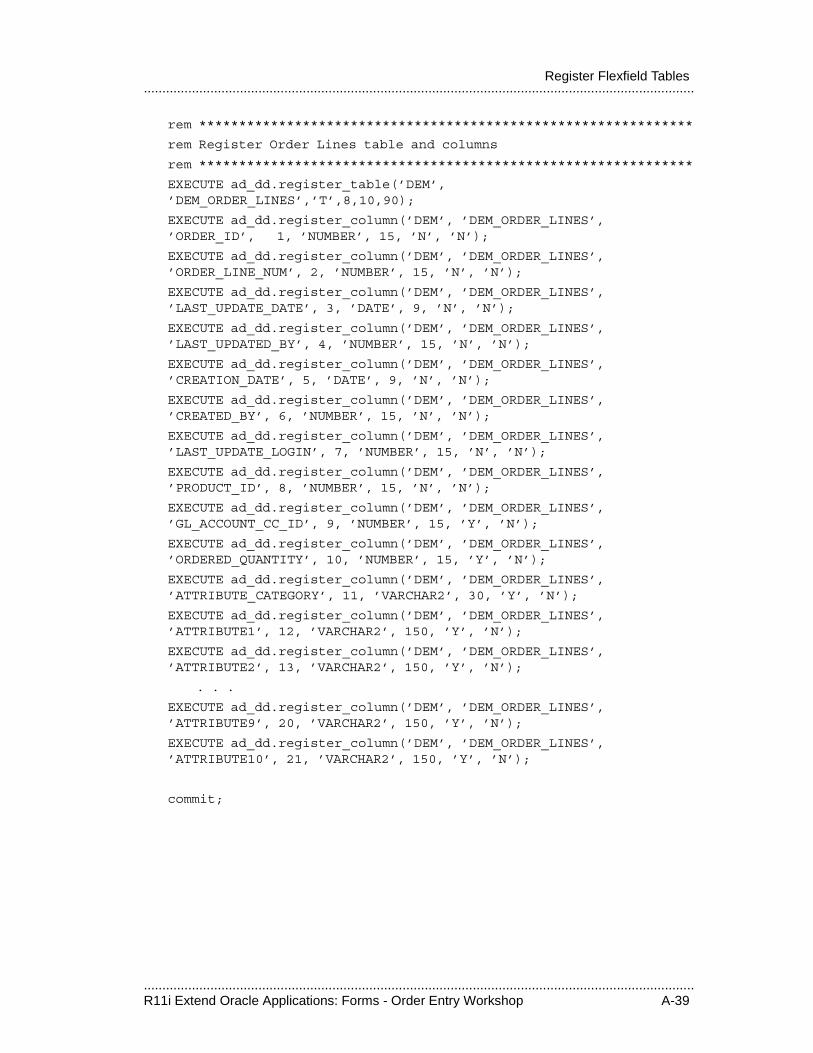
.....................................................................................................................................................R11i Extend Oracle Applications: Forms - Order Entry Workshop A-39
.....................................................................................................................................................Register Flexfield Tables
rem **************************************************************
rem Register Order Lines table and columns
rem **************************************************************
EXECUTE ad_dd.register_table(’DEM’, ’DEM_ORDER_LINES’,’T’,8,10,90);
EXECUTE ad_dd.register_column(’DEM’, ’DEM_ORDER_LINES’, ’ORDER_ID’, 1, ’NUMBER’, 15, ’N’, ’N’);
EXECUTE ad_dd.register_column(’DEM’, ’DEM_ORDER_LINES’, ’ORDER_LINE_NUM’, 2, ’NUMBER’, 15, ’N’, ’N’);
EXECUTE ad_dd.register_column(’DEM’, ’DEM_ORDER_LINES’, ’LAST_UPDATE_DATE’, 3, ’DATE’, 9, ’N’, ’N’);
EXECUTE ad_dd.register_column(’DEM’, ’DEM_ORDER_LINES’, ’LAST_UPDATED_BY’, 4, ’NUMBER’, 15, ’N’, ’N’);
EXECUTE ad_dd.register_column(’DEM’, ’DEM_ORDER_LINES’, ’CREATION_DATE’, 5, ’DATE’, 9, ’N’, ’N’);
EXECUTE ad_dd.register_column(’DEM’, ’DEM_ORDER_LINES’, ’CREATED_BY’, 6, ’NUMBER’, 15, ’N’, ’N’);
EXECUTE ad_dd.register_column(’DEM’, ’DEM_ORDER_LINES’, ’LAST_UPDATE_LOGIN’, 7, ’NUMBER’, 15, ’N’, ’N’);
EXECUTE ad_dd.register_column(’DEM’, ’DEM_ORDER_LINES’, ’PRODUCT_ID’, 8, ’NUMBER’, 15, ’N’, ’N’);
EXECUTE ad_dd.register_column(’DEM’, ’DEM_ORDER_LINES’, ’GL_ACCOUNT_CC_ID’, 9, ’NUMBER’, 15, ’Y’, ’N’);
EXECUTE ad_dd.register_column(’DEM’, ’DEM_ORDER_LINES’, ’ORDERED_QUANTITY’, 10, ’NUMBER’, 15, ’Y’, ’N’);
EXECUTE ad_dd.register_column(’DEM’, ’DEM_ORDER_LINES’, ’ATTRIBUTE_CATEGORY’, 11, ’VARCHAR2’, 30, ’Y’, ’N’);
EXECUTE ad_dd.register_column(’DEM’, ’DEM_ORDER_LINES’, ’ATTRIBUTE1’, 12, ’VARCHAR2’, 150, ’Y’, ’N’);
EXECUTE ad_dd.register_column(’DEM’, ’DEM_ORDER_LINES’, ’ATTRIBUTE2’, 13, ’VARCHAR2’, 150, ’Y’, ’N’);
. . .
EXECUTE ad_dd.register_column(’DEM’, ’DEM_ORDER_LINES’, ’ATTRIBUTE9’, 20, ’VARCHAR2’, 150, ’Y’, ’N’);
EXECUTE ad_dd.register_column(’DEM’, ’DEM_ORDER_LINES’, ’ATTRIBUTE10’, 21, ’VARCHAR2’, 150, ’Y’, ’N’);
commit;

.....................................................................................................................................................A-40 R11i Extend Oracle Applications: Forms - Order Entry Workshop
.....................................................................................................................................................Appendix A: Order Entry Workshop
................................
Practices

.....................................................................................................................................................B-2 R11i Extend Oracle Applications: Forms - Practices
.....................................................................................................................................................Appendix B: Practices
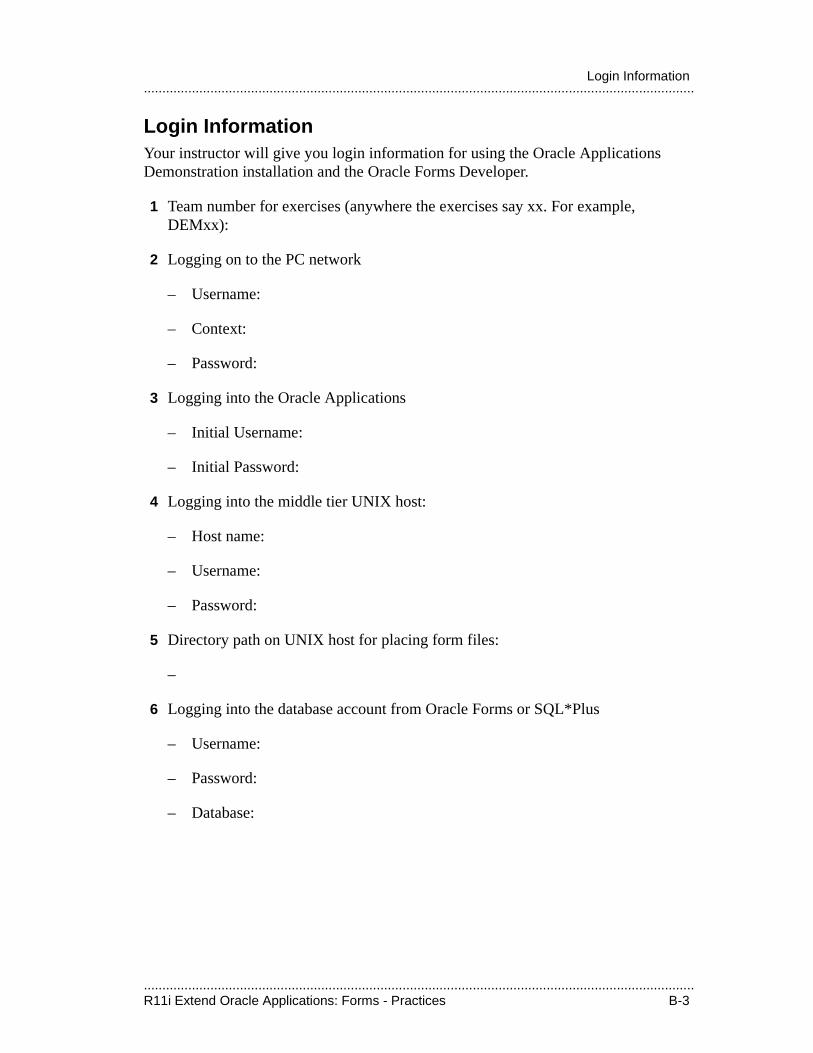
.....................................................................................................................................................R11i Extend Oracle Applications: Forms - Practices B-3
.....................................................................................................................................................Login Information
Login InformationYour instructor will give you login information for using the Oracle Applications Demonstration installation and the Oracle Forms Developer.
1 Team number for exercises (anywhere the exercises say xx. For example, DEMxx):
2 Logging on to the PC network
– Username:
– Context:
– Password:
3 Logging into the Oracle Applications
– Initial Username:
– Initial Password:
4 Logging into the middle tier UNIX host:
– Host name:
– Username:
– Password:
5 Directory path on UNIX host for placing form files:
–
6 Logging into the database account from Oracle Forms or SQL*Plus
– Username:
– Password:
– Database:
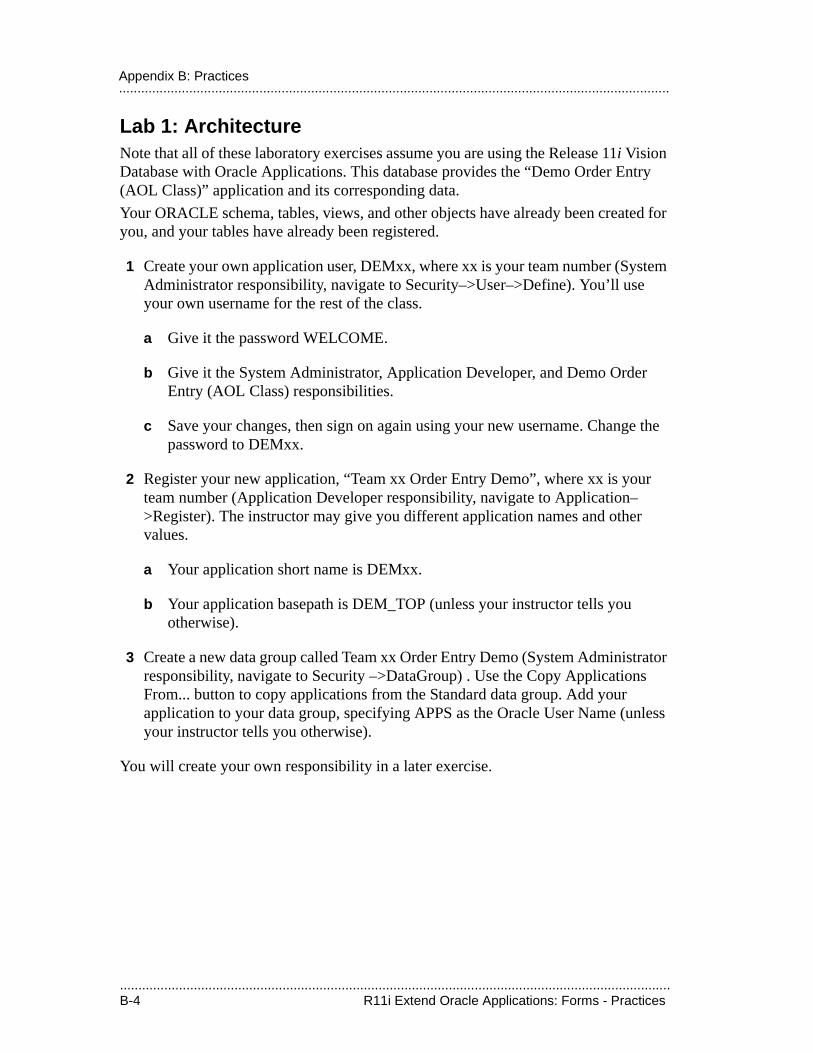
.....................................................................................................................................................B-4 R11i Extend Oracle Applications: Forms - Practices
.....................................................................................................................................................Appendix B: Practices
Lab 1: ArchitectureNote that all of these laboratory exercises assume you are using the Release 11i Vision Database with Oracle Applications. This database provides the “Demo Order Entry (AOL Class)” application and its corresponding data.
Your ORACLE schema, tables, views, and other objects have already been created for you, and your tables have already been registered.
1 Create your own application user, DEMxx, where xx is your team number (System Administrator responsibility, navigate to Security–>User–>Define). You’ll use your own username for the rest of the class.
a Give it the password WELCOME.
b Give it the System Administrator, Application Developer, and Demo Order Entry (AOL Class) responsibilities.
c Save your changes, then sign on again using your new username. Change the password to DEMxx.
2 Register your new application, “Team xx Order Entry Demo”, where xx is your team number (Application Developer responsibility, navigate to Application–>Register). The instructor may give you different application names and other values.
a Your application short name is DEMxx.
b Your application basepath is DEM_TOP (unless your instructor tells you otherwise).
3 Create a new data group called Team xx Order Entry Demo (System Administrator responsibility, navigate to Security –>DataGroup) . Use the Copy Applications From... button to copy applications from the Standard data group. Add your application to your data group, specifying APPS as the Oracle User Name (unless your instructor tells you otherwise).
You will create your own responsibility in a later exercise.
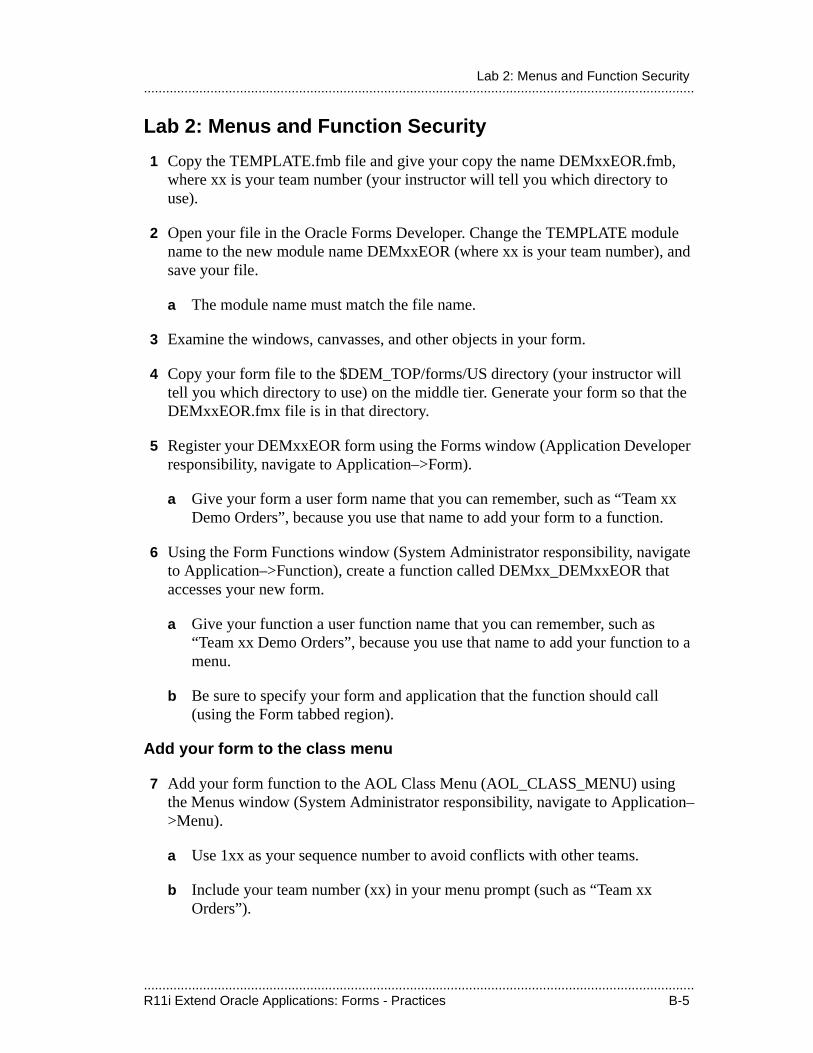
.....................................................................................................................................................R11i Extend Oracle Applications: Forms - Practices B-5
.....................................................................................................................................................Lab 2: Menus and Function Security
Lab 2: Menus and Function Security
1 Copy the TEMPLATE.fmb file and give your copy the name DEMxxEOR.fmb, where xx is your team number (your instructor will tell you which directory to use).
2 Open your file in the Oracle Forms Developer. Change the TEMPLATE module name to the new module name DEMxxEOR (where xx is your team number), and save your file.
a The module name must match the file name.
3 Examine the windows, canvasses, and other objects in your form.
4 Copy your form file to the $DEM_TOP/forms/US directory (your instructor will tell you which directory to use) on the middle tier. Generate your form so that the DEMxxEOR.fmx file is in that directory.
5 Register your DEMxxEOR form using the Forms window (Application Developer responsibility, navigate to Application–>Form).
a Give your form a user form name that you can remember, such as “Team xx Demo Orders”, because you use that name to add your form to a function.
6 Using the Form Functions window (System Administrator responsibility, navigate to Application–>Function), create a function called DEMxx_DEMxxEOR that accesses your new form.
a Give your function a user function name that you can remember, such as “Team xx Demo Orders”, because you use that name to add your function to a menu.
b Be sure to specify your form and application that the function should call (using the Form tabbed region).
Add your form to the class menu
7 Add your form function to the AOL Class Menu (AOL_CLASS_MENU) using the Menus window (System Administrator responsibility, navigate to Application–>Menu).
a Use 1xx as your sequence number to avoid conflicts with other teams.
b Include your team number (xx) in your menu prompt (such as “Team xx Orders”).
.....................................................................................................................................................B-6 R11i Extend Oracle Applications: Forms - Practices
.....................................................................................................................................................Appendix B: Practices
8 Try out your form from the class menu using the Demo Order Entry (AOL Class) responsibility. If the class responsibility or menu do not appear, exit completely from Oracle Applications and try again.
Create your own menu and responsibility
9 Using the Menus window (System Administrator responsibility, navigate to Application–>Menu), create your own submenu that accesses your new function.
a Give your menu the user menu name of Team xx Menu.
b Add your function as the first entry (be sure to give it a prompt).
c Add a second entry to your menu with the prompt of Demo Form, and the function of Demo Order Entry (this is the AOL class demo form).
10 Using the Menus window (System Administrator responsibility, navigate to Application–>Menu), create top-level menu that accesses your new submenu.
a Give your new menu the user menu name Team xx Top.
b Specify your new submenu as the first entry. Be sure to give it a prompt.
c Have your menu call the FND_OTHER 4.0 menu as a submenu for the second entry. This entry provides Standard Request Submission and Profiles forms.
11 Create a new responsibility that uses your menu (System Administrator responsibility, navigate to Security–>Responsibility–>Define). Use the data group you created for your application and the Demo Order Entry request group.
12 Add your new responsibility to your own application user (System Administrator responsibility, navigate to Security–>User–>Define).
13 Sign on again using your own user name and try out your form from your own responsibility. If your new responsibility or new menu do not appear, exit completely from Oracle Applications and try again.
You should now be able to access your form from either your own responsibility or the Demo Order Entry (AOL Class) responsibility.
.....................................................................................................................................................R11i Extend Oracle Applications: Forms - Practices B-7
.....................................................................................................................................................Lab 3: Container Objects
Lab 3: Container ObjectsAs with all software development, save your work frequently! Note that as you go through the lab exercises you will be saving backup copies of your form. These backup copies should remain on your desktop machine and do not need to be copied to the middle tier.
1 Save a backup copy of your form file as DEMxxE01.fmb. Continue working on DEMxxEOR.fmb.
2 Create your Orders and Order Lines windows.
a Create a new window, ORDERS, and set its Title property to Orders. Set the property class for the window (what class should it be?).
b Create another window, LINES, and set its Title property to Order Lines. Set the property class for the window (what class should it be?).
3 Create your two content canvasses.
a Create a new canvas, ORDERS, and set its Window property to ORDERS. Set your property class for the canvas (what class should it be?).
b Create another canvas, LINES, and set its Window property to LINES. Set your property class for the canvas (what class should it be?).
c Go back to your ORDERS window and set its Primary Canvas property to ORDERS.
d Go back to your LINES window and set its Primary Canvas property to LINES.
Create blocks and initial layouts
4 Use the Data Block Wizard and the Layout Wizard to create two new blocks, ORDERS and LINES (do not simply copy the template blocks). Set the new block options as follows. For both blocks, include all available columns from the views as database items. Do not create any master-detail relationships at this time. Keep the existing template blocks for now.
ORDERS BlockBase Table (view): DEM_ORDERS_V
Canvas: ORDERS
In the Layout Wizard, select the displayed items onto your canvas and set the prompts and widths as shown in your specification pictures (do not set the height at this point). Select the fields in the order the user will tab through them (according to the picture).
.....................................................................................................................................................B-8 R11i Extend Oracle Applications: Forms - Practices
.....................................................................................................................................................Appendix B: Practices
Layout Style: Form
Records Displayed: 1
Set the frame title to “Delete Me” (so it will be easy to identify and delete later)
LINES block:Base Table (view): DEM_ORDER_LINES_V
Canvas: LINES
In the Layout Wizard, select the displayed items onto your canvas and set the prompts and widths as shown in your specification pictures (do not set the height at this point). Select the fields in the order the user will tab through them (according to the picture).
Layout Style: Tabular
Records Displayed: 10
Scrollbar (checked)
5 Use proper grid size and grid snap settings for all canvases. Format–>Layout Options–>Ruler.
a Set the ruler to Character Cells, Grid Spacing of 1 and Snap Point of 2.
b Set your canvas and view to the appropriate size (they should both be the same dimensions).
c Set Snap to Grid on.
d Set the canvas to not be displayed so that you can see the character points in the layout editor (this will allow you to check the alignment of items and check that they are snapped to grid).
6 Now that you have finished with the Layout Wizard, change your block names and set block properties:
Block Name: DEM_ORDERS_V changes to ORDERS
Property Class: BLOCK
Navigation style: Same Record
Key Mode: Non-Updateable (because it is based on a view)
ORDER BY Clause: order_id
.....................................................................................................................................................R11i Extend Oracle Applications: Forms - Practices B-9
.....................................................................................................................................................Lab 3: Container Objects
Block name: DEM_ORDER_LINES_V changes to LINES
Property Class: BLOCK
Navigation style: Change record
Key Mode: Non-Updateable (because it is based on a view)
7 Create another block, called CONTROL, manually (not using the Data Block Wizard):
Base Table: <none>
Property Class: BLOCK
8 Create a relation in the ORDERS block between the Orders block and the Lines block. The master block is ORDERS; the detail block is LINES. The relation name will default to ORDERS_LINES.
a Set Master Deletes to Isolated.
b Set Coordination to Prevent Masterless Operation
c Set the join condition to ORDER_ID (which means that orders.order_ID = lines.order_ID).
9 Sequence your blocks correctly in the Object Navigator.
10 Set your module’s First Navigation Block to ORDERS.
11 In the ORDERS block on the ORDER_ID item, set the item-level Primary Key property to Yes.
12 In the LINES block on the ORDER_ID item, set the item-level Primary Key property to Yes. Also, set the item-level Primary Key property on ORDER_LINE_NUM to Yes (the LINES block has a composite primary key).
Block Navigation Behavior
13 Set the Next Navigation Data Block properties for your blocks to ensure that Next Block (Shift-PageDown for most U.S. keyboards) and Previous Block (Shift-PageUp for most U.S. keyboards) take you to the Orders and Order Lines blocks as appropriate (where that might mean the block may need to go to itself).
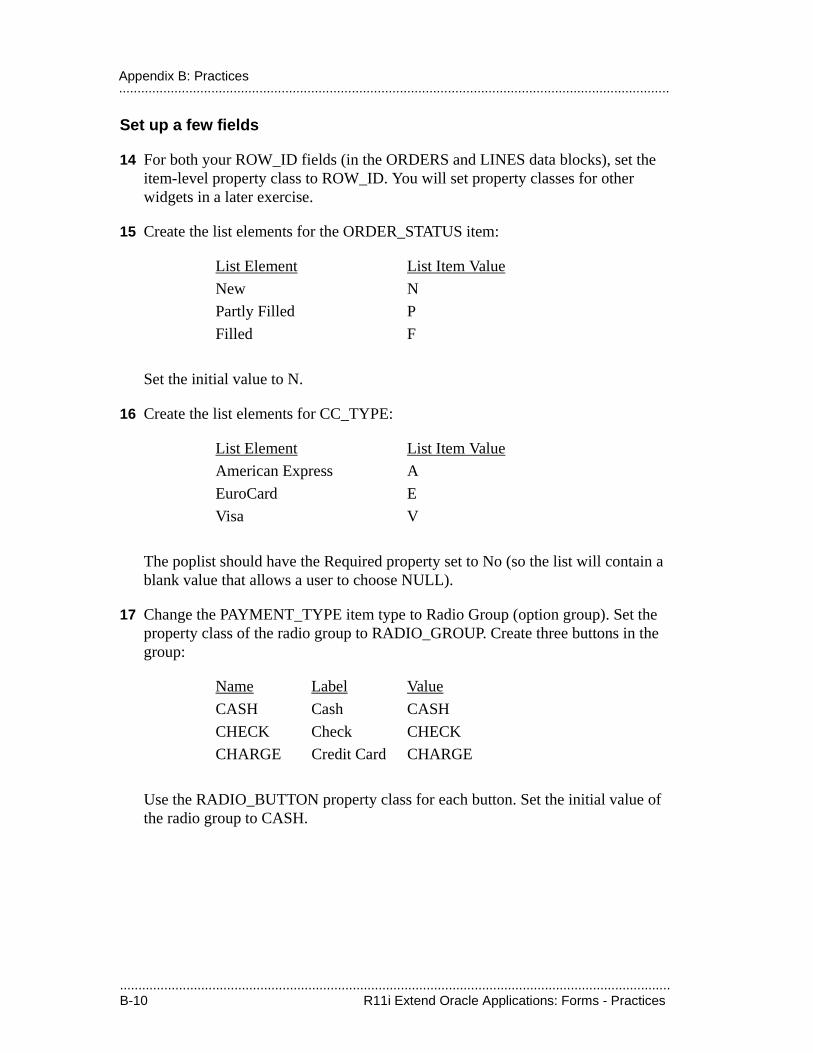
.....................................................................................................................................................B-10 R11i Extend Oracle Applications: Forms - Practices
.....................................................................................................................................................Appendix B: Practices
Set up a few fields
14 For both your ROW_ID fields (in the ORDERS and LINES data blocks), set the item-level property class to ROW_ID. You will set property classes for other widgets in a later exercise.
15 Create the list elements for the ORDER_STATUS item:
List Element List Item Value
New N
Partly Filled P
Filled F
Set the initial value to N.
16 Create the list elements for CC_TYPE:
List Element List Item Value
American Express A
EuroCard E
Visa V
The poplist should have the Required property set to No (so the list will contain a blank value that allows a user to choose NULL).
17 Change the PAYMENT_TYPE item type to Radio Group (option group). Set the property class of the radio group to RADIO_GROUP. Create three buttons in the group:
Name Label Value
CASH Cash CASH
CHECK Check CHECK
CHARGE Credit Card CHARGE
Use the RADIO_BUTTON property class for each button. Set the initial value of the radio group to CASH.

.....................................................................................................................................................R11i Extend Oracle Applications: Forms - Practices B-11
.....................................................................................................................................................Lab 3: Container Objects
PRE-FORM Trigger
18 Modify your form-level PRE-FORM trigger. This will be covered in a later chapter, but you must do it now to avoid error messages about invalid window names and window IDs.
a Modify the FND_STANDARD.FORM_INFO call for your own application short name (DEMxx, not FND), module title, and form author name. Note that there may be many extra spaces within the existing call in the TEMPLATE form (the call is not incomplete).
b Modify the APP_WINDOW.SET_WINDOW_POSITION call to use your main (first) window name, ORDERS, instead of BLOCKNAME. Do not modify the text “FIRST_WINDOW”.
Try It Out
19 Do Program->Compile->All.
20 Save your form.
21 Copy your form to the middle tier and generate it. Run your form.
22 Remove your ‘Delete Me’ frames.
Expected BehaviorAt this point, you should be able to do (only) View->Find All from the Orders block and see any existing orders. If you then do Next Block (Shift-PageDown for most U.S. keyboards), you should be able to see any existing order lines for the order displayed in the Orders block.
Note that you cannot yet insert, update, or delete records, because you have not yet built your table handlers or any other logic such as LOVs. Note also that you will have errors at this point, which may include errors/warnings generating due to having no items in the CONTROL block. Finally, you should expect your form to look terrible at this point because you have not done anything to modify the default block layout. You will also fix this in a later exercise.
.....................................................................................................................................................B-12 R11i Extend Oracle Applications: Forms - Practices
.....................................................................................................................................................Appendix B: Practices
Lab 4: Widgets
Items:
1 Save a backup copy of your form file as DEMxxE02.fmb. Continue working on DEMxxEOR.fmb.
2 For the items you created by creating your ORDERS and LINES blocks (see the following lists):
a Apply the appropriate property classes to your items.
You can select all the items in a block for which you want to change a particular property, such as Canvas, and apply the property to all selected items. However, you cannot select multiple items and apply a property class to multiple items at once.
Note that the property class may change many item properties, possibly including the item type or data type for a given item. Be very careful to apply the correct class to each item the first time, since changing an item to the wrong class may change properties, such as the data type, that might not be changed back correctly when you change the property class again. Save your work frequently (about every 10-20 changes) during this process.
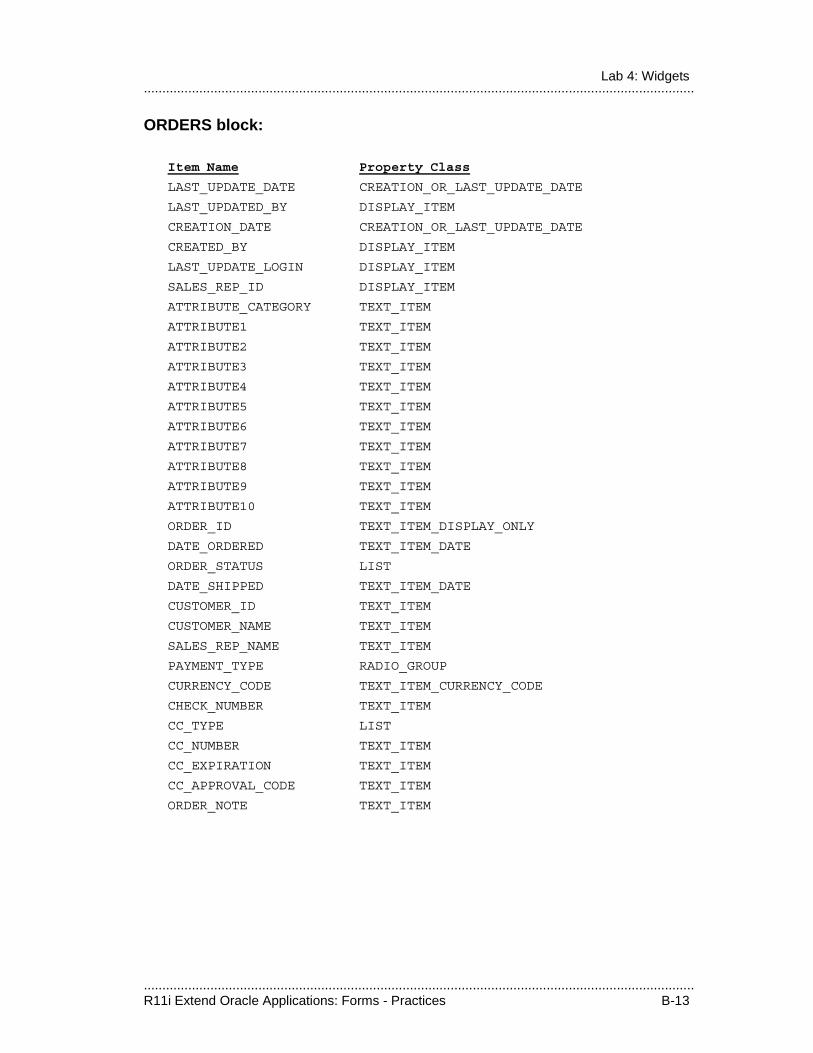
.....................................................................................................................................................R11i Extend Oracle Applications: Forms - Practices B-13
.....................................................................................................................................................Lab 4: Widgets
ORDERS block:
Item Name Property Class
LAST_UPDATE_DATE CREATION_OR_LAST_UPDATE_DATE
LAST_UPDATED_BY DISPLAY_ITEM
CREATION_DATE CREATION_OR_LAST_UPDATE_DATE
CREATED_BY DISPLAY_ITEM
LAST_UPDATE_LOGIN DISPLAY_ITEM
SALES_REP_ID DISPLAY_ITEM
ATTRIBUTE_CATEGORY TEXT_ITEM
ATTRIBUTE1 TEXT_ITEM
ATTRIBUTE2 TEXT_ITEM
ATTRIBUTE3 TEXT_ITEM
ATTRIBUTE4 TEXT_ITEM
ATTRIBUTE5 TEXT_ITEM
ATTRIBUTE6 TEXT_ITEM
ATTRIBUTE7 TEXT_ITEM
ATTRIBUTE8 TEXT_ITEM
ATTRIBUTE9 TEXT_ITEM
ATTRIBUTE10 TEXT_ITEM
ORDER_ID TEXT_ITEM_DISPLAY_ONLY
DATE_ORDERED TEXT_ITEM_DATE
ORDER_STATUS LIST
DATE_SHIPPED TEXT_ITEM_DATE
CUSTOMER_ID TEXT_ITEM
CUSTOMER_NAME TEXT_ITEM
SALES_REP_NAME TEXT_ITEM
PAYMENT_TYPE RADIO_GROUP
CURRENCY_CODE TEXT_ITEM_CURRENCY_CODE
CHECK_NUMBER TEXT_ITEM
CC_TYPE LIST
CC_NUMBER TEXT_ITEM
CC_EXPIRATION TEXT_ITEM
CC_APPROVAL_CODE TEXT_ITEM
ORDER_NOTE TEXT_ITEM
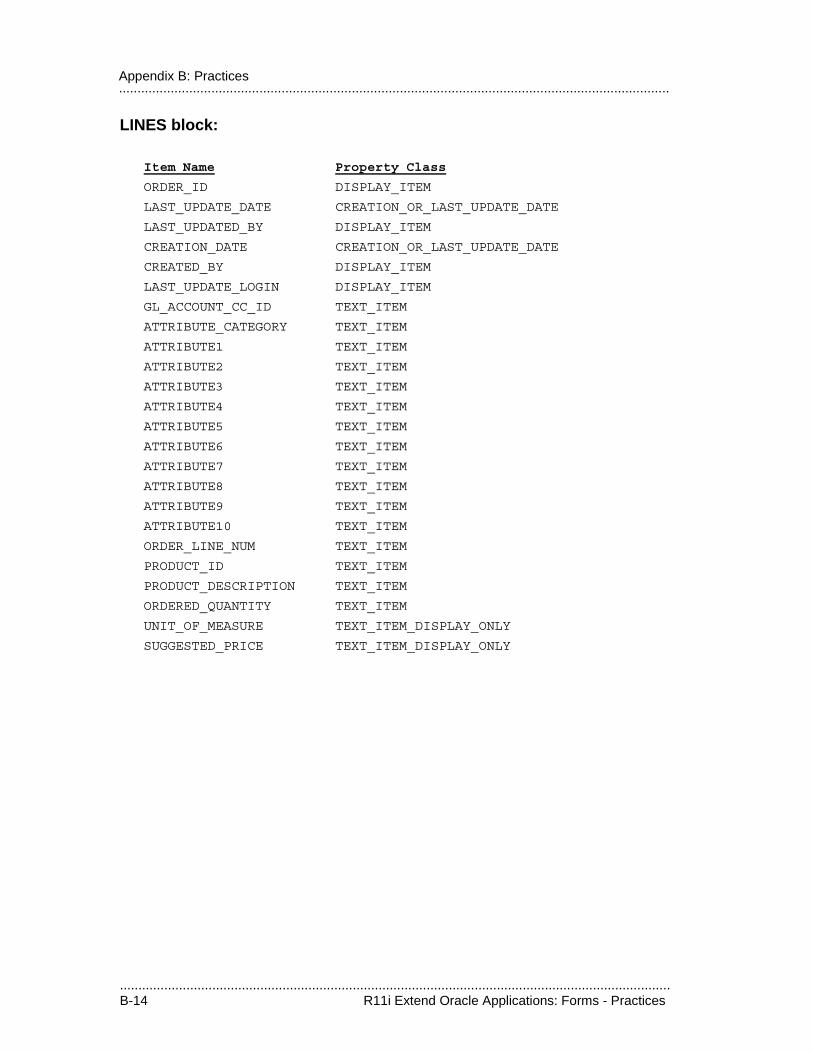
.....................................................................................................................................................B-14 R11i Extend Oracle Applications: Forms - Practices
.....................................................................................................................................................Appendix B: Practices
LINES block:
Item Name Property Class
ORDER_ID DISPLAY_ITEM
LAST_UPDATE_DATE CREATION_OR_LAST_UPDATE_DATE
LAST_UPDATED_BY DISPLAY_ITEM
CREATION_DATE CREATION_OR_LAST_UPDATE_DATE
CREATED_BY DISPLAY_ITEM
LAST_UPDATE_LOGIN DISPLAY_ITEM
GL_ACCOUNT_CC_ID TEXT_ITEM
ATTRIBUTE_CATEGORY TEXT_ITEM
ATTRIBUTE1 TEXT_ITEM
ATTRIBUTE2 TEXT_ITEM
ATTRIBUTE3 TEXT_ITEM
ATTRIBUTE4 TEXT_ITEM
ATTRIBUTE5 TEXT_ITEM
ATTRIBUTE6 TEXT_ITEM
ATTRIBUTE7 TEXT_ITEM
ATTRIBUTE8 TEXT_ITEM
ATTRIBUTE9 TEXT_ITEM
ATTRIBUTE10 TEXT_ITEM
ORDER_LINE_NUM TEXT_ITEM
PRODUCT_ID TEXT_ITEM
PRODUCT_DESCRIPTION TEXT_ITEM
ORDERED_QUANTITY TEXT_ITEM
UNIT_OF_MEASURE TEXT_ITEM_DISPLAY_ONLY
SUGGESTED_PRICE TEXT_ITEM_DISPLAY_ONLY
.....................................................................................................................................................R11i Extend Oracle Applications: Forms - Practices B-15
.....................................................................................................................................................Lab 4: Widgets
Create or Modify More ORDERS Block Items:
3 Create a descriptive flexfield item in the ORDERS block (you can copy the descriptive flexfield item from the BLOCKNAME block and paste it into the ORDERS block). Make sure its property class is set to TEXT_ITEM_DESC_FLEX. Its prompt should be set to [ (a single bracket).
a Set its canvas to ORDERS.
b Set Validate from List to No (override the inherited property).
4 Set the Initial Value property of the CURRENCY_CODE item to USD.
5 Create a button in the ORDERS block. You can cut the BUTTON_1 item from the BLOCKNAME block and paste it into the ORDERS block.
a Change its name to LINES and its label to be Order Lines, with O as the access key in the label. It should be on the ORDERS canvas.
b Set its property class (what should it be?).
c Make the button keyboard navigable.
d Make the button the default button.
Create or Modify More LINES Block Items:
6 Create a descriptive flexfield item in the LINES block (you can copy it from the DETAILBLOCK block and paste it into the LINES block). Make sure its property class is set to TEXT_ITEM_DESC_FLEX. Its prompt should be set to [__] (brackets around two spaces).
a Change its canvas to LINES.
b Set Validate from List to No (override the inherited property).
7 Create a current record indicator for the LINES block (you can copy the CURRENT_RECORD_INDICATOR from the DETAILBLOCK block and paste it into the LINES block). Make sure its property class is set to CURRENT_RECORD_INDICATOR.
a Change its canvas to LINES.
b Modify its WHEN-NEW-ITEM-INSTANCE trigger so that it goes to the first field in LINES.
.....................................................................................................................................................B-16 R11i Extend Oracle Applications: Forms - Practices
.....................................................................................................................................................Appendix B: Practices
8 For the SUGGESTED_PRICE item, set Justification to End (this overrides an inherited property).
9 Create a non-database text item, TOTAL_PRICE. Use the TEXT_ITEM_DISPLAY_ONLY property class.
a Set its canvas to LINES.
b Change the Data Type to Number.
c Set Database Item to No.
d Set Justification to End (this overrides an inherited property).
e Set Prompt to Total Price.
10 Create a non-database text item, ACCTG_FLEX_VALUES. Use the TEXT_ITEM property class. Its maximum length should be 2000.
a Set its canvas to LINES.
b Set Database Item to No.
c Set Prompt to Account.
Create CONTROL Block Item:
11 Create a check box in the CONTROL block. Set its name to ORDERS_LINES and its canvas to LINES. This will become your coordination check box. Set its property class (what should it be?). Set its width to 0.3.
Adjust your layout with the Layout Wizard
12 Use the Layout Wizard on the ORDERS and LINES data blocks to redo your two main layouts. This step is to account for the height changes from applying the property classes and for the new fields you have added to the LINES block. Be sure to delete the surrounding frames again. For the LINES block, be sure you reset the layout style to Tabular and reset Records Displayed to 10.
13 Adjust your two window sizes (in the layout editor) so you can see all your fields.
14 Ensure that your ‘Delete Me’ frames have been removed.
.....................................................................................................................................................R11i Extend Oracle Applications: Forms - Practices B-17
.....................................................................................................................................................Lab 4: Widgets
Try It Out
15 Do Program->Compile->All.
16 Save your form.
17 Copy your form to the middle tier and generate it. Run your form.
.....................................................................................................................................................B-18 R11i Extend Oracle Applications: Forms - Practices
.....................................................................................................................................................Appendix B: Practices
Lab 5: Layout
Adjust Your Layout
1 Save a backup copy of your form file as DEMxxE03.fmb. Continue working on DEMxxEOR.fmb.
2 Ensure that tabbing through the form fields goes in the expected order.
a Rearrange the field order within each block in the Object Navigator.
3 In the layout editor, move items around to an appropriate layout (see the form specification in the Order Entry Workshop appendix). Be sure to follow layout standards as shown in the Oracle Applications User Interface Standards.
For now, put your Accounting Flexfield field just after the descriptive flexfield in the LINES canvas. You will move it to a different canvas later when you build your tabbed regions. You will create the tab canvases in a later exercise.
a Ensure that you use the proper grid size (set ruler settings for each canvas) and grid snap settings. Align and snap your items to the grid according to standard.
b Make all prompt and title text follow appropriate font, size, weight, and alignment standards. Be sure to leave adequate space for prompt translation requirements.
c Use frames to delineate regions, etc. Be sure to set line weights, colors, and bevels correctly.
4 Alter prompts and change item sizes as appropriate.
5 Size your windows as appropriate. For now, your Lines window will be wider than its final size because you must accommodate the Account field, which will be moved to a stacked canvas later.

.....................................................................................................................................................R11i Extend Oracle Applications: Forms - Practices B-19
.....................................................................................................................................................Lab 5: Layout
Remove unused template objects
6 Delete the BLOCKNAME block (including its items), canvas, and window from the Object Navigator.
7 Delete the DETAILBLOCK block (including its items) from the Object Navigator.
Try It Out
8 Do Program -> Compile -> All.
9 Save your form.
10 Copy your form to the middle tier and generate it. Run your form.
11 Check that tabbing through the form fields goes in the expected order. If not:
a Rearrange the field order within each block in the Object Navigator.
b Save your form.
c Copy your form to the middle tier and generate it. Run your form.
12 Challenge 1- For accessibility add appropriate hint text to those items that require it for a screen reader. Which fields require hints and what should they be?
Expected BehaviorAt this point, you should be able to do (only) View -> Find from the Orders block and see any existing orders. In the Lines block, you should be able to see any existing order lines for the order displayed in the Orders block. Note that your non-database fields should not display anything because you have not yet built their supporting logic. Also, you cannot yet insert, update, or delete records, because you have not yet built your table handlers.
.....................................................................................................................................................B-20 R11i Extend Oracle Applications: Forms - Practices
.....................................................................................................................................................Appendix B: Practices
Lab 6: Enhance Items: Create LOVs
1 Save a backup copy of your form file as DEMxxE04.fmb. Continue working on DEMxxEOR.fmb.
2 Create separate LOVs for each of the following fields. For each LOV and its associated record group, select whatever columns of the appropriate table or view you think will be useful to the user.
CUSTOMER_ID
CUSTOMER_NAME
SALES_REP_NAME
PRODUCT_ID
PRODUCT_DESCRIPTION
a For each pair of related fields, make sure each LOV returns values to both of the related fields (and SALES_REP_NAME should also return a value to SALES_REP_ID, even though SALES_REP_ID does not have an LOV of its own).
b For the product fields, create record groups and LOVs that select all the appropriate product information to be returned into the related fields.
c Be sure to set the column titles to match your item prompts and to set your column widths appropriately (most will default to widths that are much too wide).
d Apply the LOV property class to each of your LOVs.
e Be sure to set the LOV width according to the user interface standards. Automatic Column Width and Position properties should have been set to Yes by the property class.
3 For the CURRENCY_CODE item, create an LOV using the FND_CURRENCIES_ACTIVE_V view in the SQL statement of its record group:
a Be sure to set the column titles to match your item prompts and to set your column widths appropriately (most will default to widths that are much too wide).
.....................................................................................................................................................R11i Extend Oracle Applications: Forms - Practices B-21
.....................................................................................................................................................Lab 6: Enhance Items: Create LOVs
b Apply the LOV property class to this LOV.
c Be sure to set the LOV width according to the user interface standards. Automatic Column Width and Position properties should have been set to Yes by the property class.
4 Ensure that you have changed the system-generated record group name to match the associated LOV(s).
5 Set your fields’ LOV property to call the correct LOV, and check that LOV for Validation is set to Yes as appropriate.
Try It Out
6 Do Program ->Compile ->All.
7 Save your form.
8 Copy your form to the middle tier and generate it. Run your form.
9 Tab through your fields and try out your LOVs.
Expected BehaviorAt this point, you should be able to do (only) View -> Find All from the Orders block and see any existing orders. If you then do Next Block (Shift-PageDown for most U.S. keyboards), you should be able to see any existing order lines for the order displayed in the Orders block. Note that your non-database fields should not display anything because you have not yet built their supporting logic. Also, you cannot yet insert, update, or delete records, because you have not yet built your table handlers.
.....................................................................................................................................................B-22 R11i Extend Oracle Applications: Forms - Practices
.....................................................................................................................................................Appendix B: Practices
Lab 7: Coding with PL/SQL
Table HandlersYou will create table handlers for your form, using predefined files for your package bodies (because of the length of the procedures). To demonstrate how you would also create “private” packages to keep any package from getting too large, and to keep your table handlers “out of the way” during your later labs, you will be putting the table handlers in private packages but calling them from the main block packages.
1 Save a backup copy of your form file as DEMxxE05.fmb. Continue working on DEMxxEOR.fmb.
2 Set up the private package for your ORDERS block table handlers. You will create a package called ORDERS_PRIVATE to contain the actual table handlers for the ORDERS block (called from the ORDERS package later).
a Create a package spec program unit called ORDERS_PRIVATE that defines four table handler procedures. The text of your package spec should be:
PACKAGE ORDERS_PRIVATE IS
PROCEDURE Insert_Row;
PROCEDURE Update_Row;
PROCEDURE Lock_Row;
PROCEDURE Delete_Row;
END ORDERS_PRIVATE;
b Compile your package spec.
c Create a corresponding package body program unit called ORDERS_PRIVATE.
d Import the file ordertab.txt into the text of your ORDERS_PRIVATE body program unit. Ensure that the package begins and ends properly (correct package names, no extra package name or ending declarations, etc.).
e Compile your package body.
3 Set up the table handler for your ORDERS block. You will create a package called ORDERS to contain item and event handlers for the ORDERS block. This package will call the table handlers in your private package.
.....................................................................................................................................................R11i Extend Oracle Applications: Forms - Practices B-23
.....................................................................................................................................................Lab 7: Coding with PL/SQL
a Create a package spec program unit called ORDERS that defines four table handler procedures. The text of your package spec should be:
PACKAGE ORDERS IS
PROCEDURE Insert_Row;
PROCEDURE Update_Row;
PROCEDURE Lock_Row;
PROCEDURE Delete_Row;
END ORDERS;
b Compile your package spec.
c Create a corresponding package body program unit called ORDERS and create the four procedures corresponding to your spec. Each of your procedures simply calls the corresponding procedure in the private package.
d Compile your package body.
4 Set up the private package for your LINES block table handlers. You will create a package called LINES_PRIVATE to contain the actual table handlers for the LINES block (called from the LINES package later).
a Create a package spec program unit called LINES_PRIVATE that defines four table handler procedures. The text of your package spec should be:
PACKAGE LINES_PRIVATE IS
PROCEDURE Insert_Row;
PROCEDURE Update_Row;
PROCEDURE Lock_Row;
PROCEDURE Delete_Row;
END LINES_PRIVATE;
b Compile your package spec.
c Create a corresponding package body program unit called LINES_PRIVATE.
d Import the file linestab.txt into the text of your LINES_PRIVATE body program unit. Ensure that the package begins and ends properly (correct package names, no extra package name or ending declarations, etc.).
e Compile your package body.
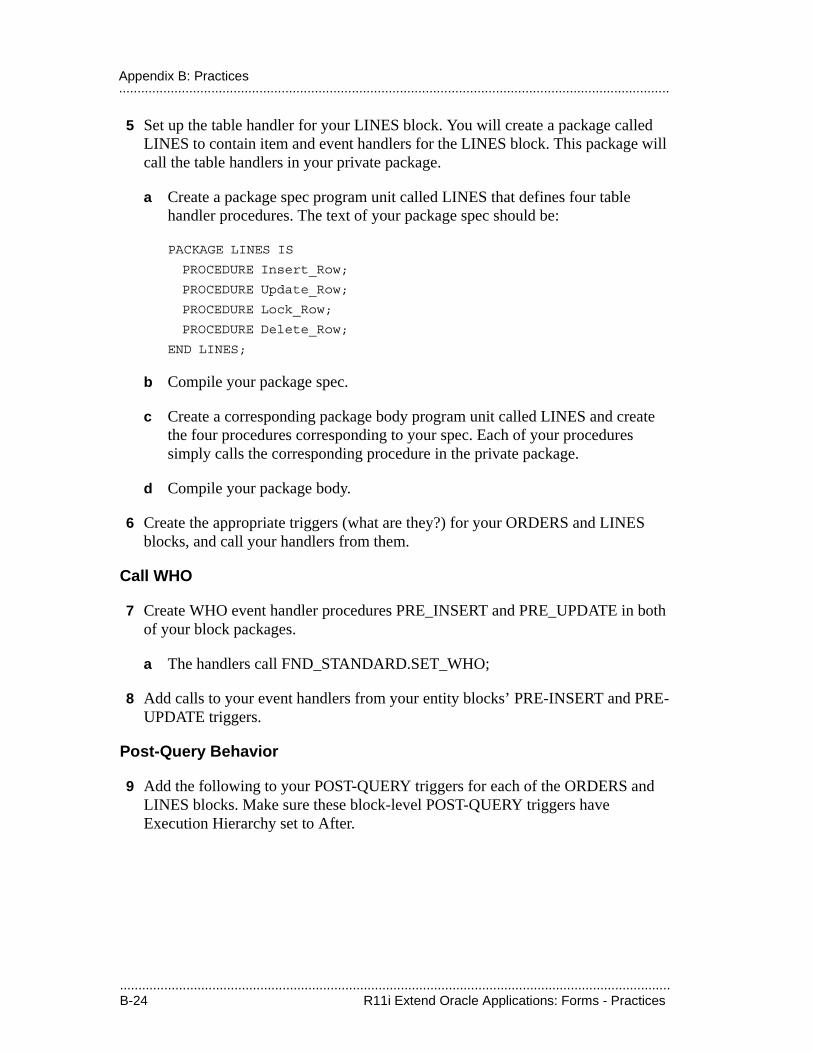
.....................................................................................................................................................B-24 R11i Extend Oracle Applications: Forms - Practices
.....................................................................................................................................................Appendix B: Practices
5 Set up the table handler for your LINES block. You will create a package called LINES to contain item and event handlers for the LINES block. This package will call the table handlers in your private package.
a Create a package spec program unit called LINES that defines four table handler procedures. The text of your package spec should be:
PACKAGE LINES IS
PROCEDURE Insert_Row;
PROCEDURE Update_Row;
PROCEDURE Lock_Row;
PROCEDURE Delete_Row;
END LINES;
b Compile your package spec.
c Create a corresponding package body program unit called LINES and create the four procedures corresponding to your spec. Each of your procedures simply calls the corresponding procedure in the private package.
d Compile your package body.
6 Create the appropriate triggers (what are they?) for your ORDERS and LINES blocks, and call your handlers from them.
Call WHO
7 Create WHO event handler procedures PRE_INSERT and PRE_UPDATE in both of your block packages.
a The handlers call FND_STANDARD.SET_WHO;
8 Add calls to your event handlers from your entity blocks’ PRE-INSERT and PRE-UPDATE triggers.
Post-Query Behavior
9 Add the following to your POST-QUERY triggers for each of the ORDERS and LINES blocks. Make sure these block-level POST-QUERY triggers have Execution Hierarchy set to After.
.....................................................................................................................................................R11i Extend Oracle Applications: Forms - Practices B-25
.....................................................................................................................................................Lab 7: Coding with PL/SQL
set_record_property(:system.trigger_record,
:system.trigger_block, STATUS,
QUERY_STATUS);
Try It Out
10 Do Program -> Compile ->All.
11 Save your form.
12 Copy your form to the middle tier and generate it. Run your form.
Expected BehaviorAt this point, you should be able to query a record and update or delete it, but you should avoid updating or deleting existing records because they are shared with the entire class. Adding something to the Notes field for an existing record and saving that would be fine, as that would not corrupt existing data (modifying payment method data would because you do not yet have the form logic to do it correctly). Note that you cannot insert a new record until you have completed the (later) lab that provides logic for ORDER_ID. Your non-database fields should not display anything because you have not yet built their supporting logic.
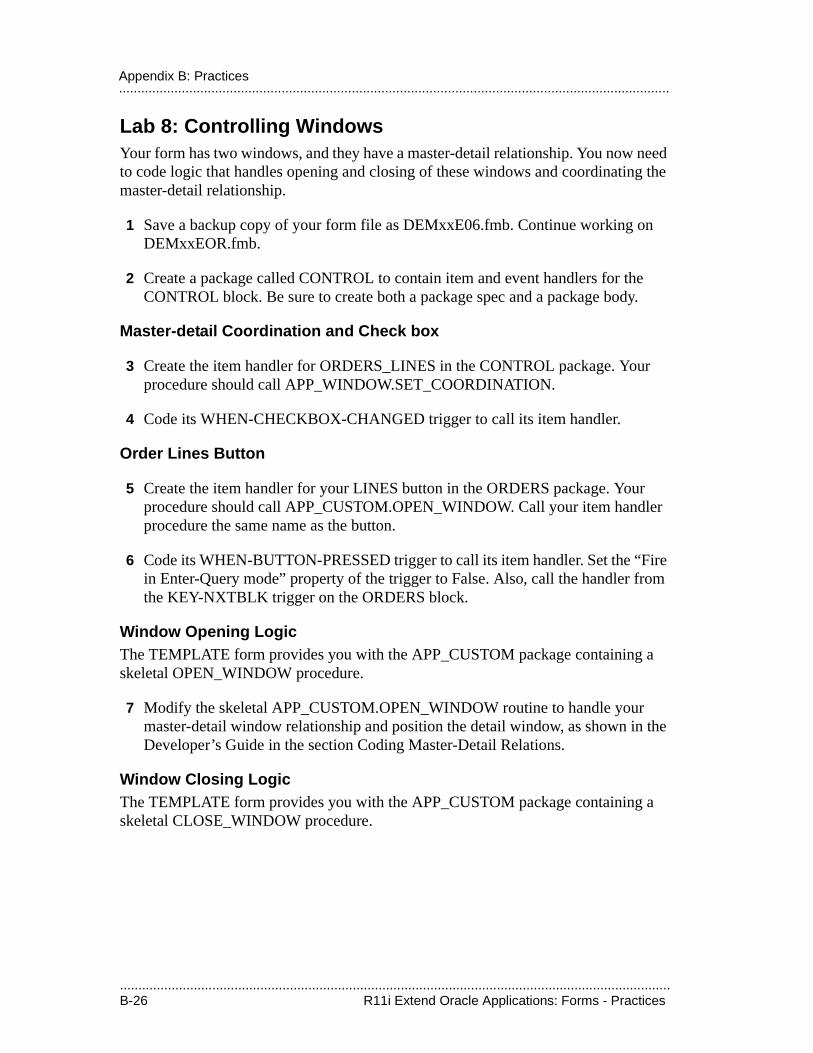
.....................................................................................................................................................B-26 R11i Extend Oracle Applications: Forms - Practices
.....................................................................................................................................................Appendix B: Practices
Lab 8: Controlling WindowsYour form has two windows, and they have a master-detail relationship. You now need to code logic that handles opening and closing of these windows and coordinating the master-detail relationship.
1 Save a backup copy of your form file as DEMxxE06.fmb. Continue working on DEMxxEOR.fmb.
2 Create a package called CONTROL to contain item and event handlers for the CONTROL block. Be sure to create both a package spec and a package body.
Master-detail Coordination and Check box
3 Create the item handler for ORDERS_LINES in the CONTROL package. Your procedure should call APP_WINDOW.SET_COORDINATION.
4 Code its WHEN-CHECKBOX-CHANGED trigger to call its item handler.
Order Lines Button
5 Create the item handler for your LINES button in the ORDERS package. Your procedure should call APP_CUSTOM.OPEN_WINDOW. Call your item handler procedure the same name as the button.
6 Code its WHEN-BUTTON-PRESSED trigger to call its item handler. Set the “Fire in Enter-Query mode” property of the trigger to False. Also, call the handler from the KEY-NXTBLK trigger on the ORDERS block.
Window Opening LogicThe TEMPLATE form provides you with the APP_CUSTOM package containing a skeletal OPEN_WINDOW procedure.
7 Modify the skeletal APP_CUSTOM.OPEN_WINDOW routine to handle your master-detail window relationship and position the detail window, as shown in the Developer’s Guide in the section Coding Master-Detail Relations.
Window Closing LogicThe TEMPLATE form provides you with the APP_CUSTOM package containing a skeletal CLOSE_WINDOW procedure.
.....................................................................................................................................................R11i Extend Oracle Applications: Forms - Practices B-27
.....................................................................................................................................................Lab 8: Controlling Windows
8 Modify APP_CUSTOM.CLOSE_WINDOW to handle your master-detail window relationship, as shown in the Developer’s Guide for master-detail relations. Be sure to include logic to close your first window if it is not already there.
Set Context-Dependent Window TitleThe title of the LINES window is context-dependent on the order, and dynamically displays the order number and customer name. You do not want to show a Set of Books name (session information), however.
9 Use APP_WINDOW.SET_TITLE to change the title dynamically. What would be the exact syntax of the call? See your Developer’s Guide for help.
10 Code the call into the appropriate triggers. You need a PRE-RECORD trigger on the master block, and you need a trigger on each of the three possible context fields so that your order lines title will change whenever any of the context fields change (what trigger do you need, and on which three fields do you need it?).
.....................................................................................................................................................B-28 R11i Extend Oracle Applications: Forms - Practices
.....................................................................................................................................................Appendix B: Practices
Lab 9: Tabbed Regions
Layout Changes
1 Save a backup copy of your form file as DEMxxE07.fmb. Continue working on DEMxxEOR.fmb.
2 Check the that the physical properties of your content LINES canvas are as follows:
– Viewport X Position on Canvas: 0
– Viewport Y Position on Canvas: 0
– Width: 7.8
– Height: 4
3 Create a new tab canvas, TAB_LINES_REGIONS. Assign it the property class TAB_CANVAS. Set Viewport and Physical properties appropriately.
4 Create two new tab pages, LINE_QUANTITY and LINE_ACCOUNT, associated with TAB_LINES_REGIONS. Give them the TAB_PAGE property class. Give them appropriate labels: “Quantity, Price” and “Account”.
5 Create a new stacked canvas for the fixed fields. Call it TAB_LINES_REGIONS_FIXED and give it the property class CANVAS_STACKED_FIXED_FIELD. Assign the canvas to the LINES window and set Viewport and Physical properties appropriately.
6 Create two new stacked canvases, LINE_QUANTITY and LINE_ACCOUNT. Give them the CANVAS_STACKED property class. Assign your stacked canvases to the LINES window. Set your ruler and grid settings properly for each canvas.
7 Move your ORDER_LINE_NUM, PRODUCT_ID, PRODUCT DESCRIPTION, DESC_FLEX fields and the LINES scroll bar to the TAB_LINES_REGIONS_FIXED canvas (change the canvas property of the items to the new canvas). Position your fields appropriately.
.....................................................................................................................................................R11i Extend Oracle Applications: Forms - Practices B-29
.....................................................................................................................................................Lab 9: Tabbed Regions
8 Move your ORDERED_QUANTITY, UNIT_OF_MEASURE, SUGGESTED_PRICE, and TOTAL_PRICE items to the LINE_QUANTITY canvas (change the canvas property of the items to the new canvas). Position the fields appropriately.
.....................................................................................................................................................B-30 R11i Extend Oracle Applications: Forms - Practices
.....................................................................................................................................................Appendix B: Practices
9 Move your ACCTG_FLEX_VALUES item to the LINE_ACCOUNT canvas (change the canvas property of the item to the new canvas).
Logic Changes
10 Create the tab handler based upon FNDTABFF.txt; put it in the CONTROL program unit. Make the generic FNDTABFF.txt file fit your form by changing it as appropriate including the procedure name. Alter the handler appropriately to handle WHEN-TAB-PAGE-CHANGED and WHEN-NEW-ITEM-INSTANCE.
11 Call the tab handler from the block-level WHEN-NEW-ITEM-INSTANCE trigger on the LINES block.
12 Call the tab handler from the WHEN-TAB-PAGE-CHANGED trigger at the form level.
13 Call SHOW_VIEW on startup from the form-level WHEN-NEW-FORM-INSTANCE to ensure correct canvas sequencing.
14 Test your form.
.....................................................................................................................................................R11i Extend Oracle Applications: Forms - Practices B-31
.....................................................................................................................................................Lab 10: Currency Fields
Lab 10: Currency FieldsThe Price and Total Price fields should display prices in the appropriate currency format, which is specified in the Currency Code field in the Orders window. The format of your price fields should change to reflect changes in the specified currency code.
Note that because your application does not do any sort of currency conversion logic and there is no currency code associated with the price in the product table, the amount numbers won’t change with the change of currency code. Only the currency format will change. Normally, conversion routines would be designed into your application and have appropriate logic.
1 Save a backup copy of your form file as DEMxxE08.fmb. Continue working on DEMxxEOR.fmb.
2 Write a procedure, FORMAT_PRICE, that gets the format mask for the currency fields and sets the appropriate properties for the SUGGESTED_PRICE and TOTAL_PRICE fields. Note that you do not need to include logic to handle data entry of currency values for this form. You will be calling it from WHEN-VALIDATE-ITEM and POST-QUERY triggers.
3 Write an item handler procedure for the TOTAL_PRICE item that calculates the total price for the order line (quantity times the price per item) and populates the TOTAL_PRICE field.
4 Call your procedures from the appropriate triggers.
.....................................................................................................................................................B-32 R11i Extend Oracle Applications: Forms - Practices
.....................................................................................................................................................Appendix B: Practices
Lab 11: Runtime Behavior
Date fields
1 Save a backup copy of your form file as DEMxxE09.fmb. Continue working on DEMxxEOR.fmb.
2 For each of your date fields, DATE_ORDERED and DATE_SHIPPED, set the List of Values property to ENABLE_LIST_LAMP. Make sure the Validate from List property is set to No (this overrides an inherited property).
3 For each of your date fields, DATE_ORDERED and DATE_SHIPPED, add a KEY-LISTVAL trigger that shows the Calendar (what call should the triggers contain?). The KEY-LISTVAL trigger must have Execution Hierarchy set to Override, and should not fire in enter-query mode.
4 Set up the DATE_ORDERED field to default to the current date. What mechanism would you use?
Order ID
5 Create an item handler that gives a new order an order number.
a In what package would you put this handler?
b Use the sequence DEM_ORDERS_S, provided with your tables, in your handler. What is the text of your handler?
c Call your handler from the appropriate trigger. What would it be?
d Call your title handler to update the Lines window title after the insert (to show the new order number).
.....................................................................................................................................................R11i Extend Oracle Applications: Forms - Practices B-33
.....................................................................................................................................................Lab 12: Conditionally Dependent Items
Lab 12: Conditionally Dependent ItemsThe behavior of fields in the Payment Type region depends on which payment type is selected. If Cash is selected, all other fields in the region are disabled. If Check is selected, the Number field is enabled. If Credit is selected, the credit card type, number, expiration date and approval fields are enabled.
1 Save a backup copy of your form file as DEMxxE10.fmb. Continue working on DEMxxEOR.fmb.
2 Create an item handler procedure for PAYMENT_TYPE. You also create an item handler for the CHECK_NUMBER item and a handler for the credit items.
a In what package would you put these handlers?
Put these handlers in the ORDERS package.
b What is the text of your handler procedures?
3 Call your handler from the appropriate triggers. What would they be? See your Developer’s Guide for help.
4 Generate your form. Try using it and make sure your new logic works.
5 Enhance (change) your code so that the Approval Code is enabled (and required) if the credit card type is Visa, but not enabled for other cards.
.....................................................................................................................................................B-34 R11i Extend Oracle Applications: Forms - Practices
.....................................................................................................................................................Appendix B: Practices
Lab 13: Message Dictionary
1 Save a backup copy of your form file as DEMxxE11.fmb. Continue working on DEMxxEOR.fmb.
2 Create a message that informs the user that the ship date may not come before the order date using the Oracle Application Object Library Messages form. Depending on how your class environment is set up, you may not be able to use this message in your form (your instructor will tell you if you can).
a Give the message a name of ‘DEMxx_SHIP_BEFORE_ORDER’ where xx is your team number.
b Use your instructor’s Demo Order Entry application as the application name instead of your own application.
c Include tokens for SHIPDATE and ORDERDATE in the text of your message.
3 Create a record-level handler for your DATE_SHIPPED and DATE_ORDERED items that checks that the ship date never comes before the order date. If it does, use Message Dictionary to display an error message (use the application shortname ‘DEM’, and the message name ‘DEMxx_SHIP_BEFORE_ORDER’).
a Use FND_MESSAGE.SET_NAME to set your message.
b Call the message from appropriate triggers using one of the procedures: FND_MESSAGE.ERROR, FND_MESSAGE.SHOW, FND_MESSAGE.WARN or FND_MESSAGE.HINT.
c If the message uses tokens, use FND_MESSAGE_SET_TOKEN to set the token value before displaying the message.
4 Call it from the appropriate triggers (what are they?).
5 Generate your message file using the Submit Request window or the command line. Use your instructor’s Demo Order Entry application (instead of your own).
.....................................................................................................................................................R11i Extend Oracle Applications: Forms - Practices B-35
.....................................................................................................................................................Lab 14: Flexfields
Lab 14: Flexfields
1 Save a backup copy of your form file as DEMxxE12.fmb. Continue working on DEMxxEOR.fmb.
2 For each of your three flexfields, set the List of Values property to ENABLE_LIST_LAMP. Make sure the Validate from List property is set to No (this overrides an inherited property).
3 Create an item handler for the ACCTG_FLEX_VALUES item that sets up the definition for the Accounting Flexfield (application shortname SQLGL, flexfield code GL#, and default structure 101). Note that the structure ID (NUM) is hardcoded to 101 for simplicity; otherwise we would have to deal with the GL_SET_OF_BOOKS_ID and other GL information. Your ID field is the GL_ACCOUNT_CC_ID item.
4 Call your handler as directed in your Developer’s Guide.
5 Create item handlers that set up flexfield definitions for your two descriptive flexfields. Use the DEM application shortname and the descriptive flexfield names “DEM_ORDERS” and “DEM_ORDER_LINES” (unless your instructor tells you otherwise).
6 Call your descriptive flexfield handlers as directed in your Developer’s Guide.
7 Invoke all the flexfields in your form using FND_FLEX.EVENT calls as directed in your Developer’s Guide. You only need a single set of these FND_FLEX.EVENT calls.
8 Register your descriptive flexfields with Oracle Application Object Library using the Register Descriptive Flexfield form (unless your instructor tells you otherwise).
9 Define and compile your descriptive flexfields (unless your instructor tells you otherwise).
10 Try out all of your flexfields.
.....................................................................................................................................................B-36 R11i Extend Oracle Applications: Forms - Practices
.....................................................................................................................................................Appendix B: Practices
Lab 15: Query Find
Row LOV Window
1 Save a backup copy of your form file as DEMxxE13.fmb. Continue working on DEMxxEOR.fmb.
2 Create a row LOV window for your LINES block according to your form specification and using your Developer’s Guide.
Query Find Window
3 Create a query find window on your ORDERS block. See your Developer’s Guide for help.
a Copy the QUERY_FIND object group from the APPSTAND form as directed in the manual.
b Delete the object group from your form.
c Rename the appropriate objects.
d Edit the appropriate triggers.
e Set the navigation block property.
f Change the window title.
g Create necessary items in your window as shown in your form specification. Adjust the properties as directed in the manual.
Suggestion: get your Find window working with just one or two items at first, then add more items as time allows.
h Adjust your window size.
i Create your PRE-QUERY trigger in the Results block (ORDERS) to copy values from the Query Find Window into items in the ORDERS block before the actual query. Your trigger should account for fields that pass character data, numeric data, date range data, and null values.
j Create your QUERY_FIND trigger as directed.
.....................................................................................................................................................R11i Extend Oracle Applications: Forms - Practices B-37
.....................................................................................................................................................Lab 16: Advanced Function Security
Lab 16: Advanced Function Security
1 Save a backup copy of your form file as DEMxxE14.fmb. Continue working on DEMxxEOR.fmb.
2 Create a program unit called DEMxxEOR (to match your module and file names), and create a handler in it that accepts a call from the SPECIAL1 trigger and generates a message.
a In your handler, generate a debug message that the SPECIAL1 logic has been fired.
3 Create a form-level user-named trigger called SPECIAL1 that calls your handler and passes the trigger name.
4 Invoke your SPECIAL1 trigger as directed in your manual so that it appears as the first entry on the Tools menu. Make the menu choice be “Special 1”, with S as the access key.
5 Try it out.
6 Make your special menu choice available only to users of authorized responsibilities by adding a function security test.
a Register a new function, DEMxx_DEMxxEOR_SPECIAL1.
b Add it to your own menu.
c Add code to your PRE_FORM handler to make it test for the function before enabling the Special menu choice. Add debug messages to indicate both if the function is available or not available.
7 Try it out. Make sure it works both when the function is available and not available to your responsibility. Remove the extra debug messages when you are satisfied it works correctly.
8 Challenge 1: Create a button that executes the Special 1 logic. Make the button appear or not depending on your function security routines.
.....................................................................................................................................................B-38 R11i Extend Oracle Applications: Forms - Practices
.....................................................................................................................................................Appendix B: Practices
9 Challenge 2: Create additional special menu entries including entries on the Reports and/or Actions menus, separator lines, and check boxes on the Tools menu.
.....................................................................................................................................................R11i Extend Oracle Applications: Forms - Practices B-39
.....................................................................................................................................................Lab 17: Setting Up Attachments
Lab 17: Setting Up Attachments
1 Define your Orders and Lines document entities using the Document Entities window (Application Developer responsibility, navigate to Attachments–>Document Entities).
a Use the class tables DEM_ORDERS and DEM_ORDER_LINES.
b For your entity IDs, append “TEAM_xx” to the table name so your entities do not conflict with entities defined by other students.
c For your entity names, call them “Team xx Orders” and “Team xx Lines”.
d Be sure to use your own application name for your entities.
2 Optional: Define your own document category using the Document Categories window (Application Developer responsibility, navigate to Attachments–>Document Categories).
3 Define your attachment function using the Attachment Functions window (Application Developer responsibility, navigate to Attachments–>Attachment Functions).
a Specify your existing form function name.
b Specify the Miscellaneous category and/or your own category.
4 Set up attachments for your ORDERS block.
a Set the context to display the customer name and the order number in the title of the Attachments window.
b Use your “Team xx Orders” entity as the main entity, and include it in the indicator.
c Give it all privileges (Always).
d Specify the primary key field with which the attachment should be associated.
5 Set up attachments for your LINES block.
.....................................................................................................................................................B-40 R11i Extend Oracle Applications: Forms - Practices
.....................................................................................................................................................Appendix B: Practices
a Set the context to display the customer name, the order number, and the line number in the title of the Attachments window.
b Use your “Team xx Lines” entity as the main entity, and include it in the indicator.
c Give it all privileges (Always).
d Specify the primary key fields with which the attachment should be associated.
6 Try it out. You should be able to view and create Orders attachments from the Orders window, and Lines attachments from the Order Lines window.
.....................................................................................................................................................R11i Extend Oracle Applications: Forms - Practices B-41
.....................................................................................................................................................Lab 18: Testing and Reviewing Your Form
Lab 18: Testing and Reviewing Your Form
1 Test your form for about fifteen minutes to make sure that your form is built to specifications and that your form features all work correctly. Test for (at least):
a Querying master and details works correctly with and without coordination check box checked
b Inserts work correctly
c Updates work correctly (update only your own inserted records)
d Deletes of master and/or details work correctly (update only your own inserted records)
e LOVs all work and appear correctly
f Order ID populates on insert
g Tabbed regions work correctly
h Opening and closing of windows works correctly
i WHO feature works correctly (use Help–>Record History)
j Flexfields work correctly
k Messages, validation logic on date fields work correctly
l Find window on Orders works correctly
m Row LOV on Order Lines works correctly
n Function security works correctly
2 Do a fifteen-minute user interface review of the form belonging to the team with the next lower team number (Team 01 review the highest-numbered team). Use your manuals and your class notes to help you. List some things the team can do to improve the user interface (especially cosmetics) of their form. Discuss your findings with that team when you finish.
a ________________________________________________
b ________________________________________________
c ________________________________________________
d ________________________________________________
.....................................................................................................................................................B-42 R11i Extend Oracle Applications: Forms - Practices
.....................................................................................................................................................Appendix B: Practices
e ________________________________________________
................................
Practices and Solutions
.....................................................................................................................................................C-2 R11i Extend Oracle Applications: Forms - Practices and Solutions
.....................................................................................................................................................Appendix C: Practices and Solutions
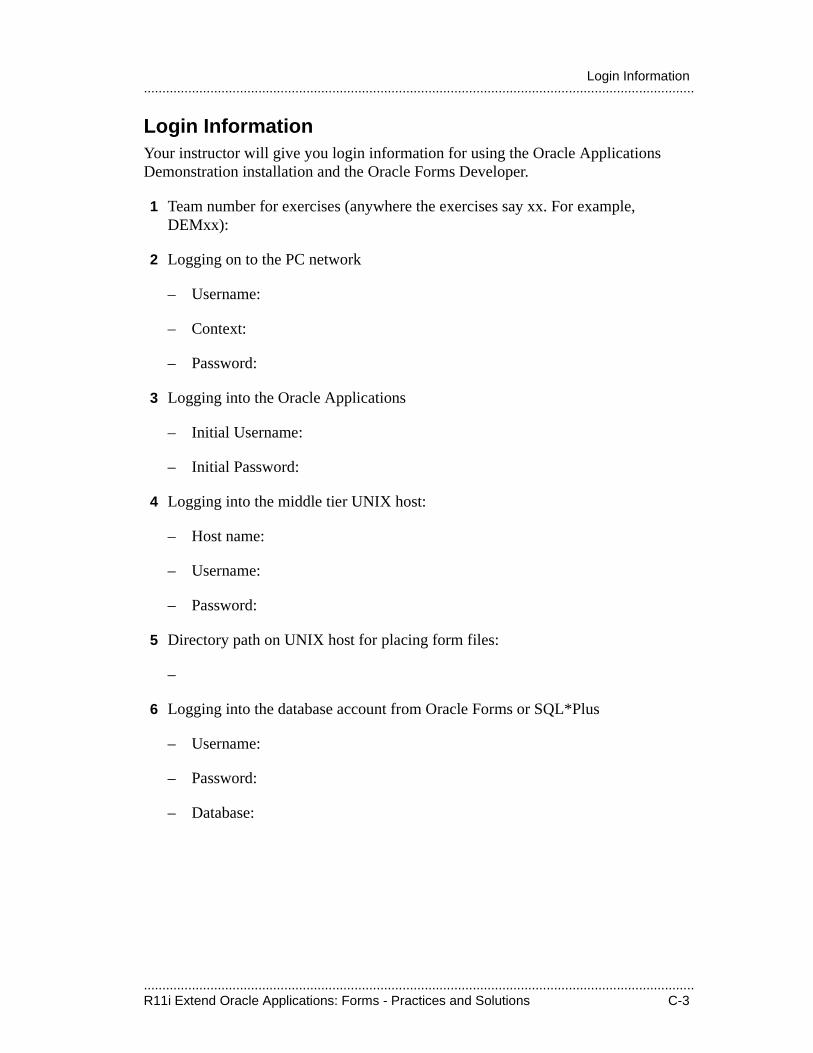
.....................................................................................................................................................R11i Extend Oracle Applications: Forms - Practices and Solutions C-3
.....................................................................................................................................................Login Information
Login InformationYour instructor will give you login information for using the Oracle Applications Demonstration installation and the Oracle Forms Developer.
1 Team number for exercises (anywhere the exercises say xx. For example, DEMxx):
2 Logging on to the PC network
– Username:
– Context:
– Password:
3 Logging into the Oracle Applications
– Initial Username:
– Initial Password:
4 Logging into the middle tier UNIX host:
– Host name:
– Username:
– Password:
5 Directory path on UNIX host for placing form files:
–
6 Logging into the database account from Oracle Forms or SQL*Plus
– Username:
– Password:
– Database:
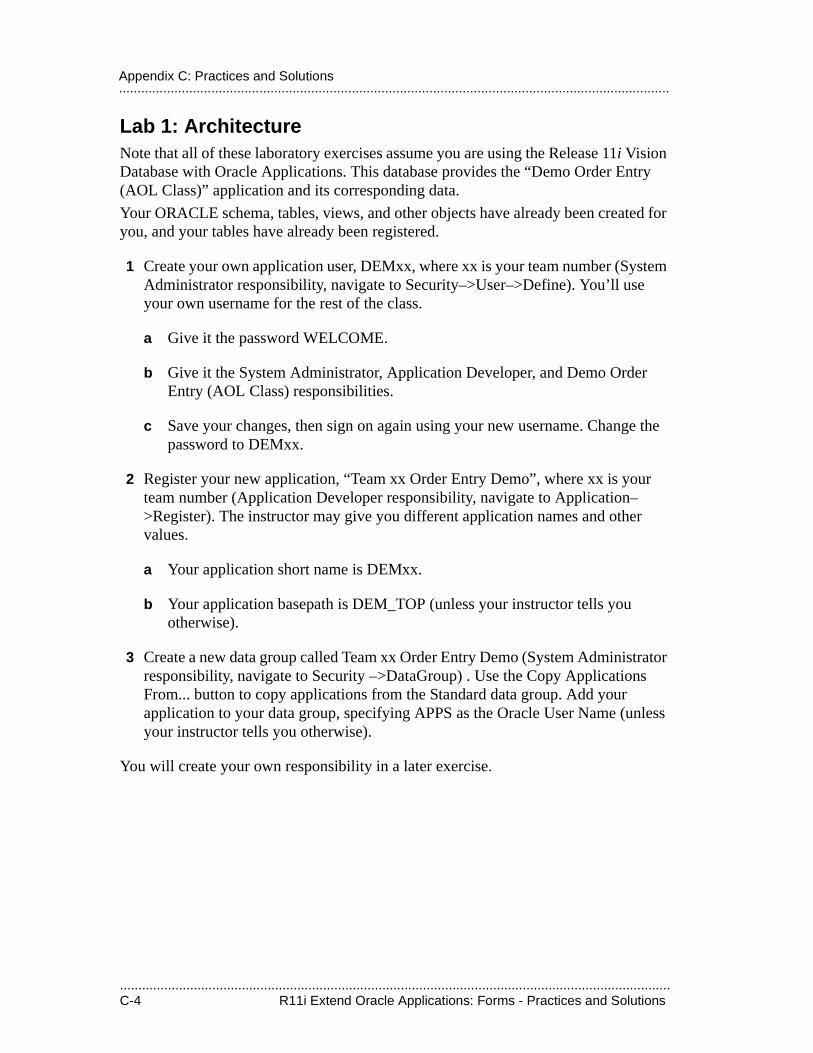
.....................................................................................................................................................C-4 R11i Extend Oracle Applications: Forms - Practices and Solutions
.....................................................................................................................................................Appendix C: Practices and Solutions
Lab 1: ArchitectureNote that all of these laboratory exercises assume you are using the Release 11i Vision Database with Oracle Applications. This database provides the “Demo Order Entry (AOL Class)” application and its corresponding data.
Your ORACLE schema, tables, views, and other objects have already been created for you, and your tables have already been registered.
1 Create your own application user, DEMxx, where xx is your team number (System Administrator responsibility, navigate to Security–>User–>Define). You’ll use your own username for the rest of the class.
a Give it the password WELCOME.
b Give it the System Administrator, Application Developer, and Demo Order Entry (AOL Class) responsibilities.
c Save your changes, then sign on again using your new username. Change the password to DEMxx.
2 Register your new application, “Team xx Order Entry Demo”, where xx is your team number (Application Developer responsibility, navigate to Application–>Register). The instructor may give you different application names and other values.
a Your application short name is DEMxx.
b Your application basepath is DEM_TOP (unless your instructor tells you otherwise).
3 Create a new data group called Team xx Order Entry Demo (System Administrator responsibility, navigate to Security –>DataGroup) . Use the Copy Applications From... button to copy applications from the Standard data group. Add your application to your data group, specifying APPS as the Oracle User Name (unless your instructor tells you otherwise).
You will create your own responsibility in a later exercise.
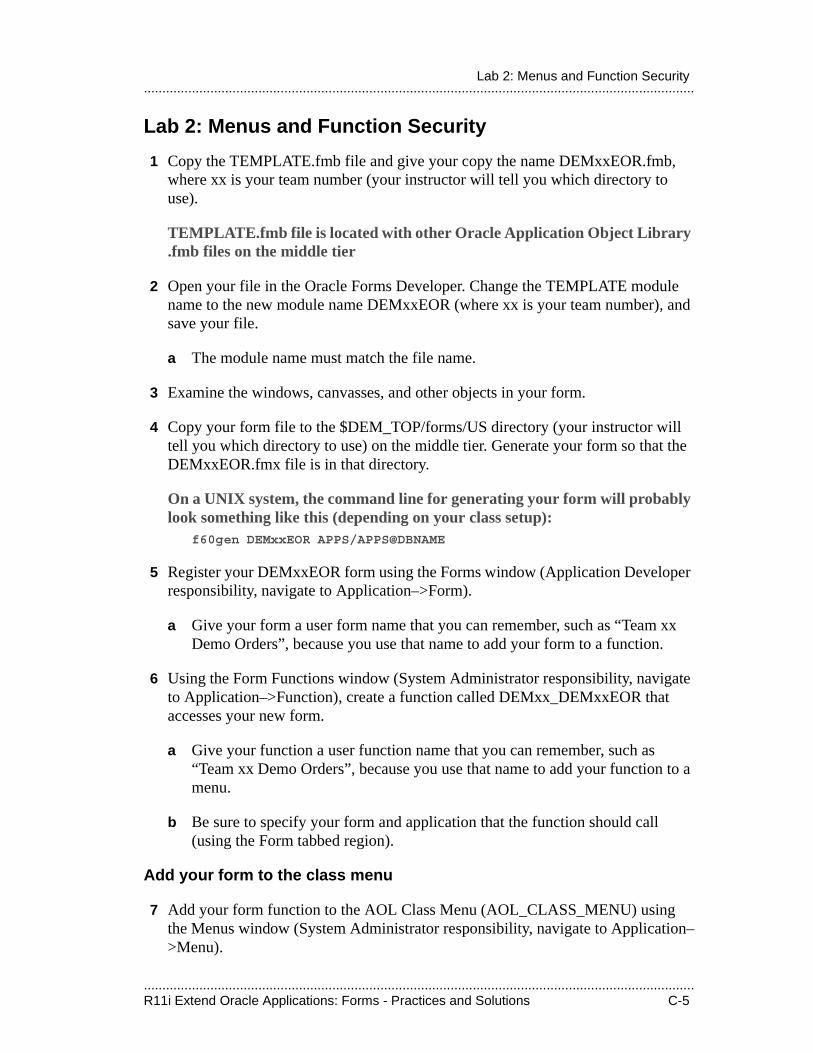
.....................................................................................................................................................R11i Extend Oracle Applications: Forms - Practices and Solutions C-5
.....................................................................................................................................................Lab 2: Menus and Function Security
Lab 2: Menus and Function Security
1 Copy the TEMPLATE.fmb file and give your copy the name DEMxxEOR.fmb, where xx is your team number (your instructor will tell you which directory to use).
TEMPLATE.fmb file is located with other Oracle Application Object Library .fmb files on the middle tier
2 Open your file in the Oracle Forms Developer. Change the TEMPLATE module name to the new module name DEMxxEOR (where xx is your team number), and save your file.
a The module name must match the file name.
3 Examine the windows, canvasses, and other objects in your form.
4 Copy your form file to the $DEM_TOP/forms/US directory (your instructor will tell you which directory to use) on the middle tier. Generate your form so that the DEMxxEOR.fmx file is in that directory.
On a UNIX system, the command line for generating your form will probably look something like this (depending on your class setup):
f60gen DEMxxEOR APPS/APPS@DBNAME
5 Register your DEMxxEOR form using the Forms window (Application Developer responsibility, navigate to Application–>Form).
a Give your form a user form name that you can remember, such as “Team xx Demo Orders”, because you use that name to add your form to a function.
6 Using the Form Functions window (System Administrator responsibility, navigate to Application–>Function), create a function called DEMxx_DEMxxEOR that accesses your new form.
a Give your function a user function name that you can remember, such as “Team xx Demo Orders”, because you use that name to add your function to a menu.
b Be sure to specify your form and application that the function should call (using the Form tabbed region).
Add your form to the class menu
7 Add your form function to the AOL Class Menu (AOL_CLASS_MENU) using the Menus window (System Administrator responsibility, navigate to Application–>Menu).
.....................................................................................................................................................C-6 R11i Extend Oracle Applications: Forms - Practices and Solutions
.....................................................................................................................................................Appendix C: Practices and Solutions
a Use 1xx as your sequence number to avoid conflicts with other teams.
b Include your team number (xx) in your menu prompt (such as “Team xx Orders”).
8 Try out your form from the class menu using the Demo Order Entry (AOL Class) responsibility. If the class responsibility or menu do not appear, exit completely from Oracle Applications and try again.
Create your own menu and responsibility
9 Using the Menus window (System Administrator responsibility, navigate to Application–>Menu), create your own submenu that accesses your new function.
a Give your menu the user menu name of Team xx Menu.
b Add your function as the first entry (be sure to give it a prompt).
c Add a second entry to your menu with the prompt of Demo Form, and the function of Demo Order Entry (this is the AOL class demo form).
10 Using the Menus window (System Administrator responsibility, navigate to Application–>Menu), create top-level menu that accesses your new submenu.
a Give your new menu the user menu name Team xx Top.
b Specify your new submenu as the first entry. Be sure to give it a prompt.
c Have your menu call the FND_OTHER 4.0 menu as a submenu for the second entry. This entry provides Standard Request Submission and Profiles forms.
11 Create a new responsibility that uses your menu (System Administrator responsibility, navigate to Security–>Responsibility–>Define). Use the data group you created for your application and the Demo Order Entry request group.
12 Add your new responsibility to your own application user (System Administrator responsibility, navigate to Security–>User–>Define).
13 Sign on again using your own user name and try out your form from your own responsibility. If your new responsibility or new menu do not appear, exit completely from Oracle Applications and try again.
.....................................................................................................................................................R11i Extend Oracle Applications: Forms - Practices and Solutions C-7
.....................................................................................................................................................Lab 2: Menus and Function Security
You should now be able to access your form from either your own responsibility or the Demo Order Entry (AOL Class) responsibility.
.....................................................................................................................................................C-8 R11i Extend Oracle Applications: Forms - Practices and Solutions
.....................................................................................................................................................Appendix C: Practices and Solutions
Lab 3: Container ObjectsAs with all software development, save your work frequently! Note that as you go through the lab exercises you will be saving backup copies of your form. These backup copies should remain on your desktop machine and do not need to be copied to the middle tier.
1 Save a backup copy of your form file as DEMxxE01.fmb. Continue working on DEMxxEOR.fmb.
The DEMXXE02 file contains this completed exercise.
2 Create your Orders and Order Lines windows.
a Create a new window, ORDERS, and set its Title property to Orders. Set the property class for the window (what class should it be?).
Property class should be WINDOW
b Create another window, LINES, and set its Title property to Order Lines. Set the property class for the window (what class should it be?).
Property class should be WINDOW
3 Create your two content canvasses.
a Create a new canvas, ORDERS, and set its Window property to ORDERS. Set your property class for the canvas (what class should it be?).
Property class should be CANVAS
b Create another canvas, LINES, and set its Window property to LINES. Set your property class for the canvas (what class should it be?).
Property class should be CANVAS
c Go back to your ORDERS window and set its Primary Canvas property to ORDERS.
d Go back to your LINES window and set its Primary Canvas property to LINES.
.....................................................................................................................................................R11i Extend Oracle Applications: Forms - Practices and Solutions C-9
.....................................................................................................................................................Lab 3: Container Objects
Create blocks and initial layouts
4 Use the Data Block Wizard and the Layout Wizard to create two new blocks, ORDERS and LINES (do not simply copy the template blocks). Set the new block options as follows. For both blocks, include all available columns from the views as database items. Do not create any master-detail relationships at this time. Keep the existing template blocks for now.
The Data Block Wizard does not let you name your block explicitly (it uses the table name instead), so you have to manually change the block name after you have finished using the Layout Wizard.
ORDERS BlockBase Table (view): DEM_ORDERS_V
Canvas: ORDERS
In the Layout Wizard, select the displayed items onto your canvas and set the prompts and widths as shown in your specification pictures (do not set the height at this point). Select the fields in the order the user will tab through them (according to the picture).
In the Layout Wizard, select the following items onto your canvas and set the prompts and widths as listed (do not set the height at this point). All items are text items unless otherwise noted.
Item Name Prompt Width
ORDER_ID Order Number 1.6
DATE_ORDERED Order Date 1.2
ORDER_STATUS (Pop List) Order Status 2.3
DATE_SHIPPED Ship Date 1.2
CUSTOMER_ID Customer Number 1.6
CUSTOMER_NAME Customer Name 3
SALES_REP_NAME Salesperson Name 3
CURRENCY_CODE Currency .4
PAYMENT_TYPE (Radio Group) Payment Type .551
CHECK_NUMBER Number 1.6
CC_TYPE (Pop List) Type 2.7
CC_NUMBER Number 2.7
CC_EXPIRATION Expires .5
CC_APPROVAL_CODE Approval Code 1.5
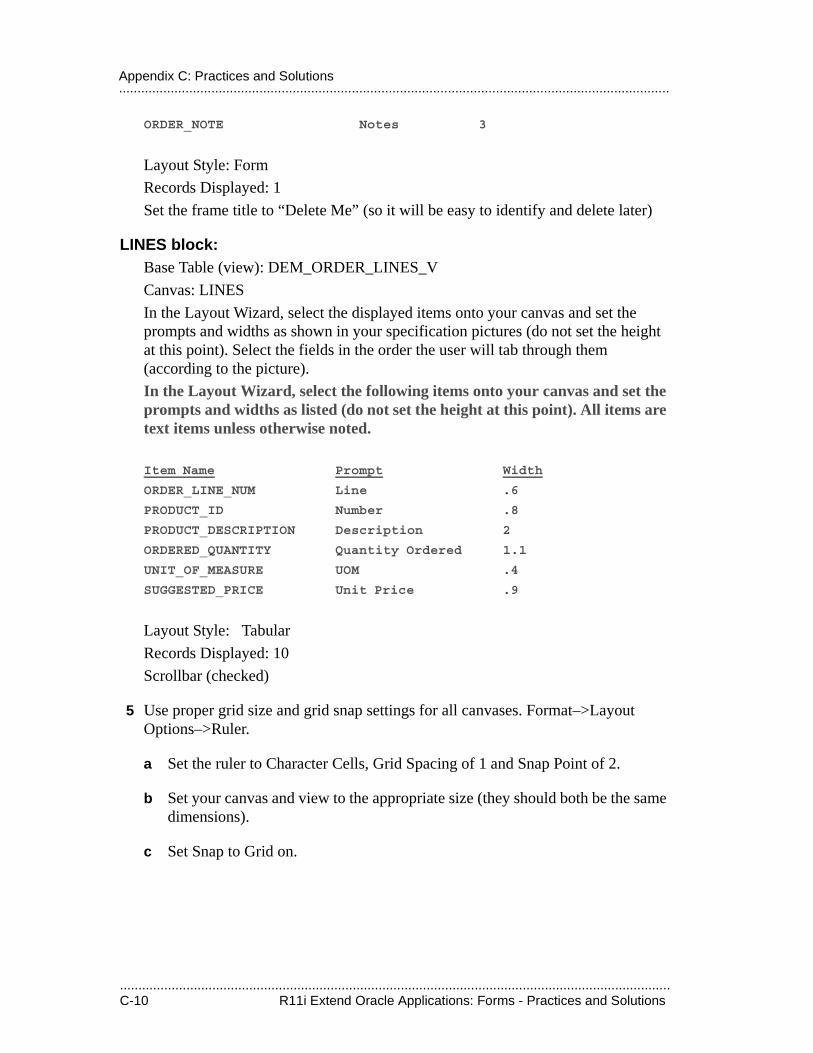
.....................................................................................................................................................C-10 R11i Extend Oracle Applications: Forms - Practices and Solutions
.....................................................................................................................................................Appendix C: Practices and Solutions
ORDER_NOTE Notes 3
Layout Style: Form
Records Displayed: 1
Set the frame title to “Delete Me” (so it will be easy to identify and delete later)
LINES block:Base Table (view): DEM_ORDER_LINES_V
Canvas: LINES
In the Layout Wizard, select the displayed items onto your canvas and set the prompts and widths as shown in your specification pictures (do not set the height at this point). Select the fields in the order the user will tab through them (according to the picture).
In the Layout Wizard, select the following items onto your canvas and set the prompts and widths as listed (do not set the height at this point). All items are text items unless otherwise noted.
Item Name Prompt Width
ORDER_LINE_NUM Line .6
PRODUCT_ID Number .8
PRODUCT_DESCRIPTION Description 2
ORDERED_QUANTITY Quantity Ordered 1.1
UNIT_OF_MEASURE UOM .4
SUGGESTED_PRICE Unit Price .9
Layout Style: Tabular
Records Displayed: 10
Scrollbar (checked)
5 Use proper grid size and grid snap settings for all canvases. Format–>Layout Options–>Ruler.
a Set the ruler to Character Cells, Grid Spacing of 1 and Snap Point of 2.
b Set your canvas and view to the appropriate size (they should both be the same dimensions).
c Set Snap to Grid on.

.....................................................................................................................................................R11i Extend Oracle Applications: Forms - Practices and Solutions C-11
.....................................................................................................................................................Lab 3: Container Objects
d Set the canvas to not be displayed so that you can see the character points in the layout editor (this will allow you to check the alignment of items and check that they are snapped to grid).
6 Now that you have finished with the Layout Wizard, change your block names and set block properties:
Block Name: DEM_ORDERS_V changes to ORDERS
Property Class: BLOCK
Navigation style: Same Record
Key Mode: Non-Updateable (because it is based on a view)
ORDER BY Clause: order_id
Block name: DEM_ORDER_LINES_V changes to LINES
Property Class: BLOCK
Navigation style: Change record
Key Mode: Non-Updateable (because it is based on a view)
7 Create another block, called CONTROL, manually (not using the Data Block Wizard):
Base Table: <none>
Property Class: BLOCK
8 Create a relation in the ORDERS block between the Orders block and the Lines block. The master block is ORDERS; the detail block is LINES. The relation name will default to ORDERS_LINES.
a Set Master Deletes to Isolated.
b Set Coordination to Prevent Masterless Operation
c Set the join condition to ORDER_ID (which means that orders.order_ID = lines.order_ID).
9 Sequence your blocks correctly in the Object Navigator.
ORDERS, LINES, CONTROL

.....................................................................................................................................................C-12 R11i Extend Oracle Applications: Forms - Practices and Solutions
.....................................................................................................................................................Appendix C: Practices and Solutions
10 Set your module’s First Navigation Block to ORDERS.
11 In the ORDERS block on the ORDER_ID item, set the item-level Primary Key property to Yes.
12 In the LINES block on the ORDER_ID item, set the item-level Primary Key property to Yes. Also, set the item-level Primary Key property on ORDER_LINE_NUM to Yes (the LINES block has a composite primary key).
Block Navigation Behavior
13 Set the Next Navigation Data Block properties for your blocks to ensure that Next Block (Shift-PageDown for most U.S. keyboards) and Previous Block (Shift-PageUp for most U.S. keyboards) take you to the Orders and Order Lines blocks as appropriate (where that might mean the block may need to go to itself).
ORDERS block:Next Navigation Block: LINESPrevious Navigation Block: ORDERSLINES block:Next Navigation Block: LINESPrevious Navigation Block: ORDERS
Set up a few fields
14 For both your ROW_ID fields (in the ORDERS and LINES data blocks), set the item-level property class to ROW_ID. You will set property classes for other widgets in a later exercise.
15 Create the list elements for the ORDER_STATUS item:
List Element List Item Value
New N
Partly Filled P
Filled F
Set the initial value to N.
16 Create the list elements for CC_TYPE:
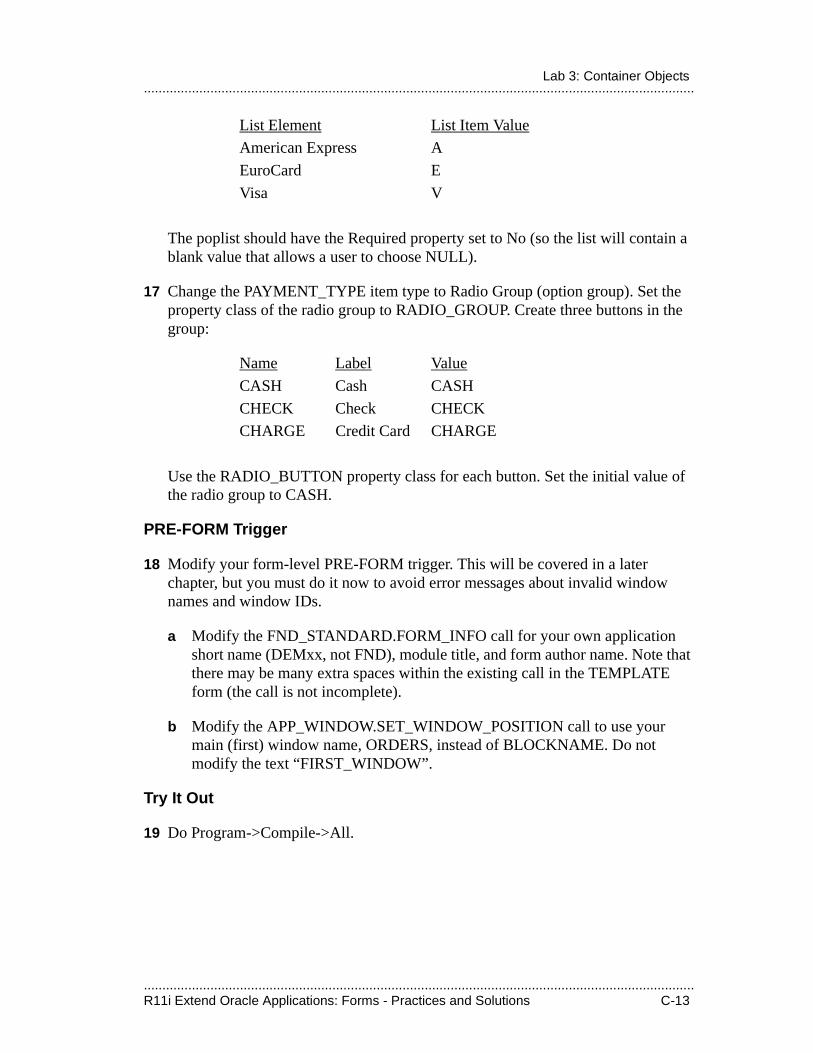
.....................................................................................................................................................R11i Extend Oracle Applications: Forms - Practices and Solutions C-13
.....................................................................................................................................................Lab 3: Container Objects
List Element List Item Value
American Express A
EuroCard E
Visa V
The poplist should have the Required property set to No (so the list will contain a blank value that allows a user to choose NULL).
17 Change the PAYMENT_TYPE item type to Radio Group (option group). Set the property class of the radio group to RADIO_GROUP. Create three buttons in the group:
Name Label Value
CASH Cash CASH
CHECK Check CHECK
CHARGE Credit Card CHARGE
Use the RADIO_BUTTON property class for each button. Set the initial value of the radio group to CASH.
PRE-FORM Trigger
18 Modify your form-level PRE-FORM trigger. This will be covered in a later chapter, but you must do it now to avoid error messages about invalid window names and window IDs.
a Modify the FND_STANDARD.FORM_INFO call for your own application short name (DEMxx, not FND), module title, and form author name. Note that there may be many extra spaces within the existing call in the TEMPLATE form (the call is not incomplete).
b Modify the APP_WINDOW.SET_WINDOW_POSITION call to use your main (first) window name, ORDERS, instead of BLOCKNAME. Do not modify the text “FIRST_WINDOW”.
Try It Out
19 Do Program->Compile->All.
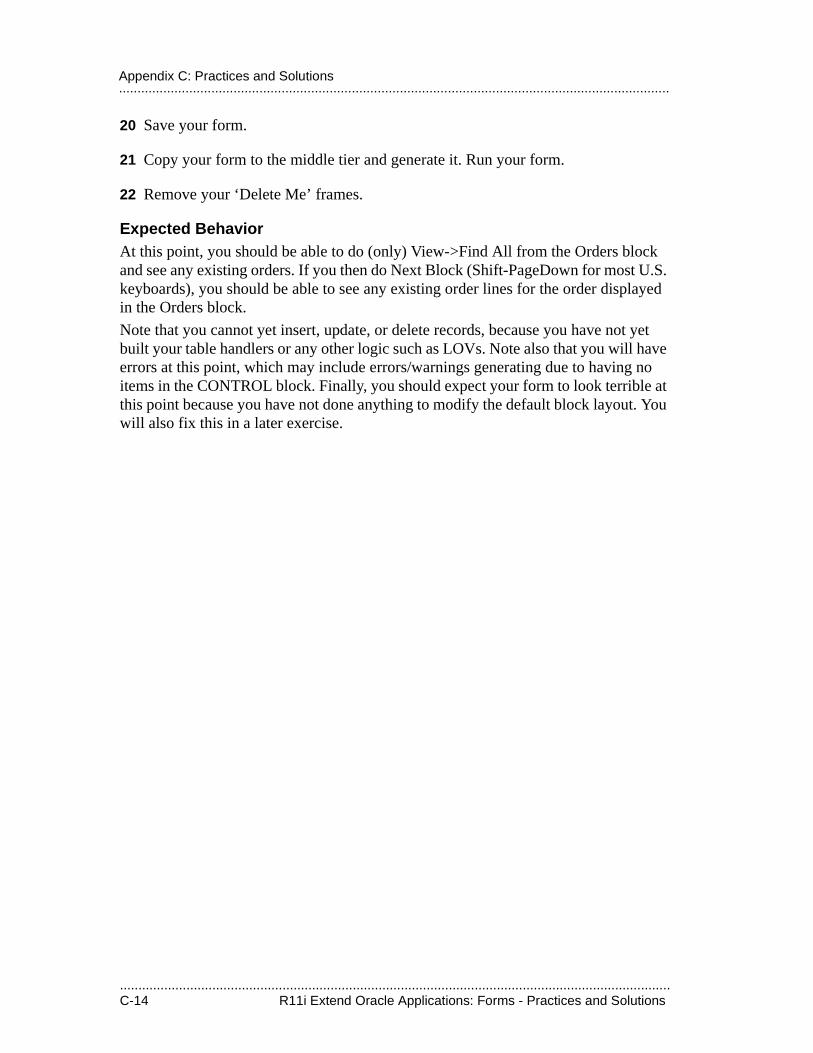
.....................................................................................................................................................C-14 R11i Extend Oracle Applications: Forms - Practices and Solutions
.....................................................................................................................................................Appendix C: Practices and Solutions
20 Save your form.
21 Copy your form to the middle tier and generate it. Run your form.
22 Remove your ‘Delete Me’ frames.
Expected BehaviorAt this point, you should be able to do (only) View->Find All from the Orders block and see any existing orders. If you then do Next Block (Shift-PageDown for most U.S. keyboards), you should be able to see any existing order lines for the order displayed in the Orders block.
Note that you cannot yet insert, update, or delete records, because you have not yet built your table handlers or any other logic such as LOVs. Note also that you will have errors at this point, which may include errors/warnings generating due to having no items in the CONTROL block. Finally, you should expect your form to look terrible at this point because you have not done anything to modify the default block layout. You will also fix this in a later exercise.
.....................................................................................................................................................R11i Extend Oracle Applications: Forms - Practices and Solutions C-15
.....................................................................................................................................................Lab 4: Widgets
Lab 4: Widgets
Items:
1 Save a backup copy of your form file as DEMxxE02.fmb. Continue working on DEMxxEOR.fmb.
The DEMXXE03 file contains this completed exercise.
2 For the items you created by creating your ORDERS and LINES blocks (see the following lists):
a Apply the appropriate property classes to your items.
You can select all the items in a block for which you want to change a particular property, such as Canvas, and apply the property to all selected items. However, you cannot select multiple items and apply a property class to multiple items at once.
Note that the property class may change many item properties, possibly including the item type or data type for a given item. Be very careful to apply the correct class to each item the first time, since changing an item to the wrong class may change properties, such as the data type, that might not be changed back correctly when you change the property class again. Save your work frequently (about every 10-20 changes) during this process.
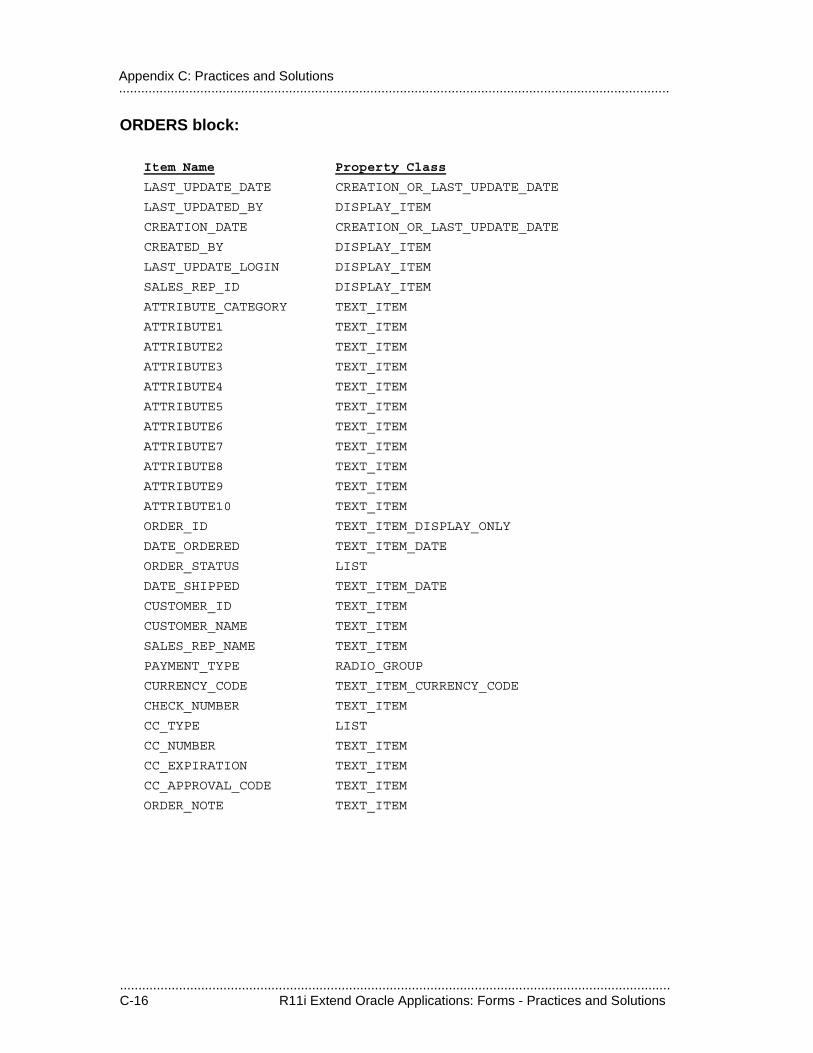
.....................................................................................................................................................C-16 R11i Extend Oracle Applications: Forms - Practices and Solutions
.....................................................................................................................................................Appendix C: Practices and Solutions
ORDERS block:
Item Name Property Class
LAST_UPDATE_DATE CREATION_OR_LAST_UPDATE_DATE
LAST_UPDATED_BY DISPLAY_ITEM
CREATION_DATE CREATION_OR_LAST_UPDATE_DATE
CREATED_BY DISPLAY_ITEM
LAST_UPDATE_LOGIN DISPLAY_ITEM
SALES_REP_ID DISPLAY_ITEM
ATTRIBUTE_CATEGORY TEXT_ITEM
ATTRIBUTE1 TEXT_ITEM
ATTRIBUTE2 TEXT_ITEM
ATTRIBUTE3 TEXT_ITEM
ATTRIBUTE4 TEXT_ITEM
ATTRIBUTE5 TEXT_ITEM
ATTRIBUTE6 TEXT_ITEM
ATTRIBUTE7 TEXT_ITEM
ATTRIBUTE8 TEXT_ITEM
ATTRIBUTE9 TEXT_ITEM
ATTRIBUTE10 TEXT_ITEM
ORDER_ID TEXT_ITEM_DISPLAY_ONLY
DATE_ORDERED TEXT_ITEM_DATE
ORDER_STATUS LIST
DATE_SHIPPED TEXT_ITEM_DATE
CUSTOMER_ID TEXT_ITEM
CUSTOMER_NAME TEXT_ITEM
SALES_REP_NAME TEXT_ITEM
PAYMENT_TYPE RADIO_GROUP
CURRENCY_CODE TEXT_ITEM_CURRENCY_CODE
CHECK_NUMBER TEXT_ITEM
CC_TYPE LIST
CC_NUMBER TEXT_ITEM
CC_EXPIRATION TEXT_ITEM
CC_APPROVAL_CODE TEXT_ITEM
ORDER_NOTE TEXT_ITEM
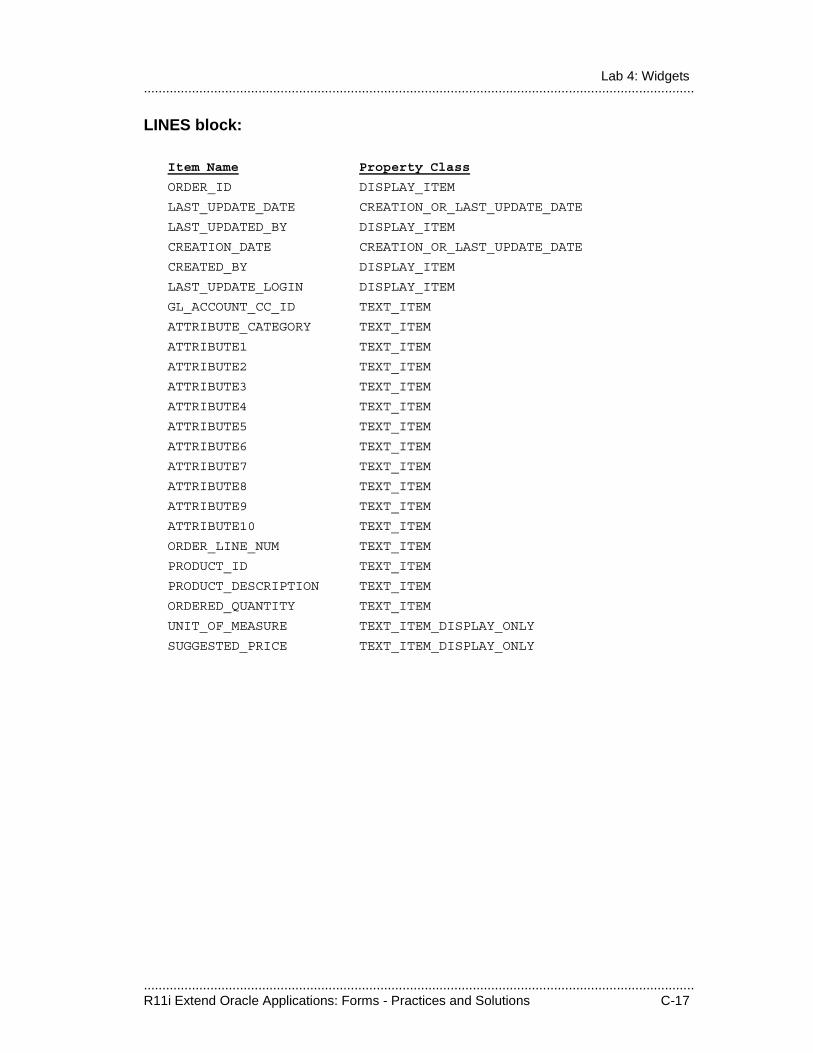
.....................................................................................................................................................R11i Extend Oracle Applications: Forms - Practices and Solutions C-17
.....................................................................................................................................................Lab 4: Widgets
LINES block:
Item Name Property Class
ORDER_ID DISPLAY_ITEM
LAST_UPDATE_DATE CREATION_OR_LAST_UPDATE_DATE
LAST_UPDATED_BY DISPLAY_ITEM
CREATION_DATE CREATION_OR_LAST_UPDATE_DATE
CREATED_BY DISPLAY_ITEM
LAST_UPDATE_LOGIN DISPLAY_ITEM
GL_ACCOUNT_CC_ID TEXT_ITEM
ATTRIBUTE_CATEGORY TEXT_ITEM
ATTRIBUTE1 TEXT_ITEM
ATTRIBUTE2 TEXT_ITEM
ATTRIBUTE3 TEXT_ITEM
ATTRIBUTE4 TEXT_ITEM
ATTRIBUTE5 TEXT_ITEM
ATTRIBUTE6 TEXT_ITEM
ATTRIBUTE7 TEXT_ITEM
ATTRIBUTE8 TEXT_ITEM
ATTRIBUTE9 TEXT_ITEM
ATTRIBUTE10 TEXT_ITEM
ORDER_LINE_NUM TEXT_ITEM
PRODUCT_ID TEXT_ITEM
PRODUCT_DESCRIPTION TEXT_ITEM
ORDERED_QUANTITY TEXT_ITEM
UNIT_OF_MEASURE TEXT_ITEM_DISPLAY_ONLY
SUGGESTED_PRICE TEXT_ITEM_DISPLAY_ONLY
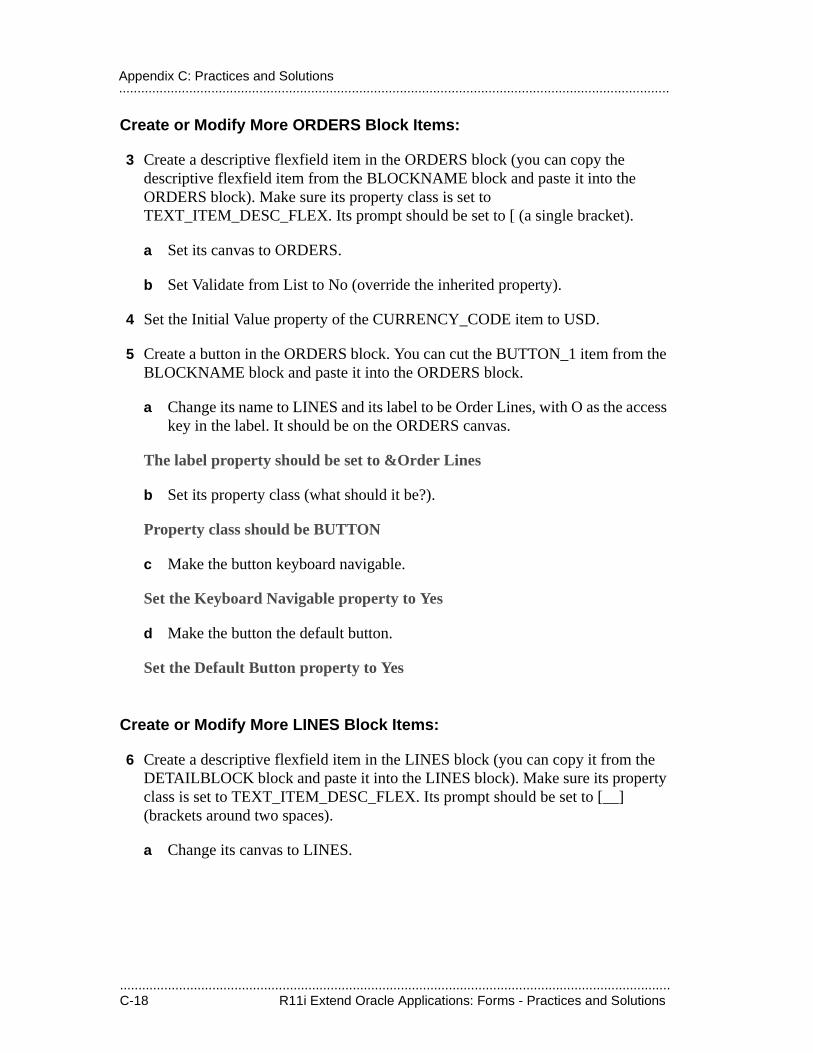
.....................................................................................................................................................C-18 R11i Extend Oracle Applications: Forms - Practices and Solutions
.....................................................................................................................................................Appendix C: Practices and Solutions
Create or Modify More ORDERS Block Items:
3 Create a descriptive flexfield item in the ORDERS block (you can copy the descriptive flexfield item from the BLOCKNAME block and paste it into the ORDERS block). Make sure its property class is set to TEXT_ITEM_DESC_FLEX. Its prompt should be set to [ (a single bracket).
a Set its canvas to ORDERS.
b Set Validate from List to No (override the inherited property).
4 Set the Initial Value property of the CURRENCY_CODE item to USD.
5 Create a button in the ORDERS block. You can cut the BUTTON_1 item from the BLOCKNAME block and paste it into the ORDERS block.
a Change its name to LINES and its label to be Order Lines, with O as the access key in the label. It should be on the ORDERS canvas.
The label property should be set to &Order Lines
b Set its property class (what should it be?).
Property class should be BUTTON
c Make the button keyboard navigable.
Set the Keyboard Navigable property to Yes
d Make the button the default button.
Set the Default Button property to Yes
Create or Modify More LINES Block Items:
6 Create a descriptive flexfield item in the LINES block (you can copy it from the DETAILBLOCK block and paste it into the LINES block). Make sure its property class is set to TEXT_ITEM_DESC_FLEX. Its prompt should be set to [__] (brackets around two spaces).
a Change its canvas to LINES.
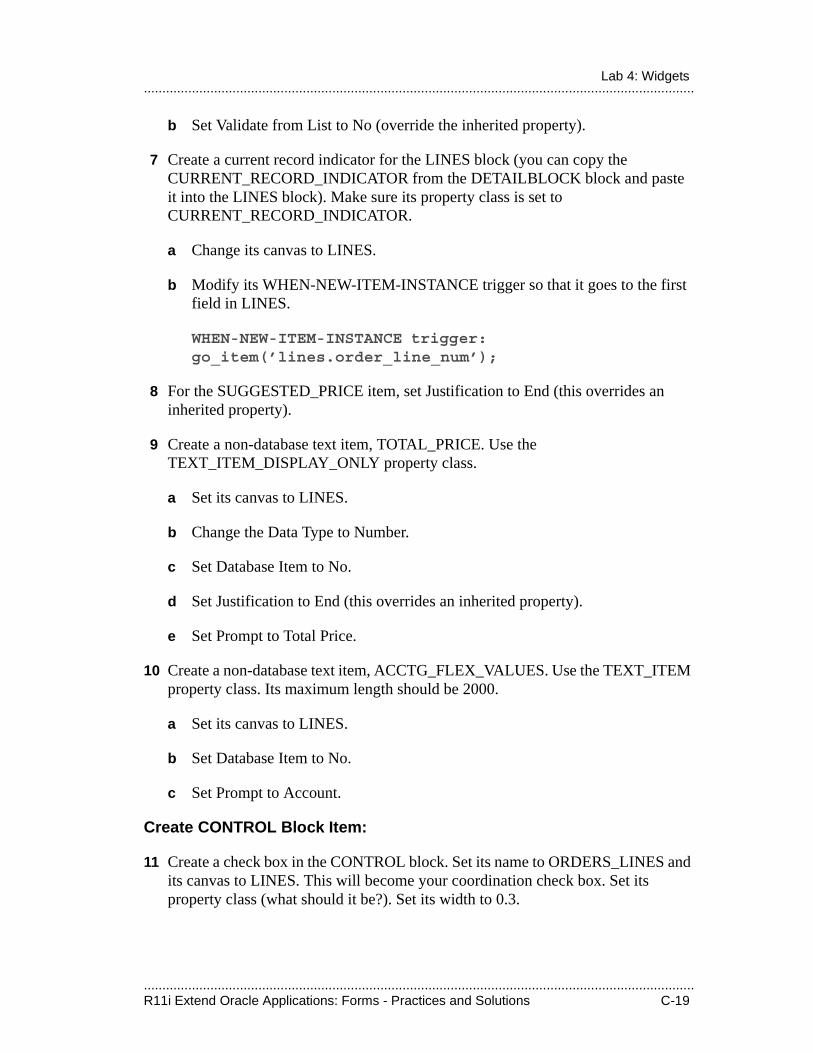
.....................................................................................................................................................R11i Extend Oracle Applications: Forms - Practices and Solutions C-19
.....................................................................................................................................................Lab 4: Widgets
b Set Validate from List to No (override the inherited property).
7 Create a current record indicator for the LINES block (you can copy the CURRENT_RECORD_INDICATOR from the DETAILBLOCK block and paste it into the LINES block). Make sure its property class is set to CURRENT_RECORD_INDICATOR.
a Change its canvas to LINES.
b Modify its WHEN-NEW-ITEM-INSTANCE trigger so that it goes to the first field in LINES.
WHEN-NEW-ITEM-INSTANCE trigger: go_item(’lines.order_line_num’);
8 For the SUGGESTED_PRICE item, set Justification to End (this overrides an inherited property).
9 Create a non-database text item, TOTAL_PRICE. Use the TEXT_ITEM_DISPLAY_ONLY property class.
a Set its canvas to LINES.
b Change the Data Type to Number.
c Set Database Item to No.
d Set Justification to End (this overrides an inherited property).
e Set Prompt to Total Price.
10 Create a non-database text item, ACCTG_FLEX_VALUES. Use the TEXT_ITEM property class. Its maximum length should be 2000.
a Set its canvas to LINES.
b Set Database Item to No.
c Set Prompt to Account.
Create CONTROL Block Item:
11 Create a check box in the CONTROL block. Set its name to ORDERS_LINES and its canvas to LINES. This will become your coordination check box. Set its property class (what should it be?). Set its width to 0.3.
.....................................................................................................................................................C-20 R11i Extend Oracle Applications: Forms - Practices and Solutions
.....................................................................................................................................................Appendix C: Practices and Solutions
Property class should be CHECKBOX_COORDINATION
Adjust your layout with the Layout Wizard
12 Use the Layout Wizard on the ORDERS and LINES data blocks to redo your two main layouts. This step is to account for the height changes from applying the property classes and for the new fields you have added to the LINES block. Be sure to delete the surrounding frames again. For the LINES block, be sure you reset the layout style to Tabular and reset Records Displayed to 10.
13 Adjust your two window sizes (in the layout editor) so you can see all your fields.
14 Ensure that your ‘Delete Me’ frames have been removed.
Try It Out
15 Do Program->Compile->All.
16 Save your form.
17 Copy your form to the middle tier and generate it. Run your form.
.....................................................................................................................................................R11i Extend Oracle Applications: Forms - Practices and Solutions C-21
.....................................................................................................................................................Lab 5: Layout
Lab 5: Layout
Adjust Your Layout
1 Save a backup copy of your form file as DEMxxE03.fmb. Continue working on DEMxxEOR.fmb.
The DEMXXE04 file contains this completed exercise.
2 Ensure that tabbing through the form fields goes in the expected order.
a Rearrange the field order within each block in the Object Navigator.
3 In the layout editor, move items around to an appropriate layout (see the form specification in the Order Entry Workshop appendix). Be sure to follow layout standards as shown in the Oracle Applications User Interface Standards.
For now, put your Accounting Flexfield field just after the descriptive flexfield in the LINES canvas. You will move it to a different canvas later when you build your tabbed regions. You will create the tab canvases in a later exercise.
a Ensure that you use the proper grid size (set ruler settings for each canvas) and grid snap settings. Align and snap your items to the grid according to standard.
If your cursor keys do not seem to work to move an item one snap point, turn Grid Snap on.
b Make all prompt and title text follow appropriate font, size, weight, and alignment standards. Be sure to leave adequate space for prompt translation requirements.
c Use frames to delineate regions, etc. Be sure to set line weights, colors, and bevels correctly.
4 Alter prompts and change item sizes as appropriate.
5 Size your windows as appropriate. For now, your Lines window will be wider than its final size because you must accommodate the Account field, which will be moved to a stacked canvas later.
.....................................................................................................................................................C-22 R11i Extend Oracle Applications: Forms - Practices and Solutions
.....................................................................................................................................................Appendix C: Practices and Solutions
Remove unused template objects
6 Delete the BLOCKNAME block (including its items), canvas, and window from the Object Navigator.
7 Delete the DETAILBLOCK block (including its items) from the Object Navigator.
Try It Out
8 Do Program -> Compile -> All.
9 Save your form.
10 Copy your form to the middle tier and generate it. Run your form.
11 Check that tabbing through the form fields goes in the expected order. If not:
a Rearrange the field order within each block in the Object Navigator.
b Save your form.
c Copy your form to the middle tier and generate it. Run your form.
12 Challenge 1- For accessibility add appropriate hint text to those items that require it for a screen reader. Which fields require hints and what should they be?
“Check Number”
“Credit Card Type”
“Credit Card Number”
“Credit Card Expires”
“Credit Card Approval Code”
“Product Number”
“Product Description”
Expected BehaviorAt this point, you should be able to do (only) View -> Find from the Orders block and see any existing orders. In the Lines block, you should be able to see any existing order lines for the order displayed in the Orders block. Note that your non-database
.....................................................................................................................................................R11i Extend Oracle Applications: Forms - Practices and Solutions C-23
.....................................................................................................................................................Lab 5: Layout
fields should not display anything because you have not yet built their supporting logic. Also, you cannot yet insert, update, or delete records, because you have not yet built your table handlers.

.....................................................................................................................................................C-24 R11i Extend Oracle Applications: Forms - Practices and Solutions
.....................................................................................................................................................Appendix C: Practices and Solutions
Lab 6: Enhance Items: Create LOVs
1 Save a backup copy of your form file as DEMxxE04.fmb. Continue working on DEMxxEOR.fmb.
The DEMXXE05 file contains this completed exercise.
2 Create separate LOVs for each of the following fields. For each LOV and its associated record group, select whatever columns of the appropriate table or view you think will be useful to the user.
CUSTOMER_ID
CUSTOMER_NAME
SALES_REP_NAME
PRODUCT_ID
PRODUCT_DESCRIPTION
Select statements for creating the record groups would be something like:
SELECT CUSTOMER_ID, NAME, CREDIT_RATING
FROM DEM_CUSTOMERS
ORDER BY CUSTOMER_ID
SELECT NAME, CUSTOMER_ID, CREDIT_RATING
FROM DEM_CUSTOMERS
ORDER BY NAME
SELECT SALES_REP_NAME, SALES_REP_ID
FROM DEM_SALES_REPS_V
ORDER BY SALES_REP_NAME
a For each pair of related fields, make sure each LOV returns values to both of the related fields (and SALES_REP_NAME should also return a value to SALES_REP_ID, even though SALES_REP_ID does not have an LOV of its own).
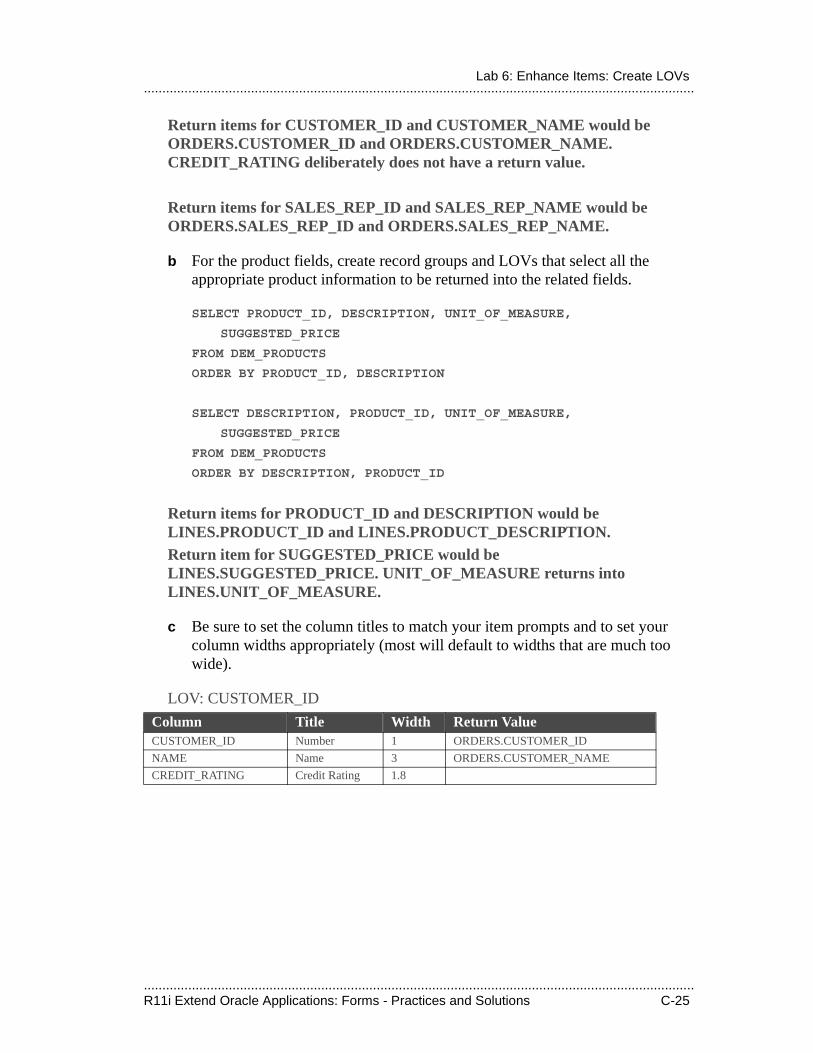
.....................................................................................................................................................R11i Extend Oracle Applications: Forms - Practices and Solutions C-25
.....................................................................................................................................................Lab 6: Enhance Items: Create LOVs
Return items for CUSTOMER_ID and CUSTOMER_NAME would be ORDERS.CUSTOMER_ID and ORDERS.CUSTOMER_NAME. CREDIT_RATING deliberately does not have a return value.
Return items for SALES_REP_ID and SALES_REP_NAME would be ORDERS.SALES_REP_ID and ORDERS.SALES_REP_NAME.
b For the product fields, create record groups and LOVs that select all the appropriate product information to be returned into the related fields.
SELECT PRODUCT_ID, DESCRIPTION, UNIT_OF_MEASURE,
SUGGESTED_PRICE
FROM DEM_PRODUCTS
ORDER BY PRODUCT_ID, DESCRIPTION
SELECT DESCRIPTION, PRODUCT_ID, UNIT_OF_MEASURE,
SUGGESTED_PRICE
FROM DEM_PRODUCTS
ORDER BY DESCRIPTION, PRODUCT_ID
Return items for PRODUCT_ID and DESCRIPTION would be LINES.PRODUCT_ID and LINES.PRODUCT_DESCRIPTION. Return item for SUGGESTED_PRICE would be LINES.SUGGESTED_PRICE. UNIT_OF_MEASURE returns into LINES.UNIT_OF_MEASURE.
c Be sure to set the column titles to match your item prompts and to set your column widths appropriately (most will default to widths that are much too wide).
LOV: CUSTOMER_ID
Column Title Width Return ValueCUSTOMER_ID Number 1 ORDERS.CUSTOMER_ID
NAME Name 3 ORDERS.CUSTOMER_NAME
CREDIT_RATING Credit Rating 1.8
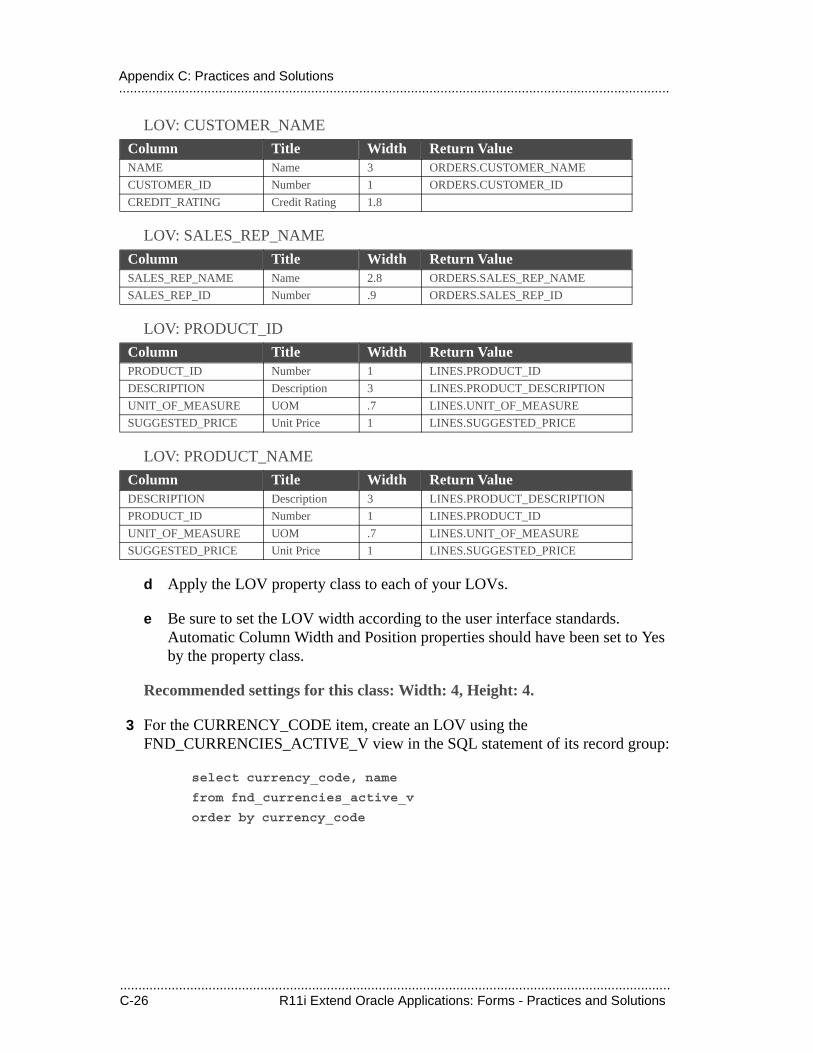
.....................................................................................................................................................C-26 R11i Extend Oracle Applications: Forms - Practices and Solutions
.....................................................................................................................................................Appendix C: Practices and Solutions
LOV: CUSTOMER_NAME
LOV: SALES_REP_NAME
LOV: PRODUCT_ID
LOV: PRODUCT_NAME
d Apply the LOV property class to each of your LOVs.
e Be sure to set the LOV width according to the user interface standards. Automatic Column Width and Position properties should have been set to Yes by the property class.
Recommended settings for this class: Width: 4, Height: 4.
3 For the CURRENCY_CODE item, create an LOV using the FND_CURRENCIES_ACTIVE_V view in the SQL statement of its record group:
select currency_code, name
from fnd_currencies_active_v
order by currency_code
Column Title Width Return ValueNAME Name 3 ORDERS.CUSTOMER_NAME
CUSTOMER_ID Number 1 ORDERS.CUSTOMER_ID
CREDIT_RATING Credit Rating 1.8
Column Title Width Return ValueSALES_REP_NAME Name 2.8 ORDERS.SALES_REP_NAME
SALES_REP_ID Number .9 ORDERS.SALES_REP_ID
Column Title Width Return ValuePRODUCT_ID Number 1 LINES.PRODUCT_ID
DESCRIPTION Description 3 LINES.PRODUCT_DESCRIPTION
UNIT_OF_MEASURE UOM .7 LINES.UNIT_OF_MEASURE
SUGGESTED_PRICE Unit Price 1 LINES.SUGGESTED_PRICE
Column Title Width Return ValueDESCRIPTION Description 3 LINES.PRODUCT_DESCRIPTION
PRODUCT_ID Number 1 LINES.PRODUCT_ID
UNIT_OF_MEASURE UOM .7 LINES.UNIT_OF_MEASURE
SUGGESTED_PRICE Unit Price 1 LINES.SUGGESTED_PRICE
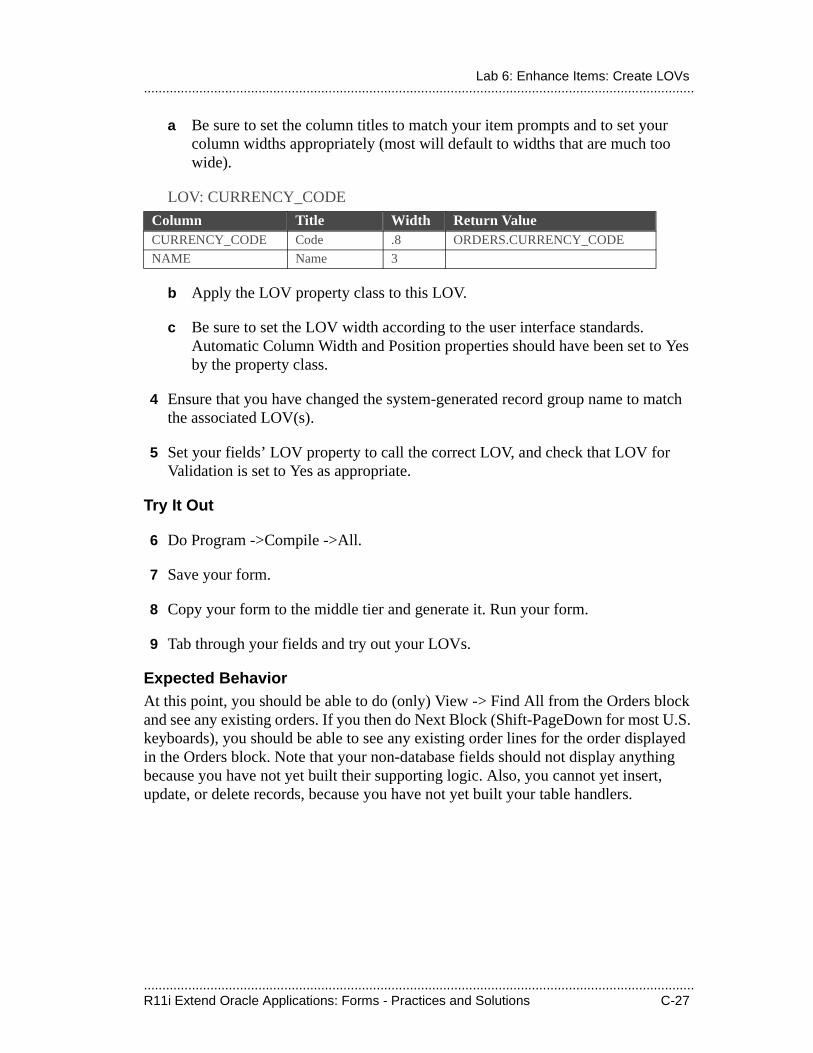
.....................................................................................................................................................R11i Extend Oracle Applications: Forms - Practices and Solutions C-27
.....................................................................................................................................................Lab 6: Enhance Items: Create LOVs
a Be sure to set the column titles to match your item prompts and to set your column widths appropriately (most will default to widths that are much too wide).
LOV: CURRENCY_CODE
b Apply the LOV property class to this LOV.
c Be sure to set the LOV width according to the user interface standards. Automatic Column Width and Position properties should have been set to Yes by the property class.
4 Ensure that you have changed the system-generated record group name to match the associated LOV(s).
5 Set your fields’ LOV property to call the correct LOV, and check that LOV for Validation is set to Yes as appropriate.
Try It Out
6 Do Program ->Compile ->All.
7 Save your form.
8 Copy your form to the middle tier and generate it. Run your form.
9 Tab through your fields and try out your LOVs.
Expected BehaviorAt this point, you should be able to do (only) View -> Find All from the Orders block and see any existing orders. If you then do Next Block (Shift-PageDown for most U.S. keyboards), you should be able to see any existing order lines for the order displayed in the Orders block. Note that your non-database fields should not display anything because you have not yet built their supporting logic. Also, you cannot yet insert, update, or delete records, because you have not yet built your table handlers.
Column Title Width Return ValueCURRENCY_CODE Code .8 ORDERS.CURRENCY_CODE
NAME Name 3
.....................................................................................................................................................C-28 R11i Extend Oracle Applications: Forms - Practices and Solutions
.....................................................................................................................................................Appendix C: Practices and Solutions
Lab 7: Coding with PL/SQL
Table HandlersYou will create table handlers for your form, using predefined files for your package bodies (because of the length of the procedures). To demonstrate how you would also create “private” packages to keep any package from getting too large, and to keep your table handlers “out of the way” during your later labs, you will be putting the table handlers in private packages but calling them from the main block packages.
1 Save a backup copy of your form file as DEMxxE05.fmb. Continue working on DEMxxEOR.fmb.
The DEMXXE06 file contains this completed exercise.
2 Set up the private package for your ORDERS block table handlers. You will create a package called ORDERS_PRIVATE to contain the actual table handlers for the ORDERS block (called from the ORDERS package later).
a Create a package spec program unit called ORDERS_PRIVATE that defines four table handler procedures. The text of your package spec should be:
PACKAGE ORDERS_PRIVATE IS
PROCEDURE Insert_Row;
PROCEDURE Update_Row;
PROCEDURE Lock_Row;
PROCEDURE Delete_Row;
END ORDERS_PRIVATE;
b Compile your package spec.
c Create a corresponding package body program unit called ORDERS_PRIVATE.
d Import the file ordertab.txt into the text of your ORDERS_PRIVATE body program unit. Ensure that the package begins and ends properly (correct package names, no extra package name or ending declarations, etc.).
e Compile your package body.
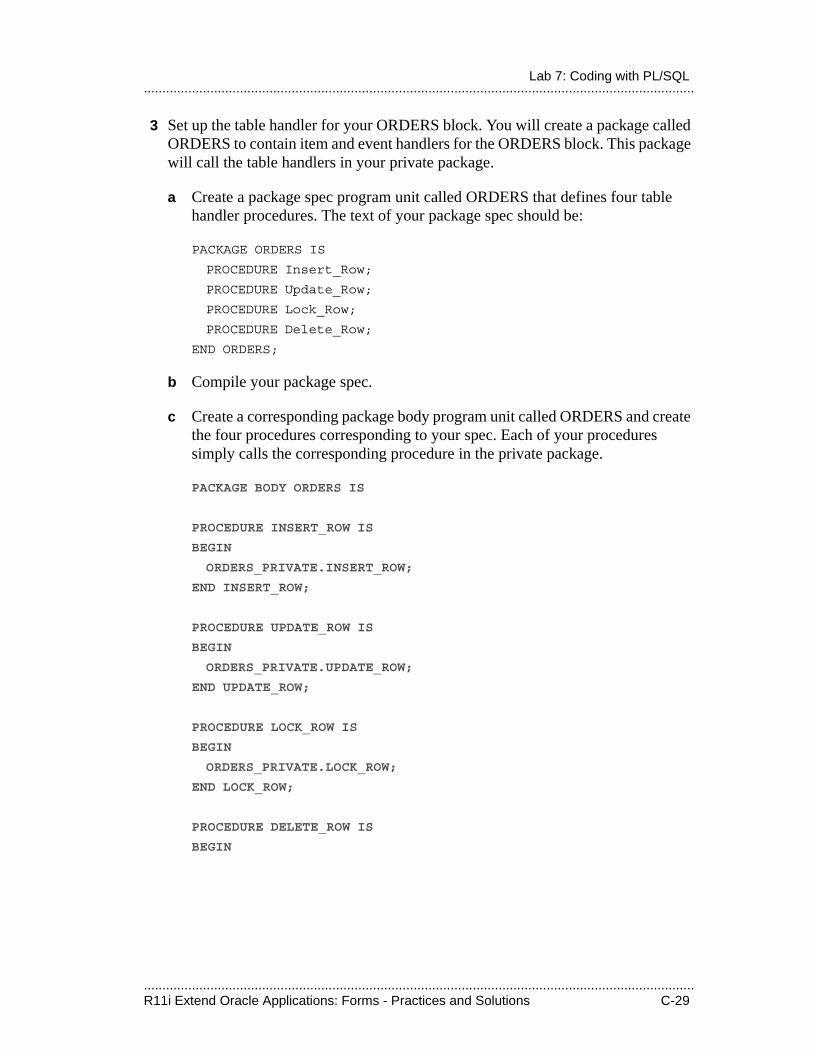
.....................................................................................................................................................R11i Extend Oracle Applications: Forms - Practices and Solutions C-29
.....................................................................................................................................................Lab 7: Coding with PL/SQL
3 Set up the table handler for your ORDERS block. You will create a package called ORDERS to contain item and event handlers for the ORDERS block. This package will call the table handlers in your private package.
a Create a package spec program unit called ORDERS that defines four table handler procedures. The text of your package spec should be:
PACKAGE ORDERS IS
PROCEDURE Insert_Row;
PROCEDURE Update_Row;
PROCEDURE Lock_Row;
PROCEDURE Delete_Row;
END ORDERS;
b Compile your package spec.
c Create a corresponding package body program unit called ORDERS and create the four procedures corresponding to your spec. Each of your procedures simply calls the corresponding procedure in the private package.
PACKAGE BODY ORDERS IS
PROCEDURE INSERT_ROW IS
BEGIN
ORDERS_PRIVATE.INSERT_ROW;
END INSERT_ROW;
PROCEDURE UPDATE_ROW IS
BEGIN
ORDERS_PRIVATE.UPDATE_ROW;
END UPDATE_ROW;
PROCEDURE LOCK_ROW IS
BEGIN
ORDERS_PRIVATE.LOCK_ROW;
END LOCK_ROW;
PROCEDURE DELETE_ROW IS
BEGIN
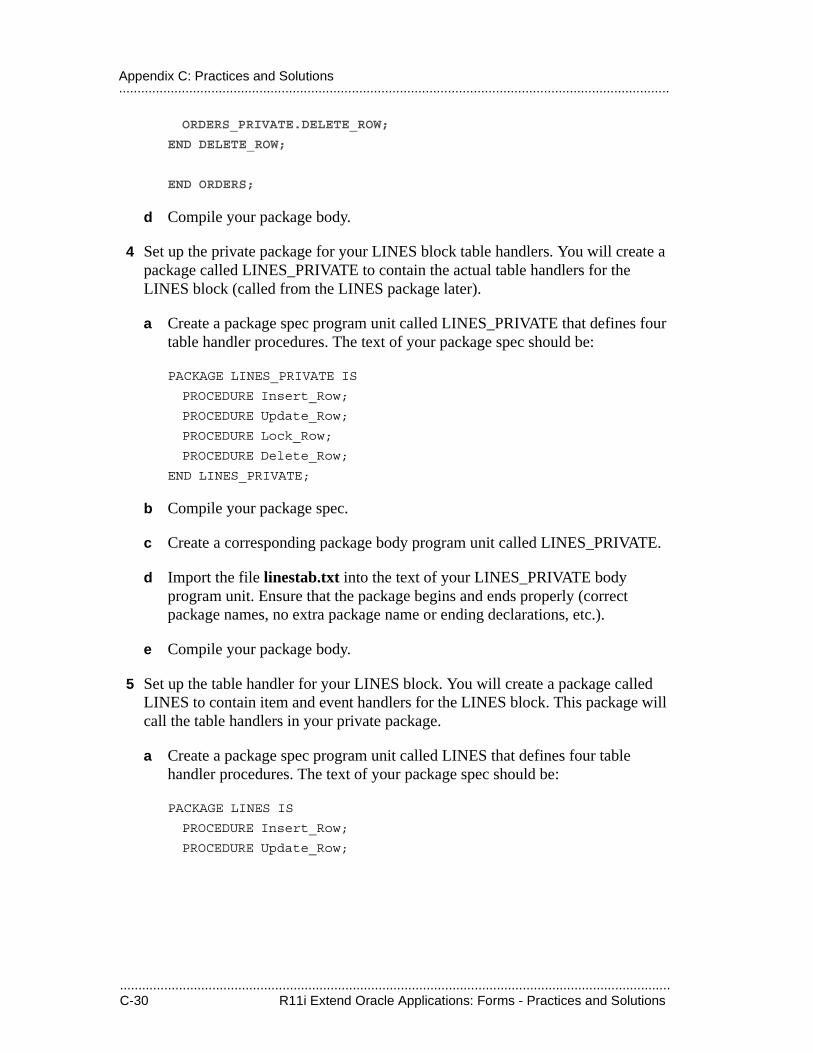
.....................................................................................................................................................C-30 R11i Extend Oracle Applications: Forms - Practices and Solutions
.....................................................................................................................................................Appendix C: Practices and Solutions
ORDERS_PRIVATE.DELETE_ROW;
END DELETE_ROW;
END ORDERS;
d Compile your package body.
4 Set up the private package for your LINES block table handlers. You will create a package called LINES_PRIVATE to contain the actual table handlers for the LINES block (called from the LINES package later).
a Create a package spec program unit called LINES_PRIVATE that defines four table handler procedures. The text of your package spec should be:
PACKAGE LINES_PRIVATE IS
PROCEDURE Insert_Row;
PROCEDURE Update_Row;
PROCEDURE Lock_Row;
PROCEDURE Delete_Row;
END LINES_PRIVATE;
b Compile your package spec.
c Create a corresponding package body program unit called LINES_PRIVATE.
d Import the file linestab.txt into the text of your LINES_PRIVATE body program unit. Ensure that the package begins and ends properly (correct package names, no extra package name or ending declarations, etc.).
e Compile your package body.
5 Set up the table handler for your LINES block. You will create a package called LINES to contain item and event handlers for the LINES block. This package will call the table handlers in your private package.
a Create a package spec program unit called LINES that defines four table handler procedures. The text of your package spec should be:
PACKAGE LINES IS
PROCEDURE Insert_Row;
PROCEDURE Update_Row;
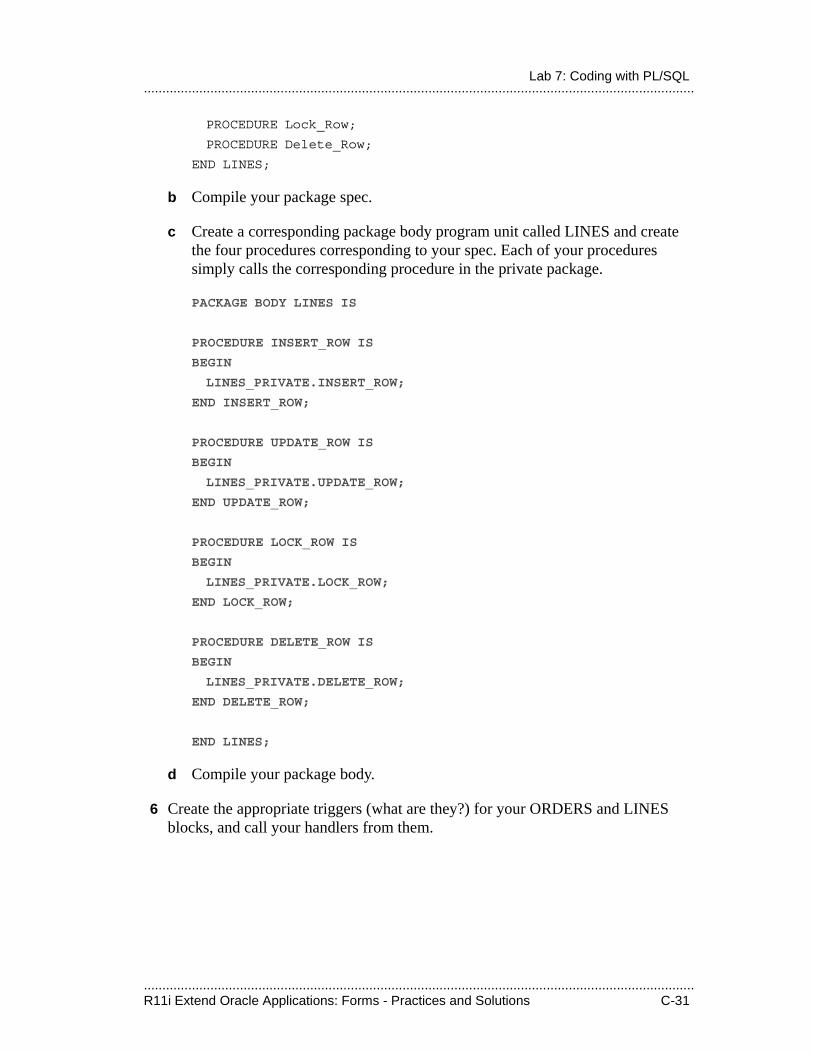
.....................................................................................................................................................R11i Extend Oracle Applications: Forms - Practices and Solutions C-31
.....................................................................................................................................................Lab 7: Coding with PL/SQL
PROCEDURE Lock_Row;
PROCEDURE Delete_Row;
END LINES;
b Compile your package spec.
c Create a corresponding package body program unit called LINES and create the four procedures corresponding to your spec. Each of your procedures simply calls the corresponding procedure in the private package.
PACKAGE BODY LINES IS
PROCEDURE INSERT_ROW IS
BEGIN
LINES_PRIVATE.INSERT_ROW;
END INSERT_ROW;
PROCEDURE UPDATE_ROW IS
BEGIN
LINES_PRIVATE.UPDATE_ROW;
END UPDATE_ROW;
PROCEDURE LOCK_ROW IS
BEGIN
LINES_PRIVATE.LOCK_ROW;
END LOCK_ROW;
PROCEDURE DELETE_ROW IS
BEGIN
LINES_PRIVATE.DELETE_ROW;
END DELETE_ROW;
END LINES;
d Compile your package body.
6 Create the appropriate triggers (what are they?) for your ORDERS and LINES blocks, and call your handlers from them.
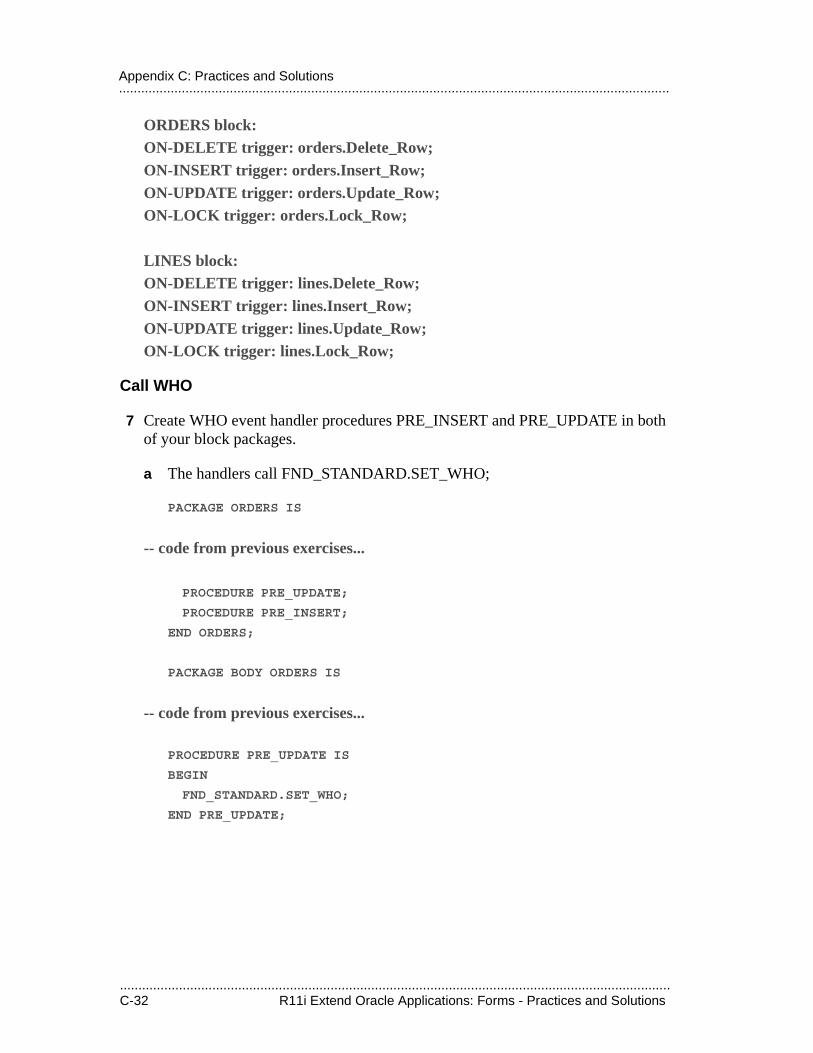
.....................................................................................................................................................C-32 R11i Extend Oracle Applications: Forms - Practices and Solutions
.....................................................................................................................................................Appendix C: Practices and Solutions
ORDERS block: ON-DELETE trigger: orders.Delete_Row;ON-INSERT trigger: orders.Insert_Row;ON-UPDATE trigger: orders.Update_Row;ON-LOCK trigger: orders.Lock_Row;
LINES block: ON-DELETE trigger: lines.Delete_Row;ON-INSERT trigger: lines.Insert_Row;ON-UPDATE trigger: lines.Update_Row;ON-LOCK trigger: lines.Lock_Row;
Call WHO
7 Create WHO event handler procedures PRE_INSERT and PRE_UPDATE in both of your block packages.
a The handlers call FND_STANDARD.SET_WHO;
PACKAGE ORDERS IS
-- code from previous exercises...
PROCEDURE PRE_UPDATE;
PROCEDURE PRE_INSERT;
END ORDERS;
PACKAGE BODY ORDERS IS
-- code from previous exercises...
PROCEDURE PRE_UPDATE IS
BEGIN
FND_STANDARD.SET_WHO;
END PRE_UPDATE;
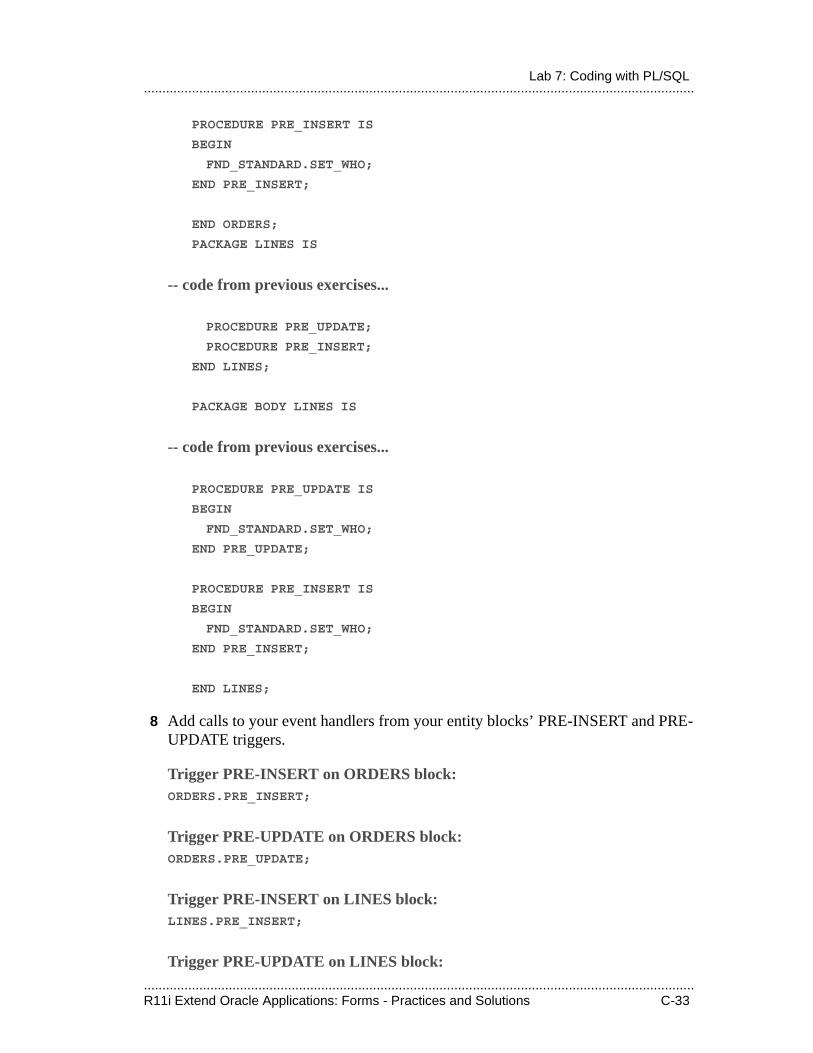
.....................................................................................................................................................R11i Extend Oracle Applications: Forms - Practices and Solutions C-33
.....................................................................................................................................................Lab 7: Coding with PL/SQL
PROCEDURE PRE_INSERT IS
BEGIN
FND_STANDARD.SET_WHO;
END PRE_INSERT;
END ORDERS;
PACKAGE LINES IS
-- code from previous exercises...
PROCEDURE PRE_UPDATE;
PROCEDURE PRE_INSERT;
END LINES;
PACKAGE BODY LINES IS
-- code from previous exercises...
PROCEDURE PRE_UPDATE IS
BEGIN
FND_STANDARD.SET_WHO;
END PRE_UPDATE;
PROCEDURE PRE_INSERT IS
BEGIN
FND_STANDARD.SET_WHO;
END PRE_INSERT;
END LINES;
8 Add calls to your event handlers from your entity blocks’ PRE-INSERT and PRE-UPDATE triggers.
Trigger PRE-INSERT on ORDERS block:ORDERS.PRE_INSERT;
Trigger PRE-UPDATE on ORDERS block:ORDERS.PRE_UPDATE;
Trigger PRE-INSERT on LINES block:LINES.PRE_INSERT;
Trigger PRE-UPDATE on LINES block:
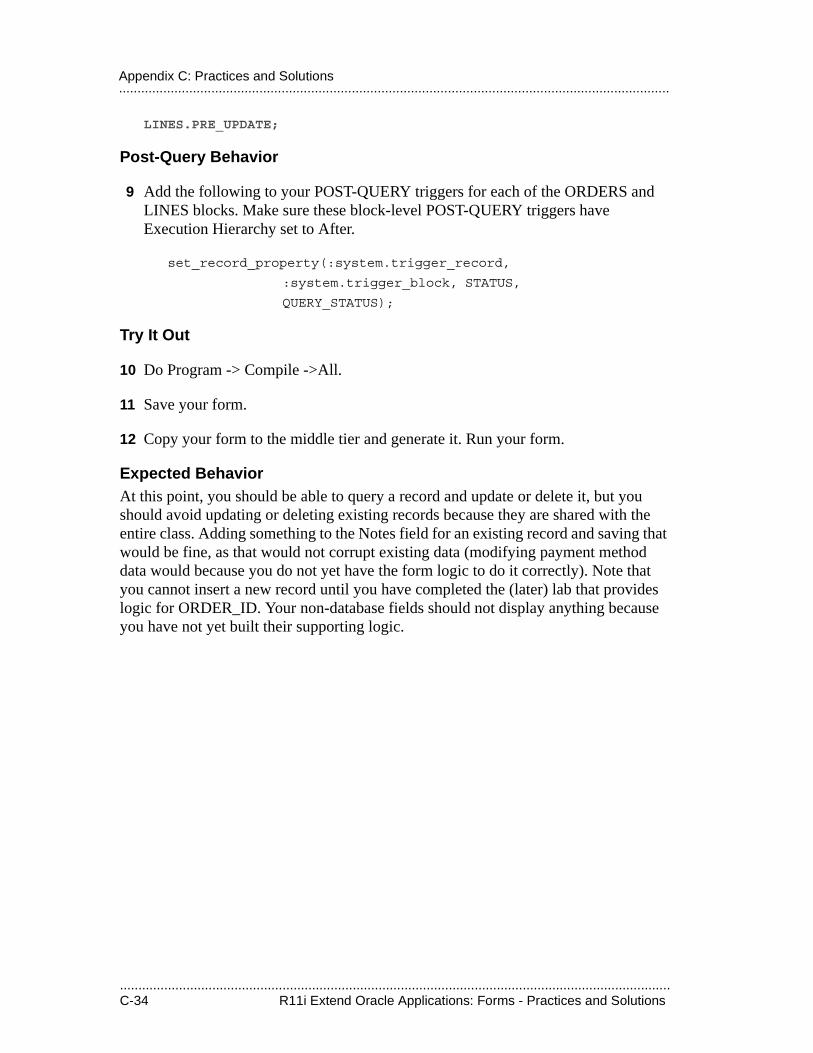
.....................................................................................................................................................C-34 R11i Extend Oracle Applications: Forms - Practices and Solutions
.....................................................................................................................................................Appendix C: Practices and Solutions
LINES.PRE_UPDATE;
Post-Query Behavior
9 Add the following to your POST-QUERY triggers for each of the ORDERS and LINES blocks. Make sure these block-level POST-QUERY triggers have Execution Hierarchy set to After.
set_record_property(:system.trigger_record,
:system.trigger_block, STATUS,
QUERY_STATUS);
Try It Out
10 Do Program -> Compile ->All.
11 Save your form.
12 Copy your form to the middle tier and generate it. Run your form.
Expected BehaviorAt this point, you should be able to query a record and update or delete it, but you should avoid updating or deleting existing records because they are shared with the entire class. Adding something to the Notes field for an existing record and saving that would be fine, as that would not corrupt existing data (modifying payment method data would because you do not yet have the form logic to do it correctly). Note that you cannot insert a new record until you have completed the (later) lab that provides logic for ORDER_ID. Your non-database fields should not display anything because you have not yet built their supporting logic.
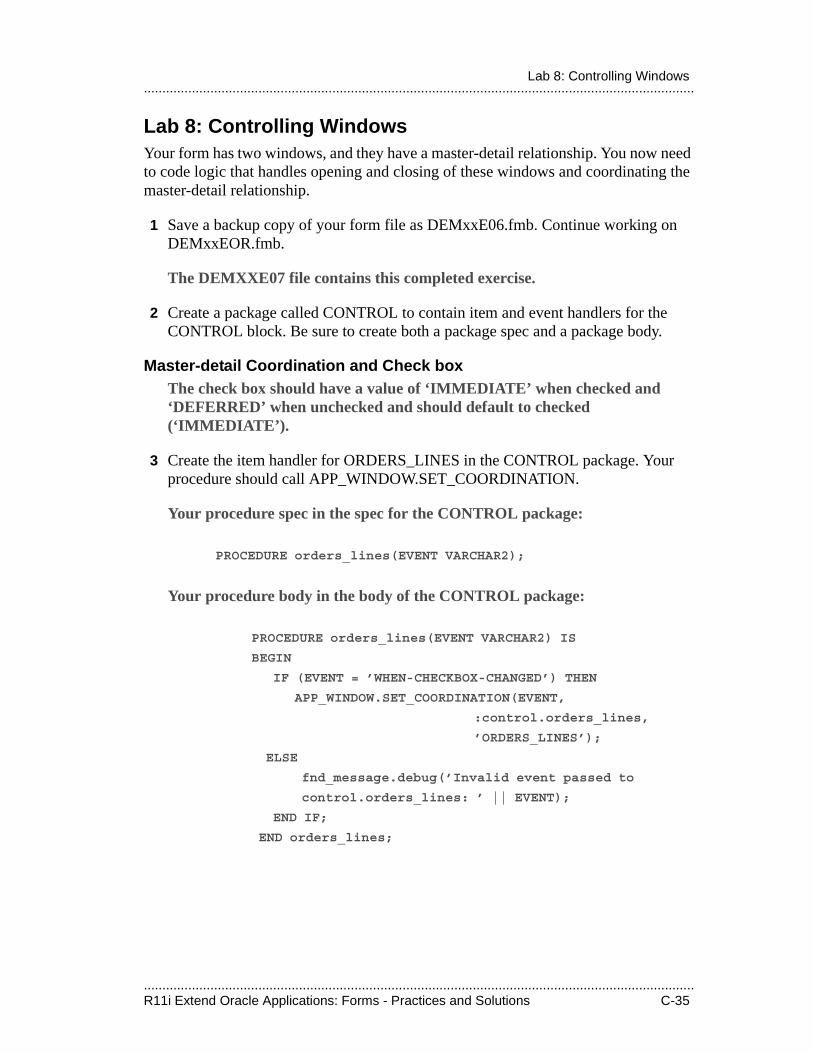
.....................................................................................................................................................R11i Extend Oracle Applications: Forms - Practices and Solutions C-35
.....................................................................................................................................................Lab 8: Controlling Windows
Lab 8: Controlling WindowsYour form has two windows, and they have a master-detail relationship. You now need to code logic that handles opening and closing of these windows and coordinating the master-detail relationship.
1 Save a backup copy of your form file as DEMxxE06.fmb. Continue working on DEMxxEOR.fmb.
The DEMXXE07 file contains this completed exercise.
2 Create a package called CONTROL to contain item and event handlers for the CONTROL block. Be sure to create both a package spec and a package body.
Master-detail Coordination and Check boxThe check box should have a value of ‘IMMEDIATE’ when checked and ‘DEFERRED’ when unchecked and should default to checked (‘IMMEDIATE’).
3 Create the item handler for ORDERS_LINES in the CONTROL package. Your procedure should call APP_WINDOW.SET_COORDINATION.
Your procedure spec in the spec for the CONTROL package:
PROCEDURE orders_lines(EVENT VARCHAR2);
Your procedure body in the body of the CONTROL package:
PROCEDURE orders_lines(EVENT VARCHAR2) IS
BEGIN
IF (EVENT = ’WHEN-CHECKBOX-CHANGED’) THEN
APP_WINDOW.SET_COORDINATION(EVENT,
:control.orders_lines,
’ORDERS_LINES’);
ELSE
fnd_message.debug(’Invalid event passed to
control.orders_lines: ’ || EVENT);
END IF;
END orders_lines;
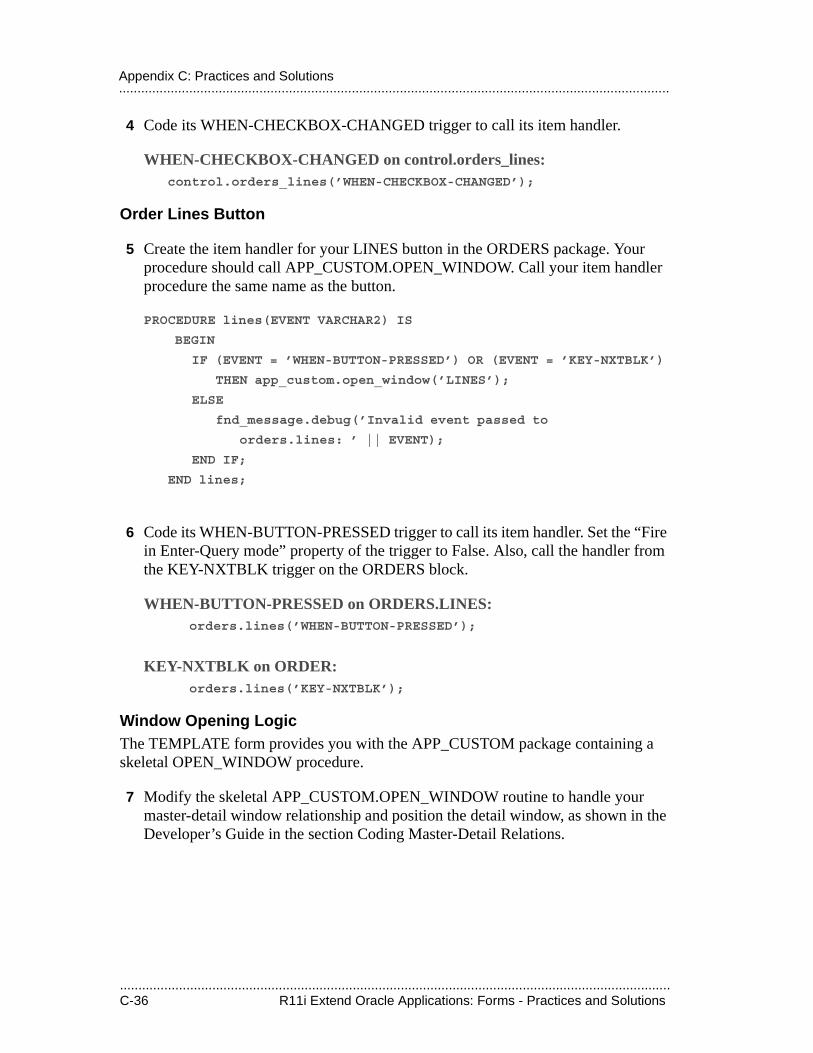
.....................................................................................................................................................C-36 R11i Extend Oracle Applications: Forms - Practices and Solutions
.....................................................................................................................................................Appendix C: Practices and Solutions
4 Code its WHEN-CHECKBOX-CHANGED trigger to call its item handler.
WHEN-CHECKBOX-CHANGED on control.orders_lines:control.orders_lines(’WHEN-CHECKBOX-CHANGED’);
Order Lines Button
5 Create the item handler for your LINES button in the ORDERS package. Your procedure should call APP_CUSTOM.OPEN_WINDOW. Call your item handler procedure the same name as the button.
PROCEDURE lines(EVENT VARCHAR2) IS
BEGIN
IF (EVENT = ’WHEN-BUTTON-PRESSED’) OR (EVENT = ’KEY-NXTBLK’)
THEN app_custom.open_window(’LINES’);
ELSE
fnd_message.debug(’Invalid event passed to
orders.lines: ’ || EVENT);
END IF;
END lines;
6 Code its WHEN-BUTTON-PRESSED trigger to call its item handler. Set the “Fire in Enter-Query mode” property of the trigger to False. Also, call the handler from the KEY-NXTBLK trigger on the ORDERS block.
WHEN-BUTTON-PRESSED on ORDERS.LINES: orders.lines(’WHEN-BUTTON-PRESSED’);
KEY-NXTBLK on ORDER: orders.lines(’KEY-NXTBLK’);
Window Opening LogicThe TEMPLATE form provides you with the APP_CUSTOM package containing a skeletal OPEN_WINDOW procedure.
7 Modify the skeletal APP_CUSTOM.OPEN_WINDOW routine to handle your master-detail window relationship and position the detail window, as shown in the Developer’s Guide in the section Coding Master-Detail Relations.
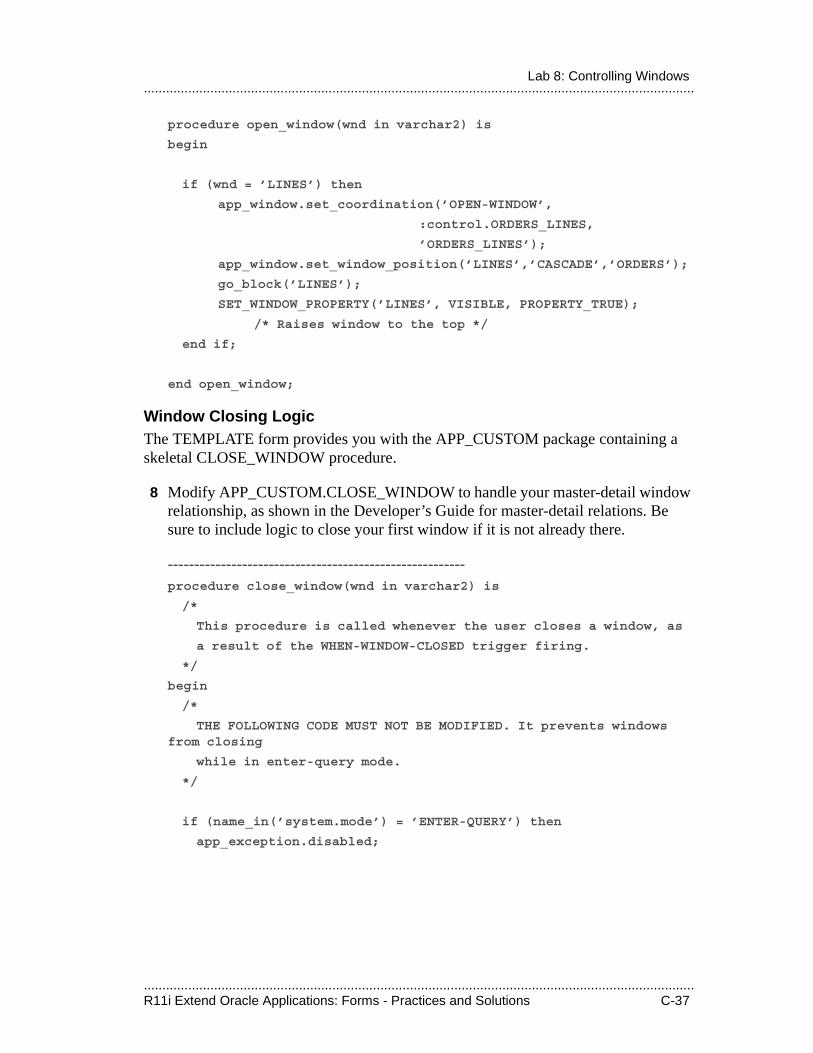
.....................................................................................................................................................R11i Extend Oracle Applications: Forms - Practices and Solutions C-37
.....................................................................................................................................................Lab 8: Controlling Windows
procedure open_window(wnd in varchar2) is
begin
if (wnd = ’LINES’) then
app_window.set_coordination(’OPEN-WINDOW’,
:control.ORDERS_LINES,
’ORDERS_LINES’);
app_window.set_window_position(’LINES’,’CASCADE’,’ORDERS’);
go_block(’LINES’);
SET_WINDOW_PROPERTY(’LINES’, VISIBLE, PROPERTY_TRUE);
/* Raises window to the top */
end if;
end open_window;
Window Closing LogicThe TEMPLATE form provides you with the APP_CUSTOM package containing a skeletal CLOSE_WINDOW procedure.
8 Modify APP_CUSTOM.CLOSE_WINDOW to handle your master-detail window relationship, as shown in the Developer’s Guide for master-detail relations. Be sure to include logic to close your first window if it is not already there.
--------------------------------------------------------procedure close_window(wnd in varchar2) is
/*
This procedure is called whenever the user closes a window, as
a result of the WHEN-WINDOW-CLOSED trigger firing.
*/
begin
/*
THE FOLLOWING CODE MUST NOT BE MODIFIED. It prevents windows from closing
while in enter-query mode.
*/
if (name_in(’system.mode’) = ’ENTER-QUERY’) then
app_exception.disabled;
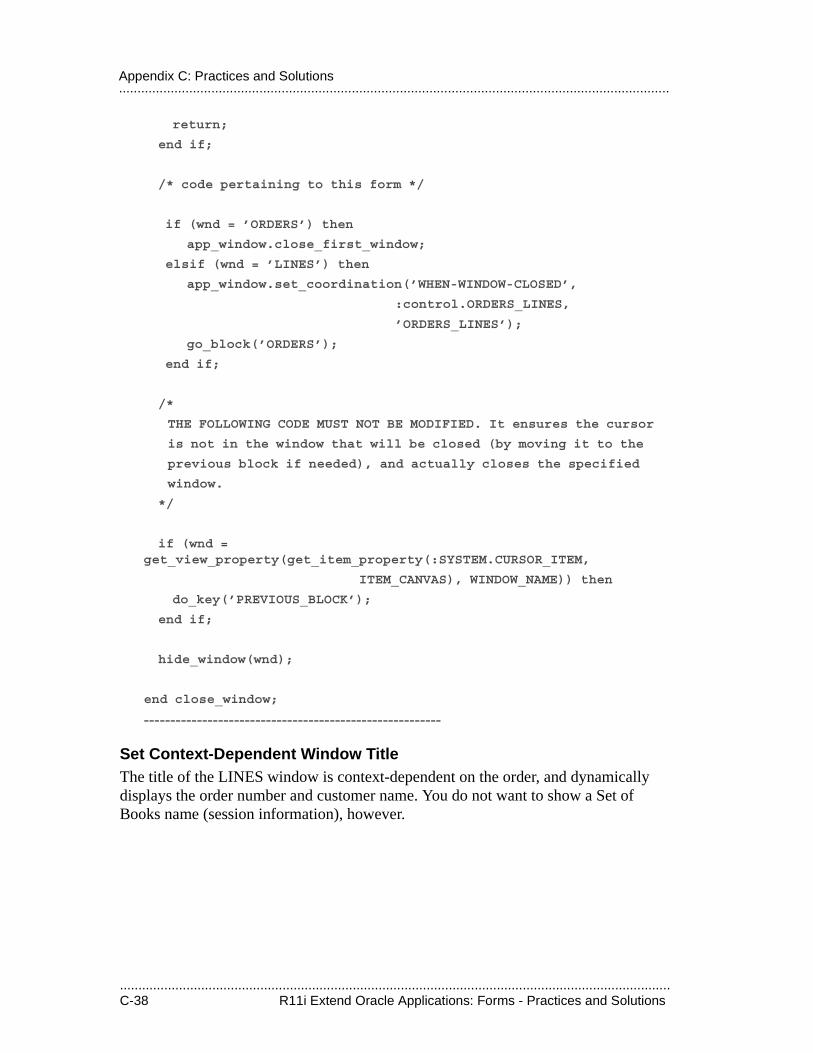
.....................................................................................................................................................C-38 R11i Extend Oracle Applications: Forms - Practices and Solutions
.....................................................................................................................................................Appendix C: Practices and Solutions
return;
end if;
/* code pertaining to this form */
if (wnd = ’ORDERS’) then
app_window.close_first_window;
elsif (wnd = ’LINES’) then
app_window.set_coordination(’WHEN-WINDOW-CLOSED’,
:control.ORDERS_LINES,
’ORDERS_LINES’);
go_block(’ORDERS’);
end if;
/*
THE FOLLOWING CODE MUST NOT BE MODIFIED. It ensures the cursor
is not in the window that will be closed (by moving it to the
previous block if needed), and actually closes the specified
window.
*/
if (wnd = get_view_property(get_item_property(:SYSTEM.CURSOR_ITEM,
ITEM_CANVAS), WINDOW_NAME)) then
do_key(’PREVIOUS_BLOCK’);
end if;
hide_window(wnd);
end close_window;
--------------------------------------------------------
Set Context-Dependent Window TitleThe title of the LINES window is context-dependent on the order, and dynamically displays the order number and customer name. You do not want to show a Set of Books name (session information), however.
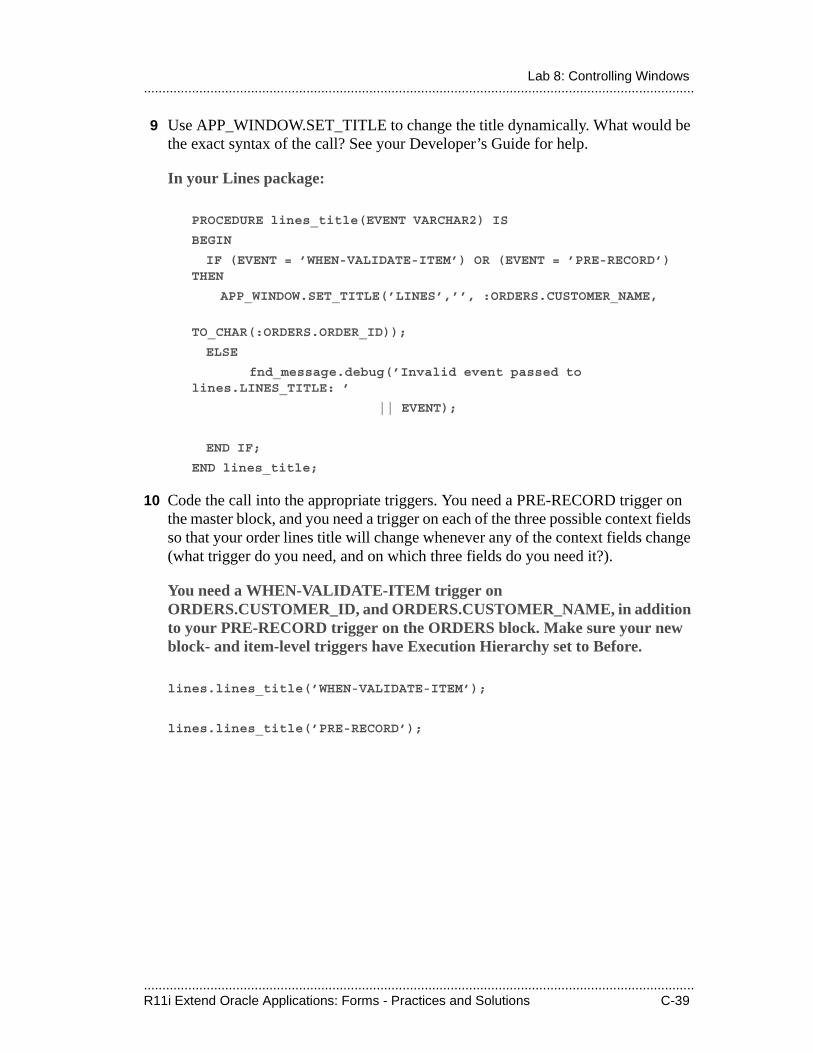
.....................................................................................................................................................R11i Extend Oracle Applications: Forms - Practices and Solutions C-39
.....................................................................................................................................................Lab 8: Controlling Windows
9 Use APP_WINDOW.SET_TITLE to change the title dynamically. What would be the exact syntax of the call? See your Developer’s Guide for help.
In your Lines package:
PROCEDURE lines_title(EVENT VARCHAR2) IS
BEGIN
IF (EVENT = ’WHEN-VALIDATE-ITEM’) OR (EVENT = ’PRE-RECORD’) THEN
APP_WINDOW.SET_TITLE(’LINES’,’’, :ORDERS.CUSTOMER_NAME,
TO_CHAR(:ORDERS.ORDER_ID));
ELSE
fnd_message.debug(’Invalid event passed to lines.LINES_TITLE: ’
|| EVENT);
END IF;
END lines_title;
10 Code the call into the appropriate triggers. You need a PRE-RECORD trigger on the master block, and you need a trigger on each of the three possible context fields so that your order lines title will change whenever any of the context fields change (what trigger do you need, and on which three fields do you need it?).
You need a WHEN-VALIDATE-ITEM trigger on ORDERS.CUSTOMER_ID, and ORDERS.CUSTOMER_NAME, in addition to your PRE-RECORD trigger on the ORDERS block. Make sure your new block- and item-level triggers have Execution Hierarchy set to Before.
lines.lines_title(’WHEN-VALIDATE-ITEM’);
lines.lines_title(’PRE-RECORD’);
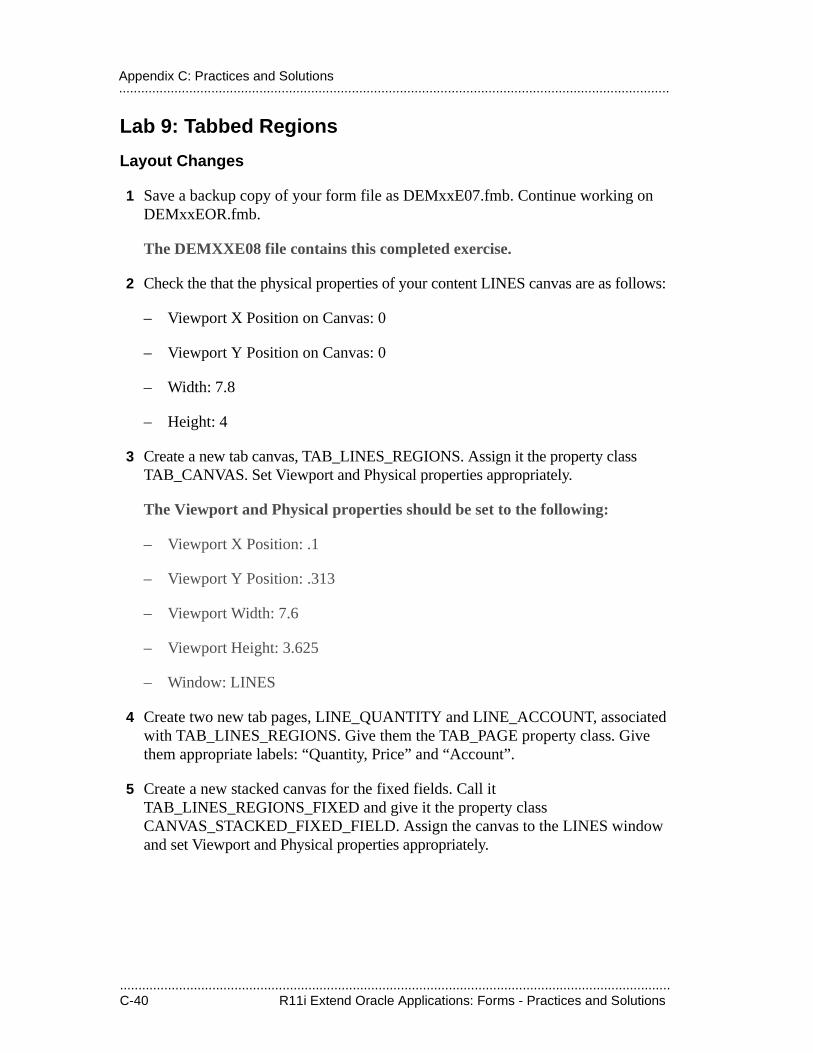
.....................................................................................................................................................C-40 R11i Extend Oracle Applications: Forms - Practices and Solutions
.....................................................................................................................................................Appendix C: Practices and Solutions
Lab 9: Tabbed Regions
Layout Changes
1 Save a backup copy of your form file as DEMxxE07.fmb. Continue working on DEMxxEOR.fmb.
The DEMXXE08 file contains this completed exercise.
2 Check the that the physical properties of your content LINES canvas are as follows:
– Viewport X Position on Canvas: 0
– Viewport Y Position on Canvas: 0
– Width: 7.8
– Height: 4
3 Create a new tab canvas, TAB_LINES_REGIONS. Assign it the property class TAB_CANVAS. Set Viewport and Physical properties appropriately.
The Viewport and Physical properties should be set to the following:
– Viewport X Position: .1
– Viewport Y Position: .313
– Viewport Width: 7.6
– Viewport Height: 3.625
– Window: LINES
4 Create two new tab pages, LINE_QUANTITY and LINE_ACCOUNT, associated with TAB_LINES_REGIONS. Give them the TAB_PAGE property class. Give them appropriate labels: “Quantity, Price” and “Account”.
5 Create a new stacked canvas for the fixed fields. Call it TAB_LINES_REGIONS_FIXED and give it the property class CANVAS_STACKED_FIXED_FIELD. Assign the canvas to the LINES window and set Viewport and Physical properties appropriately.
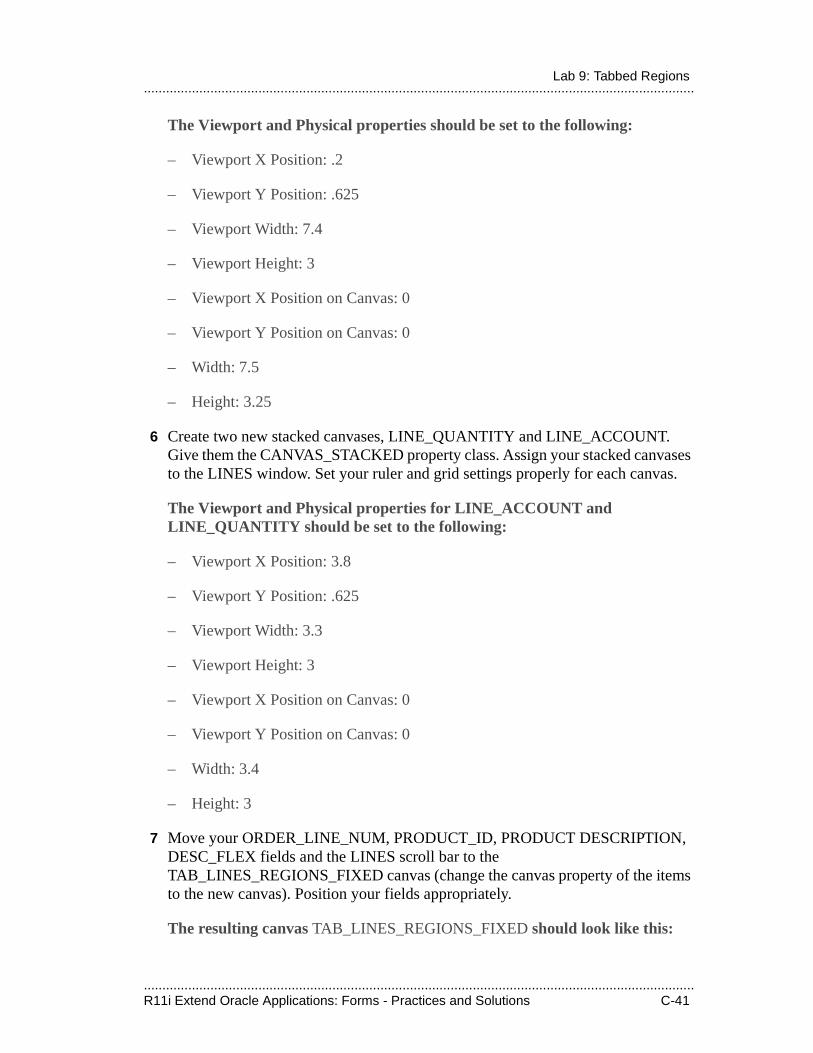
.....................................................................................................................................................R11i Extend Oracle Applications: Forms - Practices and Solutions C-41
.....................................................................................................................................................Lab 9: Tabbed Regions
The Viewport and Physical properties should be set to the following:
– Viewport X Position: .2
– Viewport Y Position: .625
– Viewport Width: 7.4
– Viewport Height: 3
– Viewport X Position on Canvas: 0
– Viewport Y Position on Canvas: 0
– Width: 7.5
– Height: 3.25
6 Create two new stacked canvases, LINE_QUANTITY and LINE_ACCOUNT. Give them the CANVAS_STACKED property class. Assign your stacked canvases to the LINES window. Set your ruler and grid settings properly for each canvas.
The Viewport and Physical properties for LINE_ACCOUNT and LINE_QUANTITY should be set to the following:
– Viewport X Position: 3.8
– Viewport Y Position: .625
– Viewport Width: 3.3
– Viewport Height: 3
– Viewport X Position on Canvas: 0
– Viewport Y Position on Canvas: 0
– Width: 3.4
– Height: 3
7 Move your ORDER_LINE_NUM, PRODUCT_ID, PRODUCT DESCRIPTION, DESC_FLEX fields and the LINES scroll bar to the TAB_LINES_REGIONS_FIXED canvas (change the canvas property of the items to the new canvas). Position your fields appropriately.
The resulting canvas TAB_LINES_REGIONS_FIXED should look like this:
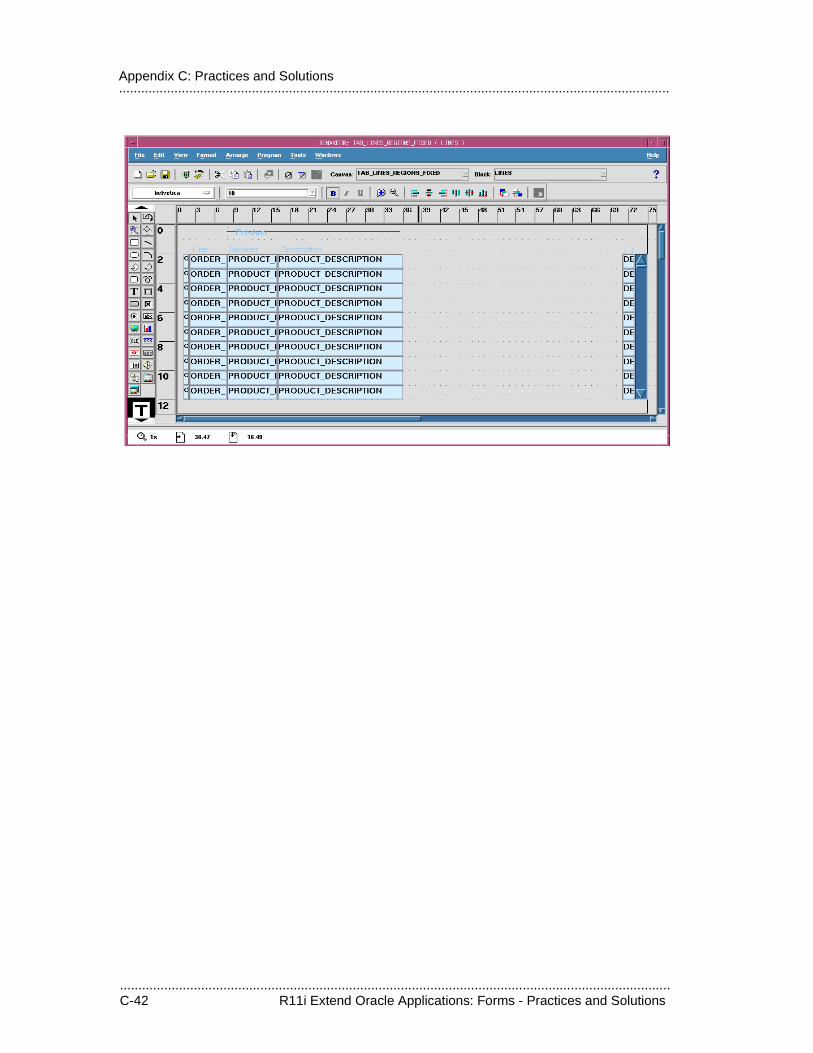
.....................................................................................................................................................C-42 R11i Extend Oracle Applications: Forms - Practices and Solutions
.....................................................................................................................................................Appendix C: Practices and Solutions
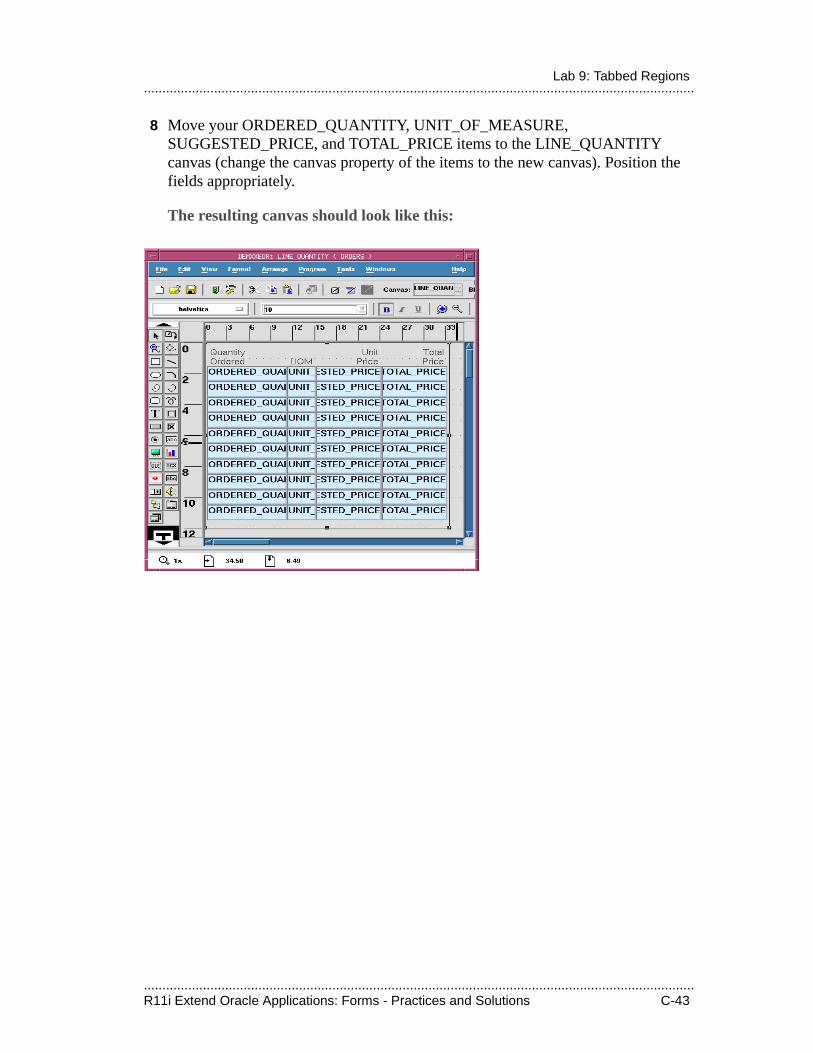
.....................................................................................................................................................R11i Extend Oracle Applications: Forms - Practices and Solutions C-43
.....................................................................................................................................................Lab 9: Tabbed Regions
8 Move your ORDERED_QUANTITY, UNIT_OF_MEASURE, SUGGESTED_PRICE, and TOTAL_PRICE items to the LINE_QUANTITY canvas (change the canvas property of the items to the new canvas). Position the fields appropriately.
The resulting canvas should look like this:
.....................................................................................................................................................C-44 R11i Extend Oracle Applications: Forms - Practices and Solutions
.....................................................................................................................................................Appendix C: Practices and Solutions
9 Move your ACCTG_FLEX_VALUES item to the LINE_ACCOUNT canvas (change the canvas property of the item to the new canvas).
The resulting canvas should look like this:
Logic Changes
10 Create the tab handler based upon FNDTABFF.txt; put it in the CONTROL program unit. Make the generic FNDTABFF.txt file fit your form by changing it as appropriate including the procedure name. Alter the handler appropriately to handle WHEN-TAB-PAGE-CHANGED and WHEN-NEW-ITEM-INSTANCE.
PROCEDURE TAB_LINES_REGIONS(event VARCHAR2) IS
/* --------------------------------------------------------------------
$Header: fndtabff.pls 115.0 99/04/16 17:34:45 swoodhul ship $
+======================================================================+
| Copyright (c) 1999 Oracle Corporation Redwood Shores, California, USA|
| All rights reserved. |
+======================================================================+
This is a template of the control procedure for Tab Regions. Import
into your form program unit (package) and MODIFY as appropriate for
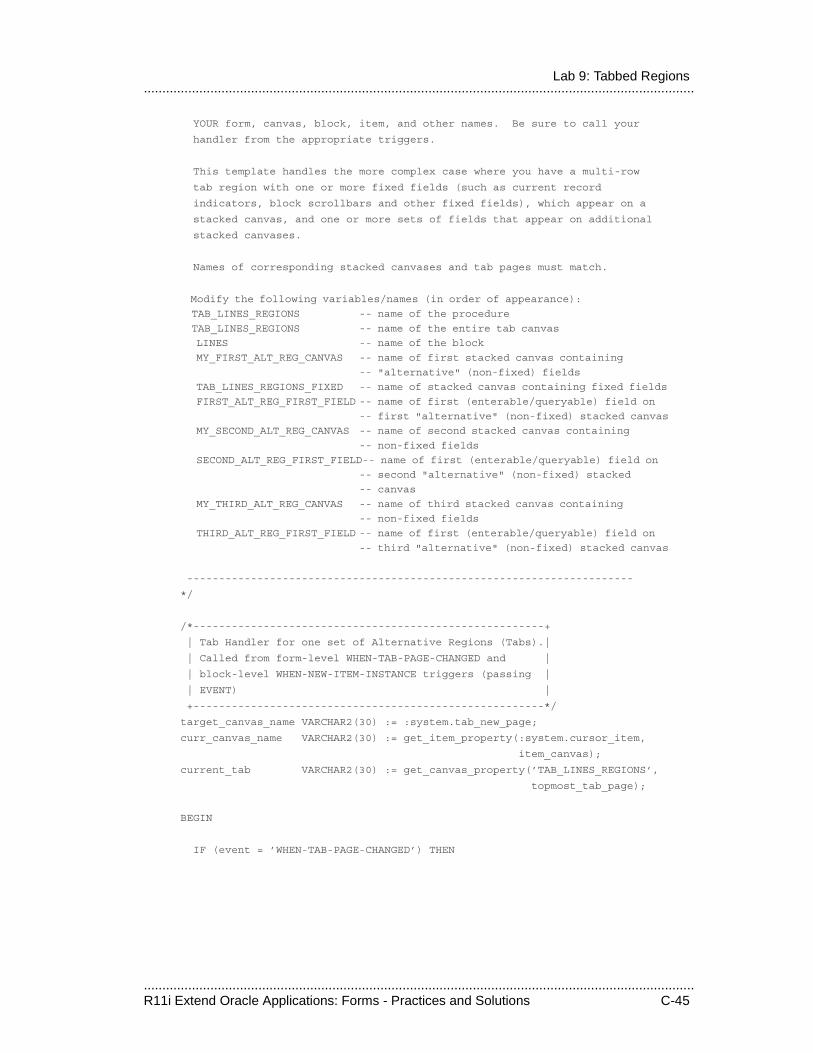
.....................................................................................................................................................R11i Extend Oracle Applications: Forms - Practices and Solutions C-45
.....................................................................................................................................................Lab 9: Tabbed Regions
YOUR form, canvas, block, item, and other names. Be sure to call your
handler from the appropriate triggers.
This template handles the more complex case where you have a multi-row
tab region with one or more fixed fields (such as current record
indicators, block scrollbars and other fixed fields), which appear on a
stacked canvas, and one or more sets of fields that appear on additional
stacked canvases.
Names of corresponding stacked canvases and tab pages must match.
Modify the following variables/names (in order of appearance):
TAB_LINES_REGIONS -- name of the procedure
TAB_LINES_REGIONS -- name of the entire tab canvas
LINES -- name of the block
MY_FIRST_ALT_REG_CANVAS -- name of first stacked canvas containing
-- "alternative" (non-fixed) fields
TAB_LINES_REGIONS_FIXED -- name of stacked canvas containing fixed fields
FIRST_ALT_REG_FIRST_FIELD -- name of first (enterable/queryable) field on
-- first "alternative" (non-fixed) stacked canvas
MY_SECOND_ALT_REG_CANVAS -- name of second stacked canvas containing
-- non-fixed fields
SECOND_ALT_REG_FIRST_FIELD-- name of first (enterable/queryable) field on
-- second "alternative" (non-fixed) stacked
-- canvas
MY_THIRD_ALT_REG_CANVAS -- name of third stacked canvas containing
-- non-fixed fields
THIRD_ALT_REG_FIRST_FIELD -- name of first (enterable/queryable) field on
-- third "alternative" (non-fixed) stacked canvas
----------------------------------------------------------------------
*/
/*-------------------------------------------------------+
| Tab Handler for one set of Alternative Regions (Tabs).|
| Called from form-level WHEN-TAB-PAGE-CHANGED and |
| block-level WHEN-NEW-ITEM-INSTANCE triggers (passing |
| EVENT) |
+-------------------------------------------------------*/
target_canvas_name VARCHAR2(30) := :system.tab_new_page;
curr_canvas_name VARCHAR2(30) := get_item_property(:system.cursor_item,
item_canvas);
current_tab VARCHAR2(30) := get_canvas_property(’TAB_LINES_REGIONS’,
topmost_tab_page);
BEGIN
IF (event = ’WHEN-TAB-PAGE-CHANGED’) THEN
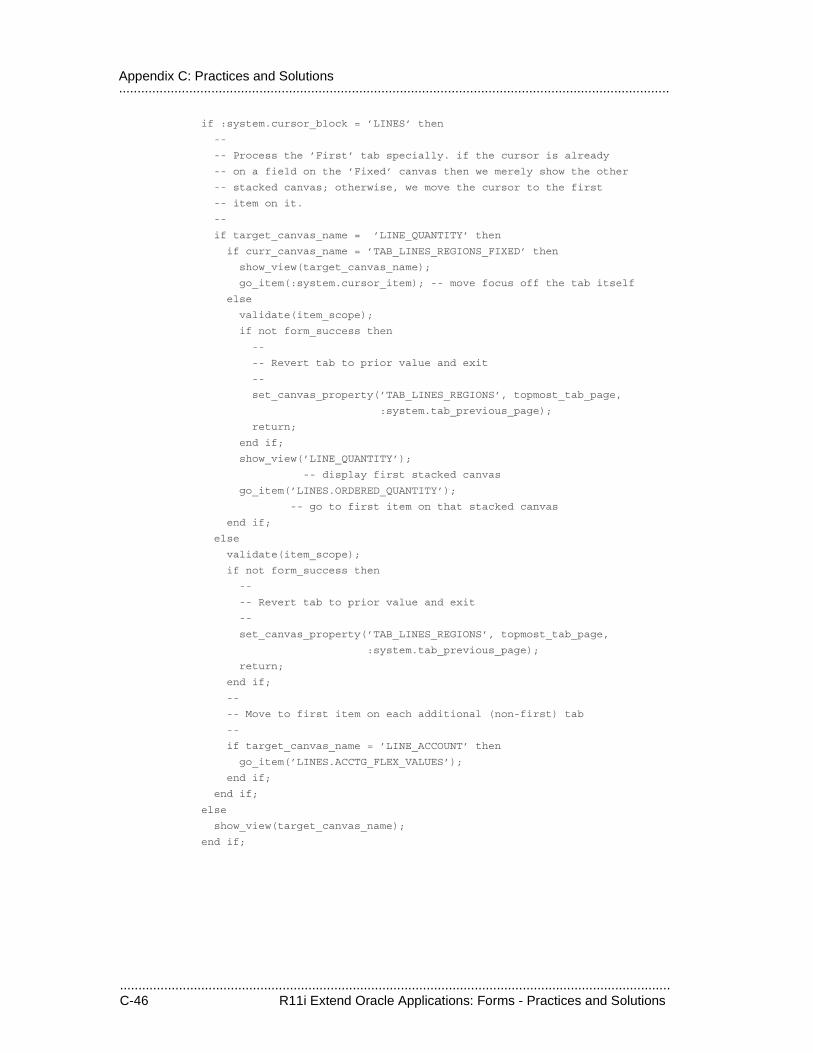
.....................................................................................................................................................C-46 R11i Extend Oracle Applications: Forms - Practices and Solutions
.....................................................................................................................................................Appendix C: Practices and Solutions
if :system.cursor_block = ’LINES’ then
--
-- Process the ’First’ tab specially. if the cursor is already
-- on a field on the ’Fixed’ canvas then we merely show the other
-- stacked canvas; otherwise, we move the cursor to the first
-- item on it.
--
if target_canvas_name = ’LINE_QUANTITY’ then
if curr_canvas_name = ’TAB_LINES_REGIONS_FIXED’ then
show_view(target_canvas_name);
go_item(:system.cursor_item); -- move focus off the tab itself
else
validate(item_scope);
if not form_success then
--
-- Revert tab to prior value and exit
--
set_canvas_property(’TAB_LINES_REGIONS’, topmost_tab_page,
:system.tab_previous_page);
return;
end if;
show_view(’LINE_QUANTITY’);
-- display first stacked canvas
go_item(’LINES.ORDERED_QUANTITY’);
-- go to first item on that stacked canvas
end if;
else
validate(item_scope);
if not form_success then
--
-- Revert tab to prior value and exit
--
set_canvas_property(’TAB_LINES_REGIONS’, topmost_tab_page,
:system.tab_previous_page);
return;
end if;
--
-- Move to first item on each additional (non-first) tab
--
if target_canvas_name = ’LINE_ACCOUNT’ then
go_item(’LINES.ACCTG_FLEX_VALUES’);
end if;
end if;
else
show_view(target_canvas_name);
end if;
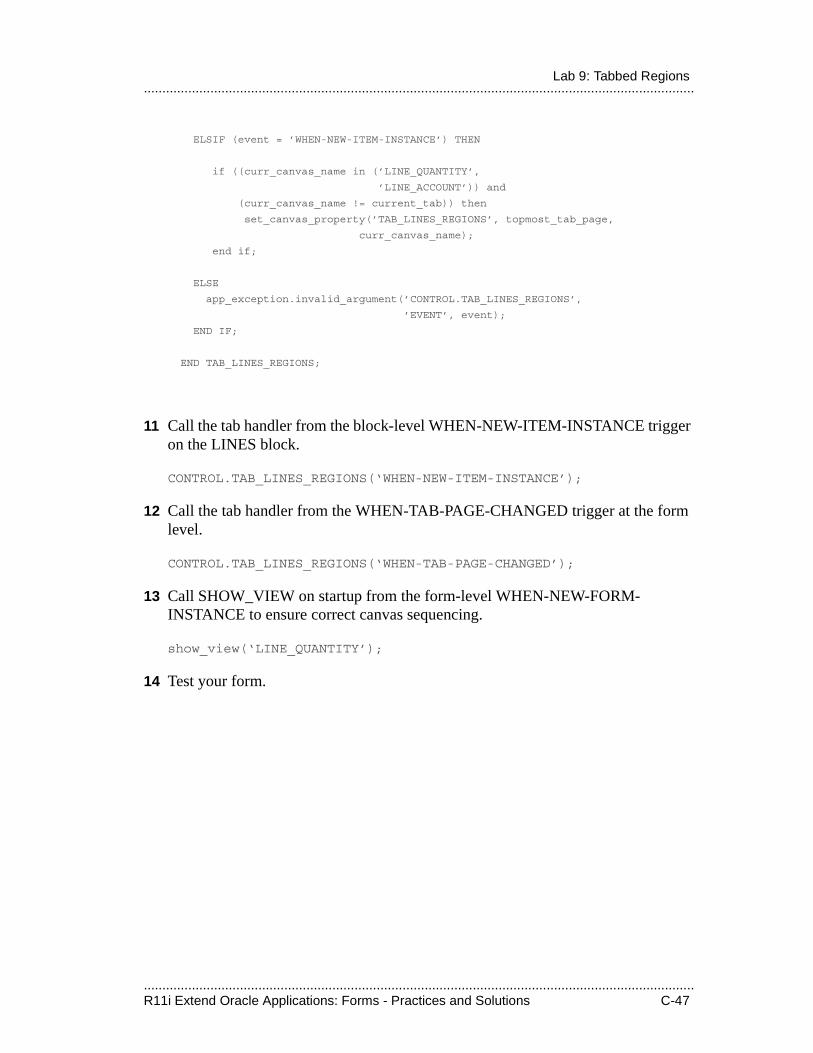
.....................................................................................................................................................R11i Extend Oracle Applications: Forms - Practices and Solutions C-47
.....................................................................................................................................................Lab 9: Tabbed Regions
ELSIF (event = ’WHEN-NEW-ITEM-INSTANCE’) THEN
if ((curr_canvas_name in (’LINE_QUANTITY’,
’LINE_ACCOUNT’)) and
(curr_canvas_name != current_tab)) then
set_canvas_property(’TAB_LINES_REGIONS’, topmost_tab_page,
curr_canvas_name);
end if;
ELSE
app_exception.invalid_argument(’CONTROL.TAB_LINES_REGIONS’,
’EVENT’, event);
END IF;
END TAB_LINES_REGIONS;
11 Call the tab handler from the block-level WHEN-NEW-ITEM-INSTANCE trigger on the LINES block.
CONTROL.TAB_LINES_REGIONS(‘WHEN-NEW-ITEM-INSTANCE’);
12 Call the tab handler from the WHEN-TAB-PAGE-CHANGED trigger at the form level.
CONTROL.TAB_LINES_REGIONS(‘WHEN-TAB-PAGE-CHANGED’);
13 Call SHOW_VIEW on startup from the form-level WHEN-NEW-FORM-INSTANCE to ensure correct canvas sequencing.
show_view(‘LINE_QUANTITY’);
14 Test your form.
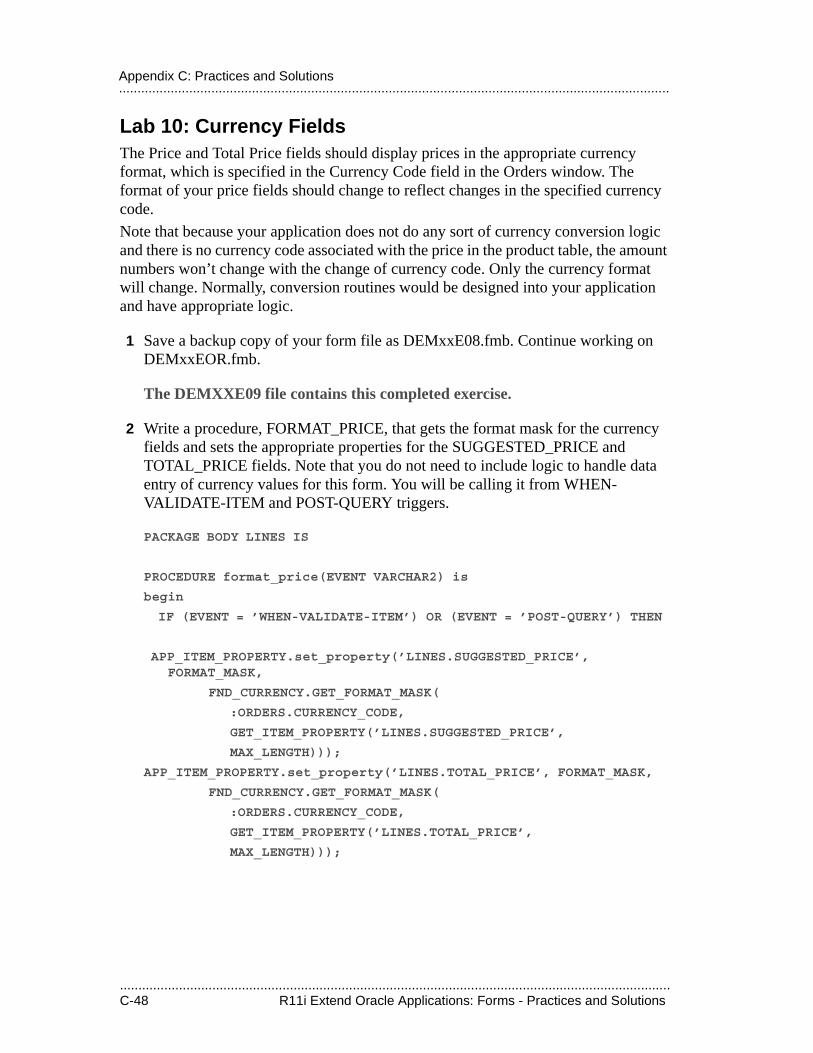
.....................................................................................................................................................C-48 R11i Extend Oracle Applications: Forms - Practices and Solutions
.....................................................................................................................................................Appendix C: Practices and Solutions
Lab 10: Currency FieldsThe Price and Total Price fields should display prices in the appropriate currency format, which is specified in the Currency Code field in the Orders window. The format of your price fields should change to reflect changes in the specified currency code.
Note that because your application does not do any sort of currency conversion logic and there is no currency code associated with the price in the product table, the amount numbers won’t change with the change of currency code. Only the currency format will change. Normally, conversion routines would be designed into your application and have appropriate logic.
1 Save a backup copy of your form file as DEMxxE08.fmb. Continue working on DEMxxEOR.fmb.
The DEMXXE09 file contains this completed exercise.
2 Write a procedure, FORMAT_PRICE, that gets the format mask for the currency fields and sets the appropriate properties for the SUGGESTED_PRICE and TOTAL_PRICE fields. Note that you do not need to include logic to handle data entry of currency values for this form. You will be calling it from WHEN-VALIDATE-ITEM and POST-QUERY triggers.
PACKAGE BODY LINES IS
PROCEDURE format_price(EVENT VARCHAR2) is
begin
IF (EVENT = ’WHEN-VALIDATE-ITEM’) OR (EVENT = ’POST-QUERY’) THEN
APP_ITEM_PROPERTY.set_property(’LINES.SUGGESTED_PRICE’,FORMAT_MASK,
FND_CURRENCY.GET_FORMAT_MASK(
:ORDERS.CURRENCY_CODE,
GET_ITEM_PROPERTY(’LINES.SUGGESTED_PRICE’,
MAX_LENGTH)));
APP_ITEM_PROPERTY.set_property(’LINES.TOTAL_PRICE’, FORMAT_MASK,
FND_CURRENCY.GET_FORMAT_MASK(
:ORDERS.CURRENCY_CODE,
GET_ITEM_PROPERTY(’LINES.TOTAL_PRICE’,
MAX_LENGTH)));
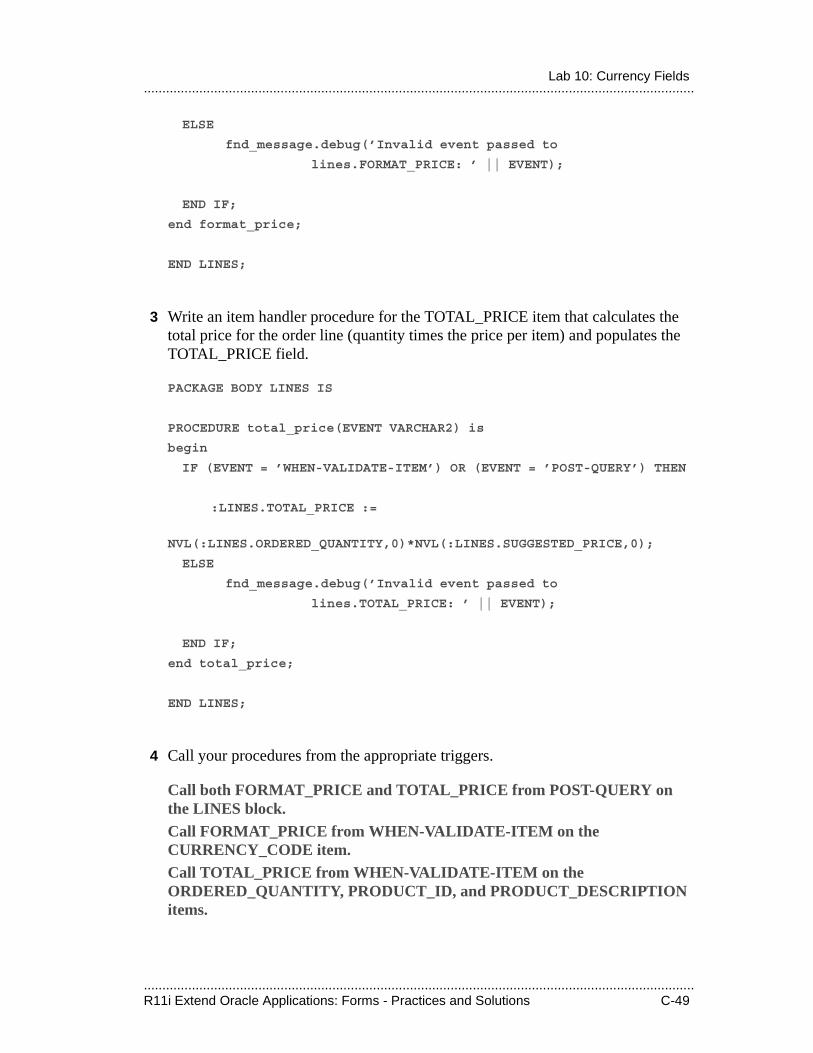
.....................................................................................................................................................R11i Extend Oracle Applications: Forms - Practices and Solutions C-49
.....................................................................................................................................................Lab 10: Currency Fields
ELSE
fnd_message.debug(’Invalid event passed to
lines.FORMAT_PRICE: ’ || EVENT);
END IF;
end format_price;
END LINES;
3 Write an item handler procedure for the TOTAL_PRICE item that calculates the total price for the order line (quantity times the price per item) and populates the TOTAL_PRICE field.
PACKAGE BODY LINES IS
PROCEDURE total_price(EVENT VARCHAR2) is
begin
IF (EVENT = ’WHEN-VALIDATE-ITEM’) OR (EVENT = ’POST-QUERY’) THEN
:LINES.TOTAL_PRICE :=
NVL(:LINES.ORDERED_QUANTITY,0)*NVL(:LINES.SUGGESTED_PRICE,0);
ELSE
fnd_message.debug(’Invalid event passed to
lines.TOTAL_PRICE: ’ || EVENT);
END IF;
end total_price;
END LINES;
4 Call your procedures from the appropriate triggers.
Call both FORMAT_PRICE and TOTAL_PRICE from POST-QUERY on the LINES block.Call FORMAT_PRICE from WHEN-VALIDATE-ITEM on the CURRENCY_CODE item.Call TOTAL_PRICE from WHEN-VALIDATE-ITEM on the ORDERED_QUANTITY, PRODUCT_ID, and PRODUCT_DESCRIPTION items.
.....................................................................................................................................................C-50 R11i Extend Oracle Applications: Forms - Practices and Solutions
.....................................................................................................................................................Appendix C: Practices and Solutions
Make sure your new WHEN-VALIDATE-ITEM triggers have Execution Hierarchy set to Before.A common problem is to have errors complaining about an incorrect format mask for the TOTAL_PRICE field. This happens if the Data Type property is set to Char instead of Number.
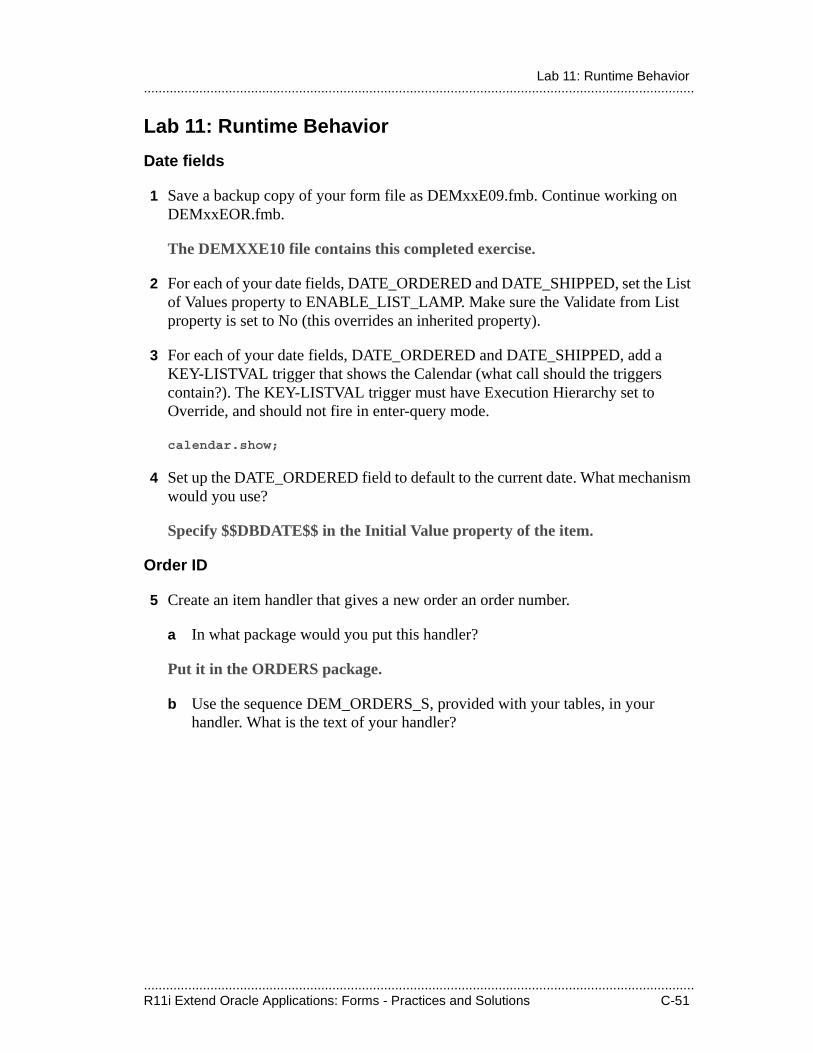
.....................................................................................................................................................R11i Extend Oracle Applications: Forms - Practices and Solutions C-51
.....................................................................................................................................................Lab 11: Runtime Behavior
Lab 11: Runtime Behavior
Date fields
1 Save a backup copy of your form file as DEMxxE09.fmb. Continue working on DEMxxEOR.fmb.
The DEMXXE10 file contains this completed exercise.
2 For each of your date fields, DATE_ORDERED and DATE_SHIPPED, set the List of Values property to ENABLE_LIST_LAMP. Make sure the Validate from List property is set to No (this overrides an inherited property).
3 For each of your date fields, DATE_ORDERED and DATE_SHIPPED, add a KEY-LISTVAL trigger that shows the Calendar (what call should the triggers contain?). The KEY-LISTVAL trigger must have Execution Hierarchy set to Override, and should not fire in enter-query mode.
calendar.show;
4 Set up the DATE_ORDERED field to default to the current date. What mechanism would you use?
Specify $$DBDATE$$ in the Initial Value property of the item.
Order ID
5 Create an item handler that gives a new order an order number.
a In what package would you put this handler?
Put it in the ORDERS package.
b Use the sequence DEM_ORDERS_S, provided with your tables, in your handler. What is the text of your handler?

.....................................................................................................................................................C-52 R11i Extend Oracle Applications: Forms - Practices and Solutions
.....................................................................................................................................................Appendix C: Practices and Solutions
------------------------------------------------------------
procedure order_id(EVENT VARCHAR2) is
cursor C is
select dem_orders_s.NEXTVAL from dual;
begin
IF (EVENT = ’ON-INSERT’) THEN
open C;
fetch C into :orders.order_id;
if (C%NOTFOUND) then
close C;
raise NO_DATA_FOUND;
end if;
close C;
ELSE
fnd_message.debug(’Invalid event passed to
orders.ORDER_ID: ’ || EVENT);
END IF;
end order_id;
-------------------------------------------------------------
c Call your handler from the appropriate trigger. What would it be?
ON-INSERT trigger on ORDERS block, just before the table handler call:orders.order_ID(’ON-INSERT’);
d Call your title handler to update the Lines window title after the insert (to show the new order number).
In the ON-INSERT trigger, right after your order_ID call, add the line: lines.lines_title(‘ON-INSERT’);
Be sure to modify your title handler to include the ON-INSERT event.
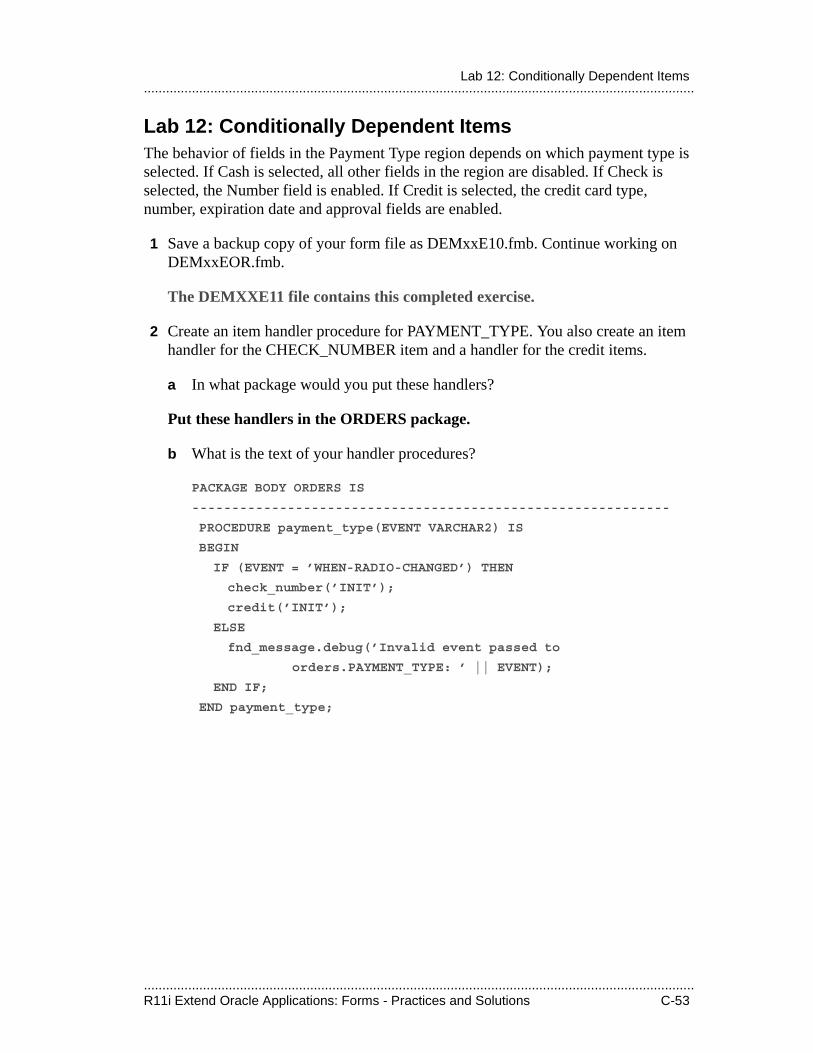
.....................................................................................................................................................R11i Extend Oracle Applications: Forms - Practices and Solutions C-53
.....................................................................................................................................................Lab 12: Conditionally Dependent Items
Lab 12: Conditionally Dependent ItemsThe behavior of fields in the Payment Type region depends on which payment type is selected. If Cash is selected, all other fields in the region are disabled. If Check is selected, the Number field is enabled. If Credit is selected, the credit card type, number, expiration date and approval fields are enabled.
1 Save a backup copy of your form file as DEMxxE10.fmb. Continue working on DEMxxEOR.fmb.
The DEMXXE11 file contains this completed exercise.
2 Create an item handler procedure for PAYMENT_TYPE. You also create an item handler for the CHECK_NUMBER item and a handler for the credit items.
a In what package would you put these handlers?
Put these handlers in the ORDERS package.
b What is the text of your handler procedures?
PACKAGE BODY ORDERS IS
------------------------------------------------------------
PROCEDURE payment_type(EVENT VARCHAR2) IS
BEGIN
IF (EVENT = ’WHEN-RADIO-CHANGED’) THEN
check_number(’INIT’);
credit(’INIT’);
ELSE
fnd_message.debug(’Invalid event passed to
orders.PAYMENT_TYPE: ’ || EVENT);
END IF;
END payment_type;
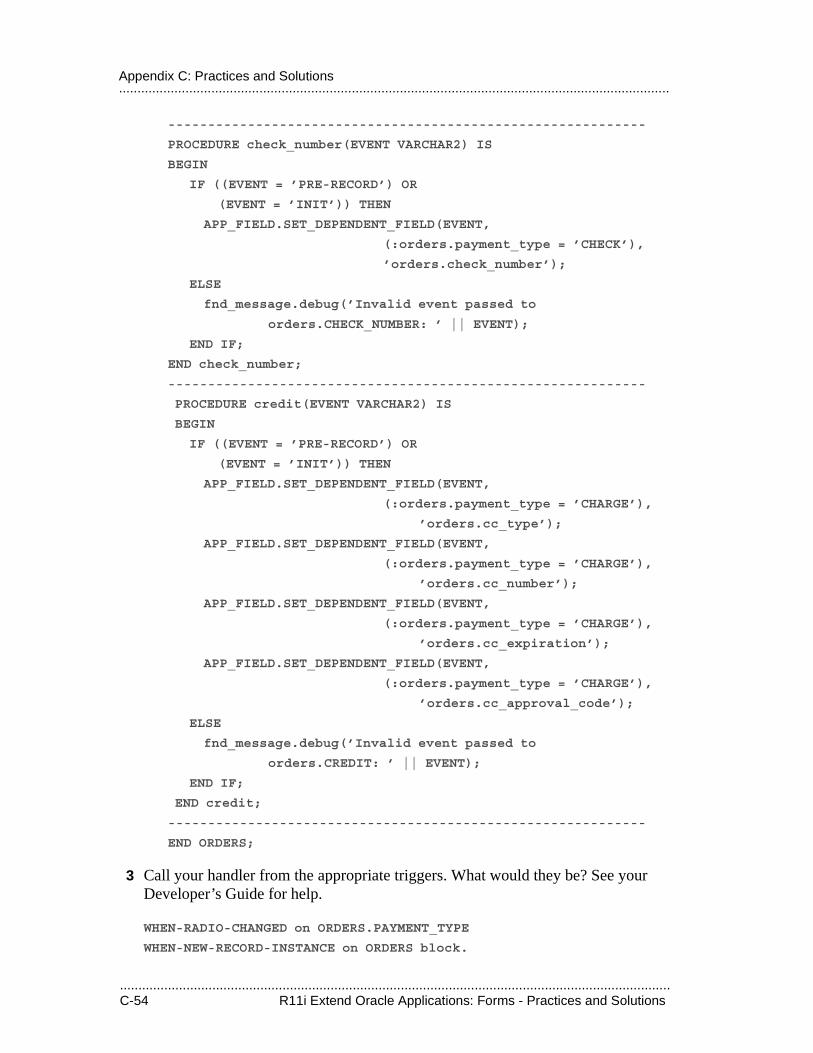
.....................................................................................................................................................C-54 R11i Extend Oracle Applications: Forms - Practices and Solutions
.....................................................................................................................................................Appendix C: Practices and Solutions
------------------------------------------------------------
PROCEDURE check_number(EVENT VARCHAR2) IS
BEGIN
IF ((EVENT = ’PRE-RECORD’) OR
(EVENT = ’INIT’)) THEN
APP_FIELD.SET_DEPENDENT_FIELD(EVENT,
(:orders.payment_type = ’CHECK’),
’orders.check_number’);
ELSE
fnd_message.debug(’Invalid event passed to
orders.CHECK_NUMBER: ’ || EVENT);
END IF;
END check_number;
------------------------------------------------------------
PROCEDURE credit(EVENT VARCHAR2) IS
BEGIN
IF ((EVENT = ’PRE-RECORD’) OR
(EVENT = ’INIT’)) THEN
APP_FIELD.SET_DEPENDENT_FIELD(EVENT,
(:orders.payment_type = ’CHARGE’),
’orders.cc_type’);
APP_FIELD.SET_DEPENDENT_FIELD(EVENT,
(:orders.payment_type = ’CHARGE’),
’orders.cc_number’);
APP_FIELD.SET_DEPENDENT_FIELD(EVENT,
(:orders.payment_type = ’CHARGE’),
’orders.cc_expiration’);
APP_FIELD.SET_DEPENDENT_FIELD(EVENT,
(:orders.payment_type = ’CHARGE’),
’orders.cc_approval_code’);
ELSE
fnd_message.debug(’Invalid event passed to
orders.CREDIT: ’ || EVENT);
END IF;
END credit;
------------------------------------------------------------
END ORDERS;
3 Call your handler from the appropriate triggers. What would they be? See your Developer’s Guide for help.
WHEN-RADIO-CHANGED on ORDERS.PAYMENT_TYPE
WHEN-NEW-RECORD-INSTANCE on ORDERS block.
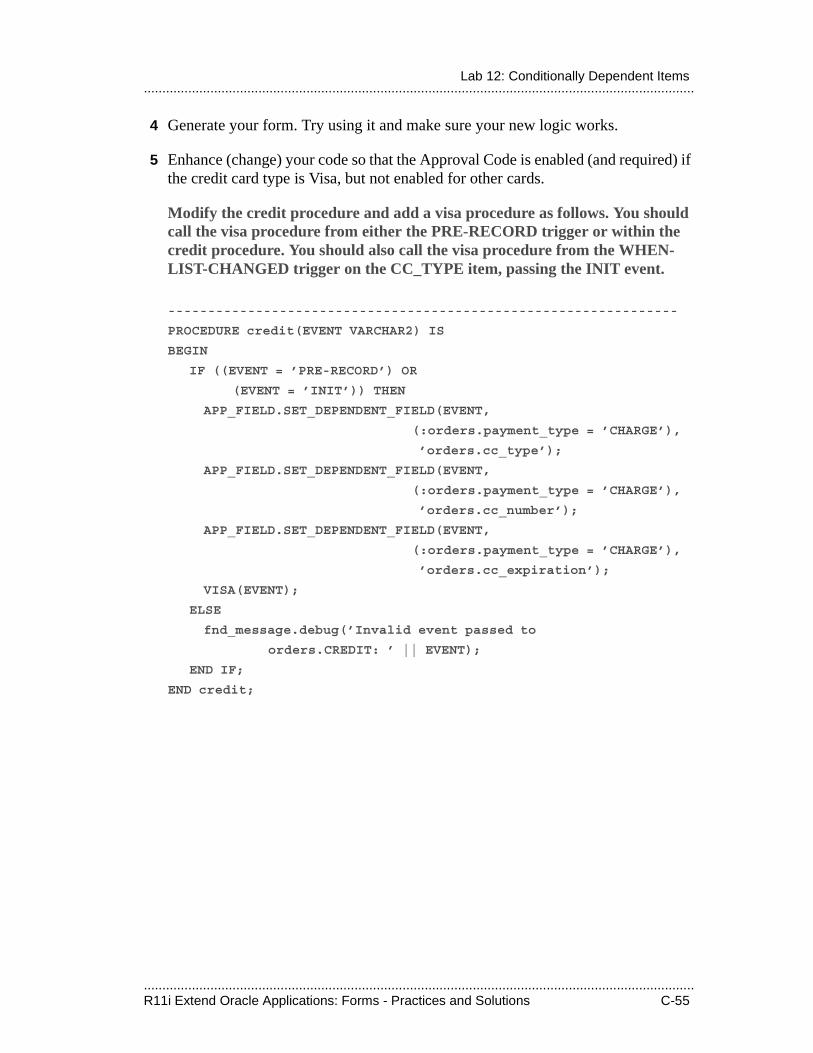
.....................................................................................................................................................R11i Extend Oracle Applications: Forms - Practices and Solutions C-55
.....................................................................................................................................................Lab 12: Conditionally Dependent Items
4 Generate your form. Try using it and make sure your new logic works.
5 Enhance (change) your code so that the Approval Code is enabled (and required) if the credit card type is Visa, but not enabled for other cards.
Modify the credit procedure and add a visa procedure as follows. You should call the visa procedure from either the PRE-RECORD trigger or within the credit procedure. You should also call the visa procedure from the WHEN-LIST-CHANGED trigger on the CC_TYPE item, passing the INIT event.
----------------------------------------------------------------
PROCEDURE credit(EVENT VARCHAR2) IS
BEGIN
IF ((EVENT = ’PRE-RECORD’) OR
(EVENT = ’INIT’)) THEN
APP_FIELD.SET_DEPENDENT_FIELD(EVENT,
(:orders.payment_type = ’CHARGE’),
’orders.cc_type’);
APP_FIELD.SET_DEPENDENT_FIELD(EVENT,
(:orders.payment_type = ’CHARGE’),
’orders.cc_number’);
APP_FIELD.SET_DEPENDENT_FIELD(EVENT,
(:orders.payment_type = ’CHARGE’),
’orders.cc_expiration’);
VISA(EVENT);
ELSE
fnd_message.debug(’Invalid event passed to
orders.CREDIT: ’ || EVENT);
END IF;
END credit;
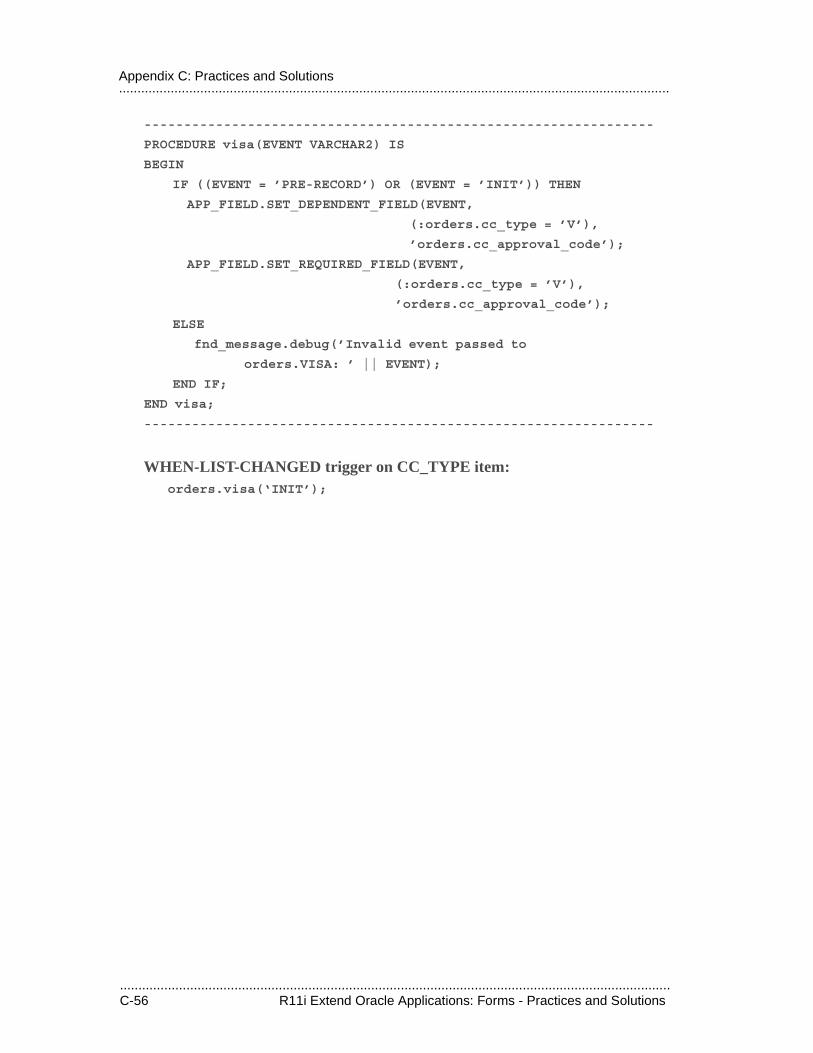
.....................................................................................................................................................C-56 R11i Extend Oracle Applications: Forms - Practices and Solutions
.....................................................................................................................................................Appendix C: Practices and Solutions
----------------------------------------------------------------
PROCEDURE visa(EVENT VARCHAR2) IS
BEGIN
IF ((EVENT = ’PRE-RECORD’) OR (EVENT = ’INIT’)) THEN
APP_FIELD.SET_DEPENDENT_FIELD(EVENT,
(:orders.cc_type = ’V’),
’orders.cc_approval_code’);
APP_FIELD.SET_REQUIRED_FIELD(EVENT,
(:orders.cc_type = ’V’),
’orders.cc_approval_code’);
ELSE
fnd_message.debug(’Invalid event passed to
orders.VISA: ’ || EVENT);
END IF;
END visa;
----------------------------------------------------------------
WHEN-LIST-CHANGED trigger on CC_TYPE item:orders.visa(‘INIT’);
.....................................................................................................................................................R11i Extend Oracle Applications: Forms - Practices and Solutions C-57
.....................................................................................................................................................Lab 13: Message Dictionary
Lab 13: Message Dictionary
1 Save a backup copy of your form file as DEMxxE11.fmb. Continue working on DEMxxEOR.fmb.
The DEMXXE12 file contains this completed exercise.
2 Create a message that informs the user that the ship date may not come before the order date using the Oracle Application Object Library Messages form. Depending on how your class environment is set up, you may not be able to use this message in your form (your instructor will tell you if you can).
a Give the message a name of ‘DEMxx_SHIP_BEFORE_ORDER’ where xx is your team number.
b Use your instructor’s Demo Order Entry application as the application name instead of your own application.
c Include tokens for SHIPDATE and ORDERDATE in the text of your message.
Please enter an order date (&ORDERDATE) that comes before the ship date (&SHIPDATE).
3 Create a record-level handler for your DATE_SHIPPED and DATE_ORDERED items that checks that the ship date never comes before the order date. If it does, use Message Dictionary to display an error message (use the application shortname ‘DEM’, and the message name ‘DEMxx_SHIP_BEFORE_ORDER’).
a Use FND_MESSAGE.SET_NAME to set your message.
b Call the message from appropriate triggers using one of the procedures: FND_MESSAGE.ERROR, FND_MESSAGE.SHOW, FND_MESSAGE.WARN or FND_MESSAGE.HINT.
c If the message uses tokens, use FND_MESSAGE_SET_TOKEN to set the token value before displaying the message.
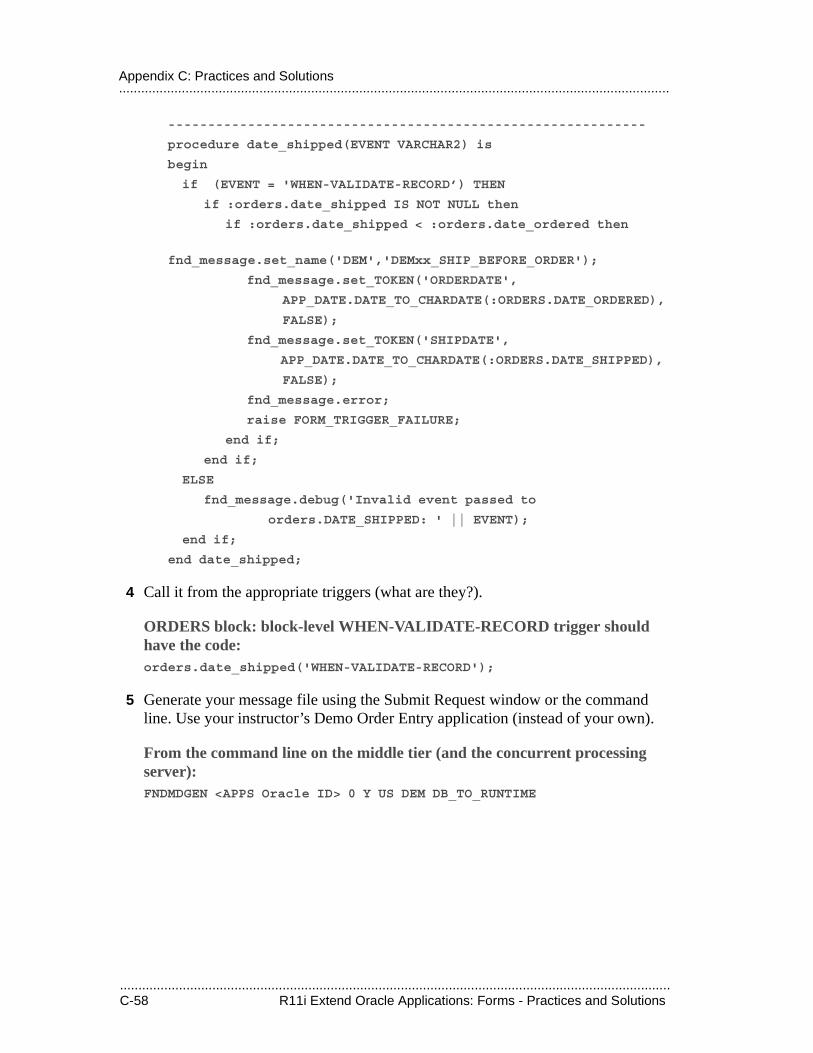
.....................................................................................................................................................C-58 R11i Extend Oracle Applications: Forms - Practices and Solutions
.....................................................................................................................................................Appendix C: Practices and Solutions
------------------------------------------------------------
procedure date_shipped(EVENT VARCHAR2) is
begin
if (EVENT = 'WHEN-VALIDATE-RECORD’) THEN
if :orders.date_shipped IS NOT NULL then
if :orders.date_shipped < :orders.date_ordered then
fnd_message.set_name('DEM','DEMxx_SHIP_BEFORE_ORDER');
fnd_message.set_TOKEN('ORDERDATE',
APP_DATE.DATE_TO_CHARDATE(:ORDERS.DATE_ORDERED),
FALSE);
fnd_message.set_TOKEN('SHIPDATE',
APP_DATE.DATE_TO_CHARDATE(:ORDERS.DATE_SHIPPED),
FALSE);
fnd_message.error;
raise FORM_TRIGGER_FAILURE;
end if;
end if;
ELSE
fnd_message.debug('Invalid event passed to
orders.DATE_SHIPPED: ' || EVENT);
end if;
end date_shipped;
4 Call it from the appropriate triggers (what are they?).
ORDERS block: block-level WHEN-VALIDATE-RECORD trigger should have the code:orders.date_shipped('WHEN-VALIDATE-RECORD');
5 Generate your message file using the Submit Request window or the command line. Use your instructor’s Demo Order Entry application (instead of your own).
From the command line on the middle tier (and the concurrent processing server):FNDMDGEN <APPS Oracle ID> 0 Y US DEM DB_TO_RUNTIME

.....................................................................................................................................................R11i Extend Oracle Applications: Forms - Practices and Solutions C-59
.....................................................................................................................................................Lab 14: Flexfields
Lab 14: Flexfields
1 Save a backup copy of your form file as DEMxxE12.fmb. Continue working on DEMxxEOR.fmb.
The DEMXXE13 file contains this completed exercise.
2 For each of your three flexfields, set the List of Values property to ENABLE_LIST_LAMP. Make sure the Validate from List property is set to No (this overrides an inherited property).
ORDERS.DESC_FLEX, LINES.DESC_FLEX, LINES.ACCTG_FLEX_VALUES
3 Create an item handler for the ACCTG_FLEX_VALUES item that sets up the definition for the Accounting Flexfield (application shortname SQLGL, flexfield code GL#, and default structure 101). Note that the structure ID (NUM) is hardcoded to 101 for simplicity; otherwise we would have to deal with the GL_SET_OF_BOOKS_ID and other GL information. Your ID field is the GL_ACCOUNT_CC_ID item.
--------------------------------------------------------
PROCEDURE ACCTG_FLEX_VALUES(EVENT VARCHAR2) IS
BEGIN
IF (EVENT = ’WHEN-NEW-FORM-INSTANCE’) THEN
FND_KEY_FLEX.DEFINE(
BLOCK=>’LINES’,
FIELD=>’ACCTG_FLEX_VALUES’,
ID=>’GL_ACCOUNT_CC_ID’,
APPL_SHORT_NAME=>’SQLGL’,
CODE=>’GL#’,
NUM=>’101’);
ELSE
fnd_message.debug(’Invalid event passed tolines.ACCTG_FLEX_VALUES: ’ || EVENT);
END IF;
END ACCTG_FLEX_VALUES;
4 Call your handler as directed in your Developer’s Guide.
WHEN-NEW-FORM-INSTANCE trigger:
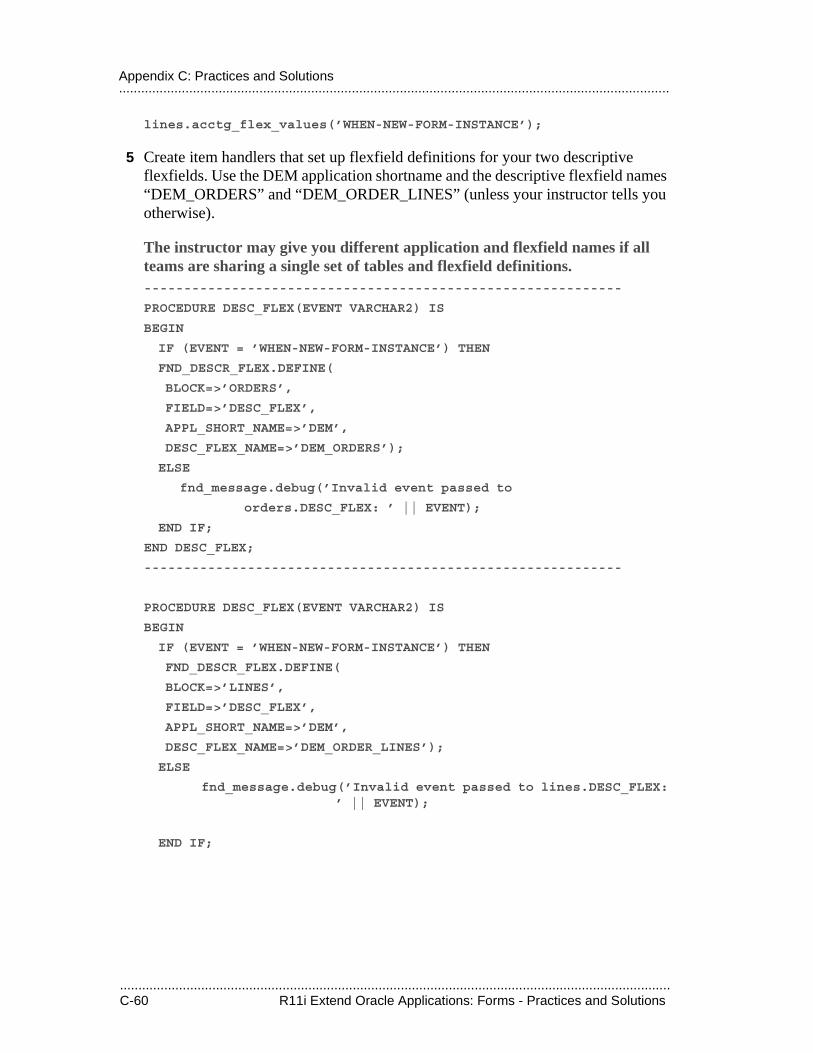
.....................................................................................................................................................C-60 R11i Extend Oracle Applications: Forms - Practices and Solutions
.....................................................................................................................................................Appendix C: Practices and Solutions
lines.acctg_flex_values(’WHEN-NEW-FORM-INSTANCE’);
5 Create item handlers that set up flexfield definitions for your two descriptive flexfields. Use the DEM application shortname and the descriptive flexfield names “DEM_ORDERS” and “DEM_ORDER_LINES” (unless your instructor tells you otherwise).
The instructor may give you different application and flexfield names if all teams are sharing a single set of tables and flexfield definitions.------------------------------------------------------------
PROCEDURE DESC_FLEX(EVENT VARCHAR2) IS
BEGIN
IF (EVENT = ’WHEN-NEW-FORM-INSTANCE’) THEN
FND_DESCR_FLEX.DEFINE(
BLOCK=>’ORDERS’,
FIELD=>’DESC_FLEX’,
APPL_SHORT_NAME=>’DEM’,
DESC_FLEX_NAME=>’DEM_ORDERS’);
ELSE
fnd_message.debug(’Invalid event passed to
orders.DESC_FLEX: ’ || EVENT);
END IF;
END DESC_FLEX;
------------------------------------------------------------
PROCEDURE DESC_FLEX(EVENT VARCHAR2) IS
BEGIN
IF (EVENT = ’WHEN-NEW-FORM-INSTANCE’) THEN
FND_DESCR_FLEX.DEFINE(
BLOCK=>’LINES’,
FIELD=>’DESC_FLEX’,
APPL_SHORT_NAME=>’DEM’,
DESC_FLEX_NAME=>’DEM_ORDER_LINES’);
ELSE
fnd_message.debug(’Invalid event passed to lines.DESC_FLEX:’ || EVENT);
END IF;
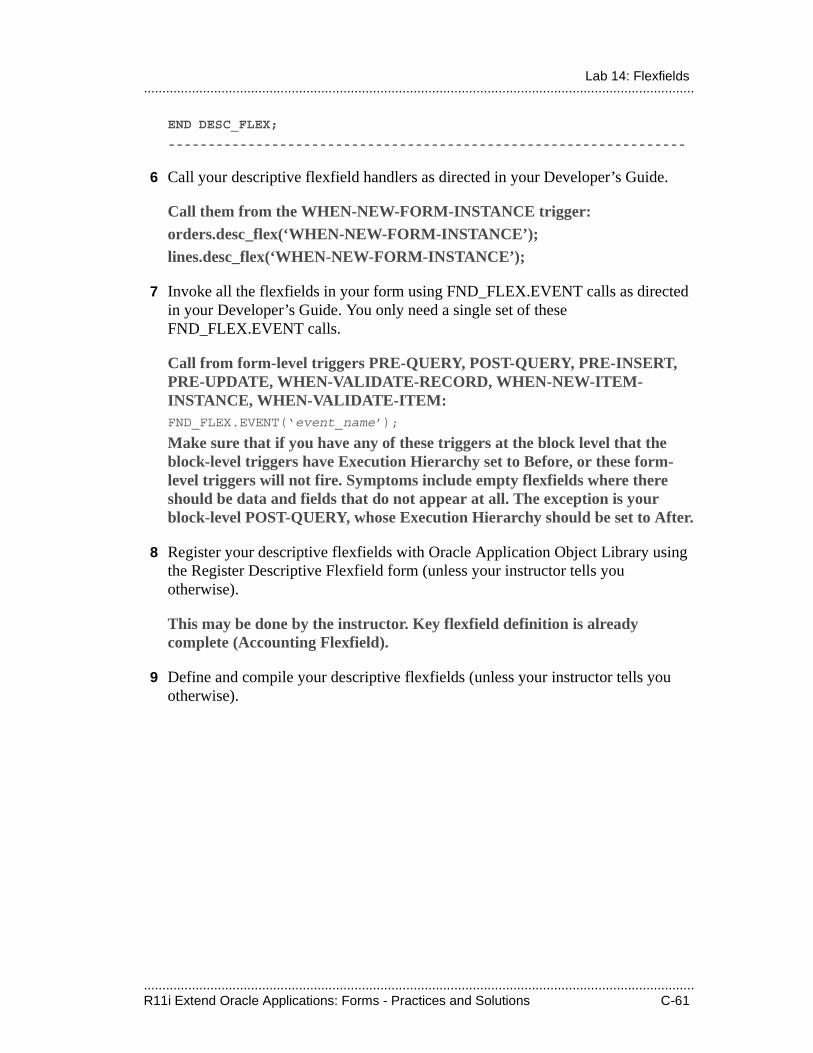
.....................................................................................................................................................R11i Extend Oracle Applications: Forms - Practices and Solutions C-61
.....................................................................................................................................................Lab 14: Flexfields
END DESC_FLEX;
-----------------------------------------------------------------
6 Call your descriptive flexfield handlers as directed in your Developer’s Guide.
Call them from the WHEN-NEW-FORM-INSTANCE trigger:orders.desc_flex(‘WHEN-NEW-FORM-INSTANCE’);lines.desc_flex(‘WHEN-NEW-FORM-INSTANCE’);
7 Invoke all the flexfields in your form using FND_FLEX.EVENT calls as directed in your Developer’s Guide. You only need a single set of these FND_FLEX.EVENT calls.
Call from form-level triggers PRE-QUERY, POST-QUERY, PRE-INSERT, PRE-UPDATE, WHEN-VALIDATE-RECORD, WHEN-NEW-ITEM-INSTANCE, WHEN-VALIDATE-ITEM:FND_FLEX.EVENT(‘event_name’);
Make sure that if you have any of these triggers at the block level that the block-level triggers have Execution Hierarchy set to Before, or these form-level triggers will not fire. Symptoms include empty flexfields where there should be data and fields that do not appear at all. The exception is your block-level POST-QUERY, whose Execution Hierarchy should be set to After.
8 Register your descriptive flexfields with Oracle Application Object Library using the Register Descriptive Flexfield form (unless your instructor tells you otherwise).
This may be done by the instructor. Key flexfield definition is already complete (Accounting Flexfield).
9 Define and compile your descriptive flexfields (unless your instructor tells you otherwise).
.....................................................................................................................................................C-62 R11i Extend Oracle Applications: Forms - Practices and Solutions
.....................................................................................................................................................Appendix C: Practices and Solutions
This may be done by the instructor. Key flexfield definition is already complete (Accounting Flexfield).
10 Try out all of your flexfields.
.....................................................................................................................................................R11i Extend Oracle Applications: Forms - Practices and Solutions C-63
.....................................................................................................................................................Lab 15: Query Find
Lab 15: Query Find
Row LOV Window
1 Save a backup copy of your form file as DEMxxE13.fmb. Continue working on DEMxxEOR.fmb.
The DEMXXE14 file contains this completed exercise.
2 Create a row LOV window for your LINES block according to your form specification and using your Developer’s Guide.
Your ORDER_LINES_QF record group should be something like:select order_line_num, product_id, product_description, ordered_quantity from dem_order_lines_v where order_id = :lines.order_id
Query Find Window
3 Create a query find window on your ORDERS block. See your Developer’s Guide for help.
a Copy the QUERY_FIND object group from the APPSTAND form as directed in the manual.
APPSTAND is probably located in apps10/au10/res/US/appstand.fmb, depending on your class setup.
b Delete the object group from your form.
c Rename the appropriate objects.
d Edit the appropriate triggers.
e Set the navigation block property.
f Change the window title.
g Create necessary items in your window as shown in your form specification. Adjust the properties as directed in the manual.
.....................................................................................................................................................C-64 R11i Extend Oracle Applications: Forms - Practices and Solutions
.....................................................................................................................................................Appendix C: Practices and Solutions
Suggestion: get your Find window working with just one or two items at first, then add more items as time allows.
h Adjust your window size.
i Create your PRE-QUERY trigger in the Results block (ORDERS) to copy values from the Query Find Window into items in the ORDERS block before the actual query. Your trigger should account for fields that pass character data, numeric data, date range data, and null values.
IF :parameter.G_query_find = ’TRUE’ THEN
:orders.order_id := :ORDERS_QF.ORDER_ID;
app_find.query_range(:orders_qf.date_ordered_from,
:orders_qf.date_ordered_to,
’ORDERS.DATE_ORDERED’);
COPY (:orders_qf.order_status, ’ORDERS.ORDER_STATUS’);
:orders.customer_id := :ORDERS_QF.CUSTOMER_ID;
COPY (:orders_qf.customer_name, ’ORDERS.CUSTOMER_NAME’);
:orders.sales_rep_id := :ORDERS_QF.SALES_REP_ID;
COPY (:orders_qf.sales_rep_name, ’ORDERS.SALES_REP_NAME’);
if :orders_qf.payment_type is not null then
COPY (:orders_qf.payment_type, ’ORDERS.PAYMENT_TYPE’);
end if;
:parameter.G_query_find := ’FALSE’;
end if;
j Create your QUERY_FIND trigger as directed.
.....................................................................................................................................................R11i Extend Oracle Applications: Forms - Practices and Solutions C-65
.....................................................................................................................................................Lab 16: Advanced Function Security
Lab 16: Advanced Function Security
1 Save a backup copy of your form file as DEMxxE14.fmb. Continue working on DEMxxEOR.fmb.
The DEMXXE15 file contains this completed exercise.Lab answer files may have the package DEMXXEOR (and references to it) as DEMXXE14.
2 Create a program unit called DEMxxEOR (to match your module and file names), and create a handler in it that accepts a call from the SPECIAL1 trigger and generates a message.
PACKAGE DEMXXEOR IS
PROCEDURE SPECIAL1_HANDLER(event varchar2);
END DEMXXEOR;
a In your handler, generate a debug message that the SPECIAL1 logic has been fired.
fnd_message.debug(’The SPECIAL1 menu logic has been fired from event: ’ || EVENT);
3 Create a form-level user-named trigger called SPECIAL1 that calls your handler and passes the trigger name.
DEMXXEOR.SPECIAL1_HANDLER(’SPECIAL1’);
4 Invoke your SPECIAL1 trigger as directed in your manual so that it appears as the first entry on the Tools menu. Make the menu choice be “Special 1”, with S as the access key.
Create a new procedure in the DEMXXEOR package:PROCEDURE PRE_FORM IS
BEGIN
app_special.instantiate(’SPECIAL1’,’&Special 1’);
END PRE_FORM;
Call this procedure from your PRE-FORM trigger:DEMXXEOR.PRE_FORM;
.....................................................................................................................................................C-66 R11i Extend Oracle Applications: Forms - Practices and Solutions
.....................................................................................................................................................Appendix C: Practices and Solutions
5 Try it out.
6 Make your special menu choice available only to users of authorized responsibilities by adding a function security test.
a Register a new function, DEMxx_DEMxxEOR_SPECIAL1.
b Add it to your own menu.
c Add code to your PRE_FORM handlerto make it test for the function before enabling the Special menu choice. Add debug messages to indicate both if the function is available or not available.
Sample code:PROCEDURE PRE_FORM IS
IF (FND_FUNCTION.TEST(’DEMxx_DEMxxEOR_SPECIAL1’)) THEN
/* Put Special 1 on the Special menu */
fnd_message.debug(’The Special 1 function is
available’);
app_special.instantiate(’SPECIAL1’,’&Special 1’);
app_special.enable(’SPECIAL1’,PROPERTY_ON);
ELSE
fnd_message.debug(’The Special 1 function is not
available’);
null;
END IF;
END PRE_FORM
7 Try it out. Make sure it works both when the function is available and not available to your responsibility. Remove the extra debug messages when you are satisfied it works correctly.
8 Challenge 1: Create a button that executes the Special 1 logic. Make the button appear or not depending on your function security routines.
9 Challenge 2: Create additional special menu entries including entries on the Reports and/or Actions menus, separator lines, and check boxes on the Tools menu.
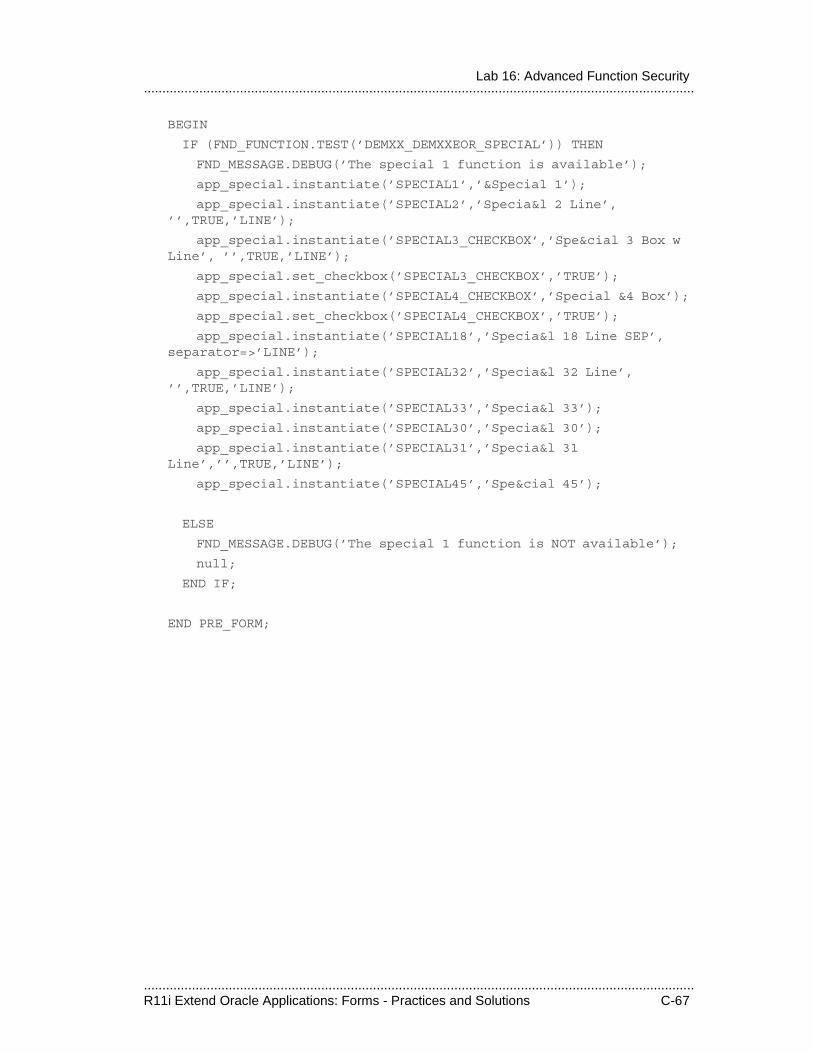
.....................................................................................................................................................R11i Extend Oracle Applications: Forms - Practices and Solutions C-67
.....................................................................................................................................................Lab 16: Advanced Function Security
BEGIN
IF (FND_FUNCTION.TEST(’DEMXX_DEMXXEOR_SPECIAL’)) THEN
FND_MESSAGE.DEBUG(’The special 1 function is available’);
app_special.instantiate(’SPECIAL1’,’&Special 1’);
app_special.instantiate(’SPECIAL2’,’Specia&l 2 Line’, ’’,TRUE,’LINE’);
app_special.instantiate(’SPECIAL3_CHECKBOX’,’Spe&cial 3 Box w Line’, ’’,TRUE,’LINE’);
app_special.set_checkbox(’SPECIAL3_CHECKBOX’,’TRUE’);
app_special.instantiate(’SPECIAL4_CHECKBOX’,’Special &4 Box’);
app_special.set_checkbox(’SPECIAL4_CHECKBOX’,’TRUE’);
app_special.instantiate(’SPECIAL18’,’Specia&l 18 Line SEP’, separator=>’LINE’);
app_special.instantiate(’SPECIAL32’,’Specia&l 32 Line’, ’’,TRUE,’LINE’);
app_special.instantiate(’SPECIAL33’,’Specia&l 33’);
app_special.instantiate(’SPECIAL30’,’Specia&l 30’);
app_special.instantiate(’SPECIAL31’,’Specia&l 31 Line’,’’,TRUE,’LINE’);
app_special.instantiate(’SPECIAL45’,’Spe&cial 45’);
ELSE
FND_MESSAGE.DEBUG(’The special 1 function is NOT available’);
null;
END IF;
END PRE_FORM;

.....................................................................................................................................................C-68 R11i Extend Oracle Applications: Forms - Practices and Solutions
.....................................................................................................................................................Appendix C: Practices and Solutions
Lab 17: Setting Up Attachments
1 Define your Orders and Lines document entities using the Document Entities window (Application Developer responsibility, navigate to Attachments–>Document Entities).
a Use the class tables DEM_ORDERS and DEM_ORDER_LINES.
b For your entity IDs, append “TEAM_xx” to the table name so your entities do not conflict with entities defined by other students.
c For your entity names, call them “Team xx Orders” and “Team xx Lines”.
d Be sure to use your own application name for your entities.
2 Optional: Define your own document category using the Document Categories window (Application Developer responsibility, navigate to Attachments–>Document Categories).
3 Define your attachment function using the Attachment Functions window (Application Developer responsibility, navigate to Attachments–>Attachment Functions).
a Specify your existing form function name.
b Specify the Miscellaneous category and/or your own category.
4 Set up attachments for your ORDERS block.
a Set the context to display the customer name and the order number in the title of the Attachments window.
ORDERS.CUSTOMER_NAME, ORDERS.ORDER_ID
b Use your “Team xx Orders” entity as the main entity, and include it in the indicator.
c Give it all privileges (Always).
d Specify the primary key field with which the attachment should be associated.
orders.order_id
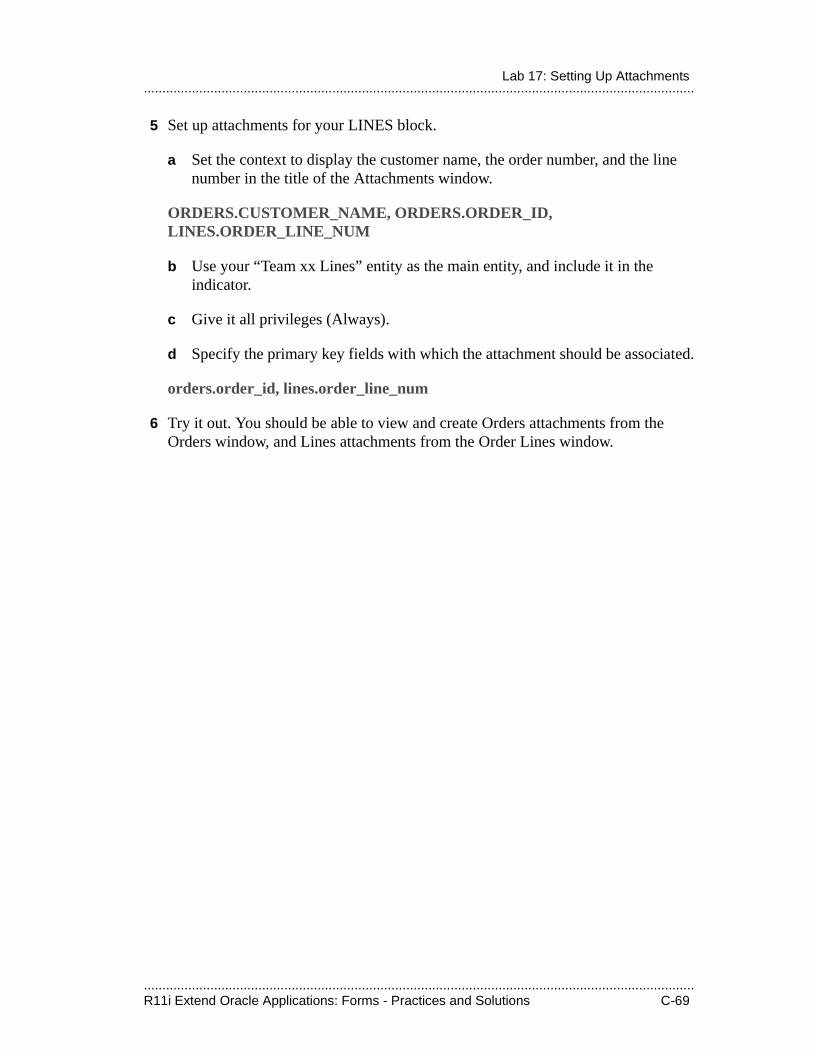
.....................................................................................................................................................R11i Extend Oracle Applications: Forms - Practices and Solutions C-69
.....................................................................................................................................................Lab 17: Setting Up Attachments
5 Set up attachments for your LINES block.
a Set the context to display the customer name, the order number, and the line number in the title of the Attachments window.
ORDERS.CUSTOMER_NAME, ORDERS.ORDER_ID, LINES.ORDER_LINE_NUM
b Use your “Team xx Lines” entity as the main entity, and include it in the indicator.
c Give it all privileges (Always).
d Specify the primary key fields with which the attachment should be associated.
orders.order_id, lines.order_line_num
6 Try it out. You should be able to view and create Orders attachments from the Orders window, and Lines attachments from the Order Lines window.
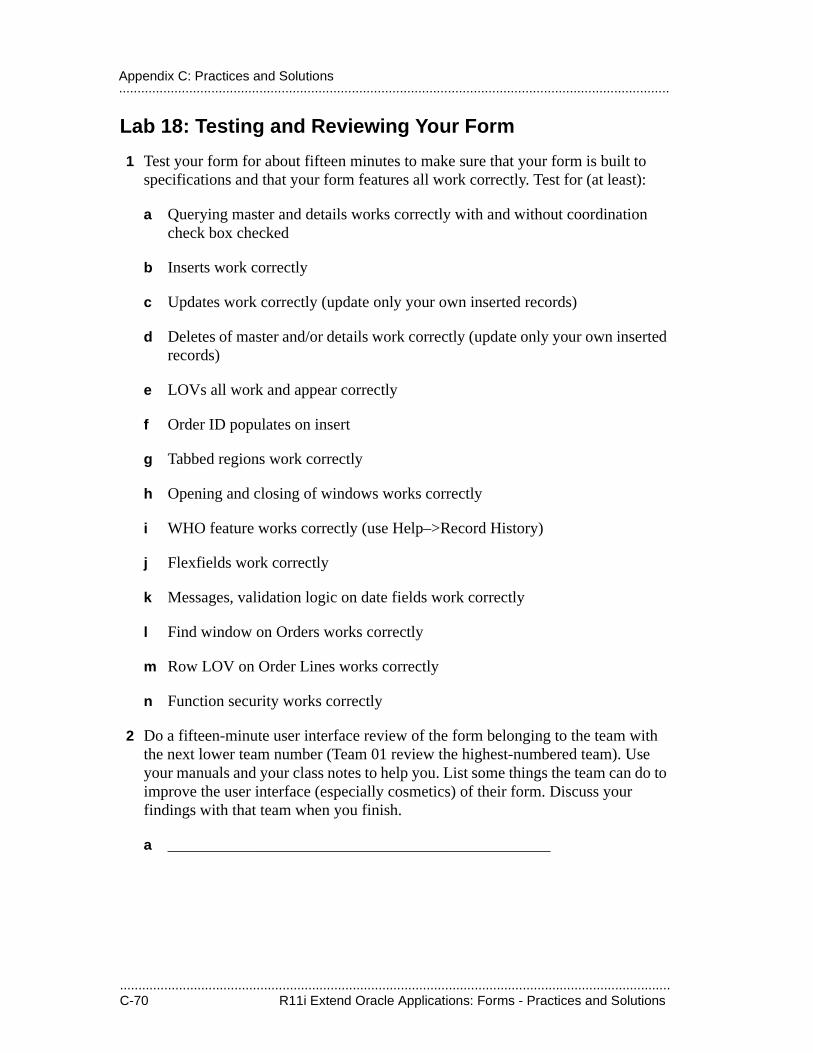
.....................................................................................................................................................C-70 R11i Extend Oracle Applications: Forms - Practices and Solutions
.....................................................................................................................................................Appendix C: Practices and Solutions
Lab 18: Testing and Reviewing Your Form
1 Test your form for about fifteen minutes to make sure that your form is built to specifications and that your form features all work correctly. Test for (at least):
a Querying master and details works correctly with and without coordination check box checked
b Inserts work correctly
c Updates work correctly (update only your own inserted records)
d Deletes of master and/or details work correctly (update only your own inserted records)
e LOVs all work and appear correctly
f Order ID populates on insert
g Tabbed regions work correctly
h Opening and closing of windows works correctly
i WHO feature works correctly (use Help–>Record History)
j Flexfields work correctly
k Messages, validation logic on date fields work correctly
l Find window on Orders works correctly
m Row LOV on Order Lines works correctly
n Function security works correctly
2 Do a fifteen-minute user interface review of the form belonging to the team with the next lower team number (Team 01 review the highest-numbered team). Use your manuals and your class notes to help you. List some things the team can do to improve the user interface (especially cosmetics) of their form. Discuss your findings with that team when you finish.
a ________________________________________________
.....................................................................................................................................................R11i Extend Oracle Applications: Forms - Practices and Solutions C-71
.....................................................................................................................................................Lab 18: Testing and Reviewing Your Form
b ________________________________________________
c ________________________________________________
d ________________________________________________
e ________________________________________________

.....................................................................................................................................................C-72 R11i Extend Oracle Applications: Forms - Practices and Solutions
.....................................................................................................................................................Appendix C: Practices and Solutions