Embed Size (px)
Citation preview

© Kristen Daniels Dotti 2011 Experimental Biology Curriculum Samples [email protected] This product is licensed to a single user.
Experimental Biology Daily Lesson Plans
(samples)
A Pre-AP and General Biology Course Based on Inquiry Learning
This full-year curriculum includes:
• 170 sequential lesson plans covering the General Biology requirements for all 50 states, including study skills and lab skills.
• A pacing calendar, a materials list, student handouts and grading rubrics for all activities and labs.
• 100% hands-on learning so the teacher can provide a student-centered classroom environment with no lecture.
• Content, skills and processes covered using lab experiments, games, model building, debates, projects and other activities designed to promote critical thinking.
Please visit our website at www.CatalystLearningCurricula.com to download additional sample lesson plans or to place an order.

© Kristen Daniels Dotti 2011 Experimental Biology Curriculum Samples [email protected] This product is licensed to a single user.
Experimental Biology Daily Lesson Plans Curriculum
A Pre-AP and General Biology Course Based on Inquiry Learning
Table of Contents
I. Overview and Teaching Tips
II. Full Year Calendar III. Materials List
IV. Daily Lesson Plans Curriculum for Biochemistry – 24 Days V. Daily Lesson Plans Curriculum for Cell Biology – 29 Days
VI. Daily Lesson Plans Curriculum for Genetics – 31 Days VII. Daily Lesson Plans Curriculum for Anatomy and Physiology – 28 Days VIII. Daily Lesson Plans Curriculum for Botany – 27 Days IX. Daily Lesson Plans Curriculum for Ecology – 31 Days X. Notes

© Kristen Daniels Dotti 2011 Experimental Biology Curriculum Samples [email protected] This product is licensed to a single user.
Experimental Biology Curriculum Biochemistry Unit
(sample lesson plan)
Day 13 I. Topic: Protein Enzyme Experiments II. Warm-up: 5 minutes
Prior to class, write the following on the board: “List the factors that affect the function of an enzyme. What do you think would be unusual about the enzymes that exist in bacteria living in the water of a hot spring?” (Organisms that live in hot springs have enzymes that can function under very high temperatures.) “What do you think might be unusual about the enzymes that break food down in your stomach?” (The enzymes in your stomach can function in a very acidic, or low pH, environment.)
III. Activity One: Student-designed Enzyme Lab Using Pectinase 20 minutes Objectives:
a) The learner will (TLW) observe the effect an enzyme has on a substrate. b) TLW determine the factors that influence the effectiveness of an enzyme. c) TLW plan an experiment to test the effectiveness of an enzyme under
different conditions.
Materials: For the class: 2 single-serving (4oz each) plastic containers of applesauce (look for a brand that has the least amount of added chemicals, sweeteners, color or flavor enhancements), 2 12 x 12cm squares of triple-layered cheesecloth, 2 200ml beakers (or large plastic cups), 2 large rubber bands, 1ml of distilled water, 1 disposable 1ml pipette (or a 1-5cc syringe, or other accurate device for delivering measured amounts between 0.25 and 4ml of liquid), 1 100ml bottle of pectinase enzyme (kept at 4°C until use), 2 glass or wooden stir rods, and 2 100ml graduated cylinders.
Procedure:
1. Approximately one hour prior to class, set up the pectinase demonstration: Cut two 12 x 12cm pieces of triple-layered cheesecloth and secure each over the top of a beaker or cup using a rubber band. Label one of the beakers “Enzyme” and the other beaker “No Enzyme.” Open the two single-serving containers of applesauce. Note the start time for the experiment, then add 1ml of pectinase to one container of the applesauce and 1ml of distilled water to the other container of applesauce. Place each container in front of the corresponding labeled beaker and stir the

© Kristen Daniels Dotti 2011 Experimental Biology Curriculum Samples [email protected] This product is licensed to a single user.
contents of each container with separate stir rods. Set out the two 100ml cylinders for use when the students arrive.
2. When the students arrive, explain to them what you have done so far and tell them how much time has passed (it should be about 20-50 minutes). Ask four students to come to the demonstration table and help you with the experiment by pouring the applesauce samples onto the cheesecloth covering each beaker: Ask one student to hold the cheesecloth in place by placing their hands around the rubber band that holds the fabric, while a second student uses a stir rod to scrape out all the contents of the plastic container onto the cheesecloth. Meanwhile, the second pair of students will do the same with the other beaker.
3. Tell the students you are going to give the samples about 15 minutes to drain. Ask the students to interpret what they think pectinase might do to the applesauce, based on the name of the chemical. (The -ase ending indicates that pectinase is a protein, so the students should be able to guess that it will act as an enzyme; they are welcome to use the Internet to look up additional information). Ask them what they think will be the difference between the two samples. Use additional questioning to get the students to explain their answers completely, backing up their ideas with reasoning, past experiences, or facts.
4. Confirm that pectinase is indeed an enzyme and let the students know that it is widely used to break down the polysaccharides (repeating sugar molecules) found in plants. When pectinase breaks down polysaccharides into smaller chains or monomers, the fruit or plant material releases juice and becomes clearer. Pectinase is used in the juice and wine industries to obtain more juice from fruit and to remove the haziness, so that the resulting beverages are clear.
5. Tell the students that they are scientists who have been consulted by a client who sells pectinase enzyme to the juice industry and wants to find the optimal conditions for the enzyme. Ask the students what factors they think could be adjusted to make the enzyme work best. Make a list on the board, encouraging the students to think about what they have read in their textbook and what they have learned from the in-class modeling of protein enzymes.
6. When they have come up with a fairly complete list, tell them that the client they are working for has asked them to optimize four specific parameters—pH, temperature, concentration of enzyme, and reaction time—to determine the functionality of the enzyme along a wide range. Assign one of the four parameters to each lab group (or allow the students to choose the parameter that interests them most) and have each group write a procedure to test the range limits, effectiveness and optimal conditions for their factor (which will be carried out in Activity Two, below).
7. Carefully remove the cheesecloth and applesauce covering each beaker and pour off the contents of each beaker into separate graduated cylinders. Allow two students to come to the front of the class to announce the amount of juice derived from each treatment.
8. Allow the students to divide into lab groups for the next activity.

© Kristen Daniels Dotti 2011 Experimental Biology Curriculum Samples [email protected] This product is licensed to a single user.
IV. Activity Two: Peer Review of Pectinase Experiments 25 minutes
Objectives: a) TLW clarify their experimental question, hypothesis, and procedure. b) TLW will offer help clarifying the experimental questions, hypotheses, and
procedures of their peers.
Materials: For each student: their copy of the “Lab Report Requirements” handout (that follows the lesson plan for Day 7 of this unit). For each lab group: 1 sheet of large easel pad paper, and 2-3 dark-colored, wide-tipped markers.
Procedure:
1. Ask the lab groups to each generate the best possible procedure to test the
parameters of the factor they were assigned (or that they chose). They should try to create the simplest procedure possible that is scientific, repeatable, clear, and without introduced errors.
2. Once the general procedure has been created, ask the students to make a visual presentation that concisely presents their question, hypothesis, null hypothesis, and procedure to the rest of the class (you may give each group space on a section of the board or distribute easel pad paper and markers).
3. When all the lab groups are ready, ask one group to come forward and present their scientific experiment question, hypotheses, and procedure to the rest of the class.
4. Tell the students who are listening to the presentation that they will be graded on the help they give to their peers. If needed, remind your students how to give constructive criticism (for example, by asking questions that reveal a weak part of the experiment and by offering solutions to problems as they are pointed out).
5. After the audience has helped this group perfect their procedure as much as possible, allow any other group who is testing the same factor to present their experiment next, so that the two procedures can be compared.
6. After all the experiments have been presented, reviewed and improved, allow the lab groups a few moments to convene to make corrections and finalize their work.
7. Ask the groups to each give you a list of any supplies they will need, so that you can obtain and prep the supplies for the next class meeting.
HW: Ask the students to write the Methods section of their enzyme lab report and create an appropriate data chart for their procedure.

© Kristen Daniels Dotti 2011 Experimental Biology Curriculum Samples [email protected] This product is licensed to a single user.
Experimental Biology Curriculum Biochemistry Unit
(sample lesson plan)
Day 14 I. Topic: Protein Enzyme Experiments II. Warm-up: 5 minutes
Prior to class, write the following on the board: “Collect the supplies needed for your experiment and begin.”
IV. Activity Two: Conduct Pectinase Enzyme Experiments 20 minutes
Objectives: a) The learner will (TLW) practice conducting repeatable scientific experiments
to gather data on a specific scientific question. b) TLW review lab skills and techniques.
Materials:
For each lab group: 6 single-serving (4oz each) plastic containers of applesauce, 6 12cm x 12cm squares of triple-layered cheesecloth, 6 200ml beakers (or large plastic cups), 6 large rubber bands, 6 disposable 1ml pipettes (or 1-5cc syringes, or other accurate device for delivering measured amounts between 0.25 and 4ml of liquid), 6-10ml of pectinase enzyme (kept at 4°C until use), 6 glass or wooden stir rods, 1 100ml graduated cylinder, 1 frozen ice pack, 1 bucket of ice (or a refrigerator with a freezer compartment), 1 hot water bath (or Styrofoam cooler with hot water), 1 box of baking soda, 1 lemon, and any other necessary supplies as determined by the lab procedures written by the students.
Procedure:
1. Allow the lab groups to proceed with their pectinase experiments. 2. Remind the students that each member of each lab group must have their own
completed data chart before leaving class today. 3. Five minutes before the bell, ask the students to clean up their area of the lab and
return clean materials back to their proper places. HW: Ask the students to graph their data and write the Results and Conclusion sections of their lab report.

© Kristen Daniels Dotti 2011 Experimental Biology Curriculum Samples [email protected] This product is licensed to a single user.
Experimental Biology Curriculum Biochemistry Unit
(sample lesson plan)
Day 15 I. Topic: Protein Enzyme Experiments II. Warm-up: 5 minutes
Prior to class, write the following on the board: “Take out your graph and your list of conclusions. Imagine you are from another lab group and take a quick glance at the graph. What does the graph tell you?” (One glance should tell the story of the entire experiment.)
III. Activity One: Present Graph and Conclusions of Data to Peers 45 minutes
Objectives: a) The learner will (TLW) refine their graphing skills. b) TLW establish what conclusions can be supported by the data that has been
collected.
Materials: For each student: the graph and conclusions they created as homework, and their copy of the “Guidelines for Creating Scientific Graphs” handout (which follows the lesson plan for Day 4 of this unit). For each lab group: 2 pieces of large easel pad paper, 1 meter stick, and 1 marker.
Procedure:
1. Ask the students to take turns sharing their graphs with their lab group. Lab group members should point out the strengths and weaknesses of each graph as it is presented to the group. All students should consult the “Guidelines for Creating Scientific Graphs” handout to make sure each graph presented contains the required elements.
2. Ask the lab groups to each make the best graphic representation of their data on the piece of easel pad paper, using the meter stick and the marker. All graphs should have a title (a full sentence with all the essential features of the experiment) and axes labeled with units and consistent increments. Each group graph should be of an appropriate style and should fill the entire space available without running into the limits of either axis. Tell the students that their group graphs will be presented to the class, so the handwriting must be legible—large, neat and in a color that stands out—from any position in the class.
3. Ask the students to take turns sharing their list of conclusions and errors with their lab group. Other members of the lab group should speak up if they disagree with any conclusions or errors stated by another person in the group. They should carefully consider the conclusions listed by each person in their group and discuss whether or not each conclusion is valid according to their data.

© Kristen Daniels Dotti 2011 Experimental Biology Curriculum Samples [email protected] This product is licensed to a single user.
4. On their second piece of easel pad paper, each lab group must list all the conclusions they think are fully supported by their data. Again, this list will be presented to the class and must feature handwriting that is legible from any position in the class.
5. Ask each group to present their graph of data and their conclusions to the class. Remind the class that their role as an audience is to help the presenting lab group create an appropriate graph and analyze their data correctly. Let the students know that full audience participation is imperative and will result in a participation grade for the day. Inform the students that this is not a situation in which you will be critiquing their work; it is a chance for them to help one another earn a better grade before you give your feedback. As much as possible, refrain from participating in the discussion, allowing the students to collaborate.
6. Before class is dismissed, allow a few minutes for the lab group members to jot down any notes and revisions made during the peer review.
7. Ask the students to work together to determine what background information should be included in the Introduction section of their lab reports. All students must include the items listed in the Introduction section of the “Lab Report Requirements” handout, but each lab report should also feature background information that is uniquely relevant to the main topic explored in each particular lab experiment. For example, all students in the class will need to describe how pectinase works as an enzyme—what is the substrate and what are the products. And all students will need to include information about how enzymes are affected by their environment in general—temperature, pH, concentration, and competitive or non-competitive inhibitors. In addition to these topics, each lab group will need to include specific information about pectinase as it pertains to the factor they tested. For example, the lab group that is studying the range of pH will introduce some specific information about pectinase as an enzyme, such as the fact that it functions at a lower pH than most enzymes because it evolved to break down fruit polysaccharides and most fruits have a lower pH.
8. If your students have a hard time determining what information is relevant, ask them to work backwards from their conclusions. For instance, if a group has found that pectinase works at very high temperatures, then they may need to research this conclusion (in which they’ll discover that pectinase is used in canning and jelly production, so it is manipulated to work well up to about 180°F). This same group might find that pectinase works well at very low temperatures, so in their research they might learn that this enzyme helps to break down or ripen fruit that matures in the late fall, when temperatures are low. It is in researching and writing the background information for the Introduction section that your students will learn the majority of the details regarding their main topic of study. Encourage the students to use their textbooks and Internet resources to become an expert on the specific sub-topic they investigated. The process of justifying their conclusions will help solidify the main concepts in the students’ minds as they find the linking ideas that explain relationships between what they have been told or what they have read and what they observed firsthand.
HW: Ask the students to complete the rough draft of their Introduction section, conducting any research necessary for the background information.
© Kristen Daniels Dotti 2011 Experimental Biology Curriculum Samples [email protected] This product is licensed to a single user.
Experimental Biology Curriculum Biochemistry Unit
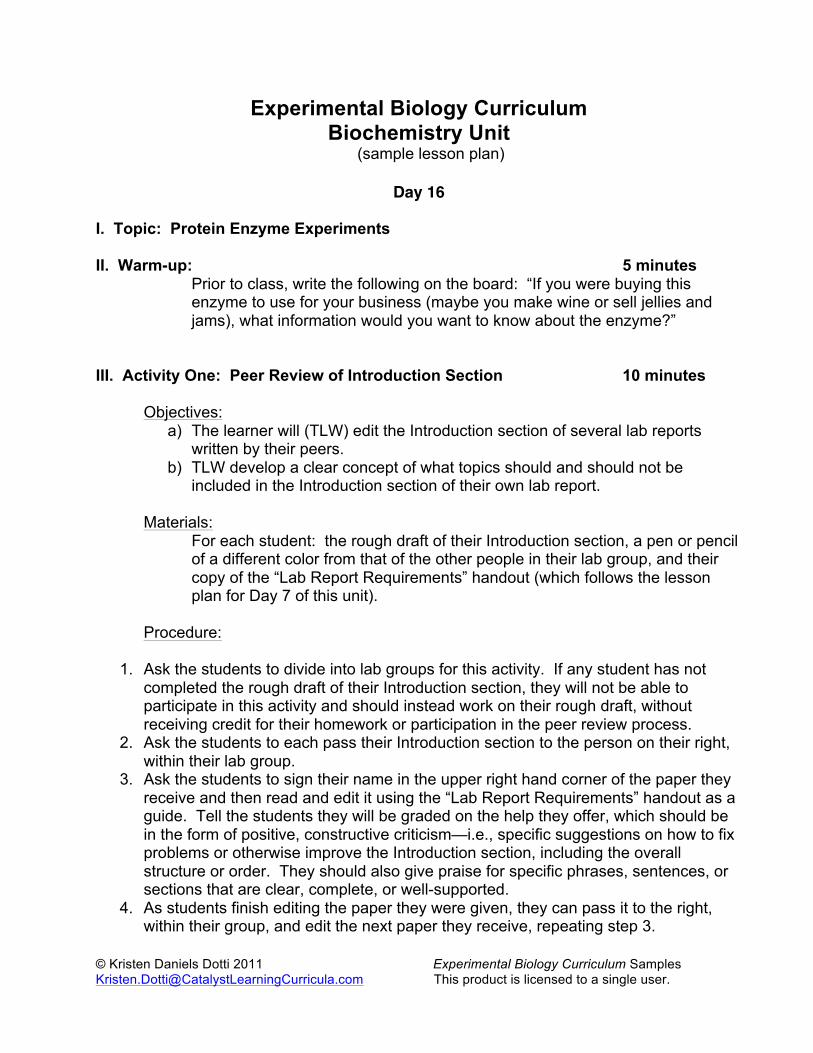
(sample lesson plan)
Day 16 I. Topic: Protein Enzyme Experiments II. Warm-up: 5 minutes
Prior to class, write the following on the board: “If you were buying this enzyme to use for your business (maybe you make wine or sell jellies and jams), what information would you want to know about the enzyme?”
III. Activity One: Peer Review of Introduction Section 10 minutes
Objectives: a) The learner will (TLW) edit the Introduction section of several lab reports
written by their peers. b) TLW develop a clear concept of what topics should and should not be
included in the Introduction section of their own lab report.
Materials: For each student: the rough draft of their Introduction section, a pen or pencil of a different color from that of the other people in their lab group, and their copy of the “Lab Report Requirements” handout (which follows the lesson plan for Day 7 of this unit).
Procedure:
1. Ask the students to divide into lab groups for this activity. If any student has not
completed the rough draft of their Introduction section, they will not be able to participate in this activity and should instead work on their rough draft, without receiving credit for their homework or participation in the peer review process.
2. Ask the students to each pass their Introduction section to the person on their right, within their lab group.
3. Ask the students to sign their name in the upper right hand corner of the paper they receive and then read and edit it using the “Lab Report Requirements” handout as a guide. Tell the students they will be graded on the help they offer, which should be in the form of positive, constructive criticism—i.e., specific suggestions on how to fix problems or otherwise improve the Introduction section, including the overall structure or order. They should also give praise for specific phrases, sentences, or sections that are clear, complete, or well-supported.
4. As students finish editing the paper they were given, they can pass it to the right, within their group, and edit the next paper they receive, repeating step 3.
© Kristen Daniels Dotti 2011 Experimental Biology Curriculum Samples [email protected] This product is licensed to a single user.
5. After all the papers have been edited and returned to their original authors, allow time for the students to read the comments given in case they need clarification from the editor who wrote them (each editor at the table should have used a different color ink or lead so that all comments can easily be traced to the editor who made them).
6. If you intend to give a grade for this peer review activity, have the students keep all rough drafts of the Introduction section, so that they can attach the pages to the back of their lab reports when they turn in the final, completed version for grading.
IV. Activity Two: Peer Review of Lab Report 20 minutes
Objectives: a) TLW refine their editing skills and practice giving constructive criticism. b) TLW be exposed to the quality and depth of work produced by their peers.
Materials:
Each student will need all rough draft pieces of their lab report stapled together in order: Title, Introduction, Methods, Results, and Conclusion sections, as well as a pen or pencil in a different color from those of their lab group members, and their copy of the “Lab Report Requirements” handout (that follows the lesson plan for Day 7 in this unit).
Procedure:
1. Ask the students to sit with their lab groups. Any student who does not have their
complete rough draft will not be able to work with their group today. They should sit separately and complete any work that is missing.
2. Each person in the lab group will need a different color pen or pencil. 3. Ask members of the lab group to hand their complete rough draft to the person on
their right. Each student should sign their name in the upper right hand corner of the paper.
4. Ask the students to carefully read the lab report they received, comparing it to the “Lab Report Requirements” criteria and suggesting corrections (not just commenting, but clearly offering a solution to what is lacking) for any part of the lab report that is incomplete, unclear, or incorrect. They should also write down positive comments to the writer, giving praise for specific sentences, phrases, or parts that are clear, complete, or well-supported. Each student will be given a grade for the editing they perform on this and their other peers’ reports. It is imperative that the editors take their job seriously and that they are as thorough as possible in analyzing and suggesting improvements on the work of their peers.
5. When all students have had adequate time to review and edit the paper they were given, they should then pass the paper they edited to the right, within their group, and again sign their name in the upper right hand corner of the new rough draft they have just received. (This second editor signature on the paper will be distinct from the first, and all subsequent signatures, by the fact that each will be in a different color of pen or pencil.) The students should repeat the reviewing and editing

© Kristen Daniels Dotti 2011 Experimental Biology Curriculum Samples [email protected] This product is licensed to a single user.
process with this report. Inform the students that it is not necessary to repeat any comments that were made by the first editor, but adding novel comments on a lab report is an effective way to increase their editing grade, if the comments are correct and relevant. When the students have finished editing this lab report, have them continue exchanging and reviewing lab reports until each lab member’s report has been read by all the other group members.
6. When the lab reports have been returned to their original authors, allow the students a few minutes to read comments and ask for any clarifications as needed. Remind the students that they do not have to take the advice given by their peers, but they do need to review and improve their lab reports one more time before turning them in for a grade at the beginning of the next class period.
7. Tell the students that the company that hired them to perform the optimization for the pectinase enzyme (on Day 13, in Activity 1, in Procedure steps 5 and 6) was very pleased with the high quality of work they performed. In fact, the company was so pleased that it now wants to commission the students to publish their results and conclusions in a pamphlet that will accompany any sale of the pectinase enzyme.
8. Ask all of the lab groups to share their results with the class, so that each person in the class has the optimization data for pH, temperature, concentration, and reaction time (all of the factors that were optimized). This may be accomplished by having each of the groups write their data chart on the board, for the class to copy in their notes, or by having each group photocopy their data chart and distribute it to the class.
9. Using your computer, show the students how to open a brochure template in Microsoft Office by clicking on “New” under the start button in the upper right hand corner of the Microsoft Word screen. On the left hand side of the New Documents window, click on “Brochure” to open templates. The students can choose any tri-fold brochure template to use for their pamphlet.
10. Tell the students that in their pamphlet they must tell the enzyme purchaser the range and optimization information for all aspects of the enzyme (pH, temperature, concentration, and reaction time). They will need to include all of the information required for a typical lab report, but they will write it for the target audience that purchases this type of enzyme product. In other words, the pamphlet will be similar to a lab report, in that the students will demonstrate their fluency in the optimization information for all factors that affect enzymes, but it will allow them a little creative license in the presentation of the information. Assign a due date for the pamphlets.
HW: Ask the students to each bring in a completed, final copy of their pectinase pamphlet by the next lab period. Despite the creative presentation format, each pamphlet should contain all the information you’d find in a lab report. Ask them to each staple to the back of their pamphlet the four corrected rough drafts of the separate sections. This is so that you can see the original work, the help given in the peer reviews, and the final draft of the report (in the sales pamphlet format), all in one packet. Remind the class that the pamphlets will be graded according to the criteria in the “Lab Report Requirements” handout, so they should check for the inclusion of each item on the handout before coming to class with their final draft.

© Kristen Daniels Dotti 2011 Experimental Biology Curriculum Samples [email protected] This product is licensed to a single user.
Experimental Biology Curriculum Cell Biology Unit
(sample lesson plan)
Day 17 I. Topic: Cell Respiration II. Warm-up: 5 minutes
Prior to class, in a location where it is safe to eat, set out small cups containing different foods or drinks produced by fermentation (buttermilk, yogurt, kimchi, yeast breads, sour cream, kefir, root beer, ginger ale, honey, sauerkraut, kombucha). Keep the container from each of these foods/drinks to use in step 2 of the procedure below. Allow the students to taste several of the foods or drinks so they can determine some similarities between the foods (sour taste, ropy texture, carbonation, etc.). Write the following on the board: “Many foods we eat and drink are produced by a process called fermentation. What are some similarities between these types of foods or drinks? What do you think gives these foods or drinks their similar properties?”
III. Activity One: Mitochondria Efficiency – Fermentation 30 minutes
Objectives: a) The learner will (TLW) learn which types of organisms use fermentation to
produce ATP. b) TLW compare the relative efficiency of fermentation and cell respiration for
net ATP production.
Materials: For each team of 4-5 students: 15-18 blank white index cards, each cut into 6 squares; ~50 scraps of paper; 1 marker; 10-12 blue index cards for each team representing cells that produce acetic acid; 1 bowl containing ~150 pennies; 1 bowl containing ~30 quarters; 1 bowl containing ~30 dimes; 1 bowl containing ~30 pennies (this bowl will be placed at a different location than the other bowl of pennies); 1 medium-large empty bowl; 1 sign that says “Glycolysis”; 1 sign that says “Citric Acid Cycle”; 1 sign that says “Net Products.” For each student, a small sample of each of the following in a disposable paper cup: yeast bread, yogurt, kimchi, sour cream, buttermilk, kefir, sauerkraut, kombucha, honey, brewed root beer, brewed ginger ale.
Note: The coins used in this game can be replaced with plastic coins that mock similar denominations, or you might prefer to use poker chips or colored beads, each representing a specific value. Students tend to be competitive anyway when placed in a

© Kristen Daniels Dotti 2011 Experimental Biology Curriculum Samples [email protected] This product is licensed to a single user.
racing situation, so it is easy to get them to engage in the game without the additional motivation of earning money, but it always increases their natural tendencies to be alert and on the ball when cash is involved. The coins will represent the amount of energy gained from the different energy acquisition processes-glycolysis, and the citric acid cycle.
Procedure:
1. Prior to class, do the following: a. Create 90-100 small cards from the white index cards by cutting each card
into 6 pieces that are approximately square. Write the symbol “O2” on one side of about 30-40 of the cards. Shuffle the cards well, so that the blank ones are well mixed with those that read “O2.”
b. Find a place where your students can safely play a running (or walking) relay race, in a hallway, in the cafeteria, or outside. Set up the playing area as depicted below, such that the total distance between the starting line and the Citric Acid Cycle table is about 6-8 meters.
Team members line up: START Glycolysis Citric Acid Cycle Bread yeast team chair chair Kimchi bacteria team chair
chair Human muscle team chair
chair Kombucha bacteria team chair
chair Honey yeast team chair
chair
c. Create a starting line on the ground using a piece of chalk, tape, or yarn. The
starting line needs to allow about one meter of space for each team, so if you plan to have four teams it should be about 4 meters long.
d. Place a chair next to the starting line near each team. Tape a sign to each chair that says “Net Products” and place a bowl on this chair to collect the money and by products from each team member as they return from their turn.
e. Create another line on the ground about 3-4 meters from the starting line (with chalk, tape, or yarn) and place one chair on this line along the path that each team will take in the relay. To each chair, tape a sign that says “Glycolysis” and place a bowl, with ~150 pennies in it, on the seat of each chair. Also stack about 90-100 shuffled “O2” cards on this chair (some cards will say “O2”, some will be blank)-these will be used as a draw pile for each
Place coins in bowls on this table

© Kristen Daniels Dotti 2011 Experimental Biology Curriculum Samples [email protected] This product is licensed to a single user.
team to find out if oxygen is available or not during their turn. Place a stack of scrap paper and a marker on each of these chairs as well.
f. Place one long table or a small table for each team about 3-4 meters beyond the glycolysis line, so each team has a destination point that is along the pathway for their team. Tape a sign to each table that says “Citric Acid Cycle” and also place each of the bowls that contain ~30 coins—quarters, dimes, and pennies—on this table.
2. When class begins, divide the students into four- or five-person teams. Tell each team they represent a group of bacteria cells, yeast cells, or muscle cells. Let the teams know what specific type of cell they represent by telling them about the food product made by their fermentation process and by placing a sample or empty container of the representative food next to their team. Below are some species that you might assign to each team and the familiar products these organism create:
Type of cell Product of fermentation Commonly used to make: Human muscle cells Lactic acid Yeast: Saccharomyces cerivisiae
Ethanol Bread, root beer, ginger ale, kefir, and alcoholic beverages
Yeast: Dekkera intermedia Ethanol Honey Yeast: Brettanomyces spp. Ethanol Limbic ales Bacteria: Lactobacilli spp. Lactic acid Yogurt, kefir, kimchi Bacteria: Leuconostoc spp. Lactic acid Sauerkraut Bacteria: Gluconacetobacter spp.
Acetic Acid Kombucha
3. Ask the students a series of questions to find out if they can identify how these
groups of cells are similar in the way they obtain their energy. (All of the groups represented can perform fermentation in the absence of oxygen; some of these organisms perform fermentation preferentially even when oxygen is present; they all use glycolysis, but not the citric acid cycle, when they are performing fermentation. All organisms that perform fermentation must follow glycolysis with some other process to regenerate the ADP needed for more glycolysis to occur. This regenerative process has a by-product that is released into the surrounding area: ethanol, lactic acid or acetic acid for the organisms used in this game.)
4. Ask each team to give themselves a team name related to their energy-making potential (e.g., Bionic Biceps, Focused Fungi, Kimchi Creators, Probiotic Potential, Rising Power).
5. Ask the students from each team to line up, one behind the other, next to their “Net Products” chair, with the first team member’s feet behind the starting line. Place two pennies into each team’s starting bowl (i.e., the empty bowl on their “Net Products” chair). This money represents the ATP necessary to begin the process of glycolysis (the first step of either cell respiration or fermentation).
6. Describe the following rules and procedures to the teams: a. The goal of this game is to make as much net energy, or ATP, as possible
given the conditions encountered by each team.

© Kristen Daniels Dotti 2011 Experimental Biology Curriculum Samples [email protected] This product is licensed to a single user.
b. Each team will act in a relay fashion; the first person in line will take two pennies from the “Net Products” bowl, leave the starting line, and race to the first chair, marked “Glycolysis,” where they will drop off their original two pennies and pick up four pennies and a card from the draw pile.
1) If the card has nothing written on it, then the cell is in an anaerobic environment and cannot go on to the Citric Acid Cycle. When this is the case the cell should return the used white card to the bottom of the stack, pick up a scrap of paper and marker and write the name of the by-product they will produce by performing fermentation (“Ethanol” if it is a yeast cell; “Lactic Acid” if it is a muscle cell; “Ethanol,” “Lactic Acid,” or “Acetic Acid” if it is a bacterial cell, depending on the type of bacterium represented). After they have written their by-product they can quickly return to the starting line, where they are to deposit their coins and by-product into the “Net Products” bowl.
2) If the card says “O2” on it, the cell has enough oxygen to go on to the Citric Acid Cycle and should race to the far table to complete the next step.
c. When a student reaches the “Citric Acid Cycle” table, they need to collect 36 cents and then return to the starting line and deposit the coins in the “Net Products” bowl.
d. Each time coins are added to the “Net Products” bowl the next cell on the team can attempt to gain energy for their team by repeating steps a-c, above.
7. Stop the game after all team members from the slowest team have had a chance to run the relay 4-5 times.
8. Ask each team to count up the coins and cards in their “Net Products” bowl and write their totals in a chart on the board (or on a portable white board if you are outside of the classroom).
9. Ask the students to summarize what happened in this game. They should point out that if there was no oxygen present then they could not earn nearly as much ATP. They should realize that the citric acid cycle generated much more “bang for the buck” with 36 ATP instead of the 2 ATP generated from glycolysis. They should also point out that some teams had more by-products than other teams, depending on how often they were performing fermentation rather than cell respiration.
10. Discuss the by-products that each team made. Your students may be able to identify the different by-products since they have different properties.
11. Tell the students that some cells, such as Saccharomyces spp., actually perform fermentation even when oxygen is present. Ask the students what factors they think would affect the process of fermentation. Ask each student to make a list of ideas on a scrap sheet of paper. When every student has something written down, ask the students to take turns going to the board and adding one idea. Discuss the ideas briefly to arouse curiosity for each topic. Do not reveal if any idea is actually a factor or not, since the students will be conducting experiments on some of these ideas during the next class period. Some factors the students might list include: the presence or availability of oxygen; availability of sugar or carbon energy source; the type of carbon energy source available (fructose,

© Kristen Daniels Dotti 2011 Experimental Biology Curriculum Samples [email protected] This product is licensed to a single user.
maltose, dextrose, etc.); the type of organism; temperature; light; pH; moisture; and so on. If the students are having a hard time thinking of potential factors, use questioning to lead them to concepts.
12. Tell the students they will be designing and conducting experiments on the rate of fermentation tomorrow. Ask each student to write down a list of the factors they feel could have an influence on the rate of fermentation and then to number the factors according to which is most interesting to them. Keep the lists the students generate because they may choose to explore one of the factors on this list further on Day 22, when they design additional experiments.
IV. Activity Two: Measuring the Rate of Fermentation 15 minutes Objectives:
a) TLW observe the release of carbon dioxide given off during fermentation. b) TLW learn a method to collect data on the rate of fermentation in an
anaerobic environment.
Materials: For each student: one 15 ml graduated conical test tube, 1 beaker of tap water, 8 ml of a liquid yeast culture (4 packages of Fleishman’s yeast in 400 ml of warm tap water) in a paper/wax cup, 8 ml of 5% glucose solution (20 grams of glucose in 400 ml of warm tap water) in a paper/wax cup, 1 thumb tack.
Procedure:
1. Prior to class, create one example setup of the fermentation measuring apparatus so the visual learners can have a point of reference.
a. Using a thumb tack, punch 4-6 holes in the middle section of the cap of a 15 ml graduated, conical tube.
b. Pour ~7.5 to 8 ml glucose water into the tube. c. Stir the liquid yeast culture and top off the tube with this solution, using
~7.5 to 8 ml so the liquid is overfilling the tube and swelling up above the top of the tube.
d. Cap the tube and make sure liquid seeps out of the holes that were punched, indicating that no air has been trapped inside the tube. If no liquid appears, make sure the holes are punched clear through the cap; then top off the liquid again and recap the tube.
e. Immediately invert the tube into the beaker of tap water so the holes in the cap are submerged in the beaker water. The pointed end of the tube will be sticking out above the surface of the water and some of the water can now be drained from the beaker to make the tube stable enough to sit upright on the cap (if it leans too much gas bubbles may come out of the holes in the cap).

© Kristen Daniels Dotti 2011 Experimental Biology Curriculum Samples [email protected] This product is licensed to a single user.
f. Allow the yeast to break down the glucose solution, producing carbon dioxide gas in the conical tip of the inverted tube.
g. Use a permanent marker to indicate the amount of gas or foam in the tube at 5 minute intervals for 30 minutes or more. It helps to gently tap the tube to release gas bubbles along the sides of the tube before each mark with the permanent pen. When you have completed your data collection, remove the tube and use the graduations on the side of the tube to measure the production of CO2 over time.
h. Note the gas content of the tube at each 5 minute interval on a chart on the board that students can see when they enter. Place the tube back into the beaker water so the experimental setup can be noted by the students.
2. When the students are ready to begin this activity lead them through the steps above with a fresh tube, demonstrating each step as the students perform it themselves.
3. Once the students have set up their own inverted fermentation tube, ask them to use the marker to record any starting amount of gas if they have trapped any air in their tube during the setup or ask them to redo the setup if they have more than a small bubble.
4. Ask the students to predict what will happen in the tube. Now that each group has experience using this set-up, you can reveal the data you have collected on the board prior to class to allow the students to confirm or correct their predictions.
5. Ask the student to return to the list of factors that might affect the rate of fermentation. Ask the students to explain how this fermentation measuring device could be used to gather data for each of the variables listed on the board.
6. After you feel that the students understand how to write a procedure for any of the variables that were considered, divide the students into lab groups according to the variable they would prefer to study in the next lab period.
7. Ask each lab group to design a lab experiment that uses the fermentation measuring device they made today to test the variable assigned or chosen by their lab group.
8. Circulate among the lab groups, listening to their experimental setups in order to make sure they are heading in the right direction. Make sure each lab group has run their procedure by you for approval before the class period is over.
HW: Ask the students to read the portions of their textbook that cover fermentation and the efficiency of cell respiration. Ask each student to write up the procedure for their student-designed lab experiment on fermentation.
© Kristen Daniels Dotti 2011 Experimental Biology Curriculum Samples [email protected] This product is licensed to a single user.
Special Topics Curricula $175 (per licensed user) Incorporating Math and Statistics into AP/IB Science (14 lesson plans covering 20-22 class periods) AIDS: A Case Study Approach to Exploring the Immune System, Viruses and Community Health (20 lesson plans covering 28-32 class periods) Diabetes: A Case Study Approach to Exploring Energy Use, the Endocrine System, Cell Signaling and Membrane Transport (22 lesson plans covering 30-42 class periods) Hemoglobin: A Case Study Approach to Exploring Proteins, the Cardiorespiratory System and the Evolution of a Gene Family (24 lesson plans covering 32-44 class periods)
Full-year Curricula $570 (per licensed user)
AP® Biology Daily Lesson Plans Full-year curriculum for AP*/IB Biology Experimental Biology Daily Lesson Plans Full-year curriculum for general, Pre-AP*/IB or Honors Biology using inquiry methods AP® Environmental Science Daily Lesson Plans Full-year curriculum for AP*/IB or general Environmental Science * AP College Board is not involved in the production or the endorsement of this curriculum

© Kristen Daniels Dotti 2011 Experimental Biology Curriculum Samples [email protected] This product is licensed to a single user.
Billing Information: Shipping Information: Name of Billing Contact Person: Name of Shipping Contact Person:
_________________________________ __________________________________ Address: Address:
__________________________________ __________________________________
__________________________________ __________________________________ Telephone: Telephone:
Email: Email:
Name of School: ___________________
Name of Licensed User(s): _______________Email of Licensed User(s): ____________________
How did you hear about Catalyst Learning Curricula Daily Lesson Plans? ________________ A curriculum license extends to only one teacher. Additional copies must be purchased for each teacher who will be using the curriculum in a given school or school district. Please contact us using the email address below to receive a discount for multiple user licenses.
Product Title: AP Biology, APES, or Experimental Biology; or Name of the Case Study, Game or Syllabus
Quantity (number of users – one user per license)
Format Desired (CD or download)
Price
Shipping ($0 for download or $14/CD, $14 per game): _______
Taxes (6.75%-8.25% sales tax, depending on local tax rates, for NC residents only): _______
Total: _______
Payment Method:
Purchase Order Number: _____________________________
Checks should be made out to Catalyst Learning Curricula
Credit Card purchases will have an additional $22 charge added to the total.
Card Number: ________________________________ Expiration date: ________
Name on card: ________________ 3-digit security code: ____ Billing zip code: _______ You may either email a picture of this completed form to
[email protected] or mail the completed form to: Kristen Dotti, 59 Clemmons St., Asheville NC 28801 (Ph: 828-687-0807)


![Aviation] X-Planes at Edwards [MBI Enthusiast Color Series] [Experimental Aircraft & Prototypes]](https://img.pdfslide.us/doc/110x75/5572065b497959fc0b8b8e8a/aviation-x-planes-at-edwards-mbi-enthusiast-color-series-experimental-aircraft-prototypes.jpg)