Embed Size (px)
Citation preview

ECDC_6_0_UserGuide_CC.book Page i Monday, December 16, 2002 1:45 PM
Creator Classic™
Expanded User’s Guide

Easy CD & DVD Creator 6 Expanded User’s Guide: Creator ClassicLegal Information ii
ECDC_6_0_UserGuide_CC.book Page ii Monday, December 16, 2002 1:45 PM
Legal Information
©1994–2003 Roxio, Inc. All rights reserved. No part of this publication may be reproduced, stored in a retrieval system, or transmitted in any form or by any means, electronic, mechanical, photocopying, recording or otherwise, without the prior written consent of Roxio, Inc., 455 El Camino Real, Santa Clara, CA 95050.
Roxio, the Roxio logo, the burning CD logo, Easy CD & DVD Creator, The Digital Media Suite, Disc Copier, DVD Builder, Label Creator, AudioCentral, Creator Classic, Roxio Player, Roxio Updater, and Drag-to-Disc are trademarks of Roxio, Inc., which may be registered in some jurisdictions.
Easy CD Creator, PhotoSuite, and Web-CheckUp are registered trademarks of Roxio, Inc. in the U.S., and may be registered in some other jurisdictions.
Microsoft, Windows, Windows Media, the Windows Media logo, Windows 98, Windows 2000, Windows Me, and Windows XP are trademarks or registered trademarks of Microsoft Corporation in the United States and/or other countries.
QDesign MP3 Audio Codec. Copyright 1999-2000. QDesign Corporation. All rights reserved. For more information, visit http://www.qdesign.com.
MPEG Layer-3 audio compression technology licensed by Fraunhofer IIS and Thomson multimedia. http://www.iis.fhg.de/amm/.

Easy CD & DVD Creator 6 Expanded User’s Guide: Creator ClassicLegal Information iii
ECDC_6_0_UserGuide_CC.book Page iii Monday, December 16, 2002 1:45 PM
mp3PRO audio coding technology licensed from Coding Technologies, Fraunhofer IIS and Thomson multimedia.
For DVD Builder software - Primary interface design by XEODesign®, Inc. http://www.xeodesign.com.
Music recognition technology and related data are provided by Gracenote and the
Gracenote CDDB® Music Recognition Service (sm). Gracenote is the industry standard in music recognition technology and related content delivery. For more information visit www.gracenote.com.
Gracenote is CDDB, Inc. d/b/a “Gracenote.” CD and music-related data from Gracenote
CDDB® Music Recognition Service (sm) © 2000, 2001 Gracenote. Gracenote CDDB2 Client Software © 2000, 2001 Gracenote. U.S. Patents Numbers #5,987,525; #6,061,680; #6,154,773, and other patents issued or pending.
CDDB is a registered trademark of Gracenote. The Gracenote logo and logotype, the Gracenote CDDB logo and logotype, and the “Powered by Gracenote CDDB” logo are trademarks of Gracenote. Music Recognition Service and MRS are service marks of Gracenote.
Adobe, the Adobe logo, Acrobat and Reader are either registered trademarks or trademarks of Adobe Systems Incorporated in the United States and/or other countries.
VST Plug-in Technology by Steinberg. Copyright © 2002 Steinberg Media Technologies AG. Steinberg is a registered trademark of Steinberg Soft- und Hardware GmbH.
®
Easy CD & DVD Creator 6 Expanded User’s Guide: Creator ClassicLegal Information iv
ECDC_6_0_UserGuide_CC.book Page iv Monday, December 16, 2002 1:45 PM
Audio effect engine licensed by Algorithmix www.algorithmix.com.
This software is based in part on the work of the Independent JPEG Group.
Ogg Vorbis audio compression technology provided courtesy of the Xiph.Org Foundation.
Some digital content © 1994-2002 Hemera* Technologies Inc. All Rights Reserved. * Trademark of Hemera Technologies Inc.
Monotype and Century Poster are trademarks of Monotype Typography Limited registered in U.S. Patent and Trademark Office and certain other jurisdictions. Creepy, Curlz, Falstaf, Figaro, Palace Script, Plump, M Gothic, M Mincho, and Team are trademarks of the Monotype Corporation and may be registered in certain jurisdictions. Adolescence is a trademark of Lunchbox Digital Typeface Library.
Banjoman is a trademark of Paul Veres. Bermuda and Wendy are trademarks of LetterPerfect Design. Eraser Dust is a trademark of Intecsas. Footlight is a trademark of the Monotype Corporation registered in the U.S. Patent and Trademark Office and may be registered in certain jurisdictions. KidType and Paint are trademarks of DS Design. Mistral is a trademark of Trip Productions BV. Orbus Multiserif is a trademark of Charles Anderson. Space Toaster is a trademark of Exploding Font Company.
The TWAIN Toolkit is distributed as is. The developer and distributors of the TWAIN Toolkit expressly disclaim all implied, express or statutory warranties including, without limitation, the implied warranties of merchantability, non-infringement of third party rights and fitness for a particular purpose. Neither the developers nor the distributors will be liable for damages, whether direct, indirect, special, incidental, or consequential, as a result of the reproduction, modification, distribution or other use of the TWAIN Toolkit.
All other company or product names are trademarks and/or registered trademarks of their respective owners.
Changes
The material in this document is for information only and is subject to change without notice. While reasonable efforts have been made in the preparation of this document to assure its accuracy, Roxio, Inc. assumes no liability resulting from errors or omissions in this document, or from the use of the information contained herein.

Easy CD & DVD Creator 6 Expanded User’s Guide: Creator ClassicLegal Information v
ECDC_6_0_UserGuide_CC.book Page v Monday, December 16, 2002 1:45 PM
Roxio reserves the right to make changes in the product design without reservation and without notification to its users.
Disclaimer
IF THIS PRODUCT DIRECTS YOU TO COPY MATERIALS, YOU MUST HAVE PERMISSION FROM THE COPYRIGHT OWNER OF THE MATERIALS TO AVOID VIOLATING THE LAW WHICH COULD RESULT IN DAMAGES OR OTHER REMEDIES.

Easy CD & DVD Creator 6 Expanded User’s Guide: Creator ClassicLegal Information vi
ECDC_6_0_UserGuide_CC.book Page vi Monday, December 16, 2002 1:45 PM

vii
ECDC_6_0_UserGuide_CC.book Page vii Monday, December 16, 2002 1:45 PM
Contents
1 Getting Started with Creator Classic 1
About Creator Classic . . . . . . . . . . . . . . . . . . . . . . . . . . . . . . . . . . 2Starting Creator Classic . . . . . . . . . . . . . . . . . . . . . . . . . . . . . . . . . 2The Creator Classic User Interface. . . . . . . . . . . . . . . . . . . . . . . . . 3Saving and Opening a Project . . . . . . . . . . . . . . . . . . . . . . . . . . . . 4Getting Help . . . . . . . . . . . . . . . . . . . . . . . . . . . . . . . . . . . . . . . . . 4
2 Making Data Discs 5
What is a Data Disc? . . . . . . . . . . . . . . . . . . . . . . . . . . . . . . . . . . . 6Starting a New Data Project . . . . . . . . . . . . . . . . . . . . . . . . . . . . . 6Adding Files and Folders to Your Project . . . . . . . . . . . . . . . . . . . . 7Recording a Large Project to Multiple Discs . . . . . . . . . . . . . . . . . 8Working with Files and Folders in Your Project . . . . . . . . . . . . . . . 9
Creating a New Folder . . . . . . . . . . . . . . . . . . . . . . . . . . . . . . . 9Removing Files and Folders . . . . . . . . . . . . . . . . . . . . . . . . . . . 9

Easy CD & DVD Creator 6 Expanded User’s Guide: Creator ClassicContents
viii
ECDC_6_0_UserGuide_CC.book Page viii Monday, December 16, 2002 1:45 PM
Renaming Files and Folders . . . . . . . . . . . . . . . . . . . . . . . . . . . 9Finding Files . . . . . . . . . . . . . . . . . . . . . . . . . . . . . . . . . . . . . . 10
Burning Your Disc. . . . . . . . . . . . . . . . . . . . . . . . . . . . . . . . . . . . 11Retrieving Files and Folders Recorded to Multiple Discs . . . . . . . 12Making a Multisession Disc. . . . . . . . . . . . . . . . . . . . . . . . . . . . . 13
3 Making Music CDs 15
What is a Music CD?. . . . . . . . . . . . . . . . . . . . . . . . . . . . . . . . . . 16Starting a New Music CD Project . . . . . . . . . . . . . . . . . . . . . . . . 17Adding Tracks to Your Project . . . . . . . . . . . . . . . . . . . . . . . . . . . 17Adding Audio Files to Your Project . . . . . . . . . . . . . . . . . . . . . . . 19Working with Tracks in the Project . . . . . . . . . . . . . . . . . . . . . . . 19
Playing a Track. . . . . . . . . . . . . . . . . . . . . . . . . . . . . . . . . . . . 20Merging Tracks. . . . . . . . . . . . . . . . . . . . . . . . . . . . . . . . . . . . 20Splitting Tracks . . . . . . . . . . . . . . . . . . . . . . . . . . . . . . . . . . . . 20Applying Transition Effects to Tracks . . . . . . . . . . . . . . . . . . . 21Renaming the Disc Title and Artist Name . . . . . . . . . . . . . . . . 22Renaming Tracks . . . . . . . . . . . . . . . . . . . . . . . . . . . . . . . . . . 23Changing the Order of Your Tracks . . . . . . . . . . . . . . . . . . . . 23Removing a Track. . . . . . . . . . . . . . . . . . . . . . . . . . . . . . . . . . 23
Burning Your Disc. . . . . . . . . . . . . . . . . . . . . . . . . . . . . . . . . . . . 24Converting a Track to an MP3, WAV, or WMA Audio File . . . . . 25Accessing the Online Music Database. . . . . . . . . . . . . . . . . . . . . 27
Setting Internet Options . . . . . . . . . . . . . . . . . . . . . . . . . . . . . 27Using the Gracenote CDDB Service . . . . . . . . . . . . . . . . . . . . 28
Writing CD TEXT to Disc. . . . . . . . . . . . . . . . . . . . . . . . . . . . . . . 28Advanced Music CD Topics . . . . . . . . . . . . . . . . . . . . . . . . . . . . 29
Entering a UPC . . . . . . . . . . . . . . . . . . . . . . . . . . . . . . . . . . . . 29Entering ISRC Information. . . . . . . . . . . . . . . . . . . . . . . . . . . . 29

Easy CD & DVD Creator 6 Expanded User’s Guide: Creator ClassicContents
ix
ECDC_6_0_UserGuide_CC.book Page ix Monday, December 16, 2002 1:45 PM
4 Making MP3 Player Discs 31
What is an MP3 Player Disc?. . . . . . . . . . . . . . . . . . . . . . . . . . . . 32Starting an MP3 Player Disc Project . . . . . . . . . . . . . . . . . . . . . . 33Adding MP3 Files to Your Project . . . . . . . . . . . . . . . . . . . . . . . . 34Working with MP3 Files in Your Project . . . . . . . . . . . . . . . . . . . 35
Creating a New Folder . . . . . . . . . . . . . . . . . . . . . . . . . . . . . . 35Removing Files and Folders . . . . . . . . . . . . . . . . . . . . . . . . . . 35Renaming Files and Folders . . . . . . . . . . . . . . . . . . . . . . . . . . 36Finding Files . . . . . . . . . . . . . . . . . . . . . . . . . . . . . . . . . . . . . . 36
Using the MP3 Playlist Editor . . . . . . . . . . . . . . . . . . . . . . . . . . . 37Burning Your Disc. . . . . . . . . . . . . . . . . . . . . . . . . . . . . . . . . . . . 38Making MP3 Files . . . . . . . . . . . . . . . . . . . . . . . . . . . . . . . . . . . . 39
5 Making Enhanced CDs 41
What is an Enhanced CD? . . . . . . . . . . . . . . . . . . . . . . . . . . . . . . 42Starting an Enhanced CD Project. . . . . . . . . . . . . . . . . . . . . . . . . 43Adding Tracks to Your Project . . . . . . . . . . . . . . . . . . . . . . . . . . . 44Adding Audio Files to Your Project . . . . . . . . . . . . . . . . . . . . . . . 46Adding Files and Folders to Your Project . . . . . . . . . . . . . . . . . . . 47Burning Your Disc. . . . . . . . . . . . . . . . . . . . . . . . . . . . . . . . . . . . 48
6 Making Mixed-Mode CDs 49
What is a Mixed-Mode CD? . . . . . . . . . . . . . . . . . . . . . . . . . . . . 50Starting a Mixed-Mode CD Project . . . . . . . . . . . . . . . . . . . . . . . 51Adding Files and Folders to Your Project . . . . . . . . . . . . . . . . . . . 52Adding Tracks to Your Project . . . . . . . . . . . . . . . . . . . . . . . . . . . 53Adding Audio Files to Your Project . . . . . . . . . . . . . . . . . . . . . . . 54

Easy CD & DVD Creator 6 Expanded User’s Guide: Creator ClassicContents
x
ECDC_6_0_UserGuide_CC.book Page x Monday, December 16, 2002 1:45 PM
Burning Your Disc. . . . . . . . . . . . . . . . . . . . . . . . . . . . . . . . . . . . 55
7 Making Bootable Discs 57
What is a Bootable Disc?. . . . . . . . . . . . . . . . . . . . . . . . . . . . . . . 58Verifying That Your System Supports Bootable Disc . . . . . . . . . . 59Finding or Creating a Bootable Floppy . . . . . . . . . . . . . . . . . . . . 59
Additional Bootable Floppy Information . . . . . . . . . . . . . . . . . 60Making a Bootable Disc with Creator Classic . . . . . . . . . . . . . . . 61Tips for Using Floppy Disk Emulation . . . . . . . . . . . . . . . . . . . . . 63Advanced Settings . . . . . . . . . . . . . . . . . . . . . . . . . . . . . . . . . . . . 63
Load Segment. . . . . . . . . . . . . . . . . . . . . . . . . . . . . . . . . . . . . 63Sector Count. . . . . . . . . . . . . . . . . . . . . . . . . . . . . . . . . . . . . . 64
8 Using Additional Features 65
Creating and Recording Disc Image Files . . . . . . . . . . . . . . . . . . 66Selecting Disc Size . . . . . . . . . . . . . . . . . . . . . . . . . . . . . . . . . . . 69Changing the Default Recorder . . . . . . . . . . . . . . . . . . . . . . . . . . 69Understanding the Record Methods . . . . . . . . . . . . . . . . . . . . . . 70Excluding Files from Your Project . . . . . . . . . . . . . . . . . . . . . . . . 71Erasing a ReWritable Disc . . . . . . . . . . . . . . . . . . . . . . . . . . . . . . 72Validating a Project . . . . . . . . . . . . . . . . . . . . . . . . . . . . . . . . . . . 73Viewing Project, Drive, and Disc Properties . . . . . . . . . . . . . . . . 73
Viewing Project Properties . . . . . . . . . . . . . . . . . . . . . . . . . . . 73Viewing Drive Properties . . . . . . . . . . . . . . . . . . . . . . . . . . . . 73Viewing Disc Information. . . . . . . . . . . . . . . . . . . . . . . . . . . . 74
Viewing Creator Classic Options . . . . . . . . . . . . . . . . . . . . . . . . . 74Running the System Tests . . . . . . . . . . . . . . . . . . . . . . . . . . . . . . 74Starting Roxio Retrieve . . . . . . . . . . . . . . . . . . . . . . . . . . . . . . . . 75Starting Label Creator . . . . . . . . . . . . . . . . . . . . . . . . . . . . . . . . . 75

Easy CD & DVD Creator 6 Expanded User’s Guide: Creator ClassicContents
xi
ECDC_6_0_UserGuide_CC.book Page xi Monday, December 16, 2002 1:45 PM
9 Creator Classic Reference 77
Creator Classic Menus. . . . . . . . . . . . . . . . . . . . . . . . . . . . . . . . . 78File Menu . . . . . . . . . . . . . . . . . . . . . . . . . . . . . . . . . . . . . . . . 78Edit Menu. . . . . . . . . . . . . . . . . . . . . . . . . . . . . . . . . . . . . . . . 79View Menu. . . . . . . . . . . . . . . . . . . . . . . . . . . . . . . . . . . . . . . 80Disc Menu . . . . . . . . . . . . . . . . . . . . . . . . . . . . . . . . . . . . . . . 81Tools Menu . . . . . . . . . . . . . . . . . . . . . . . . . . . . . . . . . . . . . . 81Track Menu . . . . . . . . . . . . . . . . . . . . . . . . . . . . . . . . . . . . . . 81Help Menu . . . . . . . . . . . . . . . . . . . . . . . . . . . . . . . . . . . . . . . 82
Keyboard Shortcuts . . . . . . . . . . . . . . . . . . . . . . . . . . . . . . . . . . . 82
Index 83

Easy CD & DVD Creator 6 Expanded User’s Guide: Creator ClassicContents
xii
ECDC_6_0_UserGuide_CC.book Page xii Monday, December 16, 2002 1:45 PM

1
ECDC_6_0_UserGuide_CC.book Page 1 Monday, December 16, 2002 1:45 PM
Getting Started withCreator Classic
In this chapter
About Creator Classic 2
Starting Creator Classic 2
The Creator Classic User Interface 3
Saving and Opening a Project 4
Getting Help 4

Easy CD & DVD Creator 6 Expanded User’s Guide: Creator ClassicChapter 1: Getting Started with Creator Classic 2
ECDC_6_0_UserGuide_CC.book Page 2 Monday, December 16, 2002 1:45 PM
About Creator ClassicUse Creator Classic to back-up, share, or archive your important files to CD or DVD, or large projects to multiple discs. Create advanced format, bootable, music discs and more.
With Creator Classic, burning a disc is a simple process:
1 Start a Creator Classic project. With Creator Classic, you can start a project for making a Data Disc, Music CD, MP3 Player Disc, Enhanced CD, Mixed-Mode CD, and Bootable Disc.
2 Add files, folders, and tracks to the project. You can add files and folders from your hard disk and other discs to your project. If you are making a music CD, you can add tracks from an existing music CD, and MP3, WAV, and WMA audio files to your project.
3 Burn your disc. When you have added and organized all of the files that you want to record to your project, you are ready to burn your project to disc.
Starting Creator Classic
You can start Creator Classic in any of these ways:
■ From Easy CD & DVD Creator Home, click Creator Classic.
■ Choose Start Menu > Programs > Roxio Easy CD and DVD Creator 6 > Creator Classic.
The Creator Classic User Interface appears.

Easy CD & DVD Creator 6 Expanded User’s Guide: Creator ClassicChapter 1: Getting Started with Creator Classic 3
ECDC_6_0_UserGuide_CC.book Page 3 Monday, December 16, 2002 1:45 PM
The Creator Classic User InterfaceCreator Classic has a different user interface depending on the type of project you are working with. The user interface for a data project is displayed below to show parts of the interface that are common across all project types.
Note You can adjust how Creator Classic appears on your screen by selecting the various options under the View menu.
Source Window
Project Window
ConvertDataProjects
RemovefromProject
Play
Name
BurnButton
Disc Info Bar
MusicProjects
Creator ClassicMenus
Add toProject
Disc Size Icon
OtherProjects
Up OneLevel
DefaultRecorder

Easy CD & DVD Creator 6 Expanded User’s Guide: Creator ClassicChapter 1: Getting Started with Creator Classic 4
ECDC_6_0_UserGuide_CC.book Page 4 Monday, December 16, 2002 1:45 PM
Saving and Opening a ProjectYou can save your project or open existing projects.
To save a project using a different name:
1 Choose File > Save Project List As.
2 Type a file name, and select a location for the file.
3 Click Save.
To overwrite the current project:
■ Choose File > Save Project List.
To open a project:
1 Choose File > Open Project.
2 Select the project you want to open.
3 Click Open.
Getting HelpIn addition to the printed user guide, online help is available throughout the Creator Classic application.
You can access online help in any of these ways:
■ Choose Help > Creator Classic Help.
■ For help on a dialog box, click Help.

5
ECDC_6_0_UserGuide_CC.book Page 5 Monday, December 16, 2002 1:45 PM
Making Data Discs
In this chapter
What is a Data Disc? 6
Starting a New Data Project 6
Adding Files and Folders to Your Project 7
Recording a Large Project to Multiple Discs 8
Working with Files and Folders in Your Project 9
Burning Your Disc 11
Retrieving Files and Folders Recorded to Multiple Discs 12
Making a Multisession Disc 13

Easy CD & DVD Creator 6 Expanded User’s Guide: Creator ClassicChapter 2: Making Data Discs 6
ECDC_6_0_UserGuide_CC.book Page 6 Monday, December 16, 2002 1:45 PM
What is a Data Disc?A data disc is a CD or DVD that contains only computer data, and no digital audio tracks. With Creator Classic, you can make your own data discs by recording files and folders from your hard disk and other discs.
Note Roxio Drag-to-Disc lets you copy (or delete) large amounts of data to a disc just as you would use a floppy disk.
Starting a New Data Project
You can start a new project in any of these ways:
■ Choose File > New Project > Data Disc.
■ In the Project Window, click the Data button.
An untitled project appears.
Data Button
Source Window
Project Window
Easy CD & DVD Creator 6 Expanded User’s Guide: Creator ClassicChapter 2: Making Data Discs 7
ECDC_6_0_UserGuide_CC.book Page 7 Monday, December 16, 2002 1:45 PM
Adding Files and Folders to Your ProjectYou can add files and folders from your hard disk and other discs to your project.
Tip The Disc Info Bar at the bottom of the Project Window displays the current size of your project.
You can add files and folders in any of these ways:
■ Drag one or more files and folders from the Source Window to the Project Window.
■ Select one or more files and folders in the Source Window, and then
click Add icon.
■ Select one or more files and folders in the Source Window, and choose Edit > Add to Project.
■ Drag one or more files and folders from Windows Explorer to the Project Window.
■ Copy and paste one or more files and folders from the Source Window or Windows Explorer to the Project Window.
Note If you have a large project that cannot fit on a single disc, you can record it to multiple discs. See Recording a Large Project to Multiple Discs on page 8.

Easy CD & DVD Creator 6 Expanded User’s Guide: Creator ClassicChapter 2: Making Data Discs 8
ECDC_6_0_UserGuide_CC.book Page 8 Monday, December 16, 2002 1:45 PM
Recording a Large Project to Multiple DiscsYou can record a large project to two or more discs. When the amount of files and folders that you add to a project exceeds what can fit onto a single disc (blank CD or DVD), the Disc Info Bar at the bottom of the Project Window changes and displays the project size and the number of discs required to record the project.
You record this type of project as you would a normal data disc. When one disc becomes full with data, you are prompted to insert another blank disc until the project has been completely recorded.
Note You cannot record large projects to multiple discs using discs that already contain data. The maximum number of discs that can be used to record a large project is 30. The discs should be of the same size.
When you want to retrieve files and folders from your multiple disc set and copy them back to your hard disk, use the Roxio Retrieve program. See Retrieving Files and Folders Recorded to Multiple Discs on page 12.
Disc Info Bar
Project Size

Easy CD & DVD Creator 6 Expanded User’s Guide: Creator ClassicChapter 2: Making Data Discs 9
ECDC_6_0_UserGuide_CC.book Page 9 Monday, December 16, 2002 1:45 PM
Working with Files and Folders in Your ProjectOnce you have added one or more files to your project, you have the following options:
■ Creating a New Folder
■ Removing Files and Folders
■ Renaming Files and Folders
■ Finding Files
Creating a New FolderYou can create a new folder in your project and then add files and folders
to that new folder.
You can create a new folder in any of these ways:
■ Right-click in the Project Window and select New Folder.
■ Click any where in the Project Window and then choose Edit > New Folder.
Removing Files and FoldersYou can remove files and folders from your project. This does not remove
the original file or folder from your hard disk.
You can remove a file or folder in any of these ways:
■ Select the file or folder in the project and click Remove icon.
■ Right-click the file or folder in the project and select Remove from Project.
■ Select the file or folder in the project and choose Edit > Remove from Project.
■ Select the file or folder in the project and press the Delete key.
Renaming Files and FoldersYou can rename files and folders in your project. This does not change the
original name of the file or folder on your hard disk.

Easy CD & DVD Creator 6 Expanded User’s Guide: Creator ClassicChapter 2: Making Data Discs 10
ECDC_6_0_UserGuide_CC.book Page 10 Monday, December 16, 2002 1:45 PM
You can rename a file or folder in any of these ways:
■ Right-click the file or folder in the project and select Rename.
■ Select the file or folder in the project and choose Edit > Rename.
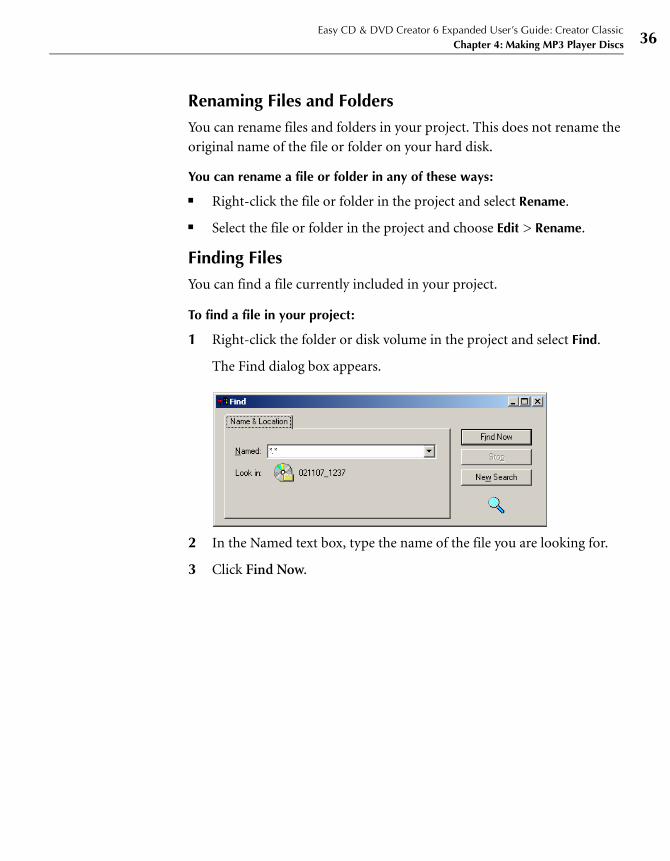
Finding FilesYou can find a file currently included in your project.
To find a file in your project:
1 Right-click the folder or disk volume in the project and select Find.
The Find dialog box appears.
2 In the Named text box, type the name of the file you are looking for (wildcard characters are allowed).
3 Click Find Now.

Easy CD & DVD Creator 6 Expanded User’s Guide: Creator ClassicChapter 2: Making Data Discs 11
ECDC_6_0_UserGuide_CC.book Page 11 Monday, December 16, 2002 1:45 PM
Burning Your DiscWhen you have added and organized all of the files that you want to record to your project, you are ready to burn your project to disc.
To burn your project to disc:
1 Insert a blank disc into your recorder.
Note If you plan on using a disc already containing data, see Making a Multisession Disc on page 13.
2 Click Burn .
The Record Setup dialog box appears.
3 Click OK.
4 After the disc has been successfully burned, you are prompted to launch Label Creator to make a custom disc label or insert for your disc case. You can choose to start Label Creator by clicking Label Creator, or you can continue without starting Label Creator by clicking No.

Easy CD & DVD Creator 6 Expanded User’s Guide: Creator ClassicChapter 2: Making Data Discs 12
ECDC_6_0_UserGuide_CC.book Page 12 Monday, December 16, 2002 1:45 PM
Retrieving Files and Folders Recorded to Multiple DiscsThe Roxio Retrieve program allows you to retrieve files and folders that were recorded to multiple discs using Creator Classic. You can choose to retrieve all files and folders on the disc or specific files and folders only.
Caution Large projects burned to multiple discs using Creator Classic may contain split files that were recorded across multiple discs. A split file can be retrieved by using Roxio Retrieve only. Attempting to copy a split file to your hard disk without using Roxio Retrieve results in an unusable file.
You can start Roxio Retrieve in any of these ways:
■ Insert one of the multiple discs that was recorded using Creator Classic into your drive.
Allow a few moments for the disc to spin-up. The Retrieve window automatically appears.
■ In Creator Classic, choose Tools > Roxio Retrieve.
■ From Easy CD & DVD Creator Home, click Extras & Utilities and select Roxio Retrieve.
■ Choose Start menu > Programs > Roxio Easy CD and DVD Creator 6 > Roxio Retrieve.
Note See Roxio Retrieve’s online help for instructions on using the software to retrieve files and folders.

Easy CD & DVD Creator 6 Expanded User’s Guide: Creator ClassicChapter 2: Making Data Discs 13
ECDC_6_0_UserGuide_CC.book Page 13 Monday, December 16, 2002 1:45 PM
Making a Multisession DiscA session is a recorded area on a disc that contains one or more music or data tracks. A disc can have either a single session (as is the case with most music CDs) or multiple sessions, which are called multisession discs.
Note A multisession music CD is not recommended. Only the tracks recorded in the first session are playable on most home or car stereo CD players. To combine both music and data on a CD, see What is an Enhanced CD? on page 42 and What is a Mixed-Mode CD? on page 50.
To make the first session:
1 To record the first session, prepare the project as you normally would when making a data disc.
2 When you are ready to burn the disc, do the following:
■ In the Record Setup dialog box (displayed when you click the Burn
button) under Options, select “Track-at-Once” and “Finalize
Session. Don’t Finalize Disc” as the record method.
To make the disc a multisession disc:
When you are ready to add another session to the disc, do the following:
1 Make sure the disc is inserted in the default recorder.
2 Add files and folders to the project as you normally would when making a data disc.
When you add data to the project, a dialog box warns you that the disc already contains data.
3 Click Yes to add additional data to the disc.
The data from the first session is automatically imported into your project along with the files and folders you just added.
4 Continue as you normally would for making a data disc.

Easy CD & DVD Creator 6 Expanded User’s Guide: Creator ClassicChapter 2: Making Data Discs 14
ECDC_6_0_UserGuide_CC.book Page 14 Monday, December 16, 2002 1:45 PM

15
ECDC_6_0_UserGuide_CC.book Page 15 Monday, December 16, 2002 1:45 PM
Making Music CDs
In this chapter
What is a Music CD? 16
Starting a New Music CD Project 17
Adding Tracks to Your Project 17
Adding Audio Files to Your Project 19
Working with Tracks in the Project 19
Burning Your Disc 24
Converting a Track to an MP3, WAV, or WMA Audio File 25
Accessing the Online Music Database 27
Writing CD TEXT to Disc 28
Advanced Music CD Topics 29

Easy CD & DVD Creator 6 Expanded User’s Guide: Creator ClassicChapter 3: Making Music CDs 16
ECDC_6_0_UserGuide_CC.book Page 16 Monday, December 16, 2002 1:45 PM
What is a Music CD?A music CD is a compact disc (CD) that can be played on both audio CD players and computer disc drives; however, they contain no computer data. With Creator Classic, you can make your own music CDs by recording tracks from other music CDs, and from audio files (MP3, WAV, or WMA files) stored on your hard disk and other discs.
If you want to make a disc that contains MP3 files only and can be played on MP3 players, see Making MP3 Player Discs on page 31.
Note Roxio AudioCentral also allows you to make music CDs. See AudioCentral’s online help for instructions on using the software.
Easy CD & DVD Creator 6 Expanded User’s Guide: Creator ClassicChapter 3: Making Music CDs 17
ECDC_6_0_UserGuide_CC.book Page 17 Monday, December 16, 2002 1:45 PM
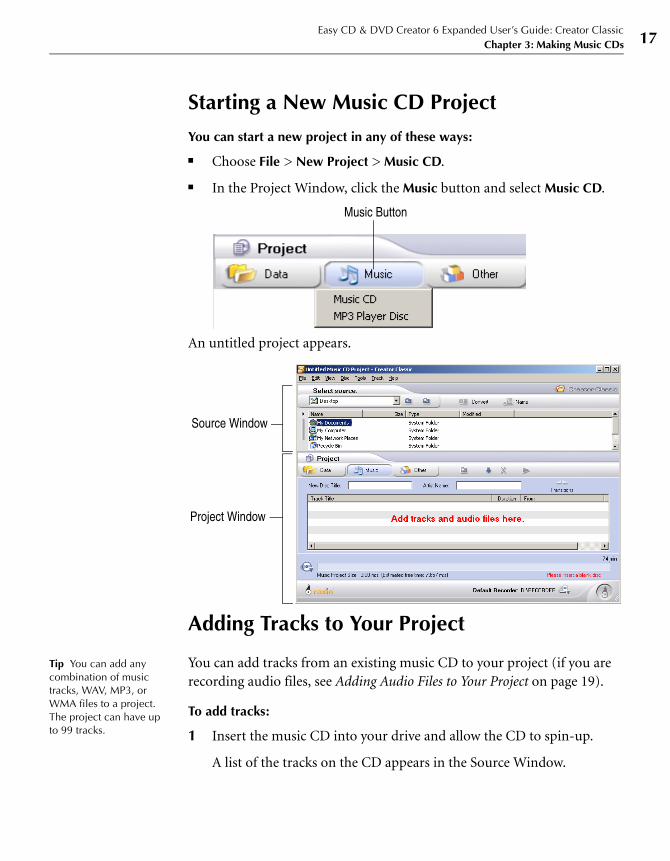
Starting a New Music CD Project
You can start a new project in any of these ways:
■ Choose File > New Project > Music CD.
■ In the Project Window, click the Music button and select Music CD.
An untitled project appears.
Adding Tracks to Your Project
Tip You can add any combination of music tracks, WAV, MP3, or WMA files to a project. The project can have up to 99 tracks.
You can add tracks from an existing music CD to your project (if you are recording audio files, see Adding Audio Files to Your Project on page 19).
To add tracks:
1 Insert the music CD into your drive and allow the CD to spin-up.
A list of the tracks on the CD appears in the Source Window.
Music Button
Source Window
Project Window

Easy CD & DVD Creator 6 Expanded User’s Guide: Creator ClassicChapter 3: Making Music CDs 18
ECDC_6_0_UserGuide_CC.book Page 18 Monday, December 16, 2002 1:45 PM
Note If the disc information (disc title, artist name, and track titles) is not displayed in the Source Window, click the Name icon to download the information from an online music database on the Internet.
Tip The Disc Info Bar at the bottom of the Project Window displays the current size of your project.
2 Do any of the following to add the track to your project:
■ Drag one or more tracks from the Source Window to the project
Window.
■ Select one or more tracks in the Source Window, and then click
the Add icon.
■ Select one or more tracks in the Source Window, and choose Edit
> Add to Project.
■ Copy and paste one or more tracks from the Source Window or
Windows Explorer to the Project Window.
Note Tracks from multiple CDs can be added to the project by repeating the above steps (this is especially useful when you want to make a compilation music CD). Before the actual record process you are prompted to insert the appropriate music CD for the track being recorded.
Name

Easy CD & DVD Creator 6 Expanded User’s Guide: Creator ClassicChapter 3: Making Music CDs 19
ECDC_6_0_UserGuide_CC.book Page 19 Monday, December 16, 2002 1:45 PM
Adding Audio Files to Your ProjectYou can add MP3, WAV, and WMA audio files on your hard disk to your project (if you are recording tracks from music CDs, see Adding Audio Files to Your Project on page 19).
You can audio files in any of these ways:
■ Drag one or more audio files from the Source Window to the Project Window.
■ Select one or more audio files in the Source Window, and then click
the Add icon.
■ Select one or more audio files in the Source Window, and choose Edit > Add to Project.
■ Drag one or more audio files from Windows Explorer to the Project Window.
■ Copy and paste one or more audio files from the Source Window or Windows Explorer to the Project Window.
Working with Tracks in the ProjectOnce you have added one or more tracks to your project, you have the following options:
■ Playing a Track
■ Merging Tracks
■ Splitting Tracks
■ Applying Transition Effects to Tracks
■ Renaming the Disc Title and Artist Name
■ Renaming Tracks
■ Changing the Order of Your Tracks
■ Removing a Track

Easy CD & DVD Creator 6 Expanded User’s Guide: Creator ClassicChapter 3: Making Music CDs 20
ECDC_6_0_UserGuide_CC.book Page 20 Monday, December 16, 2002 1:45 PM
Playing a TrackYou can play one or more tracks in your project to hear how they will be
recorded to your CD. This is especially useful if you want to preview any effects applied to your tracks.
You can play a track in any of these ways:
■ Select one or more tracks and click the Play icon.
■ Right-click one or more tracks in the Project Window and select Play.
The Player appears and begins playing the selected tracks.
Merging TracksYou can merge tracks to create a single composite track.
You can merge a track in any of these ways:
■ Select two or more tracks, then right-click the tracks and select Merge Tracks.
■ Select two or more tracks and choose Track > Merge Tracks.
Splitting TracksYou can split a track that has been merged back to the original track titles
in the Project Window.
You can split a track in any of these ways:
■ Right-click the merged track that you want to split and select Split Tracks.
■ Select the merged track that you want to split and choose Track > Split Tracks.

Easy CD & DVD Creator 6 Expanded User’s Guide: Creator ClassicChapter 3: Making Music CDs 21
ECDC_6_0_UserGuide_CC.book Page 21 Monday, December 16, 2002 1:45 PM
Applying Transition Effects to TracksYou can apply Transition effects such as fade-in, fade-out, and crossfade to
your tracks:
To apply a transition effect:
1 Select a track in the project.
2 Do any of the following:
■ Click the Transitions icon.
■ Choose Track > Transitions Effects.
■ Right-click the track and select Transitions Effects.
The Audio Track Transitions dialog box appears.
Transitions

Easy CD & DVD Creator 6 Expanded User’s Guide: Creator ClassicChapter 3: Making Music CDs 22
ECDC_6_0_UserGuide_CC.book Page 22 Monday, December 16, 2002 1:45 PM
3 Select the effects you want to apply as well as the duration (in seconds:frames) of the effects.
■ Fade-in: This effect gradually increases the volume level at the
beginning of the track from low to the track’s normal level in the
amount of time you specify. For example, if you specify a fade-in
time of two seconds, the beginning two seconds of the track start
in silence and increase to the track’s normal sound level.
■ Fade-out: This effect gradually reduces the volume level from the
track’s normal volume level to low in the amount of time you
specify. For example, if you specify two seconds, the final two
seconds of the track will decrease in volume from the normal
sound level to silence.
■ Crossfade: This effect blends two tracks: the currently selected
track and the track immediately following it in the project. A
combination of fade-out or fade-in can be selected for the two
tracks. You can specify the duration of the crossfade by entering a
value in Length of Crossfade:.
■ Gap: This effect adds silence between two tracks: the currently
selected track and the track immediately following it in the project.
You can specify the duration of the gap by entering a value in
Length of Gap.
4 Click OK.
Note Applying a transition to a track automatically changes the recording method to Disc-at-Once recording.
Renaming the Disc Title and Artist NameYou can name your disc with a disc title and artist name. When you play
the disc on most players, the disc title and artist name will be displayed.
To rename the Disc Title or Artist Name:
■ Type a new name in the New Disc Title or Artist Name text box.

Easy CD & DVD Creator 6 Expanded User’s Guide: Creator ClassicChapter 3: Making Music CDs 23
ECDC_6_0_UserGuide_CC.book Page 23 Monday, December 16, 2002 1:45 PM
Renaming Tracks
You can rename tracks in any of these ways:
■ Right-click the track that you want to rename and select Rename.
■ Select the track that you want to rename and choose Edit > Rename.
Changing the Order of Your TracksThe order of the tracks as they appear in the project is the order the tracks
are recorded to disc.
To change the order of the tracks:
■ Drag the track to the new position.
Removing a TrackRemoving a track from the project does not remove the original track from
the music CD, or the MP3, WAV, or WMA file on your hard disk.
You can remove a track in any of these ways:
■ Right-click one or more tracks and select Remove.
■ Select one or more tracks and click the Remove icon.
■ Select one or more tracks and choose Edit > Remove from Project.
■ Select one or more tracks and press the Delete key.
Disc Title Artist Name

Easy CD & DVD Creator 6 Expanded User’s Guide: Creator ClassicChapter 3: Making Music CDs 24
ECDC_6_0_UserGuide_CC.book Page 24 Monday, December 16, 2002 1:45 PM
Burning Your DiscWhen you have added and organized all of the tracks and audio files that you want to record to your project, you are ready to burn your project to disc.
To burn your project to disc:
1 Insert a blank disc into your recorder.
2 Click Burn .
The Record Setup dialog box appears.
Note You can select various record methods for burning audio to your disc. See Understanding the Record Methods on page 70
3 Click OK.
4 After the disc has been successfully burned, you are prompted to launch Label Creator to make a custom disc label or insert for your
Easy CD & DVD Creator 6 Expanded User’s Guide: Creator ClassicChapter 3: Making Music CDs 25
ECDC_6_0_UserGuide_CC.book Page 25 Monday, December 16, 2002 1:45 PM
disc case. You can choose to start Label Creator by clicking Label Creator, or you can continue without starting Label Creator by clicking No.
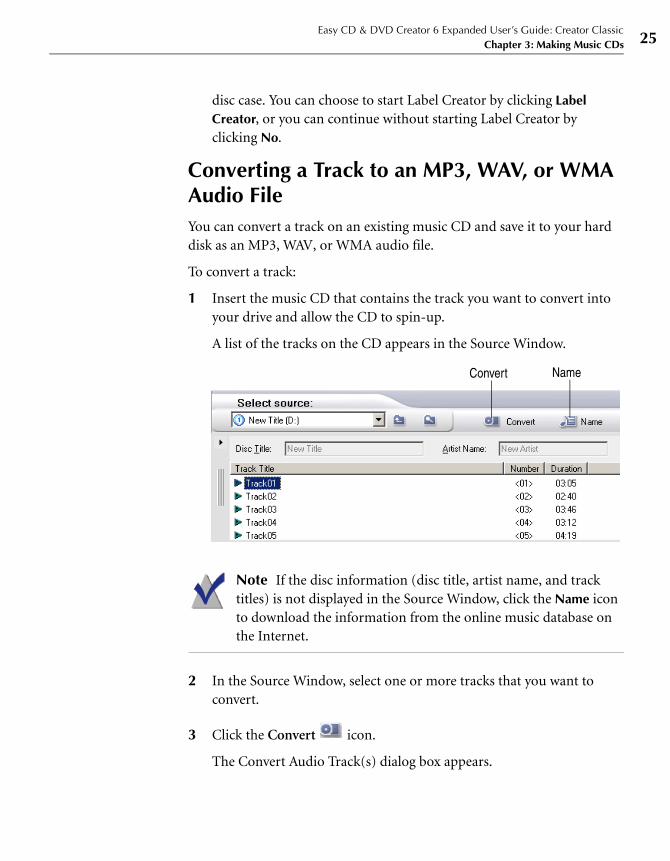
Converting a Track to an MP3, WAV, or WMA Audio FileYou can convert a track on an existing music CD and save it to your hard disk as an MP3, WAV, or WMA audio file.
To convert a track:
1 Insert the music CD that contains the track you want to convert into your drive and allow the CD to spin-up.
A list of the tracks on the CD appears in the Source Window.
Note If the disc information (disc title, artist name, and track titles) is not displayed in the Source Window, click the Name icon to download the information from the online music database on the Internet.
2 In the Source Window, select one or more tracks that you want to convert.
3 Click the Convert icon.
The Convert Audio Track(s) dialog box appears.
Name Convert

Easy CD & DVD Creator 6 Expanded User’s Guide: Creator ClassicChapter 3: Making Music CDs 26
ECDC_6_0_UserGuide_CC.book Page 26 Monday, December 16, 2002 1:45 PM
4 In the Save In drop-down list box, select a location for the file.
5 In the File Name text box, type a name for the file.
6 In the Save as Type drop-down list box, select the format type:
■ *.MP3
■ *.WAV
■ *.WMA
7 In the Format drop-down list box, select the format quality that you want for the file.
The available options vary depending on your system. In general, higher quality settings result in larger file sizes.
8 Click Save.

Easy CD & DVD Creator 6 Expanded User’s Guide: Creator ClassicChapter 3: Making Music CDs 27
ECDC_6_0_UserGuide_CC.book Page 27 Monday, December 16, 2002 1:45 PM
Accessing the Online Music DatabaseIf you have Internet access, you can access an online music database to automatically retrieve information about a commercially produced music CD, including the disc title, artist name, and track titles.
To access the online music database:
1 Insert the music CD into your drive and allow the CD to spin-up.
A list of the tracks on the CD appears in the Source Window.
2 If the disc information (disc title, artist name, and track titles) is not displayed in the Source Window, click the Name icon to download the information from the online music database on the Internet.
If the CD is found in the database, the disc title, artist name, and track titles are displayed in the Source Window
Setting Internet OptionsYou can set Internet options for the online music database.
To set Internet options:
1 Choose Tools > Options.
2 Click the Internet Options tab.
Click the Help button on the dialog for information on each of the options.
Name

Easy CD & DVD Creator 6 Expanded User’s Guide: Creator ClassicChapter 3: Making Music CDs 28
ECDC_6_0_UserGuide_CC.book Page 28 Monday, December 16, 2002 1:45 PM
Using the Gracenote CDDB ServiceCreator Classic uses the Gracenote CDDB® Music Recognition Service (SM) from Gracenote to display artist, title, track, and other information.
To see or edit the full Gracenote CDDB information for a CD, choose Disc > CDDB Disc Information.
Writing CD TEXT to DiscCD TEXT is a feature that allows you to store text information like the disc title, artist name, and track titles on a music CD. This information can then be displayed on consumer electronic devices that support CD TEXT information.
You can enable the feature on your disc if your recorder supports CD TEXT and you record your disc in Disc-at-Once mode.
To write CD TEXT:
1 Prepare your music CD project as you normally would.
2 When you burn your project to disc, make sure the following is true in the Record Setup dialog box:
■ Select the Write CD TEXT check box. (If you cannot check this box
and Disc-at-Once is the selected Record Method, the feature is not
supported by your recorder.)
■ Click the Details button and make sure Disc-at-Once is the
selected Record Method.

Easy CD & DVD Creator 6 Expanded User’s Guide: Creator ClassicChapter 3: Making Music CDs 29
ECDC_6_0_UserGuide_CC.book Page 29 Monday, December 16, 2002 1:45 PM
Advanced Music CD Topics
Entering a UPC
You can enter a Universal Product Code (UPC) for identifying your music
CD. A UPC can be entered from the Project Properties dialog box.
To enter a UPC:
1 Choose File > Project Properties.
The Project Properties dialog box appears.
2 In the UPC text box, enter the UPC code
Entering ISRC Information
The ISRC (International Standard Recording Code) is the international
identification system for sound recordings and music video recordings.
You can enter ISRC information for the music CDs that you make. This information includes each track’s country code, registrant code, year of reference, and designation code. ISRC information can be entered from the Audio Track Properties dialog box.
To enter ISRC information:
1 In the Project Window, right-click the track that you want to provide ISRC information and select Properties.
The Audio Track Properties dialog box appears.
2 In the ISRC text box, enter the 12 character ISRC as described in the dialog box.
The ISRC consists of 12 characters:
■ Country Code (2 ASCII characters)
■ Registrant Code (3 ASCII characters)
■ Year of Reference (2 digits)
■ Designation Code (5 digits)

Easy CD & DVD Creator 6 Expanded User’s Guide: Creator ClassicChapter 3: Making Music CDs 30
ECDC_6_0_UserGuide_CC.book Page 30 Monday, December 16, 2002 1:45 PM

31
ECDC_6_0_UserGuide_CC.book Page 31 Monday, December 16, 2002 1:45 PM
Making MP3 Player Discs
In this chapter
What is an MP3 Player Disc? 32
Starting an MP3 Player Disc Project 33
Adding MP3 Files to Your Project 34
Working with MP3 Files in Your Project 35
Using the MP3 Playlist Editor 37
Burning Your Disc 38
Making MP3 Files 39

Easy CD & DVD Creator 6 Expanded User’s Guide: Creator ClassicChapter 4: Making MP3 Player Discs 32
ECDC_6_0_UserGuide_CC.book Page 32 Monday, December 16, 2002 1:45 PM
What is an MP3 Player Disc?An MP3 Player Disc is a CD or DVD data disc that can be played on an MP3 Player (any player that supports MP3 data files). With Creator Classic, you can make your own MP3 Player Discs by recording MP3 files stored on your hard disk and other discs.
If you want to make a music CD that can be played on both audio CD players and computer disc drives, see Making Music CDs on page 15.

Easy CD & DVD Creator 6 Expanded User’s Guide: Creator ClassicChapter 4: Making MP3 Player Discs 33
ECDC_6_0_UserGuide_CC.book Page 33 Monday, December 16, 2002 1:45 PM
Starting an MP3 Player Disc Project
You can start a new project in any of these ways:
■ Choose File > New Project > MP3 Player Disc.
■ In the Project Window, click the Music button and select MP3 Player Disc.
An untitled project appears.
Music Button
Source Window
Project Window

Easy CD & DVD Creator 6 Expanded User’s Guide: Creator ClassicChapter 4: Making MP3 Player Discs 34
ECDC_6_0_UserGuide_CC.book Page 34 Monday, December 16, 2002 1:45 PM
Adding MP3 Files to Your ProjectYou can add MP3 audio files that are on your hard disk or another disc to your project.
Note The order you add MP3 files to your project is the order the files are displayed in the MP3 playlist file. See Using the MP3 Playlist Editor on page 37 to rename and edit the playlist file.
Tip The Disc Info Bar at the bottom of the Project Window displays the current size of your project.
You can add MP3 files in any of these ways:
■ Drag one or more MP3 files from the Source Window to the Project Window.
■ Select one or more MP3 files in the Source Window, and then click
Add icon.
■ Select one or more MP3 files in the Source Window, and choose Edit > Add to Project.
■ Drag one or more MP3 files from Windows Explorer to the Project Window.
■ Copy and paste one or more MP3 files from the Source Window or Windows Explorer to the Project Window.

Easy CD & DVD Creator 6 Expanded User’s Guide: Creator ClassicChapter 4: Making MP3 Player Discs 35
ECDC_6_0_UserGuide_CC.book Page 35 Monday, December 16, 2002 1:45 PM
Working with MP3 Files in Your ProjectOnce you have added one or MP3 files to your project, you have the following options:
■ Creating a New Folder
■ Removing Files and Folders
■ Renaming Files and Folders
■ Finding Files
Creating a New FolderYou can create a new folder in your project and then add files and folders
to that new folder.
You can create a new folder in any of these ways:
■ Right-click in the Project Window and select New Folder.
■ Choose Edit > New Folder.
Removing Files and FoldersYou can remove files and folders from your project. This does not remove
the original file or folder from your hard disk.
You can remove a file or folder in any of these ways:
■ Select the file or folder in the project and click Remove icon.
■ Right-click the file or folder in the project and select Remove from Project.
■ Select the file or folder in the project and choose Edit > Remove from Project.
■ Select the file or folder in the project and press the Delete key.
Easy CD & DVD Creator 6 Expanded User’s Guide: Creator ClassicChapter 4: Making MP3 Player Discs 36
ECDC_6_0_UserGuide_CC.book Page 36 Monday, December 16, 2002 1:45 PM
Renaming Files and FoldersYou can rename files and folders in your project. This does not rename the
original name of the file or folder on your hard disk.
You can rename a file or folder in any of these ways:
■ Right-click the file or folder in the project and select Rename.
■ Select the file or folder in the project and choose Edit > Rename.
Finding FilesYou can find a file currently included in your project.
To find a file in your project:
1 Right-click the folder or disk volume in the project and select Find.
The Find dialog box appears.
2 In the Named text box, type the name of the file you are looking for.
3 Click Find Now.

Easy CD & DVD Creator 6 Expanded User’s Guide: Creator ClassicChapter 4: Making MP3 Player Discs 37
ECDC_6_0_UserGuide_CC.book Page 37 Monday, December 16, 2002 1:45 PM
Using the MP3 Playlist EditorThe MP3 Playlist Editor allows you to edit the MP3 playlist file (the default name of the file is playlist.m3u). The first time you add MP3 files to the project, the MP3 playlist file is generated and added to the root directory of your project.
You can use the MP3 Playlist Editor to rename the playlist file or change the order of the songs in the playlist file. You must make any changes to the playlist file before you click the Burn button to record your disc.
You can start the MP3 Playlist Editor in any of these ways:
■ Choose Edit > MP3 Playlist Editor.
■ Double-click the playlist file in the Project Window.
■ Right-click the playlist file in the Project Window and select Edit MP3 Playlist.
The MP3 Playlist Editor dialog box appears.
Click Help on the dialog box for information on how to use the MP3 Playlist Editor.

Easy CD & DVD Creator 6 Expanded User’s Guide: Creator ClassicChapter 4: Making MP3 Player Discs 38
ECDC_6_0_UserGuide_CC.book Page 38 Monday, December 16, 2002 1:45 PM
Burning Your DiscWhen you have added and organized all of the MP3 files that you want to record to your project, you are ready to burn your project to disc.
To burn your project to disc:
1 Insert a blank disc into your recorder.
2 Click Burn .
The Record Setup dialog box appears.
3 Click OK.
4 After the disc has been successfully burned, you are prompted to launch Label Creator to make a custom disc label or insert for your disc case. You can choose to start Label Creator by clicking Label Creator, or you can continue without starting Label Creator by clicking No.

Easy CD & DVD Creator 6 Expanded User’s Guide: Creator ClassicChapter 4: Making MP3 Player Discs 39
ECDC_6_0_UserGuide_CC.book Page 39 Monday, December 16, 2002 1:45 PM
Making MP3 FilesWith Creator Classic, you can make your own MP3 files from tracks on your music CDs. This process is commonly referred to as encoding or ripping MP3 files. To make MP3 files using Creator Classic, see Converting a Track to an MP3, WAV, or WMA Audio File on page 25.
Note Roxio AudioCentral also allows you to rip MP3 files. See AudioCentral’s online help for instructions on ripping MP3 files.

Easy CD & DVD Creator 6 Expanded User’s Guide: Creator ClassicChapter 4: Making MP3 Player Discs 40
ECDC_6_0_UserGuide_CC.book Page 40 Monday, December 16, 2002 1:45 PM

41
ECDC_6_0_UserGuide_CC.book Page 41 Monday, December 16, 2002 1:45 PM
Making Enhanced CDs
In this chapter
What is an Enhanced CD? 42
Starting an Enhanced CD Project 43
Adding Tracks to Your Project 44
Adding Audio Files to Your Project 46
Adding Files and Folders to Your Project 47
Burning Your Disc 48

Easy CD & DVD Creator 6 Expanded User’s Guide: Creator ClassicChapter 5: Making Enhanced CDs 42
ECDC_6_0_UserGuide_CC.book Page 42 Monday, December 16, 2002 1:45 PM
What is an Enhanced CD?An enhanced CD is a multisession CD that contains both music tracks and computer data. The first session on the CD contains the music tracks, so a home or car stereo CD player can play them. The second session contains data intended for your computer’s disc drive. Many music CDs are made as an enhanced CD to provide music CD tracks and a music video all on the same CD.

Easy CD & DVD Creator 6 Expanded User’s Guide: Creator ClassicChapter 5: Making Enhanced CDs 43
ECDC_6_0_UserGuide_CC.book Page 43 Monday, December 16, 2002 1:45 PM
Starting an Enhanced CD Project
You can start a new project in any of these ways:
■ Choose File > New Project > Enhanced CD.
■ In the Project Window, click the Other button and then select Enhanced CD.
An untitled project appears.
Other
Source Window
Project Window

Easy CD & DVD Creator 6 Expanded User’s Guide: Creator ClassicChapter 5: Making Enhanced CDs 44
ECDC_6_0_UserGuide_CC.book Page 44 Monday, December 16, 2002 1:45 PM
Adding Tracks to Your ProjectYou can add tracks from an existing music CD to the Audio Project of your Enhanced CD project (if you are recording audio files, see Adding Audio Files to Your Project on page 46).
To add tracks:
1 Insert the music CD into your drive and allow the CD to spin-up.
A list of the tracks on the CD appears in the Source Window.
Note If the disc information (disc title, artist name, and track titles) is not displayed in the Source Window, click the Name icon to download the information from an online music database on the Internet.
2 Click the Audio Project in the Project Window to select it.
Name
Audio Project

Easy CD & DVD Creator 6 Expanded User’s Guide: Creator ClassicChapter 5: Making Enhanced CDs 45
ECDC_6_0_UserGuide_CC.book Page 45 Monday, December 16, 2002 1:45 PM
3 Do any of the following to add the track to your project:
■ Drag one or more tracks from the Source Window to the Audio
Project in the Project Window.
■ Select one or more tracks in the Source Window, and then click
Add icon.
■ Select one or more tracks in the Source Window, and choose Edit
> Add to Project.
■ Copy and paste one or more tracks from the Source Window or
Windows Explorer to the Project Window.

Easy CD & DVD Creator 6 Expanded User’s Guide: Creator ClassicChapter 5: Making Enhanced CDs 46
ECDC_6_0_UserGuide_CC.book Page 46 Monday, December 16, 2002 1:45 PM
Adding Audio Files to Your ProjectYou can add MP3, WAV, and WMA audio files from your hard disk and other discs to the Audio Project of your Enhanced CD project (if you are recording tracks from music CDs, see Adding Tracks to Your Project on page 44).
1 Click the Audio Project in the Project Window to select it.
2 Do any of the following to add the track to your project:
■ Drag one or more audio files from the Source Window to the
Audio Project in the Project Window.
■ Select one or more audio files in the Source Window, and then
click Add icon.
■ Select one or more audio files in the Source Window, and choose
Edit > Add to Project.
■ Drag one or more audio files from Windows Explorer to the Audio
Project in the Project Window.
■ Copy and paste one or more audio files from the Source Window
or Windows Explorer to the Audio Project in the Project Window.
Audio Project

Easy CD & DVD Creator 6 Expanded User’s Guide: Creator ClassicChapter 5: Making Enhanced CDs 47
ECDC_6_0_UserGuide_CC.book Page 47 Monday, December 16, 2002 1:45 PM
Adding Files and Folders to Your ProjectYou can add files and folders from your hard disk and other discs to the Data Project of your Enhanced CD project.
1 Click the Data Project (the disc icon below the audio project) in the Project Window to select it.
Note The CDPLUS and PICTURES folders in the Data Project are automatically created and are required for making an Enhanced CD.
2 Do any of the following to add files and folders to your project:
■ Drag one or more files and folders from the Source Window to the
Data Project of the Project Window.
■ Select one or more files and folders in the Source Window, and
then click the Add icon.
■ Select one or more files and folders in the Source Window, and
choose Edit > Add to Project.
■ Drag one or more files and folders from Windows Explorer to the
Data Project of the Project Window.
Data Project

Easy CD & DVD Creator 6 Expanded User’s Guide: Creator ClassicChapter 5: Making Enhanced CDs 48
ECDC_6_0_UserGuide_CC.book Page 48 Monday, December 16, 2002 1:45 PM
Burning Your DiscWhen you have added and organized all of the audio tracks and data files that you want to record to your project, you are ready to burn your project to disc.
To burn your project to disc:
1 Insert a blank disc into your recorder.
2 Click Burn .
The Record Setup dialog box appears.
3 Click OK.
4 After the disc has been successfully burned, you are prompted to launch Label Creator to make a custom disc label or insert for your disc case. You can choose to start Label Creator by clicking Label Creator, or you can continue without starting Label Creator by clicking No.

49
ECDC_6_0_UserGuide_CC.book Page 49 Monday, December 16, 2002 1:45 PM
Making Mixed-Mode CDs
In this chapter
What is a Mixed-Mode CD? 50
Starting a Mixed-Mode CD Project 51
Adding Files and Folders to Your Project 52
Adding Tracks to Your Project 53
Adding Audio Files to Your Project 54
Burning Your Disc 55

Easy CD & DVD Creator 6 Expanded User’s Guide: Creator ClassicChapter 6: Making Mixed-Mode CDs 50
ECDC_6_0_UserGuide_CC.book Page 50 Monday, December 16, 2002 1:45 PM
What is a Mixed-Mode CD?A mixed-mode CD is a single-session CD that contains both computer data and music tracks, and is typically used for entertainment and educational programs. Data is written to the first track on the CD followed by one or more music tracks.
Note Mixed-mode CDs are used in ROM drives and recorders only and cannot be played in home or car stereo CD players.

Easy CD & DVD Creator 6 Expanded User’s Guide: Creator ClassicChapter 6: Making Mixed-Mode CDs 51
ECDC_6_0_UserGuide_CC.book Page 51 Monday, December 16, 2002 1:45 PM
Starting a Mixed-Mode CD Project
You can start a new project in any of these ways:
■ Choose File > New Project > Mixed-Mode CD.
■ In the Project Window, click the Other icon and then select Mixed-Mode CD.
An untitled project appears.
Other
Source Window
Project Window

Easy CD & DVD Creator 6 Expanded User’s Guide: Creator ClassicChapter 6: Making Mixed-Mode CDs 52
ECDC_6_0_UserGuide_CC.book Page 52 Monday, December 16, 2002 1:45 PM
Adding Files and Folders to Your ProjectYou can add files and folders from your hard disk and other discs to the Data Project of your Mixed-Mode CD project.
1 Click the Data Project (the disc icon above the audio project) in the Project Window to select it.
2 Do any of the following to add files and folders to your project:
■ Drag one or more files and folders from the Source Window to the
Data Project of the Project Window.
■ Select one or more files and folders in the Source Window, and
then click the Add icon.
■ Select one or more files and folders in the Source Window, and
choose Edit > Add to Project.
■ Drag one or more files and folders from Windows Explorer to the
Data Project of the Project Window.
■ Copy and paste one or more files and folders from the Source
Window or Windows Explorer to the Data Project of the Project
Window.
Data Project

Easy CD & DVD Creator 6 Expanded User’s Guide: Creator ClassicChapter 6: Making Mixed-Mode CDs 53
ECDC_6_0_UserGuide_CC.book Page 53 Monday, December 16, 2002 1:45 PM
Adding Tracks to Your ProjectYou can add tracks from an existing music CD to the Audio Project of your Mixed-Mode CD project (if you are recording audio files, see Adding Audio Files to Your Project on page 54).
To add tracks:
1 Insert the music CD into your drive and allow the CD to spin-up.
A list of the tracks on the CD appears in the Source Window.
Note If the disc information (disc title, artist name, and track titles) is not displayed in the Source Window, click the Name icon to download the information from an online music database on the Internet.
2 Click the Audio Project in the Project Window to select it.
Name
Audio Project

Easy CD & DVD Creator 6 Expanded User’s Guide: Creator ClassicChapter 6: Making Mixed-Mode CDs 54
ECDC_6_0_UserGuide_CC.book Page 54 Monday, December 16, 2002 1:45 PM
3 Do any of the following to add the track to your project:
■ Drag one or more tracks from the Source Window to the Audio
Project in the Project Window.
■ Select one or more tracks in the Source Window, and then click
Add icon.
■ Select one or more tracks in the Source Window, and choose Edit
> Add to Project.
■ Copy and paste one or more tracks from the Source Window or
Windows Explorer to the Audio Project in the Project Window.
Adding Audio Files to Your ProjectYou can add MP3, WAV, and WMA audio files from your hard disk and other discs to the Audio Project of your Mixed-Mode CD project (if you are recording tracks from music CDs, see Adding Tracks to Your Project on page 53).
1 Click the Audio Project in the Project Window to select it.
2 Do any of the following to add the track to your project:
■ Drag one or more audio files from the Source Window to the
Audio Project in the Project Window.
■ Select one or more audio files in the Source Window, and then
click Add icon.
■ Select one or more audio files in the Source Window, and choose
Edit > Add to Project.
Audio Project

Easy CD & DVD Creator 6 Expanded User’s Guide: Creator ClassicChapter 6: Making Mixed-Mode CDs 55
ECDC_6_0_UserGuide_CC.book Page 55 Monday, December 16, 2002 1:45 PM
■ Drag one or more audio files from Windows Explorer to the Audio
Project in the Project Window.
■ Copy and paste one or more audio files from the Source Window
or Windows Explorer to the Audio Project in the Project Window.
Burning Your DiscWhen you have added and organized all of the audio tracks and data files that you want to record to your project, you are ready to burn your project to disc.
To burn your project to disc:
1 Insert a blank disc into your recorder.
2 Click Burn .
The Record Setup dialog box appears.
3 Click OK.
4 After the disc has been successfully burned, you are prompted to launch Label Creator to make a custom disc label or insert for your disc case. You can choose to start Label Creator or you can continue without starting Label Creator.

Easy CD & DVD Creator 6 Expanded User’s Guide: Creator ClassicChapter 6: Making Mixed-Mode CDs 56
ECDC_6_0_UserGuide_CC.book Page 56 Monday, December 16, 2002 1:45 PM

57
ECDC_6_0_UserGuide_CC.book Page 57 Monday, December 16, 2002 1:45 PM
Making Bootable Discs
In this chapter
What is a Bootable Disc? 58
Verifying That Your System Supports Bootable Disc 59
Finding or Creating a Bootable Floppy 59
Making a Bootable Disc with Creator Classic 61
Tips for Using Floppy Disk Emulation 63
Advanced Settings 63

Easy CD & DVD Creator 6 Expanded User’s Guide: Creator ClassicChapter 7: Making Bootable Discs 58
ECDC_6_0_UserGuide_CC.book Page 58 Monday, December 16, 2002 1:45 PM
What is a Bootable Disc?A bootable disc is a CD or DVD that contains a bootable image, which is an exact representation of a bootable floppy disk or hard disk. With Creator Classic, you can make a bootable disc that can be used to start your system.
Bootable discs are useful if you wish to boot your system, bypassing the operating system on your hard disk. Bootable discs are also useful if you wish to run backup, drive utility, or virus scan software.
Note Making a bootable disc is intended for the advanced user. It requires an in depth understanding of how to create bootable floppies and hard disk images, and how to create and edit DOS config.sys and autoexec.bat files.
Instructions are provided below to assist you in making a bootable disc from a bootable floppy image. This is called Floppy Disk Emulation.
To make a bootable disc from a hard disk image (Hard Disk Emulation) you will need an understanding of which files are needed to boot a hard drive.
There are several steps involved in making a bootable disc. To begin the process of making a bootable disc, follow the instructions in each of the following sections:
■ Verify That Your System Supports Bootable Disc
■ Finding or Creating a Bootable Floppy
■ Making a Bootable Disc with Creator Classic

Easy CD & DVD Creator 6 Expanded User’s Guide: Creator ClassicChapter 7: Making Bootable Discs 59
ECDC_6_0_UserGuide_CC.book Page 59 Monday, December 16, 2002 1:45 PM
Verifying That Your System Supports Bootable DiscTo start your system from a bootable disc, the system itself must support the bootable disc feature. Here is what you need to verify:
■ Check your system BIOS settings (review your system’s user’s guide to learn how to access your system’s BIOS settings)and look for the Bootable CD-ROM support option. If it is available, enable the option. Most Pentium-class systems (or higher) support this feature.
■ If your CD or DVD drive is connected to your system via a SCSI host adapter, the SCSI host adapter may have an onboard BIOS. Check your host adapter's documentation to verify if the SCSI adapter supports bootable discs. If bootable disc support is available, review your SCSI host adapter's documentation to learn how to access the SCSI host adapter’s BIOS settings to enable this feature.
Finding or Creating a Bootable FloppyYour system may have included a bootable floppy disk, if not, some versions of Windows support creating a bootable floppy disk.
To make a bootable floppy under Windows 98 or Windows Me:
1 Open the Control Panel.
2 Launch Add/Remove Programs.
3 Click on the tab labeled Startup Disc.
4 Insert a floppy disk in Drive A.
5 Click the Create Disk button.
To make a bootable floppy under Windows XP:
1 Insert a floppy disc in Drive A
2 Double-click My Computer.
3 Right-click the floppy drive.
4 Select Make Startup Disk.

Easy CD & DVD Creator 6 Expanded User’s Guide: Creator ClassicChapter 7: Making Bootable Discs 60
ECDC_6_0_UserGuide_CC.book Page 60 Monday, December 16, 2002 1:45 PM
5 Click OK.
Note To make a bootable floppy under Windows NT and Windows 2000, please refer to your Windows User’s Guide.
Additional Bootable Floppy InformationThe floppy disk you need to create is dependent on the system you are planning to boot from. The floppy disk needs to be formatted with the DOS Format command (FORMAT A: /S) and it also needs to contain a config.sys and autoexec.bat file.
The config.sys file typically contains the instructions to load your DOS CD-ROM driver while the autoexec.bat file contains the instructions to load Microsoft's DOS CD-ROM Extensions (i.e., mscdex.exe).
Please consult your system's documentation for the proper way to load your DOS CD-ROM driver and mscdex.exe. You should test this configuration with your bootable floppy disk before you make a bootable disc. If your target system boots properly with the floppy disk, and assigns a drive letter for the CD-ROM drive on that system, you are ready to make a bootable disc.
Note When you add the command lines to the config.sys and autoexec.bat, do not use fixed paths. For example:
Recommended Entry: device=aspicd.sys /d:aspicd0Not Recommended: device=a:\aspicd.sys /d:aspicd0
Once you have created a bootable floppy disk, you can use it to create a bootable disc.

Easy CD & DVD Creator 6 Expanded User’s Guide: Creator ClassicChapter 7: Making Bootable Discs 61
ECDC_6_0_UserGuide_CC.book Page 61 Monday, December 16, 2002 1:45 PM
Making a Bootable Disc with Creator Classic
To make a Bootable Disc:
1 Do any of the following to start a new project:
■ Choose File > New Project > Bootable Disc.
■ In the Project Window, click the Other icon and then select
Bootable Disc.
The Choose Type of Bootable Disc dialog box appears.
2 Select the Bootable Disc Type:
■ Floppy Disk Emulation (1.44 MB): Select this option if you want to
create a bootable disc that is an exact representation of a 1.44 MB
bootable floppy. This option allows you take a bootable floppy
image and copy it to a 1.44 MB partition on the disc. With this
option selected, your bootable image cannot exceed 1.44 MB.
Other

Easy CD & DVD Creator 6 Expanded User’s Guide: Creator ClassicChapter 7: Making Bootable Discs 62
ECDC_6_0_UserGuide_CC.book Page 62 Monday, December 16, 2002 1:45 PM
■ Floppy Disk Emulation (2.88 MB): Select this option if you want a
bootable disc that is an exact representation of a 2.88 MB bootable
floppy. This option allows you take a bootable floppy image and
copy it to a 2.88 MB partition on the disc. With this option
selected, your bootable image cannot exceed 2.88 MB.
■ Hard Disk Emulation: Select this option if you want a bootable disc
that emulates a hard disk. With this option selected, you can create
a bootable image on your disc that is larger than that available
using the bootable floppy disk option. The size of your bootable
image will be limited to the space on your disc.
■ No Emulation: Select this option if you do not want the disc to
emulate a floppy or hard disk.With this option selected, the image
is loaded into memory and executed.
3 In Emulation Option, select the emulation appropriate for the Bootable Disc Type selected above:
■ Generate Image from Floppy: Select this option to create a
bootable disc from a bootable floppy. To use this feature, you must
have a bootable floppy disk.
■ Use Existing Image File: Select this option to create a bootable disc
from an existing image file. To use this feature you need a bootable
image on your hard disk. The image can be a bootable floppy
image (1.44 or 2.88 MB) or a larger image to be used when
choosing the Hard Disk Emulation or No Emulation bootable disc
types. Click Browse to search for you bootable image.
4 Click OK. Follow any on-screen instructions that may appear.
5 When the Bootable disc project appears, use Creator Classic as you normally would for making a data disc.

Easy CD & DVD Creator 6 Expanded User’s Guide: Creator ClassicChapter 7: Making Bootable Discs 63
ECDC_6_0_UserGuide_CC.book Page 63 Monday, December 16, 2002 1:45 PM
Note When the disc has been burned, take it to the system you want to boot from. Make sure it has bootable disc support enabled, insert the bootable disc in your CD or DVD drive, and reboot the system. If you are able to start your system from the bootable disc, you have successfully made a bootable disc.
Tips for Using Floppy Disk EmulationWhen booting from a bootable disc, your bootable disc will emulate a bootable floppy, the disc will in effect become Drive A, and your floppy drive will be shifted to Drive B.
You can copy other information onto your disc outside of the boot image. Other information that can be included on the disc might be:
■ Hard disk utilities
■ Application installers
■ Backup utilities, etc.
If you wish to access information on your disc outside of the boot image, you must make sure the following files are included your boot image:
■ mscdex.exe
■ cdrom.sys
■ Device drivers for your CD or DVD drives
If these files are not included in the boot image, the disc will not be accessible. Device drivers for your CD or DVD drives can be found on software that came with your drive.
Advanced Settings
Load SegmentThe Load Segment specifies the hexadecimal address in memory where the master boot record will be loaded. To create a standard bootable disc, you will not need to change this value.

Easy CD & DVD Creator 6 Expanded User’s Guide: Creator ClassicChapter 7: Making Bootable Discs 64
ECDC_6_0_UserGuide_CC.book Page 64 Monday, December 16, 2002 1:45 PM
Sector CountThe Sector Count specifies the number of virtual/emulated sectors the system will store at the load segment during the initial boot process. To create a standard bootable disc, you will not need to change this value.

65
ECDC_6_0_UserGuide_CC.book Page 65 Monday, December 16, 2002 1:45 PM
Using Additional Features
In this chapter
Creating and Recording Disc Image Files 66
Selecting Disc Size 69
Changing the Default Recorder 69
Understanding the Record Methods 70
Excluding Files from Your Project 71
Erasing a ReWritable Disc 72
Validating a Project 73
Viewing Project, Drive, and Disc Properties 73
Viewing Creator Classic Options 74
Running the System Tests 74
Starting Roxio Retrieve 75
Starting Label Creator 75

Easy CD & DVD Creator 6 Expanded User’s Guide: Creator ClassicChapter 8: Using Additional Features 66
ECDC_6_0_UserGuide_CC.book Page 66 Monday, December 16, 2002 1:45 PM
Creating and Recording Disc Image FilesA disc image file is a complete copy of the data as it will appear on the disc you wish to record—only it’s stored on your hard disk instead of recorded to a blank disc. You can create a disc image file for any type of project in Creator Classic.
Note When making a disc image file, make sure you have enough space on your hard disk to store the disc image file.
To create the disc image file:
1 Prepare your project as you normally would.
2 When you have added and organized all of the files that you want to record to your project, you are ready to create your disc image file.
Note A disc image file cannot be created for a large project that is recorded to multiple discs.
3 Choose File > Create Disc Image.
The Create Disc Image File dialog box appears.

Easy CD & DVD Creator 6 Expanded User’s Guide: Creator ClassicChapter 8: Using Additional Features 67
ECDC_6_0_UserGuide_CC.book Page 67 Monday, December 16, 2002 1:45 PM
4 Type a file name and select a location for the file.
5 Click Save.
The Burn Disc Progress dialog box appears.
6 Click OK when the recording is finished.
To burn the disc image file to disc:
1 Choose File > Record Disc from Image.
The Record Disc From Image File dialog box appears.
2 Select the image file that you want to burn to disc and click Open.
The Record Setup dialog box appears.

Easy CD & DVD Creator 6 Expanded User’s Guide: Creator ClassicChapter 8: Using Additional Features 68
ECDC_6_0_UserGuide_CC.book Page 68 Monday, December 16, 2002 1:45 PM
3 Insert a blank disc into your recorder
4 Click OK.
5 After the disc has been successfully burned, you are prompted to launch Label Creator to make a custom disc label or insert for your disc case. You can choose to start Label Creator by clicking Label Creator, or you can continue without starting Label Creator by clicking No.

Easy CD & DVD Creator 6 Expanded User’s Guide: Creator ClassicChapter 8: Using Additional Features 69
ECDC_6_0_UserGuide_CC.book Page 69 Monday, December 16, 2002 1:45 PM
Selecting Disc SizeThe Disc Info Bar at the bottom of the Project Window displays the current size of your project, the number discs required to burn the project, and the disc size of the media in your recorder.
The disc size is automatically determined once you insert a disc into the recorder; however, you can manually change the disc size for certain situations. For example, if your DVD recorder is not currently connected and you want to create a disc image file that you want to burn to a DVD at a later time, you could change the disc size to “DVD 4.7 GB” and then create the disc image file as you normally would.
To manually change the disc size:
■ Click the Disc Size icon and select the disc size you want to use.
Changing the Default RecorderIf you have multiple recorders installed in your computer, you can choose one as the default recorder that will be used for burning discs in Creator Classic.
To change the default recorder:
■ Click the Default Recorder icon and select the recorder that you want to use as your default recorder.
Disc Size Icon
Disc Info Bar Disc Size
Default Recorder Icon

Easy CD & DVD Creator 6 Expanded User’s Guide: Creator ClassicChapter 8: Using Additional Features 70
ECDC_6_0_UserGuide_CC.book Page 70 Monday, December 16, 2002 1:45 PM
Understanding the Record MethodsThe record method determines how the data in your project is written to the disc in your recorder. You can select the record method from the Record Setup dialog box that appears after you click the Burn button.
Here is a description of the available Record Methods:
■ Track-at-Once: This method writes data to the disc in multiple passes and allows you to record a single track (data or music) at a time. Tracks recorded in Track-at-Once mode are separated by gaps. If a data track is followed by a music track, the gap is two or three seconds. The gap between two music tracks is usually two seconds.
■ Don’t Finalize Session: If you are making a music CD, select this
option to enable you to keep adding tracks to the disc in a single
session. You cannot play the CD on home stereo equipment until
the session is finalized. This option is available when making a
music CD only.
■ Finalize Session. Don’t Finalize Disc: Select this option to finalize
the session. The disc itself is not finalized so additional sessions
can be added later.
Record Methods

Easy CD & DVD Creator 6 Expanded User’s Guide: Creator ClassicChapter 8: Using Additional Features 71
ECDC_6_0_UserGuide_CC.book Page 71 Monday, December 16, 2002 1:45 PM
If you are making a music CD, this option finalizes the session so that the disc can be played on home stereo equipment. If additional sessions are added later, only the first session on the CD can be played on most stereo equipment.
■ Finalize Disc: Select this option to finalize both the session and
disc. Once the disc is finalized, you cannot add additional tracks or
files to the disc.
■ Disc-at-Once: This method writes data to the disc in a single operation, and finalizes both the session and disc at the end of the recording process.
If you are making a music CD, this option eliminates the two-second gap between tracks and write-protects the CD. The CD can be played on home stereo equipment.
If you want to enable CD TEXT on your disc, this option must be selected.
Note For more information on the options available in the dialog box, click the Help button.
Excluding Files from Your ProjectYou can exclude certain file types from being added to a Data, Enhanced CD, Mixed-Mode CD, or Bootable Disc project.
To exclude files from your project:
1 Choose File > Project Properties.
The Project Properties dialog box appears.

Easy CD & DVD Creator 6 Expanded User’s Guide: Creator ClassicChapter 8: Using Additional Features 72
ECDC_6_0_UserGuide_CC.book Page 72 Monday, December 16, 2002 1:45 PM
2 Click the File Filter tab.
3 Select your options from the dialog box.
Click the Help button on the dialog box for information on the various options.
Erasing a ReWritable DiscIf you are using a rewritable disc, you can erase it completely so that it is blank.
Caution When you erase a rewritable disc, all files on that disc will be permanently deleted.
File Filter Tab
Easy CD & DVD Creator 6 Expanded User’s Guide: Creator ClassicChapter 8: Using Additional Features 73
ECDC_6_0_UserGuide_CC.book Page 73 Monday, December 16, 2002 1:45 PM
Caution If you have copied extremely sensitive data to a rewritable disc (such as private personal information) we strongly recommend that you destroy the disc rather than choose the option of erasing it and re-recording over the data.
You can erase a rewritable disc in any of these ways:
■ Right-click the recorder in the Source Window and select Erase.
■ In the Source Window, select the recorder that contains the rewritable disc you want to erase, and choose Disc > Erase Disc.
Validating a ProjectValidating a project allows you to verify that the source contents have not been moved, deleted, renamed, or modified since you added them to the project. If an item cannot be found, you are prompted to delete the item from the project before recording the project to disc.
To validate a CD project:
■ Choose File > Validate Project.
Viewing Project, Drive, and Disc Properties
Viewing Project PropertiesThe project properties dialog box displays general, advanced, and file filter project properties.
To view project properties:
Choose File > Project Properties.
Viewing Drive PropertiesThe drive properties dialog box displays information about the disc drives and recorder connected to your computer.
To view drive properties:
Choose Tools > Drive Properties.

Easy CD & DVD Creator 6 Expanded User’s Guide: Creator ClassicChapter 8: Using Additional Features 74
ECDC_6_0_UserGuide_CC.book Page 74 Monday, December 16, 2002 1:45 PM
Viewing Disc InformationThe disc information dialog box displays information about the discs in your CD or DVD drives and recorders.
To view disc information:
Choose Disc > Disc Information.
Viewing Creator Classic OptionsThe Creator Classic Options dialog box displays settings for temporary files, “Don’t Show Me Again” options, and Internet options for your online music database.
To view drive properties:
Choose Tools > Options.
Running the System TestsThe system tests allow you to check your system for compatibility with Creator Classic.
Note The system tests run automatically whenever you first attempt to make a disc when copying from a new source location.
To run the system tests:
1 Choose Tools > System Tests.
2 Select the device you want to test.
3 Select one or more of the tests:
■ Data Transfer Rate Test: This test determines the average rate at
which data is read from the drive.
■ Audio Extraction Test: This test determines the average rate at
which digital audio is extracted from the drive.
4 Click Test.
5 Follow any on-screen instructions that may appear.

Easy CD & DVD Creator 6 Expanded User’s Guide: Creator ClassicChapter 8: Using Additional Features 75
ECDC_6_0_UserGuide_CC.book Page 75 Monday, December 16, 2002 1:45 PM
Starting Roxio RetrieveYou can start the Roxio Retrieve application to retrieve files and folders from large projects that were burned to multiple discs.
To start Roxio Retrieve:
■ Choose Tools > Roxio Retrieve.
Starting Label CreatorYou can start the Label Creator to make a custom disc label or insert for your disc case.
To start Label Creator:
■ Choose Tools > Label Creator.

Easy CD & DVD Creator 6 Expanded User’s Guide: Creator ClassicChapter 8: Using Additional Features 76
ECDC_6_0_UserGuide_CC.book Page 76 Monday, December 16, 2002 1:45 PM

77
ECDC_6_0_UserGuide_CC.book Page 77 Monday, December 16, 2002 1:45 PM
Creator Classic Reference
In this chapter
Creator Classic Menus 78
Keyboard Shortcuts 82

Easy CD & DVD Creator 6 Expanded User’s Guide: Creator ClassicChapter 9: Creator Classic Reference 78
ECDC_6_0_UserGuide_CC.book Page 78 Monday, December 16, 2002 1:45 PM
Creator Classic MenusThe following menus are available in Creator Classic:
■ File Menu
■ Edit Menu
■ View Menu
■ Disc Menu
■ Tools Menu
■ Track Menu
■ Help Menu
File MenuThe following table lists the commands under the File menu.
Command Description
New Project Starts a new Creator Classic project. The following projects are available.■ Data Disc■ Music CD■ MP3 Player Disc■ Mixed-Mode CD■ Enhanced CD■ Bootable Disc
Open Project Opens a previously saved Creator Classic project.
Save Project List Saves your Creator Classic project
Save Project List As Saves your Creator Classic under a different name.
Validate Project Verifies that the source contents have not been moved, deleted, renamed, or modified since they were added to the project.
Record Disc Displays the Record Setup dialog box.
Finalize Disc Finalizes (close) an open session music CD so that it can be played on home stereo equipment.

Easy CD & DVD Creator 6 Expanded User’s Guide: Creator ClassicChapter 9: Creator Classic Reference 79
ECDC_6_0_UserGuide_CC.book Page 79 Monday, December 16, 2002 1:45 PM
Edit MenuThe following table lists the commands under the Edit menu.
Create a Disc Image Creates a disc image file that can be burned to disc at a later time.
Record Disc from Image
Records a previously saved disc image file.
Project Properties Displays the Project Properties dialog box.
Recent File Opens a recent Creator Classic project.
Exit Quits Creator Classic.
Command Description
New Folder Creates a new folder in the Project Window.
Cut Removes a file, folder, or track from the Project Window and allows you to paste it to a different location within the Project Window.
Copy Copies a file, folder, or track from the Project Window and allows you to paste it to a different location within the Project Window
Paste Allows you to paste a file, folder, or track that was cut or copied into a different location within the Project Window.
Add to Project Adds the selected file(s) from the Source Window to the Project Window.
Remove from Project Removes the selected file(s) from the Project Window.
Rename Renames the selected file or folder in the Project Window.
Edit MP3 Playlist Displays the MP3 Playlist Editor.
Select All Selects all files, folders, and tracks in the Project Window.
Command Description

Easy CD & DVD Creator 6 Expanded User’s Guide: Creator ClassicChapter 9: Creator Classic Reference 80
ECDC_6_0_UserGuide_CC.book Page 80 Monday, December 16, 2002 1:45 PM
View MenuThe following table lists the commands under the View menu.
Command Description
Disc Info Bar Shows or hides the Disc Info Bar at the bottom of the Project Window.
Source Tree View Displays the folder tree structure in the Source Window.
Project Tree View Displays the folder tree structure in the Project Window.
Up One Level Moves up one level in the folder structure.
Show Files ■ All Files: Displays all files in the Source Window.■ Audio Files Only: Displays music CD tracks and
MP3, WAV, and WMA audio files in the Source Window only.
Split ■ Left-Right: Resizes the folder tree structure in the Source Window horizontally.
■ Up-Down: Resizes the Source Window vertically.
Large Icons Displays large icons in the Source Window.
Small Icons Displays small icons in the Source Window.
List Displays files in the Source Window.
Details Displays file details in the Source Window
Arrange Icons Arranges the icons in the Source Window:■ Sort by Name■ Sort by Number■ Sort by Type■ Sort by Size■ Sort by Date
Refresh Refreshes the folder views.

Easy CD & DVD Creator 6 Expanded User’s Guide: Creator ClassicChapter 9: Creator Classic Reference 81
ECDC_6_0_UserGuide_CC.book Page 81 Monday, December 16, 2002 1:45 PM
Disc MenuThe following table lists the commands under the Disc menu.
Tools MenuThe following table lists the commands under the Tools menu.
Track MenuThe following table lists the commands under the Track menu.
Command Description
Eject Ejects the disc in the recorder.
Erase Disc Erases the ReWritable disc in the recorder.
Disc Information Displays the Disc Information dialog box.
CDDB Disc Information
Displays the Gracenote CDDB Disc Information dialog box.
Command Description
Search for Files Displays the Windows Search Results dialog.
System Tests Displays the System Tests dialog box.
Drive Properties Displays the Driver Properties dialog box.
Roxio Retrieve Starts the Roxio Retrieve application.
Label Creator Starts the Label Creator application.
Options Displays the Creator Classic Options dialog box.
Command Description
Play Starts the Player to play audio tracks and files.
Convert to Audio File Displays the dialog box for converting audio tracks to MP3, WAV, or WMA files.
Merge Tracks Merges two or more tracks in the Project Window.
Split Tracks Splits a merged track.
Transition Effects Displays the Audio Track Transitions dialog box.
Name Tracks Searches the online music database on the Internet for disc information on the selected music CD.

Easy CD & DVD Creator 6 Expanded User’s Guide: Creator ClassicChapter 9: Creator Classic Reference 82
ECDC_6_0_UserGuide_CC.book Page 82 Monday, December 16, 2002 1:45 PM
Help MenuThe following table lists the commands under the Help menu.
Keyboard ShortcutsYou can use your keyboard instead of your mouse to access menu commands. An underlined letter in a menu item or command indicates the keyboard shortcut you would type to choose that option.
Command Description
About Creator Classic
Opens the About dialog box for Creator Classic, which displays the application's version number and copyright notice.
Creator Classic Help Starts Creator Classic Online Help
Tutorial Starts the Creator Classic Tutorial
Components Information
Displays a listing of associated Creator Classic files.
Gracenote CDDB – The Music Information Source
Links to the Gracenote website.
To Press
Open an existing Creator Classic project. Ctrl-O
Save your Creator Classic project. Ctrl-S
Cut a file, folder, or track from the Project Window. Ctrl-X
Copy a file, folder, or track from the Project Window. Ctrl-C
Paste a file, folder, or track that was Cut or Copied into the Project Window.
Ctrl-V
Add a file, folder, or track from the Source Window to the Project Window.
Ctrl-T
Remove a file, folder, or track from the Project Window. Del
Select all files, folders, and tracks displayed in the Source Window.
Ctrl-A

83
ECDC_6_0_UserGuide_CC.book Page 83 Monday, December 16, 2002 1:45 PM
Index
Aabout dialog box 82add icon 3, 7, 18, 19, 34, 45, 46, 47, 52,
54adding
a new folder 9, 35audio files to project 19, 46, 54files and folder 7, 47, 52MP3 files 34tracks to project 17, 44, 53
artist name 22, 27, 28audio files 16, 25
adding to project 19, 46, 54converting to 25
Audio Track Properties dialog box 29Audio Track Transitions dialog box 21AudioCentral 39autoexec.bat 60
Bbootable disc 59bootable disc project
starting 61bootable floppy disk 59
burn button 3, 11burning your disc 11, 24, 38, 48, 55
CCD TEXT 28, 71CDDB 81CDPLUS folder 47changing
default recorder 69names of files and folders before making
the disc 9, 36order of tracks 23
combining music and data on discs 42, 50
compilation CD 18components information 82config.sys 60Convert Audio Track(s) dialog box 25convert icon 3, 25converting a track 25, 81copyright information iicreating
data disc 6enhanced CD 42mixed-mode CD 50MP3 files 39

Easy CD & DVD Creator 6 Expanded User’s Guide: Creator ClassicIndex 84
ECDC_6_0_UserGuide_CC.book Page 84 Monday, December 16, 2002 1:45 PM
MP3 player disc 32music CD 16new folder 9, 35
Creator Classicabout 2help 4, 82menus 3user interface 3
crossfade 21, 22
Ddata and music on discs 42, 50data disc 8data project 3, 9
starting 6default recorder icon 3, 69deleting
files and folders before making the disc 9, 35
directoriesremoving before making the disc 9, 35renaming before making the disc 9, 36
disc image file 66, 79disc info bar 3, 7, 8, 18, 34, 69, 80disc information 74disc size icon 3, 69disc title 22, 27, 28Disc-at-Once 22, 28, 71discs
burning 11, 24, 38, 48, 55multiple 7, 8, 12multisession 13, 42number of 8
don’t show me again 74Drag-to-Disc 6drive properties 73
Eedit menu 79editing
names of files and folders before making the disc 9, 36
emulation 62encoding MP3 files 39enhanced CD 13, 42enhanced CD project
starting 43erasing
rewritable discs 72, 81excluding files 71
Ffade effects
previewing a track before recording to disc 20
fade-in 21, 22fade-out 21, 22file filter 72file menu 78files
adding to project 7, 47, 52excluding from project 71finding 10, 36removing before making the disc 9, 35renaming before making the disc 9, 36retrieving 12
finalize disc 70, 78finalize session 13, 70find dialog box 10, 36floppy disk emulation 61, 63folder
adding to project 7, 47, 52creating new 9, 35

Easy CD & DVD Creator 6 Expanded User’s Guide: Creator ClassicIndex 85
ECDC_6_0_UserGuide_CC.book Page 85 Monday, December 16, 2002 1:45 PM
removing before making the disc 9, 35renaming before making the disc 9, 36retrieving 12
Ggap 22getting started 1Gracenote CDDB Service 28, 82
Hhard disk emulation 62help
for Creator Classic 4help menu 82
Iimage file 66info bar 8Internet 27, 74ISRC 29
Kkeyboard shortcuts 82
LLabel Creator 11, 24, 38, 75, 81large project 7, 8, 12load segment 63
M.m3u file 37making
data disc 6enhanced CD 42mixed-mode CD 50MP3 files 39MP3 player disc 32music CD 15new folder 9, 35
menus 3merging tracks 20, 81mixed-mode CD 13, 50
starting 51MP3 file 16, 19, 25, 32, 34, 39, 46, 54MP3 player disc 32MP3 playlist editor 34, 37, 79mscdex.exe 60multiple discs 7, 8, 12multisession disc 13, 42music and data on discs 42, 50music CD 16, 25, 27music database 25, 27music project 3music video 42
Nname icon 3, 18, 25, 27, 44, 53new folder 9, 35, 79new project 78number of discs 8
Oonline help

Easy CD & DVD Creator 6 Expanded User’s Guide: Creator ClassicIndex 86
ECDC_6_0_UserGuide_CC.book Page 86 Monday, December 16, 2002 1:45 PM
for Creator Classic 4online music database 25, 27, 74, 81open a project 4, 78options 74order
of tracks 23other projects 3
PPICTURES folder 47play icon 3, 20player 20, 81playing a track 20playlist editor 37playlist file 34project
adding audio files 19, 46, 54applying transition effects 21changing order of tracks 23creating new folder 9, 35merging tracks 20open 4properties 29, 73recording a large project 7, 8removing a track 23removing files and folders 9, 35renaming disc title and artist name 22renaming files and folders 9, 36renaming tracks 23saving 4size 8splitting tracks 20tree view 80validating 73window 3, 6, 17, 33, 43, 51, 69working with files and folders 9, 35working with tracks 19
properties
project 79viewing 73
RRecord Disc From Image File dialog box
67record method 13, 24, 28, 70Record Setup dialog box 11, 24, 38, 48,
55, 67, 70, 78recording a large project 7, 8remove icon 3, 9, 35removing
files and folders 9, 35track from the project 23
renamingdisc title and artist name 22files and folders 9, 36tracks 23
retrievefiles and folders 8, 12
rewritable discerasing 72
rewritable discserasing 73
ripping MP3 files 39Roxio Retrieve 8, 12, 75, 81
Ssave project list 78saving a project 4SCSI 59sector count 64show files 80size, project 8source tree view 80source window 3, 6, 17, 33, 43, 51

Easy CD & DVD Creator 6 Expanded User’s Guide: Creator ClassicIndex 87
ECDC_6_0_UserGuide_CC.book Page 87 Monday, December 16, 2002 1:45 PM
split file 12splitting tracks 20, 81starting
a project 4bootable disc project 61Creator Classic 2data project 6enhanced CD project 43Label Creator 11, 24, 38MP3 player disc project 33music CD project 17
system tests 74, 81
Ttrack titles 27, 28Track-at-Once 13, 70tracks
adding to project 17, 44, 53applying transition effects 21changing order of 23converting to audio file 25from multiple discs 18removing 23renaming 23splitting 20titles 27working with in the project 19
trademarks iitransition effects 21, 81tutorial 82
Uup one level 80UPC 29user interface
Creator Classic 3
Vvalidating a project 73, 78video 42view menu 80
WWAV file 16, 19, 25, 46, 54WMA file 16, 19, 25, 46, 54