Embed Size (px)
Citation preview

COLOR VERSION
EXERCISE CARDS www.ToolsToGrowOT.com
Copyright ©2019 Tools to Grow, Inc. All rights reserved.
X
INCLUDES: 17 Hand Exercise Therapy Cards
Therapist Instructions Therapist Information Sheets
Parent/Caregiver Information Sheet
X 2 PER PAGE EXERCISE CARDS

THERAPY PUTTY
X PURPOSE W • Strong hands are important for children to manage their
environment for success at home and school. Strong hands with full range of motion and mobility provide a child with the power, endurance, and variety of movements needed for performing functional fine motor tasks. These include using fasteners to manage clothing, using utensils to eat, manipulating a pencil/pen, using a keyboard, and utilizing craft and classroom tools (ex: scissors, ruler, hole-punch, and eraser).
• To help your clients attain optimal range of motion and hand strength, provide these Therapy Putty Strengthening Exercise Cards.
• The advantage of using therapy putty is that it is very malleable for rolling, squeezing, pinching and poking. Because it is so pliable, the client can achieve their full range of motion while manipulating the putty. These exercises will build strength in the intrinsic and extrinsic muscles of the hand as the child moves against the resistance of the putty. Therapy putty is available in a range of strengths or resistances to meet your client’s needs.
• These cards are designed to offer a clear image of the hand and putty that can be imitated by your client. Simple instructions are also provided on the cards.
• These cards may be used during therapy sessions or provided to children for home programs.
EXERCISE CARDS THERAPY PUTTY
EXERCISE CARDS
THERAPIST INSTRUCTIONS 1 www.ToolsToGrowOT.com

X SET UP W
THERAPY PUTTY: The therapist will need to supply hand putty for the resistance. Select the putty based upon your client’s needs. The different strengths are color coded as follows:
• Yellow: Extra Soft • Red: Soft • Green: Medium • Blue: Firm
HAND EXERCISE THERAPY PUTTY INFORMATION SHEET:
• These pages are provided for the therapist’s use. • This information page explains how the exercise is performed by your
client and how the given exercise may help the child. • The information sheet will help you select appropriate exercises based
upon the client’s needs. • General Information to share with your clients when recommending
therapy putty exercises: Wash hands before and after using therapy putty to keep it clean. Ideally each child should use the same piece of therapy putty. Place the therapy putty on a clean surface for use. Replace putty into air tight container after use.
HAND EXERCISE THERAPY CARDS: • These cards are for the client’s use. • The exercise cards should be printed and laminated for durability and
ongoing use. • The cards provide clear images that depict what action the client is
expected to perform. • The image clearly shows the putty and hand position or series of positions. • A simple written explanation details how to move the hand and manipulate
the putty to get optimal results.
THERAPY PUTTY EXERCISE CARDS
THERAPY PUTTYEXERCISE CARDS
THERAPIST INSTRUCTIONS 2 www.ToolsToGrowOT.com

THERAPY PUTTY
• Strong hands are important for children to manage their environment for success at home and school. Strong and mobile hands provide a child with the power, endurance, and variety of movements needed for performing functional fine motor tasks.
• To help your child attain optimal flexibility and hand strength, your child’s therapist has provided these Therapy Putty Strengthening Exercise Cards.
• The advantage of using therapy putty is that it is very malleable for rolling, squeezing, pinching and poking. Because it is so pliable, your child can achieve their full finger movement while manipulating the putty.
• These exercises will build strength in the potential muscles of the hand as your child moves against the resistance of the putty.
• These cards are designed to offer a clear image of the hand and putty that can be imitated by your child. Simple instructions are also provided on the cards.
• General Information to follow when using the attached therapy putty exercises:
Wash hands before and after using therapy putty to keep it clean. Ideally each child should use the same piece of therapy putty. Place the therapy putty on a clean surface for use. Replace putty into air tight container after use.
• Special Instructions:
EXERCISE CARDS THERAPY PUTTY
EXERCISE CARDS
PARENT/CAREGIVER INFORMATION SHEET www.ToolsToGrowOT.com

1. Helps to develop the longitudinal arch of the hand. Well-developed arches balance stability and mobility in the hand.
2. Strengthens the intrinsic hand muscles including the lumbricals. The lumbricals are used to adjust writing/ drawing tools especially during upstrokes.
1. Promotes motoric separation of the hand which allows for precise movement from the radial side and stability on the ulnar side.
2. Increases thumb strength and mobility.
1. Increases strength in the extensor muscles of the fingers.
2. Promotes sensory awareness of individual fingers of the hand.
1. Increases strength in the intrinsic hand muscles.
1. Promotes strength in the muscles and mobility in the joints that abduct and adduct the thumb.
1. Promotes sensory awareness and tactile discrimination within the hand.
2. Promotes bilateral coordination to use both hands together.
1
www.ToolsToGrowOT.com
1.
2.
2.
THE
PA
NCAK
E
FING
ERS
U
P TH
UM
BS
UP
GET
A
GRI
P TH
UM
B
PINC
H TH
E TE
AR
THERAPY PUTTY

1. Promotes skilled use of the hand by abducting and medially rotating the thumb into a stable position of opposition.
2. Develops the longitudinal arch that helps balance stability and mobility in the hand.
3. Strengthens the intrinsic hand muscles.
1. Promotes strength in the muscles and mobility in the joints that oppose and flex the thumb.
1. Promotes motoric separation of the hand which allows for precise movement from the radial side and stability on the ulnar side.
1. Promotes development of the oblique hand arches. The hand arches balance stability and mobility.
2. Increases strength in the intrinsic hand muscles needed for speed and dexterity.
1. Promotes development of the oblique hand arches. The arches balance stability and mobility in the hand.
2. Improves stability of the ulnar side of the hand while the radial side guides and orients the tool.
1. Promotes development of hand arches which balance stability and mobility in the hand.
1. Promotes skilled use of the hand by abducting and medially rotating the thumb into a stable position of opposition.
2. Develops the longitudinal arch that helps balance stability and mobility in the hand.
3. Strengthens the intrinsic hand muscles.
1.
2.
1.
2
www.ToolsToGrowOT.com
THE
PI
NCH
COIN
PU
SH
& P
ULL
TH
UM
B PR
ESS
THE
TW
IST
CUT
WIT
H
A KN
IFE
THE
PU
LL
THERAPY PUTTY

1. Promotes sensory awareness and tactile discrimination within the hand.
2. Increases hand strength and bilateral skills.
1. Promotes a strong, stable wrist that is needed to support the arches that shape the hand to perform functional fine motor tasks.
1. Strengthens the muscles that straighten the fingers and wrist.
1. Promotes an open web space with thumb opposition.
2. Strengthens muscles needed to oppose thumb to each finger. The use of controlled pressure may occur from this hand position.
1. Promotes strength in the muscles and mobility in joints that flex the metacarpals and extend the interphalangeal joints of the fingers.
1.
2.
1.
3
www.ToolsToGrowOT.com
HIDE
AND
SE
EK
SAU
SAG
E W
RIST
U
P
THE
FI
NGER
TIP
PIN
CH
THE
AL
LIG
ATO
R THERAPY PUTTY

X THE PANCAKE W
X THUMBS UP W
X
www.ToolsToGrowOT.com
THE PANCAKE WX THE PANCAKE
1 Position your arm
with the thumb up. 2 Loop the putty
around your thumb while the rest of the fingers press the remaining putty into the palm.
3 Push your thumb against the putty.
4 Reform putty and repeat.
THE PANCAKE
1 Make a pancake with the putty. 2 Hold your hand upright with finger tips pointing up. 3 Drape the pancake of putty over the tips of all your fingers. 4 Carefully spread fingers to expand the putty, then close the
fingers to squeeze the putty. 5 Reform putty and repeat.
©ToolsToGrowOT
©ToolsToGrowOT
www.ToolsToGrowOT.com

X FINGERS UP W
X GET A GRIP W
FINGERS UPFINGERS UP W
www.ToolsToGrowOT.com
1 Place a cylindrical shaped piece of putty across the palm. 2 Make a fist while squeezing the putty. 3 Reform and repeat.
1 Bend one finger and place a loop of putty around it. 2 Hold the remaining putty taut in the other hand. 3 Extend or straighten the finger up. 4 Repeat for this finger and then perform with other fingers.
©ToolsToGrowOT
©ToolsToGrowOT
www.ToolsToGrowOT.com
GET A GRIP W
Place a cylindrical shaped piece of putty across the palm. Place a cylindrical shaped piece of putty across the palm.
©ToolsToGrowOT
X GET A GRIP
1 Place a cylindrical shaped piece of putty across the palm. Place a cylindrical shaped piece of putty across the palm.

X THUMB PINCH W
X THE TEAR W
1 Place a ball of putty between your thumb and side of your pointer finger.
2 Bend your fingers. 3 Push with your
thumb to pinch the putty against the side of the pointer finger.
4 Reform and repeat.
www.ToolsToGrowOT.com
©ToolsToGrowOT
©ToolsToGrowOT
www.ToolsToGrowOT.com
1 Place a ball of putty between your thumb Place a ball of putty between your thumb Place a ball of putty
and side of your between your thumb and side of your between your thumb
pointer finger. and side of your pointer finger. and side of your
2 Bend your fingers. 3 Push with your
thumb to pinch the Push with your
thumb to pinch the Push with your
putty against the thumb to pinch the putty against the thumb to pinch the
side of the pointer putty against the side of the pointer putty against the
finger. side of the pointer finger. side of the pointer
4 Reform and repeat. ©ToolsToGrowOT
1 Grasp a ball of
putty between the thumbs and fingers of both hands.
2 Gently pull until a small piece of putty is torn off.
3 Continue until only tiny pieces of putty remain.

X THE PINCH W
X THUMB PRESS W
1 Place a ball of putty into your palm. 2 Press your thumb into the putty until your thumb pushes
to your palm. 3 Reform and repeat.
www.ToolsToGrowOT.com
©ToolsToGrowOT
©ToolsToGrowOT
www.ToolsToGrowOT.com
1 Place a strip of
putty on a flat surface.
2 Use the tip of your pointer finger and thumb to pinch the putty.
3 Make a circle with these fingers when pinching.
3 Repeat as you move across the strip.
THUMB PRESS WW
Place a ball of putty into your palm. Press your thumb into the putty until your thumb pushes
©ToolsToGrowOT
X THUMB PRESS
1 Place a ball of putty into your palm. 2 Press your thumb into the putty until your thumb pushes
to your palm. Press your thumb into the putty until your thumb pushes
to your palm. Press your thumb into the putty until your thumb pushes
THUMB PRESS
Place a ball of putty into your palm. Press your thumb into the putty until your thumb pushes

X COIN PUSH & PULL W
X THE TWIST W
X COIN PUSH & PULL1 Place a thick strip
of putty on a flat surface.
2 Grasp a clean coin between the tip of your thumb and index finger.
3 Push coins down into the putty.
4 Pull coins out in the same manner.
5 Reform and repeat.
www.ToolsToGrowOT.com
WX THE TWIST W
©ToolsToGrowOT
©ToolsToGrowOT
www.ToolsToGrowOT.com
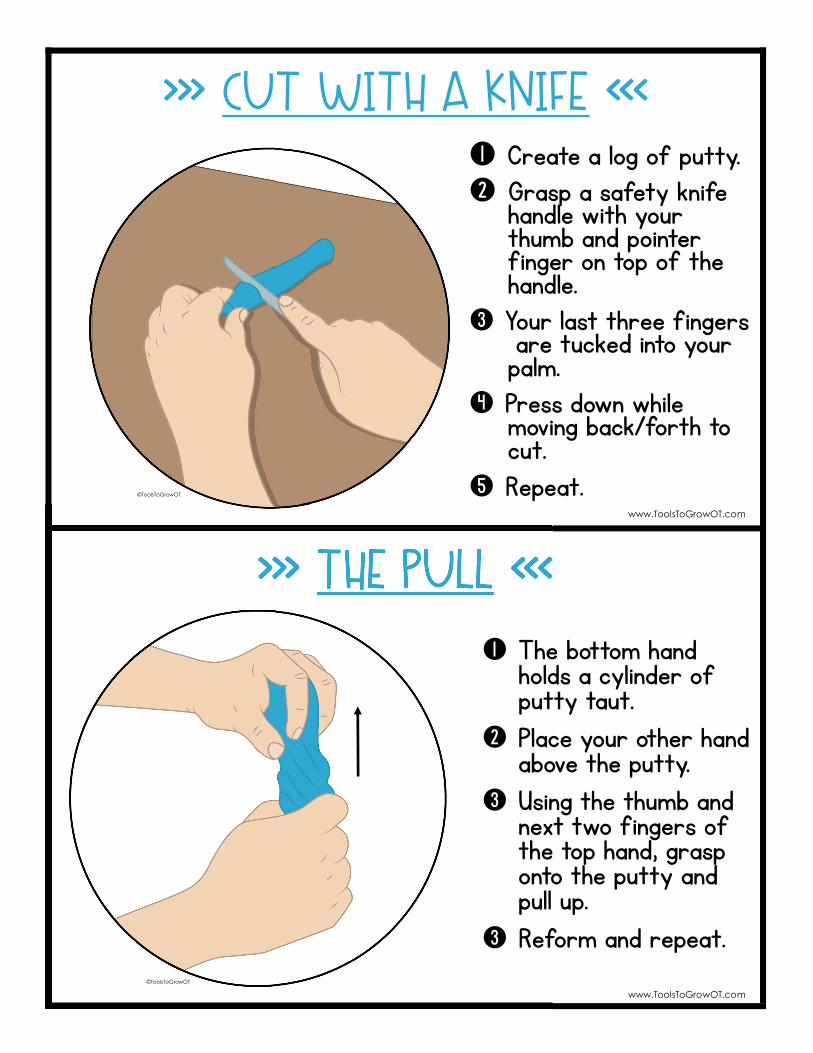
1 The bottom hand
holds a cylinder of putty taut.
2 Place your other hand above the putty.
3 Using the thumb and next two fingers of the top hand, grasp onto the putty and twist.
3 Reform and repeat.
X CUT WITH A KNIFE W
X THE PULL W X THE PULL WW
1 Create a log of putty. 2 Grasp a safety knife
handle with your thumb and pointer finger on top of the handle.
3 Your last three fingers are tucked into your palm.
4 Press down while moving back/forth to cut.
5 Repeat.
www.ToolsToGrowOT.com
©ToolsToGrowOT
©ToolsToGrowOT
www.ToolsToGrowOT.com
1 The bottom hand
holds a cylinder of putty taut.
2 Place your other hand above the putty.
3 Using the thumb and next two fingers of the top hand, grasp onto the putty and pull up.
3 Reform and repeat.

X HIDE AND SEEK W
X WRIST UP W W
X HIDE AND SEEK
X WRIST UP W
1 Flatten the putty and place a collection of small beads on top.
2 Roll, then squeeze the putty into a ball.
3 Use both hands to dig and pull out the beads.
4 Repeat.
www.ToolsToGrowOT.com
©ToolsToGrowOT
©ToolsToGrowOT
www.ToolsToGrowOT.com
1 With your palm down, rest
your forearm on a table. 2 Let your wrist hang over
the edge. 3 Place your other hand just
below the upper hand while holding onto putty.
4 Reach down with top hand and grasp putty.
5 Next, bring wrist up to stretch the putty.
6 Reform and repeat.

X SAUSAGE W
X THE FINGERTIP PINCH W
1 Place a mound of putty on a flat surface.
2 Using a straight wrist and fingers, gently press into putty and roll back and forth to create a log.
www.ToolsToGrowOT.com
THE FINGERTIP PINCHTHE FINGERTIP PINCH W
©ToolsToGrowOT
©ToolsToGrowOT
www.ToolsToGrowOT.com
1 Place a small ball of putty between the tip of your thumb and fingertips.
2 Pinch until the fingers press through the putty. 3 Make a circle with these fingers while pinching. 3 Reform and repeat.
X THE FINGERTIP PINCHTHE FINGERTIP PINCH
©ToolsToGrowOT
1 Place a small ball of putty between the tip of your thumb and Place a small ball of putty between the tip of your thumb and fingertips.
2 Pinch until the fingers press through the putty. Pinch until the fingers press through the putty.

X THE ALLIGATOR W
1 Place putty between the thumb and fingers.
2 The thumb stays un-derneath as you squeeze by bending only at the knuckles.
3 The other finger joints remain straight.
4 Reform and repeat.
www.ToolsToGrowOT.com
©ToolsToGrowOT


![2019 Christmas Cards - EASE Products...三] I 2019 Christmas Cards Greeting, Mini Cards & Post Cards CONTENTS GREETING CARDS 03 Basic Christmas Cards 05 Import & Turnowsky Christmas](https://img.pdfslide.us/doc/110x75/5f07a85f7e708231d41e157a/2019-christmas-cards-ease-products-i-2019-christmas-cards-greeting-mini.jpg)