Embed Size (px)
Citation preview

EE4107 - Cybernetics Advanced
Faculty of Technology, Postboks 203, Kjølnes ring 56, N-3901 Porsgrunn, Norway. Tel: +47 35 57 50 00 Fax: +47 35 57 54 01
Exercise 10: Basic LabVIEW Programming
In this exercise we will learn the basic principles in LabVIEW.
LabVIEW will be used in later exercises and in the project part, as well in other courses later, so it is
crucial that we learn and know about the basic features in LabVIEW. LabVIEW is a general
programming language, but the main difference between e.g. Visual Basic/C# and LabVIEW is that
LabVIEW is a graphical programming language, while the others are text-based languages.
LabVIEW is an excellent tool for simulation and control because it has a lot of built-in features for
these applications that programming languages like Visual Basic/C# or tools like Maple are missing.
MathScript/MATLAB is good to use in the design phase when creating your control system, while
LabVIEW is a much better tool when it comes to practical implementation of the control system and
communication with the real process. As an engineer you need to use several tools to get the job
done.
Recommended LabVIEW Videos:
LabVIEW Quickie! by Finn Haugen
LabVIEW 101 by National Instruments
Getting Started with NI LabVIEW Student Training by National Instruments
Short Introduction to LabVIEW
1 - Getting Started
LabVIEW programs are called Virtual Instruments, or VIs, because their appearance and operation
imitate physical instruments, such as oscilloscopes and multimeters. When opening LabVIEW, you
first come to the “Getting Started” window. Select “File → New VI (Ctrl + N)” in order to get started.
2
EE4107 - Cybernetics Advanced
2 - Front Panel vs. Block Diagram
Then, 2 different windows appear: The “Front Panel” and the “Block Diagram”. You use the “Front
Panel” to create you Graphical User Interface (GUI), while you use the “Block Diagram” to create your
code, i.e. the logic that makes your program works. Both the Front Panel and the Block Diagram are
saved in the same file (.vi).
You can easily switch between the “Front Panel” and the “Block Diagram” using “Ctrl + E”.
Front Panel → User Interface window Block Diagram → Code window
3 - Controls Palette and Functions Palette
When you right-click on the “Front Panel”, the “Controls Palette” appears. Here you will find all the
necessary elements you will need to create your GUI. When you right-click on the “Block Diagram”,
the “Functions Palette” appears. Here you will find all the functions you need to create the logic in
your program.
Controls Palette (right-click on the Front Panel) Functions Palette (right-click on the Block Diagram)
Note! It might look different on your computer depending on what you have installed.
3
EE4107 - Cybernetics Advanced
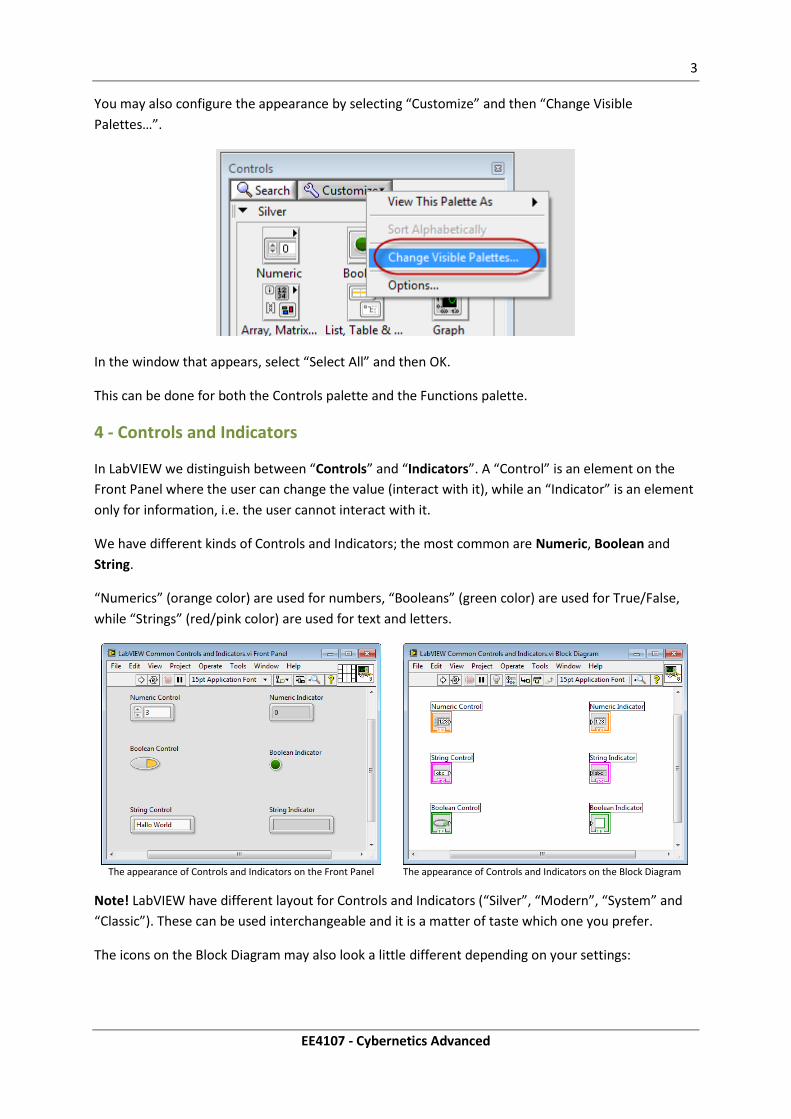
You may also configure the appearance by selecting “Customize” and then “Change Visible
Palettes…”.
In the window that appears, select “Select All” and then OK.
This can be done for both the Controls palette and the Functions palette.
4 - Controls and Indicators
In LabVIEW we distinguish between “Controls” and “Indicators”. A “Control” is an element on the
Front Panel where the user can change the value (interact with it), while an “Indicator” is an element
only for information, i.e. the user cannot interact with it.
We have different kinds of Controls and Indicators; the most common are Numeric, Boolean and
String.
“Numerics” (orange color) are used for numbers, “Booleans” (green color) are used for True/False,
while “Strings” (red/pink color) are used for text and letters.
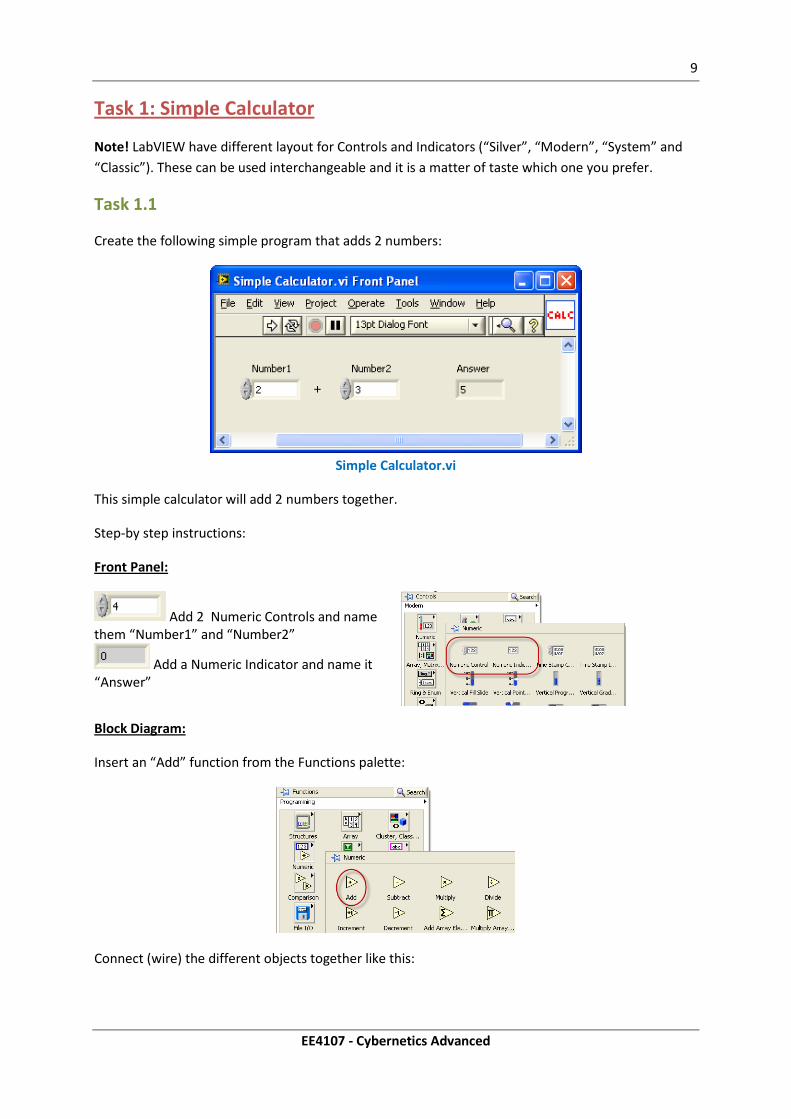
The appearance of Controls and Indicators on the Front Panel The appearance of Controls and Indicators on the Block Diagram
Note! LabVIEW have different layout for Controls and Indicators (“Silver”, “Modern”, “System” and
“Classic”). These can be used interchangeable and it is a matter of taste which one you prefer.
The icons on the Block Diagram may also look a little different depending on your settings:

4
EE4107 - Cybernetics Advanced
or:
or:
or:
You may easily change this by right-clicking on the icons and select “View As Icon”.
5 – Wiring: Creating the logic
In order to create the logic in the program, we need to wire the different icons on the Block Diagram
together:
6 - Run the Program
We are now ready to test the program, i.e. run it. When you are ready to test your program, click the
“Run” button on the toolbar (or Ctrl + R).

5
EE4107 - Cybernetics Advanced
Simple Example
Create a user interface (Front Panel) with the following controls (right-click to open the Controls
palette then select “Modern” → ”Numeric”):
“Vertical Pointer Slide” (Note! This is a “Control”)
“Tank” (Note! This is an “Indicator”)
The Front Panel shall now look like this:
The Block Diagram should look like this:
Wire them together like this:

6
EE4107 - Cybernetics Advanced
Set the slider on e.g. 5:
Run the program by clicking the “Run” button:
Then click the “Run Continuously” button and change the value for the “Slide” and observe
what’s happens.
While Loop
In some situations the “Run Continuously” button is handy to use, but in most situations we rather
want to use a While Loop instead. So we will extend the program with a While Loop.
Right-click to open the Functions palette on the Block Diagram and select a While
Loop (“Structures” → ”While Loop”).
Drag the While Loop over the blocks we already have on the Block Diagram so it looks something like
this:

7
EE4107 - Cybernetics Advanced
Next, we need to specify when the While loop is going to end using the “Loop Condition”.
The Loop Condition is a True/False value. When it is False, the loop is running. When it is True,
the loop is stopping. We will wire a “Stop button” to this condition:
Front Panel:
Right-click to open the “Controls palette” on the Front Panel and add a “Stop Button”
(“Modern” → ”Boolean” → “Stop Button”).
The Front Panel should look like this:
Block Diagram:
Wire the “Stop Button” to the “Loop Condition” .
The Block Diagram should now look like this:

8
EE4107 - Cybernetics Advanced
Run the program by clicking the “Run” button and change value on the Slider and observe
what’s happening.
9
EE4107 - Cybernetics Advanced
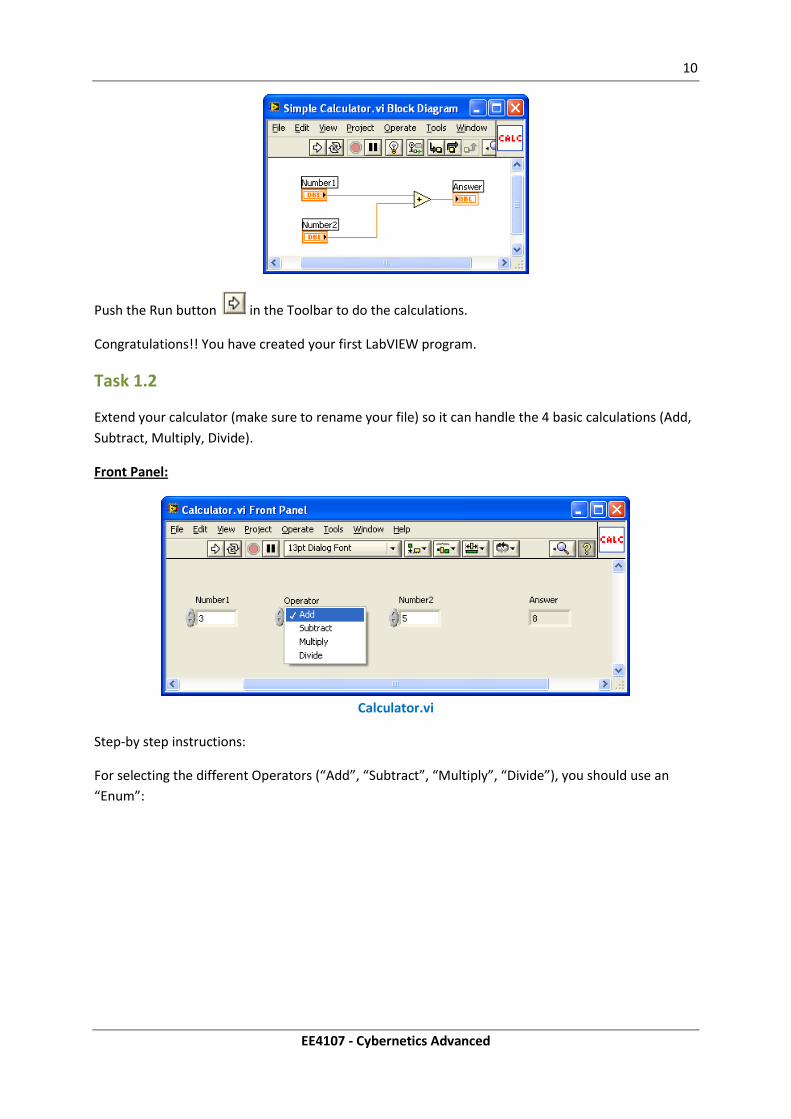
Task 1: Simple Calculator
Note! LabVIEW have different layout for Controls and Indicators (“Silver”, “Modern”, “System” and
“Classic”). These can be used interchangeable and it is a matter of taste which one you prefer.
Task 1.1
Create the following simple program that adds 2 numbers:
Simple Calculator.vi
This simple calculator will add 2 numbers together.
Step-by step instructions:
Front Panel:
Add 2 Numeric Controls and name them “Number1” and “Number2”
Add a Numeric Indicator and name it “Answer”
Block Diagram:
Insert an “Add” function from the Functions palette:
Connect (wire) the different objects together like this:
10
EE4107 - Cybernetics Advanced
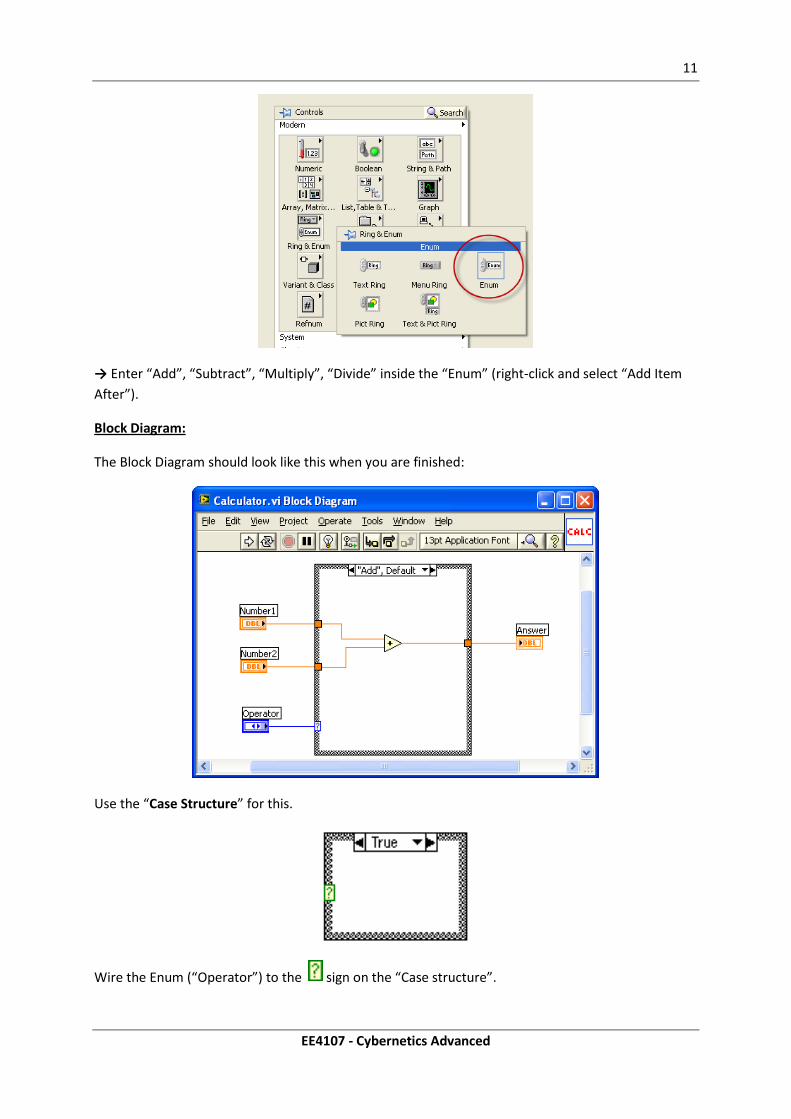
Push the Run button in the Toolbar to do the calculations.
Congratulations!! You have created your first LabVIEW program.
Task 1.2
Extend your calculator (make sure to rename your file) so it can handle the 4 basic calculations (Add,
Subtract, Multiply, Divide).
Front Panel:
Calculator.vi
Step-by step instructions:
For selecting the different Operators (“Add”, “Subtract”, “Multiply”, “Divide”), you should use an
“Enum”:
11
EE4107 - Cybernetics Advanced
→ Enter “Add”, “Subtract”, “Multiply”, “Divide” inside the “Enum” (right-click and select “Add Item
After”).
Block Diagram:
The Block Diagram should look like this when you are finished:
Use the “Case Structure” for this.
Wire the Enum (“Operator”) to the sign on the “Case structure”.

12
EE4107 - Cybernetics Advanced
Push the Run button in the Toolbar to do the calculations.
Task 2: While Loop
Note! LabVIEW have different layout for Controls and Indicators (“Silver”, “Modern”, “System” and
“Classic”). These can be used interchangeable and it is a matter of taste which one you prefer.
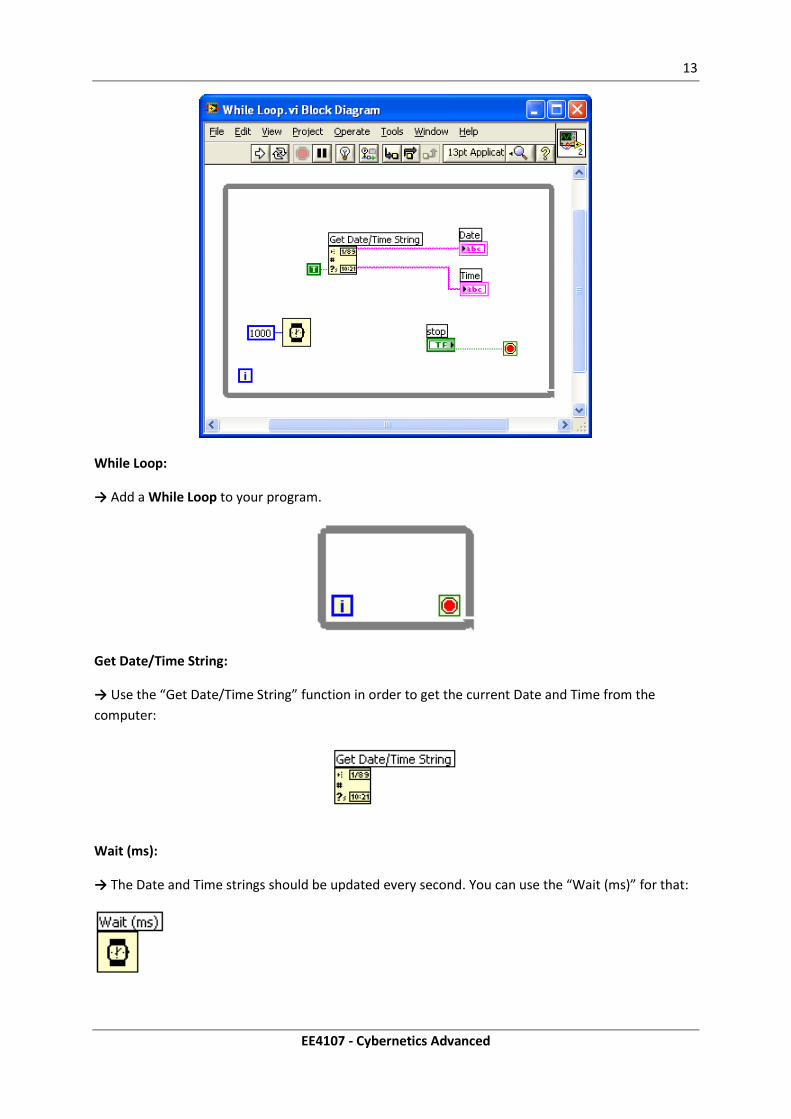
Create the following program:
While Loop.vi
The program will update the date and time each second using a While loop until you stop the
program using the Stop button.
Front Panel:
→ Add 2 String Indicators and name them “Date” and “Time”.
Block Diagram:
The Block Diagram should look like this when you are finished:
13
EE4107 - Cybernetics Advanced
While Loop:
→ Add a While Loop to your program.
Get Date/Time String:
→ Use the “Get Date/Time String” function in order to get the current Date and Time from the
computer:
Wait (ms):
→ The Date and Time strings should be updated every second. You can use the “Wait (ms)” for that:

14
EE4107 - Cybernetics Advanced
Task 3: Advanced Calculator
Note! LabVIEW have different layout for Controls and Indicators (“Silver”, “Modern”, “System” and
“Classic”). These can be used interchangeable and it is a matter of taste which one you prefer.
Create the following program:
Advanced Calculator.vi
Front Panel:
→ Add the User Interface objects as shown in the Figure above.
The calculations will be performed when you click the “Calculate” button.
Block Diagram:
You need to use the following in your program:
While Loop:
Event Structure:
Add an “Event Structure” inside the While Loop.

15
EE4107 - Cybernetics Advanced
The Block Diagram should look like this when you are finished:
Task 4: SubVIs
Task 4.1
Create a SubVI from the Calculator created in a previous task:
Calculator.vi
Define inputs and outputs as in the illustration above (click with you mouse).
16
EE4107 - Cybernetics Advanced
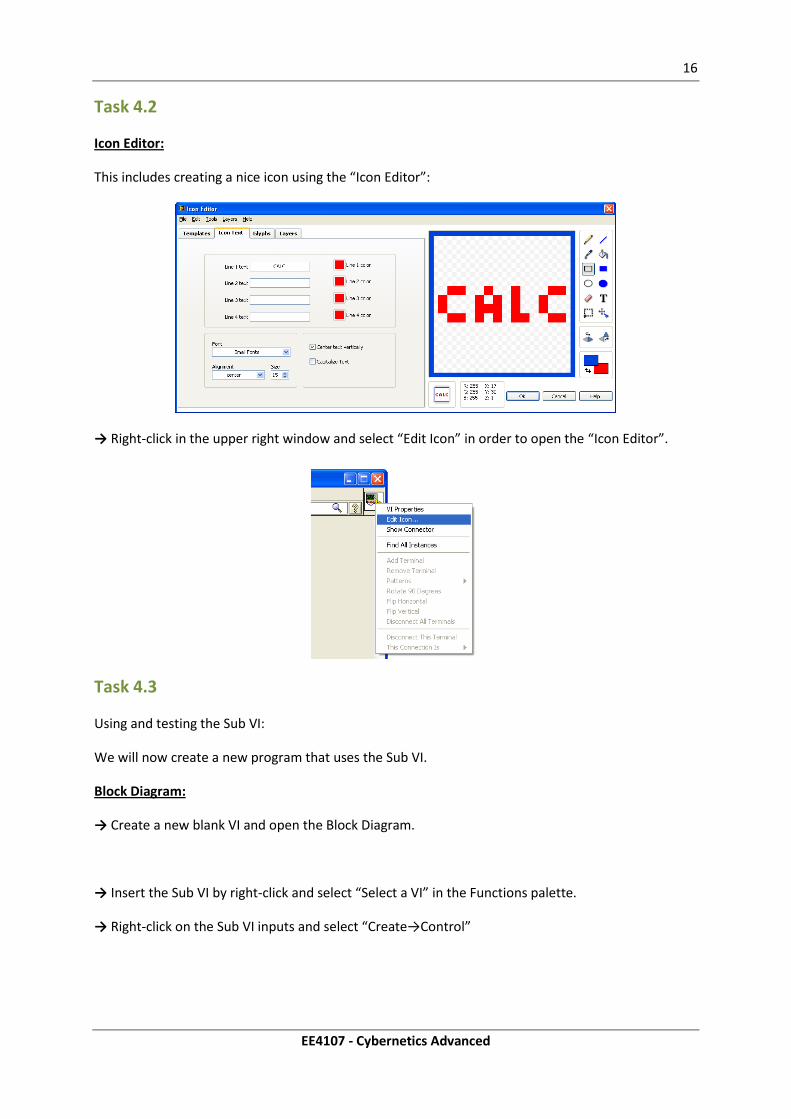
Task 4.2
Icon Editor:
This includes creating a nice icon using the “Icon Editor”:
→ Right-click in the upper right window and select “Edit Icon” in order to open the “Icon Editor”.
Task 4.3
Using and testing the Sub VI:
We will now create a new program that uses the Sub VI.
Block Diagram:
→ Create a new blank VI and open the Block Diagram.
→ Insert the Sub VI by right-click and select “Select a VI” in the Functions palette.
→ Right-click on the Sub VI inputs and select “Create→Control”

17
EE4107 - Cybernetics Advanced
The Block Diagram should look like this when you are finished:
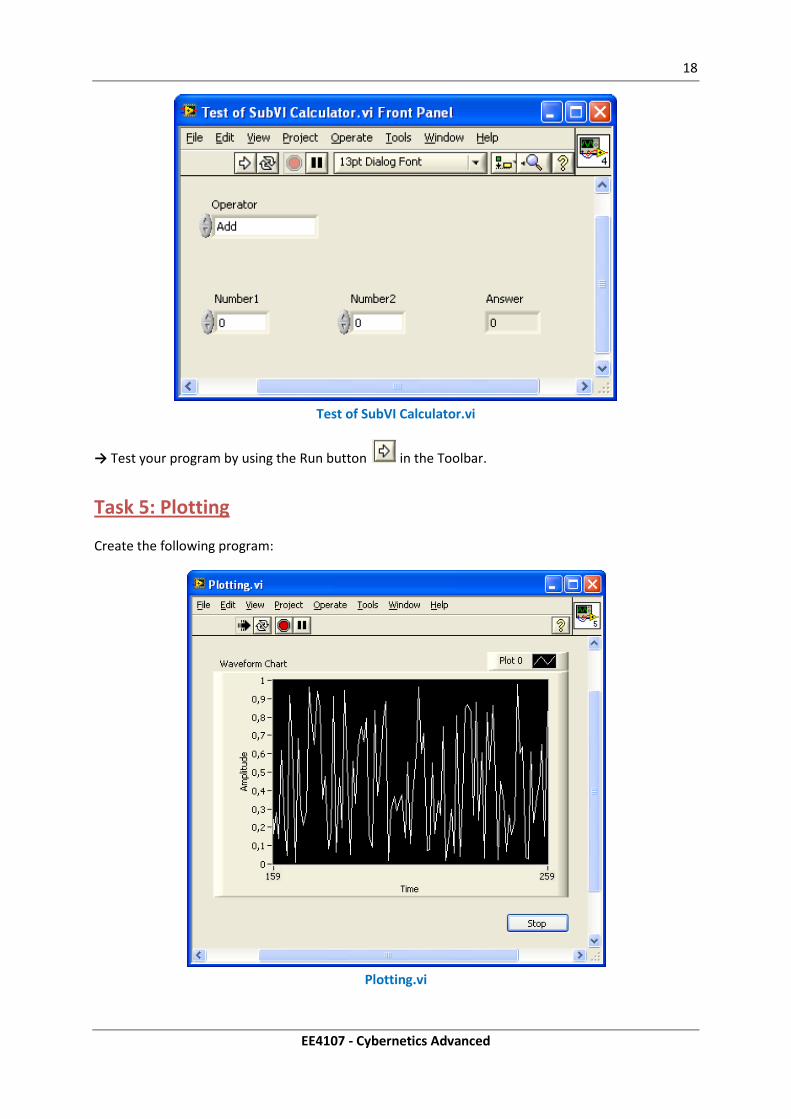
Front Panel:
The Front Panel could look like this:
18
EE4107 - Cybernetics Advanced
Test of SubVI Calculator.vi
→ Test your program by using the Run button in the Toolbar.
Task 5: Plotting
Create the following program:
Plotting.vi

19
EE4107 - Cybernetics Advanced
Front Panel:
Use the “Waveform Chart” Control:
Block Diagram:
Random Number (0-1):
→ Use the “Random Number (0-1)” function in order to create some random data in your plot:
Waveform Chart:
→ Insert the “Waveform Chart” inside the “While Loop”.
Wait (ms):
→ Update the chart every second by using the “Wait (ms)”:
The Block Diagram should look like this when you are finished:

20
EE4107 - Cybernetics Advanced
Additional Task
We want to convert the temperature from degrees Celsius to degrees Fahrenheit.
The Front Panel may look like this:
Temperature.vi
The conversion formula is as follows:
→ Create a SubVI that converts the temperature from degrees Celsius to degrees Fahrenheit.
Use the SubVI to convert the temperature in the VI above (“Temperature.vi”).

21
EE4107 - Cybernetics Advanced
Additional Resources
Tutorial: Introduction to LabVIEW: http://home.hit.no/~hansha/?tutorial=labview
LabVIEW Starter: http://home.hit.no/~hansha/training/labview/starter
Here you will find tutorials and other resources.
LabVIEW Videos:
LabVIEW Quickie! by Finn Haugen
LabVIEW 101 by National Instruments
Getting Started with NI LabVIEW Student Training by National Instruments