Embed Size (px)
Citation preview

1
Exercise #1 Creating a Performance Issue
You are asked to create a Performance Issue for a specific contractor.
1. Log into the CRPS beta system website for today’s training session:
http://www.portal.beta.state.pa.us/portal/server.pt/community/crps/19097
2. Select the Performance Issue link from the navigation menu. (The Performance Issue Search form will display.)
3. Select the New button. (The Detail portion of the Performance Issues Search page expands.)
4. Populate the following fields with the applicable information from the dropdown menu:
a. Plant: [select your Plant]
b. Severity: High
c. Reason: Damaged items
d. Action: Cure letter/corrective action response
5. Populate the following fields with the applicable information from the
dropdown menu:
a. Plant: [select your Plant]
b. Severity: High
c. Reason: Damaged items
d. Action: Cure letter/corrective action response

2
6. Enter the following information into the applicable fields:
a. Contract Number: 4400001234
b. PO Number: 4300009876
c. Contact: [enter your name]
d. Phone: [enter your phone number]
e. Email: [enter your email address]
7. Select the checkbox to verify that you have notified the contractor.
8. Complete the contractor information area by entering 215518 in the SAP Vendor number field and then select the SAP Lookup button. (The
data for the contractor is populated with information stored in SAP.
Note: In the real world, if the contractor is not a registered vendor,
you will need to manually enter the Contractor information in the appropriate fields. Vendor TIN, Name, Address, City, State, and Zip
are required fields.
9. Enter the following information into the applicable fields:
a. Approver Name: [enter the name of your approver]
b. Approver Email: [enter your approver’s email address]
c. Reenter Approver Email: [enter your approver’s email address]
d. Sender’s Email: [enter your email address]
10. Enter a Description of the performance issue: On August 30, 2012,
the vendor damaged the dental equipment during installation.
11. Select the Save button.
12. Record the Issue ID number that automatically generates. ________

3
Exercise #1 Creating a Performance Issue
You are asked to create a Performance Issue for a specific contractor.
1. Log into the CRPS beta system website for today’s training session:
http://www.portal.beta.state.pa.us/portal/server.pt/community/crps/19097
2. Select the Performance Issue link from the navigation menu. (The Performance Issue Search form will display.)
3. Select the New button.

4
4. The Detail portion of the Performance Issues Search page expands.
5. Populate the following fields with the applicable information from the dropdown menu:
a. Plant: [select your Plant]
b. Severity: High
c. Reason: Damaged items
d. Action: Cure letter/corrective action response

5
6. Enter the following information into the applicable fields:
a. Contract Number: 4400001234
b. PO Number: 4300009876
c. Contact: [enter your name]
d. Phone: [enter your phone number]
e. Email: [enter your email address]
7. Select the checkbox to verify that you have notified the contractor.
8. Complete the contractor information area by entering 215518 in the
SAP Vendor number field and then select the SAP Lookup button.

6
The data for the contractor is populated with information stored in SAP.
Note: In the real world, if the contractor is not a registered vendor,
you will need to manually enter the Contractor information in the appropriate fields. Vendor TIN, Name, Address, City, State, and Zip
are required fields.
9. Enter the following information into the applicable fields:
a. Approver Name: [enter the name of your approver]
b. Approver Email: [enter your approver’s email address]
c. Reenter Approver Email: [enter your approver’s email address]
d. Sender’s Email: [enter your email address]

7
10. Enter a Description of the performance issue: On August 30, 2012,
the vendor damaged the dental equipment during installation.
11. Select the Save button.
12. Record the Issue ID number that automatically generates. ________

1
Exercise #2 Adding/Deleting Attachments to the Performance Issue
Users with the role of PI Creator have the ability to add/delete files to a Performance Issue in Pending status, for the agency. PI Approver has the
ability to add/delete files for any Performance Issue with an Approved or Resolved status.
1. Log into the CRPS beta system website for today’s training session: http://www.portal.beta.state.pa.us/portal/server.pt/community/crps/19097
2. Select the Performance Issue link from the navigation menu. (The
Performance Issue Search form will display.)
3. Locate the Performance Issue created in Exercise #1 and select the Search
button.
4. The search results display as in the example below. Select the Edit button to open the Performance Issue. Minimize Performance Issue screen.
5. From the desktop open MS Word; create and name document Status
Report. Save document to the desktop for attaching to the Performance Issue.
6. Maximize the Performance Issue screen and select the Attachments tab.
The Attachments tab displays and does not contain any files. Select the Add button.
7. The Upload Attachments dialog box displays. Select the Browse button to
search and locate the MS Word document that was just created and saved.
8. On the Choose File to Upload pop-up, search and locate appropriate file and
select the Open button.
9. Enter a brief descriptive title for the document. Select the Continue button.
10. A message will display confirming that the file was uploaded successfully.
The file name automatically converts to a hyperlink.
11. To delete the attachment, select the Delete button next to the file to be removed.
12. When the warning displays, select Continue to proceed with the
deletion; or select Cancel to prevent deletion of the Performance Issue and return to the search results.

2
Exercise #2 Adding/Deleting Attachments to the Performance Issue
Users with the role of PI Creator have the ability to add/delete files to a
Performance Issue in Pending status, for the agency. PI Approver has the ability to add/delete files for any Performance Issue with an Approved or
Resolved status.
1. Log into the CRPS beta system website for today’s training session: http://www.portal.beta.state.pa.us/portal/server.pt/community/crps/19097
2. Select the Performance Issue link from the navigation menu. (The Performance Issue Search form will display.)
3. Locate the Performance Issue created in Exercise #1 and select the Search button.
4. The search results display as in the example below. Select the Edit button to open the Performance Issue. Minimize Performance Issue
screen.
5. From the desktop open MS Word; create and name document Status
Report. Save document to the desktop for attaching to the
Performance Issue.

3
6. Maximize the Performance Issue screen and select the Attachments tab.
The Attachments tab displays and does not contain any files. Select the Add button.
7. The Upload Attachments dialog box displays. Select the Browse button to search and locate the MS Word document that was just created and
saved.
8. On the Choose File to Upload pop-up, search and locate appropriate file and select the Open button.

4
9. Enter a brief descriptive title for the document. Select the Continue
button.
10. A message will display confirming that the file was uploaded
successfully. The file name automatically converts to a hyperlink.
11. To delete the attachment, select the Delete button next to the file to be removed.

5
12. When the warning displays, select Continue to proceed with the
deletion; or select Cancel to prevent deletion of the Performance Issue and return to the search results.

1
Exercise #3 Viewing/Editing a Performance Issue
Users with the role of PI Creator have the ability to edit performance issues for their agency with a status of Pending.
1. Log into the CRPS beta system website for today’s training session: http://www.portal.beta.state.pa.us/portal/server.pt/community/crps/19097
2. Select the Performance Issue link from the navigation menu. (The Performance Issue Search form will display.)
3. Locate the Performance Issue created in Exercise #1. Enter the desired search criteria. For example: Status (Pending) and
Agency (General Services). Select the Search button.
4. The search results display. Select the Edit button to open the
Performance Issue and make edits to the entry as desired.
5. Edit the description to include: Additional damage was noticed on
September 1, 2012.
6. Select the Save button to save the changes to the performance issue or select Cancel to return to the Performance Issue search results.
7. If desired, you may select Print to display and /or print a saved entry.

2
Exercise #3 Viewing/Editing a Performance Issue
Users with the role of PI Creator have the ability to edit performance issues for their agency with a status of Pending.
1. Log into the CRPS beta system website for today’s training session: http://www.portal.beta.state.pa.us/portal/server.pt/community/crps/19097
2. Select the Performance Issue link from the navigation menu. (The Performance Issue Search form will display.)
3. Locate the Performance Issue created in Exercise #1. Enter the desired search criteria. For example: Status (Pending) and
Agency (General Services). Select the Search button.

3
4. The search results display. Select the Edit button to open the
Performance Issue and make edits to the entry as desired.
Example of editing a Pending Performance Issue.

4
5. Edit the description to include: Additional damage was noticed on September 1, 2012.
6. Select the Save button to save the changes to the performance issue or
select Cancel to return to the Performance Issue search results.
7. If desired, you may select Print to display and /or print a saved entry.

1
Exercise #4 Approving a Performance Issue
Log in as an Approver. Execute a search. This search should be for a performance issue you wish to approve. The suggested search is to use the
issue ID number supplied in the email.
1. Log into the CRPS beta system website for today’s training session:
http://www.portal.beta.state.pa.us/portal/server.pt/community/crps/19097
2. Select the Performance Issue link from the navigation menu. (The
Performance Issue Search form will display.)
3. Enter the desired search criteria. For example: Status (Pending) and
Issue Id (73). Select the Search button.
4. Select the Edit button to open the Performance Issue “to be approved”.
If necessary, make any edits and/or add attachments.
5. Using the dropdown menu, change the Status to Approved. The system populates today’s date in Approved and your user ID populates
in By field.
6. Select the Save button. The confirmation message “Update Successful”
displays.
7. If the performance issue is for a statewide contract, then the Status
remains as Pending. Select Send Email to DGS button. The system sends an email and DGS edits the performance issue and changes the
status to Approved.
8. Select Cancel to return to the Performance Issue search results.

2
Exercise #4 Approving a Performance Issue
Log in as an Approver. Execute a search. This search should be for a performance issue you wish to approve. The suggested search is to use the
issue ID number supplied in the email.
1. Log into the CRPS beta system website for today’s training session:
http://www.portal.beta.state.pa.us/portal/server.pt/community/crps/19097
2. Select the Performance Issue link from the navigation
menu. (The Performance Issue Search form will display.)
3. Enter the desired search criteria. For example: Status (Pending) and
Issue Id (73). Select the Search button.

3
4. Select the Edit button to open the Performance Issue “to be approved”.
If necessary, make any edits and/or add attachments.
5. Using the dropdown menu, change the Status to Approved. The system populates today’s date in Approved and your user ID populates
in By field.

4
6. Select the Save button. The confirmation message “Update
Successful” displays.
7. If the performance issue is for a statewide contract, then the Status
remains as Pending. Select Send Email to DGS button. The system sends an email and DGS edits the performance issue and changes the
status to Approved.
8. Select Cancel to return to the Performance Issue search results.

1
Exercise #5 Resolving a Performance Issue
The (PI) Creator must determine if the contractor has corrected the unsatisfactory performance or conduct that led to the entry and notify the
(PI) Approver when the status should be changed. Log in as an Approver.
1. Log into the CRPS beta system website for today’s training session:
http://www.portal.beta.state.pa.us/portal/server.pt/community/crps/19097
2. Select the Performance Issue link from the navigation menu. (The
Performance Issue Search form will display.)
3. Enter the desired search criteria. For example: Status (Approved) and
select the Search button.
4. Select the Edit button to open the Performance Issue that will be
resolved.
5. Using the dropdown menu, change the Status to Resolved. The system populates today’s date in “Resolved” and your user ID populates the
“By” field.
6. Enter a description of the circumstances/actions taken by the contractor
to resolve the performance issue in the Resolution text box.
7. Select Save to update the Performance Issue; or select Cancel to
return to the Performance Issue search results.

2
Exercise #5 Resolving a Performance Issue
The (PI) Creator must determine if the contractor has corrected the unsatisfactory performance or conduct that led to the entry and notify the
(PI) Approver when the status should be changed. Log in as an Approver.
1. Log into the CRPS beta system website for today’s training session: http://www.portal.beta.state.pa.us/portal/server.pt/community/crps/19097
2. Select the Performance Issue link from the navigation menu. (The Performance Issue Search form will display.)
3. Enter the desired search criteria. For example: Status (Approved) and select the Search button.

3
4. Select the Edit button to open the Performance Issue that will be
resolved.
5. Using the dropdown menu, change the Status to Resolved. The system populates today’s date in “Resolved” and your user ID populates the
“By” field.

4
6. Enter a description of the circumstances/actions taken by the contractor
to resolve the performance issue in the Resolution text box.
7. Select Save to update the Performance Issue; or select Cancel to return to the Performance Issue search results.

5
Exercise #6 Deleting a Performance Issue
Log in as an Approver.
1. Log into the CRPS beta system website for today’s training session:
http://www.portal.beta.state.pa.us/portal/server.pt/community/crps/19097
2. Select the Performance Issue link from the navigation menu. (The
Performance Issue Search form will display.)
3. Enter the desired search criteria. For example: Status (Pending) and
select the Search button.
4. Select the Delete button next to the Pending Performance Issue which
will not be approved. When the warning displays, select Continue to proceed with the deletion; or Cancel to return to the search results.

6
Exercise #6 Deleting a Performance Issue
Log in as an Approver.
1. Log into the CRPS beta system website for today’s training session:
http://www.portal.beta.state.pa.us/portal/server.pt/community/crps/19097
2. Select the Performance Issue link from the navigation
menu. (The Performance Issue Search form will display.)
3. Enter the desired search criteria. For example: Status (Pending) and
select the Search button.

7
4. Select the Delete button next to the Pending Performance Issue which will not be approved. When the warning displays, select Continue to
proceed with the deletion; or Cancel to return to the search results.

1
Exercise #1 Perform a CRP Check, No Records Found
1. Log into the CRPS production system.
2. Select the CRP Check link from the navigation menu. (The CRP
Name/TIN Check form will display.)
3. At the top of the form, enter All Star Shredding LP in the Name field
and 141305020 in the TIN field.
4. Select the Search button.
5. When the CRP Name/TIN Check Results display, review the information.
6. Select the Print Certification button.
7. Review the CRP Check Certification form.
8. Select the Back To CRP Check link.

2
Exercise #1 Perform a CRP Check, No Records Found
1. Log into the CRPS production system.
2. Select the CRP Check link from the navigation menu. (The
CRP Name/TIN Check form will display.)
3. At the top of the form, enter All Star Shredding LP in the Name field and 141305020 in the TIN field.

3
4. Select the Search button.
5. When the CRP Name/TIN Check Results display, review the information.
6. Select the Print Certification button.

4
7. Review the CRP Check Certification form.
8. Select the Back To CRP Check link.

1
Exercise #2 Perform a CRP Check, Obligations Found
You are asked to perform a CRP Check and are only provided with the supplier’s SAP vendor number. During the completion of this exercise, you
will need to locate the supplier’s Tax ID Number (TIN) and registered Name.
1. Log into the CRPS production system.
2. Select the CRP Check link from the navigation menu. (The CRP Name/TIN Check form will display.)
3. In the “SAP Lookup” area, enter 179709 in the SAP Vendor # field.
4. Select the SAP Lookup button.
5. Using the results, populate the NAME and TIN fields within the Name/TIN Check area.
Tip: Use your mouse to highlight the data within the existing field, “drag” it up to the Check area, and “drop” it into the destination field. (The data is
copied into the destination field.)
6. Select the Search button.
7. When the CRP Name/TIN Check Results display, select the Detail button next to item(s).
8. Review the information.
9. Select the Return To Result button.

2
Exercise #2 Perform a CRP Check, Obligations Found
You are asked to perform a CRP Check and are only provided with the supplier’s SAP vendor number. During the completion of this exercise, you
will need to locate the supplier’s Tax ID Number (TIN) and registered Name.
1. Log into the CRPS production system.
2. Select the CRP Check link from the navigation menu. (The CRP Name/TIN Check form will display.)
3. In the “SAP Lookup” area, enter 179709 in the SAP Vendor # field.

3
4. Select the SAP Lookup button.
5. Using the results, populate the NAME and TIN fields within the Name/TIN Check area.
Tip: Use your mouse to highlight the data within the existing field, “drag” it up to the Check area, and “drop” it into the destination field. (The data is
copied into the destination field.)
6. Select the Search button.

4
7. When the CRP Name/TIN Check Results display below the form, select
the Detail button next to item(s).
8. Review the information.
9. Select the Return To Result button.

1
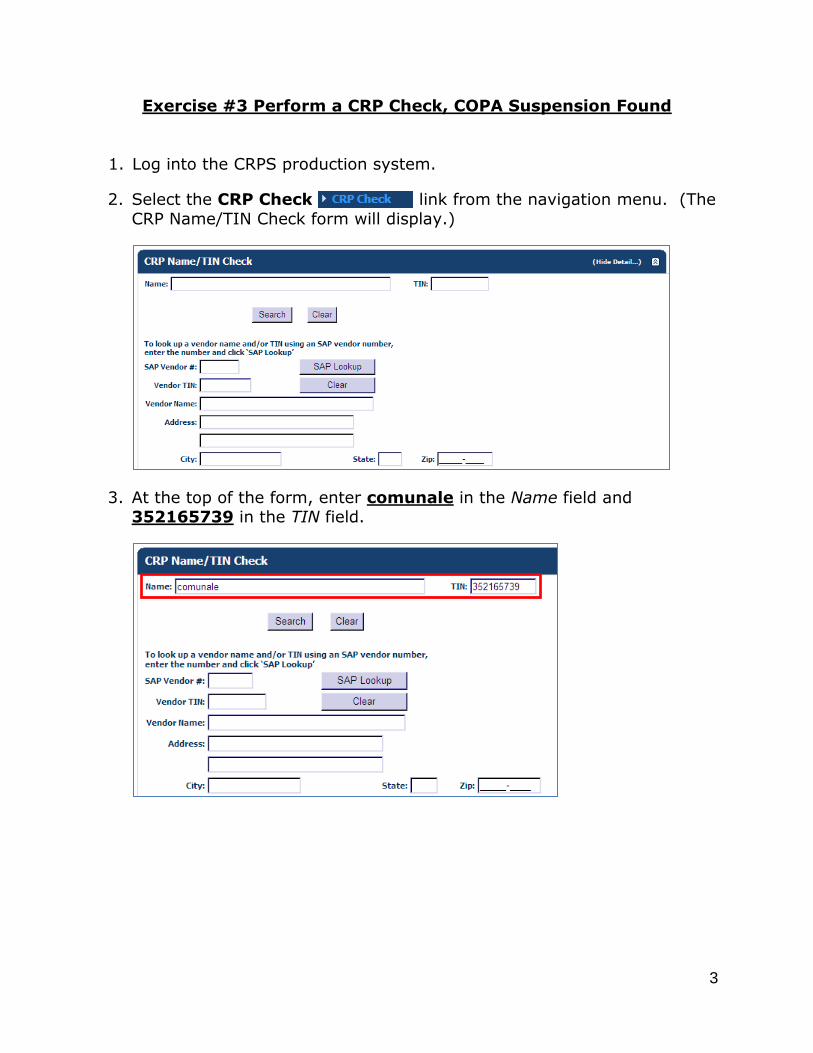
Exercise #3 Perform a CRP Check, COPA Suspension Found
1. Log into the CRPS production system.
2. Select the CRP Check link from the navigation menu. (The CRP
Name/TIN Check form will display.)
3. At the top of the form, enter comunale in the Name field and
352165739 in the TIN field.
4. Select the Search button.
5. When the CRP Name/TIN Check Results display below the form, select the Detail button next to item(s).
6. Review the information.
7. Select the Return To Result button.
8. Select the Print Certification button.
9. Review the information on the form.
10. Select the Back To CRP Check link.
11. The CRP Name/TIN Check form re-displays.
12. At the top of the form, enter rolling scrap tires in the Name field and
341949859 in the TIN field.
13. Select the Search button.
14. In the CRP Name/TIN Check Results, select the Detail button next to item(s).

2
15. Review the information.
16. Select the Return To Result button.
17. Highlight the entire name of the Vendor, and then copy it using the
right-click button on your mouse.
18. Paste the captured text into the Name field, overwriting “rolling scrap
tires”.
19. Select the Search button, then the Print Certification button.
20. Review the information on the form. Notice that the Contractor Name has updated to reflect the full company name as well as the individual
owner names.
21. Select the Back To CRP Check link.
3
Exercise #3 Perform a CRP Check, COPA Suspension Found
1. Log into the CRPS production system.
2. Select the CRP Check link from the navigation menu. (The
CRP Name/TIN Check form will display.)
3. At the top of the form, enter comunale in the Name field and 352165739 in the TIN field.

4
4. Select the Search button.
5. When the CRP Name/TIN Check Results display below the form, select
the Detail button next to item(s).
6. Review the information.
7. Select the Return To Result button.

5
8. Select the Print Certification button.
9. Review the information on the form.

6
10. Select the Back To CRP Check link.
11. The CRP Name/TIN Check form re-displays.
12. At the top of the form, enter rolling scrap tires in the Name field and 341949859 in the TIN field.

7
13. Select the Search button.
14. In the CRP Name/TIN Check Results, select the Detail button next to
item(s).
15. Review the information.
16. Select the Return To Result button.
17. Highlight the entire name of the Vendor, and then copy it using the
right-click button on your mouse.

8
18. Paste the captured text into the Name field, overwriting “rolling scrap
tires”.
19. Select the Search button, then the Print Certification button.
20. Review the information on the form. Notice that the Contractor Name has updated to reflect the full company name as well as the individual
owner names.
21. Select the Back To CRP Check link.

1
Exercise #4 Perform a CRP Check, COPA Performance Issue Found
1. Log into the CRPS production system.
2. Select the CRP Check link from the navigation menu. (The CRP
Name/TIN Check form will display.)
3. At the top of the form, enter Long Hauling & Excavation Inc in the
Name field and 331094678 in the TIN field.
4. Select the Search button.
5. When the CRP Name/TIN Check Results display below the form, select the Detail button next to item(s).
6. Review the information.
7. Select the Return To Result button.
8. Select the Print Certification button.
9. Review the information on the form.
10. Select the Back To CRP Check link.

2
Exercise #4 Perform a CRP Check, COPA Performance Issue Found
1. Log into the CRPS production system.
2. Select the CRP Check link from the navigation menu. (The
CRP Name/TIN Check form will display.)
3. At the top of the form, enter Long Hauling & Excavation Inc in the Name field and 331094678 in the TIN field.

3
4. Select the Search button.
5. When the CRP Name/TIN Check Results display below the form, select the Detail button next to item(s).
6. Review the information.
7. Select the Return To Result button.

4
8. Select the Print Certification button.
9. Review the information on the form.

5
13. Select the Back To CRP Check link.

1
Exercise #1 Perform a CRP Search, without Additional Criteria,
Name Only
You are performing a CRP Name Search for “21st Century Foods”, and will
not be including any additional search criteria.
1. Log into the CRPS production system.
2. Select the Name Search link from the navigation menu. (The CRP Name Search form will display.)
3. Enter 21st in the Name field and select the Search button.
4. When the CRP Name Search Results display, locate the applicable items.
5. Select the Detail button next to item(s) and review the information.
6. Select the Return To Result button.

2
Exercise #1 Perform a CRP Search, without Additional Criteria,
Name only
You are performing a CRP Name Search for “21st Century Foods”, and will
not be including any additional search criteria.
1. Log into the CRPS production system.
2. Select the Name Search link from the navigation menu. (The CRP Name Search form will display.)
3. Enter 21st in the Name field and select the Search button.

3
4. When the CRP Name Search Results display, locate the applicable items.
5. Select the Detail button next to item(s) and review the information.
6. Select the Return To Result button.

1
Exercise #2 Perform a CRP Search, without Additional Criteria,
TIN Only
You are performing a CRP TIN Search, and will not be including any
additional search criteria.
1. Log into the CRPS production system.
2. Select the TIN Search link from the navigation menu. (The CRP TIN Search form will display.)
3. Enter 251589241 in the TIN field and select the Search button.
4. When the CRP TIN Search Results display, locate the applicable items.
5. Select the Detail button next to item(s) and review the information.
6. Select the Return To Result button.

2
Exercise #2 Perform a CRP Search, without Additional Criteria,
TIN Only
You are performing a CRP TIN Search, and will not be including any
additional search criteria.
1. Log into the CRPS production system.
2. Select the TIN Search link from the navigation menu. (The CRP TIN Search form will display.)
3. Enter 251589241 in the TIN field and select the Search button.

3
4. When the CRP TIN Search Results display, locate the applicable items.
5. Select the Detail button next to item(s) and review the information.
6. Select the Return To Result button.

1
Exercise #3 Perform a CRP Search, with Additional Criteria,
Name Only
You are performing a CRP Name Search for “Otis Elevator”, and will be
including additional search criteria.
1. Log into the CRPS production system.
2. Select the Name Search link from the navigation menu. (The CRP Name Search form will display.)
3. Select all three of the checkboxes to include the additional criteria when searching.
4. Enter Otis Elevator in the Name field and select the Search button.
5. Select the Detail button next to item(s) and review the information.
6. Select the Return To Result button.

2
Exercise #3 Perform a CRP Search, with Additional Criteria,
Name Only
You are performing a CRP Name Search for “Otis Elevator”, and will be
including additional search criteria.
1. Log into the CRPS production system.
2. Select the Name Search link from the navigation menu. (The CRP Name Search form will display.)
3. Select all three of the checkboxes to include the additional criteria when searching.
4. Enter Otis Elevator in the Name field and select the Search button.

3
5. Select the Detail button next to item(s) and review the information.
6. Select the Return To Result button.

1
Exercise #4 Perform a CRP Name-TIN Search,
without Additional Criteria
You are asked to perform a CRP Name/TIN Search and are only provided
with the supplier’s SAP vendor number. During the completion of this exercise, you will need to locate the supplier’s Tax ID Number (TIN) and
registered Name. This search will not include any additional search criteria.
1. Log into the CRPS production system.
2. Select the Name/TIN Search link from the navigation menu. (The CRP Name/TIN Search form will display.)
3. In the “SAP Lookup” area, enter 153574 in the SAP Vendor # field.
4. Select the SAP Lookup button.
5. Using the results, populate the NAME and TIN fields within the CRP
Name/TIN Search area.
Tip: Use your mouse to highlight the data within the existing field, “drag” it up to the Search area, and “drop” it into the destination field. (The data is
copied into the destination field.)
6. Select the Search button.
7. When the CRP Name/TIN Search Results display, select the Detail button next to item(s).
8. Review the information.
9. Select the Return To Result button.

2
Exercise #4 Perform a CRP Name-TIN Search,
without Additional Criteria
You are asked to perform a CRP Name/TIN Search and are only provided
with the supplier’s SAP vendor number. During the completion of this exercise, you will need to locate the supplier’s Tax ID Number (TIN) and
registered Name. This search will not include any additional search criteria.
1. Log into the CRPS production system.
2. Select the Name/TIN Search link from the navigation menu. (The CRP TIN Search form will display.)
3. In the “SAP Lookup” area, enter 153574 in the SAP Vendor # field.

3
4. Select the SAP Lookup button.
5. Using the results, populate the NAME and TIN fields within the
Name/TIN Check area.
Tip: Use your mouse to highlight the data within the existing field, “drag” it
up to the Check area, and “drop” it into the destination field. (The data is copied into the destination field.)

4
6. Select the Search button.
7. When the CRP Name/TIN Search Results display, select the Detail
button next to item(s).
8. Review the information.
9. Select the Return To Result button.

1
Exercise #1 Generating Reports, History of CRP Checks by Reason
1. Log into the CRPS production system.
2. Select the Reports link from the navigation menu. (The Reports form
will display.)
3. In the Report List dropdown menu, choose History of CRP Checks by
Reason.
4. Complete the From Date and To Date fields by either typing the date or
choosing the date from the calendar.
5. In the Reason Type field, “Obligations” will default. However, you may
choose another type from the dropdown menu if you wish.
6. Select the View Report button.
7. Review the contents of the History of CRP Checks by Reason report.
8. Select the Back to Reports link.

2
Exercise #1 Generating Reports, History of CRP Checks by Reason
1. Log into the CRPS production system.
2. Select the Reports link from the navigation menu. (The
Reports form will display.)
3. In the Report List dropdown menu, choose History of CRP Checks by
Reason.
4. Complete the From Date and To Date fields by either typing the date or
choosing the date from the calendar.

3
5. In the Reason Type field, “Obligations” will default. However, you may
choose another type from the dropdown menu if you wish.
6. Select the View Report button.

4
7. Review the contents of the History of CRP Checks by Reason report.
8. Select the Back to Reports link.

1
Exercise #2 Generating Reports,
History of CRP Checks for a Specific Vendor
1. Log into the CRPS production system.
2. Select the Reports link from the navigation menu. (The Reports form will display.)
3. In the Report List dropdown menu, choose History of CRP Checks for a Specific Vendor.
4. Complete the From Date and To Date fields by either typing the date or choosing the date from the calendar.
5. Enter Eplus in the Vendor Name field.
6. Enter 541904151 in the Vendor SSN/EIN field.
7. Select the View Report button.
8. Review the contents of the History of CRP Checks for a Specific Vendor
report.
9. Select the Back to Reports link.

2
Exercise #2 Generating Reports,
History of CRP Checks for a Specific Vendor
1. Log into the CRPS production system.
2. Select the Reports link from the navigation menu. (The Reports form will display.)
3. In the Report List dropdown menu, choose History of CRP Checks for a Specific Vendor.
4. Complete the From Date and To Date fields by either typing the date or choosing the date from the calendar.

3
5. Enter Eplus in the Vendor Name field.
6. Enter 541904151 in the Vendor SSN/EIN field.
7. Select the View Report button.
8. Review the contents of the History of CRP Checks for a Specific Vendor
report.

4
9. Select the Back to Reports link.

1
Exercise #3 Generating Reports,
List of Vendors with Obligations in a Specific Department
1. Log into the CRPS production system.
2. Select the Reports link from the navigation menu. (The Reports form will display.)
3. In the Report List dropdown menu, choose List of Vendors with Obligations in a Specific Department.
4. In the Department dropdown menu, choose SWIF.
5. Select the View Report button.
6. Review the contents of the List of Vendors with Obligations in a Specific Agency report.
7. Select the Back to Reports link.

2
Exercise #3 Generating Reports,
List of Vendors with Obligations in a Specific Department
1. Log into the CRPS production system.
2. Select the Reports link from the navigation menu. (The Reports form will display.)
3. In the Report List dropdown menu, choose List of Vendors with Obligations in a Specific Department.
4. In the Department dropdown menu, choose SWIF.

3
5. Select the View Report button.
6. Review the contents of the List of Vendors with Obligations in a Specific Agency report.
7. Select the Back to Reports link.

1
Exercise #4 Generating Reports, Performance Issues
1. Log into the CRPS production system.
2. Select the Reports link from the navigation menu. (The Reports form
will display.)
3. In the Report List dropdown menu, choose History of CRP Checks by
Reason.
4. Complete the From Date and To Date fields by either typing the date or
choosing the date from the calendar.
5. In the Reason Type field, choose “Performance” from the dropdown
menu. (Note that “Obligations” will display as the default.)
6. Select the View Report button.
7. Review the contents of the History of CRP Checks by Reason report.
8. Select the Back to Reports link.

2
Exercise #4 Generating Reports, Performance Issues
1. Log into the CRPS production system.
2. Select the Reports link from the navigation menu. (The
Reports form will display.)
3. In the Report List dropdown menu, choose History of CRP Checks by
Reason.
4. Complete the From Date and To Date fields by either typing the date or
choosing the date from the calendar.

3
5. In the Reason Type field, choose “Performance” from the dropdown
menu. (Note that “Obligations” will display as the default.)
6. Select the View Report button.

4
7. Review the contents of the History of CRP Checks by Reason report.
8. Select the Back to Reports link.