Embed Size (px)
DESCRIPTION
Exchange infrastructure | Implementing single domain namespace scheme | Part 2#2 | Part 18#36 http://o365info.com/exchange-infrastructure-implementing-single-domain-namespace-part-2-of-2-part-18-of-36 The current article is the second article in which we review the concept of Exchange infrastructure and the use of a single namespace. Eyal Doron | o365info.com
Citation preview

Page 1 of 42 | Exchange infrastructure | Implementing single domain namespace scheme
| Part 2#2 | Part 18#36
Written by Eyal Doron | o365info.com | Copyright © 2012-2015
Exchange infrastructure | Implementing
single domain namespace scheme | Part
2#2 | Part 18#36
The current article is the second article in which we review the concept of Exchange
infrastructure and the use of a single namespace.
In the former article, we review the concept and the reason for the
recommendation of using an Exchange single namespace.
The current article is focused on a scenario in which we want to convert our existing
Exchange infrastructure into an Exchange single namespace.
Page 2 of 42 | Exchange infrastructure | Implementing single domain namespace scheme
| Part 2#2 | Part 18#36
Written by Eyal Doron | o365info.com | Copyright © 2012-2015
Autodiscover infrastructure | Exchange infrastructure and
namespace convention | The article series
The article series include the following articles:
1. Should I use a single namespace for Exchange Infrastructure? | Part 1#2 | Part
17#36
2. Exchange infrastructure | Implementing single domain namespace scheme |
Part 2#2 | Part 18#36
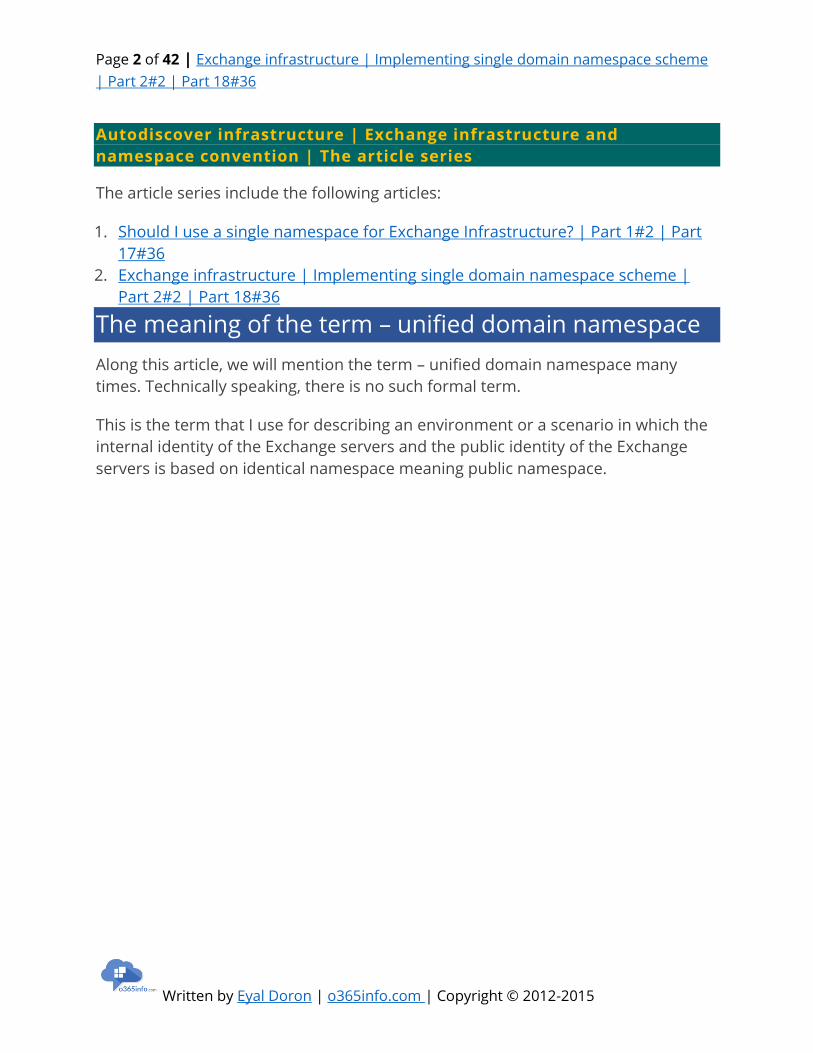
The meaning of the term – unified domain namespace
Along this article, we will mention the term – unified domain namespace many
times. Technically speaking, there is no such formal term.
This is the term that I use for describing an environment or a scenario in which the
internal identity of the Exchange servers and the public identity of the Exchange
servers is based on identical namespace meaning public namespace.
Page 3 of 42 | Exchange infrastructure | Implementing single domain namespace scheme
| Part 2#2 | Part 18#36
Written by Eyal Doron | o365info.com | Copyright © 2012-2015
In the former article (Should I use a single namespace for Exchange Infrastructure?
| Part 1#2 | Part 17#36) we have reviewed the default Exchange infrastructure that
is implemented in a scenario in which the Active Directory domain name is private.
Invalid Fully Qualified Domain Names – the main reason
I have also mentioned my reservations about the concept of “using a private
domain name for Active Directory” but the infrastructure is popular or common, in
many organizations.
Regardless of my opinion on the use of the Active Directory private domain name
for the Exchange internal infrastructure, here is a very strong argument for
changing this type of configuration – Invalid Fully Qualified Domain Names.

Page 4 of 42 | Exchange infrastructure | Implementing single domain namespace scheme
| Part 2#2 | Part 18#36
Written by Eyal Doron | o365info.com | Copyright © 2012-2015
The term “Invalid Fully Qualified Domain Names”, relates to a new certificate
standard in which a public SAN certificate will not support the use of “single
hostname” and host names (FQDN) that use the private domain name suffix such
as – local
This type of configuration will be no longer supported since 1 November 2015
Note – you can read additional information about the subject of Invalid Fully
Qualified Domain Names in the article – Autodiscover process and Exchange
security infrastructure | Part 20#36
There are additional reasons for using the option on -”unified domain namespace
for Exchange infrastructure” such as – more Intuitive, more convent
troubleshooting processes, simplified management and much more.
Page 5 of 42 | Exchange infrastructure | Implementing single domain namespace scheme
| Part 2#2 | Part 18#36
Written by Eyal Doron | o365info.com | Copyright © 2012-2015
In a modern Exchange environment, we can say that there is no escape from the
need to use a single domain namespace for the Exchange infrastructure.

Page 6 of 42 | Exchange infrastructure | Implementing single domain namespace scheme
| Part 2#2 | Part 18#36
Written by Eyal Doron | o365info.com | Copyright © 2012-2015
Let’s assume that you convinced, and you want to avert the existing Exchange
infrastructure that is based upon the concept of- two different domain namespace
to the infrastructure of – unified domain name scheme for Exchange infrastructure.
The main questions are:
Q: Can it be done? Is there an option to “convert” my existing Exchange domain
name infrastructure to a unified domain namespace?
A: And the answer is: “yes”
Additional important questions are:
Q1. What are the steps that are involved throughout this process?
Q2. Does this “change” can impact the availability of the Exchange services?
Q3. Given that I will read the article thoroughly, will I be able to do it without a need
for involving an external help?
And the answers for this question are:

Page 7 of 42 | Exchange infrastructure | Implementing single domain namespace scheme
| Part 2#2 | Part 18#36
Written by Eyal Doron | o365info.com | Copyright © 2012-2015
A1. In the following article, we will review each of the “steps”, infrastructure and
components that involve in the process of converting the existing Exchange
infrastructure to a ”unified domain namespace”
A2. Now, given that you make the required “planning process” and implemented all
the required necessary configurations, there will be no “down time” for your
Exchange clients.
A3. The answer is “Yes”. It is always good if it is passable to get help or advice from
an experienced people, which has “hands-on experience”. However, if you are an
experienced Active Directory and Exchange administrator who “migration” is quite
simple.
Converting the existing Exchange infrastructure to a –
“unified domain namespace” | Tasks list
The most important phase, in the migration process to – “Exchange infrastructure
that is based on unified domain namespace” is the planning process, in which we
will need to consider all the components and task that will be involved.
Page 8 of 42 | Exchange infrastructure | Implementing single domain namespace scheme
| Part 2#2 | Part 18#36
Written by Eyal Doron | o365info.com | Copyright © 2012-2015
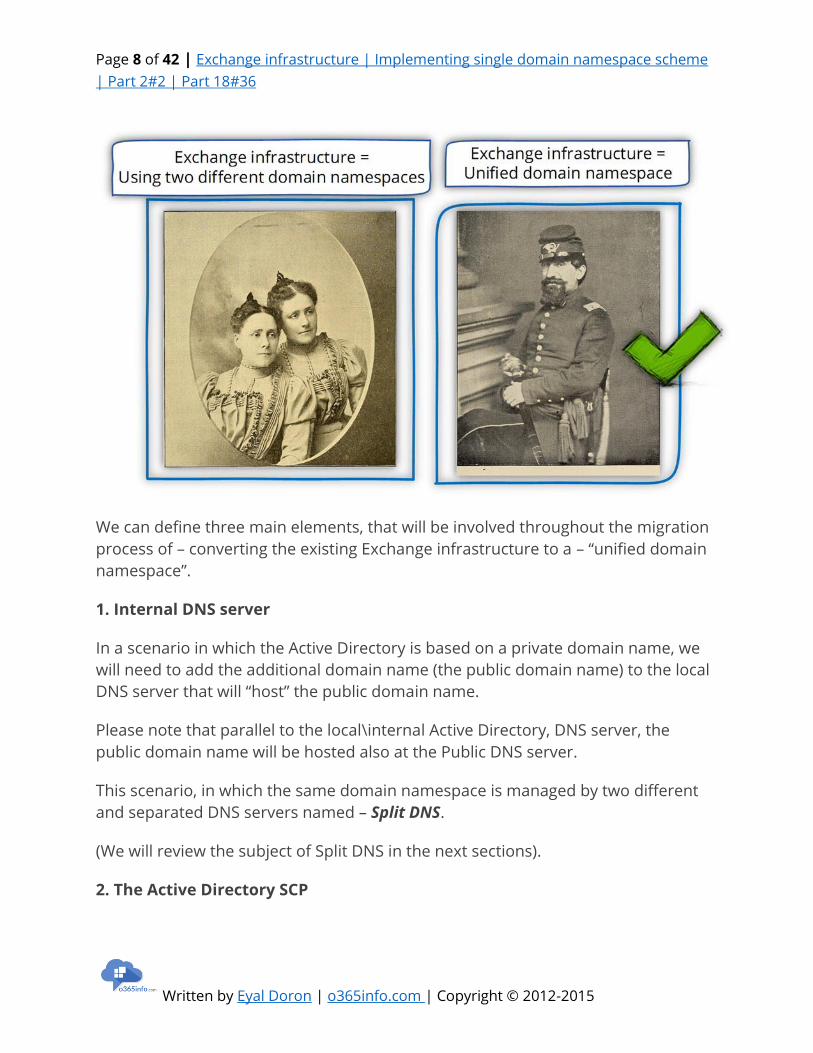
We can define three main elements, that will be involved throughout the migration
process of – converting the existing Exchange infrastructure to a – “unified domain
namespace”.
1. Internal DNS server
In a scenario in which the Active Directory is based on a private domain name, we
will need to add the additional domain name (the public domain name) to the local
DNS server that will “host” the public domain name.
Please note that parallel to the local\internal Active Directory, DNS server, the
public domain name will be hosted also at the Public DNS server.
This scenario, in which the same domain namespace is managed by two different
and separated DNS servers named – Split DNS.
(We will review the subject of Split DNS in the next sections).
2. The Active Directory SCP

Page 9 of 42 | Exchange infrastructure | Implementing single domain namespace scheme
| Part 2#2 | Part 18#36
Written by Eyal Doron | o365info.com | Copyright © 2012-2015
We will need to update the information that was registered in the Active Directory
SCP and “replace” the existing Exchange CAS server\s name\s.
By default, each of the existing Exchange CAS server\s will automatically register
himself at the Active Directory SCP using his private meaning, the FQDN which
includes the Active Directory private domain name suffix.
3. Exchange CAS server
Part of the Exchange CAS server includes the URL address of the Exchange CAS
server web services. This URL address includes the private host name of the
Exchange CAS server.
When we implement the method of – “unified domain namespace for internal +
external Exchange infrastructure”, we will also need to update all the Exchange CAS
server URL addresses so the “new URL address” will include the “new public name”
of the Exchange CAS server.
In the following diagram, we can see a summary that points out the element, and
the infrastructure that we will need to update with the “new Exchange server host
name” and Exchange web service URL address.

Page 10 of 42 | Exchange infrastructure | Implementing single domain namespace scheme
| Part 2#2 | Part 18#36
Written by Eyal Doron | o365info.com | Copyright © 2012-2015
Implementing “unified domain namespace” Exchange
infrastructure | Task list
In the following section, we will describe each of the “major steps” that involved in
the process of – Implementing “unified domain namespace” in Exchange
infrastructure”.
The main components that are involved throughout the process are:
1. Split DNS
When we use a unified domain namespace for the internal and the external
Exchange FQDN name, in a scenario in which the Active Directory domain name is a
private domain name, we will need to add to the local DNS additional zone that will
“host” the public domain name.
The internal DNS server will be configured as “authoritative” for the public domain
name.
In this scenario, we will need to manually add all of the DNS records that relate to
the Exchange infrastructure such as:
The A record for the Exchange server host name, the Autodiscover record, the MX
record and so on.
2. Active Directory SCP
We will need to remove from the Active Directory SCP the hostname who includes
the Exchange FQDN that uses the Active Directory private domain name and
instead adds information for the Exchange CAS server\s that exists using use the
public domain name suffix.
3. Exchange CAS server configurations
We will need to update all the Exchange web service URL addresses that include the
Exchange host name who use a private domain name to the “new Exchange FQDN”
that uses the public domain name suffix.

Page 11 of 42 | Exchange infrastructure | Implementing single domain namespace scheme
| Part 2#2 | Part 18#36
Written by Eyal Doron | o365info.com | Copyright © 2012-2015
Step 1: implementing Split DNS infrastructure
The implementation of Split DNS, enable us to bypass the obstacle in which the
Exchange server host names (FQDN) are based by default on the Active Directory
domain naming scheme.
In case that the Active Directory is a private domain name space, we would like to
“disconnect” or to “detached” the Exchange infrastructure namespace from the
Active Directory private domain name and, to “associate” the Exchange domain
name space with a public domain name.
Q: How making this magic happened?
A: Using the option of Split DNS
The next question could be:
Q: What is the meaning of Split DNS and if Split DNS is good to me, I should I
implement this configuration?

Page 12 of 42 | Exchange infrastructure | Implementing single domain namespace scheme
| Part 2#2 | Part 18#36
Written by Eyal Doron | o365info.com | Copyright © 2012-2015
Basic concept of DNS as a distributed database and single
source of authority
The DNS world is a very interesting and complex world, which can share data
between Infinite numbers of DNS servers.
Despite the fact, that many DNS servers can share any information such as
information about a specific domain name (zone transfer and so on) logically, there
is only “one source of authority”.
The meaning is that only one DNS server can be considered as “authoritative” for
the information that he holds.
This “source of authority” (the primary DNS), can replicate the information to
additional DNS servers but the basic role is that the information should be identical
on all the DNS servers who hold a replica of the zone file (the domain name) that
was accepted from the primary DNS (the source of authority).

Page 13 of 42 | Exchange infrastructure | Implementing single domain namespace scheme
| Part 2#2 | Part 18#36
Written by Eyal Doron | o365info.com | Copyright © 2012-2015
In the following diagram, we can see that the primary DNS server is replicating
information about a specific domain name (the domain name that considers “under
his authority”) to the additional DNS server.
DNS clients, can access or query each of the DNS servers and the “answer” that the
DNS client will get is supposed to be identical in each of the DNS servers.
What is the meaning of – Split DNS?
The simple explanation for the term “Split DNS” is – a configuration, in which two
different and separated DNS servers serve as “source of authority” at the same time
for the same namespace (domain name).
Note – additional popular terms for this configuration are – Split-Horizon DNS and
Split-Brain DNS

Page 14 of 42 | Exchange infrastructure | Implementing single domain namespace scheme
| Part 2#2 | Part 18#36
Written by Eyal Doron | o365info.com | Copyright © 2012-2015
When using the configuration of Split DNS, we are “violating” one of the most basic
concepts of the DNS infrastructure because we create a scenario in which two
different DNS servers “think” that they are the only owner of a specific domain
name while, in reality, there are two DNS infrastructures – internal Active Directory
DNS infrastructure and external public DNS infrastructure that define as
authoritative for the same domain name.
Each of the DNS infrastructure, is “sure” that he is the “only one” and each of the
DNS infrastructure doesn’t know of the existence of the other DNS infrastructure.

Page 15 of 42 | Exchange infrastructure | Implementing single domain namespace scheme
| Part 2#2 | Part 18#36
Written by Eyal Doron | o365info.com | Copyright © 2012-2015
Q: Why do we need to use the option of Split DNS?
A: The answer is that – when we use a configuration of Split DNS, we have the
ability to provide different answers, for different clients based on their physical
location.

Page 16 of 42 | Exchange infrastructure | Implementing single domain namespace scheme
| Part 2#2 | Part 18#36
Written by Eyal Doron | o365info.com | Copyright © 2012-2015
Public facing Exchange CAS server – one name and two different
IP address
In a scenario in which we are converting the existing Exchange domain scheme
from – “Two domain name infrastructure” to a – “single unified domain name”, the
main target is to enable internal + external Exchange clients to use the same FQDN
(the same host name who uses the public domain name suffix).
However, at the same time, we should not forget that despite the concept of “single
unified domain name” relates, to the domain name and, not to the IP address of the
Exchange CAS server.

Page 17 of 42 | Exchange infrastructure | Implementing single domain namespace scheme
| Part 2#2 | Part 18#36
Written by Eyal Doron | o365info.com | Copyright © 2012-2015
In the following diagram, we can see an example of a scenario, in which the
Exchange on-Premises servers have two sets of IP address.
In our scenario, the Exchange server will be represented by the host name
– mail.o365info.com
This host name will be “published” in the internal and the external DNS server using
a different IP address.
Internal Exchange clients, which will try to access the host name
– o365info.com will try to communicate the Exchange CAS server using the
private IP address – 192.168.1.5
External Exchange clients, which will try to access the host name
– o365info.com will try to communicate the Exchange CAS server using the
private IP address – 212.25.80.239

Page 18 of 42 | Exchange infrastructure | Implementing single domain namespace scheme
| Part 2#2 | Part 18#36
Written by Eyal Doron | o365info.com | Copyright © 2012-2015
Note – in reality, we are not physically assigning the public IP address to the
Exchange on-Premises server but instead, use a Firewall that has the specific public
IP address range.
Each connection attempt from external mail client that needs access to the Public
facing Exchange CAS server, will be automatically “forwarded” to the Exchange CAS
server using the private IP address (this is the implementation of NAT
configuration).
Implementing Split DNS configuration by using two DNS servers
In our example, the “Green DNS server” (server A in the diagram), is the Active
Directory internal DNS server who will be accessible or available only for hosts who
are located on the company private network and the “purple DNS server” will be
available only for external clients.
Each of these DNS servers, hold or consider as an “SOA – source of authority” for
the domain name – o365info.com
Each of the DNS servers, publish “different information” about the IP address of
specific hosts.
In the following diagram, we can see an example of the Split DNS concept.

Page 19 of 42 | Exchange infrastructure | Implementing single domain namespace scheme
| Part 2#2 | Part 18#36
Written by Eyal Doron | o365info.com | Copyright © 2012-2015
We can see that there are two DNS servers, which “claim to be a source of
information”
Additionally, we can see that the information in each of the DNS database (the zone
file) is different.
The DNS server at “claim” that the IP address of a host named mail.o365info.com is –
192.198.1.5
DNS server B “claim” that the IP address of a host named mail.o365info.com is
– 212.25.80.239
In the next diagram, we can see the concept of Split DNS but this time, from the
DNS client point of view.
When an internal DNS client, query the DNS server for a host
named mail.o365info.com, the DNS server reply, will include the private IP address
of the host.
When an external DNS client, query the DNS server for a host
named mail.o365info.com, the DNS server reply will include the public IP address of
the host.
Page 20 of 42 | Exchange infrastructure | Implementing single domain namespace scheme
| Part 2#2 | Part 18#36
Written by Eyal Doron | o365info.com | Copyright © 2012-2015
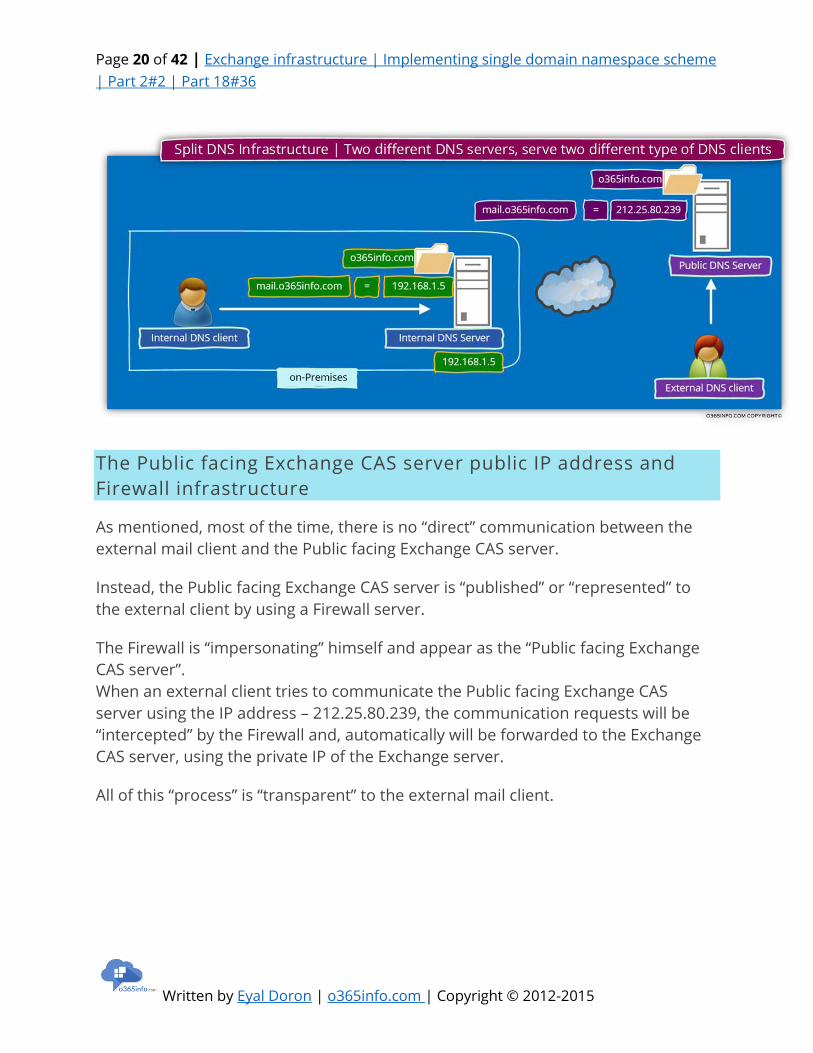
The Public facing Exchange CAS server public IP address and
Firewall infrastructure
As mentioned, most of the time, there is no “direct” communication between the
external mail client and the Public facing Exchange CAS server.
Instead, the Public facing Exchange CAS server is “published” or “represented” to
the external client by using a Firewall server.
The Firewall is “impersonating” himself and appear as the “Public facing Exchange
CAS server”.
When an external client tries to communicate the Public facing Exchange CAS
server using the IP address – 212.25.80.239, the communication requests will be
“intercepted” by the Firewall and, automatically will be forwarded to the Exchange
CAS server, using the private IP of the Exchange server.
All of this “process” is “transparent” to the external mail client.
Page 21 of 42 | Exchange infrastructure | Implementing single domain namespace scheme
| Part 2#2 | Part 18#36
Written by Eyal Doron | o365info.com | Copyright © 2012-2015
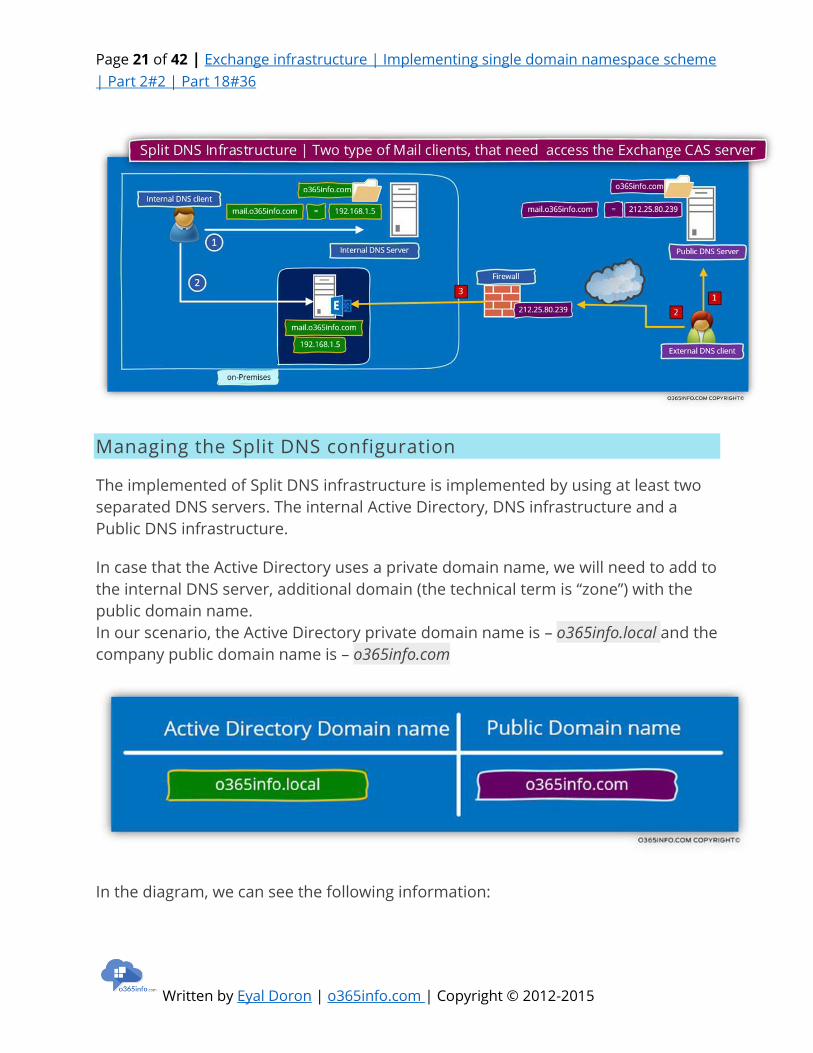
Managing the Split DNS configuration
The implemented of Split DNS infrastructure is implemented by using at least two
separated DNS servers. The internal Active Directory, DNS infrastructure and a
Public DNS infrastructure.
In case that the Active Directory uses a private domain name, we will need to add to
the internal DNS server, additional domain (the technical term is “zone”) with the
public domain name.
In our scenario, the Active Directory private domain name is – o365info.local and the
company public domain name is – o365info.com
In the diagram, we can see the following information:

Page 22 of 42 | Exchange infrastructure | Implementing single domain namespace scheme
| Part 2#2 | Part 18#36
Written by Eyal Doron | o365info.com | Copyright © 2012-2015
1. The organization uses two different DNS servers – internal DNS server who is
available for internal “Active Directory users” and additional “Public DNS
server” that will be used by external clients.
2. The internal DNS server is authoritative for two different domains
– o365info.local + o365info.com
3. The “public host name” that was chosen for the Exchange CAS server is- mail.
This host name, will be configured twice – in the internal DNS server + in the
external DNS server.
Pay attention to the fact that the “real host name” (the NetBIOS name) of the
Exchange CAS server is – ex01
Technically, this name will be registered automatically in the private Active
Directory domain name (o365info.local) but in our scenario, we don’t want to enable
the use of the “default Exchange server name who is based on the Active Directory
private name suffix.
The host name who will be used by the internal, and the external mail client is
The FQDN of the Exchange CAS server will be – mail.o365info.com

Page 23 of 42 | Exchange infrastructure | Implementing single domain namespace scheme
| Part 2#2 | Part 18#36
Written by Eyal Doron | o365info.com | Copyright © 2012-2015
Managing the internal Active Directory DNS
server
In the following screenshot, we can see an example to the internal DNS that
includes two different domain names.
1. o365info.local DNS zone
The Active Directory domain name is – o365info.local we be managed automatically.
By default, the DNS zone is configured to support the future of DDNS (Dynamic
DNS). Each of the internal hosts in the domain, “know” how to register himself in
the DNS under the Active Directory domain name.
2. o365info.com DNS zone
The additional domain name that represents the Public domain name (in our
scenarioo365info.com) will be managed manually because, the Active Directory
hosts (domain joined hosts) doesn’t “belong” or associated with this domain name.
We will need to add manually, each of the host names that we need to “publish”
under the public domain name and additionally, add his private IP address.

Page 24 of 42 | Exchange infrastructure | Implementing single domain namespace scheme
| Part 2#2 | Part 18#36
Written by Eyal Doron | o365info.com | Copyright © 2012-2015
In the following screenshot, we can see that under the Public domain name, we add
the host name – mail, which represent the Exchange CAS server and his private IP
address.
Regarding the Autodiscover record, technically, we don’t need to add this record,
because internal hosts that configured as a domain joined, will not use the DNS
services for locating the name of the Exchange CAS server, but instead, will access
the Active Directory for getting the name of the Exchange CAS server (the name
whom the Active Directory will provide in our scenario is mail.o365info.com)
The need for adding the Autodiscover record is only for internal host who are not
the domain joined.
What will happen in the case that we don’t use the Split DNS
configuration?
An interesting question that could appear in our suspicious mind is – ”What will
happen in the case that we don’t use the Split DNS configuration?”

Page 25 of 42 | Exchange infrastructure | Implementing single domain namespace scheme
| Part 2#2 | Part 18#36
Written by Eyal Doron | o365info.com | Copyright © 2012-2015
The answer is that in some scenarios, everything will work fine without all the
“headache” of Implemented a Split DNS configuration which requires to add
additional zones to the internal DNS server, add A records to the public name DNS
zone, etc.
The reason for implementing the configuration of Split DNS, is for preventing from
the internal clients, to use the Public IP address of the “internal host” (the Exchange
CAS server in our scenario).
Instead, we would like that the internal Exchange clients will the Exchange CAS
server by using his private IP address.

Page 26 of 42 | Exchange infrastructure | Implementing single domain namespace scheme
| Part 2#2 | Part 18#36
Written by Eyal Doron | o365info.com | Copyright © 2012-2015
In case that the internal Exchange clients will address the Exchange CAS server by
using his public IP address, the communication channel, can be configured as-
“twisted”.
The communication channel between: internal hosts and external host
A “normal” communication channel between- internal hosts and external host is
implemented in the following way:
When an internal client, need to access to “external host” (host with public IP
address), the internal host, will need the help of a “gateway” such as a Firewall or
Proxy server, that will “forward his request” to the destination external host and
vice versa.
When the external host reply, the Gateway will forward the response to the internal
host.

Page 27 of 42 | Exchange infrastructure | Implementing single domain namespace scheme
| Part 2#2 | Part 18#36
Written by Eyal Doron | o365info.com | Copyright © 2012-2015
The described communication channel is “acceptable” when we really need access
to external hosts, but in our scenario, the Exchange CAS server is not an external
host.
None recommended communication channel between-internal hosts
and external host
In case that we will not use the configuration of Split DNS, each of the DNS queries
for host the “belong” to the public domain name (such as DNS query for the host
name- mail.o365info.com), will be “redirected” to the authoritative authority of the
public domain name.
By default, the authoritative authority is the external DNS server who host the
domain name –o365info.com
This scenario, in which we use the public DNS as authoritative authority of the
public domain name, will cause to an “Incident”, in which Internal Exchange clients
will try to address them Exchange CAS server using a public IP address instead of
using his “standard” private IP address.

Page 28 of 42 | Exchange infrastructure | Implementing single domain namespace scheme
| Part 2#2 | Part 18#36
Written by Eyal Doron | o365info.com | Copyright © 2012-2015
The outcome of this scenario is that the communication channel will be
implemented in a non – optimal way that could lead to – slowdown in performance
or even logical error and other problem that will prevent the communication
between the internal mail client and his internal Exchange CAS server.
To demonstrate what will happen in the case that we will not use the split DNS
configuration, let’s use the following example:
An internal mail client needs to access his Exchange CAS server.
The mail client connects the local Active Directory and the Active Directory replay
with the name of the Exchange CAS server – mail.o365info.com
1. The internal client connects the local DNS looking for the IP address of the host –
mail.o365info.com
2. The local DNS server, will connect an external Root DNS server for getting the
name and the IP address of the DNS server who “host” (authoritative) for the
domain – o365info.com
3. The internal DNS provides to the internal client the public IP address of the host
– 212.25.80.239
4. The internal client “understand” that this IP is not local, and for this reason
connects hos Gateway.
5. The Gateway “bounce” the request to his “external leg” because he is responsible
for this public IP (in our scenario – 212.25.80.239).

Page 29 of 42 | Exchange infrastructure | Implementing single domain namespace scheme
| Part 2#2 | Part 18#36
Written by Eyal Doron | o365info.com | Copyright © 2012-2015
6. The Gateway, address the internal host using the Private IP address of the host
(192.168.1.5 in our scenario).
7. The internal host (the Exchange CAS server) “answer” to the “host” that makes to
the connection attempt.
Pay attention to the fact that from the internal Exchange CAS server point of
view, the host who try to contact him is the “internal leg” of the Firewall server.
Page 30 of 42 | Exchange infrastructure | Implementing single domain namespace scheme
| Part 2#2 | Part 18#36
Written by Eyal Doron | o365info.com | Copyright © 2012-2015
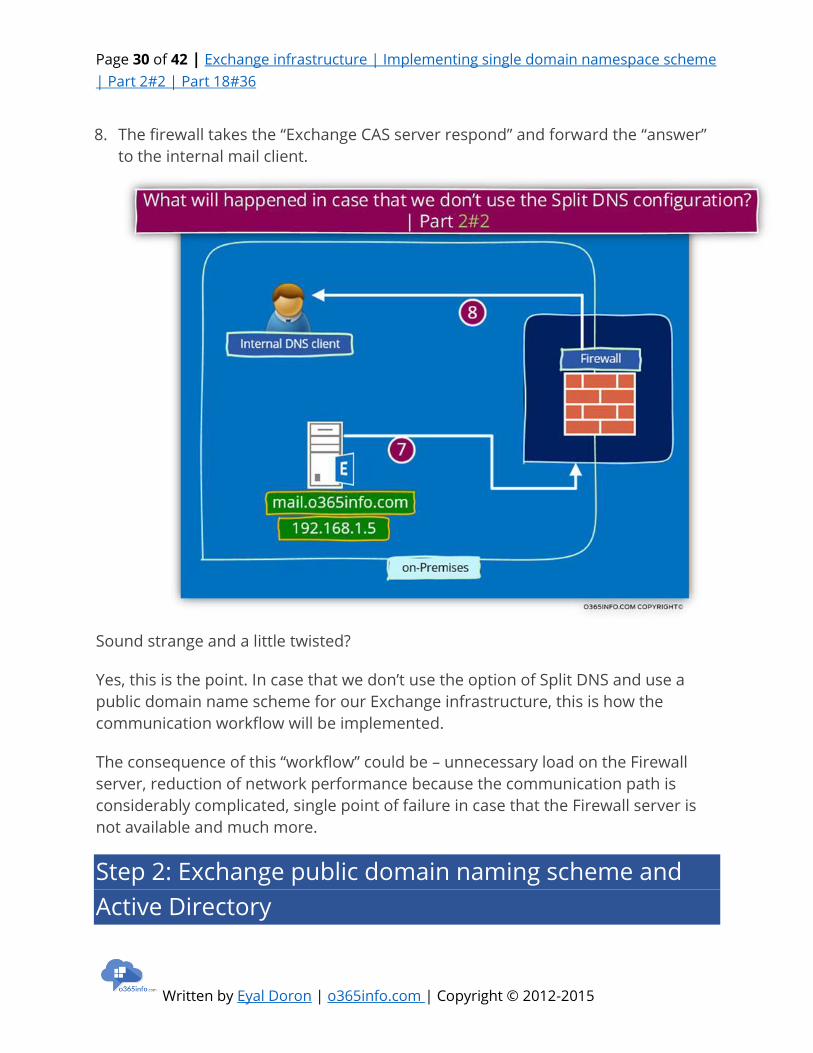
8. The firewall takes the “Exchange CAS server respond” and forward the “answer”
to the internal mail client.
Sound strange and a little twisted?
Yes, this is the point. In case that we don’t use the option of Split DNS and use a
public domain name scheme for our Exchange infrastructure, this is how the
communication workflow will be implemented.
The consequence of this “workflow” could be – unnecessary load on the Firewall
server, reduction of network performance because the communication path is
considerably complicated, single point of failure in case that the Firewall server is
not available and much more.
Step 2: Exchange public domain naming scheme and
Active Directory

Page 31 of 42 | Exchange infrastructure | Implementing single domain namespace scheme
| Part 2#2 | Part 18#36
Written by Eyal Doron | o365info.com | Copyright © 2012-2015
An additional element in the scenario of – Exchange public domain naming scheme
is the component of the Active Directory and the Exchange CAS server information
that is registered in the Active Directory SCP (service connection point).
In a scenario in which the Active Directory uses a private domain name, each of the
Exchange CAS servers automatically registers himself at the Active Directory SCP
(Service Connection Point) using his host name who includes the Active Directory
private domain name.
In a scenario of – ”single naming scheme for Exchange Infrastructure”, we will need
to “remove” the existing information that was registered at the Active Directory SCP
and instead, update the information so it will “point” to the “new Exchange CAS
server name who is based on the public domain name suffix.
To demonstrate this concept, let’s use the following example:
The Active Directory uses a private domain named – o365info.lcoal

Page 32 of 42 | Exchange infrastructure | Implementing single domain namespace scheme
| Part 2#2 | Part 18#36
Written by Eyal Doron | o365info.com | Copyright © 2012-2015
The public name of the company is – o365info.com
The host name of the local Exchange CAS server is – exo1 and, the “Full name”
(the FQDN) of the Exchange CAS server is – mail.o365info.local
The name whom we want to assign, to on-Premises Exchange CAS server
using the public domain name is – mail.o365info.com
Pay attention to the fact that by default, the Exchange CAS server was already
registered himself at the Active Directory SCP using the host name
– ex01.o365info.local
In our scenario, we want that each time that a mail client (Autodiscover client) will
query the Active Directory for the name of the available Autodiscover Endpoint (the
Exchange CAS server\s), the answer that the Active Directory will provide will be the
“public name” of the Exchange CAS server.
To be able to accomplish this requirement, we will need to update the existing
value that was automatically registered at the Active Directory SCP to the “new
name” of the Exchange CAS server.
In our example, we will need to update the Exchange CAS server name who was
registered in the Active Directory SCP to the “new name” by using a PowerShell
command such as:
Set-ClientAccessServer -Identity “EX01″ -AutodiscoverServiceInternalURI
“https://mail.o365info.com/Autodiscover/Autodiscover.xml”
Step 3: updating the Exchange CAS server web services
URL address.
The Exchange CAS server “tell” his client about the available web services by using a
URL address.
We can relate to the URL address that the Exchange CAS server provides as a
“pointer” to the required Exchange web service.

Page 33 of 42 | Exchange infrastructure | Implementing single domain namespace scheme
| Part 2#2 | Part 18#36
Written by Eyal Doron | o365info.com | Copyright © 2012-2015
As mentioned, the Exchange CAS server uses two separate interfaces for internal
Exchange clients and for external Exchange clients.
Each of the Exchange CAS server web services is published using an internal URL
address and external URL address.
The internal URL address is supposed to be used by the internal Exchange client,
and the external URL address is supposed to be used by the external Exchange
client.
In our scenario, in which we use only one domain name (the public domain name),
we will need to update the URL address of each of the Exchange web services so
that internal URL address that is configured by default with the private domain
name, will be updated and will be configured as identical to the external URL
address that is based on the Public domain name suffix.
The Exchange web service that we will need to update their URL addresses are:
Exchange web services (EWS)

Page 34 of 42 | Exchange infrastructure | Implementing single domain namespace scheme
| Part 2#2 | Part 18#36
Written by Eyal Doron | o365info.com | Copyright © 2012-2015
ActiveSync
OWA
ECP
OAB
Updating the Exchange CAS server URL address by using the
Exchange graphical management interface.
Most of this Exchange web services, can be updated by using the Exchange
graphical management interface.
In the Exchange 2010 server version, we can use the use the graphical management
interface for updating all the Exchange web service URL beside the Exchange web
services (EWS).
In case that you use Exchange 2013, we can use the web management interface for
updating all the Exchange web services, including the Exchange web services (EWS).
In the following screenshot, we can see an example for the option that are available
for us when using the Exchange 2010 graphical management interface.
Under the Server Configuration, Client Access, we can see the “tabs” for each of the
Exchange web services.
Page 35 of 42 | Exchange infrastructure | Implementing single domain namespace scheme
| Part 2#2 | Part 18#36
Written by Eyal Doron | o365info.com | Copyright © 2012-2015
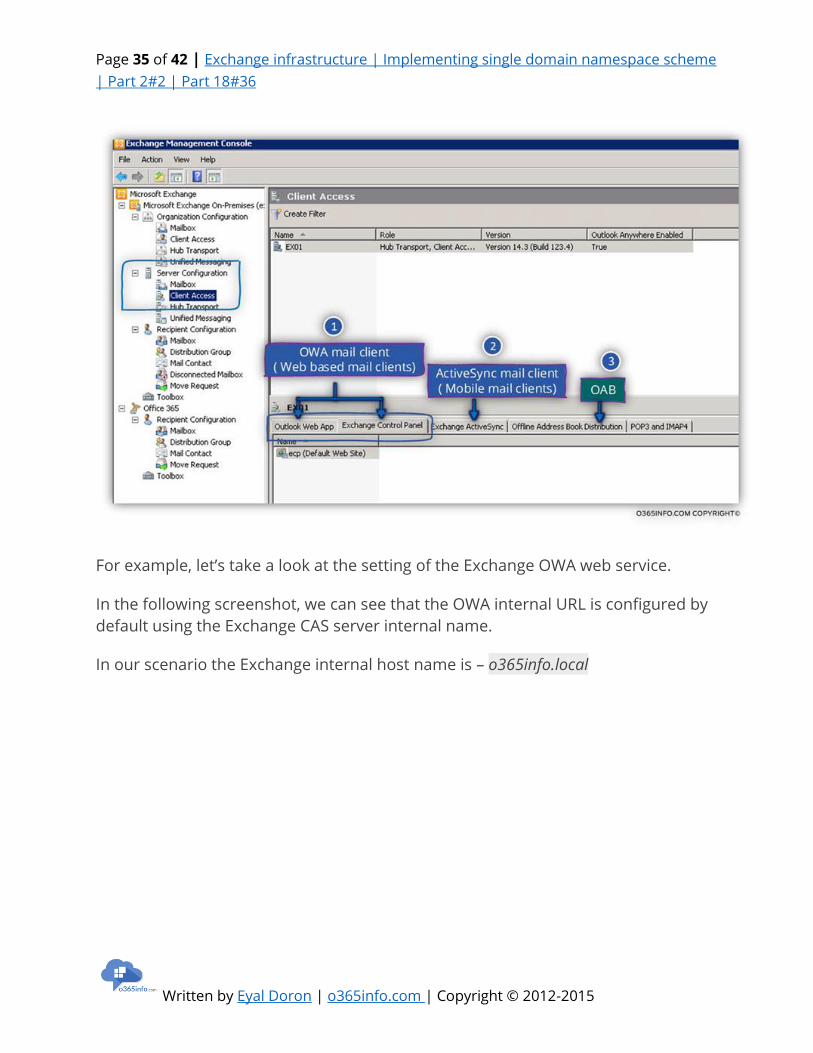
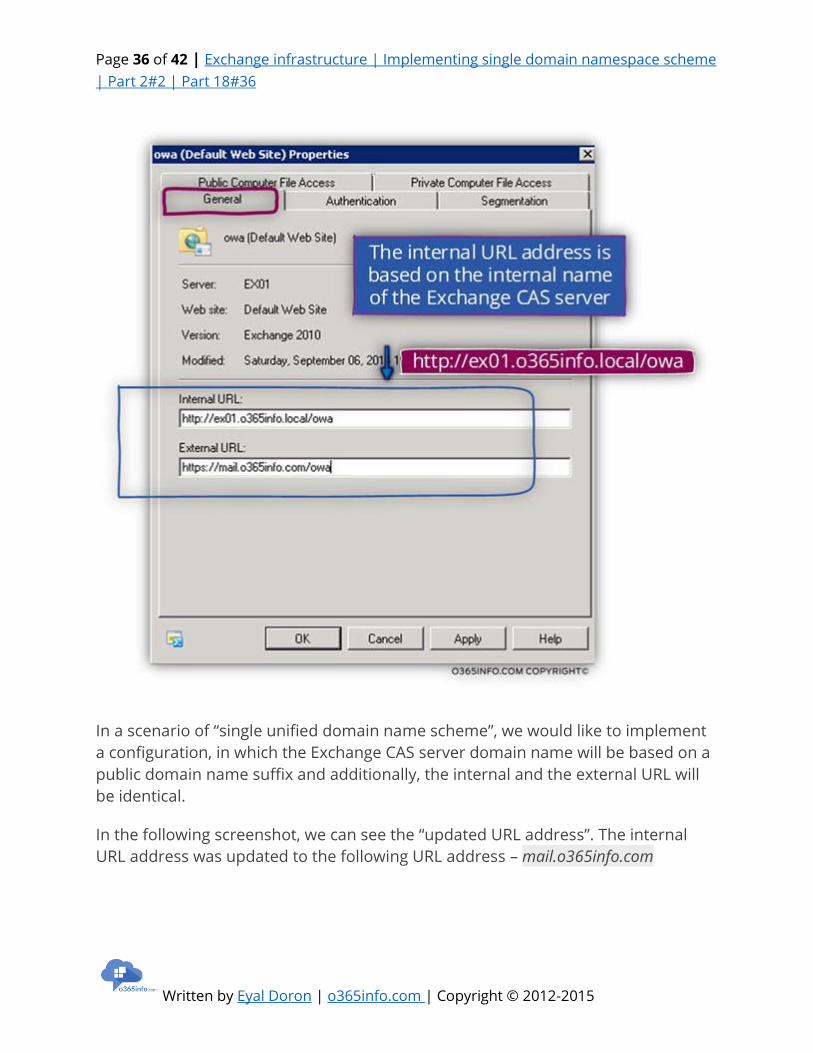
For example, let’s take a look at the setting of the Exchange OWA web service.
In the following screenshot, we can see that the OWA internal URL is configured by
default using the Exchange CAS server internal name.
In our scenario the Exchange internal host name is – o365info.local
Page 36 of 42 | Exchange infrastructure | Implementing single domain namespace scheme
| Part 2#2 | Part 18#36
Written by Eyal Doron | o365info.com | Copyright © 2012-2015
In a scenario of “single unified domain name scheme”, we would like to implement
a configuration, in which the Exchange CAS server domain name will be based on a
public domain name suffix and additionally, the internal and the external URL will
be identical.
In the following screenshot, we can see the “updated URL address”. The internal
URL address was updated to the following URL address – mail.o365info.com

Page 37 of 42 | Exchange infrastructure | Implementing single domain namespace scheme
| Part 2#2 | Part 18#36
Written by Eyal Doron | o365info.com | Copyright © 2012-2015
Updating the Exchange CAS server web services URL address by
using the Exchange PowerShell interface.
Another option for updating the Exchange CAS server web services URL address is
by using the PowerShell interface.
In the following section, you can see an example of the PowerShell command that
could be used for updating the Exchange internal URL address.
Page 38 of 42 | Exchange infrastructure | Implementing single domain namespace scheme
| Part 2#2 | Part 18#36
Written by Eyal Doron | o365info.com | Copyright © 2012-2015
Note – if you want more detailed information about the available PowerShell
command that we can use for managing the CAS server web services URL address
by using the Exchange PowerShell interface, you can read the article- Exchange
Web services | Manage the Internal and external URL address | Part 10#36
Set\update the URL address of – Exchange web services (EWS)
In the following example, we will update the internal and the external URL address
of the Exchange EWS services using the “New” Exchange CAS server host name
– mail.o365info.com
PowerShell command:
Set-WebServicesVirtualDirectory -Identity “CAS01\EWS (Default Web Site)”
–InternalUrl “https://mail.o365info.com/ews/exchange.asmx”
–ExternalUrl “https://mail.o365info.com/ews/exchange.asmx”
Set\update the URL address of – ActiveSync Exchange web service
In the following example, we will update the internal and the external URL address
of the Exchange ActiveSync services using the “New” Exchange CAS server host
name –mail.o365info.com
Set-ActiveSyncVirtualDirectory -Identity “EX01\Microsoft-Server-ActiveSync”
-InternalUrl “mail.o365info.com/Microsoft-Server-ActiveSync”
-ExternalUrl “mail.o365info.com/Microsoft-Server-ActiveSync”
Set\update the URL address of – OWA Exchange web service
In the following example, we will update the internal and the external URL address
of the Exchange OWA (web mail services) using the “New” Exchange CAS server host
name –mail.o365info.com
Set-OwaVirtualDirectory -Identity “ex01\owa (default Web site)”
-InternalUrl “https:// mail.o365info.com/owa”
-ExternalUrl “https://mail.o365info.com/owa”
Set\update the URL address of – Exchange ECP
Page 39 of 42 | Exchange infrastructure | Implementing single domain namespace scheme
| Part 2#2 | Part 18#36
Written by Eyal Doron | o365info.com | Copyright © 2012-2015
In the following example, we will update the internal and the external URL address
of the Exchange ECP (Exchange control panel) using the “New” Exchange CAS server
host name –mail.o365info.com
Set-EcpVirtualDirectory -Identity “ex01\ECP (Default Web Site)”
-InternalUrl “https://mail.o365info.com/ecp”
-ExternalUrl “https://mail.o365info.com/ecp”
Exchange OAB (offline address book)
In the following example, we will update the internal and the external URL address
of the Exchange OAB (Offline address book) using the “New” Exchange CAS server
host name –mail.o365info.com
Set-OABVirtualDirectory -identity ” ex01\OAB (Default Web Site)”
-InternalUrl “https://ex01.o365info.local/oab”
-ExternalUrl “https://mail.o365info.com/oab”
Exchange Private Domain name versus Public Domain
name pros and cons.
As you already manage to understand, my opinion is that the preferable method or
the most efficient or preferable method is – using a single namespace, meaning,
assign to the public domain name scheme for the Exchange infrastructure instead
of maintaining two separated name scheme (private and public).
In case that until this point you are not quite convinced, here is a quick review of
the pros and cons for each of the options.
Before we review these pros and cons, I would like to summarize my mantra – after
we “invest” the required resources for planning and creating the required Split DNS
infrastructure, our life should be very easy and simple and, despite that it took me a
lot of “words” to explain the Split DNS infrastructure the “resources” that we will
need to allocate is quite easy and simple.
Page 40 of 42 | Exchange infrastructure | Implementing single domain namespace scheme
| Part 2#2 | Part 18#36
Written by Eyal Doron | o365info.com | Copyright © 2012-2015
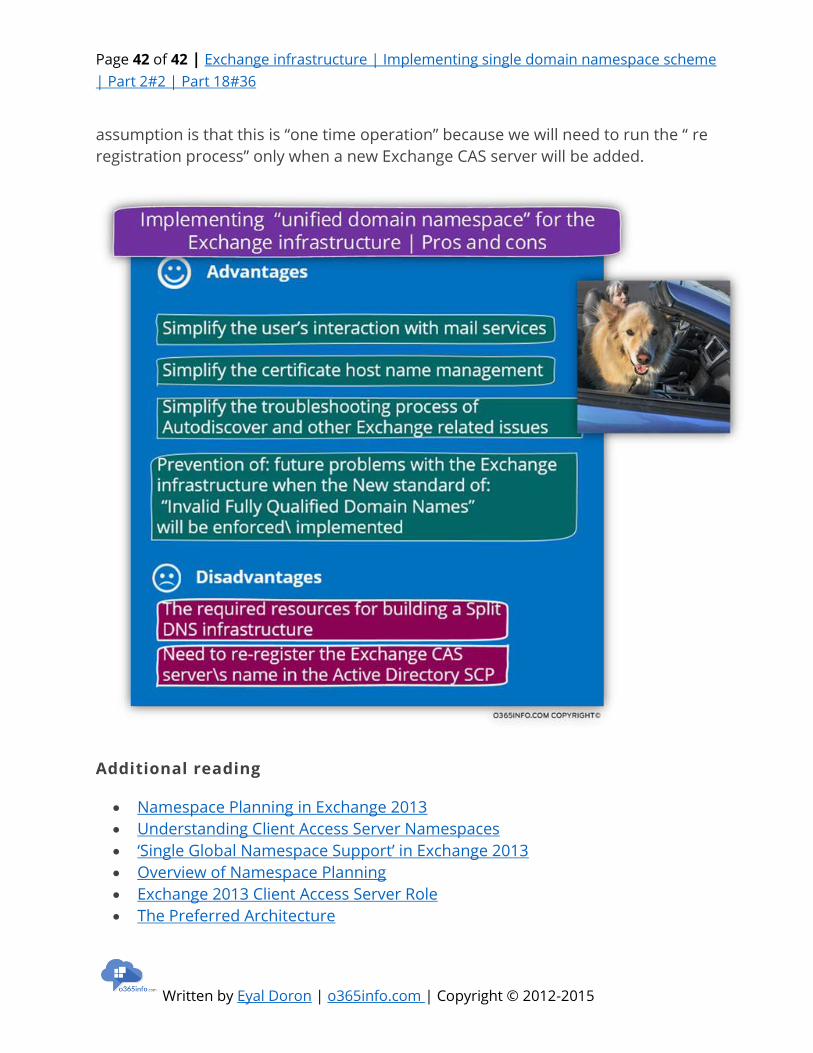
Using the public domain naming scheme for Exchange
infrastructure
Advantages
1. Simplify the user’s interaction with mail services
When using the Public domain name scheme for the Exchange infrastructure, the
Exchange clients will no longer need to memorize two separated host names for
addressing Exchange server from internal network verses address Exchange from
external\public network.
2. Simplify the certificate host name management.

Page 41 of 42 | Exchange infrastructure | Implementing single domain namespace scheme
| Part 2#2 | Part 18#36
Written by Eyal Doron | o365info.com | Copyright © 2012-2015
In case that we use only one naming scheme (the public name scheme), we will no
longer need to “populate” the Exchange public certificate with external + internal
host names.
3. Simplify the troubleshooting process of Autodiscover and other Exchange related
issues.
In case that we will need to deal with a troubleshooting scenario that relates to the
Autodiscover and other Exchange web services, it’s much easier to troubleshoot the
problem when using only one naming scheme (the public domain name scheme).
4. Prevention of – future problems with the Exchange infrastructure when the new
standard of: “Invalid Fully Qualified Domain Names” will be enforced\implemented
We have already reviewed the subject of – Invalid Fully Qualified Domain Names in
public certificate and, it looks like that, there will be no option besides of embracing
the scenario of using only a public naming scheme and “get rid of” the assignment
of the private Active Directory naming scheme to Exchange infrastructure.
Disadvantages
1. The required resources for building a Split DNS infrastructure
Theoretically, we will need to allocate resources for building the “Split DNS
infrastructure” that will serve as a foundation for assigning only a public name
scheme to the Exchange infrastructure.
In reality, the only real resource that we will need to allocate is the time that we will
need to spend on reading “how to build Split DNS infrastructure”.
The implementation of Split DNS infrastructure, doesn’t need any dedicated servers
or hardware resources.
All we need to do is just add additional zone (domain name) to the build on a DNS
server that comes from a part of every DC (Active Directory server).
2. The need to re-register the Exchange CAS server\s name in the Active Directory
SCP
The need for re-register the Exchange CAS server\s name in the Active Directory
SCP can be implemented very easily by using a PowerShell command and the basic
Page 42 of 42 | Exchange infrastructure | Implementing single domain namespace scheme
| Part 2#2 | Part 18#36
Written by Eyal Doron | o365info.com | Copyright © 2012-2015
assumption is that this is “one time operation” because we will need to run the “ re
registration process” only when a new Exchange CAS server will be added.
Additional reading
Namespace Planning in Exchange 2013
Understanding Client Access Server Namespaces
‘Single Global Namespace Support’ in Exchange 2013
Overview of Namespace Planning
Exchange 2013 Client Access Server Role
The Preferred Architecture
![XSL Transformations (XSLT) Version 1 · belonging to a specific XML namespace (see [2.1 XSLT Namespace]), which is referred to in this specification as the XSLT namespace. Thus this](https://img.pdfslide.us/doc/110x75/5e6be3fc3160165d82646b66/xsl-transformations-xslt-version-1-belonging-to-a-specific-xml-namespace-see.jpg)