Embed Size (px)
Citation preview
CteinDigital Restoration from Start to Finish
346
This mid-20th-century 3.5 ! 5-inch snapshot is so badly faded that the girls are almost unrecognizable ( Figure 11 - 10a ). Part of the image, in the lower-right corner, is entirely missing, and the left side of the photograph is so light that it’s hard to tell if there’s any detail there at all.
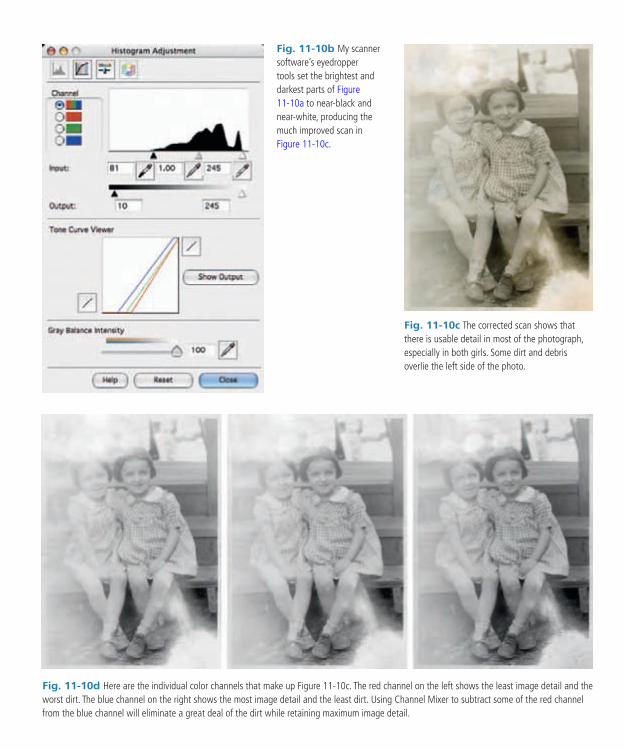
As always in cases like this, a good scan is the fi rst order of business. Although there wasn’t any particularly fi ne photographic detail in this print, I chose to scan it at 1200 ppi to make it easier to use fi lters to separate the dirt and damage from the image itself. I clicked the black eyedropper in my scanner’s levels/histogram software on a point right under the steps where the image was darkest ( Figure 11 - 10b ). Similarly, I clicked the white eyedropper on the lightest point I could fi nd in the photograph. That got me to Figure 11 - 10c .
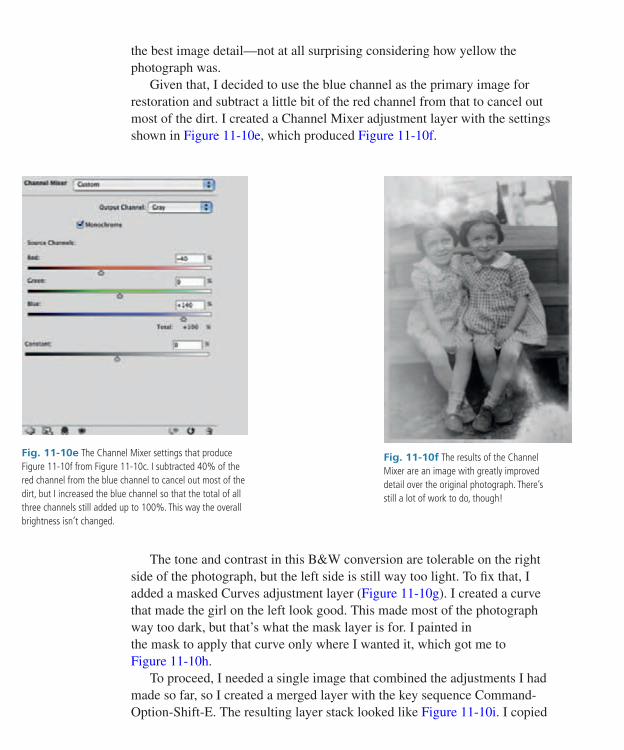
The scan showed that along with severe and uneven fading, the photograph was plagued with a lot of fi ne dirt, which came out bluish in the scan. When I looked at the individual color channels, the dirt was most visible in the red channel ( Figure 11 - 10d , left). The blue channel ( Figure 11 - 10d , right) showed
Example 10: Restoring a Very Yellowed B & W Snapshot
Fig. 11 - 10a This photograph is so badly yellowed that it’s diffi cult to tell which parts of the image have faded and which have been lost entirely.
Dow
nloa
ded
by [G
alen
Gla
ze] a
t 07:
39 1
2 Ja
nuar
y 20
16
347
ExamplesChapter 11
Fig. 11 - 10b My scanner software’s eyedropper tools set the brightest and darkest parts of Figure 11 - 10a to near-black and near-white, producing the much improved scan in Figure 11- 10c .
Fig. 11 - 10c The corrected scan shows that there is usable detail in most of the photograph, especially in both girls. Some dirt and debris overlie the left side of the photo.
Fig. 11 - 10d Here are the individual color channels that make up Figure 11 - 10c . The red channel on the left shows the least image detail and the worst dirt. The blue channel on the right shows the most image detail and the least dirt. Using Channel Mixer to subtract some of the red channel from the blue channel will eliminate a great deal of the dirt while retaining maximum image detail.
Dow
nloa
ded
by [G
alen
Gla
ze] a
t 07:
39 1
2 Ja
nuar
y 20
16
CteinDigital Restoration from Start to Finish
348
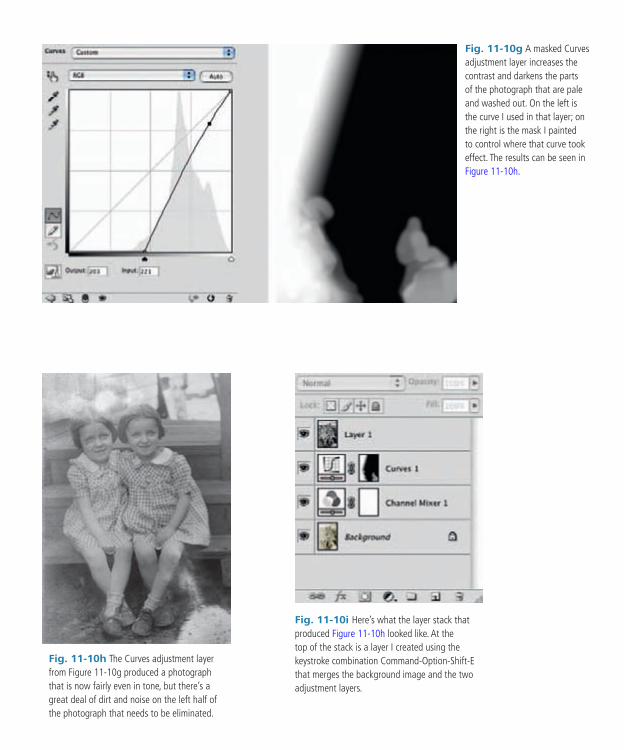
Fig. 11 - 10f The results of the Channel Mixer are an image with greatly improved detail over the original photograph. There’s still a lot of work to do, though!
Fig. 11 - 10e The Channel Mixer settings that produce Figure 11 - 10f from Figure 11 - 10c . I subtracted 40% of the red channel from the blue channel to cancel out most of the dirt, but I increased the blue channel so that the total of all three channels still added up to 100%. This way the overall brightness isn’t changed.
the best image detail — not at all surprising considering how yellow the photograph was.
Given that, I decided to use the blue channel as the primary image for restoration and subtract a little bit of the red channel from that to cancel out most of the dirt. I created a Channel Mixer adjustment layer with the settings shown in Figure 11- 10e , which produced Figure 11-10f .
The tone and contrast in this B&W conversion are tolerable on the right side of the photograph, but the left side is still way too light. To fi x that, I added a masked Curves adjustment layer ( Figure 11 - 10g ). I created a curve that made the girl on the left look good. This made most of the photograph way too dark, but that’s what the mask layer is for. I painted in the mask to apply that curve only where I wanted it, which got me to Figure 11- 10h .
To proceed, I needed a single image that combined the adjustments I had made so far, so I created a merged layer with the key sequence Command-Option-Shift-E. The resulting layer stack looked like Figure 11 - 10i . I copied
Dow
nloa
ded
by [G
alen
Gla
ze] a
t 07:
39 1
2 Ja
nuar
y 20
16
349
ExamplesChapter 11
Fig. 11 - 10g A masked Curves adjustment layer increases the contrast and darkens the parts of the photograph that are pale and washed out. On the left is the curve I used in that layer; on the right is the mask I painted to control where that curve took effect. The results can be seen in Figure 11 - 10h .
Fig. 11 - 10h The Curves adjustment layer from Figure 11 - 10g produced a photograph that is now fairly even in tone, but there’s a great deal of dirt and noise on the left half of the photograph that needs to be eliminated.
Fig. 11 - 10i Here’s what the layer stack that produced Figure 11 - 10h looked like. At the top of the stack is a layer I created using the keystroke combination Command-Option-Shift-E that merges the background image and the two adjustment layers.
Dow
nloa
ded
by [G
alen
Gla
ze] a
t 07:
39 1
2 Ja
nuar
y 20
16
CteinDigital Restoration from Start to Finish
350
the merged layer into a new fi le so that I wouldn’t be carrying the computational overhead from all the individual layers in the later steps.
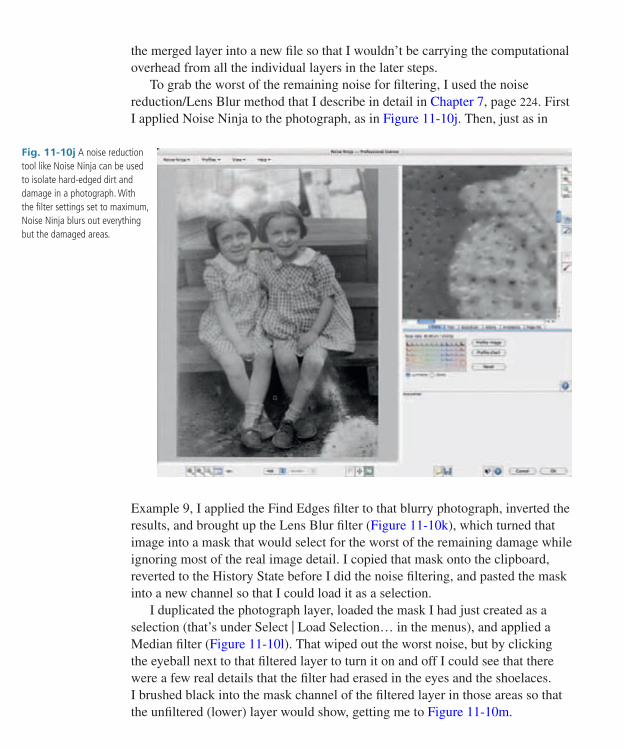
To grab the worst of the remaining noise for fi ltering, I used the noise reduction/Lens Blur method that I describe in detail in Chapter 7, page 224 . First I applied Noise Ninja to the photograph, as in Figure 11- 10j . Then, just as in
Fig. 11 - 10j A noise reduction tool like Noise Ninja can be used to isolate hard-edged dirt and damage in a photograph. With the fi lter settings set to maximum, Noise Ninja blurs out everything but the damaged areas.
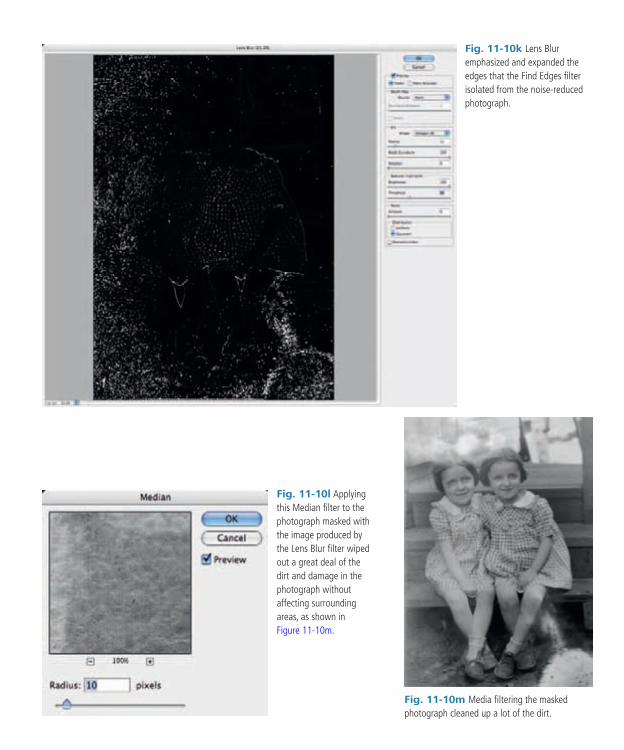
Example 9, I applied the Find Edges fi lter to that blurry photograph, inverted the results, and brought up the Lens Blur fi lter ( Figure 11 - 10k ), which turned that image into a mask that would select for the worst of the remaining damage while ignoring most of the real image detail. I copied that mask onto the clipboard, reverted to the History State before I did the noise fi ltering, and pasted the mask into a new channel so that I could load it as a selection.
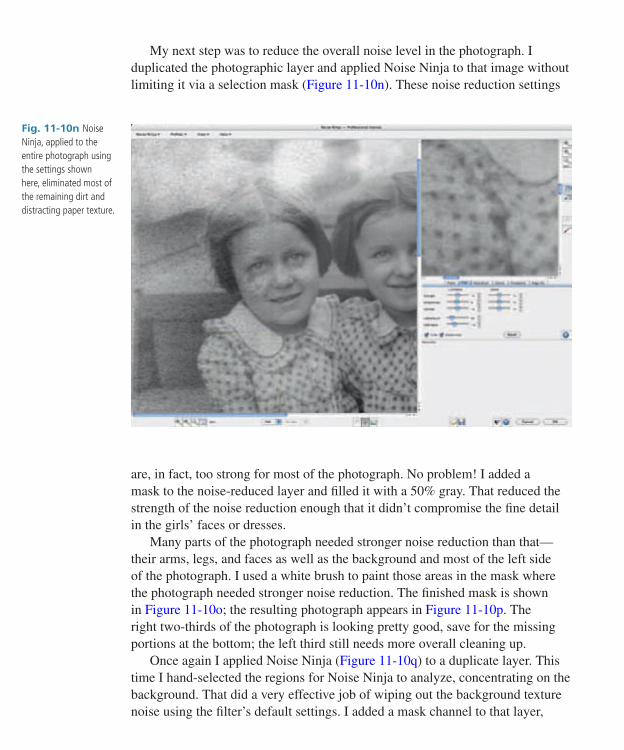
I duplicated the photograph layer, loaded the mask I had just created as a selection (that’s under Select | Load Selection … in the menus), and applied a Median fi lter ( Figure 11 - 10l ). That wiped out the worst noise, but by clicking the eyeball next to that fi ltered layer to turn it on and off I could see that there were a few real details that the fi lter had erased in the eyes and the shoelaces. I brushed black into the mask channel of the fi ltered layer in those areas so that the unfi ltered (lower) layer would show, getting me to Figure 11- 10m .
Dow
nloa
ded
by [G
alen
Gla
ze] a
t 07:
39 1
2 Ja
nuar
y 20
16
351
ExamplesChapter 11
Fig. 11 - 10k Lens Blur emphasized and expanded the edges that the Find Edges fi lter isolated from the noise-reduced photograph.
Fig. 11 - 10l Applying this Median fi lter to the photograph masked with the image produced by the Lens Blur fi lter wiped out a great deal of the dirt and damage in the photograph without affecting surrounding areas, as shown in Figure 11 - 10m .
Fig. 11 - 10m Media fi ltering the masked photograph cleaned up a lot of the dirt.
Dow
nloa
ded
by [G
alen
Gla
ze] a
t 07:
39 1
2 Ja
nuar
y 20
16
CteinDigital Restoration from Start to Finish
352
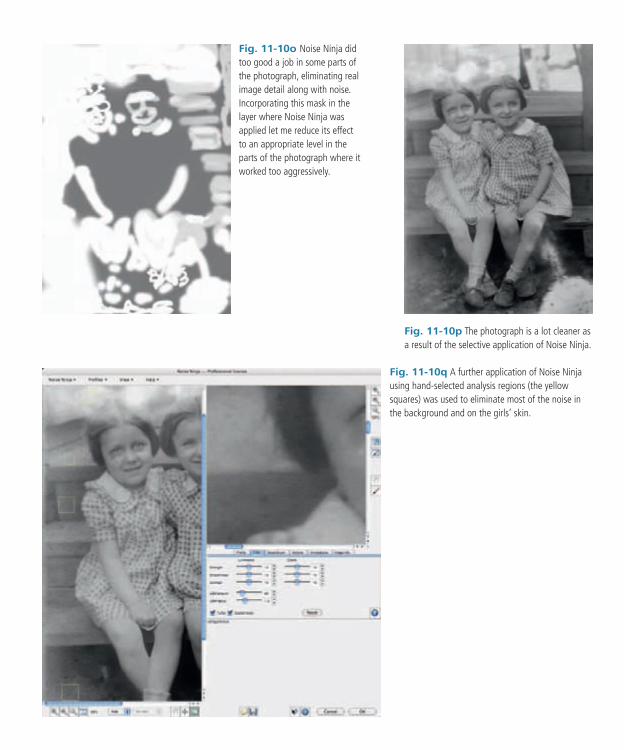
Fig. 11 - 10n Noise Ninja, applied to the entire photograph using the settings shown here, eliminated most of the remaining dirt and distracting paper texture.
My next step was to reduce the overall noise level in the photograph. I duplicated the photographic layer and applied Noise Ninja to that image without limiting it via a selection mask ( Figure 11 - 10n ). These noise reduction settings
are, in fact, too strong for most of the photograph. No problem! I added a mask to the noise-reduced layer and fi lled it with a 50% gray. That reduced the strength of the noise reduction enough that it didn’t compromise the fi ne detail in the girls ’ faces or dresses.
Many parts of the photograph needed stronger noise reduction than that — their arms, legs, and faces as well as the background and most of the left side of the photograph. I used a white brush to paint those areas in the mask where the photograph needed stronger noise reduction. The fi nished mask is shown in Figure 11 - 10o ; the resulting photograph appears in Figure 11 - 10p . The right two-thirds of the photograph is looking pretty good, save for the missing portions at the bottom; the left third still needs more overall cleaning up.
Once again I applied Noise Ninja ( Figure 11 - 10q ) to a duplicate layer. This time I hand-selected the regions for Noise Ninja to analyze, concentrating on the background. That did a very effective job of wiping out the background texture noise using the fi lter’s default settings. I added a mask channel to that layer,
Dow
nloa
ded
by [G
alen
Gla
ze] a
t 07:
39 1
2 Ja
nuar
y 20
16
353
ExamplesChapter 11
Fig. 11 - 10o Noise Ninja did too good a job in some parts of the photograph, eliminating real image detail along with noise. Incorporating this mask in the layer where Noise Ninja was applied let me reduce its effect to an appropriate level in the parts of the photograph where it worked too aggressively.
Fig. 11 - 10q A further application of Noise Ninja using hand-selected analysis regions (the yellow squares) was used to eliminate most of the noise in the background and on the girls ’ skin.
Fig. 11 - 10p The photograph is a lot cleaner as a result of the selective application of Noise Ninja.
Dow
nloa
ded
by [G
alen
Gla
ze] a
t 07:
39 1
2 Ja
nuar
y 20
16
CteinDigital Restoration from Start to Finish
354
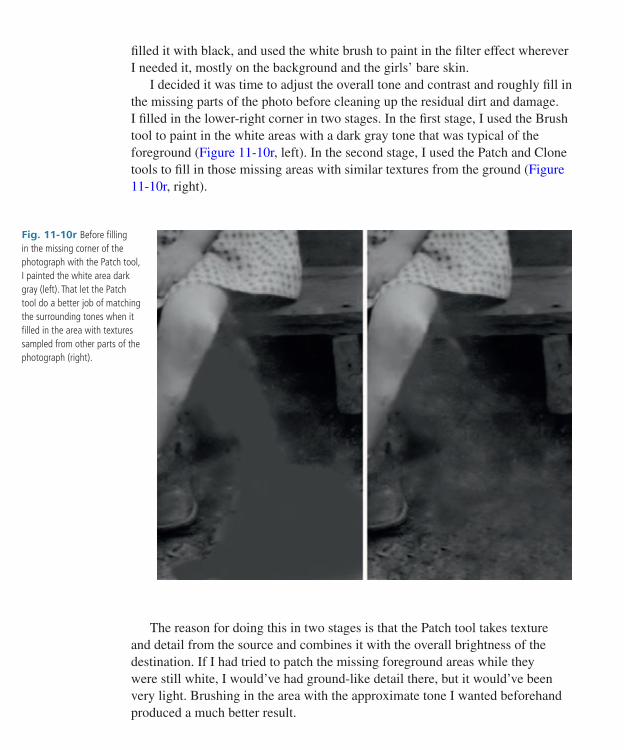
Fig. 11 - 10r Before fi lling in the missing corner of the photograph with the Patch tool, I painted the white area dark gray (left). That let the Patch tool do a better job of matching the surrounding tones when it fi lled in the area with textures sampled from other parts of the photograph (right).
fi lled it with black, and used the white brush to paint in the fi lter effect wherever I needed it, mostly on the background and the girls ’ bare skin.
I decided it was time to adjust the overall tone and contrast and roughly fi ll in the missing parts of the photo before cleaning up the residual dirt and damage. I fi lled in the lower-right corner in two stages. In the fi rst stage, I used the Brush tool to paint in the white areas with a dark gray tone that was typical of the foreground ( Figure 11 - 10r , left). In the second stage, I used the Patch and Clone tools to fi ll in those missing areas with similar textures from the ground ( Figure 11 - 10r , right).
The reason for doing this in two stages is that the Patch tool takes texture and detail from the source and combines it with the overall brightness of the destination. If I had tried to patch the missing foreground areas while they were still white, I would’ve had ground-like detail there, but it would’ve been very light. Brushing in the area with the approximate tone I wanted beforehand produced a much better result.
Dow
nloa
ded
by [G
alen
Gla
ze] a
t 07:
39 1
2 Ja
nuar
y 20
16
355
ExamplesChapter 11
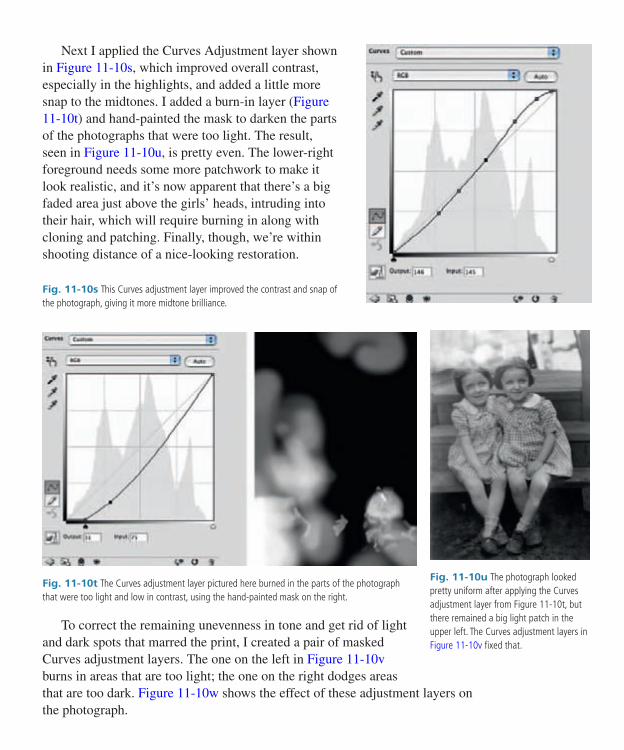
Next I applied the Curves Adjustment layer shown in Figure 11 - 10s , which improved overall contrast, especially in the highlights, and added a little more snap to the midtones. I added a burn-in layer ( Figure 11 - 10t ) and hand-painted the mask to darken the parts of the photographs that were too light. The result, seen in Figure 11 - 10u , is pretty even. The lower-right foreground needs some more patchwork to make it look realistic, and it’s now apparent that there’s a big faded area just above the girls ’ heads, intruding into their hair, which will require burning in along with cloning and patching. Finally, though, we’re within shooting distance of a nice-looking restoration.
Fig. 11 - 10s This Curves adjustment layer improved the contrast and snap of the photograph, giving it more midtone brilliance.
Fig. 11 - 10t The Curves adjustment layer pictured here burned in the parts of the photograph that were too light and low in contrast, using the hand-painted mask on the right.
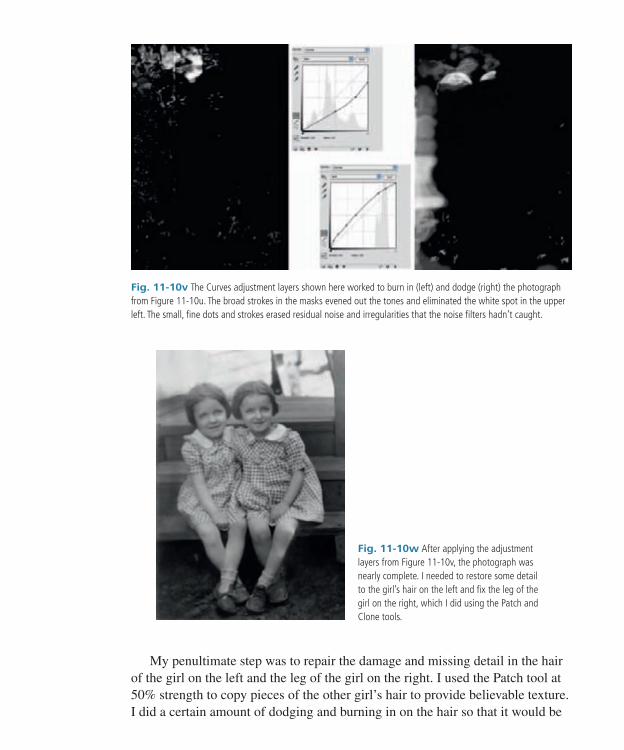
To correct the remaining unevenness in tone and get rid of light and dark spots that marred the print, I created a pair of masked Curves adjustment layers. The one on the left in Figure 11 - 10v burns in areas that are too light; the one on the right dodges areas that are too dark. Figure 11 - 10w shows the effect of these adjustment layers on the photograph.
Fig. 11 - 10u The photograph looked pretty uniform after applying the Curves adjustment layer from Figure 11 - 10t , but there remained a big light patch in the upper left. The Curves adjustment layers in Figure 11 - 10v fi xed that.
Dow
nloa
ded
by [G
alen
Gla
ze] a
t 07:
39 1
2 Ja
nuar
y 20
16
CteinDigital Restoration from Start to Finish
356
Fig. 11 - 10w After applying the adjustment layers from Figure 11 - 10v , the photograph was nearly complete. I needed to restore some detail to the girl’s hair on the left and fi x the leg of the girl on the right, which I did using the Patch and Clone tools.
Fig. 11 - 10v The Curves adjustment layers shown here worked to burn in (left) and dodge (right) the photograph from Figure 11 - 10u . The broad strokes in the masks evened out the tones and eliminated the white spot in the upper left. The small, fi ne dots and strokes erased residual noise and irregularities that the noise fi lters hadn’t caught.
My penultimate step was to repair the damage and missing detail in the hair of the girl on the left and the leg of the girl on the right. I used the Patch tool at 50% strength to copy pieces of the other girl’s hair to provide believable texture. I did a certain amount of dodging and burning in on the hair so that it would be
Dow
nloa
ded
by [G
alen
Gla
ze] a
t 07:
39 1
2 Ja
nuar
y 20
16
357
ExamplesChapter 11
less obvious that I had copied from one head to the other. To fi x the leg, I used the Clone stamp to sample the middle of the leg and extend the edges.
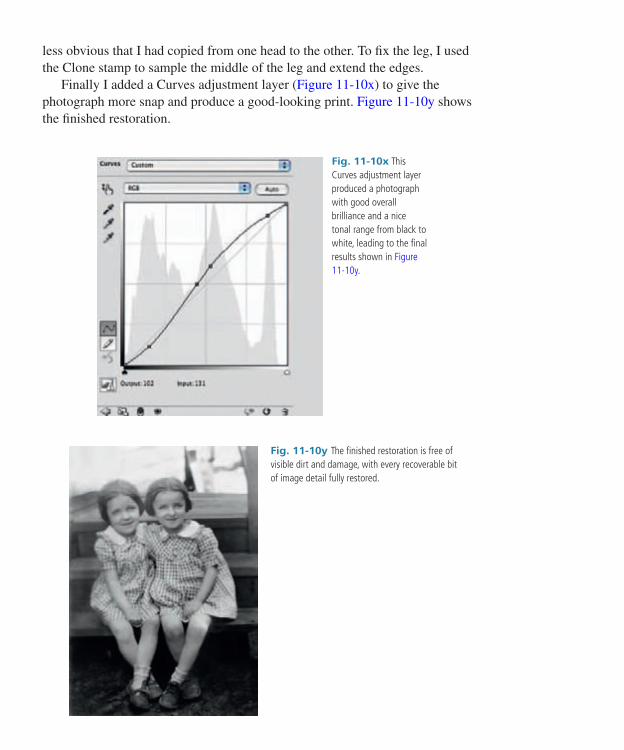
Finally I added a Curves adjustment layer ( Figure 11 - 10x ) to give the photograph more snap and produce a good-looking print. Figure 11 - 10y shows the fi nished restoration.
Fig. 11- 10y The fi nished restoration is free of visible dirt and damage, with every recoverable bit of image detail fully restored.
Fig. 11- 10x This Curves adjustment layer produced a photograph with good overall brilliance and a nice tonal range from black to white, leading to the fi nal results shown in Figure 11 - 10y.
Dow
nloa
ded
by [G
alen
Gla
ze] a
t 07:
39 1
2 Ja
nuar
y 20
16