Embed Size (px)
Citation preview

Page 1 of 14
eWPAF Review Guidelines: Accessing Files for Review
1. Log in to your Interfolio account via the Faculty Affairs website. Select “Current Faculty” and select “eWPAF” https://facaffairs.sfsu.edu/ewpaf
2. Scroll down the page to Reviewer Resources, click on the sign-on link https://account.interfolio.com/sso

Page 2 of 14
3. Search for San Francisco State University from the drop down menu and select SIGN IN. Sign in with your SFSU credentials on the next page.
4. Click on Cases from the Menu on the left side of the page. A list of cases available for review will appear. Select the case you are reviewing from the list of available cases or by entering the candidate’s
name in the search box. Click on the candidate’s name to view the case.

Page 3 of 14
Reviewing Files Viewing the File
1. Once inside a candidate’s file, click “Read Case” next to the search case materials box.
2. Select items to review from the index menu on the left of the screen. Documents will show in the document reader panel on right hand side of the screen.

Page 4 of 14
You may also access faculty materials to review by going to the Candidate Packet section of the case file. Select the section, and click on the material to review. This will bring you to the Packet page of the case file. IMPORTANT: Please DO NOT UNLOCK sections to view uploaded materials.
Page 5 of 14
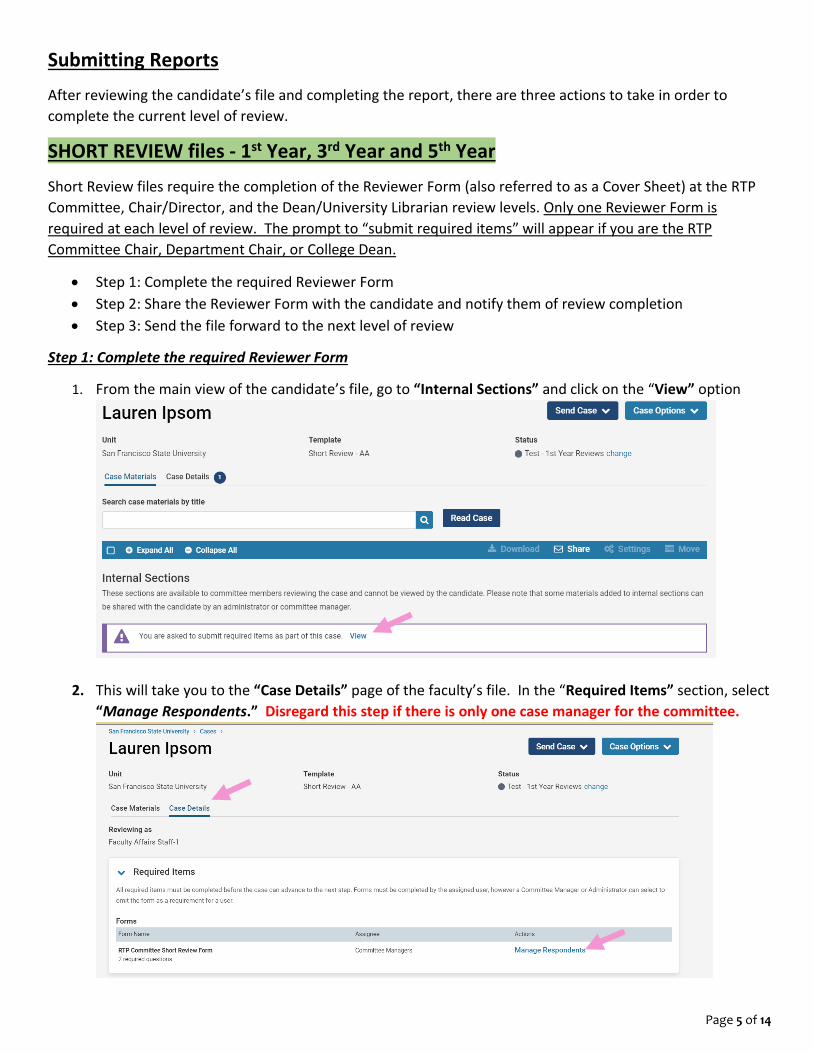
Submitting Reports
After reviewing the candidate’s file and completing the report, there are three actions to take in order to complete the current level of review.
SHORT REVIEW files - 1st Year, 3rd Year and 5th Year
Short Review files require the completion of the Reviewer Form (also referred to as a Cover Sheet) at the RTP Committee, Chair/Director, and the Dean/University Librarian review levels. Only one Reviewer Form is required at each level of review. The prompt to “submit required items” will appear if you are the RTP Committee Chair, Department Chair, or College Dean.
• Step 1: Complete the required Reviewer Form • Step 2: Share the Reviewer Form with the candidate and notify them of review completion • Step 3: Send the file forward to the next level of review
Step 1: Complete the required Reviewer Form
1. From the main view of the candidate’s file, go to “Internal Sections” and click on the “View” option
2. This will take you to the “Case Details” page of the faculty’s file. In the “Required Items” section, select “Manage Respondents.” Disregard this step if there is only one case manager for the committee.
Page 6 of 14
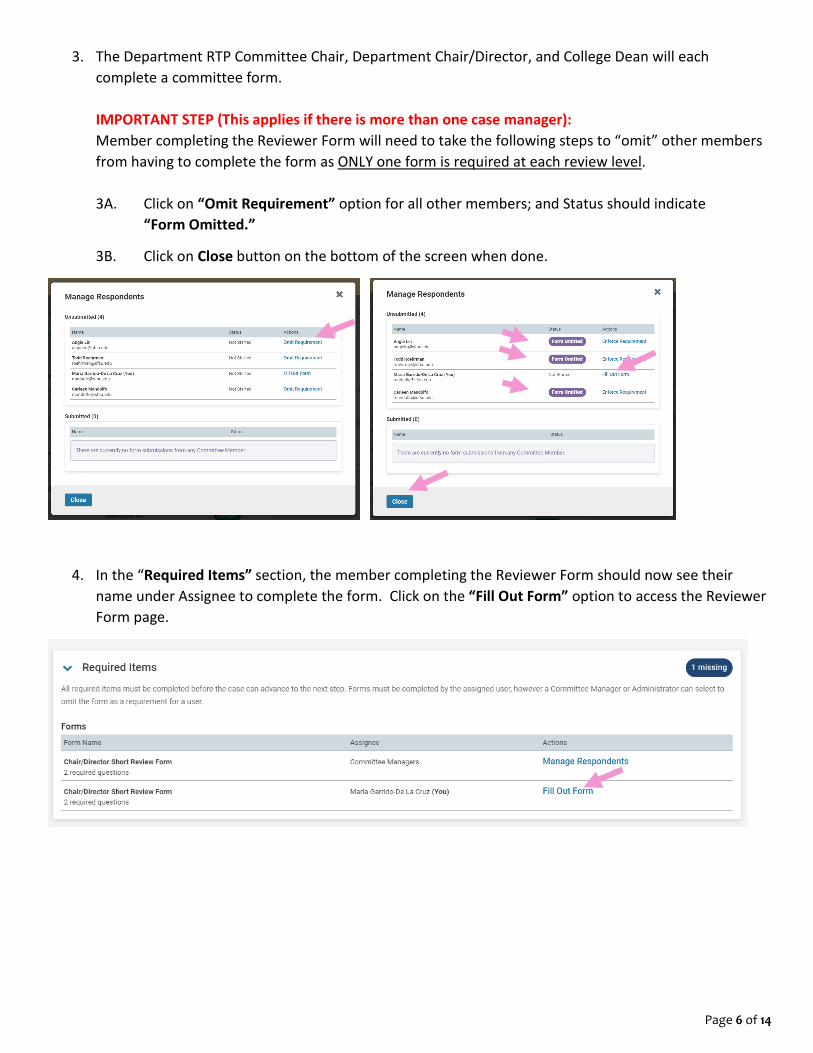
3. The Department RTP Committee Chair, Department Chair/Director, and College Dean will each complete a committee form. IMPORTANT STEP (This applies if there is more than one case manager): Member completing the Reviewer Form will need to take the following steps to “omit” other members from having to complete the form as ONLY one form is required at each review level. 3A. Click on “Omit Requirement” option for all other members; and Status should indicate
“Form Omitted.”
3B. Click on Close button on the bottom of the screen when done.
4. In the “Required Items” section, the member completing the Reviewer Form should now see their name under Assignee to complete the form. Click on the “Fill Out Form” option to access the Reviewer Form page.

Page 7 of 14
5. Reviewer Form page There are two (2) required questions that need to be completed: 1) if the candidate’s file has been reviewed; and 2) if the candidate is meeting RTP criteria applicable for the current review period.
There is an option to provide additional comments, if needed.
6. Click on “Submit Form” button at the bottom of the page when done. A message will be displayed to confirm action. Click “Yes.” Reviewer will be able to change or edit responses while the case file is at the current step.

Page 8 of 14
Step 2: Share the Reviewer Form with the candidate and notify them of review completion
7. From the main view of the candidate’s file, click on the checkbox next to your file and select “Share” from the blue bar at the top. Select “With Candidate” to share the letter with the candidate.
8. Give your message a subject and a message text.
Message should include: “You have 10 days to submit a rebuttal for this review.”
9. Verify that the correct letter is attached by confirming that the file name is below. 10. Leave “File Response” box blank/unchecked. 11. Click “Send” button at the bottom of the page to send message to candidate.
Page 9 of 14
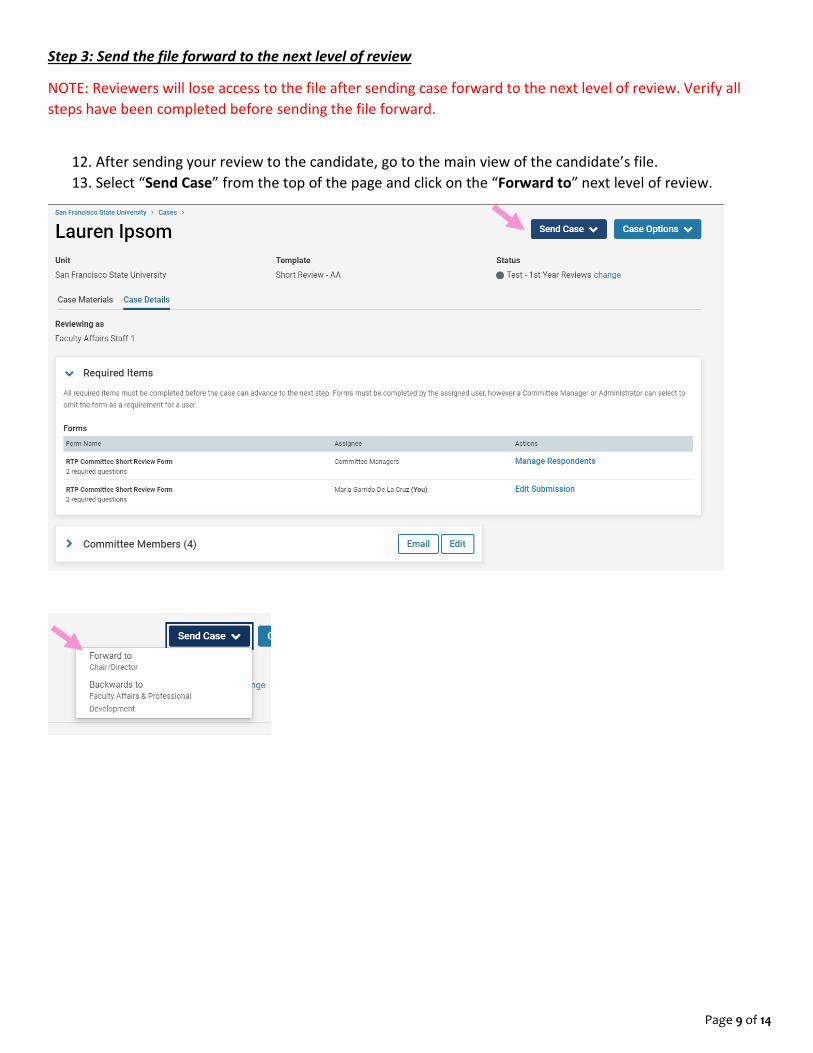
Step 3: Send the file forward to the next level of review
NOTE: Reviewers will lose access to the file after sending case forward to the next level of review. Verify all steps have been completed before sending the file forward.
12. After sending your review to the candidate, go to the main view of the candidate’s file. 13. Select “Send Case” from the top of the page and click on the “Forward to” next level of review.

Page 10 of 14
14. From the pop up window, select the option to “Send a message to the reviewers gaining access”. This will send an email notification to the next level of review telling them the case is ready for review.
15. Provide a subject and text for your message.
16. Click on “Continue” button to move the file to the next level of review.

Page 11 of 14
COMPREHENSIVE REVIEW files – 2nd Year, 4th Year, Tenure and/or Promotion
• Step 1: Upload the report to the candidate’s file • Step 2: Share the uploaded report with the candidate and notify them of review completion • Step 3: Send the file forward to the next level of review
Step 1: Upload the Report to the candidate’s file
1. From the main view of the candidate’s file, go to the “Reviewer Documents” section under Internal Sections
2. Select “Add File”
3. Drag and drop or browse your computer for the report for your level of review. 4. Rename the file as needed and then click “Save.”

Page 12 of 14
Step 2: Sharing Reviewer letters with the Candidate
5. From the main view of the candidate’s file, click on the checkbox next to your uploaded file and select “Share” from the blue bar at the top. Select “With Candidate” to share the letter with the candidate.
6. Give your message a subject and a message text. Message should include: “You have 10 days to submit a rebuttal for this review.”
7. Verify that the correct letter is attached by confirming that the file name is below. 8. Leave “File Response” box blank/unchecked. 9. Click “Send” button at the bottom of the page to send message to candidate.
Page 13 of 14
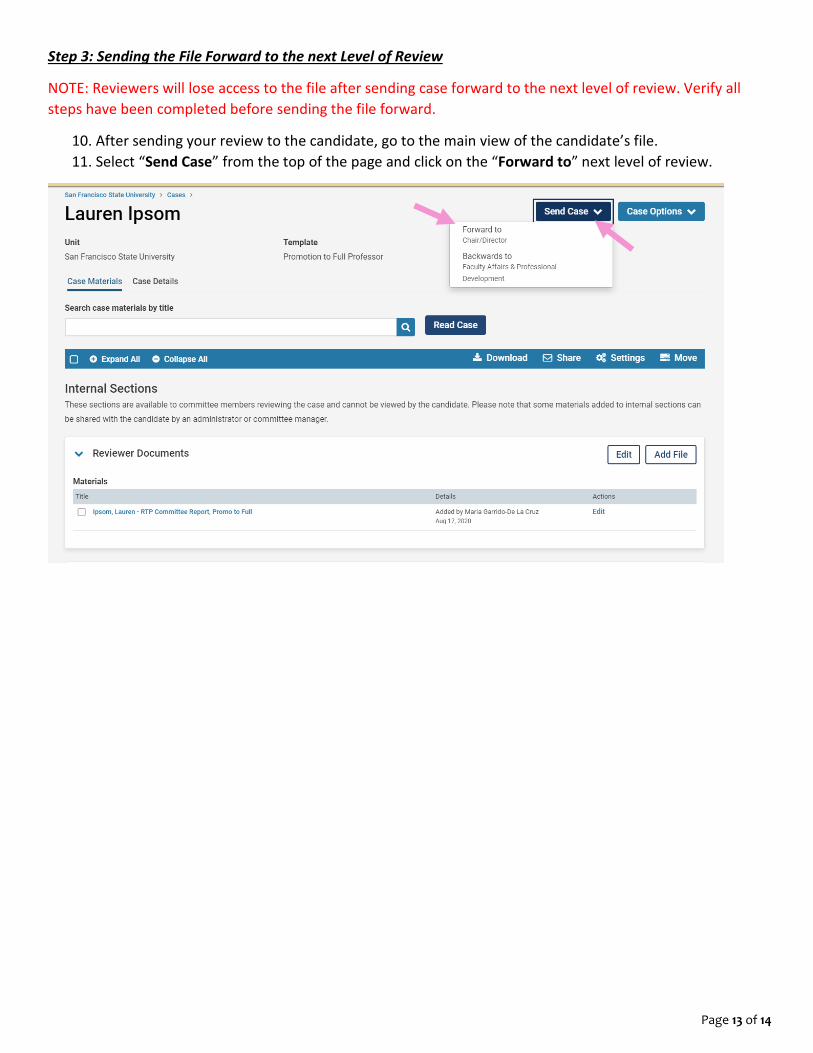
Step 3: Sending the File Forward to the next Level of Review
NOTE: Reviewers will lose access to the file after sending case forward to the next level of review. Verify all steps have been completed before sending the file forward.
10. After sending your review to the candidate, go to the main view of the candidate’s file. 11. Select “Send Case” from the top of the page and click on the “Forward to” next level of review.

Page 14 of 14
12. From the pop up window, select the option to “Send a message to the reviewers gaining access”. This will send an email notification to the next level of review telling them the case is ready for review.
13. Provide a subject and text for your message.
14. Click on “Continue” button to move the file to the next level of review.