Embed Size (px)
Citation preview

Documentation June 2015
Copyright 2015 EVTV LLC 1
EVTV CANdue Microcontroller
Arduino Due Compatible Atmel SAM3X Microcontroller
With CAN Bus Port

Documentation June 2015
Copyright 2015 EVTV LLC 2
INTRODUCTION This document describes the EVTV CANdue Microcontroller single-board computer. The introduction of the Arduino.cc organizations 32-bit DUE version of their popular microcontroller board has received a lukewarm reception in the Arduino community, largely due to the lower 3.3v operating voltage, lack of onboard EEPROM memory, and slightly different pinout that makes compatibility with earlier shields problematic. We don’t share those sentiments and have been enormously enthusiastic over the introduction of this very capable Atmel ARM Cortex based 84 MHz controller. But we have had a couple of items on our “wish list” that we would have liked them to do differently. So we have designed and had manufactured our own version of this very capabile microcontroller. It is pin and software compatible with Arduino Due.
USB Port. The Arduino Due features 2 USB ports but both are of the very lightweight “micro” hardware version. In practice, these are actually quite fragile and break off the board easily or lose connectivity with the board circuitry. We’ve had numerous Arduino Due board failures that were simply broken or dislodged USB port hardware – and by that we literally mean the metal socket itself. On the EVTV CANdue Microcontroller board we have eliminated the “programming port” and associated circuitry and kept the “native port” replacing the actual connector with the much more robust Mini B printer version of USB. This is physically the strongest USB hardware. The programming port on the Due offers little advantage. We have had no difficulties “programming” the Arduino using the Native port. By Native port, they refer to a USB port that is internally providedd by the Atmel SAM3X chip itself. This port is actually much much faster than the Programming port and is directly wired to the chip. It automatically adjusts
Documentation June 2015
Copyright 2015 EVTV LLC 3
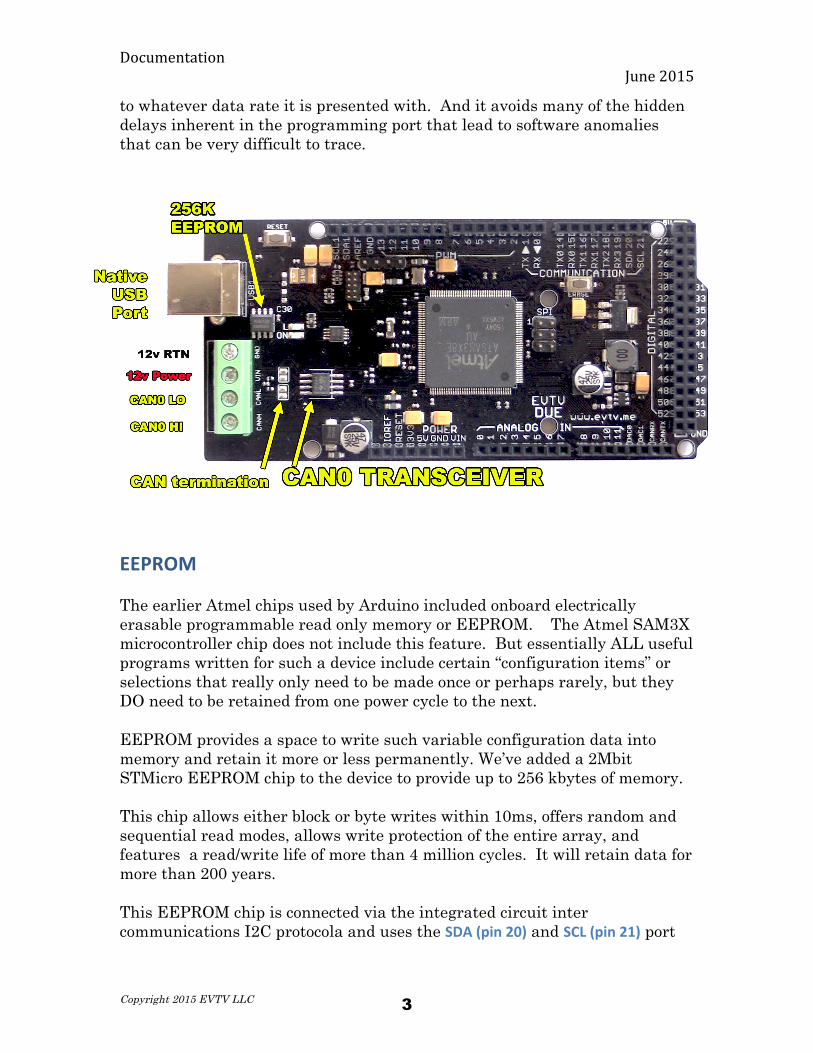
to whatever data rate it is presented with. And it avoids many of the hidden delays inherent in the programming port that lead to software anomalies that can be very difficult to trace.
EEPROM The earlier Atmel chips used by Arduino included onboard electrically erasable programmable read only memory or EEPROM. The Atmel SAM3X microcontroller chip does not include this feature. But essentially ALL useful programs written for such a device include certain “configuration items” or selections that really only need to be made once or perhaps rarely, but they DO need to be retained from one power cycle to the next. EEPROM provides a space to write such variable configuration data into memory and retain it more or less permanently. We’ve added a 2Mbit STMicro EEPROM chip to the device to provide up to 256 kbytes of memory. This chip allows either block or byte writes within 10ms, offers random and sequential read modes, allows write protection of the entire array, and features a read/write life of more than 4 million cycles. It will retain data for more than 200 years. This EEPROM chip is connected via the integrated circuit inter communications I2C protocola and uses the SDA (pin 20) and SCL (pin 21) port

Documentation June 2015
Copyright 2015 EVTV LLC 4
on the board to communicate with the EEPROM. This may limit the ability to use other shields that use pins 20 and 21 of the board.
CAN COMMUNICATIONS For us, one of the most valuable features of the SAM3X chip is an included internal Controller Area Network (CAN) controller. But to use this feature, you must provide a CAN transceiver chip to actually interface with a CAN network. Introduced in 1988 by Bosch Gmbh, CAN has become the defacto communications protocol used on virtually all modern automobiles but particularly all modern electric vehicles. Automotive applications are a very small segment of the wider Arduino community and so the Arduino organization did not devote the board real estate necessary for CAN communications on their Arduino Due design. By eliminating the programming USB port circuitry, we freed up sufficient space to install the top of the CAN line – the Texas Instruments SN65HVD234 The SN65HVD234 is used in applications employing the controller area network (CAN) serial communication physical layer in accordance with the ISO 11898 standard. As a CAN transceiver, each provides transmit and receive capability between the differential CAN bus and a CAN controller, with signaling rates up to 1 Mbps.
Designed for operation in especially harsh environments, the device features cross-wire protection, overvoltage protection up to ±36 V, loss of ground protection, overtemperature (thermal shutdown) protection, and common-mode transient protection of ±100 V. These devices operate over a wide –7 V to 12 V common-mode range. This transceiver is the interface between the host CAN controller on the microprocessor and the differential CAN bus used in industrial, building automation, transportation, and automotive applications.
Our own Collin Kidder wrote the DUE_CAN library available for all Arduino CAN applications using the SAM3X microcontroller. This library provides advanced interrupt features far beyond the earlier libraries available for CAN adapters on the 8-bit Arduino boards making CAN communications an EASY software task instead of a chore and with performance just not attainable with the earlier chips and libraries.

Documentation June 2015
Copyright 2015 EVTV LLC 5
In automotive applications in the electric vehicle field, this can be the difference between success and failure. We’ve learned the hard way that the CAN frame rates of the Tesla Model S, for example, can easily exceed 1500 frames per second, and the existing hardware and software solutions for Arduino just cannot deal with this without dropping frames.
The CAN interface terminates in two screw terminals on the edge of the board that are named CAN0 in software by convention and include CANHI and CANLO connections for the differential CAN bus.
Additionally, solder bridge “lands” are provided on the board to terminate the CAN connection with a standard 120 ohm resistance and a filter capacitor if your application requires termination.
The CAN transceiver chip uses the CANRX and CANTX pins of the board normally reserved for that task anyway, and so should pose no conflict with other non-CAN shields.
12V POWER
Software development on Arduino boards commonly involves powering the board by USB connection that is also used to upload the software. Additionally, a barrel connector is provided for 9-16v to power the board without USB.
In automotive applications, this barrel connector is again not sufficiently robust. It can easily vibrate loose, leaving your board disconnected from the circuit.
We have provided two screw terminal connections for 12v power and the 12v return – usually frame ground. This allows you to secuirely connect your EVTV CANdue microcontroller to power. Typically, you would turn on the board which would automatically initialize and begin running the last program loaded, when powered up by 12v.
In this way, you can easily connect by USB to upload programs or make configuration changes to existing programs. But then you can disconnect the laptop and put it away. The board will faithfully come up and run the new software or configuration whenever powered by 12v.

Documentation June 2015
Copyright 2015 EVTV LLC 6
CAN PROGRAMMING The EVTV CANdue Microcontroller is in all respects program compatible with the Arduino Integrated Design Environment.
To select the board, in the Arduino IDE simply select
TOOLS
BOARD
Arduino Due (Native USB Port) In your program, you will want to include the DUE_CAN libarary using the statement:
#include <due_can.h> See the examples included with the DUE_CAN library for further instructions on use.
EEPROM PROGRAMMING To use the EEPROM, you must include two libraries also written by Collin Kidder,
#include due_wire
#Wire_EEPROM
All of these libraries available from http://github.com/Collin80
Documentation June 2015
Copyright 2015 EVTV LLC 7
SERIAL PORT ISSUES Many Arduino Due programs route serial data out the programming port for viewing on the Arduino IDE terminal using simply Serial(“Printing some stuff”); statements. These can easily be rerouted out the native USB serial port with a single define at the top of the program:
#define Serial SerialUSB

Documentation June 2015
Copyright 2015 EVTV LLC 8


![arXiv:1309.7173v2 [cs.AI] 25 Dec 2013Login to site -> View Course -> View Chat page -> View Chat window -> Initialize Chat -> Initialize Initial Update { After initializing chat the](https://img.pdfslide.us/doc/110x75/5ea596fa70710b49c1668765/arxiv13097173v2-csai-25-dec-2013-login-to-site-view-course-view.jpg)