Embed Size (px)
Citation preview
EveryonePrint Installation and Configuration Guide 2016.09.01 Page 1 of 221
EveryonePrint 4.2
Installation and
Configuration Guide

EveryonePrint Installation and Configuration Guide 2016.09.01 Page 2 of 221
1. EveryonePrint Overview ........................................................................................................................................................... 6 1.1 What is EveryonePrint? .................................................................................................................................................. 6 1.2 Prerequisites and Requirements .................................................................................................................................... 8 1.3 Important note about performance ............................................................................................................................. 10 1.4 Ports and protocols ..................................................................................................................................................... 11 1.5 Supported documents ................................................................................................................................................. 12 1.6 EveryonePrint with print accounting solutions ............................................................................................................. 13
2. Quick Start Guide .................................................................................................................................................................. 15 2.1 Installation Summary .................................................................................................................................................. 15 2.2 Configure Email Account ............................................................................................................................................. 15 2.3 Prepare printers on the server ..................................................................................................................................... 16 2.4 Installing EveryonePrint ............................................................................................................................................... 16
2.4.1 Unattended/Silent installation or update of EveryonePrint .................................................................................... 18 2.5 EveryonePrint Admin ................................................................................................................................................... 19
2.5.1 Access EveryonePrint Admin remotely .................................................................................................................. 19 2.5.2 Default EveryonePrint Admin login ....................................................................................................................... 19
2.6 Adding Printers to EveryonePrint ................................................................................................................................. 20 2.7 Access user Web portal and do simple test print ......................................................................................................... 21
3. Configuring EveryonePrint ..................................................................................................................................................... 23 3.1 Dashboard with statistics ............................................................................................................................................ 23 3.2 EveryonePrint Monitor ................................................................................................................................................. 24
3.2.1 Hide user and document information in Monitor .................................................................................................. 24 3.2.2 Hide the Monitor completely ................................................................................................................................ 25
3.3 Licensing .................................................................................................................................................................... 25 3.4 Choose EveryonePrint Edition ...................................................................................................................................... 26 3.5 Logging and Troubleshooting ..................................................................................................................................... 27 3.6 Document Support ...................................................................................................................................................... 28 3.7 Application Settings .................................................................................................................................................... 29 3.8 Print output settings ................................................................................................................................................... 29 3.9 Languages and Location.............................................................................................................................................. 29 3.10 Modifying language text strings .................................................................................................................................. 31 3.11 Printing and Security ................................................................................................................................................... 32 3.12 User Authentication .................................................................................................................................................... 35
3.12.1 LDAP Authentication ............................................................................................................................................ 35 3.12.2 Prepend/append username with domain information ........................................................................................... 36
3.13 User Web Portal Configuration .................................................................................................................................... 37 3.13.1 Customize login text on Web portal ..................................................................................................................... 38 3.13.2 Web Portal single-sign-on ................................................................................................................................... 40
3.13.2.1 Internal built in single-sign-on .................................................................................................................. 41 3.13.2.2 CAS Jasig Central Authentication Service .................................................................................................... 42
3.13.3 Change default Web ports from 7290 and 9443................................................................................................... 43 3.14 Web Print configuration............................................................................................................................................... 44 3.15 Driver Print configuration ............................................................................................................................................ 45
3.15.1 LPD Server ........................................................................................................................................................... 47 3.16 Configure Email Print .................................................................................................................................................. 48
3.16.1 Email Authentication ............................................................................................................................................ 52 3.16.2 Note when using Exchange MAPI for internal email .............................................................................................. 53
3.17 Mobile Print configuration ........................................................................................................................................... 54 3.17.1 Strict Mobile device authentication ....................................................................................................................... 56 3.17.2 Mobile App Settings ............................................................................................................................................. 56
3.18 Wide Area Mobile Print ................................................................................................................................................ 57 3.18.1 Configuration overview ........................................................................................................................................ 58 3.18.2 Create Wide Area Mobile Print sub domains ......................................................................................................... 58 3.18.3 Configure EveryonePrint Mobile Gateway ............................................................................................................. 59 3.18.4 Configure DNS server ........................................................................................................................................... 60

EveryonePrint Installation and Configuration Guide 2016.09.01 Page 3 of 221
3.18.4.1 Configure Windows DNS ............................................................................................................................ 60 3.18.4.2 Configure BIND .......................................................................................................................................... 63
3.18.5 Verifying DNS configuration ................................................................................................................................. 64 3.18.6 Set search domains on mobile devices ................................................................................................................. 65 3.18.7 One Wide Area Mobile Print sub domain .............................................................................................................. 65
3.18.7.1 Single sub domain configuration on Windows DNS .................................................................................... 65 3.18.7.2 Single sub domain configuration on BIND .................................................................................................. 67
3.18.8 Multiple Wide Area Mobile Print sub domains ....................................................................................................... 68 3.18.8.1 Multiple sub domains configuration on Windows DHCP ............................................................................. 68 3.18.8.2 Multiple sub domains configuration on Linux DHCP ................................................................................... 70
3.19 Configure Google Cloud Print ...................................................................................................................................... 71 3.20 Google Cloud Print configuration summary ................................................................................................................. 73
3.20.1 Create a Google Account...................................................................................................................................... 73 3.20.2 Enable Google API access on Google Account ...................................................................................................... 74 3.20.3 Register printers from EveryonePrint in Google Cloud Print .................................................................................. 79 3.20.4 Enable “Public Link” sharing for printers ............................................................................................................... 81
3.21 Configure Outgoing Mail ............................................................................................................................................. 85 3.22 Card server ................................................................................................................................................................. 87 3.23 Card Reader Profiles .................................................................................................................................................... 88 3.24 Administrator Alert Notifications ................................................................................................................................. 89 3.25 Change Administrator login ........................................................................................................................................ 89 3.26 Restrict access to administration Web interface based on IP address ........................................................................... 89 3.27 Managing Users .......................................................................................................................................................... 90
3.27.1 Import User Email Addresses from CSV file .......................................................................................................... 91 3.28 Managing Cards .......................................................................................................................................................... 91 3.29 Managing Devices ....................................................................................................................................................... 93
3.29.1 Advanced Driver Print .......................................................................................................................................... 93 3.29.2 Associating network card reader with device ........................................................................................................ 94 3.29.3 Generate QR codes for easy printer access ........................................................................................................... 95
3.30 Private Print Clouds ..................................................................................................................................................... 96 3.30.1 Pull print essentials .............................................................................................................................................. 96 3.30.2 Create Private Print Cloud .................................................................................................................................... 97 3.30.3 Print to Private Print Cloud ................................................................................................................................... 97
4. Sending print jobs via Web .................................................................................................................................................... 99 5. Sending print jobs via Driver ............................................................................................................................................... 102
5.1 Simple vs. Advanced Driver Print ............................................................................................................................... 104 5.2 Deploying EveryonePrint printers to workstation PC’s ............................................................................................... 104
5.2.1 Configure Device in EveryonePrint...................................................................................................................... 105 5.2.2 Create IPP print queue on print server ................................................................................................................ 105 5.2.3 Create LPR print queue on print server ............................................................................................................... 107 5.2.4 Deploy print queue using Group Policy or Logon Script ...................................................................................... 108
6. Sending print jobs via Email ................................................................................................................................................ 109 6.1 Direct Email Print ...................................................................................................................................................... 111
6.1.1 Direct Email Print using mail subject .................................................................................................................. 111 6.1.2 Direct Email Print to Printer Email Alias .............................................................................................................. 112
6.1.2.1 Configuring a mail forwarding account on Microsoft Exchange ................................................................ 113 6.1.2.2 Configuring Email Print Alias in EveryonePrint .......................................................................................... 113
7. Sending print jobs from mobile devices ............................................................................................................................... 114 8. Releasing Print Jobs (release codes) ..................................................................................................................................... 115
8.1 Web release interface ................................................................................................................................................ 115 8.1.1 Restrict Access to Web release interface ............................................................................................................. 117
9. Releasing Print Jobs (authentication).................................................................................................................................... 118 9.1 Users selecting favorite printers in My Printers .......................................................................................................... 118
10. Using Device Groups ......................................................................................................................................................... 119 10.1 Example 1: Grouping devices for more friendly viewing ............................................................................................ 119 10.2 Example 2: Limit what printers are visible ................................................................................................................. 121

EveryonePrint Installation and Configuration Guide 2016.09.01 Page 4 of 221
10.2.1 Using simple LDAP attribute .............................................................................................................................. 121 10.2.2 Using Windows Active Directory Group membership .......................................................................................... 124
11. Using SSL with EveryonePrint ............................................................................................................................................. 128 11.1 Obtaining an SSL certificate from a trusted Certificate Authority ............................................................................... 129
11.1.1 Create new keystore and generate private key ................................................................................................... 129 11.2 Generating a Test Certificate ..................................................................................................................................... 141
11.2.1 Configuring EveryonePrint with the Test Certificate ............................................................................................ 142 11.2.2 Verifying the Test Certificate .............................................................................................................................. 142
11.3 Import SSL certificates for LDAPS or mail servers ....................................................................................................... 143 12. Printing to remote print servers ......................................................................................................................................... 146 13. Installing document support applications .......................................................................................................................... 148
13.1 Install Microsoft Office 2007, Office 2010 or Office 2013 ......................................................................................... 148 13.1.1 Install Microsoft Office 2007, Office 2010 or Office 2013 .................................................................................. 148 13.1.2 Open Microsoft Word ......................................................................................................................................... 149
13.2 Install OpenOffice 3.x ............................................................................................................................................... 150 13.2.1 Installing OpenOffice 3.3.0 ................................................................................................................................ 150 13.2.2 Open Writer ....................................................................................................................................................... 152
14. EveryonePrint clustering for high-availability and high scalability ...................................................................................... 154 14.1 Cluster Servers Overview ........................................................................................................................................... 155
14.1.1 Server Types ...................................................................................................................................................... 156 14.1.2 Configuration types ........................................................................................................................................... 157
14.2 Prerequisites for a cluster configuration .................................................................................................................... 158 14.3 Configuring a primary server .................................................................................................................................... 158
14.3.1 Open firewall on primary server ......................................................................................................................... 159 14.3.2 Configure shared spool ...................................................................................................................................... 160
14.4 Configuring additional secondary servers ................................................................................................................. 160 14.4.1 Configure shared spool ...................................................................................................................................... 161 14.4.2 Modify secondary servers cluster configuration.................................................................................................. 162 14.4.3 Replicate printers from primary ......................................................................................................................... 163
14.5 Installing EveryonePrint in a Windows failover cluster ................................................................................................ 164 14.5.1 Validate cluster .................................................................................................................................................. 164 14.5.2 Install EveryonePrint on first active node ............................................................................................................ 166 14.5.3 Change service logon accounts .......................................................................................................................... 167 14.5.4 Move database to shared storage ....................................................................................................................... 167 14.5.5 Modify primary cluster nodes configuration ....................................................................................................... 172 14.5.6 Change the primary servers spool folder ............................................................................................................ 173
14.6 Adding external load balancer for high front-end scalability ..................................................................................... 174 14.7 Replicate printers across all servers .......................................................................................................................... 175
14.7.1 Using Windows Print Migration Printbrm.exe command-line tool ....................................................................... 175 14.8 Licensing in clustered configurations ........................................................................................................................ 178 14.9 EveryonePrint clustering in high-availability virtual configurations ............................................................................ 179
15. Backup EveryonePrint data ................................................................................................................................................ 179 16. Upgrading or Uninstalling EveryonePrint ........................................................................................................................... 179 17. EveryonePrint API .............................................................................................................................................................. 180
17.1 API licensing requirements ........................................................................................................................................ 180 17.2 Communicating with EveryonePrint API ..................................................................................................................... 180 17.3 Securing API calls ...................................................................................................................................................... 180 17.4 Note about SSL and non-SSL communication ............................................................................................................ 181 17.5 Logging and Troubleshooting ................................................................................................................................... 181 17.6 Define return type format ......................................................................................................................................... 181 17.7 Examples with curl .................................................................................................................................................... 182 17.8 API Functions and Methods ....................................................................................................................................... 182
17.8.1 Get Server Version ............................................................................................................................................. 182 17.8.2 Add all printers from server ............................................................................................................................... 183 17.8.3 Get all printers from server ................................................................................................................................ 183 17.8.4 Delete all printers from server ........................................................................................................................... 184

EveryonePrint Installation and Configuration Guide 2016.09.01 Page 5 of 221
17.8.5 Get UserID Hash ................................................................................................................................................. 185 17.8.6 Add Email Address To Username ....................................................................................................................... 186 17.8.7 Delete Email Address From Username ................................................................................................................ 188 17.8.8 Submit print job file or URL for printing ............................................................................................................. 189 17.8.9 Add a printer ..................................................................................................................................................... 192 17.8.10 Get a printer ...................................................................................................................................................... 193 17.8.11 Update a printer ................................................................................................................................................. 194 17.8.12 Delete a printer .................................................................................................................................................. 195 17.8.13 Add a device group or a printer to a device group.............................................................................................. 196 17.8.14 Get a device group ............................................................................................................................................. 197 17.8.15 Edit a device group ............................................................................................................................................ 198 17.8.16 Delete a device group or remove a device from group ....................................................................................... 200 17.8.17 Add a Wide Area Sub domain or printers to a sub domain .................................................................................. 201 17.8.18 Get a Wide Area Sub domain .............................................................................................................................. 202 17.8.19 Edit a Wide Area Sub domain ............................................................................................................................. 203 17.8.20 Delete a Wide Area Sub domain ......................................................................................................................... 204
18. Troubleshooting and other tips ......................................................................................................................................... 206 18.1 Collecting log files for support .................................................................................................................................. 206 18.2 Check and verify Microsoft Exchange email support .................................................................................................. 206
18.2.1 Microsoft Exchange MAPI ................................................................................................................................... 206 18.2.2 Microsoft Exchange Web Services ....................................................................................................................... 208
18.3 Common LDAP authentication error codes ................................................................................................................ 210 18.4 Troubleshooting Microsoft Office conversion ............................................................................................................ 214 18.5 Outgoing email are not received ............................................................................................................................... 218 18.6 Customize release code, username and password generation formatting .................................................................. 219
18.6.1 Customize the time release code is retained for users ....................................................................................... 220 18.7 Selectively delete all users, print job history, emails and printers .............................................................................. 221

EveryonePrint Installation and Configuration Guide 2016.09.01 Page 6 of 221
1. EveryonePrint Overview
1.1 What is EveryonePrint?
EveryonePrint is a server based secure and mobile printing solution that allows users to print
from their workstation PC’s, laptops and notebooks, mobile devices and tablets with ease, using
Web print, driver printing, email, WiFi or Google Cloud printing.
Web print Users can upload documents to print via a Web portal, optionally with
login validation.
Driver print Users can print from within their programs and applications on
workstations or notebooks, with or without a driver installation, directly
to the EveryonePrint server, optionally with authentication.
Email print Users can send documents to print from mobile devices, by sending an
email with documents attached, to an email address configured for the
purpose. EveryonePrint retrieves emails and processes to the relevant
print queues, optionally allowing for secure printing with login
validation or privacy release codes.
Mobile print Users can send documents to print using the native Apple iOS AirPrint
capability on iPhones and iPads, Google Android based smartphones
and tablets, or Windows Phone devices, with optional authentication or
release code print.
Google Cloud Print Users can print from their Google Chromebook, phone or tablets,
Google Apps such as Gmail, Google Docs, Google Sheets, or using any
other application or device that supports Google Cloud Print, to the
printers you select in EveryonePrint.
What printing methods are available to users can be customized in the administration interface.

EveryonePrint Installation and Configuration Guide 2016.09.01 Page 7 of 221
Print jobs can be held in secure private print clouds, until user walks up to their printer of choice
and release their print jobs, either by entering a private release code, login credentials, or by
card swipe.
EveryonePrint can be configured for many different uses and different integrations with existing
environments, integrating with existing print accounting or print management systems and
much more. If in doubt about the best setup for your organization, please contact EveryonePrint
support or your local EveryonePrint solution specialist.
EveryonePrint Installation and Configuration Guide 2016.09.01 Page 8 of 221
1.2 Prerequisites and Requirements
EveryonePrint is available for installation on both Windows and Linux server operating systems.
For more information about installing EveryonePrint on Linux Enterprise, refer to the specific
EveryonePrint for Linux Enterprise documentation.
The following are required for a successful EveryonePrint installation:
A server with the following minimum specifications:
o Supported servers include: Windows 2003 Server SP2 (32 or 64 bit), Windows
2008 Server SP1 (32 or 64 bit), Windows 2008 R2 Server (32 or 64 bit), Windows
2012 or Windows 2012 R2
o Recent generation server CPU processor, such as Intel Xeon 64 or equivalent
(see below for important note about performance). Desktop CPU’s are NOT
recommended for production use.
o Minimum 1 GB free RAM memory (minimum 4 GB free RAM memory
recommended for higher volume processing)
o Minimum 5 GB free hard disk space for print job spooling and processing (10 GB
free disk space recommended for higher volume processing)
o No anti-virus program monitoring or interrupting the EveryonePrint directories
For Microsoft Office document support, either use the built-in conversion engine (see
separate licensing requirements) or Microsoft Office installed on the EveryonePrint server
o For Microsoft Office document support using Microsoft engine, the following
must be installed:
Microsoft Office 2007 SP2, Microsoft Office 2010 or Microsoft Office
2013 installed with minimum Word, Excel and PowerPoint. Both 32 bit
and 64 bit editions are supported.
Microsoft Office must be activated.
For OpenOffice document support, either use the built-in conversion engine (see
separate licensing requirements) or OpenOffice installed on the EveryonePrint server
o For OpenOffice or LibreOffice document support (odt, ods, odp) using
OpenOffice engine, OpenOffice 3.3 or 3.4 must be installed. (LibreOffice and
other OpenOffice variants are supported, but install OpenOffice to support these
OpenOffice document variants)
No proxy server interrupting local communication on the server (localhost/127.0.0.1)
A local administrative user

EveryonePrint Installation and Configuration Guide 2016.09.01 Page 9 of 221
If Email Print is enabled, the following are minimum specifications:
A POP3/IMAP (SSL or non-SSL), Exchange MAPI or Exchange Web Services email account
configured on a mail server to which users can send email print jobs, for example
EveryonePrint can support Microsoft Exchange with the following:
o Microsoft MAPI via RPC protocol with NTLM authentication
o Microsoft Exchange Web Services over HTTPS with Basic, NTLM, or forms-based
authentication. Kerberos, ADFS and RPC over http(s) authentication is not
supported.
See section 18.2 for information about how to check and verify Exchange support.
An SMTP server for sending release code or authentication emails from EveryonePrint to
the users email address

EveryonePrint Installation and Configuration Guide 2016.09.01 Page 10 of 221
1.3 Important note about performance
EveryonePrint can be a resource demanding application, as the EveryonePrint typically handle
many of the tasks done by a normal workstation.
In a normal client/server environment, when a user prints a Word document, Office on the client
PC renders the document to print. With EveryonePrint, if a user uploads a Word document, that
conversion and rendering now takes place on the server, and effectively EveryonePrint assumes
the workload of many clients.
It’s therefore essential that the EveryonePrint server is fitted with proper sufficient CPU and
memory to handle the print volume.
EveryonePrint contains multiple ways to print, Web upload, Driver Print, Email Print and
Mobile/App print. Each of these perform differently, and performance further depends on the
document type and complexity of the document
Web Print Upload of Microsoft Office or OpenOffice documents is most resource
demanding, with each job processing taking from 1-2 seconds for
simple jobs to 15-20 seconds for more complex documents.
PDF documents and images require very little server processing, and are
processed typically in less than 2 seconds.
Email Print Office, PDF and images attached to emails are processed similar to Web
Print jobs, and take the same time and resources to process.
Driver Print With Driver Print there are 2 different core methods: “Simple” which uses
a generic driver the user have already got on their machine, meaning no
need to download and install a driver for the user; and “Advanced”
where the user uses a manufacturer Postscript or PCL driver, for
example, to use finishing options like stapling and binding.
Driver Print fundamentally is very efficient. With “Simple” driver print,
users print with a generic Postscript driver, and this data is converted
and ultimately sent to the final destination printer using the driver
installed on the EveryonePrint server.
Mobile Print Print jobs from native app printing from mobile devices is typically very
efficient, as little processing is required.
In case of excessive print job volume within a short time, the server will simply let jobs it cannot
handle expire.

EveryonePrint Installation and Configuration Guide 2016.09.01 Page 11 of 221
The following numbers are based on load testing with mixed Office and PDF documents, various
number of pages and complexity, to simulate a typical customer environment.
The server was an Intel i7-level server CPU with 4 GB ram on Windows 2008 R2 only running
EveryonePrint and Microsoft Office. This server could process and print:
Web/Email print: 800 Jobs per hour
Simple Driver Print: 1500 Jobs per hour
Advanced Driver Print: 12000 Jobs per hour
Mobile Print: 1500 Jobs per hour
So the usage pattern, volume of jobs, features used and the documents printed fully determines
how many servers are needed. Target the number of servers for the peak load. If using a high-
end server and the expected print volume is less than above test results, a single server should
be sufficient.
1.4 Ports and protocols
Web interfaces and Web Print
EveryonePrint includes Web interfaces for administrator configuration, Web print upload and user
print release. Per default the following ports are used:
HTTP (non-SSL) TCP port 7290
HTTPS (SSL) TCP port 9443
Driver Print
Printing to EveryonePrint via driver, is either through HTTP/HTTPS IPP printing protocol or the
LPD server for LPR print. Per default, the following ports are used:
IPP print TCP port 631
IPP print (SSL) TCP port 9443
LPR print TCP port 515
Email Print
The EveryonePrint server will communicate with external mail servers on the network when
retrieving and sending emails. The ports used depend on the mail servers configuration, but
typical ports are:
POP3 non-SSL: TCP port 110
POP3 SSL: TCP port 995
IMAP non-SSL: TCP port 143
IMAP SSL: TCP port 993
SMTP non-SSL: TCP port 25
SMTP SSL: TCP port 465
Exchange MAPI: TCP port 135 and Windows RPC protocols
Exchange WS: HTTP TCP port 80 and HTTPS TCP port 443
Mobile Print
Refer to separate EveryonePrint Mobile Gateway documentation for details on Mobile Print ports
and protocols requirements.

EveryonePrint Installation and Configuration Guide 2016.09.01 Page 12 of 221
Google Cloud Print
The EveryonePrint server communicates with the Google Cloud Print services hosted with Google
through the following ports:
TCP port 80 and 443
XMPP protocol TCP port 5222
Important! The Google Cloud Print service is marked as a BETA software by Google. This means
that Google could change anything and everything at anytime, interrupting or breaking the
integration between EveryonePrint and Google Cloud Print.
Other ports
When EveryonePrint releases print jobs to Windows print queues, internal Windows printing
protocols are used, RPC, IPP, LPR etc, depending on the printers driver configuration.
1.5 Supported documents
The following document formats are supported via Web and Email Print. All document formats
are supported under Driver Print.
File format Requirements
Pdf, html, htm, gif, png, jpg, tif, bmp, txt No special requirements
doc, docx, xls, xlsx, ppt, pptx, rtf Requires Microsoft Office or EveryonePrint
built-in conversion engine (see separate
licensing requirements)
odt, ods, odp Requires OpenOffice or EveryonePrint built-in
conversion engine (see separate licensing
requirements)

EveryonePrint Installation and Configuration Guide 2016.09.01 Page 13 of 221
1.6 EveryonePrint with print accounting solutions
EveryonePrint can work seamlessly as an add-on to nearly all print accounting or print
management solutions. Set the EveryonePrint edition to EveryonePrint Connect (see section 3.4
Choose EveryonePrint Edition) and under Printing and Security (see section 3.11 Printing and
Security), choose either Privacy with Authentication or Direct with Authentication, so users and
their print jobs are authenticated.
When a user sends a print job via EveryonePrint, EveryonePrint will send the print job into the
associated print queue with the user’s username as the print job owner, and print accounting
solutions monitoring the Windows print queue, will use this information to track and account the
print jobs.
EveryonePrint can either be installed directly on the print server or on a separate server, for
example in a DMZ zone.

EveryonePrint Installation and Configuration Guide 2016.09.01 Page 14 of 221
If EveryonePrint is installed on its own separate server, and not the print server, EveryonePrint
can still send print jobs to the print servers where the print accounting solution is installed. See
section 12 Printing to remote print servers for more information about sending jobs to remote
servers.
EveryonePrint has deep integration with several of the most popular print accounting and print
management solutions in the market, to allow for advanced guest printing scenarios, displaying
user account balances inside of EveryonePrint, and more. Contact EveryonePrint support to
obtain details, on how to enable these integration features for your accounting or print
management solution.
EveryonePrint Installation and Configuration Guide 2016.09.01 Page 15 of 221
2. Quick Start Guide The following section walks through a simple setup of EveryonePrint, with a user uploading a
document to print via the Web portal.
2.1 Installation Summary
These are the overall steps involved in setting up and configuring an EveryonePrint server.
Setup email account If email printing is to be used (optional), start by configuring the
pop3/imap/MAPI/EWS email account to which users send their
print jobs, for example [email protected]
Prepare server Prepare the server on which to install EveryonePrint, ensure that it
meets the minimum requirements for memory and disk space.
Prepare printers Prepare the printers on the server on which users should be able
to print
Install and configure
EveryonePrint
Run the installer, configure in EveryonePrint Admin, do a test print
job to selected printers
If the server has been prepared, the basic EveryonePrint installation and configuration takes less
than 10 minutes.
2.2 Configure Email Account
An essential component in the mobile printing process with EveryonePrint, is the email account
to which users send emails with documents attached to print.
The EveryonePrint server supports POP3, IMAP4, Microsoft Exchange MAPI or Exchange Web
Services email accounts, either with or without SSL encryption. There are no limitations to the
mail servers supported, as long as they adhere to standard POP3, IMAP4 or MAPI mail
specifications.
Most enterprise email systems, such as Microsoft Exchange and Lotus Domino/Notes, fully
support IMAP email access and SMTP for sending emails.
Note that email printing is not required for EveryonePrint to function. The Email Print features
can be disabled, if the wish is to only use, for example, Web and Driver print.
If for some reason you are unable to configure an email account, please contact EveryonePrint
support, and we can provide you with a temporary account on the EveryonePrint mail servers for
initial setup and demo purposes, such as [email protected].
EveryonePrint Installation and Configuration Guide 2016.09.01 Page 16 of 221
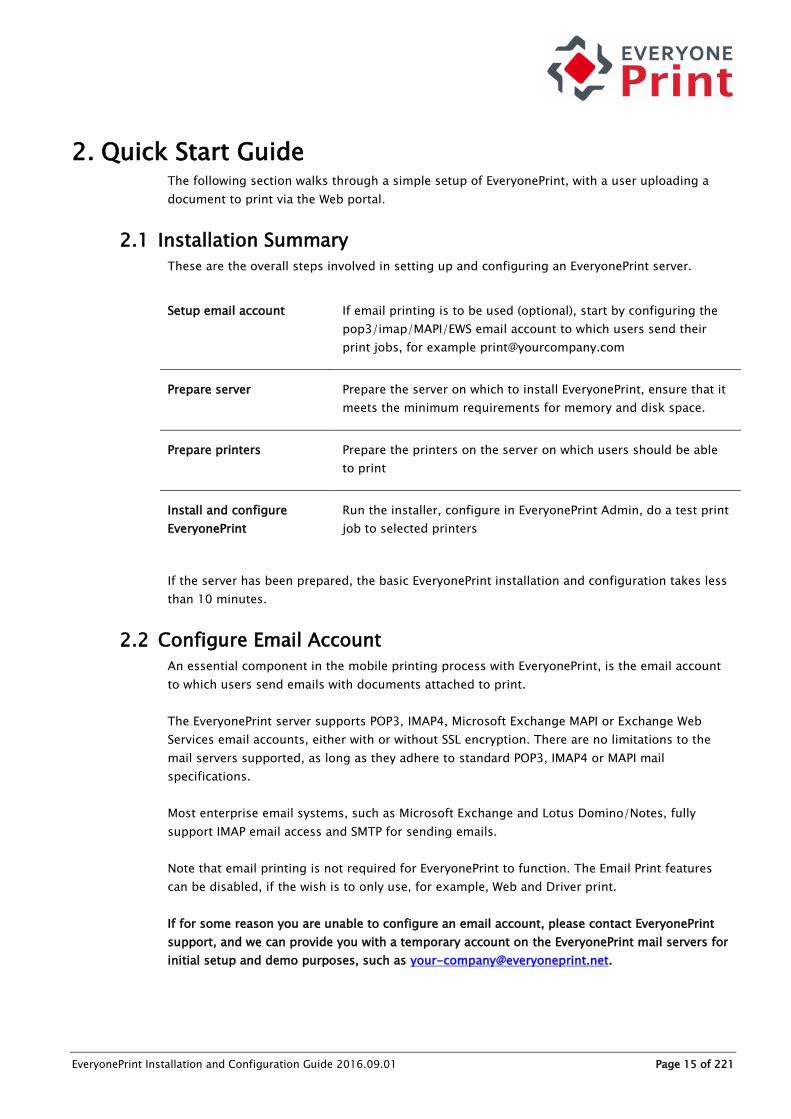
2.3 Prepare printers on the server
If the server on which to install EveryonePrint is not already a print server containing printers,
install the relevant printers on the server.
EveryonePrint can print to locally installed printers or local print queues which point to other
print servers with printing via LPR or using other printer ports. For printing to remote print
servers, see the section 12 Printing to remote print servers.
There are no known limitations to the type of printer, driver or the communication protocol of
the printer. If you can print to the printer from Word without any special configuration with each
print job, then users printing via EveryonePrint, should be able to print to it as well.
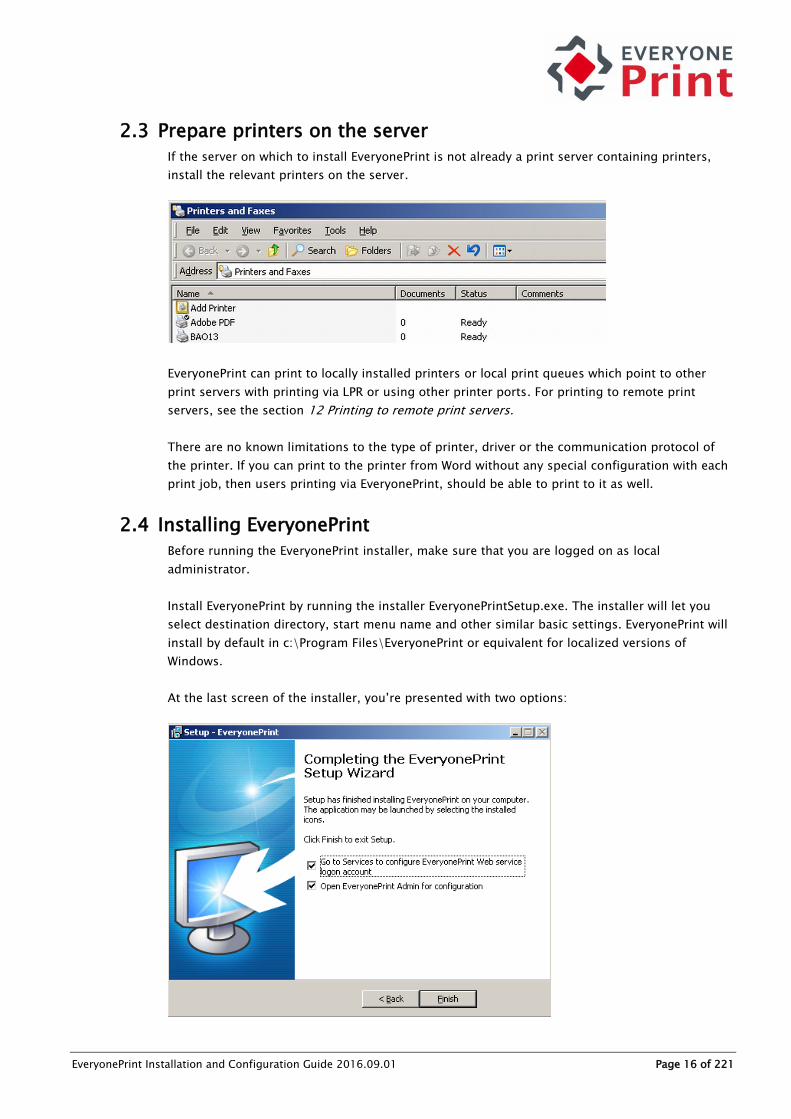
2.4 Installing EveryonePrint
Before running the EveryonePrint installer, make sure that you are logged on as local
administrator.
Install EveryonePrint by running the installer EveryonePrintSetup.exe. The installer will let you
select destination directory, start menu name and other similar basic settings. EveryonePrint will
install by default in c:\Program Files\EveryonePrint or equivalent for localized versions of
Windows.
At the last screen of the installer, you’re presented with two options:

EveryonePrint Installation and Configuration Guide 2016.09.01 Page 17 of 221
EveryonePrint is installed as a Windows service, and automatically starts with Windows.

EveryonePrint Installation and Configuration Guide 2016.09.01 Page 18 of 221
For EveryonePrint to successfully convert documents and print, the EveryonePrint Web service in
Windows Services must be logged on as a user with local administrative rights. You can open
Windows Services by checking the “Go to Services” in the above dialog.
Make sure that you’re using a local administrative user. It does not have to be .\Administrator
specifically, but a local user account which is member of Administrators group.
Only the EveryonePrint Web service should be started as local administrator. Other EveryonePrint
Windows services such as “EveryonePrint Data service” and “EveryonePrint Print Service” should
run as LocalSystem.
2.4.1 Unattended/Silent installation or update of EveryonePrint
The EveryonePrint installer program accepts optional command line parameters. These can be
useful when deploying new EveryonePrint servers, or updating existing EveryonePrint
installations.
/SILENT or /VERYSILENT
Instructs installer to be silent or very silent. When installer is silent the wizard and the
background window are not displayed but the installation progress window is. When a setup is
very silent this installation progress window is not displayed. Everything else is normal so for
example error messages during installation are displayed.
If a restart is necessary and the '/NORESTART' command isn't used (see below) and installer is
silent, it will display a Reboot now? message box. If it's very silent it will reboot without asking.
/NORESTART
Instructs installer not to reboot even if it's necessary.
/DIR="x:\dirname"
Overrides the default directory name displayed on the Select Destination Location wizard page. A
fully qualified pathname must be specified. Should only be used on new installations!

EveryonePrint Installation and Configuration Guide 2016.09.01 Page 19 of 221
2.5 EveryonePrint Admin
To configure EveryonePrint start the EveryonePrint Admin from the shortcut either in the
Windows start menu, the desktop icon or by entering the URL for the admin interface:
http://127.0.0.1:7290/admin or https://localhost:9443/admin
2.5.1 Access EveryonePrint Admin remotely
The admin interface can be accessed remotely from any client with access to the IP address of
the computer hosting the EveryonePrint service, through the URL: http://{server-ip}:7290 where
{server-ip} is the IP address of the server, or https://{server-ip}:9443, if the network and firewall
configuration permits it.
2.5.2 Default EveryonePrint Admin login
The default username and password for the EveryonePrint Admin is:
Username: admin
Password: eop
It is strongly recommended to change this password after logging on, by going to Administrator
Login in the Settings section.

EveryonePrint Installation and Configuration Guide 2016.09.01 Page 20 of 221
2.6 Adding Printers to EveryonePrint
A server on which EveryonePrint is installed may contain many printers that may or may not be
used in EveryonePrint. It is therefore necessary to add the printers to be used in EveryonePrint,
via the admin interface.
Go to Devices in the admin site. If no printers have been added previously, it will automatically
show the “Add New Device” page.
Click “Import All Printers from Server” to automatically add all printers that exist on the server on
which EveryonePrint is installed. Imported printers can be changed or removed at any time
afterwards, if any adjustments are necessary later.
A printer can also be added manually for more control.
Printer ID A unique identifier for the printer. Can be a number, serial
number, IP address or similar.
EveryonePrint Installation and Configuration Guide 2016.09.01 Page 21 of 221
Important: If using EveryonePrint with release terminals,
make sure the Printer ID is as defined by the release
terminal supplier, for example the output device IP
address.
Printer Description A user friendly description of the device, to identify the
printer to the end user
Output Printer The corresponding Windows print queue as installed on
the EveryonePrint server.
Check the box Send a test print to send a test print job from the EveryonePrint application after
adding the printer, useful for verifying the configuration of the device.
2.7 Access user Web portal and do simple test print
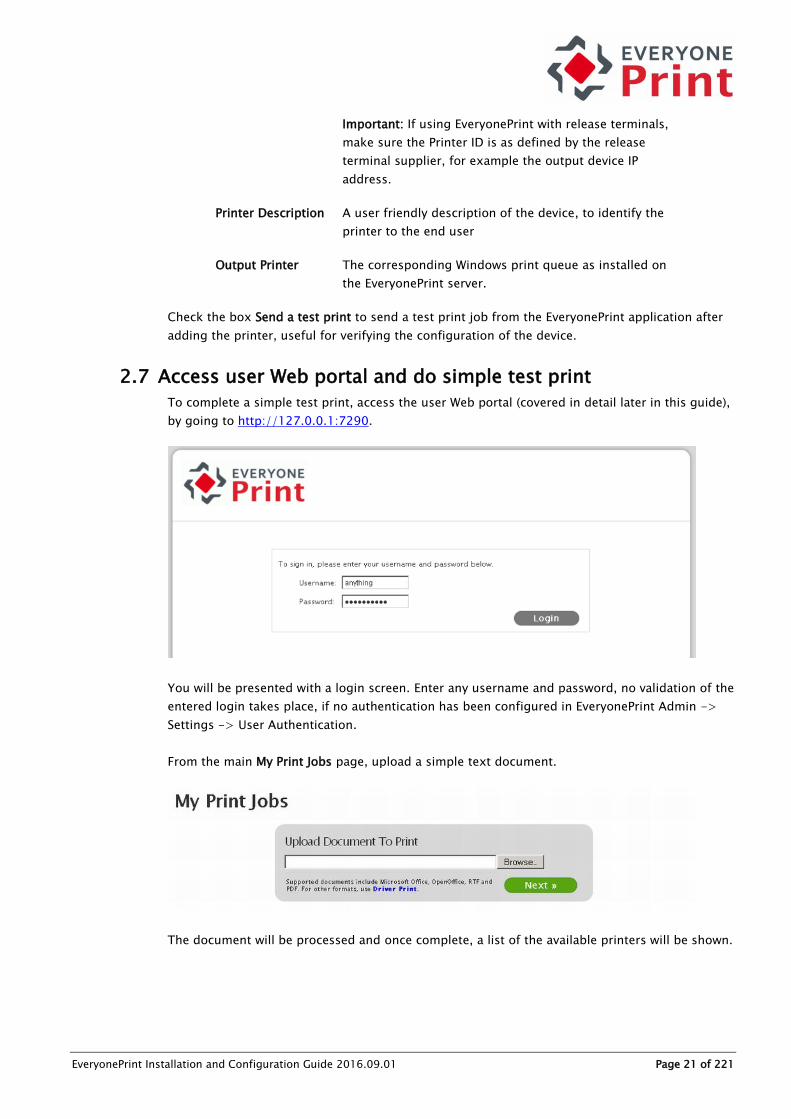
To complete a simple test print, access the user Web portal (covered in detail later in this guide),
by going to http://127.0.0.1:7290.
You will be presented with a login screen. Enter any username and password, no validation of the
entered login takes place, if no authentication has been configured in EveryonePrint Admin ->
Settings -> User Authentication.
From the main My Print Jobs page, upload a simple text document.
The document will be processed and once complete, a list of the available printers will be shown.

EveryonePrint Installation and Configuration Guide 2016.09.01 Page 22 of 221
Release to a printer and confirm the output.
You have successfully completed the basic EveryonePrint installation!
Please see the next sections for configuring the EveryonePrint server further, with user
authentication, printing behavior, additional print methods and so on.

EveryonePrint Installation and Configuration Guide 2016.09.01 Page 23 of 221
3. Configuring EveryonePrint The following section covers the configuration screens in EveryonePrint Admin.
3.1 Dashboard with statistics
The Dashboard is an overall view of completed print job usage and activity in the EveryonePrint
system.
Select a reporting date range for the dashboard by selecting the date from and date to fields,
and clicking Apply.

EveryonePrint Installation and Configuration Guide 2016.09.01 Page 24 of 221
The number of pages reported in the Dashboard does not reflect the accurate printed output on
device, as EveryonePrint reports the number of pages contained in the document, not the actual
output. For accurate output tracking, use EveryonePrint together with a print accounting system.
3.2 EveryonePrint Monitor
The Monitor in the admin shows recent print jobs and email activity in the EveryonePrint server,
useful for verifying the status of certain print jobs or just monitoring activity.
Print jobs not actively being processed or printing, can be deleted by clicking the red cross.
If the card server service is enabled, the Monitor will also show recent active card swipes.
If an unknown card has been swiped, click the “unknown” username, to associate that card with
an actual username.
If a user logs out on the release terminal, the relevant card swipes sessions are cleared from the
Monitor.
3.2.1 Hide user and document information in Monitor
For situations where administrators should not be able to view user names and/or document
names in the Monitor, for privacy reasons, a settings parameter can be added to the main
EveryonePrint configuration file eop.xml found in the installation directory.
1. Stop EveryonePrint Web service
2. Open eop.xml in a text editor such as Notepad
3. Add/edit the following parameter:
<adminprivacy>0</adminprivacy>
0 = Normal operation
1 = User name is hidden
2 = Document name is hidden

EveryonePrint Installation and Configuration Guide 2016.09.01 Page 25 of 221
3 = User name and Document name are hidden
4. Start the EveryonePrint Web service
3.2.2 Hide the Monitor completely
For situations where the Monitor view should be hidden completely from the EveryonePrint
administration interface, a settings parameter can be added to the main EveryonePrint
configuration file eop.xml found in the installation directory.
1. Stop EveryonePrint Web service
2. Open eop.xml in a text editor such as Notepad
3. Add/edit the following parameter:
<hidemonitor>true</hidemonitor>
4. Start the EveryonePrint Web service
3.3 Licensing
In EveryonePrint Admin and General Settings, are overall application settings for EveryonePrint.
EveryonePrint installs with a 60 day trial license. An EveryonePrint license can be purchased from
most print/copy manufacturers, resellers and print solution providers worldwide or by contacting
EveryonePrint.
License keys are unique to the particular server where EveryonePrint is installed. If the server
where EveryonePrint is installed is renamed or changed significantly, a new license key must be
issued. Changes to server which will trigger a new license key requirement include CPU or
primary MAC address changes.
To obtain a license key, supply your EveryonePrint representative with the Server name and
Server ID.
A license for EveryonePrint gives access to a specific edition of EveryonePrint, either
EveryonePrint Standalone or EveryonePrint Connect. A license for Connect cannot be used with
Standalone edition, and vice versa. See section 3.4 Choose EveryonePrint Edition for more
information about editions.

EveryonePrint Installation and Configuration Guide 2016.09.01 Page 26 of 221
3.4 Choose EveryonePrint Edition
An important setting in EveryonePrint, is the selection of edition. EveryonePrint can be used in
many different environments and configurations depending on customer needs. This setting
turns on and off features relevant to overall configurations:
- If EveryonePrint is used as a standalone secure and mobile print solution, or
- If EveryonePrint is an add-on to a print accounting solution.
Depending on the choice, different features only relevant for that type of configuration are
enabled.
See below matrix for which features are available based on edition selected.
Standalone Connect
Connect
Professional Enterprise
Licensing
License per
device (no
server or
user cost)
License per
server (no
device or
user cost)
License per
server (no
device or
user cost)
Unlimited
server and
device
licenses in a
pre-defined
region
All general features in
EveryonePrint
Includes Web, Email, Driver,
Mobile Print and Google Cloud
Print features
Yes Yes Yes Yes
Integration to print
management
Can be used with 3rd party Print
Management/Accounting Solution
No Yes Yes Yes
Use EveryonePrint as
standalone secure print
solution
Configure EveryonePrint with own
release terminals for MFP
displays, card readers and basic
pull printing
Yes No No Yes
Wide Area Mobile Print
Print using native AirPrint across
large complex networks, without
requiring Apple Bonjour or any
Apps
Yes No Yes Yes

EveryonePrint Installation and Configuration Guide 2016.09.01 Page 27 of 221
Built-in MS Office and Open
Office conversion engine
Allow users to send Office
documents to print, with no
requirement to install MS Office
on the server.
Yes No Yes Yes
App co-branding
Ability to brand Apple iOS and
Android Apps with company logo
inside of Apps
No No No Yes
MDM/EMM integration
Use Apple iOS and Android
Apps with leading MDM/EMM
solutions
No No No Yes
Clustering
Support for high availability and
high scalability configurations,
load balancing and redundancy
Yes No Yes Yes
Central license management
Centralized license management
for enterprise deployments
No No No Yes
All other features in EveryonePrint are available in all editions. The edition chosen in
EveryonePrint must match a purchased license, ie. a server license cannot be used with the
"standalone" edition and vice versa.
EveryonePrint Secure standalone cannot technically be used with print accounting systems. To
use EveryonePrint with a print accounting solution, choose the EveryonePrint Connect edition.
3.5 Logging and Troubleshooting
All errors and other information from EveryonePrint are logged to the central EveryonePrint log
“eopapp_yyyy_mm_dd.log” located by default in c:\Program Files\EveryonePrint\logs
Other EveryonePrint components, such as the built-in IPP print server also creates log files in the
\logs directory.
For troubleshooting, enable “Debug Logging” in the EveryonePrint admin interface, and the logs
generated become very detailed with all activity in the EveryonePrint server.
Do not use debug logging in production unless necessary for troubleshooting, as debug logging
can create very large log files.

EveryonePrint Installation and Configuration Guide 2016.09.01 Page 28 of 221
3.6 Document Support
EveryonePrint includes a built-in Microsoft Office and OpenOffice conversion engine, which
means that users can send Office documents to print, and EveryonePrint can convert and print
those documents without relying on any outside third party applications.
The built-in conversion engine is enabled by default, but you can choose to either use the built-
in engine or use Microsoft Office and OpenOffice to convert and print documents.
The built-in conversion engine requires a license with the feature enabled. Refer to the section
3.4 Choose EveryonePrint Edition for licensing requirements.
Important! The built-in conversion engine cannot guarantee 100% accurate print output. For
environments where document output fidelity is critical, such as higher education environments,
where students pay for their prints, it is strongly recommended to use Microsoft Office engine
for conversion.
Enabling the option to use Microsoft Office or OpenOffice for conversion, without first installing
the supporting application (MS Office or OpenOffice) will result in conversion errors. You can
install Microsoft Office and OpenOffice and enable additional document support at any time,
including after installing EveryonePrint.
For more information about installing Microsoft Office and OpenOffice for document conversion,
refer to section 13 Installing document support applications.

EveryonePrint Installation and Configuration Guide 2016.09.01 Page 29 of 221
3.7 Application Settings
When EveryonePrint is configured in a privacy mode, prints are held in EveryonePrint until
release. Adjust the timeout for when unreleased jobs are cleaned up and auto deleted. Default
value is 1440 minutes (24 hours).
3.8 Print output settings
For documents which do not have a set size, such as Microsoft PowerPoint presentations, choose
the default paper size, either A4 (default in Europe) or Letter (default in North America).
By default EveryonePrint will print jobs as simplex in color. Under Print Output Settings, different
default settings can be chosen, for example, presetting all jobs to be printed as duplex in
black/white.
Settings can further be restricted, so users are not able to modify the presets.
The settings apply to Web upload, Email print jobs and simple Driver print jobs.
3.9 Languages and Location
EveryonePrint support multiple languages and locale for displaying dates and numbers in local
formats.
Select the languages that should be available to use for users. Selected languages will appear in
the top navigation of the user interfaces.

EveryonePrint Installation and Configuration Guide 2016.09.01 Page 30 of 221
Choose the default language that appears, and the language used in email responses sent from
EveryonePrint, such as emails containing release codes and similar.
Select the locale determining how numbers and dates should be formatted relevant to your
location.

EveryonePrint Installation and Configuration Guide 2016.09.01 Page 31 of 221
3.10 Modifying language text strings
All text strings used in the EveryonePrint end-user Web interfaces are part of a translation
system, so users easily can change from one language to another.
It’s possible to manually edit the language files containing the raw text, and change any text
appearing in EveryonePrint.
The language files are located in
<install-directory>\eop\languagefiles
Files are named public_ for the end-user interface and the language abbreviation _en for English
_se for Swedish and so on.
To edit, for example, the English text strings in the end-user interface, open public_en.xml in an
editor such as Notepad, and carefully edit the text. Both plain text and HTML tags are possible.
For example, to change the Advanced Driver Print instructions for Windows 7 English, to insert a
link, edit the following from:
<cfcase value="dp_win7_7b">Choose the driver for the printer model specified below or
click <strong>Have Disk..</strong> to install driver, and click
<strong>OK</strong>.</cfcase>
To:
<cfcase value="dp_win7_7b">Choose the driver for the printer model specified below or
click <strong>Have Disk..</strong> to install driver, and click <strong>OK</strong>.
To download the driver <a href="http://www.acme.com/driver.zip">click
here</a>.</cfcase>
This would change the appearance in the EveryonePrint Web interface to:
IMPORTANT: Language files are provided as is. It’s strongly recommended to backup the
language files prior to editing. EveryonePrint provide no assistance or support relating to
changing of language files. Any changes done to language files will automatically be overwritten
by any EveryonePrint update.

EveryonePrint Installation and Configuration Guide 2016.09.01 Page 32 of 221
3.11 Printing and Security
The Printing and Security screen contains the primary settings that determine the overall printing
behavior of EveryonePrint. Decide here how EveryonePrint will behave when a user sends an
email print job, whether a user can print with or without authentication, and so on.
There are 2 overall modes for Printing and Security, where one keeps prints in EveryonePrint until
they’re released (Privacy Print), and another releases prints to a pre-selected print queue
immediately following processing (Direct Print).
Please note that changing Printing and Security mode changes how EveryonePrint features work,
so if you for example use Driver Print in one mode, but then change mode, the Driver Print
configuration changes, and it is therefore necessary to add your Driver Print printer again.
Privacy Print Privacy print is used if users print jobs should be stored in EveryonePrint until
the user releases the print, either in one of the EveryonePrint Web interfaces or
on a release terminal dedicated to EveryonePrint.
Privacy Print has 2 modes:
Privacy with Release Code
When this mode is selected, users can print without authentication via Web,
driver and email.
Web Print in Privacy with Release Code:
Users can access the Web print interface without having to log on. A release
code is shown on screen. Users can either release jobs to print in the Web
interface, or enter the release code on a supported release terminal.
Driver Print in Privacy with Release Code:
Users add a printer to their computer which is preconfigured with a fixed release
code, they can use to release print jobs, either in the EveryonePrint release Web
interface, or on a supported release terminal.
Email Print in Privacy with Release Code:
When a user has sent documents to print via email to EveryonePrint, the user will
get a reply email from the system, with a release code for the job, to use for
release either in EveryonePrint release Web interface or on a release terminal.

EveryonePrint Installation and Configuration Guide 2016.09.01 Page 33 of 221
Privacy with Authentication:
When this mode is selected, users must enter a username and password to print,
which is authenticated as per the settings in the User Authentication screen.
Web Print in Privacy with Authentication:
Users log on the user Web printing portal and upload their documents to print,
which are stored in EveryonePrint. The user can release using the Web interface,
or by authenticating at a release terminal.
Driver Print in Privacy with Authentication:
Users add a printer to their computer which will be configured in such a way
that authentication details are sent with the print job. Users can release print
jobs sent via Driver Print, either by logging on to the Web interface or by
authenticating at a release terminal.
Email Print in Privacy with Authentication:
Users send documents to print as attachments in an email, which are picked up
by EveryonePrint. The first time a user sends an email print job, they are asked
to authenticate with their username and password. After successful
authentication, the users email address is associated with their username, and
all subsequent jobs from that address are processed without delay. A user can
have an unlimited number of associated email addresses, which means a user
can print from an employee device and from home etc. Users can release print
sent via Email Print, either by logging on to the Web interface or by
authenticating at a release terminal.
Direct Print The Direct Print mode is used if an external secure printing solution is used or if
print jobs should be printed directly immediately, either anonymously or with
authentication.
Driver Print has 2 modes:
Direct with No Authentication:
This is the most direct and open configuration setting. Any user can send print
jobs, and they are released automatically to the selected print queue.

EveryonePrint Installation and Configuration Guide 2016.09.01 Page 34 of 221
Web Print with Direct with No Authentication:
Users can access the Web Print portal and upload a document to print. It is
immediately released to the printer selected in the EveryonePrint Admin by
administrators. The owner of the print job in the print queue, is the users
sending IP address.
Driver Print with Direct with No Authentication:
Users provide no special authentication information when sending print jobs via
Driver Print. Prints are released to the preselected print queue automatically.
The owner of the job in the queue, is the username of the sending clients
computer, if available, otherwise the sending users IP address.
Email Print with Direct with No Authentication:
Any user can send an email with documents attached to print. The processed
jobs are released immediately to the preselected print queue. The owner of the
job in the print queue, is the users email address.
Direct with Authentication:
The Direct with Authentication mode is used primarily if an external secure print
accounting system or print management system, is configured with one central
“follow me” pull-queue. Users authenticate to print, and prints sent via
EveryonePrint are released directly into this external print queue, from where
users can release using, for example, embedded MFP release terminals.
Web Print in Privacy with Authentication:
Users log on the user Web printing portal and upload their documents to print.
Print job is released directly to preselected queue.
Driver Print in Privacy with Authentication:
Users add a printer to their computer which will be configured in such a way
that authentication details are sent with the print job. Print job is released
directly to preselected queue.
Email Print in Privacy with Authentication:
Users send documents to print as attachments in an email, which are picked up
by EveryonePrint. The first time a user sends an email print job, they are asked
to authenticate with their username and password. After successful
authentication, the users email address is associated with their username, and
all subsequent jobs from that address are processed without delay. A user can
have an unlimited number of associated email addresses, which means a user
can print from an employee device and from home etc. Print jobs received via
email in this mode are released directly to preselected queue.

EveryonePrint Installation and Configuration Guide 2016.09.01 Page 35 of 221
3.12 User Authentication
If Printing and Security is set to either Privacy with Authentication or Direct with Authentication,
then the actual authentication method, how user logins are validated, is configured in the User
Authentication screen. If a different Printing and Security mode is used, then settings in the User
Authentication screen are ignored.
Per default no authentication method is chosen, which means that any entered username and
password is accepted as valid. This is useful for initial setup and testing, but should not be used
in production.
EveryonePrint supports Authentication via LDAP, which includes Windows Active Directory.
3.12.1 LDAP Authentication
Enter the details for the LDAP authentication server, including a test username and password of a
valid user account in the LDAP, and click Save and Test to verify the configuration.
A highly recommended tool for identifying proper LDAP settings to use, is LDAP Browser 2.6,
which can be downloaded for free via http://www.ldapadministrator.com
EveryonePrint Installation and Configuration Guide 2016.09.01 Page 36 of 221
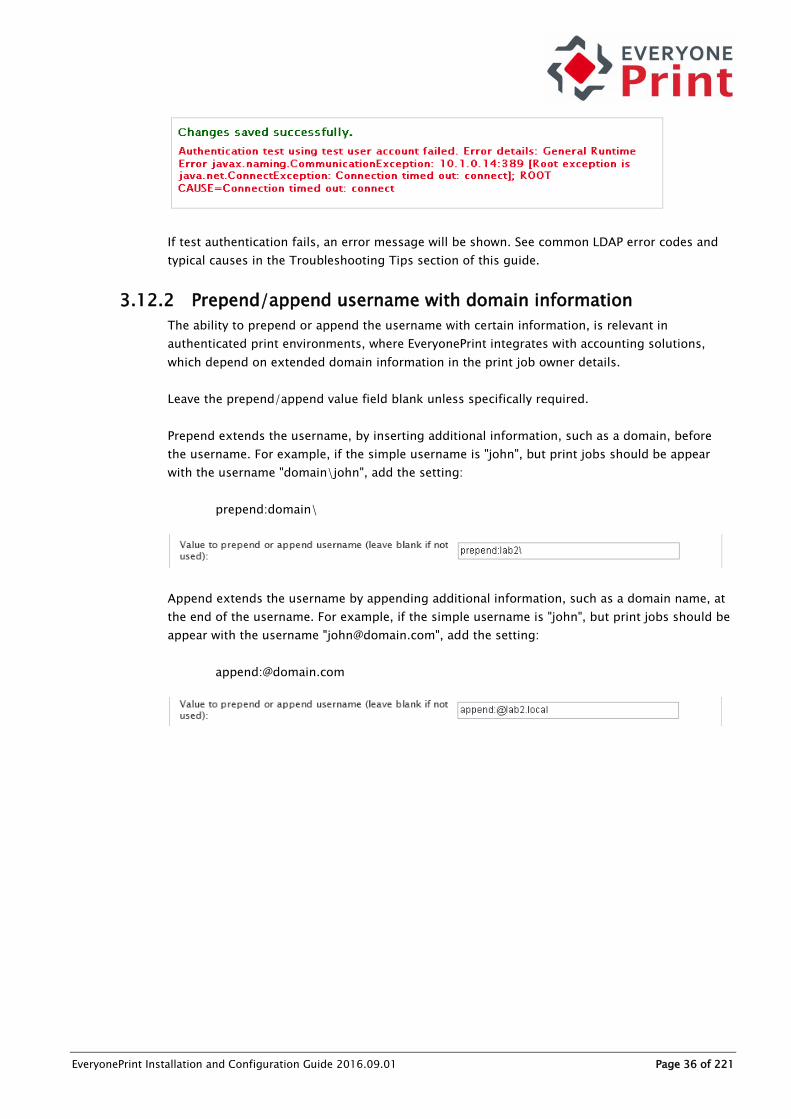
If test authentication fails, an error message will be shown. See common LDAP error codes and
typical causes in the Troubleshooting Tips section of this guide.
3.12.2 Prepend/append username with domain information
The ability to prepend or append the username with certain information, is relevant in
authenticated print environments, where EveryonePrint integrates with accounting solutions,
which depend on extended domain information in the print job owner details.
Leave the prepend/append value field blank unless specifically required.
Prepend extends the username, by inserting additional information, such as a domain, before
the username. For example, if the simple username is "john", but print jobs should be appear
with the username "domain\john", add the setting:
prepend:domain\
Append extends the username by appending additional information, such as a domain name, at
the end of the username. For example, if the simple username is "john", but print jobs should be
appear with the username "[email protected]", add the setting:
append:@domain.com

EveryonePrint Installation and Configuration Guide 2016.09.01 Page 37 of 221
3.13 User Web Portal Configuration
A central interface in EveryonePrint is the Web portal, where end users will go to upload
documents to print via Web Print, see instructions for how to use Driver Print and guide for Email
Print.
The user Web portal is accessible per default on http://127.0.0.1:7290 or https://localhost:9443
for HTTPS/SSL.
Since this Web interface may be accessed from users outside of the local server, provide a Web
URL address for the Web interface, that is accessible to users externally.
If an SSL certificate has been successfully installed and configured, the redirect option can be
enabled to automatically redirect users that access the Web portal with non-SSL HTTP to
HTTPS/SSL. Before enabling this option, ensure that HTTPS/SSL is fully working.

EveryonePrint Installation and Configuration Guide 2016.09.01 Page 38 of 221
Customize the Web interfaces easily by uploading a new logo file. The logo uploaded can be a
GIF, JPG or PNG file. There are no fixed size restrictions. The logo replaces the EveryonePrint logo
in the header.
Check the Reset logo to default logo at any time to clear a custom logo and revert back to
EveryonePrint logo.
The “My Print Jobs” screen is the main page that users see in the EveryonePrint end-user Web
interface. Customize what is displayed in this page by enabling or disabling the options.
3.13.1 Customize login text on Web portal
It’s possible to customize the login screen of the user Web portal, with a welcome message or
special login instructions.
Any text or HTML, including CSS formatting, can be inserted.
Any inserted text or HTML will appear above the login dialog box.

EveryonePrint Installation and Configuration Guide 2016.09.01 Page 39 of 221
Customization is only relevant if authentication is selected in Printing and Security, so users see
the login screen, otherwise it’s just ignored.

EveryonePrint Installation and Configuration Guide 2016.09.01 Page 40 of 221
3.13.2 Web Portal single-sign-on
EveryonePrint can be configured to either allow both traditional form login on the EveryonePrint
Web Portal as well as single-sign-on in parallel, or allow only single-sign-on, using one of the
supported systems.
If Single-Sign-On only is chosen, a Web URL is entered, and any unauthenticated user accessing
EveryonePrint, will be redirected to this URL for authentication by the single-sign-on system.
It’s further possible to specify an optional logout URL to where users are redirected after a
logout.
EveryonePrint can support two different single-sign-on systems:
1. Internal built in single-sign-on system
2. CAS Jasig Central Authentication Service (http://www.jasig.org/cas)

EveryonePrint Installation and Configuration Guide 2016.09.01 Page 41 of 221
3.13.2.1 Internal built in single-sign-on
EveryonePrint includes a very simple single sign on system for easy implementation in any
programming language and platform.
Implement user authentication in any way required, and pass users to EveryonePrint using either
HTTP/S POST or a HTTP header redirection. Two variables are included, the username and an
MD5 check hash value consisting of the username and a pass key only known by administrator
and EveryonePrint.
When an authenticated user is passed to EveryonePrint, the user is automatically authenticated,
and have usual functionality presented to them. To finish the session, the user can press “Log
Out” in the navigation or close the browser window, and be logged out of the EveryonePrint
session.
Example authentication
Username = john
SSO Pass Key = asecretvalue
check = md5(“johnasecretvalue”)
If user is transferred to EveryonePrint using a Web form:
<form action="https://servername/ssologin.cfm" method="post">
<input type="hidden" name="username" value="john">
<input type="hidden" name="check" value=" 4137e7b6413db3cb3a5b8da9bd5b6e27">
<input name="submit" type="submit" value="continue" />
</form>
If user is transferred to EveryonePrint using HTTP header redirect:
https://servername/ssologin.cfm?username=john&check=4137e7b6413db3cb3a5b8da
9bd5b6e27
Due to browsers caching of URL’s, it is strongly recommended that a “301 permanently moved”
status code redirect is used for HTTP header redirect, and NOT traditional HTML anchors, ie. <a
href=”URL”>click here</a>.
See below URL for examples of HTTP header redirect:
http://www.stevenhargrove.com/redirect-web-pages

EveryonePrint Installation and Configuration Guide 2016.09.01 Page 42 of 221
3.13.2.2 CAS Jasig Central Authentication Service
To enable CAS authentication enter the authentication and validation URL’s of the central CAS
service.
It’s only necessary to enter the main URL addresses to login and serviceValidate interfaces.
EveryonePrint will append the relevant service variables based on External Web Portal URL setting
configured in Web Portal Settings.
When testing CAS single-sign-on, make sure to enable the debug logging in General Settings,
and both successful and unsuccessful authentication attempts will be written to the main
application log file in \logs directory, such as:
12/01/13 14:12.49: error; EOP; ssologincas; Authentication failed ticket: no
authenticationsuccess
12/01/13 14:13.53: error; EOP; ssologincas; SSO login failed missing ticket. Source
192.168.0.187
And successful:
12/01/13 14:16.49: debug; EOP; ssologincas; Authentication ticket: ST-956-
Lyg0BdLkgdrBO9W17bXS raw response:
<cas:serviceResponse xmlns:cas='http://foo.bar.com/is/cas'>
<cas:authenticationSuccess>
<cas:user>john</cas:user>
</cas:authenticationSuccess>
</cas:serviceResponse>
12/01/13 14:16.49: debug; EOP; ssologin; Successful SSO CAS login. Username: john

EveryonePrint Installation and Configuration Guide 2016.09.01 Page 43 of 221
3.13.3 Change default Web ports from 7290 and 9443
The Web interfaces in EveryonePrint, run on TCP ports 7290 (http) and 9443 (https) per default.
These can be changed to common HTTP ports 80 and HTTPS port 443 if no other Web server
software is running on the server.
Before changing default ports, ensure there are no port conflicts with other software running on
the same server.
To change the default HTTP port:
1. Open the file C:\Program Files\EveryonePrint\etc\jetty.xml
2. Find the line:
<Set name="port"><SystemProperty name="jetty.port" default="7290"/></Set>
3. Change from 7290 to the port of your choice, and save the file.
4. Open the file C:\Program Files\EveryonePrint\eop.xml
5. Find the line:
<eopapiendpoint>http://127.0.0.1:7290/api/</eopapiendpoint>
6. Change from 7290 to the same port as used in jetty.xml above.
7. Restart EveryonePrint Web service
To change the default HTTPS port:
1. Open the file C:\Program Files\EveryonePrint\etc\jetty-ssl.xml
2. Find the line:
<Set name="Port">9443</Set>
3. Change from 9443 to the port of your choice, and save the file.
4. Restart EveryonePrint Web service

EveryonePrint Installation and Configuration Guide 2016.09.01 Page 44 of 221
3.14 Web Print configuration
Web Print is the feature in the user Web portal that allows users to upload a document to print or
print by entering a Web URL address.
This feature is enabled per default in EveryonePrint.
If Web Print should not be available to users, disable it from the Web Print configuration page in
the EveryonePrint Admin.
If Web Print is enabled, it’s further possible to enable/disable the Web URL address printing
feature. If disabled, the Web Address to Print box will not appear.
When users enter a Web URL address to print, EveryonePrint will connect to the Internet to
retrieve the contents of the entered address and convert to print data. If EveryonePrint must go
through a proxy server to reach the Internet, enter the proxy server details.

EveryonePrint Installation and Configuration Guide 2016.09.01 Page 45 of 221
By default the server has no limit to the file sizes that can be uploaded, but a limit can be put in
place.
Please note that due to browser limitations, the EveryonePrint server does not know the actual
size of the upload until the upload has completed. If the limit is set to 10 MB, a user can still
upload a 20 MB job, it will however be deleted and an error be shown, once upload has
completed, which ensures no excessive jobs beyond the limit are processed.
3.15 Driver Print configuration
EveryonePrint includes an IPP print server that allows users to print directly from within their
programs and applications, on Windows, Mac and Linux, across the network or Internet, to the
local EveryonePrint server.
In the Driver Print configuration page you can enable or disable this printing method.
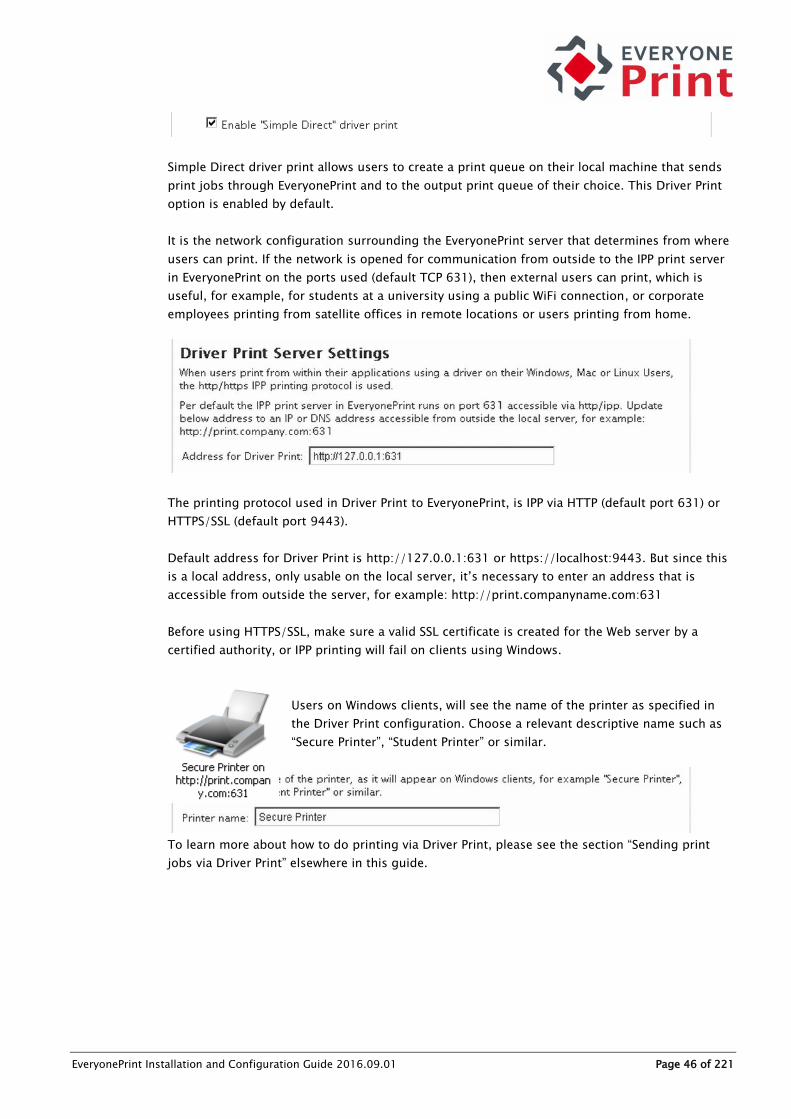
EveryonePrint Installation and Configuration Guide 2016.09.01 Page 46 of 221
Simple Direct driver print allows users to create a print queue on their local machine that sends
print jobs through EveryonePrint and to the output print queue of their choice. This Driver Print
option is enabled by default.
It is the network configuration surrounding the EveryonePrint server that determines from where
users can print. If the network is opened for communication from outside to the IPP print server
in EveryonePrint on the ports used (default TCP 631), then external users can print, which is
useful, for example, for students at a university using a public WiFi connection, or corporate
employees printing from satellite offices in remote locations or users printing from home.
The printing protocol used in Driver Print to EveryonePrint, is IPP via HTTP (default port 631) or
HTTPS/SSL (default port 9443).
Default address for Driver Print is http://127.0.0.1:631 or https://localhost:9443. But since this
is a local address, only usable on the local server, it’s necessary to enter an address that is
accessible from outside the server, for example: http://print.companyname.com:631
Before using HTTPS/SSL, make sure a valid SSL certificate is created for the Web server by a
certified authority, or IPP printing will fail on clients using Windows.
Users on Windows clients, will see the name of the printer as specified in
the Driver Print configuration. Choose a relevant descriptive name such as
“Secure Printer”, “Student Printer” or similar.
To learn more about how to do printing via Driver Print, please see the section “Sending print
jobs via Driver Print” elsewhere in this guide.

EveryonePrint Installation and Configuration Guide 2016.09.01 Page 47 of 221
3.15.1 LPD Server
EveryonePrint includes an LPD server which makes it simple to print from workstations in
network environments, such as business PC’s or workstations.
LPR/LPD is a printing protocol commonly used in TCP/IP networks and is very simple to
implement and widely supported on all clients.
To print to the EveryonePrint server, first enable the LPD server under the Driver Print settings in
EveryonePrint Admin, and then add a printer on a client using standard TCP/IP port with LPR
protocol.
The Printer Name or IP Address is the IP or hostname of the EveryonePrint LPD server.
For LPR Queue name, use either the PrinterID or the External ID in parentheses under a printer in
EveryonePrint. Make sure LPR Byte counting Enabled is checked.
Choose a printer driver which is compatible with the output device. Print jobs sent to the LPD
server are not modified, the original print data (Postscript, PCL etc) is sent untouched to the
output queue, which means that any output settings selected in the driver, duplex, binding etc,
are also sent to output device.

EveryonePrint Installation and Configuration Guide 2016.09.01 Page 48 of 221
3.16 Configure Email Print
With EveryonePrint users can send emails from their mobile devices or computers to your mail
server. EveryonePrint will then retrieve and process those emails.
The Email Print feature is not enabled per default, as it will only work successfully, if mail server
settings, both incoming and outgoing, have been setup correctly.
In the Email Print section in the Admin, you can configure the connection information for
EveryonePrint to connect to your email server.
Start by providing the email to which users send their email print jobs.
Enter the server address details of the mail server, including the protocol with or without SSL
encryption and server address.

EveryonePrint Installation and Configuration Guide 2016.09.01 Page 49 of 221
For Microsoft Exchange Web Services enter the fully accessible URL including protocol (http or
https) to the Exchange Web interface. For Microsoft Exchange MAPI, enter just the server name
or IP address (no http or https).
When Microsoft Exchange is selected, enter also the Mail Domain Name, which is the domain
name for email known by the Exchange server.
For Microsoft Exchange:
EveryonePrint can support Microsoft MAPI via RPC protocol with NTLM authentication,
which can be verified with Outlook (2010): Go to the File tab, click Account Settings. On
the list of accounts, select an account and click Change, then More Settings on the
dialog that appears. On the Connection tab, the "Connect to Microsoft Exchange using
HTTP" should be unchecked.
EveryonePrint can support Microsoft Exchange Web Services over HTTPS with Basic,
NTLM, or forms-based authentication, which can be verified by accessing the web
service URL. This is typically https://<server>/news/exchange.asmx. Kerberos, ADFS
and RPC over http(s) authentication is not supported.
Enter the account login details for the account from which to retrieve email.
Choose how frequently EveryonePrint should check for new emails. The default is every 10
seconds, but if the mail server is not on the same internal network, a higher interval, such as
every 30 seconds, is recommended.
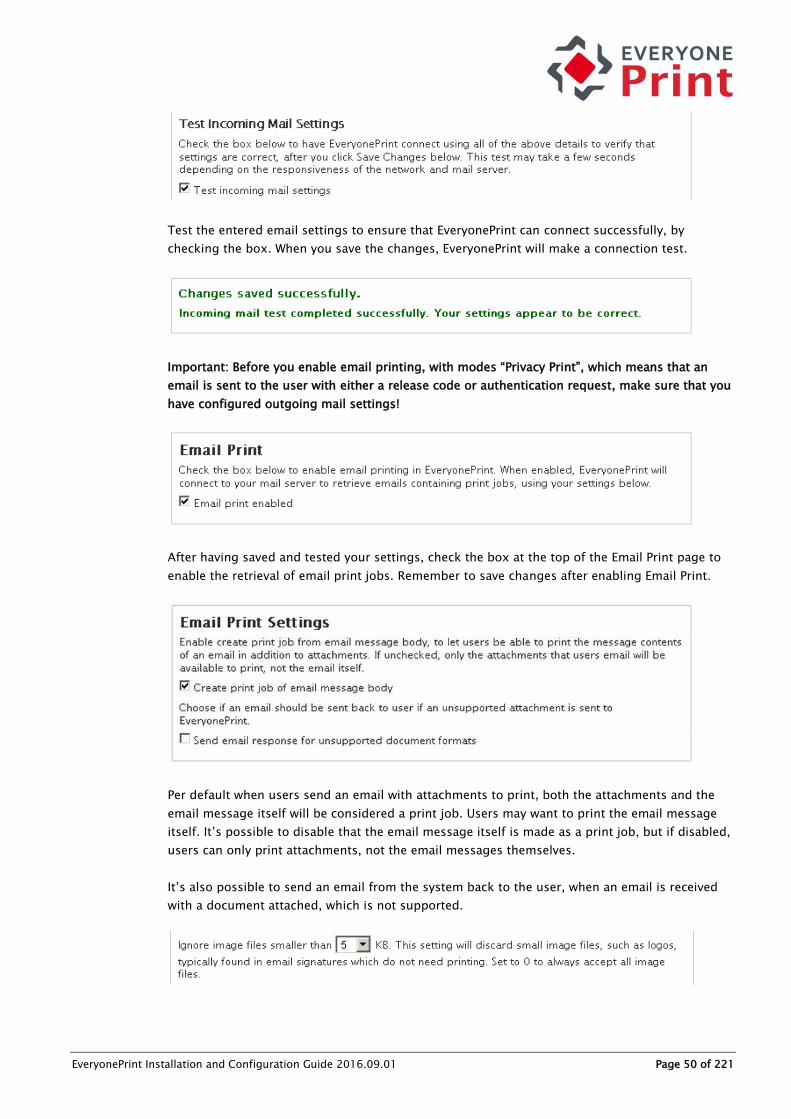
EveryonePrint Installation and Configuration Guide 2016.09.01 Page 50 of 221
Test the entered email settings to ensure that EveryonePrint can connect successfully, by
checking the box. When you save the changes, EveryonePrint will make a connection test.
Important: Before you enable email printing, with modes “Privacy Print”, which means that an
email is sent to the user with either a release code or authentication request, make sure that you
have configured outgoing mail settings!
After having saved and tested your settings, check the box at the top of the Email Print page to
enable the retrieval of email print jobs. Remember to save changes after enabling Email Print.
Per default when users send an email with attachments to print, both the attachments and the
email message itself will be considered a print job. Users may want to print the email message
itself. It’s possible to disable that the email message itself is made as a print job, but if disabled,
users can only print attachments, not the email messages themselves.
It’s also possible to send an email from the system back to the user, when an email is received
with a document attached, which is not supported.

EveryonePrint Installation and Configuration Guide 2016.09.01 Page 51 of 221
If a user sends an email with an email signature containing an image, such as a logo,
EveryonePrint can be configured to ignore these suspected small signature images.
If using Privacy with Release Code mode, emails sent from EveryonePrint containing release
codes, by default contain a link the Web release interface. Use this setting to toggle the display
of this link in the release code email.
If using Privacy with Authentication mode, then by default instructions are shown in the Web
interface to end-users, how to send print jobs direct to specific printers.
Uncheck this option, to hide these instructions.
Choose the option to send confirmation email to users, if users should receive an email
confirmation when their job has been received and processed by the server, for example being
ready to print, or after having been sent to a print management solutions “follow me” queue.
This setting applies to Email Print only and “Privacy with Authentication” and “Direct with
Authentication” modes, as “Privacy with Release Code” mode by itself will send an email with
release code.
Restrict senders to only approved domains, by entering domain names (multiple separated by
comma), or blacklist certain domains. Emails not matching the criteria are automatically
discarded.

EveryonePrint Installation and Configuration Guide 2016.09.01 Page 52 of 221
3.16.1 Email Authentication
If email printing is enabled and print behavior is set to require authentication under Printing and
Security (either Privacy with Authentication or Direct with Authentication), and if Allow Self
Registration below is enabled, then the first time an unknown user sends a print job via email to
EveryonePrint, they will be asked to register their email address in the system.
Users will visit a simple registration page, included in EveryonePrint, sign in with their username
and password, and EveryonePrint will then know that the email address is approved and
associated with the right user.
If users are known in the system, either because their email address has been manually added or
imported from a CSV, or if LDAP email address lookup is enabled, then no registration is
necessary.
Uncheck Allow Self Registration, if the system should only allow print jobs from users that either
exist in the internal EveryonePrint users database or in LDAP.
If the email address used for email printing, eg. [email protected], is configured to allow
external users to email print jobs, then make sure that the Web URL to the registration page is
accessible from external computers.
By choosing Use restrictive email registration system users can only register email addresses
from which they’ve sent email print jobs.

EveryonePrint Installation and Configuration Guide 2016.09.01 Page 53 of 221
A user can have an unlimited number of email addresses associated with their account, so a user
can print from any of their email addresses.
3.16.2 Note when using Exchange MAPI for internal email
If using the Exchange MAPI protocol for Email Print, and using EveryonePrint internally in your
organization, Exchange via MAPI does not always share the senders full email address, ie
[email protected], which will cause email authentication in EveryonePrint to fail.
A workaround to this behavior of Exchange via MAPI, is to let EveryonePrint check the Active
Directory via LDAP, for the users email address. Simply configure LDAP authentication under
User Authentication, and EveryonePrint will automatically attempt to retrieve the email address of
internal company users as needed.

EveryonePrint Installation and Configuration Guide 2016.09.01 Page 54 of 221
3.17 Mobile Print configuration
To enable native printing from supported mobile devices, the EveryonePrint Mobile Gateway
must be installed and configured. See the separate documentation for details.
Configure the name of the main printer as it will appear on users mobile devices, for devices that
support printer naming.
In the Mobile Print screen, manage feature behavior for native printing from mobile devices, such
as AirPrint on Apple iOS devices (iPhone and iPads) and Android based smartphones and tablets.
Depending on the configuration in Printing and Security, different behavior is available. Choose
relevant setting for the current configuration.
For example, are users allowed to only send print jobs to EveryonePrint in general, or are users
allowed to send print jobs directly to all devices configured in EveryonePrint.
Central EveryonePrint Also allowing direct printing
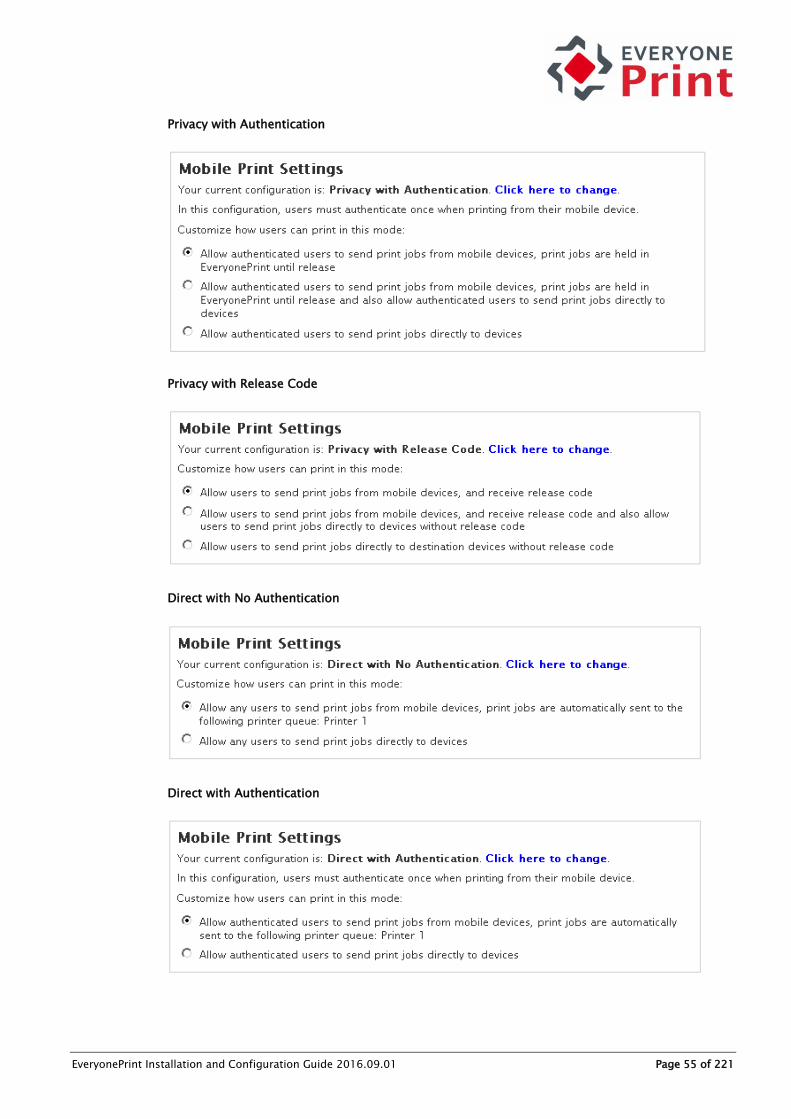
EveryonePrint Installation and Configuration Guide 2016.09.01 Page 55 of 221
Privacy with Authentication
Privacy with Release Code
Direct with No Authentication
Direct with Authentication
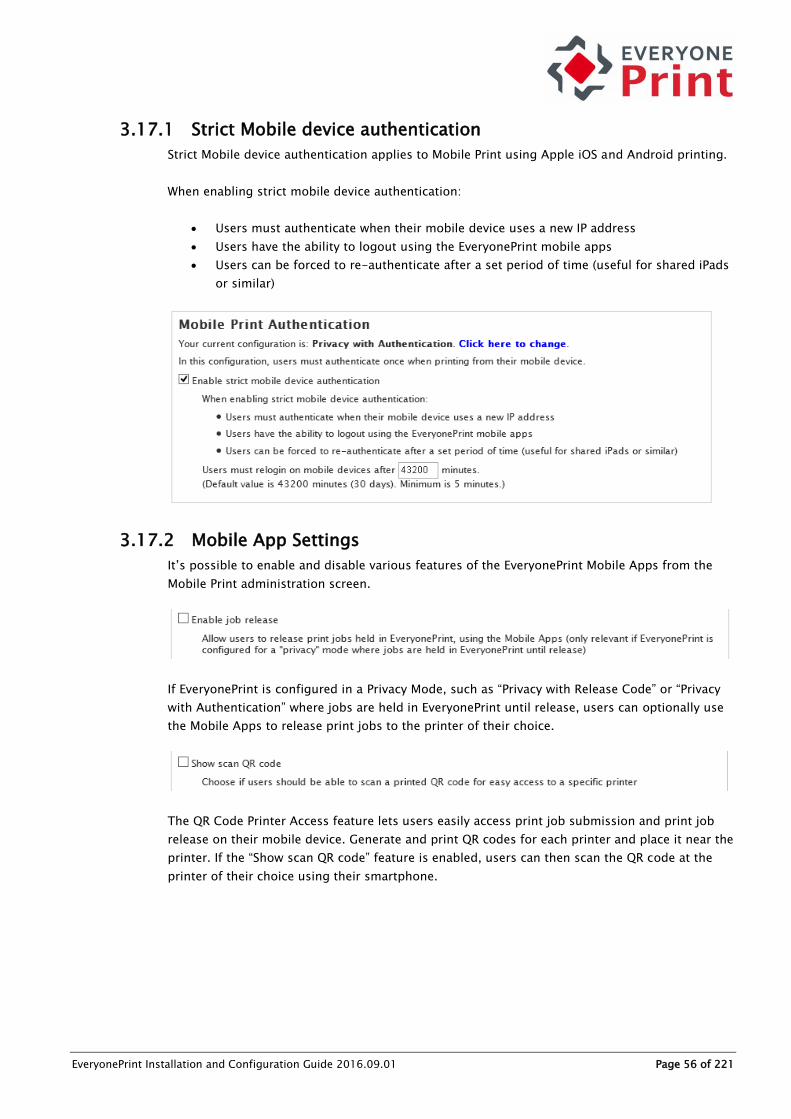
EveryonePrint Installation and Configuration Guide 2016.09.01 Page 56 of 221
3.17.1 Strict Mobile device authentication
Strict Mobile device authentication applies to Mobile Print using Apple iOS and Android printing.
When enabling strict mobile device authentication:
Users must authenticate when their mobile device uses a new IP address
Users have the ability to logout using the EveryonePrint mobile apps
Users can be forced to re-authenticate after a set period of time (useful for shared iPads
or similar)
3.17.2 Mobile App Settings
It’s possible to enable and disable various features of the EveryonePrint Mobile Apps from the
Mobile Print administration screen.
If EveryonePrint is configured in a Privacy Mode, such as “Privacy with Release Code” or “Privacy
with Authentication” where jobs are held in EveryonePrint until release, users can optionally use
the Mobile Apps to release print jobs to the printer of their choice.
The QR Code Printer Access feature lets users easily access print job submission and print job
release on their mobile device. Generate and print QR codes for each printer and place it near the
printer. If the “Show scan QR code” feature is enabled, users can then scan the QR code at the
printer of their choice using their smartphone.

EveryonePrint Installation and Configuration Guide 2016.09.01 Page 57 of 221
3.18 Wide Area Mobile Print
Wide Area Mobile Print is a highly flexible and powerful alternative to Apple’s multicast DNS
Bonjour method of announcing printers to Apple iOS devices.
Wide Area Mobile Print uses Unicast DNS-SD, and announcing available printers in EveryonePrint
to Apple iOS devices, can be achieved with extreme ease using the Wide Area Mobile Print
feature combined with simple standard DNS records created on the DNS server. With Wide Area
Mobile Print, AirPrint can be enabled across large and complex networks.
In above example, 2 subdomains have been created, one for each building, Building A and
Building B. Mobile devices in each network, query the DNS server, which forwards DNS requests
to the EveryonePrint Mobile Gateway. EveryonePrint Mobile Gateway responds with relevant
printers for the sub domain(s) available to specific mobile device.
An Apple iOS device with buildingb sub domain specified, see only those printers in that sub
domain. Multiple sub domains can be specified as needed.
The following assumes that EveryonePrint has been configured and one or more printers have
been added to EveryonePrint.

EveryonePrint Installation and Configuration Guide 2016.09.01 Page 58 of 221
The Wide Area Mobile Print feature is available in EveryonePrint Professional and EveryonePrint
Enterprises editions only.
3.18.1 Configuration overview
The Wide Area Mobile Print configuration involves the following overall steps:
1. Create one or more Wide Area Mobile Print sub domains in EveryonePrint Admin
2. Install and configure the EveryonePrint Mobile Gateway
3. Configure the network DNS server
4. Set search domain on mobile devices
3.18.2 Create Wide Area Mobile Print sub domains
Start in the EveryonePrint administrator interface and the section Wide Area Mobile Print, and
create one or more sub domains for the printers.
Multiple sub domains can be created, to separate access to printers, for example:
By location (one sub domain per building, campus, city, department)
By user access level (one sub domain for teachers, another for students, or one sub domain
for employees, another sub domain for guests)
In this example 2 sub domains have been created, one for each building.
There are no limitations in EveryonePrint as to how the separation can be configured, as it all
depends on which of the sub domains created in EveryonePrint that a particular mobile device
has access to.
Creating just 1 sub domain for all Wide Area Mobile Print, for example
“mobileprint.company.com” containing all the printer(s) that should be available to mobile

EveryonePrint Installation and Configuration Guide 2016.09.01 Page 59 of 221
devices, is strongly recommended, as it greatly simplifies the later setup of search domain, as
will be described in section below.
3.18.3 Configure EveryonePrint Mobile Gateway
Install the EveryonePrint Mobile Gateway, either on the EveryonePrint server or on its own server.
Mobile devices will communicate with the Mobile Gateway and not directly to the EveryonePrint
server, so the gateway can be placed in a DMZ zone or similar, to further separate mobile
devices from the secure printing infrastructure.
EveryonePrint Mobile Gateway installed on the EveryonePrint server
EveryonePrint Mobile Gateway installed on its own server
With EveryonePrint Mobile Gateway installed, open the gateway admin Web interface, configure
the server connection details, test and save.

EveryonePrint Installation and Configuration Guide 2016.09.01 Page 60 of 221
3.18.4 Configure DNS server
For each created Wide Area Mobile Print sub domain, the DNS requests for those sub domains,
should be delegated to the EveryonePrint Mobile Gateway, so EveryonePrint can respond with
relevant printer details for the sub domains.
For more information about Zone Delegation, refer to the following articles:
http://en.wikipedia.org/wiki/DNS_zone
http://technet.microsoft.com/en-us/library/cc771640.aspx
http://technet.microsoft.com/en-us/library/cc753500.aspx
For example configurations of the zone delegation, refer to below two sections on Microsoft
Windows DNS or BIND (Mac OSX or Linux).
3.18.4.1 Configure Windows DNS
To configure zone delegation for the created Wide Area Mobile Print sub domains on Windows
DNS, open Windows DNS on the DNS server that mobile devices use.
1. Right-click domain and choose New Delegation.
2. Enter the sub domain name as created in EveryonePrint

EveryonePrint Installation and Configuration Guide 2016.09.01 Page 61 of 221
3. Choose to Add a name server
4. Enter the server name/hostname of the EveryonePrint Mobile Gateway server followed by the
Wide Area Mobile Print sub domain and Active Directory domain, and then enter the IP
address of the EveryonePrint Mobile Gateway server.

EveryonePrint Installation and Configuration Guide 2016.09.01 Page 62 of 221
In this example, the hostname of the EveryonePrint Mobile Gateway server is “mobileserver”
and its IP address is 192.168.0.109
5. Repeat for each created sub domain

EveryonePrint Installation and Configuration Guide 2016.09.01 Page 63 of 221
3.18.4.2 Configure BIND
Configure zone delegation for the created Wide Area Mobile Print sub domains on BIND running
on Mac OSX or Linux, by adding the sub domains to the domains master zone file.
1. In this example, the sub domains are added to the BIND master zone file for the domain
“company.com”.
Now any DNS requests for one of the sub domains to the primary DNS server, will be forwarded
to the EveryonePrint Mobile Gateway server.

EveryonePrint Installation and Configuration Guide 2016.09.01 Page 64 of 221
3.18.5 Verifying DNS configuration
To confirm the proper DNS configuration with either Windows DNS or BIND on Mac OSX or Linux,
run the nslookup command for each of the sub domains:
nslookup -query=ptr _ipp._tcp.buildinga.company.com
If successfully configured, this will return a list of the printers in the sub domain as configured in
EveryonePrint.
Nslookup result from Windows
Nslookup result from Linux
If no printers appear, confirm with telnet that a connection can be established to the
EveryonePrint Mobile Gateway ip address on port 53.
Remember that mobile device clients must have access to the EveryonePrint Mobile Gateway
server on port 53, to retrieve the printer lists.

EveryonePrint Installation and Configuration Guide 2016.09.01 Page 65 of 221
3.18.6 Set search domains on mobile devices
For Apple iOS mobile devices to retrieve the printers available for Wide Area Mobile Print, the iOS
devices must be instructed to query the sub domains, using DNS-SD.
This can be done in one of two ways, depending on one or multiple sub domains having been
created in EveryonePrint. Refer to the
3.18.7 One Wide Area Mobile Print sub domain
If only one Wide Area Mobile Print sub domain has been created (recommended) the
configuration needed to instruct Apple iOS devices to query the domain is simple.
3.18.7.1 Single sub domain configuration on Windows DNS
In addition to a delegation DNS record for the single “mobileprint.company.com” sub domain as
outlined in section 3.18.4.1 Configure Windows DNS, create DNS-SD discovery record in
Windows DNS.
1. Under the domain (in this case company.com) right-click on _udp and select Other new
records..
2. Select to insert a Service Location (SRV) record
3. In the Service field, type in any characters, and in Protocol enter _dns-sd

EveryonePrint Installation and Configuration Guide 2016.09.01 Page 66 of 221
4. There should now be an _dns-sd folder under _udp. Delete the SRV record from within the
_dns-sd folder that was created.
5. Right-click the _dns-sd folder and select Other new records… and select to insert a Pointer
(PTR) record.
6. In Host IP Address enter the letter b and in Host Name enter the Wide Area sub domain such
as mobileprint.company.com
7. Create an additional Pointer (PTR) record with letters lb also pointing to the same sub
domain
The final structure should look like below.
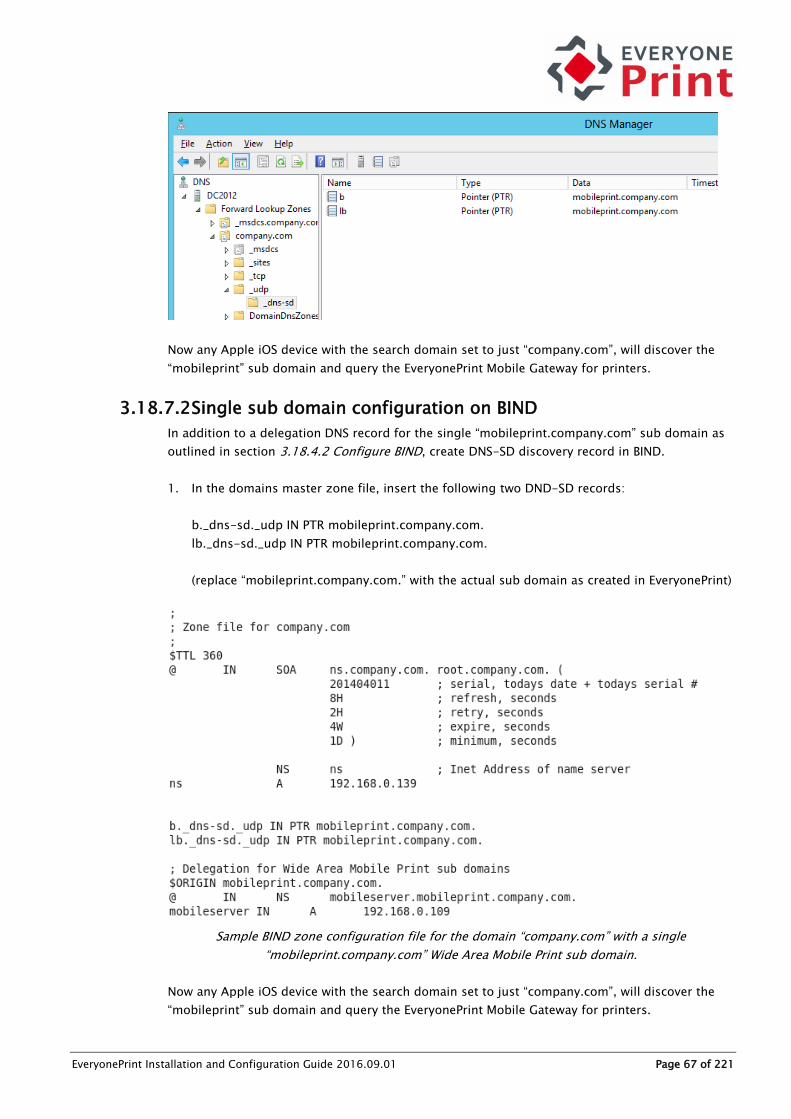
EveryonePrint Installation and Configuration Guide 2016.09.01 Page 67 of 221
Now any Apple iOS device with the search domain set to just “company.com”, will discover the
“mobileprint” sub domain and query the EveryonePrint Mobile Gateway for printers.
3.18.7.2 Single sub domain configuration on BIND
In addition to a delegation DNS record for the single “mobileprint.company.com” sub domain as
outlined in section 3.18.4.2 Configure BIND, create DNS-SD discovery record in BIND.
1. In the domains master zone file, insert the following two DND-SD records:
b._dns-sd._udp IN PTR mobileprint.company.com.
lb._dns-sd._udp IN PTR mobileprint.company.com.
(replace “mobileprint.company.com.” with the actual sub domain as created in EveryonePrint)
Sample BIND zone configuration file for the domain “company.com” with a single
“mobileprint.company.com” Wide Area Mobile Print sub domain.
Now any Apple iOS device with the search domain set to just “company.com”, will discover the
“mobileprint” sub domain and query the EveryonePrint Mobile Gateway for printers.

EveryonePrint Installation and Configuration Guide 2016.09.01 Page 68 of 221
3.18.8 Multiple Wide Area Mobile Print sub domains
If multiple Wide Area Mobile Print sub domains have been created, access to the sub domains on
Apple iOS devices is given, by populating the “search domain” on the mobile device, with the
search domain or domains that the particular device should have access to.
This can be done either manually, or by having the DHCP server provide this value, using what is
called “DHCP option 119”.
See below sections for instructions on how to populate “search domain” using Windows and
Linux DHCP.
3.18.8.1 Multiple sub domains configuration on Windows DHCP
Microsoft Windows DHCP does not provide a friendly configuration interface for the DHCP option
119.
Configuration of DHCP option 119 on Windows DHCP involves the following steps:
1. If not done previously, first define the DHCP option 119 to the Windows DHCP server by
running the following command on the DHCP server
netsh dhcp server V4 add optiondef 119 "DNS Search domains" BYTE 1
2. In the EveryonePrint Administrator interface, go to Wide Area Mobile Print and click the
Windows DHCP Configuration Utility
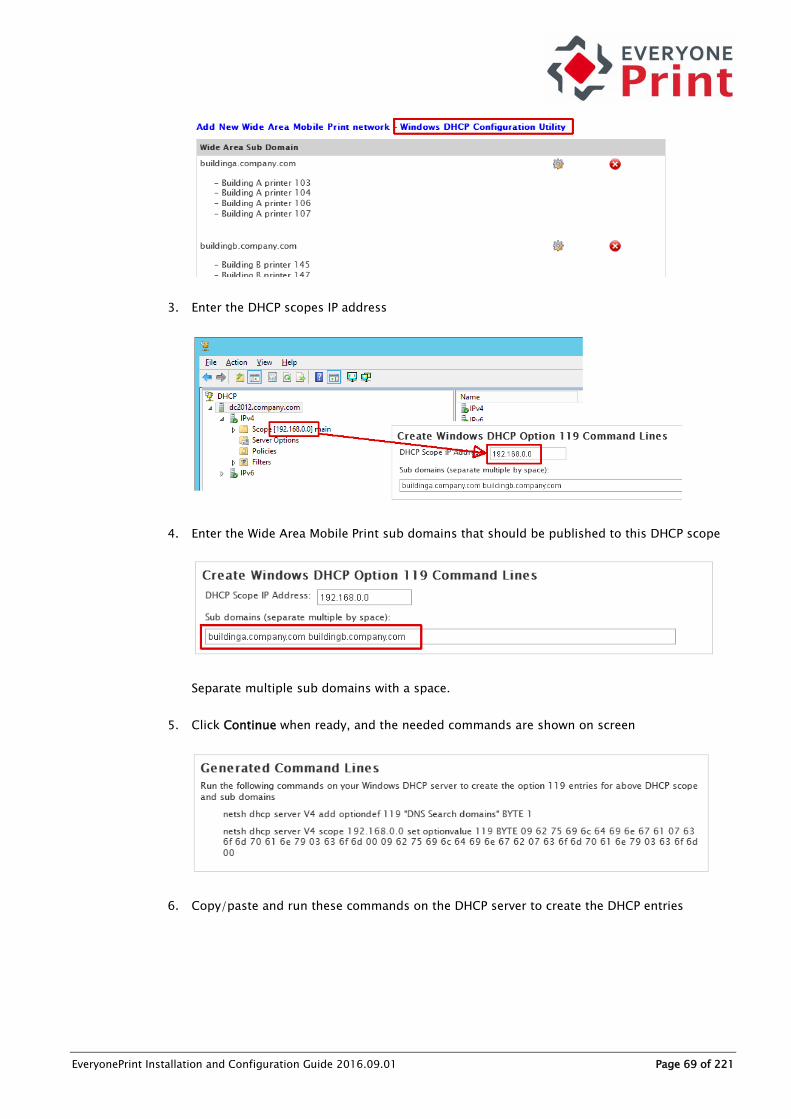
EveryonePrint Installation and Configuration Guide 2016.09.01 Page 69 of 221
3. Enter the DHCP scopes IP address
4. Enter the Wide Area Mobile Print sub domains that should be published to this DHCP scope
Separate multiple sub domains with a space.
5. Click Continue when ready, and the needed commands are shown on screen
6. Copy/paste and run these commands on the DHCP server to create the DHCP entries
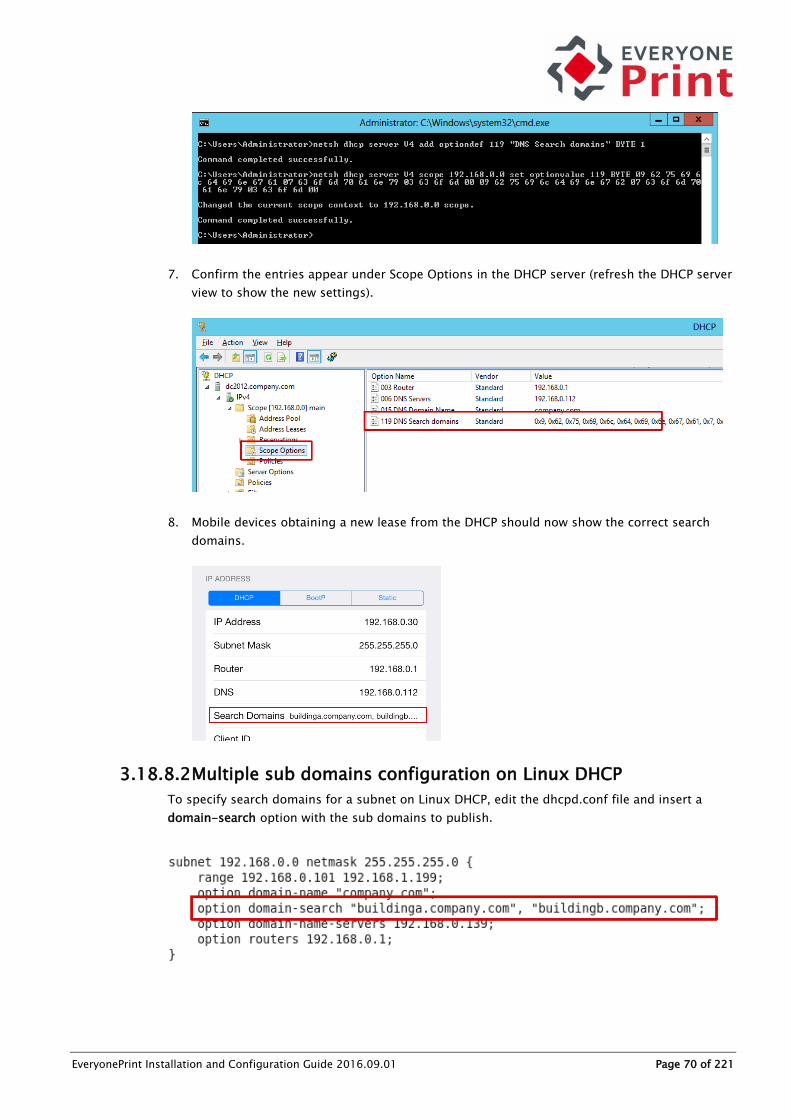
EveryonePrint Installation and Configuration Guide 2016.09.01 Page 70 of 221
7. Confirm the entries appear under Scope Options in the DHCP server (refresh the DHCP server
view to show the new settings).
8. Mobile devices obtaining a new lease from the DHCP should now show the correct search
domains.
3.18.8.2 Multiple sub domains configuration on Linux DHCP
To specify search domains for a subnet on Linux DHCP, edit the dhcpd.conf file and insert a
domain-search option with the sub domains to publish.

EveryonePrint Installation and Configuration Guide 2016.09.01 Page 71 of 221
3.19 Configure Google Cloud Print
With Google Cloud Print support in EveryonePrint, users can print from their Google
Chromebook, phone or tablets, Google Apps such as Gmail, Google Docs, Google Sheets, or
using any other application or device which supports Google Cloud Print, to the printers you
select in EveryonePrint.
Any authentication settings in EveryonePrint Printing and Security such as Release Code or
Authenticated printing, still applies for Google Cloud Print.
Privacy with Release Code
If EveryonePrint is configured for “Privacy with Release Code” and a user prints via Google Cloud
Print to EveryonePrint general printer, the user will receive a release code back via email, just as
they receive release codes for Email Print.
Users do not receive release codes for jobs sent via Google Cloud Print through EveryonePrint
directly to specific printers.
Privacy with Authentication or Direct with Authentication
In an Authentication mode, where users are required to authenticate to print, the authentication
settings in User Authentication apply.
When a user sends a print job via Google Cloud Print, their Google Account email address is
“sender” of the job as it arrives in EveryonePrint.
EveryonePrint will first check its internal user database, and if the user is not found there, it will
search LDAP, if LDAP search is enabled.

EveryonePrint Installation and Configuration Guide 2016.09.01 Page 72 of 221
If the user is not found in LDAP, a self-registration email invitation is sent to the user, if Allow
Self Registration is enabled.
The user must enter their network username and password, to register their Google Account
with the system. This is only needed once for the user.
In above example, the job sent from [email protected] will after processing, be sent to the
print queue on the EveryonePrint server as the user “studentuserjohn”.

EveryonePrint Installation and Configuration Guide 2016.09.01 Page 73 of 221
3.20 Google Cloud Print configuration summary
Summary of steps included to enable Google Cloud Print support in EveryonePrint:
1. Create an organization Google Account
2. Enable Google API access on the Google Account
3. Register printers from EveryonePrint in Google Cloud Print
4. Enable “Public Link” sharing for Google Cloud Print registered printers
Important! The Google Cloud Print service is marked as a BETA software by Google. This means
that Google could change anything and everything at anytime, interrupting or breaking the
integration between EveryonePrint and Google Cloud Print.
3.20.1 Create a Google Account
First create a normal Google Account. This can be done most easily by creating a Google Gmail
account.
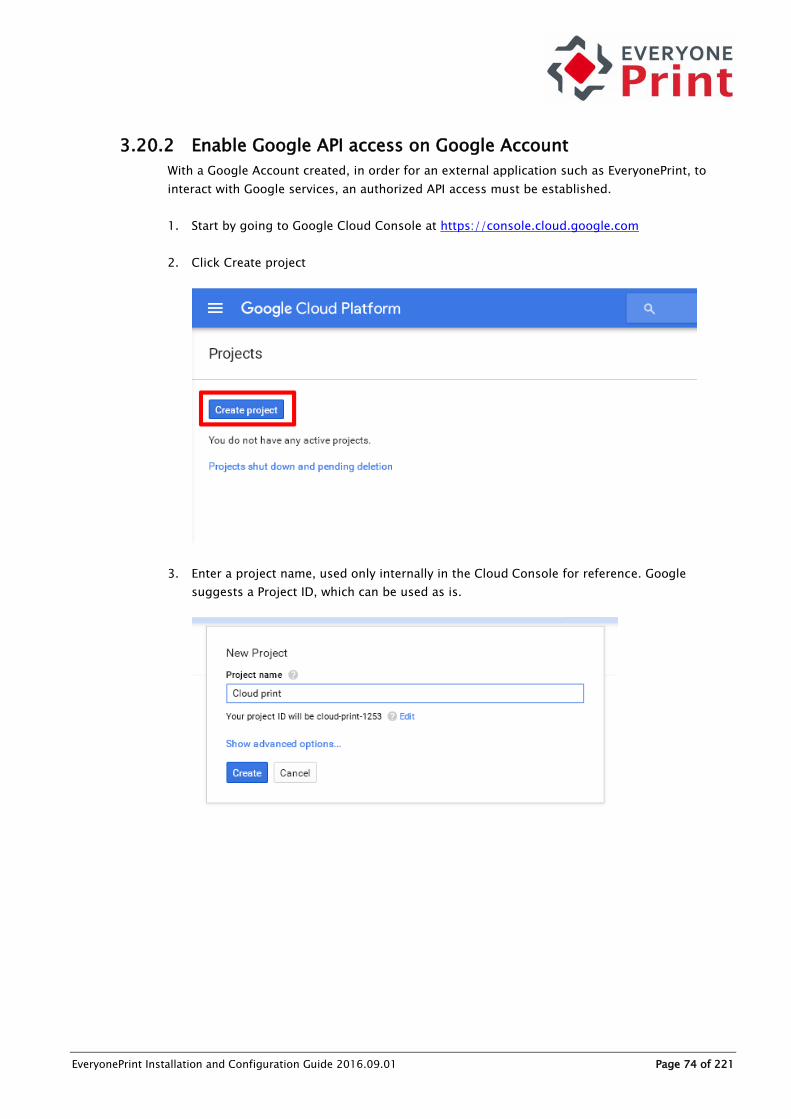
EveryonePrint Installation and Configuration Guide 2016.09.01 Page 74 of 221
3.20.2 Enable Google API access on Google Account
With a Google Account created, in order for an external application such as EveryonePrint, to
interact with Google services, an authorized API access must be established.
1. Start by going to Google Cloud Console at https://console.cloud.google.com
2. Click Create project
3. Enter a project name, used only internally in the Cloud Console for reference. Google
suggests a Project ID, which can be used as is.

EveryonePrint Installation and Configuration Guide 2016.09.01 Page 75 of 221
4. Depending on your account status, you may be asked to verify your account via SMS

EveryonePrint Installation and Configuration Guide 2016.09.01 Page 76 of 221
5. Under Use Google API’s choose Enable and Manage APIs
6. Choose Credentials on the left, then OAuth consent screen and fill out a Product name.
Other details can be entered as well, but are not required. When done, click Save at the
bottom.

EveryonePrint Installation and Configuration Guide 2016.09.01 Page 77 of 221
7. In Credentials choose Create credentials and an OAuth client ID
8. Under Application type choose Other and enter a Name used only internally.

EveryonePrint Installation and Configuration Guide 2016.09.01 Page 78 of 221
9. The Google account Client ID and Client Secret needed for integration are now created and
displayed on screen.
10. Copy/paste the Client ID and Client Secret into the EveryonePrint Google Cloud Print
configuration screen.
The overall connection between Google and Google Cloud Print has now been established, and
printers in EveryonePrint can now be registered with Google Cloud Print.

EveryonePrint Installation and Configuration Guide 2016.09.01 Page 79 of 221
3.20.3 Register printers from EveryonePrint in Google Cloud Print
It’s assumed that printers have already been configured in EveryonePrint.
For each of the printers in EveryonePrint, that you would like to make available to users via
Google Cloud Print, 3 steps must be performed:
1. Register printer in Google Cloud Print
2. Authenticate the printer
3. Share the printer
First click Register for each of the printers that you would like to make available in Google Cloud
Print.
After a few seconds, the status will change to Awaiting authentication and a new button will
appear. Click Authenticate to continue.
A new window will open with a Google Printer registration page. Click the link in the middle of
the page.

EveryonePrint Installation and Configuration Guide 2016.09.01 Page 80 of 221
Finally click the Finish printer registration button
After 20-30 seconds the Status of the printer in the EveryonePrint configuration page will change
to Active, and the registration of the printer is now complete.
All registered printers are visible in the Google Cloud Print Manage Printers page at
https://www.google.com/cloudprint#printers
Next it’s important to share the printer, otherwise no users have access to the printers.
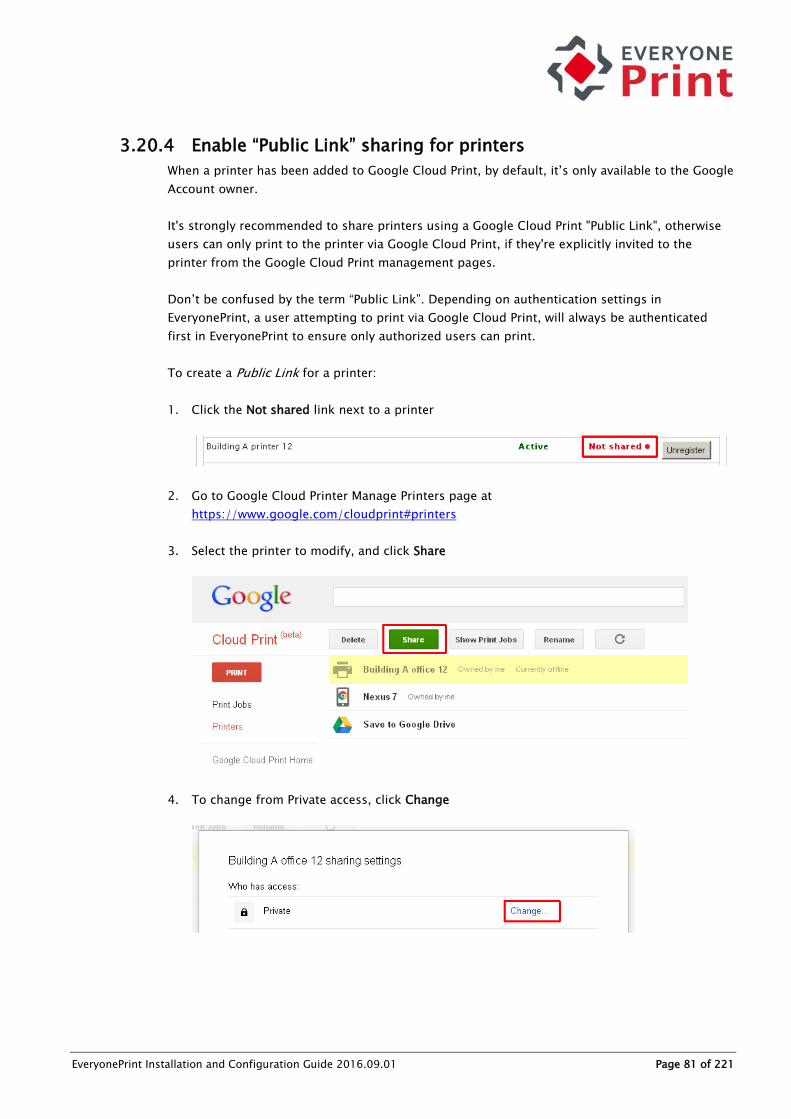
EveryonePrint Installation and Configuration Guide 2016.09.01 Page 81 of 221
3.20.4 Enable “Public Link” sharing for printers
When a printer has been added to Google Cloud Print, by default, it’s only available to the Google
Account owner.
It's strongly recommended to share printers using a Google Cloud Print "Public Link", otherwise
users can only print to the printer via Google Cloud Print, if they're explicitly invited to the
printer from the Google Cloud Print management pages.
Don’t be confused by the term “Public Link”. Depending on authentication settings in
EveryonePrint, a user attempting to print via Google Cloud Print, will always be authenticated
first in EveryonePrint to ensure only authorized users can print.
To create a Public Link for a printer:
1. Click the Not shared link next to a printer
2. Go to Google Cloud Printer Manage Printers page at
https://www.google.com/cloudprint#printers
3. Select the printer to modify, and click Share
4. To change from Private access, click Change

EveryonePrint Installation and Configuration Guide 2016.09.01 Page 82 of 221
5. Choose Anyone with the link has access to the printer
6. Change the limit of how much users can print to this printer, by clicking the 15 pages/day
7. Choose Unlimited quota

EveryonePrint Installation and Configuration Guide 2016.09.01 Page 83 of 221
8. Finally copy the "Link to share" and insert this link in the printers Public Link page in
EveryonePrint and click Save Changes.

EveryonePrint Installation and Configuration Guide 2016.09.01 Page 84 of 221
When printers are shared via Public Link, a user can log on to the EveryonePrint Web interface,
and view printers available to them from the Google Cloud Print page in the end user Web
interface in EveryonePrint.
Only printers which have been shared with Public Link, are listed in this page.
Device groups and device group printer permissions still apply, so on the Google Cloud Print
page within EveryonePrint, a user will only see printers listed that they have access to. If no
device group permissions are set, users will see all Google Cloud Print printers with a Public Link.
When a user clicks Add Printer the printer will be added to their Google account, and they can
print from Google Apps, ChromeBook and similar.

EveryonePrint Installation and Configuration Guide 2016.09.01 Page 85 of 221
3.21 Configure Outgoing Mail
EveryonePrint must be able to send outgoing email, both with friendly error messages, if
someone sends a print job in a format which is not supported, a too large email or when sending
release codes or authentication requests to users.
Under Outgoing Mail Server in Settings, enter the mail servers SMTP settings for outgoing email,
including choosing relevant ports and security protocols as needed for the SMTP mail server.
Enter the details that will appear as “Sender” on the email. It’s important to use a different
address than the Email Print address, otherwise you risk creating an infinite email print loop.
You can test the settings by entering an email address to receive a test email, and checking the
box saying “Send test email”. When you click Save changes, a test email will be sent, to confirm

EveryonePrint Installation and Configuration Guide 2016.09.01 Page 86 of 221
that EveryonePrint can successfully transmit emails to end-users. It’s recommended to choose an
external test email address, to confirm that EveryonePrint can send emails to all users.
Tip: If EveryonePrint says email was sent successfully, but no email is received, check the file
c:\Program Files\EveryonePrint\temp\cfmail\mail.log (or alternate install directory) for errors
such as:
02/10/11 13:29.27: MailOutFail: [email protected]; From=Company
<[email protected]>; Subject=Outgoing test mail from EveryonePrint;
Server=mail.company.com;25; Size=515 bytes:javax.mail.MessagingException: Could
not connect to SMTP host: mail.company.com, port: 25; nested exception is:
java.net.ConnectException: Connection timed out: connect
With the above error message in mail.log, EveryonePrint could not successfully deliver the test
email to the mail server due to lack of connection. Make sure that no firewalls are interrupting
the connection.

EveryonePrint Installation and Configuration Guide 2016.09.01 Page 87 of 221
3.22 Card server
EveryonePrint includes a card server for network
TCP/IP based swipe card readers. This enables
card swipe authentication on printers or multi
function devices, so a user walks up to a device of
their choice, equipped with a reader, then swipe
their door access card or similar, at which point
the user is authenticated at the device. No need to
enter login credentials.
The card server runs on TCP port 7292 per default. Configure the network card readers to send
data to the EveryonePrint servers IP on this port.
Associate the network card reader with a device added in EveryonePrint, by going to the Device
enabling card reader, and entering the IP address of the network card reader.
Card swipe timeout is the time from when the user swipes their card, and until the swipe
authentication expires.
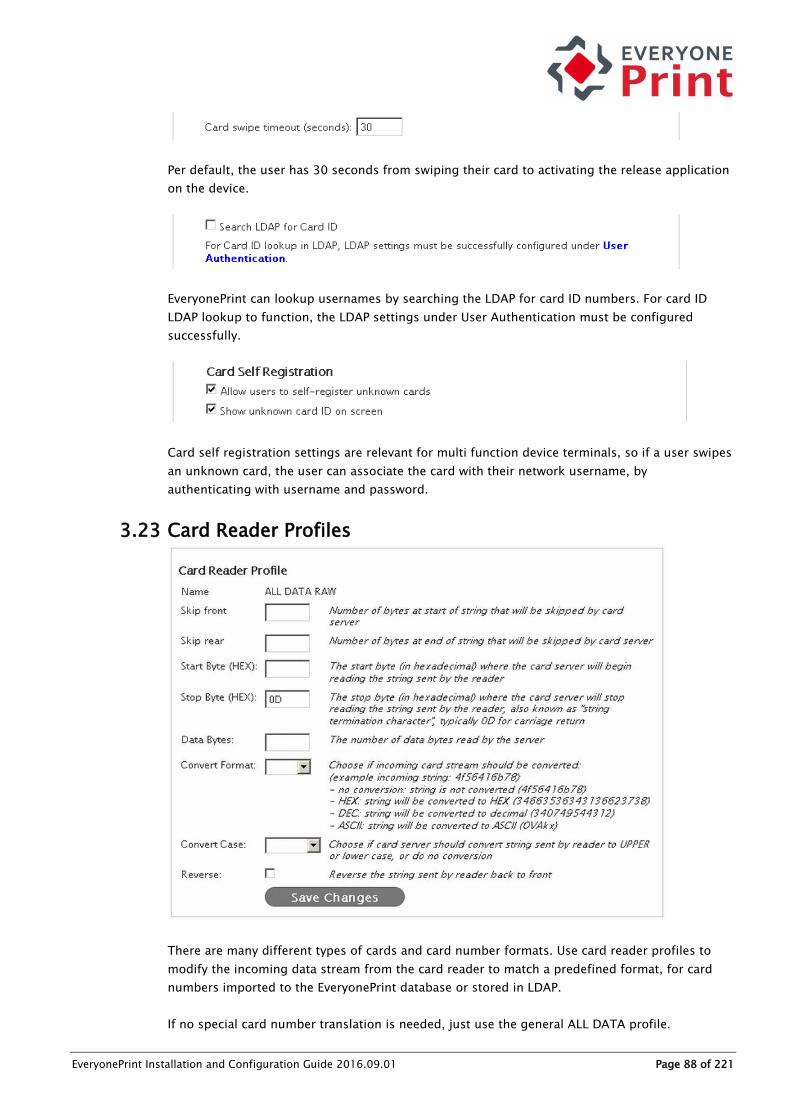
EveryonePrint Installation and Configuration Guide 2016.09.01 Page 88 of 221
Per default, the user has 30 seconds from swiping their card to activating the release application
on the device.
EveryonePrint can lookup usernames by searching the LDAP for card ID numbers. For card ID
LDAP lookup to function, the LDAP settings under User Authentication must be configured
successfully.
Card self registration settings are relevant for multi function device terminals, so if a user swipes
an unknown card, the user can associate the card with their network username, by
authenticating with username and password.
3.23 Card Reader Profiles
There are many different types of cards and card number formats. Use card reader profiles to
modify the incoming data stream from the card reader to match a predefined format, for card
numbers imported to the EveryonePrint database or stored in LDAP.
If no special card number translation is needed, just use the general ALL DATA profile.

EveryonePrint Installation and Configuration Guide 2016.09.01 Page 89 of 221
3.24 Administrator Alert Notifications
EveryonePrint includes an administrator notification feature, to alert administrators in case of
critical faults, such as licensing errors.
Configure Outgoing Mail settings and then enter the administrators email address.
3.25 Change Administrator login
Use the Administrator Login screen in the EveryonePrint Admin to change the default admin
password.
If the password to the admin is lost, it is necessary to contact EveryonePrint support.
3.26 Restrict access to administration Web interface based on IP
address
Easily restrict access to the EveryonePrint administration Web interface, to only allowed IP
addresses.
IP addresses are entered a comma delimited list. Subnet of IP's can be allowed by specifying only
parts of the IP address, for example, entering "192.168." will allow access for any IP address
starting with "192.168.".
By default, all IP addresses are allowed.

EveryonePrint Installation and Configuration Guide 2016.09.01 Page 90 of 221
3.27 Managing Users
Users in EveryonePrint are users which have an email address or a card associated with them.
If EveryonePrint is configured for an authentication mode in Printing and Security then when
users send email print jobs the first time, they will be asked to authenticate with the printing
system, so EveryonePrint can link their email address together with their username. See section
3.16.1
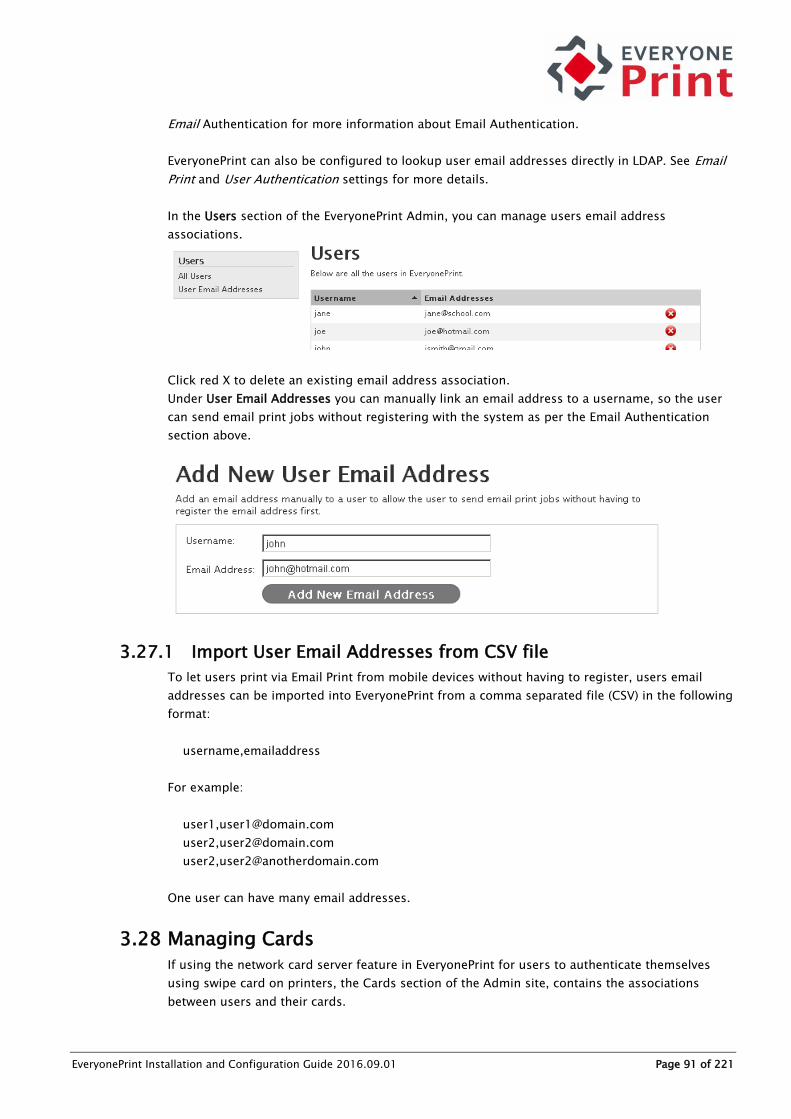
EveryonePrint Installation and Configuration Guide 2016.09.01 Page 91 of 221
Email Authentication for more information about Email Authentication.
EveryonePrint can also be configured to lookup user email addresses directly in LDAP. See Email
Print and User Authentication settings for more details.
In the Users section of the EveryonePrint Admin, you can manage users email address
associations.
Click red X to delete an existing email address association.
Under User Email Addresses you can manually link an email address to a username, so the user
can send email print jobs without registering with the system as per the Email Authentication
section above.
3.27.1 Import User Email Addresses from CSV file
To let users print via Email Print from mobile devices without having to register, users email
addresses can be imported into EveryonePrint from a comma separated file (CSV) in the following
format:
username,emailaddress
For example:
user1,[email protected]
user2,[email protected]
user2,[email protected]
One user can have many email addresses.
3.28 Managing Cards
If using the network card server feature in EveryonePrint for users to authenticate themselves
using swipe card on printers, the Cards section of the Admin site, contains the associations
between users and their cards.

EveryonePrint Installation and Configuration Guide 2016.09.01 Page 92 of 221
See section 3.22 Card server for more information about configuring the card server. Card server
can be configured to look realtime in LDAP for card ID’s.
Card associations can also be imported from a comma separated file (CSV) in the following
format:
username,cardid
For example:
user1,8312A780
user2,686C5966
user2,DB0F2148
One user can have many cards.

EveryonePrint Installation and Configuration Guide 2016.09.01 Page 93 of 221
3.29 Managing Devices
If printers have been added to EveryonePrint, the Devices page will automatically list installed
printers.
Click the edit icon to change settings or send a test print to the selected printer. Click the
delete icon to delete the printer from EveryonePrint.
The dropdown will let you view different settings for the listed printers.
Output printer - The corresponding Windows print queue
Advanced Printer Model - The printer model specified under Advanced Driver Print
Advanced Print Enabled - If Advanced Driver Print is turned on for the device
Printer Email Alias - What, if any, printer email address alias has been configured
External Printer ID - The external Printer ID for the device for use in IPP or LPD
3.29.1 Advanced Driver Print
When Advanced Driver Print is enabled on a print queue, it’s possible to print to the print queue
using any printer driver which is compatible with the destination output device.
Make sure that the printer model description is accurate, so end users choose the proper printer
driver for the output printer.
See section 5 Sending print jobs via Driver for more information about simple versus advanced
driver print.
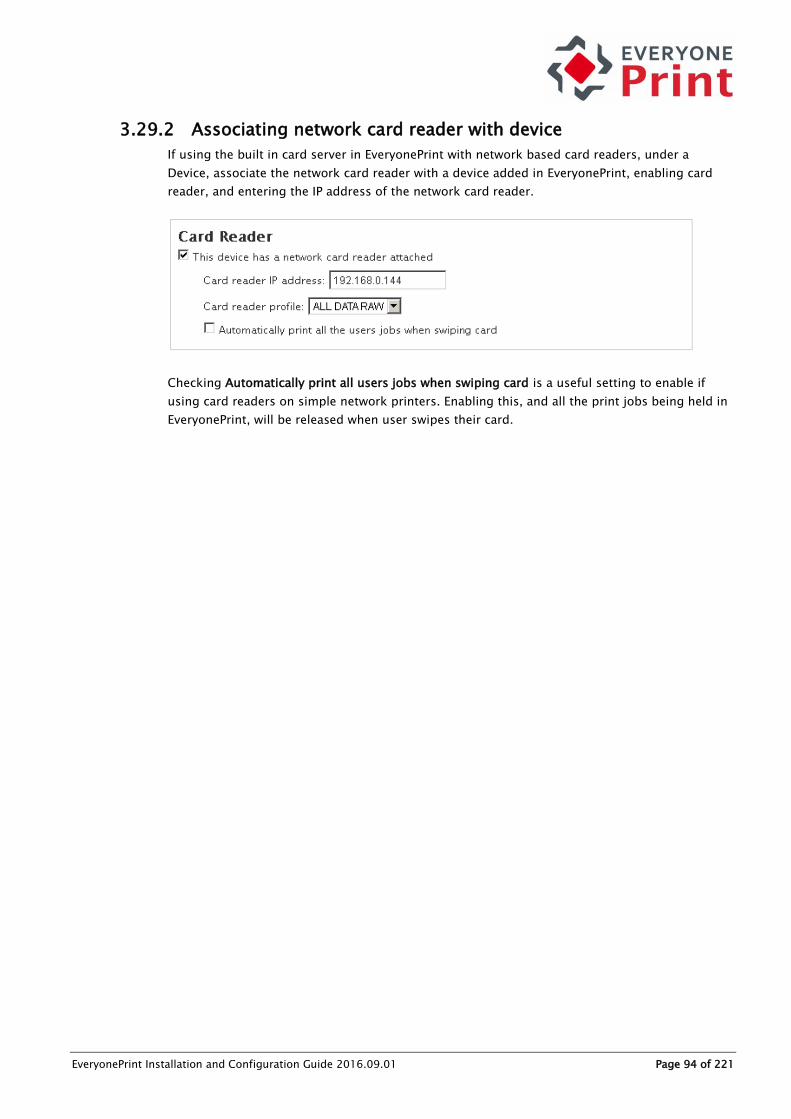
EveryonePrint Installation and Configuration Guide 2016.09.01 Page 94 of 221
3.29.2 Associating network card reader with device
If using the built in card server in EveryonePrint with network based card readers, under a
Device, associate the network card reader with a device added in EveryonePrint, enabling card
reader, and entering the IP address of the network card reader.
Checking Automatically print all users jobs when swiping card is a useful setting to enable if
using card readers on simple network printers. Enabling this, and all the print jobs being held in
EveryonePrint, will be released when user swipes their card.

EveryonePrint Installation and Configuration Guide 2016.09.01 Page 95 of 221
3.29.3 Generate QR codes for easy printer access
Let users easily access print job submission and print job release from their mobile devices, by
printing a QR code for each printer and placing it near the printer. Users can then scan the QR
code at the printer of their choice using their smartphone.
Generate a QR code for a printer device:
1. In EveryonePrint Admin, go to Devices
2. Choose to Edit the device
3. Customize any QR text instructions (CSS and HTML can be entered as well)
4. Click the desired print size: small, medium or large
Small size contains only the QR code and instructions, medium contains smaller QR code,
instructions as well as logo, and large is a full page sheet with logo, large QR code and
instructions.
The logo displayed on the QR code sheet, can be customized by uploading a logo under the Web
Portal settings.
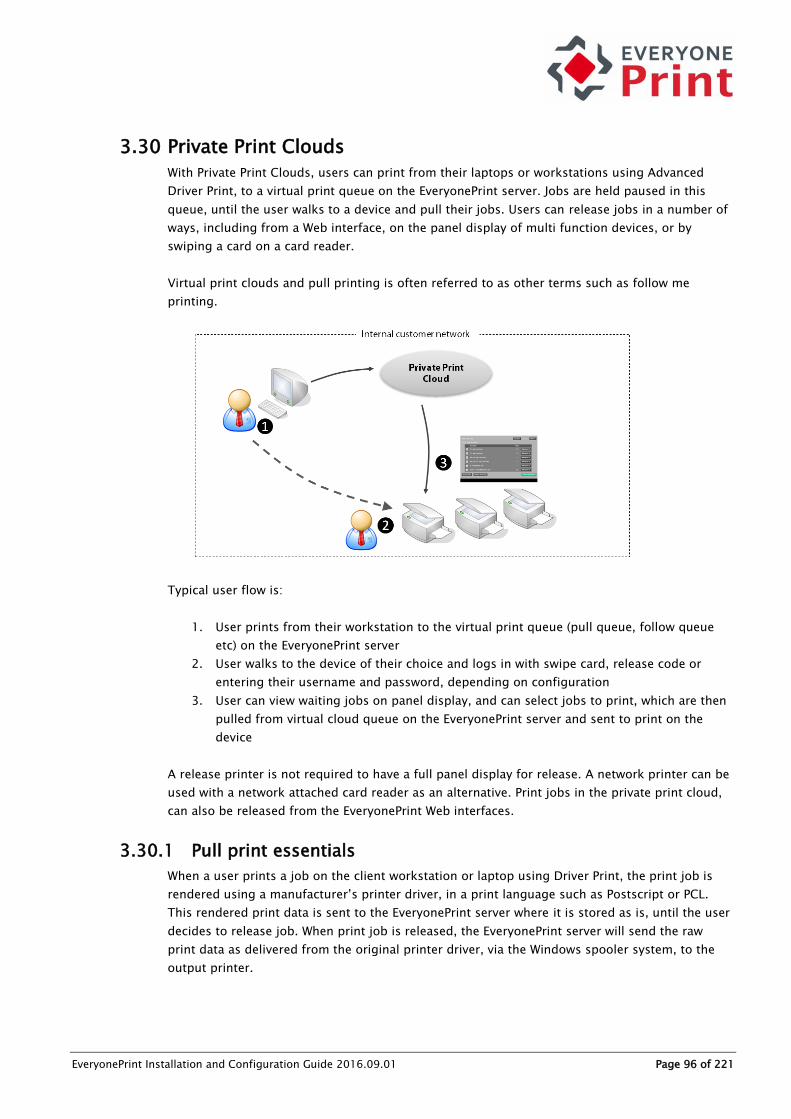
EveryonePrint Installation and Configuration Guide 2016.09.01 Page 96 of 221
3.30 Private Print Clouds
With Private Print Clouds, users can print from their laptops or workstations using Advanced
Driver Print, to a virtual print queue on the EveryonePrint server. Jobs are held paused in this
queue, until the user walks to a device and pull their jobs. Users can release jobs in a number of
ways, including from a Web interface, on the panel display of multi function devices, or by
swiping a card on a card reader.
Virtual print clouds and pull printing is often referred to as other terms such as follow me
printing.
Typical user flow is:
1. User prints from their workstation to the virtual print queue (pull queue, follow queue
etc) on the EveryonePrint server
2. User walks to the device of their choice and logs in with swipe card, release code or
entering their username and password, depending on configuration
3. User can view waiting jobs on panel display, and can select jobs to print, which are then
pulled from virtual cloud queue on the EveryonePrint server and sent to print on the
device
A release printer is not required to have a full panel display for release. A network printer can be
used with a network attached card reader as an alternative. Print jobs in the private print cloud,
can also be released from the EveryonePrint Web interfaces.
3.30.1 Pull print essentials
When a user prints a job on the client workstation or laptop using Driver Print, the print job is
rendered using a manufacturer’s printer driver, in a print language such as Postscript or PCL.
This rendered print data is sent to the EveryonePrint server where it is stored as is, until the user
decides to release job. When print job is released, the EveryonePrint server will send the raw
print data as delivered from the original printer driver, via the Windows spooler system, to the
output printer.
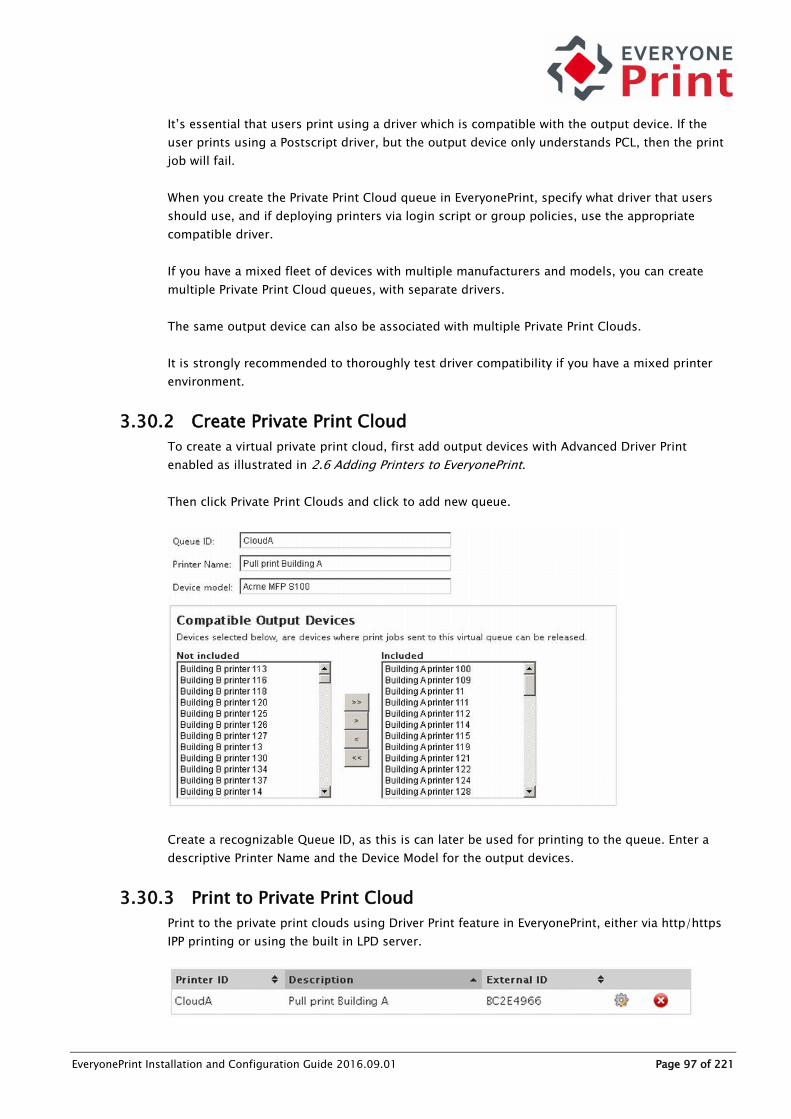
EveryonePrint Installation and Configuration Guide 2016.09.01 Page 97 of 221
It’s essential that users print using a driver which is compatible with the output device. If the
user prints using a Postscript driver, but the output device only understands PCL, then the print
job will fail.
When you create the Private Print Cloud queue in EveryonePrint, specify what driver that users
should use, and if deploying printers via login script or group policies, use the appropriate
compatible driver.
If you have a mixed fleet of devices with multiple manufacturers and models, you can create
multiple Private Print Cloud queues, with separate drivers.
The same output device can also be associated with multiple Private Print Clouds.
It is strongly recommended to thoroughly test driver compatibility if you have a mixed printer
environment.
3.30.2 Create Private Print Cloud
To create a virtual private print cloud, first add output devices with Advanced Driver Print
enabled as illustrated in 2.6 Adding Printers to EveryonePrint.
Then click Private Print Clouds and click to add new queue.
Create a recognizable Queue ID, as this is can later be used for printing to the queue. Enter a
descriptive Printer Name and the Device Model for the output devices.
3.30.3 Print to Private Print Cloud
Print to the private print clouds using Driver Print feature in EveryonePrint, either via http/https
IPP printing or using the built in LPD server.

EveryonePrint Installation and Configuration Guide 2016.09.01 Page 98 of 221
To print to the queue created above via IPP, make sure Driver Print has been configured and
enabled in the EveryonePrint Admin. Then log on to the EveryonePrint end user Web portal, and
choose Driver Print and Advanced.
Select the print queue, and instructions for that queue and operating system will appear.
See section 5 Sending print jobs via Driver for more information about printing using Driver
Print, and more about how to deploy printers to workstations.
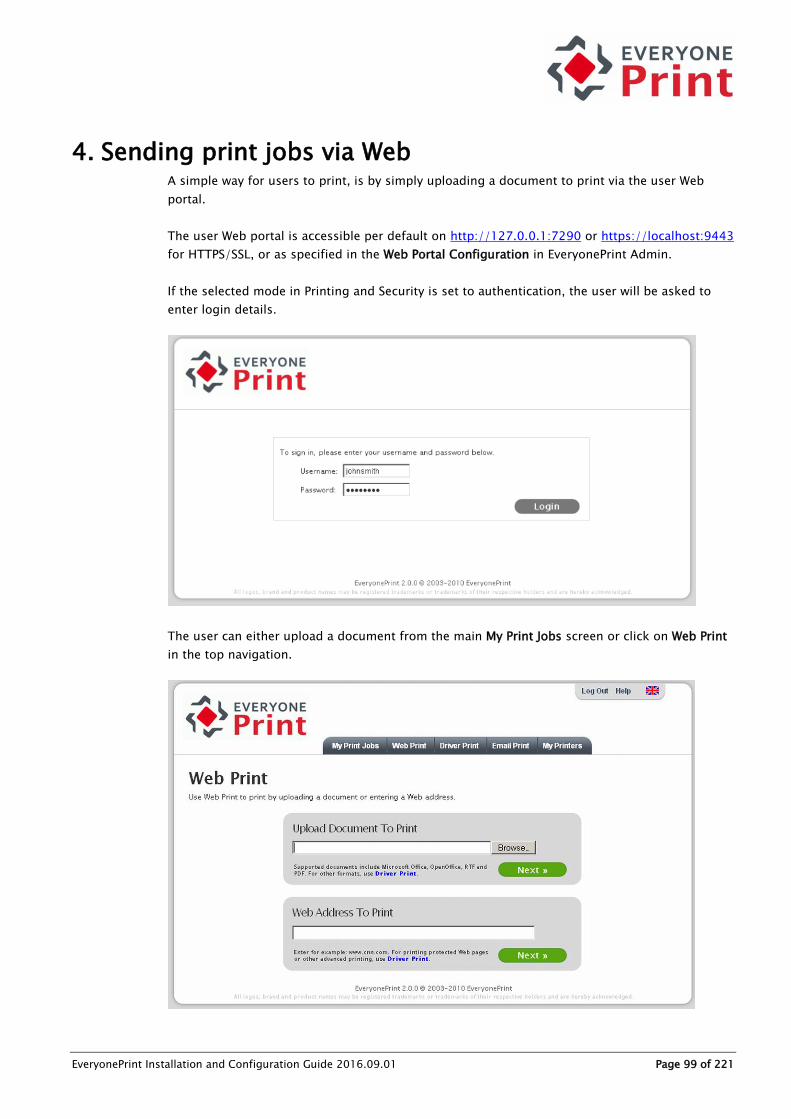
EveryonePrint Installation and Configuration Guide 2016.09.01 Page 99 of 221
4. Sending print jobs via Web A simple way for users to print, is by simply uploading a document to print via the user Web
portal.
The user Web portal is accessible per default on http://127.0.0.1:7290 or https://localhost:9443
for HTTPS/SSL, or as specified in the Web Portal Configuration in EveryonePrint Admin.
If the selected mode in Printing and Security is set to authentication, the user will be asked to
enter login details.
The user can either upload a document from the main My Print Jobs screen or click on Web Print
in the top navigation.

EveryonePrint Installation and Configuration Guide 2016.09.01 Page 100 of 221
Users can upload Microsoft Office (doc, docx, xls, xlsx, ppt, pptx), PDF, TXT and RTF documents.
Simply select the file locally and click Next. The document will be uploaded to the server and
processing begin.
Users can also print Web addresses, such as www.cnn.com or http://www.google.com. The
addresses entered must be publicly accessible. EveryonePrint cannot access URL’s that require
authentication or a specific user session, as EveryonePrint will connect to the URL directly as a
new user and attempt to retrieve the contents.
It’s also possible to print documents by simply entering the Web link to them, so for example, if
a user has a link to a document such as www.acmesoftware.com/brochure.docx, instead of the
user download and then uploading or printing, the user can simply enter that address in the Web
Address To Print and EveryonePrint will download and process the document directly.
After uploading or entering a Web address, the user will be redirected to the My Print Jobs page.
Depending on the configuration in Printing and Security in EveryonePrint Admin, the print job
may or may not be released to a printer immediately. In this example the Privacy with
Authentication mode has been selected, and prints are therefore held in EveryonePrint until
released to a printer.
The user can simply click the button for the printer on which to print the job (or select in
dropdown if many printers are installed).
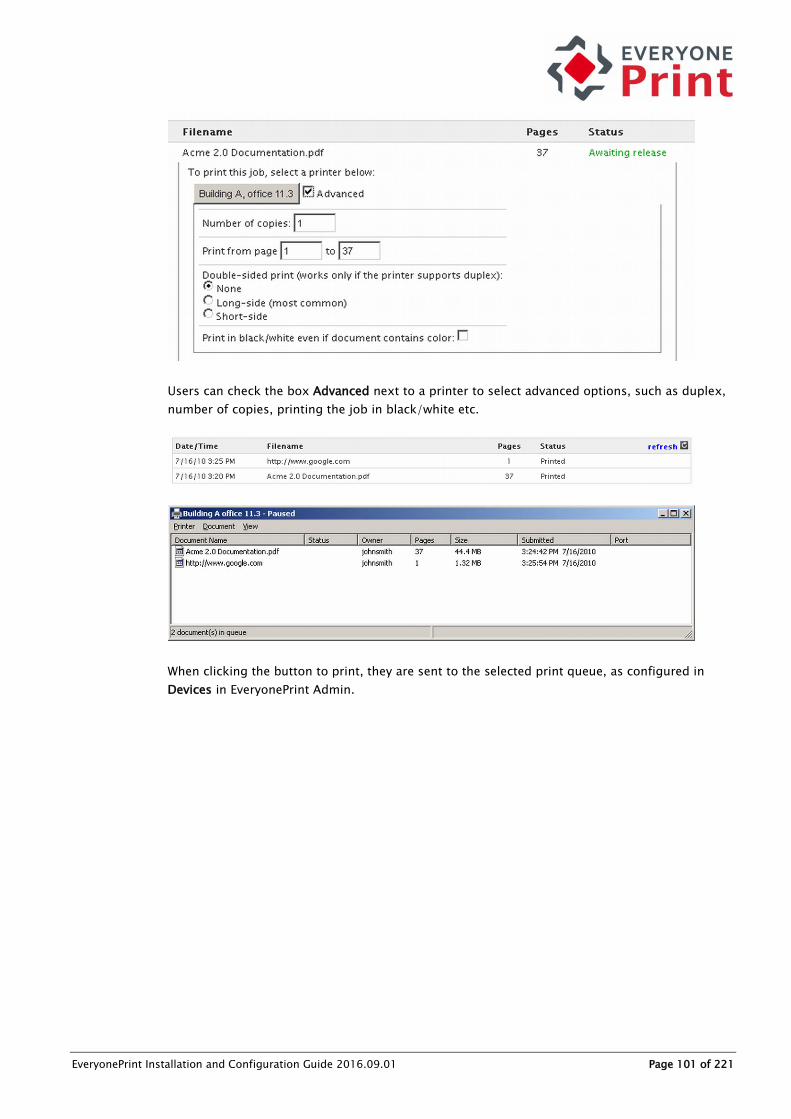
EveryonePrint Installation and Configuration Guide 2016.09.01 Page 101 of 221
Users can check the box Advanced next to a printer to select advanced options, such as duplex,
number of copies, printing the job in black/white etc.
When clicking the button to print, they are sent to the selected print queue, as configured in
Devices in EveryonePrint Admin.

EveryonePrint Installation and Configuration Guide 2016.09.01 Page 102 of 221
5. Sending print jobs via Driver The most efficient method for users that print frequently, is the Driver Print method, that allows
users to print directly from within the programs and applications they use, on Windows, Mac and
Linux.
It lets users print from anywhere, including securely and encrypted across the Internet, if the
network configuration permits it.
Users begin by clicking Driver Print in the top navigation of the user Web portal.
Depending on the configuration chosen in Printing and Security in the EveryonePrint Admin, the
instructions and information in the Driver Print pages will change. In this example Privacy with
Authentication mode is active, and the instructions therefore include driver setup instructions
that include authentication details for the user.
The user first clicks the logo of the platform they’re using, whether it’s Windows, Mac or Linux.
Instructions are included for most common platforms and versions, including Windows, Mac OS
X and Linux (most distributions include CUPS for IPP printing per default, otherwise RPMS is
available from www.cups.org).

EveryonePrint Installation and Configuration Guide 2016.09.01 Page 103 of 221
Step-by-step instructions are provided for the chosen platform, with information tailored to the
specific users authentication information.
Completing the simple step-by-step instructions should take no more than a few minutes, and
is only needed once. The user will now have a printer installed on their computer they can use to
print from anywhere.
In this example, an active mode is chosen where prints are released using the Web interface or a
release terminal.

EveryonePrint Installation and Configuration Guide 2016.09.01 Page 104 of 221
Prints sent via Driver Print appear alongside other prints in the Web interface, ready for release.
5.1 Simple vs. Advanced Driver Print
With simple print, users print using a generic PostScript driver they already have on their
computer. Setup is very quick and simple, users can print without downloading and installing
special drivers. EveryonePrint will convert the PostScript on the server to PDF and store
encrypted. When the user releases the job, the PDF is printed using the correct driver installed on
the EveryonePrint server compatible with the output device.
With advanced print users use a printer driver which is compatible with the printers they want to
print to, which will make it possible to use the advanced features of the output printer, such as
binding and stapling. EveryonePrint does not convert or modify the print data stream when
sending Advanced. It is forwarded as is to the destination print queue, when released.
Users can create multiple printers on their computer for different print queues in the
EveryonePrint system.
5.2 Deploying EveryonePrint printers to workstation PC’s
EveryonePrint can be integrated seamlessly as a secure print solution in existing print and
workstation environments.
Deploying EveryonePrint print queues to workstations involve:
1. Configure device in EveryonePrint with advanced print enabled
2. Create IPP or LPR print queue on print server

EveryonePrint Installation and Configuration Guide 2016.09.01 Page 105 of 221
3. Deploy print queue from print server to workstations using Windows Group Policy or Logon
Script
The following outline applies to Windows environments, but similar procedures can be used in
other environments.
5.2.1 Configure Device in EveryonePrint
Start by configuring a device in EveryonePrint with Advanced Driver Print enabled.
If using EveryonePrint standalone without a print accounting solution, you have the option to
create Private Cloud Print queues, which are virtual printers users can print to, where jobs are
held paused, until the user selects a destination printer, either in the Web interface, or on a
release terminal at a device and pull print jobs.
You can also configure a normal EveryonePrint device for deployment, just by enabling Advanced
Driver Print.
When users print to this queue, the print jobs will automatically be sent directly to the output
queue on the EveryonePrint server, without being paused for release.
5.2.2 Create IPP print queue on print server
To create an IPP based printer to deploy to workstations, ensure that workstation PC’s have the
Windows IPP print client installed (this may not be installed per default depending on domain
policies).
On the Windows print server from where you’re deploying printers, choose to add new printer.
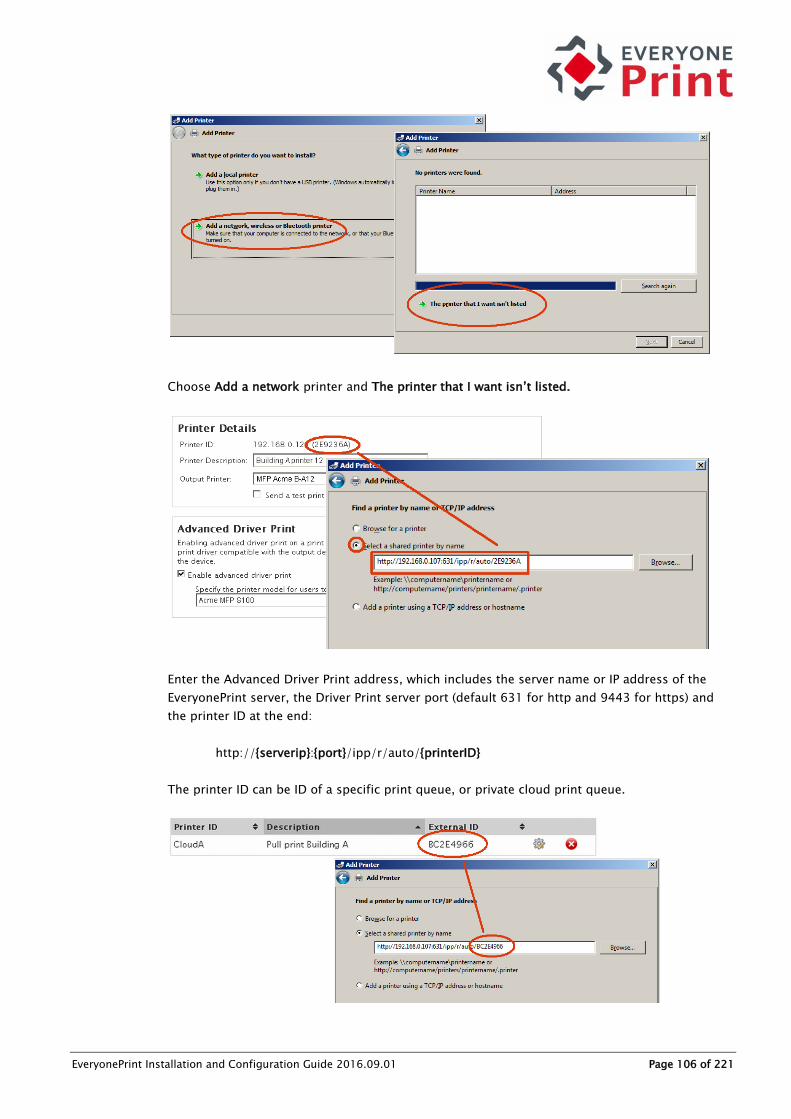
EveryonePrint Installation and Configuration Guide 2016.09.01 Page 106 of 221
Choose Add a network printer and The printer that I want isn’t listed.
Enter the Advanced Driver Print address, which includes the server name or IP address of the
EveryonePrint server, the Driver Print server port (default 631 for http and 9443 for https) and
the printer ID at the end:
http://{serverip}:{port}/ipp/r/auto/{printerID}
The printer ID can be ID of a specific print queue, or private cloud print queue.

EveryonePrint Installation and Configuration Guide 2016.09.01 Page 107 of 221
5.2.3 Create LPR print queue on print server
To create an LPR based print queue on the server for deployment onto workstations, create a
new network printer.
1. Enter the IP address or hostname of the EveryonePrint server
2. Choose Custom Settings
3. Choose LPR printing protocol
4. Enter the printer ID of the queue in EveryonePrint
5. Check the box LPR Byte Counting Enabled
The printer ID can be ID of a specific print queue, or private cloud print queue.
LPR printing using the standard TCP/IP port in Windows, is a widely supported method on most
Windows workstations from Windows XP and onwards.

EveryonePrint Installation and Configuration Guide 2016.09.01 Page 108 of 221
5.2.4 Deploy print queue using Group Policy or Logon Script
With print queues created on the print server, deploy to workstation using Windows Domain
Group Policy or using Logon Script.
Please consult with Microsoft Windows server documentation for more information about using
group policies or logon scripts.

EveryonePrint Installation and Configuration Guide 2016.09.01 Page 109 of 221
6. Sending print jobs via Email If Email Print is enabled in the EveryonePrint Admin, the user Web portal will include a link to
Email Print, containing instructions for the user on how to print via email.
Depending on the configuration chosen in Printing and Security in the EveryonePrint Admin, the
instructions and information in the Email Print pages will change. In this example Privacy with
Release Code mode is active, and the instructions therefore include instructions that include
release codes sent back to the user via email.
Either from a computer, a mobile device or any other email client, the user can compose or
forward an email to the email print address.

EveryonePrint Installation and Configuration Guide 2016.09.01 Page 110 of 221
The EveryonePrint server will collect this email and depending on the settings in Printing and
Security either send back a release code, ask for authentication if it’s a new user, process and
hold or release to direct print queue.
The print job will appear in the Monitor in the Admin. In this example the mode is Privacy with
Release Code and a release code was sent to the user. The print jobs are now awaiting release.

EveryonePrint Installation and Configuration Guide 2016.09.01 Page 111 of 221
6.1 Direct Email Print
EveryonePrint allows for two different methods for sending print jobs directly to a specific output
queue.
6.1.1 Direct Email Print using mail subject
If EveryonePrint is configured for Privacy with Authentication, users can send print jobs from
their mobile device via email, directly to a specific printer, just by entering the name of the
printer in the subject of the email with documents to print, and EveryonePrint will send the print
jobs to the selected queue.
For example:
Subject: P:Building B, office 1
Users can also print directly by
giving their favorite printers a
shorter personal name.
1. Users select their favorite
printers under My Printers
2. Give their printers a simple
name they can remember
and easily enter on thei
mobile device, for example
"x"
3. Enter the printer nickname
in email subject when
sending a job, for example
"P:x"
The print job will then be sent
to the favorite printer the user called "x".

EveryonePrint Installation and Configuration Guide 2016.09.01 Page 112 of 221
6.1.2 Direct Email Print to Printer Email Alias
EveryonePrint supports email addresses for specific printers, making it possible for users to send
print jobs directly to a print queue, simply by emailing a specific email address.
Email forwarding accounts should be created on the email server for each printer, which
forwards emails to the central Email Print account.
EveryonePrint will retrieve email from the central Email Print account, and if an email was sent to
an alias email address, EveryonePrint will immediately forward the print job to the relevant print
queue.
To configure Printer Email Alias:
1. Create email accounts for each printer which forward to main email print account
2. Add the email address to the devices in EveryonePrint Admin
The configuration of email forwarding addresses vary from mail server to mail server.

EveryonePrint Installation and Configuration Guide 2016.09.01 Page 113 of 221
6.1.2.1 Configuring a mail forwarding account on Microsoft Exchange
Configuring forward accounts on Microsoft Exchange involves creating a standard mailbox, then
setting a forwarding address.
Go to the individual printers email account properties, choose Mail Flow Settings then Delivery
Options and finally check the Forward to and choose the main Email Print account. Repeat this
for all individual printer email addresses.
Any emails sent to printer1 in the above example, and Exchange will forward to “print” email
account.
6.1.2.2 Configuring Email Print Alias in EveryonePrint
In the EveryonePrint Admin under each output device, add the email address for each printer.
Any print job now sent to [email protected] will be sent to the Printer 1 queue. The usual
authentication settings apply.

EveryonePrint Installation and Configuration Guide 2016.09.01 Page 114 of 221
7. Sending print jobs from mobile devices EveryonePrint supports printing natively from Apple iOS devices (iPhones and iPads) and Google
Android based smartphones and tables.
Install and configure the
EveryonePrint Mobile Gateway on a
server which is hosted in the same
sub network as the mobile device
clients. This can either be the same
server as the EveryonePrint server
or a different server, depending on
the network configuration.
Once configured, users can print
from any app that can support
printing.
If EveryonePrint is configured to
require users to authenticate or if
EveryonePrint is configured for
release code print, then users must
install the EveryonePrint app from
the iTunes AppStore to authenticate
their mobile print jobs to the
EveryonePrint server.
See the EveryonePrint Mobile
Gateway installation guide for
further details.
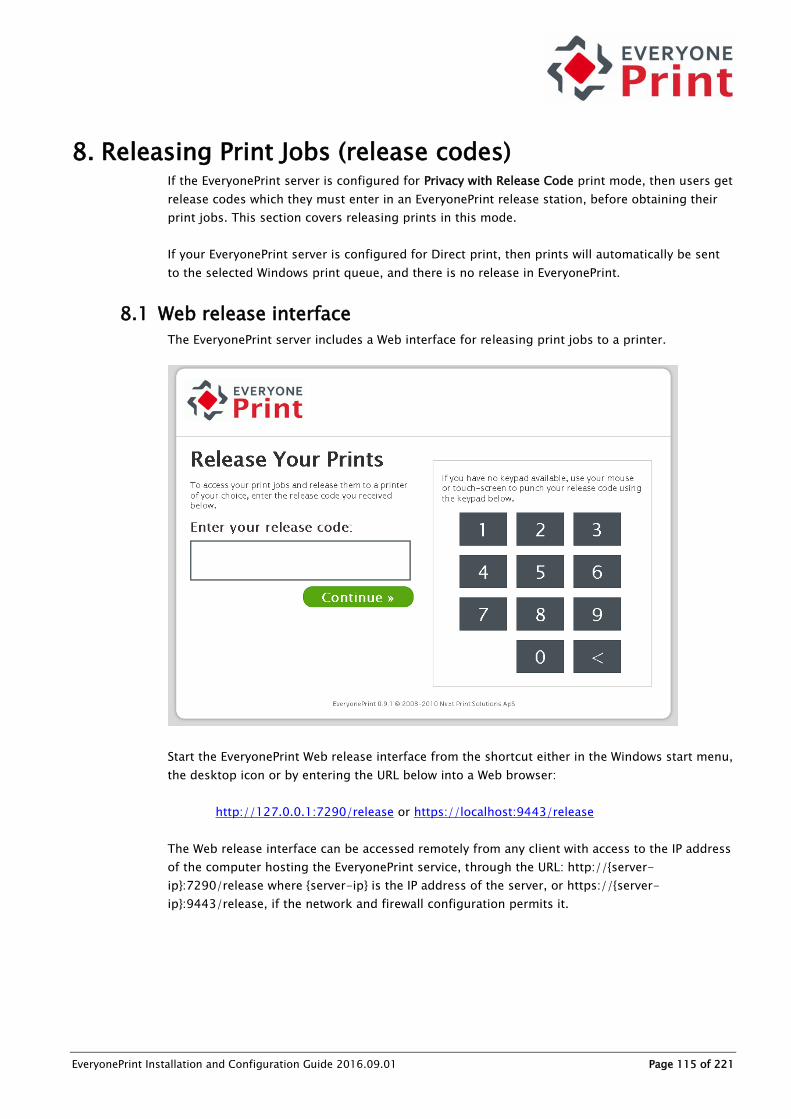
EveryonePrint Installation and Configuration Guide 2016.09.01 Page 115 of 221
8. Releasing Print Jobs (release codes) If the EveryonePrint server is configured for Privacy with Release Code print mode, then users get
release codes which they must enter in an EveryonePrint release station, before obtaining their
print jobs. This section covers releasing prints in this mode.
If your EveryonePrint server is configured for Direct print, then prints will automatically be sent
to the selected Windows print queue, and there is no release in EveryonePrint.
8.1 Web release interface
The EveryonePrint server includes a Web interface for releasing print jobs to a printer.
Start the EveryonePrint Web release interface from the shortcut either in the Windows start menu,
the desktop icon or by entering the URL below into a Web browser:
http://127.0.0.1:7290/release or https://localhost:9443/release
The Web release interface can be accessed remotely from any client with access to the IP address
of the computer hosting the EveryonePrint service, through the URL: http://{server-
ip}:7290/release where {server-ip} is the IP address of the server, or https://{server-
ip}:9443/release, if the network and firewall configuration permits it.

EveryonePrint Installation and Configuration Guide 2016.09.01 Page 116 of 221
Enter the release code:
The documents related to the entered release code is shown, along with the printers available:
Select documents to print and the destination device, and click Print Selected.
The documents have been sent to the printer successfully.

EveryonePrint Installation and Configuration Guide 2016.09.01 Page 117 of 221
8.1.1 Restrict Access to Web release interface
It’s possible to restrict access to the Web release interface to certain IP or IP subnets.
To configure IP access restrictions:
1. Stop the EveryonePrint Web Service
2. Open the EveryonePrint configuration file eop.xml in an editor such as Notepad
3. Find or create the entry <releaseallowediplist></releaseallowediplist>
4. Enter either specific IP addresses or partial IP's separated by comma. Subnets can be
specified by entering only part of the IP address, for example, entering "192.168.10." will
allow access for any IP address starting with "192.168.10.".
Example: 1 address (localhost) and 2 IP subnets: 127.0.0.1,172.1.0.,192.168.10.
Save the eop.xml file and start the EveryonePrint Web Service

EveryonePrint Installation and Configuration Guide 2016.09.01 Page 118 of 221
9. Releasing Print Jobs (authentication) If the EveryonePrint server is configured for Privacy with Authentication then a user can log on to
the user Web portal to release their print jobs in the My Print Jobs page, or release at a release
terminal using their username and password.
The user Web portal is accessible per default on http://127.0.0.1:7290 or https://localhost:9443
for HTTPS/SSL, or as specified in the Web Portal Configuration in EveryonePrint Admin.
The My Print Jobs page contains all the users print jobs sent via Web, Driver or Email, for a
simple and consistent experience for the user.
9.1 Users selecting favorite printers in My Printers
If using the Privacy with Authentication mode in Printing and Security, a navigation item in the
user portal called My Printers appear.

EveryonePrint Installation and Configuration Guide 2016.09.01 Page 119 of 221
The My Printers page allows users to select certain printers as their favorite printers, to show
only printers relevant to them in the My Print Jobs page.
This feature is useful if the printer list includes many printers.
10. Using Device Groups Device Groups in EveryonePrint is a highly useful feature for either grouping devices in a long
list, for example by department, location or similar, or to limit what printers are shown and
available to users.
This section covers two different configuration examples.
Device Groups are only relevant for Privacy modes, Privacy with Release Code or Privacy with
Authentication. If a Direct Print mode is used, the device group settings are ignored, as prints
are released directly to a print queue.
10.1 Example 1: Grouping devices for more friendly viewing
For better using long list of printers, it can be helpful to users, if printers are grouped by
department, location or similar.

EveryonePrint Installation and Configuration Guide 2016.09.01 Page 120 of 221
Create Device Groups by going to Device Groups in EveryonePrint Admin, and click Add New
Device Group.
Enter a friendly name for the group, leave external group name empty for this first example, and
select the devices that should be included in the group, and save changes. Repeat for each
group.
Notice how printers can appear in multiple groups. In above example, Printer C, appears in both
Department A and B.
Now when users see printer listings in the EveryonePrint Web interfaces, they are grouped as
above.

EveryonePrint Installation and Configuration Guide 2016.09.01 Page 121 of 221
10.2 Example 2: Limit what printers are visible
To limit the visibility of printers to specific users, a simple LDAP attribute can be used where
groups are entered as a comma delimited list, or alternatively using the Windows security group
membership features in a Windows Active Directory.
10.2.1 Using simple LDAP attribute
The following describes using a simple LDAP attribute, with device groups entered as comma
delimited list.
In the above example User1 should only be able to view printers in Department A and B, and
User2 can view printers in Department C.
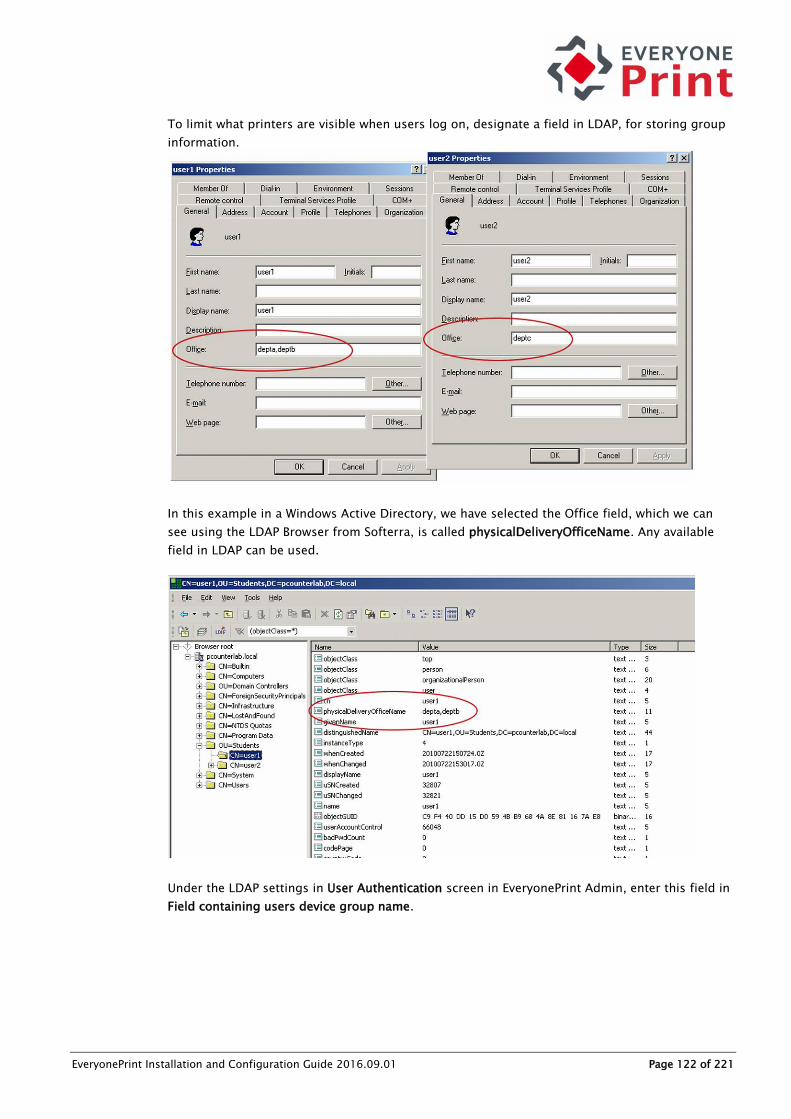
EveryonePrint Installation and Configuration Guide 2016.09.01 Page 122 of 221
To limit what printers are visible when users log on, designate a field in LDAP, for storing group
information.
In this example in a Windows Active Directory, we have selected the Office field, which we can
see using the LDAP Browser from Softerra, is called physicalDeliveryOfficeName. Any available
field in LDAP can be used.
Under the LDAP settings in User Authentication screen in EveryonePrint Admin, enter this field in
Field containing users device group name.

EveryonePrint Installation and Configuration Guide 2016.09.01 Page 123 of 221
To associate the “depta” and “deptb” from LDAP with an actual Device Group in EveryonePrint,
either add or edit Device Groups, and enter the relevant group name under External Group
Name.

EveryonePrint Installation and Configuration Guide 2016.09.01 Page 124 of 221
User1 we had given permission to both depta and deptb (separated with comma in LDAP field),
and when user1 now logs on, user1 can see only those printers from “depta” and “deptb”.
10.2.2 Using Windows Active Directory Group membership
For easier management of users association with different groups, the Windows global security
groups can be used.
In this example we will create 3 groups of printers in EveryonePrint, create equivalent Windows
groups and make User1 a member of only Department A and Department B, for access only to
those department printers.

EveryonePrint Installation and Configuration Guide 2016.09.01 Page 125 of 221
First we must configure the LDAP authentication to look in the memberOf attribute of the LDAP
server (Active Directory).
Note that using Windows group memberships for printer grouping, requires that the group
membership attribute in LDAP is called memberOf. The attribute name can be confirmed with an
LDAP browser tool such as Softerra LDAP Browser.
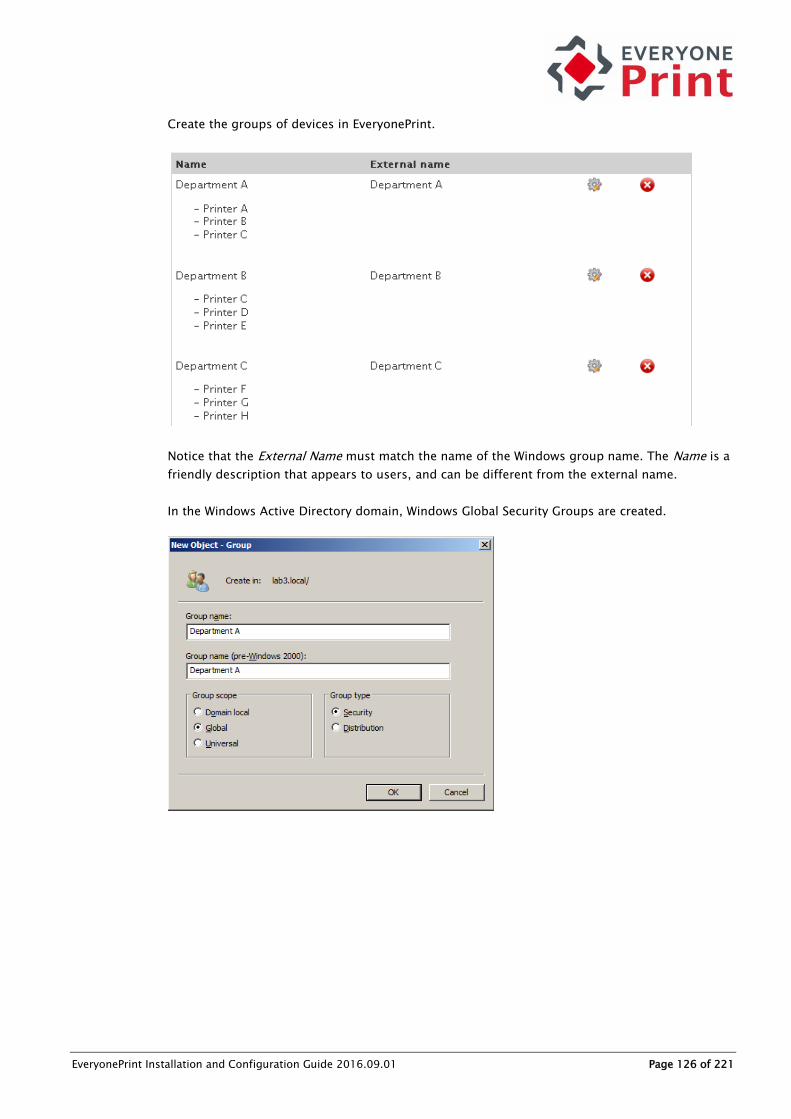
EveryonePrint Installation and Configuration Guide 2016.09.01 Page 126 of 221
Create the groups of devices in EveryonePrint.
Notice that the External Name must match the name of the Windows group name. The Name is a
friendly description that appears to users, and can be different from the external name.
In the Windows Active Directory domain, Windows Global Security Groups are created.

EveryonePrint Installation and Configuration Guide 2016.09.01 Page 127 of 221
User1 is made member of Department A and B.
Now when User1 logs on to EveryonePrint and submits a document, only the printers of selected
groups are available.
EveryonePrint Installation and Configuration Guide 2016.09.01 Page 128 of 221
11. Using SSL with EveryonePrint SSL, or Secure Socket Layer, allows Web browsers and Web servers to communicate over a
secured connection using the HTTPS protocol where both the server and the browser encrypt
data before transmission.
To establish an SSL encrypted connection between a client browser and the EveryonePrint
embedded Web server, the EveryonePrint server must have an SSL certificate configured.
What is an SSL certificate?
A certificate is a document which describes a network host's identity. It contains, among others,
the DNS name of the host, the name and ID of the certificate issuer, an expiry date and a digital
signature.
Certificates are created together with a host's private key. The certificate is either self-signed or
signed by a certification authority (CA). Safe communication requires the certificate to be signed
by a CA. Basically, a self-signed certificate can never be used to verify the identity of a server,
but it can be used to seed the ciphers used to encrypt communication. For this reason, self-
signed certificates are often used in test systems, but seldom in production systems.
Official CAs sign public certificates for a certain price. Well-known official CAs are Thawte
(http://www.thawte.com/), GeoTrust (http://www.geotrust.com/) and Verisign
(http://www.verisign.com/). To obtain a CA signed certificate, a "certificate request" (unsigned
certificate) is generated and sent to CA’s as part of the SSL certificate purchase process.
All major Web browsers, such as Internet Explorer, Firefox etc, access a local database
containing the certificates of the official CAs. CA signed certificates can only be verified by this
local database that contains trusted CA certificates.
It is quite possible to set up one's own local CA and use that to sign servers' certificates.
Although this avoids the expense of using an official CA, all clients must then have a local copy
of your own CA's SSL certificate.
What is a certification authority (CA)?
A certification authority (CA) is a trusted third party that two Internet hosts can use to verify the
identity of their peers.
Every CA has its own SSL certificate, and this certificate must be known for all applications that
use the CA to verify certificates. Most operating systems are bundled with a file containing such
certificates, so most PC’s and Web browsers already know CA’s that can be trusted.
What is a private key?
A private key is a string of arbitrary data that is secret for the host on which it was generated.
This key is used to encrypt the data sent from the host. No two SSL hosts should share the same
private key, as this greatly degrades the level of security. If the private key is compromised, the
encrypted link will no longer be safe.
The private key ensures that the data transmitted to and from the host is infeasible to decode
even if the algorithms used to produce the cipher are known.

EveryonePrint Installation and Configuration Guide 2016.09.01 Page 129 of 221
11.1 Obtaining an SSL certificate from a trusted Certificate
Authority
The following is a step-by-step guide on how to obtain a certificate from a trusted Certificate
Authority. In this example the certificate will be created for the EveryonePrint demo server, on
the domain demo.everyoneprint.com using GeoTrust as the Certificate Authority.
The free Keystore Explorer tool available at http://keystore-explorer.sourceforge.net, will be
used in this guide. For experienced users, the Keytool included in C:\Program
Files\EveryonePrint\jre\bin can also be used, however this guide will focus entirely on the easier
GUI based application Keystore Explorer.
This guide will assume that this configuration is done on a working and configured EveryonePrint
server.
11.1.1 Create new keystore and generate private key
Begin by creating a new keystore that will contain our certificate. Open the Keystore Explorer
tool, and choose to create a new keystore of the type JKS (Java Key Store).
Next with an empty keystore open, choose to create new key pair. Choose RSA and key size
2048.

EveryonePrint Installation and Configuration Guide 2016.09.01 Page 130 of 221
When prompted, choose Version 3, MD5 with RSA and validity of 10 years. This doesn’t
determine the expiration of the final SSL certificate, but only the validity of the key pair. Choose
the Edit Name button.
Enter the details of the SSL certificate.
Common name is the FQDN (fully qualified domain name), the exact Web URL that users will use
to access the EveryonePrint server. This could be print.company.com or similar. Make sure the
CN is correct matching your DNS, or you will have to issue a new certificate.
OU means the department or similar. O is the company name; L is for example the city; ST
means the Country or State, C is the country code and finally email is a working email address
belonging to the domain.
When clicking OK, enter an “alias” which is just an internal recognizable name for the certificate.
Using the CN is best practice.

EveryonePrint Installation and Configuration Guide 2016.09.01 Page 131 of 221
Finally, you’re prompted for a key password. This must be a password that is kept secret, not
shared with anyone, used later for the configuration of EveryonePrint.
You’re now ready to create the “Certificate Signing Request” which the Certificate Authority (SSL
issuer) will need to create a signed certificate.
Right click the key pair entry and choose Generate CSR.
Under Signature Algorithm, choose MD5 with RSA. Leave Challenge blank, as this is not needed.
For CSR, choose where to save the CSR request. In this example we choose to save it to desktop
as a txt file as we will need to open and copy text from this later.

EveryonePrint Installation and Configuration Guide 2016.09.01 Page 132 of 221
Clicking OK and a mycsr.txt is created on the desktop. Open the file and you can see the full CSR
request as an encrypted string.
For this demonstration we’re using GeoTrust to create us a 30 day free test SSL certificate
(http://www.freessl.com).
As part of the purchasing process, the CSR is supplied, simply by pasting the entire contents of
the CSR generated on the server.

EveryonePrint Installation and Configuration Guide 2016.09.01 Page 133 of 221

EveryonePrint Installation and Configuration Guide 2016.09.01 Page 134 of 221
Each certificate authority has their own way of validating the request. Some use a phone call
verification.
Following approval and completed purchase, the CA will either send the certificate via email, or
will let you download the certificate from a Web site.
Most CA’s use an intermediate certificate, between their CA root certificate, which is known by
the server and client PC, and the certificate issued. All certificates must be chained, in order to
establish the trust of the certificate generated for the server. If only the Web server certificate is
imported without chain through intermediate certificates, the client browser will see the
certificate as invalid/untrusted.

EveryonePrint Installation and Configuration Guide 2016.09.01 Page 135 of 221
In this example, GeoTrust delivered an intermediate certificate and the Web server certificate,
both saved as .cer files on the desktop.
Certificates must be chained before importing into the keystore created for EveryonePrint server.
The easiest way to establish a chain between certificates, is to use the Windows certificate store.
Simply double-click each certificate file you received from the CA. Make sure you choose to
import any root and intermediate certificates first, or the web server certificate may not be
chained properly!

EveryonePrint Installation and Configuration Guide 2016.09.01 Page 136 of 221
Import all certificates like this, ending with the Web server certificate. Confirm that the Web
server certificate appear as trusted.
Verify that the certificate has the proper chain from Web server all the way up to root.

EveryonePrint Installation and Configuration Guide 2016.09.01 Page 137 of 221
With the import and chaining complete, we can now export the certificate to a file, which we can
import into the keystore file created for EveryonePrint.
Choose Copy to file.. and as export file format choose .P7B and make sure to check to include all
certificates in the path.

EveryonePrint Installation and Configuration Guide 2016.09.01 Page 138 of 221
Save as .p7b file
Now return to the Keystore Explorer tool with the private key pair created in the beginning.
Right-click this entry and choose Import CA Reply.

EveryonePrint Installation and Configuration Guide 2016.09.01 Page 139 of 221
Confirm the certificate chain by right clicking and choosing View Certificate.
Now save the keystore file and set a password on the keystore, if prompted.
The last step is to instruct the EveryonePrint Web server to use the new keystore. Open the jetty-
ssl.xml file stored in the folder C:\Program Files\EveryonePrint\etc
Restart the EveryonePrint Web service, and open up a browser and confirm the SSL certificate is
working, by loading the https version of the URL, for example https://demo.everyoneprint.com

EveryonePrint Installation and Configuration Guide 2016.09.01 Page 140 of 221
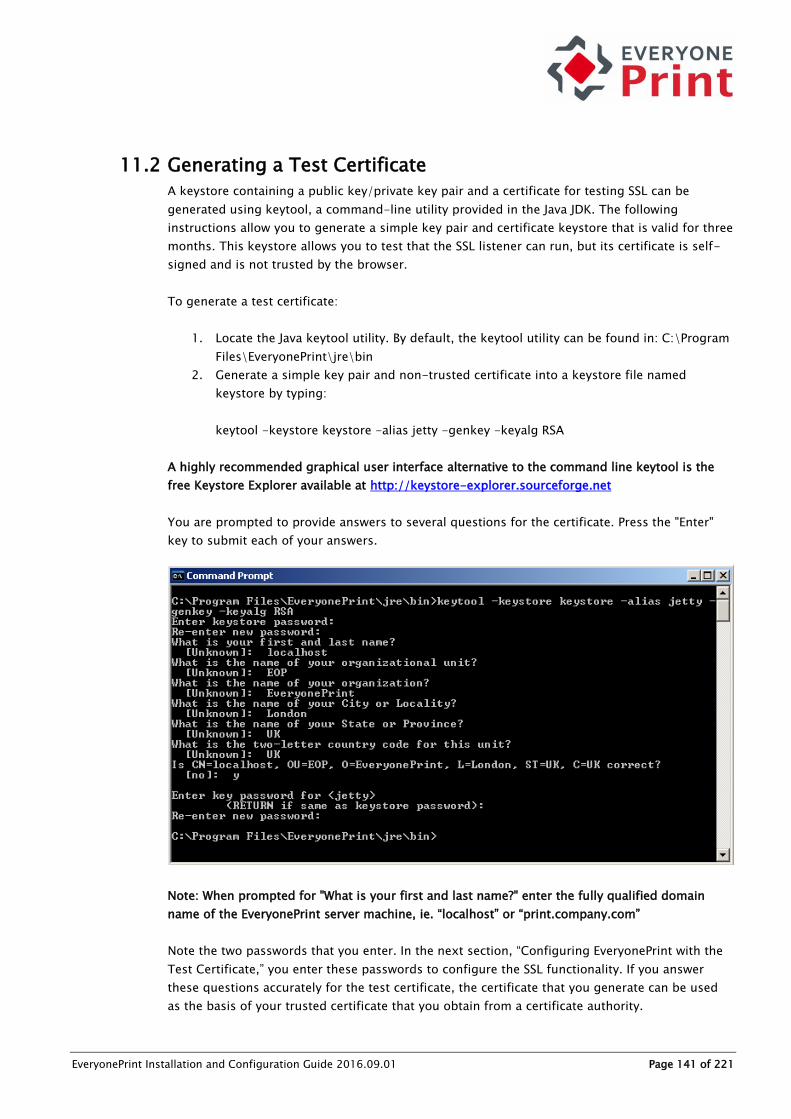
EveryonePrint Installation and Configuration Guide 2016.09.01 Page 141 of 221
11.2 Generating a Test Certificate
A keystore containing a public key/private key pair and a certificate for testing SSL can be
generated using keytool, a command-line utility provided in the Java JDK. The following
instructions allow you to generate a simple key pair and certificate keystore that is valid for three
months. This keystore allows you to test that the SSL listener can run, but its certificate is self-
signed and is not trusted by the browser.
To generate a test certificate:
1. Locate the Java keytool utility. By default, the keytool utility can be found in: C:\Program
Files\EveryonePrint\jre\bin
2. Generate a simple key pair and non-trusted certificate into a keystore file named
keystore by typing:
keytool -keystore keystore -alias jetty -genkey -keyalg RSA
A highly recommended graphical user interface alternative to the command line keytool is the
free Keystore Explorer available at http://keystore-explorer.sourceforge.net
You are prompted to provide answers to several questions for the certificate. Press the "Enter"
key to submit each of your answers.
Note: When prompted for "What is your first and last name?" enter the fully qualified domain
name of the EveryonePrint server machine, ie. “localhost” or “print.company.com”
Note the two passwords that you enter. In the next section, “Configuring EveryonePrint with the
Test Certificate,” you enter these passwords to configure the SSL functionality. If you answer
these questions accurately for the test certificate, the certificate that you generate can be used
as the basis of your trusted certificate that you obtain from a certificate authority.

EveryonePrint Installation and Configuration Guide 2016.09.01 Page 142 of 221
The generated keystore file is located in the directory in which you ran the keytool. If
connections to EveryonePrint come only from inside your organization, a nonexpiring, self-
signed certificate that is added to each internal user’s Web browser certificate store may be
adequate. See the options for keytool to generate a nonexpiring, self-signed certificate.
11.2.1 Configuring EveryonePrint with the Test Certificate
To configure EveryonePrint with the test certificate you just generated, you will copy the keystore
into the EveryonePrint directory structure, make a configuration change in a Web configuration
file, then restart EveryonePrint Web services.
1. Copy the keystore file, keystore, to EveryonePrint\etc. (C:\Program
Files\EveryonePrint\etc)
2. Open the configuration file jetty-ssl.xml located in the folder \etc (C:\Program
Files\EveryonePrint\etc)
3. Change the password, keyPassword and trustPassword values to the passwords chosen
when generating the certificate.
4. If you want the port to be something other than 9443, change the Port value.
5. Save the file and restart EveryonePrint Web service.
If you are already running a Web server with SSL encryption enabled on the same server on which
EveryonePrint is installed, it will be necessary to change the port on which SSL is running for
either EveryonePrint or the other Web service. SSL default listens on port 9443. Change to a
different port in jetty-ssl.xml and restart EveryonePrint Web services if there is a port conflict.
11.2.2 Verifying the Test Certificate
Now that you have reconfigured EveryonePrint to accept HTTPS requests and restarted it, verify
that you can log in to EveryonePrint using HTTPS.
1. Open a browser and type the following URL. Use the fully qualified domain name for host
that you specified when you generated the keystore. Replace 9443 with the HTTPS port
number you configured.

EveryonePrint Installation and Configuration Guide 2016.09.01 Page 143 of 221
https://localhost:9443/admin
2. Because you generated the certificate yourself, a dialog box appears, warning that the
EveryonePrint Web site is certified by an unknown authority. Choose to accept this
certificate temporarily for this session and select OK. The login page for EveryonePrint
Admin is displayed.
11.3 Import SSL certificates for LDAPS or mail servers
The following describes a very simple way to import SSL certificates from remote LDAP or mail
servers.
If you'd like to connect to an LDAP/Active Directory or mail server over SSL, and the certificate is
not issued by a trusted Certificate Authority, then the connection will fail with an SSL error, that
typically looks like:
To establish a trusted SSL connection to the remote LDAP/AD or mail server, the SSL certificate
from the remote server must be imported into the SSL Keystore in EveryonePrint.
EveryonePrint uses Java keystores, so any Keystore management tool, can be used, but
EveryonePrint includes 2 simple command line scripts, that makes it very easy to import remote
certificates.
The scripts below work identical for LDAPS and mail server certificates, just enter the
corresponding port:
LDAPS SSL: port 636
POP3 SSL: port 995
IMAP SSL: 993
Exchange Web Services: 443
First, on the EveryonePrint server, open a command as administrator and change to the
EveryonePrint directory
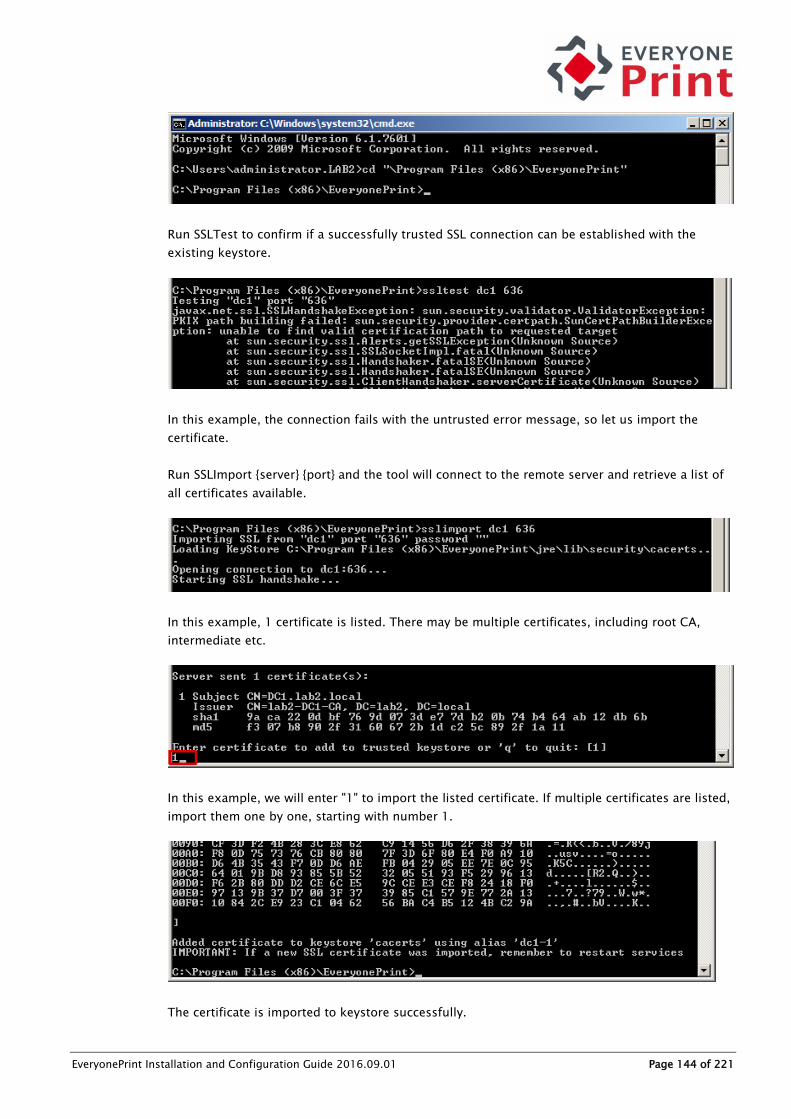
EveryonePrint Installation and Configuration Guide 2016.09.01 Page 144 of 221
Run SSLTest to confirm if a successfully trusted SSL connection can be established with the
existing keystore.
In this example, the connection fails with the untrusted error message, so let us import the
certificate.
Run SSLImport {server} {port} and the tool will connect to the remote server and retrieve a list of
all certificates available.
In this example, 1 certificate is listed. There may be multiple certificates, including root CA,
intermediate etc.
In this example, we will enter "1" to import the listed certificate. If multiple certificates are listed,
import them one by one, starting with number 1.
The certificate is imported to keystore successfully.

EveryonePrint Installation and Configuration Guide 2016.09.01 Page 145 of 221
Restart the EveryonePrint Web service, for the certificate keystore to be reloaded. This can be
done either via Windows services or via the command line:
Now the SSL connection can be established successfully.
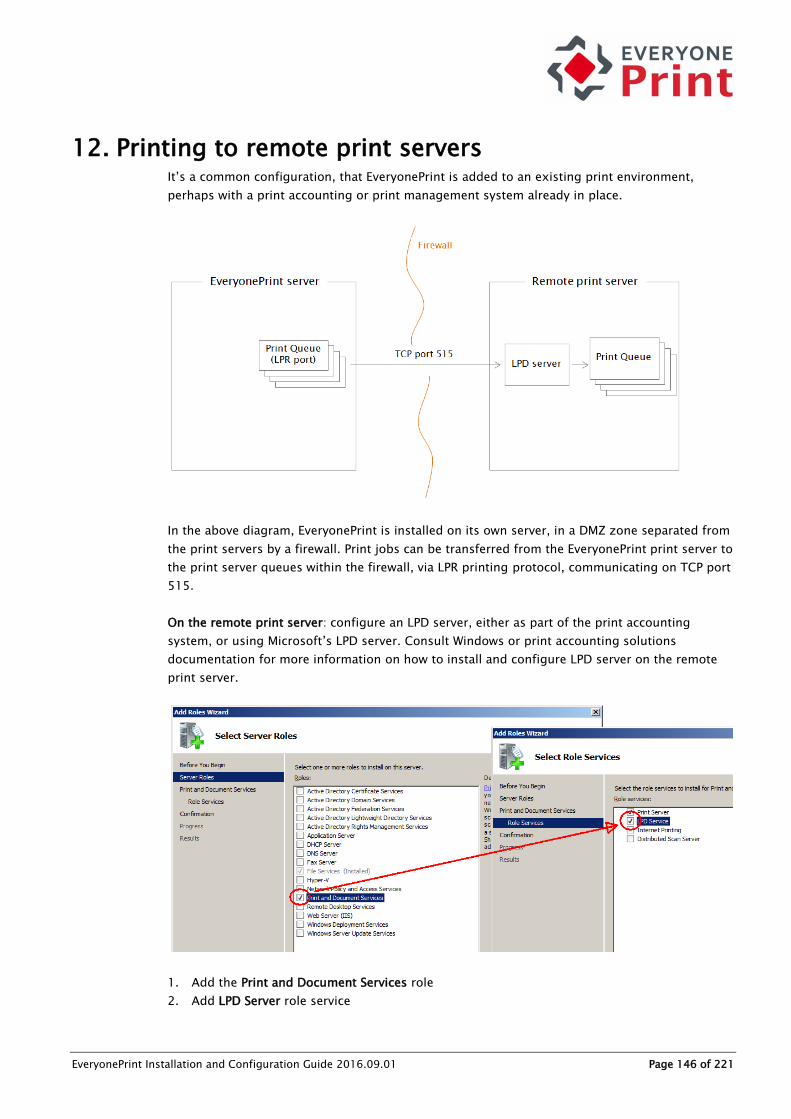
EveryonePrint Installation and Configuration Guide 2016.09.01 Page 146 of 221
12. Printing to remote print servers It’s a common configuration, that EveryonePrint is added to an existing print environment,
perhaps with a print accounting or print management system already in place.
In the above diagram, EveryonePrint is installed on its own server, in a DMZ zone separated from
the print servers by a firewall. Print jobs can be transferred from the EveryonePrint print server to
the print server queues within the firewall, via LPR printing protocol, communicating on TCP port
515.
On the remote print server: configure an LPD server, either as part of the print accounting
system, or using Microsoft’s LPD server. Consult Windows or print accounting solutions
documentation for more information on how to install and configure LPD server on the remote
print server.
1. Add the Print and Document Services role
2. Add LPD Server role service

EveryonePrint Installation and Configuration Guide 2016.09.01 Page 147 of 221
On the EveryonePrint server: create LPR printer queues, which point to equivalent queues on the
remote print server.
1. Enter the IP address/hostname of the remote print server with LPD server
2. Choose custom settings
3. Choose LPR print protocol
4. Enter the print queue name on the remote server (avoid spaces or special characters)
5. Select LPR byte counting enabled
Choose the same driver on this LPR print queue, as on the remote print server print queue.
The created LPR print queue on the EveryonePrint server, can then be added to EveryonePrint via
the EveryonePrint Admin -> Devices. When users print to this queue, it will be spooled and then
transferred via LPR to the remote print server.

EveryonePrint Installation and Configuration Guide 2016.09.01 Page 148 of 221
13. Installing document support applications The following sections apply to those not using the built-in conversion engines, but wish to use
external applications for specific formats, such as the Microsoft Office engine for converting and
printing Office documents, Word, Excel and PowerPoint.
13.1 Install Microsoft Office 2007, Office 2010 or Office 2013
If using Microsoft Office for conversion, Office 2007 SP2, Office 2010 or Office 2013 must be
installed.
13.1.1 Install Microsoft Office 2007, Office 2010 or Office 2013
The following section refers to Office 2013, but the same instructions apply to Office 2007 and
2010.
First, install Microsoft Office 2007 SP2, 2010 or 2013 with at least Word, Excel and PowerPoint.
By default all necessary programs are installed, but the installation can be customized to only
install programs to use.
There is no need to install any other Office suite programs, such as OneNote, Access or similar.

EveryonePrint Installation and Configuration Guide 2016.09.01 Page 149 of 221
If you customize the installation, make sure that Fonts and Additional TrueType Fonts under
Office Shared Features are installed, for broadest font support. And make sure that Visual Basic
for Applications is also installed.
13.1.2 Open Microsoft Word
After installation it is necessary to open Microsoft Word, as it shows a dialog which will otherwise
prevent printing.

EveryonePrint Installation and Configuration Guide 2016.09.01 Page 150 of 221
Uncheck all Privacy Options.
To avoid Office restarting and doing server reboots on its own, disable automatic update service.
Now exit and reopen Word. If Word opens to a blank page, you have completed the Office
installation.
For any issues with Microsoft Office conversion, refer to the troubleshooting section, at
the end of this guide, for step-by-step troubleshooting tips.
13.2 Install OpenOffice 3.x
Installing OpenOffice is optional, it is only needed if OpenOffice should do the conversion and
printing of OpenOffice documents (odt, ods and odp).
13.2.1 Installing OpenOffice 3.3.0
It is recommended to install the standard version of OpenOffice which includes JRE (Java Runtime
Engine). Filename of downloaded installer file is for example: OOo_3.4.0_Win_x86_install-
wJRE_en-US.exe. Make sure the installation is done as a local administrator user.

EveryonePrint Installation and Configuration Guide 2016.09.01 Page 151 of 221
During installation, choose Custom setup type.
Under OpenOffice Program Modules, select to install only Writer, Calc and Impress.
Under Optional Components scroll to the bottom and for the component Quickstarter, choose
This feature will not be available, so the Quickstarter is not installed.

EveryonePrint Installation and Configuration Guide 2016.09.01 Page 152 of 221
Continue the rest of the installation with default settings.
These are installed with the standard installation. Other OpenOffice programs are not supported
and therefore not needed, but can be installed.
13.2.2 Open Writer
After installation it is necessary to open OpenOffice Writer, as a dialog is shown on first launch,
which will otherwise prevent proper conversion.
During the setup wizard, uncheck the option Check for updates automatically and choose to not
register.

EveryonePrint Installation and Configuration Guide 2016.09.01 Page 153 of 221
Now open and close OpenOffice. Then re-open OpenOffice Writer and the following dialog will
show.
Choose No, I do not wish to participate and click OK, and OpenOffice will open. Close and the
installation of OpenOffice is complete.

EveryonePrint Installation and Configuration Guide 2016.09.01 Page 154 of 221
14. EveryonePrint clustering for high-availability and
high scalability With the EveryonePrint clustering features, it’s possible to configure EveryonePrint for enterprise
scalability through load balancing, multi-server deployments and high-availability through
failover and redundancy.
The cluster configuration options are many, some typical configuration would be:
1. High availability redundancy with multiple servers in failover cluster
Primary servers in a failover cluster configuration, with 1 active primary server and any
number of passive standby server node(s) in case the active fails.
2. High scalability with many additional servers for load balancing and job processing

EveryonePrint Installation and Configuration Guide 2016.09.01 Page 155 of 221
A single primary server and any number of additional secondary servers for load balancing
and job processing for very high print job volumes.
3. High availability and high scalability combining both failover clustering and load balancing.
A configuration for highest availability and redundancy, and highest scalability for very large
job processing, with multiple primary servers in a failover cluster and multiple secondary
servers for scalability behind a load balancer.
The configuration possibilities with high availability and scalability are endless, and these
examples and guides are for common configurations only. For the best configuration for a
particular project, please contact your EveryonePrint specialist for guidance and
recommendation.
14.1 Cluster Servers Overview
When an EveryonePrint server starts up and connects to the EveryonePrint database, it will
register itself in the EveryonePrint system.

EveryonePrint Installation and Configuration Guide 2016.09.01 Page 156 of 221
Servers are continually checked for status. If a server fails, an alert is shown in the view and a
notification email is sent to the administrator notification email address, if configured.
Clicking the address of the server, will open a new browser window with the destination servers
administration interface.
14.1.1 Server Types
There are 2 types of servers:
Primary Servers – Primary servers run all the EveryonePrint Web, Print and Database services, and
manages overall internal processes as well as licensing when using Enterprise licenses. A single
EveryonePrint server installation will always run as a primary server.
IMPORTANT! There must only be 1 active primary server in a cluster configuration, as the
primary server run essential database and management tasks.
Secondary Servers – Secondary servers run the EveryonePrint Web and Print services, and are
designed to be additional servers for load balancing, additional job processing and printing, or
additional servers configured for specific roles, such as servers dedicated to downloading emails
and similar.
Functions possible Primary Secondary
Web services Yes Yes
Print Service Yes Yes
Database Service Yes No
Job conversion and printing Yes Yes
Web Print Yes Yes
Driver Print Yes Yes
Email Print Yes Yes
Mobile Print Yes Yes
Google Cloud Print Yes No
Management of Devices Yes No
Configuration of Wide Area Mobile Print Yes No
Google Cloud Print services run only from the Primary server.

EveryonePrint Installation and Configuration Guide 2016.09.01 Page 157 of 221
14.1.2 Configuration types
An EveryonePrint server in a cluster configuration can use either its own configuration, or it can
use a configuration shared by multiple servers.
Local configuration
A local configuration means the server uses its own configuration stored locally on the server. It
will use printers from the central system database, but all other settings, such as email or
authentication configuration, are set locally. This is useful in cluster configuration, if adding
additional secondary servers which perform a dedicated role, such as downloading email from a
mail server.
Shared configuration
A shared configuration means that the configuration is stored in a shared location such as a
network file share or similar, and shared between multiple servers. Configuration can be set
from any of the shared servers, using that same shared configuration.
In a cluster configuration with many servers with different roles, different groups of servers can
share different configurations, for example, a group of secondary servers dedicated to job
processing can share their own specific configuration.

EveryonePrint Installation and Configuration Guide 2016.09.01 Page 158 of 221
14.2 Prerequisites for a cluster configuration
For a successful EveryonePrint cluster configuration, all servers in the cluster must have stable
and fast network connections.
High speed network, such as 1 Gigabit Ethernet
Highly available shared storage, such as NAS or SAN
Firewall ports open for servers:
o Primary server type:
HTTP tcp port (default): 7290 or
HTTPS tcp port (default): 9443
Database server port 7291
o Secondary server type:
HTTP tcp port (default): 7290 or
HTTPS tcp port (default): 9443
Secondary servers connect to the primary server for job information, licensing validation and
similar. The primary server connect to the secondary server for regular status checks.
14.3 Configuring a primary server
A primary server in a cluster configuration is a standard EveryonePrint server, running all the
usual EveryonePrint Web, Print and Database services. An existing single EveryonePrint can
automatically be a primary server for other secondary servers in a cluster configuration.
Install a primary server simply by running the EveryonePrint installer, and choose to install Server
as part of a cluster configuration.

EveryonePrint Installation and Configuration Guide 2016.09.01 Page 159 of 221
And then This server will run the database service.
This will install a server with the standard Web, Print and Database services, as a standard single
EveryonePrint server.
14.3.1 Open firewall on primary server
Since secondary servers will communicate with the database running on the primary server,
ensure that any firewalls allow incoming traffic on default database TCP port 7291.
EveryonePrint includes a command line script for easily configuring the Windows firewall on the
server.
The script is located in the tools sub folder of the EveryonePrint installation folder, typically
C:\Program Files (x86)\EveryonePrint\tools
Run this cmd line script as Administrator.
Choose option 1 to open ports for server.

EveryonePrint Installation and Configuration Guide 2016.09.01 Page 160 of 221
This will create the necessary rules in the local Windows firewall.
14.3.2 Configure shared spool
Aside from the normal configuration of EveryonePrint, such as creating and adding print queues
to EveryonePrint, it’s necessary to configure the spool directory where EveryonePrint stores files
that have been received from users, are being processed and stored until printing.
Open the EveryonePrint Administrators interface and go to General Settings. Under Application
Settings change the Application spool folder to a highly available shared storage, accessible by
all servers in the cluster.
This must be entered as a full path to the directory, either a network share UNC path, eg
\\fileserver\spool or a local mapped drive and folder, eg. x:\spool.
Confirm that the user account under which the EveryonePrint Web service is running has read
and write rights to the shared path.
14.4 Configuring additional secondary servers
Secondary servers run the EveryonePrint Web and Print services, and are designed to be
additional servers for load balancing, additional job processing and printing, or additional
servers configured for specific roles, such as servers dedicated to downloading emails and
similar.
Install a secondary server simply by running the EveryonePrint installer, and choose to install
Server as part of a cluster configuration.

EveryonePrint Installation and Configuration Guide 2016.09.01 Page 161 of 221
Then choose This server will connect to an existing database and enter the server IP/hostname
of the primary server or primary server failover cluster IP address.
When clicking Next a connection is attempted to the database service, which may take a few
seconds.
If a connection cannot be made and an error is shown, it is possible to either go back and
change the parameters or continuing. However, the secondary EveryonePrint server will not
function without a working connection to the primary database.
14.4.1 Configure shared spool
After installation, open the EveryonePrint Administrators interface on the secondary server, and
go to General Settings. Under Application Settings change the Application spool folder to the
same shared storage, as the primary server.
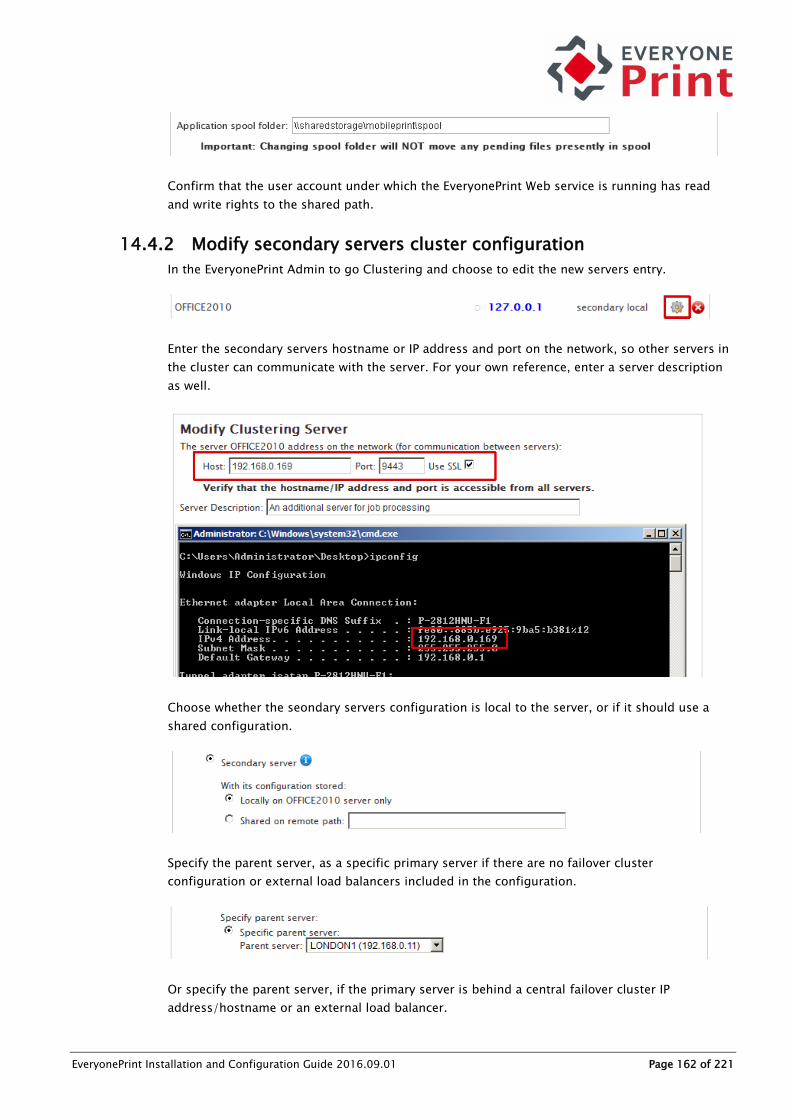
EveryonePrint Installation and Configuration Guide 2016.09.01 Page 162 of 221
Confirm that the user account under which the EveryonePrint Web service is running has read
and write rights to the shared path.
14.4.2 Modify secondary servers cluster configuration
In the EveryonePrint Admin to go Clustering and choose to edit the new servers entry.
Enter the secondary servers hostname or IP address and port on the network, so other servers in
the cluster can communicate with the server. For your own reference, enter a server description
as well.
Choose whether the seondary servers configuration is local to the server, or if it should use a
shared configuration.
Specify the parent server, as a specific primary server if there are no failover cluster
configuration or external load balancers included in the configuration.
Or specify the parent server, if the primary server is behind a central failover cluster IP
address/hostname or an external load balancer.

EveryonePrint Installation and Configuration Guide 2016.09.01 Page 163 of 221
14.4.3 Replicate printers from primary
Printers that exist on the primary server, must be replicated to the secondary server.
See the section 14.7 Replicate printers across all servers for more information about replicating
printers.

EveryonePrint Installation and Configuration Guide 2016.09.01 Page 164 of 221
14.5 Installing EveryonePrint in a Windows failover cluster
For high availability and redundancy, EveryonePrint can be installed in a Windows active/passive
failover cluster, using Windows clustering services.
This guide does not cover the core setup and configuration of a Windows cluster, as
comprehensive literature already exist on the subject, but assumes that Windows clustering
services have been successfully installed.
14.5.1 Validate cluster
Begin by validating the cluster.
Choose to run all tests.
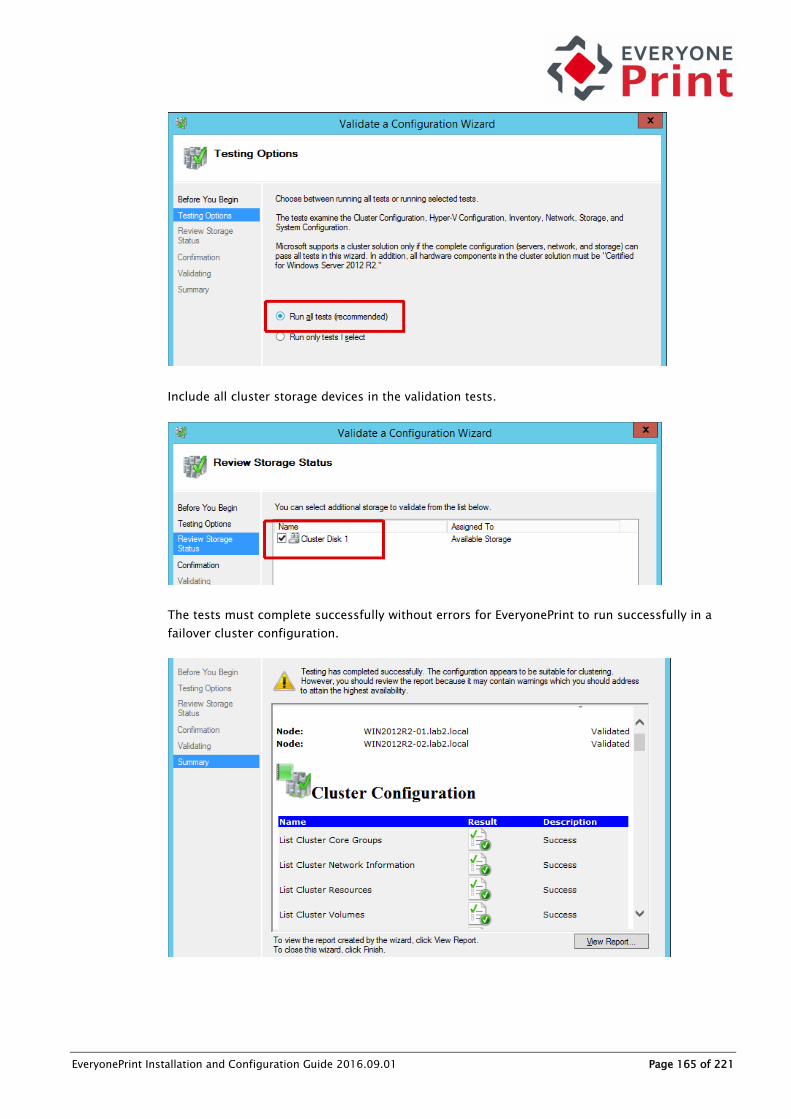
EveryonePrint Installation and Configuration Guide 2016.09.01 Page 165 of 221
Include all cluster storage devices in the validation tests.
The tests must complete successfully without errors for EveryonePrint to run successfully in a
failover cluster configuration.

EveryonePrint Installation and Configuration Guide 2016.09.01 Page 166 of 221
14.5.2 Install EveryonePrint on first active node
EveryonePrint must be installed on the active node. To make sure that EveryonePrint is installed
on the active node, ensure that the current host is the current host owner.
Confirm that the current active node has access to all relevant cluster disk storage.
Now run the installer, choosing any local directory on the server. Next choose Server as part of a
cluster configuration.
Then choose that this server will run the database service.

EveryonePrint Installation and Configuration Guide 2016.09.01 Page 167 of 221
14.5.3 Change service logon accounts
After installer finishes, open the Windows services and change the logon account of the
EveryonePrint Web service and the EveryonePrint Data service, not the EveryonePrint Print Service,
the EveryonePrint Print Service must always run as localsystem.
The service logon account used must have full read/write rights to the shared cluster storage.
Restart services to confirm that the services can successfully start under the new accounts, then
stop all services (start and stop of services will be controlled by the cluster services).
14.5.4 Move database to shared storage
As the database will be run by any of the nodes in the cluster, the database must be placed in a
shared storage or cluster disk, accessible to all nodes in the failover cluster.
With services confirmed stopped, move the \data subfolder in the EveryonePrint installation
folder, by default C:\Program Files (x86)\EveryonePrint to the shared storage, eg
\\dc1\mobileprint in this example.
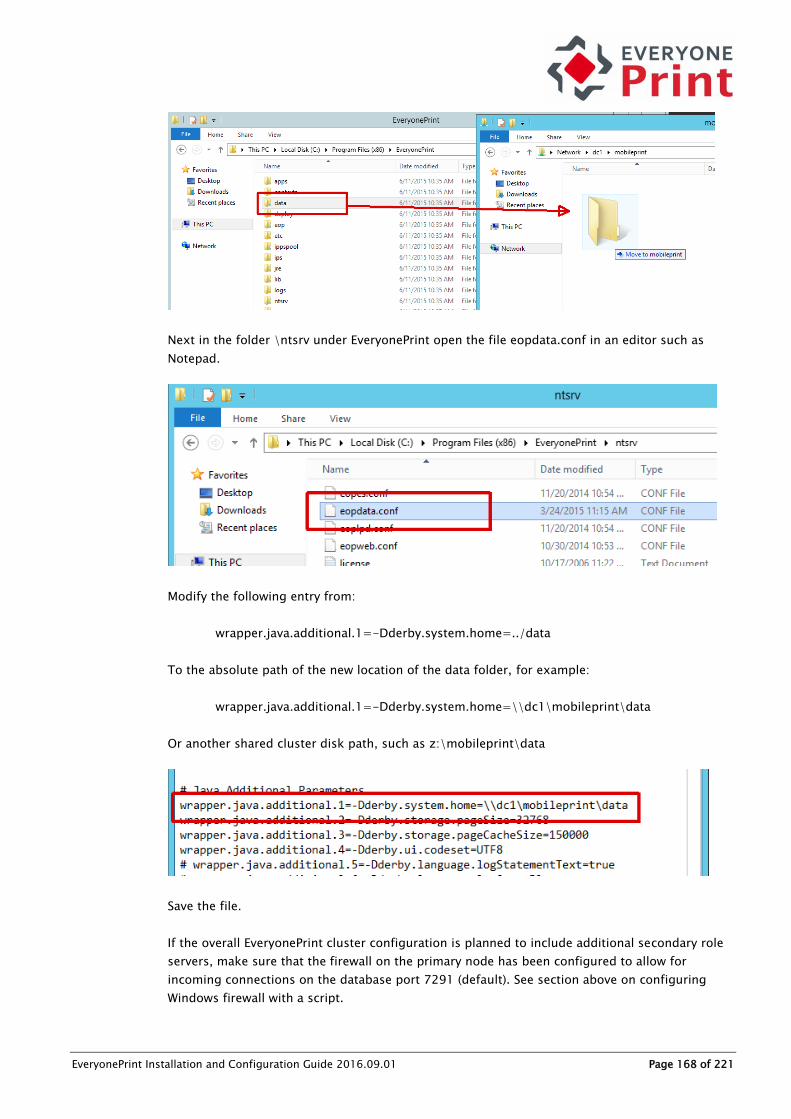
EveryonePrint Installation and Configuration Guide 2016.09.01 Page 168 of 221
Next in the folder \ntsrv under EveryonePrint open the file eopdata.conf in an editor such as
Notepad.
Modify the following entry from:
wrapper.java.additional.1=-Dderby.system.home=../data
To the absolute path of the new location of the data folder, for example:
wrapper.java.additional.1=-Dderby.system.home=\\dc1\mobileprint\data
Or another shared cluster disk path, such as z:\mobileprint\data
Save the file.
If the overall EveryonePrint cluster configuration is planned to include additional secondary role
servers, make sure that the firewall on the primary node has been configured to allow for
incoming connections on the database port 7291 (default). See section above on configuring
Windows firewall with a script.

EveryonePrint Installation and Configuration Guide 2016.09.01 Page 169 of 221
Repeat the above steps on all additional nodes:
1. Run installer, choose server is part of cluster and that the server will run the database service
2. Change logon account on EveryonePrint Web and Database to the same service account
3. Stop all EveryonePrint services
4. Edit the ntsrv\eopdata.conf to have the EveryonePrint Data service use the shared \data
folder.
When all nodes have the EveryonePrint services installed, it’s time to configure the EveryonePrint
cluster resource in the Windows cluster services.
On the current cluster owner node, open Windows Failover Cluster manager, choose the cluster
and Configure Role.
Choose to create a Generic Service.
Select the EveryonePrint Web service and click Next.

EveryonePrint Installation and Configuration Guide 2016.09.01 Page 170 of 221
Enter a descriptive name for future reference, and the address for the EveryonePrint primary
cluster as it will be accessed by users and other secondary EveryonePrint servers.
Select any storage as needed for the cluster configuration.
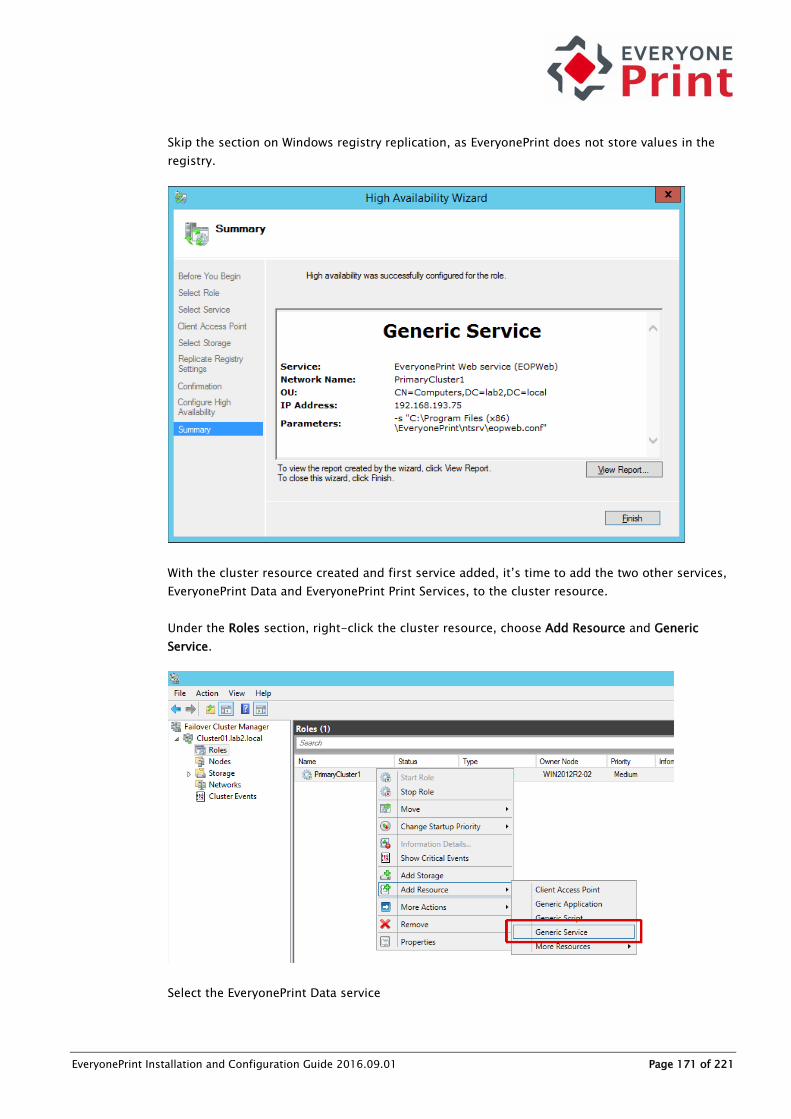
EveryonePrint Installation and Configuration Guide 2016.09.01 Page 171 of 221
Skip the section on Windows registry replication, as EveryonePrint does not store values in the
registry.
With the cluster resource created and first service added, it’s time to add the two other services,
EveryonePrint Data and EveryonePrint Print Services, to the cluster resource.
Under the Roles section, right-click the cluster resource, choose Add Resource and Generic
Service.
Select the EveryonePrint Data service
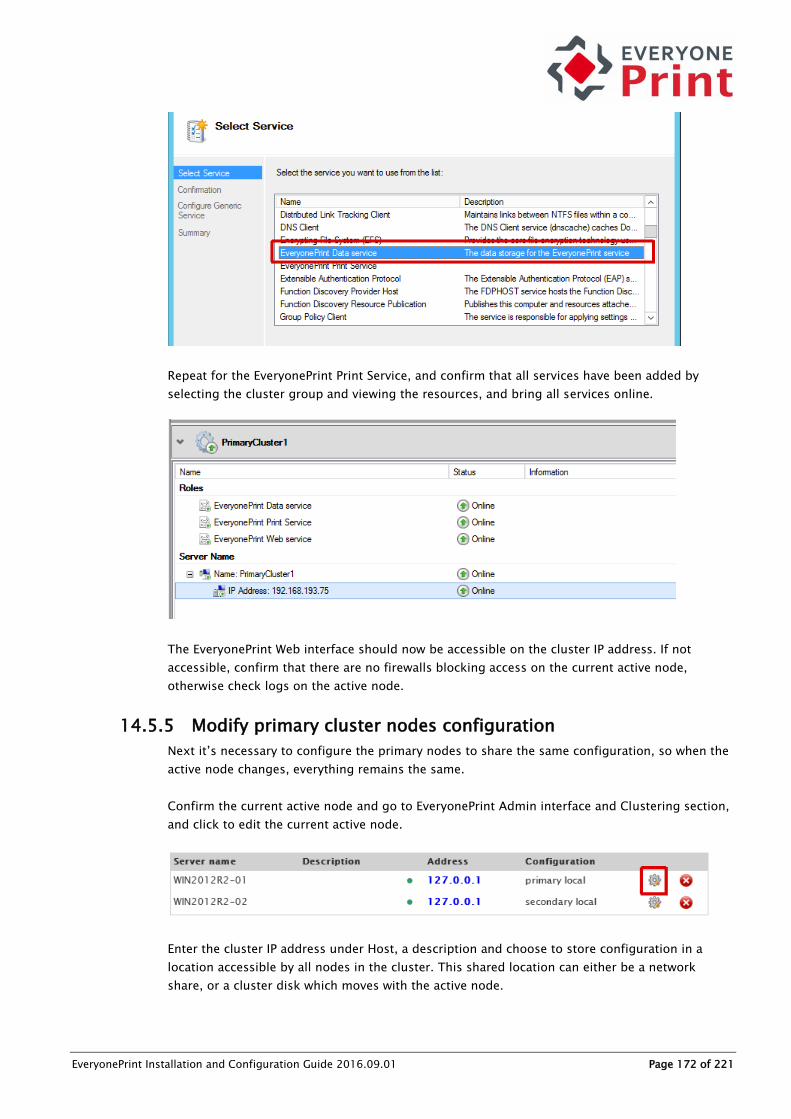
EveryonePrint Installation and Configuration Guide 2016.09.01 Page 172 of 221
Repeat for the EveryonePrint Print Service, and confirm that all services have been added by
selecting the cluster group and viewing the resources, and bring all services online.
The EveryonePrint Web interface should now be accessible on the cluster IP address. If not
accessible, confirm that there are no firewalls blocking access on the current active node,
otherwise check logs on the active node.
14.5.5 Modify primary cluster nodes configuration
Next it’s necessary to configure the primary nodes to share the same configuration, so when the
active node changes, everything remains the same.
Confirm the current active node and go to EveryonePrint Admin interface and Clustering section,
and click to edit the current active node.
Enter the cluster IP address under Host, a description and choose to store configuration in a
location accessible by all nodes in the cluster. This shared location can either be a network
share, or a cluster disk which moves with the active node.

EveryonePrint Installation and Configuration Guide 2016.09.01 Page 173 of 221
Repeat for all other primary cluster nodes.
Write the cluster host, description, choose it’s a Primary server and to use the same shared
configuration.
Save changes.
When returning to the list, a warning will be shown saying that only 1 primary server can run at
the same time. With the failover configuration in place, Windows will start and stop services as
necessary, so there exist only 1 active node.
14.5.6 Change the primary servers spool folder
It’s important that the spool directory of EveryonePrint, where print jobs are held while being
processed, awaiting release etc, is located in a shared storage, such as network share or cluster
disk volume that moves with the active node.
Create a dedicated folder, such as \\dc1\mobileprint\spool and then go to General Settings.
Under Application Settings change the Application spool folder to the shared storage.

EveryonePrint Installation and Configuration Guide 2016.09.01 Page 174 of 221
Confirm that the user account under which the EveryonePrint Web service is running has read
and write rights to the shared path.
The cluster configuration is now complete. It is strongly recommended to thoroughly test
failover, by simulating failures and changing the active node several times, confirming in
between each switch, that EveryonePrint is functioning correctly.
IMPORTANT! Make sure that all printers created on the active primary server are replicated
across all nodes in failover cluster, or printing will fail, when nodes failover.
14.6 Adding external load balancer for high front-end scalability
EveryonePrint clusters can be combined with external load balancing, to achieve very high
scalability and redundancy.
Use an external load balancer, when many users will access the front-end interfaces, such as
Web Print, Driver Print or Mobile Print, to balance the requests between many servers behind the
load balancer.

EveryonePrint Installation and Configuration Guide 2016.09.01 Page 175 of 221
Configure primary and secondary servers as needed, as described above, then add an external
load balancer, such as F5 (https://f5.com) or Zen (http://www.zenloadbalancer.com) which be
either a physical appliance or a software based load balancer, or Windows NLB
(https://technet.microsoft.com/library/hh831698.aspx).
The configuration possibilities with high availability and scalability are endless, and these
examples and guides are for common configurations only. For the best configuration for a
particular project, please contact your EveryonePrint specialist for guidance and
recommendation.
14.7 Replicate printers across all servers
Since any server in a cluster configuration can be sending print jobs to printers, all servers are
required to have all print queues installed.
In many cases, customers using a single “follow me” print queue, this is trivial, since there has to
be only a single print queue on each server. But for customers with thousands of printers, it’s
impractical to manually create and manage print queues across servers.
Fortunately, it’s very simple to script print replication across many servers using the Windows
Print Migration tools.
14.7.1 Using Windows Print Migration Printbrm.exe command-line tool
The Windows print migration tool, printbrm.exe, is an excellent tool for replicating printers
across multiple servers.
For detailed information about print migration on Windows servers, see:
https://technet.microsoft.com/en-us/library/cc722360.aspx
https://technet.microsoft.com/en-us/library/jj134237.aspx
The migration tool is included in the Print Management Windows tools that come with the Print
Server role service on Windows servers.
For Print Migration to work using printbrm.exe, at least 1 printer must be created and shared on
all servers involved in replication.
Begin by adding the Print and Document Services Role on all servers.

EveryonePrint Installation and Configuration Guide 2016.09.01 Page 176 of 221
Only the Print Server role service is required.
Create at least 1 print queue on all servers and share this queue, even if it’s a dummy queue.
Choose to not publish the shared printer in the domain directory, to avoid users printing to the
queue directly.
With the Print Management tools installed, we can replicate printers. First open a command
prompt as administrator, as a user with administrative rights on source and destination server on
the source server, containing all the printers to replicate.
Backup the printers using the command line:
Printbrm.exe –b –s \\servername –f printers.printerexport

EveryonePrint Installation and Configuration Guide 2016.09.01 Page 177 of 221
Now in the same command line window, run the command to restore the backup file to the new
destination server.
Printbrm.exe –r –s \\newserver –f printers.printerexport

EveryonePrint Installation and Configuration Guide 2016.09.01 Page 178 of 221
Printers will now exist on destination server, identical to the source.
The above commands can be included in a BAT or CMD file and be scheduled using Windows
Task Manager, for example:
@echo off
C:\Windows\System32\spool\tools\printbrm -b -s \\primary -f c:\temp\printer
s.printerexport
C:\Windows\System32\spool\tools\printbrm -r -s \\secondary1 -f c:\temp\printer
s.printerexport
C:\Windows\System32\spool\tools\printbrm -r -s \\secondary2 -f c:\temp\printer
s.printerexport
14.8 Licensing in clustered configurations
EveryonePrint Clustering features are available in Trial, Professional and Enterprise license levels.
No license key required to deploy an EveryonePrint cluster during the initial trial license.
If using a Professional license, a Professional license key must be entered on each server in the
cluster configuration.
EveryonePrint Installation and Configuration Guide 2016.09.01 Page 179 of 221
If using an Enterprise license, an Enterprise license key is only needed on the first primary server.
All other servers in the cluster configuration will validate its license from the parent server, the
primary server containing the Enterprise license, and it’s not necessary to enter any license keys
on additional servers.
14.9 EveryonePrint clustering in high-availability virtual
configurations
Virtual server platforms such as VMWare, Hyper-V and Xen offer features to achieve very high
availability and very quick disaster recovery of individual virtual servers, and are generally
recommended as part of a disaster recovery policy.
EveryonePrint can work seamlessly with virtual machine platforms, as the use of a virtual server
is transparent to the EveryonePrint server application. This includes Windows print servers with
Hyper-V high availability.
The high availability features offered by the virtual platforms, generally only apply to the
individual virtual server instance as a whole, and does not in itself provide an application level
redundancy, so a multi-server EveryonePrint cluster configuration is still recommended, if high
application availability or redundancy is required.
15. Backup EveryonePrint data To backup EveryonePrint settings, copy the following files or directories to a safe location:
C:\Program Files\EveryonePrint\eop.xml
C:\Program Files\EveryonePrint\printers.xml
C:\Program Files\EveryonePrint\data (entire folder with subdirectories)
If you have changed Web port configuration or configured SSL certificates, backup this folder:
C:\Program Files\EveryonePrint\etc
16. Upgrading or Uninstalling EveryonePrint Before upgrading to a new version, verify that your license has valid maintenance for access to
software updates! If maintenance has expired and a new version is installed, the program will
cease to function until the license is renewed or upgraded.
Before uninstalling or upgrading EveryonePrint, make sure to backup any existing data and
configuration files in EveryonePrint.
To upgrade EveryonePrint, simply download and run the installer with the latest version of
EveryonePrint. The installer will update your existing installation.
After upgrading an existing installation, confirm your settings in EveryonePrint, and if necessary
re-active the Driver Print and Email Print in the EveryonePrint Admin.

EveryonePrint Installation and Configuration Guide 2016.09.01 Page 180 of 221
During an update, the \jre folder may be overwritten, including any imported SSL certificates
from mail or LDAP servers. It may be necessary to re-import SSL certificates from LDAP and mail
servers after an update.
17. EveryonePrint API EveryonePrint includes an API to allow third parties to interact with the EveryonePrint server from
scripts or other applications, performing many of the functions available in the administrative
UI’s.
17.1 API licensing requirements
Certain API functions in the EveryonePrint API require a valid EveryonePrint Enterprise license. A
licensing note will appear under the API function description below, if an Enterprise license is
required.
17.2 Communicating with EveryonePrint API
The EveryonePrint API is a REST HTTP/HTTPS based API, which accepts Web
GET/POST/PUT/DELETE commands with URL parameters, and returns either JSON or XML.
For example calling:
GET http://127.0.0.1:7290/api/rest.cfm/ServerVersion
Could return:
{"currentversion":"3.7.0"}
The API uses standard HTTP status codes, ie 200 for success, 401 for unauthorized and so on.
17.3 Securing API calls
Under Settings and API Access, specify the API authentication token, which must be supplied with
each API call from third parties.
Further specify any IP addresses which are permitted to access the API.

EveryonePrint Installation and Configuration Guide 2016.09.01 Page 181 of 221
If blank, any IP address is allowed to access the API.
17.4 Note about SSL and non-SSL communication
The EveryonePrint server fully supports HTTPS/SSL communication. A default self-signed SSL
certificate for “localhost” is included in the EveryonePrint server, which allows for secure SSL
communication such as:
https://localhost:9443/api/rest.cfm/ServerVersion
See the main documentation on how to create your own certificate.
By default EveryonePrint listens for non-SSL http traffic on port 7290 and SSL https on 9443, but
please note that these ports may be changed by the EveryonePrint server administrator.
In this API documentation, we refer to the non-secure for consistency and simplicity.
It is strongly recommended to ONLY use SSL communication whenever possible, to reduce the
risk of compromising authentication tokens and other similar sensitive data.
17.5 Logging and Troubleshooting
All errors produced by interaction with the API are logged to the central EveryonePrint log
“eopapp.log” located per default in c:\Program Files\EveryonePrint\logs
The EveryonePrint Web server in addition writes a request log, logging all HTTP/HTTPS requests,
also found in the \logs directory.
For troubleshooting, enable “Debug Logging” in the EveryonePrint admin interface, and the
eopapp.log becomes very detailed with all API calls and responses.
17.6 Define return type format
By default the response format is JSON for any API calls which return data. The API can return
either JSON or XML, which is controlled by specifying the Accept HTTP header in the request.
Example JSON (default):
curl.exe -X GET -i -H "X-EOP-AuthToken: xyz" -H "Accept: application/json" http://
127.0.0.1:7290/api/rest.cfm/ServerVersion
HTTP/1.1 200 OK
Content-Type: application/json
{"currentversion":"3.7.0"}
Example XML:
curl.exe -X GET -i -H "X-EOP-AuthToken: xyz" -H "Accept: application/xml" http://1
27.0.0.1:7290/api/rest.cfm/ServerVersion

EveryonePrint Installation and Configuration Guide 2016.09.01 Page 182 of 221
HTTP/1.1 200 OK
Content-Type: application/xml
<apiresponse><currentversion>3.7.0</currentversion></apiresponse>
17.7 Examples with curl
In the documentation we provide examples of each function for use with curl.
Curl is a free command line tool used to simplify the interaction with API’s such as the
EveryonePrint API. Download curl from http://curl.haxx.se
17.8 API Functions and Methods
All calls must include the HTTP header X-EOP-AuthToken containing the API authentication
token password as specified in the administrative interface.
17.8.1 Get Server Version
Returns the current version of the EveryonePrint server.
Request:
GET http://127.0.0.1:7290/api/rest.cfm/ServerVersion
Parameters:
(none)
Response:
currentversion String (50) The current server version
Example request:
curl.exe -X GET -i -H "X-EOP-AuthToken: xyz"
http://127.0.0.1:7290/api/rest.cfm/ServerVersion
Example response (success):
HTTP/1.1 200 OK
Content-Type: application/json
{"currentversion":"3.7.0"}
Example response (failure):
HTTP/1.1 401 Unauthorized
Content-Type: application/json

EveryonePrint Installation and Configuration Guide 2016.09.01 Page 183 of 221
"Invalid AuthToken"
17.8.2 Add all printers from server
Add all print queues present on the host server to the EveryonePrint server.
Request:
PUT http://127.0.0.1:7290/api/rest.cfm/printers
Parameters:
(none)
Response:
success Boolean Returns true if import was successful
printersadded Numeric Returns the number of printers added
to the EveryonePrint server
Example request:
curl.exe -X PUT -i -H "X-EOP-AuthToken: xyz"
http://127.0.0.1:7290/api/rest.cfm/printers
Example response (success):
HTTP/1.1 200 OK
Content-Type: application/json
{"success":true,"printersadded":5}
Example response (failure):
HTTP/1.1 401 Unauthorized
Content-Type: application/json
"Invalid AuthToken"
17.8.3 Get all printers from server
Retrieve all printers from server.
Request:
GET http://127.0.0.1:7290/api/rest.cfm/printers
Parameters:

EveryonePrint Installation and Configuration Guide 2016.09.01 Page 184 of 221
(none)
Response:
An array of printers with each printer being a structure within the array.
printerid String (50) The ID of the printer. Printername String (255) The printers friendly name
Printerpath String (255) The printers associated output print
queue
PrinterEmailAlias String (255) The printers direct email alias address
altprinterid String (50) The printers external ID for use in IPP
print queues, QR codes or similar
Example request:
curl.exe -X GET -H "X-EOP-AuthToken: xyz" -k
http://127.0.0.1:7290/api/rest.cfm/printers
Example response (success):
HTTP/1.1 200 OK
Content-Type: application/json
[{"altprinterid":"A0877B6D","printeremailalias":"[email protected]","printerid":1,"pri
ntername":"Printer
1","printerpath":"printer1"},{"altprinterid":"36203EBF","printeremailalias":"printer2@comp
any.com","printerid":2,"printername":"Printer
2","printerpath":"printer2"},{"altprinterid":"332F4AD5","printeremailalias":"printer3@comp
any.com","printerid":3,"printername":"Printer 3","printerpath":"printer3"}]
Example response (failure):
HTTP/1.1 401 Unauthorized
Content-Type: application/json
"Invalid AuthToken"
-X GET -H ""X-EOP-AuthToken: xyz"" -k http://127.0.0.1:7290/api/rest.cfm/printers
17.8.4 Delete all printers from server
Delete all printer device entries in the EveryonePrint server.
Request:
DELETE http://127.0.0.1:7290/api/rest.cfm/printers
Parameters:

EveryonePrint Installation and Configuration Guide 2016.09.01 Page 185 of 221
(none)
Response:
success Boolean Returns true if deletion was successful
Example request:
curl.exe -X DELETE -i -H "X-EOP-AuthToken: xyz"
http://127.0.0.1:7290/api/rest.cfm/printers
Example response (success):
HTTP/1.1 200 OK
Content-Type: application/json
{"success":true}
Example response (failure):
HTTP/1.1 401 Unauthorized
Content-Type: application/json
"Invalid AuthToken"
17.8.5 Get UserID Hash
Returns the UserID hash for a given username for use with EveryonePrint IPP Driver Print feature,
ie http://127.0.0.1:631/ipp/{useridhash}
Request:
GET http://127.0.0.1:7290/api/rest.cfm/useridhash/?username=johnsmith
Parameters:
username String (255) The username for which to return hash
ID
Response:
username String (255) The username for which returned hash
ID
useridhash String (50) Returned UserID hash
Example request:
curl.exe -X GET -i -H "X-EOP-AuthToken: xyz" -k
http://127.0.0.1:7290/api/rest.cfm/useridhash/?username=johnsmith

EveryonePrint Installation and Configuration Guide 2016.09.01 Page 186 of 221
Example response (success):
HTTP/1.1 200 OK
Content-Type: application/json
{"username":"johnsmith","useridhash":"570ec1806068989"}
Example response (failure):
HTTP/1.1 400 Bad Request
Content-Type: application/json
"Username parameter missing"
17.8.6 Add Email Address To Username
Adds an email address to a user. This function returns true if the email address was added
successfully.
Request:
PUT http://127.0.0.1:7290/api/rest.cfm/useremails
Parameters:
Username String (255) The username on which to add the
email address EmailAddress String (255) The email address to add
Response:
success Boolean Returns true if adding was successful
Example request:
curl.exe -X PUT -i -H "X-EOP-AuthToken: xyz" "http://127.0.0.1:7290/api/rest.cfm/u
seremails/?username=johnsmith&[email protected]"
Example response (success):
HTTP/1.1 200 OK
Content-Type: application/json
{"success":true}
Example response (failure):
HTTP/1.1 401 Unauthorized
Content-Type: application/json

EveryonePrint Installation and Configuration Guide 2016.09.01 Page 187 of 221
"Invalid AuthToken"

EveryonePrint Installation and Configuration Guide 2016.09.01 Page 188 of 221
17.8.7 Delete Email Address From Username
Deletes an email address from a user. This function returns true if the email address was deleted
successfully.
Request:
DELETE http://127.0.0.1:7290/api/rest.cfm/useremails
Parameters:
Username String (255) The username on which to delete the
email address EmailAddress String (255) The email address to delete
Response:
success Boolean Returns true if delete was successful
Example request:
curl.exe -X DELETE -i -H "X-EOP-AuthToken: xyz"
"http://127.0.0.1:7290/api/rest.cfm/u
seremails/?username=johnsmith&[email protected]"
Example response (success):
HTTP/1.1 200 OK
Content-Type: application/json
{"success":true}
Example response (failure):
HTTP/1.1 401 Unauthorized
Content-Type: application/json
"Invalid AuthToken"

EveryonePrint Installation and Configuration Guide 2016.09.01 Page 189 of 221
17.8.8 Submit print job file or URL for printing
Submit a file, Word document, PDF, image or other supported file type, to EveryonePrint as a
user print job, for further processing.
Submit a Web address to print. EveryonePrint retrieves the content of the Web page and registers
as a user print job, for further processing.
Request:
POST http://127.0.0.1:7290/api/rest.cfm/printjob
Parameters:
Type String (5) Whether the print job is a file or URL to
print. Possible values:
file = a file will be uploaded in
PrintJobFile
url = a Web address is provided in
URLToPrint
ClientIPAddress String (50) The IP address of the sending client.
Username String (50) The username of the user which the
ClientIPAddress belongs to
(required for privacy-authentication
and direct-authentication modes)
PrintJobTitle String (255) The originating jobs document name or
title, can be the same as URLToPrint in
case
PrinterID String (50) The PrinterID of the destination printer
(optional)
MimeType String (50) The mimetype of the submitted
document file (optional)
PrintJobFile String (255) The multipart form field containing the
document to submit. Only if type=file
URLToPrint String (255) The Web address URL to print, ie
“http://www.google.com”. Only if
type=url
AdvOptCopies Numeric Optional. Number of copies (default 1)
AdvOptPageFrom Numeric Optional. Page to print from
AdvOptPageTo Numeric Optional. Page to print to
AdvOptDuplex Numeric Optional. Possible values:
1 = None/Simplex
2 = Duplex/Long-side (most common)
3 = Duplex/Short-side
AdvOptPrintBW Numeric Optional. Print in black/white even if
document contains color.
0 = leave as is, ie color
1 = Force BW

EveryonePrint Installation and Configuration Guide 2016.09.01 Page 190 of 221
Response:
success Boolean Returns true if submitting job was
successful
jobreleasecode String(50) If privacy-releasecode mode, the
release code is returned for the
submitted job.
Example request (submitting a file):
curl.exe -X POST -v -H "X-EOP-AuthToken: xyz" -F PrintJobFile=@C:\ test.pdf -F
"type=file" -F "ClientIPAddress=1.2.3.4" -F "Username=johnsmith" -F
"PrintJobTitle=Test page" -k http://127.0.0.1:7290/api/rest.cfm/printjob
Example request (submitting a Web address):
curl.exe -X POST -v -H "X-EOP-AuthToken: xyz" -F
"URLtoprint=www.everyoneprint.com" -F "type=url" -F "ClientIPAddress=1.2.3.4" -F
"Username=q" -F "PrintJobTitle=www.everyoneprint.com" -k
http://127.0.0.1:7290/api/rest.cfm/printjob
Example response (success):
HTTP/1.1 200 OK
Content-Type: application/json
{"success":true}
Example response (success with release code):
HTTP/1.1 200 OK
Content-Type: application/json
{"success":true,"jobreleasecode":234056}
Example response (failure):
HTTP/1.1 401 Unauthorized
Content-Type: application/json
"Invalid AuthToken"
MimeTypes:
.xls mimetype: application/vnd.ms-excel
.xlsx mimetype: application/vnd.openxmlformats-officedocument.spreadsheetml.sheet
.doc mimetype: application/msword

EveryonePrint Installation and Configuration Guide 2016.09.01 Page 191 of 221
.docx mimetype: application/vnd.openxmlformats-
officedocument.wordprocessingml.document
.ppt mimetype: application/vnd.ms-powerpoint
.pptx mimetype: application/vnd.openxmlformats-
officedocument.presentationml.presentation
.ods mimetype: application/vnd.oasis.opendocument.spreadsheet
.odt mimetype: application/vnd.oasis.opendocument.text
.rtf mimetype: application/rtf
.txt mimetype: text/plain
.html mimetype: text/html
.pdf mimetype: application/pdf
.jpg mimetype: image/jpeg
.png mimetype: image/png
.tiff mimetype: image/tiff

EveryonePrint Installation and Configuration Guide 2016.09.01 Page 192 of 221
17.8.9 Add a printer
Add a printer to the server.
This API function requires a valid EveryonePrint Enterprise or evaluation license.
Request:
POST http://127.0.0.1:7290/api/rest.cfm/printer
Parameters:
printerid String (50) (Optional) The ID of the printer to add.
Could be IP address, serial number or
similar. If omitted (default), a numeric
ID is generated automatically by server. Printername String (255) The printers friendly name and
description as it appears in end-user
interfaces
Printerpath String (255) The printers associated output print
queue
PrinterEmailAlias String (255) (Optional) The printers direct email
alias address
BulkAdd Boolean (Optional) Default is false. When set to
true, the server does not write the new
printer to the configuration file,
dramatically speeding up adding large
imports of printers. If bulkadd is used,
have the last printer use
bulkadd=false, to make sure all the
newly added printers are written to the
configuration file.
Response:
success Boolean Returns true if successful
Example request:
curl.exe -X POST -H "X-EOP-AuthToken: xyz" -d "printerid=1&printername=Printer
1&printerpath=printer1&[email protected]&AltPrinterID=XYZ" -
k http://127.0.0.1:7290/api/rest.cfm/printer
Example response (success):
HTTP/1.1 200 OK
Content-Type: application/json

EveryonePrint Installation and Configuration Guide 2016.09.01 Page 193 of 221
{"success":true}
Example response (failure):
HTTP/1.1 401 Unauthorized
Content-Type: application/json
"Invalid AuthToken"
17.8.10 Get a printer
Retrieve specific printer(s) from the server, as array of results with each returned printer as a
structure
This API function requires a valid EveryonePrint Enterprise or evaluation license.
Request:
GET http://127.0.0.1:7290/api/rest.cfm/printer
Parameters:
printerid String (50) (Optional) The ID of the printer to
retrieve. Printername String (255) (Optional) The name of the printer to
retrieve
PrinterEmailAlias String (255) (Optional) The printers direct email
alias address of the printer to retrieve
Response:
An array of printers with each printer being a structure within the array.
printerid String (50) The ID of the printer. Printername String (255) The printers friendly name
Printerpath String (255) The printers associated output print
queue
PrinterEmailAlias String (255) The printers direct email alias address
altprinterid String (50) The printers external ID for use in IPP
print queues, QR codes or similar
Example request:
curl.exe -X GET -H "X-EOP-AuthToken: xyz" -k
http://127.0.0.1:7290/api/rest.cfm/printer?printerid=1
Example response (success):
HTTP/1.1 200 OK

EveryonePrint Installation and Configuration Guide 2016.09.01 Page 194 of 221
Content-Type: application/json
[{"altprinterid":"XYZ","printeremailalias":"[email protected]","printerid":1,"printerna
me":"Printer 1","printerpath":"printer1"}]
Example response (failure):
HTTP/1.1 400 Bad Request
Content-Type: application/json
"Error occurred while retrieving printer No valid query "
17.8.11 Update a printer
Update an existing printer. All values must be supplied.
This API function requires a valid EveryonePrint Enterprise or evaluation license.
Request:
PUT http://127.0.0.1:7290/api/rest.cfm/printer
Parameters:
printerid String (50) The ID of the printer to update. Printername String (255) The printers friendly name
Printerpath String (255) The printers associated output print
queue
PrinterEmailAlias String (255) (Optional) The printers direct email
alias address
BulkUpdate Boolean (Optional) Default is false. When set to
true, the server does not write the
changed printer to the configuration
file, dramatically speeding up updates
of large number of printers. If
BulkUpdate is used, have the last
printer use BulkUpdate=false, to make
sure all the newly updated printers are
written to the configuration file.
Response:
success Boolean Returns true if successful
Example request:
curl.exe -X PUT -H "X-EOP-AuthToken: xyz" -d "printerid=1&printername=Printer 1
edited&printerpath=printer1edited&[email protected]" -k
http://127.0.0.1:7290/api/rest.cfm/printer

EveryonePrint Installation and Configuration Guide 2016.09.01 Page 195 of 221
Example response (success):
HTTP/1.1 200 OK
Content-Type: application/json
{"success":true}
Example response (failure):
HTTP/1.1 401 Unauthorized
Content-Type: application/json
"Invalid AuthToken"
17.8.12 Delete a printer
Deletes an existing printer.
This API function requires a valid EveryonePrint Enterprise or evaluation license.
Request:
DELETE http://127.0.0.1:7290/api/rest.cfm/printer
Parameters:
Printerid String (50) The ID of the printer to delete. BulkDelete Boolean (Optional) Default is false. When set to
true, the server does not write the
changes to the configuration file,
dramatically speeding up updates of
large number of printers. If BulkDelete
is used, have the last printer use
BulkDelete=false, to make sure all the
changes are written to the
configuration file.
Response:
success Boolean Returns true if successful
Example request:
curl.exe -X DELETE -H "X-EOP-AuthToken: xyz" -d "printerid=1" -k
http://127.0.0.1:7290/api/rest.cfm/printer
Example response (success):

EveryonePrint Installation and Configuration Guide 2016.09.01 Page 196 of 221
HTTP/1.1 200 OK
Content-Type: application/json
{"success":true}
Example response (failure):
HTTP/1.1 401 Unauthorized
Content-Type: application/json
"Invalid AuthToken"
17.8.13 Add a device group or a printer to a device group
Add a device group or add a printer to an existing device group
This API function requires a valid EveryonePrint Enterprise or evaluation license.
Request:
POST http://127.0.0.1:7290/api/rest.cfm/printergroups
Parameters:
PrinterGroupID Numeric (Optional) Include the printergroupid if
adding printers to an existing device
group. PrinterGroupName String (50) (Optional) Required if adding a new
device group. Is not used if
PrinterGroupID is supplied
ExternalGroupName String (50) (Optional) The device group external
name in LDAP attribute or Windows
membership security group
PrinterIDs String (1024) (Optional) Comma delimited list of the
ID’s of printers to add to the group.
Required if adding printers to a device
group.
Response:
success Boolean Returns true if successful
Example request adding a device group:
curl.exe -X POST -H "X-EOP-AuthToken: xyz" -d
"PrinterGroupName=group1&ExternalGroupName=group1ext&printerids=1,2" -k
http://127.0.0.1:7290/api/rest.cfm/printergroups

EveryonePrint Installation and Configuration Guide 2016.09.01 Page 197 of 221
Example request adding a printer to existing device group:
curl.exe -X POST -H "X-EOP-AuthToken: xyz" -d "PrinterGroupID=1&printerids=2,3" -k
http://127.0.0.1:7290/api/rest.cfm/printergroups
Example response (success):
HTTP/1.1 200 OK
Content-Type: application/json
{"success":true}
Example response (failure):
HTTP/1.1 401 Unauthorized
Content-Type: application/json
"Invalid AuthToken"
17.8.14 Get a device group
Retrieve all or a specific device group.
This API function requires a valid EveryonePrint Enterprise or evaluation license.
Request:
GET http://127.0.0.1:7290/api/rest.cfm/printergroups
Parameters:
PrinterGroupID String (50) (Optional) The ID of the printer group
to retrieve. If omitted all groups are
returned
Response:
An array of device groups with each group being a structure within the array.
PrinterGroupID Numeric ID of group PrinterGroupName String (50) Name of group
ExternalGroupName String (50) The device group external name in
LDAP attribute or Windows membership
security group
PrinterIDs String (1024) Comma delimited list of the ID’s of
printers in the group.
Example request:
EveryonePrint Installation and Configuration Guide 2016.09.01 Page 198 of 221
curl.exe -X GET -H "X-EOP-AuthToken: xyz" -k
http://127.0.0.1:7290/api/rest.cfm/printergroups?PrinterGroupID=1
Example response (success):
HTTP/1.1 200 OK
Content-Type: application/json
[{"externalgroupname":"","printergroupid":19,"printergroupname":"Group 2
","printerids":"1,3"},{"externalgroupname":"group1ext","printergroupid":54,"printergroup
name":"group1","printerids":"1,2"}]
Example response (failure):
HTTP/1.1 401 Unauthorized
Content-Type: application/json
"Invalid AuthToken"
17.8.15 Edit a device group
Update an existing device group name or external name.
This API function requires a valid EveryonePrint Enterprise or evaluation license.
Request:
PUT http://127.0.0.1:7290/api/rest.cfm/printergroups
Parameters:
PrinterGroupID Numeric The printergroupid of group to update PrinterGroupName String (50) Name of group
ExternalGroupName String (50) (Optional) The device group external
name in LDAP attribute or Windows
membership security group
Response:
success Boolean Returns true if successful
Example request:
curl.exe -X PUT -H "X-EOP-AuthToken: xyz" -d
"PrinterGroupID=1&PrinterGroupName=group1edited&ExternalGroupName=group1exte
dited" -k http://127.0.0.1:7290/api/rest.cfm/printergroups

EveryonePrint Installation and Configuration Guide 2016.09.01 Page 199 of 221
Example response (success):
HTTP/1.1 200 OK
Content-Type: application/json
{"success":true}
Example response (failure):
HTTP/1.1 401 Unauthorized
Content-Type: application/json
"Invalid AuthToken"

EveryonePrint Installation and Configuration Guide 2016.09.01 Page 200 of 221
17.8.16 Delete a device group or remove a device from group
Delete a device group or delete a printer from an existing device group
This API function requires a valid EveryonePrint Enterprise or evaluation license.
Request:
DELETE http://127.0.0.1:7290/api/rest.cfm/printergroups
Parameters:
PrinterGroupID Numeric ID of group to delete or to delete
printers from. PrinterIDs String (1024) (Optional) Comma delimited list of the
ID’s of printers to delete from the
group. Required if deleting printers
from a device group.
Response:
success Boolean Returns true if successful
Example request deleting a device group:
curl.exe -X DELETE -H "X-EOP-AuthToken: xyz" -d "PrinterGroupID=1" -k
http://127.0.0.1:7290/api/rest.cfm/printergroups
Example request deleting a printer from an existing device group:
curl.exe -X DELETE -H "X-EOP-AuthToken: xyz" -d "PrinterGroupID=1&printerids=2,3" -
k http://127.0.0.1:7290/api/rest.cfm/printergroups
Example response (success):
HTTP/1.1 200 OK
Content-Type: application/json
{"success":true}
Example response (failure):
HTTP/1.1 401 Unauthorized
Content-Type: application/json
"Invalid AuthToken"

EveryonePrint Installation and Configuration Guide 2016.09.01 Page 201 of 221
17.8.17 Add a Wide Area Sub domain or printers to a sub domain
Add a Wide Area Subdomain or add printers to an existing Wide Area Subdomain.
This API function requires a valid EveryonePrint Enterprise or evaluation license.
Request:
POST http://127.0.0.1:7290/api/rest.cfm/wideareas
Parameters:
name String (255) The Wide Area sub domain name. PrinterIDs String (1024) The ID’s of printers to add to the sub
domain
BulkAdd Boolean (Optional) Default is false. When set to
true, the server does not write the
changes to the configuration file,
dramatically speeding up large imports
of printers. If bulkadd is used, have the
last printer use bulkadd=false, to make
sure all the newly added printers are
written to the configuration file.
Response:
success Boolean Returns true if successful
Example request:
curl.exe -X POST -H "X-EOP-AuthToken: xyz" -d "name=test.name&printerids=1,2" -k
http://127.0.0.1:7290/api/rest.cfm/wideareas
Example response (success):
HTTP/1.1 200 OK
Content-Type: application/json
{"success":true}
Example response (failure):
HTTP/1.1 401 Unauthorized
Content-Type: application/json
"Invalid AuthToken"
EveryonePrint Installation and Configuration Guide 2016.09.01 Page 202 of 221
17.8.18 Get a Wide Area Sub domain
Retrieve all or a specific wide area sub domain.
This API function requires a valid EveryonePrint Enterprise or evaluation license.
Request:
GET http://127.0.0.1:7290/api/rest.cfm/wideareas
Parameters:
name String (255) (Optional) The name of the sub domain
to retrieve. If omitted all domains are
returned.
Response:
An array of wide area sub domains with each domain being a structure within the array.
name String (255) Name of subdomain PrinterIDs String (1024) Comma delimited list of the ID’s of
printers in the sub domain.
Example request:
curl.exe -X GET -H "X-EOP-AuthToken: xyz" -k
http://127.0.0.1:7290/api/rest.cfm/wideareas?name= test.name
Example response (success):
HTTP/1.1 200 OK
Content-Type: application/json
[{"name":"building1.lab2.local","printerids":""},{"name":"test.name","printerids":"1,2,3"}]
Example response (failure):
HTTP/1.1 401 Unauthorized
Content-Type: application/json
"Invalid AuthToken"

EveryonePrint Installation and Configuration Guide 2016.09.01 Page 203 of 221
17.8.19 Edit a Wide Area Sub domain
Update an existing Wide Area sub domain name.
This API function requires a valid EveryonePrint Enterprise or evaluation license.
Request:
PUT http://127.0.0.1:7290/api/rest.cfm/wideareas
Parameters:
name String (255) The name of the sub domain to
change. NewName String (255) The new name for the sub domain
Response:
success Boolean Returns true if successful
Example request:
curl.exe -X PUT -H "X-EOP-AuthToken: xyz" -d
"name=test.name&newname=newname.test" -k
http://127.0.0.1:7290/api/rest.cfm/wideareas
Example response (success):
HTTP/1.1 200 OK
Content-Type: application/json
{"success":true}
Example response (failure):
HTTP/1.1 401 Unauthorized
Content-Type: application/json
"Invalid AuthToken"
EveryonePrint Installation and Configuration Guide 2016.09.01 Page 204 of 221
17.8.20 Delete a Wide Area Sub domain
Delete a wide area sub domain or delete a printer from a sub domain
This API function requires a valid EveryonePrint Enterprise or evaluation license.
Request:
DELETE http://127.0.0.1:7290/api/rest.cfm/wideareas
Parameters:
name String (255) The Wide Area sub domain name. PrinterIDs String (1024) The ID’s of printers to add to the sub
domain
BulkDelete Boolean (Optional) Default is false. When set to
true, the server does not write the
changes to the configuration file,
dramatically speeding up large
changes. If bulkdelete is used, have the
last printer use bulkdelete=false, to
make sure all the deleted printers are
written to the configuration file.
Response:
success Boolean Returns true if successful
Example request deleting a device group:
curl.exe -X DELETE -H "X-EOP-AuthToken: xyz" -d "PrinterGroupID=1" -k
http://127.0.0.1:7290/api/rest.cfm/printergroups
Example request deleting a printer from an existing device group:
curl.exe -X DELETE -H "X-EOP-AuthToken: xyz" -d "PrinterGroupID=1&printerids=2,3" -
k http://127.0.0.1:7290/api/rest.cfm/printergroups
Example response (success):
HTTP/1.1 200 OK
Content-Type: application/json
{"success":true}
Example response (failure):
HTTP/1.1 401 Unauthorized

EveryonePrint Installation and Configuration Guide 2016.09.01 Page 205 of 221
Content-Type: application/json
"Invalid AuthToken"
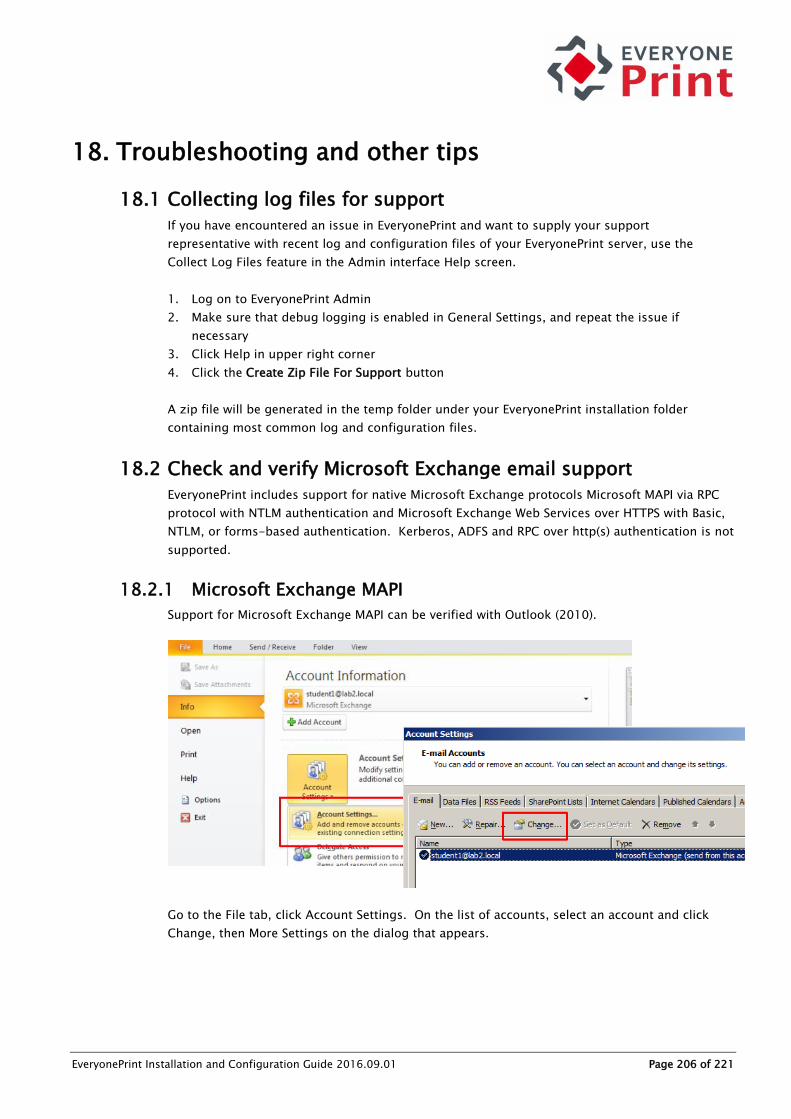
EveryonePrint Installation and Configuration Guide 2016.09.01 Page 206 of 221
18. Troubleshooting and other tips
18.1 Collecting log files for support
If you have encountered an issue in EveryonePrint and want to supply your support
representative with recent log and configuration files of your EveryonePrint server, use the
Collect Log Files feature in the Admin interface Help screen.
1. Log on to EveryonePrint Admin
2. Make sure that debug logging is enabled in General Settings, and repeat the issue if
necessary
3. Click Help in upper right corner
4. Click the Create Zip File For Support button
A zip file will be generated in the temp folder under your EveryonePrint installation folder
containing most common log and configuration files.
18.2 Check and verify Microsoft Exchange email support
EveryonePrint includes support for native Microsoft Exchange protocols Microsoft MAPI via RPC
protocol with NTLM authentication and Microsoft Exchange Web Services over HTTPS with Basic,
NTLM, or forms-based authentication. Kerberos, ADFS and RPC over http(s) authentication is not
supported.
18.2.1 Microsoft Exchange MAPI
Support for Microsoft Exchange MAPI can be verified with Outlook (2010).
Go to the File tab, click Account Settings. On the list of accounts, select an account and click
Change, then More Settings on the dialog that appears.

EveryonePrint Installation and Configuration Guide 2016.09.01 Page 207 of 221
On the Connection tab, the "Connect to Microsoft Exchange using HTTP" should be unchecked.

EveryonePrint Installation and Configuration Guide 2016.09.01 Page 208 of 221
18.2.2 Microsoft Exchange Web Services
Support for Microsoft Exchange Web Services can be verified using Internet Explorer by accessing
the Web service URL. This is typically https://<server>/ews/exchange.asmx
This should show a login prompt for username and password. If using Internet Explorer and no
authentication prompt appears, go to Internet Options -> Security and choose Custom Level for
the current zone. Then scroll to User Authentication Logon and choose Prompt for user name
and password. Close and reopen all Internet Explorer Windows and access the Web services URL
again.
A prompt for username and password should appear.
Notice the Domain value, this will be used in the Email Print configuration in EveryonePrint.

EveryonePrint Installation and Configuration Guide 2016.09.01 Page 209 of 221
Going to the /ews/exchange.asmx the Exchange server with a successful configuration will show
a WSDL page similar to below. If this appears, the Exchange Web Services are confirmed
accessible.

EveryonePrint Installation and Configuration Guide 2016.09.01 Page 210 of 221
18.3 Common LDAP authentication error codes
Configuring Lightweight Directory Access Protocol (LDAP) can be complex. Included in
EveryonePrint is a testing function, but before using the test function, you will need to obtain the
path and settings for the internal LDAP system. With the path we recommend using a LDAP
browser to view the directory to gain a better understanding of how LDAP is implemented at your
company.
Using a LDAP browser
One example of a free LDAP Browser is available from Softerra. If you can connect with the
Browser, you can navigate through the tree to see where the users are stored. When you find the
directory with the users, look at the top bar of the LDAP Browser to get your Start Search DN
path. Groups can be found similarly.
Using the LDAP Browser, you can verify a user's information. Typically you will use
"sAMAccountName" or "cn".
Log files
When configuring LDAP authentication, it is useful to enable debug logging in General Settings.
This will ensure that any relevant details are logged to file. Log files are located in \logs
subdirectory of the EveryonePrint installation.
LDAP Specific Errors
1. Error: com.server.exception.DBException: Error in bind() from LDAP source: [server]:[port]
Cause: This is a very general error, and it means something went wrong when trying to
bind to LDAP/AD. Check to see if the LDAP/AD server name and/or port number you
have specified is incorrect or an incorrect DN was specified as the administrator
username.
2. Error: javax.naming.CommunicationException: [server]:[port] [Root exception is
java.net.ConnectException: Connection refused: connect]
Cause: The port name you have specified for the LDAP/AD server is incorrect.
3. Error: javax.naming.CommunicationException: [server]:[port] [Root exception is
java.net.UnknownHostException: [server]]
Cause: The LDAP/AD server name you have specified is incorrect.
4. Error: javax.naming.NamingException: Cannot parse url: [protocol]://[server]:[port] [Root
exception is java.net.MalformedURLException: Not an LDAP URL: [protocol]://[server]:[port]]
Cause: The protocol you have specified is not correct.
5. Error: javax.naming.AuthenticationException: [LDAP: error code 49 - Invalid Credentials]
Cause: The DN path or password which you have specified for the administrator is
invalid. Any of the below will result in this error:

EveryonePrint Installation and Configuration Guide 2016.09.01 Page 211 of 221
* Pointed to non-user DN
* Pointed to a non-existent user, but in existing DN
* Pointed to non existent DN
* Pointed to an existing user, but non existing DN
* Pointed to an incorrect admin DN, uid instead of cn
* Pointed to a non administrator user
* Pointed to a valid admin but password is incorrect
6. Error: com.server.exception.DBException: Error in searchForUserList from LDAP plugin: [LDAP:
error code 32 - No Such Object]
Cause: Very general error when there is a problem finding the users in LDAP/AD. Could
be that the DN pointing to the users is pointing to the wrong place or is just incorrect
and does not exist.
7. Error: javax.naming.NameNotFoundException: [LDAP: error code 32 - No Such Object];
remaining name '[DN]'
Cause: The DN path which points to where the users are located in the directory is
invalid.
8. Error: com.server.exception.DBException: Error in searchForUserList from LDAP plugin: [LDAP:
error code 2 - Bad search filter]
Cause: Invalid search filter passed to the LDAP/AD server.
9. Error: javax.naming.directory.InvalidSearchFilterException: Missing 'equals'; remaining name
'[DN]'
Cause: The filter specified is wrong or CPS constructed a bad filter.
10. Error: javax.naming.directory.InvalidSearchFilterException: Unbalanced parenthesis;
remaining name [DN]
Cause: You did not have correct opening and closing of parenthesis in your search filter.
11. Error: Error in bind from LDAP source: [LDAP: error code 49 - Invalid Credentials]
javax.naming.AuthenticationException
Cause: Could not authenticate the user trying to login. This can be the result of an
incorrect username or password, or an incorrect prefix and/or suffix specified in the
LDAP Authentication screen, depending on the type of LDAP/AD system. Could also
mean the authentication type is incorrect.
12. Error: Error in bind from LDAP source: [LDAP: error code 34 - invalid DN]
javax.naming.InvalidNameException
Cause: This is caused by a bad prefix specified in the LDAP Authentication screen, on
most LDAP/AD systems. This could mean you did not specify a prefix at all, which
means the LDAP/AD server did not receive a full DN from EveryonePrint or that you did
not specify a correct prefix, such as CN instead of UID, which results in the LDAP/AD

EveryonePrint Installation and Configuration Guide 2016.09.01 Page 212 of 221
server not receiving a correct DN from EveryonePrint. Can also be caused by a missing
comma at the beginning of the suffix or an extra comma at the end of the suffix. This
error could also mean the authentication type is incorrect.
13. Error: NoSuchAttributeException
Cause: This is caused by providing a name for an attribute which is not correct or does
not exist.
Active Directory Specific Errors
1. Error: com.server.exception.DBException: Error in bind() from LDAP source: [LDAP: error code
49 - 80090308: LdapErr: DSID-0C09030F, comment: AcceptSecurityContext error, data 525,
vece] javax.naming.AuthenticationException
Cause: The administrator domain name, username, and or password is incorrect in the
LDAP Authentication screen.
2. Error: com.server.exception.DBException: Error in searchForUserList from LDAP plugin: [LDAP:
error code 32 - 0000208D: NameErr: DSID-031001C6, problem 2001 (NO_OBJECT), data 0, best
match of: '[DN]' ] javax.naming.NameNotFoundException
Cause: A non-existent DN specified in the Start Search field.
3. Error: javax.naming.PartialResultException [Root exception is
javax.naming.CommunicationException: [server]:[port] [Root exception is
java.net.UnknownHostException: [server]]]
Cause: An incorrect DN was specified in the Start Search field.
4. Error: com.server.exception.DBException: Error in searchForUserList from LDAP plugin: [DN]:
[LDAP: error code 34 - 0000208F: NameErr: DSID-031001B3, problem 2006 (BAD_NAME), data
8350, best match of: '[DN],' ] javax.naming.InvalidNameException
Cause: An incorrectly formatted DN was specified.
5. Error: javax.naming.NameNotFoundException: [LDAP: error code 32 - 0000208D: NameErr:
DSID-03100198, problem 2001 (NO_OBJECT), data 0, best match of: '']; remaining name ''
Cause: This error appears if you do not have Group settings filled in, but have User
Search filled in. Some systems do not care, while some systems experience problems
with the empty DN.
6. Error: Error in bind from LDAP source: [LDAP: error code 49 - 80090308: LdapErr: DSID-
0C09030F, comment: AcceptSecurityContext error, data 52e, vece ]
javax.naming.AuthenticationException
Cause: Could not authenticate the user trying to login. This can be the result of an
incorrect username or password, or an incorrect prefix and/or suffix specified in the
LDAP Authentication screen, depending on the type of LDAP/AD system. Could also
mean the authentication type is incorrect. Also an incorrect username attribute or

EveryonePrint Installation and Configuration Guide 2016.09.01 Page 213 of 221
incorrect name attribute can cause this. Common cause of this error is a user trying to
login with DOMAIN\login instead of just login.
7. Error: javax.naming.NamingException: [LDAP: error code 1 - 000020D6: SvcErr: DSID-
03100690, problem 5012 (DIR_ERROR), data 0 ];
Cause: The DN specified in the Start Search tab is incorrect, wrong, or incorrectly
formatted.

EveryonePrint Installation and Configuration Guide 2016.09.01 Page 214 of 221
18.4 Troubleshooting Microsoft Office conversion
The following section outlines possible steps to handle Microsoft documents that fail to process,
resulting in jobs becoming "Expired" in EveryonePrint.
This section applies in particular to installations of EveryonePrint on Microsoft Windows Server
2012, which introduced a more restrictive permission system. Depending on the Windows
domain security configuration in place, the below steps may be required for your Windows 2012
installation.
1. Microsoft Office Test and Diagnostics tool
EveryonePrint includes a “self-test” Office test and diagnostics tool, which can be used to
confirm if Office document processing works, and if not, return any error messages to help
troubleshooting.
First make sure that .Net Framework 3.51 SP1 or later is installed. This is required for the
Office Test and Diagnostics tool.
Choose the tests to run and click Run Office Tests.

EveryonePrint Installation and Configuration Guide 2016.09.01 Page 215 of 221
If a test fails, the error codes returned may not be friendly and helpful, so if a test fails,
proceed with the below troubleshooting steps. If the problem persists, after following the
steps below, contact your EveryonePrint support representative.
2. Confirm that the EveryonePrint Web service runs as a local administrative user.
3. Log on the server with the EveryonePrint service account, and start each of the Office
applications, Word, Excel and PowerPoint, and activate if prompted.
4. Confirm that the Windows Printer Spooler Service is running and at least one local printer
queue is installed on the server.
5. Confirm that Visual Basic for Applications is installed as part of the Office Installation.
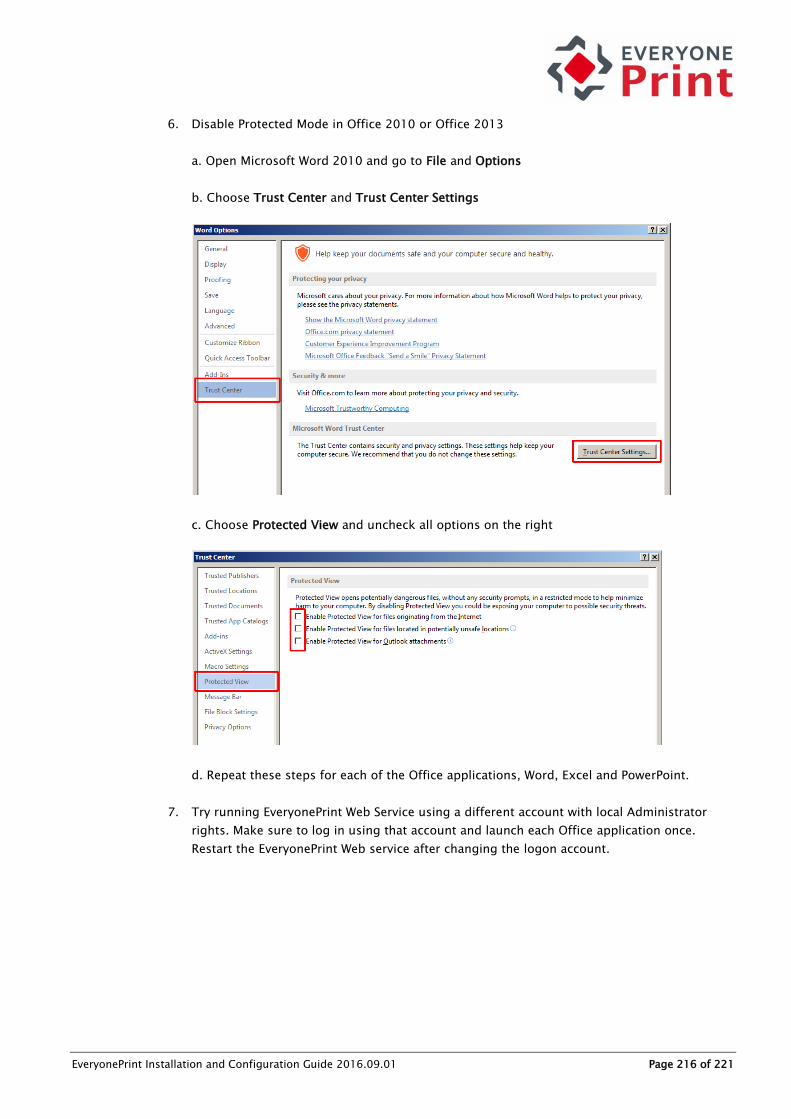
EveryonePrint Installation and Configuration Guide 2016.09.01 Page 216 of 221
6. Disable Protected Mode in Office 2010 or Office 2013
a. Open Microsoft Word 2010 and go to File and Options
b. Choose Trust Center and Trust Center Settings
c. Choose Protected View and uncheck all options on the right
d. Repeat these steps for each of the Office applications, Word, Excel and PowerPoint.
7. Try running EveryonePrint Web Service using a different account with local Administrator
rights. Make sure to log in using that account and launch each Office application once.
Restart the EveryonePrint Web service after changing the logon account.

EveryonePrint Installation and Configuration Guide 2016.09.01 Page 217 of 221
8. Change DCOM permissions for Office programs
a. Open Component Services, by opening a command prompt as administrator and type:
mmc comexp.msc
If you’re using a 64 bit operating system, such as Windows 2008 R2 or Windows 2012, but a
Microsoft Office 32 bit, type:
mmc comexp.msc /32
b. Navigate to Component Services -> Computers -> My Computer -> DCOM Config
c. For each of the entries:
“Microsoft Word 97 - 2003 Document”
“Microsoft Excel Application”
“Microsoft PowerPoint Slide”
Right click and choose Properties
Under Identity choose This user and specify the same service account with local
administrative rights, as used on the EveryonePrint Web Service.
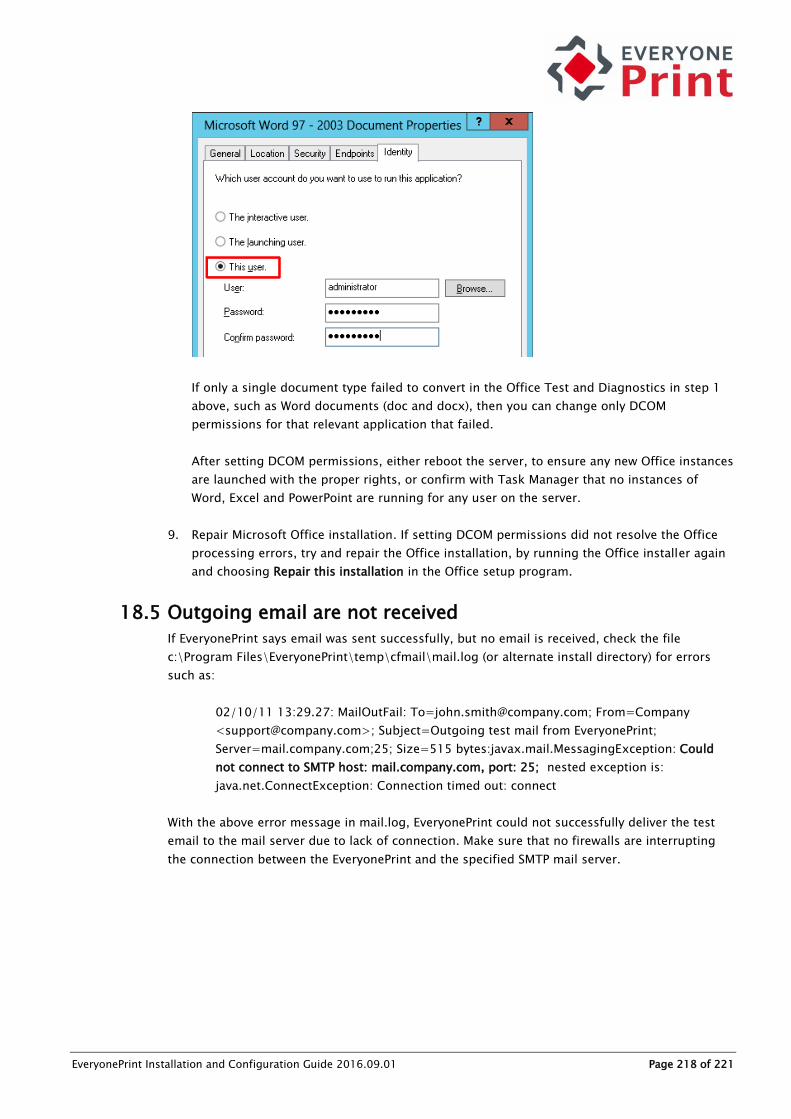
EveryonePrint Installation and Configuration Guide 2016.09.01 Page 218 of 221
If only a single document type failed to convert in the Office Test and Diagnostics in step 1
above, such as Word documents (doc and docx), then you can change only DCOM
permissions for that relevant application that failed.
After setting DCOM permissions, either reboot the server, to ensure any new Office instances
are launched with the proper rights, or confirm with Task Manager that no instances of
Word, Excel and PowerPoint are running for any user on the server.
9. Repair Microsoft Office installation. If setting DCOM permissions did not resolve the Office
processing errors, try and repair the Office installation, by running the Office installer again
and choosing Repair this installation in the Office setup program.
18.5 Outgoing email are not received
If EveryonePrint says email was sent successfully, but no email is received, check the file
c:\Program Files\EveryonePrint\temp\cfmail\mail.log (or alternate install directory) for errors
such as:
02/10/11 13:29.27: MailOutFail: [email protected]; From=Company
<[email protected]>; Subject=Outgoing test mail from EveryonePrint;
Server=mail.company.com;25; Size=515 bytes:javax.mail.MessagingException: Could
not connect to SMTP host: mail.company.com, port: 25; nested exception is:
java.net.ConnectException: Connection timed out: connect
With the above error message in mail.log, EveryonePrint could not successfully deliver the test
email to the mail server due to lack of connection. Make sure that no firewalls are interrupting
the connection between the EveryonePrint and the specified SMTP mail server.

EveryonePrint Installation and Configuration Guide 2016.09.01 Page 219 of 221
18.6 Customize release code, username and password generation
formatting
If using EveryonePrint in Privacy with Release Codes, by default EveryonePrint will generate a 6-
digit numeric release code for the user.
If using EveryonePrint with an accounting solution, where EveryonePrint can create user
accounts, by default, EveryonePrint will create numeric username and password for the user.
It’s possible to customize the format of created release codes, usernames and passwords, for
example to have a shorter or longer string, or one that also contains letters.
To modify the format of the generated release code, username or password, do the following:
1. Stop the EveryonePrint Web service
2. Backup the settings file EveryonePrint\eop.xml
3. Open the eop.xml in a text editor such as Notepad
4. Modify the relevant configuration:
<genreleasecode>numeric,6,0,0,,</genreleasecode>
<genusername>numeric,6,0,0,,</genusername>
<genpassword>numeric,6,0,0,,</genpassword>
5. Save the eop.xml and start EveryonePrint Web service
genreleasecode The format for release code generation
genusername The format for username generation
genpassword The format for password generation
Each type, release code, username and password can have its own definition.
The configuration is stored as a comma delimited string in the format of:
format,length,numericPrefix,numericSuffix,fixedPrefix,fixedSuffix
format Whether to generate numeric, string, alphanumeric
length The length of the key to generate
numericPrefix Number of random digits to start the key with (the rest of the key will be
whatever the 'format' is)
numericSuffix Number of random digits to end the key with (the rest of the key will be
whatever the 'format' is)
fixedPrefix A prefix prepended to the generated key. The length of which is
subtracted from the 'length' argument
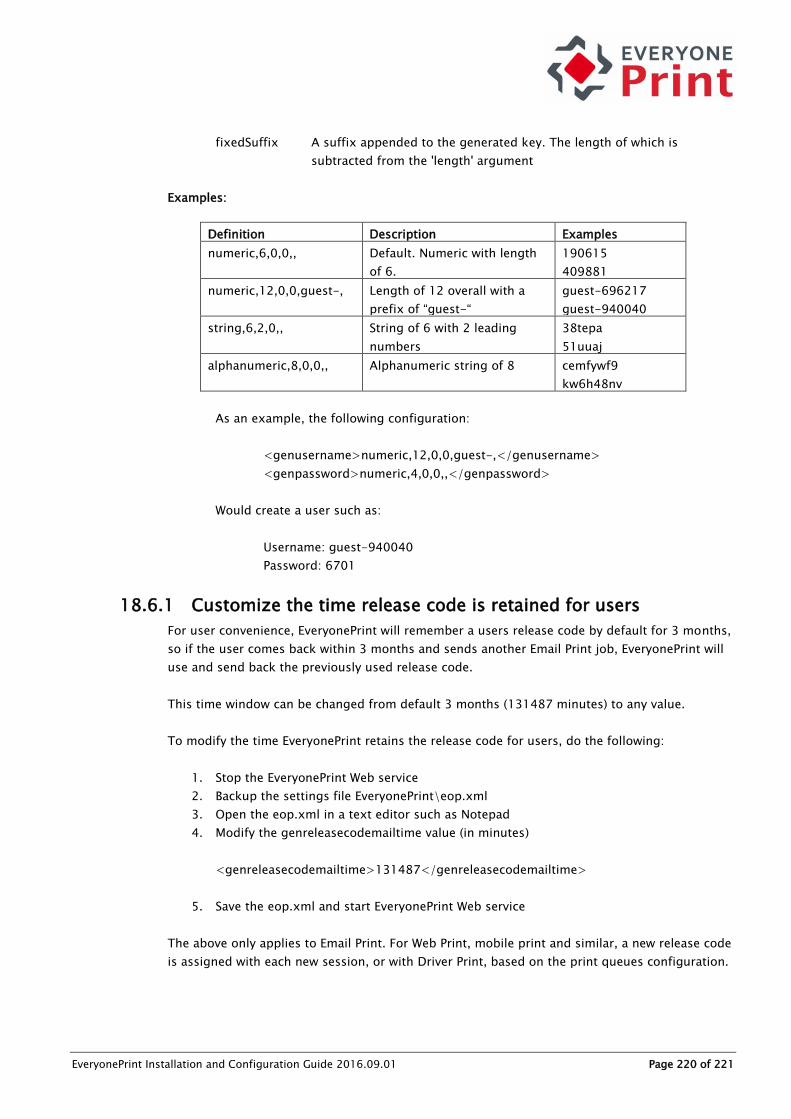
EveryonePrint Installation and Configuration Guide 2016.09.01 Page 220 of 221
fixedSuffix A suffix appended to the generated key. The length of which is
subtracted from the 'length' argument
Examples:
As an example, the following configuration:
<genusername>numeric,12,0,0,guest-,</genusername>
<genpassword>numeric,4,0,0,,</genpassword>
Would create a user such as:
Username: guest-940040
Password: 6701
18.6.1 Customize the time release code is retained for users
For user convenience, EveryonePrint will remember a users release code by default for 3 months,
so if the user comes back within 3 months and sends another Email Print job, EveryonePrint will
use and send back the previously used release code.
This time window can be changed from default 3 months (131487 minutes) to any value.
To modify the time EveryonePrint retains the release code for users, do the following:
1. Stop the EveryonePrint Web service
2. Backup the settings file EveryonePrint\eop.xml
3. Open the eop.xml in a text editor such as Notepad
4. Modify the genreleasecodemailtime value (in minutes)
<genreleasecodemailtime>131487</genreleasecodemailtime>
5. Save the eop.xml and start EveryonePrint Web service
The above only applies to Email Print. For Web Print, mobile print and similar, a new release code
is assigned with each new session, or with Driver Print, based on the print queues configuration.
Definition Description Examples
numeric,6,0,0,, Default. Numeric with length
of 6.
190615
409881
numeric,12,0,0,guest-, Length of 12 overall with a
prefix of “guest-“
guest-696217
guest-940040
string,6,2,0,, String of 6 with 2 leading
numbers
38tepa
51uuaj
alphanumeric,8,0,0,, Alphanumeric string of 8 cemfywf9
kw6h48nv

EveryonePrint Installation and Configuration Guide 2016.09.01 Page 221 of 221
18.7 Selectively delete all users, print job history, emails and
printers
EveryonePrint includes the possibility for administrators to selectively delete data from the
EveryonePrint server, for example, to clean up test users and test print jobs before deploying a
server in production, or for a reseller to clean prior to a demo for a customer.
Access the reset feature by loading the below page:
http://127.0.0.1:7290/admin/reset.cfm
Or equivalent URL should the port or IP/hostname of the server have changed.