Embed Size (px)
Citation preview
ETT EPrime Module Manual For the ETT Olfactometer
Manual and Tutorial
For Version 1.1.x.y and newer
Rev. 1.1
2 © Emerging Tech Trans, LLC
Table of Contents Introduction .............................................................................................................................................. 3
Prerequisites ............................................................................................................................................. 3
Connecting the Device .............................................................................................................................. 3
Before the first power up ...................................................................................................................... 3
ETT Olfactometer 2 ............................................................................................................................... 4
ETT Olfactometer S & ETT Olfactometer C ........................................................................................... 6
Initial test / device COM port setup:......................................................................................................... 7
Utilization ................................................................................................................................................ 10
Package installation ............................................................................................................................ 10
List of included functions ........................................................................................................................ 11
The sample paradigm .......................................................................................................................... 16
3 © Emerging Tech Trans, LLC
Introduction
For all our devices in the ETT Olfactometer line we are offering multiple ways to interface with the
device. This manual describes how to use our compatible devices with the ETT Olfactometer EPrime
package.
For registered users, we are offering all our software as a download on our website
(emergingtechtrans.com). Access will usually be provided at the time of purchase of the device via email
contact with our support. Additional accounts can be created at any time upon request to
The downloadable .zip folder contains the EPRIME package (‘ettOlfactometer.epk2’), a sample paradigm
(ettOlfactSample.es2), a quick installation tutorial (‘Installing ETT Olfactometer EPRIME package.gif’) and
this manual (‘ettOlfactometer EPrime Module manual 2016b.pdf’). Feel free to reach out to our support
at any time for more help and specific instructions.
Prerequisites
For this EPrime package we recommend to also install the latest version of ETTDirectControl. Firmware
updates and hardware self-testing is only offered for this software. Respiratory triggered paradigms are
also currently only supported via ETTDirectControl. The installer contains software components that are
required, particularly FTDI chip drivers. These drivers are also separately available in the support section
of our website under drivers.
Connecting the Device
Before the first power up
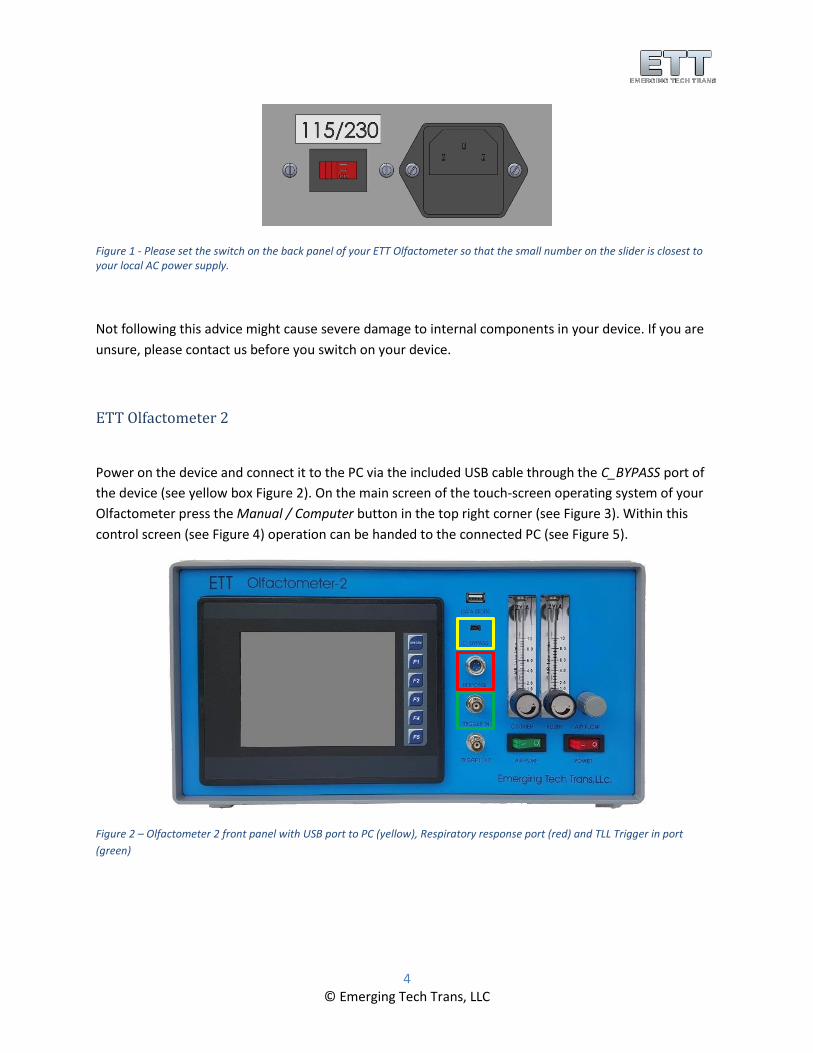
All ETT devices can be operated with the most common AC supply voltages around the world. Before
you start your new ETT Olfactometer please make sure that the voltage setting on the back panel is set
to the correct voltage of your local power system (slide switch to position so that correct voltage is
readable as in Figure 1).
4 © Emerging Tech Trans, LLC
Figure 1 - Please set the switch on the back panel of your ETT Olfactometer so that the small number on the slider is closest to your local AC power supply.
Not following this advice might cause severe damage to internal components in your device. If you are
unsure, please contact us before you switch on your device.
ETT Olfactometer 2
Power on the device and connect it to the PC via the included USB cable through the C_BYPASS port of
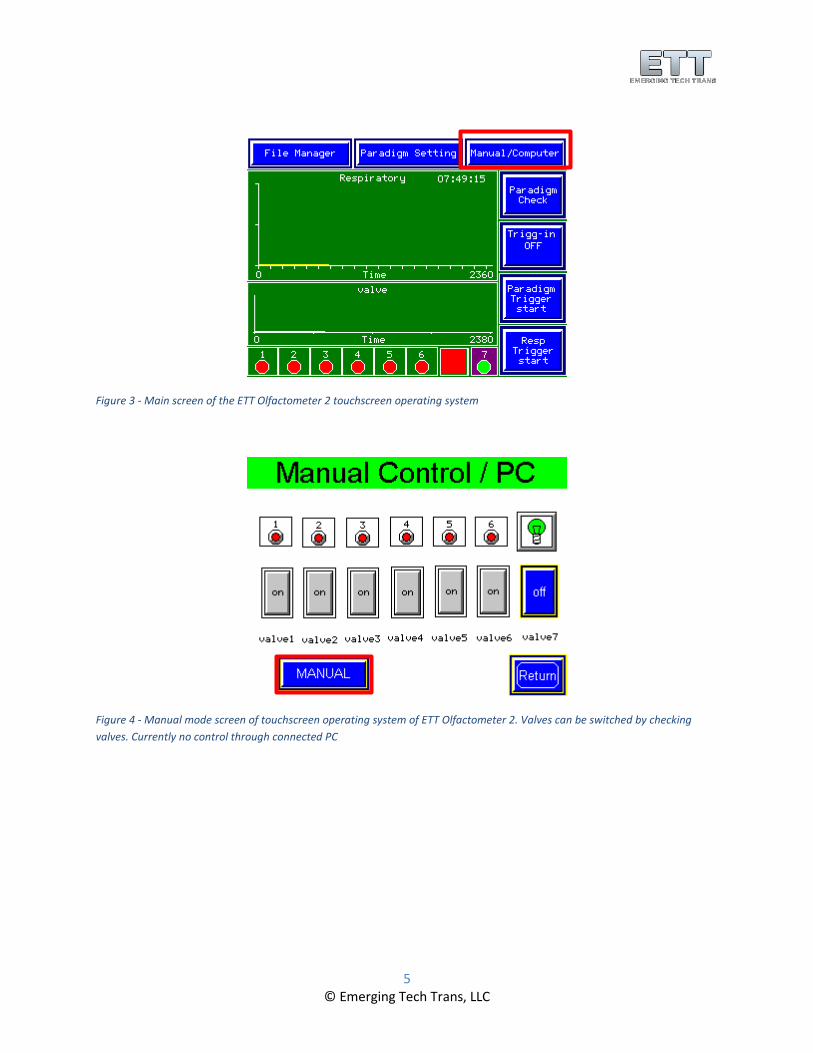
the device (see yellow box Figure 2). On the main screen of the touch-screen operating system of your
Olfactometer press the Manual / Computer button in the top right corner (see Figure 3). Within this
control screen (see Figure 4) operation can be handed to the connected PC (see Figure 5).
Figure 2 – Olfactometer 2 front panel with USB port to PC (yellow), Respiratory response port (red) and TLL Trigger in port
(green)
5 © Emerging Tech Trans, LLC
Figure 3 - Main screen of the ETT Olfactometer 2 touchscreen operating system
Figure 4 - Manual mode screen of touchscreen operating system of ETT Olfactometer 2. Valves can be switched by checking
valves. Currently no control through connected PC
6 © Emerging Tech Trans, LLC
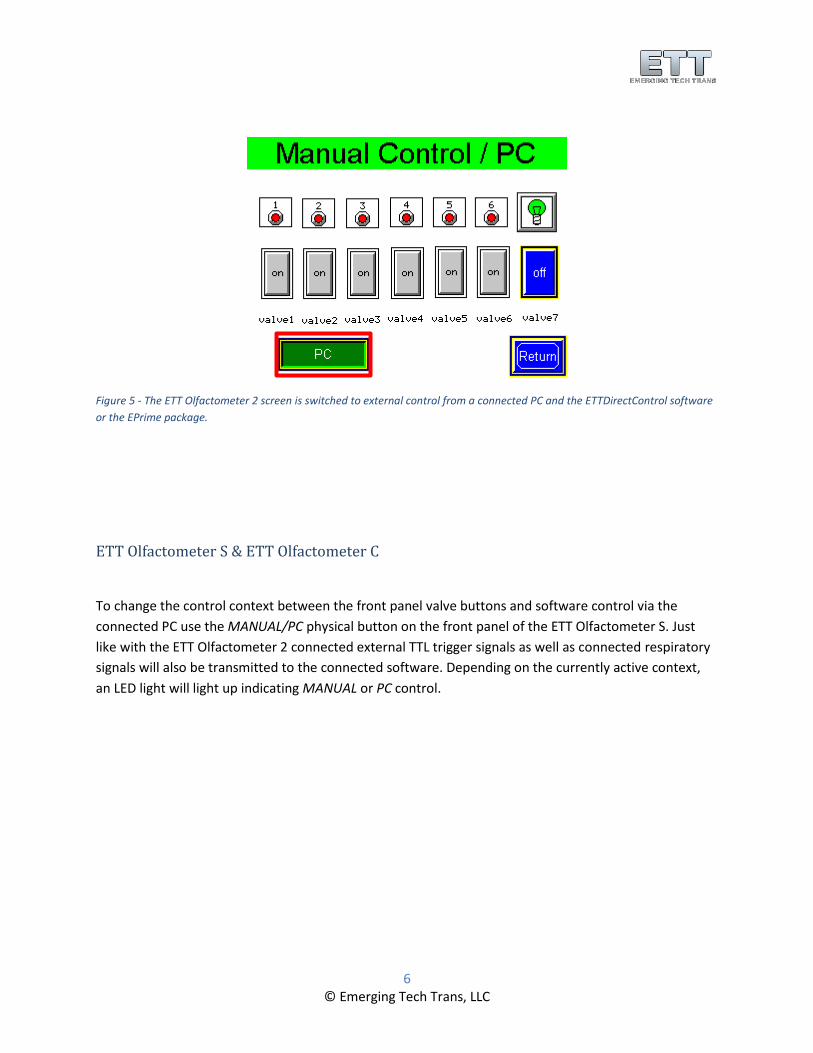
Figure 5 - The ETT Olfactometer 2 screen is switched to external control from a connected PC and the ETTDirectControl software
or the EPrime package.
ETT Olfactometer S & ETT Olfactometer C
To change the control context between the front panel valve buttons and software control via the
connected PC use the MANUAL/PC physical button on the front panel of the ETT Olfactometer S. Just
like with the ETT Olfactometer 2 connected external TTL trigger signals as well as connected respiratory
signals will also be transmitted to the connected software. Depending on the currently active context,
an LED light will light up indicating MANUAL or PC control.
7 © Emerging Tech Trans, LLC
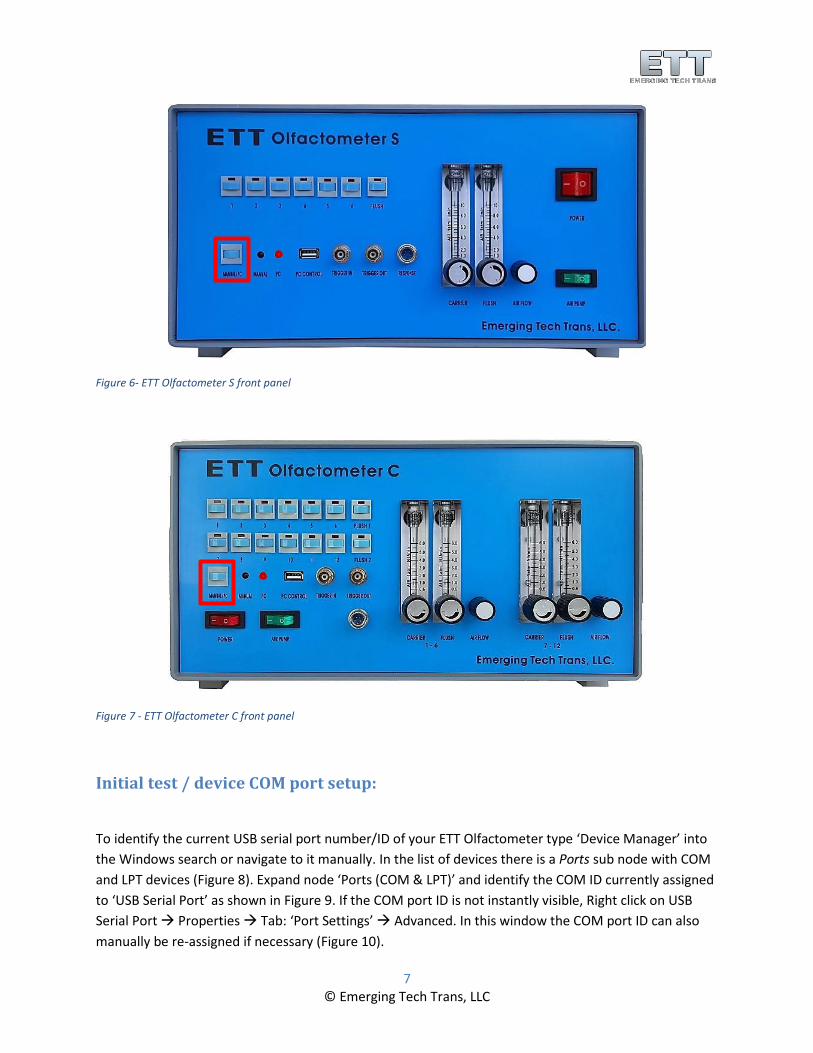
Figure 6- ETT Olfactometer S front panel
Figure 7 - ETT Olfactometer C front panel
Initial test / device COM port setup:
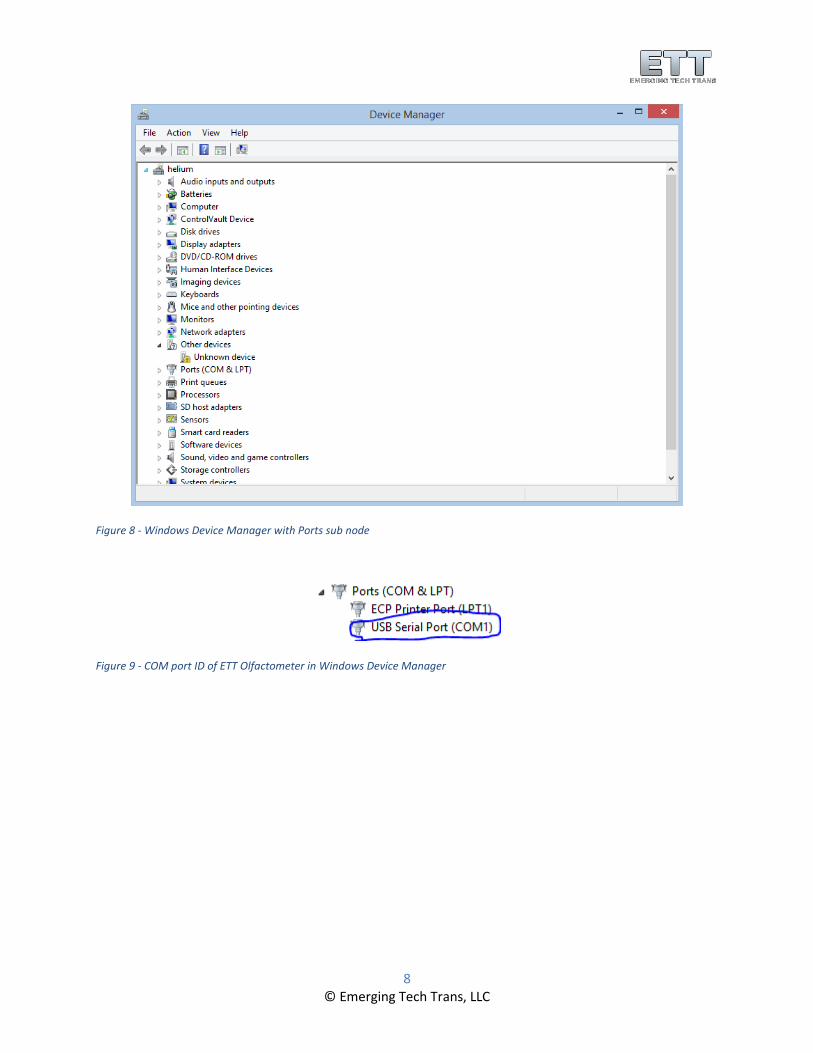
To identify the current USB serial port number/ID of your ETT Olfactometer type ‘Device Manager’ into
the Windows search or navigate to it manually. In the list of devices there is a Ports sub node with COM
and LPT devices (Figure 8). Expand node ‘Ports (COM & LPT)’ and identify the COM ID currently assigned
to ‘USB Serial Port’ as shown in Figure 9. If the COM port ID is not instantly visible, Right click on USB
Serial Port Properties Tab: ‘Port Settings’ Advanced. In this window the COM port ID can also
manually be re-assigned if necessary (Figure 10).
8 © Emerging Tech Trans, LLC
Figure 8 - Windows Device Manager with Ports sub node
Figure 9 - COM port ID of ETT Olfactometer in Windows Device Manager
9 © Emerging Tech Trans, LLC
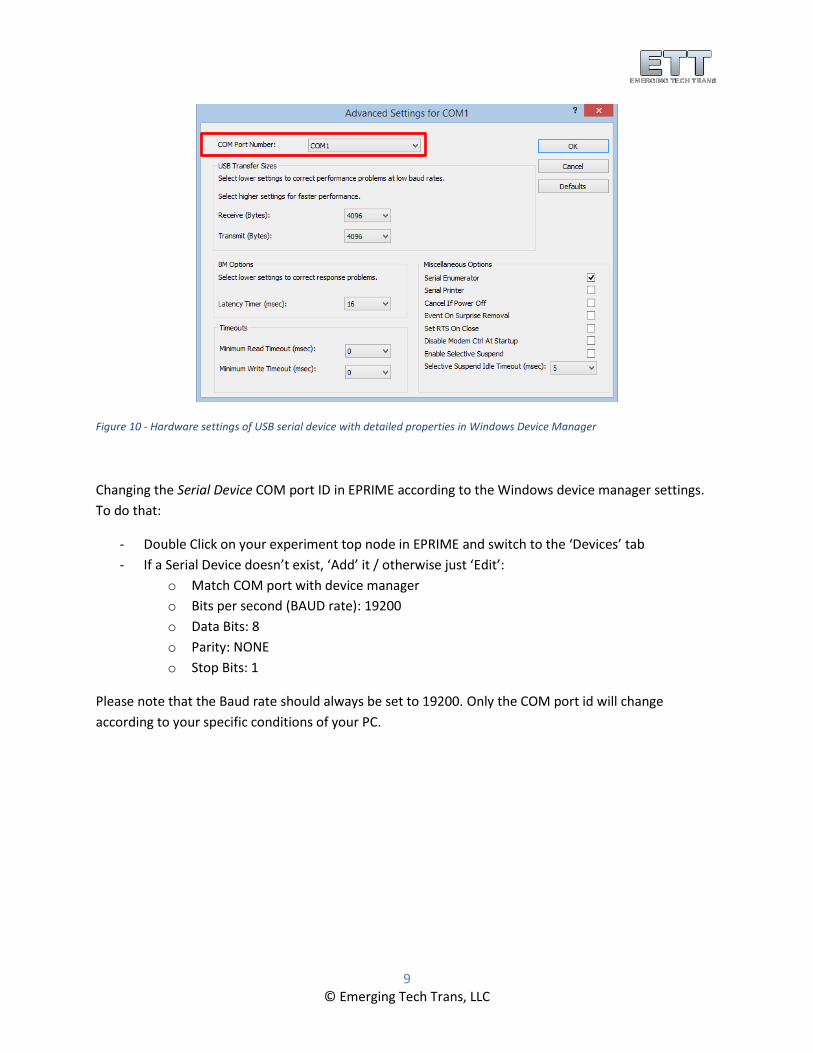
Figure 10 - Hardware settings of USB serial device with detailed properties in Windows Device Manager
Changing the Serial Device COM port ID in EPRIME according to the Windows device manager settings.
To do that:
- Double Click on your experiment top node in EPRIME and switch to the ‘Devices’ tab
- If a Serial Device doesn’t exist, ‘Add’ it / otherwise just ‘Edit’:
o Match COM port with device manager
o Bits per second (BAUD rate): 19200
o Data Bits: 8
o Parity: NONE
o Stop Bits: 1
Please note that the Baud rate should always be set to 19200. Only the COM port id will change
according to your specific conditions of your PC.
10 © Emerging Tech Trans, LLC
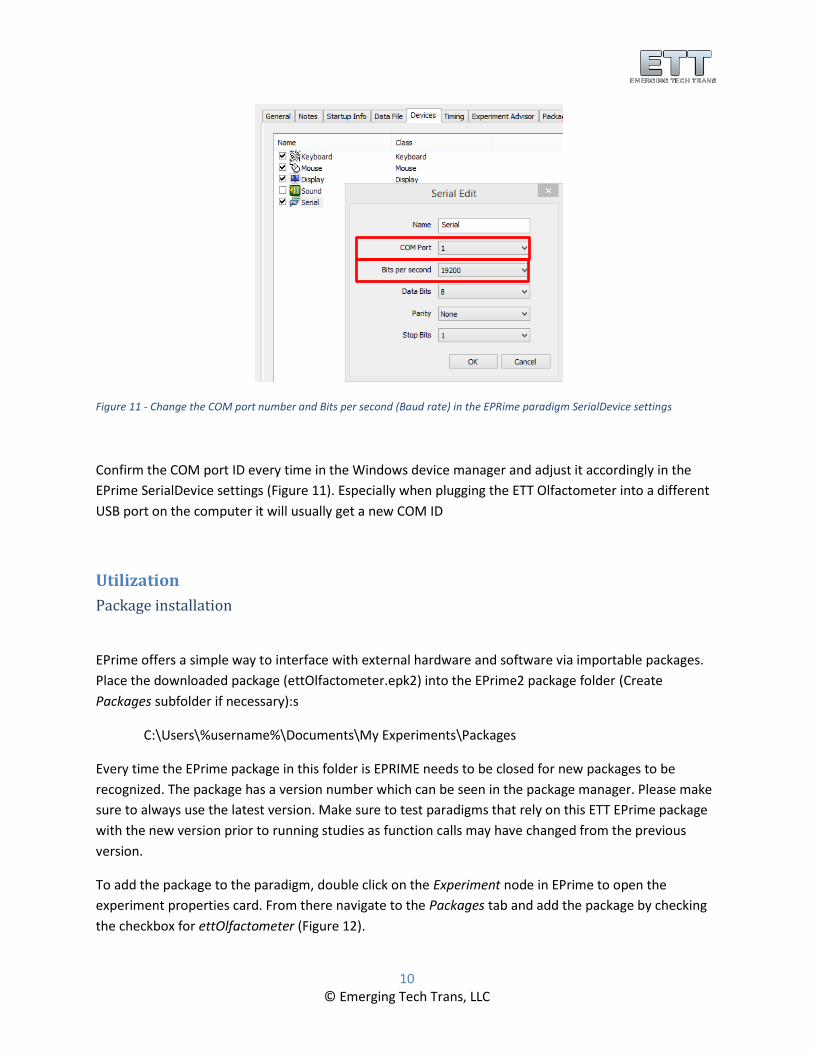
Figure 11 - Change the COM port number and Bits per second (Baud rate) in the EPRime paradigm SerialDevice settings
Confirm the COM port ID every time in the Windows device manager and adjust it accordingly in the
EPrime SerialDevice settings (Figure 11). Especially when plugging the ETT Olfactometer into a different
USB port on the computer it will usually get a new COM ID
Utilization
Package installation
EPrime offers a simple way to interface with external hardware and software via importable packages.
Place the downloaded package (ettOlfactometer.epk2) into the EPrime2 package folder (Create
Packages subfolder if necessary):s
C:\Users\%username%\Documents\My Experiments\Packages
Every time the EPrime package in this folder is EPRIME needs to be closed for new packages to be
recognized. The package has a version number which can be seen in the package manager. Please make
sure to always use the latest version. Make sure to test paradigms that rely on this ETT EPrime package
with the new version prior to running studies as function calls may have changed from the previous
version.
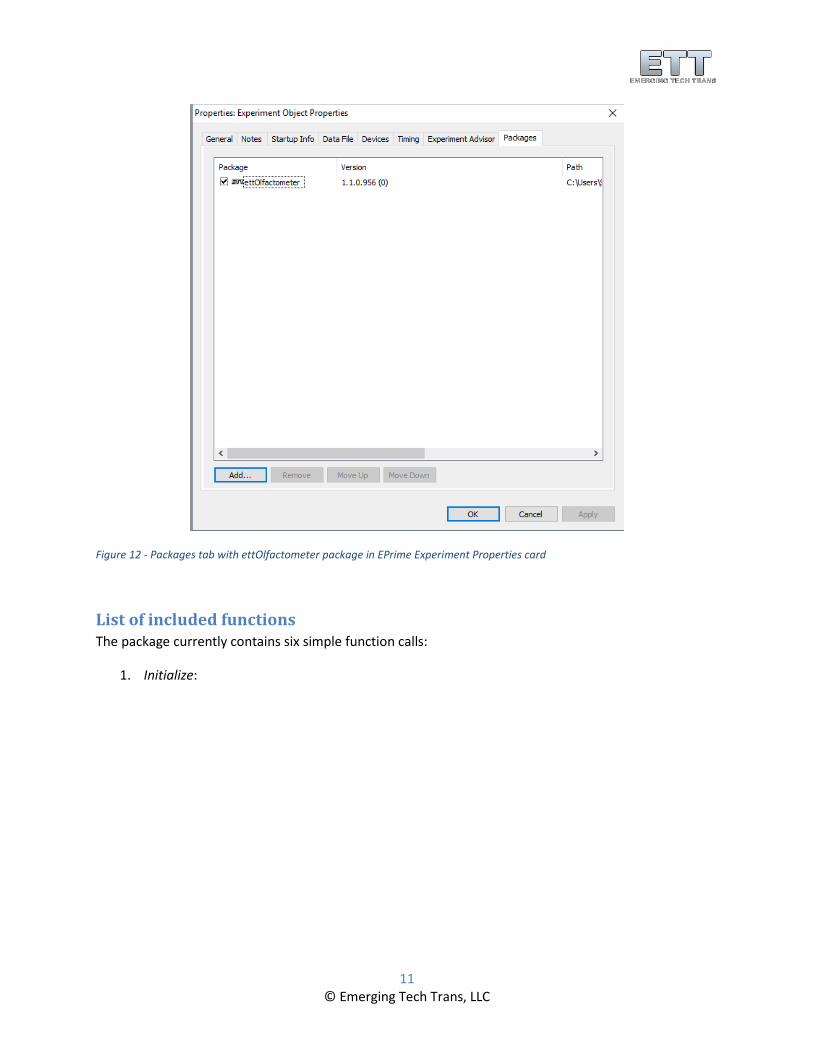
To add the package to the paradigm, double click on the Experiment node in EPrime to open the
experiment properties card. From there navigate to the Packages tab and add the package by checking
the checkbox for ettOlfactometer (Figure 12).
11 © Emerging Tech Trans, LLC
Figure 12 - Packages tab with ettOlfactometer package in EPrime Experiment Properties card
List of included functions The package currently contains six simple function calls:
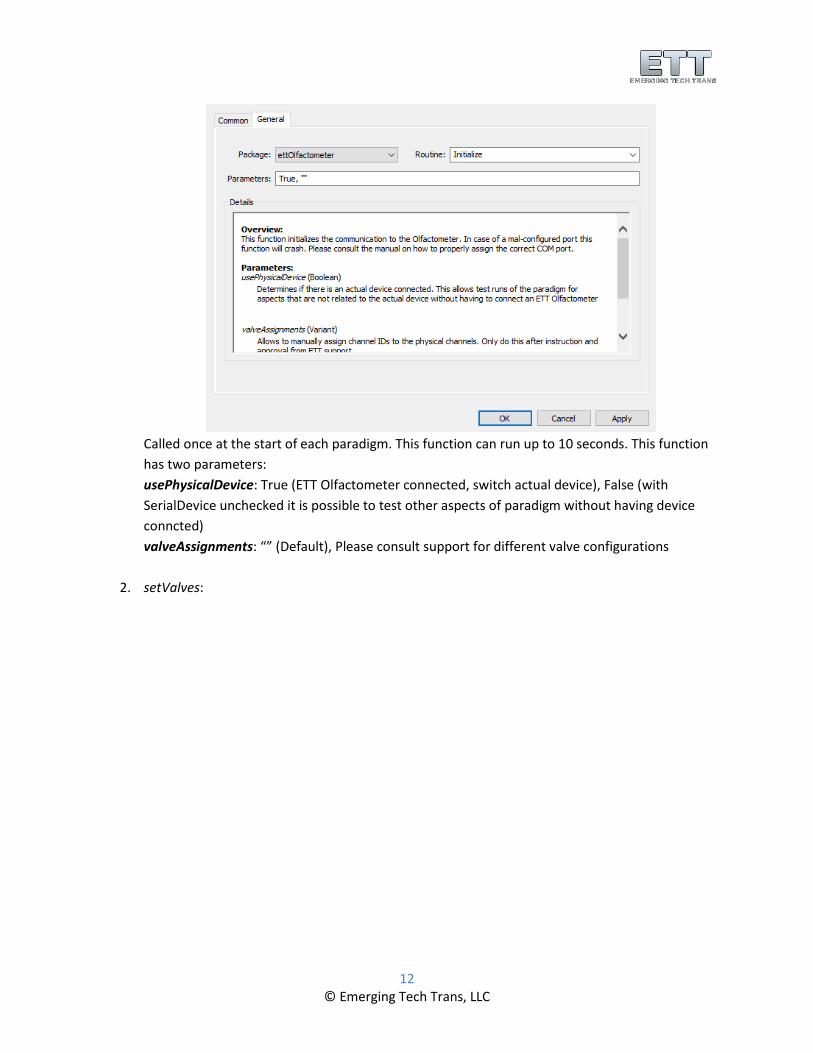
1. Initialize:
12 © Emerging Tech Trans, LLC
Called once at the start of each paradigm. This function can run up to 10 seconds. This function
has two parameters:
usePhysicalDevice: True (ETT Olfactometer connected, switch actual device), False (with
SerialDevice unchecked it is possible to test other aspects of paradigm without having device
conncted)
valveAssignments: “” (Default), Please consult support for different valve configurations
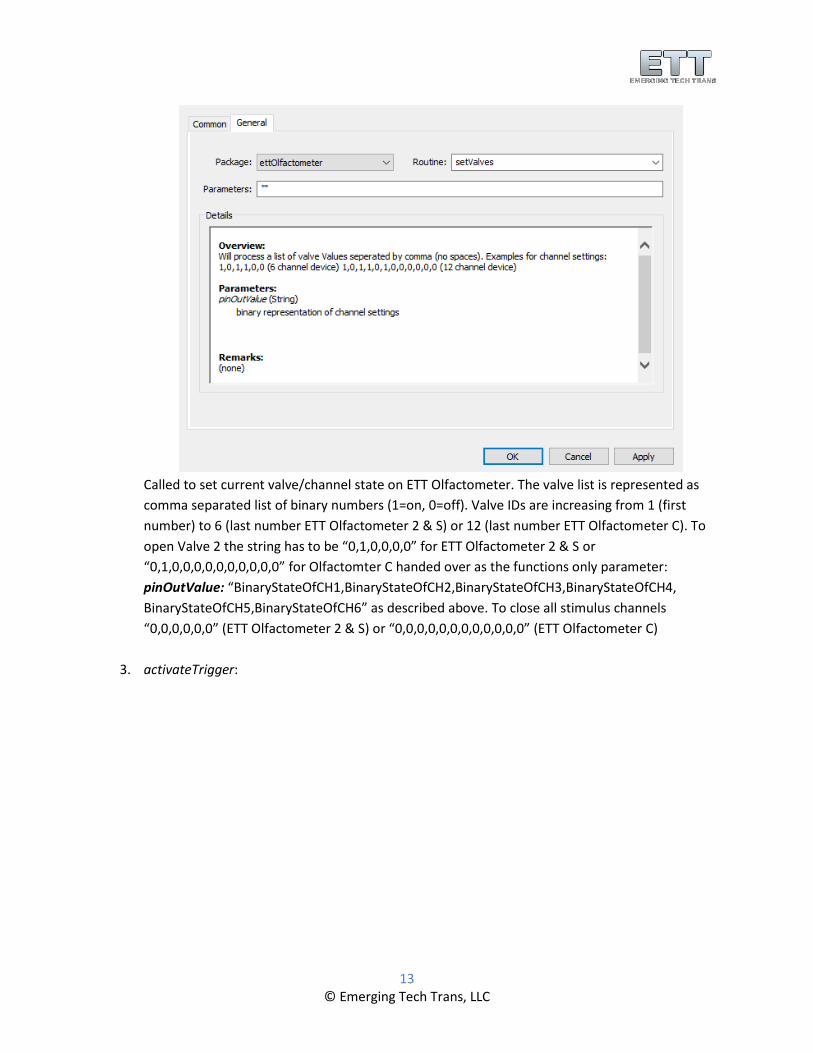
2. setValves:
13 © Emerging Tech Trans, LLC
Called to set current valve/channel state on ETT Olfactometer. The valve list is represented as
comma separated list of binary numbers (1=on, 0=off). Valve IDs are increasing from 1 (first
number) to 6 (last number ETT Olfactometer 2 & S) or 12 (last number ETT Olfactometer C). To
open Valve 2 the string has to be “0,1,0,0,0,0” for ETT Olfactometer 2 & S or
“0,1,0,0,0,0,0,0,0,0,0,0” for Olfactomter C handed over as the functions only parameter:
pinOutValue: “BinaryStateOfCH1,BinaryStateOfCH2,BinaryStateOfCH3,BinaryStateOfCH4,
BinaryStateOfCH5,BinaryStateOfCH6” as described above. To close all stimulus channels
“0,0,0,0,0,0” (ETT Olfactometer 2 & S) or “0,0,0,0,0,0,0,0,0,0,0,0” (ETT Olfactometer C)
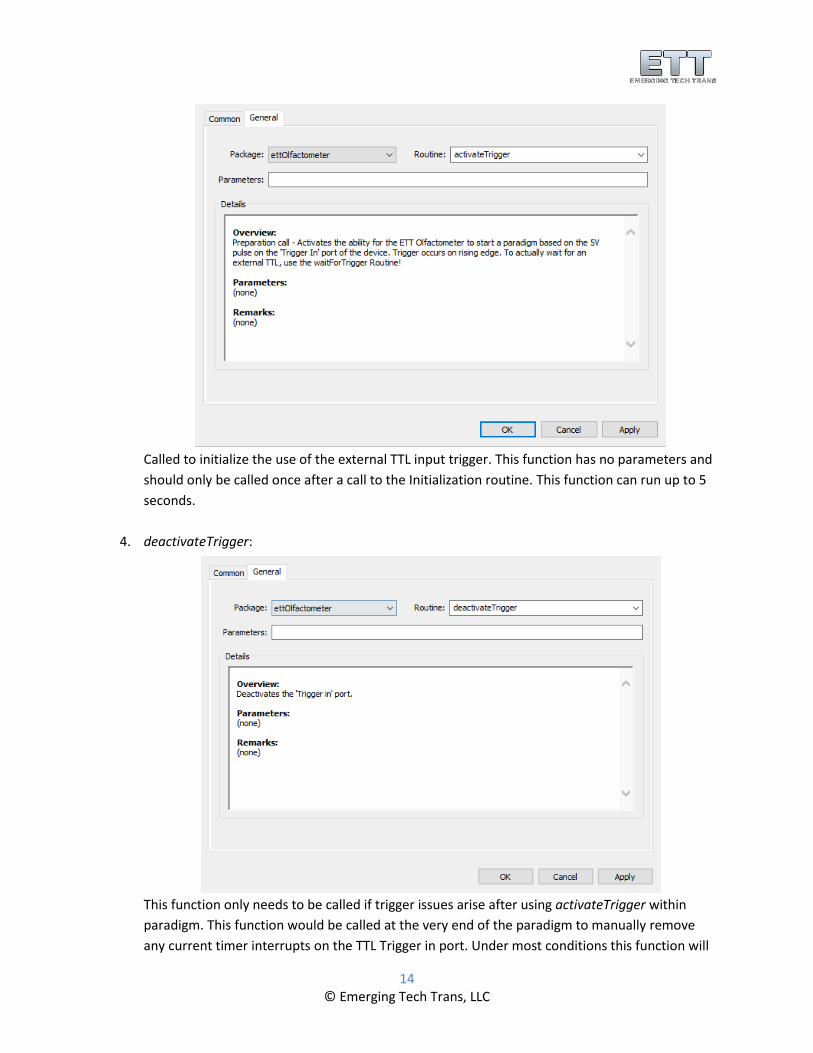
3. activateTrigger:
14 © Emerging Tech Trans, LLC
Called to initialize the use of the external TTL input trigger. This function has no parameters and
should only be called once after a call to the Initialization routine. This function can run up to 5
seconds.
4. deactivateTrigger:
This function only needs to be called if trigger issues arise after using activateTrigger within
paradigm. This function would be called at the very end of the paradigm to manually remove
any current timer interrupts on the TTL Trigger in port. Under most conditions this function will
15 © Emerging Tech Trans, LLC
be automatically executed by the Olfactometer internally prior to activating the trigger. This
function has no parameters and can run for up to 5 seconds.
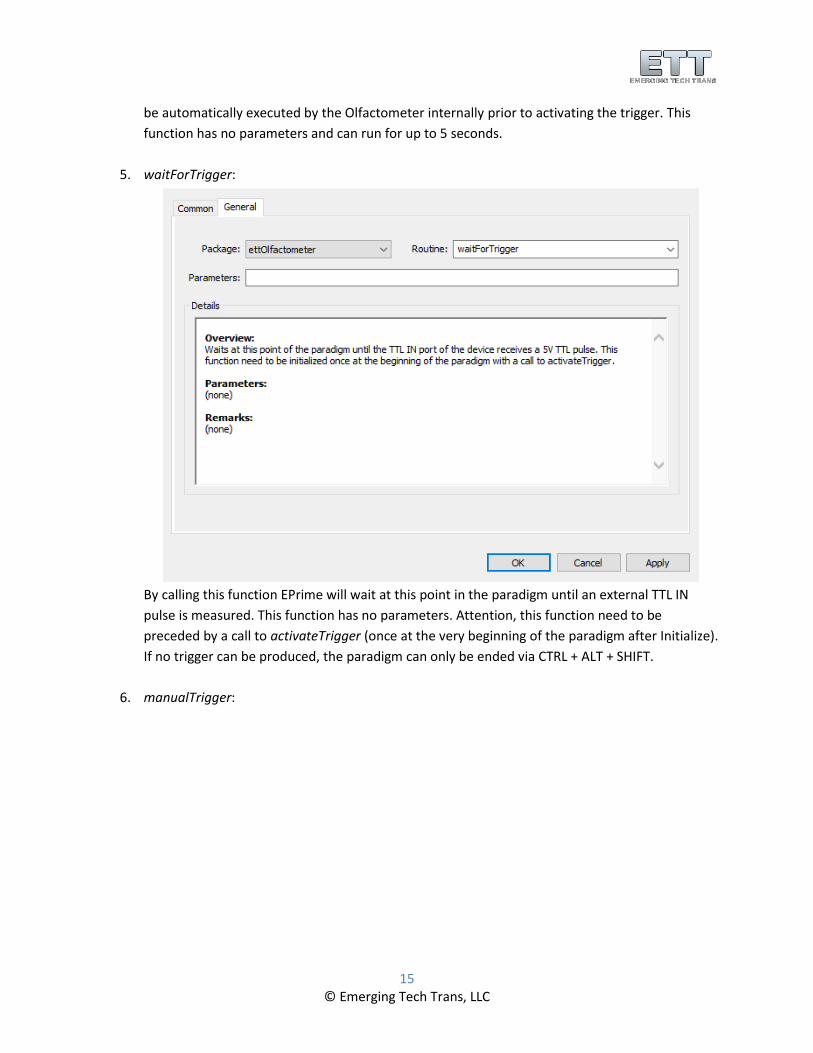
5. waitForTrigger:
By calling this function EPrime will wait at this point in the paradigm until an external TTL IN
pulse is measured. This function has no parameters. Attention, this function need to be
preceded by a call to activateTrigger (once at the very beginning of the paradigm after Initialize).
If no trigger can be produced, the paradigm can only be ended via CTRL + ALT + SHIFT.
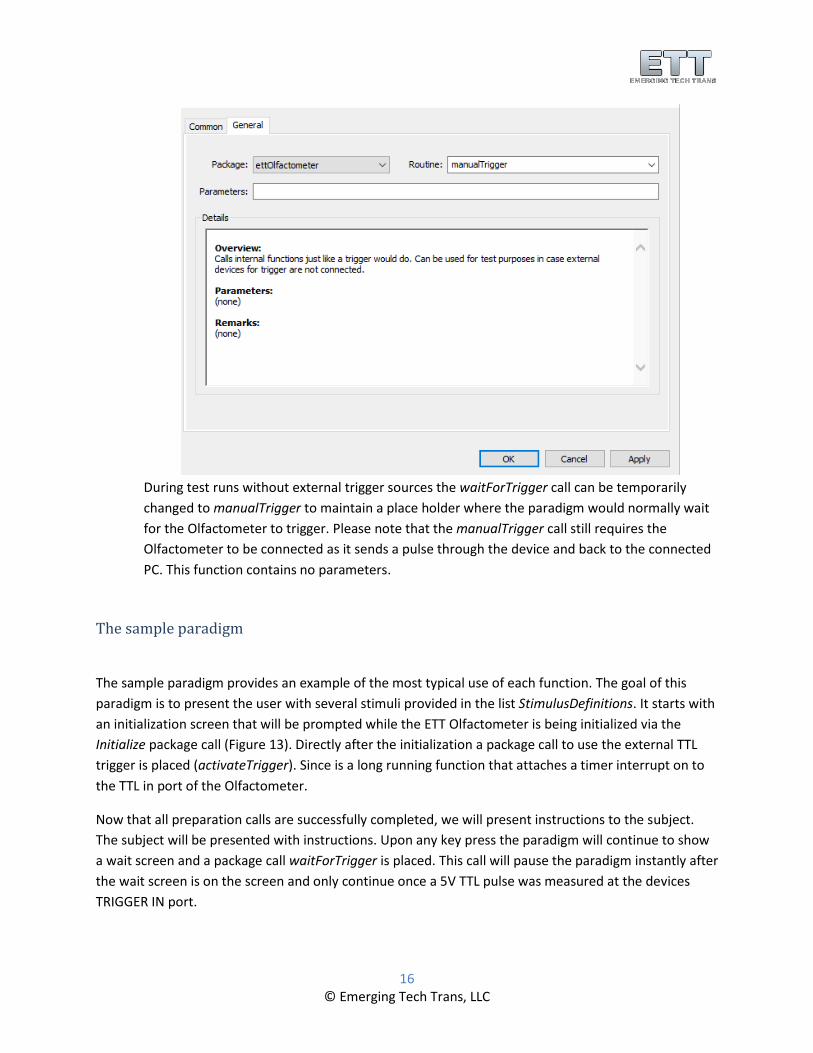
6. manualTrigger:
16 © Emerging Tech Trans, LLC
During test runs without external trigger sources the waitForTrigger call can be temporarily
changed to manualTrigger to maintain a place holder where the paradigm would normally wait
for the Olfactometer to trigger. Please note that the manualTrigger call still requires the
Olfactometer to be connected as it sends a pulse through the device and back to the connected
PC. This function contains no parameters.
The sample paradigm
The sample paradigm provides an example of the most typical use of each function. The goal of this
paradigm is to present the user with several stimuli provided in the list StimulusDefinitions. It starts with
an initialization screen that will be prompted while the ETT Olfactometer is being initialized via the
Initialize package call (Figure 13). Directly after the initialization a package call to use the external TTL
trigger is placed (activateTrigger). Since is a long running function that attaches a timer interrupt on to
the TTL in port of the Olfactometer.
Now that all preparation calls are successfully completed, we will present instructions to the subject.
The subject will be presented with instructions. Upon any key press the paradigm will continue to show
a wait screen and a package call waitForTrigger is placed. This call will pause the paradigm instantly after
the wait screen is on the screen and only continue once a 5V TTL pulse was measured at the devices
TRIGGER IN port.
17 © Emerging Tech Trans, LLC
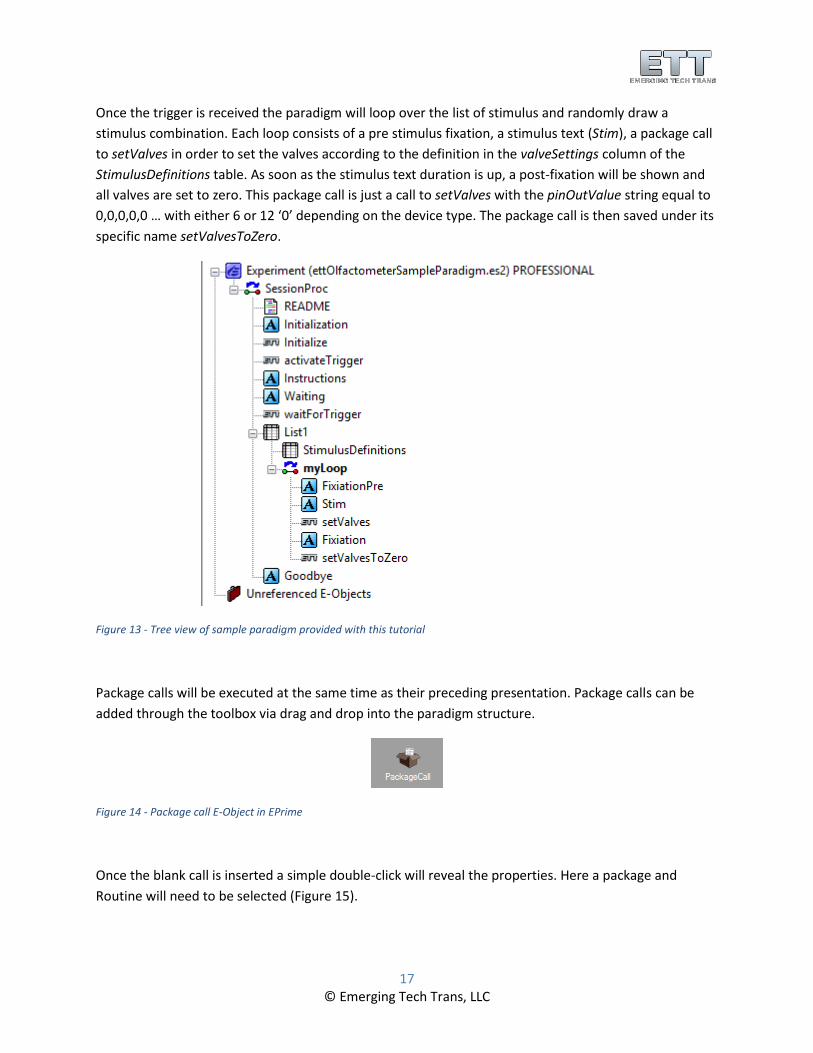
Once the trigger is received the paradigm will loop over the list of stimulus and randomly draw a
stimulus combination. Each loop consists of a pre stimulus fixation, a stimulus text (Stim), a package call
to setValves in order to set the valves according to the definition in the valveSettings column of the
StimulusDefinitions table. As soon as the stimulus text duration is up, a post-fixation will be shown and
all valves are set to zero. This package call is just a call to setValves with the pinOutValue string equal to
0,0,0,0,0 … with either 6 or 12 ‘0’ depending on the device type. The package call is then saved under its
specific name setValvesToZero.
Figure 13 - Tree view of sample paradigm provided with this tutorial
Package calls will be executed at the same time as their preceding presentation. Package calls can be
added through the toolbox via drag and drop into the paradigm structure.
Figure 14 - Package call E-Object in EPrime
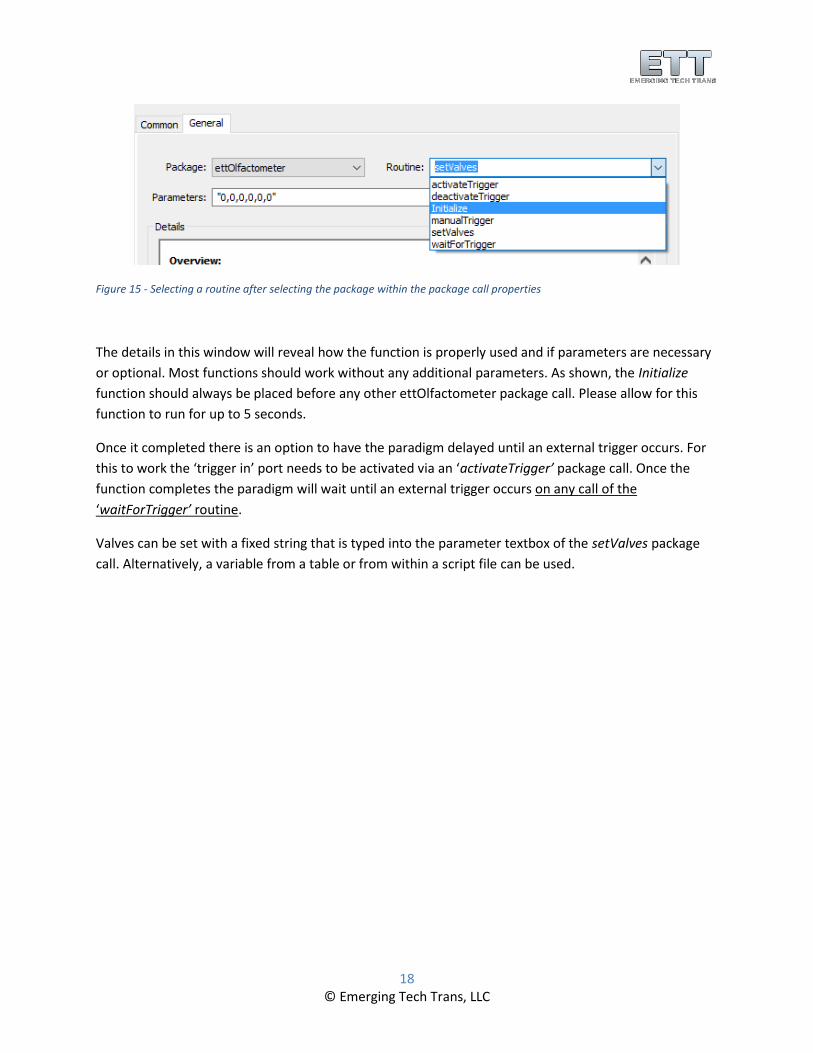
Once the blank call is inserted a simple double-click will reveal the properties. Here a package and
Routine will need to be selected (Figure 15).
18 © Emerging Tech Trans, LLC
Figure 15 - Selecting a routine after selecting the package within the package call properties
The details in this window will reveal how the function is properly used and if parameters are necessary
or optional. Most functions should work without any additional parameters. As shown, the Initialize
function should always be placed before any other ettOlfactometer package call. Please allow for this
function to run for up to 5 seconds.
Once it completed there is an option to have the paradigm delayed until an external trigger occurs. For
this to work the ‘trigger in’ port needs to be activated via an ‘activateTrigger’ package call. Once the
function completes the paradigm will wait until an external trigger occurs on any call of the
‘waitForTrigger’ routine.
Valves can be set with a fixed string that is typed into the parameter textbox of the setValves package
call. Alternatively, a variable from a table or from within a script file can be used.
19 © Emerging Tech Trans, LLC
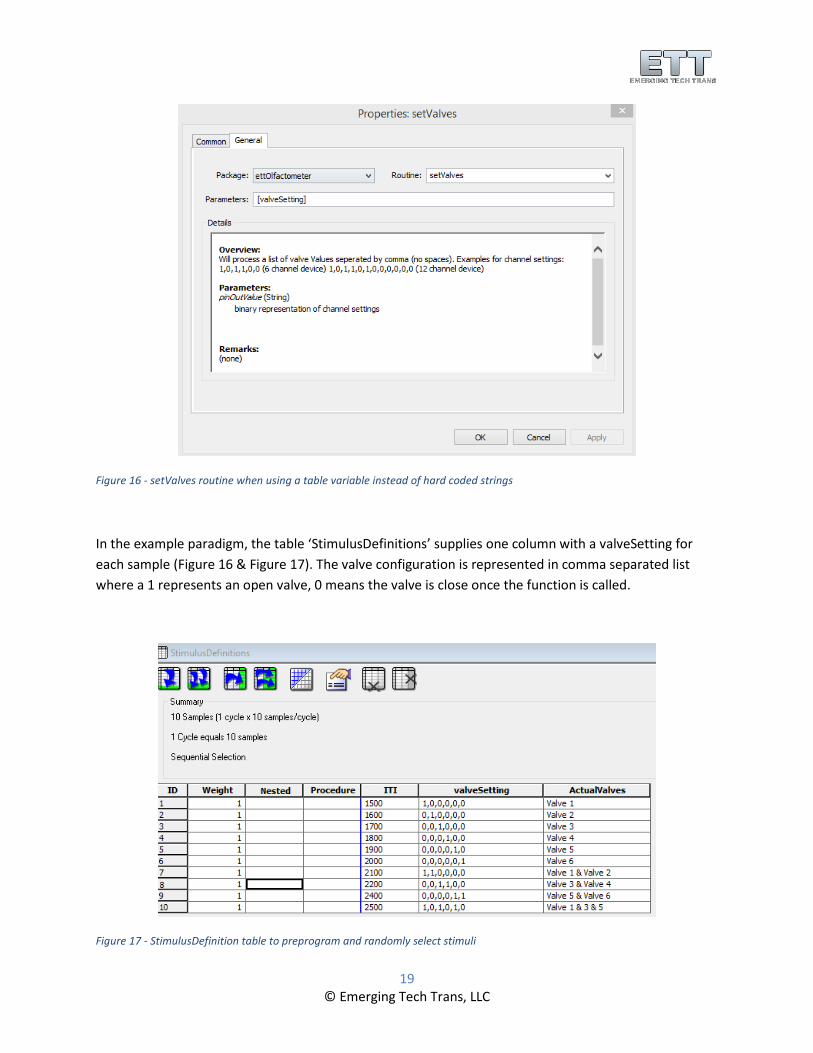
Figure 16 - setValves routine when using a table variable instead of hard coded strings
In the example paradigm, the table ‘StimulusDefinitions’ supplies one column with a valveSetting for
each sample (Figure 16 & Figure 17). The valve configuration is represented in comma separated list
where a 1 represents an open valve, 0 means the valve is close once the function is called.
Figure 17 - StimulusDefinition table to preprogram and randomly select stimuli
20 © Emerging Tech Trans, LLC
The valve ID is incremented from left to right starting like 1,2,3,4,…
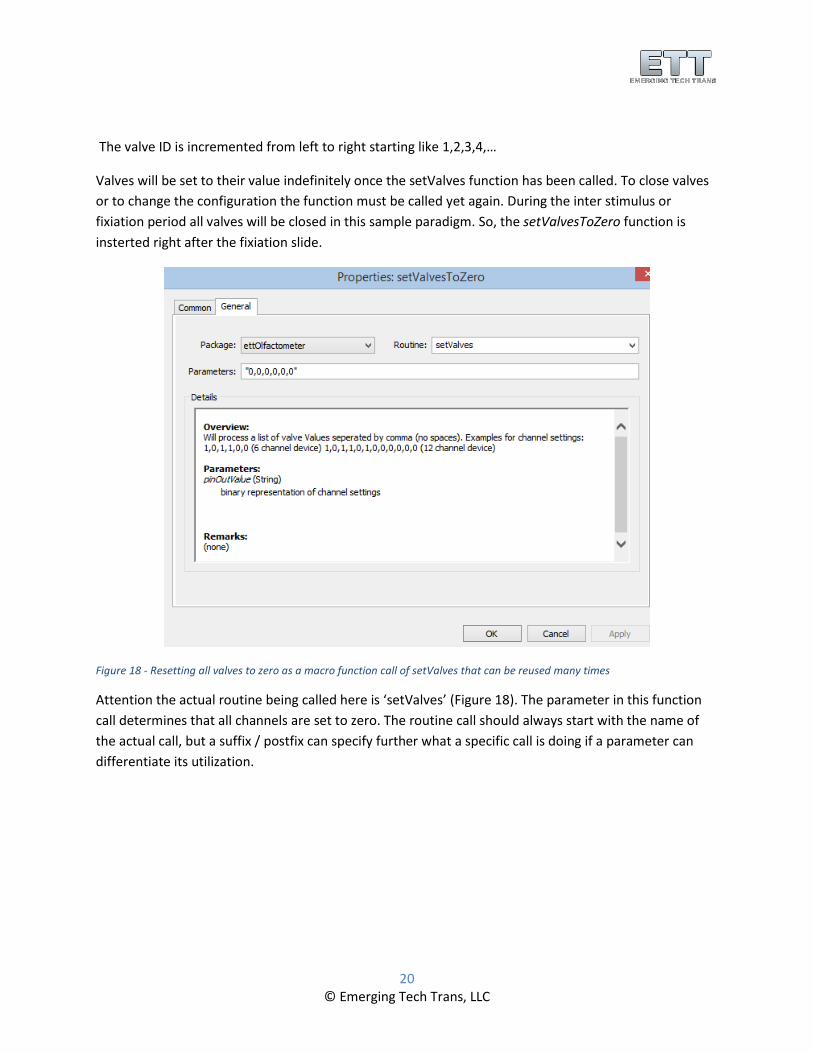
Valves will be set to their value indefinitely once the setValves function has been called. To close valves
or to change the configuration the function must be called yet again. During the inter stimulus or
fixiation period all valves will be closed in this sample paradigm. So, the setValvesToZero function is
insterted right after the fixiation slide.
Figure 18 - Resetting all valves to zero as a macro function call of setValves that can be reused many times
Attention the actual routine being called here is ‘setValves’ (Figure 18). The parameter in this function
call determines that all channels are set to zero. The routine call should always start with the name of
the actual call, but a suffix / postfix can specify further what a specific call is doing if a parameter can
differentiate its utilization.