Embed Size (px)
Citation preview


Guide: ETG-47 Effective: 24 Aug 2014 Page #: 1 of 56
Subject: Blackboard 9.1 SP 14 Student Manual
Revision #: 1.0 Supersedes: --- Date: 12 May 2014
Table of Contents Log in to Learn ........................................................................................................................ 5
My Grade Update ................................................................................................................... 6
Tools Updates ..................................................................................................................... 7
Browser Support for SP 14 .................................................................................................. 7
Traditionally Released Browsers ......................................................................................... 7
My Institution Tab................................................................................................................... 8
Explore the My Institution Tab ........................................................................................... 8
Modules ................................................................................................................................ 10
Edit Module Content......................................................................................................... 10
Customize Module Layout ................................................................................................ 10
Drag-and-Drop Function ............................................................................................... 10
Keyboard Accessible Reordering Tool .............................................................................. 11
How to Add a Module ....................................................................................................... 11
Personalize the Page ......................................................................................................... 12
Course Catalog ...................................................................................................................... 12
Browse the Course Catalog ............................................................................................... 12
Courses Tab ....................................................................................................................... 13
About Course Enrollments ................................................................................................ 13
How to Hide a Course in Your List .................................................................................... 13
My Blackboard and Navigation ............................................................................................. 14
Access the Global Navigation Menu and My Blackboard ........................................ 15
My Blackboard Tools ......................................................................................................... 15
In this section... ............................................................................................................... 16
Password, Personal Information, and Settings ................................................................. 16
How to Edit Personal Information ................................................................................ 16
How to Add an Avatar Image ........................................................................................ 17
Calendar ................................................................................................................................ 18
The Calendar Interface ..................................................................................................... 19

Guide: ETG-47 Effective: 24 Aug 2014 Page #: 2 of 56
Subject: Blackboard 9.1 SP 14 Student Manual
Revision #: 1.0 Supersedes: --- Date: 12 May 2014
How to Create an Event .................................................................................................... 20
How to Add a Calendar Link to the Course Menu..................................................... 20
Messages .............................................................................................................................. 21
Updates ................................................................................................................................. 22
My Grades ............................................................................................................................. 22
Access My Grades ......................................................................................................... 22
View Grade Details ........................................................................................................... 24
My Grade Item Status ....................................................................................................... 24
In Your Course ....................................................................................................................... 25
In this section... ............................................................................................................... 25
Navigate a Course ............................................................................................................. 25
Your Course Environment ................................................................................................. 26
Course-to-Course Navigation............................................................................................ 27
Course Home Page ....................................................................................................... 28
File Attachments ................................................................................................................... 29
Accepted Characters in File Names ............................................................................ 29
Recognized Attachment File Types ............................................................................ 29
Course Content ..................................................................................................................... 31
Course Content Areas ....................................................................................................... 31
About Content Areas ..................................................................................................... 31
Content Area Organization ........................................................................................... 32
Learning Modules ....................................................................................................... 32
Lesson Plans .............................................................................................................. 32
Orientation Bar ........................................................................................................... 32
Home Page ........................................................................................................................ 33
Types of Course Content................................................................................................... 33
Types of Content ............................................................................................................ 34
Content Availability ........................................................................................................ 35
Learning Modules ................................................................................................................. 36
Navigate Within Learning Modules .................................................................................. 36
Table of Contents ........................................................................................................... 36

Guide: ETG-47 Effective: 24 Aug 2014 Page #: 3 of 56
Subject: Blackboard 9.1 SP 14 Student Manual
Revision #: 1.0 Supersedes: --- Date: 12 May 2014
Lesson Plan ........................................................................................................................... 37
Access a Lesson Plan ......................................................................................................... 38
Assignments .......................................................................................................................... 39
Submit Assignments ......................................................................................................... 39
How to Submit an Assignment ..................................................................................... 39
How to Save an Assignment as a Draft and Submit Later ............................................ 41
How to Edit or Resubmit an Assignment ...................................................................... 41
Submit Group Assignments .............................................................................................. 42
How to Submit Work for a Group Assignment ............................................................. 42
How to Save a Group Assignment as a Draft and Submit Later ................................... 43
Edit or Resubmit a Group Assignment .......................................................................... 43
View Group Assignment Grades and Feedback ....................................................... 43
Access My Grades From Your Course ................................................................... 44
Review Your Grade from the Group Homepage ................................................... 44
Assignment Grades ........................................................................................................... 44
Review a Graded Assignment Submission Inline .......................................................... 44
Inline Viewing Supported Formats ....................................................................................... 44
SafeAssign ............................................................................................................................. 45
The SafeAssignments Process .................................................................................... 45
Safeguard Your Work .................................................................................................... 45
SafeAssign Originality Reports .................................................................................... 45
How to Submit a SafeAssignment ............................................................................... 45
How to View SafeAssignment Submissions .............................................................. 46
Tests ...................................................................................................................................... 48
Taking a Test .................................................................................................................. 48
Tips for Taking a Test ................................................................................................ 48
How to Take a Test .................................................................................................... 49
Timed Tests .................................................................................................................... 50
Timer Status Bar ........................................................................................................ 50
Feedback and Grades............................................................................................................ 51
Retaking a Test .............................................................................................................. 52

Guide: ETG-47 Effective: 24 Aug 2014 Page #: 4 of 56
Subject: Blackboard 9.1 SP 14 Student Manual
Revision #: 1.0 Supersedes: --- Date: 12 May 2014
Presentation Options ............................................................................................................ 52
Force Test Completion .............................................................................................. 52
Prohibit Backtracking ................................................................................................. 52
Test Presentation ....................................................................................................... 52
Question Completion Status ......................................................................................... 53
Surveys .................................................................................................................................. 54
Taking a Survey ............................................................................................................. 54
How to Take a Survey ....................................................................................................... 54
Timed Surveys ............................................................................................................... 55
Time Status Bar ............................................................................................................. 56
Retaking a Survey .............................................................................................................. 56

Guide: ETG-47 Effective: 24 Aug 2014 Page #: 5 of 56
Subject: Blackboard 9.1 SP 14 Student Manual
Revision #: 1.0 Supersedes: --- Date: 12 May 2014
This is latest information about new features and updates to Blackboard Learn. KSAU-HS
determine to make these updates available to you.
Watch the latest new features and enhancements video
Log in to Learn
The first step in using Blackboard Learn is to log in to the system.
1- Go to KSAU‐HS website http://www.ksau‐hs.edu.sa and select “Blackboard
System” under quick links.
2- Direct link https://elms.ksau-hs.edu.sa
1- Type your KSAU-HS Username.
2- Type your KSAU-HS Password.
3- Click Login.

Guide: ETG-47 Effective: 24 Aug 2014 Page #: 6 of 56
Subject: Blackboard 9.1 SP 14 Student Manual
Revision #: 1.0 Supersedes: --- Date: 12 May 2014
My Grade Update
An Order by drop-down list allows you to change order by course, last activity, or due date.
By default items are ordered by course, which displays items in the order the instructor has
arranged them.
You can narrow the listed items by selecting All, Graded, Upcoming, and Submitted. For
example, selecting Graded only shows rows that have been graded by the instructor.
The text size and row spacing have been reduced, resulting in more information being
displayed on the page at once. Feedback is included right in-line, so you do not need to click
on anything to view it – it just shows up on the page.
Instructors can restrict where a test can be taken to a specific location. If your instructor has
restricted a test to a specific location and you try to take the test from outside of that location,
you will not be able to take the test and may be provided with information on where the test
can be taken.

Guide: ETG-47 Effective: 24 Aug 2014 Page #: 7 of 56
Subject: Blackboard 9.1 SP 14 Student Manual
Revision #: 1.0 Supersedes: --- Date: 12 May 2014
Tools Updates
Assignments, Blogs, Journals and Wikis have been updated with the following:
Instructions have been removed from the details panel and is now above the content for quick reference. By default the instructions are minimized in Assignments but expanded in Blogs, Journals, and Wikis.
You can view any goals your instructor has aligned to Blogs, Journals and Wikis from the instructions panel.
Browser Support for SP 14
Blackboard supports four primary browsers for Learn releases. Links to the vendor sites for the browsers are included in this topic.
The browser versions listed are those that were available when Blackboard Learn 9.1 Service
Pack 14. These are not the only browsers supported on this release.
Traditionally Released Browsers
The dates listed are the original release dates for general availability.
Internet Explorer® 10 & Internet Explorer 9 from Microsoft
Some configuration options for Internet Explorer might make
some features of Blackboard Learn difficult to use.
Safari® 6 from Apple

Guide: ETG-47 Effective: 24 Aug 2014 Page #: 8 of 56
Subject: Blackboard 9.1 SP 14 Student Manual
Revision #: 1.0 Supersedes: --- Date: 12 May 2014
Firefox® 24 (stable channel) from Mozilla
Chrome™ 30 (stable channel) from Google
My Institution Tab
After logging in to Blackboard, you "land" on the My Institution tab. Across the top of that page, other tabs might be available to you. Your institution can rename the pages and tabs that appear.
Modules on the My Institution tab collect information from all the courses you are enrolled
in, giving you a total picture of news and activity for your courses.
Explore the My Institution Tab
A. The Global Navigation Menu and My Blackboard are available everywhere in Blackboard
Learn. Click the arrow next to your name at the top of the screen to access:
All of your courses, as well as the Home and Help links. Users can change their settings, such
as text size and personal information. The logout function is nearby.
On the left side of the panel, My Blackboard pages display course communication, due dates,
grades, and more. A number next to your name indicates how many new items are available. To
learn more, see.

Guide: ETG-47 Effective: 24 Aug 2014 Page #: 9 of 56
Subject: Blackboard 9.1 SP 14 Student Manual
Revision #: 1.0 Supersedes: --- Date: 12 May 2014
B. Tools: The tools available on this page roll up information from all of your courses. For example, Calendar shows events for all courses. Descriptions of the tools are available later in this page.
C. Modules: Modules on the My Institution tab collect information from all the courses you are enrolled in or are teaching. Your institution determines which modules appear and whether you can add modules.
Use links in the modules to view information and navigate to those areas in your courses. You can collapse individual windows and drag modules to new positions on the page.
KSAU-HS determines which modules appear. Modules you see might include:
My Courses: Access the courses you are enrolled in or teaching.
My Announcements: Displays announcements for courses and from your institution. Announcements communicate important, time-sensitive information.
My Tasks: Displays tasks added by instructors. You can add personal tasks when accessing tasks from Tools.
D. Add Module: Click to view the list of available modules, such as dictionary, report card, and notes. Descriptions are provided in the list so you can choose the most significant. Your institution determines if you are allowed to add modules.
E. Personalize Page: Change the color scheme of the page. Your institution determines if you are allowed to personalize the page.
Watch a Video Tutorial

Guide: ETG-47 Effective: 24 Aug 2014 Page #: 10 of 56
Subject: Blackboard 9.1 SP 14 Student Manual
Revision #: 1.0 Supersedes: --- Date: 12 May 2014
Modules
Modules are a great way to see what's happening in your courses, as well as access
commonly used tools with just one click. You are allowed to minimize or remove modules;
however, some modules are required to appear. You may also be allowed to edit the content
that appears in the modules.
Edit Module Content
To edit information, click the Manage icon located at the top of each module.
Customize Module Layout
You can reorder the modules on a tab using the drag-and-drop function or the keyboard accessible reordering tool.
Drag-and-Drop Function
Press and drag the header of a module to move it to a new location. The module is surrounded by a dashed line as you move it. Release the module to place it in its new location.

Guide: ETG-47 Effective: 24 Aug 2014 Page #: 11 of 56
Subject: Blackboard 9.1 SP 14 Student Manual
Revision #: 1.0 Supersedes: --- Date: 12 May 2014
Keyboard Accessible Reordering Tool
You can use the keyboard accessible reordering tool for an alternative method to reorder
items. The tool appears on the action bar .
Select one of the modules. Use the up and down arrow icons to move the module to a new position in a column list. Use the right- and left-pointing arrows to move a module between columns.
How to Add a Module
1. Access the My Institution tab or another tab containing modules.
2. Click Add Module.
3. On the Add Module page, select the modules to appear on the tab. You can search by keyword or browse by category to find modules. Your institution can disable options.
4. Click Add to place the module on your My Institution page. Click Remove to delete the module from your My Institution page.
Guide: ETG-47 Effective: 24 Aug 2014 Page #: 12 of 56
Subject: Blackboard 9.1 SP 14 Student Manual
Revision #: 1.0 Supersedes: --- Date: 12 May 2014
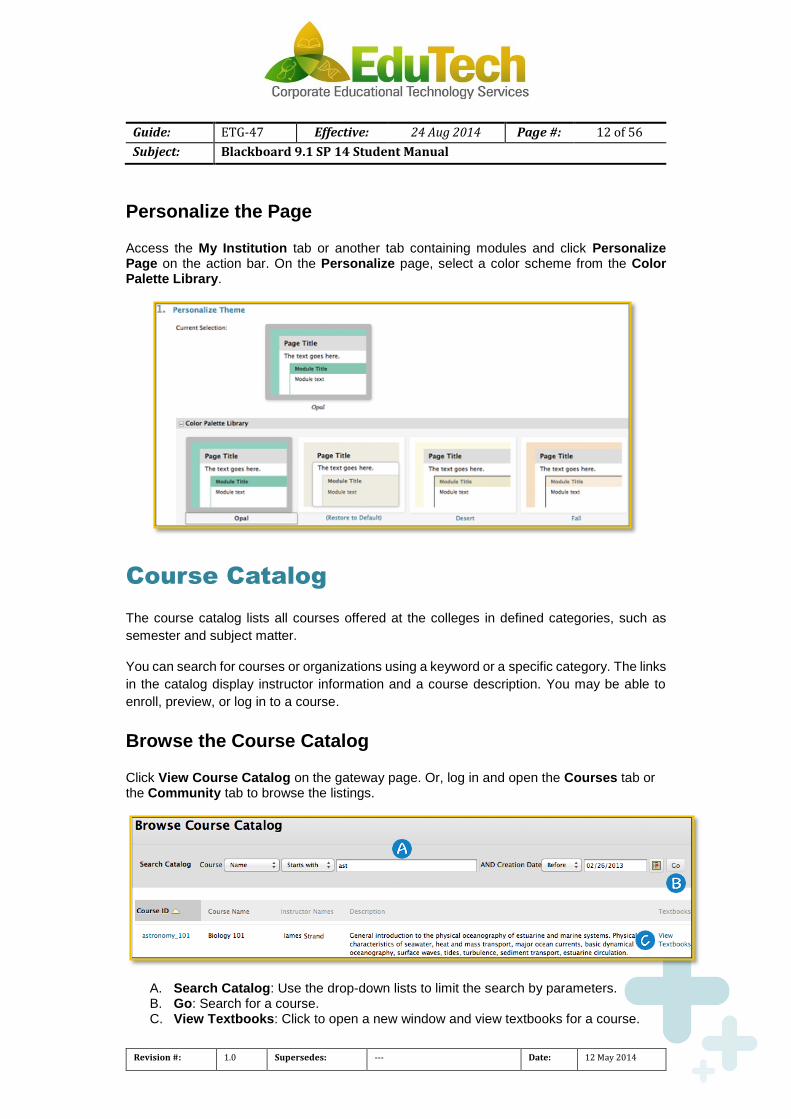
Personalize the Page
Access the My Institution tab or another tab containing modules and click Personalize Page on the action bar. On the Personalize page, select a color scheme from the Color Palette Library.
Course Catalog
The course catalog lists all courses offered at the colleges in defined categories, such as
semester and subject matter.
You can search for courses or organizations using a keyword or a specific category. The links
in the catalog display instructor information and a course description. You may be able to
enroll, preview, or log in to a course.
Browse the Course Catalog
Click View Course Catalog on the gateway page. Or, log in and open the Courses tab or the Community tab to browse the listings.
A. Search Catalog: Use the drop-down lists to limit the search by parameters. B. Go: Search for a course. C. View Textbooks: Click to open a new window and view textbooks for a course.

Guide: ETG-47 Effective: 24 Aug 2014 Page #: 13 of 56
Subject: Blackboard 9.1 SP 14 Student Manual
Revision #: 1.0 Supersedes: --- Date: 12 May 2014
Courses Tab
Explore the Courses Tab
A. Course Search: You can search for a course, and if allowed, preview the course. Type a keyword or text string in the box, click Go. The results appears on the Browse Course Catalog page.
B. Course List: From the list, you can access any course you are enrolled in or teaching. For example, if you are a student in two courses and a teaching assistant in one course, your course list is divided into the courses you are enrolled in and the courses you are a TA for.
C. Course Catalog: You can search the catalog for courses or organizations. Select a category link or click Browse Course Catalog to begin your search
About Course Enrollments
Course enrollments are handled by your KSAU-HS Colleges. If you are enrolled in a course but do not see it in the course list, or if you are enrolled in the incorrect course, contact your College for assistance.
How to Hide a Course in Your List
You use the same steps to hide a course from the Courses tab or from the My Courses module on the My Institution tab.
1. Click the Manage icon that appears when you move your mouse pointer over the module.
Guide: ETG-47 Effective: 24 Aug 2014 Page #: 14 of 56
Subject: Blackboard 9.1 SP 14 Student Manual
Revision #: 1.0 Supersedes: --- Date: 12 May 2014
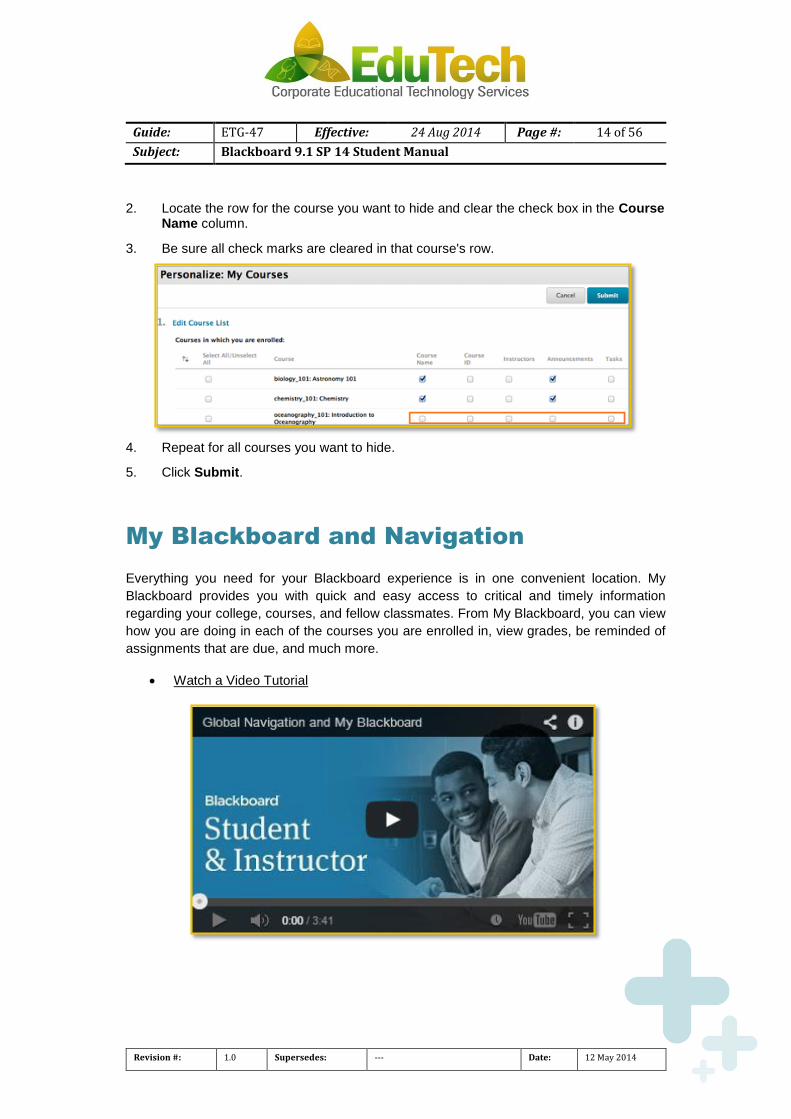
2. Locate the row for the course you want to hide and clear the check box in the Course Name column.
3. Be sure all check marks are cleared in that course's row.
4. Repeat for all courses you want to hide.
5. Click Submit.
My Blackboard and Navigation
Everything you need for your Blackboard experience is in one convenient location. My
Blackboard provides you with quick and easy access to critical and timely information
regarding your college, courses, and fellow classmates. From My Blackboard, you can view
how you are doing in each of the courses you are enrolled in, view grades, be reminded of
assignments that are due, and much more.
Watch a Video Tutorial

Guide: ETG-47 Effective: 24 Aug 2014 Page #: 15 of 56
Subject: Blackboard 9.1 SP 14 Student Manual
Revision #: 1.0 Supersedes: --- Date: 12 May 2014
Access the Global Navigation Menu and My Blackboard
Access My Blackboard from the global navigation menu by clicking the arrow next to your name in at the top of any page.
My Blackboard Tools
Tools Description
Bb Home: Gives you an overview of the items that are due and recently graded. Move your mouse pointer over View to reveal your grade. Bb Home displays the
five most recent activities relevant to you.
Calendar: Review everything you have due and be reminded of when you
need to complete it.
Posts: Displays the posts made in the last seven days in the courses and
organizations you are enrolled in and follow. For example, you can see when a classmate submits a blog post in your course.
Updates: Review a list of notifications alerting you to important events and
information. For example, you can see when an assignment has been graded.
My Grades: View your grades for each assignment, test, or activity in all of
your courses. Sort the grades by date or course.
Home
Help: Go to Behind the Blackboard for manuals, tutorials, and more.
Guide: ETG-47 Effective: 24 Aug 2014 Page #: 16 of 56
Subject: Blackboard 9.1 SP 14 Student Manual
Revision #: 1.0 Supersedes: --- Date: 12 May 2014
In this section...
Password, Personal Information, and Settings
Calendar
Messages
My Grades
People
Posts
Profiles
Spaces
Updates
Password, Personal Information, and Settings
You can edit your personal information and settings from the global navigation menu.
Note: KSAU-HS is not allowing you to change password through Blackboard Learn to
ensure that your user name and password is the same everywhere.
How to Edit Personal Information
You can edit the information that appears in your account profile on the Edit Personal Information page. Changes you make on this page are reflected throughout Blackboard Learn. For example, if you change your last name, the new last name appears in all the courses you are enrolled in. Most of the personal information is optional.

Guide: ETG-47 Effective: 24 Aug 2014 Page #: 17 of 56
Subject: Blackboard 9.1 SP 14 Student Manual
Revision #: 1.0 Supersedes: --- Date: 12 May 2014
Watch a Video Tutorial
Use the following steps to edit your personal Information
1. From the global navigation menu, click Settings, and then click Personal Information. You can also access Personal Information on the Tools panel.
2. On the Personal Information page, click Edit Personal Information. 3. On the Edit Personal Information page, make changes to the appropriate fields. 4. Click Submit.
How to Add an Avatar Image
You can upload an avatar that is used to represent you throughout the system. Avatar images appear in the page header, blogs, journals, discussions, and within notifications modules such as what are New, Needs Attention, and To Do.
Users can upload a photo or other image they have created to use as an avatar. The recommended pixel size for an avatar image is 150 by 150.
Watch a Video Tutorial

Guide: ETG-47 Effective: 24 Aug 2014 Page #: 18 of 56
Subject: Blackboard 9.1 SP 14 Student Manual
Revision #: 1.0 Supersedes: --- Date: 12 May 2014
Use the following steps to add your avatar image:
1. From the global navigation menu, click Settings, and then click Personal Information. You can also access Personal Information on the Tools panel.
2. On the Personal Information page, click Personalize My Settings. 3. On the Personalize My Settings page, you can add or change your personal avatar.
Click Use custom avatar image. You will not see this option if your institution has turned on the profiles feature.
4. Click Browse My Computer. 5. Select the avatar image file and click Open. 6. Click Submit.
Calendar
You can use the course calendar to provide students with dates for course-related events. Course calendar events appear to all members of the course. Common entries include the following items:
Meetings
Instructor office hours
Exams
Guest speakers
Course items with due dates
Watch a Video Tutorial
The calendar displays a consolidated view of all your institution, course, organization, and personal calendar events. You can view events by day, week, or month. You can also view and organize upcoming and past events into categories.
Course calendar events appear to all members of the course. Common entries include upcoming tests, due dates for assignments, or special lectures. Course items with due dates automatically appear in the course calendar. Only instructors may create course calendar events.

Guide: ETG-47 Effective: 24 Aug 2014 Page #: 19 of 56
Subject: Blackboard 9.1 SP 14 Student Manual
Revision #: 1.0 Supersedes: --- Date: 12 May 2014
The Calendar Interface
You can access the calendar from your course, from the Tools panel on the My Institution tab, or from the My Blackboard menu.
A. View events by day, week, or month. B. Navigate to another month. C. Click the plus (+) to create a new event. You can also click a date to create an event.
Assign the event to the appropriate calendar, select the date and time, and add a description.
Note: Students cannot create an event on a course and institution calendar. Instructors cannot create an event for the institution calendar unless they have administrator privileges.
D. Click an event to manage it. You can also press and drag an event to change the date. E. Select the calendars you want to show, such as institution, personal, or course. By
default, all calendars are visible. Optionally, change the color of each calendar to suit your preference. Using a distinct color for each calendar easily displays which calendar the event is associated to without opening the event.
Note: All institution events appear in the institution calendar. All course events, such as assignments due, appear in the course calendar.
F. Get an iCal URL for importing your Blackboard Learn calendar into an external calendar application. After the Learn iCal URL is set up in an external calendar, it is updated dynamically with new Learn calendar events. For example, log in to Google Calendar and access the Other Calendar drop-down list. Select Add by URL and paste the iCal URL generated by Blackboard Learn.
Note: You cannot import external calendars into this calendar.

Guide: ETG-47 Effective: 24 Aug 2014 Page #: 20 of 56
Subject: Blackboard 9.1 SP 14 Student Manual
Revision #: 1.0 Supersedes: --- Date: 12 May 2014
How to Create an Event
1. On the calendar, click the plus (+) to create a new event. You can also click a specific date to create an event.
2. Type the New Event Name. 3. Select a calendar to associate the event to, such as your personal calendar. 4. Only instructors and administrators can add events to the course and institution
calendars. 5. Select the Start and End times. 6. Type the Event Description. There is a 4,000 character limit for event descriptions. 7. Click Save.
How to Add a Calendar Link to the Course Menu
If you want students to access the course calendar from your course, you can add a link to the course menu for one-click access to the tool. You can also customize the name of the link.
1. Point to the plus sign above the course menu. The Add Menu Item drop-down list appears.
2. Select Tool Link. 3. Type a Name for the link. 4. From the Type drop-down list, select Calendar. 5. Select the Available to Users check box. 6. Click Submit

Guide: ETG-47 Effective: 24 Aug 2014 Page #: 21 of 56
Subject: Blackboard 9.1 SP 14 Student Manual
Revision #: 1.0 Supersedes: --- Date: 12 May 2014
Messages
Exchange simple messages with other people who use Blackboard.
Access your messages through the global navigation menu. If prompted, you must accept
the terms of service and provide an email address before using this tool for the first time.
A. View your messages in the left panel. The most recent appears first. Click a message
to view the entire conversation.
B. Click Compose to start a conversation with another user.
C. Delete the conversation.
D. Write a reply.
My Blackboard messages are not the same as course messages or email. You do not have
to be online at the same time as other people to send and receive messages. You do have
to be logged in to Blackboard to send and receive My Blackboard messages.

Guide: ETG-47 Effective: 24 Aug 2014 Page #: 22 of 56
Subject: Blackboard 9.1 SP 14 Student Manual
Revision #: 1.0 Supersedes: --- Date: 12 May 2014
Updates
Access your updates through the global navigation menu. On the Updates page, you can see all notifications for each course and organization you are enrolled in. To learn more, see Notifications.
A. Browse all notifications. B. View notifications by course. C. Open a notification's contextual menu to take action. D. Select the notification types you want to show. Hiding a notification on the Updates page
does not remove it from your system-wide notification settings.
My Grades
The My Grades page shows the status of gradable items, such as tests, assignments, journal and blog entries, and discussion posts.
The My Grades page may include item names, details, due dates, student and instructor dates of activity, posted grades, points possible, links to rubrics used for grading, and your instructor's comments about the items.
Access My Grades
Your instructor and institution control which tools are available.
1. On the course menu, click Tools or a customized My Grades link.

Guide: ETG-47 Effective: 24 Aug 2014 Page #: 23 of 56
Subject: Blackboard 9.1 SP 14 Student Manual
Revision #: 1.0 Supersedes: --- Date: 12 May 2014
-OR-
On the My Institution tab, click My Grades on the Tools panel.
-OR-
In the page header, click the arrow next to your name to access the My Blackboard menu. Click the My Grades icon.
The My Grades page appears.

Guide: ETG-47 Effective: 24 Aug 2014 Page #: 24 of 56
Subject: Blackboard 9.1 SP 14 Student Manual
Revision #: 1.0 Supersedes: --- Date: 12 May 2014
View Grade Details
If you access My Grades from the My Institution tab or the My Blackboard menu, you see grades for all your courses. On the left side of the screen, you can sort by All Courses or Last Graded.
If you access My Grades inside a course, you see your grades for that course only.
The Order by drop-down list allows you to change the order by Course Order, Last Activity, or Due Date. By default items are ordered by course order.
Above the list of gradable items, you can narrow the list by selecting All, Graded, Upcoming, or Submitted. For example, Graded shows only items that have been graded by the instructor.
If your instructor included feedback during grading, it is included inline. You can also point to a title and click the arrow that appears to show the type of graded item, such as assignment or blog.
If your gradable item has not been graded, the Grade column contains a symbol indicating its status. After an item is graded, the grade appears in the Grade column. To view more detail, click a graded item's title.
My Grade Item Status
The following table describes the symbols appearing on the My Grades page.
Symbol Description
- Item has not been completed. No information is available.
Item is completed, but will not have a grade (for items such as surveys).
Item has been submitted. This item is waiting to be reviewed by your instructor.
-OR-
Item has been submitted. Your instructor may review this item, but may not be provided a grade.
Grade Item has been graded. Click the grade to view detailed feedback.
Attempt is in progress. This item has not been submitted. To submit the item, see How to Save an Assignment as a Draft and Submit Later.

Guide: ETG-47 Effective: 24 Aug 2014 Page #: 25 of 56
Subject: Blackboard 9.1 SP 14 Student Manual
Revision #: 1.0 Supersedes: --- Date: 12 May 2014
Symbol Description
Grade is exempted for this user. If you do not complete this assignment, it will not affect your grade.
Error has occurred. Contact your instructor.
In Your Course
The topics in this section introduce you to the main ideas and tasks for working within a
course. Review the table of contents on the left to see Help sections about specific areas of
a course, such as assignments and the Grade Center.
In this section...
Navigate a Course
Instructor Features
Content Editor
Navigate a Course
Courses vary in design depending on the instructor and the institution, but some common elements exist.
You can read this page in its entirety, or click the Table of Contents icon in the upper right and choose a topic that interests you.
Guide: ETG-47 Effective: 24 Aug 2014 Page #: 26 of 56
Subject: Blackboard 9.1 SP 14 Student Manual
Revision #: 1.0 Supersedes: --- Date: 12 May 2014
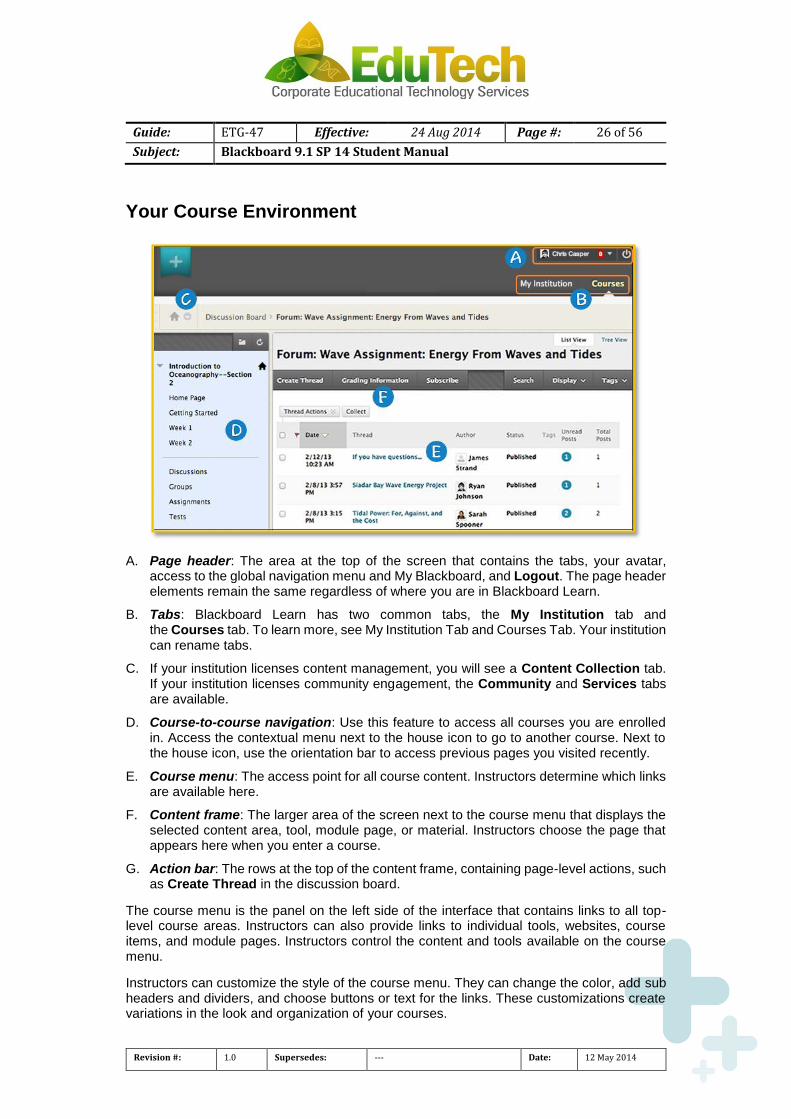
Your Course Environment
A. Page header: The area at the top of the screen that contains the tabs, your avatar, access to the global navigation menu and My Blackboard, and Logout. The page header elements remain the same regardless of where you are in Blackboard Learn.
B. Tabs: Blackboard Learn has two common tabs, the My Institution tab and the Courses tab. To learn more, see My Institution Tab and Courses Tab. Your institution can rename tabs.
C. If your institution licenses content management, you will see a Content Collection tab. If your institution licenses community engagement, the Community and Services tabs are available.
D. Course-to-course navigation: Use this feature to access all courses you are enrolled in. Access the contextual menu next to the house icon to go to another course. Next to the house icon, use the orientation bar to access previous pages you visited recently.
E. Course menu: The access point for all course content. Instructors determine which links are available here.
F. Content frame: The larger area of the screen next to the course menu that displays the selected content area, tool, module page, or material. Instructors choose the page that appears here when you enter a course.
G. Action bar: The rows at the top of the content frame, containing page-level actions, such as Create Thread in the discussion board.
The course menu is the panel on the left side of the interface that contains links to all top-level course areas. Instructors can also provide links to individual tools, websites, course items, and module pages. Instructors control the content and tools available on the course menu.
Instructors can customize the style of the course menu. They can change the color, add sub headers and dividers, and choose buttons or text for the links. These customizations create variations in the look and organization of your courses.

Guide: ETG-47 Effective: 24 Aug 2014 Page #: 27 of 56
Subject: Blackboard 9.1 SP 14 Student Manual
Revision #: 1.0 Supersedes: --- Date: 12 May 2014
A. For the course menu design, instructors can use text only or labeled buttons for the links.
B. Open the course menu in a separate window. The detached menu always displays course materials as a directory tree. You can expand the view to show the hierarchy of course navigation and move the window wherever you want.
C. Refresh your view.
D. Expand or collapse the course menu frame by moving your mouse pointer near the border and clicking the arrow. When you collapse the course menu, you have more room to view content.
Course-to-Course Navigation
While inside one of your courses, you can conveniently access all of the courses you are enrolled in. Access the contextual menu next to the house icon. Click another course title. If the same page you are currently viewing in the course exists in the next course that is where you will land. The most recently visited course is listed first.

Guide: ETG-47 Effective: 24 Aug 2014 Page #: 28 of 56
Subject: Blackboard 9.1 SP 14 Student Manual
Revision #: 1.0 Supersedes: --- Date: 12 May 2014
For example, if you are viewing the announcements page in one course and click another course in the contextual menu, you are taken to that course's announcements page.
Watch a Video Tutorial
Course Home Page
By default, a link to a course's Home Page appears in the course menu, but your instructor or institution can change this. The Home Page contains modules with information about course events and notifications. The modules function similar to the modules on the My Institution tab. Use the links in modules to navigate to areas in your courses, and add, delete, and rearrange modules.
KSAU-HS can rename modules and determine which are available.

Guide: ETG-47 Effective: 24 Aug 2014 Page #: 29 of 56
Subject: Blackboard 9.1 SP 14 Student Manual
Revision #: 1.0 Supersedes: --- Date: 12 May 2014
File Attachments
You can add file attachments to different areas in your course, such as to a content item, an assignment, or a discussion board post. Users open a file by clicking a link to the file that appears in the course.
Locate the file you want to attach:
To upload a file from your computer, click Browse My Computer.
To upload a file from the course's storage repository:
o If Course Files is the course's storage repository, click Browse Course.
-OR-
o If your institution licenses content management, click Browse Content Collection.
After selecting a file to attach, you may add a name for the link to the file. This link title appears to users, instead of the name of the document. For example, type "Biology Lab" as the link title instead of using the file namelab_bio_101.doc.
Accepted Characters in File Names
Blackboard Learn allows the use of all characters in file names. However, a user's operating system and browser may limit the types of characters accepted. For example, some browsers do not accept multi-byte characters, and some may not have the languages installed to display the special alphabetic characters specific to them.
Recognized Attachment File Types
The following file types are recognized by Blackboard Learn. These files can appear within a content item.
Blackboard Learn can recognize additional file types and associated applications if a MIME extension is added. Contact your institution to learn more about adding MIME extensions.
Extension File Type Programs associated with the File Type
AAM Multimedia Adobe® Authorware® plug-in. Note that the AAM file is the starting point for a series of files that must be enclosed in a ZIP file.
AIFF Audio Audio media player
ASF Multimedia Microsoft® .NET™ Show
AU Audio Real Audio Player™
AVI Video Video player (not Macintosh®compatible)
DOC Text Microsoft® Word or other word processor
EXE Executable Executable file

Guide: ETG-47 Effective: 24 Aug 2014 Page #: 30 of 56
Subject: Blackboard 9.1 SP 14 Student Manual
Revision #: 1.0 Supersedes: --- Date: 12 May 2014
Extension File Type Programs associated with the File Type
GIF Image Graphics program or web browser
HTML, HTM Web page HTML editor or web browser
JPG, JPEG Image Graphics program or web browser
JIF Image Graphics program or web browser
MP3 Audio Audio media player
MPE Audio/Video Audio media player
MPG, MPEG Audio/Video Audio media player
MOOV,MOVIE Movie QuickTime® movie player
MOV Video Movie or media player
PDF Text Adobe® Acrobat® Reader
PNG Image Portable Network Graphics
PPT, PPS Slideshow Microsoft® PowerPoint® and PowerPoint® Player®
QT Movie QuickTime™
RA Audio Real Audio Player™
RAM Video Real Audio Movie™
RM Audio Audio media player
RTF Text Rich Text Format
SWF Multimedia Adobe® Shockwave® plug-in
TIFF, TIF Image Graphics program or web browser
TXT Text Text or HTML editor, word processor
WAV Audio Audio media player
WMA Audio Audio media player
WMF Graphic Microsoft® Windows®
WMV Video Microsoft® Windows®

Guide: ETG-47 Effective: 24 Aug 2014 Page #: 31 of 56
Subject: Blackboard 9.1 SP 14 Student Manual
Revision #: 1.0 Supersedes: --- Date: 12 May 2014
Extension File Type Programs associated with the File Type
WPD Text WordPerfect® or other word processor
XLS Spreadsheet Microsoft® Excel®
ZIP Text WinZip®
Course Content
Course Content Areas
A content area can contain multiple components. For example, an instructor may create a content area containing a week’s worth of course material, such as readings, assignments, a discussion forum link, and a web link.
About Content Areas

Guide: ETG-47 Effective: 24 Aug 2014 Page #: 32 of 56
Subject: Blackboard 9.1 SP 14 Student Manual
Revision #: 1.0 Supersedes: --- Date: 12 May 2014
To navigate content areas:
On the course menu, click the name of the content area. The content appears in the content frame.
In the content frame, click a link to access content, such as a file link or a discussion board forum link.
Your instructor or your institution creates the names of the areas in a course, which may differ from the names referenced in this section. The content area names can also change course by course within your institution.
Content Area Organization
Click the link on the course menu to access a content area item. In the content frame, click a link to a content item such as a lecture or a test. The item opens in the content frame.
Learning Modules
Learning modules are containers for packaging and presenting course content. Learning modules have a table of contents where your instructor organizes the presentation of content. All types of content, such as items, assignments, and tests can appear in a learning module.
Lesson Plans
A lesson plan is a container for content similar to a learning module or folder that holds and organizes content items. Your instructor can create lesson plans to hold lesson profiles, instructional objectives, and the content items you need to complete a lesson.
Orientation Bar
As you view items and links in a content area, use the orientation bar to navigate to previous pages or the course entry page—click the house icon to access it. Use the orientation bar when you can, and not the browser back button, to navigate back.

Guide: ETG-47 Effective: 24 Aug 2014 Page #: 33 of 56
Subject: Blackboard 9.1 SP 14 Student Manual
Revision #: 1.0 Supersedes: --- Date: 12 May 2014
Home Page
The Home Page contains modules that display notifications about your course. For example, the What's New module displays new content.
Your instructor can choose not to use the page, give it a different name, and choose which modules appear.
A. What’s New: Contains links to new content, such as announcements, assignments, tests, surveys, newly graded items, mashups, and unread discussion board messages.
B. To Do: Divided into What’s Past Due and What’s Due. You can use this information as the launching point for your daily course work.
Types of Course Content
A content item is any type of file, text, image, or link that appears in a content area, learning module, lesson plan, or folder. Your instructors add different types of content to these course areas.

Guide: ETG-47 Effective: 24 Aug 2014 Page #: 34 of 56
Subject: Blackboard 9.1 SP 14 Student Manual
Revision #: 1.0 Supersedes: --- Date: 12 May 2014
Types of Content
Different types of content appear in a content area. Many types of content allow your instructor to add a description and set options, such as availability and date restrictions.
Each institution can select a different set of icons so your courses may look different.
Icon Content Type Description
Item A general piece of content, such as a file, image, or text. Your
instructor can include a description and attach files, images,
video, audio, or mashups.
File An HTML file viewed as a page within your course or as a
separate piece of content in a separate browser window.
Audio An audio file can play when you open the page and continue to
play until you stop it or navigate away from the page.
Image Image file shown on the page.
Video A video player appears directly on the page for viewing the
video.
URL A link to a website or resource to provide a quick access point
to relevant materials.
Learning
module
A set of content that focuses on a specific subject with its own
navigation. Your instructor can include all types of content,
such as text, images, multimedia, assignments, and tests. To
learn more, see Learning Modules.
Lesson plan A lesson plan is a special type of content container that
combines information about the lesson itself with the content
items. To learn more, see Lesson Plans.
Syllabus A syllabus contains course information, objectives, instructor
contact information, assignments, class meeting dates, and
textbook information.

Guide: ETG-47 Effective: 24 Aug 2014 Page #: 35 of 56
Subject: Blackboard 9.1 SP 14 Student Manual
Revision #: 1.0 Supersedes: --- Date: 12 May 2014
Icon Content Type Description
Course link A shortcut to an item, tool, or area in a course for quick
access to relevant materials.
Content folder A content folder is a way of organizing content items. Content
folders and subfolders set up a hierarchy to group related
material together, such as "Week 1 Case Studies" inside the
Week 1 content area. Folders makes materials easier to find
and reduces scrolling.
Blank page Click the title to see the content. No description appears, which
reduces the amount of scrolling and streamlines the
appearance of the course area.
Module page Module pages are specialized content pages that present
content in module boxes, such as the Home Page.
Tool A shortcut to a specific tool in your course, such as the
discussion board, blogs, or groups. Alternatively, if the
the Tools link appears on the course menu, access all
available tools from theTools page.
Flickr® Photo View photos and images.
SlideShare
Presentation
View Microsoft® PowerPoint®, Microsoft® OpenOffice, or
Adobe®PDF presentations.
YouTube™
video
View online videos.
Content Availability
Instructors can limit the availability of content items based on date, time, individual users, course groups, and performance on graded items. This means that the content you see on the course menu or in content areas can change over time.
For example, your instructor restricts access to a piece of content until you complete a unit test. The content appears after you complete the test. Your instructor can add further settings such as only making the item appear after you complete the test and score at least 70 percent.

Guide: ETG-47 Effective: 24 Aug 2014 Page #: 36 of 56
Subject: Blackboard 9.1 SP 14 Student Manual
Revision #: 1.0 Supersedes: --- Date: 12 May 2014
Learning Modules
A learning module is an organized collection of content presented together. Learning modules are shells in which your instructor adds other content items such as files, folders and tools. It can support a course goal, a subject, a concept, or a theme. Learning modules enable you to follow a structured path for progressing through content.
Navigate Within Learning Modules
By default, the table of contents appears to the left of the content frame.
A. On the action bar of the content page or the table of contents, use the arrows to page through content sequentially.
B. On the action bar of the table of contents, click the down arrow—the Move to the Bottom function—to change the position of the table of contents to the bottom of the page. Click Minimize Table of Contents or Maximize Table of Contents to close or open the table of contents.
C. Use the orientation bar to return to the content area.
D. The current content page you are viewing in the content frame is highlighted in the table of contents and the available pages are links.
The name of a folder or sub-folder counts as a page. For example, if the learning module contains two folders, each containing one file, you can access a total of four pages.
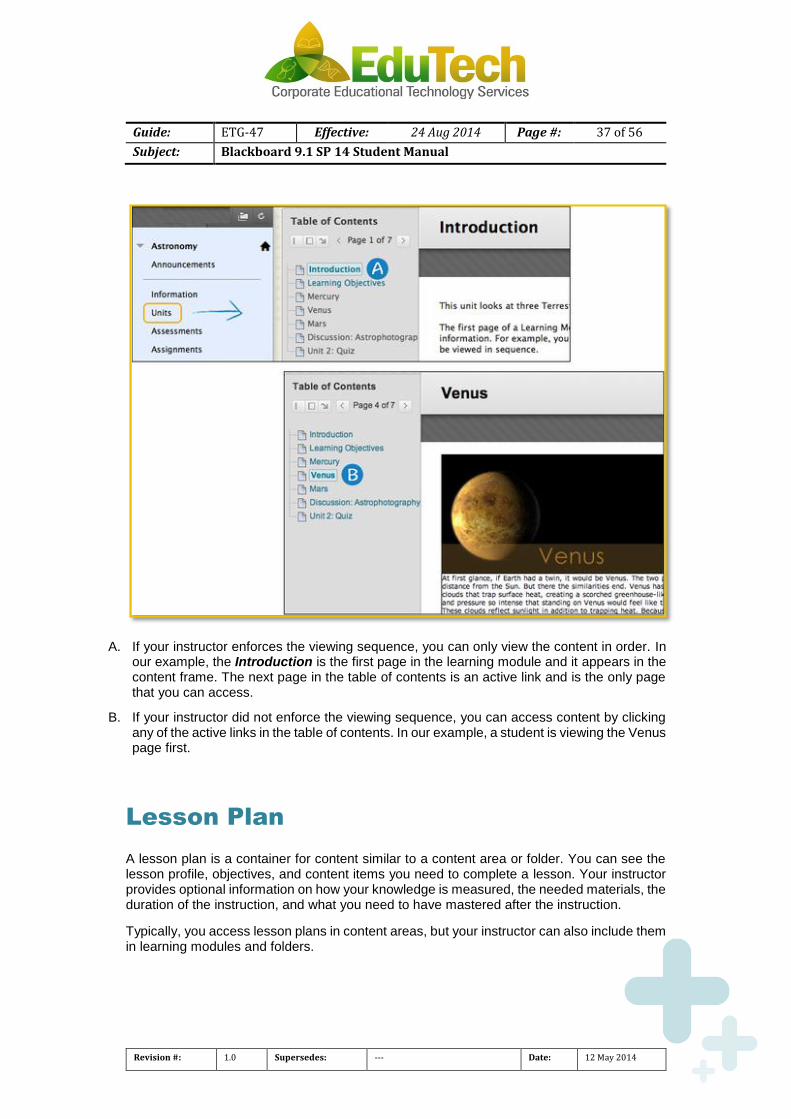
Table of Contents
Your instructor decides whether to enforce a sequential path through the content or allow you to open pages in any order.
Guide: ETG-47 Effective: 24 Aug 2014 Page #: 37 of 56
Subject: Blackboard 9.1 SP 14 Student Manual
Revision #: 1.0 Supersedes: --- Date: 12 May 2014
A. If your instructor enforces the viewing sequence, you can only view the content in order. In our example, the Introduction is the first page in the learning module and it appears in the content frame. The next page in the table of contents is an active link and is the only page that you can access.
B. If your instructor did not enforce the viewing sequence, you can access content by clicking any of the active links in the table of contents. In our example, a student is viewing the Venus page first.
Lesson Plan
A lesson plan is a container for content similar to a content area or folder. You can see the lesson profile, objectives, and content items you need to complete a lesson. Your instructor provides optional information on how your knowledge is measured, the needed materials, the duration of the instruction, and what you need to have mastered after the instruction.
Typically, you access lesson plans in content areas, but your instructor can also include them in learning modules and folders.

Guide: ETG-47 Effective: 24 Aug 2014 Page #: 38 of 56
Subject: Blackboard 9.1 SP 14 Student Manual
Revision #: 1.0 Supersedes: --- Date: 12 May 2014
Access a Lesson Plan
Select the content area from the course menu that holds the lesson plan and click its name. If your instructor added a description, it appears following the title.
The lesson plan’s general information and content items are organized following the title. The top portion contains general information about the lesson, while the bottom contains content items.
Your instructor chooses how to display the content items: icons only, text only, or icons and text. In our example, the content items for the lesson are shown with icons and text.

Guide: ETG-47 Effective: 24 Aug 2014 Page #: 39 of 56
Subject: Blackboard 9.1 SP 14 Student Manual
Revision #: 1.0 Supersedes: --- Date: 12 May 2014
Assignments
Instructors use assignments to assess your mastery over course content and objectives. You can find assignments—referred to collectively as assessments—in any content area, learning module, lesson plan, or folder.
Your instructor assigns point values to assignments. Your completed assignment is submitted for grading, and the results are recorded in the Grade Center. You can see your grades when your instructor makes them available to you.
Submit Assignments
The assignments tool presents a variety of learning activities. You view and submit assignments from one location.
Assignments list the name, description, and attachments for class work. Your instructor provides you all the information you need to complete the assignment. You can include comments for your instructor before you submit your work. You may upload files to complete the assignment from your computer. If your school licenses content management, you can attach files from the Content Collection.
Watch a Tutorial
How to Submit an Assignment
When you finish your assignment, you must click Submit. If you do not, your instructor will not receive your completed assignment.
Warning: If your instructor has not allowed multiple attempts, you can submit your assignment only once. Before you click Submit, be sure that you have attached any
required files to your assignment.

Guide: ETG-47 Effective: 24 Aug 2014 Page #: 40 of 56
Subject: Blackboard 9.1 SP 14 Student Manual
Revision #: 1.0 Supersedes: --- Date: 12 May 2014
1. On the course menu, select the content area that holds the assignment. For example, your instructor might create an Assignments content area.
2. Click the name of the assignment.
3. On the Upload Assignment page, review the instructions, due date, points possible, and download any files provided by your instructor. Complete the assignment using one or both of the following:
o Click Write Submission to expand the Text Submission box where you can type your response. You can use the content editor to format text, add files, images, links, multimedia, and mashups.
o If your response to the assignment is in a separate file, click Browse My Computer, Browse Course, orBrowse Content Collection and select a file to attach. Follow the instructions that your instructor provided for naming your file.
o If you select the wrong file, you can remove it by clicking Do not attach. If the same file is attached to your assignment more than once, the new file is saved with a number appended to the name, such as history_assignment(1).doc.
o If your instructor is using a rubric and has made it available, click View Rubric to view the grading criteria.
4. Optionally, type Comments.
5. Click Submit.
6. A success message appears, confirming the assignment submission.

Guide: ETG-47 Effective: 24 Aug 2014 Page #: 41 of 56
Subject: Blackboard 9.1 SP 14 Student Manual
Revision #: 1.0 Supersedes: --- Date: 12 May 2014
How to Save an Assignment as a Draft and Submit Later
Click Save as Draft if you need to return to your assignment at a later time. This function saves your comments and files on the page. When you return, you can resume working.
1. On the Upload Assignment page, click Save as Draft to save your changes and continue working later.
2. Return to your assignment and click the assignment title.
3. On the Review Submission History page, click Continue Current Submission.
4. On the Upload Assignment page, make your changes.
5. Optionally, type Comments.
6. Click Submit. The Review Submission History page appears showing the information about your submitted assignment.
Warning: When you finish your assignment, you must click Submit. If you do not, your instructor will not receive your completed assignment.
How to Edit or Resubmit an Assignment
Your instructor may allow you to submit an assignment more than once for a variety of reasons. For example, your instructor can provide comments on your first draft so that you can try to improve your work. Your instructor can choose to use either the highest graded attempt or the last graded attempt for your grade.
If your instructor allows you to submit an assignment more than once, you will see Start New on the Review Submission History page. You access this page by clicking the assignment link in your course.
Warning: Before you click Submit, be sure that you have attached any required files to your assignment. If you do not click Submit, your instructor will not receive your completed assignment. Return to your assignment. On the Review Submission History page, view the details of your first submission. Click Start New. On the Upload Assignment page, make your changes to the new submission. Optionally, type Comments. Click Submit. You are returned to the Review Submission History page where your submission appears. View your past submission attempts by expanding the Attempt section.

Guide: ETG-47 Effective: 24 Aug 2014 Page #: 42 of 56
Subject: Blackboard 9.1 SP 14 Student Manual
Revision #: 1.0 Supersedes: --- Date: 12 May 2014
Submit Group Assignments
All members of a group receive the same grade for group assignments. Assignments list the name, description, and attachments for group work. You can also add comments for your instructor.
How to Submit Work for a Group Assignment
1. On the course menu, select the content area that holds the group assignment, such as Assignments. Click the name of the group assignment.
-OR-
In the My Groups panel, select your group name. On the group homepage, click the name of the assignment in the Group Assignments section.
2. On the Upload Assignment page, review the instructions and download any files provided by your instructor. Complete the group assignment using the content editor, by attaching files, or both.

Guide: ETG-47 Effective: 24 Aug 2014 Page #: 43 of 56
Subject: Blackboard 9.1 SP 14 Student Manual
Revision #: 1.0 Supersedes: --- Date: 12 May 2014
Warning: If your instructor has not allowed multiple attempts, your group can submit an assignment only once. Before you click Submit, be sure that you have attached any
required files to your group assignment.
3. Optionally, type your Comments.
4. Click Submit. The Review Submission History page appears showing the information about your submitted group assignment.
How to Save a Group Assignment as a Draft and Submit Later
Use the Save as Draft function if you need to return to your group assignment at a later time. This function saves your comments and files on the page. You can resume your work where you left off when you return.
1. On the Upload Assignment page, click Save as Draft to save your changes and continue working later.
2. Return to your group assignment and click the group assignment link.
3. On the Review Submission History page, click Continue Current Submission.
4. On the Upload Assignment page, make your changes.
5. Optionally, add comments.
6. Click Submit. The Review Submission History page appears showing the information about your submitted group assignment.
Warning: When you finish your group assignment, you must click Submit. If you
do not, your instructor will not receive your completed assignment.
Edit or Resubmit a Group Assignment
Editing a group assignment requires you to resubmit the assignment, and not all assignments can be resubmitted. Contact your instructor to ask for the opportunity to resubmit the assignment.
Your instructor may allow you to submit a group assignment more than once for a variety of reasons. For example, your instructor can provide comments on your first draft so that you can try to improve your work. Your instructor can choose to use either the highest graded attempt or the last graded attempt for your grade.
If your instructor has allowed you to submit a group assignment more than once, you will see a Start New function on the Review Submission History page. You access this page by clicking the group assignment link in your course.
View Group Assignment Grades and Feedback
Blackboard does not score assignments automatically. Your instructor must review and grade each group assignment. You can review the information provided by your instructor in My Grades or on the group assignment's Review Submission History page.
Guide: ETG-47 Effective: 24 Aug 2014 Page #: 44 of 56
Subject: Blackboard 9.1 SP 14 Student Manual
Revision #: 1.0 Supersedes: --- Date: 12 May 2014
Access My Grades From Your Course
You can view your grades from inside your course in My Grades. My Grades can appear on the course menu or on the Tools page.
Review Your Grade from the Group Homepage
You can also view your grade and any feedback provided by your instructor on the group assignment's Review Submission History page. If your instructor attached a file, you must access it from the group assignment link on the group homepage.
Assignment Grades
Assignments are not graded automatically. Your instructor needs to grade each assignment. You can
review the information provided by your instructor in My Grades or on the assignment's Review
Submission History page. To learn more about what information you can access.
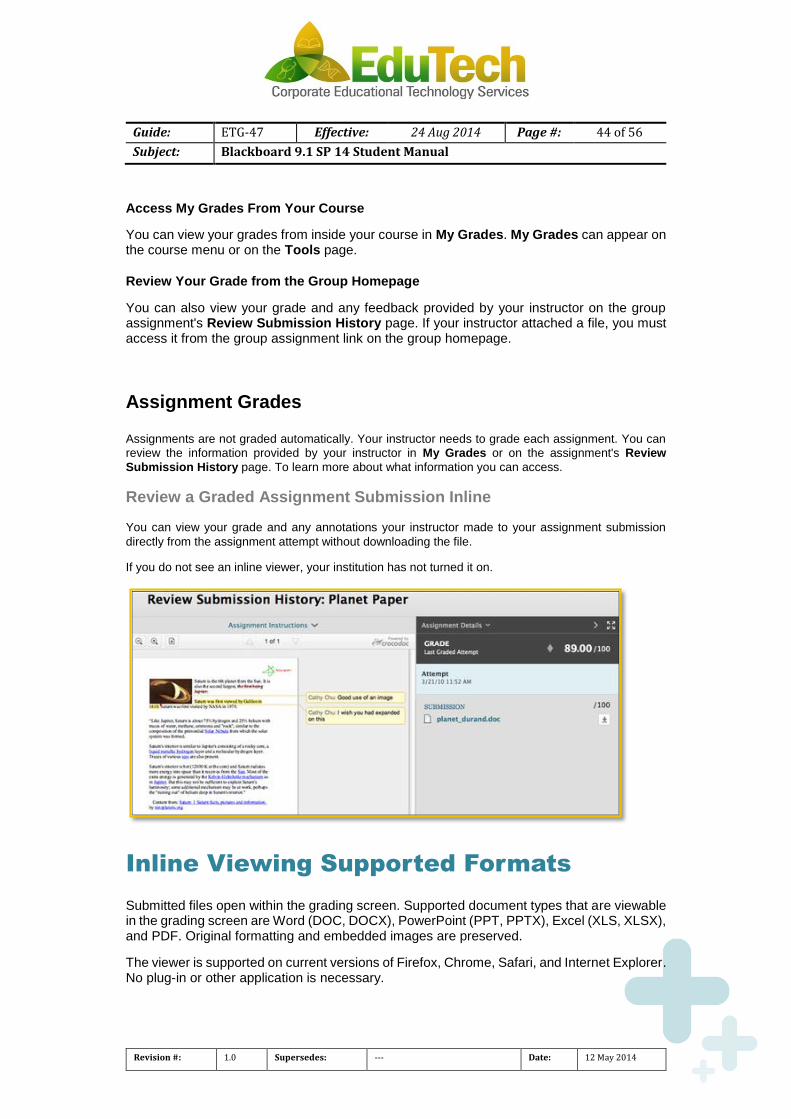
Review a Graded Assignment Submission Inline
You can view your grade and any annotations your instructor made to your assignment submission
directly from the assignment attempt without downloading the file.
If you do not see an inline viewer, your institution has not turned it on.
Inline Viewing Supported Formats
Submitted files open within the grading screen. Supported document types that are viewable in the grading screen are Word (DOC, DOCX), PowerPoint (PPT, PPTX), Excel (XLS, XLSX), and PDF. Original formatting and embedded images are preserved.
The viewer is supported on current versions of Firefox, Chrome, Safari, and Internet Explorer. No plug-in or other application is necessary.

Guide: ETG-47 Effective: 24 Aug 2014 Page #: 45 of 56
Subject: Blackboard 9.1 SP 14 Student Manual
Revision #: 1.0 Supersedes: --- Date: 12 May 2014
SafeAssign
Safe Assign is used to prevent plagiarism and to create opportunities to help you identify how to properly attribute sources rather than paraphrase.
SafeAssign compares your submitted assignments against a set of academic papers to identify areas of overlap between the submitted assignment and existing works.
The SafeAssignments Process
SafeAssign is based on a unique text matching algorithm capable of detecting exact and inexact matching between a paper and source material. SafeAssignments are compared against several different databases containing millions of articles dating from the 1990s to the present. After the comparison a report is generated that provides detailed information about the matches found between your submitted paper and existing sources.
Safeguard Your Work
You can safeguard your own work by submitting copies of your papers to the Global Reference Database. Papers from other institutions are checked against your paper. This protects the originality of your work across institutions. The Global Reference Database is a separate database from your institution's database. When you submit your papers to the database voluntarily, you agree not to delete papers in the future. You are free to select the option to check your papers without submitting them to the Global Reference Database. Blackboard does not claim ownership of submitted papers.
SafeAssign Originality Reports
After a paper has been processed, a report is generated detailing the percentage of text in the submitted paper that matches existing sources. The report also shows the suspected sources of each section of the submitted paper that returns a match. Your instructor can delete matching sources from the report and process it again when the paper is a continuation of a previously submitted work.
The originality report does not state whether a phrase that matches a source is properly attributed. Your instructor will read the report and determine if proper citations were used.
How to Submit a SafeAssignment
You can only submit a SafeAssignment once. If you want to edit, delete, or resubmit a SafeAssignment, contact your instructor and request that they clear your first submission.
1. On the course menu, select the link where SafeAssignment is located, for example, Assignments.
2. On the Assignments page, look for the SafeAssignment and click View/Complete.

Guide: ETG-47 Effective: 24 Aug 2014 Page #: 46 of 56
Subject: Blackboard 9.1 SP 14 Student Manual
Revision #: 1.0 Supersedes: --- Date: 12 May 2014
3. On the Upload SafeAssignment page, optionally, type your comments in the Comment box.
4. Browse to select a file to attach as your submission.
5. Optionally, select the Global Reference Database check box to upload your paper to the Global Reference Database.
6. Click Submit.
In Learn 9.1 SP 13 and earlier, ensure your browser's cookies are enabled before you click Submit. If they are not, you will receive an error indicating either you are not logged in, your session has timed out or you do not have appropriate privileges. (In Learn 9.1 SP 14, you won't even be able to navigate to theAssignments page if your browser cookies are not already enabled.)
After you submit SafeAssignments, there is a slight delay between the upload and the availability of the SafeAssign report. Results are normally available within 10-15 minutes.
How to View SafeAssignment Submissions
View your submissions and the SafeAssign reports associated with it by accessing the SafeAssignment after submitting your paper. This option is only available if allowed by your instructor.
1. Return to the assignment link in the content area that holds the SafeAssignment, for example, the Assignments content area.
2. On the Assignments page, look for the SafeAssignment and click View/Complete. You will find:
o Assignment Information: This section displays the name of the SafeAssignment and its description.
o Submitted Work: This section provides link to the following:
Text: Select this option to view your paper and comments.

Guide: ETG-47 Effective: 24 Aug 2014 Page #: 47 of 56
Subject: Blackboard 9.1 SP 14 Student Manual
Revision #: 1.0 Supersedes: --- Date: 12 May 2014
File: Select this option to download the submission.
Matching: The percentage listed is the percentage of your paper that matches other sources. Read the full report to determine if the matching is properly attributed.
SA Report: Select this option to view the full SafeAssign report.
o View Grade: This section lists the grade given by your instructor.
o Instructor's Feedback: This section lists any feedback, and provides links to open or download any files attached by your instructor.

Guide: ETG-47 Effective: 24 Aug 2014 Page #: 48 of 56
Subject: Blackboard 9.1 SP 14 Student Manual
Revision #: 1.0 Supersedes: --- Date: 12 May 2014
Tests
Tests are used to assess your mastery over course content and objectives. Your instructor assigns point values to questions in the test. Your answers are submitted for grading, and the results are recorded in the Grade Center. You can view your grades in My Grades when your instructor makes them available to you.
You can find tests in any content area, learning module, lesson plan, or folder.
Watch a Tutorial
Taking a Test
Your instructor lets you know when a test is available and where to find it in your course.
Tips for Taking a Test
Start your test as soon as you can. If your instructor schedules three days for your test, plan to take the exam early on the first day. That way, if you have an issue, you will have time to contact technical support and your instructor.
Be prepared. Have any materials that you need at hand.
Read all of the instructions. If you have any trouble taking your test or understanding test questions, contact your instructor immediately.
Check your Internet connection. You need to make sure that you have a strong internet connection.
o A wired connection is usually more reliable than a wireless connection.
o Check with your instructor and institution before taking a test using a cellular data connection. Most institutions will advise you to avoid using a cellular data connection unless your institution is a Blackboard Mobile Learn-enabled site with a Mobile Learn app available AND your instructor has created a Mobile-compatible test.
Do not refresh the page, close the window, or click the browser's back button while taking a test. If you experience problems during a test, contact your instructor immediately.

Guide: ETG-47 Effective: 24 Aug 2014 Page #: 49 of 56
Subject: Blackboard 9.1 SP 14 Student Manual
Revision #: 1.0 Supersedes: --- Date: 12 May 2014
How to Take a Test
1. Navigate to the test and click the title.
2. Click Begin to take the test.
3. Your instructor may choose to have you type a password to begin taking a test. If necessary, type the valid password and click Submit to begin the test. The test continues to prompt for a valid password until the correct one is provided.
4. As you work, answers are saved automatically. You can also click Save next to each question or Save All Answers at the top or bottom of the page as you work. If your instructor associated a rubric with an Essay, File Response, or Short Answer question, click View Rubric to display grading criteria.

Guide: ETG-47 Effective: 24 Aug 2014 Page #: 50 of 56
Subject: Blackboard 9.1 SP 14 Student Manual
Revision #: 1.0 Supersedes: --- Date: 12 May 2014
5. When you complete the test, click Save and Submit.
Warning: Do not use the browser's back button during a test. This may cause loss of data. If you have difficulties while taking a test, contact your instructor.
Timed Tests
If your instructor chose a timed test, the scheduled time is included in the instructions before you begin.
You are notified of the instructor's choice of Timer Setting:
1. Auto-submit: Test saves and submits automatically when time expires.
-OR-
2. Continue beyond the time limit: You receive no automatic penalty for continuing beyond the time limit, however, final scoring decisions are made by your instructor. Talk to your instructor if you have questions about this setting. The total time you spend on the test is recorded and available to your instructor when the test is submitted.
If you save and exit the test, the timer continues running. If you start your test on Tuesday, save and exit it, then complete it on Thursday the timer will show that it took you 48 hours to complete the test.
When the timer runs out with the auto-submit feature, the test saves and submits, and the Test Submitted page appears. Without auto-submit, a pop-up window appears with the choice to submit or continue.
Timer Status Bar
While taking a test, the remaining time appears on a status bar. Click the arrows next to the timer to collapse or expand it.

Guide: ETG-47 Effective: 24 Aug 2014 Page #: 51 of 56
Subject: Blackboard 9.1 SP 14 Student Manual
Revision #: 1.0 Supersedes: --- Date: 12 May 2014
Timer warnings appear when half the time, five minutes, one minute, and thirty seconds remain. When the remaining time reads 1 minute, 30 seconds, the status bar turns yellow. At 1 minute, the warning is red, and at 30 seconds, both the status bar and the warning are red. If the timer is collapsed, the color changes are not visible.
Feedback and Grades
The majority of questions in tests are auto-graded. When creating a test, your instructor defines the correct answers and assigns a certain number of points to each question. The system validates your answers against the key and assigns the score. You may see your score immediately after completing the test if all questions are auto-graded and your instructor releases this information. Your instructor may choose a date in the future before releasing specific test information to allow for your classmates to take the test.
Essay, File Response, and Short Answer questions are not auto-graded. Your instructor must manually grade these question types. Grades for tests with these question types are released after your instructor finishes grading and allows it.
If your instructor associated a rubric with an Essay, File Response, or Short Answer question and made it available, View Rubric appears next to the Save Answer function. Click View Rubric to review the criteria your instructor has chosen.
After completing a test, the performance results you receive depend on the options selected by your instructor. For example, your instructor may only show the final score for one test, while for another test the final score and correct answers are displayed. Feedback includes one or more of the following:
Final score for the test
Answers submitted
Correct answers
Feedback for the questions

Guide: ETG-47 Effective: 24 Aug 2014 Page #: 52 of 56
Subject: Blackboard 9.1 SP 14 Student Manual
Revision #: 1.0 Supersedes: --- Date: 12 May 2014
To access feedback and grade information, select the test in the content area or use My Grades. On the View Attempts page, click the grade link in the Calculated Grade column to access the test, your answers, and any instructor feedback.
If your instructor used a rubric for grading an Essay, File Response, or Short Answer question and made it available, click View Rubric while viewing the graded test to see detailed information.
Retaking a Test
If you are allowed to take a test multiple times, this appears at the top of the test. If your instructor placed a limit on the number of attempts, the number is stated. A link to take the test again appears when the test is reopened. Your instructor determines whether one or more of the test attempt scores are recorded in the Grade Center.
Presentation Options
Force Test Completion
If force completion is enabled, you must complete the test the first time you open it. You are not allowed to exit the test and continue working on it at a later date. This is stated at the top of the test. The Save function is available for you to save the test as you work through it, but you are not allowed to exit and re-enter the test.
Prohibit Backtracking
If backtracking is prohibited, you are not allowed to go back to questions you already answered. This is stated at the top of the test. An error appears when you attempt to use the Back function within the test.
Test Presentation
Your instructor can choose to present test questions all-at-once or one-at-a-time.

Guide: ETG-47 Effective: 24 Aug 2014 Page #: 53 of 56
Subject: Blackboard 9.1 SP 14 Student Manual
Revision #: 1.0 Supersedes: --- Date: 12 May 2014
An all-at-once test presents all of the questions at the same time. The following options are available while taking this type of test:
Function Action
Store answers Click Save All Answers. A saved icon appears in the
question completion status indicator. You are allowed to
change answers after they are saved.
Finish the test Click Save and Submit. You receive a confirmation
followed by a receipt page stating that the test is
completed.
A one-at-a-time test presents questions separately. Only one question appears on the screen at a time. You decide when you are ready to move on to the next question. The following options are available while taking this type of test:
Function Action
Navigate through
questions
Use the navigation arrows (<<, <, >, or >>). The question
completion status indicator describes the current location
in the test and the overall number of questions. When
backtracking is prohibited, these arrows do not appear.
Save answers Click Save All Answers. Questions you answered up to
this point are saved.
Finish the test Click Save and Submit. You receive a confirmation
followed by a receipt page stating that the test is
completed.
Question Completion Status
The question completion status indicator provides an up-to-date look at complete or incomplete questions in a test.
The status of which questions you answered appears at the top of the page. Click the arrows next to the status indicator to collapse or expand it.

Guide: ETG-47 Effective: 24 Aug 2014 Page #: 54 of 56
Subject: Blackboard 9.1 SP 14 Student Manual
Revision #: 1.0 Supersedes: --- Date: 12 May 2014
When you answer a question and move to the next question in a question-by-question test, the status box is updated on the next page to show that you answered the previous question. If you do not answer a question and move on to the next page, the status box on the next page shows that you did not answer the previous question. Navigate between questions by clicking the question number in the status indicator.
When you take an all-at-once test—a test where the questions all appear on the same page—click Save Answer to save a specific question without scrolling to save. When you click Save All Answers at the top or bottom of the page, the status indicator shows which questions you completed. You can click it after completing one, three, or more questions on a page.
Surveys
Surveys are used for polling purposes and evaluations. Surveys are not graded. You can find surveys in any content area, learning module, lesson plan, or folder. Your responses to survey questions are anonymous.
Taking a Survey
Your instructor lets you know when a survey is available and where to find it in your course. Before you begin, make sure you have a strong internet connection. A wired connection is more reliable than a wireless connection in some instances. Have any materials you need at hand before you begin. Click the link to launch the survey. Read all of the instructions. If you have any trouble taking your survey or understanding the questions, contact your instructor.
Although your instructor will be notified that you have completed the survey and a check mark will appear in My Grades, your instructor will not be able to see your individual answers.
Warning: Do not refresh the page, close the window, or click the browser's back button while taking a survey. If you experience problems during a survey, contact your instructor.
How to Take a Survey
1. Navigate to the survey and click the title.
2. Click Begin to take the survey.

Guide: ETG-47 Effective: 24 Aug 2014 Page #: 55 of 56
Subject: Blackboard 9.1 SP 14 Student Manual
Revision #: 1.0 Supersedes: --- Date: 12 May 2014
3. Your instructor may choose to have you type a password to begin taking a survey. If necessary, type the valid password and click Submit to begin the survey. The survey continues to prompt for a valid password until the correct one is provided.
4. As you work, answers are saved automatically. You can also click Save next to each question or Save All Answers at the top or bottom of the page as you work.
5. Click Save and Submit when you complete the survey.
Warning: Do not use the browser's back button during a survey. This may cause loss of
data. If you have difficulties while taking an assessment, contact your instructor.
Timed Surveys
If your instructor chose a timed survey, the scheduled time is included in the instructions before you begin.
You are notified of the instructor's choice of Timer Setting, which determines whether the survey saves and submits automatically when time expires -OR- if you have the option to continue beyond the time limit.
If you save and exit the survey, the timer continues running. If you start your survey on Tuesday, save and exit it, then complete it on Thursday the timer will show that it took you 48 hours to complete the survey.
When the timer runs out with the auto-submit feature, a pop-up window appears with the choice to submit or continue.

Guide: ETG-47 Effective: 24 Aug 2014 Page #: 56 of 56
Subject: Blackboard 9.1 SP 14 Student Manual
Revision #: 1.0 Supersedes: --- Date: 12 May 2014
Time Status Bar
When taking a survey, the remaining time appears on a status bar. Click the arrows next to the timer to collapse or expand it.
Timer warnings appear when half the time, five minutes, one minute, and thirty seconds remain. When the remaining time reads 1 minute, 30 seconds, the status bar turns yellow. At 1 minute, the warning is red, and at 30 seconds, both the status bar and the warning are red. If the timer is collapsed, the color changes are not visible.
Retaking a Survey
If you are allowed to take a survey multiple times, this appears at the top of the survey. If your instructor placed a limit on the number of attempts, the number is stated. A link to take the survey again appears when the survey is reopened.


![Une institution Ville de Genèveinstitutions.ville-geneve.ch/fileadmin/user_upload/... · Cover band hits : [play 8 songs with tab and sound-alike audio]. – Milwaukee : H. Leonard,](https://img.pdfslide.us/doc/110x75/6074947cd7614c1348033f14/une-institution-ville-de-gen-cover-band-hits-play-8-songs-with-tab-and-sound-alike.jpg)