Embed Size (px)
Citation preview

Snaptekk – www.snaptekk.com -‐ Houston, TX
ESP8266 -‐02 General purpose control board 2x4 outputs
Model 8266GPCB02 2/27/15
General description The 8266GPCB02 ESP8266 based general purpose control board is a configurable WIFI enabled device that allows controlling 2 banks of 4 signals suitable to drive relays or other low current devices (LEDs, other digital boards, etc). It is based on the ESP8266-‐02 and features the following characteristics:
• Custom ESP8266 firmware has been installed on the board that implements the control protocol.
• Configurable using a web browser. No need for serial interface. • Reset button • Flash programming switch, if reprogramming of the ESP8266 is needed • 5V power input • Serial RX and TX screw terminal for convenient serial programming or monitoring
• Board responds to TCP protocol commands sent to port 9999 at the IP address assigned to the board, i.e. xxx.xxx.xxx.xxx:9999
Setting up the board
Using a web browser • Connect the 5V power • Press board reset button • From your computer, check available wireless networks and connect to a network which name has the form ESP_STATION_xxxxxxx
• When prompted, enter the password to the ESP_STATION. The preset password is ‘espadmin’
• Wait until your computer successfully connects to ESP_STATION_xxxxxxx

Snaptekk – www.snaptekk.com -‐ Houston, TX
• From your web browser and after station is connected, point to 192.168.4.1 • Wait until your browser shows the IP address that has been assigned automatically to the board
• Take note of that IP address, this is the address for the board WIFI • You can now send TCP commands to the board IP address on port 9999 according to the logic table below.
Using the serial interface • Using your favorite terminal program connect to the serial port the board is plugged into
• Connect the RX on the board to the TX of the USB serial cable, and the TX on the board to the RX on the USB serial cable
• Type node.restart() • You should receive a message:
> Firmware Copyright (c) 2014 zeroday nodemcu.com
> Custom firmware Copyright(c) 2015 Snaptekk www.snaptekk.com
> ESP8266 2x4 GPIO Control v01
> The Station IP is not yet set
• Type:
> wifi.setmode(wifi.STATIONAP)
> wifi.sta.config(ssid,password)
ssid: the ssid of your WIFI network
password: the password of your WIFI network
• Type node.restart() • Wait a few seconds and you should see the message:
> Board IP successfully assigned 192.168.x.x
(this is the IP assigned to the board)
Snaptekk – www.snaptekk.com -‐ Houston, TX
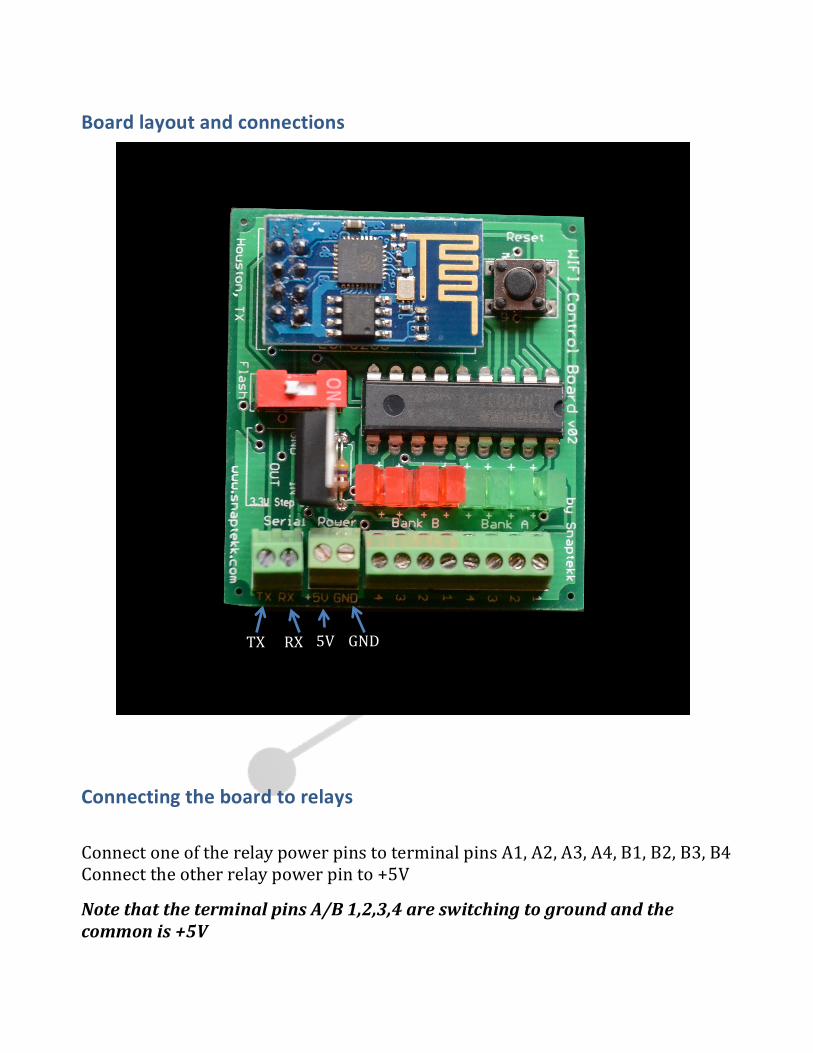
Board layout and connections
Connecting the board to relays
Connect one of the relay power pins to terminal pins A1, A2, A3, A4, B1, B2, B3, B4 Connect the other relay power pin to +5V
Note that the terminal pins A/B 1,2,3,4 are switching to ground and the common is +5V
TX
RX
5V
GND


![ESP8266 SSL ÒB µ Y - AI-thinkerwiki.ai-thinker.com/_media/esp8266/docs/5a-esp8266_sdk_ssl_user... · " "Espressif Systems " ESP8266 SSL User Manual 1. ¹ z \ È ] U h - ESP8266_NONOS_SDK](https://img.pdfslide.us/doc/110x75/5a832d2e7f8b9aa24f8e98c1/esp8266-ssl-b-y-ai-espressif-systems-esp8266-ssl-user-manual-1-z-u-h.jpg)