Embed Size (px)
Citation preview

Version 0.1
Copyright © 2015
ESP32
User Guide

About This GuideThis guide describes the software, firmware environment and development recommendations
required to build an application around the ESP32 development board with build-in ESP32
chip.
This document is structured as follows:
Style Identifiers
This is a code input style.
This is a code output style.
Release Notes
Note:
This guide is only for SDK Verison 1.0.0. Refer to the “ESP32 System Description” for more details on the ESP32 development board.
Chapter Title Subject
Chapter 1 Introduction
Introduces the ESP32 and software and hardware required.
Explains the software package with details on its architecture and contents.
Chapter 2 Getting StartedGuides users how to build and upload an application firmware provided by Espressif.
Appendix Notices FCC/CE compliance statement.
Code Input
Code output
Date Version Release notes
2015.12 V0.1 Confidential for internal use only.Confidential

Table of Contents
1. Introduction 4 ...............................................................................................................................................
1.1. ESP32 4 .......................................................................................................................................................................
1.2. Requirements 4 .........................................................................................................................................................
1.2.1. Hardware 4 .........................................................................................................................................................
1.2.2. Software 6 ...........................................................................................................................................................
2. Getting Started 8 ..........................................................................................................................................
2.1. Getting Started to Use SDK 8 ................................................................................................................................
2.1.1. Process Overview 8 .........................................................................................................................................
2.1.2. Building Toolchain 8 ........................................................................................................................................
2.1.3. Building Firmware 11 ........................................................................................................................................
2.1.4. Uploading Firmware 12 ...................................................................................................................................
2.1.5. Running Application 15 ....................................................................................................................................
2.2. SSC Command Reference 15 ...................................................................................................................................
2.2.1. op 15 ......................................................................................................................................................................
2.2.2. sta 16 .....................................................................................................................................................................
2.2.3. ap 17 ......................................................................................................................................................................
2.2.4. mac 17 ...................................................................................................................................................................
2.2.5. dhcp 18 .................................................................................................................................................................
2.2.6. ip 18 .......................................................................................................................................................................
2.2.7. reboot 19 .............................................................................................................................................................
2.2.8. ram 19 ...................................................................................................................................................................
Appendix - Notices 20 ......................................................................................................................................
I. Federal Communications Commission (FCC) Declaration of Conformity 20 ..............................................
II. EC Declaration of Conformity 20..........................................................................................................................
Confidential

1. Introduction
1. Introduction
1.1. ESP32
ESP32 provides a Wi-Fi solution in the 2.4GHz band by using 40nm technology. It delivers
highly integrated Wi-Fi SoC solution to meet the continuous demands for efficient power
usage, compact design and reliable performance.
You can use ESP32 series hardware and software provided by Espressif to develop and
program some useful Wi-Fi and wearable electronics applications and products in Internet of
Things(IoT) industry.
1.2. Requirements
Before getting started to run and develop firmware applications on your ESP32, there are
some hardware and software requirements.
1.2.1. Hardware
• An ESP32 development board or ESP-WROOM-03(build-in ESP32).
• A USB TTL Serial cable or a Micro-USB cable.
• Debian GNU/Linux OS on an x86 machine.
Notes:
1. We assume to use the Debian or Ubuntu Linux OS. You may make some modifications for theother Linux OS.
2. For more information about ESP-WROOM-03, refer to “ESP-WROOM-03 Specification".
Espressif 2015.12
Confidential
1. Introduction
1.2.2. Software
Development Platform
ESP32 RTOS SDK is a development platform provided for the users to develop their project.
• For the latest version, go to Download ESP32 RTOS SDK in Github.
• For the package components, refer to Figure 1-2.
Figure 1-2. Package Components
Bin files to be downloaded to the flash
Example codes of SDK applications
Header files required for compilation
Files for SDK compilation and link
Library files of SDK compilation
Library files of open source code
Compilation tools
Bin files for SSC
driver codes
Sample project template
Extra head files for compiling
Header files provided by Espressif
Header files of freeRTOS
Header files of Json library
Header files of LwIP library
Header files of SSL library
Espressif 2015.12
Confidential

1. Introduction
Serial Terminal Tool
We recommend using Minicom as a serial terminal tool to show the communication
information and debug code.
Uploading Tool
We recommend using Python 2.6 or 2.7 and esptool_ESP32.py to upload firmware to the
flash.
• For the latest version of Python, go to Download Python.
• esptool_ESP32.py file is in the ESP32 RTOS SDK > tools folder, refer to Figure 1-2.
Package Components.
• For the details of instructions, refer to 2.5.2 Uploading Files.
Espressif 2015.12
Confidential

2. Getting Started
2. Getting Started
2.1. Getting Started to Use SDK
2.1.1. Process Overview
2.1.2. Building Toolchain
We suggest to choose Crosstool-ng as the compiler toolchain. Follow the instructions below to
install Crosstool-ng.
1. Update the system.
sudo apt-get update
Figure 2-1. Process Overview
Start
Buildingfirmware
End
Uploading firmware
Buildingtoolchain
Configuring firmware
Note:
Your PC needs to connect to the Internet.
Espressif 2015.12
Confidential

2. Getting Started
2. Install the required toolchain packages.
sudo apt-get install git autoconf build-essential gperf bison flex
texinfo libtool libncurses5-dev wget gawk libc6 python-serial
libexpat-dev
2 upgraded, 37 newly installed, 0 to remove and 395 not upgraded.
Need to get 10.4 MB of archives.
After this operation, 48.7 MB of additional disk space will be used.
Do you want to continue? [Y/n]
y
Setting up texinfo (5.2.0.dfsg.1-2) ...
Setting up libwww-perl (6.05-2) ...
Setting up liblwp-protocol-https-perl (6.04-2ubuntu0.1) ...
Setting up libxml-parser-perl (2.41-1build3) ...
Setting up libxml-sax-expat-perl (0.40-2) ...
update-perl-sax-parsers: Registering Perl SAX parser XML::SAX::Expat
with priority 50...
update-perl-sax-parsers: Updating overall Perl SAX parser modules
info file...
Replacing config file /etc/perl/XML/SAX/ParserDetails.ini with new
version
3. Create a directory to store the toolchain.
sudo mkdir /opt/Espressif
4. Make the current user as the owner.
sudo chown $USER /opt/Espressif/
5. Download the latest toolchain installation file.
cd /opt/Espressif/
git clone -b esp108-1.21.0 git://github.com/jcmvbkbc/crosstool-NG.git
Cloning into 'crosstool-NG'...
remote: Counting objects: 28443, done.
remote: Total 28443 (delta 0), reused 0 (delta 0), pack-reused 28443
Receiving objects: 100% (28443/28443), 15.83 MiB | 71.00 KiB/s, done.
Resolving deltas: 100% (16473/16473), done.
Checking connectivity... done.
Espressif 2015.12
Confidential

2. Getting Started
6. Install toolchain.
cd crosstool-NG/
./bootstrap && ./configure --prefix=`pwd` && make && make install
For auto-completion, do not forget to install 'ct-ng.comp' into
your bash completion directory (usually /etc/bash_completion.d)
username:/opt/Espressif/crosstool-NG$
./ct-ng xtensa-esp108-elf
***********************************************************
WARNING! This sample may enable experimental features.
Please be sure to review the configuration prior
to building and using your toolchain!
Now, you have been warned!
***********************************************************
Now configured for "xtensa-esp108-elf"
username:/opt/Espressif/crosstool-NG$
./ct-ng build
[INFO ] Cleaning-up the toolchain's directory
[INFO ] Stripping all toolchain executables
[INFO ] Cleaning-up the toolchain's directory: done in 1.85s (at
24:28)
[INFO ] Build completed at 20151210.175153
[INFO ] (elapsed: 24:27.54)
[INFO ] Finishing installation (may take a few seconds)...
7. Set the PATH variable to point to the newly compiled toolchain.
export PATH=/opt/Espressif/crosstool-NG/builds/xtensa-esp108-elf/bin:
$PATH
Note:
It takes about dozens of minutes to build toolchain.
⚠ Notice:
Make sure you set the correct path, or it will occur a compile error.
Espressif 2015.12
Confidential

2. Getting Started
�
2.1.3. Building Firmware
1. Create a directory to store a new project.
mkdir ~/Workspace
cd ~/Workspace
2. Download the latest ESP32 RTOS SDK.
git clone https://github.com/espressif/ESP32_RTOS_SDK.git
3. Create a directory to store the.bin files compiled.
mkdir –p ~/Workspace/ESP32_BIN
4. Set the PATHs variable to point to the SDK and BIN files.
export SDK_PATH=~/Workspace/ESP32_RTOS_SDK
export BIN_PATH=~/Workspace/ESP32_BIN
5. Start to compile files.
cd ~/Workspace/project_template
make clean
make
�
Note:
You need to do Step 6 every time you open a new shell, or you can put it inside your .bashrc file.
Notes:
1. For the package components of the SDK, refer to “1.3 Package Components”.
2. You can build customized project according the ESP32_RTOS_SDK/examples/project_template.
⚠ Warning:
Make sure you set the correct paths, or it will occur a compile error.
Note:
You need to do Step 3 every time you open a new shell, or you can put it inside your .bashrc file.
Espressif 2015.12
Confidential
2. Getting Started
2.1.4. Uploading Firmware
1. Power on the board with 5V/1A power.
2. Connect the development board to a PC.
3. Toggle 8-digit Toggle Switch to the Download Boot as Table 1-2.
4. Install Minicom.
sudo apt-get install minicom
5. Run Minicom.
sudo minicom -s
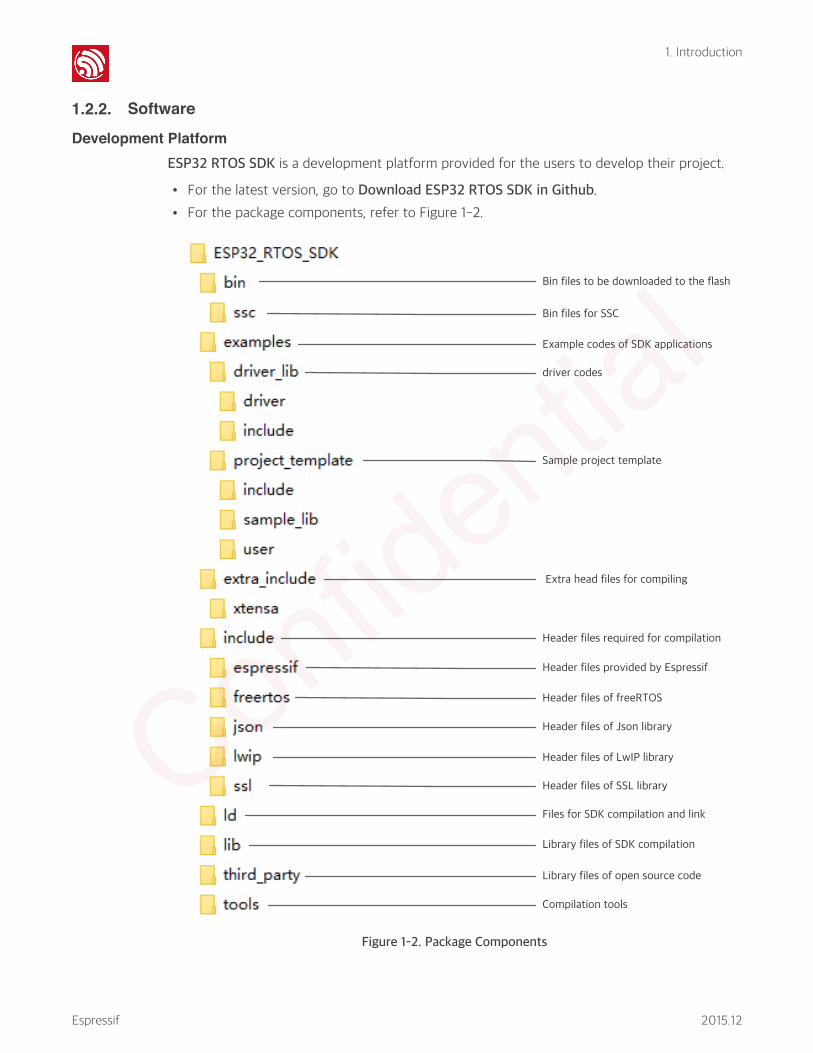
6. Configure the items as Figure 2-2.
Figure 2-2. Configuration items of Minicom
Note:
If your project is successfully compiled, the irom1.bin, irom0_flash.bin, and user.ota files will be generated in /Workspace/ESP32_BIN directory. Current contents of /Workspace/ESP32_BIN directory is shown as Table2-1.
Table 2-1. ESP32_BIN Directory Files
File Name Description
blank.bin • Provided with the SDK.
• Used to initialize the system parameters.
boot.bin • Provided with the SDK.
• Main program.
irom1.bin • Generated from compiling.• Main program.
irom0_flash.bin • Generated from compiling.
• Main program.
User.ota • Generated from compiling.
• Main program.
• Don’t need to be uploaded, and will be updated by OTA.
Espressif 2015.12
Confidential
2. Getting Started
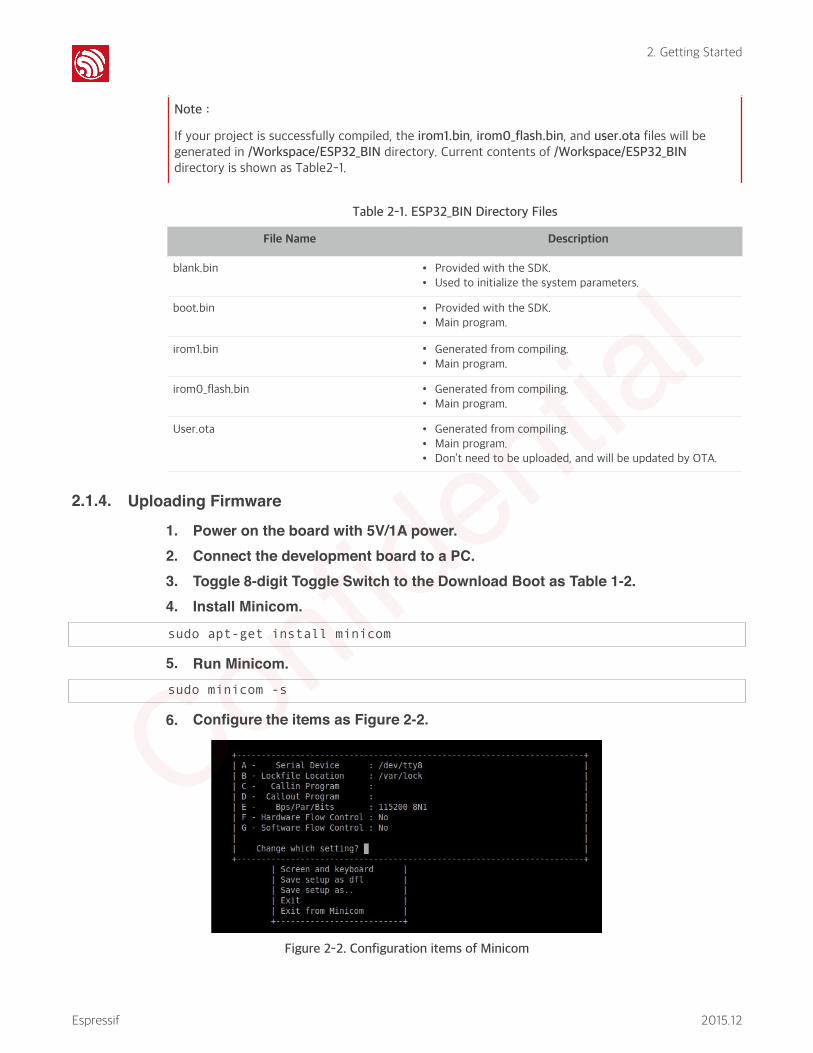
The configuration items are shown in Table 2-2.
7. Upload files.
>python esptool_ESP32.py -p dev/tty8 -b 115200 write_flash -ff 40m -
fm qio -fs 2m
0x0 ~/Workspace/ESP32_BIN/boot.bin
0x04000 ~/Workspace/ESP32_BIN/irom1.bin
0x40000 ~/Workspace/ESP32_BIN/bin/irom0_flash.bin
0xFC000 ~/Workspace/ESP32_BIN/blank.bin
0x1FC000 ~/Workspace/ESP32_BIN/esp_init_data_default.bin
For the configuration instructions, refer to Table 2-3. The system will show the information as
below.
Connecting...
Erasing flash...
Wrote 3072 bytes at 0x00000000 in 0.3 seconds (73.8 kbit/s)...
Erasing flash...
Wrote 395264 bytes at 0x04000000 in 43.2 seconds (73.2 kbit/s)...
Erasing flash...
Wrote 1024 bytes at 0x40000000 in 0.1 seconds (74.5 kbit/s)...
Erasing flash...
Wrote 4096 bytes at 0xfc000000 in 0.4 seconds (73.5 kbit/s)...
Erasing flash...
Wrote 4096 bytes at 0x1fc00000 in 0.5 seconds (73.8 kbit/s)...
Leaving...
Table 2-2. Configuration Items of Minicom
Item Value
Bps/Par/Bits 115200 8N1
Hardware Flow Control No
Software Flow Control No
Table 2-3. Configuration Items of uploading files
Item Value
COM Port You can choose an available COM port for the uploading. We use dev/tty in this example.
Baud Rate Set the baud rate of the uploading. The default value is 115200 bps.
Espressif 2015.12
Confidential

2. Getting Started
�
SPI Speed Set the SPI speed of the uploading. The default value is 40 MHz.
SPI Mode Set the SPI speed of the uploading. The default value is QIO.
Flash Size The size of your flash, We use 2Mbit flash in this example. The flash size of 1MB, 2MB, 4MB, 8MB, 16MB and 32MB are supported.
Start Address Set the start addresses of the bin files. The start address of blank.bin and esp_init_data_default.bin may be different when you use a different flash size. For the start Address of different size of flash, refer to Table 2-4.
Item Value
Table 2-4. Configuration Items of uploading files
File NameStart Address
NotesFlash Size: 1 MB Flash Size: 2 MB
boot.bin 0x00000 -
irom1.bin 0x04000 -
irom0_flash.bin 0x40000 -
user.ota① Doesn’t need to be uploaded. -
blank.bin 0xFE000 0x1FE000As shown in the figure above, the file will start from the second section(4K) from bottom of the flash.②
esp_init_data_default.bin③
0xFC000 0x1FC000As shown in the figure above, the file will start from the fourth section(4K) from bottom of the flash.②
Notes:
1. User.ota file doesn’t need to be uploaded, and will be used in OTA upgrading.
2. The flash size of 1MB, 2MB, 4MB, 8MB, 16MB and 32MB are supported.
3. esp_init_data_default.bin isn’t provided in the version 1.0.0.
Espressif 2015.12
Confidential

2. Getting Started
Result
The flash layout is shown as Figure 2-3.
For the flash usage, refer to Table 2-5.
2.1.5. Running Application
1. Power off and switch the hardware to the running mode.
2. Power on the hardware and run the application.
�
2.2. SSC Command Reference
Here lists some common Wi-Fi commands for you to test the board.
2.2.1. op
Description
op commands are used to set and query the Wi-Fi mode of the system.
Example
op -Q
Figure 2-3. Flash Layout
16K
boot.bin
240K
irom1.bin irom0_flash.bin
3840K
esp_init_data_default.bin
4K 4K 4K
blank.bin
System Parameter
Available segment
4K
Table 2-5. Flash Usage
Segment Name Start Address Length
dport0_0_seg org = 0x3FF00000 len = 0x10
dram0_0_seg org = 0x3FFD8000 len = 0x24000
iram1_0_seg org = 0x40040000 len = 0x20000
irom0_0_seg org = 0x40080010 len = 0x37FFF0
irom0_1_seg org = 0x3FE04010 len = 0x3BFF0
Espressif 2015.12
Confidential

2. Getting Started
op -S -o wmode
Parameter
2.2.2. sta
Description
sta commands are used to scan the STA network interface, connect or disconnect AP, and
query the connecting status of STA network interface.
Example
sta -S [-s ssid] [-b bssid] [-n channel] [-h]
sta -Q
sta -C [-s ssid] [-p password]
sta -D
Parameter
Table 2-6. op Command Parameter
Parameter Description
-Q Query Wi-Fi mode.
-S Set Wi-Fi mode.
wmode
There are 3 Wi-Fi modes:
• mode = 1: STA mode
• mode = 2: AP mode
• mode = 3: STA+AP mode
Table 2-7. sta Command Parameter
Parameter Description
-S scan Scan Access Points.
-s ssid Scan or connect Access Points with the ssid.
-b bssid Scan the Access Points with the bssid.
-n channel Scan the channel.
-h Show scan results with hidden ssid Access Points.
-Q Show STA connect stutus.
-D Disconnected with current Access Points.
Espressif 2015.12
Confidential

2. Getting Started
2.2.3. ap
Description
ap commands are used to set the parameter of AP network interface.
Example
ap -S [-s ssid] [-p password] [-t encrypt] [-n channel] [-h] [-m
max_sta]
ap –Q
ap –L
Parameter
2.2.4. mac
Description
mac commands are used to query the MAC address of the network interface.
Example
mac -Q [-o mode]
Parameter
Table 2-8. ap Command Parameter
Parameter Description
-S Set AP mode.
-s ssid Set AP ssid.
-p password Set AP password.
-t encrypt Set AP encrypt mode.
-h Hide ssid.
-m max_sta Set AP max connections.
-Q Show AP parameters.
-L Show MAC Address and IP Address of the connected station.
Table 2-9. mac Command Parameter
Parameter Description
-Q Show MAC address.
-o mode• mode = 1: MAC address in STA mode.
• mode = 2: MAC address in AP mode.
Espressif 2015.12
Confidential
2. Getting Started
2.2.5. dhcp
Description
dhcp commands are used to enable or disable dhcp server/client.
Example
dchp -S [-o mode]
dhcp -E [-o mode]
dhcp -Q [-o mode]
Parameter
2.2.6. ip
Description
ip command are used to set and query the IP address of the network interface.
Example
ip -Q [-o mode]
ip -S [-i ip] [-o mode] [-m mask] [-g gateway]
Parameter
Table 2-10. dhcp Command Parameter
Parameter Description
-S Start DHCP (Client/Server).
-E End DHCP (Client/Server).
-Q show DHCP status.
-o mode
• mode = 1 : DHCP client of STA interface.
• mode = 2 : DHCP server of AP interface.
• mode = 3 : both.
Table 2-11. ip Command Parameter
Parameter Description
-Q Show IP address.
-o mode
• mode = 1 : IP address of interface STA.
• mode = 2 : IP address of interface AP.
• mode = 3 : both
-S Set IP address.
-i ip IP address.
-m mask Subnet address mask.
-g gateway Default gateway.
Espressif 2015.12
Confidential

2. Getting Started
2.2.7. reboot
Description
reboot command is used to reboot the board.
Example
reboot
2.2.8. ram
ram command is used to query the size of the remaining heap in the system.
Example
ram
Espressif 2015.12
Confidential
Appendix - Notices
Appendix - Notices
I. Federal Communications Commission (FCC) Declaration of Conformity
This equipment has been tested and found to comply with the limits for a Class B digital device, pursuant to part 15 of the FCC Rules. These limits are designed to provide reasonable protection against harmful interference in a residential installation. This equipment generates uses and can radiate radio frequency energy and, if not installed and used in accordance with the instructions, may cause harmful interference to radio communications. However, there is no guarantee that interference will not occur in a particular installation. If this equipment does cause harmful interference to radio or television reception, which can be determined by turning the equipment off and on, the user is encouraged to try to correct the interference by one or more of the following measures:
• Reorient or relocate the receiving antenna.
• Increase the separation between the equipment and the receiver.
• Connect the equipment into an outlet on a circuit different from that to which the receiveris connected.
• Consult the dealer or an experienced radio/TV technician for help.
Any changes or modifications to this equipment not expressly approved by Espressif may cause harmful interference and void the user’s authority to operate this equipment.
This device complies with Part 15 of the FCC Rules. Operation is subject to the following two conditions: (1) this device may not cause harmful interference, and (2) this device must accept any interference received, including interference that may cause undesired operation.
FCC Radiation Exposure Statement
This equipment complies with FCC radiation exposure limits set forth for an uncontrolled environment. This equipment should be installed and operated with minimum distance 20cm between the radiator& your body.
This transmitter must not be co-located or operating in conjunction with any other antenna or transmitter.
II. EC Declaration of Conformity
This equipment can be used in member states of the European Union once the corresponding administrative license is obtained.
Espressif, as manufacturer of the product ESP32, declares that the said product complies with the essential requirements established in Article 3 of the Council of Europe Directive 1999/5/ CE, dated 9th March, 1999.
Espressif 2015.12
Confidential

Disclaimer and Copyright Notice
Information in this document, including URL references, is subject to change without notice.
THIS DOCUMENT IS PROVIDED AS IS WITH NO WARRANTIES WHATSOEVER, INCLUDING ANY
WARRANTY OF MERCHANTABILITY, NON-INFRINGEMENT, FITNESS FOR ANY PARTICULAR
PURPOSE, OR ANY WARRANTY OTHERWISE ARISING OUT OF ANY PROPOSAL,
SPECIFICATION OR SAMPLE. All liability, including liability for infringement of any proprietary
rights, relating to use of information in this document is disclaimed. No licenses express or
implied, by estoppel or otherwise, to any intellectual property rights are granted herein.
The Wi-Fi Alliance Member logo is a trademark of the Wi-Fi Alliance.
All trade names, trademarks and registered trademarks mentioned in this document are
property of their respective owners, and are hereby acknowledged.
Copyright © 2015 Espressif Inc. All rights reserved.
Espressif IOT Team
http://bbs.espressif.com
The OEM or final integrator must ensure that FCC labeling requirements are met. This includes an additional label on the outside of the final product housing with the following contents:Company NameModel:ESP32FCC ID:2AC7Z-ESP32This device complies with part 15 of the FCC Rules. Operation is subject to the following two conditions:(1) This device may not cause harmful interference, and(2) this device must accept any interference received, including interference that may cause undesired operation.To satisfy FCC RF Exposure requirements for this transmission devices, a separation distance of 20cm or more should be maintained between the antenna of this device and persons during operation. To ensure compliance, operation at closer than this distance is not recommended. The antenna(s) used for this transmitter must not be co‐located or operating in conjunction with any other antenna or transmitter.Changes or modifications not expressly approved by the party responsible for compliancecould void the user's authority to operate the equipment.The modular transmitter must be equipped with either a permanently affixed label or must be capable of electronically displaying its FCC identification number:(A) If using a permanently affixed label, the modular transmitter must be labeled with its own FCC identification number, and, if the FCC identification number is not visible when the module is installed inside another device, then the outside of the device into which the module is installed must also display a label referring to the enclosed module. This exterior label can use wording such as the following: “Contains Transmitter Module FCC ID: 2AC7Z-ESP32” or “Contains FCC ID: 2AC7Z-ESP32.” Any similar wording that expresses the same meaning may be used. The Grantee may either provide such a label, an example of which must be included in the application for equipment authorization, or, must provide adequate instructions along with the module which explain this requirement. In the latter case, a copy of these instructions must be included in the application for equipment authorization


![OdakyuAndroid t Google play] Wi-Fi Android ios t App Store] Wi-Fi [App Store] [iPhone Profile) Wi-Fi # —E Odakyu Odakyu Free Wi-Fi Android [Google play] WI-Fi Android [App Wi-Fi](https://img.pdfslide.us/doc/110x75/5fcc31f69b77e950d81a9828/android-t-google-play-wi-fi-android-ios-t-app-store-wi-fi-app-store-iphone.jpg)