Embed Size (px)
Citation preview
[Electronic Submittal of Information]
ESI BEGINNER’S GUIDE FOR CONTRACTORS
(Composting Facility Owner/Operator’s Contractors & Consultants)
Version 1.0
FEBRUARY 2018
ESI Homepage:
https://www.waterboards.ca.gov/water_issues/programs/ust/electronic_submittal/
ESI Beginner’s Guide - Contractors
TABLE OF CONTENTS 1.0 INTRODUCTION ................................................................................................................ 1
1.1 About GeoTracker.......................................................................................................... 1
1.2 What are the State Water Board Electronic Data Submittal Requirements? ................... 1
1.3 Contractor Responsibilities ............................................................................................ 2
1.4 What Information Should Be Submitted (Uploaded)? ..................................................... 2
2.0 ESI START-UP GUIDELINE .............................................................................................. 4
STEP 1: Creating a Secure GeoTracker ESI Account and Logging In ................................ 4
STEP 2: Getting Access to Sites/Facilities .......................................................................... 6
STEP 3: How to Create and Upload Field Point Names to Site ........................................... 8
STEP 4: Upload (Submit) Data and Reports ...................................................................... 10
STEP 5: Delete an Electronic Submittal after Uploading .................................................... 28
STEP 6: DENIED Electronic Submission Notification ......................................................... 30
3.0 ADDITIONAL RESOURCES ............................................................................................ 31
3.1 Contact the GeoTracker Helpdesk:.......................................................................... 31
3.2 Online Resources .................................................................................................... 31
3.3 Guidance Documents .............................................................................................. 31
APPENDIX A ......................................................................................................................... 33
FIGURE 1: START-UP TASKS .......................................................................................... 33
FIGURE 2: ESI SUBMITTAL PROCESS OVERVIEW AND DATA FLOW ......................... 34
APPENDIX B ......................................................................................................................... 35
B.1 INDIVIDUALS, ENTITIES, AND RESPONSIBILITIES ............................................. 35
B.2 IMPORTANT ESI TERMS DEFINED ....................................................................... 38
APPENDIX C ......................................................................................................................... 41
Uploading Multiple Field Point Names (FPNs) ................................................................... 41
APPENDIX D ......................................................................................................................... 44
Error Checking A New Electronic Submittal of Information (ESI) Data File ......................... 44
ESI Beginner’s Guide - Contractors
Page 1
1.0 INTRODUCTION This guide is intended to provide Contractors a generalized step-by-step guideline for preparing and uploading (submitting) compliance data and reports into the GeoTracker system on behalf of composting facility owners/operators (Responsible Party [RP]) for facilities enrolled under the General Waste Discharge Requirements for Composting Operations, Order WQ 2015-0121-DWQ (Composting General Order). A composting facility owner/operator is referred to as the “Discharger” in the Composting General Order. Submitting compliance data and reports to GeoTracker is intended to satisfy the reporting requirement of the Composting General Order, and allows the lead regulatory agency caseworker to review, approve, or deny submittals, as well as to make reports accessible to the public.
1.1 About GeoTracker GeoTracker is the State Water Resources Control Board’s (State Water Board) internet-accessible database system used by the State Water Board, Regional Water Quality Control Boards (Regional Water Boards), and local agencies to access and archive compliance data from authorized or unauthorized discharges to land, or unauthorized releases of hazardous substances from underground storage tanks. This system consists of a relational database, on-line compliance reporting features, a geographical information system (GIS) interface and other features that are utilized by the State Water Board, Regional Water Boards, local agencies, regulated industry, and the public to input, manage, or access compliance and regulatory tracking data. GeoTracker was developed in 2000 in accordance with a mandate by the California State Legislature to investigate the feasibility of establishing a statewide GIS-based program to compile data for leaking underground storage tank (LUST) sites. The use of GeoTracker has since expanded to include information for other types of facilities such as, but not limited to, landfills, mines, and composting facilities, making it a critical resource for both regulators and the public.
GeoTracker provides access to statewide environmental data and regulatory information for the following types of sites:
Composting Operations; Leaking Underground Storage Tanks (LUST) cleanup sites; Permitted Underground Storage Tank (UST) facilities (Note: Permitted UST information
is now being maintained by CERS http://cers.calepa.ca.gov/ and GeoTracker’s Permitted UST data is no longer up-to-date);
Cleanup Program Sites (CPS, also known as Site Cleanups [SC] and formerly known as Spills, Leaks, Investigations, and Cleanups [SLIC] sites);
Military sites (including Military UST sites, Military Privatized sites, and Military Cleanup sites [formerly known as Department of Defense (DOD) non-UST]);
Land Disposal sites (Landfills, Surface Impoundments, Waste Piles); Waste Discharge Requirement (WDR) sites; and Irrigated Lands Regulatory Program (ILRP) sites.
1.2 What are the State Water Board Electronic Data Submittal Requirements? Electronic reporting regulations (California Code of Regulations, Title 23, Division 3, Chapter 30 and Title 27, Division 3) require electronic submittal of any report or data required by a regulatory agency. Submission dates are set by the Regional Water Board or by other regulatory agencies. Once a report/data is successfully uploaded and approved by the lead
ESI Beginner’s Guide - Contractors
Page 2
agency caseworker, the reporting requirement is considered satisfied (i.e. the compliance measure for electronic submittals is the actual upload itself). The upload date should be on or prior to the regulatory due date. The State Water Board has several goals in implementing Electronic Submittal of Information (ESI): 1. Electronic reporting will provide decision-makers with more accurate, up-to-date, accessible,
and complete statewide information. 2. Electronic reporting will enhance the capabilities of the State Water Board, Regional Water
Boards, and local agencies in monitoring and assessing threat of contamination to drinking water wells.
3. Electronic reporting facilitates public access to information and transparency; rather than traveling to a government building to review a paper copy of a case file, interested parties can review and analyze information through the internet.
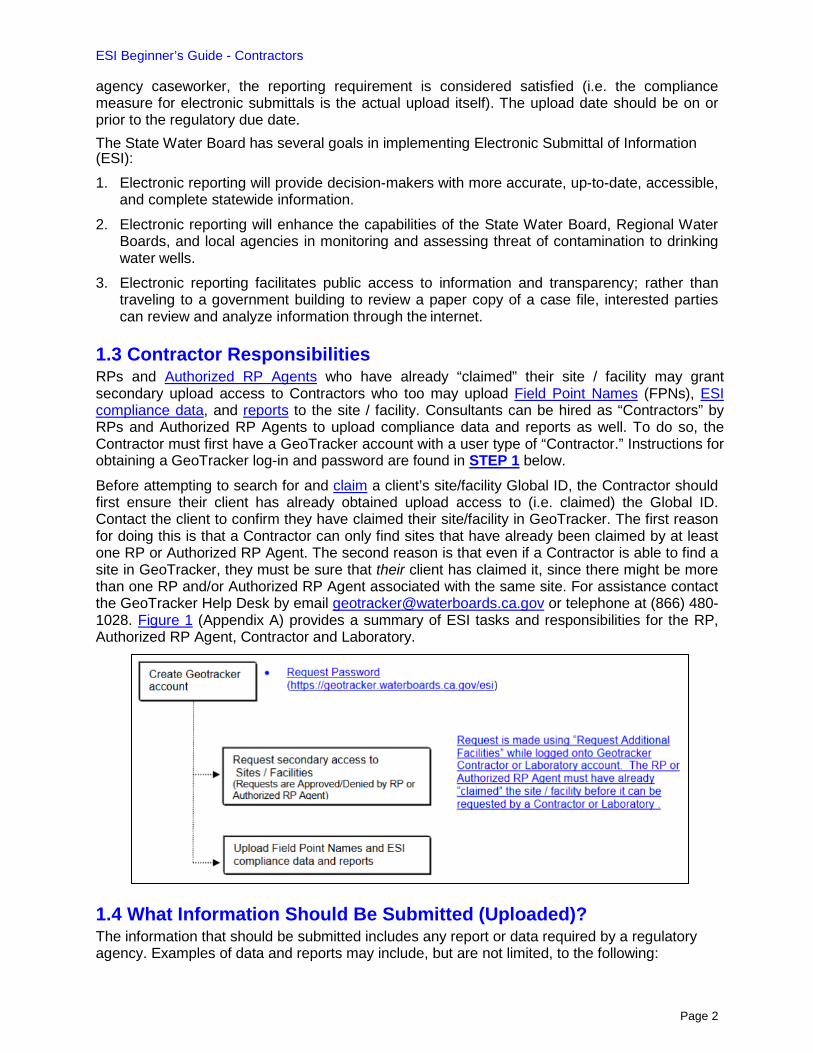
1.3 Contractor Responsibilities RPs and Authorized RP Agents who have already “claimed” their site / facility may grant secondary upload access to Contractors who too may upload Field Point Names (FPNs), ESI compliance data, and reports to the site / facility. Consultants can be hired as “Contractors” by RPs and Authorized RP Agents to upload compliance data and reports as well. To do so, the Contractor must first have a GeoTracker account with a user type of “Contractor.” Instructions for obtaining a GeoTracker log-in and password are found in STEP 1 below.
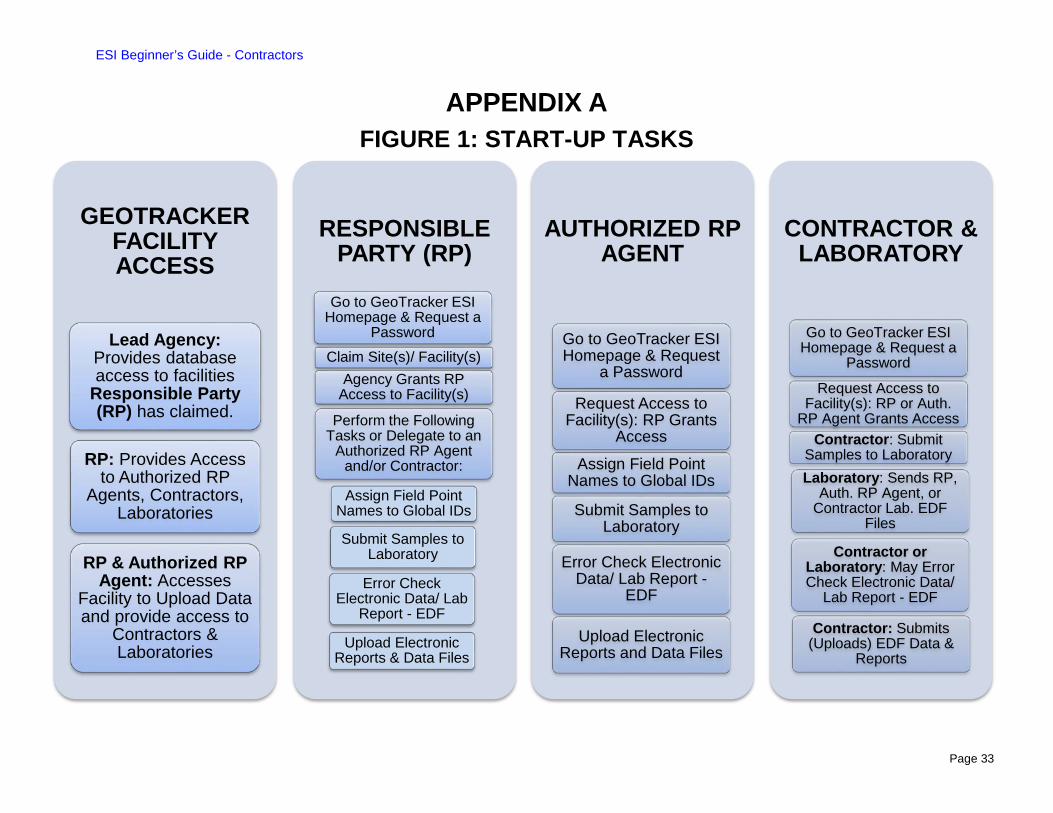
Before attempting to search for and claim a client’s site/facility Global ID, the Contractor should first ensure their client has already obtained upload access to (i.e. claimed) the Global ID. Contact the client to confirm they have claimed their site/facility in GeoTracker. The first reason for doing this is that a Contractor can only find sites that have already been claimed by at least one RP or Authorized RP Agent. The second reason is that even if a Contractor is able to find a site in GeoTracker, they must be sure that their client has claimed it, since there might be more than one RP and/or Authorized RP Agent associated with the same site. For assistance contact the GeoTracker Help Desk by email [email protected] or telephone at (866) 480-1028. Figure 1 (Appendix A) provides a summary of ESI tasks and responsibilities for the RP, Authorized RP Agent, Contractor and Laboratory.
1.4 What Information Should Be Submitted (Uploaded)? The information that should be submitted includes any report or data required by a regulatory agency. Examples of data and reports may include, but are not limited, to the following:
ESI Beginner’s Guide - Contractors
Page 3
REPORTS (i.e. Notice of Intent, Technical Report, Final Post-Construction Report, Annual Monitoring & Maintenance Report)
LABORATORY ANALYTICAL DATA - Electronic Deliverable Format [EDF] may include, but is not limited to the following: soil sampling data, groundwater monitoring data, leachate sampling data, pond wastewater data, biosolids sampling data, etc.
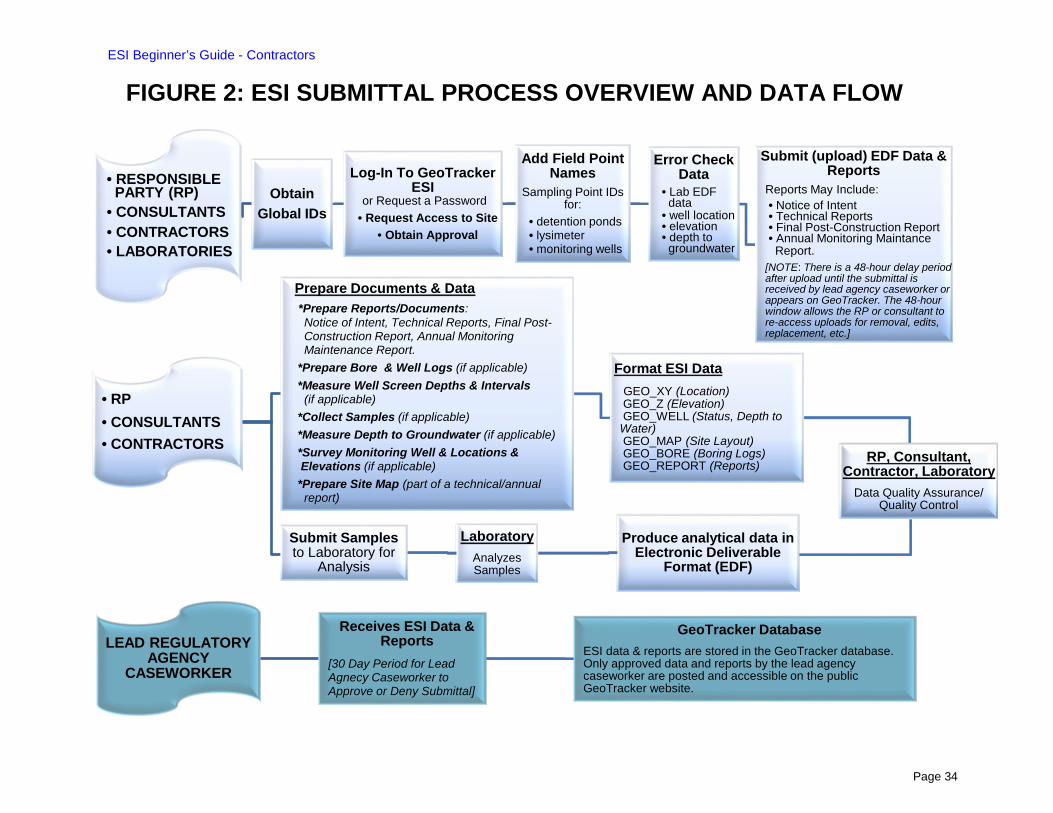
SAMPLE LOCATIONS (Latitude / Longitude) GROUNDWATER MONITORING WELL ELEVATION DATA GROUNDWATER WELL DATA (Depth to Water, Well Operational Status) SITE MAP Figure 2 (Appendix A) provides an overview of the ESI submittal process and data flow process for RPs, Authorized RP Agents, Contractors and Laboratories.
ESI Beginner’s Guide - Contractors
Page 4
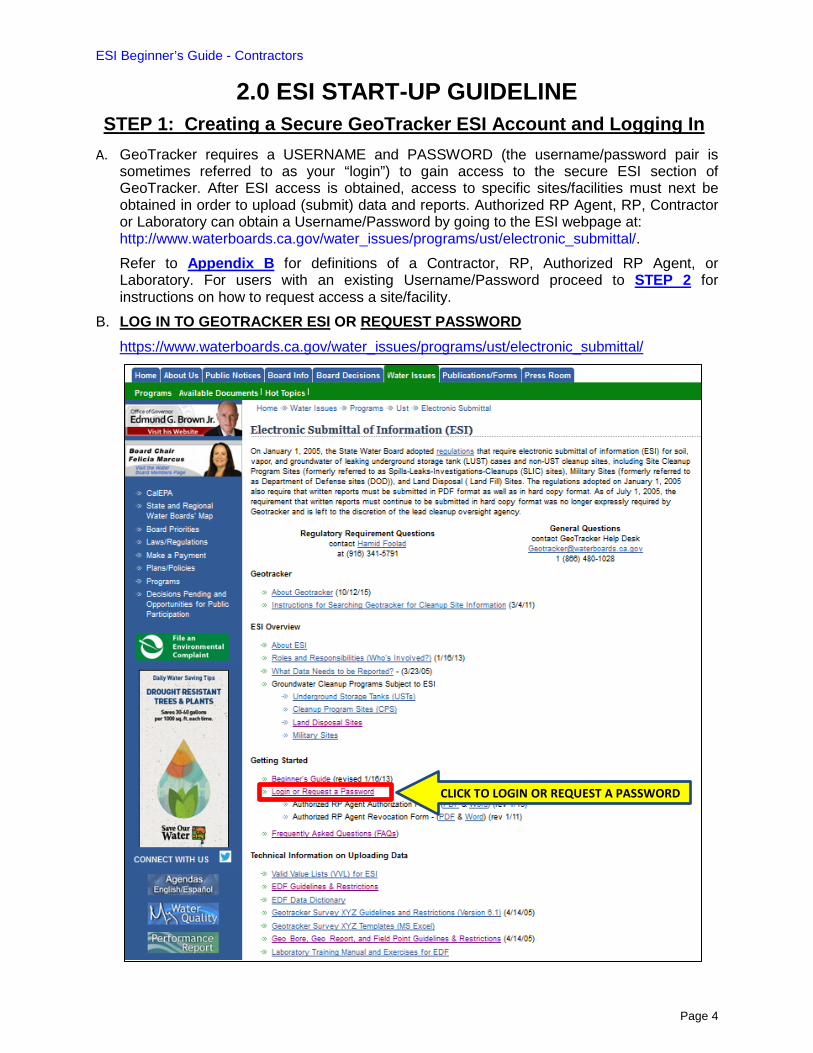
2.0 ESI START-UP GUIDELINE STEP 1: Creating a Secure GeoTracker ESI Account and Logging In
A. GeoTracker requires a USERNAME and PASSWORD (the username/password pair is sometimes referred to as your “login”) to gain access to the secure ESI section of GeoTracker. After ESI access is obtained, access to specific sites/facilities must next be obtained in order to upload (submit) data and reports. Authorized RP Agent, RP, Contractor or Laboratory can obtain a Username/Password by going to the ESI webpage at: http://www.waterboards.ca.gov/water_issues/programs/ust/electronic_submittal/. Refer to Appendix B for definitions of a Contractor, RP, Authorized RP Agent, or Laboratory. For users with an existing Username/Password proceed to STEP 2 for instructions on how to request access a site/facility.
B. LOG IN TO GEOTRACKER ESI OR REQUEST PASSWORD
https://www.waterboards.ca.gov/water_issues/programs/ust/electronic_submittal/
CLICK TO LOGIN OR REQUEST A PASSWORD
ESI Beginner’s Guide - Contractors
Page 5
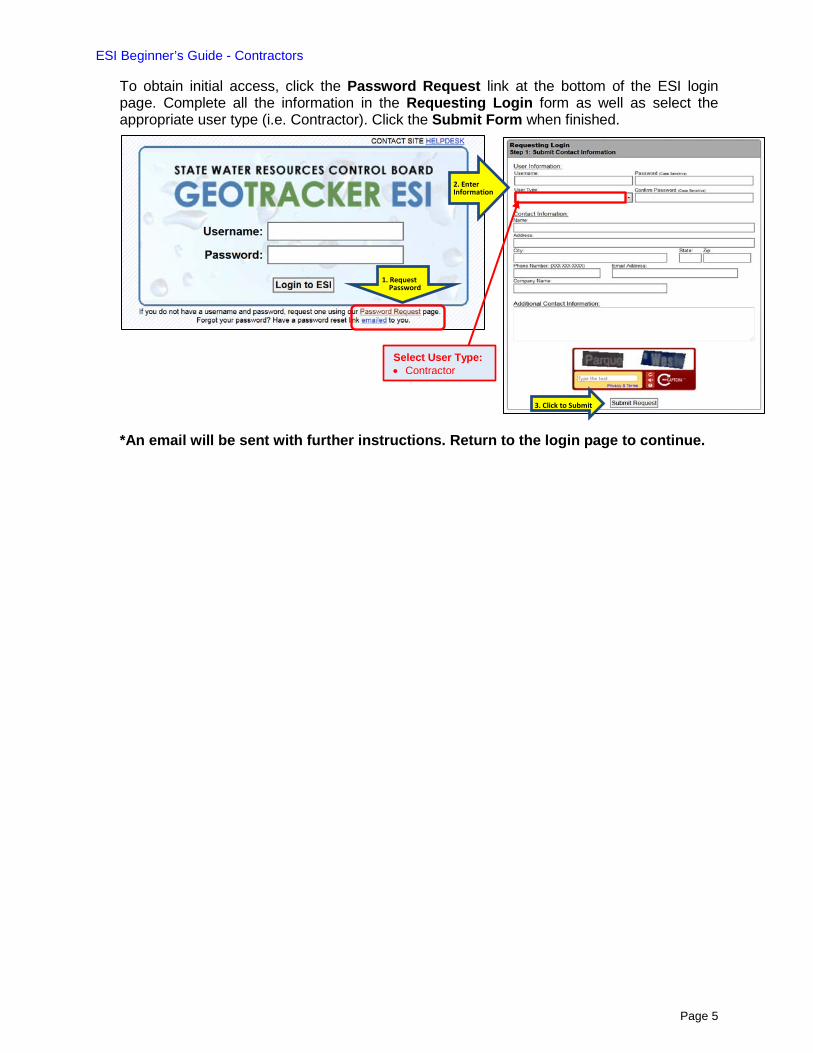
To obtain initial access, click the Password Request link at the bottom of the ESI login page. Complete all the information in the Requesting Login form as well as select the appropriate user type (i.e. Contractor). Click the Submit Form when finished.
*An email will be sent with further instructions. Return to the login page to continue.
2. Enter Information
1. Request Password
Select User Type: • Contractor
3. Click to Submit
ESI Beginner’s Guide - Contractors
Page 6
STEP 2: Getting Access to Sites/Facilities
A. A site must be claimed by the RP or by an agent acting on behalf of the RP (Authorized RP Agent) prior to (1) other entities, such as Contractors, receiving access to a site, (2) uploading Field Point Names (FPN), and (3) submitting ESI compliance data and reports. A “claimed” site is a site/facility that the RP (or their Authorized RP Agent) requested and State Water Board granted access. A FPN is defined in STEP 3: How to Create and Upload Field Point Names to Site.
B. To upload FPNs, ESI compliance data, or reports, a Contractor will need to request access to a facility from the RP or their Authorized RP Agent. Requests may be approved or denied by the RP or their Authorized RP Agent, not State Water Board staff. The following instructions describe how to gain site/facility access in GeoTracker.
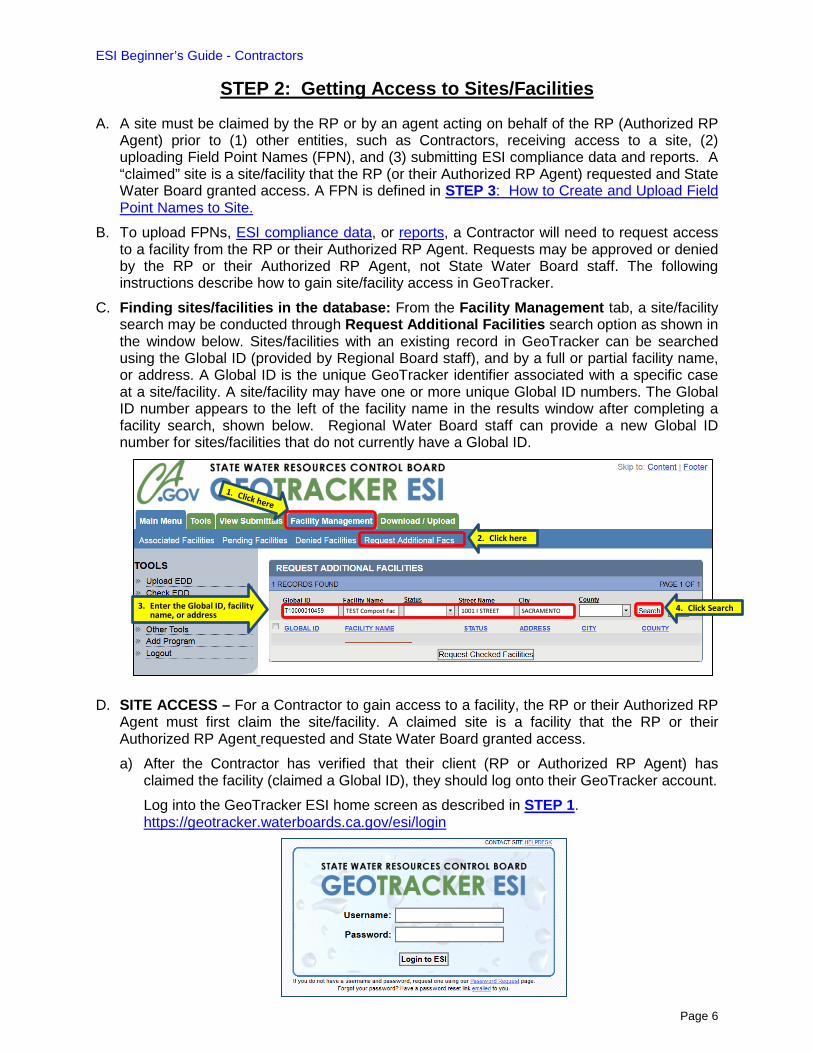
C. Finding sites/facilities in the database: From the Facility Management tab, a site/facility search may be conducted through Request Additional Facilities search option as shown in the window below. Sites/facilities with an existing record in GeoTracker can be searched using the Global ID (provided by Regional Board staff), and by a full or partial facility name, or address. A Global ID is the unique GeoTracker identifier associated with a specific case at a site/facility. A site/facility may have one or more unique Global ID numbers. The Global ID number appears to the left of the facility name in the results window after completing a facility search, shown below. Regional Water Board staff can provide a new Global ID number for sites/facilities that do not currently have a Global ID.
D. SITE ACCESS – For a Contractor to gain access to a facility, the RP or their Authorized RP Agent must first claim the site/facility. A claimed site is a facility that the RP or their Authorized RP Agent requested and State Water Board granted access. a) After the Contractor has verified that their client (RP or Authorized RP Agent) has
claimed the facility (claimed a Global ID), they should log onto their GeoTracker account. Log into the GeoTracker ESI home screen as described in STEP 1. https://geotracker.waterboards.ca.gov/esi/login
3. Enter the Global ID, facility name, or address TEST Compost Fac 1001 I STREET SACRAMENTO 4. Click Search
2. Click here
ESI Beginner’s Guide - Contractors
Page 7
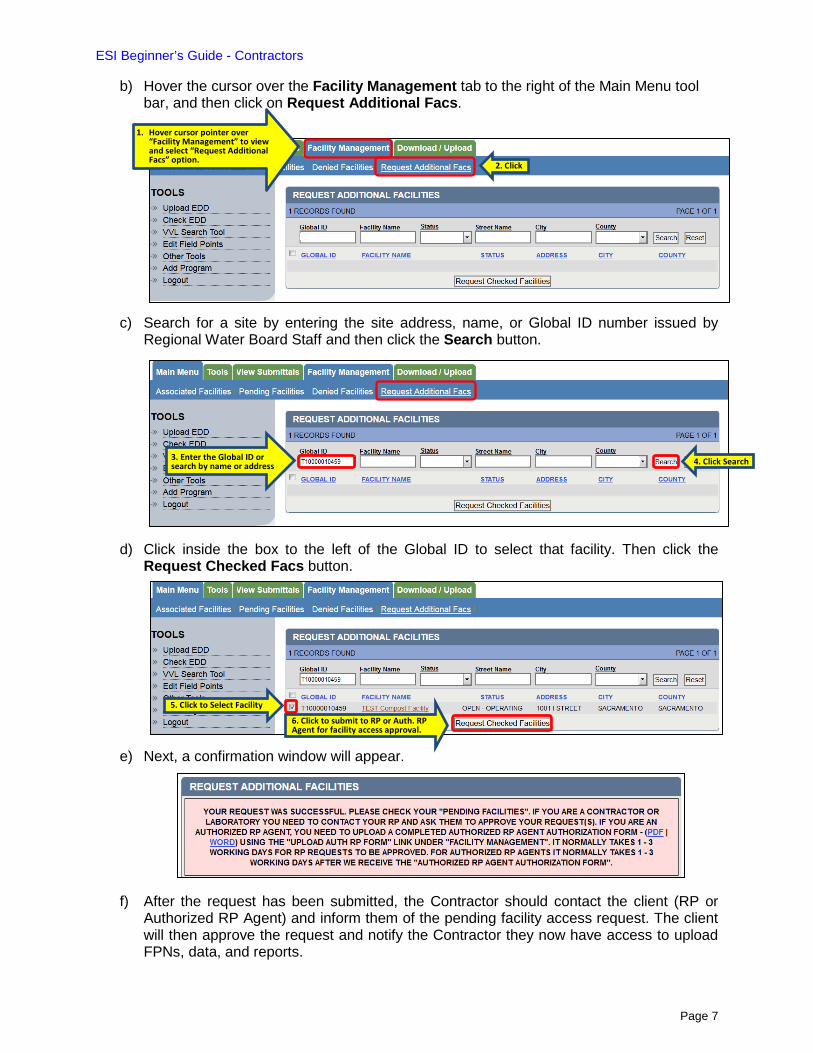
b) Hover the cursor over the Facility Management tab to the right of the Main Menu tool bar, and then click on Request Additional Facs.
c) Search for a site by entering the site address, name, or Global ID number issued by Regional Water Board Staff and then click the Search button.
d) Click inside the box to the left of the Global ID to select that facility. Then click the Request Checked Facs button.
e) Next, a confirmation window will appear.
f) After the request has been submitted, the Contractor should contact the client (RP or Authorized RP Agent) and inform them of the pending facility access request. The client will then approve the request and notify the Contractor they now have access to upload FPNs, data, and reports.
5. Click to Select Facility
2. Click
1. Hover cursor pointer over “Facility Management” to view and select “Request Additional Facs” option.
6. Click to submit to RP or Auth. RP Agent for facility access approval.
3. Enter the Global ID or search by name or address 4. Click Search

ESI Beginner’s Guide - Contractors
Page 8
STEP 3: How to Create and Upload Field Point Names to Site
A. The FPN is a unique identifier that the RP (or their Authorized RP Agents, Contractors, or Laboratory) assigns to a specific sample point (location) where measurements or samples are taken (e.g. BASIN-1 [Detention Basin 1], MW-1 [Monitoring Well 1], or B-1 [Borehole 1], etc.). FPNs must be created prior to uploading ESI Data. (Refer to the Important Notes section in Appendix C for additional details). An RP may choose to create and assign FPNs or approve an Authorized RP Agent, Contractor, or Laboratory to perform the task for them.
B. FPNs and well construction information can be added to a Global ID interactively by clicking on Edit Field Points, located under TOOLS in the left column, and then click on the facility’s name if it appears on the list or enter the Global ID and click Search. For existing sites with pre-existing FPNs in the system, this will display the current list of FPNs associated with the site.
C. There are two options for adding FPNs: Option 1 is for manually adding individual FPNs to a site and Option 2 allows for multiple FPNs to be uploaded all at once. Option 2 guidelines for creating FPNs are presented in Appendix C. a) OPTION 1 - Click on ADD FIELD POINT NAME / WELL CONSTRUCTION (located at
the upper left-hand side under the facility name and address).
b) Enter a new FIELD POINT NAME, select the appropriate FIELD POINT CLASS from
the drop down list. (Note that field Quality Control [QC] selections [i.e. trip blank, equipment blank, etc.] are at the bottom of the drop down list.)
c) It is highly recommended that you limit all of your FPNs to 10 or less characters to provide flexibility in your choice of laboratories. Refer to the Frequently Asked Questions - Field Point Names section for additional information on determining Field Point Names: https://www.waterboards.ca.gov/ust/electronic_submittal/esi_faq5.shtml#fpn5.3
1. Select
4. Select Facility
2. Enter the Global ID 3. Click Search to View FPNs
1. Click Here
ESI Beginner’s Guide - Contractors
Page 9
2. Complete Fields
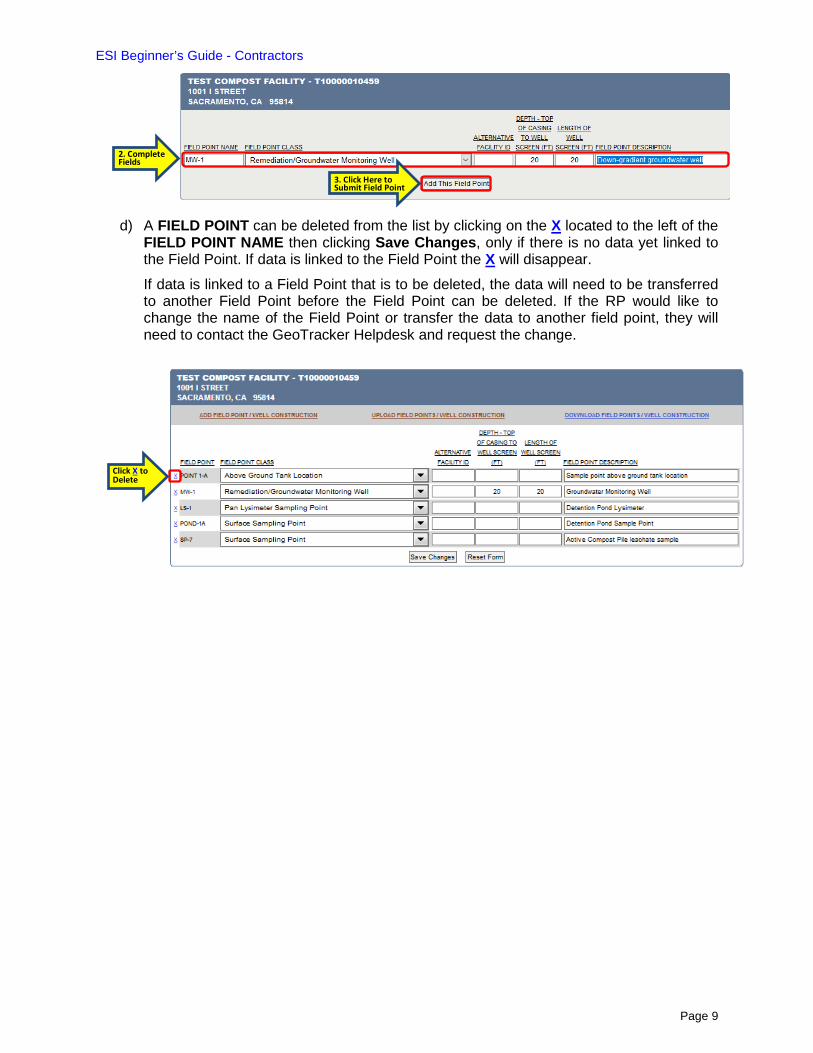
d) A FIELD POINT can be deleted from the list by clicking on the X located to the left of the FIELD POINT NAME then clicking Save Changes, only if there is no data yet linked to the Field Point. If data is linked to the Field Point the X will disappear.
If data is linked to a Field Point that is to be deleted, the data will need to be transferred to another Field Point before the Field Point can be deleted. If the RP would like to change the name of the Field Point or transfer the data to another field point, they will need to contact the GeoTracker Helpdesk and request the change.
3. Click Here to Submit Field Point
Click X to Delete
ESI Beginner’s Guide - Contractors
Page 10
STEP 4: Upload (Submit) Data and Reports
At the direction of an RP, a Contractor may be requested to create and upload ESI data files and reports. These instructions are for Authorized RP Agents to upload data should an RP not perform this function. An EDD or Electronic Data Deliverable can be either a data file such as an EDF, GEO XY, GEO Z, or GEO WELL, or a document file such as a GEO REPORT, GEO MAP, or GEO BORE. EDF stands for Electronic Deliverable Format and is an electronic version of a laboratory report. Data is formatted for ease of use by multiple parties and provides a consistent level of quality. An EDF data file is specific to analytical laboratory data. These data and document file types are defined in Appendix B. Prior to uploading an EDF, GEO XY, GEO Z, GEO WELL data file, it should be checked for formatting errors using the data error checking tool, referred to as the Check EDD Tool. By request, most laboratories and surveyors can perform the EDF and the GEO XY data file error check, respectively. Guidelines to perform error checks on the EDF, GEO XY, GEO Z, and GEO WELL data using the Check EDD Tool are provided in Appendix D. After the EDF, GEO_XY, GEO_Z, and GEO_WELL data files have been error-checked, the next step is to upload the files according to the instructions below. **For solutions to common ERROR messages during data upload refer to the Frequently Asked Questions webpage for guidance: https://www.waterboards.ca.gov/ust/electronic_submittal/esi_faq7.shtml#incorr_fields7.1
A. Upload a GEO_REPORT File GEO_REPORT is a paperless reporting requirement. A GEO_REPORT file is an electronic image of the report submitted to the regulatory oversight agency in PDF format. A complete copy of all reports must be submitted to GeoTracker in PDF format. The uploaded PDF report may include the signed transmittal letter, professional certification and all data that are uploaded into GeoTracker. File size must not exceed 400MB. If the report exceeds 400MB, the report can either be (1) separated into multiple parts such as chapters, volumes, or sections so that each file submission is less than 400MB each; or (2) reduced in size using the Adobe Acrobat program. For facilities enrolled under the Composting General Order, reports or documents to upload as a GEO_REPORT may include, but are not limited to:
• Notice of Intent & Technical Report • Final Post-Construction Report • Annual Monitoring & Maintenance Report • Revised Notice of Intent
For additional information please refer to the links provided in Section 3.0 Additional Resources.
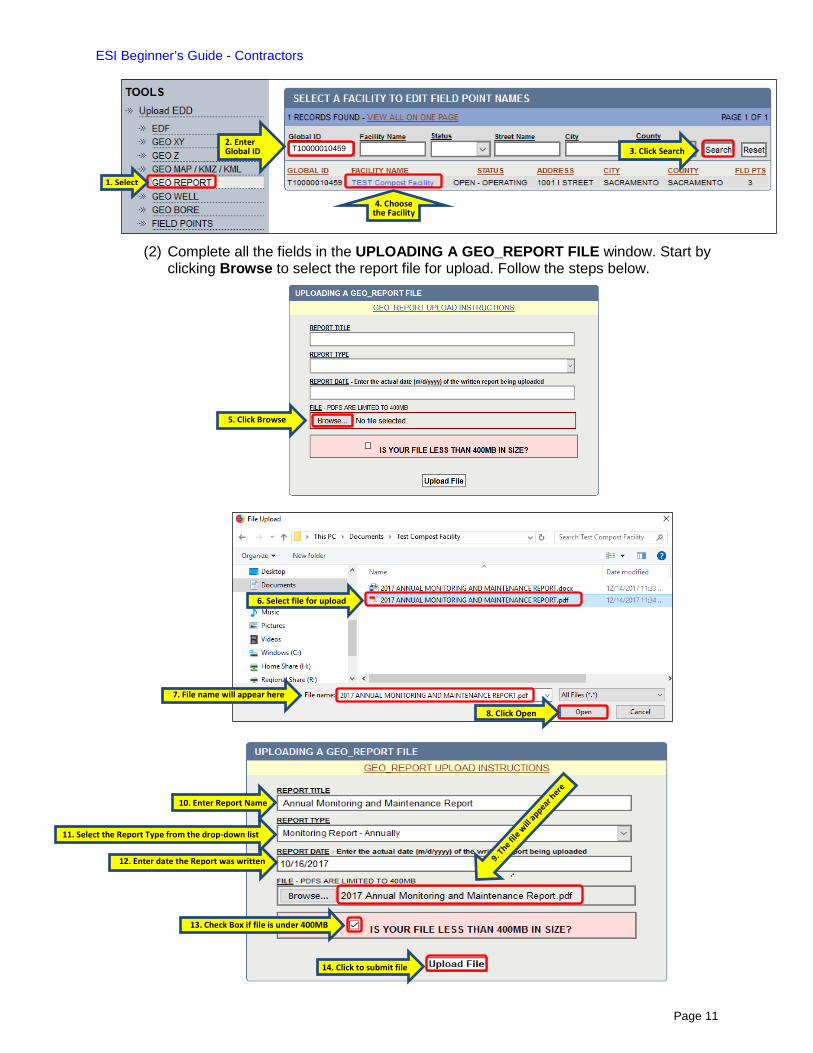
INSTRUCTIONS FOR GEO_REPORT FILE UPLOAD (1) Select GEO_REPORT under Upload EDD located in the TOOLS menu. Enter the
Global ID, select the Search button, and the facility will appear below the search fields. Select the facility name.
ESI Beginner’s Guide - Contractors
Page 11
(2) Complete all the fields in the UPLOADING A GEO_REPORT FILE window. Start by
clicking Browse to select the report file for upload. Follow the steps below.
13. Check Box if file is under 400MB
10. Enter Report Name
14. Click to submit file
6. Select file for upload
7. File name will appear here
8. Click Open
1. Select
T10000010459 2. Enter Global ID 3. Click Search
12. Enter date the Report was written
11. Select the Report Type from the drop-down list
5. Click Browse
4. Choose the Facility
ESI Beginner’s Guide - Contractors
Page 12
If the report is greater than 400MB in size, the report document must be split into two or more files to reduce file size to allow for upload. Repeat the step above [e) GEO_REPORT, i) INSTRUCTIONS FOR GEO_REPORT UPLOAD FILE, STEP (2)] until all of the parts have been uploaded for a complete report. Contact the GeoTracker Help Desk for additional assistance: [email protected] or call at 1 (866) 480-1028.
B. Upload a GEO_MAP File GEO_MAP is an electronic image (PDF version) of a site map. The standard GEO_MAP submittal file is an electronic image of the stand-alone generalized site map for upload into the GeoTracker system. The GEO_MAP site map should show the following:
• North arrow • Map Scale • Buildings; • Streets bordering the facility; • Location of the working
surface used for storing incoming feedstock, additives, and amendments (receiving area);
• Location of the working surface used for active and curing compost;
• Location of the working surface used for the storage of final product;
• Drainage pattern; • Berms and ditches for the
conveyance of wastewaters;
• Location of all detention ponds, if applicable;
• Location of all sampling points for the monitoring of wastewater contained within ponds pursuant to the requirements of the Composting General Order, if applicable;
• Location of all sampling points for the monitoring of storm water runoff under the Industrial General Storm Water Permit, if applicable
• Location of any groundwater monitoring wells and water supply wells within and/or near the property boundary; and
• Other useful information
A stand-alone version of the site map as a GEO_MAP should be submitted in addition to the electronic version of the written report (GEO_REPORT). Additional updated GEO_MAP site maps may be submitted at any time. For additional information please refer to the links provided in Section 3.0 Additional Resources. GEO_MAP site maps can be submitted in the following formats:
• PDF • TIFF • JPEG • GIF
These files cannot exceed 400MB in size. KMZ/KML files may also be uploaded. KMZ/KML files are used to indicate locations of items such as boundaries, plumes, source areas, excavation areas, operable units, and areas of interest. KMZ/KML specific upload fields appear on the upload screen only after a KMZ or KML file has been selected for upload.
• KML files cannot exceed 10MB in size • KMZ files cannot exceed 3MB in size • The "PNG" image file in a KMZ Image Overlay file cannot exceed 500KB
ESI Beginner’s Guide - Contractors
Page 13
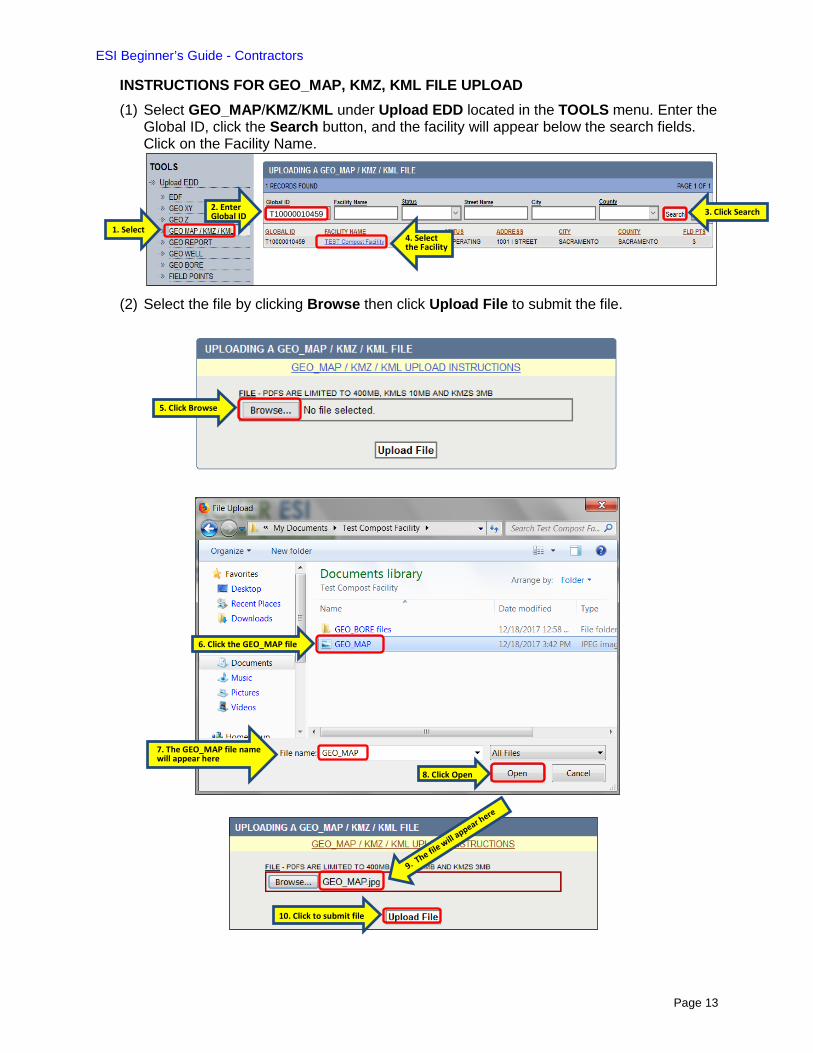
INSTRUCTIONS FOR GEO_MAP, KMZ, KML FILE UPLOAD (1) Select GEO_MAP/KMZ/KML under Upload EDD located in the TOOLS menu. Enter the
Global ID, click the Search button, and the facility will appear below the search fields. Click on the Facility Name.
(2) Select the file by clicking Browse then click Upload File to submit the file.
10. Click to submit file
1. Select 4. Select the Facility
5. Click Browse
T10000010459 2. Enter Global ID 3. Click Search
6. Click the GEO_MAP file
8. Click Open
7. The GEO_MAP file name will appear here
ESI Beginner’s Guide - Contractors
Page 14
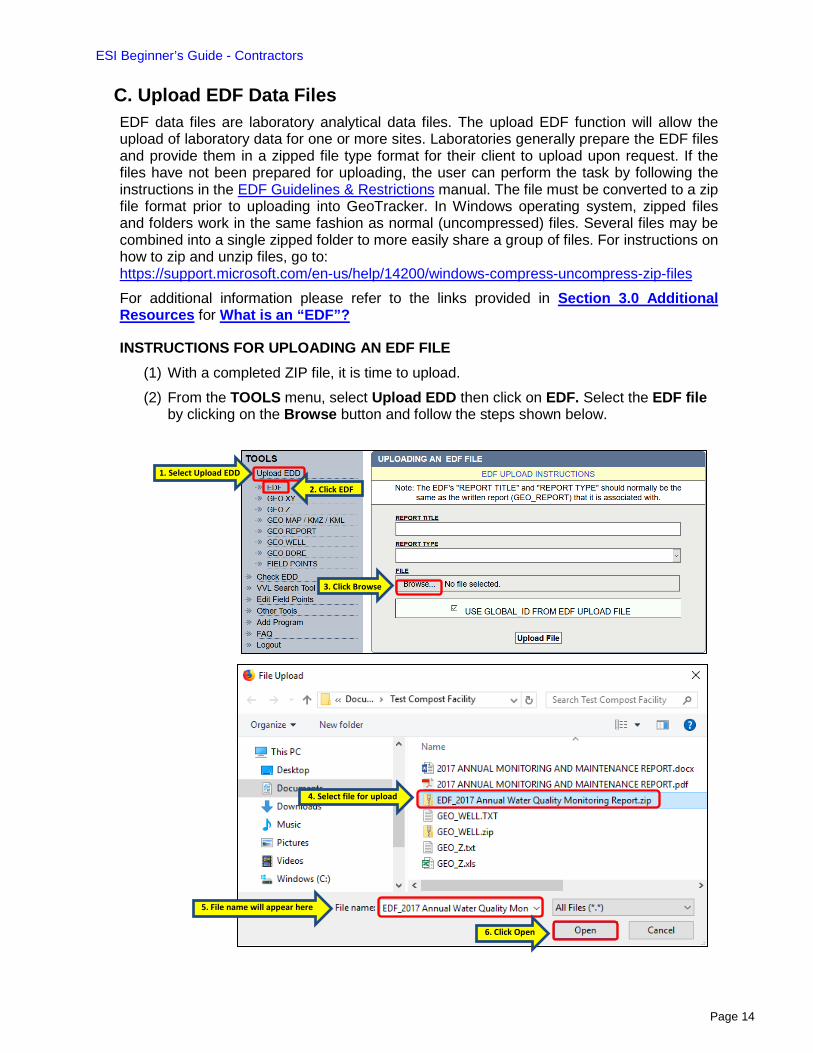
C. Upload EDF Data Files EDF data files are laboratory analytical data files. The upload EDF function will allow the upload of laboratory data for one or more sites. Laboratories generally prepare the EDF files and provide them in a zipped file type format for their client to upload upon request. If the files have not been prepared for uploading, the user can perform the task by following the instructions in the EDF Guidelines & Restrictions manual. The file must be converted to a zip file format prior to uploading into GeoTracker. In Windows operating system, zipped files and folders work in the same fashion as normal (uncompressed) files. Several files may be combined into a single zipped folder to more easily share a group of files. For instructions on how to zip and unzip files, go to: https://support.microsoft.com/en-us/help/14200/windows-compress-uncompress-zip-files For additional information please refer to the links provided in Section 3.0 Additional Resources for What is an “EDF”?
INSTRUCTIONS FOR UPLOADING AN EDF FILE (1) With a completed ZIP file, it is time to upload. (2) From the TOOLS menu, select Upload EDD then click on EDF. Select the EDF file
by clicking on the Browse button and follow the steps shown below.
1. Select Upload EDD
2. Click EDF
3. Click Browse
4. Select file for upload
5. File name will appear here
6. Click Open
ESI Beginner’s Guide - Contractors
Page 15
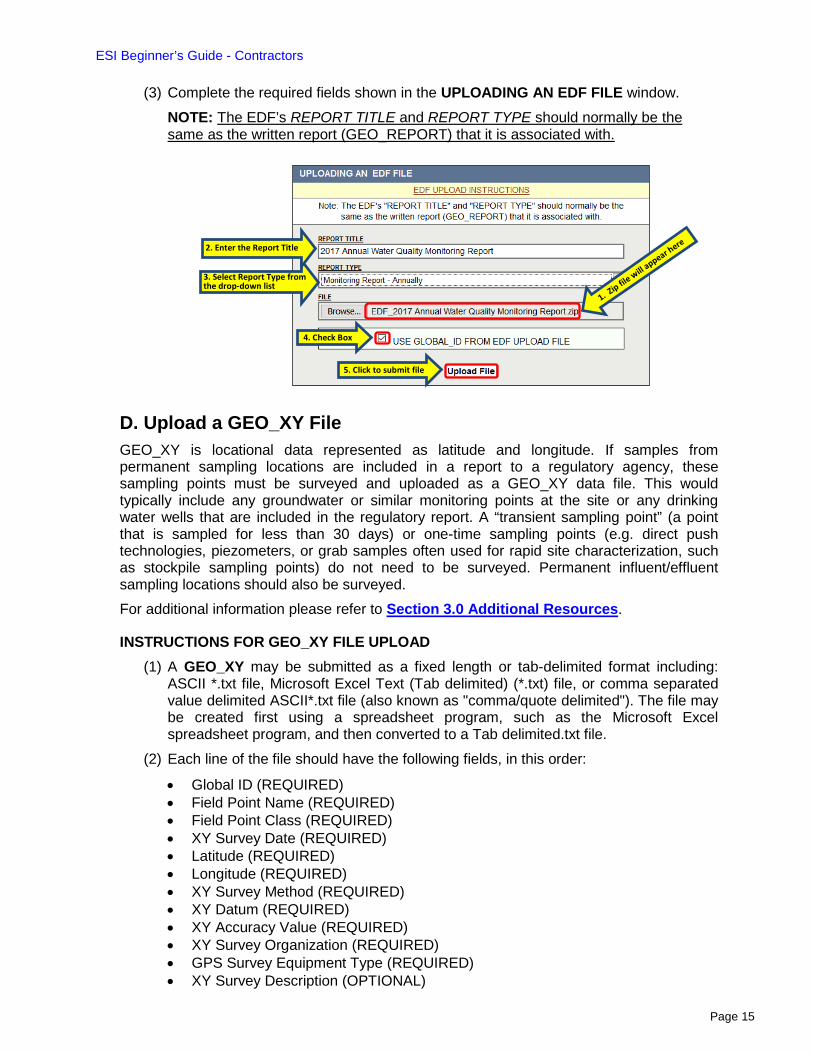
(3) Complete the required fields shown in the UPLOADING AN EDF FILE window. NOTE: The EDF’s REPORT TITLE and REPORT TYPE should normally be the same as the written report (GEO_REPORT) that it is associated with.
D. Upload a GEO_XY File GEO_XY is locational data represented as latitude and longitude. If samples from permanent sampling locations are included in a report to a regulatory agency, these sampling points must be surveyed and uploaded as a GEO_XY data file. This would typically include any groundwater or similar monitoring points at the site or any drinking water wells that are included in the regulatory report. A “transient sampling point” (a point that is sampled for less than 30 days) or one-time sampling points (e.g. direct push technologies, piezometers, or grab samples often used for rapid site characterization, such as stockpile sampling points) do not need to be surveyed. Permanent influent/effluent sampling locations should also be surveyed. For additional information please refer to Section 3.0 Additional Resources.
INSTRUCTIONS FOR GEO_XY FILE UPLOAD (1) A GEO_XY may be submitted as a fixed length or tab-delimited format including:
ASCII *.txt file, Microsoft Excel Text (Tab delimited) (*.txt) file, or comma separated value delimited ASCII*.txt file (also known as "comma/quote delimited"). The file may be created first using a spreadsheet program, such as the Microsoft Excel spreadsheet program, and then converted to a Tab delimited.txt file.
(2) Each line of the file should have the following fields, in this order: • Global ID (REQUIRED) • Field Point Name (REQUIRED) • Field Point Class (REQUIRED) • XY Survey Date (REQUIRED) • Latitude (REQUIRED) • Longitude (REQUIRED) • XY Survey Method (REQUIRED) • XY Datum (REQUIRED) • XY Accuracy Value (REQUIRED) • XY Survey Organization (REQUIRED) • GPS Survey Equipment Type (REQUIRED) • XY Survey Description (OPTIONAL)
3. Select Report Type from the drop-down list
2. Enter the Report Title
5. Click to submit file
4. Check Box
ESI Beginner’s Guide - Contractors
Page 16
(3) IMPORTANT NOTE: For various data fields, GeoTracker will only accept data written in a certain format using valid values. Valid values are built-in codes required for certain fields such as datum and survey method. The reason for using specific values for these fields is to standardize data entry, to ensure data consistency, and to help prevent errors. Freely entered data might contain extra spaces, commas, or dashes that would make meaningful data manipulation and thorough or accurate data searches impossible. Most valid values are abbreviations of common or proper names; hence selecting the correct code is generally straightforward. To search the lists of valid values select the link below: http://geotracker.waterboards.ca.gov/searchvvl.asp
(4) Latitude/Longitude data must be in decimal degrees with up to 7 decimal points. Measurements must be to +/- 1 meter accuracy.
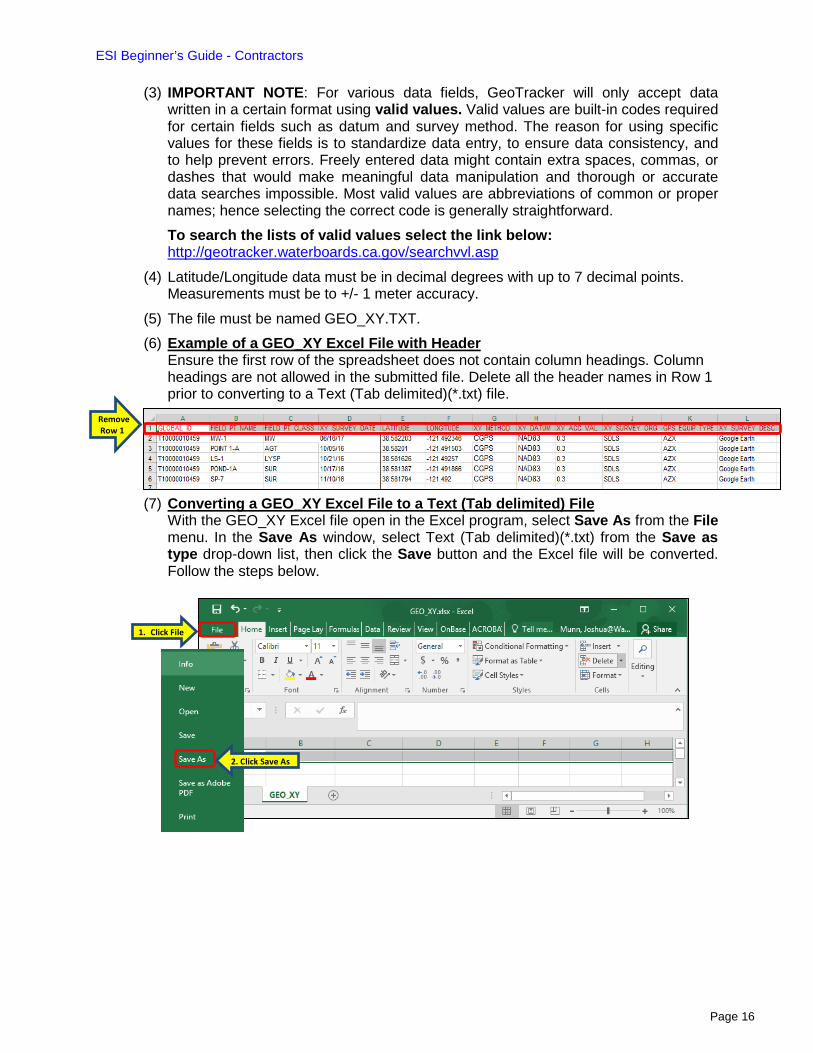
(5) The file must be named GEO_XY.TXT. (6) Example of a GEO_XY Excel File with Header
Ensure the first row of the spreadsheet does not contain column headings. Column headings are not allowed in the submitted file. Delete all the header names in Row 1 prior to converting to a Text (Tab delimited)(*.txt) file.
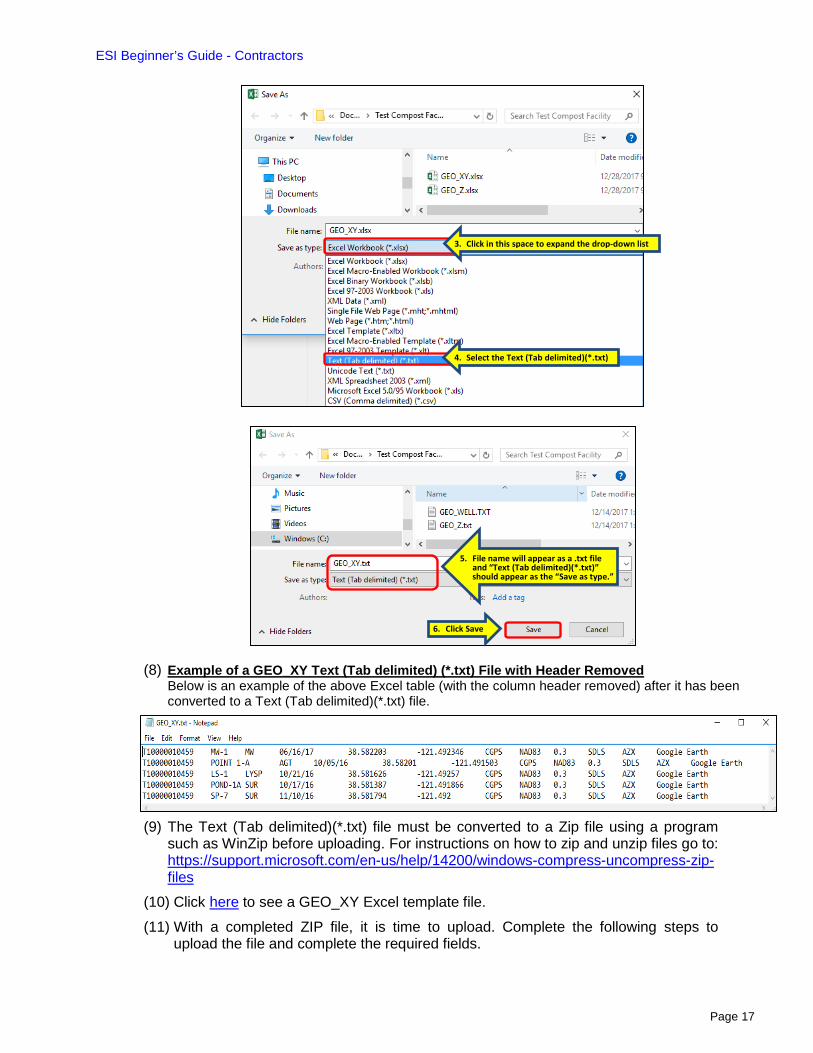
(7) Converting a GEO_XY Excel File to a Text (Tab delimited) File With the GEO_XY Excel file open in the Excel program, select Save As from the File menu. In the Save As window, select Text (Tab delimited)(*.txt) from the Save as type drop-down list, then click the Save button and the Excel file will be converted. Follow the steps below.
Remove Row 1
1. Click File
2. Click Save As
ESI Beginner’s Guide - Contractors
Page 17
(8) Example of a GEO_XY Text (Tab delimited) (*.txt) File with Header Removed Below is an example of the above Excel table (with the column header removed) after it has been converted to a Text (Tab delimited)(*.txt) file.
(9) The Text (Tab delimited)(*.txt) file must be converted to a Zip file using a program such as WinZip before uploading. For instructions on how to zip and unzip files go to: https://support.microsoft.com/en-us/help/14200/windows-compress-uncompress-zip-files
(10) Click here to see a GEO_XY Excel template file. (11) With a completed ZIP file, it is time to upload. Complete the following steps to
upload the file and complete the required fields.
3. Click in this space to expand the drop-down list
4. Select the Text (Tab delimited)(*.txt)
5. File name will appear as a .txt file and “Text (Tab delimited)(*.txt)” should appear as the “Save as type.”
6. Click Save

ESI Beginner’s Guide - Contractors
Page 18
2. Click Browse
1. Select
3. Select file for upload
4. File name will appear here
5. Click Open
6. Enter Surveyor’s Name
7. Enter License Type: • Professional Land Surveyor •Geologist • Civil Engineer • Petroleum Engineer • Federal Official (no license # required) •Not Applicable (no license # required)
8. Enter License Number
9. Enter Report Title
10. File will appear here
11. Click to submit file
ESI Beginner’s Guide - Contractors
Page 19
E. Upload a GEO_Z file GEO_Z contains groundwater monitoring well elevation data and must be submitted for all permanent groundwater monitoring wells. Elevation measurements to the top of groundwater monitoring well casings are required for all groundwater monitoring wells (to be submitted as part of the GEO_Z file). If applicable, drinking water wells included in the report, do not need to have the elevation reported unless they are identified as permanent sampling points. For additional information please refer to the links provided in Section 3.0 Additional Resources.
INSTRUCTIONS FOR GEO_Z FILE UPLOAD (1) A GEO_Z may be submitted as a fixed length or tab-delimited format including:
ASCII *.txt file, Microsoft Excel Tab Delimited*.txt file, or comma separated value delimited ASCII *.txt file (also known as "comma/quote delimited"). The file may be created first using a spreadsheet program, such as the Microsoft Excel spreadsheet program, and then converted to a Tab delimited.txt file.
(2) Each line of the file should have the following fields, in this order:
• Global ID (REQUIRED) • Field Point Name (REQUIRED) • Elevation Survey Date (REQUIRED) • Elevation (REQUIRED) • Elevation Method (REQUIRED) • Elevation Datum (REQUIRED) • Elevation Accuracy Value (REQUIRED) • Elevation Survey Organization (REQUIRED) • Riser Height (OPTIONAL - Unless the monitoring well has been installed with a
riser pipe above the ground surface) • Elevation Survey Description (OPTIONAL) • Effective Date (OPTIONAL)
(3) IMPORTANT NOTE: For various data fields, GeoTracker will only accept data written in a certain format using valid values. Valid values are built-in codes required for certain fields such as datum and survey method. The reason for using specific values for these fields is to standardize data entry, to ensure data consistency, and to help prevent errors. Freely entered data might contain extra spaces, commas, or dashes that would make meaningful data manipulation and thorough or accurate data searches impossible. Most valid values are abbreviations of common or proper names; hence selecting the correct code is generally straightforward. To search the lists of valid values select the link below: http://geotracker.waterboards.ca.gov/searchvvl.asp
(4) Elevation measurement should be from top of casing and reported relative to mean sea Level (MSL). The file must be named GEO_Z.TXT.
(5) Example of a GEO_Z Excel File with Header Ensure the first row of the spreadsheet does not contain column headings. Column headings are not allowed in the submitted file. Delete all the header names in Row 1 prior to converting to a Text (Tab delimited)(*.txt) file.
ESI Beginner’s Guide - Contractors
Page 20
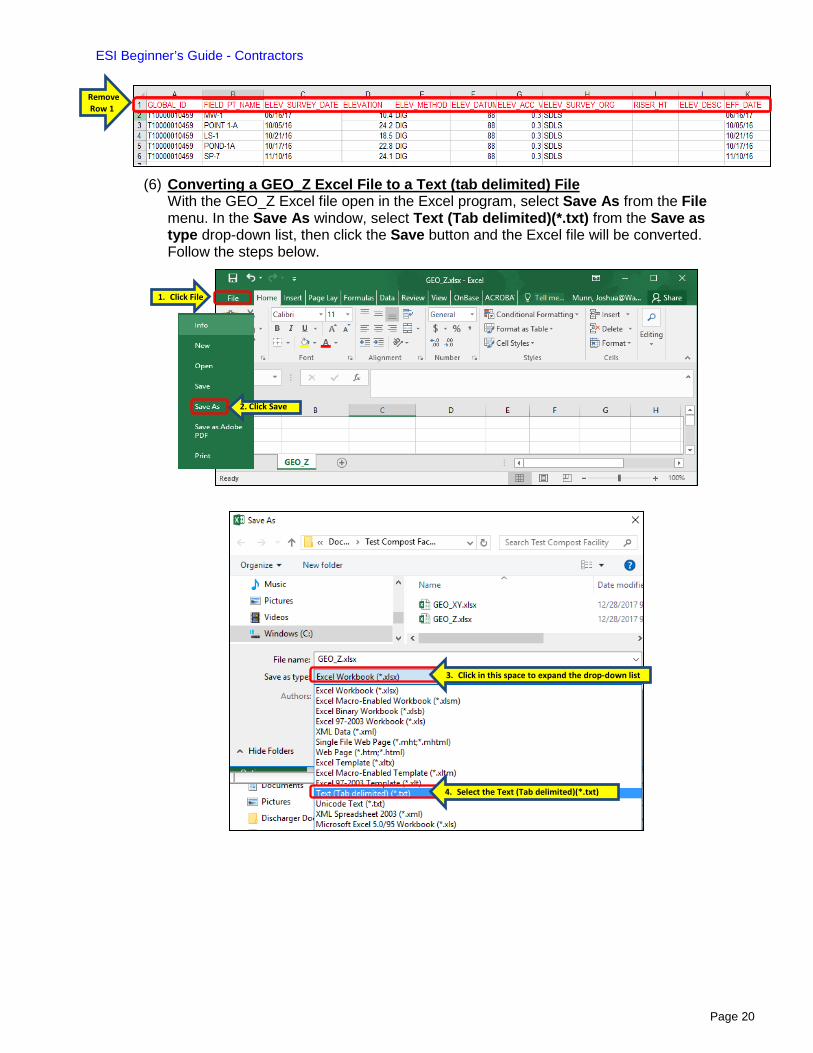
(6) Converting a GEO_Z Excel File to a Text (tab delimited) File
With the GEO_Z Excel file open in the Excel program, select Save As from the File menu. In the Save As window, select Text (Tab delimited)(*.txt) from the Save as type drop-down list, then click the Save button and the Excel file will be converted. Follow the steps below.
3. Click in this space to expand the drop-down list
4. Select the Text (Tab delimited)(*.txt)
1. Click File
2. Click Save
Remove Row 1

ESI Beginner’s Guide - Contractors
Page 21
(7) Example of a GEO_Z Text (Tab delimited) (*.txt) File with Header Removed Below is an example of the above Excel table (with the column header removed), after it has been converted to a Text (Tab delimited)(*.txt) file.
(8) The Text (Tab delimited)(*.txt) file must be converted to a Zip file using a program
such as WinZip before uploading. For instructions on how to zip and unzip files go to: https://support.microsoft.com/en-us/help/14200/windows-compress-uncompress-zip-files
(9) Click here to see a GEO_Z Excel template file. (10) With a completed ZIP file, it is time to upload. Complete the following steps to
upload the file and complete the required fields.
1. Select
2. Click Browse
5. File name will appear as a .txt file and “Text (Tab delimited)(*.txt) “should appear as the “Save as type.”
6. Click Save
ESI Beginner’s Guide - Contractors
Page 22
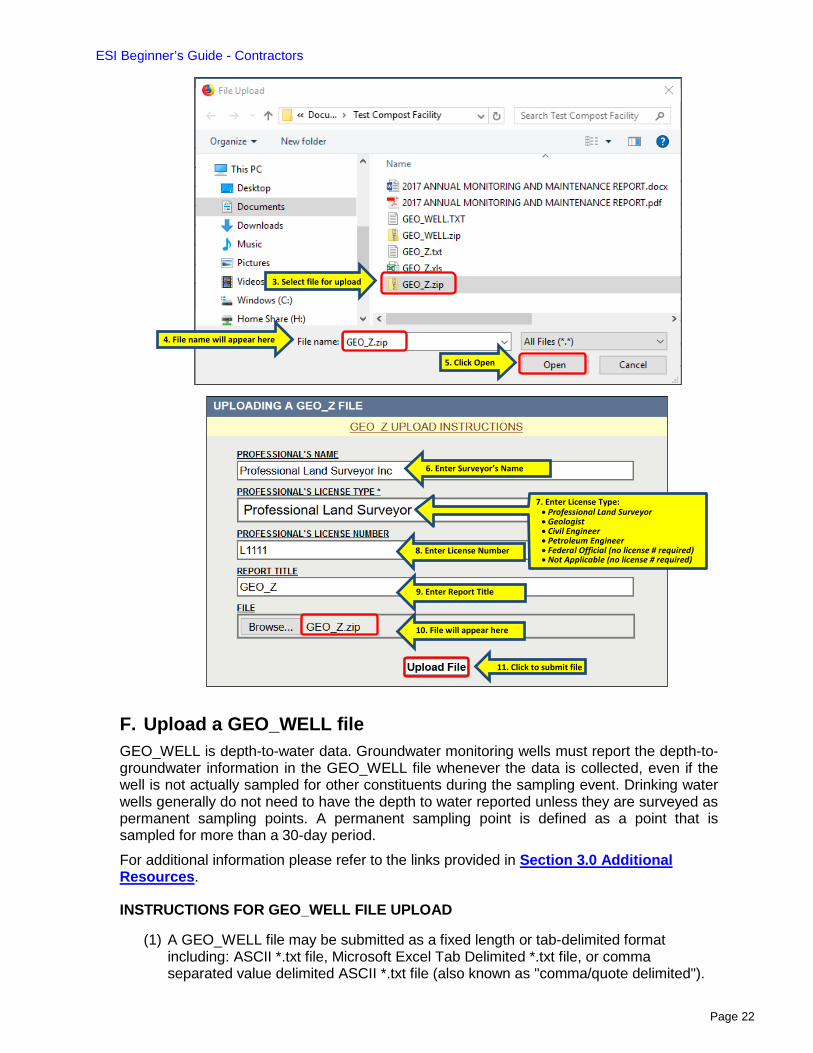
F. Upload a GEO_WELL file GEO_WELL is depth-to-water data. Groundwater monitoring wells must report the depth-to-groundwater information in the GEO_WELL file whenever the data is collected, even if the well is not actually sampled for other constituents during the sampling event. Drinking water wells generally do not need to have the depth to water reported unless they are surveyed as permanent sampling points. A permanent sampling point is defined as a point that is sampled for more than a 30-day period. For additional information please refer to the links provided in Section 3.0 Additional Resources.
INSTRUCTIONS FOR GEO_WELL FILE UPLOAD
(1) A GEO_WELL file may be submitted as a fixed length or tab-delimited format including: ASCII *.txt file, Microsoft Excel Tab Delimited *.txt file, or comma separated value delimited ASCII *.txt file (also known as "comma/quote delimited").
3. Select file for upload
4. File name will appear here
5. Click Open
6. Enter Surveyor’s Name
7. Enter License Type: • Professional Land Surveyor •Geologist • Civil Engineer • Petroleum Engineer • Federal Official (no license # required) •Not Applicable (no license # required)
8. Enter License Number
9. Enter Report Title
10. File will appear here
11. Click to submit file

ESI Beginner’s Guide - Contractors
Page 23
The file may be created first using a spreadsheet program, such as the Microsoft Excel spreadsheet program, and then converted to a Tab delimited.txt file.
(2) Each line of the file should have the following fields, in this order: • Global ID (REQUIRED) - Needs to match the facility’s Global ID. • Field Point Name (REQUIRED – Needs to correspond to FPNs used in the
GEO_XYZ files.) • Status (REQUIRED) • Groundwater Measurement Date (REQUIRED) • Depth to Free Product (OPTIONAL – unless free product is present) • Depth to Groundwater Surface (REQUIRED FOR ACTIVE SAMPLING POINTS) • Riser Height (OPTIONAL) • Total Depth (OPTIONAL) • Groundwater Measurement Description (OPTIONAL)
(3) Measurement must be completed from the top of the well casing to the groundwater surface to the nearest +/-0.01 foot accuracy.
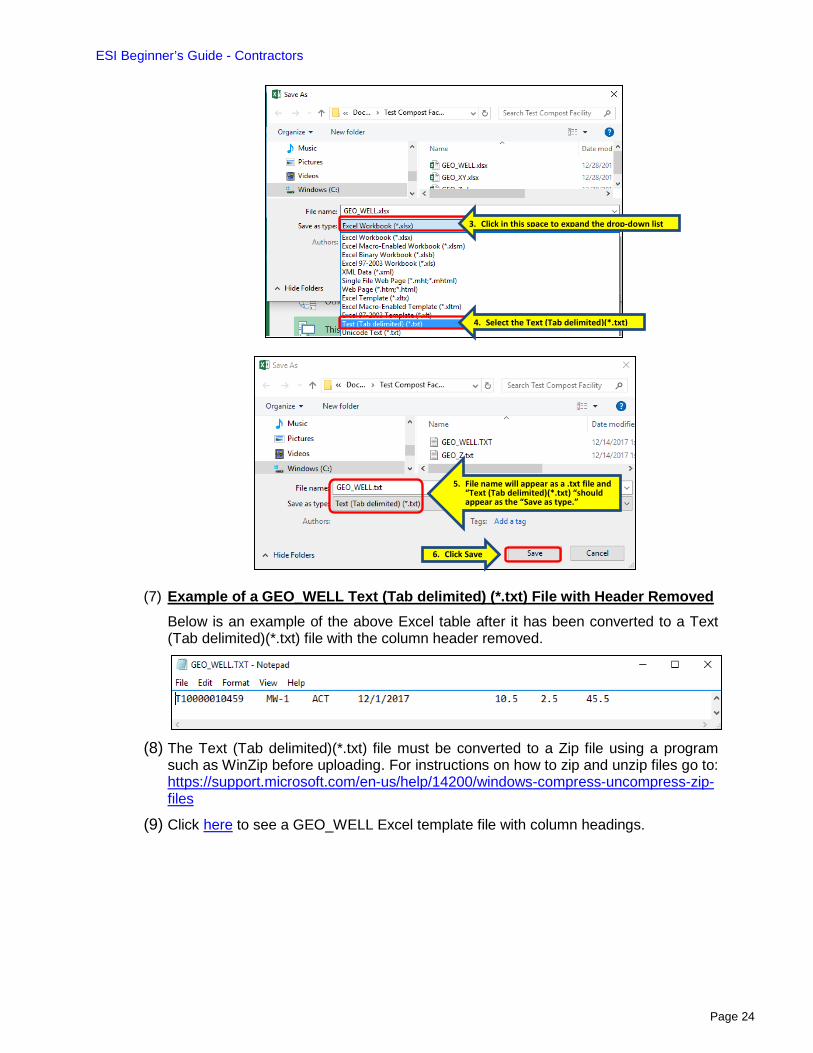
(4) The file must be named GEO_WELL.TXT. (5) Example of a GEO_WELL Excel File with Header
Ensure the first row of the spreadsheet does not contain column headings. Column headings are not allowed in the submitted file. Delete all the header names in Row 1 prior to converting to a Text (Tab delimited)(*.txt) file.
(6) Converting a GEO_WELL Excel File to a Text (Tab delimited) File
With the GEO_WELL Excel file open in the Excel program, select Save As from the File menu. In the Save As window, select Text (Tab delimited)(*.txt) from the Save as type drop-down list, then click the Save button and the Excel file will be converted. Follow the steps below.
1. Click File
2. Click Save As
Remove Row 1
ESI Beginner’s Guide - Contractors
Page 24
(7) Example of a GEO_WELL Text (Tab delimited) (*.txt) File with Header Removed
Below is an example of the above Excel table after it has been converted to a Text (Tab delimited)(*.txt) file with the column header removed.
(8) The Text (Tab delimited)(*.txt) file must be converted to a Zip file using a program such as WinZip before uploading. For instructions on how to zip and unzip files go to: https://support.microsoft.com/en-us/help/14200/windows-compress-uncompress-zip-files
(9) Click here to see a GEO_WELL Excel template file with column headings.
5. File name will appear as a .txt file and “Text (Tab delimited)(*.txt) “should appear as the “Save as type.”
6. Click Save
3. Click in this space to expand the drop-down list
4. Select the Text (Tab delimited)(*.txt)
ESI Beginner’s Guide - Contractors
Page 25
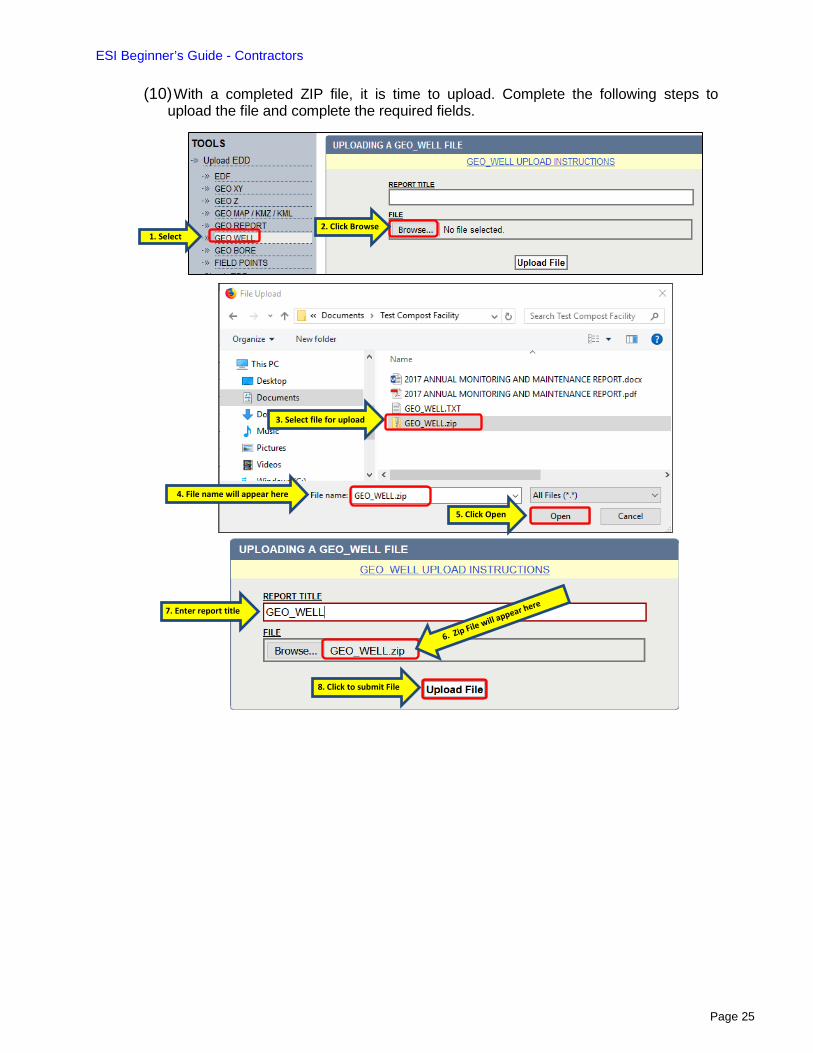
(10) With a completed ZIP file, it is time to upload. Complete the following steps to upload the file and complete the required fields.
1. Select 2. Click Browse
7. Enter report title
8. Click to submit File
3. Select file for upload
4. File name will appear here
5. Click Open
ESI Beginner’s Guide - Contractors
Page 26
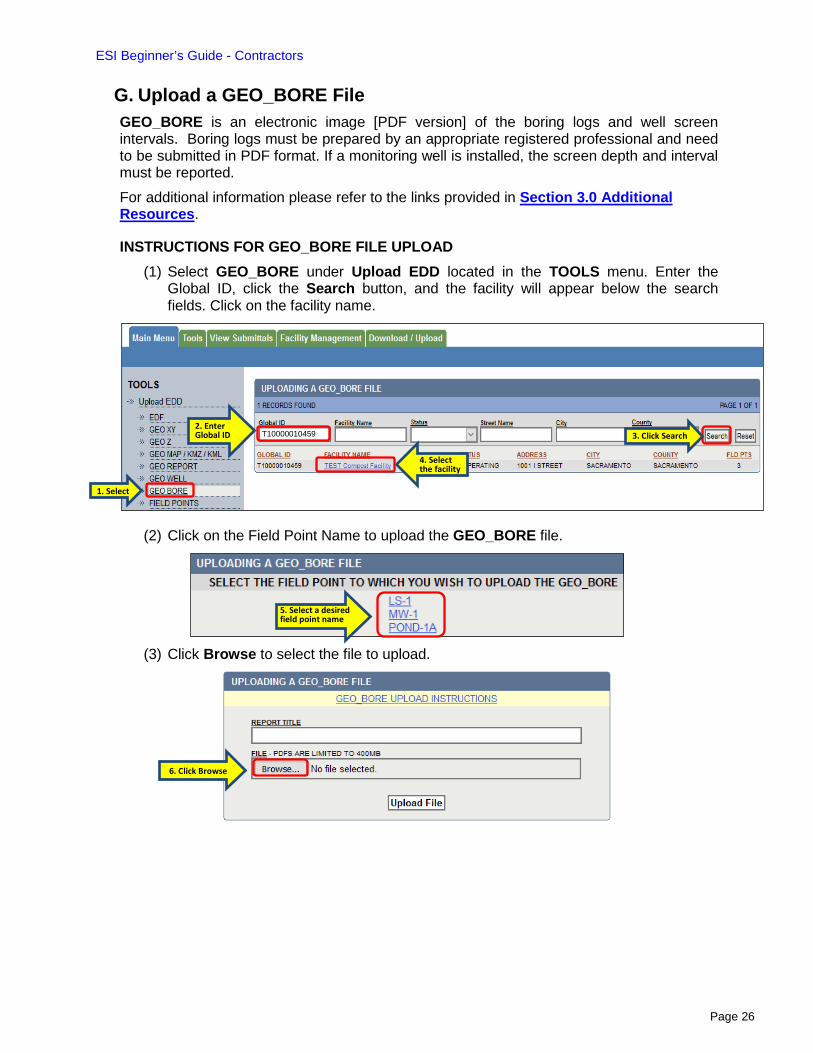
G. Upload a GEO_BORE File GEO_BORE is an electronic image [PDF version] of the boring logs and well screen intervals. Boring logs must be prepared by an appropriate registered professional and need to be submitted in PDF format. If a monitoring well is installed, the screen depth and interval must be reported. For additional information please refer to the links provided in Section 3.0 Additional Resources.
INSTRUCTIONS FOR GEO_BORE FILE UPLOAD (1) Select GEO_BORE under Upload EDD located in the TOOLS menu. Enter the
Global ID, click the Search button, and the facility will appear below the search fields. Click on the facility name.
(2) Click on the Field Point Name to upload the GEO_BORE file.
(3) Click Browse to select the file to upload.
1. Select
4. Select the facility
5. Select a desired field point name
6. Click Browse
T10000010459 2. Enter Global ID 3. Click Search
ESI Beginner’s Guide - Contractors
Page 27
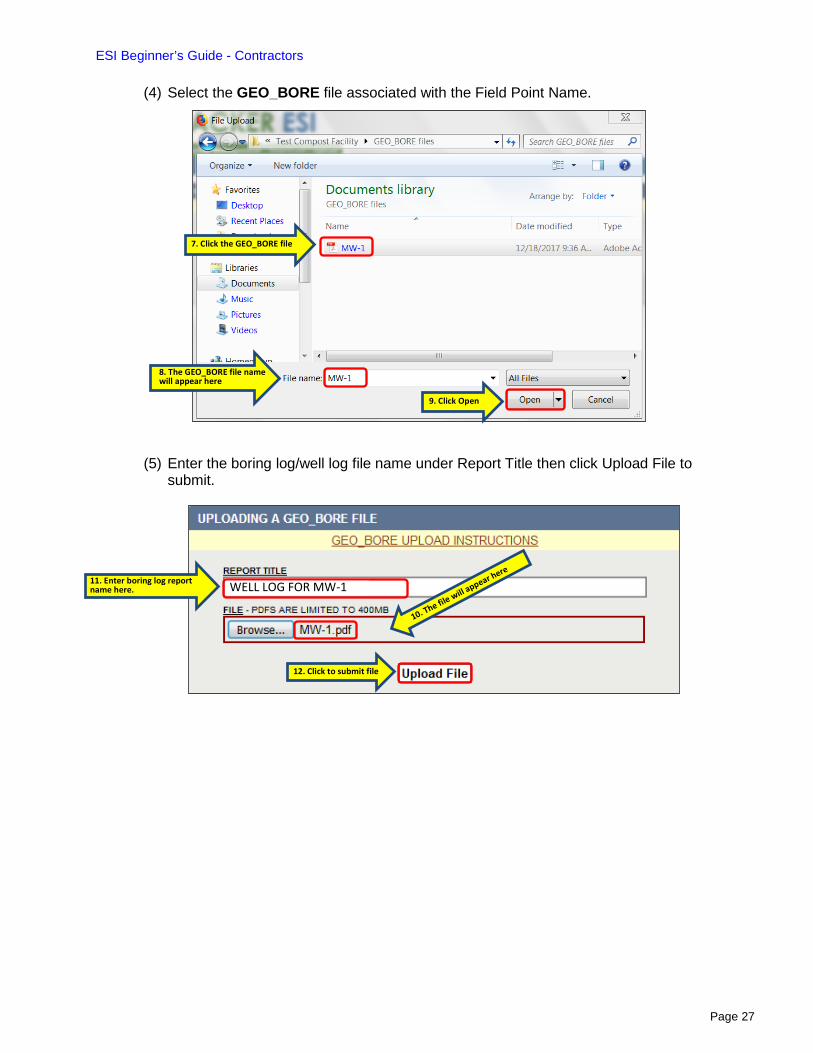
(4) Select the GEO_BORE file associated with the Field Point Name.
(5) Enter the boring log/well log file name under Report Title then click Upload File to submit.
7. Click the GEO_BORE file
9. Click Open
8. The GEO_BORE file name will appear here
11. Enter boring log report name here.
12. Click to submit file
WELL LOG FOR MW-1
ESI Beginner’s Guide - Contractors
Page 28
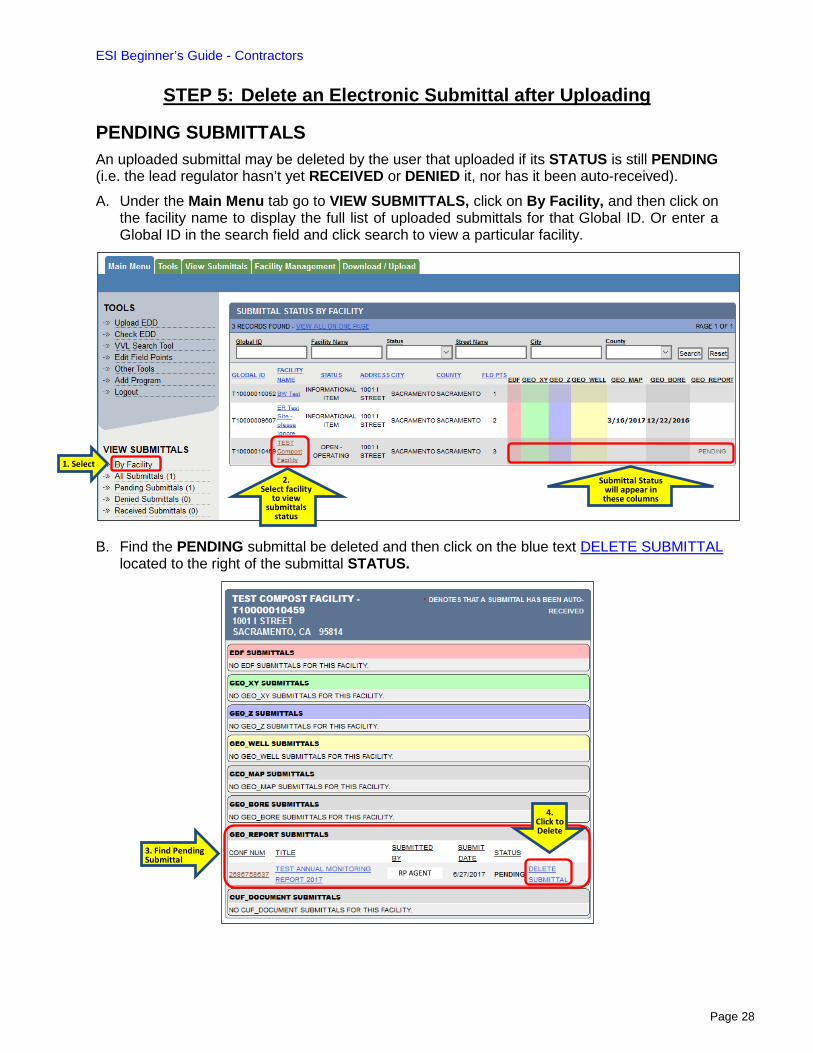
STEP 5: Delete an Electronic Submittal after Uploading
PENDING SUBMITTALS An uploaded submittal may be deleted by the user that uploaded if its STATUS is still PENDING (i.e. the lead regulator hasn’t yet RECEIVED or DENIED it, nor has it been auto-received). A. Under the Main Menu tab go to VIEW SUBMITTALS, click on By Facility, and then click on
the facility name to display the full list of uploaded submittals for that Global ID. Or enter a Global ID in the search field and click search to view a particular facility.
B. Find the PENDING submittal be deleted and then click on the blue text DELETE SUBMITTAL located to the right of the submittal STATUS.
1. Select
2. Select facility
to view submittals
status
Submittal Status will appear in these columns
3. Find Pending Submittal
4. Click to Delete
RP AGENT

ESI Beginner’s Guide - Contractors
Page 29
RECEIVED SUBMITTALS Deleting or replacing a submittal after it has been RECEIVED by the regulator: A. Deleting A Received Submittal: If the submittal has already been RECEIVED, contact the
lead regulator and ask them to DENY it. a. Replacing a received GEO_REPORT, GEO_BORE, GEO_MAP, or EDF submittal with
an updated revised/corrected version: If a GEO_REPORT, GEO_BORE, GEO_MAP, or EDF submittal has been RECEIVED and it has been determined that it needs to be replaced with a revised or corrected version, the lead agency caseworker will need to DENY that submittal. The replacement file can be uploaded before the submittal appears as denied.
b. Replacing a received GEO_XY, GEO_Z, or GEO_WELL submittal with an updated revised/corrected version: If a GEO_XY, GEO_Z, or GEO_WELL submittal has been RECEIVED, needs to be replaced with a revised or corrected version, and the replacement contains the same survey dates or depth to water measurement dates as the previous version, the lead agency caseworker needs to DENY the previously RECEIVED submittal before the corrected replacement can be uploaded.
ESI Beginner’s Guide - Contractors
Page 30
STEP 6: DENIED Electronic Submission Notification
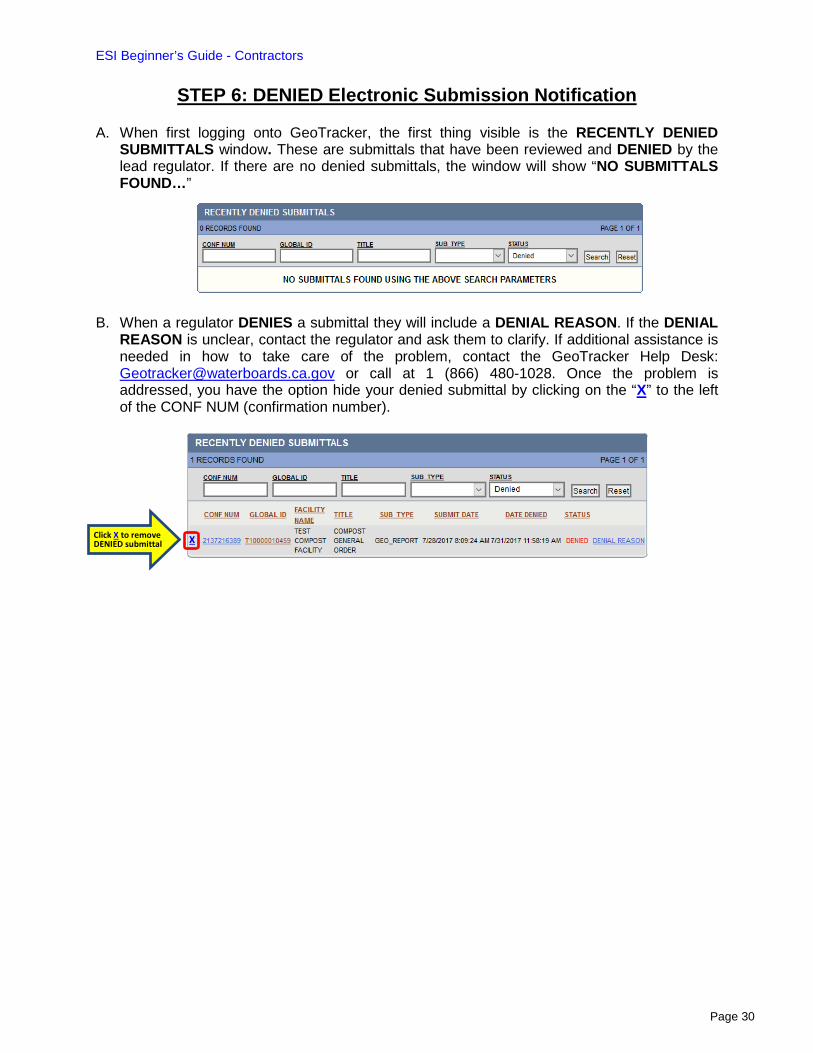
A. When first logging onto GeoTracker, the first thing visible is the RECENTLY DENIED SUBMITTALS window. These are submittals that have been reviewed and DENIED by the lead regulator. If there are no denied submittals, the window will show “NO SUBMITTALS FOUND…”
B. When a regulator DENIES a submittal they will include a DENIAL REASON. If the DENIAL REASON is unclear, contact the regulator and ask them to clarify. If additional assistance is needed in how to take care of the problem, contact the GeoTracker Help Desk: [email protected] or call at 1 (866) 480-1028. Once the problem is addressed, you have the option hide your denied submittal by clicking on the “X” to the left of the CONF NUM (confirmation number).
Click X to remove DENIED submittal
X
ESI Beginner’s Guide - Contractors
Page 31
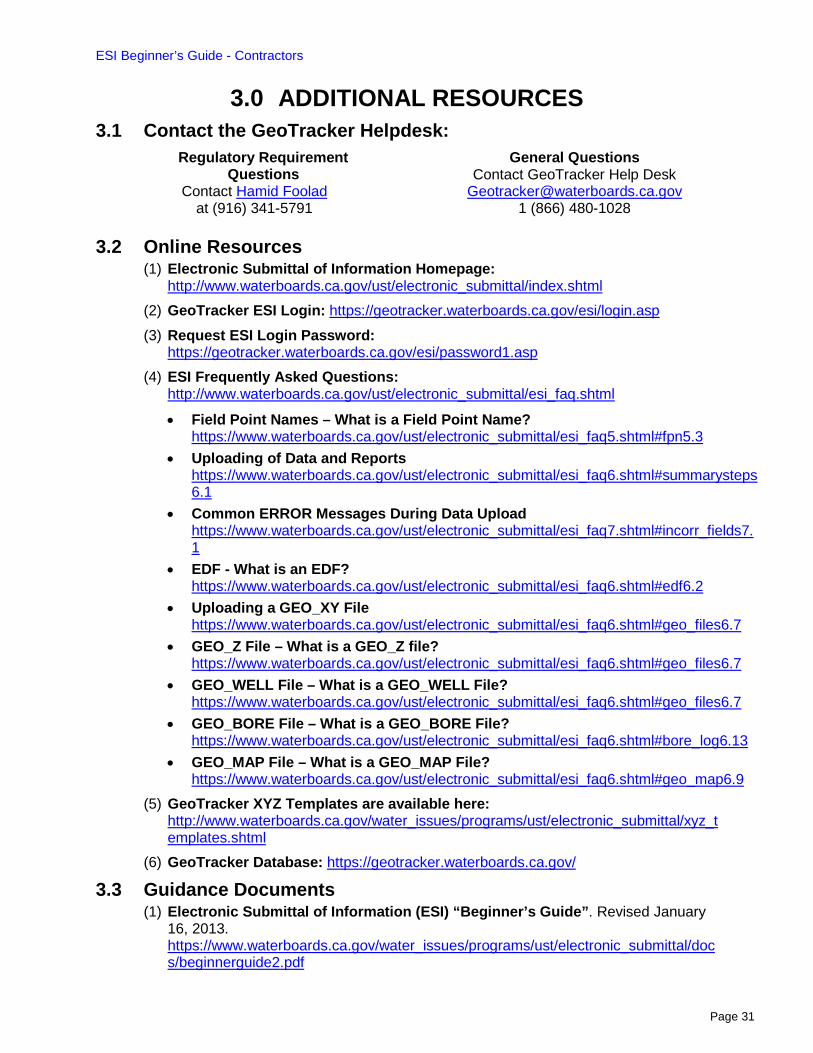
3.0 ADDITIONAL RESOURCES 3.1 Contact the GeoTracker Helpdesk:
Regulatory Requirement Questions
Contact Hamid Foolad at (916) 341-5791
General Questions Contact GeoTracker Help Desk
[email protected] 1 (866) 480-1028
3.2 Online Resources (1) Electronic Submittal of Information Homepage:
http://www.waterboards.ca.gov/ust/electronic_submittal/index.shtml (2) GeoTracker ESI Login: https://geotracker.waterboards.ca.gov/esi/login.asp (3) Request ESI Login Password:
https://geotracker.waterboards.ca.gov/esi/password1.asp (4) ESI Frequently Asked Questions:
http://www.waterboards.ca.gov/ust/electronic_submittal/esi_faq.shtml
• Field Point Names – What is a Field Point Name? https://www.waterboards.ca.gov/ust/electronic_submittal/esi_faq5.shtml#fpn5.3
• Uploading of Data and Reports https://www.waterboards.ca.gov/ust/electronic_submittal/esi_faq6.shtml#summarysteps6.1
• Common ERROR Messages During Data Upload https://www.waterboards.ca.gov/ust/electronic_submittal/esi_faq7.shtml#incorr_fields7.1
• EDF - What is an EDF? https://www.waterboards.ca.gov/ust/electronic_submittal/esi_faq6.shtml#edf6.2
• Uploading a GEO_XY File https://www.waterboards.ca.gov/ust/electronic_submittal/esi_faq6.shtml#geo_files6.7
• GEO_Z File – What is a GEO_Z file? https://www.waterboards.ca.gov/ust/electronic_submittal/esi_faq6.shtml#geo_files6.7
• GEO_WELL File – What is a GEO_WELL File? https://www.waterboards.ca.gov/ust/electronic_submittal/esi_faq6.shtml#geo_files6.7
• GEO_BORE File – What is a GEO_BORE File? https://www.waterboards.ca.gov/ust/electronic_submittal/esi_faq6.shtml#bore_log6.13
• GEO_MAP File – What is a GEO_MAP File? https://www.waterboards.ca.gov/ust/electronic_submittal/esi_faq6.shtml#geo_map6.9
(5) GeoTracker XYZ Templates are available here: http://www.waterboards.ca.gov/water_issues/programs/ust/electronic_submittal/xyz_templates.shtml
(6) GeoTracker Database: https://geotracker.waterboards.ca.gov/
3.3 Guidance Documents (1) Electronic Submittal of Information (ESI) “Beginner’s Guide”. Revised January
16, 2013. https://www.waterboards.ca.gov/water_issues/programs/ust/electronic_submittal/docs/beginnerguide2.pdf
ESI Beginner’s Guide - Contractors
Page 32
(2) GeoTracker Survey XYZ, Well Data, and Site Map Guidelines & Restrictions*. Revision 6.1, April 2005. http://www.waterboards.ca.gov/ust/electronic_submittal/docs/geotrackersurvey_xyz_4_14_05.pdf Please note that the above referenced document contains some out-of-date links and "valid value" information. Please refer to the ESI Frequently Asked Questions (ESI FAQs) webpage for up-to-date information on how to look up valid values and other helpful information. Refer to the ESI Frequently Asked Questions webpage linked above.
(3) Electronic Reporting – Roles and Responsibilities. January 16, 2013: https://www.waterboards.ca.gov/water_issues/programs/ust/electronic_submittal/docs/roles_responsibilities.pdf
(4) GEO_BORE, GEO_REPORT, and FIELD POINT/WELL CONSTRUCTION Guidelines & Restrictions, Electronic Delivery Format. Version 2. April 2005: https://www.waterboards.ca.gov/water_issues/programs/ust/electronic_submittal/docs/geo_bore_geo_report_guidelines.pdf
(5) GeoTracker Survey XYZ, Well Data, and Site Map Guidelines & Restrictions, Electronic Deliverable Format and Data Dictionary. Revision 6.1. April, 2005: https://www.waterboards.ca.gov/water_issues/programs/ust/electronic_submittal/docs/geotrackersurvey_xyz_4_14_05.pdf
ESI Beginner’s Guide - Contractors
Page 33
APPENDIX A FIGURE 1: START-UP TASKS
GEOTRACKER FACILITY ACCESS
Lead Agency:Provides database access to facilities
Responsible Party (RP) has claimed.
RP: Provides Access to Authorized RP
Agents, Contractors, Laboratories
RP & Authorized RP Agent: Accesses
Facility to Upload Data and provide access to
Contractors & Laboratories
RESPONSIBLE PARTY (RP)
Go to GeoTracker ESI Homepage & Request a
PasswordClaim Site(s)/ Facility(s)
Agency Grants RP Access to Facility(s)
Perform the Following Tasks or Delegate to an
Authorized RP Agent and/or Contractor:
Assign Field Point Names to Global IDs
Submit Samples to Laboratory
Error Check Electronic Data/ Lab
Report - EDF
Upload Electronic Reports & Data Files
AUTHORIZED RP AGENT
Go to GeoTracker ESI Homepage & Request
a Password
Request Access to Facility(s): RP Grants
Access
Assign Field Point Names to Global IDs
Submit Samples to Laboratory
Error Check Electronic Data/ Lab Report -
EDF
Upload Electronic Reports and Data Files
CONTRACTOR & LABORATORY
Go to GeoTracker ESI Homepage & Request a
Password
Request Access to Facility(s): RP or Auth.
RP Agent Grants AccessContractor: Submit
Samples to LaboratoryLaboratory: Sends RP,
Auth. RP Agent, or Contractor Lab. EDF
Files
Contractor or Laboratory: May Error Check Electronic Data/
Lab Report - EDF
Contractor: Submits (Uploads) EDF Data &
Reports
ESI Beginner’s Guide - Contractors
Page 34
FIGURE 2: ESI SUBMITTAL PROCESS OVERVIEW AND DATA FLOW
• RP • CONSULTANTS • CONTRACTORS
Prepare Documents & Data*Prepare Reports/Documents: Notice of Intent, Technical Reports, Final Post-Construction Report, Annual Monitoring Maintenance Report.
*Prepare Bore & Well Logs (if applicable)*Measure Well Screen Depths & Intervals (if applicable)
*Collect Samples (if applicable)*Measure Depth to Groundwater (if applicable)*Survey Monitoring Well & Locations & Elevations (if applicable)*Prepare Site Map (part of a technical/annual report)
Format ESI DataGEO_XY (Location)GEO_Z (Elevation)GEO_WELL (Status, Depth to
Water)GEO_MAP (Site Layout)GEO_BORE (Boring Logs) GEO_REPORT (Reports)
Submit Samplesto Laboratory for
Analysis
LaboratoryAnalyzes Samples
Produce analytical data in Electronic Deliverable
Format (EDF)
RP, Consultant, Contractor, Laboratory
Data Quality Assurance/Quality Control
• RESPONSIBLE PARTY (RP)
• CONSULTANTS • CONTRACTORS • LABORATORIES
Obtain Global IDs
Log-In To GeoTracker ESI
or Request a Password• Request Access to Site
• Obtain Approval
Add Field Point Names
Sampling Point IDs for:
• detention ponds • lysimeter • monitoring wells
Error Check Data
• Lab EDF data
• well location • elevation• depth to groundwater
Submit (upload) EDF Data & Reports
Reports May Include: • Notice of Intent• Technical Reports• Final Post-Construction Report • Annual Monitoring Maintance Report.
[NOTE: There is a 48-hour delay period after upload until the submittal is received by lead agency caseworker or appears on GeoTracker. The 48-hour window allows the RP or consultant to re-access uploads for removal, edits, replacement, etc.]
LEAD REGULATORY AGENCY
CASEWORKER
Receives ESI Data & Reports
[30 Day Period for Lead Agnecy Caseworker to Approve or Deny Submittal]
GeoTracker Database ESI data & reports are stored in the GeoTracker database. Only approved data and reports by the lead agency caseworker are posted and accessible on the public GeoTracker website.
ESI Beginner’s Guide - Contractors
Page 35
APPENDIX B B.1 INDIVIDUALS, ENTITIES, AND RESPONSIBILITIES
RESPONSIBLE PARTY (RP) RPs have two primary electronic reporting responsibilities:
(1) Claiming their site/facility(s) in GeoTracker (claiming means the RP (or their Authorized RP Agent [i.e. consultant] has obtained upload access to the RP’s site/facility); and
(2) Uploading the required ESI compliance data and reports. If the RP does not have internet access or does not wish to perform the electronic role of RP, they can choose not to create a GeoTracker RP account and can instead delegate the claiming and upload duties to a consultant acting as their Authorized RP Agent. Even if the RP chooses to create an RP GeoTracker account (i.e. an account with this user type of Responsible Party), and have claimed their site/facility, they still have the option to do the uploading themselves and/or have a consultant upload for them as their Authorized RP Agent and/or grant secondary access to Contractors and/or Laboratories so they too can upload information. RPs are ultimately responsible for ensuring submittals are uploaded in accordance with the facility’s requirements. Only RPs and Authorized RP Agents can grant secondary access to Contractors and Laboratories. AUTHORIZED RP AGENT The Authorized RP Agent (sometimes referred to as Auth_RP) is an individual or organization to whom primary electronic reporting responsibilities for a specific site/facility GLOBAL ID have been delegated by an RP who does not have Internet access or does not wish to perform the electronic online role of RP. Separate ESI instructions are available for Authorized RP Agents. The consultant who acts as an Authorized RP Agent must have a GeoTracker account with a user type of Authorized RP Agent. The Authorized RP Agent consultant can use the same GeoTracker account to upload to multiple Global IDs for multiple RPs, but each request for access is handled separately. The Authorized RP Agent logs onto their GeoTracker account and requests access to the Global ID they need to upload to. The requested Global ID will be added to the Authorized RP Agent’s Pending Facilities List. Before the State Water Board grants the Authorized RP Agent access to a requested Global ID, the Authorized RP Agent needs to upload a completed Authorized RP Agent Authorization Form for each requested Global ID. The Authorized RP Agent Authorization Form can be obtained in the Getting Started section on the public ESI webpage:
http://www.waterboards.ca.gov/ust/electronic_submittal/index.shtml Should an RP choose to revoke an Authorized RP Agent’s existing access to their site, the RP will need to submit an Authorized RP Agent Revocation Form located under the Getting Started section. If additional assistance is needed in finding and/or requesting a site/facility, the GeoTracker Help Desk can be contacted via email at: [email protected] or via telephone at (866) 480-1028. *Refer to STEP 1 Creating a Secure GeoTracker ESI Account and Logging In and STEP 2 How to Claim Sites / Facilities in this guide for additional instructions. CONTRACTOR Consultants can be hired as Contractors by RPs and Authorized RP Agents to upload data and reports to GeoTracker. To do so, the Contractor must first have a GeoTracker account with a user type of Contractor. A single Contractor account can be used to upload to multiple sites having different RP and Authorized RP Agent clients or separate Contractor accounts can be
ESI Beginner’s Guide - Contractors
Page 36
established for each client. Before attempting to search for and claim a client’s site/facility Global ID, the Contractor should first ensure their client has already obtained upload access to (i.e. claimed) the Global ID. The first reason for doing this is that a Contractor can only find sites that have already been claimed by at least one RP or Authorized RP Agent. The second reason is that even if a Contractor is able to find a site in GeoTracker, they must be sure that their client has claimed it, since there might be more than one RP and/or Authorized RP Agent associated with the same site. If the Contractor’s client is not already associated with the site, but another RP or Authorized RP Agent is, the Contractor’s request to be associated with it will most likely not get approved since the other RP or Authorized RP Agent won’t be expecting the Contractor to request the site. After verifying their client has claimed the Global ID, the Contractor should log onto their GeoTracker account, use the Request Additional Facilities tool, and search for and request the Global ID. Once they have requested the Global ID, the Contractor should inform their client (RP or Authorized RP Agent); the RP then needs to log onto their own GeoTracker account and approve the Contractor’s request. LABORATORY The Laboratory is responsible for sample analysis and providing the RP, Authorized RP Agent, and/or Contractor with the analytical results in GeoTracker EDF format and in hard copy or electronic format for their client to use in their written report. Each laboratory must obtain a unique GeoTracker identifier called a LABCODE. Normally the laboratory error checks the EDF online using their GeoTracker account (user type “Laboratory”) but is not necessarily responsible for uploading the EDF to GeoTracker. Instead, the laboratory must forward the EDF to the RP/ Authorized RP Agent/Contractor who will review the files (e.g. to ensure the sample FPNs and site Global ID are correct) and then upload it into GeoTracker. Sometimes an RP or Authorized RP Agent wants the laboratory to upload the EDF data directly to GeoTracker. To upload EDFs directly using their “Laboratory” user type GeoTracker account, the laboratory must log onto their GeoTracker account and request access in the same manner as a GeoTracker Contractor. The request will then need to be approved by the RP or Authorized RP Agent client. Although not very common, sometimes, a laboratory needs to obtain upload access to a Global ID as an Authorized RP Agent rather than as a Laboratory. In that type of situation, the laboratory needs to create another GeoTracker account, and select Authorized RP Agent instead of Laboratory user type. The instructions for Authorized RP Agent will be followed to request upload access for that Global ID. STATE WATER BOARD STAFF State Water Board staff are responsible for the overall operation and maintenance of the GeoTracker system and its successful use by all entities involved with soil and groundwater contamination issues. The State Water Board is also responsible for approving RP and Authorized RP Agent requests for upload access to sites/facilities. Further responsibilities of State Water Board staff include providing guidance and tools to standardize the review and quality of ESI data and reports submitted (i.e. uploaded) to GeoTracker and maintaining user accounts for RPs, consultants, and regulatory agencies. LEAD REGULATORY AGENCY CASEWORKER The lead regulatory agency caseworker reviews ESI compliance data and reports that have been submitted (i.e. uploaded) by (or for) the RP and either “receives” or “denies” submittals. The review procedure typically includes checking the Field Point Names in the EDF match the names used in the written report and other electronic submittals (GEO_XY, GEO_Z, GEO_WELL, GEO_MAP, and GEO_BORE). Once an ESI compliance submittal has been “received,” it becomes immediately available to the public on the public GeoTracker web site. The lead regulatory agency oversees the RP to ensure current and accurate data is uploaded to GeoTracker. The accuracy, completeness, and timeliness of the data are critical because:
(1) The data are used by the public to understand the conditions of sites / facilities;
ESI Beginner’s Guide - Contractors
Page 37
(2) The data are used by the real-estate industry to assess the value of sites / facilities and surrounding property;
(3) The data are used by the state and federal government to make decisions related to priorities and funding;
(4) Efficient use of GeoTracker by lead regulatory agencies can increase overall effectiveness in managing their caseloads, and eases accessing and reviewing data and reports. Having all incoming and outgoing documents related to a cleanup site/facility included in GeoTracker makes them available to the public, other agencies, RP(s), and consultants who may work on the case;
(5) The regulator can effectively track incoming documents by their due dates and receive reminders when a document is past due. GeoTracker assists in moving toward paperless case management;
(6) The Office of Management and Budget, Congress, U.S. Environmental Protection Agency (USEPA) headquarters, and USEPA Region 9 to evaluate the effectiveness of various programs;
(7) Lead regulatory agencies are requested to ensure that all their open cases are properly “claimed” by RPs (or, alternatively, by their Authorized RP Agents) and that ESI data and reports for open cases are being submitted regularly. Additionally, lead regulatory agencies are responsible for ensuring that the proper case status for each site / facility is correctly entered into GeoTracker and updated as the case status changes (e.g., assessment, remediation, closure).
ESI Beginner’s Guide - Contractors
Page 38
B.2 IMPORTANT ESI TERMS DEFINED LABORATORY ANALYTICAL DATA Electronic Deliverable Format (EDF) is an electronic version of a laboratory report. Data is formatted for ease of use by multiple parties and provides a consistent level of quality. The GeoTracker EDF is specific to analytical laboratory data. Analytical data (including geochemical data) for all soil, vapor and water samples that are collected for the purpose of subsurface investigation, groundwater monitoring, or remediation are required to be submitted in EDF format to the GeoTracker system via the Internet.
Groundwater, soil and vapor samples include: • monitoring well samples • borehole samples • gas and vapor samples • groundwater grab samples • piezometer samples • stockpile samples • samples from drinking water wells
FIELD POINT NAME (FPN) The FPN is the unique identifier that the RP (or their Authorized RP Agent, Contractor, or Laboratory) assigns to a specific sample point (location) where measurements or samples are taken, e.g. MW-1 (Monitoring Well 1), B-1 (Borehole 1), etc. The FPNs normally match those used in the written report. Any discrepancies should be explained in the narrative. BORING LOGS AND WELL SCREEN INTERVALS (GEO_BORE) Boring logs and monitoring well information, such as screen intervals, are submitted as a GEO_BORE file. Boring logs must be prepared by an appropriate registered professional and submitted in PDF format. If a monitoring well is installed, the screen depth and interval must be reported. DEPTH TO WATER DATA (GEO_WELL) Monitoring wells need to have the depth-to-water information reported in the GEO_WELL file whenever the data is collected, even if the well is not sampled for any other constituents during the sampling event. Drinking water wells generally do not need to have the depth to water reported unless they are surveyed as permanent sampling points. A permanent sampling point is defined as a point that is sampled for more than a 30-day period. GEO_WELL data should be submitted after every sampling event and provides depth-to-water field measurements data from groundwater wells for import into the GeoTracker system. GEO_WELL is a text file and must always be named GEO_WELL.txt. The file size must be reduced using a compressed (zipped) file feature prior to uploading into GeoTracker. In Windows operating system, zipped files and folders work in the same fashion as normal (uncompressed) files. For instructions on how to zip and unzip files go to: https://support.microsoft.com/en-us/help/14200/windows-compress-uncompress-zip-files LOCATIONAL DATA (GEO_XY) If samples from the permanent sampling locations are included in a regulatory report, these sampling points must be surveyed. This would typically include any groundwater or similar monitoring points at the site or any drinking water wells that are included in the regulatory report. The surveyed locational information for these sampling points should be submitted using the GEO_XY file. Transient or one-time sampling points (e.g. direct push technologies, piezometers, stockpile sampling points, or grab samples often used for rapid site
ESI Beginner’s Guide - Contractors
Page 39
characterization) do not need to be surveyed. Permanent influent/effluent sampling locations do not need to be surveyed. Transient sampling points (a point that is sampled for less than 30 days) are not required to be surveyed. Each permanent sampling location's longitude (X) and latitude (Y) should be reported only once for a site unless resurveyed (a "permanent sampling location" is one that is sampled for more than 30 days). The longitude/latitude coordinates should be geographic, decimal degrees to 7 decimal places, NAD83 datum, to provides sub-meter accuracy horizontal location measurements data for import into the GeoTracker system. The GEO_XY file is a text file and must always be named GEO_XY.txt. The file size must be reduced using a compressed (zipped) file feature prior to uploading into GeoTracker. In Windows operating system, zipped files and folders work in the same fashion as normal (uncompressed) files. Several files may be combined into a single zipped folder to more easily share a group of files. For instructions on how to zip and unzip files go to: https://support.microsoft.com/en-us/help/14200/windows-compress-uncompress-zip-files ELEVATION DATA (GEO_Z) Elevation measurements to the top of groundwater well casings are required for all groundwater monitoring wells to be submitted as part of the GEO_Z file. Drinking water wells included in the report do not need to have the elevation reported unless they are identified as permanent sampling points. Elevation data should be submitted every time a new survey is performed. The GEO_Z file is a text file and must always be named GEO_Z.txt. The file size must be reduced using a compressed (zipped) file feature prior to uploading into GeoTracker. In Windows operating system, zipped files and folders work in the same fashion as normal (uncompressed) files. Several files may be combined into a single zipped folder to more easily share a group of files. For instructions on how to zip and unzip files go to: https://support.microsoft.com/en-us/help/14200/windows-compress-uncompress-zip-files The collection of information related to the exact location of groundwater wells, required by CCR, Title 23, Sections 2729-2729.1, constitutes "land surveying," as defined in section 8726 of the Business and Profession Code, and the collection of data is restricted to those who are licensed to practice land surveying in California. See the link below for additional information:
http://www.waterboards.ca.gov/ust/electronic_submittal/pe_ls_legal.shtml Consumer-grade GPS units do not meet GeoTracker's sub-meter accuracy requirements (less than one meter). An online list of acceptable GPS units are available on the ESI webpage. (Note: The same search can be done while logged onto a secured ESI account, see ESI Frequently Asked Questions number 6.15, How to lookup Valid Values.) A GPS unit must be used that is either specifically listed or at least its general model series is listed on the GPS_EQUIP_TYPE list. If the general model series is listed, enter that valid value for GPS_EQUIP_TYPE and enter the actual unit used in the XY_SURVEY_DESC field. If the GPS unit or series is not on the list and you think it meets GeoTracker's accuracy requirements, email a request to the GeoTracker Help Desk, [email protected] and include either the manufacturer's specification sheet in electronic format (e.g. Adobe Acrobat) or a web link to the manufacturer's online specifications page. If the specifications meet GeoTracker requirements, Water Board staff will add a valid value for that GPS unit to the GPS_EQUIP_TYPE list of approved units. SITE MAP (GEO_MAP) An electronic generalized site plan map is required to be submitted into the State database (GEO_MAP). Site map should display tank locations, streets bordering the facility, and sampling locations for all soil, water and vapor samples. The site map is a stand-alone document that
ESI Beginner’s Guide - Contractors
Page 40
may be submitted in various formats. Additional updated site maps may be submitted at any time. PAPERLESS REPORTING REQUIREMENT (GEO_REPORT) Starting on January 1, 2005, a complete copy of all clean-up and monitoring reports must be submitted to GeoTracker. This uploaded PDF report may include the signed transmittal letter, professional certification, and all data that are uploaded into GeoTracker. The survey data (latitude/longitude and elevation), depth-to-water, and site map information files must be submitted as required to the State Water Board’s GeoTracker database via the Internet in accordance with the GeoTracker XYZ survey Guidelines and Restrictions. ZIP FILE A “ZIP” (a.k.a. “ZIPPED”) file is a file having file extension of “.zip” that has been compressed so it takes up less disk storage space. Because it is smaller in size from the original file, it takes less time to upload and download on the Internet. When a file is unzipped later (i.e. uncompressed or “extracted”), it is identical to the original. Microsoft Windows has built-in capability to zip (compress) and unzip (uncompress). Search Windows “Help” for the word “zipped” to find instructions on how to zip/unzip files using your version of Windows’ built-in zip/unzip capability. A GeoTracker “zip” file should only contain one GEO text file or one set of EDF text files at a time. Do not include GEO and EDF files in the same zip file. The name(s) of the text files contained in the zip file must always be the name(s) specified for each type of submittal (e.g. must be “GEO_XY.txt” or “geo_xy.txt” and not “233BranchSt_GEO_XY.txt”). The zip file itself can be named anything you want, e.g. “233BranchSt_GEO_XY.zip” or “GEOXY_233branch.zip”, “J34456_GEO_XY.zip”, etc.
ESI Beginner’s Guide - Contractors
Page 41
APPENDIX C Uploading Multiple Field Point Names (FPNs)
These instructions describe how to upload multiple FPNs using a tab delimited or comma delimited text file by clicking on UPLOAD FIELD POINTS / WELL CONSTRUCTION.
After clicking on FIELD POINTS/WELL CONSTRUCTION, the FIELD POINT UPLOAD INSTRUCTIONS link will appear to provide additional instructions on creating the text file.
Examples of a tab delimited text file versus comma delimited text file are provided below. The column headings must be removed for upload. It is up to the user to decide which text file is appropriate. Either form is acceptable.
Tab Delimited File Example
Comma Delimited File Example
To create the UPLOAD FIELD POINTS / WELL CONSTRUCTION file, open a text editor such as Notepad or a spreadsheet program, such as Microsoft Excel. Excel has a save-as option that will convert the file from a spreadsheet format to a text (tab delimited) file. Instructions are provided below.
• Enter Global IDs and Field Point Names in text editor program (See example below). • Save as tab delimited file (for Microsoft Excel under file choose “save as” and for “save as
type” choose “Text (Tab delimited)”.
T0600000001 MW-1 FACID01 Description for MW-1 MW 10 2 T0600000001 MW-2 MW 12 3 T0600000001 MW-3 FACID01 MW 9 4 T0600000001 MW-4 BH
T0600000001,MW-1,FACID01,Description for MW-1,MW,10,2 T0600000001,MW-2,,,MW,12,3 T0600000001,MW-3,FACID01,,MW,9,4 T0600000001,MW-4,,,BH,,
1. Click Here 2. Select Option
Click Here
ESI Beginner’s Guide - Contractors
Page 42
• Enter as many field point names/facilities as needed.
• Each line of the file should have the following fields: (1) Global ID (REQUIRED) – The unique identifier for a regulated facility or site. This
number is provided by Regional Water Board staff. (2) Field Point Name (REQUIRED) - The field name or common name of the location
where the field sample has been collected (i.e. Well 01). The FPNs should normally match those used in the written report (any discrepancies should be explained in the narrative).
(3) Responsible Party Facility ID (optional) - A facility or site code designated by the responsible party.
(4) Field Point Description (optional) - A description of the sampling location provided by the responsible party.
(5) Field Point Class (REQUIRED) – Code describing the type of “point” being sampled. Must be one of the listed valid values that can be viewed by clicking here: (listed valid values).
(6) Depth (REQUIRED FOR WELLS) - The depth reported in feet from top of the casing to the beginning of the screened interval for a well.
(7) Length of Screen in feet (REQUIRED FOR MONITORING WELLS) - Length of screened interval reported in feet for a well
*DELETE COLUMN HEADINGS: All column headings must be deleted prior to uploading a tab or comma delimited text file.
Example of an Excel file prior to conversion to a Tab (Delimited) file and removal of the column headings.
To upload the FPN tab delimited or comma delimited file, click on UPLOAD FIELD POINTS/WELL CONSTRUCTION located at the top and center of the EDIT FIELD POINTS tools option. Select the tab delimited or comma delimited file for upload by clicking on the browse button.
GLOBAL ID FIELD POINT NAME RP FACID (OPTIONAL)FIELD POINT DESCRIPTION (OPTIONAL)
FIELD POINT CLASS
DEPTH - TOP OF CASING TO TOP OF SCREEN LENGTH OF SCREEN
Global ID #1 MW-01 RPFACID#400 Groundwater Monitoring Well MWGlobal ID #1 MW-02 RPFACID#400 Groundwater Monitoring Well MWGlobal ID #1 MW-03 RPFACID#400 Groundwater Monitoring Well MW
1. Click Here 2. Select Option
ESI Beginner’s Guide - Contractors
Page 43
IMPORTANT NOTES: Before GEO_XY, GEO_Z, GEO_WELL, GEO_BORE, or EDF files can be uploaded, the FPN(s) must be uploaded first and appear on the Global ID’s list of FPNs. The FPNs used in GEO_XY, GEO_Z, GEO_WELL, and EDF uploads must match exactly how they are shown on the FPN list (e.g. MW-1 is NOT the same as MW1). Do not use commas, quotes, or apostrophes in the FPN. FPNs can be added interactively to a Global ID’s list of FPNs using “Edit Field Points” or uploaded as a text file. If the lab provides an EDF file that uses FPNs different from the FPNs uploaded, for example MW1 instead of MW-1, a “Field Point Name (LOCID): is invalid” error will appear when the EDF is uploaded (note: LOCID [Location ID] is the early version of “Field Point Name”). DO NOT add the EDF’s FPNs to the Global ID’s list of FPNs as new versions of already existing FPNs. Instead, change the FPNs in the EDF so they match the existing FPN(s). Additionally, the laboratory can either correct the FPN errors, or they can be corrected manually. The GeoTracker Help Desk is always available to assist with editing the EDF FPNs at 1-866-480-1028. If no data has been uploaded (including GEO_BORE) to that sample location, the FPN can be modified to match the FPN provided by the laboratory using the “Edit Field Point” tool (at upper left, under “TOOLS”). Delete the existing FPN from that Global ID’s FPN list by clicking on the blue “x” to the left of the FPN (the “x” is only displayed when there is nothing uploaded yet to that FPN). Consistent FPNs must be used with the commencement of sample collection.
“Field Point Name (LOCID): is invalid” errors occur as a result of inconsistencies between the FPN associated with a Global ID and sample location information upon data upload. If the FPN is entered incorrectly on the Chain-of-Custody form (COC), the lab may enter it correctly when creating the EDF to prevent “Field Point Name (LOCID): is invalid” errors. The FPNs must be consistent with the well names and borehole names used in the written report submitted to the lead agency caseworker. The lead agency caseworker will often reject EDFs where the FPNs do not match well names and borehole names in the written reports. For additional information please refer to the links provided in Section 3.0 Additional Resources.
2. Click the blue “X” to delete Field Point
1. Click Here
3. Click browse and select file for upload
4. Click Here
ESI Beginner’s Guide - Contractors
Page 44
APPENDIX D Error Checking A New Electronic Submittal of Information
(ESI) Data File An ESI data file should be checked for errors using the Check EDD tool prior to being uploaded. Data files that may be error checked include:
1) Laboratory Electronic Deliverable Format (EDF) data (i.e. lab analytical data) a) This may include EDF monitoring data from detention ponds, biosolids, or
groundwater analysis, if applicable. 2) Sample location data:
a) GEO_XY (latitude & longitude) b) GEO_Z (depth to groundwater) c) GEO_WELL (top of casing elevation)
3) Follow the EDF UPLOAD INSTRUCTIONS linked at the top center of the Check An EDF File window.
A. Checking an EDF File - To check the EDF data file for errors prior to uploading it, click on Check EDD under the TOOLS in the upper left of the screen.
1. Select EDF
2. Click Instructions
ESI Beginner’s Guide - Contractors
Page 45
(1) To begin, select the EDF data file that was prepared according to the upload instructions by clicking on the Browse button to find the file and follow the steps provided below.
(2) Click the box CHECK GLOBAL_ID AND FIELD POINT NAMES to check the data for
proper format and errors; click the box USE GLOBAL_ID FROM EDF UPLOAD FILE to link the Global ID in the file to the facility in the database; and then click the Check File button to run the error analysis. If an error is reported, correct the file error and check the file once more for errors before proceeding to upload the file in STEP 4.
1. Click Browse
2. Select the file
3. File name will appear here
4. Click Open
5. The file will appear here
6. Click Box
8. Click Check File
7. Click Box
ESI Beginner’s Guide - Contractors
Page 46
B. Checking a GEO_XY File - To check the GEO_XY data file for errors prior to uploading it, click on Check EDD under the TOOLS in the upper left of the screen. Follow the GEO_XY UPLOAD INSTRUCTIONS linked at the top and center of the window.
(1) To begin, select the GEO_XY data file that was prepared according to the upload
instructions by clicking on the Browse button to find the file. Follow the steps provided below.
1. Select
2. Click Instructions
1. Click Browse

ESI Beginner’s Guide - Contractors
Page 47
(2) Click the Check File button to run the error analysis. If an error is reported, correct the
file error and check the file once more for errors before proceeding to upload the file in STEP 4.
C. Checking a GEO_Z File - To check the GEO_Z data file for errors prior to uploading it, click
on Check EDD under the TOOLS in the upper left of the screen. Follow the GEO_Z UPLOAD INSTRUCTIONS linked at the top and center of the window.
5. The file will appear here
2. Select the file
3. File name will appear here
4. Click Open
6. Click Check File
1. Select
2. Click Instructions
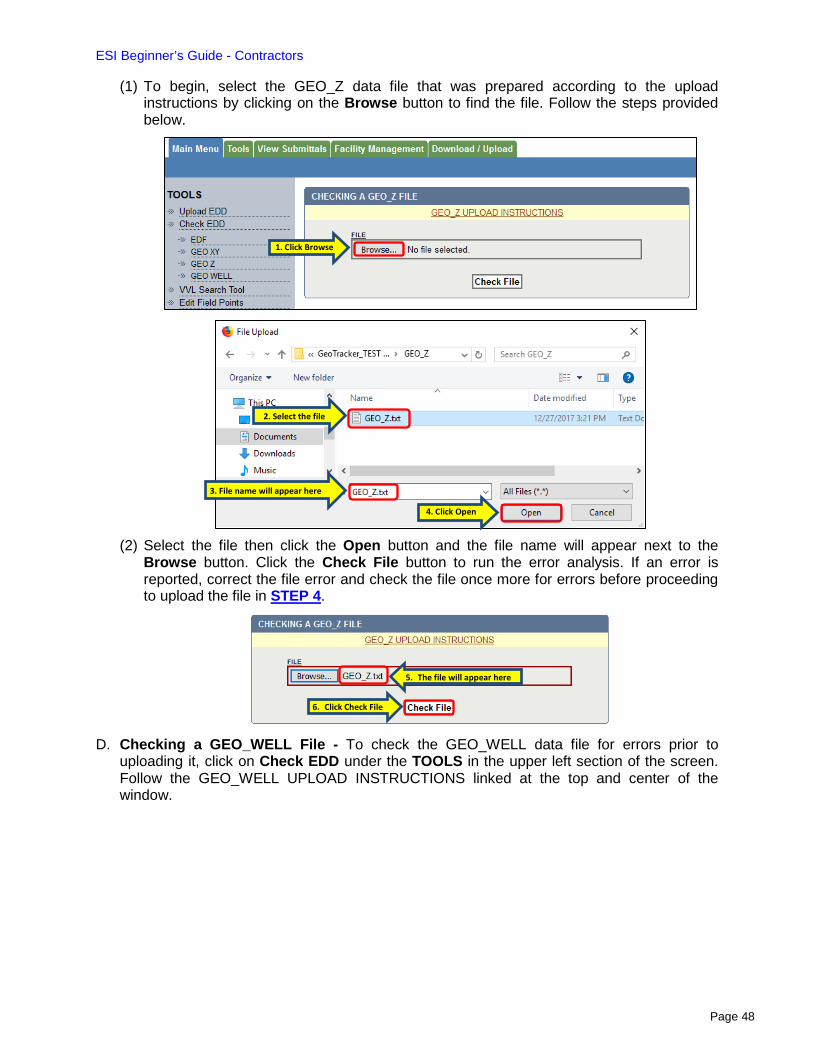
ESI Beginner’s Guide - Contractors
Page 48
(1) To begin, select the GEO_Z data file that was prepared according to the upload instructions by clicking on the Browse button to find the file. Follow the steps provided below.
(2) Select the file then click the Open button and the file name will appear next to the
Browse button. Click the Check File button to run the error analysis. If an error is reported, correct the file error and check the file once more for errors before proceeding to upload the file in STEP 4.
D. Checking a GEO_WELL File - To check the GEO_WELL data file for errors prior to
uploading it, click on Check EDD under the TOOLS in the upper left section of the screen. Follow the GEO_WELL UPLOAD INSTRUCTIONS linked at the top and center of the window.
1. Click Browse
2. Select the file
3. File name will appear here
4. Click Open
5. The file will appear here
6. Click Check File
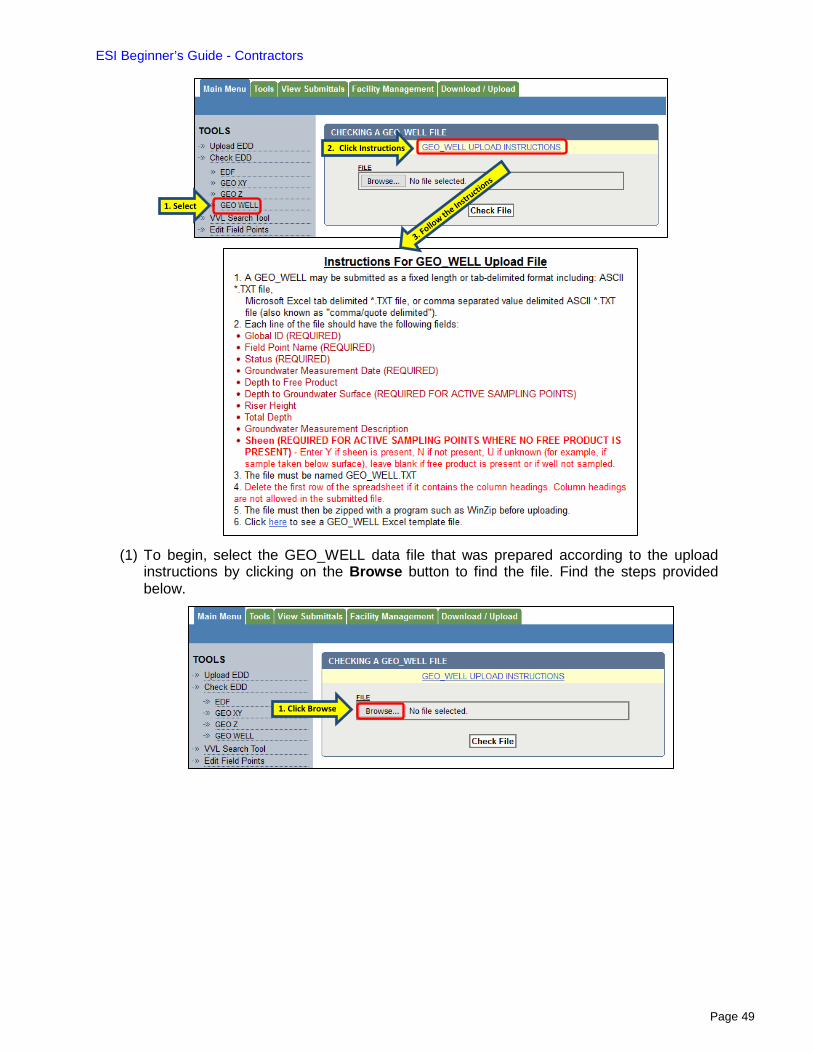
ESI Beginner’s Guide - Contractors
Page 49
(1) To begin, select the GEO_WELL data file that was prepared according to the upload
instructions by clicking on the Browse button to find the file. Find the steps provided below.
1. Select
2. Click Instructions
1. Click Browse
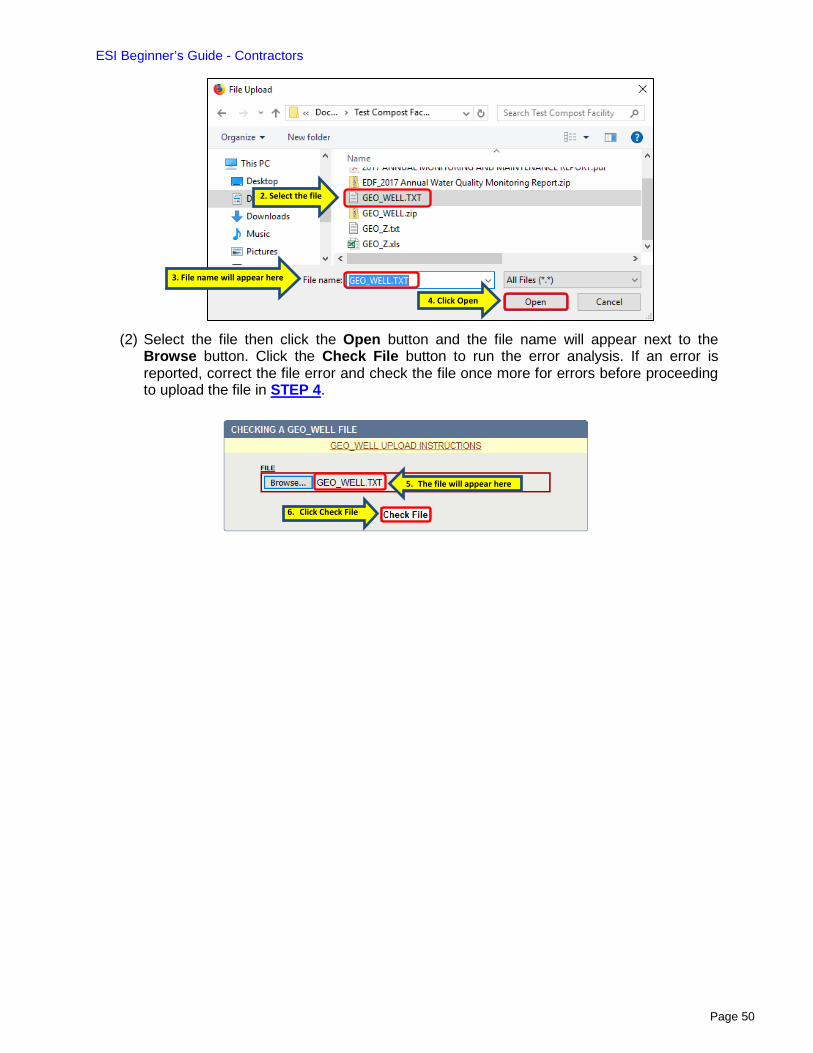
ESI Beginner’s Guide - Contractors
Page 50
(2) Select the file then click the Open button and the file name will appear next to the
Browse button. Click the Check File button to run the error analysis. If an error is reported, correct the file error and check the file once more for errors before proceeding to upload the file in STEP 4.
2. Select the file
3. File name will appear here
4. Click Open
5. The file will appear here
6. Click Check File