Embed Size (px)
Citation preview
ESET SECURITY FOR KERIO
Installation Manual and User Guide
Microsoft® Windows® Server 2003 / 2008 / 2008 R2 / 2012 / 2012 R2/ 2016
Click here to display Online help version of this document
ESET SECURITYCopyright ©2018 by ESET, spol. s r.o.ESET Securi ty for Kerio was developed by ESET, spol . s r.o.
For more information vis i t www.eset.com.Al l rights reserved. No part of this documentation may be reproduced, s tored in aretrieva l system or transmitted in any form or by any means , electronic, mechanica l ,photocopying, recording, scanning, or otherwise without permiss ion in wri ting fromthe author.ESET, spol . s r.o. reserves the right to change any of the described appl ication softwarewithout prior notice.
Customer Care: www.eset.com/support
REV. 4/18/2018
Contents
.......................................................6Introduction1.
....................................................................................................6What's new1.1
....................................................................................................6Help pages1.2
....................................................................................................8System requirements1.3
....................................................................................................9User interface1.4
....................................................................................................11Managed via ESET RemoteAdministrator
1.5
..............................................................................12Override mode1.5.1
.......................................................16Installation2.
....................................................................................................18ESET Security for Kerio installation steps2.1..............................................................................21Command line installation2.1.1
..................................................................................22ESET AV Remover2.1.1.1
....................................................................................................23Product activation2.2
....................................................................................................24Terminal Server2.3
.......................................................25Beginner's guide3.
....................................................................................................25Monitoring3.1
....................................................................................................27Log files3.2
....................................................................................................29Scan3.3..............................................................................30Hyper-V scan3.3.1
....................................................................................................32Update3.4..............................................................................33Setting up virus DB update3.4.1
..............................................................................36Configuring Proxy server for updates3.4.2
....................................................................................................37Setup3.5..............................................................................38Server3.5.1
..............................................................................39Computer3.5.2
..............................................................................40Tools3.5.3
..............................................................................41Import and export settings3.5.4
....................................................................................................42Tools3.6..............................................................................43Running processes3.6.1
..............................................................................45Watch activity3.6.2
..................................................................................45Time period selection3.6.2.1
..............................................................................46Protection statistics3.6.3
..............................................................................47Cluster3.6.4
..................................................................................49Cluster wizard - page 13.6.4.1
..................................................................................50Cluster wizard - page 23.6.4.2
..................................................................................51Cluster wizard - page 33.6.4.3
..................................................................................53Cluster wizard - page 43.6.4.4
..............................................................................56ESET Shell3.6.5
..................................................................................58Usage3.6.5.1
..................................................................................61Commands3.6.5.2
..................................................................................63Batch files / Scripting3.6.5.3
..............................................................................64ESET SysInspector3.6.6
..................................................................................65Create a computer status snapshot3.6.6.1
..................................................................................65ESET SysInspector3.6.6.2
........................................................................65Introduction to ESET SysInspector3.6.6.2.1
........................................................................65Starting ESET SysInspector3.6.6.2.1.1
........................................................................66User Interface and application usage3.6.6.2.2
........................................................................66Program Controls3.6.6.2.2.1
........................................................................68Navigating in ESET SysInspector3.6.6.2.2.2
........................................................................69Keyboard shortcuts3.6.6.2.2.1
........................................................................70Compare3.6.6.2.2.3
........................................................................71Command line parameters3.6.6.2.3
........................................................................72Service Script3.6.6.2.4
........................................................................72Generating Service script3.6.6.2.4.1
........................................................................72Structure of the Service script3.6.6.2.4.2
........................................................................75Executing Service scripts3.6.6.2.4.3
........................................................................75System requirements for ESET SysInspector3.6.6.2.5
........................................................................76FAQ3.6.6.2.6
..............................................................................77ESET SysRescue Live3.6.7
..............................................................................77Scheduler3.6.8
..................................................................................79Scheduler - Add task3.6.8.1
..............................................................................80Submit samples for analysis3.6.9
..................................................................................80Suspicious file3.6.9.1
..................................................................................81Suspicious site3.6.9.2
..................................................................................81False positive file3.6.9.3
..................................................................................81False positive site3.6.9.4
..................................................................................81Other3.6.9.5
..............................................................................82Quarantine3.6.10
....................................................................................................83Help and support3.7..............................................................................83How to3.7.1
..................................................................................84How to update ESET Security for Kerio3.7.1.1
..................................................................................84How to activate ESET Security for Kerio3.7.1.2
..................................................................................85How to create a new task in Scheduler3.7.1.3
..................................................................................86How to schedule a scan task (every 24 hours)3.7.1.4
..................................................................................86How to remove a virus from your server3.7.1.5
..............................................................................87Submit support request3.7.2
..............................................................................87ESET Specialized Cleaner3.7.3
..............................................................................87About ESET Security for Kerio3.7.4
..............................................................................88Product activation3.7.5
..................................................................................89Registration3.7.5.1
..................................................................................89Security Admin activation3.7.5.2
..................................................................................89Activation failure3.7.5.3
..................................................................................89License3.7.5.4
..................................................................................89Activation progress3.7.5.5
..................................................................................89Activation successful3.7.5.6
.......................................................90Working with ESET Security for Kerio4.
....................................................................................................90Server4.1..............................................................................90Kerio Connect4.1.1
..............................................................................91Kerio Control4.1.2
....................................................................................................91Antivirus and antispyware4.2
....................................................................................................91Rules4.3..............................................................................92Rules list4.3.1
..................................................................................93Rule wizard4.3.1.1
........................................................................93Rule condition4.3.1.1.1
........................................................................94Rule action4.3.1.1.2
....................................................................................................94Computer4.4..............................................................................95An infiltration is detected4.4.1
..............................................................................96Processes exclusions4.4.2
..............................................................................96Automatic exclusions4.4.3

..............................................................................97Shared local cache4.4.4
..............................................................................98Real-time file system protection4.4.5
..................................................................................99Exclusions4.4.5.1
........................................................................100Add or Edit exclusion4.4.5.1.1
........................................................................101Exclusion format4.4.5.1.2
..................................................................................101ThreatSense parameters4.4.5.2
........................................................................104File extenstions excluded from scanning4.4.5.2.1
........................................................................104Additional ThreatSense parameters4.4.5.2.2
........................................................................105Cleaning levels4.4.5.2.3
........................................................................105When to modify real-time protection configuration4.4.5.2.4
........................................................................105Checking real-time protection4.4.5.2.5
........................................................................105What to do if real-time protection does not work4.4.5.2.6
........................................................................106Submission4.4.5.2.7
........................................................................106Statistics4.4.5.2.8
........................................................................106Suspicious files4.4.5.2.9
..............................................................................107On-demand computer scan and Hyper-V scan4.4.6
..................................................................................108Custom scan and Hyper-V scan launcher4.4.6.1
..................................................................................110Scan progress4.4.6.2
..................................................................................112Scan log4.4.6.3
..................................................................................113Profile manager4.4.6.4
..................................................................................113Scan targets4.4.6.5
..................................................................................113Pause a scheduled scan4.4.6.6
..............................................................................113Idle-state scanning4.4.7
..............................................................................114Startup scan4.4.8
..................................................................................114Automatic startup file check4.4.8.1
..............................................................................115Removable media4.4.9
..............................................................................115Document protection4.4.10
..............................................................................115HIPS4.4.11
..................................................................................117HIPS rules4.4.11.1
........................................................................118HIPS rule settings4.4.11.1.1
..................................................................................120Advanced setup4.4.11.2
........................................................................120Drivers always allowed to load4.4.11.2.1
....................................................................................................120Update4.5..............................................................................123Update rollback4.5.1
..............................................................................123Update mode4.5.2
..............................................................................124HTTP Proxy4.5.3
..............................................................................125Connect to LAN as4.5.4
..............................................................................126Mirror4.5.5
..................................................................................128Updating from the Mirror4.5.5.1
..................................................................................130Mirror files4.5.5.2
..................................................................................130Troubleshooting Mirror update problems4.5.5.3
....................................................................................................130Device control4.6..............................................................................131Device control rules editor4.6.1
..............................................................................132Adding Device control rules4.6.2
..............................................................................133Detected devices4.6.3
..............................................................................133Device groups4.6.4
....................................................................................................134Tools4.7..............................................................................134ESET LiveGrid®4.7.1
..................................................................................136Exclusion filter4.7.1.1
..............................................................................137Microsoft Windows update4.7.2
..............................................................................137ESET CMD4.7.3
..............................................................................138WMI Provider4.7.4
..................................................................................139Provided data4.7.4.1
..................................................................................144Accessing Provided Data4.7.4.2
..............................................................................144ERA scan targets4.7.5
..............................................................................146Log files4.7.6
..................................................................................147Log filtering4.7.6.1
..................................................................................148Find in log4.7.6.2
..............................................................................148Proxy server4.7.7
..............................................................................150Email notifications4.7.8
..................................................................................151Message format4.7.8.1
..............................................................................151Presentation mode4.7.9
..............................................................................152Diagnostics4.7.10
..............................................................................152Customer Care4.7.11
..............................................................................153Cluster4.7.12
....................................................................................................154User interface4.8..............................................................................156Alerts and notifications4.8.1
..............................................................................157Access setup4.8.2
..................................................................................157Password4.8.2.1
..................................................................................157Password setup4.8.2.2
..............................................................................158Help4.8.3
..............................................................................158ESET Shell4.8.4
..............................................................................158Disable GUI on Terminal Server4.8.5
..............................................................................158Disabled messages and statuses4.8.6
..................................................................................159Confirmation messages4.8.6.1
..................................................................................159Application statuses settings4.8.6.2
..............................................................................159System tray icon4.8.7
..................................................................................160Pause protection4.8.7.1
..............................................................................160Context menu4.8.8
....................................................................................................161Revert all settings in this section4.9
....................................................................................................161Revert to default settings4.10
....................................................................................................161Scheduler4.11..............................................................................162Task details4.11.1
..............................................................................162Task timing - Once4.11.2
..............................................................................162Task timing4.11.3
..............................................................................163Task timing - Daily4.11.4
..............................................................................163Task timing - Weekly4.11.5
..............................................................................163Task timing - Event triggered4.11.6
..............................................................................163Task details - Run application4.11.7
..............................................................................163Skipped task4.11.8
..............................................................................164Scheduled task overview4.11.9
..............................................................................164Update profiles4.11.10
....................................................................................................165Quarantine4.12..............................................................................165Quarantining files4.12.1
..............................................................................165Restoring from Quarantine4.12.2
..............................................................................165Submitting file from Quarantine4.12.3
....................................................................................................165Operating system updates4.13
.......................................................166Glossary5.
....................................................................................................166Types of infiltration5.1..............................................................................166Viruses5.1.1
..............................................................................167Worms5.1.2
..............................................................................167Trojan horses5.1.3

Contents..............................................................................168Rootkits5.1.4
..............................................................................168Adware5.1.5
..............................................................................168Spyware5.1.6
..............................................................................169Botnet5.1.7
..............................................................................169Ransomware5.1.8
..............................................................................169Packers5.1.9
..............................................................................169Exploit Blocker5.1.10
..............................................................................169Advanced Memory Scanner5.1.11
..............................................................................169Potentially unsafe applications5.1.12
..............................................................................170Potentially unwanted applications5.1.13
....................................................................................................170Email5.2..............................................................................170Advertisements5.2.1
..............................................................................171Hoaxes5.2.2
..............................................................................171Phishing5.2.3
..............................................................................171Recognizing spam scams5.2.4
..................................................................................172Rules5.2.4.1
..................................................................................172Whitelist5.2.4.2
..................................................................................172Blacklist5.2.4.3
..................................................................................172Server-side control5.2.4.4

6
1. IntroductionESET Security for Kerio Control and Connect is an integrated solution that protects against various types of malwarecontent including email attachments infected by worms or trojans, documents containing harmful scripts andphishing. ESET Security for Kerio provides two types of protection: Antivirus and the application of user-definedrules. ESET Security for Kerio filters the malicious content at the server level. It filters email messages before theyarrive in the recipient email client mailboxes.
ESET Security for Kerio provides antivirus and antispyware server protection for Mail server (Kerio Connect).ESET Security for Kerio provides antivirus and antispyware server protection for Gateway server (Kerio Control).
While providing protection for Kerio Control and Connect, ESET Security for Kerio also has tools to ensure protectionof the server itself.
You can remotely manage ESET Security for Kerio in larger networks with the help of ESET Remote Administrator.
1.1 What's new
ESET Security for Kerio introduces the following new features:
· ESET Cluster - A Cluster on its own, synchronizes configuration and allows for data exchange between ESETSecurity for Kerio on each node. Can also be used when deploying ESET Security for Kerio on multiple serverswithout the need to install ESET Security for Kerio on each server individually.
· Processes exclusions - Ensures better compatibility with 3rd party software, such as backup solutions.
· GUI enhancements.
· Rule-based filtering scan - Gives you a possibility to define rules with conditions and actions that will be takenwith email attachments or files once the conditions are met.
· Optimization for virtualized environments.
· Hyper-V scan - Is a new technology that allows for scanning of Virtual Machine (VM) disks on Microsoft Hyper-V Server without the need of any "Agent" on the particular VM.
1.2 Help pages
This guide is intended to help you make the best use of ESET Security for Kerio. To learn more about any window inthe program, press F1 on your keyboard with the given window open. The help page related to the window you arecurrently viewing will be displayed.
For consistency and to help prevent confusion, terminology used throughout this guide is based on the ESETSecurity for Kerio parameter names. We also used a uniform set of symbols to highlight topics of particular interestor significance.
NOTEA note is just a short observation. Although you can omit it, notes can provide valuable information, such asspecific features or a link to some related topic.
IMPORTANTThis requires your attention and is not recommended to skip over it. Important notes include significant but non-critical information.
WARNINGCritical information you should treat with increased caution. Warnings are placed specifically to deter you from

7
committing potentially harmful mistakes. Please read and understand text placed in warning brackets, as itreferences highly sensitive system settings or something risky.
EXAMPLEThis is a use case or a practical example that aims to help you understand how a certain function or feature can beused.
Convention Meaning
Bold type Names of interface items such as boxes and option buttons.
Italic type Placeholders for the information that you provide. For example, file name or path means youtype the actual path or a name of file.
Courier New Code samples or commands.
Hyperlink Provides quick and easy access to cross-referenced topics or external web locations. Hyperlinksare highlighted in blue and may be underlined.
%ProgramFiles% The Windows system directory which stores installed programs of Windows and others.
· Topics in this guide are divided into several chapters and sub-chapters. You can find relevant information bybrowsing the Contents of the help pages. Alternatively, you can use the Index to browse by keywords or use full-text Search.
ESET Security for Kerio allows you to search help topics by keyword or by typing words or phrases to search forwithin the User Guide. The difference between these two methods is that a keyword may be logically related tohelp pages which do not contain that particular keyword in the text. Searching by words and phrases will search thecontent of all pages and display only those containing the searched word or phrase in the actual text.
· You can post your rating and/or provide feedback on a particular topic in help, click the Was this informationhelpful? link or Rate this article: Helpful / Not Helpful in case of ESET Knowledgebase, underneath the help page.

8
1.3 System requirements
Supported Operating Systems:
· Microsoft Windows Server 2016 (Kerio Connect only)
· Microsoft Windows Server 2012 R2 Essentials
· Microsoft Windows Server 2012 Essentials
· Microsoft Windows Small Business Server 2011 (x64)
· Microsoft Windows Small Business Server 2008 (x64)
· Microsoft Windows Small Business Server 2003 R2 (x86)
· Microsoft Windows Small Business Server 2003 (x86)
· Microsoft Windows Server 2012 R2
· Microsoft Windows Server 2012
· Microsoft Windows Server 2008 R2
· Microsoft Windows Server 2008 (x86 and x64)
· Microsoft Windows Server 2003 R2 (x86 and x64)
· Microsoft Windows Server 2003 SP2 (x86 and x64)
Supported Host Operating Systems with Hyper-V role:
· Microsoft Windows Server 2012 R2
· Microsoft Windows Server 2012
· Microsoft Windows Server 2008 R2 - Virtual Machines can be scanned only while they are offline.
Supported Kerio Connect versions:
· Kerio Connect 8.x and newer
IMPORTANTWhen upgrading Kerio Connect from version 8.0 to 8.1 or newer, or from 9.2.1 to a newer version, while havingESET Security for Kerio running, there is an interval of up to 30 minutes when your mail server is not protected.This is due to changes of Kerio Connect installation folders and other Kerio changes. ESET Security for Keriochecks for such changes and re-integrates itself with Kerio using new paths to installation folders and otherchanges in Kerio. To ensure protection at all times, we recommend you to restart your server immediately afterthe Kerio upgrade.
Supported Kerio Control versions:
· Kerio Control 7.4 and newer
Hardware requirements depend on the operating system version and the version of Kerio product in use. Werecommend reading the Kerio product documentation for more detailed information on hardware requirements.
NOTEWe strongly recommend that you install the latest Service Pack for your Microsoft Server operating system andserver application before installing your ESET security product. We also recommend that you install the latestWindows updates and hotfixes whenever they became available.

9
1.4 User interface
ESET Security for Kerio has a intuitive graphical user interface (GUI) that gives users easy access to main programfunctions. The main program window of ESET Security for Kerio is divided into two main sections. The primarywindow on the right displays the information that corresponds to the option selected from the main menu on theleft.
The different sections of the main menu are described below:
· Monitoring - Provides information about the protection status of ESET Security for Kerio, license validity, virussignature database updates, basic statistics and system information.
· Log files - Accesses log files that contain information about all important program events that have occurred.These files provide an overview of detected threats as well as other security related events.
· Scan - Allows you to configure and launch a Storage scan, Smart scan, Custom scan or Removable media scan. Youcan also repeat the last scan that was run.
· Update - Provides information about the virus signature database and notifies you about available updates.Product activation can also be performed from this section.
· Setup - Adjust your Server and Computer security settings.
· Tools - Provides additional information about your system protection. Additional tools to help you manage yoursecurity. The Tools section contains the following items: Running processes, Watch activity, Protection statistics,Cluster, ESET Shell, ESET SysInspector, ESET SysRescue Live to create a rescue CD or USB and Scheduler. You canalso Submit sample for analysis and check your Quarantine.
· Help and support - Provides access to help pages, the ESET Knowledgebase and other Support tools. Also availableare links to open a Customer Care support request and information about product activation.

10
In addition to the main GUI, the Advanced setup window is accessible from anywhere in the program by pressingthe F5 key.
From the Advanced setup window, you can configure settings and options based on your needs. The menu on theleft includes the following categories:
· Server - Allows you to configure Antivirus and antispyware, Rules, etc.
· Computer - Enable or disable detection of potentially unwanted, unsafe, suspicious application, specifyexclusions, Real-time file system protection, On-demand computer scan and Hyper-V scan, etc.
· Update - Configure a list of profiles, create a snapshots of update file, update source information like the updateservers being used and authentication data for these servers.
· Device control - Configure Device control Rules and Groups.
· Tools - Allows you to customize tools, such as ESET LiveGrid®, Log files, Proxy server, Cluster, etc.
· User interface - Configure the behavior of the program's Graphical user interface (GUI), Statuses, Licenseinformation, etc.
When you click an item (category or subcategory) in the menu on the left, the respective settings for that item areshown on the right tab.

11
1.5 Managed via ESET Remote Administrator
ESET Remote Administrator (ERA) is an application that allows you to manage ESET products in a networkedenvironment from one central location. The ESET Remote Administrator task management system allows you toinstall ESET security solutions on remote computers and quickly respond to new problems and threats. ESET RemoteAdministrator does not provide protection against malicious code on its own, it relies on the presence of ESETsecurity solutions on each client.
ESET security solutions support networks that include multiple platform types. Your network can include acombination of current Microsoft, Linux-based, Mac OS and mobile operating systems.
· ESET Remote Administrator Server - ERA Server can be installed on Windows as well as Linux servers and alsocomes as a Virtual Appliance. It handles communication with Agents, and collects and stores application data.
· ERA Web Console a web-based user interface that presents data from ERA Server and allows you to manage ESETsecurity solutions in your environment. The Web Console can be accessed using a Web browser. It displays anoverview of the status of clients on your network and can be used to deploy ESET solutions to unmanagedcomputers remotely. If you decide to make the web server accessible from the Internet, you can use ESET RemoteAdministrator from nearly any device with an active Internet connection.
· ERA Agent - The ESET Remote Administrator Agent facilitates communication between the ERA Server and clientcomputers. You must install the Agent on any client computer to establish communication between thatcomputer and the ERA Server. Because it is located on the client computer and can store multiple securityscenarios, use of the ERA Agent significantly lowers reaction time to new threats. Using ERA Web Console, youcan deploy the ERA Agent to unmanaged computers that have been recognized via your Active Directory or ESETRD Sensor.
NOTEFor more information about ERA, see ESET Remote Administrator Online help. Online help is divided into threeparts: Installation/Upgrade, Administration and VA Deployment. You can use the navigation tabs in the header toswitch between the parts.

12
1.5.1 Override mode
If you have ESET Remote Administrator policy applied to ESET Security for Kerio, you'll see a lock icon insteadof Enable/Disable switch on Setup page and a lock icon next to the switch in Advanced setup window.
Normally, settings that are configured via ESET Remote Administrator policy cannot be modified. Override modeallows you to temporarily unlock these settings. However, you need to enable Override mode using ESET RemoteAdministrator policy.
Log into ERA Web Console, navigate to Admin > Policies, select and edit existing policy that is applied to ESETSecurity for Kerio or create a new one. In Settings, click Override Mode, enable it and configure the rest of itssettings including Authentication type (Active directory user or Password).
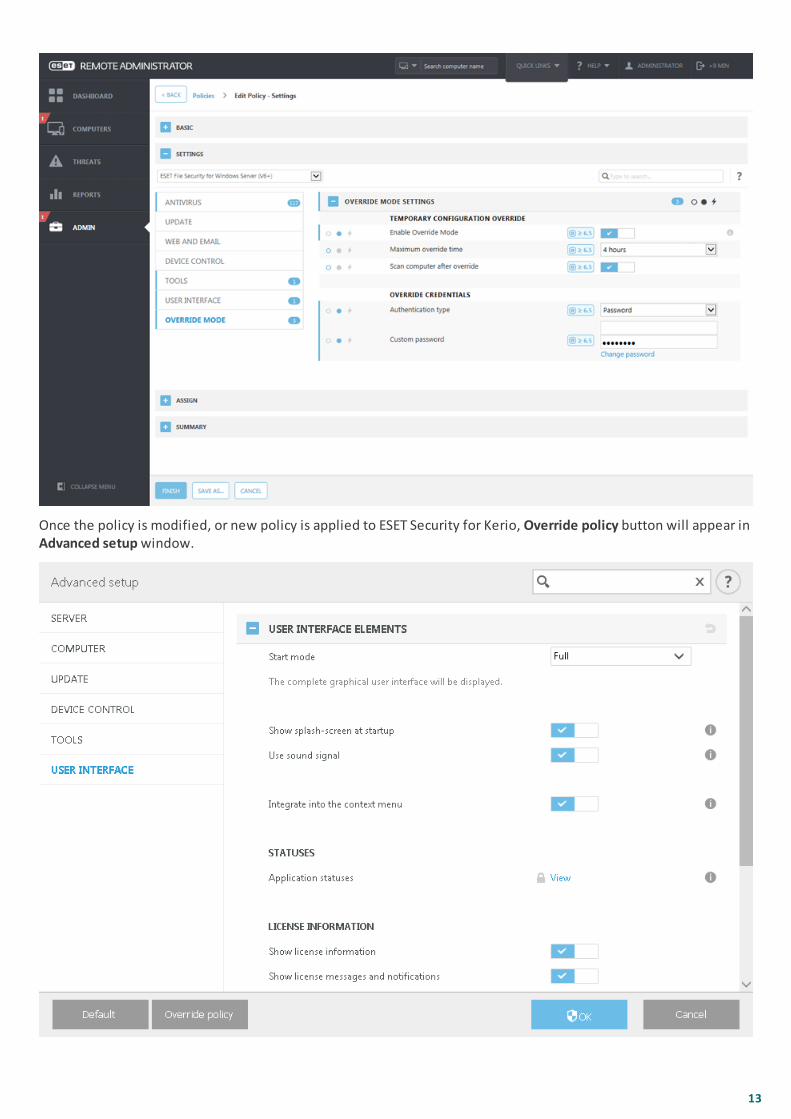
13
Once the policy is modified, or new policy is applied to ESET Security for Kerio, Override policy button will appear inAdvanced setup window.
14
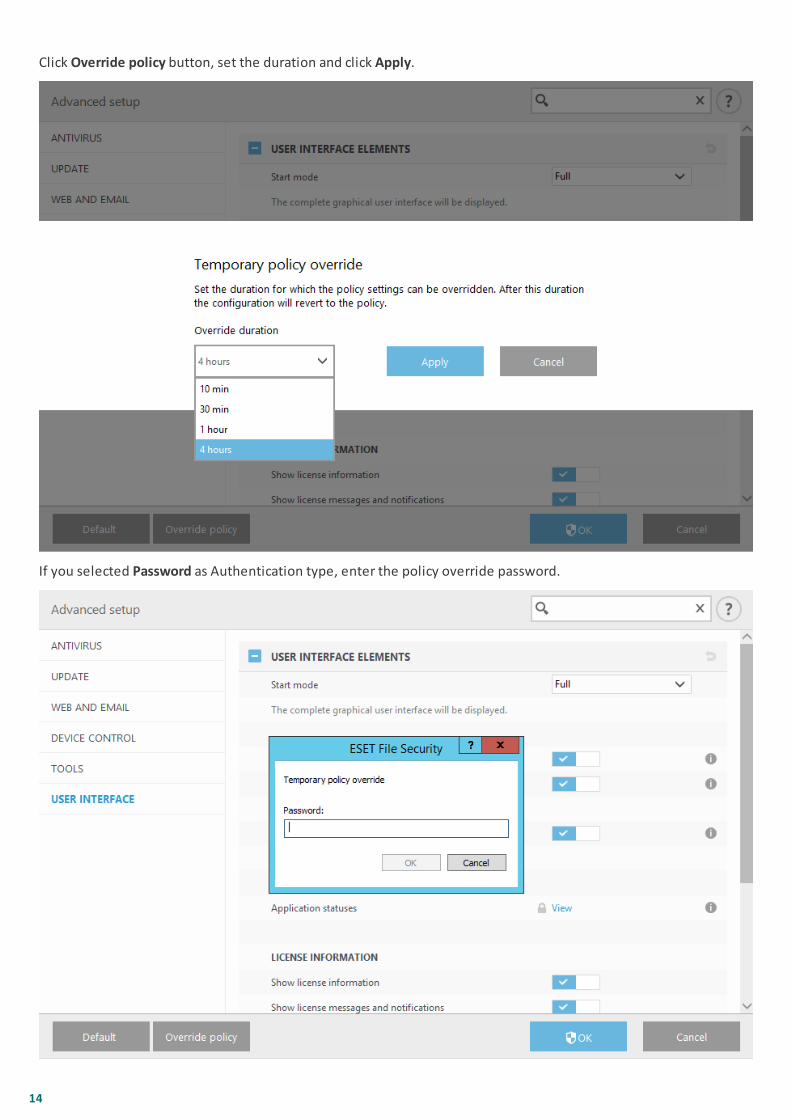
Click Override policy button, set the duration and click Apply.
If you selected Password as Authentication type, enter the policy override password.

15
Once the Override mode expires, any configuration changes you've made will revert back to original ESET RemoteAdministrator policy settings. You'll see a notification before the Override expires.
You can End override mode anytime before it expires on Monitoring page or in Advanced setup window.
16
2. InstallationAfter purchasing ESET Security for Kerio, the installer can be downloaded from ESET’s website (www.eset.com) asan .msi package.
NOTEIf you have previously used other third-party antivirus software on your system, we recommend that youuninstall it completely prior to the installation of ESET Security for Kerio. You can use ESET AV Remover to assistin the removal of third-party software.
If you are installing on Windows Server 2016, Microsoft recommends to uninstall Windows Defender Featuresand withdraw from Windows Defender ATP enrollment to prevent problems caused by having multiple antivirusproducts installed on a machine.
Please note that you must to execute the installer using the Built-in Administrator account or a domainAdministrator account (in the event that local Administrator account is disabled). Any other user, despite being amember of Administrators group, will not have sufficient access rights. Therefore you need to use the Built-inAdministrator account, as you will not be able to successfully complete installation under any other user accountthan local or domain Administrator.
IMPORTANTWe highly recommend installing ESET Security for Kerio on a freshly installed and configured OS, if possible. Ifyou do need to install it on an existing system, we recommend that you uninstall the version of ESET Security forKerio, restart the server and install the new ESET Security for Kerio afterwards.
To install ESET Security for Kerio, you have two installation modes to choose from. Using an installation wizard (GUI)or a command line installation.
Installation wizard:
This is a typical GUI installation mode. Double-click the .msi package to run the installation wizard and choosedesired installation type.
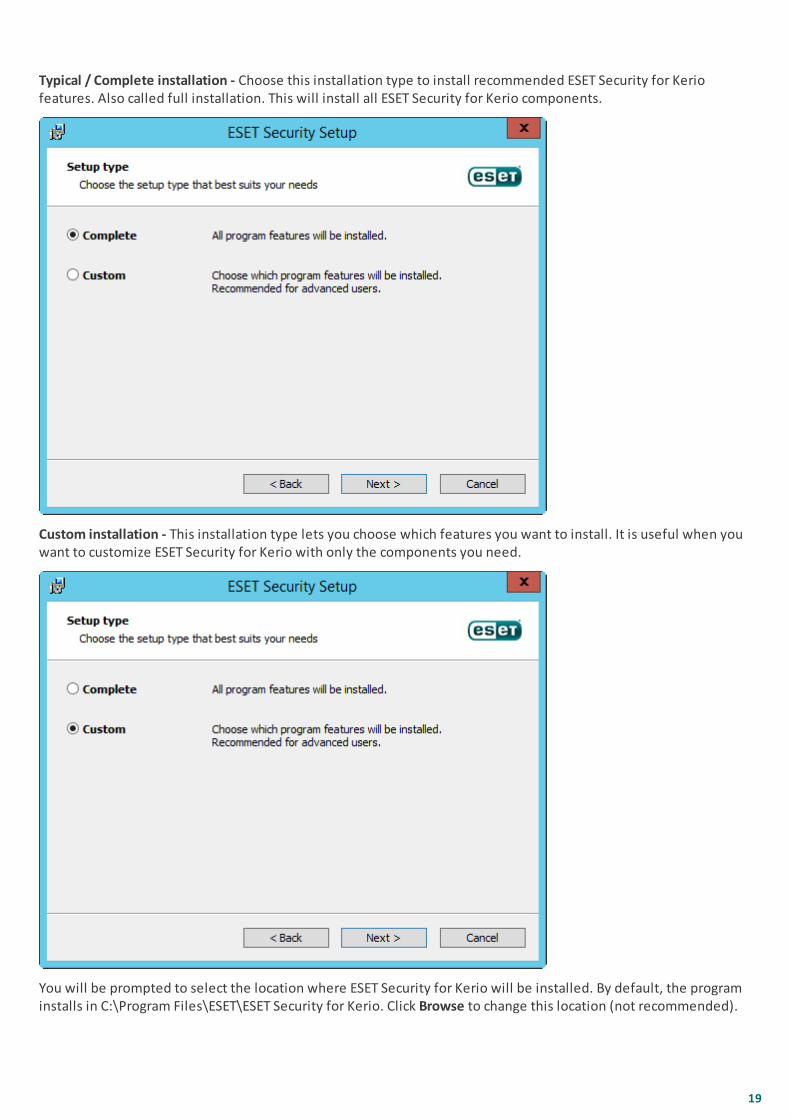
Complete or Typical
This is the recommended installation type. You can select the install location for ESET Security, however werecommend that you use default values. For detailed installation procedure, see ESET Security for Kerioinstallation steps.
Core
This installation type is intended for Windows Server Core editions. Installation steps are the same as completeinstallation, but only core features and the command line user interface will be installed. Although coreinstallation is mainly for use on Windows Server Core, you can still install it on a regular Windows Servers if youprefer. ESET security product installed using core installation will not have any GUI. This means that you can onlyuse the command line user interface when working with ESET Security for Kerio.
EXAMPLETo execute Core installation via command line, use the following sample command:
msiexec /qn /i efsw_nt64_ENU.msi ^
/l inst.log ADDLOCAL=HIPS,_Base,SERVER,_FeaturesCore,WMIProvider,Scan,Updater,eShell,^
UpdateMirror,RealtimeProtection,_License
NOTEFor more detailed information and other special parameters, see Command line installation section.
17
Custom
Custom installation lets you choose which features of ESET Security for Kerio will be installed on your system. Alist of product modules and features will be displayed before the installation starts. For detailed installationprocedure, see ESET Security for Kerio installation steps.
Command line installation:
In addition to the installation wizard, you can choose to install ESET Security for Kerio silently via command line. Thisinstallation type does not require any interaction and is also referred to as an unattended installation.
Silent / Unattended installation
Run the following command to complete installation via command line: msiexec /i <packagename> /qn /l*xvmsi.log
(On Windows Server 2008 and 2008 R2 the Web and Email feature will not be installed.)
To make sure the installation was successful or in case of any issues with the installation, use Windows EventViewer to check the Application Log (look for records from Source: MsiInstaller).
EXAMPLEFull installation on a 64-bit system:
msiexec /i efsw_nt64_ENU.msi /qn /l*xv msi.log ADDLOCAL=WebAndEmail,EmailClientProtection,^
MailPlugins,ProtocolFiltering,WebAccessProtection,_Base,ShellExt,HIPS,SERVER,_FeaturesCore,^
RealtimeProtection,DeviceControl,WMIProvider,Scan,Updater,DocumentProtection,CLUSTER,^
GraphicUserInterface,eShell,UpdateMirror,SysInspector,SysRescue,OnlineHelp,OfflineHelp,^
EnterpriseInspector
EXAMPLEFull installation on a 32-bit system:
msiexec /i efsw_nt32_ENU.msi /qn /l*xv msi.log ADDLOCAL=WebAndEmail,EmailClientProtection,^
MailPlugins,ProtocolFiltering,WebAccessProtection,_Base,ShellExt,HIPS,SERVER,_FeaturesCore,^
RealtimeProtection,DeviceControl,WMIProvider,Scan,Updater,DocumentProtection,CLUSTER,^
GraphicUserInterface,eShell,UpdateMirror,SysInspector,SysRescue,OnlineHelp,OfflineHelp,^
EnterpriseInspector
When the installation finishes, ESET GUI starts and tray icon is displayed in the notification area (system tray).
EXAMPLEInstallation without ProtocolFiltering and WebAccessProtection on a 32-bit system:
msiexec /i efsw_nt32_ENU.msi /qn /l*xv msi.log ADDLOCAL=_Base,ShellExt,HIPS,SERVER,^
_FeaturesCore,RealtimeProtection,DeviceControl,WMIProvider,Scan,Updater,DocumentProtection,^
CLUSTER,GraphicUserInterface,eShell,UpdateMirror,SysInspector,SysRescue,OnlineHelp,^
OfflineHelp,EnterpriseInspector
EXAMPLEAdding a feature (ProtocolFiltering) on a 64-bit system:
msiexec /i efsw_nt64_ENU.msi /qn /l*xv msi.log ADDLOCAL=WebAndEmail,EmailClientProtection,^
MailPlugins,ProtocolFiltering,WebAccessProtection REINSTALL=_Base,ShellExt,HIPS,_Base,SERVER,^
_FeaturesCore,RealtimeProtection,DeviceControl,WMIProvider,Scan,Updater,DocumentProtection,^
CLUSTER,GraphicUserInterface,eShell,UpdateMirror,SysInspector,SysRescue,OnlineHelp,^
OfflineHelp,EnterpriseInspector
EXAMPLERemoving a feature (ProtocolFiltering) on a 64-bit system:
msiexec /i efsw_nt64_ENU.msi /qn /l*xv msi.log REMOVE=WebAndEmail,EmailClientProtection,^
MailPlugins,ProtocolFiltering,WebAccessProtection REINSTALL=_Base,ShellExt,HIPS,SERVER,^
_FeaturesCore,RealtimeProtection,DeviceControl,WMIProvider,Scan,Updater,DocumentProtection,^
CLUSTER,GraphicUserInterface,eShell,UpdateMirror,SysInspector,SysRescue,OnlineHelp,^
OfflineHelp,EnterpriseInspector

18
IMPORTANTWhen specifying values for REINSTALL parameter, you must list the rest of the features that are not used asvalues for ADDLOCAL or REMOVE parameter. It is necessary for the command line installation to run properlythat you list all the features as values for REINSTALL, ADDLOCAL and REMOVE parameters. See Command lineinstallation section for the complete list of features.
Adding or removing may not be successful if you do not use the REINSTALL parameter.
EXAMPLEComplete removal (uninstallation) from a 64-bit system:
msiexec /x efsw_nt64_ENU.msi /qn /l*xv msi.log
NOTEYour sever will reboot automatically after a successful uninstallation.
2.1 ESET Security for Kerio installation steps
Follow the steps below to install ESET Security for Kerio using the Setup Wizard:
Click Next, the End-User License Agreement will be displayed. After you acknowledge your acceptance of the End-User License Agreement and click Next, choose one of available installation types. Installation types availabledepend on your operating system.
Windows Server 2003, 2003 R2, 2012 and 2012 R2:
o Complete - Installs all ESET Security for Kerio features.
o Custom - Lets you select which ESET Security for Kerio features will be installed on your system.
Windows Server 2008 and 2008 R2:
o Typical - Installs recommended ESET Security for Kerio features.
o Custom - Lets you select which ESET Security for Kerio features will be installed on your system.
19
Typical / Complete installation - Choose this installation type to install recommended ESET Security for Keriofeatures. Also called full installation. This will install all ESET Security for Kerio components.
Custom installation - This installation type lets you choose which features you want to install. It is useful when youwant to customize ESET Security for Kerio with only the components you need.
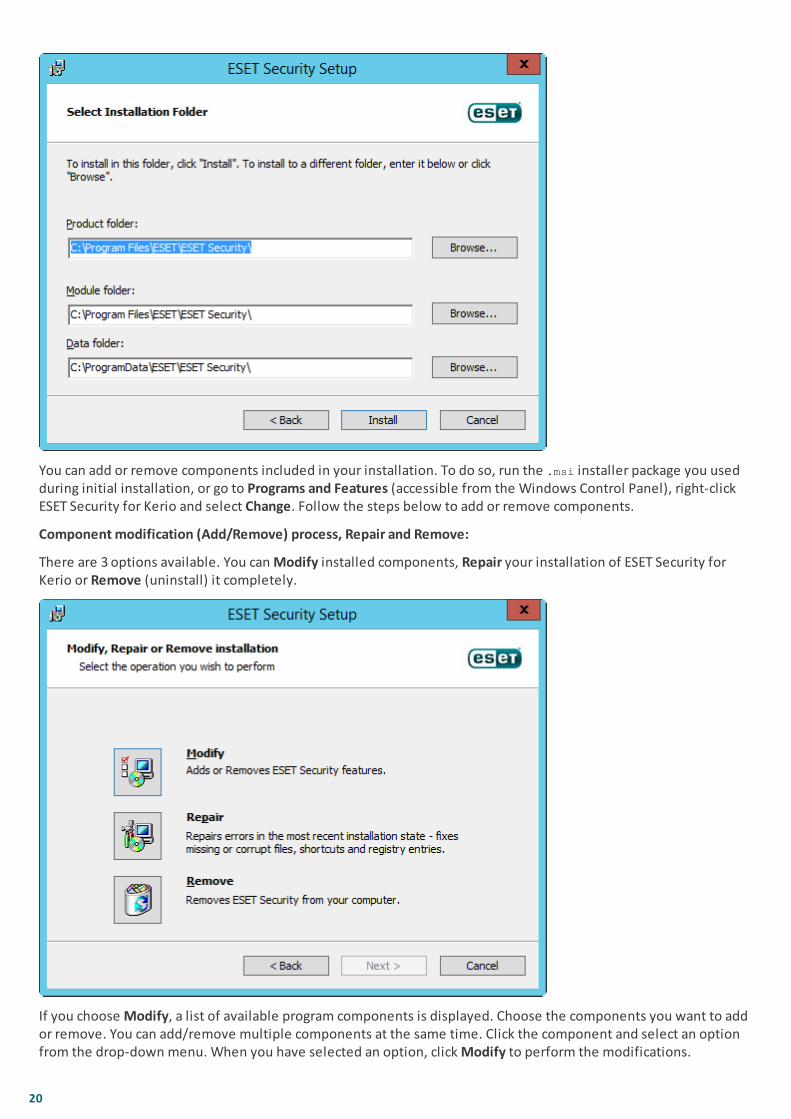
You will be prompted to select the location where ESET Security for Kerio will be installed. By default, the programinstalls in C:\Program Files\ESET\ESET Security for Kerio. Click Browse to change this location (not recommended).
20
You can add or remove components included in your installation. To do so, run the .msi installer package you usedduring initial installation, or go to Programs and Features (accessible from the Windows Control Panel), right-clickESET Security for Kerio and select Change. Follow the steps below to add or remove components.
Component modification (Add/Remove) process, Repair and Remove:
There are 3 options available. You can Modify installed components, Repair your installation of ESET Security forKerio or Remove (uninstall) it completely.
If you choose Modify, a list of available program components is displayed. Choose the components you want to addor remove. You can add/remove multiple components at the same time. Click the component and select an optionfrom the drop-down menu. When you have selected an option, click Modify to perform the modifications.

21
NOTEYou can modify installed components at any time by running the installer. For most components, a server restartis not necessary to carry out the change. The GUI will restart and you will only see the components you chose toinstall. For components that require a server restart, the Windows Installer will prompt you to restart and newcomponents will become available once the server is back online.
2.1.1 Command line installation
The following settings are intended for use only with the reduced, basic and none level of the user interface. Seedocumentation for the msiexec version used for the appropriate command line switches.
Supported parameters:
APPDIR=<path>
· path - Valid directory path
· Application installation directory
· For example: efsw_nt64_ENU.msi /qn APPDIR=C:\ESET\ ADDLOCAL=DocumentProtection
APPDATADIR=<path>
· path - Valid directory path
· Application Data installation directory
MODULEDIR=<path>
· path - Valid directory path
· Module installation directory
ADDEXCLUDE=<list>
· The ADDEXCLUDE list is a comma-separated list of all feature names not to be installed, as a replacement for theobsolete REMOVE.
· When selecting a feature not to install, then the whole path (i.e., all its sub-features) and related invisiblefeatures must be explicitly included in the list.
· For example: efsw_nt64_ENU.msi /qn ADDEXCLUDE=<list>
NOTEADDEXCLUDE cannot be used with ADDLOCAL.
ADDLOCAL=<list>
· Component installation - list of non-mandatory features to be installed locally.
· Usage with ESET .msi packages: efsw_nt64_ENU.msi /qn ADDLOCAL=<list>
· For more information about the ADDLOCAL property see http://msdn.microsoft.com/en-us/library/aa367536%28v=vs.85%29.aspx
Rules
· The ADDLOCAL list is a comma-separated list of all feature that will be installed.
· When selecting a feature to install, the full path (all parent features) must be explicitly included in the list.
· See additional rules for correct usage.
Feature Presence
· Mandatory - the feature is always installed
· Optional - the feature may be deselected for install
· Invisible - logical feature mandatory for other features to work properly
· Placeholder - feature with no effect on the product, listed with sub-features
Below is an example of the ESET Security for Kerio feature tree:
Feature tree Feature Name Feature Presence
Computer Computer Mandatory

22
Computer / Antivirus and antispyware Antivirus MandatoryComputer / Antivirus and antispyware > Real-time filesystem protection
RealtimeProtection Mandatory
Computer / Antivirus and antispyware > Computer scan Scan MandatoryComputer / Antivirus and antispyware > Documentprotection
DocumentProtection Optional
Computer / Device control DeviceControl OptionalUpdate mirror UpdateMirror Optional
Command line Core installation examples:
msiexec /qn /i efsw_nt64_ENU.msi /l inst.log ADDLOCAL=HIPS,_Base,SERVER,_FeaturesCore,WMIProvider,Scan,Updater,eShell,UpdateMirror,RealtimeProtection,_License
msiexec /qn /i efsw_nt64_ENU.msi /l*xv msi.log ADDLOCAL=SERVER,eShell,RealtimeProtection CFG_POTENTIALLYUNWANTED_ENABLED=0 CFG_LIVEGRID_ENABLED=0
List of CFG_ properties:
CFG_POTENTIALLYUNWANTED_ENABLED=1/0
· 0 - Disabled, 1 - Enabled
CFG_LIVEGRID_ENABLED=1/0
· 0 - Disabled, 1 - Enabled
· LiveGrid
FIRSTSCAN_ENABLE=1/0
· 0 - Disable, 1 - Enable
· Schedule a new FirstScan after installation
CFG_PROXY_ENABLED=0/1
· 0 - Disabled, 1 - Enabled
CFG_PROXY_ADDRESS=<ip>
· Proxy IP address
CFG_PROXY_PORT=<port>
· Proxy port number
CFG_PROXY_USERNAME=<user>
· User name for authentication
CFG_PROXY_PASSWORD=<pass>
· Password for authentication
2.1.1.1 ESET AV Remover
To remove/uninstall third-party antivirus software from your system, we recommend that you use the ESET AVRemover. To do so, follow these steps:
1. Download the ESET AV Remover from ESET website Utilities download page.
2. Click I accept, start search to accept the EULA and begin searching your system.
3. Click Launch uninstaller to remove the installed antivirus software.
For a list of third-party antivirus software that can be removed using ESET AV Remover see this KB article.

23
2.2 Product activation
When installation is complete, you will be prompted to activate your product.
Select one of the available methods to activate ESET Security for Kerio. See How to activate ESET Security for Keriofor more information.

24
After you've successfully activated ESET Security for Kerio, the main program window will open and display yourcurrent status in the Monitoring page. Some attention may be required initially, for example, you'll be asked if youwant to be part of ESET LiveGrid®.
The main program window will also display notifications about other items, such as system updates (WindowsUpdates) or virus signature database updates. When all items that require attention are resolved, the monitoringstatus will turn green and display the status Maximum protection.
2.3 Terminal Server
If you are installing ESET Security for Kerio on a Windows Server that acts as a Terminal Server, you may want todisable the ESET Security for Kerio GUI to prevent it from starting up every time a user logs in. See Disable GUI onTerminal Server for specific steps to disable the GUI.

25
3. Beginner's guideThis chapter provides an overview of ESET Security for Kerio, the main parts of the menu, functionalities and basicsettings.
· Monitoring
· Log files
· Scan
· Update
· Setup
· Tools
· Help and support
3.1 Monitoring
The protection status shown in the Monitoring section informs you about the current protection level of yourcomputer. A status summary about the operation of ESET Security for Kerio will be displayed in the primary window.
The green Maximum protection status indicates that maximum protection is ensured. The status window alsodisplays quick links to frequently used features in ESET Security for Kerio and information about the last update.

26
Modules that are working properly are assigned a green check. Modules that are not fully functional are assigned ared exclamation point or an orange notification icon. Additional information about the module is shown in theupper part of the window. A suggested solution for fixing the module is also displayed. To change the status of anindividual module, click Setup in the main menu and then click the desired module.
The red icon indicates critical problems - maximum protection of your computer is not ensured. A red icon willbe displayed to signal the following scenarios:
· Mail server antivirus protection disabled - Click Enable antivirus protection in the Monitoring or re-enableAntivirus mail server protection in the Setup tab of the main program window.
· You are using an outdated virus signature database - Click Update the virus signature database or click Updatenow in the Update tab of the main program window.
· Product not activated or License expired - This is indicated by the protection status icon turning red. The programis not able to update after the license expires. Follow the instructions in the alert window to renew your license.
The orange icon indicates that your ESET product requires attention for a non-critical problem. An orange iconwill be displayed to signal the following scenarios:
· Presentation mode is enabled - All pop-up windows will be suppressed and scheduled tasks paused.
· Your license will expire soon - This is indicated by the protection status icon displaying an exclamation point.After your license expires, the program will not be able to update and the Protection status icon will turn red.
· Policy override active - The configuration set by the policy is temporarily overridden, possibly untiltroubleshooting is complete.
The Monitoring page also contains information about your system including:
Product version - Version number of ESET Security for Kerio.Server Name - Machine hostname or FQDN.

27
System - Operating system details.Computer - Hardware details.Server uptime - Shows how long the system is up and running, basically the opposite of downtime.Users - ESET Security for Kerio detects the number of mailboxes on local Kerio Connect.
NOTEIf you have only Kerio Control running on your system, the Users will display 0. If you have both, Kerio Connectand Control on the same system, the Users will display number of mailboxes of Kerio Connect. User count isrefreshed every 60 minutes.
If you are unable to solve a problem using the suggested solutions, click Help and support to access the help files orsearch the ESET Knowledgebase. If you still need assistance, you can submit an ESET Customer Care support request.ESET Customer Care will respond quickly to your questions and help find a resolution.
3.2 Log files
Log files contain information about important program events that have occurred and provide an overview ofdetected threats. Logs are essential for system analysis, threat detection and troubleshooting. Logging is performedactively in the background with no user interaction. Information is recorded based on log verbosity settings. It ispossible to view text messages and logs directly from the ESET Security for Kerio environment or export them forviewing elsewhere.
Log files are accessible from the main program window by clicking Log files. Choose the desired log type from thedrop-down menu. The following logs are available:
· Detected threats - The threat log offers detailed information about infiltrations detected by ESET Security forKerio modules. This includes the time of detection, name of infiltration, location, the performed action and thename of the user logged in at the time the infiltration was detected. Double-click any log entry to display itsdetails in a separate window.
28
· Events - All important actions performed by ESET Security for Kerio are recorded in the event log. The event logcontains information about events and errors that have occurred in the program. It is designed to help systemadministrators and users resolve problems. Often the information found here can help you find a solution for aproblem occurring in the program.
· Computer scan - All scan results are displayed in this window. Each line corresponds to a single computer control.Double-click any entry to view the details of the respective scan.
· HIPS - Contains records of specific rules that are marked for recording. The protocol shows the application thatcalled the operation, the result (whether the rule was permitted or prohibited) and the name of the rule created.
· Device control - Contains records of removable media or devices that were connected to the computer. Onlydevices with a Device control rule will be recorded to the log file. If the rule does not match a connected device, alog entry for a connected device will not be created. Here you can also see details such as device type, serialnumber, vendor name and media size (if available).
· Hyper-V scan - Contains a list of Hyper-V scan results. Double-click any entry to view the details of the respectivescan.
NOTEIn each section, the displayed information can be copied to the clipboard (keyboard shortcut Ctrl + C) by selectingthe entry and clicking Copy. The Ctrl and Shift keys can be used to select multiple entries.
Click the switch icon Filtering to open the Log filtering window where you can define the filtering criteria.
To view the context menu options below, right-click a specific record:
· Show - Shows more detailed information about the selected log in a new window (same as double-click).
· Filter same records - This activates log filtering and only shows records of the same type as the one selected.
· Filter... - After clicking this option, the Log filtering window will allow you to define filtering criteria for specificlog entries.
· Enable filter - Activates filter settings. The first time that you filter logs, you must define your filtering criteria.Once filters are set they will remain unchanged until you edit them.
· Copy - Copies information from selected/highlighted record(s) to the clipboard.
· Copy all - Copies information of all the records in the window.
· Delete - Deletes selected/highlighted record(s) - this action requires administrator privileges.
· Delete all - Deletes all the record(s) in the window - this action requires administrator privileges.
· Export... - Exports information from a selected/highlighted record(s) into an XML file.
· Export all... - Exports all the information in the window into an XML file.
· Find... - Opens the Find in log window and lets you define search criteria. Works on content that has already beenfiltered as an additional means of narrowing results.
· Find next - Finds the next occurrence of a previously defined search (above).
· Find previous - Finds the previous occurrence of a previously defined search (above).
· Scroll log - Leave this option enabled to auto scroll old logs and view active logs in the Log files window.
29
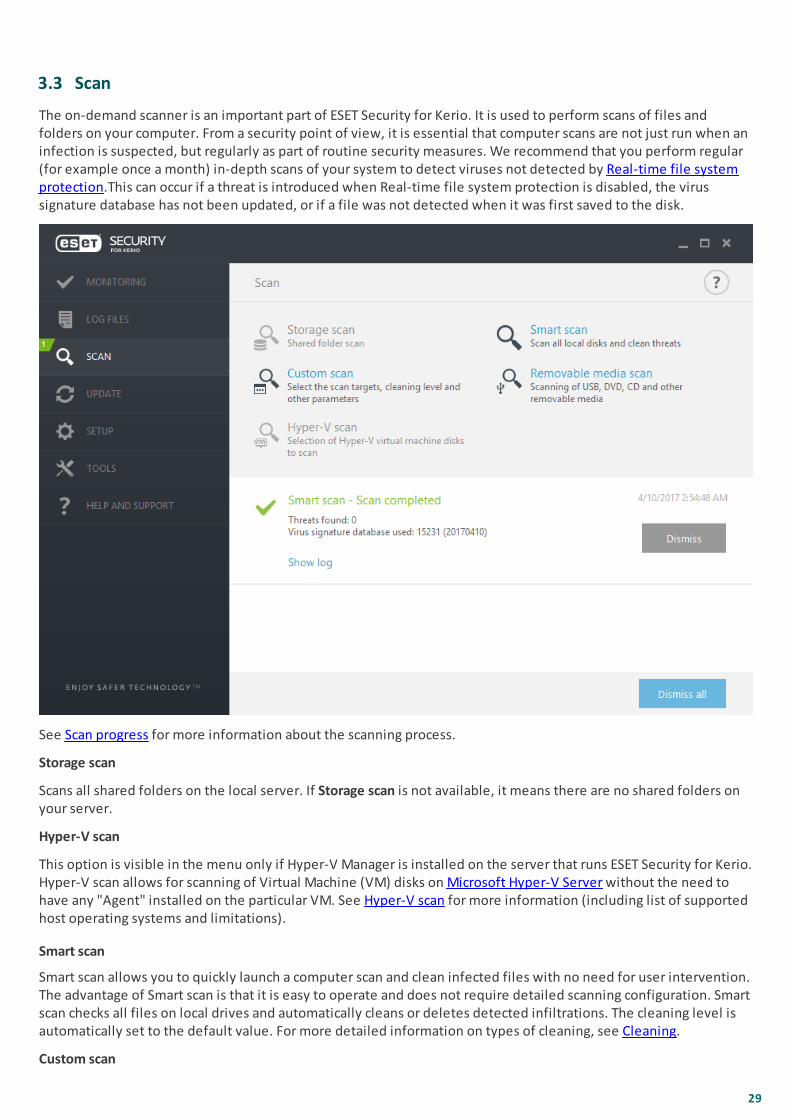
3.3 Scan
The on-demand scanner is an important part of ESET Security for Kerio. It is used to perform scans of files andfolders on your computer. From a security point of view, it is essential that computer scans are not just run when aninfection is suspected, but regularly as part of routine security measures. We recommend that you perform regular(for example once a month) in-depth scans of your system to detect viruses not detected by Real-time file systemprotection.This can occur if a threat is introduced when Real-time file system protection is disabled, the virussignature database has not been updated, or if a file was not detected when it was first saved to the disk.
See Scan progress for more information about the scanning process.
Storage scan
Scans all shared folders on the local server. If Storage scan is not available, it means there are no shared folders onyour server.
Hyper-V scan
This option is visible in the menu only if Hyper-V Manager is installed on the server that runs ESET Security for Kerio.Hyper-V scan allows for scanning of Virtual Machine (VM) disks on Microsoft Hyper-V Server without the need tohave any "Agent" installed on the particular VM. See Hyper-V scan for more information (including list of supportedhost operating systems and limitations).
Smart scan
Smart scan allows you to quickly launch a computer scan and clean infected files with no need for user intervention.The advantage of Smart scan is that it is easy to operate and does not require detailed scanning configuration. Smartscan checks all files on local drives and automatically cleans or deletes detected infiltrations. The cleaning level isautomatically set to the default value. For more detailed information on types of cleaning, see Cleaning.
Custom scan
30
Custom scan is an optimal solution if you want to specify scanning parameters such as scan targets and scanningmethods. The advantage of Custom scan is the ability to configure the parameters in detail. Configurations can besaved to user-defined scan profiles, which can be useful if scanning is repeatedly performed using the sameparameters.
To select scan targets, select Computer scan > Custom scan and select an option from the Scan targets drop-downmenu, or select specific targets from the tree structure. A scan target can also be specified by entering the path ofthe folder or file(s) you want to include. If you are only interested in scanning the system without additionalcleaning actions, select Scan without cleaning. When performing a scan, you can choose from three cleaning levelsby clicking Scan > Custom Scan > Setup... > ThreatSense parameters > Cleaning.
NOTEPerforming computer scans with Custom scan is only recommended for advanced users with previous experienceusing antivirus programs.
Removable media scan
Similar to Smart scan - quickly launch a scan of removable media (such as CD/DVD/USB) that are connected to thecomputer. This may be useful when you connect a USB flash drive to a computer and want to scan its content formalware and other potential threats.
This type of scan can be also initiated by clicking Custom scan and then selecting Removable media from the Scantargets drop-down menu and clicking Scan.
Repeat last scan
Runs the last scan, whichever it was (Storage, Smart, Custom, etc.), with the exact same settings.
NOTEWe recommend that you run a computer scan at least once a month. Scanning can be configured as a scheduledtask from Tools > Scheduler.
3.3.1 Hyper-V scan
This type of scan allows you to scan the disks of a Microsoft Hyper-V Server, which is a virtual machine (VM), withoutthe need to have any Agent installed on the VM. The ESET security is installed using Administrative privileges forthe Hyper-V server.
Current version of Hyper-V scan supports scanning of online or offline virtual system in Hyper-V. Supported types ofscanning according to hosted Windows Hyper-V system and state of virtual system are shown here:
Virtual systems with Hyper-Vfeature
Windows Server2008 R2 Hyper-V
Windows Server2012 Hyper-V
Windows Server 2012R2 Hyper-V
Windows Server 2016Hyper-V
online VM no scan read-only read-only read-only
offline VM read-only/cleaning
read-only/cleaning read-only/cleaning read-only/cleaning
Hardware requirements
The server should have no performance issues running Virtual Machines. Scanning activity primarily uses CPUresources.To scan online VMs, free disk space is required. Disk space must be at least double the space used by checkpoints/snapshots and virtual disks.
Specific limitations
· Scanning on RAID storage, Spanned Volumes and Dynamic Disks are not supported due to the nature of DynamicDisks. Therefore, we recommend that you avoid using the Dynamic Disk type in your VMs if possible.
· Scanning is always performed the current VM and does not affect checkpoints or snapshots.
· Hyper-V running on a host in a cluster is currently not supported by ESET Security for Kerio.
31
· Virtual Machines on a Hyper-V host running on Windows Server 2008 R2 can only be scanned in read-only mode(No cleaning), regardless of what cleaning level is selected in ThreatSense parameters.
NOTEWhile ESET Security supports the scan of virtual disk MBRs, read-only scanning is the only method supported forthese targets. This setting can be changed in Advanced setup > Computer > Hyper-V scan > ThreatSenseparameters > Boot sectors.
Virtual Machine to be scanned is "offline" - switched Off state
ESET Security for Kerio uses Hyper-V Management to detect and to connect to virtual disks. This way, ESET Securityfor Kerio has the same access to the content of the virtual disks it does when accessing data and files on any genericdrive.
Virtual Machine to be scanned is "online" - Running, Paused, Saved state
ESET Security for Kerio uses Hyper-V Management to detect virtual disks. Actual connection to these the disks is notpossible. Therefore, ESET Security for Kerio creates a checkpoint/snapshot of the Virtual Machine, then connects tothe checkpoint/snapshot. Once the scan is completed, the checkpoint/snapshot is deleted. This means that read-only scan can be performed because the running Virtual Machine(s) are unaffected by scan activity.
Allow up to one minute for ESET Security to create a snapshot or checkpoint during scanning. You should take thisinto account when running a Hyper-V scan on a larger number of Virtual Machines.
Naming convention
The module of Hyper-V Scan uses the following naming convention:VirtualMachineName\DiskX\VolumeY
where X is the number of disks and Y is the number of volumes.for example, “Computer\Disk0\Volume1”.
The number suffix is added based on the order of detection, and is identical to the order seen in the Disk Managerof the VM.This naming convention is used in the tree-structured list of targets to be scanned, in the progress bar and also inthe log files.
Executing a scan
A scan can be executed 3 ways:
· On-demand - Click Hyper-V Scan to view a list of Virtual Machines and volumes available for scanning.
· Select the Virtual Machine(s), disk(s) or volume(s) you want to scan and click Scan.
· Via the scheduler.
· Via ESET Remote Administrator as a Client Task called Server Scan.
It is possible to execute several Hyper-V scans simultaneously.
You will receive a notification with a link to log files when a scan is complete.
Possible issues
· When executing the scan of an online Virtual Machine, a checkpoint/snapshot of the particular Virtual Machinehas to be created and during the creation of a checkpoint/snapshot some generic actions of the Virtual Machinemight be limited or disabled.
· If an offline Virtual Machine is being scanned, it cannot be turned on until the scan is finished.
· Hyper-V Manager allows you to name two different Virtual Machines identically and this presents an issue whentrying to differentiate the machines while reviewing the scan logs.

32
3.4 Update
Regularly updating ESET Security for Kerio is the best method to maintain the maximum level of security on yourcomputer. The Update module ensures that the program is always up to date in two ways, by updating the virussignature database and system components.
Click Update in the main program window to view the current update status of your system, including the date andtime of the last successful update. The primary window also contains the virus signature database version. Theupdate version number is an active link to information about signatures added in the given update.
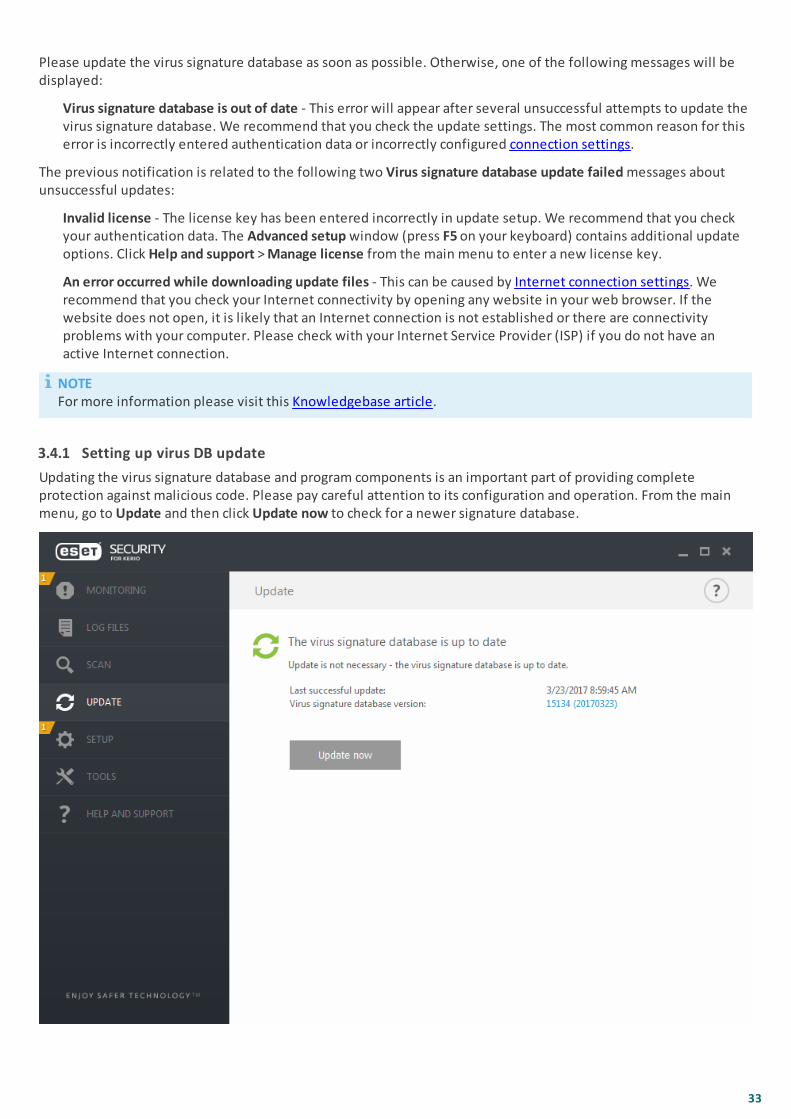
Click Update now to check for updates. Updating the virus signature database and updating program componentsare important parts of maintaining complete protection against malicious code.
Last successful update - The date of the last update. Make sure it refers to a recent date, which means that the virussignature database is current.
Virus signature database version - The virus signature database number, which is also an active link to the ESETwebsite. Click this to view a list of all signatures added in a given update.
Update process
After clicking Update now, the download process begins and the progress of the update is displayed. To interruptthe update click Cancel update.
IMPORTANTUnder normal circumstances, when updates are downloaded properly the message Update is not necessary - thevirus signature database is up to date will appear in the Update window. If this is not the case, the program is outof date and more vulnerable to infection.
33
Please update the virus signature database as soon as possible. Otherwise, one of the following messages will bedisplayed:
Virus signature database is out of date - This error will appear after several unsuccessful attempts to update thevirus signature database. We recommend that you check the update settings. The most common reason for thiserror is incorrectly entered authentication data or incorrectly configured connection settings.
The previous notification is related to the following two Virus signature database update failed messages aboutunsuccessful updates:
Invalid license - The license key has been entered incorrectly in update setup. We recommend that you checkyour authentication data. The Advanced setup window (press F5 on your keyboard) contains additional updateoptions. Click Help and support > Manage license from the main menu to enter a new license key.
An error occurred while downloading update files - This can be caused by Internet connection settings. Werecommend that you check your Internet connectivity by opening any website in your web browser. If thewebsite does not open, it is likely that an Internet connection is not established or there are connectivityproblems with your computer. Please check with your Internet Service Provider (ISP) if you do not have anactive Internet connection.
NOTEFor more information please visit this Knowledgebase article.
3.4.1 Setting up virus DB update
Updating the virus signature database and program components is an important part of providing completeprotection against malicious code. Please pay careful attention to its configuration and operation. From the mainmenu, go to Update and then click Update now to check for a newer signature database.

34
You can configure update settings from the Advanced setup window (press the F5 key on your keyboard). Toconfigure advanced update options such as the update mode, proxy server access, LAN connection and virussignature copy settings (Mirror), click Update > Profiles. If you experience problems with an update, click Clear toclear the temporary update cache.

35
The Update server menu is set to Choose automatically by default. Choose automatically means that the updateserver, from which the virus signature updates are downloaded, is chosen automatically. We recommend that youleave the default option selected. If you do not want the the system tray notification at the bottom right corner ofthe screen to appear, select Disable display notification about successful update.
For optimal functionality, it is important that the program is automatically updated. This is only possible if thecorrect License key is entered in Help and support > Activate License.
If you did not activate your product following installation, you can do so at any time. For more detailed informationabout activation see How to activate ESET Security for Kerio and enter the license data you received with your ESETsecurity product into the License details window.
36
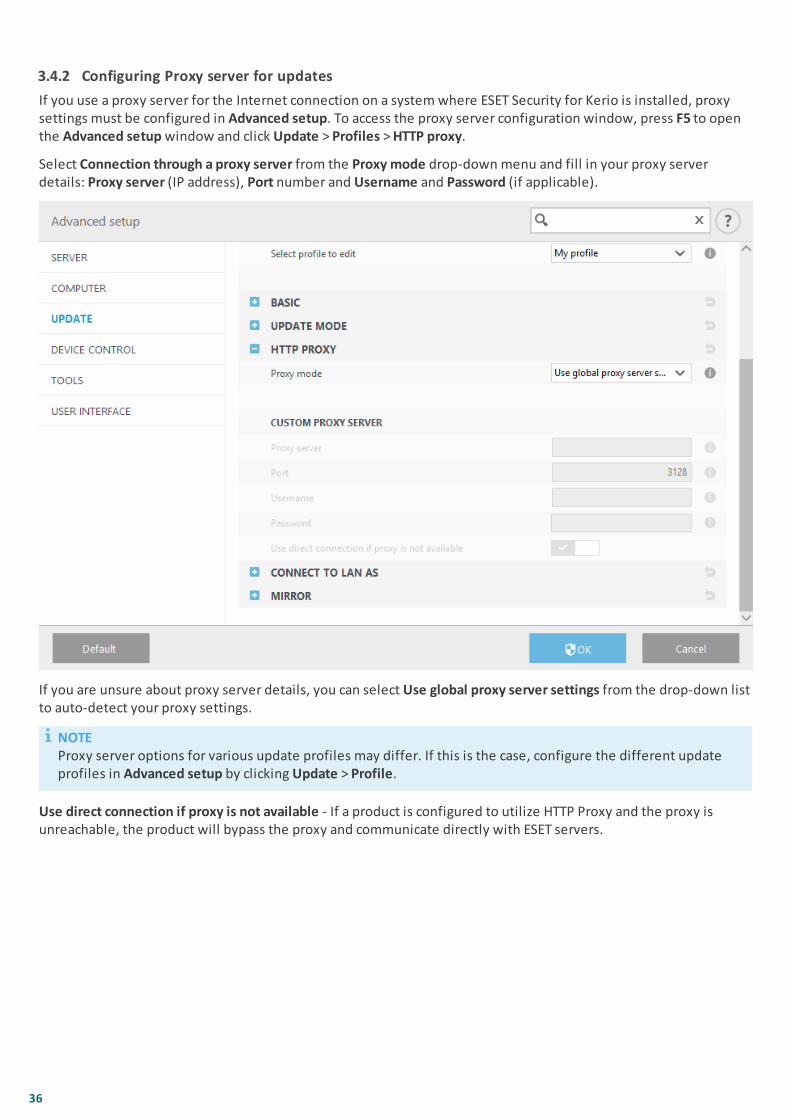
3.4.2 Configuring Proxy server for updates
If you use a proxy server for the Internet connection on a system where ESET Security for Kerio is installed, proxysettings must be configured in Advanced setup. To access the proxy server configuration window, press F5 to openthe Advanced setup window and click Update > Profiles > HTTP proxy.
Select Connection through a proxy server from the Proxy mode drop-down menu and fill in your proxy serverdetails: Proxy server (IP address), Port number and Username and Password (if applicable).
If you are unsure about proxy server details, you can select Use global proxy server settings from the drop-down listto auto-detect your proxy settings.
NOTEProxy server options for various update profiles may differ. If this is the case, configure the different updateprofiles in Advanced setup by clicking Update > Profile.
Use direct connection if proxy is not available - If a product is configured to utilize HTTP Proxy and the proxy isunreachable, the product will bypass the proxy and communicate directly with ESET servers.

37
3.5 Setup
The Setup menu contains the following sections:
· Server
· Computer
· Tools
To temporarily disable individual modules, click the green switch next to the desired module. Note that thismay decrease the protection level of your computer.
To re-enable the protection of a disabled security component, click the red switch to return a component to itsenabled state.
To access detailed settings for a particular security component, click the gear icon .
Click Advanced setup or press F5 to configure advanced settings.
There are additional options at the bottom of the setup window. To load setup parameters using an .xmlconfiguration file, or to save the current setup parameters to a configuration file, use Import/Export settings. Pleasesee Import/Export settings for more detailed information.
38
3.5.1 Server
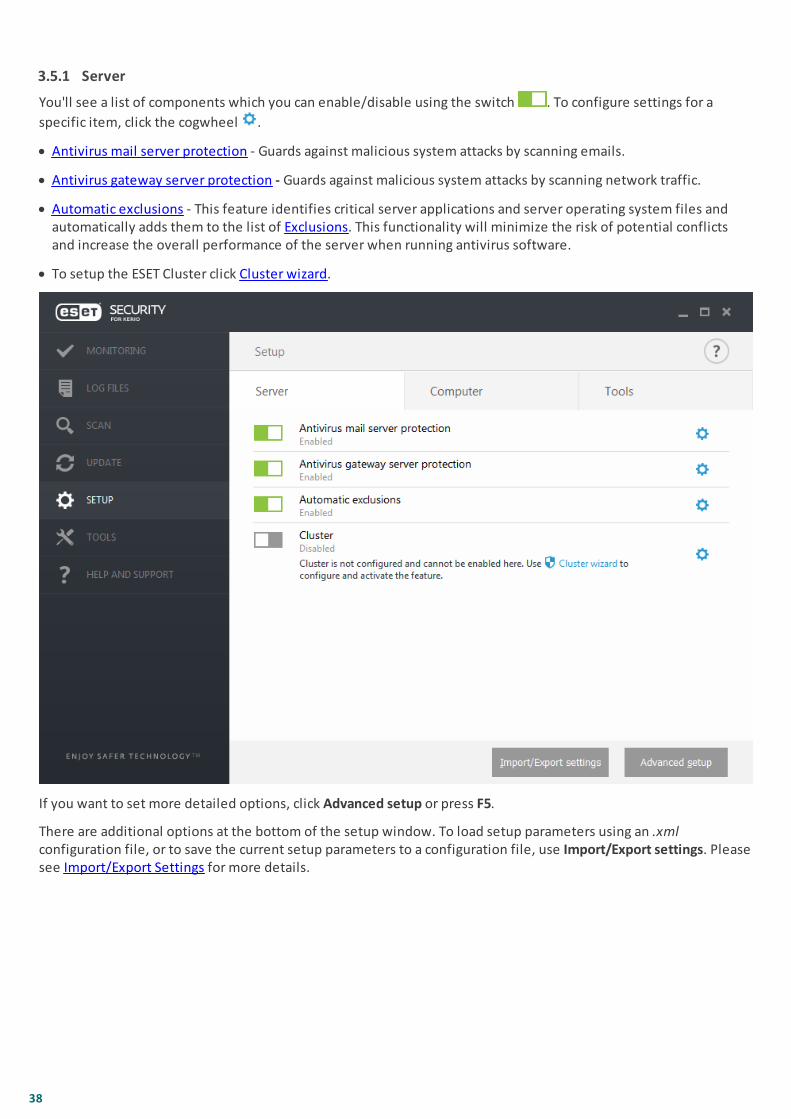
You'll see a list of components which you can enable/disable using the switch . To configure settings for a
specific item, click the cogwheel .
· Antivirus mail server protection - Guards against malicious system attacks by scanning emails.
· Antivirus gateway server protection - Guards against malicious system attacks by scanning network traffic.
· Automatic exclusions - This feature identifies critical server applications and server operating system files andautomatically adds them to the list of Exclusions. This functionality will minimize the risk of potential conflictsand increase the overall performance of the server when running antivirus software.
· To setup the ESET Cluster click Cluster wizard.
If you want to set more detailed options, click Advanced setup or press F5.
There are additional options at the bottom of the setup window. To load setup parameters using an .xmlconfiguration file, or to save the current setup parameters to a configuration file, use Import/Export settings. Pleasesee Import/Export Settings for more details.

39
3.5.2 Computer
ESET Security for Kerio has all of the necessary components to ensure significant protection of the server as acomputer. Each component provides a specific type of protection, such as: Antivirus and Antispyware, Real-time filesystem protection, etc.
The Computer section can be found under Setup > Computer. You'll see a list of components which you can enable/
disable using the switch . To configure settings for a specific item, click the gear icon .
For Real-time file system protection, there is also an option to Edit exclusions, which will open the exclusions setupwindow where you can exclude files and folders from scanning.
Pause Antivirus and antispyware protection - Any time that you temporarily disable Antivirus and antispywareprotection, you can select the period of time for which you want the selected component to be disabled using thedrop-down menu and then click Apply to disable the security component. To re-enable protection, click EnableAntivirus and antispyware protection.
The Computer module allows you to enable/disable and configure the following components:
· Real-time file system protection - All files are scanned for malicious code when they are opened, created or runon your computer.
· Document protection - The document protection feature scans Microsoft Office documents before they areopened, as well as files downloaded automatically by Internet Explorer, such as Microsoft ActiveX elements.
NOTEDocument protection is disabled by default. If you want, you can easily enable it by clicking the switch icon.
· Device control - This module allows you to scan, block or adjust extended filters/permissions and define a user'sability to access and work with a given device.
· HIPS - The HIPS system monitors events that occur within the operating system and reacts to them according to acustomized set of rules.

40
· Presentation mode - A feature for users that demand uninterrupted usage of their software, do not want to bedisturbed by pop-up windows, and want to minimize CPU usage. You will receive a warning message (potentialsecurity risk) and the main program window will turn orange after enabling Presentation mode.
· Anti-Stealth protection - Provides detection of dangerous programs, such as rootkits, which are able to hidethemselves from the operating system. This means it is not possible to detect them using ordinary testingtechniques.
There are additional options at the bottom of the setup window. To load setup parameters using an .xmlconfiguration file, or to save the current setup parameters to a configuration file, use Import/Export settings. Pleasesee Import/Export settings for more detailed information.
If you want to set more detailed options, click Advanced setup or press F5.
3.5.3 Tools
Diagnostic logging - When you click the switch to enable diagnostic logging, you can choose for how long it will beenabled (10 minutes, 30 minutes, 1 hour, 4 hours, 24 hours, until next server restart or permanently).
When you click the gear icon , the Advanced setup window where you can configure which components will writediagnostic logs (when diagnostic logging is enabled) will open.
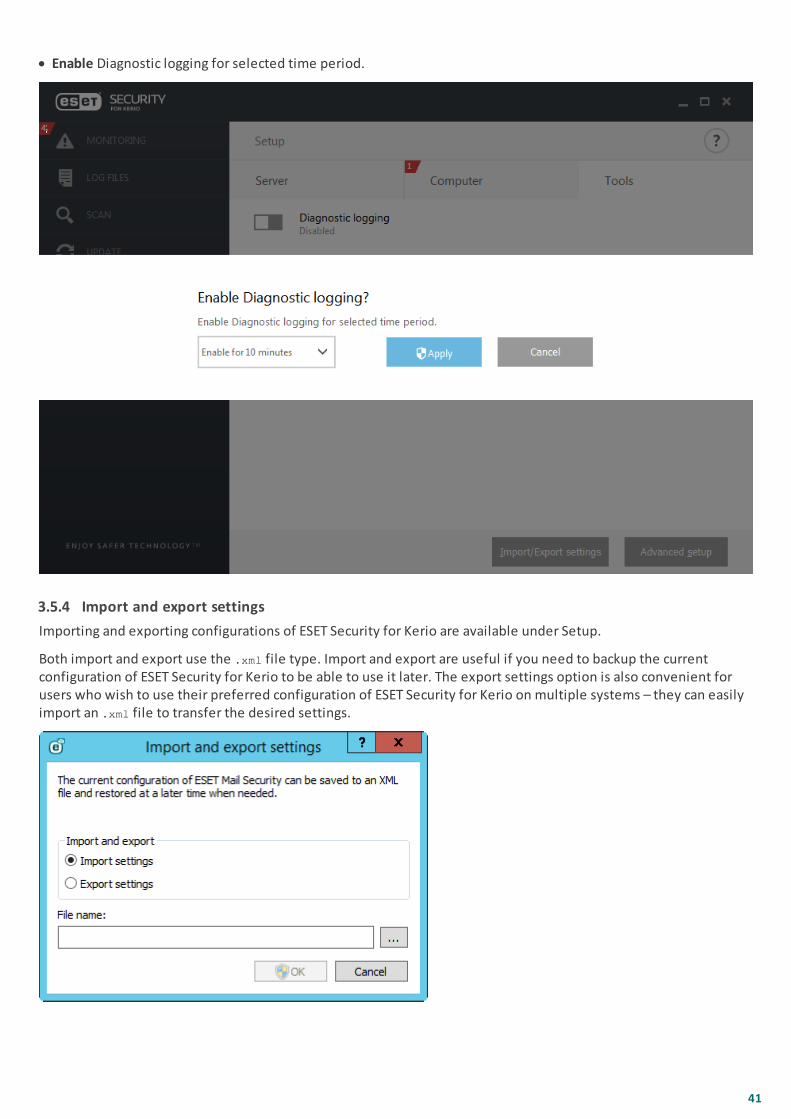
41
· Enable Diagnostic logging for selected time period.
3.5.4 Import and export settings
Importing and exporting configurations of ESET Security for Kerio are available under Setup.
Both import and export use the .xml file type. Import and export are useful if you need to backup the currentconfiguration of ESET Security for Kerio to be able to use it later. The export settings option is also convenient forusers who wish to use their preferred configuration of ESET Security for Kerio on multiple systems – they can easilyimport an .xml file to transfer the desired settings.

42
3.6 Tools
The Tools menu includes modules that help simplify program administration and offer additional options. Itincludes the following tools:
· Running processes
· Watch activity
· Protection statistics
· Cluster
· ESET Shell
· ESET SysInspector
· ESET SysRescue Live
· Scheduler
· Submit sample for analysis
· Quarantine

43
3.6.1 Running processes
Running processes displays the running programs or processes on your computer and keeps ESET immediately andcontinuously informed about new infiltrations. ESET Security for Kerio provides detailed information on runningprocesses to protect users with ESET LiveGrid® technology enabled.
Risk level - In most cases, ESET Security for Kerio and ESET LiveGrid® technology assign risk levels to objects (files,processes, registry keys, etc.) using a series of heuristic rules that examine the characteristics of each object andthen weigh their potential for malicious activity. Based on these heuristics, objects are assigned a risk level from 1-Fine (green) to 9- Risky (red).
Process - Image name of the program or process that is currently running on your computer. You can also use theWindows Task Manager to see all running processes on your computer. You can open Task Manager by right-clickingan empty area on the taskbar and then clicking Task Manager, or by pressing Ctrl+Shift+Esc on your keyboard.
PID - Is an ID of processes running in Windows operating systems.
NOTEKnown applications marked as Fine (green) are definitely clean (whitelisted) and will be excluded fromscanning, as this will improve the scanning speed of on-demand computer scan or Real-time file systemprotection on your computer.
Number of users - The number of users that use a given application. This information is gathered by ESET LiveGrid®technology.
Time of discovery - Period of time since the application was discovered by ESET LiveGrid® technology.
NOTEWhen an application is marked as Unknown (orange), it is not necessarily malicious software. Usually it is just anewer application. If you are not sure about the file, use the Submit sample for analysis feature to send the file

44
to the ESET Virus Lab. If the file turns out to be a malicious application, its detection will be added to one of theupcoming Virus Signature Database updates.
Application name - Given name of a program this process belongs to.
By clicking a given application at the bottom, the following information will appear at the bottom of the window:
· Path - Location of an application on your computer.
· Size - File size either in kB (kilobytes) or MB (megabytes).
· Description - File characteristics based on the description from the operating system.
· Company - Name of the vendor or application process.
· Version - Information from the application publisher.
· Product - Application name and/or business name.
· Created on - Date and time when an application was created.
· Modified on - Last date and time when an application was modified.
NOTEReputation can also be checked for files that do not act as running programs/processes - mark files you want tocheck, right-click them and select Advanced options > Check File Reputation using ESET LiveGrid® from thecontext menu.
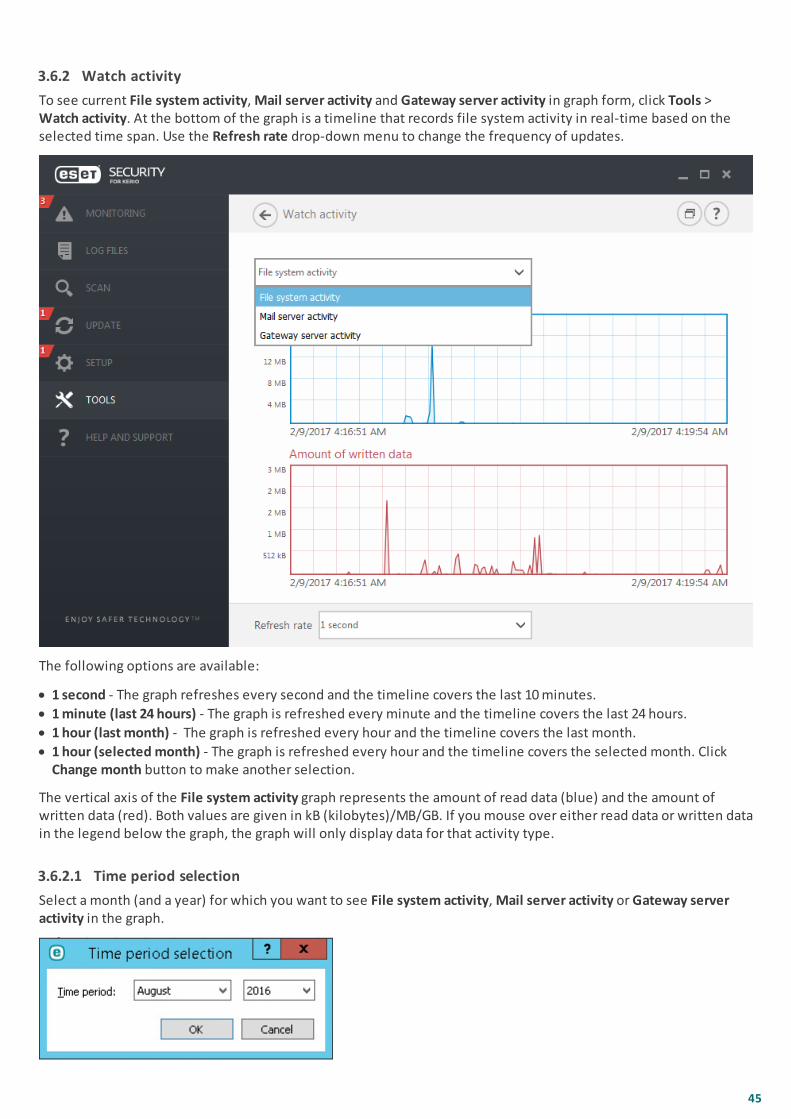
45
3.6.2 Watch activity
To see current File system activity, Mail server activity and Gateway server activity in graph form, click Tools >Watch activity. At the bottom of the graph is a timeline that records file system activity in real-time based on theselected time span. Use the Refresh rate drop-down menu to change the frequency of updates.
The following options are available:
· 1 second - The graph refreshes every second and the timeline covers the last 10 minutes.
· 1 minute (last 24 hours) - The graph is refreshed every minute and the timeline covers the last 24 hours.
· 1 hour (last month) - The graph is refreshed every hour and the timeline covers the last month.
· 1 hour (selected month) - The graph is refreshed every hour and the timeline covers the selected month. ClickChange month button to make another selection.
The vertical axis of the File system activity graph represents the amount of read data (blue) and the amount ofwritten data (red). Both values are given in kB (kilobytes)/MB/GB. If you mouse over either read data or written datain the legend below the graph, the graph will only display data for that activity type.
3.6.2.1 Time period selection
Select a month (and a year) for which you want to see File system activity, Mail server activity or Gateway serveractivity in the graph.

46
3.6.3 Protection statistics
To view a graph of statistical data related to protection modules in ESET Security for Kerio, click Tools > Protectionstatistics. Select the desired protection module from the drop-down menu to see the corresponding graph andlegend. Mouse over an item in the legend to display data for that item in the graph.
The following statistic graphs are available:
· Antivirus and antispyware protection - Displays the overall number of infected and cleaned objects.
· File system protection - Displays objects that were read or written to the file system only.
· Mail server protection - Displays antivirus and antispyware mail server statistics.
· Server web access protection - Displays number of declined HTTP connections due to found threat.
· Web access and Anti-Phishing protection - Displays objects downloaded by web browsers only.
· Mail transport protection activity - Displays objects verified/blocked/deleted by the mail server.
· Mail transport protection performance - Displays data processed by SMTP task (object count, object size and scantime) for specific time period.
· Gateway server protection activity - Displays objects verified/blocked/deleted on the network traffic that flowsthrough Kerio Control.
· Gateway server protection performance - Displays data processed by ESET Security for Kerio on the network traffic(object count, object size and scan time) for specific time period.
Next to the statistics graphs, you can see the number of all scanned, infected, cleaned and clean objects. Click Resetto clear statistics information, or click Reset all to clear and remove all existing data.
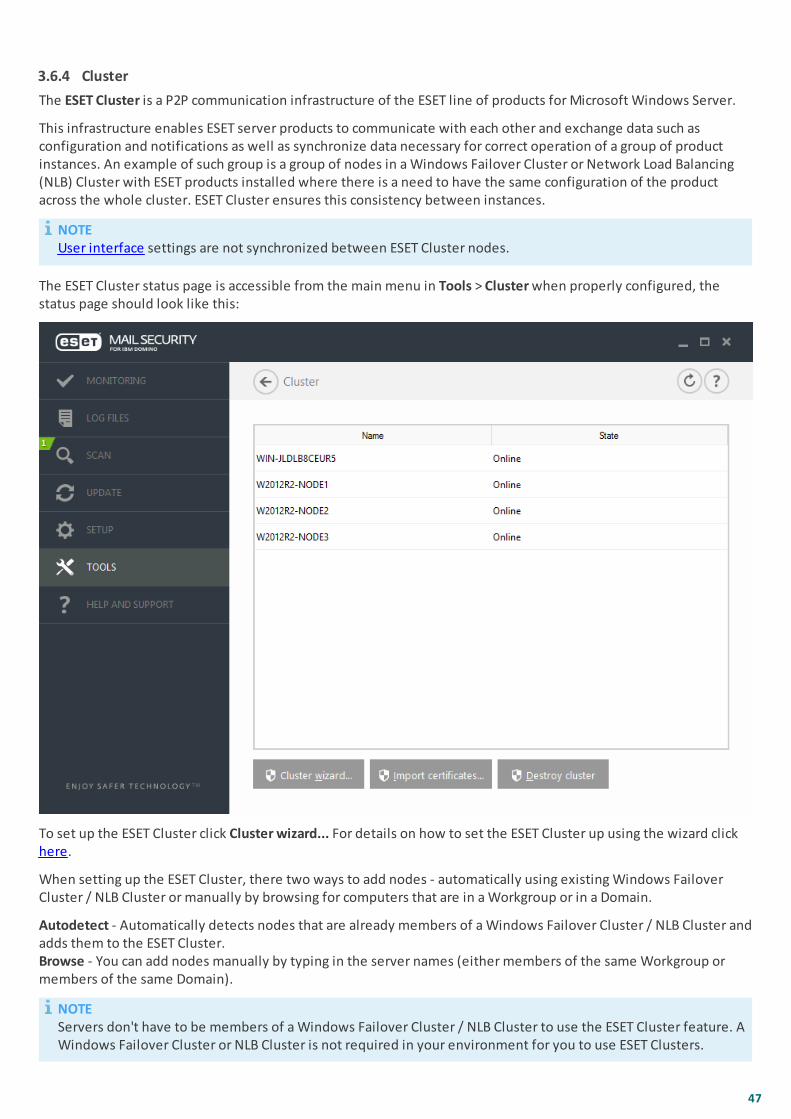
47
3.6.4 Cluster
The ESET Cluster is a P2P communication infrastructure of the ESET line of products for Microsoft Windows Server.
This infrastructure enables ESET server products to communicate with each other and exchange data such asconfiguration and notifications as well as synchronize data necessary for correct operation of a group of productinstances. An example of such group is a group of nodes in a Windows Failover Cluster or Network Load Balancing(NLB) Cluster with ESET products installed where there is a need to have the same configuration of the productacross the whole cluster. ESET Cluster ensures this consistency between instances.
NOTEUser interface settings are not synchronized between ESET Cluster nodes.
The ESET Cluster status page is accessible from the main menu in Tools > Cluster when properly configured, thestatus page should look like this:
To set up the ESET Cluster click Cluster wizard... For details on how to set the ESET Cluster up using the wizard clickhere.
When setting up the ESET Cluster, there two ways to add nodes - automatically using existing Windows FailoverCluster / NLB Cluster or manually by browsing for computers that are in a Workgroup or in a Domain.
Autodetect - Automatically detects nodes that are already members of a Windows Failover Cluster / NLB Cluster andadds them to the ESET Cluster.Browse - You can add nodes manually by typing in the server names (either members of the same Workgroup ormembers of the same Domain).
NOTEServers don't have to be members of a Windows Failover Cluster / NLB Cluster to use the ESET Cluster feature. AWindows Failover Cluster or NLB Cluster is not required in your environment for you to use ESET Clusters.

48
Once you have added nodes to your ESET Cluster, the next step is the installation of ESET Security for Kerio on eachnode. This is done automatically during ESET Cluster setup.
Credentials that are required for remote installation of ESET Security for Kerio on other cluster nodes:
· Domain scenario - domain administrator credentials
· Workgroup scenario - you need to make sure that all nodes use the same local administrator accountcredentials
In an ESET Cluster, you can also use a combination of nodes added automatically as members of an existingWindows Failover Cluster / NLB Cluster and nodes added manually (provided they are in the same Domain).
NOTEIt is not possible to combine domain nodes with workgroup nodes.
Another requirement for the use of an ESET Cluster is that File and Printer Sharing must be enabled in WindowsFirewall before pushing ESET Security for Kerio solutions to ESET Cluster nodes.
ESET Clusters can be dismantled by clicking Destroy cluster. Each node will write a record in their event log aboutthe ESET Cluster being destroyed. After that, all ESET firewall rules are removed from the Windows Firewall. Formernodes will be reverted to their previous state and can be used again in another ESET Cluster if necessary.
NOTEThe creation of ESET Clusters between ESET Security for Kerio and ESET File Security for Linux is not supported.
Adding new nodes to an existing ESET Cluster can be done anytime by running the Cluster wizard as described aboveand here.

49
3.6.4.1 Cluster wizard - page 1
The first step when setting up an ESET Cluster is adding nodes. You can either use the Autodetect option or Browseto add nodes. Alternatively, you can type the server name into the text box and click Add.
Autodetect automatically adds nodes from an existing Windows Failover Cluster / Network Load Balancing (NLB)Cluster. The server you are using to create the ESET Cluster from needs to be a member of this Windows FailoverCluster / NLB Cluster in order to automatically add the nodes. The NLB Cluster must have the Allow remote controlfeature enabled in cluster properties for the ESET Cluster to detect the nodes correctly. Once you have the list ofnewly added nodes, you can remove unwanted ones.
Click Browse to find and select computers within a Domain or a Workgroup. This method allows for the manualaddition of nodes to the ESET Cluster. Another way to add nodes is by typing the host name of the server you wantadd and clicking Add.
To modify Cluster nodes in the list, select the node you want to remove and click Remove, or to clear the listcompletely click Remove all.
If you already have an existing ESET Cluster, you can add new nodes to it at any time. The steps are the same asdescribed above.
NOTEAll nodes that remain in the list must be online and reachable. Localhost is added into the cluster nodes bydefault.
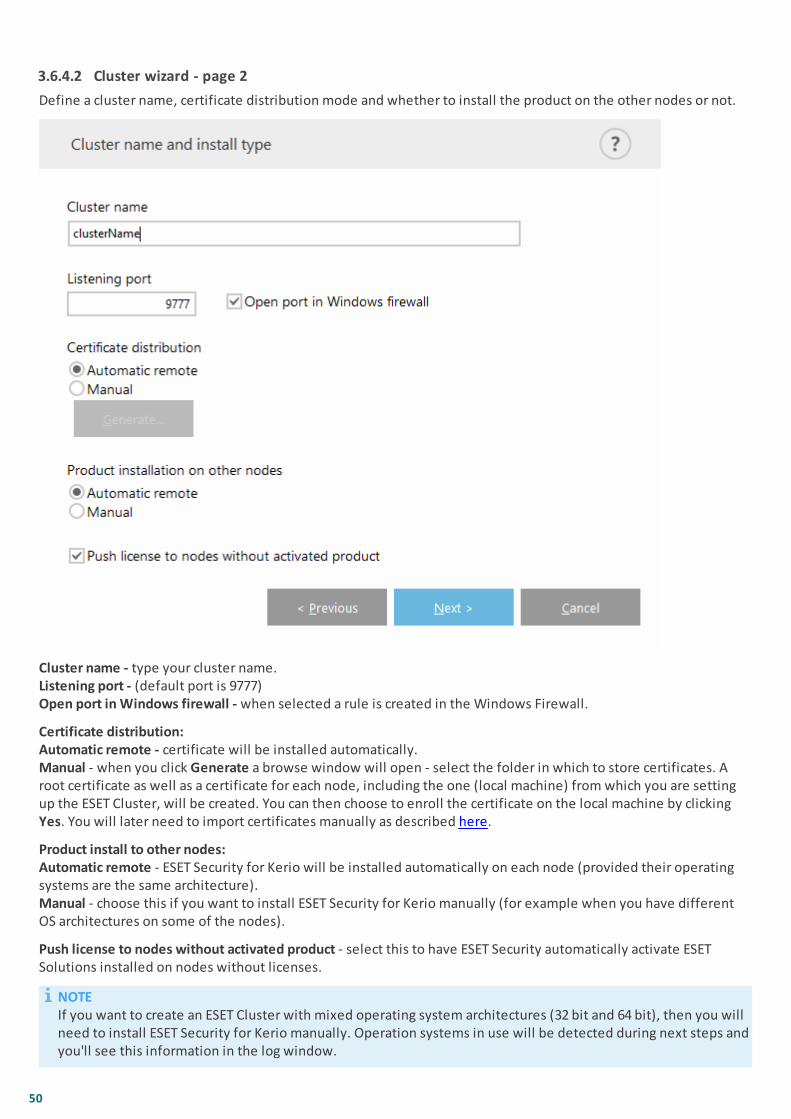
50
3.6.4.2 Cluster wizard - page 2
Define a cluster name, certificate distribution mode and whether to install the product on the other nodes or not.
Cluster name - type your cluster name.Listening port - (default port is 9777)Open port in Windows firewall - when selected a rule is created in the Windows Firewall.
Certificate distribution:Automatic remote - certificate will be installed automatically.Manual - when you click Generate a browse window will open - select the folder in which to store certificates. Aroot certificate as well as a certificate for each node, including the one (local machine) from which you are settingup the ESET Cluster, will be created. You can then choose to enroll the certificate on the local machine by clicking Yes. You will later need to import certificates manually as described here.
Product install to other nodes:Automatic remote - ESET Security for Kerio will be installed automatically on each node (provided their operatingsystems are the same architecture).Manual - choose this if you want to install ESET Security for Kerio manually (for example when you have differentOS architectures on some of the nodes).
Push license to nodes without activated product - select this to have ESET Security automatically activate ESETSolutions installed on nodes without licenses.
NOTEIf you want to create an ESET Cluster with mixed operating system architectures (32 bit and 64 bit), then you willneed to install ESET Security for Kerio manually. Operation systems in use will be detected during next steps andyou'll see this information in the log window.
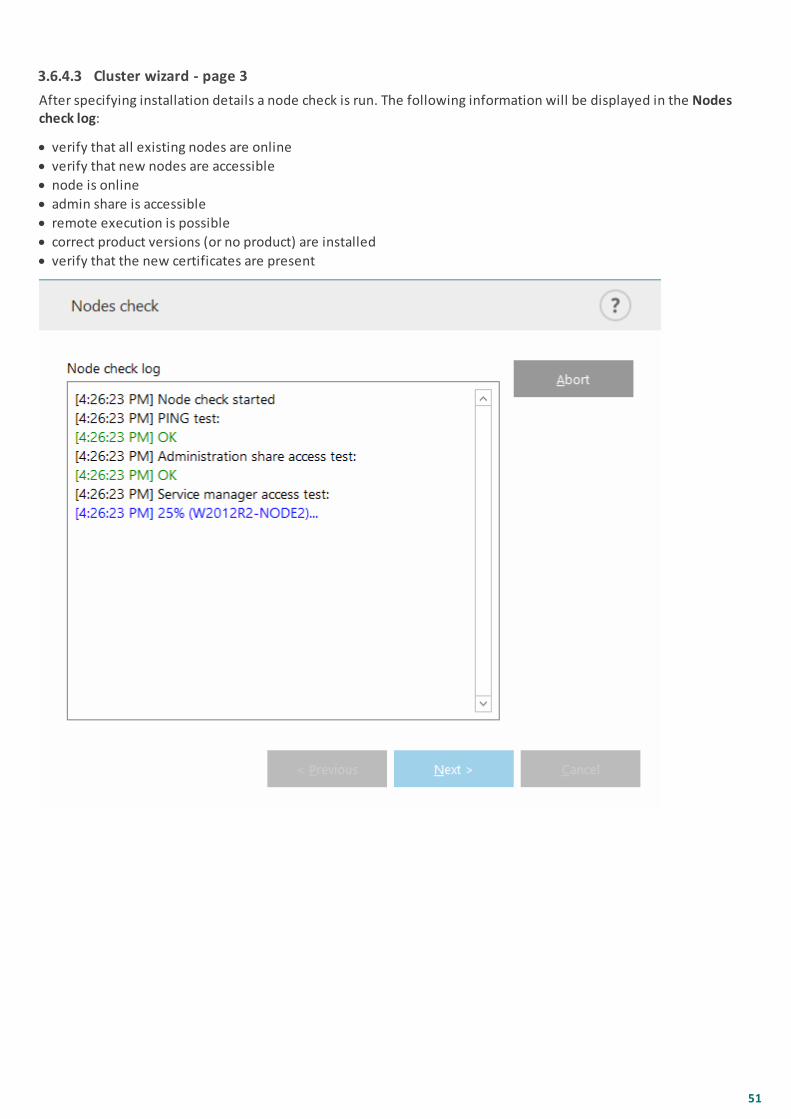
51
3.6.4.3 Cluster wizard - page 3
After specifying installation details a node check is run. The following information will be displayed in the Nodescheck log:
· verify that all existing nodes are online
· verify that new nodes are accessible
· node is online
· admin share is accessible
· remote execution is possible
· correct product versions (or no product) are installed
· verify that the new certificates are present

52
You will see the report once the node check is finished:
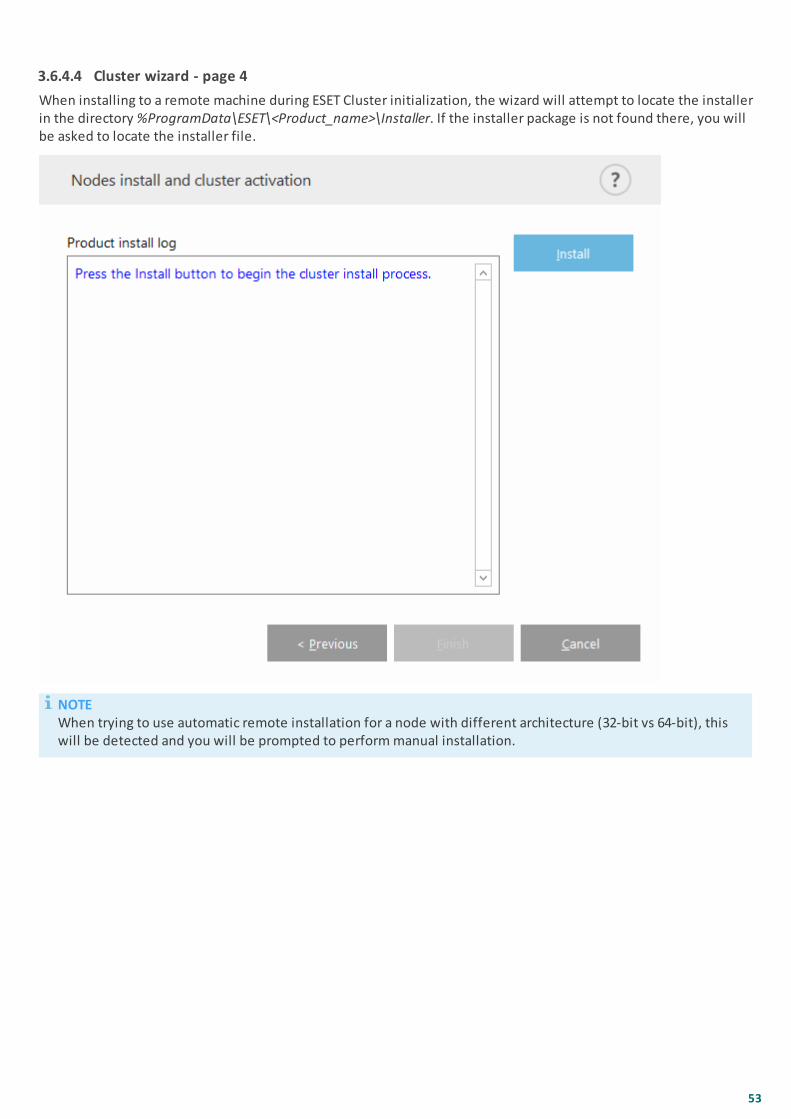
53
3.6.4.4 Cluster wizard - page 4
When installing to a remote machine during ESET Cluster initialization, the wizard will attempt to locate the installerin the directory %ProgramData\ESET\<Product_name>\Installer. If the installer package is not found there, you willbe asked to locate the installer file.
NOTEWhen trying to use automatic remote installation for a node with different architecture (32-bit vs 64-bit), thiswill be detected and you will be prompted to perform manual installation.
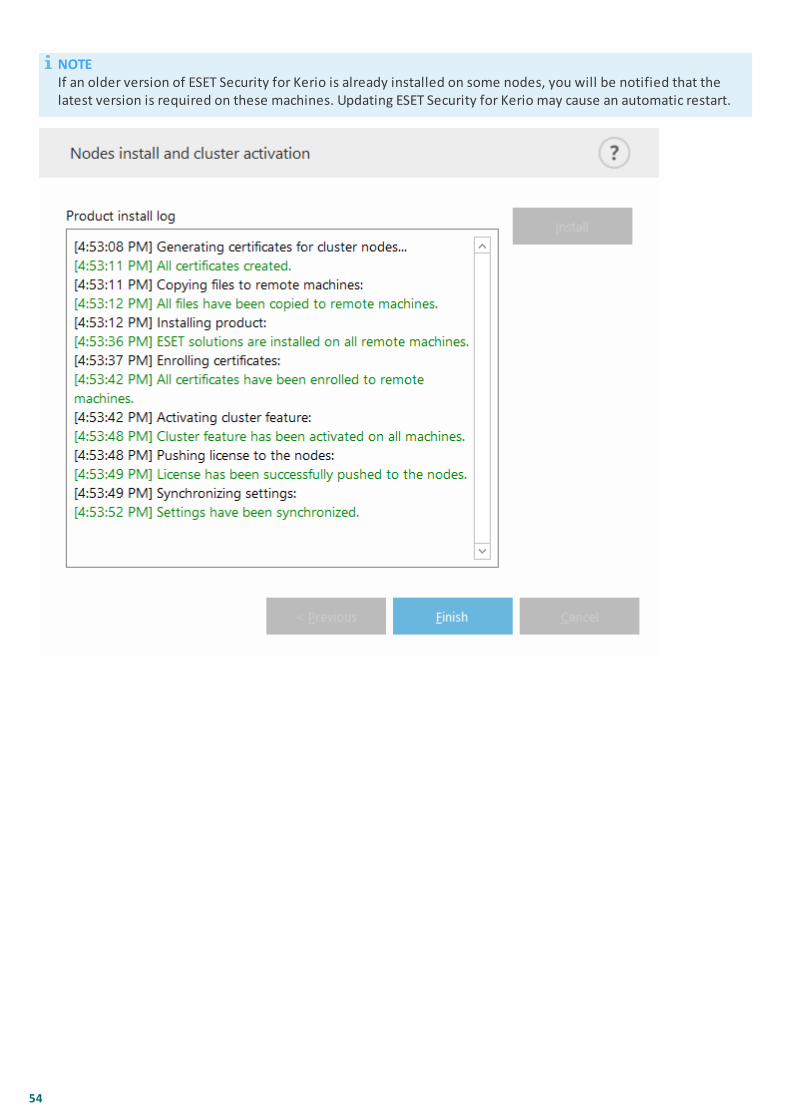
54
NOTEIf an older version of ESET Security for Kerio is already installed on some nodes, you will be notified that thelatest version is required on these machines. Updating ESET Security for Kerio may cause an automatic restart.
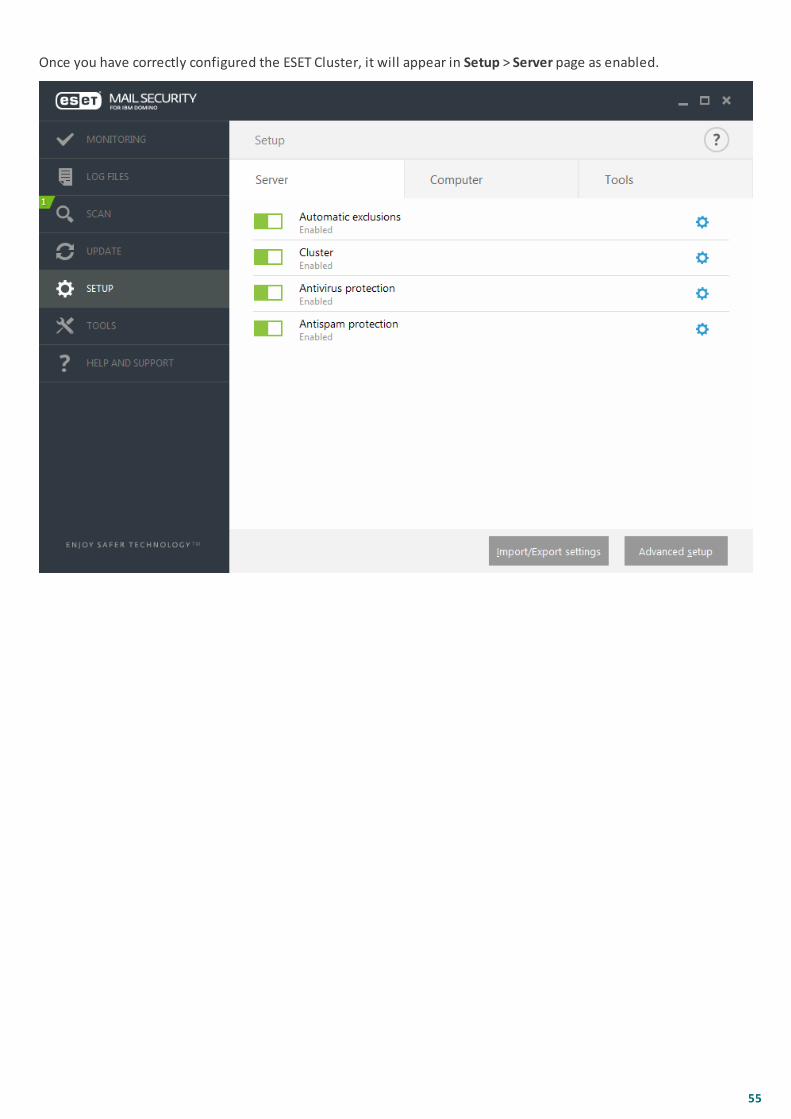
55
Once you have correctly configured the ESET Cluster, it will appear in Setup > Server page as enabled.

56
Additionally, you can check its current status from the Cluster status page (Tools > Cluster).
Import certificates - Navigate to the folder that contains the certificates (generated during the use of Clusterwizard). Select the certificate file and click Open.
3.6.5 ESET Shell
eShell (short for ESET Shell) is a command line interface for ESET Security for Kerio. It is an alternative to thegraphical user interface (GUI). eShell includes all the features and options that the GUI normally gives you. eShelllets you configure and administer the whole program without the use of the GUI.
Apart from all the functions and features that are available in the GUI, it also provides you with the option of usingautomation by running scripts in order to configure, modify configuration or perform an action. Also, eShell can beuseful for those who prefer to use the command line over the GUI.
There are two modes in which eShell can be run:
· Interactive mode - this is useful when you want to work with eShell (not just execute a single command) for taskssuch as changing configuration, viewing logs, etc. You can use interactive mode if you are not familiar with all thecommands yet. Interactive mode will make it easier for you when navigating through eShell. It also shows youavailable commands you can use within a particular context.
· Single command / Batch mode - you can use this mode if you only need to execute a command without enteringthe interactive mode of eShell. This can be done from the Windows Command Prompt by typing in eshell withthe appropriate parameters. For example:
eshell get status or eshell set antivirus status disabled
In order to run certain commands (such as the second example above) in batch/script mode, there are a couple ofsettings that you need to configure first. Otherwise, you'll get an Access Denied message. This is for securityreasons.

57
NOTEFor full functionality we recommend you to open the eShell using Run as administrator. The same applies whenexecuting a single command via Windows Command Prompt (cmd). Open the prompt using Run as administrator.Failing to run the command prompt as Administrator will stop you from running commands due to lack ofpermissions.
NOTESettings changes are required to allow the use of eShell commands from a Windows Command Prompt. Forfurther information about running batch files click here.
There are two ways to enter interactive mode in eShell:
· Via Windows Start menu: Start > All Programs > ESET > ESET Security > ESET Shell
· From Windows Command Prompt by typing in eshell and pressing the Enter key
IMPORTANTIf you get an error 'eshell' is not recognized as an internal or external command, this is due to newEnvironment Variables not being loaded by your system after the installation of ESET Security for Kerio. You canopen new Command Prompt and try starting eShell again. If you are still getting an error or have Core installationof ESET Security for Kerio, start eShell using absolute path, for example "%PROGRAMFILES%\ESET\ESET Security\eShell.exe" (you must use "" in order for the command to work).
When you run eShell in interactive mode for the first time, a first run (guide) screen will display.
NOTEIf you want to display the first run screen in future, type in guide command. It shows you some basic exampleshow to use eShell with Syntax, Prefix, Command path, Abbreviated forms, Aliases, etc.
Next time you run eShell, you'll see this screen:
NOTECommands are not case sensitive. You can use upper case (capital) or lower case letters and the command willexecute regardless.
Customizing eShell

58
You can customize eShell in ui eshell context. You can configure aliases, colors, language, execution policy forscripts, settings for hidden commands and more.
3.6.5.1 Usage
SyntaxCommands must be formatted in the correct syntax to function and can be composed of a prefix, context,arguments, options, etc. This is the general syntax used throughout eShell:
[<prefix>] [<command path>] <command> [<arguments>]
Example (this activates document protection):SET ANTIVIRUS DOCUMENT STATUS ENABLED
SET - a prefixANTIVIRUS DOCUMENT - path to a particular command, a context where this command belongsSTATUS - the command itselfENABLED - an argument for the command
Using ? as an argument for command will display the syntax for that particular command. For example, STATUS ? willshow you the syntax for STATUS command:
SYNTAX: [get] | status set status enabled | disabled
You may notice that [get] is in brackets. It designates that the prefix get is default for the status command. Thismeans that when you execute status without specifying any prefix, it will actually use the default prefix (in thiscase get status). Using commands without a prefix saves time when typing. Usually get is the default prefix formost commands, but you need to be sure what the default prefix is for a particular command and that it is exactlywhat you want to execute.
NOTECommands are not case sensitive, you can use upper case (capital) or lower case letters and the command willexecute regardless.
Prefix / OperationA prefix is an operation. The GET prefix will give you information about how a certain feature of ESET Security forKerio is configured or show you the status (such as GET ANTIVIRUS STATUS will show you current protection status).The SET prefix will configure functionality or change its status (SET ANTIVIRUS STATUS ENABLED will activateprotection).
These are the prefixes that eShell lets you use. A command may or may not support any of the prefixes:
GET - returns current setting/status SET - sets value/status SELECT - selects an item ADD - adds an item REMOVE - removes an item CLEAR - removes all items/files START - starts an action STOP - stops an action PAUSE - pauses an action RESUME - resumes an action RESTORE - restores default settings/object/file SEND - sends an object/file IMPORT - imports from a file EXPORT - exports to a file
Prefixes such as GET and SET are used with many commands, but some commands (such as EXIT) do not use a prefix.
Command path / Context
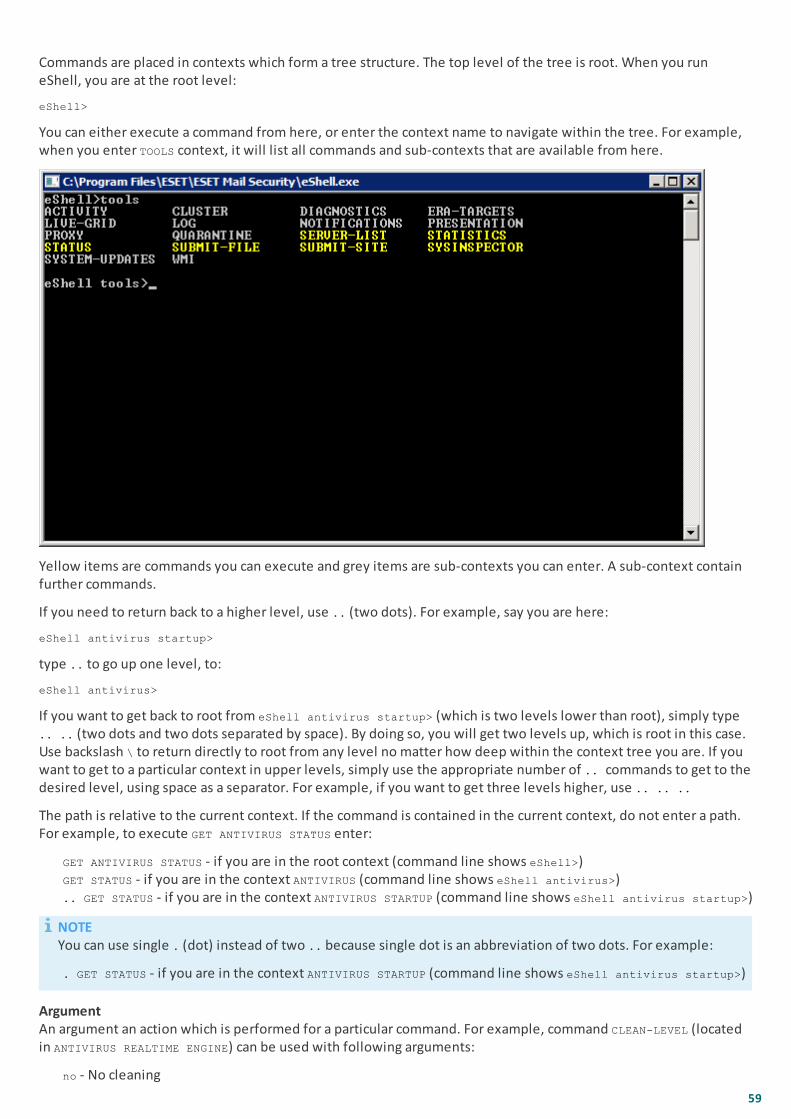
59
Commands are placed in contexts which form a tree structure. The top level of the tree is root. When you runeShell, you are at the root level:
eShell>
You can either execute a command from here, or enter the context name to navigate within the tree. For example,when you enter TOOLS context, it will list all commands and sub-contexts that are available from here.
Yellow items are commands you can execute and grey items are sub-contexts you can enter. A sub-context containfurther commands.
If you need to return back to a higher level, use .. (two dots). For example, say you are here:
eShell antivirus startup>
type .. to go up one level, to:
eShell antivirus>
If you want to get back to root from eShell antivirus startup> (which is two levels lower than root), simply type.. .. (two dots and two dots separated by space). By doing so, you will get two levels up, which is root in this case.Use backslash \ to return directly to root from any level no matter how deep within the context tree you are. If youwant to get to a particular context in upper levels, simply use the appropriate number of .. commands to get to thedesired level, using space as a separator. For example, if you want to get three levels higher, use .. .. ..
The path is relative to the current context. If the command is contained in the current context, do not enter a path.For example, to execute GET ANTIVIRUS STATUS enter:
GET ANTIVIRUS STATUS - if you are in the root context (command line shows eShell>) GET STATUS - if you are in the context ANTIVIRUS (command line shows eShell antivirus>) .. GET STATUS - if you are in the context ANTIVIRUS STARTUP (command line shows eShell antivirus startup>)
NOTEYou can use single . (dot) instead of two .. because single dot is an abbreviation of two dots. For example:
. GET STATUS - if you are in the context ANTIVIRUS STARTUP (command line shows eShell antivirus startup>)
ArgumentAn argument an action which is performed for a particular command. For example, command CLEAN-LEVEL (locatedin ANTIVIRUS REALTIME ENGINE) can be used with following arguments:
no - No cleaning

60
normal - Normal cleaning strict - Strict cleaning
Another example are the arguments ENABLED or DISABLED, which are used to enable or disable a certain feature orfunctionality.
Abbreviated form / Shortened commandseShell allows you to shorten contexts, commands and arguments (provided the argument is a switch or analternative option). It is not possible to shorten a prefix or argument that are concrete values such as a number,name or path.
NOTEYou can use numbers 1 and 0 instead of enabled and disabled arguments. For example:
set status enabled => set stat 1 set status disabled => set stat 0
Examples of the short form:
set status enabled => set stat en add antivirus common scanner-excludes C:\path\file.ext => add ant com scann C:\path\file.ext
In a case where two commands or contexts start with the same letters (such as ABOUT and ANTIVIRUS, and you enter Aas shortened command), eShell will not be able to decide which command of these two you want to run. An errormessage will display and list commands starting with "A" which you can choose from:
eShell>a
The following command is not unique: a
The following commands are available in this context:
ABOUT - Shows information about program ANTIVIRUS - Changes to context antivirus
By adding one or more letters (for example, AB instead of just A) eShell will execute ABOUT command since it isunique now.
NOTEWhen you want to be sure that a command executes the way you need, we recommend that you do notabbreviate commands, arguments, etc. and use the full form. This way it will execute exactly as you need andprevent unwanted mistakes. This is especially true for batch files / scripts.
Automatic completionThis new feature was introduced in eShell 2.0 and is very similar to automatic completion in Windows CommandPrompt. While Windows Command Prompt completes file paths, eShell completes commands, context andoperation names. Argument completion is not supported. When typing command simply, press Tab to complete orcycle through available variations. Press Shift + Tab to cycle backwards. Mixing abbreviated form and automaticcompletion is not supported. Use either one or the other. For example, when you type antivir real scan hittingTab will do nothing. Instead, type antivir and then Tab to complete antivirus, continue typing real + Tab and scan+ Tab. You can then cycle through all available variations: scan-create, scan-execute, scan-open, etc.
AliasesAn alias is an alternative name which can be used to execute a command (provided that the command has an aliasassigned). There are a few default aliases:
(global) close - exit (global) quit - exit (global) bye - exit warnlog - tools log events virlog - tools log detections antivirus on-demand log - tools log scans
"(global)" means that the command can be used anywhere regardless of current context. One command can have

61
multiple aliases assigned, for example the command EXIT has aliases CLOSE, QUIT and BYE. When you want to exiteShell, you can use the EXIT command itself or any of its aliases. The alias VIRLOG is an alias for the commandDETECTIONS which is located in the TOOLS LOG context. This way the detections command is available from the ROOTcontext, making it easier to access (you don't have to enter TOOLS and then LOG context and run it directly fromROOT).
eShell allows you to define your own aliases. Command ALIAS can be found in UI ESHELL context.
Password protected settingsESET Security for Kerio settings can be protected by a password. You can set a password using GUI or eShell usingthe set ui access lock-password. You'll then have to enter this password interactively for certain commands (suchas those that change settings or modify data). If you plan to work with eShell for a longer period of time and do notwant to enter the password repeatedly, you can get eShell to remember the password using the set passwordcommand. Your password will then be filled-in automatically for each executed command that requires a password.It is remembered until you exit eShell, this means that you'll need to use set password again when you start a newsession and want eShell to remember your password.
Guide / HelpWhen you run the GUIDE or HELP command, it will display a "first run" screen explaining how to use eShell. Thiscommand is available from the ROOT context (eShell>).
Command historyeShell keeps a history of previously executed commands. This applies only to the current eShell interactive session.Once you exit eShell, the command history will be dropped. Use the Up and Down arrow keys on your keyboard tonavigate through the history. Once you find the command you were looking for, you can execute it again, or modifyit without having to type in the entire command from the beginning.
CLS / Clear screenThe CLS command can be used to clear the screen. It works the same way as it does with Windows Command Promptor similar command line interfaces.
EXIT / CLOSE / QUIT / BYETo close or exit eShell, you can use any of these commands (EXIT, CLOSE, QUIT or BYE).
3.6.5.2 Commands
This section lists a few basic eShell commands with descriptions.
NOTECommands are not case sensitive, you can use uppercase (capital) or lowercase letters and the command willexecute regardless.
Example commands (contained within the ROOT context):
ABOUT
Lists information about the program. It shows information such as:
· Name of your ESET security product installed and its version number.
· Operating system and basic hardware details.
· Username (including domain), Full computer name (FQDN, if your server is a member of a domain) and Seatname.
· Installed components of your ESET security product, including version number of each component.
CONTEXT PATH:
root

62
PASSWORD
Normally, to execute password-protected commands, you are prompted to type in a password for security reasons.This applies to commands such as those that disable antivirus protection and those that may affect ESET Security forKerio configuration. You will be prompted for a password every time you execute such a command. You can definethis password in order to avoid entering a password every time. It will be remembered by eShell and automatically entered when a password-protected command is executed.
NOTEYour password only works for the current eShell interactive session. Once you exit eShell, this defined passwordwill be dropped. When you start eShell again, the password needs to be defined again.
Defined password can also be used when running unsigned batch files or scripts. Make sure to set ESET Shellexecution policy to Full access when running unsigned batch files. Here is an example of such a batch file:
eshell set password plain <yourpassword> "&" set status disabled
This concatenated command above defines a password and disables protection.
IMPORTANTWe recommend you to use signed batch files whenever possible. This way, you'll avoid having plain textpasswords in the batch file (if using the method described above). See Batch files / Scripting (Signed batch filessection) for more details.
CONTEXT PATH:
root
SYNTAX:
[get] | restore password
set password [plain <password>]
OPERATIONS:
get - Show password
set - Set or clear password
restore - Clear password
ARGUMENTS:
plain - Switch to enter password as parameter
password - Password
EXAMPLES:
set password plain <yourpassword> - Sets a password which will be used for password-protected commands
restore password - Clears password
EXAMPLES:
get password - Use this to see whether the password is configured or not (this only shows asterisks "*", it doesnot list the password itself), when no asterisks are visible, it means that there is no password set
set password plain <yourpassword> - Use this to set a defined password
restore password - This command clears the defined password
STATUS
Shows information about the current protection status of ESET Security for Kerio (similar to GUI).
63
CONTEXT PATH:
root
SYNTAX:
[get] | restore status
set status disabled | enabled
OPERATIONS:
get - Show antivirus protection status
set - Disable/Enable antivirus protection
restore - Restores default settings
ARGUMENTS:
disabled - Disable antivirus protection
enabled - Enable antivirus protection
EXAMPLES:
get status - Shows current protection status
set status disabled - Disables protection
restore status - Restores protection to default setting (Enabled)
VIRLOG
This is an alias of the DETECTIONS command. It is useful when you need to view information about detectedinfiltrations.
WARNLOG
This is an alias of the EVENTS command. It is useful when you need to view information about various events.
3.6.5.3 Batch files / Scripting
You can use eShell as a powerful scripting tool for automation. To use a batch file with eShell, create one with aneShell and command in it. For example:
eshell get antivirus status
You can also chain commands, which is sometimes necessary, for instance if you want to type a particular scheduledtask, enter the following:
eshell select scheduler task 4 "&" get scheduler action
Item selection (task number 4 in this case) usually applies only to a currently running instance of eShell. If you wereto run these two commands one after the other, the second command would fail with the error "No task selected orselected task no longer exists".
For security reasons, the execution policy is set to Limited Scripting by default. This allows you to use eShell as amonitoring tool, but it won't let you make configuration changes to ESET Security for Kerio by running a script. If youtry executing a script with commands that can affect security, for example, by disabling protection, an AccessDenied message will be displayed. We recommend that you use signed batch files to execute commands that makeconfiguration changes.
To change configuration using a single command entered manually in the Windows Command Prompt, you mustgrant eShell full access (not recommended). To grant full access, use ui eshell shell-execution-policy in theInteractive mode of eShell itself, or via GUI in Advanced Setup > User interface > ESET Shell.
Signed batch fileseShell allows you to secure common batch files (*.bat) with a signature. Scripts are signed with the same password

64
that is used for settings protection. In order to sign a script you need to enable settings protection first. This can bedone via the GUI, or from within eShell using set ui access lock-password command. Once the settings protectionpassword is set up you can start signing batch files.
To sign a batch file, run sign <script.bat> from the root context of eShell, where script.bat is the path to the scriptyou want to sign. Enter and confirm the password that will be used for signing. This password must match yoursettings protection password. A signature is placed at the end of the batch file in the form of a comment. If thisscript has already been signed, the signature will be replaced with a new one.
NOTEWhen you modify a previously signed batch file, it must be signed again.
NOTEIf you change your settings protection password, you must sign all scripts again, otherwise the scripts will fail toexecute the following the password change. The password entered when signing a script must match the settingsprotection password on the target system.
To execute a signed batch file from a Windows Command Prompt or as a scheduled task, use following command:
eshell run <script.bat>
Where script.bat is the path to the batch file. For example eshell run d:\myeshellscript.bat
3.6.6 ESET SysInspector
ESET SysInspector is an application that thoroughly inspects your computer and gathers detailed information aboutsystem components such as installed drivers and applications, network connections or important registry entriesand assesses the risk level of each component. This information can help determine the cause of suspicious systembehavior that may be due to software or hardware incompatibility or malware infection.
The ESET SysInspector window displays the following information about created logs:
· Time - The time of log creation.
· Comment - A short comment.
· User - The name of the user who created the log.
· Status - The status of log creation.
The following actions are available:
· Open - Opens the created log. You can also right-click a log and select Show from the context menu.
· Compare - Compares two existing logs.
· Create - Creates a new log. Please wait until the ESET SysInspector log is complete (Status will be shown asCreated).
· Delete - Removes selected logs from the list.
After right-clicking one or more selected logs, the following options are available from the context menu:
· Show - Opens the selected log in ESET SysInspector (same function as double-clicking a log).
· Compare - Compares two existing logs.
· Create - Creates a new log. Please wait until the ESET SysInspector log is complete (Status shown as Created).
· Delete - Removes selected logs from the list.
· Delete all - Deletes all logs.
· Export - Exports the log to an .xml file or zipped .xml.
65
3.6.6.1 Create a computer status snapshot
Enter a short comment describing the log to be created and click the Add button. Please wait until the ESETSysInspector log is complete (status will be shown as Created). Log creation may take some time depending on yourhardware configuration and system data.
3.6.6.2 ESET SysInspector
3.6.6.2.1 Introduction to ESET SysInspector
ESET SysInspector is an application that thoroughly inspects your computer and displays gathered data in acomprehensive way. Information like installed drivers and applications, network connections or important registryentries can help you to investigate suspicious system behavior be it due to software or hardware incompatibility ormalware infection.
You can access ESET SysInspector two ways: From the integrated version in ESET Security solutions or bydownloading the standalone version (SysInspector.exe) for free from ESET’s website. Both versions are identical infunction and have the same program controls. The only difference is how outputs are managed. The standalone andintegrated versions each allow you to export system snapshots to an .xml file and save them to disk. However, theintegrated version also allows you to store your system snapshots directly in Tools > ESET SysInspector (except ESETRemote Administrator).
Please allow some time while ESET SysInspector scans your computer. It may take anywhere from 10 seconds up to afew minutes depending on your hardware configuration, operating system and the number of applications installedon your computer.
3.6.6.2.1.1 Starting ESET SysInspector
To start ESET SysInspector, simply run the SysInspector.exe executable you downloaded from ESET's website.
Please wait while the application inspects your system, which could take up to several minutes.
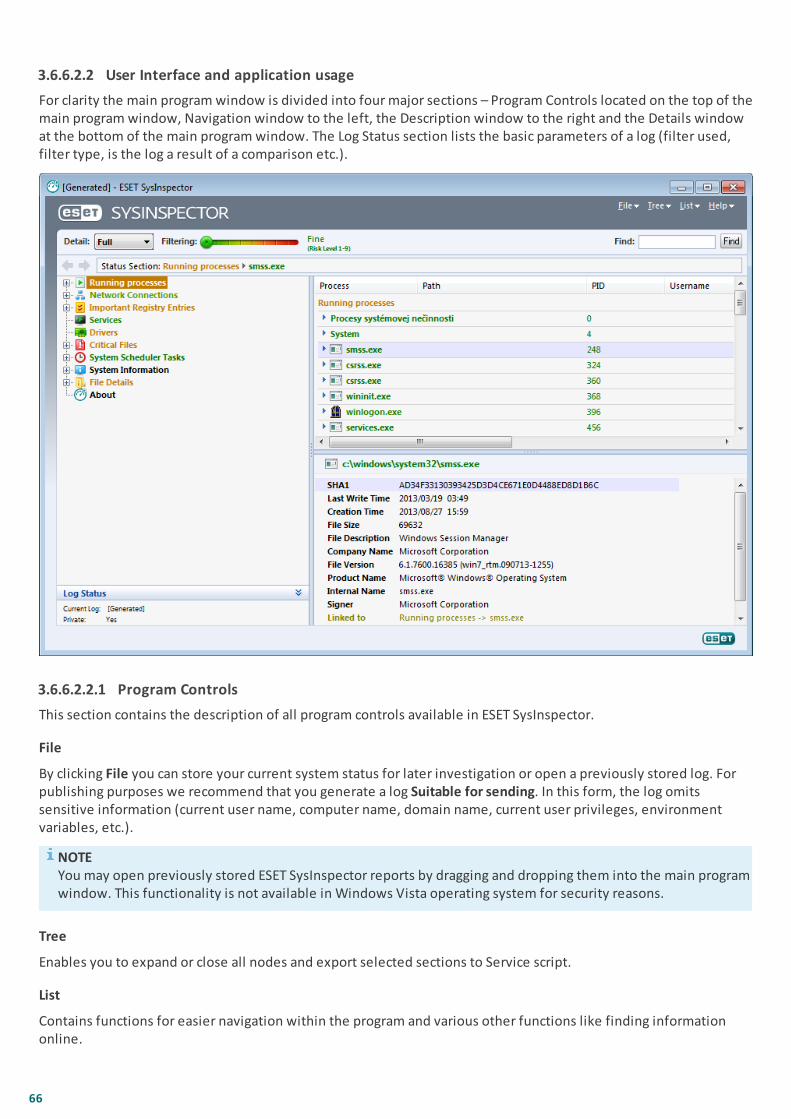
66
3.6.6.2.2 User Interface and application usage
For clarity the main program window is divided into four major sections – Program Controls located on the top of themain program window, Navigation window to the left, the Description window to the right and the Details windowat the bottom of the main program window. The Log Status section lists the basic parameters of a log (filter used,filter type, is the log a result of a comparison etc.).
3.6.6.2.2.1 Program Controls
This section contains the description of all program controls available in ESET SysInspector.
File
By clicking File you can store your current system status for later investigation or open a previously stored log. Forpublishing purposes we recommend that you generate a log Suitable for sending. In this form, the log omitssensitive information (current user name, computer name, domain name, current user privileges, environmentvariables, etc.).
NOTEYou may open previously stored ESET SysInspector reports by dragging and dropping them into the main programwindow. This functionality is not available in Windows Vista operating system for security reasons.
Tree
Enables you to expand or close all nodes and export selected sections to Service script.
List
Contains functions for easier navigation within the program and various other functions like finding informationonline.

67
Help
Contains information about the application and its functions.
Detail
This setting influences the information displayed in the main program window to make the information easier towork with. In "Basic" mode, you have access to information used to find solutions for common problems in yoursystem. In the "Medium" mode, the program displays less used details. In "Full" mode, ESET SysInspector displaysall the information needed to solve very specific problems.
Filtering
Item filtering is best used to find suspicious files or registry entries in your system. By adjusting the slider, you canfilter items by their Risk Level. If the slider is set all the way to the left (Risk Level 1), then all items are displayed. Bymoving the slider to the right, the program filters out all items less risky than current risk level and only displayitems which are more suspicious than the displayed level. With the slider all the way to the right, the programdisplays only known harmful items.
All items labeled as risk 6 to 9 can pose a security risk. If you are not using a security solution from ESET, werecommend that you scan your system with ESET Online Scanner if ESET SysInspector has found any such item. ESETOnline Scanner is a free service.
NOTEThe Risk level of an item can be quickly determined by comparing the color of the item with the color on the RiskLevel slider.
Compare
When comparing two logs, you can choose to display all items, display only added items, display only removeditems or to display only replaced items.
Find
Search can be used to quickly find a specific item by its name or part of its name. The results of the search requestare displayed in the Description window.
Return
By clicking the back or forward arrows, you can return to previously displayed information in the Descriptionwindow. You can use the backspace and space keys instead of clicking back and forward.
Status section
Displays the current node in Navigation window.
IMPORTANTItems highlighted in red are unknown, which is why the program marks them as potentially dangerous. If an itemis in red, it does not automatically mean that you can delete the file. Before deleting, please make sure that filesare really dangerous or unnecessary.

68
3.6.6.2.2.2 Navigating in ESET SysInspector
ESET SysInspector divides various types of information into several basic sections called nodes. If available, you mayfind additional details by expanding each node into its subnodes. To open or collapse a node, double-click the nameof the node or click or next to the name of the node. As you browse through the tree structure of nodes andsubnodes in the Navigation window you may find various details for each node shown in the Description window. Ifyou browse through items in the Description window, additional details for each item may be displayed in theDetails window.
The following are the descriptions of the main nodes in the Navigation window and related information in theDescription and Details windows.
Running processes
This node contains information about applications and processes running at the time of generating the log. In theDescription window you may find additional details for each process such as dynamic libraries used by the processand their location in the system, the name of the application's vendor and the risk level of the file.
The Detail window contains additional information for items selected in the Description window such as the filesize or its hash.
NOTEAn operating system is comprised of several important kernel components running constantly that provide basicand vital functions for other user applications. In certain cases, such processes are displayed in the tool ESETSysInspector with file path beginning with \??\. Those symbols provide pre-launch optimization for thoseprocesses; they are safe for the system.
Network connections
The Description window contains a list of processes and applications communicating over the network using theprotocol selected in the Navigation window (TCP or UDP) along with the remote address where to which theapplication is connected to. You can also check the IP addresses of DNS servers.
The Detail window contains additional information for items selected in the Description window such as the filesize or its hash.
Important Registry Entries
Contains a list of selected registry entries which are often related to various problems with your system like thosespecifying startup programs, browser helper objects (BHO), etc.
In the Description window you may find which files are related to specific registry entries. You may see additionaldetails in the Details window.
Services
The Description window Contains a list of files registered as windows Services. You may check the way the service isset to start along with specific details of the file in the Details window.
Drivers
A list of drivers installed in the system.
Critical files
The Description window displays content of critical files related to the Microsoft windows operating system.
System Scheduler Tasks
Contains a list of tasks triggered by Windows Task Scheduler at a specified time/interval.
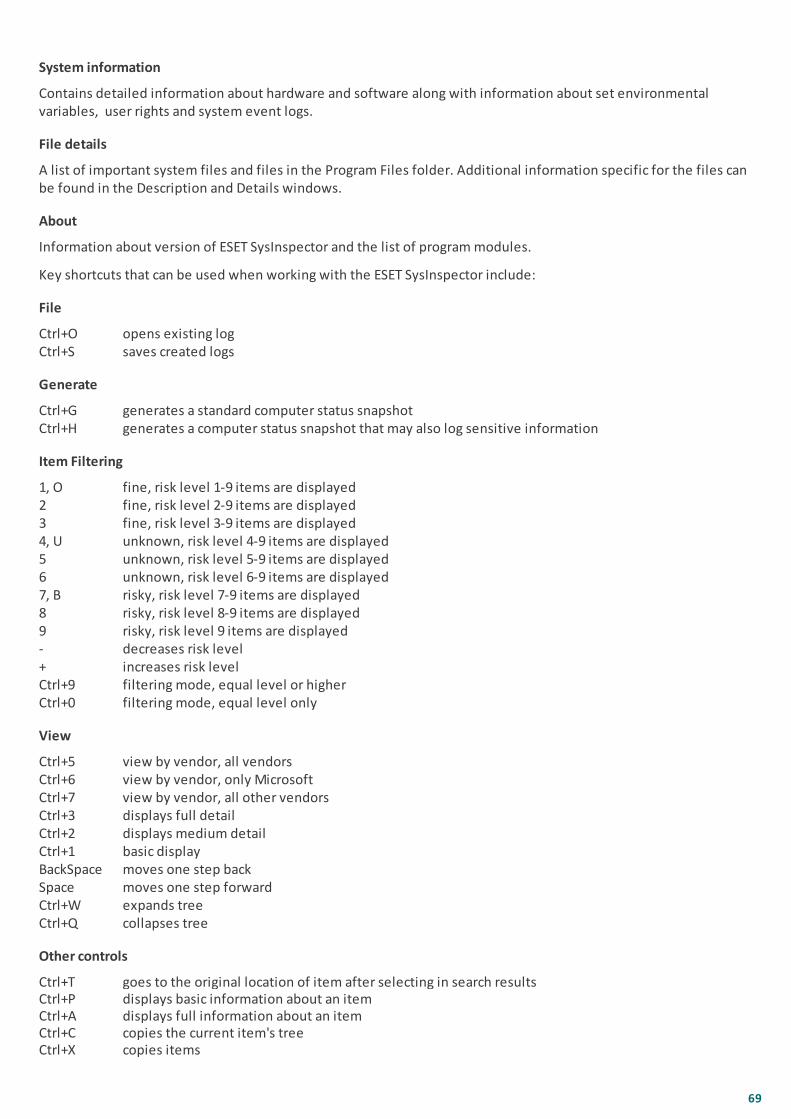
69
System information
Contains detailed information about hardware and software along with information about set environmentalvariables, user rights and system event logs.
File details
A list of important system files and files in the Program Files folder. Additional information specific for the files canbe found in the Description and Details windows.
About
Information about version of ESET SysInspector and the list of program modules.
Key shortcuts that can be used when working with the ESET SysInspector include:
File
Ctrl+O opens existing logCtrl+S saves created logs
Generate
Ctrl+G generates a standard computer status snapshotCtrl+H generates a computer status snapshot that may also log sensitive information
Item Filtering
1, O fine, risk level 1-9 items are displayed2 fine, risk level 2-9 items are displayed3 fine, risk level 3-9 items are displayed4, U unknown, risk level 4-9 items are displayed5 unknown, risk level 5-9 items are displayed6 unknown, risk level 6-9 items are displayed7, B risky, risk level 7-9 items are displayed8 risky, risk level 8-9 items are displayed9 risky, risk level 9 items are displayed- decreases risk level+ increases risk levelCtrl+9 filtering mode, equal level or higherCtrl+0 filtering mode, equal level only
View
Ctrl+5 view by vendor, all vendorsCtrl+6 view by vendor, only MicrosoftCtrl+7 view by vendor, all other vendorsCtrl+3 displays full detailCtrl+2 displays medium detailCtrl+1 basic displayBackSpace moves one step backSpace moves one step forwardCtrl+W expands treeCtrl+Q collapses tree
Other controls
Ctrl+T goes to the original location of item after selecting in search resultsCtrl+P displays basic information about an itemCtrl+A displays full information about an itemCtrl+C copies the current item's treeCtrl+X copies items

70
Ctrl+B finds information about selected files on the InternetCtrl+L opens the folder where the selected file is locatedCtrl+R opens the corresponding entry in the registry editorCtrl+Z copies a path to a file (if the item is related to a file)Ctrl+F switches to the search fieldCtrl+D closes search resultsCtrl+E run service script
Comparing
Ctrl+Alt+O opens original / comparative logCtrl+Alt+R cancels comparisonCtrl+Alt+1 displays all itemsCtrl+Alt+2 displays only added items, log will show items present in current logCtrl+Alt+3 displays only removed items, log will show items present in previous logCtrl+Alt+4 displays only replaced items (files inclusive)Ctrl+Alt+5 displays only differences between logsCtrl+Alt+C displays comparisonCtrl+Alt+N displays current logCtrl+Alt+P opens previous log
Miscellaneous
F1 view helpAlt+F4 close programAlt+Shift+F4 close program without askingCtrl+I log statistics
3.6.6.2.2.3 Compare
The Compare feature allows the user to compare two existing logs. The outcome of this feature is a set of items notcommon to both logs. It is suitable if you want to keep track of changes in the system, a helpful tool for detectingmalicious code.
After it is launched, the application creates a new log which is displayed in a new window. Click File > Save log tosave a log to a file. Log files can be opened and viewed at a later time. To open an existing log, click File > Open log.In the main program window, ESET SysInspector always displays one log at a time.
The benefit of comparing two logs is that you can view a currently active log and a log saved in a file. To comparelogs, click File > Compare log and choose Select file. The selected log will be compared to the active one in the mainprogram windows. The comparative log will display only the differences between those two logs.
NOTEIf you compare two log files, click File > Save log to save it as a ZIP file; both files will be saved. If you open thisfile later, the contained logs are automatically compared.
Next to the displayed items, ESET SysInspector shows symbols identifying differences between the compared logs.
Description of all symbols that can be displayed next to items:
· new value, not present in the previous log
· tree structure section contains new values
· removed value, present in the previous log only
· tree structure section contains removed values
· value / file has been changed
· tree structure section contains modified values / files
· the risk level has decreased / it was higher in the previous log
· the risk level has increased / it was lower in the previous log
The explanation section displayed in the left bottom corner describes all symbols and also displays the names oflogs which are being compared.
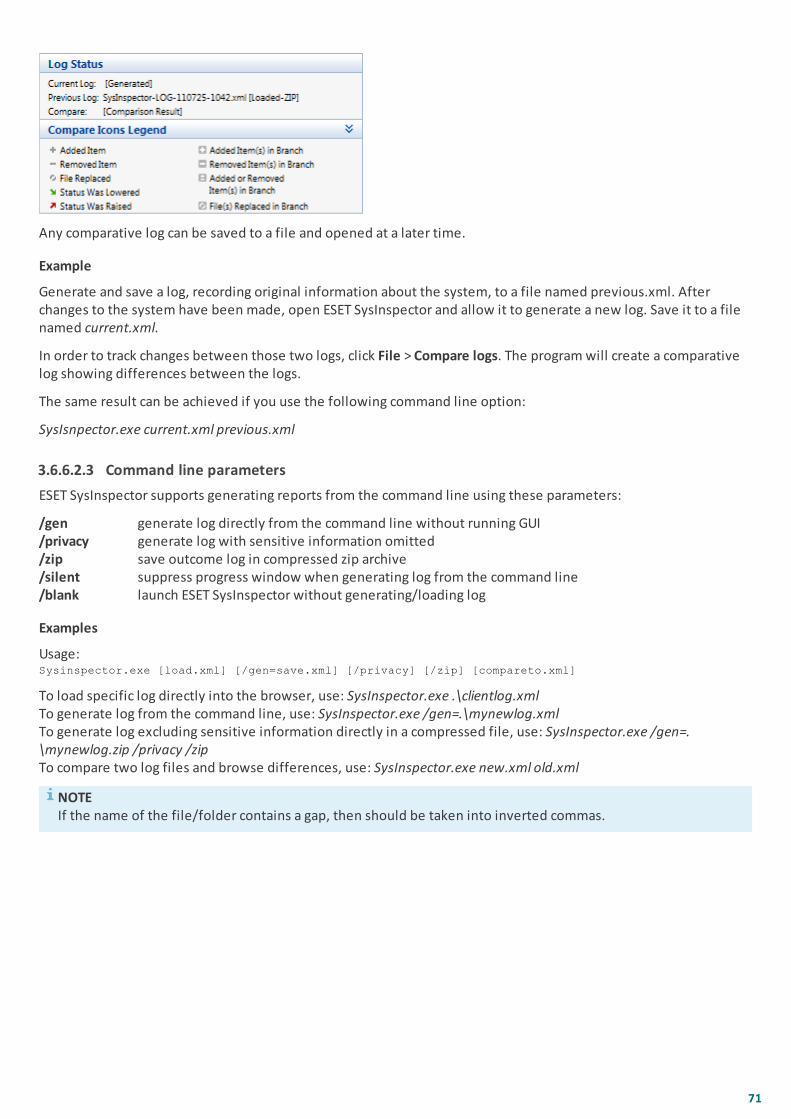
71
Any comparative log can be saved to a file and opened at a later time.
Example
Generate and save a log, recording original information about the system, to a file named previous.xml. Afterchanges to the system have been made, open ESET SysInspector and allow it to generate a new log. Save it to a filenamed current.xml.
In order to track changes between those two logs, click File > Compare logs. The program will create a comparativelog showing differences between the logs.
The same result can be achieved if you use the following command line option:
SysIsnpector.exe current.xml previous.xml
3.6.6.2.3 Command line parameters
ESET SysInspector supports generating reports from the command line using these parameters:
/gen generate log directly from the command line without running GUI/privacy generate log with sensitive information omitted/zip save outcome log in compressed zip archive/silent suppress progress window when generating log from the command line/blank launch ESET SysInspector without generating/loading log
Examples
Usage:Sysinspector.exe [load.xml] [/gen=save.xml] [/privacy] [/zip] [compareto.xml]
To load specific log directly into the browser, use: SysInspector.exe .\clientlog.xmlTo generate log from the command line, use: SysInspector.exe /gen=.\mynewlog.xmlTo generate log excluding sensitive information directly in a compressed file, use: SysInspector.exe /gen=.\mynewlog.zip /privacy /zipTo compare two log files and browse differences, use: SysInspector.exe new.xml old.xml
NOTEIf the name of the file/folder contains a gap, then should be taken into inverted commas.

72
3.6.6.2.4 Service Script
Service script is a tool that provides help to customers that use ESET SysInspector by easily removing unwantedobjects from the system.
Service script enables the user to export the entire ESET SysInspector log, or its selected parts. After exporting, youcan mark unwanted objects for deletion. You can then run the modified log to delete marked objects.
Service Script is suited for advanced users with previous experience in diagnosing system issues. Unqualifiedmodifications may lead to operating system damage.
Example
If you suspect that your computer is infected by a virus which is not detected by your antivirus program, follow thestep-by-step instructions below:
1. Run ESET SysInspector to generate a new system snapshot.2. Select the first item in the section on the left (in the tree structure), press Shift and select the last item to mark
all items.3. Right click the selected objects and select Export Selected Sections To Service Script.4. The selected objects will be exported to a new log.5. This is the most crucial step of the entire procedure: open the new log and change the – attribute to + for all
objects you want to remove. Please make sure you do not mark any important operating system files/objects.6. Open ESET SysInspector, click File > Run Service Script and enter the path to your script.7. Click OK to run the script.
3.6.6.2.4.1 Generating Service script
To generate a script, right-click any item from the menu tree (in the left pane) in the ESET SysInspector mainwindow. From the context menu, select either Export All Sections To Service Script or Export Selected Sections ToService Script.
NOTEIt is not possible to export the service script when two logs are being compared.
3.6.6.2.4.2 Structure of the Service script
In the first line of the script’s header, you can find information about the Engine version (ev), GUI version (gv) andthe Log version (lv). You can use this data to track possible changes in the .xml file that generates the script andprevent any inconsistencies during execution. This part of the script should not be altered.
The remainder of the file is divided into sections in which items can be edited (denote those that will be processedby the script). You mark items for processing by replacing the “-” character in front of an item with a “+” character.Sections in the script are separated from each other by an empty line. Each section has a number and title.
01) Running processes
This section contains a list of all processes running in the system. Each process is identified by its UNC path and,subsequently, its CRC16 hash code in asterisks (*).
Example:
01) Running processes:
- \SystemRoot\System32\smss.exe *4725*
- C:\Windows\system32\svchost.exe *FD08*
+ C:\Windows\system32\module32.exe *CF8A*
[...]
In this example a process, module32.exe, was selected (marked by a “+” character); the process will end uponexecution of the script.

73
02) Loaded modules
This section lists currently used system modules.
Example:
02) Loaded modules:
- c:\windows\system32\svchost.exe
- c:\windows\system32\kernel32.dll
+ c:\windows\system32\khbekhb.dll
- c:\windows\system32\advapi32.dll
[...]
In this example the module khbekhb.dll was marked by a “+”. When the script runs, it will recognize the processesusing that specific module and end them.
03) TCP connections
This section contains information about existing TCP connections.
Example:
03) TCP connections:
- Active connection: 127.0.0.1:30606 -> 127.0.0.1:55320, owner: ekrn.exe
- Active connection: 127.0.0.1:50007 -> 127.0.0.1:50006,
- Active connection: 127.0.0.1:55320 -> 127.0.0.1:30606, owner: OUTLOOK.EXE
- Listening on *, port 135 (epmap), owner: svchost.exe
+ Listening on *, port 2401, owner: fservice.exe Listening on *, port 445 (microsoft-ds), owner:
System
[...]
When the script runs, it will locate the owner of the socket in the marked TCP connections and stop the socket,freeing system resources.
04) UDP endpoints
This section contains information about existing UDP endpoints.
Example:
04) UDP endpoints:
- 0.0.0.0, port 123 (ntp)
+ 0.0.0.0, port 3702
- 0.0.0.0, port 4500 (ipsec-msft)
- 0.0.0.0, port 500 (isakmp)
[...]
When the script runs, it will isolate the owner of the socket at the marked UDP endpoints and stop the socket.
05) DNS server entries
This section contains information about the current DNS server configuration.
Example:
05) DNS server entries:
+ 204.74.105.85
- 172.16.152.2
[...]
Marked DNS server entries will be removed when you run the script.
06) Important registry entries
This section contains information about important registry entries.

74
Example:
06) Important registry entries:
* Category: Standard Autostart (3 items)
HKLM\SOFTWARE\Microsoft\Windows\CurrentVersion\Run
- HotKeysCmds = C:\Windows\system32\hkcmd.exe
- IgfxTray = C:\Windows\system32\igfxtray.exe
HKCU\SOFTWARE\Microsoft\Windows\CurrentVersion\Run
- Google Update = “C:\Users\antoniak\AppData\Local\Google\Update\GoogleUpdate.exe” /c
* Category: Internet Explorer (7 items)
HKLM\Software\Microsoft\Internet Explorer\Main
+ Default_Page_URL = http://thatcrack.com/
[...]
The marked entries will be deleted, reduced to 0-byte values or reset to their default values upon script execution.The action to be applied to a particular entry depends on the entry category and key value in the specific registry.
07) Services
This section lists services registered within the system.
Example:
07) Services:
- Name: Andrea ADI Filters Service, exe path: c:\windows\system32\aeadisrv.exe, state: Running,
startup: Automatic
- Name: Application Experience Service, exe path: c:\windows\system32\aelupsvc.dll, state: Running,
startup: Automatic
- Name: Application Layer Gateway Service, exe path: c:\windows\system32\alg.exe, state: Stopped,
startup: Manual
[...]
The services marked and their dependent services will be stopped and uninstalled when the script is executed.
08) Drivers
This section lists installed drivers.
Example:
08) Drivers:
- Name: Microsoft ACPI Driver, exe path: c:\windows\system32\drivers\acpi.sys, state: Running,
startup: Boot
- Name: ADI UAA Function Driver for High Definition Audio Service, exe path: c:\windows\system32
\drivers\adihdaud.sys, state: Running, startup: Manual
[...]
When you execute the script, the drivers selected will be stopped. Note that some drivers won't allow themselvesto be stopped.
09) Critical files
This section contains information about files that are critical to proper function of the operating system.

75
Example:
09) Critical files:
* File: win.ini
- [fonts]
- [extensions]
- [files]
- MAPI=1
[...]
* File: system.ini
- [386Enh]
- woafont=dosapp.fon
- EGA80WOA.FON=EGA80WOA.FON
[...]
* File: hosts
- 127.0.0.1 localhost
- ::1 localhost
[...]
The selected items will either be deleted or reset to their original values.
3.6.6.2.4.3 Executing Service scripts
Mark all desired items, then save and close the script. Run the edited script directly from the ESET SysInspector mainwindow by selecting the Run Service Script option from the File menu. When you open a script, the program willprompt you with the following message: Are you sure you want to run the service script “%Scriptname%”? After youconfirm your selection, another warning may appear, informing you that the service script you are trying to run hasnot been signed. Click Run to start the script.
A dialog window will confirm that the script was successfully executed.
If the script could only be partially processed, a dialog window with the following message will appear: The servicescript was run partially. Do you want to view the error report? Select Yes to view a complex error report listing theoperations that were not executed.
If the script was not recognized, a dialog window with the following message will appear: The selected service scriptis not signed. Running unsigned and unknown scripts may seriously harm your computer data. Are you sure youwant to run the script and carry out the actions? This may be caused by inconsistencies within the script (damagedheading, corrupted section title, empty line missing between sections etc.). You can either reopen the script fileand correct the errors within the script or create a new service script.
3.6.6.2.5 System requirements for ESET SysInspector
For seamless operation of ESET SysInspector, the system should meet the following hardware and softwarerequirements:
Microsoft® Windows® XP, Server 2003
400 MHz 32-bit (x86) / 64-bit (x64)128MB RAM of system memory10MB available spaceSuper VGA (800 x 600)
Microsoft® Windows® 10, 8, 7, Vista, Home Server, Server 2008, Server 2012, Server 2016
1 GHz 32-bit (x86) / 64-bit (x64)512MB RAM of system memory10MB available spaceSuper VGA (800 x 600)

76
3.6.6.2.6 FAQ
Does ESET SysInspector require Administrator privileges to run?
While ESET SysInspector does not require Administrator privileges to run, some of the information it collects canonly be accessed from an Administrator account. Running it as a Standard User or a Restricted User will result in itcollecting less information about your operating environment.
Does ESET SysInspector create a log file?
ESET SysInspector can create a log file of your computer's configuration. To save one, click File > Save Log in the mainprogram window. Logs are saved in XML format. By default, files are saved to the %USERPROFILE%\My Documents\directory, with a file naming convention of "SysInpsector-%COMPUTERNAME%-YYMMDD-HHMM.XML". You maychange the location and name of the log file to something else before saving if you prefer.
How do I view the ESET SysInspector log file?
To view a log file created by ESET SysInspector, run the program and click File > Open Log in the main programwindow. You can also drag and drop log files onto the ESET SysInspector application. If you need to frequently viewESET SysInspector log files, we recommend creating a shortcut to the SYSINSPECTOR.EXE file on your Desktop; youcan then drag and drop log files onto it for viewing. For security reasons Windows Vista/7 may not allow drag anddrop between windows that have different security permissions.
Is a specification available for the log file format? What about an SDK?
At the current time, neither a specification for the log file or an SDK are available since the program is still indevelopment. After the program has been released, we may provide these based on customer feedback anddemand.
How does ESET SysInspector evaluate the risk posed by a particular object?
In most cases, ESET SysInspector assigns risk levels to objects (files, processes, registry keys and so forth) using aseries of heuristic rules that examine the characteristics of each object and then weight the potential for maliciousactivity. Based on these heuristics, objects are assigned a risk level from 1 - Fine (green) to 9 - Risky (red). In the leftnavigation pane, sections are colored based on the highest risk level of an object inside them.
Does a risk level of "6 - Unknown (red)" mean an object is dangerous?
ESET SysInspector's assessments do not guarantee that an object is malicious – that determination should be madeby a security expert. What ESET SysInspector is designed for is to provide a quick assessment for security experts sothat they know what objects on a system they may want to further examine for unusual behavior.
Why does ESET SysInspector connect to the Internet when run?
Like many applications, ESET SysInspector is signed with a digital signature "certificate" to help ensure the softwarewas published by ESET and has not been altered. In order to verify the certificate, the operating system contacts acertificate authority to verify the identity of the software publisher. This is normal behavior for all digitally-signedprograms under Microsoft Windows.
What is Anti-Stealth technology?
Anti-Stealth technology provides effective rootkit detection.
If the system is attacked by malicious code that behaves as a rootkit, the user may be exposed to data loss or theft.Without a special anti-rootkit tool, it is almost impossible to detect rootkits.
Why are there sometimes files marked as "Signed by MS", having a different "Company Name" entry at the sametime?
When trying to identify the digital signature of an executable, ESET SysInspector first checks for a digital signatureembedded in the file. If a digital signature is found, the file will be validated using that information. If a digitalsignature is not found, the ESI starts looking for the corresponding CAT file (Security Catalog - %systemroot%

77
\system32\catroot) that contains information about the executable file processed. If the relevant CAT file is found,the digital signature of that CAT file will be applied in the validation process of the executable.
This is why there are sometimes files marked as "Signed by MS", but having a different "CompanyName" entry.
3.6.7 ESET SysRescue Live
ESET SysRescue Live is a utility that enables you to create a bootable disk containing one of the ESET Securitysolutions - ESET NOD32 Antivirus, ESET Smart Security or certain server-oriented products. The main advantage ofESET SysRescue Live is the fact that the ESET Security solution runs independent of the host operating system buthas direct access to the disk and file system. This makes it possible to remove infiltrations which normally could notbe deleted, for example, when the operating system is running, etc.
3.6.8 Scheduler
Scheduler can be found in the Tools section of the main program window. Scheduler manages and launchesscheduled tasks according to defined parameters.
Scheduler contains a list of all scheduled tasks in the form of a table which shows their parameters such as Tasktype, task Name, Launch time and Last run. For more details, double-click a task to see its Scheduled task overview.After the installation, there is a set of predefined tasks. You can also create new scheduled tasks by clicking Addtask.
When you right-click a task, you can choose an action to perform. Available actions are:
· Show task details
· Run now
· Add...
· Edit...
· Delete
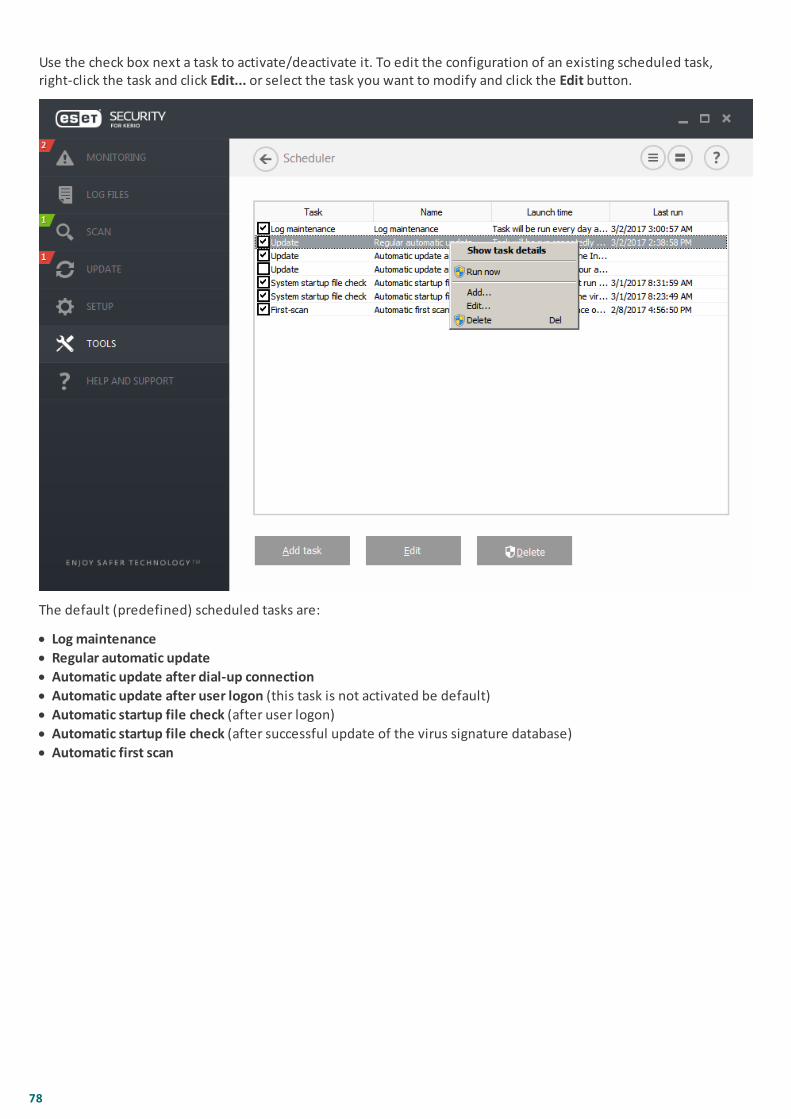
78
Use the check box next a task to activate/deactivate it. To edit the configuration of an existing scheduled task,right-click the task and click Edit... or select the task you want to modify and click the Edit button.
The default (predefined) scheduled tasks are:
· Log maintenance
· Regular automatic update
· Automatic update after dial-up connection
· Automatic update after user logon (this task is not activated be default)
· Automatic startup file check (after user logon)
· Automatic startup file check (after successful update of the virus signature database)
· Automatic first scan
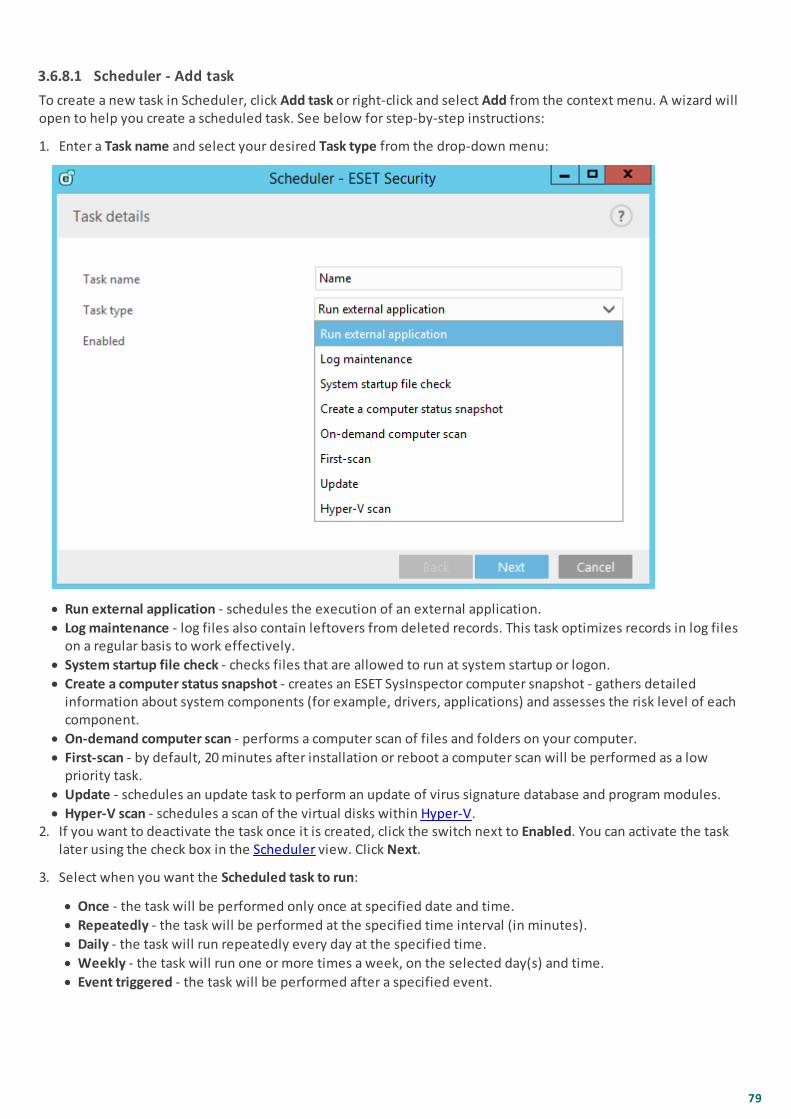
79
3.6.8.1 Scheduler - Add task
To create a new task in Scheduler, click Add task or right-click and select Add from the context menu. A wizard willopen to help you create a scheduled task. See below for step-by-step instructions:
1. Enter a Task name and select your desired Task type from the drop-down menu:
· Run external application - schedules the execution of an external application.
· Log maintenance - log files also contain leftovers from deleted records. This task optimizes records in log fileson a regular basis to work effectively.
· System startup file check - checks files that are allowed to run at system startup or logon.
· Create a computer status snapshot - creates an ESET SysInspector computer snapshot - gathers detailedinformation about system components (for example, drivers, applications) and assesses the risk level of eachcomponent.
· On-demand computer scan - performs a computer scan of files and folders on your computer.
· First-scan - by default, 20 minutes after installation or reboot a computer scan will be performed as a lowpriority task.
· Update - schedules an update task to perform an update of virus signature database and program modules.
· Hyper-V scan - schedules a scan of the virtual disks within Hyper-V.2. If you want to deactivate the task once it is created, click the switch next to Enabled. You can activate the task
later using the check box in the Scheduler view. Click Next.
3. Select when you want the Scheduled task to run:
· Once - the task will be performed only once at specified date and time.
· Repeatedly - the task will be performed at the specified time interval (in minutes).
· Daily - the task will run repeatedly every day at the specified time.
· Weekly - the task will run one or more times a week, on the selected day(s) and time.
· Event triggered - the task will be performed after a specified event.

80
4. If you want to prevent the task from being executed when the system is running on batteries (for example UPS),click the switch next to Skip task when running on battery power. Click Next.
5. If the task could not be run at the scheduled time, you can choose when it will be run:
· At the next scheduled time
· As soon as possible
· Immediately, if the time since the last run exceeds a specified value (the interval can be defined using theTime since last run selector)
6. Click Next. Depending on the Task type, Task details might need to be specified. Once done, click Finish. Thenew scheduled task will appear in the Scheduler view.
3.6.9 Submit samples for analysis
The sample submission dialog enables you to send a file or a site to ESET for analysis and can be found in Tools >Submit sample for analysis. If you find a suspiciously behaving file on your computer or suspicious site on theInternet, you can submit it to the ESET Virus Lab for analysis. If the file turns out to be a malicious application orwebsite, its detection will be added to an upcoming update.
Alternatively, you can submit the file by email. To do so, compress the file(s) using a program like WinRAR orWinZip, protect the archive with the password "infected" and send it to [email protected]. Please remember touse a descriptive subject and enclose as much information about the file as possible (for example, the website youdownloaded it from).
NOTEBefore submitting a sample to ESET, make sure it meets one or more of the following criteria:
· the file or website is not detected at all
· the file or website is incorrectly detected as a threat
You will not receive a response unless further information is required for analysis.
Select the description from the Reason for submitting the sample drop-down menu that best fits your message:
· Suspicious file
· Suspicious site (a website that is infected by malware)
· False positive file (file that is detected as an infection but are not infected)
· False positive site
· Other
File/Site - The path to the file or website you intend to submit.
Contact email - This contact email is sent along with suspicious files to ESET, and may be used to contact you iffurther information is required for analysis. Entering a contact email is optional. You will not get a response fromESET unless more information is required; since each day our servers receive tens of thousands of files, making itimpossible to reply to all submissions.
3.6.9.1 Suspicious file
Observed signs and symptoms of malware infection - Enter a description of the suspicious file behavior observed onyour computer.
File origin (URL address or vendor) - Please enter the file origin (source) and how you encountered this file.
Notes and additional information - Here you can enter additional info or a description that will help with theprocess of identifying the suspicious file.
NOTEThe first parameter - Observed signs and symptoms of malware infection - is required, but providing additionalinformation will significantly help our laboratories with the identification process of samples.

81
3.6.9.2 Suspicious site
Please select one of the following from the What's wrong with the site drop-down menu:
· Infected - A website that contains viruses or other malware distributed by various methods.
· Phishing - Often used to gain access to sensitive data such as bank account numbers, PIN numbers and more. Read more about this type of attack in the glossary.
· Scam - A swindle or a fraudulent website.
· Select Other if the aforementioned options do not refer the site you are going to submit.
Notes and additional information - Here you can enter additional info or a description that will help while analyzingthe suspicious website.
3.6.9.3 False positive file
We request that you submit files that are detected as an infection but are not infected to improve our antivirus andantispyware engine and help others to be protected. False positives (FP) may occur when a pattern of a file matchesthe same pattern contained in a virus signature database.
Application name and version - Program title and its version (for example number, alias or code name).
File origin (URL address or vendor) - Please enter a file origin (source) and note how you encountered this file.
Application's purpose - The general application description, type of application (for example, browser, mediaplayer, ...) and its functionality.
Notes and additional information - Here you can add additional information or descriptions that will help whileprocessing the suspicious file.
NOTEThe first three parameters are required to identify legitimate applications and distinguish them from maliciouscode. By providing additional information, you will help our laboratories significantly in the identificationprocess and in the processing of samples.
3.6.9.4 False positive site
We encourage you to submit sites that are detected as an infected, scam or phishing sites but are not. Falsepositives (FP) may occur when a pattern of a file matches the same pattern contained in a virus signature database.Please provide this website to improve our antivirus and anti-phishing engine and help others to be protected.
Notes and additional information - Here you can add additional information or descriptions that will help whileprocessing the suspicious file.
3.6.9.5 Other
Use this form if the file cannot be categorized as a Suspicious file or False positive.
Reason for submitting the file - Please enter a detailed description and the reason for sending the file.

82
3.6.10 Quarantine
The main function of the quarantine is to safely store infected files. Files should be quarantined if they cannot becleaned, if it is not safe or advisable to delete them or if they are being falsely detected by ESET Security for Kerio.
You can choose to quarantine any file. This is advisable if a file behaves suspiciously but is not detected by theantivirus scanner. Quarantined files can be submitted for analysis to the ESET Virus Lab.
Files stored in the quarantine folder can be viewed in a table that displays the date and time of quarantine, the pathto the original location of the infected file, its size in bytes, reason (for example, object added by user), and numberof threats (for example, if it is an archive containing multiple infiltrations).
Quarantining files
ESET Security for Kerio automatically quarantines deleted files (if you have not disabled this option in the alertwindow). If desired, you can quarantine any suspicious file manually by clicking Quarantine. Quarantined files willbe removed from their original location. The context menu can also be used for this purpose; right-click in the Quarantine window and select Quarantine.
Restoring from Quarantine
Quarantined files can also be restored to their original location. Use the Restore feature, available from the contextmenu by right-clicking a given file in the Quarantine window, to do so. If a file is marked as a potentially unwantedapplication, the Restore and exclude from scanning option will be available. Read more about this type ofapplication in the glossary. The context menu also offers the Restore to... option which allows you to restore a fileto a location other than the one from which it was deleted.
NOTEIf the program quarantines a harmless file by mistake, please exclude the file from scanning after restoring it andsend the file to ESET Customer Care.
83
Submitting a file from the Quarantine
If you have quarantined a suspicious file that was not detected by the program, or if a file was determined to beinfected incorrectly (for example, by heuristic analysis of the code) and subsequently quarantined, please send thefile to the ESET Virus Lab. To submit a file from quarantine, right-click the file and select Submit for analysis from thecontext menu.
3.7 Help and support
ESET Security for Kerio contains troubleshooting tools and support information that will assist you in solving issuesthat you may encounter.
Help
· Search ESET Knowledgebase - The ESET Knowledgebase contains answers to the most frequently asked questionsas well as recommended solutions for various issues. Regularly updated by ESET technical specialists, theKnowledgebase is the most powerful tool for resolving various types of problems.
· Open help - Click this link to launch the ESET Security for Kerio help pages.
· Find quick solution - Select this to find solutions to the most frequently encountered problems. We recommendthat you read this section before contacting technical support.
Customer Care
· Submit support request - If you cannot find an answer to your problem, you can also use this form located on theESET website to quickly contact our Customer Care department.
Support Tools
· Threat encyclopedia - Links to the ESET Threat Encyclopedia, which contains information about the dangers andsymptoms of different types of infiltration.
· ESET Log Collector - Links to the ESET Log Collector download page. Log Collector is an application thatautomatically collects information, such as configuration and logs from your server in order to help resolve issuesmore quickly. For more information about ESET Log Collector see Online help.
· Virus signature database history - Links to ESET Virus radar, which contains information about versions of the ESETVirus signature database.
· ESET Specialized cleaner - This cleaner automatically identifies and removes common malware infections, formore information please visit this ESET Knowledgebase article.
Product and License information
· About ESET Security for Kerio - Displays information about your copy of ESET Security for Kerio.
· Activate product / Manage license - Click to launch the Product activation window. Select one of the availablemethods to activate ESET Security for Kerio.
3.7.1 How to
This chapter covers some of the most frequently asked questions and problems encountered. Click the topic title tofind out how to solve your problem:
How to update ESET Security for Kerio
How to activate ESET Security for Kerio
How to schedule a scan task (every 24 hours)
How to remove a virus from my server
How Automatic exclusions work

84
If your problem is not included in the help pages list above, try searching by keyword or phrase describing yourproblem and search within the ESET Security for Kerio Help Pages.
If you cannot find the solution to your problem/question within the Help Pages, you can try our regularly updatedonline Knowledgebase.
If necessary, you can directly contact our online technical support center with your questions or problems. Thecontact form can be found in the Help and Support tab of your ESET program.
3.7.1.1 How to update ESET Security for Kerio
Updating ESET Security for Kerio can be performed either manually or automatically. To trigger the update, click Update now. You will find this in the Update section of the program.
The default installation settings create an automatic update task which is performed on an hourly basis. If you needto change the interval, navigate to the Scheduler (for more information on Scheduler, click here).
3.7.1.2 How to activate ESET Security for Kerio
After installation is complete, you will be prompted to activate your product.
There are several methods for activating your product. Availability of a particular activation scenario in theactivation window may vary depending on the country, as well as the means of distribution (CD/DVD, ESET webpage, etc.).
To activate your copy of ESET Security for Kerio directly from the program, click the system tray icon and selectProduct is not activated from the menu. You can also activate your product from the main menu under Help andsupport > Activate Product or Monitoring status > Product is not activated.
You can use any of the following methods to activate ESET Security for Kerio:
· License Key - A unique string in the format XXXX-XXXX-XXXX-XXXX-XXXX which is used for identification of the thelicense owner and for activation of the license.
· Security Admin - An account created on the ESET License Administrator portal with credentials (email address +password). This method allows you to manage multiple licenses from one location.
· Offline License file - An automatically generated file that will be transferred to the ESET product to providelicense information. Your offline License file is generated from the license portal and is used in environmentswhere the application cannot connect to the licensing authority.
· Click Activate later with ESET Remote Administrator if your computer is a member of a managed network, andyour administrator will perform remote activation via ESET Remote Administrator. You can also use this option ifyou want to activate this client at a later time.
Select Help and support > Manage license in the main program window to manage your license information at anytime. You will see the public license ID used to identify your product by ESET and for license identification. YourUsername, under which the computer is registered, is stored in the About section, which you can view by right-
clicking the system tray icon .
NOTEESET Remote Administrator is able to activate client computers silently using licenses made available by theadministrator.

85
3.7.1.3 How to create a new task in Scheduler
To create a new task in Scheduler, click Add task or right-click and select Add from the context menu. A wizard willopen to help you create a scheduled task. See below for step-by-step instructions:
1. Enter a Task name and select your desired Task type from the drop-down menu:
· Run external application - schedules the execution of an external application.
· Log maintenance - log files also contain leftovers from deleted records. This task optimizes records in log fileson a regular basis to work effectively.
· System startup file check - checks files that are allowed to run at system startup or logon.
· Create a computer status snapshot - creates an ESET SysInspector computer snapshot - gathers detailedinformation about system components (for example, drivers, applications) and assesses the risk level of eachcomponent.
· On-demand computer scan - performs a computer scan of files and folders on your computer.
· First-scan - by default, 20 minutes after installation or reboot a computer scan will be performed as a lowpriority task.
· Update - schedules an update task to perform an update of virus signature database and program modules.
· Hyper-V scan - schedules a scan of the virtual disks within Hyper-V.2. If you want to deactivate the task once it is created, click the switch next to Enabled. You can activate the task
later using the check box in the Scheduler view. Click Next.
3. Select when you want the Scheduled task to run:
· Once - the task will be performed only once at specified date and time.
· Repeatedly - the task will be performed at the specified time interval (in minutes).
· Daily - the task will run repeatedly every day at the specified time.
· Weekly - the task will run one or more times a week, on the selected day(s) and time.
· Event triggered - the task will be performed after a specified event.
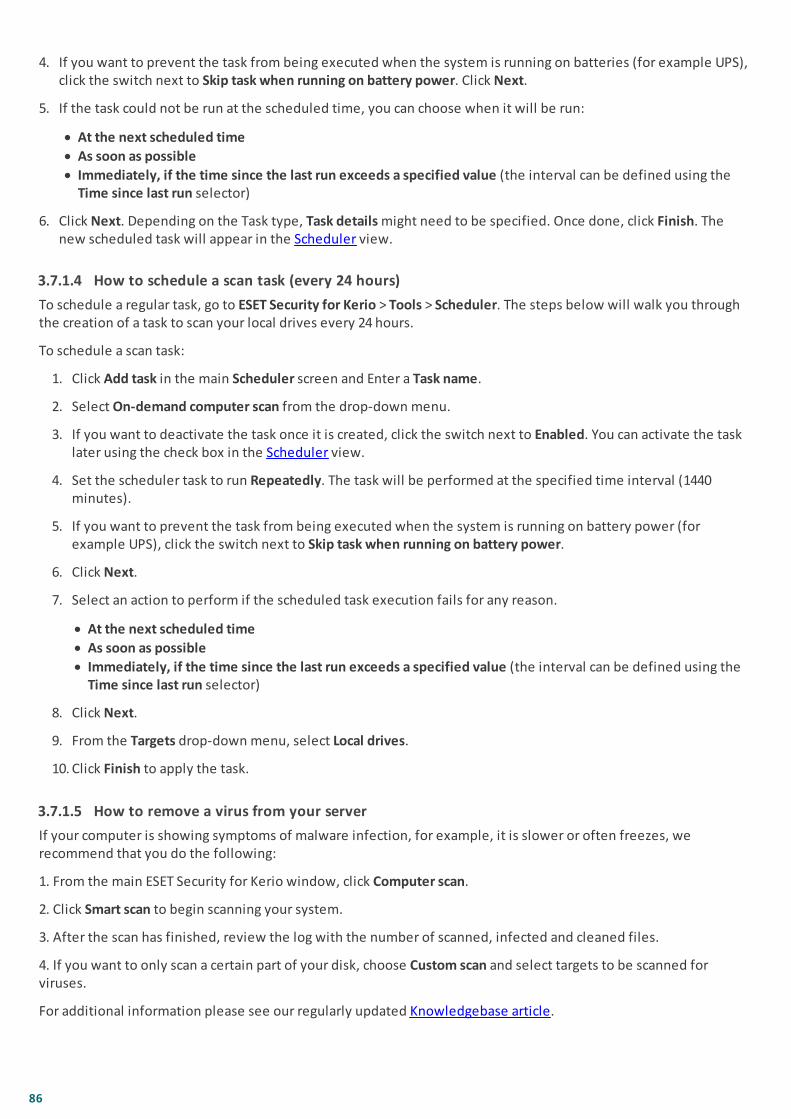
86
4. If you want to prevent the task from being executed when the system is running on batteries (for example UPS),click the switch next to Skip task when running on battery power. Click Next.
5. If the task could not be run at the scheduled time, you can choose when it will be run:
· At the next scheduled time
· As soon as possible
· Immediately, if the time since the last run exceeds a specified value (the interval can be defined using theTime since last run selector)
6. Click Next. Depending on the Task type, Task details might need to be specified. Once done, click Finish. Thenew scheduled task will appear in the Scheduler view.
3.7.1.4 How to schedule a scan task (every 24 hours)
To schedule a regular task, go to ESET Security for Kerio > Tools > Scheduler. The steps below will walk you throughthe creation of a task to scan your local drives every 24 hours.
To schedule a scan task:
1. Click Add task in the main Scheduler screen and Enter a Task name.
2. Select On-demand computer scan from the drop-down menu.
3. If you want to deactivate the task once it is created, click the switch next to Enabled. You can activate the tasklater using the check box in the Scheduler view.
4. Set the scheduler task to run Repeatedly. The task will be performed at the specified time interval (1440minutes).
5. If you want to prevent the task from being executed when the system is running on battery power (forexample UPS), click the switch next to Skip task when running on battery power.
6. Click Next.
7. Select an action to perform if the scheduled task execution fails for any reason.
· At the next scheduled time
· As soon as possible
· Immediately, if the time since the last run exceeds a specified value (the interval can be defined using theTime since last run selector)
8. Click Next.
9. From the Targets drop-down menu, select Local drives.
10. Click Finish to apply the task.
3.7.1.5 How to remove a virus from your server
If your computer is showing symptoms of malware infection, for example, it is slower or often freezes, werecommend that you do the following:
1. From the main ESET Security for Kerio window, click Computer scan.
2. Click Smart scan to begin scanning your system.
3. After the scan has finished, review the log with the number of scanned, infected and cleaned files.
4. If you want to only scan a certain part of your disk, choose Custom scan and select targets to be scanned forviruses.
For additional information please see our regularly updated Knowledgebase article.
87
3.7.2 Submit support request
In order to provide assistance as quickly and accurate as possible, ESET requires information about your ESETSecurity for Kerio configuration, detailed system system information, running processes (ESET SysInspector log file)and registry data. ESET will only use this data to provide technical assistance to the customer.
When you submit the web form, your system configuration data will be submitted to ESET. Select Always submitthis information to remember this action for this process. To submit the form without sending any data select Don'tsubmit data and you can contact ESET customer care using the online support form.
This setting can also be configured from the Advanced setup window (press the F5 key on your keyboard). ClickTools > Diagnostics > Customer Care.
NOTEIf you choose to submit system data you must fill and submit the web form, otherwise your ticket will not becreated and your system data will be lost.
3.7.3 ESET Specialized Cleaner
The ESET Specialized Cleaner is a removal tool for common malware infections such as Conficker, Sirefef or Necurs.For more information please visit this ESET Knowledgebase article.
3.7.4 About ESET Security for Kerio
This window provides details about the installed version of ESET Security for Kerio. The top part of the windowcontains information about your operating system and system resources, the current user and full computer name.

88
Installed components contain information about modules. Click Installed components to view a list of installedcomponents and their details. Click Copy to copy the list to your clipboard. This may be useful duringtroubleshooting or when contacting Technical Support.
3.7.5 Product activation
After installation is complete, you will be prompted to activate your product.
There are several methods for activating your product. Availability of a particular activation scenario in theactivation window may vary depending on the country, as well as the means of distribution (CD/DVD, ESET webpage, etc.).
To activate your copy of ESET Security for Kerio directly from the program, click the system tray icon and selectProduct is not activated from the menu. You can also activate your product from the main menu under Help andsupport > Activate Product or Monitoring status > Product is not activated.
You can use any of the following methods to activate ESET Security for Kerio:
· License Key - A unique string in the format XXXX-XXXX-XXXX-XXXX-XXXX which is used for identification of the thelicense owner and for activation of the license.
· Security Admin - An account created on the ESET License Administrator portal with credentials (email address +password). This method allows you to manage multiple licenses from one location.
· Offline License file - An automatically generated file that will be transferred to the ESET product to providelicense information. Your offline License file is generated from the license portal and is used in environmentswhere the application cannot connect to the licensing authority.
· Click Activate later with ESET Remote Administrator if your computer is a member of a managed network, andyour administrator will perform remote activation via ESET Remote Administrator. You can also use this option if

89
you want to activate this client at a later time.
Select Help and support > Manage license in the main program window to manage your license information at anytime. You will see the public license ID used to identify your product by ESET and for license identification. YourUsername, under which the computer is registered, is stored in the About section, which you can view by right-
clicking the system tray icon .
NOTEESET Remote Administrator is able to activate client computers silently using licenses made available by theadministrator.
3.7.5.1 Registration
Register your license by completing the fields in the registration form and clicking Continue. The fields marked asrequired in brackets are mandatory. This information will only be used for matters involving your ESET License.
3.7.5.2 Security Admin activation
The Security Admin account is an account created on the license portal with your email address and password, whichis able to see all seat authorizations.
A Security Admin account allows you to manage multiple licenses. If you do not have a Security Admin account, clickCreate account and you will be redirected to the ESET License Administrator web page where you can register withyour credentials.
If you have forgotten your password click Forgotten password? and you will be redirected to the ESET Businessportal. Enter your email address and click Submit to confirm. After that you will obtain a message with instructionsto reset your password.
NOTEFor more information about using ESET License Administrator, see the ESET License Administrator User Guide.
3.7.5.3 Activation failure
Activation of ESET Security for Kerio was not successful. Make sure you have entered the proper License Key orattached an Offline License. If you have a different Offline License, please enter it again. To check the license keyyou entered, click recheck the License Key or click purchase a new license and you will be redirected to ourwebpage where you can buy a new license.
3.7.5.4 License
If you choose the Security Admin activation option, you will be prompted to select a license associated with youraccount that will be used for ESET Security for Kerio. Click Activate to continue.
3.7.5.5 Activation progress
ESET Security for Kerio is now activating, please be patient. This may take a few moments.
3.7.5.6 Activation successful
Activation was successful and ESET Security for Kerio is now activated. From now on, ESET Security for Kerio willreceive regular updates to identify the latest threats and keep your computer safe. Click Done to finish productactivation.
90
4. Working with ESET Security for KerioFrom the Advanced setup window, you can configure settings and options based on your needs. The menu on theleft includes the following categories:
· Server - Allows you to configure Antivirus and antispyware, Rules, etc.
· Computer - Enable or disable detection of potentially unwanted, unsafe, suspicious application, specifyexclusions, Real-time file system protection, On-demand computer scan and Hyper-V scan, etc.
· Update - Configure a list of profiles, create a snapshots of update file, update source information like the updateservers being used and authentication data for these servers.
· Device control - Configure Device control Rules and Groups.
· Tools - Allows you to customize tools, such as ESET LiveGrid®, Log files, Proxy server, Cluster, etc.
· User interface - Configure the behavior of the program's Graphical user interface (GUI), Statuses, Licenseinformation, etc.
When you click an item (category or subcategory) in the menu on the left, the respective settings for that item areshown on the right tab.
4.1 Server
In this section, you can specify whether ESET Security for Kerio is registered to Kerio Connect/ Control server. Thishas direct effect on protection status. It is registered by default. When Register to Kerio Control server or Register toKerio Connect server checkbox is ticked, it means that ESET Security for Kerio has registered its dll andconfiguration in Kerio Control/Connect accordingly. When you clear the Register to Kerio Control server or Registerto Kerio Connect server checkbox, then the dll is unregistered from Kerio Control/Connect which means that theprotection is disabled.
NOTEWhen you change Register to Kerio Control server or Register to Kerio Connect server setting and click OK button,ESET Security for Kerio automatically restarts relevant Kerio service.
For more information about ESET Security for Kerio registration into Kerio product see following topic for KerioConnect or Kerio Control.
4.1.1 Kerio Connect
This is where you can specify whether ESET Security for Kerio is registered to Kerio Connect server. This has directeffect on protection status. It is registered by default. When Register to Kerio Connect server checkbox is ticked, itmeans that ESET Security for Kerio has registered its dll and configuration in Kerio Connect. When you clear theRegister to Kerio Connect server checkbox, then the dll is unregistered from Kerio Connect which means that theprotection is disabled.
NOTE By changing this setting and then pressing OK button, ESET Security for Kerio automatically restarts relevantKerio service.

91
4.1.2 Kerio Control
This is where you can specify whether ESET Security for Kerio is registered to Kerio Control server. This has directeffect on protection status. It is registered by default. When Register to Kerio Control server checkbox is ticked, itmeans that ESET Security for Kerio has registered its dll and configuration in Kerio Control. When you clear theRegister to Kerio Control server checkbox, then the dll is unregistered from Kerio Control which means that theprotection is disabled.
NOTE By changing this setting and then pressing OK button, ESET Security for Kerio automatically restarts relevantKerio service.
4.2 Antivirus and antispyware
You can configure Antivirus and antispyware for the following types of protection:
· Kerio Connect - You can enable or disable antivirus and antispyware server protection for Mail server.
· Kerio Control - You can enable or disable antivirus and antispyware server protection for Gateway server.
· ThreatSense parameters - The advanced virus scanner setup enables you to configure scan targets, detectionmethods, etc.
NOTEScan engine of ESET Security for Kerio is able to clean infiltrations, however Kerio itself doesn't accept cleanedfiles. Thus the cleaning is not supported. If an infiltration is found, ESET Security for Kerio scan engine marks thefile as infected (mark for deletion) and the file is then handled by Kerio.
List of AV scan engine outputs accepted by Kerio:
· Clean - file is clean and is delivered, downloaded, etc.
· Infected - file is infected, ESET Security for Kerio scan engine marks the file for deletion (even if ESET Security forKerio scan engine is able to clean it). The appropriate action is set by Kerio itself.
· Not-Scanned - it is not possible to scan a file (encrypted, password protected or damaged). ESET Security for Kerioscan marks file as not scanned. The appropriate action is set by Kerio itself.
· Failed - an error occurs during scanning. ESET Security for Kerio scan returns an error. Action is taken based onKerio's (internal) settings.
4.3 Rules
The Rules allow administrators to manually define email filtering conditions and actions to take with filteredemails.

92
4.3.1 Rules list
The Rules list window displays existing rules. Rules are classified into three levels and are evaluated in this order:
· Filtering rules (1) - rule evaluated before antispam and antivirus scan
· Attachment processing rules (2) - rule evaluated during antivirus scan
· Result processing rules (3) - rule evaluated after antivirus scan
Rules with the same level are evaluated in the same order as they are displayed in the Rules window. You can onlychange the rule order for rules of the same level. For example, when you have multiple filtering rules, you canchange the order they are applied in. You cannot change their order by putting Attachment processing rules beforeFiltering rules, the Up/Down buttons will not be available. In other words, you cannot mix rules of different Levels.
The Hits column displays the number of times the rule was successfully applied. Deselecting a check box (to the leftof each rule name) deactivates the corresponding rule until you select the check box again.
· Add - adds a new rule
· Edit - modifies an existing rule
· Remove - removes selected rule
· Up - moves the selected rule up in the list
· Down - moves the selected rule down in the list
· Reset - resets the counter for the selected rule (the Hits column)
NOTE If a new rule is added or an existing rule has been modified, message rescan will automatically start using thenew/modified rules.

93
4.3.1.1 Rule wizard
You can define Conditions and Actions using the Rule wizard. Define Condition(s) first, then Action(s).
1. Click Add and a Rule condition window will appear where you can select condition type, operation and value.
2. From here you can add a Rule action. Once conditions and actions are defined, type a Name for the rule(something that you'll recognize the rule by), this name will be displayed in the Rules list.
3. If you want to prepare rules but plan to use them later, you can click the switch next to Active to deactivate therule. To activate the rule, select the check box next to the rule you want to activate from the Rules list.
4.3.1.1.1 Rule condition
This wizard lets you add conditions for a rule. Select Type > Operation from the drop-down list (the list of operationschanges depending on what rule type you've chosen) and select Parameter. Parameter fields will change dependingon rule type and operation.
For example, choose Attachment size > is greater than and under Parameter specify 10 MB. Using these settings, anymessage that contains an attachment larger than 10 MB will be processed using the rule action you have specified.For this reason you should specify the action that is taken when a given rule is triggered if you have not done sowhen setting parameters for that rule.
NOTEIt is possible to add multiple conditions for one rule.
The following Conditions are available for Kerio Connect and Kerio Control (some of the options might not displaydepending on your previously selected conditions):
Conditions nameKerio
ConnectKerio
ControlDescriptions
Attachment name Applies to messages containing attachments with a specific name.
Attachment size Applies to messages with an attachment that does not meet a specified size,is within a specified size range, or exceeds a specified size.
Attachment type Applies to messages with a specific file type attached. File types arecategorized in groups for easy selection, you can select multiple file types orwhole categories.
Antivirus scanresult
Applies to messages flagged as malicious or not malicious.
Containspasswordprotected archive
Applies to messages with archive attachments that are protected by apassword.
Containsdamaged archive
Applies to messages with archive attachments that are damaged (most likelyimpossible to open).

94
4.3.1.1.2 Rule action
You can add actions that will be taken with messages and/or attachments that match rule conditions.
NOTEIt is possible to add multiple actions for one rule.
The list of available Actions for Kerio Connect and Kerio Control (some of the options might not show up dependingon your selected actions):
Actions nameKerio
ConnectKerio
ControlDescriptions
Quarantineattachment
Puts email attachment into file quarantine, email will be delivered to therecipient with the attachment truncated to zero length.
Delete attachment
Deletes a message attachment the message will be delivered to therecipient without the attachment.
Send emailnotification
Sends email notifications to a recipient specified in Email notifications. Youneed to enable Send event notification by email feature. You can thencustomize the format of event messages (use the tooltip for suggestions)while creating the rule. Also, you can select verbosity for event messages,however this depends on the minimum verbosity setting in Emailnotifications section.
Evaluate other rules
Allows the evaluation of other rules, enabling the user to define multiplesets of conditions and multiple actions to take given the conditions.
Log to events
Writes information about the applied rule to the program log and define theformat of event messages (use the tooltip for suggestions).
4.4 Computer
The Computer module can be found under Setup > Computer. It displays an overview of the protection modulesdescribed in the previous chapter. In this section, the following settings are available:
· Real-time file system protection
· On-demand computer scan
· Idle-state scanning
· Startup scan
· Removable media
· Document protection
· HIPS
Scanner options for all protection modules allow you to enable or disable detection of the following:
· Potentially unwanted applications (PUAs) are not necessarily intended to be malicious, but may affect theperformance of your computer in a negative way. Read more about these types of applications in the glossary.
· Potentially unsafe applications refers to legitimate commercial software that has the potential to be misused formalicious purposes. Examples of potentially unsafe applications include remote access tools, password-crackingapplications, and keyloggers (programs that record each keystroke typed by a user). This option is disabled bydefault. Read more about these types of applications in the glossary.
· Potentially suspicious applications include programs compressed with packers or protectors. These types ofprotectors are often exploited by malware authors to evade detection.
Anti-Stealth technology is a sophisticated system that detects dangerous programs such as rootkits which are able tohide themselves from the operating system, making it impossible to detect them using ordinary testing techniques.
95
Processes exclusions allows you to exclude specific processes. For example processes of the backup solution, all fileoperations attributed to such excluded process are being ignored and considered safe, thus minimizing theinterference with the backup process.
Exclusions enable you to exclude files and folders from scanning. To ensure that all objects are scanned for threats,we recommend only creating exclusions when it is absolutely necessary. Situations where you may need to excludean object might include scanning large database entries that would slow your computer during a scan or softwarethat conflicts with the scan.
4.4.1 An infiltration is detected
Infiltrations can reach the system from various entry points such as webpages, shared folders, via email or fromremovable devices (USB, external disks, CDs, DVDs, diskettes, etc.).
Standard behavior
As a general example of how infiltrations are handled by ESET Security for Kerio, infiltrations can be detected using:
· Real-time file system protection
· On-demand computer scan
Each uses the standard cleaning level and will attempt to clean the file and move it to Quarantine or terminate theconnection. A notification window is displayed in the notification area at the bottom right corner of the screen. Formore information about cleaning levels and behavior, see Cleaning.
Cleaning and deleting
If there is no predefined action to take for Real-time file system protection, you will be prompted to select anoption in the alert window. Usually the options Clean, Delete and No action are available. Selecting No action is notrecommended, as this will leave infected files uncleaned. The exception to this is when you are sure that a file isharmless and has been detected by mistake.
Apply cleaning if a file has been attacked by a virus that has attached malicious code to the file. If this is the case,attempt to clean the infected file in order to restore it to its original state before cleaning. If the file consistsexclusively of malicious code, it will be deleted.
If an infected file is “locked“ or in use by a system process, it will usually only be deleted after it is released(normally after a system restart).
Multiple threats
If any infected files were not cleaned during Computer scan (or the Cleaning level was set to No Cleaning), an alertwindow prompting you to select actions for those files is displayed. Select an action individually for each threat inthe list or you can use Select action for all listed threats and choose one action to take on all the threats in the list,then click Finish.
Deleting files in archives
In Default cleaning mode, the entire archive will only be deleted if it contains infected files and no clean files. Inother words, archives are not deleted if they also contain harmless clean files. Use caution when performing a Strictcleaning scan, with Strict cleaning enabled an archive will be deleted if it contains at least one infected fileregardless of the status of other files in the archive.If your computer is showing signs of a malware infection, for example, it is slower, often freezes, etc., werecommend that you do the following:
1. Open ESET Security for Kerio and click Computer scan2. Click Smart scan (for more information, see Computer scan)3. After the scan has finished, review the log for the number of scanned, infected and cleaned files
If you only want to scan a certain part of your disk, click Custom scan and select targets to be scanned for viruses.
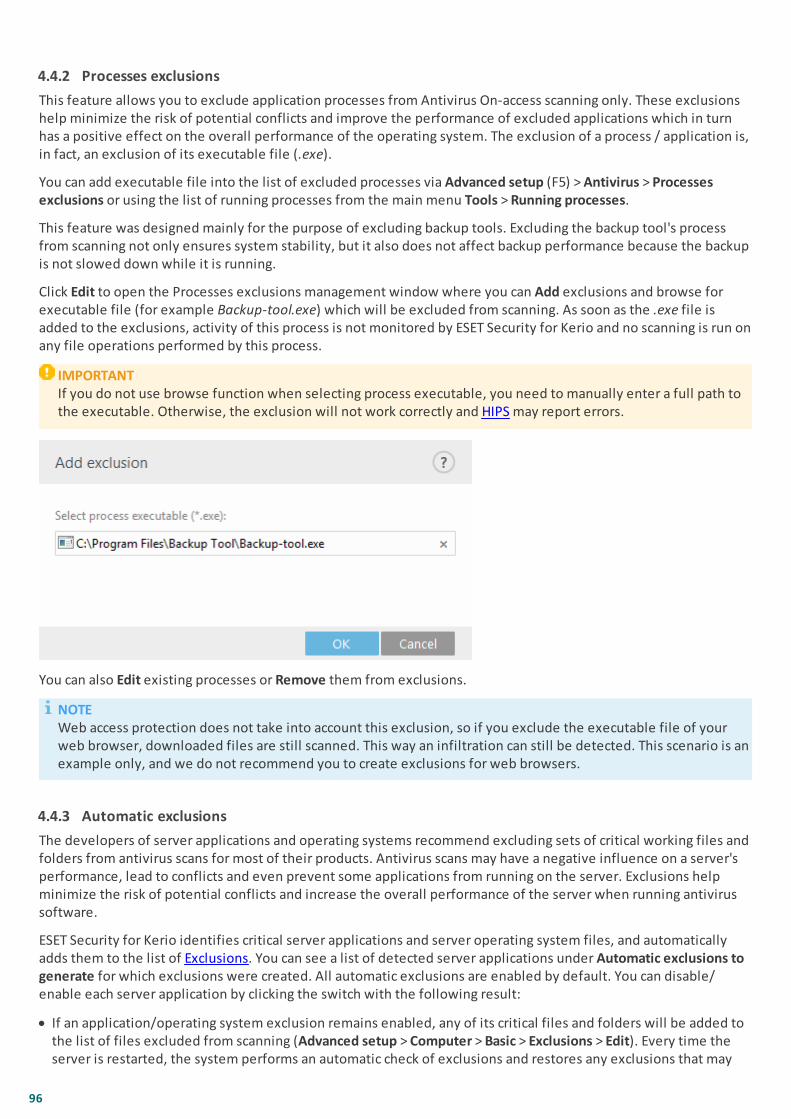
96
4.4.2 Processes exclusions
This feature allows you to exclude application processes from Antivirus On-access scanning only. These exclusionshelp minimize the risk of potential conflicts and improve the performance of excluded applications which in turnhas a positive effect on the overall performance of the operating system. The exclusion of a process / application is,in fact, an exclusion of its executable file (.exe).
You can add executable file into the list of excluded processes via Advanced setup (F5) > Antivirus > Processesexclusions or using the list of running processes from the main menu Tools > Running processes.
This feature was designed mainly for the purpose of excluding backup tools. Excluding the backup tool's processfrom scanning not only ensures system stability, but it also does not affect backup performance because the backupis not slowed down while it is running.
Click Edit to open the Processes exclusions management window where you can Add exclusions and browse forexecutable file (for example Backup-tool.exe) which will be excluded from scanning. As soon as the .exe file isadded to the exclusions, activity of this process is not monitored by ESET Security for Kerio and no scanning is run onany file operations performed by this process.
IMPORTANTIf you do not use browse function when selecting process executable, you need to manually enter a full path tothe executable. Otherwise, the exclusion will not work correctly and HIPS may report errors.
You can also Edit existing processes or Remove them from exclusions.
NOTEWeb access protection does not take into account this exclusion, so if you exclude the executable file of yourweb browser, downloaded files are still scanned. This way an infiltration can still be detected. This scenario is anexample only, and we do not recommend you to create exclusions for web browsers.
4.4.3 Automatic exclusions
The developers of server applications and operating systems recommend excluding sets of critical working files andfolders from antivirus scans for most of their products. Antivirus scans may have a negative influence on a server'sperformance, lead to conflicts and even prevent some applications from running on the server. Exclusions helpminimize the risk of potential conflicts and increase the overall performance of the server when running antivirussoftware.
ESET Security for Kerio identifies critical server applications and server operating system files, and automaticallyadds them to the list of Exclusions. You can see a list of detected server applications under Automatic exclusions togenerate for which exclusions were created. All automatic exclusions are enabled by default. You can disable/enable each server application by clicking the switch with the following result:
· If an application/operating system exclusion remains enabled, any of its critical files and folders will be added tothe list of files excluded from scanning (Advanced setup > Computer > Basic > Exclusions > Edit). Every time theserver is restarted, the system performs an automatic check of exclusions and restores any exclusions that may

97
have been deleted from the list. This is the recommended setting if you want to make sure the recommendedAutomatic exclusions are always applied.
· If the user disables an application/operating system exclusion, its critical files and folders remain on the list offiles excluded from scanning (Advanced setup > Computer > Basic > Exclusions > Edit). However, they will not beautomatically checked and renewed on the Exclusions list every time the server is restarted (see point 1 above).We recommend this setting for advanced users, who wish to remove or modify some of the standard exclusions.If you wish to remove the exclusions from the list without restarting the server, you will need to remove themmanually from the list (Advanced setup >Computer > Basic > Exclusions > Edit).
Any user-defined exclusions entered manually (under Advanced setup > Computer > Basic > Exclusions > Edit) willnot be affected by the settings described above.
NOTEExcluded object for Kerio are following:
· Kerio Connect - store folder (for example C:\Program Files\Kerio\MailServer\store\*.*). Location of the Keriostore folder is read from the configuration file mailserver.cfg (tag <variable name="StoreDir">).
· Kerio Control - whole installation folder (for example C:\Program Files (x86)\Kerio\WinRoute Firewall\*.*).
4.4.4 Shared local cache
ESET Shared local cache will boost performance in virtualized environments by eliminating duplicate scanning in thenetwork. This ensures that each file will be scanned only once and stored in the shared cache.
Turn on the Caching option switch to save information about scans of files and folders on your network to the localcache. If you perform a new scan, ESET Security for Kerio will search for scanned files in the cache. If files match,they will be excluded from scanning.
Cache server setup contains the following:
· Hostname - Name or IP address of the computer where the cache is located.
· Port - Number of the port used for communication (same as was set in Shared local cache).
· Password - Specify the Shared local cache password if required.

98
4.4.5 Real-time file system protection
Real-time file system protection controls all antivirus-related events in the system. All files are scanned formalicious code when they are opened, created, or run on your computer. Real-time file system protection islaunched at system startup.
By default, Real-time file system protection launches at system start-up and provides uninterrupted scanning. Inspecial cases (for example, if there is a conflict with another real-time scanner), real-time protection can bedisabled by disengaging Start Real-time file system protection automatically in Advanced setup under Real-time filesystem protection > Basic.
Media to scan
By default, all types of media are scanned for potential threats:
· Local drives - Controls all system hard drives.
· Removable media - Controls CD/DVD's, USB storage, Bluetooth devices, etc.
· Network drives - Scans all mapped drives.
We recommend that you use default settings and only modify them in specific cases, such as when scanning certainmedia significantly slows data transfers.
Scan on
By default, all files are scanned upon opening, creation, or execution. We recommend that you keep these defaultsettings, as they provide the maximum level of real-time protection for your computer:
· File open - Enables or disables scanning when files are opened.
· File creation - Enables or disables scanning when files are created.
· File execution - Enables or disables scanning when files are run.
· Removable media access - Enables or disables scanning triggered by accessing particular removable media withstorage space.

99
· Computer shutdown - Enables or disables scanning triggered by computer shutdown.
Real-time file system protection checks all types of media and is triggered by various system events such asaccessing a file. Using ThreatSense technology detection methods (as described in the ThreatSense parameterssection), Real-time file system protection can be configured to treat newly created files differently than existingfiles. For example, you can configure Real-time file system protection to more closely monitor newly created files.
To ensure a minimal system footprint when using real-time protection, files that have already been scanned are notscanned repeatedly (unless they have been modified). Files are scanned again immediately after each virussignature database update. This behavior is controlled using Smart optimization. If Smart optimization is disabled,all files are scanned each time they are accessed. To modify this setting, press F5 to open Advanced setup andexpand Computer > Real-time file system protection. Click ThreatSense parameters > Other and select or deselectEnable Smart optimization.
4.4.5.1 Exclusions
Exclusions enable you to exclude files and folders from scanning. To ensure that all objects are scanned for threats,we recommend only creating exclusions when it is absolutely necessary. Situations where you may need to excludean object might include scanning large database entries that would slow your computer during a scan or softwarethat conflicts with the scan (for example, backup software).
WARNINGNot to be confused with Excluded extensions.
To exclude an object from scanning, click Add and enter the path to an object or select it in the tree structure.
NOTEA threat within a file will not be detected by the Real-time file system protection module or Computer scanmodule if that file meets the criteria for exclusion from scanning.
Columns
Path - Path to excluded files and folders.Threat - If the name of a threat is displayed next to an excluded file, it means that the file is only excluded for the
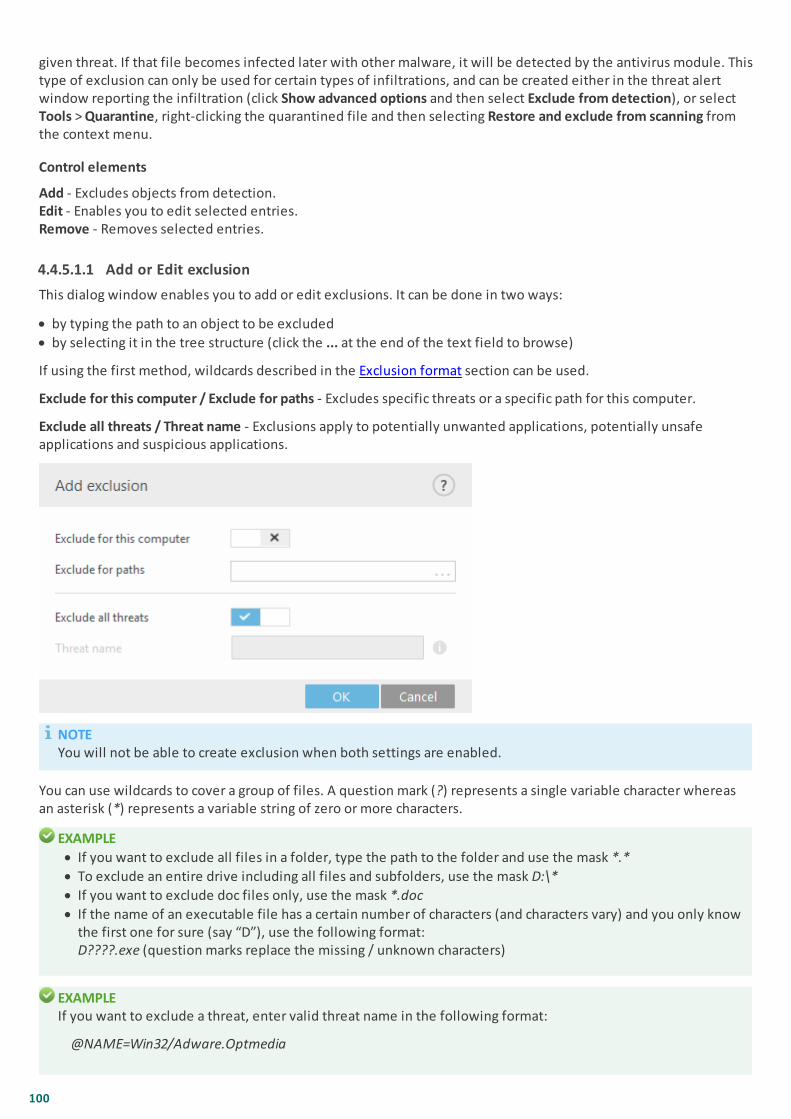
100
given threat. If that file becomes infected later with other malware, it will be detected by the antivirus module. Thistype of exclusion can only be used for certain types of infiltrations, and can be created either in the threat alertwindow reporting the infiltration (click Show advanced options and then select Exclude from detection), or selectTools > Quarantine, right-clicking the quarantined file and then selecting Restore and exclude from scanning fromthe context menu.
Control elements
Add - Excludes objects from detection.Edit - Enables you to edit selected entries.Remove - Removes selected entries.
4.4.5.1.1 Add or Edit exclusion
This dialog window enables you to add or edit exclusions. It can be done in two ways:
· by typing the path to an object to be excluded
· by selecting it in the tree structure (click the ... at the end of the text field to browse)
If using the first method, wildcards described in the Exclusion format section can be used.
Exclude for this computer / Exclude for paths - Excludes specific threats or a specific path for this computer.
Exclude all threats / Threat name - Exclusions apply to potentially unwanted applications, potentially unsafeapplications and suspicious applications.
NOTEYou will not be able to create exclusion when both settings are enabled.
You can use wildcards to cover a group of files. A question mark (?) represents a single variable character whereasan asterisk (*) represents a variable string of zero or more characters.
EXAMPLE
· If you want to exclude all files in a folder, type the path to the folder and use the mask *.*
· To exclude an entire drive including all files and subfolders, use the mask D:\*
· If you want to exclude doc files only, use the mask *.doc
· If the name of an executable file has a certain number of characters (and characters vary) and you only knowthe first one for sure (say “D”), use the following format:D????.exe (question marks replace the missing / unknown characters)
EXAMPLEIf you want to exclude a threat, enter valid threat name in the following format:
@NAME=Win32/Adware.Optmedia
101
@NAME=Win32/TrojanDownloader.Delf.QQI@NAME=Win32/Bagle.D
EXAMPLEYou can use an asterisk * to denote a folder name, for example C:\Users\*\Application Data\
A few more exclusion examples using an asterisk:
C:\Tools - will be automatically converted to C:\Tools\*.*C:\Tools\*.dat - will exclude dat files in the Tools folderC:\Tools\sg.dat - will exclude this particular file located in the exact path
4.4.5.1.2 Exclusion format
You can use wildcards to cover a group of files. A question mark (?) represents a single variable character whereasan asterisk (*) represents a variable string of zero or more characters.
EXAMPLE
· If you want to exclude all files in a folder, type the path to the folder and use the mask *.*
· To exclude an entire drive including all files and subfolders, use the mask D:\*
· If you want to exclude doc files only, use the mask *.doc
· If the name of an executable file has a certain number of characters (and characters vary) and you only knowthe first one for sure (say “D”), use the following format:D????.exe (question marks replace the missing / unknown characters)
EXAMPLEIf you want to exclude a threat, enter valid threat name in the following format:
@NAME=Win32/Adware.Optmedia@NAME=Win32/TrojanDownloader.Delf.QQI@NAME=Win32/Bagle.D
EXAMPLEYou can use an asterisk * to denote a folder name, for example C:\Users\*\Application Data\
A few more exclusion examples using an asterisk:
C:\Tools - will be automatically converted to C:\Tools\*.*C:\Tools\*.dat - will exclude dat files in the Tools folderC:\Tools\sg.dat - will exclude this particular file located in the exact path
4.4.5.2 ThreatSense parameters
ThreatSense is technology comprised of many complex threat detection methods. This technology is proactive,which means it also provides protection during the early spread of a new threat. It uses a combination of codeanalysis, code emulation, generic signatures and virus signatures which work in concert to significantly enhancesystem security. The scanning engine is capable of controlling several data streams simultaneously, maximizing theefficiency and detection rate. ThreatSense technology also successfully eliminates rootkits.
NOTEFor details about automatic startup file check, see Startup scan.
ThreatSense engine setup options allow you to specify several scan parameters:
· File types and extensions that are to be scanned
· The combination of various detection methods
· Levels of cleaning, etc.

102
To enter the setup window, click ThreatSense engine parameter setup in the Advanced setup window for anymodule that uses ThreatSense technology (see below). Different security scenarios may require differentconfigurations. With this in mind, ThreatSense is individually configurable for the following protection modules:
· Antivirus and antispyware (Kerio Connect / Kerio Control)
· Hyper-V scan
· Real-time file system protection
· Idle-state scanning
· Startup scan
· Document protectionThreatSense parameters are highly optimized for each module, and their modification can significantly influencesystem operation. For example, changing parameters to always scan runtime packers, or enabling advancedheuristics in the Real-time file system protection module could result in a system slow-down (normally, only newly-created files are scanned using these methods). We recommend that you leave the default ThreatSense parametersunchanged for all modules except Computer scan.
Objects to scan
This section allows you to define which computer components and files will be scanned for infiltrations.
· Operating memory - Scans for threats that attack the operating memory of the system.
· Boot sectors - Scans boot sectors for the presence of viruses in the MBR (Master Boot Record). In case of a Hyper-VVirtual Machine, its disk MBR is scanned in read - only mode.
· Email files - The program supports the following extensions: DBX (Outlook Express) and EML.
· Archives - The program supports the following extensions: ARJ, BZ2, CAB, CHM, DBX, GZIP, ISO/BIN/NRG, LHA,MIME, NSIS, RAR, SIS, TAR, TNEF, UUE, WISE, ZIP, ACE, and many others.
· Self-extracting archives – Self-extracting archives (SFX) are archives needing no specialized programs – archives –to decompress themselves.
· Runtime packers - After being executed, runtime packers (unlike standard archive types) decompress in memory.In addition to standard static packers (UPX, yoda, ASPack, FSG, etc.), the scanner is able to recognize severaladditional types of packers through the use of code emulation.
Scan options
Select the methods used when scanning the system for infiltrations. The following options are available:
· Heuristics - A heuristic is an algorithm that analyzes the (malicious) activity of programs. The main advantage ofthis technology is the ability to identify malicious software which did not exist, or was not known by the previousvirus signatures database.
· Advanced heuristics/DNA signatures - Advanced heuristics consist of a unique heuristic algorithm developed byESET, optimized for detecting computer worms and trojan horses and written in high level programminglanguages. The use of advanced heuristics greatly increases the threat detection capabilities of ESET products.Signatures can reliably detect and identify viruses. Utilizing the automatic update system, new signatures areavailable within a few hours of a threat discovery. The disadvantage of signatures is that they only detect virusesthey know (or slightly modified versions of these viruses).
Cleaning
The cleaning settings determine the behavior of the scanner while cleaning infected files. There are 3 levels ofcleaning:
No cleaning - Infected files will not be cleaned automatically. The program will display a warning window and allowthe user to choose an action. This level is designed for more advanced users who know which steps to take in theevent of an infiltration.
Normal cleaning - The program will attempt to automatically clean or delete an infected file based on a predefinedaction (depending on the type of infiltration). Detection and deletion of an infected file is signaled by a notificationin the bottom-right corner of the screen. If it is not possible to select the correct action automatically, the programprovides other follow-up actions. The same happens when a predefined action cannot be completed.

103
Strict cleaning - The program will clean or delete all infected files. The only exceptions are system files. If it is notpossible to clean a file, the user will be asked what type of action should be taken.
WARNINGIf an archive contains a file or files that are infected, there are two options for dealing with the archive. In thedefault mode, Normal cleaning, the whole archive will be deleted if all the files it contains are infected. In Strictcleaning mode, the archive will be deleted if it contains at least one infected file, regardless of the status of theother files in the archive.
IMPORTANTIf a Hyper-V host is running on Windows Server 2008 R2, Normal cleaning and Strict cleaning are not supported.Scanning of Virtual Machine disks is done in read-only mode, no cleaning will be performed. Regardless of thecleaning level selected, the scan is always performed in read-only mode.
Exclusions
An extension is the part of a file name delimited by a period. An extension defines the type and content of a file.This section of the ThreatSense parameter setup lets you define the types of files to exclude from scan.
Other
When configuring ThreatSense engine parameters setup for a On-demand computer scan, the following options in Other section are also available:
· Scan alternate data streams (ADS) - Alternate data streams used by the NTFS file system are file and folderassociations which are invisible to ordinary scanning techniques. Many infiltrations try to avoid detection bydisguising themselves as alternate data streams.
· Run background scans with low priority - Each scanning sequence consumes a certain amount of system resources.If you work with programs that place a high load on system resources, you can activate low priority backgroundscanning and save resources for your applications.
· Log all objects - If this option is selected, the log file will show all the scanned files, even those not infected. Forexample, if an infiltration is found within an archive, the log will also list clean files contained within the archive.
· Enable Smart optimization - With Smart Optimization enabled, the most optimal settings are used to ensure themost efficient scanning level, while simultaneously maintaining the highest scanning speeds. The variousprotection modules scan intelligently, making use of different scanning methods and applying them to specificfile types. If Smart Optimization is disabled, only the user-defined settings in the ThreatSense core of theparticular modules are applied when performing a scan.
· Preserve last access timestamp - Select this option to keep the original access time of scanned files instead ofupdating them (for example, for use with data backup systems).
Limits
The Limits section allows you to specify the maximum size of objects and levels of nested archives to be scanned:
· Default object settings - Enable to use default settings (no limits). ESET Security for Kerio will be ignoring yourcustom settings.
· Maximum object size - Defines the maximum size of objects to be scanned. The given antivirus module willthen scan only objects smaller than the size specified. This option should only be changed by advanced userswho may have specific reasons for excluding larger objects from scanning. Default value: unlimited.
· Maximum scan time for object (sec.) - Defines the maximum time value for scanning of an object. If a user-defined value has been entered here, the antivirus module will stop scanning an object when that time haselapsed, regardless of whether the scan has finished. Default value: unlimited.
Archive scan setup
· To modify archive scan settings, deselect Default archive scan settings.

104
· Archive nesting level - Specifies the maximum depth of archive scanning. Default value: 10. For objectsdetected by Mailbox transport protection, actual nesting level is +1 because archive attachment in an email isconsidered first level.
EXAMPLEIf you have nesting level set to 3, an archive file with nesting level 3 will only be scanned on a transport layerup to its actual level 2. Therefore, if you want to have archives scanned by Mailbox transport protection up tolevel 3, set the value for Archive nesting level to 4.
· Maximum size of file in archive - This option allows you to specify the maximum file size for files contained inarchives (when they are extracted) that are to be scanned. Default value: unlimited.
NOTEWe do not recommend changing the default values; under normal circumstances, there should be no reasonto modify them.
4.4.5.2.1 File extenstions excluded from scanning
An extension is the part of a file name delimited by a period. The extension defines the type of a file. Normally, allfiles are scanned. However, if you need to exclude files with a specific extension, ThreatSense parameter setup letsyou exclude files from scanning based on their extension. Excluding may be useful if scanning of certain file typesprevents an application from running properly.
EXAMPLETo add a new extension to the list, click Add. Type the extension into the text field (for example tmp) and clickOK. When you select Enter multiple values, you can add multiple file extensions delimited by lines, commas orsemicolons (for example, choose Semicolon from the drop-down menu as a separator, and type edb;eml;tmp).
You can use a special symbol ? (question mark). The question mark represents any symbol (for example ?db).
NOTETo display the extension (file type) for all files in a Windows operating system, deselect Hide extensions forknown file types under Control Panel > Folder Options > View.
4.4.5.2.2 Additional ThreatSense parameters
Additional ThreatSense parameters for newly created and modified files - The probability of infection in newly-created or modified files is comparatively higher than in existing files. For this reason, the program checks thesefiles with additional scanning parameters. Along with common signature-based scanning methods, advancedheuristics, which can detect new threats before the virus signature database update is released, are also used. Inaddition to newly-created files, scanning is performed on self-extracting files (.sfx) and runtime packers (internallycompressed executable files). By default, archives are scanned up to the 10th nesting level and are checkedregardless of their actual size. To modify archive scan settings, disable Default archive scan settings.
To learn more about Runtime packers, Self-extracting archives and Advanced heuristics see ThreatSense engineparameters setup.
Additional ThreatSense parameters for executed files - By default, Advanced heuristics is used when files areexecuted. When enabled, we strongly recommend keeping Smart optimization and ESET LiveGrid® enabled tomitigate impact on system performance.

105
4.4.5.2.3 Cleaning levels
Real-time protection has three cleaning levels (to access cleaning level settings, click ThreatSense parameters inthe Real-time file system protection section. Select the desired cleaning level from the drop-down list:
No cleaning - Infected files will not be cleaned automatically. The program will display a warning window and allowthe user to choose an action. This level is designed for more advanced users who know which steps to take in theevent of an infiltration.
Normal cleaning - The program will attempt to automatically clean or delete an infected file based on a predefinedaction (depending on the type of infiltration). Detection and deletion of an infected file is signaled by a notificationin the bottom-right corner of the screen. If it is not possible to select the correct action automatically, the programprovides other follow-up actions. The same happens when a predefined action cannot be completed.
Strict cleaning - The program will clean or delete all infected files. The only exceptions are system files. If it is notpossible to clean a file, the user will be asked what type of action should be taken.
WARNINGIf an archive contains a file or files that are infected, there are two options for dealing with the archive. In thedefault mode, Normal cleaning, the whole archive will be deleted if all the files it contains are infected. In Strictcleaning mode, the archive will be deleted if it contains at least one infected file, regardless of the status of theother files in the archive.
IMPORTANTIf a Hyper-V host is running on Windows Server 2008 R2, Normal cleaning and Strict cleaning are not supported.Scanning of Virtual Machine disks is done in read-only mode, no cleaning will be performed. Regardless of thecleaning level selected, the scan is always performed in read-only mode.
4.4.5.2.4 When to modify real-time protection configuration
Real-time file system protection is the most essential component for maintaining a secure system. Always becareful when modifying its parameters. We recommend that you only modify its parameters in specific cases.
After installing ESET Security for Kerio, all settings are optimized to provide the maximum level of system security
for users. To restore default settings, click next to each tab in the window (Advanced setup > Computer > Real-time file system protection).
4.4.5.2.5 Checking real-time protection
To verify that real-time protection is working and detecting viruses, use a test file from eicar.com. This test file is aharmless file detectable by all antivirus programs. The file was created by the EICAR company (European Institutefor Computer Antivirus Research) to test the functionality of antivirus programs. The file is available for downloadat http://www.eicar.org/download/eicar.com
4.4.5.2.6 What to do if real-time protection does not work
In this chapter, we describe problems that may arise when using real-time protection and how to troubleshootthem.
Real-time protection is disabled
If real-time protection was inadvertently disabled by a user, it needs to be reactivated. To reactivate real-timeprotection, navigate to Setup in the main program window and click Real-time file system protection.
If real-time protection is not initiated at system startup, it is usually because Start Real-time file system protectionautomatically is deselected. To enable this option, navigate to Advanced setup (F5) and click Computer > Real-timefile system protection > Basic in the Advanced setup section. Make sure that Start Real-time file system protectionautomatically is turned on.
If Real-time protection does not detect and clean infiltrations

106
Make sure that no other antivirus programs are installed on your computer. If two real-time protection shields areenabled at the same time, they may conflict with each other. We recommend that you uninstall any other antivirusprograms on your system before installing ESET.
Real-time protection does not start
If real-time protection is not initiated at system startup (and Start Real-time file system protection automatically isenabled), it may be due to conflicts with other programs. For assistance resolving this issue, please contact ESETCustomer Care.
4.4.5.2.7 Submission
You can select how files and statistical information will be submitted to ESET. Select By means of RemoteAdministrator or directly to ESET for files and statistics to be submitted by any available means. Select the By meansof Remote Administrator option to submit files and statistics to the remote administration server, which will ensuretheir subsequent submission to the ESET Threat Lab. If Directly to ESET is selected, all suspicious files and statisticalinformation are sent to the ESET virus lab directly from the program.
When there are files pending submission, the Submit now button will be active. Click this button to immediatelysubmit files and statistical information.
Select Enable logging to create a log to record file and statistical information submissions.
4.4.5.2.8 Statistics
The <%TSN%> Early Warning System collects anonymous information about your computer related to newlydetected threats. This information may include the name of the infiltration, the date and time it was detected, theESET security product version, your operating system version and the location setting. The statistics are typicallydelivered to ESET servers once or twice a day.
Below is an example of a statistical package submitted:
# utc_time=2005-04-14 07:21:28
# country=“Slovakia“
# language=“ENGLISH“
# osver=5.1.2600 NT
# engine=5417
# components=2.50.2
# moduleid=0x4e4f4d41
# filesize=28368
# filename=C:\Documents and Settings\Administrator\Local Settings\
Temporary Internet Files\Content.IE5\C14J8NS7\rdgFR1463[1].exe
When to submit - You can define when the statistical information will be submitted. If you choose to submit Assoon as possible, statistical information will be sent immediately after it is created. This setting is suitable if apermanent Internet connection is available. If During update is selected, statistical information will be submittedcollectively during the next update.
4.4.5.2.9 Suspicious files
The Suspicious files tab allows you to configure the manner in which threats are submitted to the ESET Threat Labfor analysis.
If you find a suspicious file, you can submit it for analysis to our ThreatLabs. If it is a malicious application, itsdetection will be added to the next virus signature update.
File submission can be set to occur automatically, or select Ask before submitting if you want to know which fileshave been sent for analysis and confirm the submission.
If you do not want any files to be submitted, select Do not submit for analysis. Selecting not to submit files foranalysis does not affect submission of statistical information which is configured in its own setup (see section Statistics).
When to submit - By default, As soon as possible is selected for suspicious files to be sent to ESET‘s Threat Lab. This

107
is recommended if a permanent Internet connection is available and suspicious files can be delivered withoutdelay. Select the During update option for suspicious files to be uploaded to ThreatSense.Net during the nextupdate.
Exclusion filter - The Exclusion filter allows you to exclude certain files/folders from submission. For example, itmay be useful to exclude files which may carry confidential information, such as documents or spreadsheets. Themost common file types are excluded by default (.doc, etc.). You can add to the list of excluded files if desired.
Contact email - Your Contact email [optional] can sent with any suspicious files and may be used to contact you iffurther information is required for analysis. Please note that you will not receive a response from ESET unless moreinformation is needed.
4.4.6 On-demand computer scan and Hyper-V scan
This section provides options to select scanning parameters. Selected profile - a particular set of parameters used bythe on-demand scanner. To create a new one, click Edit next to List of profiles.
NOTEThis scan profile selector applies to both On-demand computer scan and Hyper-V scan.
If you only want to scan a specific target, you can click Edit next to Scan targets and choose an option from drop-down menu or selecting specific targets from the folder (tree) structure.
The scan targets window allows you to define which objects (memory, drives, sectors, files and folders) are scannedfor infiltrations. Select targets from the tree structure, which lists all devices available on the computer. The Scantargets drop-down menu allows you to select predefined scan targets.
· By profile settings - Selects targets set in the selected scan profile.
· Removable media - Selects diskettes, USB storage devices, CD/DVD.
· Local drives - Selects all system hard drives.
· Network drives - Selects all mapped network drives.
· Shared Folders - Selects all folders on the local server that are shared.
108
· No selection - Clears all selections.
Scan targets for Hyper-V drop-down menu allows you to select predefined scan targets:
· By profile settings - Selects targets set in the selected scan profile.
· All virtual machines - Selects all virtual machines.
· Powered on virtual machines - Selects all online VMs.
· Powered off virtual machines - Selects all offline VMs.
· No selection - Clears all selections.
Click ThreatSense parameters to modify scan parameters (for example, detection methods) for the On-demandcomputer scanner.
4.4.6.1 Custom scan and Hyper-V scan launcher
If you only want to scan a specific target, you can use the Custom scan and select an option from the Scan targetsdrop-down menu or select specific targets from the folder (tree) structure.
NOTEThis scan target selector applies to both Custom scan and Hyper-V scan.
The scan targets window allows you to define which objects (memory, drives, sectors, files and folders) are scannedfor infiltrations. Select targets from the tree structure, which lists all devices available on the computer. The Scantargets drop-down menu allows you to select predefined scan targets.
· By profile settings - Selects targets set in the selected scan profile.
· Removable media - Selects diskettes, USB storage devices, CD/DVD.
· Local drives - Selects all system hard drives.
· Network drives - Selects all mapped network drives.
· Shared Folders - Selects all folders on the local server that are shared.
· No selection - Clears all selections.
Scan targets for Hyper-V drop-down menu allows you to select predefined scan targets:
· By profile settings - Selects targets set in the selected scan profile.
· All virtual machines - Selects all virtual machines.
· Powered on virtual machines - Selects all online VMs.
· Powered off virtual machines - Selects all offline VMs.
· No selection - Clears all selections.
To quickly navigate to a scan target or to add a new target file or folder, enter it in the blank field below the folderlist. This is only possible if no targets are selected in the tree structure and the Scan targets menu is set to Noselection.

109
Custom scan pop-up window:
If you are only interested in scanning the system without additional cleaning actions, select Scan without cleaning.This is useful when you only want to obtain an overview whether there are infected items and get details aboutthese infections, if there are any. You can choose from three cleaning levels by clicking Setup > ThreatSenseparameters > Cleaning. Information about scanning is saved to a scan log.
When you select Ignore exclusions, it lets you perform a scan while ignoring exclusions that otherwise apply.
The Hyper-V scan pop-up window (see Hyper-V scan for more information):
You can choose a profile from the Scan profile drop-down menu to be used for scanning chosen targets. The defaultprofile is Smart scan. There are two more pre-defined scan profiles called In-depth scan and Context menu scan.These scan profiles use different ThreatSense engine parameters. Click Setup... to configure a scan profile from theScan profile menu in detail. Available options are described in ThreatSense engine parameters setup.
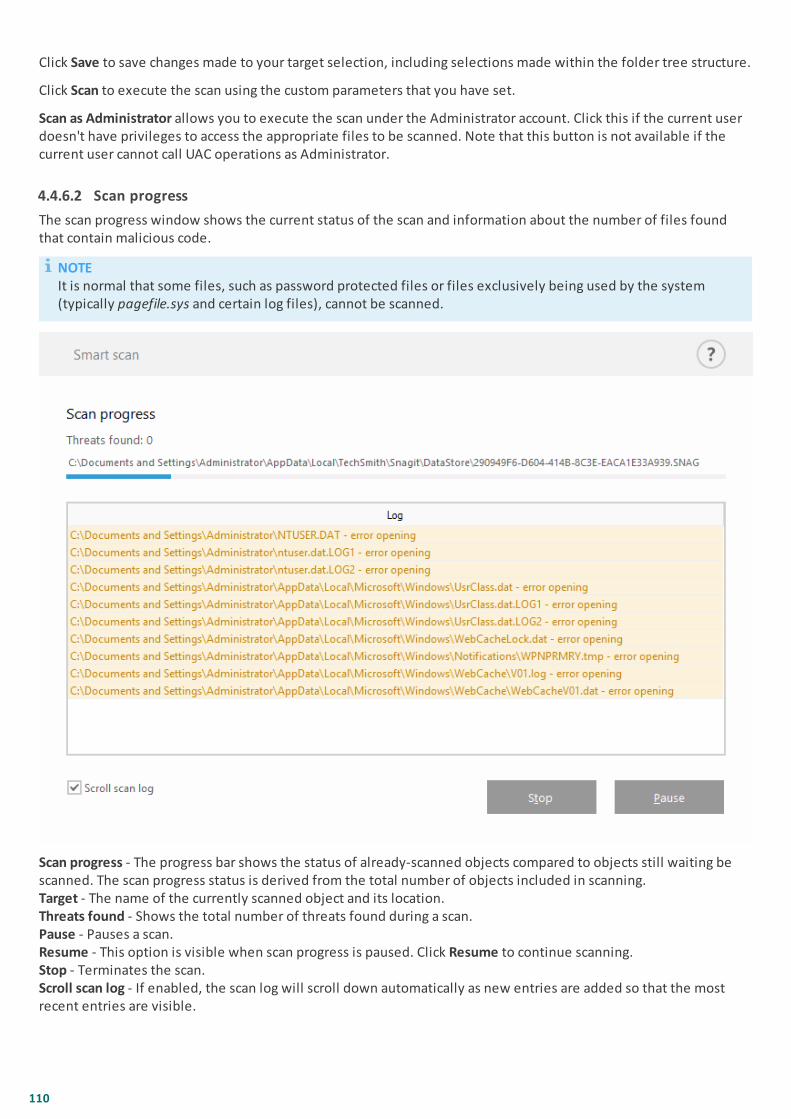
110
Click Save to save changes made to your target selection, including selections made within the folder tree structure.
Click Scan to execute the scan using the custom parameters that you have set.
Scan as Administrator allows you to execute the scan under the Administrator account. Click this if the current userdoesn't have privileges to access the appropriate files to be scanned. Note that this button is not available if thecurrent user cannot call UAC operations as Administrator.
4.4.6.2 Scan progress
The scan progress window shows the current status of the scan and information about the number of files foundthat contain malicious code.
NOTEIt is normal that some files, such as password protected files or files exclusively being used by the system(typically pagefile.sys and certain log files), cannot be scanned.
Scan progress - The progress bar shows the status of already-scanned objects compared to objects still waiting bescanned. The scan progress status is derived from the total number of objects included in scanning.Target - The name of the currently scanned object and its location.Threats found - Shows the total number of threats found during a scan.Pause - Pauses a scan.Resume - This option is visible when scan progress is paused. Click Resume to continue scanning.Stop - Terminates the scan.Scroll scan log - If enabled, the scan log will scroll down automatically as new entries are added so that the mostrecent entries are visible.
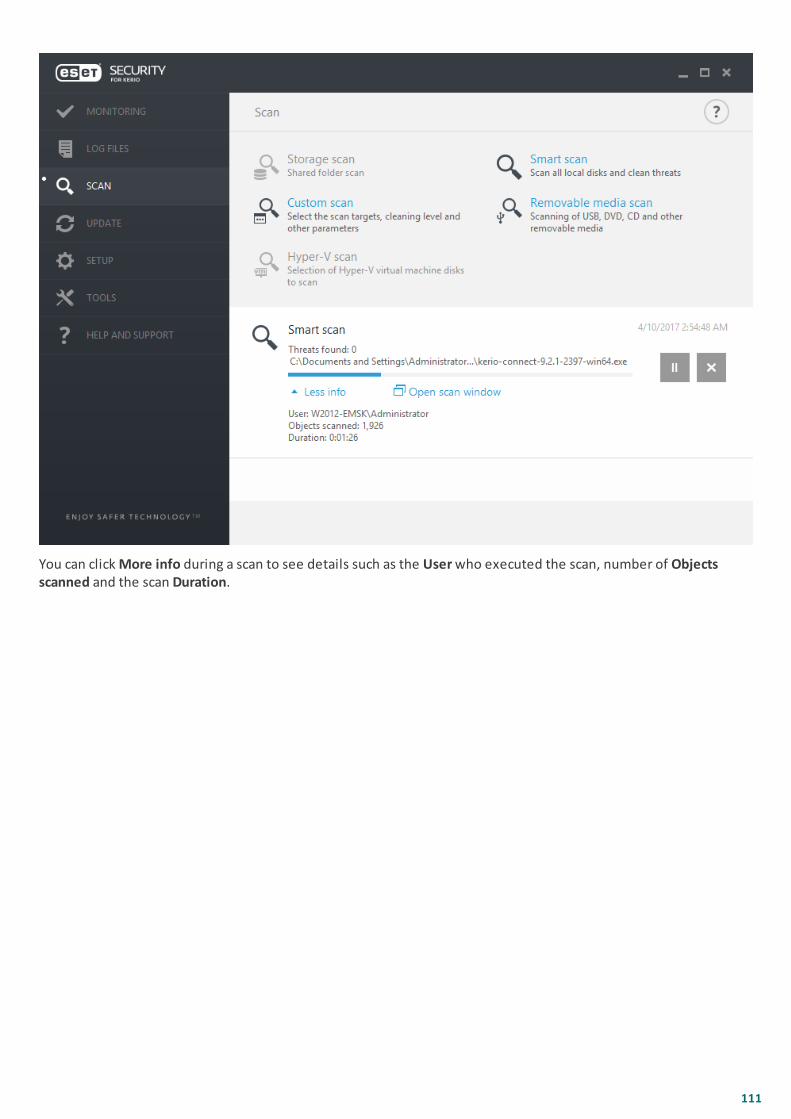
111
You can click More info during a scan to see details such as the User who executed the scan, number of Objectsscanned and the scan Duration.

112
4.4.6.3 Scan log
The scan log window shows the current status of the scan and information about the number of files found thatcontain malicious code.
NOTEIn each section, the displayed information can be copied to the clipboard (keyboard shortcut Ctrl + C) by selectingthe entry and clicking Copy. The Ctrl and Shift keys can be used to select multiple entries.
Click the switch icon Filtering to open the Log filtering window where you can define the filtering criteria.
To view the context menu options below, right-click a specific record:
· Show - Shows more detailed information about the selected log in a new window (same as double-click).
· Filter same records - This activates log filtering, showing only records of the same type as the one selected.
· Filter... - After clicking this option, the Log filtering window will allow you to define filtering criteria for specificlog entries.
· Enable filter - Activates filter settings. The first time you activate filtering, you must define settings.
· Disable filter - Turns filtering off (same as clicking the switch at the bottom).
· Copy - Copies information of selected/highlighted record(s) into the clipboard.
· Copy all - Copies information from all records in the window.
· Delete - Deletes selected/highlighted record(s) - this action requires administrator privileges.
· Delete all - Deletes all record(s) in the window - this action requires administrator privileges.
· Export... - Exports information of selected/highlighted record(s) into an XML file.
· Export all... - Exports all the information in the window into an XML file.
· Find... - Opens Find in log window and lets you define search criteria. You can use the find feature to locate aspecific record even while filtering is on.
· Find next - Finds the next occurrence of your defined search criteria.
· Find previous - Finds the previous occurrence.
113
· Scroll log - Leave this enabled to auto scroll old logs and view active logs in the Log files window.
4.4.6.4 Profile manager
Profile manager is used in two places within ESET Security for Kerio:
On-demand computer scan
Your preferred scan parameters can be saved for future scanning. We recommend that you create a different profile(with various scan targets, scan methods and other parameters) for each regularly used scan.
EXAMPLETo create a new profile, open the Advanced setup window (F5) and click Computer > On-demand computer scanand then Edit next to List of profiles. The Selected profile drop-down menu that lists existing scan profiles. Tohelp you create a scan profile to fit your needs, see the ThreatSense engine parameters setup section for adescription of each parameter of the scan setup.
Update
· The profile editor in the Update section allows users to create new update profiles. It is only necessary to createcustom update profiles if your computer uses multiple means to connect to update servers.
4.4.6.5 Scan targets
The scan targets window allows you to define which objects (memory, drives, sectors, files and folders) are scannedfor infiltrations. Select targets from the tree structure, which lists all devices available on the computer. The Scantargets drop-down menu allows you to select predefined scan targets.
· By profile settings - Selects targets set in the selected scan profile.
· Removable media - Selects diskettes, USB storage devices, CD/DVD.
· Local drives - Selects all system hard drives.
· Network drives - Selects all mapped network drives.
· Shared Folders - Selects all folders on the local server that are shared.
· No selection - Clears all selections.
Scan targets for Hyper-V drop-down menu allows you to select predefined scan targets:
· By profile settings - Selects targets set in the selected scan profile.
· All virtual machines - Selects all virtual machines.
· Powered on virtual machines - Selects all online VMs.
· Powered off virtual machines - Selects all offline VMs.
· No selection - Clears all selections.
4.4.6.6 Pause a scheduled scan
The scheduled scan can be postponed. Set a value for the Stop scheduled scans in (min) option, if you wish topostpone the computer scan.
4.4.7 Idle-state scanning
You can enable the idle-state scanner in Advanced setup or press F5, navigate to Computer > Idle-state scanning >Basic. Set the switch next to Enable Idle-state scanning to enable this feature. When the computer is in idle state, asilent computer scan is performed on all local drives.
By default, the Idle-state scanner will not run when the computer (notebook) is operating on battery power. Youcan override this setting by selecting the check box next to Run even if computer is powered from battery.
Turn on the Enable logging switch in Advanced setup or press F5 to record a computer scan output in the Log filessection (from the main program window click Log files and select log type Computer scan from the drop-downmenu).
114
Idle-state detection will run when your computer is in the following states:
· Turned off screen or screen saver
· Computer lock
· User logoff
Click ThreatSense parameters to modify scan parameters (for example, detection methods) for the Idle-statescanner.
4.4.8 Startup scan
By default, the automatic startup file check will be performed on system startup and during virus signature databaseupdates. This scan is controlled by the Scheduler configuration and tasks.
Startup scan options are a part of the System startup file check scheduler task. To modify Startup scan settings,navigate to Tools > Scheduler, click Automatic startup file check and then click Edit. In the last step, the Automaticstartup file check window will appear (see the following chapter for more details).
For detailed instructions about Scheduler task creation and management, see Creating new tasks.
4.4.8.1 Automatic startup file check
When creating a System startup file check scheduled task, you have several options to adjust the followingparameters:
The Scan target drop-down menu specifies the scan depth for files run at system startup. Files are arranged inascending order according to the following criteria:
· Only the most frequently used files (least files scanned)
· Frequently used files
· Commonly used files
· Rarely used files
· All registered files (most files scanned)
Two specific Scan target groups are also included:
· Files run before user logon - Contains files from locations that may be accessed without the user being logged in(includes almost all startup locations such as services, browser helper objects, winlogon notify, Windowsscheduler entries, known dll's, etc.).
· Files run after user logon - Contains files from locations that may only be accessed after a user has logged in(includes files that are only run by a specific user, typically files in HKEY_CURRENT_USER\SOFTWARE\Microsoft\Windows\CurrentVersion\Run).
Lists of files to be scanned are fixed for each aforementioned group.
Scan priority - The level of priority used to determine when a scan will start:
· Normal - at an average system load,
· Lower - at a low system load,
· Lowest - when the system load is the lowest possible,
· When idle - the task will be performed only when the system is idle.

115
4.4.9 Removable media
ESET Security for Kerio provides automatic removable media (CD/DVD/USB) scanning. This module allows you toscan inserted media. This may be useful if the computer administrator wants to prevent the users from usingremovable media with unsolicited content.
Action to take after inserting removable media - select the default action that will be performed when a removablemedia device is inserted into the computer (CD/DVD/USB). If Show scan options is selected, a notification willdisplay which allows you to choose a desired action:
· Do not scan - No action will be performed and the New device detected window will be closed.
· Automatic device scan - An on-demand computer scan of the inserted removable media device will beperformed.
· Show scan options - Opens the Removable media setup section.
When removable media is inserted, the following dialog will shown:
· Scan now - This will trigger a scan of removable media.
· Scan later - Scanning of removable media will be postponed.
· Setup - Opens Advanced setup.
· Always use the selected option - When selected, the same action will be performed when removable media isinserted another time.
In addition, ESET Security for Kerio features Device control, which allows you to define rules for the use of externaldevices on a given computer. More details on Device control can be found in the Device control section.
4.4.10 Document protection
The Document protection feature scans Microsoft Office documents before they are opened, as well as filesdownloaded automatically by Internet Explorer such as Microsoft ActiveX elements. Document protection providesa layer of protection in addition to Real-time file system protection, and can be disabled to enhance performanceon systems that are not exposed to a high volume of Microsoft Office documents.
· Integrate into system activates the protection system. To modify this option, press F5 to open the Advanced setupwindow and click Computer > Document protection in the Advanced setup tree.
· See Threatsense parameters for more information about Document protection settings.
This feature is activated by applications that use the Microsoft Antivirus API (for example, Microsoft Office 2000 andhigher, or Microsoft Internet Explorer 5.0 and higher).
4.4.11 HIPS
Host-based Intrusion Prevention System (HIPS) protects your system from malware and unwanted activityattempting to negatively affect your computer. HIPS utilizes advanced behavioral analysis coupled with thedetection capabilities of network filtering to monitor running processes, files and registry keys. HIPS is separatefrom Real-time file system protection and is not a firewall; it only monitors processes running within the operatingsystem.
WARNINGChanges to HIPS settings should only be made by an experienced user. Incorrect configuration of HIPS settingscan lead to system instability.

116
HIPS settings can be found in Advanced setup (F5) > Computer > HIPS > Basic. The HIPS state (enabled/disabled) isshown in the ESET Security for Kerio main program window, in the Setup tab, on the right side of the Computersection.
ESET Security for Keriouses the built-in Self-defense technology as a part of HIPS to prevent malicious software fromcorrupting or disabling your antivirus and antispyware protection. Self-defense protects crucial system and ESET'sprocesses, registry keys and files from being tampered with.
Advanced Memory Scanner works in combination with Exploit Blocker to strengthen protection against malwarethat has been designed to evade detection by antimalware products through the use of obfuscation or encryption.Advanced Memory Scanner is enabled by default. Read more about this type of protection in the glossary.
Exploit Blocker is designed to fortify commonly exploited application types such as web browsers, PDF readers,email clients and MS Office components. Exploit Blocker is enabled by default. Read more about this type ofprotection in the glossary.
Filtering can be performed in one of four modes:
· Automatic mode - Operations are enabled with the exception of those blocked by pre-defined rules that protectyour system.
· Smart mode - The user will only be notified about very suspicious events.
· Interactive mode - The user will be prompted to confirm operations.
· Policy-based mode - Operations are blocked.
· Learning mode - Operations are enabled and a rule is created after each operation. Rules created in this mode canbe viewed in the Rule editor, but their priority is lower than the priority of rules created manually or rules createdin automatic mode. When you select Learning mode from the HIPS Filtering mode drop down menu, the Learningmode will end at setting will become available. Select the duration for which you want to engage learning mode(the maximum duration is 14 days). When the specified duration has passed, you will be prompted to edit therules created by HIPS while it was in learning mode. You can also choose a different filtering mode, or postponethe decision and continue using learning mode.
The HIPS system monitors events inside the operating system and reacts accordingly based on rules similar to the
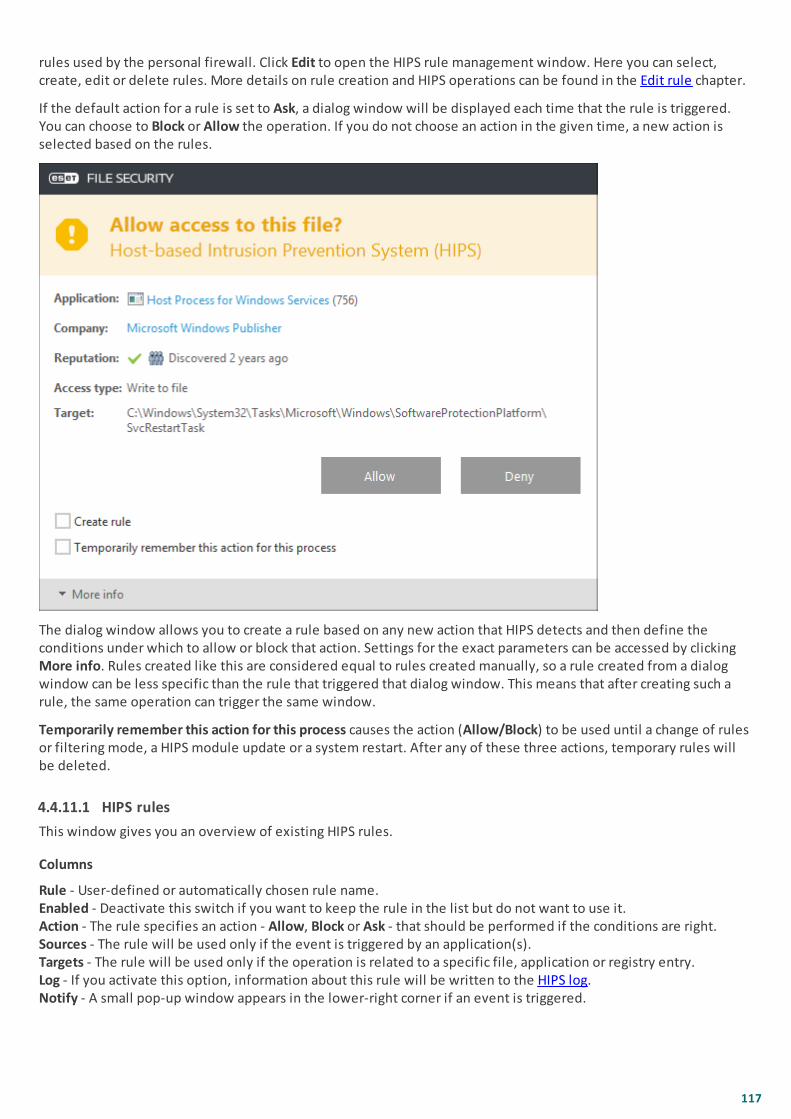
117
rules used by the personal firewall. Click Edit to open the HIPS rule management window. Here you can select,create, edit or delete rules. More details on rule creation and HIPS operations can be found in the Edit rule chapter.
If the default action for a rule is set to Ask, a dialog window will be displayed each time that the rule is triggered.You can choose to Block or Allow the operation. If you do not choose an action in the given time, a new action isselected based on the rules.
The dialog window allows you to create a rule based on any new action that HIPS detects and then define theconditions under which to allow or block that action. Settings for the exact parameters can be accessed by clicking More info. Rules created like this are considered equal to rules created manually, so a rule created from a dialogwindow can be less specific than the rule that triggered that dialog window. This means that after creating such arule, the same operation can trigger the same window.
Temporarily remember this action for this process causes the action (Allow/Block) to be used until a change of rulesor filtering mode, a HIPS module update or a system restart. After any of these three actions, temporary rules willbe deleted.
4.4.11.1 HIPS rules
This window gives you an overview of existing HIPS rules.
Columns
Rule - User-defined or automatically chosen rule name.Enabled - Deactivate this switch if you want to keep the rule in the list but do not want to use it.Action - The rule specifies an action - Allow, Block or Ask - that should be performed if the conditions are right.Sources - The rule will be used only if the event is triggered by an application(s).Targets - The rule will be used only if the operation is related to a specific file, application or registry entry.Log - If you activate this option, information about this rule will be written to the HIPS log.Notify - A small pop-up window appears in the lower-right corner if an event is triggered.
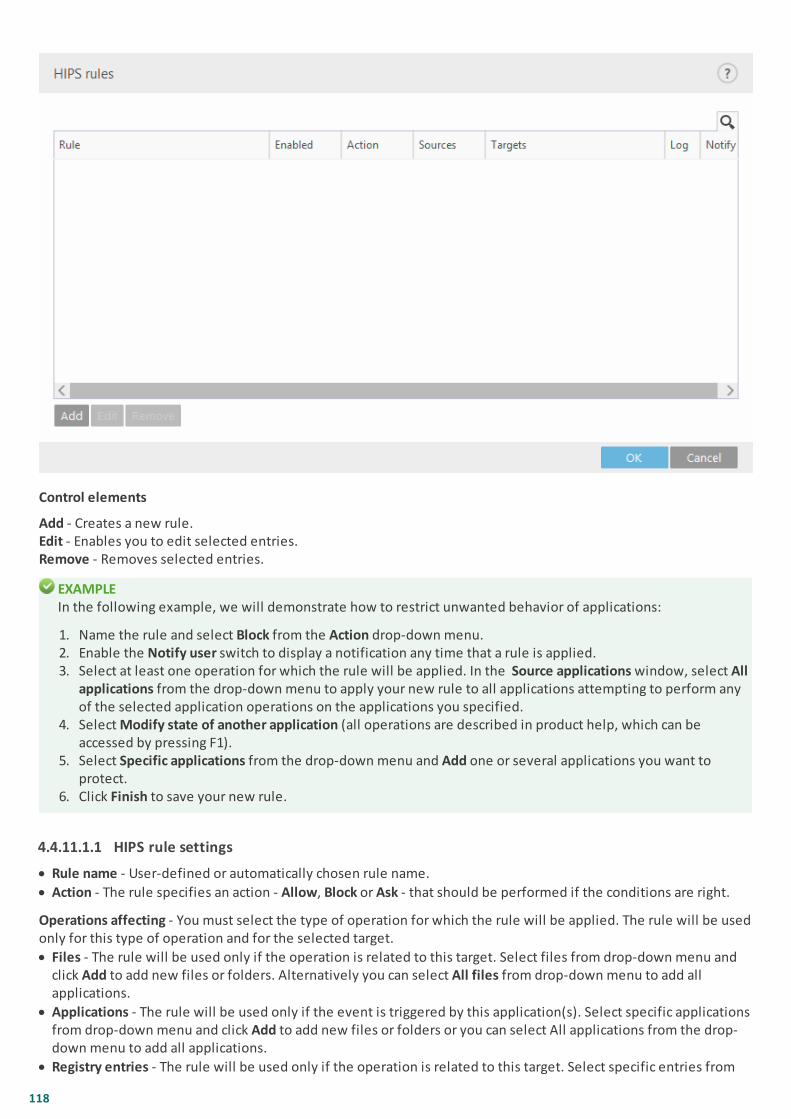
118
Control elements
Add - Creates a new rule.Edit - Enables you to edit selected entries.Remove - Removes selected entries.
EXAMPLEIn the following example, we will demonstrate how to restrict unwanted behavior of applications:
1. Name the rule and select Block from the Action drop-down menu.2. Enable the Notify user switch to display a notification any time that a rule is applied.3. Select at least one operation for which the rule will be applied. In the Source applications window, select All
applications from the drop-down menu to apply your new rule to all applications attempting to perform anyof the selected application operations on the applications you specified.
4. Select Modify state of another application (all operations are described in product help, which can beaccessed by pressing F1).
5. Select Specific applications from the drop-down menu and Add one or several applications you want toprotect.
6. Click Finish to save your new rule.
4.4.11.1.1 HIPS rule settings
· Rule name - User-defined or automatically chosen rule name.
· Action - The rule specifies an action - Allow, Block or Ask - that should be performed if the conditions are right.
Operations affecting - You must select the type of operation for which the rule will be applied. The rule will be usedonly for this type of operation and for the selected target.
· Files - The rule will be used only if the operation is related to this target. Select files from drop-down menu andclick Add to add new files or folders. Alternatively you can select All files from drop-down menu to add allapplications.
· Applications - The rule will be used only if the event is triggered by this application(s). Select specific applicationsfrom drop-down menu and click Add to add new files or folders or you can select All applications from the drop-down menu to add all applications.
· Registry entries - The rule will be used only if the operation is related to this target. Select specific entries from
119
drop-down menu and click Add to add new files or folders or you can select All entries from the drop-down menuto add all applications.
· Enabled - Deactivate this switch if you want to keep the rule in the list but do not want to use it.
· Log - If you activate this option, information about this rule will be written to the HIPS log.
· Notify user - A small pop-up window appears in the lower-right corner if an event is triggered.
The rule consists of parts that describe the conditions triggering this rule:
Source applications - The rule will be used only if the event is triggered by this application(s).Select Specificapplications from drop-down menu and click Add to add new files or folders or you can select All applications fromthe drop-down menu to add all applications.
Files - The rule will only be used if the operation is related to this target. Select Specific files from the drop-downmenu and click Add to add new files or folders. Alternatively you can select All files from drop-down menu to addall applications.
Applications - The rule will only be used if the operation is related to this target. Select Specific applications fromthe drop-down menu and click Add to add new files or folders. Alternatively you can select All applications fromthe drop-down menu to add all applications.
Registry entries - The rule will only be used if the operation is related to this target. Select Specific entries from thedrop-down menu and click Add to add new files or folders. Alternatively you can select All entries from the drop-down menu to add all applications.
NOTESome operations of specific rules predefined by HIPS cannot be blocked and are allowed by default. In addition,not all system operations are monitored by HIPS. HIPS monitors operations that may be considered unsafe.
Descriptions of important operations:
File operations
· Delete file - Application is asking for permission to delete the target file.
· Write to file - Application is asking for permission to write to the target file.
· Direct access to disk - Application is trying to read from or write to the disk in a non-standard way that willcircumvent common Windows procedures. This may result in files being modified without the application ofcorresponding rules. This operation may be caused by malware trying to evade detection, backup softwaretrying to make an exact copy of a disk, or a partition manager trying to reorganize disk volumes.
· Install global hook - Refers to calling the SetWindowsHookEx function from the MSDN library.
· Load driver - Installation and loading of drivers onto the system.
Application operations
· Debug another application - Attaching a debugger to the process. While debugging an application, many detailsof its behavior can be viewed and modified and its data can be accessed.
· Intercept events from another application - The source application is attempting to catch events targeted at aspecific application (for example a keylogger trying to capture browser events).
· Terminate/suspend another application - Suspending, resuming or terminating a process (can be accesseddirectly from Process Explorer or the Processes window).
· Start new application - Starting of new applications or processes.
· Modify state of another application - The source application is attempting to write into the target applications'memory or run code on its behalf. This functionality may be useful to protect an essential application byconfiguring it as a target application in a rule blocking the use of this operation.
Registry operations
· Modify startup settings - Any changes in settings that define which applications will be run at Windows startup.These can be found, for example, by searching for the Run key in the Windows Registry.
· Delete from registry - Deleting a registry key or its value.
· Rename registry key - Renaming registry keys.
120
· Modify registry - Creating new values of registry keys, changing existing values, moving data in the databasetree or setting user or group rights for registry keys.
NOTEYou can use wildcards with certain restrictions when entering a target. Instead of a particular key the * (asterisk)symbol can be used in registry paths. For example HKEY_USERS\*\software can mean HKEY_USER\.default\software but not HKEY_USERS\S-1-2-21-2928335913-73762274-491795397-7895\.default\software. HKEY_LOCAL_MACHINE\system\ControlSet* is not a valid registry key path. A registry key path containing \*defines "this path, or any path on any level after that symbol". This is the only way of using wildcards for filetargets. First, the specific part of a path will be evaluated, then the path following the wildcard symbol (*).
WARNINGYou may receive a notification if you create an overly generic rule.
4.4.11.2 Advanced setup
The following options are useful for debugging and analyzing an application's behavior:
· Drivers always allowed to load - selected drivers are always allowed to load regardless of configured filteringmode, unless explicitly blocked by user rule.
· Log all blocked operations - all blocked operations will be written to the HIPS log.
· Notify when changes occur in Startup applications - displays a desktop notification each time an application isadded to or removed from system startup.
4.4.11.2.1 Drivers always allowed to load
Drivers shown in this list will always be allowed to load regardless of HIPS filtering mode, unless explicitly blockedby user rule.
Add - adds a new driver.Edit - edit the path for a selected driver.Remove - removes a driver from the list.Reset - reloads a set of system drivers.
NOTEClick Reset if you do not want drivers that you have added manually to be included. This can be useful if you haveadded several drivers and you cannot delete them from the list manually.
4.5 Update
Update setup options are available in the Advanced setup window (press the F5 key on your keyboard) underUpdate > General. This section specifies update source information like the update servers being used andauthentication data for these servers.
NOTEFor updates to be downloaded properly, it is essential that you fill in all update parameters correctly. If you use afirewall, please make sure that your ESET program is allowed to communicate with the Internet (for example,HTTP communication).
General
The Update profile that is currently in use is displayed in the selected profile drop-down menu. If youexperience problems with an update, click Clear to clear the temporary update cache.
Outdated virus signature database alerts

121
· Set maximum database age automatically / Maximum database age (days) - Allows you to set maximum time(in days) after which the virus signature database will be reported as out of date. The default value is 7.
Rollback
If you suspect that a new update of the virus database and/or program modules may be unstable or corrupt, youcan roll back to the previous version and disable updates for a set period of time. Alternatively, you can enablepreviously disabled updates if you had postponed them indefinitely. ESET Security for Kerio records snapshots ofvirus signature database and program modules for use with the Rollback feature. In order to create virusdatabase snapshots, leave Create snapshots of update files enabled. The Number of locally stored snapshotsfield defines the number of previous virus database snapshots stored.
EXAMPLELet the number 10646 be the most recent version of virus signature database. 10645 and 10643 are stored as avirus signature database snapshots. Note that 10644 is not available because, for example, the computer wasturned off and a more recent update was made available before 10644 was downloaded. If the Number oflocally stored snapshots field is set to 2 and you click Rollback, the virus signature database (including programmodules) will be restored to version number 10643. This process may take some time. Check whether thevirus signature database version has downgraded from the main program window of ESET Security for Kerio inthe Update section.
Profiles

122
To create a new profile, select Edit next to List of profiles, enter your own Profile name and then click Add. Youcan Edit profile with the following options:
Basic
Update type - Select the type of update to use from the drop-down menu:
· Regular update - By default, the Update type is set to Regular update to ensure that update files willautomatically be downloaded from the ESET server with the least network traffic.
· Pre-release update - Are updates that have gone through thorough internal testing and will be available tothe general public soon. You can benefit from enabling pre-release updates by having access to the mostrecent detection methods and fixes. However, pre-release updates might not be stable enough at all timesand SHOULD NOT be used on production servers and workstations where maximum availability and stabilityis required.
· Delayed update - Allows updating from special update servers providing new versions of virus databaseswith a delay of at least X hours (i.e. databases tested in a real environment and therefore considered asstable).
Disable notification about successful update - Turns off the system tray notification at the bottom right corner ofthe screen. It is useful to select this option if a full screen application or a game is running. Please note thatPresentation mode will turn off all notifications.
Update from removable media - Allows you to update from removable media if contains created mirror. WhenAutomatic selected, updates will run in the background. If you want to show update dialogs select Always ask.
Update server
The Update server menu is set to Choose automatically by default. The Update server is the location whereupdates are stored. If you use an ESET server, we recommend that you leave the default option selected.
When using a local HTTP server - also known as a Mirror - the update server should be set as follows:http://computer_name_or_its_IP_address:2221
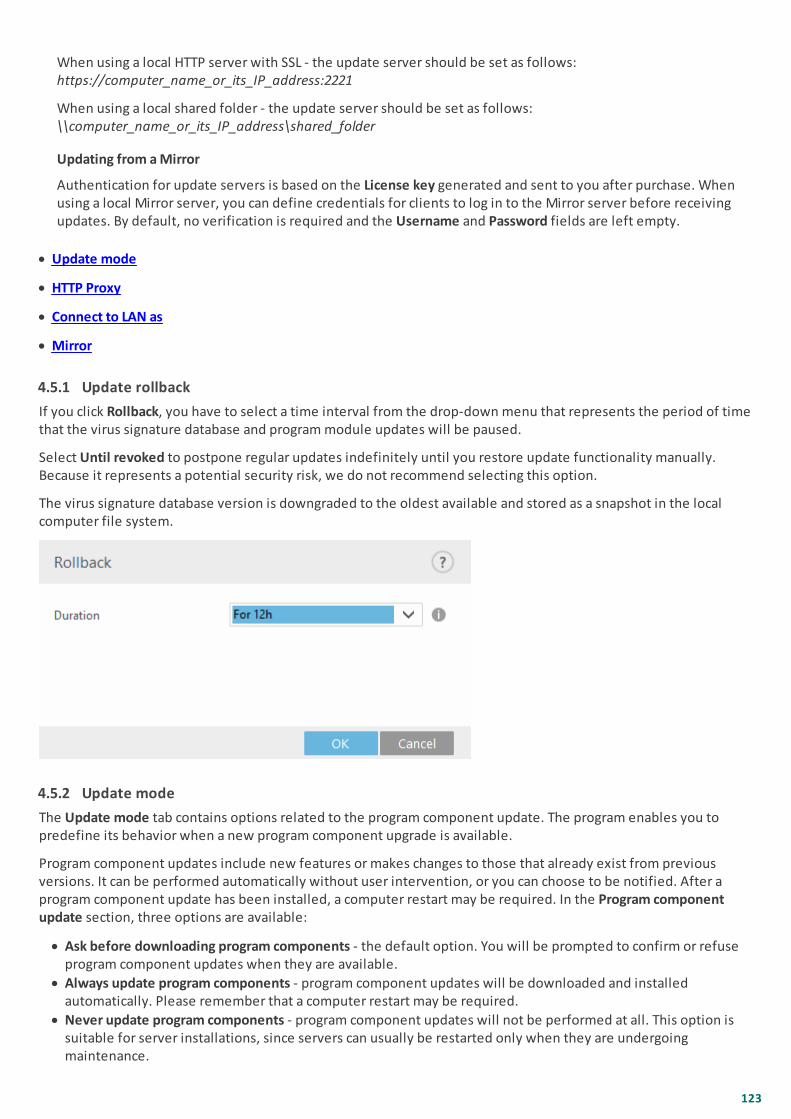
123
When using a local HTTP server with SSL - the update server should be set as follows:https://computer_name_or_its_IP_address:2221
When using a local shared folder - the update server should be set as follows:\\computer_name_or_its_IP_address\shared_folder
Updating from a Mirror
Authentication for update servers is based on the License key generated and sent to you after purchase. Whenusing a local Mirror server, you can define credentials for clients to log in to the Mirror server before receivingupdates. By default, no verification is required and the Username and Password fields are left empty.
· Update mode
· HTTP Proxy
· Connect to LAN as
· Mirror
4.5.1 Update rollback
If you click Rollback, you have to select a time interval from the drop-down menu that represents the period of timethat the virus signature database and program module updates will be paused.
Select Until revoked to postpone regular updates indefinitely until you restore update functionality manually.Because it represents a potential security risk, we do not recommend selecting this option.
The virus signature database version is downgraded to the oldest available and stored as a snapshot in the localcomputer file system.
4.5.2 Update mode
The Update mode tab contains options related to the program component update. The program enables you topredefine its behavior when a new program component upgrade is available.
Program component updates include new features or makes changes to those that already exist from previousversions. It can be performed automatically without user intervention, or you can choose to be notified. After aprogram component update has been installed, a computer restart may be required. In the Program componentupdate section, three options are available:
· Ask before downloading program components - the default option. You will be prompted to confirm or refuseprogram component updates when they are available.
· Always update program components - program component updates will be downloaded and installedautomatically. Please remember that a computer restart may be required.
· Never update program components - program component updates will not be performed at all. This option issuitable for server installations, since servers can usually be restarted only when they are undergoingmaintenance.

124
NOTESelecting the most appropriate option depends on the workstation where the settings will be applied. Please beaware that there are differences between workstations and servers - for example, restarting the serverautomatically after a program update could cause serious damage.
If you want to upgrade to a newer version of ESET Security for Kerio Enable manual program component update. Thisis disabled by default, when enabled and a newer version of ESET Security for Kerio is available, Check for updatesappears in Update tab.
If the Ask before downloading update option is active, a notification will display when a new update is available.
If the update file size is greater than the value specified in the Ask if an update file is greater than (kB) field, theprogram will display a notification.
4.5.3 HTTP Proxy
To access the proxy server setup options for a given update profile, click the Proxy mode and select one of the threefollowing options:
· Do not use proxy server - No proxy server will be used to update ESET Security for Kerio.
NOTEThe default setting for the proxy server is Use global proxy server settings.
· Connection through a proxy server - Use this option if:
· A proxy server should be used to update ESET Security for Kerio that is different from the proxy server specifiedin the global settings (Tools > Proxy server). If so, the settings should be specified here: Proxy server address,communication Port (3128 by default), plus Username and Password for the proxy server if required.
· The proxy server settings were not set globally, but ESET Security for Kerio will connect to a proxy server forupdates.

125
· Your computer is connected to the Internet via a proxy server. The settings are taken from Internet Explorerduring program installation, but if they are subsequently changed (for example, if you change your ISP), pleasecheck that the HTTP proxy settings listed in this window are correct. Otherwise the program will not be able toconnect to the update servers.
NOTEAuthentication data such as Username and Password is intended for accessing the proxy server. Complete thesefields only if a username and password are required. Please note that these fields are not for your Username/Password for ESET Security for Kerio, and should only be completed if you know you need a password to accessthe Internet via a proxy server.
· Use global proxy server settings - Proxy server configuration specified in the Advanced setup > Tools > Proxyserver will be used.
· Use direct connection if proxy is not available - if a product is configured to utilize HTTP Proxy and the proxy isunreachable, the product will bypass the proxy and communicate directly with ESET servers.
4.5.4 Connect to LAN as
When updating from a local server running Windows, authentication for each network connection is required bydefault. Configuration options are located in the Advanced setup tree (F5) under Update > Profiles > Connect to LANas. To configure your account, select one of the following options from the Local user type drop-down menu:
· System account (default) - use the system account for authentication. Normally, no authentication process takesplace if there is no authentication data supplied in the main update setup section.
· Current user - select this to ensure that the program authenticates using the currently logged-in user account. Thedrawback of this solution is that the program is not able to connect to the update server if no user is currentlylogged in.
· Specified user - select this to use a specific user account for authentication. Use this method when the default

126
system account connection fails. Please be aware that the specified user account must have access to the updatefiles directory on the local server. Otherwise the program will not be able to establish a connection and downloadupdates.
WARNINGWhen either Current user or Specified user is selected, an error may occur when changing the identity of theprogram to the desired user. We recommend entering the LAN authentication data in the main update setupsection. In this update setup section, the authentication data should be entered as follows: domain_name\user(if it is a workgroup, enter workgroup_name\name) and password. When updating from the HTTP version of thelocal server, no authentication is required.
· Disconnect from server after update - to force a disconnect if a connection to the server remains active even afterupdates have been downloaded.
4.5.5 Mirror
ESET Security for Kerio allows you to create copies of update files that can be used to update other workstations onthe network. The use of a "mirror" - a copy of the update files in the LAN environment is convenient because theupdate files do not need to be downloaded from the vendor update server repeatedly by each workstation.Updates are downloaded to the local mirror server and then distributed to all workstations to avoid the risk ofnetwork traffic overload. Updating client workstations from a Mirror optimizes network load balance and savesInternet connection bandwidth.
Configuration options for the local Mirror server are located in the Advanced setup tree (F5) in the Update > Profiles> Mirror tab.
Create update mirror
Create update mirror - Enabling this option activates other Mirror configuration options such as the way updatefiles will be accessed and the update path to the mirrored files.
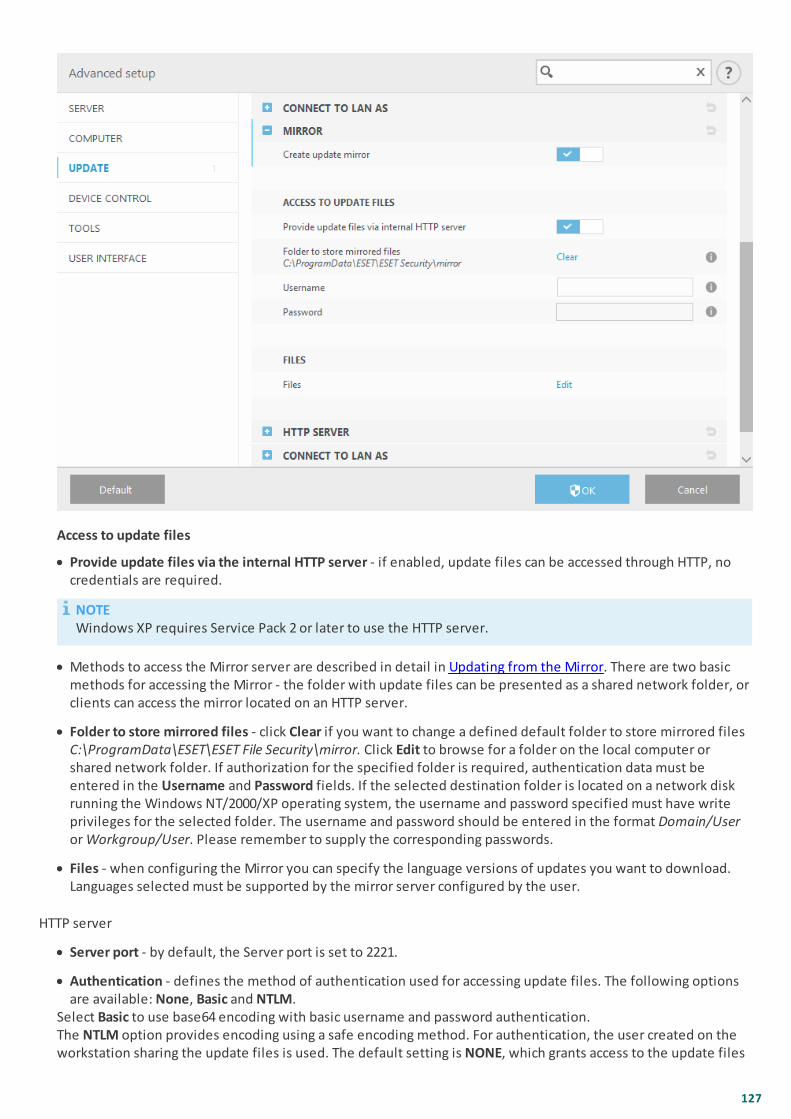
127
Access to update files
· Provide update files via the internal HTTP server - if enabled, update files can be accessed through HTTP, nocredentials are required.
NOTEWindows XP requires Service Pack 2 or later to use the HTTP server.
· Methods to access the Mirror server are described in detail in Updating from the Mirror. There are two basicmethods for accessing the Mirror - the folder with update files can be presented as a shared network folder, orclients can access the mirror located on an HTTP server.
· Folder to store mirrored files - click Clear if you want to change a defined default folder to store mirrored filesC:\ProgramData\ESET\ESET File Security\mirror. Click Edit to browse for a folder on the local computer orshared network folder. If authorization for the specified folder is required, authentication data must beentered in the Username and Password fields. If the selected destination folder is located on a network diskrunning the Windows NT/2000/XP operating system, the username and password specified must have writeprivileges for the selected folder. The username and password should be entered in the format Domain/Useror Workgroup/User. Please remember to supply the corresponding passwords.
· Files - when configuring the Mirror you can specify the language versions of updates you want to download.Languages selected must be supported by the mirror server configured by the user.
HTTP server
· Server port - by default, the Server port is set to 2221.
· Authentication - defines the method of authentication used for accessing update files. The following optionsare available: None, Basic and NTLM.
Select Basic to use base64 encoding with basic username and password authentication.The NTLM option provides encoding using a safe encoding method. For authentication, the user created on theworkstation sharing the update files is used. The default setting is NONE, which grants access to the update files

128
with no need for authentication.
SSL for HTTP server
· Append your Certificate chain file, or generate a self-signed certificate if you want to run HTTP server withHTTPS (SSL) support. The following certificate types are available: PEM, PFX and ASN. For additional security,you can use HTTPS protocol to download update files. It is almost impossible to track data transfers and logincredentials using this protocol.
· The Private key type is set to Integrated by default (and therefore the Private key file option is disabled bydefault). This means that the private key is a part of the selected certificate chain file.
Connect to LAN as
· Local user type - the System account (default), Current user, and Specified user settings will be displayed intheir corresponding drop-down menus. Username and Password settings are optional. See Connect to LAN as.
· Select Disconnect from server after update to force a disconnection if a connection to the server remains activeafter updates have been downloaded.
Program component update
· Automatically update components - allows for the installation of new features and updates to existingfeatures. An update can be performed automatically without user intervention, or you can choose to benotified. After a program component update has been installed, a computer restart may be required.
· Update components now - updates your program components to the latest version.
4.5.5.1 Updating from the Mirror
There are two basic methods to configure a Mirror, which is essentially a repository where clients can downloadupdate files. The folder with update files can be presented as a shared network folder or as an HTTP server.
Accessing the Mirror using an internal HTTP server
This configuration is the default, specified in the predefined program configuration. To allow access to the Mirrorusing the HTTP server, navigate to Advanced setup (F5) > Update > Profiles > Mirror and select Create update mirror.
In the HTTP Server section of the Mirror tab you can specify the Server port where the HTTP server will listen as wellas the type of Authentication used by the HTTP server. By default, the Server port is set to 2221. The Authenticationoption defines the method of authentication used for accessing the update files. The following options areavailable: None, Basic, and NTLM.
· Select Basic to use base64 encoding with basic username and password authentication.
· The NTLM option provides encoding using a safe encoding method. For authentication, the user created on theworkstation sharing the update files is used.
· The default setting is None, which grants access to the update files with no need for authentication.
WARNINGIf you want to allow access to the update files via the HTTP server, the Mirror folder must be located on the samecomputer as the ESET Security for Kerio instance creating it.
SSL for HTTP Server
Append your Certificate chain file, or generate a self-signed certificate if you want to run HTTP server with HTTPS(SSL) support. The following certificate types are available: PEM, PFX and ASN. For additional security, you can useHTTPS protocol to download update files. It is almost impossible to track data transfers and login credentials usingthis protocol. Private key type is set to Integrated by default, which means that the private key is a part of theselected certificate chain file.
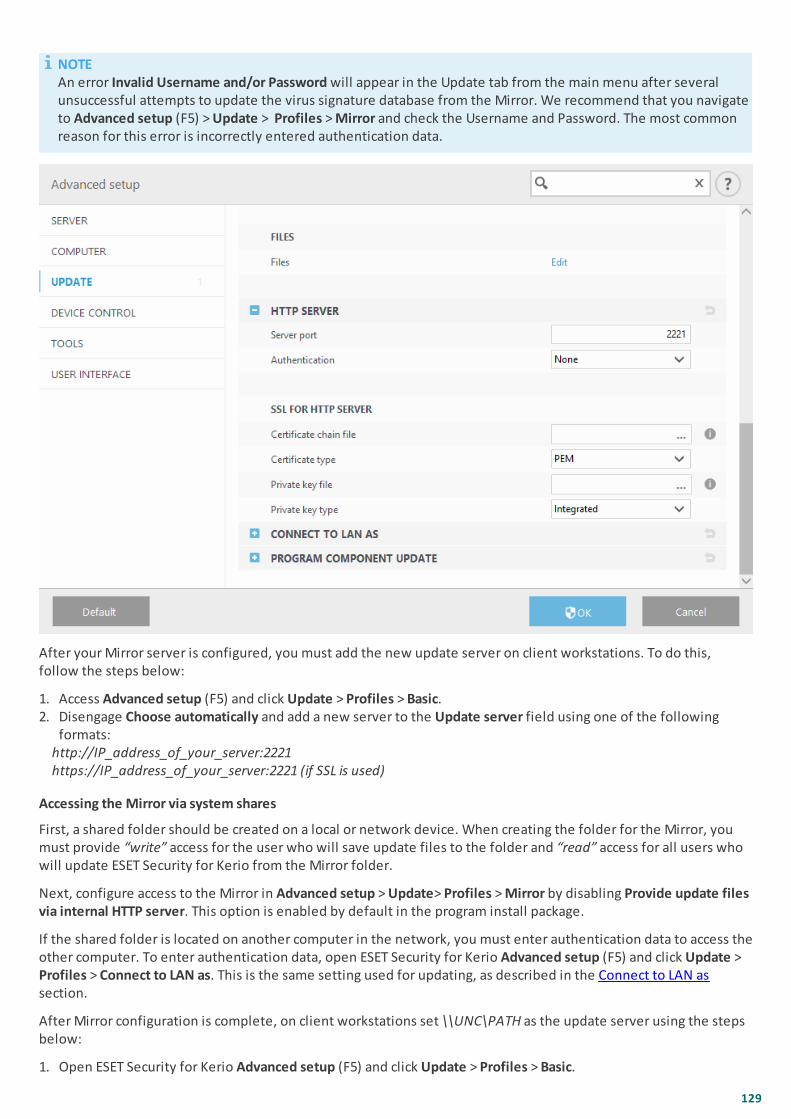
129
NOTEAn error Invalid Username and/or Password will appear in the Update tab from the main menu after severalunsuccessful attempts to update the virus signature database from the Mirror. We recommend that you navigateto Advanced setup (F5) > Update > Profiles > Mirror and check the Username and Password. The most commonreason for this error is incorrectly entered authentication data.
After your Mirror server is configured, you must add the new update server on client workstations. To do this,follow the steps below:
1. Access Advanced setup (F5) and click Update > Profiles > Basic.2. Disengage Choose automatically and add a new server to the Update server field using one of the following
formats:http://IP_address_of_your_server:2221https://IP_address_of_your_server:2221 (if SSL is used)
Accessing the Mirror via system shares
First, a shared folder should be created on a local or network device. When creating the folder for the Mirror, youmust provide “write” access for the user who will save update files to the folder and “read” access for all users whowill update ESET Security for Kerio from the Mirror folder.
Next, configure access to the Mirror in Advanced setup > Update> Profiles > Mirror by disabling Provide update filesvia internal HTTP server. This option is enabled by default in the program install package.
If the shared folder is located on another computer in the network, you must enter authentication data to access theother computer. To enter authentication data, open ESET Security for Kerio Advanced setup (F5) and click Update >Profiles > Connect to LAN as. This is the same setting used for updating, as described in the Connect to LAN assection.
After Mirror configuration is complete, on client workstations set \\UNC\PATH as the update server using the stepsbelow:
1. Open ESET Security for Kerio Advanced setup (F5) and click Update > Profiles > Basic.

130
2. Click Update server and add a new server using the \\UNC\PATH format.
NOTEFor updates to function properly, the path to the Mirror folder must be specified as a UNC path. Updates frommapped drives may not work.
The last section controls program components (PCUs). By default, downloaded program components are preparedto copy to the local mirror. If Program component update is activated, there is no need to click Update, because filesare copied to the local mirror automatically when they are available. See Update mode for more information aboutprogram component updates.
4.5.5.2 Mirror files
List of available and localized program component files.
4.5.5.3 Troubleshooting Mirror update problems
In most cases, problems during an update from a Mirror server are caused by one or more of the following: incorrectspecification of the Mirror folder options, incorrect authentication data for the Mirror folder, incorrect configurationon local workstations attempting to download update files from the Mirror, or a combination of the reasons above.Below is an overview of the most frequent problems which may occur during an update from the Mirror:
· ESET Security for Kerio reports an error connecting to Mirror server - Likely caused by incorrect specification of theupdate server (network path to the Mirror folder) from which local workstations download updates. To verify thefolder, click the Windows Start menu, click Run, enter the folder name and click OK. The contents of the foldershould be displayed.
· ESET Security for Kerio requires a username and password - Likely caused by incorrect authentication data(username and password) in the update section. The username and password are used to grant access to theupdate server, from which the program will update itself. Make sure that the authentication data is correct andentered in the correct format. For example, Domain/Username, or Workgroup/Username, plus the correspondingPasswords. If the Mirror server is accessible to “Everyone”, please be aware that this does not mean that any useris granted access. “Everyone” does not mean any unauthorized user, it just means that the folder is accessible forall domain users. As a result, if the folder is accessible to “Everyone”, a domain username and password will stillneed to be entered in the update setup section.
· ESET Security for Kerio reports an error connecting to the Mirror server - Communication on the port defined foraccessing the HTTP version of the Mirror is blocked.
4.6 Device control
ESET Security for Kerio includes automatic device (CD/DVD/USB/) control. This module allows you to scan, block oradjust extended filters/permissions and define a user's ability to access and work with a given device. This may beuseful if the computer administrator wants to prevent the use of devices containing unsolicited content.
Supported external devices:
· Disk storage (HDD, USB removable disk)
· CD/DVD
· USB printer
· FireWire Storage
· Bluetooth Device
· Smart card reader
· Imaging Device
· Modem
· LPT/COM port
· Portable Device
· All device types

131
Enabling the switch next to Integrate into system activates the Device control feature in ESET Security for Kerio; youwill need to restart your computer for this change to take effect.
Device control Rules and Groups will become active, allowing you to edit their settings.
If a device blocked by an existing rule is detected, a notification window will be displayed and access to the devicewill not be granted.
4.6.1 Device control rules editor
The Device control rules editor window displays existing rules and allows for precise control of external devices thatusers connect to the computer.
Specific devices can be allowed or blocked by user, user group, or any of several additional parameters that can bespecified in the rule configuration. The list of rules contains several descriptions of a rule such as its name, the typeof external device, the action to perform when a device is detected, and log severity.
Use the following buttons at the bottom of the window to manage rules:
· Add - lets you add a new rule.
· Edit - lets you modify settings of an existing rule.
· Copy - creates a new rule based on the parameters of the selected rule.
· Remove - if you want to delete the selected rule. Alternatively, you can use the check box next to a given ruleto disable it. This can be useful if you don't want to delete a rule permanently so that you can use it in thefuture.
· Populate - detects removable media device parameters for devices connected to your computer.
· Rules are listed in order of priority with higher-priority rules at the top. You can select multiple rules and applyactions, such as deleting or moving them up or down the list by clicking Top/Up/Down/Bottom (arrow buttons).
Log entries can be viewed from the main program window of ESET Security for Kerio in Tools > Log files.
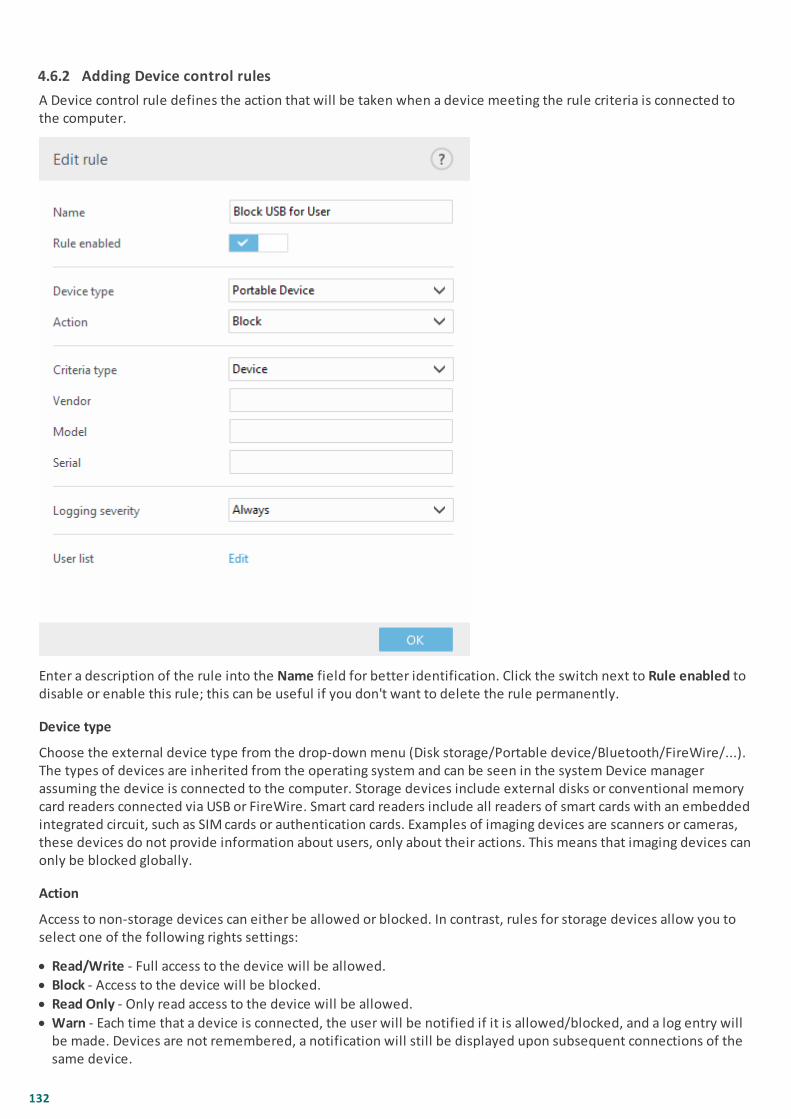
132
4.6.2 Adding Device control rules
A Device control rule defines the action that will be taken when a device meeting the rule criteria is connected tothe computer.
Enter a description of the rule into the Name field for better identification. Click the switch next to Rule enabled todisable or enable this rule; this can be useful if you don't want to delete the rule permanently.
Device type
Choose the external device type from the drop-down menu (Disk storage/Portable device/Bluetooth/FireWire/...).The types of devices are inherited from the operating system and can be seen in the system Device managerassuming the device is connected to the computer. Storage devices include external disks or conventional memorycard readers connected via USB or FireWire. Smart card readers include all readers of smart cards with an embeddedintegrated circuit, such as SIM cards or authentication cards. Examples of imaging devices are scanners or cameras,these devices do not provide information about users, only about their actions. This means that imaging devices canonly be blocked globally.
Action
Access to non-storage devices can either be allowed or blocked. In contrast, rules for storage devices allow you toselect one of the following rights settings:
· Read/Write - Full access to the device will be allowed.
· Block - Access to the device will be blocked.
· Read Only - Only read access to the device will be allowed.
· Warn - Each time that a device is connected, the user will be notified if it is allowed/blocked, and a log entry willbe made. Devices are not remembered, a notification will still be displayed upon subsequent connections of thesame device.

133
Please note that not all rights (actions) are available for all device types. If a device has storage space, all fouractions are made available. For non-storage devices, there are only two (for example Read Only is not available forBluetooth , so Bluetooth devices can only be allowed or blocked).
Additional parameters shown below can be used to fine-tune rules and tailor them to devices. All parameters arecase-insensitive:
· Vendor - Filter by vendor name or ID.
· Model - The given name of the device.
· Serial - External devices usually have their own serial numbers. In the case of a CD/DVD, this is the serial numberof the given media, not the CD drive.
NOTEIf these three descriptors are empty, the rule will ignore these fields when matching. Filtering parameters in alltext fields are case-insensitive and no wildcards (*, ?) are supported.
In order to figure out the parameters of a device, create a rule to allow that type of device, connect the device toyour computer and then review the device details in the Device control log.
Severity
· Always - Logs all events.
· Diagnostic - Logs information needed to fine-tune the program.
· Information - Records informative messages, including successful update messages, plus all records above.
· Warning - Records critical errors and warning messages.
· None - No logs will be recorded.
Rules can be limited to certain users or user groups by adding them to the User list:
· Add - Opens the Object types: Users or Groups dialog window that allows you to select desired users.
· Remove - Removes the selected user from the filter.
NOTEAll devices can be filtered by user rules (for example imaging devices do not provide information about users,only about invoked actions).
4.6.3 Detected devices
The Populate button provides an overview of all currently connected devices with the following information: devicetype, device vendor, model and serial number (if available). When you select a device (from the list of Detecteddevices) and click OK, a rule editor window appears with predefined information (you can adjust all the settings).
4.6.4 Device groups
The Device groups window is divided into two parts. The right part of the window contains a list of devices thatbelong to a respective group and the left part of the window contains a list of existing groups. Select the group thatcontains the devices you want to display in the right pane.
WARNINGHaving an external device connected to your computer may pose a security risk.
When you open the Device groups window and select a group, you can add or remove devices from the list. Anotherway to add devices to the group is to import them from a file. Alternatively, you can click Populate and all devicesconnected to your computer will be listed in the Detected devices window. Select a device from the populated listto add it to the group by clicking OK.
NOTEYou can create different groups of devices for which different rules will be applied. You can also create a singlegroup of devices that are set to Read/Write or Read only. This ensures that unrecognized devices will be blocked

134
by Device control when connected to your computer.
The following functions are available:
· Add - a new device group by entering its name or add a device to an existing group (optionally, you can specifydetails such as vendor name, model and serial number) depending on where in the window you clicked thebutton.
· Edit - lets you modify the name of a selected group or parameters for the devices contained therein (vendor,model, serial number).
· Remove - deletes the selected group or device depending on where in the window you clicked.
· Import - imports a serial number list of devices from a file.
· Populate - detects removable media device parameters for devices connected to your computer.
When you are done with customization click OK. Click Cancel to leave the Device groups window without savingyour changes.
NOTENote that not all actions (permissions) are available for all device types. For storage devices, all four actions areavailable. For non-storage devices, there are only three actions available (for example Read Only is not availablefor Bluetooth, therefore Bluetooth devices can only be allowed, blocked or warned).
4.7 Tools
The following are advanced settings for all the tools ESET Security for Kerio offers under the Tools tab in the mainGUI window.
· Log files
· Proxy server
· Email notifications
· Presentation mode
· Diagnostics
· Cluster
4.7.1 ESET LiveGrid®
ESET LiveGrid® is an advanced early warning system comprised of several cloud-based technologies. It helps detectemerging threats based on reputation and improves scanning performance by means of whitelisting. New threatinformation is streamed in real-time to the cloud, which enables the ESET Malware Research Lab to provide timelyresponse and consistent protection at all times. Users can check the reputation of running processes and filesdirectly from the program's interface or contextual menu with additional information available from ESET LiveGrid®.When installing ESET Security for Kerio, select one of the following options:
1. You can decide not to enable ESET LiveGrid®. Your software will not lose any functionality, but in some casesESET Security for Kerio may respond slower to new threats than virus signature database update.
2. You can configure ESET LiveGrid® to submit anonymous information about new threats and where the newthreatening code was detected. This file can be sent to ESET for detailed analysis. Studying these threats willhelp ESET update its threat detection capabilities.
ESET LiveGrid® will collect information about your computer related to newly-detected threats. This informationmay include a sample or copy of the file in which the threat appeared, the path to that file, the filename, the dateand time, the process by which the threat appeared on your computer and information about your computer‘soperating system.
135
By default, ESET Security for Kerio is configured to submit suspicious files to the ESET Virus Lab for analysis. Fileswith certain extensions such as .doc or .xls are always excluded. You can also add other extensions if there areparticular files that you or your organization want to avoid sending.
The ESET LiveGrid® reputation system provides cloud-based whitelisting and blacklisting. To access settings for ESETLiveGrid®, press F5 to enter Advanced setup and expand Tools > ESET LiveGrid®.
Enable ESET LiveGrid® reputation system (recommended) - The ESET LiveGrid® reputation system improves theefficiency of ESET anti-malware solutions by comparing scanned files to a database of whitelisted and blacklisteditems in the cloud.
Submit anonymous statistics - Allow ESET to collect information about newly detected threats such as the threatname, date and time of detection, detection method and associated metadata, product version, and configurationincluding information about your system.
Submit samples - Suspicious samples resembling threats, and/or samples with unusual characteristics or behaviorare submitted to ESET for analysis.
Select Enable logging to create an event log to record file and statistical information submissions. This will enablelogging to the Event log when files or statistics are sent.
Contact email (optional) - Your contact email can be included with any suspicious files and may be used to contactyou if further information is required for analysis. Please note that you will not receive a response from ESET unlessmore information is needed.
136
Exclusions - The Exclusion filter allows you to exclude certain files/folders from submission (for example, it may beuseful to exclude files that may carry confidential information, such as documents or spreadsheets). The files listedwill never be sent to ESET labs for analysis, even if they contain suspicious code. The most common file types areexcluded by default (.doc, etc.). You can add to the list of excluded files if desired.
If you have used ESET LiveGrid® before and have disabled it, there may still be data packages to send. Even afterdeactivating, such packages will be sent to ESET. Once all current information is sent, no further packages will becreated.
4.7.1.1 Exclusion filter
The Edit option next to Exclusions in ESET LiveGrid® allows you to configure how threats are submitted to ESET VirusLabs for analysis.
If you find a suspicious file, you can submit it for analysis to our ThreatLabs. If it is a malicious application, itsdetection will be added to the next virus signature update.
137
4.7.2 Microsoft Windows update
Windows updates provide important fixes to potentially dangerous vulnerabilities and improve the general securitylevel of your computer. For this reason, it is vital that you install Microsoft Windows updates as soon as theybecome available. ESET Security for Kerio notifies you about missing updates according to the level you specify. Thefollowing levels are available:
· No updates - No system updates will be offered for download.
· Optional updates - Updates marked as low priority and higher will be offered for download.
· Recommended updates - Updates marked as common and higher will be offered for download.
· Important updates - Updates marked as important and higher will be offered for download.
· Critical updates - Only critical updates will be offered for download.
Click OK to save changes. The System updates window will be displayed after status verification with the updateserver. Sytem update information may not be immediately available after saving changes.
4.7.3 ESET CMD
This is a feature that enables advanced ecmd commands. It allows you to export and import settings using thecommand line (ecmd.exe). Until now, it was only possible to export settings using the GUI. ESET Security for Kerioconfiguration can be exported to an .xml file.
When you have enabled ESET CMD, there are two authorization methods available:
· None - no authorization. We do not recommend you this method because it allows importation of any unsignedconfiguration, which is a potential risk.
· Advanced setup password - a password is required to import a configuration from an .xml file, this file must besigned (see singing .xml configuration file further down). The password specified in Access Setup must beprovided before a new configuration can be imported. If you do not have access setup enabled, your passworddoes not match or the .xml configuration file is not signed, the configuration will not be imported.
Once ESET CMD is enabled, you can use the command line to import or export ESET Security for Kerio configurations.You can do it manually or create a script for the purpose of automation.
IMPORTANTTo use advanced ecmd commands, you need to run them with administrator privileges, or open a WindowsCommand Prompt (cmd) using Run as administrator. Otherwise, you'll get Error executing command. message.Also, when exporting a configuration, the destination folder must exist. The export command still works whenthe ESET CMD setting is switched off.
EXAMPLEExport settings command:ecmd /getcfg c:\config\settings.xml
Import settings command:ecmd /setcfg c:\config\settings.xml
NOTEAdvanced ecmd commands can only be run locally. Executing the client task Run command using ERA will notwork.
Signing an .xml configuration file:
1. Download XmlSignTool executable.
2. Open a Windows Command Prompt (cmd) using Run as administrator.

138
3. Navigate to the location of xmlsigntool.exe
4. Execute a command to sign the .xml configuration file, usage: xmlsigntool /version 1|2 <xml_file_path>
IMPORTANTValue of the parameter /version depends on the version of your ESET Security for Kerio. Use /version 1 for ESETSecurity for Kerio 6.5.
5. Enter and Re-enter your Advanced Setup Password when prompted by the XmlSignTool. Your .xmlconfiguration file is now signed and can be used to import on another instance of ESET Security for Kerio withESET CMD using the password authorization method.
EXAMPLESign exported configuration file command:xmlsigntool /version 1 c:\config\settings.xml
NOTEIf your Access Setup password changes and you want to import a configuration that was signed earlier with an oldpassword, you can sign the .xml configuration file again using your current password. This allows you to use anolder configuration file without exporting it to another machine running ESET Security for Kerio before theimport.
4.7.4 WMI Provider
About WMI
Windows Management Instrumentation (WMI) is the Microsoft implementation of Web-Based EnterpriseManagement (WBEM), which is an industry initiative to develop a standard technology for accessing managementinformation in an enterprise environment.
For more information on WMI, see http://msdn.microsoft.com/en-us/library/windows/desktop/aa384642(v=vs.85).aspx
ESET WMI Provider
The purpose of the ESET WMI Provider is to allow for the remote monitoring of ESET products in an enterpriseenvironment without requiring any ESET-specific software or tools. By exposing the basic product, status and
139
statistics information via WMI, we greatly expand the possibilities of enterprise administrators when monitoringthe ESET products. Administrators can take advantage of the number of access methods offered by WMI (commandline, scripts and third-party enterprise monitoring tools) to monitor the state of their ESET products.
The current implementation provides read-only access to basic product information, installed features and theirprotection status, statistics of individual scanners, and product log files.
The WMI Provider allows for the use of standard Windows WMI infrastructure and tools to read the state of theproduct and product logs.
4.7.4.1 Provided data
All the WMI classes related to ESET product are located in the “root\ESET“ namespace. The following classes, whichare described in more detail below, are currently implemented:
General:
· ESET_Product
· ESET_Features
· ESET_Statistics
Logs:
· ESET_ThreatLog
· ESET_EventLog
· ESET_ODFileScanLogs
· ESET_ODFileScanLogRecords
· ESET_ODServerScanLogs
· ESET_ODServerScanLogRecords
· ESET_HIPSLog
· ESET_URLLog
· ESET_DevCtrlLog
· ESET_GreylistLog
· ESET_MailServeg
· ESET_HyperVScanLogs
· ESET_HyperVScanLogRecords
ESET_Product class
There can only be one instance of the ESET_Product class. Properties of this class refer to basic information aboutyour installed ESET product:
· ID - Product type identifier, for example, “emsl”
· Name - Name of the product, for example, "ESET Mail Security"
· FullName - Full name of the product, for example, "ESET Mail Security for IBM Domino"
· Version - Product version, for example, "6.5.14003.0"
· VirusDBVersion - Version of the virus database, for example, "14533 (20161201)"
· VirusDBLastUpdate - Timestamp of the last update of the virus database. The string contains the timestamp inWMI datetime format. for example, “20161201095245.000000+060”
· LicenseExpiration - License expiration time. The string contains timestamp in WMI datetime format
· KernelRunning - Boolean value indicating whether the ekrn service is running on the machine, for example,“TRUE”
· StatusCode - Number indicating the protection status of the product: 0 - Green (OK), 1 - Yellow (Warning), 2 -Red (Error)
· StatusText - Message describing the reason for a non-zero status code, otherwise it is null
ESET_Features class
The ESET_Features class has multiple instances, depending on the number of product features. Each instancecontains:
· Name - Name of the feature (list of names is provided below)
140
· Status - Status of the feature: 0 - inactive, 1 - disabled, 2 - enabled
A list of strings representing currently recognized product features:
· CLIENT_FILE_AV - Real-time file system anti-virus protection
· CLIENT_WEB_AV - Client web anti-virus protection
· CLIENT_DOC_AV - Client document anti-virus protection
· CLIENT_NET_FW - Client personal firewall
· CLIENT_EMAIL_AV - Client email anti-virus protection
· CLIENT_EMAIL_AS - Client email anti-spam protection
· SERVER_FILE_AV - Real-time anti-virus protection of files on the protected file server product, for example, filesin SharePoint’s content database in the case of ESET Security for Kerio
· SERVER_EMAIL_AV - Anti-virus protection of emails of protected server product, for example, emails in MSExchange or IBM Domino
· SERVER_EMAIL_AS - Anti-spam protection of emails of protected server product, for example, emails in MSExchange or IBM Domino
· SERVER_GATEWAY_AV - Anti-virus protection of protected network protocols on the gateway
· SERVER_GATEWAY_AS - Anti-spam protection of protected network protocols on the gateway
ESET_Statistics class
The ESET_Statistics class has multiple instances, depending on the number of scanners in the product. Each instancecontains:
· Scanner - String code for the particular scanner, for example, “CLIENT_FILE”
· Total - Total number of files scanned
· Infected - Number of infected files found
· Cleaned - Number of cleaned files
· Timestamp - Timestamp of the last change of this statistics. In WMI datetime format, for example,“20130118115511.000000+060”
· ResetTime - Timestamp of when the statistics counter was last reset. In WMI datetime format, for example,“20130118115511.000000+060”
List of strings representing currently recognized scanners:
· CLIENT_FILE
· CLIENT_EMAIL
· CLIENT_WEB
· SERVER_FILE
· SERVER_EMAIL
· SERVER_WEB
ESET_ThreatLog class
The ESET_ThreatLog class has multiple instances, each one representing a log record from the “Detected threats”log. Each instance contains:
· ID - Unique ID of this scan log record
· Timestamp - Creation timestamp of the log (in the WMI date/time format)
· LogLevel - severity of the log record expressed as a number in the [0-8]. Values correspond to the followingnamed levels: Debug, Info-Footnote, Info, Info-Important, Warning, Error, SecurityWarning, Error-Critical,SecurityWarning-Critical
· Scanner - Name of the scanner that created this log event
· ObjectType - Type of object that produced this log event
· ObjectName - Name of the object that produced this log event
· Threat - Name of the threat that has been found in the object described by ObjectName and ObjectTypeproperties
· Action - Action performed after the threat was identified
· User - User account that caused this log event to be generated
· Information - Additional description of the event
· Hash - Hash of the object that produced this log event

141
ESET_EventLog
The ESET_EventLog class has multiple instances, each one representing a log record from the “Events” log. Eachinstance contains:
· ID - Unique ID of this scan log record
· Timestamp - Creation timestamp of the log (in the WMI date/time format)
· LogLevel - Severity of the log record expressed as a number in the [0-8] interval. Values correspond to thefollowing named levels: Debug, Info-Footnote, Info, Info-Important, Warning, Error, SecurityWarning, Error-Critical, SecurityWarning-Critical
· Module - Name of the module that created this log event
· Event - Description of the event
· User - User account that caused this log event to be generated
ESET_ODFileScanLogs
The ESET_ODFileScanLogs class has multiple instances, each one representing an on-demand file scan record. This isequivalent to the GUI “On-demand computer scan” list of logs. Each instance contains:
· ID - Unique ID of this scan log record
· Timestamp - Creation timestamp of the log (in the WMI date/time format)
· Targets - Target folders/objects of the scan
· TotalScanned - Total number of objects scanned
· Infected - Number of infected objects found
· Cleaned - Number of objects cleaned
· Status - Status of the scan process
ESET_ODFileScanLogRecords
The ESET_ODFileScanLogRecords class has multiple instances, each one representing a log record in one of the scanlogs represented by instances of the ESET_ODFileScanLogs class. Instances of this class provide log records of all theon-demand scans/logs. When instance of a particular scan log are required only, they must be filtered by the LogIDproperty. Each class instance contains:
· LogID - ID of the scan log this record belongs to (ID of one of the instances of the ESET_ODFileScanLogs class)
· ID - Unique ID of this scan log record
· Timestamp - Creation timestamp of the log (in the WMI date/time format)
· LogLevel - Severity of the log record expressed as a number [0-8]. Values correspond to the following namedlevels: Debug, Info-Footnote, Info, Info-Important, Warning, Error, SecurityWarning, Error-Critical,SecurityWarning-Critical
· Log - The actual log message
ESET_ODServerScanLogs
The ESET_ODServerScanLogs class has multiple instances, each one representing a run of the on-demand serverscan. Each instance contains:
· ID - Unique ID of this scan log record
· Timestamp - Creation timestamp of the log (in the WMI date/time format)
· Targets - Target folders/objects of the scan
· TotalScanned - Total number of objects scanned
· Infected - Number of infected objects found
· Cleaned - Number of objects cleaned
· RuleHits - Total number of rule hits
· Status - Status of the scan process
ESET_ODServerScanLogRecords
The ESET_ODServerScanLogRecords class has multiple instances, each one representing a log record in one of thescan logs represented by instances of the ESET_ODServerScanLogs class. Instances of this class provide log records ofall the on-demand scans/logs. When instance of a particular scan log are required only, they must be filtered by theLogID property. Each class instance contains:
· LogID - ID of the scan log this record belongs to (ID of one of the instances of the ESET_ ODServerScanLogs class)
142
· ID - Unique ID of this scan log record
· Timestamp - Creation timestamp of the log record (in the WMI date/time format)
· LogLevel - Severity of the log record expressed as a number in the [0-8] interval. Values correspond to thefollowing named levels: Debug, Info-Footnote, Info, Info-Important, Warning, Error, SecurityWarning, Error-Critical, SecurityWarning-Critical
· Log - The actual log message
ESET_GreylistLog
The ESET_GreylistLog class has multiple instances, each one representing a log record from the “Greylist” log. Eachinstance contains:
· ID - Unique ID of this scan log record
· Timestamp - Creation timestamp of the log record (in the WMI date/time format)
· LogLevel - Severity of the log record expressed as a number [0-8]. Values correspond to the following namedlevels: Debug, Info-Footnote, Info, Info-Important, Warning, Error, SecurityWarning, Error-Critical,SecurityWarning-Critical
· HELODomain - Name of the HELO domain
· IP - Source IP address
· Sender - Email sender
· Recipient - Email recipient
· Action - Action performed
· TimeToAccept - Number of minutes after which the email will be accepted
ESET_HIPSLog
The ESET_HIPSLog class has multiple instances, each one representing a log record from the “HIPS” log. Each instancecontains:
· ID - Unique ID of this log record
· Timestamp - Creation timestamp of the log record (in the WMI date/time format)
· LogLevel - Severity of the log record expressed as a number in the [0-8] interval. Values correspond to thefollowing named levels: Debug, Info-Footnote, Info, Info-Important, Warning, Error, SecurityWarning, Error-Critical, SecurityWarning-Critical
· Application - source application
· Target - Type of operation
· Action - Action taken by HIPS, e.g. allow, deny, etc.
· Rule - Name of the rule responsible for the action
· AdditionalInfo
ESET_URLLog
The ESET_URLLog class has multiple instances, each one representing a log record from the “Filtered websites” log.Each instance contains:
· ID - Unique ID of this log record
· Timestamp - Creation timestamp of the log record (in the WMI date/time format)
· LogLevel - Severity of the log record expressed as a number [0-8]. Values correspond to the following namedlevels: Debug, Info-Footnote, Info, Info-Important, Warning, Error, SecurityWarning, Error-Critical,SecurityWarning-Critical
· URL - The URL
· Status - What happened to URL, e.g. "Blocked by Web control"
· Application - Application that tried to access the URL
· User - User account the application was running under
ESET_DevCtrlLog
The ESET_DevCtrlLog class has multiple instances, each one representing a log record from the “Device control” log.Each instance contains:
· ID - Unique ID of this log record
· Timestamp - Creation timestamp of the log record (in the WMI date/time format)
· LogLevel - Severity of the log record expressed as a number [0-8]. Values correspond to the following named

143
levels: Debug, Info-Footnote, Info, Info-Important, Warning, Error, SecurityWarning, Error-Critical,SecurityWarning-Critical
· Device - Device name
· User - User account name
· UserSID - User account SID
· Group - User group name
· GroupSID - User group SID
· Status - What happened to the device, e.g. "Writing blocked"
· DeviceDetails - Additional info regarding the device
· EventDetails - Additional info regarding the event
ESET_MailServerLog
The ESET_MailServerLog class has multiple instances, each one representing a log record from the “Mail server” log.Each instance contains:
· ID - Unique ID of this log record
· Timestamp - Creation timestamp of the log record (in the WMI date/time format)
· LogLevel - Severity of the log record expressed as a number [0-8]. Values correspond to the following namedlevels: Debug, Info-Footnote, Info, Info-Important, Warning, Error, SecurityWarning, Error-Critical,SecurityWarning-Critical
· IPAddr - Source IP address
· HELODomain - Name of the HELO domain
· Sender - Email sender
· Recipient - Email recipient
· Subject - E-mail subject
· ProtectionType - Protection type that has performed the action described by the current log record, i.e.antivirus, antispam or rules.
· Action - Action performed
· Reason - The reason why was the action performed on the object by the given ProtectionType.
ESET_HyperVScanLogs
The ESET_HyperVScanLogs class has multiple instances, each one representing a run of the Hyper-V file scan. This isequivalent to the GUI “Hyper-V scan” list of logs. Each instance contains:
· ID - Unique ID of this log record
· Timestamp - Creation timestamp of the log record (in the WMI date/time format)
· Targets - Target machines/disks/volumes of the scan
· TotalScanned - Total number of objects scanned
· Infected - Number of infected objects found
· Cleaned - Number of objects cleaned
· Status - Status of the scan process
ESET_HyperVScanLogRecords
The ESET_HyperVScanLogRecords class has multiple instances, each one representing a log record in one of the scanlogs represented by instances of the ESET_HyperVScanLogs class. Instances of this class provide log records of all theHyper-V scans/logs. When instance of a particular scan log are required only, they must be filtered by the LogIDproperty. Each class instance contains:
· LogID - ID of the scan log this record belongs to (ID of one of the instances of the ESET_HyperVScanLogs class)
· ID - Unique ID of this log record
· Timestamp - Creation timestamp of the log record (in the WMI date/time format)
· LogLevel - Severity of the log record expressed as a number [0-8]. Values correspond to the following namedlevels: Debug, Info-Footnote, Info, Info-Important, Warning, Error, SecurityWarning, Error-Critical,SecurityWarning-Critical
· Log - The actual log message
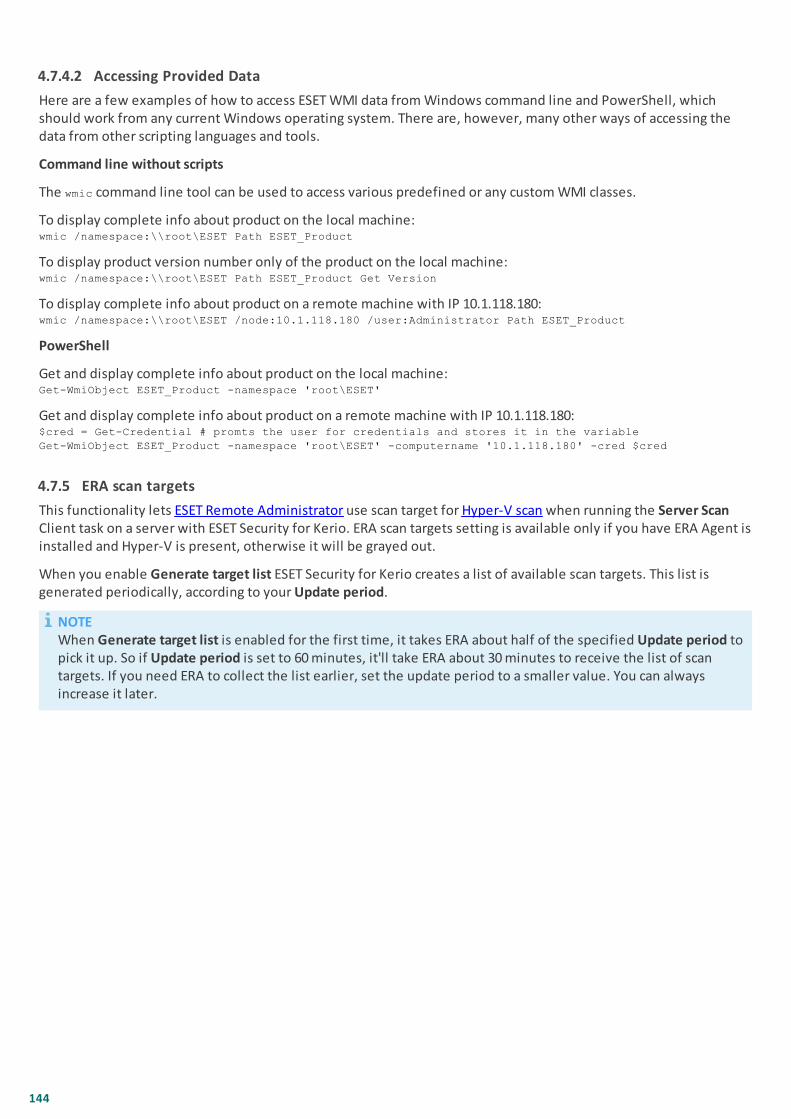
144
4.7.4.2 Accessing Provided Data
Here are a few examples of how to access ESET WMI data from Windows command line and PowerShell, whichshould work from any current Windows operating system. There are, however, many other ways of accessing thedata from other scripting languages and tools.
Command line without scripts
The wmic command line tool can be used to access various predefined or any custom WMI classes.
To display complete info about product on the local machine:wmic /namespace:\\root\ESET Path ESET_Product
To display product version number only of the product on the local machine:wmic /namespace:\\root\ESET Path ESET_Product Get Version
To display complete info about product on a remote machine with IP 10.1.118.180:wmic /namespace:\\root\ESET /node:10.1.118.180 /user:Administrator Path ESET_Product
PowerShell
Get and display complete info about product on the local machine:Get-WmiObject ESET_Product -namespace 'root\ESET'
Get and display complete info about product on a remote machine with IP 10.1.118.180:$cred = Get-Credential # promts the user for credentials and stores it in the variable
Get-WmiObject ESET_Product -namespace 'root\ESET' -computername '10.1.118.180' -cred $cred
4.7.5 ERA scan targets
This functionality lets ESET Remote Administrator use scan target for Hyper-V scan when running the Server ScanClient task on a server with ESET Security for Kerio. ERA scan targets setting is available only if you have ERA Agent isinstalled and Hyper-V is present, otherwise it will be grayed out.
When you enable Generate target list ESET Security for Kerio creates a list of available scan targets. This list isgenerated periodically, according to your Update period.
NOTEWhen Generate target list is enabled for the first time, it takes ERA about half of the specified Update period topick it up. So if Update period is set to 60 minutes, it'll take ERA about 30 minutes to receive the list of scantargets. If you need ERA to collect the list earlier, set the update period to a smaller value. You can alwaysincrease it later.
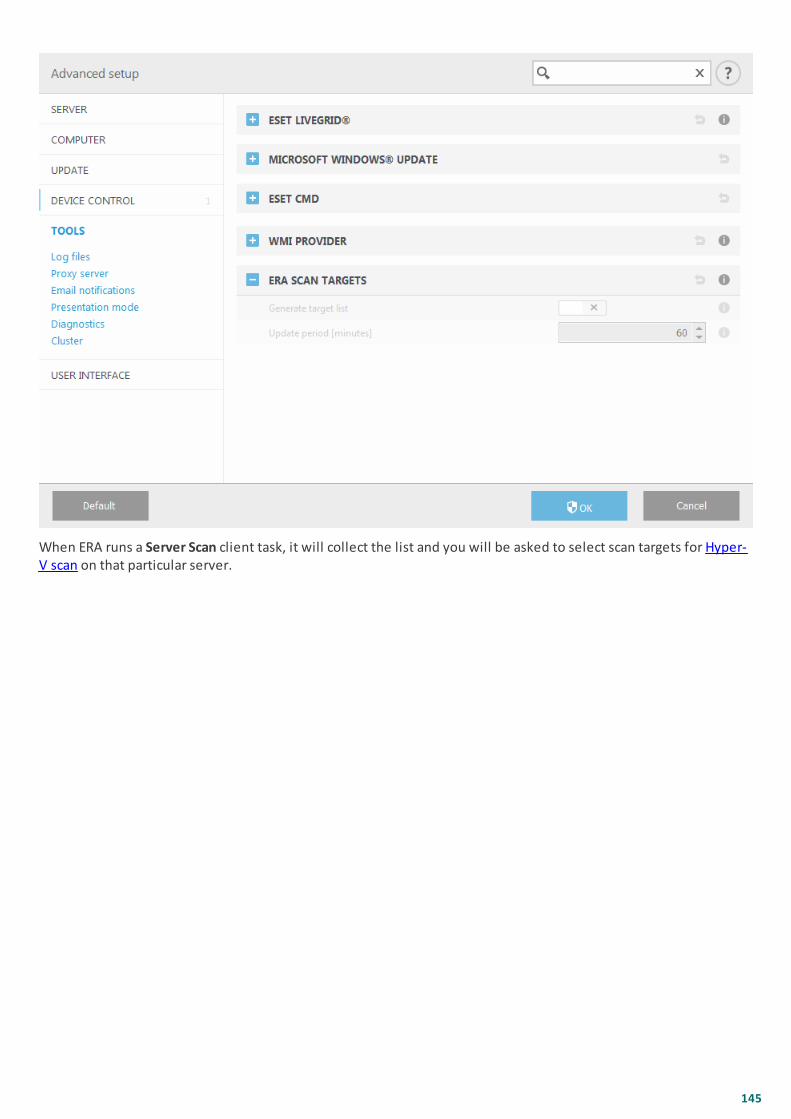
145
When ERA runs a Server Scan client task, it will collect the list and you will be asked to select scan targets for Hyper-V scan on that particular server.
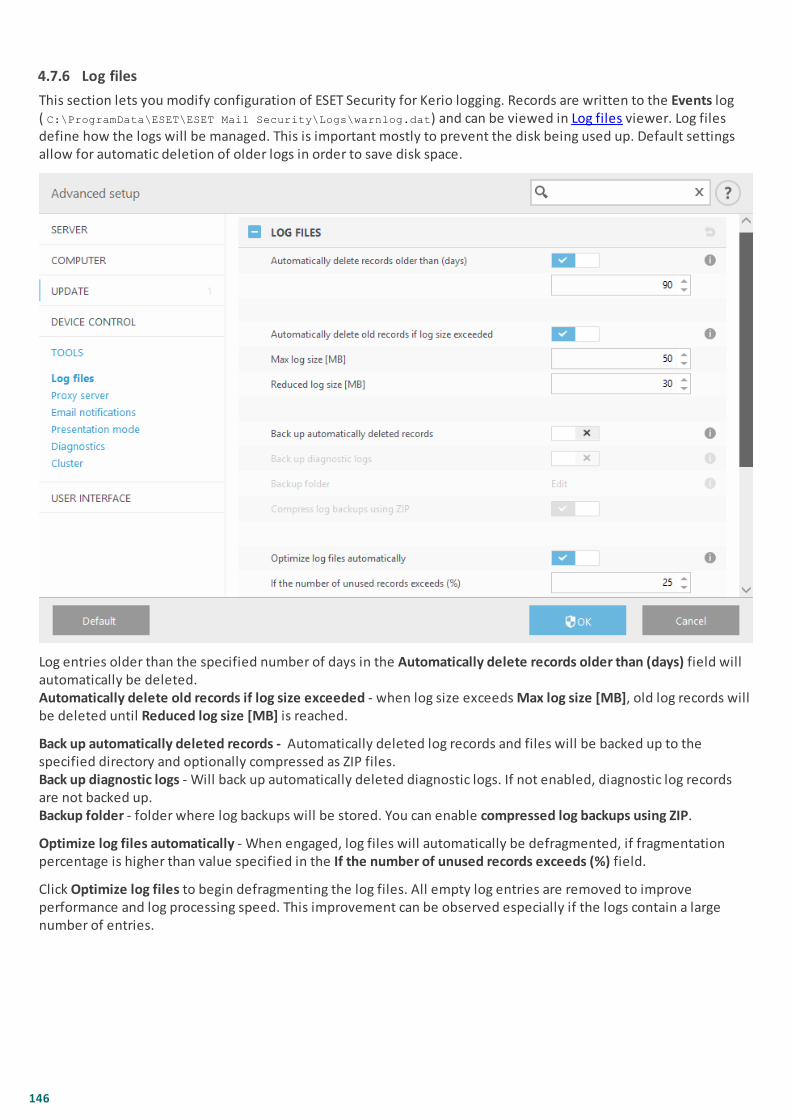
146
4.7.6 Log files
This section lets you modify configuration of ESET Security for Kerio logging. Records are written to the Events log( C:\ProgramData\ESET\ESET Mail Security\Logs\warnlog.dat) and can be viewed in Log files viewer. Log filesdefine how the logs will be managed. This is important mostly to prevent the disk being used up. Default settingsallow for automatic deletion of older logs in order to save disk space.
Log entries older than the specified number of days in the Automatically delete records older than (days) field willautomatically be deleted.Automatically delete old records if log size exceeded - when log size exceeds Max log size [MB], old log records willbe deleted until Reduced log size [MB] is reached.
Back up automatically deleted records - Automatically deleted log records and files will be backed up to thespecified directory and optionally compressed as ZIP files.Back up diagnostic logs - Will back up automatically deleted diagnostic logs. If not enabled, diagnostic log recordsare not backed up.Backup folder - folder where log backups will be stored. You can enable compressed log backups using ZIP.
Optimize log files automatically - When engaged, log files will automatically be defragmented, if fragmentationpercentage is higher than value specified in the If the number of unused records exceeds (%) field.
Click Optimize log files to begin defragmenting the log files. All empty log entries are removed to improveperformance and log processing speed. This improvement can be observed especially if the logs contain a largenumber of entries.

147
Turn on Enable text protocol to enable the storage of logs in another file format separate from Log files:
· Target directory - The directory where log files will be stored (only applies to Text/CSV). Each log section has itsown file with a predefined file name (for example, virlog.txt for Detected threats section of Log files, if you useplain text file format to store logs).
· Type - If you select the Text file format, logs will be stored in a text file; data will be separated by tabs. The sameapplies to comma-separated CSV file format. If you choose Event, logs will be stored in the Windows Event log(can be viewed using Event Viewer in Control panel) as opposed to file.
· Delete all log files - Erases all stored logs currently selected in the Type drop-down menu.
4.7.6.1 Log filtering
Logs store information about important system events. The log filtering feature allows you to display records abouta specific type of event.
Enter the search keyword into the Find text field. Use the Search in columns drop-down menu to refine your search.
Record types - Choose one or more record log types from the drop-down menu:
· Diagnostic - Logs information needed to fine-tune the program and all records above.
· Informative - Records informative messages, including successful update messages, plus all records above.
· Warnings - Records critical errors and warning messages.
· Errors - Errors such as "Error downloading file" and critical errors will be recorded.
· Critical - Logs only critical errors (error starting antivirus protection).
Time period - Define the time period from which you want the results to be displayed.
Match whole words only - Select this check box if you want to search for specific whole words for more preciseresults.
Case sensitive - Enable this option if it is important for you to use capital or lower case letters while filtering.

148
4.7.6.2 Find in log
In addition to Log filtering, you can use the search functionality within Log files, however you can also use itindependently from log filtering. This is useful when you are looking for particular records in logs. Like Log filtering,this search feature will help you find the information you are looking for, especially when there are too manyrecords.
When using search in log, you can Find text by typing a specific string, use the Search in columns drop-down menuto filter by column, select Record types and set a Time period to only search for records from a specific time period.By specifying certain search options, only records that are relevant (according to those search options) will besearched in the Log files window.
Find text: Type a string (word, or part of a word). Only records that contain this string will be found. Other recordswill be omitted.
Search in columns: Select what columns will be taken into account when searching. You can check one or morecolumns to be used for searching. By default, all columns are selected:
· Time
· Scanned folder
· Event
· User
Record types: Choose one or more record log types from the drop-down menu:
· Diagnostic - Logs information needed to fine-tune the program and all records above.
· Informative - Records informative messages, including successful update messages, plus all records above.
· Warnings - Records critical errors and warning messages.
· Errors - Errors such as "Error downloading file" and critical errors will be recorded.
· Critical - Logs only critical errors (error starting antivirus protection).
Time period: Define the time period from which you want the results to be displayed.
· Not specified (default) - does not search within time period, searches the whole log.
· Last day
· Last week
· Last month
· Time period - you can specify the exact time period (date and time) to search only those records from a specifiedtime period.
Match whole words only - Finds only records that match the string as a whole word in the What text box.
Match case sensitive - Finds only records that match the string with exact capitalization in the What text box.
Search upwards - Searches from the current position upwards.
Once you have configured your search options, click Find to start searching. The search stops when it finds the firstcorresponding record. Click Find again to see additional records. The Log files are searched from top to bottom,starting from your current position (the record that is highlighted).
4.7.7 Proxy server
In large LAN networks, the connection of your computer to the Internet can be mediated by a proxy server. If this isthe case, the following settings need to be defined. Otherwise the program will not be able to update itselfautomatically. In ESET Security for Kerio, proxy server setup is available in two different sections within the Advanced setup window (F5).
1. Advanced setup > Update > Profiles > HTTP Proxy - This setting applies for the given update profile and isrecommended for laptops that often receive virus signature updates from different locations. For moreinformation about this setting, see the section Advanced update setup.
2. Advanced setup > Tools > Proxy server - Specifying the proxy server at this level defines global proxy server

149
settings for all of ESET Security for Kerio. Parameters here will be used by all modules that connect to theInternet.
To specify proxy server settings for this level, turn on the Use proxy server switch and then enter the address of theproxy server into the Proxy server field, along with the Port number of the proxy server.
· If communication with the proxy server requires authentication, turn the Proxy server requires authenticationswitch on and enter a valid Username and Password into the respective fields.
· Click Detect to automatically detect and populate proxy server settings. The parameters specified in InternetExplorer will be copied.
NOTEThis feature does not retrieve authentication data (username and password); it must be supplied by you.
· Use direct connection if proxy is not available - if a product is configured to utilize HTTP Proxy and the proxy isunreachable, the product will bypass the proxy and communicate directly with ESET servers.
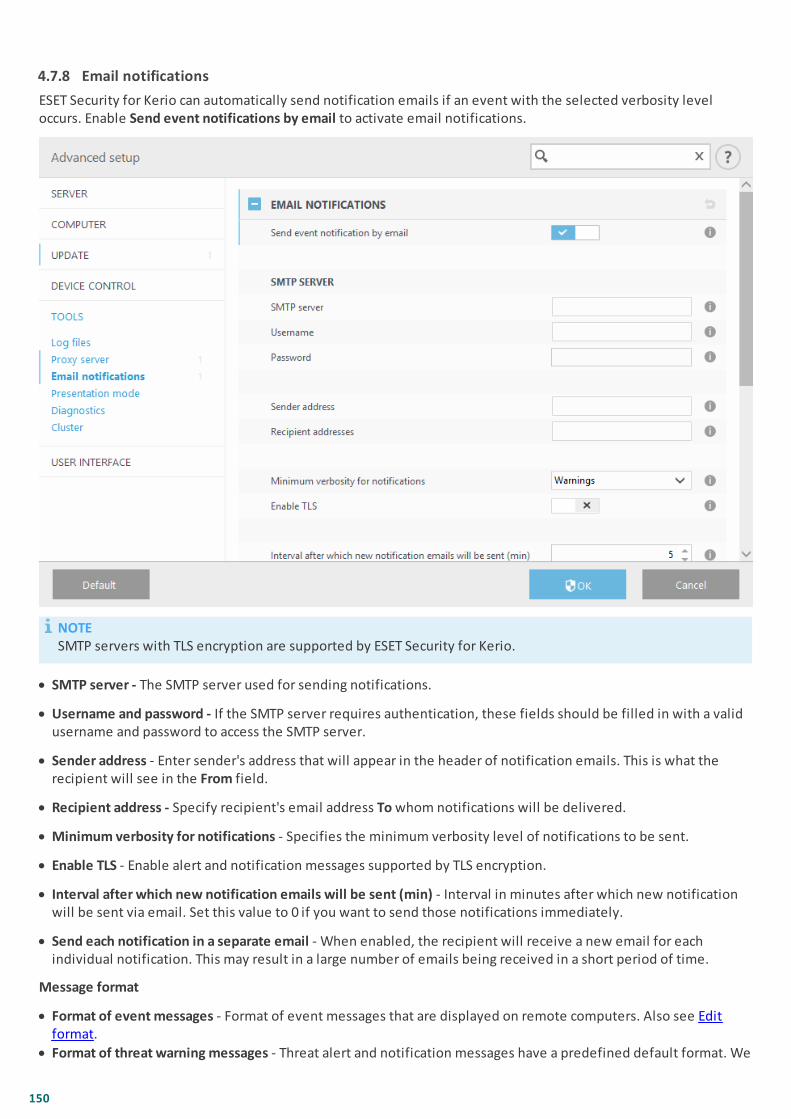
150
4.7.8 Email notifications
ESET Security for Kerio can automatically send notification emails if an event with the selected verbosity leveloccurs. Enable Send event notifications by email to activate email notifications.
NOTESMTP servers with TLS encryption are supported by ESET Security for Kerio.
· SMTP server - The SMTP server used for sending notifications.
· Username and password - If the SMTP server requires authentication, these fields should be filled in with a validusername and password to access the SMTP server.
· Sender address - Enter sender's address that will appear in the header of notification emails. This is what therecipient will see in the From field.
· Recipient address - Specify recipient's email address To whom notifications will be delivered.
· Minimum verbosity for notifications - Specifies the minimum verbosity level of notifications to be sent.
· Enable TLS - Enable alert and notification messages supported by TLS encryption.
· Interval after which new notification emails will be sent (min) - Interval in minutes after which new notificationwill be sent via email. Set this value to 0 if you want to send those notifications immediately.
· Send each notification in a separate email - When enabled, the recipient will receive a new email for eachindividual notification. This may result in a large number of emails being received in a short period of time.
Message format
· Format of event messages - Format of event messages that are displayed on remote computers. Also see Editformat.
· Format of threat warning messages - Threat alert and notification messages have a predefined default format. We

151
advise against changing this format. However, in some circumstances (for example, if you have an automatedemail processing system), you may need to change the message format. Also see Edit format.
· Use local alphabetic characters - Converts an email message to the ANSI character encoding based on WindowsRegional settings (for example, windows-1250). If you leave this deselected, a message will be converted andencoded in ACSII 7-bit (for example "á" will be changed to "a" and an unknown symbol to "?").
· Use local character encoding - The email message source will be encoded to Quoted-printable (QP) format whichuses ASCII characters and can correctly transmit special national characters by email in 8-bit format (áéíóú).
4.7.8.1 Message format
Communications between the program and a remote user or system administrator are done via emails or LANmessages (using the Windows messenger service). The default format of the alert messages and notifications willbe optimal for most situations. In some circumstances, you may need to change the message format of eventmessages.
Keywords (strings separated by % signs) are replaced in the message by the actual information as specified. Thefollowing keywords are available:
· %TimeStamp% - Date and time of the event.
· %Scanner% - Module concerned.
· %ComputerName% - Name of the computer where the alert occurred.
· %ProgramName% - Program that generated the alert.
· %InfectedObject% - Name of infected file, message, etc.
· %VirusName% - Identification of the infection.
· %ErrorDescription% - Description of a non-virus event.
The keywords %InfectedObject% and %VirusName% are only used in threat warning messages, and %ErrorDescription% is only used in event messages.
4.7.9 Presentation mode
Presentation mode is a feature for users that demand uninterrupted usage of their software, do not want to bedisturbed by pop-up windows, and want to minimize CPU usage. Presentation mode can also be used duringpresentations that cannot be interrupted by antivirus activity. When enabled, all pop-up windows are disabled andscheduled tasks are not run. System protection still runs in the background, but does not require any userinteraction.
· Click Setup > Computer and then click the switch next to Presentation mode to enable presentation modemanually.
· In Advanced setup window (F5), click Tools > Presentation mode, and then click Enable Presentation mode whenrunning applications in full-screen mode automatically to have ESET Security for Kerio engage Presentation modeautomatically when full-screen applications are run. Enabling Presentation mode is a potential security risk, sothe Monitoring status icon in the taskbar will turn orange and display a warning. You will also see this warning inthe main program window where you will see Presentation mode enabled in orange.
When Enable Presentation mode when running applications in full-screen mode automatically is engaged,Presentation mode will start whenever you initiate a full-screen application and will automatically stop after youexit the application. This is especially useful for starting Presentation mode immediately after starting a game,opening a full screen application or starting a presentation.You can also select Disable Presentation mode automatically after to define the amount of time in minutes afterwhich Presentation mode will automatically be disabled.

152
4.7.10 Diagnostics
Diagnostics provides application crash dumps of ESET processes (for example, ekrn). If an application crashes, adump will be generated. This can help developers debug and fix various ESET Security for Kerio problems. Click thedrop-down menu next to Dump type and select one of three available options:
· Select Disable (default) to disable this feature.
· Mini - Records the smallest set of useful information that may help identify why the application crashedunexpectedly. This kind of dump file can be useful when space is limited. However, because of the limitedinformation included, errors that were not directly caused by the thread that was running at the time of theproblem may not be discovered by an analysis of this file.
· Full - Records all the contents of system memory when the application stops unexpectedly. A complete memorydump may contain data from processes that were running when the memory dump was collected.
Enable Protocol filtering advanced logging - Record all data passing through Protocol filtering engine in PCAP formatin order to help developers diagnose and fix the problems related to Protocol filtering.
Target directory - Directory where the dump during the crash will be generated.
Open diagnostics folder - Click Open to open this directory within a new Windows explorer window.
4.7.11 Customer Care
Submit system configuration data - Select Always submit from the drop-down menu, or select Ask beforesubmission to be prompted before submitting data.

153
4.7.12 Cluster
Enable Cluster is automatically enabled when the ESET Cluster is configured. You can disable it manually in theAdvanced setup window by clicking the switch icon (it is suitable when you need to change configuration withoutaffecting other nodes in the ESET Cluster). This switch only enables or disables the ESET Cluster functionality. To setup or destroy the cluster, to use the Cluster wizard or Destroy the cluster located in the Tools > Cluster section of themain program window.
ESET Cluster not configured and disabled:

154
ESET Cluster properly configured with its details and options:
For more information on the ESET Cluster click here.
4.8 User interface
The User interface section allows you to configure the behavior of the program's Graphical user interface (GUI). Youcan adjust the program's visual appearance and effects.
User interface elements
In the User interface elements section, you can adjust the working environment. Use the GUI start mode drop-downmenu to select from the following Graphical user interface (GUI) start modes:o Full - The complete GUI will be displayed.o Terminal - No notifications or alerts will be displayed. GUI can only be started by the Administrator. The user
interface should be set to Terminal if graphical elements slow the performance of your computer or cause otherproblems. You may also want to turn off the GUI on a Terminal server. For more information about ESET Securityfor Kerio installed on Terminal server, see Disable GUI on Terminal Server topic.
· If you want to deactivate the ESET Security for Kerio splash-screen, deselect Show splash-screen at startup.
· To have ESET Security for Kerio play a sound when important events occur during a scan, for example when athreat is discovered or when the scan has finished, select Use sound signal.
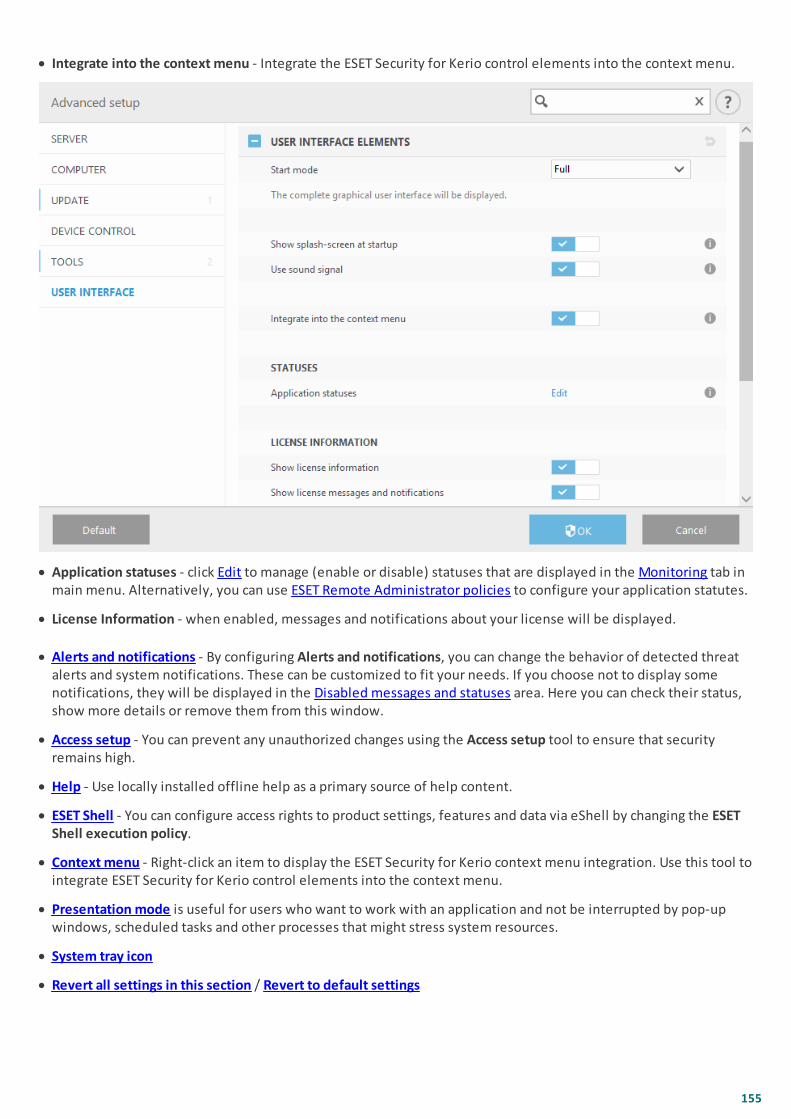
155
· Integrate into the context menu - Integrate the ESET Security for Kerio control elements into the context menu.
· Application statuses - click Edit to manage (enable or disable) statuses that are displayed in the Monitoring tab inmain menu. Alternatively, you can use ESET Remote Administrator policies to configure your application statutes.
· License Information - when enabled, messages and notifications about your license will be displayed.
· Alerts and notifications - By configuring Alerts and notifications, you can change the behavior of detected threatalerts and system notifications. These can be customized to fit your needs. If you choose not to display somenotifications, they will be displayed in the Disabled messages and statuses area. Here you can check their status,show more details or remove them from this window.
· Access setup - You can prevent any unauthorized changes using the Access setup tool to ensure that securityremains high.
· Help - Use locally installed offline help as a primary source of help content.
· ESET Shell - You can configure access rights to product settings, features and data via eShell by changing the ESETShell execution policy.
· Context menu - Right-click an item to display the ESET Security for Kerio context menu integration. Use this tool tointegrate ESET Security for Kerio control elements into the context menu.
· Presentation mode is useful for users who want to work with an application and not be interrupted by pop-upwindows, scheduled tasks and other processes that might stress system resources.
· System tray icon
· Revert all settings in this section / Revert to default settings
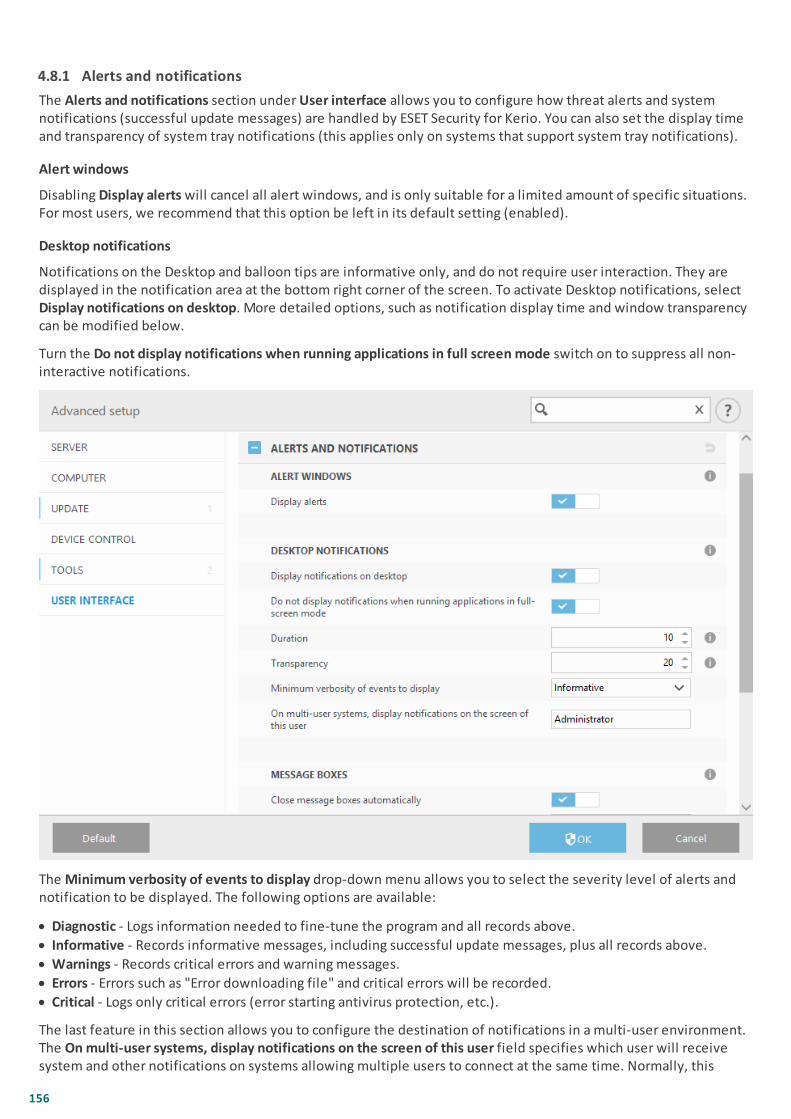
156
4.8.1 Alerts and notifications
The Alerts and notifications section under User interface allows you to configure how threat alerts and systemnotifications (successful update messages) are handled by ESET Security for Kerio. You can also set the display timeand transparency of system tray notifications (this applies only on systems that support system tray notifications).
Alert windows
Disabling Display alerts will cancel all alert windows, and is only suitable for a limited amount of specific situations.For most users, we recommend that this option be left in its default setting (enabled).
Desktop notifications
Notifications on the Desktop and balloon tips are informative only, and do not require user interaction. They aredisplayed in the notification area at the bottom right corner of the screen. To activate Desktop notifications, select Display notifications on desktop. More detailed options, such as notification display time and window transparencycan be modified below.
Turn the Do not display notifications when running applications in full screen mode switch on to suppress all non-interactive notifications.
The Minimum verbosity of events to display drop-down menu allows you to select the severity level of alerts andnotification to be displayed. The following options are available:
· Diagnostic - Logs information needed to fine-tune the program and all records above.
· Informative - Records informative messages, including successful update messages, plus all records above.
· Warnings - Records critical errors and warning messages.
· Errors - Errors such as "Error downloading file" and critical errors will be recorded.
· Critical - Logs only critical errors (error starting antivirus protection, etc.).
The last feature in this section allows you to configure the destination of notifications in a multi-user environment.The On multi-user systems, display notifications on the screen of this user field specifies which user will receivesystem and other notifications on systems allowing multiple users to connect at the same time. Normally, this

157
would be a system or network administrator. This option is especially useful for terminal servers, provided that allsystem notifications are sent to the administrator.
Message boxes
To close pop-up windows automatically after a certain period of time, select Close message boxes automatically. Ifthey are not closed manually, alert windows are automatically closed after the specified time period elapses.
4.8.2 Access setup
In order to provide maximum security for your system, it is essential that ESET Security for Kerio is correctlyconfigured. Any unqualified change may result in a loss of important data. To avoid unauthorized modifications, thesetup parameters of ESET Security for Kerio can be password protected. Configuration settings for passwordprotection are located in the Access setup submenu under User interface in the Advanced setup tree (F5).
Password protect settings - Locks/unlocks the program's setup parameters. Click to open the Password setupwindow.
To set or change a password to protect setup parameters, click Set password.
Require full administrator rights for limited administrator accounts - Select this option to prompt the current user (ifhe or she does not have administrator rights) to enter an administrator username and password when modifyingcertain system parameters (similar to UAC in Windows Vista). The modifications include disabling protectionmodules.
NOTEIf the Access Setup password changes and you want to import an existing .xml configuration file (that was signedbefore the password change) using the ESET CMD command line, make sure to sign it again using your currentpassword. This allows you to use older configuration file without the need to export it on the other machinerunning ESET Security for Kerio before the import.
4.8.2.1 Password
To avoid unauthorized modification, the setup parameters of ESET Security for Kerio can be password protected.
4.8.2.2 Password setup
To protect the setup paramaters of ESET Security for Kerio in order to avoid unauthorized modification, a newpassword must be set. When you want to change an existing password, type your old password in the Old passwordfield, enter your new password in the New password and Confirm password fields and then click OK. This passwordwill be required for any future modifications to ESET Security for Kerio.
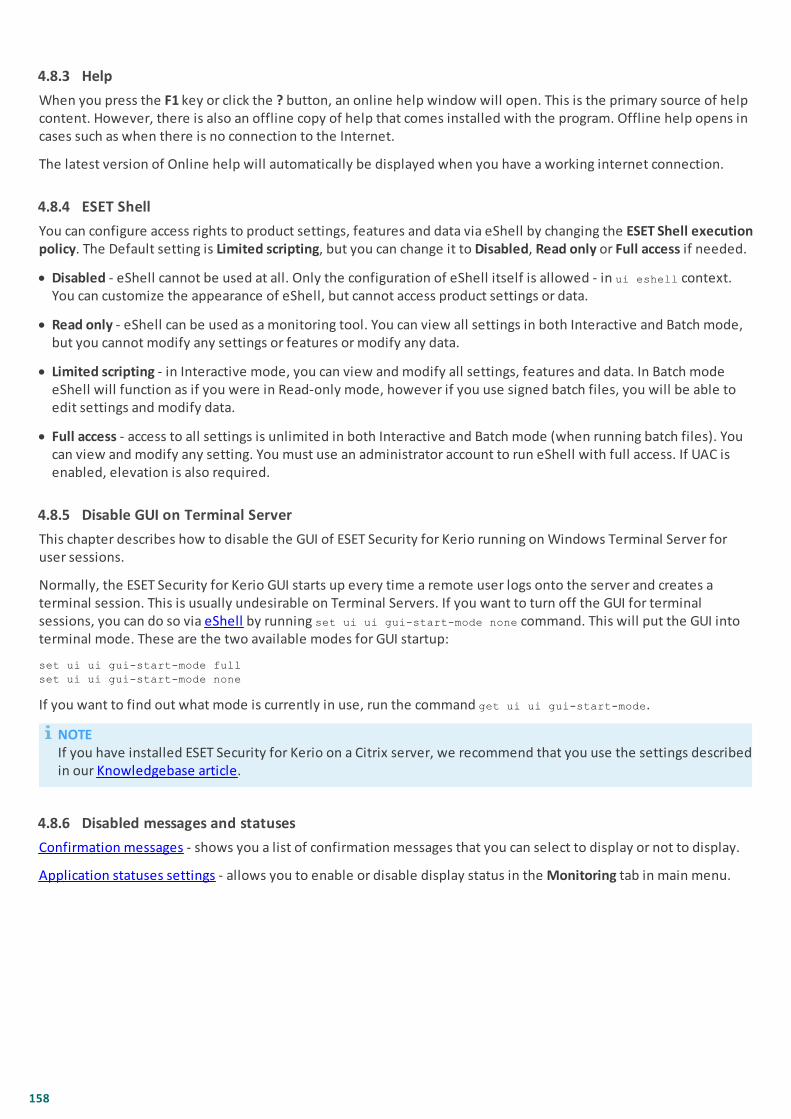
158
4.8.3 Help
When you press the F1 key or click the ? button, an online help window will open. This is the primary source of helpcontent. However, there is also an offline copy of help that comes installed with the program. Offline help opens incases such as when there is no connection to the Internet.
The latest version of Online help will automatically be displayed when you have a working internet connection.
4.8.4 ESET Shell
You can configure access rights to product settings, features and data via eShell by changing the ESET Shell executionpolicy. The Default setting is Limited scripting, but you can change it to Disabled, Read only or Full access if needed.
· Disabled - eShell cannot be used at all. Only the configuration of eShell itself is allowed - in ui eshell context.You can customize the appearance of eShell, but cannot access product settings or data.
· Read only - eShell can be used as a monitoring tool. You can view all settings in both Interactive and Batch mode,but you cannot modify any settings or features or modify any data.
· Limited scripting - in Interactive mode, you can view and modify all settings, features and data. In Batch modeeShell will function as if you were in Read-only mode, however if you use signed batch files, you will be able toedit settings and modify data.
· Full access - access to all settings is unlimited in both Interactive and Batch mode (when running batch files). Youcan view and modify any setting. You must use an administrator account to run eShell with full access. If UAC isenabled, elevation is also required.
4.8.5 Disable GUI on Terminal Server
This chapter describes how to disable the GUI of ESET Security for Kerio running on Windows Terminal Server foruser sessions.
Normally, the ESET Security for Kerio GUI starts up every time a remote user logs onto the server and creates aterminal session. This is usually undesirable on Terminal Servers. If you want to turn off the GUI for terminalsessions, you can do so via eShell by running set ui ui gui-start-mode none command. This will put the GUI intoterminal mode. These are the two available modes for GUI startup:
set ui ui gui-start-mode full
set ui ui gui-start-mode none
If you want to find out what mode is currently in use, run the command get ui ui gui-start-mode.
NOTEIf you have installed ESET Security for Kerio on a Citrix server, we recommend that you use the settings describedin our Knowledgebase article.
4.8.6 Disabled messages and statuses
Confirmation messages - shows you a list of confirmation messages that you can select to display or not to display.
Application statuses settings - allows you to enable or disable display status in the Monitoring tab in main menu.

159
4.8.6.1 Confirmation messages
This dialog window displays confirmation messages that ESET Security for Kerio will display before any action isperformed. Select or deselect the check box next to each confirmation message to allow or disable it.
4.8.6.2 Application statuses settings
This dialog window lets you select or deselect which application statuses will be or will not be displayed. Forexample, when you pause Antivirus and antispyware protection that will result in a change of protection statuswhich will appear in Monitoring page. An application status will also be displayed if your product is not activated orif your license has expired.
Application statuses can be managed via ESET Remote Administrator policies. Categories and statutes are shown in alist with two options Show and Send the status. Send column for application statuses is visible only in ESET RemoteAdministrator policy configuration. ESET Security for Kerio shows settings with lock icon. You can use Override modeto temporarily change Application statuses.
4.8.7 System tray icon
Some of the most important setup options and features are available by right-clicking the system tray icon .
Pause protection - Displays the confirmation dialog box that disables Antivirus and antispyware protection, whichguards against attacks by controlling file, web and email communication.
The Time interval drop-down menu represents the period of time that Antivirus and antispyware protection will bedisabled for.
Advanced setup - Select this option to enter the Advanced setup. You can also access Advanced setup by pressing
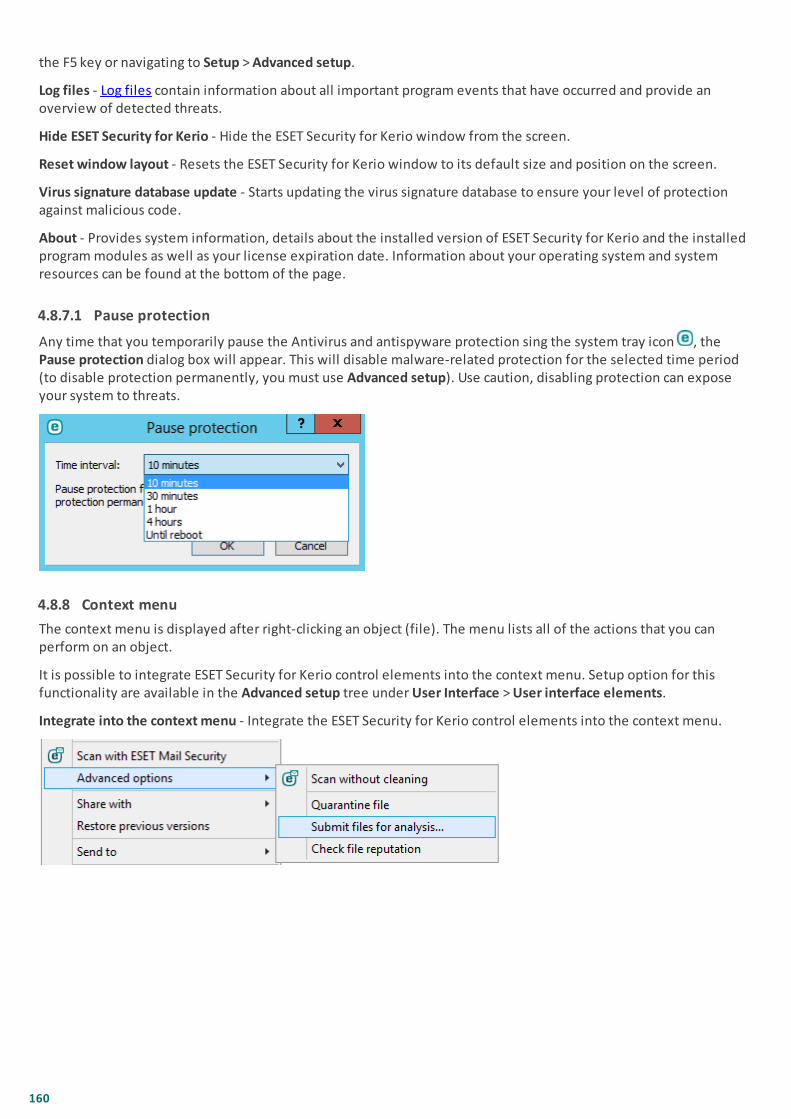
160
the F5 key or navigating to Setup > Advanced setup.
Log files - Log files contain information about all important program events that have occurred and provide anoverview of detected threats.
Hide ESET Security for Kerio - Hide the ESET Security for Kerio window from the screen.
Reset window layout - Resets the ESET Security for Kerio window to its default size and position on the screen.
Virus signature database update - Starts updating the virus signature database to ensure your level of protectionagainst malicious code.
About - Provides system information, details about the installed version of ESET Security for Kerio and the installedprogram modules as well as your license expiration date. Information about your operating system and systemresources can be found at the bottom of the page.
4.8.7.1 Pause protection
Any time that you temporarily pause the Antivirus and antispyware protection sing the system tray icon , thePause protection dialog box will appear. This will disable malware-related protection for the selected time period(to disable protection permanently, you must use Advanced setup). Use caution, disabling protection can exposeyour system to threats.
4.8.8 Context menu
The context menu is displayed after right-clicking an object (file). The menu lists all of the actions that you canperform on an object.
It is possible to integrate ESET Security for Kerio control elements into the context menu. Setup option for thisfunctionality are available in the Advanced setup tree under User Interface > User interface elements.
Integrate into the context menu - Integrate the ESET Security for Kerio control elements into the context menu.
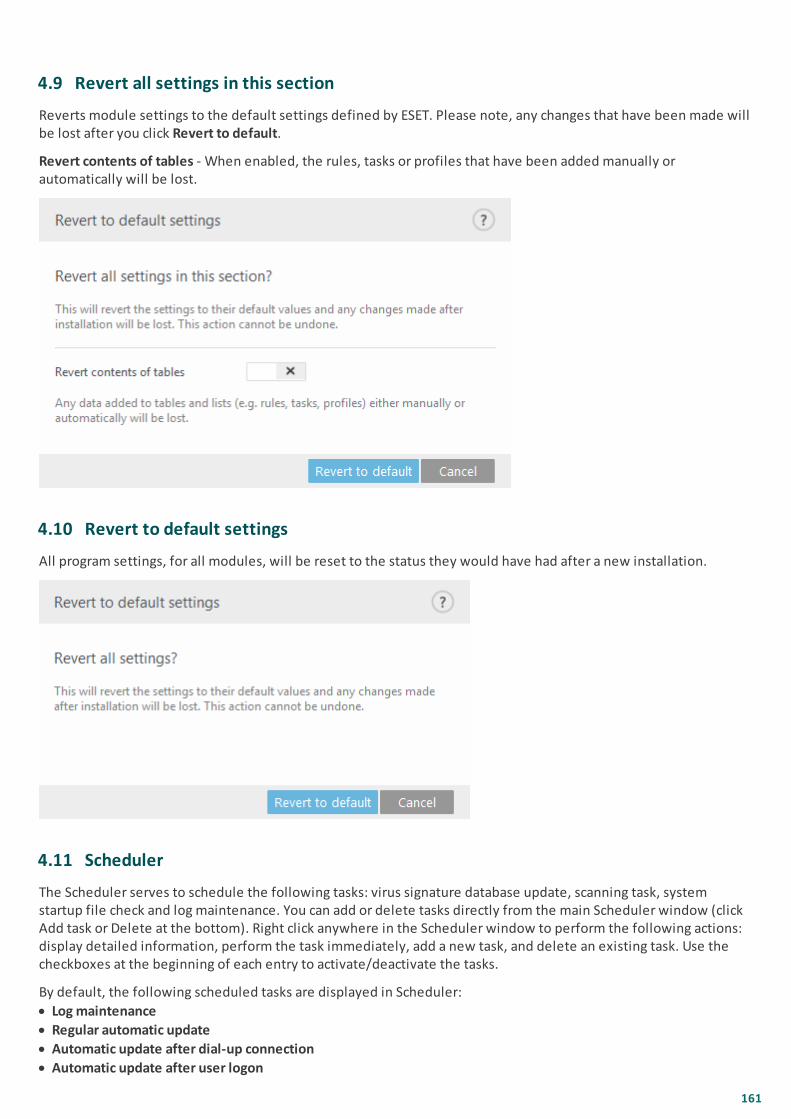
161
4.9 Revert all settings in this section
Reverts module settings to the default settings defined by ESET. Please note, any changes that have been made willbe lost after you click Revert to default.
Revert contents of tables - When enabled, the rules, tasks or profiles that have been added manually orautomatically will be lost.
4.10 Revert to default settings
All program settings, for all modules, will be reset to the status they would have had after a new installation.
4.11 Scheduler
The Scheduler serves to schedule the following tasks: virus signature database update, scanning task, systemstartup file check and log maintenance. You can add or delete tasks directly from the main Scheduler window (clickAdd task or Delete at the bottom). Right click anywhere in the Scheduler window to perform the following actions:display detailed information, perform the task immediately, add a new task, and delete an existing task. Use thecheckboxes at the beginning of each entry to activate/deactivate the tasks.
By default, the following scheduled tasks are displayed in Scheduler:
· Log maintenance
· Regular automatic update
· Automatic update after dial-up connection
· Automatic update after user logon

162
· Automatic startup file check (after user logon)
· Automatic startup file check (after successful update of the virus signature database)
· Automatic first scanTo edit the configuration of an existing scheduled task (both default and user-defined), right-click the task and click Edit... or select the task you wish to modify and click the Edit button.
Add a new task:
1. Click Add task at the bottom of the window.
2. Enter a name of the task.
3. Select the desired Task type.
4. Turn on the Enabled switch if you want to activate the task (you can do this later by selecting/deselectingcheckbox in the list of scheduled tasks).
5. Click Next and select one of the timing options and specify when it will be performed again.
6. Review scheduled task when you double-click the task in Scheduler view, or right-click the scheduled task andchoose Show task details.
4.11.1 Task details
Enter a Task name and select your desired Task type from the drop-down menu:
· Run external application - schedules the execution of an external application.
· Log maintenance - log files also contains leftovers from deleted records. This task optimizes records in log files ona regular basis to work effectively.
· System startup file check - checks files that are allowed to run at system startup or logon.
· Create a computer status snapshot - creates an ESET SysInspector computer snapshot - gathers detailedinformation about system components (for example, drivers, applications) and assesses the risk level of eachcomponent.
· On-demand computer scan - performs a computer scan of files and folders on your computer.
· First-scan - by default, 20 minutes after installation or reboot a computer scan will be performed as a low prioritytask.
· Update - schedules an update task to perform an update of virus signature database and program modules.
· Hyper-V scan - schedules a scan of the virtual disks within Hyper-V.
If you want to deactivate the task once it is created, click the switch next to Enabled. You can activate the task laterusing the check box in the Scheduler view. Click Next to proceed to the next step.
4.11.2 Task timing - Once
Specify the date and time for one-time Task execution.
4.11.3 Task timing
Select one of the following timing options to define when you want the Scheduled task to run:
· Once - the task will be performed only once at specified date and time.
· Repeatedly - the task will be performed at the specified time interval (in minutes).
· Daily - the task will run repeatedly every day at the specified time.
· Weekly - the task will run one or more times a week, on the selected day(s) and time.
· Event triggered - the task will be performed after a specified event.
If you enable Skip task when running on battery power, a task will not start if the system is running on batteries atthe time the task should launch. This applies to computers running on UPS, for example.
Click Next to proceed to the next step.
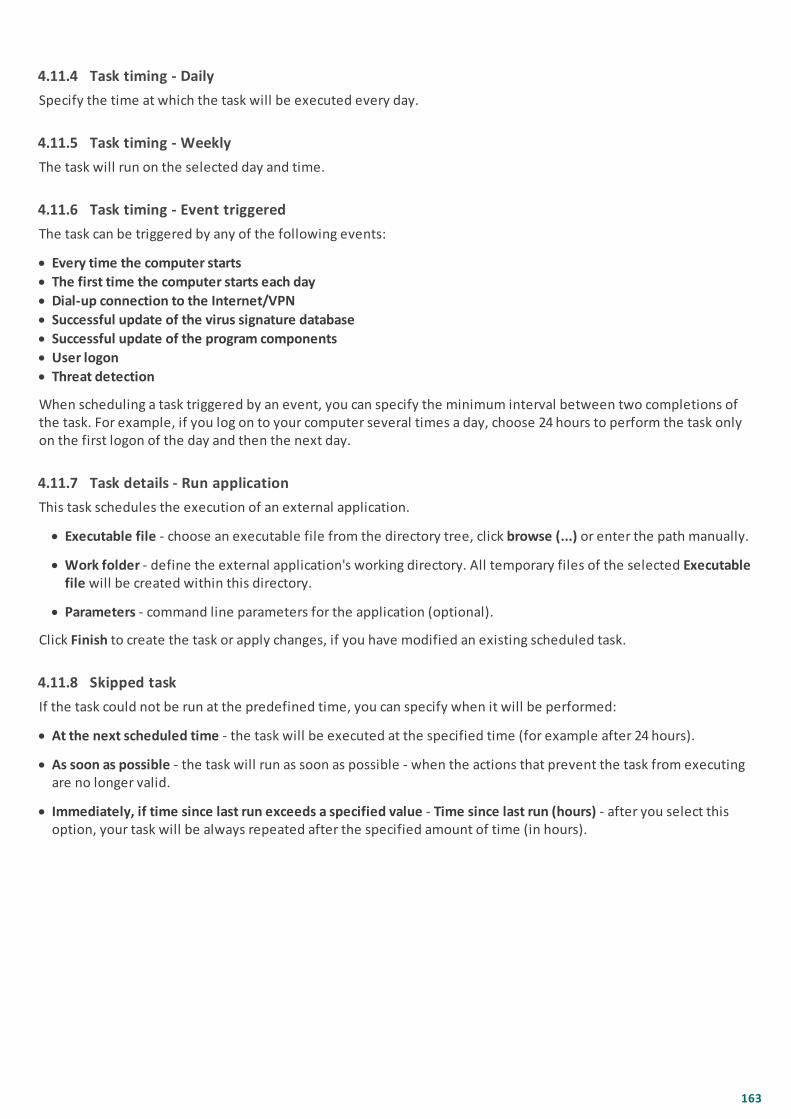
163
4.11.4 Task timing - Daily
Specify the time at which the task will be executed every day.
4.11.5 Task timing - Weekly
The task will run on the selected day and time.
4.11.6 Task timing - Event triggered
The task can be triggered by any of the following events:
· Every time the computer starts
· The first time the computer starts each day
· Dial-up connection to the Internet/VPN
· Successful update of the virus signature database
· Successful update of the program components
· User logon
· Threat detection
When scheduling a task triggered by an event, you can specify the minimum interval between two completions ofthe task. For example, if you log on to your computer several times a day, choose 24 hours to perform the task onlyon the first logon of the day and then the next day.
4.11.7 Task details - Run application
This task schedules the execution of an external application.
· Executable file - choose an executable file from the directory tree, click browse (...) or enter the path manually.
· Work folder - define the external application's working directory. All temporary files of the selected Executablefile will be created within this directory.
· Parameters - command line parameters for the application (optional).
Click Finish to create the task or apply changes, if you have modified an existing scheduled task.
4.11.8 Skipped task
If the task could not be run at the predefined time, you can specify when it will be performed:
· At the next scheduled time - the task will be executed at the specified time (for example after 24 hours).
· As soon as possible - the task will run as soon as possible - when the actions that prevent the task from executingare no longer valid.
· Immediately, if time since last run exceeds a specified value - Time since last run (hours) - after you select thisoption, your task will be always repeated after the specified amount of time (in hours).

164
4.11.9 Scheduled task overview
This dialog window displays detailed information about a scheduled task when you double-click the task in Scheduler view, or right-click the scheduled task and choose Show task details.
4.11.10 Update profiles
If you wish to update the program from two update servers, then it is necessary to create two different updateprofiles. If the first one fails to download update files, then the program automatically switches to the alternativeone. This is suitable, for example, for notebooks which normally update from a local LAN update server, but theirowners often connect to the Internet using other networks. So, if the first profile fails, the second one willautomatically download update files from ESET's update servers.

165
You will find more information on update profiles in chapter Update.
4.12 Quarantine
· Quarantining files
· Restoring from Quarantine
· Submitting a file from the Quarantine
4.12.1 Quarantining files
ESET Security for Kerio automatically quarantines deleted files (if you have not disabled this option in the alertwindow). If desired, you can quarantine any suspicious file manually by clicking Quarantine. If this is the case, theoriginal file is not removed from its original location. The context menu can also be used for this purpose right-clickin the Quarantine window and select Quarantine.
4.12.2 Restoring from Quarantine
Quarantined files can also be restored to their original location. To restore a quarantined file, right-click it in theQuarantine window and select Restore from the context menu. If a file is marked as a potentially unwantedapplication, Restore and exclude from scanning will also be available. The context menu also contains the Restoreto... option, which allows you to restore a file to a location other than the one from which it was deleted.
Deleting from Quarantine - Right-click on a given item and select Delete from Quarantine, or select the item youwant to delete and press Delete on your keyboard. You can also select multiple items and delete them together.
NOTEIf the program quarantines a harmless file by mistake, please exclude the file from scanning after restoring it andsend the file to ESET Customer Care.
4.12.3 Submitting file from Quarantine
If you have quarantined a suspicious file that was not detected by the program, or if a file was incorrectly evaluatedas infected (for example, by heuristic analysis of the code) and subsequently quarantined, please send the file tothe ESET Threat Lab. To submit a file from quarantine, right-click the file and select Submit for analysis from thecontext menu.
4.13 Operating system updates
The System updates window shows the list of available updates ready to be downloaded and installed. The updatepriority level is shown next to the name of the update.
Click Run system update to start downloading and installing operating system updates.
Right-click any update row and click Show information to display a pop-up window with additional info.
166
5. GlossaryThe glossary contains many of the technical terms about threats and internet security.
Choose category (or see a Virus Radar Glossary online):
· Types of infiltration
5.1 Types of infiltration
An infiltration is a piece of malicious software trying to enter and/or damage a user’s computer.
· Viruses
· Worms
· Trojan horses
· Rootkits
· Adware
· Spyware
· Botnet
· Ransomware
· Packers
· Exploit Blocker
· Advanced Memory Scanner
· Potentially unsafe applications
· Potentially unwanted applications
NOTEVisit our Virus radar page for more information about Glossary, versions of ESET Virus signature database orTools.
5.1.1 Viruses
A computer virus is an infiltration that corrupts existing files on your computer. Viruses are named after biologicalviruses, because they use similar techniques to spread from one computer to another.
Computer viruses mainly attack executable files and documents. To replicate, a virus attaches its “body“ to the endof a target file. In short, this is how a computer virus works: after execution of the infected file, the virus activatesitself (before the original application) and performs its predefined task. Only after that is the original applicationallowed to run. A virus cannot infect a computer unless a user, either accidentally or deliberately, runs or opens themalicious program by him/herself.
Computer viruses can range in purpose and severity. Some of them are extremely dangerous because of their abilityto purposely delete files from a hard drive. On the other hand, some viruses do not cause any damage - they onlyserve to annoy the user and demonstrate the technical skills of their authors.
It is important to note that viruses (when compared to trojans or spyware) are increasingly rare because they are notcommercially enticing for malicious software authors. Additionally, the term “virus” is often used incorrectly tocover all types of infiltrations. This usage is gradually being overcome and replaced by the new, more accurate term“malware” (malicious software).

167
If your computer is infected with a virus, it is necessary to restore infected files to their original state - i.e., to cleanthem by using an antivirus program.
Examples of viruses are: OneHalf, Tenga, and Yankee Doodle.
5.1.2 Worms
A computer worm is a program containing malicious code that attacks host computers and spreads via a network.The basic difference between a virus and a worm is that worms have the ability to replicate and travel bythemselves - they are not dependent on host files (or boot sectors). Worms spread through email addresses in yourcontact list or exploit security vulnerabilities in network applications.
Worms are therefore much more viable than computer viruses. Due to the wide availability of the Internet, they canspread across the globe within hours or even minutes of their release. This ability to replicate independently andrapidly makes them more dangerous than other types of malware.
A worm activated in a system can cause a number of inconveniences: It can delete files, degrade systemperformance, or even deactivate programs. The nature of a computer worm qualifies it as a “means of transport“ forother types of infiltrations.
If your computer is infected with a worm, we recommend you delete the infected files because they likely containmalicious code.
Examples of well-known worms are: Lovsan/Blaster, Stration/Warezov, Bagle, and Netsky.
5.1.3 Trojan horses
Historically, computer trojan horses have been defined as a class of infiltrations which attempt to presentthemselves as useful programs, thus tricking users into letting them run. But it is important to note that this wastrue for trojan horses in the past- oday, there is no longer a need for them to disguise themselves. Their solepurpose is to infiltrate as easily as possible and accomplish their malicious goals. “Trojan horse” has become a verygeneral term describing any infiltration not falling under any specific class of infiltration.
Since this is a very broad category, it is often divided into many subcategories:
· Downloader - A malicious program with the ability to download other infiltrations from the Internet
· Dropper - A type of trojan horse designed to drop other types of malware onto compromised computers
· Backdoor - An application which communicates with remote attackers, allowing them to gain access to a systemand to take control of it
· Keylogger - (keystroke logger) - A program which records each keystroke that a user types and sends theinformation to remote attackers
· Dialer - Dialers are programs designed to connect to premium-rate numbers. It is almost impossible for a user tonotice that a new connection was created. Dialers can only cause damage to users with dial-up modems, whichare no longer regularly used
Trojan horses usually take the form of executable files with the extension .exe. If a file on your computer isdetected as a trojan horse, it is advisable to delete it, since it most likely contains malicious code.
Examples of well-known trojans are: NetBus, Trojandownloader. Small.ZL, Slapper.
168
5.1.4 Rootkits
Rootkits are malicious programs that grant Internet attackers unlimited access to a system, while concealing theirpresence. Rootkits, after accessing a system (usually exploiting a system vulnerability), use functions in theoperating system to avoid detection by antivirus software: they conceal processes, files and Windows registry data,etc. For this reason, it is almost impossible to detect them using ordinary testing techniques.
There are two levels of detection to prevent rootkits:
1) When they try to access a system. They are still not present, and are therefore inactive. Most antivirus systemsare able to eliminate rootkits at this level (assuming that they actually detect such files as being infected).
2) When they are hidden from the usual testing. ESET Security for Kerio users have the advantage of Anti-Stealthtechnology, which is also able to detect and eliminate active rootkits.
5.1.5 Adware
Adware is a short for advertising-supported software. Programs displaying advertising material fall under thiscategory. Adware applications often automatically open a new pop-up window containing advertisements in anInternet browser, or change the browser’s home page. Adware is frequently bundled with freeware programs,allowing their creators to cover development costs of their (usually useful) applications.
Adware itself is not dangerous - users will only be bothered with advertisements. Its danger lies in the fact thatadware may also perform tracking functions (as spyware does).
If you decide to use a freeware product, please pay particular attention to the installation program. The installer willmost likely notify you of the installation of an extra adware program. Often you will be allowed to cancel it andinstall the program without adware.
Some programs will not install without adware, or their functionality will be limited. This means that adware mayoften access the system in a “legal” way, because users have agreed to it. In this case, it is better to be safe thansorry. If there is a file detected as adware on your computer, it is advisable to delete it, since there is a highprobability that it contains malicious code.
5.1.6 Spyware
This category covers all applications which send private information without user consent/awareness. Spyware usestracking functions to send various statistical data such as a list of visited websites, email addresses from the user‘scontact list, or a list of recorded keystrokes.
The authors of spyware claim that these techniques aim to find out more about users’ needs and interests and allowbetter-targeted advertisement. The problem is that there is no clear distinction between useful and maliciousapplications and no one can be sure that the retrieved information will not be misused. The data obtained byspyware applications may contain security codes, PINs, bank account numbers, etc. Spyware is often bundled withfree versions of a program by its author in order to generate revenue or to offer an incentive for purchasing thesoftware. Often, users are informed of the presence of spyware during a program‘s installation to give them anincentive to upgrade to a paid version without it.
Examples of well-known freeware products which come bundled with spyware are client applications of P2P(peer-to-peer) networks. Spyfalcon or Spy Sheriff (and many more) belong to a specific spyware subcategory - theyappear to be antispyware programs, but in fact they are spyware programs themselves.
If a file is detected as spyware on your computer, it is advisable to delete it, since there is a high probability that itcontains malicious code.
169
5.1.7 Botnet
A bot or web robot is an automated malware program that scans blocks of network addresses and infects vulnerablecomputers. This type of program allows hackers to take control of many computers at the same time and turn theminto bots (also known as a zombies). Hackers typically use bots to infect large numbers of computers. This largegroup of infected computers is referred to as a botnet. If your computer is infected and becomes a member of abotnet, it can be used in distributed denial of service (DDoS) attacks, and can also be used to perform automatedtasks over the Internet unbeknownst to you (for example sending spam, viruses or stealing personal and privateinformation such as bank credentials or credit card numbers).
For more information see Virus radar.
5.1.8 Ransomware
A particular kind of malicious software used for extortion. When activated, ransomware prevents access to a deviceor the data on it until the victim pays a fee.
5.1.9 Packers
A packer is a runtime self-extracting executable that combines several kinds of malware into a single package.
The most common packers are UPX, PE_Compact, PKLite and ASPack. The same malware may be detecteddifferently when compressed using a different packer. Packers also have the ability to make their "signatures"mutate over time, making malware more difficult to detect and remove.
5.1.10 Exploit Blocker
Exploit Blocker is designed to fortify commonly exploited applications such as web browsers, PDF readers, emailclients or MS Office components. It monitors behavior of processes for suspicious activity that might indicate anexploit. It adds another layer of protection, one step closer to attackers, by using a completely different technologycompared to techniques focusing on detection of malicious files themselves.
When Exploit Blocker identifies a suspicious process, it can stop the process immediately and record data about thethreat, which is then sent to the ESET LiveGrid® cloud system. This data is processed by the ESET Threat Lab and usedto better protect all users from unknown threats and zero-day attacks (newly released malware for which there isno pre-configured remedy).
5.1.11 Advanced Memory Scanner
Advanced Memory Scanner works in combination with Exploit Blocker to provide better protection against malwarethat has been designed to evade detection by antimalware products through the use of obfuscation and/orencryption. In cases where ordinary emulation or heuristics might not detect a threat, the Advanced MemoryScanner is able to identify suspicious behavior and scan threats when they reveal themselves in system memory.This solution is effective against even heavily obfuscated malware. Unlike Exploit Blocker, this is a post-executionmethod, which means that there is a risk that some malicious activity could have been performed prior to itsdetecting a threat. However in the case that other detection techniques have failed, it offers an additional layer ofsecurity.
5.1.12 Potentially unsafe applications
There are many legitimate programs whose function is to simplify the administration of networked computers.However, in the wrong hands, they may be misused for malicious purposes. ESET Security for Kerio provides theoption to detect such threats.
Potentially unsafe applications is the classification used for commercial, legitimate software. This classificationincludes programs such as remote access tools, password-cracking applications, and keyloggers (a program thatrecords each keystroke a user types).
If you find that there is a potentially unsafe application present and running on your computer (and you did notinstall it), please consult your network administrator or remove the application.
170
5.1.13 Potentially unwanted applications
Potentially unwanted applications (PUAs) are not necessarily intended to be malicious, but may affect theperformance of your computer in a negative way. Such applications usually require consent before installation. Ifthey are present on your computer, your system behaves differently (compared to the state before theirinstallation). The most significant changes are:
· New windows you haven’t seen previously (pop-ups, ads)
· Activating and running of hidden processes
· Increased usage of system resources
· Changes in search results
· Application communicates with remote servers
5.2 Email
Email, or electronic mail, is a modern form of communication with many advantages. It is flexible, fast and direct,and played a crucial role in the proliferation of the Internet in the early 1990‘s.
Unfortunately, with a high level of anonymity, email and the Internet leave room for illegal activities such asspamming. Spam includes unsolicited advertisements, hoaxes and proliferation of malicious software - malware.The inconvenience and danger to you is increased by the fact that the cost of sending spam is minimal, and authorsof spam have many tools to acquire new email addresses. In addition, the volume and variety of spam makes it verydifficult to regulate. The longer you use your email address, the more likely it will end up in a spam enginedatabase. Some hints for prevention:
· If possible, don’t publish your email address on the Internet.
· Only give your email address to trusted individuals.
· If possible, don’t use common aliases - with more complicated aliases, the probability of tracking is lower.
· Don’t reply to spam that has already arrived in your inbox.
· Be careful when filling out Internet forms - be especially cautious of options such as “Yes, I want to receiveinformation”.
· Use “specialized” email addresses - e.g., one for business, one for communication with your friends, etc.
· From time to time, change your email address.
· Use an Antispam solution.
5.2.1 Advertisements
Internet advertising is one of the most rapidly growing forms of advertising. Its main marketing advantages areminimal costs and a high level of directness; what’s more, messages are delivered almost immediately. Manycompanies use email marketing tools to effectively communicate with their current and prospective customers.
This type of advertising is legitimate, since you may be interested in receiving commercial information about someproducts. But many companies send unsolicited bulk commercial messages. In such cases, email advertising crossesthe line and becomes spam.
The amount of unsolicited email has become a problem and it shows no signs of slowing. Authors of unsolicitedemail often attempt to disguise spam as legitimate messages.
171
5.2.2 Hoaxes
A hoax is misinformation which is spread across the Internet. Hoaxes are usually sent via email or communicationtools like ICQ and Skype. The message itself is often a joke or Urban Legend.
Computer Virus hoaxes try to generate fear, uncertainty and doubt (FUD) in the recipients, bringing them to believethat there is an “undetectable virus“ deleting files and retrieving passwords, or performing some other harmfulactivity on their system.
Some hoaxes work by asking recipients to forward messages to their contacts, perpetuating the hoax. There aremobile phone hoaxes, pleas for help, people offering to send you money from abroad, etc. It is often impossible todetermine the intent of the creator.
If you see a message prompting you to forward it to everyone you know, it may very well be a hoax. There are manywebsites on the Internet that can verify if an email is legitimate. Before forwarding, perform an Internet search onany message you suspect is a hoax.
5.2.3 Phishing
The term phishing defines a criminal activity which uses techniques of social engineering (manipulating users inorder to obtain confidential information). Its aim is to gain access to sensitive data such as bank account numbers,PIN codes, etc.
Access is usually achieved by sending email masquerading as a trustworthy person or business (e.g., financialinstitution, insurance company). The email can look very genuine, and will contain graphics and content which mayhave originally come from the source it is impersonating. You will be asked to enter, under various pretenses (dataverification, financial operations), some of your personal data - bank account numbers or usernames and passwords.All such data, if submitted, can easily be stolen and misused.
Banks, insurance companies, and other legitimate companies will never request usernames and passwords in anunsolicited email.
5.2.4 Recognizing spam scams
Generally, there are a few indicators which can help you identify spam (unsolicited emails) in your mailbox. If amessage fulfills at least some of the following criteria, it is most likely a spam message:
· Sender address does not belong to someone on your contact list.
· You are offered a large sum of money, but you have to provide a small sum first.
· You are asked to enter, under various pretenses (data verification, Financial operations), some of your personaldata - bank account numbers, usernames and passwords, etc.
· It is written in a foreign language.
· You are asked to buy a product you are not interested in. If you decide to purchase anyway, please verify that themessage sender is a reliable id (consult the original product manufacturer).
· Some of the words are misspelled in an attempt to trick your spam filter. For example “vaigra” instead of “viagra”,etc.

172
5.2.4.1 Rules
In the context of Antispam solutions and email clients, rules are tools for manipulating email functions. They consistof two logical parts:
1) Condition (e.g., an incoming message from a certain address)
2) Action (e.g., deletion of the message, moving it to a specified folder)
The number and combination of rules varies with the Antispam solution. These rules serve as measures againstspam (unsolicited email). Typical examples:
· Condition: An incoming email message contains some of the words typically seen in spam messages 2. Action:Delete the message
· Condition: An incoming email message contains an attachment with an .exe extension 2. Action: Delete theattachment and deliver the message to the mailbox
· Condition: An incoming email message arrives from your employer 2. Action: Move the message to the “Work”folder
We recommend that you use a combination of rules in Antispam programs in order to facilitate administration andto more effectively filter spam.
5.2.4.2 Whitelist
In general, a whitelist is a list of items or persons who are accepted, or have been granted permission. The term“email whitelist“ defines a list of contacts from whom the user wishes to receive messages. Such whitelists arebased on keywords searched for in email addresses, domain names, or IP addresses.
If a whitelist works in “exclusivity mode“, then messages from any other address, domain, or IP address will not bereceived. If a whitelist is not exclusive, such messages will not be deleted, but filtered in some other way.
A whitelist is based on the opposite principle to that of a blacklist. Whitelists are relatively easy to maintain, moreso than blacklists. We recommend that you use both the Whitelist and Blacklist to filter spam more effectively.
5.2.4.3 Blacklist
Generally, a blacklist is a list of unaccepted or forbidden items or persons. In the virtual world, it is a techniqueenabling acceptance of messages from all users not present on such a list.
There are two types of blacklist. Those created by users within their Antispam application, and a professional,regularly updated blacklists which are created by specialized institutions and can be found on the Internet.
It is essential to use blacklists to successfully block spam, but they are difficult to maintain, since new items to beblocked appear every day. We recommended you use both a whitelist and a blacklist to most effectively filter spam.
5.2.4.4 Server-side control
Server-side control is a technique for identifying mass spam based on the number of received messages and thereactions of users. Each message leaves a unique digital “footprint” based on the content of the message. Theunique ID number tells nothing about the content of the email. Two identical messages will have identicalfootprints, while different messages will have different footprints.
If a message is marked as spam, its footprint is sent to the server. If the server receives more identical footprints(corresponding to a certain spam message), the footprint is stored in the spam footprints database. When scanningincoming messages, the program sends the footprints of the messages to the server. The server returns informationon which footprints correspond to messages already marked by users as spam.