Embed Size (px)
Citation preview
eServices Self Service Help for Students
Updated: March, 2018 (JD)
eServices Self Service Help for Students
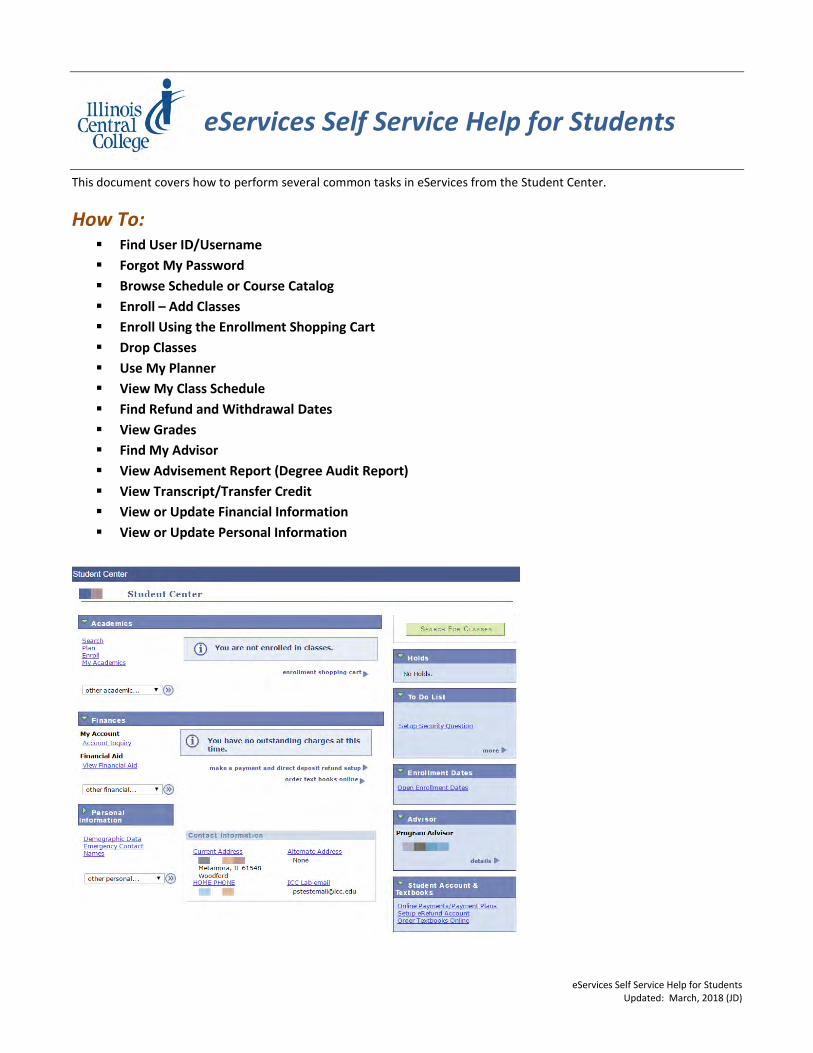
This document covers how to perform several common tasks in eServices from the Student Center.
How To: Find User ID/Username
Forgot My Password
Browse Schedule or Course Catalog
Enroll – Add Classes
Enroll Using the Enrollment Shopping Cart
Drop Classes
Use My Planner
View My Class Schedule
Find Refund and Withdrawal Dates
View Grades
Find My Advisor
View Advisement Report (Degree Audit Report)
View Transcript/Transfer Credit
View or Update Financial Information
View or Update Personal Information

eServices Self Service Help for Students
Updated: March, 2018 (JD)
Find User ID/Username 1. Direct your browser to www.icc.edu 2. From the ICC Home Page, click the down arrow for
MY ICC and select ESERVICES 3. Click Find Login ID under First Time User
4. Enter last name and entire social security number
Username format is initials + number (example: AB123 or AB123A)
Using “Forgot My Password”
To change your password if your password has expired or you’ve forgotten it:
1. On the eServices login page (www.icc.edu/eservices) click on the Forgot My Password link.
2. Enter your User ID when prompted and click Continue

eServices Self Service Help for Students
Updated: March, 2018 (JD)
3. If you have set up a security question, enter your Response and click Email New Password.
4. The system confirms that an email is sent.
5. Check your ICC email account for the User ID Password notification.
6. Return to eServices Login page and enter
your User ID/Username and paste the new password from the email into the Password field. Click the Sign In link.
7. You will receive a notification that your password has Expired. Click on the Click here to change your password link.

eServices Self Service Help for Students
Updated: March, 2018 (JD)
8. Paste the new password from the email into the Current Password field. Enter your new password and confirm your new password. Reminder: passwords are required to be at least 8 characters long and contain a minimum of 1 number, 1 special character, 1 lowercase letter and 1 uppercase letter. Click on the Change Password link.
9. System will confirm your password has been changed. Click on the OK button to continue to your homepage.
10. If your password is expired or you have forgotten it and you have not set up your security question and response, you will receive the following message. You will need to contact the Help Desk (309-694-5457) for assistance.
To change your password while logged into ICC eServices:
1. Click on Main Menu > Change My Password in the top navigation. 2. Enter current password, a new password and confirm new password
and click on the Change Password button. 3. Click on the OK button when the Password Saved page is displayed
which will return to the Change Password page. 4. Passwords are required to be at least 8 characters long and contain a
minimum of 1 number, 1 special character, 1 lowercase letter and 1 uppercase letter.
5. Need help with passwords? Contact the ICC Help Desk: at 309-694-5457 or [email protected]. Hours of operation: Sunday 4pm to 8:30pm, M-Th, 7am to 6:30pm, Friday 7am to 4pm, and Saturday closed.

eServices Self Service Help for Students
Updated: March, 2018 (JD)
Browse Schedule or Course Catalog To find classes from within eServices:
1. In the Student Center click Search 2. Fill in the Class Search Criteria and click on the Search button 3. If you wish to add a class to your enrollment shopping cart:
a) Click select class b) Select a section and click next c) View the information about the section and click next.
OR Browse course catalog
1. In the Student Center click Search 2. Click on browse course catalog
This defaults to a listing that begins with “A”. Click the letter of the course you are looking for, such as “B” and then select a course. (example: BIOL – Biology)
3. Select the course you are looking for by clicking on the selected Course Title to view a description of the course.

eServices Self Service Help for Students
Updated: March, 2018 (JD)
4. Click on View Class Sections to see all available sections of the course or click on Add to Planner button.
5. Click on down arrow for Terms Offered to select the desired term and then click Show Sections button.

eServices Self Service Help for Students
Updated: March, 2018 (JD)
To find classes from the ICC home page:
1. Click the down arrow next to Academics in the blue header row and select Class Schedule.
2. Click the Class Schedule link. Search the live class schedule with the new ICC Mobile Site. Download the ICC app from Google Play Store or iTunes.

eServices Self Service Help for Students
Updated: March, 2018 (JD)
To browse the course catalog from the ICC home page:
1. Click the down arrow next to Academics in the blue header row and select Full Text Catalog.
2. The complete catalog may be downloaded or viewed by clicking on View CATALOG link. Click on VIEW ALL PROGRAMS to see course information about programs.

eServices Self Service Help for Students
Updated: March, 2018 (JD)
Enroll - Add Classes This feature is for enrolling immediately in one or more classes during periods when enrollment is open for the desired term. Once logged in to eServices, in the Student Center under the Academics heading:
1. Click Enroll 2. Select a term and then click CONTINUE. 3. Select classes to add for the selected term:
Find Classes by 4-digit class number a. Enter 4 digit class number (if you know it) and click on the enter
button
b. Confirm the class information and click Next
OR Find Classes by Class Search or My Planner (My Requirements is not being used at this time.)
a. Enter Course Subject, such as BIOL or click on the select subject and click on the letter associated with the beginning of the course, such as B for BIOL and click select button.
b. Enter Course Number OR leave blank Notes about searching:
Entering a specific Course Subject and Number will show sections of a specific course, such as BIOL110.
Entering only Course Subject will display all courses with that Course Subject, such as all courses with the BIOL prefix.
You can optionally use Additional Search Criteria for meeting time, days of week, time of day, instructor, mode of instruction and location.
4. Click Select button a. If enrolling into a Lab Science class, a Select Laboratory section (Required): page will display. b. Select the related lab section
5. Click Next button 6. To add more classes, start over at step 3; to continue with this class, click Proceed to Step 2 of 3 7. Click Finish Enrolling 8. Click My Class Schedule to view class schedule

eServices Self Service Help for Students
Updated: March, 2018 (JD)
Enroll Using the Enrollment Shopping Cart The Enrollment Shopping Cart is a tool that provides you the opportunity to save classes for use when you are ready and
able (when the enrollment period opens) to enroll. In other words, it is a great tool for selecting classes and validating
them before the enrollment period begins so you can be sure you’re ready when the enrollment period opens. Selecting
and validating your classes before you attempt to enroll will allow you to address any issues (needed prerequisites, time
conflicts, etc.) that may come up related to your enrollment. If you attempt to enroll before the enrollment period begins for
a particular term, you will get a message stating, “You do not have a valid enrollment appointment at this time.” Otherwise,
when the enrollment period begins, you’ll be able to enroll very quickly using this feature!
Once logged in to eServices, in the Student Center under the Academics heading:
1. Click Enrollment Shopping Cart
2. Select a term and then click CONTINUE 3. Enter a Class Number and click Enter
OR 4. Find Classes
a. Select Class Search or My Planner (My Requirements is not being used at this time.) Entering a specific Course Subject and Number will show sections of a specific course, such as BIOL110. Entering just Course Subject will display all courses with that Course Subject, such as all courses with the BIOL prefix.
b. Selecting My Planner and clicking on the Search button will list all classes in the Planner. If you have no courses in My Planner, you will receive a message telling you “The Search from My Planner feature is not available at this time. You will need to add classes to My Planner before doing this.
i. Click on the Select button next to the course you want to enroll in. ii. A list of courses for the subject you selected will be displayed.
iii. Once you have selected the section you want click on the Select button. iv. Click Next v. Continue using the instructions for Validate
5. Review class selection 6. Click Next 7. Continue with entering a class number or class search until all classes have been entered. 8. Validate your classes
Use this functionality to check for prerequisites, conflicts or other problems with the shopping cart schedule. If no conflicts are displayed, you will see: OK to Add. (If there are conflicts there will be a detailed message as to the conflict.) Click on Shopping Cart button If there is a conflict of any type, the course that has the conflict can be deleted by doing the following:
a. Put a check mark next to the class that is in conflict b. Click delete. (You can elect to leave the class and take care of any conflicts such as a prerequisite not
being met, etc.)
The Shopping Cart will now be available for you to work with prior to open enrollment.

eServices Self Service Help for Students
Updated: March, 2018 (JD)
Drop Classes Once logged in to eServices, in the Student Center under the Academics heading:
1. Click Enroll. 2. Select a term and then click CONTINUE. 3. Click on drop tab
4. Check Select column for class to be dropped 5. Click Drop Selected Classes 6. Click Finish Dropping 7. Click My Class Schedule to confirm class has been dropped
(Note: If the class was dropped prior to start date, then the class will not be displayed on the class schedule. If the class was dropped during the semester, the class schedule will display the class with a status of withdrawn.)
Use My Planner The My Planner feature allows you to plan courses on a short or long-term basis and to directly enroll in planned classes as
terms become available. It allows you to choose the courses you will need so that you have them readily and easily usable
for enrolling in a term.
Once logged in to eServices, in the Student Center under the Academics heading:
1. Click Plan 2. Click Browse Course Catalog to choose courses to add to The Planner 3. Select a course and click Add To Planner 4. Once you have courses in My Planner, when you are ready to enroll, simply select My Planner when searching for
courses and you will see all sections available for the courses you have added to My Planner.

eServices Self Service Help for Students
Updated: March, 2018 (JD)
View My Class Schedule
In eServices, in the Student Center under the Academics heading:
1. Click the other academic dropdown list 2. Select Class Schedule and click the submit button
3. Select a Term and then click the Continue
This will give you a detailed view of your class schedule with class number, section, date and time, building name and room number, instructor and start/end date.
Find Refund and Withdrawal Dates
1. In the Student Center click on Deadlines icon ( ) in the first column of the class schedule
OR
1. In the Student Center click the other academic drop down menu and select Class Schedule and click the submit button
2. Select a term and then click Continue
3. Click Academic Calendar Deadlines icon ( ) in the last column of the class schedule
View Grades
1. In the Student Center click the other academic drop down menu and select Grades and click the submit button
2. Select a term and then click Continue 3. You can click on Printer Friendly Version to print
Find My Advisor
1. In the right column of the Student Center under Advisor > Program Advisor you will see your advisors name.
2. click Details 3. If you wish to contact your advisor by email, click on your advisor’s
name.

eServices Self Service Help for Students
Updated: March, 2018 (JD)
View Advisement Report (Degree Audit Report) The Information contained on your advisement report is the same information the Graduation department will use when
determining your eligibility to graduate. If you see issues with the degree audit report, please contact your advisor.
In the Student Center, under Academics:
1. Click on My Academics
2. Select “View my advisement report” to view your degree audit report for each of the active programs of study listed on this page:

eServices Self Service Help for Students
Updated: March, 2018 (JD)
View Transcript/Transfer Credit To view/obtain your Unofficial Transcript: In the Student Center, under Academics:
3. Click on My Academics 4. Click on View my unofficial transcript 5. Select Report Type of Unofficial Transcript
from drop down menu 6. Click on view report. (**this process may
take a few minutes to complete. please do not press any other buttons or links while processing is taking place**)
7. Print your unofficial transcript if desired To view your Transfer Credit: In the Student Center, under Academics:
1. Click on My Academics 2. Click on View my transfer credit report
View or Update Finances Account Inquiry
1. In the Student Center under the Finances heading click on Account Inquiry. 2. Use the tabs to view your financial information
View Financial Aid Information This section applies for students who receive financial aid.
1. In the Student Center under the Finances heading click on View Financial Aid. 2. Click the aid year you wish to view. 3. Award Summary page
a. Financial Aid Year 20xx-20xx b. Select the term hyperlinks below to see more detailed information. c. Click on Loan Details to get more information on loans. d. Click on Return to Award Summary
4. Click on Financial Aid Summary (This is your financial aid eligibility based on your estimated financial aid (budget) costs, family contribution, and estimated need for this aid year.)
5. Click on Return 6. Click on View Scheduled Disbursement Dates to view dates when the Financial Aid will be disbursed. 7. Click on Return to Award Summary to return to the Award Summary Page.

eServices Self Service Help for Students
Updated: March, 2018 (JD)
Update Personal Information In the Student Center under Personal Information, click on Demographic Data to view or change information about you in eServices.
View Student ID You can obtain your student id number from the Demographic Data tab. (See next steps…) View Demographic Data
1. Click on Demographic Data (For all changes to demographic information, contact the ICC Student Service Center at 694-5610.)
Names
1. List of your current names. Each name has a type associated with it that is indicative of the name's use. For all name changes, please contact the Student Service Center at 694-5610.
View/Change Current Address Edit Current Address:
1. To edit the current address, click on the edit button. 2. Make the necessary changes and click on the OK button. 3. Verify that the information is correct and click on the Save button. 4. Click the OK button on the Save Confirmation page.
Add a New Address:
1. Click on the Add a New Address button. 2. Enter the new address and click on OK button. 3. Place a check mark next to appropriate address type in the Address Types field, for example: Home. 4. Verify that the information is correct and click on the Save button. 5. Click the OK button on the Save Confirmation page.
View/Change Home Phone To delete the phone number displayed:
1. Select another phone number listed to be the Preferred phone number (Note: You cannot delete the Preferred phone number)
2. use the drop down menu and select other to change from the home number (Note: You cannot delete the Home phone number)
3. Click on Save and click on OK for the Save Confirmation 4. Click on delete for the old phone number once the changes have been made 5. On the Delete Confirmation page click on the Yes – Delete button if you are sure this is what you want to do
otherwise click on the No – Do Not Delete button.

eServices Self Service Help for Students
Updated: March, 2018 (JD)
To add a phone number:
1. click on the Add a Phone Number button. 2. Use the drop menu to select the phone type and enter the phone number in the following format: 309/694-5457. 3. Check preferred if this is to be the preferred phone number. 4. Click on the Save button. 5. Click the OK button on the Save Confirmation page.
View/Change Email Address(es) The lab e-mail address cannot be edited or deleted. To add an e-mail address:
1. Click on the Add an Email Address button 2. Use the drop down menu and select one of the following email types: business, home or other and add the email
address for the type selected. 3. Click on the Save button. 4. Click the OK button on the Save Confirmation page. 5. To delete the e-mail type of business, home and/or other click on the delete button. 6. Confirm whether or not you want to actually delete this address
View/Change Emergency Contacts To add an Emergency Contact:
1. click on the Add an Emergency Contact button 2. Fill in the required information for the Emergency Contact Detail 3. If more than one phone number is to be entered click on Add a Phone Number button.
To delete an Emergency Contact: (You must either enter a new contact or make a previously entered contact the Primary Contact)
1. Click on the delete button 2. Click the OK button on the Save Confirmation page.
View/Change Ethnicity To change Ethnicity:
1. Click on Yes, I am Hispanic or Latino or No, I am not Hispanic or Latino
2. Click each race that applies
3. Click The Information is correct as entered.
4. Click the Submit button.
Need additional help? Contact the ICC Help Desk: Hours: Sunday: 4pm to 8:30pm, M-Th: 7am to 6:30pm, Friday: 7am to 4pm, and Saturday: closed
Phone: 309-694-5457
Email: [email protected]


![eServices Training Presentation - Supplier (for publishing) [Autosaved]€¦ · eServices Training Presentation - Supplier (for publishing) [Autosaved] Author: Julianne Bambacas Created](https://img.pdfslide.us/doc/110x75/5f07b6367e708231d41e5bbf/eservices-training-presentation-supplier-for-publishing-autosaved-eservices.jpg)