Embed Size (px)
Citation preview

Logistics
eSchenker (Next Generation eServices) Booking - User Guide –
eServices
Digital Solutions
Version 2.1
April 2017
Schenker AG –Digital Solutions - eServices 2
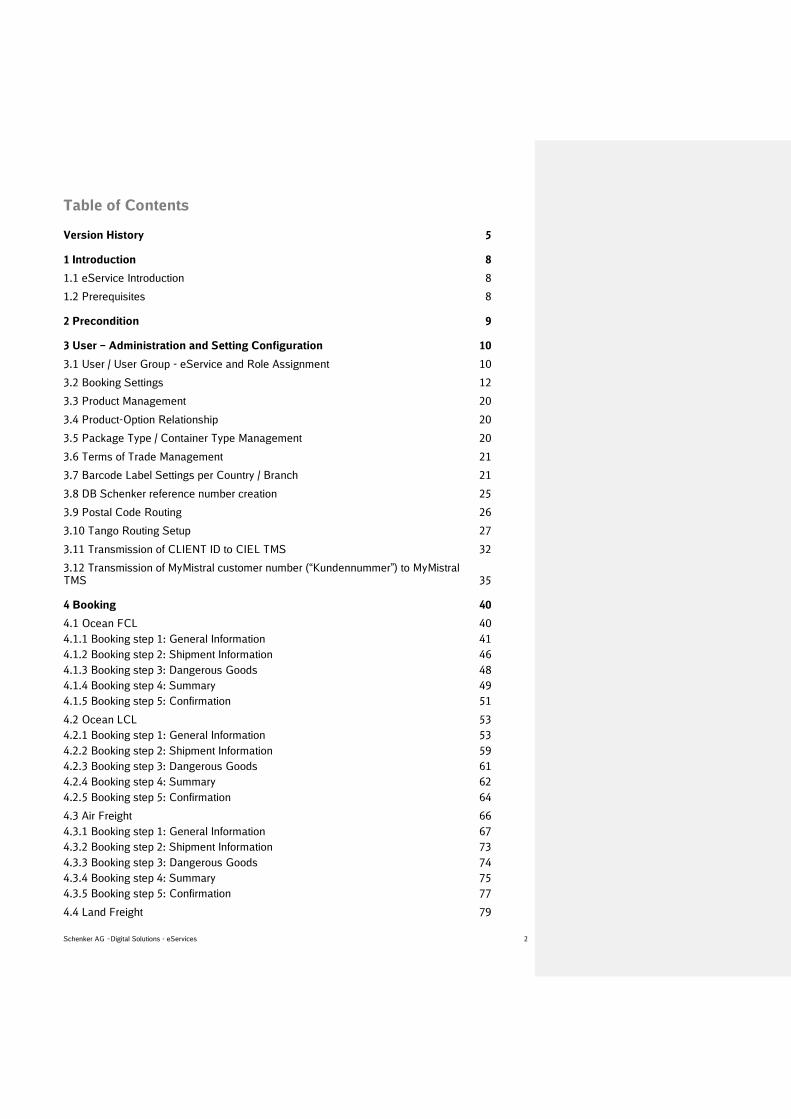
Table of Contents
Version History 5
1 Introduction 8
1.1 eService Introduction 8
1.2 Prerequisites 8
2 Precondition 9
3 User – Administration and Setting Configuration 10
3.1 User / User Group - eService and Role Assignment 10
3.2 Booking Settings 12
3.3 Product Management 20
3.4 Product-Option Relationship 20
3.5 Package Type / Container Type Management 20
3.6 Terms of Trade Management 21
3.7 Barcode Label Settings per Country / Branch 21
3.8 DB Schenker reference number creation 25
3.9 Postal Code Routing 26
3.10 Tango Routing Setup 27
3.11 Transmission of CLIENT ID to CIEL TMS 32
3.12 Transmission of MyMistral customer number (“Kundennummer”) to MyMistral TMS 35
4 Booking 40
4.1 Ocean FCL 40
4.1.1 Booking step 1: General Information 41
4.1.2 Booking step 2: Shipment Information 46
4.1.3 Booking step 3: Dangerous Goods 48
4.1.4 Booking step 4: Summary 49
4.1.5 Booking step 5: Confirmation 51
4.2 Ocean LCL 53
4.2.1 Booking step 1: General Information 53
4.2.2 Booking step 2: Shipment Information 59
4.2.3 Booking step 3: Dangerous Goods 61
4.2.4 Booking step 4: Summary 62
4.2.5 Booking step 5: Confirmation 64
4.3 Air Freight 66
4.3.1 Booking step 1: General Information 67
4.3.2 Booking step 2: Shipment Information 73
4.3.3 Booking step 3: Dangerous Goods 74
4.3.4 Booking step 4: Summary 75
4.3.5 Booking step 5: Confirmation 77
4.4 Land Freight 79

Schenker AG –Digital Solutions - eServices 3
4.4.1 Booking step 1: General Information 80
4.4.2 Booking step 2: Shipment Information 85
4.4.3 Booking step 3: Dangerous Goods 87
4.4.4 Booking step 4: Summary 88
4.4.5 Booking step 5: Confirmation 90
4.4.6 Neutral Shipping 90
4.5 My Bookings 92
4.6 My Templates 96
5 eDesk Coordination and Monitoring Setup 98
5.1 eDesk Monitoring 98
5.2 eDesk Booking Coordination (Leadbranch / Controltower Function) 102
5.2.1 eDesk Administration Setup 102
5.2.2 Monitoring and Coordination 105
6 My Supplier eService 107
7 My eSchenker Legacy Bookings 112
8 Customization Capabilities 113

Schenker AG –Digital Solutions - eServices 4

Schenker AG –Digital Solutions - eServices 5
Version History
Version Creator Date Content
1.0 Martin Bell 06.10.2014 Initial Version
1.1 Martin Bell 13.04.2015 Updated Version - Multiple new features
1.2 Martin Bell 12.05.2015 Updated Version - Multiple new features
1.3 Martin Bell 25.11.2015 Updated Version - Multiple new features
1.4 Martin Bell 04.04.2016 Updated Version (respective document chap-ters in brackets)
- Usage of Client ID for Land TMS (3.11) - Disclaimer Management (3.2) - Home Branch (3.2) - DGR updated information (4.1.3, 4.2.3,
4.3.3, 4.3.4) - Integration of Land Scheduler in Book-
ing [released on 10.04.16] (4.4) - Barcode per email to 3rd party (4.4.5) - MyBookings – Improved search (4.5) - Last shipment event (4.5) - Optimzed Export functionality (4.5) - Share Booking Templates (4.6) - eDesk Coordination to Departments
(5.2) - Send emails from eDesk Coordination
(5.2) - eDesk Cancel Booking (5.2) - Coordinate via Default branch (5.2) - Manually confirm submitted bookings
(5.2)
1.5 Sarah Bludau/ Martin Bell
09.06.2016 Updated Version (respective document chap-ters in brackets)
- Transport Mode Configuration – Disable Barcode Generation (3.2)
- Pickup Date Configuration (3.2) - Pickup Date (4.1.1, 4.2.1, 4.3.1, 4.4.1) - eDesk Monitoring of Bookins of User
Groups/Department (5.1.2)
1.6 Martin Bell 21.06.2016 Updated Version - Added chapter 3.12 MyMistral transmis-
sion
1.7 Sarah Bludau/Mar-tin Bell
16.08.2016 Updated Version (respective document chap-ters in brackets)
- Home Branch and Department settings (3.2)
- Booking Addresses Validation (4.1.1, 4.2.1, 4.3.1, 4.4.1)
- Option “EKAER applicable” (4.4.1) - Shipment Option “Print CMR” notifica-
tion (4.4.2)

Schenker AG –Digital Solutions - eServices 6
- Added chapter “Neutral Shipping” (4.4.6)
- E-Mail hyperlinks (4.5) - My Bookings – New columns “Attache-
ment” and “Stackable” (4.5) - Barcode Print from Status “ Ready to
Submit” (4.5)
1.8 Sarah Bludau/Mar-tin Bell
20.10.2016 Updated Version (respective document chap-ters in brackets)
- Add classification for the upload docu-ments (4.1.4, 4.2.4, 4.3.4, .4.4.4)
- Warning Screen for Dangerous Goods bookings without uploaded documents (4.1.4, 4.2.4, 4.3.4, .4.4.4)
- Additional criteria as new search pa-rameter in My Bookings menu (4.5)
- Destination-Country-flag (4.5)
1.9 Sarah Bludau/Mar-tin Bell
30.11.2016 Updated Version (respective document chap-ters in brackets)
- Small adaptions and references (3) - E-Mail Confirmations in Transportmode
Confiurations(3.2) - Booking Solution Configurations (3.2) - Reference to address confiuration
(4.1.1, 4.2.1, 4.3.1, 4.4.1) - Notify Address Confirmation (4.1.1,
4.2.1, 4.3.1, 4.4.1) - My Bookings: Additional Criteria: Pack-
age Types (4.5) - Select user Goups to minot bookings
(5) - New searchfilter options in eDesk Moni-
toring & MySupplier (5.1, 6)
2.0 Sarah Bludau/Mar-tin Bell
14.02.2017 Updated Version (respective document chap-ters in brackets)
- Tranpsormode Configurations: E-Mail Notifications configuration on User Group Level (3.2)
- Pickup Date Configurations: Same Day Pickup (3.2)
- Dangerous Goods NEM (4.1.3, 4.2.3, 4.3.3, 4.4.3)
- Visability of Event Location accordingly to the set event (4.5)
- Visability of eDesk Name (4.5, 5.1, 6) - Editing of Booking in eDesk Coordina-
tion (5.2.2)
2.1 Sarah Bludau/Mi-chael Bell
12.04.2017 Updated Version (respective document chap-ters in brackets)
- New Configurations possibilities on User Group Level (3.2)
- Return Documents for special refer-ences (4.1.1, 4.2.1, 4.3.1, 4.4.1)

Schenker AG –Digital Solutions - eServices 7
- My Bookings: New Search Criteria, new Columns and “Mark All” fuctionality (4.5)
- New Search criteria and “Mark All” func-tionality (5.1, 6)
- Updated Customization Capabilities (8)

Schenker AG –Digital Solutions - eServices 8
1 Introduction
1.1 eService Introduction
“Booking” as one of the eSchenker eServices offers DB Schenker customers the option to place a booking request (pickup request) online in the eSchenker web portal. Bookings can be placed for the transport modes air, ocean (LCL, FCL) and land (international, domestic). eSchenker “Booking” solely reflects the business case of customer bookings and does not re-flect any carrier booking process or application. The booking requests from the customers are forwarded to the DB Schenker branch office that is responsible for this respective booking request. The responsibility, which branch office is re-sponsible for which customer, can be defined either by postal code assignment or by a fix cus-tomer-DB Schenker office assignment. The customer booking information is sent to the branch office via two ways: EDI and email. Each booking generates a data file that is sent to the transport management system of the branch office via a technical interface. Furthermore each customer booking triggers an email that includes all booking related information and that is sent to the branch office. The operational handling of the booking request and transformation into a shipment is then op-erationally managed by the DB Schenker branch office and maintained in the respective transport management system of the branch office. The “Booking” eService then receives a status update from the operational transport manage-ment system in order to provide the customer full visibility on the booking status.
1.2 Prerequisites
eSchenker is a web-application and world-wide accessible via multiple web browsers. Below you find our web browser version recommendation for having a stable and optimized rendered application:
Web Browser Version
Internet Explorer 9.0 or higher
Firefox 31.0 or higher
Chrome 39.0 or higher
Opera 23.0 or higher
Safari 8.0 or higher

Schenker AG –Digital Solutions - eServices 9
2 Precondition
Before customer users can access the “Booking” eService, following settings need to be availa-ble and configured:
User has a security SIMS account to login to the eSchenker portal
User has been assigned to a User group
User group and user have the eServices “Booking” and “Address Management” assigned
User group and user have necessary “Booking” roles assigned
User group has the necessary Booking settings assigned
Terms of Trade Management has been configured
Product Management has been configured
Product-Option relationship has been configured
Package type / Container type Management has been configured
Postal Code routing has been configured
Barcode label settings are configured per country / branch (only applicable for land transport and if label print is applicable for the respective country)
DB Schenker reference number (STT# / Consignment waybill #) generation is configured (only applicable if reference number creation is applicable for the respective country)
Tango routing has been setup (if Ocean freight customer handled in Tango)

Schenker AG –Digital Solutions - eServices 10
3 User – Administration and Setting Configuration
3.1 User / User Group - eService and Role Assignment
Precondition: Each user needs to be assigned to a user group (how to do so is described in the Portal Administration User Guide). The booking settings can then be done for the user group and are applicable for all users in this user group. An administrator needs to log onto the portal and navigate to the Portal Administration eService and select “User Groups” in the navigation bar.
Double click on the respective user group in order to configure the user group. In the Edit User Group Settings select “Services – Available eServices” and assign the “Book-ing” and “Address Management” eServices to the user group via the shuffle box option.

Schenker AG –Digital Solutions - eServices 11
As next step the respective booking roles need to be assigned to the user group.
In the Edit User Group Settings select “Main – Roles” and assign the booking related roles (see description below) via the shuffle box option.
Schenker AG –Digital Solutions - eServices 12
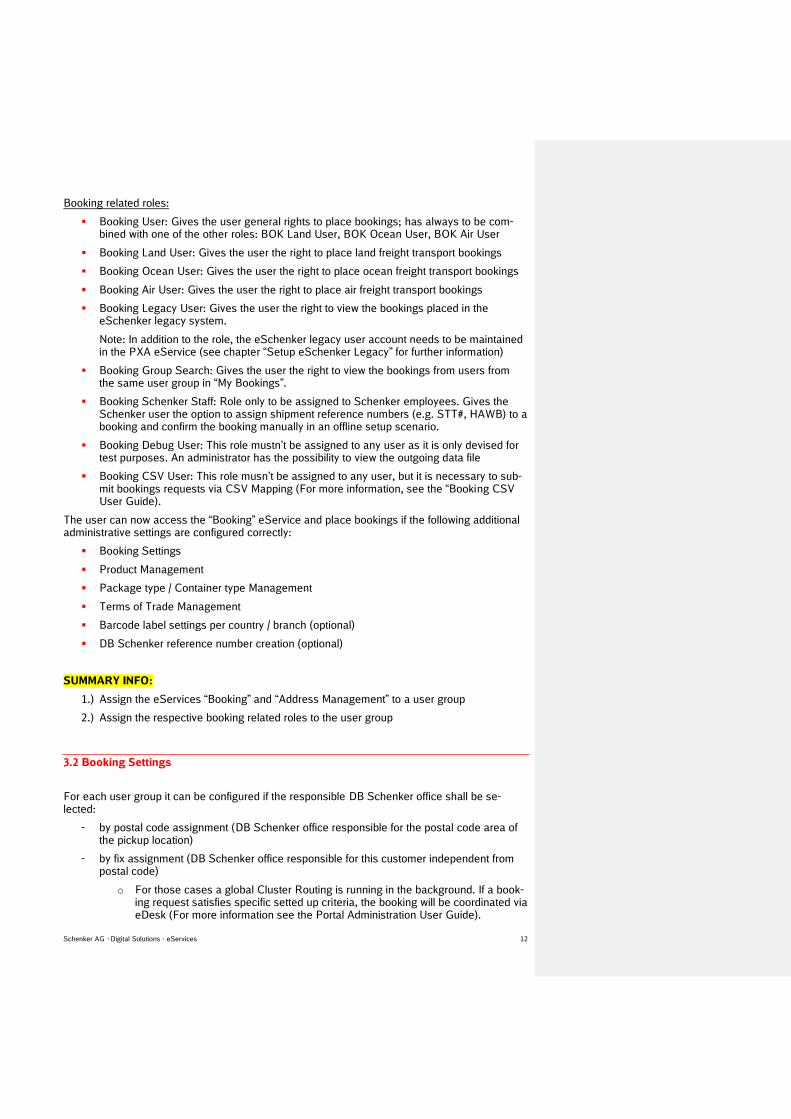
Booking related roles:
Booking User: Gives the user general rights to place bookings; has always to be com-bined with one of the other roles: BOK Land User, BOK Ocean User, BOK Air User
Booking Land User: Gives the user the right to place land freight transport bookings
Booking Ocean User: Gives the user the right to place ocean freight transport bookings
Booking Air User: Gives the user the right to place air freight transport bookings
Booking Legacy User: Gives the user the right to view the bookings placed in the eSchenker legacy system.
Note: In addition to the role, the eSchenker legacy user account needs to be maintained in the PXA eService (see chapter “Setup eSchenker Legacy” for further information)
Booking Group Search: Gives the user the right to view the bookings from users from the same user group in “My Bookings”.
Booking Schenker Staff: Role only to be assigned to Schenker employees. Gives the Schenker user the option to assign shipment reference numbers (e.g. STT#, HAWB) to a booking and confirm the booking manually in an offline setup scenario.
Booking Debug User: This role mustn’t be assigned to any user as it is only devised for test purposes. An administrator has the possibility to view the outgoing data file
Booking CSV User: This role musn’t be assigned to any user, but it is necessary to sub-mit bookings requests via CSV Mapping (For more information, see the “Booking CSV User Guide).
The user can now access the “Booking” eService and place bookings if the following additional administrative settings are configured correctly:
Booking Settings
Product Management
Package type / Container type Management
Terms of Trade Management
Barcode label settings per country / branch (optional)
DB Schenker reference number creation (optional)
SUMMARY INFO:
1.) Assign the eServices “Booking” and “Address Management” to a user group
2.) Assign the respective booking related roles to the user group
3.2 Booking Settings
For each user group it can be configured if the responsible DB Schenker office shall be se-lected:
- by postal code assignment (DB Schenker office responsible for the postal code area of the pickup location)
- by fix assignment (DB Schenker office responsible for this customer independent from postal code)
o For those cases a global Cluster Routing is running in the background. If a book-ing request satisfies specific setted up criteria, the booking will be coordinated via eDesk (For more information see the Portal Administration User Guide).

Schenker AG –Digital Solutions - eServices 13
- by eDesk setup (Schenker eDesk user needs to coordinate the booking to the respective DB Schenker office)
Based on this setting the booking data file will be sent to the respective transport management system. Booking Settings are maintained on user group level and are applicable for all users in this user group. The settings are separated in four different main areas (‘Transport Mode Configuration’, ‘Pickup Date Configuration’, ‘Booking Solution Configuration’, ‘Default Value of Shipment Op-tions).

Schenker AG –Digital Solutions - eServices 14
Transport Mode Configuration
Select “Misc” and then “Booking” in the user group settings and define per transport mode (Land domestic, Land international, Air, Ocean FCL and Ocean LCL) if the user group shall be handled by a fix branch (“Use default branch”), by postal code assignment (“Assignment by Postal code”) or by eDesk coordination. In the cases “Use default Branch” and “Postal Code Assignment” it is mandatory to select a de-fault branch.
If “Use default branch” is selected the default branch is always the responsible DB Schenker of-fice.
If “Assignment by Postal code” is selected but no or a wrong postal code is available in the booking, then the data file will be forwarded to the default branch as a kind of a fallback solution or the the assigned eDesk.
It is possible to deside between a default branch or an eDesk setup as fallback scenario.
In case of an eDesk assignment, the eDesk needs to be selected from the drop down menu.
Furthermore it can be configured: - if the responsible DB Schenker office shall receive the booking email notification or not - if the booking user shall receive the booking email confirmation or not - if the eDesk shall receive the booking email notification or not - if additional recipients shall receive the booking email notification or not
SUMMARY INFO:
1. Assign a user group to a DB Schenker office per transport mode
a. By fix assignment
b. By Postal Code Assignment
c. By an eDesk coordination setup

Schenker AG –Digital Solutions - eServices 15
E-Mail Confirmation
In this section it is also possible to configure, what kind of E-Mail Confirmations shall be done
after a booking request is submitted.
E-Mail Notification
You also have the opportunity to send notifications to additional persons, who need to know about your delivery-process by adding the respective E-Mail address to the “E-Mail Notification to additional recipients” textbox. The listed E-Mail addresses will be set as default and will be displayed in the Booking process, if the customer inserts the Notifiy Address.
Disclaimer Management
In the booking settings it is possible to embed the country and transport mode specific dis-claimer texts under Disclaimer Management.
These documents will then be available in the booking eService under the “Terms and Condi-tions” on the booking summary screen.

Schenker AG –Digital Solutions - eServices 16
Home Branch
For each user group and user a dedicated Schenker “Home Branch” can be assigned. Further-more it is possible to assign a respective Department of the Home Branch to the user group and user. This indicates the Schenker office that is responsible for the customer (and not neces-sarily for the pick up of this customer’s booking).
The Home Branch and respective Department information can be maintained in the user group settings Main Home Branches.
Either the home branch contact or the department contact (if selected) and the respective-address information is then postulated on the respective booking summary pdf.

Schenker AG –Digital Solutions - eServices 17
Disable Barcode Generation
This checkbox functionality is implemented on user Group level to disable the function of bar-code labels not to be generated automatically when a booking is placed within the respective group. Furthermore the barcode reference number is not generated within the SGI message,if the checkbox is marked.
The default setting of the checkbox is unmarked.

Schenker AG –Digital Solutions - eServices 18
Pickup Date Configurations
The settings are valid for all transport modes. It is possible to define which days are pick-up
days for this user group, respectively this customer, and what is the default Pickup Time ("From"
and "To") for this user group (customer). Furthermore it is possible to define the default pickup
date ("Default Pickup Date", i.e. Today +1 day)
- Per default following days are selected: Mon - Fri
- Default Pickup Date selection: Today, Today + 1, Today + 2
- Per default following times are selected: From = 08:00 To = 17:00
- Checkbox “Same day pickup”:
- Per default following pick-up date calculation before 12pm is selected: Today
- Per default following pick-up date calculation after 12pm is selected: Today +1
Special cases (within the eService booking logic):
If a user group is configured in that way that Mon-Wed are pickup days, the system validates
accordingly and show an error message if the selected pickup day is e.g. Thu or Fri.
The error message is translatable and says: "The selected pickup day is not possible. Please
select another pickup day."
Booking Solution Configurations
Within the Booking Solution Configuration step it is necessary to assign one of all available
booking solutions to the user group.
Furthermore it is possible to choose special wizards for every transport mode individually, but
only if those wizards are assigned in the booking solution configuration itself.

Schenker AG –Digital Solutions - eServices 19
Default Value of Shipment Configurations
This configuration area offers the possibility to set default values of certain shipment options on user group level. It includes the shipment options Value of Goods, Insurance Value, Cash Amount, Special Cargo Information, transport temperature, Consignee Contact, Consignee Phone, Contact and Mobile Phone of the customer. During the booking process the shipment options are pre-filled with the values provided in this confiuguration settings tab. These options are overwritable, meaning booking users may still change the proposed values. The default values can be entered independently for each transport mode.

Schenker AG –Digital Solutions - eServices 20
3.3 Product Management
In the “Portal Administration” area specific DB Schenker products can be maintained and as-signed to respective country transport lanes. Please refer to the user guide “Product Manage-ment” for a dedicated manual. In general all products are configured by the administrator in advance so that it is not necessary to further elaborate this chapter right here. See chapter 8 “Customization Capabilities” for further information.
3.4 Product-Option Relationship
In the “Portal Administration” area specific DB Schenker product-option relationships can be maintained and assigned to respective country transport lanes. Please refer to the user guide “Product Management” for a dedicated manual. In general all product-options are configured by the administrator in advance so that it is not necessary to further elaborate this chapter right here. See chapter 8 “Customization Capabilities” for further information.
3.5 Package Type / Container Type Management

Schenker AG –Digital Solutions - eServices 21
In the “Portal Administration” area specific package types and container types can be main-tained and assigned to respective DB Schenker products. Please refer to the user guide “Pack-age type / Container type Management” for a dedicated manual. In general all package types and container types are configured by the administrator in advance so that it is not necessary to further elaborate this chapter right here. See chapter 8 “Customization Capabilities” for further information.
3.6 Terms of Trade Management
In the “Portal Administration” area specific Terms of Trade can be maintained and assigned to respective country transport lanes. Please refer to the user guide “Terms of Trade Manage-ment” for a dedicated manual. In general all terms of trade are configured by the administrator in advance so that it is not nec-essary to further elaborate this chapter right here. See chapter 8 “Customization Capabilities” for further information.
3.7 Barcode Label Settings per Country / Branch
In the “Portal Administration” area specific barcode label settings can be maintained and as-signed to respective countries. This can be maintained country-wise if the country wants to pro-vide the possibility to print standard SSCC labels to their customers. In general all barcode label information needs to be provided by the respective country in ad-vance so that the Portal Administrator can configure the settings accordingly.
For the standard SSCC label following information needs to be provided:
Undefined Dispatch Unit
GLN Number
Start package number
End package number
The Portal Administrator needs to maintain this data in the “Country Details” area where he needs to select the respective “Country” from the dropdown list, select the country to be maintained and press “Edit” in the toolbar.

Schenker AG –Digital Solutions - eServices 22
Schenker AG –Digital Solutions - eServices 23
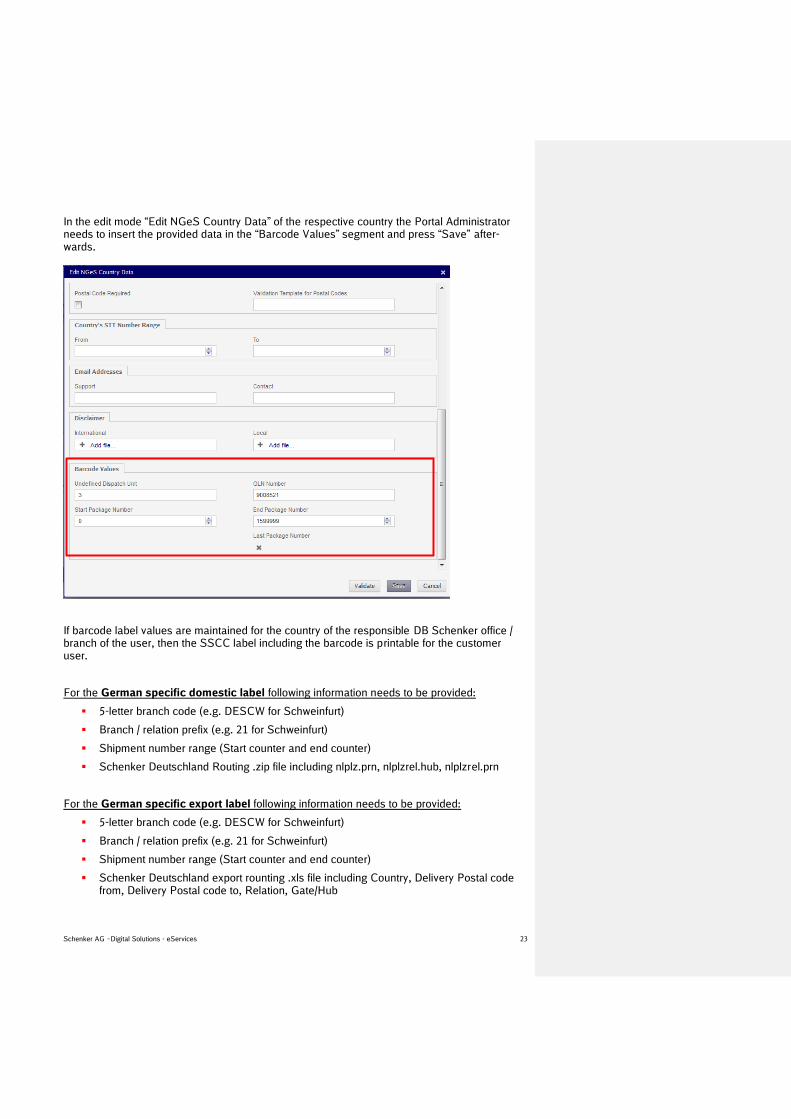
In the edit mode “Edit NGeS Country Data” of the respective country the Portal Administrator needs to insert the provided data in the “Barcode Values” segment and press “Save” after-wards.
If barcode label values are maintained for the country of the responsible DB Schenker office / branch of the user, then the SSCC label including the barcode is printable for the customer user.
For the German specific domestic label following information needs to be provided:
5-letter branch code (e.g. DESCW for Schweinfurt)
Branch / relation prefix (e.g. 21 for Schweinfurt)
Shipment number range (Start counter and end counter)
Schenker Deutschland Routing .zip file including nlplz.prn, nlplzrel.hub, nlplzrel.prn
For the German specific export label following information needs to be provided:
5-letter branch code (e.g. DESCW for Schweinfurt)
Branch / relation prefix (e.g. 21 for Schweinfurt)
Shipment number range (Start counter and end counter)
Schenker Deutschland export rounting .xls file including Country, Delivery Postal code from, Delivery Postal code to, Relation, Gate/Hub
Schenker AG –Digital Solutions - eServices 24
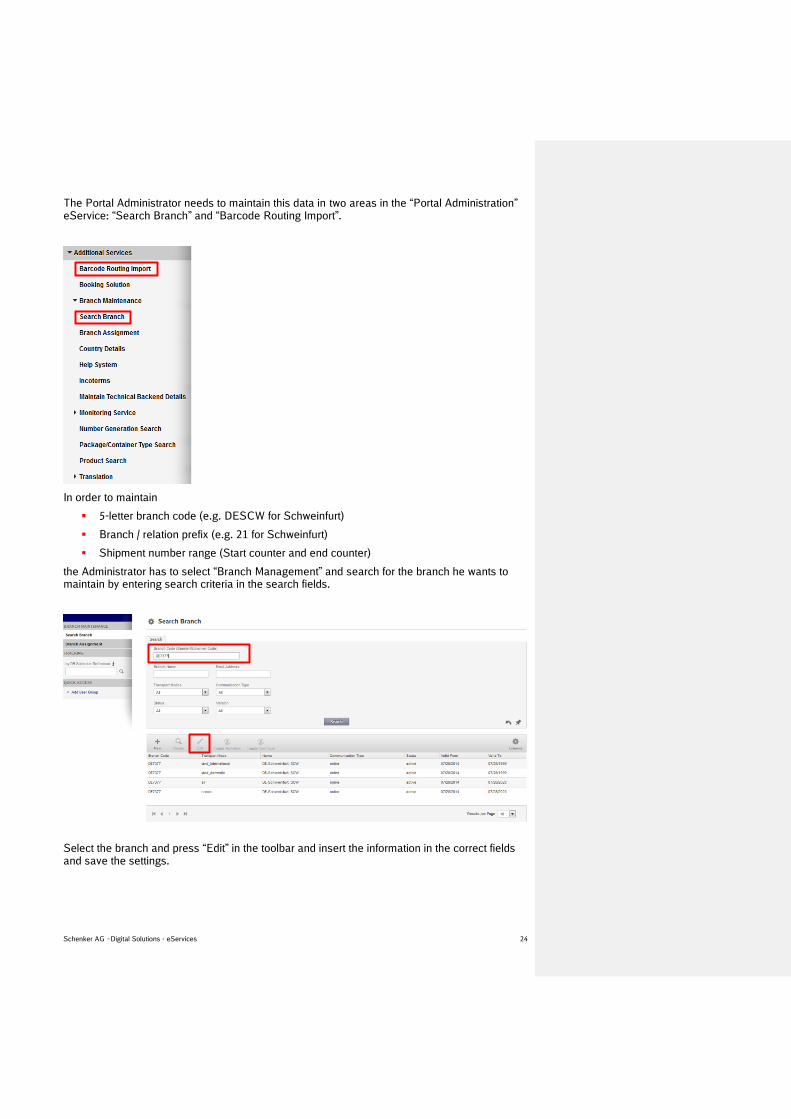
The Portal Administrator needs to maintain this data in two areas in the “Portal Administration” eService: “Search Branch” and “Barcode Routing Import”.
In order to maintain
5-letter branch code (e.g. DESCW for Schweinfurt)
Branch / relation prefix (e.g. 21 for Schweinfurt)
Shipment number range (Start counter and end counter)
the Administrator has to select “Branch Management” and search for the branch he wants to maintain by entering search criteria in the search fields.
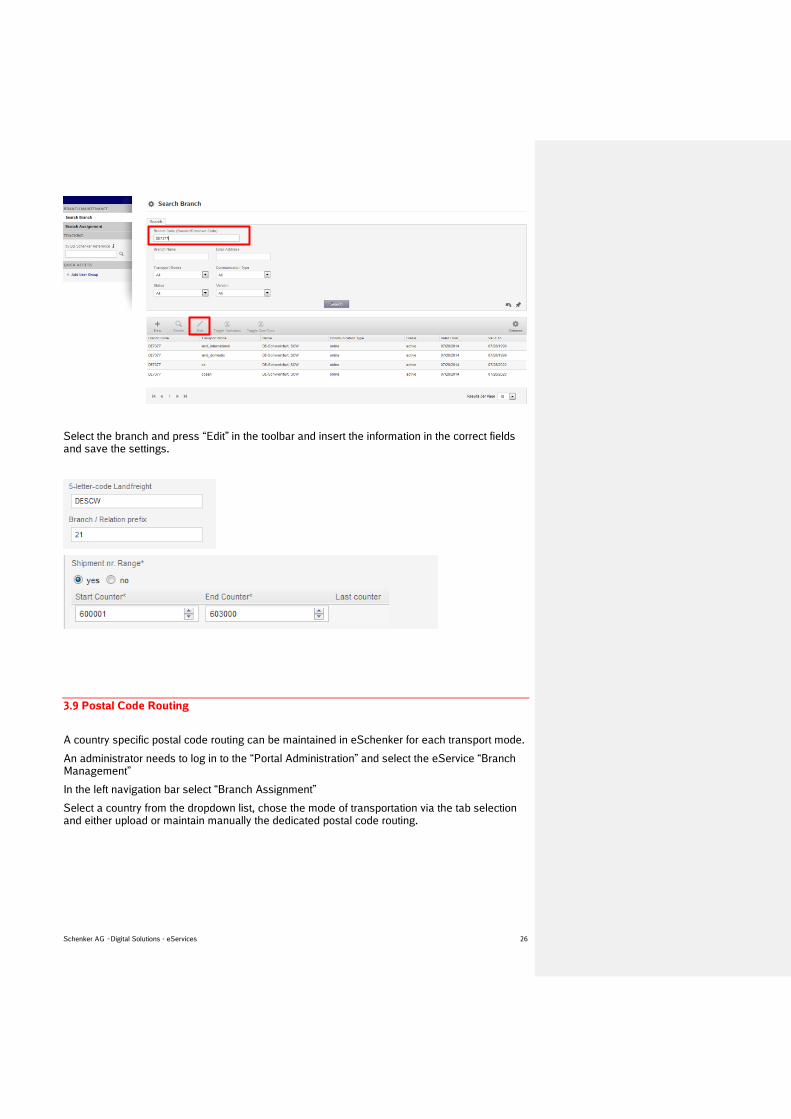
Select the branch and press “Edit” in the toolbar and insert the information in the correct fields and save the settings.

Schenker AG –Digital Solutions - eServices 25
In order to maintain
Schenker Deutschland Routing .zip file including nlplz.prn, nlplzrel.hub, nlplzrel.prn
Schenker Deutschland export rounting .xls file including Country, Delivery Postal code from, Delivery Postal code to, Relation, Gate/Hub
the Administrator has to select “Barcode Routing” and upload the respective .zip file for the Ger-man domestic routing and / or the German export routing .xls file per branch. For the export routing file the Administrator has to select the correct branch from the dropdown list first.
3.8 DB Schenker reference number creation
If eSchenker has to create the DB Schenker reference number (STT# / Consignment waybill #) for any Country this has to be maintained within “Branch Management”. At the moment this is only needed for Germany but in future also Russian waybill numbers need to be created. In order to create the reference numbers (STT# / Consignment waybill #) for Germany following data has to be maintained (the creation of the number itself is done automatically afterwards):
5-letter branch code (e.g. DESCW for Schweinfurt)
Branch / relation prefix (e.g. 21 for Schweinfurt)
Shipment number range (Start counter and end counter)
The Administrator has to select “Branch Management” and search for the branch he wants to maintain by entering search criteria in the search fields.
Schenker AG –Digital Solutions - eServices 26
Select the branch and press “Edit” in the toolbar and insert the information in the correct fields and save the settings.
3.9 Postal Code Routing
A country specific postal code routing can be maintained in eSchenker for each transport mode.
An administrator needs to log in to the “Portal Administration” and select the eService “Branch Management”
In the left navigation bar select “Branch Assignment”
Select a country from the dropdown list, chose the mode of transportation via the tab selection and either upload or maintain manually the dedicated postal code routing.

Schenker AG –Digital Solutions - eServices 27
3.10 Tango Routing Setup
TANGO follows the logic that all data and information is assigned to a specific TANGO partner, called Principal. This principal is similar to the invoice address in eSchenker. The principal is the partner that gives the order to transport goods and under whose contractual agreements the freight and other charges are invoiced. If no invoice address in eSchenker is selected, the Principal is either the shipper or the con-signee based on the specific Incoterm.
In order to configure a dedicated customer setup for Tango Ocean or Air freight, please follow below steps.
1. Configure a customer EDI profile in TANGO. This needs to be requested at the TANGO team and is a precondition for any EDI transmission between eSchenker and Tango.
Therefore a pre-alignment with the respective TANGO team is mandatory for any setup.
For every new setup that you want to configure send an email to your respective TANGO MDM country team and send a copy to [email protected]
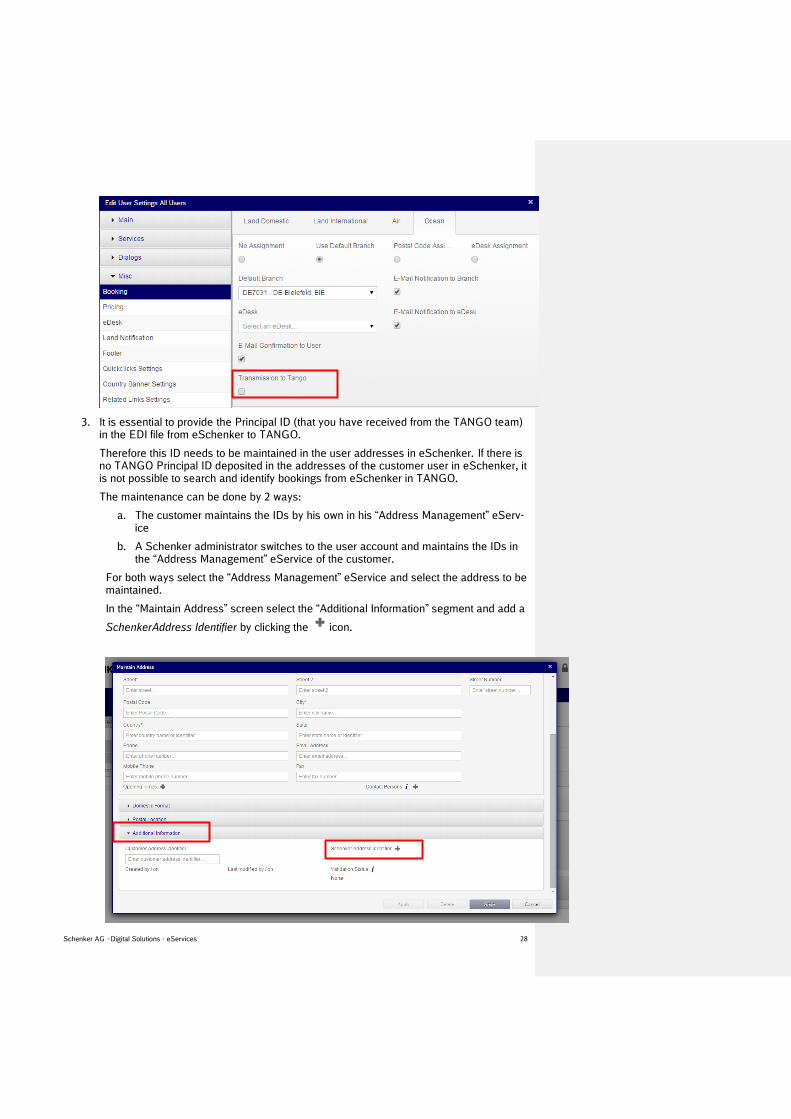
2. In the booking settings of a user group the “Transmission to Tango” checkbox needs to be activated in the transport mode Ocean and / or Air. All the bookings from users in this user group will then be routed to TANGO.
Schenker AG –Digital Solutions - eServices 28
3. It is essential to provide the Principal ID (that you have received from the TANGO team) in the EDI file from eSchenker to TANGO.
Therefore this ID needs to be maintained in the user addresses in eSchenker. If there is no TANGO Principal ID deposited in the addresses of the customer user in eSchenker, it is not possible to search and identify bookings from eSchenker in TANGO.
The maintenance can be done by 2 ways:
a. The customer maintains the IDs by his own in his “Address Management” eServ-ice
b. A Schenker administrator switches to the user account and maintains the IDs in the “Address Management” eService of the customer.
For both ways select the “Address Management” eService and select the address to be maintained.
In the “Maintain Address” screen select the “Additional Information” segment and add a
SchenkerAddress Identifier by clicking the icon.

Schenker AG –Digital Solutions - eServices 29
Select “Ocean” from the drop down list and add the respective ID.
Or select “Air” from the drop down list and add the respective ID.
NOTE: The Principal ID needs to be maintained in the address that is the partner who gives the order to transport goods and under whose contractual agreements the freight and other charges are invoiced. In eSchenker this is the Invoice Address. Therefore it is mandatory that the ID is maintained and that this address is selected as Invoice Address in the booking process.
If no Invoice Address is selected the Principal is derived from the shipper or consignee address depending on the incoterm. Then it is mandatory to maintain the Principal ID in the respective shipper / consignee address.
SUMMARY INFO:
1. Setup a TANGO EDI profile in TANGO
2. Configure user group and activate “Transmission to Tango”
3. Maintain the Principal ID in the eSchenker addresses

Schenker AG –Digital Solutions - eServices 30
IMPORTANT: Change of Principal ID maintenance in eSchenker as of mid December 2015 !
Step 3. Of above mentioned setup process will be changed.
New Step 3:
It is essential to provide the Partner ID of the Principal address (that you have received from the TANGO team) in the EDI file from eSchenker to TANGO.
Therefore this Principal address including the Partner ID needs to be maintained in the user group of the respective user in eSchenker by an administrator.
How to maintain a Principal address including the Partner ID in eSchenker:
Send the address details of the Prinicipal address including the Partner ID from TANGO to [email protected]
Provide at least (* mandatory):
o Company's Name / Person's Last Name*
o Company's Additional Name / Person's First Name
o Country*
o State
o Postal Code (* mandatory depending on country)
o City*
o Street*
o State
o Street Number
o Transport Mode* (Oean or Air)
o Principal ID*
State the eSchenker user group of the customer that has been set up (see chapter 3.1. and 3.2). The address will then be assigned to the user group by a global admin-istrator. If a user from this user group places a booking, the address of this group (in-cluding the partner ID of the Principal address will be added to the data file which is sent to TANGO.
If there is no TANGO Principal ID deposited in the user group of the respective user in eSchenker, the system will check if an invoice address in the booking has been selected and if this invoice address has a Partner ID assigned.
How to assign a Partner ID to an address:
The maintenance can be done by 2 ways:
a. The customer maintains the IDs by his own in his “Address Management” eServ-ice
b. A Schenker administrator switches to the user account and maintains the IDs in the “Address Management” eService of the customer.
For both ways select the “Address Management” eService and select the address to be maintained.
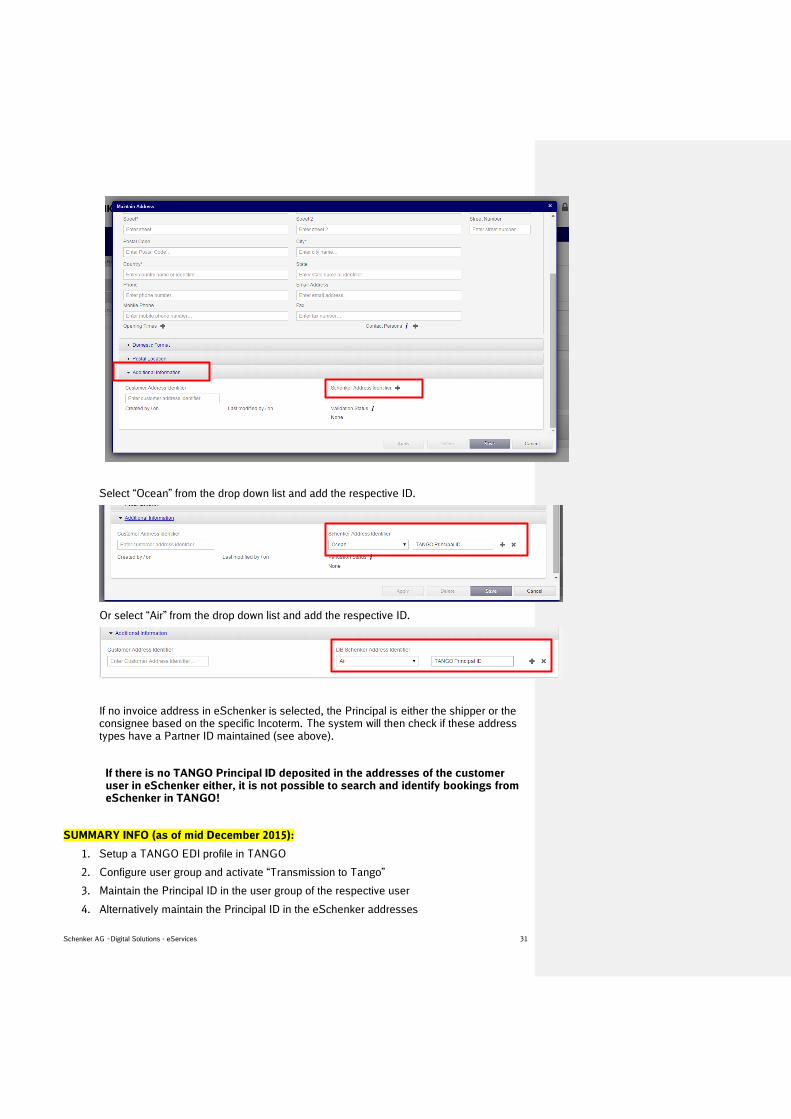
In the “Maintain Address” screen select the “Additional Information” segment and add a
SchenkerAddress Identifier by clicking the icon.
Feldfunktion geändert
Schenker AG –Digital Solutions - eServices 31
Select “Ocean” from the drop down list and add the respective ID.
Or select “Air” from the drop down list and add the respective ID.
If no invoice address in eSchenker is selected, the Principal is either the shipper or the consignee based on the specific Incoterm. The system will then check if these address types have a Partner ID maintained (see above).
If there is no TANGO Principal ID deposited in the addresses of the customer user in eSchenker either, it is not possible to search and identify bookings from eSchenker in TANGO!
SUMMARY INFO (as of mid December 2015):
1. Setup a TANGO EDI profile in TANGO
2. Configure user group and activate “Transmission to Tango”
3. Maintain the Principal ID in the user group of the respective user
4. Alternatively maintain the Principal ID in the eSchenker addresses

Schenker AG –Digital Solutions - eServices 32
3.11 Transmission of CLIENT ID to CIEL TMS
For each customer it is possible to maintain a CIEL client ID which is submitted in the EDI to the CIEL Transport Management System. The ID needs to be maintained by a user group adminis-trator.
In order to maintain the CIEL client ID on customer level and submit it to the CIEL Transport Management System following configuration is needed:
1. Create a user group in the portal administration for a customer.
2. Create an address book for this user group (either via address management or it is cre-ated automatically in the user group import).
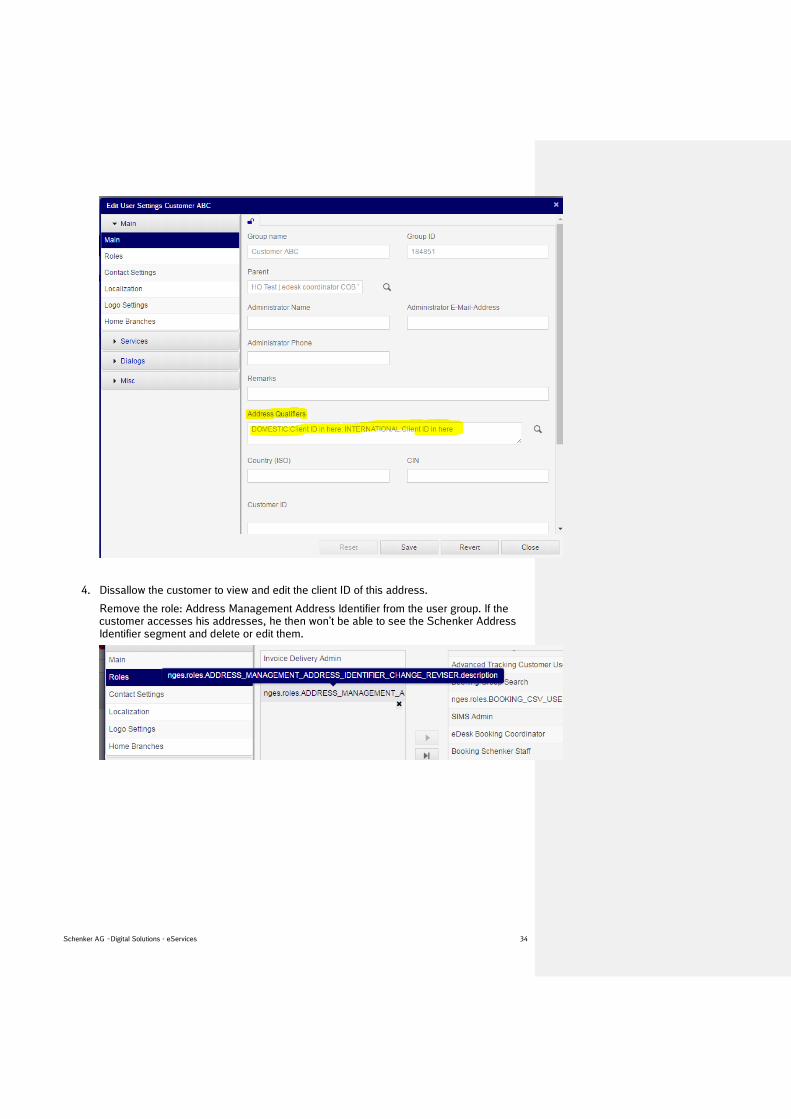
In the user group settings you can create a new address for this user group’s address book or select an address from the address book by opening the magnifying glass on Address Qualifiers level.
The address that you select for this user group has to include the client ID. This address is dedicatedly assigned to this user group (= reflects the customer) and is submitted in each data transmission to CIEL automatically. The customer does not need to select it in the booking process.

Schenker AG –Digital Solutions - eServices 33
3. Maintain the customer address and client ID in the address book and assign this cus-tomer address as default address to the user group.
Schenker AG –Digital Solutions - eServices 34
4. Dissallow the customer to view and edit the client ID of this address.
Remove the role: Address Management Address Identifier from the user group. If the customer accesses his addresses, he then won’t be able to see the Schenker Address Identifier segment and delete or edit them.

Schenker AG –Digital Solutions - eServices 35
5. With each booking of this customer the system will add the default customer address (in-cluding the client ID) to the outgoing EDI message (even though the address has not been selected by the customer).
3.12 Transmission of MyMistral customer number (“Kundennummer”) to MyMistral TMS
For each customer it is mandatory to maintain a customer number which is submitted in the EDI to the Mymistral Transport Management System. The ID needs to be maintained by a user group administrator.
MyMistral requires this number otherwise the bookings won’t be accepted by MyMistral.
In order to maintain the customer number on customer level and submit it to the MyMistral Transport Management System following configuration is needed:
1. Create a user group in the portal administration for a customer.
2. Create an address book for this user group (either via address management or it is cre-ated automatically in the user group import).

Schenker AG –Digital Solutions - eServices 36
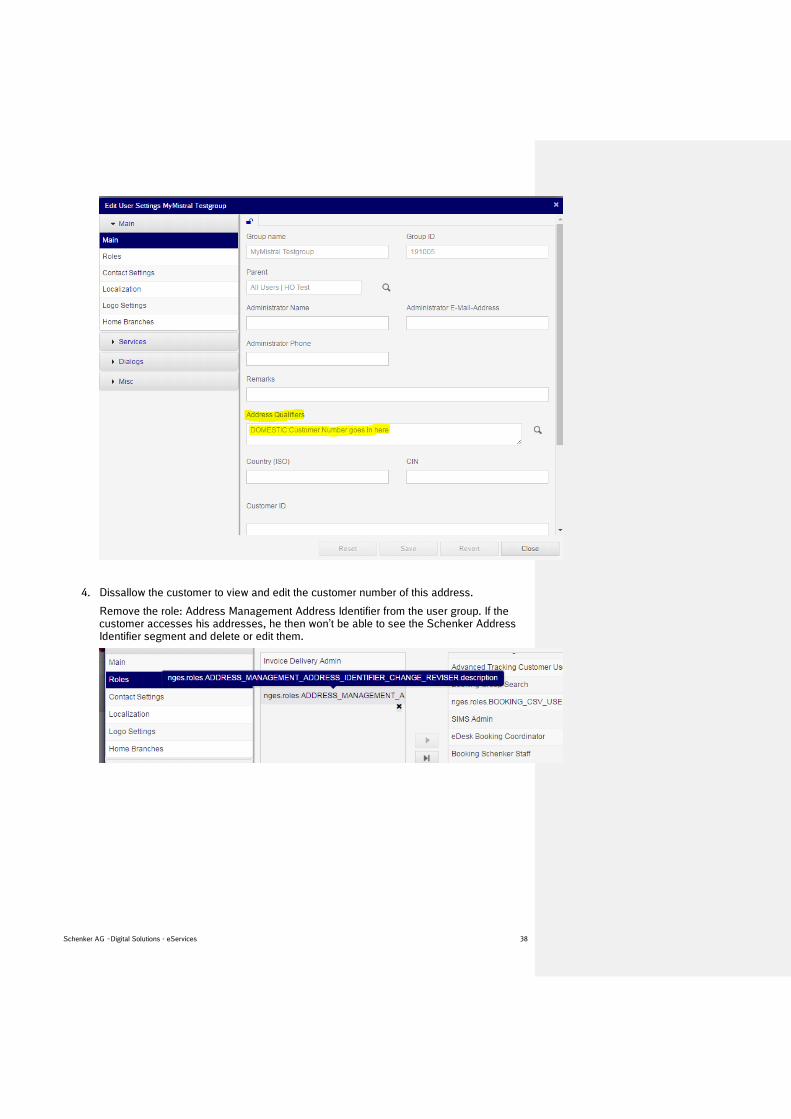
In the user group settings you can create a new address for this user group’s address book or select an address from the address book by opening the magnifying glass on Address Qualifiers level.
The address that you select for this user group has to include the customer number. This address is dedicatedly assigned to this user group (= reflects the customer) and is sub-mitted in each data transmission to MyMistral automatically. The customer does not need to select it in the booking process.

Schenker AG –Digital Solutions - eServices 37
3. Maintain the customer address and customer number in the address book and assign this customer address as default address to the user group.
Schenker AG –Digital Solutions - eServices 38
4. Dissallow the customer to view and edit the customer number of this address.
Remove the role: Address Management Address Identifier from the user group. If the customer accesses his addresses, he then won’t be able to see the Schenker Address Identifier segment and delete or edit them.

Schenker AG –Digital Solutions - eServices 39
5. With each booking of this customer the system will add the default customer address (in-cluding the customer number) to the outgoing EDI message (even though the address has not been selected by the customer).

Schenker AG –Digital Solutions - eServices 40
4 Booking
Booking itself is available for the transport modes Air, Ocean (FCL and LCL) and Land. Further-more the customer has the possibility to maintain all his bookings under “My Bookings”. There is also the possibility to save a booking as a template and use it to create new bookings from a template.
4.1 Ocean FCL
In order to create a new Oceanfreight FCL booking select “Ocean Freight FCL”
Schenker AG –Digital Solutions - eServices 41
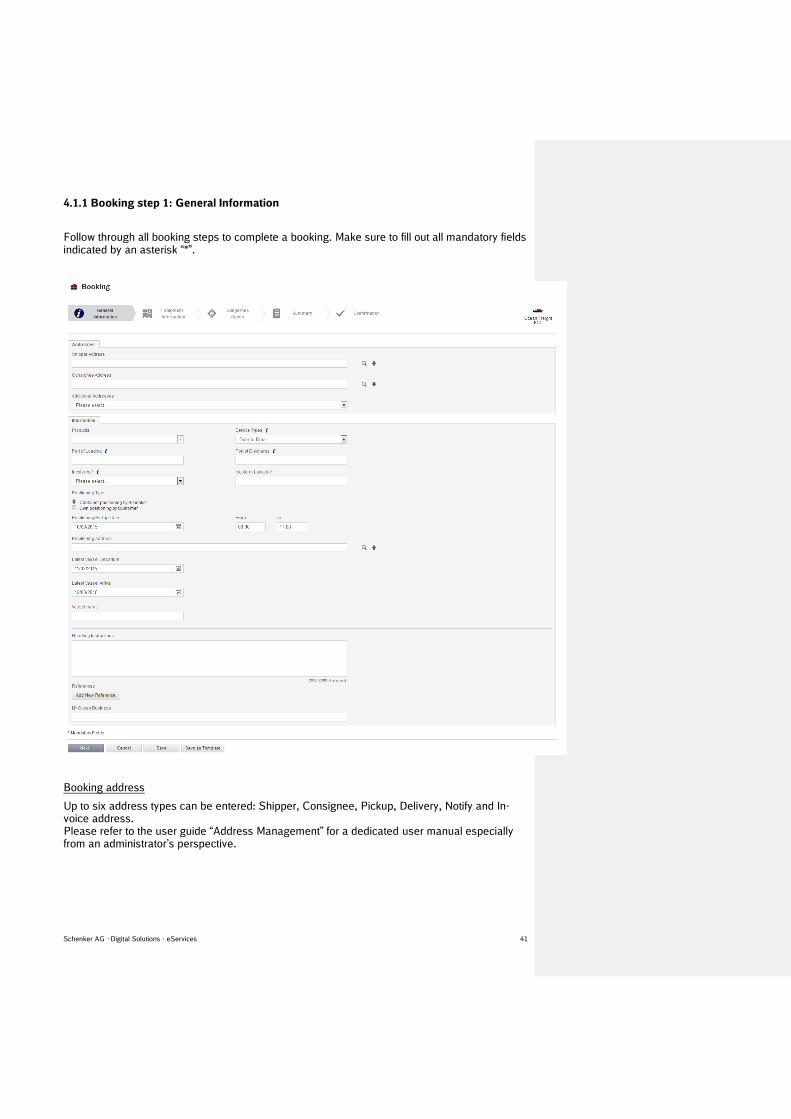
4.1.1 Booking step 1: General Information
Follow through all booking steps to complete a booking. Make sure to fill out all mandatory fields indicated by an asterisk “*”.
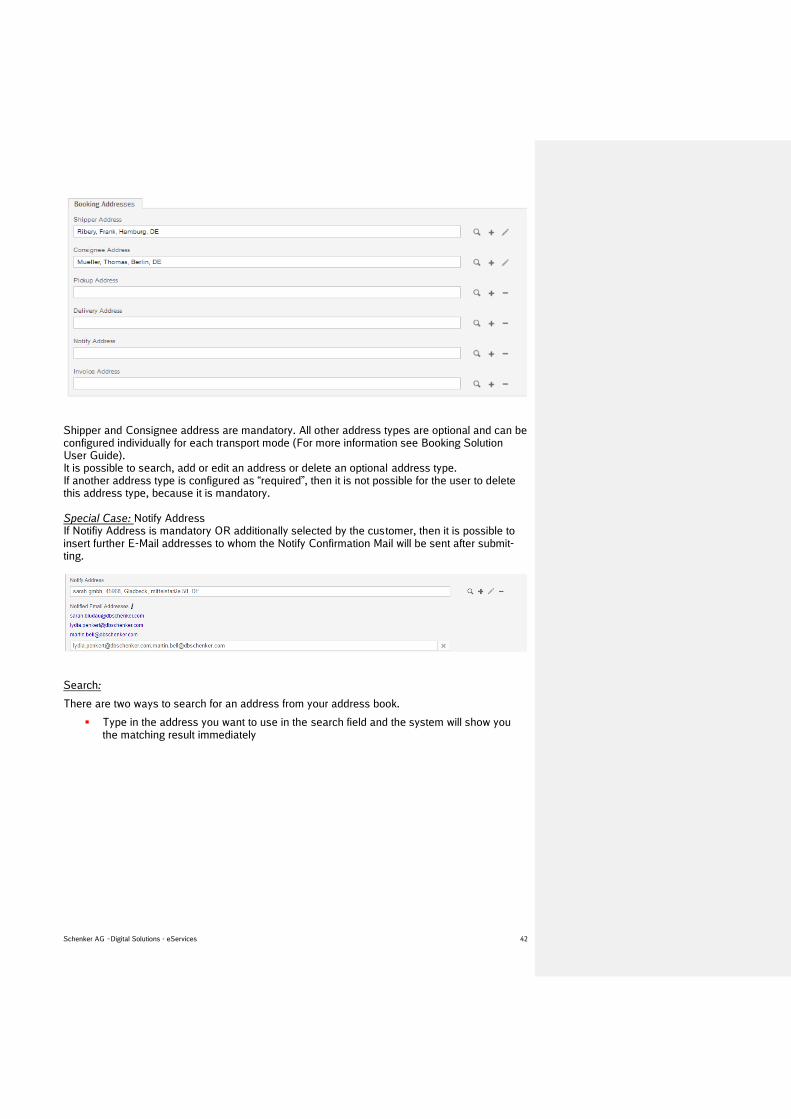
Booking address
Up to six address types can be entered: Shipper, Consignee, Pickup, Delivery, Notify and In-voice address. Please refer to the user guide “Address Management” for a dedicated user manual especially from an administrator’s perspective.
Schenker AG –Digital Solutions - eServices 42
Shipper and Consignee address are mandatory. All other address types are optional and can be configured individually for each transport mode (For more information see Booking Solution User Guide). It is possible to search, add or edit an address or delete an optional address type. If another address type is configured as “required”, then it is not possible for the user to delete this address type, because it is mandatory. Special Case: Notify Address If Notifiy Address is mandatory OR additionally selected by the customer, then it is possible to insert further E-Mail addresses to whom the Notify Confirmation Mail will be sent after submit-ting.
Search:
There are two ways to search for an address from your address book.
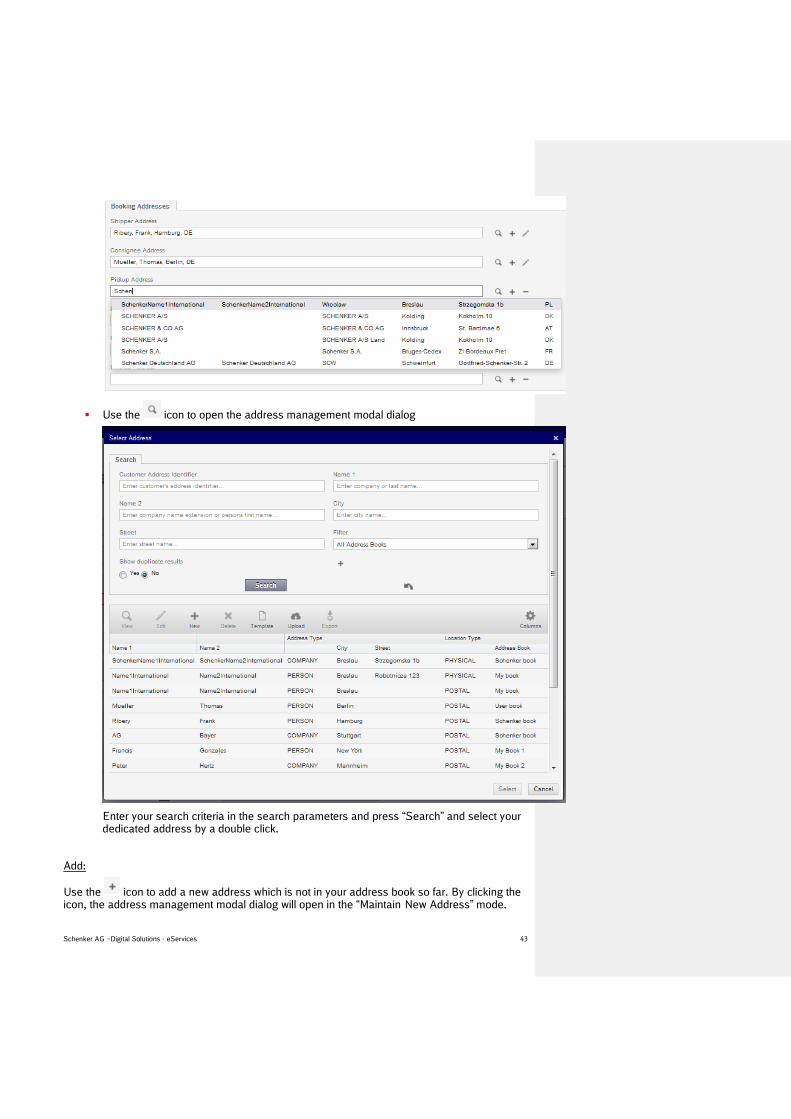
Type in the address you want to use in the search field and the system will show you the matching result immediately
Schenker AG –Digital Solutions - eServices 43
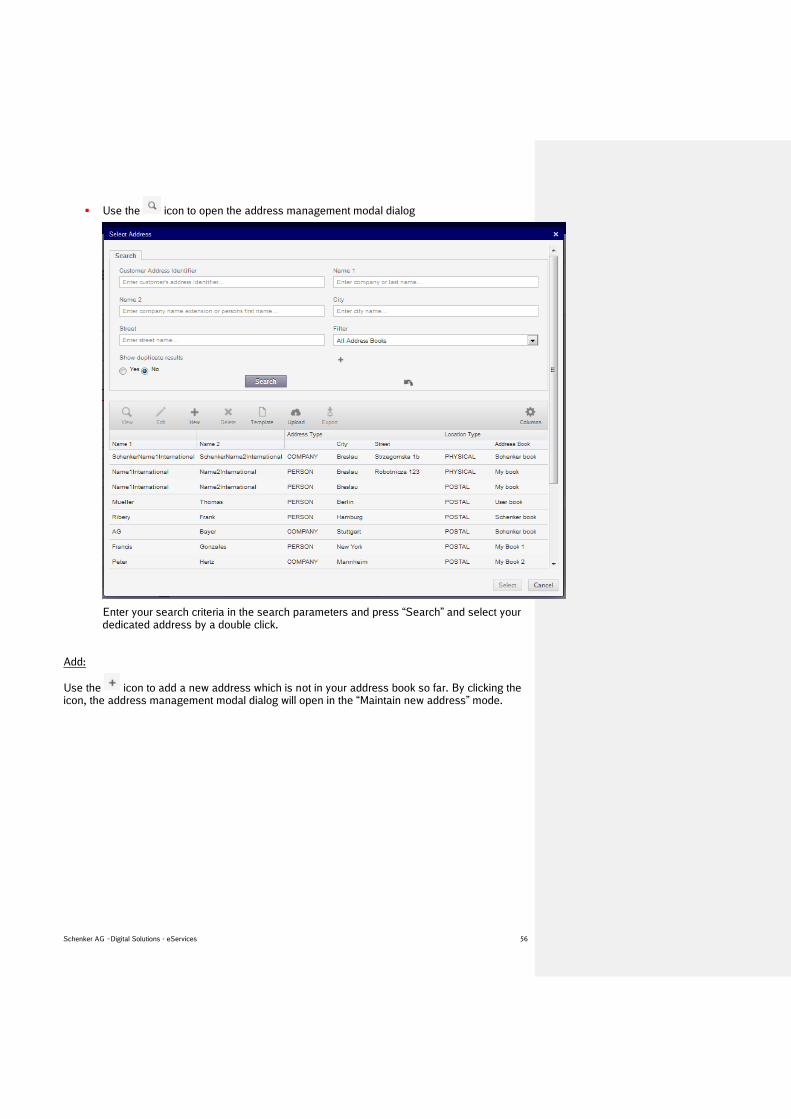
Use the icon to open the address management modal dialog
Enter your search criteria in the search parameters and press “Search” and select your dedicated address by a double click.
Add:
Use the icon to add a new address which is not in your address book so far. By clicking the icon, the address management modal dialog will open in the “Maintain New Address” mode.

Schenker AG –Digital Solutions - eServices 44
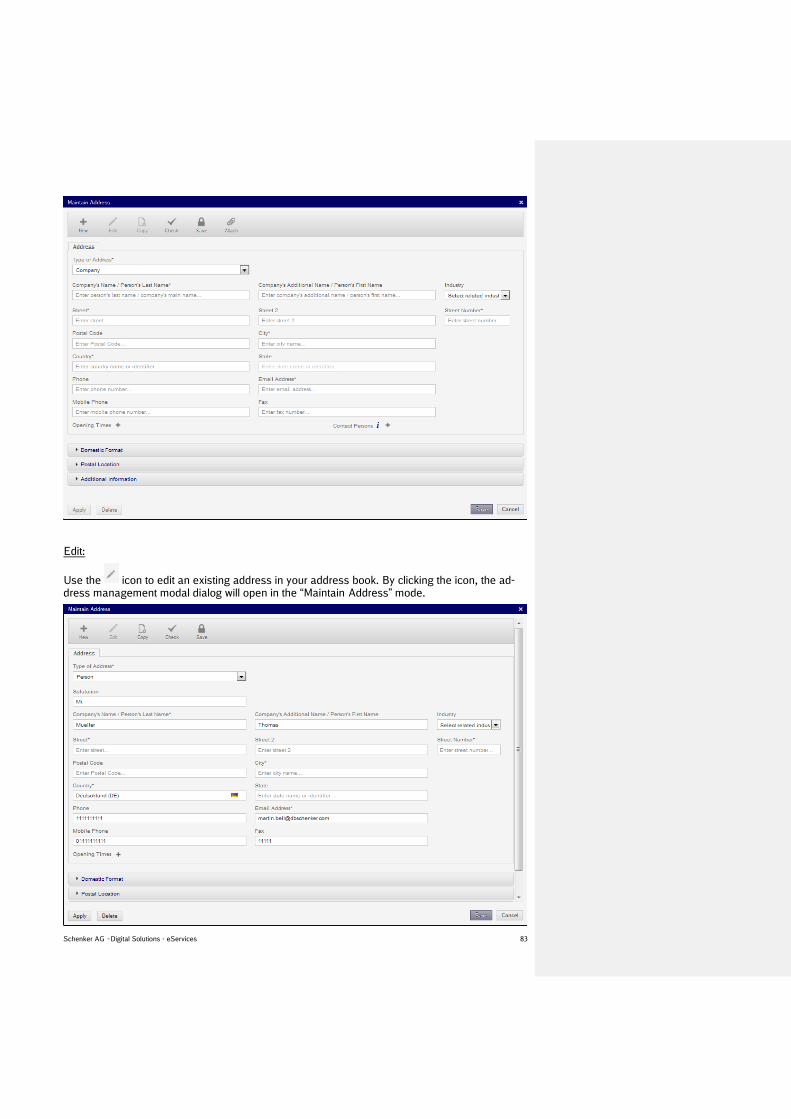
Edit:
Use the icon to edit an existing address in your address book. By clicking the icon, the ad-dress management modal dialog will open in the “Maintain Address” mode.

Schenker AG –Digital Solutions - eServices 45
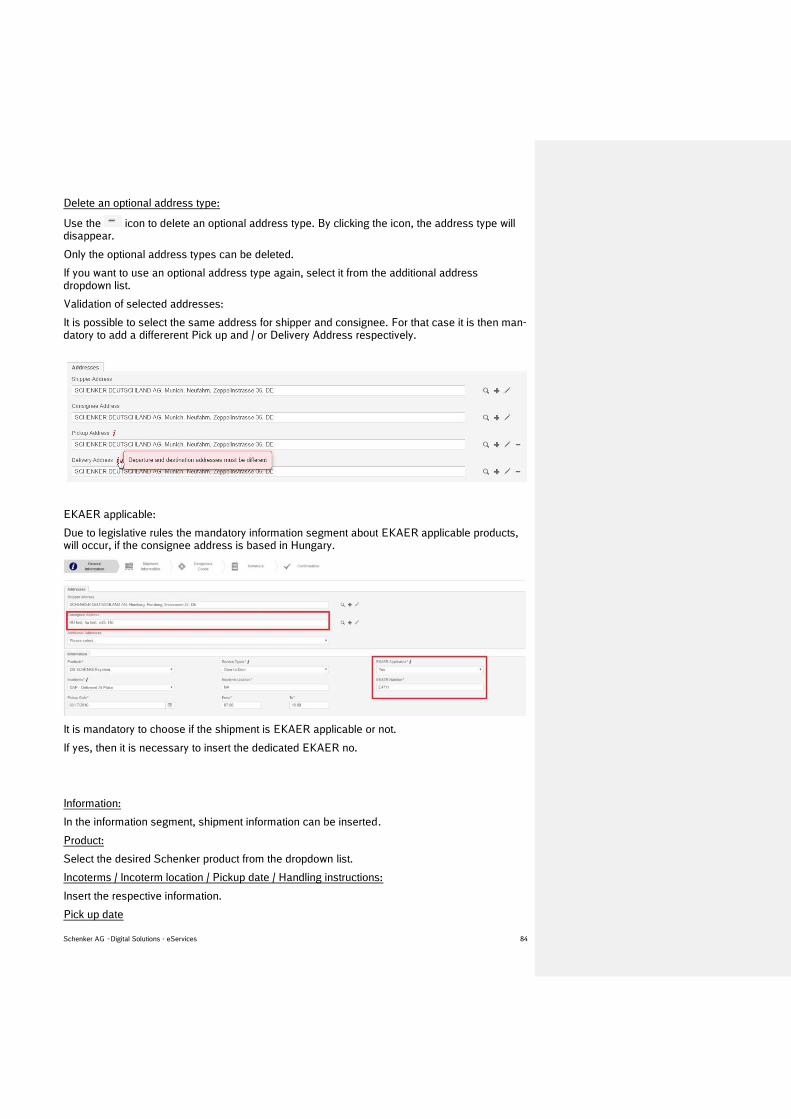
Delete an optional address type:
Use the icon to delete an optional address type. By clicking the icon, the address type will disappear. Only the optional address types can be deleted. If you want to use an optional address type again, select it from the additional address dropdown list.
Validation of selected addresses:
It is possible to select the same address for shipper and consignee. For that case it is then man-datory to add a differerent Pick up and / or Delivery Address respectively.
Information:
In the information segment, shipment information can be inserted:
Service type:
Select door-door, port-port, port-door or door-port
Port of loading / discharge:
Port of loading is mandatory if the service type is port-port or port-door
Port of discharge is mandatory if the service type is port-port or door-port
Type in the UN port code or port name you want to use in the search field and the system will show you the matching result(s)
Incoterms / Incoterm location / Positioning type – date – address / Latest vessel departure - arri-val / Vessel name / Handling instructions / My Ocean business:
Insert the respective information.
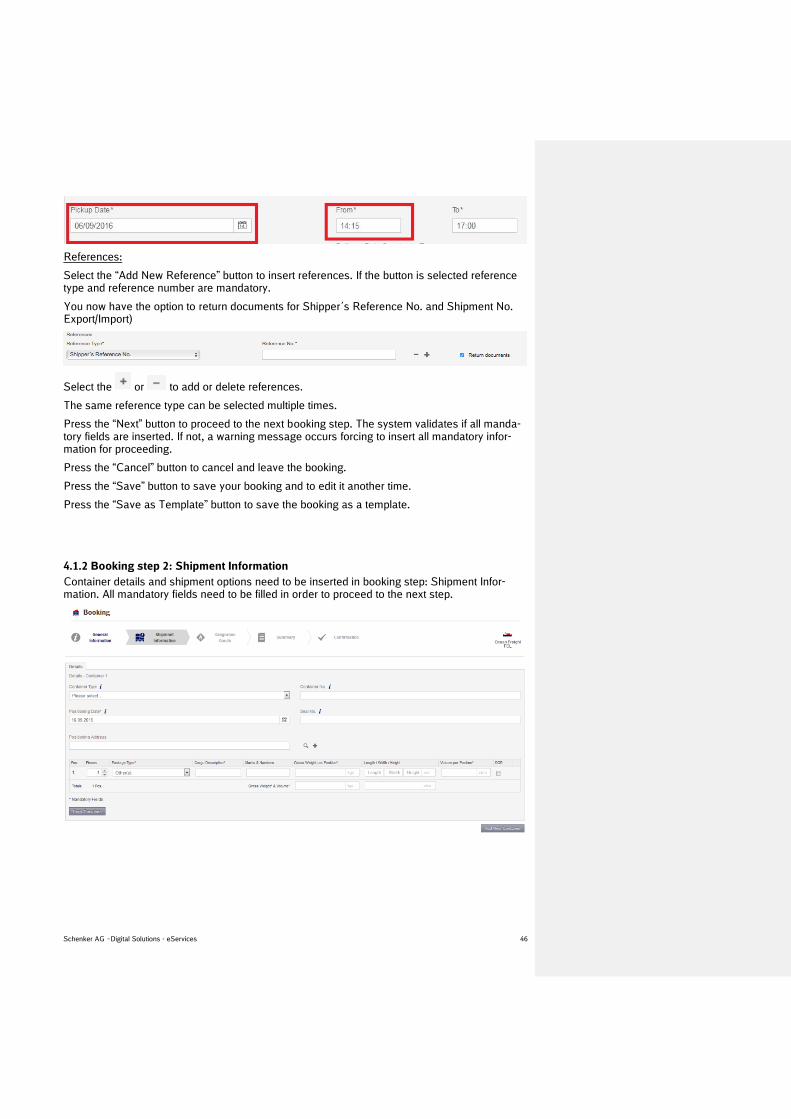
Pick up date Insert the respective Information of Date and Time. Special cases for dates that are on the same day (‘today’): If the pick up day is today, the applicable time ‘From’ is the user’s time + 15 minutes. In case that the user’s time 6 a.m. on the same day, then the default setting time remains 8:00.
Schenker AG –Digital Solutions - eServices 46
References:
Select the “Add New Reference” button to insert references. If the button is selected reference type and reference number are mandatory.
You now have the option to return documents for Shipper´s Reference No. and Shipment No. Export/Import)
Select the or to add or delete references.
The same reference type can be selected multiple times.
Press the “Next” button to proceed to the next booking step. The system validates if all manda-tory fields are inserted. If not, a warning message occurs forcing to insert all mandatory infor-mation for proceeding.
Press the “Cancel” button to cancel and leave the booking.
Press the “Save” button to save your booking and to edit it another time.
Press the “Save as Template” button to save the booking as a template.
4.1.2 Booking step 2: Shipment Information
Container details and shipment options need to be inserted in booking step: Shipment Infor-mation. All mandatory fields need to be filled in order to proceed to the next step.

Schenker AG –Digital Solutions - eServices 47
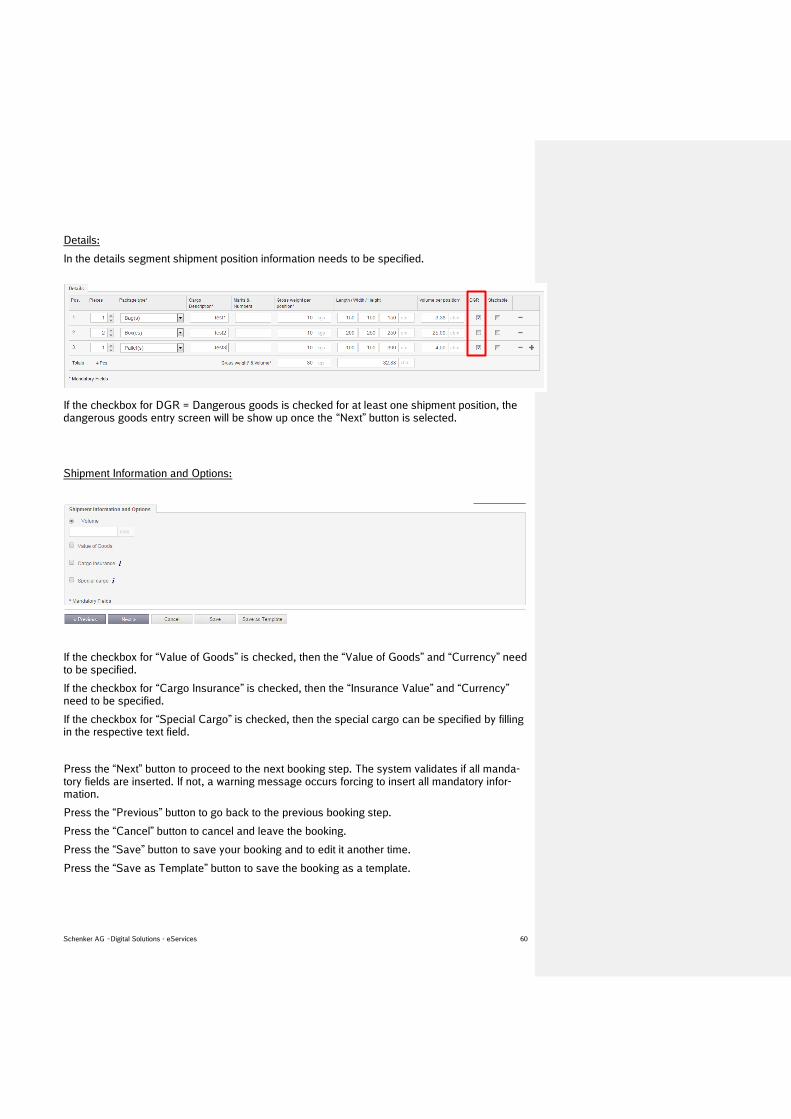
Details:
In the details segment container information needs to be specified. Here the options to add a new container and to copy the container are available.
If the Copy Container button is pressed, it needs to be specified how often the container shall be copied.
If the checkbox for DGR = Dangerous goods is checked for at least one shipment position, the dangerous goods entry screen will be show up once the next button is selected.
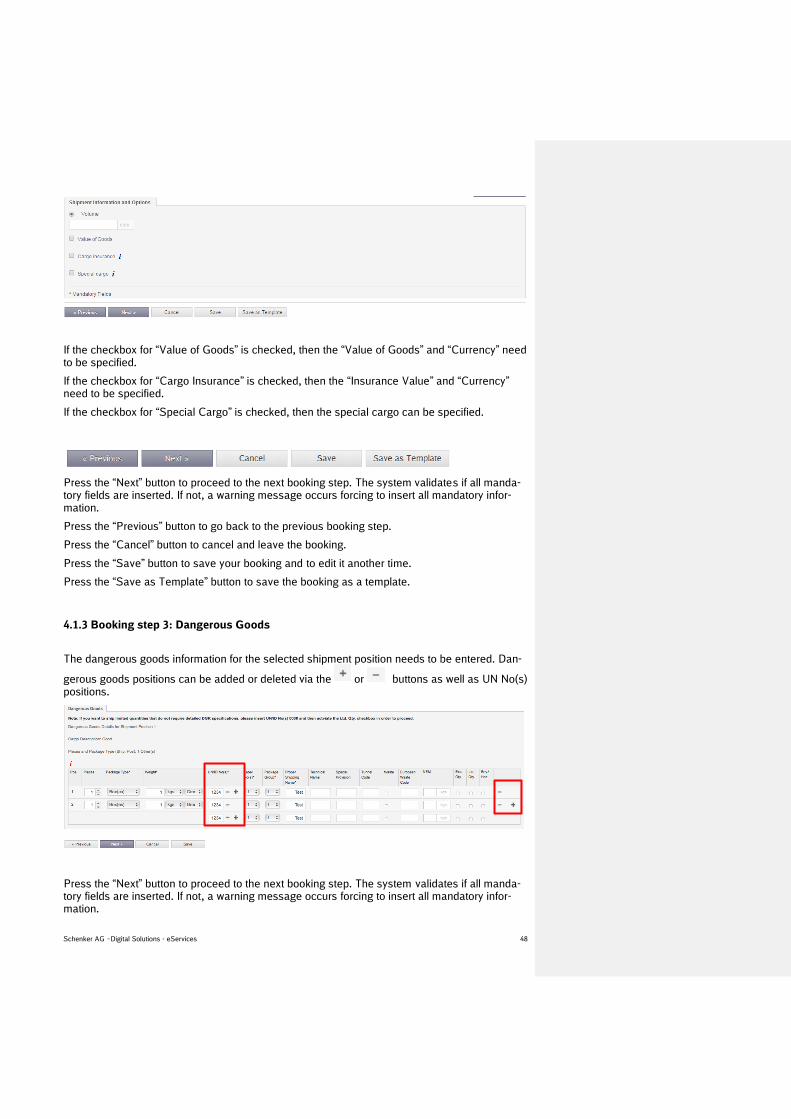
Shipment Information and Options:
Schenker AG –Digital Solutions - eServices 48
If the checkbox for “Value of Goods” is checked, then the “Value of Goods” and “Currency” need to be specified.
If the checkbox for “Cargo Insurance” is checked, then the “Insurance Value” and “Currency” need to be specified.
If the checkbox for “Special Cargo” is checked, then the special cargo can be specified.
Press the “Next” button to proceed to the next booking step. The system validates if all manda-tory fields are inserted. If not, a warning message occurs forcing to insert all mandatory infor-mation.
Press the “Previous” button to go back to the previous booking step.
Press the “Cancel” button to cancel and leave the booking.
Press the “Save” button to save your booking and to edit it another time.
Press the “Save as Template” button to save the booking as a template.
4.1.3 Booking step 3: Dangerous Goods
The dangerous goods information for the selected shipment position needs to be entered. Dan-
gerous goods positions can be added or deleted via the or buttons as well as UN No(s) positions.
Press the “Next” button to proceed to the next booking step. The system validates if all manda-tory fields are inserted. If not, a warning message occurs forcing to insert all mandatory infor-mation.

Schenker AG –Digital Solutions - eServices 49
Press the “Previous” button to go back to the previous booking step.
Press the “Cancel” button to cancel and leave the booking.
Press the “Save” button to save your booking and to edit it another time.
Press the “Save as Template” button to save the booking as a template.
Note:
If you insert a UN ID the system automatically prefills dedicated information based on the DGR database.
If a customer wants to ship limited quantities that do not require detailed DGR specifications, in-sert UN/ID No(s) = 0000 and then activate the Ltd. Qty. checkbox in order to proceed.
If a customer wants to ship NEM (Net Explosive Mass) it is necessary to enter a valid UNID and valid Label No(s). Henceforth it is necessary to make sure that the added values will be correct.
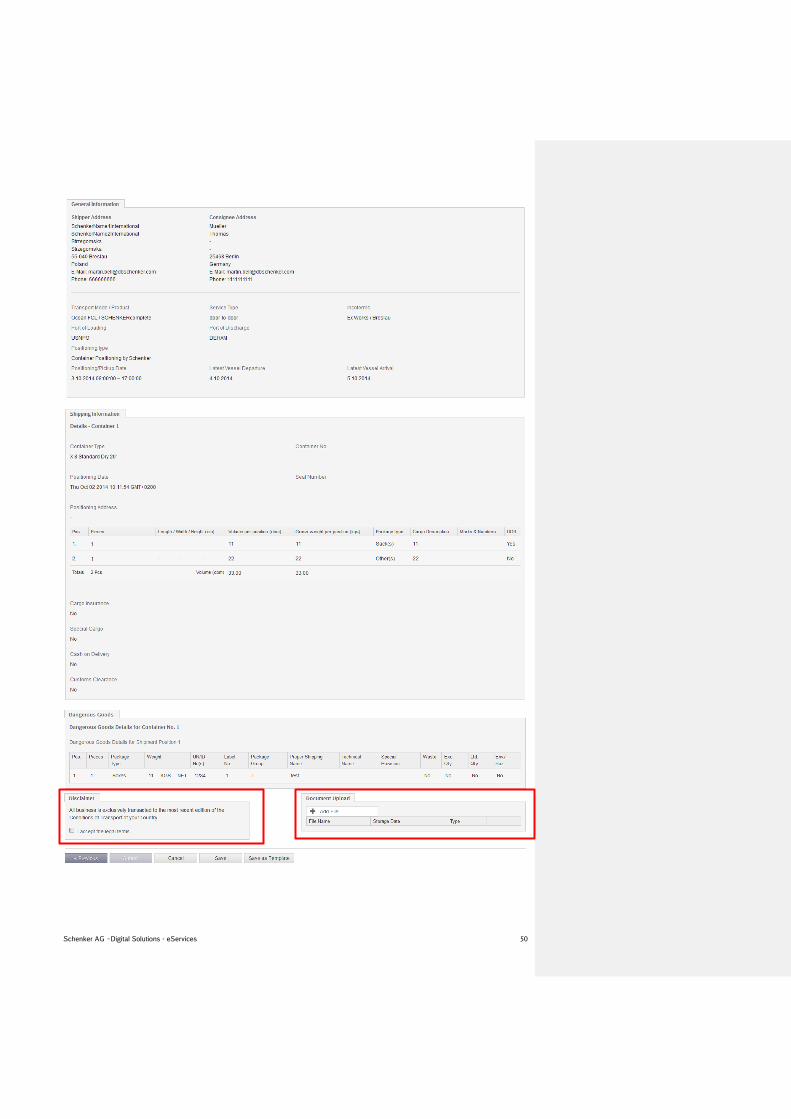
4.1.4 Booking step 4: Summary
All inserted booking information is summarized. The customer user has the option to upload documents and he needs to accept the transport conditions in order to activate the “Submit” but-ton.
Schenker AG –Digital Solutions - eServices 50
Schenker AG –Digital Solutions - eServices 51
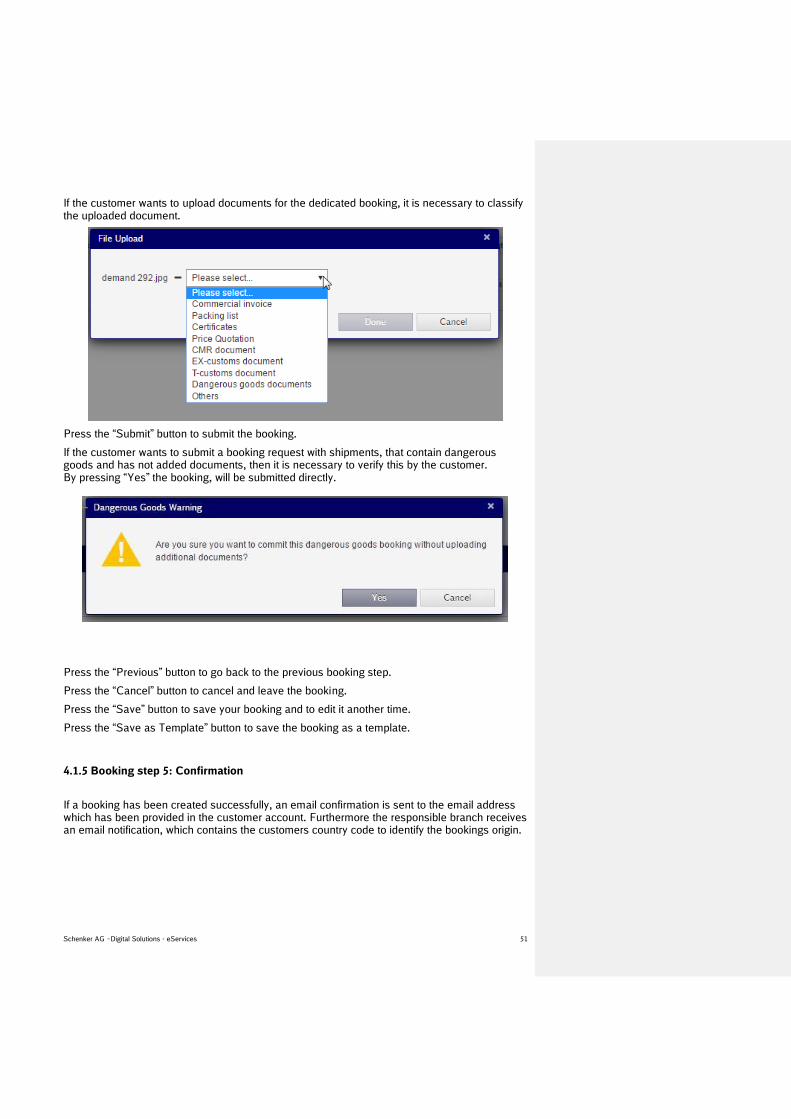
If the customer wants to upload documents for the dedicated booking, it is necessary to classify the uploaded document.
Press the “Submit” button to submit the booking.
If the customer wants to submit a booking request with shipments, that contain dangerous goods and has not added documents, then it is necessary to verify this by the customer. By pressing “Yes” the booking, will be submitted directly.
Press the “Previous” button to go back to the previous booking step.
Press the “Cancel” button to cancel and leave the booking.
Press the “Save” button to save your booking and to edit it another time.
Press the “Save as Template” button to save the booking as a template.
4.1.5 Booking step 5: Confirmation
If a booking has been created successfully, an email confirmation is sent to the email address which has been provided in the customer account. Furthermore the responsible branch receives an email notification, which contains the customers country code to identify the bookings origin.

Schenker AG –Digital Solutions - eServices 52

Schenker AG –Digital Solutions - eServices 53
4.2 Ocean LCL
In order to create a new Oceanfreight LCL booking select “Ocean Freight LCL”
4.2.1 Booking step 1: General Information
Follow through all booking steps to complete a booking. Make sure to fill out all mandatory
fields.

Schenker AG –Digital Solutions - eServices 54
Booking address
Up to six address types can be entered: Shipper, Consignee, Pickup, Delivery, Notify and In-voice address.
Please refer to the user guide “Address Management” for a dedicated user manual.

Schenker AG –Digital Solutions - eServices 55
Shipper and Consignee address are mandatory. All other address types are optional and can be configured individually for each transport mode (For more information see Booking Solution User Guide). It is possible to search, add or edit an address or delete an optional address type. If another address type is configured as “required”, then it is not possible for the user to delete this address type, because it is mandatory. Special Case: Notify Address If Notifiy Address is mandatory OR additionally selected by the customer, then it is possible to insert further E-Mail addresses to whom the Notify Confirmation Mail will be sent after submit-ting.
Search:
There are two ways to search for an address from your address book.
Type in the address you want to use in the search field and the system will show you the matching result
Schenker AG –Digital Solutions - eServices 56
Use the icon to open the address management modal dialog
Enter your search criteria in the search parameters and press “Search” and select your dedicated address by a double click.
Add:
Use the icon to add a new address which is not in your address book so far. By clicking the icon, the address management modal dialog will open in the “Maintain new address” mode.

Schenker AG –Digital Solutions - eServices 57
Edit:
Use the icon to edit an existing address in your address book. By clicking the icon, the ad-dress management modal dialog will open in the “Maintain Address” mode.

Schenker AG –Digital Solutions - eServices 58
Delete an optional address type:
Use the icon to delete an optional address type. By clicking the icon, the address type will disappear.
Only the optional address types can be deleted.
If you want to use an optional address type again, select it from the additional address dropdown list.
Validation of selected addresses:
It is possible to select the same address for shipper and consignee. For that case it is then man-datory to add a differerent Pick up and / or Delivery Address respectively.
Information:
In the information segment, shipment information can be inserted.
Service type:
Select door-door, port-port, port-door or door-port
Port of loading / discharge:
Port of loading is mandatory if the service type is port-port or port-door
Port of discharge is mandatory if the service type is port-port or door-port
Type in the UN port code or port name you want to use in the search field and the system will show you the matching result(s)
Incoterms / Incoterm location / Precarriage type – date / Latest vessel departure - arrival / Ves-sel name / Handling instructions / My Ocean business:
Insert the respective information.
Pick up date Insert the respective Information of Date and Time. Special cases for dates that are on the same day (‘today’): If the pick up day is today, the applicable time ‘From’ is the user’s time + 15 minutes.

Schenker AG –Digital Solutions - eServices 59
In case that the user’s time 6 a.m. on the same day, then the default setting time remains 8:00.
References:
Select the “Add New Reference” button to insert references. If the button is selected reference type and reference number are mandatory.
You now have the option to return documents for Shipper´s Reference No. and Shipment No. Export/Import)
Select the or to add or delete references.
The same reference type can be selected multiple times.
Press the “Next” button to proceed to the next booking step. The system validates if all manda-tory fields are inserted. If not, a warning message occurs asking to insert all mandatory infor-mation.
Press the “Cancel” button to cancel and leave the booking.
Press the “Save” button to save your booking and to edit it another time.
Press the “Save as Template” button to save the booking as a template.
4.2.2 Booking step 2: Shipment Information
Shipment details and options need to be inserted in booking step: Shipment Information. All mandatory fields need to be filled in order to proceed to the next step.
Schenker AG –Digital Solutions - eServices 60
Details:
In the details segment shipment position information needs to be specified.
If the checkbox for DGR = Dangerous goods is checked for at least one shipment position, the dangerous goods entry screen will be show up once the “Next” button is selected.
Shipment Information and Options:
If the checkbox for “Value of Goods” is checked, then the “Value of Goods” and “Currency” need to be specified.
If the checkbox for “Cargo Insurance” is checked, then the “Insurance Value” and “Currency” need to be specified.
If the checkbox for “Special Cargo” is checked, then the special cargo can be specified by filling in the respective text field.
Press the “Next” button to proceed to the next booking step. The system validates if all manda-tory fields are inserted. If not, a warning message occurs forcing to insert all mandatory infor-mation.
Press the “Previous” button to go back to the previous booking step.
Press the “Cancel” button to cancel and leave the booking.
Press the “Save” button to save your booking and to edit it another time.
Press the “Save as Template” button to save the booking as a template.

Schenker AG –Digital Solutions - eServices 61
4.2.3 Booking step 3: Dangerous Goods
The dangerous goods information for the selected shipment position needs to be entered. Dan-
gerous goods positions can be added or deleted via the or buttons as well as UN No(s) positions.
Press the “Next” button to proceed to the next booking step. The system validates if all manda-tory fields are inserted. If not, a warning message occurs forcing to insert all mandatory infor-mation.
Press the “Previous” button to go back to the previous booking step.
Press the “Cancel” button to cancel and leave the booking.
Press the “Save” button to save your booking and to edit it another time.
Press the “Save as Template” button to save the booking as a template.
Note:
If you insert a UN ID the system automatically prefills dedicated information based on the DGR database.
If a customer wants to ship limited quantities that do not require detailed DGR specifications, in-sert UN/ID No(s) = 0000 and then activate the Ltd. Qty. checkbox in order to proceed.
If a customer wants to ship NEM (Net Explosive Mass) it is necessary to enter a valid UNID and valid Label No(s). Henceforth it is necessary to make sure that the added values will be correct.

Schenker AG –Digital Solutions - eServices 62
4.2.4 Booking step 4: Summary
All inserted booking information is summarized. The customer user has the option to upload documents and he needs to accept the transport conditions in order to activate the “Submit” but-ton.
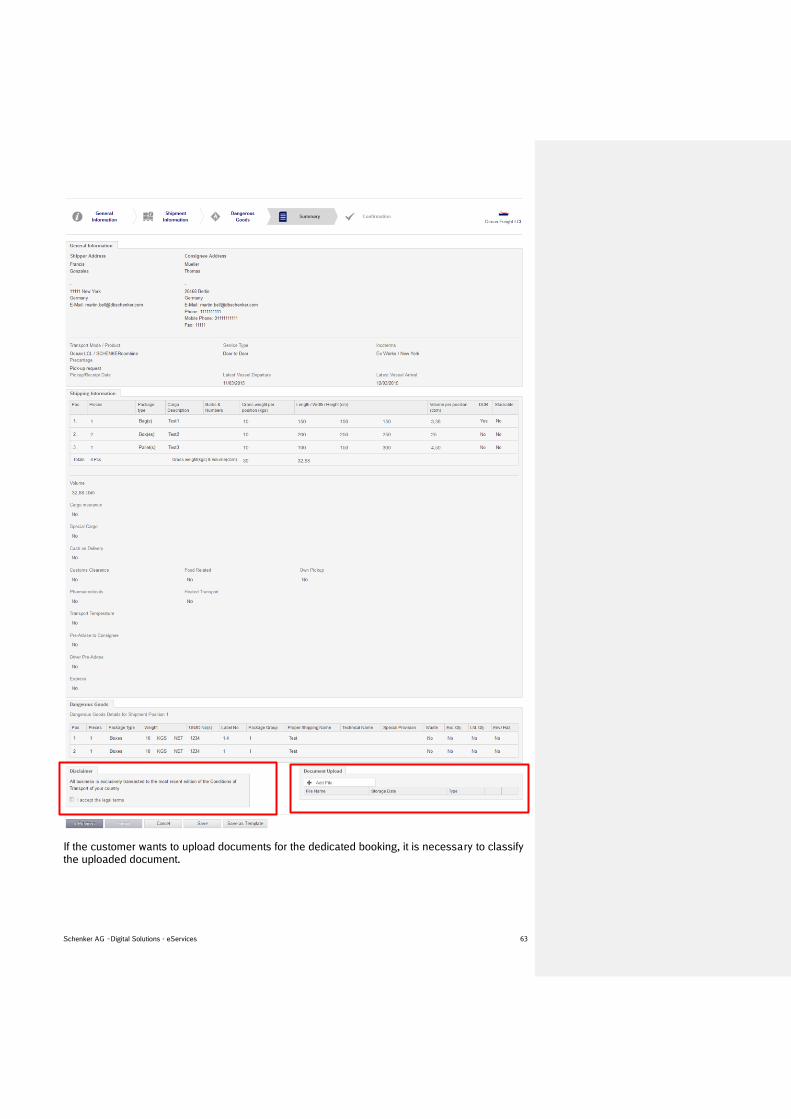
Schenker AG –Digital Solutions - eServices 63
If the customer wants to upload documents for the dedicated booking, it is necessary to classify the uploaded document.

Schenker AG –Digital Solutions - eServices 64
Press the “Submit” button to submit the booking.
If the customer wants to submit a booking request with shipments, that contain dangerous goods and has not added documents, then it is necessary to verify this by the customer. By pressing “Yes” the booking, will be submitted directly.
Press the “Previous” button to go back to the previous booking step.
Press the “Cancel” button to cancel and leave the booking.
Press the “Save” button to save your booking and to edit it another time.
Press the “Save as Template” button to save the booking as a template.
4.2.5 Booking step 5: Confirmation
If a booking has been created successfully, an email confirmation is sent to the email address
which has been provided in the customer account. Furthermore the responsible branch receives
an email notification, which contains the customers country code to identify the bookings origin.

Schenker AG –Digital Solutions - eServices 65
Schenker AG –Digital Solutions - eServices 66
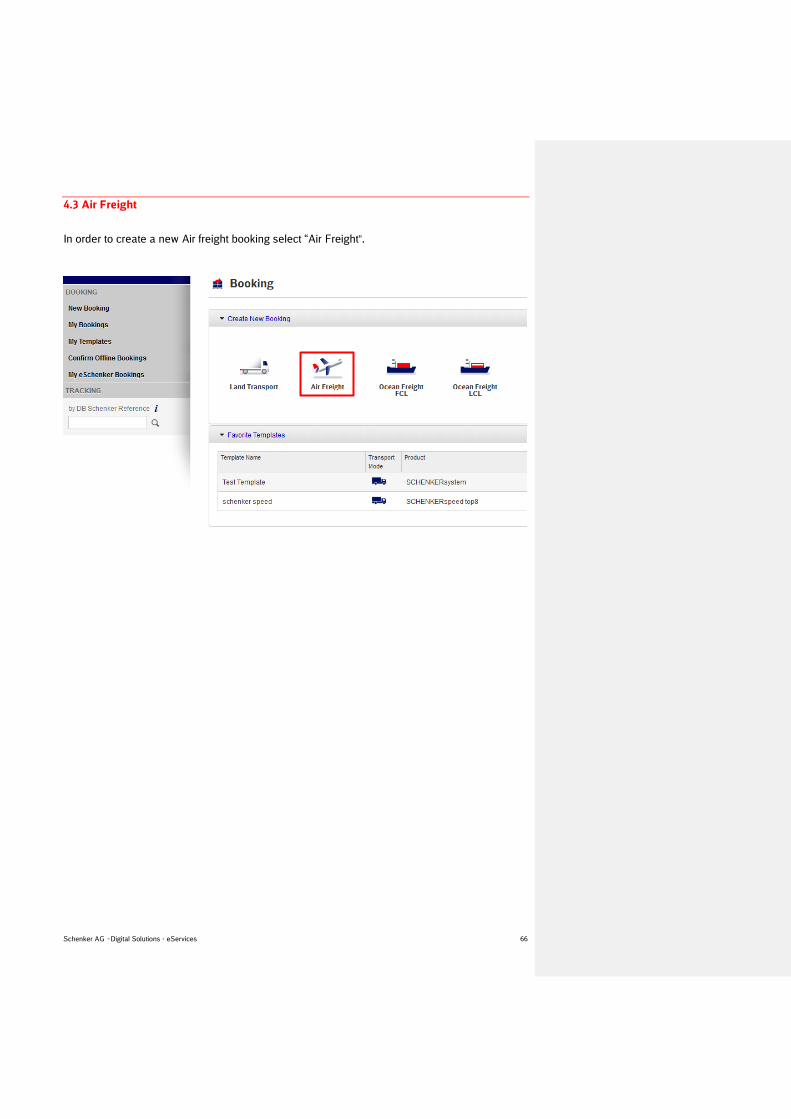
4.3 Air Freight
In order to create a new Air freight booking select “Air Freight”.

Schenker AG –Digital Solutions - eServices 67
4.3.1 Booking step 1: General Information
Follow through all booking steps to complete a booking. Make sure to fill out all mandatory
fields.

Schenker AG –Digital Solutions - eServices 68
Booking address
Up to six address types can be entered: Shipper, Consignee, Pickup, Delivery, Notify and In-voice address.
Please refer to the user guide “Address Management” for a dedicated manual.
Shipper and Consignee address are mandatory. All other address types are optional and can be configured individually for each transport mode (For more information see Booking Solution User Guide). It is possible to search, add or edit an address or delete an optional address type. If another address type is configured as “required”, then it is not possible for the user to delete this address type, because it is mandatory. Special Case: Notify Address If Notifiy Address is mandatory OR additionally selected by the customer, then it is possible to insert further E-Mail addresses to whom the Notify Confirmation Mail will be sent after submit-ting.
Search:
There are two ways to search for an address from your address book.
Type in the address you want to use in the search field and the system will show you the matching result

Schenker AG –Digital Solutions - eServices 69
Use the icon to open the address management modal dialog
Enter your search criteria in the search parameters and press “Search” and select your dedicated address by a double click.
Add:

Schenker AG –Digital Solutions - eServices 70
Use the icon to add a new address which is not in your address book so far. By clicking the icon, the address management modal dialog will open in the “Maintain new address” mode.
Edit:
Use the icon to edit an existing address in your address book. By clicking the icon, the ad-dress management modal dialog will open in the “Maintain Address” mode.

Schenker AG –Digital Solutions - eServices 71
Delete an optional address type:
Use the icon to delete an optional address type. By clicking the icon, the address type will disappear.
Only the optional address types can be deleted.
If you want to use an optional address type again, select it from the additional address dropdown list.
Validation of selected addresses:
It is possible to select the same address for shipper and consignee. For that case it is then man-datory to add a differerent Pick up and / or Delivery Address respectively.
Information:
In the information segment, shipment information can be inserted.
Product:
Select the desired Schenker product from the dropdown list.

Schenker AG –Digital Solutions - eServices 72
Service type:
Select door-door, airport-airport, airport-door or door-airport
Departure Airport / Destination Airport:
Departure Airport is mandatory if the service type is airport-airport or airport-door
Destination Airport is mandatory if the service type is airport-airport or door-airport
Type in the UN airport code or airport name you want to use in the search field and the system will show you the matching result(s)
Incoterms / Incoterm location / Precarriage type – date / Handling instructions / My Air business:
Insert the respective information.
Pick up date Insert the respective Information of Date and Time. Special cases for dates that are on the same day (‘today’): If the pick up day is today, the applicable time ‘From’ is the user’s time + 15 minutes. In case that the user’s time 6 a.m. on the same day, then the default setting time remains 8:00.
References:
Select the “Add New Reference” button to insert references. If the button is selected reference type and reference number are mandatory.
You now have the option to return documents for Shipper´s Reference No. and Shipment No. Export/Import)
Select the or to add or delete references.
The same reference type can be selected multiple times.
Press the “Next” button to proceed to the next booking step. The system validates if all manda-tory fields are inserted. If not, a warning message occurs forcing to insert all mandatory infor-mation.
Press the “Cancel” button to cancel and leave the booking.
Press the “Save” button to save your booking and to edit it another time.
Press the “Save as Template” button to save the booking as a template.

Schenker AG –Digital Solutions - eServices 73
4.3.2 Booking step 2: Shipment Information
Shipment details and options need to be inserted in booking step: Shipment Information. All mandatory fields need to be filled in order to proceed to the next step.
Details:
In the details segment shipment position information needs to be specified.
If the checkbox for DGR = Dangerous goods is checked for at least one shipment position, the dangerous goods entry screen will be show up once the “Next” button is selected.
NOTE:
Dangerous goods can only be selected if the product “SCHENKERjetcargo special” is chosen in the previous booking step.
Shipment Information and Options:
Schenker AG –Digital Solutions - eServices 74
If the checkbox for “Value of Goods” is checked, then the “Value of Goods” and “Currency” need to be specified.
If the checkbox for “Cargo Insurance” is checked, then the “Insurance Value” and “Currency” need to be specified.
If the checkbox for “Special Cargo” is checked, then the special cargo can be specified.
Press the “Next” button to proceed to the next booking step. The system validates if all manda-tory fields are inserted. If not, a warning message occurs forcing to insert all mandatory infor-mation.
Press the “Previous” button to go back to the previous booking step.
Press the “Cancel” button to cancel and leave the booking.
Press the “Save” button to save your booking and to edit it another time.
Press the “Save as Template” button to save the booking as a template.
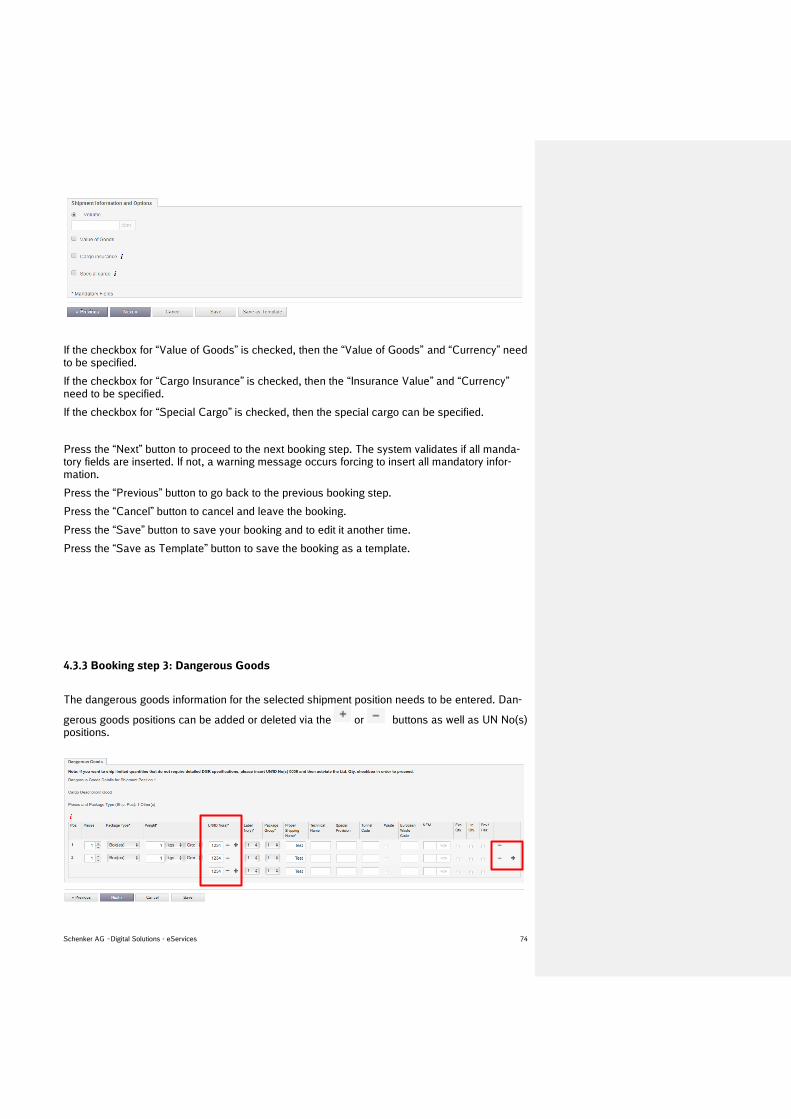
4.3.3 Booking step 3: Dangerous Goods
The dangerous goods information for the selected shipment position needs to be entered. Dan-
gerous goods positions can be added or deleted via the or buttons as well as UN No(s) positions.

Schenker AG –Digital Solutions - eServices 75
Press the “Next” button to proceed to the next booking step. The system validates if all manda-tory fields are inserted. If not, a warning message occurs forcing to insert all mandatory infor-mation.
Press the “Previous” button to go back to the previous booking step.
Press the “Cancel” button to cancel and leave the booking.
Press the “Save” button to save your booking and to edit it another time.
Press the “Save as Template” button to save the booking as a template.
Note:
If you insert a UN ID the system automatically prefills dedicated information based on the DGR database.
If a customer wants to ship limited quantities that do not require detailed DGR specifications, in-sert UN/ID No(s) = 0000 and then activate the Ltd. Qty. checkbox in order to proceed.
If a customer wants to ship NEM (Net Explosive Mass) it is necessary to enter a valid UNID and valid Label No(s). Henceforth it is necessary to make sure that the added values will be correct.
4.3.4 Booking step 4: Summary
All inserted booking information is summarized. The customer user has the option to upload documents and he needs to accept the transport conditions in order to activate the “Submit” but-ton.

Schenker AG –Digital Solutions - eServices 76
If the customer wants to upload documents for the dedicated booking, it is necessary to classify the uploaded document.

Schenker AG –Digital Solutions - eServices 77
Press the “Submit” button to submit the booking.
If the customer wants to submit a booking request with shipments, that contain dangerous goods and has not added documents, then it is necessary to verify this by the customer. By pressing “Yes” the booking, will be submitted directly.
Press the “Previous” button to go back to the previous booking step.
Press the “Cancel” button to cancel and leave the booking.
Press the “Save” button to save your booking and to edit it another time.
Press the “Save as Template” button to save the booking as a template.
4.3.5 Booking step 5: Confirmation
If a booking has been created successfully, an email confirmation is sent to the email address
which has been provided in the customer account. Furthermore the responsible branch receives
an email notification, which contains the customers country code to identify the bookings origin.

Schenker AG –Digital Solutions - eServices 78

Schenker AG –Digital Solutions - eServices 79
4.4 Land Freight
In order to create a new Land freight booking select “Land Transport”.
Note: In the booking settings of a group it can be configured to calculate multiple options based on the information from the land scheduler:
The options need to be activated in the booking settings of a group and can be set individually for Land Domestic and Land International Air and Ocean does not have this option.

Schenker AG –Digital Solutions - eServices 80
Following options are possible:
- Show Estimates Time of Arrival
- Validate available products for this transport lane
- Validate the pickup date against the schedule for this transport lane
- Validate the delivery date against the schedule for this transport lane
Important notice: Booking can only make use of the data that the scheduler provides in the in-terface. If this is not sufficient or updates are needed, then this needs to be aligned.
4.4.1 Booking step 1: General Information
Follow through all booking steps to complete a booking. Make sure to fill out all mandatory
fields.
Booking address
Up to six address types can be entered: Shipper, Consignee, Pickup, Delivery, Notify and In-voice address.
Please refer to the user guide “Address Management” for a dedicated manual.

Schenker AG –Digital Solutions - eServices 81
Shipper and Consignee address are mandatory. All other address types are optional and can be configured individually for each transport mode (For more information see Booking Solution User Guide). It is possible to search, add or edit an address or delete an optional address type. If another address type is configured as “required”, then it is not possible for the user to delete this address type, because it is mandatory. Special Case: Notify Address If Notifiy Address is mandatory OR additionally selected by the customer, then it is possible to insert further E-Mail addresses to whom the Notify Confirmation Mail will be sent after submit-ting.
Search:
There are two ways to search for an address from your address book.
Type in the address you want to use in the search field and the system will show you the matching result

Schenker AG –Digital Solutions - eServices 82
Use the icon to open the address management modal dialog
Enter your search criteria in the search parameters and press “Search” and select your dedicated address by a double click.
Add:
Use the icon to add a new address which is not in your address book so far. By clicking the icon, the address management modal dialog will open in the “Maintain New Address” mode.
Schenker AG –Digital Solutions - eServices 83
Edit:
Use the icon to edit an existing address in your address book. By clicking the icon, the ad-dress management modal dialog will open in the “Maintain Address” mode.
Schenker AG –Digital Solutions - eServices 84
Delete an optional address type:
Use the icon to delete an optional address type. By clicking the icon, the address type will disappear.
Only the optional address types can be deleted.
If you want to use an optional address type again, select it from the additional address dropdown list.
Validation of selected addresses:
It is possible to select the same address for shipper and consignee. For that case it is then man-datory to add a differerent Pick up and / or Delivery Address respectively.
EKAER applicable:
Due to legislative rules the mandatory information segment about EKAER applicable products, will occur, if the consignee address is based in Hungary.
It is mandatory to choose if the shipment is EKAER applicable or not.
If yes, then it is necessary to insert the dedicated EKAER no.
Information:
In the information segment, shipment information can be inserted.
Product:
Select the desired Schenker product from the dropdown list.
Incoterms / Incoterm location / Pickup date / Handling instructions:
Insert the respective information.
Pick up date

Schenker AG –Digital Solutions - eServices 85
Insert the respective Information of Date and Time. Special cases for dates that are on the same day (‘today’): If the pick up day is today, the applicable time ‘From’ is the user’s time + 15 minutes. In case that the user’s time 6 a.m. on the same day, then the default setting time remains 8:00.
References:
Select the “Add New Reference” button to insert references. If the button is selected reference type and reference number are mandatory.
You now have the option to return documents for Shipper´s Reference No. and Shipment No. Export/Import)
Select the or to add or delete references.
The same reference type can be selected multiple times.
Press the “Next” button to proceed to the next booking step. The system validates if all manda-tory fields are inserted. If not, a warning message occurs forcing to insert all mandatory infor-mation.
Press the “Cancel” button to cancel and leave the booking.
Press the “Save” button to save your booking and to edit it another time.
Press the “Save as Template” button to save the booking as a template.
4.4.2 Booking step 2: Shipment Information
Shipment details and options need to be inserted in booking step: Shipment Information. All mandatory fields need to be filled in order to proceed to the next step.
Schenker AG –Digital Solutions - eServices 86
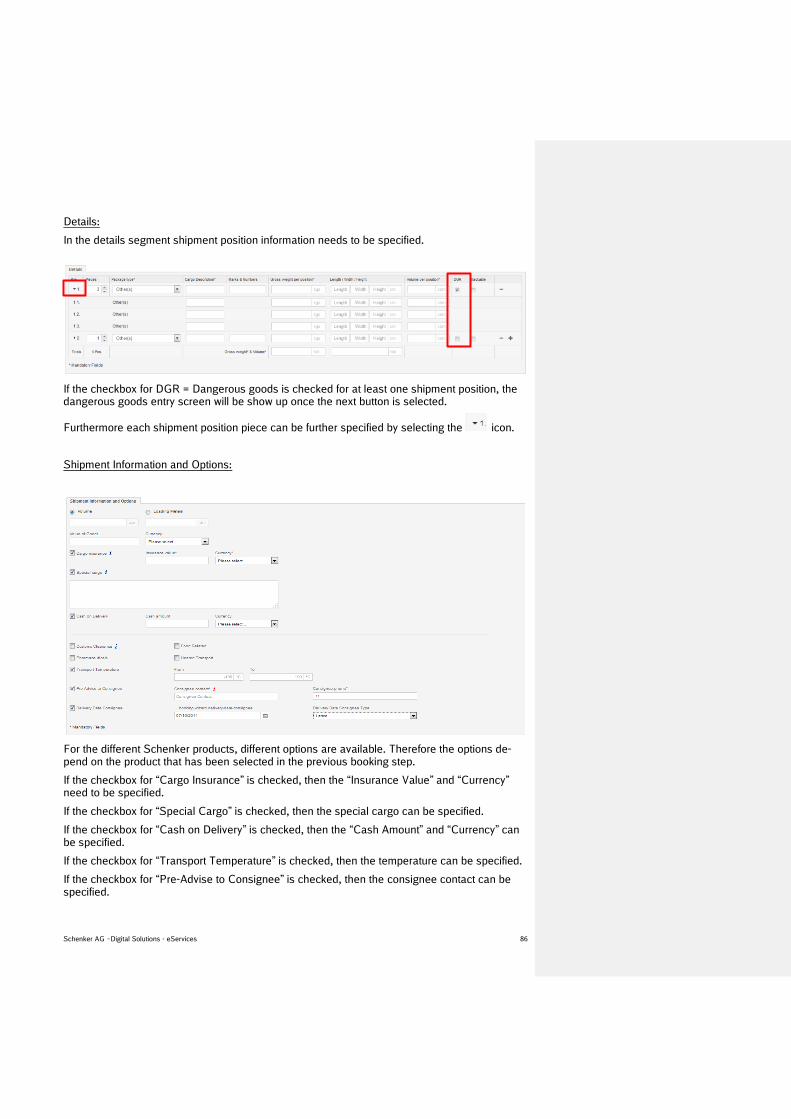
Details:
In the details segment shipment position information needs to be specified.
If the checkbox for DGR = Dangerous goods is checked for at least one shipment position, the dangerous goods entry screen will be show up once the next button is selected.
Furthermore each shipment position piece can be further specified by selecting the icon.
Shipment Information and Options:
For the different Schenker products, different options are available. Therefore the options de-pend on the product that has been selected in the previous booking step.
If the checkbox for “Cargo Insurance” is checked, then the “Insurance Value” and “Currency” need to be specified.
If the checkbox for “Special Cargo” is checked, then the special cargo can be specified.
If the checkbox for “Cash on Delivery” is checked, then the “Cash Amount” and “Currency” can be specified.
If the checkbox for “Transport Temperature” is checked, then the temperature can be specified.
If the checkbox for “Pre-Advise to Consignee” is checked, then the consignee contact can be specified.

Schenker AG –Digital Solutions - eServices 87
If the checkbox for “Delivery Date Consignee” is checked, then the delivery date and type can be specified.
Press the “Next” button to proceed to the next booking step. The system validates if all manda-tory fields are inserted. If not, a warning message occurs forcing to insert all mandatory infor-mation.
Print CMR:
NOTE: This Shipment Option is only available for dedicated countries using CIEL as their TMS and needs to be configured in the booking solution settings. It is not available by default with re-lease 1.2.11. The CIEL booking solution needs to be released first.
With this Shipment Option it is possible for the customer to indicate to send a CMR document to a dedicated email in order to receive the CMR document per mail.
If the checkbox for “Print CMR” is checked, then the respective mail address needs to be in-serted.
Press the “Previous” button to go back to the previous booking step.
Press the “Cancel” button to cancel and leave the booking.
Press the “Save” button to save your booking and to edit it another time.
Press the “Save as Template” button to save the booking as a template.
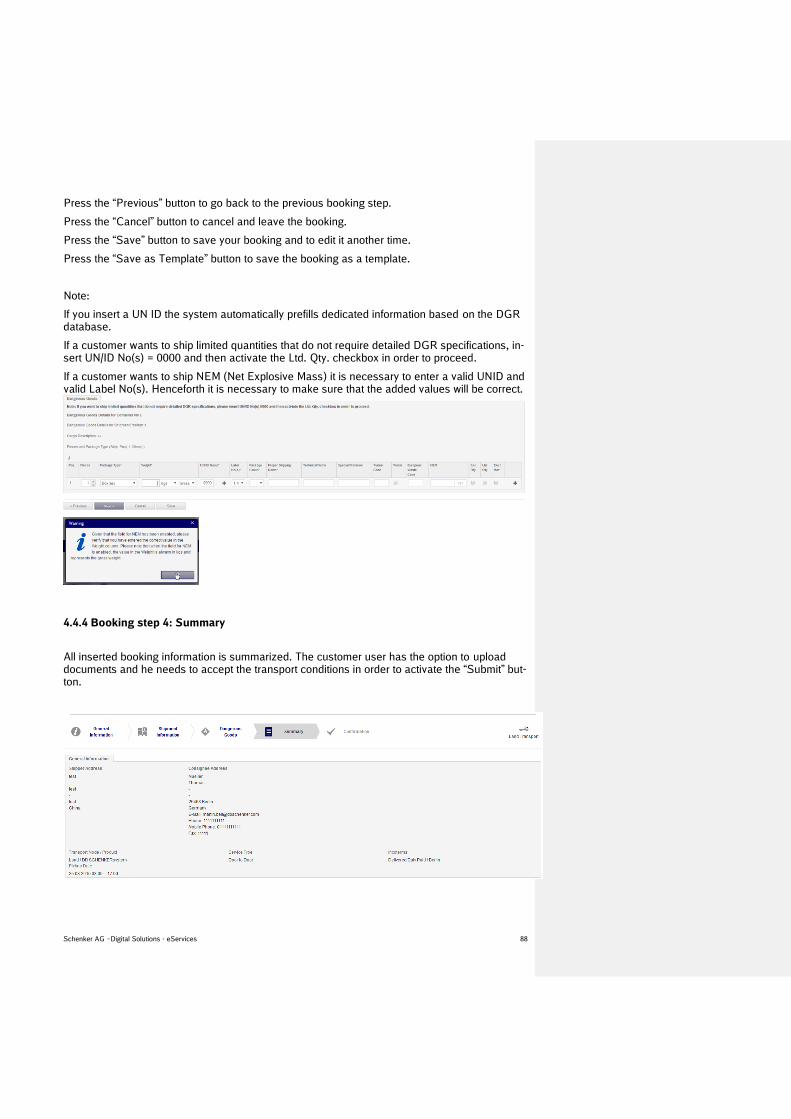
4.4.3 Booking step 3: Dangerous Goods
The dangerous goods information for the selected shipment position needs to be entered. Dan-
gerous goods positions can be added or deleted via the or buttons as well as UN No(s) positions.
Press the “Next” button to proceed to the next booking step. The system validates if all manda-tory fields are inserted. If not, a warning message occurs forcing to insert all mandatory infor-mation.
Schenker AG –Digital Solutions - eServices 88
Press the “Previous” button to go back to the previous booking step.
Press the “Cancel” button to cancel and leave the booking.
Press the “Save” button to save your booking and to edit it another time.
Press the “Save as Template” button to save the booking as a template.
Note:
If you insert a UN ID the system automatically prefills dedicated information based on the DGR database.
If a customer wants to ship limited quantities that do not require detailed DGR specifications, in-sert UN/ID No(s) = 0000 and then activate the Ltd. Qty. checkbox in order to proceed.
If a customer wants to ship NEM (Net Explosive Mass) it is necessary to enter a valid UNID and valid Label No(s). Henceforth it is necessary to make sure that the added values will be correct.
4.4.4 Booking step 4: Summary
All inserted booking information is summarized. The customer user has the option to upload documents and he needs to accept the transport conditions in order to activate the “Submit” but-ton.
Schenker AG –Digital Solutions - eServices 89
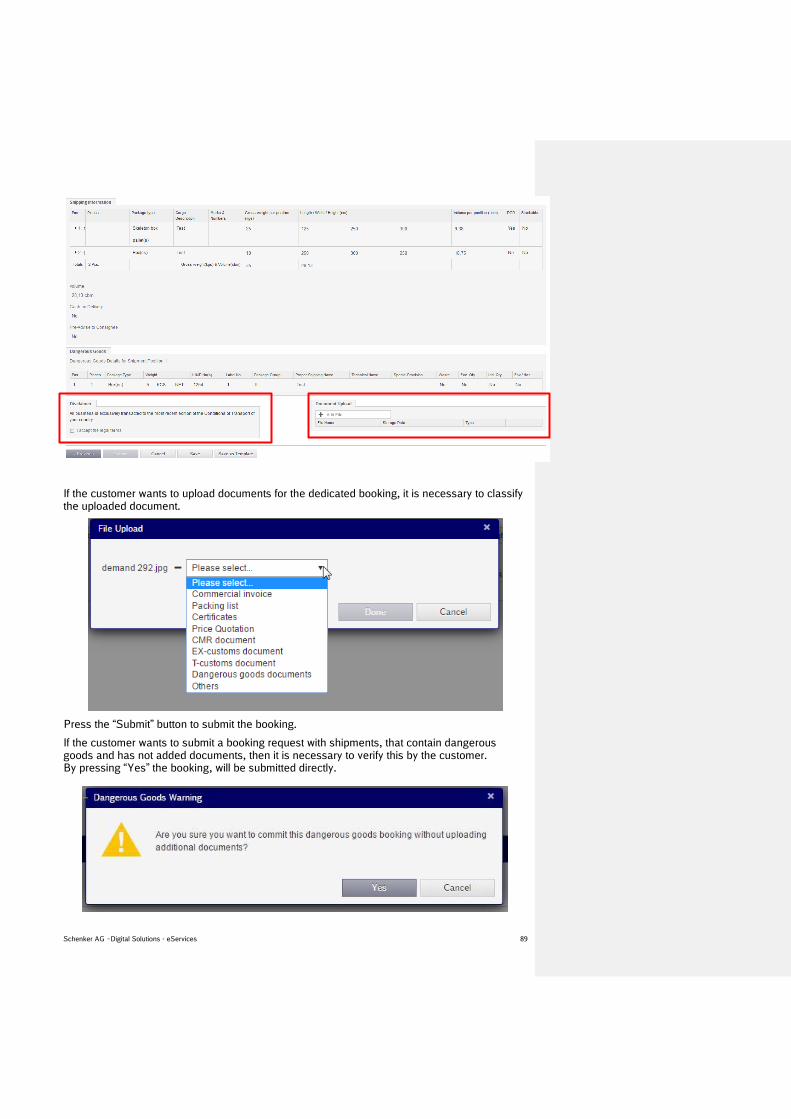
If the customer wants to upload documents for the dedicated booking, it is necessary to classify the uploaded document.
Press the “Submit” button to submit the booking.
If the customer wants to submit a booking request with shipments, that contain dangerous goods and has not added documents, then it is necessary to verify this by the customer. By pressing “Yes” the booking, will be submitted directly.

Schenker AG –Digital Solutions - eServices 90
Press the “Previous” button to go back to the previous booking step.
Press the “Cancel” button to cancel and leave the booking.
Press the “Save” button to save your booking and to edit it another time.
Press the “Save as Template” button to save the booking as a template.
4.4.5 Booking step 5: Confirmation
If a booking has been created successfully, an email confirmation is sent to the email address
which has been provided in the customer account. Furthermore the responsible branch receives
an email notification, which contains the customers country code to identify the bookings origin.
For land transport bookings additionally barcode labels can be printed and sent to a dedicated email address.
4.4.6 Neutral Shipping
NOTE: This chapter only contains functionalities for German Landfreight.
The neutral shipping option can be chosen via the checkbox below the address information.

Schenker AG –Digital Solutions - eServices 91
Then the customer has to select between two options how to deliver the invoice: “Invoice to real shipper (Pick up Address)” and “Invoice based on Incoterm or Invoice Address”.

Schenker AG –Digital Solutions - eServices 92
4.5 My Bookings
In the My Bookings segment the customer can maintain his latest bookings.
Select My Bookings in the left menu bar to access “My Bookings”.
You can now distinguish between “Land Domestic” and “Land International”.
In the Search segment the customer can configure his individual search based on multiple search criteria.
Additional criteria contains Departure Country, Destination Country, Last tracking status and at-tached document type.
Furthermore it is possible to add and filter for several Package Type(s).
Save the specific search via the icon. The customer is then asked to define a specific name for his search.

Schenker AG –Digital Solutions - eServices 93
All saved searches can then be found in the left navigation bar after clicking on the small trian-gle on the left side of “My Bookings”.
The customer is also able to reset the search with the icon.
In the result segment of “My Bookings”, the respective search results are listed in an overview.
The display of the columns can be adjusted individually via the icon.
New: you can now display the column “Origin City”.

Schenker AG –Digital Solutions - eServices 94
The latest shipment event for bookings is displayed in the “Latest Event” column. The event check is updated every six hours.
The latest event location is displayed in the “Event Location” column.
By looking at the “eDesk Name” column it is possible to determine the eDesk name without communicating with the local administrator.
Via the column “Attachment” it is possible to see in the overview how many files are attached to the booking.
The column “Stackable” displays, if the shipment goods are stackable or not.

Schenker AG –Digital Solutions - eServices 95
To view the details of a booking, the respective booking row needs to be marked and the
icon needs to be selected or the row needs to be double-clicked.
Within the details of a specific booking the E-Mail contacts are provided as hyperlinks. Direct mails can be send via this option.
It is possible to edit not submitted bookings by marking the respective booking row or using the
button and clicking on the icon. The customer may also delete the not submitted
bookings with the icon.
With the icon one can copy the selected booking.
There is the possibility to download the freight list as a PDF. The customer has to mark the de-
sired bookings and click on the icon.
With the icon one can download an excel table with the overview of the latest bookings.
The excel export has been enhanced and shows all the information regarding to the booking in separated columns.
With the icon one can print multiple barcode labels for the selected bookings including all booking status. These barcode labels then will be send to a dedicated email address.
There is also the possibility to track the selected booking via the icon, which allows you to track your shipment while staying in the ‘My Bookings’ section whithout loosing your search results.
Furthermore there is the option to submit multiple bookings at once via which are in the status: Ready to submit.

Schenker AG –Digital Solutions - eServices 96
Bookings in status ‘Ready to submit’ are bookings that have been saved on the confirmation page where the the legal terms have been accepted.
4.6 My Templates
In the “My Templates” segment the customer can maintain his templates.
Select “My Templates” in the left menu bar to access “My Templates”.
It is possible to search for a template and also to save the search via the icon. The cus-tomer is then asked to define a specific name for his search.
To create a new template select the icon.
To use a template, mark the respective row and select the icon. The customer is then automatically forwarded to the first step of the booking.
One can also delete templates with the icon.
The user is able to share the template with his group. For this he has to select the checkbox in the column “Share with Group”.
To add some templates to the favorite templates, the customer has to select the checkbox in the column “Favorite”. The templates are then shown on the “New Booking” page and one can
create a booking from the template by selecting the icon.

Schenker AG –Digital Solutions - eServices 97

Schenker AG –Digital Solutions - eServices 98
5 eDesk Coordination and Monitoring Setup
An eDesk is a virtual Schenker employee account. An eDesk can view all bookings for a dedi-cated Schenker branch or an eDesk or bookings that are assigned to a specific branch depart-ment via User Groups. The eDesk can be configured in that way that he / she decides which Schenker office shall receive the pickup order.
5.1 eDesk Monitoring
5.1.1 Branch Monitoring
To setup an eDesk branch monitoring scenario, following configuration is needed:
1. Create a user group that shall monitor the bookings of a dedicated branch (how to do this is described in the Portal Administration user guide)
2. Assign the branch(es) to this user group
This needs to be maintained in the user group “eDesk Settings” in the “Misc” segment. Select the button “Select Branches to monitor Bookings” and add the respective branches via the search filters and the shuffle box. The amout of user groups to monitor bookings is limited to 250 user groups.

Schenker AG –Digital Solutions - eServices 99
3. To monitor the bookings the eService “eDesk” needs to be assigned to the user group. (See chapter 3.1 for more information on eService assignment)
4. Now add the following eDesk role to the Schenker user group. (See chapter 3.1 for more information on role assignment)
o eDesk Booking Observer
The users in this user group now can monitor all Branch, eDesk and User Group/Depart-ment related bookings in the eService “eDesk”

Schenker AG –Digital Solutions - eServices 100
5.1.2 eDesk User Group/Department Monitoring
To setup an eDesk User Group/Department monitoring scenario, following configuration is needed:
1. Create a user group whose bookings shall be monitored.
a. Configure the booking settings
b. If desired, configure booking settings where the responsible branch is further specified on department level
2. Create a user group who shall monitor a different user group (or deparment)
This needs to be maintained in the specific User Group “eDesk Settings” in the “Misc” segment. Select the button “Select User Group to monitor Bookings” and add the re-spective User Group (with the dedicated department)
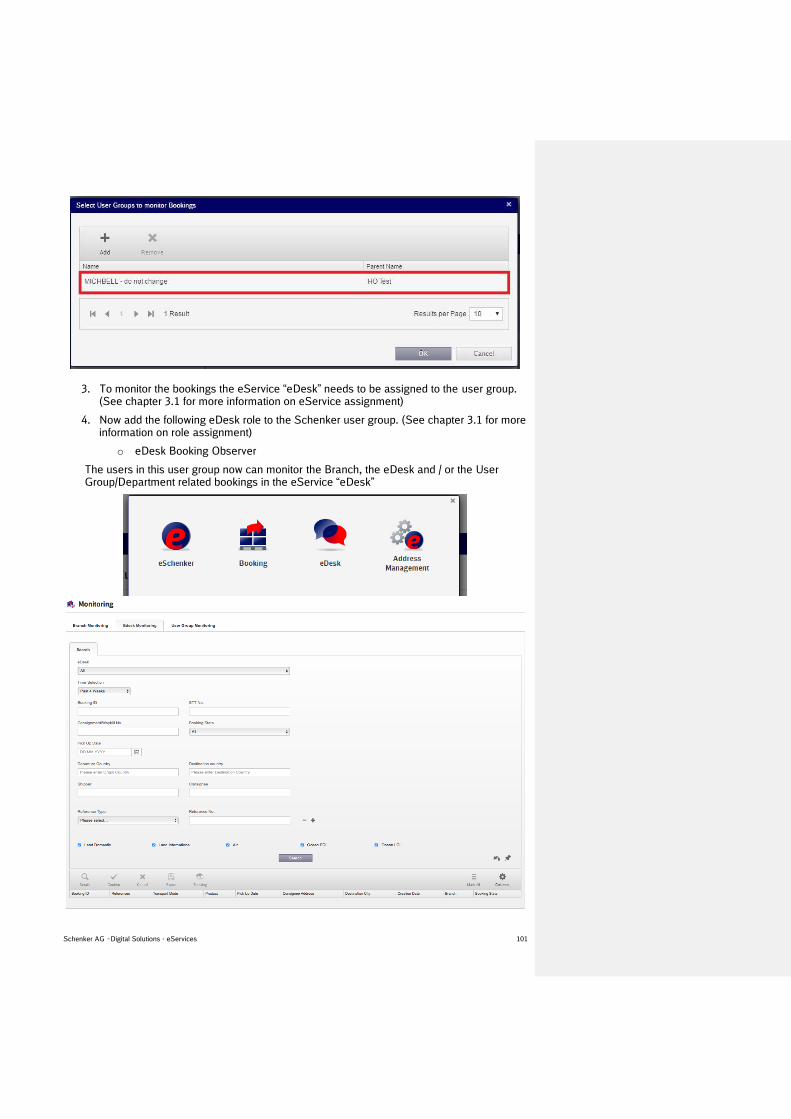
Schenker AG –Digital Solutions - eServices 101
3. To monitor the bookings the eService “eDesk” needs to be assigned to the user group. (See chapter 3.1 for more information on eService assignment)
4. Now add the following eDesk role to the Schenker user group. (See chapter 3.1 for more information on role assignment)
o eDesk Booking Observer
The users in this user group now can monitor the Branch, the eDesk and / or the User Group/Department related bookings in the eService “eDesk”

Schenker AG –Digital Solutions - eServices 102
The display of the columns can be adjusted individually via the icon.
With the icon one can download an excel table with the overview of the latest bookings.
The excel export has been enhanced and shows all the information regarding to the booking in separated columns.
There is also the possibility to track the selected booking via the icon, which allows you to track your shipment while staying in the ‘eDesk Monitoring’ section whithout loosing your search results.
5.2 eDesk Booking Coordination (Leadbranch / Controltower Function)
5.2.1 eDesk Administration Setup
To setup an eDesk booking coordination scenario, following configuration is needed:
1. A Global Portal Administrator needs to create an eDesk account in the eDesk Admin-istration area of the eDesk eService.
To create a new eDesk following information is needed:
- The eDesk name
- The eDesk description
- The eDesk email list (up to 500 characters). The list needs to be comma-separated with-out a blank.

Schenker AG –Digital Solutions - eServices 103
2. As next step the customer user group needs to be configured. In the user group’s book-ing settings the assignment choice ”Use eDesk” needs to be selected and the respective eDesk needs to be selected from the drop down list. See chapter 3.2 for further infor-mation.
3. As a next step the eDesk now needs to be assigned to a user group (Schenker users) that shall handle the coordination.
The users in this user group can then coordinate all bookings that have been booked on the respective eDesk.
This needs to be maintained in the user group “eDesk Settings” in the “Misc” segment.
Select the button “Select Booking eDesks for Coordination” and add the respective eDesk via the shuffle box.
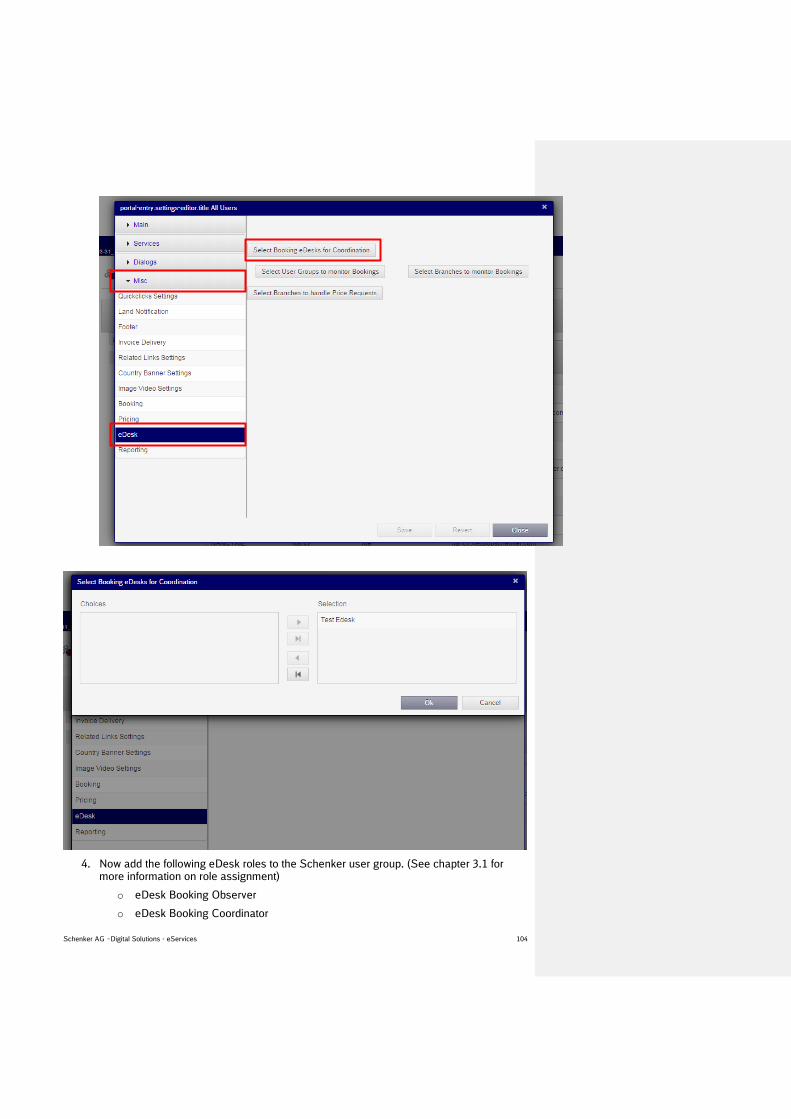
Schenker AG –Digital Solutions - eServices 104
4. Now add the following eDesk roles to the Schenker user group. (See chapter 3.1 for more information on role assignment)
o eDesk Booking Observer
o eDesk Booking Coordinator
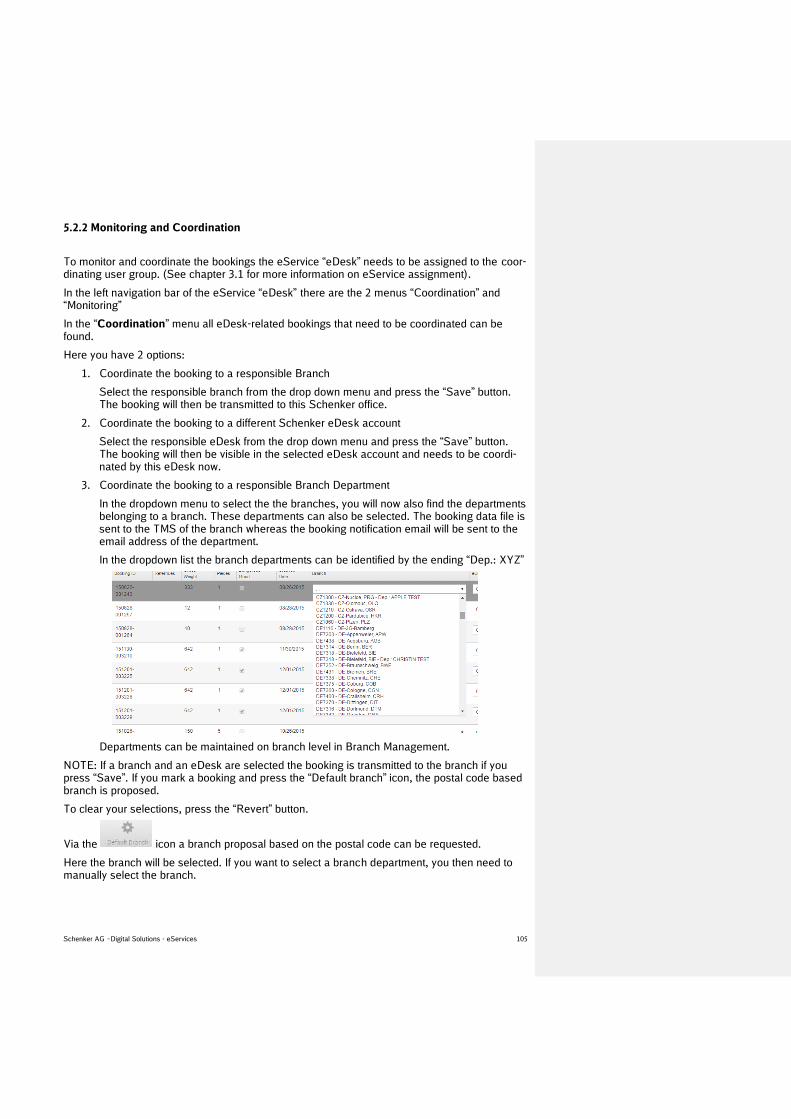
Schenker AG –Digital Solutions - eServices 105
5.2.2 Monitoring and Coordination
To monitor and coordinate the bookings the eService “eDesk” needs to be assigned to the coor-dinating user group. (See chapter 3.1 for more information on eService assignment).
In the left navigation bar of the eService “eDesk” there are the 2 menus “Coordination” and “Monitoring”
In the “Coordination” menu all eDesk-related bookings that need to be coordinated can be found.
Here you have 2 options:
1. Coordinate the booking to a responsible Branch
Select the responsible branch from the drop down menu and press the “Save” button. The booking will then be transmitted to this Schenker office.
2. Coordinate the booking to a different Schenker eDesk account
Select the responsible eDesk from the drop down menu and press the “Save” button. The booking will then be visible in the selected eDesk account and needs to be coordi-nated by this eDesk now.
3. Coordinate the booking to a responsible Branch Department
In the dropdown menu to select the the branches, you will now also find the departments belonging to a branch. These departments can also be selected. The booking data file is sent to the TMS of the branch whereas the booking notification email will be sent to the email address of the department.
In the dropdown list the branch departments can be identified by the ending “Dep.: XYZ”
Departments can be maintained on branch level in Branch Management.
NOTE: If a branch and an eDesk are selected the booking is transmitted to the branch if you press “Save”. If you mark a booking and press the “Default branch” icon, the postal code based branch is proposed.
To clear your selections, press the “Revert” button.
Via the icon a branch proposal based on the postal code can be requested.
Here the branch will be selected. If you want to select a branch department, you then need to manually select the branch.

Schenker AG –Digital Solutions - eServices 106
In the eDesk coordination it is possible to edit bookings and change data via the icon. The original booking creator will be notified via mail about any changes. It is now also possible to change the shipper and consignee addresses.
From the details page of a booking, it is furthermore possible to send an email to dedicated re-cipients and add notes.
In the “Monitoring” menu all eDesk-related bookings that have been coordinated and need to be coordinated can be found.
Here you will also find all branch related bookings if the user group has been configured to mon-itor branch-related bookings. (See chapter 5.1 for further information)
Here it is possible for an eDesk User to Cancel bookings and manually confirm bookings.

Schenker AG –Digital Solutions - eServices 107
6 My Supplier eService
The My Supplier eService is an eService which gives the user the possibility to easily monitor the bookings of his suppliers. Before the user can use the eService, following settings need to be configured:
1. Assgin the “My Supplier” Service to the user group of the user.
2. Assign the supplier groups to the user group of the user. Select “Misc” and then “My Supplier” in the user group settings and then click on the “add” icon to search for the supplier groups and to add them after selecting the right ones.

Schenker AG –Digital Solutions - eServices 108

Schenker AG –Digital Solutions - eServices 109
To go to the My Supplier eService select the icon in the Launchpad.
In the search segment all the user groups, which are assigned as a supplier, are automatically selected.
The user may configure an individual search and save it with the icon.

Schenker AG –Digital Solutions - eServices 110
He is then asked to define a name fort he saved search.
The saved search is available in the left side menu after clicking on the triangle which is on the left side of “My Supplier Bookings”.
After selecting the search button, all the results are shown in the overview segment. It is then possible to view the details of the bookings and also to track them.
Via the icon, one may adjust the selected columns.
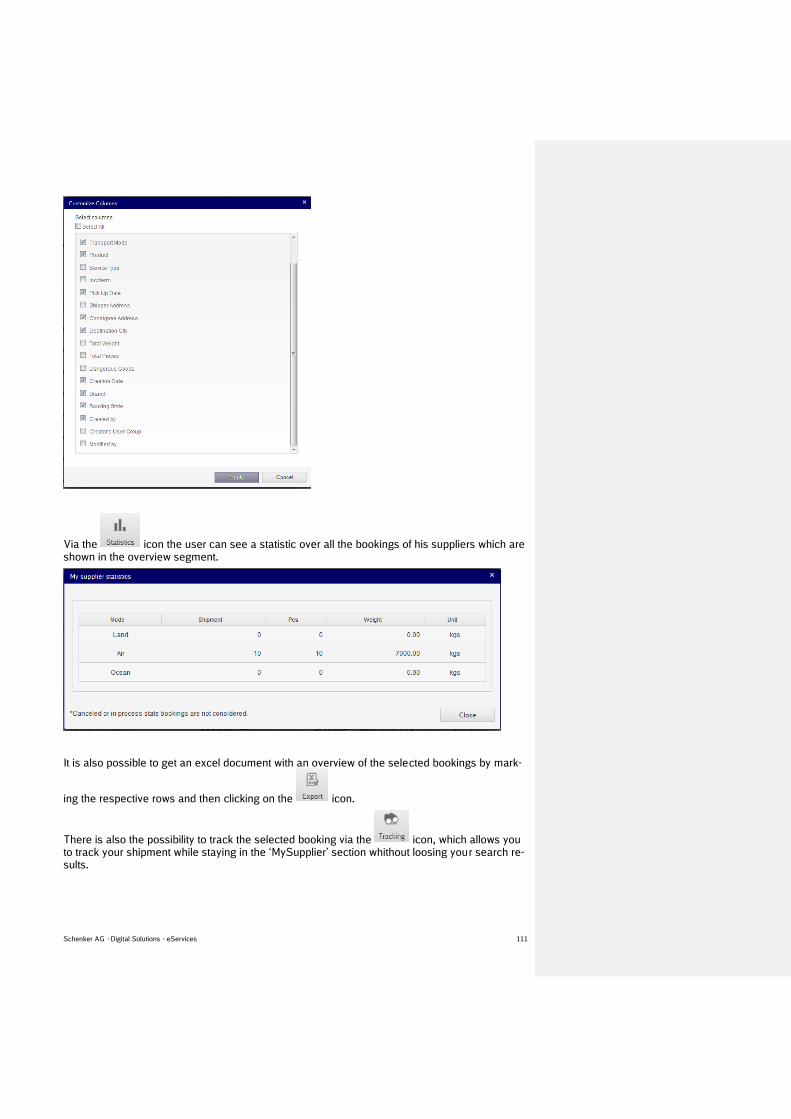
Schenker AG –Digital Solutions - eServices 111
Via the icon the user can see a statistic over all the bookings of his suppliers which are shown in the overview segment.
It is also possible to get an excel document with an overview of the selected bookings by mark-
ing the respective rows and then clicking on the icon.
There is also the possibility to track the selected booking via the icon, which allows you to track your shipment while staying in the ‘MySupplier’ section whithout loosing your search re-sults.
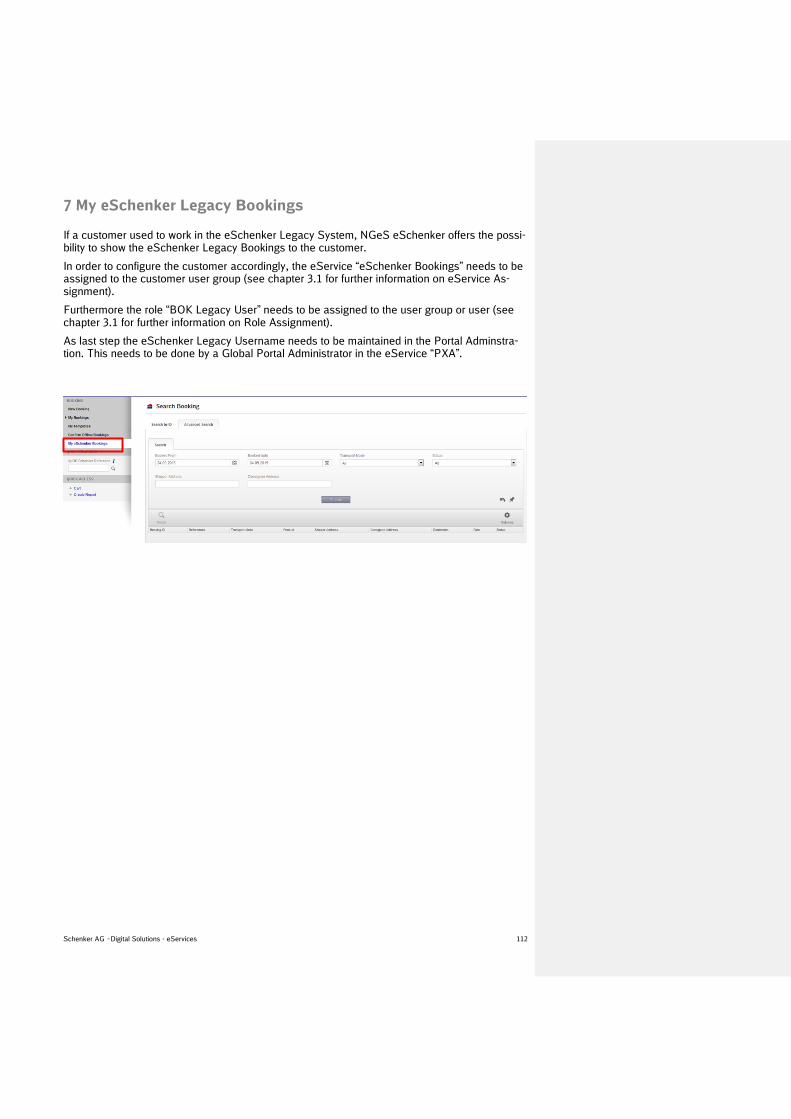
Schenker AG –Digital Solutions - eServices 112
7 My eSchenker Legacy Bookings
If a customer used to work in the eSchenker Legacy System, NGeS eSchenker offers the possi-bility to show the eSchenker Legacy Bookings to the customer.
In order to configure the customer accordingly, the eService “eSchenker Bookings” needs to be assigned to the customer user group (see chapter 3.1 for further information on eService As-signment).
Furthermore the role “BOK Legacy User” needs to be assigned to the user group or user (see chapter 3.1 for further information on Role Assignment).
As last step the eSchenker Legacy Username needs to be maintained in the Portal Adminstra-tion. This needs to be done by a Global Portal Administrator in the eService “PXA”.

Schenker AG –Digital Solutions - eServices 113
8 Customization Capabilities
Following customization settings can be configured in the Portal Administration as of today.
1. Branch Maintenance
A branch per transport mode and location can be configured individually. All below shown data elements can be configured and maintained by a Global Portal Administra-tor.

Schenker AG –Digital Solutions - eServices 114
2. Terms of Trade
All Incoterms can be defined individually per transport lane, depending on the departure and destination country. The settings can be configured and maintained by a Global Por-tal Administrator.
3. Country Data Maintenance
Country specific address maintenance information can be configured individually. All be-low shown data elements can be configured and maintained by a Global Portal Adminis-trator.
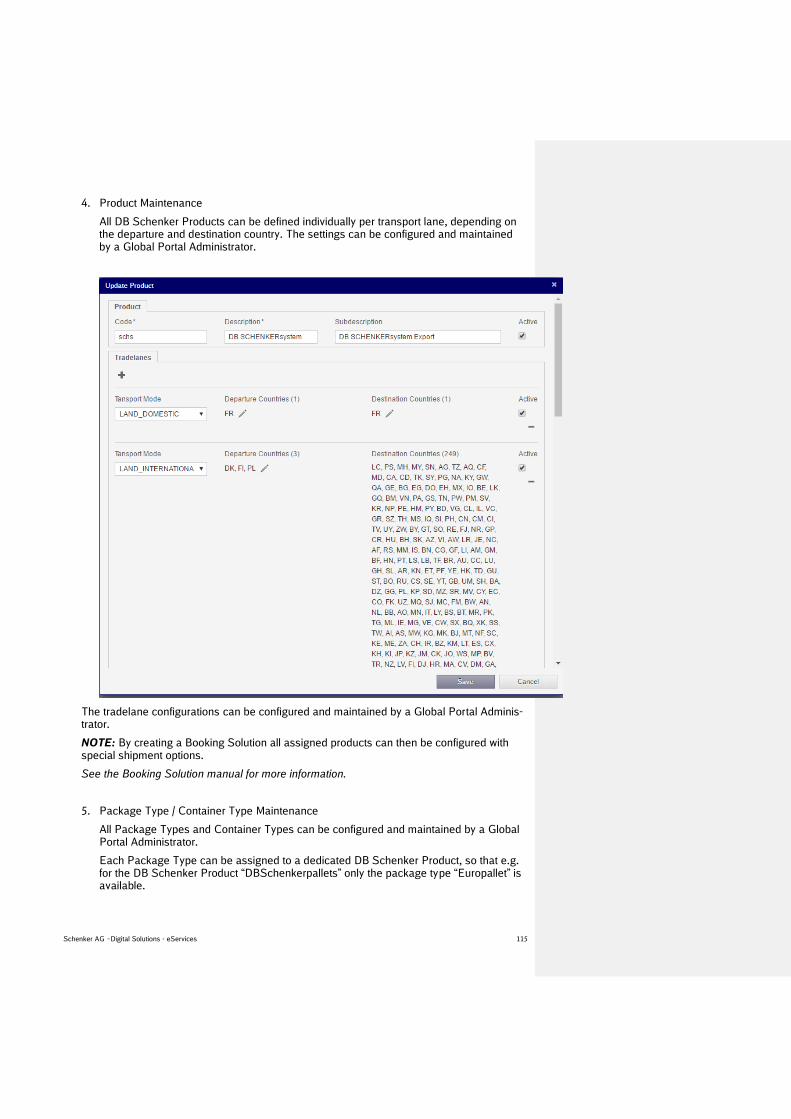
Schenker AG –Digital Solutions - eServices 115
4. Product Maintenance
All DB Schenker Products can be defined individually per transport lane, depending on the departure and destination country. The settings can be configured and maintained by a Global Portal Administrator.
The tradelane configurations can be configured and maintained by a Global Portal Adminis-trator.
NOTE: By creating a Booking Solution all assigned products can then be configured with special shipment options.
See the Booking Solution manual for more information.
5. Package Type / Container Type Maintenance
All Package Types and Container Types can be configured and maintained by a Global Portal Administrator.
Each Package Type can be assigned to a dedicated DB Schenker Product, so that e.g. for the DB Schenker Product “DBSchenkerpallets” only the package type “Europallet” is available.

Schenker AG –Digital Solutions - eServices 116
6. Country Postal Code Routing
For each country and transport mode an individual Postal Code Routing can be up-loaded and maintained by a Global Portal Administrator.
7. Transmission of booking data to German System “Cadis”
A user group can be configured in that way that the bookings from users in this user group are not transmitted to the German transport management system “Cadis”
NOTE: In the upcoming eSchenker releases the customization settings will be enhanced further and the documentation will be adapted accordingly.