Embed Size (px)
Citation preview
IOAK-3230 / 8061085(04.2015./2)
10131.3QX
(ES) MANUAL DE INSTRUCCIONES...............................2(EN) INSTRUCTION MANUAL.......................................24
CO
2
¡Nota!Use el horno solamente después de leer el presente manual.
El horno está destinado solamente para uso doméstico.
El fabricante se reserva el derecho a realizar cambios que no influyan en la formade funcionamiento del aparato
ESTIMADO CLIENTE,
Los hornos Amica son fáciles de usar y muy eficaces. Después de leer el manual, el uso del horno será muy sencillo.
Antes de abandonar la fábrica y ser embalado, el horno fue minuciosamente comprobadopara que funcione siguiendo los más estrictos controles de calidad.
Les rogamos lean con atención este manual de uso antes de encender el aparato.Seguir las instrucciones incluidas en el presente manual les protegerá de un uso inadecuado.
Guarde el manual de manera que esté siempre accesible.Siga rigurosamente las instrucciones de uso para evitar contratiempos.
3
CONTENIDO
Información básica.........................................................................................2Seguridad................................................................................................................................4Descripción del producto..........................................................................................8Características del producto......................................................................................9Instalación..............................................................................................................10Funcionamiento...............................................................................................................12Cocinado en el horno - consejos prácticos.....................................................16Limpieza y mantenimiento del horno..............................................................18Situaciones de emergencia....................................................................................................22Datos técnicos............................................................................................23
4
SEGURIDAD
Nota. El horno y sus partes visibles externas se calientan durante el uso. En caso de tocar los elementos calefacto-res tenga especial cuidado. Mantenga alejados a los niños menores de 8 años si no están al cuidado de un adultos.
El uso de este equipo por personas (incluyendo niños) con capacidad física, sensorial o psíquica limitada, que no tengan conocimientos o estén familiarizados con el uso del aparato, puede ser peligroso, por lo que se recomienda lo hagan bajo vigilancia o sigan las instrucciones de uso del aparato bajo la supervisión de la persona responsable de su seguridad. Evite que los niños jueguen con el aparato y realice la limpieza y las tareas de mantenimiento cuando los niños estén bajo tutela.
Durante el uso, el equipo se calienta. Por favor, tenga pre-caución y no toque los elementos calientes dentro del horno.
Las partes exteriores visibles pueden calentarse durante el uso, por lo que se recomienda cuidar que los niños pequeños se mantengan alejados del dispositivo.
Nota. No usar líquidos abrasivos de limpieza o artículos metálicos rugosos para la limpieza de la puerta de vidrio, ya que podrían rayar la superficie, y provocar roturas del vidrio.
Nota. Para evitar riesgos eléctricos, antes de reemplazar la bombilla asegúrese de que el equipo está apagado.
5
SEGURIDAD
Para limpiar el horno no se deben usar dispositivos de lim- pieza con vapor.
¡Peligro de quemaduras! A la hora de abrir la puerta del horno puede que salga vapor. Durante, o una vez terminada la cocción, abra con cuidado la puerta del horno. Cuando abra la puerta, no se incline por encima de ella Tenga en cuenta que en función de la temperatura el vapor puede ser invisible
l Tenga cuidado de que los cables de otros electrodomésticos no estén en contacto o toquen el horno, ya que el aislamiento del cable podría no resistir las altas tempe-raturas.
l No se debe dejar el horno sin vigilancia a la hora de la cocción. Los aceites y grasas podrían provocar fuego a consecuencia del sobrecalentamiento.
l En la puerta del horno no se deben colocar recipientes cuyo peso supere los 15 kg.
l No use el horno si observa que no funciona correctamente. Todas las incidencias deben ser reparadas por los servicios técnicos.
l En caso de una avería técnica, es obligatorio desconectar. el horno de la alimentación eléctrica.
l El dispositivo debe ser usado solamente para los fines para los cuales ha sido diseñado. Cualquier otro uso (por ejemplo, calentar una habitación) se considera inadecuado y peligroso.
6
CÓMO AHORRAR ENERGÍA
Al usar la energía de forma responsable cuidamos la economía familiar y ac-tuamos a favor del medio ambiente. Merece la pena ahorrar energía eléctrica. Esto lo conseguimos de la
siguiente forma:
lEvite la situación de “comprobar si los platos están preparados”.Evite abrir demasiadas veces la puerta del horno mientras está en funcionamiento.
lUse el horno para cocinar grandes cantidades.Una carne con peso inferior a 1 Kg se prepara de forma más económica en una placa.
lEmpleo de calor sobrante del horno. En caso de preparar un plato durante más de 40 minutos es aconsejable desconectar el horno 10 minutos antes de finalizar la cocción.
¡Nota! En caso de usar el programador hay que introducir los tiempos más cortos en la preparación del plato.
lApertura y cierre de la puerta del horno.Vigile que los perfiles de la puerta estén limpios para evitar cualquier fuga de calor.
lNo empotrar el horno cerca a de las neveras. En este caso contrario el gasto de energía eléctrica aumentaría sin sentido.
7
DESEMBALAJE RETIRO DE USO
El embalaje fue diseñado para proteger el producto du-rante el tiempo de transporte. Después de desembalar el dispositivo les rogamos eliminen los elementos del embalaje de forma que no
sea perjudicial para el medio ambiente.Todos los materiales que se emplean para embalar no son nocivos para el medio am- biente, son 100% reciclables y llevan el respectivo símbolo.
¡Nota! Los materiales de embalaje (bolsas de polietileno, trozos de poliuretano, etc.) deben mantenerse lejos del alcance de niños a la hora de desembalar.
Este aparato está marcado con símbolo de contenedor para desechos tachado de acuerdo con la Directiva Euro- pea 2012/19/UE y la ley espa-ñola sobre equipos eléctricos y electrónicos usados R.D.
208/2005.
Este símbolo informa que este aparato, una vez finalizado su uso, no debe ser desechado junto con otros desechos procedentes de casa.El usuario está obligado a devolverlo a un lugar destinado para recoger equipos eléc-tricos y electrónicos usados.La devolución de este aparato debe re-alizarse a través de entidades que realicen la recogida, así como puntos locales de recogida, tiendas o entidades municipales.
El uso adecuado del equipo eléctrico y elec-trónico usado ayuda a evitar consecuencias nocivas para humanos y para el medio ambiente provocados por componentes peligrosos, el inadecuado almacenamiento y procesamiento de estos dispositivos
8
DESCRIPCIÓN DEL PRODUCTO
CO
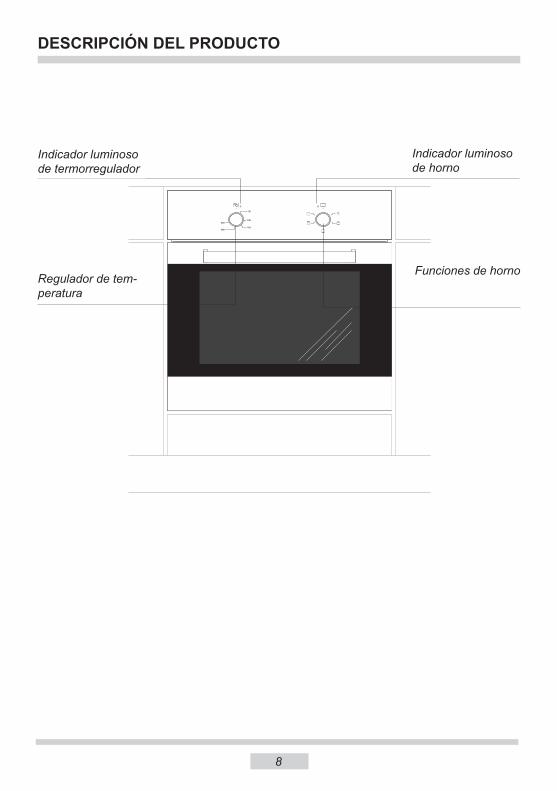
Funciones de hornoRegulador de tem-peratura
Indicador luminoso de termorregulador
Indicador luminoso de horno
9
CARACTERÍSTICAS DEL PRODUCTO
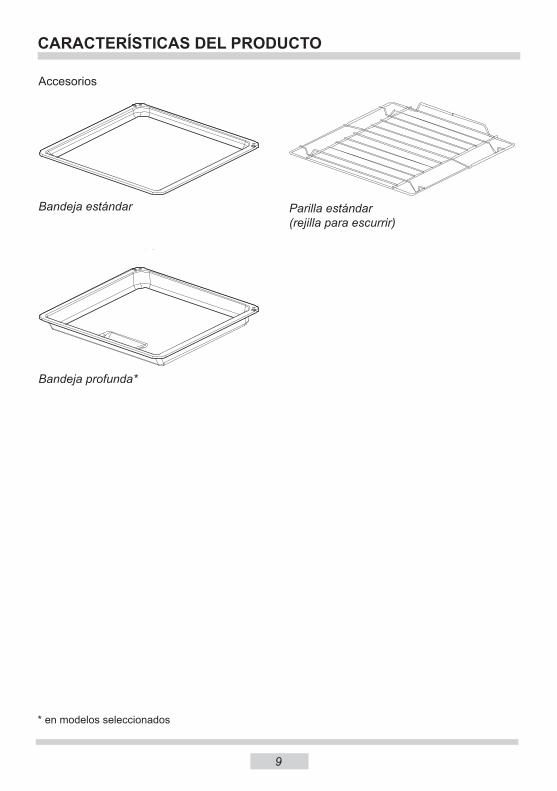
Accesorios
Bandeja estándar Parilla estándar(rejilla para escurrir)
Bandeja profunda*
* en modelos seleccionados
10
INSTALACIÓN
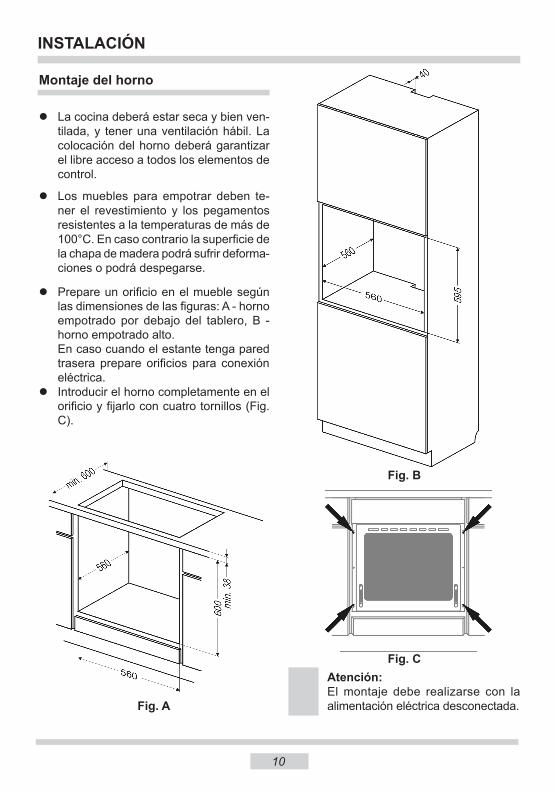
Montaje del horno
l La cocina deberá estar seca y bien ven-tilada, y tener una ventilación hábil. La colocación del horno deberá garantizar el libre acceso a todos los elementos de control.
lLos muebles para empotrar deben te-ner el revestimiento y los pegamentos resistentes a la temperaturas de más de 100°C. En caso contrario la superficie de la chapa de madera podrá sufrir deforma-ciones o podrá despegarse.
l Prepare un orificio en el mueble según las dimensiones de las figuras: A - horno empotrado por debajo del tablero, B - horno empotrado alto.
En caso cuando el estante tenga pared trasera prepare orificios para conexión eléctrica.
l Introducir el horno completamente en el orificio y fijarlo con cuatro tornillos (Fig. C).
Fig. A
Fig. B
Atención:El montaje debe realizarse con la alimentación eléctrica desconectada.
Fig. C
11
Conexión del horno a la instalación eléctrica
¡Advertencia!La conexión a la instalación puede ser efec- tuada tan solo por un instalador cualificado que cuente con las licencias adecuadas. Se prohíbe modificar o introducir cambios en la instalación eléctrica por cuenta propia.
El horno está configurado por el fabricante para una alimentación con corriente alterna monofásica (230V 1N~50Hz) y está dotado de un cable de conexión 3 x 1,5 mm2.
¡Advertencia!La instalación eléctrica que alimenta del horno debe estar dotada de un interruptor de seguridad que facilite el corte de la co-rriente eléctrica en casos de emergencia. La distancia entre los contactos de trabajo del interruptor de seguridad debe ser como mínimo de 3 mm.
Antes de realizar la conexión del horno a la instalación eléctrica lea la información in-cluida en la placa de datos y en el esquema de conexión. ¡Advertencia! El instalador está obligado a entregarle al usuario el “certificado de cone- xión del horno a la instalación eléctrica” (el cual se encuentra en la garantía).Cualquier otra forma de conexión del horno distinta a la mostrada en el esquema pue- de provocar una avería.
INSTALACIÓN
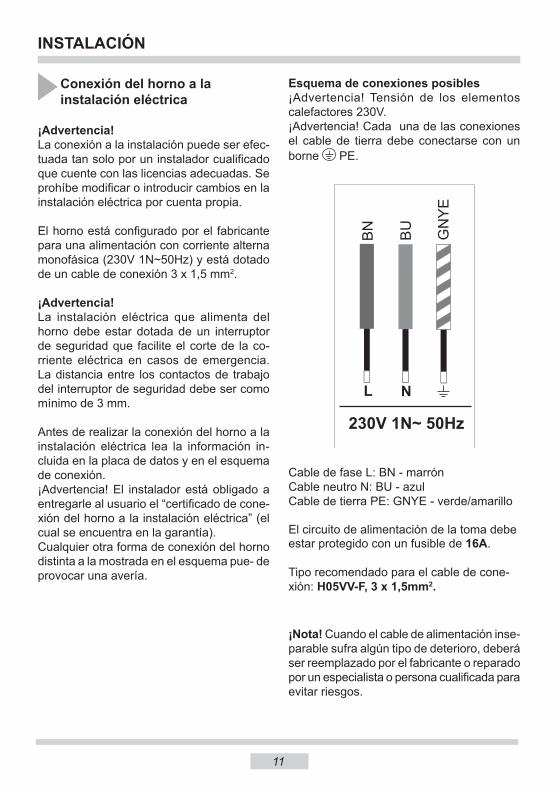
Esquema de conexiones posibles¡Advertencia! Tensión de los elementos calefactores 230V.¡Advertencia! Cada una de las conexiones el cable de tierra debe conectarse con un borne PE.
Cable de fase L: BN - marrónCable neutro N: BU - azulCable de tierra PE: GNYE - verde/amarillo
El circuito de alimentación de la toma debeestar protegido con un fusible de 16A.
Tipo recomendado para el cable de cone-xión: H05VV-F, 3 x 1,5mm2.
GN
YE
N
BU
BN
L
¡Nota! Cuando el cable de alimentación inse-parable sufra algún tipo de deterioro, deberá ser reemplazado por el fabricante o reparado por un especialista o persona cualificada para evitar riesgos.
12
FUNCIONAMENTO
Antes de poner en marcha el horno por primera vez
¡Importante!El interior del horno debe lavarse solamente con agua templada y un suave detergente lavaplatos.
lRetire los elementos del embalaje, limpie el interior del horno de los medios de conservación de fábrica,
lExtraiga los accesorios del horno y láve-los con agua templada y un detergente suave,
lAccione la ventilación en la cocina u abra la ventana,
lCaliente el horno (en la temp. de 250°C, durante unos 30 min.), elimine la sucie-dad y lave cuidadosamente, (véase el apartado: Funcionamiento del programa-dor y mandos del horno),
13
FUNCIONAMENTO
Las funciones del horno y su manejo.
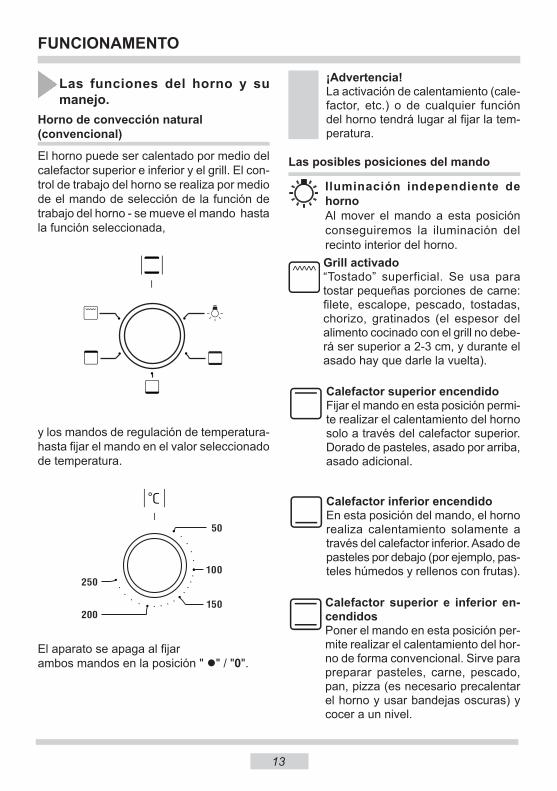
Horno de convección natural (convencional)
El horno puede ser calentado por medio del calefactor superior e inferior y el grill. El con-trol de trabajo del horno se realiza por medio de el mando de selección de la función de trabajo del horno - se mueve el mando hasta la función seleccionada,
Las posibles posiciones del mando
Iluminación independiente de hornoAl mover el mando a esta posición conseguiremos la iluminación del recinto interior del horno.Grill activado“Tostado” superficial. Se usa para tostar pequeñas porciones de carne: filete, escalope, pescado, tostadas, chorizo, gratinados (el espesor del alimento cocinado con el grill no debe-rá ser superior a 2-3 cm, y durante el asado hay que darle la vuelta).
Calefactor superior encendido Fijar el mando en esta posición permi-te realizar el calentamiento del horno solo a través del calefactor superior. Dorado de pasteles, asado por arriba, asado adicional.
Calefactor inferior encendidoEn esta posición del mando, el horno realiza calentamiento solamente a través del calefactor inferior. Asado de pasteles por debajo (por ejemplo, pas-teles húmedos y rellenos con frutas).
y los mandos de regulación de temperatura- hasta fijar el mando en el valor seleccionado de temperatura.
El aparato se apaga al fijarambos mandos en la posición " l" / "0".
¡Advertencia!La activación de calentamiento (cale- factor, etc.) o de cualquier función del horno tendrá lugar al fijar la tem-peratura.
Calefactor superior e inferior en-cendidosPoner el mando en esta posición per-mite realizar el calentamiento del hor-no de forma convencional. Sirve para preparar pasteles, carne, pescado, pan, pizza (es necesario precalentar el horno y usar bandejas oscuras) y cocer a un nivel.
14
FUNCIONAMENTO
Lámpara avisadora
El encendido del horno se señala con el en- cendido de dos lámparas de control, amarrilla y roja. El encendido de la lámpara avisadora de color amarillo avisa del funcionamiento del horno. El apagado de la lámpara avisadora roja señala que el horno ha llegado la tem-peratura fijada. Si una receta recomiendan meter los platos en el horno precalentado hay que hacerlo justo después del primer apagado de la lámpara avisadora. Durante el asado la lámpara roja de vez en cuando se encenderá y apagará (para mantener la temperatura dentro de la cámara del horno). La lámpara amarilla también puede encen-derse en la posición del mando “Iluminación del horno”.
15
Para apagar el grill, es necesario:lPoner el mando del horno en la posición
marcada con el símbolo , l Calentar el horno durante unos 5 minutos
(con la puerta cerrada del horno).l Situar la bandeja con el alimento en el
nivel adecuado y en caso de tostar en parilla, situar al nivel inferior siguiente (por debajo de la parilla) la bandeja para la grasa,
lcerrar la puerta del horno.
FUNCIONAMENTO
Uso de tostador
El proceso de tostado se produce como con-secuencia de la acción de los rayos infrarro-jos emitidos por el grill calentado al rojo vivo.
¡Nota!El tostado debe ser realizado con la puerta del horno cerrada.
En caso de usar el grill, las partes visibles exteriores del horno pueden estar muy calientes. Se recomienda vigilar que los niños no se acerquen al horno.
Para la función grill y grill fuerte, poner la temperatura máxima en 250 oC para la función grill con ventilador en 190 oC como máximo.

16
COCINADO EN EL HORNO - CONSEJOS PRÁCTICOS
Preparación de repostería
l Se recomienda preparar repostería en las bandejas incluidas para cocinar,l Se pueden también preparar pasteles en otras bandejas compradas a terceros
que deben situarse en la rejilla. Para cocer se recomienda usar bandejas de color negro que conducen mejor el calor y reducen el tiempo de cocción,
l No recomendamos el uso de moldes y bandejas para repostería con superficie clara y brillante en caso de usar la calefacción convencional (calefactor superior+ inferior) el uso de este tipo de moldes puede hacer que la base del pastel no esté bien asada,
l Antes de sacar el pastel del horno hay que comprobar la calidad del horneado con un palito de madera (al pinchar el pastel, el palo deberá permanecer seco y limpio una vez extraido),
l Se recomienda dejar el pastel en el horno después de apagarlo durante unos 5 minutos,
l Los parámetros de la tabla son aproximados y deben ser corregidos en función de sus propias experiencias y gustos culinarios.
l En caso de que la información de los libros de cocina se diferencien bastante de los valores de la tabla, les sugerimos seguir los del manual.
Asado de carnes
l Se recomienda preparar en el horno las porciones de carne de más de 1kg. Las porciones más pequeñas es mejor prepararlas en la placa.
l Para asar se recomienda usar vasos refractarios y los mangos de estos vasos deben resistir altas temperaturas,
l En caso de asar en la rejilla o en el asador, se recomienda colocar una bandeja en el nivel inferior con un poco de agua,
l Al menos una vez, a la mitad del asado, se recomienda dar la vuelta a la carne. Y durante el asado se recomienda rociar la carne con la salsa de la bandeja o con agua caliente salada - NO se debe rociar con agua fría.
17
COCINADO EN EL HORNO - CONSEJOS PRÁCTICOS
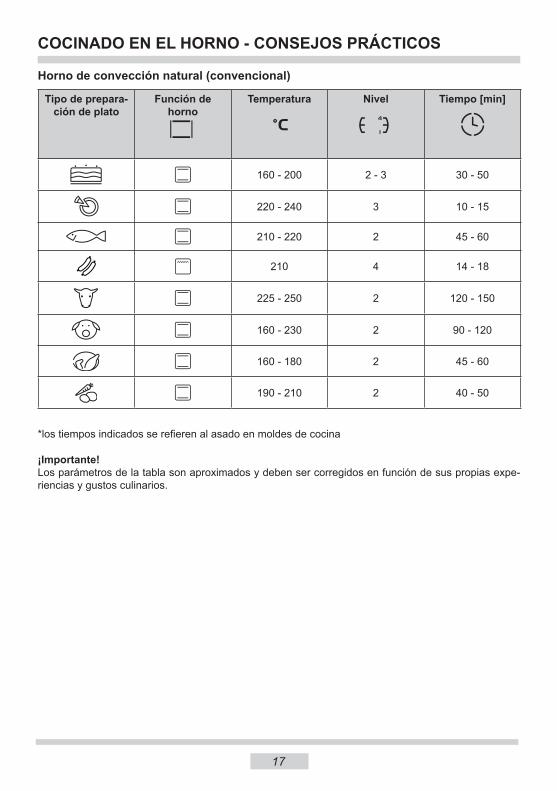
Tipo de prepara-ción de plato
Función de horno
Temperatura Nivel Tiempo [min]
160 - 200 2 - 3 30 - 50
220 - 240 3 10 - 15
210 - 220 2 45 - 60
210 4 14 - 18
225 - 250 2 120 - 150
160 - 230 2 90 - 120
160 - 180 2 45 - 60
190 - 210 2 40 - 50
¡Importante!Los parámetros de la tabla son aproximados y deben ser corregidos en función de sus propias expe-riencias y gustos culinarios.
*los tiempos indicados se refieren al asado en moldes de cocina
Horno de convección natural (convencional)
18
LIMPIEZA Y MANTENIMIENTO DEL HORNO
El cuidado de la limpieza del horno y un adecuado mantenimiento, influyen de forma importante en la prolongación del periodo de vida útil del equipo sin averías.
Antes de empezar la limpieza hay que apagar el horno asegurándo-se de que todos los mandos se encuentren en la posición “apa-gado”. Las tareas de limpieza deberán empezar una vez que el horno esté frío.
l El honro debe limpiarse después de cada uso. Después de limpiar el horno puede encender la iluminación para conseguir una mejor visibilidad del espacio de tra-bajo.
l La cámara interior del horno debe lim-piarse solamente con agua templada y un poco de lavavajillas.
lLimpieza con vapor-Steam Clean: - En una bandeja situada en el horno en
el primer nivel desde el fondo vierta un vaso de agua (0,25 l),
- Cierre la puerta del horno, - Fije el regulador de temperatura en la
posición 500C y el mando de función en la posición calentador inferior ,
- Caliente la cámara del horno durante unos 30 minutos,
- Después de terminar la limpieza, abra la puerta del horno, limpie el interior con una esponja o con un trapo y, luego, límpielo con agua templada y lavavajillas.
¡Importante!
Para la limpieza y mantenimiento no se permite usar ningún limpia- dor abrasivo, detergente agresivo ni objetos rugosos.
Para limpiar el frontal de la arma-dura utilice solo agua caliente con una pequeña cantidad de líquido lavavajillas o limpiacristales. No aplicar crema limpiadora.
19
LIMPIEZA Y MANTENIMIENTO DEL HORNO
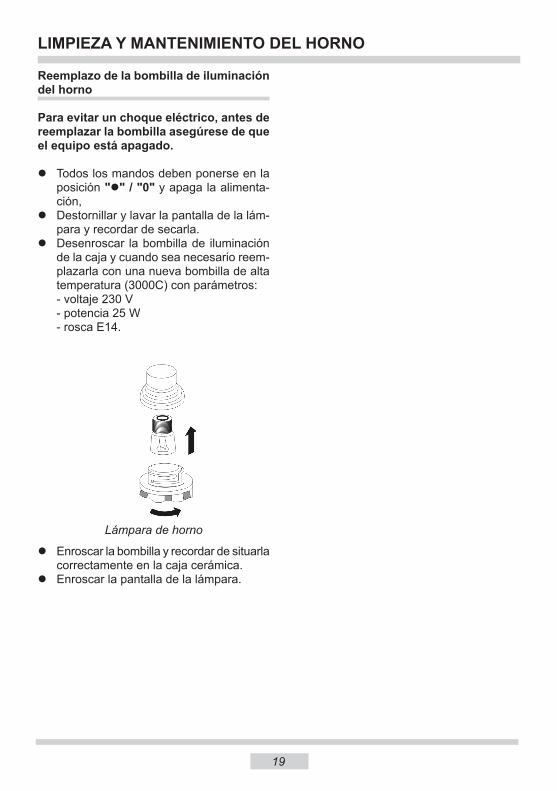
Reemplazo de la bombilla de iluminación del horno
Para evitar un choque eléctrico, antes de reemplazar la bombilla asegúrese de que el equipo está apagado.
l Todos los mandos deben ponerse en la posición "l" / "0" y apaga la alimenta-ción,
l Destornillar y lavar la pantalla de la lám-para y recordar de secarla.
l Desenroscar la bombilla de iluminación de la caja y cuando sea necesario reem-plazarla con una nueva bombilla de alta temperatura (3000C) con parámetros:
- voltaje 230 V - potencia 25 W - rosca E14.
l Enroscar la bombilla y recordar de situarla correctamente en la caja cerámica.
l Enroscar la pantalla de la lámpara.
Lámpara de horno
20
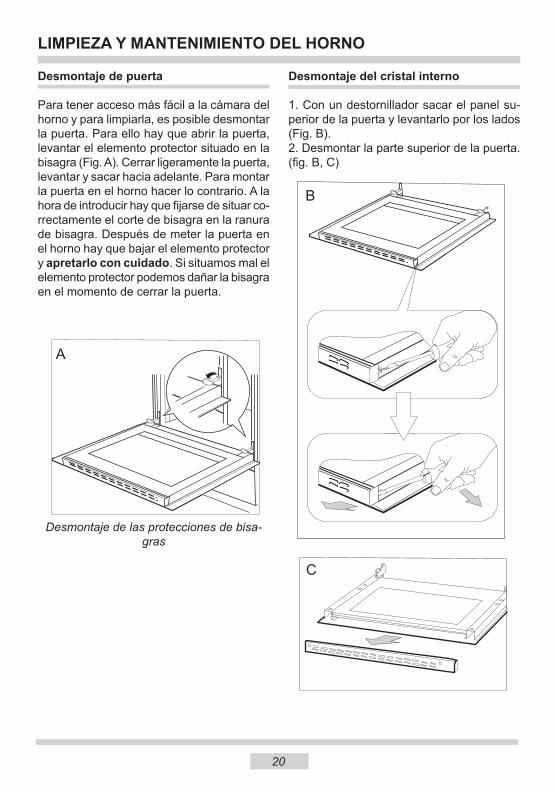
Desmontaje de las protecciones de bisa-gras
LIMPIEZA Y MANTENIMIENTO DEL HORNO
Desmontaje de puerta
Para tener acceso más fácil a la cámara del horno y para limpiarla, es posible desmontar la puerta. Para ello hay que abrir la puerta, levantar el elemento protector situado en la bisagra (Fig. A). Cerrar ligeramente la puerta, levantar y sacar hacia adelante. Para montar la puerta en el horno hacer lo contrario. A la hora de introducir hay que fijarse de situar co-rrectamente el corte de bisagra en la ranura de bisagra. Después de meter la puerta en el horno hay que bajar el elemento protector y apretarlo con cuidado. Si situamos mal el elemento protector podemos dañar la bisagra en el momento de cerrar la puerta.
Desmontaje del cristal interno
1. Con un destornillador sacar el panel su-perior de la puerta y levantarlo por los lados (Fig. B).2. Desmontar la parte superior de la puerta. (fig. B, C)
A
B
C
21
LIMPIEZA Y MANTENIMIENTO DEL HORNO
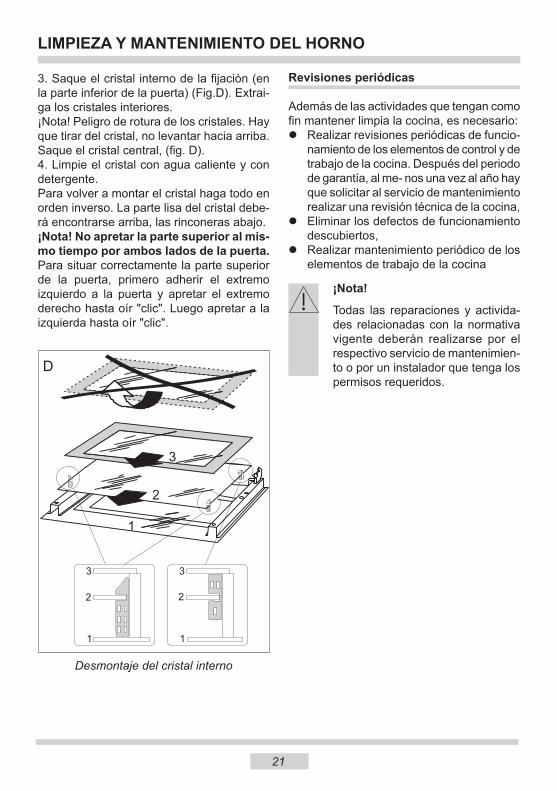
Desmontaje del cristal interno
3. Saque el cristal interno de la fijación (en la parte inferior de la puerta) (Fig.D). Extrai-ga los cristales interiores.¡Nota! Peligro de rotura de los cristales. Hay que tirar del cristal, no levantar hacia arriba.Saque el cristal central, (fig. D).4. Limpie el cristal con agua caliente y con detergente.Para volver a montar el cristal haga todo en orden inverso. La parte lisa del cristal debe-rá encontrarse arriba, las rinconeras abajo.¡Nota! No apretar la parte superior al mis-mo tiempo por ambos lados de la puerta. Para situar correctamente la parte superior de la puerta, primero adherir el extremo izquierdo a la puerta y apretar el extremo derecho hasta oír "clic". Luego apretar a la izquierda hasta oír "clic".
D
1
2
3
1
2
3
1
2
3
Revisiones periódicas
Además de las actividades que tengan comofin mantener limpia la cocina, es necesario:l Realizar revisiones periódicas de funcio-
namiento de los elementos de control y de trabajo de la cocina. Después del periodo de garantía, al me- nos una vez al año hay que solicitar al servicio de mantenimiento realizar una revisión técnica de la cocina,
l Eliminar los defectos de funcionamiento descubiertos,
l Realizar mantenimiento periódico de los elementos de trabajo de la cocina
¡Nota!
Todas las reparaciones y activida- des relacionadas con la normativa vigente deberán realizarse por el respectivo servicio de mantenimien-to o por un instalador que tenga los permisos requeridos.
22
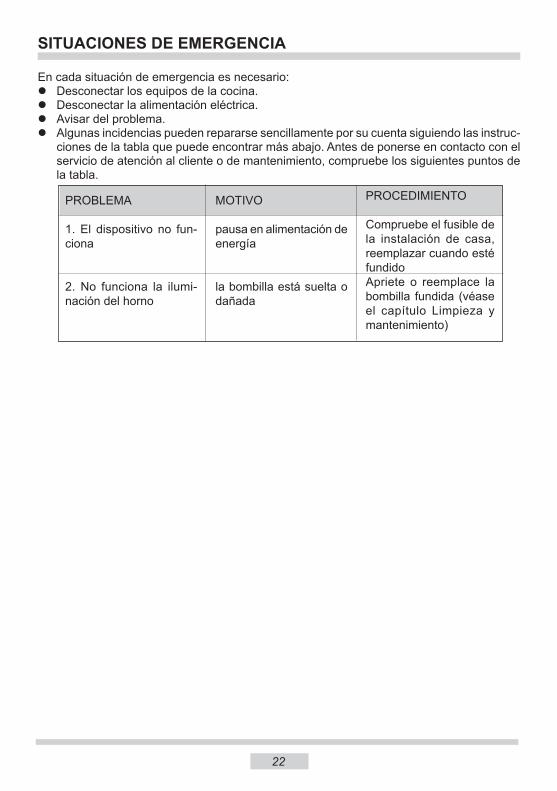
PROBLEMA
1. El dispositivo no fun-ciona
2. No funciona la ilumi-nación del horno
MOTIVO
pausa en alimentación de energía
la bombilla está suelta o dañada
PROCEDIMIENTO
Compruebe el fusible de la instalación de casa, reemplazar cuando esté fundidoApriete o reemplace la bombilla fundida (véase el capítulo Limpieza y mantenimiento)
SITUACIONES DE EMERGENCIA
En cada situación de emergencia es necesario:l Desconectar los equipos de la cocina.l Desconectar la alimentación eléctrica.l Avisar del problema.l Algunas incidencias pueden repararse sencillamente por su cuenta siguiendo las instruc-
ciones de la tabla que puede encontrar más abajo. Antes de ponerse en contacto con el servicio de atención al cliente o de mantenimiento, compruebe los siguientes puntos de la tabla.
23
DATOS TÉCNICOS
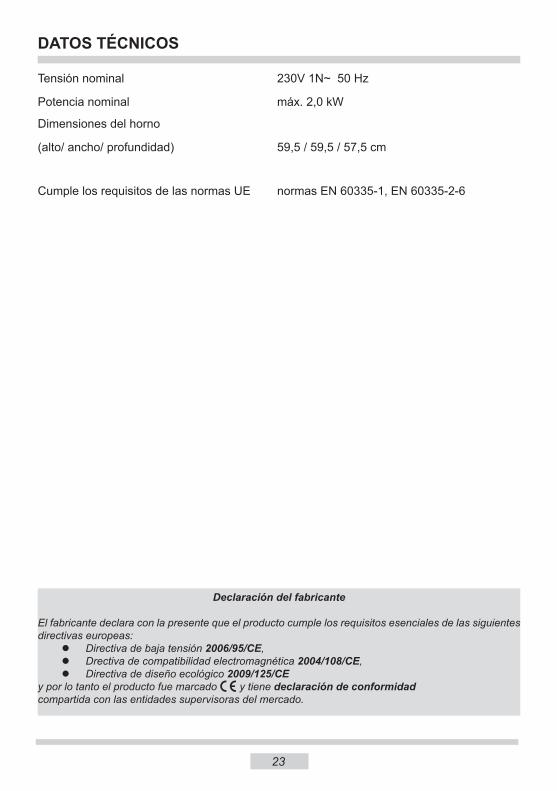
Tensión nominal 230V 1N~ 50 Hz
Potencia nominal máx. 2,0 kW
Dimensiones del horno
(alto/ ancho/ profundidad) 59,5 / 59,5 / 57,5 cm
Cumple los requisitos de las normas UE normas EN 60335-1, EN 60335-2-6
Declaración del fabricante
El fabricante declara con la presente que el producto cumple los requisitos esenciales de las siguientes directivas europeas:
l Directiva de baja tensión 2006/95/CE, l Drectiva de compatibilidad electromagnética 2004/108/CE,l Directiva de diseño ecológico 2009/125/CE
y por lo tanto el producto fue marcado y tiene declaración de conformidadcompartida con las entidades supervisoras del mercado.
24
DEAR CUSTOMER,
The oven is exceptionally easy to use and extremely efficient. After reading the instruction manual, operating the oven will be easy.
Before being packaged and leaving the manufacturer, the oven was thoroughly checked with regard to safety and functionality.
Before using the appliance, please read the instruction manual carefully.By following these instructions carefully you will be able to avoid any problems in using the appliance.
It is important to keep the instruction manual and store it in a safe place so that it can be consulted at any time.It is necessary to follow the instructions in the manual carefully in order to avoid possible accidents.
Caution!Do not use the oven until you have read this instruction manual.
The oven is intended for household use only.
The manufacturer reserves the right to introduce changes which do not affect the operation of the appliance.
25
Safety instructions ........................................................................................................... 26
Description of the appliance ........................................................................................... 30
Installation ......................................................................................................................... 32
Operation ........................................................................................................................... 34
Baking in the oven – practical hints ............................................................................... 37
Cleaning and maintenance .............................................................................................. 39
Technical data ................................................................................................................... 43
TABLE OF CONTENTS
26
SAFETY INSTRUCTIONS
Warning: The appliance and its accessible parts become hot during use. Care should be taken to avoid touching heating elements. Children less than 8 years of age shall be kept away unless continuously supervised.This appliance can be used by children aged from 8 years and above and persons with reduced physical, sensory or mental capabilities or lack of experience and knowledge if they have been given supervision or instruction concerning use of the appliance in a safe way and understand the ha-zards involved. Children shall not play with the appliance. Cleaning and user maintenance shall not be made by chil-dren without supervision. During use the appliance becomes hot. Care should be taken to avoid touching heating elements inside the oven. Accessible parts may become hot during use. Young children should be kept away. Warning: Do not use harsh abrasive cleaners or sharp metal scrapers to clean the oven door glass since they can scratch the surface, which may result in shattering of the glass. Warning: Ensure that the appliance is switched off before re-placing the lamp to avoid the possibillity of electric shock. You should not use steam cleaning devices to clean the appliance.
27
SAFETY INSTRUCTIONS
● Ensure that small items of household equipment, including connection leads, do not touch the hot oven as the insulation material of this equipment is usually not resistant to high temperatures.
● Do not leave the oven unattended when frying. Oils and fats may catch fire due to overheating or boiling over.
● Do not put pans weighing over 15 kg on the opened door of the oven.
● Do not use harsh cleaning agents or sharp metal objects to clean the door as they can scratch the surface, which could then result in the glass cracking.
● Do not use the oven in the event of a technical fault. Any faults must be fixed by an appropriately qualified and authorised person.
● In the event of any incident caused by a technical fault, disconnect the power and report the fault to the service centre to be repaired.
● The rules and provisions contained in this instruction manual should be strictly observed. Do not allow anybody who is not familiar with the contents of this instruc-tion manual to operate the oven.
● The appliance has been designed only for cooking. Any other use (for example for heating) does not comply with its operating profile and may cause danger.
Danger of burns! Hot steam may escape when you open the oven door. Be careful when you open the oven door during or after cooking. Do NOT lean over the door when you open it. Please note that depending on the temperature the steam can be invisible.
28
HOW TO SAVE ENERGY
Using energy in a respon-sible way not only saves money but also helps the environment. So let’s save energy! And this is how you can do it:
● Do not uncover the pan too often (a watched pot never boils!).Do not open the oven door unnecessarily often.
● Only use the oven when cooking larger dishes.Meat of up to 1 kg can be prepared more economically in a pan on the cooker hob.
● Make use of residual heat from the oven.If the cooking time is greater than 40 minutes switch off the oven 10 minutes before the end time.
Important! When using the timer, set appropriately shorter cooking times according to the dish being prepared.
● Make sure the oven door is properly closed.Heat can leak through spillages on the door seals. Clean up any spillages immediately.
● Do not install the cooker in the direct vicinity of refrigerators/freezers.Otherwise energy consumption increases unnecessarily.
29
During transportation, protec-tive packaging was used to protect the appliance against any damage. After unpack-ing, please dispose of all elements of packaging in a way that will not cause dam-
age to the environment. All materials used for packaging the appli-ance are environmentally friendly; they are 100% recyclable and are marked with the appropriate symbol.
Caution! During unpacking, the packag-ing materials (polythene bags, polystyrene pieces, etc.) should be kept out of reach of children.
UNPACKING DISPOSAL OF THE APPLIANCE
Old appliances should not sim-ply be disposed of with normal household waste, but should be delivered to a collection and recycling centre for electric and electronic equipment. A symbol shown on the product, the in-
struction manual or the packaging shows that it is suitable for recycling.
Materials used inside the appliance are recyclable and are labelled with information concerning this. By recycling materials or other parts from used devices you are making a significant contribution to the protection of our environment.
Information on appropriate disposal centres for used devices can be provided by your local authority.
30
DESCRIPTION OF THE APPLIANCE
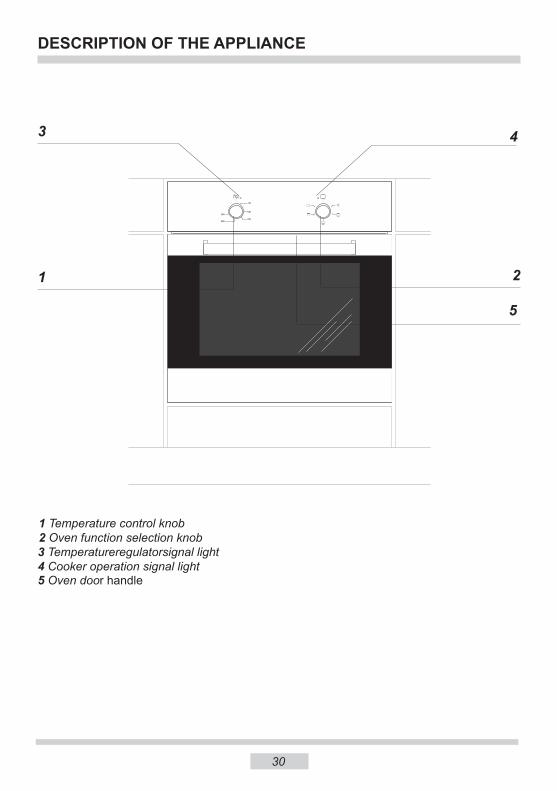
1 Temperature control knob 2 Oven function selection knob3 Temperatureregulatorsignal light 4 Cooker operation signal light 5 Oven door handle
CO
1
3
2
4
5

*optional
31
SPECIFICATIONS OF THE APPLIANCE
Cooker fittings:
Baking tray* Grill grate(drying rack)
Roasting tray*
32
INSTALLATION
Installing the oven
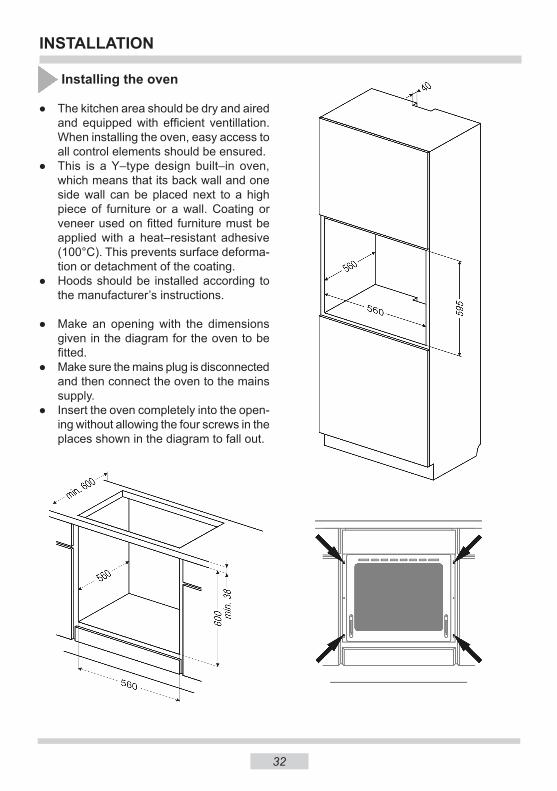
● The kitchen area should be dry and aired and equipped with efficient ventillation. When installing the oven, easy access to all control elements should be ensured.
● This is a Y–type design built–in oven, which means that its back wall and one side wall can be placed next to a high piece of furniture or a wall. Coating or veneer used on fitted furniture must be applied with a heat–resistant adhesive (100°C). This prevents surface deforma-tion or detachment of the coating.
● Hoods should be installed according to the manufacturer’s instructions.
● Make an opening with the dimensions given in the diagram for the oven to be fitted.
● Make sure the mains plug is disconnected and then connect the oven to the mains supply.
● Insert the oven completely into the open-ing without allowing the four screws in the places shown in the diagram to fall out.
33
INSTALLATION
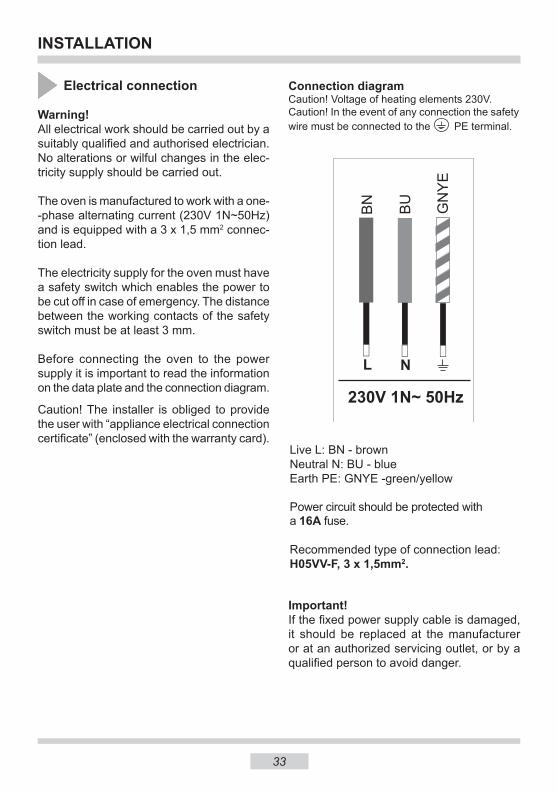
Live L: BN - brownNeutral N: BU - blueEarth PE: GNYE -green/yellow
Power circuit should be protected witha 16A fuse.
Recommended type of connection lead:H05VV-F, 3 x 1,5mm2.
Connection diagramCaution! Voltage of heating elements 230V.Caution! In the event of any connection the safetywire must be connected to the PE terminal.
GN
YE
N
BU
BN
L
Important!If the fixed power supply cable is damaged, it should be replaced at the manufacturer or at an authorized servicing outlet, or by a qualified person to avoid danger.
Electrical connection
Warning!All electrical work should be carried out by a suitably qualified and authorised electrician. No alterations or wilful changes in the elec-tricity supply should be carried out.
The oven is manufactured to work with a one--phase alternating current (230V 1N~50Hz) and is equipped with a 3 x 1,5 mm2 connec-tion lead.
The electricity supply for the oven must have a safety switch which enables the power to be cut off in case of emergency. The distance between the working contacts of the safety switch must be at least 3 mm.
Before connecting the oven to the power supply it is important to read the information on the data plate and the connection diagram.
Caution! The installer is obliged to provide the user with “appliance electrical connection certificate” (enclosed with the warranty card).
34
OPERATION
Before using the oven for the first time
Remove packaging, clean the interior of the oven and the hob.
Take out and wash the oven fittings with warm water and a little washing–up liq-uid.
Switch on the ventillation in the room or open a window.
Heat the oven (to a temperature of 250°C, for approx. 30 min.), remove any stains and wash carefully;
Important!The inside of the oven should only be washed with warm water and a small amount of washing–up liquid.
35
OPERATION
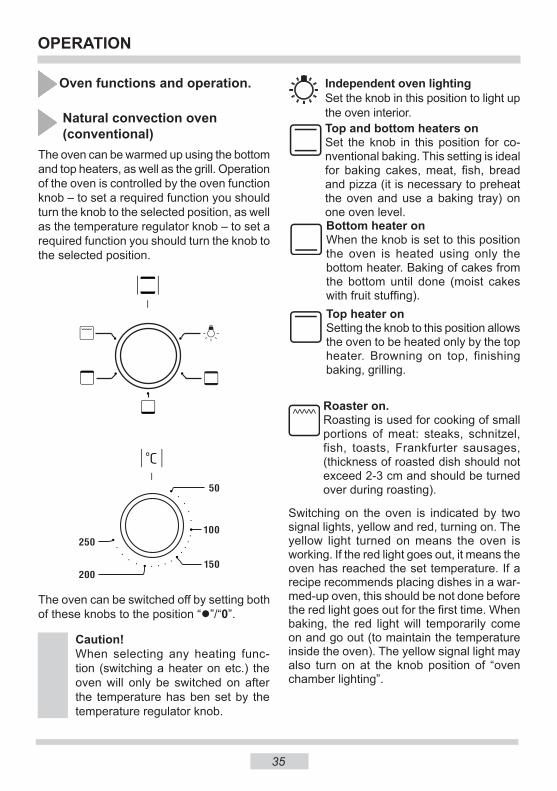
Oven functions and operation.
Caution!When selecting any heating func-tion (switching a heater on etc.) the oven will only be switched on after the temperature has ben set by the temperature regulator knob.
The oven can be warmed up using the bottom and top heaters, as well as the grill. Operation of the oven is controlled by the oven function knob – to set a required function you should turn the knob to the selected position, as well as the temperature regulator knob – to set a required function you should turn the knob to the selected position.
The oven can be switched off by setting both of these knobs to the position “l”/“0”.
Natural convection oven (conventional)
Independent oven lightingSet the knob in this position to light up the oven interior.
Top heater onSetting the knob to this position allows the oven to be heated only by the top heater. Browning on top, finishing baking, grilling.
Bottom heater onWhen the knob is set to this position the oven is heated using only the bottom heater. Baking of cakes from the bottom until done (moist cakes with fruit stuffing).
Top and bottom heaters onSet the knob in this position for co-nventional baking. This setting is ideal for baking cakes, meat, fish, bread and pizza (it is necessary to preheat the oven and use a baking tray) on one oven level.
Roaster on.Roasting is used for cooking of small portions of meat: steaks, schnitzel, fish, toasts, Frankfurter sausages, (thickness of roasted dish should not exceed 2-3 cm and should be turned over during roasting).
Switching on the oven is indicated by two signal lights, yellow and red, turning on. The yellow light turned on means the oven is working. If the red light goes out, it means the oven has reached the set temperature. If a recipe recommends placing dishes in a war-med-up oven, this should be not done before the red light goes out for the first time. When baking, the red light will temporarily come on and go out (to maintain the temperature inside the oven). The yellow signal light may also turn on at the knob position of “oven chamber lighting”.
36
OPERATION
Use of the grill
The grilling process operates through infrared rays emitted onto the dish by the incandes-cent grill heater.
In order to switch on the grill you need to:● Set the oven knob to the position marked
grill ,● Heat the oven for approx. 5 minutes (with
the oven door shut).● Insert a tray with a dish onto the appropri-
ate cooking level; and if you are grilling on the grate insert a tray for dripping on the level immediately below (under the grate).
● Close the oven door.
For grilling with the function grill and com-bined grill the temperature must be set to 250ºC, but for the function fan and grill it must be set to a maximum of 190ºC.
Warning!When using function grill it is rec-ommended that the oven door is closed.When the grill is in use accessible parts can become hot. It is best to keep children away from the oven.
37
BAKING IN THE OVEN – PRACTICAL HINTS
Baking● we recommend using the baking trays which were provided with your cooker;
● it is also possible to bake in cake tins and trays bought elsewhere which should be put on the drying rack; for baking it is better to use black trays which conduct heat better and shorten the baking time;
● shapes and trays with bright or shiny surfaces are not recommended when using the conventional heating method (top and bottom heaters), use of such tins can result in undercooking the base of cakes;
● before the cake is taken out of the oven, check if it is ready using a wooden stick (if the cake is ready the stick should come out dry and clean after being inserted into the cake);
● after switching off the oven it is advisable to leave the cake inside for about 5 min.;
● the baking parameters given in Table are approximate and can be corrected based on your own experience and cooking preferences;
● if information given in recipe books is significantly different from the values included in this instruction manual, please apply the instructions from the manual.
Roasting meat● cook meat weighing over 1 kg in the oven, but smaller pieces should be cooked on
the gas burners.
● use heatproof ovenware for roasting, with handles that are also resistant to high temperatures;
● when roasting on the drying rack or the grate we recommend that you place a baking tray with a small amount of water on the lowest level of the oven;
● it is advisable to turn the meat over at least once during the roasting time and during roasting you should also baste the meat with its juices or with hot salty water – do not pour cold water over the meat.
38
BAKING IN THE OVEN – PRACTICAL HINTS
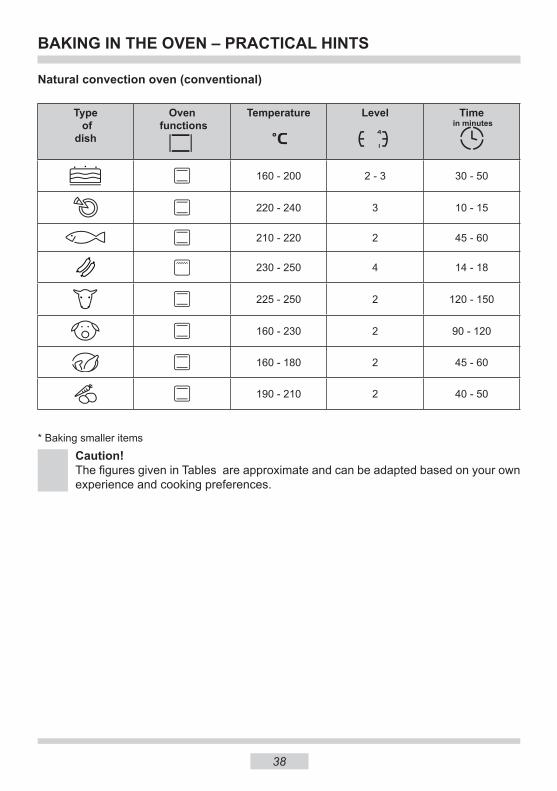
Caution!The figures given in Tables are approximate and can be adapted based on your own experience and cooking preferences.
* Baking smaller items
Type of
dish
Oven functions
Temperature Level Time in minutes
160 - 200 2 - 3 30 - 50
220 - 240 3 10 - 15
210 - 220 2 45 - 60
230 - 250 4 14 - 18
225 - 250 2 120 - 150
160 - 230 2 90 - 120
160 - 180 2 45 - 60
190 - 210 2 40 - 50
Natural convection oven (conventional)
39
CLEANING AND MAINTENANCE
Oven
● The oven should be cleaned after every use. When cleaning the oven the lighting should be switched on to enable you to see the surfaces better.
● The oven chamber should only be washed with warm water and a small amount of washing-up liquid.
● After cleaning the oven chamber wipe it dry.
● Steam Cleaning function: -pour 250ml of water (1 glass) into a bowl
placed in the oven on the first level from the bottom,
- close the oven door, - set the temperature knob to 50°C, and
the function knob to the bottom heater position
- heat the oven chamber for approximately 30 minutes,
- open the oven door, wipe the chamber inside with a cloth or sponge and wash using warm water with washing-up liqu-id.,
● After cleaning the oven chamber wipe it
dry.
Caution! Do not use cleaning products contain-ing abrasive materials for the cleaning and maintenance of the glass front panel.
By ensuring proper cleaning and mainte-nance of your cooker you can have a sig-nificant influence on the continuing fault-free operation of your appliance.Before you start cleaning, the cooker must be switched off and you should ensure that all knobs are set to the position “off ”. Do not start cleaning until the cooker has completely cooled.
Replacement of the oven light bulb
In order to avoid the possibility of an electric shock ensure that the appliance is switched off before replacing the bulb.
● Set all control knobs to the position “●”/“0” and disconnect the mains plug,
● unscrew and wash the lamp cover and then wipe it dry.
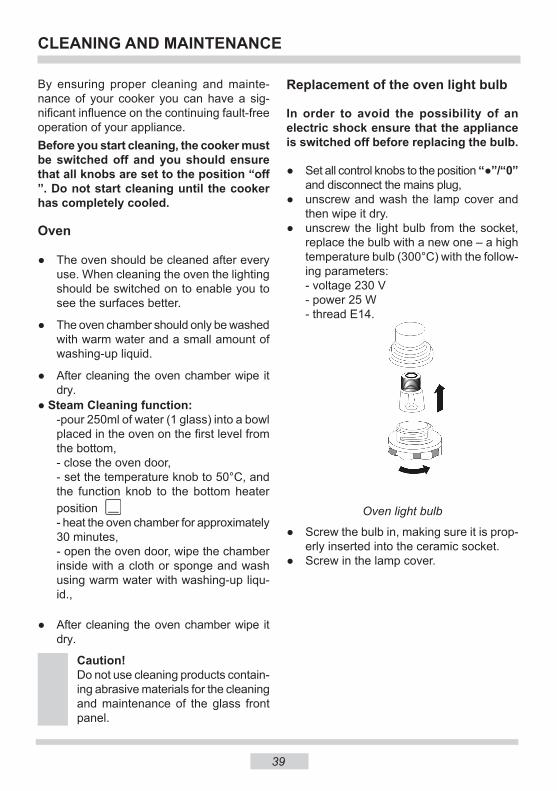
● unscrew the light bulb from the socket, replace the bulb with a new one – a high temperature bulb (300°C) with the follow-ing parameters:
- voltage 230 V - power 25 W - thread E14.
● Screw the bulb in, making sure it is prop-erly inserted into the ceramic socket.
● Screw in the lamp cover.
Oven light bulb
40
CLEANING AND MAINTENANCE
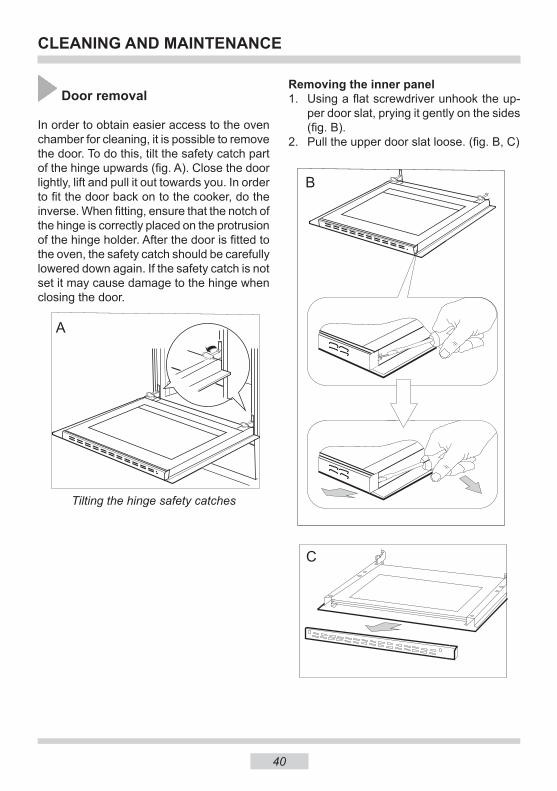
Door removal
In order to obtain easier access to the oven chamber for cleaning, it is possible to remove the door. To do this, tilt the safety catch part of the hinge upwards (fig. A). Close the door lightly, lift and pull it out towards you. In order to fit the door back on to the cooker, do the inverse. When fitting, ensure that the notch of the hinge is correctly placed on the protrusion of the hinge holder. After the door is fitted to the oven, the safety catch should be carefully lowered down again. If the safety catch is not set it may cause damage to the hinge when closing the door.
Removing the inner panel1. Using a flat screwdriver unhook the up-
per door slat, prying it gently on the sides (fig. B).
2. Pull the upper door slat loose. (fig. B, C)
Tilting the hinge safety catches
A
B
C
41
Regular inspections
Besides keeping the oven clean, you should:● carry out periodic inspections of the con-
trol elements and cooking units of the cooker. After the guarantee has expired you should have a technical inspection of the cooker carried out at a service centre at least once every two years,
● fix any operational faults,● carry out periodical maintenance of the
cooking units of the oven.
Caution!All repairs and regulatory activities should be carried out by the ap-propriate service centre or by an appropriately authorised fitter.
CLEANING AND MAINTENANCE
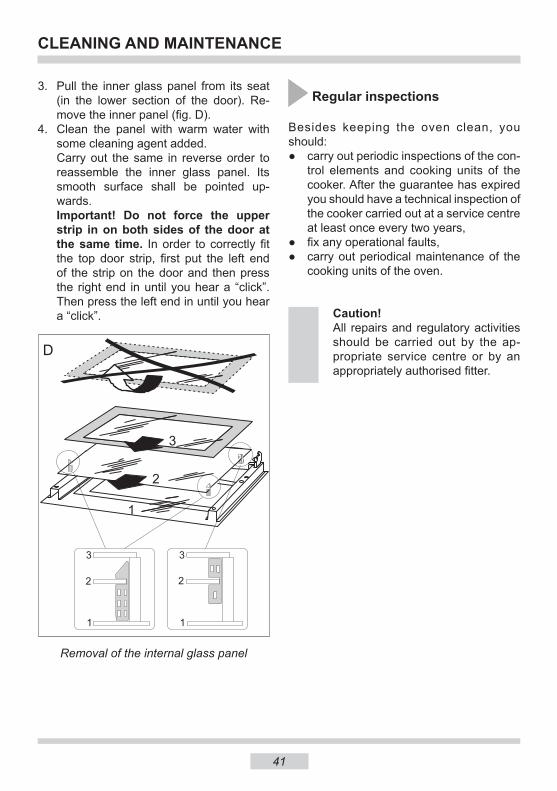
3. Pull the inner glass panel from its seat (in the lower section of the door). Re-move the inner panel (fig. D).
4. Clean the panel with warm water with some cleaning agent added.
Carry out the same in reverse order to reassemble the inner glass panel. Its smooth surface shall be pointed up-wards.
Important! Do not force the upper strip in on both sides of the door at the same time. In order to correctly fit the top door strip, first put the left end of the strip on the door and then press the right end in until you hear a “click”. Then press the left end in until you hear a “click”.
Removal of the internal glass panel
D
1
2
3
1
2
3
1
2
3
42
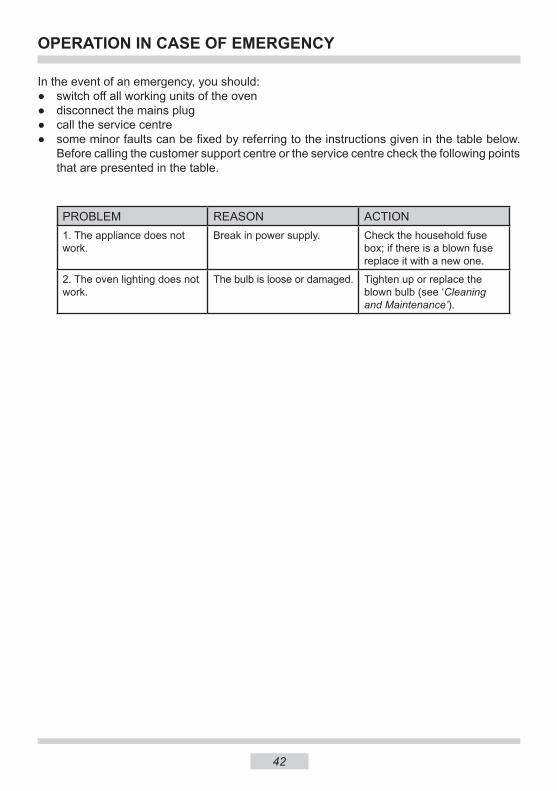
OPERATION IN CASE OF EMERGENCY
In the event of an emergency, you should:● switch off all working units of the oven● disconnect the mains plug● call the service centre● some minor faults can be fixed by referring to the instructions given in the table below.
Before calling the customer support centre or the service centre check the following points that are presented in the table.
PROBLEM REASON ACTION1. The appliance does not work.
Break in power supply. Check the household fuse box; if there is a blown fuse replace it with a new one.
2. The oven lighting does not work.
The bulb is loose or damaged. Tighten up or replace the blown bulb (see ‘Cleaning and Maintenance’).
43
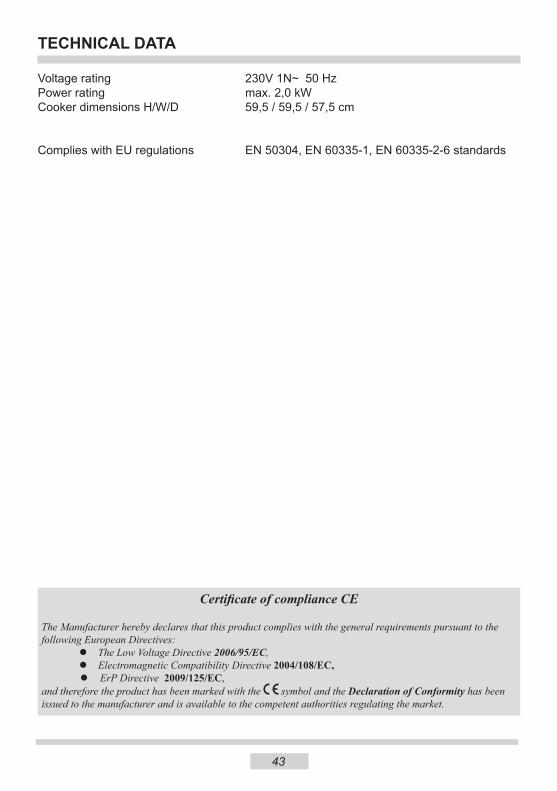
Voltage rating 230V 1N~ 50 HzPower rating max. 2,0 kWCooker dimensions H/W/D 59,5 / 59,5 / 57,5 cm
Complies with EU regulations EN 50304, EN 60335-1, EN 60335-2-6 standards
TECHNICAL DATA
Certificate of compliance CE
The Manufacturer hereby declares that this product complies with the general requirements pursuant to the following European Directives:
l The Low Voltage Directive 2006/95/EC, l Electromagnetic Compatibility Directive 2004/108/EC,
lErP Directive 2009/125/EC,and therefore the product has been marked with the symbol and the Declaration of Conformity has been issued to the manufacturer and is available to the competent authorities regulating the market.