Embed Size (px)
Citation preview
Making the railway system work better for society.
ERAIL-REP APPLICATION GUIDE
2016-10-27
https://erail.era.europa.eu
This step-by-step instruction is intended for National Investigation Bodies NIBs, when
reporting investigations of railway accident and incident.
Making the railway system work better for society.
CONTENTS
1 ERAIL SERVER ........................................................................................................................................... 1
2 PUBLIC INFORMATION ............................................................................................................................. 1
2.1 Public repository ...................................................................................................................... 2
2.2 Private repositories of each NIB .............................................................................................. 2
3 LOGIN ....................................................................................................................................................... 2
4 NAVIGATING AROUND ............................................................................................................................. 3
4.1 Private menu ........................................................................................................................... 3
4.2 View list of occurrences ........................................................................................................... 4
4.3 View occurrence ...................................................................................................................... 5
5 USER MANAGEMENT ............................................................................................................................... 6
5.1 View list of users ...................................................................................................................... 6
5.2 Create new user ....................................................................................................................... 6
6 WORKFLOW ............................................................................................................................................. 9
6.1 Overview .................................................................................................................................. 9
6.2 workflow toolbar ..................................................................................................................... 9
7 ROUND 1 NOTIFICATION ........................................................................................................................ 10
7.1 Step 1 - Create new Occurrence ............................................................................................ 10
7.1.1 DEFINE YOUR OWN TEMPLATES ...................................................................... 11
7.1.2 Completing the form ............................................................................................... 12
7.2 Step 2 - Edit and save occurrence .......................................................................................... 27
7.2.1 Edit the occurrence ................................................................................................. 27
7.2.2 Save the occurrence ................................................................................................ 27
7.2.3 Required fields ......................................................................................................... 28
7.2.4 Recommended fields ............................................................................................... 28
7.3 Step 3 – Send to ERA.............................................................................................................. 28
7.3.1 Mandatory fields for “Send to ERA” ........................................................................ 29
7.4 Step 4 – Validation ................................................................................................................. 30
8 WORKFLOW – ROUND 2 - FINAL REPORT ............................................................................................... 30
8.1 Step 1 – Create final report ................................................................................................... 30
8.1.1 Causation ................................................................................................................. 30
8.1.2 Recommendations ................................................................................................... 33
8.2 Step 2-4 Edit, Send to ERA and Validation ............................................................................. 34
9 CONTACT INFORMATION AND SUPPORT ............................................................................................... 34
Making the railway system work better for society.
Disclaimer All examples given in the guide are fictive examples. For technical reasons, the test user accounts which were created for drafting this guide had to be linked with real existing member states and organisations. For that reason, the fictive examples were linked with specific NIBs or users. Under no circumstances, any conclusions to the railway safety of these member states or to the performance of the NIB may be drawn from these examples.
Making the railway system work better for society.
1
1 ERAIL SERVER
The URL address for the ERAIL system is the following: https://erail.era.europa.eu.
2 PUBLIC INFORMATION
The data publically available in ERAIL database is the following:
- Investigation notifications and reports submitted by NIBs,
- CSI data submitted by NSAs.
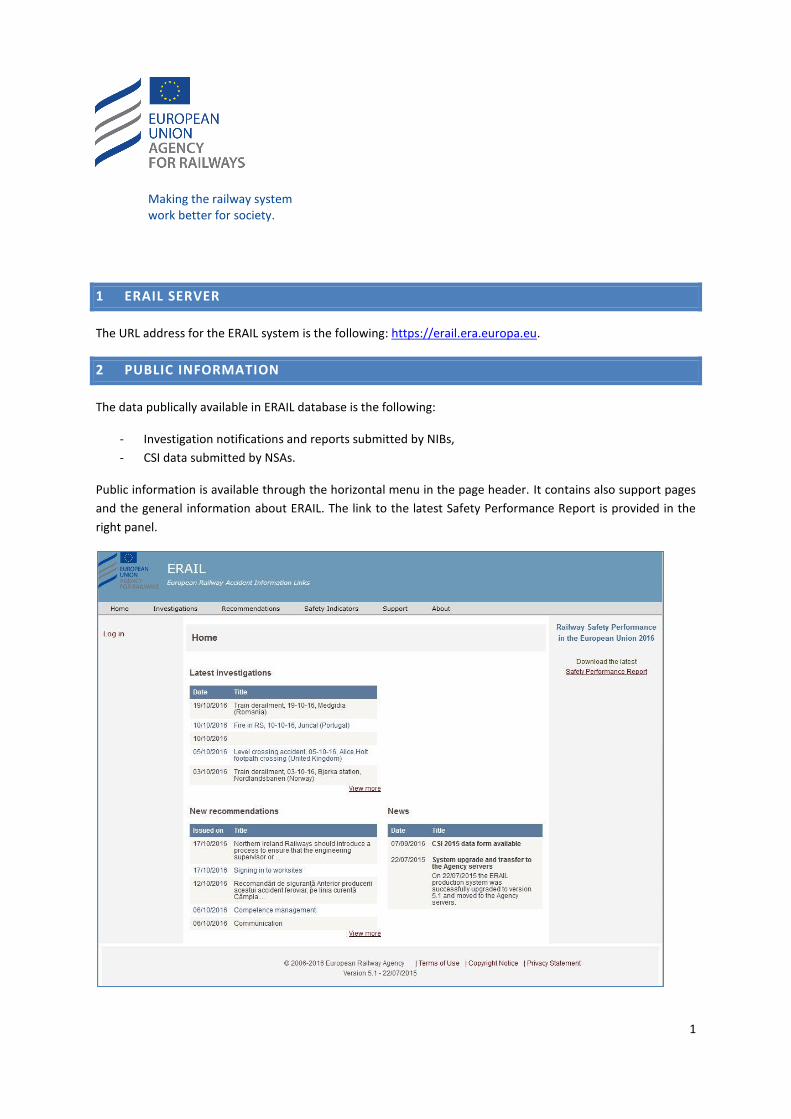
Public information is available through the horizontal menu in the page header. It contains also support pages
and the general information about ERAIL. The link to the latest Safety Performance Report is provided in the
right panel.
Making the railway system work better for society.
2
2.1 PUBLIC REPOSITORY
Only the investigation data submitted by NIBs to ERA is available for public in menu “Investigations”, which is
the public repository. It is possible to read the details of each investigation, to make search according to specified
criteria and to download the reports, images and other documentation. The information contained in public
repository is a copy of the information from the private repositories of each NIB.
2.2 PRIVATE REPOSITORIES OF EACH NIB
Each NIB has its own private repository, where all the declared investigation data is stored. The NIB can declare
investigation data only to its private repository. When an investigation notification is sent to ERA, it is copied
into the public repository, where it becomes validated by ERA. The investigations not sent to ERA remain only in
private repositories of NIBs and are not visible for public.
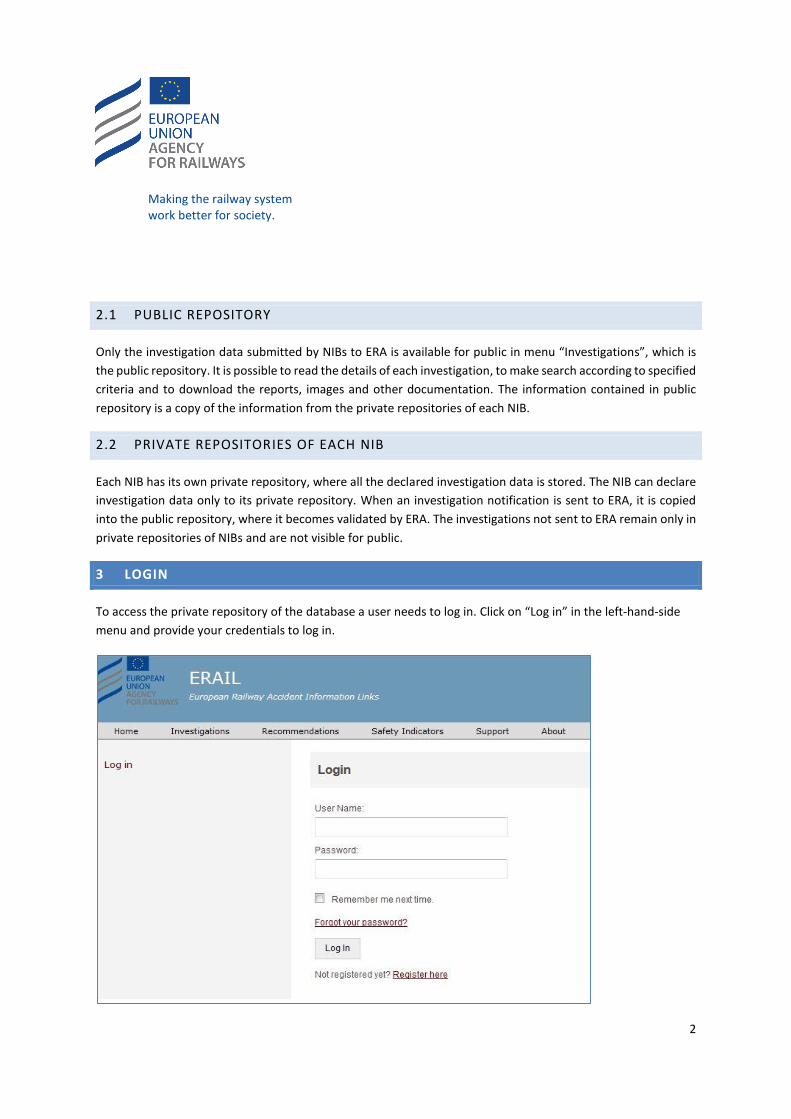
3 LOGIN
To access the private repository of the database a user needs to log in. Click on “Log in” in the left-hand-side
menu and provide your credentials to log in.
Making the railway system work better for society.
3
4 NAVIGATING AROUND
In order to work with the occurrence data: declare new occurrences and modify the existing ones, you must be
logged in with the Reporter rights (see section 5). For any investigator in an organisation, this means plainly that
you log in to the system with the credentials given to you by your colleague who has organisation admin rights.
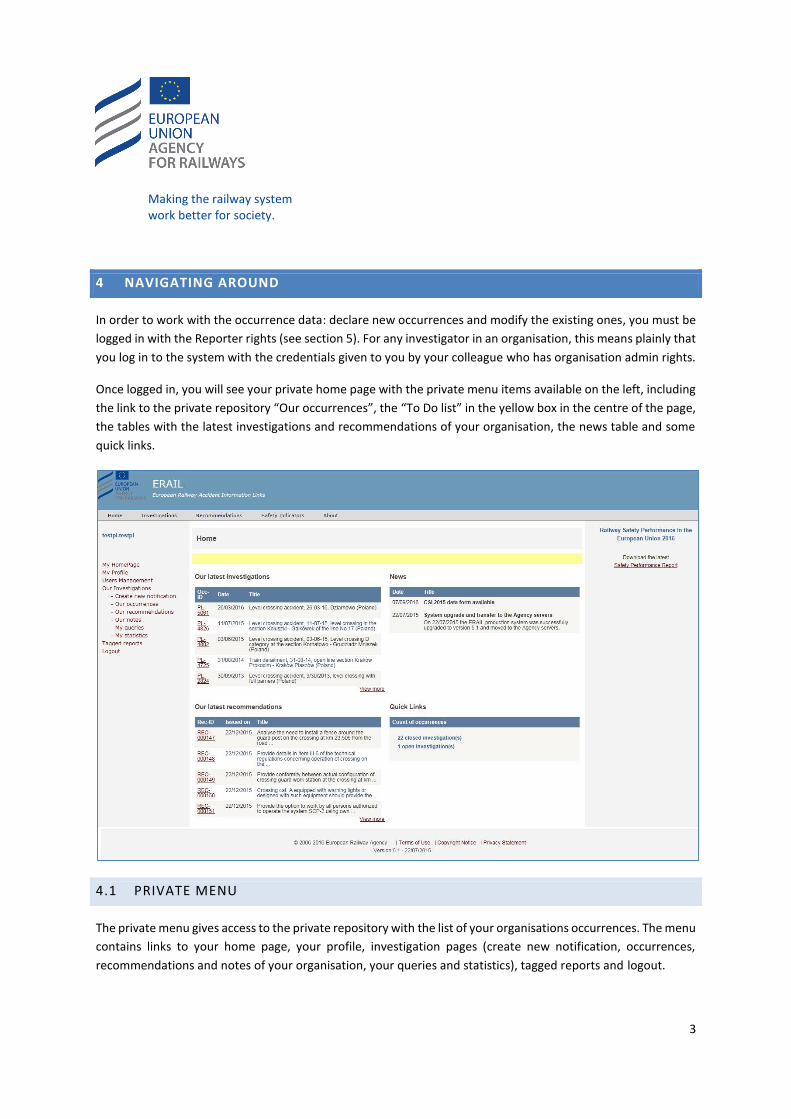
Once logged in, you will see your private home page with the private menu items available on the left, including
the link to the private repository “Our occurrences”, the “To Do list” in the yellow box in the centre of the page,
the tables with the latest investigations and recommendations of your organisation, the news table and some
quick links.
4.1 PRIVATE MENU
The private menu gives access to the private repository with the list of your organisations occurrences. The menu
contains links to your home page, your profile, investigation pages (create new notification, occurrences,
recommendations and notes of your organisation, your queries and statistics), tagged reports and logout.
Making the railway system work better for society.
4
To go back to your private home page from any other page, click on “My HomePage” link in your private menu.
To log out from the system, click on “Logout” link.
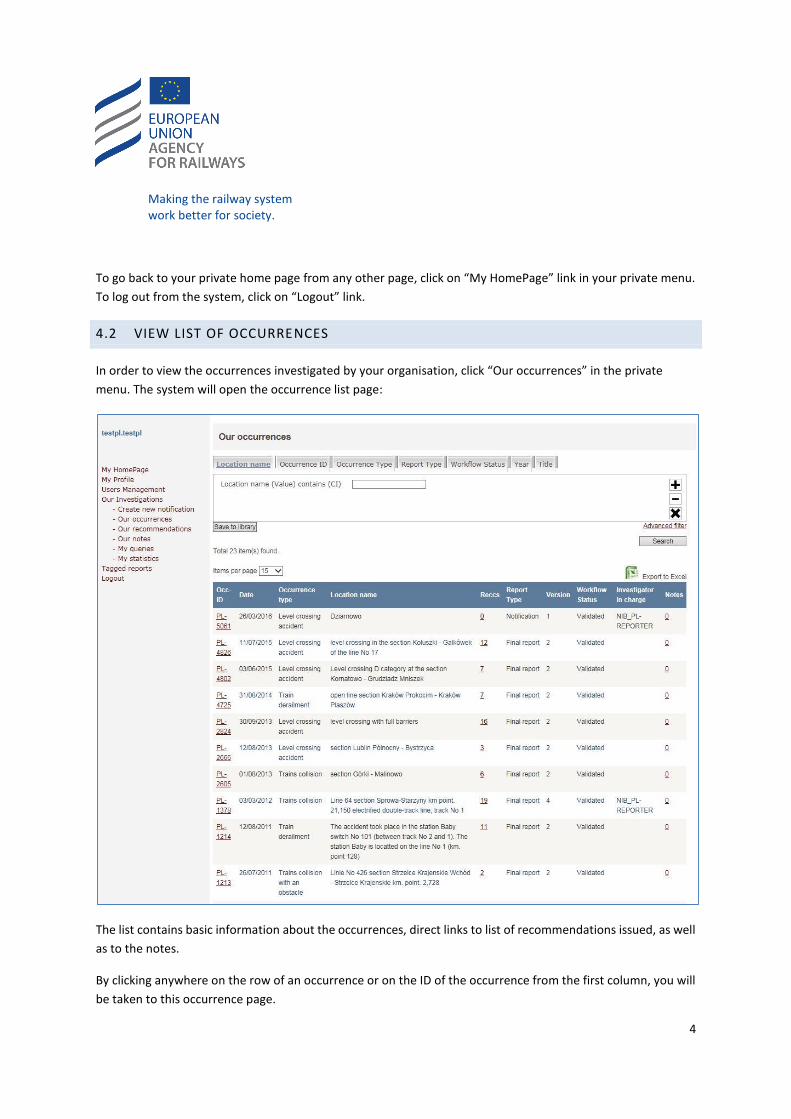
4.2 VIEW LIST OF OCCURRENCES
In order to view the occurrences investigated by your organisation, click “Our occurrences” in the private
menu. The system will open the occurrence list page:
The list contains basic information about the occurrences, direct links to list of recommendations issued, as well
as to the notes.
By clicking anywhere on the row of an occurrence or on the ID of the occurrence from the first column, you will
be taken to this occurrence page.
Making the railway system work better for society.
5
By clicking on the figure showing the number of recommendations (Recs column), you will be taken to the “Our
recommendations” page, filtered to show only the recommendations for this specific occurrence. In the lists of
recommendations you can click on the occurrence ID and then come to the occurrence itself.
The functionality for the figure of notes (Notes column) is similar to the figure for recommendations.
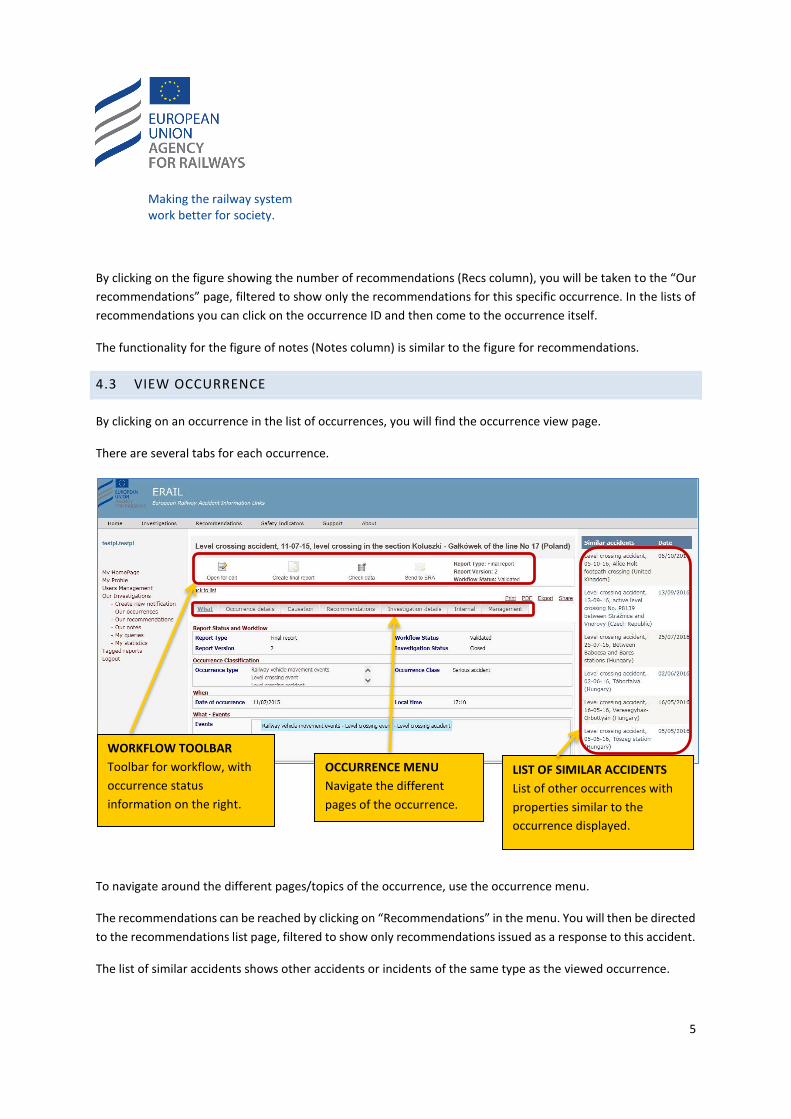
4.3 VIEW OCCURRENCE
By clicking on an occurrence in the list of occurrences, you will find the occurrence view page.
There are several tabs for each occurrence.
To navigate around the different pages/topics of the occurrence, use the occurrence menu.
The recommendations can be reached by clicking on “Recommendations” in the menu. You will then be directed
to the recommendations list page, filtered to show only recommendations issued as a response to this accident.
The list of similar accidents shows other accidents or incidents of the same type as the viewed occurrence.
WORKFLOW TOOLBAR
Toolbar for workflow, with
occurrence status
information on the right.
OCCURRENCE MENU
Navigate the different
pages of the occurrence.
LIST OF SIMILAR ACCIDENTS
List of other occurrences with
properties similar to the
occurrence displayed.
Making the railway system work better for society.
6
5 USER MANAGEMENT
Every user can have up to three different access rights.
Organisation admin – has the rights to manage user accounts of all users from his organisation. He can
view the list of users from his organisation and create new user accounts for users belonging to his
organisation.
Reporter – has the rights to create the investigation notification and reports data and to submit this
information to ERA (public repository).
Reader – these rights are intended for cases when an organisation wants to give access to the private
repository to other users, for example for sharing information on an investigation in progress.
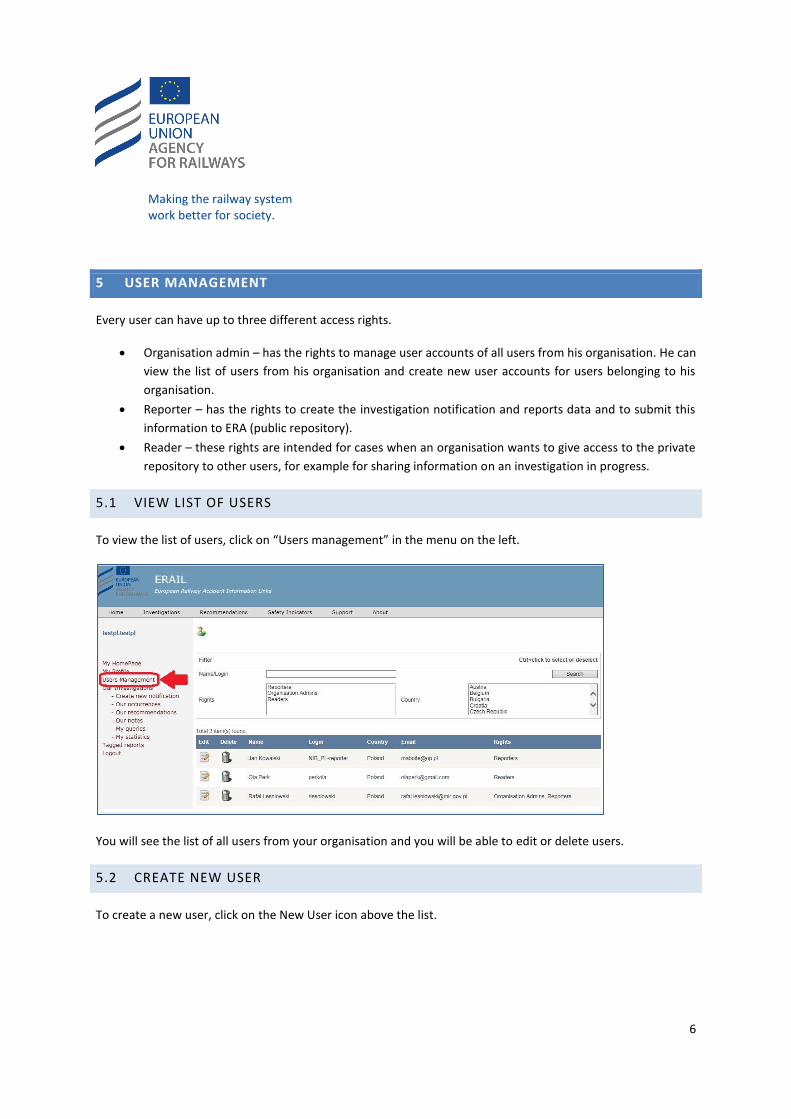
5.1 VIEW LIST OF USERS
To view the list of users, click on “Users management” in the menu on the left.
You will see the list of all users from your organisation and you will be able to edit or delete users.
5.2 CREATE NEW USER
To create a new user, click on the New User icon above the list.
Making the railway system work better for society.
7
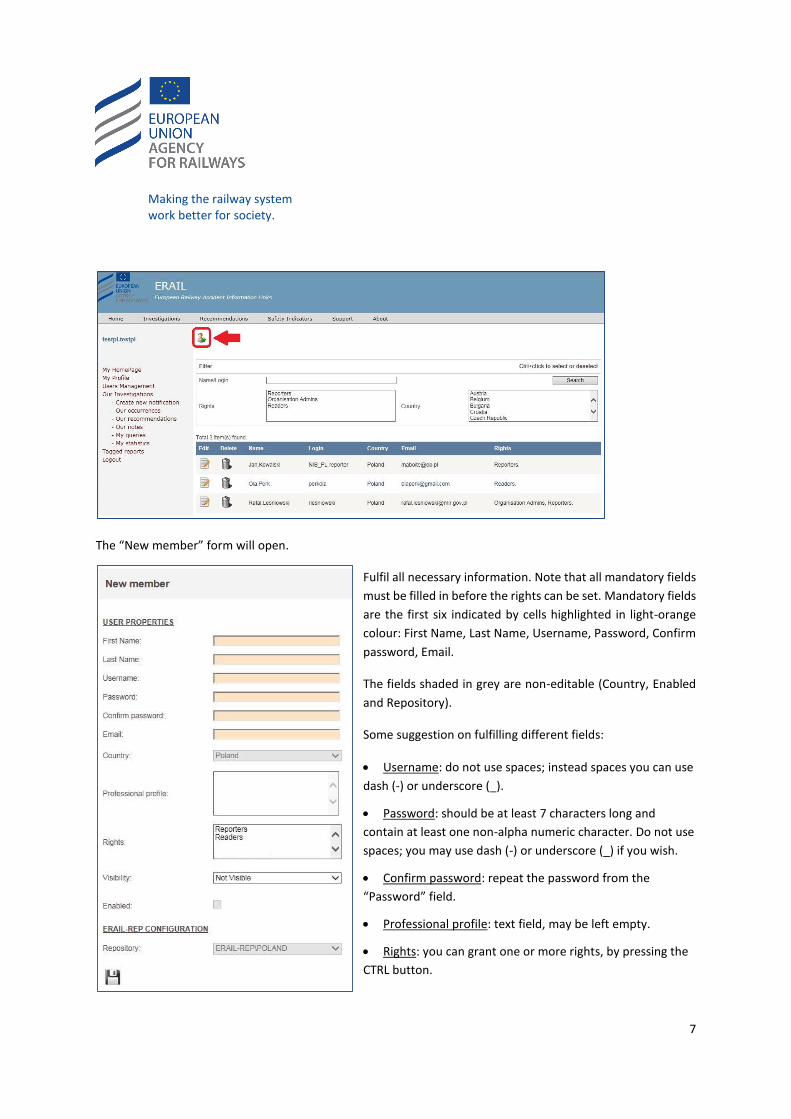
The “New member” form will open.
Fulfil all necessary information. Note that all mandatory fields
must be filled in before the rights can be set. Mandatory fields
are the first six indicated by cells highlighted in light-orange
colour: First Name, Last Name, Username, Password, Confirm
password, Email.
The fields shaded in grey are non-editable (Country, Enabled
and Repository).
Some suggestion on fulfilling different fields:
Username: do not use spaces; instead spaces you can use
dash (-) or underscore (_).
Password: should be at least 7 characters long and
contain at least one non-alpha numeric character. Do not use
spaces; you may use dash (-) or underscore (_) if you wish.
Confirm password: repeat the password from the
“Password” field.
Professional profile: text field, may be left empty.
Rights: you can grant one or more rights, by pressing the
CTRL button.
Making the railway system work better for society.
8
Once all fields are fulfilled, click on the “Save” icon:
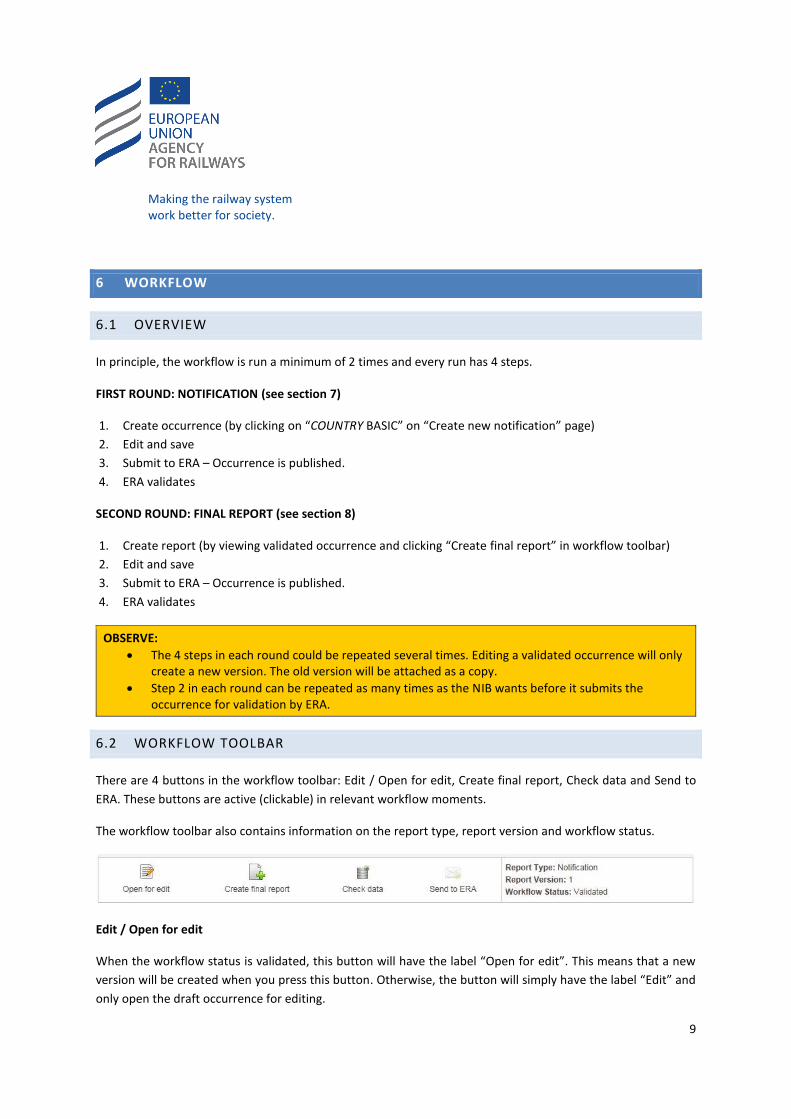
The system will display the text message in green, informing about successful creation of the new user profile:
The automatic email will be sent to the email address of the new user, with the information on Username and
the temporary password:
At this moment the user account is not yet enabled. To enable the account, the user must follow the instructions
provided in the email to confirm his registration and change the password. Only afterwards, his user profile will
become enabled and the user will be able to use it.
Making the railway system work better for society.
9
6 WORKFLOW
6.1 OVERVIEW
In principle, the workflow is run a minimum of 2 times and every run has 4 steps.
FIRST ROUND: NOTIFICATION (see section 7)
1. Create occurrence (by clicking on “COUNTRY BASIC” on “Create new notification” page)
2. Edit and save
3. Submit to ERA – Occurrence is published.
4. ERA validates
SECOND ROUND: FINAL REPORT (see section 8)
1. Create report (by viewing validated occurrence and clicking “Create final report” in workflow toolbar)
2. Edit and save
3. Submit to ERA – Occurrence is published.
4. ERA validates
OBSERVE:
The 4 steps in each round could be repeated several times. Editing a validated occurrence will only create a new version. The old version will be attached as a copy.
Step 2 in each round can be repeated as many times as the NIB wants before it submits the occurrence for validation by ERA.
6.2 WORKFLOW TOOLBAR
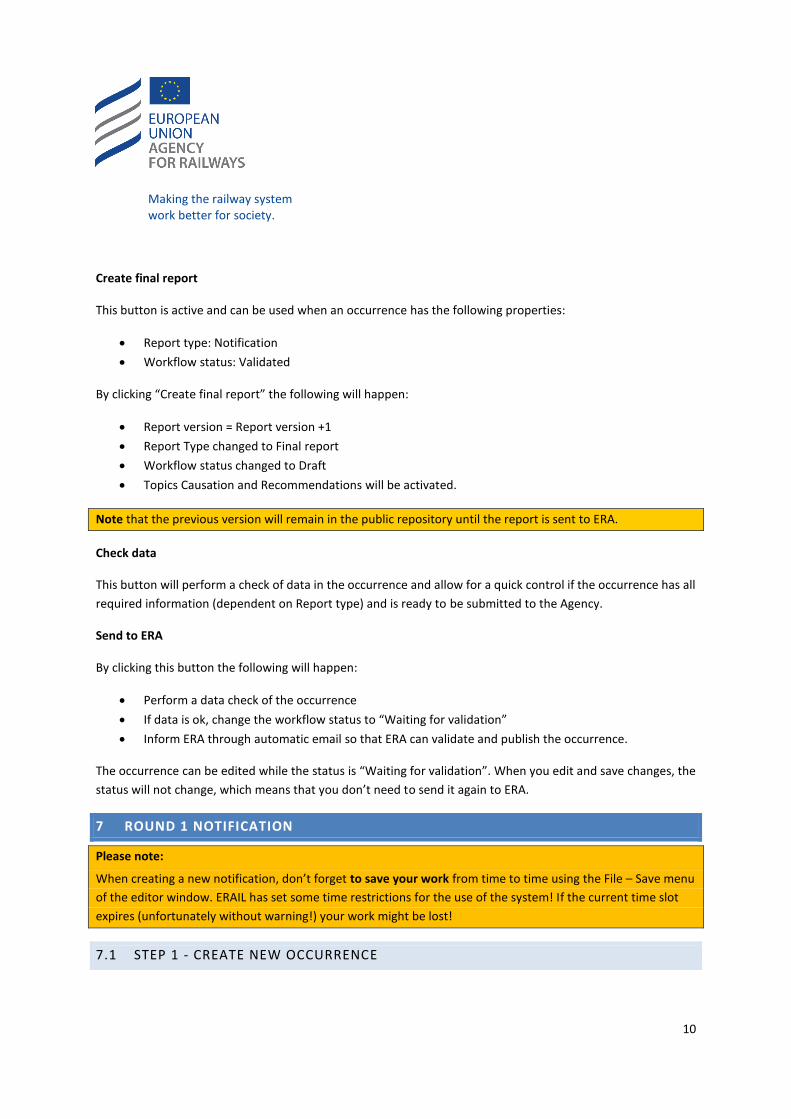
There are 4 buttons in the workflow toolbar: Edit / Open for edit, Create final report, Check data and Send to
ERA. These buttons are active (clickable) in relevant workflow moments.
The workflow toolbar also contains information on the report type, report version and workflow status.
Edit / Open for edit
When the workflow status is validated, this button will have the label “Open for edit”. This means that a new
version will be created when you press this button. Otherwise, the button will simply have the label “Edit” and
only open the draft occurrence for editing.
Making the railway system work better for society.
10
Create final report
This button is active and can be used when an occurrence has the following properties:
Report type: Notification
Workflow status: Validated
By clicking “Create final report” the following will happen:
Report version = Report version +1
Report Type changed to Final report
Workflow status changed to Draft
Topics Causation and Recommendations will be activated.
Note that the previous version will remain in the public repository until the report is sent to ERA.
Check data
This button will perform a check of data in the occurrence and allow for a quick control if the occurrence has all
required information (dependent on Report type) and is ready to be submitted to the Agency.
Send to ERA
By clicking this button the following will happen:
Perform a data check of the occurrence
If data is ok, change the workflow status to “Waiting for validation”
Inform ERA through automatic email so that ERA can validate and publish the occurrence.
The occurrence can be edited while the status is “Waiting for validation”. When you edit and save changes, the
status will not change, which means that you don’t need to send it again to ERA.
7 ROUND 1 NOTIFICATION
Please note:
When creating a new notification, don’t forget to save your work from time to time using the File – Save menu
of the editor window. ERAIL has set some time restrictions for the use of the system! If the current time slot
expires (unfortunately without warning!) your work might be lost!
7.1 STEP 1 - CREATE NEW OCCURRENCE
Making the railway system work better for society.
11
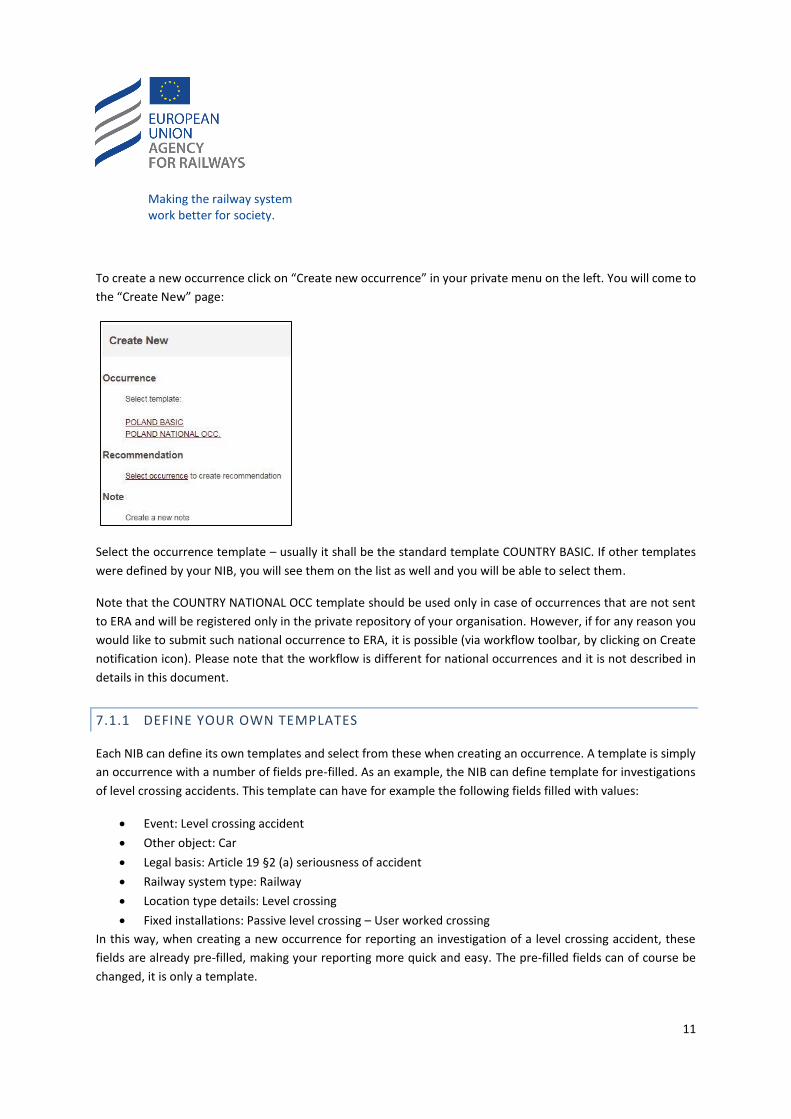
To create a new occurrence click on “Create new occurrence” in your private menu on the left. You will come to
the “Create New” page:
Select the occurrence template – usually it shall be the standard template COUNTRY BASIC. If other templates
were defined by your NIB, you will see them on the list as well and you will be able to select them.
Note that the COUNTRY NATIONAL OCC template should be used only in case of occurrences that are not sent
to ERA and will be registered only in the private repository of your organisation. However, if for any reason you
would like to submit such national occurrence to ERA, it is possible (via workflow toolbar, by clicking on Create
notification icon). Please note that the workflow is different for national occurrences and it is not described in
details in this document.
7.1.1 DEFINE YOUR OWN TEMPLATES
Each NIB can define its own templates and select from these when creating an occurrence. A template is simply
an occurrence with a number of fields pre-filled. As an example, the NIB can define template for investigations
of level crossing accidents. This template can have for example the following fields filled with values:
Event: Level crossing accident
Other object: Car
Legal basis: Article 19 §2 (a) seriousness of accident
Railway system type: Railway
Location type details: Level crossing
Fixed installations: Passive level crossing – User worked crossing
In this way, when creating a new occurrence for reporting an investigation of a level crossing accident, these
fields are already pre-filled, making your reporting more quick and easy. The pre-filled fields can of course be
changed, it is only a template.
Making the railway system work better for society.
12
If you wish to create your own templates, specify what fields you want pre-filled and with what values, and give
a name to the template and send this information by email to [email protected]. We will then insert
the requested template so that you can access it from your “Create new occurrence” page.
7.1.2 COMPLETING THE FORM
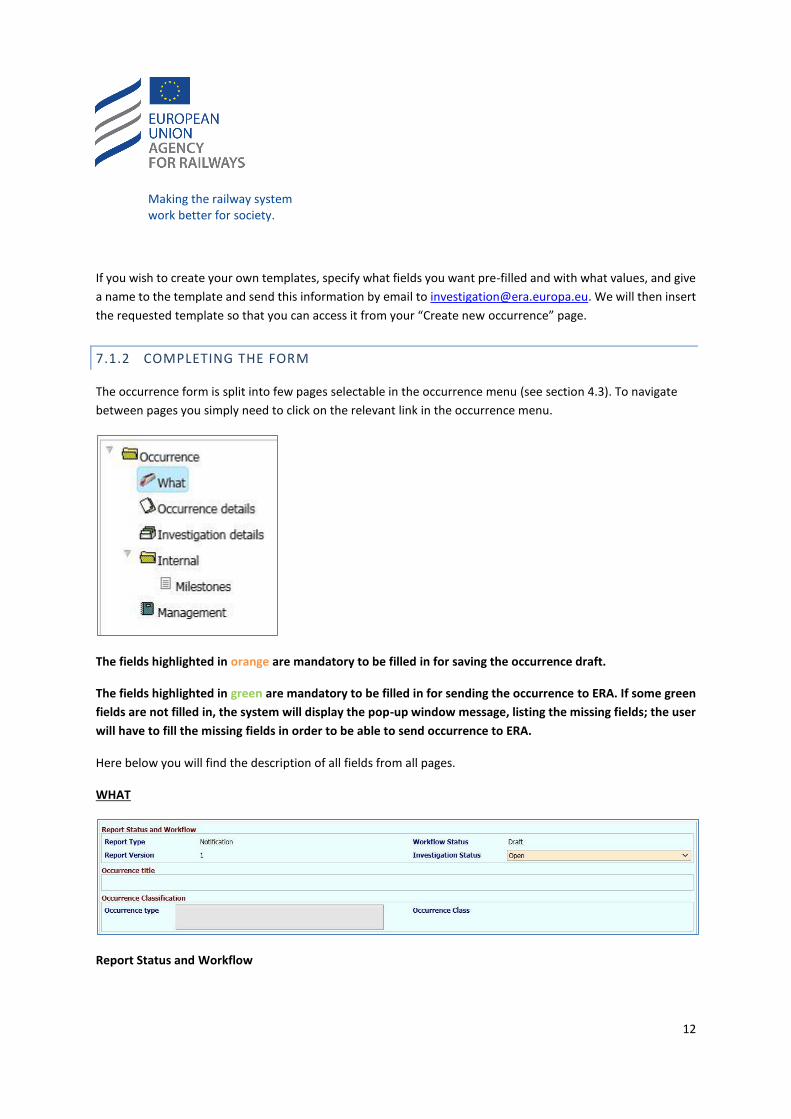
The occurrence form is split into few pages selectable in the occurrence menu (see section 4.3). To navigate
between pages you simply need to click on the relevant link in the occurrence menu.
The fields highlighted in orange are mandatory to be filled in for saving the occurrence draft.
The fields highlighted in green are mandatory to be filled in for sending the occurrence to ERA. If some green
fields are not filled in, the system will display the pop-up window message, listing the missing fields; the user
will have to fill the missing fields in order to be able to send occurrence to ERA.
Here below you will find the description of all fields from all pages.
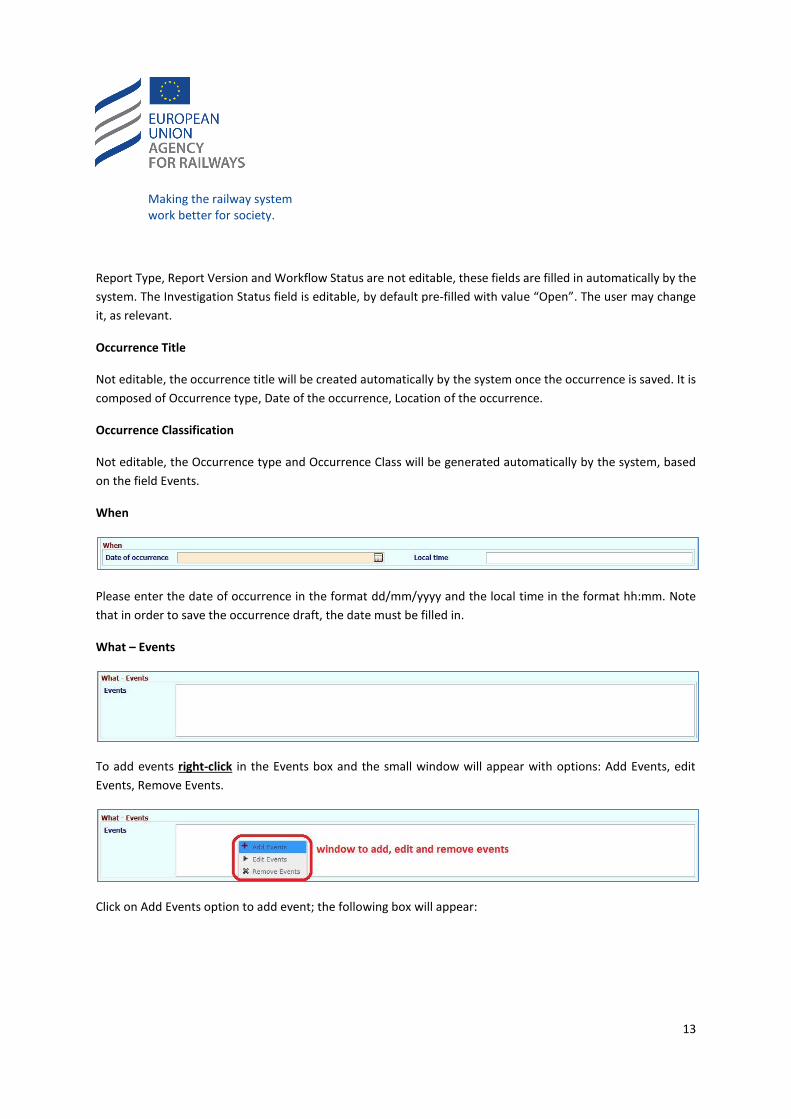
WHAT
Report Status and Workflow
Making the railway system work better for society.
13
Report Type, Report Version and Workflow Status are not editable, these fields are filled in automatically by the
system. The Investigation Status field is editable, by default pre-filled with value “Open”. The user may change
it, as relevant.
Occurrence Title
Not editable, the occurrence title will be created automatically by the system once the occurrence is saved. It is
composed of Occurrence type, Date of the occurrence, Location of the occurrence.
Occurrence Classification
Not editable, the Occurrence type and Occurrence Class will be generated automatically by the system, based
on the field Events.
When
Please enter the date of occurrence in the format dd/mm/yyyy and the local time in the format hh:mm. Note
that in order to save the occurrence draft, the date must be filled in.
What – Events
To add events right-click in the Events box and the small window will appear with options: Add Events, edit
Events, Remove Events.
Click on Add Events option to add event; the following box will appear:
Making the railway system work better for society.
14
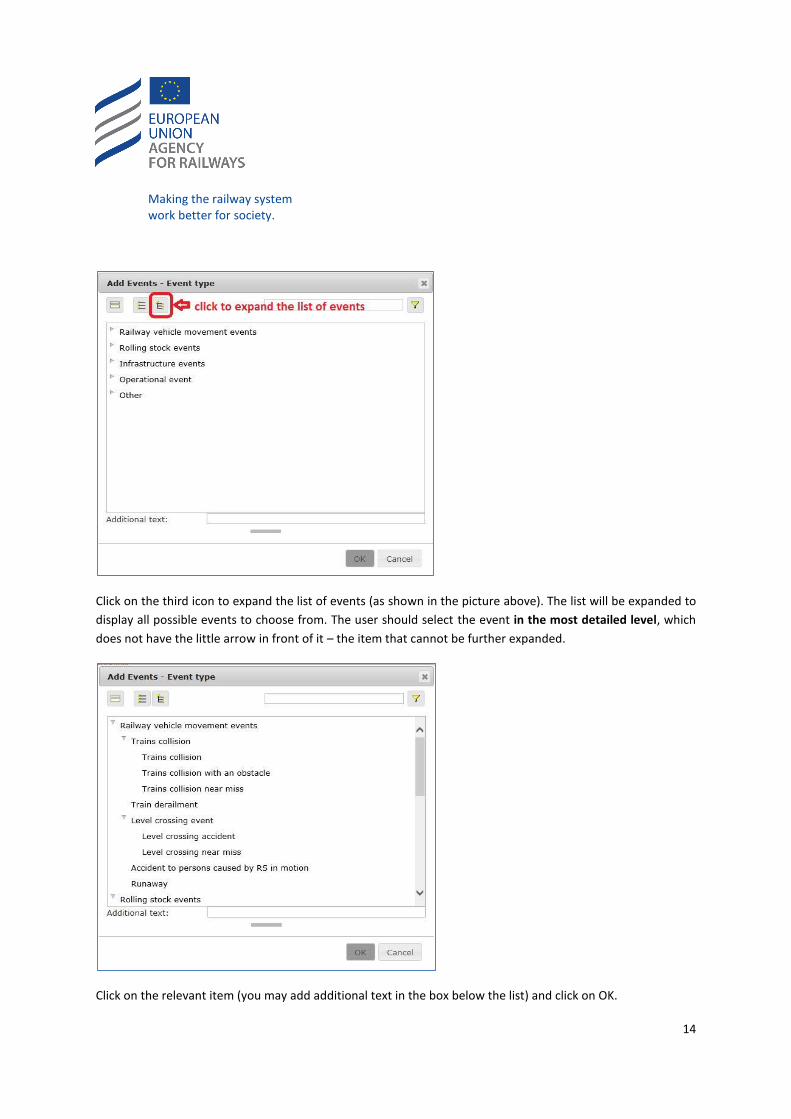
Click on the third icon to expand the list of events (as shown in the picture above). The list will be expanded to
display all possible events to choose from. The user should select the event in the most detailed level, which
does not have the little arrow in front of it – the item that cannot be further expanded.
Click on the relevant item (you may add additional text in the box below the list) and click on OK.
Making the railway system work better for society.
15
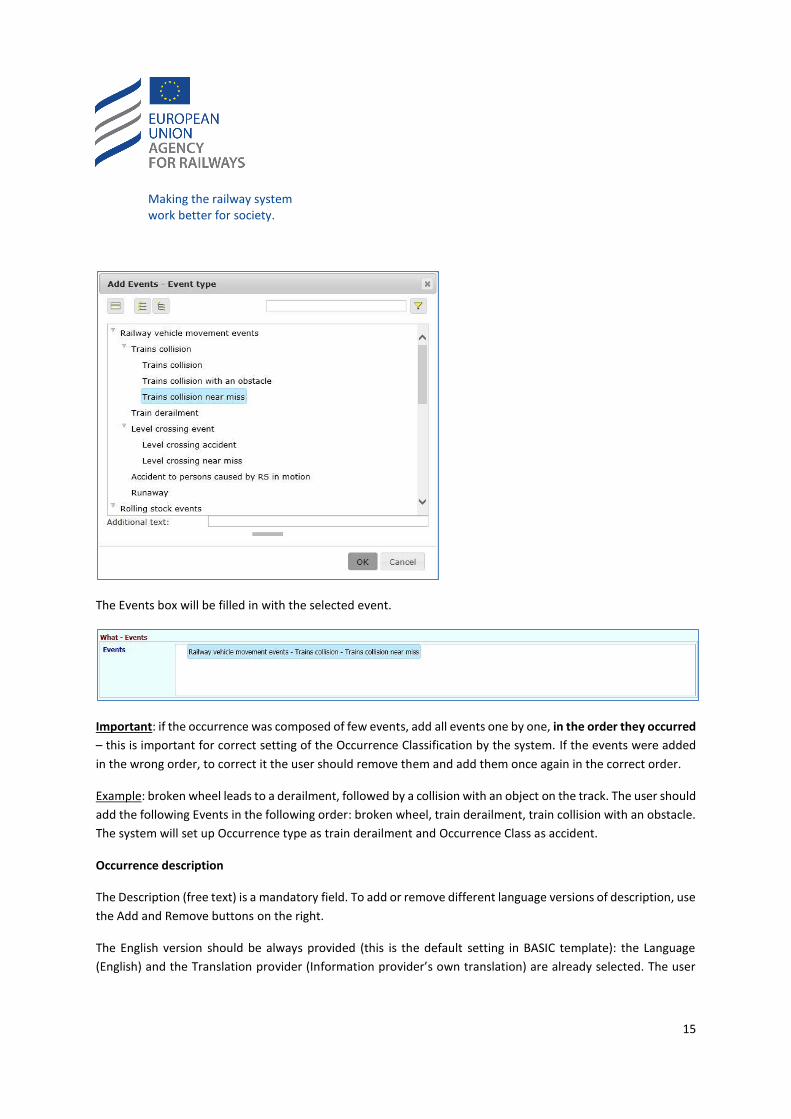
The Events box will be filled in with the selected event.
Important: if the occurrence was composed of few events, add all events one by one, in the order they occurred
– this is important for correct setting of the Occurrence Classification by the system. If the events were added
in the wrong order, to correct it the user should remove them and add them once again in the correct order.
Example: broken wheel leads to a derailment, followed by a collision with an object on the track. The user should
add the following Events in the following order: broken wheel, train derailment, train collision with an obstacle.
The system will set up Occurrence type as train derailment and Occurrence Class as accident.
Occurrence description
The Description (free text) is a mandatory field. To add or remove different language versions of description, use
the Add and Remove buttons on the right.
The English version should be always provided (this is the default setting in BASIC template): the Language
(English) and the Translation provider (Information provider’s own translation) are already selected. The user
Making the railway system work better for society.
16
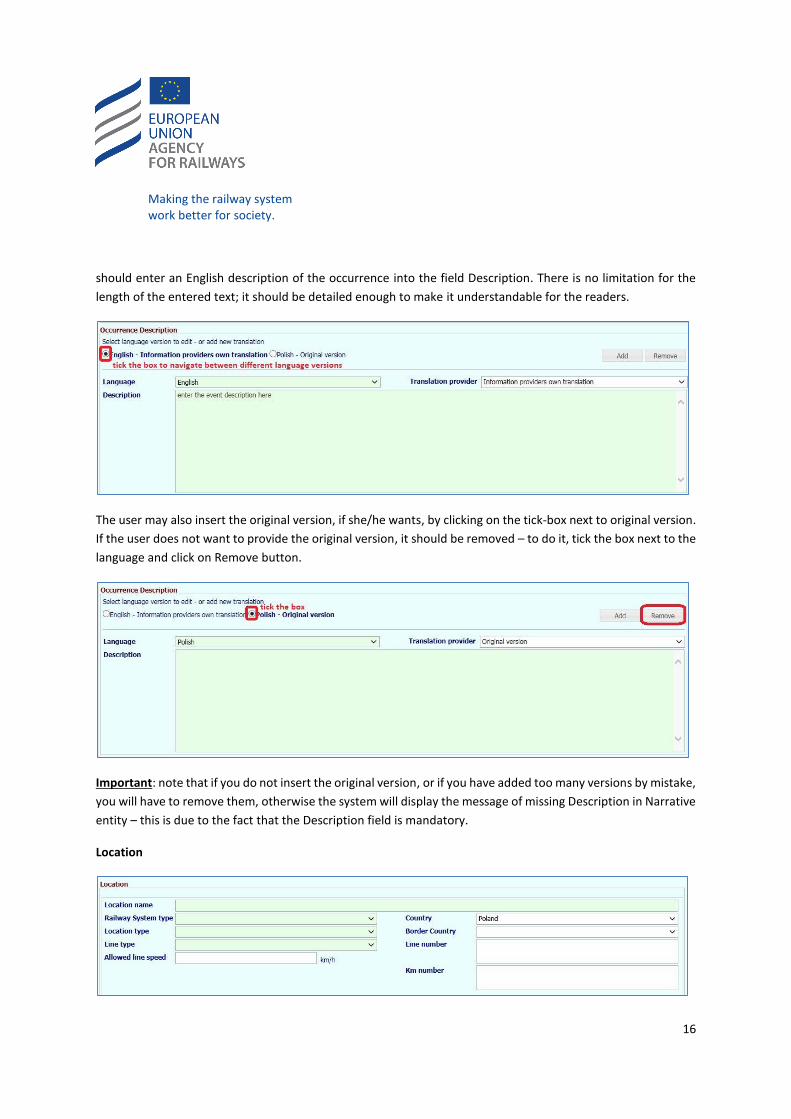
should enter an English description of the occurrence into the field Description. There is no limitation for the
length of the entered text; it should be detailed enough to make it understandable for the readers.
The user may also insert the original version, if she/he wants, by clicking on the tick-box next to original version.
If the user does not want to provide the original version, it should be removed – to do it, tick the box next to the
language and click on Remove button.
Important: note that if you do not insert the original version, or if you have added too many versions by mistake,
you will have to remove them, otherwise the system will display the message of missing Description in Narrative
entity – this is due to the fact that the Description field is mandatory.
Location
Making the railway system work better for society.
17
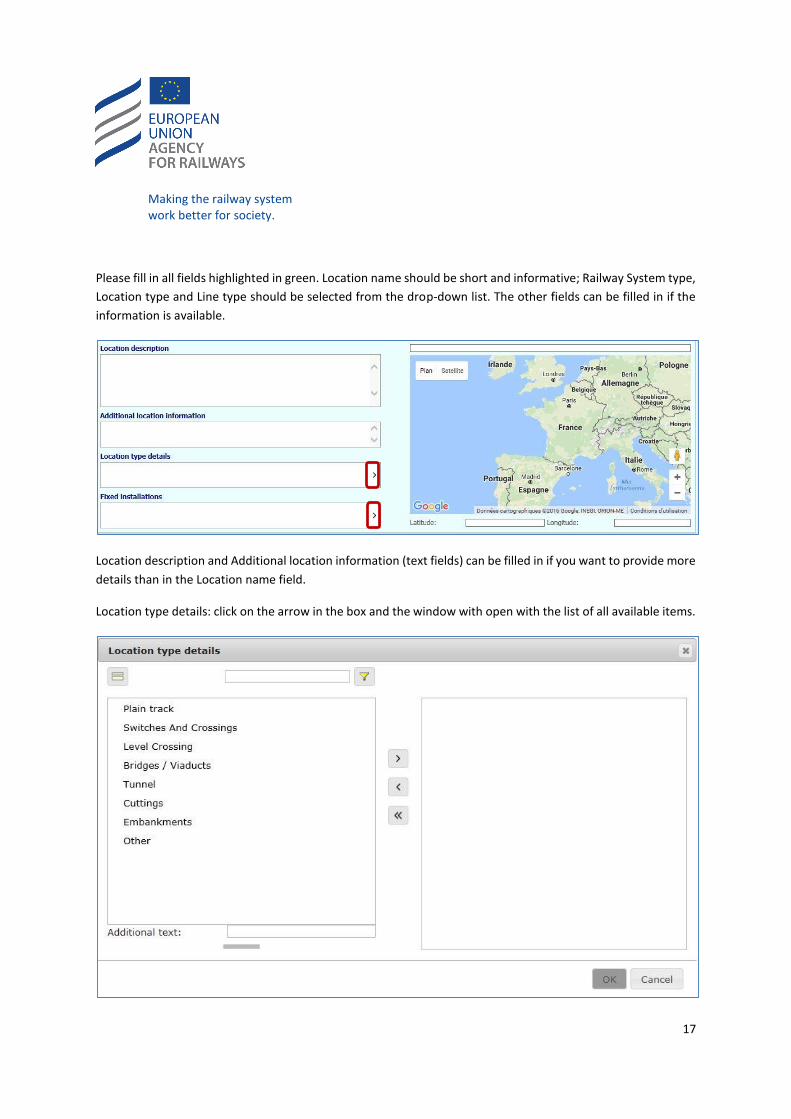
Please fill in all fields highlighted in green. Location name should be short and informative; Railway System type,
Location type and Line type should be selected from the drop-down list. The other fields can be filled in if the
information is available.
Location description and Additional location information (text fields) can be filled in if you want to provide more
details than in the Location name field.
Location type details: click on the arrow in the box and the window with open with the list of all available items.
Making the railway system work better for society.
18
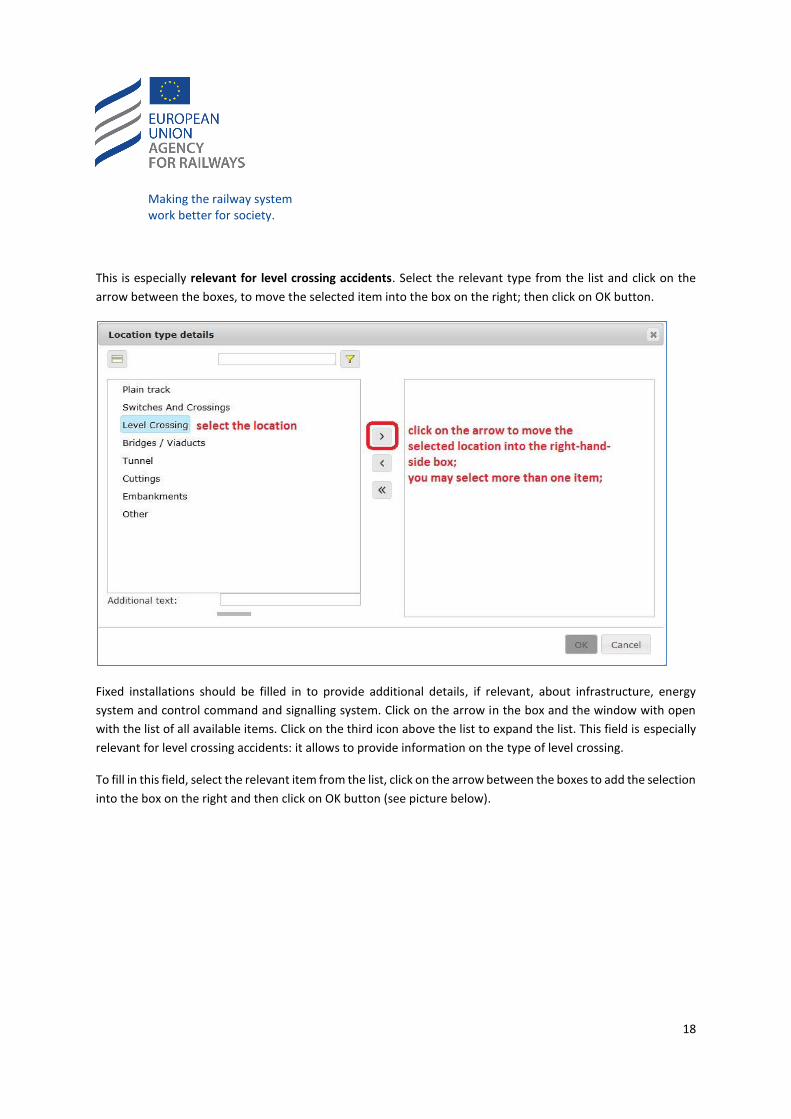
This is especially relevant for level crossing accidents. Select the relevant type from the list and click on the
arrow between the boxes, to move the selected item into the box on the right; then click on OK button.
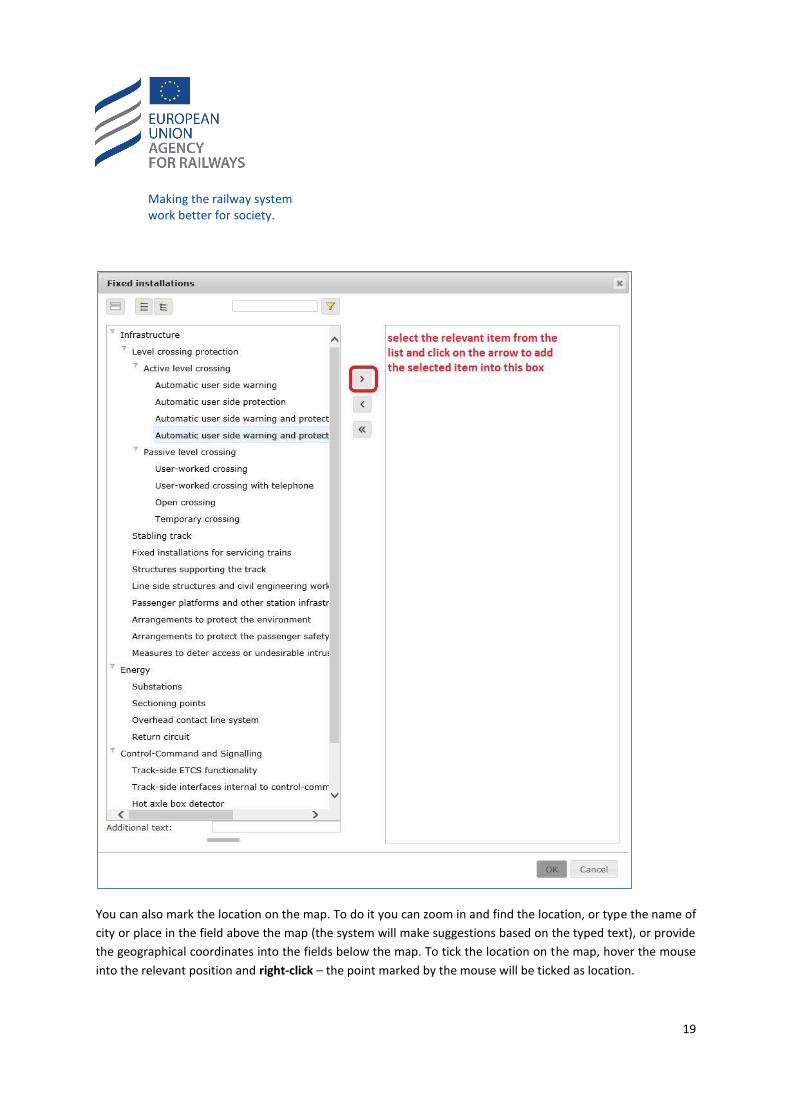
Fixed installations should be filled in to provide additional details, if relevant, about infrastructure, energy
system and control command and signalling system. Click on the arrow in the box and the window with open
with the list of all available items. Click on the third icon above the list to expand the list. This field is especially
relevant for level crossing accidents: it allows to provide information on the type of level crossing.
To fill in this field, select the relevant item from the list, click on the arrow between the boxes to add the selection
into the box on the right and then click on OK button (see picture below).
Making the railway system work better for society.
19
You can also mark the location on the map. To do it you can zoom in and find the location, or type the name of
city or place in the field above the map (the system will make suggestions based on the typed text), or provide
the geographical coordinates into the fields below the map. To tick the location on the map, hover the mouse
into the relevant position and right-click – the point marked by the mouse will be ticked as location.
Making the railway system work better for society.
20
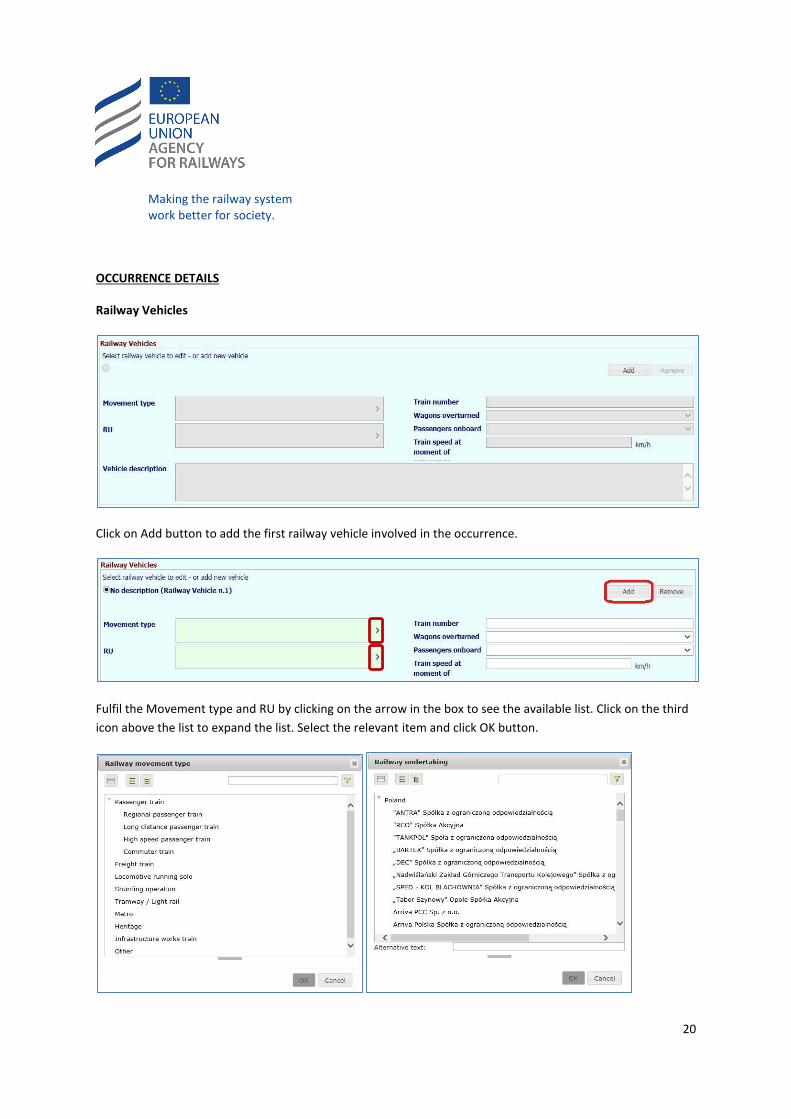
OCCURRENCE DETAILS
Railway Vehicles
Click on Add button to add the first railway vehicle involved in the occurrence.
Fulfil the Movement type and RU by clicking on the arrow in the box to see the available list. Click on the third
icon above the list to expand the list. Select the relevant item and click OK button.
Making the railway system work better for society.
21
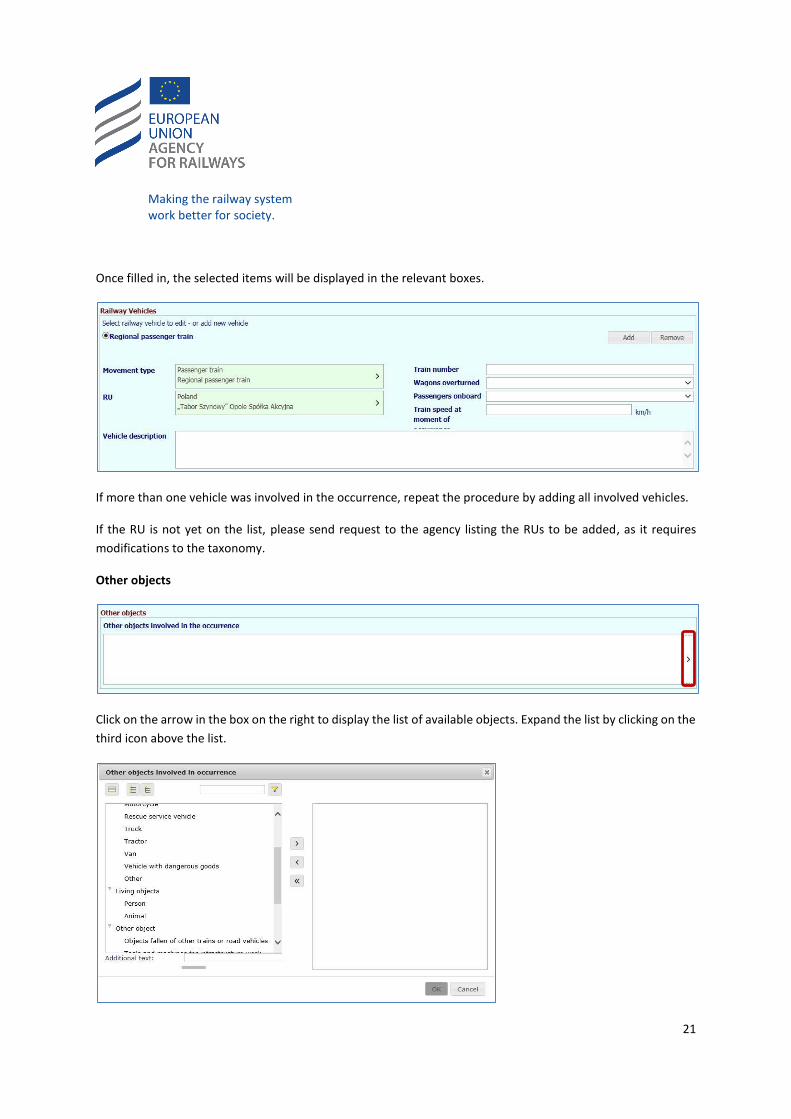
Once filled in, the selected items will be displayed in the relevant boxes.
If more than one vehicle was involved in the occurrence, repeat the procedure by adding all involved vehicles.
If the RU is not yet on the list, please send request to the agency listing the RUs to be added, as it requires
modifications to the taxonomy.
Other objects
Click on the arrow in the box on the right to display the list of available objects. Expand the list by clicking on the
third icon above the list.
Making the railway system work better for society.
22
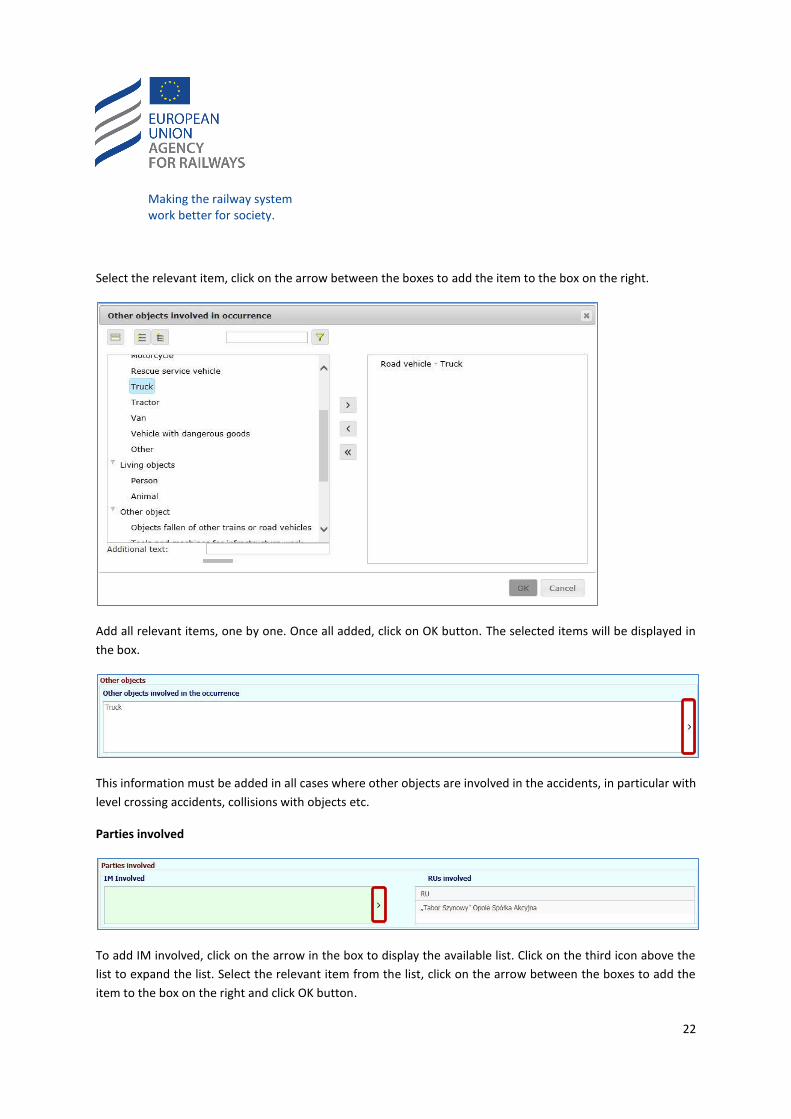
Select the relevant item, click on the arrow between the boxes to add the item to the box on the right.
Add all relevant items, one by one. Once all added, click on OK button. The selected items will be displayed in
the box.
This information must be added in all cases where other objects are involved in the accidents, in particular with
level crossing accidents, collisions with objects etc.
Parties involved
To add IM involved, click on the arrow in the box to display the available list. Click on the third icon above the
list to expand the list. Select the relevant item from the list, click on the arrow between the boxes to add the
item to the box on the right and click OK button.

Making the railway system work better for society.
23
The selected IM will be displayed in the box.
If the IM is not yet on the list, please send request to the agency listing the IMs to be added, as it requires
modifications to the taxonomy.
The content of the field RUs involved is generated automatically by the entries made under “railway vehicles”.
Casualties
Please enter the number of casualties into the appropriate fields.
Making the railway system work better for society.
24
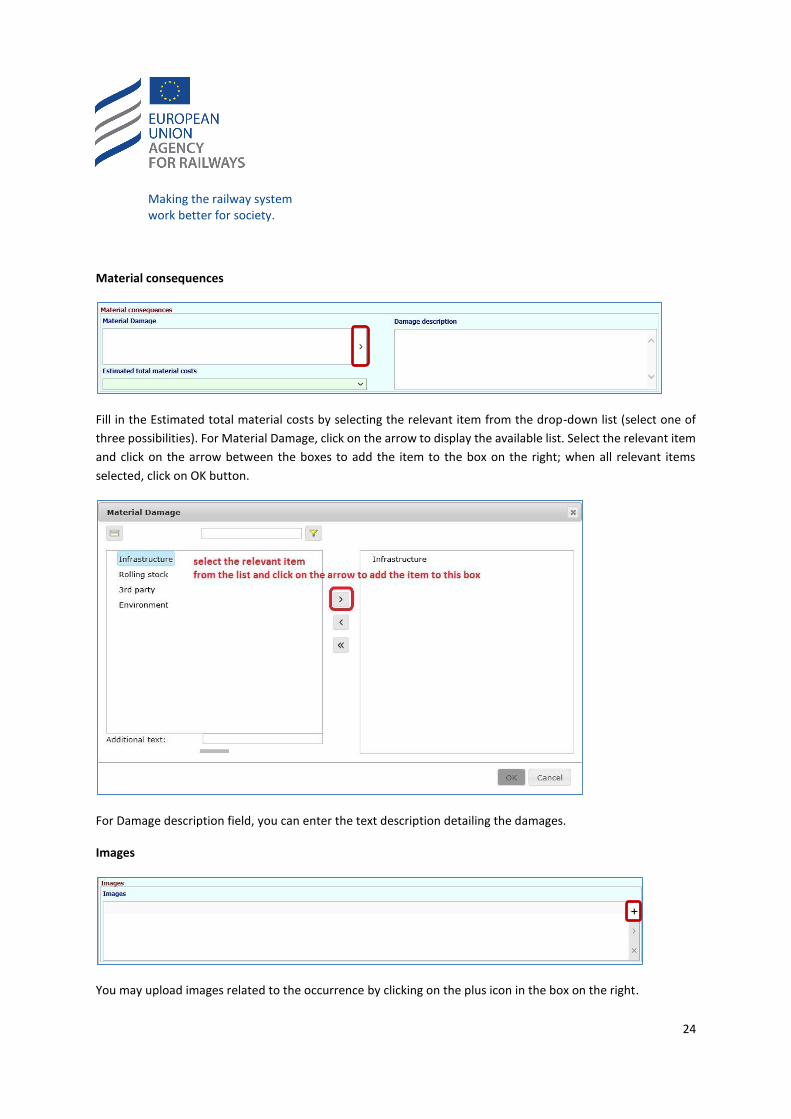
Material consequences
Fill in the Estimated total material costs by selecting the relevant item from the drop-down list (select one of
three possibilities). For Material Damage, click on the arrow to display the available list. Select the relevant item
and click on the arrow between the boxes to add the item to the box on the right; when all relevant items
selected, click on OK button.
For Damage description field, you can enter the text description detailing the damages.
Images
You may upload images related to the occurrence by clicking on the plus icon in the box on the right.
Making the railway system work better for society.
25
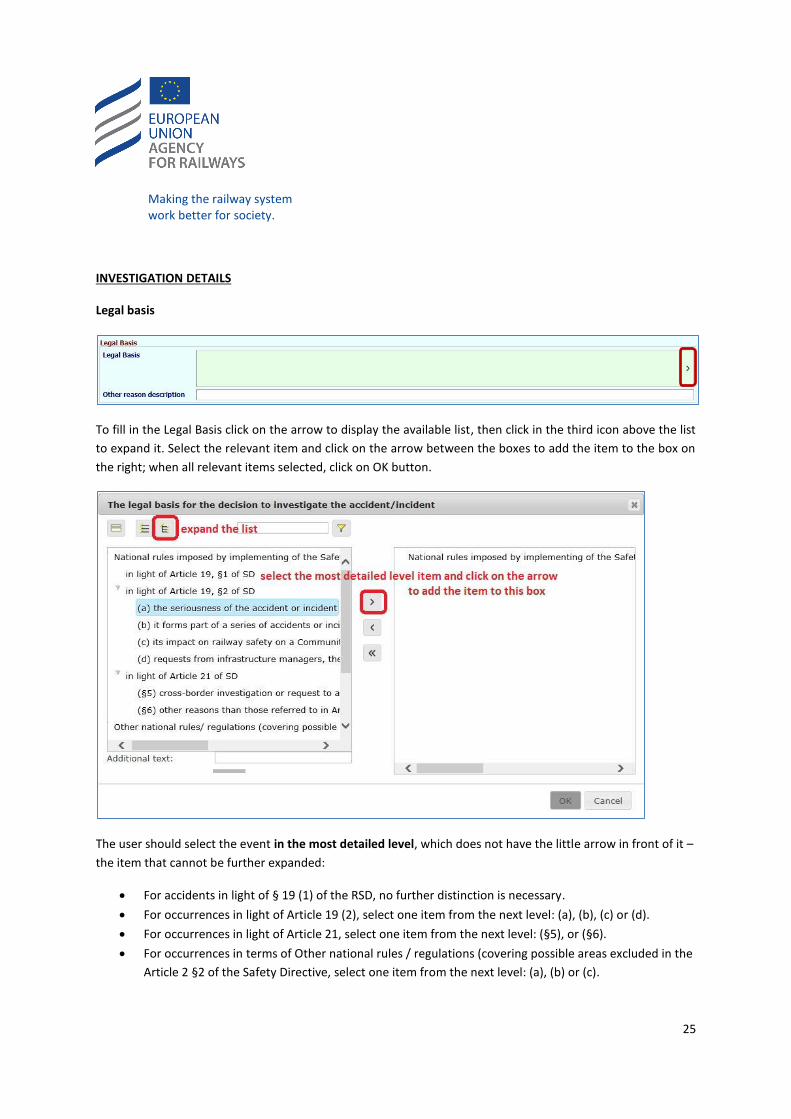
INVESTIGATION DETAILS
Legal basis
To fill in the Legal Basis click on the arrow to display the available list, then click in the third icon above the list
to expand it. Select the relevant item and click on the arrow between the boxes to add the item to the box on
the right; when all relevant items selected, click on OK button.
The user should select the event in the most detailed level, which does not have the little arrow in front of it –
the item that cannot be further expanded:
For accidents in light of § 19 (1) of the RSD, no further distinction is necessary.
For occurrences in light of Article 19 (2), select one item from the next level: (a), (b), (c) or (d).
For occurrences in light of Article 21, select one item from the next level: (§5), or (§6).
For occurrences in terms of Other national rules / regulations (covering possible areas excluded in the
Article 2 §2 of the Safety Directive, select one item from the next level: (a), (b) or (c).
Making the railway system work better for society.
26
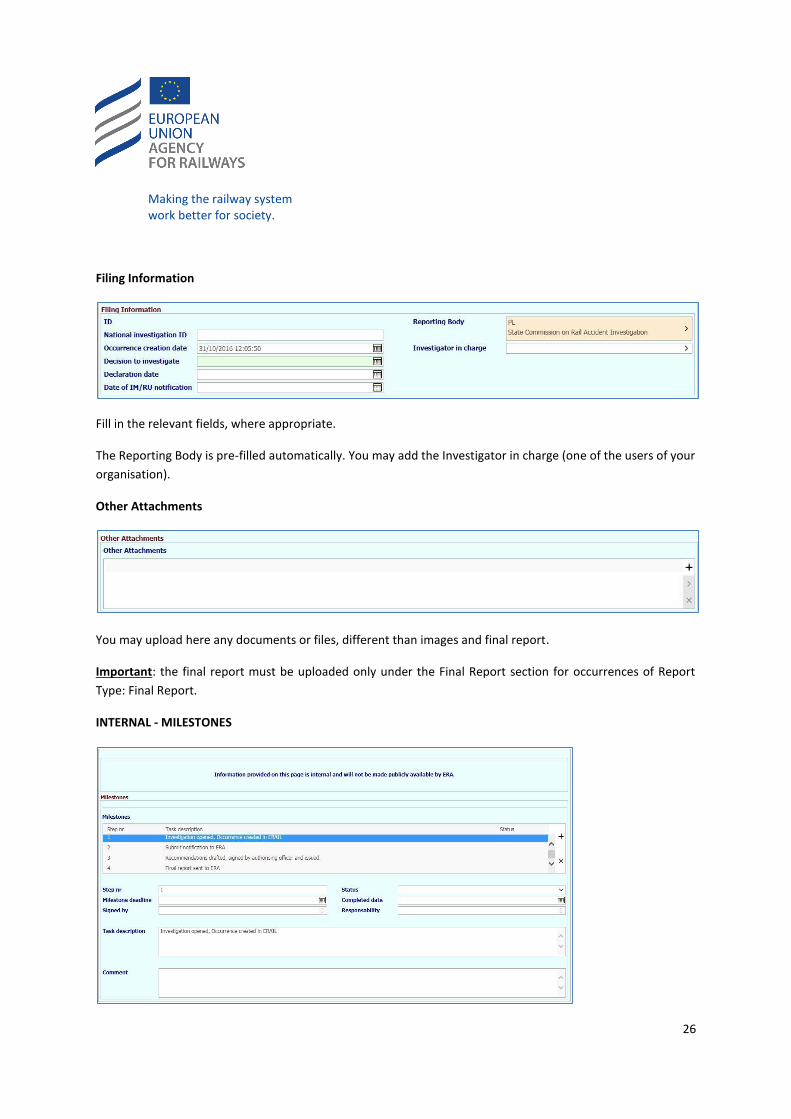
Filing Information
Fill in the relevant fields, where appropriate.
The Reporting Body is pre-filled automatically. You may add the Investigator in charge (one of the users of your
organisation).
Other Attachments
You may upload here any documents or files, different than images and final report.
Important: the final report must be uploaded only under the Final Report section for occurrences of Report
Type: Final Report.
INTERNAL - MILESTONES
Making the railway system work better for society.
27
This page you can use to manage your investigations e.g. by setting milestones. This page is visible only in the
private repository of the NIB which provides the information; it is not copied to the public repository when you
send the occurrence to ERA.
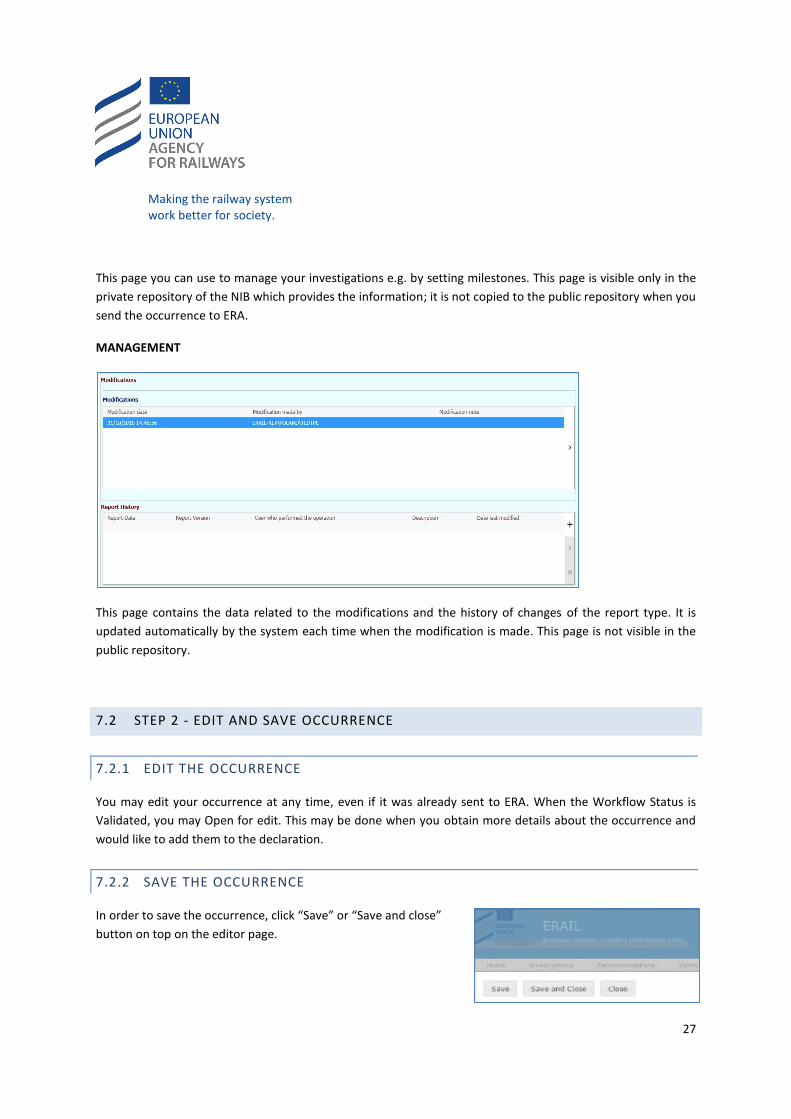
MANAGEMENT
This page contains the data related to the modifications and the history of changes of the report type. It is
updated automatically by the system each time when the modification is made. This page is not visible in the
public repository.
7.2 STEP 2 - EDIT AND SAVE OCCURRENCE
7.2.1 EDIT THE OCCURRENCE
You may edit your occurrence at any time, even if it was already sent to ERA. When the Workflow Status is
Validated, you may Open for edit. This may be done when you obtain more details about the occurrence and
would like to add them to the declaration.
7.2.2 SAVE THE OCCURRENCE
In order to save the occurrence, click “Save” or “Save and close”
button on top on the editor page.
Making the railway system work better for society.
28
After saving the occurrence certain fields will be “calculated” by the system:
Title will be automatically set
Occurrence type and Occurrence class will be automatically set
Occurrence ID, workflow attributes and a number of other fields will be set.
7.2.3 REQUIRED FIELDS
Date of occurrence and Investigation Status are required for saving the occurrence.
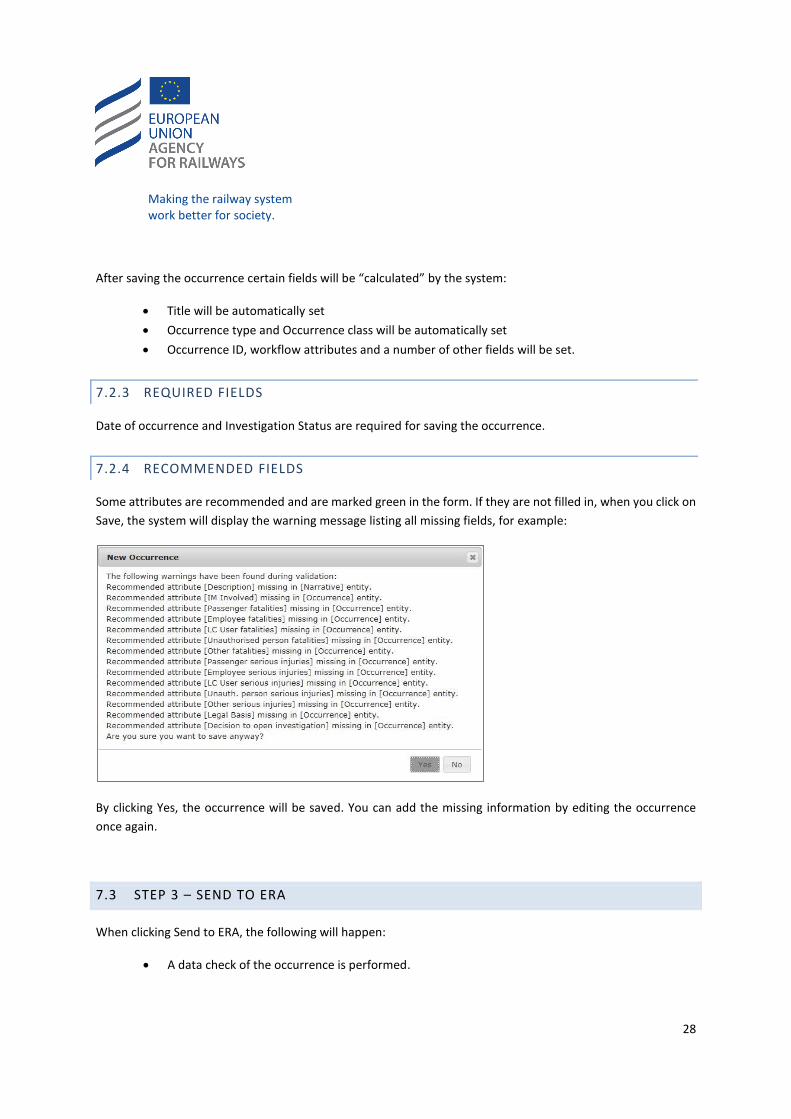
7.2.4 RECOMMENDED FIELDS
Some attributes are recommended and are marked green in the form. If they are not filled in, when you click on
Save, the system will display the warning message listing all missing fields, for example:
By clicking Yes, the occurrence will be saved. You can add the missing information by editing the occurrence
once again.
7.3 STEP 3 – SEND TO ERA
When clicking Send to ERA, the following will happen:
A data check of the occurrence is performed.
Making the railway system work better for society.
29
If data is ok, the status is changed to “Waiting for validation” and the occurrence is copied into the
public repository with the disclaimer saying that it was not yet validated by ERA.
ERA is informed through automatic email about submission of occurrence for validation. When ERA
validates, the disclaimer will disappear.
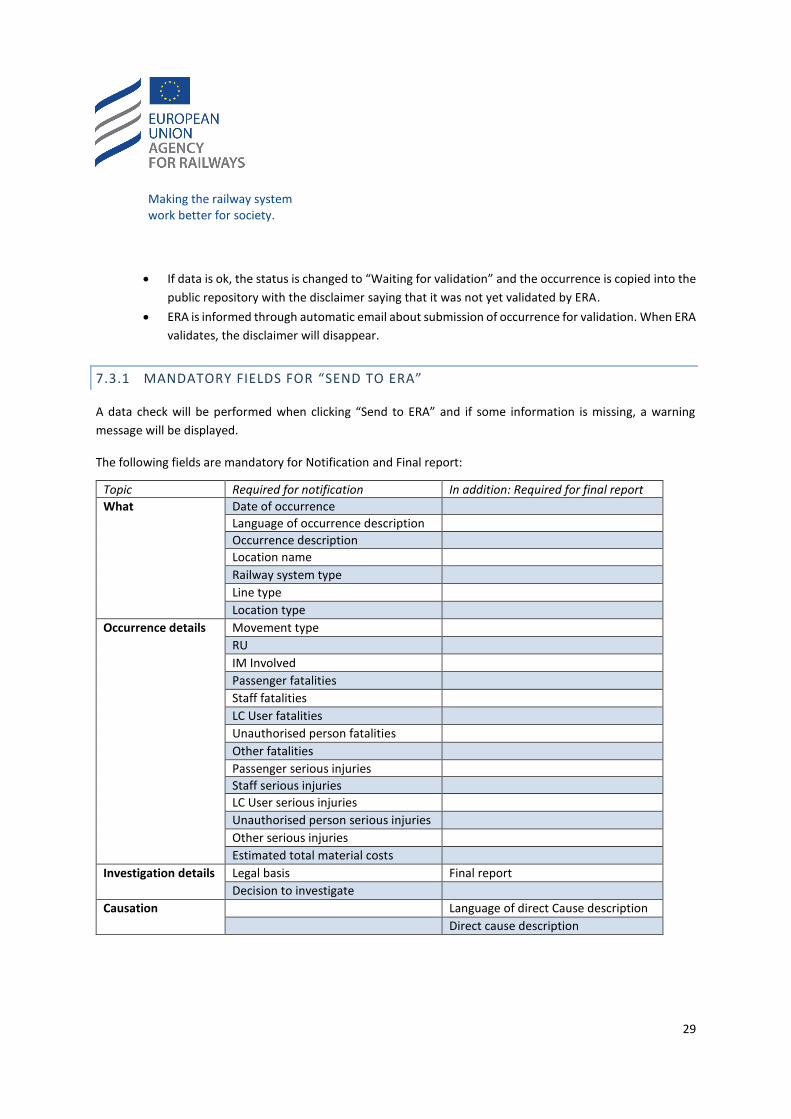
7.3.1 MANDATORY FIELDS FOR “SEND TO ERA”
A data check will be performed when clicking “Send to ERA” and if some information is missing, a warning
message will be displayed.
The following fields are mandatory for Notification and Final report:
Topic Required for notification In addition: Required for final report
What Date of occurrence
Language of occurrence description
Occurrence description
Location name
Railway system type
Line type
Location type
Occurrence details Movement type
RU
IM Involved
Passenger fatalities
Staff fatalities
LC User fatalities
Unauthorised person fatalities
Other fatalities
Passenger serious injuries
Staff serious injuries
LC User serious injuries
Unauthorised person serious injuries
Other serious injuries
Estimated total material costs
Investigation details Legal basis Final report
Decision to investigate
Causation Language of direct Cause description
Direct cause description
Making the railway system work better for society.
30
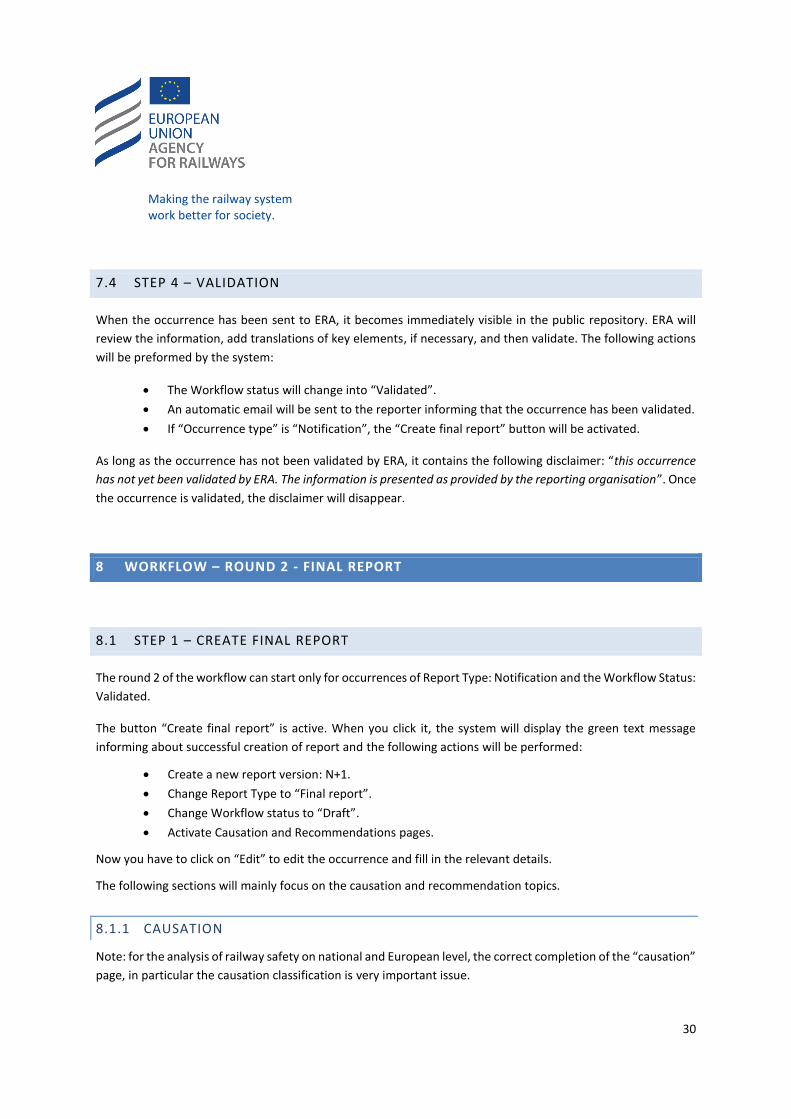
7.4 STEP 4 – VALIDATION
When the occurrence has been sent to ERA, it becomes immediately visible in the public repository. ERA will
review the information, add translations of key elements, if necessary, and then validate. The following actions
will be preformed by the system:
The Workflow status will change into “Validated”.
An automatic email will be sent to the reporter informing that the occurrence has been validated.
If “Occurrence type” is “Notification”, the “Create final report” button will be activated.
As long as the occurrence has not been validated by ERA, it contains the following disclaimer: “this occurrence
has not yet been validated by ERA. The information is presented as provided by the reporting organisation”. Once
the occurrence is validated, the disclaimer will disappear.
8 WORKFLOW – ROUND 2 - FINAL REPORT
8.1 STEP 1 – CREATE FINAL REPORT
The round 2 of the workflow can start only for occurrences of Report Type: Notification and the Workflow Status:
Validated.
The button “Create final report” is active. When you click it, the system will display the green text message
informing about successful creation of report and the following actions will be performed:
Create a new report version: N+1.
Change Report Type to “Final report”.
Change Workflow status to “Draft”.
Activate Causation and Recommendations pages.
Now you have to click on “Edit” to edit the occurrence and fill in the relevant details.
The following sections will mainly focus on the causation and recommendation topics.
8.1.1 CAUSATION
Note: for the analysis of railway safety on national and European level, the correct completion of the “causation”
page, in particular the causation classification is very important issue.
Making the railway system work better for society.
31
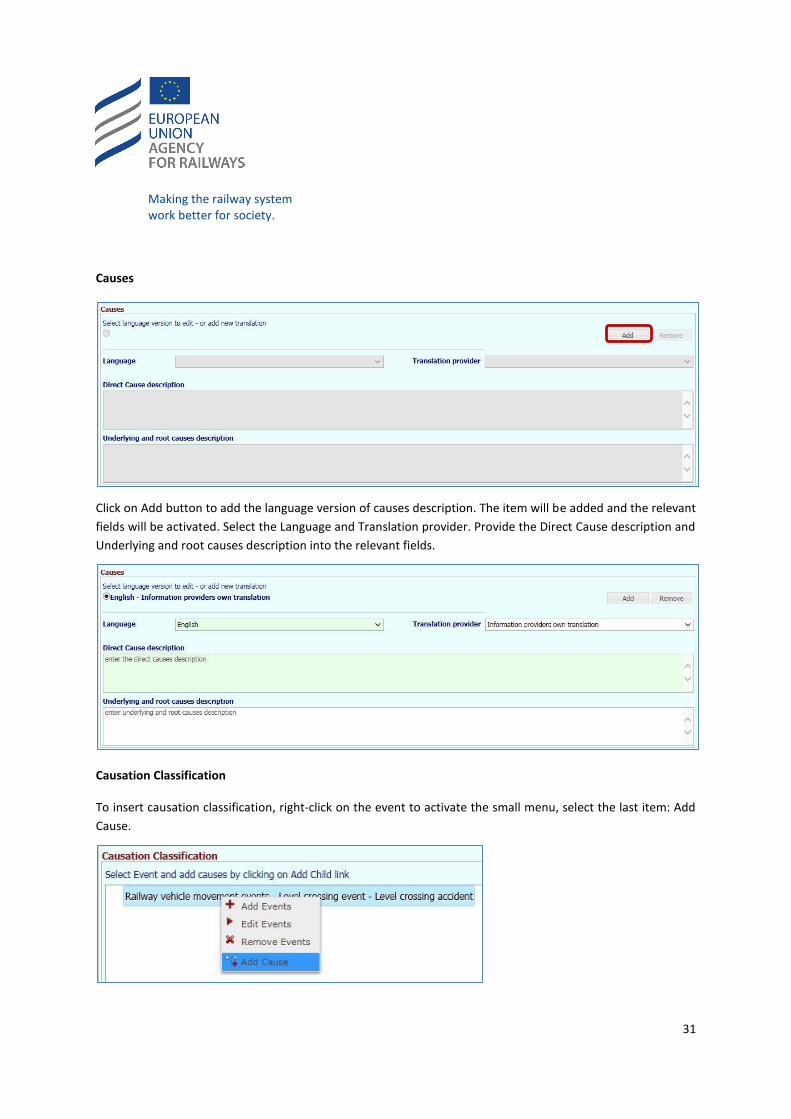
Causes
Click on Add button to add the language version of causes description. The item will be added and the relevant
fields will be activated. Select the Language and Translation provider. Provide the Direct Cause description and
Underlying and root causes description into the relevant fields.
Causation Classification
To insert causation classification, right-click on the event to activate the small menu, select the last item: Add
Cause.
Making the railway system work better for society.
32
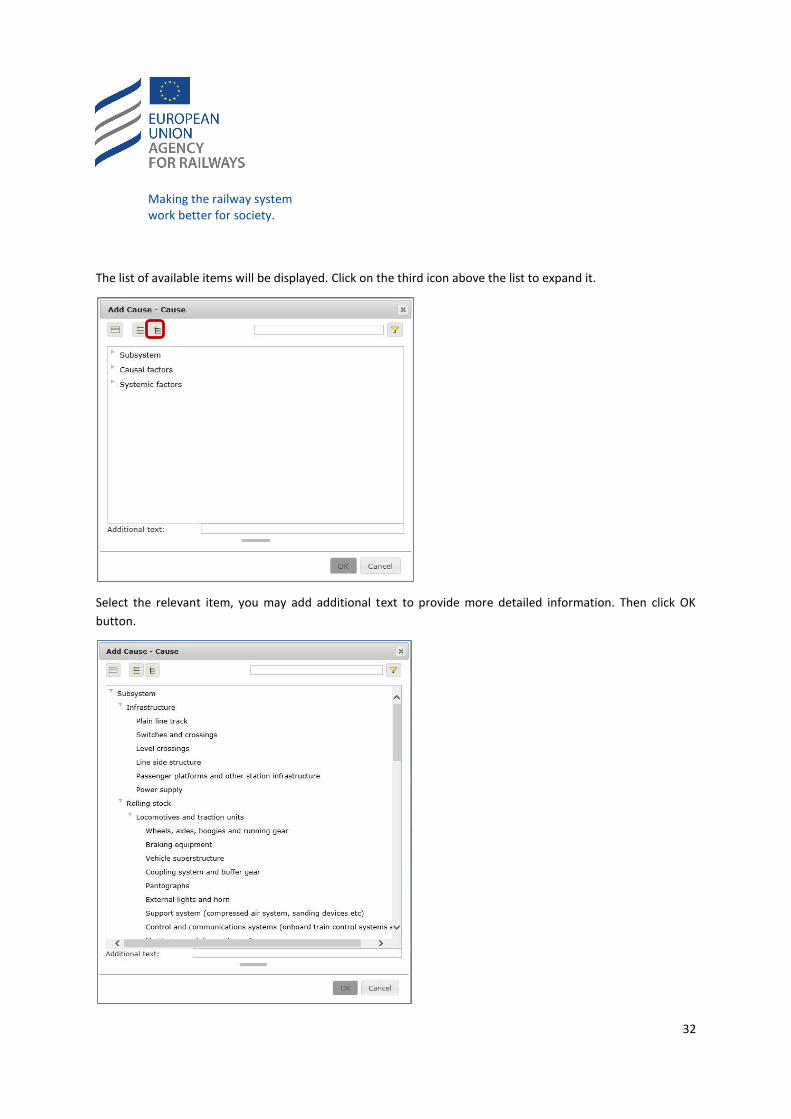
The list of available items will be displayed. Click on the third icon above the list to expand it.
Select the relevant item, you may add additional text to provide more detailed information. Then click OK
button.
Making the railway system work better for society.
33
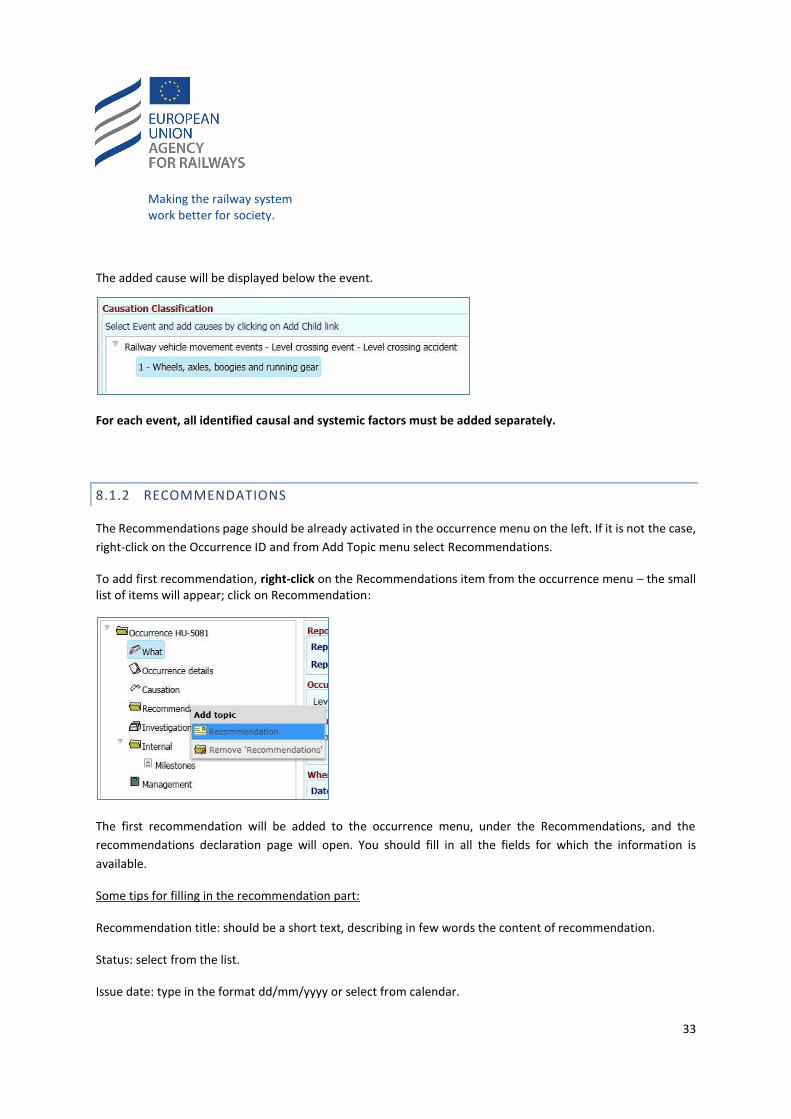
The added cause will be displayed below the event.
For each event, all identified causal and systemic factors must be added separately.
8.1.2 RECOMMENDATIONS
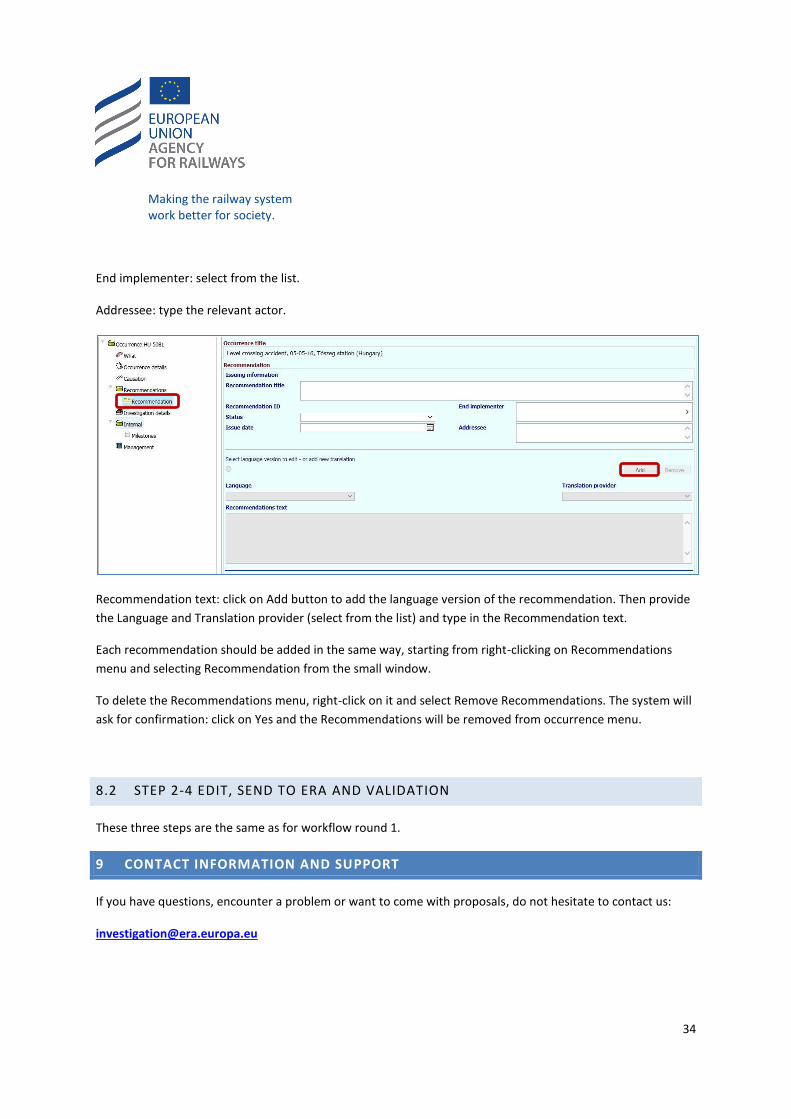
The Recommendations page should be already activated in the occurrence menu on the left. If it is not the case,
right-click on the Occurrence ID and from Add Topic menu select Recommendations.
To add first recommendation, right-click on the Recommendations item from the occurrence menu – the small list of items will appear; click on Recommendation:
The first recommendation will be added to the occurrence menu, under the Recommendations, and the
recommendations declaration page will open. You should fill in all the fields for which the information is
available.
Some tips for filling in the recommendation part:
Recommendation title: should be a short text, describing in few words the content of recommendation.
Status: select from the list.
Issue date: type in the format dd/mm/yyyy or select from calendar.
Making the railway system work better for society.
34
End implementer: select from the list.
Addressee: type the relevant actor.
Recommendation text: click on Add button to add the language version of the recommendation. Then provide
the Language and Translation provider (select from the list) and type in the Recommendation text.
Each recommendation should be added in the same way, starting from right-clicking on Recommendations
menu and selecting Recommendation from the small window.
To delete the Recommendations menu, right-click on it and select Remove Recommendations. The system will
ask for confirmation: click on Yes and the Recommendations will be removed from occurrence menu.
8.2 STEP 2-4 EDIT, SEND TO ERA AND VALIDATION
These three steps are the same as for workflow round 1.
9 CONTACT INFORMATION AND SUPPORT
If you have questions, encounter a problem or want to come with proposals, do not hesitate to contact us:


![NIB Neg UPS [ MBA ]](https://img.pdfslide.us/doc/110x75/55721454497959fc0b9446d8/nib-neg-ups-mba-.jpg)