Embed Size (px)
Citation preview

ESET REMOTEADMINISTRATORMigration guide
(intended for product version 5.3 and higher)

ESET REMOTE ADMINISTRATOR
Migration guide
Copyright 2015 by ESET, spol. s r.o.ESET REMOTE ADMINISTRATOR was developed by ESET, spol. s r.o.For more information visit www.eset.com.All rights reserved. No part of this documentation may be reproduced, stored in aretrieval system or transmitted in any form or by any means, electronic, mechanical,photocopying, recording, scanning, or otherwise without permission in writingfrom the author.ESET, spol. s r.o. reserves the right to change any of the described applicationsoftware without prior notice.
Customer Care Worldwide: http://support.eset.com
REV. 11/19/2015
Contents
..................................................4Introduction1.
..................................................4Prepare for the migration2.........................................................................4Server backup2.1
........................................................................5Database backup2.2
........................................................................7Server name mismatch2.3
..................................................7Migration3.........................................................................8Migration recommendations3.1
........................................................................8Migrating and upgrade across localized versions of ERA3.2
........................................................................9Upgrading your clients3.3
........................................................................9Policy migration3.4
........................................................................13Restore/Failed upgrade3.5
........................................................................13Finish3.6
4
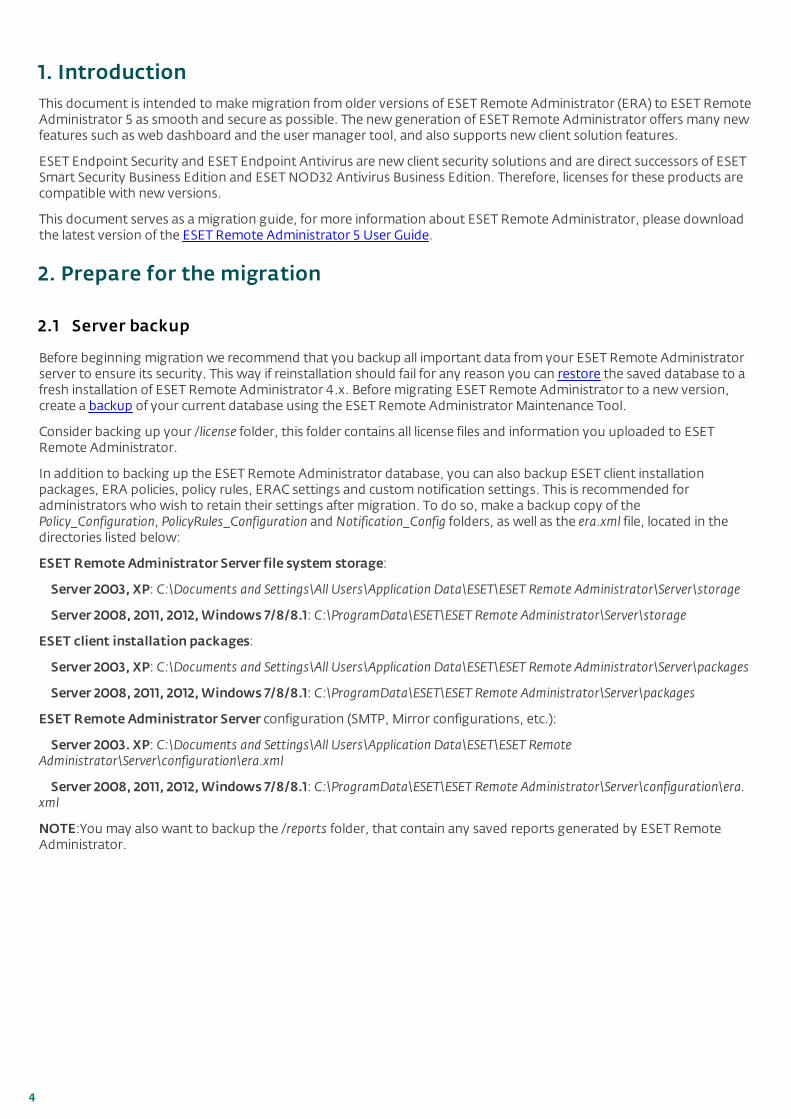
1. IntroductionThis document is intended to make migration from older versions of ESET Remote Administrator (ERA) to ESET RemoteAdministrator 5 as smooth and secure as possible. The new generation of ESET Remote Administrator offers many newfeatures such as web dashboard and the user manager tool, and also supports new client solution features.
ESET Endpoint Security and ESET Endpoint Antivirus are new client security solutions and are direct successors of ESETSmart Security Business Edition and ESET NOD32 Antivirus Business Edition. Therefore, licenses for these products arecompatible with new versions.
This document serves as a migration guide, for more information about ESET Remote Administrator, please downloadthe latest version of the ESET Remote Administrator 5 User Guide.
2. Prepare for the migration
2.1 Server backup
Before beginning migration we recommend that you backup all important data from your ESET Remote Administratorserver to ensure its security. This way if reinstallation should fail for any reason you can restore the saved database to afresh installation of ESET Remote Administrator 4.x. Before migrating ESET Remote Administrator to a new version,create a backup of your current database using the ESET Remote Administrator Maintenance Tool.
Consider backing up your /license folder, this folder contains all license files and information you uploaded to ESETRemote Administrator.
In addition to backing up the ESET Remote Administrator database, you can also backup ESET client installationpackages, ERA policies, policy rules, ERAC settings and custom notification settings. This is recommended foradministrators who wish to retain their settings after migration. To do so, make a backup copy of the Policy_Configuration, PolicyRules_Configuration and Notification_Config folders, as well as the era.xml file, located in thedirectories listed below:
ESET Remote Administrator Server file system storage:
Server 2003, XP: C:\Documents and Settings\All Users\Application Data\ESET\ESET Remote Administrator\Server\storage
Server 2008, 2011, 2012, Windows 7/8/8.1: C:\ProgramData\ESET\ESET Remote Administrator\Server\storage
ESET client installation packages:
Server 2003, XP: C:\Documents and Settings\All Users\Application Data\ESET\ESET Remote Administrator\Server\packages
Server 2008, 2011, 2012, Windows 7/8/8.1: C:\ProgramData\ESET\ESET Remote Administrator\Server\packages
ESET Remote Administrator Server configuration (SMTP, Mirror configurations, etc.):
Server 2003. XP: C:\Documents and Settings\All Users\Application Data\ESET\ESET RemoteAdministrator\Server\configuration\era.xml
Server 2008, 2011, 2012, Windows 7/8/8.1: C:\ProgramData\ESET\ESET Remote Administrator\Server\configuration\era.xml
NOTE:You may also want to backup the /reports folder, that contain any saved reports generated by ESET RemoteAdministrator.
5
2.2 Database backup
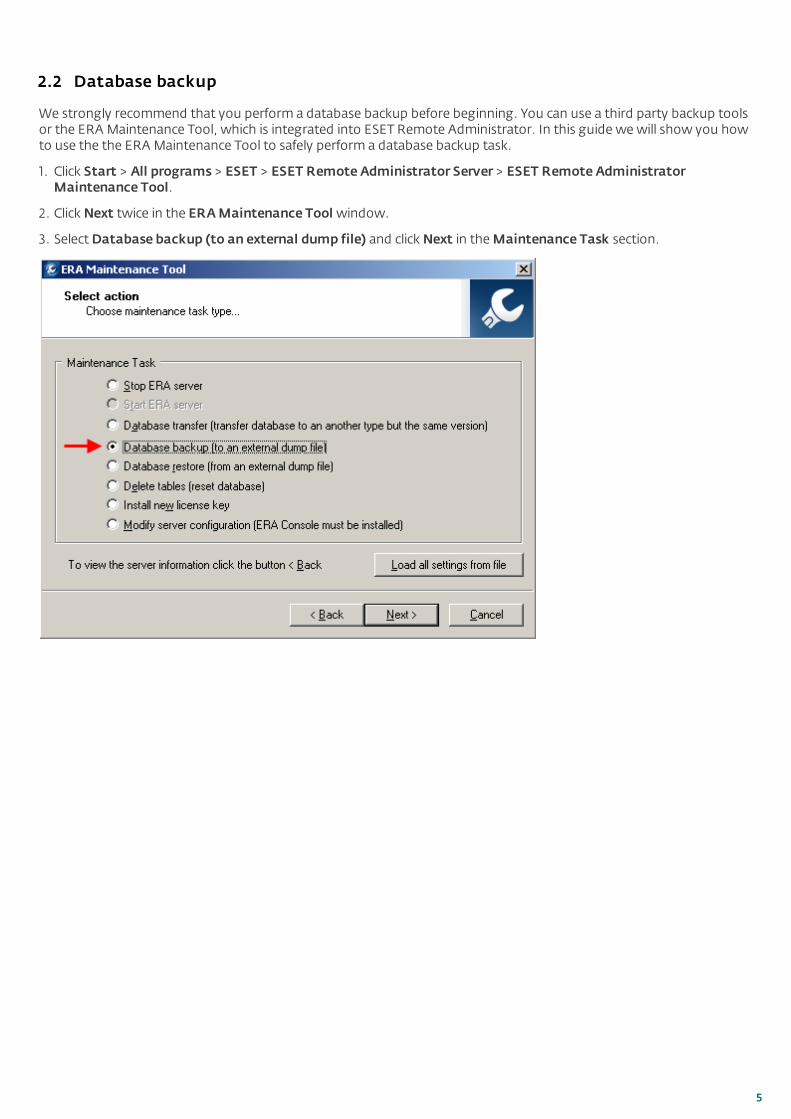
We strongly recommend that you perform a database backup before beginning. You can use a third party backup toolsor the ERA Maintenance Tool, which is integrated into ESET Remote Administrator. In this guide we will show you howto use the the ERA Maintenance Tool to safely perform a database backup task.
1. Click Start > All programs > ESET > ESET Remote Administrator Server > ESET Remote AdministratorMaintenance Tool.
2. Click Next twice in the ERA Maintenance Tool window.
3. Select Database backup (to an external dump file) and click Next in the Maintenance Task section.

6
4. Click Load current server configuration (default is MS Access) in the Database connection properties section.
5. Click Test connection to ensure that your network connection is functioning properly.
6. Click Save settings to file and save the configuration file to the location of your choice. Click Next.
7. Specify where to save the dump file and click Next.
8. Click Start. Click OK when the backup completes and then click Finish.

7
2.3 Server name mismatch
This issue occurs most commonly when migrating the same version of ERA to a different computer, but can sometimesoccur during an upgrade. The issue is indicated by the following error message in the server log: The server name storedin the database (NAME_B) does not match the actual server name (NAME_A). This can mean the database is used by anotherserver. If you want to continue using this database enable "Ignore database server name mismatch" setting in the serveradvanced settings, or run the server once with the switch /server_name_repair to repair the server name stored in the database.
There are two methods to resolve this issue if it occurs:
Method 1 (Ignore the server name mismatch)
1. Open the ESET Remote Administrator Console (ERAC) by double-clicking the ERAC icon on your Desktop, or byclicking Start > All Programs > ESET > ESET Remote Administrator Console > ESET Remote AdministratorConsole.
2. Click Tools > Server Options.
3. Click the Advanced tab, then click Edit Advanced Settings.
4. In the ESET Configuration Editor, expand ESET Remote Administrator > ERA Server > Setup > Advanced andselect Ignore database server name mismatch.
5. Select the check box next to Yes / No and click Console to save your changes.
6. Click OK to exit the Server Options window.
Method 2 (Repair the server name mismatch)
1. To stop the ERA Server services, click Start and type services.msc into the search field and then click Enter to confirm,or click Start > Administrative Tools > Services.
2. In the Services window, right-click the ESET Remote Administrator Server service and select stop from the contextmenu.
3. Click Start and type cmd into the search field and then click Enter to confirm.
4. In the command prompt, navigate to the folder where the server application is stored (by default, C:\ProgramFiles\ESET\ESET Remote Administrator\Server).
5. Run the era.exe executable with the switch /server_name_repair.
6. This command will repair the server name in the database and the error message will no longer occur.
3. MigrationWe recommend that you perform a direct reinstall over your old version of ERA (in this case, version 5.x over version 4.x). When using version 3.x, we recommend that you upgrade to version 4.x first and then to 5.x, rather than upgradingdirectly from 3.x to 5.x.
Double-click the installer file and follow the instruction on the screen. Note the new settings (Dashboard server, ServiceAccounts, Logging options,Server maintenance options and so on). You can read more about these settings in the ESET Remote Administrator 5 User Guide. The ERA Server service will need to be restarted for migration, which willterminate all client connections. We recommend that you perform migration during non-work hours for this reason.
NOTE: Version 4.x and version 5.x Server services (this is valid also for replicated servers) are not compatible.

8
3.1 Migration recommendations
Database transfer
We recommend that you allocate free hard drive space equal to at least 3 times the size of your current database for themigration. This is for migration purposes only, the database will be shrunk during server maintenance once migration isfinished.
NOTE: Insufficient disk space is a common cause of migration failure.
Replicated servers
It is up to the administrator to decide whether to start the installation from the top servers and then install to lowerservers, or vice versa.
1. Starting from the top server - After you upgrade your top server to the latest version of ERA, communication withservers running the older version is not possible. To keep track of clients and data, connect to the servers from amachine that is still using an older version of ERA Console.
2. Starting from the lower servers - If you start migration on lower servers, you can maintain a comprehensiveoverview of your network. Keep in mind that servers running a newer version of ERA can not communicate withservers running an older version of ERA.
NOTE: If you upgrade a server to a newer version of ERA, it can not communicate with other servers running olderversions. Data received by the servers that have not yet been updated (logs,reports,etc) is not lost, it is saved locally tothe individual servers.
If you plan to migrate to a different PC with the same ERA version, please visit this ESET Knowledgebase article.
3.2 Migrating and upgrade across localized versions of ERA
Known Issues
Reports generated in a different language version are not localized after the upgrade.
Reports where the condition "Group by" is used may display duplicated data after the upgrade when receiving newlogs.
Replication between different language versions is not fully supported, however, such replication should work onceyou enable and configure it (Replication to/from a server with a different language version of ERA). Logs may berecorded in different languages in this situation because some of the logs are being received from the server andsome from the client.
When migrating between different language versions of ESET Remote Administrator, no errors should occur. Seebelow for instructions specific to your scenario:
1. ESET Remote Administrator 5 to ESET Remote Administrator 5 of different versions and languages: Select arepair installation when reinstalling and follow the on-screen instructions.
2. ESET Remote Administrator 4 to ESET Remote Administrator 5 of different languages: Select an upgradeinstallation and follow the on-screen instructions. The same steps as described in the Migration chapter apply.
3. ESET Remote Administrator 5 > ESET Remote Administrator 5 of the same version but a different language: Theprogram will prompt you to reinstall, follow the on-screen instructions.
This guide is intended to assist users upgrading from earlier versions of ESET Remote Administrator ( V4.x and older) toESET Remote Administrator 5, as described in scenario 2. Scenarios 1 and 3 are covered in case you want to performsuch an installation later.
NOTE: Your product version ( for both ERA Console and ERA Server) can be determined from the ESET RemoteAdministrator Console menu. Click Help > About ESET Remote Administrator Console and view the Version row. Theversion of the server is listed in the Information: field below, in the Server: row.

9
3.3 Upgrading your clients
1. If you are upgrading your clients to ESET Endpoint Security/ESET Endpoint Antivirus locally, the steps are verysimple. Click on the new installation file (fore example ees_nt32_enu.msi) and follow the on-screen instructions. SelectUse current settings when prompted to use your configuration from an earlier installation of ESET. For moreinformation, see the ESET Endpoint Security or ESET Endpoint Antivirus user`s manual.
2. If you are upgrading client workstations remotely via ESET Remote Administrator, select the Upgrade client remoteinstallation type in the remote installation tab. This type of installation is designated for clients with ESS/EAV version4.2 and later. Beginning with version 4.2, a new upgrade mechanism was implemented that allows ERA to initiatethe upgrade process on the client side without the need for the einstaller.exe agent. This mechanism works in amanner similar to the program component update, or PCU, which upgrades clients to a newer version of theprogram. For version 4.2 and later ESS/EAV clients, we strongly recommend this type of upgrade.
NOTE: If a custom configuration file has been defined for the installation package it will be ignored during the upgrade.
The Upgrade Client command allows you to remotely upgrade a client/group of clients.
1. In the ESET Remote Administrator Console, select clients you want to upgrade from the Client tab.
2. Click Add Clients Special if you want to use the selection tool to choose which clients to upgrade. After you finishmaking your selections click Next to continue.
NOTE: Clicking Add Clients Special opens a new window in which you can add clients by server (in the Servers section)or by group (in the Groups section).
3. In the Package settings window you can use the respective pull-down menus to select the Type and the Name ofthe ESET product package that will be used to upgrade your client(s). After you finish making your selections click Next.
4. In the Task settings window you can change the default name and description of your upgrade task, select Applytask now if you want the task to execute immediately or Apply task later if you want to setup a later date for thetask execution. Click Finish to complete the configuration of your upgrade client task.
For more information on upgrading your clients, see the ESET Remote Administrator 5 User Guide.
NOTE: This task works only on clients that connect directly to the primary server. Clients on replicated servers will beignored.
NOTE: It is up to the administrator to decide whether to upgrade the server and then the clients, or vice versa based onthe specifics and needs of your network.
3.4 Policy migration
The ESET Configuration Editor is different in ESET Remote Administrator 5 than in previous versions, with separatebranches for version 4 and version 5 settings. Configurations exported from client workstations running version 4endpoint products, when merged with a new ERA5 configuration, will only be applied to version 4 machines.
Version 4.2 and later ESET Business Edition users: You can preserve existing settings by upgrading an individualclient workstation and then exporting the settings from that workstation as an .xml configuration. You can thenimport that configuration into ESET Remote Administrator 5 and use it to create a new policy.
Version 4.0.xxxx and earlier ESET Business Edition users: We recommend that you export the configuration youwant to duplicate from a client workstation before upgrading. Settings from ESET Business Edition products will notcarry over automatically, however you can access the exported configuration file to use as a reference when creatingyour new policy.
If you have a number of settings already configured on a client workstation running ESET NOD32 Antivirus BusinessEdition/Smart Security Business Edition version 4.2, follow the step-by-step instructions below to export yourconfiguration from a client workstation and implement it as a policy in ESET Remote Administrator Console.
Important: Perform part I of the instructions below from the client workstation with the configuration you want toduplicate, perform part II from the computer where you have ESET Remote Administrator Console installed.
Client workstation
1. On the client (running an earlier version of ESET) that has the settings you want to use as your new policy, open the
10
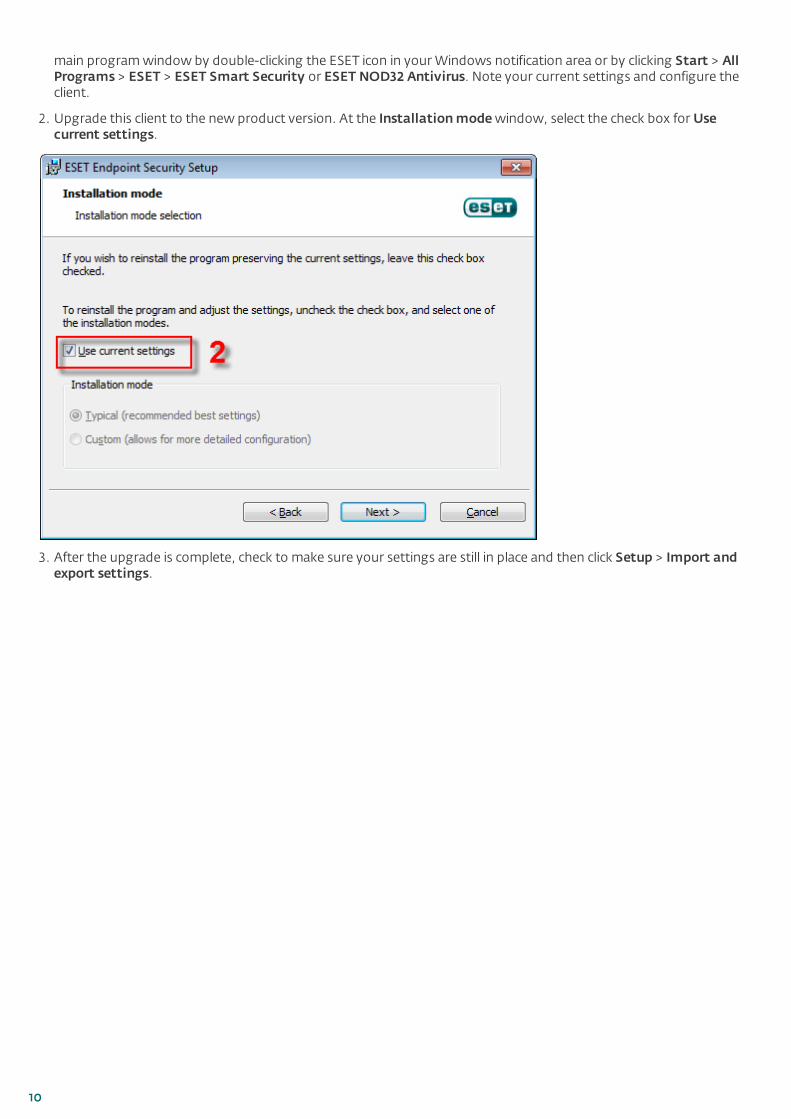
main program window by double-clicking the ESET icon in your Windows notification area or by clicking Start > AllPrograms > ESET > ESET Smart Security or ESET NOD32 Antivirus. Note your current settings and configure theclient.
2. Upgrade this client to the new product version. At the Installation mode window, select the check box for Usecurrent settings.
3. After the upgrade is complete, check to make sure your settings are still in place and then click Setup > Import andexport settings.
11
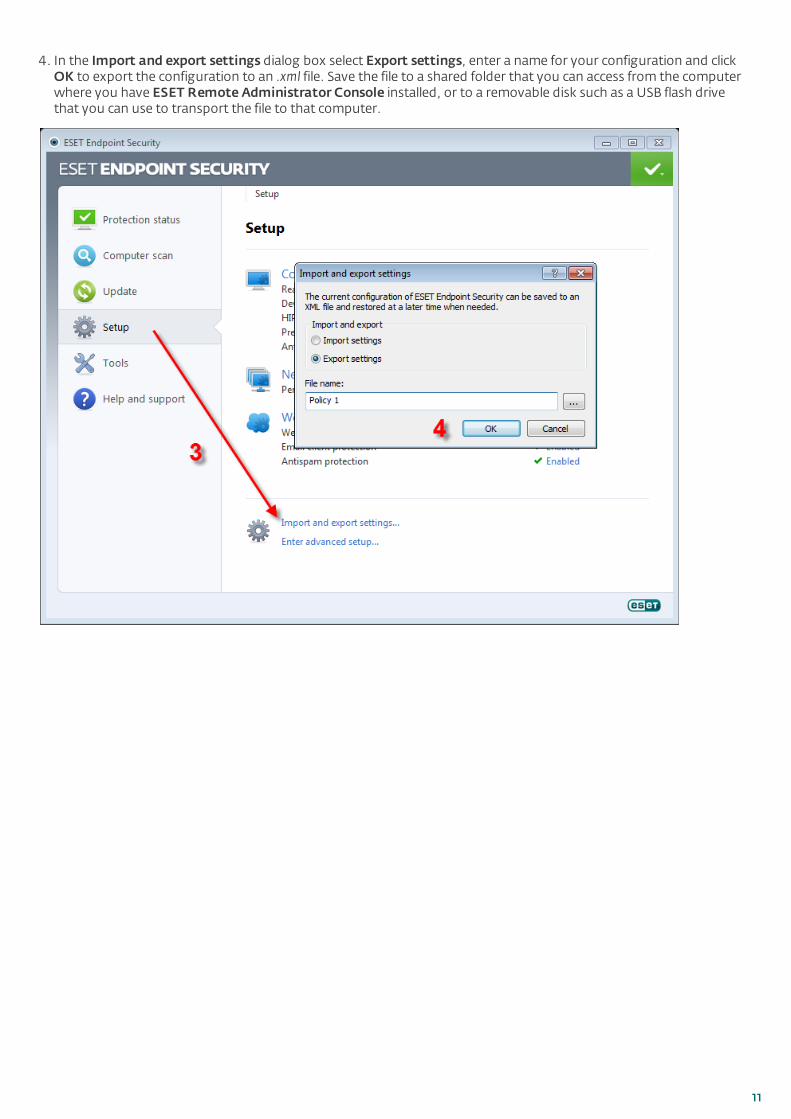
4. In the Import and export settings dialog box select Export settings, enter a name for your configuration and clickOK to export the configuration to an .xml file. Save the file to a shared folder that you can access from the computerwhere you have ESET Remote Administrator Console installed, or to a removable disk such as a USB flash drivethat you can use to transport the file to that computer.
12
ESET Remote Administrator Console
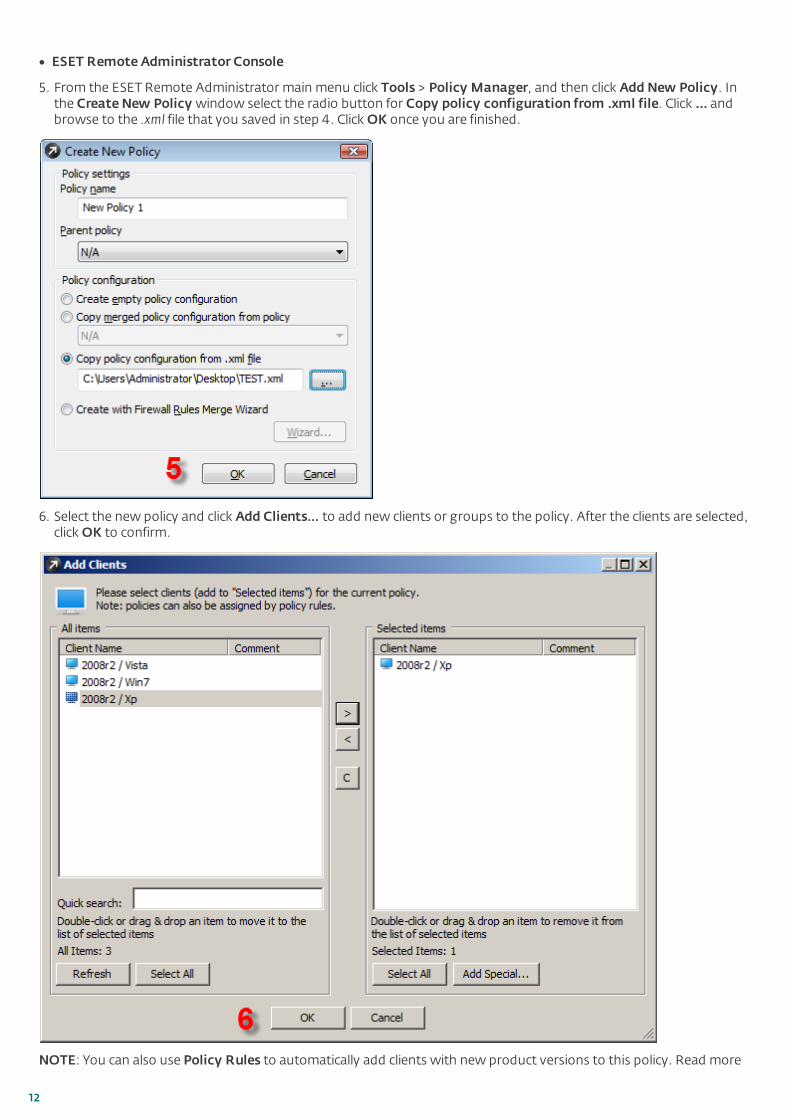
5. From the ESET Remote Administrator main menu click Tools > Policy Manager, and then click Add New Policy. Inthe Create New Policy window select the radio button for Copy policy configuration from .xml file. Click ... andbrowse to the .xml file that you saved in step 4. Click OK once you are finished.
6. Select the new policy and click Add Clients… to add new clients or groups to the policy. After the clients are selected,click OK to confirm.
NOTE: You can also use Policy Rules to automatically add clients with new product versions to this policy. Read more
13
about policy rules in the ESET Remote Administrator 5 User Guide.
7. Click OK to confirm the changes and to close the Policy Manager. The new policy will be enforced on clientworkstations the next time that they log into the ESET Remote Administrator Server.
3.5 Restore/Failed upgrade
If installation should fail when the old version is uninstalled and the new version is not installed, it is possible to restoreyour saved data using the backup to a fresh installation of an older version of ESET Remote Administrator (from theversion where the backup was created).
1. Install ESET Remote Administrator 4.x.
2. Restore the data (settings, license files, etc.) saved during the Server backup.
3. Using the Database restore task in the ERA Maintenance Tool, restore the database saved during the Databasebackup:
Go to Start > All Programs > ESET > ESET Remote Administrator Server > ESET Remote AdministratorMaintenance Tool. Select Database restore (from an external dump file).
The first step is to check the database connection.
If the database is an MS Access database, specify the path to the .mdb file. The path specified during ERA Serverinstallation is used by default.
All other database formats require additional parameters to be set:
Connection string: Special string used to identify the source database
Username: Username for accessing the database
Password: Password for accessing the database
Schema name: Name of a schema (available for Oracle and MS SQL only)
Click Load current server configuration to use the current ERA Server settings. Click Test Connection to test thedatabase connection. If the connection cannot be established, check the parameters for errors. After the database testis successful click Next.
For all database types besides MS Access database select whether to create the database tables automatically (Createtables in the database automatically) or insert the tables into the database later (View Script > Save to File) in thenext step. For an MS SQL database the Create a new database ESETRADB automatically option automaticallycreates a new MS SQL database named ESETRADB. The final step is to confirm the database restore.
Select the file from which the database is to be restored in the next step. Optional parameters in the lower part of thewindow enable you to import a file from a different database type as selected in the previous step (Allow import froma different type of database) as well as to stop ESET Remote Administrator Server during database restore (Stopserver during processing task). Click Next to confirm the task execution.
3.6 Finish
Once your upgrade to the latest version is completed, you can explore the new features of ESET Remote Administrator5. See the ESET Remote Administrator User Guide for more information.