Embed Size (px)
Citation preview

EPPI Reviewer 4, Web Browsers, and Silverlight…
1. Our software runs via your web browser; it is not installed as an application on your computer.
You will need one of the following web browsers -:
i. Internet Explorer version 11* (or 10 or 9; not Microsoft’s Edge browser)
(available from https://support.microsoft.com/en-us/help/17621/internet-explorer-downloads)
ii. Mozilla Firefox ESR version 52.9.0** (or earlier i.e. the legacy EXTENDED SUPPORT RELEASE, not the standard version or the newest ESR version 60)
(available from https://archive.mozilla.org/pub/firefox/releases/52.9.0esr/)
iii. Safari
(available from https://www.apple.com/safari/)
NOTE: Chrome does not work with the necessary add-ons, so cannot be used to run EPPI Reviewer 4.
2. You will need to ensure the browser add-on Microsoft Silverlight is installed and enabled.
Further details of these web browsers and the add-on are given on the following pages.

You can check the version of the browser you are running using the following steps -:
1. Internet Explorer
i. Click the Help menu, and then select About Internet Explorer
ii. The version will be displayed in a pop-up box

2. Firefox ESR
i. Click the Menu button, and then the Help icon
ii. Select the About Firefox option

iii. The version details will be displayed
3. Safari
i. Open your Safari browser by clicking on the Safari icon in the dock of the Mac desktop or laptop computer.
ii. Click on Safari in the menu bar at the top of the screen.iii. Choose the option labeled About Safari in the drop-down menu that appears.iv. A small dialog box appears with the browser's version number. The first number, located
outside of the parenthesis, is the actual version of Safari. The longer second number, located inside the parentheses, is the WebKit/Safari Build version. For example, if the dialog box displays Version 11.0.3 (13604.5.6), the Safari version number is 11.0.3.


Accessing Internet Explorer 11
*NOTE: If you are trying to locate Internet Explorer on your PC, but can only locate Microsoft’s Edge browser (which has a very similar icon), press the Start button, and then being typing Internet Explorer. The program should be listed.

If it is not listed, you will have to enable it.
1. Press the Start button, and open the Control Panel

2. Select Programs and Features
3. Select Turn Windows features on or off

4. Click the option to turn Internet Explorer 11 on
Internet Explorer 11 should now be available from the Start menu, as described earlier.

(The screenshot below shows the same process for Windows 10, rather than Windows 7.)
1. Press the Start button, and then begin typing Programs and Features

2. Select Turn Windows features on or off, and then Check the tickbox to turn Internet Explorer 11 on

3. Internet Explorer 11 should now be available by pressing the Start button, and then beginning to type Internet Explorer 11

Installing Firefox 52.9.0 ESR**
You will need to ensure you are using the legacy Extended Support Release version of Firefox to run EPPI Reviewer 4 i.e. version 52.9.0 ESR or earlier, which allows the use of NPAPI plug-ins such as Silverlight.
(Note that we are currently testing new versions of EPPI Reviewer, which run without add-ons and will work on all current browsers and devices – computers, mobile phones and tablets.)
As mentioned previously, you can check your current version of Firefox by selecting Help, then About Firefox.

The version number should be displayed in a new pop-up window.

Alternatively, click the Menu icon at the top-right of the screen, then Open Help Menu, then About Firefox.


You can also type about: into the address bar.

Bookmarks / Favourites
If you already have a later version of Firefox installed, we would recommend backing up your Firefox favourites. You can then either uninstall your current version of Firefox and install version 52.9.0 ESR, or install version 52.9.0 ESR to a different folder and keep both versions on your PC. (NOTE: Apple Macs will install 52.9.0 separately by default, so any previously-installed version of Firefox will automatically still be available.)
To save your bookmarks before installing version 52.9.0 ESR, click the Bookmarks menu or icon.

Then select Show All Bookmarks.

In the resultant window, click the Import and Backup button.

Select Backup to save your backups. You can then select the Restore function to bring your bookmarks into your new installation of Firefox.
Alternatively, select Export Bookmarks to HTML (which will save your bookmarks in an external file, viewable in any browser). You can then use the Import Bookmarks from HTML to bring your bookmarks into your new installation of Firefox.)

Installation
Firefox v. 52.9.0 ESR is available from Mozilla, via their FTP site at https://archive.mozilla.org/pub/firefox/releases/52.9.0esr/.

You will see a list of folders containing various versions – Linux i686 or x86 64 bit, Mac, Windows 32 bit or 64 bit, etc. Select the correct version for your operating system, then the correct language e.g. Windows 7 64-bit versions are at https://archive.mozilla.org/pub/firefox/releases/52.9.0esr/win64/, listed by language e.g. en-GB is the English (British) version, available at https://archive.mozilla.org/pub/firefox/releases/52.9.0esr/win64/en-GB/.
(A full list of language abbreviations can be found at http://www.lingoes.net/en/translator/langcode.htm e.g. the Swedish version is at https://archive.mozilla.org/pub/firefox/releases/52.9.0esr/win64/sv-SE/.)

If you are unsure as to which version of Windows you have, right-click on the My Computer icon on your desktop (or right-click on Computer within Windows Explorer) and select Properties.)
The system type will be displayed -:

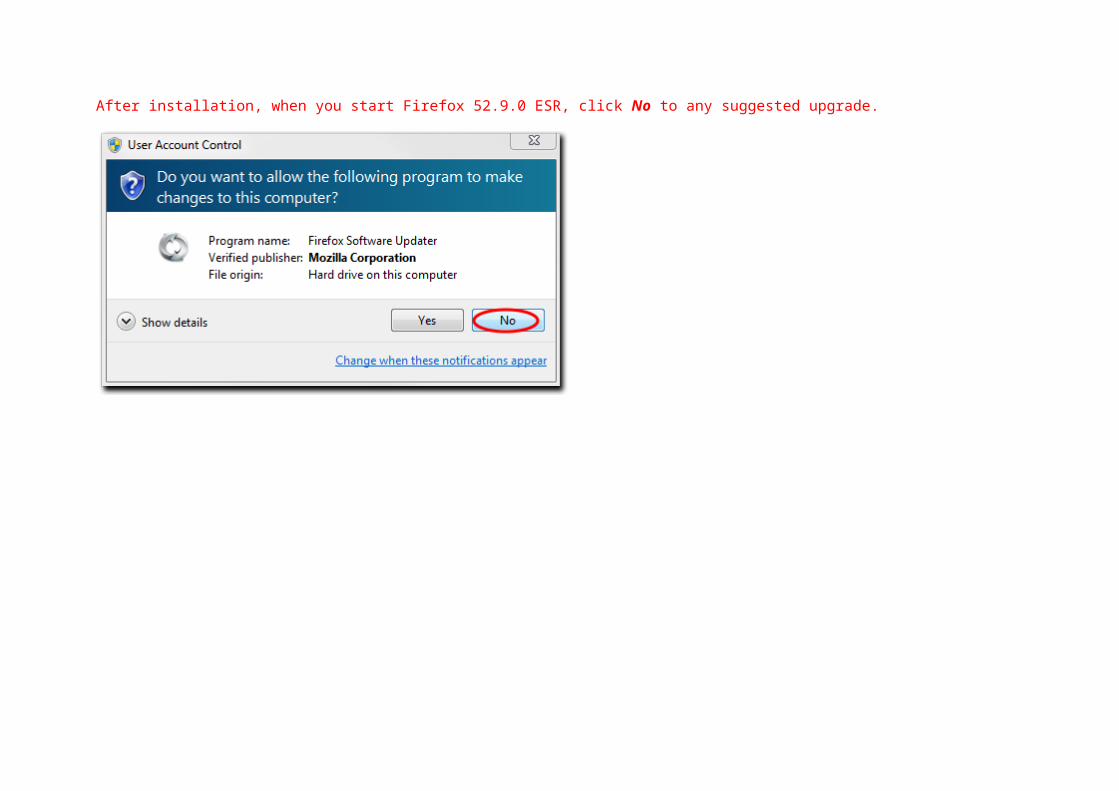
After installation, when you start Firefox 52.9.0 ESR, click No to any suggested upgrade.

Note that you can set options within Firefox, so it does not check for updates; this may be something you wish to do, so you are not shown the option to upgrade every time you run the application.
Select Tools and then Options.

Alternatively, click the Menu button, then the Options button.

Select the Advanced section on the left, and the Update tab across the top; then click the Never check for updates option.
(or Check for updates, but let me choose whether to install them).

Multiple Firefox Versions
To install two versions of Firefox (e.g. the legacy 52.9.0 ESR version and the standard 62 version), simply specify you wish to perform a custom installation, and ensure that you specify a different directory names for the installation. You can then rename the program shortcuts as appropriate.
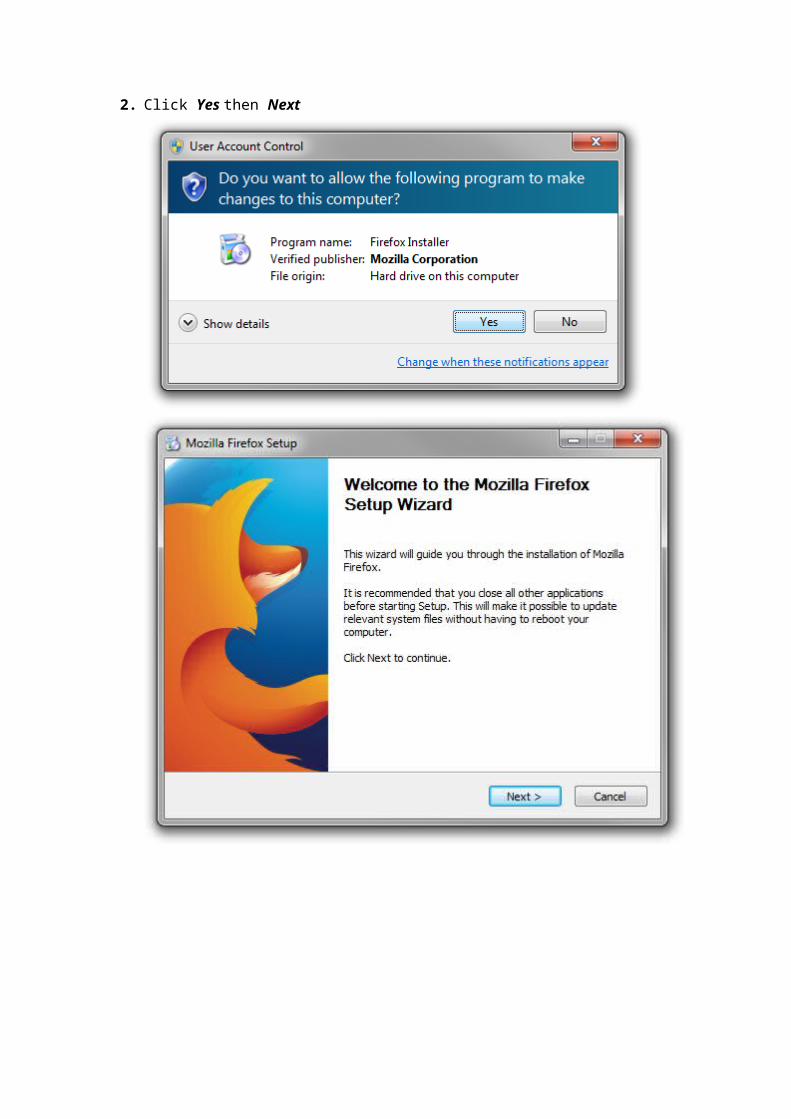
Once you have downloaded the installation file and double-clicked it, follow the steps below -:
1. Click Run
The program will extract.

2. Click Yes then Next

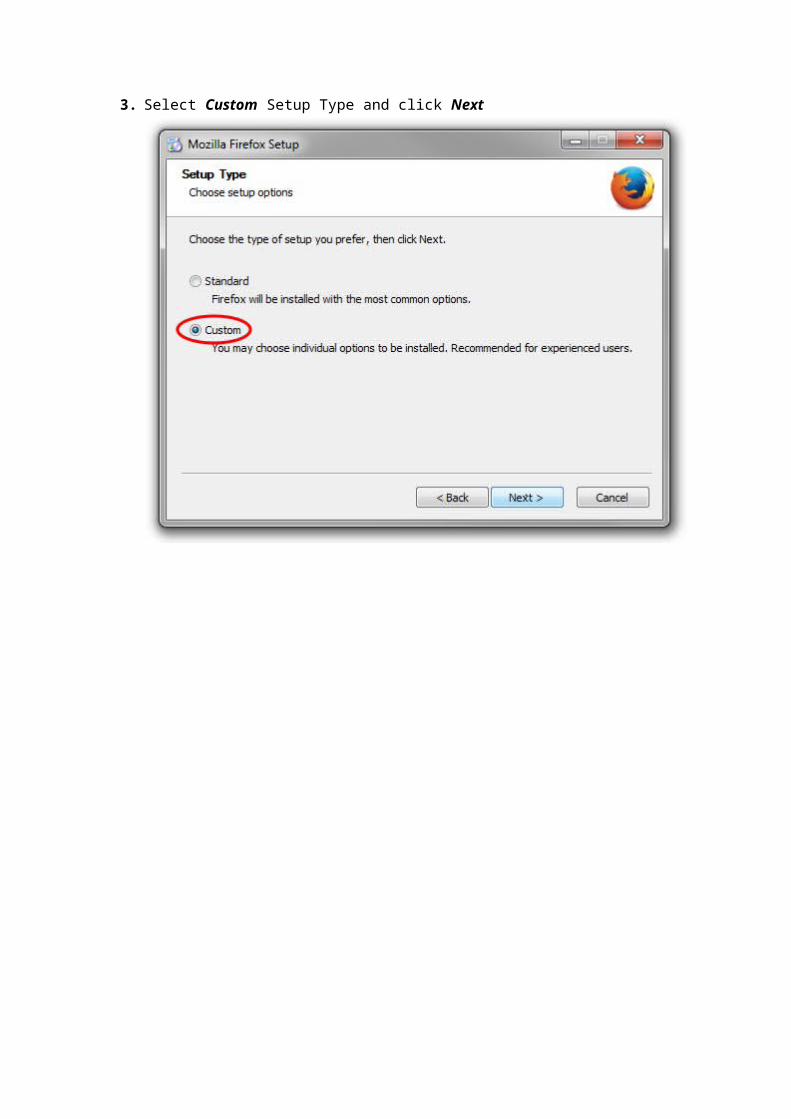
3. Select Custom Setup Type and click Next

4. Rename the standard directory name from Mozilla Firefox to something else, then click Next

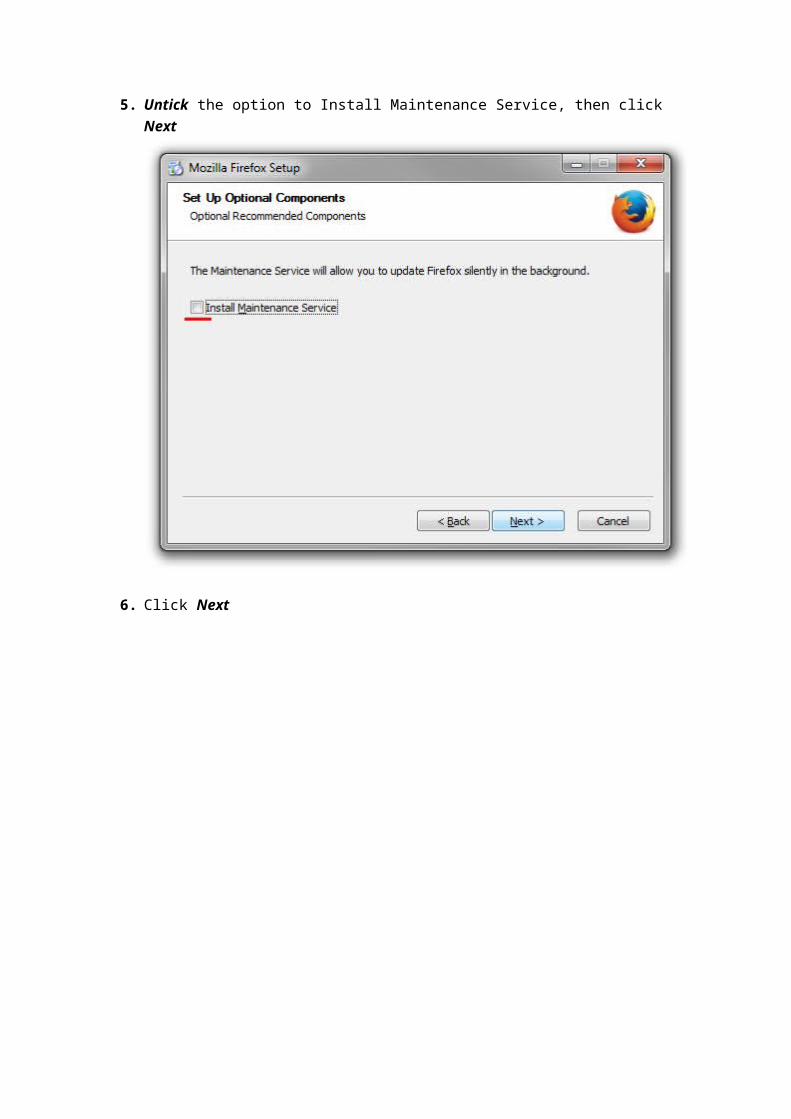
5. Untick the option to Install Maintenance Service, then click Next
6. Click Next
7. Untick the option to set this installation as your default browser, then click Install
8. Click Finish

9. You can import your existing favourites and home page if you wish, when you first start the application.
10. The browser window should then appear

11. DO NOT CLICK CHECK FOR UPDATES… (As mentioned before, you can set Firefox to never check for updates.)

12. You will want to change the name of any program shortcuts or Start menu entries, to distinguish the various versions of Mozilla Firefox that you have installed.


After installation and name-changes, you should be able to see both versions listed and available in the start menu.


Silverlight
You will also need to install and enable the Microsoft Silverlight add-on.
Visit https://www.microsoft.com/getsilverlight/Get-Started/Install/Default to download and install Silverlight.
You will then need to enable it.
For Internet Explorer 11
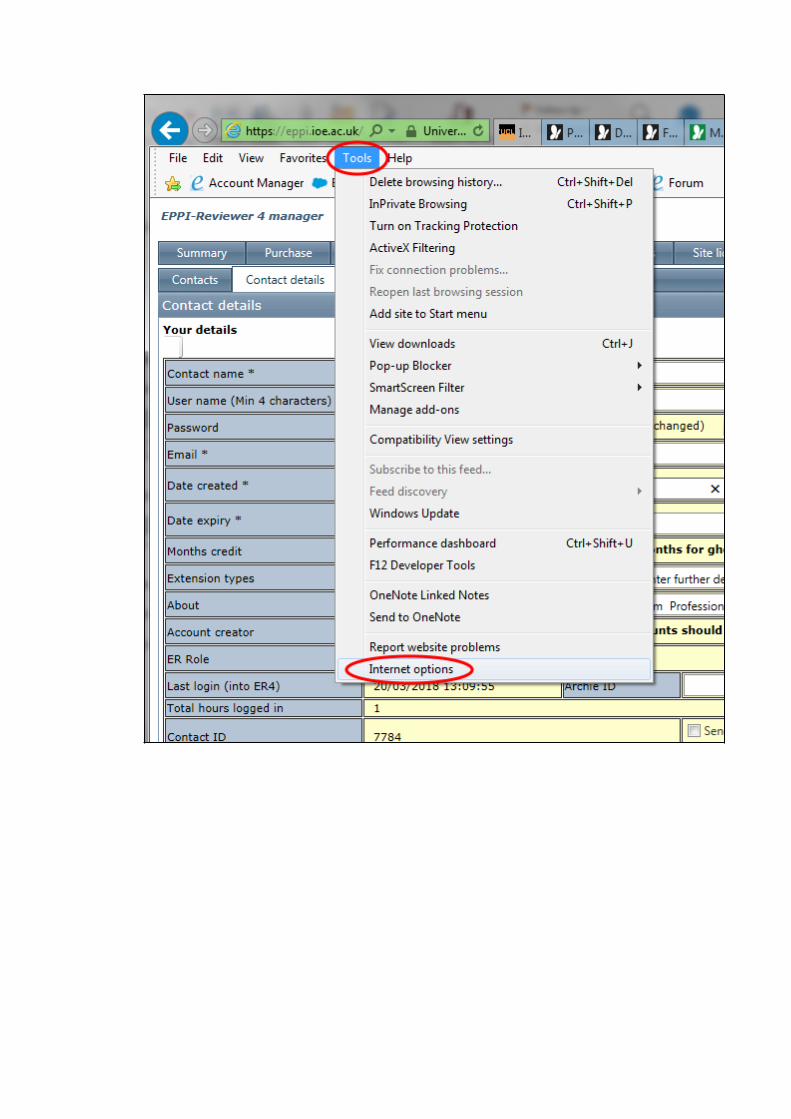
1. Click the Tools cog icon, or select the Tools option from the menu bar, then click Internet Options.


2. Select the Programs tab and then the Manage add-ons button.

3. Ensure All add-ons are shown.

4. Select Microsoft Silverlight.

5. Ensure it is enabled by clicking the Enable button, then click Close to close the options windows
For Firefox 52.9.0 ESR
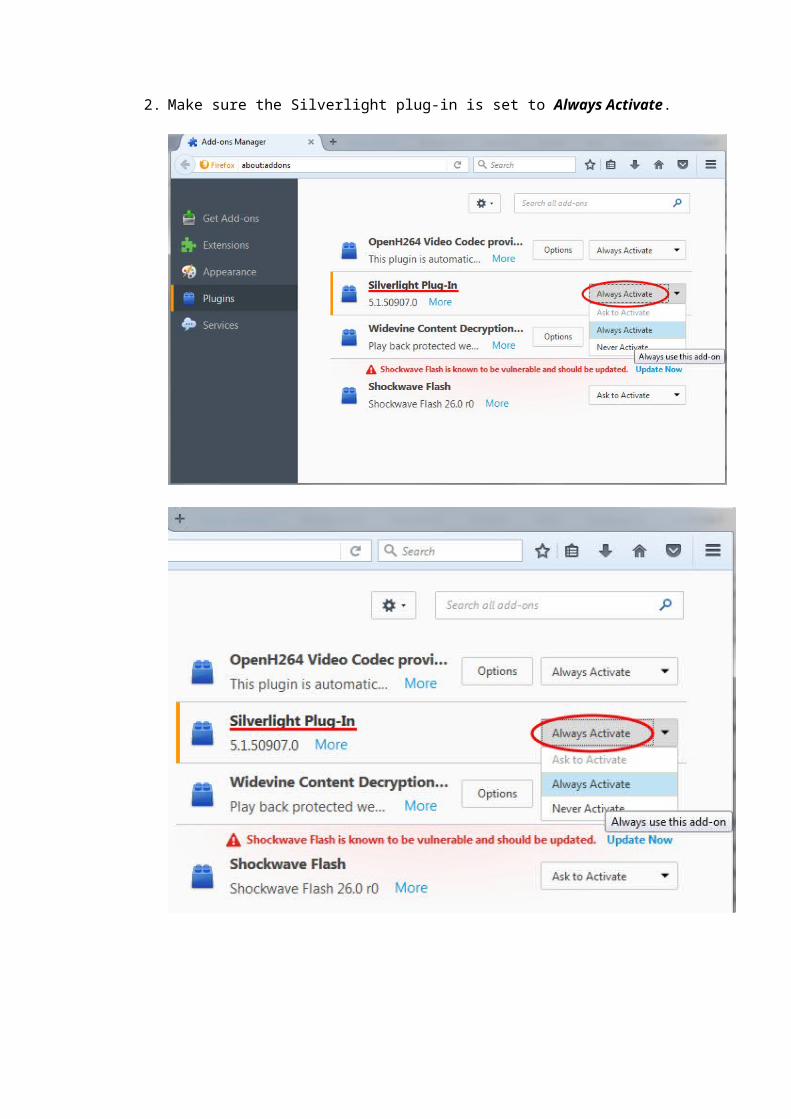
1. Click the menu bar icon at the top right of the window, and then select Add-ons.

2. Make sure the Silverlight plug-in is set to Always Activate.

For Safari on a Mac
1. Open Safari at the EPPI Reviewer 4 site (http://eppi.ioe.ac.uk/eppireviewer4/)
2. Open Safari -> Preferences (⌘)

3. Select the “Security” tab
4. Make sure “Allow Plug-ins” checkbox is checked
5. Click the “Manage Website Settings…” button
6. You will see a list of plug-ins on the left, and a list of websites currently open on the right. Select "Silverlight" in the plug-in list on the left.

7. Select the relevant website (i.e. eppi.ioe.ac.uk/eppireviewer4/) from the list of currently open websites, and choose "Run in Unsafe Mode".
NOTE: You may need to hold down the Option/Alt key on your keyboard, and then click on the menu next to website to display the additional option of “Run in Unsafe Mode”.

NOTE: Other versions of Safari may look slightly different, and you may need to disable or untick the Run in Safe Mode option (rather than enabling the Run in Unsafe Mode option).

8. In the alert box, click "Trust".
9. Click the "Done" button.
10. Close the "Preferences" panel.
11. Reload the web page to enable the change.
Testing your Silverlight installation
Once you have Silverlight installed and enabled, you can test it by visiting the following page -: http://bubblemark.com/silverlight2.html
You should see some bouncing green bubbles moving around the screen, as per the screenshot below.

Other Tips
It is always worth restarting your browser after installing and enabling Silverlight, or if you are experiencing problems with EPPI Reviewer.
You can also try clearing the cache, in case of issues with EPPI Reviewer.
If you are using Internet Explorer, follow these steps -:
1. Once your browser is open, click the gear icon (Tools). Then, select Internet options

(Or select Tools from across the top menu bar, then select Internet options.)

2. Select the General tab, and press the Delete button to clear your temporary internet files
3. Your computer will work for a moment, and then the process will be complete.

If you are using Firefox ESR, follow these steps -:
1. WIth the browser open, select Tools from the menu bar across the top, or press the Menu icon
2. Select Options (or the gear icon)

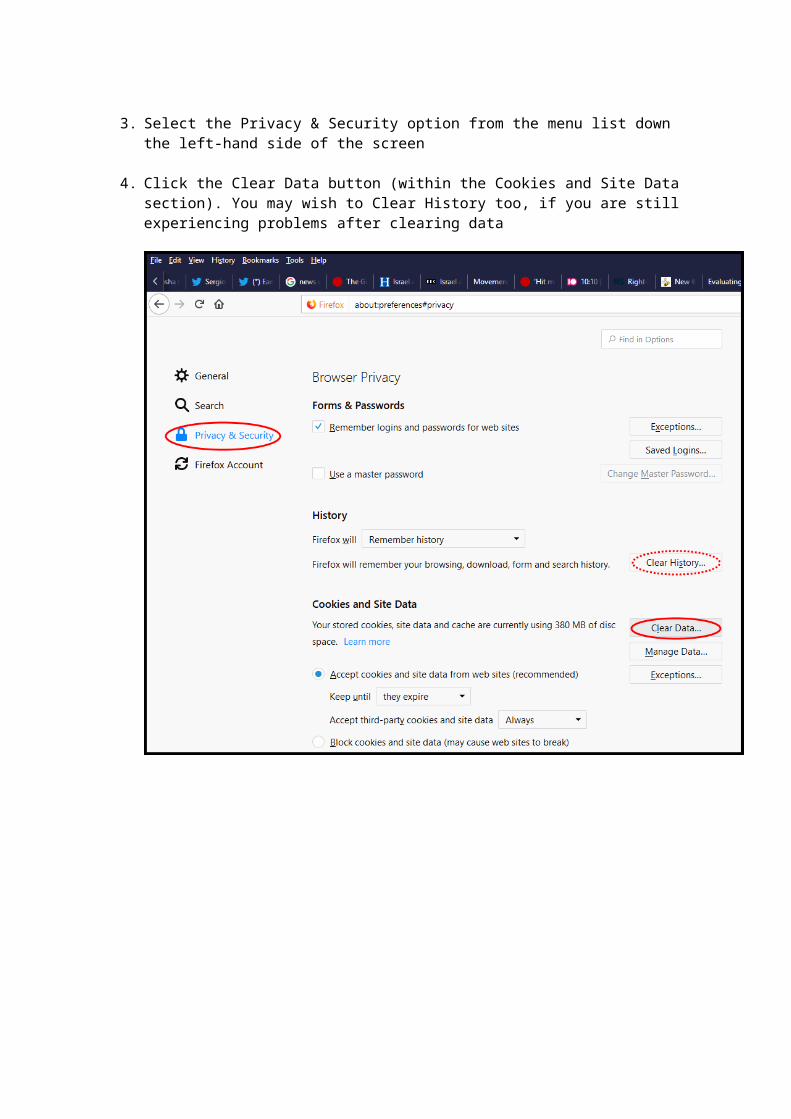
3. Select the Privacy & Security option from the menu list down the left-hand side of the screen
4. Click the Clear Data button (within the Cookies and Site Data section). You may wish to Clear History too, if you are still experiencing problems after clearing data

If you are using Safari, follow these steps -:
1. In the top menu, choose Safari.
2. Click Preferences.
3. Choose the Advanced tab.
4. Enable Show Develop menu in menu bar.
5. Now go to Develop in menu bar.
6. Choose Empty caches.
7. Make sure you close/quit the browser and restart it after clearing cache. (Note that cache-clearing can take a while.
Further information
Finally, the old trick of turning it off and then on again has actually been known to work. (It does clear the memory of your computer, will properly close any applications that have been quit in unstable ways, etc.)
If you are still having trouble using EPPI Reviewer 4, do please email [email protected]; you may also find our forum at useful. Finally, we have a full manual available online, together with instructional videos, here.

Additional Notes for Apple Mac users
It seems some Apple users are finding issues enabling Silverlight, whilst others are unable to upload files even when the extension is enabled.
NOTE: Some of the settings used to enable Silverlight and allow file uploads via your web browser can only be accessed by holding down the Option key -:
“For more options, hold down the Option key, then click the pop-up menu -:
Enable Security Protection: Safari lets the website use the plug-in, even when Apple is using File Quarantine to block it. This is a security risk, so don't choose this setting unless you trust the website. In Safari 10, this setting appears only if the plug-in is blocked.
Run in Safe Mode: If you allow the plug-in to run in safe mode, Safari lets the website use the plug-in and runs the malware safety checks built in to your Mac. If you run in unsafe mode, Safari lets the website use the plug-in, but doesn't run the malware safety checks. This is a security risk, so don't disable safe mode unless you trust the website and have no other way to view the content.
Ideally, you should let the application run in unsafe mode via the additional options presented when holding down the Option key.”

File Upload and Download from Safari
The latest versions of the Apple Macintosh (Mac) Safari browser do not allow a user to view or upload files from his/her Documents directory without explicitly setting permissions to do so.
On most versions of Mac OSX, the following steps will allow the user to set these permissions. However, they must be done for each web site you want to use in this way. Safari 10 requires an extra step that will be covered later.
1. Open the EPPI Reviewer 4 website.
2. From the Safari menu, choose Preferences, click the Security tab at the top and select Silverlight from the menu on the left. You should see the Silverlight sites you have visited that require a plug-in.
3. Next to the entry for the EPPI Reviewer website, click the drop-down box and select “Run in Unsafe Mode”. To the pop-up “Are you sure…”, answer “Trust”. The “Allow Always” setting will display next to the selected site. Reopen the drop-down and hover over it to observe that the option below “Allow Always” is now “Run in Safe Mode”. That is how you know the “Run in Unsafe Mode” setting was adopted. Then when you leave the drop-down, “Allow Always” will have triangle next to it, showing it is in the unsafe mode.
4. Now when you attempt to upload a file, you should be able to see your desired documents directory.

5. In Safari 10, you must hold down the option key on your keyboard before selecting the drop-down menu (Ask,Off,On) next to the desired site to see options in addition to Ask, Off and On.
6. Un-check "Run In Safe Mode" and it will function the same as the unsafe mode in prior browser versions.
A word about the Safe/Unsafe modes:
Safe Mode: If you allow the plug-in to run in safe mode, Safari lets the website use the plug-in and runs the malware safety checks built in to your Mac. Unsafe Mode: If you run in unsafe mode, Safari lets the website use the plug-in, but doesn't run the malware safety checks. This is a security risk, so don't disable safe mode unless you trust the website and have no other way to view the content.

Notes from Apple on Internet Plug-Ins (https://support.apple.com/en-us/HT202819)
How to use Internet plug-ins in Safari for Mac
With Safari, you can use plug-ins only when you need them, see which ones are installed, and control when websites are allowed to use them.
To load webpages more quickly, save energy, and strengthen security, Safari is optimized for content that uses the HTML5 web standard. Safari prefers that content when loading webpages.
Some websites require plug-ins such as Flash or Java to show video, animation, or other proprietary content. You can install such plug-ins, then use Safari to turn them on for the websites you visit. When you turn on a plug-in, it remains active for as long as you regularly use that plug-in on any website.
Turn on plug-ins
When visiting a website that requires a plug-in to show content, you might see a placeholder where that content would appear. The placeholder might say that the plug-in is missing, that you should click to use the plug-in, or that the plug-in is blocked, out of date, or subject to a security alert. Click the placeholder to learn more.
If the plug-in is installed, Safari might ask whether to use the plug-in once or every time you visit the website:
Use Once: Safari uses the plug-in to show content on this website during this visit. The next time you visit, Safari asks again.
Use Every Time: Safari uses the plug-in to show content for this website, and it keeps the plug-in turned on as long as you regularly visit the site.
Cancel: Safari doesn't use the plug-in to show content on this website during this visit. The next time you visit, Safari asks again.

Safari might also ask whether you want to trust the website to use the plug-in:
Trust: Safari lets the website use the plug-in and doesn’t ask again. Not Now: Safari doesn’t let the website use the plug-in this time, but asks again
the next time you visit. Never for this Website: Safari doesn’t let the website use the plug-in—now or
in the future.
Allow or block websites from using plug-ins
Choose Safari > Preferences, then click Security.
To turn off all plug-ins for all websites, deselect Allow Plug-ins. Websites that require a plug-in might not function correctly, might show a placeholder instead of the plug-in content, or might ask you to install the plug-in.

To view your installed plug-ins or turn off a specific plug-in for all websites, click the Plug-in Settings button, then deselect the checkbox for that plug-in:
You can also configure a plug-in for specific websites, whether or not the website currently requires the plug-in:
Here you see websites that are currently open or previously configured to use the plug-in. Use the pop-up menus to configure the blocking policy for each website:
Ask: Safari asks you before letting the website use the plug-in.
Off: Safari tries to load the content without using the plug-in. If the site requires the plug-in, Safari blocks the plug-in and might show a placeholder instead of the plug-in content.
On: Safari lets the website use the plug-in, unless Apple is using File Quarantine to block the plug-in for security reasons (example).

For more options, hold down the Option key, then click the pop-up menu:
Enable Security Protection: Safari lets the website use the plug-in, even when Apple is using File Quarantine to block it. This is a security risk, so don't choose this setting unless you trust the website. In Safari 10, this setting appears only if the plug-in is blocked.
Run in Safe Mode: If you allow the plug-in to run in safe mode, Safari lets the website use the plug-in and runs the malware safety checks built in to your Mac. If you run in unsafe mode, Safari lets the website use the plug-in, but doesn't run the malware safety checks. This is a security risk, so don't disable safe mode unless you trust the website and have no other way to view the content.
Information about products not manufactured by Apple, or independent websites not controlled or tested by Apple, is provided without recommendation or endorsement. Apple assumes no responsibility with regard to the selection, performance, or use of third-party websites or products. Apple makes no representations regarding third-party website accuracy or reliability. Risks are inherent in the use of the Internet. Contact the vendor for additional information. Other company and product names may be trademarks of their respective owners.
Published Date:February 15, 2017