Embed Size (px)
Citation preview

EPPI Reviewer 4 and PCs
• Installation• Testing your Silverlight installation
• Other tips
1. Introduction
Our software runs via your web browser; it is not installed as an application on your computer.
It currently utilises an add-on from Microsoft, called Silverlight.
This add-on is only compatible with certain web browsers – either Internet Explorer 11 (or earlier),
or Firefox ESR v52.9.0 (or earlier).
(NOTE: We are currently in the process of re-writing EPPI Reviewer and testing new versions which
run without add-ons, and will work on all current browsers and devices – computers, mobile
phones and tablets. You can already use our Coding-Only interface to try the new software – see
https://eppi.ioe.ac.uk/eppireviewer-coding/home.)
The browsers are available from -:
i. Microsoft’s Internet Explorer version 11* (or earlier; not Microsoft’s Edge browser)
(available from https://support.microsoft.com/en-us/help/17621/internet-explorer-
downloads)
ii. Mozilla’s Firefox ESR version 52.9.0** (or earlier i.e. the legacy EXTENDED SUPPORT
RELEASE, not the standard version or the newer ESR version 60)
(available from https://archive.mozilla.org/pub/firefox/releases/52.9.0esr/)
You will need to ensure the browser add-on Microsoft Silverlight is installed and enabled, available
from https://www.microsoft.com/silverlight/default
Full instructions for PCs are detailed on the following pages.

2. PCs and Firefox
2.1. Checking which version of Firefox is installed
You can check the version of the browser you are running using the following steps -:
i. Click the Menu button, and then the Help icon
ii. Select the About Firefox option
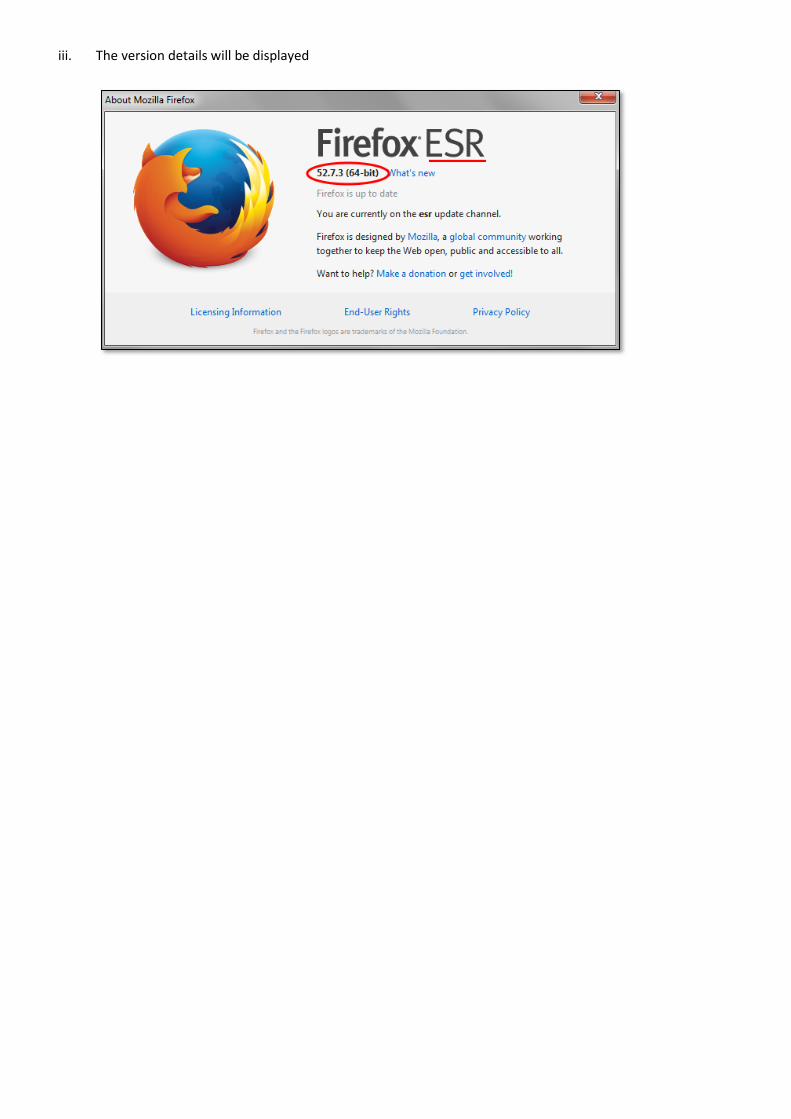
iii. The version details will be displayed
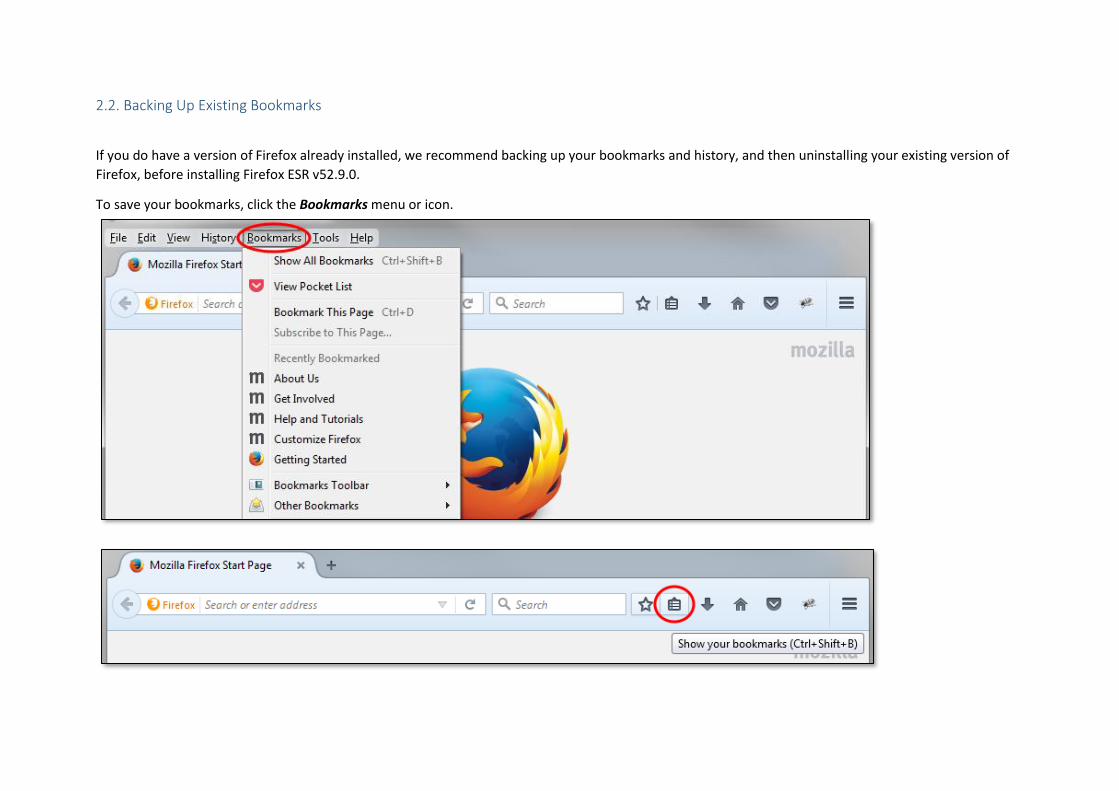
2.2. Backing Up Existing Bookmarks
If you do have a version of Firefox already installed, we recommend backing up your bookmarks and history, and then uninstalling your existing version of
Firefox, before installing Firefox ESR v52.9.0.
To save your bookmarks, click the Bookmarks menu or icon.

Then select Show All Bookmarks.

In the resultant window, click the Import and Backup button.

Select Backup to save your backups.
You can then select the Restore function to bring your bookmarks into any new installation of Firefox.
NOTE: Backing up your Favourites will not store your cached passwords, history, etc. If you did wish to save these, we recommend backing up your Firefox
profile, as described in section 2.3.

Alternatively, select Export Bookmarks to HTML (which will save your bookmarks in an external file, viewable in any browser). You can then use the Import
Bookmarks from HTML to bring your bookmarks into your new installation of Firefox.)

(Obviously, these operations will need you to backup / export to a specific file and location, and restore / import from a specific file and location, and you
will be shown the relevant file selection dialogue.)

2.3 Installing Firefox
There are two options you may wish to consider when installing Mozilla Firefox ESR v52.9.0.
The first option is to install only Firefox ESR v52.9.0 and use that to run EPPI Reviewer 4. You can still
use any other browser (e.g. Microsoft Edge, Google Chrome, Apple Safari) to visit other websites.
(You could also use the legacy ESR version of Firefox to visit other websites, but it may not be able to
show all active content and will not offer all the features and security measures of their newer
standard browser.)
The second option is to install both the legacy ESR version of Firefox and the current standard
version of Firefox. You can then use the former solely to access EPPI Reviewer 4, and the latter to
access any other website – ensuring you have all the latest features and security measures available
from Mozilla.

Option 1 – Installing ONLY Firefox ESR v52.9.0
If you do have any other version of Firefox installed, we recommend backing up your existing
bookmarks (favourites) and then uninstalling it, before installing Firefox ESR v52.9.0.
Firefox v. 52.9.0 ESR is available from Mozilla, via their FTP site at
https://archive.mozilla.org/pub/firefox/releases/52.9.0esr/.
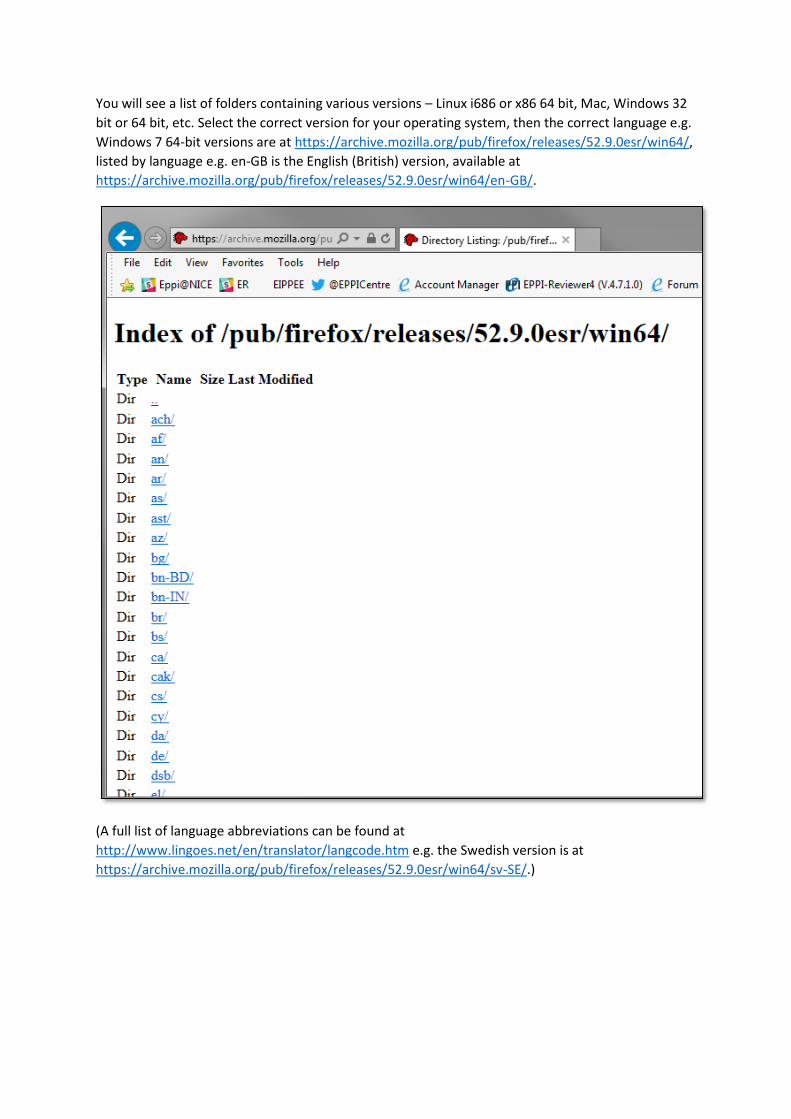
You will see a list of folders containing various versions – Linux i686 or x86 64 bit, Mac, Windows 32
bit or 64 bit, etc. Select the correct version for your operating system, then the correct language e.g.
Windows 7 64-bit versions are at https://archive.mozilla.org/pub/firefox/releases/52.9.0esr/win64/,
listed by language e.g. en-GB is the English (British) version, available at
https://archive.mozilla.org/pub/firefox/releases/52.9.0esr/win64/en-GB/.
(A full list of language abbreviations can be found at
http://www.lingoes.net/en/translator/langcode.htm e.g. the Swedish version is at
https://archive.mozilla.org/pub/firefox/releases/52.9.0esr/win64/sv-SE/.)

If you are unsure as to which version of Windows you have, right-click on the My Computer icon on
your desktop (or right-click on Computer within Windows Explorer) and select Properties.)
The system type will be displayed -:

After installation, when you start Firefox 52.9.0 ESR, click No to any suggested upgrade.
(When first running Firefox ESR v52.9.0, also make sure you do not set it as your default browser,
and ensure the option to check in future is disabled / unticked.)
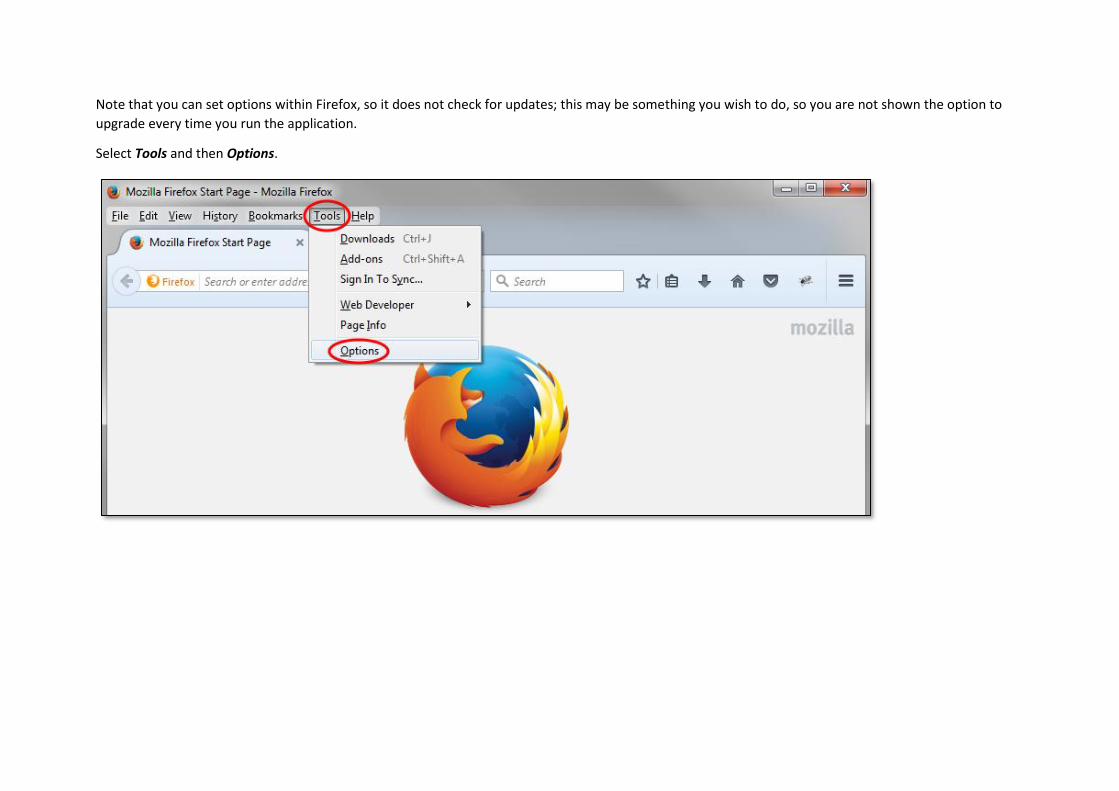
Note that you can set options within Firefox, so it does not check for updates; this may be something you wish to do, so you are not shown the option to
upgrade every time you run the application.
Select Tools and then Options.
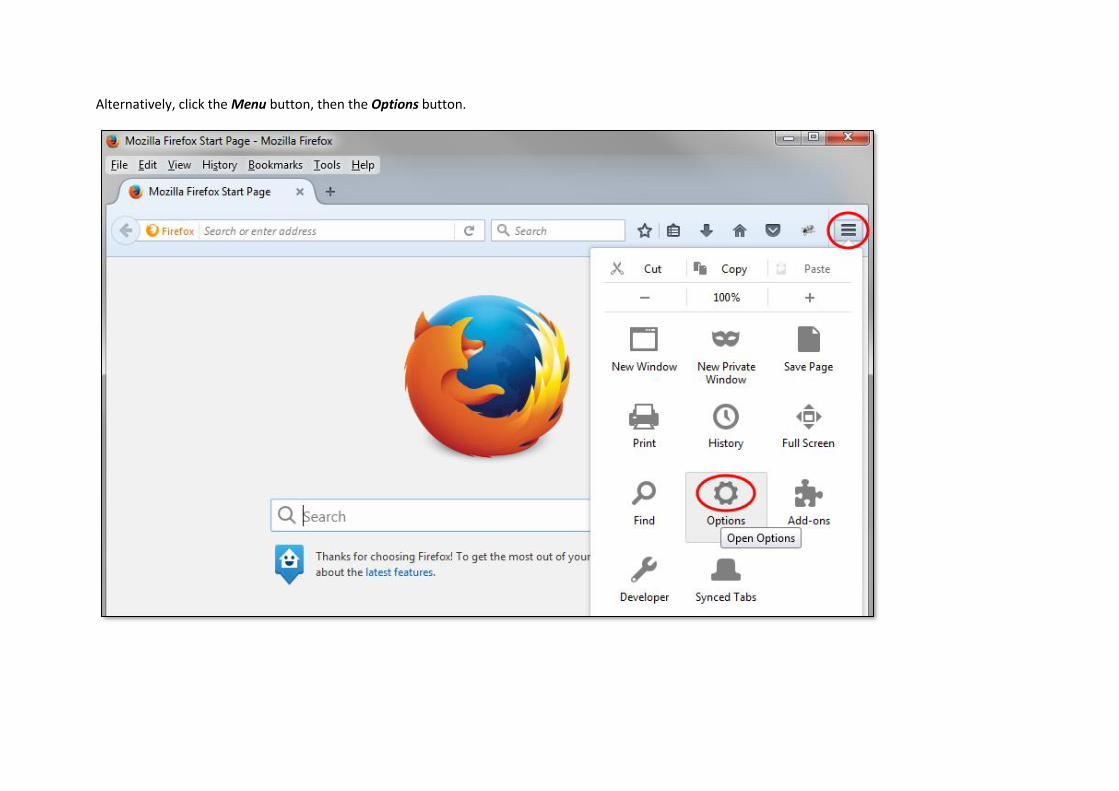
Alternatively, click the Menu button, then the Options button.

Select the Advanced section on the left, and the Update tab across the top; then click the Never check for updates option.

Option 2 – Installing BOTH Firefox ESR v.52.9.0 AND standard Firefox (currently Firefox
Quantum).
Note – this process will also work if you wish to install the legacy version of Firefox ESR
(v52.9.0) and the latest version of Firefox ESR (currently v60, available from
https://www.mozilla.org/en-US/firefox/organizations/). This may be a mandatory
requirement in some institutions.
If you do have any other version of Firefox installed, we recommend backing up your existing
bookmarks before installing Firefox ESR v52.9.0, as discussed in the section above.
If you are keeping the existing (i.e. already installed) version of Firefox and installing Firefox ESR
v52.9.0 alongside (i.e. concurrently with) it, you should create a new, separate, Firefox profile to use
with your second installation (of Firefox ESR v52.9.0). Equally, if you are creating two new
installations of Firefox ESR v52.9.0 and another version of Firefox (e.g. Firefox Quantum v62 or
Firefox ESR v60) you may wish to create a second profile alongside the existing default profile, to use
when running Firefox ESR.
(Firefox saves your personal information such as bookmarks, passwords, and user preferences in a
set of files called your profile, which is stored in a separate location from the Firefox program files.
You can have multiple Firefox profiles, each containing a separate set of user information. The
Profile Manager allows you to create, remove, rename, and switch profiles. Using the same profile
for both versions of Firefox can cause issues, as they are not guaranteed to be backwardly
compatible. You could also tailor your environment so, for example, your Firefox ESR v52.9.0
browser has its homepage set to EPPI Reviewer 4.)
2. If Firefox is open, close Firefox:
Click the Firefox menu , then click Exit.
3. Press the Windows Start button + R on the keyboard (or press , then type Run and press Enter).
A Run dialog will open. In the Run dialog box, type in -:
firefox.exe –P
(Note: You can use -P, -p, or -ProfileManager; any of them should work).
4. Click OK or press Return. The Firefox Profile Manager (Choose User Profile) window shouldopen.
(Note: Another way to start the Profile Manager is from the Search box in the Windows Startmenu. Close Firefox (if open), press , type firefox.exe -P and press Enter.

If the Profile Manager window does not appear, you may need to include the full path to the Firefox
program, enclose that line in quotes, then add a space followed by -P. Examples:
Firefox (32-bit) on 64-bit Windows
"C:\Program Files (x86)\Mozilla Firefox\firefox.exe" -P
Firefox (32-bit) on 32-bit Windows (or 64-bit Firefox on 64-bit Windows)
"C:\Program Files\Mozilla Firefox\firefox.exe" -P
If the Profile Manager window still does not open, Firefox may have been running in the background,
even though it was not visible. Close all instances of Firefox or restart the computer and then try
again.

After starting the Profile Manager as explained above, you can create a new, additional profile as
follows:
In the Profile Manager, click Create Profile... to start the Create Profile Wizard.
You will see an information box displayed. Click Next.

Enter the name of the profile. Use a profile name that is descriptive, such as “LegacyESR”. This name
is not exposed on the Internet.
You can also choose where to store the profile on your computer. To choose its storage location,
click Choose Folder....
Warning: If you choose your own folder location for the profile, select a new or empty folder. If you
choose a folder that isn't empty and you later remove the profile and choose the "Delete Files"
option, everything inside that folder will be deleted.
To create the new profile, click Finish.
You will be taken back to the Profile Manager window, where you can either start Firefox or exit the
Profile Manager.
Note: If you want the Profile Manager to appear the next time you start Firefox, remove the
checkmark from the box, "Use the selected profile without asking at startup". Otherwise, the
selected profile will be used automatically.
Note: You can also delete and rename profiles as you wish. (You can choose whether to remove the underlying profile files when deleting an existing profile. Bear in mind that when renaming a profile, the folder containing the files for the profile is not renamed.)

Now when you start either version of Firefox, you will be asked which profile to use. Select the Default one for the standard version of Firefox, and the LegacyESR one for the Legacy ESR version.
(Ensure the option to “Use the selected profile without asking at startup” is NOT ticked. If you do tick this option, you will always be using that profile, even if you wish to use the other i.e. you are not given the option when starting up Firefox. You will have to manually start the Profile Manager first to select a profile.)
NOTE: To copy all of your Firefox data and settings to another Firefox installation (e.g. when you get a new computer), you can make a backup of your Firefox profile, then restore it in your new location. For instructions, see Back up and restore information in Firefox profiles.

Note: The option to “Use the selected profile without asking at startup” is only available via the profile manager when Firefox is not running. You can manage profiles when Firefox is open, but you will not be able to alter this option…To manage profiles when Firefox is open, type about:profiles into the Firefox address bar.
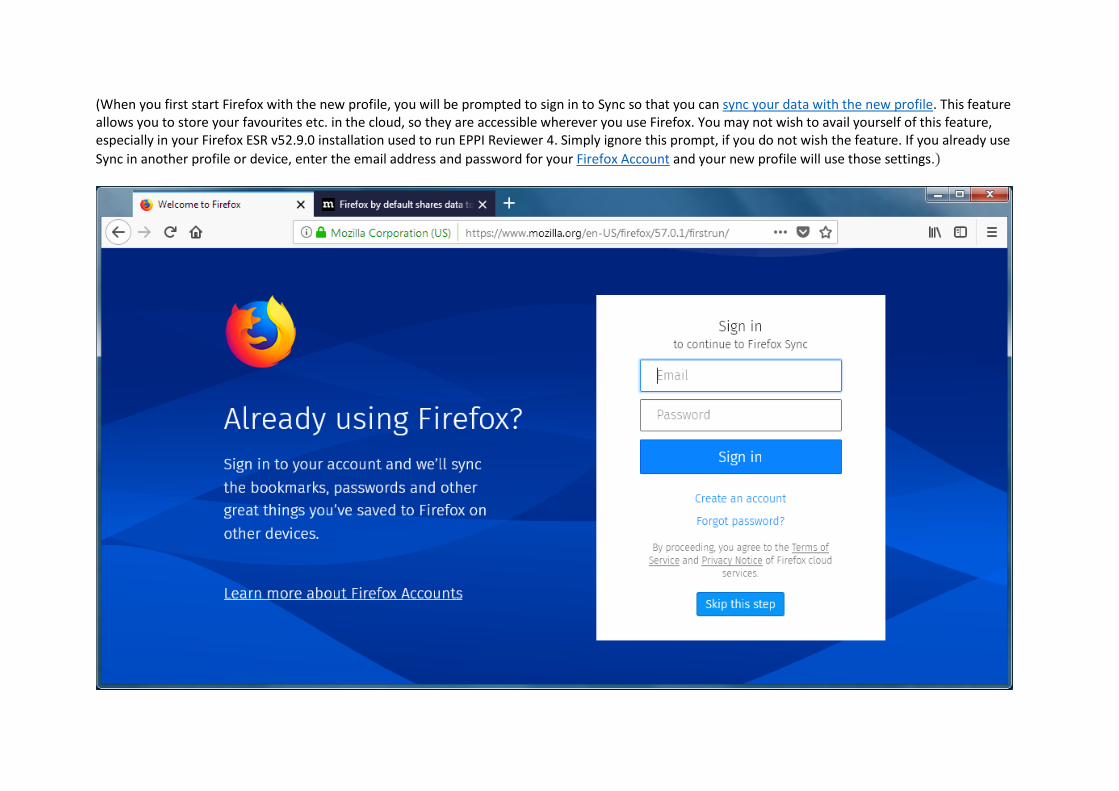
(When you first start Firefox with the new profile, you will be prompted to sign in to Sync so that you can sync your data with the new profile. This feature allows you to store your favourites etc. in the cloud, so they are accessible wherever you use Firefox. You may not wish to avail yourself of this feature, especially in your Firefox ESR v52.9.0 installation used to run EPPI Reviewer 4. Simply ignore this prompt, if you do not wish the feature. If you already use
Sync in another profile or device, enter the email address and password for your Firefox Account and your new profile will use those settings.)

Once you have one version of Firefox installed, and you have created a separate profile for your
second installation, you can then install the second version.
However, you will need to perform a custom installation and specify an alternative destination
directory to the default, so the two programs do not overwrite each other.
You can then rename the program shortcuts as appropriate.
Once you have downloaded the installation file* and double-clicked it, follow the steps below -:
1. Click Run
The program will extract.

2. Click Yes then Next
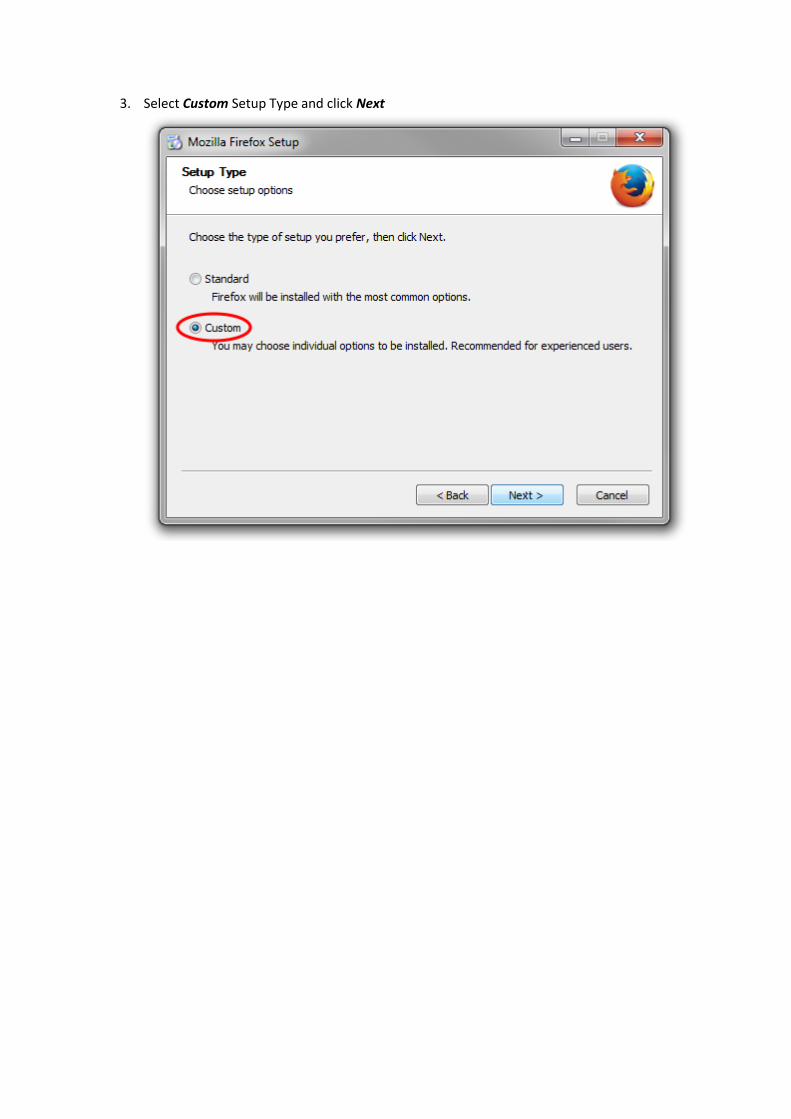
3. Select Custom Setup Type and click Next
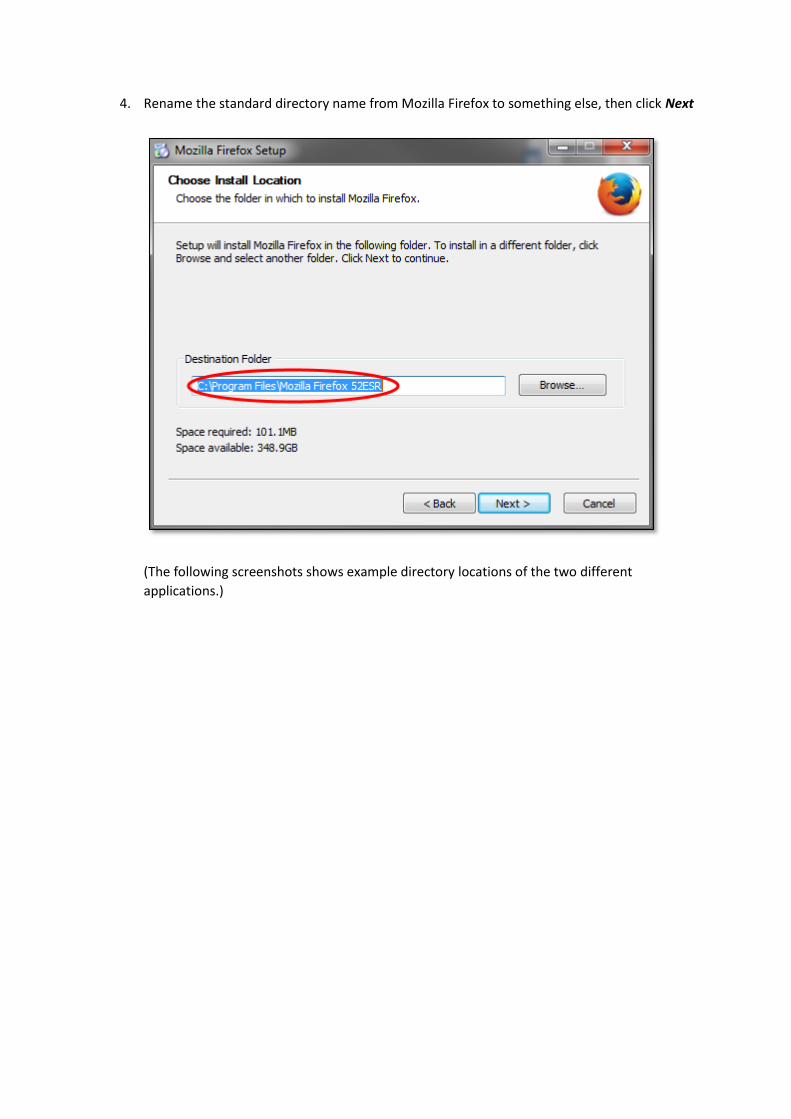
4. Rename the standard directory name from Mozilla Firefox to something else, then click Next
(The following screenshots shows example directory locations of the two different
applications.)


5. Untick the option to Install Maintenance Service, then click Next
6. Click Next

7. Untick the option to set this installation as your default browser, then click Install

8. Click Finish
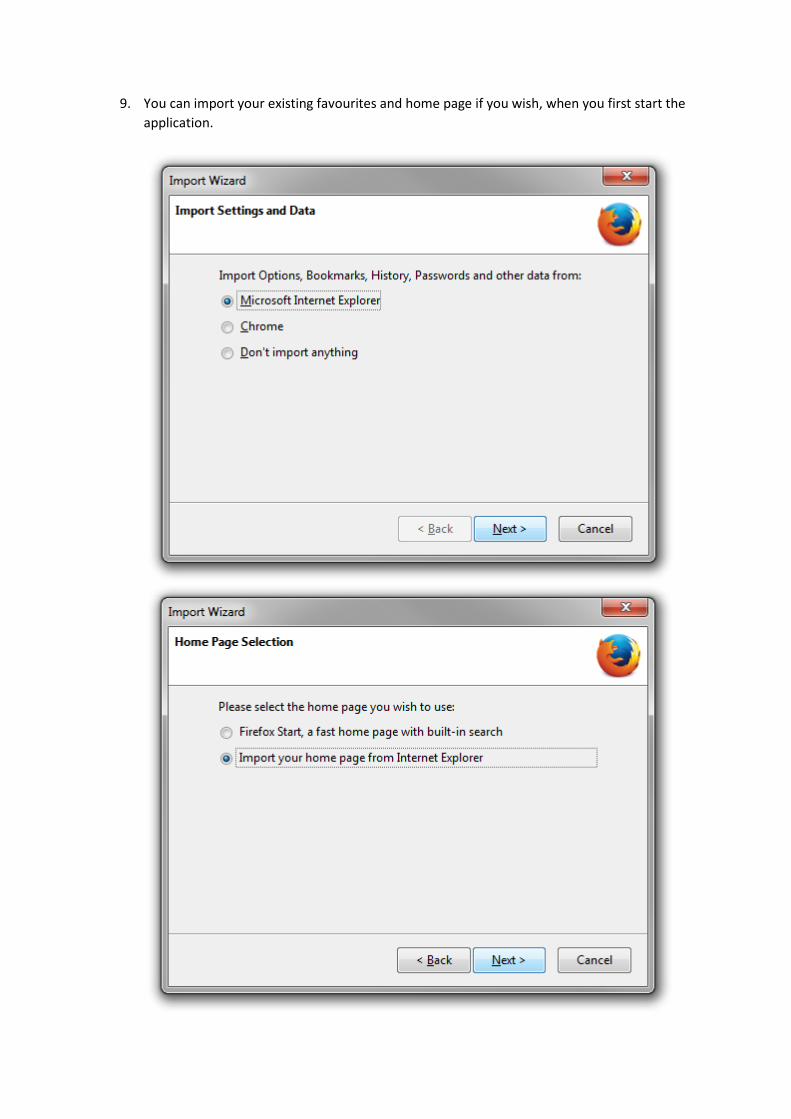
9. You can import your existing favourites and home page if you wish, when you first start the
application.

10. The browser window should then appear

11. DO NOT CLICK CHECK FOR UPDATES… (As mentioned before, you can set Firefox to never
check for updates.)

12. You will want to change the name of any program shortcuts or Start menu entries, to
distinguish the various versions of Mozilla Firefox that you have installed.


After installation and name-changes, you should be able to see both versions listed and
available in the start menu.

If you have set up your profiles correctly, you should be asked which profile you wish to use when you start either version of Firefox.
The screenshot below shows two different versions of Firefox running concurrently.

This following shortcut shows two separate applications using separate profiles concurrently.

However, you may wish to create some shortcuts on your desktop or in your Start menu that allow you to start each version of Firefox without having to
select the relevant profile.
In the example below, the application is located in the directory C:\Users\qtnvozg\AppData\Local\FirefoxESR52:\Program Files\Mozilla Firefox and the
relevant executable program is firefox.exe. We wish to use this with the profile named LegacyESR.
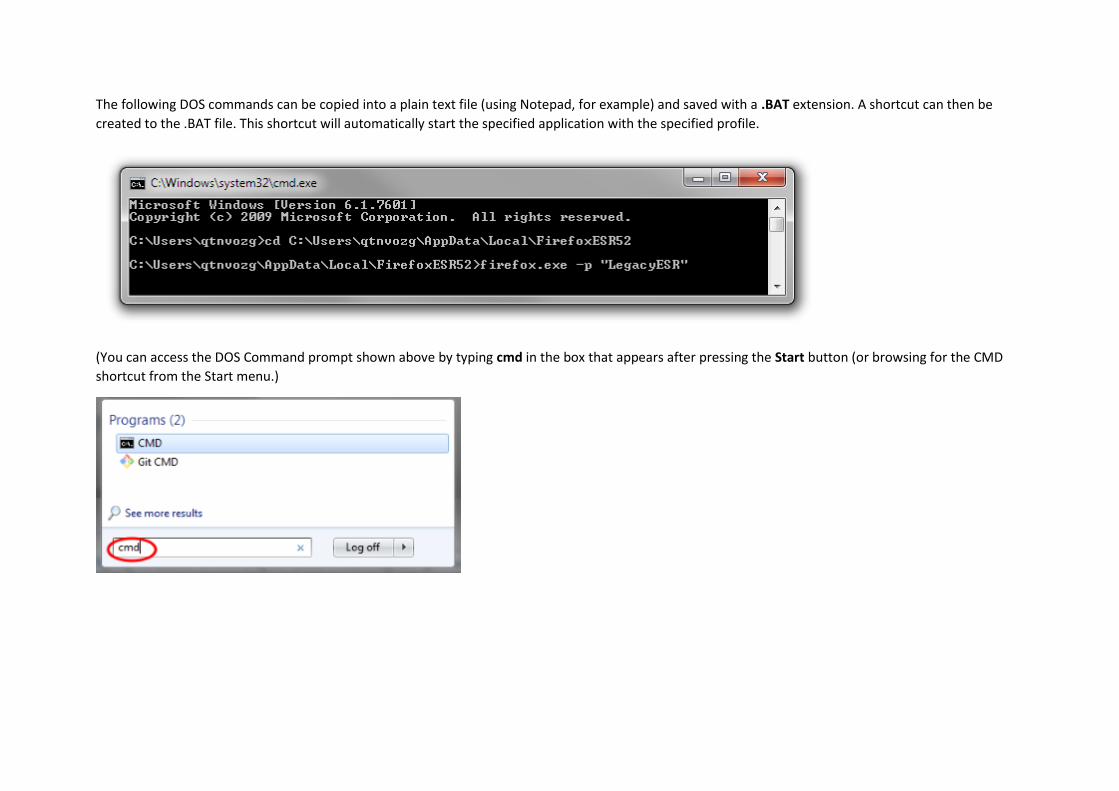
The following DOS commands can be copied into a plain text file (using Notepad, for example) and saved with a .BAT extension. A shortcut can then be
created to the .BAT file. This shortcut will automatically start the specified application with the specified profile.
(You can access the DOS Command prompt shown above by typing cmd in the box that appears after pressing the Start button (or browsing for the CMD
shortcut from the Start menu.)

Alternatively, right-click on your desktop and select new shortcut.
Then enter the following details -:

Finally, give the shortcut an appropriate name to distinguish the version.
The shortcut will appear on your desktop; it will automatically start the associated version of Firefox
with the specified profile.
You can do the same for other versions of Firefox on your computer.
(NOTE: You can also use the switches --no remote –new-instance (along with the –
profile switch), to ensure the browser you open is not controllable by further external
commands or other Firefox windows, and to ensure the browser opens a new instance, rather than a
new window in a running browser / existing Firefox session.)

2.4. Activating Silverlight
1. Download and install Silverlight from https://www.microsoft.com/silverlight/default.
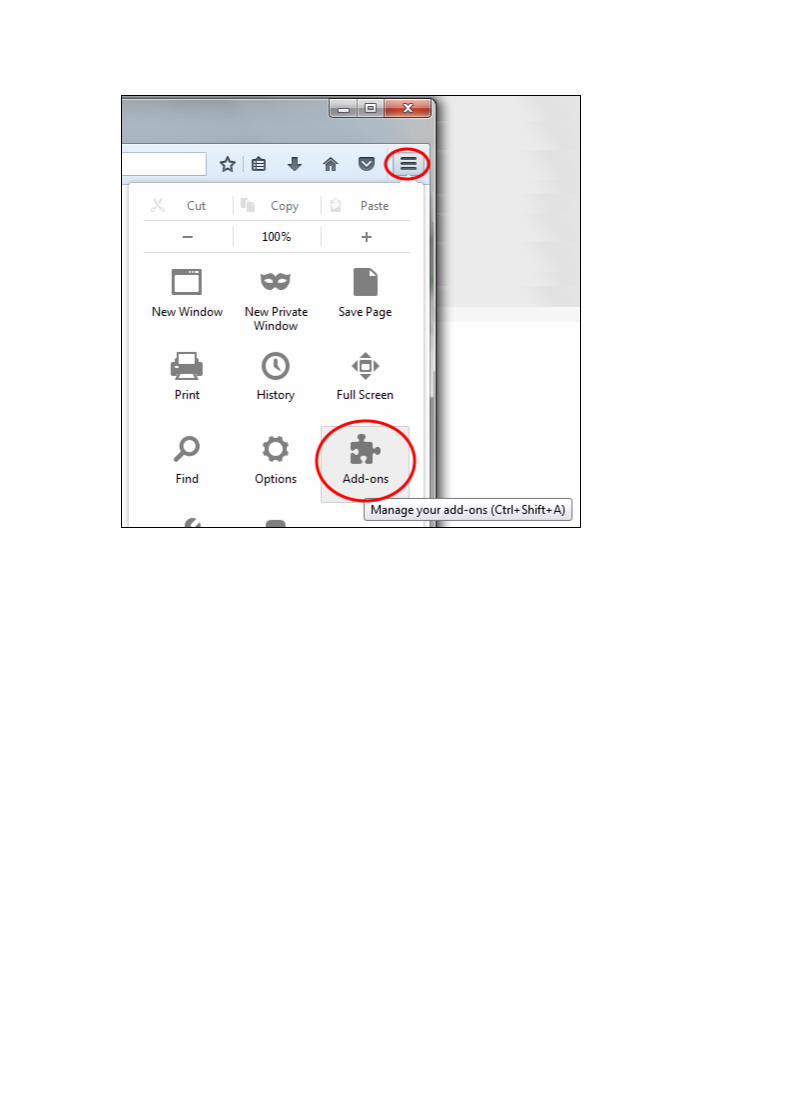
2. Click the menu bar icon at the top right of the window, and then select Add-ons.
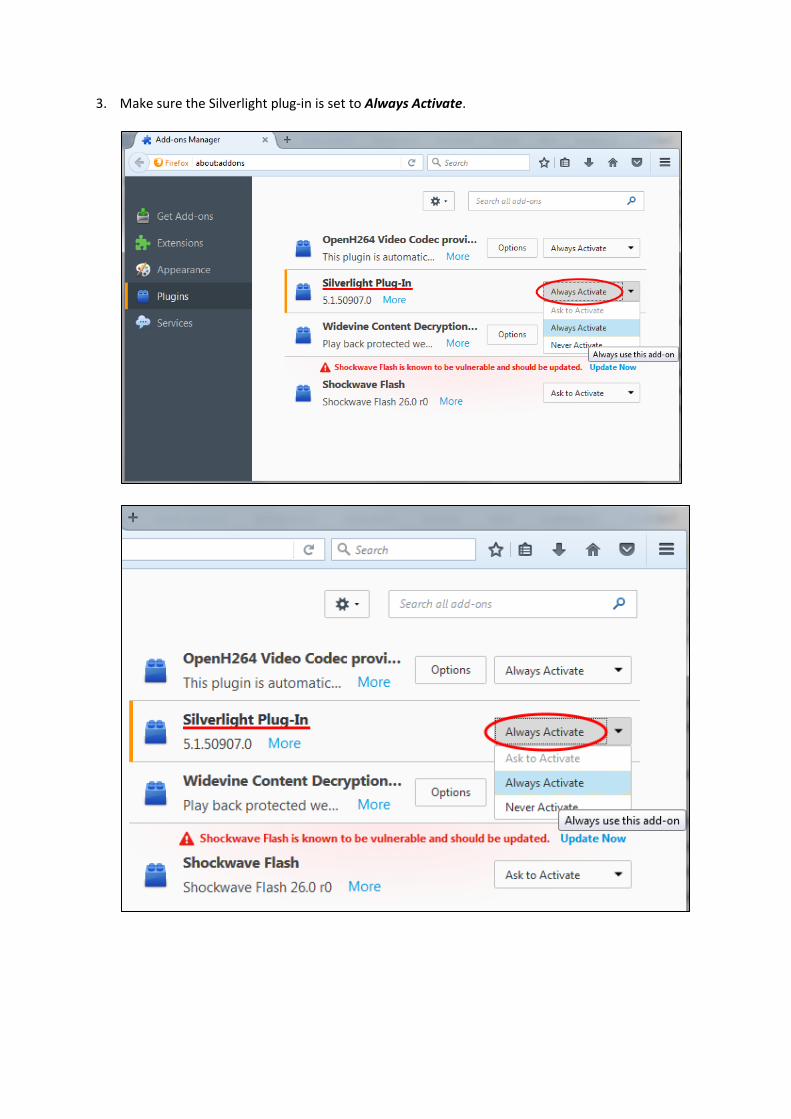
3. Make sure the Silverlight plug-in is set to Always Activate.

3. PCs and Internet Explorer
3.1. Checking which version of Internet Explorer is installed
i. Click the Help menu, and then select About Internet Explorer
ii. The version will be displayed in a pop-up box. (You will need version 9, 10 or 11.)


3.2. Accessing Internet Explorer 11
*NOTE: If you are trying to locate Internet Explorer on your PC, but can only locate Microsoft’s Edge browser (which has a very similar icon), press the Start
button, and then being typing Internet Explorer. The program should be listed.


If it is not listed, you will have to enable it.
1. Press the Start button, and open the Control Panel


2. Select Programs and Features
3. Select Turn Windows features on or off
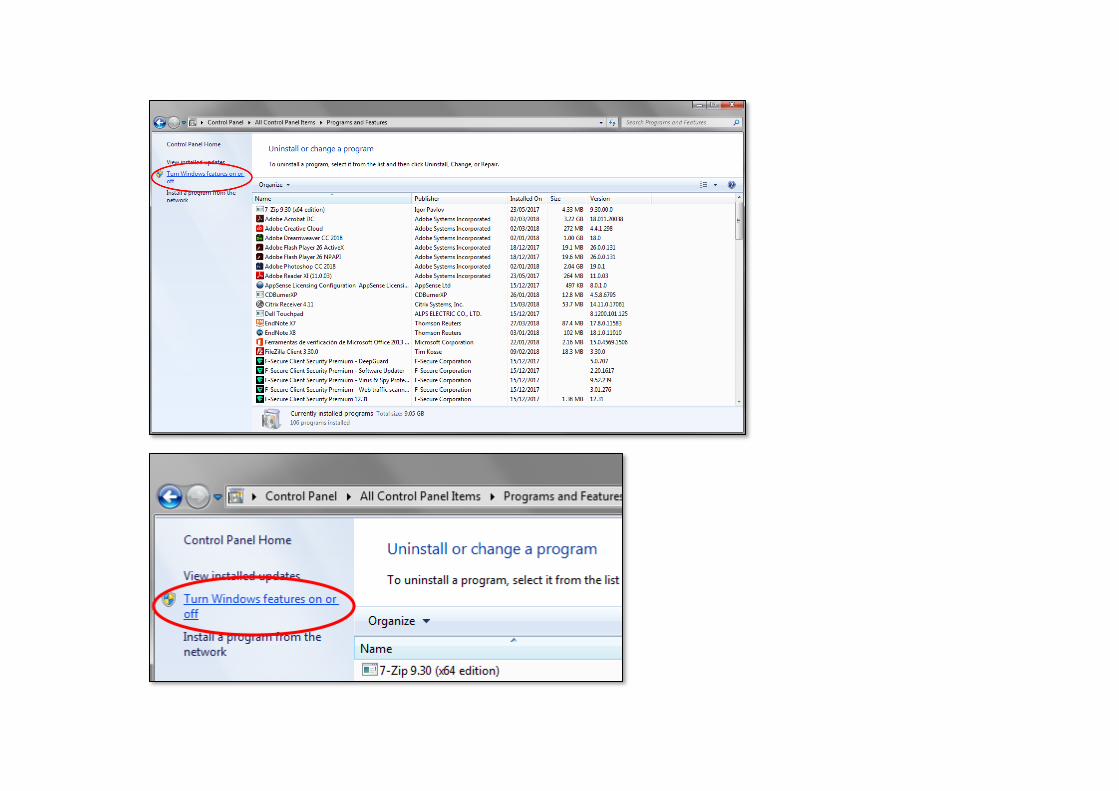

4. Click the option to turn Internet Explorer 11 on
Internet Explorer 11 should now be available from the Start menu, as described earlier.
(If you cannot locate it, it is available from https://support.microsoft.com/en-us/help/17621/internet-explorer-downloads.)

(The screenshot below shows the same process for Windows 10, rather than Windows 7.)
1. Press the Start button, and then begin typing Programs and Features
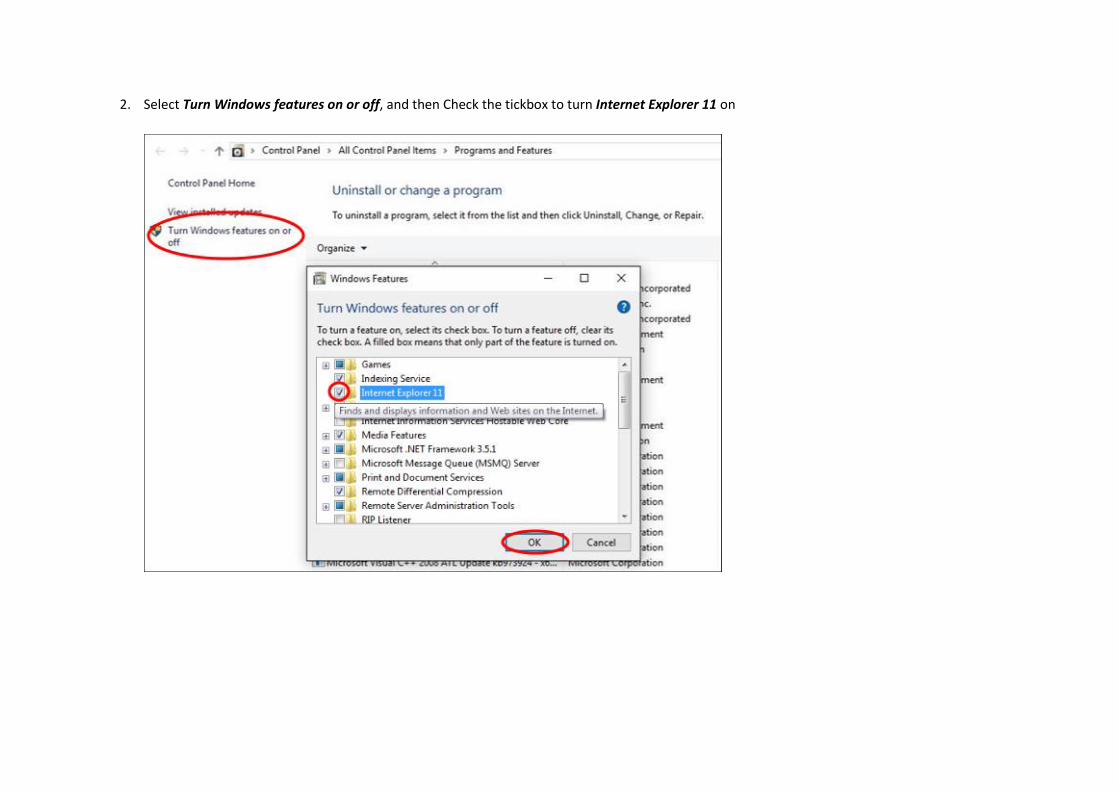
2. Select Turn Windows features on or off, and then Check the tickbox to turn Internet Explorer 11 on

3. Internet Explorer 11 should now be available by pressing the Start button, and then beginning to type Internet Explorer 11

3.3. Activating Silverlight
1. Download and install Microsoft Silverlight from https://www.microsoft.com/silverlight/default.
2. Click the Tools cog icon, or select the Tools option from the menu bar, then click Internet Options.


3. Select the Programs tab and then the Manage add-ons button.


4. Ensure All add-ons are shown.


5. Select Microsoft Silverlight.


6. Ensure it is enabled by clicking the Enable button, then click Close to close the options windows

4. Testing your Silverlight installation
Once you have Silverlight installed and enabled, you can test it by visiting the following page -:
http://bubblemark.com/silverlight2.html
You should see some bouncing green bubbles moving around the screen, as per the screenshot
below.
5. Other Tips
It is always worth restarting your browser after installing and enabling Silverlight, or if you are
experiencing problems with EPPI Reviewer.
You can also try clearing the cache, in case of issues with EPPI Reviewer.
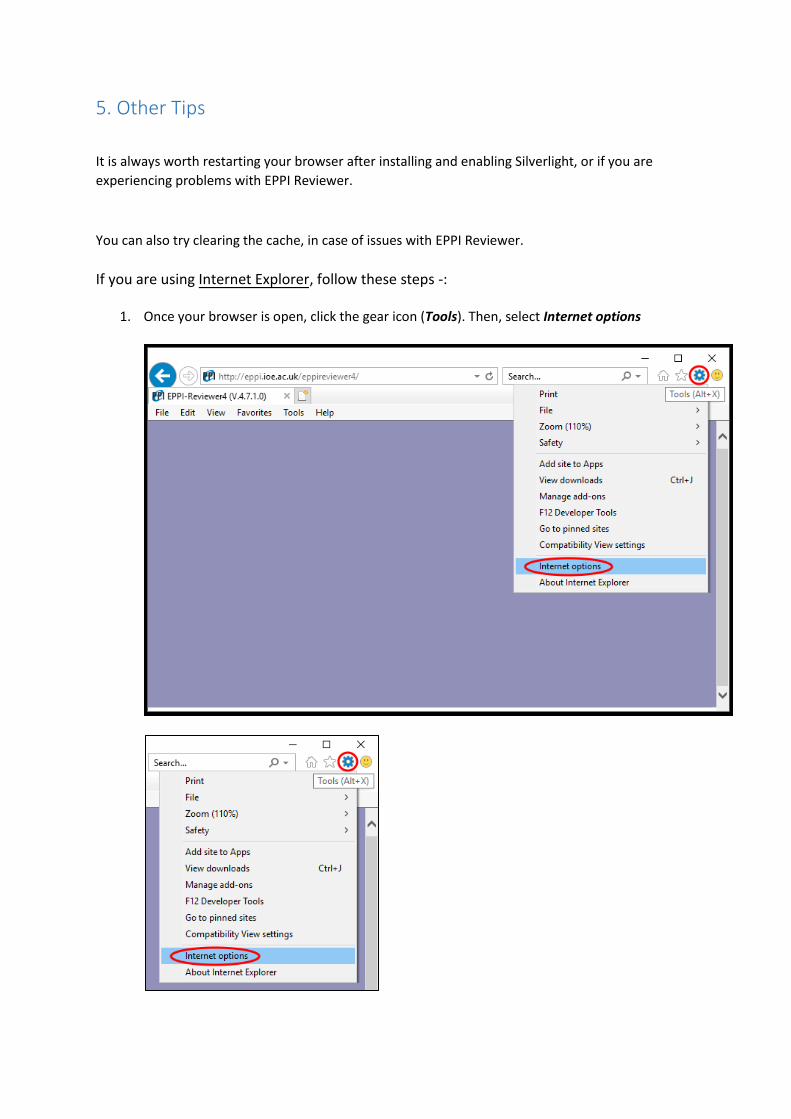
If you are using Internet Explorer, follow these steps -:
1. Once your browser is open, click the gear icon (Tools). Then, select Internet options

(Or select Tools from across the top menu bar, then select Internet options.)

2. Select the General tab, and press the Delete button to clear your temporary internet files
3. Your computer will work for a moment, and then the process will be complete.
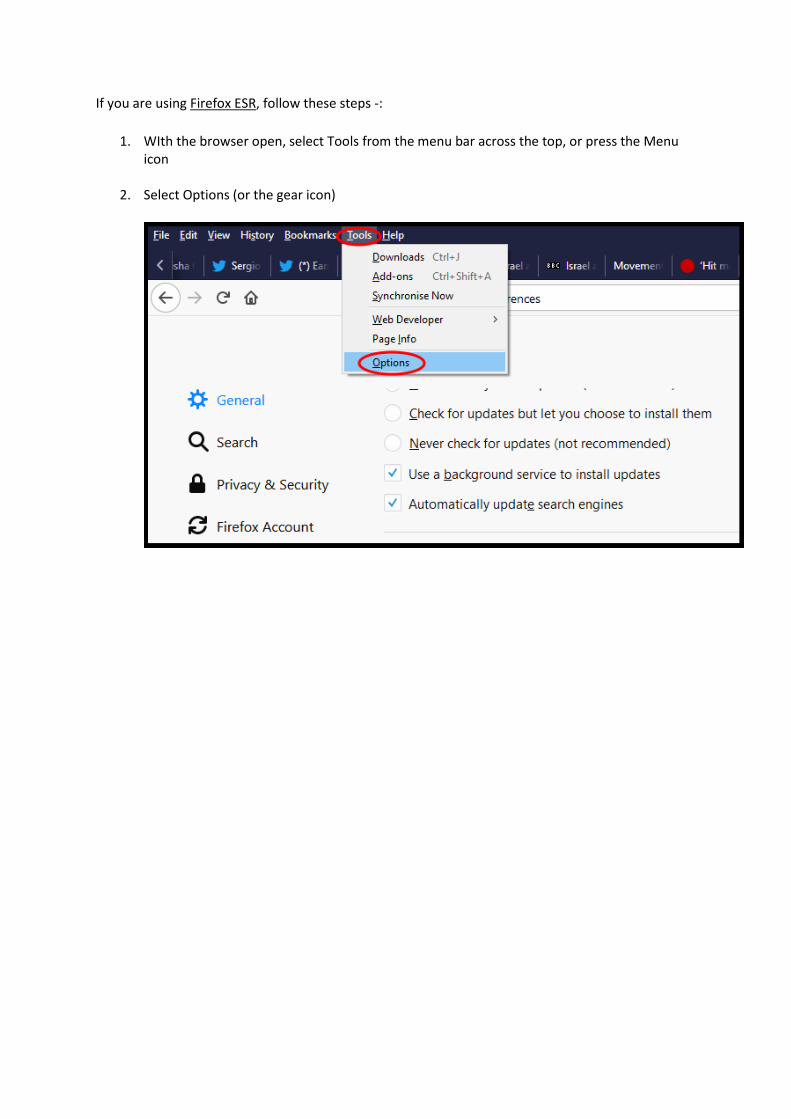
If you are using Firefox ESR, follow these steps -:
1. WIth the browser open, select Tools from the menu bar across the top, or press the Menuicon
2. Select Options (or the gear icon)
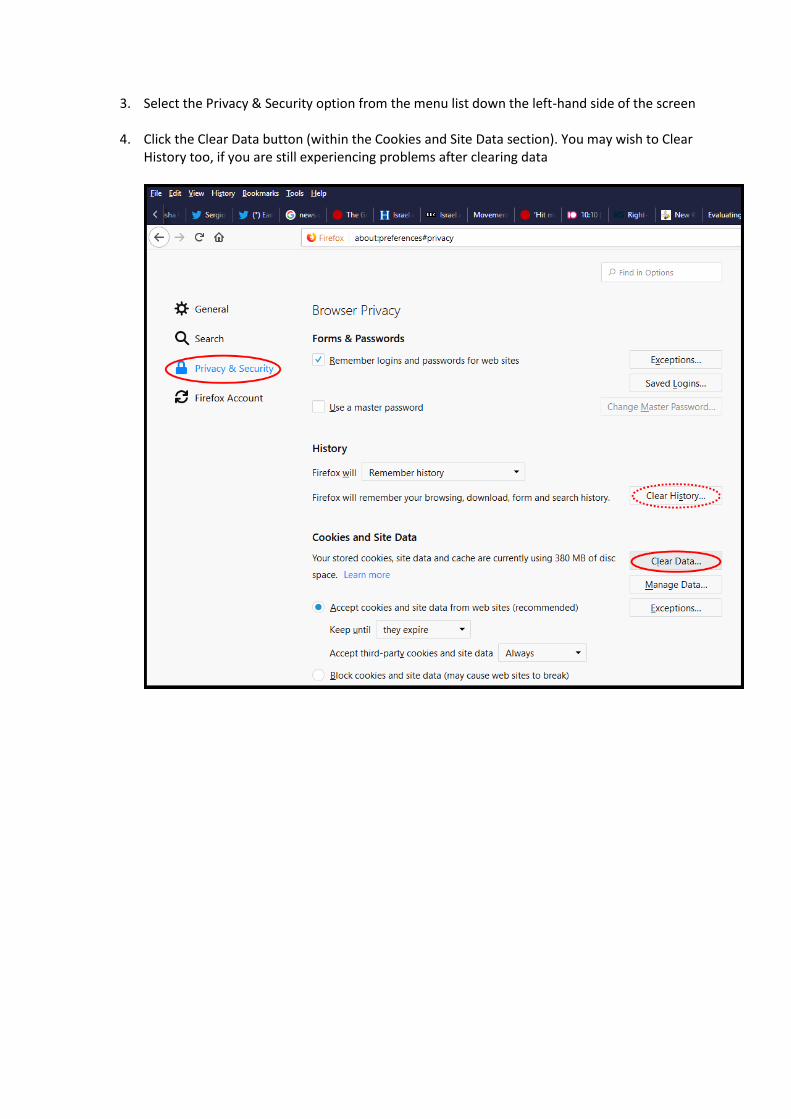
3. Select the Privacy & Security option from the menu list down the left-hand side of the screen
4. Click the Clear Data button (within the Cookies and Site Data section). You may wish to ClearHistory too, if you are still experiencing problems after clearing data

6. Further information
Finally, the old trick of turning it off and then on again has actually been known to work. (It does
clear the memory of your computer, will properly close any applications that have been quit in
unstable ways, etc.)
If you are still having trouble using EPPI Reviewer 4, do please email [email protected]; you
may also find our forum at useful. Finally, we have a full manual available online, together with
instructional videos, here.