Embed Size (px)
Citation preview

EOB5751BA................................................ .............................................EN OVEN USER MANUAL
CONTENTS
1. SAFETY INFORMATION . . . . . . . . . . . . . . . . . . . . . . . . . . . . . . . . . . . . . . . . . . . . . . . . . . . 3
2. SAFETY INSTRUCTIONS . . . . . . . . . . . . . . . . . . . . . . . . . . . . . . . . . . . . . . . . . . . . . . . . . . 4
3. PRODUCT DESCRIPTION . . . . . . . . . . . . . . . . . . . . . . . . . . . . . . . . . . . . . . . . . . . . . . . . . 6
4. BEFORE FIRST USE . . . . . . . . . . . . . . . . . . . . . . . . . . . . . . . . . . . . . . . . . . . . . . . . . . . . . . 7
5. CONTROL PANEL . . . . . . . . . . . . . . . . . . . . . . . . . . . . . . . . . . . . . . . . . . . . . . . . . . . . . . . 8
6. DAILY USE . . . . . . . . . . . . . . . . . . . . . . . . . . . . . . . . . . . . . . . . . . . . . . . . . . . . . . . . . . . . . 9
7. CLOCK FUNCTIONS . . . . . . . . . . . . . . . . . . . . . . . . . . . . . . . . . . . . . . . . . . . . . . . . . . . . 11
8. AUTOMATIC PROGRAMMES . . . . . . . . . . . . . . . . . . . . . . . . . . . . . . . . . . . . . . . . . . . . . . 13
9. USING THE ACCESSORIES . . . . . . . . . . . . . . . . . . . . . . . . . . . . . . . . . . . . . . . . . . . . . . . 14
10. ADDITIONAL FUNCTIONS . . . . . . . . . . . . . . . . . . . . . . . . . . . . . . . . . . . . . . . . . . . . . . . . 16
11. CARE AND CLEANING . . . . . . . . . . . . . . . . . . . . . . . . . . . . . . . . . . . . . . . . . . . . . . . . . . . 18
12. WHAT TO DO IF… . . . . . . . . . . . . . . . . . . . . . . . . . . . . . . . . . . . . . . . . . . . . . . . . . . . . . . 21
WE’RE THINKING OF YOUThank you for purchasing an Electrolux appliance. You’ve chosen a product that brings with itdecades of professional experience and innovation. Ingenious and stylish, it has been designedwith you in mind. So whenever you use it, you can be safe in the knowledge that you’ll get greatresults every time.
Welcome to Electrolux.
Visit our website for:
Get usage advice, brochures, trouble shooter, service information:www.electrolux.com
Register your product for better service:www.electrolux.com/productregistration
Buy Accessories, Consumables and Original spare parts for your appliance:www.electrolux.com/shop
CUSTOMER CARE AND SERVICEWe recommend the use of original spare parts.When contacting Service, ensure that you have the following data available.The information can be found on the rating plate. Model, PNC, Serial Number.
Warning / Caution-Safety information
General information and tips
Environmental information
Subject to change without notice.
2 www.electrolux.com

1. SAFETY INFORMATION
Before the installation and use of the appliance, carefullyread the supplied instructions. The manufacturer is notresponsible if an incorrect installation and use causes in-juries and damages. Always keep the instructions withthe appliance for future reference.
1.1 Children and vulnerable people safety
WARNING!Risk of suffocation, injury or permanent disability.
• This appliance can be used by children aged from 8years and above and persons with reduced physical,sensory or mental capabilities or lack of experience andknowledge if they are supervised by an adult or a per-son who is responsible for their safety.
• Do not let children play with the appliance.
• Keep all packaging away from children.
• Keep children and pets away from the appliance whenit operates or when it cools down. Accessible parts arehot.
• If the appliance has a child safety device, we recom-mend that you activate it.
• Cleaning and user maintenance shall not be made bychildren without supervision.
1.2 General Safety
• Internally the appliance becomes hot when in opera-tion. Do not touch the heating elements that are in theappliance. Always use oven gloves to remove or put inaccessories or ovenware.
• Do not use a steam cleaner to clean the appliance.
• Before maintenance cut the power supply.
ENGLISH 3
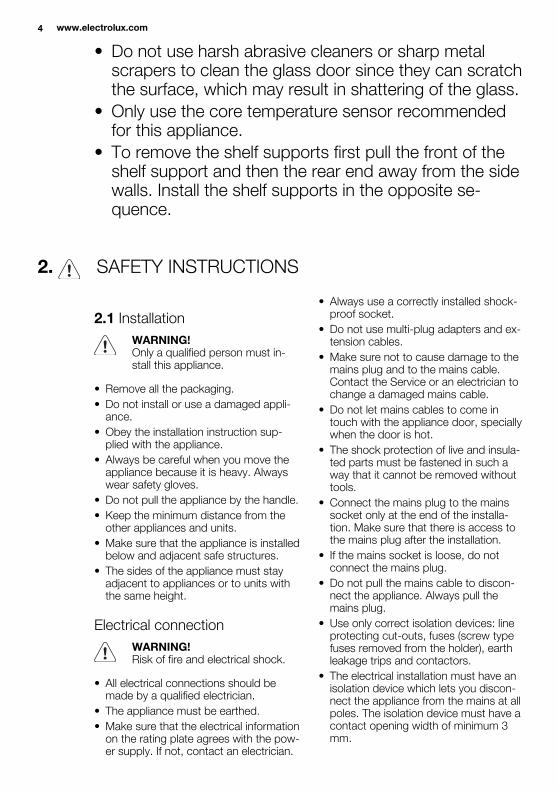
• Do not use harsh abrasive cleaners or sharp metalscrapers to clean the glass door since they can scratchthe surface, which may result in shattering of the glass.
• Only use the core temperature sensor recommendedfor this appliance.
• To remove the shelf supports first pull the front of theshelf support and then the rear end away from the sidewalls. Install the shelf supports in the opposite se-quence.
2. SAFETY INSTRUCTIONS
2.1 Installation
WARNING!Only a qualified person must in-stall this appliance.
• Remove all the packaging.
• Do not install or use a damaged appli-ance.
• Obey the installation instruction sup-plied with the appliance.
• Always be careful when you move theappliance because it is heavy. Alwayswear safety gloves.
• Do not pull the appliance by the handle.
• Keep the minimum distance from theother appliances and units.
• Make sure that the appliance is installedbelow and adjacent safe structures.
• The sides of the appliance must stayadjacent to appliances or to units withthe same height.
Electrical connection
WARNING!Risk of fire and electrical shock.
• All electrical connections should bemade by a qualified electrician.
• The appliance must be earthed.
• Make sure that the electrical informationon the rating plate agrees with the pow-er supply. If not, contact an electrician.
• Always use a correctly installed shock-proof socket.
• Do not use multi-plug adapters and ex-tension cables.
• Make sure not to cause damage to themains plug and to the mains cable.Contact the Service or an electrician tochange a damaged mains cable.
• Do not let mains cables to come intouch with the appliance door, speciallywhen the door is hot.
• The shock protection of live and insula-ted parts must be fastened in such away that it cannot be removed withouttools.
• Connect the mains plug to the mainssocket only at the end of the installa-tion. Make sure that there is access tothe mains plug after the installation.
• If the mains socket is loose, do notconnect the mains plug.
• Do not pull the mains cable to discon-nect the appliance. Always pull themains plug.
• Use only correct isolation devices: lineprotecting cut-outs, fuses (screw typefuses removed from the holder), earthleakage trips and contactors.
• The electrical installation must have anisolation device which lets you discon-nect the appliance from the mains at allpoles. The isolation device must have acontact opening width of minimum 3mm.
4 www.electrolux.com
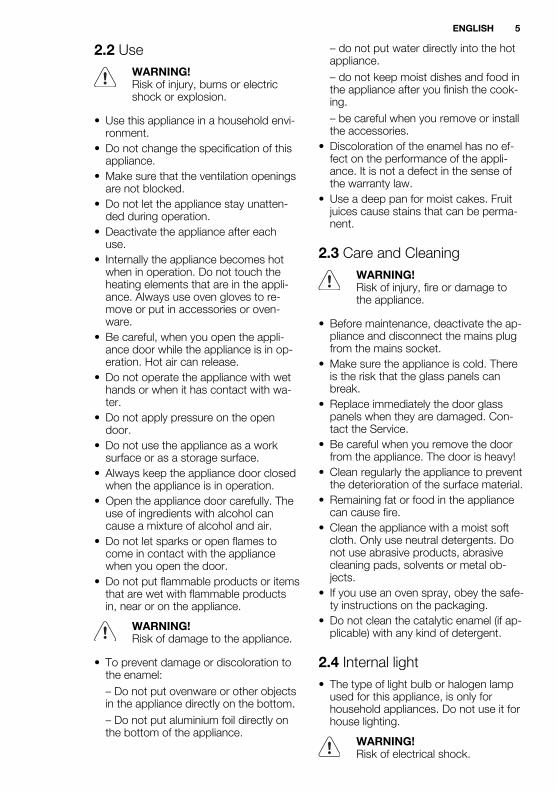
2.2 Use
WARNING!Risk of injury, burns or electricshock or explosion.
• Use this appliance in a household envi-ronment.
• Do not change the specification of thisappliance.
• Make sure that the ventilation openingsare not blocked.
• Do not let the appliance stay unatten-ded during operation.
• Deactivate the appliance after eachuse.
• Internally the appliance becomes hotwhen in operation. Do not touch theheating elements that are in the appli-ance. Always use oven gloves to re-move or put in accessories or oven-ware.
• Be careful, when you open the appli-ance door while the appliance is in op-eration. Hot air can release.
• Do not operate the appliance with wethands or when it has contact with wa-ter.
• Do not apply pressure on the opendoor.
• Do not use the appliance as a worksurface or as a storage surface.
• Always keep the appliance door closedwhen the appliance is in operation.
• Open the appliance door carefully. Theuse of ingredients with alcohol cancause a mixture of alcohol and air.
• Do not let sparks or open flames tocome in contact with the appliancewhen you open the door.
• Do not put flammable products or itemsthat are wet with flammable productsin, near or on the appliance.
WARNING!Risk of damage to the appliance.
• To prevent damage or discoloration tothe enamel:
– Do not put ovenware or other objectsin the appliance directly on the bottom.
– Do not put aluminium foil directly onthe bottom of the appliance.
– do not put water directly into the hotappliance.
– do not keep moist dishes and food inthe appliance after you finish the cook-ing.
– be careful when you remove or installthe accessories.
• Discoloration of the enamel has no ef-fect on the performance of the appli-ance. It is not a defect in the sense ofthe warranty law.
• Use a deep pan for moist cakes. Fruitjuices cause stains that can be perma-nent.
2.3 Care and Cleaning
WARNING!Risk of injury, fire or damage tothe appliance.
• Before maintenance, deactivate the ap-pliance and disconnect the mains plugfrom the mains socket.
• Make sure the appliance is cold. Thereis the risk that the glass panels canbreak.
• Replace immediately the door glasspanels when they are damaged. Con-tact the Service.
• Be careful when you remove the doorfrom the appliance. The door is heavy!
• Clean regularly the appliance to preventthe deterioration of the surface material.
• Remaining fat or food in the appliancecan cause fire.
• Clean the appliance with a moist softcloth. Only use neutral detergents. Donot use abrasive products, abrasivecleaning pads, solvents or metal ob-jects.
• If you use an oven spray, obey the safe-ty instructions on the packaging.
• Do not clean the catalytic enamel (if ap-plicable) with any kind of detergent.
2.4 Internal light
• The type of light bulb or halogen lampused for this appliance, is only forhousehold appliances. Do not use it forhouse lighting.
WARNING!Risk of electrical shock.
ENGLISH 5

• Before replacing the lamp, disconnectthe appliance from the power supply.
• Only use lamps with the same specifi-cations.
2.5 Disposal
WARNING!Risk of injury or suffocation.
• Disconnect the appliance from themains supply.
• Cut off the mains cable and discard it.
• Remove the door catch to prevent chil-dren and pets to get closed in the ap-pliance.
3. PRODUCT DESCRIPTION
21
10
43
5
6
78
9
5
4
321
1 Control panel
2 Electronic programmer
3 Socket for the core temperature sen-sor
4 Heating element
5 Lamp
6 Fan
7 Rear wall heating element
8 Bottom heat
9 Shelf support, removable
10 Shelf positions
3.1 Accessories
Wire shelfFor cookware, cake tins, roasts.
Baking trayFor cakes and biscuits.
6 www.electrolux.com

Grill- / Roasting panTo bake and roast or as a pan to collectfat.
Core temperature sensorTo measure how far the food is cooked.
Telescopic runnersFor shelves and trays.
4. BEFORE FIRST USE
WARNING!Refer to the Safety chapters.
4.1 Initial Cleaning
• Remove all parts from the appliance.
• Clean the appliance before first use.
Refer to chapter "Care and Clean-ing".
4.2 Setting and changing thetime
After the first connection to the mains, allsymbols in the display are on for someseconds. For the subsequent few sec-onds the display shows the software ver-sion.
After the software version goes off, thedisplay shows h and 12:00.
Setting the time of day:
1. Touch or to set the hours.
2. Touch .
3. Touch or to set the minutes.
4. Touch or .The Temperature / Time display showsthe new time.
Changing the time of day
You can change the time of day only
when the appliance is off. Touch . flashes in the display. To set the new timeof day, use the above procedure.
ENGLISH 7
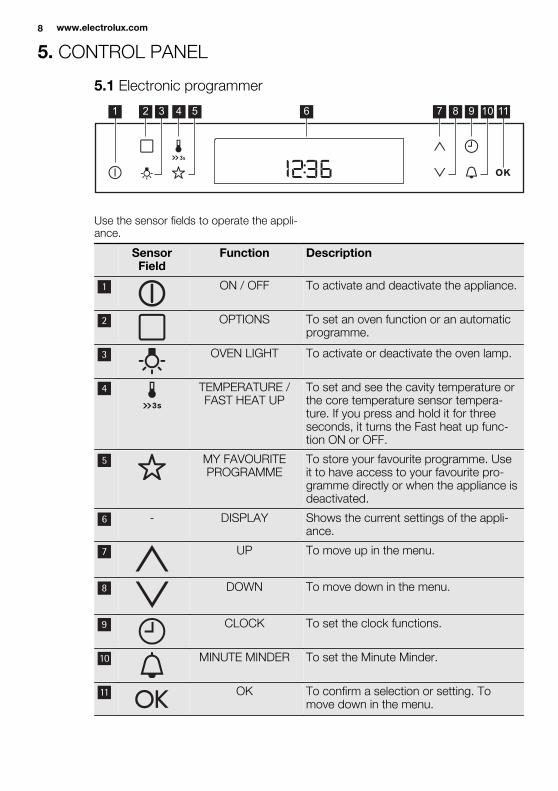
5. CONTROL PANEL
5.1 Electronic programmer
1 112 3 4 65 7 8 9 10
Use the sensor fields to operate the appli-ance.
SensorField
Function Description
1 ON / OFF To activate and deactivate the appliance.
2 OPTIONS To set an oven function or an automaticprogramme.
3 OVEN LIGHT To activate or deactivate the oven lamp.
4 TEMPERATURE /FAST HEAT UP
To set and see the cavity temperature orthe core temperature sensor tempera-ture. If you press and hold it for threeseconds, it turns the Fast heat up func-tion ON or OFF.
5 MY FAVOURITEPROGRAMME
To store your favourite programme. Useit to have access to your favourite pro-gramme directly or when the appliance isdeactivated.
6 - DISPLAY Shows the current settings of the appli-ance.
7 UP To move up in the menu.
8 DOWN To move down in the menu.
9 CLOCK To set the clock functions.
10 MINUTE MINDER To set the Minute Minder.
11 OK To confirm a selection or setting. Tomove down in the menu.
8 www.electrolux.com

5.2 Display
A B C
DE
A) Oven function symbol
B) Number of the oven function / pro-gramme
C) Indicators for the clock functions (referto the table "Clock functions")
D) Clock / residual heat display (also Mi-nute Minder and Time of Day)
E) Temperature / time display
5.3 Other indicators in the display
Symbols Name Description
Automatic pro-gramme
You can choose an automatic programme.
My favourite pro-gramme
The favourite programme operates.
/ kg / gr An automatic programme with weight inputoperates.
/ h / min A clock function operates.
Odour filter The odour filter operates (selected modelsonly).
Heat-up / residualheat indicator
Shows the temperature level in the appli-ance.
Temperature / fastheat up
The function operates.
Temperature You can examine or change the tempera-ture.
Core temperaturesensor
The core temperature sensor is in the coretemperature sensor socket.
Minute minder The minute minder function operates.
5.4 Heat up indicator
If you activate an oven function, the bars
come on in the display. The bars
show that the temperature in the appli-ance increases or decreases.When the appliance is at the set tempera-ture, the bars go off the display.
6. DAILY USE
WARNING!Refer to the Safety chapters.
To operate the appliance you can use:
• The manual mode - to set a heatingfunction, the temperature and the cook-ing time manually.
• automatic programmes - to preparea dish when you do not have knowl-edge or experience in cooking.
ENGLISH 9
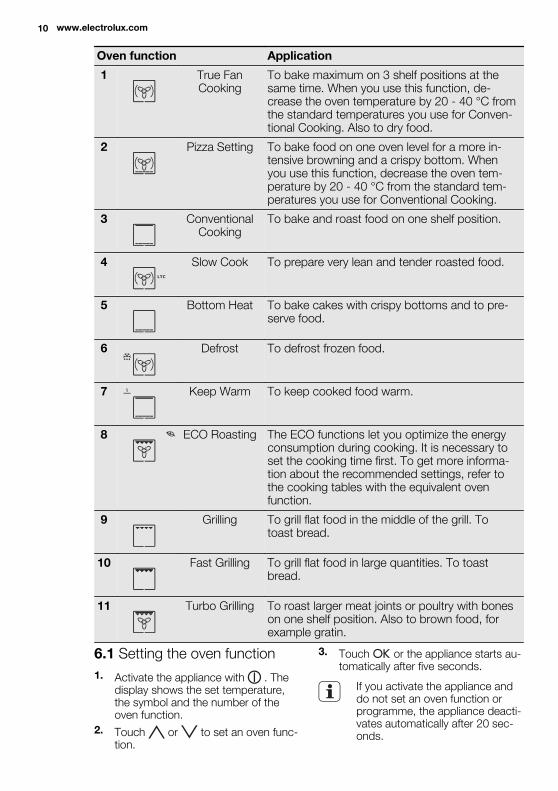
Oven function Application
1 True FanCooking
To bake maximum on 3 shelf positions at thesame time. When you use this function, de-crease the oven temperature by 20 - 40 °C fromthe standard temperatures you use for Conven-tional Cooking. Also to dry food.
2 Pizza Setting To bake food on one oven level for a more in-tensive browning and a crispy bottom. Whenyou use this function, decrease the oven tem-perature by 20 - 40 °C from the standard tem-peratures you use for Conventional Cooking.
3 ConventionalCooking
To bake and roast food on one shelf position.
4 Slow Cook To prepare very lean and tender roasted food.
5 Bottom Heat To bake cakes with crispy bottoms and to pre-serve food.
6 Defrost To defrost frozen food.
7 Keep Warm To keep cooked food warm.
8 ECO Roasting The ECO functions let you optimize the energyconsumption during cooking. It is necessary toset the cooking time first. To get more informa-tion about the recommended settings, refer tothe cooking tables with the equivalent ovenfunction.
9 Grilling To grill flat food in the middle of the grill. Totoast bread.
10 Fast Grilling To grill flat food in large quantities. To toastbread.
11 Turbo Grilling To roast larger meat joints or poultry with boneson one shelf position. Also to brown food, forexample gratin.
6.1 Setting the oven function
1. Activate the appliance with . Thedisplay shows the set temperature,the symbol and the number of theoven function.
2. Touch or to set an oven func-tion.
3. Touch or the appliance starts au-tomatically after five seconds.
If you activate the appliance anddo not set an oven function orprogramme, the appliance deacti-vates automatically after 20 sec-onds.
10 www.electrolux.com

6.2 Changing the temperature
Touch / to change the tempera-ture in steps of 5 °C.When the appliance is at the set tempera-ture, an acoustic signal sounds threetimes and the Heat up indicator goes out.
6.3 Checking the temperature
You can see the temperature in the appli-ance when the function or programmeoperates.
1. Touch . The Temperature / Timedisplay shows the temperature in theappliance. If you want to change the
oven temperature, touch one more
time and use or .
2. Touch to go back to the set tem-perature or the display shows it auto-matically after five seconds.
6.4 Fast heat up function
The Fast heat up function decreases theheat up time.Activating the Fast heat up function:
Touch and hold for more than threeseconds.If you activate the Fast heat up function,horizontal bars on the display flash toshow that the function operates.Additional information:
• Do not put food in the oven when theFast heat up function operates.
• The Fast heat up is not available withevery oven function. An acoustic signalsounds if the Fast heat up is not availa-ble for the set function.
6.5 Energy saving
The appliance contains fea-tures which help you save en-ergy during everyday cooking:
• Residual heat:
– When the heating function orprogramme operates, theheating elements are deacti-vated 10% earlier (the lampand fan continue to operate).For this feature to operate,the cooking time must belonger than 30 minutes oryou must use the clock func-tions (Duration, End, Timedelay). This feature does notoperate with the grill func-tions.
– When the appliance is off,you can use the heat to keepfood warm. The clock / resid-ual heat display shows the re-maining temperature, and thebars show the temperatureas it decreases.
• Cooking with the lamp off -
Touch to deactivate thelamp during cooking.
• Deactivating the display - Ifnecessary, you can fully deacti-
vate the appliance. Touch
and at the same time untilthe display goes out. This stepalso activates the appliance.
• Eco functions - refer to "Ovenfunctions".
7. CLOCK FUNCTIONS
SYMBOL FUNCTION DESCRIPTION
TIME OF DAY To examine the time of day. For changing thetime of day refer to 'Setting and changing the
time'.
DURATION To set how long the appliance operates.
ENGLISH 11
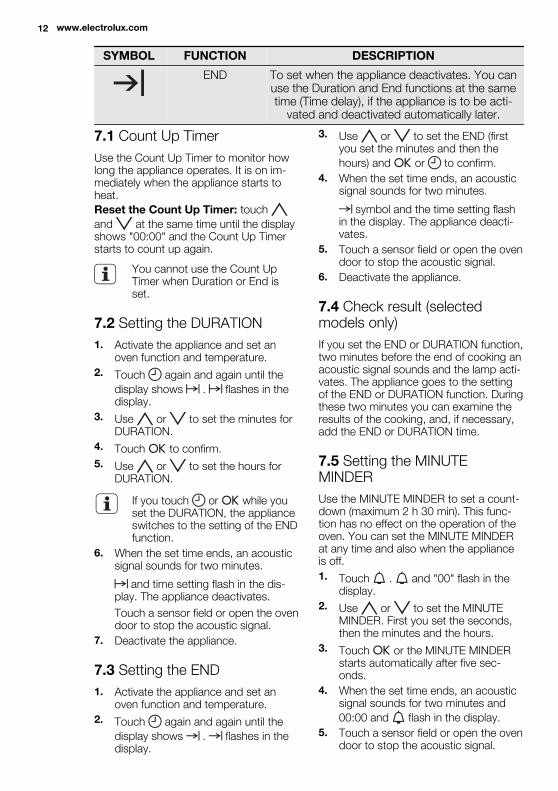
SYMBOL FUNCTION DESCRIPTION
END To set when the appliance deactivates. You canuse the Duration and End functions at the sametime (Time delay), if the appliance is to be acti-
vated and deactivated automatically later.
7.1 Count Up Timer
Use the Count Up Timer to monitor howlong the appliance operates. It is on im-mediately when the appliance starts toheat.
Reset the Count Up Timer: touch
and at the same time until the displayshows "00:00" and the Count Up Timerstarts to count up again.
You cannot use the Count UpTimer when Duration or End isset.
7.2 Setting the DURATION
1. Activate the appliance and set anoven function and temperature.
2. Touch again and again until the
display shows . flashes in thedisplay.
3. Use or to set the minutes forDURATION.
4. Touch to confirm.
5. Use or to set the hours forDURATION.
If you touch or while youset the DURATION, the applianceswitches to the setting of the ENDfunction.
6. When the set time ends, an acousticsignal sounds for two minutes.
and time setting flash in the dis-play. The appliance deactivates.
Touch a sensor field or open the ovendoor to stop the acoustic signal.
7. Deactivate the appliance.
7.3 Setting the END
1. Activate the appliance and set anoven function and temperature.
2. Touch again and again until the
display shows . flashes in thedisplay.
3. Use or to set the END (firstyou set the minutes and then the
hours) and or to confirm.
4. When the set time ends, an acousticsignal sounds for two minutes.
symbol and the time setting flashin the display. The appliance deacti-vates.
5. Touch a sensor field or open the ovendoor to stop the acoustic signal.
6. Deactivate the appliance.
7.4 Check result (selectedmodels only)
If you set the END or DURATION function,two minutes before the end of cooking anacoustic signal sounds and the lamp acti-vates. The appliance goes to the settingof the END or DURATION function. Duringthese two minutes you can examine theresults of the cooking, and, if necessary,add the END or DURATION time.
7.5 Setting the MINUTEMINDER
Use the MINUTE MINDER to set a count-down (maximum 2 h 30 min). This func-tion has no effect on the operation of theoven. You can set the MINUTE MINDERat any time and also when the applianceis off.
1. Touch . and "00" flash in thedisplay.
2. Use or to set the MINUTEMINDER. First you set the seconds,then the minutes and the hours.
3. Touch or the MINUTE MINDERstarts automatically after five sec-onds.
4. When the set time ends, an acousticsignal sounds for two minutes and
00:00 and flash in the display.
5. Touch a sensor field or open the ovendoor to stop the acoustic signal.
12 www.electrolux.com
7.6 Setting the Time delayfunction
The DURATION and END functionscan be used at the same time, if the ovenis to be activated and deactivated auto-matically later. In this case, first set the
DURATION and then the END
function (refer to "Setting the DURATION"and "Setting the END ").When the Time delay function is activated,the display shows a static symbol of the
oven function, with a dot and . Thedot shows which clock function is on inthe Clock / residual heat display.
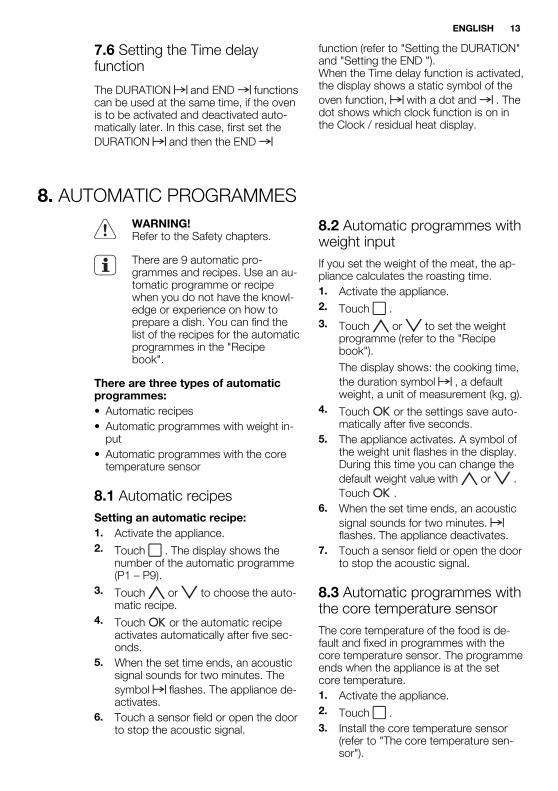
8. AUTOMATIC PROGRAMMES
WARNING!Refer to the Safety chapters.
There are 9 automatic pro-grammes and recipes. Use an au-tomatic programme or recipewhen you do not have the knowl-edge or experience on how toprepare a dish. You can find thelist of the recipes for the automaticprogrammes in the "Recipebook".
There are three types of automaticprogrammes:
• Automatic recipes
• Automatic programmes with weight in-put
• Automatic programmes with the coretemperature sensor
8.1 Automatic recipes
Setting an automatic recipe:
1. Activate the appliance.
2. Touch . The display shows thenumber of the automatic programme(P1 – P9).
3. Touch or to choose the auto-matic recipe.
4. Touch or the automatic recipeactivates automatically after five sec-onds.
5. When the set time ends, an acousticsignal sounds for two minutes. The
symbol flashes. The appliance de-activates.
6. Touch a sensor field or open the doorto stop the acoustic signal.
8.2 Automatic programmes withweight input
If you set the weight of the meat, the ap-pliance calculates the roasting time.
1. Activate the appliance.
2. Touch .
3. Touch or to set the weightprogramme (refer to the "Recipebook").
The display shows: the cooking time,
the duration symbol , a defaultweight, a unit of measurement (kg, g).
4. Touch or the settings save auto-matically after five seconds.
5. The appliance activates. A symbol ofthe weight unit flashes in the display.During this time you can change the
default weight value with or .
Touch .
6. When the set time ends, an acoustic
signal sounds for two minutes. flashes. The appliance deactivates.
7. Touch a sensor field or open the doorto stop the acoustic signal.
8.3 Automatic programmes withthe core temperature sensor
The core temperature of the food is de-fault and fixed in programmes with thecore temperature sensor. The programmeends when the appliance is at the setcore temperature.
1. Activate the appliance.
2. Touch .
3. Install the core temperature sensor(refer to "The core temperature sen-sor").
ENGLISH 13

4. Touch or to set the pro-gramme for the core temperaturesensor.
The display shows the cooking time,
and .
5. Touch or the settings save auto-matically after five seconds.
6. When the set time ends, an acoustic
signal sounds for two minutes. flashes. The appliance deactivates.
7. Touch a sensor field or open the doorto stop the acoustic signal.
9. USING THE ACCESSORIES
WARNING!Refer to the Safety chapters.
9.1 Core temperature sensor
The core temperature sensor measuresthe core temperature of the meat. Whenthe meat is at the set temperature, theappliance deactivates.
There are two temperatures to set:
• The oven temperature: refer to the tablefor roasting in the recipe book.
• The core temperature: refer to the tablefor the core temperature sensor in therecipe book.
Only use the core temperaturesensor supplied or the correct re-placement parts.
1. Activate the appliance.
2. Put the tip of the core temperature
sensor (with on the handle) intothe centre of the meat.
3. Put the plug of the core temperaturesensor into the socket at the front of
the appliance. The display shows and the default set core temperature.The temperature is 60 °C for the firstoperation, and the last set value foreach subsequent operation.
4. Touch or to set the core tem-perature.
5. Touch or the settings save auto-matically after 5 seconds.
Useful information:
You can set the core temperature on-
ly when flashes. If is in thedisplay but does not flash before you
set the core temperature, touch
and or to set a new value.
6. Set the oven function and, if necessa-ry, the oven temperature.
The display shows the current coretemperature and the temperature bar,which shows the relation between theset oven temperature and the currentoven temperature.
Useful information:
The core temperature sensor muststay in the meat and in the socketduring the cooking.
While the appliance calculates the ap-proximate duration time, the value ofthe Count Up Timer function shows inthe Timer / residual heat display.When the first calculation ends, theTimer / residual heat display shows -and then the approximate duration ofthe cooking. The appliance continuesto calculate the duration during thecooking. The display updates at inter-vals with the new duration value.
7. When the meat is at the set core tem-perature, the core temperature and
flash. An acoustic signal sounds
14 www.electrolux.com
for two minutes. Touch a sensor fieldto deactivate the acoustic signal.
8. Remove the core temperature sensorfrom the socket and remove the meatfrom the appliance.
WARNING!Be careful when you remove thecore temperature sensor. It is hot.There is a risk of burns.
9. Deactivate the appliance.
When you put the core tempera-ture sensor into the socket, youcancel the settings for the clockfunctions.
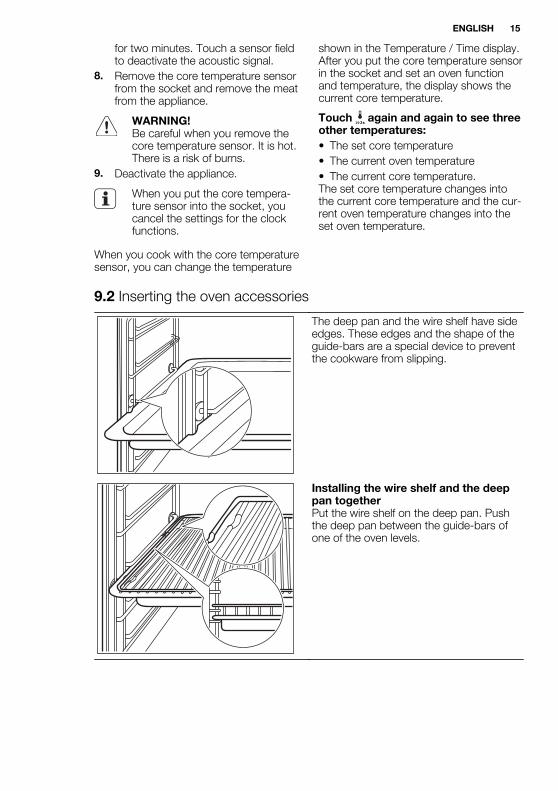
When you cook with the core temperaturesensor, you can change the temperature
shown in the Temperature / Time display.After you put the core temperature sensorin the socket and set an oven functionand temperature, the display shows thecurrent core temperature.
Touch again and again to see threeother temperatures:
• The set core temperature
• The current oven temperature
• The current core temperature.The set core temperature changes intothe current core temperature and the cur-rent oven temperature changes into theset oven temperature.
9.2 Inserting the oven accessories
The deep pan and the wire shelf have sideedges. These edges and the shape of theguide-bars are a special device to preventthe cookware from slipping.
Installing the wire shelf and the deeppan togetherPut the wire shelf on the deep pan. Pushthe deep pan between the guide-bars ofone of the oven levels.
ENGLISH 15
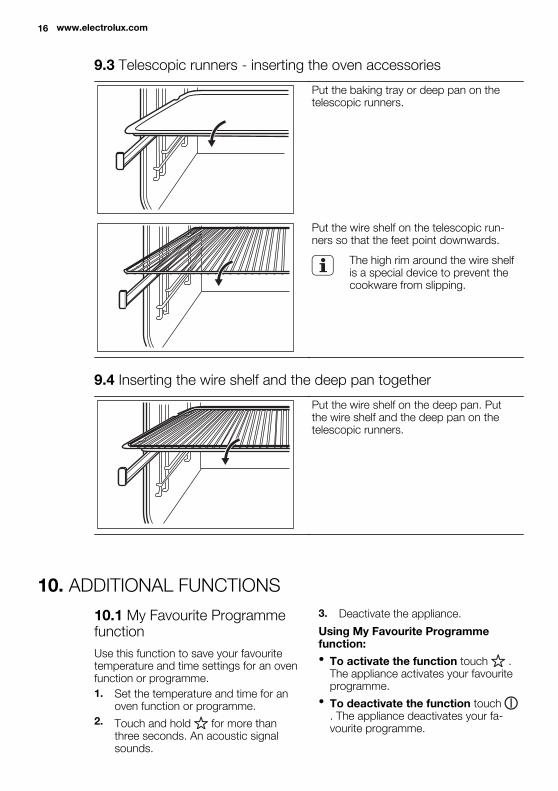
9.3 Telescopic runners - inserting the oven accessories
Put the baking tray or deep pan on thetelescopic runners.
Put the wire shelf on the telescopic run-ners so that the feet point downwards.
The high rim around the wire shelfis a special device to prevent thecookware from slipping.
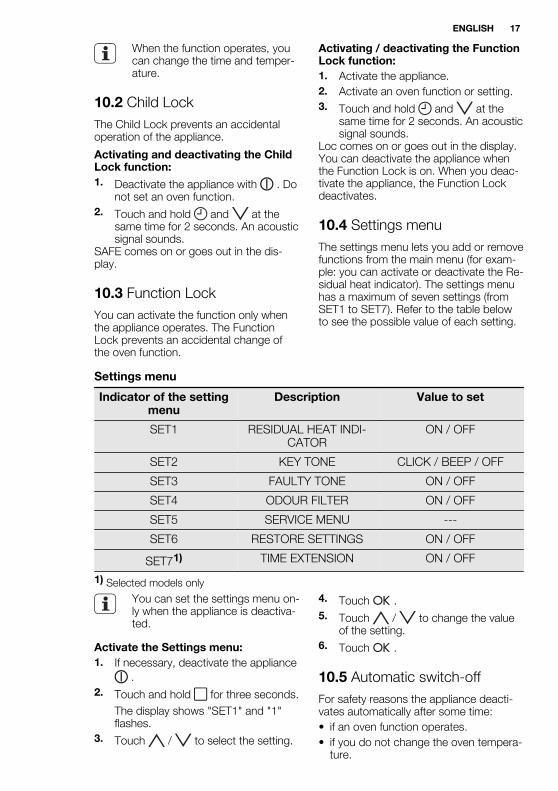
9.4 Inserting the wire shelf and the deep pan together
Put the wire shelf on the deep pan. Putthe wire shelf and the deep pan on thetelescopic runners.
10. ADDITIONAL FUNCTIONS
10.1 My Favourite Programmefunction
Use this function to save your favouritetemperature and time settings for an ovenfunction or programme.
1. Set the temperature and time for anoven function or programme.
2. Touch and hold for more thanthree seconds. An acoustic signalsounds.
3. Deactivate the appliance.
Using My Favourite Programmefunction:
• To activate the function touch .The appliance activates your favouriteprogramme.
• To deactivate the function touch . The appliance deactivates your fa-vourite programme.
16 www.electrolux.com
When the function operates, youcan change the time and temper-ature.
10.2 Child Lock
The Child Lock prevents an accidentaloperation of the appliance.
Activating and deactivating the ChildLock function:
1. Deactivate the appliance with . Donot set an oven function.
2. Touch and hold and at thesame time for 2 seconds. An acousticsignal sounds.
SAFE comes on or goes out in the dis-play.
10.3 Function Lock
You can activate the function only whenthe appliance operates. The FunctionLock prevents an accidental change ofthe oven function.
Activating / deactivating the FunctionLock function:
1. Activate the appliance.
2. Activate an oven function or setting.
3. Touch and hold and at thesame time for 2 seconds. An acousticsignal sounds.
Loc comes on or goes out in the display.You can deactivate the appliance whenthe Function Lock is on. When you deac-tivate the appliance, the Function Lockdeactivates.
10.4 Settings menu
The settings menu lets you add or removefunctions from the main menu (for exam-ple: you can activate or deactivate the Re-sidual heat indicator). The settings menuhas a maximum of seven settings (fromSET1 to SET7). Refer to the table belowto see the possible value of each setting.
Settings menu
Indicator of the settingmenu
Description Value to set
SET1 RESIDUAL HEAT INDI-CATOR
ON / OFF
SET2 KEY TONE CLICK / BEEP / OFF
SET3 FAULTY TONE ON / OFF
SET4 ODOUR FILTER ON / OFF
SET5 SERVICE MENU ---
SET6 RESTORE SETTINGS ON / OFF
SET71) TIME EXTENSION ON / OFF
1) Selected models only
You can set the settings menu on-ly when the appliance is deactiva-ted.
Activate the Settings menu:
1. If necessary, deactivate the appliance
.
2. Touch and hold for three seconds.
The display shows "SET1" and "1"flashes.
3. Touch / to select the setting.
4. Touch .
5. Touch / to change the valueof the setting.
6. Touch .
10.5 Automatic switch-off
For safety reasons the appliance deacti-vates automatically after some time:
• if an oven function operates.
• if you do not change the oven tempera-ture.
ENGLISH 17

Temperature Switch-off time
30 °C - 120 °C 12.5 h
120 °C - 200 °C 8.5 h
200 °C - 250 °C 5.5 h
250 °C - maximum °C 3.0 h
After the Automatic switch-off, touch asensor field to operate the applianceagain.
The Automatic switch-off workswith all oven functions, apart fromSlow Cook, Core temperaturesensor, Duration, End, Time delay.
10.6 Brightness of the display
There are two modes of displaybrightness:
• Night brightness - when the applianceis deactivated, the brightness of thedisplay is lower between 10 PM and 6AM.
• Day brightness:
– When the appliance is activated.
– If you touch a sensor field during thenight brightness (apart from ON /OFF), the display goes back to theday brightness mode for the next 10seconds.
– If the appliance is deactivated andyou set the Minute Minder. When theMinute Minder function ends, the dis-play goes back to the night bright-ness.
10.7 Cooling fan
When the appliance operates, the coolingfan activates automatically to keep thesurfaces of the appliance cool. If you de-activate the appliance, the cooling fan cancontinue to operate until the appliancecools down.
11. CARE AND CLEANING
WARNING!Refer to the Safety chapters.
Notes on cleaning:
• Clean the front of the appliance with asoft cloth with warm water and a clean-ing agent.
• To clean metal surfaces, use a usualcleaning agent.
• Clean the appliance interior after eachuse. Then you can remove dirt moreeasily and it does not burn on.
• Clean stubborn dirt with a special ovencleaner.
• Clean all accessories after each useand let them dry. Use a soft cloth withwarm water and a cleaning agent.
• If you have nonstick accessories, donot clean them using aggressiveagents, sharp-edged objects or a dish-
washer. It can cause damage to thenonstick coating.
11.1 Odour filter
The odour filter is on:
• With all oven functions.
• If the temperature in the appliance ismore than 50 °C.
When the odour filter is on, the display
shows the odour filter symbol .At the end of the oven function, the heat-ed odour filter continues to operate for thenext 10 minutes. The odour filter stopswhen you deactivate the appliance oropen the oven door.For pyrolytic cleaning (if applicable), theodour filter works automatically for thefirst 15 minutes when the oven tempera-ture is lower than 400 °C.
18 www.electrolux.com

11.2 Shelf supports
Removing the shelf supports
You can remove the shelf supports toclean the side walls.
1. Pull the front of the shelf supportaway from the side wall.
1
2
2. Pull the rear end of the shelf supportaway from the side wall and removeit.
Installing the shelf supports
Install the shelf supports in the oppositesequence.
Valid for telescopic runners:The retaining pins on the tele-scopic runners must point to thefront.
11.3 Lamp
WARNING!There is a risk of electrical shock.The lamp and the lamp glass cov-er can be hot.
Before you change the lamp:
• Deactivate the appliance.
• Remove the fuses from the fuse box ordeactivate the circuit breaker.
CAUTION!Put a cloth on the bottom of theinterior of the appliance. It pre-vents damage to the lamp glasscover and the cavity.Always use the same lamp type.
Replacing the lamp at the cavityceiling:
1. Turn the lamp glass cover counter-clockwise to remove it.
2. Remove the metal ring and clean theglass cover.
3. Replace the lamp with a suitable 300°C heat-resistant lamp.
4. Attach the metal ring to the glass cov-er.
5. Install the glass cover.
Replacing the lamp on the left side ofthe cavity:
1. Remove the left shelf support.
2. Use a Torx 20 screwdriver to removethe cover.
3. Remove and clean the metal frameand the seal.
4. Replace the lamp with a suitable 300°C heat-resistant lamp.
5. Install the metal frame and the seal.Tighten the screws.
6. Install the left shelf support.
ENGLISH 19

11.4 Oven ceiling
You can fold down the heating elementon the oven ceiling to clean the oven ceil-ing easily.
WARNING!Deactivate the appliance beforeyou fold down the heating ele-ment. Make sure that the appli-ance is cold. There is a risk ofburns.
Folding down the heating element
1. Remove the shelf supports.
2. Hold the heating element with twohands at the front.
3. Pull it forwards against the springpressure and out along the supportson the two sides.
4. The heating element folds down.
You can clean the oven ceiling.
Installing the heating element
1. Install the heating element in the op-posite sequence.
Install the heating element cor-rectly above the supports on theinner walls of the appliance.
2. Install the shelf supports.
11.5 Cleaning the oven door
Removing the door and the glass panels
You can remove the oven door and theinternal glass panels to clean it. The num-ber of glass panels is different for differentmodels.
WARNING!Be careful when you remove thedoor from the appliance. The dooris heavy.
A
A
1. Open the door fully.
2. Fully press the clamping levers (A) onthe two door hinges.
3. Close the oven door to the first open-ing position (approximately 70° angle).
4. Hold the door with one hand on eachside and pull it away from the appli-ance at an up angle.
5. Put the door with the outer sidedown on a soft cloth on a stable sur-face. This is to prevent scratches.
20 www.electrolux.com

2
B
1
6. Hold the door trim (B) on the topedge of the door at the two sidesand push inwards to release the clipseal.
7. Pull the door trim to the front to re-move it.
8. Hold the door glass panels on theirtop edge one by one and pull themup out of the guide.
9. Clean the glass panel with water andsoap. Dry the glass panel carefully.
Installing the door and the glasspanels
When the cleaning is completed, installthe glass panels and the oven door. Do
the above steps in the opposite se-quence. Install the smaller panel first, thenthe larger.
12. WHAT TO DO IF…
WARNING!Refer to the Safety chapters.
Problem Possible cause Remedy
The appliance does notheat up.
The appliance is deacti-vated.
Activate the appliance.
The appliance does notheat up.
The clock is not set. Set the clock. Refer to“Setting and changing thetime”.
The appliance does notheat up.
The necessary settingsare not set.
Make sure that the set-tings are correct.
The appliance does notheat up.
The automatic cut-out isactivated.
Refer to “Automaticswitch-off”.
The appliance does notheat up.
The fuse is released. Make sure that the fuse isthe cause of the malfunc-tion. If the fuse releasesagain and again, contacta qualified electrician.
The lamp does not oper-ate.
The lamp is defective. Replace the lamp.
ENGLISH 21

Problem Possible cause Remedy
The display shows an er-ror code that is not in thislist.
There is an electrical fault. • Deactivate the appli-ance with the housefuse or the safetyswitch in the fuse boxand activate it again.
• If the display shows theerror code again, con-tact the Service Center.
If you cannot find a solution to the prob-lem yourself, contact your dealer or theservice centre.
The necessary data for the service centreis on the rating plate. The rating plate ison the front frame of the appliance cavity.
We recommend that you write the data here:
Model (MOD.) .........................................
Product number (PNC) .........................................
Serial number (S.N.) .........................................
13. ENVIRONMENT CONCERNS
Recycle the materials with the symbol
. Put the packaging in applicablecontainers to recycle it.Help protect the environment and humanhealth and to recycle waste of electrical
and electronic appliances. Do not dispose
appliances marked with the symbol
with the household waste. Return theproduct to your local recycling facility orcontact your municipal office.
22 www.electrolux.com

ENGLISH 23

www.electrolux.com/shop
89
29
49
18
9-C
-32
20
12