Embed Size (px)
Citation preview
1 (38)
www.envirotainer.com
This manual is valid for:
RAP version 140007R-( )
Doc. No. MO-RAP-3062Version 1.6: Oct. 04, 2011
Envirotainer RAP t2
Container
Operations Manual

Doc. No. MO-RAP-3062
Version 1.6: Oct. 04, 2011 2 (38)
RECORD OF REVISION
RECORD OF REVISION
Ver. No. Issue date Revision
1.6 Oct. 04, 2011 E-mail for support updated, page 4 changed.
Note for re-icing during deep frozen shipments added,
page 9 changed.
Alerts "Fan 1 Warning", "Fan 2 Warning" and "Ambient
Temp Out of Spec" added, page 21 changed.
Doc. No. MO-RAP-3062
Version 1.6: Oct. 04, 2011 3 (38)
TABLE OF CONTENTS
TABLE OF CONTENTS
INTRODUCTION ............................................................................................................... 4
LIMITS, AMBIENT CONDITIONS ...................................................................................... 6
PRECONDITIONING ......................................................................................................... 7
CARGO / DRY ICE LOADING........................................................................................... 9
CONTAINER HANDLING GUIDELINES .......................................................................... 14
CONTROL UNIT OPERATION (Type 3) ........................................................................... 15
CONTROL UNIT OPERATION (Type 4) ........................................................................... 17
ALERTS AND ALARMS ................................................................................................. 21
DRY ICE CALCULATION ................................................................................................ 23
DRY ICE TABLES .......................................................................................................... 27
TECHNICAL SPECIFICATION RAP t2 ............................................................................ 30
TROUBLESHOOTING ..................................................................................................... 32
RAP t2 CONTAINER CHECKLIST .................................................................................. 37

Doc. No. MO-RAP-3062
Version 1.6: Oct. 04, 2011 4 (38)
INTRODUCTION
INTRODUCTION
Scope of Manual
This manual provides information for personnel involved in the handling and transport of Envirotainer
container series RAP t2 and is published by Envirotainer AB without warranty.
If there are questions regarding this manual or the container, send an e-mail to
[email protected], or telephone one of our operations centers:
- Frankfurt Operations Center +49 69 69 76 79 0
- Dallas Operations Center +1 972 831 3800
- Sydney Operations Center +61 2 9599 4522
Safety Instructions
The design minimizes hazards to personnel and equipment during use. No material used in the
construction constitutes a risk to the health of the personnel involved. All structural and
mechanical components are free of sharp edges. Every attempt has been made to anticipate
potential dangers and build in protections to prevent injury to personnel.
Normal precautions should be observed when handling locks, doors and lids. Wherever
necessary, warning stickers or texts will be attached to the container as a warning to users and
ground handler personnel.
Always follow the "IATA Dangerous Goods Regulations" when loading the container. For example,
due to low battery level, malfunction, etc., the container may not maintain the temperature in the
container cargo space. Special consideration should be given to this fact if dangerous goods such
as liquids with a low boiling point are to be transported.
The dry ice used as a refrigerant is considered a Class 9 dangerous cargo with the UN
identification number 1845 and is described as “Carbon Dioxide, Solid”.
Do not allow any exposed skin or body part to make physical contact with dry ice. Given the
extreme cold temperature of dry ice (-78.5°C / -109°F), severe frostbite can occur within seconds.
Personnel handling dry ice must use gloves or other insulating material.
Dry ice sublimates into large amounts of CO2 gas. This colorless, odorless gas is heavier than air and
can accumulate and displace oxygen in low areas. Do not enter areas where CO2 may have
accumulated without ventilating the space.
The Container
The RAP t2 container is a temperature controlled air cargo container used to transport
temperature sensitive cargo in the refrigerated, do not freeze (2-25°C / 36-77°F) and deep frozen
product temperature ranges. In general, the product temperature to be maintained must be less
than the ambient temperature.
The container consists of two primary parts; the cargo space and the dry ice bunker (refer to
Figure 1 on the following page). A temperature sensor located in the cargo space monitors the air
temperature, and when cooling is required, two fans are activated. Air from the cargo space is
drawn around the dry ice bunker where it is cooled before re-entering the cargo space.
Dry ice is contained in a separate bunker, which prevents carbon dioxide gas from entering the
cargo space and allows personnel to add dry ice to the container without disturbing the cargo
area.

Doc. No. MO-RAP-3062
Version 1.6: Oct. 04, 2011 5 (38)
INTRODUCTION
Dry ice bunker (on
the rear side)
Manufacturer's plate
Control unit
Placard holder
(Document pouch)
The cooling system uses dry ice as a refrigerant and D-cell alkaline batteries to power the control unit
and fan. The container uses two fans for air distribution.
The RAP t2 is a fork liftable LD-9 air cargo container designed to hold four US-pallets 1220 x 1016 mm
(48 x 40") or five EURO-pallets 1200 x 800 mm (47,3 x 31,5") of cargo. The RAP can be moved with
a fork lift only when empty, and must be moved with a roller bed system when it is loaded.
Control Unit
The control unit is the user interface for starting the container, setting the temperature, reading the
actual air temperature inside the cargo space and other information. The control unit also has alert
and alarm indicators. The control unit is located outside the container on the left side (Figure 1).
Refer to section "Control unit operation" for details.
Figure 1
Cargo space

Doc. No. MO-RAP-3062
Version 1.6: Oct. 04, 2011 6 (38)
LIMITS, AMBIENT CONDITIONS
LIMITS, AMBIENT CONDITIONS
The RAP t2 container is designed to maintain the temperature of the cargo shipped in a range
from -20°C (-4°F) to +20°C (+68°F) provided the ambient temperature is 5°C (9°F) to 25°C (45°F)
higher than the set temperature. The following conditions must apply for the container to work
properly:
Pre-conditioning of Cargo
The container does not have battery capacity to cool down or heat up a large quantity of cargo.
The container is designed to maintain the temperature of the cargo. It is therefore very important
that the cargo is pre-conditioned correctly.
Maximum Operating Time without Changing Batteries
The maximum operating time for the container without changing the batteries is 72 hours. If the
container is operated outside the specified temperature limits, the fans may operate continously
which reduces the maximum operating time before batteries must be changed. An example of this
case is deep frozen cargo where it is recommended to change the batteries every 24 hours.
Exposure to Extreme Heat; 25°C (45°F) Above the Set Temperature
Avoid exposure to extreme heat or direct sunshine as it increases the dry ice consumption rate.
Exposure to temperatures 25°C (45°F) above the set temperature should be limited. Take into
account exposure to such conditions when calculating the required amount of dry ice.
Exposure to Temperatures Near or Below the Set Temperature
Since the container does not heat, exposure to temperatures near or below the set temperature
must be avoided. The container must be stored in an environment where temperatures are at least
5°C (9°F) higher than the container set temperature (not applicable to deep frozen cargo).
Exposure to temperatures near or below the set temperatures should be limited.

Doc. No. MO-RAP-3062
Version 1.6: Oct. 04, 2011 7 (38)
PRECONDITIONING
PRECONDITIONING
The cargo and container must be pre-conditioned to the set temperature prior to loading. Improper
precondition will affect the container's ability to maintain cargo temperature.
Cargo Preconditioning
The cargo must be pre-conditioned to the temperature that is to be maintained during transport.
Important!
If pre-conditioning is not carried out correctly, the risk for temperature deviations during shipment
is high.
Cargo temperature recording
If records must be kept of cargo temperature, Envirotainer strongly recommends that temperature
recorders are placed inside cargo boxes in accordance with industrial guidelines. The temperature
displayed on the control unit is the temperature of the air at the sensor in the container and will
fluctuate more than the temperature of the product.
It is also recommended to record ambient temperatures by placing a temperature monitor in the
container document pouch.
Container Preconditioning
Prior to preconditioning, a functional test of the container should be performed. Refer to section
"Control unit operation".
There are three recommended practices for container preconditioning:
Precondition with a temperature-controlled room
1) Turn off the control unit or remove the batteries from the holder.
2) Place the container in a temperature-controlled room that is set to the desired temperature.
3) Open the doors to the cargo space.
4) Allow at least one hour for container preconditioning before loading the cargo.
Precondition with dry ice (for refrigerated cargo)
An amount of dry ice required to pre-condition and maintain the cargo temperature during shipment
(as stated in the Dry Ice Tables) is placed in the dry ice bunker.
1) Calculate the total amount of dry ice required for preconditioning and shipment. Refer to
sections "Dry ice calculation" and "Dry ice tables".
2) Place batteries in the control unit and set the temperature. Refer to section "Control unit
operation".
3) Load the dry ice in the bunker. Refer to section "Cargo/Dry ice loading".
4) Close the doors to the cargo space.
5) Allow at least one hour for container preconditioning before loading the cargo.
Doc. No. MO-RAP-3062
Version 1.6: Oct. 04, 2011 8 (38)
PRECONDITIONING
Precondition with dry ice (for deep frozen cargo)
An amount of dry ice required to pre-condition the container is placed in the dry ice bunker and in
the cargo space to accelerate the preconditioning process.
1) Calculate the total amount of dry ice required for preconditioning and shipment. Refer to
sections "Dry ice calculation" and "Dry ice tables".
2) Place batteries in the control unit and set the temperature. Refer to section "Control unit
operation".
3) Load 20% of total amount of dry ice in the bunker. The remaining dry ice will be loaded with
the cargo. Refer to section "Cargo/Dry ice loading".
4) Distribute 50 kg of dry ice on a pallet in the cargo area.
5) Close the doors to the cargo space.
6) Allow at least one hour for container preconditioning before loading the cargo.
Doc. No. MO-RAP-3062
Version 1.6: Oct. 04, 2011 9 (38)
CARGO / DRY ICE LOADING
CARGO / DRY ICE LOADING
Dry Ice
Dry ice shall be used wrapped or unwrapped as stated in the dry ice tables.
• Wrapped dry ice
Dry ice in paper/plastic bags. Note that the paper/plastic bag shall not be removed when
wrapped dry ice is used. Also note that cardboard boxes should not be put into the dry ice
bunker.
• Unwrapped dry ice
Dry ice without any wrapping.
Avoid using dry ice that has been exposed to ambient conditions for several days before use since
the humidity in the air condensates and freezes on the dry ice blocks, creating a crust of ice and
thereby reducing the effectiveness of the dry ice.
Dry Ice Loading
To load dry ice in the container bunker:
1) Unlatch and open the dry ice bunker lid.
2) Evenly distribute dry ice blocks weighing between 2 kg and 7 kg on the bottom of the bunker.
3) Close and secure the dry ice bunker lid.
Re-Icing the Container
In the event of delays, long transit times or extreme ambient temperatures, it may be necessary
to add dry ice to the container. To "re-ice" the container:
1) Unlatch and open the dry ice bunker lid.
2) Discard any remaining dry ice in the bunker.
3) Put the correct amount of dry ice in the bunker.
Note!
For re-icing of deep frozen shipments it is not allowed to open the container doors without
authorization from the shipper. If allowed to open the container doors by the shipper, place 80
% of the required ice on top of the cargo and 20 % in the bunker. Refer to section "Cargo
loading - Frozen". If not allowed to open the container doors, place all of the ice in the dry ice
bunker.
4) Close and secure the dry ice bunker lid.

Doc. No. MO-RAP-3062
Version 1.6: Oct. 04, 2011 10 (38)
CARGO / DRY ICE LOADING
Figure 2
Cargo Loading - General Guidelines
Observe the following general guidelines when loading the container:
1) Use the door straps (Figure 2) to hold the doors open when loading.
2) Load the cargo on a pallet or on spacers at least 2 cm high to allow a proper airflow.
3) Do not load cargo between the spacers on the container walls.
4) Ensure that the fans are not blocked by the cargo.
5) Do not position the cargo outside the loading area (indicated with red lines).
6) Ensure proper weight distribution.
6) Secure the cargo to the tie-down brackets (Figure 3) using straps.
Important!
Always follow the "IATA Dangerous Goods Regulations" when loading the container.
Figure 3
Doc. No. MO-RAP-3062
Version 1.6: Oct. 04, 2011 11 (38)
CARGO / DRY ICE LOADING
Cargo Loading - Refrigerated / Do Not Freeze
When the container is preconditioned with a temperature-controlled room
Container loading takes place in the temperature-controlled room used for preconditioning.
1) Ensure that the container is preconditioned to the required cargo temperature.
2) Load the container. Refer to section "Cargo loading - General guidelines".
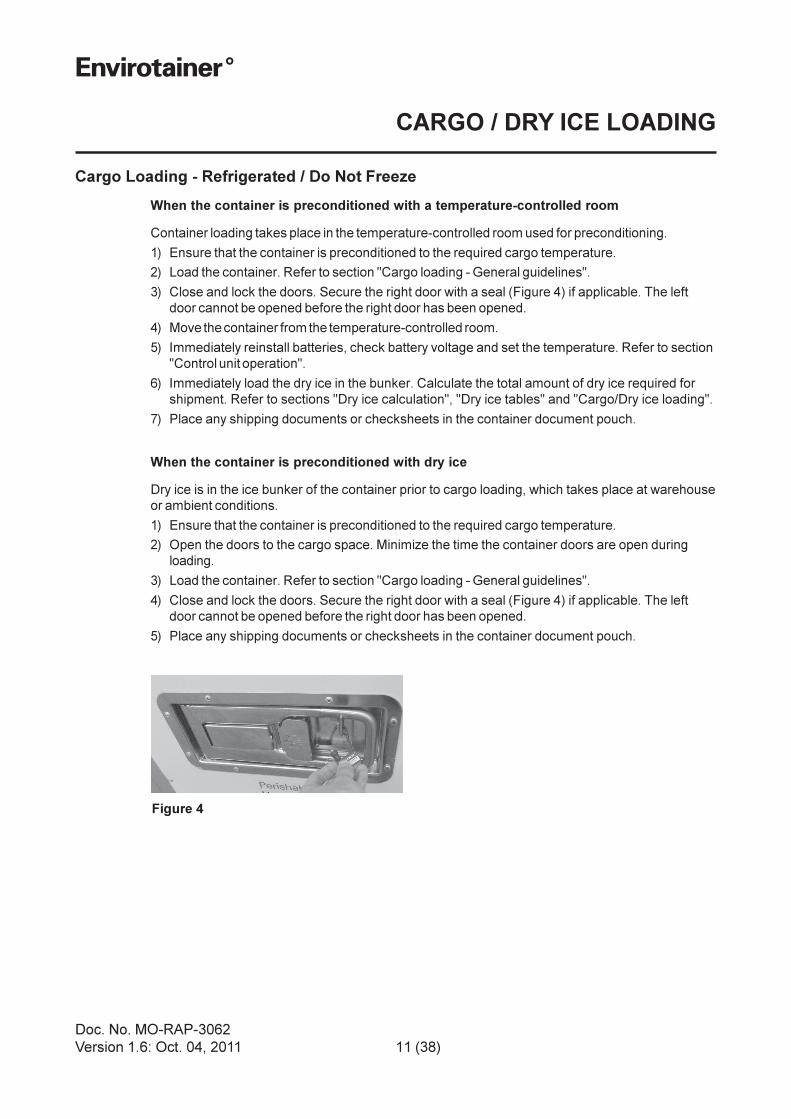
3) Close and lock the doors. Secure the right door with a seal (Figure 4) if applicable. The left
door cannot be opened before the right door has been opened.
4) Move the container from the temperature-controlled room.
5) Immediately reinstall batteries, check battery voltage and set the temperature. Refer to section
"Control unit operation".
6) Immediately load the dry ice in the bunker. Calculate the total amount of dry ice required for
shipment. Refer to sections "Dry ice calculation", "Dry ice tables" and "Cargo/Dry ice loading".
7) Place any shipping documents or checksheets in the container document pouch.
When the container is preconditioned with dry ice
Dry ice is in the ice bunker of the container prior to cargo loading, which takes place at warehouse
or ambient conditions.
1) Ensure that the container is preconditioned to the required cargo temperature.
2) Open the doors to the cargo space. Minimize the time the container doors are open during
loading.
3) Load the container. Refer to section "Cargo loading - General guidelines".
4) Close and lock the doors. Secure the right door with a seal (Figure 4) if applicable. The left
door cannot be opened before the right door has been opened.
5) Place any shipping documents or checksheets in the container document pouch.
Figure 4

Doc. No. MO-RAP-3062
Version 1.6: Oct. 04, 2011 12 (38)
CARGO / DRY ICE LOADING
Cargo Loading - Frozen
For shipments with frozen cargo dry ice is placed in the cargo space. This keeps the cargo frozen
when ambient temperatures exceed the specified temperature limits, however a lower temperature
limit can not be controlled.
When the container is preconditioned with a temperature controlled room
Container loading takes place in the temperature-controlled room used for preconditioning.
1) Ensure that the cargo and all packing material is preconditioned for at least one week prior to
loading.
2) Ensure that the container is preconditioned to the required cargo temperature.
3) Reinstall batteries, check battery voltage and set the temperature. Refer to section "Control
unit operation".
Note!
The lower temperature range for the sensor is -45°C (-49°F). Therefore the display might show
odd temperatures if the actual temperature in the cargo space is below -45°C (-49°F).
4) Load the container. Refer to section "Cargo loading - General guidelines".
If the product is to be loaded on a pallet:
• Calculate the total amount of dry ice required for shipment. Refer to sections "Dry ice
calculation" and "Dry ice tables".
• Load the cargo on a pallet and distribute 80% of the dry ice on top of the cargo using one of
the following methods:
• Put dry ice in boxes and secure on top of the cargo with plastic wrap or by other
means.
• Distribute dry ice on top of the cargo and secure with plastic wrap or by other
means.
• Put the pallet into the container.
• Put any remaining dry ice in boxes and load around the cargo on at least 2 cm (0,8 in)
spacers to allow air flow.
If the product is to be hand loaded directly in the container:
• Put at least 2 cm (0,8 in) spacers on the floor of the container.
• Calculate the total amount of dry ice required for shipment. Refer to sections "Dry ice
calculation" and "Dry ice tables".
• Load the cargo and distribute 80% of the dry ice on top of the cargo using one of the following
methods:
• Put dry ice in boxes and secure on top of the cargo with plastic wrap or by other
means.
• Distribute dry ice on top of the cargo and secure with plastic wrap or by other
means.
• Put any remaining dry ice in boxes and load around the cargo on at least 2 cm (0,8 in)
spacers to allow air flow.
5) Close and lock the doors. Secure the right door with a seal (Figure 4) if applicable. The left
door cannot be opened before the right door has been opened.
6) Move the container from the temperature-controlled room.
7) Load remaining 20% of the dry ice in the bunker. Refer to section "Dry ice loading".
8) Place any shipping documents or checksheets in the container document pouch.
Doc. No. MO-RAP-3062
Version 1.6: Oct. 04, 2011 13 (38)
CARGO / DRY ICE LOADING
When the container is preconditioned with dry ice
Dry ice is in the ice bunker and cargo space of the container prior to cargo loading, which takes
place at warehouse or ambient conditions.
1) Ensure product and all packing material is preconditioned for at least one week prior to
loading.
2) Ensure that the container is preconditioned to the required cargo temperature.
3) Open the doors to the cargo space. Minimize the time the container doors are open during
loading.
4) Remove the pallet with dry ice used for preconditioning from the cargo space.
5) Load the container. Refer to section "Cargo loading - General guidelines".
If the product is to be loaded on a pallet:
• Load the cargo on a pallet and distribute the remaining 80% of the dry ice (20% already in
bunker) on top of the cargo using one of the following methods:
• Put dry ice in boxes and secure on top of the cargo with plastic wrap or by other
means.
• Distribute dry ice on top of the cargo and secure with plastic wrap or by other
means.
• Put the pallet into the container.
• Put any remaining dry ice in boxes and load around the cargo on at least 2 cm (0,8 in)
spacers to allow air flow.
If the product is to be hand-loaded directly in the container:
• Put at least 2 cm (0,8 in) spacers on the floor of the container.
• Load the cargo and distribute the remaining 80% of the dry ice (20% already in bunker) on
top of the cargo in one of the following methods:
• Put dry ice in boxes and secure on top of the cargo with plastic wrap or by other
means.
• Distribute dry ice on top of the cargo and secure with plastic wrap or by other
means.
• Put any remaining dry ice in boxes and load around the cargo on at least 2 cm (0,8 in)
spacers to allow air flow.
6) Close and lock the doors. Secure the right door with a seal (Figure 4) if applicable. The left
door cannot be opened before the right door has been opened.
7) Place any shipping documents or checksheets in the container document pouch.
After Loading Any Type of Cargo
1) Confirm set temperature is correct on the control unit. Refer to section "Control unit operation".
2) Allow up to one hour for the container temperature to stabilize around the set temperature.
3) Confirm that all doors and covers are closed and latched.
4) Ensure that the container is stored in accordance with the specified limits and ambient
conditions. Refer to section "Limits, ambient conditions".

Doc. No. MO-RAP-3062
Version 1.6: Oct. 04, 2011 14 (38)
HANDLING AND TRANSPORT
CONTAINER HANDLING GUIDELINES
General Guidelines
Observe the following guidelines when handling the container:
1) The container can be forklifted only when empty; the use of slave pallets is recommended.
2) Use the straps outside the corners of the container to handle the container on roller beds.
3) Ensure that the container is handled in accordance with the specified limits and ambient
conditions. Refer to section "Limits, ambient conditions".
4) If delays occur during transit, it may be necessray to add additional dry ice to the bunker.
5) Wrapping of the container must not be used. If the container is wrapped the air inlets and
outlets are blocked and the container can not work properly.
Ground Transport Precautions
This section is not applicable to deep frozen cargo.
Ensure that the container is transported in an environment where temperatures are between 5°C
(9°F) to 25°C (45°F) higher than the set temperature or limit exposure to cold/warm temperatures.
Refer to section "Limits, ambient conditions".
If a temperature-controlled truck is used, it is recommended to set the temperature of the truck
10°C (18°F) higher than the set temperature of the container.
Note!
Do not use the ambient temperature displayed by the control unit as a reference for verifying
ambient temperature conditions.
Aircraft Transport Precautions
Observe the following guidelines when transporting the container:
1) Store the container at airport warehouse temperatures at least 5°C (9°F) higher than the set
temperature.
2) Limit time on the tarmac during aircraft loading (to avoid temperature extremes and direct
sunlight).
3) Provide Notice to Captain (NOTOC) and note on the Air Way Bill (not applicable to frozen
cargo): "Maintain 15-20°C aircraft cargo hold. Do not position container near the cargo door.”
4) The shipper should comply with airline regulations for shipping dry ice.
Unloading
Before unloading the container, check for damage. Unload the container by unlocking and opening
the doors. After unloading:
1) Remove the batteries and follow local regulations for disposal.
2) Remove and dispose of any remaining dry ice. If local regulations allow it, the dry ice may be
placed outdoors. It will dissolve quickly.
Storage
It is recommended that the RAP t2 container be stored on flat ground. The storage temperature
should be between -40°C (-40°F) and +50°C (+122°F).
Important!
No container, cargo or other must be stored on top of a RAP t2.

Doc. No. MO-RAP-3062
Version 1.6: Oct. 04, 2011 15 (38)
CONTROL UNIT OPERATION
+
-
+
-
-
+
-
+
CONTROL UNIT OPERATION (Type 3)
Mounting Batteries
1) Open the door to the control unit.
2) Place 16 "D-cell" alkaline batteries in the holder.
Voltage 1.5V
IEC / JIS LR 20
ANSI / NEDA 13A
3) Ensure proper battery polarity (Figure 5).
Start the Control Unit
1) Press the ”On/Off" button.
2) Make sure the default mode is visible on the display (Figure 6). The default mode show
"Container temp" and "Set temp".
The control unit type 3 has two buttons for settings and information.
- The set temperature mode is reached via the "Set" button" (refer to next page).
- The control unit menu is reached via the "Menu/Enter" button and includes settings and
information. Use the "plus", "minus" and "Menu/Enter" buttons to navigate in the menu (Figure
7) .
Figure 5
Control unit
display
"Set" button
Temp 5.0°C
Set temp 5.0°C
"minus" button
"Menu/Enter" button"On/Off"
button
"plus"
button
Figure 6
Set temp
View info (ambient temp & battery level)
Change to °F / Change to °C
Fan status
Connect T. Tale (not in use)
Temp Tale info (not in use)
Adjust contrast
Exit
Manufacturer settings (Login)
DEFAULT MODE
Figure 7
"Set" button
"Menu/Enter" button
"Service" button

Doc. No. MO-RAP-3062
Version 1.6: Oct. 04, 2011 16 (38)
CONTROL UNIT OPERATION
Setting Temperature
1) To change between Celsius and Fahrenheit:
• Press the "Menu/Enter" button to enter the main menu; the display shows "View info".
• Use the "plus" or "minus" button to step to "Change to °F" or "Change to °C" (depending on
current setting).
• Press the "Menu/Enter" button to confirm the change and return to default mode.
2) Press the "Set" button to enter set temperature mode.
Important!
The set temperature mode is activated for ten seconds. If the display returns to default mode
before new set temperaure has been confirmed by pressing the "Set" button, the new set
temperature was not saved.
3) Use the "plus" and "minus" buttons to change the set temperature. Hold down the buttons to speed
up the change.
4) Press the "Set" button to confirm the new set temperature and return to default mode.
5) Check that the set temperature is correct in the default mode.
Battery Voltage Check
1) Press the "Menu/Enter" button to enter the main menu; the display shows "View info".
2) Press the "Menu/Enter" button to confirm.
3) Check the battery voltage for the two battery packs. New batteries should read at least 11V. The
minimum allowable battery voltage when the container is in use is 9V; change the batteries as
necessary.
Note!
If the battery voltage is above 15V the control unit is malfunctioning and the container should be
repaired.
4) Press the "Menu/Enter" button again to return to default mode.
Functional Test
1) Set temperature 3°C (5,4°F) lower than actual temperature, the fan will start.
2) Check for air discharge from air guides in the ceiling (Figure 8).
3) Set temperature 3°C (5,4°F) higher than actual temperature, the fan will stop.
4) If the fan alarm is displayed (Figure 9) one of the fans is malfunctioning and the container
should be repaired.
Temp 5.0°C
Set temp 5.0°C
Fan alarm
Figure 8 Figure 9
Check for air discharge

Doc. No. MO-RAP-3062
Version 1.6: Oct. 04, 2011 17 (38)
CONTROL UNIT OPERATION
CONTROL UNIT OPERATION (Type 4)
Mounting Batteries
1) Open the door to the control unit and the battery lid.
2) Place 16 "D-cell" alkaline batteries in the holder.
Voltage 1.5V
IEC / JIS LR 20
ANSI / NEDA 13A
3) Ensure proper battery polarity (Figure 10).
Start the Control Unit
1) Press the ”On/Off" button.
During the start-up, the four indicators are lit one by one (yellow-red-blue-green) to test the
function of the indicators. The display shows "System On". If the indicators are not lit during
start-up, the container must be subject to repair.
2) Ensure the indicators are switched off, except from the green indicator, and that the default
mode is visible on the display (Figure 11). The default mode (CONTAINER INFO) shows
"Container temp", "Set temp" and battery status for the two battery packs. If any alert/alarm is
activated the display toggles between default mode and showing activated alert/alarm.
The control unit menu is reached via the "Menu/Enter" button and includes settings and
information. Use the "Up", "Down", "Back" and "Menu/Enter" buttons to navigate in the menu
(Figure 12) .
Figure 10
+
-
+
-
-
+
-
+
Control unit
display
"Down"
button
"Menu/Enter"
button
"On/Off"
button
"Up"
button
"Back"
button
Indicators: alert (yellow),
alarm (red) &
system on (green)
Figure 11
Control unit display
default mode
CONTAINER INFO
Container temp 5.5°C
Set temp 5.0°C
BatteryA 11.4 V
B 11.5 V
TEMP MENU
TRIP MENU
SYSTEM MENU
DEFAULT MODE SET TEMP
TEMP UNIT
AMBIENT TEMP
CONTAINER TEMP
RAPID SETTING (not in use)
ALARM VIEW
SETUP (Login)
SYSTEM INFO
SW VERSION
TIME & DATE
FAN STATUS
ALERT VIEW
Figure 12
Doc. No. MO-RAP-3062
Version 1.6: Oct. 04, 2011 18 (38)
CONTROL UNIT OPERATION
Setting Temperature
1) To change between Celsius and Fahrenheit:
• Press the "Menu/Enter" button to enter the main menu; the display shows "TEMP MENU".
• Press the "Menu/Enter" button to enter the "TEMP MENU"; the display shows "SET TEMP".
• Use the "Up" or "Down" button to step to "Current unit F Set changes to C" or
"Current unit C Set changes to F" (depending on current setting).
• Press the "Menu/Enter" button to confirm the change.
• Press the "Back" button to return to default mode.
2) Press the "Menu/Enter" button to enter the main menu; the display shows "TEMP MENU".
3) Press the "Menu/Enter" button to enter the "TEMP MENU"; the display shows "SET TEMP".
4) Press the "Menu/Enter" button to enter the "SET TEMP"; the display shows "SET NEW
TEMP".
Important!
The "SET NEW TEMP" mode is activated for 30 seconds. If the display returns to default mode
before new set temperaure has been confirmed by pressing the "Menu/Enter" button, the new
set temperature was not saved.
5) Use the "Up" and "Down" buttons to change the set temperature. Hold down the buttons to
speed up the change.
6) Press the "Menu/Enter" button to confirm the new set temperature.
7) Press the "Back" button to return to default mode.
8) Check that the set temperature is correct in the default mode.
Doc. No. MO-RAP-3062
Version 1.6: Oct. 04, 2011 19 (38)
CONTROL UNIT OPERATION
Battery Voltage Check
1) The current battery status for the two battery packs is continously shown in the default mode
(CONTAINER INFO).
2) Check the battery voltage for the two battery packs. New batteries should read at least 11V.
The minimum allowable battery voltage when the container is in use is 9V; change the
batteries if necessary.
Note!
There will be a battery alert at 9.5 V. The alert is to be seen as information that the battery
level is going towards 9.0 V and that a change of batteries should be considered depending on
remaining shipping time. The batteries can still be used down to 9.0 V.
Refer to section "Alerts & Alarms"
Note!
If the battery voltage is above 15V the control unit is malfunctioning and the container should
be repaired.
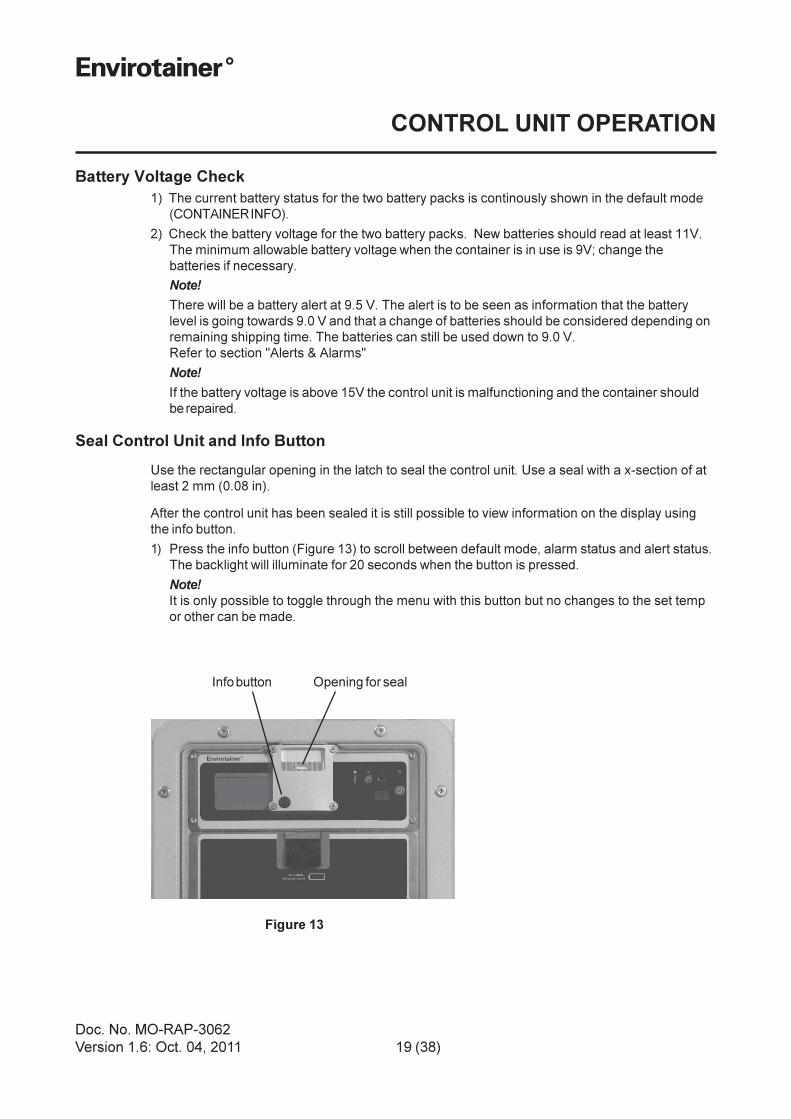
Seal Control Unit and Info Button
Use the rectangular opening in the latch to seal the control unit. Use a seal with a x-section of at
least 2 mm (0.08 in).
After the control unit has been sealed it is still possible to view information on the display using
the info button.
1) Press the info button (Figure 13) to scroll between default mode, alarm status and alert status.
The backlight will illuminate for 20 seconds when the button is pressed.
Note!
It is only possible to toggle through the menu with this button but no changes to the set temp
or other can be made.
Info button Opening for seal
Figure 13

Doc. No. MO-RAP-3062
Version 1.6: Oct. 04, 2011 20 (38)
CONTROL UNIT OPERATION
Functional Test
1) Set temperature 3°C (5,4°F) lower than actual temperature, the fans will start.
2) Check for air discharge from air guides in the ceiling (Figure 14).
3) Set temperature 3°C (5,4°F) higher than actual temperature, the fans will stop.
4) Check that no alerts are activated. If any alert is activated the yellow alert indicator is flashing
and the alert is shown on the display. If so, check what alert that has been activated and
perform recommended actions. Refer to section "Alerts and alarms".
It is also possible to view activated alert in the control unit menu.
• Press the "Menu/Enter" button to enter the main menu; the display shows "TEMP MENU".
• Use the "Up" or "Down" button to step to "SYSTEM MENU" and press the "Menu/Enter"
button to confirm; the display shows "ALARM VIEW".
• Use the "Up" or "Down" button to step to "ALERT VIEW" and press the "Menu/Enter"
button to confirm; the display shows activated alerts.
The activated alert is shown as ALERT 1/1. If more than one alert is activated, ALERT
1/2 is shown (Figure 15).
• Press "Menu/Enter" to scroll between activated alarms.
5) Check that no alarms are activated. If any alarm is activated the red alarm indicator is
flashing. If so, abort shipment, check what alarm that has been activated and report failure to
Envirotainer. The container should be replaced. Refer to section "Alerts and alarms".
It is also possible to view activated alarm in the control unit menu.
• Press the "Menu/Enter" button to enter the main menu; the display shows "TEMP MENU".
• Use the "Up" or "Down" button to step to "SYSTEM MENU" and press the "Menu/Enter"
button to confirm; the display shows "ALARM VIEW".
• Press the "Menu/Enter" button; the display shows activated alarms.
The activated alarm is shown as ALARM 1/1. If more than one alarm is activated, ALARM
1/2 is shown (Figure 16).
• Press "Menu/Enter" to scroll between activated alarms.
Figure 15 Figure 16
Alarm 1/2
Fan 1 error
Alert 1/2
Battery below 9.5 V
Figure 14
Check for air discharge

Doc. No. MO-RAP-3062
Version 1.6: Oct. 04, 2011 21 (38)
ALERTS AND ALARMS
ALERTS AND ALARMS
Alerts and Actions to be Taken
If any alert is activated the yellow indicator is flashing (type 4 only) on the control unit and the alert
is shown on the control unit display. Refer to section "Control unit operation".
"Battery below 9.5 V"
Reason: The battery voltage is below 9.5 V.
Action: Check the battery level immediately. The batteries can be used down to 9.0 V; the
purpose of the alert is to inform that the battery level is going towards 9.0 V and that
change of batteries should be considered depending on remaining shipping time. Refer
to section "Control unit operation".
”Fan 1 Warning”
Reason: If the control unit has detected a ”Fan 1 Error” it will be indicated as an alarm.
However if the fan subsequently is detected as working, the fan alarm is cleared and
replaced by this ”Fan 1 Warning” alert. This alert is raised permanently as a need for-
inspection indication (after shipment) and can only be cleared by authorized
personnel.
Action: The shipment can proceed as normal. After shipment it is recommended to inspect
the container and have the alert cleared by authorized personnel.
”Fan 2 Warning”
Reason: If the control unit has detected a ”Fan 2 Error” it will be indicated as an alarm.
However if the fan subsequently is detected as working, the fan alarm is cleared and
replaced by this ”Fan 2 Warning” alert. This alert is raised permanently as a need for-
inspection indication (after shipment) and can only be cleared by authorized
personnel.
Action: The shipment can proceed as normal. After shipment it is recommended to inspect
the container and have the alert cleared by authorized personnel.
”Ambient Temp Out of Spec”
Reason: The ambient temperature is out of specification (above +40°C / +104°F).
Action: Move the container to an area with temperature within the specifications. Refer to
section ”Limits, ambient conditions”.
Note!
Do not use the ambient temperature displayed by the control unit as a reference for verifying
ambient temperature conditions.
Doc. No. MO-RAP-3062
Version 1.6: Oct. 04, 2011 22 (38)
ALERTS AND ALARMS
Alarms
If any alarm is activated the red indicator is flashing (type 4 only) on the control unit and the alarm
is shown on the control unit display. Refer to section "Control unit operation".
"FAN 1 Error"
Reason: Fan 1 is out of order. The container cannot work properly.
Action: The current shipment must be stopped and the container must be repaired.
Contact Envirotainer for advice.
"FAN 2 Error"
Reason: Fan 2 is out of order. The container cannot work properly.
Action: The current shipment must be stopped and the container must be repaired.
Contact Envirotainer for advice.
"Temp Probe Error"
Reason: The temperature sensor is out of order. The container cannot work properly.
Action: The current shipment must be stopped and the container must be repaired.
Contact Envirotainer for advice.
Doc. No. MO-RAP-3062
Version 1.6: Oct. 04, 2011 23 (38)
DRY ICE CALCULATION
DRY ICE CALCULATION
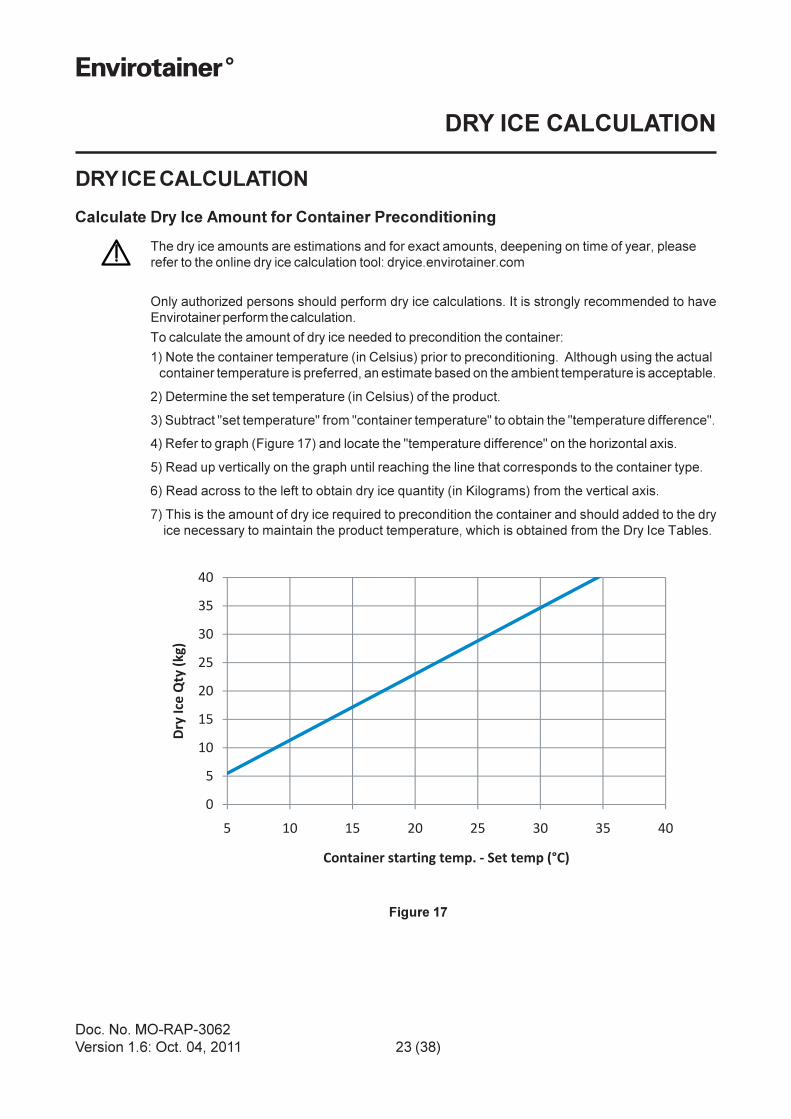
Calculate Dry Ice Amount for Container Preconditioning
The dry ice amounts are estimations and for exact amounts, deepening on time of year, please
refer to the online dry ice calculation tool: dryice.envirotainer.com
Only authorized persons should perform dry ice calculations. It is strongly recommended to have
Envirotainer perform the calculation.
To calculate the amount of dry ice needed to precondition the container:
1) Note the container temperature (in Celsius) prior to preconditioning. Although using the actual
container temperature is preferred, an estimate based on the ambient temperature is acceptable.
2) Determine the set temperature (in Celsius) of the product.
3) Subtract "set temperature" from "container temperature" to obtain the "temperature difference".
4) Refer to graph (Figure 17) and locate the "temperature difference" on the horizontal axis.
5) Read up vertically on the graph until reaching the line that corresponds to the container type.
6) Read across to the left to obtain dry ice quantity (in Kilograms) from the vertical axis.
7) This is the amount of dry ice required to precondition the container and should added to the dry
ice necessary to maintain the product temperature, which is obtained from the Dry Ice Tables.
Figure 17
0
5
10
15
20
25
30
35
40
5 10 15 20 25 30 35 40
Dry
Ice
Qty
(kg)
Container starting temp. - Set temp (°C)

Doc. No. MO-RAP-3062
Version 1.6: Oct. 04, 2011 24 (38)
DRY ICE CALCULATION
0
5
10
15
20
25
30
35
40
5 10 15 20 25 30 35 40
Dry
Ice
Qty
(kg)
Container starting temp. - Set temp (°C)
Calculation Example - Dry Ice Preconditioning
An RAP container needs preconditioning with dry ice before loading cargo that has a 5°C
temperature requirement. The current ambient temperature is 25°C.
1) The container temperature is 25°C
2) The set temperature is 5°C
3) Container Temp - Set Temp = 20°C
4) Read up from 20°C to the line and across to the left
5) The amount of dry ice for preconditioning the container is 23 kg
23 kg
Doc. No. MO-RAP-3062
Version 1.6: Oct. 04, 2011 25 (38)
DRY ICE CALCULATION
Calculate Dry Ice Amount for Container Shipment
The dry ice amounts are estimations and for exact amounts, deepening on time of year, please
refer to the online dry ice calculation tool: dryice.envirotainer.com
Only authorized persons should perform dry ice calculations. It is strongly recommended to have
Envirotainer perform the calculation.
To calculate the amount of dry ice needed to maintain temperature during container shipment:
1) Determine the transportation time from container preconditioning to the time the cargo is
unloaded
2) Determine the time for each activity in the transportation schedule
3) Estimate the ambient temperature for each activity by checking the weather forecast
4) Multiply the time and temperature of each activity to determine the product
5) Add the products of all the activities to obtain the product sum
6) Divide the product sum by total hours to determine the average ambient temperature
7) Locate the appropriate dry ice table based on set temperature
Note!
For cargo to be shipped at set temperatures for which no dry ice table is included in this
manual, please contact Envirotainer for advice in dry ice calculation.
8) Locate the corresponding Temperature column & Time row, rounding the values as required
9) Read across & down to determine the dry ice amount in kilograms. Note: 1 kg = 2.2 lbs
Note!
Depending on the size and type (wrapped/unwrapped) of the dry ice blocks it is not always
possible to load the specified amount of dry ice in the dry ice bunker.
10)Use wrapped or unwrapped dry ice as specified in the dry ice table
11)If the required amount of dry ice exceeds the bunker capacity, plan to re-ice the container
Many variables, such as weather conditions, delays and handling, are beyond control. Envirotainer
makes no guarantee that the amount of dry ice indicated in the tables is correct for any specific
shipment. It is recommended that the proper procedures to determine the appropriate amount of dry
ice are implemented.
Doc. No. MO-RAP-3062
Version 1.6: Oct. 04, 2011 26 (38)
DRY ICE CALCULATION
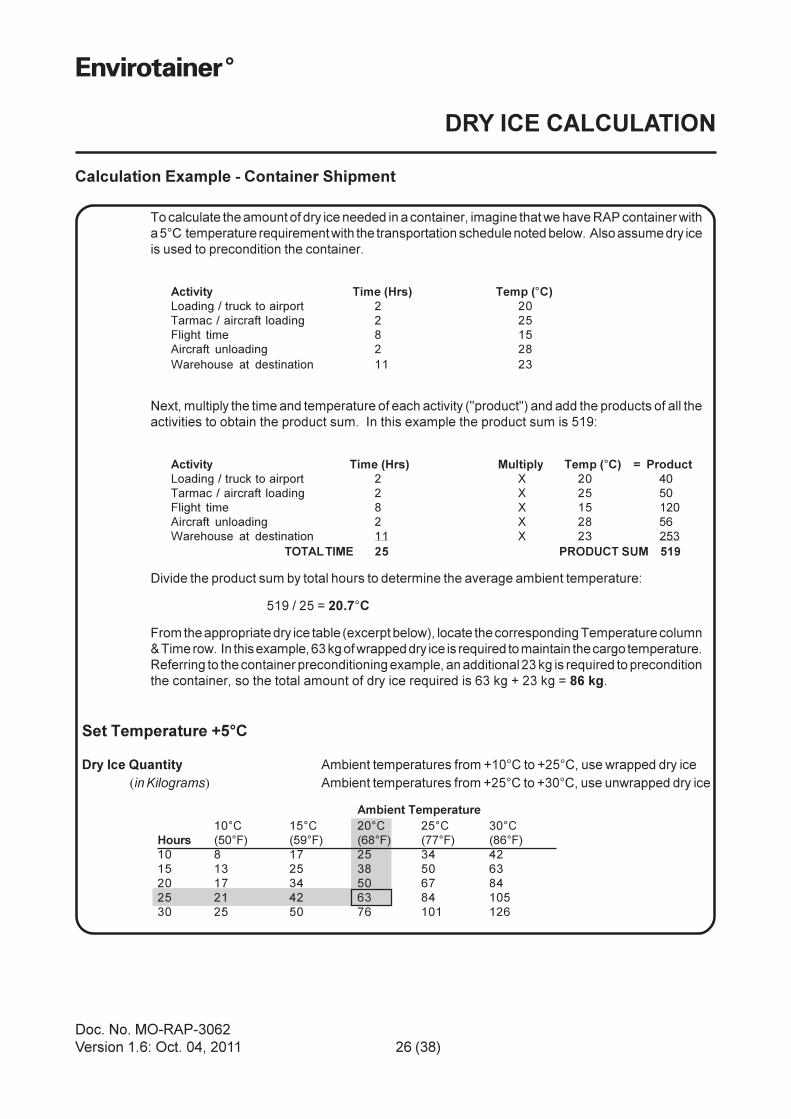
Set Temperature +5°C
Dry Ice Quantity Ambient temperatures from +10°C to +25°C, use wrapped dry ice
(in Kilograms) Ambient temperatures from +25°C to +30°C, use unwrapped dry ice
Ambient Temperature
10°C 15°C 20°C 25°C 30°C
Hours (50°F) (59°F) (68°F) (77°F) (86°F)
10 8 17 25 34 42
15 13 25 38 50 63
20 17 34 50 67 84
25 21 42 63 84 105
30 25 50 76 101 126
Calculation Example - Container Shipment
To calculate the amount of dry ice needed in a container, imagine that we have RAP container with
a 5°C temperature requirement with the transportation schedule noted below. Also assume dry ice
is used to precondition the container.
Activity Time (Hrs) Temp (°C)
Loading / truck to airport 2 20
Tarmac / aircraft loading 2 25
Flight time 8 15
Aircraft unloading 2 28
Warehouse at destination 11 23
Next, multiply the time and temperature of each activity ("product") and add the products of all the
activities to obtain the product sum. In this example the product sum is 519:
Activity Time (Hrs) Multiply Temp (°C) = Product
Loading / truck to airport 2 X 20 40
Tarmac / aircraft loading 2 X 25 50
Flight time 8 X 15 120
Aircraft unloading 2 X 28 56
Warehouse at destination 11 X 23 253
TOTAL TIME 25 PRODUCT SUM 519
Divide the product sum by total hours to determine the average ambient temperature:
519 / 25 = 20.7°C
From the appropriate dry ice table (excerpt below), locate the corresponding Temperature column
& Time row. In this example, 63 kg of wrapped dry ice is required to maintain the cargo temperature.
Referring to the container preconditioning example, an additional 23 kg is required to precondition
the container, so the total amount of dry ice required is 63 kg + 23 kg = 86 kg.

Doc. No. MO-RAP-3062
Version 1.6: Oct. 04, 2011 27 (38)
DRY ICE TABLES
Note!
If the required amount of dry ice exceeds the bunker capacity (300 kg), plan to re-ice the
container. Refer to section "Cargo/dry ice loading".
DRY ICE TABLES
Set Temperature +5°C
The dry ice amounts are estimations and for exact amounts, deepening on time of year, please
refer to the online dry ice calculation tool: dryice.envirotainer.com
Dry Ice Quantity Ambient temperatures from +10°C to +25°C, use wrapped dry ice
(in Kilograms) Ambient temperatures from +25°C to +30°C, use unwrapped dry ice
Ambient Temperature
10°C 15°C 20°C 25°C 30°C
Hours (50°F) (59°F) (68°F) (77°F) (86°F)
10 8 17 25 34 42
15 13 25 38 50 63
20 17 34 50 67 84
25 21 42 63 84 105
30 25 50 76 101 12635 29 59 88 118 147
40 34 67 101 134 168
45 38 76 113 151 189
50 42 84 126 168 210
55 46 92 139 185 231
60 50 101 151 202 252
65 55 109 164 218 273
70 59 118 176 235 294
75 63 126 189 252

Doc. No. MO-RAP-3062
Version 1.6: Oct. 04, 2011 28 (38)
DRY ICE TABLES
Note!
If the required amount of dry ice exceeds the bunker capacity (300 kg), plan to re-ice the
container. Refer to section "Cargo/dry ice loading".
Set Temperature +15°C
The dry ice amounts are estimations and for exact amounts, deepening on time of year, please
refer to the online dry ice calculation tool: dryice.envirotainer.com
Dry Ice Quantity Ambient temperatures from +20°C to +30°C, use wrapped dry ice
(in Kilograms) Ambient temperatures from +30°C to +40°C, use unwrapped dry ice
Ambient Temperature
20°C 25°C 30°C 35°C 40°C
Hours (68°F) (77°F) (86°F) (95°F) (104°F)
10 8 17 25 34 42
15 13 25 38 50 63
20 17 34 50 67 84
25 21 42 63 84 105
30 25 50 76 101 126
35 29 59 88 118 147
40 34 67 101 134 168
45 38 76 113 151 189
50 42 84 126 168 210
55 46 92 139 185 231
60 50 101 151 202 252
65 55 109 164 218 273
70 59 118 176 235 294
75 63 126 189 252

Doc. No. MO-RAP-3062
Version 1.6: Oct. 04, 2011 29 (38)
DRY ICE TABLES
Set Temperature -20°C
The dry ice amounts are estimations and for exact amounts, deepening on time of year, please
refer to the online dry ice calculation tool: dryice.envirotainer.com
Dry Ice Quantity For all ambient temperatures, use unwrapped dry ice
(in Kilograms)
Ambient Temperature
10°C 15°C 20°C 25°C
Hours (50°F) (59°F) (68°F) (77°F)
10 97 113 129 145
15 145 169 193 217
20 193 225 258 290
25 242 282
30 290
Doc. No. MO-RAP-3062
Version 1.6: Oct. 04, 2011 30 (38)
TECHNICAL SPECIFICATION
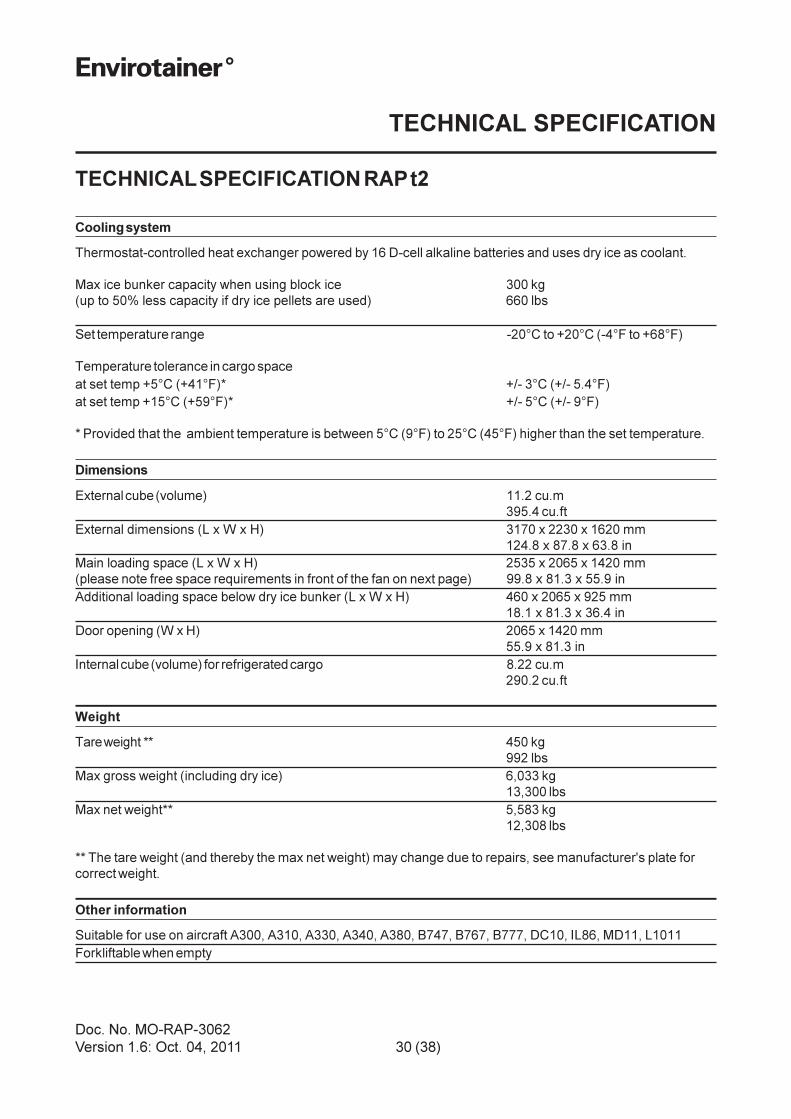
TECHNICAL SPECIFICATION RAP t2
Cooling system
Thermostat-controlled heat exchanger powered by 16 D-cell alkaline batteries and uses dry ice as coolant.
Max ice bunker capacity when using block ice 300 kg
(up to 50% less capacity if dry ice pellets are used) 660 lbs
Set temperature range -20°C to +20°C (-4°F to +68°F)
Temperature tolerance in cargo space
at set temp +5°C (+41°F)* +/- 3°C (+/- 5.4°F)
at set temp +15°C (+59°F)* +/- 5°C (+/- 9°F)
* Provided that the ambient temperature is between 5°C (9°F) to 25°C (45°F) higher than the set temperature.
Dimensions
External cube (volume) 11.2 cu.m
395.4 cu.ft
External dimensions (L x W x H) 3170 x 2230 x 1620 mm
124.8 x 87.8 x 63.8 in
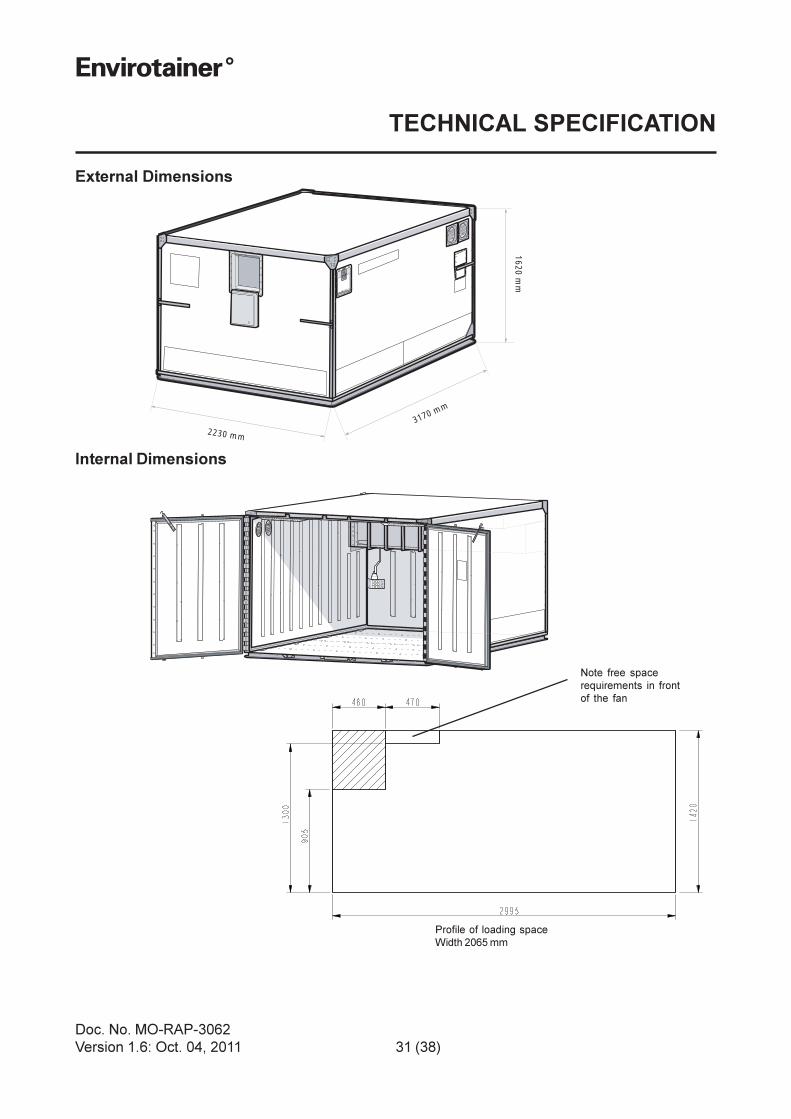
Main loading space (L x W x H) 2535 x 2065 x 1420 mm
(please note free space requirements in front of the fan on next page) 99.8 x 81.3 x 55.9 in
Additional loading space below dry ice bunker (L x W x H) 460 x 2065 x 925 mm
18.1 x 81.3 x 36.4 in
Door opening (W x H) 2065 x 1420 mm
55.9 x 81.3 in
Internal cube (volume) for refrigerated cargo 8.22 cu.m
290.2 cu.ft
Weight
Tare weight ** 450 kg
992 lbs
Max gross weight (including dry ice) 6,033 kg
13,300 lbs
Max net weight** 5,583 kg
12,308 lbs
** The tare weight (and thereby the max net weight) may change due to repairs, see manufacturer's plate for
correct weight.
Other information
Suitable for use on aircraft A300, A310, A330, A340, A380, B747, B767, B777, DC10, IL86, MD11, L1011
Forkliftable when empty
Doc. No. MO-RAP-3062
Version 1.6: Oct. 04, 2011 31 (38)
TECHNICAL SPECIFICATION
Internal Dimensions
External Dimensions
Note free space
requirements in front
of the fan
Profile of loading space
Width 2065 mm
2230 mm
3170 mm
1620 mm
Doc. No. MO-RAP-3062
Version 1.6: Oct. 04, 2011 32 (38)
TROUBLESHOOTING
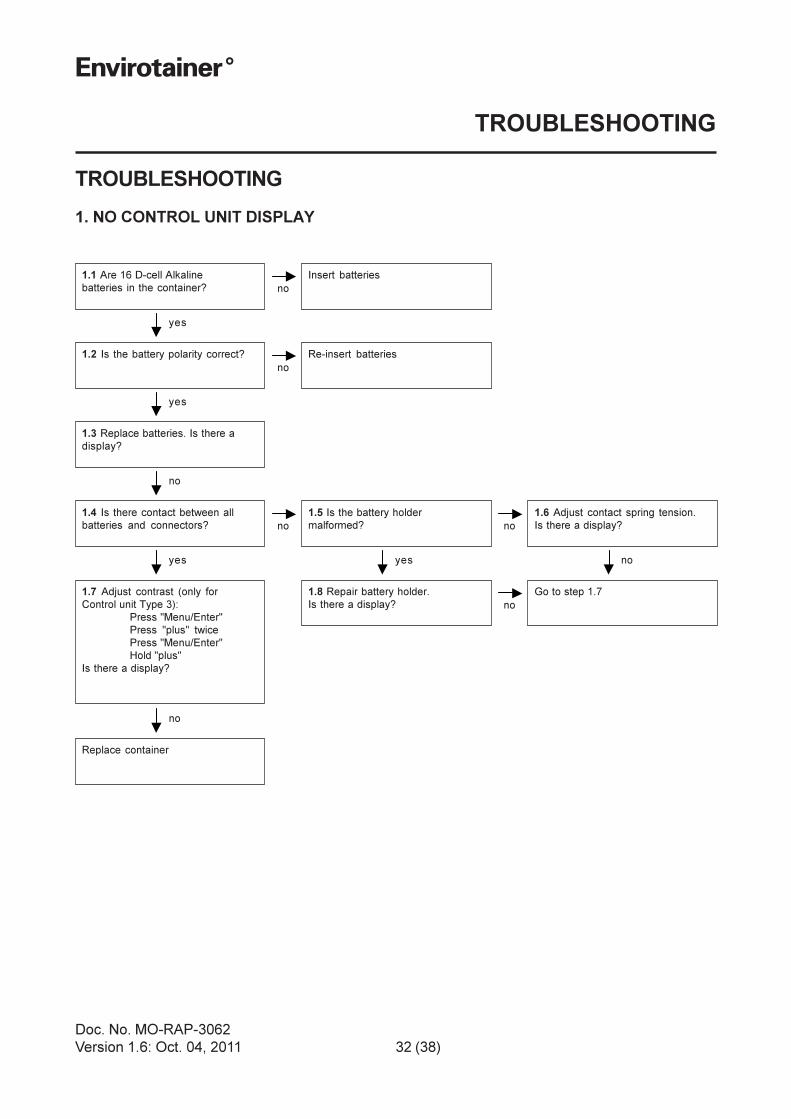
TROUBLESHOOTING
1. NO CONTROL UNIT DISPLAY
1.1 Are 16 D-cell Alkaline
batteries in the container?
1.2 Is the battery polarity correct?
1.3 Replace batteries. Is there a
display?
yes
no
Insert batteries
Re-insert batteries
no
yes
1.4 Is there contact between all
batteries and connectors?
no
no
1.5 Is the battery holder
malformed?
1.6 Adjust contact spring tension.
Is there a display?no
yes yes no
1.7 Adjust contrast (only for
Control unit Type 3):
Press "Menu/Enter"
Press "plus" twice
Press "Menu/Enter"
Hold "plus"
Is there a display?
no
Replace container
1.8 Repair battery holder.
Is there a display? no
Go to step 1.7
Doc. No. MO-RAP-3062
Version 1.6: Oct. 04, 2011 33 (38)
TROUBLESHOOTING
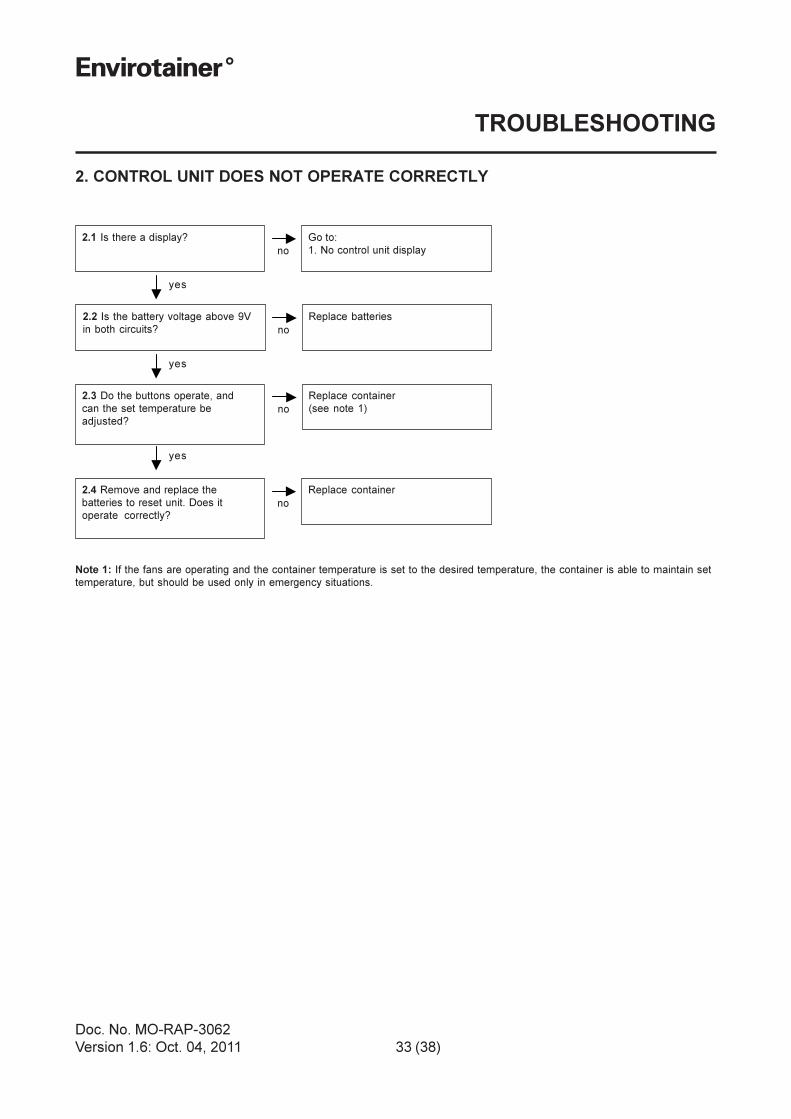
2. CONTROL UNIT DOES NOT OPERATE CORRECTLY
2.1 Is there a display?
2.2 Is the battery voltage above 9V
in both circuits?
yes
no
Go to:
1. No control unit display
Replace batteries
no
yes
yes
Replace container
(see note 1)no
Note 1: If the fans are operating and the container temperature is set to the desired temperature, the container is able to maintain set
temperature, but should be used only in emergency situations.
2.3 Do the buttons operate, and
can the set temperature be
adjusted?
Replace container
no
2.4 Remove and replace the
batteries to reset unit. Does it
operate correctly?
Doc. No. MO-RAP-3062
Version 1.6: Oct. 04, 2011 34 (38)
TROUBLESHOOTING
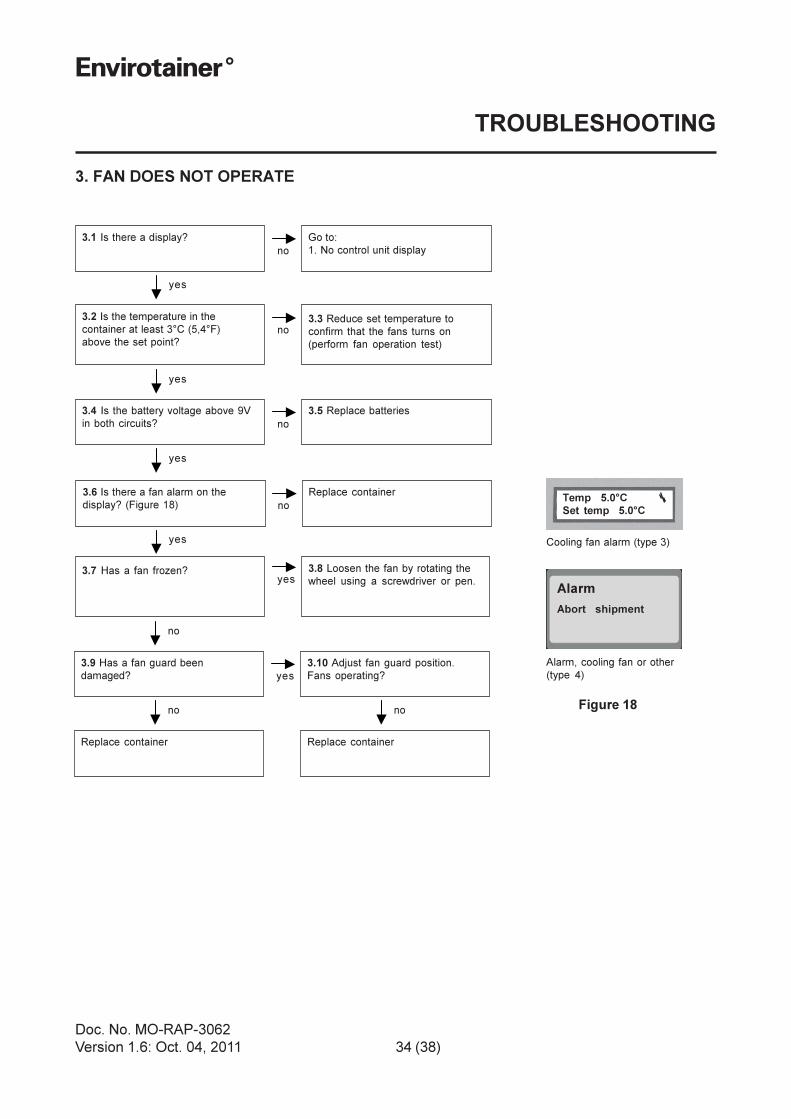
3. FAN DOES NOT OPERATE
3.1 Is there a display?
3.4 Is the battery voltage above 9V
in both circuits?
yes
no
Go to:
1. No control unit display
3.3 Reduce set temperature to
confirm that the fans turns on
(perform fan operation test)
no
yes
3.9 Has a fan guard been
damaged? yes
3.10 Adjust fan guard position.
Fans operating?
Replace container
3.5 Replace batteries
no
3.2 Is the temperature in the
container at least 3°C (5,4°F)
above the set point?
yes
no
Replace container
no
3.7 Has a fan frozen?yes
3.8 Loosen the fan by rotating the
wheel using a screwdriver or pen.
no
3.6 Is there a fan alarm on the
display? (Figure 18) no
Replace container
yes
Figure 18
Temp 5.0°C
Set temp 5.0°C
Cooling fan alarm (type 3)
Alarm
Abort shipment
Alarm, cooling fan or other
(type 4)
Doc. No. MO-RAP-3062
Version 1.6: Oct. 04, 2011 35 (38)
TROUBLESHOOTING
yes
no
Add dry ice
yes
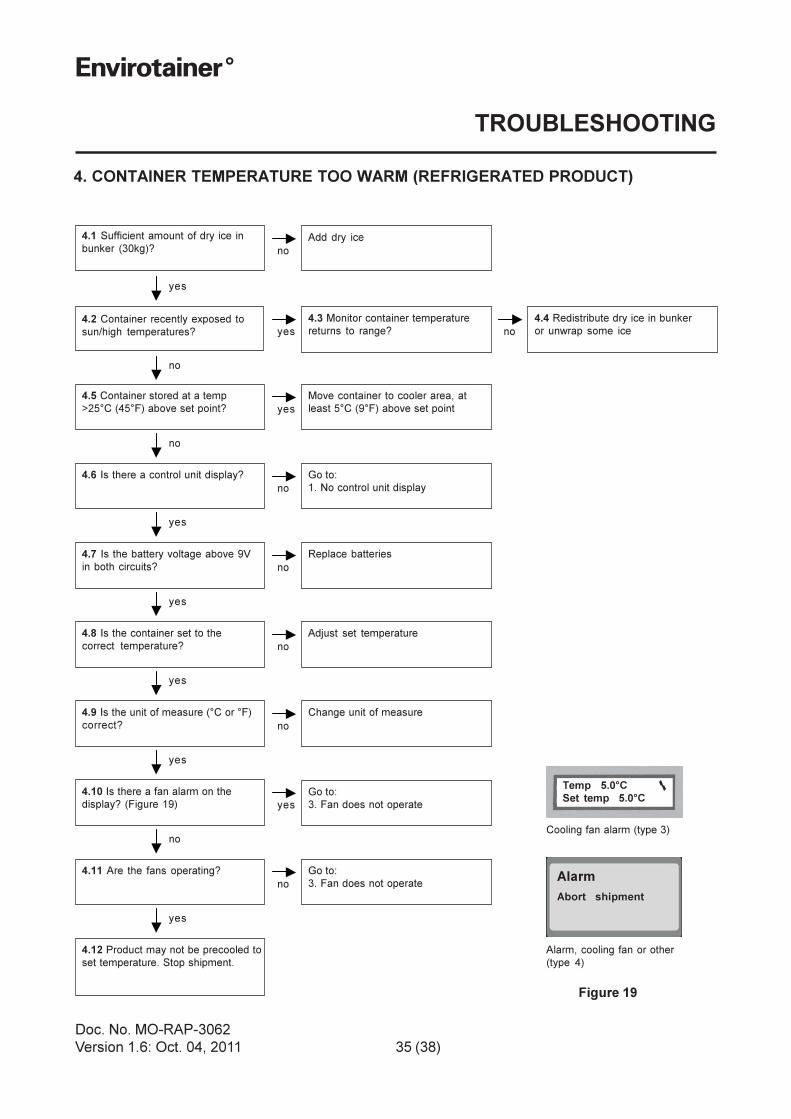
4. CONTAINER TEMPERATURE TOO WARM (REFRIGERATED PRODUCT)
4.4 Redistribute dry ice in bunker
or unwrap some ice
4.3 Monitor container temperature
returns to range? no
4.1 Sufficient amount of dry ice in
bunker (30kg)?
no
4.2 Container recently exposed to
sun/high temperatures?
4.5 Container stored at a temp
>25°C (45°F) above set point?
4.6 Is there a control unit display?
no
no
Go to:
1. No control unit display
Move container to cooler area, at
least 5°C (9°F) above set point
4.7 Is the battery voltage above 9V
in both circuits?
4.8 Is the container set to the
correct temperature?
4.9 Is the unit of measure (°C or °F)
correct?
yes
no
Replace batteries
no
yes
4.10 Is there a fan alarm on the
display? (Figure 19)
yes
yes
4.11 Are the fans operating?
yes
yes
yes
Adjust set temperature
Change unit of measure
Go to:
3. Fan does not operate
no
no
Go to:
3. Fan does not operateno
4.12 Product may not be precooled to
set temperature. Stop shipment.
Figure 19
Temp 5.0°C
Set temp 5.0°C
Cooling fan alarm (type 3)
Alarm
Abort shipment
Alarm, cooling fan or other
(type 4)
Doc. No. MO-RAP-3062
Version 1.6: Oct. 04, 2011 36 (38)
TROUBLESHOOTING
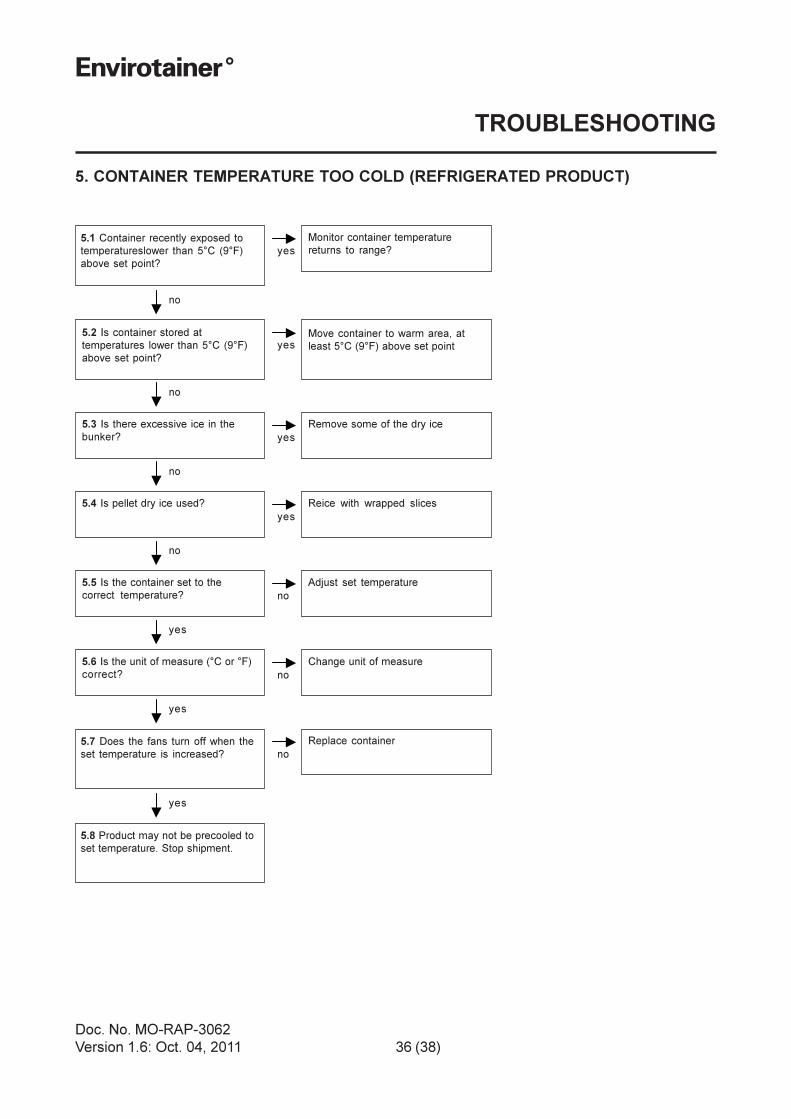
5. CONTAINER TEMPERATURE TOO COLD (REFRIGERATED PRODUCT)
5.3 Is there excessive ice in the
bunker?
yes
no
5.4 Is pellet dry ice used?
no
yes
Reice with wrapped slices
Remove some of the dry ice
5.5 Is the container set to the
correct temperature?
5.6 Is the unit of measure (°C or °F)
correct?
yes
no
Adjust set temperature
no
yes
yes
Move container to warm area, at
least 5°C (9°F) above set point
yes
no
Change unit of measure
Replace container
no
5.2 Is container stored at
temperatures lower than 5°C (9°F)
above set point?
5.7 Does the fans turn off when the
set temperature is increased?
5.8 Product may not be precooled to
set temperature. Stop shipment.
no
yes
Monitor container temperature
returns to range?5.1 Container recently exposed to
temperatureslower than 5°C (9°F)
above set point?
Doc. No. MO-RAP-3062
Version 1.6: Oct. 04, 2011 37 (38)
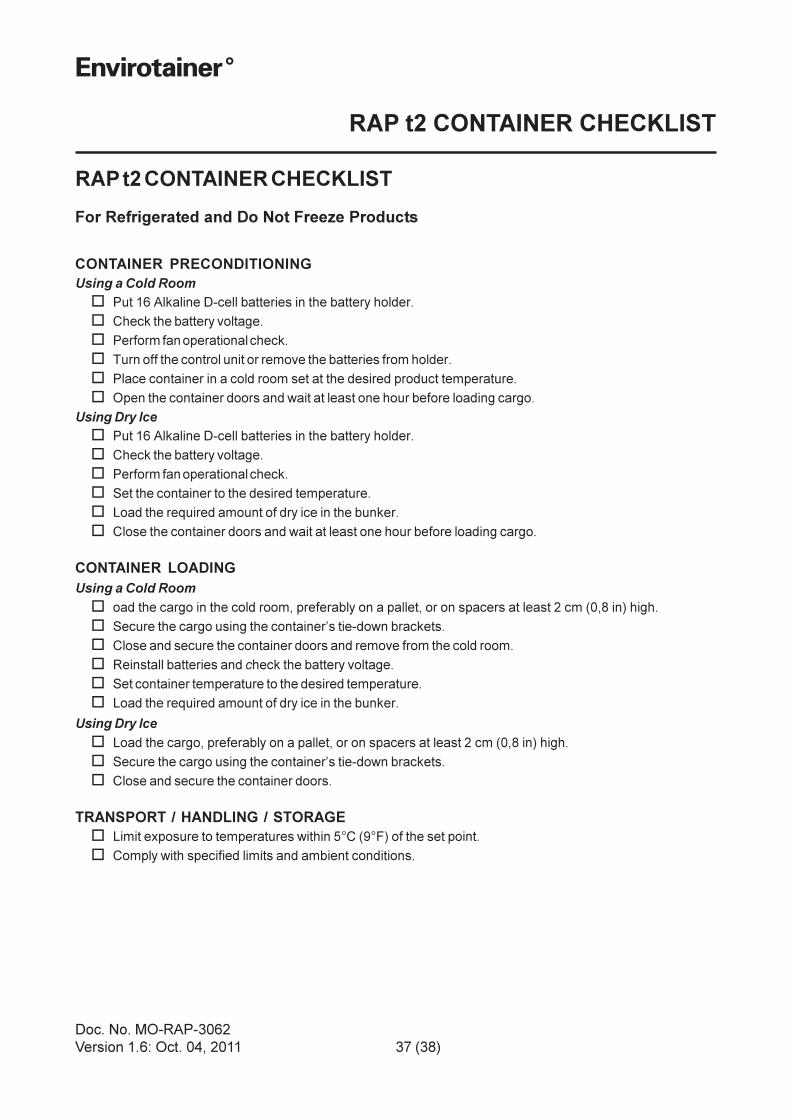
RAP t2 CONTAINER CHECKLIST
RAP t2 CONTAINER CHECKLIST
For Refrigerated and Do Not Freeze Products
CONTAINER PRECONDITIONING
Using a Cold Room
� Put 16 Alkaline D-cell batteries in the battery holder.
� Check the battery voltage.
� Perform fan operational check.
� Turn off the control unit or remove the batteries from holder.
� Place container in a cold room set at the desired product temperature.
� Open the container doors and wait at least one hour before loading cargo.
Using Dry Ice
� Put 16 Alkaline D-cell batteries in the battery holder.
� Check the battery voltage.
� Perform fan operational check.
� Set the container to the desired temperature.
� Load the required amount of dry ice in the bunker.
� Close the container doors and wait at least one hour before loading cargo.
CONTAINER LOADING
Using a Cold Room
� oad the cargo in the cold room, preferably on a pallet, or on spacers at least 2 cm (0,8 in) high.
� Secure the cargo using the container’s tie-down brackets.
� Close and secure the container doors and remove from the cold room.
� Reinstall batteries and check the battery voltage.
� Set container temperature to the desired temperature.
� Load the required amount of dry ice in the bunker.
Using Dry Ice
� Load the cargo, preferably on a pallet, or on spacers at least 2 cm (0,8 in) high.
� Secure the cargo using the container’s tie-down brackets.
� Close and secure the container doors.
TRANSPORT / HANDLING / STORAGE
� Limit exposure to temperatures within 5°C (9°F) of the set point.
� Comply with specified limits and ambient conditions.
Doc. No. MO-RAP-3062
Version 1.6: Oct. 04, 2011 38 (38)
RAP t2 CONTAINER CHECKLIST
RAP t2 CONTAINER CHECKLIST
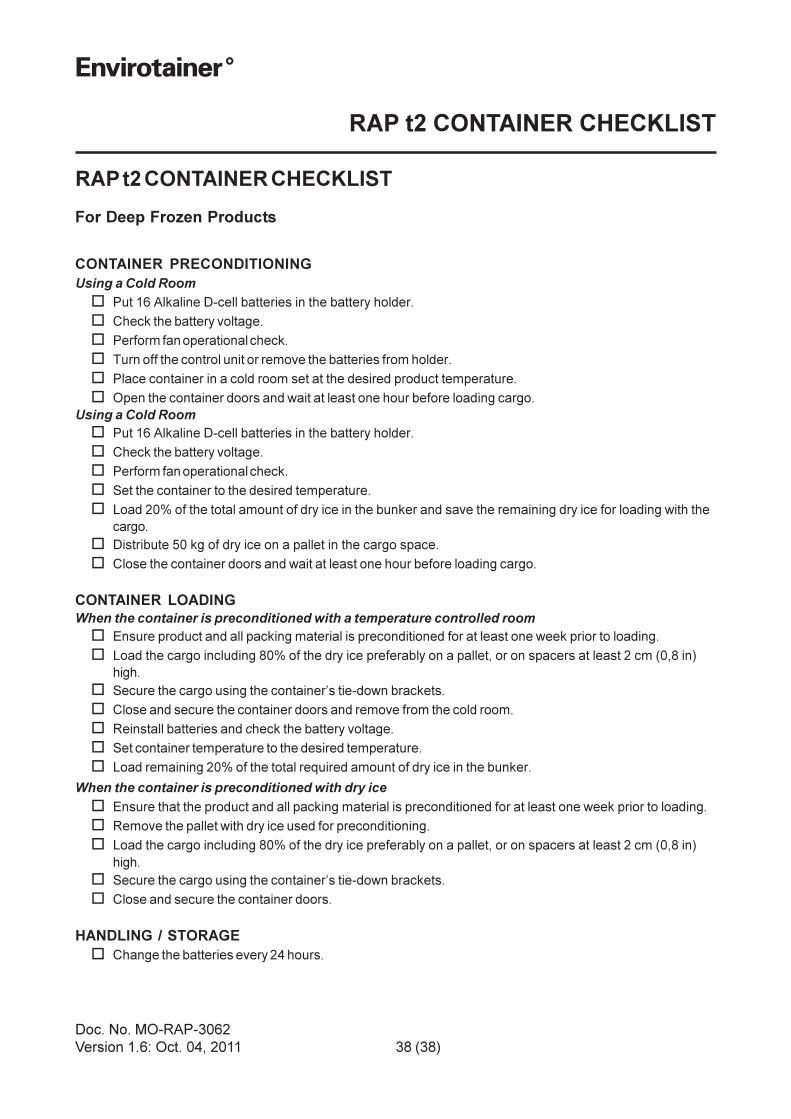
For Deep Frozen Products
CONTAINER PRECONDITIONING
Using a Cold Room
� Put 16 Alkaline D-cell batteries in the battery holder.
� Check the battery voltage.
� Perform fan operational check.
� Turn off the control unit or remove the batteries from holder.
� Place container in a cold room set at the desired product temperature.
� Open the container doors and wait at least one hour before loading cargo.
Using a Cold Room
� Put 16 Alkaline D-cell batteries in the battery holder.
� Check the battery voltage.
� Perform fan operational check.
� Set the container to the desired temperature.
� Load 20% of the total amount of dry ice in the bunker and save the remaining dry ice for loading with the
cargo.
� Distribute 50 kg of dry ice on a pallet in the cargo space.
� Close the container doors and wait at least one hour before loading cargo.
CONTAINER LOADING
When the container is preconditioned with a temperature controlled room
� Ensure product and all packing material is preconditioned for at least one week prior to loading.
� Load the cargo including 80% of the dry ice preferably on a pallet, or on spacers at least 2 cm (0,8 in)
high.
� Secure the cargo using the container’s tie-down brackets.
� Close and secure the container doors and remove from the cold room.
� Reinstall batteries and check the battery voltage.
� Set container temperature to the desired temperature.
� Load remaining 20% of the total required amount of dry ice in the bunker.
When the container is preconditioned with dry ice
� Ensure that the product and all packing material is preconditioned for at least one week prior to loading.
� Remove the pallet with dry ice used for preconditioning.
� Load the cargo including 80% of the dry ice preferably on a pallet, or on spacers at least 2 cm (0,8 in)
high.
� Secure the cargo using the container’s tie-down brackets.
� Close and secure the container doors.
HANDLING / STORAGE
� Change the batteries every 24 hours.